

Page 1

INSTALLATION MANUAL
Domestic hot water tank with option kit for air to
water heat pump system
EKHWSU150B3V3
EKHWSU200B3V3
EKHWSU300B3V3
EKUHWBB
EKUHW2WB
Page 2
EKHWSU150B3V3 EKUHWBB
1x 2x 1x1x
1x
4x
1356
2
4
EKHWSU200B3V3
EKHWSU300B3V3 EKUHW2WB
Domestic hot water tank with option kit for air to
water heat pump system
Installation manual
Contents Page
Introduction ....................................................................................... 1
General information .................................................................................. 1
Scope of this manual ................................................................................ 1
Model identification .................................................................................. 1
Accessories....................................................................................... 1
Accessories supplied with the EKHWSU domestic hot water tank .......... 1
Accessories supplied with the EKUHWBB option kit for the
domestic hot water tank ........................................................................... 2
Accessories supplied with the EKUHW2WB option kit for the
domestic hot water tank when the EKSOLHWAV1 option kit is
installed .................................................................................................... 2
Optional equipment .................................................................................. 2
Installation of the EKHWSU domestic hot water tank ....................... 2
Main components ..................................................................................... 3
Outlook diagram ....................................................................................... 4
Installation guidelines ............................................................................... 4
Installing the domestic hot water tank...................................................... 4
Connecting the water circuits ................................................................... 4
Field wiring ............................................................................................... 6
Installation of the option kit on the domestic hot water tank.............. 9
Piping requirements ................................................................................. 9
Installation procedure of the option kit.................................................... 10
Commissioning................................................................................ 10
Filling up................................................................................................. 10
Draining .................................................................................................. 10
Maintenance..................................................................................... 11
Troubleshooting................................................................................11
General guidelines ..................................................................................11
General symptoms .................................................................................. 11
Technical specifications................................................................... 12
Domestic hot water tank specifications .................................................. 12
Pressure reducing valve specifications.................................................. 13
Field wiring diagram ............................................................................... 13
READ THESE INSTRUCTIONS CAREFULLY BEFORE
INSTALLATION. KEEP THIS MANUAL IN A HANDY
PLACE FOR FUTURE REFERENCE.
PLEASE LEAVE THIS MANUAL WITH THE EKHWSU
DOMESTIC HOT WATER TANK AFTER INSTALLATION.
IMPROPER INSTALLATION OR ATTACHMENT OF
EQUIPMENT OR ACCESSORIES COULD RESULT IN
ELECTRIC SHOCK, SHORT-CIRCUIT, LEAKS, FIRE OR
OTHER DAMAGE TO THE EQUIPMENT. BE SURE ONLY
TO USE ACCESSORIES MADE BY DAIKIN WHICH ARE
SPECIFICALLY DESIGNED FOR USE WITH THE
EQUIPMENT AND HAVE THEM INSTALLED BY A
PROFESSIONAL.
IF UNSURE OF INSTALLATION PROCEDURES OR USE,
ALWAYS CONTACT YOUR DAIKIN DEALER FOR
ADVICE AND INFORMATION.
THE UNIT DESCRIBED IN THIS MANUAL IS DESIGNED
FOR INDOOR INSTALLATION ONLY AND FOR
AMBIENT TEMPERATURES RANGING 0°C~35°C.
Introduction
General information
Thank you for purchasing this Daikin Altherma EKHWSU domestic
hot water tank.
The Daikin Altherma domestic hot water tank must be installed by a
competent person and be installed in compliance with instructions as
of subject in this manual, all current legislation, codes of practice and
regulations governing the installation of unvented hot water cylinders
in force at the date of installation.
This installation is subject to building regulation approval,
notify Local Authority of intention to install.
The domestic hot water tank is to be connected to the Daikin
Altherma unit.
The EKHWSU domestic hot water tank with integrated 3 kW
electrical booster heater is available in three types: 150, 200 and 300.
All models can be floor mounted, while the 150 type model can be
wall mounted as well via option kit EKWBSWW150.
Scope of this manual
This installation manual describes the procedures for installing and
connecting the EKHWSU domestic hot water tanks with the
EKUHWBB option kit and with the EKUHW2WB option kit in case the
EKSOLHWAV1 option kit is to be installed as well.
Model identification
Domestic hot water tank
EK HWS U 150 B 3 V3
Booster heater voltage
V3=1P, 230 V
Capacity booster heater: 3 kW
Series
Indication of storage capacity in litres
Special version for United Kingdom only
Standard version when no letter is mentioned
Hot Water stainless Steel tank
European Kit
Accessories
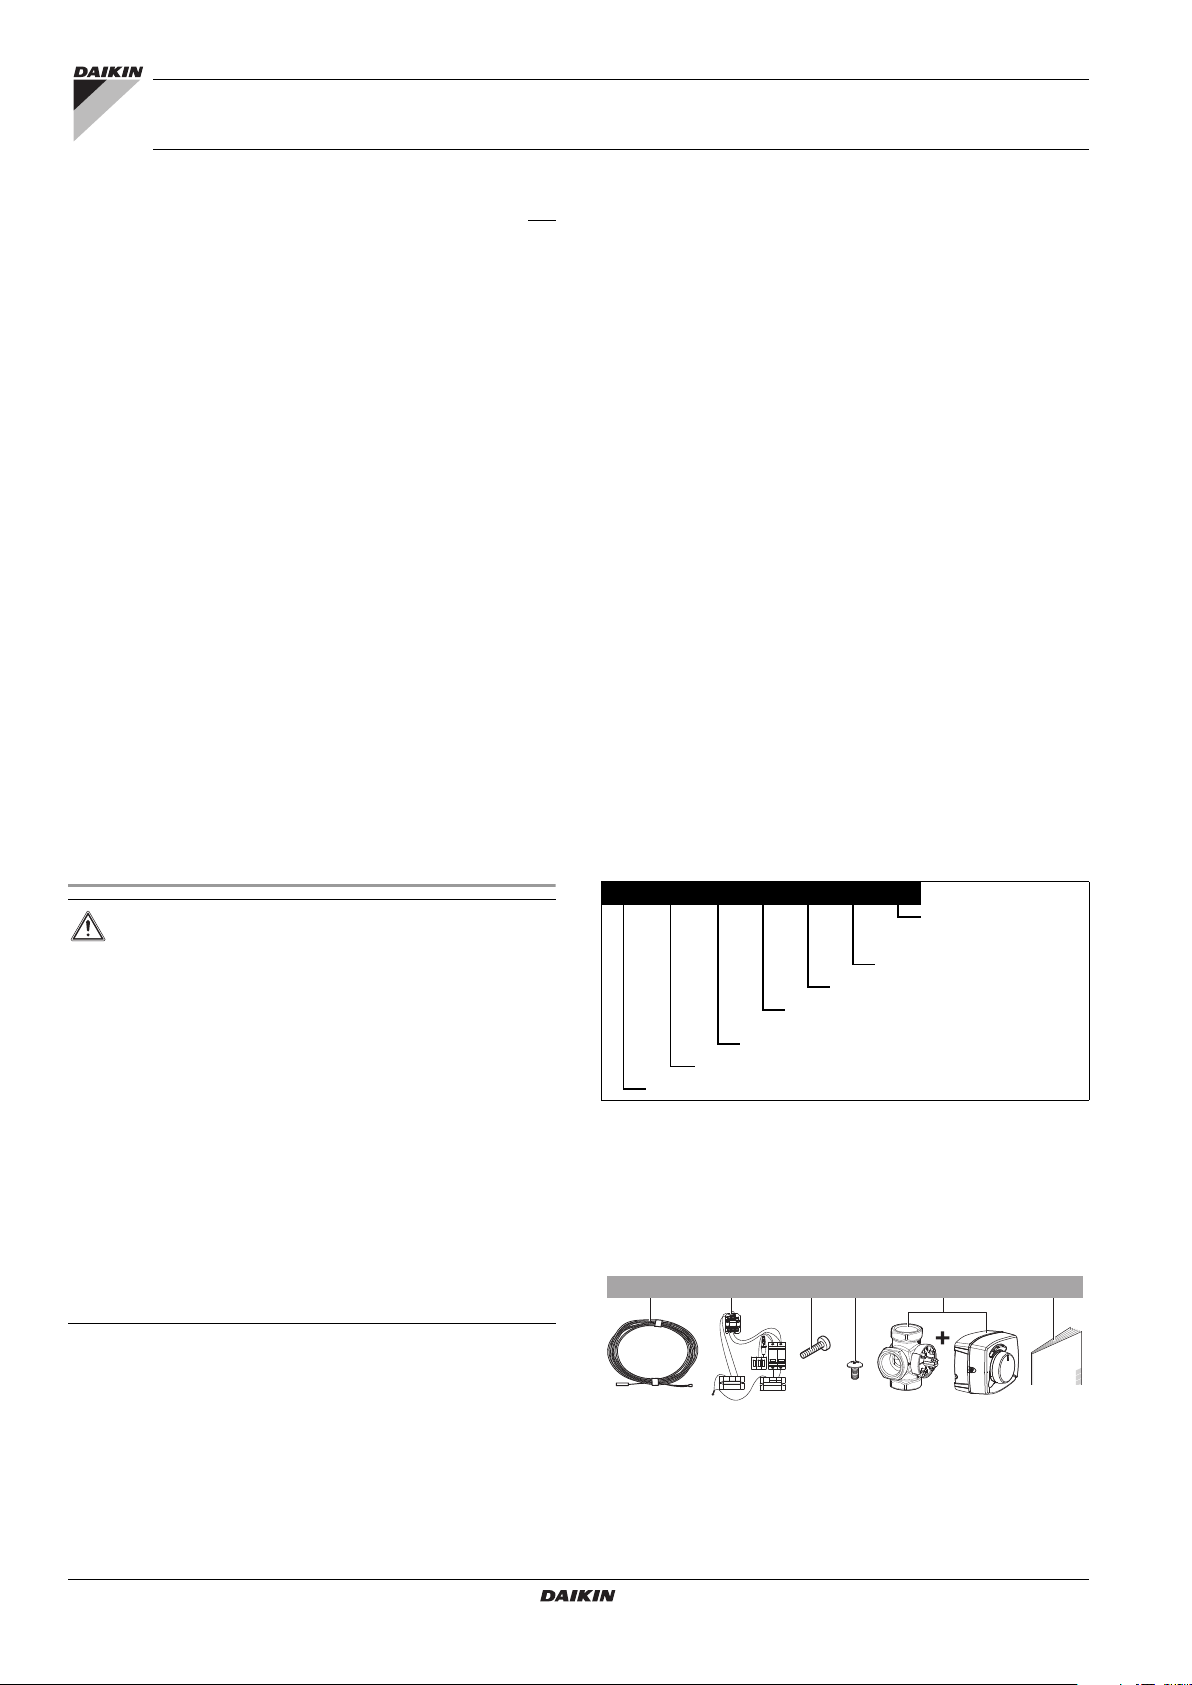
Accessories supplied with the EKHWSU domestic hot
water tank
Installation manual
1
1 Thermistor + connection wire (12 m)
2 Contactor - fuse assembly
3 Contactor fixing screw
4 Tapping screw
5 3-way valve + motor
6 Installation manual
Domestic hot water tank with option kit for air to water heat pump
EKUHWBB + EKUHW2WB + EKHWSU150-300B3V3
4P344370-1 – 2013.03
system
Page 3
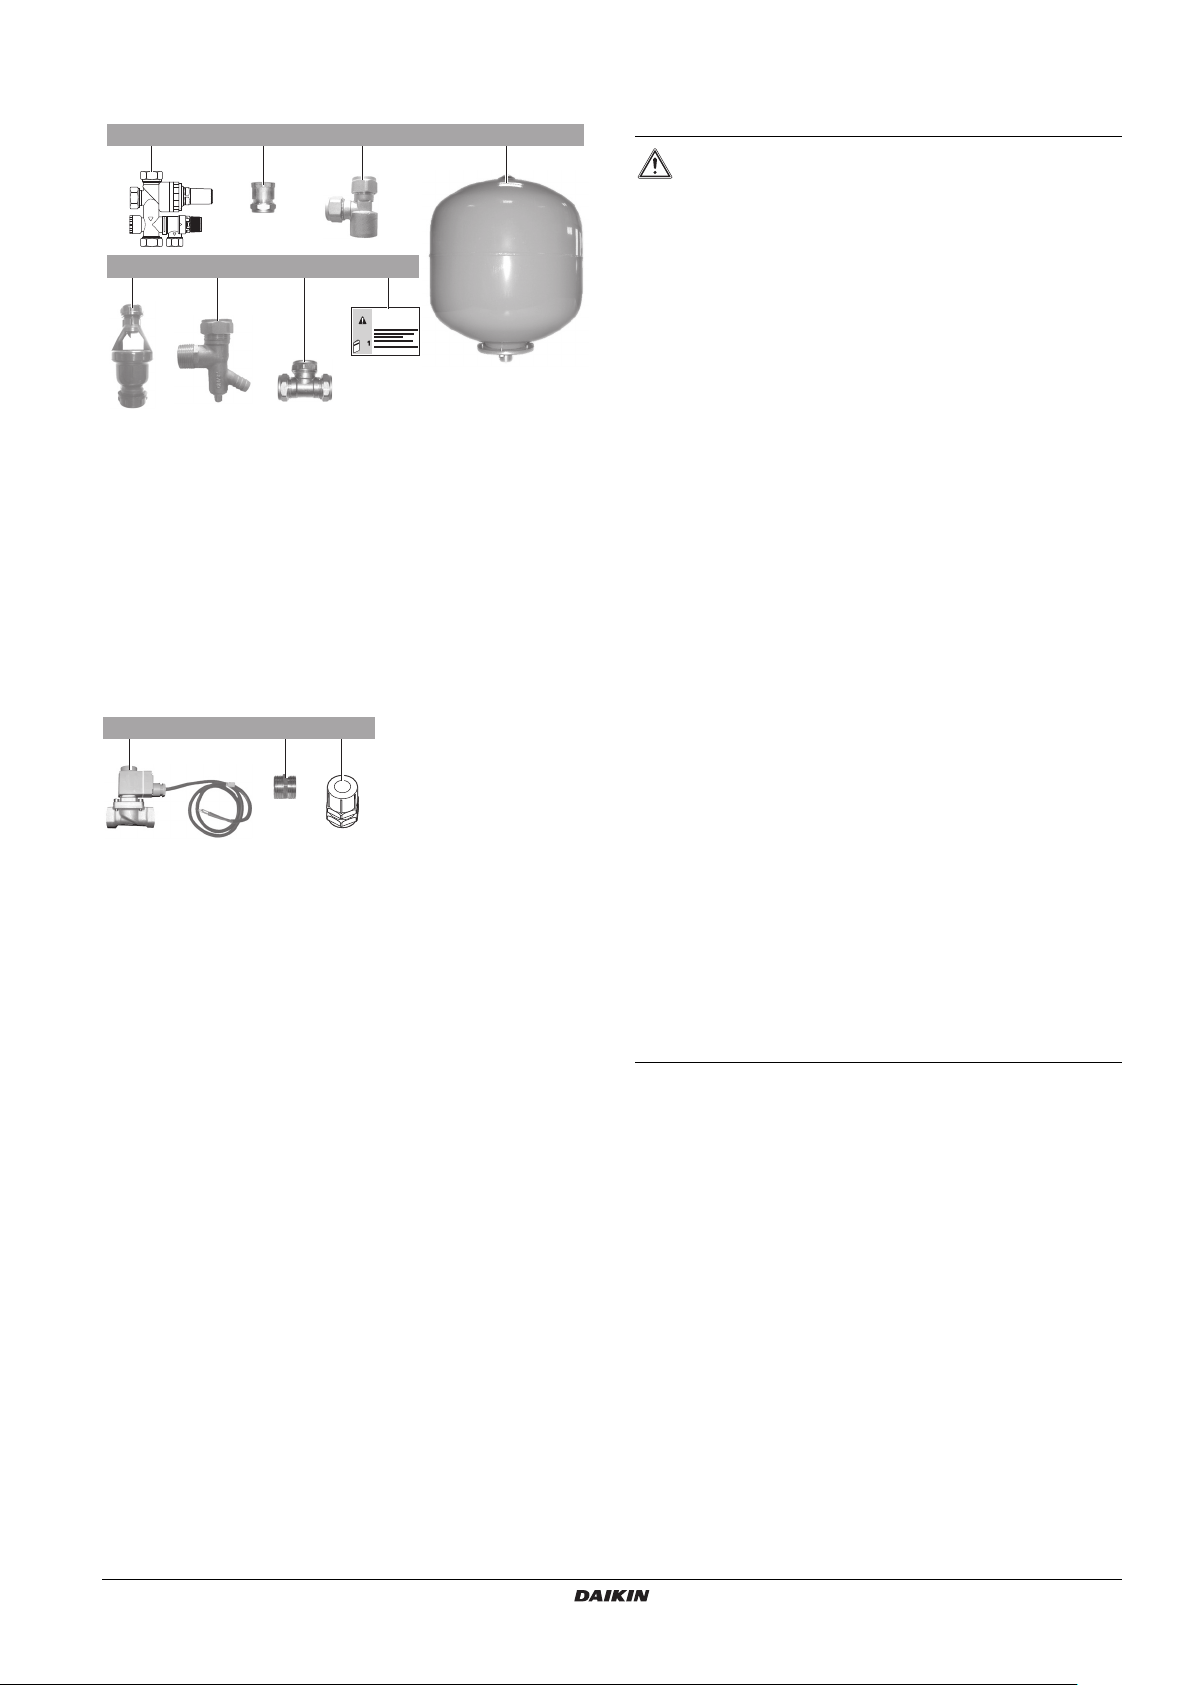
Accessories supplied with the EKUHWBB option kit for
1x
1x
1x1x
1x 1x
1x
1x
134
658
2
7
1x
2x21x
the domestic hot water tank
1 Pressure reducing valve and expansion relief valve. Water
inlet and water outlet 22 mm connection, discharge piping
connection 15 mm
2 Adaptor 22 mm×3/4" Female BSP
3 T-piece 1/2" Female BSP×15 mm×15 mm
4 Expansion vessel of 18 litres 3/4" Male BSP
5 Tundish 15 mm inlet, 22 mm outlet
6 Elbow/Drain valve 22 mm×3/4" Male BSP
7 T-piece 22 mm×22 mm×22 mm
8 Instruction sheet
Accessories supplied with the EKUHW2WB option kit for
the domestic hot water tank when the EKSOLHWAV1
option kit is installed
1
1 Solenoid 2-way valve 3/4" Female BSP×3/4" Female BSP
2 Connection nipple 3/4" Male BSP
3 PG nipple and nut
3
Optional equipment
EKWBSWW150: kit, including a wall bracket for a domestic hot water
tank of 150 litres.
Installation of the EKHWSU domestic hot
water tank
The total Daikin Altherma system is designed for
combination with a Daikin Altherma domestic hot
water tank. In case another tank or a spare part other
than native Daikin is being used in combination with
the Daikin Altherma unit, Daikin cannot guarantee
neither good operation nor reliability of the system.
For those reasons Daikin cannot give warranty of the
system in such case.
The equipment is not intended for use in a potentially
explosive atmosphere.
For safety reasons, it is not allowed to add ethylene
glycol to the water circuit. Adding ethylene glycol
might lead to contamination of the domestic water if a
leakage would occur in the heat exchanger coil.
Only this tank can be used in combination with the
solar kit option.
Domestic water quality must be according to EN
directive 98/83 EC.
Wherever possible the main supply pipe should be in
22 mm. The minimum main water supply requirement
should be 1.5 bar working pressure and 20 litres per
minute flow rate. At these values outlet flow rates may
be poor if several outlets are used simultaneously, the
higher the available pressure and flow rate the better
the system performance will be.
It is important that the storage capacity of the
domestic water tank meets normal daily fluctuations in
consumption of hot water without any fall of the water
outlet temperature during use.
Immediately after installation, the domestic hot water
tank must be flushed with fresh water. This procedure
must be repeated at least once a day the first 5
consecutive days after installation.
If applicable legislation requires a chemical
disinfection in specific situations, involving the
Altherma domestic hot water tank, please be aware
that the domestic hot water tank is a stainless steel
cylinder containing an aluminium anode. We therefore
advise in these circumstances to use a non-chloride
based disinfectant approved for use with water
intended for human consumption.
Where the secondary return circuits are used an
additional expansion vessel may be required.
EKUHWBB + EKUHW2WB + EKHWSU150-300B3V3
Domestic hot water tank with option kit for air to water heat pump
system
4P344370-1 – 2013.03
Installation manual
2
Page 4
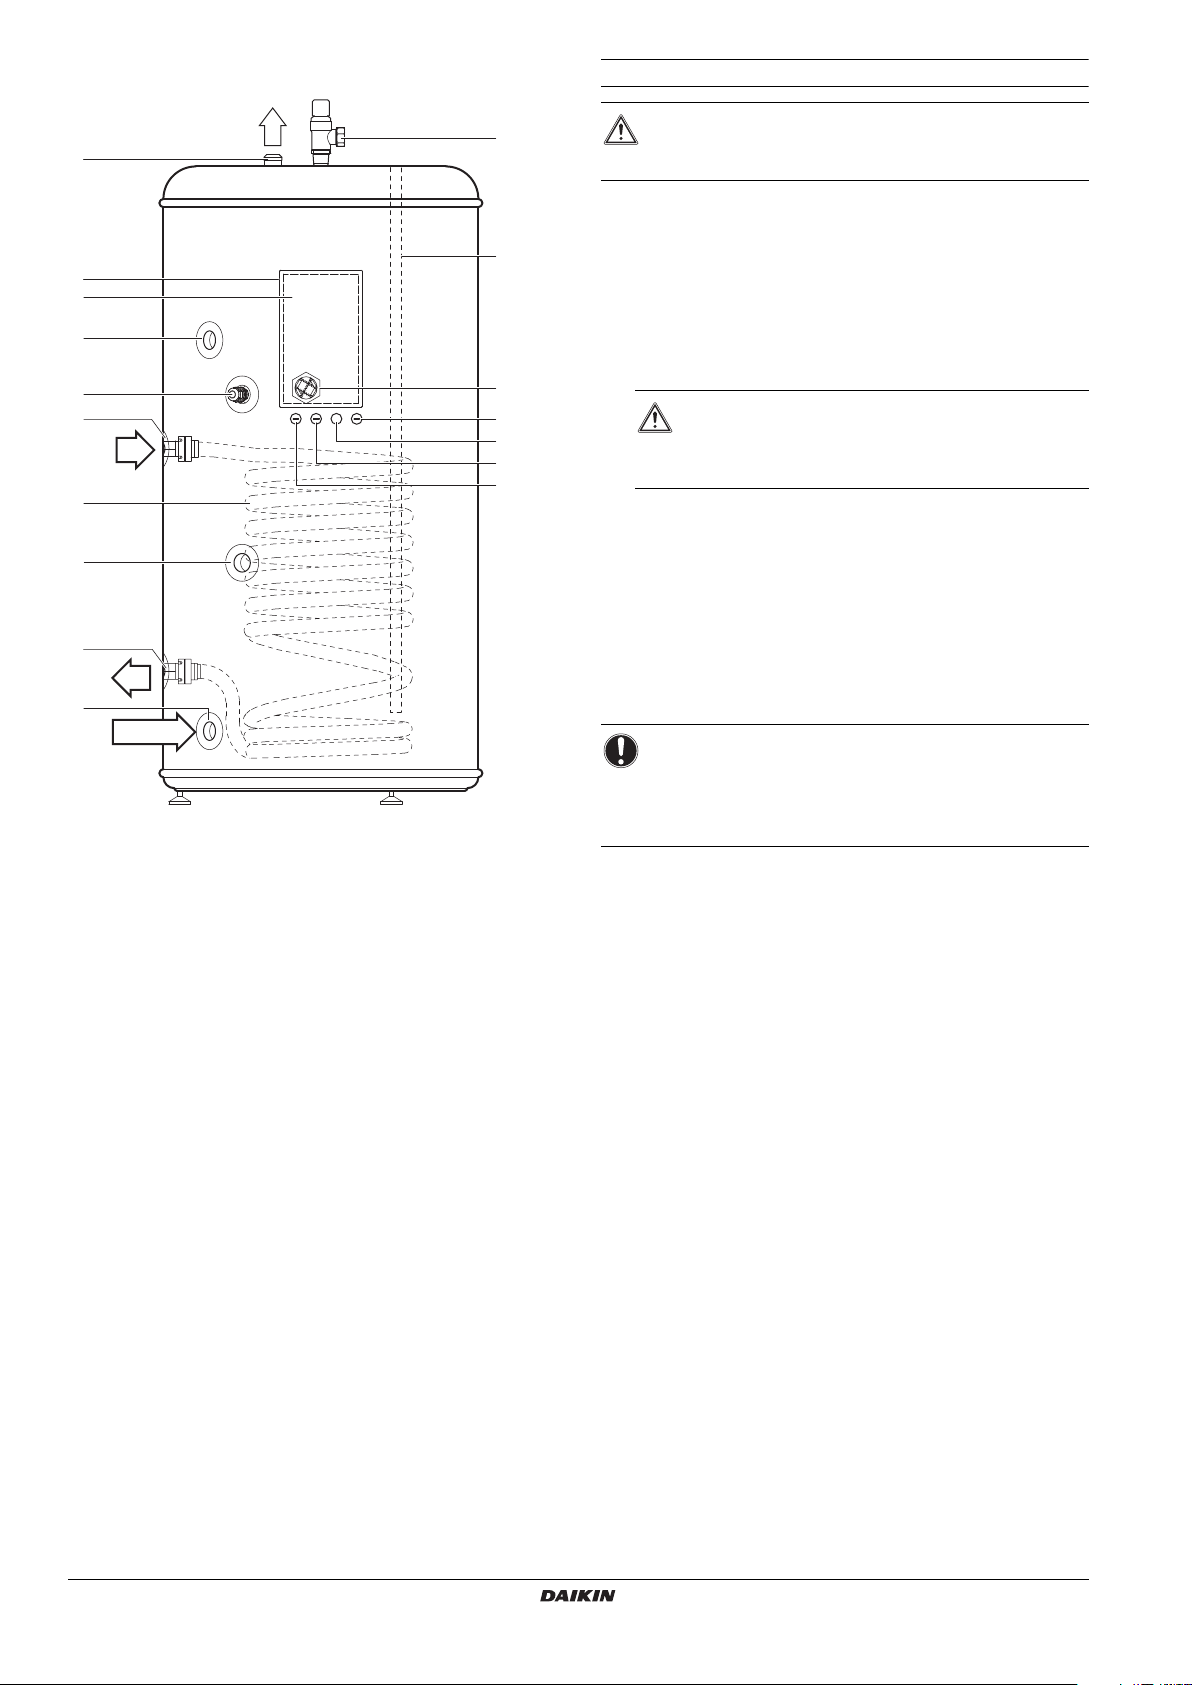
Main components
C
15
14
13
12
16
2
17
1
3
R
4
7
10
1
1
8
5
6
9
F
H
Safety devices
The domestic hot tank relief valve connections should
not be used for other purposes.
Do not install heaters without thermal cut-outs.
Thermal protector — The booster heater in the domestic hot
water tank is equipped with a thermal protector (setting 85°C).
For EKUHW2WB only: Secondary thermal protector (solenoid
2-way valve) — The thermal protector will close the solenoid
2-way valve (setting 85°C).
Both thermal protectors are activated when the temperature
becomes too high. When activated, the protectors have to be
reset on the domestic hot water tank by pressing the red button
(for access, remove the electrical box lid).
The electrical box lid must only be opened by a
licensed electrician.
Switch off the power supply before opening the
electrical box lid.
For EKUHW2WB only: Thermostat (solenoid 2-way valve)
The thermostat will close the solenoid 2-way valve when the
temperature becomes too high (setting 79°C).
Temperature and pressure relief valve
The temperature and pressure relief valve prevents excessive
water temperature (>95°C) and excessive water pressure
(≥10 bar) in the domestic hot water tank.
Expansion relief valve (option kit)
The pressure relief valve prevents excessive water pressure
(≥8 bar) in the water circuit.
NOTICE
Refer to "Installation of the option kit on the domestic hot
water tank" on page 9 for connection of other safety
1 Hot water connection
2 Temperature and pressure relief valve
3 Electrical box
4 Electrical box lid
5 Recirculation hole
6 Thermistor socket
7 Flow inlet connection
8 Heat exchanger coil
9 Threaded thermistor hole for use with solar kit option.
Refer to the installation manual of the EKSOLHWAV1
option kit.
10 Return outlet connection
11 Cold water connection
12 Only in case of installing the EKSOLHWAV1 option kit
Cable hole to fit PG nipple and nut for use with solar kit
option. Refer to the installation manual of the
EKSOLHWAV1 option kit.
13 Cable hole to fit PG nipple and nut into for cable
connections of booster heater, power supply and thermal
protection cable.
14 Only in case of installing the EKSOLHWAV1 option kit.
Cable hole to fit PG nipple and nut into for cable
connections of solenoid valve. Refer to the installation
manual of the EKSOLHWAV1 option kit.
15 Only in case of installing the EKSOLHWAV1 option kit.
Cable hole to fit PG nipple and nut into for cable
connections of solenoid valve power supply and solar
pump power supply. Refer to the installation manual of the
EKSOLHWAV1 option kit.
16 Electrical booster heater
17 Anode for corrosion protection
devices in accordance with relevant local and national
regulations.
Installation manual
3
Domestic hot water tank with option kit for air to water heat pump
EKUHWBB + EKUHW2WB + EKHWSU150-300B3V3
4P344370-1 – 2013.03
system
Page 5
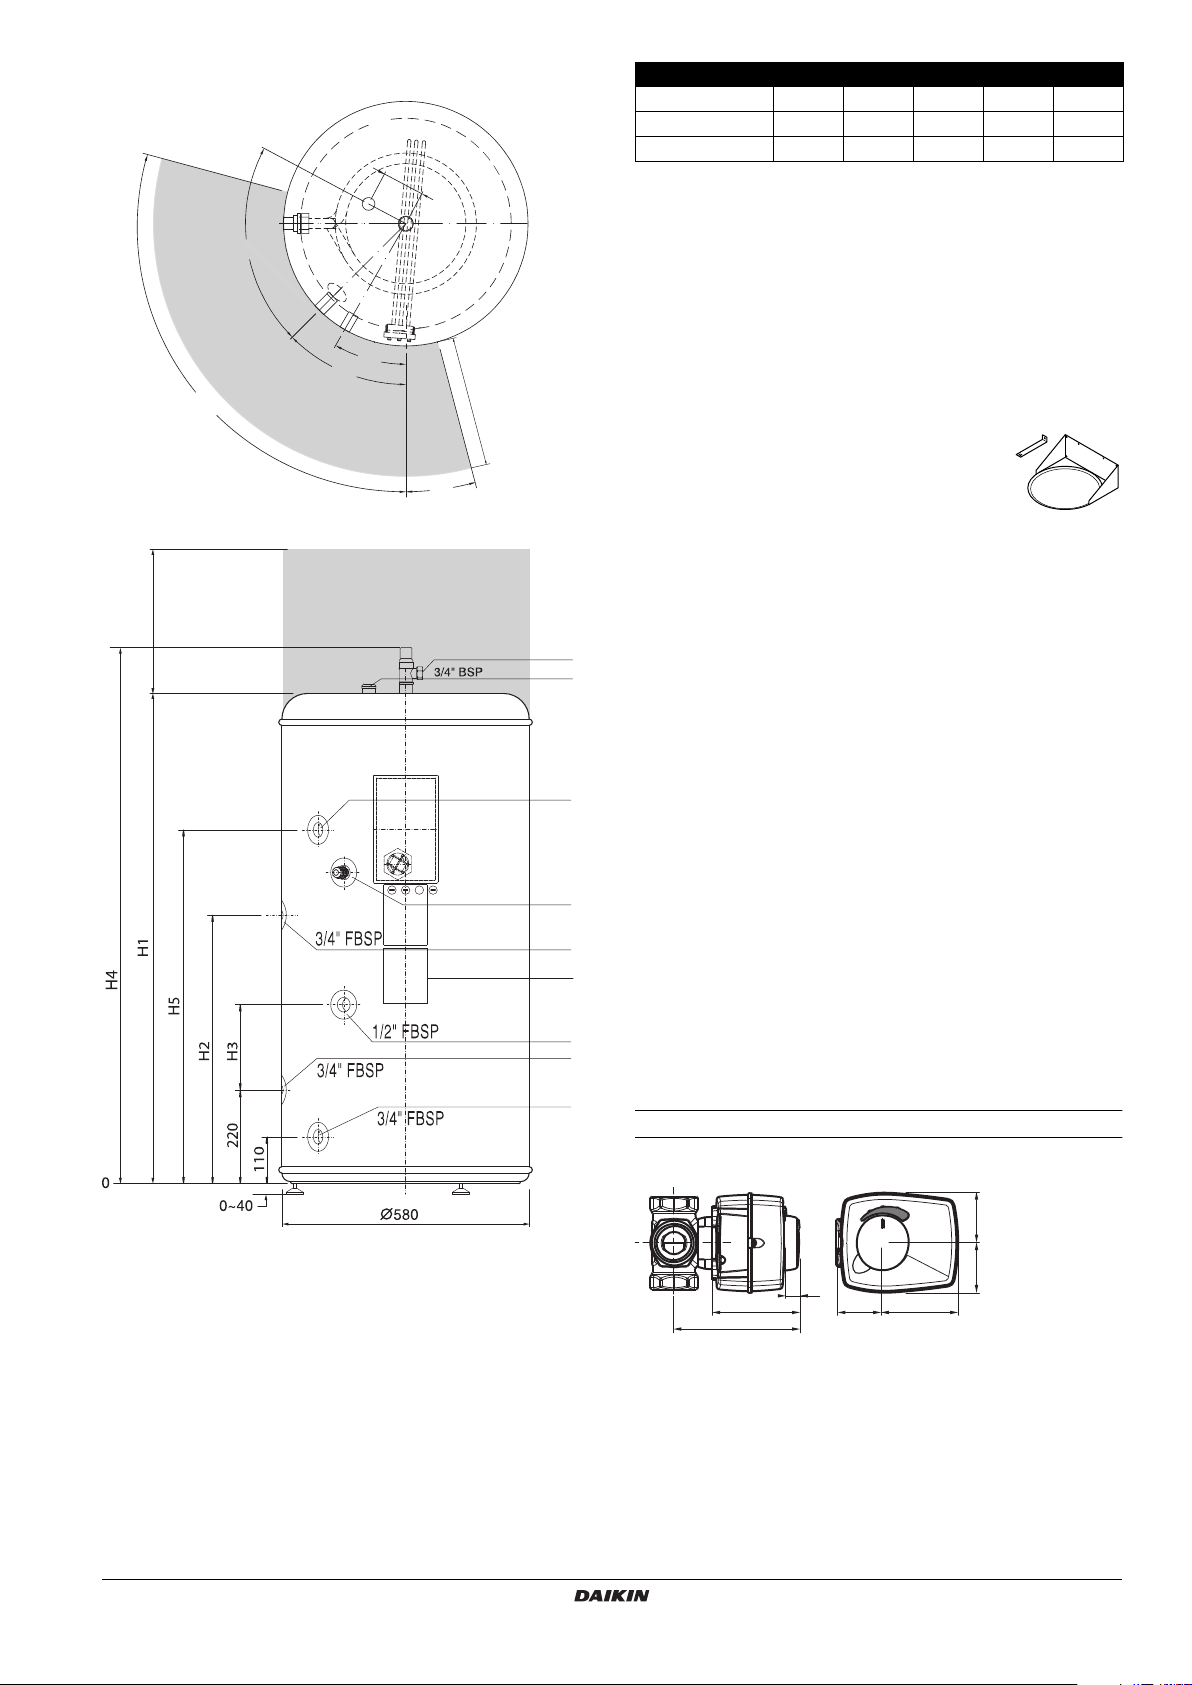
Outlook diagram
105
45
30
73
100
15
400
300
15 mm
13
77
111
38 67
44
44
H1 H2 H3 H4 H5
EKHWSU150B3V3 900 mm 475 mm 185 mm 1015 mm 605 mm
EKHWSU200B3V3 1150 mm 630 mm 200 mm 1265 mm 830 mm
EKHWSU300B3V3 1600 mm 630 mm 200 mm 1715 mm 830 mm
Installation guidelines
Keep in mind the following guidelines when installing the domestic
hot water tank:
The installation location is frost-free.
Make sure to make the piping in size 1" or more (and reduce to
3/4" at the inlet of the tank) as to have sufficient water volume in
the piping between unit and domestic hot water tank.
Locate the domestic hot water tank in a suitable position to
facilitate easy maintenance; remember access is required to the
electrical box. Refer to the grey zones in the outlook diagram.
The domestic hot water tank model
EKHWSU150B3V3 can be floor or wall
mounted. In case of wall mounting, wall
mounting kit EKWBSWW150 is required
(separate ordering).
If installing an EKHWSU* domestic hot water tank, installing the
option kit EKUHWB is obligatory. Refer to the UK Building
Regulation G3.
If installing the kit EKSOLHWAV1, installing the option kit
EKUHW2WB is obligatory.
Take care that in the event of a leak, water cannot cause any
6
1
damage to the installation space and surroundings.
Installing the domestic hot water tank
1 Hot water connection
2 Recirculation hole
3 Flow inlet connection (see also "Installation guidelines" on
page 4 regarding pipe size to use)
4 Return outlet connection (see also "Installation guidelines"
on page 4 regarding pipe size to use)
5 Cold water connection
6 Temperature and pressure relief valve connection
7 Thermistor socket
8 Threaded thermistor hole for use with solar kit option.
Refer to the installation manual of the EKSOLHWAV1
option kit.
9 Warning label
1 Check if all domestic hot water tank accessories (see
2
"Accessories" on page 1) are enclosed.
2 When floor mounting, place the domestic hot water tank on a
level surface. When wall mounting (only for EKHWSU150B3V3
model), make sure the wall is sturdy. In both cases, make sure
the tank is mounted level.
7
3 Apply thermal paste to the thermistor and insert the thermistor
as deep as possible in the thermistor socket. Fix using the nut
3
provided.
9
Connecting the water circuits
8
Refer to "Typical application examples" described in the installation
4
manual delivered with the unit for details on connecting the water
circuits and the motorised 3-way valve.
5
Connecting the 3-way valve
1 Refer to the figure below before making the connection.
EKUHWBB + EKUHW2WB + EKHWSU150-300B3V3
Domestic hot water tank with option kit for air to water heat pump
system
4P344370-1 – 2013.03
Installation manual
4
Page 6

2 Installation position.
4
L
N
Y
DIR
2P
1x
It is advised to connect the 3-way valve as close as possible to
the unit. It can be installed in accordance with one of the
following four configurations.
1
1
5 When installing in accordance with figure A or figure D, open the
valve motor cover by loosening the screw and change the
jumper so as to change the rotation direction of the valve.
By default the jumper is factory set to apply for installation in
accordance with figure B and figure C.
Installation in accordance with
figure A and figure D
Installation in accordance with
figure B and figure C
2
3
figure A figure B
2
1
2
3
3
figure C figure D
1 From Daikin Altherma unit
2 To domestic hot water tank
3 To room heating
3 Unpack the 3-way valve body and 3-way valve motor.
3
1
Rotation direction of the valve
6 Push the motor on the motor sleeve.
Make sure not to rotate the sleeve during this action, so as to
maintain the valve position as set during step 4.
7
2
IP41
8 Put the scale on the valve as shown below.
Domestic hot
water tank
Installation in accordance with
figure B and figure C
Room
heating
Room
heating
Installation in accordance with
figure A and figure D
Domestic hot
water tank
2
1
1 Sleeve
2 Valve motor cover
3 Screw
4 Scale
3
4 Install the 3-way valve body in the pipework.
Make sure the shaft will be positioned in such a way that the
motor can be mounted and replaced.
Put the sleeve on the valve and turn the valve to the middle
position of the scale plate.
Check that the valve is positioned as in the figure below. It
should be blocking the outlet connection to the domestic hot
water for 50% and the outlet connection to the room heating also
for 50%.
Installation in accordance
with figure A and figure B
Installation in accordance
with figure C and figure D
9 Make sure to firmly fix the power supply cord onto the 3-way
valve body with a field supplied cable tie like in illustration below.
10 Perform the wiring in the unit in accordance with the following
figure:
8910
3-way valve
BRN
LNY
BLU
BLK
Refer also to the drawing on page 8.
See "Installation of the option kit on the domestic hot water tank" on
page 9 for details on installation in accordance with relevant local and
national regulations.
If the valve is not positioned in this way before mounting
the motor, the valve will give way to both domestic water
and room heating during operation.
Installation manual
5
Domestic hot water tank with option kit for air to water heat pump
EKUHWBB + EKUHW2WB + EKHWSU150-300B3V3
4P344370-1 – 2013.03
system
Page 7

Field wiring
1x
See also "Field wiring diagram" on page 13.
A main switch or other means for disconnection,
having a contact separation in all poles, must be
incorporated in the fixed wiring in accordance with
relevant local and national legislation.
All field wiring and components must be installed by a
licensed electrician and must comply with relevant
European and national regulations.
The field wiring must be carried out in accordance
with the wiring diagram sticker supplied with the unit
and the instructions given below.
The domestic hot water tank must be earthed via the
unit.
2 Booster heater power supply
Connect the booster heater power
supply and thermal protection cable
as shown in wiring diagram sticker
on the inside of the switch box lid.
3 Solenoid valve power supply
Connect the solenoid valve power
supply cable as shown in the
following diagram sticker on the
inside of the switch box lid.
4 Solenoid valve
Connect the solenoid valve as
shown in the following diagram
sticker on the inside of the switch
box lid.
Power circuit and cable requirements
Be sure to use a dedicated power circuit. Never use a
power circuit shared by another appliance.
Use one and same dedicated power supply for the
unit(s), backup heater and domestic hot water tank.
For cable requirements and specifications, see "Field wiring" in the
unit installation manual supplied with the unit.
NOTICE
Select the power cable in accordance with relevant local
and national regulations.
Thermistor cable
The distance between the thermistor cable and power supply cable
must always be at least 5 cm to prevent electromagnetic interference
on the thermistor cable.
Procedure
Switch off the power supply before making any
connections.
Connections to be made in the domestic hot water tank
electrical box
Make sure all field wiring is insulated from the surface of
the inspection hole or can resist temperatures to 90°C.
1 Prior to upwiring
Make sure to ensure strain relief of the power cable by correctly
mounting the PG nipple and PG nut (delivered with the tank).
Connections to be made in the unit switch box
NOTICE
Only for EHBH/X:
X3M will not be installed. See figure in "For EHBH/X units
only" on page 8 for more details.
5 Mount the prewired contactor (K3M), circuit breaker (F2B) and
terminal blocks (X3M, X4M). The contactor and terminal blocks
should be fixed with the 3
6 Plug the connector connected to the contactor K3M in the socket
X13A on the PCB.
7 Plug the thermistor cable connector in the socket X9A on the
PCB.
8 Connect the prewired earth wires of the terminal block X3M and
X4M to the earthing screw.
9 Connect the booster heater power supply and thermal protection
cable (field supply) to terminal X4M earth, 1, 2, and X2M 13, 14.
10 For other models: Connect the booster heater power supply
cable to the terminal block X3M.
Only for EHBH/X: Connect the booster heater power supply
cable to the circuit breaker (F2B). The earth wire must be
connected to X4M.
11 Connect the solenoid valve power supply cable to terminal block
X7M as shown on wiring diagram B in paragraph "Connections
to be made in the domestic hot water tank electrical box" on
page 6.
12 Fix the cables to the cable tie mountings with cable ties to
ensure strain relief.
13 For other models: Set DIP switch SS2-2 on the PCB to ON.
Only for EHBH/X: Connections to the domestic hot water tank
must be enabled by installer settings on the indoor unit. Refer to
the installer reference guide.
14 When routing out cables, make sure that these do not obstruct
mounting of the unit cover.
× 2 screws supplied.
EKUHWBB + EKUHW2WB + EKHWSU150-300B3V3
Domestic hot water tank with option kit for air to water heat pump
system
4P344370-1 – 2013.03
Installation manual
6
Page 8

Note: only relevant field wiring is shown.
A4P
K6M
F2B
K3M
K7M
F1B
TR1
TR1
A1P
A1P
X2M
X1M
K5M
K2M
K1M
K1M
K2M
K5M
K4M
K3M
X9A
X13A
1 2423
X4M X2M
>50 mm
X4M
X3M
3-way
valve
L
BRN
BLU
BLK
NY
A11P
K3M
F2B
X13A
X2M
X9A
X3M
X4M
8
9
10
13
14
12 423
X4M X2M
230 V AC
3 kW
LN
400 V AC
3 kW
L1L2
V3
Z2
3-way
valve
L
BRN
BLU
BLK
NY
K3M
F2B
X2M
X9A
X3M
X4M
A11P
For EKHBH/X units only
For E(D/B)(H/L)Q011-014-016 units only
Installation manual
7
Domestic hot water tank with option kit for air to water heat pump
EKUHWBB + EKUHW2WB + EKHWSU150-300B3V3
4P344370-1 – 2013.03
system
Page 9

For EKCBH/X units only For EHBH/X units only
230 V AC
3 kW
LN
400 V AC
3 kW
L1L2
V3
Z2
12 423
X4M X2M
3-way
valve
L
BRN
BLU
BLK
NY
X9A
X13A
X3M
F2B
X4M
X2M
A1P
K3M
LN Y
3-way
valve
BLK
BLU
BRN
8 9 10 13 14
X2M
8,9,10
A1P
X9A
X2M
13,14
X3M
X4M
A7P
A1P
Q1L
X6M X7M
X7M
K5M K3M
F1B
F2B
X2M
X1M
X4M
X5M
X6Y
X6YA
X6YB
TR1
8 910 1413
X9A
X13A
K1M K2M
12 4
2
13 14
3
X4M X2M
>50 mm
230 V AC
3 kW
LN
400 V AC
3 kW
L1 L2
V3
Z2
M3S
M3S
L
BRN
BLU
BLK
NYL
BLK
BLU
BRN
NY
R5T
A
A
F2BF2B
X4M
X3M
K3M
X3M
1
Booster heater power supply
30
30
EKUHWBB + EKUHW2WB + EKHWSU150-300B3V3
Domestic hot water tank with option kit for air to water heat pump
system
4P344370-1 – 2013.03
Installation manual
8
Page 10

Installation of the option kit on the domestic hot water tank
H
C
R
F
5
600 mm
>300 mm
D1
D1
D2
Fixed grating
Trapped
10
8
9
6
6
6
11
7
12
13
3
12
600 mm
2
4
EKUHW2WB
6
All pipework and fittings must be flushed free of all flux and debris prior to the fitting of controls of this option kit. Failure to do this
may cause irreparable damage to the controls. Flush the system by opening the hot water tap.
All cautions as under chapter "Installation of the EKHWSU domestic hot water tank" on page 2 remain of extreme importance and
are equally valid in this chapter.
Piping requirements
Tundish
The tundish should be vertical, located in the same space as the
domestic hot water tank and be fitted as close as possible to, but
lower than the temperature and pressure relief valve on the
domestic hot water tank and the expansion relief valve included
in the option kit, with no more than 600 mm of pipe between the
valve outlet and the tundish. The tundish must be visible.
Tundish pipework
Tundish pipework must be 22 mm metal pipe with a minimum
vertical length of 300 mm below the tundish before any elbows
or bends in the pipework. All pipework must have a continuous
fall of at least 1 in 200 thereafter. Maximum permitted
(equivalent) length of 22 mm pipework is 9 m. Each bend or
elbow is equivalent to 0.8 m of pipework.
Sizing of copper discharge pipe D2 for common temperature
relief valve outlet sizes
Valve
outlet
size
15 mm 15 mm 22 mm up to 9 m 0.8 m
(a) The maximum allowed resistance is expressed as a length of straight pipe
(i.e. no ellbows or bends)
Requirements to discharges
Discharge piping, tundish, drain valves, etc. must be
positioned away from any electrical components.
The discharge pipe away from the tundish must terminate in
a safe, visible position without forming any risk to persons in
the vicinity.
If in any doubt, refer to Building Regulation G3.
effluent water
(a)
Resistance
created by
each elbow
or bend
Discharge
pipe size D1
Discharge
pipe size D2
from tundish
Maximum
resistance
Do not install any valves between the domestic hot
water tank and relief valves/expansion vessel.
Installation manual
9
Domestic hot water tank with option kit for air to water heat pump
EKUHWBB + EKUHW2WB + EKHWSU150-300B3V3
4P344370-1 – 2013.03
system
Page 11

Installation procedure of the option kit
1 Locate the domestic hot water tank in a suitable position to
facilitate the installation of water supply, discharge fittings and
pipework. It is therefore recommended to first read through this
whole procedure.
Refer to the figure on the facing page at the start of this chapter
for full understanding of next procedure steps.
Pre-assembly
Do not install shut-off valves between the expansion relief
valve and the domestic hot water tank.
2 Pre-assemble the T-piece and tundish (parts 3 and 5 of this kit)
so that tundish is ready for installation.
3 Pre-assemble the adaptor and expansion vessel (parts 2 and 4
of this kit) so that the expansion vessel is ready for installation.
4 Manually operate the temperature and pressure relief valve to
ensure free water flow through discharge pipe. Turn knob left.
Water main in
5 Fit the elbow/drain valve (part 6 of this kit) in the cold water
connection <C> of the domestic hot water tank.
6 Position both, the pressure reducing valve with integrated non
return valve and line strainer and the expansion relief valve
(part 1 of this kit) as high as possible and connect it to the water
mains inlet.
The pressure reducing valve and expansion relief valve must be
installed higher than the temperature and pressure relief.
Fit a length of copper tube Ø22 mm (field supply) in between the
elbow/drain valve (procedure step 5) and the pressure reducing
valve.
Make sure to provide for a connection on this pipe to the
expansion vessel (part 4 of this kit).
7 Fit a length of copper tube Ø22 mm (field supply) inbetween the
T-piece (part 7 of this kit) and the pre-assembled expansion
vessel (procedure steps 3 and 6).
Discharge
8 Install the tundish in a vertical position within a maximum of
600 mm away from the temperature and pressure relief valve
and expansion relief valve. (Procedure step 4).
Make sure that you install it so that you can still connect the
15 mm outlet of the expansion relief valve and the horizontal
inlet of the T-piece on top of the tundish. (Procedure step 11)
9 Connect a metal discharge pipe Ø15 mm (field supply) from the
temperature and pressure relief valve to the vertical inlet of the
T-piece on top of the tundish (≤600 mm).
10 Connect a metal discharge pipe Ø15 mm (field supply) from the
expansion relief valve to the horizontal inlet of the T-piece on top
of the tundish (≤600 mm).
11 Connect a metal discharge pipe from the tundish. Refer to
"Tundish pipework" on page 9.
All pipework must have a continuous fall and be fitted conform to
the requirements of the Building Regulation G3.
Only when installing the EKUHW2WB option kit
Flow inlet connection
Check direction of the flow arrow cast on the solenoid valve
body.
Do not grip the valve head while making and tightening up
connections. Either hold brass body in your hand or attach
adjustable spanner across hexagonal or flat faces in valve
body at each port’s screw thread.
13 Make sure that the solenoid 2-way valve is wired up properly as
described in "Connections to be made in the domestic hot water
tank electrical box" on page 6.
After completing the installation
14 After completing the installation, the installer has to fill in the
warning label on the tank with indelible ink. Refer to "Outlook
diagram" on page 4 for location of the warning label.
Commissioning
Filling up
Follow the next steps to fill up the tank:
1 Switch off the power supply.
2 Open each hot water tap in turn to expel air from the system
pipe work.
3 Open the cold water supply valve.
4 Check for leaks.
5 Close all water taps if all air is expelled.
6 Manually operate the temperature and pressure relief valve to
ensure free water flow through the discharge pipe (turn knob
left). Refer to "Main components" on page 3 for location of the
temperature and pressure relief valve.
Draining
Follow the next steps to drain the tank:
1 Switch off the power supply.
2 Turn off the cold water supply valve.
3 Open the hot water taps.
4 Open the drain valve.
12 Fit the solenoid 2-way valve (part 1 of this kit) using the
connection nipples (part 2 of this kit) for screwing into the 3/4"
FBSP flow inlet connection <F> of the domestic hot water tank.
Also refer to "Installation guidelines" on page 4.
The valve must be mounted so that the valve head is above
horizontal level of pipework to prevent that in the highly unlikely
event of a leak, a safety hazard results.
EKUHWBB + EKUHW2WB + EKHWSU150-300B3V3
Domestic hot water tank with option kit for air to water heat pump
system
4P344370-1 – 2013.03
Installation manual
10
Page 12

Maintenance
Troubleshooting
In order to ensure optimal availability of the unit, a number of checks
and inspections on the unit and the field wiring have to be carried out
at regular intervals.
Before carrying out any maintenance or repair activity,
always switch off the circuit breaker on the supply
panel, remove the fuses or open the protection
devices of the unit.
For E(K)HBH/X units only
Make sure that before starting any maintenance or
repair activity, also the power supply to the outdoor
unit is switched off.
The described checks must be executed at least once a year.
1 Domestic hot water tank booster heater
It is advisable to remove lime buildup on the booster heater to
extend its life span, especially in regions with hard water. To do
so, drain the domestic hot water tank, remove the booster heater
from the domestic hot water tank and immerse in a bucket (or
similar) with lime-removing product for 24 hours
2 Chemical disinfection
If applicable legislation requires a chemical disinfection in
specific situations,involving the domestic hot water tank, please
be aware that the domestic hot water tank is a stainless steel
cylinder containing an aluminium anode.
We therefore advise in these circumstances to use a
non-chloride based disinfectant approved for use with water
intended for human consumption.
3 Temperature and pressure relief valve
Check for correct operation of the temperature and pressure
relief valve. Manually operate the temperature and pressure
relief valve to ensure free water flow through discharge pipe.
Turn knob left.
4 Pressure reducing valve with integrated non return valve and
line strainer
Depending on local water conditions, annual inspection of the
integral line strainer, pressure reducing valve cartridge and
seating may be necessary.
Unscrew the retaining nut of the valve. The complete
operating mechanism, including the strainer can be removed.
Clean the filter mesh and cartridge under running water.
Replace cartridge, ensuring that strainer is correctly located
and reassemble the unit.
5 Expansion relief valve
Check for correct operation of the expansion relief valve.
Manually operate the expansion relief valve to ensure free water
flow through discharge pipe. Turn knob left.
Depending on local water conditions, annual inspection of the
expansion relief valve cartridge and seating may be necessary.
Unscrew the expansion relief headwork from valve body.
Clean valve seat face and seating - do not scratch or damage
either seat face or seating.
Refit in reverse order. Do not over tighten.
6 Unit switch box
Carry out a thorough visual inspection of the switch box and
look for obvious defects such as loose connections or
defective wiring.
Check for correct operation of contactor K3M by use of an
ohmmeter. All contacts of this contactor must be in open
position.
For the anode no maintenance or replacement is required.
If it is necessary to view internal of the cylinder, the booster heater
boss can be used.
This section provides useful information for diagnosing and correcting certain troubles which may occur in the unit.
General guidelines
Before starting the trouble shooting procedure, carry out a thorough
visual inspection of the unit and look for obvious defects such as
loose connections or defective wiring.
Before contacting your local dealer, read this chapter carefully, it will
save you time and money.
When carrying out an inspection on the supply panel or on
the switch box of the unit, always make sure that the circuit
breaker of the unit is switched off.
When a safety device was activated, stop the unit and find out why
the safety device was activated before resetting it. Under no circumstances safety devices may be bridged or changed to a value other
than the factory setting. If the cause of the problem cannot be found,
call your local dealer.
General symptoms
Symptom 1: No water flow from hot taps
POSSIBLE CAUSES CORRECTIVE ACTION
The main water supply is off. The cold water inlet pressure
The strainer is blocked. Turn off the water supply, remove
The cold water inlet pressure
reducing valve is not fitted properly
Symptom 2: Water from hot taps is cold
POSSIBLE CAUSES CORRECTIVE ACTION
The thermal cut-out(s) has/have
operated
The unit is not operating. Check the unit operation. Refer to
The solenoid 2-way valve is not
operating correctly (only when option
kit EKUHW2WB is installed).
Symptom 3: Intermittent water discharge
POSSIBLE CAUSES CORRECTIVE ACTION
Thermal control failure (water will be
hot).
The expansion vessel is broken. Replace the expansion vessel.
reducing valve is not fitted properly
and clean the strainer (see
"Pressure reducing valve with
integrated non return valve and line
strainer" on page 11 on how to do
this).
Check and refit as required (see
"Pressure reducing valve with
integrated non return valve and line
strainer" on page 11 on how to do
this).
Check and reset button(s).
the manual delivered with the unit.
If any faults are suspected, contact
your local dealer.
Check the wiring, F2U and the
plumbing connections to the
solenoid 2-way valve.
Check the setting of the thermostat
(79°C).
Switch off power to the unit.
When discharge has stopped, check
the thermal controls and replace if
faulty.
Contact your local dealer.
Installation manual
11
Domestic hot water tank with option kit for air to water heat pump
EKUHWBB + EKUHW2WB + EKHWSU150-300B3V3
4P344370-1 – 2013.03
system
Page 13

Symptom 4: Continuous water discharge
POSSIBLE CAUSES CORRECTIVE ACTION
Cold water inlet pressure. Check the pressure reducing valve.
Temperature and pressure relief
valve.
The expansion relief valve is not
functioning properly.
Replace the pressure reducing valve
if the measured pressure is >2.1 bar.
Check and reset button.
Check for correct operation of the
pressure relief valve by turning the
red knob on the valve counter
clockwise:
• If you do not hear a clacking
sound, contact your local dealer.
• In case the water keeps running
out of the unit, close both the
water inlet and outlet shut-off
valves first and then contact your
local dealer.
Technical specifications
Domestic hot water tank specifications
Storage capacity 150 l 200 l 285 l
Hot water capacity
(a)
EKHWSU150B3V3 EKHWSU200B3V3 EKHWSU300B3V3
136 l 175 l 252 l
Overall dimensions (Ø×H) 580×1015 mm 580×1265 mm 580×1715 mm
Booster heater
- power supply 230 V 50 Hz 1P 230 V 50 Hz 1P 230 V 50 Hz 1P
- running current 13 A 13 A 13 A
- capacity 3 kW 3 kW 3 kW
Operating pressure / set pressure of the pressure
reducing valve
3.5 bar 3.5 bar 3.5 bar
Maximum primary working pressure (heating side) 2.5 bar 2.5 bar 2.5 bar
Expansion vessel pre-charge pressure 2.5 bar 2.5 bar 2.5 bar
Preset opening pressure of expansion relief valve 8 bar 8 bar 8 bar
Maximum design pressure 10 bar 10 bar 10 bar
Preset opening temperature of temperature and
pressure relief valve
Set opening pressure of temperature
and pressure relief valve
Temperature and pressure relief valve replacement
part number
Connections 3/4" FBSP
90~95°C 90~95°C 90~95°C
10 bar 10 bar 10 bar
302810P 302810P 302810P
(b)
3/4" FBSP
(b)
3/4" FBSP
(b)
Weight
-empty 38 kg 46 kg 60 kg
- when full 188 kg 246 kg 345 kg
Mounting Wall or floor Floor Floor
Supply temperature time
Maximum water supply pressure 8 bar 8 bar 8 bar
Re-heat time
(a)(d)
Maximum operating temperature of the heating fluid
Pressure drop through the primary heater
Primary heating power input(d)
Primary flow rate
Standing heat losses
(a)(c)
(a)
(a)
(a)
(a)
(a)
41.98 min 31.96 min 46.08 min
41.61 min 31.82 min 45.68 min
80°C 80°C 80°C
20 kPa 50 kPa 50 kPa
10.1 kW 17.3 kW 17.1 kW
15 l/min 15 l/min 15 l/min
1.55 kWh/24h 1.77 kWh/24h 2.19 kWh/24h
Corrosion protection: anode Aluminium Aluminium Aluminium
(a) Values according to EN12897.
(b) FBSP = Female British Standard Pipe.
(c) The time it takes to increase the temperature from 15°C to 60°C.
(d) The time it takes to increase 70% of the vessel back up to 60°C.
EKUHWBB + EKUHW2WB + EKHWSU150-300B3V3
Domestic hot water tank with option kit for air to water heat pump
system
4P344370-1 – 2013.03
Installation manual
12
Page 14

Pressure reducing valve specifications
0
1
2
3
4
5
6
10 20 30 40 50 60 70 80 90
0
Q2T
Q2L
X5M
SR
NL
T
VUW
13 14 1 2
X4M
X2M
K3M
X6M
Q3L
Q2L
E4H
F2U
X7M
F2B
3
4
3
4
domestic hot water tank
electrical box
solenoid
valve
Y1S
EKUHW2WB
unit switch box
2
1
2
1
A2
A1
The pressure drop graphic of the pressure reducing valve is
shown below.
7
A
100
B
70% back pressure
Open outlet
A Pressure drop (bar)
B Flow rate (l/min)
The outlet flow rates in function of inlet flow and inlet pressure
are shown below.
Outlet flow (l/min)
Static inlet
pressure
(bar)
10 20 30 40 50 60 70 80 90
1 10 18 25 30 34 37 39 40 42
2 10 19 27 34 40 44 48 51 53
3 10 20 28 36 42 48 53 57 60
4 10 20 28 37 44 51 56 61 65
5 10 20 29 37 46 53 60 66 71
Inlet flow (l/min)
Field wiring diagram
E4H ........................Booster heater
F2B.........................Fuse booster heater
F2U.........................Fuse 5 A/250 V
K3M ........................Contactor booster heater
L .............................Live
N.............................Neutral
Q2T ........................Thermostat domestic hot water tank
Q2L.........................Thermal protector domestic hot water tank
Q3L.........................Thermal protector booster heater
Y1S.........................Solenoid valve
X1M ........................Terminal block
X5M~X7M ..............Terminal block
..........................Protective earth
...................Field wiring
Installation manual
13
Domestic hot water tank with option kit for air to water heat pump
EKUHWBB + EKUHW2WB + EKHWSU150-300B3V3
4P344370-1 – 2013.03
system
Page 15

Page 16

*4P344370-1 0000000J*
4P344370-1 2013.03
Copyright 2013 Daikin
 Loading...