


Daewoo DTR-29U1MT User Manual

P/N : 48586908E201-R1
INSTRUCTION MANUAL
COLOR TELEVISION
DTR-1420(MT/P/T/TP/Z)
DTR-2120(MT/P/T/TP/Z)
DTR-14D2(MT/P/T/TP/Z)
DTR-21D2(MT/P/T/TP/Z)
DTR-20D4(MT/P/T/TP/Z)
DTR-21D7(MT/P/T/TP/Z)
DTR-14D9(MT/P/T/TP/Z)
DTR-20D9(MT/P/T/TP/Z)
DTR-21D9(MT/P/T/TP/Z)
DTR-14K2(MT/P/T/TP/Z)
DTR-21K2(MT/P/T/TP/Z)
DTR-14K3(MT/P/T/TP/Z)
DTR-21K3(MT/P/T/TP/Z)
DTR-2131(MT/P/T/TP/Z)
DTR-2132(MT/P/T/TP/Z)
DTR-2134(MT/P/T/TP/Z)
DTR-2135(MT/P/T/TP/Z)
DTR-29M5(MT/P/T/TP/Z)
DTR-29M6(MT/P/T/TP/Z)
DTR-29M7(MT/P/T/TP/Z)
DTR-29U1(MT/P/T/TP/Z)
DTR-29U5(MT/P/T/TP/Z)

Table of contents
Safeguards 2
INTRODUCTION
Features 3
Installation 3
Identification of controls 4
Remote control 4
Swicthing the set ON/OFF 5
Tuning the TV channels 6
Convenient picture control 8
Enjoying wide and zoom picture 9
Convenient sound control 10
Using other menus 11
Watching picture in picture (option) 15
Connecting the external equipment 17
Connecting with other equipment 18
Connecting DVD PLAYER/BS receiver 19
The Othello game
20
Teletext(option)
22
Specification 23

2
SAFEGUARDS
To operate your receiver at the peak performance, please read this Instruction Manual carefully and retain it for the
future reference.
M Water and Moisture : Never install the set in the following places : in the bathroom, in a wet basement(Dripping or
splashing water).
No objects filled with liquids, such as vases, shall be placed on the apparatus.
M Heat : No naked flame sources, such as candles, should be placed on the apparatus.
M Ventilation : The ventilation should not be impeded by covering the ventilation openings with items, such
as newspapers, table-clothes, curtains, etc. Accidental contact with high voltage components
could result in electric shock. Never place the set in a confined space such as a bookcase or built-in
cabinet, unless proper ventilation is provided. The set requires minimum distances around the
apparatus for sufficient ventilation.
M Object Entry : Do not insert foreign objects, such as needles and coins, into the ventilation openings.
M Lightning Striking : You should disconnect your set from the main and the aerial system during thunderstorms.
M Cleaning : Unplug the set from the main before cleaning. Do not use liquid cleaners of aerosol cleaners. Use only a
lightly dampened soft cloth.
M Do not place liquids including flower vases and vessels filled with chemicals or water, etc. on the top of the unit.
Keep the inside of the unit free from foreign objects such as hairpin. If hazardous objects fall inside of the unit,
unplug it immediately and call a qualified technician for removal.
M When you don’t use the set for an extended period during vacation or other occasions, always make sure of
switching off the MAIN POWER(ON
/
OFF) SWITCH of the TV set.
M Do not place this television equipment on an unstable cart, stand, or table.
The television equipment may fall, causing serious injury to a child or adult, and serious damage to the
equipment. Use only with a cart or stand recommend by the manufacture’s instructions, and should use a
mounting kit approved by the manufacture.
M When replacement parts are required, be sure the service technician has used replacement parts specified by the
manufacture that have the same characteristics as the original parts. Unauthorized substitutions may result fire,
electric shock, or other hazards.
M Upon completion of any service or repairs to the set, ask the service (as specified by the manufacture) to
determine that the set is in safe operating condition.
M If anything goes wrong, don’t try any fix it yourself, get a qualified service agent to look at it.
M When Install the TV set, make the gap at least 10cm from the wall(at back, bottom, top and side of the TV set).
NOTE
If the receiver is moved or placed in a different direction, the MAIN POWER (ON
/
OFF) SWITCH must be switched off for
at least 15 minutes in order to take out a colour strain on the screen.

3
Features
INTRODUCTION
Installation
WIDE / ZOOM Screen : You can select a desired WIDE(or ZOOM) screen mode for movies
as well as the most 4:3 picture mode.
Selectable picture and selectable sound : Allows one-touch selection of your favorite picture
quality and tone quality.
Off-timer and On-timer: Turns off the TV automatically and will turn it back on at a preset time.
Picture-In-Picture (Option)
Digital-Eye (Option)
Teletext(Option)
AFTER MOVING THE SET
If the used set is moved or placed in a different direction, the ON/OFF button must be switched off for
at least 15minutes in order to take out a colour stain on the screen.
INSERTING BATTERIES INTO THE REMOTE CONTROL UNIT
Press down the battery compartment grip and slide the cover. Insert the batteries supplied(two 1.5V,
type AA).
Make sure that the polarity matches with the (+) and (-) marks inside of the battery compartment.
Used batteries should be disposed of properly.
AERIAL CONNECTION
For better picture and sound quality, an effective aerial installation is the most important.
If you are located in a relatively strong area, you will be able to use the indoor aerial.
When using an outdoor aerial, it is usually connected to the set by means of 75 ohm coaxial cable.
MAINS CONNECTION
Plug the mains cable into the power socket with 110-250V AC, 50/60Hz.
INTRODUCTION
4
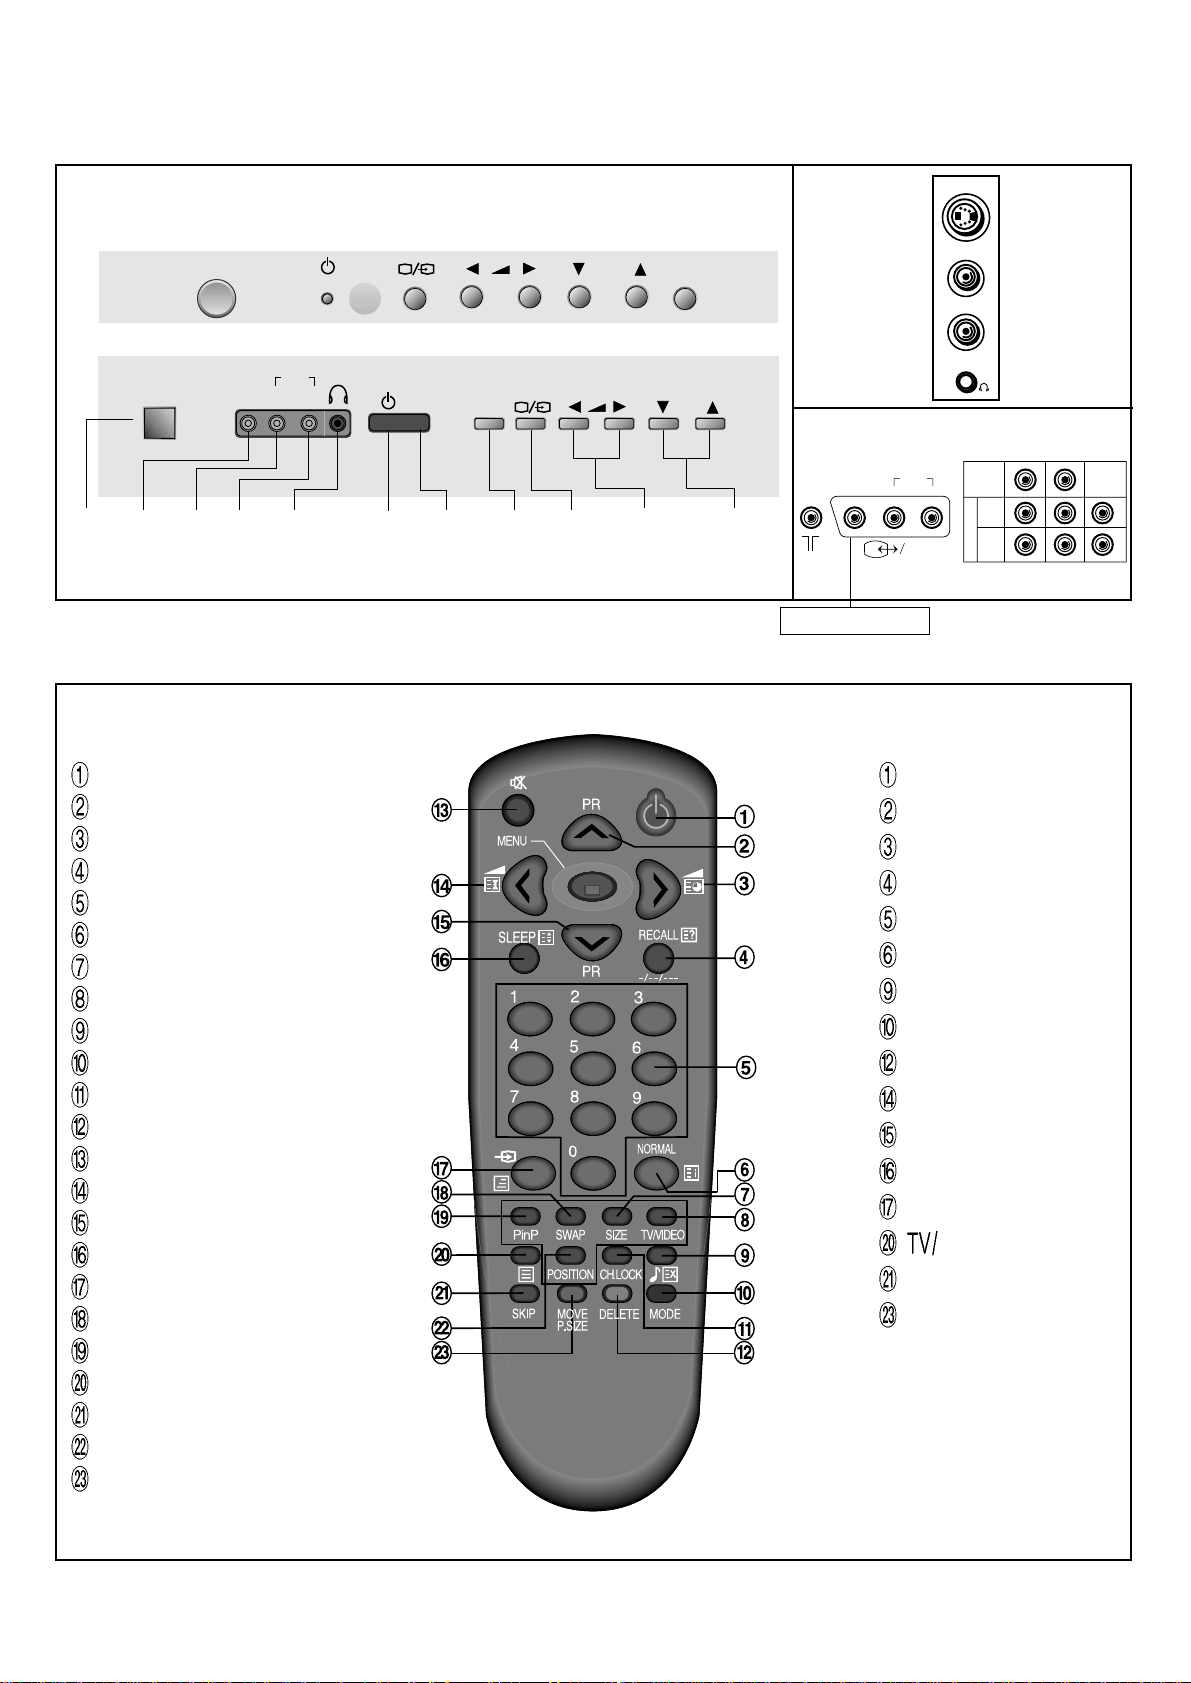
Identification of controls
SIDE
Remote control
TV mode
ON/OFF
PR (CURSOR) UP
VOLUME UP (CURSOR RIGHT)
RECALL
(-/--/---)
NUMBER 0~9
NORMAL
SIZE(PIP)
TV/VIDEO(PIP)
SOUND MODE
SOUND SYSTEM
CH.LOCK
DELETE(Edit mode)
MUTE
VOLUME DOWN(CURSOR LEFT)
PR(CURSOR) DOWN
SLEEP
AV
SWAP(PIP)
PinP ON/OFF(PIP)
TV/TEXT
SKIP(Edit mode)
POSITION(PIP)
MOVE(Edit mode)
PICTURE SIZE
TELETEXT MODE
POWER
PAGE UP
SUB PAGE
REVEAL
NUMBER 0~9
INDEX
CANCEL
B
Y
HOLD
PAGE DOWN
SIZE
MIX
TEXT
R
G
REAR
FRONT
SCART(OPTION)
29”
Others
29”
OUT
AV1
ANT
DVD IN
DVD-Y
Cb
Cr
VIDEO
VIDEO
AUDIO
R
L
(MONO)
LR
A
U
D
I
O
ON/OFF
MAIN
POWER
BUTTON
VIDEO 2
INPUT
RL
(MONO)
HEAD
PHONE
STAND-BY
INDICATOR
REMOTE
SENSOR
MENU
BUTTON
VOLUME
DOWN/UP
BUTTONS
PROGRAMME
DOWN/UP
BUTTONS
TV/VIDEO
VIDEO 2
AUDIO
PR
MENU
L(MONO) R
ON/OFF
PR
MENU
VIDEO 2
L(MONO)
AUDIO
R

5
SWITCHING THE SET ON AND OFF
Switching On
Switch the set on with the ON/OFF button in front of the receiver TV. The set will be turn on.
If not, press either : - PR UP or DOWN button on the front of set - or POWER button or the PR
UP/DOWN button or one of the NUMBER button 0..9 on the remote controller.
The STAND-BY INDICATOR turns “RED” to “OFF”, then picture will appear on the screen.
Switching Off
Press POWER button on the remote controller to return the set to its stand-by mode.
The STAND-BY INDICATOR will illuminate.
If you don't use the set for extended period of time, turn it off with MAIN POWER button in front of
the receiver.
Auto-power-off
If broadcasting signal is not present for 30 minutes, the TV will automatically turn off after about 30
minutes. However, if the Off-time or Sleep time is operating, it takes precedence.
This Auto-Power-Off function does not operate in the “AV1” or “AV2” or “DVD” mode.
6
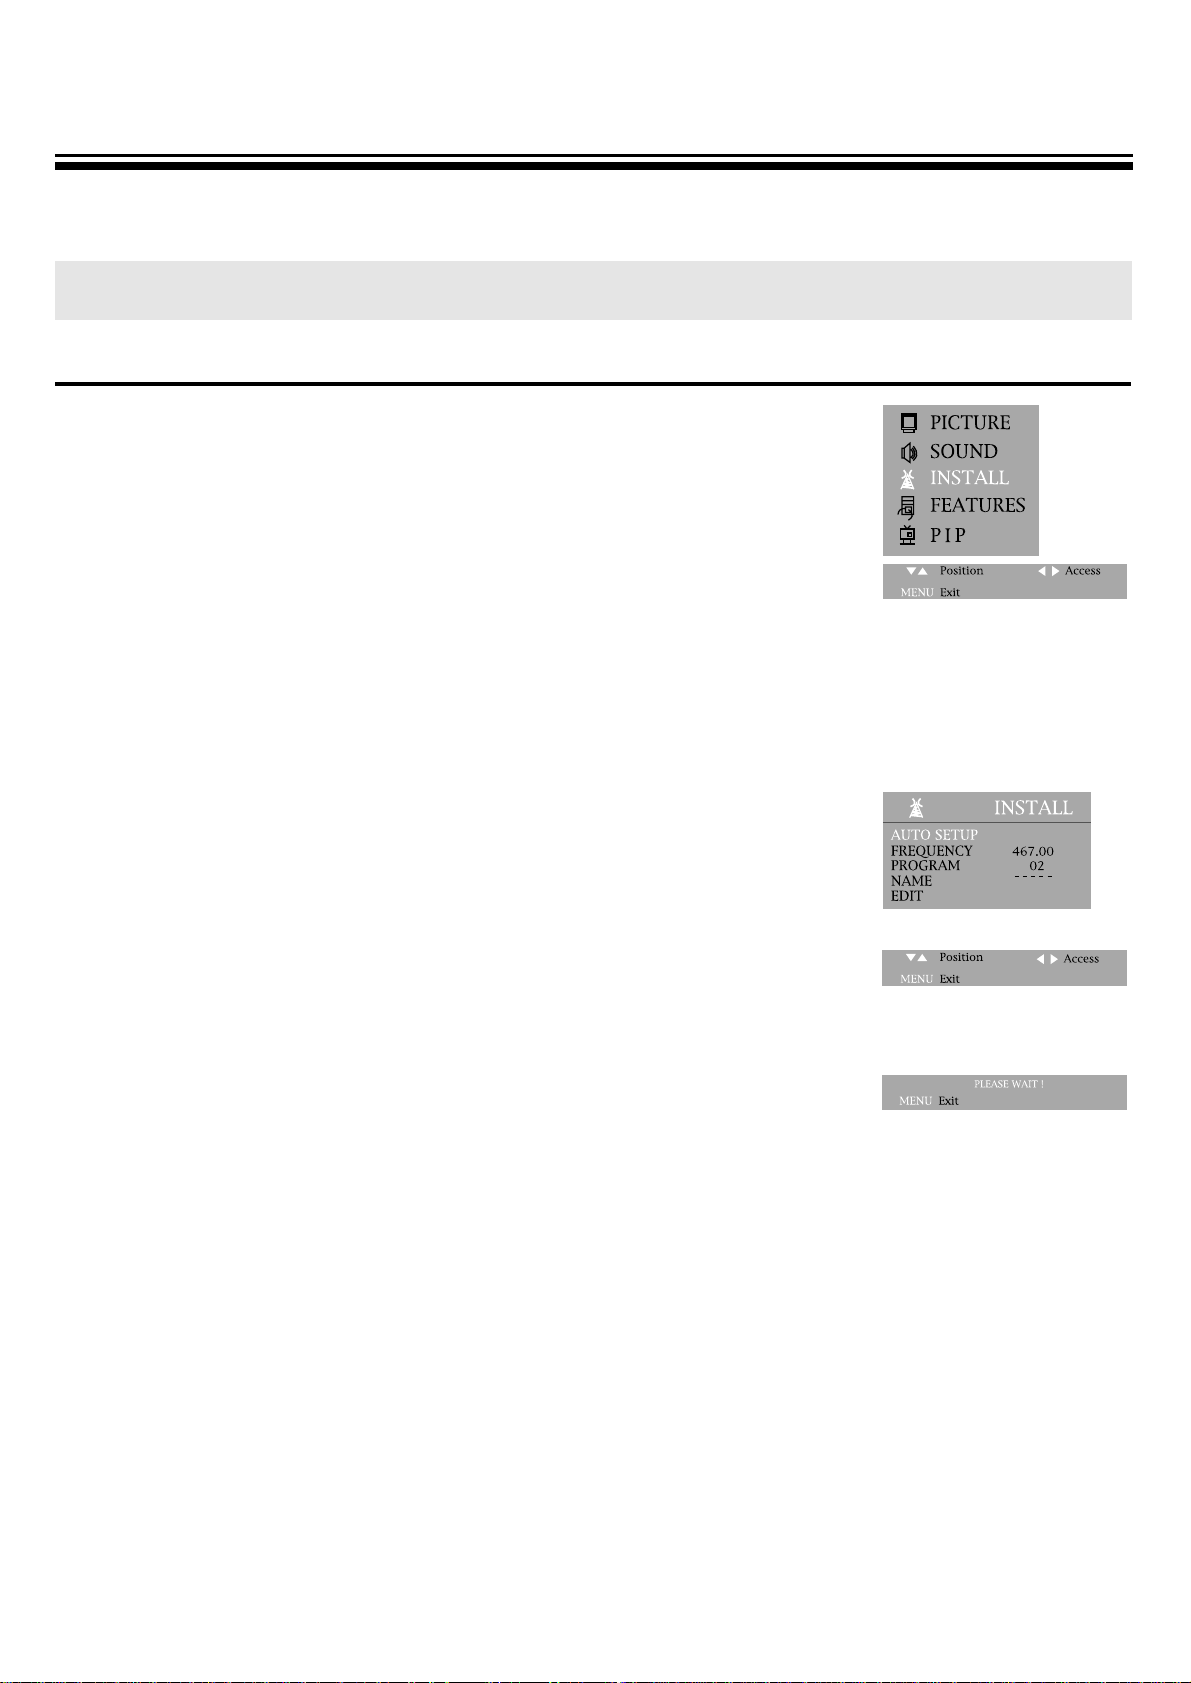
AUTO SETUP SYSTEM
1.Press the MENU button to select INSTALL.
2.Press the y
/
x buttons and then select INSTALL.
3.Select AUTO SETUP with the PRy
/
x buttons.
Press the right button and then select a sound system.
Press the right button to start AUTO SETUP.
4.Please wait until the EDIT menu appears.
TUNING THE TV CHANNELS
AUTO SETUP SYSTEM
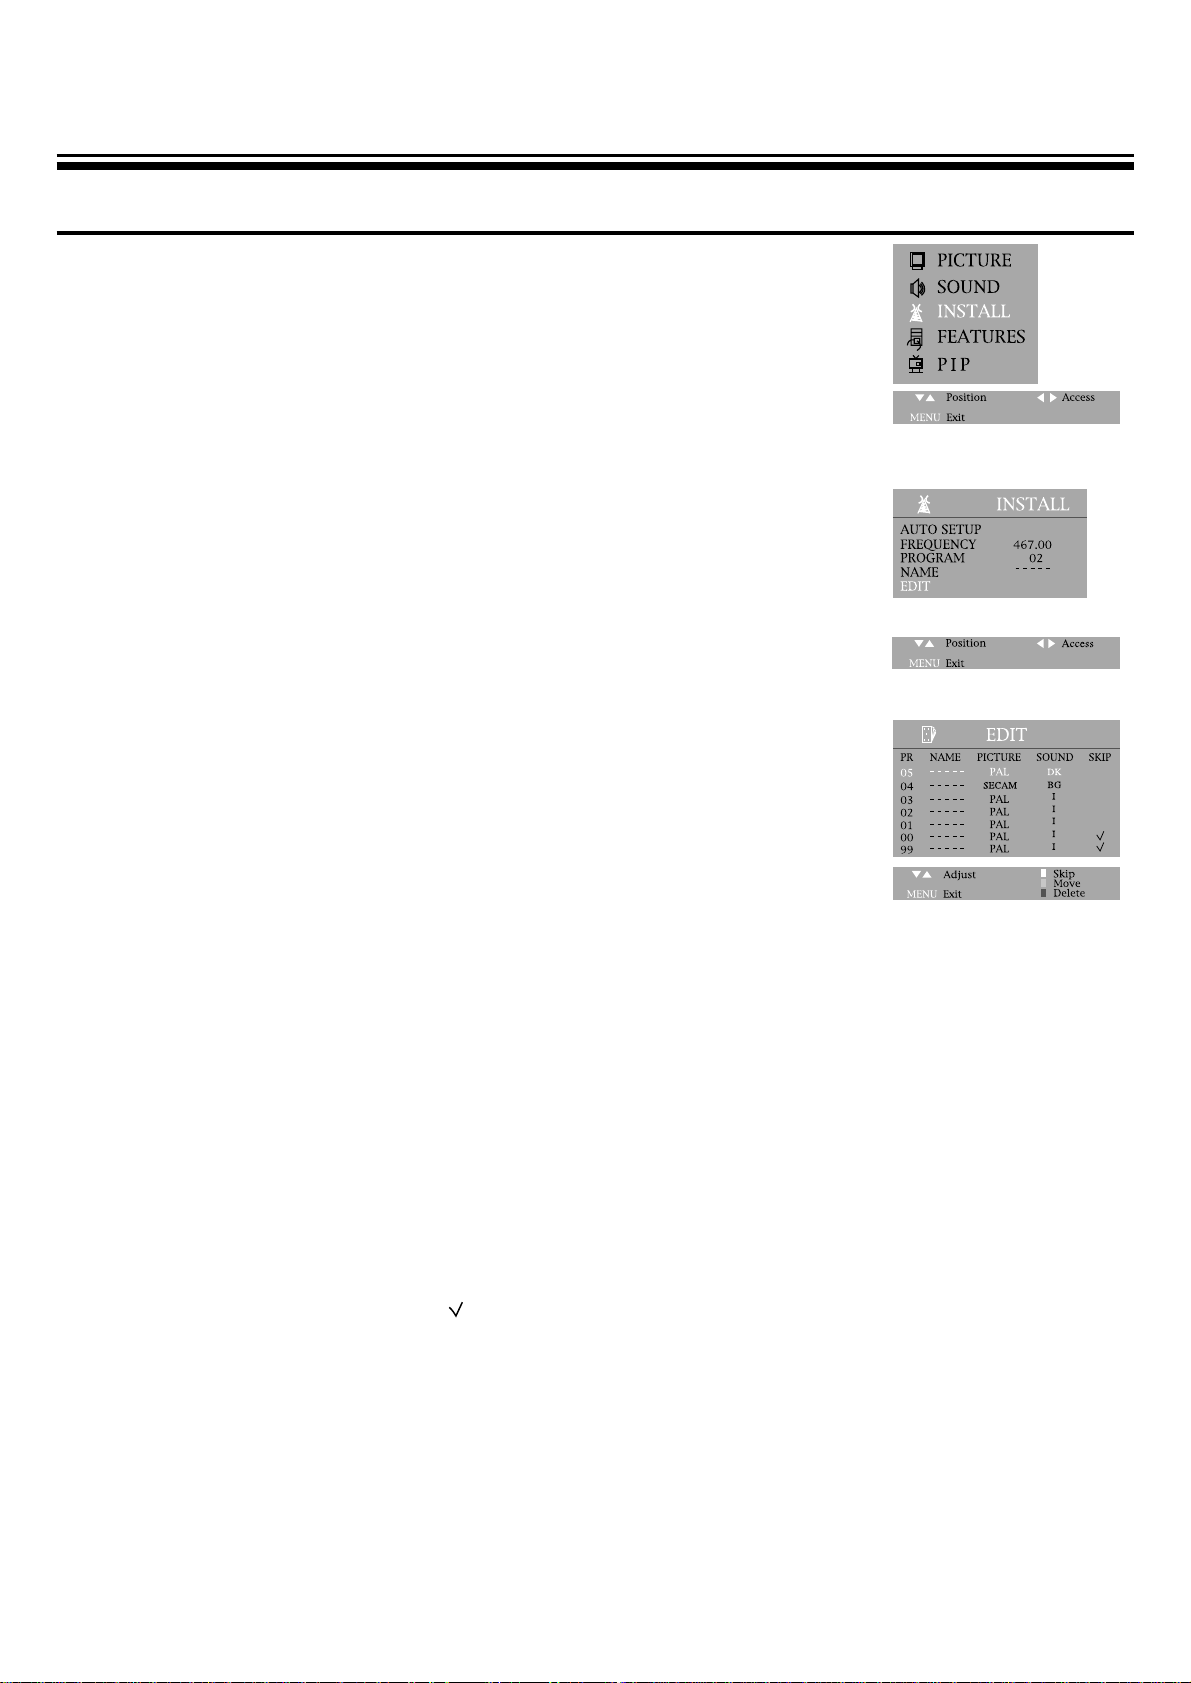
EDIT
1.Press the menu button to select INSTALL.
2.Press the y
/
x buttons and then INSTALL SYSTEM.
3. Select EDIT with the PR y
/
x buttons and press the C
/
B buttons to
start EDIT.
4.DELETE PROGRAM POSITION DATA.
Position the blue-line to the program to delete with the PR y
/
x
buttons and the DELETE button.
5.CHANGING THE ORDER OF THE CHANNELS
Position the blue-line to a program to move with the PR y
/
x buttons and the MOVE button.
Press the PR y
/
x buttons to position the blue-line to another program to move.
By pressing the MOVE button again, selected two program will be moved.
6.ENTER A STATION NAME
Locate the cursor to below NAME with the C
/
B buttons.
Using the PR y
/
x buttons, select the desired letter, number or blank.
Press the B(right button) to select the next position.
7.SKIPPING THE CHANNELS
You can select SKIP with the SKIP button in EDIT mode or locate in the cursor to below SKIP
with the C
/
B buttons and then press the PR y
/
x buttons to skip the desired program.
A program marked with skip “ ” is skipped when changing channel using the program
UP
/
DOWN(on normal operation).
Press the NUMBER buttons 0~9 or the PR y
/
x buttons to select program number you want. The
screen will change according to the selected program number.
8. SELECT SOUND SYSTEM
When the sound is abnormal, press the MODE button on the remote controller. Select the correct
sound system.
7
 Loading...