


INSTALLATION and SERVICE INSTRUCTIONS
USE and CARE INSTRUCTIONS
DE91PYROS
MULTIFUNCTION
PYROLYTIC OVEN
distributed by
DèLonghi
Pty Ltd

Dear Customer,
Thank you for having purchased and given your
preference to our product.
The safety precautions and recommendations reported
below are for your own safety and that of others. They
will also provide a means by which to make full use of
the features offered by your appliance.
Please keep this booklet in a safe place. It may be
useful in future, either to yourself or to others in the
event that doubts should arise relating to its operation.
This appliance must be used only for the task it has
explicitly been designed for, that is for cooking
foodstuffs. Any other form of usage is to be considered
as inappropriate and therefore dangerous.
The manufacturer declines all responsibility in the
event of damage caused by improper, incorrect or
illogical use of the appliance or be faulty installation.
PRODUCT LABEL
This oven has been designed and constructed in accordance with the following codes
and specifications:
AS/NZS 60335-1 General Requirements for Domestic electrical appliances
AS/NZS 60335-2-6 Particular Requirements for Domestic electrical cooking appliances
AS/NSZ 1044 Electromagnetic Compatibility Requirements.
2

IMPORTANT PRECAUTIONS AND RECOMMENDATIONS FOR
USE OF ELECTRICAL APPLIANCES
Use of any electrical appliance implies the necessity to follow a series of fundamental rules. In particular:
■ Never touch the appliance with wet hands or feet;
■ Do not operate the appliance barefooted;
■ The appliance is not intended for use by young children or infirm persons
without supervision;
■ Young children should be supervised to ensure they do not play with the
appliance.
The manufacturer cannot be held responsible for any damages caused by improper,
incorrect or illogical use of the appliance.
USING THE OVEN FOR THE FIRST TIME
You are advised to carry out the following operations:
■ Furnish the interior of the oven.
■ Switch the empty oven ON at maximum temperature for about two hours to
eliminate traces of grease and smell from the components.
■ Disconnect the appliance from the electric power supply and clean the
interior of the oven with a cloth soaked in water and neutral detergent and
dry thoroughly.
3

IMPORTANT PRECAUTIONS AND RECOMMENDATIONS
After having unpacked the appliance, check to ensure that it is not damaged.
In case of doubt, do not use it and consult your supplier or a professionally qualified
technician.
Packing elements (i.e. plastic bags, polystyrene foam, nails, packing straps, etc.) should
not be left around within easy reach of children, as these may cause serious injuries.
■ Do not attempt to modify the technical characteristics of the appliance as this may
become dangerous to use.
■ Do not carry out cleaning or maintenance operations on the appliance without hav-
ing previously disconnected it from the electric power supply.
■ After use, ensure that the oven is switched off.
■
Household appliances are not intended to be played with by children.
■
Keep children away from the oven during use.
■
Children, or persons with a disability which limits their ability to use the appliance, should
have a responsible person to instruct them in its use. The instructor should be satisfied
that they can use the appliance without danger to themselves or their surroundings.
■ During and after use of the appliance, certain parts will become very hot. Do not
touch hot parts. Care should be taken to avoid touching heating elements inside
the oven.
■ Some appliances are supplied with a protective film on steel and aluminium parts.
This film must be removed before using the appliance.
■ Make sure that electrical cables connecting other appliances in the proximity of the
oven do not become entrapped in the oven door.
■ Do not line the oven walls with aluminium foil. Do not place baking trays or the
drip tray on the base of the oven chamber.
■ WARNING When correctly installed, your product meets all safety requirements
laid down for this type of product category. However special care should be taken
around the rear or the underneath of the appliance as these areas are not designed
or intended to be touched and may contain sharp or rough edges, that may cause
injury.
■ Fire risk! Do not store flammable material in the oven.
■ Always use oven gloves when removing the shelves and food trays from the oven
whilst hot.
■ Do not hang towels, dishcloths or other items on the appliance or its handle – as
this could be a fire hazard.
4

■ Clean the oven regularly and do not allow fat or oils to build up in the oven base
or tray. Remove spillages as soon as they occur.
■ Do not stand on the open oven door.
■ Always stand back from the appliance when opening the oven door to allow steam
and hot air to escape before removing the food.
■ This appliance is for domestic use only.
■ Safe food handling: leave food in the oven for as short a time as possible before
and after cooking. This is to avoid contamination by organisms which may cause
food poisoning. Take particular care during warmer weather.
■ The manufacturer declines all liability for injury to persons or damage to property
caused by incorrect or improper use of the appliance.
■ WARNING: Taking care NOT to lift the oven by the door handle.
■ IMPORTANT NOTE: This appliance shall not be used as a space heater,
especially if installed in marine craft or caravans.
■ Do not operate your appliance by means of an external timer or sep-
arate remote-control system.
5

INSTALLATION
CAUTION:
■ This appliance must be installed in accordance with these installation
instructions.
■ This appliance shall only be serviced by authorized personnel.
■ This appliance is to be installed only by an authorised person.
■ Incorrect installation, for which the manufacturer accepts no responsibil-
ity, may cause personal injury of damage.
■ Always disconnect the oven from mains power supply before carrying
out any maintenance operations or repairs.
ELECTRICAL REQUIREMENTS
■ Connection to the mains must be carried out by qualified personnel in
accordance with current regulations.
■ The appliance must be connected to the mains checking that the voltage
corresponds to the value given in the rating plate and that the electrical cable
sections can withstand the load specified on the plate.
■ A suitable isolating switch providing full disconnection from the mains power
supply (under overvoltage category III conditions) must be incorporated in the
permanent wiring, mounted and positioned to comply with the local wiring
rules and regulations.
The isolating switch must be of an approved type and provide a 3 mm air gap
contact separation in all poles (or in all active [phase] conductors if the local
wiring rules allow for this variation of the requirements).
■ The power supply cable must not touch the hot parts and must be positioned
so that it does not exceed 75°C at any point.
■ Once the appliance has been installed, the switch or socket must always be
accessible.
■
If the supply cord is damaged it must be replaced by the manufacturer
or its Service Agent or a similarly qualified person in order to avoid a
hazard.
N.B. • The connection of the appliance to earth is mandatory.
• For connection to the mains, do not use adapters, reducers or
branching devices as they can cause overheating and burning.
If the installation requires alterations to the domestic electrical system call a qualified
electrician. He should also check that the domestic electrical system is suitable for the
power drawn by the appliance.
6

REPAIRS
230 - 240 V
E
N
L
1 (L )2
REPLACING THE POWER SUPPLY CABLE
■ Unhook the terminal board cover by inserting a screwdriver into the two
hooks A (fig. 2).
■ Open the cable gland by unscrewing screw F (fig. 3), unscrew the terminal
screws and remove the cable.
■ The new supply cable, of suitable type and section, is connected to the
terminal board following the diagram of fig. 1.
FEEDER CABLE SECTION TYPE HO5RR-F
230 V ~ 4400 W (19.13 A) 3 x 2,5 mm
240 V ~ 4791 W (19.96 A) 3 x 2,5 mm
Figure 1
Figure 2 Figure 3
2
2
A
F
7
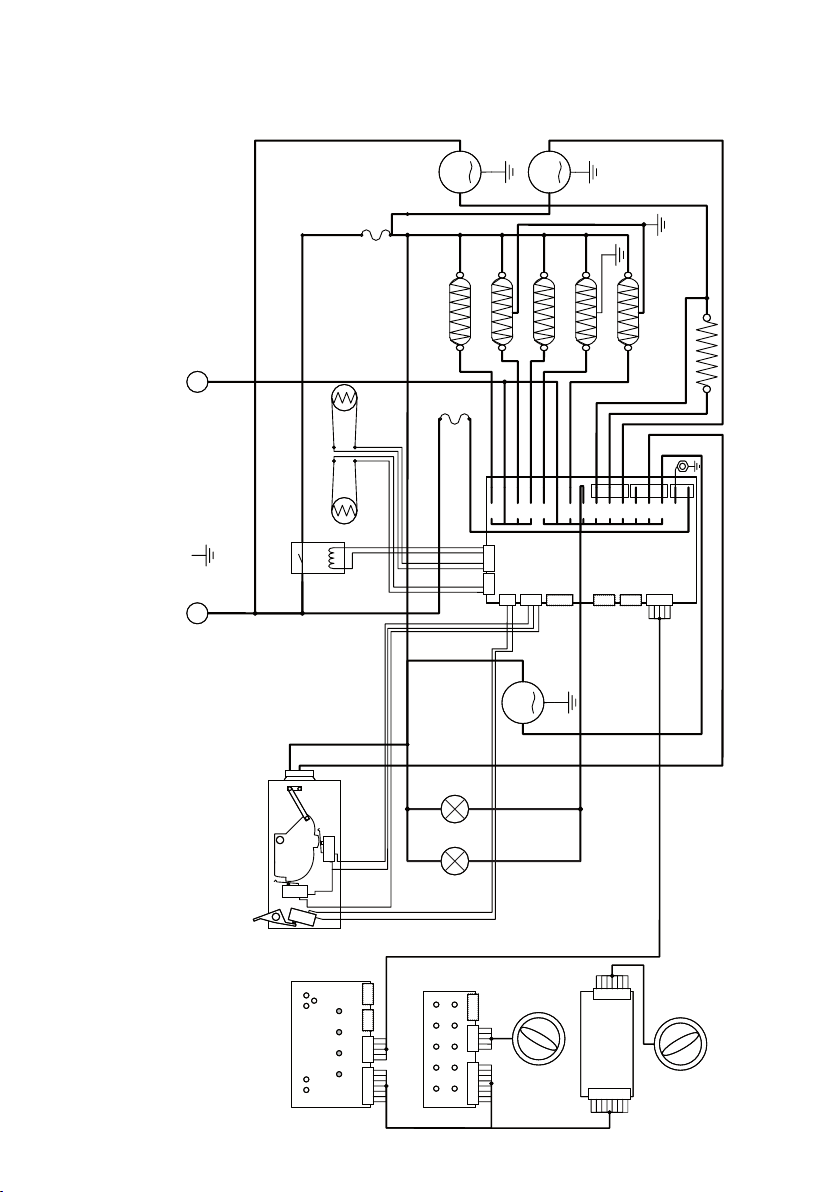
ELECTRIC DIAGRAM
O
u
t
e
r
G
r
i
l
l
∞∞
TT
P1P1
T
her
mal
Fus
e
O
u
t
e
r
b
a
k
e
I
n
n
e
r
B
a
k
e
I
n
n
e
r
G
r
i
l
l
F
a
n
E
l
e
m
e
n
t
T
her
mal
Fus
e
B
a
k
e
O
u
t
e
r
O
u
t
e
r
G
r
i
l
l
I
n
n
e
r
B
a
k
e
F
a
n
E
l
e
m
e
n
t
M
a
i
n
s
2
I
n
n
e
r
G
r
i
l
l
L
i
g
h
t
s
C
o
o
l
F
a
n
H
C
o
o
l
F
a
n
L
o
C
a
v
i
t
y
F
a
n
L
o
c
k
U
n
l
o
c
k
E
a
r
t
h
M
a
i
n
s
1
EE
G
r
e
e
n
/
Y
e
l
l
o
w
W
h
i
t
e
Y
e
l
l
o
w
G
r
e
y
P
u
r
p
l
e
B
l
a
c
k
B
l
u
e
B
l
a
c
k
B
l
u
e
B
l
u
e
C
o
o
l
i
n
g
f
a
n
C
a
v
i
t
y
F
a
n
C
l
o
c
k
B
o
a
r
d
F
u
n
c
t
i
o
n
B
o
a
r
d
T
e
m
p
e
r
a
t
u
r
e
B
o
a
r
d
L
o
c
k
U
n
l
o
c
k
M
a
i
n
∞∞
TT
8
8:
8
8
D
o
o
r
8
8
8
M
NN
B
r
o
w
n
B
l
u
e
T
e
m
p
e
r
a
t
u
r
e
S
e
n
s
o
r
A
u
x
i
l
i
a
r
y
T
e
m
p
e
r
a
t
u
r
e
S
e
n
s
o
r
B
l
a
c
k
M
a
i
n
s
3
R
o
t
i
s
s
e
r
i
e
P
o
w
e
r
B
o
a
r
d
R
e
d
M
M
L
a
m
p
L
a
m
p
Red
Purple
Figure 4
8
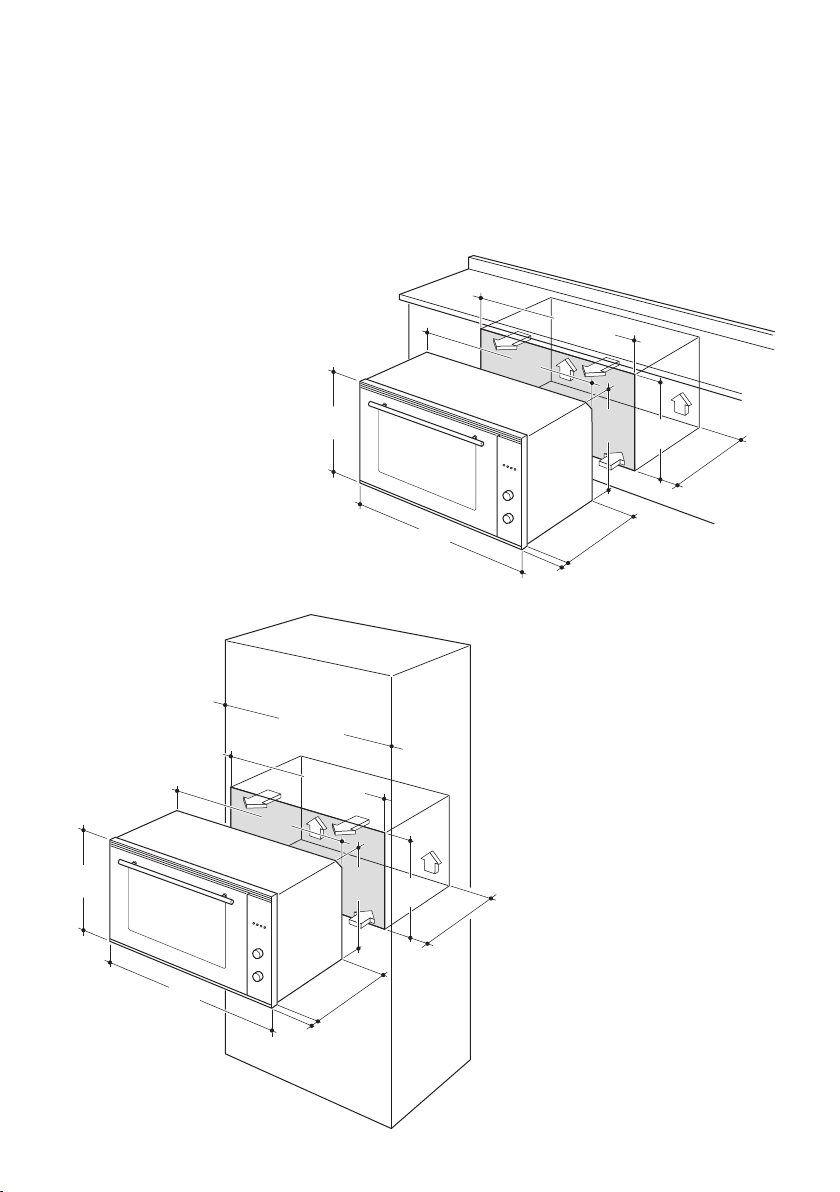
FITTING REQUIREMENTS
8
5
3
8
9
6
478
5
4
4
2
2
m
i
n
.
5
5
0
480
467
min.
8
6
0
853
896
478
5
4
4
2
2
m
i
n
.
5
5
0
480
467
mi
n.
860
min. 900
• The appliance should be installed by a QUALIFIED INSTALLATION TECHNICIAN.
• The appliance must be installed in compliance with regulations in force.
• The walls surrounding the oven must be made of heat-resistant material.
WARNING: Taking care NOT to lift the oven by the door handle.
The oven can be fitted in
standard units, width 90
cm and depth 60 cm.
Installation requires a compartment as illustrated in
figures 5 and 6.
On the lover side, the
oven must lay on supports
standing the oven weight.
Figure 5
WARNING
When correctly installed,
your product meets all
safety requirements laid
down for this type of product category.
Figure 6
However special care
should be taken around
the rear or the underneath
of the appliance as these
areas are not designed or
intended to be touched
and may contain sharp or
rough edges, that may
cause injury.
9
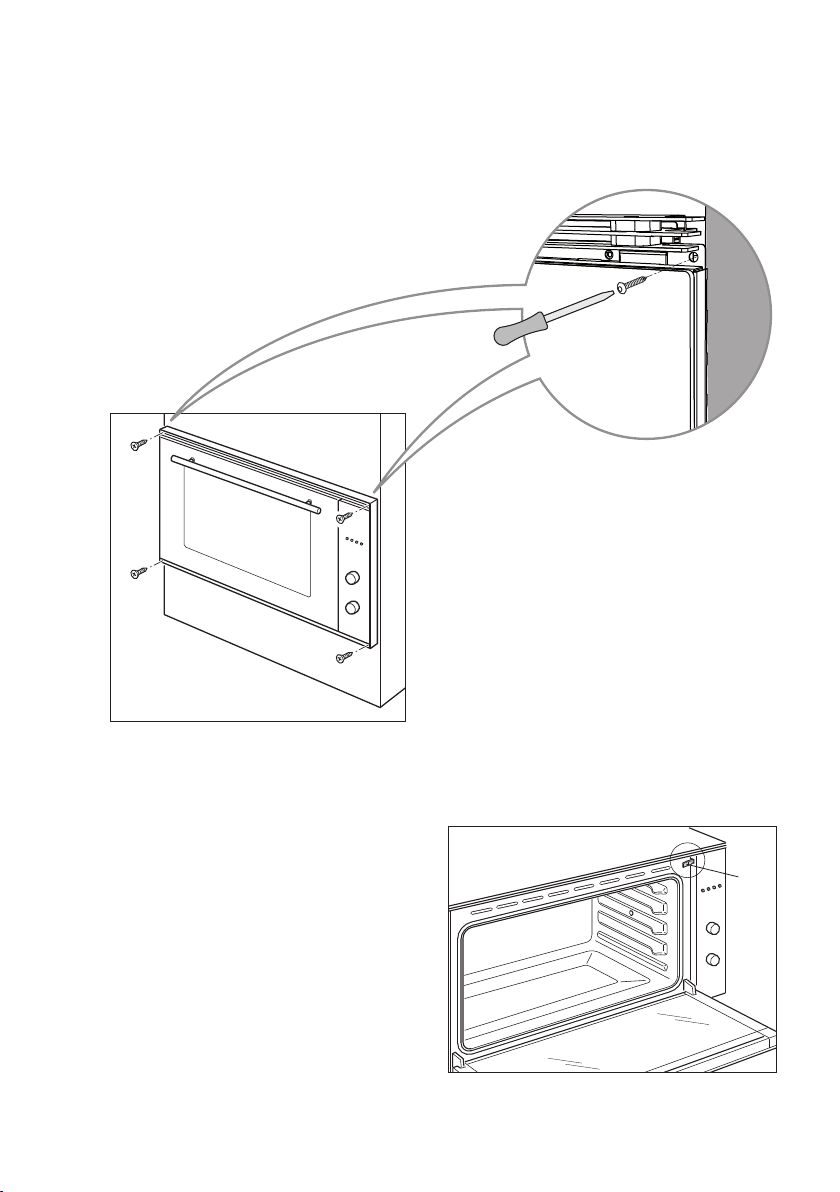
FIXING THE OVEN
Introduce the oven into the furniture opening and fix it with 4 screws (not supplied)
as figure 7. It is essential that the oven rests on a surface which will support its
weight, as the screw fixing is only complementary.
Figure 7
IMPORTANT: When handling the
oven, take care not to damage the
door sensor lever “L” (near the top
right corner of the oven seal).
10
Figure 8
L
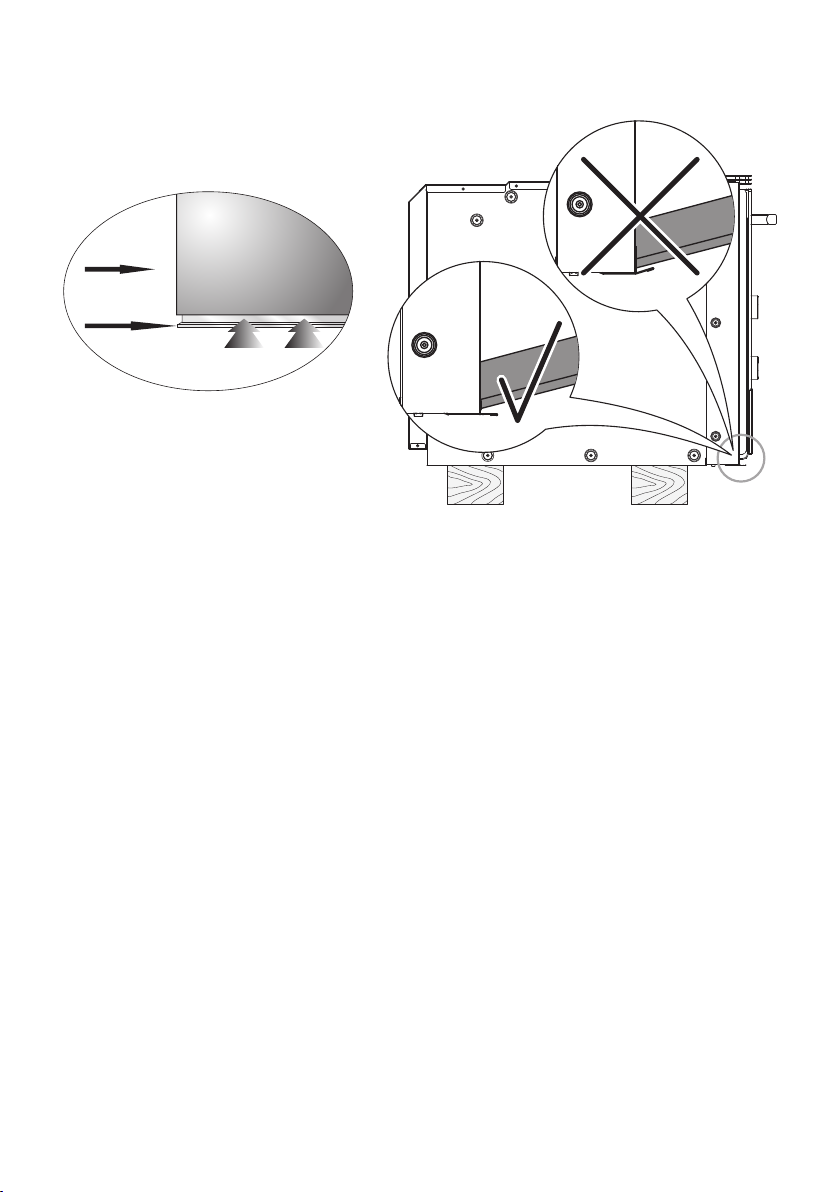
Figure 9
Oven
Door
Lower Trim
Air Flow
IMPORTANT:
To avoid damage to the lower trim please note the following instructions.
The lower trim is designed to allow for good air circulation and the correct opening
of the oven door.
To ensure the trim is not damaged due to the appliance being placed on the floor,
the appliance should be suitably supported as in above illustrations.
After installation the appliance door should be slowly opened to ensure no damage
has occurred.
No responsibility for lower trim damage will be accepted if these instructions have not been followed.
11
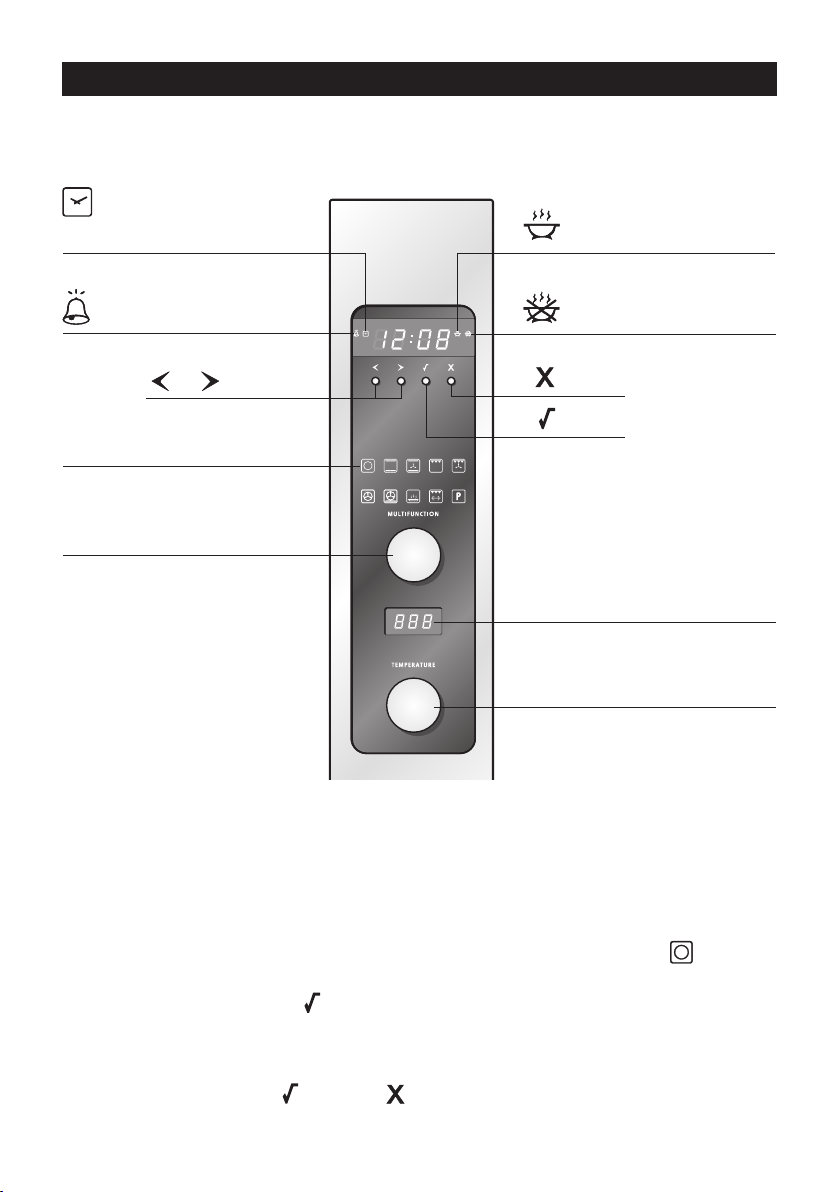
USE and CARE
Timer indicator
(see ‘Using the timer’)
Clock indicator
(see ‘Setting the clock
and first use’)
Cooking time indicator
(see ‘Automatic cooking’)
Stop time indicator
(see ‘Automatic cooking’)
Scroll
Select
Cancel
Function indicators
(see ‘Oven functions’)
Function dial
(see ‘Using your oven’)
Temperature indicator
(see ‘Using your oven’)
Temperature dial
(see ‘Using your oven’)
THE CONTROL PANEL
Figure 10
Locking the control panel
You can lock the control panel to prevent unintended use (eg. children playing with
the oven).
Doing so will disable the dials and all the buttons.
To lock the control panel
1. Make sure the oven is not in use (the function dial is turned to Off ) and neither automatic cooking nor the timer is set (no indicator is lit in the display).
2. Press and hold the select button until you hear a beep and - - - appears in the
temperature indicator.
To unlock the control panel
Press and hold the select or cancel button until you hear a beep and the temperature indicator becomes blank.
12

SETTING THE CLOCK
You will need to set the clock to make full use of your oven.
Figures 11
1. Ensure the power supply to the oven is on.
2. Select the clock by pressing the right scroll
button twice.
• The clock indicator will appear and the colon
will flash.
3. Press the select button to confirm.
• The display will flash to indicate the clock is ready
to be set.
4. Set the time by pressing the scroll buttons. Holding
the buttons down will speed up the scrolling.
햲
햳
햴
햵
5. Press the select button to confirm.
• The clock indicator will soon disappear but
the clock is now set.
햶
13
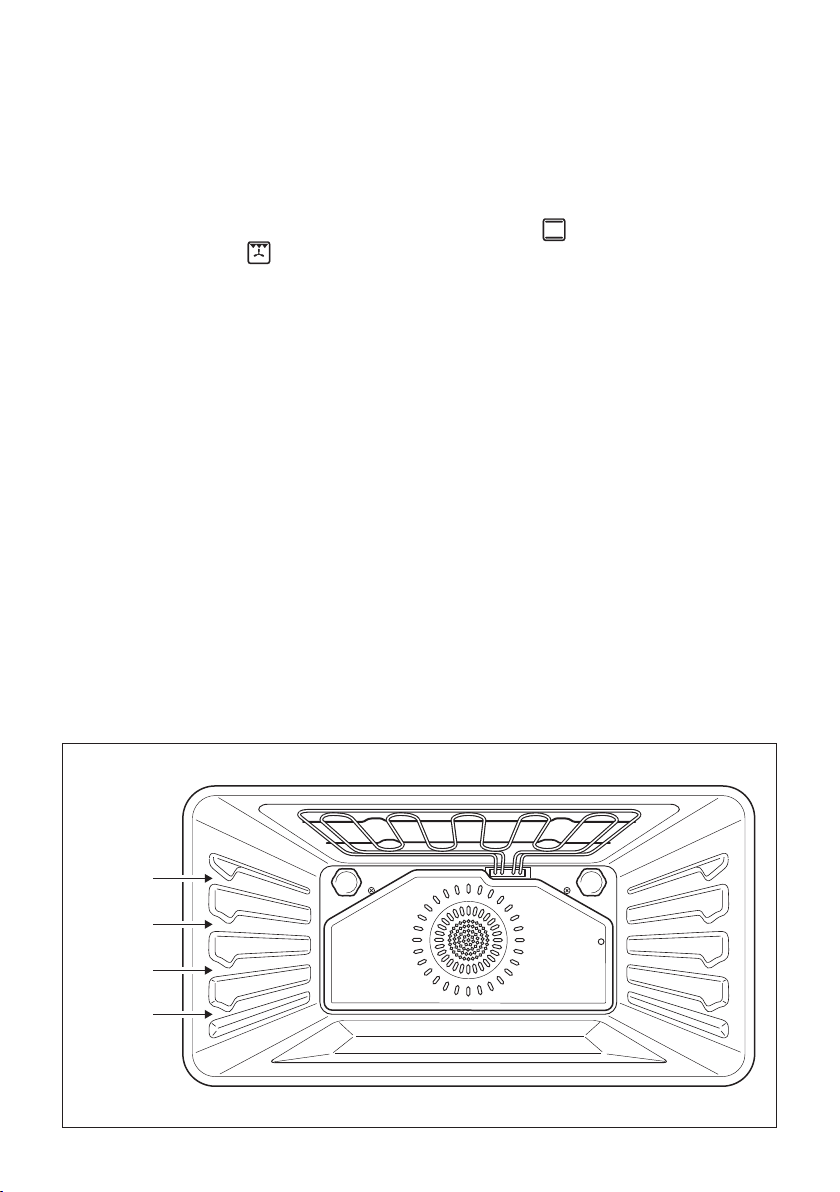
SHELF
POSITIONS
4
3
2
1
FIRST USE - Conditioning the oven
It is important to condition your oven before using it for cooking and baking.
Conditioning will burn off any manufacturing residues and ensure that you get the
best results right from the start.
1. Make sure you have set the clock.
2. Slide in the shelves and the grill tray. See ‘Using your oven’ for instructions.
3. Heat the oven for: 30 minutes at 200 °C using Bake then 15 minutes at 200
°C using Fan Grill
• There will be a distinctive smell while you are conditioning the oven. This is normal, but make sure the kitchen is well ventilated during the conditioning.
4. Once cooled, wipe out the oven with a damp cloth and mild detergent, and dry
thoroughly.
.
14
Figure 12
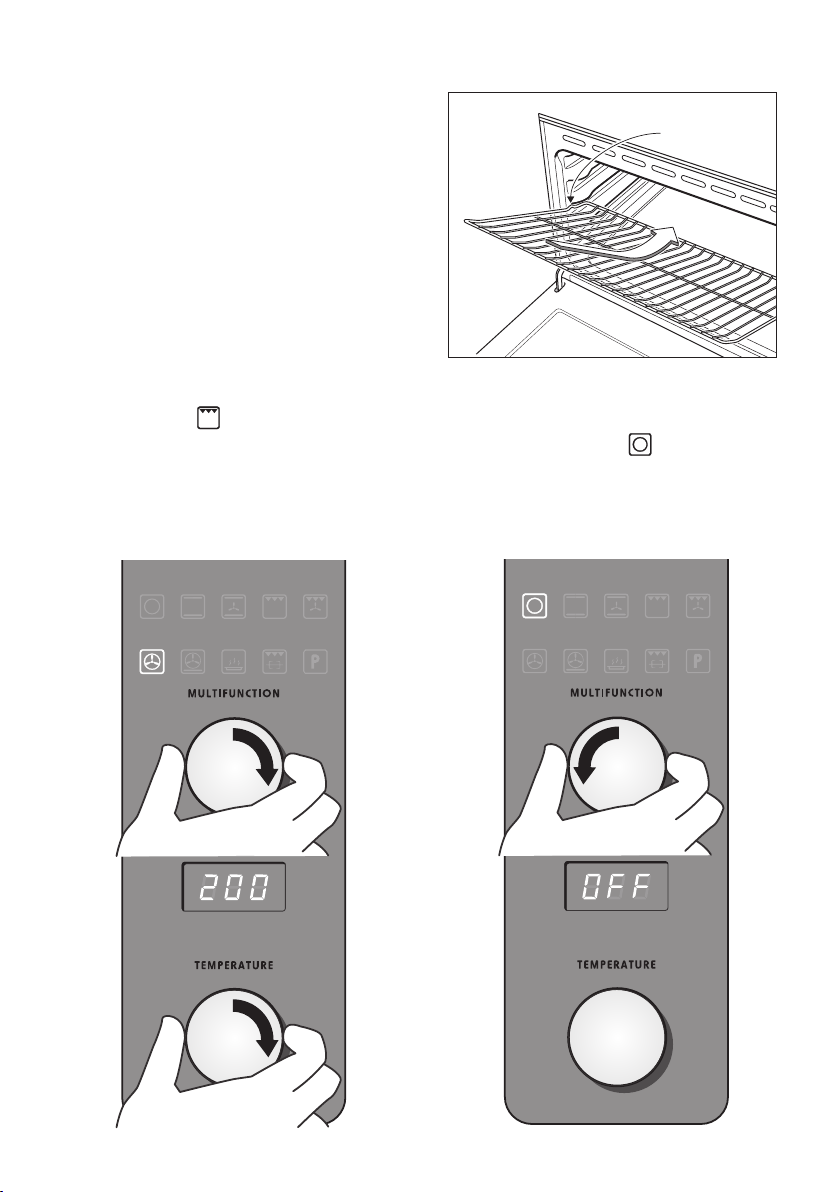
USING YOUR OVEN
Figure 13
1. Slide in the shelf. The oven shelf is
provided with a security block to prevent accidental extraction. It must be
inserted operating as per figure 13.
The oven trays shall be placed
above the shelves.
2. Select a function (fig. 14).
3. Set the temperature.
• While the oven is heating up, the
temperature indicator will alternately show the actual and set
temperatures.
• When the oven has reached set temperature, a long tone will sound.
• Note: Grill provides instant radiant heat, so there will be no tone.
4. When you have finished cooking, turn the function dial to Off (fig. 15).
Figure 14
Figure 15
Safety catch
햲
햳
햴
햵
15

OVEN FUNCTIONS
OFF
Selecting this will turn the oven off.
BAKE
This is the traditional method of baking. It is best to bake on only one shelf at a time
in this function. Ideal for large cakes and dishes that bake for several hours.
FAN BAKE
Ideal for dishes like lasagne that need to brown on top and also single trays of small
cakes or biscuits that bake in less than an hour.
GRILL
Grill is the most suitable function for ‘finishing off’ many meals, for example browning the top of potato gratin and frittata. Use Grill to toast bread or to grill your
favourite chicken, fish and steak.
Note: heat levels are from LO (50% power) to HI (100% power), with settings from
1 to 9 in between. Grill provides instant radiant heat.
FAN GRILL
Ideal for roasting tender cuts of meat and poultry. Use the lower shelf positions for
larger items eg a whole chicken.
FAN FORCED
Great for multi-shelf cooking. The consistent temperature ensures baking is well risen.
Cookies baked on Fan Forced are crisp on the outside and chewy in the middle.
16

PASTRY BAKE
Excellent for sweet and savoury pastry foods, for moist breads and brownies and
cookies that you want extra chewy.
WARM
Use this function to keep cooked food hot and to warm plates and serving dishes.
To reheat food from cold, use a cooking function at 150°C, then switch to Warm set
between 70-90°C only when the food is piping hot. Note: this function is not for
cooking food and the temperature cannot be set higher than 90°C.
ROTISSERIE
Rotisserie is a delicious way to cook meat and poultry. The slowly rotating food is
basted continuously in its own juices, making it tender on the inside and well browned
and full of flavour on the outside. See ‘Using the rotisserie’.
SELF CLEAN
The Self Clean cycle takes care of the mess and grime that is traditionally associated
with oven cleaning. See ‘Using the Self Clean function’ for details.
IMPORTANT NOTES:
The Self Clean is not a cooking function but is only used to clean the oven.
Before starting the Self Cleaning cycle:
- Take all the accessories out of the oven (drip tray and shelves).
- Clean any traces of liquid which have overflowed.
- Close the oven door and make sure that it is closed properly.
If there are cracks or flaws on the oven door glass (inside/outside) or if the oven
gasket is ruined or worn or if the door does not close perfectly, unplug the appliance and contact the After-Sales Service Centre.
Smells and fumes produced during pyrolysis are not a cause of alarm. Adequate
ventilation should however be provided in the room where the oven is installed,
e.g. by opening a window.
17

USING THE SELF CLEAN FUNCTION
• This convenient pyrolytic Self Clean function takes care of the mess and grime that
is traditionally associated with oven cleaning. The extremely high temperature during a Self Clean cycle burns off and breaks down stubborn soil and grease deposits.
All that remains is a clean oven cavity with a little grey ash which you can easily
remove.
Important!
• Do not use oven cleaners, any degreasing cleaners, or oven liners.
• Make sure you remove the oven shelves and trays, rotisserie and all other bakeware
and utensils from the oven before starting a Self Clean cycle. If left in the oven,
they will become permanently discoloured or damaged; items made from combustible materials (eg wood, fabric, plastic) may even catch fire.
• Do not use your oven to clean miscellaneous parts.
• Make sure the room is well ventilated.
• Before starting a Self Clean cycle, make sure you move any pet birds to another,
closed and wellventilated room. Some pet birds are extremely sensitive to the fumes
given off during a Self Clean cycle, and may die if left in the same room as the
oven during such a cycle.
• During a Self Clean cycle, the oven reaches higher temperatures than it does for
cooking. Under such conditions, the surfaces may get hotter than usual and children should be kept away.
• The oven door will be locked during the Self Clean cycle.
• If there are cracks or flaws on any of the oven door glass panes, if the oven seal
is damaged or worn, or if the door does not close properly, do not start a Self
Clean cycle. Call your Authorised Repairer or Customer Care.
To start a Self Clean cycle
1a. Remove oven shelves and all other
accessories, bakeware, and utensils
(Fig. 16).
1b. Wipe up any spills. Failure to do so
may discolour the oven surfaces.
1c. Check the inner glass pane of the
oven door (D). If it has soiling on
it (eg stains from greasy splatter),
you will need to clean it manually
before starting a Self Clean cycle.
18
Figure 16
햲
D

For instructions, see ‘Care and cleaning’.
Important!
If soiling is left on the glass, it
will become burnt on during the
Self Clean cycle, making it very
difficult to remove.
2. Close the oven door firmly (Fig. 17).
Figure 17
햳
3. Select the Self Clean function (fig.
18).
• The display will flash
cating the duration of a Self Clean
cycle (3 hours).
• The temperature indicator will be
blank, as temperature cannot be
adjusted.
4. Once the display is flashing 3:00,
press the select button to start the
Self Clean cycle (fig. 19).
• The time will start counting down.
• For your safety, the oven door will
automatically lock and remain
locked during the cycle.
• Note: if the select button is not
pressed within 15 seconds, the
oven will automatically turn off.
Start from step 3 again.
3:00, indi-
Figures 18
햴
햵
Figures 19
19

When a Self Clean cycle has finished
The oven will:
• emit a long tone
• automatically turn off
• automatically unlock the door.
In a few seconds, the display will show the time of day.
You need to:
1. wait for the oven to cool down completely
2. remove the grey ash with a small brush or damp cloth
3. wipe out the oven with a clean damp cloth
4. dry with a clean lint-free cloth
5. replace the shelves.
To cancel a Self Clean cycle
IMPORTANT!
• Do NOT turn off the mains power supply
to the oven (wall switch). Turning off the
power while the oven is too hot may
damage the oven and its surrounding
cabinetry.
To cancel a Self Clean cycle, press the cancel button (Fig. 20) or turn the function dial
in either direction (Fig. 21).
Figure 20
• If the oven needs to cool down, the Self
Clean function indicator will stay lit, the
display will show the remaining cool-down
time, the temperature indicator will show
cascading bars and the door will
remain locked.
• When it has cooled down, the oven will turn
off, the door will unlock, a long tone will
sound and the display will show the time of
day.
• We do not recommend cancelling a Self
Clean cycle and then immediately starting
one again..
20
OR
Figure 21

Rotate the fork screws
to loosen and tighten
Handle
Fork
Skewer
G
USING THE ROTISSERIE
Shelf
Tray
1. Secure the meat (fig. 22).
Important!
Take care, the forks are sharp!
When securing the meat, ensure
that:
• the skewer goes through the centre of the meat
• the forks hold the meat firmly in
place
• the fork screws are tightened
• there are no loose or projecting
parts. Poultry should be trussed.
Note: the rotisserie can rotate up to
6 kg of meat.
2. Twist the handle off (fig. 22).
3. Insert the shelf and the tray in the
oven (fig. 23).
• Insert the shelf in the lowest rack
holders (shelf position 1 - fig. 12).
• Place the oven tray above the
shelf.
Figure 22
Figure 23
Figure 24
4. Insert the rotisserie support (fig. 24)
in the second rack holders (shelf position 2 - fig. 13).
5. Insert the rotisserie in the oven
(fig. 25).
1. Push the skewer through the “G”
hole on the right-hand wall of the
oven, then insert it fully into the
rotisserie drive hole.
2. Place the skewer on the rotisserie
support.
Figure 25
햲
햳
21

5. Select the Rotisserie function
(fig. 26).
• The skewer will start rotating.
• Check that the meat does not
touch the grill tray or the grill element at the top of the oven.
6. Set the temperature (fig. 26).
• We recommend around 210 °C.
When you have finished using
the rotisserie
1. Turn the oven off.
2. Using oven mitts, carefully disengage
the right end of the skewer from the
rotisserie drive hole.
3. Slide out the grill tray and place it
on a heat-resistant surface.
4. Twist the handle onto the left end of
the skewer.
5. Lift the skewer off the supports by
the handle.
6. Loosen the fork screws and slide the
meat off the skewer.
Figure 26
햶
햷
Tips for using the rotisserie
• For food safety reasons, we do not
recommend using the rotisserie with
stuffed meat.
• If your meat is too big or heavy (over
6 kg) for the skewer, place it on top
of the grill rack in the grill tray, and
use Fan Forced . This function will
give a result similar to a rotisserie.
• Use a meat thermometer to ensure
that meat is cooked through to a safe
temperature.
• See ‘Care and cleaning’ for advice on
cleaning the rotisserie parts.
22

USING THE TIMER
• You can use the timer at any time, even if you are not using the oven.
• If the time is more than an hour, the display will count down in minutes (hr:min).
If it is less than an hour, it will count down in seconds (min:sec).
• You can set the timer for up to 23 hours 59 minutes.
Important! The timer does NOT turn the oven off.
Figures 27
1. Select the timer by pressing the right scroll
button once (figures 27).
• The timer indicator will appear and the colon
will flash.
2. Press the select button to confirm.
• The display will flash to indicate the timer is ready
to be set.
3. Set the time by pressing the scroll buttons.
• Holding the buttons down will speed up the
scrolling.
4. Press the select button to confirm.
• The timer will then begin to count down.
햲
햳
햴
5. If you want to check the time of day, you can toggle between this and the timer countdown by pressing the scroll buttons.
햵
To modify the timer setting
• Make sure the display shows the remaining time
counting down.
• Press the select button.
• Press the scroll buttons to set a new time.
• Press the select button to confirm.
햶
To cancel the timer setting
• Make sure the display shows the remaining time counting down.
• Press the cancel button until the display shows the time of day and the timer
indicator disappears.
When the set time is up
• The display will show 0:00 and a tone will sound every 15 seconds.
• Press any button to stop the tone sounding. The display will revert to showing the
time of day.
23

AUTOMATIC COOKING
• You can set the oven to automatically turn on later, cook for a preset time (cooking time), then automatically turn off at a preset stop time. See the example and
instructions below (steps 1 to 7).
• If you start cooking manually and only want the oven to turn off automatically
after a set cooking time: simply set the cooking time following steps 1 to 3 below.
The oven will automatically turn off when the cooking time is over.
IMPORTANT!
Safe food handling: leave food in the oven for as short a time as possible before and after cooking or defrosting. This is to avoid contamination
by organisms which may cause food poisoning. Take particular care during warmer weather.
Example: It is 11:05 a.m. You want your food to cook for 1 hour, and you would
like it to be ready by lunchtime (12:30 p.m.)
Set the cooking time (figures 28)
1. Check the clock shows the correct time of day.
2a. Press the right scroll button three times to scroll
to the cooking time indicator.
2b. Press the select button to confirm.
3a. Press the right scroll button to set the cooking
time. Make sure you allow for preheat time in your
calculation.
3b. Press the select button to confirm.
햲
햳
햴
Figures 28
2a
3a
2b
3b
24

Set the stop time (figures 29)
4a. Press the right scroll button once to scroll to
the stop time indicator.
4b. Press the select button to confirm.
Figures 29
햵
5a. Press the right scroll button to set the time you
would like your food to be ready by (ie the stop
time).
5b. Press the select button to confirm.
Select function and temperature (figure 30)
6. Select a function.
7. Set the temperature.
When automatic cooking is set
• The oven and the lights will stay off, the halos will
be unlit, but your oven is now set for automatic
cooking. It will automatically turn on at the required
time.
• In a few seconds, the display will show the time of
day with the cooking time and stop time
indicators lit.
• Note: you can modify the function and temperature
while the oven is waiting to start cooking.
햶
4a
5a
Figure 30
햷
4b
5b
When the stop time is reached
The oven will automatically turn off and a long tone
will sound.
To check the set cooking time and stop time
Use the scroll buttons.
To cancel automatic cooking
Turn the function dial to Off .
햸
25

BAKING CHART
Please note:
• The settings in the following chart are guidelines only. Follow the instructions in
your recipe or on food packaging and be prepared to adjust the oven settings and
baking times to achieve the best possible results for you.
• Shelf positions are counted from the base up (1 is the lowest, 4 the highest).
• Arrange oven shelves before you turn the oven on, then preheat the oven to
the required temperature. Place items in the oven only when the long tone has
sounded.
• Single shelf positions below use the flat oven shelf; where a multi shelf arrangement is recommended, the higher position uses the step-down shelf.
• Due to the width of the oven, a single shelf can usually accommodate double the
standard recipe.
Food
Small cakes
Scones
Sponge
Light fruit cake
Rich fruit cake
Apple pie single shelf 1 185 35-45 mins
Custard tart single shelf 1
Quiche single shelf 1 180-200 30-40 mins
Meringues single shelf 1 100-120 1 hr
Bread rolls single shelf 1 210-230 15-20 mins
Muffins
Pastry case
(baked ‘blind’)
Note on
arrangement
single shelf 2
multi shelf 1 and 3
single shelf 2
single shelf 1 and 3
two small pans (20
cm),on single shelf
one large pan
(26 cm)
two pans (21 cm)
on single shelf
exact baking time
will depend on size
2 x 12 muffin trays
on single shelf
one 21 cm flan tin 1 200
Shelf
position(s)
2
2
2 155-165 1 hr 30 mins
2 130-150 3-6 hrs
3
Best
function
or
Temperature
(°C)
180-190 13-17 mins
160-170 16-21 mins
210-230 8-12 mins
210-230 8-12 mins
170-190 25-35 mins
175 30-40 mins
220
then 180**
190-200 10-15 mins
20-30** mins
10 mins with
beans, then 10
mins without
Time
10, then
* Note: the tone may occurs some time after the set temperature has been reached. This is
because—when heating up from cold—your oven is designed to initially heat to a temperature
somewhat higher than what you have set. This is to provide optimal baking conditions right from
the start.
26
** This is a two-stage baking process: adjust the temperature after the first stage.

USER PREFERENCE SETTINGS
You can set your oven to:
• display the temperature in degrees Celsius or Fahrenheit
• give audio feedback (tones and beeps) or operate quietly
• display time as 12-hr or 24-hr
• operate with the display off
• have its lights on or off during cooking
• operate in Sabbath setting (see ‘Sabbath setting’ following).
How to change preference settings
(figures 31-32)
1. Check the display shows the time of day.
• If you’re unsure, press the cancel button twice.
2. Press and hold the scroll buttons together
for 3 seconds to enter the user preference menu.
3. Press the right scroll button to scroll to the set-
ting you want to change. Refer to the table following.
4. Press the select button to select the particular
setting.
• The display will flash.
Figures 31
햲
햳
together
햴
햵
27

5. Press the right scroll button to scroll through
the options for that particular setting. Refer to the
table below.
6
a
.
Pr
6
b
.
ess the sel
o
ptio
n
.
Fo
r
all o
c
el b
ptio
utto
n
n
ec
s
exc
to
t b
ept ‘Dis
quit th
utto
e us
n to
play o
er
pr
sa
ff’:
pr
efer
ve the new
es
s
th
e c
an
en
c
e men
u.
Figures 32
햶
햷
-
Setting Default option Alternative option(s)
TEMPERATURE SCALE
Select between degrees
Celsius or Fahrenheit.
AUDIO FEEDBACK
Turn the beeps and
tones on or off.*
TIME SCALE &
‘DISPLAY OFF’ OPTION
Select between 24-hr or
12-hr clock display or set
‘Display off’ option if you
only need the basic func-
tionalities of your oven.
OVEN LIGHTS
Have the light off during
cooking if you want to
save power or want the
food you cook to be a
surprise for others!
SABBATH SETTING
6a
CELSIUS FAHRENHEIT
BEEPS/TONES ON BEEPS/TONES OFF
24 HR 12 HR DISPLAY OFF **
LIGHTS ON
DURING COOKING
LIGHTS OFF
DURING COOKING
SABBATH OFF See ‘Sabbath setting’ for
instructions.
6b
* The timer tone and alert beeps will sound even if you save the BEEPS/TONES OFF option.
** With this option saved, you can still use the oven but the display will be unlit and the buttons
will be unresponsive. To quit this option and enable the display, press and hold the cancel
button.
28

SABBATH SETTING
This setting is designed for religious faiths that observe a ‘no work’ requirement on
the Sabbath.
While your oven is in Sabbath setting
• The display and indicators will be unlit, the buttons will be unresponsive.
• No tones or beeps will sound.
• No alert codes or temperature changes will be displayed.
• Th
e
oven
l
i
g
h
ts
w
i
l
l
s
tay
on
.
I
f
you
w
an
t
th
e
oven
l
i
g
h
ts
to
b
e
off
duri
n
g
Sab
b
ath
s
etti
n
g,
fi
rs
t
s
el
ect
th
e
‘
Li
g
h
ts
off
’
op
ti
on
as
des
cri
b
ed
i
n
‘
U
s
er
p
ref
eren
ti
n
•
B
ake
s
etti
H
ow to s
1. Sel
2. Set
3. Wai
4. P
res
for 3 s
(fi
g
g
ect
ce s
.
n
g
th
t
s
an
.
34).
.
th
e
un
econ
etti
e
des
ti
d h
i
s
th
t Sa
e
B
l
th
n
i
red
ol
ds
g
ake
e
s
’
, an
e on
bba
temp
oven
d th
to en
d on
l
y fun
th s
e s
cti
e
tting
fun
cti
erature
s
tarts
crol
l
ter th
l
y th
on
on
e us
up
en
avai
(fi
g
(fi
g
.
er p
s
et Sab
l
ab
.
33).
.
33).
b
utton
referen
l
e i
b
ath
n
Sab
s
tog
ce men
s
b
eth
et
ath
-
-
er
u
Figure 33
햲
햵
햳
Figure 34
together
29

5a. Press the right scroll button to scroll to the
Sabbath setting (figures 35).
5b. Press the select button to select the Sabbath
setting. The default option is ‘Sabbath off’.
• The display will flash.
Figures 35
햶
5a
6a. Press the right scroll button to scroll to the
‘Sabbath on’ option.
6b. Press the select button to activate the new
option.
햷
6a
The display, indicators and dial halos will be unlit and unresponsive, but the oven will
bake until you quit Sabbath setting.
5b
6b
To quit Sabbath setting
Press and hold the cancel button until the time of day appears in the display and
the oven turns off.
30

CLEANING and MAINTENANCE
GENERAL ADVICE
■ Before you begin cleaning, you must ensure that the appliance is
switched off.
■ It is advisable to clean when the appliance is cold and especially when
cleaning the enamelled parts.
■ Avoid leaving alkaline or acidic substances (lemon juice, vinegar, etc.) on the
surfaces.
■ Avoid using cleaning products with a chlorine or acidic base.
■ Do not use a steam cleaner because the moisture can get into the
appliance thus make it unsafe.
■ Stainless steel surfaces: clean with a suitable product. Always dry thoroughly.
Do not use harsh abrasive cleaners or sharp metal scrapers to clean the oven door
glass since they can scratch the surface, which may result in shattering of the
glass.
WARNING
When correctly installed, your product meets all safety requirements laid
down for this type of product category. However special care should be
taken around the rear or the underneath of the appliance as these areas
are not designed or intended to be touched and may contain sharp or
rough edges, that may cause injury.
ENAMELLED PARTS
All the enamelled parts must be cleaned with a sponge and soapy water only or other
non-abrasive products.
Dry preferably with a microfibre or soft cloth.
31

STAINLESS STEEL SURFACE
■ CAUTION:
The stainless steel front surfaces (control panel, oven door) used in this oven
are protected with a Special Lacquer to reduce finger-print marks. To avoid
damaging this lacquer, do not clean the stainless steel with abrasive cleaners
or abrasive cloths or scouring pads.
ONLY SOAP/WARM WATER MUST BE USED TO CLEAN THE STAINLESS
STEEL SURFACES.
PAINTED PARTS AND SILKSCREEN PRINTED SURFACES
Clean using an appropriate product.
IMPORTANT: these parts must be cleaned very carefully to avoid scratching and abrasion. You are advised to use a soft cloth and neutral soap.
CAUTION: Do not use abrasive substances or non-neutral detergents as these
will irreparably damage the surface.
Always dry thoroughly.
GLASS CONTROL PANEL
Clean using an appropriate product.
Always dry thoroughly.
Do not use harsh abrasive cleaners or sharp metal scrapers to clean the control panel
since they can scratch the surface, which may result in shattering of the glass.
INSIDE OF OVEN
■ The oven should always be cleaned after use when it has cooled down.
The cavity should be cleaned using a mild detergent solution and warm water.
Suitable proprietary chemical cleaners may be used after first consulting with the
manufacturers recommendations and testing a small sample of the oven cavity.
Abrasive cleaning agents or scouring pads/cloths should not be used on the cavity surface.
■ NOTE: The manufacturers of this appliance will accept no responsibility for dam-
age caused by chemical or abrasive cleaning.
■ Do not store flammable material in the oven.
■ Let the oven cool down and pay special attention no to touch the hot
heating elements inside the oven cavity.
32

REPLACING THE OVEN LAMPS
WARNING: Ensure the appliance is switched off before replacing the lamp
to avoid the possibility of electric shock.
■ Let the oven cavity and the heating elements to cool down;
■ Switch off the electrical supply;
■ Remove the protective cover A (fig. 36);
■ Unscrew and replace the bulb B with a new one suitable for high temperatures
(300 °C) having the following specifications:
power (check watt power as stamped in the bulb itself) of the replaced
bulb.
■ Refit the protective cover A;
NOTE: Oven bulb replacement is not covered by your guarantee.
230-240V 50 Hz, E14 and same
Figure 36
A
B B
A
33

REMOVING AND REPLACING THE INNER DOOR GLASS
PANES FOR CLEANING
If you wish to clean inner panes of glass of the door, make sure you follow the
precautions and instructions very carefully.
Replacing the glass panes and the door incorrectly may result in damage to the oven
and may void your warranty.
IMPORTANT!
• Take care, the oven door is heavy. If you have any doubts, do not attempt to
remove the door.
• Make sure the oven and all its parts have cooled down. Do not attempt to handle
the parts of a hot oven.
• Take extreme care when handling the glass panes. Avoid the edges of the glass
bumping against any surface. This may result in the glass shattering.
• Don’t use oven cleaners or any other harsh/abrasive cleaners, cloths, scouring pads,
steel wool or sharp metal scrapers to clean the glass surfaces. These scratch the
glass and may damage its special coating, which in turn could result in the glass
cracking or shattering.
• If you notice any sign of damage on any of the glass panes (such as chipping, or
cracks), do not use the oven. Call your Authorised Service Centre or Customer Care.
• Make sure you replace all the glass panes correctly. Do not use the oven without
all the glass panes correctly in place.
• If the glass panes feel difficult to remove or replace, do not force them. Call your
Authorised Service Centre or Customer Care.
Note: service visits providing assistance with using or maintaining the oven are not
covered by your warranty.
34

B
A
C
REMOVING THE DOOR
Make sure you have prepared enough
space for resting the door and its glass
panes on a clean, flat surface.
1. Open the door to its full extent
(fig. 37a).
2. Open the levers on the left and right
hinges to their full extent, as shown
in fig. 37b.
3. Gently close the door until the left
and right hinge levers are hooked to
the door (fig. 37c).
4. Hold the door firmly, as shown in
fig. 37.
5. Lift the door and disengage the
hinges (fig. 37d).
6. Rest the door on a soft surface.
Ensure you lay it with the handle side
down.
Figure 37a
Figure 37b
A
B
Figure 37c
Figure 37
Figure 37d
C
35

11221
2
DDD
2
1
2
1
2
REMOVE THE INNER GLASS RETAINER
1. Press down on both tabs to release the glass retainer (fig. 38).
2. Remove the glass retainer.
Figure 38
REMOVE THE INNER GLASS PANE
Lift and remove the inner pane (D) slightly, as shown in the figure 39.
Figure 39
36

REMOVE THE FIRST MIDDLE GLASS PANE
22
11
CCC
2
1
22
11
BBB
2
1
Lift and remove the first middle pane (C) slightly, as shown in the figure 40.
Figure 40
REMOVE THE SECOND MIDDLE GLASS PANE
Lift and remove the second middle pane (B) slightly, as shown in the figure 41.
Figure 41
37

AFTER CLEANING, REPLACE THE GLASS PANES
11221
2
BBB
BBB
When replacing the glass panes, makes sure that:
•you replace all the three panes correctly, as shown. Each pane must be in the posi-
tion described below in order to fit into the door and to ensure that the oven operates safely and correctly
•you take extra care not to bump the edges of the glass against any object or surface
•you do not force any of the panes into place. If you are experiencing difficulties
replacing the panes, remove them and start the process again from the beginning.
If this still does not help, call Customer Care.
REPLACE THE FIRTS MIDDLE GLASS PANE
Take either one of the middle panes (B or C) and hold it firmly. Insert it in the lowest pair of grooves, push it slightly towards yourself (fig. 42) and gently lower into
place (fig. 43).
Note: the two middle panes (B and C) are identical.
Figure 42
38
Figure 43

11221
2
CCC
CCC
REPLACE THE SECOND MIDDLE GLASS PANE
Take the other middle pane and hold it firmly. Insert it in the next pair of grooves,
push it slightly towards yourself (fig. 44) and gently lower into place (fig. 45).
Figure 44
Figure 45
39

11221
2
DDD
REPLACE THE INNER GLASS PANE
Take the inner pane, holding it with the angle-cut corner orientated as shown in
figure 46.
Insert it in the uppermost pair of grooves, push it slightly towards yourself and
gently lower into place.
Important!
Make sure that the angle-cut corner of the inner pane is at the bottom of
the oven door, on the left-hand side. It has to be in this position for the
door to function correctly.
Figure 46
40

1
2
M
2
1
click
click
M
M
REPLACE THE GLASS RETAINER
1. Position the glass retainer, as shown in the figure 47. It should sit on the bottom
edge of the outer glass. Check that the clamps M of the glass retainer are not
deformed or damaged.
2. Gently push the glass retainer back into place. You should be able to hear the tabs
on both sides click as they lock the glass retainer in.
Important!
Make sure the glass retainer is correctly and firmly in place and that the
glass panes are secure.
Figure 47
41

REFIT THE DOOR
A
1. Hold the door firmly (fig. 48).
2. Insert the hinge tongues into the slots, making sure that the notches on both sides
drop into place as shown in the figure 49.
3. Open the door to its full extent.
4. Fully close the levers on the left and right hinges, as shown in the figure 50.
5. Close the door, turn the power supply to the oven on at the wall, then check
that the door is properly in place:
- When you open the door, the lights in the oven should come on.
- When you close the door, the lights in the oven should turn off.
Figure 48
42
Figure 49 Figure 50

TROUBLESHOOTING
If there is a problem, check the chart below to see if you can fix it. If the problem
cannot be fixed or persists, call your Authorised Repairer or Customer Care.
Problem Possible causes What to do
General
Check that the mains
The oven does not work.
No power.
power supply (wall switch)
is turned on and there is
no power outage in your
area.
The lights do not come
on when I open the
oven door.
The temperature
indicator shows
and the dials and
buttons are unresponsive.
The oven is not heating.
The oven light bulb(s)
have blown.
The door is not correctly
fitted.
The oven is in Sabbath
setting and the ‘Light off’
option has been saved.
The control panel is
locked.
The door is not properly
closed or it is opened too
frequently during cooking.
Replace the light bulb(s).
See ‘Care and cleaning’ for
instructions.
See ‘Care and cleaning’ for
instructions on fitting the
door correctly.
To quit Sabbath setting,
press and hold the cancel
button. See ‘User preference settings’ for instructions on changing the
‘Light off’ option.
Press and hold the select
or cancel button to
unlock the control panel.
The heating elements are
disabled while the door is
open.
Make sure the door is
properly closed and avoid
opening it frequently during cooking.
A glass pane in the oven
door has cracked,
chipped, or shattered.
Incorrect cleaning or the
edge of the glass hitting
against something.
You must NOT use the
oven.
Call your Authorised
Repairer or Customer Care.
43

Problem Possible causes What to do
General
To quit the ‘Display off’ option,
The oven is set to ‘Display
off’ option.
The oven is heating
but the display is
dark.
The oven is in Sabbath
setting.
press and hold the cancel
button until the display shows
the time of day.
To quit Sabbath setting, press
and hold the cance button
until the display shows the
time of day.
The oven cancels
automatic cooking
when I try to adjust
the clock setting.
The oven beeps when
I try to turn the
temperature dial OFF
or below a certain
temperature.
The rotisserie skewer
will not rotate.
The oven was set for
automatic cooking when
you were trying to adjust
the clock setting.
This is normal: for food
safety reasons, the oven
functions have factory-set
minimum temperature settings.
The skewer did not fully
engage in the rotisserie
drive.
The meat is too heavy.
You can only adjust the clock
setting while the oven is not
set for automatic cooking. See
section ‘Setting the clock and
first use’ for instructions.
The temperature dial itself can-
not be ‘turned off’. Selecting
Off with the function dial
will turn the oven off.
Make sure the skewer is
pushed fully into the rotisserie
drive hole.
To get a finish similiar to a
rotisserie for pieces of meat or
poultry heavier than 6 kg, use
the grill tray and rack and the
Fan Forced function.
The rotisserie skewer
stops rotating when I
open the door.
44
This is normal: the rotisserie drive is disabled while the
door is open.

Problem Possible causes What to do
Self Clean function
During a Self Clean
cycle, the oven is
louder than usual.
The display shows
.
The display shows 0:00
but the oven door will
not open.
At a point during a
Self Clean cycle, the
temperature indicator
starts displaying
cascading bars .
I have cancelled a Self
Clean cycle but cannot
use the oven:
• the oven door will
not open
• the display is still
counting down
minutes or showing
0:00
• the Self Clean
function indicator is
still lit
• the temperature
indicator shows
cascading bars
• the dials and buttons
are unresponsive.
This is normal: the oven’s cooling fans operate at their
highest speed.
The door has not been
properly closed.
The oven door is locked
because the oven is still
too hot to be used for
cooking.
This is normal: the oven
is in the last phase of the
Self Clean cycle, cooling
down.
This is normal: the oven
is still too hot to be used
for cooking and needs to
cool down.
Make sure you close the door
properly.
Wait until the Self Clean cycle
has finished. If you cancelled
a Self Clean cycle which was
already underway, the oven
still needs to cool down
before it can be used. The
oven door will automatically
unlock.
Wait until the Self Clean cycle
has finished. A long tone will
sound and the oven door will
automatically unlock when
the oven is ready to use.
Wait until the cool-down
phase has finished. A long
tone will sound and the oven
door will automatically unlock
when the oven is ready to
use.
Note: depending on when
the Self Clean cycle was cancelled, the cool-down phase
may take up to 45 minutes.
The oven is beeping
and the display shows
A2 or A3.
See section ‘Alert codes’ for instructions.
45

ALERT CODES
If there is a problem, the oven will:
• automatically suspend all oven functions
• beep five times
• display an alert code.
IMPORTANT!
Do not turn off the mains power supply to the oven (wall switch) if you get an alert
code, unless the instructions in the chart following specifically instruct you to. There
are cooling fans within the oven which are needed to cool the oven’s components.
Turning off the power while the oven is too hot may damage the oven and its surrounding cabinetry.
What to do if an alert code is displayed
1. If the beeping hasn’t stopped already, press any button to stop it.
2. Make a note of the alert code displayed. You may need this information.
3. Check the chart following to see if you can fix the problem yourself and follow
the instructions.
4. If you can fix the problem and the alert code does not reappear, you can keep
using your oven.
OR
If you can’t fix the problem yourself or the alert code reappears and the problem
persists: wait until the cooling fans have stopped and the oven has completely
cooled down, then turn the power to the oven off at the wall and call your
Authorised Repairer or Customer Care with the alert code information.
46

Alert code Possible causes What to do
1. Allow the oven to cool down.
2. If the door is locked, wait until it automatically unlocks.
3. Once the oven has cooled down and
the door has unlocked, the alert code
will disappear. You can now use the
oven again.
1. Turn the power to the oven off at the
wall and on again.
2. Wait approximately 10 seconds. This is
to allow the door lock to return to its
initial position.
3. Set the clock. See ‘Setting the clock
and first use’ for instructions.
4. Try starting a Self Clean cycle again,
making sure that you close the door
firmly. See ‘Using the Self Clean function’.
1. Turn the power to the oven off at the
wall and on again.
2. Try pressing on the oven door to help
the door lock disengage.
3. If this doesn’t help and the alert code
reappears, call your Authorised
Repairer or Customer Care.
A1
A2
A3
The oven has overheated.
Door lock error: the door
cannot be locked after
you have started a Self
Clean cycle.
Door lock error: the door
cannot be unlocked after
a Self Clean cycle has finished.
1. Note down the alert code.
2. Wait until the cooling fans have
stopped and the oven has completely
cooled down.
F + number
Should you still require assistance please contact our Customer Service Centre for
your nearest Authorised Delonghi Service Agent.
Descriptions and illustrations in this booklet are given as simply indicative. The manufacturer reserves the right,
considering the characteristics of the models described here, at any time and without notice, to make eventual
necessary modifications for their construction or for commercial needs.
Technical fault.
3. Turn the power to the oven off at the
wall.
4. Call your Authorised Repairer or
Customer Care with the alert code
information.
47

Cod. 1103725 - ß4
 Loading...