

ECE R44/04, Gr II–III | ca. 3–12Y (15-36kg/33–79lbs) | <150cm
CYBEX Industrial Ltd.
1/F., Sunning Plaza | 10 Hysan Avenue | Causeway Bay | Hong Kong
info@cybex-online.com
/ www.cybex-online.com
KR / EN / FR
SOLUTION X-fi x
USER GUIDE
C223_640_01D
1
2
1 2
4 5
6
7 8
9 10
11 12 13 14 15
한국 – 간편설명서 그룹Ⅰ / EN – Short manual / FR – Le Sommaire
경고
이 요약설명서는 대략적인 설명서입니다. 최대한 보호하고 최고로 아이에게 안락함을 주기 위하여 반드시 숙독하시고, 사용 설명
서에 따라 올바르게 사용하시기 바랍니다.
한국
WARNING! THIS SHORT MANUAL SERVES AS AN OVERVIEW ONLY. FOR MAXIMUM PROTECTION AND BEST
COMFORT OF YOUR CHILD, IT IS ESSENTIAL TO READ AND FOLLOW THE ENTIRE INSTRUCTION MANUAL
CAREFULLY.
EN
ATTENTION! LE SOMMAIRE EST UNE SYNTHÈSE. AFIN QUE VOTRE ENFANT BÉNÉFICIE D‘UN MAXIMUM DE
PROTECTION ET DE CONFORT, IL EST ESSENTIEL DE LIRE ATTENTIVEMENT, L‘INTÉGRALITÉ DU MANUEL
D‘INSTRUCTION.
FR
1 2
3
123

4
고객 여러분
CYBEX Solution X-fix를 구입해 주셔서 대단히 감사합니다.
CYBEX Solution X-fix는 안전과 편안함, 그리고 쉬운 작동법의 기능을 갖는데 중점을 뒀습니다. 엄격한 안전규격에 적합하도록 남다른
고품질의 관리 감독하에 개발되었습니다.
DEAR CUSTOMER
THANK YOU FOR PURCHASING THE CYBEX SOLUTION X-FIX.
WE ASSURE YOU THAT IN THE PROCESS OF DEVELOPING THE CYBEX SOLUTION X-FIX WE FOCUSED ON SAFETY,
COMFORT AND USER FRIENDLINESS. THE PRODUCT IS MANUFACTURED UNDER SPECIAL QUALITY SURVEILLANCE
AND COMPLIES WITH THE STRICTEST SAFETY REQUIREMENTS.
CHER CLIENT
MERCI D‘AVOIR CHOISI D‘ACHETER LE SOLUTION X-FIX.
LORS DE SON DÉVELOPPEMENT. NOUS NOUS SOMMES FOCALISÉS SUR LA SÉCURITÉ. LE CONFORT ET LA FACILITÉ
D‘UTILISATION. CE PRODUIT DE QUALITÉ RÉPOND AUX NORMES ACTUELLES LES PLUS STRICTES.
5 6
04/2010
5
6
INSTRUCTION MANUAL
CYBEX Solution X-fix
booster with backrest
RECOMMENDED FOR:
Age: from approximately 3 to 12 years
Weight: 15 to 36 kg
Body height: up to 150 cm
For vehicle seats with three-point
automatic retractor belt
HOMOLOGATION:
ECE R-44/04, group II/III, 15 to 36 kg
한국
EN
사용설명서
싸이벡스 솔루션X등 받침
사용연령
나이:대략적으로 3~12세 /체
중 : 15~36kg/
키150cm
이하의 어린이3점식 시트벨트
가 장착되어 있는 차량
인증사항:
* 2007년 10월 해외
안전규격 합격 :
ECE R44/04, groupII/III 15~36kg
카시트와 커넥터의 연결 ............................................................................................ 11
Solution X-fix의 제거. ............................................................................................... 13
목차
요약 설명서 .................................................................................................................1
경고 / 주의 .................................................................................................................. 2
사용조건 ...................................................................................................................... 5
처음 설치 ..................................................................................................................... 7
아이 보호 ................................................................................................................... 13
아이의 안전을 위한 카시트의 올바른 장착 위치 ....................................................... 17
제품 관리 ................................................................................................................... 19
차량사고 발생 시의 행동요령 .................................................................................... 21
몸사이즈에 맞춰 조정하기 ...........................................................................................7
헤드레스트 조정하기 ................................................................................................... 7
차에서 올바른 위치 .....................................................................................................9
안전벨트 착용하기 ..................................................................................................... 15
헤드레스트 기울기.....................................................................................................17
시트커버 탈착 ............................................................................................................ 19
세탁 ...........................................................................................................................19
제품 교체시기 ............................................................................................................ 21
처분 ........................................................................................................................... 21
품질보증 ....................................................................................................................23
본 사용설명서를 등받이의 측면에 위치한 고무덮개 아래에 보관하여 언제든 찾
아볼 수 있도록 하여 주십시오.
주의!
경고
아이의 안전을 위해 반드시 사용설명서에 따라 CYBEX Solution X-fix를 설 치
하고 사용해 주십시오.
CONTENTS CONTENU
Short manual ..............................................................................................................1
Warning / Note ..........................................................................................................2
Admission - Homologation .......................................................................................5
First installation ...........................................................................................................8
Securing the child .................................................................................................... 14
Is your child properly secured? ...............................................................................18
Product care ............................................................................................................20
What to do after an accident ................................................................................ 22
Adjustment regarding the child‘s height ................................................................8
Adjustment of the headrest .....................................................................................8
Installation of the car seat with connectors .........................................................12
Uninstalling the Solution X-fix ..................................................................................14
The best position in the car .....................................................................................10
Fastening the seat belt of your child ..................................................................... 16
Reclining headrest .................................................................................................. 18
Removing the seat cover .......................................................................................20
Cleaning ...................................................................................................................20
Durability of the product ........................................................................................22
Disposal .................................................................................................................... 22
Warranty ...................................................................................................................24
For your child‘s maximum protection, it is essential to use and install
the CYBEX Solution X-fix according to the instructions in this manual.
Warning!
Note! Please always store the instruction manual under the elastic cover on
the rear side of the backrest, so it is at hand in case you would like to look
something up.
Résumé du manuel d‘instruction .....................................................................1
Attention / A Noter ............................................................................................2
Qualification ......................................................................................................5
Première installation ..........................................................................................8
Mettre votre enfant en sécurité ....................................................................14
Votre enfant est-il correctement attaché? ..................................................18
Entretien du siège auto ...................................................................................20
Que faire à la suite d‘un accident? ..............................................................22
Ajuster en fonction de la taille de l‘enfant .....................................................8
Ajuster le repose tête ........................................................................................8
Installation du siège auto avec les connecteurs .........................................12
Ôter le Solution X-fix ......................................................................................... 14
Position correcte dans le véhicule .................................................................10
Attacher la ceinture de votre enfant ............................................................16
Repose tête inclinable ....................................................................................18
Ôter la housse ..................................................................................................20
Nettoyage ........................................................................................................20
Durée de vie du produit .................................................................................22
Recyclage ........................................................................................................22
Garantie ...........................................................................................................24
Attention! Pour une protection parfaite de votre enfant, il est essentiel
d‘utiliser et d‘installer le CYBEX Solution X-fix comme indiqué dans le
manuel d‘instructions.
Note! Merci de toujours conserver le manuel d‘instructions sous la housse
elastique a l‘arriere du dossier du siege, de facon a ce qu‘elle soit toujours
a portee de main.
FR
a
d
b
a
c
d
e
f
e
h
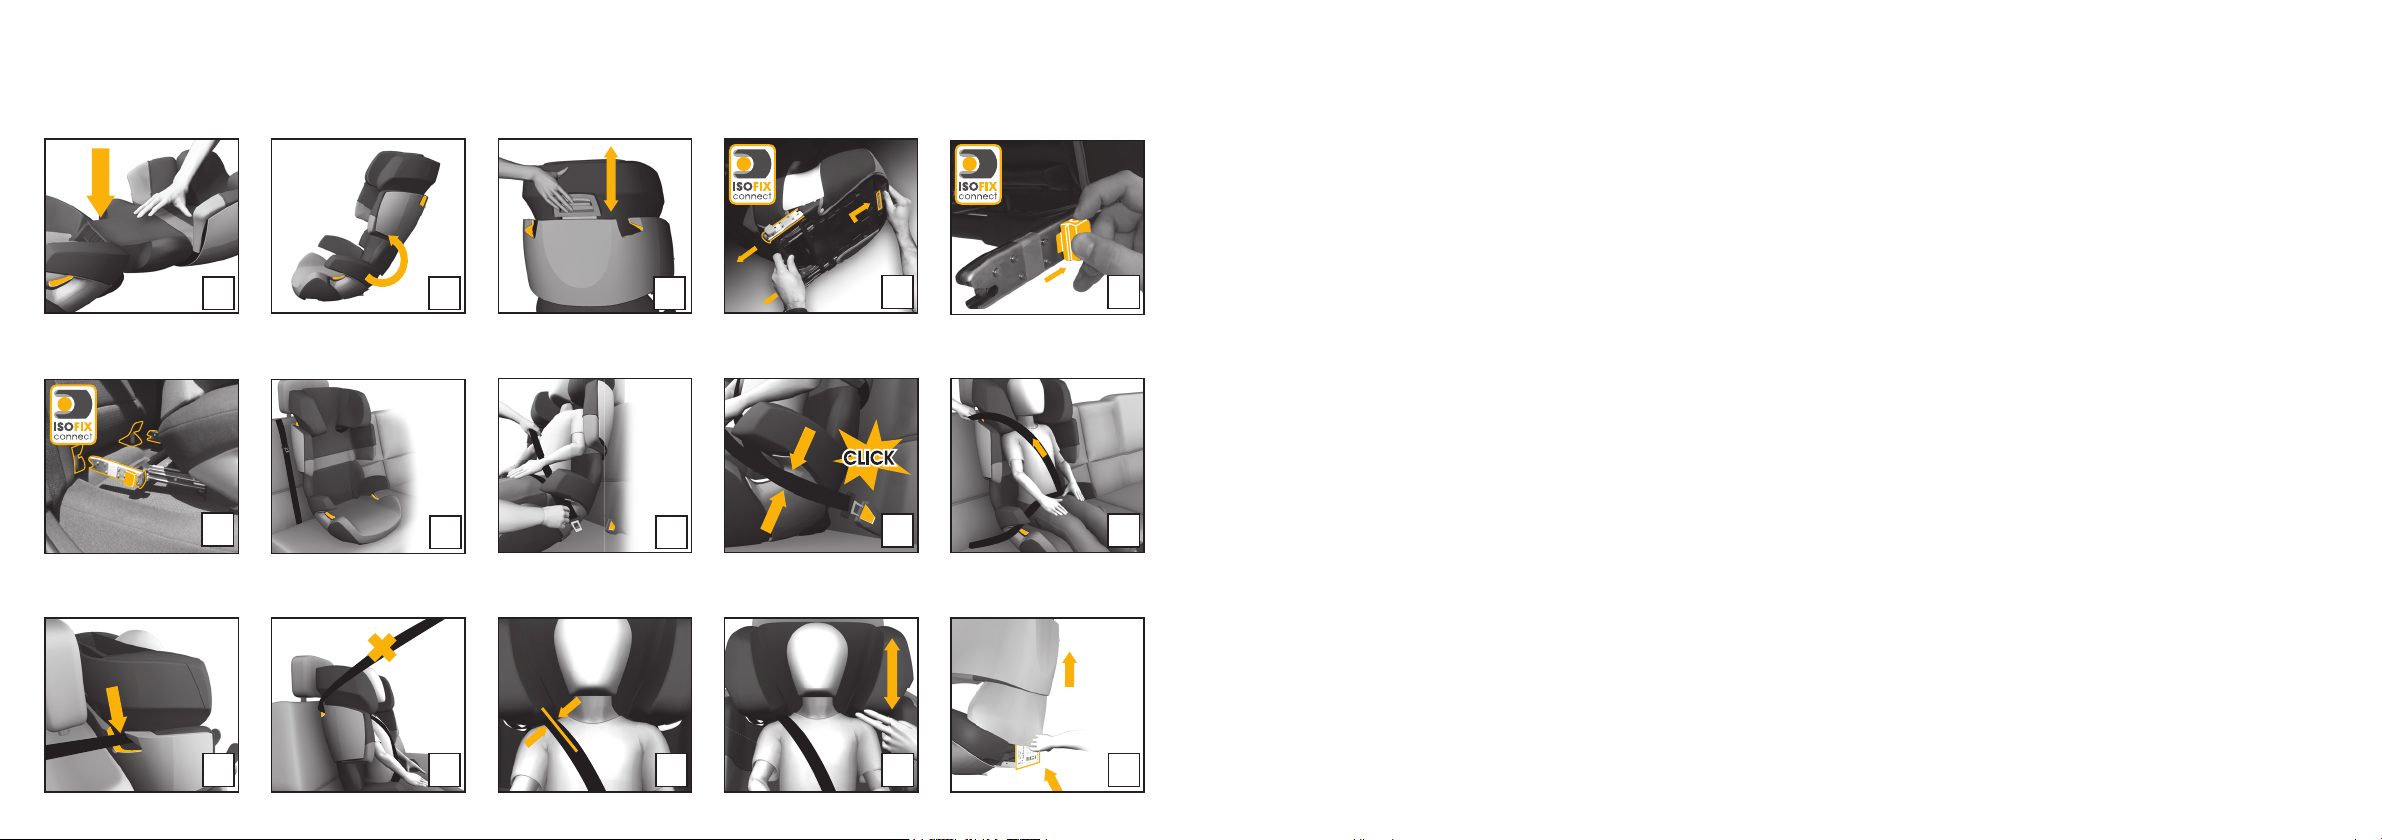
FIRST INSTALLATION
The child seat consists of a booster seat (d) and a backrest (a) with height
adjustable shoulder and headrest. Only the combination of both parts
provides best protection and comfort to your child.
Warning! The parts of the CYBEX Solution X-fix must not be used alone or in
combination with boosters, backrests or headrests from other
manufacturers or of a different product series. In such cases, the
certification expires immediately.
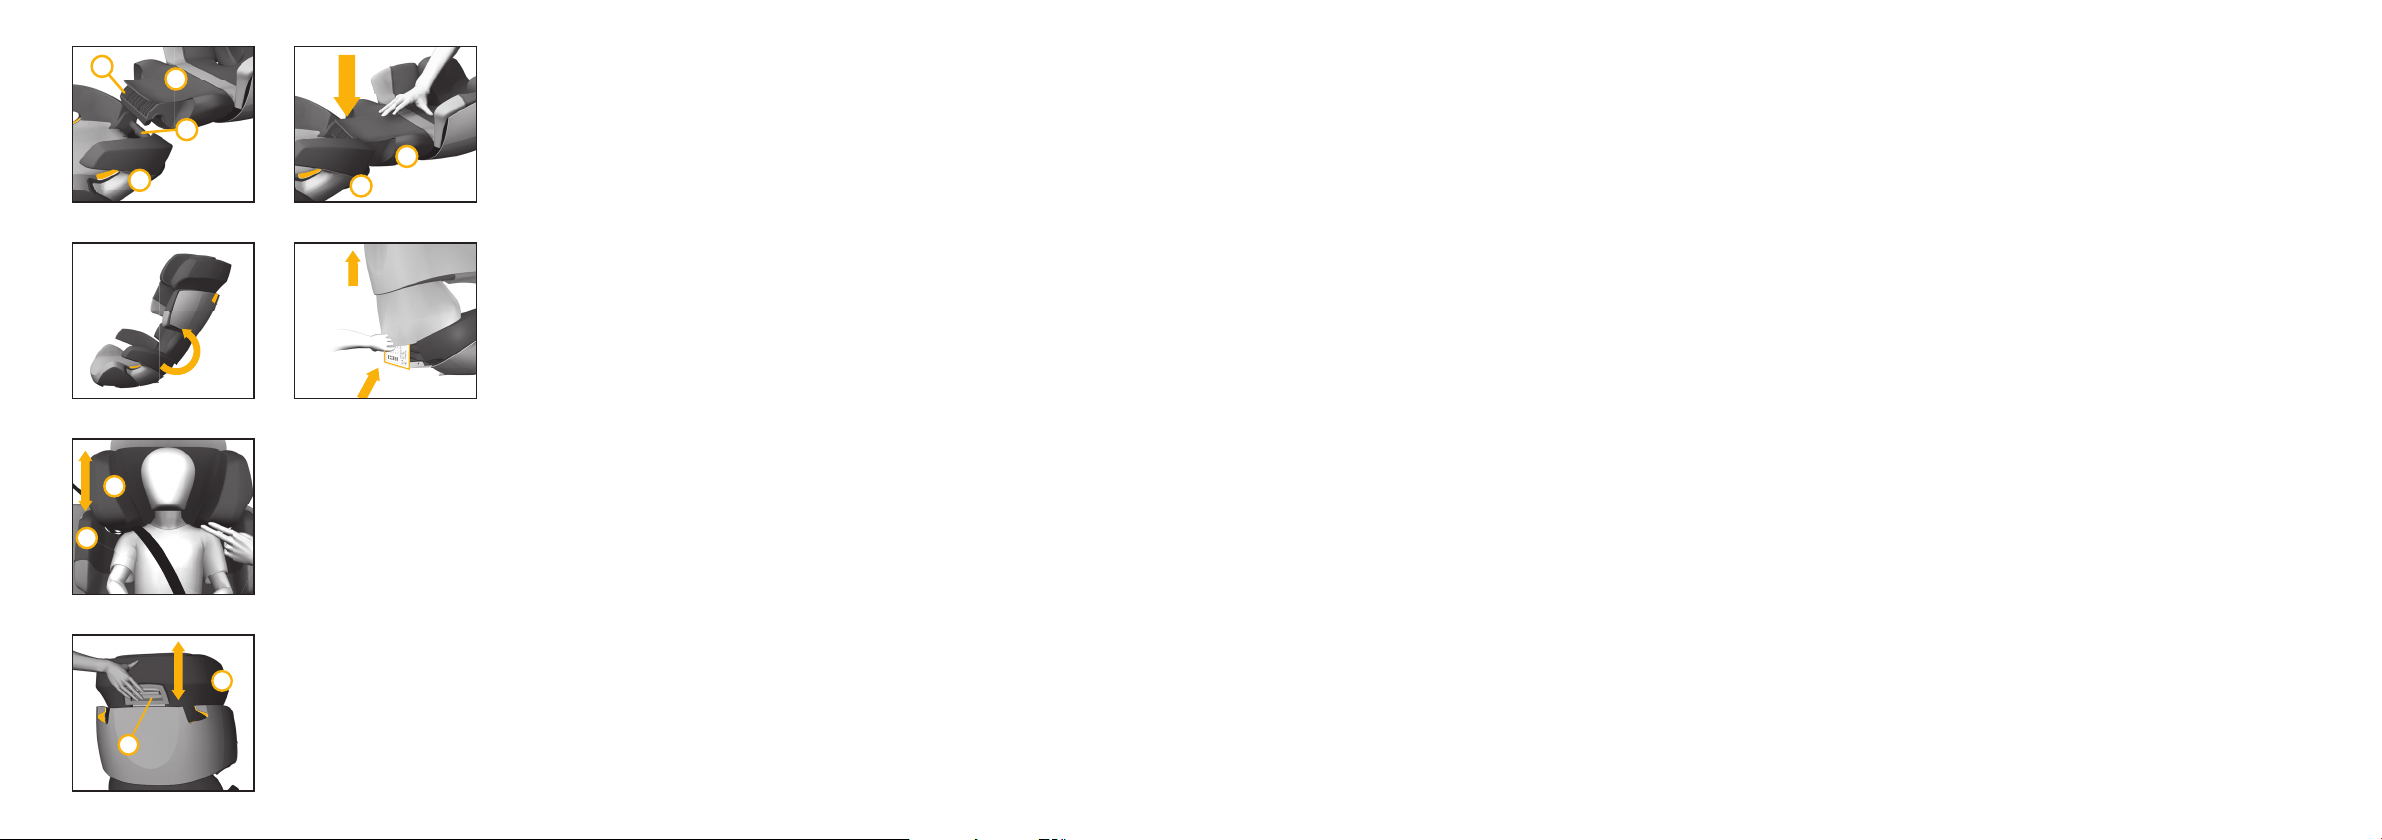
Connect the backrest (a) to the booster (d) by hooking the guide lug (b)
on the axis (c) of the booster (d).
Note! Please keep the instruction manual close by for future reference (e.g.
by storing it under the elastic cover at the rear side of the backrest.)
Warning! Please make sure that the plastic parts of the child seat never get
jammed (e.g. in the car door or by adjusting the back seat).
ADJUSTMENT REGARDING THE CHILD‘S HEIGHT
A headrest can only provide the best protection and comfort for your child
if optimally adjusted. Only then it can guarantee the optimal position of the
diagonal belt (f). You can adjust the height of the Solution X-fix headrest (e)
in 11 positions. The shoulder rest is attached to the headrest and does not
have to be adjusted separately. You can check the optimal adjustment of
the headrest by trying to fit exactly two fingers between the headrest and
the shoulders of the child.
ADJUSTMENT OF THE HEADREST
– Place your child in the child seat.
– Pull the adjustment handle (h) in order to unlock the shoulder and
headrest.
– Bring the shoulder and headrest (e) in the desired position.
– As soon as you let go of the adjustment handle (h), the shoulder and
headrest (e) locks automatically.
7 8
7
8
처음 설치
등받침(a)은 가이드 러그(b)를 사용하여 시트(d)의 축(c)에 고정시킵
니다.
본 사용설명서를 등받이의 측면에 위치한 고무덮개 아래에 보관하여 주십시오.
경고 싸이벡스 솔루션 X는 시트쿠션, 등받이 그리고 헤드레스트를 따로 사 용하거
나 이 세 부품중에 한 부분이라도 없을 때에는 사용하지 마십시오. 또 한 다른 제
조사의 제품과 함께 사용하거나 싸이벡스의 다른 시리즈의 부품 과 함께 사용하
여 변경하여서는 안됩니다. 그럴 경우 제품 보증이 즉시 만 기됩니다.
경고
매일 주의하여 차량용 시트와 문이나 다른 단단한 장애물에 끼여서 손 상을
입지 않았는지를 꼭 확인해주십시오.
주의! 본 사용설명서를 언제나 필요할때 찾아볼 수 있도록 안전한 곳에 보관하
여 주십시오.
카시트는 시트쿠션(d)과 어깨의 높이조정 및 헤드레스트 기능이 가능한 등 받침
(a)으로 구성되어 있습니다. 이 두 부품이 잘 설치되어야 아이가 편안하 고 안전
하게 보호될 수 있습니다.
몸사이즈에 맞춰 조정하기
유일하게 어깨와 헤드레스트(e) 높이 조절이 11단계까지 가능한 어깨보호부는
최고의 안전함 과 안락함을 아이들에게 제공합니다. 그리고 안전벨트의 헤드레
스트에 고정되어 있으며 별도로 조절할 필요가 없습니다. 아이의 어깨와 헤드레
스트 가장자리 사이에 간격이 손가락 2개 정도가 들어갈 수 있을 정도가 되도록
조절해 주십시오.
헤드레스트 조정하기
– 카시트에 아이 탑승시키기
– 어깨와 헤드레스트를 풀기 위하여 핸들(h)을 당기십시오.
– 올바른 위치에 어깨와 헤드레스트(e)를 장착하십시오.
– 핸들(h)을 조정하여 어깨와 헤드레스트(e)가 스스로 잠기게 하십시오.
PREMIÈRE INSTALLATION
Le siège auto comprend une assise (d) et un dossier (a) ajustable en
hauteur, aux épaules et au niveau du repose tête .
Attention! Les pièces du siège auto Solution X-fix ne doivent pas être utilisées,
seules, séparemment, en combinaison avec une autre série CYBEX ou en
combinaison avec des pièces d‘autres fabriquants. Dans l‘éventualité la
garantie est nulle.
Le dossier (a) est clipsé dans l‘axe (c) de l‘assise (d) grâce à la fixation (b) .
A Noter ! Merci de conserver ce manuel d‘instructions, il doit toujours être à
portée de main pour référence ultérieure.
Conserver le manuel d‘instructions sous la housse élastique, située au dos
du dossier.
Attention! Merci de faire attention à ne pas endommager le siège auto en
ainsérant la ceinture et en fermant la porte du véhicule .
AJUSTER EN FONCTION DE LA TAILLE DE L‘ENFANT
Uniquement un dossier (e) bien règlé en hauteur assure confort et
protection optimale. Ceci permet également de bien règler la ceinture
diagonale. Vous pouvez ajuster la hauteur (e) du dossier en 11 positions.
Le protège épaules est fixé au dossier et ne doit pas être ajusté
séparemment. La bonne hauteur du dossier peut être vérifiée en passant
2 doigts entre le bas de l‘appui tête et l‘épaule de l‘enfant.
AJUSTER LE REPOSE TÊTE
– installer votre enfant dans le siège auto
– saisir la poignée de règlage en hauteur (h) pour dévérouiller les protèges
épaules et repose tête.
– Règler à la bonne hauteur puis relâcher la poignée, le vérouillage du
protège épaules et du repose tête s‘active automatiquement.

경고! 측면 탑승좌석이 있는 차량에서는 이 아이시트를 사용하시면 안됩니다. 운
행방향에 반대로 위치한 좌석에서는 (예: 밴 또는 미니버스) 아이시트를 사용
하셔도 됩니다. 시트를 맡는것은 어른을 운반하기위해서 허가됩니다. 운행방향
의 반대로 위치한 탑승좌석에 아이시트를 설치할때, 머리받침대가 벗겨지지 않
게 확인하십시요. 아이시트는 사용중이 아니더라도 안전벨트를 매어야 합니다.
비상정지 또는 충돌시에 아이시트를 풀어놓음으로서 운전자 또는 탑승객이 부상
당하는것을 방지하기 위해 이것은 필요합니다.
f
THE BEST POSITION IN THE CAR
Without using the connectors the CYBEX Solution X-fix can be installed on
all vehicle seats equipped with a three-point automatic retractor belt. We
generally recommend, however, using the child seat in the back of the vehicle.
In the front, your child is usually exposed to higher risks in case of an accident.
Warning! You must not use the Solution X-fix with a two-point belt or a lap belt.
When securing your child with a two-point belt, the child may sustain lethal
injuries in an accident.
When installing the CYBEX Solution X-fix with its ISOFIX-CONNECT system
the child seat falls into the „semi-universal“ admission category, i.e. it
may only be used in certain types of vehicles. Please refer to the list of
approved cars to check your vehicle‘s compatibility.
This list is updated regularly, and the latest version can be obtained from CYBEX,
your retailer or accessed online at www.cybex-online.com.
In exceptions, the child seat may be used on the passenger seat. Please note
the following for such cases:
– In cars equipped with airbags you should push the passenger seat as far back
as possible. Please make sure that the upper point of the vehicle seat belt
stays behind the belt guide of the child seat.
– You must follow the recommendations of the vehicle manufacturer.
Warning! The seat belt (f) must run diagonally from the back and must
never lead to the front to the upper belt point of the front seat of in your
vehicle. Should you be unable to adjust this for example by pushing the seat to
the front or by using the seat on a different seat in the car, then the child seat is
not suitable for this vehicle.
Luggage or other objects in the vehicle which may cause injuries in an
accident must always be secured properly. Loose parts may turn into deadly
projectiles during an impact.
Warning! For vehicles with passenger seats that are positioned sideways, the use
of this child seat is not allowed. For seats that are positioned against the direction
of travel, e.g. in a van or a minibus, the use of the child seat is allowed, assuming
the seat is approved to carry an adult. Please ensure that the headrest is not
taken off when mounting the child seat on a passenger seat which is positioned
against the direction of travel! The child seat must have the seat belt fastened
even when not in use. This is necessary to avoid the driver or passenger getting
injured by a loose child seat when making an emergency stop or in case of a
crash.
Note! Please never leave your child unattended in the car.
9 10
9
10
차에서 올바른 위치
CYBEX Solution X-fix는 3점식 안전벨트가 있는 차량의 어떠한 위치에서도 사
용할 수 있습니다. 하지만, 사고가 났을 때에 차량의 앞좌석이 일반적으로 아이
에게 더 위험하므로 차량의 뒷좌석 에 장착하여 사용해 주시기를 권장합니다. 기
술적으로 CYBEX Solution X-fix는 승객용 시트에 사용할 수 있으며, 반드시 다음
의 사용법에 따라 사용해 주십시오.
차량은 X-FIX 커넥터와 호환이 가능하여야 합니다. 그러므로, '세미 유니
버셜‘ 설치구분으로 분류된 차량과 동봉된 목록에 적힌 차량에만 설치가 가
능합니다. 해당 목록은 정기적으로 업데이트되고, 새로운 버전은 저희나
www.cybex-online.com에서 확인하실 수 있습니다. 주의! X-FIX 커넥터와의 호
환가능한 일부 목록에 적힌 차량은 제한된 크기에 국한될 수 있습니다
– 에어백이 내장되어 있는 좌석공간에는 카시트를 절대 설치하지 마십시오. 항상
차량의 어깨벨트 통로는 CYBEX Solution X-fix의 뒤쪽에 위치해야 합니다.
– 반드시 자동차 제조업자의 설명에 따라 올바르게 사용하시기 바랍니다.
예외로 시트는 승객시트에서 안전함 아래 언급된 상황에 주의하여 주십
시오.
사고 발생 시에 상해를 입지 않도록 차량 안에 있는 짐과 같은 방해물들은 단단
히 적절한 방법 으로 고정시켜 두십시오.
경고!! 카시트에 아이를 혼자 앉히지 마십시오.
경고 2점식 안전벨트 시스템이나 랩 벨트시스템의 챠량에 장착할 경우 치명적인
상해를 입을 수 있습니다.
경고
어깨 벨트(f)는 대각선으로 등에서부터 통과되고 어깨벨트(f)는 자동차 앞
좌석의 윗벨트 버클로 연결하면 안됩니다. 만일 CYBEX Solution X-fix를 적절한
위치에 장착할 수 없다면 이 러한 차량에는 장착하여 사용하지 마십시오.
POSITION CORRECTE DANS LA VOITURE
Le CYBEX Solution X-fix peut être utilisé sur tous les sièges de voiture disposant
d‘une ceinture 3 points à rétraction automatique. Nous recommandons
d‘utiliser le siège auto à l‘arrière du véhicule. Installer un siège auto à l‘avant
du véhicule expose votre enfant à de sérieux risques en cas d‘accident.
A ttention! Vous ne pouvez pas utiliser le siège auto avec une ceinture
2 points ou avec la ceinture ventrale généralement située sur le siège du
milieu à l‘arrière du véhicule.
Les véhicules doivent être compatibles et équipés d‘ancrages X-fix.
Le siège auto peut uniquement être utilisé dans les véhicules de
catégorie „semi universelle“ et mentionné dans la liste jointe des
véhicules approuvés. Cette liste est mise à jour régulièrement, elle
peut être obtenue sur notre site Internet www.cybex-online.com.
Cas exceptionnel, le siège auto peut être utilisé sur le siège passager. Merci
dans ce cas de suivre les instructions suivantes:
– Pour les véhicules équipés d‘un airbag passager, reculer le siège passager
au maximum.
– Assurez vous que le dérouleur de la ceinture reste bien derrière le siège.
Attention! La ceinture doit être diagonale (f) et son point le plus haut
(dérouleur) doit toujours être derrière le siège. si, par exemeple, en reculant
le siège au maximum, le point le plus haut de la ceinture ne se trouve pas
derrière le siège auto, il convient de ne pas utiliser le siège.
Baggages ou autres objets projectiles dans l‘habitacle doivent être rangés
et fixés afin de ne pas devenir dangereux en cas d‘accident.
Avertissement! L‘usage de ce siège enfant est interdit sur les sièges de
véhicules qui sont positionnés de côté par rapport au sens de la marche.
Lorsque le siège est positionné dos à la route, par exemple dans un
monospace ou minibus, l‘usage de ce produit est autorisé à condition que
ledit siège soit approuvé pour le transport d‘un adulte. Vérifiez que l‘appuietête n‘est pas retiré quand le siège enfant est installé sur un siège dos à
la route. Le siège enfant doit être attaché avec la ceinture de sécurité du
véhicule même vide, afin qu‘il ne se transforme pas en projectile en cas
d‘accident.
Avertissement!
Ne jamais laisser votre enfant sans surveillance dans votre
voiture .
11 12
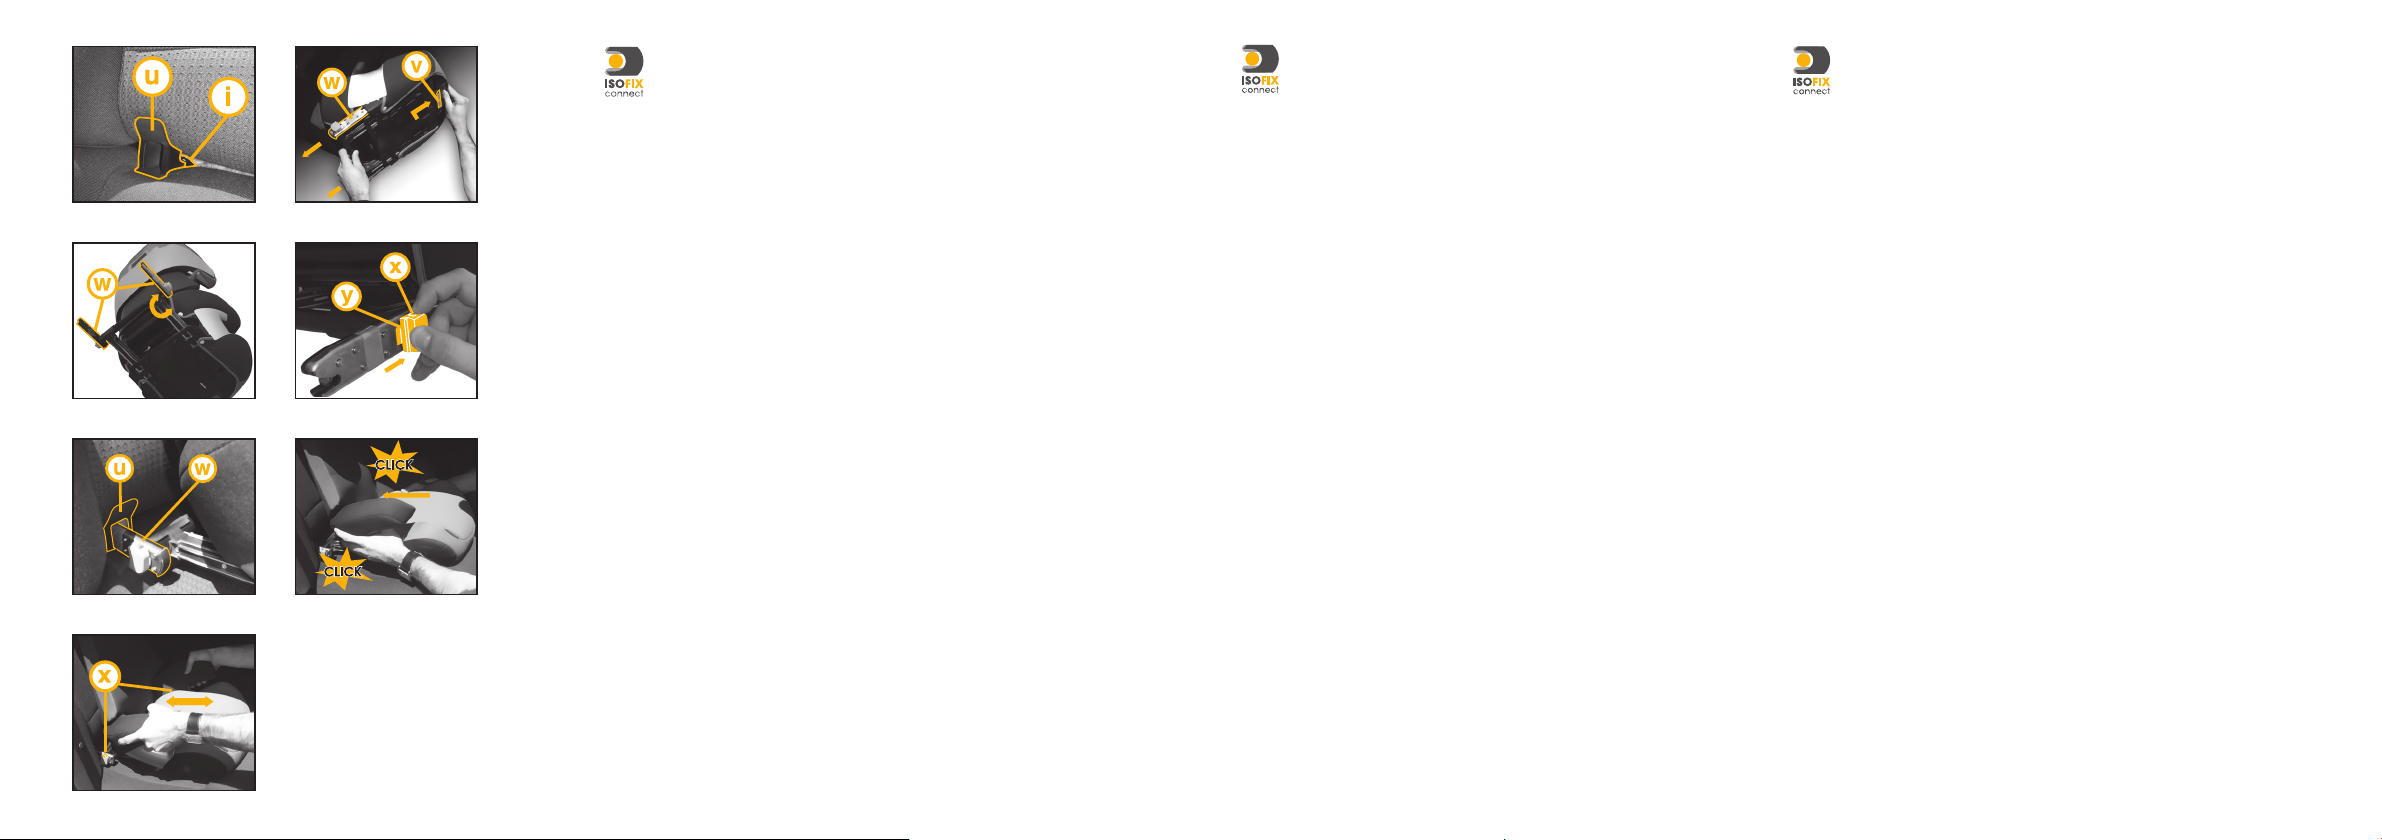
INSTALLATION OF THE CAR SEAT WITH CONNECTORS
The saftey of your child will be increased using the ISOFIX-CONNECT
system linking the child seat tightly with the vehicle. Your child will
still be buckled up using the car‘s 3-point-belt.
− Connect the two enclosed X-fix installation aids (their longer parts
pointing upwards) with the two ISOFIX anchorage points (i).
Note! The car‘s ISOFIX anchorage points (i) are two metal rings per seat,
located between the backrest and the seat cushion of your vehicle seat. If
in doubt please refer to your vehicle owner’s manual.
− For adjustment move the X-fix lever (v), located on the bottom of the
seat.
− Pull the connectors (w) as far out as they will go.
− Rotate the X-fix connectors by 180° until they point into the direction of the
installation aids.
Note! Make sure that the two green safety buttons (x) of the connectors are
not sticking out. If necessary, release the connectors by pushing the green
button and by pulling back the orange release button. Repeat this
procedure with the other connector.
− Push both of the X-fix connectors (w) into the installation aids until you
hear them clicking into the ISOFIX anchorage points (i).
− Make sure that the child seat is connected safely by trying to pull it out.
− The green security buttons then have to be clearly visible on both sides
and stick out of the orange release buttons (y).
− With the X-fix button located on the bottom of the child seat you can
now adjust the position of the seat.
Note! For additional information please refer to the section “Placing the
Seat in the Car”.
− You can now buckle up the child. Please refer to “Buckling Up the Child”.
11
12
– 동봉된 두개의 X-fix 연결도구를 (긴 부분이 위를 향하게하여) 두개의 ISOFIX
고정 포인트(i)를 연결하십시오.
− 조절을 위해서는, 시트의 밑부분에 위치한 오렌지색 X-fix 버튼을 사용하십시
오.
– 커넥터(w)를 최대한으로 당기십시오.
– X-fix 커넥터를 180°돌려서 연결도구를 향하게 하십시오.
– X-fix커넥터(w) 두개를 연결도구에 밀어넣어, 딸깍 소리가 날때까지 ISOFIX
고정포인트 (i)에 밀어넣으십시오.
– 시트를 당겨보아 단단하게 연결되었는지 확인하십시오.
– 그리고 나면 녹색 안전버튼들이 양쪽으로 보여야 하며, 오렌지색 해체버튼(y)
밖으로 튀어나와야 합니다.
– 유아용 안전 시트의 바닥에 위치한 X-fix버튼으로 시트의 위치를 조정할 수 있
습니다.
주의! ISOFIX 고정포인트(i)는 등받이와 차량의 시트 사이에 위치한, 시트 당 두개
의 금속 후크입니다. 잘 모르는 부분은 차량의 매뉴얼을 참고하십시오.
주의! 커넥터의 두개의 녹색 안전버튼(x)이 튀어나오지 않도록 하십시오. 필요시
에는, 녹색 버튼을 눌러서 커넥터를 풀어주시고, 오렌지색 버튼을 누르면서 뒤
로 잡아당기십시오.
주의! 추가적인 정보가 필요하시다면, '차량 내 시트 장착하기‘를 참조하여 주시
기 바랍니다.
− 아이에게 버클을 채우십시오. '아이에게 버클 채우기‘를 참조하시기 바랍니다.
안전카시트를 차량과 단단하게 연결해줄 수 있는 X-fix 커넥터를 사용하
여 아이의 안전을 높이십시오. 아이에게 벨트가 매어져 있는 상태에서도
3 point belt를 사용할 수 있습니다.
카시트와 커넥터의 연결
INSTALLATION DU SIÈGE AUTO AVEC LES CONNECTEURS
La sécurité de votre enfant sera augmentée avec les connecteurs
X-fix qui permettent au siège d‘être maintenu fermement dans le
véhicule. Votre enfant reste attaché par la ceinture de sécurité 3 points.
- Connecter les 2 installations X-fix fournies (les parties les plus longues,
pointant vers le haut) avec les 2 points d‘ancrages ISOFIX (i).
Note! Les points d‘ancrages ISOFIX (i) sont deux crochets métalliques situés
entre le dossier et l‘assise du siège de votre véhicule. En cas de doute, se
référer au manuel d‘instructions de votre véhicule.
– Pour ajuster, appuyer sur le bouton X-fix (v), situé au bas du siège auto.
– Tirer les connecteurs (w) le plus loin possible.
– Tourner le bouton connecteur X-fix à 180° de facon à ce qu‘ils pointent
en direction des aides d‘installation.
Note! Assurez-vous que les deux boutons verts ne soient pas enclanchés. Si
nécessaire, relâcher les connecteurs en poussant le bouton vert et en tirant
de nouveau sur la poignée orange. Répéter cette procédure pour l‘autre
connecteur.
– Pousser les deux connecteurs X-fix dans lespoints d‘ancrages (i).
– S‘assurer que le siège est connecté fermement en essayant de le tirer ver
soi.
– Les bouttons de sécurité verts doivent être visible clairement de chaque
côté et ajuster avec la poignée orange (y).
– Grâce à la poignée orange, vous pouvez ajuster la profondeur du siège.
Note! Pour plus d‘informations, merci de se référer à la section „Placer le
siège dans la voiture“.
– Vous pouvez maintenant attacher l‘enfant. Merci de vous référer à
„Comment attacher l‘enfant“

1413
UNINSTALLING THE SOLUTION X-FIX
Perform all installation steps in reverse order.
− Release the connectors (w) by pushing the green security
buttons (x) and by pulling back the orange release buttons (y).
− Pull the seat out of the installation aids (u).
− Rotate the X-fix connectors by 180°.
− Pull the X-fix lever located at the bottom of the child car seat and push
the X-fix connectors into the child seat until completely hidden.
Note! Following these steps the vehicle‘s seat pad will be protected and
the Isofix connectors will be prevented from being stained or damaged.
Damages and stains could obstruct a smooth operation.
SECURING THE CHILD
Place the child seat on the respective seat in the car.
– Please make sure that the backrest (a) of the child safety seat rests flat
against the backrest of the car seat so that the child seat is under no
circumstances in a sleeping position.
–
When using the ISOFIX-anchorages in the car, make sure that the
backrest of the Solution X-fix is perfectly aligned and in full contact
with the rear vehicle seat. The position can be adjusted with the
adjustment lever (v) located on the bottom of the child car seat.
– Should the headrest of the vehicle seat interfere, please pull it out
completely and turn it around or take it off entirely. The backrest (a)
optimally adjusts to almost any inclination of the vehicle seat.
Warning! The backrest of the Solution X-fix should rest flat against the
upright part of the car seat. Pushing the booster rearwards the seat should
be tightly pressed against the seat. For the best possible protection of your
child, the seat must be in a normal upright position!
Note! On some car seat covers made of sensitive material (e.g. velours,
leather etc.) the use of child seats may lead to traces of wear and tear. To
avoid this, you should put a blanket or a towel underneath the child seat.
2
1
a
13
14
주의! 이 절차는 시트패드를 보호하고, 얼룩이나 손상으로부터 이를 보호합니다.
손상이나 얼룩은 순조로운 작동에 방해가 될 수 있습니다.
설치의 모든 과정을 반대로 실행하십시오.
- 녹색 안전버튼(x)를 누르고 오렌지색 해체버튼(y)을 뒤로 당겨 커넥터
들을 풀어주십시오.
- 연결도구(u) 밖으로 시트를 잡아당기십시오.
- X-fix 커넥트 (w)를 180도 회전시키십시오.
- 아동안전시트의 밑에 위치한 오렌지색 X-fix버튼을 움직여 X-fix커넥터를 끝
까지 밀어주십시오.
SOLUTION X-fix의 제거
– 카시트 등받침(a)이 차량의 등받침 방향의 기울기에 맞춰 장착하여 카시트
가 어떤
환경에서도 아이가 잠을 잘 수 있는 방향이 되도록 하십시오.
– ISOFIX-고정대를 사용할때에는, Solution X-fix의 등받이가 완벽하게
수직인지, 차량의 뒷좌석 시트와 완벽하게 고정이 되어 있는지 확인하
십시오. 거리는 아동용 안전 카시트의 밑부분에 위치한 조절레버(v)를
통해 조절이 가능합니다.
– 일부 차량 시트는 민감한 소재로(벨루어, 가 죽)되어 있어 카시트 이용으로 인
하여 손상될 수 있습니다.
– 귀하의 자동차 시트가 가죽이나 특수 한 원단의 시트라면 시트를 보호하기 위
해 시트위에 담요등을 깔아 놓은 뒤에 CYBEX Solution x를 놓아 주십시오.
– 만일 자동차의 헤드레스트가 방해된다면 그것을 당겨서 전체적으로 벗 겨내야
합니다. 등받침(a)은 차량 시트 대부분의 기울기에서 최상으로 조절됩니다.
아이 보호
차에서 올바른 위치에 카시트 장착하기.
경고! Solution X-fix의 등받이는 자동차 좌석의 수직 부분에 밀착되어야 합 니다.
부스터 부분을 뒤로 밀어서 밀착되게 하십시오. 아이가 안전하기 위하여 카시트
는 올바른 방향에 설치되어야 합니다.
ÔTER LE SOLUTION X-FIX
Inverser la procédure
– Détâcher les connecteurs (w) en poussant les boutons verts de
sécurité (x) et en tirant la poignée orange (y).
– Retirer le siège de l‘aide d‘installation (u).
– Pivoter les connecteurs X-fix à 180°.
– Bouger le bouton X-fix situé au bas du siège auto et pousser les
connecteurs X-fix jusqu‘à la fin.
Note! Cette procédure protège le siège et prévient des dommages et
tâches éventuels qui pourraient gêner le bon fonctionnement.
METTRE L‘ENFANT EN SÉCURITÉ
Installer le siège auto sur un siège dans la voiture .
– Merci de vous assurer que le dossier (a) du siège auto est bien aligné au
siège de la voiture. Ne jamais incliner le dossier du siège auto afin que
votre enfant ne s‘endorme, vous favoriseriez ainsi une glissade sous la
ceinture en cas de choc frontale.
– Lorsque vous utilisez les ancrages ISOFIX dans la voiture, s‘assurer que le
dossier du Solution X-fix est parfaitement aligné et adossé au dossier
du siège de la voiture. L‘espace entre le dossier du siège auto et
celui de la voiture, peut être ajusté grâce à la manette située en bas
du siège auto.
– Nous vous conseillons de poser une serviette ou une couverture sur votre
siège afin que le siège auto ne laisse pas de marque. Si l‘appui tête
de votre voiture interfère avec la bonne installation du siège auto,
retourner-le ou ôter-le. Le dossier inclinable (a) du siège autos‘accomode
à tous les types de sièges de voiture.
Avertissement! le dossier du Solution X-fix doit être aligné au dossier du
siège de votre véhicule. L‘assise du Solution X-fix doit également être
collée à l‘assise et au dossier du siège de votre véhicule. Pour assurer la
meilleure sécurité pour votre enfant, le siège doit être en position normale
droite!
Note! Sur certain siège de voiture en velours, cuirs, alcantara, etc. le siège
auto peut parfois laisser des traces.

15 16
FASTENING THE SEATBELT OF YOUR CHILD
Put your child in the child seat. Pull out the three-point belt and lead it in
front of your child to the belt buckle (l).
Warning! Never twist the belt!
Put the belt guide (m) into the belt buckle (l). If you hear a clicking sound
it is securely locked.
Put the lap belt (n) in the bottom belt guides (k) of the child seat. Now pull
the lap belt (n) tight by pulling the diagonal belt (f) until there is no slack.
The tighter the belt the better it can protect from injuries. The diagonal belt
and lap belt should both be inserted in the bottom belt guide at the side
of the belt buckle.
Warning! The belt buckle of the car seat (l) must under no circumstances
reach into the bottom belt guide (k). If the belt strap is too long, the child
seat is not suitable for this vehicle.
The lap belt (n) should be placed in the bottom belt guides (k) on both
sides of the seat (d).
Note! Teach your child from the beginning to always pay attention to a
tight belt and that it should pull the belt tight by itself if necessary.
Warning! The lap belt must, on both sides, run as low across the groin of
your child as possible in order to take optimal effect in case of an accident.
Now lead the diagonal belt (f) through the upper red belt guide (g) in the
shoulder rest (e) until it is inside the belt guide.
Please make sure that the diagonal belt (f) runs between the outer edge
of the shoulder and your child‘s neck. If necessary, adjust the running of the
belt by adjusting the height of the headrest. The height of the headrest can
still be adjusted in the car.
m
l
k
n
f
f
l
d
k
n
g
e
f
15
16
안전벨트 착용하기
카시트에 아이를 앉히십시오. 3점식 벨트를 멀리 빼내고 벨트 버클로 아이 의 앞
에서 그것을 끼우십시오.
벨트 가이드(m)를 벨트 버클(I)에 설치하십시오. 이것은 딸깍 소리가 날 때 잠
깁니다.
랩벨트(n)는 시트 양쪽(d)에 벨트 통로(k) 밑에 두십
시오.
카시트의 아래에 있는 벨트 통로(k)에 랩벨트(n)를 두십시오. 그리고 어깨 벨트
(f)를 당기면서 랩벨트(n)가 단단히 조여지게 당기세요. 잘 조여질 수 록 벨트가
아이를 상해로부터 더욱 안전하게 보호할 수 있습니다. 어깨 벨 트와 랩벨트는 둘
다 벨트 버클 측면에 있는 아래쪽 벨트 통로(k)로 통과해 야 합니다. q
경고 벨트를 비틀지 마십시오!
경고 절대로 버클(l)이 시트 날개의 벨트 통로(k)에 닿아서는 안됩니다. 만약 버
클이 너무 길다면 CYBEX Solution X-fix를 이러한 차량에 장착하 지 마십시오.
경고! 처음 사용할 때부터 아이가 필요할 경우 스스로 당겨서 벨트를 단단 히 조
일 수 있도록 가르치고 훈련시키십시오.
어깨벨트(f)가 벨트 가이드에 닿을 때까지 어깨받침대(e)의 어깨 벨트 통 로(g)
사이로 당겨주십시오.
차량의 어깨벨트(f)는 아이의 목과 어깨의 바깥쪽 끝 사이를 지나야 합니다. 만
약 헤드레스트의 높낮이를 조절하 려면, CYBEX Solution X-fix가 차량에 정상적
으로 장착되어 있는 동안 헤드레스트의 높이를 조절하십시오.
경고 자동차 사고가 났을 때, 최대한 안전을 확보하기 위해서는 랩벨트가 아이의
사타구니 바로 위보다 아래쪽에 위치해야 합니다.
ATTACHER LA CEINTURE DE VOTRE ENFANT
Installer votre enfant dans le siège auto. Tirer sur la ceinture 3 points, assurez
vous qu‘elle soit bien fixée sur l‘enfant et boucler la ceinture dans son
encoche.
Attention! V eiller à ce que les sangles de la ceinture soient bien plates et
jamais enroulées.
Insérer la boucle (m) dans l‘encoche (l). Vous devez entendre un „CLICK“
lorsque vous bouclez la ceinture.
Passer la ceinture sur les cuisses (n) et dans les passants prévus à cet effet (k)
sur le siège auto. Serrer fermement en tirant sur la diagonale de la ceinture (f),
il ne doit pas y avoir de jeu. Plus la ceinture est serrée moins il y a de risque de
blessures. La ceinture passant sur les cuisses et celle diagonale doivent être
toutes les 2 placées dans le passant du bas prévu à cet effet sur le siège
auto.
Attention! La boucle de la ceinture (l) ne doit en aucun cas être dans le
passant du bas du siège auto (k). Si la sangle de la ceinture est trop longue,
le siège auto ne convient pas à ce véhicule.
La ceinture passant sur les cuisses (n) doit être insérée dans les passants
prévus à cet effet sur le bas du siège auto (d) .
A Noter! Enseigner à votre enfant dès le départ qu‘il doit être attaché
fermement dans son siège auto et qu‘il doit serrer la ceinture contre lui s‘il
sent qu‘elle se relache.
Attention! La ceinture des cuisses, doit être dans les passants de chaque
côté du siège auto afin d‘être optimale en cas d‘accident.
Insérer la ceinture diagonale (f) dans le passant rouge (g) prévu à cet effet
sur le dossier du siège auto.
Merci de vérifier que la ceinture diagonale passe sur l‘épaule de votre
enfant. Sinecessaire, ajuster la hauteur du dossier du siège auto, la hauteur
du dossier peut toujours être règlée dans la voiture.

17 18
r
t
IS YOUR CHILD PROPERLY SECURED?
In order to ensure the maximum safety for your child, please check prior to
the ride whether …
– the lap belt (n) runs in the bottom belt guides (k) on both sides of the seat.
– the diagonal belt (f) also runs in the bottom belt guide (k) of the seat on
the side of the belt buckle.
– the diagonal belt (f) runs through the belt guide (g) of the shoulder rest,
marked red
– the seat belt (f) runs diagonally to the back.
– the entire belt is snugly fastened and not twisted.
– the seat pad is locked in place on both sides with the X-fix
connectors and the ISOFIX anchorage points.
– the green security buttons (x) clearly stick out of the release
button (y).
– the backrest (a) of the of the child seat rests flat against the
vehicle seat, making sure the child seat always stays in an upright
position.
RECLINING HEADREST
The CYBEX Solution X-fix has a reclining headrest (r) preventing your child‘s
head from falling forward when asleep. Furthermore, this adjustable
headrest contributes to the comfort of your child during the car ride.
Note! Please ensure that the child‘s head always remains in contact with the
reclining headrest since otherwise the headrest cannot fulfill its optimal
side-crash protective function.
By slightly lifting the headrest, the inclination of the headrest (r) can be
adjusted in three different positions.
Warning! The locking device (t) must never be blocked by any objects!
In case of an accident, the free movement of the inclination must be
guaranteed since otherwise your child might be injured.
17
18
최상으로 아이가 안전할 수 있도록 카시트에 타기 전에 체크해주십시오.
– 랩벨트(n)를 시트 날개의 벨트 통로(k)를 통과하도록 하십시오.
– 어깨벨트 (f)도 시트의 벨트 버클 양사이드에 있는 시트의 벨트 통로(k)로 통
과시키세 요.
– 어깨벨트(k)는 어깨받침대의 벨트 버클(g)사이에 통과시키세요.
– 체크되 어 있는 빨간색 시트벨트(f)는 대각선 방향으로 등에서 통과되도록 합
니다.
– 모든 안전벨트는 꼬여 있어서는 안되며 단단히 조여야 합니다.
- 시트 패드의 양쪽 측면에 X-fix 커넥터와 ISOFIX 고정 포인트가 잘 고
정되어 있습니까.- 녹색 안전버튼(x)가 해체버튼 (y)으로부터 명확히
나와있습니까.
- 아동용 안전카시트가 올바르게 장착되어 있도록 아동용 안전 카시트의
등받이(a)가 차량의 뒷좌석과 완벽하게 접촉되어 있습니까.“
아이의 안전을 위한 카시트의 올바른 장착 위치
헤드레스트 기울기
싸이벡스 솔루션 X의 헤드레스트(r)는 아이가 잠들 때 아이의 머리가 안정 되
게 합니다. 나아가 이러한 헤드레스트 조정 기능은 아이들이 차를 탈 때 편 안함
을 느끼게 합니다.
헤드레스트의 뒤쪽 위에 있는 핸들(s)을 잡아 당겨서 헤드레스트의 각도를 3단
계까지 조절할 수 있습니다.
주의! 반드시 헤드레스트 기울기에 따라 아이들의 머리를 밀착시켜 주십시오 그
렇지 않으면 측면 충돌에 의한 보호기능이 최상으로 작용할 수 없습니다.
경고! 잠금장치(t)는 반드시 어떠한 물체에 의하여 제한되면 안됩니다. 사고 시 임
의로 기울어지는 움직임이 아이를 다치게 할 수 있습니다.
VOTRE ENFANT EST-IL CORRECTEMENT INSTALLÉ?
Pour s‘assurer de la sécurité de l‘enfant et du maximum de protection,
s‘assurer avant de démarrer que...
– la ceinture (n) passe dans la partie guide ceinture (k) sur les cotés du
siège.
– la ceinture diagonale (f) aussi passe dans la partie guide ceinture (k) sur
le coté du siège de la boucle ceinture.
– la ceinture diagonale (f) passe dans le guide ceinture (g) au niveau de
l‘épaule, partie en rouge
– la ceinture du siège (f) passe en diagonale sur l‘arrière.
– la sangle de la ceinture doit être tendue et pas vrillée.
– que l‘assise du siège est bien verrouillée grâce aux connecteurs X-fix
et au système d‘ancrage ISOFIX.
– que le bouton de sécurité vert (x)est clairement visible et recouvre le
visuel du bouton d‘ouverture (y).
– que le dossier (a) du siège auto est bien adossé au siège du
véhicule. Le siège auto reste ainsi maintenu dans la position droite
correcte.
REPOSE TÊTE INCLINABLE
Le CYBEX Solution X-fix dispose d‘un repose tête inclinable (r) afin d‘éviter
que la tête de l‘enfant endormit ne bascule vers l‘avant. De plus, cet appui
tête inclinable contribu au confort de votre enfant lors des trajets.
A Noter! Merci de vous assurer que la tête de votre enfant reste en contact
direct avec l‘appui tête de façon à garantir la sécurité optimale en cas
d‘accident.
En soulevant légèrement l‘appui tête vous pouvez le règler en 3 différentes
positions.
Attention! L‘encoche ne doit jamais être bloquée par quelconques objets!
En cas d‘accident, le mouvement libre de l‘inclinaison doit être garantie, à
l‘inverse votre enfant pourrait être blessé.

PRODUCT CARE
In order to guarantee the best possible protection of your child seat, it is
necessary that you take note of the following:
– All important parts of the child seat should be examined for any
damages on a regular basis. The mechanical parts must function
flawlessly.
– It is essential that the child safety car seat does not get jammed between
hard objects e.g. like the door of the car, seat rail etc. causing possible
damage to the seat.
– The child seat must be examined by the manufacturer after a fall or
similar situations.
REMOVING THE SEAT COVER
The seat cover consists of four parts which are fixed to the seat either by
velcros, press buttons or button holes. Once you have released all fixations,
the cover parts can be removed.
In order to put the covers back on the seat, proceed in the reversed order
as removing them.
Warning! The child seat must never be used without the cover.
CLEANING
It is important to use only an original CYBEX Solution X-fix seat cover since
the cover is also an essential part of the function. You may obtain spare
covers at your retailer.
Note! Please wash the cover before you use it the first time. Seat covers
are machine washable at max. 30°C on delicate cycle. If you wash it at
higher temperature, the cover fabric may lose colour. Please wash the
cover separately and never dry it mechanically! Do not dry the cover in
direct sunlight! You can clean the plastic parts with a mild detergent and
warm water.
Warning! Please do not use chemical detergents or bleaching agents
under any circumstances!
19 20
19
20
최상으로 안전할 수 있도록 아이가 타기 전에 체크해주십
시오.
제품 관리
카시트에서 가장 중요한 부품은 주기적으로 손상유무에 대한 점검이 필요합니
다. 화학부품의 기능이 결함없어야합 니다. 카시트는 차문이나 시트 레일과 같
이 무거운 것 사이에서 압력이 가해지면 안됩니다. 그러한 경우 카시트에 손상
을 줄 수 있으며 추락이나 비슷한 상황을 겪은 뒤 제조업체에 의한 점검을 받아
야 합니다.
시트커버 탈착
CYBEX Solution X-fix의 시트쿠션 커버는 4개의 똑딱단추로 채워져 있으며 벨
크로, 버튼 혹은 버튼 구멍에 의하여 고정됩니다. 커버를 벗기려면 이 똑딱단추
들을 끄르면 됩니다.
시트 커버를 씌우기 위해서는 시트커버를 벗겼던 방법과 반대로 진행하면 됩니
다.
경고 CYBEX Solution X-fix를 커버없이 사용하지 마십시오.
세탁
시트커버 역시 카시트 기능을 하는데 필수적인 부품이 되기 때문에 오리지널
CYBEX Solution X-fix 시트커버만을 사용하는 것은 굉장히 중요합니다. 구매한
매장으로부터 여분의 커버를 구할 수 있습니다.
주의! 고객님이 처음사용하시기전에 커버를 세탁하십시요. 시트커버는 부드러운
강도로 최대30도에서 기계세탁할수 있습니다. 고객님이 더 높은 온도에서 세탁
하시면 커버직물의 색이 바랠수 있습니다. 커버를 단독세탁 해주시고 절대 기계
적으로 건조하지 마십시요!! 직사광선에서 커버를 건조하지 마십시요. 순한세제
와 따뜻한물로 프라스틱부분을 청소하셔도 됩니다.
경고! 본 안전시트를 기름, 연마제, 표백제, 또는 기타 화학품에서 멀리하십시오.
ENTRETIEN DU SIÈGE AUTO
Afin de garantir la meilleure sécurité possible à votre enfant, il est
necessaire que vous preniez connaissance de ce qui suit:
– Toutes les pièces du siège auto doivent être examinées par vos soins de
façon régulière.
– Les parties principales doivent être en parfait état.
– Il est important que le siège auto ne soit pas heurté par la portière de la
voiture, etc. afin de ne pas l‘endommager.
– Le siège auto doit être examiné par le constructeur après une chute ou
situation similaire.
ÔTER LA HOUSSE
La housse se constitue de 4 parties fixées au sièges auto soient par des
velcros, bouttons pressoirs ou crochets. Une fois les fixations retirées, la
housse peut être ôtée.
Afin de remettre la housse procéder aux étapes inversées que pour l‘ôter.
Attention! Ce siège auto ne doit jamais être utilisé sans sa housse .
NETTOYAGE
Il est important d‘utiliser la housse originale du CYBEX Solution X-fix qui est
partie intégrante de ses fonctionnalités. Votre revendeur pourra vous
fournir des housses séparemment.
Note! Veuille laver la housse avant de l‘utiliser pour la première fois. Les
housses sont lavables en machine à30°C maximum, cycle délicat. Si vous
lavez à température plus élevée, le tissu peut passer. Veuillez laver la housse
séparément et ne jamais sécher mécaniquement! Ne pas sécher au soleil
directement! Les parties plastiques peuvent être nettoyées au savon doux
et à l‘eau tiède.
Attention!
Merci de ne jamais utiliser de détergents chimiques ou d‘eau de
javel.

21
WHAT TO DO AFTER AN ACCIDENT
If you had an accident, the seat might have sustained damages which are
not visible. In this case, the child seat must absolutely be examined by the
manufacturer and replaced if necessary.
DURABILITY OF THE PRODUCT
The CYBEX Solution X-fix was designed to easily fulfill its purpose for the
expected durability (adding up to 9 years). However, since high
fluctuations of temperature might occur and since there might be
unforeseeable exposures to the child seat, it is important to note the
following:
– If the car is exposed to direct sunlight for a longer period of time, the
child seat must be taken out of the car or covered with a cloth.
– Examine all plastic and metal parts of the seat for any damages or
changes about their form or colour on a yearly basis. If you notice any
changes, you need to dispose of the child seat or it must be examined
by the manufacturer and replaced if necessary.
– Changes to the fabric, in particular the fading of colour, are normal after
yearlong use in a car and do not constitute a fault.
DISPOSAL
At the end of the durability of the child seat, you must dispose it properly.
Waste disposal regulations may vary regionally. In order to guarantee a
proper disposal of the child safety seat, please contact your communal
waste management or administration of your city. In all cases, please note
the waste disposal regulations of your country.
21 22
21
22
자동차 사고 후에는 CYBEX Solution X-fix가 손상을 입었을 우려가 있으니, 제조자나
판매자에게 점검을 의뢰하거 나 가능하면 새로운 CYBEX Solution X-fix로 교체해 주십
시오.
차량사고 발생 시의 행동요령
CYBEX Solution X-fix의 사용가능연령은 4세~12세이며, 제품의 권장교체시기
는 8년입니다. 차량안의 높은 온도 차와 예상치 못한 상황이 발생할 우려가 있
으니 다음의 사항을 꼭 확인해 주십시오.
– 만약 오랜시간 직사광선에 노출되면 카시트를 차에서 빼내거나 시트를 벗겨내
야 합니다.
– 시트의 모든 플라스틱과 금속 부품들은 손상이나 변형, 변색이 없는지 매년 확
인해주십시오. 어떠한 변화를 발견하셨다면, 시트를 폐기하시거나 제조사에 검
사를 의뢰하시여 필요하시다면 교체하여주십시오.
– 모든 카시트의 플라스틱 부품이 손상되거나 그 본래 형태를 유지하는 것을 유
지하기 위해서는 매년 주기적으로 검사를 해야 합니다. 만일 어떠한 변화를 발
견할 경우 카시트를 처분하거나 제조업자로부터 검사를 의뢰하거나 가 능하다
면 교체해야 합니다. 천을 바꾸는 경우 색깔이 변색된 경우는 시간이 지나서 생
기는 자연스러운 현상이기 때 문에 손상된 것이 아님을 알려드립니다.
제품 교체시기
아이가 다 커서 CYBEX Solution X-fix를 더 이상 사용하지 않을 경우에는 각
나라마다 쓰레기처리기준이 틀리므로 적절한 처리도 중요합니다. CYBEX
SolutionX를 귀하와 가까운 쓰레기 처리 회사에 연락하여 적절히 처리될 수 있
도록 하여 주십시오. 반드시 정부의 쓰레기 처리법에 따르십시오.
처분
CONDUITE À TENIR APRÈS UN ACCIDENT DE VOITURE
Si vous avez eu un accident, le siège auto a pu être endommagé sans
que cela soit visible. Par conséquent, le siège auto doit absolument être
examiné par le constructeur et remplacé si necessaire.
DURÉE DE VIE DU PRODUIT
Le CYBEX Solution X-fix est conçu pour répondre à ses fonctionnalités
pendant toute la période nécessaire à son utilistation, soit d‘environ
3 à 12 ans, 9 ans. Toutefois, dû à des fluctuations de températrure dans
l‘habitacle, il est nécessaire de noter ce sui suit:
– Si le siège auto est exposé à la lumière directe du soleil pendant un
certain temps, retirer-le de la voiture ou couvrer-le.
– Examiner toutes les parties plastiques et métalliques chaque année pour
déceler tous dommages ou changement de couleurs des parties
plastiques. Si vous voyez des changements, il doit être vérifié par le
constructeur et changé le cas échéant.
– Si vous constater des changements, le siège auto doit être examiné par
le constructeur et éventuellement remplacé.
– Les variations de couleur du tissus sont normales au fil du temps et ne
représentent pas un défaut.
RECYCLAGE
A la fin de la durée de vie du produit, les mesures de recyclage des
matériaux varient d‘un pays à un autre. De façon à ne pas polluer,
approchez vous de votre service d‘évacuation des déchets de votre
commune ou de votre région.

WARRANTY
The following warranty applies solely in the country where this product
was initially sold by a retailer to a customer. The warranty covers all
manufacturing and material defects, existing and appearing, at the date
of purchase or appearing within a term of two (2) years from the date of
purchase from the retailer who initially sold the product to a consumer
(manufacturer’s warranty). In the event that a manufacturing or material
defect should appear, we will – at our own discretion – either repair the
product free of charge or replace it with a new product. To obtain such
warranty it is required to take or ship the product to the retailer, who initially
sold this product to a customer and to submit an original proof of purchase
(sales receipt or invoice) that contains the date of purchase, the name of
the retailer and the type designation of this product. This warranty shall not
apply in the event that this product is taken or shipped to the manufacturer
or any other person other than the retailer who initially sold this product to
a consumer. Please check the product with respect to completeness and
manufacturing or material defects immediately at the date of purchase
or, in the event that the product was purchased in distance selling,
immediately after receipt. In case of a defect stop using the product and
take or ship it immediately to the retailer who initially sold it. In a warranty
case the product has to be returned in a clean and complete condition.
Prior to contacting the retailer, please read this instruction manual
carefully. This warranty does not cover any damages caused by misuse,
environmental influence (water, fire, road accidents etc.) or normal wear
and tear. It does solely apply in the event that the use of the product
was always in compliance with the operating instructions, if any and all
modifications and services were performed by authorized persons and if
original components and accessories were used. This warranty does not
exclude, limit or otherwise affect any statutory consumer rights, including
claims in tort and claims with respect to a breach of contract, which the
buyer may have against the seller or the manufacturer of the product.
23 24
23
24
품질보증
품질보증 다음의 품질보증은 이제품이 최초 제품공급업체로부터 판매된 국가에
서만 적용됩니다. 품질보증은 모든 제조와 소재결함에 대해 제품공급업체에서
구매하신날부터 2년동안 발생하거나 구매한날에 문제가 있는 제품에 대해 보상
합니다. 제조 또는 소재결함에 있을시에 저희가 재량으로 제품을 무료로 수리
해드리거나 새제품으로 교환해 드립니다. 이러한 품질보증을 받으시려면 최초
고객님에게 제품을 판매한 공급업체에게 보내시거나 가져가셔야 합니다. 그리
고 이제품의 모델명과 공급업체명 구입날짜가 포함된 구매증서(판매영수증 또
는 송장)를 제출하셔야 합니다 이품질보증은 이제품을 고객님에게 판매한 최초
공급업체와 다른사람 또는 다른 제조업체에 보내시거나 가져가신 경우에는 적
용되지 않습니다. 구매하신날에 즉시 제품의 완전함과 제조 또는 소재결함에 대
해서 확인해 주십시요. 이제품을 통신판매로 구매하신 경우에는 수령한후 즉시
제품의 이상유무를 확인해 주십시요. 결함이 있을경우 제품 사용을 중지하시고
최초 판매한 공급업체에 즉시 보내시거나 가져가십시요. 제품이 깨끗하고 완전
한 상태로 반환됐을경우에만 보장됩니다. 공급업체에 연락하시기전에 사용설명
서를 주의깊게 읽어주십시요. 이 품질보증은 오사용, 자연재해(홍수, 화재, 자동
차사고 등등)또는 일반적인 헤짐과 찢김에 인한 어떤 손상에 대해서는 보상하지
않습니다. 품질보증은 제품을 사용하실때 항상 작동설명서를 준수한 경우, 모든
변경과 서버스가 허가된 사람에 의해서 수행됐을경우 그리고 정품부품과 악세
서리가 사용되었을 경우에만 적용됩니다. 이 품질보증은 구매자가 제품의 제조
업체 또는 판매자에 대해서 하는 불법행위 및 계약위반과 관련한 청구를 포함해
서 어떤 법적인 소비자 권리를 제한하거나 다른방법으로 영향을 주지 않습니다.
GARANTIE
La garantie suivante s‘applique uniquement dans le pays où ce produit a
été vendu la première fois par un détaillant à un client. La garantie couvre
tous les défauts matériels et de fabrication, existants ou apparaissants à la
date de l‘achat ou dans un délai de deux (2) ans à compter de la date
d‘achat au détaillant qui l‘a vendu la première fois au consommateur
(garantie fabricant). Dans le cas où un défaut de fabrication ou de
matériau apparaîtrait, le produit sera, au choix du fabricant, soit réparé
gratuitement soit remplacé par un produit neuf. Pour obtenir cette garantie
il est nécessaire de retourner le produit au détaillant qui l‘a initialement
vendu au consommateur et produire l‘original de la preuve d‘achat
(facture ou reçu) qui comporte la date d‘achat, le nom du détaillant et
la désignation du produit. La garantie ne s‘appliquera pas dans le cas
où le produit est envoyé au fabricant ou à toute personne autre que le
détaillant ayant effectué la première vente de ce produit.
 Loading...