

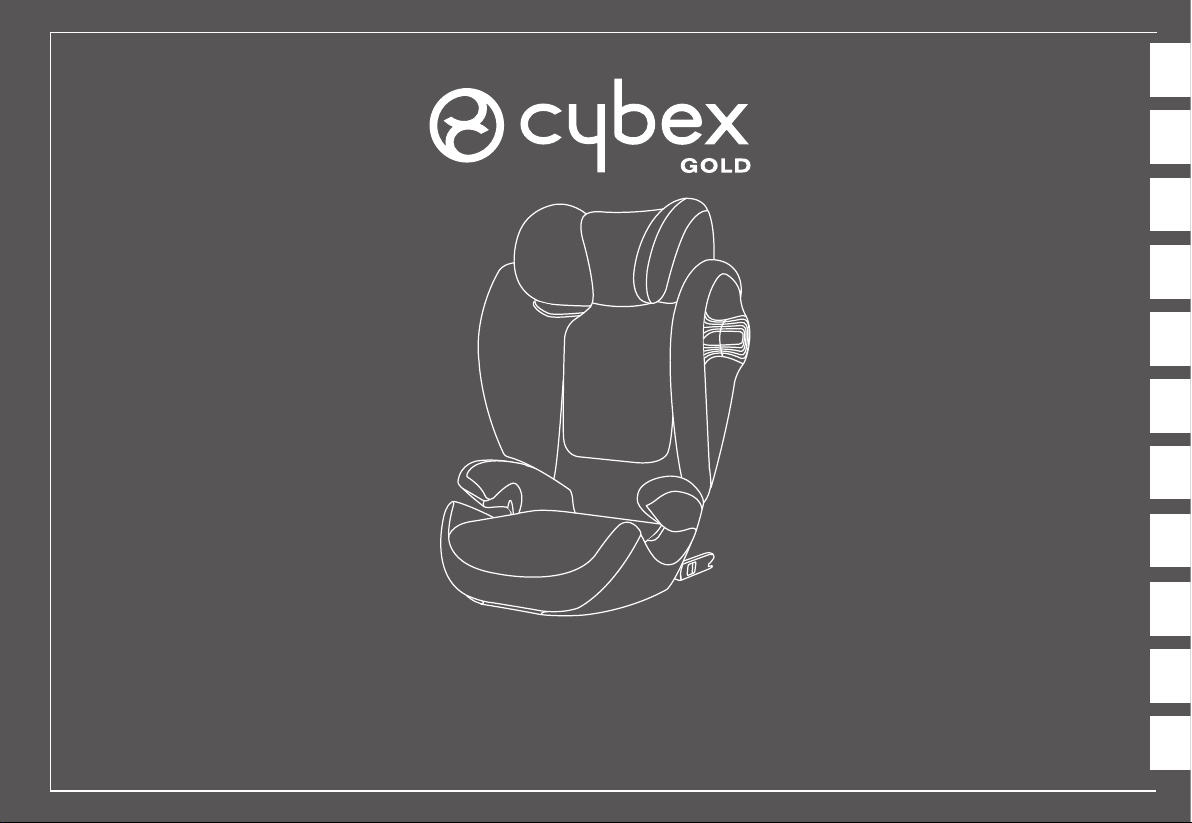
Page 1
DE
FR ENNL ITPL
HU
CZSKESPT
SOLUTION S-FIX
UN R44-04, Gr. 2 – 3, 15 – 36 kg
User guide
Page 2
Kurzanleitung Gruppe 2/3 (15-36 kg) Brief instructions Group 2/3 (15-36 kg) Istruzioni brevi Gruppo 2/3 (15-36 kg)DE: EN: IT:
Skrócona instrukcja Grupa 2/3 (15-36 kg)Korte handleiding Groep 2/3 (15-36 kg) PL:NL:
Stručné instrukce Sk. 2/3 (15-36 kg) Stručné inštrukcie Sk. 2/3 (15-36 kg)
CZ: SK:
Instructions en bref Groupe 2/3 (15-36 kg)FR:
Rövid használati utasítás 2/3 csoport (15-36 kg)
HU:
Instrucciones abreviadas Grupo 2/3 (15-36 kg) Instruções breves Gr. 2/3 (15-36 kg)ES: PT:
13
1
5
9
10
14
2
6
MAX
11
15
3
7
PRESS!
4
CLICK!
8
12
CLICK!
16
2
Page 3

DE - WARNUNG! Ohne Genehmigung der Zulassungsstelle dürfen keine Veränderungen am Kindersitz vorgenommen und keine Ergänzungen hinzugefügt werden. Reparaturen dürfen ausschließlich durch
Personen vorgenommen werden, die hierfür autorisiert sind. Dabei dürfen stets nur original Bau- und Zubehörteile verwendet werden. Die Schutzfunktion des Kindersitzes ist sonst nicht mehr gewährleistet.
WARNUNG! Der Kindersitz bietet nur dann den bestmöglichen Schutz für Ihr Kind, wenn Sie die Gebrauchsanweisung genau befolgen.
EN - WARNI NG! Without the approval of the certifi cation offi ce, the child seat may not be modifi ed or added to in any way. Repairs may only be performed by person authorised to this effect. Only original parts
EN - WARNI NG! Without the approval of the certifi cation offi ce, the child seat may not be modifi ed or added to in any way. Repairs may only be performed by person authorised to this effect. Only original parts
and accessories may be used for repairs. Failure to comply with the above will result in the protective function of the child seat no longer being guaranteed.
and accessories may be used for repairs. Failure to comply with the above will result in the protective function of the child seat no longer being guaranteed.
WARNING! The child seat only offers optimum protection for your child if you follow the usage instructions precisely.
WARNING! The child seat only offers optimum protection for your child if you follow the usage instructions precisely.
ATTENZIONE! Senza l’approvazione dell’uffi cio di certifi cazione il seggiolino non può subire modifi che o aggiunte di alcun genere. Eventuali riparazioni dovranno essere effettuate solo da persone autorizzate,
utilizzando soltanto componenti ed accessori originali. Il mancato rispetto di quanto sopra avrà come conseguenza il termine della garanzia della funzione protettiva del seggiolino.
ATTENZIONE! Il seggiolino offre la protezione ottimale per il bambino solo qualora vengano seguite precisamente le istruzioni per l’uso.
FR - ATTENTION ! Ce siège auto ne saurait être modifi é sans l’autorisation préalable de l’organisme de certifi cation compétent. Toute réparation ne peut être effectuée que par une personne habilitée. Seuls des
pièces détachées et des accessoires d’origine peuvent être utilisés. Toute entorse aux règles précitées compromettra la fonction de protection du siège auto.
ATTENTION ! Le siège auto n’offre une protection optimale que si vous suivez précisément les instructions d’utilisation.
NL - BELANGRIJK! Zonder de goedkeuring van het certifi ceringsinstelling mag het autostoeltje niet worden aangepast en mag er niets aan worden toegevoegd. Reparaties mogen alleen worden uitgevoerd door
personen die daartoe bevoegd zijn. Er mogen uitsluitend originele onderdelen en accessoires worden gebruikt voor reparaties. Niet-naleving van het bovenstaande heeft tot gevolg dat de beschermende functie
van het autostoeltje niet langer gegarandeerd is.
BELANGRIJK! Het autostoeltje biedt uw kind alleen optimale bescherming als u de handleiding precies volgt.
PL - OSTRZEŻENIE! Bez zgody instytucji certyfi kującej produkt, fotelik nie może być w żaden sposób modyfi kowany lub zmieniany. Naprawy dokonuje tylko specjalnie upoważniona do tego osoba. Tylko
oryginalne części i akcesoria mogą być użyte do naprawy. Niezastosowanie się do tych zasad może spowodować utratę funkcji ochronnej fotelika oraz utratę gwarancji.
OSTRZEŻENIE! Fotelik zapewnia optymalną ochronę tylko w przypadku postępowania zodnie z instrukcją.
HU - FIGYELMEZTETÉ S! A hitelesítő intézet jóváhagyása nélkül a terméken semmilyen módosítás nem végezhető. Javítást csak az erre felhatalmazott személy végezhet. Kizárólag eredeti alkatrészek és
tartozékok használhatók javításhoz. A fentiek be nem tartásával már nem garantálható a gyermekülés védelmi funkciója.
FIGYELMEZTETÉS! A gyermekülés akkor nyújt megfelelő védelmet gyermekének, ha pontosan követi a használati utasításokat.
CZ - VAROVÁNÍ! Bez povolení certifi kačního úřadu nesmí být autosedačka jakkoliv upravována. Opravy mohou provádět pouze autorizované osoby. K opravám lze používat pouze originální náhradní díly a
příslušenství. Při nedodržení výše uvedených podmínek nelze zaručit ochrannou funkci dětské autosedačky.
VAROVÁNÍ! Dětská autosedačka poskytuje Vašemu dítěti optimální ochranu pouze při důkladném dodržení pokynů k použití.
SK - VAROVANIE! Bez povolenia certifi kačného úradu nesmie byť autosedačka akokoľvek upravovaná. Opravy môžu vykonávať len autorizované osoby. K opravám možné používať len originálne náhradné diely a
príslušenstvo. Pri nedodržaní vyššie uvedených podmienok nemožno zaručiť ochrannú funkciu detskej autosedačky.
VAROVANIE! Detská autosedačka poskytuje Vášmu dieťaťu optimálnu ochranu len pri dôkladnom dodržaní pokynov na použitie.
DE
FR ENNL ITPL
HU
CZSKESPT
ES - ¡ATENCIÓN! La silla de auto no puede ser modifi cada ni se le pueden añadir componentes sin la aprobación de la ofi cina de certifi cación. Las reparaciones las realizará únicamente una persona autorizada
para ello. Sólo se utilizarán recambios y accesorios originales en las reparaciones. El incumplimiento de lo expuesto anteriormente resultará en la pérdida de cobertura por garantía sobre la silla.
¡ATENCIÓN! La silla de coche solo ofrece una protección óptima para su hijo si sigue las instrucciones de uso de forma precisa.
PT - Atenção! Sem expressa autorização, a cadeira infantil não poderá ser modifi cada de nenhuma maneira. As reparações só podem ser feitas por pessoas autorizadas para este efeito. Apenas partes e
acessórios originais devem ser utilizados nas reparações. Não ir de encontro ao descrito anteriormente irá fazer com que a proteção da criança não possa ser assegurada.
Atenção! A cadeira auto só oferece proteção ótima para a criança quando segue todas as instruções corretamente.
3
Page 4
SOLUTION S-fix
UN-R44-04
UNIVERSAL
SEMI-UNIVERSAL
15 – 36 kg
04301359
CYBEX GmbH
Riedingerstr. 18, 95448 Bayreuth
Germany
4
Zulassung
UN R 44-04, Gruppe 2/3, 15–36 kg
CYBEX SOLUTION S-FIX
Sitzerhöher mit Rückenlehne und Kopfstütze
Empfohlen für:
Alter: ca. 3 bis ca. 12 Jahre
Gewicht: 15 bis 36 kg
Körpergröße: bis 150 cm
nur geeignet für Fahrzeugsitze mit Dreipunkt-AutomatikGurt, die nach UN Regelung Nr. R16 oder gleichwertigem
Standard zugelassen sind
Certifi cation
UN R 44-04, group 2/3, 15 to 36 kg
CYBEX SOLUTION S-FIX
seat cushion with backrest and headrest
Recommended for:
Age: from approximately 3 to 12 years
Weight: 15 to 36 kg
Body height: up to 150 cm
Only suitable for vehicle seats with automatic three-point
belts approved in accordance with UN regulation R16 or
a comparable standard
Omologazione
UN R 44-04, guppo 2/3, da 15 a 36 kg
CYBEX SOLUTION S-FIX
cuscino seduta con schienale e poggiatesta
Adatto per:
ETA’: da circa 3 a 12 anni
Peso: da 15 a 36 kg
Altezza: ino a 150 cm
Solo per veicoli con sedili dotati di cinture di sicurezza
automatiche a 3 punti omologate secondo ECE R16 o
standard equivalente
DE
!
WARNUNG! Um den optimalen Schutz für Ihr Kind zu gewährleisten, muss der
INHALT
CYBEX SOLUTION S-FIX unbedingt so verwendet werden, wie es in dieser
Anleitung beschrieben wird.
HINWEIS! Bewahren Sie die Anleitung immer griffbereit auf (z.B. im dafür vorgesehenen
Fach an der Rückseite der Rückenlehne).
HINWEIS! Durch länderspezifi sche Anforderungen (z.B. Farbkennzeichnungen am
Kindersitz) können Produktmerkmale in ihrer äußeren Erscheinung variieren. Die korrekte
Funktionsweise des Produktes wird davon jedoch nicht beeinfl usst.
ER STMONTAGE ...........................................................................................................................................................................................6
DER RICHTIGE PLATZ IM FAHRZEUG ...........................................................................................................................................8
SICHERHEIT IM FAHRZEUG ............................................................................................................................................................. 10
DEN SITZ INS FAHRZEUG STELLEN ...........................................................................................................................................10
BEFESTIGEN DES KINDERSITZES MITTELS ISOFIX CONNECT SYSTEM ............................................................12
EINSTELLEN DER SEITENPROTEKTOREN ...............................................................................................................................14
AUSBAU DES CYBEX SOLUTION SFIX......................................................................................................................................14
ANPASSEN AN DIE KÖRPERGRÖSSE ......................................................................................................................................14
ANSCHNALLEN DES KIND ES ..........................................................................................................................................................16
IST IHR KIND RICHTIG GESICHERT? ..........................................................................................................................................18
NEIGUNGSVERSTELLBARE KOPFSTÜTZE .............................................................................................................................20
PFLE GE ..........................................................................................................................................................................................................20
ENTFERNEN DES BEZUGES ............................................................................................................................................................22
ENTFERNEN DES BEZUGS VON DER KOPFSTÜTZENKLAPPE ..................................................................................22
ENTFERNEN DES BEZUGS VON DER KOPFSTÜTZE ........................................................................................................22
ENTFERNEN DES BEZUGS VOM SCHULTERTEIL ..............................................................................................................22
ENTFERNEN DES BEZUGS VON DER SITZFLÄCHE ..........................................................................................................24
REINIGUNG .................................................................................................................................................................................................24
VERHALTEN NACH EINEM UNFALL ...............................................................................................................................................24
PRODUKTLEBENSDAUER..................................................................................................................................................................24
ENTSO RGUN G .........................................................................................................................................................................................26
GARANTIEBEDINGUNGEN ...............................................................................................................................................................26
Page 5
EN IT
CONTENTS INDICE
!
WARNING! To ensure optimum protection for your child, the CYBEX SOLUTION
S-FIX must be used as described in these instructions.
NOTE! Always keep these instructions to hand (e.g. in the designated compartment on the
rear of the backrest).
NOTA BENE! Tenere sempre a portata di mano queste istruzioni (ad esempio
nell’apposito scomparto sul retro dello schienale).
!
ATTENZIONE! Per assicurare la protezione ottimale per il bambino il CYBEX
SOLUTION S-fix deve essere usato come descritto nelle presenti istruzioni.
DE
ENIT
NOTE! Country-specifi c regulations (e.g. regarding colour-coding on child seats) may
mean that product features may vary in appearance. This will, however, not affect the
product in its correct function.
FIRST INSTALLATION .................................................................................................................................................................................7
POSITIONING THE SEAT CORRECTLY IN THE VEHICLE ...................................................................................................9
SAFETY IN TH E VEHICLE .....................................................................................................................................................................11
PLACING THE SEAT IN THE VEHICLE ..........................................................................................................................................11
SECURING THE CHILD SEAT USING THE ISOFIX CONNECT SYSTEM .................................................................13
ADJUSTING THE SIDE PROTECTORS .........................................................................................................................................15
REMOVAL OF THE CYBEX SOLUTION SFIX ........................................................................................................................... 15
ADAPTING TO BODY SIZE .................................................................................................................................................................15
FASTENING YOUR CHILD’S SEATBELT ......................................................................................................................................17
IS YOUR CHILD CORRECTLY SECURED? ...............................................................................................................................19
RECLINING HEADREST ......................................................................................................................................................................21
CARE & MAINTENANCE........................................................................................................................................................................21
REMOVING THE SEAT COVER .........................................................................................................................................................23
REMOVING THE COVER FROM THE HEADREST FLAP ....................................................................................................23
REMOVING THE COVER FROM THE HEAD SUPPORT .....................................................................................................23
REMOVING THE COVER FROM THE SHOULDER PART ..................................................................................................23
REMOVING THE COVER FROM THE BOOSTER ..................................................................................................................25
CLEANING ....................................................................................................................................................................................................25
HOW TO ACT FOLLOWING AN ACCIDENT ..............................................................................................................................25
PRODUCT LIFESPAN .............................................................................................................................................................................25
DISPOSAL .................................................................................................................................................................................................... 27
WARRANTY CONDITIONS..................................................................................................................................................................27
NOTA BENE! Le norme nazionali (ad esempio rispetto alla codifi ca cromatica dei
seggiolini) possono implicare che le caratteristiche esteriori del prodotto possano variare.
Questo comunque non infl uisce sul corretto funzionamento del prodotto.
PRIMA INSTALLAZIONE ...........................................................................................................................................................................7
POSIZIONE CORRETTA DEL SEGGIOLINO NEL VEICOLO .............................................................................................9
SICUREZZA NELL’INSTALLAZIONE IN AUTO ...........................................................................................................................11
COLLOCAZIONE DEL SEGGIOLINO NEL VEICOLO ..........................................................................................................11
FISSAGGIO DEL SEGGIOLINO CON IL SISTEMA ISOFIX CONNECT .....................................................................13
REGOLARE LE PROTEZIONI LATERALI.......................................................................................................................................15
DISINSTALLARE IL SEGGIOLINO CYBEX SOLUTION SFIX ...........................................................................................15
REGOLAZIONE IN BASE ALLA CORPORATURA .................................................................................................................15
ALLACCIARE IL BAMBINO CON LA CINTURA ........................................................................................................................ 17
IL BAMBINO È MESSO IN SICUREZZA CORRETTAMENTE? ........................................................................................19
POGGIATESTA INCLINABILE ...........................................................................................................................................................21
CURA E MANUTENZ I ON E ...................................................................................................................................................................21
RIMOZIONE DELLA FODERA DEL SEGGIOLINO .................................................................................................................23
RIMOZIONE DELLA FODERA DALL’ALETTA DEL POGGIATESTA .................................................................................23
RIMOZIONE DELLA FODERA DAL POGGIATESTA ...............................................................................................................23
RIMOZIONE DELLA FODERA DALL’AREA DELLA SPALLA ...............................................................................................23
RIMOZIONE DELLA FODERA DALLA SUPERFICIE DI SEDUTA ....................................................................................25
PULI Z IA ...........................................................................................................................................................................................................25
COME PROCEDERE IN SEGUITO A UN INCIDENTE..........................................................................................................25
VITA UTILE DEL PRODOTTO ...............................................................................................................................................................25
SMALTIMENTO ...........................................................................................................................................................................................27
CONDIZIONI DI GARANZIA ................................................................................................................................................................27
5
Page 6
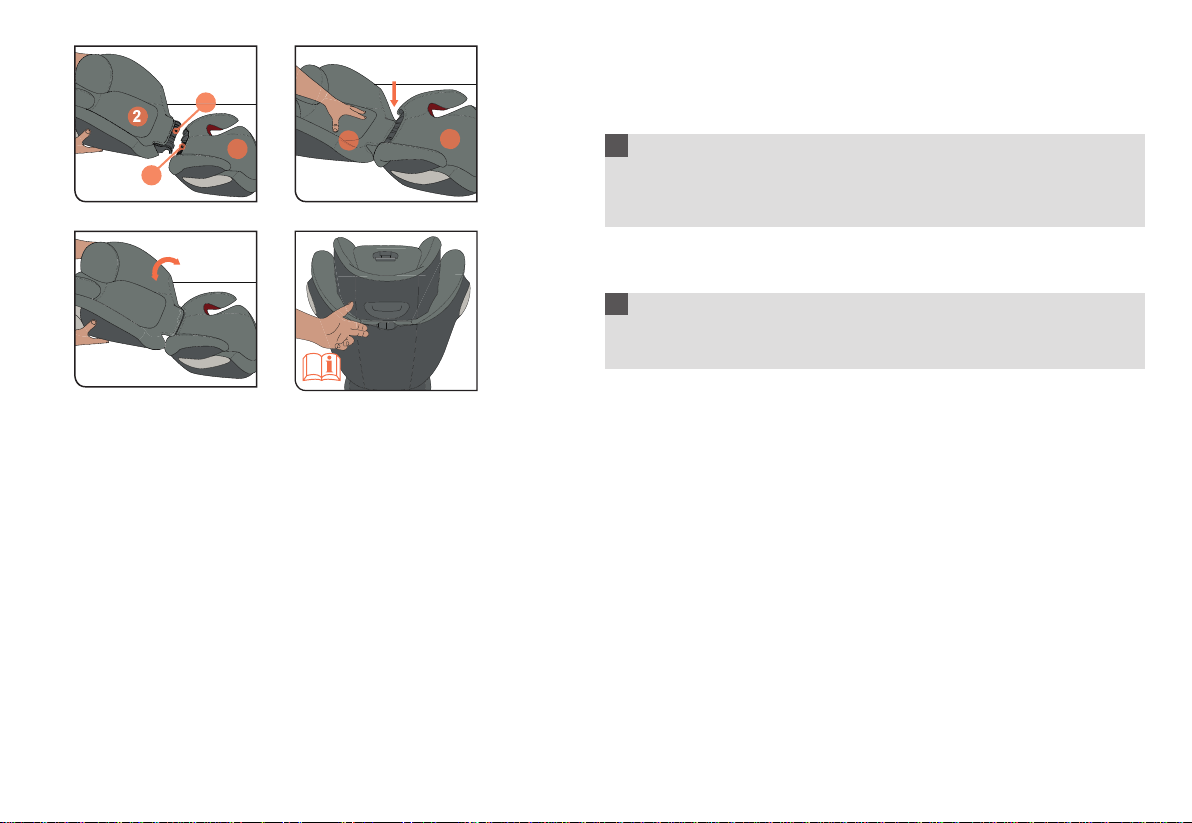
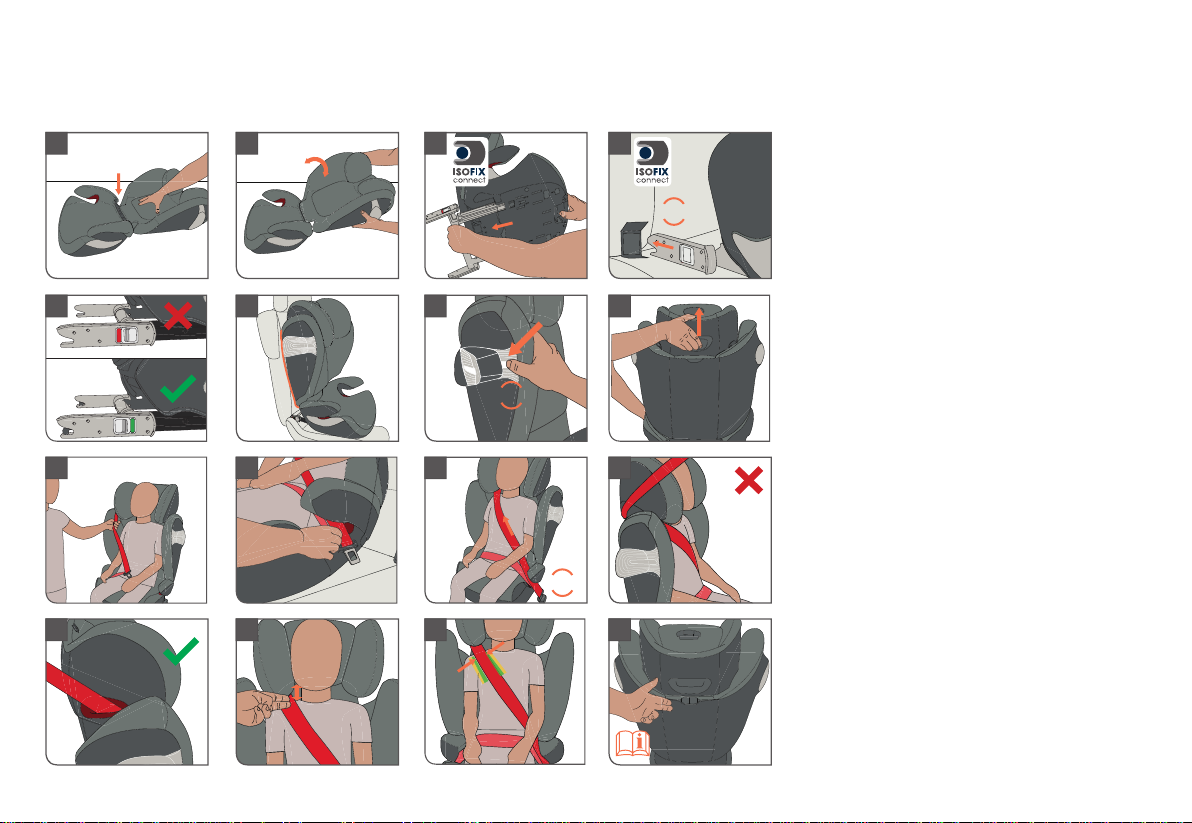
ERSTMONTAGE
Der Kindersitz besteht aus einem Sitzkissen (1) und einer Rückenlehne (2) mit
2
3
1
2
1
4
höhenverstellbarer Kopfstütze. Nur die Kombination der beiden Teile bietet Ihrem Kind den
bestmöglichen Schutz und Komfort.
!
WARNUNG! Die Bestandteile des CYBEX SOLUTION S-FIX dürfen weder einzeln
noch in Verbindung mit Sitzkissen, Rückenlehnen oder Kopfstützen anderer Hersteller
oder anderer Baureihen verwendet werden. Die Zulassung würde in einem solchen
Fall sofort erlöschen.
Die Rückenlehne (2) wird mit der Führungsnase (3), auf der Achse (4) des Sitzkissens
(1) eingehakt.
!
WARNUNG! Achten Sie immer darauf, dass die Einzelteile des Kindersitzes
niemals gestaucht oder eingeklemmt werden (z.B. durch die Fahrzeugtür oder durch
Verstellen der Rückbank).
HINWEIS! Bewahren Sie die Anleitung immer griffbereit auf (z.B. im dafür vorgesehenen
Fach an der Rückseite der Rückenlehne).
6
Page 7

FIRST INSTALLATION
The child seat consists of a booster seat (1) and a backrest (2) with a height adjustable
headrest. Only the combination of both parts provides best protection and comfort to
your child.
!
WARNING! The parts of the CYBEX SOLUTION S-FIX must not be used alone or
in combination with boosters, backrests or headrests from other manufacturers or
from different product series. In such instances, the certifi cation expires immediately.
PRIMA INSTALLAZIONE
Il seggiolino auto comprende una seduta (1), e uno schienale (2) con poggiatesta
regolabile. Solo la combinazione delle due parti insieme è in grado di garantire la massima
protezione ed il massimo comfort al bambino.
!
ATTENZIONE! Le parti del seggiolino CYBEX SOLUTION S-FIX non devono
essere modificate, usate da sole o in combinazione con sedute, schienali o
poggiatesta di altri produttori o di altri modelli. In tali circostanze, l’omologazione
perde automaticamente validità.
DE
ENIT
Connect the backrest (2) to the booster seat (1) by hooking the guide log (3) on the
axis (4) of the booster seat (1).
!
WARNING! Please ensure that the plastic parts of the child seat are never
compressed (e.g. by jamming in the car door or when adjusting the back seat).
NOTE! Always keep these instructions to hand (e.g. in the designated compartment
on the rear of the backrest).
Collegare lo schienale (2) alla seduta (1) agganciando la guida (3) all’asse (4) della
seduta (1).
!
ATTENZIONE! Verificare sempre che le parti in plastica del seggiolino non
siano mai bloccatie o compresse (ad esempio tra la portiera dell’auto o durante la
regolazione del sedile).
NOTA BENE! Tenere sempre a portata di mano queste istruzioni (ad esempio
nell’apposito scomparto sul retro dello schienale).
7
Page 8

DER RICHTIGE PLATZ IM FAHRZEUG
Der Kindersitz ist mit eingeklapptem ISOFIX Connect System auf
allen Fahrzeugplätzen mit Dreipunkt-Automatikgurt verwendbar, die im
Fahrzeughandbuch für die „universelle“ Verwendung zugelassen sind.
!
WARNUNG! Der Sitz ist nicht für die Verwendung mit einem 2-Punkt- oder
Beckengurt geeignet. Wird der Sitz mit einem 2-Punkt-Gurt gesichert, kann es bei
einem Unfall zu schweren oder gar tödlichen Verletzungen des Kindes kommen.
Für die Befestigung mit den ISOFIX Connect Rastarmen besteht eine „semiuniversale“ Genehmigung. Aus diesem Grund kann ISOFIX Connect nur in
bestimmten Fahrzeugen eingesetzt werden. Die zugelassenen Fahrzeuge
entnehmen Sie bitte der beigelegten Fahrzeugtypenliste. Die aktuelle Version
erhalten Sie auf www.cybex-online.com.
In Ausnahmefällen kann der Kindersitz auch vorne am Beifahrersitz verwendet werden.
Beachten Sie dabei die folgenden Punkte:
• Bei Fahrzeugen mit Airbag sollten Sie den Beifahrersitz so weit wie möglich nach hinten
schieben. Beachten Sie jedoch, dass der obere Gurtpunkt des Fahrzeuggurtes hinter
der Gurtführung des Kindersitzes bleibt.
• Die Empfehlungen des Fahrzeugherstellers sind unbedingt zu befolgen.
!
WARNUNG! Der Diagonalgurt (6) muss schräg nach hinten verlaufen und darf
6
nie nach vorn zum oberen Gurtpunkt in Ihrem Fahrzeug führen. Sollte dies nicht
einzustellen sein z.B. durch Vorschieben des Autositzes oder Verwendung auf einem
anderen Sitzplatz, so ist der Kindersitz für dieses Fahrzeug nicht geeignet.
!
WARNUNG! Gepäckstücke oder andere Gegenstände im Fahrzeug, welche bei
einem Unfall Verletzungen verursachen können, müssen immer gut befestigt werden.
Sie können zu tödlichen Geschossen im Fahrzeug werden.
!
WARNUNG! Auf Fahrzeugplätzen, die quer zur Fahrtrichtung angeordnet sind, ist
die Verwendung des Sitzes nicht zulässig. Auf rückwärtsgerichteten Fahrzeugsitzen,
wie z.B. in einem Van oder Minibus, ist die Verwendung zulässig, sofern der
Fahrzeugsitz für die Beförderung eines Erwachsenen zugelassen ist. Zu beachten
ist, dass die Fahrzeugkopfstütze bei rückwärtsgerichtetem Einbau nicht entfernt
werden darf!
HINWEIS! Bitte lassen Sie Ihr Kind nie unbeaufsichtigt im Fahrzeug zurück.
8
Page 9
POSITIONING THE SEAT CORRECTLY IN THE VEHICLE
The car seat with retracted ISOFIX Connect system can be used on all vehicle
seats with automatic three-point safety belts approved in the vehicle manual for,
universal‘ use.
POSIZIONE CORRETTA DEL SEGGIOLINO NEL VEICOLO
Il seggiolino, con sistema ISOFIX Connect rientrato nella base, può essere utilizzato su
tutti i sedili con cinture di sicurezza automatiche a tre punti approvate dal manuale della
vettura per uso ‘universale’.
DE
!
WARNING! The seat is not suitable for use with a two-point or lap belt. If the seat is
secured using a two-point belt, an accident may result in severe or even fatal injuries
to the child.
A ‘semi-universal’ certifi cation is given to restraint systems that are connected to
the car through ISOFIX Connect locking arms. For this reason, ISOFIX Connect
can only be used in certain vehicles. Please refer to the enclosed vehicle type
list for approved vehicles. You can obtain the most up-to-date version from www.
cybex-online.com.
In exceptional cases, the child seat may also be used on the front passenger seat. Please
note the following in this case:
• In cars with airbags, you should push the passenger seat back as far as possible. When
doing so, however, ensure that the upper pivot point of the safety belt is behind the belt
feed point of the child seat.
• Always comply with the recommendations of the vehicle manufacturer.
!
WARNING! The diagonal belt (6) must run back at a recline and must never run
forward to the upper belt point in your vehicle. If it is not possible to adjust the seat
in this way, e.g. by pushing the car seat forward or using it on another seat, this child
seat is not suitable for your vehicle.
!
WARNING! Luggage or other objects present in the vehicle that may cause injury
in the event of an accident must always be fi rmly secured. Otherwise, they may be
thrown, causing fatal injuries.
WARNING! The child seat may not be used on car seats facing to the side of the
!
direction of travel. Use of the child seat is permitted on rear-facing seats, e.g. in a van
or minibus, provided that the seat is permitted for transporting an adult. Please note
that the vehicle headrest must not be removed when fi tting on a rear-facing seat!
Even if not in use, the child seat must always be secured with the safety belt.
!
ATTENZIONE! Il seggiolino è inadatto all’uso con una cintura subaddominale o a
due punti. Gli incidenti possono causare lesioni gravi o mortali al bambino in caso di
messa in sicurezza con una cintura a due punti.
Ai sistemi di ritenuta collegati alla vettura mediante sistema ISOFIX Connect è
data una omologazione ‘semi-universale’. Gli ISOFIX CONNECT sono perciò
utilizzabili solo in alcuni veicoli. Consultare la lista di tipi di veicoli allegata
per conoscere i veicoli approvati. La versione sempre aggiornata della lista è
disponibile nel nostro sito al link: www.cybex-online.com.
In casi eccezionali, il seggiolino può essere utilizzato anche sul sedile del passeggero
anteriore. In questo caso tenere conto di quanto segue:
• Nelle auto dotate di airbag il sedile del passeggero va spinto il più indietro possibile. Nel
fare ciò accertarsi però che il punto di snodo superiore della cintura di sicurezza si trovi
dietro alla guida della cintura del seggiolino.
• Rispettare sempre le raccomandazioni del costruttore del veicolo.
!
ATTENZIONE! La cintura diagonale (6) deve sempre scorrere indietro inclinata e non
deve mai scorrere in avanti verso il punto superiore della cintura nel veicolo. Nel caso
non sia possibile regolare il sedile in questo modo, ad esempio spingendo avanti il
sedile o usando un altro sedile, il seggiolino non sarà adatto all’uso in questo veicolo.
!
ATTENZIONE! Bagagli o altri oggetti presenti nel veicolo che possono causare
lesioni in caso di incidente devono essere fissati saldamente. In caso contrario
potrebbero essere scagliati e causare lesioni mortali.
!
ATTENZIONE! Il seggiolino non è utilizzabile sui sedili rivolti lateralmente rispetto
alla direzione di marcia. L‘utilizzo del seggiolino auto è consentito nei sedili rivolti
contrari al senso di marcia, ad esempio nei furgoncini o nei minibus, a condizione
che il sedile sia omologato per il trasporto dell‘adulto. Non rimuovere il poggiatesta
del sedile del veicolo durante l’installazione del seggiolino nei sedili rivolti contrari
al senso di marcia. Anche quando non si trasporta il bambino il seggiolino auto va
assicurato con la cintura.
ENIT
NOTE! Never leave your child unattended in the vehicle.
NOTA BENE! Non lasciare mai il tuo bambino incustodito all’interno dell’auto
9
Page 10
SICHERHEIT IM FAHRZEUG
!
WARNUNG! Der Kindersitz muss, auch dann wenn er nicht benutzt wird, immer
korrekt mit dem Fahrzeuggurt im Fahrzeug befestigt sein. Bereits bei einer
Notbremsung oder einem geringen Aufprall können unbefestigte Teile andere
Mitfahrer und Sie selbst verletzen.
Achten Sie zum Schutz aller Fahrzeuginsassen stets darauf, dass...
• die umklappbaren Rückenlehnen der Fahrzeugsitze eingerastet sind und sich in einer
aufrechten Position befi nden.
• bei Einbau des Kindersitzes auf dem Beifahrersitz, dieser in der hintersten Position
steht.
• im Fahrzeug alle beweglichen Gegenstände gesichert sind.
• alle Personen im Fahrzeug angeschnallt sind.
DEN SITZ INS FAHRZEUG STELLEN
Stellen Sie den Kindersitz auf den entsprechenden Fahrzeugsitz im Auto.
• Achten Sie unbedingt darauf, dass die Rückenlehne (2) des CYBEX SOLUTION S-FIX
fl ächig an der Rückenlehne des Fahrzeugsitzes anliegt. Der Kindersitz darf sich auf
keinen Fall in einer Liegeposition befi nden. Gegebenenfalls können Sie den Abstand mit
dem ISOFIX Verstellgriff (9) einstellen.
• Sollte die Kopfstütze des Fahrzeuges störend sein, ziehen Sie diese ganz heraus oder
nehmen Sie diese ganz ab (Ausnahme siehe Abschnitt „DER RICHTIGE PLATZ IM
FAHRZEUG“). Die Rückenlehne (2) passt sich optimal stufenlos nahezu jeder Neigung
des Fahrzeugsitzes an.
!
2
9
WARNUNG! Die Rückenlehne des CYBEX Kindersitzes muss an der Lehne des
Fahrzeuges fl ächig aufl iegen. Um den größtmöglichen Schutz für das Kind zu
gewährleisten, muss sich der Sitz in einer normalen aufrechten Position befi nden!
HINWEIS! An einigen Autositzen aus empfi ndlichem Material (z.B. Velours, Leder,
etc.) können durch die Benutzung von Kindersitzen mögliche Gebrauchsspuren und/
oder Abfärbungen auftreten. Um das zu vermeiden, können Sie z.B. eine Decke oder
ein Handtuch unterlegen. Ferner weisen wir in diesem Zusammenhang auf unsere
Reinigungshinweise in dieser Gebrauchsanleitung hin, die vor der ersten Verwendung des
Sitzes unbedingt beachtet werden sollten.
!
WARNUNG! Benutzen Sie niemals andere als die in der Bedienungsanleitung beschriebenen und am Sitz markierten Punkte, um den Kindersitz zu befestigen.
10
HINWEIS! Bitte verwenden Sie die ISOFIX-Einführhilfen, um sicherzustellen, dass der
Fahrzeugsitz nicht durch die ISOFIX Connect Rastarme zerstört wird.
Page 11
SAFETY IN THE VEHICLE
!
WARNING! The car seat must always be secured correctly with the vehicle belt
in the vehicle even when not in use. In case of an emergency brake or accident, an
unsecured car seat may injure other passengers or your.
In order to guarantee the best possible safety for all passengers make sure that...
• the foldable backrests in the vehicle are locked in their upright position.
• when installing the car seat on the front passenger seat, adjust the vehcile seat in
rearmost position.
• you properly secure all objects likely to cause injury in the case of an accident.
• all passengers in the vehicle are buckled up.
PLACING THE SEAT IN THE VEHICLE
Place the child seat on the appropriate seat in the car.
• Always ensure that the entire surface of the backrest (2) of the CYBEX SOLUTION
S-FIX is placed against the backrest of the vehicle seat. The child seat must never be in
a lying position. If necessary, you can adjust the distance using the ISOFIX adjustment
lever (9).
• If the headrest of the vehicle is in the way, pull it out all the way or remove it completely
(for exceptions to this, please refer to the section “POSITIONING THE SEAT
CORRECTLY IN THE VEHICLE”).The backrest (2) will perfectly adapt to practically any
recline of the vehicle seat
SICUREZZA NELL’INSTALLAZIONE IN AUTO
!
ATTENZIONE! Il seggiolino deve sempre assicurato correttamente con la cintura presente
nel veicolo anche quando il veicolo non è in uso. Nel caso di una frenata di emergenza o di
un uno scontro, un seggiolino assicurato male può ferire voi o altri passeggeri.
Per garantire la miglior sicurezza per tutti i passeggeri assicuratevi che:
• gli schienali regolabili dei sedili del veicolo sono bloccati in posizione eretta.
• quando il seggiolino viene installato sul sedile anteriore, regolare il sedile nella posizione
più arretrata possibile.
• assicurate adeguatamente tutti gli oggetti presenti nel veicolo in quanto possono
diventare proiettili pericolosi in caso di incidente.
• assicuratevi che tutti i passeggieri abbiano le cinture allacciate.
COLLOCAZIONE DEL SEGGIOLINO NEL VEICOLO
Collocare il seggiolino sul sedile dell‘auto appropriato.
• Accertare sempre che l‘intera superfi cie dello schienale (1) del CYBEX SOLUTION
S-FIX poggi completamente contro lo schienale del sedile veicolare. Il seggiolino non
deve mai trovarsi in posizione sdraiata. Se necessario è possibile regolare la distanza
con la leva di regolazione (9).
• Se il poggiatesta del veicolo è di ingombro, alzarlo del tutto o rimuoverlo completamente
(per eccezioni, si prega di consultare la sezione „POSIZIONAMENTO CORRETTO
DEL SEGGILINO NEL VEICOLO“) Lo schienale (1) si adatterà perfettamente
praticamente a qualsiasi reclinazione del sedile del veicolo.
DE
ENIT
!
WARNING! The full surface of the backrest of the CYBEX child seat must be
against the backrest of the vehicle. To ensure maximum protection for your child, the
seat must be in a normal upright position!
NOTE! On some car seats made of sensitive materials (e.g. suede, leather etc.), the use
of child seats may leave marks and/or cause discolouration. To prevent this, you can place
a blanket or towel underneath it, for example. Please also refer in this connection to our
cleaning advises in these usage instructions; these cleaning instructions must be observed
prior to using the seat for the fi rst time.
!
WARNING! Do not use any load bearing contact points other than those described
in the instructions and marked in the child restraint.
NOTE! Please use the Isofi x Guides provided to ensure that the vehicle seat is not
destroyed by the ISOFIX Connect locking arms.
!
ATTENZIONE! L‘intera superficie dello schienale del seggiolino CYBEX deve
poggiare contro lo schienale del veicolo. Per assicurare la massima protezione
per il bambino il sedile deve trovarsi nella normale posizione eretta!
NOTA BENE! L‘uso del seggiolino su alcuni sedili veicolari realizzati in materiali delicati
(come pelle scamosciata, pelle, ecc.) può lasciare tracce e/o causare scoloriture.
Questo è evitabile utilizzando ad esempio una coperta o un asciugamano come
appoggio. Al riguardo vedere anche le istruzioni di pulizia nelle presenti istruzioni
per l‘uso; le istruzioni di pulizia devono essere consultate prima del primo uso del
seggiolino.
!
ATTENZIONE! Non utilizzare i punti di contatto di carico diversi da quelli
descritti nelle istruzioni e codificato il sistema di ritenuta.
NOTA BENE! Prego usare gli applicatori Isofi x per garantire che il Isofi x Connect non
distrugga il sedile del veicolo.
11
Page 12
7
CLICK!
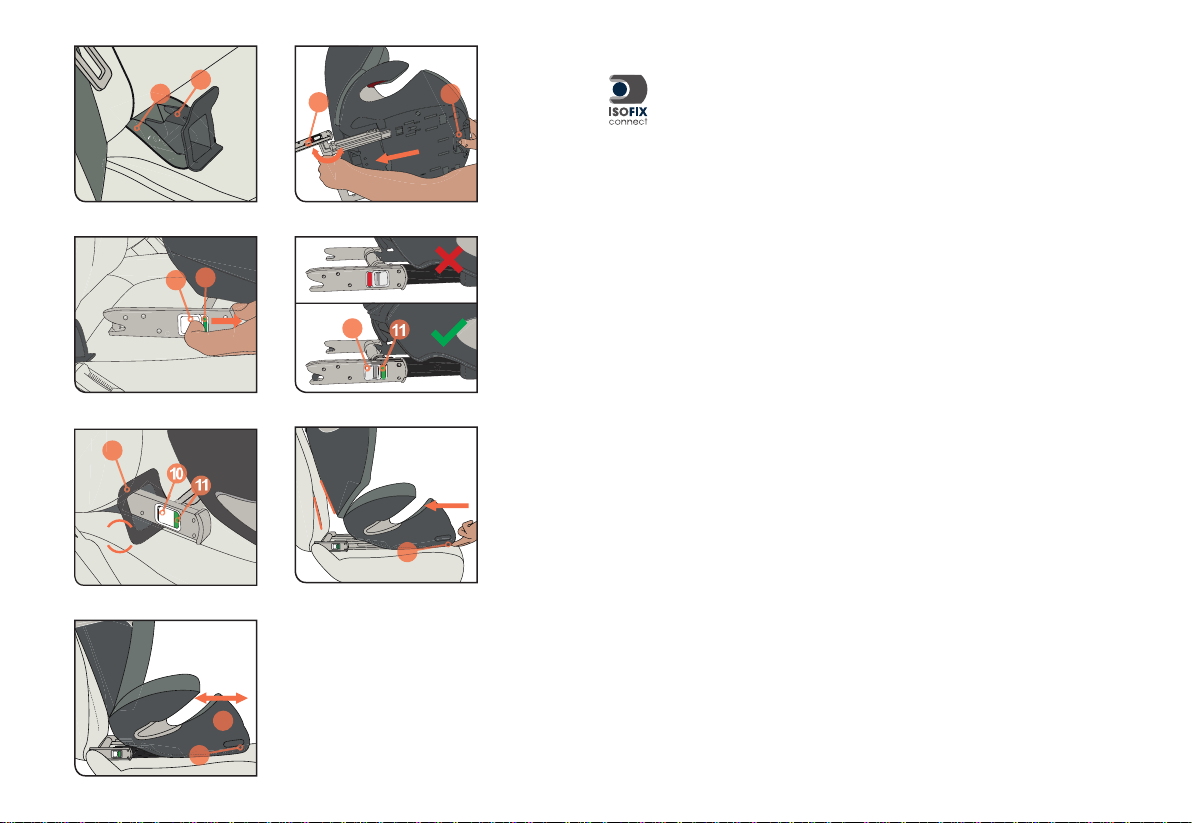
BEFESTIGEN DES KINDERSITZES MITTELS ISOFIX CONNECT SYSTEM
7
8
11
10
5
1800
10
10
11
9
11
9
Mit dem ISOFIX Connect System können Sie den CYBEX SOLUTION S-FIX
mit dem Fahrzeug verbinden und so die Sicherheit Ihres Kindes erhöhen. Ihr Kind
muss weiterhin mit dem 3-Punkt-Gurt Ihres Fahrzeuges angeschnallt werden.
• Hängen Sie die mitgelieferten Einführhilfen (7) mit der längeren Lasche nach oben in
den beiden ISOFIX Befestigungspunkten (8) ein. In manchen Fahrzeugen eignet sich
eine entgegengesetzte Einbaurichtung der Einführhilfen (7) besser.
HINWEIS! Die ISOFIX Befestigungspunkte (8) sind zwei Metalllaschen pro Sitzplatz und
befi nden sich zwischen Rückenlehne und Sitzfl äche des Fahrzeugsitzes. Im Zweifelsfall
nehmen Sie die Bedienungsanleitung Ihres Fahrzeuges zu Hilfe.
• Betätigen Sie den ISOFIX Verstellgriff (9) unter dem Sitzkissen.
• Ziehen Sie die beiden ISOFIX Connect Rastarme (5) bis zum Endanschlag.
• Drehen Sie nun die ISOFIX Connect Rastarme (5) um 180°, damit diese in Richtung
der Einführhilfen (7) zeigen.
HINWEIS! Überprüfen Sie vor dem Verbinden der ISOFIX Connect Rastarme (5) mit
den ISOFIX Befestigungspunkten (8) deren Entriegelungstasten (10). Sind die grünen
Sicherheitsindikatoren (11) zu sehen, müssen Sie vor dem Verbinden zunächst die
ISOFIX Connect Rastarme entriegeln, indem Sie die Entriegelungstaste (10) drücken und
zurückziehen. Wiederholen Sie den Vorgang gegebenenfalls auch beim zweiten Rastarm.
• Schieben Sie die beiden Rastarme (5) in die Einführhilfen (7) bis diese mit einem
hörbaren „KLICK“ an den ISOFIX Befestigungspunkten (8) einrasten.
• Vergewissern Sie sich, dass der Sitz gut hält, indem Sie versuchen ihn aus den
Einführhilfen (7) herauszuziehen.
• Der grüne Sicherheitsindikator (11) muss nun an den beiden grauen
Entriegelungstasten (10) gut sichtbar sein.
• Mit dem Isofi x Verstellgriff (9) unter dem Sitzkissen (1) können Sie nun die Position des
Sitzes einstellen.
HINWEIS! Beachten Sie dazu den Abschnitt „DEN SITZ INS FAHRZEUG STELLEN“.
12
1
9
Page 13

SECURING THE CHILD SEAT USING THE ISOFIX CONNECT SYSTEM
Using the ISOFIX Connect system, you can fi x the CYBEX SOLUTION S-FIX
to the vehicle, thereby increasing your child’s safety. The child still needs to be
secured with the three-point belt of your vehicle.
• Insert the supplied ISOFIX guides (7) with the longer strap upwards into the
two ISOFIX fi xture points (8). In some vehicles, it is better to mount the ISOFIX guides
(7) in the opposite direction.
NOTE! The ISOFIX fi xture points (8) are two metallic clips for each seat and are
positioned between the backrest and the seating surface of the vehicle seat. In case of
doubt, please refer to the driver’s manual of your vehicle.
• Use the ISOFIX adjustment lever (9) under the booster seat.
• Pull the two ISOFIX Connect locking arms (5) as far as they will go.
• Now twist the ISOFIX Connect locking arms (5) 180° so that they are facing the
direction of the ISOFIX guides (7).
FISSAGGIO DEL SEGGIOLINO CON IL SISTEMA ISOFIX CONNECT
Con il sistema ISOFIX CONNECT è possibile fi ssare il CYBEX SOLUTION S-fi x
al veicolo, aumentando così la sicurezza del bambino. Il bambino deve essere
allacciato utilizzando la cintura a tre punti del veicolo.
• Inserire le guide iISOFIX in dotazione (7), con la linguetta più lunga rivolta verso l’alto,
nei due punti di ancoraggio ISOFIX (8) della vettura. In alcuni veicoli è preferibile
montare le guide ISOFIX in dotazione (7) nella direzione opposta.
NOTA BENE! I punti di ancoraggio ISOFIX (8) sono due clip metalliche per ogni sedile,
posizionate tra lo schienale e la seduta del sedile del veicolo. In caso di dubbio consultare
il manuale istruzioni del proprio veicolo.
• Azionare la leva di regolazione ISOFIX (9) situata sotto la seduta del seggiolino.
• Estrarre completamente il carrello con i due braccetti ISOFIX Connect (5).
• Ora ruotare i connettori ISOFIX Connect (5) di 180° in modo che siano rivolti verso le
guide ISOFIX (7).
DE
ENIT
NOTE! Before clicking the the ISOFIX Connect locking arms (5) into the ISOFIX fi xture
points (8), check the release buttons (10). If the green safety indicators (11) are visible, you
must fi rst release the ISOFIX Connect locking arms before joining by pressing and pulling
back the release button (10). Repeat the process if necessary with the second locking arm.
• Push the two locking arms (8) into the ISOFIX guides (7) until these lock into place in
the ISOFIX locking arms with an audible ‘click’.
• Ensure that the seat is secure by trying to pull it out of the ISOFIX guides (7).
• The green safety indicator (11) must now be clearly visible on the two grey release
buttons (10).
• You can now use the ISOFIX adjustment lever (9) under the booster seat (1) of the
CYBEX SOLUTION S-FIX child seat to adjust the position.
NOTE! Note the information in the section “Placing the seat in the vehicle”.
NOTA BENE! Prima di agganciare i connettori ISOFIX Connect (5) nei punti di
ancoraggio ISOFIX (8), controllare i punti di rilascio (10). Se risultano visibili gli indicatori
di sicurezza di colore verde (11), prima del fi ssaggio è necessario sbloccare i connettori
ISOFIX premendo e tirando indietro il pulsante di rilascio (10). Se necessario ripetere
l’operazione con il secondo braccio di bloccaggio.
• Premere i due bracci di bloccaggio (8) negli ausili di inserimento (7) fi no a fi ssarli in
posizione nei punti di fi ssaggio ISOFIX con un udibile scatto.
• Accertare che il seggiolino sia in sicurezza tentando di tirarlo fuori dagli ausili di
inserimento (7).
• L’indicatore di sicurezza verde (11) deve ora essere chiaramente visibile sui due pulsanti
di rilascio rossi (10).
• Usare ora la leva di regolazione (9) sul terlaio (1) del seggiolino CYBEX SOLUTION
S-FIX per regolare la posizione.
NOTA BENE! Consultare la sezione “Collocazione del seggiolino nel veicolo”.
13
Page 14
14
L.S.P.
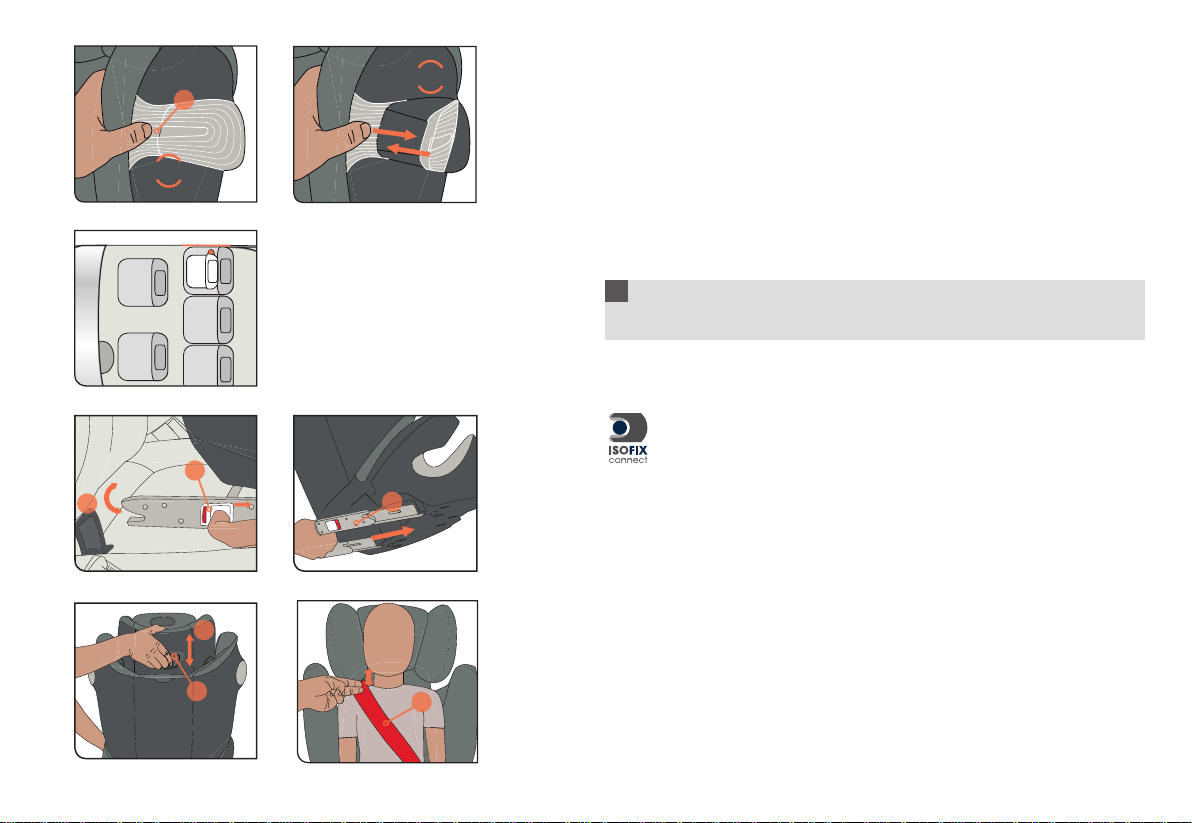
EINSTELLEN DER SEITENPROTEKTOREN
CLICK!
A
PRESS!
10
7
5
12
13
MAX
6
Im Kindersitz ist das „Linear Side-Impact Protection“ System (L.S.P.) verbaut. Dieses
System erhöht die Sicherheit Ihres Kindes im Falle eines seitlichen Aufpralls. Um die
bestmögliche Schutzwirkung zu erzielen, aktivieren Sie das L.S.P. auf der zur nächsten
Fahrzeugtür zeigenden Seite des Sitzes. Drücken Sie hierfür den markierten Bereich (A).
HINWEIS! Achten Sie darauf, dass der ausklappbare Teil einrastet. Dies ist durch ein
„KLICK“ hörbar. Sollte das L.S.P. an der Türe anstehen, klappen Sie es wieder ein.
Eine Verwendung mit ordnungsgemäß verstautem L.S.P. ist zulässig.
Das L.S.P. lässt sich wieder komplett im Sitz verstauen, indem Sie es leicht nach außen
ziehen und anschließend einklappen, bis es mit einem hörbaren „KLICK“ einrastet.
HINWEIS! Beim Einbau des Kindersitzes auf einem mittleren Sitzplatz dürfen Sie den
linearen Seitenaufprallschutz (L.S.P.) nicht ausklappen.
!
WARNUNG! Der ausgeklappte Seitenaufprallschutz (L.S.P.) dient nicht als Tragegriff
oder Einstiegshilfe.
AUSBAU DES CYBEX SOLUTION S-FIX
Führen Sie die Einbauschritte in umgekehrter Reihenfolge durch.
• Entriegeln Sie die ISOFIX Rastarme (5) beidseitig, indem Sie die grauen
Entriegelungstasten (10) drücken und gleichzeitig zurückziehen.
• Ziehen Sie den Sitz aus den Einführhilfen (7).
• Drehen Sie die Rastarme (5) um 180°.
• Betätigen Sie den ISOFIX Verstellgriff (9) unter dem Sitzkissen (1) des
CYBEX SOLUTION S-FIX Kindersitzes und schieben Sie die Rastarme (5)
bis zum Anschlag hinein.
HINWEIS! Durch das Einklappen der Rastarme (5) schonen Sie nicht nur den
Fahrzeugsitz, sondern schützen auch die Rastarme des ISOFIX Connect Systems vor
Verunreinigung und Beschädigung.
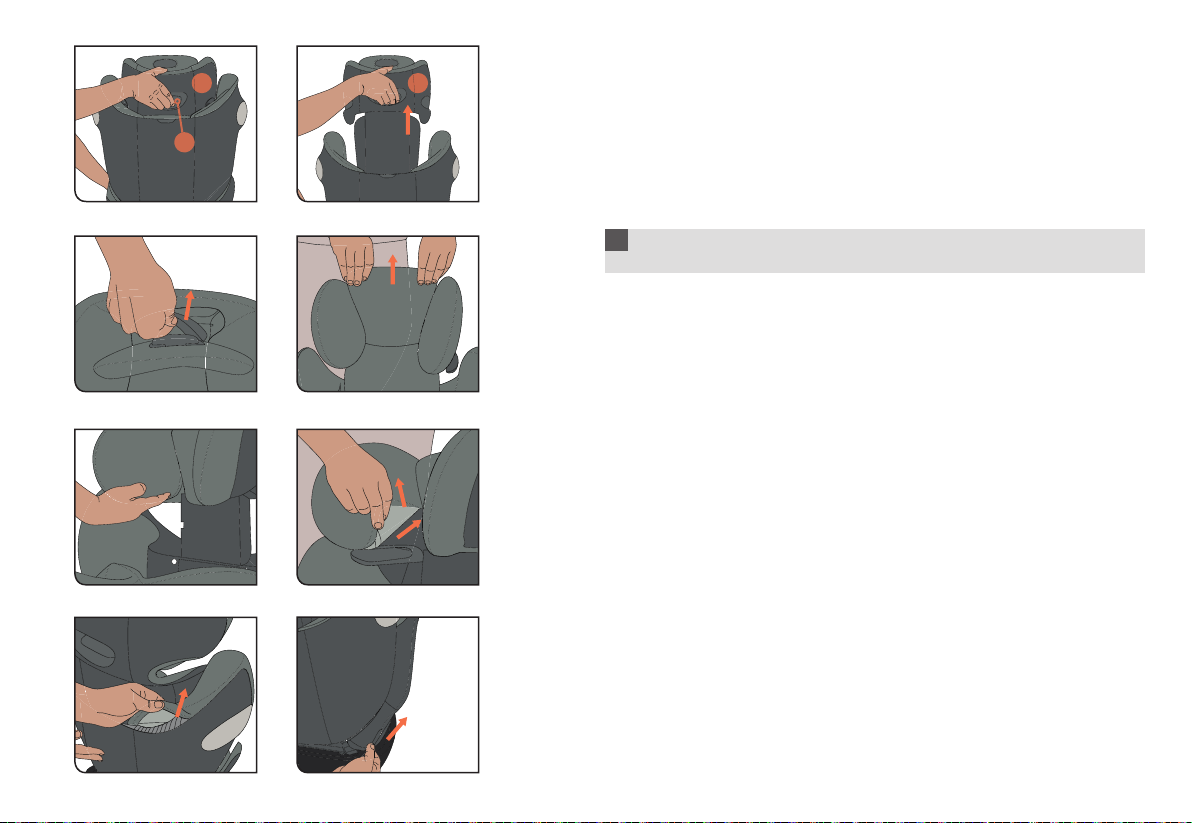
ANPASSEN AN DIE KÖRPERGRÖSSE
• Der Sitz kann mit Hilfe der verstellbaren Kopfstütze (12) an den Körper Ihres Kindes
angepasst werden. Ziehen Sie dazu den Verstellgriff der Kopfstütze (13) nach oben, um
die Kopfstütze (12) zu entriegeln.
• Die Kopfstütze muss so eingestellt werden, dass der Abstand zwischen den Schultern
des Kindes und der Kopfstütze maximal 2cm (ca. 2 Finger breit) nicht überschreitet.
HINWEIS! Nur eine in optimaler Höhe eingestellte Kopfstütze (12) bietet den
größtmöglichen Schutz und Komfort für Ihr Kind und gewährleistet außerdem den
optimalen Verlauf des Diagonalgurtes (6). Die Höhenverstellung kann beim CYBEX
SOLUTION S-FIX in 12 Positionen erfolgen.
Page 15
ADJUSTING THE SIDE PROTECTORS
The child seat is equipped with the “Linear Side-impact Protection“ system (L.S.P.). This
system increases the safety of your child in case of side impact. Activate the L.S.P. to
the nearest door side for having the best possible safety. To release the L.S.P. press the
marked area (A) on the L.S.P.
NOTE! Make sure, that the L.S.P. is fi xed with an audible “CLICK”. In case the L.S.P.
touches the door, it ought to be stored away properly.
It‘s allowed to be used in this position. In order to push back the L.S.P. into the seat, pull
out the L.S.P. slightly and fold it, until it locks with an audible “CLICK”.
NOTE! When using the child seat on a middle position in the vehicle, it‘s prohibited to fold
out the L.S.P. device.
!
WARNING! Using the L.S.P. device for carrying or climbing into the child seat
is prohibited.
REGOLARE LE PROTEZIONI LATERALI
Il seggiolino auto è dotato del sistema di “Protezione Lineare da Impatto Laterale” L.S.P.).
Tale sistema aumenta la sicurezza del tuo bambino in caso di incidente a collisione laterale.
Estrarre la protezione L.S.P. sul lato più vicino alla portiera per garantire la massima
sicurezza possibile. Per rilasciare il sistema L.S.P premere il pulsante L.S.P (A)
NOTA BENE! Assicuratevi che il sistema L.S.P sia in posizione corretta a seguito di
un chiaro scatto. Nel caso l’L.S.P. arrivi a toccare la portiera, dovrebbe essere riposto
correttamente.
E’ ammesso l’uso in questa posizione. Premere nuovamente il pulsante L.S.P e spingere il
L.S.P in posizione iniziale per farlo rietrnare nell’alloggiamento.
NOTA BENE! Quando il seggiolino è installato nel sedile centrale del veicolo gli L.S.P.
NON devono essere estratti.
!
ATTENZIONE! E’ assolutamente vietato utilizzare il dispositivo L.S.P. per trasportare
il seggiolino o per inserirlo nell’auto.
DE
ENIT
REMOVAL OF THE CYBEX SOLUTION S-FIX
Perform the installation steps in the reverse order.
• Unlock the ISOFIX Connect locking arms (5) on both sides by pushing the
grey release buttons (10) and pulling them back simultaneously.
• Pull the seat out of the ISOFIX guides (7).
• Rotate the ISOFIX Connect locking arms (5) 180°.
• Operate the ISOFIX adjustment lever (9) on the axis (4) of the CYBEX
SOLUTION S-FIX and push the locking arms in as far as they will go.
NOTE! By folding in the ISOFIX Connect locking arms (5), you are not just protecting the
vehicle seat but also the locking arms of the ISOFIX Connect system from dirt and damage.
ADAPTING TO BODY SIZE
• The seat can then be adjusted to your child’s body simply by using the adjustable
headrest (12). To do this, pull the adjustment lever (13) upwards to unlock the
headrest (12).
• Adjust the headrest so that there is at maximum 2cm gap (approximately two fi ngers)
between the child’s shoulder and the lower edge of the headrest.
NOTE! Only an optimally adjusted headrest (12) can offer your child maximum protection
and comfort while ensuring that the diagonal belt (6) can be fi tted smoothly. The height of
the CYBEX SOLUTION S-FIX can be adjusted to one of twelve positions.
DISINSTALLARE IL SEGGIOLINO CYBEX SOLUTION S-FIX
Seguire il procedimento per l’installazione nell’ordine inverso.
• Sloccare i bracci di bloccaggio ISOFIX (5) su entrambi i lati premendo e
tirando simultaneamente i pulsanti di rilancio rossi (10)
• Estrarre il seggiolino dagli ausili di inserimento(7).
• Ruotare di 180° i bracci di bloccaggio(5).
• Azionare la leva di regolazione (9) on sul telaio (4) del CYBEX SOLUTION
S-FIX e spingere all’interno i bracci di bloccaggio fi no al limite.
NOTA BENE! Ripiegando i connettori ISOFIX (5), proteggerete da possibili danni non
solo il sedile dell’auto, ma anche da danneggiamento e sporcizia i connettori ISOFIX
stessi.
REGOLAZIONE IN BASE ALLA CORPORATURA
• Il seggiolino sarà quindi adattabile alla corporatura del bambino regolando
semplicemente il poggiatesta (12). Basta semplicemente tirare verso l’alto la leva di
regolazione (13) per sbloccare il poggiatesta (12).
• Regolare l’altezza in modo che rimanga uno spazio di non più di 2cm (due dita circa) tra
la spalla del bambino e la parte inferiore del poggiatesta.
NOTA BENE! Soltanto se regolato correttamente il poggiatesta (12) è in grado di offrire al
vostro bambino la massima sicurezza ed il massimo comfort e nello stesso tempo garantire
che la cintura diagonale (6) sia nella posizione corretta. CYBEX SOLUTION S-FIX può
essere regolato in altezza in dodici posizioni.
15
Page 16

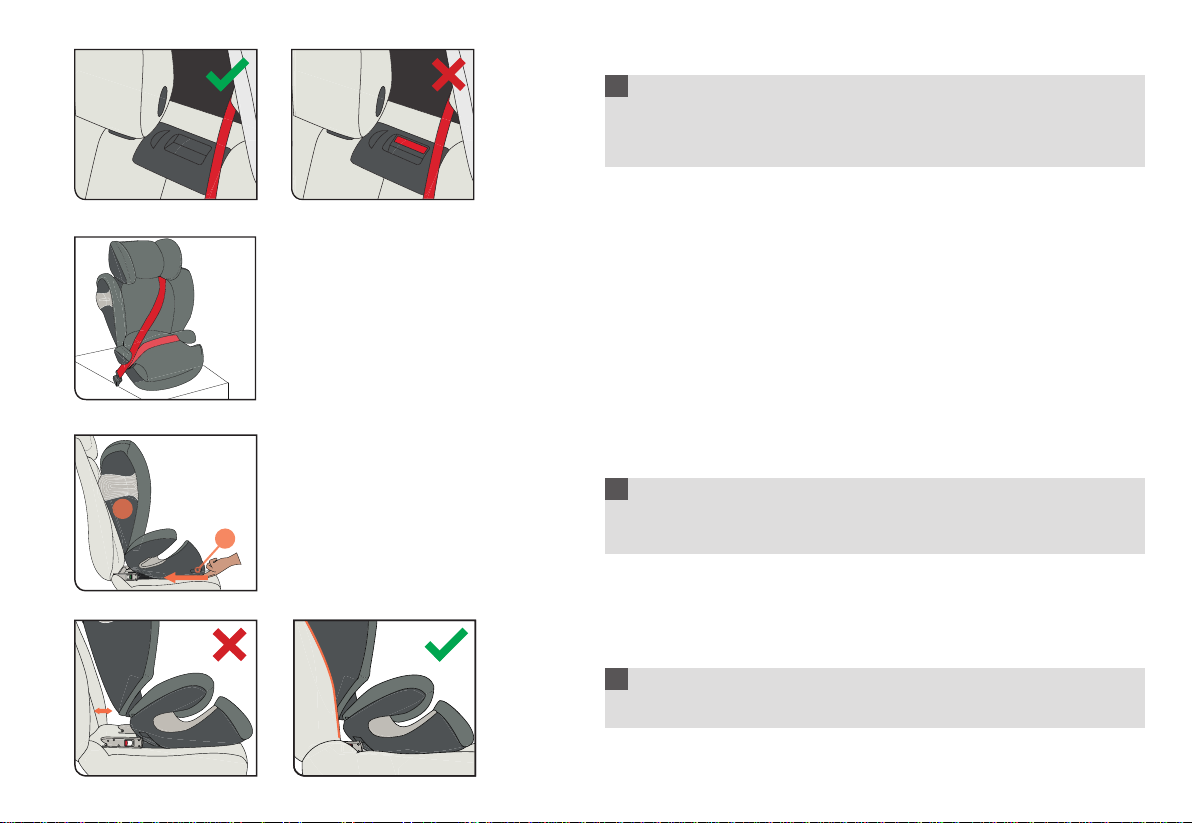
ANSCHNALLEN DES KINDES
• Setzen Sie Ihr Kind in den Kindersitz. Ziehen Sie den Dreipunktgurt weit heraus und
14
führen Sie diesen vor Ihrem Kind entlang zum Gurtschloss (14).
HINWEIS! Der Dreipunktgurt darf nur über die dafür vorgesehenen
Führungen verlaufen. Die Gurtführung wird in diesem Handbuch
genau beschrieben und ist zudem am Kindersitz rot markiert.
!
WARNUNG! Den Gurt auf keinen Fall verdrehen.
16
CLICK!
14
17
15
6
16
17
6
12
• Stecken Sie die Gurtzunge (15) in das Gurtschloss (14). Dieses muss mit einem
hörbaren „KLICK“ einrasten.
• Als nächstes legen Sie den Beckengurt (16) in die rot gekennzeichneten unteren
Gurtführungen (17) des Kindersitzes ein.
• Ziehen Sie nun kräftig am Diagonalgurt (6), um den Beckengurt (16) zu straffen. Je
enger der Gurt anliegt, desto besser kann er vor Verletzungen schützen. Auf der
Seite des Gurtschlosses (14) müssen der Diagonalgurt (6) und der Beckengurt (16)
zusammen in die untere Gurtführung (17) eingelegt sein.
• Der Beckengurt (16) sollte auf beiden Seiten des Sitzkissens in den rot
gekennzeichneten unteren Gurtführungen (17) liegen.
• Nun führen Sie den Diagonalgurt (6) durch die obere Gurtführung (18) in der Kopfstütze
(12) bis er sich innerhalb der Gurtführung befi ndet.
6
HINWEIS! Bringen Sie Ihrem Kind von Anfang an bei, immer auf eine straffe Gurtführung
16
17
12
18
6
6
16
zu achten und bei Bedarf, selbst den Gurt festzuziehen.
!
WARNUNG! Der Beckengurt (16) muss auf beiden Seiten so tief wie möglich über
der Leistenbeuge Ihres Kindes verlaufen, um im Falle eines Unfalls optimal wirken
zu können.
Achten Sie darauf, dass der Diagonalgurt (6) zwischen Schulteraußenkante und Hals Ihres
Kindes verläuft. Falls erforderlich, passen Sie durch Verstellen der Kopfstützenhöhe den
Gurtverlauf an. Die Höhe der Kopfstütze (12) kann auch im eingebauten Zustand im Auto
eingestellt werden.
17
Page 17

FASTENING YOUR CHILD’S SEATBELT
• Place your child in the child seat. Pull the three-point belt right out and feed it along the
belt buckle (14) in front of your child.
NOTE! The three-point belt must only be passed through the
designated routings. The belt routings are described in detail in
this manual and are marked in red on the car seat.
ALLACCIARE IL BAMBINO CON LA CINTURA
• Collocare il bambino nel seggiolino. Estrarre ampiamente la cintura a tre punti e farla
scorrere fi no al fermaglio della cintura (14) davanti al bambino.
NOTA BENE! La cintura a tre punti deve passare solo tra
i passaggi designati Il passaggio per le cinture sono descritte nel dettaglio
in questo manuale ed evidenziate nel seggiolino auto
DE
ENIT
!
WARNING! Never twist the belt.
• Insert the belt tongue (15) into the belt buckle (14). It must lock into place with an
audible “CLICK”.
• Next, place and tighten the lap belt (16) in the red colored lower belt guides (17) of the
child seat.
• Now pull the diagonal belt (6) fi rmly to tighten the lap belt (16). The tighter the belt
sits, the better it provides protection from injury. On the side of the belt buckle (14),
the diagonal belt (6) and the lap belt (16) must be inserted together in the lower belt
guide (17).
• The lap belt (16) should have been fed through the lower belt guides (17) on both sides
of the booster seat.
• Now feed the diagonal belt (6) through the upper belt guide (18) in the headrest (12)
until it is inside the belt guide.
NOTE! Teach your child from the start to always ensure that the belt is tight and, if
necessary, how to tighten the belt themselves.
!
WARNING! The lap belt (16) must run as low as possible on both sides along your
child’s groin to have optimum effect in the event of an accident.
Ensure that the diagonal belt (6) runs between the outside of the shoulder and the neck of
your child. If necessary, adjust the height of the headrest to change the position of the belt.
The height of the headrest (12) can still be adjusted while in the car.
!
ATTENZIONE! Non torcere mai la cintura.
• Inserire la linguetta della cintura (15) nel fermaglio della cintura (14). Il blocco in
posizione deve essere segnalato da uno scatto udibile.
• Collocare successivamente la cintura subaddominale(16)nelle guide rosse della cintura
inferiori (17) del seggiolino.
• Ora tirare saldamente la cintura diagonale(6) per tendere la cintura subaddominale
(16). Maggiormente tesa è la sede della cintura e maggiore è la protezione dalle lesioni.
Cintura diagonale (6) e cintura subaddominale (16) vanno inserite assieme nella guida
cintura inferiore (17) a lato del fermaglio della cintura (14).
• La cintura subaddominale (16) dovrebbe passare attraverso le guide della cintura
inferiori (17) su ambo i lati del cuscino di seduta.
• Far passare ora la cintura diagonale (6) attraverso la guida della cintura superiore (18)
nel poggiatesta (12) fi no a che si trova nella rossa guida della cintura.
NOTA BENE! Insegnare al bambino fi n dall’inizio a controllare sempre che la cintura sia
tesa e a tenderla autonomamente se necessario.
!
ATTENZIONE! La cintura subaddominale (16) deve scorrere più bassa possibile
su ambo i lati lungo l’inguine del bambino per avere l’effetto ottimale in caso di
incidente.
Accertare che la cintura diagonale (6) scorra tra l’esterno della spalla e il collo del
bambino. Se necessario regolare l’altezza del poggiatesta per cambiare la posizione della
cintura. L’altezza del poggiatesta (12) è regolabile anche in auto.
17
Page 18
IST IHR KIND RICHTIG GESICHERT?
14
CLICK!
17
1
19
Um die bestmögliche Sicherheit Ihres Kindes zu gewährleisten, prüfen Sie bitte immer vor
Beginn der Fahrt, ob…
• der Beckengurt (16) auf beiden Seiten des Sitzkissens (1) in den rot gekennzeichneten
unteren Gurtführungen (17) verläuft und straff und tief sitzt.
• der Diagonalgurt (6) auf der Gurtschlossseite auch in der unteren Gurtführung (17) des
Sitzes verläuft.
• der Diagonalgurt (6) durch die rot markierte obere Gurtführung (18) der Kopfstütze
(12) verläuft.
• der Diagonalgurt (6) schräg nach hinten verläuft.
12
• der gesamte Gurt straff ist und nicht verdreht am Körper des Kindes anliegt.
• bei Verwendung von ISOFIX-Connect das Sitzkissen beidseitig mit den ISOFIX
Connect Rastarmen (5) in den ISOFIX Befestigungspunkten eingerastet und der grüne
Sicherheitsindikator (11) deutlich zu sehen ist.
!
WARNUNG! Das Fahrzeuggurtschloss (14) darf keinesfalls über die Armlehne
reichen. Ist die Gurtpeitsche zu lang, ist der Kindersitz für eine Verwendung auf
dieser Position im Fahrzeug nicht geeignet. Bitte wenden Sie sich im Zweifelsfall an
den Hersteller.
!
WARNUNG! Bitte lassen Sie Ihr Kind nie unbeaufsichtigt im Fahrzeug zurück.
Die Kunststoffteile des Kindersitzes heizen sich in der Sonne auf. Ihr Kind kann
sich daran verbrennen. Schützen Sie Ihr Kind und den Kindersitz vor intensiver
Sonneneinstrahlung (z.B. indem Sie ein helles Tuch über den Sitz legen).
511
18
14
Page 19

IS YOUR CHILD CORRECTLY SECURED?
To ensure optimum safety for your child, please always check before commencing travel that
• the lap belt (16) has been fed through the lower red belt guides (17) on both sides of
the booster seat (1).
• the diagonal belt (6) on the belt buckle side has also been fed through the lower red
belt guide (17) of the seat.
• the diagonal belt (6) has been fed through the upper belt guide (18) marked red in the
headrest (12).
• the diagonal belt (6) is at a recline backwards.
• the entire belt is tightly against your child’s body and is not twisted.
• If ISOFIX Connect is used: The seat is locked in place on both sides with the ISOFIX
Connect locking arms (5) and the green safety indications (11) are clearly visible.
!
WARNING! The vehicle belt buckle (14) must never cross the arm rest. If the belt
system is too long, the child seat is not suitable for use in this position in the vehicle.
In case of doubt, please consult the retailer.
!
WARNING! Never leave your child unattended in the car. The plastic parts
in the child restraint system heat up in sun and the child may sustain burns.
Protect your child and the car seat from direct sun exposure (e.g. by covering
it with a light colored cloth).
IL BAMBINO È MESSO IN SICUREZZA CORRETTAMENTE?
Per garantire la sicurezza ottimale del bambino, prima di iniziare il viaggio controllare
sempre che
• la cintura subaddominale(16) passo attraverso le guide della cintura inferiori (17) su
ambo i lati del cuscino di seduta (1).
• la cintura diagonale (6) sul lato del fermaglio della cintura passi attraverso la guida
inferiore della cintura (17) del seggiolino auto
• la cintura diagonale (6) passi attraverso la guida della cintura (18)colorata di rosso nel
poggia-spalla (12).
• la cintura diagonale (6) scorra verso il basso inclinata
• l’intera cintura poggi tesa contro il corpo del bambino e non sia attorcigliata.
• Se si utilizza is sistema ISOFIX connect: Il seggiolino sia bloccato da entrambi i lati
tramite il sistema ISOFIX (5) e gli indicatori verdi (11) siano chiaramente visibili.
!
ATTENZIONE! La cintura dell’automobile (14) non deve mai incrociarsi sulle braccia
del bambino. Se il sistema di cinture è troppo lungo il seggiolino non è adatto all’uso
in questa posizione nel veicolo. In caso di dubbi, consultare il rivenditore autorizzato.
!
ATTENZIONE! Non lasciare mai il bambino incustodito nell’auto. Le parti in plastica
in the child restraint system heat up in sun and the child may sustain burns.
Proteggi il seggiolino auto dall’esposizione diretta dal sole (ad es. con una copertura
con un tessuto dai colori chiari).
DE
ENIT
19
Page 20
19
20
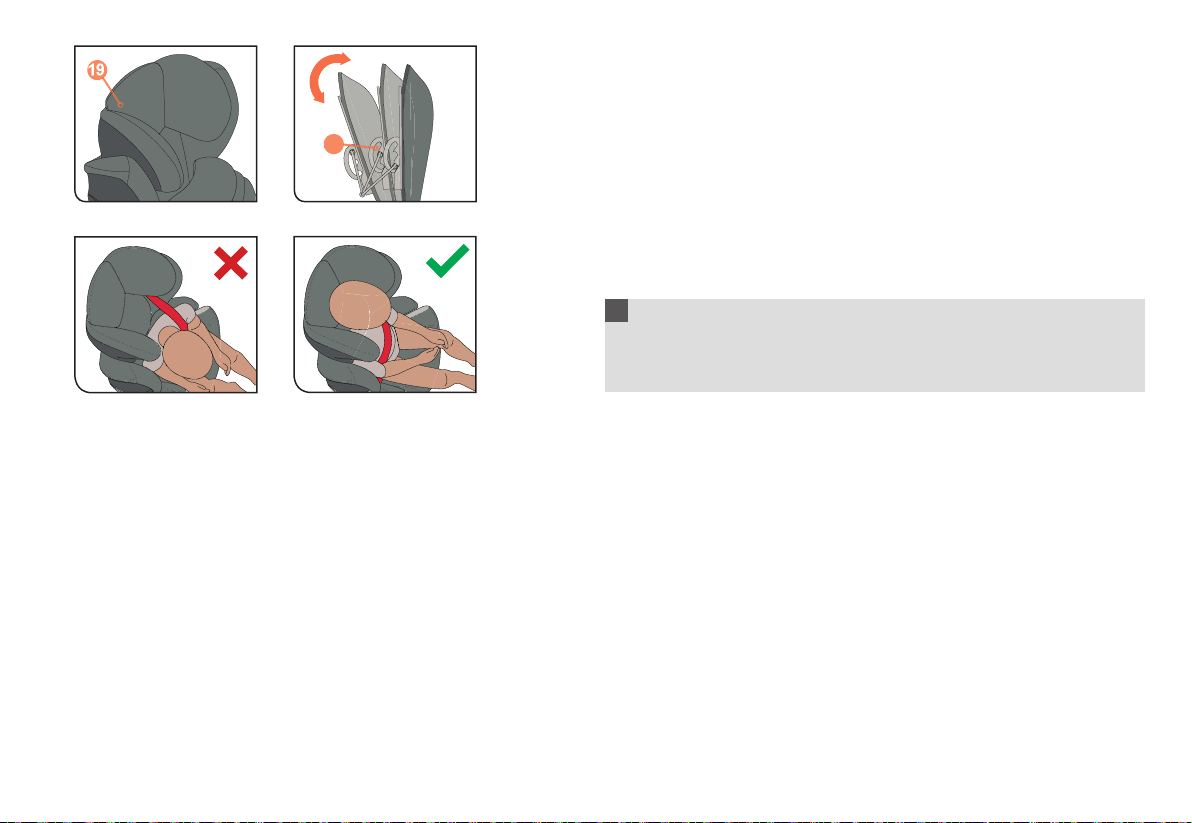
NEIGUNGSVERSTELLBARE KOPFSTÜTZE
Die neigungsverstellbare Kopfstütze hilft, das gefährliche Nach-Vorne-Kippen des Kopfes
im Schlaf zu verhindern. Bei einem Aufprall folgt die Kopfstütze der Kopfbewegung Ihres
Kindes nach vorne, rastet ein und fängt somit die anschließende Rückwärtsbewegung des
Kopfes ab.
HINWEIS! Achten Sie bitte darauf, dass der Kopf des Kindes immer in Kontakt mit der
neigungsverstellbaren Kopfstütze (19) bleibt, da die Kopfstütze nur so ihre optimierte
Seitenaufprall-Schutzfunktion erfüllen kann.
Die Neigung der Kopfstütze lässt sich in drei Positionen verstellen. Nach vorne lässt sie
sich ohne Betätigen des Hebels in die zweite bzw. dritte Position verstellen, bis diese
jeweils einrastet. Zum Zurückstellen in die Ausgangsposition, muss der Hebel betätigt und
die Kopfstütze nach hinten gezogen werden.
!
WARNUNG! Auf keinen Fall darf die Einrastvorrichtung (20) mit Gegenständen
blockiert werden! Im Falle eines Unfalls muss die Leichtgängigkeit der
Neigungsverstellung gewährleistet sein, da es sonst eventuell zu Verletzungen Ihres
Kindes kommen kann.
PFLEGE
Um die größtmögliche Schutzwirkung Ihres Kindersitzes zu gewährleisten, ist es unbedingt
notwendig, dass Sie Folgendes beachten:
• Alle wichtigen Teile des Kindersitzes sollten regelmäßig auf Beschädigungen kontrolliert
werden. Die mechanischen Bauteile müssen einwandfrei funktionieren.
• Es ist unbedingt notwendig darauf zu achten, dass der Kindersitz nicht zwischen harten
Teilen wie Fahrzeugtür, Sitzschiene usw. eingeklemmt wird und dadurch beschädigt
werden könnte.
• Der Kindersitz muss z.B. nach einem Sturz unbedingt vom Hersteller überprüft werden.
Es ist darauf zu achten, dass nur ein original CYBEX Sitzbezug verwendet wird, da auch der
Bezug ein wesentlicher Bestandteil der Funktion ist. Ersatzbezüge erhalten Sie im Fachhandel.
20
Page 21

RECLINING HEADREST
The reclining headrest helps to prevent the child’s head from dangerously tipping forward
during sleep. In the event of a collision, the headrest will follow the movement of your
child’s head forwards, lock into place and absorb the subsequent backwards motion of
your child’s head.
NOTE! Ensure that your child’s head is always in contact with the reclining headrest
(19), as this is the only way that the headrest can provide optimum protection in case of
side collisions.
The recline angle of the headrest can be set to one of three positions. It can be moved
forward without moving the lever to the second or third position until the rest locks into
position. To return it to the original position, the lever must be operated and the headrest
pulled back.
POGGIATESTA INCLINABILE
Il poggiatesta inclinabile aiuta a impedire che la testa del bambino si rovesci
pericolosamente in avanti nel sonno. In caso di collisione, il poggiatesta seguirà il
movimento in avanti della testa del bambino, si bloccherà in posizione e assorbirà il
successivo movimento indietro della testa del bambino.
NOTA BENE! Accertare che la testa del bambino sia sempre a contatto con il
poggiatesta inclinabile (19): questa è la condizione indispensabile affi nchè il poggiatesta
offra la protezione ottimanle dalle collisioni laterali.
L’angolo di inclinazione del poggiatesta è regolabile in una delle tre posizioni. È spostabile
in avanti senza azionare la leva nella seconda o terza posizione, fi no a che il poggiatesta
scatta in posizione. Per tornare in posizione originale è necessario azionare la leva e tirare
indietro il poggiatesta.
DE
ENIT
!
WARNING! Never block the locking mechanism (20)! In the event of an accident, the
recline adjustment mechanism must move smoothly, or else your child may be injured!
CARE & MAINTENANCE
To ensure that your child seat provides maximum protection, it is imperative that you note
the following:
• All major parts of the child seat should be checked regularly for damage. The
mechanical components must be free of defects.
• It is absolutely necessary to ensure that the child seat is not jammed between hard
elements such as the vehicle door or seat rail, which could potentially damage it.
• When exposed to extreme shock, e.g. after a crash, the child seat must be checked by
the manufacturer.
Ensure that only an original CYBEX seat cover is used, as the cover is a key element of the
seat’s function. Spare covers can be obtained from a specialist retailer.
!
ATTENZIONE! Non bloccare mai il meccanismo di bloccaggio (20) con degli
oggetti! Il meccaniscmo di regolazione dell’inclinazione deve operare scorrevolmente
in caso di incidente per evitare il ferimento del bambino !
CURA E MANUTENZIONE
Per garantire che il seggiolino offra la massima protezione è imperativo osservare
quanto segue:
• Tutte le parti principali del seggiolino dovrebbero essere controllate regolarmente alla
ricerca di danni. I componenti meccanici devono essere privi di difetti.
• E’ assolutamente necessario assicurare che il seggiolino non sia incastrato tra elementi
duri, quali la portiera o le guide dei sedili, che potrebbero potenzialmente danneggiarlo.
• Se esposto a colpi estremi, ad esempio in caso di incidente, il seggiolino deve essere
controllato dal produttore.
Accertarsi di utilizzare solo una fodera del sedile CYBEX, in quanto la fodera rappresenta
un elemento chiave di funzionamento del seggiolino. Le fodere di ricambio sono ottenibili
presso i rivenditori specializzati.
21
Page 22
12 12
13
ENTFERNEN DES BEZUGES
Der Bezug am Kindersitz besteht aus vier Teilen (Kopfstützenklappe, Kopfstütze,
Schulterteil, Sitzkissen).
Die Sitzbezüge sind in den am Rand des Kindersitzes verlaufenden Bezugführungen
versenkt und/oder an mehreren Stellen mit Druckknöpfen am Kindersitz befestigt.
Sobald Sie alle Befestigungen lösen, können die Einzelteile aus den Bezugführungen
gezogen werden.
Um den Bezug wieder zu befestigen, verfahren Sie in umgekehrter Reihenfolge.
!
WARNUNG! Der Kindersitz darf keinesfalls ohne Bezug verwendet werden.
ENTFERNEN DES BEZUGS VON DER KOPFSTÜTZENKLAPPE
Ziehen Sie die Kopfstütze (12) mit Hilfe des Verstellgriffes der Kopfstütze (13) in die
höchste Position. Ziehen Sie die Aussparung des Bezugs über den Verstellhebel, sodass
der Bezug beim Abziehen nach oben hin nicht am Hebel hängen bleibt.
ENTFERNEN DES BEZUGS VON DER KOPFSTÜTZE
Schieben Sie den Bezug an der Öffnung am hinteren Schulterbereich vom Haken. Ziehen
Sie den Bezug aus dem Stoffkanal.
ENTFERNEN DES BEZUGS VOM SCHULTERTEIL
Ziehen Sie den Bezug aus dem Stoffkanal heraus.
22
Page 23
REMOVING THE SEAT COVER
The cover of the child seat consists of four parts (Headrest fl ap, headrest, shoulder part
cover, booster cover and/or seat surface cover).
The four covers of the seat are fi tted into the cover attachment channels on the edge of the child
seat and are held in position at several places by press-studs (see image).
Once all studs have been released, the single parts of the cover can be removed from the
cover attachment channels.
RIMOZIONE DELLA FODERA DEL SEGGIOLINO
La fodera del seggiolino è composta da quattro parti (aletta del poggiatesta, poggiatesta,
fodera dell’aera della spalla, fodera dell’elevatore e/o fodera della superfi cie di seduta).
Le quattro fodere del seggiolino sono inserite nelle guide di attacco della fodera sui bordi
del seggiolino e sono tenute in posizione da bottoni automatici (vedere fi gura).
Una volta sbloccati tutti gli automatici, le singole parti della fodera possono essere rimosse
dalle guide di attacco della fodera.
DE
ENIT
In order to put the covers back on the seat, proceed in the reversed order as removing them.
!
WARNING! The child seat must never be used without the cover.
REMOVING THE COVER FROM THE HEADREST FLAP
Pull the opening of the cover over the adjustment lever headrest (13) so that the cover
does not get jammed on the lever when pulling it up to remove it.
REMOVING THE COVER FROM THE HEAD SUPPORT
Unlock the cover from the hook at each side of the rear of the shoulder area.
Pull the cover out of the cover attachment channel.
REMOVING THE COVER FROM THE SHOULDER PART
Pull the cover out of the cover attachment channel.
Procedere in ordine inverso rispetto alla rimozione al fi ne di ricollocare le fodere sul seggiolino
!
ATTENZIONE! Il seggiolino non deve mai essere usato senza la fodera.
RIMOZIONE DELLA FODERA DALL’ALETTA DEL POGGIATESTA
Rilasciare i due bottoni automatici su ogni lato del retro area della spalla(13) Estrarre la
fodera dalla guida di attacco della fodera.
RIMOZIONE DELLA FODERA DAL POGGIATESTA
Sbloccare i quattro bottoni automatici anteriori e posteriori dela fodera del sedile.
Estrarre la fodera dalla guida di attacco della fodera.
RIMOZIONE DELLA FODERA DALL’AREA DELLA SPALLA
Estrarre la fodera dalla guida di attacco della fodera.
23
Page 24
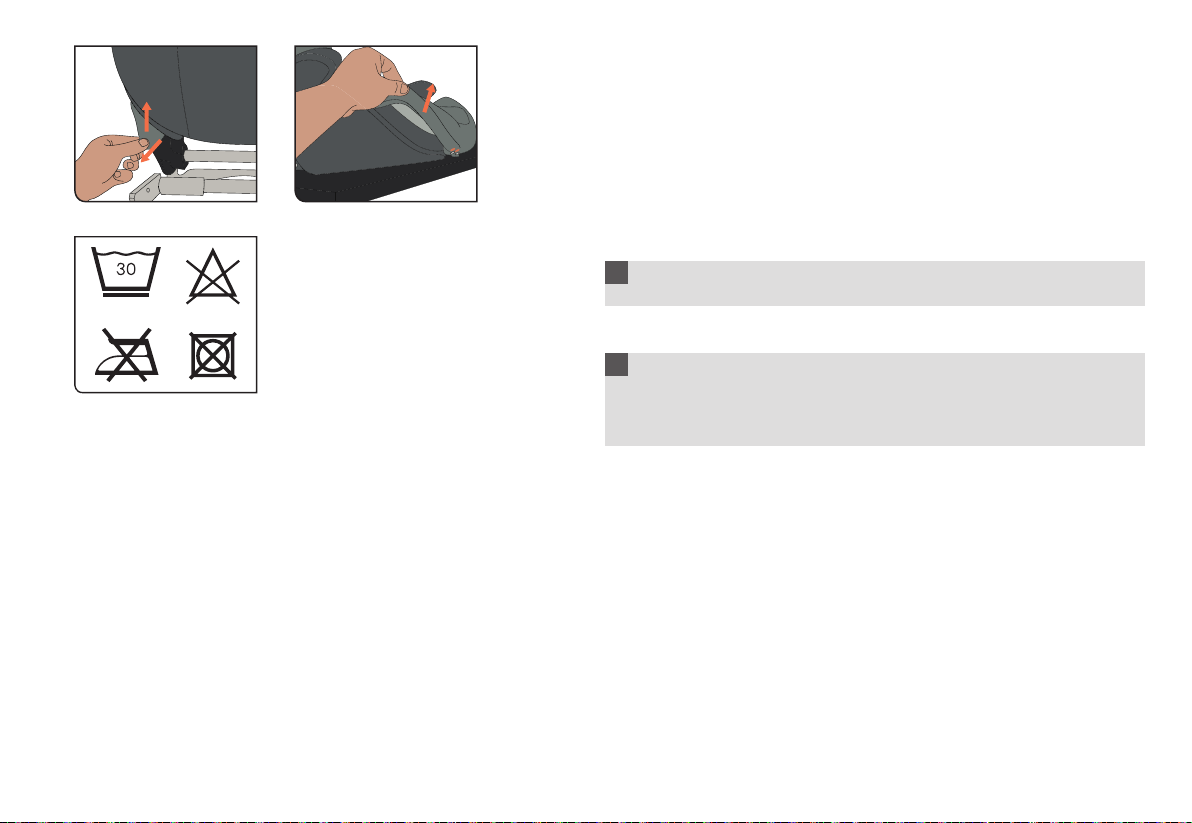
ENTFERNEN DES BEZUGS VON DER SITZFLÄCHE
Lösen Sie die 2 Druckknöpfe des Sitzbezugs vorder- und rückseitig. Ziehen Sie nun den
Bezug über die Armlehnen und entlang der Sitzfl äche ab.
REINIGUNG
HINWEIS!
30 °C im Schonwaschgang gewaschen werden. Sollten Sie mit mehr als 30°C waschen,
kann es zu Ausfärbungen des Bezugstoffes kommen. Bitte den Bezug gesondert von
anderer Wäsche waschen und nicht im Trockner trocknen! Den Bezug keinesfalls in der
prallen Sonne trocknen! Die Kunststoffteile können mit einem milden Reinigungsmittel und
warmen Wasser gereinigt werden.
!
VERHALTEN NACH EINEM UNFALL
!
PRODUKTLEBENSDAUER
Dieser Kindersitz ist so ausgelegt, dass er bei gewöhnlicher Nutzung für die gesamte
Produktlebensdauer von ca. 9 Jahren seine Eigenschaften erfüllt. Durch den langsamen
Verschleiß des Kunststoffs, beispielsweise durch Sonneneinstrahlung (UV), können sich
die Eigenschaften des Produkts geringfügig verschlechtern. Da in Fahrzeugen sehr große
Temperaturschwankungen herrschen und andere unvorhersehbare Belastungen auftreten
können, ist es notwendig, folgende Punkte zu beachten:
• Wenn das Fahrzeug längere Zeit der prallen Sonne ausgesetzt ist, muss der Kindersitz
• Prüfen Sie regelmäßig alle Kunststoff- und Metallteile des Kindersitzes auf
• Veränderungen des Stoffes, insbesondere das Ausbleichen, sind normal und stellen
Bitte den Bezug vor der ersten Verwendung waschen. Der Bezug darf nur bei
WARNUNG! Bitte auf keinen Fall scharfe Reinigungs- oder Bleichmittel verwenden!
WARNUNG! Aufgrund eines Unfalles können am Kindersitz Beschädigungen
auftreten, die mit bloßem Auge nicht erkennbar sind. Bitte tauschen Sie nach einem
Unfall unbedingt den Sitz aus. Im Zweifelsfall wenden Sie sich bitte an den Händler
oder Hersteller.
aus dem Fahrzeug entfernt oder mit einem hellen Tuch abgedeckt werden.
Beschädigung oder Veränderung von Form oder Farbe. Stellen Sie eine Veränderung
fest, ist der Kindersitz zu entsorgen oder muss vom Hersteller geprüft und
gegebenenfalls ausgetauscht werden.
keine Beeinträchtigung dar.
24
Page 25

REMOVING THE COVER FROM THE BOOSTER
Release the 2 press-studs of the seat cover at the front and the back. Now, pull off the
cover over the armrests and along the seat surface.
CLEANING
NOTE! Please wash the cover before you use it the fi rst time. The cover may only be
washed at 30 °C with a delicate wash program. Washing at more than 30°C may result
in discolouration of the cover fabric. Please wash the cover separately from other laundry
and do not dry in the dryer! Never dry the cover in direct sunlight! The plastic parts can be
cleaned with a mild cleaning agent and warm water.
RIMOZIONE DELLA FODERA DALLA SUPERFICIE DI SEDUTA
Sbloccare i due bottoni automatici anteriori e posteriori della fodera del sedile. Estrarre ora
la fodera oltre i braccioli e lungo la superfi cie di seduta.
PULIZIA
NOTA BENE! Consigliamo il lavaggio prima del primo utilizzo. La fodera è lavabile solo
a 30 °C con un programma di lavaggio delicato. Il lavaggio oltre i 30 °C può causare lo
scolorimento del tessuto della fodera. Lavare la fodera separatamente dagli altri capi e non
asciugare in asciugatrice! Non fare mai asciugare la fodera alla luce solare diretta! Le parti
in plastica possono essere pulite con un detergente delicato e dell’acqua tiepida.
DE
ENIT
!
WARNING! Never use harsh cleaning agents or bleaches!
HOW TO ACT FOLLOWING AN ACCIDENT
!
WARNING! An accident may cause damage to the child seat that is not identifi able
with the naked eye. Please replace the seat after an accident. In case of doubt,
please consult your dealer or the manufacturer.
PRODUCT LIFESPAN
This child seat has been designed to be able to fulfi ll its intended functions by ordinary use
for a product life span of approx. 9 years. Gradual wear of the plastic, for example caused
by exposure to sunlight (UV), can cause slight deterioration of the product’s properties.
Since very high temperature fl uctuations and other unforeseeable stresses are common in
vehicles, it is necessary to observe the following points:
• If the vehicle is directly exposed to strong sunlight for long periods, the child seat must
be removed from the vehicle or covered with a light cloth.
• Check all plastic and metal parts of the seat regularly for damage or change of shape or
colour. If you notice any change in the child seat, the seat must be disposed or checked
and possibly replaced by the manufacturer.
• Changes to the fabric, especially fading, are normal when used in a vehicle and do not
impair the seat’s function.
!
ATTENZIONE! Non usare mai detergenti aggressivi o candeggine!
COME PROCEDERE IN SEGUITO A UN INCIDENTE
!
ATTENZIONE! Un incidente può causare danni al seggiolino non identificabili a
occhio nudo. Sostituire il seggiolino dopo un incidente. In caso di dubbio, consultare
il proprio rivenditore o il produttore.
VITA UTILE DEL PRODOTTO
Questo seggiolino è progettato per soddisfare le proprie specifi che l’intera vita utile, pari
a circa 9 anni. Nel tempo le parti in plastica tendono ad usurarsi, es. per l’esposizione al
sole (UV) e le caratteristiche del prodotto possono subire leggere variazioni. Alla luce delle
possibili fl uttuazioni massicce di temperatura e degli sforzi imprevedili nei veicoli, devono
essere tenuti in considerazione i punti seguenti:
• Se il veicolo viene lasciato al sole per un periodo di tempo prolungato, il seggiolino deve
essere rimosso dall’abitacolo o coperto con un panno chiaro.
• Controllare regolarmente tutte le parti di plastica e metallo del seggiolino alla ricerca di
danni, deformazioni o cambiamenti di colore. Qualora si scopra qualsiasi cambiamento,
il seggiolino dovrà essere smaltito o controllato e, possibilmente, sostituito dal
produttore.
• Le variazioni del tessuto, in particolare la scoloritura, sono perfettamente normali in caso
di uso di un veicolo e non intaccano il funzionamento del seggiolino.
25
Page 26

ENTSORGUNG
Am Ende der Produktlebensdauer des Kindersitzes ist eine sachgemäße Entsorgung
vorzunehmen. Die Abfalltrennung kann kommunal unterschiedlich sein. Um eine
vorschriftsgemäße Entsorgung des Kindersitzes zu gewährleisten, setzen Sie sich mit Ihrer
kommunalen Abfallentsorgung bzw. Verwaltung Ihres Wohnortes in Verbindung. Beachten
Sie auf jeden Fall die Entsorgungsbestimmungen Ihres Landes.
GARANTIEBEDINGUNGEN
Die nachfolgenden Garantiebestimmungen gelten nur in dem Land, in dem dieses
Produkt erstmalig über den Einzelhandel an einen Verbraucher verkauft wurde. Die
Garantie deckt sämtliche Herstellungs- und Materialfehler ab, die im Zeitpunkt des Kaufs
bestanden haben oder die innerhalb von drei (3) Jahren nach dem Erstverkauf dieses
Produkts über den Einzelhandel an einen Verbraucher in Erscheinung getreten sind
(Herstellergarantie). Tritt während der Garantiezeit ein Herstellungs- und Materialfehler
auf, wird das Produkt kostenlos repariert oder – nach unserem freien Ermessen – gegen
ein neues ausgetauscht. Um Leistungen im Rahmen dieser Garantie in Anspruch nehmen
zu können, muss das Produkt an den Einzelhändler zurückgegeben werden, der es
erstmalig verkauft hat und ein Nachweis über den Kauf (Kaufbeleg oder Rechnung) im
Original vorgelegt werden, welcher das Kaufdatum, Namen und Adresse des Händlers,
sowie die Produktbezeichnung aufzeigt. Der Anspruch aus diesem Garantieversprechen
besteht nicht, wenn das Produkt an den Hersteller oder irgendeine andere Person als
den Einzelhändler, der es erstmalig verkauft hat, zum Zweck der Inanspruchnahme der
Garantieleistung geschickt wird. Die Garantie gilt nur, wenn das Produkt nach dem Kauf
umgehend auf Vollständigkeit, Herstellungs- und Materialfehler überprüft wurde. Wurde
das Produkt im Versandhandel gekauft, ist es umgehend nach Erhalt auf Vollständigkeit,
Herstellungs- und Materialfehler zu überprüfen. Falls Schäden vorhanden sind, darf
das Produkt nicht mehr benutzt werden und muss umgehend an den Händler, der es
erstmalig verkauft hat, zurückgegeben werden. Im Garantiefall muss das Produkt in
einem vollständigen und sauberen Zustand zurückgegeben werden. Bitte lesen Sie
vor einer Kontaktaufnahme mit dem Händler sorgfältig die Gebrauchsanleitung. Die
Garantie deckt keine Schäden ab, die durch Fehlgebrauch, äußere Einfl üsse (Wasser,
Feuer, Verkehrsunfälle o.ä.) oder normalen Verschleiß entstanden sind. Die Garantie
wird nur gewährt, wenn das Produkt in Übereinstimmung mit der Gebrauchsanweisung
behandelt und benutzt wurde, Reparaturen oder Veränderungen ausschließlich durch
Personen vorgenommen wurden, die hierzu befugt waren und stets nur Original Bau- und
Zubehörteile verwendet wurden. Durch diese Garantie werden weder die auf Grundlage
der jeweils anwendbaren Gesetze bestehenden Verbraucherrechte noch Rechte gegen
den Verkäufer wegen der Vertragswidrigkeit des Produkts ausgeschlossen, begrenzt oder
in anderer Weise eingeschränkt.
CYBEX GmbH
Riedingerstr. 18, 95448 Bayreuth, Germany
Tel.: 0921 78 511-511, Fax.: 0921 78 511- 888
26
Page 27

DISPOSAL
At the end of the child seat’s service life, it must be disposed of correctly. The separation
of waste may be handled differently from place to place. To ensure that the child seat is
disposed of in accordance with regulations, please contact your local waste disposal
institution or local council. Always observe the waste disposal regulations of your country.
WARRANTY CONDITIONS
The following warranty conditions only apply to the country in which this product was fi rst
sold through retail channels to a consumer. This warranty covers all manufacturing and
material defects that existed at the time of purchase or which manifest themselves within
three (3) years of fi rst sale of this product via retail channels to a consumer (manufacturer
warranty). If a manufacturing or material defect arises during the warranty period, the
product will be repaired at no charge or – at our discretion – may be replaced by a new
one. In order to make a claim on this warranty, the product must be returned to the retailer
that fi rst sold it and the original proof of purchase (receipt or invoice), containing the date
of purchase, name and address of the retailer, and the product name, must be presented.
No claims may be made on this warranty if the product is sent to the manufacturer or
any other person than the retailer having fi rst sold it for the purpose of making a claim
on the warranty. The warranty only applies if the product was checked for completeness,
manufacturing defects and material defects immediately upon purchase. If the product
was purchase by way of a mail order outlet, it must be checked for completeness,
manufacturing defects and material defects immediately upon receipt. If damage arises,
the product may no longer be used and must be returned to the retailer that original sold
it. When claiming on the warranty, the product must be returned in a complete and clean
state. Please read the usage instructions carefully before contacting the retailer. The
warranty does not cover damage caused by misuse, external infl uences (water, fi re, traffi c
accidents etc.) or normal wear and tear. Claims on the warranty will only be honoured if
the product is treated and used in accordance with the usage instructions, repairs and
modifi cations are only performed by persons authorised to do so, and only original parts
and accessories are used. This warranty does not nullify or limit in any way any consumer
rights or rights against the seller based on infringement of the purchase agreement granted
by applicable legislation.
SMALTIMENTO
Al termine della sua vita utile il seggiolino dovrà essere smaltito correttamente. La
differenziazione dei rifi uti potrebbe avvenire con modalità diverse da luogo a luogo. Per
garantire lo smaltimento corretto preghiamo di contattare l’uffi cio di competenza della
vostra città. Seguire sempre le normative vigenti nella vostra nazione.
CONDIZIONI DI GARANZIA
La seguente garanzia vale unicamente nella nazione in cui il prodotto è stato
originariamente venduto da un rivenditore al consumatore. La garanzia copre eventuali
difetti di fabbricazione e di materiali riscontrati all’acquisto o entro un periodo di tre (3)
anni dalla data di acquisto presso il rivenditore (garanzia del produttore). Qualora, durante
il periodo di garanzia, si presenti un difetto di produzione o dei materiali, il prodotto verrà
riparato gratuitamente o sostituito con uno nuovo a nostra discrezione. Per avere diritto
alla garanzia è necessario riportare o spedire il prodotto al rivenditore presso il quale è
stato acquistato ed è indispensabile fornire la prova di acquisto (scontrino fi scale, fattura,
ecc.) in originale. La prova d’acquisto dovrà contenere indicati la data di acquisto, il nome
e indirizzo del rivenditore e identifi cativo del prodotto. Non sono ammesse richieste relative
a questa garanzia qualora il prodotto, allo scopo di effettuare una richiesta di garanzia, sia
inviato al produttore o a qualsiasi altra persona diversa dal dettagliante che lo ha venduto
per la prima volta. La garanzia è valida soltanto se il prodotto è stato sottoposto ad un
accurato controllo di completezza e funzionalità all’acquisto e se eventuali manchevolezze
di produzione o di materiali sono state prontamente segnalate. Se il prodotto è
stato acquistato tramite un canale di vendita a distanza, dovrà essere controllato
immediatamente al momento del ricevimento per verifi carne la completezza ed eventuali
difetti di produzione o di materiali. In caso si riscontri qualsiasi difetto/danneggiamento
del prodotto invitiamo a non utilizzarlo e a restituirlo imediatamente al rivenditore presso
il quale è stato acquistato. I diritti di garanzia sono validi soltanto se il prodotto è reso
pulito e completo in ogni sua parte. Leggere attentamente le istruzioni per l’uso prima di
contattare il dettagliante. La garanzia non copre danni provocati da utilizzo improprio o
da eventi fortuiti e cause ambientali (acqua, fuoco, incidenti stradali, ecc.) o dal normale
deperimento d’uso. La garanzia è valida soltanto per prodotti usati in conformità a quanto
stabilito nel manuale istruzioni, se eventuali modifi che o riparazioni sono state effettuate
da personale autorizzato e se sono state utilizzate solo parti ed accessori originali. Questa
garanzia non esclude, limita o comunque pregiudica eventuali diritti legali dei consumatori,
comprese istanze in caso di torto e in caso di una violazione del contratto, che l’acquirente
può avere nei confronti del rivenditore.
DE
ENIT
27
Page 28
SOLUTION S-fix
UN-R44-04
UNIVERSAL
SEMI-UNIVERSAL
15 – 36 kg
04301359
CYBEX GmbH
Riedingerstr. 18, 95448 Bayreuth
Germany
28
homologation
UN R 44-04, groupe 2/3, 15 à 36 kg
CYBEX SOLUTION S-FIX
réhausseur avec dossier et appui-tête
Recommandé pour :
Age : de 3 à 12 ans environ
Poids : 15 à 36 kg
Taille : jusque 150 cm
Ne convient que pour les véhicules équipés d’une ceinture
automatique trois points norme ECE R16 ou équivalent
Certifi cering
UN R 44-04, groep 2/3, 15 tot 36 kg
CYBEX OPLOSSING S-FIX
zitting met rugleuning en hoofdsteun
Aanbevolen voor:
Leeftijd: vanaf ongeveer 3 tot 12 jaar
Gewicht: 15 tot 36 kg
Lichaamslengte: tot maximaal 150 cm
Alleen geschikt voor autostoelen met automatische
driepuntsgordels die zijn goedgekeurd conform UN R16
of een vergelijkbare norm.
Certyfi katy
UN R 44-04, grupa 2/3, 15 do 36 kg
CYBEX SOLUTION S-FIX
poduszka siedzenia z oparciem i zagłówkiem
Polecany dla:
Wiek: od ok. 3 do 12 lat
Waga: 15 do 36 kg
Wysokość ciała: do 150 cm
Tylko do montażu w samochodach z automatycznymi
3-punktowymi pasami w zgodzie z regulacją UN R16 lub
w porównywalnym standardzie.
FR
ATTENTION ! Le siège CYBEX SOLUTION S-fix doit être utilisé conformément aux
SOMMAIRE
!!
présentes instructions afin de garantir une protection optimale de votre enfant.
NOTE ! Gardez toujours ces instructions à portée de main (par ex. dans le compartiment
prévu à cet effet à l’arrière du dossier du siège).
NOTE ! Les règlements spécifi ques à chaque pays (concernant notamment les codes de
couleurs sur les sièges auto) peuvent faire varier l’apparence des produits. Ceci n’affecte
cependant pas le fonctionnement du produit.
PREMIÈRE INSTALLATION ..................................................................................................................................................................30
POSITIONNEMENT CORRECT DU SIÈGE DANS LE VÉHICULE ................................................................................32
SÉCU RITÉ EN VOITURE .......................................................................................................................................................................34
POSITIONNEMENT DU SIÈGE DANS LE VÉHICULE ..........................................................................................................34
INSTALLATION DU SIÈGE AVEC LE SYSTÈME ISOFIX CONNECT ..............................................................................36
RÉGLAGE DES PROTECTIONS LATÉRALES ...........................................................................................................................38
RETRAIT DU CYBEX SOLUTION SFI X .........................................................................................................................................38
RÉGLAGE DU SIÈGE AUTO ..............................................................................................................................................................38
INSTALLATION AVEC LA CEINTURE DE S ECU RITÉ .............................................................................................................4 0
VOTRE ENFANT ESTIL ATTACHÉ CORRECTEMENT? ......................................................................................................42
APPUITÊTE INCLINABLE ...................................................................................................................................................................44
ENTRETIEN ET MAINTENANCE ........................................................................................................................................................44
RETIRER LA HOUSSE ...........................................................................................................................................................................46
RETRAIT DE LA HOUSSE DU RABAT DE L’APPUIETÊTE...................................................................................................46
RETRAIT DE LA HOUSSE DE L’APPUIETÊTE ...........................................................................................................................46
RETRAIT DE LA HOUSSE DU SUPPORT D’ÉPAULE .............................................................................................................46
RETIRER LA HOUSSE DE L’ASSISE ..............................................................................................................................................48
N ETTOYAG E .................................................................................................................................................................................................48
DURÉE DE VIE DU PRODUIT .............................................................................................................................................................48
DESTR UCTION ..........................................................................................................................................................................................50
CONDITIONS DE GARANTIE .............................................................................................................................................................50
Page 29
NL PL
! !
BELANGRIJK! Voor optimale bescherming van uw kind moet u de CYBEX
SOLUTION S-FIX gebruiken zoals in deze handleiding beschreven.
SPIS TREŚCIINHOUD
OSTRZEŻENIE! Aby zapewnić dziecku optymalną ochronę, CYBEX SOLUTION
S-FIX musi być użytkowany zgodnie z instrukcją.
LET OP! Houd deze handleiding altijd bij de hand (bijvoorbeeld in het daarvoor bestemde
vakje aan de achterzijde van rugsteun).
LET OP! Nationale regelgeving (bijvoorbeeld over de kleurcodering op autostoeltjes) kan
ertoe leiden dat productkenmerken er anders uitzien. Dat heeft echter geen gevolgen voor
het goed functioneren van het autostoeltje.
EERSTE INSTALLATIE .............................................................................................................................................................................31
HET STOELTJ E GOED IN DE AUTO PLAATSEN ......................................................................................................................33
VEILIGHEID IN DE AUTO ......................................................................................................................................................................35
HET STOELTJ E IN DE AUTO PLAATSEN ......................................................................................................................................35
INSTALLATIE VAN HET AUTOSTOELTJE MET HET ISOFIX CONNECTSYSTEEM ................................................37
AANPASSEN VAN DE ZIJBESCHERMERS ................................................................................................................................39
DE CYBEX SOLUTION SFIX VERWIJDEREN ..........................................................................................................................39
AANPASSING AAN DE LICHAAMSLENGTE .............................................................................................................................39
DE AUTOGORDEL VAN UW KIND VASTMAKEN .....................................................................................................................41
IS UW KIND GOED VASTGEMAAKT? ...........................................................................................................................................43
KANTELBARE HOOFDSTEUN .........................................................................................................................................................45
REINIGING & ONDERHOUD .............................................................................................................................................................45
DE BEKLEDINGSHOES VERWIJDEREN ....................................................................................................................................47
DE HOES VAN HET ZIJSTUK HOOFDSTEUN VERWIJDEREN ....................................................................................... 47
DE BEKLEDING VAN DE HOOFDSTEUN VERWIJDEREN ................................................................................................47
DE BEKLEDING VAN HET SCHOUDERDEEL VERWIJDEREN ...................................................................................... 47
DE HOES VAN DE ZITTING VERWIJDEREN ..............................................................................................................................49
REINIGING ...................................................................................................................................................................................................49
LEVENSDUUR VAN HET PRODUCT ..............................................................................................................................................49
VERWIJDERING ........................................................................................................................................................................................51
GARANTIE ..................................................................................................................................................................................................... 51
UWAGA! Zachowaj instrukcję w zasięgu ręki (np. w specjalnym schowku z tyłu oparcia
fotelika).
UWAGA! Przepisy krajowe (na przykład w zakresie oznaczenia kolorów na fotelikach
dziecięcych) mogą mieć wpływ, że cechy produktu mogą odbiegać wyglądem.. Nie wpływa
to na poprawne funkcjonowanie fotelika.
PIERWSZY MONTAŻ FOTELIKA .......................................................................................................................................................31
OPTYMALNE MIEJSCE FOTELIKA W SAMOCHODZIE .....................................................................................................33
BEZPIECZEŃSTWO W SAMOCHODZIE...................................................................................................................................35
ZABEZPIECZANIE DZIECKA ............................................................................................................................................................35
MONTAŻ FOTELIKA ZA POMOCĄ ZACZEPÓW ISOFIX.....................................................................................................37
DOPASOWANIE OSŁON BOCZ NYCH ........................................................................................................................................39
ODPINANIE FOTELIKA CYBEX SOLUTION SFIX ..................................................................................................................39
DOSTOSOWANIE FOTELIKA DO WZROSTU DZIECKA ...................................................................................................39
ZAPINANIE FOTELIKA SAMOCHODOWYM PASEM BEZPIECZEŃSTWA ..............................................................41
CZY TWOJE DZIECKO JEST DOBRZE ZABEZPIECZONE? ...........................................................................................43
REGULOWANY ZAGŁÓWEK ............................................................................................................................................................45
KONSERWACJA ...............................................................................................................................
ŚCIĄGANIE TAPICERKI .........................................................................................................................................................................47
ZDEJMOWANIE TAPICERKI Z KLAPKI ZAGŁÓWKA ..............................................................................................................47
ZDEJMOWANIE TAPICERKI Z ZAGŁÓWKA ...............................................................................................................................47
ZDEJMOWANIE TAPICERKI Z OSŁON BARKOWYCH ........................................................................................................ 47
ZDEJ MOWANIE TAPICE RKI ...............................................................................................................................................................49
CZYSZCZENIE...........................................................................................................................................................................................49
TRWAŁOŚĆ PRODUKTU .....................................................................................................................................................................49
UTYLIZACJA .................................................................................................................................................................................................51
WARUNKI GWARANCJI ........................................................................................................................................................................51
.........................................................45
FRNLPL
29
Page 30
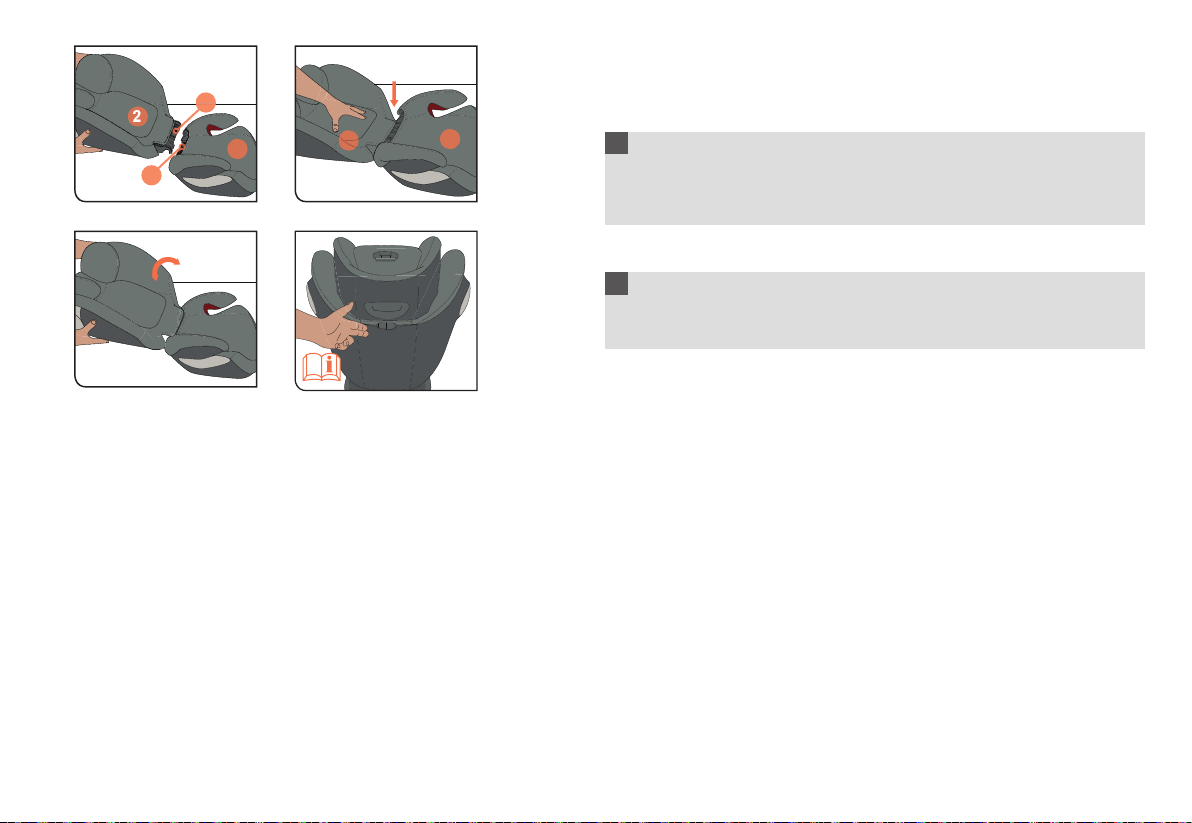
PREMIÈRE INSTALLATION
Le siège auto est composé d’un réhausseur (1) et d’un dossier (2) équipé d’un appui-tête
2
3
1
2
1
4
ajustable. Seule la combinaison de ces deux éléments peut fournir protection et confort à
votre enfant.
!
ATTENTION ! Les éléments du CYBEX SOLUTION S-FIX ne doivent pas être
utilisés seuls ou en association avec des assises, dossiers ou éléments de sièges
d’un autre modèle ou d’autres marques. Dans ces circonstances, la garantie ne
pourra fonctionner.
Connectez le dossier (2) à l’assise (1) en clipsant le guide (3) sur l’axe (4) de l’assise (1).
!
ATTENTION ! Assurez-vous toujours que les composants du siège auto ne sont
jamais compressés ou bloqués (par exemple, par la porte de la voiture ou lors du
réglage du siège).
NOTE ! Gardez toujours ces instructions à portée de main (par ex. dans le compartiment
prévu à cet effet à l’arrière du dossier).
30
Page 31

EERSTE INSTALLATIE
Het autostoeltje bestaat uit een zitting (1) en een rugleuning (2) met een verstelbare
hoofdsteun. Alleen de combinatie van beide onderdelen biedt de beste bescherming en
het grootste comfort voor uw kind.
!
BELANGRIJK! De onderdelen van de CYBEX SOLUTION S-FIX mogen niet
afzonderlijk of in combinatie met een zitting, rugleuning of hoofdsteun van een
andere fabrikant of van een ander model worden gebruikt. In die gevallen vervalt de
certificering direct.
Verbind de rugleuning (2) met de zitting (1) door de geleidenok (3) in de
as (4) van de zitting vast te haken. (1).
!
BELANGRIJK! Zorg ervoor dat de kunststof onderdelen van het autostoeltje
niet in de knel komen (bijvoorbeeld tussen een portier of bij het verstellen van de
achterbank).
LET OP! Houd deze handleiding altijd bij de hand (bijvoorbeeld in het daarvoor bestemde
vakje aan de achterzijde van rugsteun).
PIERWSZY MONTAŻ FOTELIKA
Fotelik składa się z siedziska (1) i oparcia (2) z regulowaną wysokością zagłówka. Tylko
odpowiednie połączenie części zapewnia bezpieczeństwo i komfort dziecka.
!
OSTRZEŻENIE! Części CYBEX SOLUTION S-FIX nie mogą być użyte
samodzielnie lub w kombinacji z siedziskiem, oparciem i zagłówkiem innego
producenta lub innej serii produktów. W takich przypadkach certyfikat
bezpieczeństwa traci ważność.
Połącz oparcie (2) z siedziskiem (1) wpinając zaczepy na uchwyt (3) na osi (4) siedziska (1).
!
OSTRZEŻENIE! Należy upewnić się, że żadne plastikowe części nie zostały
ściśnięte (np. przytrzasnięte drzwiami samochodowymi.
UWAGA! Zawsze należy zachować instrukcję w zasiegu ręki (np. w specjalnie
przeznaczonym do tego schowku z tyłu oparcia samochodu).
FRNLPL
31
Page 32

POSITIONNEMENT CORRECT DU SIÈGE DANS LE VÉHICULE
Ce siège auto, si son système ISOFIX Connect est rétracté, peut être utilisé sur tous les
sièges de véhicules équipés de ceinture de sécurité trois points et approuvés dans le
manuel du véhicule pour une utilisation universelle.
!
ATTENTION ! Le siège ne convient pas pour une ceinture à deux points ou ventrale.
L’utilisation du siège en conjonction avec une ceinture à deux points risque de
blesser gravement, voire mortellement l’enfant.
Un autorisation «semi-universelle» est fournie pour les équipements utilisant les
connecteurs ISOFIX Connect. C’est pour cette raison que le système ISOFIX
Connect ne peut être utilisé que dans certains véhicules. Veuillez consulter la liste
ci-jointe des véhicules approuvés. Vous pouvez consulter la dernière version ici :
www.cybex-online.com
Dans des cas exceptionnels, le siège auto peut également être installé sur le siège
passager avant. Dans ce cas, veuillez tenir compte des remarques suivantes:
• Dans les véhicules équipés d’airbags, vous devez reculer le siège au maximum. Veuillez
cependant vous assurer que le mécanisme de la ceinture de sécurité se trouve à
l’arrière du point d’attache du siège auto.
• Conformez-vous toujours aux recommandations du fabricant du véhicule.
!
ATTENTION ! La ceinture diagonale (6) doit être à l’arrière en position inclinée et ne
doit jamais être positionnée en direction du point le plus haut de la ceinture de votre
véhicule. S’il est impossible de positionner le siège de cette manière, en poussant le
6
siège auto vers l’avant ou en l’utilisant sur un autre siège, cela signifie que ce siège
auto ne convient pas à votre véhicule.
!
ATTENTION ! Les bagages ou autres objets présents dans le véhicule peuvent
provoquer des blessures en cas d’accident et doivent toujours être bien attachés.
Sinon, ils risqueraient d’être projetés, provoquant des blessures mortelles.
!
ATTENTION ! Le siège auto ne doit pas être utilisé sur des sièges de véhicules
faisant face au côté de la route. L’utilisation de ce siège auto est permise sur les
sièges de véhicules orientés dos à la route, notamment dans un van ou un minibus,
à condition que le siège du véhicule en question soit prévu pour transporter une
personne adulte. Veuillez noter que l’appui-tête d’une banquette orientée dos à la
route ne doit pas être retiré ! Le siège auto pour enfant être attaché avec la ceinture
de sécurité, même s’il est vide.
32
NOTE ! Ne laissez jamais votre enfant sans surveillance dans la voiture.
Page 33

HET STOELTJE GOED IN DE AUTO PLAATSEN OPTYMALNE MIEJSCE FOTELIKA W SAMOCHODZIE
Het autostoeltje is met ingeklapt ISOFIX Connect-systeem te gebruiken op alle
autostoelen met automatische driepuntsgordels die volgens de handleiding bij de auto zijn
goedgekeurd voor ‘universeel’ gebruik.
!
BELANGRIJK! Het stoeltje is niet geschikt voor gebruik met een tweepuntsgordel
of heupgordel. Als het stoeltje met behulp van een tweepuntsgordel wordt vastgezet,
kan een ongeval leiden tot ernstig of zelfs fataal letsel van het kind.
Als het beveiligingssysteem uitsluitend met ISOFIX Connect-vergrendelarmen in
de auto wordt bevestigd, geldt een ‘semi-universele’ goedkeuring. Dat betekent
dat ISOFIX Connect alleen in bepaalde voertuigen mag worden gebruikt. U kunt
op de bijgevoegde lijst van voertuigtypen controleren of uw auto hier geschikt voor
is. Het meest actuele overzicht kunt u downloaden op www.cybex-online.com.
In uitzonderlijke gevallen mag het autostoeltje ook op de passagiersstoel voorin gebruikt
worden. Let daarbij dan op het volgende:
• In auto’s met airbags moet u de passagiersstoel zo ver mogelijk naar achteren zetten.
Zorg er daarbij echter voor dat het bovenste draaipunt van de veiligheidsgordel achter
de gordelgeleider van het autostoeltje blijft.
• Volg altijd de aanbevelingen van de autofabrikant op.
!
BELANGRIJK! De borstriem (6) moet schuin naar achteren lopen en mag nooit
voorwaarts naar het bovenste gordelpunt in uw auto lopen. Als het niet mogelijk is
het stoeltje op deze manier te plaatsen, bijvoorbeeld door de autostoel naar voren te
schuiven of door het stoeltje op een andere autostoel te gebruiken, is dit autostoeltje
niet geschikt voor uw auto.
!
BELANGRIJK! Bagage en andere objecten die in de auto liggen en letsel
kunnen veroorzaken tijdens een ongeval, moeten altijd goed worden vastgezet.
Rondvliegende voorwerpen kunnen fataal letsel veroorzaken.
!
BELANGRIJK! Het autostoeltje mag niet worden gebruikt op autostoelen die
haaks op de rijrichting staan. Gebruik van het autostoeltje is wel toegestaan op
achterwaarts gerichte stoelen, bijvoorbeeld in een busje, vooropgesteld dat de stoel
bedoeld is voor het vervoer van een volwassene. De hoofdsteun van de autostoel
mag niet verwijderd worden als het autostoeltje op een achterwaarts gerichte stoel
wordt geplaatst! Ook als het autostoeltje niet wordt gebruikt, dient het altijd met de
veiligheidsgordel te zijn vastgemaakt.
Fotelik ze schowanymi zaczepami Isofi x może być montowany na wszystkich siedzeniach
pojazdu z automatycznymi trzypunktowymi pasami bezpieczeństwa zatwierdzonymi w
instrukcji pojazdu do powszechnego użytku.
!
OSTRZEŻENIE! Fotelik nie nadaje sie do montażu w pojazdach z dwupunktowymi
pasami bezpieczeństwa lub pasami biodrowymi. Używanie tego typu pasów
bezpieczeństwa może skutkować poważnymi lub śmiertelnymi obrażeniami dziecka w
razie wypadku.
Używanie systemu Isofi x do montażu fotelika zalicza się do kategorii
„półuniwersalnej”, co umożliwia używanie go tylko w wybranych pojazdach. Z tego
powodu ISOFIX CONNECT może być używany tylko w niektórych modelach
samochodów. Prosimy sprawdzić, czy na liście dopuszczonych pojazdów znajduje
się Państwa samochód. Aktualną listę znajdą Państwo na stronie: www.cybex-online.com.
W wyjątkowych przypadkach, fotelik może być również montowany na przednim siedzeniu
pasażera. Należy wtedy przestrzegać poniższych wskazówek:
• Jeżeli pojazd posiada poduszkę powietrzną pasażera, odsuń siedzenie do tyłu najdalej,
jak to możliwe. Należy się upewnić, ze górne mocowanie pasa znajduje się za fotelikiem.
• Ściśle przestrzegaj zaleceń producenta pojazdu.
!
OSTRZEŻENIE! Pas barkowy (6) powinien zawsze przebiegac skośnie od
tyłu i nie powinien nigdy przechodzić ku przodowi w kierunku górnego zaczepu
samochodowego pasa bezpieczeństwa. W przypadku braku możliwości
dopasowania siedzenia, np. poprzez przesuniecie fotelika do przodu lub montaż na
innym siedzeniu, oznacza to, że fotelik nie pasuje do twojego samochodu.
!
OSTRZEŻENIE! Bagaże i inne przedmioty znajdujące się w samochodzie, które
mogą zranić pasażerów w czasie wypadku powinny zostać dokładnie zabezpieczone.
Pozostawione luzem przedmioty mogą spowodować obrażenia w czasie wypadku
!
OSTRZEŻENIE! Montowanie fotelika na siedzeniach samochodowych ustawionych
bokiem do kierunku jazdy jest niedozwolone. Montowanie fotelika na siedzeniach
ustawionych tyłem do kierunku jazdy jest możliwe, np. w pojazdach typu van, minibus,
pod warunkiem, że siedzenie jest przeznaczone do przewozu osób dorosłych. Nalezy
pamiętać, że zagłówek siedzenia samochodowego nie może być zdemontowany w
przypadku umiejscowienia fotelika na siedzeniu ustawionym tyłem do kierunku jazdy!
Fotelik zawsze powinien być zabezpieczony pasami bezpieczeństwa, nawet jeśli nie
jest w użytku.
FRNLPL
LET OP! Laat uw kind nooit alleen in de auto achter. UWAGA! Nigdy nie pozostawiaj dziecka bez opieki w samochodzie
33
Page 34

SÉCURITÉ EN VOITURE
!
ATTENTION ! Le siège auto doit toujours être attaché avec la ceinture de sécurité
du véhicule, même lorsqu’il n’est pas utilisé. En cas de freinage d’urgence ou
d’accident, un siège auto non attaché peut causer des blessures aux autres
passagers et à vous même.
Afi n de garantir la meilleure sécurité possible pour tous les passagers, assurez-vous que :
Les dossiers inclinables des banquettes soient relevés dans leur position initiale droite.
En installant le siège auto sur le siège passager avant, reculer le siège au maximum.
Tous les objets susceptibles de causer des blessures en cas d’accident soient
correctement rangés dans l’habitacle.
Tous les passagers de la voiture attachent leur ceinture.
POSITIONNEMENT DU SIÈGE DANS LE VÉHICULE
Placez le siège auto pour enfant sur un siège du véhicule convenant à cet effet.
• Assurez-vous toujours que la surface entière du dossier (2) du siège CYBEX
SOLUTION S-fi x soit bien en contact avec le dossier du siège du véhicule. Le siège
auto ne doit jamais être incliné. Vous pouvez, si nécessaire, régler la profondeur des
connecteurs ISOFIX en utilisant la poignée de réglage (9).
• Si l’appui-tête du véhicule gêne, relevez-le ou retirez-le complètement (les exceptions
à cette règle fi gurent au chapitre «POSITIONNEMENT CORRECT DU SIÈGE DANS
LE VÉHICULE»). Le dossier (2) s’adaptera parfaitement à pratiquement toutes les
inclinaisons de la banquette du véhicule.
!
ATTENTION ! La surface entière du dossier du siège auto CYBEX doit reposer sur
le dossier de la banquette du véhicule. Le siège doit se trouver en position verticale
2
pour garantir la sécurité optimale de votre enfant.
9
NOTE ! Sur certaines banquettes fragiles (par exemple : velours, cuir etc.), le siège auto
peut parfois laisser des traces ou causer une décoloration. Afi n d’éviter ce problème, vous
pouvez, par exemple, mettre une couverture ou une serviette sous le siège auto. Veuillez
également combiner ces précautions à nos instructions de nettoyage; ces dernières
doivent être appliquées avant d’utiliser le siège pour la première fois.
34
!
ATTENTION ! Ne pas utiliser de points de contact autres que ceux décrits dans les
instructions.
NOTE ! Utilisez les Guidese Isofi x fournis pour ne pas endommager la banquette avec les
bras ISOFIX Connect.
Page 35

VEILIGHEID IN DE AUTO BEZPIECZEŃSTWO W SAMOCHODZIE
! !
BELANGRIJK! Het autostoeltje moet altijd correct zijn geïnstalleerd in het voertuig,
ook als het niet wordt gebruikt. Door plotseling remmen of tijdens een ongeval kan
een niet vastgemaakt autostoeltje andere passagiers of uzelf verwonden.
Om de hoogst mogelijke veiligheid van alle passagiers te garanderen is het nodig dat...
de neerklapbare stoelruggen in het voertuig rechtop staan en zijn vergrendeld.
de voorstoel zo ver mogelijk naar achteren staat als u het autostoeltje op deze stoel
installeert.
u alle voorwerpen die letsel kunnen veroorzaken tijdens een ongeval goed opbergt.
alle passagiers in het voertuig hun gordel dragen.
HET STOELTJE IN DE AUTO PLAATSEN
Plaats het autostoeltje op de juiste stoel in de auto.
• Zorg altijd dat de gehele rugleuning (2) van de CYBEX SOLUTION S-FIX goed op de
rugleuning van de autostoel aansluit. Het autostoeltje mag nooit in een liggende positie
worden geplaatst. U kunt zo nodig de stand van de rugleuning aanpassen met behulp
van de ISOFIX-aanpassingshendel. (9).
• Als de hoofdsteun van de auto in de weg zit, trek die dan helemaal uit of verwijder
hem (zie voor uitzonderingen hierop onder het kopje ‘HET STOELTJE GOED IN DE
AUTO PLAATSEN’). De rugsteun (2) past zich volledig aan aan vrijwel elke hoek van de
autostoel.
!
BELANGRIJK! Zorg altijd dat de hele rugleuning van het CYBEX-autostoeltje
goed op de rugleuning van de autostoel aansluit. Om verzekerd te zijn van maximale
bescherming van uw kind, moet het stoeltje normaal rechtop staan!
LET OP! Op sommige kwetsbare autostoelbekledingen (zoals suède of leer) kan het
gebruik van autostoeltjes sporen achterlaten en/of tot verkleuring leiden. Om dit te
voorkomen kunt u er bijvoorbeeld een deken of handdoek onder leggen. In verband
hiermee verwijzen we u ook naar de reinigingsadviezen in deze handleiding; die
reinigingsadviezen moeten in acht worden genomen alvorens het stoeltje voor het eerst
te gebruiken.
!
BELANGRIJK! Gebruik geen andere dragende contactpunten dan de in de
handleiding beschreven en op het autostoeltje aangegeven punten.
LET OP! Gebruik de meegeleverde Isofi x-geleiders om te verzekeren dat de autostoel niet
wordt beschadigd door de vergrendelarmen van ISOFIX Connect.
OSTRZEŻENIE! Fotelik samochodowy musi zawsze być przypięty samochodowym
pasem bezpieczeństwa. Nawet kiedy dziecko nie jest w nim przewożone. W razie
nagłego hamowania lub kolizji, nieprzypięty fotelik może zranić któregoś z pasażerów
lub kierowcę.
W celu zagwarantowania najlepszej ochrony wszystkich pasażerów, upewnij się, że...
rozkładane oparcia samochodowe ustawione są w pozycji pionowej.
montując fotelik na przednim siedzeniu samochodu, na fotelu pasażera, odsuń fotel
samochodowy maksymalnie do tyłu.
wszystkie elementy wewnątrz pojazdu są zabezpieczone tak, by nie spowodować obrażeń
w przypadku kolizji.
wszyscy pasażerowie mają zapięte pasy.
ZABEZPIECZANIE DZIECKA
Umieść fotelik na odpowiednim siedzeniu samochodu
• Upwenij się, że oparcie fotelika (2) CYBEX SOLUTION S-FIX przylega do oparcia
siedzenia samochodowego. Fotelik nie powinien być ustawiony w pozycji do spania. W
razie potrzeby mozna dopasować fotelik używając zaczepów Isofi x z regulacją. (9).
• Jesli zagłówek siedzenia smaochodowego przeszkadza w montażu fotelika, należy
go ustawić w najwyzszej pozycji lub zdemontować (z wyjątkiem sytuacji opisanej
w punkcie “OPTYMALNE MIEJSCE W SAMOCHODZIE”).Oparcie fotelika (2)
idealnie dopasowuje się do praktycznie każdego kąta nachylenia oparcia siedzenia
samochodowego.
!
OSTRZEŻENIE! Cała powierzchnia oparcia fotelika CYBEX powinna przylegać
do oparcia fotela samochodowego. Dla zapewnienia jak najlepszej ochrony dziecku
fotelik powinien być ustawiony w normalnej, pionowej pozycji.
UWAGA! Na nektórych tapicerkach samochodu wykonanych z delikatnego materiału (np.
zamsz, skóra itp.), fotelik może pozostawić ślady i/lub spowodować przebarwienia. W
celu zabezpieczenia tapicerki należy podłozyc pod fotelik np. kocyk lub ręcznik. Prosimy
zapoznać się z instrukcją w zakresie czyszczenia jeszcze przed pierwszym użyciem fotelika.
!
OSTRZEŻENIE! Nie używaj żadnych punktów kontaktowych nośnych innych niż
opisane w instrukcji i oznaczone na foteliku.
UWAGA! Prosimy używać nakładek na zaczepy Isofi x w celu zabezpieczenia tapicerki
przed zniszczeniem.
FRNLPL
35
Page 36

7
CLICK!
INSTALLATION DU SIÈGE AVEC LE SYSTÈME ISOFIX CONNECT
7
8
11
10
5
1800
10
10
11
9
11
9
Le système ISOFIX Connect vous permet de fi xer le siège auto au véhicule,
augmentant ainsi la sécurité de votre enfant. L’enfant doit toujours être sécurisé
avec la ceinture de sécurité trois points du véhicule.
• Insérez les guides ISOFIX fournis (7), côté le plus long vers le haut, dans les points
d’ancrage ISOFIX (8). Dans certains véhicules, il est préférable d’installer les guides
ISOFIX (7) dans la direction opposée.
NOTE ! Les points d’ancrage ISOFIX (8) sont deux barres métalliques et sont positionnés
entre le dossier et l’assise de la banquette du véhicule. En cas de doute, veuillez consulter
le manuel de votre véhicule.
• Utilisez la poignée de réglage (9) sous l’assise du siège auto.
• Tirez les deux connecteurs ISOFIX Connect (5) autant que possible.
• Faites maintenant pivoter les connecteurs ISOFIX Connect (5) à 180° de manière à ce
qu’ils soient face aux guides ISOFIX (7).
NOTE ! Avant de fi xer les connecteurs ISOFIX Connect (5) dans les point d’ancrage
ISOFIX (8), vérifi ez les boutons déclencheurs (10). Si les indicateurs de sécurité verts (11)
sont visibles, vous devez tout d’abord libérer les connecteurs ISOFIX Connect avant de
les ajuster en appuyant et en reculant le bouton déclencheur (10). Répétez la procédure si
nécessaire avec le deuxième connecteur.
• Poussez les deux connecteurs (8) dans les guides ISOFIX (7) jusqu’à ce que ceux-ci
s’emboîtent dans les points d’ancrage ISOFIX en émettant un «clic» audible.
• Assurez-vous que le siège est bien fi xé en essayant de l’extraire des points d’ancrage
ISOFIX (7).
• L’indicateur de sécurité vert (11) doit désormais être clairement visible au niveau des
deux boutons déclencheurs (10).
• Vous pouvez désormais utiliser la poignée de réglage (9) située sous l’assise (1) du
CYBEX SOLUTION S-FIX pour le positionner.
NOTE ! Tenez compte des informations du chapitre «Positionnement du siège dans le véhicule».
36
1
9
Page 37

INSTALLATIE VAN HET AUTOSTOELTJE MET HET ISOFIX CONNECT-SYSTEEM MONTAŻ FOTELIKA ZA POMOCĄ ZACZEPÓW ISOFIX
De veiligheid van uw kind neemt toe dankzij het ISOFIX Connect-systeem
waarmee u de CYBEX SOLUTION S-FIX kunt bevestigen in het voertuig. Uw kind
moet nog wel met de driepuntsgordel van uw voertuig worden vastgemaakt.
• Plaats de meegeleverde ISOFIX-geleiders (7) met de lange kant naar boven in de twee
ISOFIX-bevestigingspunten (8). In sommige auto’s is het beter om de ISOFIX-geleiders
(7) omgekeerd aan te brengen.
LET OP! The ISOFIX-bevestigingspunten (8) zijn twee metalen beugels per stoel, die
geplaatst zijn tussen de rugleuning en zitting van de autostoel. Als u twijfelt, kijk dan in de
handleiding van uw voertuig.
• Gebruik de ISOFIX aanpassingshendel (9) onder de zitting.
• Trek de twee ISOFIX Connect-vergrendelarmen (5) zo ver mogelijk uit.
• Draai de ISOFIX Connect-vergrendelarmen (5) nu 180°, zodat ze in de richting van de
ISOFIX-geleiders (7)wijzen.
LET OP! Controleer de ontgrendelingsknoppen (10) voordat u de ISOFIX Connect-
vergrendelarmen (5) in de ISOFIX bevestigingsbeugels (8) vastklikt. Als de groene
veiligheidsindicators (11) zichtbaar zijn, moet u de ISOFIX Connect-vergrendelarmen
ontgrendelen voordat u ze vastmaakt. Dat doet u door de ontgrendelingsknop (10)
in te duwen en terug te trekken. (10). Herhaal het proces zo nodig voor de tweede
vergrendelarm.
• Duw de twee vergrendelarmen (8) in de ISOFIX-geleiders (7) tot ze met een hoorbare
‘klik’ vergrendelen.
• Controleer of het stoeltje goed vastzit door te proberen het uit de ISOFIX- geleiders (7)
te trekken.
• De groene veiligheidsindicator (11) moet nu goed zichtbaar zijn op de twee grijze
ontgrendelingsknoppen (10).
• Nu kunt u de ISOFIX aanpassingshendel (9) onder de zitting (1) gebruiken om de stand
van het CYBEX SOLUTION S-FIX-autostoeltje aan te passen.
LET OP! Lees de informatie onder het kopje ‘Het stoeltje in de auto plaatsen’.
System ISOFIX w CYBEX SOLUTION S-FIX zwiększa bezpieczeństwo
Twojego dziecka w samochodzie. Dziecka wciąż powinno być zabezpieczone
trzypunktowymi pasami bezpieczeństwa.
• Użyj dołączonych osłon ISOFIX (7) kierując dłuższą część do góry na zaczepy (8). W
niektórych pojazdach lepiej użyć osłon(7) w drugą stronę.
UWAGA! Zaczepy ISOFIX (8) to dwa metalowe pierścienie znajdujace się miedzy
oparciem a siedziskiem samochodu. W razie wątpliwości należy zajrzeć do instrukcji
obsługi samochodu.
• Do regulacji ISOFIX służy uchwyt (9) na spodzie siedziska.
• Wyciągnij zaczepy (5) najdalej jak to możliwe.
• Obróć zaczepy ISOFIX (5) o 180° tak by były skierowane w kierunku osłon uchwytów
w siedzeniu (7).
UWAGA! Upewnij się, że dwa zielone przyciski zabezpieczające (5) nie są wciśnięte
(8), sprawdź przyciski zwalniające (10). Jeśli zielone wskaźniki (11) sa widoczne, należy
odbezpieczyć uchwyty ISOFIX przed połączeniem poprzez przesuniecie przycisku
zwalniającego (10). Powtórz w razie potrzeby czynności z drugą szyną.
• Wsuń zaczepy (8) w osłony ISOFIX (7) aż usłyszysz wyraźne kliknięcie i zaczepy
zatrzasną się w uchwytach Isofi x.
• Pociągnij za fotelik by sprawdzić czy jest prawidłowo zamontowany (7).
• Zielone przyciski zabezpieczające (11) musza być widoczne z obu stron (10).
• Z pomoca uchwytu regulacji ISOFIX (9) w podstawie fotelika
S-FIX możesz ustawić odpowiednie położenie.
UWAGA! Dodatkowe informacje w punkcie „ZABEZPIECZANIE DZIECKA“
FRNLPL
(1) CYBEX SOLUTION
37
Page 38

L.S.P.
RÉGLAGE DES PROTECTIONS LATÉRALES
CLICK!
A
PRESS!
10
7
5
12
13
MAX
6
Le siège auto est équipé du système de «Protection Linéaire contre les Impacts Latéraux»
(L.S.P.). Ce système accroît la sécurité de votre enfant en cas d’impact latéral. Sortez le
L.S.P. du côté de la portière adjacente pour un maximum de securite. Pour l’enclencher,
pressez l’emplacement indiqué (A) sur le L.S.P.
NOTE ! Assurez vous que le L.S.P. est enclenché avec un «CLICK» audible. Si le L.S.P.
touche la porte, il doit être correctement rangé.
Il est possible de l´utiliser dans cette position. Afi n de replacer le L.S.P. sur le siège, tirez le
légèrement et pliez le, jusqu’à ce qu’il se verrouille avec un «CLICK» audible.
NOTE ! Lorsque vous utilisez le siège auto sur la position centrale arrière, il est interdit de
déplier le dispositif (L.S.P.).
!
ATTENTION ! Il est interdit d´utiliser le dispositif L.S.P. pour porter ou grimper
dans le siège.
RETRAIT DU CYBEX SOLUTION S-FIX
Procédez en inversant les étapes d’installation.
• Déverrouillez les connecteurs ISOFIX (5) des deux côtés en appuyant sur les
boutons déclencheurs rouges (10) et en les reculant simultanément.
• Retirer le siège des guides ISOFIX (7).
• Faites pivoter les bras ISOFIX Connect (5) à 180°.
• Actionnez la poingée (9) sur l’axe (4) et poussez les connecteurs du CYBEX
SOLUTION S-FIX aussi loin que possible.
NOTE ! En repliant les connecteurs (5), vous ne vous contentez pas de protéger le siège
du véhicule, mais vous protégez également les connecteurs du système ISOFIX Connect
de la saleté et des dommages.
RÉGLAGE DU SIÈGE AUTO
• Le siège peut ensuite être réglé selon la morphologie de votre enfant en réglant le
dossier (12). Pour cela, tirez le levier de réglage (13) vers le haut pour déverrouiller le
dossier (12).
• La têtière doit être réglée de sorte que l‘écart entre l’épaule de l’enfant et le bas de la
têtière soit équivalent à 2 cm maximum (deux doigts environ).
NOTE ! Seul un dossier bien réglé (12) permettant également à la ceinture diagonale de
passer aisément (6) peut garantir à votre enfant une protection maximale. La hauteur du
dossier du siège CYBEX SOLUTION S-fi x peut être réglée sur l’une des douze positions
disponibles.
38
Page 39

AANPASSEN VAN DE ZIJBESCHERMERS DOPASOWANIE OSŁON BOCZNYCH
Het autostoeltje is uitgerust met het ‘Linear Side-Impact Protection’-systeem (L.S.P.). Dit
systeem vergroot de veiligheid van het kind bij een zijdelingse botsing. Trek de L.S.P. uit
aan de kant van het dichtstbijzijnde portier voor de grootst mogelijke veiligheid. Druk op het
gemarkeerde gebied (A) op de L.S.P. om het systeem te ontgrendelen.
LET OP! Zorg dat de L.S.P. met een duidelijke ‘KLIK’ vergrendelt. De L.S.P. mag het
portier niet raken; als dat gebeurt, moet u het systeem weer inklappen.
Het autostoeltje kan ook worden gebruikt met goed opgeborgen L.S.P.-systeem. U kunt de
L.S.P. weer geheel in de zitting opbergen door het systeem iets uit te trekken en vervolgens
weer in te klappen totdat het met een duidelijke KLIK vergrendelt.
LET OP! Als u het stoeltje op de middenstoel in het voertuig gebruikt, is het verboden de
L.S.P. uit te klappen.
!
BELANGRIJK! De L.S.P. mag niet worden gebruikt om het autostoeltje te dragen of
om erin te klauteren.
DE CYBEX SOLUTION S-FIX VERWIJDEREN
Voer de stappen van het plaatsen in omgekeerde volgorde uit.
• Ontgrendel de ISOFIX Connect-vergrendelarmen (5) aan beide zijden door
op de grijze ontgrendelingsknoppen (10) te drukken en ze tegelijkertijd terug
te trekken.
• Trek het stoeltje uit de ISOFIX-geleiders (7).
• Draai de ISOFIX Connect-vergrendelarmen (5) 180°.
• Gebruik de ISOFIX aanpassingshendel (9) op de as (4) van de CYBEX
SOLUTION S-FIX en duw de vergrendelarmen zo ver mogelijk in.
LET OP! Door de ISOFIX Connect-vergrendelarmen (5) zover mogelijk in te klappen,
beschermt u niet alleen de autostoel, maar ook de vergrendelarmen van het ISOFIX
Connect-systeem zelf tegen vuil en beschadiging.
AANPASSING AAN DE LICHAAMSLENGTE
• Het stoeltje is eenvoudig aan de lichaamslengte van uw kind aan te passen door de
verstelbare hoofdsteun (12) te gebruiken. U doet dat door aanpassingshendel (13)
omhoog te trekken om de hoofdsteun (12) te ontgrendelen.
• Stel vervolgens de hoofdsteun zo af dat de opening tussen de schouder van het kind en
de onderste rand van de hoofdsteun niet groter is dan 2 cm (ongeveer twee vingers dik).
LET OP! Alleen een optimaal afgestelde hoofdsteun (12) biedt uw kind maximale
bescherming en comfort en zorgt ervoor dat de borstriem (6) goed kan worden afgesteld.
De hoogte van de CYBEX SOLUTION S-FIX kan in twaalf standen worden ingesteld.
Fotelik został wyposażon w “Liniowy System Ochrony Bocznej“, system (L.S.P.). Podnosi
on poziom bezpieczeństwa w przypadku kolizji bocznej. Dla zapewnienia najlepszej
ochrony, wyciągnij osłonę L.S.P. najdalej jak się da w kierunku drzwi, które są najbliżej
fotelika dziecka. Aby wysunąć osłony L.S.P. naciśnij oznaczone miejsce (A) na L.S.P.
UWAGA! Upewnij się, że usłyszysz wyraźne kliknięcie. W przypadku, gdy osłona boczna
L.S.P. dotyka drzwi, złóż ją do kolejnej długości.
Korzystanie z niej jest również bezpieczne. By wcisnąć L.S.P. do fotelika, pociagnij lekko
L.S.P. i złóż, aż usłyszysz kliknięcie.
UWAGA! W przypadku montażu fotelika na środkowym siedzeniu, zabronione jest
rozkładanie osłon L.S.P.
!
OSTRZEŻENIE! Wykorzystanie osłon L.S.P w celu noszenia fotelika lub wspinania
się po foteliku jest zabronione.
ODPINANIE FOTELIKA CYBEX SOLUTION S-FIX
Postępuj zgodnie ze wskazówkami nt. montażu, w odwrotnej kolejności.
• Zwolnij zaczepy ISOFIX (5) po obu stronach wciskając szare przyciski
zwalniające (10) i przesunięcie ich.
• Wyjmij fotelik z osłon Isofi x (7).
• Obróć zaczepy (5) o 180°.
• Pociagnij za uchwyt do regulacji (9) w podstawie fotelika (4) i wciśnij zaczepy.
UWAGA! Składając zaczepy ISOFIX (5), nie tylko chronisz siedzenie samochodu ale
również same zaczepy ISOFIX od zanieczyszczeń i zniszczenia.
DOSTOSOWANIE FOTELIKA DO WZROSTU DZIECKA
• Fotelik w prosty sposób może być dopasowany do wzrostu dziecka poprzez regulację
zagłówka. Pociągnij uchwyt regulujący do góry (13) aby odblokować zagłówek. (12).
• Ustaw zagłówek maksymalnie 2 cm (średnio szczelina na 2 palce) pomiędzy ramionami
dziecka oraz dolną krawędzią zagłówka.
UWAGA! Tylko prawidłowe dopasowanie wysokości zagłówka (12) zapewnia maksymalne
bezpieczeństwo i komfort dziecku oraz pas barkowy (6) poprowadzony w sposób
poprawny. Wysokość CYBEX SOLUTION S-FIX może być dopasowana do jednej z 12
pozycji.
FRNLPL
39
Page 40

INSTALLATION AVEC LA CEINTURE DE SECURITÉ
• Installez votre enfant dans le siège auto. Tirez la ceinture trois points du véhicule et
14
passez-la jusque la boucle de ceinture (14) devant votre enfant.
NOTE ! La ceinture de sécurité trois points ne doit passer que
dans les guides dédiés Les guides de ceinture sont décrits en détail dans
ce manuel et sont de couleur rouge sur le siège auto.
!
ATTENTION ! Ne vrillez jamais la ceinture.
40
CLICK!
14
17
15
6
16
17
6
12
6
16
17
12
18
6
• Insérez la languette de la ceinture de sécurité (15) dans sa boucle (14). Elle doit
s’enclencher et émettre un «CLIC» audible.
• Ensuite, placez la ceinture ventrale (16) dans les glissières inférieures (17) du siège auto.
• Tirez la ceinture diagonale (6) fermement pour serrer la ceinture sous-abdominale (16).
Plus la ceinture est serrée, meilleure est la protection offerte contre les blessures. Sur le
côté de la boucle de ceinture (14), la ceinture diagonale (6) et la ceinture ventrale (16)
doivent être insérées ensemble dans la guide inférieur (17).
• La ceinture ventrale (16) doit passer par les deux glissières inférieures (17) situées des
deux côtés de l’assise du siège.
• Ensuite, faites passer la ceinture diagonale (6) par la glissière supérieure (18) au niveau
de l’appui-tête (12) jusqu’à ce qu’elle se trouve dans la glissière.
NOTE ! Apprenez à votre enfant à s’assurer que la ceinture est bien serrée et, si
nécessaire, à s’attacher seul.
!
ATTENTION ! La ceinture ventrale (16) doit passer aussi bas que possible le long
de l’aine de votre enfant pour assurer une protection optimale en cas d’accident.
Assurez-vous que la ceinture diagonale (6) passe entre l’extérieur de l’épaule et le cou de
votre enfant. Si nécessaire, ajustez la hauteur de dossier pour modifi er la position de la
ceinture. La hauteur du dossier (12) peut être ajustée dans la voiture.
6
16
17
Page 41

DE AUTOGORDEL VAN UW KIND VASTMAKEN ZAPINANIE FOTELIKA SAMOCHODOWYM PASEM BEZPIECZEŃSTWA
• Zet uw kind in het autostoeltje. Trek de driepuntsgordel ver uit en voer die voor het kind
langs naar het gordelslot (14).
LET OP! De driepuntsgordel mag uitsluitend over de daarvoor bedoelde geleiders lopen.
Hoe de gordel moet lopen, wordt in deze handleiding precies beschreven en is op het
autostoeltje met rood aangegeven.
!
BELANGRIJK! De gordel mag in geen geval verdraaid zijn.
• Posadź dziecko w foteliku. Wyciągnij pas i przeprowadź w kieunku zapięcia pasów (14)
przed dzieckiem.
UWAGA! Trzypunktowy pas bezpieczeństwa powinien być poprowadzony przez
odpowiednie szczeliny. Droga przechodzenia pasa jest szczegółowo opisana
w tej instrukcji oraz oznaczona na czerwono.
!
OSTRZEŻENIE! Nigdy nie skręcaj pasa.
• Steek de gordeltong (15) in het gordelslot (14). Die moet met een hoorbare ‘KLIK’
vergrendelen.
• Voer vervolgens de buikriem (16) door de met rood aangegeven onderste
gordelgeleiders (17) van het autostoeltje.
• Trek nu de borstriem (6) stevig aan om de buikriem (16) strak te trekken. Hoe strakker
de gordel zit, hoe beter deze bescherming biedt tegen letsel. Aan de kant van het
gordelslot (14)worden de borstriem (6) en de buikriem (16) samen in de onderste
gordelgeleider (17) geplaatst.
• De buikriem (16) moet aan beide zijden van de zitting door de met rood aangegeven
onderste gordelgeleiders (17) lopen.
• Voer nu de borstriem (6) door de bovenste gordelgeleider (18) in de hoofdsteun (12)
totdat deze in de gordelgeleider valt.
LET OP! Leer uw kind vanaf het begin altijd te controleren of de gordel strak genoeg is en
hoe het zelf de gordel strak kan trekken als dat nodig is.
!
BELANGRIJK! De buikriem (16) moet aan beide zijden zo laag mogelijk over de lies
van uw kind lopen om optimaal effect te hebben tijdens een ongeval.
Zorg dat de borstriem (6) tussen de buitenkant van de schouder en de hals van uw
kind loopt. Pas de hoogte van de hoofdsteun indien nodig aan om de positie van
de gordel te veranderen. De hoogte van de hoofdsteun (12) kan ook in de auto nog
steeds worden aangepast.
• Włóż zapięcia pasa (15) w klamry (14). Usłyszysz kliknięcie.
• Następnie, ułóż odpowiednio i zaciśnij pas biodrowy (16) w czerwonych szczelinach
prowadzących (17) fotelika.
• Teraz pociagnij skośny pas barkowy (6) by naprężyć pas biodrowy (16). m ciaśniej
zapięty pas, tym lepiej chroni przed obrażeniami. Po stronie klamry zamykającej pasa
samochodowego (14), pas barkowy (6) i biodrowy (16) powinny razem przechodzić
przez boczną szczelinę prowadzącą (17).
• Pas biodrowy (16) powinien być poprowadzony przez szczeliny (17) po obu stronach
siedziska.
• Teraz poprowadź pas barkowy (6) przez górną szczelinę (18) w zagłówku (12) aż
znajdzie sie w środku.
UWAGA! Od początku ucz swoje dziecko, aby zwracało uwagę, czy pas jest ciasno
zapięty i samo naprężało go w razie potrzeby.
!
OSTRZEŻENIE! Pas biodrowy (16) musi przechodzić najniżej jak to możliwe po
obu stronach pachwin dziecka w celu najlepszego zabezpieczenia.
Upewnij się, że pas barkowy (6) biegnie po zewnetrznej stronie ramion i szyi dziecka. Jeśli
to konieczne, dopasuj wysokość zagłówka tak, by zmienić pozycję, w której przebiega pas.
Wysokość zagłówka (12) może być dopasowana wewnątrz samochodu.
FRNLPL
41
Page 42

14
CLICK!
17
1
19
VOTRE ENFANT EST-IL ATTACHÉ CORRECTEMENT?
Pour assurer la sécurité optimale de votre enfant, veuillez toujours procéder aux
vérifi cations suivantes avant le départ:
• la ceinture ventrale (16) doit passer par les deux glissières inférieures (17) situées des
deux côtés de l’assise du siège (1).
• la ceinture diagonale (6) du côté de la boucle de ceinture passe également dans la
glissière inférieure (17) du siège.
• la ceinture diagonale (6) passe bien dans la glissière (18) présentant la couleur rouge
sur le support d’épaule (12).
• La ceinture diagonale (6) est inclinée vers le bas.
• la ceinture est bien ajustée contre le corps de votre enfant et n’est pas entortillée.
12
• Si utilisation du système ISOFIX Connect : le siège doit bien être fi xé des deux côtés
avec les connecteurs ISOFIX Connect (5) et les deux indicateurs verts (11) doivent
être visibles.
!
ATTENTION ! La boucle de la ceinture du véhicule (14) ne doit jamais croiser
l’accoudoir. Si le système de ceinture est trop long, ce siège auto pour enfant
n’est pas adapté pour cette position dans le véhicule. En cas de doute, contactez
votre revendeur.
!
ATTENTION ! Ne laissez jamais votre enfant sans surveillance dans la voiture. Les
parties plastiques
chauffent en plein soleil et votre enfant peut subir des brûlures.
Protégez votre enfant et le siège auto de l’exposition directe au soleil (en couvrant
le siège avec un linge par exemple).
511
42
14
Page 43

IS UW KIND GOED VASTGEMAAKT? CZY TWOJE DZIECKO JEST DOBRZE ZABEZPIECZONE?
Controleer voordat u op weg gaat voor optimale veiligheid van uw kind of Aby mieć pewność, że Twoje dziecko jest dobrze zabezpieczone, przed
• de buikriem (16) aan beide zijden van de zitting (1) door de met rood aangegeven
gordelgeleiders (17) loopt.
• de borstriem (6) aan de kant van het gordelslot ook door de met rood aangegeven
gordelgeleider (17) van het stoeltje loopt.
• de borstriem (6) door de met rood aangegeven bovenste gordelgeleider (18) van de
hoofdsteun (12) loopt.
• de borstriem (6) schuin naar achteren loopt.
• de hele gordel strak tegen het lichaam van uw kind valt en niet gedraaid is.
• Als u ISOFIX Connect gebruikt, controleert u of het stoeltje aan beide zijden verankerd
is met de ISOFIX Connect-vergrendelarmen (5) en of de groene veiligheidsindicatoren
(11) duidelijk zichtbaar zijn.
!
BELANGRIJK! De autogordel (14) mag nooit over de armleuning lopen. Als het
gordelsysteem te lang is, is het autostoeltje in die stand ongeschikt voor gebruik in
uw auto. Neem bij twijfel contact op met de fabrikant.
!
BELANGRIJK! Laat uw kind nooit alleen in de auto achter. De kunststof onderdelen
van het kinderbeveiligingssysteem worden in de zon zeer heet en kunnen
brandwonden veroorzaken.
Bescherm uw kind en het autostoeltje tegen directe blootstelling aan de zon
(bijvoorbeeld met een lichte kleur doek).
uruchomieniem samochodu sprawdź, czy:
• pas biodrowy (16) przechodzi przez boczne szczeliny (17) po obu stronach siedziska (1).
• pas barkowy (6) również przechodzi przez czerwone szczeliny w podstawie (17) fotelika.
• pas barkowy (6) przechodzi przez górną szczelinę (18) oznaczoną na czerwono w
zagłówku (12).
• pas przebiega ukośnie (6) z tyłu.
• pas na całej swojej długości jest naprężony i nie jest skręcony.
• Jeśli korzystają Państwo z ISOFIX Connect należy sprawdzić, czy: Fotelik jest
zablokowany po obu stronach zaczepami Isofi x (5) a zielone przyciski zabezpieczające
(11) są dobrze widoczne.
!
OSTRZEŻENIE! Klamra fotela samochodowego (14) nie może przechodzić pod
podłokietnikiem. Jeżeli pas klamry jest zbyt długi, fotelik nie nadaje się do tego typu
samochodu W przypadku wątpliwości, skontaktuj się ze sprzedawcą.
!
OSTRZEŻENIE! Nigdy nie zostawiaj dziecka w samochodzie bez opieki! Plastikowe
części
w pasach bezpieczeństwa nagrzewają się w słońcu, co może spowodować
poparzenie dziecka.
Nalezy chronić dziecko i fotelik samochodowy przed bezpośrednią ekspozycją na
słońce (np. poprzez przykrycie
lekką tkaniną).
FRNLPL
43
Page 44

19
20
APPUI-TÊTE INCLINABLE
L’appui-tête ajustable permet d’éviter le basculement de la tête de l’enfant vers l’avant
lorsque celui-ci dort. En cas de collision, l’appuie-tête suivra le mouvement de la tête de
votre enfant, se verrouillera et absorbera le mouvement vers l’arrière de la tête de votre
enfant consécutif au choc.
NOTE ! Assurez-vous que la tête de votre enfant est toujours en contact avec l’appuietête inclinable (19), puisque c’est la seule manière de garantir une protection optimale en
cas de collision latérale.
L’angle d’inclinaison de l’appui-tête peut être réglé sur l’une de trois positions. Il peut être
déplacé vers l’avant sans bouger le levier vers la deuxième ou la troisième position jusqu’à
ce qu’il s’enclenche dans la position souhaitée. Pour revenir à la position d’origine, il faut
lever et faire reculer l’appui-tête.
!
ATTENTION ! N’utilisez jamais d’objet pour bloquer le mécanisme de verrouillage
(20) ! En cas d’accident, le mécanisme doit rester souple, sans quoi votre enfant
risque d’être blessé.
ENTRETIEN ET MAINTENANCE
Afi n de protéger au maximum votre enfant, il est primordial de respecter les points suivants :
• Toutes les pièces principales du siège auto doivent faire l’objet d’un contrôle régulier
pour vérifi er qu’elles ne sont pas endommagées. Les composants mécaniques ne
doivent pas présenter de défauts.
• Il est absolument nécessaire de vérifi er que le siège auto n’est pas coincé entre deux
éléments rigides, comme par exemple la porte du véhicule et le rail de la banquette, qui
seraient susceptibles de l’endommager.
• En cas d’exposition à un choc extrême, p. ex. suite à une collision, le siège auto ne doit
plus être utilisé et doit être remplacé.
Veillez à utiliser uniquement une housse de siège CYBEX, celle-ci étant un élément-clé de
la fonction du siège. Des housses de rechange sont disponibles auprès d’un revendeur
spécialisé.
44
Page 45

KANTELBARE HOOFDSTEUN REGULOWANY ZAGŁÓWEK
De kantelbare hoofdsteun helpt voorkomen dat het hoofd van uw kind gevaarlijk naar voren
valt tijdens het slapen. Tijdens een botsing volgt de hoofdsteun de beweging van het hoofd
van uw kind naar voren, klikt vast en vangt de daaropvolgende achterwaartse beweging
van het hoofd van uw kind op.
LET OP! Zorg dat het hoofd van uw kind altijd contact heeft met de kantelbare hoofdsteun
(19), omdat de hoofdsteun alleen dan optimale bescherming kan bieden tijdens een
botsing van opzij.
De hoofdsteun kan in drie standen worden gekanteld. Hij kan naar voren worden ingesteld
zonder de hendel in de tweede of derde stand te zetten totdat de hoofdsteun vastklikt. Om
hem in de uitgangspositie terug te brengen, gebruikt u de hendel om de hoofdsteun naar
achteren te trekken.
!
BELANGRIJK! Zorg dat het vergrendelingsmechanisme (20) nooit door iets wordt
geblokkeerd! Tijdens een ongeval moet het kantelmechanisme ongestoord kunnen
werken, anders kan uw kind letsel oplopen!
REINIGING & ONDERHOUD
Om te garanderen dat uw autostoeltje maximale bescherming biedt, is het volgende
uiterst belangrijk:
• Alle belangrijke onderdelen van het autostoeltje dienen regelmatig op schade
gecontroleerd te worden. De mechanische onderdelen mogen geen defecten vertonen.
• Het autostoeltje mag absoluut niet worden ingeklemd tussen harde voorwerpen, zoals
een autoportier of stoelrail, omdat het daardoor beschadigd kan raken.
• Zodra het autostoeltje heeft blootgestaan aan een extreme schok, bijvoorbeeld een
botsing, moet het worden gecontroleerd door de fabrikant.
Zorg dat alleen een originele CYBEX-bekledingshoes wordt gebruikt, omdat de bekleding
een belangrijk element van de werking van de stoel is. Reserveonderdelen kunnen bij een
gespecialiseerde winkel worden gekocht.
Odchylany zagłówek zapobiega niebezpiecznemu opadaniu głowy dziecka podczas snu. W
przypadku kolizji czołowej, zagłówek porusza się do przodu, podobnie jak głowa dziecka,
blokuje się i absorbuje siłę uderzenia podczas powrotnego ruchu głowy dziecka do tyłu.
UWAGA! Upewnij się, że głowa dziecka jest zawsze umiejscowiona wewnątrz zagłówka
(19), aby zapewnić maksymalną ochronę w przypadku kolizji bocznej.
Kąt odchylenia zagłówka może być ustawiony w trzech pozycjach. Unosząc lekko do góry
zagłówek można go ustawić w żądanej pozycji Ustawienie do oryginalnej pozycji wymaga
użcyia dźwigni.
!
OSTRZEŻENIE! Nigdy nie blokuj mechanizmu blokującego (20)! Ruch zagłówka
nie może być niczym ograniczony, ponieważ w przeciwnym razie dziecko może ulec
obrażeniom w czasie wypadku.
KONSERWACJA
Aby zagwarantować najwyższy poziom bezpieczeństwa dziecka, należy pamietać:
• Wszystkie ważne części fotelika powinny być regularnie sprawdzane. Części
mechaniczne powinny działać bez zarzutu.
• Zwracaj szczególną uwagę, aby fotelik nie został uszkodzony poprzez zaklinowanie
pomiedzy drzwiami a siedzeniam samochodowym lub innymi twardymi częściami.
• W przypadku upadku fotelika, produkt powinien być poddany przegladowi.
Tylko oryginalna tapicerka CYBEX zapewni maksymalny komfort i bezpieczeństwo Twojemu
dziecku Tapicerki można nabyć u autoryzowanych partnerów.
FRNLPL
45
Page 46

12 12
13
RETIRER LA HOUSSE
La housse du siège auto est composée de quatre parties (rabat, dossier, épaules, assise
et/ou surface).
Les quatre housses du siège sont insérées dans les canaux d’attache situés sur les
rebords du siège auto et sont maintenus par des boutons-pressions (voir illustration).
Une fois les boutons-pressions détachés, les différentes pièces de la housse peuvent être
extraites des canaux d’attache.
Pour remettre les housses sur le siège, inversez la procédure effectuée.
!
ATTENTION ! Le siège auto ne doit jamais être utilisé sans la housse.
RETRAIT DE LA HOUSSE DU RABAT DE L’APPUIE-TÊTE
Tirez la housse pour la rabattre par-dessus la poignée de réglage (13) de manière à ce que
la housse ne s’entremêle pas dans le levier au moment de son retrait.
RETRAIT DE LA HOUSSE DE L’APPUIE-TÊTE
Détachez les deux boutons-pressions situés sur chaque côté de l’arrière du siège, au
niveau des épaules.
Extrayez la housse de son canal d’attache.
RETRAIT DE LA HOUSSE DU SUPPORT D’ÉPAULE
Extrayez la housse de son canal d’attache.
46
Page 47

DE BEKLEDINGSHOES VERWIJDEREN ŚCIĄGANIE TAPICERKI
De bekleding van het autostoeltje bestaat uit vier onderdelen (zijstuk hoofdsteun,
hoofdsteun, schoudergedeelte, zitting en/of inlegkussen).
De vier hoezen van het stoeltje worden in de bekledinggeleiders aan de rand van het
autostoeltje geplaatst en worden op verschillende plaatsen op hun plek gehouden met
drukknopen (zie afbeelding).
Als alle drukknopen zijn losgemaakt, kunnen de afzonderlijke delen van de bekleding uit de
geleiders worden getrokken.
Om de hoezen weer op de stoel te bevestigen, volgt u de omgekeerde volgorde van de
verwijdering.
!
BELANGRIJK! Het autostoeltje mag nooit worden gebruikt zonder bekleding.
DE HOES VAN HET ZIJSTUK HOOFDSTEUN VERWIJDEREN
Trek de opening in de hoes over de verstelhendel van de hoofdsteun (13) zodat de hoes
niet blijft haken achter de hendel wanneer u deze omhoog trekt.
DE BEKLEDING VAN DE HOOFDSTEUN VERWIJDEREN
Haal de hoes uit de haakjes aan beide zijden van achterkant van het schouderstuk.
Trek de hoes uit de bekledinggeleiders.
DE BEKLEDING VAN HET SCHOUDERDEEL VERWIJDEREN
Trek de hoes uit de bekledinggeleiders.
Tapicerka fotelika składa się z czterech części (Klapka zagłówka, zagłówek, część
zabezpieczeń barkowych, siedzisko).
Wszytskie części tapicerki dopasowane sa ściśle do krawędzi fotelika i przytwierdzone w
kilku miejscach napami lub zatrzaskami (obrazek).
Po odpięciu wszystkich zapięć tapicerkę można zdjąć.
W celu ponownego założenia tapicerki fotelika należy wykonać czynności podobnie jak
przy ściąganiu, ale w odwrotnej kolejności.
!
OSTRZEŻENIE! Fotelik nie może być używany bez tapicerki
ZDEJMOWANIE TAPICERKI Z KLAPKI ZAGŁÓWKA
Odepnij napy tapicerki (13) tak by nie została przytrzaśnięta przez dźwignię regulującą
zagłówek, pociągnij do góry i ściągnij.
ZDEJMOWANIE TAPICERKI Z ZAGŁÓWKA
Ostrożnie ściagnij tapicerkę w okolicy haków z każdej strony na tylnej części barkowej.
Odciągnij tapicerkę od krawędzi.
ZDEJMOWANIE TAPICERKI Z OSŁON BARKOWYCH
Odciągnij tapicerkę od krawędzi.
FRNLPL
47
Page 48

RETIRER LA HOUSSE DE L’ASSISE
Détachez les quatre boutons-pressions de la housse situé à l’avant et à l’arrière du siège.
Retirez la housse des accoudoirs et le long de la surface du siège.
NOTE ! Lavez la housse avant la première utilisation. La housse ne peut être lavée qu’à
30°C, en programme délicat. Tout lavage de la housse à une température supérieure à
30°C peut provoquer une décoloration du tissu. Veuillez laver la housse séparément et ne
la passez pas au sèche-linge. Ne pas sécher directement au soleil ! Vous pouvez nettoyer
les éléments en plastique à l’aide d’un détergent doux et à l’eau tiède.
NETTOYAGE
!
ATTENTION ! N’utilisez jamais de détergents agressifs ou d’eau de javel.
EN CAS D’ACCIDENT
!
ATTENTION ! Tout accident peut provoquer des dégâts sur le siège auto pour
enfant non identifiables à l’œil nu. Veuillez remplacer le siège après un accident. En
cas de doute, contactez votre revendeur ou le fabricant.
DURÉE DE VIE DU PRODUIT
Ce siège auto a été conçu pour satisfaire ses fonctions initiales en utilisation normale pour
une durée de vie de 9 ans environ. L’usure progressive de la matière plastique, causée
par exemple par l’exposition au soleil (UV), peut provoquer une légère détérioration des
propriétés du produit. Le siège auto pouvant être exposé à des variations de température
et autres désagréments, merci de suivre les instructions ci-dessous :
• Si le véhicule est exposé à la lumière directe du soleil pendant une période prolongée,
le siège auto doit être retiré du véhicule ou recouvert d’un linge clair.
• Vérifi ez régulièrement que les pièces en plastique et en métal du siège ne présentent
aucun dommage ni aucune altération de forme ou de couleur Si vous constatez un
changement quelconque, le siège doit être détruit ou faire l’objet d’une vérifi cation par
le fabricant, voire être remplacé par celui-ci.
• Les changements de couleur de la housse, surtout la décoloration, sont parfaitement
normaux lors de l’utilisation du siège dans un véhicule et n’en affectent pas l’effi cacité.
48
Page 49

DE HOES VAN DE ZITTING VERWIJDEREN ZDEJMOWANIE TAPICERKI
Maak de 2 drukknopen aan de voor- en achterkant van de zittinghoes los. Trek nu de hoes
over de armleuningen en over de zitting.
LET OP! Was de zittinghoes voordat u deze voor de eerste keer gaat gebruiken. De
bekleding mag alleen op 30°C worden gewassen met een fi jnwasprogramma. Wassen
op hogere temperaturen dan 30 °C kan verkleuring van de bekleding veroorzaken.
Was de bekleding apart en droog deze niet in de droger! Droog de bekleding ook niet
in de felle zon! De kunststof onderdelen kunnen worden schoongemaakt met een mild
reinigingsmiddel en warm water.
REINIGING
!
BELANGRIJK! Gebruik nooit agressieve reinigingsmiddelen of bleekmiddel!
WAT TE DOEN NA EEN ONGEVAL POSTĘPOWANIE PO WYPADKU DROGOWYM
! !
BELANGRIJK! Een ongeval kan schade aan het autostoeltje veroorzaken die niet
met het blote oog zichtbaar is. Vervang het stoeltje na een ongeval. Neem bij twijfel
contact op met uw winkelier of de fabrikant.
LEVENSDUUR VAN HET PRODUCT TRWAŁOŚĆ PRODUKTU
Dit autostoeltje is zo ontworpen dat het bij normaal gebruik de bedoelde functies
gedurende een levensduur van ongeveer 9 jaar kan vervullen. Door geleidelijke slijtage
van kunststof onderdelen, bijvoorbeeld door blootstelling aan zonlicht (UV), kunnen de
producteigenschappen enigszins worden aangetast. Omdat grote temperatuurverschillen
en andere onvoorziene omstandigheden normaal zijn in voertuigen, dient u met de
volgende aspecten rekening te houden:
• Als het voertuig gedurende langere tijd in direct zonlicht staat, moet het autostoeltje uit
de auto worden verwijderd dan wel met een lichte doek worden afgedekt.
• Controleer regelmatig alle kunststof en metalen onderdelen van het stoeltje op schade,
vervorming of verkleuring. Als u veranderingen opmerkt aan het autostoeltje, moet u het
wegdoen of laten controleren en mogelijk laten vervangen door de fabrikant.
• Veranderingen in de stof, vooral het fl ets worden daarvan, zijn normaal bij gebruik in een
voertuig en schaden de functie van het stoeltje niet.
Odepnij 2 napy na tapicerce z przodu i z tyłu. Następnie sciągnij tapicerkę z
podłokietników i dalej z siedziska.
UWAGA! Należy wyprać przed pierwszym użyciem. Tapicerka może być prana w
30°C, program do tkanin delikatnych. Wyższa temperatura prania może spowodować
wyblaknięcie koloru. Tapicerkę należy prać oddzielnie i nigdy nie należy suszyć jej w
suszarce! Nie należy suszyć na słońcu. Plastikowe części fotelika można przecierać ciepłą
wodą z delikatnym detergentem.
CZYSZCZENIE
!
OSTRZEŻENIE! W żadnym wypadku nie stosować chemicznych środków do
czyszczenia ani wybielaczy!
OSTRZEŻENIE! Po wypadku drogowym uszkodzenia fotelika mogą nie być
widoczne gołym okiem. Fotelik należy wymienić po kolizji. W razie wątpliwości
skontaktuj sie z dealerem lub producentem.
Fotelik został zaprojektowany tak, by spełniać swoje funkcje przy normalnym użytkowaniu
przez ok 9 lat. W związku z tym, że plastikowe części z czasem się zużywają, np. z powodu
ekspozycji na słońce, cechy produktu mogą się nieznacznie zmieniać. Jako że fotelik może
być narażony na duże wahania temperatur podczas jego eksploatacji w samochodzie oraz
inne nieprzewidziane sytuacje, należy stosować się do poniższych zaleceń:
• Jeżeli pojazd jest wystawiony na silne działanie promieni słonecznych przez długi czas,
fotelik powinien być wyciagnięty z samochodu lub przykryty lekką tkaniną.
• Należy regularnie sprawdzać plastikowe i metalowe części fotelika pod kątem
uszkodzeń, deformacji czy utraty koloru. W razie zmian w foteliku, produkt powinien
zostać zutylizowany lub ewentualnie wymieniony przez producenta.
• Zmiany na materiale, w szczególności wyblakły kolor, są naturalne podczas użytkowania
w samochodzie i nie mają wpływu na funkcjonowanie fotelika.
FRNLPL
49
Page 50

DESTRUCTION
À la fi n de la durée de vie du siège, veillez à le mettre au rebut correctement. Le tri
des déchets peut fortement varier d’un endroit à un autre. Afi n de veiller à respecter la
législation en vigueur en matière de tri des déchets, veuillez contacter l’organisme ou le
conseil local compétent. Toujours suivre les consignes d’élimination de votre pays.
CONDITIONS DE GARANTIE
La garantie ci-dessous s’applique uniquement dans les pays où ce produit a été
initialement vendu par un détaillant à un consommateur. La garantie couvre tous les
défauts de fabrication et de matériaux, qui existaient au moment de l’achat ou survenus
dans les trois (3) ans suivant l’achat initial auprès d’un détaillant par un consommateur (la
garantie du fabricant). Si un défaut de fabrication ou de matériau se manifeste au cours
de la période de garantie, le produit sera réparé sans frais ou pourra, à notre discrétion,
être remplacé par un produit neuf. Afi n de faire valoir une réclamation portant sur la
présente garantie, le produit doit être renvoyé au détaillant qui a procédé à sa première
vente, accompagné de la preuve d’achat originale présentant la date de l’achat, le nom
et l’adresse du détaillant, ainsi que le nom du produit. Aucune réclamation n’est possible
directement auprès du fabricant ou de toute autre personne autre que le détaillant chez
qui le produit a été initialement acheté. La garantie ne s’applique que si le produit a fait
l’objet d’un contrôle visant à vérifi er son intégralité, d’éventuels défauts de fabrication ou
des défauts matériels constatés immédiatement lors de l’achat. Si le produit a été acheté
par commande et livré par voie postale, il doit être soumis à un contrôle immédiat après
réception visant à vérifi er son intégralité, d’éventuels défauts de fabrications ou défauts
matériels. Si le produit présent des défauts, il faut cesser de l’utiliser et le renvoyer
au détaillant ayant effectué la vente. Toute réclamation au titre de la garantie implique
que le produit soit renvoyé propre et dans son intégralité. Veuillez lire attentivement
les instructions d’emploi avant de contacter le détaillant. La garantie ne couvre pas les
dommages causés par une mauvaise utilisation, des facteurs externes (eau, feu, accidents
de la circulation ou autres) ou par l’usure normale. Toute réclamation dans le cadre de
la garantie ne sera autorisée que si le produit a été manipulé et utilisé conformément
aux instructions d’utilisation, si des réparations ont été effectuées par des personnes
autorisées à le faire et si des pièces détachées et des accessoires d’origine ont été
utilisés. En aucun cas la présente garantie ne saurait invalider ou limiter les droits du
consommateur ou les droits de recours contre le revendeur sur la base d’une infraction au
contrat d’achat tel qu’autorisé par la législation en vigueur.
CYBEX GmbH
Riedingerstr. 18, 95448 Bayreuth, Germany
Tel.: 0921 78 511-511, Fax.: 0921 78 511- 888
50
Page 51

VERWIJDERING UTYLIZACJA
Aan het eind van de levensduur van het autostoeltje moet u het correct verwijderen.
Afvalscheiding kan van plaats tot plaats verschillen. Om te zorgen dat u het autostoeltje
overeenkomstig de regelgeving verwijdert, kunt het best contact opnemen met uw lokale
afvalverwerkingsbedrijf of de gemeente. Houd u in ieder geval aan de afvalregelgeving van
uw land.
GARANTIE WARUNKI GWARANCJI
Wraz z końcem okresu przydatności fotelika do użytkowania, produkt musi zostać
odpowiednio zutylizowany. Sposoby usuwania odpadów mogą różnić się w zależności od
kraju. To ensure that the child seat is disposed of in accordance with regulations, należy
skontaktować się z lokalną instytucją utylizacji odpadów lub zarządcą komunalnym. Always
observe the waste disposal regulations of your country.
De volgende garantievoorwaarden gelden alleen in het land waar het product voor
het eerst via de detailhandel is verkocht aan een consument. Deze garantie dekt alle
fabricagefouten en materiaaldefecten die bestaan op het moment van verkoop of die
zich voordoen binnen drie (3) jaar na eerste verkoop van het product via de detailhandel
aan de consument (fabrieksgarantie). Als er zich een fabricagefout of materiaaldefect
voordoet in de garantieperiode, wordt het product kosteloos gerepareerd of – naar
ons goeddunken – vervangen door een nieuw product. Om aanspraak te maken op
deze garantie dient u het product te retourneren aan de winkelier die het oorspronkelijk
heeft verkocht en er dient een origineel aankoopbewijs (kassabon of factuur) te worden
overlegd met de aankoopdatum, de naam en het adres van de winkelier en de naam
van het product. Er kunnen geen aanspraken worden gemaakt op deze garantie als het
product aan de fabrikant wordt verstuurd of naar een andere persoon dan de winkelier
die het oorspronkelijk heeft verkocht ten behoeve van een aanspraak op de garantie. De
garantie geldt alleen als het product direct na aankoop is gecontroleerd op volledigheid,
fabricagefouten en materiaaldefecten. Als het product per postorder is gekocht, moet
het direct na ontvangst worden gecontroleerd op volledigheid, fabricagefouten en
materiaaldefecten. Als er schade ontstaat, mag het product niet langer worden gebruikt en
moet het worden geretourneerd aan de winkelier die het oorspronkelijk heeft verkocht. Als
u aanspraak maakt op de garantie, moet het product in complete en schone staat worden
geretourneerd. Lees de gebruikshandleiding zorgvuldig voordat u contact opneemt met
de detailhandelaar. Deze garantie dekt geen schade veroorzaakt door verkeerd gebruik,
omgevingsfactoren (zoals water, brand, aanrijdingen) of normale slijtage. Aanspraken
op de garantie worden slechts gehonoreerd als het product is behandeld en gebruikt
overeenkomstig de gebruikshandleiding, als reparaties en aanpassingen uitsluitend
zijn uitgevoerd door daartoe bevoegde personen, en als er alleen originele onderdelen
en accessoires zijn gebruikt. Deze garantie vernietigt of beperkt op geen enkele wijze
de consumentenrechten of rechten jegens de verkoper vanwege schending van de
koopovereenkomst die zijn toegekend krachtens toepasselijk recht.
Gwarancja obejmuje państwa, w których produkt został po raz pierwszy sprzedany
w sklepie fi nalnemu odbiorcy. Gwarancja obejmuje wszytskie usterki fabryczne oraz
wady materiałów, które miały miejsce przed zakupem lub które pojawiły się w ciągu (3)
lat od dnia pierwszej sprzedaży produktu klientowi w sklepie (gwarancja producenta).
Jeśli wady fabryczne lub materiałów powstaną w okresie, w którym produkt objety jest
gwarancją, zostanie on bezpłatnie naprawiony lub naszą decyzją, wymieniony na nowy.
W celu skorzyastania z gwarancji, produkt powinien być zwrócony do sklepu, w którym
został sprzedany po raz pierwszy z oryginalnym dowodem zakupu (rachunek lub faktura),
zawierającym datę zakupu, nazwę i adres sklepu, oraz nazwę produktu. Roszczenia
dotyczące gwarancji nie obejmują produktów wysłanych bezpośrednio do producenta
lub innych osób, nie bedących sklepem, w którym produkt został oryginalnie zakupiony.
Gwarancja obejmuje produkty, które zostały sprawdzone pod kątem poprawności działania,
defektów fabrycznych oraz materiałów podczas zakupu. Jeśli produkt został zakupiony
on line, poprzez sprzedaż mailową, powinien zostać sprawdzony pod kątem wykonania,
funkcjonowania, defektów fabrycznych oraz materiałów podczas odbioru. W przypadku
pojawienia się usterki, produkt może nie nadawać się do dalszego użytkowania i musi
zostać zwrócony do sprzedawcy, u którego został oryginalnie zakupiony. W przypadku
roszczenia z tutuły gwarancji, produkt powinien być zwrócony w czystym stanie oraz
komplatny. Przed kontaktem ze sklepem należy uważnie przeczytać instrukcję użytkowania.
Gwarancja nie obejmuje zniszczeń spowodowanych poprzez nieprawidłowe użytkowanie,
wpływ czynników zewnętrznych (woda, ogień, zderzenie itp.) lub naturalne zużycie podczas
regularnego użytkowania. Roszczenia z tytułu gwarancji będą rozpartywane tylko jeżeli
produkt był użytkowany zgodnie z instrukcją, naprawy i modyfi kacje były przeprowadzane
tylko przez upoważnione do tego osoby, a użyte części i akcesoria są oryginalne. Niniejsza
gwarancja nie anuluje oraz nie ogranicza praw konsumenta oraz praw sprzedawcy na
podstawie naruszenia umowy sprzedaży zgodnie z obowiązującym prawem.
FRNLPL
51
Page 52

SOLUTION S-fix
UN-R44-04
UNIVERSAL
SEMI-UNIVERSAL
15 – 36 kg
04301359
CYBEX GmbH
Riedingerstr. 18, 95448 Bayreuth
Germany
52
Jóváhagyás
UN R 44-04, korcsoport 2/3, 15-36 kg
CYBEX SOLUTION S-FIX
üléspárna háttámlával és fejtámlával
Ajánlott:
Kor: kb. 3-tól 12 évig
Súly: 15-től 36 kg-ig
Testmagasság: 150 cm-ig
Kizárólag olyan járművekhez alkalmas, amelyek
rendelkeznek az UN R16 szabványa szerint jóváhagyott
automatikus hárompontos biztonsági övvel
Schválení
UN R 44-04, skupina 2/3, 15 až 36 kg
CYBEX SOLUTION S-FIX
sedák s opěrkou zad a hlavy
Doporučené pro:
Věk: od cca 3 do 12 let
Váha: 15 až 36 kg
Tělesná výška: až do 150 cm
Vhodné pouze pro sedadla s 3bodovým samonavíjecím
pásem, schváleným dle UN standardu R16 nebo jeho
ekvivalentu.
Schválenie
UN R 44-04, skupina 2/3, 15 až 36 kg
CYBEX SOLUTION S-FIX
sedák s opierkou chrbta a hlavy
Doporučené pre:
Vek: od cca 3 do 12 rokov
Váha: 15 až 36 kg
Telesná výška: až do 150 cm
Vhodné len na sedadlá s 3-bodovým samonavíjacím
pásom, schváleným podľa UN štandardu R16 alebo jeho
ekvivalentu.
HU
!
FIGYELMEZTETÉS! Hogy biztosítsa az optimális védelmet gyermekének, használja
TARTALOMJEGYZÉK
a CYBEX SOLUTION S-FIX-t a jelen útmutatóban megfogalmazott módon.
FIGYELEM! Mindig tartsa kéznél az útmutatót (pl. a háttámla mögött lévő, erre a célra
kialakított rekeszben).
FIGYELEM! Az ország-specifi kus (pl. a gyermekülések színkódjaira vonatkozó) szabályok
miatt a termékek megjelenése változhat. Ez azonban nem befolyásolja a terméket a korrekt
működésben.
ELSŐ TELEPÍTÉS ......................................................................................................................................................................................54
AZ ÜLÉS HELYES BESZERELÉSE A JÁRMŰBE ....................................................................................................................56
BIZTONSÁG AZ AUTÓBAN .................................................................................................................................................................58
AZ ÜLÉS BEHELYEZÉSE A GÉPJÁRMŰBE ..............................................................................................................................58
A GYERMEKÜLÉS RÖGZÍTÉSE AZ ISOFIX CSATLAKOZÓ RENDSZERREL ........................................................60
AZ OLDALVÉDŐK CSATLAKOZTATÁSA ........................................................................................................................................62
A CYBEX SOLUTION SFIX ELTÁVOLÍTÁSA ................................................................................................................................62
TESTMÉ RETHEZ IGAZÍTÁS ................................................................................................................................................................62
BEKÖTÉS A JÁRMŰ BIZTONSÁGI ÖVÉVEL ...............................................................................................................................64
MEGFELELŐEN RÖGZÍTETTE GYERMEKÉT? .........................................................................................................................66
ELHAJLÓ FEJTÁMLA ...............................................................................................................................................................................68
TISZTÍTÁS & KARBANTARTÁS .............................................................................................................................................................68
AZ ÜLÉSHUZAT ELTÁVOLÍTÁSA ........................................................................................................................................................70
A HUZAT ELTÁVOLÍTÁSA A FEJTÁMLASZÁRNYR ÓL .............................................................................................................. 70
A HUZAT ELTÁVOLÍTÁSA A FEJTÁMLÁRÓL .................................................................................................................................70
A HUZAT ELTÁVOLÍTÁSA A VÁLLVÉDŐKRŐL ............................................................................................................................. 70
AZ ÜLÉSMAGASÍTÓ HUZATÁNAK ELTÁVOLÍTÁSA ..................................................................................................................72
TISZTÍTÁS ......................................................................................................................................................................................................72
A TERMÉK ÉLETTARTAMA ...................................................................................................................................................................72
ÁRTALMATLANÍTÁS ..................................................................................................................................................................................74
JÓTÁLLÁSI FELTÉTELEK ........................................................................................................................................................................74
Page 53

CZ SK
! !
VAR OVÁNÍ! Pro zajištění optimální ochrany vašeho dítěte je třeba autosedačku
OBSAH
CYBEX SOLUTION S-FIX používat dle těchto pokynů.
VAR OVANIE ! Pre zaistenie optimálnej ochrany vášho dieťaťa je potrebné
autosedačku CYBEX SOLUTION S-FIX používať podľa týchto pokynov.
UPOZORNĚNÍ! Mějte tyto instrukce vždy po ruce (např. v příslušné přihrádce na zadní
straně opěrky zad).
UPOZORNĚNÍ! Předpisy jednotlivých států (např. ohledně barevného označení na
dětských autosedačkách) mohou ovlivnit vzhled produktu. Nijak to ovšem neovlivňuje
správnou funkčnost produktu.
PRVNÍ INSTALACE ....................................................................................................................................................................................55
SPRÁVNÉ UMÍSTĚ NÍ AUTOSEDAČKY VE VOZIDLE ............................................................................................................57
BEZPEČNOST VE VOZIDLE ...............................................................................................................................................................59
UMÍSTĚNÍ AUTOSEDAČKY VE VOZIDLE ...................................................................................................................................59
ZAJIŠTĚNÍ DĚTSKÉ AUTOSEDAČKY POMOCÍ SYSTÉMU ISOFIX CONNECT ......................................................61
NASTAVENÍ BOČNÍCH PROTEKTORŮ .........................................................................................................................................63
VYJMUTÍ AUTOSEDAČKY CYBEX SOLUTION SFIX .............................................................................................................63
PŘIZPŮSOBENÍ DLE VELIKOSTI TĚLA .......................................................................................................................................63
PŘIPOUTÁNÍ DĚTSKÉ AUTOSEDAČKY ........................................................................................................................................65
JE VAŠE DÍTĚ SPRÁVNĚ ZAJIŠTĚNÉ? ........................................................................................................................................... 67
NAKLÁPĚCÍ OPĚRKA HLAVY ...........................................................................................................................................................69
PÉČE A ÚDRŽBA ......................................................................................................................................................................................69
SUNDÁNÍ POTAHU AUTOSEDAČKY..............................................................................................................................................71
SUNDÁNÍ POTAHU Z NAKLÁPĚCÍ OPĚRKY HLAVY .............................................................................................................71
SUNDÁNÍ POTAHU Z OPĚRKY HLAVY .........................................................................................................................................71
SUNDÁNÍ POTAHU Z RAMENNÍ ČÁSTI ........................................................................................................................................71
SUNDÁNÍ POTAHU ZE SEDÁKU ......................................................................................................................................................73
ČIŠTĚ NÍ .......................................................................................................................................................................................................... 73
ŽIVOTNOST PRODUKTU ......................................................................................................................................................................73
LIKVI DACE ....................................................................................................................................................................................................75
ZÁRU KA .........................................................................................................................................................................................................75
UPOZORNENIE! Majte tieto inštrukcie vždy po ruke (napr. v príslušnej priehradke
na zadnej strane opierky chrbta).
UPOZORNENIE! Predpisy jednotlivých štátov (napr. ohľadom farebného označenia na
detských autosedačkách) môžu ovplyvniť vzhľad produktu. Nijako to však neovplyvňuje
správnu funkčnosť produktu.
PRVÁ INŠTALÁCIA ....................................................................................................................................................................................55
SPRÁVNE UMIESTNENIE AUTOSEDAČKY VO VOZIDLE .................................................................................................57
BEZPEČNOSŤ VO VOZIDLE ..............................................................................................................................................................59
UMIESTNENIE AUTOSEDAČKY VO VOZIDLE .........................................................................................................................59
ZAISTENIE DETSKEJ AUTOSEDAČKY POMOCOU SYSTÉMU ISOFIX CONNECT ............................................61
NASTAVENIE BOČNÝCH PROTEKTOROV .................................................................................................................................63
VYBRATIE AUTOSEDAČKY CYBEX SOLUTION SFIX .........................................................................................................63
PRISPÔSOBENIE PODĽA VEĽKOSTI TELA .............................................................................................................................63
PRIPÚTANIE DETSKÉ AUTOSEDAČKY .........................................................................................................................................65
JE VAŠE DIEŤA SPRÁVNE ZAISTENÉ? ..........................................................................................................................................67
NAKLÁPACIA OPIERKA HLAVY .......................................................................................................................................................69
STAROSTLIVOSŤ A ÚDRŽBA .............................................................................................................................................................69
ZLOŽENIE POŤAHU AUTOSEDAČKY ............................................................................................................................................ 71
ODOBRATIE POŤAHU Z NAKLÁPACIE OPIERKY HLAVY ...................................................................................................71
ODOBRATIE POŤAHU Z OPIERKY HLAVY .................................................................................................................................71
ODOBRATIE POŤAHU Z RAMENNEJ ČASTI .............................................................................................................................. 71
ODOBRATIE POŤAHU ZO SEDÁKU ...............................................................................................................................................73
ČISTENIE .......................................................................................................................................................................................................73
ŽIVOTNOSŤ PRODUKTU ......................................................................................................................................................................73
LIKVI DÁCIA ...................................................................................................................................................................................................75
ZÁRU KA .........................................................................................................................................................................................................75
HU
CZSK
53
Page 54

ELSŐ TELEPÍTÉS
A gyermekülés egy ülésmagasítóból (1) és a hátrészből (2) áll állítható magasságú
2
3
1
2
1
4
fejtámlával. Kizárólag a kettő megfelelő kombinációja képes biztosítani gyermeke számára
a legjobb védelmet és kényelmet.
!
FIGYELMEZTETÉS! A CYBEX SOLUTION S-FIX alkatrészei nem használhatóak
önmagukban vagy más gyártók különböző termékvonalából származó
ülésmagasítójával, hátrészével vagy fejtámlájával. Ilyen esetekben azonnal elveszti a
hitelességét.
Csatlakoztassa a hátrészt (2) az ülésmagasítóhoz (1) összekapcsolva a főlapot (3) az
ülésmagasító tengeléyvel (4).
!
FIGYELMEZTETÉS! Kérjük győzödjön meg arról, hogy a gyermekülés műanyag
részei nem deformálódtak (pl. az autó ajtajának beakadása közben vagy a hátsó ülés
beállításakor).
FIGYELEM! Mindig tartsa kéznél az útmutatót (pl. a háttámla mögött lévő, erre a célra
kialakított rekeszben).
54
Page 55

PRVNÍ INSTALACE PRVÁ INŠTALÁCIA
Dětská autosedačka se skládá ze sedáku (1) a opěrky zad (2) s výškově nastavitelnou
opěrkou hlavy. Pouze kombinace obou částí poskytuje nejlepší ochranu a pohodlí
vašemu dítěti.
!
VAR OVÁNÍ! Části autosedačky CYBEX SOLUTION S-FIX se nesmí používat
samostatně nebo v kombinaci se sedáky, opěrkami zad nebo hlavy jiných výrobců
nebo odlišných produktových sérií. Okamžitě by tak přestala platit certifikace
produktu.
Zahákněte spodní část opěrky zad (3) k zadnímu úchytu (4) na sedáku autosedačky. Zaháknite spodnú časť opierky chrbta (3) k zadnému úchytu (4) na sedáku autosedačky.
! !
VAR OVÁNÍ! Prosíme, vyvarujte se skřípnutí plastových částí autosedačky (např. ve
dveřích vozidla nebo při nastavování sedadla).
Detská autosedačka sa skladá zo sedáka (1) a opierky chrbta (2) s výškovo
nastaviteľnou opierkou hlavy. Iba kombinácia oboch častí poskytuje najlepšiu ochranu a
pohodlie vášmu dieťaťu.
!
VAR OVANIE ! Časti autosedačky CYBEX SOLUTION S-FIX sa nesmie používať
samostatne alebo v kombinácii so sedákmi, opierkami chrbta alebo hlavy iných
výrobcov alebo odlišných produktových sérií. Okamžite by tak prestala platiť
certifikácie produktu.
VAR OVANIE ! Prosíme, vyvarujte sa privretie plastových častí autosedačky (napr. vo
dverách vozidla alebo pri nastavovaní sedadla).
UPOZORNĚNÍ! Vždy mějte tento návod po ruce (např. v příslušné přihrádce
na zadní straně opěrky zad).
UPOZORNENIE! Vždy majte tento návod po ruke (napr. v príslušnej priehradke
na zadnej strane opierky chrbta).
HU
CZSK
55
Page 56

AZ ÜLÉS HELYES BESZERELÉSE A JÁRMŰBE
Az autós ülés ISOFIX csatlakozó rendszerrel használható minden olyan járműben, ami
automata 3 pontos biztonsági övvel van felszerelve, a jármű használati utasításában
univerzális használatra.
!
FIGYELMEZTETÉS! Az ülés nem használható kétpontos vagy lapos övvel. Ha az
ülést kétpontos övvel használják, baleset esetén a gyermek súlyos vagy akár halálos
sérülést is szenvedhet.
Egy féluniverzális tanúsítványt adnak azoknak az utasbiztonsági rendszereknek,
amik az autóhoz csatlakoznak az ISOFIX csatlakozó karjain keresztül. Ezen okból
kifolyólag az ISOFIX csak bizonyos járműveken használható. Kérjük, a mellékelt
típuslistában nézze át a jóváhagyott járműveket. A legfrissebb verziót letöltheti a
www.cybex-online.com oldalról.
Kivételes esetekben a gyermekülés az első ülésen is használható. Ebben az esetben vegye
fi gyelembe az alábbiakat:
• A légzsákkal rendelkező autókban tolja hátra az autó ülését amennyire csak lehet. Ennek
ellenére győzödjön meg arról, hogy a biztonsági öv felső csuklóponja a gyermekülés
övadagolása mögött van.
• Mindig vegye fi gyelembe a jármű gyártójának ajánlásait.
!
FIGYELMEZTETÉS! Az átlós övnek (6) vissza kell húzódnia a háttámlára, és soha
sem szabad a jármű felső övének útjában futnia. Ha nem lehetséges az ülés ilyen
6
módú beállítása, pl. ha az autósülés előre nyomja, ez a gyermekülés nem alkalmas az
ön járművébe.
!
FIGYELMEZTETÉS! Az autóban lévő csomagokat vagy más tárgyakat, amelyek
baleset esetén sérülést okozhatnak, mindig rögzíteni kell. Ellenkező esetben ezek
„elrepülhetnek” és akár halálos sérülést okozhatnak.
56
!
FIGYELMEZTETÉS! A gyermekülés nem használható olyan üléseken, amelyek
oldalra néznek. A gyermekülés használata hátsó üléseken engedélyezett, pl.
kisbuszon is, feltéve, hogy az ülés alkalmas felnőtt szállítására. Vegye figyelembe,
hogy a jármű háttámláját tilos eltávolítani, ha ráillesztik a gyermekülést. Használaton
kívül is rögzítse a gyermekülést biztonsági övvel.
FIGYELEM! Soha ne hagyja gyermekét felügyelet nélkül a járműben.
Page 57

SPRÁVNÉ UMÍSTĚNÍ AUTOSEDAČKY VE VOZIDLE SPRÁVNE UMIESTNENIE AUTOSEDAČKY VO VOZIDLE
Dětskou autosedačku se zasunutým ISOFIX Connect systémem lze používat na všech
sedadlech se samonavíjecími 3bodovými bezpečnostními pásy, schválenými v manuálu
vozidla pro „univerzální“ použití.
! !
VAR OVÁNÍ! Autosedačka není vhodná pro použití s 2bodovým nebo pouze s
břišním pásem. Zabezpečení autosedačky 2bodovým pásem může při nehodě vést k
vážným nebo dokonce fatálním zraněním dítěte.
Detskú autosedačku so zasunutým ISOFIX Connect systémom je možné používať na
všetkých sedadlách so samonavíjacími 3-bodovými bezpečnostnými pásmi, schválenými v
manuáli vozidla pre „univerzálne“ použitie.
VAR OVANIE ! Autosedačka nie je vhodná pre použitie s 2-bodovým alebo len s
brušným pásom. Zabezpečenie autosedačky 2-bodovým pásom môže pri nehode
viesť k vážnym alebo dokonca fatálnym zraneniam dieťaťa.
„Semi-univerzální“ certifi kace je udělována zádržným systémům, které jsou s
vozidlem spojeny pomocí konektorů ISOFIX Connect. Proto lze ISOFIX Connect
používat pouze v některých vozidlech. Prosíme nahlédněte do přiloženého seznamu
vhodných vozidel. Nejaktuálnější verzi seznamu naleznete na
www.cybex-online.com.
Ve výjimečných případech lze dětskou autosedačku používat i na předním sedadle
spolujezdce. V takovém případě prosíme berte na vědomí následující:
• Ve vozidlech s airbagy byste měli sedadlo spolujezdce posunout co nejvíce dozadu.
Horní vodící bod bezpečnostního pásu však musí zůstat za vrchním vedením pásu
dětské autosedačky.
• Vždy dodržujte doporučení výrobce vozidla.
! !
VAR OVÁNÍ! Diagonální pás (6) musí vždy vést od vrchního vedení pásu autosedačky
v náklonu směrem dozadu k hornímu vodícímu bodu bezpečnostního pásu. Pokud
toho nejste schopni dosáhnout (např. posunutím sedadla dopředu nebo volbou
jiného místa ve vozidle), není tato autosedačka vhodná pro vaše vozidlo.
! !
VAR OVÁNÍ! Zavazadla a ostatní předměty ve vozidle, které mohou při nehodě
způsobit zranění, musí být pevně zajištěny. V opačném případě mohou způsobit
smrtelná zranění.
!
VAR OVÁNÍ! Autosedačka se nesmí používat na sedadlech otočených bokem ke
směru jízdy. Používání dětské autosedačky na sedadlech v pozici proti směru jízdy
(např. v dodávce nebo v minimbusu) je možné pouze, pokud je sedadlo schválené
pro přepravu dospělých osob. Při používání autosedačky na sedadle v pozici proti
směru jízdy nesmí být ze sedadla sundaná opěrka hlavy! Autosedačka musí být vždy
zajištěná bezpečnostním pásem.
UPOZORNĚNÍ! Nikdy nenechávejte vaše dítě ve vozidle bez dozoru.
„Semi-univerzálna“ certifi kácia je udeľovaná zadržiavacím systémom, ktoré sú s
vozidlom spojené pomocou konektorov ISOFIX Connect. Preto je možné ISOFIX
Connect používať iba v niektorých vozidlách. Prosíme nahliadnite do priloženého
zoznamu vhodných vozidiel. Najaktuálnejšiu verziu zoznamu nájdete na
www.cybex-online.com.
Vo výnimočných prípadoch možno detskú autosedačku používať aj na prednom sedadle
spolujazdca. V takom prípade prosíme berte na vedomie nasledujúce:
• Vo vozidlách s airbagmi by ste mali sedadlo spolujazdca posunúť čo najviac dozadu.
Horný vodiaci bod bezpečnostného pásu však musí zostať za vrchným vedením pásu
detskej autosedačky.
• Vždy dodržiavajte odporúčania výrobca vozidla.
VAR OVANIE ! Diagonálny pás (6) musí vždy viesť od vrchného vedenia pásu
autosedačky v náklone smerom dozadu k hornému vodiacemu bodu bezpečnostného
pásu. Ak toho nie ste schopní dosiahnuť (napr. posunutím sedadla dopredu alebo
voľbou iného miesta vo vozidle), nie je táto autosedačka vhodná pre vaše vozidlo.
VAR OVANIE ! Batožiny a ostatné predmety vo vozidle, ktoré môžu pri nehode
spôsobiť zranenie, musí byť pevne zaistené. V opačnom prípade môžu spôsobiť
smrteľné zranenia.
!
VAR OVANIE ! Autosedačka sa nesmie používať na sedadlách otočených bokom
k smeru jazdy. Používanie detskej autosedačky na sedadlách v pozícii proti smeru
jazdy (napr. v dodávke alebo v minimbusu) je možné len, ak je sedadlo schválené pre
prepravu dospelých osôb. Pri používaní autosedačky na sedadle v pozícii proti smere
jazdy nesmie byť zo sedadla odobratá opierka hlavy! Autosedačka musí byť vždy
zaistená bezpečnostným pásom.
UPOZORNENIE! Nikdy nenechávajte vaše dieťa vo vozidle bez dozoru.
HU
CZSK
57
Page 58

BIZTONSÁG AZ AUTÓBAN
!
FIGYELMEZTETÉS! A gyermekülést mindig megfelelően be kell csatolni a jármű
biztonsági övével, még akkor is, ha épp nincs használatban. Vészfékezés vagy baleset
esetén a rögzítetlen, be nem kötött gyermekülés balesetveszélyes lehet a többi utas
és az Ön számára is.
Hogy garantálni tudja a lehető legbiztonságosabb utazást minden utas számára, győzödjön
meg a következőkről:
a járműbe szerelhető, összecsukható háttámlákat függőleges helyzetben rögzítse.
amikor az első utasülésre szereli be a gyermekülést, a jármű ülését a lehető leghátsó
pozícióba állítsa.
minden olyan tárgyat, ami egy esetleges baleset során sérülést okozhat, rögzítsen
biztonságosan.
a jármű minden utasa legyen bekötve.
AZ ÜLÉS BEHELYEZÉSE A GÉPJÁRMŰBE
Helyezze az ülést alkalmas helyre a gépjárműben.
• Mindig győzödjön meg arról, hogy a CYBEX SOLUTION S-FIX háttámlája (2) teljesen
az utósülés háttámlájának felületére van helyezve. A gyermekülésnek sosem szabad
fekvőhelyzetben lennie. Szükség esetén tud állítani a távolságon az ISOFIX beállító
karjának (9) segítségével.
• Ha a jármű fejrésze útban van, húzza ki és távolítsa el teljesen (ennek elmulasztásakor
kérjük olvassa el az „gyermekülés helyes elhelyezése a járműben” fejezetet). A háttámla
(2) tökéletesen illeszkedik bármelyik jármű üléséhez.
!
2
9
FIGYELMEZTETÉS! A CYBEX gyermekülés háttámlájának teljes felülete
érintkezzen a jármű ülésének háttámlájával. Gyermeke maximális védelme érdekében
a legjobb, ha a gyermekülés normál függőleges pozícióban van!
FIGYELEM! Bizonyos érzékeny anyagokon (pl. bőr) a gyermekülés használata nyomokat
és/vagy elszíneződéseket hagyhat. Ennek megelőzése érdekében használjon takarót vagy
törülközőt. Kérjük fogadja meg az itt megfogalmazott tisztítási tanácsokat. Ezeket már az
ülés legelső használatakor be kell tartani!
58
!
FIGYELMEZTETÉS! Nem alkalmazzon más rögzítési pontot azon kívül, amit az
útmutatóban leírtunk és a gyermekülésen jelöltünk.
FIGYELEM! Kérjük használja az ISOFIX útmutatót annak biztosítása érdekében, hogy a
játmű ülését ne roncsolják az ISOFIX rögzítő karok.
Page 59

BEZPEČNOST VE VOZIDLE BEZPEČNOSŤ VO VOZIDLE
! !
VAR OVÁNÍ! Dětská autosedačka musí být vždy řádně zajištěná bezpečnostním
pásem a to i v případech, kdy se nepoužívá. V případě prudkého zabrždění nebo při
nehodě může nezajištěná autosedačka zranit vás nebo ostatní cestující.
VAR OVANIE ! Detská autosedačka musí byť vždy riadne zaistená bezpečnostným
pásom a to aj v prípadoch, keď sa nepoužíva. V prípade prudkého zabrzdenia alebo
pri nehode môže nezaistená autosedačka zraniť vás alebo ostatných cestujúcich.
Pro zajištění nejvyšší možné ochrany všem pasažérům se ujistěte, že…
opěrky zad ve vozidle jsou uzamčené ve vzpřímené poloze.
při instalaci autosedačky na přední sedadlo spolujezdce je sedadlo v nejzazší možné pozici.
jste řádně zajistili všechny předměty, které by při nehodě mohly způsobit zranění.
jsou všichni pasažéři ve vozidle připoutaní.
UMÍSTĚNÍ AUTOSEDAČKY VE VOZIDLE
Umístěte dětskou autosedačku na vhodné sedadlo ve vozidle.
• Vždy se ujistěte, že se celá plocha opěrky zad (2) autosedačky CYBEX SOLUTION
S-FIX dotýká opěrky zad sedadla ve vozidle. Dětská autosedačka nesmí být v žádném
případě v pozici vleže. K upravení vzdálenosti můžete případně použít ISOFIX
nastavovací madlo (9).
• Pokud vám ve vozidle překáží opěrka hlavy sedadla, vytáhněte ji do nejvyšší pozice
nebo ji zcela sundejte (výjimky viz kapitola „SPRÁVNÉ UMÍSTĚNÍ AUTOSEDAČKY
VE VOZIDLE“). Opěrka zad (2) se dokonale přizpůsobí prakticky jakémukoli náklonu
sedadla ve vozidle.
!
VAR OVÁNÍ! Celá plocha opěrky zad autosedačky CYBEX se musí opírat o opěrku
zad ve vozidle. Pro zajištění maximální ochrany vašeho dítěte musí být sedadlo v
běžné vzpřímené pozici!
UPOZORNĚNÍ! Na sedadlech, vyrobených z citlivých materiálů (např. semiš, kůže atd.) se
při používání dětské autosedačky mohou projevit stopy opotřebování a/nebo ztráty barvy.
K předejití tohoto problému můžete pod autosedačku vložit např. deku nebo ručník. Ve
spojitosti s tím si prosíme přečtěte také naše doporučení ohledně čištění; tyto pokyny je
třeba si přečíst ještě před prvním použitím dětské autosedačky.
!
VAR OVÁNÍ! Pro upevnění autosedačky nepoužívejte jiné kontaktní body než ty, které
jsou popsány v návodu a označeny na autosedačce.
UPOZORNĚNÍ! Pro předejití poškození sedadel ve vozidle ISOFIX konektory, prosíme,
používejte přiložené naváděcí plasty.
Pre zaistenie najvyššej možnej ochrany všetkým pasažierom sa uistite, že …
opierky chrbta vo vozidle sú uzamknuté vo vzpriamenej polohe.
pri inštalácii autosedačky na predné sedadlo spolujazdca je sedadlo v najzadnejšej
možnej pozícii.
ste riadne zaistili všetky predmety, ktoré by pri nehode mohli spôsobiť zranenie.
sú všetci pasažieri vo vozidle pripútaní.
UMIESTNENIE AUTOSEDAČKY VO VOZIDLE
Umiestnite detskú autosedačku na vhodné sedadlo vo vozidle.
• Vždy sa uistite, že sa celá plocha opierky chrbta (2) autosedačky CYBEX SOLUTION
S-FIX dotýka opierky chrbta sedadla vo vozidle. Detská autosedačka nesmie byť v
žiadnom prípade v pozícii ležmo. K upravenie vzdialenosti môžete prípadne použiť
ISOFIX nastavovacie madlo (9).
• Ak vám vo vozidle prekáža opierka hlavy sedadla, vytiahnite ju do najvyššej pozície alebo
ju úplne zložte (výnimky viď kapitola „SPRÁVNE UMIESTNENIE AUTOSEDAČKY VO
VOZIDLE“). Opierka chrbta (2) sa dokonale prispôsobí prakticky akémukoľvek náklonu
sedadla vo vozidle.
!
VAR OVANIE ! Celá plocha opierky chrbta autosedačky CYBEX sa musí opierať o
opierku chrbta vo vozidle. Pre zaistenie maximálnej ochrany vášmu dieťaťu musí byť
sedadlo v bežnej vzpriamenej pozícii!
UPOZORNENIE! Na sedadlách, vyrobených z citlivých materiálov (napr. semiš, kože
atď.) sa pri používaní detskej autosedačky môžu prejaviť stopy opotrebovania a/alebo straty
farby. Aby sa predišlo tohto problému môžete pod autosedačku vložiť napr. deku alebo
uterák. V spojitosti s tým si prosíme prečítajte tiež naše odporúčania ohľadom čistenia; tieto
pokyny je potrebné si prečítať ešte pred prvým použitím detskej autosedačky.
!
VAR OVANIE ! Pre upevnenie autosedačky nepoužívajte iné kontaktné body ako tie,
ktoré sú popísané v návode a označené na autosedačke.
UPOZORNENIE! Pre odvrátenie poškodenie sedadiel vo vozidle ISOFIX konektormi,
prosíme, používajte priložené navádzacie plasty.
HU
CZSK
59
Page 60

7
CLICK!
A GYERMEKÜLÉS RÖGZÍTÉSE AZ ISOFIX CSATLAKOZÓ RENDSZERREL
7
8
11
10
5
1800
10
10
11
9
11
9
Az ISOFIX csatlakozó rendszer segítségével rögzítheti a CYBEX SOLUTION
S-FIX gyermekülést a járműbe, ezáltal növelve gyermeke biztonságát. A
gyermeket továbbra is a jármű hárompontos biztonsági övével kell bekötnie.
• Helyezze be a mellékelt ISOFIX vezetőket (7) a hosszabbik hevederrel felfelé a két
ISOFIX rögzítési pont között (8). Néhány járműben jobb, ha az ISOFIX vezetőket (7)
az ellenkező irányban rögzíti.
FIGYELEM! Az ISOFIX rögzítési pontok (8) két fém kapocsból állnak, minden egyes
üléshez pozícionálva a hátrész és az ülőrész felszíne között. Kétség esetén tanulmányozza
az autója használati utasítását.
• Használja az ISOFIX beállító kart (9) az ülésmagasító alatt.
• Húzza meg a két ISOFIX csatlakozó záró kart (5) amennyire csak engedi.
• Most fordítsa be az ISOFIX csatlakozó záró kart (5) 180°-ban úgy, hogy az ISOFIX
vezetők (7) felé nézzen.
FIGYELEM! Mielőtt bekattintja az ISOFIX csatlakozó záró karokat (5) az ISOFIX rögzítési
pontokba (8), ellenőrizze a kioldó gombokat (10). Ha a zöld biztonsági kiejlzől (11) láthatók,
akkor először engedje el az ISOFIX csatlakozó záró kart a csatlakozás előtt a kioldó gomb
(10) megnyomásával és visszaengedésével. Ha szükséges, ismételje meg ezt a másik
csatlakozóval is.
• Nyomja a két záró kart (8) az ISOFIX vezetőkbe (7) addig, amíg az ISOFIX
rögzítőkarokba egy kattanás halltával nem rögzülnek be.
• Ügyeljen arra, hogy az ülést biztonságosan próbálja eltávolítani az ISOFIX vezetőkből (7).
• A zöld biztonsági jelzőknek (11) tisztán láthatónak kell lennie a két szürke kioldó
gombon (10).
• Most már használhatja az ISOFIX beállítókart (9) az ülésmagasító (1) alatt hogy beállítsa
a CYBEX SOLUTION S-FIX gyermekülést.
FIGYELEM! Vegye fi gyelembe az alábbi fejezetben található információkat is “Az ülés
beszerelése a járműbe”.
60
1
9
Page 61

ZAJIŠTĚNÍ DĚTSKÉ AUTOSEDAČKY POMOCÍ SYSTÉMU ISOFIX CONNECT ZAISTENIE DETSKEJ AUTOSEDAČKY POMOCOU SYSTÉMU ISOFIX CONNECT
Pomocí systému ISOFIX Connect můžete autosedačku CYBEX SOLUTION
S-FIX připevnit přímo k vozidlu a zvýšit tak bezpečí dítěte. Stále je ovšem nezbytné
zajistit dítě 3bodovým bezpečnostním pásem ve vozidle.
• Vložte přiložené ISOFIX naváděcí plasty (7) do ISOFIX kotevních bodů (8) s delší částí
směrem nahoru. V některých vozidlech je lepší používat ISOFIX naváděcí plasty (7)
otočené.
UPOZORNĚNÍ! ISOFIX kotevní body (8) jsou dvě kovová oka u každého sedadla,
nacházející se v prostoru mezi opěrkou zad a sedákem sedadla ve vozidle. V případě
pochybností, prosíme nahlédněte do uživatelského manuálu vašeho vozidla.
• Zatáhněte za ISOFIX nastavovací madlo (9) na spodní straně sedáku.
• Co nejvíce vytáhněte oba ISOFIX Connect konektory (5).
• Nyní otočte ISOFIX konektory (5) o 180 ° tak, aby směřovaly k ISOFIX naváděcím
plastům (7).
UPOZORNĚNÍ! Před nacvaknutím ISOFIX konektorů (5) do ISOFIX kotevních bodů
(8) zkontrolujte uvolňovací tlačítka (10). Pokud jsou vidět zelené bezpečnostní ukazatele
(11), je třeba ISOFIX konektory nejdříve uvolnit. Provedete tak stisknutím a zatažením za
uvolňovací tlačítko (10). V případě nutnosti opakujte postup i u druhého konektoru.
• Zasuňte konektory (8) do ISOFIX naváděcích plastů (7) tak, aby se kotevní body
uzamkly do konektorů se slyšitelným cvaknutím.
• Pokusem o vytažení autosedačky z naváděcích plastů (7) zkontrolujte řádné připojení
autosedačky.
• Na obou uvolňovacích tlačítkách (10) musí být nyní jasně viditelný zelený bezpečnostní
ukazatel (11).
• Pro nastavení pozice autosedačky CYBEX SOLUTION S-FIX nyní můžete použít
ISOFIX nastavovací madlo (9) vespod sedáku (9) autosedačky.
UPOZORNĚNÍ! Dbejte informací v sekci „Umístění autosedačky ve vozidle“.
Pomocou systému ISOFIX Connect môžete autosedačku CYBEX SOLUTION
S-FIX pripevniť priamo k vozidlu a zvýšiť tak bezpečie dieťaťa. Stále je však
potrebné zabezpečiť dieťa 3-bodovým bezpečnostným pásom vo vozidle.
• Vložte priložené ISOFIX navádzacie plasty (7) do ISOFIX kotviacich bodov (8) s dlhšou
časťou smerom nahor. V niektorých vozidlách je lepšie používať ISOFIX navádzacie
plasty (7) otočené.
UPOZORNENIE! ISOFIX kotevné body (8) sú dve kovové oká u každého sedadla,
nachádzajúce sa v priestore medzi opierkou chrbta a sedákom sedadla vo vozidle. V
prípade pochybností, prosíme nahliadnite do užívateľského manuálu vášho vozidla.
• Zatiahnite za ISOFIX nastavovacie madlo (9) na spodnej strane sedadla.
• Čo najviac vytiahnite oba ISOFIX Connect konektory (5).
• Teraz otočte ISOFIX konektory (5) o 180 ° tak, aby smerovali k ISOFIX navádzacím
plastom (7).
UPOZORNENIE! Pred nacvaknutím ISOFIX konektorov (5) do ISOFIX kotviacich bodov
(8) skontrolujte uvoľňovacie tlačidlá (10). Ak sú vidieť zelené bezpečnostné indikátory
(11), je potrebné ISOFIX konektory najskôr uvoľniť. Urobíte tak stlačením a zatiahnutím za
uvoľňovacie tlačidlo (10). V prípade nutnosti opakujte postup aj u druhého konektora.
• Zasuňte konektory (8) do ISOFIX navádzacích plastov (7) tak, aby sa kotevné body
uzamkli do konektorov s počuteľným cvaknutím.
• Pokusom o vytiahnutie autosedačky z navádzacích plastov (7) skontrolujte riadne
pripojenie autosedačky.
• Na oboch uvoľňovacích tlačidlách (10) musí byť teraz jasne viditeľný zelený
bezpečnostný ukazovateľ (11).
• Pre nastavenie pozície autosedačky CYBEX SOLUTION S-FIX teraz môžete použiť
ISOFIX nastavovacie madlo (9) naspodu sedáka (9)
UPOZORNENIE! Dbajte informácií v sekcii „Umiestnenie autosedačky vo vozidle“.
autosedačky.
HU
CZSK
61
Page 62

L.S.P.
AZ OLDALVÉDŐK CSATLAKOZTATÁSA
CLICK!
A
PRESS!
10
7
5
12
13
MAX
6
A gyermekülés “Lineáris oldalütközés elleni védelmi“ (L.S.P.) rendszerrel van felszerelve.
Ez a rendszer növeli a gyermek biztonságát oldalirányú ütközés esetén. A lehető legjobb
védelem érdekében az L.S.P.-t a legközelebbi ajtó irányába kell aktiválni. Az L.S.P.
aktiválásához nyomja meg a kijelölt részt (A) rajta.
FIGYELEM! Győzödjön meg arról, hogy az L.S.P. biztosítása megtörtént egy hallható
kattanás kíséretében. Ha az L.S.P. hozzáér az ajtóhoz, akkor teljesen be kell hajtani.
Ebben a pozícióban kell használni. Az L.S.P. ülésbe való visszanyomásához húzza kis
óvatosan, majd hajtsa be, amíg nem záródik egy hallható kattanás kíséretében.
FIGYELEM! Ha a gyermekülést a jármű középső ülésén használja, tilos az L.S.P.
rendszer használata!
!
FIGYELMEZTETÉS! Az L.S.P. rendszer használatakor az ülés szállítása vagy a
rajta való mászkálás tilos!
A CYBEX SOLUTION S-FIX ELTÁVOLÍTÁSA
Végezze el a beszerelési lépéseket fordított sorrendben.
• Kapcsolja ki az ISOFIX csatlakozó záró karokat (5) mindkét oldalon a szürke
kijelző gomb (10) megnyomásával és egyidejűleg húzza őket vissza.
• Húzza ki a gyermekülést az ISOFIX vezetőkből (7).
• Forgassa 180°-kal az ISOFIX csatlakozó záró karokat (5).
• Működtesse az ISOFIX beállító karját (9) a CYBEX SOLITION S-FIX
tengelyén (4) és nyomja a záró karokat ameddig lehetséges.
FIGYELEM! Az ISOFIX csatlakozó záró karok (5) összecsukásával nem csak a jűrmű ülését
védi, hanem az ISOFIX csatlakozó záró karjait is a szennyeződésektől és a sérüléstől.
TESTMÉRETHEZ IGAZÍTÁS
• A gyermekülés könnyedén a gyermek méreteihez igazítható az állítható fejrész (12)
segítségével. Ennek beállításához húzza meg a beállító kart (13) felfelé hogy kioldja
a fejrészt (12).
• A fejrész beállításakor a gyermek válla és a fejrész alja között maximum 2 cm rés lehet
(kb. 2 ujjnyi táv).
FIGYELEM! Kizárólag a megfelelően beállított fejrész (12) adja meg gyermeke számára
a maximális védelmet és kényelmet, miközben biztosítja a mellső öv (6) könnyed
illeszkedését. A CYBEX SOLUTION S-FIX magassága 12 pózícióban állítható.
62
Page 63

NASTAVENÍ BOČNÍCH PROTEKTORŮ NASTAVENIE BOČNÝCH PROTEKTOROV
Dětská autosedačka je vybavena systémem „lineární ochrany při bočním nárazu“ (L.S.P.).
Tento systém zvyšuje bezpečí vašeho dítěte při nárazu z boku. Pro nejvyšší možnou
ochranu používejte L.S.P. protektor na straně autosedačky, která je blíže ke dveřím vozidla.
Pro uvolnění L.S.P. stiskněte označenou oblast protektoru (A).
UPOZORNĚNÍ! Ujistěte se, že se L.S.P. zajistilo se slyšitelným cvaknutím. Pokud se L.S.P.
protektor dotýká dveří, měl by být řádně zasunutý.
L.S.P. je možné používat i v původní pozici. Pro navrácení L.S.P. protektoru zpět do původní
pozice jej nejdříve mírně vytáhněte a potom jej složte tak, aby se zajistil se slyšitelným cvaknutím.
UPOZORNĚNÍ! Při používání dětské autosedačky na prostředním sedadle ve vozidle je
používání vyklopeného L.S.P. zakázáno.
!
VAR OVÁNÍ! L.S.P. protektory se nesmí používat pro přenášení autosedačky nebo
jako pomůcka dítěte pro nástup do autosedačky.
Detská autosedačka je vybavená systémom „lineárne ochrany pri bočnom náraze“ (L.S.P.).
Tento systém zvyšuje bezpečie vášho dieťaťa pri náraze z boku. Pre najvyššiu možnú
ochranu používajte L.S.P. protektor na strane autosedačky, ktorá je bližšie k dverám vozidla.
Pre uvoľnenie L.S.P. stlačte označenú oblasť protektora (A).
UPOZORNENIE! Uistite sa, že sa L.S.P. zabezpečilo s počuteľným cvaknutím. Ak sa
L.S.P. protektor dotýka dverí, mal by byť riadne zasunutý.
L.S.P. je možné používať aj v pôvodnej pozícii. Pre navrátenie L.S.P. protektora späť do
pôvodnej pozície ho najskôr mierne vytiahnite a potom ho zložte tak, aby sa zabezpečil s
počuteľným cvaknutím.
UPOZORNENIE! Pri používaní detskej autosedačky na prostrednom sedadle vo vozidle
je používanie vyklopeného L.S.P. zakázané.
!
VAR OVANIE ! L.S.P. protektory sa nesmie používať na prenášanie autosedačky
alebo ako pomôcka dieťaťa pre nástup do autosedačky.
VYJMUTÍ AUTOSEDAČKY CYBEX SOLUTION S-FIX
Proveďte kroky instalace v opačném pořadí.
• Stisknutím a současným zatažením za obě šedá uvolňovací tlačítka (10)
uvolněte ISOFIX konektory (5).
• Vytáhněte autosedačku z ISOFIX naváděcích plastů (7).
• Otočte ISOFIX konektory (5) o 180 °.
• Zatáhněte za ISOFIX nastavovací madlo (9) vespod sedáku autosedačky
CYBEX SOLUTION S-FIX a co nejvíce zasuňte konektory dovnitř sedáku.
UPOZORNĚNÍ! Zasunutím ISOFIX konektorů (5) nechráníte před znečištěním a
poškozením pouze sedadla ve vozidle, ale také samotné konektory.
PŘIZPŮSOBENÍ DLE VELIKOSTI TĚLA
• Autosedačku lze jednoduše přizpůsobit velikosti těla vašeho dítěte pomocí nastavitelné
opěrky hlavy (12). Nejdříve uvolněte opěrku hlavy (12) zatažením za nastavovací madlo
(13) směrem nahoru.
• Nastavte opěrku hlavy tak, aby mezi ramenem dítěte a spodní hranou opěrky hlavy zůstal
max. 2cm prostor (cca šířka dvou prstů).
UPOZORNĚNÍ! Pouze správně nastavená opěrka hlavy (12) může vašemu dítěti zaručit
maximální ochranu a pohodlí a zároveň zajistit řádné vedení diagonálního pásu (6). Výšku
autosedačky CYBEX SOLUTION S-FIX lze nastavit do jedné z dvanácti pozic.
VYBRATIE AUTOSEDAČKY CYBEX SOLUTION S-FIX
Vykonajte kroky inštalácie v opačnom poradí.
• Stlačením a súčasným zatiahnutím za obe šedá uvoľňovacie tlačidlá (10)
uvoľnite ISOFIX konektory (5).
• Vytiahnite autosedačku z ISOFIX navádzacích plastov (7).
• Otočte ISOFIX konektory (5) o 180 °.
• Zatiahnite za ISOFIX nastavovacie madlo (9) naspodu sedáka autosedačky
CYBEX SOLUTION S-FIX a čo najviac zasuňte konektory dovnútra sedáka.
UPOZORNENIE! Zasunutím ISOFIX konektorov (5) nechráníte pred znečistením a
poškodením iba sedadlá vo vozidle, ale aj samotné konektory.
PRISPÔSOBENIE PODĽA VEĽKOSTI TELA
• Autosedačku možno jednoducho prispôsobiť veľkosti tela vášho dieťaťa pomocou
nastaviteľné opierky hlavy (12). Najskôr uvoľnite opierku hlavy (12) zatiahnutím za
nastavovací madlo (13) smerom nahor.
• Nastavte opierku hlavy tak, aby medzi ramenom dieťaťa a spodnou hranou opierky hlavy
zostal max. 2cm priestor (cca šírka dvoch prstov).
UPOZORNENIE! Iba správne nastavená opierka hlavy (12) môže vášmu dieťaťu
zaručiť maximálnu ochranu a pohodlie a zároveň zabezpečiť riadne vedenie
diagonálneho pásu (6). Výšku autosedačky CYBEX SOLUTION S-FIX možno nastaviť
do jednej z dvanástich pozícií.
HU
CZSK
63
Page 64

BEKÖTÉS A JÁRMŰ BIZTONSÁGI ÖVÉVEL
• Helyezze gyermekét a gyermekülésbe. Húzza ki a 3 pontos biztonsági övet és a gyermek
14
előtt elvezetve vigye az övcsathoz (14).
FIGYELEM! A 3 pontos biztonsági övet csak a kijelölt vonalon szabad elvezetni. Az öveket
részletesen ismertetjük ebben a használati útmutatóban és az ülés pirossal kijelölt részén.
!
FIGYELMEZTETÉS! Az öv soha ne legyen megcsavarodva.
64
CLICK!
14
17
15
6
16
17
6
12
6
16
17
12
18
6
• Helyezze az öv nyelvét (15) az övcsatba (14). Hallania kell egy kattanást.
• Ezután helyezze be és húzza meg az alsó övet (16) a gyermekülés pirossal jelölt
övelvezető részén (17).
• Most húzza meg erősen a mellső övet (6) hogy kifeszítse az alsó övet (16). Minél
szorosabb az öv, annál inkább véd a sérüléstől. Az övcsat (14) oldalán, a mellső biztonsági
öv (6) és az alsó öv (16) egyszerre kell hogy beillesztődjön az övelvezetőbe (17).
• Az alsó övnek (16) az ülés mindkét oldalán az alsó övelvezetőn (17) keresztül kell
elhaladnia.
• Vezesse el a mellső övet (6) a felső övelvezetőbe (18) a fejrészen (12) keresztül.
FIGYELEM! Tanítsa meg gyermekét, hogy mindig fi gyeljen arra, hogy az öve mindig feszes
legyen és ha szükséges, arra is, hogy ő maga megfeszítse az övet.
!
FIGYELMEZTETÉS! Az alsó övnek (16) a lehető legalacsonyabban kell végigfutnia
mindkét oldalon a gyermek ágyéka mentén, hogy baleset esetén optimális hatást
fejtsen ki.
Biztosítsa a mellső övet (6) a gyermeke válla és nyaka között elvezetve. Ha szükséges,
állítsa be a fejrész magasságát és változtassa az öv pozícióját. A fejrész (12) magasságát
az autóban kell beállítani.
6
16
17
Page 65

PŘIPOUTÁNÍ DĚTSKÉ AUTOSEDAČKY PRIPÚTANIE DETSKÉ AUTOSEDAČKY
• Posaďte dítě do autosedačky. Vytáhněte 3bodový bezpečnostní pás a veďte jej před
dítětem směrem k pásové sponě (14).
UPOZORNĚNÍ! 3bodový pás musí vždy vést skrze příslušná vedení pásu na
autosedačce.
Vedení pásu jsou podrobně popsána v tomto manuálu a na autosedačce jsou označena
červenou barvou.
• Posaďte dieťa do autosedačky. Vytiahnite 3-bodový bezpečnostný pás a veďte ho pred
dieťaťom smerom k pásovej spone (14).
UPOZORNENIE! 3-bodový pás musí vždy viesť skrze príslušná vedenia pásu na
autosedačke.
Vedenia pásu sú podrobne uvedené v tomto manuáli a na autosedačke sú označené
červenou farbou.
!
VAR OVÁNÍ! Nikdy pás nepřekrucujte.
• Zasuňte jazyk pásu (15) do pásové spony (14). Jazyk pásu se musí zajistit se slyšitelným
cvaknutím.
• Poté vložte břišní pás (16) do červeně označených spodních vedení pásu (17) na
autosedačce a utáhněte jej.
• Zatažením za diagonální pás (6) nyní dotáhnete břišní pás (16). Čím pevněji je pás
utažený, tím lepší poskytuje ochranu před zraněním. Na straně, kde je pásová spona (14)
musí oba pásy (diagonální (6) a břišní (16) společně vést skrze spodní vedení pásu (17).
• Břišní pás (16) musí vést skrze spodní vedení pásu (17) na obou stranách sedáku
autosedačky.
• Poté vložte diagonální pás (6) do horního vedení pásu (18) v opěrce hlavy.
UPOZORNĚNÍ! Již od začátku se snažte vaše dítě naučit zkontrolovat řádné utažení pásu
a jeho případné dotažení.
!
VAR OVÁNÍ! Pro co nejlepší funkčnost v případě nehody je třeba, aby břišní pás (16)
vedl na obou stranách co nejníže přes rozkrok dítěte.
Ujistěte se, že diagonální pás (6) vede mezi vnější stranou ramene a krkem vašeho dítěte.
Pro změnu pozice pásu upravte výšku opěrky hlavy. Výšku opěrky hlavy
ve vozidle.
(12) lze nastavit i
!
VAR OVANIE ! Nikdy pás neprekrúcajte.
• Zasuňte jazyk pásu (15) do pásovej spony (14). Jazyk pásu sa musí zaistiť s počuteľným
cvaknutím.
• Potom vložte brušný pás (16) do červeno označených spodných vedenie pásu (17) na
autosedačke a utiahnite ho.
• Zatiahnutím za diagonálny pás (6) teraz dotiahnete brušný pás (16). Čím pevnejšie je
pás utiahnutý, tým lepšie poskytuje ochranu pred zranením. Na strane, kde je pásová
spona (14) musia obaja pásy (diagonálný (6) a brušný (16) spoločne viesť skrze spodné
vedenie pásu (17).
• Brušný pás (16) musí viesť skrz spodné vedenie pásu (17) na oboch stranách sedadla
autosedačky.
• Potom vložte diagonálny pás (6) do horného vedenia pásu (18) v opierke hlavy.
UPOZORNENIE! Už od začiatku sa snažte vaše dieťa naučiť skontrolovať riadne
utiahnutie pásu a jeho prípadné dotiahnutie.
!
VAR OVANIE ! Pre čo najlepšiu funkčnosť v prípade nehody je potrebné, aby brušný
pás (16) viedol na oboch stranách čo najnižšie cez rozkrok dieťaťa.
Uistite sa, že diagonálny pás (6) vedie medzi vonkajšou stranou ramena a krkom vášho
dieťaťa. Pre zmenu pozície pásu upravte výšku opierky hlavy. Výšku opierky hlavy (12)
možno nastaviť aj vo vozidle.
HU
CZSK
65
Page 66

14
CLICK!
17
1
19
MEGFELELŐEN RÖGZÍTETTE GYERMEKÉT?
Hogy gyermeke számára az optimális biztonságot garantálja, még az utazás megkezdése
előtt ellenőrizze, hogy...
• Az alsó övet (16) az alsó piros övvezetőn (17) vezette keresztül az ülésmagasító (1)
mindkét oldalán.
• A mellső övet (6) az övcsathoz szintén a gyermekülés alsó piros övvezetőn (17) keresztül
vezette el.
• A mellső öv (6) a felső övvezetőn (18) keresztül lett elvezetve a fejrész (12) kijelölt
piros részén.
• A mellső öv (6) visszahúzódik.
• Az egész öv megfelelően feszes-e, és nincs-e megtekeredve.
12
• Ha ISOFIX csatlakozót használ: A gyermekülés csatlakozott az ISOFIX csatlakozó záró
karokhoz (5) mindkét oldalon és a zöld biztonsági jelzés (11) tisztán látható.
!
FIGYELMEZTETÉS! A jármű övcsatja (14) nem mehet keresztül a kartámaszon. Ha
az öv túl hosszú, a biztonsági germekülés nem alkalmas ehhez a gépjárműhöz. Kétség
esetén keresse fel a kereskedőt.
!
FIGYELMEZTETÉS! Soha ne hagyja a gyermeket felügyelet nélkül az autóban. A
gyermekülés védelmi rendszerének műanyag részei felmelegedhetnek a Naptól és
égési sérülést okozhatnak.
A gyermekülés csatlakozott az ISOFIX csatlakozó záró karokhoz (5) mindkét oldalon
és a zöld biztonsági jelzés (11) tisztán látható.
Ne tegye ki közvetlen napsütésnek a gyermekülést és az utósülést (pl. világos színű
anyaggal való letakarás nélkül).
511
66
14
Page 67

JE VAŠE DÍTĚ SPRÁVNĚ ZAJIŠTĚNÉ? JE VAŠE DIEŤA SPRÁVNE ZAISTENÉ?
Pro zajištění optimální ochrany vašeho dítěte se před jízdou ujistěte, že: Pre zaistenie optimálnej ochrany vášho dieťaťa sa pred jazdou uistite, že:
• břišní pás (16) vede na obou stranách sedáku (1) skrze spodní červené vedení pásu (17).
• na straně pásové spony vede diagonální pás (6) skrze spodní červené vedení pásu (17).
• diagonální pás (6) vede skrze červeně označené horní vedení pásu (18) v opěrce hlavy. (12).
• diagonální pás (6) vede v náklonu směrem dozadu.
• celý pás je pevně utažený k tělu dítěte a není překroucený.
• V případě použítí ISOFIX Connect: Autosedačka je na obou stranách zajištěná ISOFIX
Connect konektory (5) a jsou vidět zelené bezpečnostní ukazatele (11).
!
VAR OVÁNÍ! Pásová spona (14) ve vozidle nesmí nikdy dosahovat k opěrce ruky.
Pokud je pás příliš dlouhý, není autosedačka vhodná pro použití na této pozici ve
vozidle. V případě pochybností, prosíme, kontaktujte vašeho prodejce.
!
VAR OVÁNÍ! Nikdy dítě nenechávejte ve vozidle bez dozoru. Plastové části
autosedačky se na slunci mohou zahřát a dítě se o ně může spálit.
Chraňte vaše dítě i dětskou autosedačku před přímým slunečním světlem (např.
přikrytím světlou látkou).
• brušný pás (16) vedie na oboch stranách sedadla (1) skrz spodné červené vedenie pásu (17).
• na strane pásové spony vedie diagonálny pás (6) skrz spodné červené vedenie pásu (17).
• diagonálny pás (6) vedie skrz červeno označené horné vedenie pásu (18) v opierke
hlavy. (12).
• diagonálny pás (6) vedie v náklone smerom dozadu.
• celý pás je pevne utiahnutý k telu dieťaťa a nie je prekrútený.
• V prípade použitia ISOFIX Connect: Autosedačka je na oboch stranách zaistená
ISOFIX Connect konektormi (5) a sú vidieť zelené bezpečnostné indikátory (11).
!
VAR OVANIE ! Pásové spona (14) vo vozidle nesmie nikdy dosahovať k opierke ruky.
Ak je pás príliš dlhý, nie je autosedačka vhodná pre použitie na tejto pozícii vo vozidle.
V prípade pochybností, prosíme, kontaktujte vášho predajca.
!
VAR OVANIE ! Nikdy dieťa nenechávajte vo vozidle bez dozoru. Plastové časti
autosedačky sa na slnku môžu zahriať a dieťa sa o ne môže spáliť.
Chráňte vaše dieťa aj detskú autosedačku pred priamym slnečným svetlom (napr.
prikrytím svetlou látkou).
HU
CZSK
67
Page 68

19
20
ELHAJLÓ FEJTÁMLA
Az elhajló fejtámla segíti megakadályozni, hogy a gyermek feje alvás közben veszélyesen
előreereszkedjen. Egy esetleges ütközés esetén, a fejtámla követi a gyermek fejének
előrebukását, beakad a helyére és megakadályozza a gyermek fejének további mozgását.
FIGYELEM! Biztosodjon meg róla, hogy a gyermek feje érintkezik a fejtámlával (19),
mivel kizárólag ebben az esetben nyújt a fejtámla optimális védelmet egy esetleges
oldalütközés esetén.
A fejtámla elhajlási szöge három különböző pozícióba állítható. A kar mozgatása nélkül
előre lehet hajtani a második vagy a harmadik pozícióba, amíg a helyére kattan. Az eredeti
pozíciójába visszahelyezés a beállító kar segítségével lehetséges, a fejtámla húzása közben.
!
FIGYELMEZTETÉS! Soha se akadályozza meg ezt a mechanizmust (20)! Baleset
esetén a döntésállító mechanizmust óvatosan kell mozgatni, különben a gyermek
megsérülhet!
TISZTÍTÁS & KARBANTARTÁS
A gyermekülés maximális védelmének biztosításához vegye fi gyelembe a következőket:
• A gyermekülés minden egyes fontos részét rendszeresen ellenőrizni kell. A mechanikus
részeknek hibátlanul működniük kell.
• Maximálisan biztosítani kell a gyermekülés ne tudjon beakadni olyan kemény részek
közé, mint például a jármű ajtaja vagy az üléssín, amik potenciálisan károsíthatják.
• Miután erős hatás érte, pl. baleset után, a gyermekülést minden esetben ellenőriztetni
kell a gyártóval.
Fontos, hogy mindig eredeti CYBEX huzatot használjon, mivel a huzat is fontos része a
funkciónak. Tartalék huzatot a kereskedőjétől igényelhet.
68
Page 69

NAKLÁPĚCÍ OPĚRKA HLAVY NAKLÁPACIA OPIERKA HLAVY
Naklápěcí opěrka hlavy napomáhá předcházet nebezpečnému přepadávání hlavy dítěte
dopředu během spánku. V případě nehody se opěrka hlavy pohybuje dopředu společně s
hlavou dítěte, následně se uzamkne a absorbuje energii zpětného pohybu.
UPOZORNĚNÍ! Ujistěte se, že je hlava dítěte vždy v kontaktu s naklápěcí opěrkou hlavy
(19). Pouze tehdy může opěrka hlavy při nehodě poskytnout optimální ochranu.
Opěrku hlavy lze nastavit do 3 pozic. Dopředu do druhé a třetí pozice lze opěrku hlavy
nastavit bez použití páčky. Pro navrácení opěrky do původní pozice je třeba zatáhnout za
páčku a zatlačit opěrku směrem dozadu.
! !
VAR OVÁNÍ! Nikdy neblokujte zamykací mechanismus (20)! V případě nehody musí
mechanismus polohování řádně fungovat, jinak může vaše dítě utrpět zranění!
PÉČE A ÚDRŽBA STAROSTLIVOSŤ A ÚDRŽBA
Pro zajištění maximální ochrany, poskytované vaší autosedačkou, je nezbytné dbát
následujících bodů:
• Všechny hlavní části dětské autosedačky by měly být pravidelně kontrolovány.
Mechanické části musí být bez vad.
• Je naprosto nezbytné se ujistit, že autosedačka není zaseknutá mezi tvrdými předměty,
např. dveře vozidla nebo kolejnice sedadel, které ji mohou poškodit.
• Při extrémně vysokém zatížení (např. po nehodě) musí být autosedačka
zkontrolována výrobcem.
Ujistěte se, že je používaný pouze originální CYBEX potah, jelikož potah je klíčovým prvkem
funkce autosedačky. Náhradní potahy lze zakoupit u specializovaného prodejce.
Naklápacia opierka hlavy napomáha predchádzať nebezpečnému prepadávanie hlavy
dieťaťa dopredu počas spánku. V prípade nehody sa opierka hlavy pohybuje dopredu
spoločne s hlavou dieťaťa, následne sa uzamkne a absorbuje energiu spätného pohybu.
UPOZORNENIE! Uistite sa, že je hlava dieťaťa vždy v kontakte s naklápacou opierkou
hlavy (19). Iba vtedy môže opierka hlavy pri nehode poskytnúť optimálnu ochranu.
Opierku hlavy možno nastaviť do 3 pozícií. Dopredu do druhej a tretej pozície možno
opierku hlavy nastaviť bez použitie páčky. Pre navrátenie opierky do pôvodnej pozície treba
zatiahnuť za páčku a zatlačiť opierku smerom dozadu.
VAR OVANIE! Nikdy neblokujte zamykací mechanizmus (20)! V prípade nehody musí
mechanizmus polohovanie riadne fungovať, inak môže vaše dieťa utrpieť zranenia!
Pre zaistenie maximálnej ochrany, poskytovanej vašou autosedačkou, je nevyhnutné dbať
nasledujúcich bodov:
• Všetky hlavné časti detskej autosedačky by mali byť pravidelne kontrolované.
Mechanické časti musia byť bez vád.
• Je absolútne nevyhnutné sa uistiť, že autosedačka nie je zaseknutá medzi tvrdými
predmetmi, napr. dvere vozidla alebo koľajnice sedadiel, ktoré ju môžu poškodiť.
• Pri extrémne vysokom zaťaženie (napr. po nehode) musí byť autosedačka
skontrolovaná výrobcom.
Uistite sa, že je používaný iba originálny CYBEX poťah, pretože poťah je kľúčovým prvkom
funkcie autosedačky. Náhradné poťahy je možné zakúpiť u špecializovaného predajca.
HU
CZSK
69
Page 70

12 12
13
AZ ÜLÉSHUZAT ELTÁVOLÍTÁSA
A gyermekülés huzata négy részből áll (fejtámla fül, fejtámla, vállrész takaró, ülésmagasító
vagy ülőrész huzat).
A gyermekülés négy huzatrésze a gyermekülés szélén lévő huzat rögzítőcsatornába
illeszkedik, és a különböző nyomógombok (lásd a képen) tartják a helyükön.
Ha minden patentet kioldottunk, akkor a részek egyenként eltávolíthatóak.
Az üléshuzat visszahelyezéséhez fordított sorrendben járjunk el, mint eltávolításakor.
!
FIGYELMEZTETÉS! Az ülést tilos huzat nélkül használni.
A HUZAT ELTÁVOLÍTÁSA A FEJTÁMLASZÁRNYRÓL
Húzza át a huzatnyílást a fejtámla beállító karján (13) hogy a huzat ne sérüljön, miközben
húzza és eltávolítja azt.
A HUZAT ELTÁVOLÍTÁSA A FEJTÁMLÁRÓL
Akassza le a huzatnyílást a vállrészek oldalairól.
Húzza ki a huztatot a csatlakozó csatornából.
A HUZAT ELTÁVOLÍTÁSA A VÁLLVÉDŐKRŐL
Húzza ki a huztatot a csatlakozó csatornából.
70
Page 71

SUNDÁNÍ POTAHU AUTOSEDAČKY ZLOŽENIE POŤAHU AUTOSEDAČKY
Potah dětské autosedačky se skládá ze čtyř částí (naklápěcí opěrka hlavy, opěrka hlavy,
potah ramenní části, potah sedáku).
Čtyři části potahu jsou vložené do příslušných drážek na potah na okraji autosedačky a na
několika místech jsou přichyceny patentkami (viz obrázek).
Po uvolnění všech patentek lze jednotlivé části potahu vyjmout z drážek na potah.
Pro opětovné nasazení potahů na autosedačku opakujte postup sundání v opačném pořadí. Pre opätovné nasadenie poťahov na autosedačku opakujte postup odobranie v opačnom poradie.
! !
VAR OVÁNÍ! Dětskou autosedačku nikdy nepoužívejte bez potahu. VAR OVANIE ! Detskú autosedačku nikdy nepoužívajte bez poťahu.
Poťah detskej autosedačky sa skladá zo štyroch častí (naklápacia opierka hlavy, opierka
hlavy, poťah ramennej časti, poťah sedáka).
Štyri časti poťahu sú vložené do príslušných drážok na poťah na okraji autosedačky a na
niekoľkých miestach sú prichytené patentkami (viď obrázok).
Po uvoľnenie všetkých patentiek možné jednotlivé časti poťahu vyňať z drážok na poťah.
SUNDÁNÍ POTAHU Z NAKLÁPĚCÍ OPĚRKY HLAVY
Přetáhněte otvor potahu přes nastavovací páčku opěrky hlavy (13) tak, aby se o ní potah
při vytahování nezasekl.
SUNDÁNÍ POTAHU Z OPĚRKY HLAVY ODOBRATIE POŤAHU Z OPIERKY HLAVY
Na obou stranách vyvlékněte potah z háčků na zadní straně ramenní části.
Vytáhněte potah z drážky na potah.
SUNDÁNÍ POTAHU Z RAMENNÍ ČÁSTI ODOBRATIE POŤAHU Z RAMENNEJ ČASTI
Vytáhněte potah z drážky na potah.
ODOBRATIE POŤAHU Z NAKLÁPACIE OPIERKY HLAVY
Pretiahnite otvor poťahu cez nastavovaciu páčku opierky hlavy (13) tak, aby sa o ňu poťah
pri vyťahovanie nezasekol.
Na oboch stranách vyvlečte poťah z háčikov na zadnej strane ramennej časti.
Vytiahnite poťah z drážky na poťah.
Vytiahnite poťah z drážky na poťah.
HU
CZSK
71
Page 72

AZ ÜLÉSMAGASÍTÓ HUZATÁNAK ELTÁVOLÍTÁSA
Engedje fel az ülséhuzat két tartógombját a gyermekülés elülső és hátsó részén. Most
húzza le a huzatot a karfáról és az ülőrészről.
TISZTÍTÁS
FIGYELEM! Kérjük mossa ki a huzatot az első használat előtt. A huzat max. 30°C fokon
fi nom gépi mosással mosható. Ha magasabb hőmérsékleten mossa, az anyag elvesztheti
a színét. Kérjük, a huzatot külön mossa, és soha ne szárítsa gépben! Soha ne szárítsa a
huzatot közvetlen napfénynek kitéve. Enyhén mosószerrel benedvesített ruhával és langyos
vízzel törölje át a műanyag részeket.
!
FIGYELMEZTETÉS! Soha ne használjon durva tisztítószert vagy fehérítőt!
HOGYAN JÁRJON EL BALESET UTÁN
!
FIGYELMEZTETÉS! Baleset esetén az ülésen szabad szemmel nem látható
sérülések is keletkezhetnek. Kérjük helyettesítse a gyermekülést a baleset után!
Sérülés esetén konzultáljon a kereskedővel vagy a gyártóval!
A TERMÉK ÉLETTARTAMA
A gyermekülést úgy tervezték, hogy rendeltetésszerűen lássa el funkcióit kb. 9 éven
keresztül. A termék tulajdonságai enyhén romolhatnak az idő múlásával, a műanyag
fokozatos kopása és a közvetlen napsütés (és UV sugárzás) miatt. Mivel nagy hőingadozás
és egyéb előre nem látható feszültségek fordulnak elő a járműben, ilyen esetekben a
következő pontokat vegye fi gyelembe:
• Ha a jármű hosszú ideig erős napfénynek van kitéve, a gyermekülést ki kell venni a
járműből vagy le kell takarni egy világos ruhával.
• Rendszeresen ellenőrizze a gyermekülés műanyag és fém részeit, hogy nem
károsodtak-e, vagy változott az alakjuk és a színük. Ha bármilyen változást észlel
a gyermeküléssel kapcsolatban, az ülést el kell távolítani és ellenőriztetni, és a
lehetőségekhez mérten cseréltetni a gyártóval.
• A gyermekülés huzatának változása (pl. a szín kopása) normális, nem befolyásolja a
működését és a funkcióit.
72
Page 73

SUNDÁNÍ POTAHU ZE SEDÁKU ODOBRATIE POŤAHU ZO SEDÁKU
Uvolněte 2 patentky potahu na přední a zadní straně sedáku. Nyní potah přetáhněte přes
opěrky rukou a podél povrchu sedáku.
ČIŠTĚNÍ
UPOZORNĚNÍ! Před prvním použitím potah vyperte. Potah lze prát pouze při 30°C
na mírný prací program. Praní při teplotě vyšší než 30°C může vést ke ztrátě barvy látky.
Prosíme perte potah odděleně a nesušte jej v sušičce! Nikdy potah nesušte na přímém
slunečním světle! Plastové části lze čistit pomocí teplé vody a mírného čistícího prostředku.
!
VAR OVÁNÍ! Nikdy nepoužívejte silné čistící prostředky nebo bělidla!
JAK POSTUPOVAT PO NEHODĚ
!
VAR OVÁNÍ! Při nehodě může autosedačka utrpět poškození, která nejsou pouhým
okem viditelná. Prosíme, po nehodě autosedačku vyměňte. V případě pochybností,
prosíme kontaktujte vašeho prodejce nebo výrobce.
Uvoľnite 2 patentky poťahu na prednej a zadnej strane sedáka. Teraz poťah pretiahnite cez
opierky rúk a pozdĺž povrchu sedáka.
ČISTENIE
UPOZORNENIE! Pred prvým použitím poťah vyperte. Poťah možno prať len pri 30°C
na mierny prací program. Pranie pri teplote vyššej ako 30°C môže viesť k strate farby
látky. Prosíme perte poťah oddelene a nesušte ho v sušičke! Nikdy poťah nesušte na
priamom slnečnom svetle! Plastové časti možno čistiť pomocou teplej vody a mierneho
čistiaceho prostriedku.
!
VAR OVANIE ! Nikdy nepoužívajte silné čistiace prostriedky alebo bielidlá!
AKO POSTUPOVAŤ PO NEHODE
!
VAR OVANIE ! Pri nehode môže autosedačka utrpieť poškodenia, ktorá nie sú voľným
okom viditeľná. Prosíme, po nehode autosedačku vymeňte. V prípade pochybností,
prosíme kontaktujte vášho predajca alebo výrobca.
ŽIVOTNOST PRODUKTU
Tato dětská autosedačka byla navržena tak, aby při běžném užívání plnila svoji funkci
po dobu cca 9 let. Postupné opotřebování plastů, způsobené např. vlivem slunečního
záření (UV), může vést ke zhoršení vlastností produktu. Jelikož je autosedačka často
vystavena velkým výkyvům teplot a jiným nepředvídatelným zatížením, je nezbytné dbát
následujících pokynů.
• Pokud je vozidlo po delší dobu vystaveno přímému slunečnímu světlu, měla by být
autosedačka z vozidla vyjmuta nebo přikryta světlou látkou.
• Pravidelně kontrolujte všechny plastové a kovové části na přítomnost poškození, změnu
tvaru nebo barvy. Pokud na autosedačce zaznamenáte jakékoliv změny, je třeba ji
zlikvidovat nebo zkontrolovat výrobcem a případně vyměnit.
• Změny na látkách, především vyblednutí barev, jsou při používání ve vozidlech běžné a
neovlivňují funkčnost autosedačky.
ŽIVOTNOSŤ PRODUKTU
Táto detská autosedačka bola navrhnutá tak, aby pri bežnom užívaní plnila svoju funkciu po
dobu cca 9 rokov. Postupné opotrebovanie plastov, spôsobené napr. vplyvom slnečného
žiarenia (UV), môže viesť k zhoršenie vlastností produktu. Keďže je autosedačka často
vystavená veľkým výkyvom teplôt a iným nepredvídateľným zaťažením, je nevyhnutné dbať
nasledujúcich pokynov.
• Ak je vozidlo po dlhšiu dobu vystavené priamemu slnečnému svetlu, mala by byť
autosedačka z vozidla vytiahnutá alebo prikrytá svetlou látkou.
• Pravidelne kontrolujte všetky plastové a kovové časti na prítomnosť poškodenie, zmenu
tvaru alebo farby. Pokiaľ na autosedačke zaznamenáte akékoľvek zmeny, je potrebné ju
zlikvidovať alebo skontrolovať výrobcom a prípadne vymeniť.
• Zmeny na látkach, predovšetkým vyblednutie farieb, sú pri používanie vo vozidlách bežné
a neovplyvňujú funkčnosť autosedačky.
HU
CZSK
73
Page 74

ÁRTALMATLANÍTÁS
A gyermekülés élettartamának végén megfelelően kell eljárni. Régiónként különböző lehet
a hulladék kezelési szabályzat. Hogy megbizonyosodhasson a gyermekülés megfelelő
ártalmatlanításáról, forduljon a helyi önkormányzathoz vagy a hulladékkezelő intézethez.
Mindig tartsa be az országának megfelelő hulladékkezelési szabályait.
JÓTÁLLÁSI FELTÉTELEK
Az alábbi jótállási feltételek csak azokban az országokban érvényesek, ahol a terméket a
kiskereskedelmi csatornákon keresztül értékesítették a fogyasztónak. Ez a garancia kiterjed
minden olyan gyártási- és anyaghibára, ami a vásárlás időpontjában fennállt, vagy ami a
termék kiskereskedelmi csatornákon való átvétele után (gyártói garancia) 3 éven belül
jelentkezik. Ha a gyártási vagy anyaghiba a garanciális időszak alatt jelentkezik, a termék
díjmentesen javításra kerül, vagy - a gyártó belátása szerint - egy újjal helyettesítik. A
garancia érvényesítéséhez a vásárlás helyén kell visszaadni a terméket a kiskereskedőnek,
akitől vette, valamint az eredeti vásárlási bizonylatot vagy számlát a vásárlás dátumával,
a kiskereskedő nevével és címével, valamint a termék adataival, le kell adni. A garancia
nem érvényesíthető, ha a terméket elküldték a gyártónak vagy bárki másnak úgy, hogy a
kiskereskedő nem neki adta el először. A garancia csak akkor érvényesíthető a terméket
teljesen ellenőrizték, és a gyarátási- és anyaghibák vásárláskor jelen voltak. Ha a
terméket postai úton vásárolta meg, azonnal ellenőrizni kell, hogy vannak-e a gyártásiés anyaghibák. Ha a terméken sérülés jelentkezik, vissza kell vinni a kiskereskedőnek,
aki eredetileg eladta. Jótállás igénylésekor a terméket tiszta és teljes állapotában kell
visszaküldeni. Mielőtt a jótállási igény érvényesítését megkezdené, kérjük, alaposan olvassa
át a jelen tájékoztatót. A jótállás nem terjed ki külső hatásokra (víz, tűz, közlekedési baleset,
stb…), normális kopásra, és nem érvényesíthető visszaéléssel. A garanciális igények csak
akkor érvényesíthetők, ha a terméket a használati utasításnak megfelelően használták és
kezelték, ha a javításokat és esetleges módosításokat olyan személyek végezték, akiket
erre felhatalmaztak, valamint csak ha eredeti alkatrészeket és tartozékokat alkalmaztak. Ez
a garancia semmilyen módon nem akadályozza meg vagy korlátozza a vásárlót az eladóval
szembeni fogyasztói jogok érvényesítésében a jogszabályok által biztosított vásárlási
szerződés megsértése esetén.
CYBEX GmbH
Riedingerstr. 18, 95448 Bayreuth, Germany
Tel.: 0921 78 511-511, Fax.: 0921 78 511- 888
74
Page 75

LIKVIDACE LIKVIDÁCIA
Na konci použitelnosti dětské autosedačky je nezbytná její řádná likvidace. Třídění odpadu
se může lišit podle oblasti. Pro zajištění řádné likvidace dětské autosedačky v souladu s
předpisy, prosíme kontaktujte vaše příslušné místní orgány. Vždy dodržujte vaše místní
předpisy o likvidaci odpadu.
ZÁRUKA ZÁRUKA
Následující záruční podmínky platí pouze v zemi, ve které byl tento produkt původně prodán
spotřebiteli skrze ofi ciální prodejní distribuci. Tato záruka se vztahuje na všechny výrobní a
materiálové vady, které byly přítomny v den pořízení nebo se projevily v období tří (3) let od
data prvního prodeje spotřebiteli skrze ofi ciální prodejní distribuci (výrobní záruka). Pokud
se výrobní nebo materiálová vada projeví během záručního období, bude produkt bezplatně
opraven nebo - dle našeho uvážení - vyměněn za nový. Pro uplatnění této záruky musí
být produkt navrácen původnímu prodejci společně s dokladem o nákupu (účtenka nebo
faktura), obsahujícím datum pořízení, jméno a adresu prodejce a název produktu. Při zaslání
produktu výrobci nebo osobě jiné, než je jeho původní prodejce je žádost o uplatnění
záruky neplatná. Záruka platí pouze, pokud byl produkt ihned po pořízení zkontrolován, zda
je kompletní a zcela nepoškozený. Při nákupu s doručením musí být produkt zkontrolován,
zda je kompletní a zcela nepoškozený ihned po jeho obdržení. Při výskytu vady by
výrobek neměl být nadále používán a je třeba jej vrátit jeho původnímu prodejci. V případě
uplatňování záruky musí být produkt vrácen v kompletním a čistém stavu. Než se obrátíte
na prodejce, prosíme přečtěte si pozorně návod k použití. Záruka nezahrnuje poškození
způsobená špatným použitím, okolními vlivy (voda, oheň, nehody atd.) nebo běžné
opotřebování produktu. Záruku lze uplatnit pouze pokud je produkt používán a udržován
dle pokynů uvedených v uživatelské příručce, opravy a úpravy jsou prováděny pouze
autorizovanými osobami a používají se výhradně originální náhradní díly a příslušenství.
Tato záruka neruší ani jakkoliv neomezuje jakákoliv práva spotřebitele nebo jeho práva vůči
prodejci na základě porušení dohody o nákupu, udělená platným právem.
Na konci použiteľnosti detskej autosedačky je potrebná jej riadna likvidácia. Triedenie
odpadu sa môže líšiť podľa oblasti. Pre zaistenie riadnej likvidácie detskej autosedačky v
súlade s predpismi, prosíme kontaktujte vaše príslušné miestne orgány. Vždy dodržujte
vaše miestne predpisy o likvidácii odpadu.
Nasledujúce záručné podmienky platia len v krajine, v ktorej bol tento produkt pôvodne
predaný spotrebiteľovi skrze ofi ciálnu predajnu distribúciu. Táto záruka sa vzťahuje na
všetky výrobné a materiálové chyby, ktoré boli prítomné v deň nadobudnutia alebo sa
prejavili v období troch (3) rokov od dátumu prvého predaja spotrebiteľovi skrze ofi ciálnu
predajnu distribúciu (výrobná záruka). Ak sa výrobná alebo materiálová vada prejaví počas
záručného obdobia, bude produkt bezplatne opravený alebo - podľa nášho uváženia
- vymenený za nový. Pre uplatnenie tejto záruky musí byť produkt vrátený pôvodnému
predajcovia spoločne s dokladom o nákupe (účtenka alebo faktúra), obsahujúcim dátum
obstarania, meno a adresu predajca a názov výrobku. Pri zaslaní produktu výrobcovi alebo
osobe inej, než je jeho pôvodný predajca je žiadosť o uplatnenie záruky neplatná. Záruka
platí len, ak bol produkt ihneď po nadobudnutie skontrolovaný, či je kompletný a úplne
nepoškodený. Pri nákupe s doručením musí byť produkt skontrolovaný, či je kompletný a
úplne nepoškodený ihneď po jeho doručení. Pri výskyte chyby by výrobok nemal byť naďalej
používaný a je potrebné ho vrátiť jeho pôvodnému predajcovi. V prípade uplatňovanie
záruky musí byť produkt vrátený v kompletnom a čistom stave. Než sa obrátite na predajca,
prosíme prečítajte si pozorne návod na použitie. Záruka nezahŕňa poškodenia spôsobená
zlým použitím, okolitými vplyvmi (voda, oheň, nehody atď.) alebo bežné opotrebovanie
produktu. Záruku je možné uplatniť len ak je výrobok používaný a udržiavaný podľa pokynov
uvedených v užívateľskej príručke, opravy a úpravy sú vykonávané len autorizovanými
osobami a používajú sa výhradne originálne náhradné diely a príslušenstvo. Táto záruka
neruší ani akokoľvek neobmedzuje akékoľvek práva spotrebiteľa alebo jeho práva voči
predajcovi na základe porušenie dohody o nákupe, udelená platným právom.
HU
CZSK
75
Page 76

SOLUTION S-fix
UN-R44-04
UNIVERSAL
SEMI-UNIVERSAL
15 – 36 kg
04301359
CYBEX GmbH
Riedingerstr. 18, 95448 Bayreuth
Germany
76
UN R 44-04, group 2/3, 15 to 36 kg
CYBEX SOLUTION S-FIX
cojín de seguridad con respaldo y reposacabezas
Recomendado para:
Age: desde 3 hasta los 12 años, aprox
Peso: 15 to 36 kg
Altura: hasta 150 cm
Solo compatible con vehículos con cinturón automático
de tres puntos de acuerdo a la regulación UN R16 o un
estándar comparable.
Homologação
UN R 44-04, grupo 2/3, 15 aos 36 kg
CYBEX SOLUTION S-FIX
assento com encosto de costas e cabeça.
Uso recomendado:
Idade: desde aproximadamente 3 aos 12 anos
Peso: 15 aos 36 kg
Altura: até 150 cm
Pode ser apenas utilizada em assentos de automóveis
com cintos de segurança de três pontos de retractor
automático, de acordo com a regulamentação R16 ou
equiparada.
ES
!
¡ATENCIÓN! Para garantizar que su hijo se encuentre seguro, es muy importante usar
ÍNDICECertifi cación
e instalar la CYBEX SOLUTION S-FIX de acuerdo con el manual de instrucciones.
NOTA Guarde siempre el manual de instrucciones (ej. En el compartimento designado
para ello en la parte trasera del respaldo).
NOTA De acuerdo con las especifi caciones locales, las caraterísticas del producto
pueden cambiar. Sin embargo, esto no afectará al correcto funcionamiento del producto.
MONTAJE INICIAL .....................................................................................................................................................................................78
POSICIÓN CORRECTA DE LA SILLA EN EL VEHÍCULO ..................................................................................................80
SEGURIDAD EN EL VEHÍCULO .......................................................................................................................................................82
COLOCACIÓN DE LA SILLA EN EL VEHÍCULO .....................................................................................................................82
INSTALACIÓN DE LA SILLA CON CONECTORES ISOFIX ................................................................................................84
AJUSTE DE LOS PROTECTORES LATERALES ........................................................................................................................86
DESINSTALAR LA CYBEX SOLUTION SF IX .............................................................................................................................86
ADAPTACIÓN AL TAMAÑO DEL CUERPO ................................................................................................................................86
COLOCACIÓN DEL CINTURÓN DE SEGURIDAD ................................................................................................................88
¿ESTÁ BIEN SUJETO SU HIJO? ........................................................................................................................................................90
REPOSACABEZAS RECLINABLE ..................................................................................................................................................92
CONSERVACIÓN Y MANTENIMIENTO ........................................................................................................................................92
EXTRAER LA VESTI DURA ....................................................................................................................................................................94
EXTRACCIÓN DE LA FUNDA DEL PROTECTOR DEL REPOSACABEZAS..............................................................94
EXTRACCIÓN DE LA FUNDA DEL REPOSACABEZAS ......................................................................................................94
EXTRACCIÓN DE LA FUNDA DEL PROTECTOR DE LOS HOMBROS 94
EXTRAER LA VESTIDURA DE LA BASE ........................................................................................................................................96
LIM PI EZA ...................................................................................................................... .................................................................................96
DURABILIDAD DEL PRODUCTO .....................................................................................................................................................96
ELIMINACIÓN .............................................................................................................................................................................................98
CONDICIONES DE GARANTÍA.........................................................................................................................................................98
Page 77

PT
!
ATE NÇ ÃO! Para assegurar a utilização correcta a SOLUTION S-FIX deve ser
ÍNDICE
utilizada como descrito neste manual.
AVI SO! Manter sempre à mão estas insteuções. (ex.no compartimento desenhado para o
efeito na parte de trás do encosto da cadeira.).
AVI SO! Regulações específi cas de cada país(ex. código de cores) poderão modifi car
alguma funcionalidade e/ou aparência do produto. Isto, no entanto, não afecta o seu
funcionamento correcto.
MONTAGEM INICIAL ...............................................................................................................................................................................79
COLOCAR CORRETAMENTE A CADEIRA NO AUTOMÓVEL ........................................................................................81
SEGU RANÇA NO AUTOMÓVE L ......................................................................................................................................................83
INSTALAÇÃO DA CADEIRA AO AUTOMÓVEL .........................................................................................................................83
PRENDER A CADEIRA UTILIZANDO OS CONECTORES ISOFIX ................................................................................85
AJUSTAR OS PROTETORES LATERAIS .......................................................................................................................................87
DESINSTALAR A CYBEX SOLUTION SF I X ................................................................................................................................ 87
ADAPTAR AO TAMANHO DA CRIANÇA ......................................................................................................................................87
COMO COLOCAR O CINTO DE SEGURANÇA À CRIANÇA ...........................................................................................89
VIAJA A CR IANÇA EM SEGURANÇA? ..........................................................................................................................................91
ENCOSTO DE CABEÇA RECLINÁVEL ........................................................................................................................................93
CUIDADO & MANUTENÇÃO ..............................................................................................................................................................93
REMOVER A FORRA DA CADEIRA AUTO...................................................................................................................................95
REMOVER A FORRA DAS ABAS DO ENCOSTO DE CABEÇA.......................................................................................95
REMOVER A FORRA DO SUPORTE DE CABEÇA.................................................................................................................95
REMOVER A FORRA DA PARTE DOS OM BR OS ...................................................................................................................95
REMOVER A FORRA DO ASSENTO ............................................................................................................................................. 97
LIM PEZA ........................................................................................................................................................................................................ 97
VIDA ÚTIL DO PRODUTO ..................................................................................................................................................................... 97
ELIMINAÇÃO ...............................................................................................................................................................................................99
CONDIÇÕES DA GARANTIA .............................................................................................................................................................99
ESPT
77
Page 78

MONTAJE INICIAL
La silla consiste en un asiento alzador (1) y su respaldo (2) con reposacabezas ajustable
2
3
1
2
1
4
en altura. Sólo la combinación de ambas partes proporciona la mejor protección y confort
para su hijo.
!
¡ATENCIÓN! Los componentes de la CYBEX SOLUTION S-FIX no deben usarse
por separado o en combinación con alzadores, respaldos o reposacabezas de otros
fabricantes o con otras lineas de producto. En tales casos, la homologación expiraría
inmediatamente.
Conecte el respaldo (2) al alzador (1) anclándolo en la guía (3) en el eje (4) del alzador (1).
!
¡ATENCIÓN! Por favor, asegúrese de que las partes plásticas de la silla nunca se
compriman, (p.ej. golpeándolas con la puerta del coche mientras ajuste la silla).
NOTA: Siempre mantenga estas instrucciones a mano (por ejemplo, en el
compartimento designado)
78
Page 79

MONTAGEM INICIAL
A cadeira consiste num assento (1) e encosto (2)com um encosto de cabeça ajustável em
altura Apenas a combinação das duas partes proporciona máxima proteção e conforto.
!
ATE NÇ ÃO! As partes da SOLUTION S-FIX não devem ser utilizadas em separado
ou em combinação com assentos, costas ou encostos de cabeça de outros
fabricantes ou de modelos de outras séries. Neste caso a garantia deixa de ser
válida imediatamente.
Encaixe o encosto (2) no assent (1) colocando as peças de encaixe (3) na estrutura
cilindrica (4) presente no assento (1).
!
ATE NÇ ÃO! Certifique-se de que as partes de plástico da cadeira não se encontram
nunca pressionadas (ex: entalão com a porta do automóvel ou ao ajustar as costas
da a cadeira).
NOTE! Manter smpre as instruções à mão(ex no compartimento para o efeito
na parte de trás do assento).
79
ESPT
Page 80

POSICIÓN CORRECTA DE LA SILLA EN EL VEHÍCULO
La silla de seguridad con conectores ISOFIX retráctiles se puede usar en todos los
vehículos con cinturón automático de tres puntos aprobados en el manual de instrucciones
del vehículo, uso universal.
!
¡ATENCIÓN! La silla no es apropiada para su uso con un cinturón de dos puntos.
Si se utilizara un cinturón de dos puntos para sujetar la silla, el niño podría sufrir
lesiones graves o incluso mortales en caso de accidente.
A las sillas de retención que se conectan al coche con conectores ISOFIX se les
da una homologación “semi-universal” Por ese motivo, los conectores ISOFIX sólo
se pueden usar en ciertos vehículos. Consulte la lista de vehículos adjunta para
ver en cuáles se puede utilizar. Puede obtener la información más actualizada en
www.cybex-online.com.
En algún caso excepcional, la silla podrá usarse en el asiento del copiloto. En tal caso
deberá tener en cuenta lo siguiente:
• En vehículos con airbags, retrase el asiento del acompañante tanto como sea posible.
Cuando lo haga, sobretodo asegúrese de que el punto más alto del cinturón de tres
puntos quede retrasado respecto de la pletina para el cinturón en la silla.
• Siga siempre las recomendaciones del fabricante del vehículo.
!
¡ATENCIÓN! El cinturón de seguridad (6) que sale desde el lateral del coche,
debe llegar en diagonal desde detrás, nunca desde delante. Si no puede ajustarlo
así o moviendo el asiento del coche hacia adelante o usándola en otro asiento, por
6
ejemplo, esta silla no será adecuada para este vehículo.
!
¡ATENCIÓN! Mantenga bien sujeto el equipaje y otros objetos presentes en el
vehículo que puedan causar lesiones en caso de accidente. De lo contrario podrían
salir despedidos, con el consiguiente riesgo.
!
¡ATENCIÓN! La silla no se debe usar en asientos enfocados lateralmente a la
dirección de la marcha. Para asientos que están situados en contra del sentido de
la marcha, por ejemplo en un monovolumen o minibus, el uso de la silla infantil está
permitido siempre que el asiento esté homologado para un adulto. El reposacabezas
del asiento no debe retirarse cuando instale la silla infantil en un asiento situado en
contra del sentido de la marcha. La silla debe fijarse con el cinturón, incluso cuando
el niño no está en ella.
80
NOTA: Nunca deje a su hijo sin vigilancia en el vehículo.
Page 81

COLOCAR CORRETAMENTE A CADEIRA NO AUTOMÓVEL
A CYBEX SOLUTION S-FIX com os fi xadores ISOFIX guardados pode ser utilizada em
todos os veículos com cinto automático de três pontos aprovado no manual do automóvel
para utilização Universal.
!
ATE NÇ ÃO! Esta cadeira não pode ser utilizada com um cinto de cintura de dois
pontos. Ao instalar a cadeira com um cinto de dois pontos; na eventualidade de um
acidente a criança poderá sofrer ferimentos graves ou mesmo fatais.
A homologação “semi-universal” é dada aos sistemas de retenção que vão
instalados ao automóvel mediante fi xadores ISOFIX Os fi xadores ISOFIX só
são compatíveis com certos automóveis. Verifi que a lista da compatibilidade no
automóvel. Obtenha a lista mais actualizada em www.cybex-online.com.
Em casos exepcionais esta cadeira poderá ser utilizada no lugar do coopiloto. Nesse caso
tenha atenção ao seguinte:
• Em automóveis com airbags deverá colocar a cadeira o mais atrás possivel. Ao fazê-lo,
deverá verifi car que o pino superior do cinto de segurança está por trás do ponto de
entrada do cinto da cadeira.
• Siga sempre as indicações e recomendações do fabricante.
!
ATE NÇ ÃO! O cinto diagonal (6) deve correr de forma inclinada e nunca deve estar
de frente para o ponto de onde retira o cinto. Se não é possível regular a cadeira
desta maneira a cadeira, ex: puxar a cadeira para a frente ou instalá-la noutro
assento, não está apta para o veículo.
!
ATE NÇ ÃO! Bagagem e outros objectos soltos dentro do automóvel poderão ser a
causa de ferimentos na eventualidade de um acidente. Deverá prender ou guardar
estes objectos, caso contrário, poderão causar ferimentos graves ou mortais.
!
ATE NÇ ÃO! A cadeira auto não deve ser utilizada em assento do automóvel que
estão posicionados de lado. A utilização da cadeira é permitida em assentos do
automóvel posicionados no sentido à marcha(por ex van ou autocarros em que
o assento permite o transporte de adultos.) Tenha em atenção que o encosto de
cabeça do assento no sentido inverso à marcha,não deve ser retirado quando é para
instalar uma cadeira. Mesmo que a cadeira auto não esteja a ser utilizada,deverá
estar sempre segura com o cinto de segurança do automóvel.
ESPT
AVI SO! Nunca deixe a criança sem vigilãncia no automóvel.
81
Page 82

SEGURIDAD EN EL VEHÍCULO
!
¡ATENCIÓN! La silla debe fijarse siempre con el cinturón de seguridad, incluso
cuando no está en uso. Es necesario para evitar que el conductor o el copiloto
puedan resultar heridos por una silla suelta en caso de frenada brusca o en caso de
colisión.
Con el fi n de garantizar la mejor seguridad posible para todos los pasajeros ...
Los respaldos plegables del vehículo se deben bloquear en su posición vertical.
Cuando instale la silla de seguridad en el asiento del copiloto, ajuste el asiento del
vehículo en la posición más atrás.
Asegure adecuadamente todos los objetos que puedan causar lesiones en caso de accidente.
Todos los pasajeros del vehículo deben ir correctamente abrochados.
COLOCACIÓN DE LA SILLA EN EL VEHÍCULO
Sitúe la silla de seguridad en el asiento apropiado del vehículo.
• Asegúrese siempre de que toda la superfi cie del respaldo (2) de la CYBEX SOLUTION
S-FIX SL queda en contacto contra el respaldo del asiento del vehículo. La silla nunca
debe quedar en una posición reclinada. Si es necesario, puede ajustar esta distancia
con la palanca de ajuste ISOFIX (9).
• Si el reposacabezas del asiento del vehículo entorpece, desplácelo, gírelo o retírelo
(para excepciones sobre esto, consulte el apartado POSICIÓN CORRECTA DE LA
SILLA EN EL VEHÍCULO). El respaldo (2) se adaptará perfectamente a prácticamente
cualquier ángulo del respaldo del asiento del vehículo.
!
¡ATENCIÓN! El respaldo de la silla CYBEX debe quedar completamente en
2
contacto con el respaldo del asiento del vehículo. La silla debe estar en una posición
vertical normal para garantizar un nivel óptimo de seguridad.
9
NOTA: En algunos vehículos, los asientos están hechos con materiales sensibles
(p.ej. ante, cuero, etc…), el uso de la silla de seguridad puede dejar marcas o causar
decoloración. Para evitar esto, puede poner una manta o toalla debajo de la silla, por
ejemplo. Por favor, atienda también a nuestras instrucciones de limpieza en este manual
de instrucciones; dichas instrucciones deben tenerse en cuenta antes de usar la silla por
primera vez.
!
¡ATENCIÓN! No utilice ningun otro punto de contacto excepto los que están
descritos en el manual de instrucciones y marcados en la silla de seguridad.
82
NOTA: Utilice las bocas ISOFIX proporcionadas para garantizar que el asiento del
vehículo no sea dañado por las guías de conexión ISOFIX.
Page 83

SEGURANÇA NO AUTOMÓVEL
!
ATE NÇ ÃO! Mesmo quando a cadeira auto não estiver em uso, deverá sempre
colocar o cinto de segurança na mesma. Em caso de travagem de emergência ou
acidente, uma cadeira que não esteja devidamente segura, pode causar danos
graves aos outros passageiros e a si.
Para garantir a máxima segurança para todos os passageiros assegure-se que:
que os assentos ajustáveis do automóvel não estão reclinados.
Quando instalar a cadeira no lugar do copiloto, ajuste o assento do automóvel na posição
mais para trás possivel.
que os objectos que podem ausar danos estão seguros correctamente..
todos os passageiros estão seguros com o cinto de segurança.
INSTALAÇÃO DA CADEIRA AO AUTOMÓVEL
Coloque a cadeira no assento apropriado para a correta instalação.
• Assegure-se sempre que a superfi cie do encosto (2) da CYBEX SOLUTION S-FIX
está colocada encostada ao assento do automóvel. A criança nunca deve estar deitada.
Se necessário poderá ajustar a distancia utilizando o ISOFIX (9).
• Se o encosto do assento do automóvel estiver a difi cultar a instalação puxe para
cima ou retire o mesmo completamente(no caso de exepções ao caso vá a secção
“POSICIONAR A CADEIRA NO AUTOMÓVEL DE FORMA CORRETA”).O encosto
(2) adapta-se na perfeição a qualquer reclinação de assento do automóvel.
!
ATE NÇ ÃO! A superfície do encosto de cadeira auto CYBEX deve estar sempre
encostada as costas do assento do automóvel. De maneira a assegurar a máxima
segurança à criança, a cadeira deverá estar num posição recta!
AVI SO! Em alguns assentos de automóveis feitos de materiais mais sensíveis
(pele,camurça etc..) o uso de cadeiras auto pode deixar marcas ou criar mudanças de cor.
Para prevenir esta situação poderá colocar uma toalha ou manta por debaixo da cadeira
auto. Por favor veja também as nossas referências à limpeza,presentes neste manual,
estas intruções devem ser vistas antes de utilizar a cadeira pela primeira vez.
!
ATE NÇ ÃO! Não utilize outros pontos de contacto sem ser os descritos nas
instruções e marcados na própria cadeira auto.
AVI SO! Por favor utilize as guias ISOFIX presentes na cadeira para evitar que os
assentos do automóvel sejam danifi cados com os conectores ISOFIX.
ESPT
83
Page 84

7
CLICK!
INSTALACIÓN DE LA SILLA CON CONECTORES ISOFIX
7
8
11
10
5
1800
10
10
11
9
11
9
La seguridad de su hijo aumentará con los conectores ISOFIX que permiten
anclar la CYBEX SOLUTION S-FIX al vehículo fi rmemente. Su hijo debe continuar
utilizando el cinturón de seguridad de 3 puntos del vehículo.
• Inserte las guías ISOFIX (7) incluídas con la pata más larga hacia arriba en ambos
puntos de fi jación del ISOFIX (8). En algunos vehículos es mejor instalar las guías
ISOFIX (7) al revés.
NOTA: Los puntos de anclaje ISOFIX (8) son dos ganchos de metal por asiento, situados
entre la base y el respaldo del asiento de su vehículo. En caso de duda, consulte el manual
de su vehículo.
• Use la palanca (9), situada debajo del asiento.
• Tire de los conectores ISOFIX (5) tanto como pueda.
• Gire los conectores ISOFIX (5) 180° hasta que apunten a los anclajes ISOFIX (7).
NOTA: Antes de anclar los conectores ISOFIX (5) en los anclajes ISOFIX (8), compruebe
los botones de desanclaje (10). Si los indicadores verdes (11) están visibles, primero debe
soltar los conecotres ISOFIX antes de unirlos, moviendo hacia delante y atrás el botón de
desanclaje (10). Repita el procedimiento con el segundo conector, si es preciso.
• Presione ambos conectores (8) en las guías ISOFIX (7) hasta que oiga que quedan
fi jadas en los puntos de anclaje ISOFIX con un ‘click’.
• Asegúrese de que el asiento está correctamente ancladoal intentar sacarlo de las guías
ISOFIX (7).
• El indicador verde de seguridad (11) debe quedar claramente visible en los dos botones
rojos de apertura (10).
• Ahora puede usar la palanca de ajuste (9) situada en la parte baja (1) de la CYBEX
SOLUTION S-FIX para ajustar la silla a una correcta posición.
NOTA: Consulte la sección “Colocación de la silla en el vehículo”.
84
1
9
Page 85

PRENDER A CADEIRA UTILIZANDO OS CONECTORES ISOFIX
Ao usar o sistema ISOFIX está a aumentar a estabilidade e segurança da CYBEX
SOLUTION S-FIX. A criança necessita ser sempre segura com o cinto de
segurança de três pontos presentes no automóvel.
• InsInsir as guias (7) com a parte mais comprida para cima nos dois pontos de fi xação
ISOFIX (8). Em alguns veículos, é melhor montar os fi xadores (7) na direção oposta.
AVI SO! Os pontos de fi xação ISOFIX (8) são dois ganchos metálicos para cada assento
e estão posicionados entre o encosto e o assento do banco do veículo. Em caso de
dúvida consulte o manual do automóvel.
• Use a alavanca de ajuste (9) sob o assento.
• Puxe para fora ao máximo os dois fi xadores ISOFIX (5).
• Gire os fi xadores ISOFIX (5) 180º de maneira que fi quem alinhados com as guias (7).
AVI SO! Antes de instalar os conectores ISOFIX (5) nos pontos de fi xação ISOFIX (8),
verifi que os botões (10). Se conseguir ver os indicadores de segurança verdes (11) deverá
libertar os conectores ISOFIX antes de colocá-los pressionando-os e puxando para trás o
botão de bloqueio (10). Repita o mesmo processo se necessário para o segundo fi xador.
• Empurre os dois braços (8) até as guias (7) até que estes se encaixem nos pontos de
fi xação ISOFIX. Quando a instalação é correta ouvir-se-à um “click”.
• Certifi que-se de que o assento está seguro, tentando puxá-lo para fora das guias (7).
• O indicador de segurança verde (11) deverá estar agora claramente visível nos dois
botões de desboqueio cinzentos (10).
• Poderá agora usar a patilha de ajuste (9) no assento (1) da CYBEX SOLUTION S-FIX
para ajustar a posição.
AVI SO! Consulte a informação contida na secção “Instalar a cadeira no automóvel”.
85
ESPT
Page 86

L.S.P.
AJUSTE DE LOS PROTECTORES LATERALES
CLICK!
A
La silla de seguridad está equipada con el “Sistema de Protección Lineal Contra Impactos
Laterales” (L.S.P.). Este sistema aumenta la seguridad de su hijo en caso de impacto
lateral. Active el L.S.P. del lado de la puerta para tener la mayor seguridad. Para liberar el
L.S.P. presione el área marcada (A) en el L.S.P
PRESS!
10
7
5
12
13
MAX
6
NOTA: Asegúrese de que el L.S.P. se fi ja con un “CLICK” audible. En caso de que el
L.S.P. toque la puerta, debe ser plegado correctamente.
Se permite su uso en esta posición. Para poder plegar el L.S.P., tire del L.S.P. ligeramente
y empuje hacia el asiento, hasta que se bloquee con un “CLICK” audible.
NOTA: Cuando se utilice la silla de seguridad en un asiento ubicado en el centro del
vehículo, está prohibido desplegar el L.S.P.
!
¡ATENCIÓN! Usando la L.S.P. Está prohibido utilizar el L.S.P. para transportar o
elevar la silla de seguridad infantil.
DESINSTALAR LA CYBEX SOLUTION S-FIX
Realice todos los pasos de la instalación en el orden inverso.
• Suelte los conectores ISOFIX (5) en ambos lados, presionando los botones
grises de apertura (10) y tirando de ellos simultáneamente.
• Tire de la silla (7).
• Gire los conectores ISOFIX (5) 180°.
• Utilice la palanca de ajuste de los conectores (9) de la CYBEX SOLUTION
S-FIX e introduzcalos en la estructura (4)
NOTA: Plegando los conectores (5) no sólo protegerá la tapiería del asiento del coche
sino que además evitara que entre cualquier suciedad en los anclajes.
ADAPTACIÓN AL TAMAÑO DEL CUERPO
• La silla se adapta a la estatura del niño ajustando el respaldo (12). Para hacerlo, presiona
la palanca (13) hacia arriba, así desbloquearás las posiciones del respaldo (12).
• Ajústelo de tal forma que hayan dos dedos de distancia entre la parte superior del
hombro del niño y la parte inferior del protector de cabeza.
NOTA: Solo el óptimo ajuste del respaldo (12) asegurará una protección máxima y una
correcta colocación del cinturón diagonal (6) sobre el cuerpo del niño. La altura de la
CYBEX SOLUTION S-FIX puede ajustarse en 12 posiciones.
86
Page 87

AJUSTAR OS PROTETORES LATERAIS
A cadeira auto está equipada com um Sistema de proteção contra impacto lateral (sistema
L.S.P.). Este sistema aumenta a segurança da criança em caso de impacto lateral. Active a
proteção L.S.P o mais próximo possível do lado da porta, para ter o máximo de segurança
possível. Para abrir o L.S.P carregue na area indicada (A) presente no L.S.P.
AVI SO! Assegure-se que o ISOFIX está fi xo com um click audível. No caso do L.S.P
tocar na porta pode ser fechado de forma apropriada.
Neste caso será permitido utilizar assim. Para voltar a colocar o LSP na posição inicial,
puxe ligeiramente o L.S.P para fora e empurre para dentro até fi car na posição correta com
um “click” audível.
AVI SO! Quando utiliza os LSP no assento do meio é proibido a abertura dos mesmos.
!
ATE NÇ ÃO! É proibido transportar ou levantar a cadeira segurando nos L.S.P.
DESINSTALAR A CYBEX SOLUTION S-FIX
Faça os passos de instalação na ordem inversa.
• Desbloqueie o sistema ISOFIX (5) em ambos os lados pressionando o botão
vermelho para soltar (10) e puxe-os simultaneamente.
• Extraia os fi xadores ISOFIX (7) das guias ISOFIX.
• Gire os braços do ISOFIX (5) 180°.
• Utilize a patilha de ajuste (9) na estrutura (4) da CYBEX SOLUTION S-FIX e
empurre os fi xadores o mais para dentro possível.
AVI SO! Ao guardar os fi xadores (5) para dentro, estará a proteger o assento do veículo
ao mesmo tempo que protege os fi xadores ISOFIX de poeira e possíveis estragos.
ADAPTAR AO TAMANHO DA CRIANÇA
• A cadeira pode ser ajustada à altura da criança utilizando o encosto de cabeça (12). Para
o fazer carregue na patilha de ajuste (13) desbloqueando o encosto de cabeça (12).
• Ajuste o encosto de cabeça com um máximo de 2 cm(aproximadamente dois dedos)
entre o ombro da criança e o encosto de cabeça.
AVI SO! Apenas com um ajuste ótimo do encosto de cabeça (12) a cadeira pode oferecer
máxima proteção e conforto enquanto assegura que o cinto diagonal (6) pode ser
colocado na posição correta. A altura da CYBEX SOLUTION S-FIX pode ser ajustada em
12 posições..
ESPT
87
Page 88

COLOCACIÓN DEL CINTURÓN DE SEGURIDAD
• Coloque al niño en la silla de seguridad. Tire del cinturón de seguridad de tres puntos
14
hacia fuera y paselo por delante del niño hasta abrocharlo en la hebilla (14).
NOTA: La cinturón de tres puntos solo debe pasar a través de la
la ruta designada. Las rutas del cinturón se describen en detalle en
este manual y están marcadas en rojo en el asiento del automóvil.
!
¡ATENCIÓN! Nunca gire el cinturón.
88
CLICK!
14
17
15
6
16
17
6
12
6
• Introduzca el extremo metálico (15) del cinturón en la hebilla (14) hasta que se escuche
un “CLICK”.
• Ponga el cinturón abdominal (16) en las guías rojas inferiores del cinturón (17) de la silla
de seguridad
• Tire con fuerza de la correa diagonal (6) para apretar la correa abdominal (16). Cuanto
más tenso esté el cinturón, mayor será su efi cacia para prevenir lesiones. En el lado de
la hebilla del cinturón (14), la correa diagonal (6) y la correa abdominal (16) se deben
pasar juntas por la guía inferior (17).
• La correa abdominal (16) tiene que pasar por las guías inferiores (17) en ambos lados
del cojín del asiento.
• Ahora pase el cinturón diagonal (6) a través de la guía (18) del reposacabezas (12)
hasta que quede totalmente dentro de ella.
NOTA: Enseñe al niño desde el principio que el cinturón tiene que estar tenso y, si es
necesario, explíquele como apretarlo por sí mismo.
16
17
12
18
6
!
¡ATENCIÓN! La correa abdominal (16) debe estar lo más baja posible en ambos
lados a lo largo de la ingle del niño para que sea más eficaz en caso de accidente.
El cinturón diagonal (16) debe pasar entre la parte externa del hombro y el cuello del niño.
Si fuese necesario, ajuste la altura del respaldo para cambiar la ubicación del cinturón. La
altura del respaldo (12) se puede ajustar estando dentro del coche.
6
16
17
Page 89

COMO COLOCAR O CINTO DE SEGURANÇA À CRIANÇA
• Coloque a criança na cadeira auto. Puxe para fora o cinto de três pontos para fora e
puxe-o até chegar à fi véla de encaixe do cinto (14).
AVI SO! O cinto de três pontos deve passar apenas através
dos pontos designados para a função. As passagens do cinto estão descritas neste
manual detalhadamente e estão marcadas a vermelho na cadeira auto.
!
ATE NÇ ÃO! Não torça ou dê voltas ao cinto.
• Insira a patilha do cinto (15) na fívela de encaixe (14). Ao encaixar o cinto na fovéla
dever-se-à ouvir um “CLICK”.
• De seguida, coloque o cinto de cintura (16) nas guias de cinto inferiores (17) da
cadeira.
• Agora puxe o cinto diagonal (6) fi rmemente de maneira a que o cinto de cintura (16)
fi que mais tenso. Quanto mais justo estiver o cinto mais proteção proporcionará. Do
lado da fi vela de encaixe (14), o cinto diagonal (6) e o de cintura (16) deverão ser
colocados juntos na guia inferior do cinto (17).
• O cinto de cintura (16) deverá ser colocado na guia inferior do cinto (17) em ambos os
lados do assento da cadeira..
• Insira o cinto diagonal (6) através da guia de cintos superior (18) situada no encosto
de cabeça (12) por dentro da patilha da guia.
AVI SO! Ensine a criança desde o inicio sempre a verifi car se o cinto está justo e que se
for necessário coloquem eles próprios o cinto.
!
AVI SO! O cinto de cintura (16) deve correr na posição mais baixa possível nos
dois lados ao largo do corpo dacriança para proporcionar máxima proteção em
caso de acidente.
Assegure que o cinto diagonal (6) passa entre a parte de fora do ombro e pescoço
da criança. Se necessário, ajuste a altura do encosto de cabeça para mudar o
posicionamento do cinto. A altura do encosto de cabeça (12) pode ser ajustada mesmo
dentro do automóvel.
ESPT
89
Page 90

14
CLICK!
17
1
19
¿ESTÁ BIEN SUJETO SU HIJO?
Con el fi n de garantizar la máxima seguridad para su hijo, antes de iniciar un viaje
compruebe que:
• El cinturón horizontal (16) pasa por las guías rojas inferiores (17) en ambos lados del
cojín del asiento (1).
• El cinturón diagonal (6) en el lado de la hebilla del cinturón también pasa por la guía
roja inferior (17) del asiento.
• La correa diagonal (6) pasa por la guía (18) marcada en rojo en el protector de
hombros (12).
• El cinturón diagonal (6) queda correctamente ajustado.
12
• Todo el cinturón se ajusta al cuerpo del niño y no está retorcido.
• Si se utiliza el ISOFIX: La silla está bloqueada de ambos lados con las guías de
bloqueo ISOFIX (5) y los indicadores de seguridad verdes (11) son claramente visibles.
!
¡ATENCIÓN! La hebilla del cinturón del vehículo (14) nunca debe cruzar el
reposabrazos. Si el cinturón es demasiado largo, la silla no podrá utilizarse en este
asiento del vehículo. En caso de duda, contacte con el fabricante del vehículo.
!
¡ATENCIÓN! Nunca deje a su hijo desatendido en el vehículo. Las partes de
plástico en el sistema de retención infantil se pueden calentar con el sol y el niño
puede sufrir quemaduras.
Proteja a su hijo y la silla de seguridad de la exposición directa al sol (por ejemplo,
con una tela de color blanco).
511
90
14
Page 91

VIAJA A CRIANÇA EM SEGURANÇA?
De maneira a assegurar a máxima segurança à criança, assegure-se sempre de que:
• o cinto de cintura (16) passa pelas guias mais a baixo(17) nos dois lados do assento (1).
• o cinto diagonal (6) do lado da fívela de encaixe também deve p’assar pela guia
vermelha (17) no assento.
• O cinto diagonal (6) Passou pela guia superior (18) marcada a vermelho no encosto de
cabeça(12).
• o cinto diagonal (6) está reclinado para baixo.
• O cinto está tenso e apertado ao alrededor do corpo da criança e não está torcido.
• se o ISOFIX for utilizado: A cadeira está segura dos dois lados com os conectores
ISOFIX (5) e os indicadores a verde (11) estão claramente vísiveis.
!
ATE NÇ ÃO! A fívela do cinto (14) nunca deve passar por cima do braço da cadeira.
Se o sistema do cinto for muito longo, a cadeira auto não poderá ser instalada nesta
posição. Em caso de dúvida por favor contacte o ponto de venda.
!
ATE NÇ ÃO! Nunca deixe a criança sem vigilância. As partes plásticas
do sistema de retenção aquece com o so e pode causar queimaduras à criança.
Proteja a criança e o sistema de retenção da exposição directa ao sol.(e.x tapar
com um tecido de cor clara).
91
ESPT
Page 92

19
20
REPOSACABEZAS RECLINABLE
El reposacabezas reclinable evita que la cabeza del niño caiga hacia deltante cuando se
queda dormido. En caso de impacto, el reposacabezas avanza con la incercia del choque
y se mantiene en la posición más recta, haciendo que el retroceso del cuello del niño hacia
atrás no sea tan duro.
NOTA: Asegúrese de que la cabeza del niño está siempre en contacto con el
reposacabezas reclinable (19), ya que esta es la única forma de que el reposacabezas
ofrezca la máxima protección en caso de impacto lateral.
El ángulo de reclinado del reposacabezas se puede ajustar en tres posiciones. Es posible
moverlo hacia delante sin desplazar la palanca a la posición segunda o tercera hasta que
el reposacabezas quede en posición. Para devolverlo a la posición original, debe activar la
palanca y tirar del reposacabezas hacia atrás.
!
¡ATENCIÓN! ¡Nunca bloquee el mecanismo de reclinado (20)! En caso de
accidente, el ajuste de reclinado debe moverse libremente, ¡en caso contrario su hijo
puede recibir daños!
CONSERVACIÓN Y MANTENIMIENTO
Para asegurar la máxima protección para su hijo, es importante que tenga en cuenta lo siguiente:
• Todas las partes principales de la silla de seguridad deben comprobarse regularmente.
Los componentes mecánicos deben estar en perfecto estado.
• Es absolutamente necesario asegurarse de que la silla no se golpee con la puerta del
coche u otros objetos, ya que podría dañarse.
• Cuando se exponga a un golpe grave, por ejemplo en caso de un accidente, la silla
debe ser revisada por el fabricante.
Utilice exclusivamente fundas originales CYBEX, ya que la funda es un elemento
básico para la función de la silla. Puede adquirir fundas de repuesto en
establecimientos especializados.
92
Page 93

ENCOSTO DE CABEÇA RECLINÁVEL
O encosto de cabeça reclinável ajuda a evitar que a cabeça da criança caia para a frente
ao adormecer. Em caso de impacto, o encosto de cabeça segue o movimento da cabeça
do seu fi lho, mantendo-a sempre a uma zona de segurança anulando o movimento para
trás posterior da cabeça da criança.
AVI SO! Certifi que-se de que a cabeça da criança está sempre em contacto com o
encosto de cabeça reclinável (19), pois só assim poderá fornecer a máxima proteção em
impactos laterais.
O ângulo de inclinação do encosto de cabeça pode ser ajustado em três posições. O
encosto de cabeça pode mover-se para a frente, sem necessidade de mover a patilha,
para a segunda ou terceira posição até bloquear. Para voltar à posição original, puxe a
patilha e o encosto de cabeça para trás.
!
ATE NÇ ÃO! Não coloque nenhum objecto que possa obstruir o mecanismo de
bloqueio (20)! Em caso de acidente, o mecanismo de regulação deverá moverse
suavemente, caso contrário a criança poderá magoar-se!
CUIDADO & MANUTENÇÃO
Para assegurar o máximo de proteção para a criança é imperativo que tenha em atenção
o seguinte:
• Todas as partes importantes da cadeira deverão ser revistas com regularidade Os
componentes mecânicos não deverão apresentar qualquer defeito.
• É absolutamente necessário comprovar que a cadeira de segurança não se encontra
pressionada/entalada entre objectos rígidos, tais como a porta do automóvel ou outra
parte do veículo que possa provocar-lhe danos.
• Caso a cadeira autoseja exposta a um impacto, a uma situação de acidente, a mesma
deverá ser revista pelo fabricante ou não ser mais utilizada.
Assegure-se que apenas utiliza forras CYBEX originais, uma vez que estas são
essenciais e funcionais para a cadeira. Poder-se-ão obter forras extra nos pontos de
venda especializados.
ESPT
93
Page 94

12 12
EXTRAER LA VESTIDURA
La funda de la silla infantil consta de cuatro partes (protector de reposacabezas,
reposacabezas, funda del protector de hombros y/o funda del asiento).
13
Las cuatro partes de la vestidura de la silla estan ajustadas a través de la estructura
gracias a diversos botones de presión (ver imagen).
Las distintas partes de la funda se pueden extraer después de abrir todos los broches.
Repita el procedimiento en orden inverso para volver a coloca las fundas en la silla.
!
¡ATENCIÓN! La silla nunca debe utilizarse sin vestidura.
EXTRACCIÓN DE LA FUNDA DEL PROTECTOR DEL REPOSACABEZAS
Levante la abertura de la funda por encima de la palanca de ajuste del reposacabezas (13)
para evitar que la funda se enganche en la palanca al tirar de ella para extraerla.
EXTRACCIÓN DE LA FUNDA DEL REPOSACABEZAS
Suelte los dos broches a cada lado de la parte posterior del protector de hombros.
Tire la funda para extraerla del canal.
EXTRACCIÓN DE LA FUNDA DEL PROTECTOR DE LOS HOMBROS
Tire la funda para extraerla del canal.
94
Page 95

REMOVER A FORRA DA CADEIRA AUTO
A forra da cadeira está composta por quatro partes (abas do encosto de cabeça, encosto
de cabeça, forra das costas e assento da cadeira).
As quatro partes da forra ligam-se entre si através de canais de ligação e são seguros em
diversos sítios por botões de pressão (ver imagem)
Uma vez desapertados todos os botões, as diversas partes da forra podem ser removidos.
De maneira a colocar a forra novamenyte na cadeira, proceda da mesma maneira mas de
ordem inversa.
!
ATE NÇ ÃO! A cadeira não deverá ser usada sem a forra.
REMOVER A FORRA DAS ABAS DO ENCOSTO DE CABEÇA
Passe a abertura da forra por cima da patilha de ajuste (13) de maneira a que não fi que
presa ao removê-la.
REMOVER A FORRA DO SUPORTE DE CABEÇA
Desaperte os botões em ambos os lados na parte traseira dos ombros.
Puxe a forra para fora dos canais de ligação.
REMOVER A FORRA DA PARTE DOS OMBROS
Puxe a forra para fora dos canais de instalação.
95
ESPT
Page 96

EXTRAER LA VESTIDURA DE LA BASE
Suelte los 2 broches de la funda del asiento por delante y por detrás. A continuación,
levante la funda por encima de los reposabrazos y a lo largo de la superfi cie del asiento.
LIMPIEZA
NOTA: Lave la vestidura antes de su primer uso. La funda sólo se puede lavar a 30°C
usando un programa para prendas delicadas. El tejido de la funda podría perder sus
colores si se lava a temperaturas más altas de 30ºC. Lave la funda sin mezclarla con otras
prendas y no utilice secadora. ¡Nunca seque la vestidura al sol! Las partes de plástico se
pueden limpiar con un detergente suave y agua tibia.
!
¡ATENCIÓN! No utilice detergentes fuertes ni blanqueadores.
!
¡ATENCIÓN! En caso de accidente es posible que la silla sufra daños no
perceptibles a simple vista. Por favor, reemplace la silla en caso de accidente. En
caso de duda, por favor contacte con el vendedor de la silla o con el fabricante
DURABILIDAD DEL PRODUCTO
Esta silla de seguridad ha sido diseñada para obtener una vida útil de aproximadamente
9 años. El desgaste gradual del plástico, por ejemplo, causado por la exposición a la
luz solar (UV), puede causar un ligero deterioro de las propiedades del producto. Sin
embargo, las grandes variaciones de temperatura y las circunstancias imprevistas que se
pueden producir en un vehículo obligan a tener en cuenta los siguientes puntos:
• Si el coche está expuesto normalmente a muchas horas de luz solar, la silla debe
extraerse del vehículo o cubrirse con una prenda suave.
• Examine periódicamente todas las piezas plásticas y metálicas de la silla infantil para ver
si presentan daños, deformaciones o cambios de color Si ha descubierto algún cambio
en su silla, debe ser inspeccionada o reemplazada por el fabricante.
• Los cambios en el tejido, y en especial la pérdida de color, son perfectamente normales
cuando la silla se usa en un vehículo y no afectan a su funcionamiento.
96
Page 97

REMOVER A FORRA DO ASSENTO
Abra as dua colchetas da forra da cadeira à frente e atrás. Puxe a forra para fora dos
apoios de braço e deslize-a a longo da superfície da cadeira.
LIMPEZA
AVI SO! Por favor lave a forra antes de utilizar a primeira vez. A forra só pode ser lavada a
30°C num ciclo de lavagem delicada. Lavar a forra a mais de 30°C poderá resultar numa
descoloração dos tecidos. Lave por separado e não secar na máquina! Nunca deixe secar
directamente com luz solar ! As partes de plástico podem ser limpas com água quente e
um detergente suave.
!
ATE NÇ ÃO! Não utilize lixívia ou outros agentes agressivos de limpeza!
!
ATE NÇ ÃO! Um acidente poderá causar estragos importantes à cadeira que
poderão não ser identificáveis a olha nu. Troque de cadeira após um acidente. Em
caso de dúvida consulte o distribuidor ou fabricante.
VIDA ÚTIL DO PRODUTO
A CYBEX SOLUTION S-FIX foi elaborada de forma a que tenha uma utilização perfeita
de aproximadamente 9 anos. O desgaste do plástico causado por exemplo pela luz solar
(UV) pode causar detrioração das propriedades do produto. Visto que é normal existir nos
automóveis grandes variações de temperatura e outras alterações é necessário observar
os seguintes pontos:
• Se o automóvel estiver com exposição directa do sol, durante longos periodos de
tempo, a cadeira auto deve ser tapada com um pano claro.
• Reveja regularmente todas as partes de plástico ou metal da cadeira. Em caso
de descubrir alguma diferença, a cadeira deverá ser eliminada ou verifi cada e
possivelmente trocada ou reparada pelo fabricante.
• Mudanças no tecido, como a descoloração, são perfeitamente normais com o uso e
não infl uenciam as funcionalidades da cadeira
97
ESPT
Page 98

ELIMINACIÓN
Al fi nal de la vida de la silla de seguridad, debe eliminarse de forma correcta. Las normas
sobre eliminación de residuos pueden variar de un lugar a otro. Para asegurarse de
hacerlo conforme a la normativa actual, por favor contacte con el depósito de reciclaje de
su ayuntamiento. Compruebe siempre las leyes de residuos de su país.
CONDICIONES DE GARANTÍA
La presente garantía sólo es de aplicación en el país en el que el consumidor adquirió
inicialmente el producto a un detallista. La garantía cubre todos los defectos de materiales
y fabricación, existentes o que puedan aparecer, por un período de tres (3) años desde
la fecha de compra inicial (garantía del fabricante). En caso de que aparezca cualquier
defecto de materiales o de fabricación, nosotros decidiremos, según nuestro criterio,
reparar el producto sin coste o entregar un producto nuevo. Para obtener esta garantía
es preciso entregar o enviar el producto al detallista que vendió inicialmente el producto
y aportar una prueba de compra (recibo o factura) que muestre la fecha de compra, el
nombre del detallista y el modelo del producto. Esta garantía no es de aplicación en caso
de que el producto sea enviado o entregado al fabricante o a cualquier otra persona que
no sea el detallista que vendió el producto inicialmente al consumidor. La garantía solo
se aplica si se comprueba la integridad del producto, defectos de fabricación y defectos
de material inmediatamente después de la compra. Si el producto se compra a distancia,
debe comprobarse la integridad, defectos de fabricación y materiales inmediatamente
en el mismo momento de recibirlo. En caso de apreciar cualquier defecto, deje de utilizar
el producto y entréguelo o envíelo al detallista. El producto debe entregarse limpio y
completo. Antes de contactar con la tienda lea este manual detenidamente. La garantía
no cubre ningún daño causado por un mal uso, la infl uencia del entorno (agua, fuego,
irregularidades del terreno, etc.) o el desgaste normal del producto. Sólo es de aplicación
en caso de que el uso del producto sea acorde al manual de instrucciones y si cualquier
modifi cación o reparación ha sido efectuada por personas autorizadas y se han utilizado
piezas y accesorios originales. La garantía no excluye, limita o afecta de ningún modo
a los derechos del consumidor establecidos por ley, incluyendo reclamaciones por
responsabilidad civil o quejas por incumplimiento de contrato que el comprador quiera
interponer contra el vendedor, el fabricante o el producto.
CYBEX GmbH
Riedingerstr. 18, 95448 Bayreuth, Germany
Tel.: 0921 78 511-511, Fax.: 0921 78 511- 888
98
Page 99

ELIMINAÇÃO
Ao chegar ao período fi nal da sua utilização a cadeira deverá ser devidamente eliminada.
A separação de lixo e reciclagem poderá ser diferente em cada país. Assegure-se que a
cadeira é eliminada de acordo com a regulação, contacte com a sua Freguesia ou com a
instituição local de reciclagem para garantir uma correcta reciclagem. Tenha sempre em
conta as regulações ambientais locais e nacionais.
CONDIÇÕES DA GARANTIA
A presente garantia só se aplica no país em que o consumidor adquiriu a cadeira. A
garantia cobre todos os defeitos de material e/ou de fabricação que possam existir
ou surgir num período de três (3) anos desde a data da compra inicial (garantia do
fabricante). Caso apareça qualquer defeito, dentro do periodo da garantia a Cybex irá
reparar o producto, sem gastos extra ou, caso seja necessário, o producto será trocado
por um novo. Para obter esta garantia é preciso entregar ou enviar o produto em questão
ao vendedor que inicialmente lhe vendeu o produto, apresentando, ao mesmo tempo,
a factura ou recibo de compra que mostra a data, o nome do vendedor e o modelo em
questão. Esta garantia não será aplicada caso não envie o produto directamente ao
vendedor. A garantia é apenas aplicável, se o producto foi revisto relativamente a estar
completo,sem defeitos de fabricação e defeitos de material, imediatamente após a
compra. Se o produto foi adquirido por alguma plataforma online(ou não fi sicamente) no
momento em que o receba, faça o favor de revisar se o produto está completo verifi cando
que não apresenta qualquer tipo de defeito. Em caso de defeito ou estragos, o produto
não deverá ser utilizado e deverá ser devolvido ao ponto de venda onde o adquiriu. O
produto a devolver deverá entregar-se limpo e completo. Antes de contactar com o ponto
de venda leia este manual até ao fi nal. Esta garantia não cobre estragos causados pelo
mau uso,condições externas (água, fogo, acidentes de transito, etc.) ou o desgaste normal
do produto. Esta garantia só é válida caso utilize o produto de acordo com o manual de
instrucções e se qualquer modifi cação ou reparação necessária tiver sido feita por pessoal
autorizado,sendo utilizadas peças e acessórios originais. A garantia não exclui, limita
ou afeta os direitos dos consumidores estabelecidos por lei, incluindo reclamações por
responsabilidade civil ou queixas por incumprimento do contracto entre o consumidor e
vendedor, fabricante e o produto.
99
ESPT
Page 100

CYBE X GmbH
Riedingerstr. 18 | 95448 Bayreuth | Germany
INFO@CYBEX-ONLINE.COM / WWW.CYBEX-ONLINE.COM
WWW.FACEBOOK.COM/CYBEX.ONLINE
GO TO WWW.CYBEX-ONLINE.COM
TO WATCH AN INSTRUCTIONAL VIDEO
CY_171_2507_A0817
 Loading...