

Page 1

SOLUTION X2-FIX
USER GUIDE
DE / EN / IT / FR / NL / PL / HU / CZ / SK / ES / PT
ECE R44/04, Gr. 2–3 | 15-36 kg (ca. 3–12Y)
Page 2

DE – KURZANLEITUNG / EN – SHORT MANUAL / IT – SOMMARIO / FR – LE SOMMAIRE / NL – BEKNOPTE HANDLEIDING /
PL – INSTRUKCJA SKRÓCONA / HU – RÖVID ISMERTETÉS / CZ – KRÁTKÉ INSTRUKCE / SK – KRÁTKE INŠTRUKCIE /
ES – INSTRUCCIONES ABREVIADAS / PT – INSTRUÇÕES ABREVIADAS
1
2
6 7
11 12 13 14
1
3
8
4 5
9 10
15
Page 3

DE
WARNUNG! DIESE KURZANLEITUNG DIENT NUR DER ÜBERSICHT. FÜR MAXIMALEN SCHUTZ UND KOMFORT IHRES KINDES,
IST ES UNBEDINGT NOTWENDIG, DIE GESAMTE GEBRAUCHSANLEITUNG AUFMERKSAM ZU LESEN.
EN
IT
FR
NL
PL
HU
CZ
SK
ES
WARNING! THIS SHORT MANUAL SERVES AS AN OVERVIEW ONLY. FOR MAXIMUM PROTECTION AND BEST COMFORT OF
YOUR CHILD, IT IS ESSENTIAL TO READ AND FOLLOW THE ENTIRE INSTRUCTION MANUAL CAREFULLY.
ATTENZIONE! QUESTE ISTRUZIONI SONO SOLO UN SOMMARIO. PER GARANTIRE LA MASSIMA SICUREZZA E COMFORT
AL VOSTRO BAMBINO È MOLTO IMPORTANTE LEGGERE ATTENTAMENTE ED INTERAMENTE IL MANUALE D’ISTRUZIONI E
SEGUIRNE SCRUPOLOSAMENTE LE INDICAZIONI.
ATTENTION! LE SOMMAIRE EST UNE SYNTHÈSE. AFIN QUE VOTRE ENFANT BÉNÉFICIE D‘UN MAXIMUM DE PROTECTION ET
DE CONFORT, IL EST ESSENTIEL DE LIRE ATTENTIVEMENT, L‘INTÉGRALITÉ DU MANUEL D‘INSTRUCTION.
WAARSCHUWING! DEZE BEKNOPTE HANDLEIDING DIENT UITSLUITEND ALS OVERZICHT. VOOR MAXIMALE BESCHERMING
EN OPTIMAAL COMFORT VOOR UW KIND IS HET VAN ESSENTIEEL BELANG DAT U DE GEHELE INSTRUCTIEHANDLEIDING
AANDACHTIG DOORLEEST EN NAUWGEZET OPVOLGT.
OSTRZEŻENIE! INSTRUKCJA TA JEST TYLKO OBRAZKOWYM STRESZCZENIEM. ABY ZAGWARANTOWAĆ SWOJEMU DZIECKU
MAKSYMALNE BEZPIECZEŃSTWO I WYGODĘ, NALEŻY UWAŻNIE PRZECZYTAĆ CAŁĄ INSTRUKCJĘ.
FIGYELEM! EZ A RÖVID KÉZIKÖNYV CSAK ÁTTEKINTÉSÜL SZOLGÁL. A GYERMEKE MAXIMÁLIS VÉDELME ÉS LEGJOBB
KÉNYELME ÉRDEKÉBEN ELENGEDHETETLEN A TELJES HASZNÁLATI UT ASÍTÁS ELOL VASÁSA ÉS GONDOS BETARTÁSA.
VAROVÁNÍ! TYTO KRÁTKÉ INSTRUKCE SLOUŽÍ POUZE JAKO PŘEHLED. PRO MAXIMÁLNÍ OCHRANU A POHODLÍ DÍTĚTE JE
NEZBYTNÉ SI DŮKLADNĚ PŘEČÍST CELÝ NÁVOD K POUŽITÍ A ŘÍDIT SE JÍM.
VAROVANIE! TIETO KRÁTKE INŠTRUKCIE SLÚŽI LEN AKO PREHĽAD. PRE MAXIMÁLNE OCHRANU A POHODLIE DIEŤAŤA JE
POTREBNÉ SI DÔKLADNE PREČÍTAŤ CELÝ NÁVOD NA POUŽITIE A RIADIŤ SA NÍM.
¡ADVERTENCIA! ESTAS INSTRUCCIONES SÓLO SON UN RESUMEN. PARA ASEGURAR LA MÁXIMA SEGURIDAD Y CONFORT
PARA SU HIJO, ES MUY IMPORTANTE LEER COMPLETA Y ATENTAMENTE EL MANUAL DE INSTRUCCIONES.
PT
ATENÇÃO! ESTAS INSTRUÇÕES SÃO UM RESUMO ABREVIADO. PARA GARANTIR SEGURANÇA E UM CONFORTO MÁXIMOS
PARA SUA CRIANÇA, É MUITO IMPORTANTE LER CUIDADOSAMENTE TODO O MANUAL DE INSTRUÇÕES.
2
Page 4

3
Page 5

SEHR GEEHRTE KUNDIN, SEHR GEEHRTER
KUNDE!
VIELEN DANK, DASS SIE SICH BEI DER WAHL EINES KINDERSITZES FÜR DEN CYBEX SOLUTION X2-FIX
ENTSCHIEDEN HABEN. BEI DER ENTWICKLUNG DES CYBEX KINDERSITZES SOLUTION X2-FIX HABEN
SICHERHEIT, KOMFORT UND BEDIENFREUNDLICHKEIT IM VORDERGRUND GESTANDEN. DAS PRODUKT
WIRD UNTER BESONDERER QUALITÄTSÜBERWACHUNG HERGESTELLT UND ERFÜLLT STRENGSTE
SICHERHEITSANFORDERUNGEN.
DEAR CUSTOMER!
THANK YOU FOR PURCHASING THE CYBEX SOLUTION X2-FIX. WE ASSURE YOU THAT IN THE PROCESS
OF DEVELOPING THE CYBEX SOLUTION X2-FIX WE FOCUSED ON SAFETY, COMFORT AND USER
FRIENDLINESS. THE PRODUCT IS MANUFACTURED UNDER SPECIAL QUALITY SURVEILLANCE AND
COMPLIES WITH THE STRICTEST SAFETY REQUIREMENTS.
GENTILE CLIENTE!
CI CONGRATULIAMO CON LEI PER AVERE ACQUISTATO IL SEGGIOLINO CYBEX SOLUTION X2-FIX. LE
ASSICURIAMO CHE NEL PROGETTARE CYBEX SOLUTION X2-FIX I NOSTRI PRINCIPALI OBIETTIVI SONO
STATI LA SICUREZZA, IL COMFORT E LA MANEGGEVOLEZZA. IL PRODOTTO È STATO ELABORATO SOTTO
UNO STRETTO CONTROLLO QUALITATIVO E RISPONDE AI PIÙ SEVERI STANDARD DI SICUREZZA.
4
Page 6

Gebrauchsanleitung
CYBEX Solution X2-x
Sitzerhöher mit Rückenstütze
EMPFOHLEN FÜR:
Alter: von ca. 3 bis ca. 12 Jahren
Gewicht: 15 bis 36 kg
Körpergröße: bis 150 cm
Für Fahrzeugsitze mit Dreipunkt Automatik Gurt
ZULASSUNG:
ECE R-44/04, Gruppe 2/3, 3–12 Jahre (15–36 kg)
DE INHALT
Warnung! Um den optimalen Schutz für Ihr Kind zu gewährleisten, muss der
CYBEX Solution X2-x unbedingt so verwendet werden, wie es in dieser
Anleitung beschrieben wird.
Hinweis! Bewahren Sie die Anleitung immer gribereit auf (z.B. unter dem
elastischen Bezug an der Rückseite der Rückenlehne).
Hinweis! Durch länderspezische Anforderungen können Produktmerkmale
abweichen.
2
5
INSTRUCTION MANUAL
CYBEX Solution X2-x
booster with backrest
RECOMMENDED FOR:
Age: from approximately 3 to 12 years
Weight: 15 to 36 kg
Body height: up to 150 cm
For vehicle seats with three-point
automatic retractor belt
HOMOLOGATION:
ECE R-44/04, group 2/3, 15 to 36 kg
MANUALE D‘ISTRUZIONI
CYBEX Solution X2-x
seduta con schienale
RACCOMANDATO PER:
Età: dai 3 ai 12 anni circa
Peso: dai 15 ai 36 kg
Altezza: no a 150 cm
Per sedili dotati di sistema di cinture di sicurezza a
tre punti.
OMOLOGAZIONE:
ECE R-44/04, group II/III, 15 to 36 kg
Kurzanleitung..................................................................................................1
Warnung / Hinweis
Zulassung – Eignung
Erstmontage
.........................................................................................2
......................................................................................5
...................................................................................................7
Anpassen an die Körpergröße........................................................................7
Einstellung der Kopfstütze
Der richtige Platz im Fahrzeug
..............................................................................7
.......................................................................9
Befestigen des Kindersitzes mit den X-fix Rastarmen...................................11
Ausbau des Solution X2-fix
Den Sitz ins Fahrzeug stellen
Anschnallen des Kindes
Ist Ihr Kind richtig gesichert?
Neigungsverstellbare Kopfstütze
Pflege
...........................................................................................................19
Entfernen des Bezugs
Entfernen des Sitzbezugs von der Sitzlehne
Reinigung
.....................................................................................................21
..........................................................................13
.......................................................................14
...............................................................................15
........................................................................17
..................................................................17
..................................................................................19
................................................19
Verhalten nach einem Unfall.........................................................................21
Produktlebensdauer
Entsorgung
Garantie
........................................................................................................23
.....................................................................................21
...................................................................................................23
Page 7

EN CONTENT
IT ARGOMENTI
Warning! For your child‘s maximum protection, it is essential to use and install
the CYBEX Solution X2-x according to the instructions in this manual.
Note! Please keep the instruction manual close by for future reference (e.g.
under the elastic cover on the rear side of the backrest)
Note! According to local codes the product characteristic can be dierent.
Short manual ..................................................................................................1
Warning / Note
Homologation
First installation...............................................................................................8
Adjustment regarding the child‘s height..........................................................8
Adjustment of the headrest.............................................................................8
The best position in the car
Installation of the car seat with connectors...................................................12
Uninstalling the Solution X2-fix
Securing the child
Fastening the seat belt of your child
Is your child properly secured?.....................................................................18
Reclining headrest
Product care
Removing the seat cover
Removing the seat cover of the backrest
Cleaning
What to do after an accident.........................................................................22
Product Lifespan ..........................................................................................22
Disposal
Warranty
................................................................................................2
.................................................................................................5
..........................................................................10
.....................................................................14
.........................................................................................13
.............................................................16
........................................................................................18
.................................................................................................20
..............................................................................20
.....................................................20
.......................................................................................................22
........................................................................................................24
.......................................................................................................24
Attenzione! Per garantire un’adeguata sicurezza del Vostro bambino è
molto importante che l’uso e l’installazione di CYBEX Solution X2-x siano
eettuati seguendo scrupolosamente questo manuale d’istruzioni.
Nota Bene! Consigliamo di conservare il manuale istruzioni sotto la
copertura elastica sul retro dello schienale in modo da averlo sempre a portata
di mano per una veloce consultazione.
Nota Bene! In base alle normative locali alcune caratteristiche del prodotto
potrebbero dierire.
Sommario .......................................................................................................1
Attenzione / Avvertenza
Omologazione - qualificazione
Prima installazione
Regolazione in base alla corporatura del bambino
Regolazione dell‘appoggiatesta......................................................................8
Posizionamento corretto del seggiolino all‘interno dell‘autoveicolo
Installazione del seggiolino auto con i connettori
Rimozione del Solution X2-fix.......................................................................14
Fissaggio del bambino..................................................................................14
Allacciare la cintura di sicurezza del bambino
Il bambino è fissato correttamente?
Reclinazione dell‘appoggiatesta
Manutenzione del prodotto
Rimozione del rivestimento
Rimozione del rivestimento schienale
Pulizia
...........................................................................................................22
Cosa fare a seguito di un incidente
Durata del prodotto
Smaltimento..................................................................................................24
Garanzia
.......................................................................................................24
..................................................................................2
.......................................................................5
.........................................................................................8
........................................8
..............10
.........................................12
..............................................16
.............................................................18
...................................................................18
...........................................................................20
..........................................................................20
..........................................................20
..............................................................22
.......................................................................................22
6
Page 8

b
e
f
a
c
a
d
d
ERSTMONTAGE
Der Kindersitz besteht aus einem Sitzkissen (d) und einer Rückenlehne (a) mit
höhenverstellbarer Schulter- und Kopfstütze. Nur die Kombination der beiden
Teile bietet Ihrem Kind den bestmöglichen Schutz und Komfort.
Warnung! Die Bestandteile des CYBEX Solution X2-fix dürfen weder einzeln,
noch in Verbindung mit Sitzkissen, Rückenlehnen oder Kopfstützen anderer
Hersteller oder einer anderen Baureihe verwendet werden. Die Zulassung
würde in einem solchen Fall sofort erlöschen.
Die Rückenlehne (a) wird mit der Führungsnase (b), auf der Achse (c) des
Sitzkissens (d) eingehakt.
Hinweis! Bitte bewahren Sie die Gebrauchsanleitung in Reichweite (z.B. unter
dem elastischen Bezug auf der Rückseite der Rückenlehne) auf.
Warnung! Achten Sie immer darauf, dass die Einzelteile des Kindersitzes
niemals gestaucht oder eingeklemmt werden (z.B. durch die Fahrzeugtür oder
durch Verstellen der Rückbank).
Das „Linear Side Protection“ System (LSP) wird für beide Seiten in die
z
Montagebohrungen (z) gesteckt, dann nach unten geschoben, bis es einrastet.
ANPASSEN AN DIE KÖRPERGRÖSSE
e
h
Nur eine in optimaler Höhe eingestellte Schulter- und Kopfstütze (e) bietet
größtmöglichen Schutz und Komfort für Ihr Kind und gewährleistet außerdem
den optimalen Verlauf des Diagonalgurtes (f).
Die Höhenverstellung (e) kann in insgesamt 11 Positionen erfolgen. Die
Schulterstütze ist mit der Kopfstütze fest verbunden und muss nicht separat
eingestellt werden. Die Anpassung hat so zu erfolgen, dass zwischen
der unteren Kante der Kopfstütze und der Schulter des Kindes noch zwei
Fingerbreit Platz ist.
EINSTELLUNG DER KOPFSTÜTZE
• Setzen Sie Ihr Kind in den Kindersitz.
• Ziehen Sie den Verstellgri (h) nach oben, um die Schulter- und Kopfstütze zu
7
entriegeln.
• Nun können Sie die Schulter- und Kopfstütze (e) in die gewüschte Position
bringen.
• Sobald Sie den Verstellgri (h) loslassen, rastet die Schulter- und Kopfstütze (e)
automatisch ein.
Page 9

FIRST INSTALLATION
The child seat consists of a booster seat (d) and a backrest (a) with height
adjustable shoulder and headrest. Only the combination of both parts provides
best protection and comfort to your child.
Warning! The parts of the CYBEX Solution X2-fix must not be used alone or
in combination with boosters, backrests or headrests from other manufacturers
or of a different product series. In such cases, the certification expires
immediately.
Connect the backrest (a) to the booster (d) by hooking the guide lug (b) on the
axis (c) of the booster (d).
Note! Please keep the instruction manual close by for future reference (e.g. by
storing it under the elastic cover at the rear side of the backrest.)
Warning! Please make sure that the plastic parts of the child seat never get
jammed (e.g. in the car door or by adjusting the back seat).
Insert the Linear Side-impact Protection (L.S.P. System) pads on both sides into
the mounting holes (z), then push down until they click into place.
PRIMA INSTALLAZIONE
Il seggiolino di sicurezza per auto è composto da una seduta (d) e di uno
schienale (a) con appoggiatesta e protezioni per le spalle ad altezza regolabile
integrati. Solo l’insieme di entrambe le componenti fornirà al Vostro bambino la
corretta protezione e comfort.
Attenzione! Le parti del seggiolino CYBEX Solution X2-fix non devono
assolutamente essere usate separatamente o in combinazione con prodotti
di altro modello o produttore. In tal caso la licenza sarà automaticamente
annullata.
Lo schienale (a) è agganciato nell’asse (c) della seduta (d) con il binario di
ancoraggio (b).
Nota! Raccomandiamo di conservare il manuale in un posto sicuro.
Dovrebbe essere sempre a portata di mano per riferimenti futuri.
Consigliamo di riporlo sotto la copertura elastica, sul retro dello schienale.
Attenzione! Fare sempre molta attenzione a non danneggiare il sedile durante
l’uso quotidiano, inserendo le cinture o nel chiudere le porte del veicolo.
Inserire i cuscinetti del Sistema LSP (Protezione Lineare nell‘Impatto Laterale) negli
appositi alloggiamenti (z) da ambo i lati e spingere verso il basso fino a sentire il click di
collegamento avvenuto.
ADJUSTMENT REGARDING THE CHILD‘S HEIGHT
A headrest can only provide the best protection and comfort for your child
if optimally adjusted. Only then it can guarantee the optimal position of the
diagonal belt (f). You can adjust the height of the Solution X2-x headrest (e) in
11 positions. The shoulder rest is attached to the headrest and does not have to
be adjusted separately. You can check the optimal adjustment of the headrest
by trying to t exactly two ngers between the headrest and the shoulders of
the child.
EINSTELLUNG DER KOPFSTÜTZE
• Place your child in the child seat.
• Pull the adjustment handle (h) in order to unlock the shoulder and headrest.
• Bring the shoulder and headrest (e) in the desired position.
• As soon as you let go of the adjustment handle (h), the shoulder and headrest (e)
locks automatically.
REGOLAZIONE IN BASE ALLA CORPORATURA DEL BAMBINO
Soltanto una protezione per le spalle ed un appoggiatesta (e) regolati
correttamente in base all’altezza possono fornire l’adeguata protezione e
comfort al Vostro bambino e contemporaneamente garantire la posizione
ottimale della cintura diagonale (f). L’altezza (e) può essere regolata in 11
posizioni. Le protezioni per le spalle sono ssate all’appoggiatesta e non
richiedono una regolazione distinta. L’altezza dev’essere regolata in modo da
poter inserire 2 dita tra la base dell’appoggiatesta e la spalla el
bambino.
REGOLAZIONE DELL‘APPOGGIATESTA
• Sistemare il bambino nel seggiolino
• Sollevare verso l’alto la maniglia di regolazione (h) per sbloccare il meccanismo.
• Portare protezioni per le spalle e appoggiatesta (e) nella posizione desiderata.
• Lasciando andare la maniglia di regolazione (h) le protezioni per le spalle e
l’appoggiatesta (e) si ssano automaticamente in posizione.
8
Page 10

DER RICHTIGE PLATZ IM
Der CYBEX Solution X2-x ist, ohne das ISOFIX Connect-System, auf allen
Plätzen mit Dreipunkt - Automatikgurt verwendbar. Wir empfehlen aber
generell, den Sitz hinten im Fahrzeug zu installieren. Auf dem Beifahrersitz ist
Ihr Kind bei einem Unfall in den meisten Fällen höheren Gefahren ausgesetzt.
Warnung! Der Sitz ist nicht für die V erwendung mit einem 2-Punkt- oder Beckengurt
geeignet. Wird der Sitz mit einem 2-Punkt-Gurt gesichert, kann es bei einem Unfall zu
schweren oder gar tödlichen Verletzungen des Kindes kommen.
Für die Befestigung mit X-x-Rastarmen besteht eine semi-universale
Genehmigung. Aus diesem Grund darf der Solution X2-x mit ISOFIX-
CONNECT nur in bestimmten Fahrzeugen eingesetzt werden. Die
zugelassenen Fahrzeuge entnehmen Sie bitte der beigelegten Kfz-
Typenliste. Die Typenliste wird laufend erweitert. Die aktuelle Version erhalten
Sie direkt bei CYBEX, im Fachhandel oder auf www.cybex-online.com. In
Ausnahmefällen kann der Sitz jedoch auch vorne am Beifahrersitz verwendet
werden. Beachten Sie dabei die folgenden Punkte:
• Bei Fahrzeugen mit Airbag sollten Sie den Beifahrersitz so weit wie möglich
nach hinten schieben. Beachten Sie jedoch, dass der obere Anlenkpunkt des
Fahrzeuggurtes hinter der Gurtführung des Kindersitzes bleibt.
• Die Empfehlungen des Fahrzeugherstellers sind unbedingt zu befolgen.
Warnung! Der Diagonalgurt (f) muss schräg nach hinten verlaufen und darf nie
nach vorn zum oberen Gurtpunkt in Ihrem Fahrzeug führen. Sollte dies nicht
einzustellen sein, z.B. durch Vorschieben des Autositzes oder Verwendung
auf einem anderen Sitzplatz, so ist der Kindersitz für dieses Fahrzeug nicht
geeignet.
Gepäckstücke oder andere Gegenstände im Fahrzeug, welche bei einem Unfall
Verletzungen verursachen können, müssen immer gut befestigt werden. Sie
können zu tödlichen Geschossen im Fahrzeug werden.
Warnung! Auf Fahrzeugplätzen, die quer zur Fahrtrichtung angeordnet sind,
ist die Verwendung des Sitzes nicht zulässig. Auf rückwärtsgerichteten
Fahrzeugsitzen, wie z.B. in einem Van oder Minibus, ist die Verwendung
zulässig, sofern der Fahrzeugsitz für die Beförderung eines Erwachsenen
zugelassen ist. Zu Beachten ist, dass die Kopfstütze bei rückwärtsgerichtetem
Einbau nicht entfernt werden darf! Der Kindersitz muss auch dann, wenn er
f
nicht benutzt wird, immer mit dem Fahrzeuggurt befestigt sein. Bereits bei einer
Notbremsung oder einem geringen Aufprall kann ein unbefestigter Sitz andere
Mitfahrer und Sie selbst verletzen.
Hinweis! Bitte lassen Sie Ihr Kind nie unbeaufsichtigt im Fahrzeug zurück.
9
Page 11

THE BEST POSITION IN THE
Without using the connectors the CYBEX Solution X2-x can be installed on all
vehicle seats equipped with a three-point automatic retractor belt. We generally
recommend, however, using the child seat in the back of the vehicle. In the
front, your child is usually exposed to higher risks in case of an accident.
Warning! You must not use the Solution X2-fix with a two-point belt or a lap
belt. When securing your child with a two-point belt, the child may sustain lethal
injuries in an accident.
When installing the CYBEX Solution X2-x with its ISOFIX-CONNECT
system the child seat falls into the „semi-universal“ admission category,
i.e. it may only be used in certain types of vehicles. Please refer to the
list of approved cars to check your vehicle‘s compatibility. This list is
updated regularly, and the latest version can be obtained from CYBEX, your
retailer or accessed online at www.cybex-online.com. In exceptions, the child
seat may be used on the passenger seat. Please note the following for such
cases:
• In cars equipped with airbags you should push the passenger seat as far back
as possible. Please make sure that the upper point of the vehicle seat belt stays
behind the belt guide of the child seat.
• You must follow the recommendations of the vehicle manufacturer.
Warning! The seat belt (f) must run diagonally from the back and must never
lead to the front to the upper belt point of the front seat of in your vehicle.
Should you be unable to adjust this for example by pushing the seat to the
front or by using the seat on a different seat in the car, then the child seat is not
suitable for this vehicle.
Luggage or other objects in the vehicle which may cause injuries in an accident
must always be secured properly. Loose parts may turn into deadly projectiles
during an impact.
Warning! For vehicles with passenger seats that are positioned sideways,
the use of this child seat is not allowed. For seats that are positioned against
the direction of travel, e.g. in a van or a minibus, the use of the child seat is
allowed, assuming the seat is approved to carry an adult. Please ensure that
the headrest is not taken off when mounting the child seat on a passenger seat
which is positioned against the direction of travel! The child seat must have the
seat belt fastened even when not in use. This is necessary to avoid the driver
or passenger getting injured by a loose child seat when making an emergency
stop or in case of a crash.
Note! Please never leave your child unattended in the car.
POSIZIONAMENTO CORRETTO DEL SEGGIOLINO ALL‘INTERNO
DELL‘AUTOVEICOLO
Il seggiolino CYBEX Solution X2-x può essere utilizzato su qualsiasi sedile di
autoveicolo dotato di sistema di cinture di sicurezza a tre punti di ancoraggio.
Raccomandiamo normalmente di utilizzare il seggiolino nella parte posteriore
dell’autoveicolo. Sul sedile anteriore il bambino è esposto a maggiori rischi in
caso di incidente.
Attenzione! Il seggiolino non può essere utilizzato con cinture di sicurezza a due punti
di ancoraggio o soltanto con quella per le gambe, perché in tal caso il bambino sarebbe
esposto a lesioni letali in caso di incidente
allegato. L’elenco viene aggiornato regolarmente e può essere scaricato dal
nostro sito www.cybex-online.com In casi eccezionali il seggiolino potrà essere
ssato sul sedile del passeggero. In tal caso, preghiamo di notare quanto
segue:
• Nei veicoli dotati di airbag è necessario arretrare il sedile del passeggero al
• E’ indispensabile seguire le raccomandazioni del costruttore del veicolo.
Attenzione! La cintura di sicurezza (f) deve scorrere diagonalmente da dietro
ed il punto più alto deve trovarsi sempre dietro al seggiolino. Se, per esempio,
nell’arretrare al massimo il sedile anteriore o sistemandolo in altra posizione
nell’auto, il punto più alto della cintura non si trovasse dietro al seggiolino,
quest’ultimo non potrà essere utilizzato in tale veicolo.
Bagagli o altri oggetti presenti nell’abitacolo dovranno sempre essere ben ssati e
disposti in modo da non costituire pericolo in caso di incidente.
Attenzione! Seggiolino NON utulizzabile su sedili orientati lateralmente. Per
sedili orientati contro il senso di marcia, per es. van o minibis, l‘uso è possibile
soltanto se tali sedili sono omologati per il trasporto di un adulto. Nei sedili
orientati contro il senso di marcia NON togliere l‘appoggiatesta quando viene
montato il seggiolino. Allacciare sempre il seggiolino con la cintura di sicurezza
anche quando non in uso. In caso di frenata improvvisa o di incidente, il
seggiolino non fissato può costituire un grave pericolo per il conducente o altri
passeggeri.
Avvertenza! Non lasciare MAI il bambino incustodito nell’autovettura.
L’autovettura dev’essere compatibile per l’ancoraggio addizionale con
i connettori X-x. Pertanto, questo seggiolino potrà essere utilizzato
soltanto su autovetture che rientrano ne la categoria di installazione
“semi universale”, incluse nell’elenco di autovetture approvate qui
massimo. Assicuratevi che il punto di attacco superiore delle cinture si trovi sempre
dietro alla guida superiore del seggiolino.
10
Page 12
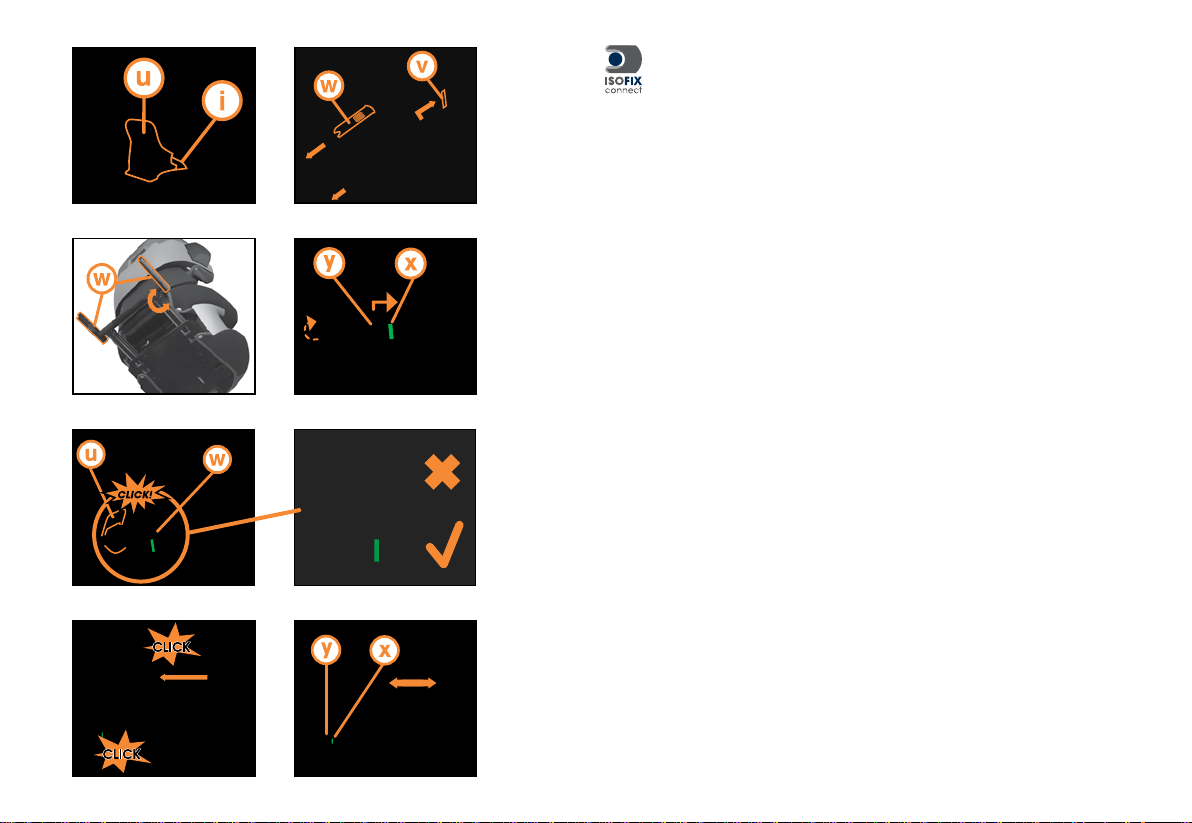
BEFESTIGEN DES SITZES MIT DEN X-FIX RASTARMEN
Mit dem ISOFIX-CONNECT System können Sie den Kindersitz fest mit
dem Fahrzeug verbinden und so die Sicherheit Ihres Kindes erhöhen.
Ihr Kind wird weiterhin mit dem 3-Punkt-Gurt Ihres Autos angeschnallt.
• Hängen Sie die beigelegten X-x Einführungshilfen (u) mit der längeren Lasche
nach oben in den beiden ISOFIX-Befestigungspunkten (i) ein.
Hinweis! Die ISOFIX-Befestigungspunkte (i) sind zwei Metalllaschen pro
Sitzplatz und benden sich zwischen Rückenlehne und Sitz des Fahrzeugs. Im
Zweifelsfall nehmen Sie die Bedienungsanleitung Ihres Fahrzeugs zu Hilfe.
• Betätigen Sie die X-x Einstelltaste (v) an der Unterseite des Kindersitzes.
• Ziehen Sie die X-x Rastarme (w) bis zum Anschlag heraus.
• Drehen Sie die X-x Rastarme um 180°, damit sie in Richtung der
Einführungshilfen zeigen.
Hinweis! Achten Sie darauf, dass die beiden grünen Sicherheitsindikatoren
(x), an den ISOFIX Rastarmen (w), nicht sichtbar sind. Entriegeln Sie
gegebenenfalls die ISOFIX Rastarme (w), indem Sie die Entriegelungstaste (y)
drücken und zurückziehen. Wiederholen Sie den Vorgang gegebenenfalls auch
beim zweiten Rastarm.
• Schieben Sie die beiden X-x Rastarme (w) in die Einführhilfen bis diese mit einem
hörbaren KLICK an den ISOFIX Befestigungspunkten (i) einrasten.
• Vergewissern Sie sich, dass die SOLUTION FIX gut hält, indem Sie versuchen sie
herauszuziehen.
• Der grüne Sicherheitsindikator (x) muss an den beiden Entriegelungstasten (y) gut
sichtbar sein.
• Mit der X-x Einstelltaste (v) an der Unterseite des Kindersitzes können Sie nun
die Position des Sitzes einstellen.
Hinweis! Beachten Sie dazu den Abschnitt „Den Sitz ins Fahrzeug stellen”.
• Jetzt können Sie Ihr Kind anschnallen, siehe „Anschnallen des Kindes“.
11
Page 13

INSTALLATION OF THE CAR SEAT WITH CONNECTORS
The saftey of your child will be increased using the ISOFIX-CONNECT
system linking the child seat tightly with the vehicle. Your child will still
be buckled up using the car‘s 3-point-belt.
INSTALLAZIONE DEL SEGGIOLINO AUTO CON I CONNETTORI
La sicurezza del Vostro bambino sarà superiore grazie ai connettori
X-x, che consentono un ssaggio ottmale del seggiolino al veicolo.
Il bambino sarà ssato al seggiolino utilizzando sempre la cintura di
sicurezza a 3 punti.
• Connect the two enclosed X-x installation aids (their longer parts pointing
upwards) with the two ISOFIX anchorage points (i).
Note! The car‘s ISOFIX anchorage points (i) are two metal rings per seat,
located between the backrest and the seat cushion of your vehicle seat. If in
doubt please refer to your vehicle owner’s manual.
• For adjustment move the X-x lever (v), located on the bottom of the seat.
• Pull the connectors (w) as far out as they will go.
• Rotate the X-x connectors by 180° until they point into the direction of the
installation aids.
Note! Make sure that the green safety indication (x) of the connectors is not
visible. If necessary, release them by pushing and simultaneously pulling back
the release button (y). Repeat this procedure with the other connector.
• Push both of the X-x connectors (w) into the installation aids until you hear them
clicking into the ISOFIX anchorage points (i).
• Make sure that the child seat is connected safely by trying to pull it out.
• The green safety indication (x) must be clearly visible on both sides of the release
buttons (y).
• With the X-x button located on the bottom of the child seat you can now adjust the
position of the seat.
Note! For additional information please refer to the section “Placing the Seat in
the Car”.
• You can now buckle up the child. Please refer to “Buckling Up the Child”.
• Collegare i due supporti per l’installazione X-x (con la parte più lunga rivolta verso
l’alto) ai punti di ancoraggio ISOFIX (i).
Nota Bene! I punti di ancoraggio ISOFIX (i) sono i due ganci metallici per
ciascun sedile della vettura, posti tra la seduta e lo schienale. In caso di dubbi,
fare riferimento al manuale dell’autovettura.
• Per le regolazioni basta spostare il pulsante X-x, alla base del seggiolino.
• Tirare i connettori (w) al massimo.
• Ruotare i connettori X-x di 180° in modo che siano correttamente
orientati rispetto ai supporti per l’installazione.
Nota! Assicurarsi che entrambi gli indicatori di sicurezza verdi (x) dei connettori
ISOFIX (w) non siano visibili. Sbloccare eventualmente il connettore (w)
premendo e tirando indietro il pulsante di rilascio (y). Se necessario ripetere la
procedura per il secondo connettore.
• Spingere entrambi i connettori X-x (w) nei supporti per l’installazione no a
quando non si sentirà lo scatto di connessione nei punti di ancoraggioISOFIX (i).
• Vericare che il seggiolino sia ssato saldamente, provando a tirarlo verso di voi.
• L’indicatore di sicurezza verde (x) deve essere chiaramente visibile su entrambi i
pulsanti di rilascio (y).
• Ora è possibile regolare la posizione del seggiolino utilizzando il pulsante X-x
posto alla sua base.
Nota Bene! Per ulteriori dettagli fare riferimento alla sezione
“Posizionamento del seggiolino nell’auto”.
• Ora è possibile accomodare e allacciare il bambino. Preghiamo di fare riferimento
alla sezione “Come allacciare il bambino”.
12
Page 14

AUSBAU DES SOLUTION X2-FIX
Führen Sie die Einbauschritte in umgekehrter Reihenfolge durch.
a
1
2
• Entriegeln Sie die ISOFIX Rastarme (w) beidseitig, indem Sie die
Entriegelungstasten (y) drücken und gleichzeitig zurückziehen.
• Ziehen Sie die SOLUTION FIX aus den ISOFIX Einführhilfen (u) heraus.
• Bringen Sie die ISOFIX Rastarme in Ihre Ausgangsposition indem Sie sie um
180°drehen.
• Betätigen Sie die X-x Einstelltaste (v) an der Unterseite des Kindersitzes und
schieben Sie die X-x Rastarme bis zum Anschlag hinein.
Hinweis! Durch das Einklappen der Rastarme schonen Sie nicht nur den
Fahrzeugsitz sondern schützen auch die Isox Rastarme vor Verunreinigungen
und Beschädigungen.
DEN SITZ INS FAHRZEUG STELLEN
Stellen Sie den Kindersitz auf den entsprechenden Fahrzeugsitz im Auto.
• Achten Sie unbedingt darauf, dass die Rückenlehne (a) des Kindersitzes
ächig an der Rückenlehne des Autositzes anliegt, so dass sich der
Kindersitz auf keinen Fall in einer Liegeposition benden kann.
• Bei Benutzung der ISOFIX Befestigungspunkte im Fahrzeug, achten
Sie darauf, dass die Rückenlehne des Solution X2-x vollächig an
Rückenlehne des Fahrzeugs auiegt. Sie können diesen Abstand mit der
Einstelltaste (v) an der Unterseite des Kindersitzes einstellen.
• Sollte die Kopfstütze des Fahrzeuges störend sein, ziehen Sie diese ganz heraus
oder nehmen Sie diese ganz ab (Ausnahme siehe Abschnitt „DER RICHTIGE
PLATZ IM FAHRZEUG“). Die Rückenlehne passt sich optimal stufenlos nahezu
jeder Neigung des Fahrzeugsitzes an.
Warnung! Die Rückenlehne des Solution X2-fix muss an der Lehne des
Fahrzeuges flächig aufliegen. Um den größtmöglichen Schutz für das Kind zu
gewährleisten, muss sich der Sitz einer normalen aufrechten Position befinden!
13
Hinweis! An einigen Autositzen aus empndlichem Material (z.B. Velours,
Leder, etc.) können durch die Benutzung von Kindersitzen mögliche
Gebrauchsspuren und/oder Abfärbungen auftreten. Um das zu vermeiden,
können Sie z.B. eine Decke oder ein Handtuch unterlegen. Ferner weisen wir in
diesem Zusammenhang auf unsere Reinigungshinweise hin, die vor der ersten
Verwendung des Sitzes unbedingt beachtet werden sollten.
Page 15

UNINSTALLING THE SOLUTION X2-FIX
Perform all installation steps in reverse order.
RIMOZIONE DEL SOLUTION X2-FIX
Eseguire tutte le operazioni per l’installazione nell’ordine inverso.
• Release the ISOFIX connectors (w) by simultaneously pulling and slinging back
the release buttons (y).
• Pull SOLUTION FIX out of the ISOFIX guides (u).
• Rotate the ISOFIX connectors by 180° to bring them to their original position.
• Pull the X-x lever located at the bottom of the child car seat and push the X-x
connectors into the child seat until completely hidden.
Note! Following these steps the vehicle‘s seat pad will be protected and the
Isox connectors will be prevented from being stained or damaged. Damages
and stains could obstruct a smooth operation.
SECURING THE CHILD
Place the child seat on the respective seat in the car.
• Please make sure that the backrest (a) of the child safety seat rests at against
the backrest of the car seat so that the child seat is under no circumstances in a
sleeping position.
• When using the ISOFIX-anchorages in the car, make sure that the backrest
of the Solution X2-x is perfectly aligned and in full contact with the rear
vehicle seat. The position can be adjusted with the adjustment lever (v)
located on the bottom of the child car seat.
• If the headrest of the vehicle is in the way, pull it out all the way or remove it
completely (for exceptions to this, please refer to the section “POSITIONING THE
SEAT CORRECTLY IN THE VEHICLE”) The backrest (a) will perfectly adapt to
practically any recline of the vehicle seat.
Warning! The backrest of the Solution X2-fix should rest flat against the upright
part of the car seat. Pushing the booster rearwards the seat should be tightly
pressed against the seat. For the best possible protection of your child, the seat
must be in a normal upright position!
Note! It is possible that some car seats that are made of soft material (e.g.
velours, leather, etc.) may show signs of usage and/or discolouration. In order
to avoid this, you could, for example, place a cover or towel underneath it.
In this context, we would also like to refer to you to our cleaning instructions,
which must absolutely be followed before the rst use of the seat.
• Sbloccare il connettore ISOFIX (w) da entrambi i lati, premendo i pulsanti di rilascio
(y) e tirandoli contemporaneamente indietro.
• Estrarre il seggiolino dai supporti per l’installazione (u).
• Ruotare i connettori X-x (w) di 180°.
• Spostare il pulsante X-x posto alla base del seggiolino e spingere i connettori
X-x al massimo.
Nota Bene! Questo procedimento aiuta a proteggere il rivestimento del sedile
da danni e tacche che potrebbero compromettere il regolare funzionamento.
FISSAGGIO DEL BAMBINO
Collocare il seggiolino di sicurezza sul sedile dell’auto.
• Prestare la massima attenzione anché lo schienale del seggiolino (a) sia
correttamente appoggiato al sedile dell’auto e non inclinato.
• Nell’utilizzare il sistema di ancoraggio ISOFIX della vettura, assicuratevi che lo
schienale del seggiolino Solution X2-x sia perfettamente allineato ed in totale
contatto con il sedile posteriore. La distanza potrà essere regolata con la leva
di regolazione (v) che si trova alla base del seggiolino.
• Nel caso di auto con rivestimento dei sedili in materiali particolarmente
delicati (per esempio velluto, pelle, ecc), l’uso del seggiolino di sicurezza
potrebbe danneggiarli. Consigliamo di utilizzare un telo o un asciugamano sotto al
seggiolino per proteggere il sedile.
• Se il poggiatesta del veicolo è di ingombro, alzarlo del tutto o rimuoverlo
completamente (per eccezioni, si prega di consultare la sezione
„POSIZIONAMENTO CORRETTO DEL SEGGILINO NEL VEICOLO“) Lo schienale
(a) si adatterà perfettamente praticamente a qualsiasi reclinazione del sedile del
veicolo.
Attenzione! Lo schienale del seggiolino Solution X2-fix dovrà essere
perfettamente apppoggiato allo schienale dell‘auto. La base dovrà essere
spinta all‘indietro contro il sedile. Per la massima sicurezza del bambino il
sedile deve trovarsi nella normale posizione eretta!
Nota Bene! Nel caso di sedili in materiali particolarmente delicati (per esempio
velluto, pelle, ecc.) per evitare danneggiamenti consigliamo di di stendere
un telo protettivo sotto il seggiolino. Con l‘occasione ricordiamo di fare
riferimento anche alle istruzioni per il lavaggio, che devono essere seguite
scrupolosamente prima dell‘utilizzo.
14
Page 16

ANSCHNALLEN DES KINDES
Setzen Sie Ihr Kind in den Kindersitz. Ziehen Sie den Dreipunktgurt weit heraus
und führen Sie diesen vor Ihrem Kind entlang zum Gurtschloss (l).
l
l
m
f
Warnung! Gurt auf keinen Fall verdrehen.
Stecken Sie die Gurtzunge (m) ins Gurtschloss (l). Dieses muss hörbar
einrasten.
Den Beckengurt (n) in die unteren Gurtführungen (k) des Kindersitzes
einlegen. Ziehen Sie nun den Beckengurt (n) stra, indem Sie kräftig am
Diagonalgurt (f) ziehen. Je enger der Gurt anliegt, desto besser kann er vor
Verletzungen schützen. Auf der Seite des Gurtschlosses müssen Schultergurt
und Beckengurt zusammen in die untere Gurtführung eingelegt sein.
15
n
k
d
g
e
n
k
Warnung! Das Fahrzeuggurtschloss (l) darf keinesfalls in die untere
Gurtführung (k) hineinreichen. Ist die Gurtpeitsche zu lang, ist der Sitz nicht für
dieses Fahrzeug geeignet.
Der Beckengurt (n) sollte auf beiden Seiten des Sitzkissens (d) in den unteren
Gurtführungen (k) liegen.
Hinweis! Bringen Sie Ihrem Kind von Anfang an bei, immer auf eine strae
Gurtführung zu achten und bei Bedarf, den Gurt selbst festzuziehen.
Warnung! Der Beckengurt muss auf beiden Seiten so tief wie möglich über der
f
f
Leistenbeuge Ihres Kindes verlaufen, um im Falle eines Unfalls optimal
wirken zu können.
Nun führen Sie den Diagonalgurt (f) durch die obere rote Gurtführung (g) in
der Schulterstütze (e), bis er sich innerhalb der Gurtführung bendet. Achten
Sie bitte darauf, dass der Diagonalgurt (f) zwischen Schulteraußen- kante und
Hals Ihres Kindes verläuft. Falls erforderlich, passen Sie durch Verstellen der
Kopfstützenhöhe den Gurtverlauf an. Die Höhe der Kopfstütze kann auch noch
im Auto eingestellt werden.
Page 17

FASTENING THE SEATBELT OF YOUR CHILD
Put your child in the child seat. Pull out the three-point belt and lead it in front of
your child to the belt buckle (l).
ALLACCIARE LA CINTURA DI SICUREZZA DEL BAMBINO
Collocare il bambino nel seggiolino di sicurezza. Tirare la cintura di sicurezza a
tre punti e farla passare davanti al bambino, no al punto di ancoraggio.
Warning! Never twist the belt!
Put the belt guide (m) into the belt buckle (l). If you hear a clicking sound it is
securely locked.
Put the lap belt (n) in the bottom belt guides (k) of the child seat. Now pull the
lap belt (n) tight by pulling the diagonal belt (f) until there is no slack. The tighter
the belt the better it can protect from injuries. The diagonal belt and lap belt
should both be inserted in the bottom belt guide at the side of the belt buckle.
Warning! The belt buckle of the car seat (l) must under no circumstances reach
into the bottom belt guide (k). If the belt strap is too long, the child seat is not
suitable for this vehicle.
Attenzione! Non attorcigliare MAI la cintura!
Sistemare la guida della cintura (m) nel dispositivo di chiusura (l). L’aggancio
corretto sarà segnalato dal “CLICK”. Sistemare la cintura per le gambe (n)
nelle guide inferiori (k) del seggiolino. Quindi regolare la lunghezza del tratto
di cintura per le gambe (n) tirando la parte diagonale della cintura (f) in modo
da eliminare qualsiasi lasco. Un ssaggio ottimale della cintura garantisce
una maggiore protezione. La cintura di sicurezza diagonale e quella per le
gambe dovrebbero essere inserite nella guida inferiore della cintura a lato del
dispositivo di chiusura.
Attenzione! Il dispositivo di aggancio della cintura di sicurezza dell’auto (l) non
deve in alcun caso arrivare all’altezza delle fessure in cui scorrono le cinture
del seggiolino (k). Se il dispositivo di aggancio delle cinture è troppo lungo, il
seggiolino non è adatto a questo tipo di autoveicolo.
The lap belt (n) should be placed in the bottom belt guides (k) on both sides of
the seat (d).
Note! Teach your child from the beginning to always pay attention to a tight belt
and that it should pull the belt tight by itself if necessary.
Warning! The lap belt must, on both sides, run as low across the groin of your
child as possible in order to take optimal effect in case of an accident.
Now lead the diagonal belt (f) through the upper red belt guide (g) in the
shoulder rest (e) until it is inside the belt guide.
Please make sure that the diagonal belt (f) runs between the outer edge of
the shoulder and your child‘s neck. If necessary, adjust the running of the belt
by adjusting the height of the headrest. The height of the headrest can still be
adjusted in the car.
La cintura per le gambe (n) deve essere inserita nelle apposite guide (k)
disposte su ambo i lati della seduta (d).
Avvertenza! Insegnate n da subito al Vostro bambino di prestare attenzione
alla regolazione della cintura, che dovrà essere sempre ben tesa. Insegnategli
a stringerla da solo se necessario.
Attenzione! La cintura di sicurezza per le gambe deve scorrere all’interno delle
guide da ambo i lati per garantire la massima protezione in caso di incidente.
A questo punto inserire la cintura di sicurezza diagonale (f) nella fessura di
sicurezza del seggiolino all’altezza delle spalle (e).
Prestare la massima attenzione anché la cintura diagonale (f) passi tra il
collo del bambino ed il lato esterno della spalla. Se necessario, sistemarne la
posizione regolandol’altezza dell’appoggiatesta. L’altezza dell’appoggiatesta
può essere regolata anche quando il seggiolino è ssato all’interno dell’auto.
16
Page 18

IST IHR KIND RICHTIG GESICHERT?
Um die bestmögliche Sicherheit Ihres Kindes zu gewährleisten, prüfen Sie bitte
vor Beginn der Fahrt, ob …
• der Beckengurt (n) auf beiden Seiten des Sitzkissens in den unteren
Gurtführungen (k) verläuft.
• der Diagonalgurt (f) auf der Gurtschlossseite auch in der unteren Gurtführung (k)
des Sitzkissens verläuft.
• der Diagonalgurt (f) durch die rot markierte Gurtführung (g) der
Schulterstütze verläuft.
• der Diagonalgurt (f) schräg nach hinten verläuft.
• der gesamte Gurt stra ist und nicht verdreht anliegt.
• die Rückenlehne (a) des Kindersitzes ächig an der Rückenlehne des
Autositzes anliegt, so dass sich der Kindersitz auf keinen Fall in einer
Liegeposition benden kann.
Hinweis! Der grüne Sicherheitsindikator (x) muss an den beiden roten
Entriegelungstasten (y) gut sichtbar sein.
t
NEIGUNGSVERSTELLBARE KOPFSTÜTZE
Der CYBEX Solution X2-x hat eine neigungsverstellbare Kopfstütze (r), die
hilft, dass der Kopf Ihres Kindes beim Einschlafen nicht so leicht nach vorne
fällt. Außerdem trägt diese verstellbare Kopfstütze zum Komfort für Ihr Kind bei
Autofahrten bei.
Hinweis! Achten Sie bitte darauf, dass der Kopf des Kindes immer in Kontakt
mit der neigungsverstellbaren Kopfstütze bleibt, da die Kopfstütze nur so ihre
optimierte Seitenaufprall-Schutzfunktion erfüllen kann.
Durch leichtes Anheben der Kopfstütze kann die Neigung der Kopfstütze (r) in
drei verschiedene Positionen verstellt werden.
17
Warnung! Auf keinen Fall darf die Einrastvorrichtung (t) mit Gegenständen
blockiert werden. Im Falle eines Unfalls muss die Leichtgängigkeit der
Neigungsverstellung gewährleistet sein, da es sonst eventuell zu Verletzungen
Ihres Kindes kommen kann.
Page 19

IS YOUR CHILD PROPERLY SECURED?
In order to ensure the maximum safety for your child, please check prior to the
ride whether …
IL BAMBINO È FISSATO CORRETTAMENTE?
Per garantire la massima sicurezza e la massima protezione del bambino,
prima di avviare il veicolo è necessario vericare i seguenti punti …
• the lap belt (n) runs in the bottom belt guides (k) on both sides of the seat.
• the diagonal belt (f) also runs in the bottom belt guide (k) of the seat on the side of
the belt buckle.
• the diagonal belt (f) runs through the belt guide (g) of the shoulder rest, marked
red.
• the seat belt (f) runs diagonally to the back.
• the entire belt is snugly fastened and not twisted.
• the seat pad is locked in place on both sides with the X-x connectors
and the ISOFIX anchorage points.
• the backrest (a) of the of the child seat rests at against the vehicle seat,
making sure the child seat always stays in an upright position.
Note! The green safety indication (x) must be clearly visible on both sides of the
red release buttons (y).
RECLINING HEADREST
The CYBEX Solution X2-x has a reclining headrest (r) preventing your child‘s
head from falling forward when asleep. Furthermore, this adjustable
headrest contributes to the comfort of your child during the car ride.
Note! Please ensure that the child‘s head always remains in contact with the
reclining headrest since otherwise the headrest cannot fulll its optimal side-
crash protective function.
By slightly lifting the headrest, the inclination of the headrest (r) can be adjusted
in three dierent positions.
Warning! The locking device (t) must never be blocked by any objects! In case
of an accident, the free movement of the inclination must be guaranteed since
otherwise your child might be injured.
• la cintura di sicurezza per le gambe (n) deve passare attraverso le guide di
sicurezza (k) su ambo i lati del seggiolino.
• la cintura di sicurezza diagonale (f) deve essere inserita anche nella guida di
sicurezza inferiore (k) del seggiolino a lato del dispositivo di aggancio della cintura
di sicurezza.
• la cintura di sicurezza diagonale (f) deve passare attraverso la guida di sicurezza
(g) delle spalle contrassegnata in rosso
Avvertenza! Gli indicatori di sicurezza di colore verde (x) devono risultare ben
visibili su ambo i lati dei pulsanti di rilascio di colore rosso (y).
RECLINAZIONE DELL’APPOGGIATESTA
Il seggiolino CYBEX Solution X2-x è dotato di un appoggiatesta reclinabile (r)
che impedisce alla testa del bambino di protendersi in avanti durante il sonno.
Inoltre, fornisce al bambino un maggiore comfort durante il viaggio.
Avvertenza! Vericare che la testa del bambino si trovi sempre a contatto
con l‘appoggiatesta reclinabile onde evitare che l’ottima funzione di questo
dispositivo di sicurezza in caso di impatto laterale sia vanicata.
Sollevando leggermente l’appoggiatesta (r) è possibile regolarne l’inclinazione
in tre diverse posizioni.
Attenzione! Il sistema di bloccaggio (t) non deve mai essere contrastato da
ostacoli. E’ indispensabile verificare che il meccanismo di reclinazione
sia libero da impedimenti per prevenire ferite al bambino in caso di incidente.
• la cintura di sicurezza (f) scorre in diagonale all’indietro.
• tutta la cintura dev’essere ben tesa e non attorcigliata.
• la base seduta dev‘essere ben ssata su ambo i lati con i connettori X-x
ed i punti di ancoraggio ISOFIX.
• lo schienale (a) del seggiolino dev‘essere completamente a contatto con
il sedile posteriore della vettura. Questo per
garantire che il seggiolino resti sempre in posizione verticale.
18
Page 20

PFLEGE
Um die größtmögliche Schutzwirkung Ihres Kindersitzes zu gewährleisten, ist es
unbedingt notwendig, dass Sie folgendes beachten:
• Alle wichtigen Teile des Kindersitzes sollten regelmäßig auf Beschädigungen
kontrolliert werden. Die mechanischen Bauteile müssen einwandfrei funktionieren.
• Es ist unbedingt darauf zu achten, dass der Kindersitz nicht zwischen harten Teilen
wie Fahrzeugtür, Sitzschiene usw. eingeklemmt wird und dadurch beschädigt
werden kann.
• Der Kindersitz muss z.B. nach einem Sturz unbedingt vom Hersteller überprüft
werden.
19
e
a
ENTFERNEN DES BEZUGES
Der Bezug besteht aus drei Teilen, die entweder mit Klettband, Druckknöpfen
oder Knopöchern am Kinderautositz befestigt sind. Sobald Sie alle
Befestigungen lösen, können die Einzelteile abgenommen werden.
Um den Bezug wieder zu befestigen, verfahren Sie in umgekehrter Reihen-
folge.
Warnung! Der Kindersitz darf keinesfalls ohne Bezug verwendet werden.
ENTFERNEN DES SITZBEZUGS VON DER SITZLEHNE
1. Ziehen Sie durch Betätigen des Verstellgriffs (h) die Kopfstütze (e) soweit wie
möglich heraus.
2. Betätigen Sie den Verstellgriff (h) und ziehen Sie gleichzeitig an der unteren Kan-
te der obersten Rippe der Sitzlehne (a), um die Kopfstütze (e) zu lösen. Ziehen
Sie diese nun komplett heraus.
3. Jetzt können Sie den Sitzbezug nach oben hin entfernen.
4. Um die Rückenlehne wieder zusammenzubauen, stecken Sie mit betätigtem
Verstellgriff (h) die Kopfstütze (e) in die Rückenstütze (a).
Page 21

PRODUCT CARE
In order to guarantee the best possible protection of your child seat, it is
necessary that you take note of the following:
MANUTENZIONE DEL PRODOTTO
Per garantire i massimi standard di sicurezza del seggiolino è necessario
prendere nota dei seguenti accorgimenti:
• All important parts of the child seat should be examined for any damages on a
regular basis. The mechanical parts must function awlessly.
• It is essential that the child safety car seat does not get jammed between hard
objects e.g. like the door of the car, seat rail etc. causing possible damage to the
seat.
• The child seat must be examined by the manufacturer after a fall or similar
situations.
REMOVING THE SEAT COVER
The seat cover consists of three parts which are xed to the seat either by
velcros, press buttons or button holes. Once you have released all xations, the
cover parts can be removed.
In order to put the covers back on the seat, proceed in the reversed order as
removing them.
Warning! The child seat must never be used without the cover.
• Tutte le parti importanti del seggiolino di sicurezza per auto devono
• E’ essenziale che il seggiolino non venga danneggiato a causa di un
RIMOZIONE DEL RIVESTIMENTO
Il rivestimento è costituito da tre parti unite al seggiolino tramite strisce di
velcro, bottoni a pressione o bottoni ad asola. Una volta sganciati tutti i punti di
ssaggio, le parti del rivestimento possono essere rimosse.
Per reinserire il rivestimento, eseguire nuovamente le operazioni nell’ordine
inverso.
Attenzione! IIl seggiolino di sicurezza non deve mai essere utilizzato senza
l’apposito rivestimento.
REMOVING THE SEAT COVER FROM THE BACKREST
1. Pull the headrest (e) into top position, by using the release handle (h).
RIMOZIONE DEL RIVESTIMENTO DELLO SCHIENALE
1. Sollevare il poggiatesta (e) fino al punto di massima estensione attivando la
2. To release the headrest (e), simultaneously pull the handle (h) and the lower
rim of the upper rib of the backrest (a). Now the headrest (e) can be completely
detached.
2. Per sganciare il poggiatesta (e) tirare contemporaneamente la maniglia (h) ed il
3. Now the cover can be removed.
4. For reassembly pull the adjustment handle (h) and insert the headrest (e) into the
backrest (a).
3. E il rivestimento tolto.
4. Per il rimontaggio tirare la maniglia di regolazione (h) ed inserire il poggiatesta (e)
essere sottoposte ad un regolare controllo per vericare eventuali danni. Le parti
meccaniche devono funzionare correttamente.
eventuale schiacciamento tra il sedile dell’auto e la porta o da altri
ostacoli solidi. Il seggiolino dovrà essere inviato al produttore per un
controllo in caso di caduta o altri eventi similari.
maniglia di sblocco (h).
lembo inferiore della copertura dello schienale (a). A questo punto il poggiatesta
(e) può essere staccato.
nello schienale (a).
20
Page 22

REINIGUNG
Es ist darauf zu achten, dass nur ein Original CYBEX Solution X2-x Sitzbezug
verwendet wird, da auch der Bezug ein wesentlicher Bestandteil der Funktion
ist. Ersatzbezüge erhalten Sie im Fachhandel.
Hinweis! Bitte den Bezug vor der ersten Verwendung waschen. Der Bezug darf
bei 30°C im Schonwaschgang gewaschen werden. Sollten Sie mit mehr als
30°C waschen, kann es zu Ausfärbungen kommen. Bitte den Bezug gesondert
von anderer Wäsche waschen und keinesfalls maschinell trocknen! Den Bezug
keinesfalls in der prallen Sonne trocknen! Die Kunststoteile können mit einem
milden Reinigungsmittel und warmen Wasser gewaschen werden.
Warnung! Bitte auf keinen Fall chemische Reinigungs- oder Bleichmittel
verwenden!
VERHALTEN NACH EINEM UNFALL
Sollten Sie einen Unfall gehabt haben, können am Kindersitz Beschädigungen
auftreten, welche nicht unbedingt offensichtlich erkennbar sind. In diesem Fall
muss der Kindersitz unbedingt vom Hersteller geprüft und gegebenenfalls
ausgetauscht werden.
PRODUKTLEBENSDAUER
Dieser Kindersitz ist so ausgelegt, dass er bei gewöhnlicher Nutzung für die
gesamte Produktlebensdauer von ca. 9 Jahren seine Eigenschaften erfüllt.
Durch den langsamen Verschleiß des Kunststos, beispielsweise durch
Sonneneinstrahlung (UV), können sich die Eigenschaften des Produkts
geringfügig verschlechtern.
Da in Fahrzeugen sehr große Temperaturschwankungen herrschen und andere
unvorhersehbare Belastungen auftreten können, ist es notwendig, folgende
Punkte zu beachten:
- Wenn das Fahrzeug längere Zeit der prallen Sonne ausgesetzt ist, muss der
Kindersitz aus dem Fahrzeug entfernt oder mit einem hellen Tuch abgedeckt
werden.
- Prüfen Sie regelmäßig alle Kunststoff- und Metallteile des Kindersitzes auf
Beschädigung oder Veränderung von Form oder Farbe. Stellen Sie eine
Veränderung fest, ist der Kindersitz zu entsorgen oder muss vom Hersteller geprüft
und gegebenenfalls ausgetauscht werden.
- Veränderungen des Stoffes, insbesondere das Ausbleichen, sind normal und stellen
keine Beeinträchtigung dar.
21
Page 23

CLEANING
It is important to use only an original CYBEX Solution X2-x seat cover since
the cover is also an essential part of the function. You may obtain spare covers
at your retailer.
Note! Please wash the cover before you use it the rst time. Seat covers
are machine washable at max. 30°C on delicate cycle. If you wash it at
higher temperature, the cover fabric may lose colour. Please wash the cover
separately and never dry it mechanically! Do not dry the cover in direct sunlight!
You can clean the plastic parts with a mild detergent and warm water.
PULIZIA
Il rivestimento è una parte importante per il funzionamento del seggiolino ed è
indispensabile utilizzare soltanto rivestimenti originali CYBEX Solution X2-x.
Rivestimenti di ricambio originali sono disponibili presso i rivenditori
autorizzati.
NB: Consigliamo il lavaggio prima del primo utilizzo. Rivestimenti lavabili in
lavatrice, ciclo delicato max 30°. L‘uso di temperature più elevate può scolorire i
tessuti. Lavare separatamente e non asciugare mai a macchina. Non asciugare
alla luce diretta del sole. Le parti in plastica possono essere pulite con
detergente neutro e acqua tiepida.
Warning! Please do not use chemical detergents or bleaching agents under any
circumstances!
WHAT TO DO AFTER AN ACCIDENT
If you had an accident, the seat might have sustained damages which are
not visible. In this case, the child seat must absolutely be examined by the
manufacturer and replaced if necessary.
PRODUCT LIFESPAN
This car seat has been designed to be able to fulll its intended functions by
ordinary use for a product life span of approx. 9 years.
Gradual wear of the plastic, for example caused by exposure to sunlight (UV),
can cause slight deterioration of the product’s properties.
Since very high temperature uctuations and other unforeseeable stresses are
common in vehicles, it is necessary to observe the following points:
- If the vehicle is directly exposed to strong sunlight for long periods, the child seat
must be removed from the vehicle or covered with a light cloth.
- Check all plastic and metal parts of the seat regularly for damage or change of
shape or colour. If you notice any change in the child seat, the child car seat must
be disposed or checked and possibly replaced by the manufacturer.
- Changes to the fabric, especially fading, are normal when used in a vehicle and do
not impair the seat‘s function.
Attenzione! Non usare mai prodotti chimici o sbiancanti per la pulizia!
COSA FARE A SEGUITO DI UN INCIDENTE
In caso di incidente il seggiolino potrebbe subire danni non immediatamente
visibili. In tal caso il seggiolino dovrà assolutamente essere inviato al produttore
per un controllo e, se necessario, sostituito.
DURATA DEL PRODOTTO
Questo seggiolino è stato progettato per garantire la funzionalità per l’intera
durata del periodo di utilizzo raccomandato, per un periodo di circa 9 anni.
Un graduale deterioramento delle plastiche, dovuto per esempio all’esposizione
al sole (UV), può nel tempo dare origina a leggere variazioni delle proprietà del
prodotto.
Poichè all’interno della vettura le temperature sono soggette ad elevate
uttuazioni, è necessario osservare quanto segue:
- Nel caso l’automobile venga lasciata al sole per un lungo periodo di tempo,
consigliamo di estrarre il seggiolino dall’abitacolo o di ripararlo con un telo di
copertura di colore chiaro.
- Controllare accuratamente e regolarmente tutte le parti in plastica e metalliche del
seggiolino per verificarne eventuali danni o cambiamenti di forma o di colore. In
caso di evidenti modifiche il seggiolino deve essere smaltito, oppure controllato e
nel caso sostituito dal produttore.
- Modifiche al tessuto di rivestimento, in particolare lo sbiadimento, sono considerate
normali con l’utilizzo all’iterno della vettura e non influiscono sulla funzionalità del
prodotto.
22
Page 24

23
ENTSORGUNG
Am Ende der Produktlebensdauer des Kindersitzes ist eine sachgemäße Entsorgung
vorzunehmen. Die Abfallentsorgung kann kommunal unterschiedlich sein. Um eine
vorschriftsmäßige Entsorgung des Kindersitzes zu gewährleisten, setzen Sie sich mit
Ihrer kommunalen Abfallentsorgung bzw. Verwaltung Ihres Wohnortes in Verbindung.
Beachten Sie auf jeden Fall die Entsorgungsbestimmungen Ihres Landes.
GARANTIEBEDINGUNGEN
Die nachfolgenden Garantiebestimmungen gelten nur in dem Land, in dem
dieses Produkt erstmalig über den Einzelhandel an einen Verbraucher verkauft
wurde. Die Garantie deckt sämtliche Herstellungs- und Materialfehler ab, die im
Zeitpunkt des Kaufs bestanden haben oder die innerhalb von drei (3) Jahren nach
dem Erstverkauf dieses Produkts über den Einzelhandel an einen Verbraucher in
Erscheinung getreten sind (Herstellergarantie). Tritt während der Garantiezeit ein
Herstellungs- und Materialfehler auf, wird das Produkt kostenlos repariert oder –
nach unserem freien Ermessen– gegen ein neues ausgetauscht. Um Leistungen
im Rahmen dieser Garantie in Anspruch nehmen zu können, muss das Produkt an
den Einzelhändler zurückgegeben werden, der es erstmalig verkauft hat und ein
Nachweis über den Kauf (Kaufbeleg oder Rechnung) im Original vorgelegt werden,
welcher das Kaufdatum, den Namen des Händlers sowie die Produktbezeichnung
aufzeigt. Der Anspruch aus diesem Garantieversprechen besteht nicht, wenn das
Produkt an den Hersteller oder irgendeine andere Person als den Einzelhändler, der
es erstmalig verkauft hat, zum Zweck der Inanspruchnahme der Garantieleistung
geschickt wird. Die Garantie gilt nur, wenn das Produkt nach dem Kauf umgehend
auf Vollständigkeit, Herstellungs- und Materialfehler überprüft wurde. Wurde das
Produkt im Versandhandel gekauft, ist es umgehend nach Erhalt auf Vollständigkeit,
Herstellungs- und Materialfehler zu überprüfen. Falls Schäden vorhanden sind, darf
das Produkt nicht mehr benutzt werden und muss umgehend an den Händler, der es
erstmalig verkauft hat, zurück gegeben werden. Im Garantiefall muss das Produkt
in einem vollständigen und sauberen Zustand zurückgegeben werden. Bitte lesen
Sie vor einer Kontaktaufnahme mit dem Händler sorgfältig die Gebrauchsanleitung.
Die Garantie deckt keine Schäden ab, die durch Fehlgebrauch, äußere Einüsse
(Wasser, Feuer, Verkehrsunfälle o.ä.) oder normalen Verschleiß entstanden
sind. Die Garantie wird nur gewährt, wenn das Produkt in Übereinstimmung
mit der Gebrauchsanweisung behandelt und benutzt wurde, Reparaturen oder
Veränderungen ausschließlich durch Personen vorgenommen wurden, die hierzu
befugt waren und stets nur Original Bau- und Zubehörteile verwendet wurden. Durch
diese Garantie werden weder die auf Grundlage der jeweils anwendbaren Gesetze
bestehenden Verbraucherrechte noch Rechte gegen den Verkäufer wegen der
Vertragswidrigkeit des Produkts ausgeschlossen, begrenzt oder in anderer Weise
eingeschränkt.
Page 25

DISPOSAL
At the end of the durability of the child seat, you must dispose it properly.
Waste disposal regulations may vary regionally. In order to guarantee a
proper disposal of the child safety seat, please contact your communal waste
management or administration of your city. In all cases, please note the waste
disposal regulations of your country.
WARRANTY
The following warranty applies solely in the country where this product was initially
sold by a retailer to a customer. The warranty covers all manufacturing and material
defects, existing and appearing, at the date of purchase or appearing within a term
of three (3) years from the date of purchase from the retailer who initially sold the
product to a consumer (manufacturer’s warranty). In the event that a manufacturing
or material defect should appear, we will – at our own discretion – either repair the
product free of charge or replace it with a new product. To obtain such warranty it
is required to take or ship the product to the retailer, who initially sold this product
to a customer and to submit an original proof of purchase (sales receipt or invoice)
that contains the date of purchase, the name of the retailer and the type designation
of this product. This warranty shall not apply in the event that this product is taken
or shipped to the manufacturer or any other person other than the retailer who
initially sold this product to a consumer. Please check the product with respect
to completeness and manufacturing or material defects immediately at the date
of purchase or, in the event that the product was purchased in distance selling,
immediately after receipt. In case of a defect stop using the product and take or ship
it immediately to the retailer who initially sold it. In a warranty case the product has to
be returned in a clean and complete condition. Prior to contacting the retailer, please
read this instruction manual carefully. This warranty does not cover any damages
caused by misuse, environmental inuence (water, re, road accidents etc.) or
normal wear and tear. It does solely apply in the event that the use of the product
was always in compliance with the operating instructions, if any and all modications
and services were performed by authorized persons and if original components and
accessories were used. This warranty does not exclude, limit or otherwise aect
any statutory consumer rights, including claims in tort and claims with respect to a
breach of contract, which the buyer may have against the seller or the manufacturer
of the product.
SMALTIMENTO
Alla ne dell’utilizzo del seggiolino di sicurezza è necessario provvedere al suo
smaltimento nel modo appropriato. Le norme per lo smaltimento variano da nazione
a nazione. Preghiamo di contattare l’ucio di competenza della vostra città di
residenza per delucidazioni in merito. In ogni caso, seguire sempre le normative
dello stato di residenza.
GARANZIA
La seguente garanzia vale unicamente nella nazione in cui il prodotto è stato
originariamente venduto da un rivenditore al consumatore. La garanzia copre
eventuali difetti di fabbricazione e di materiali riscontrati all‘acquisto o entro un
periodo di tre (3) anni dalla data di acquisto presso il rivenditore (garanzia del
produttore). Nel caso venga riscontrato o appaia un difetto di fabbricazione o di
materiali nel corso di validità della garanzia provvederemo - a nostra discrezione
- a riparare il prodotto senza costi o a sostituirlo. Per avere diritto alla garanzia
è necessario riportare o spedire il prodotto al rivenditore presso il quale è stato
acquistato ed è indispensabile fornire la prova d‘acquisto (scontrino scale, fattura,
ecc.) in originale. La prova d‘acquisto dovrà contenere indicati la data di acquisto,
il nome del rivenditore e le caratteristiche del prodotto (tipo/modello). Nessun
intervento in garanzia se il prodotto verrà inviato al produttore o a qualsiasi altra
persona diversa dal rivenditore presso il quale si è eettuato l‘acquisto. La garanzia
è valida soltanto se il prodotto è stato sottoposto ad un accurato controllo di
completezza, funzionalità all‘acquisto e eventuali manchevolezze di produzione o di
materiali sono state prontamente segnalate. Per acquisti a distanza, raccomandiamo
di eettuare un controllo completo al ricevimento del prodotto. In caso si riscontri
qualsiasi danneggiamento invitiamo a NON utilizzare il prodotto e a restituirlo immed
iatamente al rivenditore da cui è stato acquistato. I diritti di garanzia sono validi
soltanto se il prodotto è reso pulito e completo di ogni parte. Prima di contattare
il rivenditore Vi preghiamo di leggere con attenzione le istruzioni contenute nel
manuale. La garanzia non copre danni provocati da utilizzo improprio o eventi fortuiti
e cause ambientali (acqua, fuoco, incidenti stradali, ecc) o dal normale deperimento
d‘uso. La garanzia è valida soltanto per prodotti usati in conformità a quanto stabilito
nel manuale istruzioni, se eventuali modiche o riparazioni sono state eettuate
da personale autorizzato e se sono state utilizzate solo parti ed accessori originali.
Questa garanzia non esclude, limita o comunque pregiudica eventuali diritti legali
dei consumatori, comprese istanze in caso di torto e in caso di una violazione del
contratto, che l‘acquirente può avere nei confronti del rivenditore o del produttore.
24
Page 26

werden weder die auf Grundlage der jeweils anwendbaren Gesetze bestehenden
Verbraucherrechte noch Rechte gegen den Verkäufer wegen der Vertragswidrigkeit
des Produkts ausgeschlossen, begrenzt oder in anderer Weise eingeschränkt.
CYBEX GmbH
Riedinger Str. 18, 95448 Bayreuth, Germany
Tel.: +49 921 78 511-0, Fax.: +49 921 78 511- 999
25
Page 27

CYBEX GmbH
Riedinger Str. 18, 95448 Bayreuth, Germany
Tel.: +49 921 78 511-0, Fax.: +49 921 78 511- 999
CYBEX GmbH
Riedinger Str. 18, 95448 Bayreuth, Germany
Tel.: +49 921 78 511-0, Fax.: +49 921 78 511- 999
26
Page 28

27
Page 29

CHER CLIENT!
MERCI D‘AVOIR CHOISI D‘ACHETER LE SOLUTION X2-FIX. LORS DE SON DÉVELOPPEMENT. NOUS NOUS
SOMMES FOCALISÉS SUR LA SÉCURITÉ. LE CONFORT ET LA FACILITÉ D‘UTILISATION. CE PRODUIT DE
QUALITÉ RÉPOND AUX NORMES ACTUELLES LES PLUS STRICTES.
BESTE KLANT!
DANK U VOOR HET AANKOPEN VAN DE CYBEX SOLUTION X2-FIX. WIJ VERZEKEREN U DAT WIJ ONS
GEDURENDE DE ONTWIKKELING VAN DE CYBEX SOLUTION X2-FIX VOLLEDIG HEBBEN GERICHT
OP VEILIGHEID, COMFORT EN GEBRUIKSVRIENDELIJKHEID. HET PRODUCT IS ONDER SPECIALE
KWALITEITSCONTROLES VERVAARDIGD EN VOLDOET AAN DE STRENGSTE VEILIGHEIDSEISEN.
DRODZY KLIENCI!
BARDZO DZIĘKUJEMY ZA ZAKUP FOTELIKA SAMOCHODOWEGO CYBEX SOLUTION X2-FIX.
MOŻEMY PAŃSTWA ZAPEWNIĆ, ŻE OPRACOWUJĄC FOTELIK CYBEX SOLUTION X2-FIX, NAJWIĘCEJ
UWAGI POŚWIĘCILIŚMY BEZPIECZEŃSTWU, WYGODZIE ORAZ PROSTOCIE UŻYTKOWANIA. PRODUKT
TEN WYPRODUKOWANO W OPARCIU O SYSTEM ŚCISŁEJ KONTROLI JAKOŚCI I SPEŁNIA NAJSUROWSZE
WYMOGI BEZPIECZEŃSTWA.
28
Page 30

MANUEL D‘INSTRUCTION
CYBEX Solution X2-x
siège auto avec dossier
RCOMMANDÉ POUR:
Age: d‘environ 3 à 12 ans
Poids: d‘environ 15 à 36 kg
Taille: jusqu‘environ 150 cm
Convient à des véhicules avec une ceinture 3
points à rétraction
automatique.
ZULASSUNG:
ECE R-44, Groupe 2/3, 15 à 36 kg
2
Instructiehandleiding
CYBEX Solution X2-fix
kinderzitje met hoofdsteun
AANBEVOLEN VOOR:
Leeftijd: vanaf circa 3 jaar tot 12 jaar
Gewicht: 15 tot 36 kg
Lichaamslengte: Max. 150 cm
Voor autostoelen met automatische
driepuntsveiligheidsgordel
TOELATING:
ECE R-44/04, groep 2/3, 15 tot 36 kg
INSTRUKCJA UŻYTKOWANIA
Fotelik samochodowy CYBEX Solution X2-x
z oparciem
ZALECANY DLA:
Wiek: od ok. 3 do 12 lat,
Waga: od 15 do 36 kg,
Wzrost: maksymalnie 150 cm,
do foteli samochodowych z 3-punktowymi
pasami bezpieczeństwa z automatyczną blokadą.
DOPUSZCZENIE DO UŻYTKU:
Zgodny z normą ECE R44/04,grupa 2/3: 15-36 kg
FR CONTENU
Attention! Pour une protection parfaite de votre enfant, il est essentiel
d‘utiliser et d‘installer le CYBEX Solution X2-x comme indiqué dans le manuel
d‘instructions.
Note! Merci de toujours conserver le manuel d‘instructions sous la housse
elastique a l‘arriere du dossier du siege, de facon a ce qu‘elle soit toujours a
portee de main.
Note! En fonction de la législation locale, les caractéristiques du produit
peuvent être diérentes.
Résumé du manuel d‘instruction ....................................................................1
Attention / A Noter........................................................................................... 2
Qualification
Première installation
Ajuster en fonction de la taille de l‘enfant
Ajuster le repose tête....................................................................................31
Position correcte dans le véhicule
Installation du siège auto avec les connecteurs
Ôter le Solution X2-fix...................................................................................37
Mettre votre enfant en sécurité
Attacher la ceinture de votre enfant..............................................................39
Votre enfant est-il correctement attaché?
Repose tête inclinable
Entretien du siège auto.................................................................................43
Ôter la housse
Retirer la housse du dossier
Nettoyage
Que faire à la suite d‘un accident?
Durée de vie du produit
Recyclage
Garantie
..................................................................................................29
.....................................................................................31
.....................................................31
................................................................33
...........................................35
.....................................................................39
.....................................................41
..................................................................................41
..............................................................................................43
.........................................................................43
.....................................................................................................45
...............................................................45
................................................................................45
.....................................................................................................47
........................................................................................................47
29
Page 31

NL INHOUD
PL SPIS TREŚCI
Waarschuwing! Voor optimale bescherming van uw kind is het van essentieel
belang dat u de CYBEX Solution X2-x installeert en gebruikt aan de hand van
de instructies in deze handleiding.
Tip! Bewaar de handleiding steeds binnen handbereik onder de elastische
bekleding aan de achterkant van de rugleuning.
Opgepast! Afhankelijk van lokale gewoonten kunnen de eigenschappen van het
produkt verschillen.
Beknopte handleiding .....................................................................................1
Waarschuwing / Let op
Toelating - kwalificatie................................................................................... 29
Eerste installatie
Aanpassen aan de lichaamslengte...............................................................32
Afstellen van de hoofdsteun
De juiste positie in de auto
Installatie van het Autozitje met Connectoren
Verwijderen van de Solution X2-fix
Het kind veilig vastzetten
De veiligheidsriem van uw kind bevestigen
Is uw kind veilig vastgezet?
Hoofdsteun verstellen
Productonderhoud
Bekleding van het zitje verwijderen
De bekleding van de rugsteun verwijderen
Reinigen
Wat te doen na een ongeval
Levensduur van het product
Verwijdering
Garantie
.......................................................................................................46
..................................................................................................48
........................................................................................................48
...................................................................................2
...........................................................................................32
.........................................................................32
...........................................................................34
..............................................36
...............................................................38
..............................................................................40
..................................................40
..........................................................................42
...................................................................................42
........................................................................................44
..............................................................44
..................................................44
.........................................................................46
.........................................................................46
Ostrzeżenie! Aby zapewnić bezpieczeństwo dziecku, bardzo ważne jest, aby
zamontować fotelik CYBEX Solution X2-x oraz używać go zgodnie z niniejszą
instrukcją użytkowania.
Uwaga! Instrukcję zawsze przechowuj pod ręką, aby w każdej chwili można
było do niej zajrzeć (np. pod elastyczną osłonką znajdującą się z tyłu oparcia).
Uwaga! Cechy produktów mogą różnić się między sobą w zależności od modelu.
Instrukcja skrócona.........................................................................................1
Ostrzeżenie / Uwaga
Dopuszczenie do użytku – norma
Pierwszy montaż fotelika
Dostosowanie fotelika do wzrostu dziecka
Regulacja zagłówka......................................................................................32
Właściwe miejsce w samochodzie
Mocowanie fotelika za pomocą zaczepów
Wyjmowanie fotelika Solution X2-fix z samochodu
Zabezpieczenie dziecka
Zapnij dziecku pasy
Czy dziecko jest dobrze zabezpieczone?.....................................................42
Odchylany zagłówek.....................................................................................42
Konserwacja
Zdejmowanie tapicerki
Zdejmowanie tapicerki z oparcia fotelika
Czyszczenie
Postępowanie po wypadku drogowym
Cykl Życia produktu
Utylizacja
Gwarancja
......................................................................................2
................................................................29
..............................................................................32
...................................................32
...............................................................34
...................................................36
......................................38
...............................................................................40
......................................................................................40
.................................................................................................44
..................................................................................44
......................................................44
.................................................................................................46
.........................................................46
.....................................................................................46
......................................................................................................48
....................................................................................................48
30
Page 32

b
e
f
a
PREMIÈRE INSTALLATION
Le siège auto comprend une assise (d) et un dossier (a) ajustable en hauteur,
aux épaules et au niveau du repose tête.
Attention! Les pièces du siège auto Solution X2-fix ne doivent pas être
c
a
d
d
utilisées, seules, séparemment, en combinaison avec une autre série CYBEX
ou encombinaison avec des pièces d‘autres fabriquants. Dans l‘éventualité la
garantie est nulle.
Le dossier (a) est clipsé dans l‘axe (c) de l‘assise (d) grâce à la xation (b).
A Noter! Merci de conserver ce manuel d‘instructions, il doit toujours être à
portée de main pour référence ultérieure. Conserver le manuel d‘instructions
sous la housse élastique, située au dos du dossier.
Attention! Merci de faire attention à ne pas endommager le siège auto en
ainsérant la ceinture et en fermant la porte du véhicule.
Insérez les blocs du système de protection d‘impact latéral (L.S.P. System) sur les
deux côtés dans les trous de montage (z), puis appuyez jusqu‘à ce qu‘il se cliquent
en place.
z
AJUSTER EN FONCTION DE LA TAILLE DE L‘ENFANT
Uniquement un dossier (e) bien règlé en hauteur assure confort et protection
optimale. Ceci permet également de bien règler la ceinture diagonale. Vous
e
h
pouvez ajuster la hauteur (e) du dossier en 11 positions. Le protège épaules
est xé au dossier et ne doit pas être ajusté séparemment. La bonne hauteur
du dossier peut être vériée en passant 2 doigts entre le bas de l‘appui tête et
l‘épaule de l‘enfant.
AJUSTER LE REPOSE TÊTE
• installer votre enfant dans le siège auto
• saisir la poignée de règlage en hauteur (h) pour dévérouiller les protèges épaules
31
et repose tête.
• Règler à la bonne hauteur puis relâcher la poignée, le vérouillage du protège
épaules et du repose tête s‘active automatiquement.
Page 33

EERSTE INSTALLATIE
Het kinderzitje bestaat uit een zitting (d) en een hoofdsteun (a), met in hoogte
verstelbare schouder- en hoofdsteun. Uitsluitend de combinatie van deze
onderdelen biedt uw kind de beste bescherming en optimaal comfort.
Waarschuwing! De onderdelen van de CYBEX Solution X2-fix mogen niet
afzonderlijk of in combinatie met zitjes, rugleuningen of hoofdsteunen van
andere fabrikanten of uit andere productseries worden gebruikt. In
dergelijke gevallen vervalt de certificering onmiddellijk.
PIERWSZY MONTAŻ FOTELIKA
Fotelik składa się z siedziska (d) i oparcia (a) z zagłówkiem i zabezpieczeniem
barkowym o regulowanej wysokości. Tylko połączenie obu części zapewni
Twojemu dziecku wygodę i najlepszą ochronę.
Ostrzeżenie! Części fotelika CYBEX Solution X2-fix nie wolno używać osobno
lub w połączeniu z siedziskami, oparciami lub zagłówkami innych firm lub z
innej serii produktów, ponieważ powoduje to natychmiastowe unieważnienie
certyfikatu dopuszczenia do użytku.
De rugleuning (a) wordt aan de as (c) van de zitting (d) bevestigd met behulp
van geleideschoen (b).
Tip! Bewaar de handleiding goed, zodat u ze steeds kan raadplegen
indien u iets wenst na te lezen. U kan de handleiding onder de elastische
bekleding aan de achterkant van de rugleuning bewaren.
Waarschuwing! Let bij dagelijks gebruik van de auto op dat er geen
losse of kunststof onderdelen van de zitting bekneld raken, bijvoorbeeld door
verstellen van de autostoelen of door openen en sluiten van de portieren.
Het‚ Zijdelingse Impaktsysteem (LSP) wordt langs beide zijden in de montageopeningen
(z) gestoken en naar onderen geschoven tot het vastklikt.
AANPASSEN AAN DE LICHAAMSLENGTE
Uitsluitend een optimaal in hoogte afgestelde schouder- en hoofdsteun (e) biedt
uw kind maximale bescherming en comfort en waarborgt de
optimale positie van de diagonale riem (f). U kunt de hoogte (e) in 11
standen verstellen. De schoudersteun is aan de hoofdsteun bevestigd en hoeft
niet afzonderlijk te worden afgesteld. De afstelling dient zodanig te gebeuren,
dat er nog 2 vingers tussen de onderste rand van de hoofdsteun en de
schouder van het kind passen.
AFSTELLEN VAN DE HOOFDSTEUN
• Zet uw kind in het kinderzitje
• Trek de afstelhendel (h) omhoog om de schouder- en hoofdsteun te
ontgrendelen.
• Nu kunt u de schouder- en hoofdsteun (e) in de gewenste stand zetten.
• Zodra u de afstelhendel (h) loslaat, worden de schouder- en hoofdsteun (e)
automatisch vergrendeld.
Oparcie fotelika (a) zahacz o oś (c) siedziska (d) za pomocą mocowania (b).
Uwaga! Powinna być zawsze pod ręką, aby móc do niej w każdej chwili zajrzeć.
Przechowuj instrukcję pod elastyczną osłonką znajdującą się z tyłu oparcia.
Ostrzeżenie! Należy zawsze zwracać uwagę, aby luźne bądź plastikowe części
fotelika nie zaklinowały się gdzieś w wyniku codziennego używania pojazdu
(np. przesuwania siedzenia lub zamykania drzwi samochodu).
Włóż wkładki zabezpieczające przed zderzeniem bocznym (system L.S.P.) w otwory
montażowe (z) znajdujące się z obu stron, następnie wciśnij je, aż się zatrzasną.
DOSTOSOWANIE FOTELIKA DO WZROSTU DZIECKA
Tylko dostosowanie wysokości zagłówka i zabezpieczenia barkowego (e) do
najwygodniejszej pozycji zapewni optymalne bezpieczeństwo i wygodę dziecka.
Gwarantuje to również najlepsze położenie barkowego pasa bezpieczeństwa
(f). Zagłówek (e) można ustawić w 11 pozycjach. Zabezpieczenie barkowe jest
połączone z zagłówkiem, więc nie trzeba go regulować osobno. Wysokość
zagłówka należy ustawić tak, aby pomiędzy ramieniem dziecka a dolną
krawędzią zagłówka mieściły się dwa palce.
REGULACJA ZAGŁÓWKA
• Umieść dziecko w foteliku.
• Pociągnij do góry za uchwyt regulacji (h), aby odblokować zabezpieczenie
barkowe i zagłówek.
• Teraz możesz ustawić obie części (e) na wybranej wysokości.
• Kiedy puścisz uchwyt regulacji (h), zabezpieczenie barkowe i zagłówek (e)
zablokują się automatycznie w wybranej pozycji.
32
Page 34

POSITION CORRECTE DANS LA VOITURE
Le CYBEX Solution X2-x peut être utilisé sur tous les sièges de voiture
disposant d‘une ceinture 3 points à rétraction automatique. Nous
recommandons d‘utiliser le siège auto à l‘arrière du véhicule. Installer un siège
auto à l‘avant du véhicule expose votre enfant à de sérieux risques en cas
d‘accident.
Attention! Vous ne pouvez pas utiliser le siège auto avec une ceinture
2 points ou avec la ceinture ventrale généralement située sur le siège du milieu
à l‘arrière du véhicule.
Les véhicules doivent être compatibles et équipés d‘ancrages X-x. Le
siège auto peut uniquement être utilisé dans les véhicules de catégorie
„semi universelle“ et mentionné dans la liste jointe des véhicules
approuvés. Cette liste est mise à jour régulièrement, elle peut être
obtenue sur notre site Internet www.cybex-online.com. Cas exceptionnel, le
siège auto peut être utilisé sur le siège passager. Merci dans ce cas de suivre
les instructions suivantes:
• Pour les véhicules équipés d‘un airbag passager, reculer le siège passager au
maximum.
• Assurez vous que le dérouleur de la ceinture reste bien derrière le siège.
Attention! La ceinture doit être diagonale (f) et son point le plus haut (dérouleur)
doit toujours être derrière le siège. si, par exemeple, en reculant le siège au
maximum, le point le plus haut de la ceinture ne se trouve pas derrière le siège
auto, il convient de ne pas utiliser le siège.
Baggages ou autres objets projectiles dans l‘habitacle doivent être rangés et
xés an de ne pas devenir dangereux en cas d‘accident.
Avertissement! L‘usage de ce siège enfant est interdit sur les sièges de
véhicules qui sont positionnés de côté par rapport au sens de la marche.
Lorsque le siège est positionné dos à la route, par exemple dans un
monospace ou minibus, l‘usage de ce produit est autorisé à condition que ledit
siège soit approuvé pour le transport d‘un adulte. Vérifiez que l‘appuie-tête
n‘est pas retiré quand le siège enfant est installé sur un siège dos à la route.
Le siège enfant doit être attaché avec la ceinture de sécurité du véhicule même
f
vide, afin qu‘il ne se transforme pas en projectile en cas d‘accident.
33
Avertissement! Ne jamais laisser votre enfant sans surveillance dans votre
voiture.
Page 35

DE JUISTE POSITIE IN DE AUTO
De CYBEX Solution X2-x kan op alle autostoelen met een automatische
driepuntsveiligheidsgordel worden gebruikt. In het algemeen adviseren wij
de stoelen achterin de auto te gebruiken. Voorin wordt uw kind doorgaans
blootgesteld aan hogere risico‘s in geval van een ongeval.
Waarschuwing! Het zitje kan niet worden gebruikt met een tweepuntsgordel of een
heupgordel. Als het kind met een tweepuntsgordel wordt vastgezet, kan het in geval van
een ongeval levensgevaarlijk gewond raken.
Uw wagen dient geschikt te zijn voor bijkomende verankering
met X-x connectoren. Bij gevolg kan het kinderzitje enkel gebruikt
worden in auto‘s die binnen de „semi-universele “installatiecategorie
vallen. Ingesloten vindt u een lijst met goedgekeurde auto‘s. Deze lijst
wordt regelmatig aangepast en kan steeds bij ons ofonline op www.cybex-
online.com verkregen worden. In uitzonderlijke gevallen kan het zitje op de
passagiersstoel worden vastgezet. Let in dergelijke gevallen op het volgende:
• In auto‘s met een passagiersairbag moet de passagiersstoel zo ver
mogelijk naar achteren worden geduwd. Controleer dat de bovenste punt van
de autostoel aan. Voor optimale bescherming van uw kind moet het zitje in een
normale rechtopstaande positie staan!
• De aanwijzingen van de autofabrikant moeten worden opgevolgd.
Waarschuwing! De stoelgordel (f) moet diagonaal vanaf de achterzijde lopen
en mag nooit naar de voorzijde naar het bovenste gordelbevestigingspunt van
de voorstoel in de auto lopen. Als dit niet kan worden veranderd, bijvoorbeeld
door de stoel naar voren te duwen of door het zitje op een andere autostoel te
plaatsen, is het kinderzitje niet geschikt voor gebruik in deze auto.
WŁAŚCIWE MIEJSCE W SAMOCHODZIE
Fotelik CYBEX Solution X2-x może być używany na dowolnym siedzeniu
samochodu, gdzie zamontowane są 3-punktowe pasy bezpieczeństwa
z automatyczną blokadą. Generalnie zalecamy wybór tylnego siedzenia
samochodu, ponieważ na przednim dziecko jest narażone na większe
niebezpieczeństwo w razie wypadku.
Ostrzeżenie! Fotelika CYBEX Solution X2-fix nie wolno używać na siedzeniu, gdzie
znajdują się 2-punktowe pasy bezpieczeństwa lub pas biodrowy. Używanie tego
typu pasa bezpieczeństwa może spowodować śmiertelne obrażenia dziecka w razie
wypadku.
pojazdów. Lista ta jest regularnie uaktualniana i jej aktualną wersję można
uzyskać od nas lub znaleźć na stronie internetowej www.cybex-online.com.
W wyjątkowych przypadkach fotelik można umieścić na przednim siedzeniu.
Należy przy tym przestrzegać następujących zaleceń:
• Jeżeli pojazd posiada boczną poduszkę powietrzną od strony pasażera, odsuń
siedzenie do tyłu najdalej, jak jest to możliwe. Zwróć uwagę, aby górny zaczep
pasa pojazdu zawsze znajdował się za fotelikiem.
• Przestrzegaj zaleceń producenta pojazdu.
Ostrzeżenie! Pas barkowy pojazdu (f) powinien zawsze przebiegać skośnie do
tyłu i nie powinien nigdy przebiegać ku przodowi w kierunku górnego zaczepu
pasa przedniego siedzenia samochodu. Jeżeli nie jesteś w stanie w ten sposób
ustawić fotelika CYBEX Solution X2-fix na żadnym siedzeniu (np. przesuwając
siedzenie samochodu do przodu), oznacza to, że fotelik nie nadaje się do tego
typu pojazdu.
Bagage en andere objecten in de auto die in geval van een ongeval verwondingen
kunnen veroorzaken, moeten altijd goed worden vastgezet.
Bagaże i inne przedmioty znajdujące się w samochodzie powinny zostać
zabezpieczone, aby uniknąć zranienia w razie wypadku.
Ostrzeżenie! Montowanie niniejszego dziecięcego fotelika samochodowego
Opgelet! Dit kinderzitje mag niet gebruikt worden in voertuigen waarin de
passagierszitplaatsen zich aan de zijkanten bevinden. Het kinderzitje mag wel
gebruikt worden wanneer de passagierzitplaats zich tegen de rijrichting in bevindt,
bijvoorbeeld in een minibusje. In dit geval moet de passagierszitplaats geschikt
zijn voor een volwassene. Controleer dat de hoofdsteun niet weggenomen werd
wanneer u het kinderzitje op een passagierszitplaats tegen de rijrichting in plaatst!
Het kinderzitje moet met de gordel vastzitten, ook wanneer het niet gebruikt wordt.
Dit voorkomt dat de chauffeur of een passagier door een loszittend zitje gekwetst
worden in geval van een noodstop of een ongeluk.
Let op! Laat uw kind nooit alleen in de auto achter.
na fotelach samochodowych ustawionych bokiem do kierunku jazdy jest
niedozwolone. Na fotelach samochodowych umieszczonych tyłem do
kierunku jazdy, np. w samochodach typu van czy minibus, można montować
niniejszy fotelik, pod warunkiem że fotele samochodowe przeznaczone są do
przewożenia osób dorosłych. Montując fotelik samochodowy na siedzeniu
tyłem do kierunku jazdy, upewnij się, że zagłówek nie jest zdjęty. Dziecięcy
fotelik zawsze musi być zapięty pasami, nawet jeśli jest pusty. Fotelik
pozostawiony luzem może spowodować obrażenia kierowcy i pasażerów w
przypadku kolizji czy gwałtownego hamowania.
Uwaga! Nie należy nigdy zostawiać dziecka w foteliku bez opieki.
Samochody powinny mieć możliwość zamocowania fotelika za pomocą
dodatkowych łączników X-x. Dlatego fotelik ten może być używany
tylko w samochodach, które należą do „półuniwersalnej“ kategorii
instalacyjnej i które znajdują się na załączonej liście dopuszczonych
34
Page 36

INSTALLATION DU SIÈGE AUTO AVEC LES CONNECTEURS
La sécurité de votre enfant sera augmentée avec les connecteurs X-x
qui permettent au siège d‘être maintenu fermement dans le véhicule.
Votre enfant reste attaché par la ceinture de sécurité 3 points.
• Connecter les 2 installations X-x fournies (les parties les plus longues, pointant
vers le haut) avec les 2 points d‘ancrages ISOFIX (i).
Note! Les points d‘ancrages ISOFIX (i) sont deux crochets métalliques situés
entre le dossier et l‘assise du siège de votre véhicule. En cas de doute, se
référer au manuel d‘instructions de votre véhicule.
• Pour ajuster, appuyer sur le bouton X-x (v), situé au bas du siège auto.
• Tirer les connecteurs (w) le plus loin possible.
• Tourner le bouton connecteur X-x à 180° de facon à ce qu‘ils pointent en direction
des aides d‘installation.
Remarque! Veillez à ce que les deux indicateurs de sécurité verts (x) sur
les bras à encliqueter ISOFIX (w) ne soient pas visibles. Le cas échéant,
déverrouillez les bras à encliqueter ISOFIX (w) en enfonçant le bouton de
déverrouillage (y) et en tirant. Répétez le cas échéant la procédure également
pour le second bras à encliqueter.
• Pousser les deux connecteurs X-x dans lespoints d‘ancrages (i).
• S‘assurer que le siège est connecté fermement en essayant de le tirer ver soi.
• L‘indicateur de sécurité vert (x) doit être bien visible sur les deux boutons de
déverrouillage (y).
• Grâce à la poignée orange, vous pouvez ajuster la profondeur du siège.
35
Note! Pour plus d‘informations, merci de se référer à la section „Placer le siège
dans la voiture“.
• Vous pouvez maintenant attacher l‘enfant. Merci de vous référer à
„Comment attacher l‘enfant“
Page 37

INSTALLATIE VAN HET AUTOZITJE MET CONNECTOREN
De veiligheid van uw kind wordt vergroot door de X-x connectoren
die u toelaten om het kinderzitje stevig en nauw met het voertuig te
verbinden.
MOCOWANIE FOTELIKA ZA POMOCĄ ZACZEPÓW
Dzięki zaczepom X-x, które umożliwiają stabilne zamocowanie fotelika
w samochodzie, zwiększa się bezpieczeństwo Twojego dziecka.
Dziecko powinno mieć nadal zapięte 3-punktowe pasy bezpieczeństwa.
• Verbind de twee ingesloten X-x installatie-hulpstukken (de langere stukken wijzen
naar boven) met de twee ISOFIX verankeringspunten (i).
Opgelet! De ISOFIX verankeringspunten (i) bestaan uit twee metalen haken
per zitje die zich tussen de rugsteun en de zitting van uw voertuig bevinden. In
geval van twijfel, gelieve de handleiding van uw voertuig te raadplegen.
• Voor aanpassingen dient u de X-x knoppen aan de onderkant van het zitje te
bewegen
• Trek zo ver mogelijk aan de connectoren (w).
• Draai de X-x connectoren 180° zodanig dat ze in de richting van de
installatiehulpstukken wijzen.
Opmerking! Let erop dat de beide groene veiligheidsindicatoren (x) aan de
ISOFIX-connectoren (w) niet zichtbaar zijn. Ontgrendel indien nodig de ISOFIX-
connectoren (w), door de ontgrendelknop (y) in te drukken en terug te trekken.
Herhaal dit proces indien nodig bij de tweede connector.
• Duw beide X-x connectoren (w) in de installatie-hulpstukken totdat ze in de
ISOFIX verankeringspunten vastklikken (i).
• Controleer dat het zitje goed vastzit door eraan te trekken.
• De groene veiligheidsindicator (x) moet aan de beide ontgrendelknoppen (y) goed
zichtbaar zijn.
• U kan de positie van het zitje nu aanpassen met de X-xknop onderaan het
kinderautozitje.
Tip! Raadpleeg hiervoor het hoofdstuk „Het zitje in het voertuig installeren“.
• Nu kan u uw kind vastmaken, zie „Vastmaken van het kind“.
• Połącz dwa załączone elementy pomocnicze X-x (ich dłuższa część powinna być
skierowana do góry) z uchwytami ISOFIX (i).
Uwaga! Uchwyty ISOFIX (i) to dwa metalowe haki znajdujące się w szczelinie
pomiędzy oparciem a siedziskiem siedzenia samochodowego. W razie
wątpliwości należy zajrzeć do instrukcji obsługi samochodu.
• Przesuń dźwignię (v) znajdującą się na spodzie siedziska fotelika.
• Wyciągnij zaczepy (w) najdalej jak to możliwe.
• Obróć zaczepy X-x o 180°, tak aby były zwrócone w kierunku elementów
pomocniczych.
Wskazówka! Pamiętać, że obydwa zielone wskaźniki bezpieczeństwa (x) na
ramionach zatrzaskowych ISOFIX (w) nie są widoczne. Odblokować w razie
potrzeby ramiona zatrzaskowe ISOFIX (w), naciskając i odciągając przycisk
odblokowania (y). W razie potrzeby powtórzyć czynność również przy drugim
ramieniu zatrzaskowym.
• Wsuń oba zaczepy X-x (w) do elementów pomocniczych, aż usłyszysz, że
zatrzasnęły się w uchwytach ISOFIX (i).
• Pociągnij za fotelik, aby sprawdzić, czy jest prawidłowo zamocowany.
• Zielony wskaźnik bezpieczeństwa (x) musi być dobrze widoczny na obydwu
przyciskach odblokowania (y).
• Za pomocą dźwigni (v) znajdującej się na spodzie fotelika możesz teraz ustawić
fotelik w pożądanej pozycji.
Uwaga! Dodatkowe informacje znajdziesz w punkcie „Umieszczanie fotelika w
samochodzie“.
• Możesz teraz zapiąć dziecku pasy. Zajrzyj do punktu „Zapnij dziecku pasy“.
36
Page 38

ÔTER LE SOLUTION X2-FIX
Inverser la procédure.
a
1
2
• Déverrouillez les bras à encliqueter ISOFIX (w) des deux côtés en enfonçant les
boutons de déverrouillage (y) et en tirant simultanément.
• Retirer le siège de l‘aide d‘installation (u).
• Pivoter les connecteurs X-x à 180°.
• Bouger le bouton X-x situé au bas du siège auto et pousser les connecteurs X-x
jusqu‘à la n.
Note! Cette procédure protège le siège et prévient des dommages et tâches
éventuels qui pourraient gêner le bon fonctionnement.
METTRE L‘ENFANT EN SÉCURITÉ
Installer le siège auto sur un siège dans la voiture.
• Merci de vous assurer que le dossier (a) du siège auto est bien aligné au siège
de la voiture. Ne jamais incliner le dossier du siège auto an que votre enfant ne
s‘endorme, vous favoriseriez ainsi une glissade sous la ceinture en cas de choc
frontale.
• Lorsque vous utilisez les ancrages ISOFIX dans la voiture, s‘assurer que le
dossier du Solution X2-x est parfaitement aligné et adossé au dossier
du siège de la voiture. L‘espace entre le dossier du siège auto et celui de la
voiture, peut être ajusté grâce à la manette située en bas du siège auto.
• Si l‘appuie-tête du véhicule gêne, tirez-le ou retirez-le complètement (les
exceptions à cette règle gurent au chapitre «POSITIONNEMENT CORRECT
DU SIÈGE DANS LE VÉHICULE»). Le dossier (a) s‘adaptera parfaitement à
pratiquement toutes les inclinaisons de la banquette du véhicule.
Avertissement! le dossier du Solution X2-fix doit être aligné au dossier du
siège de votre véhicule. L‘assise du Solution X2-fix doit également être collée
à l‘assise et au dossier du siège de votre véhicule. Pour assurer la meilleure
sécurité pour votre enfant, le siège doit être en position normale droite!
37
Note! Il est possible que certains siège de voiture faits en matière fragile (par
ex. velours, cuir, etc.) montrent des signes d’usure et/ou de décoloration. An
d’éviter ce problème, vous pouvez, par exemple, mettre un couverture ou une
serviette sous le siège auto. Dans cette situation, merci de vous reporter à
votre notice de nettoyage, qui doit absolument être respectée avant la première
utilisation du siège auto.
Page 39

VERWIJDEREN VAN DE SOLUTION X2-FIX.
Voer alle installatiestappen in de omgekeerde volgorde uit.
WYJMOWANIE FOTELIKA SOLUTION X2-FIX Z SAMOCHODU
Wykonaj wszystkie czynności instalacyjne w odwrotnej kolejności.
• Ontgrendel de ISOFIX-connectoren (w) aan beide zijden, door de
ontgrendelknoppen (y) in te drukken en tegelijkertijd terug te trekken.
• Trek het zitje uit de installatie hulpstukken (u).
• Draai de X-x connectoren met 180°.
• Beweeg de X-x knop onderaan het kinderzitje en duw de X-x connectoren tot het
einde.
Opgelet! Deze procedure beschermt het zitje tegen schade en vlekken.
Schade en vlekken zouden een een vlot gebruik kunnen belemmeren.
HET KIND VEILIG VASTZETTEN
Zet het kinderzitje op de betreende autostoel.
• Controleer dat de rugleuning (a) van het kinderzitje tegen de rugleuning van de
autostoel ligt, zodat het kinderzitje beslist niet in de slaapstand staat.
• Wanneer u de ISOFIX-verankering in de auto gebruikt, zorg er dan voor dat
de rugsteun van de Solution X2-x goed recht staat en
volledig aansluit tegen de achterste autozetel. De afstand kan
aangepast worden door middel van de aanpassingshendel (v)
onderaan het kinderzitje.
• Het gebruik van het kinderzitje kan op de bekleding van autostoelen van
gevoelig materiaal (zoals uweel, leder, enz.) slijtagesporen veroorzaken. Om dit
te voorkomen, plaatst u een deken of een handdoek onder het
kinderzitje.
• Als de hoofdsteun van de auto in de weg zit, trek die dan helemaal uit of verwijder
hem geheel (zie voor uitzonderingen hierop onder het kopje “HET ZITJE GOED
IN DE AUTO PLAATSEN”). De rugsteun (a) past zich volledig aan aan vrijwel elke
hoek van de autostoel.
Opgelet! De rugsteun van de Solution X2-fix moet steeds nauw tegen de
rechtopstaande kant van de autozetel aansluiten. Het zitje moet dus dicht
tegen de autozetel aangeduwd worden. Voor optimale bescherming van uw
kind moet het zitje in een normale rechtopstand staan!
Opgelet! Het is mogelijk dat sommige autostoelen van zacht materiaal (bijv.
velours, leer, etc.) tekenen van gebruik en / of verkleuringen kunnen vertonen.
Om dit te voorkomen, kunt u een deken of handdoek eronder plaatsen. Graag
verwijzen we u ook naar onze schoonmaakinstructies, die absoluut moeten
worden gevolgd voor het eerste gebruik van de stoel.
• Odblokować ramiona zatrzaskowe ISOFIX (w) z dwóch stron, naciskając i
jednocześnie odciągając przyciski odblokowania (y).
• Wyjmij fotelik z elementów pomocniczych (u).
• Obróć zaczepy X-x o 180°.
• Przesuń dźwignię (v) znajdującą się na spodzie fotelika i wciśnij zaczepy X-x do
końca.
Uwaga! Procedura ta chroni siedzisko fotelika i zapobiega jego uszkodzeniu
lub poplamieniu. Uszkodzenia lub plamy mogłyby mieć wpływ na sprawność
fotelika.
ZABEZPIECZENIE DZIECKA
Umieść fotelik CYBEX Solution X2-x na odpowiednim siedzeniu samochodu.
• Należy zwrócić uwagę, żeby oparcie fotelika (a) ściśle przylegało do oparcia fotela
samochodowego. Fotelik CYBEX Solution X2-x nie może być w żadnym razie
ustawiony w pozycji do spania.
• Jeżeli zagłówek siedzenia samochodowego przeszkadza w zamontowaniu
fotelika, należy go ustawić w możliwie jak najwyższej pozycji lub zdemontować
całkowicie (z wyjątkiem sytuacji opisanej w punkcie „WŁAŚCIWE MIEJSCE
W SAMOCHODZIE“). Oparcie fotelika (a) łatwo dopasowuje się do siedzenia
samochodowego o prawie każdym nachyleniu.
Ostrzeżenie! Oparcie fotelika Solution X2-fix powinno dokładnie przylegać do
górnej części fotela samochodowego. Siedzisko fotelika powinno być dosunięte
do tyłu i ściśle przylegać do siedzenia fotela samochodowego. Dla zapewnienia
jak najlepszej ochrony dziecku fotelik CYBEX Solution X2-fix powinien być
ustawiony w normalnej, pionowej pozycji.
Uwaga! Niektóre tapicerki samochodu są wykonane z miiękkiego materiału (np.
weluru lub skóry itp.) i mogą się wykazywać oznaki zużycia lub przebarwienia.
W celu zabezpiecznia należy podożyć ręcznik lub kocyk pod fotelikiem.
Zapoznaj się również z instrukcja czyszczenia, którą należy przejrzeć przed
pierwszym użyciem fotelika.
• Korzystając z uchwytów ISOFIX w samochodzie, upewnij się, że
oparcie fotelika Solution X2-x ściśle przylega do oparcia siedzenia
samochodowego. Można to wyregulować za pomocą dźwigni (v)
umieszczonej na spodzie fotelika.
38
Page 40

ATTACHER LA CEINTURE DE VOTRE ENFANT
Installer votre enfant dans le siège auto. Tirer sur la ceinture 3 points, assurez
vous qu‘elle soit bien xée sur l‘enfant et boucler la ceinture dans son encoche.
l
l
m
f
Attention! Veiller à ce que les sangles de la ceinture soient bien plates et
jamais enroulées.
Insérer la boucle (m) dans l‘encoche (l). Vous devez entendre un „CLICK“
lorsque vous bouclez la ceinture.
Passer la ceinture sur les cuisses (n) et dans les passants prévus à cet eet (k)
sur le siège auto. Serrer fermement en tirant sur la diagonale de la ceinture (f),
il ne doit pas y avoir de jeu. Plus la ceinture est serrée moins il y a de risque de
blessures. La ceinture passant sur les cuisses et celle diagonale doivent être
toutes les 2 placées dans le passant du bas prévu à cet eet sur le siège auto.
39
n
k
d
g
e
n
k
Attention! La boucle de la ceinture (l) ne doit en aucun cas être dans le passant
du bas du siège auto (k). Si la sangle de la ceinture est trop longue, le siège
auto ne convient pas à ce véhicule.
La ceinture passant sur les cuisses (n) doit être insérée dans les passants
prévus à cet eet sur le bas du siège auto (d).
A Noter! Enseigner à votre enfant dès le départ qu‘il doit être attaché
fermement dans son siège auto et qu‘il doit serrer la ceinture contre lui s‘il sent
qu‘elle se relache.
Attention! La ceinture des cuisses, doit être dans les passants de chaque côté
f
f
du siège auto afin d‘être optimale en cas d‘accident.
Insérer la ceinture diagonale (f) dans le passant rouge (g) prévu à cet eet sur
le dossier du siège auto. Merci de vérier que la ceinture diagonale passe sur
l‘épaule de votre enfant. Sinecessaire, ajuster la hauteur du dossier du siège
auto, la hauteur du dossier peut toujours être règlée dans la voiture.
Page 41

DE VEILIGHEIDSRIEM VAN UW KIND BEVESTIGEN
Zet uw kind in het kinderzitje. Trek de driepuntsgordel ver naar buiten en leid
deze vuw kind langs naar het gordelslot.
ZAPNIJ DZIECKU PASY
Posadź dziecko w foteliku. Przeprowadź 3-punktowy pas wokół dziecka w
kierunku klamry zamykającej.
Waarschuwing! De gordel mag beslist nooit gedraaid zijn!
Klik de gesptong (m) in het gordelslot (l) vast. De tong moet met een
hoorbare „KLIK“ vergrendelen.
Bevestig de heupgordel (n) in de onderste gordelgeleidingen (k) van het
kinderzitje. Trek nu de heupgordel (n) strak, door de diagonale gordel (f) strak
te trekken. Hoe strakker de gordel, hoe beter deze kan beschermen tegen
verwondingen. De diagonale gordel en de heupgordel moeten beide in de
onderste gordelgeleiding aan de zijde van het gordelslot
bevestigd zijn.
Waarschuwing! Het gordelslot van de autostoel (l) mag beslist nooit
binnen de onderste gordelgeleider (k) vallen. Als de gordel te lang is, kan het
zitje niet in deze auto worden gebruikt.
De heupgordel (n) moet in de onderste gordelgeleidingen (k) aan beide zijden
van het kinderzitje (d) bevestigd zijn.
Let op! Leer uw kind vanaf het begin dat het er altijd op moet letten dat de
gordel strak zit en dat hij of zij de gordel zo nodig zelf moet straktrekken.
Waarschuwing! Voor optimale bescherming in geval van een ongeval moet de
heupgordel aan beide zijden zo laag mogelijk over de liezen van uw kind lopen.
Leid de diagonale gordel (f) nu door de bovenste rode gordelgeleiding (g)
in de schoudersteun (e), totdat deze in de gordelgeleider valt. Let op dat de
diagonale gordel (f) tussen de buitenrand van de schouder en de nek van uw
kind loopt. Pas het verloop van de gordel zo nodig aan door de hoogste van de
hoofdsteun aan te passen. De hoogte van de hoofdsteun van de autostoel kan
ook worden aangepast.
Ostrzeżenie! Nigdy nie skręcaj pasa!
Włóż zapięcie pasa (m) do klamry (l). Musisz usłyszeć, jak pas zatrzaskuje się
w klamrze.
Wsuń pas biodrowy (n) w szczeliny boczne (k) siedziska. Napręż pas biodrowy
(n), pociągając za pas barkowy (f). Im ciaśniej zapięty pas, tym lepiej chroni
przed obrażeniami. Oba pasy: barkowy i biodrowy należy przeprowadzić przez
szczelinę boczną siedziska od strony klamry zamykającej.
Ostrzeżenie! W żadnym wypadku klamra zamykająca (l) nie powinna dosięgać
do szczeliny bocznej fotelika (k). Jeżeli pas klamry jest zbyt długi, fotelik nie
nadaje się do tego typu samochodu.
Pas biodrowy (n) powinien się znajdować w bocznych szczelinach (k) z obu
stron siedziska (d).
Uwaga! Od początku ucz swoje dziecko, aby zwracało uwagę, czy pas jest
ciasno zapięty i samo naprężało go w razie potrzeby.
Ostrzeżenie! Aby zapewnić dziecku maksymalną ochronę w razie wypadku, pas
biodrowy powinien przebiegać jak najniżej nad pachwiną.
Następnie przeprowadź pas barkowy (f) przez boczną czerwoną szczelinę
(g) w zabezpieczeniu barkowym (e), tak aby cały pas znajdował się wewnątrz
klamry. Upewnij się, że pas barkowy (f) przechodzi pomiędzy szyją dziecka
a zewnętrzną krawędzią ramienia. Jeśli to konieczne, dostosuj wysokość
zagłówka. Wysokość zagłówka można także regulować, kiedy fotelik jest już
umieszczony w samochodzie.
40
Page 42

VOTRE ENFANT EST-IL CORRECTEMENT INSTALLÉ?
Pour s‘assurer de la sécurité de l‘enfant et du maximum de protection,
s‘assurer avant de démarrer que ...
• la ceinture (n) passe dans la partie guide ceinture (k) sur les cotés du siège.
• la ceinture diagonale (f) aussi passe dans la partie guide ceinture (k) sur le coté du
siège de la boucle ceinture.
• la ceinture diagonale (f) passe dans le guide ceinture (g) au niveau de l‘épaule,
partie en rouge
• la ceinture du siège (f) passe en diagonale sur l‘arrière.
• la sangle de la ceinture doit être tendue et pas vrillée.
• que l‘assise du siège est bien verrouillée grâce aux connecteurs X-x et
au système d‘ancrage ISOFIX.
• que le dossier (a) du siège auto est bien adossé au siège du véhicule. Le
siège auto reste ainsi maintenu dans la position droite correcte.
A Noter! L‘indication de sécurité vert (x) doit être clairement visible des deux
côtés de les boutons de déverrouillage rouge (y).
REPOSE TÊTE INCLINABLE
t
Le CYBEX Solution X2-x dispose d‘un repose tête inclinable (r) an d‘éviter
que la tête de l‘enfant endormit ne bascule vers l‘avant. De plus, cet appui
tête inclinable contribu au confort de votre enfant lors des trajets.
A Noter! Merci de vous assurer que la tête de votre enfant reste en contact
direct avec l‘appui tête de façon à garantir la sécurité optimale en cas
d‘accident.
En soulevant légèrement l‘appui tête vous pouvez le règler en 3 diérentes
positions.
41
Attention! L‘encoche ne doit jamais être bloquée par quelconques objets!
En cas d‘accident, le mouvement libre de l‘inclinaison doit être garantie, à
l‘inverse votre enfant pourrait être blessé.
Page 43

IS UW KIND VEILIG VASTGEZET?
Om de maximale veiligheid van uw kind te garanderen, dient u vóór een rit
telkens te controleren dat ...
CZY TWOJE DZIECKO JEST DOBRZE ZABEZPIECZONE?
Aby mieć pewność, że Twoje dziecko jest dobrze zabezpieczone, przed
uruchomieniem samochodu sprawdź, czy …
• dat de heupgordel (n) in de onderste gordelgeleidingen (k) aan beide
zijdevan het kinderzitje (d) bevestigd is.
• dat de diagonale gordel (n) ook in de onderste gordelgeleiding (k) van het zitje aan
de zijde van het gordelslot bevestigd is.
• dat de diagonale gordel (f) door de rode gordelgeleiding (g) van de
schoudersteun loopt.
• dat de stoelgordel (f) diagonaal naar achteren loopt.
• dat de gehele gordel strak zit en niet gedraaid is.
• het zitje op de juiste plaats aan beide kanten vergrendeld is met de X-x
connectoren en de ISOFIX verankeringspunten
• dat de rugsteun (a) van het kinderzitje volledig aansluit tegen de
achterste autozetel. Hierdoor blijft het kinderzitje steeds goed rechtop.
Let op! De groen veiligheidsindicatoren (x) moeten duidelijk zichtbaar zijn aan
beide kanten van de rode ontgrendelingsknoppen (y).
HOOFDSTEUN VERSTELLEN
De CYBEX Solution X2-x heeft een verstelbare hoofdsteun (r), die voorkomt
dat het hoofd van uw slapende kind voorover valt. Daarnaast verhoogt deze
verstelbare hoofdsteun het comfort van uw kind tijdens de autorit.
Let op! Controleer dat het hoofd van het kind altijd contact houdt met de
achterover verstelde hoofdsteun, omdat de hoofdsteun anders niet
optimaal kan functioneren om uw kind te beschermen bij een aanrijding van
opzij.
Til de hoofdsteun iets omhoog, de hoofdsteun (r) kan nu in 3 verschillende
standen worden gezet.
Waarschuwing! De vergrendeling (t) mag nooit door voorwerpen worden
geblokkeerd! In geval van een ongeval moet de vrije slag van de
hoofdsteun gewaarborgd zijn om te voorkomen dat uw kind gewond raakt.
• pas biodrowy (n) przechodzi przez boczne szczeliny (k) po obu stronach siedziska.
• pas barkowy (f) również przechodzi przez boczną szczelinę siedziska (k) odstrony
klamry zamykającej.
• pas barkowy (f) przechodzi przez czerwoną szczelinę (g) w zabezpieczeniu
barkowym
• pas przebiega ukośnie do tyłu.
• pas na całej swojej długości jest naprężony i nie jest skręcony.
Uwaga! Zielone przyciski zabezpieczające (x) powinny być widoczne z obu
stron i powinny wystawać z czerwonych przycisków zwalniających (y).
ODCHYLANY ZAGŁÓWEK
Fotelik CYBEX Solution X2-x posiada odchylany zagłówek (r), który
zabezpiecza główkę Twojego dziecka przed opadaniem do przodu, kiedy
dziecko zaśnie. Ponadto sprawia, że jazda samochodem jest dla dziecka
wygodniejsza.
Uwaga! Należy zwracać uwagę, żeby główka dziecka zawsze znajdowała się
wewnątrz zagłówka. W przeciwnym razie zagłówek nie spełnia swojej funkcji
ochronnej w przypadku bocznego zderzenia.
Lekko podnosząc zagłówek (r), można zmienić stopień odchylenia zagłówka i
ustawić go w 3 różnych pozycjach.
Ostrzeżenie! Mechanizmu blokującego zagłówka (t) nie można blokować
żadnymi przedmiotami! Ruch zagłówka nie może być niczym ograniczony,
ponieważ w przeciwnym razie dziecko może ulec obrażeniom w razie wypadku.
• siedzisko fotelika jest po obu stronach odpowiednio zamocowane za
pomocą zaczepów X-x i uchwytów ISOFIX.
• oparcie (a) fotelika ściśle przylega do oparcia tylnego siedzenia
samochodowego. Gwarantuje to, że fotelik pozostanie cały czas w pozycji
pionowej.
42
Page 44

ENTRETIEN DU SIÈGE AUTO
An de garantir la meilleure sécurité possible à votre enfant, il est
necessaire que vous preniez connaissance de ce qui suit:
• Toutes les pièces du siège auto doivent être examinées par vos soins de
façon régulière.
• Les parties principales doivent être en parfait état.
• Il est important que le siège auto ne soit pas heurté par la portière de la
voiture, etc. an de ne pas l‘endommager.
• Le siège auto doit être examiné par le constructeur après une chute ou
situation similaire.
43
e
ÔTER LA HOUSSE
La housse se constitue de 3 parties xées au sièges auto soient par des
velcros, bouttons pressoirs ou crochets. Une fois les xations retirées, la
housse peut être ôtée.
An de remettre la housse procéder aux étapes inversées que pour l‘ôter.
a
Attention! Ce siège auto ne doit jamais être utilisé sans sa housse.
RETIRER LA HOUSSE DU DOSSIER
1. Remontez l’appuie-tête (e) au maximum en actionnant la poignée (h).
2. Pour détacher l’appuie-tête (e), actionnez la poignée (h) tout en exerçant une
pression sur le haut de la protection latérale (a). L’appuie-tête (e) peut ensuite
être complètement détaché.
3. La housse peut à présent être retirée.
4. Pour remettre en place l’appuie-tête (e), actionnez la poignée (h) et insérez
l’appuie-tête dans le dossier (a).
Page 45

ONDERHOUD VAN HET PRODUKT
Om optimale bescherming van uw kind in het kinderzitje te waarborgen, dient u
het volgende in acht te nemen:
KONSERWACJA
Aby zagwarantować jak najwyższy poziom bezpieczeństwa fotelika, należy
stosować się do poniższych zaleceń:
• Alle belangrijke onderdelen van het kinderzitje moeten regelmatig op
eventuele beschadiging worden gecontroleerd. De mechanische
onderdelen moeten foutloos werken.
• Het is van essentieel belang dat het kinderzitje niet klem zit tussen harde
delen, zo als het portier, de geleiderail van de stoel, enz. Hierdoor kan het zitje
beschadigd raken. Als het kinderzitje is gevallen of iets dergelijks dient het door de
fabrikant te worden gecontroleerd.
BEKLEDING VAN HET ZITJE VERWIJDEREN
De bekleding van het zitje bestaat uit drie delen, die aan het zitje zijn bevestigd
met klittenband, drukknopen of knopen. Als alle bevestigingselementen zijn
losgemaakt, kunt u de verschillende bekledingsdelen verwijderen.
Om de onderdelen van de bekleding opnieuw te bevestigen, gaat u in
omgekeerde volgorde te werk.
Waarschuwing! Het kinderzitje mag nooit zonder bekleding worden
• Wszystkie ważne części fotelika powinny być regularnie sprawdzane. Części
mechaniczne powinny działać bez zarzutu.
• Zwracaj szczególną uwagę, aby fotelik nie został uszkodzony poprzez
zaklinowanie pomiędzy drzwiami i siedzeniem samochodowym lub innymi
twardymi elementami.
• Jeżeli fotelik upadnie lub zostanie uszkodzony, powinien zostać oddany do
przeglądu.
ZDEJMOWANIE TAPICERKI
Tapicerka składa się z trzech elementów, które przytwierdza się do fotelika
za pomocą rzepów lub zatrzasków. Po odpięciu wszystkich zapięć tapicerkę
można zdjąć.
Aby założyć tapicerkę z powrotem, wykonaj te same czynności w odwrotnej
kolejności.
Ostrzeżenie! Nie wolno używać fotelika bez tapicerki.
gebruikt.
VERWIJDEREN BEKLEDING VAN DE RUGLEUNING
1. Trek de hoofdsteun(e) in de hoogste positie, doormiddel van de verstelgreep(h)
achter de hoofdsteun.
2. Om de hoofd te verwijderen (e) trek tegelijkertijd aan de greep(h) en de onderrand
van de van de rugleuning (a) nu kan de hoofdsteun volledig worden verwijderd.
3. Nu kunt u de bekleding verwijderen
4. Voor montage trek aan de handgreep (h) en plaats de hoofdsteun (e) in de
rugleuning (a).
ZDEJMOWANIE TAPICERKI Z OPARCIA FOTELIKA
1. Ustaw zagłówek (e) w najwyższej pozycji używając uchwytu regulacji (h).
2. Aby zdjąć zagłówek (e) jednocześnie pociągnij za uchwyt (h) oraz dolną krawędź
górnej części oparcia (a). Całkowicie zdejmij zagłówek (e).
3. Teraz można zdjąć tapicerkę z oparcia.
4. Aby z powrotem założyć zagłówek pociągnij za uchwyt (h) i włóż zagłówek (e) w
oparcie (a).
44
Page 46

NETTOYAGE
Il est important d‘utiliser la housse originale du CYBEX Solution X2-x qui est
partie intégrante de ses fonctionnalités. Votre revendeur pourra vous
fournir des housses séparemment.
Note! Merci de laver la housse avant la première utilisation. Les housses sont
lavables en machine à 30°C maximum, cycle délicat. Si vous lavez à température
plus élevée, le tissu peut passer. Veuillez laver la housse séparément et ne
jamais sécher mécaniquement! Ne pas sécher au soleil directement! Les parties
plastiques peuvent être nettoyées au savon doux et à l‘eau tiède.
Attention! Merci de ne jamais utiliser de détergents chimiques ou d‘eau de
javel.
CONDUITE À TENIR APRÈS UN ACCIDENT DE VOITURE
Si vous avez eu un accident, le siège auto a pu être endommagé sans que cela
soit visible. Par conséquent, le siège auto doit absolument être examiné par le
constructeur et remplacé si necessaire.
DURÉE DE VIE DU PRODUIT
Ce siège auto a été conçu pour satisfaire ses fonctions initiales en utilisation
normale pour une durée de vie de 9 ans.
L’usure progressive de la matière plastique, causée par exemple par
l’exposition au soleil (UV), peut provoquer une légère détérioration des
propriétés du produit.
Le siège auto pouvant être exposé à des variations de température et autres
désagréments, merci de suivre les instructions ci-dessous :
- Si le véhicule est exposé à la lumière directe du soleil pendant une période
prolongée, le siège auto doit être retiré du véhicule ou recouvert avec un linge clair.
- Vérifiez régulièrement que les pièces plastiques ou les parties en métal ne
présentent aucun dommage ni de changement de forme ou de couleur.
Si vous constatez un changement quelconque, le siège doit être détruit ou faire
l’objet d’une vérification par le fabricant, voire être remplacé par celui-ci.
- Les changements de couleur de la housse, surtout la décoloration, sont
parfaitement normaux lors de l’utilisation du siège dans un véhicule et n’en affectent
pas l’efficacité.
45
Page 47

REINIGEN
Het is belangrijk om uitsluitend een originele CYBEX Solution X2-x
stoelbekleding te gebruiken, omdat de bekleding een essentieel onderdeel van
de werking vormt. Een nieuwe bekleding is verkrijgbaar via uw leverancier.
CZYSZCZENIE
Należy używać tylko oryginalnej tapicerki CYBEX Solution X2-x, ponieważ jest
ona również niezbędna dla sprawnego działania fotelika. Zapasowe tapicerki
dostępne są w sklepach oferujących produkty CYBEX.
Opgelet! Was de bekleding voordat u deze voor de eerste keer gaat gebruiken.
De bekleding van het zitje mag in de machine gewassen worden op 30°C, met
een voorzichtig programma. Indien u de bekleding op een hogere temperatuur
wast, kan ze haar kleur verliezen. Gelieve de bekleding apart te wassen en ze
nooit machinaal te drogen! Droog de bekleding niet in direkt zonlicht! U kan de
plastieken onderdelen met een milde detergent en warm water afwassen.
Waarschuwing! Gebruik beslist nooit chemische of blekende
reinigingsmiddelen!
WAT TE DOEN NA EEN ONGEVAL
Als u betrokken bent geweest in een ongeval, kan het zitje schade
opgelopen hebben die niet met het blote oog zichtbaar is. In dit geval moet het
kinderzitje door de fabrikant gecontroleerd en zo nodig ook
Uwaga! Przed pierwszym użyciem tapicerkę należy wyprać. Można ją prać w
pralce w temperaturze maks. 30°C, wybierając program dla tkanin delikatnych.
Wyższa temperatura prania może spowodować zblaknięcie koloru. Tapicerkę
należy prać oddzielnie i nigdy nie należy suszyć jej w suszarce! Nie należy
także suszyć tapicerki w pełnym słońcu! Plastikowe części fotelika można
przecierać ciepłą wodą z delikatnym detergentem.
Ostrzeżenie! W żadnym wypadku nie stosować chemicznych środków do
czyszczenia ani wybielaczy!
POSTĘPOWANIE PO WYPADKU DROGOWYM
Po wypadku drogowym uszkodzenia fotelika mogą nie być widoczne gołym
okiem. Mimo to fotelik powinien zostać wymieniony na nowy. W razie
wątpliwości kontaktuj się ze sprzedawcą lub producentem.
vervangen worden.
LEVENSDUUR VAN HET PRODUCT
Dit autostoeltje is zo ontworpen dat het bij normaal gebruik de bedoelde
functies gedurende een levensduur van ongeveer 9 jaar kan vervullen.
Door geleidelijke slijtage van kunststof onderdelen, bijvoorbeeld door
blootstelling aan zonlicht (UV), kunnen de producteigenschappen enigszins
worden aangetast.
Omdat grote temperatuurverschillen en andere onvoorziene omstandigheden
normaal zijn in voertuigen, dient u met de volgende aspecten rekening te
houden:
- Als het voertuig gedurende langere tijd in direct zonlicht staat, moet het autostoeltje
uit de auto worden verwijderd dan wel met een lichte doek worden afgedekt.
- Controleer regelmatig alle kunststof en metalen onderdelen van het stoeltje
op schade, vervorming of verkleuring. Als u veranderingen constateert aan het
autostoeltje, moet u het wegdoen of laten controleren en mogelijk laten vervangen
door de fabrikant.
- Veranderingen in de stof, vooral het flets worden daarvan, zijn normaal bij gebruik
in een voertuig en schaden de functie van het stoeltje niet.
CYKL ŻYCIA PRODUKTU
Fotelik został zaprojektowany w sposób, który pozwala na bezpieczne
korzystanie z niego przez 9 lat.
W związku z tym, że plastikowe części z czasem się zużywają, np. z powodu
ekspozycji na słońce, cechy produktu mogą się nieznacznie zmieniać.
Jako że fotelik może być narażony na duże wahania temperatur podczas
jego eksploatacji w samochodzie oraz inne nieprzewidziane sytuacje, należy
stosować się do poniższych zaleceń:
- Jeśli samochód będzie zaparkowany w bezpośrednim słońcu przez dłuższy czas,
powinno się przykryć fotelik samochodowy materiałem lub wyjąć z samochodu.
- Regularnie sprawdzaj, czy plastikowe i metalowe elementy fotelika nie są
uszkodzone lub czy nie zmienił się ich kształt lub kolor. Przy stwierdzeniu
jakichkolwiek zmian, należy skonsultować się ze sprzedawcą. Może zajść potrzeba
utylizacji lub zakupu nowego fotelika.
- miany w wyglądzie tapicerki, w szczególności blaknięcie kolorów, nie są wadą
wyrobu, ale normalnym efektem eksploatacji.
46
Page 48

RECYCLAGE
A la n de la durée de vie du produit, les mesures de recyclage des matériaux
varient d‘un pays à un autre. De façon à ne pas polluer, approchez vous de votre
service d‘évacuation des déchets de votre commune ou de votre région.
GARANTIE
Les conditions de garantie suivantes ne sont valables que dans le pays dans lequel,
ce produit a été vendu à l‘origine par un détaillant à un consommateur. La garantie
couvre tous les défauts de fabrication et de matériaux, qui existaient au moment de
l‘achat ou qui sont devenus apparents dans les trois (3) ans suivant l‘achat initial
auprès d‘un détaillant par un consommateur (la garantie du fabricant). Dans le cas
où des défauts de fabrication et de matériel apparaîtraient au cours de la période de
garantie, le produit sera réparé ou remplacé, à notre entière discrétion. Pour toute
réclamation concernant des services couverts par cette garantie, le produit doit être
retourné au détaillant auprès duquel le produit a été acheté et l‘original de la preuve
d‘achat (ticket de caisse ou facture) doit être présenté, mentionnant la date d‘achat,
le nom du détaillant, le nom du produit et sa description. Aucune réclamation n‘est
possible directement auprès du fabricant ou de toute autre personne autre que
le détaillant chez qui le produit a été initialement acheté. La garantie est valable
uniquement si sans délai après l‘achat il a été vérié que le produit était complet
et qu‘il ne présentait aucun défaut de fabrication ni aucun défaut matériel. Si le
produit a été acheté par correspondance, vous devez vérier sans délai à réception
que le produit est complet et qu‘il ne présente aucun défaut de fabrication ni aucun
défaut matériel. Si le produit est endommagé, il ne doit pas être utilisé et doit être
renvoyé sans délai au détaillant chez qui il a été acheté. Pour toute réclamation
dans le cadre de la garantie, le produit doit être retourné complet et propre. Avant
de contacter le détaillant, veuillez lire attentivement le manuel de l‘utilisateur. La
garantie ne couvre pas les dommages causés par une mauvaise utilisation, des
facteurs externes (eau, feu, accidents de la circulation ou autres) ou par l‘usure
normale. Toute réclamation dans le cadre de la garantie ne sera autorisée que si
le produit a été manipulé et utilisé conformément aux instructions d‘utilisation, si
des réparations ont été eectuées par des personnes autorisées à le faire et si
des pièces détachées et des accessoires d‘origine ont été utilisés. Cette garantie
n‘exclut, ne limite et ne restreint en rien les droits actuels des consommateurs
conformément à l‘ensemble des lois actuellement en vigueur, ni les droits contre les
vendeurs en cas de violation du contrat de produit.
47
Page 49

VERWIJDERING
Aan het einde van de levensduur van het kinderzitje, dient dit op de
correcte manier te worden afgevoerd. De regelgeving omtrent
afvalverwerking verschilt per regio. Om een correcte afvoer van het
kinderzitje te waarborgen, kunt u contact opnemen met de afvalverwerker
in uw regio of met de gemeente. Volg in ieder geval beslist de regelgeving omtrent
afvalverwerking in uw regio op.
UTYLIZACJA
Po zakończeniu użytkowania fotelika należy go wyrzucić, stosując się do właściwych
przepisów. Sposoby usuwania odpadów mogą różnić się w zależności od kraju.
Skontaktuj się z lokalną rmą zajmującą się gospodarką odpadami, aby we
właściwy sposób zutylizować fotelik. Zawsze stosuj się do przepisów dotyczących
postępowania z odpadami w swoim kraju.
GARANTIE
Deze garantie is alleen van toepassing in het land van aankoop, en verkocht door
een retailer direct aan een consument. De garantie dekt alle productie en matreriaal
fouten. Bestaande op datum aankoop of verschijnende in de periode van 3 jaar na
aankoop bij de retailer. (Fabrieksgarantie) In het geval dat een fabricagefout of een
materiaalfout verschijnt zullen wij het product kosteloos repareren of vervangen
voor een gelijkwaardig product. Om van dergelijke garantie gebruik te maken dient
u het product in de winkel van aankoop aan te bieden voorzien van aankoopsbewijs
met datum aankoop en naam retailer. Deze garantie vervalt bij doorverkoop aan
derden. Gelieve het product direct na aankoop / ontvangst controleren op eventuele
gebreken. In geval van gebreken, gebruik het artikel niet maar breng deze in nette
en originele staat naar de winkel van aankoop om zo verzekerd te zijn van de
garantie. Voorafgaand aan contact met de retailer, lees deze gebruiksaanwijzing
aandachtig door. Deze garantie dekt geen schade veroorzaakt door verkeerd
gebruik, milieu-invloed (water, vuur, verkeersongevallen, of normale slijtage.) Het
is uitsluitend van toepassing in het geval dat het gebruik van het product altijd in
overeenstemming was met de gebruiksaanwijzing, en alle reparaties of wijzigingen
aan het product door daar toe aangewezen personen is uitgevoerd, en alleen
originele onderdelen zijn gebruikt. Deze garantie sluit niet uit, beperkt of heeft
anderszins invloed op enige wettelijke rechten van de consument, waaronder
begrepen vorderingen uit onrechtmatige daad en claims met betrekking tot een
schending van het contract, welke de koper jegens verkoper of de fabrikant van het
product heeft.
GWARANCJA
Niniejsza gwarancja obowiązuje wyłącznie w kraju, w którym produkt został po raz
pierwszy sprzedany klientowi przez sklep detaliczny. Gwarancja obejmuje wszelkie
wady materiałowe i produkcyjne istniejące w momencie zakupu czy wykryte w ciągu
trzech (3) lat od daty zakupu produktu w sklepie detalicznym przez pierwszego
właściciela (gwarancja producenta). Jeśli wada materiałowa czy produkcyjna
zostanie wykryta, producent, według własnego uznania, bezpłatnie naprawi produkt
lub wymieni go na nowy. Aby skorzystać z warunków niniejszej gwarancji, należy
zanieść lub wysłać produkt do sklepu, w którym został po raz pierwszy zakupiony
oraz przedłożyć oryginalny dowód zakupu (paragon lub fakturę) zawierający datę
zakupu, nazwę sklepu oraz nazwę towaru. Warunki gwarancji nie obowiązują, jeśli
produkt zostanie odesłany do producenta lub innego podmiotu, a nie do sklepu,
w którym został po raz pierwszy zakupiony. Prosimy o sprawdzenie produktu pod
kątem jego kompletności czy jakichkolwiek wad w momencie jego zakupu, a w
przypadku sprzedaży wysyłkowej - natychmiast po jego otrzymaniu. W przypadku
stwierdzenia wady należy zaprzestać użytkowania produktu i odesłać go do sklepu,
w którym został po raz pierwszy zakupiony. Reklamowany w ramach gwarancji
produkt powinien zostać dostarczony czysty i kompletny. Jednakże przed kontaktem
ze sklepem należy uważnie przeczytać instrukcję użytkowania. Niniejsza gwarancja
nie obejmuje żadnych uszkodzeń wynikających z nieprawidłowego użytkowania,
warunków zewnętrznych (woda, ogień, wypadki drogowe i inne) oraz normalnego
zużycia. Gwarancja obowiązuje wyłącznie wtedy, jeśli produkt był użytkowany
zgodnie z instrukcją użytkowania, jeśli był naprawiany/modykowany przez
uprawnione osoby i użyto do tego celu wyłącznie oryginalnych części i akcesoriów.
Niniejsza gwarancja nie wyłącza, nie ogranicza ani nie zawiesza uprawnień
kupującego wynikających z niezgodności towaru z umową konsumencką.
CYBEX GmbH
Riedinger Str. 18, 95448 Bayreuth, Germany
Tel.: +49 921 78 511-0
Fax.: +49 921 78 511- 999
48
Page 50

49
Page 51

GENTILE TISZTELT VEVŐNK!
KÖSZÖNJÜK DÖNTÉSÉT, HOGY A CYBEX SOLUTION X2-FIX TERMÉKET VÁSÁROLTA MEG.
BIZTOSÍTHATJUK, HOGY A CYBEX SOLUTION X2-FIX TERMÉKÜNK KIFEJLESZTÉSEKOR A BIZTONSÁGRA,
KÉNYELEMRE ÉS A FELHASZNÁLÓ-BARÁT MEGOLDÁSOKRA KONCENTRÁLTUNK. A TERMÉK
KÜLÖNLEGES MINŐSÉGELLENŐRZÉS ALATT KÉSZÜLT, ÉS MEGFELEL A LEGSZIGORÚBB BIZTONSÁGI
VÁŽENÝ ZÁKAZNÍKU!
VELMI DĚKUJEME ZA VAŠE ROZHODNUTÍ KOUPIT SI AUTOSEDAČKU CYBEX SOLUTION X2-FIX.
UJIŠŤUJEME VÁS, ŽE V PRŮBĚHU VÝVOJE CYBEX SOLUTION X2-FIX JSME SE ZAMĚŘILI NA
BEZPEČNOST, POHODLÍ A PŘÁTELSKÝ POSTOJ UŽIVATELE. VÝROBEK JE VYROBEN ZA SPECIÁLNÍHO
DOHLEDU KVALITY A VYHOVUJE NEJPŘÍSNĚJŠÍM POŽADAVKŮM NA BEZPEČNOST.
VÁŽENÝ ZÁKAZNÍK!
VEĽMI ĎAKUJEME ZA VAŠE ROZHODNUTIE KÚPIŤ SI AUTOSEDAČKU CYBEX SOLUTION X2-FIX.
UISŤUJEME VÁS, ŽE V PRIEBEHU VÝVOJA CYBEX SOLUTION X2-FIX SME SA ZAMERALI NA BEZPEČNOSŤ,
POHODLIE A PRIATEĽSKÝ POSTOJ UŽÍVATEĽA. VÝROBOK JE VYROBENÝ ZA ŠPECIÁLNEHO DOHĽADU
KVALITY A VYHOVUJE NAJPRÍSNEJŠÍM POŽIADAVKÁM NA BEZPEČNOSŤ.
50
Page 52

HASZNÁLATI KÉZIKÖNYV
CYBEX Solution X2-x
ülés háttámlával
JAVASOLT:
Életkor szerint: Kb 3-12 éveseknek;
Súly szerint: 15-36 kg;
Testmagasság szerint: 150 cm-ig
Három pontos automata biztonsági övvel ellátott
gépkocsi ülésekhez.
JÓVÁHAGYÁS:
ECE R-44, 2/3 csoport, 15-36 kg,
HU TARTALOM
Figyelem! Gyermeke megfelelő védelme érdekében nagyon fontos, hogy a
CYBEX Solution X2-x terméket a jelen kézikönyvben megadott
utasítások szerint telepítse és alkalmazza.
Figyeletm! A használati utasítást tárolja mindig a háttámla hátsó részén lévő
rugalmas huzatban, azért hogy bármikor kéznél legyen.
Figyelem! Mindig legyen kéznél a használati útmutató, és tartsa az erre kialakított
rekeszben, az ülés alatt!
Rövid kézikönyv..............................................................................................1
2
NÁVOD K POUŽITÍ
Autosedačka CYBEXSolution X2-x
se zadním opěradlem
DOPORUČENA PRO:
Věk: od přibližně 3 roků do 12 let.
Hmotnost: 15 až 36 kg.
Výška těla: do 150 cm.
Pro sedadla vozidla stříbodovým automatickým
bezpečnostním pásem
SCHVÁLENÍ:
ECE R44/04, skupina 2/3, 15 až 36 kg.
INSTRUCTION MANUAL
CYBEX Solution X2-x
so zadným operadlom
DOPORUČENÁ PRE:
Vek: približne od 3 rokov do 12 rokov.
Hmotnosť: 15 až 36 kg.
Výška tela: do 150 cm.
Pre sedadlá vozidla s trojbodovým
automatickým bezpečnostným pásom
SCHVÁLENIE:
ECE R-44/04, skupina 2/3, 15 to 36 kg
Figyelem / Megjegyzés
Jóváhagyás – minősítés
Első beszerelés
A test méretéhez történő beállítás
...................................................................................2
...............................................................................51
............................................................................................53
................................................................55
A fejtámasz beállítása...................................................................................55
A helyes elhelyezés a gépkocsiban
Az autósülés összeszerelése a csatlakozókkal
A Solution X2-fix eltávolítása
A gyermek biztonságos elhelyezése
A gyermek biztonsági övvel való bekötése
Biztonságos helyzetben van a gyermeke?
A fejtámasz megdöntése
A termék gondozása
..............................................................................65
.....................................................................................67
Az ülés burkolat eltávolítása
A háttámla huzat részének eltávolítása
Tisztítás
........................................................................................................69
Mi a teendő baleset után
Termék élettartam
Hulladékkezelés
Garancia
.......................................................................................................73
..............................................................................69
.........................................................................................71
...........................................................................................71
.............................................................57
............................................59
........................................................................61
............................................................61
...................................................63
...................................................65
.........................................................................67
........................................................67
51
Page 53

CZ OBSAH
SK OBSAH
Varování! Pro řádnou ochranu dítěte je nutné používat a instalovat autosedačku
CYBEX Solution X2-x podle pokynů v této příručce.
Upozornění! Mějte tento návod na obsluhu vždy v dosahu,nejlépe pod
elastickým potahem na zadní části opěrky.
Upozornění! Podle specikace jednotlivých zemí můžou být pozměněny
vlastnosti a požadavky na jednotlivé výrobky.
Krátký návod...................................................................................................1
Varování / Upozornění
Schválení – osvědčení
První instalace
Přizpůsobení velikosti těla
Přizpůsobení opěrky hlavy
Správná poloha ve vozidle
Připevněte autosedačku prostřednictvím X-fix držáků.
Vyjmutí autosedačky Solution X2-fix
Zajištění dítěte
Upevněte bezpečnostní pás dítěte
Je dítě řádně zajištěno?
Polohovací opěrka hlavy
Péče o výrobek
Odstranění potahu sedačky..........................................................................68
Sundavání potahu autosedačky z opěrky zad
Čištění
..........................................................................................................70
Co dělat po nehodě
Životnost produktu
Likvidace.......................................................................................................72
Záruka
..........................................................................................................74
....................................................................................2
.................................................................................51
..............................................................................................54
............................................................................56
...........................................................................56
...........................................................................58
................................60
............................................................62
..............................................................................................62
...............................................................64
...............................................................................66
..............................................................................66
.............................................................................................68
..............................................68
......................................................................................70
........................................................................................72
Varovanie! Pre riadnu ochranu dieťaťa je nutné používať a inštalovať
autosedačku CYBEX Solution X2-x podľa pokynov v tejto príručke.
Upozornenie! Majte tento návod na obsluhu vždy v dosahu, najlepšie pod
elastickým poťahom na zadnej časti opierky.
Upozornenie! Vzhľadom k miestnym kódom sa môže charakteristika produktu
líšiť.
Krátky návod...................................................................................................1
Varovanie / Upozornenie
Schválenie-osvedčenie:................................................................................51
Prvá inštalácia
Prispôsobenie veľkosti tela
Prispôsobenie opierky hlavy
Správna poloha vo vozidle
Pripevnenie autosedačky prostredníctvom X-fix držiakov
Vybratie autosedačky Solution X2-fix
Zaistenie dieťaťa
Upevnenie bezpečnostného pásu dieťaťa
Je dieťa riadne zaistené?
Polohovacie opierka hlavy
Starostlivosť o výrobok
Odstránenie poťahu sedačky
Odnímanie poťahu autosedačky z opierky chrbta
Čistenie.........................................................................................................70
Čo robiť po nehode
Životnosť produktu
Likvidácia
Záruka
..............................................................................................54
......................................................................................................72
..........................................................................................................74
................................................................................2
...........................................................................56
.........................................................................56
...........................................................................58
............................60
...........................................................62
..........................................................................................62
....................................................64
.............................................................................66
............................................................................66
.................................................................................68
.......................................................................68
........................................68
.......................................................................................70
.......................................................................................72
52
Page 54

b
e
f
a
c
a
d
d
ELSŐ BESZERELÉS
A gyermek biztonsági ülés tartalmaz egy ülés részt (d) és egy háttámlát (a)
magasságban állítható váll- és fejtámasszal. Csak a két rész kombinációja
biztosítja a gyermek legjobb védelmét és kényelmét.
Figyelem! A CYBEX Solution X2-fix termék egyes részeit nem szabad
önmagukban vagy más gyártó eltérő gyártásból származó ülésével,
háttámlájával vagy fejtámaszával használni. Ilyen esetben a bizonyítvány
érvényessége azonnal megszűnik.
A háttámla (a) az üléshez (d) a tengellyel (c) csatlakozik a vezetőfülek (b)
segítségével.
Figyelem: A használati utasítást tartsa biztonságos helyen. Mindig legyen
kéznél, szüksége lehet rá a jövőben is.Tartsa a használati utasítást a rugalmas
fedő rész alatt, amely a háttámla hátulsó részén található.
Figyelem! Kérjük mindig figyeljen arra, hogy az ülés laza részei illetve műanyag
részei ne gyűrődjenek be a kocsi napi használata során, például az ülés
beállításakor vagy a kocsi ajtó mozgásakor.
Illessze az oldalütközés elleni védőpárnát (L.S.P System) mindkét oldalon a megfelelő
z
helyre (z), majd nyomja lefelé mindaddig, amíg az a helyére nem rögzül.
e
h
A TEST MÉRETÉHEZ VALÓ BEÁLLÍTÁS
Csak az optimálisan beállított váll- és fejtámasz (e) biztosítja a gyermek
legjobb védelmét és kényelmét, és ez biztosítja az átlós öv (f) optimális
helyzetét is. A magasságot 11 helyzetben lehet rögzíteni. A válltámasz
rögzítve van a fejtámaszhoz, tehát nem kell külön beállítani. A beállítást
úgy kell elvégezni, hogy 2 ujjnyi hézag maradjon a fejtámasz alsó éle és a
gyermek válla között.
A FEJTÁMASZ BEÁLLÍTÁSA
53
• Helyezze be gyermekét a gyerekülésbe.
• A váll- és fejtámasz kiakasztásához húzza felfelé a beállító fogantyút (h).
• Ezután a váll- és fejtámaszt (e) a kívánt helyzetbe lehet elmozdítani.
• Ha most elengedjük a beállító fogantyút (h), a váll- és fejtámasz (e)
automatikusan rögzítődik.
Page 55

PRVNÍ INSTALACE
Dětská bezpečnostní automobilová sedačka se skládá ze sedadla (d) azadního
opěradla (a) s výškově nastavitelným ramenem a opěrkou hlavy. Pouze
kombinace obou částí poskytuje nejlepší ochranu a pohodlí dítěte.
Varování! Části autosedačky CYBEX Solution X2-fix nesmí být používány
samostatně nebo v kombinaci se sedadly, zadními opěradly nebo opěrkami
hlavy jiných výrobců nebo jiné série výrobků. V takových případech ztratí
osvědčení okamžitě platnost.
PRVÁ INŠTALÁCIA
Detská bezpečnostná automobilová sedačka sa skladá zo sedadla (d) a
zadného operadla (a) s výškovo nastaviteľnou opierkou ramen a hlavy.
Iba kombinácia oboch častí poskytuje najlepšiu ochranu a pohodlie dieťata.
Varovanie! Časti autosedačky CYBEX Solution X2-fix nesmie byť používané
samostatne alebo v kombinácii so sedadlami, zadnými operadlami alebo
opierkami hlavy iných výrobcov alebo inej série výrobkov. V takýchto prípadoch
stratí osvedčenie okamžite platnosť.
Zadní opěradlo (a) je zahnuto k ose (c) sedačky (d) s uchem vedení (b).
Upozornění! Prosíme, uschovejte návod na obsluhu tak,abyste jej v případě
potřeby mohli kdykoliv prostudovat. Tento návod můžete uložit pod elastickým
potahem na zadní části opěrky.
Varování! Vždy prosím věnujte pozornost tomu, aby denním používáním
automobilu, například seřízením sedadla automobilu nebo dveřmi automobilu
nedošlo k vzpříčení volných nebo plastových částí sedačky.
Nasaďte lineární boční ochranný systém (L.S.P. systém) na obou stranách do montážních
otvorů (z), pak jej zatlačte směrem dolů, až dojde k jeho zajištění.
PŘIZPŮSOBENÍ VELIKOSTI TĚLA
Pouze rameno a opěra hlavy (e), která je optimálně výškově seřízena, poskytují
nejlepší ochranu a pohodlí dítěte a zaručují také optimální polohu diagonálního
pásu (f). Výšku (e) můžete nastavit v 11 polohách. Opěra ramene je upevněna
k opěrce hlavy a nemusí se nastavovat odděleně. Nastavení je třeba provést
takovým způsobem, abyste mohli vtěsnat 2 prsty mezi dolní hranu opěrky hlavy
a rameno dítěte.
PŘIZPŮSOBENÍ OPĚRKY HLAVY
• Dejte dítě do dětské sedačky
• Vytáhněte stavěcí rukojeť (h), aby se odemklo rameno a opěrka hlavy.
• Nyní můžete uvést rameno a opěrku hlavy (e) do požadované polohy.
• Jakmile pustíte stavěcí rukojeť (h), rameno a opěrka hlavy (e) se samy uzamknou
Zavesením prípojnej časti (b) na osu (c) sedadla (d), spojíte opierku chrbta (a)
k sedadlu (d).
Upozornenie! Prosíme, uschovajte návod na obsluhu tak, aby ste ho v prípade
potreby mohli kedykoľvek preštudovať. Tento návod môžete uložiť pod
elastickým poťahom na zadnej časti opierky.
Upozornenie! Prosíme uistite sa, že plastové časti detskej autosedačky nebudú
nikdy zaseknuté (napr. vo dverách automobilu alebo pri nastavovaní zadných
sedadiel).
Protektory Lineárne ochrany pri bočnom náraze (LSP Systém) vložte na oboch
stranách do príslušných otvorov (z) a potom ich zatlačte nadol tak, aby sa
zacvakli.
PRISPÔSOBENIE VEL´KOSTI TELA
Opierka hlavy môže poskytnúť najlepšiu ochranu a pohodlie iba ak je správne
nastavená. Iba vtedy je tiež zaručená optimálna pozícia diagonálneho pásu (f).
Výšku (e) môžete nastaviť v 11 polohách. Opora ramien je upevnená k opierke
hlavy a nemusí sa nastavovať oddelene. Nastavenie je potrebné vykonať takým
spôsobom, aby ste mohli vtesnať 2 prsty medzi dolnú hranu opierky hlavy a
rameno dieťaťa.
PRISPÔSOBENIE OPIERKY HLAVY
• Dajte dieťa do detskej sedačky
• Vytiahnite nastavovacie rukoväť (h), aby sa odomklo rameno a opierka hlavy.
• Teraz môžete uviesť rameno a opierku hlavy (e) do požadovanej polohy.
• Akonáhle pustíte stavacie rukoväť (h), rameno a opierka hlavy (e) sa samy
uzamknú
54
Page 56

A HELYES ELHELYEZÉS A GÉPKOCSIBAN
A CYBEX Solution X2-x gyermekülés minden olyan gépkocsi ülésnél
használható amelynél három pontos biztonsági öv van. Általában a gépkocsi
hátsó részében való használatát javasoljuk. Elől a gyermek baleset esetén
nagyobb veszélynek van kitéve.
Figyelem! Két pontos biztonsági övvel felszerelt ülésnél nem használható az
ülés. Két pontos övvel történő rögzítés esetén a gyermek balesetnél halálos
sérülést szenvedhet.
Az autónak ISOFIX-kompatibilisnek kell lennie ahhoz, hogy az X-xet rögzíteni tudjuk. Ezáltal az ülést csakis olyan járműben szabad
használni, amelyek a „semi-universal“ kategóriába tartoznak, és
mellékellt listában megtalálhatók. Ezt a listát rendszeresen frissítjük.
Az aktuális verzió elérhető közvetlenül nálunk, vagy a www.cybex-online.com
címen.
A gyerekülés kivételesen az utas-ülésen is elhelyezhető. Ebben az esetben a
következőket kell gyelembe venni:
• Légzsákkal ellátott autóban az utas-ülést a lehető leghátrábbra kell tolni. Ügyeljen
rá, hogy a gépkocsi biztonsági övének felső pontja a gyerekülés övvezetője mögött
maradjon.
• A gépkocsi gyártójának ajánlásait kell gyelembe venni.
Figyelem! A biztonsági öv (f) átlósan haladjon előre, és soha nem vezethet
előre a gépkocsi első ülés felső öv-rögzítésnél. Amennyiben ezt nem lehet
elérni az ülés előre tolásával vagy a gyerekülés másik kocsi-ülésnél történő
alkalmazásával, akkor ez a biztonsági gyerekülés nem alkalmazható ebben a
gépkocsiban.
Poggyászt vagy egyéb tárgyakat a gépkocsiban amelyek balesetkor sérülést
okozhatnak, csak megfelelően rögzítve szabad szállítani.
Figyelem! Azoknál a járműveknél, ahol az utasoldali ülés a menetirányra
merőlegesen helyezkedik el, ott ezt a gyermekülést nem szabad használni.
Azon üléseknél, ahol az ülés a menetiránynak háttal helyezkedik el, pl.
furgon vagy minibusz, ott a gyermekülés használata akkor megengedett,
ha az ülés felnőttek szállítására engedélyezett. Kérjük, ügyeljen arra, hogy
a menetiránynak háttal történő beszerelés esetén nem szabad leszerelni a
f
fejtámlát! A gyermekülést a biztonsági övvel rögzíteni kell még akkor is, amikor
az nincs használatban. A rögzítetlen ülés már egy vészfékezés vagy egy kis
ütközés során is az utasok vagy a vezető sérülését okozhatja.
55
Megjegyzés: Kérjük soha ne hagyja gyermekét a gépkocsiban felügyelet nélkül.
Page 57

SPRÁVNÁ POLOHA V
Autosedačka CYBEX Solution X2-x může být použita na všech sedadlech s
tříbodovým automatickým bezpečnostním pásem. Všeobecně doporučujeme
používat sedačku v zadní části vozidla. Vpředu je dítě obvykle vystaveno
většímu riziku v případě nehody.
Varování! Sedačku nemůžete používat s dvoubodovým pásem nebo břišním
bezpečnostním pásem. Při zajištění dítěte dvoubodovým pásem by dítě mohlo utrpět
smrtelné zranění v případě nehody.
SPRÁVNA POLOHA V
Bez použitia konektorov môže byť autosedačka CYBEX Solution X2-x použitá
na všetkých sedadlách s trojbodovým automatickým bezpečnostným pásom.
Všeobecne však odporúčame používať sedačku v zadnej časti vozidla. Vpredu
je dieťa obvykle vystavené väčšiemu riziku v prípade nehody.
Varovanie! Sedačku nemôžete používať s dvojbodovým pásom alebo brušným
bezpečnostným pásom. Pri zaistení dieťaťa dvojbodovým pásom by dieťa mohlo v
prípade nehody utrpieť smrteľné zranenia.
Pro připevnění pomocí X-x držáků využívá autosedačka univerzální
povolení. Na základě tohoto povolení je CYBEX Solution X2-x možno
připevnit pouze do schválených typů vozidel. Tyto schválené typy
vozidel naleznete v Kfz-typových listech. Tyto listy jsou průběžně
aktualizovány. Nejnovější verzi listů naleznete na přímo u rmy CYBEX,
prodejce vozidel nebo na www.cybex-online.com.handel oder auf www.cybexonline.com. Ve výjimečných případech se sedačka může připevnit k sedadlu s
polucestujícího. V takových případech berte na vědomí následující:
• V automobilech s bezpečnostním vakem byste měli posunout sedadlo
spolucestujícího co nejvíce dozadu. Ujistěte se prosím, že horní bod
bezpečnostního pásu vozidla zůstane za vedením pásu sedačky.
• Musíte se držet doporučení výrobce vozidla.
Varování! Bezpečnostní pás (f) se musí pohybovat diagonálně zezadu a nesmí
nikdy vést dopředu k hornímu bodu pásu předního sedadla vozidla. Jestliže
nejste schopni ho nastavit například posunutím sedadla dopředu nebo použitím
sedačky na jiném sedadle v automobilu, potom dětská bezpečnostní sedačka
není vhodná pro toto vozidlo.
Zavazadla nebo jiné předměty ve vozidle, které mohou způsobit zranění při
nehodě, musí být vždy řádně upevněny.
Upozornění! Na sedadla vozidel, která jsou uspořádány příčně ke směru jízdy,
je použití autosedačky zakázáno. Na sedadla proti směru jízdy vozidla, jaká
jsou např. v dodávce nebo minibusu, je použití povoleno pouze za předpokladu,
že sedadlo je certifikováno pro přepravu dospělých osob. Je třeba připomenout,
že opěrky hlavy na sedadlech proti směru jízdy nesmí být odstraněna! Dětská
autosedačka musí být vždy připevněna pásem vozidla, i když není obsazena
dítětem. Při nouzovém brzdění nebo při nárazu může neupevněná autosedačka
zranit ostatní cestující.
Upozornění! Nikdy prosím nenechávejte své dítě samotné v automobilu.
vozidiel. Tento zoznam je pravidelne aktualizovaný a jeho najnovšia verzia
je k dostaniu od rmy CYBEX, vášho Predajca alebo je voľne prístupný
na www.cybex-online.com. Vo výnimočných prípadoch sa sedačka môže
pripevniť k sedadlu spolucestujúceho. V takýchto prípadoch berte na vedomie
nasledujúce:
• V automobiloch vybavených airbagom by ste mali posunúť sedadlo
• Musíte sa držať odporúčaní výrobcu vozidla.
Varovanie! Bezpečnostný pás (f) sa musí pohybovať diagonálne zozadu a
nesmie nikdy viesť dopredu k hornému bodu pásu predného sedadla vozidla.
Ak nie ste schopní ho nastaviť napríklad posunutím sedadla dopredu alebo
použitím sedačky na inom sedadle v automobile, potom detská bezpečnostná
sedačka nie je vhodná pre toto vozidlo.
Zavazadla nebo jiné předměty ve vozidle, které mohou způsobit zranění při
nehodě, musí být vždy řádně upevněny. Pri nehode sa môžu uvoľnené predmety
premeniť na smrteľné projektily.
Upozornenie! Na sedadlá vozidiel, ktoré sú usporiadané priečne k smeru
jazdy, je použitie autosedačky zakázané. Na sedadlá proti smeru jazdy
vozidla, aké sú napríklad v dodávke alebo minibusu, je použitie povolené iba
za predpokladu, že sedadlo je certifikované pre prepravu dospelých osôb. Je
treba pripomenúť, že opierky hlavy na sedadlách proti smeru jazdy, nesmie byť
odstránená! Detská autosedačka musí byť vždy pripevnená pásom vozidla, aj
keď nie je obsadená dieťaťom. Pri núdzovom brzdení alebo pri náraze môže
neupevnené autosedačka zraniť ostatných cestujúcich.
Upozornenie! Nikdy prosím nenechávajte svoje dieťa samotné v automobile.
Pre pripevnenie pomocou ISOFIX držiakov využíva autosedačka
univerzálne povolenie. Na základe tohto povolenia je CYBEX Solution
X2-x možné pripevniť len do schválených typov vozidiel. Na zistenie
kompatibility vášho vozidla nahliadnite do zoznamu schválených
spolucestujúceho čo najviac dozadu. Uistite sa prosím, že horný bod
bezpečnostného pásu vozidla zostane za vedením pásu detskej autosedačky.
56
Page 58

AZ AUTÓSÜLÉS ÖSSZESZERELÉSE A CSA TLAKOZÓKKAL
Gyermeke biztonságát növeljük az X-x csatlakozókkal, melyek
segítségével az ülést szorosan hozzá rögzítheti a gépjárműhöz.
A gyermek 3 pontos biztonsági övvel van biztosítva.
• Csatlakoztassa a két X-x kapcsot (a hosszabbik részük felfelé álljon) az
autósülés két ISOFIX csatlakozási pontjához (i).
Figyelem! Az ISOFIX csatlakozási pontok (i) ülésenként 2 db fém kampót
jelentenek, amelyek az gépjármű ülésének háttámlája és ülő-része közt
találhatók. Ha bármiféle kétsége merülen fel, nézze meg a jármű
kézikönyvét.
• A beállításhoz mozgassa a színű X-x gombot, amely az ülés alján
helyezkedik el.
• Húzza meg a csatlakozókat (w) ameddig csak lehet.
• Fordítsa el az X-x kapcsokat 180° fokkal úgy, hogy azok az ISOFIX
csatlakozási pontok felé nézzenek.
Figyelem! Ügyeljen arra, hogy az ISOFIX rögzítőkaron (w) található két,
zöld színű biztonsági kijelző (x) ne legyen látható. Szükség esetén oldja
ki az ISOFIX rögzítőkart (w) a reteszelőgomb (y) megnyomásával és
visszahúzásával. Szükség esetén ismételje meg a műveletet a második
rögzítőkarnál is.
• Nyomja mindkét X-x kapcsot (w) az ülés ISOFIX csatlakozási pontjaihoz (i)
egészen addig, míg meg nem hallja a kattanó hangot, ami az összekapcsolódást
jelzi.
• Próbálja mozgatni az ülést - ezzel is megbizonyosodva arról, hogy a gyerekülés
szorosan rögzült.
• A két biztonsági kijelző (x) legyen jól látható mindkét ISOFIX kioldó gombon (y).
• A gyermekülés alján található X-x gombbal beállíthatja az ülés pozícióját.
57
Figyelem! További információért nézze meg az „Ülés kocsiba történő
behelyezése“ fejezetet.
• Most már becsatolhatja a gyermeket. Kérjük, nézze meg a „Gyermek
becsatolása“ fejezetet.
Page 59

PŘIPEVNĚTE AUTOSEDAČKU PROSTŘEDNICTVÍM X-FIX
Prostřednictvím X-x držáků můžete upevnit autosedačku pevně
ve vašem vozidle a tím přispět ke zvýšené bezpečnosti Vašeho
dítěte. Vaše dítě bude i nadále připevněno pomocí 3-bodového pásu
automobilu.
PRIPEVNENIE AUTOSEDAČKY POMOCOU KONEKTOROV
Prostredníctvom ISOFIX držiakov môžete upevniť autosedačku pevne
v vašom vozidle a tým prispieť k zvýšenej bezpečnosti Vášho dieťaťa.
Vaše dieťa bude aj naďalej pripevnené pomocou 3-bodového pásu
automobilu.
• Nasaďte přiložené zaváděcí pomocné otvory na Isox spony automobilu pro
snadnější montáž autosedačky.
Upozornění! ISOFIX-bezpečnostní úchyty vozidla jsou dvě kovové spony, které
naleznete mezi opěradlem a sedadlem vozidla. Případně si můžete při hledání
pomoci návodem k použití vašeho vozidla.
• Uvolněte X-x pojistky v) na spodní straně autosedačky.
• Vytáhněte Isox držáky (w) směrem ven ze sedačky.
• Otočte držáky o 180°, až jsou nastaveny správně pro připevnění.
Upozornění! Dbejte na to, aby nebyly oba zelené bezpečnostní indikátory (x)
na ramenech ISOFIX (w) se zarážkami viditelné. Odjistěte případně ramena
ISOFIX (w) se zarážkami stisknutím a vytažením odblokovacího tlačítka (y)
zpět. Opakujte případně postup také na druhém ramenu se zarážkou.
• Nasaďte oba držáky autosedačky (x) do pomocných zaváděcích otvorů až uslyšíte
slyšitelné zaklapnutí do držáků Isox automobilu (i).
• Zkontrolujte, že autosedačka je správně připevněna a zajištěna, tak, že ji zkusíte
zatáhnout směrem dopředu.
• Zelený bezpečnostní indikátor (x) musí být na obou odblokovacích tlačítkách (y)
dobře viditelný.
• Pomocí X-x pojistky (v) na spodní straně autosedačky můžete nyní nastavit
správnou pozici autosedačky ve vozidle.
Upozornění! Připevněte nyní nálepku „Autosedačka ve vozidle“.
• Nyní můžete Vaše dítě připevnit do autosedačky viz. „připevnění dítěte“.
• Pre ľahšiu montáž autosedačky nasaďte dva priložené zavádzacie pomocné
otvory (ich dlhšej časti smerujú nahor) na Isox spony (i) automobilu.
Upozornenie! Isox-bezpečnostné úchytky (i) vozidla sú dve kovové spony,
ktoré nájdete medzi operadlom a sedadlom vozidla. Prípadne si môžete pri
hľadaní pomôcť návodom na použitie vášho vozidla.
• Pre nastavenie uvoľnite X-x páčku (v) na spodnej strane autosedačky.
• Vytiahnite Isox držiaky (w) smerom von zo sedačky čo najviac je to možné.
• Otočte držiaky o 180 °, až sú správne nastavené pre pripevnenie.
Upozornenie! Dbajte na to, aby obidva zelené bezpečnostné indikátory (D) na
ISOFIX konektoroch (C) nebolo vidieť. Prípadne odomknite ISOFIX konektory
(C) tak, že stlačíte odblokovacie tlačidlo (E) a zatiahnete ho dozadu. Postup
zopakujte prípadne aj na druhom konektore.
• Nasaďte oba držiaky autosedačky (w) do pomocných zavádzacích otvorov až
počujete počuteľné zaklapnutie do držiakov Isox automobilu (i).
• Skontrolujte, že autosedačka je správne pripevnená a zaistená, tak, že ju skúsite
vytiahnuť smerom dopredu.
• Zelený bezpečnostný indikátor (x) musí byť na oboch odblokovacích tlačidlách (y)
dobre viditeľný.
• Pomocou X-x poistky (v) na spodnej strane autosedačky môžete teraz nastaviť
správnu pozíciu autosedačky vo vozidle.
Upozornenie! Pre viac informácií, prosíme nahliadnite do sekcie „Vkladanie
autosedačky do vozidla“.
• Teraz môžete dieťa pripútať. Viac v „Pútanie dieťaťa“.
58
Page 60

59
A SOLUTION X2-FIX ELTÁVOLÍTÁSA
Végezzen el minden összeszerelési műveletet fordított sorrendben.
a
1
2
• Oldja ki mindkét oldalon az ISOFIX rögzítőkart (w) a reteszelőgombok (y)
megnyomásával és egyidejű visszahúzásával.
• Húzza ki az ülést a csatlakozási kampókból (u).
• Fordítsa el az X-x kapcsokat (w) 180° fokkal.
• A gyerekülés alján levő színű X-x gombot forgassa el és nyomja meg teljesen az
X-x kapcsokat, ameddig lehet.
Figyelem! Ez a folyamat védi az üléspárnákat és megelőzi azok sérülését és
kopását. Sérülések és kopások megnehezítik a működést.
A GYERMEK BIZTONSÁGOS
Helyezze a biztonsági gyerekülést a gépkocsi megfelelő ülésére.
• Ügyeljen rá, hogy a biztonsági gyerekülés háttámlája (a) felfeküdjön a
gépkocsi ülés háttámlájára, tehát a gyerekülés semmiképpen se legyen
alvós helyzetben.
• Az ISOFIX-kapocs autóban történő használata során bizonyosodjon meg
arról, hogy a Solution X2-x háttámlája tökéletesen ráfekszik és illeszkedik
a gépjármű üléséhez. A távolságot a gyerekülés alsó részén található
beállító karral (v) lehet szabályozni.
• Egyes gépkocsi üléshuzatok kényes anyagból készülnek (pl. velúr, bőr, stb.), és
a gyerek biztonsági ülés kopás nyomokat hagyhat. Ennek elkerülésére helyezzen
valami takarót a gyerekülés alá.
• Ha a jármű fejtámlája útban van, húzza teljesen ki és távolítsa el (ez alól
kivételeket „AZ ÜLÉS HELYES POZÍCIONÁLÁSA A JÁRMŰBEN” című fejezetben
talál). A háttámla (a) tökéletesen illeszkedik bármilyen dőlésszögű járműüléshez.
Figyelem! A Solution X2-fix ülés háttámlájának teljesen fel kell feküdnie a
gépkocsi ülésének felső részéhez. Tolja hátrafelé a gyermekülés ülőrészét
addig, amíg az nem érinti szorosan az autó ülését. Gyermeke lehetséges
legjobb védelme érdekében az ülés legyen normál felfelé álló
helyzetben.
Figyelem! Előfordulhat, hogy a kényesebb anyagból (pl. velúr vagy bőr) készült
ülések elszíneződhetnek vagy kikophatnak. Ennek elkerülése érdekében kérjük
helyezzen ülésvédőt vagy pl. egy törölközőt a gyermekülés alá. Itt szeretnénk
felhívni gyelmét arra, hogy a tisztításra vonatkozó utasításokat az első
használat előtt olvassa el és minden esetben tartsa be!
Page 61

VYJMUTÍ AUTOSEDAČKY SOLUTION X2-FIX
Postupujte v opačném pořadí podle kroků instalace.
VYBRATIE AUTOSEDAČKY SOLUTION X2-FIX
Vykonajte všetky kroky inštalácie v opačnom poradí.
• Odjistěte ramena ISOFIX (w) se zarážkami stisknutím a vytažením odblokovacích
tlačítek (y) zpět.
• Nyní vytáhněte autosedačku z držáku vozidla (u).
• Otočte držáky autosedačky o 180°.
• stlačte X-x držáky (v) na spodní straně autosedačky směrem dovnitř.
Důležité! Pro ochranu sedadel automobilu před poškozením a znečištěním od
X-x držáků doporučujeme umístit pod autosedačku na kožená nebo velurová
sedadla automobilu deku nebo látku. Tím předejdete možnému nepříjemnému
poškození sedadel.
ZAJIŠTĚNÍ
Dejte dětskou bezpečnostní sedačku na příslušné sedadlo v automobilu.
• Ujistěte se prosím, že zadní opěradlo (a) dětské bezpečnostní sedačky je
umístěno proti zadnímu opěradlu sedadla automobilu, takže dětská bezpečnostní
sedačka není za žádných okolností v poloze pro spaní.
• Při použití ISOFIX upevňovacího systému je důležité, aby opěrka
autosedačky pevně doléhala na opěradlo automobilového sedadla.Toho
docílíte tím, že zmáčknete pojistku (v) a zatlačíte autosedačku směrem do
opěradla automobilu.
• Pokud při instalaci překáží hlavová opěrka sedadla ve vozidle, prosíme, co
nejvíce ji vytáhněte nebo ji sundejte (výjimky viz kapitola „SPRÁVNÁ POZICE
AUTOSEDAČKY VE VOZIDLE“). Opěrka zad (a) se dokonale přizpůsobí prakticky
jakémukoliv náklonu sedadla ve vozidle.
Varování! Opěrka zad autosedačky Solution X2-fix musí přímo doléhat k
opěradlu vozidla. Posunutím regulátoru dozadu by sedačka měla být pevně
natlačena proti sedadlu.
Důležité! Pokud jsou potahy sedadel ve vozidle vyrobeny z jemného materiálu
(např. velur, kůže, apod.), mohou se na nich objevit stopy opotřebování a/
nebo ztráty barvy. K vyvarování se tomuto jevu doporučujeme pod dětskou
autosedačku vložit např. ručník. V této souvislosti bychom vás chtěli odkázat
na naše pokyny pro čištění, které musí být dodrženy před prvním použitím
autosedačky.
• Prípadne odomknite ISOFIX konektory (w) na oboch stranách tak, že stlačíte
odblokovacie tlačidlá (y) a súčasne ich zatiahnete dozadu.
• Teraz vytiahnite autosedačku z držiaku vozidla (u).
• Otočte držiaky autosedačky o 180 °.
• Zatiahnite za X-x páčku, umiestnenú na spodnej strane detskej autosedačky a
úplne zatlačte ISOFIX konektory do detskej autosedačky.
Upozornenie! Nasledovanie týchto krokov ochráni čalúnenie vášho vozidla
a ISOFIX konektorov pred poškodením. Poškodenie a vady môžu brániť
hladkému fungovaniu.
ZABEZPEČENIE
Dajte detskú bezpečnostnú sedačku na príslušné sedadlo v automobile.
• Uistite sa prosím, že zadné operadlo (a) detskej bezpečnostnej sedačky
je umiestnené proti zadnému operadlu sedadla automobilu, takže detská
bezpečnostná sedačka nie je za žiadnych okolností v polohe na spanie.
• Při použití ISOFIX upevňovacího systému je důležité, aby opěrka
autosedačky pevně doléhala na opěradlo automobilového sedadla. Toho
docílíte tím, že zmáčknete pojistku (v) a zatlačíte autosedačku směrem do
opěradla automobilu
• Ak pri inštalácii prekáža hlavová opierka sedadla vo vozidle, prosíme, čo
najviac ju vytiahnite alebo ju zložte (výnimky viď kapitola „SPRÁVNA POZÍCIA
AUTOSEDAČKY VO VOZIDLE“). Opierka chrbta (a) sa dokonale prispôsobí
prakticky akémukoľvek náklonu sedadla vo vozidle.
Pozor! Opierka chrbta autosedačky Solution X2-fix musí priamo doliehať k
operadlu vozidla. Posunutím regulátora dozadu by sedačka mala byť pevne
natlačená proti sedadlu. Pre najlepšiu možnú ochranu vášho dieťaťa musí byť
sedačka v normálnej vzpriamenej polohe!
Upozornenie! Ak sú poťahy sedadiel vo vozidle vyrobené z jemného materiálu
(napr. velúr, koža, apod), môžu sa na nich objaviť stopy opotrebovania a/
alebo straty farby. K vyvarovanie sa tomuto javu doporučujeme pod detskú
autosedačku vložiť napr. uterák. V tejto súvislosti by sme vás chceli odkázať
na naše pokyny pre čistenie, ktoré musia byť dodržané pred prvým použitím
autosedačky.
60
Page 62

FESZÍTSE MEG A GYERMEK BIZTONSÁGI ÖVÉT.
Helyezze be a gyermeket a gyermek biztonsági ülésbe. Húzza ki jól a három
pontos biztonsági övet és vezesse el a gyermek előtt, csatolja az öv-rögzítőbe.
l
l
m
f
Figyelem! Soha ne csavarodjon meg az öv!
Helyezze az öv-vezetőt (m) az öv-csatba (l). Hallhatóan kell kapcsolódnia.
Helyezze az (n) övet a biztonsági gyerekülés alsó öv-vezetőjébe. Ezután
húzza feszesre az (n) övrészt az átlós övrész (f) meghúzásával. Minél
szorosabb az öv, annál jobban megvéd a sérülésektől. Az átlós övet és a másik
övrészt egyaránt be kell illeszteni az öv-csat oldalon lévő alsó
öv-vezetőbe.
61
n
f
k
d
g
e
n
k
f
Figyelem! A kocsi öv-csatlakozása (l) semmiképpen sem érhet bele az alsó övvezetőbe (k). Ha az öv heveder túlságosan hosszú, az ülés nem
alkalmazható ebben a gépkocsiban.
Az alsó övrészt (n) be kell helyezni az ülés két oldalán lévő alsó övvezetőkbe
(d).
Megjegyzés: Kezdetektől tanítsa meg a gyermekét, hogy mindig ügyeljen
arra, hogy az öv feszes legyen és szükség esetén maga is tudja azt
megfeszíteni.
Figyelem! Az alsó övrész a lehető legalacsonyabban haladjon el a gyermek
ágyéka előtt, mert így fejtheti ki hatását optimálisan egy balesetnél.
Ezután vezesse át az átlós övrészt (f) a felső piros öv-vezetőn (g) a
válltámaszban (e). Ügyeljen rá, hogy az átlós övrész (f) a gyermek vállának
külső széle és a gyermek nyaka között haladjon. Szükség esetén a fejtámla
magasságának állításával igazítsa be az öv lefutását. A fejtámla magassága a
kocsiban is állítható.
Page 63

UPEVNĚTE BEZPEČNOSTNÍ PÁS DÍTĚTE
Dejte dítě do dětské bezpečnostní sedačky. Vytáhněte daleko tříbodový pás a
táhněte jej před dítě do zámku bezpečnostního pásu.
UPEVNENIE BEZPEČNOSTNÉHO PÁSU DIEŤAŤA
Vložte dieťa do detskej autosedačky. Vytiahnite 3-bodový pás, stiahnite ho pred
vaše dieťa a zasuňte do spony (l).
Varování! Nikdy nepřetáčejte pás!
Dejte vedení pásu (m) do zámku bezpečnostního pásu (l). Je třeba je
uzamknout slyšitelným „ZACVAKNUTÍM“.
Dejte břišní bezpečnostní pás (n) do dolního vedení pásu (k) dětské
bezpečnostní sedačky. Nyní utáhněte břišní bezpečnostní pás (n) natažením
diagonálního pásu (f) bez průvěsu. Čím je pás napnutější, tím lépe může
chránit před zraněním. Jak diagonální pás, tak i břišní bezpečnostní pás by
měly být zasunuty do dolního vedení pásu na straně zámku bezpečnostního
pásu.
Varování! Zámek bezpečnostního pásu sedadla automobilu (l) nesmí za
žádných okolností sahat do dolního vedení pásu (k). Jestliže je pásový popruh
příliš dlouhý, potom sedačka není vhodná pro toto vozidlo.
Břišní bezpečnostní pás (n) by měl být umístěn do dolního vedení pásu (k) na
obou stranách sedačky (d).
Upozornění! Od počátku učte své dítě, aby vždy věnovalo pozornost
napnutému pásu a aby samo utáhlo pás, je-li to třeba.
Varování! Břišní bezpečnostní pás se musí na obou stranách pohybovat co
nejníže přes slabiny dítěte, aby optimálně působil v případě nehody.
Nyní táhněte diagonální pás (f) horním červeným vedením pásu (g) do opěry
ramene (e), až bude uvnitř vedení pásu. Dohlédněte na to, aby se diagonální
pás (f) pohyboval mezi vnější hranou ramene a krkem dítěte. Bude-li to nutné,
seřiďte chod pásu nastavením výšky opěrky hlavy. Výška opěrky hlavy v
automobilu se může stále nastavovat.
Pozor! Nikdy nepretáčajte pás!
Vložte jazyk pásu (m) do spony (l). Ak počujete cvaknutie, pás je bezpečne
zaistený.
Dajte brušný bezpečnostný pás (n) do dolného vedenia pásu (k) detské
bezpečnostné sedačky. Potom utiahnite brušný bezpečnostný pás (n)
natiahnutím diagonálneho pásu (f) bez preveseniu. čím je pás napnutejšie,
tým lepšie môže chrániť pred zranením. Ako diagonálny pás, tak aj brušný
bezpečnostný pás by mali byť zasunuté do dolného vedenia pásu na strane
zámku bezpečnostného pásu.
Varovanie! Zámok bezpečnostného pásu sedadla automobilu (l) nesmie za
žiadnych okolností siahať do dolného vedenia pásu (k). Ak je pásový popruh
príliš dlhý, potom sedačka nie je vhodná pre toto vozidlo.
Brušný bezpečnostný pás (n) by mal byť umiestnený do dolného vedenia pásu
(k) na oboch stranách sedačky (d).
Upozornenie! Od začiatku učte svoje dieťa, aby vždy venovalo pozornosť
napnutému pásu a aby samo utiahli pás, ak je to potrebné.
Varovanie! Brušný bezpečnostný pás sa musí na oboch stranách pohybovať čo
najnižšie cez slabiny dieťaťa, aby pôsobil optimálne v prípade nehody.
Teraz ťahajte diagonálny pás (f) horným vedením pásu (g) do opory ramena
(e), až bude vo vnútri vedenia pásu. Dohliadnite na to, aby sa diagonálny pás
(f) pohyboval medzi vonkajšou hranou ramena a krkom dieťaťa. Ak to bude
nutné, nastavte chod pásu nastavením výšky opierky hlavy. Výška opierky
hlavy v automobile sa môže stále nastavovať.
62
Page 64

BIZTONSÁGOS HELYZETBEN VAN A GYERMEKE?
Gyermeke biztonsága és maximális védelme érdekében vezetés előtt kérjük,
hogy győződjön meg arról, hogy ...
• az alsó öv-rész (n) mindkét oldalon az alsó öv-vezetőben (k) van-e
• az átlós öv-rész az öv-csat oldalon szintén átmegy a válltámasz alsó
öv-vezetőjén (k)
• az átlós öv (f) átmegy-e a válltámasz pirossal jelzett övvezetőjén (g)
• az ülés biztonsági öv (f) átlósan fut-e hátra
• az öv mindenütt legyen feszes és nem csavarodhat össze.
• az üléspárna mindkét oldalon megfelelően rögzítva van az X-x
kapcsokkal és az ülés ISOFIX csatlakozó-pontjaival.
• a gyermekülés háttámlája (a) teljesen érintkezik a gépjárű
üléssel. Ez biztosítja, hogy a gyerekülés mindig függőleges
pozícióban maradjon.
Megjegyzés: A zöld jelzésnek (x) jól láthatónak kell lennie a piros kioldó
t
gombok (y) mindkét oldalán.
A FEJTÁMASZ MEGDÖNTÉSE
A CYBEX Solution X2-x termék állítható fejtámlával (r) van felszerelve, ami
megakadályozza hogy a gyerek feje előrebillenjen ha elalszik. Ezen kívül, ez az
állítható fejtámla hozzájárul ahhoz, hogy gyermeke az utazás során
kényelmesen érezze magát.
Megjegyzés: Ügyeljen rá, hogy a gyermek feje mindig hozzáérjen az
állítható fejtámaszhoz, mert egyébként a fejtámla nem tudja optimálisan
betölteni az oldal-ütközési védelmi funkcióját.
A fejtámlát kissé megemelve, a fejtámla dőlésszöge három fokozatban
állítható.
63
Figyelem! A rögzítő eszközt (t) nem szabad idegen tárggyal akadályozni.
Balesetnél a fejtámla szabad mozgását biztosítani kell, mert egyébként a
gyerek megsérülhet.
Page 65

JE DÍTĚ ŘÁDNĚ ZAJIŠTĚNO?
Pro zaručení nejlepší možné bezpečnosti vašeho dítěte, zkontrolujte prosím
před jízdou, zda:
JE DIEŤA RIADNE ZAISTENÉ?
Pre zaručenie najlepšej možnej bezpečnosti vášho dieťaťa, skontrolujte prosím
pred jazdou, či:
• se břišní bezpečnostní pás (n) pohybuje v dolním vedení pásu (k) na obou
stranách sedačky.
• se diagonální pás (f) také pohybuje v dolním vedení pásu (k) sedadla na straně
zámku bezpečnostního pásu.
• se diagonální pás (f) pohybuje vedením pásu (g) opěry ramene, označeným
červeně
• se bezpečnostní pás (f) pohybuje diagonálně dozadu.
• celý pás by měl být napnutý a nezkroucený.
• Je důležité, aby na obou stranách byla autosedačka správně zajištěna.
• Zádová opěrka (a) autosedačky se musí celoplošně dotýkat opěradla
automobilu tak, aby se nemohla za žádných okolností překlopit do
vodorovné polohy.
Upozornění! Zelený bezpečnostní indikátor (x) musí být na obou červených
tlačítkách (y) dobře viditelný.
POLOHOVACÍ OPĚRKA HLAVY
CYBEX Solution X2-x má polohovací opěrku hlavy (r), která zabraňuje, aby
hlava dítěte při usnutí spadla dopředu. Tato nastavitelná opěra hlavy dále
přispívá k pohodlí dítěte během jízdy automobilu.
Upozornění! Zajistěte prosím, aby hlava dítěte vždy zůstala ve styku s
polohovací opěrkou hlavy, protože opěrka hlavy nemůže jinak plnit optimální
ochrannou funkci při bočním nárazu.
Sklon opěrky hlavy (r) se nepatrným nadzvednutím opěrky může seřizovat ve 3
různých polohách.
Varování! Uzamykací zařízení (t) nesmí být nikdy blokováno žádnými předměty!
V případě nehody musí být zaručen volný pohyb naklonění, protože jinak by se
dítě mohlo zranit.
• sa brušný bezpečnostný pás (n) pohybuje v dolnom vedení pásu (k) na oboch
stranách sedačky.
• sa diagonálny pás (f) tiež pohybuje v dolnom vedení pásu (k) sedadla na strane
zámku bezpečnostného pásu.
• sa diagonálny pás (f) pohybuje vedením pásu (g) opory ramena, označeným
červenou farbou.
• sa bezpečnostný pás (f) pohybuje diagonálne dozadu.
• celý pás by mal byť napnutý a nezkroucený.
• Je dôležité, aby na oboch stranách bola autosedačka správne zaistená.
• Chrbtová opierka (a) autosedačky sa musí celoplošne dotýkať operadla
automobilu tak, aby sa nemohla za žiadnych okolností preklopiť do
vodorovnej polohy.
Upozornenie! Zelený bezpečnostný indikátor (x) musí byť na oboch červených
tlačidlách (y) dobre viditeľný.
POLOHOVACIE OPIERKA HLAVY
CYBEX Solution X2-x má polohovacie opierku hlavy (r), ktorá zabraňuje, aby
hlava dieťaťa pri zaspaní spadla dopredu. Táto nastaviteľná opierka hlavy ďalej
prispieva k pohodlie dieťaťa počas jazdy automobilu.
Upozornenie! Zaistite prosím, aby hlava dieťaťa vždy zostala v styku s
polohovateľnou opierkou hlavy, pretože opierka hlavy nemôže inak plniť
optimálnu ochrannú funkciu pri bočnom náraze.
Sklon opierky hlavy (r) sa nepatrným nadvihnutím opierky môže nastavovať do
3 rôznych polôh.
Varovanie! Uzamykacie zariadenia (t) nesmie byť nikdy blokované žiadnymi
predmetmi! V prípade nehody musí byť zaručený voľný pohyb naklonenia,
pretože inak by sa dieťa mohlo zraniť.
64
Page 66

A TERMÉK GONDOZÁSA
Annak érdekében, hogy a biztonsági gyerekülés mindig a lehető legjobb
védelmet nyújtsa, kérjük, vegye figyelembe a következőket:
• A biztonsági gyerekülés minden alkotórészét rendszeresen meg kell
vizsgálni, hogy nincs-e károsodás. A mechanikai részeknek hibátlanul
kell működniük.
• Alapvető fontosságú, hogy a biztonsági gyerekülés ne gyűrődjön be
kemény tárgyak közé, mint amilyen például a kocsi-ajtó, ülés támasz, stb., mert
ezek az ülésen sérülést eredményezhetnek.
• Leesés vagy hasonló esemény után a biztonsági gyerekülést a gyártónak kell
megvizsgálnia.
65
e
a
AZ ÜLÉS HUZAT ELTÁVOLÍTÁSA
A huzat 3 részből áll, melyek tépőzárakkal és patentokkal rögzülnek az ülésre.
Amennyibenaz összes rögzítőt kilazította, könnyedén leszedhető a huzat.
A huzat visszahelyezésekor az eltávolítással ellenkező sorrendben kell eljárni.
Figyelem! A biztonsági gyermekülést soha ne használja huzat nélkül.
A HUZAT ELTÁVOLÍTÁSA A HÁTTÁMLÁRÓL
1. Húzza a fejtámlát (e) a legfelső pozicióba, használva a kioldó fogantyút (h).
2. A fejtámla (e) kioldásához egyidejűleg húzza a fogantyút (h) és háttámla felső rés-
zének az alsó szegélyét (a). Most a fejtámla (e) teljes egészében leválasztható.
3. Most a huzat eltávolítható.
4. Szétszedéshez húzza meg az állító kart (h) és helyezze be a fejtámlát (e) a
háttámlába (a).
Page 67

PÉČE O VÝROBEK
Pro zaručení nejlepší možné ochrany dětské bezpečnostní automobilové
sedačky je nutné, abyste si všimli následujícího:
STAROSTIVOSŤ O VÝROBOK
Pre zaručenie najlepšej možnej ochrany detskej bezpečnostnej sedačky je
nutné, aby ste si všimli nasledujúceho:
• Všechny důležité části dětské bezpečnostní sedačky by se měly pravidelně
kontrolovat, zda nejsou poškozeny. Mechanické díly musí bezvadně fungovat.
• Je podstatné, aby se dětská bezpečnostní automobilová sedačka nevzpříčila mezi
tvrdými částmi, jako např. dveře automobilu, vodicí lišta sedadla atd., což by mohlo
způsobit poškození sedačky.
• Po pádu nebo podobných situacích musí být dětská bezpečnostní sedačka
zkontrolována výrobcem.
ODSTRANĚNÍ POTAHU SEDAČKY
Potah sedačky se skládá ze tří částí, které jsou připevněny k sedačce suchými
zipy, knoíky a sponami. Nejprve uvolněte všechny xace, poté části potahu
mohou být odstraněny.
Pro vrácení potahů na sedačku postupujte v obráceném pořadí, než když jste
je odstraňovali.
Varování! Dětská bezpečnostní sedačka nesmí být nikdy použita bez potahu.
SUNDAVÁNÍ POTAHU AUTOSEDAČKY Z OPĚRKY ZAD
1. Pomocí uvolňovacího madla (h), vytáhněte opěrku hlavy (e) do nejvyšší pozice.
2. K uvolnění opěrky hlavy (e) zároveň zatáhněte za madlo (h) a za spodní okraj
horního žebra opěrky zad (a). Nyní může být opěrka hlavy (a) zcela vyjmuta.
3. Nyní lze potah sundat.
4. Pro opětovné smontování zatáhněte za madlo (h) a vložte opěrku hlavy (e) zpět
do opěrky zad (a).
• Všetky dôležité časti detskej bezpečnostnej autosedačky by sa mali pravidelne
kontrolovať, či nie sú poškodené. Mechanické diely musia bezchybne fungovať.
• Je dôležité, aby sa detská bezpečnostná autosedačka nevzpriečila medzi tvrdými
časťami, ako napr dvere automobilu, vodiaca lišta sedadlá atď, čo by mohlo
spôsobiť poškodenie sedačky.
• Po páde alebo podobných situáciách musí byť detská bezpečnostná sedačka
skontrolovaná výrobcom.
ODSTRÁNENIE POŤAHU SEDAČKY
Poťah sedačky sa skladá z troch častí, ktoré sú pripevnené k sedačke suchými
zipsy, gombíky a sponami. Najprv uvoľnite všetky xácie, potom môžu byť
odstránené časti poťahu.
Pre vrátenie poťahov na sedačku postupujte v obrátenom poradí, ako keď ste
je odstraňovali.
Varovanie! Detská bezpečnostná sedačka nesmie byť nikdy použitá bez poťahu.
ODNÍMANIE POŤAHU AUTOSEDAČKY Z OPIERKY CHRBTA
1. Pomocou uvoľňovacieho madla (h), vytiahnite opierku hlavy (e) do najvyššej
pozície.
2. Na uvoľnenie opierky hlavy (e) zároveň zatiahnite za rukoväť (h) a za spodný
okraj horného rebra opierky chrbta (a). Teraz môže byť opierka hlavy (a) úplne
vyňatá.
3. Teraz je možné poťah zložiť.
4. Pre opätovné zmontovanie zatiahnite za rukoväť (h) a vložte opierku hlavy (e)
späť do opierky chrbta (a).
66
Page 68

TISZTÍTÁS
Nagyon fontos, hogy csak az eredeti CYBEX Solution X2-x ülés huzatot
alkalmazzuk, mert a huzat a funkció alapvető része. Tartalék huzat részeket a
kereskedőtől lehet beszerezni.
Utasítás! Kérjük, mossa ki a huzatot az első használat előtt. A huzat 30°Con, kímélő programmal mosható. Ha 30°C-nál magasabb hőmérsékleten
mossa a huzatot, akkor az kifakulhat. Kérjük, a huzatot elkülönítve mossa,
és semmiképpen ne szárítsa gépben! A huzatot semmiképpen ne szárítsa
a tűző napon! A műanyag alkatrészek kímélő mosószerrel és meleg vízzel
moshatók le.
Figyelem! Vegyszereket és fehérítő hatóanyagokat semmiképpen sem
szabad használni.
MI A TEENDŐ BALESET UTÁN
Baleset esetén az ülésen sérülések keletkezhetnek, és ezek nem mindig
nyilvánvalóak. Ebben az esetben a biztonsági gyerekülést feltétlenül a
gyártónak kell megvizsgálnia, és szükség esetén ki kell azt cserélni.
67
Page 69

ČIŠTĚNÍ
Je důležité používat pouze originální potah sedačky CYBEX Solution X2-x,
protože potah je také hlavní funkční součástí. Rezervní potahy můžete dostat u
maloobchodníka.
ČISTENIE
Je dôležité používať iba originálny poťah sedačky CYBEX Solution X2-x,
pretože poťah je tiež hlavnou funkčnou súčasťou. Rezervné poťahy môžete
dostať u predajca.
Upozornění! Před prvním použitím potah prosíme vyperte. Potahy výrobků je
možné prát v pračce max. při 30°C. Pokud jej vyperete při vyšší teplotě, může
ztratit barvu. Potah perte zvlášť a nikdy jej neždímejte. Nevystavujte přímému
slunečnímu záření. Plastové součásti můžete očistit pomocí nedráždivého
mycího prostředku a teplé vody.
Varování! Nepoužívejte prosím za žádných okolností chemické čisticí
prostředky nebo bělicí prostředky!
CHOVÁNÍ PO NEHODĚ
Jestliže jste měli nehodu, mohlo dojít k poškození sedačky, které není jasně
viditelné. V tomto případě musí být dětská bezpečnostní sedačka zcela
zkontrolována výrobcem a vyměněna, bude-li to nezbytné.
Upozornenie! Pred prvým použitím poťah prosíme vyperte. poťahy výrobkov
je možné prať v práčke max pri 30°C. Ak ho vyperiete pri vyššej teplote,
môže stratiť farbu. Poťah perte osobitne a nikdy ho nežmýkajte. Nevystavujte
priamemu slnečnému žiareniu. Plastové súčasti môžete očistiť pomocou
nedráždivého umývacieho prostriedku a teplej vody.
Varovanie! Nepoužívajte prosím za žiadnych okolností chemické čistiace alebo
bieliace prostriedky!
ČO ROBIŤ PO NEHODĚ
Ak ste mali nehodu, mohlo dôjsť k poškodenie sedačky, ktoré nie je jasne
viditeľné. V tomto prípade musí byť detská bezpečnostná sedačka úplne
skontrolovaná výrobcom a ak to bude nevyhnutné aj vymenená.
68
Page 70

TERMÉK ÉLETTARTAM
A termék úgy lett kialakítva, hogy a mindennapi használat mellett a teljes
élettartam (kb. 9 év) alatt megfelelően működjönA termék fokozatos
elhasználódása során, pl. erős napfény hatására (UV) a hordozó részei enyhén
elszíneződhetnek.
Mivel a nagy hőmérsékletingadozás és egyéb előre nem látható hatások
gyakoriak a járművekben, szükséges az alábbiakra gyelni:
- Ha a jármű hosszú ideig erős napfénynek van kitéve, a gyermekülést ki kell venni a
járműből vagy le kell takarni egy világos ruhával.
- Ellenőrizzen rendszeresen minden fém és műanyag alkatrészt az esetleges
sérülésre, vagy színelváltozásra vonatkozóan. Amennyiben bármilyen változást
észlel a terméken, véleményeztesse és ha szükséges, cseréltesse az érintett
alkatrészt a gyártóval.Autóban történő használat során az elváltozások a
szövetben, különösen annak gyengülése normális, és nem veszélyezteti a termék
megfelelő működését.
HULLADÉKKEZELÉS
A biztonsági gyerekülést élettartamának lejártakor megfelelően le kell
selejtezni, ki kell dobni. A hulladékkezelési előírások területenként
változhatnak. Annak érdekében, hogy a használatból kivont biztonsági
gyerekülést előírásosan leselejtezhessük, fel kell venni a kapcsolatot az adott városi
kommunális hulladék kezelő társasággal. Minden esetben gyelembe kell venni az
adott országban érvényes hulladék-kezelési előírásokat.
69
Page 71

ŽIVOTNOST PRODUKTU
Tato dětská autosedačka byla navržena tak, aby při běžném používání plnila
svoji funkci po dobu přibližně 9 let.
Postupné opotřebování plastů, způsobené např. přímým slunečním zářením
(UV), může mírně zhoršit vlastnosti produktu.
Z důvodu vysokých změn teplot a jiných nepředvídatelných zatížení produktu
ve vozidle je nezbytné pozorovat následující:
- Pokud je vozidlo po delší dobu vystaveno přímému slunečnímu světlu, měla by být
autosedačka z vozidla vyjmuta nebo přikryta světlou látkou.
- Pravidelně kontrolujte, zda kovové a plastové části autosedačky nezměnily tvar či
barvu. V případě zaznamenání takové změny musí být autosedačka zkontrolována
a případně vyměněna výrobcem nebo zcela zlikvidována.
- Změny na látkách, především vyblednutí barev, jsou při běžném používání ve
vozidle zcela normální a nijak neovlivňují funkci autosedačky.
ŽIVOTNOSŤ PRODUKTU
Táto detská autosedačka bola navrhnutá tak, aby pri bežnom používaní plnila
svoju funkciu po dobu približne 9 rokov.
Postupné opotrebovanie plastov, spôsobené napr. priamym slnečným žiarením
(UV), môže mierne zhoršiť vlastnosti produktu.
Z dôvodu vysokých zmien teplôt a iných nepredvídateľných zaťaženie produktu
vo vozidle je nevyhnutné pozorovať nasledujúce:
- Ak je vozidlo po dlhšiu dobu vystavené priamemu slnečnému svetlu, mala by byť
autosedačka z vozidla vytiahnutá alebo prikrytá svetlú látkou.
- Pravidelne kontrolujte, či kovové a plastové časti autosedačky nezmenili tvar či
farbu. V prípade zaznamenania také zmeny musia byť autosedačka skontrolovaná
a prípadne vymenená výrobcom alebo úplne zlikvidovaná.
- Zmeny na látkach, predovšetkým vyblednutie farieb, sú pri bežnom používaní vo
vozidle úplne normálne a nijako neovplyvňujú funkciu autosedačky.
LIKVIDACE
Na konci trvanlivosti dětské bezpečnostní sedačky ji musíte řádně zlikvidovat.
Ustanovení pro likvidaci odpadu se mohou lišit podle oblasti. Pro zaručení správné
likvidace dětské bezpečnostní sedačky kontaktujte prosím správní úřad komunálního
odpadu ve vašem městě. Ve všech případech berte prosím na vědomí ustanovení
pro likvidaci odpadu vaší země.
LIKVIDÁCIA
Na konci trvanlivosti detskej bezpečnostnej sedačky ju musíte riadne zlikvidovať.
Ustanovenia pre likvidáciu odpadu sa môžu líšiť podľa oblasti. Pre zaručenie
správnej likvidácie detskej bezpečnostnej autosedačky kontaktujte prosím správny
úrad komunálneho odpadu vo vašom meste. Vo všetkých prípadoch berte prosím na
vedomie ustanovenia pre likvidáciu odpadu vašej krajiny.
70
Page 72

SZAVATOSSÁG
Az alábbi garancia feltételek kizárólag abban az országban érvényesek, ahol egy
forgalmazó egy ügyfél részére először értékesítette. A garancia minden gyártási és
anyaghibára kiterjed, amely a vásárláskor már fennállt, illetve a termék a forgalmazó
által az ügyfél részére történő első értékesítésétől számított három (3) éven belül
jelentkezett (gyártói garanciavállalás). Abban az eseteben, ha gyártási vagy
anyaghiba jelentkezik, a gyártó saját megítélése szerint megjavítja vagy kicseréli. A
garanciális szolgáltatásokat érintő reklamáció esetén a terméket vissza kell juttatni
annak a forgalmazónak, akitől a terméket a vevő eredetileg megvásárolta a vásárlást
igazoló elismervénnyel együtt (nyugta vagy számla), amelyen szerepel a vásárlás
időpontja, a forgalmazó neve és a termék pontos megnevezése is. A garancia nem
érvényesíthető abban az esetben, ha a terméket reklamációs céllal a gyártónak
vagy bármely más személynek küldik vissza, és nem annak a forgalmazónak, aki
a terméket eredetileg értékesítette. Kérjük, ellenőrizze a termék épségét és az
esetleges gyártási vagy anyaghibára utaló jeleket rögtön a vásárlás után illetve
rendelés esetén a kézhezvétel után azonnal. Amennyiben a termék megsérül,
ne használja tovább, haladéktalanul juttassa vissza annak a forgalmazónak,
akitől eredetileg vásárolta. A garancia érvényesítéséhez a terméket megtisztított
és hiánytalan állapotban kell visszaküldeni. Mielőtt a terméket visszaküldené a
forgalmazóhoz, kérjük, gyelmesen olvassa el a Használati útmutatót. A garancia
nem terjed ki a termék nem rendeltetésszerű használatából, külső befolyásoló
tényezők (vízkár, tűzkár, közúti balesetek stb.) hatására keletkező vagy normál
kopásból és elhasználódásból eredő károkra. A garancia csak abban az esetben
érvényesíthető, ha a terméket a használati útmutatónak megfelelően kezelték
és használták, az esetleges javításokat kizárólag az arra jogosult személyek
végezték, továbbá eredeti alkatrészeket és tartozékokat használtak. Jelen garanciát
a hatályban lévő jogszabályokban lefektetett fogyasztói jogok illetve a termékre
vonatkozó szerződések megszegése miatt a beszállítóval szemben érvényesíthető
jogok semmilyen módon nem zárják ki, korlátozzák vagy kényszerítik.
71
Page 73

ZARUKA
Následující záruka platí pouze v zemi, kde byl tento produkt původně prodán od
prodejce zákazníkovi. Záruka se vztahuje na všechny výrobní a materiálové vady,
které existují a které se objeví v den nákupu nebo se objevily v období tří (3) let
od data nákupu od prodejce, který původně prodal výrobek spotřebiteli (výrobní
záruka). V případě objevení se výrobní nebo materiální vady, výrobek - podle
vlastního uvážení - buď zdarma opravíme nebo jej nahradíme novým produktem.
Chcete-li získat takovouto záruku, je nutné přinést nebo odeslat výrobek k prodejci,
který původně prodal tento produkt zákazníkovi a předložit originál dokladu o
nákupu (účtenky nebo faktury), který obsahuje datum nákupu, jméno prodejce a
typové označení tohoto produktu. Tato záruka neplatí v případě, že je tento výrobek
přivezen nebo odeslán výrobci nebo jiné osobě, než je prodejce, který původně
prodal tento výrobek spotřebiteli. Zkontrolujte prosím, zda je daný výrobek úplný
a nejsou na něm přítomny žádné výrobní vady v den nákupu, nebo v případě, že
výrobek byl zakoupen v prodeji na dálku, ihned po obdržení. V případě závady
přestaňte produkt používat a přivezte nebo odešlete jej ihned prodejci, který Vám
výrobek původně prodal. V případě uplatňování záruky musí být výrobek vrácen v
čistém a kompletním stavu. Než se obrátíte na prodejce, přečtěte si pečlivě návod
k použití. Tato záruka se nevztahuje na škody způsobené nesprávným používáním,
vlivem prostředí (voda, oheň, dopravní nehody apod.) nebo běžným opotřebením.
Záruka také platí pouze v případě, že byl výrobek používán vždy v souladu s
návodem k obsluze, v případě potřeby byly veškeré úpravy a služby prováděny
oprávněnými osobami a byly používány originální komponenty a příslušenství. Tato
záruka nevylučuje, neomezuje ani jinak neovlivňuje zákonná práva spotřebitelů a
to včetně nároků z porušení práva a nároků s ohledem na porušení smlouvy, které
kupující může mít vůči prodávajícímu nebo výrobci výrobku.
IMPORTER / DISTRIBUTOR:
Kenyo, spol. s r.o.,
Skorkovská 2457, 198 00 Praha 9 – Cerný Most,
Tel: +42 (0) 281 910 879
Fax: +42 (0) 281 917 689
ZÁRUKA
Nasledujúci záruka platí iba v krajine, kde bol tento produkt pôvodne predaný od
predajcu zákazníkovi. Záruka sa vzťahuje na všetky výrobné a materiálové vady,
ktoré existujú a ktoré sa objavia v deň nákupu alebo sa objavili v období troch (3)
rokov od dátumu nákupu od predajcu, ktorý pôvodne predal výrobok spotrebiteľovi
(Výrobná záruka). V prípade objavenia sa výrobné alebo materiálne chyby, výrobok
- Podľa vlastného uváženia - buď zadarmo opravíme alebo ho nahradíme novým
produktom. Ak chcete získať takúto záruku, je nutné priniesť alebo odoslať výrobok
k predajcovi, ktorý pôvodne predal tento produkt zákazníkovi a predložiť originál
dokladu o nákupe (účtenky alebo faktúry), ktorý obsahuje dátum nákupu, meno
predajcu a typové označenie tohto produktu. Táto záruka neplatí v prípade, že je
tento výrobok privezený alebo odoslaný výrobcovi alebo inej osobe, než je predajca,
ktorý pôvodne predal tento výrobok spotrebiteľovi. Skontrolujte prosím, či je daný
výrobok úplný a nie sú na ňom prítomné žiadne výrobné chyby v deň nákupu,
alebo v prípade, že výrobok bol zakúpený v predaji na diaľku, ihneď po obdržaní.
V prípade poruchy prestaňte produkt používať a prineste alebo odošlite ho ihneď
predajcovi, ktorý Vám výrobok pôvodne predal. V prípade uplatňovania záruky musí
byť výrobok vrátený v čistom a kompletnom stave. Než sa obrátite na predajcu,
prečítajte si pozorne návod na použitie. Táto záruka sa nevzťahuje na škody
spôsobené nesprávnym používaním, vplyvom prostredia (voda, oheň, dopravné
nehody a pod) alebo bežným opotrebovaním. Záruka tiež platí len v prípade, že
bol výrobok používaný vždy v súlade s návodom na obsluhu, v prípade potreby
boli všetky úpravy a služby vykonávané oprávnenými osobami a boli používané
originálne komponenty a príslušenstvo. Táto záruka nevylučuje, neobmedzuje ani
inak neovplyvňuje zákonné práva spotrebiteľov a to vrátane nárokov z porušenia
práva a nárokov s ohľadom na porušenie zmluvy, ktoré kupujúci môže mať voči
predávajúcemu alebo výrobcovia výrobku.
72
Page 74

73
Page 75

¡APRECIADO CLIENTE!
MUCHAS GRACIAS POR COMPRAR UNA CYBEX SOLUTION X2-FIX. LE ASEGURAMOS QUE EN EL
DESARROLLO DE LA CYBEX SOLUTION X2-FIX SE HAN TENIDO EN CUENTA LA SEGURIDAD, EL CONFORT
Y LA PRACTICIDAD. EL PRODUCTO SE HA DESARROLLADO BAJO UN ESTRICTO CONTROL DE CALIDAD Y
TENIENDO EN CUENTA TODOS LOS ESTÁNDARES DE SEGURIDAD.
CARO CLIENTE!
MUITO OBRIGADO PELA DECISÃO DE COMPRAR A CYBEX SOLUTION X2-FIX. ASSEGURAMOS QUE
NO DESENVOLVIMENTO DE CYBEX SOLUTION X2-FIX, A SEGURANÇA, O CONFORTO E O FÁCIL
MANUSEAMENTO SÃO O FOCO PRINCIPAL. O PRODUTO FOI DESENVOLVIDO SOB UM CONTROLO DE
QUALIDADE SUPERIOR CUMPRE TODAS AS NORMAS DE SEGURANÇA STANDARD.
74
Page 76

MANUAL DE INSTRUCCIONES
CYBEX Solution X2-fix
alzador con respaldo
RECOMENDADO PARA:
Edad: Desde los 3 a los 12 años aproximadamente.
Peso: de 15 a 36 Kg.
Altura: hasta 150 cm.
Para vehículos equipados con cinturón de seguridad
retráctil de 3 puntos.
NORMATIVA:
ECE R-44/04, grupo 2/3, de 15 a 36 Kg..
ES CONTENIDO
¡Advertencia! Para garantizar que su hijo se encuentre seguro, es muy
importante usar e instalar la CYBEX Solution X2-fix de acuerdo con el Manual de
Instrucciones.
¡Atención! Guarde siempre el manual de instrucciones bajo la funda elástica que
encontrará en la parte trasera del respaldo para que pueda tenerlo a mano siempre
que precise consultar cualquier duda.
¡Aviso! Por favor, tenga siempre a mano este manual de instrucciones y guárdelo en
el compartimento destinado a ello bajo la silla.
Instrucciones abreviadas ................................................................................1
MANUAL DE INSTRUÇÕES
2
CYBEX Solution X2-fix
cadeira auto para criança com encosto de cabeça.
RECOMENDADO PARA:
Idade: desde aprox. 3 a 12 anos
Peso: 15 a 36 kg
Altura do corpo: máx. 150 cm.
Para assentos de veículos com três pontos de
fixação e pré tensão
NORMA:
ECE R44/04, grupo 2/3, de 15 a 36 kg
Advertencia / Aviso
Licencia – Homologación
Montaje inicial
Ajuste de la talla
Ajuste del reposacabezas
.........................................................................................2
.............................................................................75
...............................................................................................77
...........................................................................................77
............................................................................77
Una correcta posición en el vehículo............................................................79
Instalación de la silla de automóvil con conectores......................................81
Extraer la Solution X2–fix
.............................................................................83
Seguridad del niño........................................................................................83
Colocación del cinturón de seguridad
¿Está su hijo seguro?
...................................................................................87
Reclinado del reposacabezas
Cuidado del producto
...................................................................................89
..........................................................85
......................................................................87
Quitar la funda del asiento............................................................................89
Extraer la funda del respaldo........................................................................89
Limpieza
Qué hacer después de un accidente
.......................................................................................................91
............................................................91
Durabilidad del producto...............................................................................91
Reciclado
......................................................................................................93
Garantía........................................................................................................93
75
Page 77

PT CONTÉM
Atenção Para garantir que a sua criança está segura, é muito importante
que utilize e monte a CYBEX Solution X2-fix segundo este manual de
instruções.
Atenção! Guarde sempre o manual de instruções debaixo da capa elástica que
encontrará na parte traseira do encosto para que o possa ter perto de sí sempre que
tenha alguma dúvida.
Aviso! Por favor,tenha sempre à mão este manual de instruções e guarde-o no
compartimento destinado por baixo da cadeira.
Instrução abreviada ........................................................................................2
Atenção/ Nota
Licença – homologação................................................................................75
Montagem inicial...........................................................................................78
Ajuste à estatura do corpo............................................................................78
Ajuste do encosto de cabeça
O lugar correcto no automóvel
Instalação da cadeira com fixadores
Retirar a Solution X2-fix................................................................................84
Segurança da criança...................................................................................84
Colocação do cinto do assento da criança
Está a sua criança bem segura?
Reclinação do encosto de cabeça................................................................88
Manutenção do produto................................................................................90
Retirar a forra
Retirar a forro do encosto
Limpeza
O que fazer depois de um acidente..............................................................92
Tempo de vida do produto
Reciclagem
Garantia
.................................................................................................3
.......................................................................78
.....................................................................80
............................................................82
...................................................86
..................................................................88
...............................................................................................90
.............................................................................90
........................................................................................................92
............................................................................92
...................................................................................................94
........................................................................................................94
76
Page 78

b
e
f
a
c
a
d
d
z
MONTAJE INICIAL
La silla de seguridad está constituida por un asiento elevador (d) y un respaldo (a)
con reposacabezas reclinable y ajustable en altura. Sólo combinando las dos partes
proporcionará al niño una correcta protección y confort.
¡Atención! Las partes de la CYBEX Solution X2-fix no se deben usar por
separado o en combinación con sillas de seguridad, respaldos o reposacabezas
de otra gama o fabricante. En este caso la garantía expiraría inmediatamente.
El respaldo (a) se ancla con el eje (c) del asiento (d) mediante la guía de arrastre (b).
¡Aviso! Por favor, almacene este manual de instrucciones en un lugar seguro.
Debería tenerlo siempre a mano para futuras consultas. Guarde el manual de
instrucciones bajo la cubierta elástica, situada en la parte trasera del respaldo.
¡Atención! Por favor, siempre preste atención a que ninguna parte suelta o
plástica de la silla de seguridad quede dañada por el uso diario del coche, por
ejemplo el ajuste de la silla de seguridad o la puerta del vehículo.
Inserte la pieza del Sistema de Protección Lineal en Impactos Laterales (L.S.P.) en
las ranuras correspondientes (z), luego empújelo hacia abajo para ajustarlo.
e
h
AJUSTE DE LA TALLA
El protector de hombros y reposacabezas (e) deben ajustarse óptimamente en altura
para proporcionar la mejor protección y confort para su hijo/a y así garantizar una
posición óptima del cinturón de seguridad (f). Usted puede ajustar la altura (e) en
11 posiciones. El protector de hombros está fijado al reposacabezas y no se debe
ajustar por separado. El ajuste debe ser realizado de tal manera que usted pueda
introducir 2 dedos entre el borde final del reposacabezas y el hombro del niño/a.
AJUSTE DEL REPOSACABEZAS
- Coloque al niño/a en la silla de seguridad
- Presione el botón de ajuste (h) para desbloquear el protector de hombros y el
reposacabezas.
- Ahora puede ajustar el protector de hombros y el reposacabezas (e) a la altura
deseada.
- En cuanto deje de pulsar el mecanismo de ajuste (h), el protector de hombros y el
reposacabezas (e) se ajustarán completamente.
77
Page 79

MONTAGEM INICIAL
As partes da CYBEX Solution X2-fix não podem ser usadas separadamente ou em
combinação com assentos, costas ou apoios de cabeça de outra gama ou fabricante.
Neste caso a garantia deixa de ser válida imediatamente.
Nota! Por favor, guarde este manual de instruções num lugar seguro. Deverá têlo sempre à mão para futuras consultas. Guarde este manual de instruções, por
debaixo da capa elástica, situada na parte traseira do encosto de costas.
O apoio de costas (a) está inclinado no eixo (c) do assento (d) com a guia (b).
Aviso! Por favor tome atenção que nenhumas partes soltas ou plásticos do assento
fiquem danificados na utilização diária do automóvel, por exemplo o ajuste do
assento automóvel ou a porta.
Atenção! Por favor, preste sempre atenção a que nenhuma parte solta ou
plástica da cadeira fique danificada pela utilização diária no carro, por exemplo
a regulação da cadeira de segurança ou a porta do veículo.
Insira a peça do Sistema de Protecção Linear em Impactos Laterais (L.S.P) nas
ranhuras correspondentes (z), a seguir empurre para baixo para ajustar.
AJUSTE À ESTATURA DO CORPO
Só um bom ajuste dos apoios de cabeça e ombros em altura (e) proporciona a
melhor protecção e conforto na criança, garantindo também a melhor posição do
cinto diagonal (f). Pode ajustar a altura (e) em 11 posições. O apoio de ombros é
fixo ao apoio de cabeça e não deve ser ajustado separadamente. O ajuste tem de
ser feito de maneira que entre a base do apoio de cabeça e os ombros da criança
consiga colocar 2 dedos.
AJUSTE DO ENCOSTO DE CABEÇA
- Coloque a sua criança na cadeira auto
- Empurre o botão de ajuste (h), até destrancar o protector de ombros e encosto de
cabeça.
- Agora pode ajustar o protector de ombros e encosto de cabeça (e) à altura
desejada.
- Logo que largue o botão de ajuste (h), o protector de ombros e encosto de cabeça
(e) vai-se trancar por si próprio.
78
Page 80

79
UNA CORRECTA POSICIÓN EN EL VEHÍCULO
La CYBEX Solution X2-fix se puede usar en cualquier asiento del vehículo que
disponga de cinturón retráctil con 3 puntos de anclaje. Se recomienda usar los
asientos traseros del automóvil, ya que la parte delantera generalmente es más
peligrosa para el niño en caso de accidente.
¡Atención! No utilice la silla de seguridad con un cinturón de seguridad con dos
puntos de anclaje o cinturón abdominal. Asegurando a su hijo/a con un cinturón
de seguridad con dos puntos de anclaje, podría causar graves daños a su hijo/a
en caso de accidente.
Los automóviles deben ser compatibles para el anclaje adicional con los
conectores X-fix. En cualquier caso, la silla debe utilizarse únicamente en
aquellos automóviles incluidos dentro de la categoría „semi universal“, y que
estén dentro de la lista adjunta de automóviles homologados. Esta lista se
actualiza periódicamente, y la última versión puede obtenerse a través nuestro o bien
accediendo a www.cybex-online.com. Excepcionalmente, la CYBEX Solution X2-fix
se puede usar en el asiento del copiloto. En este caso, debe tener en cuenta las
siguientes instrucciones:
- Si el asientow del copiloto tiene airbag, debe mover el asiento hacia atrás lo más
lejos posible, pero teniendo en cuenta que el punto de anclaje del
cinturón de seguridad debe estar por detrás de la CYBEX Solution X2-fix en todo
momento. Se deben seguir las instrucciones del fabricante del vehículo.
¡Advertencia! El cinturón de seguridad (f) debe llegar en diagonal desde la parte
trasera y nunca debe sobrepasar el punto más alto del cinturón de seguridad
por la parte frontal. En el caso de que el cierre del cinturón esté fabricado de
tal modo que sea muy grande para las ranuras de anclaje del chasis, la CYBEX
Solution X2-fix no es adecuada para este tipo de vehículo.
El equipaje u otros objetos que se coloquen en el interior del vehículo y puedan
causar lesiones en caso de accidente deben estar fijados correctamente en todo
momento.
¡Atención! Para aquellos vehículos en los que los asientos están situados
lateralmente, el uso de esta silla infantil no está permitido. Para asientos
que están situados en contra del sentido de la marcha, por ejemplo en un
monovolumen o minibus, el uso de la silla infantil está permitido siempre que
el asiento esté homologado para un adulto. Por favor, asegúrese de que el
reposacabezas está colocado cuando instale la silla infantil en un asiento que
f
está situado en contra del sentido de la marcha. La silla infantil debe atarse
con el cinturón de seguridad, incluso cuando el niño no está en ella. Esto es
necesario para evitar que el conductor o el copiloto puedan resultar heridos por
una silla suelta en caso de tener que frenar bruscamente o en caso de colisión.
¡Aviso! Por favor nunca deje sin la vigilancia de un adulto a su hijo/a en el vehículo.
Page 81

O LUGAR CORRECTO NO AUTOMÓVEL
A CYBEX Solution X2-fix pode ser utilizada em todos os assentos auto com três
pontos de fixação e pré tensor. Na generalidade recomendamos que utilize os
assentos traseiros do veículo. Na frente, a criança normalmente está exposta a
maiores riscos em caso de acidente.
Aviso! Não deve utilizar o assento com cintos de segurança de 2 pontos ou de
ventre. A utilização de um cinto de segurança de 2 pontos pode causar danos
severos ou fatais à criança em caso de acidente.
Os automóveis devem ser compativeis para o encaixe adicional com os
conectores X-fix. Em qualquer caso, a cadeira deve ser utilizada únicamente
nos automoveis incluídos dentro da categoria „semi- universal“ e que estejam
dentro da lista adjunta de automoveis homologados. Esta lista é actualizada
periódicamente e a última versão pode ser obtida através do nosso site: www.cybexonline.com. Em excepcções o assento da criança pode ser utilizado no lugar do
passageiro à frente. Neste caso siga as seguintes recomendações:
- Em automóveis com airbag deve posicionar o assento do automóvel do passageiro
o mais para trás possível. Por favor certifique-se de que a parte mais alta do cinto
do veículo fica por trás da guia do cinto do assento.
- Deve seguir as recomendações do fabricante do veículo.
Aviso! O cinto de segurança(f)deve passar diagonalmente desde trás e nunca
passar acima do ponto mais alto do cinto do assento da frente do veículo. Não
deve ser possível ajustar por exemplo empurrando o assento do veículo para a
frente ou utilizar num outro assento do veículo, desta maneira a cadeira auto de
criança não se destina a este veículo.
Bagagem ou outros objectos soltos dentro do automóvel devem ser presos
comsegurança para evitar danos em caso de acidente.
Atenção! Para os veículos em que os assentos estão situados lateralmente, o
uso desta cadeira infantil não é permitido. Para os assentos que estão situados
no sentido contra a marcha do veículo, por exemplo um monovolume ou
minibus, a utilização é permitida sempre que o assento seja homologado para
um adulto. Por favor, certifique-se de que o encosto da cadeira infantil está
colocado quando a instalar num veiculo com assento em posição contrária ao
sentido da marcha. A cadeira infantil deve ser presa com o cinto de segurança,
mesmo quando a criança não está sentada nela. Isto é necessário para evitar
que o condutor ou o co-piloto possam ficar feridos por uma cadeira solta no
caso efectuar uma travagem brusca ou em caso de colisão.
Nota! Por favor nunca deixe a criança no automóvel sem a supervisão de um adulto.
80
Page 82

INSTALACIÓN DE LA SILLA DE AUTOMÓVIL CON CONECTORES
La seguridad de su hijo aumentará con los conectores X-fix que permiten
unir la silla al vehículo firmemente. Su hijo debe continuar utilizando el
cinturón de seguridad de 3 puntos del vehículo.
- Conecte las dos guías de instalación X-fix (las partes largas mirando hacia arriba)
con los dos puntos de anclaje ISOFIX (i).
¡Aviso! Los puntos de anclaje ISOFIX (i) son dos ganchos de metal por asiento,
situados entre el respaldo y la base del asiento de su vehículo. En caso de duda, por
favor consulte el manual de usuario de su vehículo.
- Para realizar ajustes, por favor mueva el botón X–fix, situado en la parte baja de la
silla infantil.
- Tire de los conectores (w) tanto como pueda.
- Gire los conectores X–fix180° de forma que apunten en la dirección de las guías de
instalación.
¡Advertencia! Asegúrese de que los dos indicadores de seguridad verdes (x) de las
pinzas de sujeción ISOFIX (w) no se pueden ver. En caso necesario, desbloquee
las pinzas de seguridad ISOFIX (w) pulsando y soltando el botón de desbloqueo (y).
Repita el proceso en la segunda pinza de sujeción, si es necesario.
- Presione ambos conectores X–fix (w) en las guías de instalación hasta que oiga
que quedan fijadas en los puntos de anclaje ISOFIX (i).
- Asegúrese de que la silla ha quedado bien instalada tirando de ella hacia afuera .
- El indicador de seguridad de verde (x) debe verse bien en los dos botones de
desbloqueo (y).
- Con el botón X–fix situado en la base de la silla infantil ahora ya puede ajustar la
posición de la silla.
¡Aviso! Si desea información adicional por favor consulte la sección „Colocar la silla
en el automóvil“.
- Ahora ya puede abrochar el cinturón de seguridad de su hijo. Por favor, consulte
„Abrochar el cinturón al niño“.
81
Page 83

INSTALAÇÃO DA CADEIRA COM FIXADORES.
A segurança do seu filho aumentará com os fixadores X-fix que permitem a
união firme da cadeira ao veículo. O seu filho deve continuar a utilizar o cinto
de segurança de 3 pontos do veículo.
- Fixe as duas guias de instalação X-fix (as partes compridas vistas de cima) com os
dois pontos de encaixe ISOFIX (i).
Nota! Os pontos de encaixe ISOFIX (i) são dois ganchos de metal por assento,
situadosentre as costas e a base do assento do seu veículo. Em caso de dúvida, por
favor consulte o manual de utilizador do seu veículo.
- Para ajustar, por favor desloque o botão X-fix, situado na parte de baixo da cadeira.
- Puxe os fixadores (w) tanto quanto possa.
- Gire os fixadores X-fix 180º de forma que apontem na direcção das guias de
instalação.
Aviso! Assegure-se de que os dois indicadores de segurança verdes (x) nos braços
de engate ISOFIX (w) não são visíveis. Se necessário, desbloqueie os braços de
engate ISOFIX (w), pressionando o botão de desbloqueio (y) e puxando para trás. Se
necessário, repita o processo com o segundo braço de engate também.
- Pressione ambos os fixadores X-fix (w) nas guias de instalação até que oiça que
ficaram fixos nos pontos de encaixe ISOFIX (i)
- Certifique-se que a cadeira ficou bem instalada puxando a cadeira para fora.
- O indicador de segurança verde (x) deve ser bem visível nos dois botões de
desbloqueio (y).
- Com o botão X-fix situado na base da cadeira infantil, agora já poderá ajustar a
posição da cadeira.
Nota! Se desejar informação adicional por favor consulte a secção „Colocar a
cadeira no automóvel“.
- Agora já pode prender o cinto de segurança do seu filho. Por favor consulte
„Apertar cinto à criança“.
82
Page 84

83
EXTRAER LA SOLUTION X2–FIX
Realice todos los pasos relativos a la instalación en orden inverso.
a
1
2
- Pulse los botones de desbloqueo (y) y tire de ellos hacia atrás al mismo
tiempo para desbloquear las pinzas de seguridad ISOFIX (w).
- Suelte la silla de las guías de instalación (u).
- Rote los conectores X–fix 180°.
- Mueva el botón X–fix situado en la base de la silla de seguridad infantil y pulse los
conectores X–fix hasta el final.
¡Aviso! Este procedimiento protege el acolchado de la silla y evita que se dañe o se
manche. Daños y manchas podrían dificultar un funcionamiento suave.
SEGURIDAD DEL NIÑO
Coloque la silla de seguridad sobre el asiento elegido del coche.
- Por favor, asegúrese que el respaldo (a) de la silla de seguridad está colocado
contra el respaldo del asiento del vehículo y bajo ninguna circunstancia en posición
reclinada.
- Cuando use los anclajes ISOFIX en el automóvil, asegúrese que el
respaldo de la Solution X2-fix está perfectamente alineado y en contacto
pleno con el respaldo del asiento del vehículo. La distancia puede ajustarse
gracias a la leva de ajuste (v) situada en la parte baja de la silla infantil.
- Si el reposacabezas del asiento del vehículo entorpece, desplácelo, gírelo o
retírelo (para excepciones sobre esto, consulte el apartado POSICIÓN CORRECTA
DE LA SILLA EN EL VEHÍCULO). El respaldo (a) se adaptará perfectamente a
prácticamente cualquier ángulo del respaldo del asiento del vehículo.
¡Atención! El respaldo de la Solution X2-fix debería quedar plano contra la parte
superior del asiento del coche. Si aprieta la parte inferior contra el asiento del
coche, la silla debería quedar bien apretada contra el asiento del coche. ¡Para la
mejor protección posible del niño, el asiento debe estar en posición vertical!
¡Aviso! En algunos asientos de coche hechos de materiales sensibles (p.ej. cuero,
terciopelo, etc.), el uso de la silla puede dejar marcas de uso y desgaste. Para
evitarlo, debería poner debajo de la silla una sábana o toalla como protección. En
este contexto, también nos gustaría referirle a las instrucciones de limpieza, que se
deben seguir desde el primer uso de la silla.
Page 85

RETIRAR A SOLUTION X2-FIX
Cumpra todos os passos relativos à instalação em ordem inversa.
- Desbloqueie os braços de engate ISOFIX (w) dos dois lados,
pressionando os botões de desbloqueio (y) e puxando para trás, em
simultâneo.
- Solte a cadeira das guias de instalação (u).
- Rode os fixadores X-fix 180º.
- Desloque o botão X-fix situado na base da cadeira de segurança infantil e
pressione os fixadores X-fix até ao final.
Nota! Este procedimento proteje o acolchoado da cadeira e evita que se estrague ou
se manche. Danos e manchas poderiam dificultar um funcionamento suave.
SEGURANÇA DA CRIANÇA
Coloque a cadeira auto de segurança no assento escolhido do automóvel.
- Por favor certifique-se de que o apoio de costas (a) da cadeira auto de criança
apoia directamente nas costas da cadeira do veículo, assim a cadeira auto de
criança estará na posição correcta.
- Quando usar os encaixes ISOFIX no automóvel, certifique-se que o
encosto de costas da Solution X2-fix está perfeitamente alinhado e em
contacto pleno com o assento do veículo. A dsitância pode ser ajustada (v)
situada na parte de baixo da cadeira infantil.
- Se o encosto de cabeça do automóvel estiver a estorvar, coloque na posição mais
elevada ou retire completamente (para exceções, consulte a secção “COLOCAR A
CADEIRA AUTO CORRETAMENTE NO AUTOMÒVEL”) O encosto da cadeira (a)
adapta-se praticamente a todas as inclinações dos assentos automóveis.
Aviso! O apoio de costas da Solution X2-fix deve ficar direito em relacção
ao assento do automóvel. Empurrando a base para trás deve pressionar
ligeiramente contra o assento. Para a melhor protecção possível da sua criança,
o assento deve estar numa posição normal e direita.
Nota! É possível que alguns assentos de automóvel de material mais sensível (ex:
veludo, pele, etc.) demonstrem.sinais de descoloração e desgaste. De forma a
evitar este desgaste poderá, por exemplo, colocar uma toalha debaixo da cadeira.
Neste contexto referimo-nos também às instruções de limpeza, que deverão ser
consideradas antes da primeira utilização.
84
Page 86

COLOCACIÓN DEL CINTURÓN DE SEGURIDAD
Coloque al niño en la silla de seguridad. Pase por delante del niño el cinturón de
l
m
f
l
n
f
k
d
g
e
n
k
f
seguridad hasta el cierre del cinturón.
¡Atención! ¡Nunca debe darle vueltas al cinturón de seguridad!
Ponga la hebilla del cinturón (m) en el cierre del cinturón (l). Ésta tiene que cerrarse
con un „CLICK“ audible.
Ponga el cinturón abdominal (n) en las guías inferiores del cinturón (k) de la silla de
seguridad. Ahora ajuste el cinturón abdominal (n) tirando del cinturón diagonal (f) y
asegurándose que no queda flojo. El cinturón de seguridad debe estar bien sujeto
para proteger de posibles lesiones. El cinturón diagonal y el cinturón abdominal
deberían estar insertados en la guía de cinturón inferior por el lado del cierre del
cinturón.
¡Atención! El cierre del cinturón del asiento del vehículo (l) no debe alcanzar
bajo ninguna circunstancia la guía inferior del cinturón (k). Si la correa que
acompaña al cierre del cinturón es demasiado larga, entonces la silla no es
apropiada para este vehículo.
El cinturón abdominal (n) debería estar colocado en las guías del cinturón inferior (k)
a ambos lados del asiento (d).
¡Aviso! Enseñe a su hijo desde un principio a vigilar la tensión del cinturón y a
hacerlo por sí mismo cuando sea necesario.
¡Atención! El cinturón abdominal debe estar lo más bajo posible y pasar por
encima de la ingle para garantizar la mayor seguridad en caso de accidente.
Ahora pase el cinturón de seguridad diagonal (f) por la ranura del hombro (g) situada
en el reposacabezas (e) hasta que quede asegurado.
Asegúrese que el cinturón diagonal (f) pase entre el cuello del niño y la parte
exterior del hombro. Si fuese necesario ajuste el reposacabezas. La altura del
reposacabezas debe ser regulada cuando el asiento está colocado en el vehículo.
85
Page 87

COLOCAÇÃO DO CINTO DO ASSENTO DA CRIANÇA
Coloque a criança na cadeira auto de segurança. Puxe o cinto de segurança de 3
pontos em volta da criança e em direção ao fecho do cinto.
Aviso! Nunca torça o cinto.
Coloque a guia do cinto (m) no fecho do cinto (l). Deve ouvir-se um clique ao ficar no
lugar.
Coloque o cinto de cintura (n) nas aberturas para o cinto (k) do assento auto para
criança. Agora puxe o cinto de cintura (n) bem apertado puxando o cinto diagonal (f)
para que não fique folga. Quanto mais justo ficar o cinto melhor protecção terá em
caso de acidente. Tanto o cinto diagonal como o de cintura devem ambos passar
juntos pela guia da base lateral.
Aviso! Em caso nenhum deve o fecho (l) atingir as guias para o cinto (k) do
assento. Se o fecho for demasiado comprido, este assento não é destinado para
este automóvel.
O cinto de cintura (n) deve passar pelas guias na base (k) em ambos os lados do
assento (d).
Nota! Ensine à criança desde o começo como se aperta o cinto, para poder apertá-lo
sozinho se for necessário.
Aviso! O cinto de cintura deve estar o mais baixo possível acima da virilha, para
garantir a segurança máxima em caso de acidente.
Agora coloque o cinto diagonal (f) na guia do cinto de cor vermelha (g) no apoio de
ombros (e) até que esteja dentro da guia.
Certifique-se de que o cinto diagonal (f) passa entre o pescoço da criança e a parte
exterior do ombro. Se necessário, ajuste a altura do encosto de cabeça. A
encosto de cabeça pode ser ajustada quando a cadeira estiver no automóvel.
altura do
86
Page 88

¿ESTÁ SU HIJO SEGURO?
Para garantizar la mayor seguridad del niño, por favor compruebe los siguientes
pasos antes de poner el vehículo en marcha …
- el cinturón abdominal (n) pasa a través de las guías inferiores (k) por ambos lados
del asiento de la silla de seguridad.
- el cinturón diagonal (f) también pasa por la guía inferior (k) de la silla por el lado del
cierre del cinturón.
- el cinturón diagonal (f) pasa por la guía del cinturón (g) del protector para los
hombros, marcado en color rojo
- el cinturón de seguridad (f) llega en diagonal desde la parte posterior.
- para una completa seguridad el cinturón debe estar perfectamente tensado y no
debe haberse girado / no tiene ninguna vuelta.
- que el acolchado está fijo en su sitio a ambos lados de los conectores
X-fix y los puntos de anclaje ISOFIX
- que el respaldo (a) de la silla infantil está en contacto pleno con el
respaldo de la silla del vehículo. Esto asegura que la silla infantil se
encuentre siempre en posición vertical.
¡Aviso! El botón verde de seguridad (x) debe quedar claramente visible en ambos
t
botones de soltado rojos (y).
RECLINADO DEL REPOSACABEZAS
CYBEX Solution X2-fix tiene un reposacabezas reclinable (r). En el caso de que
su hijo se quede dormido, le ayudará a mantener la cabeza erguida. Además
proporciona comodidad a su hijo mientras viaja en el coche.
¡Aviso! Por favor asegúrese que la cabeza del niño siempre permanezca en
contacto con el reposacabezas reclinable ya que es fundamental para proporcionar
una protección óptima en caso de impacto lateral.
El reposacabezas (r) puede ser ajustado en 3 posiciones diferentes.
87
¡Atención! ¡El dispositivo de reclinación (t) nunca debe ser bloqueado
por ningún objeto! En caso de accidente el movimiento del dispositivo de
reclinación debe estar garantizado para evitar que el niño se lesione.
Page 89

ESTÁ A SUA CRIANÇA BEM SEGURA?
Para assegurar a máxima protecção ao seu filho, prenda-o antes de arrancar com o
automovel …
- o cinto de cintura (n) tem de passar pelas guias do cinto na base (k) em ambos os
lados do assento.
- o cinto diagonal (f) também passa na guia do cinto da base (k) no lado do fecho.
- o cinto diagonal (f) tem de passar pela guia do cinto (g) do apoio dos ombros,
marcado a vermelho
- o cinto (f) corre diagonalmente por trás.
- todo o cinto de segurança deve estar bem esticado e não torcido.
- que o acolchoado está fixo em ambos os lados dos conectores X-fixe os
pontos de encaixe ISOFIX.
- que o encosto de costas da cadeira infantil está perfeitamente alinhado
e em contacto pleno com o assento do veículo. Isto assegura que a cadeira
infantil se encontre sempre em posição vertical.
Nota! O botão verde de segurança (x) deve ficar claramente visível em ambos os
botões vermelhos (y).
RECLINAÇÃO DO ENCOSTO DE CABEÇA
A CYBEX Solution X2-fix tem um encosto de cabeça reclínavel (r) que previne que
a cabeça se desloque para a frente no caso da criança adormecer. Assim como
proporciona o conforto da criança enquanto anda de automóvel.
Nota! Por favor assegure-se de que a cabeça da criança está sempre em contacto
com o apoio de cabeça reclínavel, doutra maneira a função de protecção de impacto
lateral nunca é atingida na totalidade.
Subindo com cuidado o apoio de cabeça, a inclinação do encosto de cabeça (r) pode
ajustar-se em 3 posições diferentes.
Aviso! O mecanismo de reclinação (t) nunca deve ser obstruído com
nenhumobjecto.Em caso de acidente, o movimento de reclinação deve ser
garantido para evitar que a criança sofra danos.
88
Page 90

CUIDADO DEL PRODUCTO
Para garantizar la máxima seguridad de su CYBEX Solution X2-fix, es necesario que
tome nota de lo siguiente:
- Todas las partes importantes de la silla de seguridad deben ser revisadas de daños
periódicamente. Las partes mecánicas deben funcionar perfectamente.
- Asegúrese de que la CYBEX Solution X2-fix no ha sido dañada al presionarla entre
la puerta y el asiento del coche u otros objetos sólidos.
- La silla de seguridad debe ser comprobada por el fabricante en caso de que caiga
al suelo o en casos similares.
e
QUITAR LA FUNDA DEL ASIENTO
a
El tapizado consta de 3 partes, que se acoplan a la CYBEX Solution X2-fix con velcro
o botones. Una vez haya desabrochado todas las fijaciones puede quitar el tapizado.
Para colocar de nuevo el tapizado siga las instrucciones anteriores en orden
contrario.
¡Atención! La silla de seguridad nunca debe ser usada sin el tapizado.
89
EXTRAER LA FUNDA DEL RESPALDO
1. Coloque el respaldo en la posición más elevada utilizando la palanca de
regulación de altura (h).
2. Para soltar el respaldo (e), tire de la palanca (h) y al mismo tiempo presione la
parte inferior del nervio central del respaldo (a).
3. Ahora el respaldo (e) puede extraerse completamante.
4. Para volverlo a montar, presione de nuevo la palanca de regulación de altura (h) e
introduzca el protector (e) en el respaldo (a).
Page 91

MANUTENÇÃO DO PRODUTO
Para garantir o mais alto standard de segurança da sua cadeira auto de criança, é
necessário tomar em conta o seguinte:
- Todas as partes importantes da cadeira auto de criança devem ser verificadas peri
odicamente para detectar possíveis danos. As partes mecânicas devem funcionar
correctamente.
- Preste especial atenção ao facto de que a cadeira auto de criança foi danificada
pela porta do automóvel ou outros obstáculos.
- A cadeira auto de criança deve ser verificada pelo fabricante em caso de danos,
cair ou situações similares.
RETIRAR A FORRA
A forra do assento consiste em três partes que são fixas por velcros ou botões
de fixação. Uma vez que todas as fixações estiverem soltas, as forras podem ser
retiradas.
Para repôr as forras no assento, siga as instruções em ordem inversa.
Aviso! A cadeira auto de criança nunca deve ser utilizada sem forra.
RETIRAR A FORRO DO ENCOSTO
1. Ponha o encosto de cabeça (e) na posição vertical usando a alavanca (h).
2. Para libertar o encosto de cabeça (e), puxe, simultaneamente, a alavanca (h) e a
borda inferior da parte superior do encosto (a). Desta forma o encosto de cabeça
(e) poderá ser completamente separado do resto da cadeira.
3. Desta forma o forro poderá ser devidamente removido.
4. Para voltar a colocar o encosto (a) de cabeça puxe, mais uma vez a alavanca (h)
e insira-o (e) no assento.
90
Page 92

91
LIMPIEZA
Es importante utilizar únicamente los tapizados originales de la CYBEX Solution X2-
fix ya que el tapizado es una parte fundamental para el correcto funcionamiento de
la silla de seguridad. Usted puede conseguir tapizados adicionales en los puntos de
venta correspondientes.
¡Atención! Lave a forra antes da primeira utilização. La funda es lavable a máquina a
30ºC y con ciclo de ropa delicada. Si lo lava a una temperatura mayor la funda podría
decolorarse. Por favor, lave la funda separadamente y nunca la seque en secadora.
No seque la funda bajo la luz directa del sol. Puede limpiar las piezas de plástico con
detergente suave y agua templada.
¡Atención! Por favor no usar detergentes químicos o lejía bajo ninguna
circunstancia!
QUÉ HACER DESPUÉS DE UN ACCIDENTE
Si usted ha sufrido un accidente, la silla de seguridad ha podido resultar dañada
aunque a simple vista no se aprecie. En este caso, la silla de seguridad debe ser
examinada por el fabricante y si fuera necesario debería reemplazarse.
DURABILIDAD DEL PRODUCTO
Este portabebés ha sido diseñado para cumplir con las funciones previstas con
un uso normal para una vida útil de 9 años, aprox.
Dado que los materiales de plástico se desgastan con el tiempo, por ejemplo,
de la exposición a la luz solar directa, las características de los productos
pueden variar ligeramente.
El portabebés puede estar expuesto a fuertes cambios de temperatura y a
otras circunstancias imprevisibles. En consecuencia, siga las instrucciones
abajo:
- Si el coche está expuesto habitualmente a la luz solar durante muchas horas, la
silla debe extraerse del vehículo o cubrirse con una prenda suave.
- Revise regularmente todas las piezas de plástico y metal del portabebés para
detectar daños o cambios de forma o color. Si nota algún cambio en su silla, esta
deberá ser inspeccionada y posiblemente reemplazada por el fabricante.
- Los cambios en el tejido, y en especial la pérdida de color, son perfectamente
normales cuando la silla se usa en un vehículo y no afectan a su funcionamiento.
Page 93

LIMPEZA
É importante que só utilize uma forra original da CYBEX Solution X2-fix, a forra é
também uma parte importante da funcionalidade da cadeira. Pode obter forras em
separado no representante da marca.
Atenção! Se debe lavar la vestidura antes de usarla por primera vez. A cobertura
é lavável à máquina a 30º e com programa de roupa delicada. Se o lavar a
uma temperatura mais elevada a cobertura pode decolorar. Por favor, lave
a cobertura separadamente e nunca a seque numa secadora. Não seque
a cobertura com luz directa do sol. Pode limpara as peças de plástico com
detergente suave e água temperada.
Aviso! Em nenhuma circunstância utilize detergentes químicos ou lixívia.
O QUE FAZER DEPOIS DE UM ACIDENTE
Se teve um acidente, o dano no assento pode não ser visível. Neste caso a sua
cadeira auto de criança deve ser verificada pelo fabricante e substituída se
necessário.
TEMPO DE VIDA DO PRODUTO
Esta cadeira auto foi concebida para poder cumprir as suas funções, por um
tempo de vida útil de 9 anos aprox.
O desgaste dos plásticos, por exemplo pela exposição solar (UV) pode causar
uma ligeira detrioração das propriedades do produto.
Visto que é normal existir nos automóveis grandes variações de temperatura e
outras alterações é necessário observar os seguintes pontos:
- Se o automóvel estiver com exposição directa do sol, durante longos periodos de
tempo, a cadeira auto deve ser tapada com um pano claro.
- Verifique as partes plásticas e de metal da cadeira regularmente percebendo
se existe alguma mudança de forma ou cor. Se for verificada alguma alteração
na cadeira auto, a mesma deverá de ser usada ou ser revista pelo fabricante e
possivelmente substituida.
- Mudanças nos tecidos como alterações de cor, é normal aquando a utilização da
cadeira auto no automóvel e não implica a função da mesma.
92
Page 94

RECICLADO
Cuando ya haya usado su CYBEX Solution X2-fix y no la necesite más es importante
una correcta eliminación de la silla. El sistema de reciclaje de residuos es diferente
en cada comunidad. Por favor, contacte con su Ayuntamiento o con la compañía
local de reciclaje para asegurarse la correcta eliminación de CYBEX Solution X2-fix.
GARANTÍA
La presente garantía sólo es de aplicación en el país en el que el consumidor
adquirió inicialmente el producto a un detallista. La garantía cubre todos los defectos
de materiales y fabricación, existentes o que puedan aparecer, por un período de
tres (3) años desde la fecha de compra inicial (garantía del fabricante). En caso de
que aparezca cualquier defecto de materiales o de fabricación, nosotros decidiremos,
según nuestro criterio, reparar el producto sin coste o entregar un producto nuevo.
Para obtener esta garantía es preciso entregar o enviar el producto al detallista
que vendió inicialmente el producto y aportar una prueba de compra (recibo o
factura) que muestre la fecha de compra, el nombre del detallista y el modelo del
producto. Esta garantía no es de aplicación en caso de que el producto sea enviado
o entregado al fabricante o a cualquiera otra persona que no sea el detallista que
vendió el producto inicialmente al consumidor. Por favor, verifique que el producto
está completo y que no presenta ningún defecto de materiales ni de fabricación en
el momento de la compra o, si se ha adquirido a distancia, en el mismo momento
de recibirlo. En caso de apreciar cualquier defecto, deje de utilizar el producto y
entréguelo o envíelo al detallista. El producto debe entregarse limpio y completo.
Antes de contactar con la tienda lea este manual detenidamente. La garantía no
cubre ningún daño causado por un mal uso, la influencia del entorno (agua, fuego,
irregularidades del terreno, etc.) o el desgaste normal del producto. Sólo es de
aplicación en caso de que el uso del producto sea acorde al manual de instrucciones
y si cualquiera modificación o reparación ha sido efectuada por personas autorizadas
y se han utilizado piezas y accesorios originales. La garantía no excluye, limita
o afecta de ningún modo a los derechos del consumidor establecidos por ley,
incluyendo reclamaciones por responsabilidad civil o quejas por incumplimiento de
contrato que el comprador quiera interponer contra el vendedor, el fabricante o el
producto.
93
CYBEX GmbH
Riedinger Str. 18, 95448 Bayreuth, Germany
Tel.: +49 921 78 511-0, Fax.: +49 921 78 511- 999
Page 95

RECICLAGEM
No fim de vida da cadeira auto de criança, deve deitar fora em local próprio. As regras
de reciclagem podem variar de país para país. Para poder garantir uma reciclagem
correcta da sua cadeira auto de criança, contacte os serviços da câmara municipal da
sua àrea. Em todos os casos verifique as regras de reciclagem do seu país.
GARANTÍA
A presente garantia só se aplica no país em que o consumidor adquiriu a cadeira. A
garantia cubre todos os defeitos de material e/ou de fabricação que possam existir
ou surgir num período de três (3) anos desde a data da compra inicial (garantia do
fabricante). Em caso de que apareça qualquer defeito, a Cybex decidirá reparar
o produto sem gastos extra ou, em caso de que o veja necessário, entregar um
produto novo. Para obter esta garantia é preciso entregar ou enviar o produto
em questão ao vendedor que inicialmente lhe vendeu o produto apresentando,
ao mesmo tempo, a factura ou recibo de compra que mostra a data, o nome do
vendedor e o modelo em questão. Esta garantia não será aplicada em caso de que
não envie o produto directamente ao vendedor. No momento da compra, ou se o
compra à distância, njo momento em que o receba, faça o favor de revisar se o
produto está completo e que não apresenta qualquer tipo de defeito. Em caso de
que encontre algum defeito não utilize o produto e entregue-o ou envie-o de novo
ao vendedor. O produto dever-se-á entregar limpo e completo. Antes de contactar
com a loja leia este manual até ao final. Esta garantia não cobre estragos causados
pelo mau uso, das condições externas (água, fogo, irregularidades do terreno, etc.)
ou o desgaste normal do produto. Esta garantia só é válida em caso de que use o
produto tendo em conta o seu manual de instrucções e se qualquer modificação ou
reparação foi feita por pessoal autorizado e se foram utilizadas peças e acessórios
originais. A garantia não exluiu, limita ou afecta os direitos dos consumidores
esatabelecidos por lei, incluindo reclamações por responsabillidade civil ou queixas
por inconprimento do contracto entre o consumidor e vendedor, o fabricante e o
produto.
CYBEX GmbH
Riedinger Str. 18, 95448 Bayreuth, Germany
Tel.: +49 921 78 511-0, Fax.: +49 921 78 511- 999
94
Page 96

CYBEX GmbH
Riedingerstr. 18 | 95448 Bayreuth | Germany
info@cybex-online.com
www.cybex-online.com
www.facebook.com/cybex.online
C223_741-1_01N
 Loading...