

Page 1

SIRONA Z i-SIZE
UN R129, 45 - 105 c m, ma x. 18 kg (Bir th - ca . 4 Y)
User guide
DEENITFRNLPLHUCZSKPT ES
Page 2

2
Page 3

DE - WARNUNG!
und maximalen Komfort für Ihr Kind zu erreichen, ist es unbedingt notwendig, die gesamte
Gebrauchsanleitung aufmerksam zu lesen.
EN - WARNING! The following short instruction is intended to provide only an overview. In order to
achieve maximum security and comfort for your child it is absolutely imperative that you read the whole
instruction manual carefully.
IT - AVVERTIMENTO! Le brevi istruzioni seguenti rappresentano solo un riassunto. Per una garanzia di
sicurezza e comfort massimi per il vostro bambino è assolutamente necessario leggere con attenzione
l‘intero manuale di istruzioni.
FR - ATTENTION! La brève instruction suivante n’est donnée qu’à titre d’aperçu. Pour garantir la
sécurité et le confort maximum pour votre enfant, vous devez impérativement lire avec attention le
manuel d’instruction dans son intégralité.
NL - WAARSCHUWI NG! De volgende korte instructie is slechts als inleiding bedoeld. Voor maximale
veiligheid en optimaal comfort voor uw kind dient u de volledige handleiding zorgvuldig door te lezen.
PL - OSTRZEŻENIE! Poniższa skrócona instrukcja służy jedynie celom poglądowym. Dla zapewnienia
maksymalnego bezpieczeństwa i komfortu Twojemu dziecku bezwzględnie konieczne jest staranne
przeczytanie całej instrukcji obsługi.
HU - FIGYELME ZTETÉS! A következő rövid útmutató csupán áttekintést nyújt a termékről. Gyermeke
maximális biztonsága és kényelme érdekében feltétlenül olvassa el figyelmesen a teljes útmutatót.
CZ - VÝSTRAHA! Následující návod je určen k tomu, aby podal pouze stručný přehled. Pro dosažení
maximální bezpečnosti a pohodlí pro vaše dítě je naprosto nezbytné, abyste si pozorně přečetli celý návod.
SK - UPOZORNENIE! Účelom následujúceho krátkeho pokynu je výlučne poskytnutie prehľadu. Ak chcete
zaistiť maximálnu bezpečnosť a pohodlie vášho dieťaťa musíte si bezpodmienečne prečítať celý návod.
ES - ¡ADVERTENCIA!
visión general. Para garantizar la máxima seguridad y comodidad del niño, es imprescindible que lea
detenidamente el manual de instrucciones completo.
PT - ATENCAO! A instrução curta a seguir destina-se a fornecer apenas uma visão geral. A fim de
alcançar um máximo de segurança e conforto para o seu filho, é absolutamente necessário que leia,
atentamente, todo o manual de instruções.
Die folgende Kurzanleitung dient nur der Übersicht. Um maximale Sicherheit
El siguiente manual básico está destinado a proporcionar únicamente una
6 | INHALT
7 | CONTENT
7 | ARGOMENTI
76 | CONTENU
77 | INHOUD
77 | SPIS TREŚCI
146 | TARTALOM
147 | OBSAH
147 | OBSAH
216 | CONTENIDO
217 | CONTEÚDO
DEENIT
FRNLPLHUCZSK
ESPT
3
Page 4

DE: rückwärtsgerichtet (45 - 105 cm, max. 18 kg) EN: rearward-facing (45 - 105 cm, max. 18 kg)
IT: contro il senso di marcia (45 - 105 cm, max. 18 kg) FR: dos à la route (45 - 105 cm, max. 18 kg)
NL: achterwaarts gericht (45 - 105 cm, max. 18 kg) PL: tyłem do kierunku jazdy (45–105 cm, maks. 18 kg)
HU: hátra néző (45 - 105 cm, max. 18 kg) CZ: směřující dozadu (45 - 105 cm, max. 18 kg)
SK: v protismere jazdy (45 - 105 cm, max. 18 kg) ES: sentido contrario al de la marcha (45 - 105 cm, máx. 18 kg) PT: virado para trás
(45 - 105 cm, máx. 18 kg)
1
5
9
10
MAX.
2 4
6
3
7
8
7
12 1311
4
Page 5

DE: vorwärtsgerichtet (76 - 105 cm, max. 18 kg)
IT: nel senso di marcia (76 - 105 cm, max. 18 kg)
NL: voorwaartsgericht (76 - 105 cm, max. 18 kg) PL: przodem do kierunku jazdy (76–105 cm, maks. 18 kg)
HU: előre néző (76 - 105 cm, max. 18 kg) CZ: směřující dopředu (76 - 105 cm, max. 18 kg)
SK: v smere jazdy (76 - 105 cm, max. 18 kg)
PT: virado para frente (76 - 105 cm, máx. 18 kg)
EN: forward facing (76 - 105 cm, max. 18 kg)
FR: face arrière (76 - 105 cm, max. 18 kg)
ES: sentido de la marcha (76 - 105 cm, máx. 18 kg)
1
5
9
MAX.
10
2
6
11
3
7
12
4
8
76 - 105 cm
5
Page 6
SIRONA Z iSIZE
Module Sirona Z i-Size
45cm – 105cm / ≤ 18kg
CYBEX Base Z
R129-020018
CYBEX GmbH
Riedingerstr. 18, 95448 Bayreuth
Germany
Module Sirona Z i-Size
76cm – 105cm / ≤ 18kg
CYBEX Base Z
R129-020018
CYBEX GmbH
Riedingerstr. 18, 95448 Bayreuth
Germany
6
ZULASSUNG
SIRONA Z i-Size – Kindersitz
UN R129
Größe: 45-105 cm
Gewicht: bis 18 kg
HOMOLOGATION
SIRONA Z i-Size – car seat
UN R129
Size: 45-105 cm
Weight: up to 18 kg
OMOLOGAZIONE
SIRONA Z i-Size – seggiolino
UN R129
Misure: 45-105 cm
Peso: fino a 18 kg
SEHR GEEHRTE KUNDIN,
SEHR GEEHRTER KUNDE!
Vielen Dank, dass Sie sich entschieden haben, den
SIRONA Z i-Size zu erwerben. Wir versichern Ihnen, dass
bei der Entwicklung des Kindersitzes Sicherheit, Komfort und
Bedienungsfreundlichkeit im Vordergrund gestanden haben. Das
Produkt wird unter besonderer Qualitätsüberwachung hergestellt und
erfüllt strengste Sicherheitsanforderungen.
!
WARNUNG! Damit Ihr Kind richtig geschützt werden
kann, ist es unbedingt notwendig, den Kindersitz so
zu verwenden, wie es in dieser Anleitung beschrieben
wird. Veränderungen am Sitz dürfen nicht vorgenommen werden.
!
WARNUNG! Erst wenn Ihr Kind mindestens 16
Monate alt ist, und eine Größe von 76 cm erreicht hat,
dürfen Sie den Sitz vorwärtsgerichtet verwenden.
HINWEIS! Bewahren Sie diese Anleitung immer griffbereit im dafür
vorgesehenen Fach am Kindersitz auf.
HINWEIS! Die Neugeboreneneinlage dient dem Schutz Ihres Kindes
und muss bis zu einer Körpergröße von 60 cm verwendet werden.
HINWEIS! Durch länderspezifische Anforderungen (z.B. Farbkennzeichnungen am Kindersitz) können Produktmerkmale in ihrer
äußeren Erscheinung variieren. Die korrekte Funktionsweise des
Produktes wird davon jedoch nicht beeinflusst.
Sollten Sie sich für einen Kindersitz mit SensorSafe Clip entschieden
haben, beachten Sie bitte das separate Kapitel „ANSCHNALLEN
MITTELS GU RTSYSTEM UND CLIP“. Weitere Informationen zur
Funktionsweise von SensorSafe finden Sie in der beiliegenden
Bedienungsanleitung.
Page 7

DEAR CUSTOMER GENTILE CLIENTE
Thank you very much for purchasing the SIRONA Z i-Size. We assure
you that in the development process of the car seat we focused on
safety, comfort and user friendliness. The product is manufactured
under special quality surveillance and complies with the strictest safety
requirements.
!
WARNING! For proper protection of your child, it is
essential to use and install the car seat according to
the instructions given in this manual. Any modifications
on the seat are prohibited.
Grazie di avere acquistato Sirona Z i-Size. Le assicuriamo che nel
progettare questo seggiolino auto i nostri principali obiettivi sono stati
la sicurezza, il comfort e la facilità di utilizzo. Il prodotto è stato prodotto
sotto uno stretto controllo qualitativo e risponde ai più severi standard
di sicurezza.
!
ATTENZIONE! Per la massima sicurezza del Suo bambino è essenziale installare il seggiolino auto seguendo
scrupolosamente le istruzioni fornite in questo manuale.
Non apportare alcuna modifica al prodotto.
DEENIT
!
WARNING! Do not use forward-facing before the
child is 16 month old and reached a size of 76 cm.
NOTE! Please always have the instruction manual at hand and store it
in the dedicated slot on the car seat.
NOTE! The newborn inlay protects your child. It needs to be used up
to size of 60 cm.
NOTE! Due to country-specific requirements (e.g. colour labelling on
the car seat), the product features may vary in their external appearance.
This, however, does not affect the correct functioning of the product.
If you choose an car seat with SensorSafe clip please note the separate
chapter “STRAPPING WITH HARNESS SYSTEM AND CLIP“. For
more information about the function of SensorSafe please see the
manual enclosed.
!
ATTENZIONE! Non usare rivolto nel senso di marcia
prima che il bambino abbia raggiunto un’età di 16 mesi
e l’altezza di almeno 76 cm.
NOTA BENE! Tenere sempre queste istruzioni a portata di mano
econservarle nell’apposito scomparto del seggiolino.
NOTA BENE! Il riduttore per neonati protegge il bambino.
Da utilizzare fino a un’altezza di almeno 60 cm.
NOTA BENE! In base alle diverse normative nazionali l’aspetto
di alcune caratteristiche del prodotto potrebbe differire (es. colori
delle etichette sul seggiolino). Ciò tuttavia non influisce sul corretto
funzionamento del prodotto.
Se si sceglie un seggiolino per bambini con la clip SensorSafe, notare
il capitolo a parte “LEGARE CON I L SISTEMA DI IMBRACATURA
E CLIP”. Per ulteriori informazioni sul funzionamento di SensorSafe,
guardare il manuale allegato.
7
Page 8

INHALTDE
ZULASSUNG ..........................................................................................................6
ZUM SCHUTZ DES FAHRZEUGS ...................................................................10
DER RICHTIGE PLATZ IM FAHRZEUG..........................................................12
SICHERHEIT IM FAHRZEUG ...........................................................................16
VERWENDUNGSMÖGLICHKEITEN IM FAHRZEUG ..................................18
VOR DER ERSTEN VERWENDUNG ..............................................................22
EINBAU DER BASIS ...........................................................................................24
EINSTELLEN DES STÜTZFUSSES ................................................................28
BATTERIEWECHSEL .........................................................................................30
AUSBAU DER BASIS AUS DEM FAHRZEUG ...............................................32
BEFESTIGUNG DES SITZES AUF DER BASIS ...........................................34
AUSBAU ................................................................................................................36
EINSTELLEN DER SEITENPROTEKTOREN................................................38
SITZ- UND LIEGEVERSTELLUNG ..................................................................40
DREHFUNKTION ................................................................................................42
RÜCKWÄRTSGERICHTETE VERWENDUNG (45 CM – 105 CM) .............46
ANPASSEN AN DIE KÖRPERGRÖSSE .........................................................48
ENTFERNEN DER NEUGEBORENENEINLAGE .........................................50
ANSCHNALLEN MITTELS GURTSYSTEM ...................................................52
ANSCHNALLEN MITTELS GURTSYSTEM UND CLIP ...............................54
VORWÄRTSGERICHTETE VERWENDUNG (76 CM - 105 CM) ...............58
SO IST IHR KIND RICHTIG GESICHERT ......................................................60
ENTFERNEN DES BEZUGES ..........................................................................62
REINIGUNG..........................................................................................................64
PFLEGE.................................................................................................................66
VERHALTEN NACH EINEM UNFALL ..............................................................68
PRODUKTINFORMATION.................................................................................68
PRODUKTLEBENSDAUER ..............................................................................70
ENTSORGUNG ...................................................................................................72
8
GARANTIEBESTIMMUNGEN ...........................................................................74
Page 9

CONTENT CONTENUTIEN
HOMOLOGATION .................................................................................................6
PROTECTING THE VEHICLE ..........................................................................11
CORRECT POSITION IN THE VEHICLE........................................................13
SAFETY IN THE VEHICLE ................................................................................17
USAGE IN THE VEHICLE ..................................................................................19
BEFORE FIRST USE ..........................................................................................23
INSTALLATION OF THE BASE .........................................................................25
ADJUSTING THE LOAD LEG ...........................................................................29
HOW TO CHANGE BATTERY ..........................................................................31
REMOVING THE BASE FROM THE VEHICLE .............................................33
INSTALLING THE CAR SEAT ON THE BASE ...............................................35
REMOVAL .............................................................................................................37
ADJUSTING THE SIDE PROTECTORS .........................................................39
ADJUSTMENT FOR SITTING AND RECLINING ..........................................41
ROTATION FUNCTION ......................................................................................43
REARWARD-FACING USE (45 CM – 105 CM)...............................................47
ADJUSTING TO THE BODY SIZE ...................................................................49
REMOVING THE NEWBORN INLAY ...............................................................51
STRAPPING WITH HARNESS SYSTEM .......................................................53
STRAPPING WITH HARNESS SYSTEM AND CLIP ....................................55
FORWARD-FACING USE (76 CM - 105 CM) .................................................59
CORRECT SECURING OF YOUR CHILD......................................................61
REMOVING THE COVER ..................................................................................63
CLEANING ............................................................................................................65
PRODUCT CARE ................................................................................................67
WHAT TO DO AFTER AN ACCIDENT .............................................................69
PRODUCT INFORMATION ...............................................................................69
PRODUCT LIFESPAN ........................................................................................71
DISPOSAL ............................................................................................................73
WARRANTY..........................................................................................................75
IT
OMOLOGAZIONE .................................................................................................6
PROTEZIONE VEICOLO ...................................................................................11
LA POSIZIONE CORRETTA NELL’AUTO .......................................................13
SICUREZZA NELL’AUTO ...................................................................................17
USO NEL VEICOLO ............................................................................................19
PRIMA DEL PRIMO UTILIZZO ..........................................................................23
INSTALLAZIONE DELLA BASE ........................................................................25
REGOLAZIONE DEL PIEDE DI SUPPORTO ................................................29
COME SOSTITUIRE LA BATTERIA .................................................................31
TOGLIERE LA BASE DAL VEICOLO ...............................................................33
INSTALLARE IL SEGGIOLINO SULLA BASE ................................................35
RIMOZIONE DEL SEGGILINO .........................................................................37
REGOLARE LE PROTEZIONI LATERALI ......................................................39
REGOLAZIONE PER LA SEDUTA E LA RECLINAZIONE ...........................41
FUNZIONE ROTAZIONE ...................................................................................43
USO CONTRO IL SENSO DI MARCIA (45 CM - 105 CM) ............................47
REGOLAZIONE IN BASE ALLA CORPORATURA ........................................49
RIMUOVERE GLI INSERTI ...............................................................................51
ALLACCIARE IL BAMBINO CON LE CINTURE ............................................53
LEGARE CON IL SISTEMA DI IMBRACATURA E CLIP ..............................55
USO NEL SENSO DI MARCIA (76 CM – 105 CM) ........................................59
ALLACCIARE CORRETTAMENTE IL BAMBINO ..........................................61
RIMOZIONE DEL RIVESTIMENTO .................................................................63
PULIZIA .................................................................................................................65
CURA DEL PRODOTTO.....................................................................................67
COSA FARE A SEGUITO DI UN INCIDENTE ................................................69
INFORMAZIONI SUL PRODOTTO ..................................................................69
DUREVOLEZZA PRODOTTO ...........................................................................71
SMALTIMENTO ....................................................................................................73
GARANZIA ............................................................................................................75
DEENIT
9
Page 10

ZUM SCHUTZ DES FAHRZEUGS
An einigen Autositzen aus empfindlichem Material (z.B. Velours, Leder,
etc.) können durch die Benutzung von Kindersitzen mögliche Gebrauchsspuren und/oder Abfärbungen auftreten. Um das zu vermeiden, können
Sie z.B. eine Decke oder ein Handtuch unterlegen. Ferner weisen wir
in diesem Zusammenhang auf unsere Reinigungshinweise hin, die vor
der ersten Verwendung des Sitzes unbedingt beachtet werden sollten.
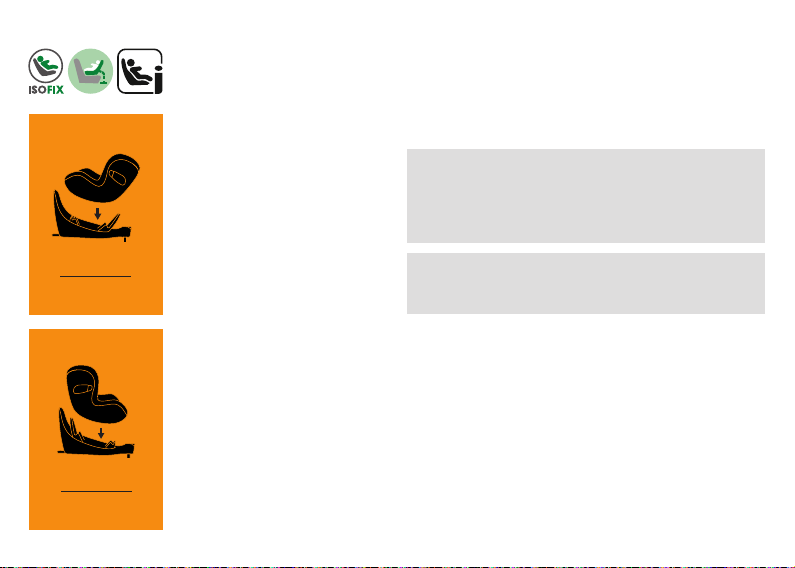
Die Verwendung der mitgelieferten ISOFIX-Einführhilfen bietet dem
Autositz weiteren Schutz. Zur Installation siehe Abschnitt: „EINBAU
DER BASIS“.
10
Page 11

PROTECTING THE VEHICLE PROTEZION E VEICOLO
Traces of use and/or discoloration can appear on some vehicle seats
made from delicate materials (e.g. velour, leather, etc.) if car seats are
used. You can avoid this by putting, e.g. a blanket or a towel underneath
the car seat. In this context also see our cleaning directions. It is
essential that these are followed before the first use of the car seat.
Usage of the provided ISOFIX guides will further protect the vehicle
seat. For installation see chapter: „INSTALLATION OF THE BASE“.
L’uso del seggiolino in auto con sedili realizzati in materiali delicati
(come velluto, pelle, ecc.) può lasciare tracce e/o causare scoloriture.
Questo è evitabile utilizzando ad esempio un telo o un asciugamano
sotto al seggiolino. A riguardo, vedere anche le istruzioni per la
pulizia: èessenziale seguire quanto in esse indicato prima dell’uso del
seggiolino. L’uso delle guide ISOFIX fornite proteggerà ulteriormente
il sedile del veicolo. Per maggiori dettagli vedere la sezione:
„INSTALLAZIONE DE LLA BASE“.
DEENIT
11
Page 12

DER RICHTIGE PLATZ IM FAHRZEUG
Dies ist ein verbessertes Kinderrückhaltesystem der Kategorie
i-Size. Es ist nach der Regulierung UN R129/02 zur Verwendung
auf Fahrzeugsitzen genehmigt worden, die gemäß den Angaben des
Fahrzeugherstellers im Fahrzeughandbuch für i-Size-Rückhaltesysteme
geeignet sind. Verfügt Ihr Fahrzeug über keinen i-Size Sitzplatz überprüfen
Sie bitte anhand der beigelegten bzw. auf der Homepage befindlichen
Typenliste, ob der Einbau erlaubt ist.
Falls Ihr Auto nicht mit ISOFIX ausgestattet ist, wenden Sie sich an den
Hersteller des Fahrzeugs.
In Ausnahmefällen kann der Kindersitz auch vorne auf dem Beifahrersitz
verwendet werden. Beachten Sie dabei bitte die folgenden Punkte:
• Überprüfen Sie, ob der Beifahrersitz mit ISOFIX- Anbindungspunkten
ausgestattet ist. Ohne ISOFIX ist eine Verwendung nicht möglich.
• Deaktivieren Sie den Beifahrerairbag! Sollte dies in Ihrem Fahrzeug
nicht möglich sein, ist eine Verwendung auf der Beifahrerseite
untersagt.
• Die Empfehlungen des Fahrzeugherstellers sind unbedingt zu
befolgen!
!
WARNUNG!
im Fahrzeug, die bei einem Unfall Verletzungen verursachen können, müssen immer gut befestigt werden.
Andernfalls können Sie sich zu tödlichen Geschossen im
Fahrzeug verwandeln.
12
Gepäckstücke oder andere Gegenstände
Page 13

CORRECT POS ITION IN THE VE HICLE LA POSIZ IONE CORR ETTA NELL’AUTO
This is an i-Size Enhanced Child Restraint System. It is approved to
Regulation
UN R129/02
positions as indicated by vehicle manufacturers in the vehicle users’
manual. If your vehicle does not have an i-Size seating position,
please check the vehicle typelist that is included or for example on
our homepage whether the installation is allowed. If your car is not
equipped with ISOFIX, please contact the vehicle manufacturer.
In exceptional cases, however, the car seat can be used on the front
passenger seat. In this case, observe the following points:
, for use in, i-Size compatible vehicle seating
Questo è un sistema di ritenuta per bambini i-Size. Omologato
secondo la norma UNR129/02, per l’uso in veicoli con sedili
passeggeri “i-Size compatibili”, come indicato dalla casa costruttrice
nel manuale d’uso del veicolo. Se la vettura non è dotata di una
posizione di seduta i-Size, preghiamo verificare gli elenchi delle vetture
inclusi o meglio quelle nel nostro sito per verificare se l’installazione è
permessa. Se la vettura non è dotata di ISOFIX, preghiamo contattare
il produttore della vettura.
In casi eccezionali, comunque, il seggiolino può essere utilizzato sul
sedile passeggero anteriore. In questo caso tenere conto di quanto
segue:
DEENIT
• Check whether the passenger seat is fitted with ISOFIX. If ISOFIX is
not fitted, the car seat may not be used.
• Deactivate the passenger airbag. If this is not possible in your vehicle,
use of the car seat on the passenger side is prohibited.
• It is imperative that you comply with the car manufacturer‘s
recommendations.
!
WARNING! Items of luggage and other loose objects
in the vehicle, which could cause injury in an accident,
must always be safely secured. They can become
deadly projectiles in the case of a car accident.
• Controllase se il sedile è dotato di ISOFIX. Se il sedile non è dotato
di ISOFIX il seggiolino non può essere installato in questa posizione.
• Disattivare l’airbag passeggero frontale. Se ciò non fosse possibile,
l’uso del seggiolino nel lato passeggero anteriore è vietato.
• E’comunue fondamentale attenersi alle raccomandazioni del
produttore della vettura.
!
ATTENZIONE! Bagagli o altri oggetti presenti
nell’abitacolo che possano causare lesioni in caso di
incidente dovranno essere sempre fissati saldamente.
In caso di incidente possono diventare proiettili letali se
lasciati liberi.
13
Page 14

!
WARNUNG!
sichtigt im Fahrzeug zurück.
!
WARNUNG!
heizen sich in der Sonne auf. Ihr Kind kann sich daran
verbrennen. Schützen Sie Ihr Kind und den Kindersitz
vorintensiver Sonneneinstrahlung (z.B. indem Sie ein
helles Tuch über die Schale legen).
!
WARNUNG! Dieser Sitz ist nicht für die Verwendung
mit einem normalen Fahrzeuggurt geeignet. Wenn Sie
versuchen, den Sitz mit dem Gurt zu sichern, kann
es bei einem Unfall zu schweren oder gar tödlichen
Verletzungen des Kindes sowie der übrigen Fahrzeuginsassen kommen.
!
WARNUNG! Auf Fahrzeugplätzen, die quer zur
Fahrtrichtung angeordnet sind, ist die Verwendung
desKindersitzes nicht zulässig. Auf rückwärtsgerichteten Fahrzeugsitzen, wie z.B. in einem Van oder Minibus,
ist die Verwendung ebenfalls nicht erlaubt.
14
Bitte lassen Sie Ihr Kind nie unbeauf-
Die Kunststoffteile des Kindersitzes
Page 15

!
WARNING! Never leave your child unattended in the
vehicle.
!
ATTENZIONE! Non lasciare mai il bambino incustodito nell’auto.
DEENIT
!
WARNING! The plastic parts in the child restraint
system heat up in sun and the child may sustain burns.
Protect your child and the car seat from direct sun
exposure (e.g. by covering it with a light colored cloth).
!
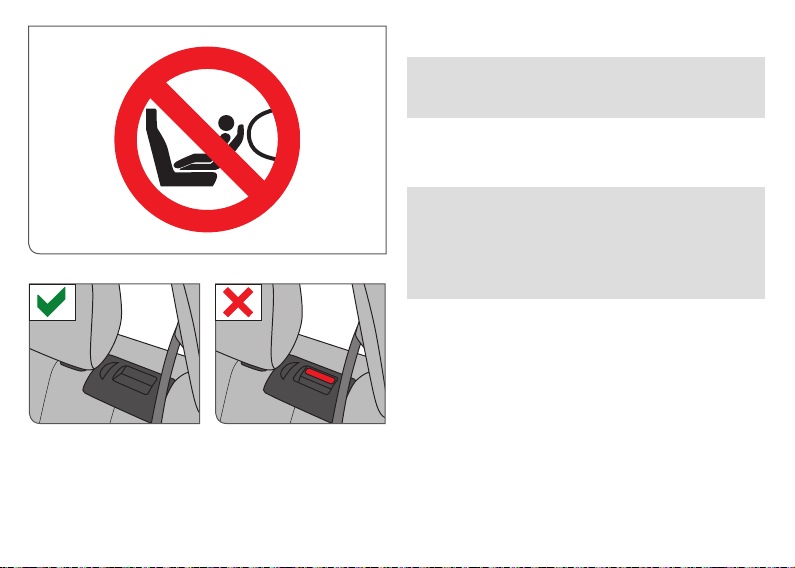
WARNING! The car seat is not suitable for use with a
normal vehicle seat belt. If the car seat is secured with
normal vehicle seat belt, in case of an accident the child
and other occupants of the vehicle may be severely
injured or killed.
!
WARNING! The car seat is not allowed to be used on
vehicle seats, which are installed at right angles to the
direction of travel. The car seat should not be used on
rearward-facing seats, for example in a van or minibus.
!
ATTENZIONE! Le parti in plastica del seggiolino
tendono a riscaldarsi se esposte al sole diretto con
pericolo di scottature per il bambino. Proteggere il
bambino ed il seggiolino da un’eccessiva esposizione
al sole diretto (per esempio stendendo un telo chiaro
sopra il seggiolino).
!
ATTENZIONE! Il seggiolino non può essere installato
con la normale cintura di sicurezza dell’auto. Se il seggiolino viene fissato con la cintura di sicurezza, in caso
di incidente il bambino e gli altri occupanti della vettura
possono subire lesioni gravi o letali.
!
ATTENZIONE! Il seggiolino non è utilizzabile sui sedili
rivolti lateralmente rispetto alla direzione di marcia. L’uso
del seggiolino non è ammesso sui sedili rivolti all’indietro, ad esempio nei van o minibus.
15
Page 16
SICHERHEIT IM FAHRZEUG
!
WARNUNG! Verwenden Sie den Kindersitz nicht auf
einem Sitz, auf dem ein Frontairbag aktiviert ist. Dies gilt
nicht für so genannte Seitenairbags.
HINWEIS! Der großvolumige Frontairbag entfaltet sich explosionsartig
und kann Ihr Kind schwer verletzen oder sogar töten.
!
WARNUNG! Der Kindersitz sowie die Basis müssen
auch dann, wenn sie nicht benutzt werden, immer
korrekt im Fahrzeug befestigt sein. Bereits bei einer
Notbremsung oder einem geringen Aufprall können
unbefestigte Teile andere Mitfahrer und Sie selbst
verletzen.
Achten Sie zum Schutz aller Fahrzeuginsassen stets darauf, dass...
• die umklappbaren Rückenlehnen der Fahrzeugsitze eingerastet sind
und sich in einer aufrechten Position befinden.
• bei Einbau des Kindersitzes auf dem Beifahrersitz, dieser in der
hintersten Position steht.
• im Fahrzeug alle beweglichen Gegenstände gesichert sind.
• alle Personen im Fahrzeug angeschnallt sind.
16
Page 17

SAFETY IN THE VEH ICLE SICUREZZA NELL’AUTO
!
WARNING! Never use the car seat on a vehicle seat
with an activated front airbag. This does not apply to
so-called side airbags.
!
ATTENZIONE! Non utilizzare mai il seggiolino su sedili
anteriori dotati di airbag frontale attivato. L’avvertenza
non riguarda i cosiddetti airbag laterali.
DEENIT
NOTE! The large-volume front airbag expands explosively and may
cause your child serious injury or even death.
!
WARNING! The car seat and the base must always be
secured correctly in the vehicle even when not in use. In
case of an emergency brake or accident, an unsecured
car seat may injure other passengers or yourself.
In order to guarantee the best possible safety for all passengers make
sure that...
• foldable backrests in the vehicle are locked in their upright position.
• when installing the car seat on the front passenger seat, adjust the
vehicle seat in rearmost position.
• you properly secure all objects likely to cause injury in the case of an
accident.
• all passengers in the vehicle are buckled up.
NOTA BENE! Gli airbag anteriori sono di grandi dimensioni con
apertura automatica esplosiva e possono provocare gravi ferite, anche
letali, al bambino.
!
ATTENZIONE! Il seggiolino e la base devono essere
sempre fissati correttamente nell’auto anche quando
non in uso. In caso di brusche frenate o di incidente,
un seggiolino non fissato può ferire i passeggeri o il
guidatore.
Per garantire la massima protezione di tutti i passeggeri è necessario
osservare quanto segue:
• gli schienali reclinabili siano ben fissati e nella posizione eretta
• nel caso il seggiolino sia installato sul sedile passeggero anteriore,
verificare che questo si trovi nella posizione più arretrata possibile.
• tutti gli oggetti che potrebbero costituire pericolo in caso di incidente
siano fissati in modo adeguato
• tutti i passeggeri abbiano le cinture allacciate.
17
Page 18
VERWENDUNGSMÖGLICHKEITEN IM FAHRZEUG
Abhängig von Körpergröße und Alter kann der Kindersitz
rückwärtsgerichtet oder vorwärtsgerichtet verwendet werden.
HINWEIS! Unfallstatistiken belegen, dass ein rückwärtsgerichteter
Transport Ihres Kindes im Fahrzeug am sichersten ist. Deshalb
empfehlen wir, den Kindersitz so lange wie möglich rückwärtsgerichtet
zu verwenden.
Rückwärtsgerichtete Verwendung (45 cm - 105 cm)
Wir empfehlen den Kindersitz bis zu einer Körpergröße von 105 cm und
max. 18 kg gegen die Fahrtrichtung zu verwenden.
!
WARNUNG! Bis zu einem Alter von 15 Monaten und
einer Körpergröße von 75 cm ist der rückwärtsgerichtete Transport zwingend vorgesehen. Doch auch
darüber hinaus ist ein rückwärtsgerichteter Transport
Ihres Kindes am sichersten. Für nähere Details lesen
Sie bitte das Kapitel: „RÜCKWÄRTSGERICHTETE
VERWENDUNG“.
18
Page 19

USAGE IN THE VEHICLE USO NEL VEICOLO
Depending on age and size the car seat may be used forward-facing or
rearward-facing.
NOTE! Accident statistics verify that in a vehicle the rearward-facing
transport of your child is the safest. Therefore we recommend to use the
car seat as long as possible in rearward-facing position.
Secondo l’età e la corporatura del bambino il segiolino auto può essere
usato contro il senso di marcia o nel senso di marcia.
NOTA BENE! Le statistiche incidenti rivelano che il trasporto dei
bambini in auto in posizione contraria a quella di marcia è la più sicura.
Per questo raccomandiamo di continuare ad utilizzare il seggiolino nella
posizione contraria alla marcia il più a lungo possibile.
DEENIT
Rearward-facing use (45 cm - 105 cm)
We recommend to use the car seat in rearward-facing position up to
size of 105 cm and max. 18 kg.
!
WARNING! It is mandatory to use rearward-facing up
to an age of 15 months and a size of 75 cm. Even beyond this limit a rearward-facing transport is the safest.
For more details please read chapter: „REARWARDFACING USE“.
Uso contro il senso di marcia (45 cm - 105 cm)
Raccomandiamo l’uso del seggiolino nella posizione contro il senso di
marcia fino all’altezza di 105 cm ed un peso di al massimo 18 kg.
!
ATTENZIONE! E’obbligatorio l’uso contro il senso di
marcia fino all’età di 15 mesi e un’altezza di almeno 75
cm. Oltre questi limiti il trasporto contro il senso di marcia resta comunque l’opzione più sicura. Per maggiori
dettagli vedere la sezione: “USO CONTRO IL SENSO
DI MARCIA”
19
Page 20
Vorwärtsgerichtete Verwendung (76 cm - 105 cm)
45 - 76 cm
76 - 105 cm
1
Eine vorwärtsgerichtete Verwendung ist frühestens ab dem 16.
Lebensmonat und bei mind. 76 cm Körpergröße zulässig.
HINWEIS! Der Indikator an der Kopfstütze
ab welcher Größe des Kindes ein Umbau auf vorwärtsgerichtete
Verwendung frühestens erlaubt ist. Die Drehfunktion ist an die
Höhe der Kopfstütze gekoppelt.
das Kapitel:
„VORWÄRTSGERICHTETE VERWENDUNG“.
HINWEIS! Neugeborene und Kleinkinder, die noch nicht selbstständig
sitzen können (bis ca. 1 Jahr), sollten aus orthopädischen und
sicherheitstechnischen Gründen immer in der flachsten Liegeposition
rückwärtsgerichtet transportiert werden.
Für nähere Details lesen Sie bitte
(1)
zeigt zusätzlich an,
HINWEIS!
der beweglichen Teile ist, während Sie den Sitz verstellen. Halten Sie
das Kind vom Sitz fern, wenn dieser aus dem Fahrzeug ausgebaut oder
in das Fahrzeug eingebaut wird. Es besteht ansonsten die Gefahr, dass
20
die Finger des Kindes eingeklemmt oder durch Scherwirkung verletzt
werden.
Achten Sie darauf, dass das Kind außerhalb der Reichweite
Page 21

Forward-facing use (76 cm – 105 cm) Uso nel senso di marcia (76 cm – 110 cm)
Use of the seat in forward-facing position is permitted when the child is
older than 15 months and min. 76 cm tall.
NOTE! The indicator on the headrest (1) shows the height of the child,
from which the seat can be changed to the forward-facing use at the
earliest. The rotation function is connected to the position of
the headrest. For more details please read chapter: „FORWARDFACING USE“.
L’uso del seggiolino rivolto nel senso di marcia è ammessa per bambini
di almeno 16 mesi ed un altezza di almeno 76 cm.
NOTA BENE! L’indicatore sul pogiatesta (1) mostra l’altezza minima
della testa del bambino da cui sarà possibile effettuare l’eventuale
cambio nel senso di marcia. La funzione di rotazione è connessa alla
posizione del poggiatesta. Per maggiori dettagli vedere la sezione:
“USO CONTRO I L SENSO DI MARCIA”
DEENIT
NOTE! Newborns and infants who are not yet able to sit up by
themselves (up to around 1 year) should, for orthopedic and safety
reasons, always be transported in the flattest recline position rearwardfacing.
NOTE! The child should be clear of any loose parts while making
adjustments with the car seat. Keep children away from the car seat,
during the installation and de-installation in the vehicle. There is a risk
that child‘s fingers can be trapped and are injured by unavoidable
scissoring actions.
NOTA BENE! I neonati e i bambini piccoli non ancora in grado di stare
seduti da soli (fino a un anno circa) dovrebbero, per ragioni di sicurezza
e ortopediche, viaggiare sempre nella posizione reclinata più piana
possibile contro il senso di marcia.
NOTA BENE! Il bambino non deve entrare in contatto con parti
libere durante le regolazioni del seggiolino. Durante le operazioni di
installazione e disinstallazione del seggiolino nell’auto, tenere i bambini
a distanza. Pericolo per le dita del bambino che potrebbero restare
intrappolate e ferite dall’inevitabile azione tagliente.
21
Page 22
VOR DER ERSTEN VERWENDUNG
!
WARNUNG! Vor der ersten Verwendung muss der
Plastikstreifen entfernt werden, damit der akustische
Indikator funktioniert.
Es ist ein charakteristisches Warnsignal zu hören bis die Basis korrekt
installiert wurde (siehe Kapitel: „EINSTELLEN DES STÜTZFUSSES“).
HINWEIS! Ist der Stützfuß ausgeklappt und es entsteht kein
Ton, obwohl der Plastikstreifen entfernt wurde, muss die Batterie
ausgetauscht werden (siehe Kapitel: „BATTERIEWECHSEL“).
22
Page 23

BEFORE FIRST USE PRIMA DEL PRIMO UTILIZZO
!
WARNING! For the acoustic indicator to be working, it
is mandatory to remove the plastic lock.
!
ATTENZIONE! Perché l’indicatore acustico funzioni,
èobbligatorio rimuovere il blocco di plastica.
DEENIT
There will be a charateristic warning signal audible till the base is
installed correctly (see chapter: „ADJUSTING THE LOAD LEG“).
NOTE! If the load leg is folded out and the transportation lock is
removed and there is no noise, you have to change the battery (see
chapter: „HOW TO CHANGE BATTERY“).
Ci sarà un segnale di avviso caratteristico udibile fino a quando
la base sarà installata correttamente (vedere il capitolo:
“REGOLAZIONE DELLA GAMBA DEL CARICO”).
NOTA BENE! Se la gamba del carico viene aperta e il blocco del
trasporto viene rimosso e non c’è rumore, è necessario sostituire la
batteria (vedere il capitolo: „COME CAMBIARE LA BATTERIA“).
23
Page 24

EINBAU DER BASIS
Wählen Sie einen zulässigen Fahrzeugsitz.
HINWEIS! Verfügt Ihr Fahrzeug über keinen i-Size Sitzplatz überprüfen
Sie bitte anhand der beiliegenden Typenliste, ob der Einbau erlaubt ist.
3
2
24
HINWEIS! Die ISOFIX-Befestigungspunkte (2) sind zwei
Metalllaschen pro Sitzplatz und befinden sich zwischen Rückenlehne
und Sitzfläche des Fahrzeugsitzes. Im Zweifelsfall nehmen Sie die
Bedienungsanleitung Ihres Fahrzeugs zu Hilfe.
• Sind die ISOFIX-Befestigungspunkte (2) Ihres Fahrzeugs schwer
zugänglich, so können Sie die mitgelieferten ISOFIX-Einführhilfen (3)
in den beiden ISOFIX-Befestigungspunkten (2) dauerhaft einhängen.
HINWEIS! Stellen Sie keine Gegenstände in den Fußraum vor den
Kindersitz.
Page 25

INSTALLATION OF THE BASE INSTALLAZIONE DELLA BASE
Please select an appropriate seat in the vehicle. Scegliere il sedile corretto all’interno dell’auto.
NOTE! If your car is not equipped with an i-Size seating position,
please check the typelist attached to the product.
NOTA BENE! Se la vettura non è dotata di una posizione i-Size,
verificate nell’elenco allegato al prodotto.
DEENIT
NOTE! The ISOFIX anchorage points (2) are two metal lugs per seat
and are located between the backrest and the seat of the car. If you are
in any doubt, consult your car‘s instruction manual for assistance.
• If the ISOFIX anchorage points (2) of your vehicle are difficult to
access, you should use the ISOFIX insert guides (3) that fix on the
ISOFIX anchorage points (2) permanently.
NOTE! Do not put any objects in the foot area in front of the car seat. NOTA BENE! Non lasciare nessun oggetto nell’area piedi di fronte al
NOTA BENE! I punti di ancoraggio ISOFIX (2) sono due clip
metalliche per ogni sedile, posizionate tra lo schienale e la seduta del
sedile del veicolo. Se in dubbio consultare il manuale istruzioni della
vettura.
• Se i punti di ancoraggio ISOFIX (2) della vettura sono difficili da
raggiungere, consigliamo di utilizzare le guide ISOFIX (3) fornite
in dotazione, fissandole permanentemente ai punti di ancoraggio
ISOFIX (2).
seggiolino.
25
Page 26

6
7
4
2
5
6
7
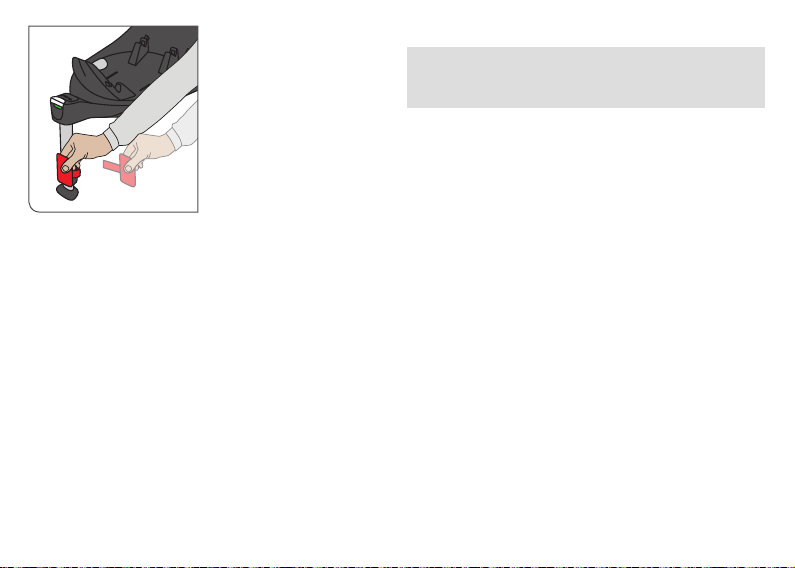
• Klappen Sie immer den Stützfuß (4) aus, bis er vorne einrastet.
HINWEIS! Es ist ein charakteristisches Warnsignal zu hören bis die
Basis korrekt installiert wurde (siehe Kapitel: „EINSTELLEN DES
STÜTZFUSSES“).
HINWEIS! Ist der Stützfuß ausgeklappt und es entsteht kein
Ton, obwohl der Plastikstreifen entfernt wurde, muss die Batterie
ausgetauscht werden (siehe Kapitel: „BATTERIEWECHSEL“).
• Lösen Sie die Arretierung der ISOFIX-Konnektoren (5). Beide
Arretierungen lassen sich unabhängig voneinander verstellen. Betätigen
Sie beide Tasten (6) und (7) gleichzeitig und ziehen die ISOFIX-
Arretierung bis zum Anschlag aus der Basis.
• Die ISOFIX-Konnektoren (5) müssen hörbar an den beiden ISOFIX-
Befestigungspunkten (2) einrasten.
• Vergewissern Sie sich, dass der Sitz gut hält, indem Sie versuchen, ihn
aus den ISOFIX-Einführhilfen herauszuziehen.
• Der grüne Sicherheitsindikator (8) muss an den beiden ISOFIX-
Entriegelungstasten gut sichtbar sein.
• Anschließend schieben Sie die Basis in Richtung Rückenlehne, bis
diese fest und möglichst vollflächig anliegt.
8
26
HINWEIS! Wechselseitiges Hin- und Herbewegen der Basis
verspannt diese zusätzlich mit der Rückenlehne des Fahrzeuges.
Page 27

• Always fold out the load leg (4) until it locks. • Portare in posizione il piede di supporto (4) fino a quando si blocca.
NOTE! There will be a charateristic warning signal audible till the base
is installed correctly (see chapter: „ADJUSTING THE LOAD LEG“).
NOTE! If the load leg is folded out and the transportation lock is
removed and there is no noise, you have to change the battery (see
chapter: „HOW TO CHANGE BATTERY“).
NOTA BENE! Ci sarà un segnale di avviso caratteristico udibile fino
a quando la base non sarà installata correttamente (vedere il capitolo:
„REGOLAZIONE PIEDE DI SUPPORTO“).
NOTA BENE! Se si apre il piede di supporto e si rimuove il blocco di
trasporto e non si ode alcun suono, sarà necessario cambiare le batterie
(vedere il capitolo: “COME SOSTITUIRE LE BATTERIE“).
DEENIT
• Release the lock of the ISOFIX connectors (5). Both locks can be
adjusted independently. Push both buttons (6) and (7) simultaneously
and pull the ISOFIX connectors out of the base to the endstopper.
• The ISOFIX connectors (5) have to lock into the ISOFIX anchorage
points (2) with an audible click.
• Make sure that the seat stays firmly in place by trying to pull it out of
the ISOFIX connect guides.
• The green safety indicator (8) must be clearly visible on both ISOFIX
release buttons.
• Next, push the base in the direction to the backrest until it is fully
aligned with the backrest.
NOTE! Moving the base sideways will further brace the base with the
backrest.
• Sbloccare la chiusura dei connettori ISOFIX (5). Entrambi i fermi si
regolano indipendentemente. Premere entrambi i pulsanti (6) e (7)
simultaneamente ed estrarre i connettori ISOFIX dalla base fino a
fine corsa.
• I connettori ISOFIX (5) devono agganciarsi saldamente ai punti di
ancoraggio ISOFIX (2) con un sonoro “click”.
• Verificate che il seggiolino sia fissato fermamente cercando di tirarlo
verso la parte opposta alle guide di connessione ISOFIX.
• L’indicatore di sicurezza verde (8) deve essere ora chiaramente
visibile su entrambi i pulsanti di rilascio.
• Quindi, spingere la base verso lo schienale fino a quando si trova
perfettamente allineata con esso.
NOTA BENE! Spostando lateralmente la base si rinforza ulteriormente
la base con lo schienale.
27
Page 28
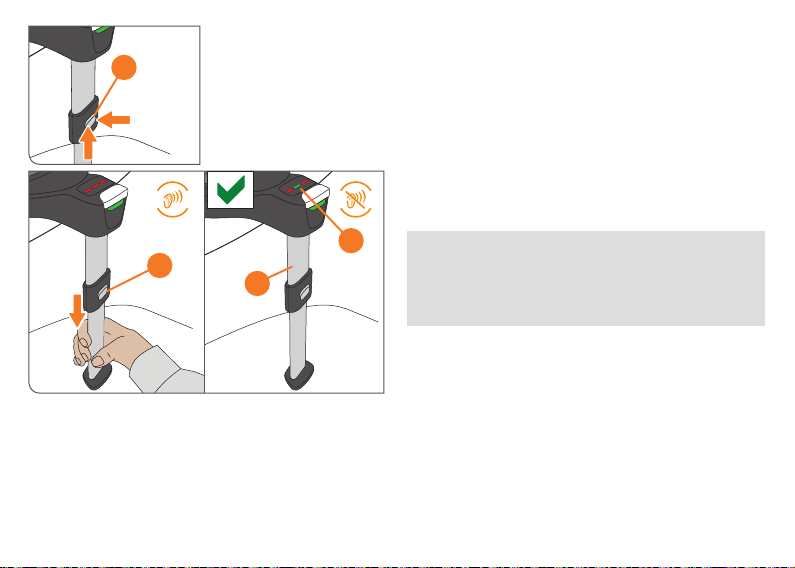
EINSTELLEN DES STÜTZFUSSES
Vergewissern Sie sich, dass der Stützfuß (4) in der vordersten Position
9
10
9
4
28
eingerastet ist. Schieben Sie die Verstelltaste (9) am Stützfuß nach oben
und halten Sie diese gedrückt, um den Stützfuß auszuziehen. Ziehen Sie
den Stützfuß (4) soweit heraus, bis dieser den Fahrzeugboden berührt.
Ziehen Sie den Stützfuß zur nächsten Verrastung aus, um eine optimale
Kraftaufnahme zu gewährleisten. Der Stützfußindikator (10) an der Basis
schaltet dann auf GRÜN um. Dabei hört der charakteristische Ton auf.
HINWEIS! Achten Sie darauf, dass die Basis möglichst flächig auf
dem Fahrzeugsitz aufliegt.
!
WARNUNG! Der Stützfuß (4) muss immer direkten
Bodenkontakt haben. Es dürfen keine Gegenstände
oder Hohlräume zwischen Fahrzeugboden und dem
Stützfuß sein. Besitzt Ihr Auto Staufächer im Fußraum,
wenden Sie sich unbedingt an den Fahrzeughersteller.
Page 29

ADJUSTING TH E LOAD LEG REGOLAZIONE DEL PIEDE DI SUPPORTO
Make sure that the load leg (4) is fixed in the forward position. Push the
adjustment button (9) upwards on the load leg and press it to pull the
load leg. Pull the load leg (4) out until it touches the vehicle floor. After
this, pull the foot out to the next locking position to ensure optimal force
transmission. The load leg indicator (10) on the base will show GREEN
and the characteristic noise will stop.
Verificare che il piede di supporto (4) sia fissato nella posizone davanti.
Spingere verso l’alto il pulsante di regolazione (9) sul piede di supporto
e premerlo per estrarre il piede di supporto. Estrarre il piede di supporto
(4) fino a quando appoggia bene sul pavimento dell’auto. A questo
punto allungare leggermente per fissare il piede di supporto nel foro
di blocco immediatamente successivo, per garantire la trasmissione
ottimale delle forze d’impatto. La spia del piede di supporto (10) sulla
base mostrerà il colore VERDE e si potrà udire il caratteristico “Click”.
DEENIT
NOTE! Make sure that the base rests as flat as possible on the car seat. NOTA BENE! Verificare che la base sia ben appoggiata sulla superficie
!
WARNING! The load leg (4) must always be in direct
contact with the vehicle floor. There must be no objects
or spaces between the vehicle floor and the load leg.
If there are storage compartments in the floor of the
vehicle you must contact the vehicle manufacturer.
del sedile dell’auto.
!
ATTENZIONE! Il piede di supporto (4) dev’essere
sempre a contatto diretto con il pavimento della vettura.
Non ci devono essere oggetti o spazio tra il pavimento
della vettura ed il piede di supporto. Se nel pavimento
sono presenti scomparti portaoggetti è necessario
contattare il produttore della vettura.
29
Page 30
BATTERIEWECHSEL
Achten Sie beim Wechsel der Batterie auf folgende Punkte:
• Bewahren Sie Batterien außer Reichweite von Kindern auf.
• Verwenden Sie ausschließlich die empfohlenen Batterien des Typs
CR2032.
• Eine leere Batterie muss stets aus dem Produkt entfernt werden, um
zu verhindern, dass eventuell austretende Flüssigkeit das Produkt
beschädigen könnte.
• Setzen Sie das Produkt und die Batterie auf keinen Fall Feuer aus.
• Verwenden Sie keine alten Batterien oder Batterien, die undichte
Stellen oder Risse aufweisen.
• Verwenden Sie ausschließlich neue und qualitativ hochwertige
Batterien.
• Achten Sie auf die richtige Polung (+/-).
Um die Batterie zu wechseln, muss das Fach auf der Rückseite des
Stützfußes mit einem Schraubenzieher geöffnet werden. Nach dem
Austausch der Batterie muss dieses wieder sicher verschlossen werden
und der charakteristische Ton hörbar sein, wenn der Stützfuß nicht
richtig installiert ist.
30
Page 31

HOW TO CHANGE BATTERY COME SOSTITUI RE LA BATTERIA
Consider the following points for changing the battery: Considerare i seguienti punti per cambiare la batteria:
• Keep all batteries out of reach of children.
• Only use the recommended type CR2032 batteries.
• An empty battery always has to be removed in order to protect the
product from escaping liquids.
• Never expose this product or the battery to fire.
• Do not use old batteries or batteries that show signs of leakage or
cracks.
• Use only high-quality new batteries.
• Pay attention to the correct polarity (+/-).
• Tenere le pile lontano dalla portata dei bambini.
• Raccomandiamo l’utilizzo delle sole batterie tipo CR2032.
• La batteria esaurita deve essere sempre rimossa per proteggere il
prodotto dalla fuoriuscita di liquidi.
• Non esporre mai il prodotto o le batterie alle fiamme.
• Non utilizzare vecchie pile o pile che mostrino segni di usura o rottura.
• Utilizzare solo pile nuove e di alta qualità.
• Prestare attenzione a posizionare le pile con la giusta polarità (+/-).
DEENIT
To change the battery you have to open the compartment located at
rear of the load leg with a screw driver. After changing the battery it
is mandatory to close this compartment again and the characeristic
warning signal is audible if the load leg isn‘t installed correctly.
Per cambiare la batteria dovete aprire con un cacciavite lo scomparto
che si trova nella parte posteriore della gamba d’appoggio. Dopo
aver sostituito la batteria è obbligatorio richiudere lo scomparto ed è
necessario udire il caratteristico suono di avverimento se la gamba non
è stata installata in modo corretto.
31
Page 32

AUSBAU DER BASIS AUS DEM FAHRZEUG
6 7
5
9
32
• Entriegeln Sie nacheinander beide ISOFIX-Konnektoren (5) durch
gleichzeitiges Betätigen der Tasten (6) und (7), und ziehen diese aus
den Einführhilfen.
• Ziehen Sie die Basis aus den ISOFIX-Befestigungspunkten heraus.
• Schieben Sie die Konnektoren (5) in die Ausgangsposition zurück.
• Durch Drücken der Verstelltaste (9) können Sie den Stützfuß wieder
in seine Ausgangsposition schieben und danach platzsparend
zurückklappen.
Page 33

REMOVING THE BASE FROM THE VEHICLE TOGLIER E LA BASE DAL VEICOLO
• Unlock both ISOFIX connectors (5) through pushing the buttons
(6) and (7) simultaneously and pull them out of the ISOFIX connect
guides.
• Pull out the base from the ISOFIX anchorage points.
• Push the connectors (5) back into the original position.
• By pressing the adjustment button (9) you can push back the load leg
into its original position and then fold it back to save space.
• Sbloccare entrambi i connettori ISOFIX (5) premendo
simultaneamente i pulsanti (6) e (7) ed estrarli dalle guide ISOFIX.
• Estrarre la Base dai punti di ancoraggio ISOFIX.
• Spingere i connettori (5) per farli rientrare nella posizione originaria.
• Premendo il pulsante di regolazione (9) è possibile fare rientrare
il piede di supporto nella posizione originaria, quindi ripiegarlo per
salvare spazio.
DEENIT
33
Page 34

14
11
BEFESTIGUNG DES SITZES AUF DER BASIS
HINWEIS! Stellen Sie sicher, dass die Oberfläche der Basis frei von
Fremdkörpern ist.
HINWEIS! Achten Sie vor der Installation des Sitzes darauf, dass die
Basis sich in der für die Fahrt zugelassenen Grundposition befindet
(siehe Kapitel: „DREHFUNKTION“).
Positionieren Sie den Kindersitz auf der Basis. Stellen Sie sicher,
dass beide Raststangen (11) mit einem hörbaren „KLICK“ verriegeln.
Kontrollieren Sie anschließend, ob der Basisindikator (12) an der Basis
GRÜN zeigt. Sollte der Indikator nicht GRÜN zeigen, ist der Sitz nicht
ausreichend verriegelt. Wiederholen Sie ggf. den Vorgang.
12
34
Aktivieren Sie nun den Seitenprotektor (14) (siehe Kapitel:
„EINSTELLEN DER SEITENPROTEKTOREN“).
Page 35

INSTALLING THE CAR SEAT ON THE BASE INSTALLARE IL SEGGIOLINO SULLA BASE
NOTE! Make sure that the surface of the base is clear of free objects. NOTA BENE! Assicuratevi che la superficie della base sia
NOTE! Before installing the seat take care that the base is turned in the
authorized position for driving (see chapter: “ROTATION FUNCTION”).
completamente libera da qualsiasi oggetto.
NOTA BENE! Prima di installare il seggiolino, accertarsi che la base sia
girata nella posizione autorizzata per la guida o in posizione di imbarco
(vedere il capitolo “FUNZIONE ROTAZIONE”). Piccoli triangoli sulla
base aiuteranno a trovare la posizione corretta.
DEENIT
Place the car seat on the base. Please ensure that both locking bars
(11) lock with an audible “CLICK”. Check whether the base indicator
(12) on the base is GREEN. If the indicator is not GREEN, the car seat
is not sufficiently locked. If necessary, repeat the procedure.
Activate the side protector (14) (see chapter: “ADJUSTING THE SIDE
PROTECTORS”).
Posizionare il seggiolino sulla base Verificare che entrambe le barre
(11) siano ben fissate, dovrete udire un sonoro „CLICK“. L’indicatore
(12) sulla base dovrà essere di colore VERDE. Se l’indicatore non è di
colore VERDE, il seggiolino non è fissato correttamente. Se necessario,
ripetere il procedimento.
Attivare le protezioni laterali (14) (vedi sezione “REGOLAZIONE
DELLE PROTEZ IONI LATERALI”).
35
Page 36

AUS BAU
HINWEIS! Um Ihr Fahrzeug sowie den Kindersitz vor Beschädigungen
16
15
36
zu schützen, muss der Seitenprotektor vor der Entnahme wieder
in den Sitz geklappt werden (siehe Kapitel: „EINSTELLEN DER
SEITEN PROTEKTOREN“).
Drücken Sie gleichzeitig die grüne Entriegelungstaste (15) und ziehen
Sie die obere Entriegelungstaste (16) nach oben, um den Sitz von der
Basis zu entriegeln. Kippen Sie den Sitz etwas an. Der Basisindikator
zeigt nun ROT. Nun können Sie die Entriegelungstasten (15) und (16)
loslassen und den Kindersitz von der Basis abheben.
Page 37

REMOVAL RIMOZIONE DEL SEGGILINO
NOTE! To prevent damage to your car and the car seat, the side
protector should be folded back before removing the car seat (see
chapter: „ADJUSTING THE SIDE PROTECTORS“).
Press the green release butten (15) and pull the upper release button
(16) up to unlock the car seat from the base. Tilt the seat a little. The
base indicator shows RED. Now you can release the unlocking buttons
(15) and (16) to lift the car seat off the base.
NOTA BENE! Per proteggere sia il seggiolino che la vettura da
eventuali danni fare sempre rientrare le protezioni laterali prima di
togliere il seggiolino dall’auto (vedi sezione “REGOLAZIONE DELLE
PROTEZIONI LATERALI”).
Premere il pulsante verde (15) e tirare verso l’alto il pulsante di
rilascio superiore (16) per sbloccare il seggiolino dalla base. Inclinare
leggermente il seggiolino. L’indicatore sulla base ora è di colore
ROSSO. A questo punto si possono rilasciare i pulsanti di sblocco
(15)e(16) e sollevare il seggiolino dalla Base.
DEENIT
37
Page 38

EINSTELLEN DER SEITENPROTEKTOREN
Im Kindersitz ist das „Linear Side-Impact Protection“ System (L.S.P.)
verbaut. Dieses System erhöht die Sicherheit Ihres Kindes im Falle eines
seitlichen Aufpralls. Um die bestmögliche Schutzwirkung zu erzielen,
aktivieren Sie das L.S.P. auf der zur nächsten Fahrzeugtür zeigenden
Seite des Sitzes. Drücken Sie hierfür den markierten Bereich (17). Sollte
17
38
das L.S.P. bei geschlossener Fahrzeugtüre nicht vollständig ausgeklappt
werden können, kann der Kindersitz auch mit eingeklapptem L.S.P.
verwendet werden.
HINWEIS! Achten Sie darauf, dass das L.S.P. mit einem hörbaren
„KLICK“ eingerastet ist.
Das L.S.P. lässt sich wieder komplett in den Sitz verstauen, indem Sie
es leicht nach außen ziehen und anschließend einklappen, bis es mit
einem hörbaren „KLICK“ einrastet.
HINWEIS! Beim Einbau des Kindersitzes auf einem mittleren Sitzplatz
dürfen Sie den linearen Seitenaufprallschutz (L.S.P.) nicht ausklappen.
!
WARNUNG! Der ausgeklappte Seitenaufprallschutz
(L.S.P.) dient nicht als Tragegriff oder zur Befestigung
des Kindersitzes.
Page 39

ADJUSTING TH E SIDE PROTECTORS REGOLARE LE PROTEZIONI LATERALI
The “Linear Side-impact Protection” (L.S.P.) is built into the car seat.
This system enhances the safety of your child in the event of a side
crash. In order to achieve the best possible protective effect, unfold
the L.S.P. as far as possible towards the vehicle door closest to the car
seat. To release the L.S.P. press the marked area (17) on the L.S.P.
If it’s not possible to completely unfold the L.S.P. with a closed vehicle
door, you may as well use the car seat with a closed L.S.P.
Il sistema “Linear Side.Impact Protection” (L.S.P.) è integrato nel
seggiolino. Questo sistema migliora la sicurezza del vostro bambino in
caso di incidente laterale. Per ottenere la migliore protezione possibile,
estrarre al massimo la protezione L.S.P. sul lato del seggiolino più vicino
alla portiera dell’auto. Per sbloccare la protezione premere nella zona
contrassegnata (17) sull’L.S.P.
Nel caso l’L.S.P. superi lo spazio designato arrivando a toccare la
portiera, il seggiolino può essere utilizzato con LSP non estratti.
DEENIT
NOTE! Ensure that the extendable part locks in place with an audible
“CLICK”.
In order to push back the L.S.P. into the seat, pull out the L.S.P. slightly
and fold it, until it locks with an audible “CLICK”.
NOTE! When using the car seat on a middle position in the vehicle, it‘s
prohibited to fold out the (L.S.P.) device.
!
WARNING! Using the (L.S.P.) device to carry or to
fasten the car seat is prohibited.
NOTA BENE! Verificare che la parte estensibile sia bloccata in
posizione con un sonoro “click”.
E’ammesso l’uso in questa posizione. Per fare rientrare la protezione
L.S.P. nel seggiolino, estrarla e piegarla, fino a quando si fissa con un
sonoro „CLICK“.
NOTA BENE! Quando il seggiolino è installato nel sedile centrale del
veicolo gli L.S.P. NON devono essere estratti.
!
ATTENZIONE! E’ assolutamente vietato utilizzare i
braccetti (L.S.P.) per trasportare o fissare il seggiolino.
39
Page 40

SITZ UND LI EGEVERSTELLUNG
18
40
Der CYBEX SIRONA Z i-Size bietet bis zu 5 unterschiedliche Sitz- und
Liegepositionen zum sicheren und komfortablen Transport Ihres Kindes im
Fahrzeug. Falls gewünscht, betätigen Sie die Positionsverstelltaste (18)
an der Vorderseite des Kindersitzes, um den CYBEX SIRONA Z i-Size in
eine der gewünschten Liegepositionen zu führen.
!
WARNUNG! Eine Einstellung der Sitzposition durch
den Fahrzeugführer ist während der Fahrt ausdrücklich
untersagt!
!
WARNUNG! Achten Sie immer darauf, dass die Sitzschale in Liege- sowie in Sitzposition hörbar einrastet.
Page 41

ADJUSTMENT FOR SITTING AN D RECLINING REGOLAZ IONE PER LA SEDUTA E LA RECLINAZ IONE
CYBEX SIRONA Z i-Size offers up to 5 different sitting and reclining
positions for the safe and comfortable transport of your child in the
car. If wanted, activate the position adjustment handle (18) on the front
of the child seat, to put the CYBEX SIRONA Z i-Size in the required
reclining position.
CYBEX SIRONA Z i-Size offre ben 5 possibili regolazioni di seduta e
reclinazione per il trasporto sicuro e confortevole del bambino in auto.
Quando necessario, è sufficiente agire sulla maniglia di regolazione
della posizione (18), che si trova sulla parte frontale del seggiolino,
per inclinare CYBEX SIRONA Z i-Size nelle posizioni di reclinazione
desiderate.
DEENIT
!
WARNING! Reclining of the seat position by the driver
is prohibited while travelling!
!
WARNING! Always ensure that the seat shell gives an
audible “CLICK” when locking into the lying or seated
position.
!
ATTENZIONE! Al guidatore è vietata la regolazione
della posizione sdraiata durante la guida!
!
ATTENZIONE! Verificare sempre che la scocca si
blocchi in posizione sdraiata o seduta con un sonoro
“click”.
41
Page 42

DREHFUNKTION
18
13
42
Der Kindersitz verfügt über eine 360°-Drehfunktion, um dasEinund Aussteigen Ihres Kindes zu erleichtern und um von der
rückwärtsgerichteten zur vorwärtsgerichteten Verwendungsart
zu wechseln.Die Drehfunktion ist an die Höhe der Kopfstütze
gekoppelt.
HINWEIS! Der Kindersitz kann nur gedreht werden, wenn er in
aufrechter Position ist und der Indikator (13) ROT zeigt. Der Sitz lässt
sich nur nach vorne drehen, wenn die Kopfstütze in der 7. Position oder
höher eingestellt ist.
Um die Sitzschale in Einstiegsposition drehen zu können, gehen Sie
bitte wie folgt vor:
• Ziehen Sie an der Positionsverstelltaste (18) und führen die Sitz-
schale bei gezogener Taste in eine ganz aufrechte Sitzposition.
• Nun können Sie die Sitzschale zur Tür drehen und Ihr Kindbequem
anschnallen. Siehe Kapitel: „ANSCHNALLEN MITTELS
GURTSYSTEM“.
HINWEIS! Vor Fahrtantritt müssen Sie die Sitzschale wieder in eine
eingerastete Grundposition bringen.
• Drehen Sie die Sitzschale wieder zurück. Sobald die neutrale Position
erreicht wurde, muss die Sitzschale wieder mindestens in die erste
Sitzposition eingerastet werden. Dies geschieht mit einem hörbaren
„KLICK“.
• Kontrollieren Sie anschließend, ob der Indikator (13) GRÜN zeigt.
Sollte der Indikator ROT zeigen, ist der Sitz nicht ausreichend
verriegelt. Wiederholen Sie ggf. den Vorgang.
Page 43

ROTATION FUNCTION
The car seat can be rotated 360°, in order to help to put your child into
and take your child out of the vehicle. This also allows you to change the
position of the seat from rearward-facing to forward-facing. The rotation
function is connected to the position of the headrest.
FUNZIONE ROTAZIONE
Il seggiolino può essere ruotato a 360° per facilitare le operazioni di
ingresso e di uscita del bambino. Questo consente anche di modificare
la posizione del seggiolino da contro il senso di marcia al senso
di marcia. The rotation function is connected to the position of the
headrest.
DEENIT
NOTE! Only when the car seat is in most upright position and the
indicator (13) shows RED, the car seat can be rotated. The seat can
only be rotated forward-facing when the headrest is in 7th position or
higher.
In order to be able to rotate the seat shell into boarding position, please
proceed as follows:
• Pull the position adjustment handle (18) and while keeping the handle
pulled, bring the seat shell into a completely upright position.
• Now you can rotate the seat shell towards the door and strap the
child in without difficulty. See chapter: “SECURING BY MEANS OF
HARNESS SYSTEM”.
NOTE! Before starting your journey you must return the seat shell to a
basic position, locked in place.
• Rotate the seat shell back to its original position. As soon as the
neutral position is reached, the seat must be locked at least into the
first sitting position. This can be noticed by an audible “CLICK”.
• Next control if the indicator (13) on the base is GREEN. If the
indicator shows RED, the seat is not locked well. Repeat the process
if necessary.
NOTA BENE! Il seggiolino può essere ruotato solamente quando
è nella posizione più verticale e l’indicatore (13) appare ROSSO.
Il seggiolino può essere ruotato verso il senso di marcia solamente
quando il poggiatesta è nella 7a posizione o più alta.
In modo da poter ruotare il seggiolino nella posizione per salire,
proseguire come segue:
• Tirare la manopola per la regolazione della posizione (18) e mentre
si tiene la manopola tirata, portare il guscio del seggiolino in una
posizione completamente verticale.
• Adesso si può ruotare il guscio del seggiolino verso la porta e
allacciare la cintura al bambino senza difficoltà. Vedere il capitolo
“ASSICURARE PER MEZZO DI UN SISTEMA DI IMB RACATURA”.
NOTA BENE! Prima di iniziare il viaggio la scocca 16 la scocca deve
essere ruotata e fissata in una delle due posizioni di viaggio.
• Riportare la scocca nella posizione originaria. Raggiunta la posizione
neutra il seggiolino deve essere fissato almeno nella prima posizone
di seduta. Un sonoro “CLICK” ne darà conferma.
• Quindi verificare che l’indicatore (13) sulla Base sia di colore VERDE.
Se l’indicatore è di colore ROSSO significa che il seggiolino non è
fissato corretamente. Se necessario ripetere l’operazione.
43
Page 44

Um die Sitzschale vorwärts drehen zu können, gehen Sie bitte wie folgt
18
1
44
vor:
• Bringen Sie die Kopfstütze in die 7. Position oder höher, so dass die
rote Linie am Indikator (1) hinter der Kopfstütze verdeckt ist.
• Ziehen Sie nun an der Positionsverstelltaste (18) und führen die
Sitzschale bei gezogener Taste in eine ganz aufrechte Sitzposition.
• Nun können Sie die Sitzschale nach vorne drehen.
HINWEIS! Vergewissern Sie sich, dass die Sitzschale ordnungsgemäß
eingerastet ist, indem Sie versuchen, diese ohne Drücken der Positionsverstelltaste (18) zu drehen und zu kippen.
HINWEIS! Wir empfehlen Ihnen, das L.S.P. zu deaktivieren,
bevor Sie den Sitz drehen. Siehe Kapitel: „EINSTELLEN DER
SEITEN PROTEKTOREN“.
HINWEIS! Achten Sie darauf, dass kein Schmutz in den Spalt
zwischen Sitz und Basis gelangt. Dies kann auf Dauer die Leichtgängigkeit der Dreh- und Schwenkfunktion negativ beeinflussen. Sollte dies
dennoch vorkommen, sollte der Schmutz entfernt werden, bevor eine
weitere Betätigung des Dreh- und Schwenkmechanismus den Sitz
unter Umständen dauerhaft beschädigen könnte.
!
WARNUNG! Während der Fahrt muss der Kindersitz
stets in rückwärts- oder vorwärtsgerichteter Position
eingerastet sein. Benutzen Sie den Sitz niemals in Einstiegsposition oder in einer nicht eingerasteten Position
während Sie fahren.
Page 45

In order to be able to rotate the seat shell into forward-facing position,
please proceed as follows:
• Adjust the headrest into 7th position or higher, so that the red line on
the indicator (1) behind the headrest can not be seen anymore.
• Now pull the position adjustment handle (18) and while keeping the
handle pulled, bring the seat shell into a completely upright position.
• Now you can rotate the seat shell forward-facing.
NOTE! Make sure that the seat shell is correctly locked into place by
trying to rotate it, without pressing the adjustment handle (18).
NOTE! We suggest to kindly deactivate the L.S.P. before rotating the
seat. For details see chapter: „ADJUSTING THE SIDE PROTECTORS“.
In modo da poter ruotare il guscio del seggiolino nella posizione verso il
senso di marcia, proseguire come segue:
• Regolare il poggiatesta nella 7a posizione o più alta in modo che la
linea rossa sull’indicatore (1) dietro il poggiatesta non possa essere
vista più.
• Adesso tirare la manopola per la regolazione della posizione (18) e
mentre si tiene la manopola tirata, portare il guscio del seggiolino in
una posizione completamente verticale.
• Adesso si può ruotare il guscio del seggiolino verso il senso di marcia.
NOTA BENE! Verificare che la scocca del seggiolino sia ben fissata in
posizione cercando di ruotarla, senza premere la maniglia di regolazione
(18).
NOTA BENE! Consigliamo di disattivare gli L.S.P. prima di ruotare il
seggiolino. Per maggiori dettagli vedere la sezione “REGOLAZIONE
DELLE PROTEZ IONI LATERALI”.
DEENIT
NOTE! Avoid getting any dirt or sand in between the upper seat shell
and the base. This can have a negative impact on the performance of
the rotation and recline function. Should this happen the dirt should be
removed before rotating and reclining the seat any further to avoid any
permanent damage of the seat.
!
WARNING! While travelling the car seat must always
be locked in the rearward-facing or forward-facing
position. Never use the seat in the boarding position or
in any unlocked intermediate position while travelling.
NOTA BENE! Evitare assolutamente che sporco o sabbia penetrino
tra la scocca della seduta e la base. Ciò potrebbe compromettere le
funzioni di rotazione e di reclinazione. Nel caso dovesse accadere,
raccomandiamo di non forzare la rotazione o la reclinazione, ma di
rimuovere prima lo sporco, per evitare danni permanenti al seggiolino.
!
ATTENZIONE! Durante la marcia il seggiolino deve
sempre essere ben fissato in una delle due posizioni di
utilizzo: contro il senso di marcia o nel senso di marcia.
Non lasciare mai il seggiolino in posizioni intermedie o
laterali durante il viaggio.
45
Page 46

RÜCKWÄRTSGERICHTETE VERWE NDUNG 45 CM 105 CM
HINWEIS!
muss bis zu einer Körpergröße von 60 cm verwendet werden.
HINWEIS!
größe von 105 cm genutzt werden. Die integrierte Driving Direction Control
Technologie im Kindersitz verhindert die vorwärtsgerichtete Position bis zur
6. Kopfstützenposition (siehe Kapitel: „DREHFUNKTION“).
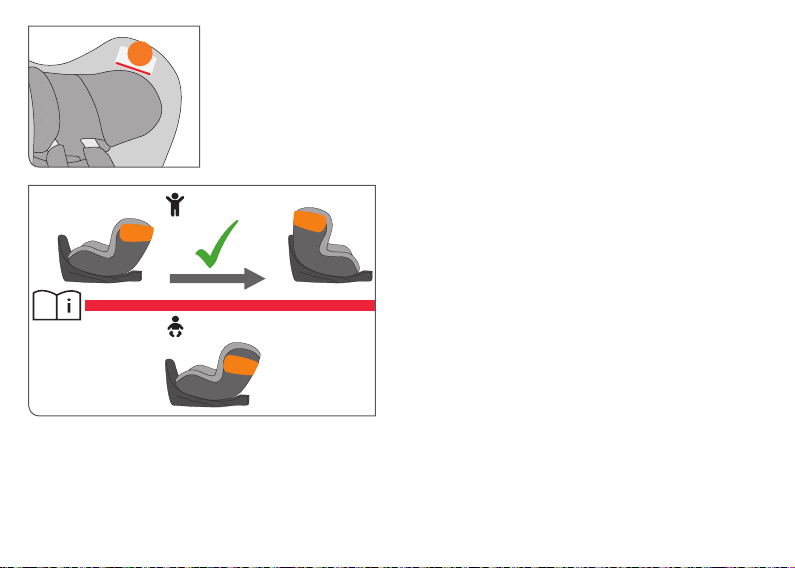
Der Indikator an der Kopfstütze (1) zeigt zusätzlich an, ab welcher
Größe des Kindes ein Umbau frühestens möglich ist.
Eine vorwärtsgerichtete Verwendung ist nur dann zugelassen, wenn:
Die Neugeboreneneinlage dient dem Schutz Ihres Kindes und
Der Kindersitz kann rückwärtsgerichtet bis zu einer Körper-
• das Kind > 76 cm groß ist.
• das Kind mindestens im 16. Lebensmonat ist. Es wird empfohlen,
den Sitz so lange wie möglich in der rückwärts gerichteten Position
zu verwenden.
• die korrekt eingestellte Kopfstütze (19) den Indikator (1) verdeckt.
1
19
46
Page 47

REARWARDFACING USE 45 CM 105 CM USO CONTRO IL SENSO DI MARCIA 45 CM 105 CM
NOTE! The newborn inlay protects your child. It needs to be used up
to size of 60 cm.
NOTE! The car seat can be used in rearward-facing position up to
105cm. The integrated Driving Direction Control Technology in the
car seat prevents the usage of seat in forward-facing position till
6thheadrest position (see chapter: “ROTATION FUNCTION”).
The indicator on the headrest (1) shows the height of the child from
which the seat can be transformed the earliest.
The seat may only be used forward-facing, if:
• the child is > 76 cm tall.
• the child is min. 16 months old. We recommend to use the seat as
long as possible in rearward-facing position.
• the correctly adjusted headrest (19) covers the indicator (1).
NOTA BENE! Il riduttore per neonati porotegge il bambino. Dev’essere
utilizzato fino a quando il bambino raggiunge un’altezza di almeno 60cm.
NOTA BENE! Il seggiolino può essere usato rivolto contro il senso
di marcia fino a quando il bambino raggiunge l’altezza di 105 cm. Il
Controllo Direzione di Marcia integrato impedisce la rotazione del
seggiolino nel senso di marcia finchè il poggiatesta non arriva alla
6posizione (vedi il capitolo: “FUNZIONE ROTAZIONE”).
L’indicatore sul pogiatesta (1) mostra l’altezza minima della testa del
bambino da cui sarà possibile effettuare l’eventuale cambio nel senso
di marcia.
L’uso nel senso di marcia è possibile soltanto se:
• il bambino ha superato l’altezza di 76 cm.
• ha raggiunto almeno l’età di 16 mesi. Raccomandiamo l’uso contro il
senso di marcia il più a lungo possibile.
• il poggiatesta (19) correttamente regolato, si sovrappone
all’indicatore (1).
DEENIT
47
Page 48

MAX.
48
19
20
ANPASSEN AN DIE KÖRPERGRÖSSE
Anpassen der Kopfstütze
HINWEIS! Die Neugeboreneneinlage dient dem Schutz Ihres Kindes
und muss bis zu einer Körpergröße von 60 cm verwendet werden.
HINWEIS!
(19)
Höhenverstellung kann in 12 Positionen erfolgen.
HINWEIS! Die Schultergurte sind mit der Kopfstütze fest verbunden und
müssen nicht separat eingestellt werden.
Nur eine in optimaler Höhe eingestellte Kopfstütze
gewährt Ihrem Kind größtmöglichen Schutz und Komfort. Die
• Die Kopfstütze muss so eingestellt werden, dass der Abstand
zwischen den Schultern des Kindes und der Kopfstütze 2 cm
(ca. 2 Finger) nicht überschreitet.
• Ziehen Sie den Verstellgriff (20) nach oben, um die Kopfstütze (19) zu
entriegeln. Nun können Sie die Einstellung vornehmen.
Page 49

ADJUSTING TO THE BODY SIZE REGOLAZ IONE IN BASE ALLA CORPORATURA
Adjusting the Headrest Regolazione del poggiatesta
NOTE! The newborn inlay protects your child. It needs to be used up
to size of 60 cm.
NOTE!
The headrest
child only if it is adjusted to the optimum height. There are 12 height
positions that can be set.
(20)
ensures the best possible protection for your
NOTA BENE! Il riduttore per neonati porotegge il bambino.
Dev’essere utilizzato fino a quando il bambino raggiunge un’altezza di
almeno 60 cm.
ATTENZIONE! Il poggiatesta (19) garantisce la protezione ottimale per
il bambino soltanto se regolato all’altezza corretta.
essere regolato in 12 diverse posizioni.
Il poggiatesta può
DEENIT
• The headrest must be adjusted so that max. 2 cm (ca. 2 finger’s
width) remains free between the child’s shoulder and the headrest.
• Pull the adjustment handle (20) upwards to unlock the headrest (19).
Now you can adjust the headrest.
NOTE! The shoulder belts are firmly connected to the headrest and do
not have to be adjusted separately.
• Il poggiatesta deve essere regolato in modo che ci siano 2 cm
(ca. due dita) liberi tra le spalle del bambino e il poggiatesta.
• A tale fine tirare in alto la leva di regolazione (20) per sbloccare il
poggiatesta (19). A questo punto è possibile regolare il poggiatesta.
NOTA BENE! Le cinture per le spalle sono fissate al poggiatesta e non
devono essere regolate separatamente.
49
Page 50

ENTFERNEN DER NEUGEBORENENEINLAGE
Die bereits bei Auslieferung in der Schale integrierte
Neugeboreneneinlage gibt Ihrem noch kleinen Baby die
notwendige Unterstützung, mehr Liegekomfort und Halt.
Ab 61 cm (ca. 3 Monaten) sollte die Neugeboreneneinlage entfernt
werden, um ausreichend Platz für ihr Kind zu schaffen.
Zum Entfernen der Neugeboreneneinlage öffnen Sie die Druckknöpfe
am Kopfstützenbezug. Anschließend können Sie den Kopfstützenbezug
abziehen und die Neugeboreneneinlage entfernen. Bringen Sie
anschließend erneut den Kopfstützenbezug an, bringen die Schultergurte
in Position, und schließen erneut die Druckknöpfe.
Bevor Sie die Neugeboreneneinlage waschen, entfernen Sie bitte
den Schaumstoff durch die dafür vorgesehenen Öffnungen aus der
Neugeboreneneinlage. Nachdem die Neugeboreneneinlage gewaschen
und getrocknet ist, können Sie den Schaumstoff wieder durch die
vorgesehenen Öffnungen zurück stecken.
50
Page 51

REMOVING THE NEWBORN INLAY RIMUOVERE GLI INSERTI
The preinstalled newborn inlay helps to support lying comfort and
fit for the smallest babies.
L’inserto neonato preinstallato favorisce una posizione sdraiata più
confortevole e le dimensioni più adatte per i bambini più piccoli.
DEENIT
The newborn inlay may be removed after the baby is 61 cm (approx. 3
months) to provide more space for the child.
To remove the newborn inlay open the snap buttons of the headrest
cover. Now first pull off the headrest cover and then remove the newborn
insert. After that put the headrest cover back in place, reposition the
shoulder belts and finally close the snap buttons again.
Before washing the newborn inlay, please remove the foam in the
newborn inlay via dedicated slots. You can put the foam back through
the slot after the newborn inlay is washed and dried.
L’inserto neonato può essere rimosso dopo che il bambino ha superato
un’altezza di 61 cm (3 mesi circa), per fornire maggiore spazio.
Per togliere l’inserto neonato aprire i bottoni a pressione del rivestimento
poggiatesta. A questo punto prima rimuovere il rivestimento del
poggiatesta e quindi estrarre l’inserto neonato. Quindi rimettere in
posizione il rivestimento del poggiatesta, riposizionare le cinture per le
spalle ed infine richiudere i bottoni a pressione.
Prima di lavare il riduttore neonato preghiamo togliere la schiuma
attraverso le apposite aperture. Dopo che il riduttore è stato lavato ed è
bene asciutto, riinserire la schiuma attraverso le apposite aperture.
51
Page 52

21
22
23
25
26
24
CLICK!
52
ANSCHNALLE N MITTELS GURTSYSTEM
HINWEIS!
eingerastet ist, bevor Sie den Kindersitz verwenden.
HINWEIS! Sorgen Sie dafür, dass der Kindersitz frei von Spielsachen
und harten Objekten ist.
HINWEIS! Bitte ziehen Sie immer am Schultergurt (21) und nicht an
den Gurtpolstern.
HINWEIS! Achten Sie darauf, dass die Schultergurte (21) nicht
verdreht sind.
HINWEIS! Für den optimalen Schutz durch den Kindersitz sollten die
Schultergurte (21) so nahe wie möglich am Körper und die Beckengurte
möglichst tief verlaufen, so dass sie eng am Becken anliegen.
Achten Sie darauf, dass die Kopfstütze ordnungsgemäß
• Lockern Sie die Schultergurte (21), indem Sie die Verstelltaste am
Zentralversteller (22) betätigen und gleichzeitig beide Schultergurte
nach oben ziehen.
• Öffnen Sie das Gurtschloss (23) durch kräftiges Drücken der roten
Taste. Die Schlosszungen (24) können seitlich am Bezug, auf dem
dafür gekennzeichneten Bereich (26), fixiert werden. Dieser Bereich
ist magnetisch.
• Setzen Sie Ihr Kind in den Kindersitz.
• Führen Sie die Schultergurte (21) gerade über die Schultern Ihres
Kindes.
• Führen Sie die beiden Schlosszungen (24) zusammen und rasten Sie
diese im Gurtschloss (23) mit einem hörbaren „KLICK“ ein.
• Ziehen Sie behutsam am Zentralverstellgurt (25), um die
Schultergurte (21) soweit zu straffen, bis diese am Körper Ihres
Kindes anliegen.
Page 53

STRAPPING WITH HARNESS SYSTEM ALLACCIARE IL BAMBINO CON LE CINTURE
NOTE! Ensure that the headrest is correctly locked in place before
using the car seat.
NOTE! Ensure that the car seat is free from toys and hard objects. NOTA BENE! Verificare che il seggiolino sia libero da giocattoli o altri
• Loosen shoulder belts (21) by pressing the adjustment button on
central adjuster (22) and simultaneously pulling both shoulder belts
up.
NOTE! Please always pull on shoulder belt (21) and not on belt pads. NOTA BENE! Tirare sempre agendo sulle cinture (21) non sui
• Undo the belt buckle (23) by pressing the red button firmly.The belt
tongues (24) can be fixed sideward on the cover (26). This area is
magnetic.
NOTE! Ensure that shoulder belts (21) are not twisted. NOTA BENE! Le cinture (21) non devono mai essere attorcigliate.
NOTA BENE! Verificare che il poggiatesta sia bloccato correttamente
in posizione prima di utilizzare il seggiolino.
oggetti rigidi.
• Allentare le cinture (21) premendo il pulsante di regolazione centrale
(22) e tirare simultaneamente entrambe le cinture verso l’alto.
cuscinetti.
• Allentare la fibbia della cintura (23) premendo con decisione il
pulsante rosso. Le linguette della cintura (24) possono essere fissate
lateralmente sulla scocca (26). Questa zona è dotata di magneti.
DEENIT
• Put your child into the car seat.
• Place shoulder belts (21) directly over your child’s shoulders.
• Place both buckle tongues (24) together and lock them in place in belt
buckle (23) with an audible “CLICK”.
• Pull cautiously on central adjustment belt (25) in order to tighten
shoulder belts (21) until they fit your child’s body.
NOTE! For the car seat to offer optimum protection, shoulder belts
should fit the body as closely as possible (21) and the hip belts should
should run as low as possible so they are thight against the pelvis.
• Collocare il bambino nel seggiolino.
• Appoggiare le cinture (21) sulle spalle del bambino.
• Unire tra loro le due linguette (24) ed inserirle insieme nella fibbia
centrale (23) dove si fissano con un sonoro “CLICK”.
• Tirare delicatamente la cintura di regolazione centrale (25) per
stringere le cinture (21) fino a farle aderire perfettamente alle spalle
del bambino.
NOTA BENE! Affinché il seggiolino dell’auto offra una protezione
ottimale, le cinture per le spalle dovrebbero adattarsi il più possibile al
corpo (21) e le cinghie del bacino dovrebbero correre il più in basso
possibile in modo che siano ben dirette contro il bacino.
53
Page 54

ANSCHNALLE N MITTELS GURTSYSTEM UND CLIP
Dieses Kapitel bezieht sich nur auf Kindersitze, welche bereits beim
Kauf mit SensorSafe Clip ausgestattet sind bzw. im Nachhinein mit
einem separaten SensorSafe Clip aufgerüstet werden.
Der SensorSafe Clip ist am Gurtsystem des Kindersitzes befestigt.
Die beiden Teile des Clips haben Schlitze zum Einfädeln in das
Gurtsystem.
Gehen Sie für die Installation beider Teile wie folgt vor:
• Greifen Sie den Gurt unterhalb der Schulterpolster und führen ihn
21
22
54
von vorn nach hinten in den oberen Schlitz des Clips.
• Führen Sie den Gurt hinter dem Clip entlang und fädeln Sie ihn nun
von hinten nach vorn durch den unteren Schlitz.
Um den Clip zu entfernen, führen Sie die Schritte bitte in umgekehrter
Reihenfolge durch.
HINWEIS! Achten Sie darauf, dass die Kopfstütze ordnungsgemäß
eingerastet ist, bevor Sie den Kindersitz verwenden.
HINWEIS! Sorgen Sie dafür, dass der Kindersitz frei von
Spielsachen und harten Objekten ist.
• Lockern Sie die Schultergurte (21), indem Sie die Verstelltaste am
Zentralversteller (22) betätigen und gleichzeitig beide Schultergurte
nach oben ziehen.
HINWEIS! Bitte ziehen Sie immer am Schultergurt (21) und nicht an
den Gurtpolstern.
Page 55

STRAPPING WITH HARNESS SYSTEM AND CLIP
This chapter only applies for car seats that are equipped with the
SensorSafe Clip at point of sales or are upgraded with a separate
SensorSafe Clip.
The SensorSafe Clip is attached to the harness system of the seat.
Both parts of the clip have slots for connecting it to the harness system.
For installation of both parts please proceed as follows:
• Grasp the harness under the shoulder pads and guide it from back
to front through the upper slot of the clip.
• Guide the harness behind the clip and insert it from back to front in
the lower slot.
To uninstall the clip, follow the steps in opposite order.
NOTE! Ensure that the headrest is correctly locked in place before
using the car seat.
NOTE! Ensure that the car seat is free from toys and hard objects.
• Loosen shoulder belts (21) by pressing the adjustment button on
central adjuster (22) and simultaneously pulling both shoulder belts
up.
NOTE! Please always pull on shoulder belt (21) and not on belt pads.
LEGARE CON IL SISTEMA DI IMBRACATURA E CLIP
Questo capitolo riguarda solo i seggiolini auto che sono forniti di Clip
SensorSafe presso i punti vendita o che sono aggiornati con una Clip
SensorSafe separata.
La Clip SensorSafe è attaccata al sistema di imbracatura del seggiolino.
Entrambe le parti della clip hanno fessure per connetterla al sistema di
imbracatura.
Per l’installazione di entrambe le parti, proseguire come segue:
• Afferrare l’imbracatura sotto le imbottiture delle spalle e
accompagnarla dal dietro al davanti attraverso la fessura superiore
della clip.
• Accompagnare l’imbracatura dietro la clip e inserirla dal dietro al
davanti nella fessura inferiore.
Per disinstallare la clip, seguire le fasi nell’ordine opposto.
NOTA BENE! Assicurarsi che il poggiatesta sia bloccato correttamente
al proprio posto prima di usare il seggiolino.
NOTA BENE! Assicurarsi che il seggiolino sia libero da giochi e oggetti
duri.
• Allentare le cinture delle spalle (21) premendo il pulsante per la
regolazione sul regolatore centrale (22) e tirando su simultaneamente
entrambe le cinture delle spalle.
NOTA BENE! Please always pull on shoulder belt (21) and not on belt
pads.
DEENIT
55
Page 56

• Öffnen Sie das Gurtschloss (23) durch kräftiges Drücken der roten
Taste.
• Öffnen Sie den Clip. in dem Sie den Knopf in der Mitte des Clips
drücken und die beiden Teile auseinanderziehen.
23
25
24
26
21
56
Die Schlosszungen (24) können nun seitlich am Bezug, auf dem dafür
gekennzeichneten Bereich (26), fixiert werden. Dieser Bereich ist
magnetisch.
HINWEIS! Achten Sie darauf, dass die Schultergurte (21) nicht
verdreht sind.
• Setzen Sie Ihr Kind in den Kindersitz.
• Führen Sie die Schultergurte (21) gerade über die Schultern Ihres
Kindes.
• Führen Sie die beiden Schlosszungen (24) zusammen und rasten Sie
diese im Gurtschloss (23) mit einem hörbaren „KLICK“ ein.
• Schließen Sie den Clip mit einem hörbaren „KLICK“ .
• Schieben Sie den geschlossenen Clip nach unten in Richtung des
Gurtschlosses.
• Ziehen Sie behutsam am Zentralverstellgurt (25), um die
Schultergurte (21) soweit zu straffen, bis diese am Körper Ihres
Kindes anliegen.
• Positionieren Sie den Clip direkt unterhalb der Schulterpolster.
HINWEIS! Für den optimalen Schutz durch den Kindersitz sollten die
Schultergurte (21) so nahe wie möglich am Körper und die Beckengurte
möglichst tief verlaufen, so dass sie eng am Becken anliegen.
Page 57

• Undo the belt buckle (23) by pressing the red button firmly.
• Open the clip by pressing the release button and pulling both parts
apart.
The belt tongues (24) can now be fixed sideward on the cover (26).
This area is magnetic.
• Slacciare la fibbia della cintura (23) premendo fermamente il pulsante
rosso.
• Aprire la clip premendo il pulsante di rilascio e smontando entrambe
le parti.
Le linguette della cintura (24) ora possono essere fissate lateralmente
sulla copertura (26). Quest’area è magnetica.
DEENIT
NOTE! Ensure that shoulder belts (21) are not twisted.
• Put your child into the car seat.
• Place shoulder belts (21) directly over your child’s shoulders.
• Place both buckle tongues (24) together and lock them in place in
belt buckle (23) with an audible “CLICK”.
• Fasten the clip with an audible “CLICK”.
• Push the closed clip down toward belt buckle.
• Pull cautiously on central adjustment belt (25) in order to tighten
shoulder belts (21) until they fit your child’s body.
• Position the Clip right under the shoulder pads.
NOTE! For the car seat to offer optimum protection, shoulder belts
should fit the body as closely as possible (21) and the hip belts should
should run as low as possible so they are thight against the pelvis.
NOTA BENE! Assicurarsi che le cinture delle spalle (21) non siano
attorcigliate.
• Porre il bambino nel seggiolino.
• Porre le cinture delle spalle (21) direttamente sulle spalle del
bambino.
• Porre entrambe le linguette della fibbia (24) insieme e bloccarle al
proprio posto nella fibbia della cintura (23) con un “CLIC” udibile.
• Assicurare la clip in modo che si senta un “CLIC”.
• Spingere giù la clip chiusa verso la fibbia della cintura.
• Tirare attentamente la cintura di regolazione centrale (25) in modo da
stringere le cinture delle spalle (21) fino a che non si adattino al corpo
del bambino.
• Posizionare la clip esattamente sotto le imbottiture delle spalle.
NOTA BENE! Le cinture delle spalle devono adattarsi al corpo il
più strettamente possibile (21), in modo che il seggiolino offra una
protezione ottimale e le cinture dei fianchi devono essere il più in basso
possibile in modo da essere strette contro il bacino.
57
Page 58

VORWÄRTSGERICHTETE VE RWEND UNG 76 CM 105 CM
Eine vorwärtsgerichtete Verwendung ist zugelassen, wenn Ihr Kind
älter als 15 Monate und mindestens 76 cm groß ist. Um Ihrem Kind
den bestmöglichen Schutz zu bieten, empfehlen wir, den Kindersitz
so lange wie möglich rückwärtsgerichtet zu verwenden. Sollte aber,
unter oben genannten Voraussetzungen, der Platz für die Beine Ihres
Kindes nicht mehr ausreichend sein, können Sie den Kindersitz auch
vorwärtsgerichtet verwenden. Wie Sie ihr Kind anschnallen, erfahren sie
im Kapitel: „ANSCHNALLEN MITTELS GURTSYSTEM“.
HINWEIS! Unfallstatistiken belegen, dass ein rückwärtsgerichteter
Transport Ihres Kindes im Fahrzeug am sichersten ist. Deshalb
empfehlen wir, den Kindersitz so lange wie möglich rückwärtsgerichtet
zu verwenden.
1
HINWEIS! Der Indikator an der Kopfstütze (1) zeigt zusätzlich an, ab
welcher Größe des Kindes ein Umbau möglich ist.
19
58
HINWEIS! Der Kindersitz kann rückwärtsgerichtet bis zu einer
Körpergröße von 105 cm genutzt werden. Die integrierte Driving
Direction Control Technologie im Kindersitz verhindert die vorwärtsgerichtete Position bis zur 6. Kopfstützenposition (siehe Kapitel
„DREHFUNKTIONEN“).
Eine vorwärtsgerichtete Verwendung ist nur dann zugelassen, wenn:
• das Kind > 76 cm groß ist und mindestens im 16. Lebensmonat ist.
Es wird empfohlen, den Sitz so lange wie möglich in der rückwärts
gerichteten Position zu verwenden.
• die korrekt eingestellte Kopfstütze (19) den Indikator (1) verdeckt.
• die Kopfstütze in der 7. Position oder höher eingestellt ist.
Page 59

FORWARDFACING USE 76 CM 105 CM USO NEL SENSO DI MARCIA 76 CM 105 CM
Using the seat in forward-facing position is permitted if the child is
older than 15 months and min. 76 cm tall. In order to offer your child the
highest level of protection, we recommend to use the child seat in the
rearward-facing position for as long as possible. If there is not enough
room for your child´s legs you can use the the child seat in the forwardfacing position. Learn more about how to secure your child in chapter:
„SECURING WITH HARNESS SYSTEM“.
L’uso nel senso di marcia è ammesso soltanto se il bambino ha superato
l’età di 15 mesi e l’altezza di 76 cm. Per offrire al bambino il massimo
livello di sicurezza raccomandiamo di usare il seggiolino rivolto contro il
senso di marcia il più a lungo possibile. Soltanto quando lo spazio non
sarà più sufficiente potrete ruotare il seggiolino nella direzione di marcia.
Maggiori informazioni su come allacciare il bambino nella sezione
“ALLACCIARE IL BAMBI NO CON LE CINTURE”.
DEENIT
NOTE! Accident statistics prove that the safest way to transport
your child in the car is in the rearward-facing position. Therefore we
recommend to use the child seat in the rearward-facing position for as
long as possible.
NOTE! The indicator on the headrest (1) shows the body height of the
child, from which the seat can be transformed the earliest.
NOTE! The car seat can be used in rearward-facing position up to
105cm. The integrated Driving Direction Control Technology in the
car seat prevents the usage of seat in forward-facing position till
6thheadrest position (see chapter: “ROTATION FUNCTION”).
The seat may only be used forward-facing, if: L’uso nel senso di marcia è possibile soltanto se:
• the child is > 76 cm tall and is min. 16 months old. We recommend
to use the seat as long as possible in rearward-facing position.
• the correctly adjusted headrest (19) covers the indicator (1).
• the headrest is at 7th or higher position.
NOTA BENE! Le statistiche sugli incidenti dimostrano che il modo
più sicuro per trasportare i bambini in auto è nella posizione contro il
senso di marcia. Per questo raccomandiamo di continuare ad usare il
seggiolino rivolto contro il senso di marcia il più a lungo possibile.
NOTA BENE! L’indicatore del poggiatesta (1) mostra l’altezza minima
che il bambino deve avere superato per poter utilizzare il seggiolino nel
senso di marcia.
NOTA BENE! Il seggiolino può essere usato rivolto contro il senso
di marcia fino a quando il bambino raggiunge l’altezza di 105 cm. Il
Controllo Direzione di Marcia integrato impedisce la rotazione del
seggiolino nel senso di marcia finchè il poggiatesta non arriva alla 6
posizione.
• il bambino ha superato l’altezza di 76 cm ha raggiunto almeno l’età
di 16 mesi. Raccomandiamo l’uso contro il senso di marcia il più a
lungo possibile.
• il poggiatesta (19) correttamente regolato, si sovrappone
all’indicatore (1).
• il poggiatesta si trova nella posizione 7 o maggiore.
59
Page 60

SO IST IHR KIND RICHTIG GESICHERT
Um die bestmögliche Sicherheit Ihres Kindes zu gewährleisten,
prüfen Sie bitte vor Beginn der Fahrt, ob…
• die Basis fest und möglichst vollflächig an der Rückenlehne des
Fahrzeugsitzes anliegt.
• die ISOFIX- Konnektoren ordnungsgemäß mit dem Fahrzeug
verbunden sind und der Stützfuß korrekt installiert wurde.
• der Sitz entweder in rückwärts- oder vorwärtsgerichteter Position
eingerastet ist.
• das 5-Punkt-Gurtsystem an die Körpergröße Ihres Kindes angepasst
wurde, die Schultergurte nicht verdreht sind und das Gurtsystem
geschlossen ist.
Neugeborene und Kleinkinder, die noch nicht selbstständig
sitzen können (bis ca. 1 Jahr), sollten aus orthopädischen und
sicherheitstechnischen Gründen immer in der flachsten Liegeposition
rückwärtsgerichtet transportiert werden.
60
Page 61

CORRECT SECURING OF YOUR CHILD ALLACCIARE CORRETTAMENTE IL BAMBINO
To ensure optimum safety for your child, please always check
before commencing travel that…
Per garantire la massima sicurezza del bambino,
prima di iniziare il viaggio è necessario verificare che:
DEENIT
• the base sits tight and is fully aligned with the backrest of the vehicle
seat.
• The ISOFIX connectors are correctly fastened to the vehicle and the
load leg has been correctly installed.
• the seat is locked in either rear or forward facing position.
• the 5-point belt system has been correctly adjusted to the size of the
child, the shoulder belts have not been twisted and the belt system
has been locked.
Newborns and infants who are not yet able to sit up by themselves (up
to around 1 year) should, for orthopedic and safety reasons, always be
transported in the flattest recline position rearward-facing.
• Accertare sempre che l’intera superficie dello schienale del seggiolino
appoggi completamente contro lo schienale del sedile dell’auto.
• I connettori ISOFIX siano agganciati saldamente al veicolo e che il
piede di supporto sia installato correttamente.
• il seggiolino sia ben fissato nella posizione contro il senso di marcia o
nel senso di marcia.
• Che le cinture a 5 punti siano regolate correttamente secondo la
corporatura del bambino, che le cinture per le spalle non siano
attorcigliate e che il sistema di cinture sia bene allacciato.
I neonati e i bambini piccoli non ancora in grado di stare seduti da
soli (fino a un anno circa) dovrebbero, per ragioni di sicurezza e
ortopediche, viaggiare sempre nella posizione reclinata più piana
possibile contro il senso di marcia.
61
Page 62

ENTFERNEN DES BEZUGES
Entfernen
Der Bezug besteht aus 7 Teilen, die mittels Gummiband, Druckknöpfen
27
23
28
62
und Reißverschluss am Sitzgestell befestigt sind. Sobald Sie alle
Befestigungen lösen, können die Einzelteile abgenommen werden.
HINWEIS!
Achten Sie bitte vor dem Abziehen aller Einzelteile des
Bezuges darauf, dass dieser oberhalb der silbernen Dekorteile liegt.
Gehen Sie wie folgt vor:
• Öffnen Sie das Gurtschloss (23) des 5-Punkt-Gurtsystems.
• Öffnen Sie die Druckknöpfe aller Gurtpolster und Bezugsteile (27).
• Haken Sie die Schulterpolster von ihrer Aufhängung (28) aus.
• Entfernen Sie alle Gurtpolster.
• Fädeln Sie nun die Schultergurte aus dem Kopfstützenbezug.
• Sie können nun den Bezug der Kopfstütze und den Sitzbezug nach
vorne hin abziehen.
• Um die Bezüge wieder zu befestigen, verfahren Sie in umgekehrter
Reihenfolge.
HINWEIS!
Achten Sie bei der Wiederanbringung der Schulterpolster
unbedingt darauf, dass ...
• die geschlossene Seite zum Hals hin zeigt.
• die Schulterpolster vollständig in ihrer Aufhängung (28) eingehakt
sind.
• die Schultergurte im Schulterpolster geführt sind.
Page 63

REMOVING THE COVER RIMOZIONE DEL RIVESTIMENTO
Removal Rimozione
The cover consists of 7 components fastened to the seat shell by
elastic pipings, snap buttons and zipper. Once you have released all the
fastenings, you can remove the individual components for washing.
NOTE!
Before detaching the cover please pull out the elastics under
silver decorative parts to avoid damage.
Proceed as follows:
• Open the harness buckle (23) of the 5-point harness system.
• Open all snap buttons of the pads and cover parts (27).
• Unhook the shoulder pads from the brackets (28).
• Remove all belt pads.
• Thread the shoulder belts out of the cover.
• Remove the cover by pulling it forwards.
• To fix the cover again on the seat carry out the steps in reverse order.
NOTE!
When remounting the shoulder pads, it is essential to ensure
that ...
• the closed side faces towards the childs neck.
• the shoulder pads are perfectly mounted on the brackets (28).
• the shoulder belts are guided inside the shoulder pads.
Il rivestimento è composto da 7 parti fissate alla scocca con
collegamenti elastici, bottoni a pressione e staffe. Una volta sganciati
tutti i punti di fissaggio è possibile rimuovere ciadscuna delle parti per
il lavaggio.
ATTENZIONE!
sotto le decorazioni argentate per evitare danneggiamenti.
Procedere come di seguito descritto:
• Aprire la fibbia (23) del sistema di citure a 5 punti.
• Slacciare tutti i bottoni a pressione dei cuscinetti e del rivestimento
(27).
• Sganciare i cuscinetti per le spalle dalle staffe (28).
• Togliere tutti i cuscinetti delle cinture.
• Sfilare le cinture per le spalle dal rivestimento.
• Togliere il rivestimento tirandolo in avanti.
• Per riposizionare il rivestimento sul seggiolino, ripetere i passaggi
nell’ordine inverso.
ATTENZIONE!
indispensabile verificare che...
• la parte chiusa sia rivolta verso il collo del bambino.
• i cuscinetti per le spalle siano perfettamente installati sulle staffe (28).
• le cinture per le spalle siano infilate correttamente nei cuscinetti per
le spalle.
Prima di staccare il rivestimento estrarre gli elastici da
Per riposizionare i cuscinetti per le spalle è
DEENIT
63
Page 64

!
WARNUNG! Der Bezug ist integraler Bestandteil des
Kindersitz-Sicherheitskonzeptes. Der Kindersitz darf
aus diesem Grund keinesfalls ohne Bezug verwendet
werden.
REINIGUNG
Es ist darauf zu achten, dass nur ein originaler Sitzbezug verwendet
wird, da auch der Bezug ein wesentlicher Bestandteil der Funktion ist.
Ersatzbezüge erhalten Sie im Fachhandel.
HINWEIS!
Bitte den Bezug vor der ersten Verwendung waschen.
Der Bezug darf bei 30°C im Schonwaschgang gewaschen werden.
Sollten Sie mit mehr als 30°C waschen, kann es zu Ausfärbungen
kommen. Bitte den Bezug gesondert von anderer Wäsche waschen
und keinesfalls maschinell trocknen! Den Bezug keinesfalls in der
prallen Sonne trocknen! Die Kunststoffteile können mit einem milden
Reinigungsmittel und warmem Wasser gewaschen werden.
!
WARNUNG! Bitte auf keinen Fall chemische Reinigungs- oder Bleichmittel verwenden!
!
WARNUNG! Das Gurtsystem kann nicht ausgebaut
werden! Entfernen Sie niemals einzelne Bestandteile
des Gurtsystems!
64
Page 65

!
WARNING! The cover is an integral component of the
car seat‘s safety design. The car seat must therefore
never be used without the cover.
CLEANING PULIZIA
It is important to use an original seat cover only since the cover is an
essential part of the function. You may obtain spare covers at your
retailer.
NOTE!
Please wash the cover before you use it the first time. Seat
covers are machine washable at max. 30°C on delicate cycle. If you
wash it at higher temperature, the cover fabric may lose colour. Please
wash the cover separately and never dry it mechanically! Do not dry
the cover in direct sunlight! You can clean the plastic parts with a mild
detergent and warm water.
!
ATTENZIONE! La fodera è parte integrante e un
componente essenziale per il design di sicurezza del
seggiolino auto. Il seggiolino non deve mai essere usato
senza il rivestimento.
Il rivestimento è una parte importante per la funzionalità del seggiolino
ed è indispensabile utilizzare solo rivestimenti originali. Rivestimenti
di ricambio originali sono disponibili su ordinazione presso i nostri
rivenditori.
ATTENZIONE!
del primo utilizzo. I rivestimenti sono lavabili in lavatrice con cliclo delicato
a max 30°. L’uso di temperature più elevate può scolorire i tessuti. Lavare
separatamente e non asciugare mai a macchina. Non fare asciugare il
rivestimento alla luce solare diretta. Le parti in plastica possono essere
pulite con un detergente neutro e acqua tiepida.
DEENIT
Consigliamo sempre un lavaggio dei rivestimenti prima
!
WARNING! Please do not use chemical detergents or
bleaching agents under any circumstances!
!
WARNING! The integrated harness system cannot be
removed from the baby seat. Do not remove parts of the
harness system.
!
ATTENZIONE! Raccomandiamo di non usare
detergenti chimici o agenti sbiancanti.
!
ATTENZIONE! Il sistema di cinture integrato non può
e non deve essere rimosso. Non rimuovere alcuna parte
del sistema di cinture dal seggiolino.
65
Page 66

PFLEGE
Um die größtmögliche Schutzwirkung Ihres Kindersitzes zu
gewährleisten, ist es unbedingt notwendig, dass Sie Folgendes
beachten:
• Alle wichtigen Teile des Kindersitzes sollten regelmäßig auf
Beschädigungen kontrolliert werden. Die mechanischen Bauteile
müssen einwandfrei funktionieren.
• Es ist unbedingt notwendig, darauf zu achten, dass der Kindersitz
nicht zwischen harten Teilen wie Fahrzeugtür, Sitzschiene usw.
eingeklemmt wird und dadurch beschädigt werden könnte.
• Achten Sie darauf, dass kein Schmutz in den Spalt zwischen
Sitz und Basis gelangt. Dies kann die Funktionalität des
Arretierungsmechanismus negativ beeinflussen. Sollte dies dennoch
vorkommen, sollte der Schmutz entfernt werden. Entfernen Sie dafür
den Sitz von der Basis.
• Der Kindersitz muss nach einem Sturz, Unfall oder einer anderen
Form der direkten Beeinträchtigung unbedingt vom Hersteller
überprüft werden.
Wird die Basis gelagert, ist es wichtig, den Stützfuß so einzuklappen,
dass der charakteristische Ton aufhört. Hierfür gibt es einen kleinen
Spalt auf der Unterseite der Basis. Somit wird die Batterie geschont.
Wird die Basis für längere Zeit nicht genutzt, muss die Batterie
aus der Basis entfernt werden, um diese vor etwaigen Schäden
durch austretende Flüssigkeiten zu schützen (siehe Kapitel:
„BATTERIEWECHSEL“).
66
Page 67

PRODUCT CARE CURA DEL PRODOTTO
To guarantee that your car seat provides the maximum protection, it is
essential to comply with the following points:
• All major components of the car seat must be regularly checked for
damage. The mechanical parts must work without problems.
• Make sure that the car seat is not jammed between hard parts such
as the car door, seat rails etc., which can damage it.
• Avoid getting any dirt or sand in between the upper seat shell and
the base. This can have a negative impact on the performance of the
rotation and recline function. Should this happen the dirt should be
removed before rotating and reclining the seat any further to avoid
any permanent damage of the seat. To do that remove the seat from
the base.
• If e.g. the car seat is dropped, it must be tested by the manufacturer
before being used again.
Perchè il seggiolino continui ad offrire la massima protezione è necessario
tenere presente quanto segue:
• Tutte le parti principali del seggiolino devono essere sottoposte ad
un regolare controllo per verificare eventuali danni. I componenti
meccanici devono funzionare correttamente.
• E’ essenziale che il seggiolino non venga mai schiaccia-
to tra oggetti rigidi, come le portiere dell’auto, i binari del sedile, ecc.
perchè ne sarebbe danneggiato.
• Evitare assolutamente che sporco o sabbia penetrino tra la
scocca della seduta e la base. Ciò potrebbe compromettere le
funzioni di rotazione e di reclinazione. Nel caso dovesse accadere,
raccomandiamo di non forzare la rotazione o la reclinazione, ma di
rimuovere prima lo sporco, per evitare danni permanenti al seggiolino.
A questo punto è possibile sollevare il seggiolino dalla base.
• Nel caso il seggiolino dovesse cadere, dovrà essere controllato dal
produttore prima di poter essere riutilizzato.
DEENIT
Is the base stored away it is crucial to fold the load leg in a way so the
characteristic noise will stop. Therefore a small slot at the bottom of the
base is provided. This will protect the battery.
Is the base not in use for a long time it is important to remove the
battery so it can‘t harm the base through escaping liquids (see chapter:
„HOW TO CHANGE BATTERY“).
Se la base è riposta, è fondamentale piegare la gamba del carico in
modo che il rumore caratteristico si fermi. Pertanto viene fornita una
piccola fessura nella parte inferiore della base. Questo protegge la
batteria.
Se la base non viene utilizzata per un lungo periodo, è importante
rimuovere la batteria in modo che non possa danneggiare la base
con liquidi in uscita (vedere il capitolo “COME SOSTITUIRE LE
BATTERIE“).
67
Page 68

VERHALTEN NACH EINEM UNFALL
!
WARNUNG! Aufgrund eines Unfalls können am Kindersitz Beschädigungen auftreten, die mit bloßem Auge
nicht erkennbar sind. Bitte tauschen Sie nach einem
Unfall unbedingt den Sitz aus. Im Zweifelsfall wenden
Sie sich an den Händler oder Hersteller.
PRODUKTI NFORMATION
Bei Fragen wenden Sie sich zuerst an Ihren Händler. Folgende Angaben
sollten Ihnen vorliegen:
• Seriennummer (siehe Aufkleber)
• Marke und Typ des Autos und die Position des Sitzes, auf dem der
Kindersitz benutzt wird
• Gewicht, Alter und Größe des Kindes
Weitere Informationen zu unseren Produkten finden Sie auch unter
www.cybex-online.com.
68
Page 69

WHAT TO DO AFTER AN ACCIDENT COSA FARE A SEGUITO DI UN INCIDENTE
!
WARNING! An accident may cause damage to the
car seat that is not visible to the naked eye. Please
exchange the seat without fail after an accident. In case
of doubt contact the retailer or manufacturer.
PRODUCT IN FORMATION INFOR MAZION I SUL PRODOTTO
If you have any questions contact your retailer first. You should have the
following details ready:
• Serial number (see sticker)
• Make and model of the vehicle and the position of the vehicle seat on
which the car seat is used
• Weight, age and height of the child
Further information about our products can be found at
www.cybex-online.com.
!
ATTENZIONE! Un incidente può causare danni al
seggiolino non identificabili a occhio nudo. Dopo un
incidente il seggiolino dev’essere subito sostituito.
Seindubbio contattare il rivenditore o il produttore.
Per qualsiasi dubbio o informazione rivolgersi prima al rivenditore.
Accertandovi di avere questi dati a portata di mano:
• Numero di serie (vedi etichetta adesiva).
• Marca e modello dell’auto e posizione in cui viene normalmente
installato.
• Peso, età e altezza del bambino.
Maggiori informazioni sui prodotti nel sito www.cybex-online.com
DEENIT
69
Page 70

PRODUKTLEBENSDAUER
Dieser Kindersitz ist so ausgelegt, dass er bei gewöhnlicher Nutzung für
die gesamte Produktlebensdauer von ca. 8 Jahren seine Eigenschaften
erfüllt.
Durch den langsamen Verschleiß des Kunststoffs, beispielsweise durch
Sonneneinstrahlung (UV), können sich die Eigenschaften des Produkts
geringfügig verschlechtern.
Da in Fahrzeugen sehr große Temperaturschwankungen herrschen und
andere unvorhersehbare Belastungen auftreten können, ist es notwendig,
folgende Punkte zu beachten:
• Wenn das Fahrzeug längere Zeit der prallen Sonne ausgesetzt ist,
muss der Kindersitz aus dem Fahrzeug entfernt oder mit einem hellen
Tuch abgedeckt werden.
• Prüfen Sie regelmäßig alle Kunststoff- und Metallteile des
Kindersitzes auf Beschädigung oder Veränderung der Form oder
Farbe. Stellen Sie eine Veränderung fest, ist der Kindersitz zu
entsorgen oder muss vom Hersteller geprüft und gegebenenfalls
ausgetauscht werden.
• Veränderungen des Stoffes, insbesondere das Ausbleichen, sind
normal und stellen keine Beeinträchtigung dar.
70
Page 71

PRODUCT LIFE SPAN DUREVOLEZZA PRODOTTO
This child seat has been designed to be able to fulfill its intended functions by ordinary use for a product life span of approx. 8 years.
Gradual wear of the plastic, for example caused by exposure to sunlight
(UV), can cause slight deterioration of the product’s properties.
Questo seggiolino è progettato per soddisfare le proprie specifiche per
l’intera vita utile, pari a circa 8 anni.
Nel tempo le parti in plastica tendono ad usurarsi, es. per l’esposizione
al sole (UV) e le caratteristiche del prodotto possono subire leggere
variazioni.
DEENIT
Since very high temperature fluctuations and other unforeseeable
stresses are common in vehicles, it is necessary to observe the following
points:
• If the vehicle is directly exposed to strong sunlight for long periods,
the child seat must be removed from the vehicle or covered with a
light cloth.
• Check all plastic and metal parts of the seat regularly for damage or
change of shape or colour. If you notice any change in the child seat,
the seat must be disposed or checked and possibly replaced by the
manufacturer.
• Changes to the fabric, especially fading, are normal when used in a
vehicle and do not impair the seat‘s function.
Alla luce delle possibili fluttuazioni massicce di temperatura e degli sforzi
imprevedili nei veicoli, devono essere tenuti in considerazione i punti
seguenti:
• Se il veicolo viene lasciato al sole per un periodo di tempo
prolungato, il seggiolino deve essere rimosso dall’abitacolo o coperto
con un panno chiaro.
• Controllare regolarmente tutte le parti di plastica e metallo del
seggiolino alla ricerca di eventuali danni, deformazioni o cambiamenti
di colore. Qualora si riscontri qualsiasi cambiamento, il seggiolino
dovrà essere smaltito o controllato dal produttore e, se necessario,
sostituito.
• Modifiche del tessuto, in particolare la scoloritura, sono perfettamente
normali in caso di uso in un veicolo e non influiscono sul
funzionamento del seggiolino.
71
Page 72

ENTSORGUNG
Aus Umweltschutzgründen bitten wir den Benutzer zu Beginn (Verpackung) und am Ende (Produktteile) der Lebensdauer des Kindersitzes,
den anfallenden Abfall zu trennen und zu entsorgen. Die Abfallentsorgung
kann kommunal unterschiedlich geregelt sein. Um eine vorschriftsmäßige
Entsorgung des Kindersitzes zu gewährleisten, setzen Sie sich mit Ihrer
kommunalen Abfallentsorgung bzw. Verwaltung lhres Wohnortes in
Verbindung. Beachten Sie auf jeden Fall die Entsorgungsbestimmungen
lhres Landes.
!
WARNUNG! Bewahren Sie Verpackungsmaterial
aus Kunststoff außer Reichweite Ihres Kindes auf, da
Erstickungsgefahr besteht!
Wenn Sie die Basis nicht mehr verwenden wollen, geben Sie diese bei
einer öffentlichen Sammelstelle für Elektroaltgeräte kostenlos ab.
!
WARNUNG! Elektroaltgeräte dürfen in keinem Fall in
die Restabfalltonne gegeben werden.
!
WARNUNG! Batterien sind Sondermüll und gehören
nicht in den Hausmüll!
72
Page 73

DISPOSAL SMALTIMENTO
To protect the environment we ask the user to separate and dispose
the waste arising at the start (packaging) and the end (product parts) of
the car seat’s lifespan. Waste removal is arranged differently depending
on the local authorities. In order to ensure that the car seat is disposed
off in accordance with regulations, contact your area’s waste removal
agency or local authority. Always observe your country’s waste disposal
regulations.
Per ragioni di natura ambientale chiediamo agli utilizzatori di provvedere
allo smaltimento separato e corretto di ogni parte dall’inizio (imballo) alla
fine (seggiolino ed ogni sua parte) alla fine della durata di utilizzo del
seggiolino. Le norme per lo smaltimento variano localmente. Per garantire
lo smaltimento corretto secondo le normative vigenti vi preghiamo di
contattare l’ufficio di competenza della vostra città. In ogni caso, seguire
sempre le normative vigenti nella zona di residenza.
DEENIT
!
WARNING! Keep plastic packaging material out of
your child’s reach due to danger of suffocation!
If you do not want to use the base any longer, return it free of charge to
a recycling depot for used electric appliances.
!
WARNING! Used electric devices do not belong in the
household garbage.
!
WARNING! Batteries are special waste and aren‘t
allowed to be disposed in the household waste!
!
ATTENZIONE! Tenere tutte le parti in plastica dell’imballo lontane dalla portata dei bambini per evitare il
rischio di soffocamento!
Se non si desidera più utilizzare la base, restituirla gratuitamente a un
deposito di riciclaggio per apparecchi elettrici usati.
!
ATTENZIONE! I dispositivi elettrici usati non appartengono ai rifiuti domestici.
!
ATTENZIONE! Le batterie sono rifiuti speciali e non
possono essere smaltite nei rifiuti domestici!
73
Page 74

GARANTIEBESTIMMUNGEN
Die nachfolgenden Garantiebestimmungen gelten nur in dem Land,
in dem dieses Produkt erstmalig über den Einzelhandel an einen
Verbraucher verkauft wurde.
1. Die Garantie deckt sämtliche Herstellungs- und Materialfehler ab,
die im Zeitpunkt des Kaufs bestanden haben oder die innerhalb
von drei (3) Jahren nach dem Erstverkauf dieses Produkts über den
Einzelhandel an einen Verbraucher in Erscheinung getreten sind
(Herstellergarantie). Bitte überprüfen Sie das Produkt nach dem
Kauf oder wenn es im Versandhandel gekauft wurde nach Erhalt
umgehend auf Vollständigkeit, Herstellungs- und Materialfehler.
2. Falls Schäden vorhanden sind, darf das Produkt nicht mehr benutzt
werden. Um Leistungen im Rahmen dieser Garantie in Anspruch
nehmen zu können, muss das Produkt in einem vollständigen und
sauberen Zustand an den Einzelhändler zurückgegeben werden,
der es erstmalig verkauft hat und ein Nachweis über den Kauf
(Kaufbeleg oder Rechnung) im Original vorgelegt werden. Bitte
bringen oder schicken sie das Produkt nicht direkt zum Hersteller!
3. Die Garantie deckt keine Schäden ab, die durch Fehlgebrauch,
äußere Einflüsse (Wasser, Feuer, Unfälle o.ä.), normalen Verschleiß
oder durch Behandlung und Benutzung entstanden sind, die im
Gegensatz zu den Instruktionen dieser Gebrauchsanweisung
stehen. Die Garantie wird nur gewährt, wenn Reparaturen oder
Veränderungen ausschließlich durch Personen vorgenommen
wurden, die hierzu befugt waren und stets nur originale Bau- und
Zubehörteile verwendet wurden.
4. Durch diese Garantie werden weder bestehende Verbraucherrechte
noch Rechte gegen den Verkäufer wegen Vertragswidrigkeit des
Produkts beeinflusst.
74
Page 75

WARRANTY GARANZIA
The following warranty applies solely in the country where this product
was initially sold by a retailer to a customer.
1. The warranty covers all manufacturing and material defects,
existing and appearing, at the date of purchase or appearing
within a term of three (3) years from the date of purchase from the
retailer who initially sold the product to a consumer (manufacturer’s
warranty). Please check the product with respect to completeness
and manufacturing or material defects immediately at the date of
purchase or immediately after receipt. Please always keep your
dated proof of purchase.
2. In case of a defect, stop using the product immediately. To obtain
the warranty please take or ship the product to the original retailer,
who initially sold this product to you in a clean and complete
condition and submit an original proof of purchase (sales
receipt or invoice). Please do not take or ship the product to the
manufacturer directly.
3. This warranty does not cover any damages which result from
misuse, environmental influence (water, fire, accidents etc.), normal
wear and tear or failure to comply with the instructions provided in
this user manual. The warranty does not apply if modifications and
services were performed by unauthorized persons or if non-original
components and accessories were used.
4. This warranty does not affect any statutory consumer rights,
including claims in tort and claims with respect to a breach of
contract, which the buyer may have against the seller or the
manufacturer of the product.
La garanzia vale unicamente nella nazione in cui il prodotto è stato
inizialmente venduto da un rivenditore al consumatore.
1. La garanzia copre eventuali difetti di fabbricazione e di materiali
riscontrati all’acquisto o entro un periodo di tre (3) anni dalla
data di acquisto presso il rivenditore che ha inizialmente venduto
il prodotto al consumatore (garanzia del produttore). Si prega di
verificare il prodotto per quanto riguarda la completezza e difetti
di produzione o materiale immediatamente alla data di acquisto o
immediatamente dopo la ricezione. Conservare accuratamente la
prova di acquisto con la data.
2. In caso si riscontrino difetti è necessario smettere di utilizzare
il prodotto immediatamente. Per avere diritto alla garanzia è
necessario riportare o spedire il prodotto pulito e completo al
rivenditore presso il quale è stato acquistato ed è indispensabile
fornire la prova di acquisto (scontrino fiscale, fattura, ecc.)
in originale. Preghiamo di non riportare o spedire il prodotto
direttamente al produttore.
3. La garanzia non copre danni provocati da utilizzo improprio o
cause ambientali (acqua, fuoco, incidenti, ecc.), dal normale
deperimento d’uso o dall’innosservanza delle indicazioni fornite in
questo manuale d’utilizzo. La garanzia decade in caso di modifiche
o riparazioni effettuate da personale non autorizzato e se non sono
state utilizzate parti ed accessori originali.
4. Questa garanzia non esclude, limita o comunque pregiudica
eventuali diritti legali dei consumatori, comprese istanze in caso di
torto e in caso di una violazione del contratto che l’acquirente può
avere nei confronti del rivenditore o del produttore.
DEENIT
75
Page 76

SIRONA Z iSIZE
Module Sirona Z i-Size
45cm – 105cm / ≤ 18kg
CYBEX Base Z
R129-020018
CYBEX GmbH
Riedingerstr. 18, 95448 Bayreuth
Germany
Module Sirona Z i-Size
76cm – 105cm / ≤ 18kg
CYBEX Base Z
R129-020018
CYBEX GmbH
Riedingerstr. 18, 95448 Bayreuth
Germany
76
HOMOLOGATION
SIRONA Z i-Size – siège auto
UN R129
Taille : 45-105 cm
Poids : jusque 18 kg
GOEDKEURING
SIRONA Z i-Size – autostoeltje
UN R129
Lengte: 45-105 cm
Gewicht: tot 18 kg
HOMOLOGACJA
Fotelik samochodowy SIRONA Z i-Size
UN R129
Wzrost: 45-105 cm
Waga: do 18 kg
CHER CLIENT
Nous vous remercions d’avoir acheté le SIRONA Z i-Size. Nous vous
assurons qu’au cours du processus de développement du siège auto,
nous avons accordé la priorité à la sécurité, au confort et la simplicité
d’utilisation pour les utilisateurs. Pour une protection adéquate de votre
enfant, il est essentiel d’utiliser et d’installer le siège auto en suivant les
instructions fournies dans ce manuel.
!
ATTENTION ! Pour une protection adéquate de votre
enfant, il est essentiel d’utiliser et d’installer le siège
auto en suivant les instructions fournies dans ce manuel. Toute modification apportée au siège est interdite.
!
ATTENTION ! Ne pas orienter le siège côté face vers
l’avant avant que l’enfant soit âgé de 16 mois et qu’il ait
atteint une taille de 76 cm.
NOTE ! Veillez à toujours conserver le mode d’emploi à portée de main
en le rangeant dans la fente réservée à cet effet sur le siège auto.
NOTE ! Le réducteur nouveau-né protège votre enfant. Il doit être utilisé
tant que la taille du bébé ne dépasse pas 60 cm.
NOTE ! En raison des législations locales (ex. coloris de l’étiquette
sur le siège auto), l’apparence du produit peut varier. Cependant, cela
n’affecte pas le bon fonctionnement du produit.
Si vous choisissez un siège auto pour bébé avec le clip SensorSafe,
veuillez prendre note du chapitre séparé « SANGLAGE AVEC
SYSTÈME DE HARNAIS ET DE CLI P ». Pour plus d’informations
à propos de la fonction de SensorSafe, veuillez consulter le manuel
ci-joint.
Page 77

Het verheugt ons dat u de Sirona Z i-Size hebt gekocht. U kunt erop
vertrouwen dat we bij de ontwikkeling van het autostoeltje ons volledig
hebben gericht op veiligheid, comfort en gebruiksvriendelijkheid. Dit
product is aan een bijzondere kwaliteitscontrole onderworpen en
voldoet aan de strengste veiligheidseisen.
DROGI KLIENCIEBESTE KLANT,
Dziękujemy za zakup fotelika samochodowego SIRONA Z i-Size.
Pragniemy zapewnić, iż bezpieczeństwo, wygoda i łatwa obsługa
to wartości nadrzędne, przyświecające nam podczas projektowania
naszych produktów. Ten produkt powstaje pod najwyższą kontrolą
jakości i spełnia najbardziej rygorystyczne normy bezpieczeństwa.
!
BELANGRIJK! Voor de goede bescherming van uw
kind is het noodzakelijk het autostoeltje te gebruiken en
te installeren volgens de instructies in deze handleiding.
Aanpassingen aan het stoeltje zijn verboden.
!
BELANGRIJK! Niet voorwaarts gericht gebruiken
voordat het kind 16 maanden oud is en 76 cm lang is.
LET OP! Zorg er a.u.b. voor dat u de handleiding altijd bij de hand
hebt. Bewaar de handleiding in de daarvoor bedoelde sleuf onder het
autostoeltje.
LET OP! De inleg voor pasgeboren baby’s beschermt uw kind. Hij dient
gebruikt te worden tot een lengte van 60 cm.
LET OP! Vanwege nationale regelgeving (bijvoorbeeld betreffende
kleurlabels op het autostoeltje) kunnen de productkenmerken er anders
uitzien. Dit is echter niet van invloed op het correct functioneren van
het product.
Als u een babyautostoeltje kiest met een SensorSafe-clip, raadpleeg
dan het aparte hoofdstuk “VASTGESPI NG MET HARNASSYSTEEM
EN CLIP” Voor meer informatie over de functie van SensorSafe.
!
OSTRZEŻENIE! Korzystaj z fotelika samochodowego
zgodnie z instrukcją obsługi, aby zapewnić najwyższy
poziom bezpieczeństwa Twojemu dziecku. Wszelkie
modyfikacje fotelika są zabronione.
!
OSTRZEŻENIE! Nie przewoź dziecka przodem do
kierunku jazdy przed 16 miesiąca życia i osiągnięciem
76 cm wzrostu.
UWAGA! Zachowaj instrukcję zawsze pod ręką. Radzimy, aby
przechowywać ją w przeznaczonym do tego schowku znajdującym się
pod fotelikiem samochodowym.
UWAGA! Wkładka niemowlęca chroni dziecko. Musi być używana do
60 cm wzrostu dziecka.
UWAGA! Ze względu na wymagania poszczególnych krajów (np.
oznakowanie kolorystyczne na foteliku) cechy produktów mogą różnić
się pod względem wyglądu zewnętrznego. Nie wpływa to na poprawne
funkcjonowanie fotelika.
Jeśli wybiorą Państwo fotelik samochodowy dla dzieci z klipsem
SensorSafe, należy zwrócić uwagę na oddzielny rozdział
„PRZYPINANIE ZA POMOCĄ SYSTEMU UPRZĘŻY I KLIPSA”.
Więcej informacji na temat funkcji SensorSafe można znaleźć w
załączonej instrukcji.
FRNLPL
77
Page 78

FR
HOMOLOGATION ...............................................................................................76
PROTECTION DU VÉHICULE ..........................................................................80
POSITION CORRECTE DANS LE VÉHICULE ..............................................82
SÉCURITÉ DANS LE VÉHICULE ....................................................................86
UTILISATION DANS LE VEHICULE ................................................................88
AVANT LA PREMIÈRE UTILISATION ..............................................................92
INSTALLATION DE LA BASE ............................................................................94
AJUSTER LA JAMBE DE CHARGE .................................................................98
COMMENT CHANGER LA PILE .....................................................................100
RETIRER LA BASE DU VÉHICULE ...............................................................102
INSTALLATION DU SIÈGE AUTO SUR LA BASE .......................................104
RETRAIT .............................................................................................................106
RÉGLAGE DES PROTECTIONS LATÉRALES ...........................................108
RÉGLAGE DE L’ASSISE ET DE L’INCLINAISON ....................................... 110
FONCTION DE ROTATION .............................................................................11 2
UTILISATION DOS A LA ROUTE (45 CM – 105 CM) ...................................116
RÉGLAGE DU SIÈGE .......................................................................................118
RETIRER LES INSERTS .................................................................................120
SANGLER AVEC LE SYSTÈME DE HARNAIS ...........................................122
SANGLAGE AVEC SYSTÈME DE HARNAIS ET DE CLIP ........................124
FORWARD-FACING USE (76 CM – 105 CM) ..............................................128
ASSURER CORRECTEMENT LA PROTECTION DE VOTRE ENFANT 130
RETRAIT DE LA HOUSSE ...............................................................................132
NETTOYAGE ......................................................................................................134
ENTRETIEN DU PRODUIT .............................................................................136
EN CAS D’INCIDENT ........................................................................................138
INFORMATION PRODUIT ...............................................................................138
DURÉE DE VIE DU PRODUIT ........................................................................140
ELIMINATION .....................................................................................................142
78
GARANTIE ..........................................................................................................144
CONTENU
Page 79

NL
GOEDKEURING ..................................................................................................76
HET VOERTUIG BESCHERMEN .....................................................................81
JUISTE PLAATS IN HET VOERTUIG ..............................................................83
VEILIGHEID IN DE AUTO ..................................................................................87
VEILIGHEID IN DE AUTO ..................................................................................89
VÓÓR HET EERSTE GEBRUIK .......................................................................93
INSTALLATIE VAN DE BASIS ...........................................................................95
AANPASSEN VAN DE STEUNVOET...............................................................99
HET VERVANGEN VAN DE BATTERIJ .........................................................101
DE BASIS UIT HET VOERTUIG VERWIJDEREN .......................................103
HET AUTOSTOELTJE OP DE BASIS PLAATSEN ......................................105
VERWIJDEREN .................................................................................................107
AANPASSEN VAN DE ZIJBESCHERMERS ................................................109
ZIT- EN KANTELVERSTELLING ....................................................................111
DRAAIFUNCTIE.................................................................................................113
ACHTERWAARTS GERICHT GEBRUIK (45 CM – 105 CM) .....................117
AANPASSEN AAN DE LICHAAMSOMVANG ...............................................119
DE INLEG VOOR PASGEBOREN BABY’S VERWIJDEREN ....................121
VASTMAKEN MET HET GORDELSYSTEEM ..............................................123
VASTGESPING MET HARNASSYSTEEM EN CLIP .................................125
VOORWAARTS GERICHT GEBRUIK (76 CM – 105 CM) .........................129
HET KIND OP DE JUISTE WIJZE VASTMAKEN ........................................131
DE BEKLEDING VERWIJDEREN ..................................................................133
REINIGING .........................................................................................................135
ONDERHOUD ....................................................................................................137
NA EEN ONGEVAL ............................................................................................139
PRODUCTINFORMATIE ..................................................................................139
LEVENSDUUR VAN HET PRODUCT ............................................................141
VERWIJDERING ...............................................................................................143
GARANTIE ..........................................................................................................145
PL
HOMOLOGACJA .................................................................................................76
OCHRONA TAPICERKI SAMOCHODOWEJ .................................................81
POPRAWNY MONTAŻ W POJEŹDZIE ...........................................................83
BEZPIECZEŃSTWO W SAMOCHODZIE .......................................................87
MONTAŻ FOTELIKA SAMOCHODOWEGO W AUCIE ................................89
PRZED PIERWSZYM UŻYCIEM ......................................................................93
MONTAŻ BAZY ....................................................................................................95
REGULACJA NOGI STABILIZUJĄCEJ ...........................................................99
JAK WYMIENIĆ BATERIĘ ...............................................................................101
WYJMOWANIE BAZY Z SAMOCHODU .......................................................103
MONTAŻ FOTELIKA NA BAZIE ......................................................................105
WYJMOWANIE ..................................................................................................107
REGULACJA OSŁON BOCZNYCH ...............................................................109
REGULACJA POZYCJI SIEDZĄCEJ I ODCHYLANIE ...............................111
OBRACANIE FOTELIKA ..................................................................................113
MONTAŻ TYŁEM DO KIERUNKU JAZDY (45 CM – 105 CM) ...................117
DOPASOWANIE DO WZROSTU DZIECKA .................................................11 9
WYJMOWANIE WKŁADKI DLA NOWORODKA ..........................................121
ZAPINANIE DZIECKA PASAMI ......................................................................123
PRZYPINANIE ZA POMOCĄ SYSTEMU UPRZĘŻY I KLIPSA ................125
MONTAŻ PRZODEM DO KIERUNKU JAZDY (76 CM – 105 CM) ..........129
ZAPINANIE DZIECKA .......................................................................................131
ZDEJMOWANIE TAPICERKI FOTELIKA ......................................................133
CZYSZCZENIE ..................................................................................................135
PIELĘGNACJA PRODUKTU ...........................................................................137
POSTĘPOWANIE POWYPADKOWE ............................................................139
INFORMACJA O PRODUKCIE .......................................................................139
TRWAŁOŚĆ PRODUKTU ................................................................................141
UTYLIZACJA ......................................................................................................143
GWARANCJA .....................................................................................................145
SPIS TREŚCIINHOUD
FRNLPL
79
Page 80

PROTECTION DU VÉHICULE
Suite à l’utilisation de sièges auto, des traces ou une légère
décoloration peuvent apparaître sur certains sièges de voiture fabriqués
dans des matériaux délicats (par exemple velours, cuir, etc.). Vous
pouvez éviter ces traces en plaçant une couverture ou une serviette
sous le siège auto. À ce sujet, veuillez aussi consulter nos instructions
d’entretien. Il est essentiel qu’elles soient suivies avant la première
utilisation du siège auto. L’utilisation des guides ISOFIX fournis
protègera encore davantage le siège du véhicule. Pour procéder à
l’installation, consultez le chapitre : « INSTALLATION DE LA BASE ».
80
80
Page 81

Het gebruik van autostoeltjes kan op sommige autozittingen met een
kwetsbare bekleding (zoals velours of leer) sporen nalaten en/of deze
doen verkleuren. U kunt dit voorkomen door bijvoorbeeld een deken of
een handdoek onder het autostoeltje op de stoel te leggen. Raadpleeg
in dit verband ook onze reinigingsinstructies. Het is van groot belang dat
u die opvolgt voordat u het autostoeltje voor het eerst gebruikt. Ook met
de meegeleverde ISOFIX-geleidehulzen beschermt u de autostoel. Zie
voor installatie het hoofdstuk: “INSTALLATI E VAN DE BASIS”.
OCHRONA TAPICERKI SAMOCHODOWEJHET VOERTUIG BESCHERMEN
Ślady użytkownia i/lub blaknięcie może wystąpić na niektórych
fotelach/kanapach samochodowych wykonanych z delikatnego
materiału (np.welur, skóra itp.), na których używany jest fotelik
samochodowy. Aby tego uniknąć można zabezpieczyć tapicerkę
przez podłożenie koca lub ręcznika pod fotelik. Zachęcamy do
zapoznania się z zaleceniami dotyczącymi czyszczenia fotelika
oraz jego tapicerki. Należy ich bezwzględnie przestrzegać przed
pierwszym skorzystaniem z fotelika. Użytkowanie łączników ISOFIX
ochroni fotelik samochodowy. W celu uzyskania instrukcji montażu
patrz rozdział: „MONTAŻ BAZY W SAMOCHODZIE”.
FRNLPL
81
81
Page 82

POSITION CORRECTE DANS LE VÉHICULE
Ce produit est un siège auto i-Size. Le siège est homologué
conformément à la réglementation UN R129/02, et destiné à une
utilisation dans les places assises de véhicules compatibles i-Size
comme indiqué par les constructeurs automobiles dans le manuel
d’utilisation du véhicule. Si votre véhicule n´est pas équipé d´une
position i-Size, merci de vérifier la liste sur notre site web afin de savoir
si l´installation est autorisée. Si votre véhicule n´est pas équipé du
système ISOFIX, contactez votre constructeur.
Toutefois dans des cas exceptionnels, le siège auto peut être utilisé sur
la place passager avant. Dans ce cas, respectez les points suivants :
• Vérifiez que le siège passager est équipé du système ISOFIX. Si
votre véhicule ne possède pas de connecteurs ISOFIX vous ne
pouvez pas utiliser le siège.
• désactivez l΄airbag passager. Si cela n’est pas possible dans votre
véhicule, l’utilisation du siège auto côté passager est interdite.
• Il est impératif que vous vous conformiez aux recommandations du
constructeur du véhicule.
!
ATTENTION ! Les bagages et autres objets mobiles
placés dans le véhicule, qui pourraient causer des blessures en cas d’accident, doivent toujours être fixés de
manière appropriée. Ils peuvent devenir des projectiles
mortels en cas d‘accident.
82
Page 83

POPRAWNY MONTAŻ W POJEŹDZIEJUISTE PLAATS IN HET VOERTUIG
Dit is het verbeterde autostoeltje i-Size. Het is goedgekeurd conform
ECE R129/02 voor gebruik op voor i-Size geschikte autostoelen, zoals
door de autofabrikant aangegeven in de handleiding van het voertuig.
Als uw voertuig geen i-Size-stoelpositie heeft, controleer dan op het
overzicht van voertuigtypes dat is meegeleverd of bijvoorbeeld op onze
homepage of de installatie is toegestaan. Als uw auto geen ISOFIX
heeft, neem dan contact op met de autofabrikant.
In uitzonderlijke gevallen mag het autostoeltje ook op de passagiersstoel
voorin worden gebruikt. Let daarbij op het volgende:
• Controleer of de passagiersstoel ISOFIX heeft. Als die geen ISOFIX
heeft, mag het autostoeltje niet worden gebruikt.
• Deactiveer de airbag van de passagiersstoel. Als dat niet mogelijk is
in uw voertuig, is gebruik van het autostoeltje aan de passagierskant
verboden.
• Het is van essentieel belang dat u de aanbevelingen van de
autofabrikant opvolgt.
!
BELANGRIJK! Bagage en andere losse voorwerpen
in de auto, die letsel kunnen veroorzaken tijdens een
ongeval, moeten altijd veilig zijn vastgemaakt. Ze kunnen tijdens een auto-ongeval veranderen in dodelijke
projectielen.
Baza posiada homologację i-Size. Homologacja zgodna z regulacją
UN R129/02, do użytku w samochodach zgodnych z normą „i-Size”
jak wskazano w instrukcji obsługi samochodu. Jeśli Twój samochód nie
posiada pozycji zgodnej z normą i-Size, należy sprawdzić na dołączonej
liście marek samochodów czy dozwolony jest montaż fotelika w
samochodzie. Jeśli Twój samochód nie jest wyposażony w ISOFIX,
skontaktuj się z producentem samochodu.
W wyjątkowych przypdkach fotelik można zamontować na przednim
siedzeniu pasażera. W tym przypadku zwróć uwagę na następujące
punkty:
• Sprawdź czy fotel wyposażony jest w ISOFIX. Jeśli nie, to w tym
samochodzie nie będziesz mógł korzystać z tego modelu fotelika.
• Pamiętaj aby wyłączyć poduszkę powietrzną pasażera. W przypadku
braku możliwości dezaktywowania poduszki powietrznej, nie ma
możliwości montażu fotelika samochodowego na miejscu pasażera.
• Konieczne jest, aby stosować się do zaleceń producenta pojazdu.
!
OSTRZEŻENIE! Zabezpiecz wszystkie rzeczy znajdujące się w samochodzie jak np. bagaże lub inne obiekty,
które mogłyby spowodować uszkodzenie w razie kolizji/
wypadku. Mogą one spowodować uszkodzenia ciała, a
nawet śmierć w razie wypadku/ostrego hamowania.
FRNLPL
83
Page 84

!
ATTENTION ! Ne laissez jamais votre enfant sans
surveillance dans le véhicule.
!
ATTENTION ! Les pièces en plastique du siège auto
se réchauffent en plein soleil et l’enfant peut subir des
brûlures. Protégez votre enfant et son siège contre
l’exposition directe du soleil (par exemple en le couvrant
avec un linge de couleur claire).
!
ATTENTION ! Le siège auto ne convient pas à une
utilisation avec une ceinture de sécurité normale. Si le
siège auto est fixé avec la ceinture de sécurité normale
du véhicule, en cas d’accident, l’enfant et les autres
occupants du véhicule peuvent être gravement blessés
ou tués.
!
ATTENTION ! Il est interdit d’utiliser le siège auto sur
des sièges de véhicule installés perpendiculairement au
sens du déplacement. Le siège enfant ne doit pas être
utilisé sur les sièges orientés vers l’arrière, comme par
exemple dans une camionnette ou un minibus.
84
Page 85

!
BELANGRIJK! Laat uw kind nooit alleen in de auto
achter.
!
OSTRZEŻENIE! Nigdy nie zostawiaj dziecka w
samochodzie bez opieki.
!
BELANGRIJK! De kunststof onderdelen van het
kinderbeveiligingssysteem kunnen warm worden in de
zon en het kind brandwonden bezorgen. Bescherm uw
kind en het autostoeltje tegen directe blootstelling aan
de zon (bijvoorbeeld door er een lichte doek overheen
te leggen).
!
BELANGRIJK! Het autostoeltje is niet geschikt voor
gebruik met een gewone autogordel. Als het stoeltje
met de gewone autogordel wordt vastgemaakt, kunnen
het kind en andere inzittenden tijdens een ongeval
ernstig of dodelijk letsel oplopen.
!
BELANGRIJK! Dit autostoeltje mag niet worden
gebruikt op autostoelen die haaks op de rijrichting
staan. Het autostoeltje mag niet worden gebruikt op
achterwaarts gerichte stoelen, zoals in een bestelwagen
of (mini)busje.
!
OSTRZEŻENIE! Plastikowe elementy fotelika nagrzewają się pozostawione w nasłonecznionym miejscu.
Uważaj, gdyż mogą oparzyć dziecko. Chroń swoje
dziecko oraz fotelik przed bezpośrednią ekspozycją na
słońce (np. przykrywając fotelik tkaniną).
!
OSTRZEŻENIE! Fotelika nie można przypinać samochodowym pasem bezpieczeństwa. W razie wypadku,
gdy fotelik jest przypięty pasem bezpieczeństwa,
dziecko oraz inni pasażerowie mogą doznać poważnych
a nawet śmiertelnych obrażeń ciała.
!
OSTRZEŻENIE! Fotelika nie można używać w
samochodach, w których fotel/kanapa samochodowa
znajduje się bokiem do kierunku jazdy. Fotelika nie
należy używać w samochodach, gdzie fotel/kanapa
samochodowa jest zamontowana tyłem do kierunku
jazdy, np. w vanach lub minibusach.
FRNLPL
85
Page 86

SÉCUR ITÉ DANS LE VÉHICULE
!
ATTENTION ! Ne jamais utiliser le siège auto sur une
place équipée d’un airbag frontal. Ceci ne s’applique
pas aux airbags latéraux.
NOTE ! L’airbag frontal de grand volume s’ouvre de façon explosive et
peut causer des blessures graves ou même la mort de votre enfant.
!
ATTENTION ! Le siège auto et la base doivent toujours
être fixés correctement dans le véhicule même lorsqu’ils
ne sont pas utilisés. En cas de freinage d’urgence ou
d’accident, un siège auto non attaché peut causer des
blessures aux autres passagers et à vous même.
Afin de garantir la meilleure sécurité possible pour tous les passagers,
assurez-vous que…
• Les dossiers inclinables des banquettes soient relevés dans leur
position initiale droite
• En installant le siège auto sur le siège passager avant, celui-ci soit
reculé au maximum.
• vous fixez correctement tous les objets susceptibles de causer des
blessures en cas d’accident.
• tous les passagers du véhicule sont attachés.
86
Page 87

BEZPIECZEŃ STWO W SAMOCHODZI EVEILIGHEID IN DE AUTO
!
BELANGRIJK! Plaats het stoeltje nooit op een stoel
met een geactiveerde voorairbag. Dit geldt niet voor
zogeheten zij-airbags.
LET OP! De grote airbag aan de voorzijde wordt in zeer korte tijd
explosief opgeblazen en kan daardoor ernstig letsel of zelfs overlijden
van het kind tot gevolg hebben.
!
BELANGRIJK! Het autostoeltje en de basis moeten
altijd correct zijn geïnstalleerd in het voertuig, ook als ze
niet worden gebruikt. Door plotseling remmen of tijdens
een ongeval kan een niet vastgemaakt autostoeltje
andere passagiers of uzelf verwonden.
Om de hoogst mogelijke veiligheid van alle passagiers te garanderen is
het nodig dat...
• klapbare rugleuningen in het voertuig rechtop staan en zijn
vergrendeld.
• de passagiersstoel zo ver mogelijk naar achteren staat als u het
autostoeltje op deze stoel installeert.
• u alle voorwerpen die letsel kunnen veroorzaken tijdens een ongeval
goed opbergt.
• alle passagiers in het voertuig hun gordel dragen.
!
OSTRZEŻENIE! Nie korzystaj z fotelika samochodowego na przednim fotelu pasażera z włączoną przednią
poduszką powietrzną. Nie dotyczy to bocznych poduszek powietrznych tzw. kurtyn powietrznych.
UWAGA! Przednia poduszka powietrzna aktywowana jest eksplozywnie i może zranić Twoje dziecko lub doprowadzić do śmierci.
!
OSTRZEŻENIE! Fotelik samochodowy i baza zawsze
muszą być przypięte pasami bezpieczeństwa, nawet
kiedy nie podróżuje w nim dziecko. W przypadku nagłego hamowania lub wypadku, niezabezpieczony fotelik
może zranić pasażerów.
W celu zapewnienia możliwie najlepszego bezpieczeństwa wszystkim
pasażerom upewnij się, że:
• składane oparcia w samochodzie są zablokowane w pozycji pionowej.
• montujac fotelik na przednim siedzeniu pasażera, fotelik znajduje się w
najbardziej odsuniętej do tyłu pozycji.
• wszystkie przedmioty znajdujące się w samochodzie zostały
zabezpieczone i nie stworzą zagrożenia w przypadku nagłego
hamowania/wypadku.
• wszyscy pasażerowie mają zapięte pasy.
FRNLPL
87
Page 88

UTILISATION DANS LE VEHICULE
Selon l’âge et la taille de l’enfant, le siège auto peut être utilisé face à la
route ou dos à la route.
NOTE ! Les statistiques d’accidents montrent que dans un véhicule, le
transport de votre enfant dos à la route est le plus sûr. Par conséquent,
nous recommandons d’utiliser le siège auto autant que possible dos
à la route.
Utilisation dos à la route (45 cm - 105 cm)
Nous recommandons l’utilisation du siège auto dos à la route jusque
105 cm et 18 kg max.
!
ATTENTION ! Il est obligatoire d’utiliser le siège dos à
la route jusqu’à l’âge de 15 mois et lorsque la taille du
bébé est inférieure à 75 cm. Même au-delà de cette
limite, la position dos à la route est la plus sûre. Pour
plus de détails, veuillez lire le chapitre : « UTILISATION
DOS A LA ROUTE »
88
Page 89

MONTAŻ FOTELIKA SAMOCHODOWEGO W AUCIEVEILIGHEID IN DE AUTO
Afhankelijk van de leeftijd en lengte kan het autostoeltje achterwaarts en
voorwaarts gericht worden gebruikt.
LET OP! Uit ongevallenstatistieken blijkt dat achterwaarts gericht
vervoer van uw kind in een voertuig het veiligst is. Daarom raden we aan
het autostoeltje zo lang mogelijk achterwaarts gericht te gebruiken.
Wij raden aan het autostoeltje achterwaarts gericht te gebruiken tot een
lengte van 105 cm en maximaal 18 kg.
!
BELANGRIJK! Het is verplicht het stoeltje tot 15
maanden of een lengte van 75 cm achterwaarts gericht
te gebruiken. Ook daarna is achterwaarts gericht
vervoer het veiligst. Meer informatie leest u in het hoofdstuk: “ACHTERWAARTS GERICHT GEBRUIK”.
W zależności od wieku oraz wzrostu dziecka, w foteliku można
przewozić dziecko tyłem oraz przodem do kierunku jazdy.
UWAGA! Statystyki wypadkowe potwierdzają, że najbezpieczniej
przewozić dzieci tyłem do kierunku jazdy. Dlatego rekomendujemy, aby
przewozić dziecko możliwie jak najdłużej tyłem do kierunku jazdy.
Przewożenie dziecka tyłem do kierunku jazdy (45 cm – 105 cm)Achterwaarts gericht gebruik (45 cm – 105 cm)
Rekomendujemy, aby używać fotelika tyłem do kierunku jazdy do 105cm
wzrostu dziecka i maksymalnie 18 kg.
!
OSTRZEŻENIE! Dziecko można przewozić wyłącznie
tyłem do kierunku jazdy do chwili ukończenia przez
nie 15. miesiąca życia oraz jednocześnie osiągnięcia
75cm wzrostu. Nawet po spełnieniu powyższych kryteriów, przewożenie tyłem do kierunku jazdy pozostaje
najbezpieczniejsze. Więcej szczegółów w rozdziale:
„Przewożenie dziecka tyłem do kierunku jazdy”.
FRNLPL
89
Page 90

Utilisation face à la route (76 cm - 105 cm)
45 - 76 cm
76 - 105 cm
1
L’utilisation du siège auto en position face à la route est permise lorsque
l’enfant est âgé de plus de 15 mois et 76 cm de hauteur.
NOTE ! L’indicateur sur l’appui-tête (1) indique la taille de l’enfant,
à partir de laquelle (au plus tôt) le siège peut être changé pour une
utilisation face à la route. La fonction de rotation est connectée à la
position de l’appuie-tête. Pour plus de détails, veuillez lire le chapitre :
«UTILISATION FACE A LA ROUTE »
NOTE ! Les nouveau-nés et les nourrissons qui ne sont pas encore
capables de s’asseoir seuls (jusqu’à environ 1 an) doivent toujours,
pour des raisons orthopédiques et de sécurité, être transportés dos à la
route dans la position d’inclinaison la plus plane.
NOTE ! Tenez l’enfant loin de toute pièce mobile lorsque vous réglez le
siège auto. Tenez l’enfant loin du siège auto lorsque vous l’installez ou le
retirez du véhicule. Il existe un risque que les doigts de l’enfant puissent
90
être coincés et blessés par des actions de ciseaux inévitables.
Page 91

Voorwaarts gericht gebruik (76 cm – 105 cm)
Przewożenie dziecka przodem do kierunku jazdy (76 cm – 105 cm)
Het stoeltje mag voorwaarts gericht gebruikt worden als het kind ouder
dan 15 maanden en minimaal 76 cm lang is.
LET OP! De indicator op de hoofdsteun (1) geeft aan vanaf welke
lengte van het kind het stoeltje op zijn vroegst voorwaarts gericht
kan worden gebruikt. The rotation function is connected to the
position of the headrest. Meer informatie leest u in het hoofdstuk:
“VOORWAARTS GERICHT GEBRUIK”
LET OP! Pasgeboren baby’s en baby’s die nog niet uit zichzelf rechtop
kunnen zitten (tot ongeveer 1 jaar) dienen om orthopedische en
veiligheidsredenen altijd in de vlakst mogelijke achterwaarts gerichte
stand te worden vervoerd.
LET OP! Er mogen geen losse onderdelen tegen het kind aan liggen
als u het autostoeltje verstelt. Houd kinderen uit de buurt als u het
stoeltje in het voertuig installeert of eruit haalt. Door onvermijdelijke
schaarbewegingen van onderdelen kunnen de vingers van het kind
bekneld en verwond raken.
Dziecko można przewozić w foteliku przodem do kierunku jazdy
wyłącznie w chwili ukończenia przez nie 15 miesiąca życia oraz
jednocześnie osiągnięcia 76 cm wzrostu.
UWAGA! Wskaźnik na zagłówku (1) pokazuje wzrost od którego można
zacząć przewozić dziecko przodem do kierunku jazdy. Funkcja obracania
jest połączona z położeniem zagłówka. Więcej szczegółów w rozdziale:
„Przewożenie dziecka przodem do kierunku jazdy”.
UWAGA! Noworodki i dzieci, które jeszcze samodzielnie nie siedzą
(do ok. 1 r.ż.) powinny być zawsze przewożone w możliwie najbardziej
płaskiej pozycji tyłem do kierunku jazdy.
UWAGA! Podczas regulacji fotelika dziecko nie powinno mieć
żadnych luźnych przedmiotów. Trzymaj dziecko z dala od fotelika
samochodowego podczas jego montażu i demontażu w samochodzie.
Istnieje ryzyko przycięcia i skaleczenia palców dziecka.
FRNLPL
91
Page 92

AVANT LA PREMIÈRE UTI LISATION
!
ATTENTION ! Pour que l’indicateur sonore fonctionne,
il est obligatoire d’enlever le verrou en plastique.
Un signal d’avertissement caractéristique sera audible jusqu’à ce que la
base soit correctement installée (voir chapitre : « AJUSTER LE PIED DE
SUPPORT »).
NOTE ! Si le pied de support est déplié, que le verrou de transport est
retiré et qu’il n’y a pas de bruit, vous devez changer la pile (voir chapitre :
« COMMENT CHANGER LA PILE »).
92
Page 93

PRZED PIERWSZYM UŻYCIEMVÓÓR HET EERSTE GEBRUIK
!
BELANGRIJK! Het geluidssignaal werkt alleen als de
plastic vergrendeling is verwijderd.
Er is een kenmerkend geluidssignaal hoorbaar totdat de basis juist is
geïnstalleerd (zie hoofdstuk: “AANPASSING VAN DE STEU NVOET“).
LET OP! Als de steunvoet uitgeklapt is en de transportvergrendeling is
verwijderd en er geen geluid hoorbaar is, moet u de batterij vervangen
(zie hoofdstuk: “HET VERVANGE N VAN DE BATTERIJ“).
!
OSTRZEŻENIE! Aby ostrzeżenie dźwiękowe działało
poprawnie należy koniecznie zdjąć plastikową osłonę.
Dopóki baza nie zostanie poprawnie zamocowana, słyszalny będzie
dźwięk ostrzegawczy (patrz rozdział: „REGULACJA NOGI FOTELIKA”).
UWAGA! Jeśli noga fotelika jest rozłożona, a blokada jest zdjęta i nie
pojawił się dźwięk ostrzegawczy, należy wymienić baterię (patrz rozdział:
„JAK WYMIENIĆ BATERIĘ”).
FRNLPL
93
Page 94

INSTALLATION DE LA BASE
Veuillez sélectionner un siège approprié dans le véhicule.
3
2
94
NOTE ! Si votre véhicule n´est pas équipé de sièges i-Size, merci de
vérifier la liste de compatibilité du produit.
NOTE ! Les points d΄ancrage ISOFIX (2) se composent de deux pattes
métalliques par siège et sont situés entre le dossier et le siège de la
voiture. En cas de doute, consultez le manuel d’instructions de votre
voiture pour obtenir de l’aide.
• Si les points d’ancrage ISOFIX (2) de votre véhicule sont difficiles
d’accès, vous devez utiliser les guides d’insertion ISOFIX (3) qui
fixent en permanence les points d’attache ISOFIX (2).
NOTE ! N‘entreposez aucun objet sur le plancher de la voiture au
niveau du siège auto.
Page 95

MONTAŻ BAZYINSTALLATIE VAN DE BASIS
Wybierz odpowiednie miejsce w pojeździe.Kies de juiste stoel in het voertuig.
LET OP! Als uw auto niet is uitgerust met een i-Size-autostoel,
controleer dan de bij het product meegeleverde typelijst.
LET OP! De ISOFIX-ankerpunten (2) zijn twee metalen beugels per
stoel, die geplaatst zijn tussen de rugleuning en zitting van de auto. Als
u twijfelt, lees dan de handleiding van uw auto voor meer informatie.
• Als de ISOFIX-punten (2) van uw voertuig lastig toegankelijk zijn,
gebruik dan de meegeleverde ISOFIX-montagehulpen (3) die
permanent op de ISOFIX-ankerpunten (2) kunnen worden geplaatst.
LET OP! Leg geen voorwerpen in het voetgedeelte aan de voorkant
van het autostoeltje.
UWAGA! Jeśli Twój samochód nie posiada pozycji siedzącej i-Size,
sprawdź załączoną listę pojazdów.
UWAGA! Dwa punkty zaczepu ISOFIX (2) zlokalizowane są pomiędzy
oparciem a siedziskiem fotela samochodowego. W razie jakiekolwiek
wątpliwości, należy skorzystać z samochodowej instrukcji obsługi.
• Jeśli punkty zaczepu ISOFIX (2) w Twoim samochodzie są ciężko
dostępne, skorzystaj z nakładek (3) dołączonych do fotelika i umieść
je w punktach zaczepu ISOFIX (2) na stałe.
UWAGA! W miejscu, gdzie rozstawiona będzie noga fotelika na
podłodze samochodowej nie mogą znajdować się żadne elementy.
FRNLPL
95
Page 96

6
7
4
2
5
6
7
• Toujours déplier le pied de support (4) jusqu’à ce qu’il se verrouille.
NOTE ! Un signal d’avertissement caractéristique sera audible jusqu’à
ce que la base soit correctement installée (voir chapitre : « AJUSTER
LE PIED DE SUPPORT »).
NOTE ! Si le pied de support est déplié, que le verrou de transport
estretiré et qu’il n’y a pas de bruit, vous devez changer la pile (voir
chapitre : « COMMENT CHANGER LA PILE »).
• Libérez le système de blocage des connecteurs ISOFIX (5). Les
deux verrous peuvent être indépendamment réglés. Poussez les
deux boutons (6) et (7) simultanément tout en tirant les connecteurs
ISOFIX de la base jusqu’à la butée.
• Les connecteurs ISOFIX (5) doivent se fixer dans les points
d’ancrage ISOFIX (2) en émettant un clic audible.
• Assurez-vous que le siège reste bien en place en essayant de
l’extraire.
• L’indicateur de sécurité vert (8) doit être clairement visible au niveau
des deux boutons de déverrouillage ISOFIX.
• Ensuite, poussez la base dans la direction du dossier jusqu’à ce
qu’elle soit complètement alignée avec le dossier.
8
96
NOTE ! En bougeant la base sur les côtés, elle s’ajustera mieux contre
le dossier.
Page 97

• Rozłóż nogę wpierającą (4) aż się zablokuje. • Klap de steunvoet altijd (4) uit tot deze is vergrendeld.
LET OP! Er is een kenmerkend geluidssignaal hoorbaar totdat de
basis juist is geïnstalleerd (zie hoofdstuk: “AANPASSING VAN DE
STEUNVOET”).
LET OP! Als de steunvoet uitgeklapt is en de transportvergrendeling is
verwijderd en er geen geluid hoorbaar is, moet u de batterij vervangen
(zie hoofdstuk: “HET VERVANGEN VAN DE BATTERIJ”).
• Ontgrendel de ISOFIX-connectoren (5). Beide vergrendelingen
kunnen afzonderlijk worden versteld. Druk beide knoppen (6) en
(7) gelijktijdig in en trek de ISOFIX-connectoren uit de basis tot de
eindstop.
• Duw de ISOFIX-connectoren (5) in de ISOFIX-ankerpunten (2) met
een hoorbare klik.
• Controleer of de basis goed vastzit door aan de ISOFIX-
montagehulpen te trekken.
• De groene veiligheidsindicator (8) moet nu goed zichtbaar zijn op
beide ISOFIX-ontgrendelingsknoppen.
• Duw nu de basis naar de rugleuning toe tot deze volledig aansluit op
die rugleuning.
LET OP! Als u de basis opzij duwt, wordt deze nog sterker verankerd
met de rugleuning.
UWAGA! Charakterystyczny ostrzegawczy dźwięk będzie słyszalny do
momentu aż baza nie zostanie poprawnie zamontowana (patrz rozdział:
„REGULACJA NOGI FOTELIKA”).
UWAGA! Jeśli noga jest rozłożona, a blokada zdjęta i nie słychać
dźwięku ostrzegawczego, należy wymienić baterię (patrz rozdział:
„JAKWYMIENIĆ BATERIĘ”).
• Zwolnij blokadę uchwytów ISOFIX (5). Obie blokady mogą być
regulowane niezależnie od siebie. Wciśnij jednocześnie przyciski (6)
i(7) i wyciągnij łączniki ISOFIX z bazy do samego końca.
• Prowadnice uchwytów ISOFIX (5) muszą zablokować się w
zaczepach ISOFIX (2). Usłyszysz wyraźne kliknięcie.
• Upewnij się, że fotelik trzyma się stabilnie w miejscu, próbując
wyciągnąć go z ISOFIX.
• Zielony wskaźnik bezpieczeństwa (8) musi być wyraźnie widoczny po
obu stronach przycisków zwalniających blokadę ISOFIX.
• Następnie popchnij fotelik w kierunku oparcia tak, by dokładnie
dopasował się do oparcia siedzenia smochodowego.
UWAGA! Poruszanie bazą na boki spowoduje lepsze dopasowanie
fotelika do oparcia siedzenia.
FRNLPL
97
Page 98

AJUSTER LA JAMBE DE CHARG E
9
10
9
4
98
Vérifiez que le pied de support (4) est fixé vers l’avant. Poussez le
bouton de réglage situé sur le pied de support (9) vers le haut et
appuyez dessus pour tirer le pied de support. Tirez le pied de support
(4) jusqu’à ce qu’il touche le plancher du véhicule. Ensuite, tirez le
pied jusqu’à la position de verrouillage suivante pour assurer une
transmission de force optimale. L’indicateur du pied de support (10)
situé sur la base deviendra VERT et le bruit caractéristique s’arrêtera.
NOTE ! Assurez-vous que la base repose aussi plat que possible sur
le siège d’auto.
!
ATTENTION ! Le pied de support (4) doit toujours être
en contact direct avec le plancher du véhicule. Il ne doit
pas y avoir d’objets ou d’espaces entre le plancher du
véhicule et le pied de support. Si des compartiments
de stockage sont intégrés dans le plancher, vous devez
contacter le constructeur du véhicule.
Page 99

REGU LACJA NOGI STABILIZUJĄCEJAANPASSEN VAN DE STEUNVOET
Zorg dat de steunvoet (4) is vastgemaakt in de voorwaartse positie.
Duw de instellingsknop (9) op de steunvoet omhoog en druk hem in
om de steunvoet uit te trekken. Trek de steunvoet (4) uit tot deze op de
bodem van de auto staat. Trek daarna de steunvoet naar het volgende
vergrendelingsniveau voor optimale krachtengeleiding. De indicator op
de steunvoet (10) op de basis wordt GROEN en het kenmerkende
geluid stopt.
LET OP! Zorg dat de basis zo vlak mogelijk op de autozitting staat.
!
BELANGRIJK! De steunvoet (4) moet altijd direct
contact maken met de bodem van de auto. Er mogen
geen voorwerpen of ruimte tussen de bodem en de
steunvoet zijn. Als er opbergvakken op de vloer van
het voertuig zijn, dient u contact op te nemen met de
autofabrikant.
Upewnij się, że noga (4) znajduje się przodem do kierunku jazdy.
Naciśnij przycisk (9) i wyciągnij nogę. Wyciągnij nogę (4) do momentu
aż bezpiecznie oprze się o podłogę samochodową. Następnie wyciągnij
stopę tak, aby znalazła oparcie o podłogę. Upewnij się, że wskaźnik
nogi fotelika (10) znajdujący się na bazie pokazuje kolor ZIELONY ze
słyszalnym kliknięciem.
UWAGA! Upewnij się, że fotelik spoczywa płasko na fotelu
samochodowym.
!
OSTRZEŻENIE! Noga wspierająca fotelik (4) musi
być zawsze oparta o podłogę w samochodzie. Nie wolno umieszczać żadnych przedmiotów pod nogą fotelika.
Jeśli w podłodze jest schowek podłogowy, skontaktuj
się z producentem samochodu.
FRNLPL
99
Page 100

100
COMMENT CHANGER LA PILE
Suivez la procédure suivante pour changer la pile :
• Tenez toutes les piles hors de portée des enfants.
• N’utilisez que des piles de type CR2032.
• Une pile vide doit toujours être retirée afin de protéger le produit des
fuites de liquides.
• N’exposez jamais ce produit ou la pile au feu.
• N’utilisez pas de piles usagées ou présentant des signes de fuite ou
de fissure.
• Utilisez uniquement des piles neuves de haute qualité.
• Faites attention à la polarité (+/-).
Pour changer la pile, vous devez ouvrir le compartiment situé à l’arrière
du pied de support à l’aide d’un tournevis. Après avoir changé la pile,
il est obligatoire de fermer à nouveau ce compartiment. Le signal
d’avertissement caractéristique est audible si le pied de support n’est
pas installé correctement.
 Loading...