

Page 1
SIRONA Q i-SIZE
ECE R-129, 4 5 cm - 105 cm , max . 18 kg (Birt h - ca. 4 Y )
User guide
DEENITFRNLPLHUCZSKPT ES
PT ES
Page 2

DE: rückwärtsgerichtet (45 - 105 cm, max. 18 kg, 0M - ca. 4Y)
MAX.
IT: contro il senso di marcia (45 - 105 cm, max. 18 kg, 0M - circa 4A)
NL: achterwaarts gericht (45 - 105 cm, max. 18 kg, 0 M - ca. 4 J)
PL: tyłem do kierunku jazdy (45–105 cm, maks. 18 kg,
od 0 mies. do ok. 4 lat)
SK: v protismere jazdy (45 - 105 cm, max. 18 kg, 0M - cca. 4R)
PT: virado para trás (45 - 105 cm, máx. 18 kg, 0M - aprox. 4anos)
EN: rearward-facing (45 - 105 cm, max. 18 kg, 0M - ca. 4Y)
FR: dos à la route (45 - 105 cm, max. 18 kg, 0M - env. 4A)
HU: hátra néző (45 - 105 cm, max. 18 kg, 0M - kb. 4 éves korig)
CZ: směřující dozadu (45 - 105 cm, max. 18 kg, 0 M - cca 4 R)
ES: sentido contrario al de la marcha (45 - 105 cm, máx. 18 kg,
0M - aprox. 4A)
CLICK!
DE - WARNUNG! Die folgende Kurzanleitung dient nur der Übersicht. Um maximale Sicherheit und maximalen Komfort
für Ihr Kind zu erreichen, ist es unbedingt notwendig, die gesamte Gebrauchsanleitung aufmerksam zu lesen.
EN - WARNI NG! The following short instruction is intended to provide only an overview. In order to achieve maximum
security and comfort for your child it is absolutely imperative that you read the whole instruction manual carefully.
IT - AVVERTIME NTO! Le brevi istruzioni seguenti rappresentano solo un riassunto. Per una garanzia di sicurezza e
comfort massimi per il vostro bambino è assolutamente necessario leggere con attenzione l‘intero manuale di istruzioni.
FR - WARNING! La brève instruction suivante n’est donnée qu’à titre d’aperçu. Pour garantir la sécurité et le confort
maximum pour votre enfant, vous devez impérativement lire avec attention le manuel d’instruction dans son intégralité.
NL - WAARSCHUWI NG! De volgende korte instructie is slechts als inleiding bedoeld. Voor maximale veiligheid en
optimaal comfort voor uw kind dient u de volledige handleiding zorgvuldig door te lezen.
PL - OSTRZEŻENIE! Poniższa skrócona instrukcja służy jedynie celom poglądowym. Dla zapewnienia maksymalnego
bezpieczeństwa i komfortu Twojemu dziecku bezwzględnie konieczne jest staranne przeczytanie całej instrukcji obsługi.
HU - FIGYELMEZTETÉ S! A következő rövid útmutató csupán áttekintést nyújt a termékről. Gyermeke maximális
biztonsága és kényelme érdekében feltétlenül olvassa el figyelmesen a teljes útmutatót.
CZ - VÝSTRAHA! Následující návod je určen k tomu, aby podal pouze stručný přehled. Pro dosažení maximální
bezpečnosti a pohodlí pro vaše dítě je naprosto nezbytné, abyste si pozorně přečetli celý návod.
6 | INHALT
7 | CONTENT
7 | ARGOMENTI
56 | CONTENU
57 | INHOUD
57 | SPIS TREŚCI
106 | TARTALOM
107 | OBSAH
107 | OBSAH
156 | CONTENIDO
DEENIT
FRNLPLHUCZSK
ESPT
< 60 cm
SK - UPOZORNENIE! Účelom následujúceho krátkeho pokynu je výlučne poskytnutie prehľadu. Ak chcete zaistiť
maximálnu bezpečnosť a pohodlie vášho dieťaťa musíte si bezpodmienečne prečítať celý návod.
ES - ¡ADVERTENCIA! El siguiente manual básico está destinado a proporcionar únicamente una visión general. Para
garantizar la máxima seguridad y comodidad del niño, es imprescindible que lea detenidamente el manual de instrucciones
completo.
PT - WARNING! A instrução curta a seguir destina-se a fornecer apenas uma visão geral. A fim de alcançar um máximo
de segurança e conforto para o seu filho, é absolutamente necessário que leia, atentamente, todo o manual de instruções.
157 | CONTEÚDO
2 3
Page 3

DE: vorwärtsgerichtet (76 - 105 cm, max. 18 kg, 15M - ca. 4Y)
MAX.
IT: nel senso di marcia (76 - 105 cm, max. 18 kg, 15M - circa 4A)
NL: voorwaartsgericht (76 - 105 cm, max. 18 kg, 15 M - ca. 4 J)
PL: przodem do kierunku jazdy (76–105 cm, maks. 18 kg,
od 15 mies. do ok. 4 lat)
SK: v smere jazdy (76 - 105 cm, max. 18 kg, 15M - cca. 4R)
PT: virado para frente (76 - 105 cm, máx. 18 kg, 15M - aprox. 4anos)
EN: forward facing (76 - 105 cm, max. 18 kg, 15M - ca. 4Y)
FR: face arrière (76 - 105 cm, max. 18 kg, 15M - env. 4A)
HU: előre néző (76 - 105 cm, max. 18 kg, 15M - kb. 4 éves korig)
CZ: směřující dopředu (76 - 105 cm, max. 18 kg, 15 M - cca 4 R)
ES: sentido de la marcha (76 - 105 cm, máx. 18 kg, 15M - aprox. 4A)
CLICK!
4 5
Page 4

SIRONA Q I-SIZE
SIRONA Q i-Size
i-Size Universal ISOFIX
45-105cm
max. 18 kg
1
129 - 010014
UN Regulation
No. 129/01
CYBEX GmbH
Riedingerstr. 18, 95448 Bayreuth
Germany
6 7
ZULASSUNG
CYBEX Sirona Q i-Size –
ECE R 129
Größe: 45-105 cm
Gewicht: bis 18 kg
HOMOLOGATION
CYBEX Sirona Q i-Size –
ECE R 129
Size: 45-105 cm
Weight: up to 18 kg
OMOLOGAZIONE
CYBEX Sirona Q i-Size –
ECE R 129
Altezza: 45-105 cm
Peso: no a 18 kg
SEHR GEEHRTE KUNDIN, SEHR GEEHRTER KUNDE!
Vielen Dank, dass Sie sich entschieden haben, den
Sirona Q i-Size zu erwerben. Wir versichern Ihnen,
dass bei der Entwicklung des Kindersitzes Sicherheit,
Komfort und Bedienungsfreundlichkeit im Vordergrund
gestanden haben. Das Produkt wird unter besonderer
Qualitätsüberwachung hergestellt und erfüllt strengste
Sicherheitsanforderungen.
WARNUNG! Damit Ihr Kind richtig geschützt
!
werden kann, ist es unbedingt notwendig, den Kindersitz so zu verwenden, wie es in dieser Anleitung
beschrieben wird. Veränderungen am Sitz dürfen
nicht vorgenommen werden.
WARNUNG! Erst wenn Ihr Kind mindestens 15 Mo-
!
nate alt ist, und eine Größe von 76 cm erreicht hat,
dürfen Sie den Sitz vorwärtsgerichtet verwenden.
HINWEIS! Bewahren Sie diese Anleitung immer gribereit
im dafür vorgesehenen Fach hinten am Kindersitz auf.
HINWEIS! Die Neugeboreneneinlage dient dem Schutz
Ihres Kindes und sollte bis zu einer Körpergröße von 60
cm verwendet werden.
HINWEIS! Durch länderspezische Anforderungen
können Produktmerkmale abweichen.
DEAR CUSTOMER
Thank you very much for purchasing the Sirona Q i-Size. We
assure you that in the development process of the car seat
we focused on safety, comfort and user friendliness. The
product is manufactured under special quality surveillance
and complies with the strictest safety requirements.
WARNING!
!
essential to use and install the car seat according to
the instructions given in this manual. Any modications on the seat are prohibited.
WARNING!
!
child is 15 months old and reached a size of 76 cm.
NOTE! Please always have the instruction manual at
hand and store it in the dedicated slot on the backside of
the seat.
NOTE! The newborn inlay protects your child. It should
be used up to size of 60 cm.
NOTE! According to local codes the product characteristic
can be dierent.
For proper protection of your child, it is
Do not use forward-facing before the
GENTILE CLIENTE
Grazie per aver acquistato Sirona Q i-Size. Garantiamo
che nel processo di sviluppo del seggiolino auto abbiamo
messo al primo posto sicurezza, comfort e facilità d'uso. La
produzione è conforme ai requisiti di sicurezza più severi
ed è stato sottoposto a uno speciale controllo di qualità.
AVVERTIMENTO!
!
del vostro bambino è essenziale usare e montare il
seggiolino auto nel rispetto delle istruzioni riportate
in questo manuale. Non è consentito apportare modi-
che al seggiolino.
AVVERTIMENTO!
!
so di marcia prima che il bambino abbia raggiunto il
15° mese di vita e un'altezza di 76 cm.
NOTA! Tenere sempre a portata di mano il manuale di
istruzioni e conservarlo nella tasca apposita sul retro del
seggiolino.
NOTA! L'inserto per neonati protegge il bambino.
Dovrebbe essere usato no ad un'altezza del bambino
di 60 cm.
NOTA! A seconda dei codici locali le caratteristiche del
prodotto potrebbero essere diverse.
Per una protezione adeguata
Non usare il seggiolino nel sen-
DEENIT
Page 5

EN
ZULASSUNG .............................................................................................................. 6
ERSTE MONTAGE ..................................................................................................10
ZUM SCHUTZ DES FAHRZEUGS.......................................................................10
DER RICHTIGE PLATZ IM FAHRZEUG .............................................................12
SICHERHEIT IM FAHRZEUG ............................................................................... 16
VERWENDUNGSMÖGLICHKEITEN DES KINDERSITZES IM FAHRZEUG 18
EINBAU DES KINDERSITZES INS FAHRZEUG .............................................22
EINSTELLEN DES STÜTZFUSSES ...................................................................26
AUSBAU DES KINDERSITZES AUS DEM FAHRZEUG ................................26
EINSTELLEN DER SEITENPROTEKTOREN ..................................................28
SITZ- UND LIEGEVERSTELLUNG .....................................................................30
360° ROTATION ........................................................................................................32
RÜCKWÄRTSGERICHTETE VERWENDUNG (45 CM – 105 CM) ...............36
ANPASSEN AN DIE KÖRPERGRÖSSE ............................................................38
ANSCHNALLEN MITTELS GURTSYSTEM ......................................................42
UMBAU VON RÜCKWÄRTS- ZU VORWÄRTSGERICHTETER VERWENDUNG 44
VORWÄRTSGERICHTETE VERWENDUNG (76 CM - 105 CM) ...................48
EINSTELLEN DES FANGKÖRPERS ..................................................................50
ANSCHNALLEN MITTELS FANGKÖRPER ......................................................52
IST IHR KIND RICHTIG GESICHERT? ..............................................................54
ENTFERNEN DES BEZUGES..............................................................................56
REINIGUNG ..............................................................................................................58
PFLEGE .....................................................................................................................60
VERHALTEN NACH EINEM UNFALL .................................................................62
PRODUKTINFORMATION ....................................................................................62
PRODUKTLEBENSDAUER ..................................................................................64
ENTSORGUNG ........................................................................................................64
GARANTIEBESTIMMUNGEN ..............................................................................66
8 9
HOMOLOGATION .....................................................................................................6
FIRST INSTALLATION............................................................................................11
PROTECTING THE VEHICLE .............................................................................. 11
CORRECT POSITION IN THE VEHICLE ........................................................... 13
SAFETY IN THE VEHICLE ....................................................................................17
USE OF THE SEAT IN THE CAR ......................................................................... 19
INSTALLING THE CAR SEAT IN THE VEHICLE ..............................................23
ADJUSTING THE SUPPORT LEG ...................................................................... 27
REMOVING THE CAR SEAT FROM THE VEHICLE ....................................... 27
ADJUSTING THE SIDE PROTECTORS ............................................................29
ADJUSTMENT FOR SITTING AND RECLINING .............................................31
360° ROTATION ........................................................................................................33
REARWARD-FACING USE (45 CM – 105 CM) ..................................................37
ADJUSTING TO BODY SIZE ................................................................................ 39
STRAPPING WITH HARNESS SYSTEM ..........................................................43
CONVERTING FROM REARWARD- TO FORWARD-FACING USE ........... 45
FORWARD-FACING USE (76 CM - 105 CM) .....................................................49
ADJUSTING THE IMPACT SHIELD ....................................................................51
STRAPPING WITH THE IMPACT SHIELD ........................................................53
IS YOUR CHILD PROPERLY SECURED? ........................................................55
REMOVING THE COVER ......................................................................................57
CLEANING ................................................................................................................59
WHAT TO DO AFTER AN ACCIDENT .................................................................63
PRODUCT INFORMATION ................................................................................... 63
PRODUCT DURABILITY........................................................................................65
DISPOSAL .................................................................................................................65
WARRANTY ..............................................................................................................67
CONTENT CONTENUTOINHALTDE
IT
OMOLOGAZIONE ..................................................................................................... 6
PRIMA INSTALLAZIONE ....................................................................................... 11
PROTEZIONE DEL VEICOLO ..............................................................................11
POSIZIONE CORRETTA NEL VEICOLO ...........................................................13
SICUREZZA NEL VEICOLO ..................................................................................17
USO DEL SEGGIOLINO NEL VEICOLO ............................................................19
MONTAGGIO DEL SEGGIOLINO AUTO NEL VEICOLO ...............................23
REGOLAZIONE DEL PIEDE DI SUPPORTO....................................................27
SMONTAGGIO DEL SEGGIOLINO AUTO DAL VEICOLO ............................27
REGOLAZIONE DELLE PROTEZIONI LATERALI ..........................................29
REGOLAZIONE PER LA SEDUTA E L'INCLINAZIONE ..................................31
ROTAZIONE DI 360° ...............................................................................................33
USO CONTRO IL SENSO DI MARCIA (45 CM – 105 CM) ..............................37
ADATTAMENTO ALL'ALTEZZA ............................................................................39
ALLACCIARE LE CINTURE ..................................................................................43
PASSAGGIO DALL'USO CONTRO IL SENSO DI MARCIA ALL'USO NEL
SENSO DI MARCIA .................................................................................................45
USO NEL SENSO DI MARCIA (76 CM - 105 CM) .............................................49
REGOLAZIONE DELLA PROTEZIONE ANTIURTO .......................................51
ALLACCIARE LE CINTURE DELLA PROTEZIONE ANTIURTO .................. 53
AVETE ALLACCIATO CORRETTAMENTE IL VOSTRO BAMBINO? ..........55
RIMOZIONE DEI RIVESTIMENTI ........................................................................57
PULIZIA ......................................................................................................................59
COSA FARE DOPO UN INCIDENTE ..................................................................63
INFORMAZIONI SUL PRODOTTO ......................................................................63
DURATA DEL PRODOTTO ....................................................................................65
SMALTIMENTO ........................................................................................................65
GARANZIA ................................................................................................................67
DEENIT
Page 6

1
3
2
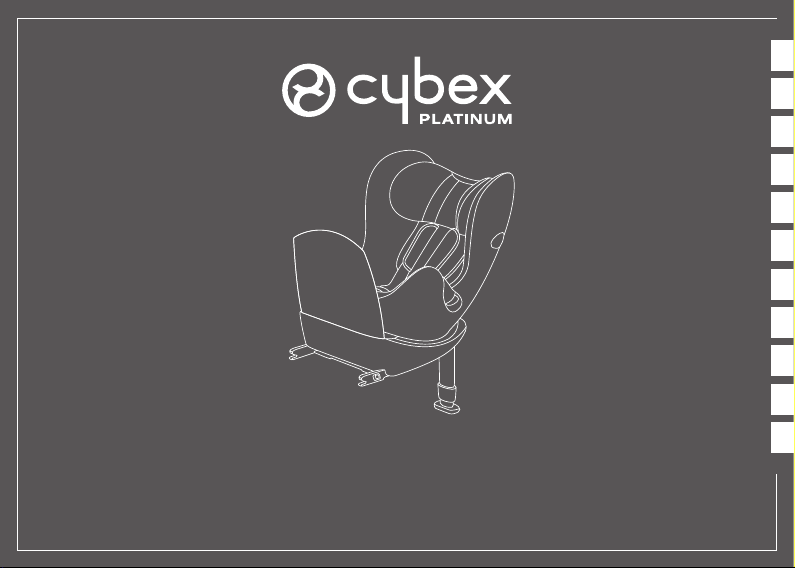
ERSTE MONTAGE
HINWEIS! Vor der ersten Verwendung müssen Sie den
Transportschutz (1) und die Schutzkappen (2) entfernen.
Durch Abziehen der vor der Auslieferung eingelegten
Folie werden zusätzliche Sicherheitsfunktionen des
CYBEX SIRONA Q i-SIZE aktiviert. Bewahren Sie die
Schutzkappen in der mitgelieferten Aufbewahrungstasche
auf. Der Sicherheitsbügel (3) ist zu montieren. Mehr
Details im Kapitel „RÜCKWÄRTSGERICHTETE
VERWENDUNG (45-105 cm)“.
WARNUNG! Ohne Entfernen des Transport-
!
schutzes (1) darf CYBEX SIRONA Q i-SIZE nicht
verwendet werden!
FIRST INSTALLATION
NOTE! Before using the seat for the rst time, you must
remove the transport guard (1) and the protection covers
(2). Detaching the foil installed before delivery activates
additional safety functions of the CYBEX SIRONA Q
i-SIZE. Keep the protection covers in the included storage
bag. The rebound bar (3) must be installed. For more detail
see section „REARWARD - FACING USE
WARNING! CYBEX SIRONA Q i-SIZE must not
!
be used unless the transport guard (1) has been
removed!
(45-105 cm)
“.
PRIMA INSTALLAZIONE
NOTA! Prima di usare il seggiolino per la prima volta,
rimuovere la protezione per il trasporto (1) e le coperture
protettive (2). Staccando la pellicola apportata prima
della consegna vengono attivate funzioni di sicurezza
addizionali di CYBEX SIRONA Q i-SIZE. Conservare
le coperture protettive nel sacchetto apposito incluso.
Montare la barra antirimbalzo (3). Per maggiori dettagli
vedere il paragrafo "USO CONTRO IL SENSO DI
(45-105 cm)
MARCIA
AVVERTIMENTO! Non usare CYBEX SIRONA
!
Q i-SIZE prima di aver rimosso la protezione per il
trasporto (1)!
“.
DEENIT
ZUM SCHUTZ DES FAHRZEUGS
An einigen Autositzen aus empndlichem Material (z.B.
Velours, Leder, etc.) können durch die Benutzung von
Kindersitzen mögliche Gebrauchsspuren und/oder
Abfärbungen auftreten. Um das zu vermeiden, können
Sie z.B. eine Decke oder ein Handtuch unterlegen.
Ferner weisen wir in diesem Zusammenhang auf unsere
Reinigungshinweise hin, die vor der ersten Verwendung
des Kindersitzes unbedingt beachtet werden sollten.
10 11
PROTECTING THE VEHICLE
Traces of use and/or discolouration can appear on some
vehicle seats made from delicate materials (e.g. velour,
leather, etc.) if car seats are used. You can avoid this
by putting, e.g. a blanket or a towel underneath the car
seat. In this context also see our cleaning directions. It
is essential that these are followed before the rst use of
the car seat.
PROTEZIONE DEL VEICOLO
Alcuni sedili di veicoli rivestiti con materiali delicati (ad
es. velours, pelle, ecc.) possono presentare tracce d'uso
e/o scolorimento, se su di essi viene montato il seggiolino
auto. Per evitare tali inconvenienze proteggere il sedile
ad es. con un lenzuolo o un asciugamano al di sotto
del seggiolino auto. Consultare in proposito anche le
nostre prescrizioni per la pulizia. È essenziale che queste
vengano seguite prima di usare il seggiolino auto per la
prima volta.
Page 7

DER RICHTIGE PLATZ IM FAHRZEUG
Dies ist ein Kinderrückhaltesystem der Kategorie „i-Size“.
Es ist nach der Regelung ECE R 129 zur Verwendung auf
solchen Fahrzeugsitzen genehmigt worden, die gemäß den
Angaben des Fahrzeugherstellers im Fahrzeughandbuch
für i-Size-Rückhaltesysteme geeignet sind.
Verfügt Ihr Fahrzeug über keinen i-Size Sitzplatz überprüfen
Sie bitte anhand der beigelegten bzw. auf der Homepage
bendlichen Typenliste, ob der Einbau erlaubt ist.
Falls Ihr Auto nicht mit ISOFIX ausgestattet ist, wenden
Sie sich an den Hersteller.
In Ausnahmefällen kann der Kindersitz auch vorne auf
dem Beifahrersitz verwendet werden. Beachten Sie dabei
bitte die folgenden Punkte
• Überprüfen Sie, ob der Beifahrersitz mit ISOFIXAnbindungspunkten ausgestattet ist. Ohne ISOFIX ist
eine Verwendung nicht möglich.
• Deaktivieren Sie den Beifahrerairbag! Sollte dies
in Ihrem Fahrzeug nicht möglich sein, ist eine
Verwendung auf der Beifahrerseite untersagt.
• Die Empfehlungen des Fahrzeugherstellers sind
unbedingt zu befolgen!
Gepäckstücke oder andere Gegenstände im Fahrzeug,
die bei einem Unfall Verletzungen verursachen können,
müssen immer gut befestigt werden. Andernfalls
CORRECT POSITION IN THE VEHICLE
This is an „i-Size“ Child Restraint System. It is approved
to ECE R 129, for use in, „i-Size compatible“ vehicle
seating positions as indicated by vehicle manufacturers in
the vehicle users’ manual.
If your vehicle does not have an i-Size seating
position, please check the vehicle typelist that is
included or for example on our homepage whether the
installation is allowed.
If your car is not equipped with ISOFIX, please contact
the vehicle manufacturer.
In exceptional cases, however, the car seat can be used
on the front passenger seat. In this case, observe the
following points:
• Check whether the passenger seat is tted with ISOFIX.
If ISOFIX is not tted, the car seat may not be used.
• Deactivate the passenger airbag. If this is not possible
in your vehicle, use of the car seat on the passenger
side is prohibited.
• It is imperative that you comply with the car
manufacturer‘s recommendations.
Items of luggage and other loose objects in the vehicle,
which could cause injury in an accident, must always be
safely secured. They can become deadly projectiles in
the case of a car accident.
können Sie sich zu tödlichen Geschossen im Fahrzeug
verwandeln.
12 13
POSIZIONE CORRETTA NEL VEICOLO
Questo è un sistema di ritenuta per bambini "i-Size".
È omologato in base alla norma ECE R 129 per l'uso
in veicoli con sedili "compatibili con i-Size" secondo
quanto indicato dalla casa automobilistica produttrice nel
manuale d'uso del veicolo stesso.
Se il vostro veicolo non dispone di un sedile compatibile
con i-Size, controllare l'elenco dei tipi di veicolo incluso o
ad esempio visitare la nostra homepage per vericare se
il montaggio sia consentito.
Se il vostro veicolo non è dotato di ISOFIX contattare la
casa automobilistica produttrice.
In casi eccezionali, tuttavia, il seggiolino auto può essere
usato sul sedile del passeggero anteriore. In questo caso
osservare i seguenti punti:
• Controllare se il sedile del passeggero è provvisto di
ISOFIX. Se ISOFIX non è presente non è possibile
usare il seggiolino auto in questa posizione.
• Disattivare l'airbag del passeggero anteriore. Se nel
vostro veicolo ciò non è possibile, non è consentito
usare il seggiolino auto sul lato passeggero.
• Rispettare assolutamente i consigli della casa
automobilistica produttrice.
Fissare sempre saldamente bagagli e altri oggetti sparsi
presenti nel veicolo che possano causare lesioni in
caso di incidente. In caso di incidente stradale possono
diventare proiettili mortali.
DEENIT
Page 8

WARNUNG!
!
sichtigt im Fahrzeug zurück. Die Kunststoteile des
Kindersitzes heizen sich in der Sonne auf. Ihr Kind
kann sich daran verbrennen. Schützen Sie Ihr Kind
und den Kindersitz vor intensiver Sonneneinstrahlung
(z.B. indem Sie ein helles Tuch über die Schale legen).
WARNUNG! Dieser Sitz ist nicht für die Verwen-
!
dung mit einem normalen Fahrzeuggurt geeignet.
Wenn Sie versuchen, den Sitz mit dem Gurt zu
sichern, kann es bei einem Unfall zu schweren oder
gar tödlichen Verletzungen des Kindes sowie der
übrigen Fahrzeuginsassen kommen.
WARNUNG!
!
Fahrtrichtung angeordnet sind, ist die Verwendung
des Kindersitzes nicht zulässig. Auf rückwärtsgerichteten Fahrzeugsitzen, wie z.B. in einem Van oder
Minibus, ist die Verwendung ebenfalls nicht erlaubt.
14 15
Bitte lassen Sie Ihr Kind nie unbeauf-
Auf Fahrzeugplätzen, die quer zur
WARNING! Never leave your child unattended in the
!
vehicle. The plastic parts in the child restraint system
heat up in sun and the child may sustain burns.
Protect your child and the car seat from direct sun exposure (e.g. by covering it with a light colored cloth).
WARNING! The car seat is not suitable for use with
!
a normal vehicle seat belt. If the car seat is secured
with normal vehicle seat belt, in case of an accident
the child and other occupants of the vehicle may be
severely injured or killed.
WARNING! The car seat is not allowed to be used
!
on vehicle seats, which are installed at right angles
to the direction of travel. The car seat should not be
used on rearward-facing seats, for example in a van
or minibus.
AVVERTIMENTO! Non lasciare mai il bambino
!
incustodito nel veicolo. Le parti in plastica del sistema
di ritenuta del bambino si riscaldano al sole e il
bambino è esposto al rischio di ustioni. Proteggere il
bambino e il seggiolino auto dall'esposizione diretta
al sole (ad es. coprendolo con un telo chiaro).
AVVERTIMENTO! Il seggiolino auto non è adatto
!
per l'uso con una normale cintura di sicurezza del
sedile del veicolo. Se il seggiolino auto viene ssato
con una normale cintura di sicurezza del sedile del
veicolo, in caso di incidente il bambino e altri occupanti del veicolo possono andare incontro a lesioni
gravi o alla morte.
AVVERTIMENTO! Il seggiolino auto non può esse-
!
re usato su sedili del veicolo montati ad angolo retto
rispetto al senso di marcia. Non usare il seggiolino
auto su sedili rivolti contro il senso di marcia, per
esempio in van o minibus.
DEENIT
Page 9

SICHERHEIT IM FAHRZEUG
WARNUNG! Verwenden Sie den Kindersitz nicht
!
auf einem Sitz, auf dem ein Frontairbag aktiviert ist.
Dies gilt nicht für so genannte Seitenairbags.
WARNUNG! Der Kindersitz muss, auch dann wenn
!
er nicht benutzt wird, immer korrekt im Fahrzeug
befestigt sein. Bereits bei einer Notbremsung oder
einem geringen Aufprall können unbefestigte Teile
andere Mitfahrer und Sie selbst verletzen.
Achten Sie zum Schutz aller Fahrzeuginsassen stets
darauf, dass...
• die umklappbaren Rückenlehnen der Fahrzeugsitze
eingerastet sind und sich in einer aufrechten Position
benden.
• bei Einbau des Kindersitzes auf dem Beifahrersitz,
dieser in der hintersten Position steht.
• im Fahrzeug alle beweglichen Gegenstände gesichert
sind.
• alle Personen im Fahrzeug angeschnallt sind.
16 17
SAFETY IN THE VEHICLE
WARNING! Never use the car seat on a vehicle seat
!
with an activated front airbag. This does not apply to
so-called side airbags.
WARNING! The car seat must always be secured
!
correctly in the vehicle even when not in use. In case
of an emergency brake or accident, an unsecured car
seat may injure other passengers or yourself.
In order to guarantee the best possible safety for all
passengers make sure that...
• foldable backrests in the vehicle are locked in their
upright position.
• when installing the car seat on the front passenger seat,
adjust the vehicle seat in rearmost position.
• you properly secure all objects likely to cause injury in
the case of an accident.
• all passengers in the vehicle are buckled up.
SICUREZZA NEL VEICOLO
AVVERTIMENTO! Non usare mai il seggiolino
!
auto su un sedile del veicolo per il quale sia attivato l'airbag anteriore. Ciò non vale per i cosiddetti
airbag laterali.
AVVERTIMENTO! Il seggiolino auto deve essere
!
sempre ssato correttamente nel veicolo anche se
non in uso. In caso di uso del freno di stazionamento
o di incidente, un seggiolino auto non ssato può
causare lesioni ad altri passeggeri o al conducente.
Per garantire la migliore sicurezza possibile per tutti i
passeggeri assicurarsi che...
• schienali ribaltabili del veicolo siano bloccati nella
posizione verticale.
• se il seggiolino auto viene montato sul sedile del
passeggero anteriore, il sedile del veicolo sia regolato
nella posizione più arretrata possibile.
• tutti gli oggetti che possano causare lesioni in caso di
incidenti siano ssati.
• tutti i passeggeri abbiano allacciato la cintura di
sicurezza.
DEENIT
Page 10

VERWENDUNGSMÖGLICHKEITEN DES KINDER
SITZES IM FAHRZEUG
Abhängig von Körpergröße und Alter kann der Kindersitz
vorwärtsgerichtet und rückwärtsgerichtet verwendet werden.
HINWEIS! Unfallstatistiken belegen, dass ein
rückwärtsgerichteter Transport Ihres Kindes im Fahrzeug
am sichersten ist. Deshalb empfehlen wir, den Kindersitz
so lange wie möglich rückwärtsgerichtet zu verwenden.
WARNUNG! Bis zu einem Alter von 15 Monaten
!
und einer Körpergröße von 75 cm ist dies zwingend
vorgesehen. Doch auch darüber hinaus ist ein rückwärtsgerichteter Transport Ihres Kindes am sichersten. Für nähere Details lesen Sie bitte den Kapitel:
„RÜCKWÄRTSGERICHTETE VERWENDUNG“.
USE OF THE SEAT IN THE CAR
Depending on age and size the car seat may be used
forward-facing and rearward-facing.
NOTE! Accident statistics verify that in a vehicle the
rearward-facing transport of your child is the safest.
Therefore we recommend to use the car seat as long as
possible in rearward-facing position.
WARNING! It is mandatory to use rearward-facing
!
up to an age of 15 months and a size of 75 cm.
Even beyond this limit a rearward-facing transport
is the safest. For more details please read section:
„REARWARDFACING USE“.
USO DEL SEGGIOLINO NEL VEICOLO
A seconda dell'età e della statura del bambino il
seggiolino auto può essere usato nel senso di marcia e
contro il senso di marcia.
NOTA! Le statistiche sugli incidenti hanno constatato che
in un veicolo il trasporto di un bambino contro il senso di
marcia è quello più sicuro. Perciò consigliamo di usare
il seggiolino auto quanto più a lungo possibile contro il
senso di marcia.
AVVERTIMENTO! L'uso contro il senso di marcia
!
è obbligatorio no a un'età di 15 mesi e a un'altezza
di 75 cm. Anche al di là di questo limite un trasporto
contro il senso di marcia rimane quello più sicuro.
Per maggiori informazioni leggere il paragrafo:
"USO CONTRO IL SENSO DI MARCIA".
DEENIT
Rückwärtsgerichtete Verwendung (45 cm - 105 cm)
Wir empfehlen den Kindersitz bis zu einer Körpergröße
von 105 cm und max. 18 kg gegen die Fahrtrichtung zu
verwenden.
18 19
Rearward-facing use (45 cm - 105 cm)
We recommend to use the car seat in rearward-facing
position up to size of 105 cm and max. 18 kg.
Uso contro il senso di marcia (45 cm - 105 cm)
Raccomandiamo l'uso del seggiolino auto contro il
senso di marcia no a un'altezza di 105 cm e un peso
di max. 18 kg.
Page 11

Vorwärtsgerichtete Verwendung (76 cm - 105 cm)
Eine vorwärtsgerichtete Verwendung ist frühestens ab dem
4
16. Lebensmonat und bei mind. 76 cm Körpergröße zulässig.
HINWEIS! Der Indikator an der Kopfstütze (4) zeigt
zusätzlich an, ab welcher Größe des Kindes ein
Umbau auf vorwärtsgerichtete Verwendung frühestens
erlaubt ist. Für nähere Details lesen Sie bitte das
Kapitel: „VORWÄRTSGERICHTETE VERWENDUNG
(76 cm - 105 cm)“.
HINWEIS! Neugeborene und Kleinkinder, die noch nicht
selbstständig sitzen können (bis ca. 1 Jahr), sollten aus
orthopädischen und sicherheitstechnischen Gründen
immer in der achsten Liegeposition rückwärtsgerichtet
transportiert werden.
HINWEIS! Achten Sie darauf, dass das Kind außerhalb
der Reichweite der beweglichen Teile ist, während Sie
den Sitz verstellen. Halten Sie das Kind vom Sitz fern,
Forward-facing use (76 cm – 105 cm)
Use of the seat in forward-facing position is permitted when
the child is older than 16 months and min. 76 cm tall.
NOTE! The indicator on the headrest (4) shows the height
of the child, from which the seat can be changed to the
forward-facing use at the earliest. For more details please
read section: „FORWARD-FACING USE (76 cm - 105 cm)“.
NOTE! Newborns and infants who are not yet able to
sit up by themselves (up to around 1 year) should, for
orthopedic and safety reasons, always be transported in
the attest recline position rearward-facing.
NOTE! The child should be clear of any loose parts while
making adjustments with the car seat. Keep children
away from the car seat, during the installation and deinstallation in the vehicle. There is a risk that child`s
ngers can be trapped and are injured by unavoidable
scissoring actions.
wenn dieser aus dem Fahrzeug ausgebaut oder in das
Fahrzeug eingebaut wird. Es besteht ansonsten die
Gefahr, dass die Finger des Kindes eingeklemmt oder
Uso nel senso di marcia (76 cm – 105 cm)
L'uso del seggiolino nel senso di marcia è consentito se
il bambino ha compiuto i 16 mesi di vita e ha raggiunto
un'altezza min. di 76 cm.
NOTA! L'indicatore sul poggiatesta (4) mostra l'altezza
del bambino dalla quale si può passare all'uso del
seggiolino nel senso di marcia. Per maggiori informazioni
leggere il paragrafo: "USO NEL SENSO DI MARCIA (76
cm - 105 cm)".
NOTA! Neonati e bambini che non sono ancora in
grado di sedersi da soli (no all'incirca all'età di un anno)
per motivi ortopedici e di sicurezza dovrebbero essere
sempre trasportati contro il senso di marcia con la
maggiore inclinazione possibile.
NOTA! Accertarsi che sul bambino non siano presenti
oggetti sparsi durante la regolazione del seggiolino auto.
Tenere lontani i bambini dal seggiolino auto durante il
montaggio e lo smontaggio nel e dal veicolo. Sussiste
il rischio che le dita del bambino possano incastrarsi e
ferirsi durante movimenti sforbicianti inevitabili.
durch die Scherwirkung verletzt werden.
20 21
DEENIT
Page 12

EINBAU DES KINDERSITZES INS FAHRZEUG
Wählen Sie einen zulässigen Fahrzeugsitz.
HINWEIS! Verfügt Ihr Fahrzeug über keinen i-Size
Sitzplatz überprüfen Sie bitte anhand der beiliegenden
Typenliste ob der Einbau erlaubt ist.
5
6
7
22 23
Mit dem ISOFIX-System können Sie den Sitz fest mit
dem Fahrzeug verbinden.
HINWEIS! Die ISOFIX-Befestigungspunkte (5) sind zwei
Metalllaschen pro Sitzplatz und benden sich zwischen
Rückenlehne und Sitzäche des Fahrzeugsitzes. Im
Zweifelsfall nehmen Sie die Bedienungsanleitung Ihres
Fahrzeugs zu Hilfe.
• Sind die ISOFIX-Befestigungspunkte (5) Ihres
Fahrzeugs schwer zugänglich, sollten Sie zur
Schonung des Bezuges die mitgelieferten Einführhilfen
(6) verwenden.
• Falls erforderlich, hängen Sie die mitgelieferten
Einführhilfen (6) mit der längeren Lasche nach oben in
die beiden ISOFIX-Befestigungspunkte (5) ein.
• Klappen Sie immer den Stützfuß (7) aus, bis er vorne
einrastet.
INSTALLING THE CAR SEAT IN THE VEHICLE
Please select an appropriate seat in the vehicle.
NOTE! If your car is not equipped with an i-Size seating
position, please check the typelist attached to the
product.
The ISOFIX system allows you to t the car seat securely
into the car.
NOTE! The ISOFIX anchorage points (5) are two metal
lugs per seat and are located between the backrest and
the seat of the car. If you are in any doubt, consult your
car‘s instruction manual for assistance.
• If the ISOFIX anchorage points (5) in your car are
dicult to access, you should use the ISOFIX connect
guides (6) provided in order to avoid damaging the
cover.
• if necessary, attach the ISOFIX connect guides (6)
provided with the longer lug pointing upwards into both
ISOFIX anchorage points (5).
• Always fold out the supporting leg (7) until it locks.
MONTAGGIO DEL SEGGIOLINO AUTO NEL VEICOLO
Selezionare un sedile adatto nel veicolo.
NOTA! Se il vostro veicolo non è dotato di sedili
compatibili con i-Size, consultare l'elenco dei tipi in
dotazione al prodotto.
Il sistema ISOFIX consente di ssare il seggiolino auto in
modo sicuro nel veicolo.
NOTA! I punti di ancoraggio ISOFIX (5) sono due alette
in metallo posizionate su ogni sedile tra lo schienale e il
sedile del veicolo. In caso di dubbi consultare il manuale
d'istruzioni del veicolo.
• Se i punti di ancoraggio ISOFIX (5) del veicolo sono di
dicile accesso, usare le guide di raccordo ISOFIX (6)
in dotazione per evitare danni ai rivestimenti.
• Se necessario inserire le guide di raccordo ISOFIX (6)
in dotazione nei due punti di ancoraggio ISOFIX (5),
con l'aletta più lunga rivolta verso l'alto.
• Aprire il piede di supporto (7) fino a quando non si
blocca.
DEENIT
Page 13

9
10
5
8
12
11
11
24 25
HINWEIS! Stellen Sie keine Gegenstände in den Fußraum
vor den Kindersitz.
• Lösen Sie die Arretierung der ISOFIX-Konnektoren (8),
indem Sie sowohl auf beiden Seiten die grüne Knopftaste
(9) drücken und gleichzeitig die ISOFIX-Verstelltasten (10)
nach oben ziehen.
• Halten Sie auf einer Seite die Verstelltaste (10) weiterhin
gedrückt und ziehen Sie mit der anderen Hand die
ISOFIX-Konnektoren (8) bis zum Anschlag aus dem Sitz.
HINWEIS! Achten Sie darauf, dass vor dem Einbau die
beiden grünen Sicherheitsindikatoren (11) an den ISOFIXKonnektoren (8) nicht sichtbar sind. Entriegeln Sie diese
gegebenenfalls, indem Sie die ISOFIX-Entriegelungstaste
(12) drücken und gleichzeitig zurückziehen.
• Die ISOFIX-Konnektoren (8) müssen hörbar an den
beiden ISOFIX-Befestigungspunkten (5) einrasten.
• Vergewissern Sie sich, dass der Sitz gut hält, indem
Sie versuchen ihn aus den ISOFIX-Einführhilfen
herauszuziehen.
• Der grüne Sicherheitsindikator (11) muss an den beiden
ISOFIX-Entriegelungstasten (12) gut sichtbar sein.
• Betätigen Sie erneut die ISOFIX-Verstelltasten (10), um
den Kindersitz in Richtung der Fahrzeugrückenlehne
schieben können, bis sich diese berühren.
• Drücken Sie den Sitz nun am Grundrahmen leicht gegen
die Sitzpolsterung, bis die ISOFIX-Verstelltasten (10)
selbstständig und hörbar verriegeln.
• Fahren Sie fort mit „EINSTELLEN DES STÜTZFUSSES“.
NOTE! Do not put any objects in the foot well in front of the
child seat.
• To activate ISOFIX connectors (8), push the green buttons
(9) on both sides and lift the ISOFIX adjustment handles
(10).
• Continue to hold one adjustment handle (10) pressed,
while pulling the ISOFIX connectors (8) out of the seat to
the endstopper with the other hand.
NOTE! Make sure that both green safety indicators
(11) on the ISOFIX connectors (8) are not visible before
installation. Release these, if necessary, by pressing the
ISOFIX release button (12) and at the same time pulling
the connector rearwards.
• Both ISOFIX connectors (8) have to lock into the ISOFIX
anchorage points (5) with an audible click.
• Make sure that the seat stays rmly in place by trying to
pull it out of the ISOFIX connect guides.
• The green safety indicator (11) must be clearly visible on
both ISOFIX release buttons (12).
• Activate again the Isox adjustment handles (10) to push
the car seat in the direction of the vehicle’s backrest until
they are in contact with each other.
• Now gently press the mainframe of the car seat against
the vehicle seat padding until the ISOFIX adjustment
handles (10) lock independently with an audible click.
• Carry on with “ADJUSTING THE SUPPORTING LEG“.
NOTA! Non riporre oggetti nel vano piedi di fronte al
seggiolino per bambini.
• Per attivare i connettori ISOFIX (8) premere i pulsanti verdi
(9) su entrambi i lati e sollevare le maniglie di regolazione
ISOFIX (10).
• Continuare a tener premuta una delle maniglie di
regolazione (10) e con l'altra mano estrarre i connettori
ISOFIX (8) dal sedile no a ne corsa.
NOTA! Prima del montaggio assicurarsi che i due
indicatori di sicurezza verdi (11) dei connettori ISOFIX
(8) non siano visibili. Se necessario rilasciarli premendo
l'apposito pulsante ISOFIX (12) e tirando allo stesso tempo
il connettore all'indietro.
• Entrambi i connettori ISOFIX (8) devono bloccarsi nei
punti di ancoraggio ISOFIX (5) con un clic udibile.
• Provare ad estrarre il seggiolino dalle guide di raccordo
ISOFIX per accertarsi che sia ssato saldamente.
• L'indicatore di sicurezza verde (11) deve essere
chiaramente visibile su entrambi i pulsanti di rilascio
ISOFIX (12).
• Riattivare le maniglie di regolazione Isox (10) per
spingere il seggiolino auto verso lo schienale del veicolo
nché seggiolino e schienale non sono a contatto.
• Ora premere gentilmente la base del seggiolino auto
contro l'imbottitura del sedile del veicolo nché le maniglie
di regolazione ISOFIX (10) non si bloccano singolarmente
con un clic udibile.
• Continuare con "REGOLAZIONE DEL PIEDE DI
SUPPORTO".
DEENIT
Page 14

EINSTELLEN DES STÜTZFUSSES
Vergewissern Sie sich, dass der Stützfuß (7) in der
vordersten Position eingerastet ist. Schieben Sie die
7 13
CLICK!
8
26 27
12
Verstelltaste (13) am Stützfuß nach oben und halten Sie
diese gedrückt um den Stützfuß auszuziehen. Ziehen Sie den
Stützfuß (7) soweit heraus, bis dieser den Fahrzeugboden
berührt. Ziehen Sie den Stützfuß zur nächsten Verrastung
aus, um eine optimale Kraftaufnahme zu gewährleisten. Der
Stützfußindikator (14) an der Basis schaltet dann auf GRÜN
um, dabei ist ein charakteristisches Klicken zu hören.
HINWEIS! Achten Sie darauf, dass der Kindersitz
weiterhin ächig auf dem Fahrzeugsitz auiegt.
WARNUNG! Der Stützfuß muss immer direkten
!
14
Bodenkontakt haben. Es dürfen keine Gegenstände
untergelegt werden. Bei Staufächern im Fußraum
wenden Sie sich unbedingt an den Fahrzeughersteller.
AUSBAU DES KINDERSITZES AUS DEM FAHRZEUG
Führen Sie die Einbauschritte in umgekehrter
Reihenfolge durch.
• Entriegeln Sie die ISOFIX-Konnektoren (8), indem
Sie die roten Entriegelungstasten (12) drücken und
gleichzeitig zurückziehen.
• Ziehen Sie den Sitz aus den ISOFIX-Befestigungspunkten
heraus.
• Bringen Sie die ISOFIX-Konnektoren (8) in Ihre
Ausgangsposition.
• Drücken Sie die Taste am Stützfuß (7) und schieben
Sie diesen in die Ausgangsposition.
• Klappen Sie den Stützfuß zurück unter den Sitz.
ADJUSTING THE SUPPORT LEG
Make sure that the support leg (7) is xed in the forward
position. Push the adjustment button (13) upwards on the
support leg and press it to pull the support leg (7) until it
touches the vehicle oor. After this, pull the foot out to the
next locking position to ensure optimal force transmission.
The support leg indicator (14) on the base will show
GREEN and a characteristic ‚CLICK‘ may be heard.
NOTE! Make sure that the car seat still rests at on the
car seat.
WARNING! The support leg must always have
!
direct contact with the ground. It is not allowed to
place objects under the support leg. For information
on the storage compartments in the foot area please
contact your vehicle manufacturer.
REMOVING THE CAR SEAT FROM THE VEHICLE
Perform the installation procedure in reverse order.
• Unlock the ISOFIX connectors (8) by pressing and
pulling back the red release buttons (12).
• Pull out the base from the ISOFIX anchorage points.
• Fold back the ISOFIX connectors (8) in it’s starting
position by turning it back by 180°.
• Push the button on the support leg (7) and push it back
into its original position.
• Fold back the support leg.
REGOLAZIONE DEL PIEDE DI SUPPORTO
Assicurarsi che il piede di supporto (7) sia ssato nel
senso di marcia. Spingere verso l'alto il pulsante di
regolazione (13) del piede di supporto e premerlo per
tirare il piede di supporto (7) nché non tocca il pavimento
del veicolo. Dopo di che, estrarre il piede no alla
posizione di bloccaggio successiva per assicurare una
trasmissione ottimale della forza. L'indicatore del piede di
supporto (14) sulla base sarà VERDE e sarà udibile un
tipico CLIC.
NOTA! Assicurarsi che il seggiolino auto sia ancora in
posizione piana rispetto al sedile del veicolo.
AVVERTIMENTO! Il piede di supporto deve
!
essere sempre a diretto contatto con il pavimento.
Non è consentito disporre oggetti al di sotto del
piede di supporto. Per informazioni sugli scomparti
portaoggetti eventualmente presenti nel vano piedi
rivolgersi alla casa automobilistica produttrice.
SMONTAGGIO DEL SEGGIOLINO AUTO DAL VEICOLO
Eseguire i passi della procedura di montaggio nella
sequenza inversa.
• Sbloccare i connettori ISOFIX (8) premendo e tirando
indietro i pulsanti di rilascio rossi (12).
• Estrarre la base dai punti di ancoraggio ISOFIX.
• Far rientrare i connettori ISOFIX (8) nella loro posizione
originaria.
• Premere il pulsante sul piede di supporto (7) e
respingerlo all'indietro nella sua posizione originaria.
• Far rientrare il piede di supporto.
DEENIT
Page 15

EINSTELLEN DER SEITENPROTEKTOREN
Im Kindersitz ist das „Linear Side-Impact Protection“
System (L.S.P.) verbaut. Dieses System erhöht die
Sicherheit Ihres Kindes im Falle eines seitlichen Aufpralls.
Hinweis! Achten Sie darauf, dass der ausfahrbare Teil
15
a
b
c
28 29
einrastet. Dies ist durch ein „KLICK“ hörbar.
Das L.S.P. verfügt über 3 Positionen. Ziehen Sie das
L.S.P. bei der dem Sitz zugewandten geschlossenen
Autotür immer mindestens auf Position (a) aus.
Um die bestmögliche Schutzwirkung zu erzielen, ziehen
Sie das L.S.P. soweit wie möglich heraus. Sollte das
L.S.P. in der längsten Position (c) an der Türe anstehen,
müssen Sie die Zwischenposition (b) verwenden.
Dazu müssen Sie zuerst das L.S.P. komplett ausziehen.
Anschließend betätigen Sie die Entriegelungstaste (15)
und schieben das L.S.P. in die Zwischenposition.
Das L.S.P. lässt sich wieder komplett in den Sitz
einschieben, indem Sie die Entriegelungstaste (15)
drücken und gleichzeitig mit leichtem Druck den
ausgezogenen Teil zum Sitz hin bewegen.
HINWEIS! Beim Einbau des Kindersitzes auf
einem mittleren Sitzplatz dürfen Sie den linearen
Seitenaufprallschutz (L.S.P.) nicht herausfahren.
WARNUNG! Der ausgefahrene Seitenaufprallschutz
!
(L.S.P.) dient nicht als Tragegri oder zur Befestigung des Kindersitzes.
ADJUSTING THE SIDE PROTECTORS
The car seat is equipped with the „Linear Side-Impact
Protection“ System (L.S.P.). This system increases the
safety of your child in case of a side impact.
NOTE! Make sure, that the L.S.P. is xed with an audible
„CLICK“.
The L.S.P. disposes of 3 positions. At least pull out the
L.S.P. in position (a). For best protection, pull out the
L.S.P. out as much as possible towards the car door close
to the child seat.
In case the L.S.P. exceeds its designated space and
touches the door in its longest position (c), the inclined
position (b) has to be used.
This can be done by extracting the L.S.P. completely and
subsequently by pressing the locking button (15) and
moving the L.S.P. into the inclined position.
In order to push back the L.S.P. into the seat press the
locking button (15) and at the same time push the L.S.P.
towards the seat.
NOTE! When using the car seat on a middle position in
the vehicle, it’s prohibited to extend the side protector.
WARNING! Using the side protector to carry or to
!
fasten the car seat is prohibited.
REGOLAZIONE DELLE PROTEZIONI LATERALI
Il seggiolino auto è dotato del sistema di "protezione
lineare nell'impatto laterale" (L.S.P. – Linear Side-Impact
Protection). Questo sistema aumenta la sicurezza del
vostro bambino in caso di impatto laterale.
NOTA! Assicurarsi che il sistema L.S.P. si blocchi con un
"CLIC" udibile.
Il sistema L.S.P. dispone di 3 posizioni. Come
impostazione minima estrarre il sistema L.S.P. nella
posizione (a). Per la migliore protezione estrarre il
sistema L.S.P. quanto più possibile verso la portiera del
veicolo prossima al seggiolino per bambini.
Nel caso in cui le dimensioni del sistema L.S.P. siano
superiori allo spazio a disposizione e se impostato nella
sua posizione più lunga tocchi la portiera (c), usare la
posizione inclinata (b).
Per far ciò estrarre completamente il sistema L.S.P.,
premere quindi il pulsante di blocco (15) e portare il
sistema L.S.P. nella posizione inclinata.
Per far rientrare il sistema L.S.P. nel seggiolino, premere
il pulsante di blocco (15) e contemporaneamente
spingere il sistema L.S.P. verso il seggiolino.
NOTA! Se il seggiolino auto viene usato sul sedile
centrale del veicolo, è proibito estrarre la protezione
laterale.
AVVERTIMENTO! Non è consentito usare la
!
protezione laterale per trasportare o allacciare il
seggiolino auto.
DEENIT
Page 16

16
SITZ UND LIEGEVERSTELLUNG
CYBEX SIRONA Q i-SIZE bietet bis zu 7 unterschiedliche
Sitz- und Liegepositionen zum sicheren und komfortablen
Transport Ihres Kindes im Fahrzeug. Falls gewünscht,
betätigen Sie die Positionsverstelltaste (16) an der
Vorderseite des Kindersitzes, um CYBEX SIRONA Q i-SIZE
in eine der gewünschten Liegepositionen zu führen. Achten
Sie immer darauf, dass die Sitzschale (17) hörbar einrastet.
ADJUSTMENT FOR SITTING AND RECLINING
CYBEX SIRONA Q i-SIZE oers up to 7 dierent sitting
and reclining positions for the safe and comfortable
transport of your child in the car. If wanted, activate the
position adjustment handle (16) on the front of the child
seat, to put the CYBEX SIRONA Q I-SIZE in the required
reclining position. Always make sure that the seat shell
(17) locks into place with an audible click.
REGOLAZIONE PER LA SEDUTA E L'INCLINAZIONE
CYBEX SIRONA Q i-SIZE ore no a 7 diverse posizioni
di seduta e di inclinazione per il trasporto sicuro e
comodo del vostro bambino nel veicolo. Se desiderato
attivare la maniglia per la regolazione della posizione (16)
sul lato anteriore del seggiolino auto per regolare CYBEX
SIRONA Q I-SIZE alla posizione reclinata desiderata.
Prestare sempre attenzione che la scocca del seggiolino
(17) si blocchi in posizione con un clic udibile.
1716
30 31
DEENIT
Page 17

360° ROTATION
Der Kindersitz verfügt über eine 360°- Drehfunktion,
16
16
18
32 33
um das Ein- und Aussteigen Ihres Kindes zu
erleichtern und um von der rückwärtsgerichteten zur
vorwärtsgerichteten Verwendungsart zu wechseln.
Hierzu verweisen wir auf das Kapitel „UMBAU BEI
VORWÄRTSGERICHTETER VERWENDUNG“.
• Um die Sitzschale drehen zu können, müssen Sie zuerst
die Positionsverstelltaste (16) drücken und die Sitzschale
bei gedrückter Taste in eine ganz aufrechte Sitzposition
führen. Diese ist durch seitliche Markierungen am
Grundrahmen (18) und der Sitzschale gekennzeichnet
HINWEIS! Nur wenn die Markierung des Grundrahmens
(18) mit jener der Sitzschale übereinstimmt, kann die
Sitzschale gedreht werden.
• Nun können Sie die Sitzschale zur Tür drehen
und Ihr Kind bequem anschnallen. Siehe Kapitel
„ANSCHNALLEN MITTELS GURTSYSTEM“.
HINWEIS! Vor Fahrtantritt müssen Sie die Sitzschale
wieder in eine eingerastete Grundposition bringen.
• Drehen Sie die Sitzschale wieder zurück. Sobald die
neutrale Position erreicht wurde, muss die Sitzschale
wieder mindestens in die erste Sitzposition eingerastet
werde. Dies geschieht mit einem hörbaren „KLICK“.
HINWEIS! Vergewissern Sie sich, dass die Sitzschale
ordnungsgemäß eingerastet ist, indem Sie versuchen,
diese ohne Drücken der Positionsverstelltaste (16) zu
drehen und zu kippen.
360° ROTATION
The car seat can be rotated 360°, in order to help to put
your child into and take your child out of the vehicle. This
also allows you to change the position of the seat from
rearward-facing to forward-facing. For this subject please
refer to the section „CONVERSION TO FORWARDFACING USE“.
• In order to be able to rotate the seat shell, you must rst
press the position adjustment handle (16) and while
keeping the handle pressed, bring the seat shell into a
completely upright position, which is indicated by markings
on the sides of the main frame (18) and of the seat shell.
NOTE! Only when the marking on the main frame (18) is
aligned with the marking on the seat shell, the car seat
can be rotated.
• Now you can rotate the seat shell towards the door
and strap the child in without diculty. See section,
“SECURING BY MEANS OF HARNESS SYSTEM”.
NOTE! Before starting your journey you must return the
seat shell to a basic position, locked in place.
• Rotate the seat shell back to its original position. As
soon as the neutral position is reached, the seat must
be locked at least into the rst sitting position. This can
be noticed by an audible “CLICK”.
NOTE! Make sure that the seat shell is correctly locked
into place by trying to rotate it, without pressing the
position adjustment handle (16).
ROTAZIONE DI 360°
Il seggiolino auto può essere ruotato di 360° per poter
adagiare e prelevare il bambino dal veicolo con facilità. Ciò
vi consentirà anche di modicare la posizione del seggiolino
da contro il senso di marcia a nel senso di marcia. Per
maggiori dettagli in proposito consultare il paragrafo
"PASSAGGIO ALL'USO NEL SENSO DI MARCIA".
• Per poter ruotare la scocca del seggiolino, premere
prima la maniglia per la regolazione della posizione
(16) e tenendo premuta la maniglia portare la scocca
del seggiolino nella posizione più verticale possibile
riconoscibile dai contrassegni sui lati della base (18) e
della scocca del seggiolino.
NOTA! Solo se il contrassegno sulla base (18) è allineato
con quello sulla scocca sarà possibile ruotare il seggiolino.
• Ora è possibile ruotare la scocca del seggiolino verso
la portiera e allacciarvi il bambino senza dicoltà.
Vedi il paragrafo "ALLACCIARE IL BAMBINO CON LE
CINTURE".
NOTA! Prima di partire riportare la scocca del seggiolino
alla sua posizione originaria e bloccarla in tale posizione.
• Ruotare la scocca del seggiolino riportandola alla sua
posizione originaria. Non appena raggiunta la posizione
neutra bloccare il seggiolino per lo meno nella sua
prima posizione di seduta. Ciò viene confermato da un
"CLIC" udibile.
NOTA! Assicurarsi che la scocca del seggiolino sia
bloccata correttamente nella sua posizione provando a
ruotarla senza premere la maniglia di regolazione della
posizione (16).
DEENIT
Page 18

HINWEIS! Achten Sie darauf, dass kein Schmutz
in den Spalt zwischen Sitz und Basis gelangt. Dies
kann auf Dauer die Leichtgängigkeit der Dreh- und
Schwenkfunktion negativ beeinussen. Sollte dies
dennoch vorkommen sollte der Schmutz entfernt
werden, bevor eine weitere Betätigung des Dreh- und
Schwenkmechanismus den Sitz unter Umständen
dauerhaft beschädigen könnte.
WARNUNG! Während der Fahrt muss der Kinder-
!
sitz stets in rückwärts- oder vorwärtsgerichteter
Position eingerastet sein. Benutzen Sie den Sitz
niemals in Einstiegsposition oder in einer nicht
eingerasteten Position während Sie fahren.
34 35
NOTE! Avoid getting any dirt or sand in between the
upper seat shell and the base. This can have a negative
impact on the performance of the rotation and recline
function. Should this happen the dirt should be removed
before rotating and reclining the seat any further to avoid
any permanent damage of the seat.
WARNING! While travelling the car seat must
!
always be locked in the rearward-facing or forwardfacing position. Never use the seat in the loading
position or in any unlocked intermediate position
while travelling.
NOTA! Evitare che sporco o sabbia penetri tra la
scocca superiore del seggiolino e la base. Ciò può
avere un impatto negativo sulla funzione di rotazione
e di inclinazione. Se ciò si verica rimuovere lo sporco
prima di ruotare e reclinare ulteriormente il seggiolino per
evitare che quest'ultimo subisca danni permanenti.
AVVERTIMENTO! Durante il viaggio il seggiolino
!
auto deve essere sempre bloccato nel senso di
marcia o contro il senso di marcia. Non usare mai il
seggiolino nella posizione di accesso o in qualsiasi
posizione intermedia non bloccata durante il viaggio.
DEENIT
Page 19

3
CLICK!
19
4
36 37
RÜCKWÄRTSGERICHTETE VERWENDUNG
45 CM 105 CM
Anbringen des Sicherheitsbügels
Drehen Sie den Sitz entgegen der Fahrtrichtung. Bitte
entnehmen Sie den mitgelieferten Sicherheitsbügel (3)
aus der Verpackung. Befestigen Sie diesen auf dem
hinteren Teil des Kindersitzes, indem Sie den Sicherheitsbügel in die dafür vorgesehenen Aussparungen (19)
stecken. Achten Sie darauf, dass die Fläche des Sicherheitsbügels (3), auf der die Schraubenköpfe sichtbar sind,
zum Fahrzeugsitz zugewandt ist. Ein hörbares „KLICK“
signalisiert das ordnungsgemäße Einrasten.
WARNUNG! Die Anbringung des Sicherheitsbü-
!
gels ist bei rückwärtsgerichteter Verwendung des
Kindersitzes aus sicherheitstechnischen Gründen
zwingend erforderlich.
WARNUNG! Bis zu einem Alter von 15 Monaten
!
und einer Körpergröße von 75 cm ist die rückwärtsgerichtete Verwendung zwingend vorgesehen. Doch
auch darüber hinaus ist ein rückwärtsgerichteter
Transport Ihres Kindes am sichersten.
HINWEIS!
an, ab welcher Größe des Kindes ein Umbau auf vorwärtsgerichtete Verwendung frühestens erlaubt werden kann.
Details im Kapitel „VORWÄRTSGERICHTETE VERWENDUNG (76 cm - 105 cm)“.
Der Indikator an der Kopfstütze (4) zeigt zusätzlich
Mehr
WARNUNG! Eine rückwärtsgerichtete Verwendung
!
mit dem Fangkörper ist nicht zugelassen!
REARWARDFACING USE 45 CM 105 CM
Attaching the rebound bar
Turn the seat rearward facing. Please take the supplied
rebound bar (3) out of the packaging. Plug the rebound
bar into the appropriate recesses (19) at the rear of car
seat. Make sure that the side with the screw heads on the
rebound bar (3) is facing the rear of the car. An audible
„CLICK“ indicates that the rebound bar is properly locked.
WARNING! For safety reasons the rebound bar must
!
be installed for rearward facing use of the car seat.
WARNING! It is mandatory to use rearward-facing
!
up to an age of 15 months and a size of 75 cm.
Even beyond this limit a rearward-facing transport
is the safest.
NOTE! The indicator on the headrest (4) shows the height
of the child, from which the seat can be changed to the
forward-facing use at the earliest. For more details please
read section: „FORWARD-FACING USE (76 cm - 105 cm)“.
WARNING! Use of the impact shield in the
!
rearward-facing position is not permitted!
USO CONTRO IL SENSO DI MARCIA 45 CM 105 CM
Montaggio della barra antirimbalzo
Ruotare il seggiolino contro il senso di marcia. Estrarre
dalla confezione la barra antirimbalzo (3) in dotazione.
Innestare la barra antirimbalzo nelle scanalature apposite
(19) sul retro del seggiolino auto. Accertarsi che il lato
della barra antirimbalzo con le teste delle viti (3) sia rivolto verso il lato posteriore del veicolo. Un "CLIC" udibile
indica che la barra antirimbalzo è bloccata correttamente.
AVVERTIMENTO! Per ragioni di sicurezza la barra
!
antirimbalzo deve essere montata per l'uso del
seggiolino auto contro il senso di marcia.
AVVERTIMENTO! L'uso contro il senso di marcia
!
è obbligatorio no a un'età di 15 mesi e a un'altezza
di 75 cm. Anche al di là di questo limite un trasporto
contro il senso di marcia rimane quello più sicuro.
NOTA! L'indicatore sul poggiatesta (4) mostra l'altezza
del bambino dalla quale si può passare all'uso del seggiolino nel senso di marcia. Per maggiori informazioni
leggere il paragrafo: "USO NEL SENSO DI MARCIA
(76 cm - 105 cm)".
AVVERTIMENTO! L'uso della protezione antiurto
!
contro il senso di marcia non è consentito!
DEENIT
Page 20

MAX.
ADATTAMENTO ALL'ALTEZZA
Regolazione del poggiatesta
NOTA! L'inserto per neonati protegge il bambino.
Dovrebbe essere usato no ad un'altezza del bambino
di 60 cm.
NOTA! Il poggiatesta
(20)
garantisce la migliore
protezione possibile per il vostro bambino solo con
una regolazione in altezza ottimale. Possono essere
impostate 12 posizioni in altezza.
(20)
• Il poggiatesta
deve essere regolato in modo tale
che la distanza tra le spalle del bambino e il poggiatesta
non superi i 3 cm (circa 2 dita di larghezza).
• Attivare la maniglia di regolazione (21) sul lato inferiore
del poggiatesta (20) e portarlo nella posizione opportuna.
20
21
ANPASSEN AN DIE KÖRPERGRÖSSE
Anpassen der Kopfstütze
HINWEIS! Die Neugeboreneneinlage dient dem Schutz
Ihres Kindes und sollte bis zu einer Körpergröße von 60
cm verwendet werden.
HINWEIS!
Nur eine in optimaler Höhe eingestellte
Kopfstütze (20) gewährt Ihrem Kind größtmöglichen
Schutz und Komfort. Die Höhenverstellung kann in 12
Positionen erfolgen.
(20)
• Die Kopfstütze
muss so eingestellt werden, dass
der Abstand zwischen den Schultern des Kindes und
der Kopfstütze 3 cm (ca. 2 Finger) nicht überschreitet.
• Betätigen Sie die Einstelltaste (21) an der Unterkante
der Kopfstütze (20) und führen Sie diese in die
ADJUSTING TO BODY SIZE
Adjusting the Headrest
NOTE! The newborn inlay protects your child. It should
be used up to size of 60 cm.
NOTE! The headrest (20) ensures the best possible
protection for your child only if it is adjusted to the optimum
height. There are 12 height positions that can be set.
(20)
• The headrest
has to be adjusted in a way that
the distance between the child‘s shoulders and the
headrest doesn‘t exceed 3 cm (approx. 2 ngers width).
• Activate the adjustment handle (21) on the bottom
side of the headrest (20) and move it into the required
position.
gewünschte Position.
38 39
DEENIT
Page 21

22
Entfernen der Neugeboreneneinlage
Die bereits bei Auslieferung in der Schale integrierte
Neugeboreneneinlage gibt Ihrem noch kleinen Baby
die notwendige Unterstützung, mehr Liegekomfort
und Halt. Ab 61 cm (ca. 3 Monaten) sollte die
Neugeboreneneinlage (22) entfernt werden, um
ausreichend Platz fur ihr Kind zu schaen. Zur
Entfernung der Neugeboreneneinlage (22) önen Sie
die Druckknöpfe am Kopfstützenbezug. Anschließend
können Sie den Kopfstützenbezug abziehen die
Neugeboreneneinlage entfernen. Bringen Sie
anschließend erneut den Kopfstützenbezug an,
bringen die Schultergurte in Position, und schließen
erneut die Druckknöpfe.
Bevor Sie die Neugeboreneneinlage waschen, entfernen
Sie bitte den Schaumsto durch die dafür vorgesehenen
Removing the Newborn Inlay
The preinstalled newborn inlay helps to support lying
comfort and t for the smallest babies. The newborn inlay
(22) may be removed after the baby is 61 cm (approx. 3
months) to provide more space for the child. To remove
the newborn inlay (22) open the snap buttons of the
headrest cover. Now rst pull o the headrest cover
and then remove the newborn insert. After that put the
headrest cover back in place, reposition the shoulder
belts and nally close the snap buttons again.
Before washing the newborn inlay, please remove
the foam in the newborn inlay via the dedicated slots.
You can put the foams back through the slots after the
newborn inlay is washed and dried.
Rimozione dell'inserto per neonati
L'inserto per neonati premontato aumenta il comfort
del bambino ed è adatto anche ai bambini più piccoli.
L'inserto per neonati (22) può essere rimosso una volta
che il bambino ha raggiunto un'altezza di 61 cm (circa
3 mesi) per aumentare lo spazio a disposizione. Per
rimuovere l'inserto per neonato (22) aprire i bottoni a
pressione del rivestimento del poggiatesta. Ora prima
estrarre il rivestimento del poggiatesta e quindi rimuovere
l'inserto per neonato. Rimettere il rivestimento del
poggiatesta, riposizionare le cinture per le spalle e inne
richiudere i bottoni a pressione.
Prima di lavare il riduttore neonato preghiamo togliere
la schiuma attraverso le apposite aperture. Dopo che il
riduttore è stato lavato ed è bene asciutto, riinserire la
schiuma attraverso le apposite aperture.
Önungen aus der Neugeboreneneinlage. Nachdem
die Neugeboreneneinlage gewaschen und getrocknet
ist, können Sie den Schaumsto wieder durch die
vorgesehenen Löcher zurück stecken.
40 41
DEENIT
Page 22

ANSCHNALLEN MITTELS GURTSYSTEM
23
24
28
25
27
26
42 43
HINWEIS!
ordnungsgemäß eingerastet ist, bevor Sie den
Kindersitz verwenden.
HINWEIS! Sorgen Sie dafür, dass der Kindersitz frei von
Spielsachen und harten Objekten ist.
Die Schultergurte (23) sind mit der Kopfstütze fest
verbunden und müssen nicht separat eingestellt werden.
Achten Sie darauf, dass die Kopfstütze ordnungsgemäß
eingerastet ist, bevor Sie den Sitz verwenden.
• Lockern Sie die Schultergurte (23), indem Sie die
HINWEIS! Bitte ziehen Sie immer am Schultergurt (23)
und nicht an den Schulterpolstern (25).
• Önen Sie das Gurtschloss (26) durch kräftiges
HINWEIS! Achten Sie darauf, dass die Schultergurte (23)
nicht verdreht sind.
• Setzen Sie Ihr Kind in den Kindersitz.
• Führen Sie die Schultergurte (23) gerade über die
• Führen Sie die beiden Schlosszungen (27) zusammen
• Ziehen Sie behutsam am Zentralverstellgurt (28), um
HINWEIS! Für den optimalen Schutz des Kindersitzes
sollten die Schultergurte (23) so nahe wie möglich am
Körper und die Hüftgurte an der Hüfte anliegen.
Achten Sie darauf, dass die Kopfstütze
Verstelltaste am Zentralversteller (24) betätigen und
gleichzeitig beide Schultergurte nach oben ziehen.
Drücken der roten Taste.
Schultern Ihres Kindes.
und rasten Sie diese im Gurtschloss (26) mit einem
hörbaren „KLICK“ ein.
die Schultergurte (23) soweit zu straen, bis diese am
Körper Ihres Kindes anliegen.
STRAPPING WITH HARNESS SYSTEM
NOTE! Ensure that the headrest is correctly locked in
place before using the car seat.
NOTE! Ensure that the car seat is free from toys and
hard objects.
The shoulder belts (23) are rmly attached to the
headrest and must not be adjusted separately. Make sure
that the headrest is correctly locked in place before you
use the seat.
• Loosen shoulder belts (23) by pressing the adjustment
button on central adjuster (24) and simultaneously
pulling both shoulder belts up.
NOTE! Please always pull on shoulder belt (23) and not
on belt pads (25).
• Undo the belt buckle (26) by pressing the red button rmly.
NOTE! Ensure that shoulder belts (23) are not twisted.
• Put your child into the car seat.
• Place shoulder belts (23) directly over your child’s
shoulders.
• Place both buckle tongues (27) together and lock them
in place in belt buckle (26) with an audible “CLICK”.
• Pull cautiously on central adjustment belt (28) in order to
tighten shoulder belts (23) until they t your child’s body.
NOTE! For the car seat to oer optimum protection,
shoulder belts (23) and hip belts should t the body as
closely as possible.
ALLACCIARE LE CINTURE
NOTA! Assicurarsi che il poggiatesta sia bloccato
correttamente nella sua posizione prima di usare il
seggiolino auto.
NOTA! Assicurarsi che sul seggiolino auto non ci siano
giocattoli e oggetti duri.
Le cinture per le spalle (23) sono montate in modo
sso al poggiatesta e non devono essere regolate
separatamente. Assicurarsi che il poggiatesta sia
bloccato correttamente nella sua posizione prima di usare
il seggiolino.
• Per allentare le cinture per le spalle (23) premere il pulsante
di regolazione centrale (24) e contemporaneamente tirare
entrambe le cinture per le spalle.
NOTA! Tirare sempre le cinture per le spalle (23) e non i
loro cuscinetti (25).
• Aprire la bbia della cintura (26) premendo con forza il
pulsante rosso.
NOTA! Assicurarsi che le cinture per le spalle (23) non
siano attorcigliate.
• Adagiare il bambino nel seggiolino auto.
• Appoggiare le cinture per le spalle (23) direttamente
sulle spalle del bambino.
• Unire le due linguette della bbia (27) e agganciarle
nella bbia della cintura (26) con un "CLIC" udibile.
• Tirare con cautela la cintura di regolazione centrale (28)
per stringere le cinture per le spalle (23), nché non
sono regolate in modo perfetto per il bambino.
NOTA! Anché il seggiolino auto possa orire protezione
massima, le cinture per le spalle (23) e quelle addominali
dovrebbero aderire quanto più possibile al corpo.
DEENIT
Page 23

UMBAU VON RÜCKWÄRTS ZU VORWÄRTSGE
RICHTETER VERWENDUNG
Um den Kindersitz vorwärtsgerichtet verwenden zu
können, müssen Sie folgende Punkte beachten:
Demontage des Sicherheitsbügels
Der Sicherheitsbügel ist nur bei rückwärtsgerichteter
Verwendung des Kindersitzes erforderlich. Daher muss
er entfernt werden, bevor Sie den Sitz vorwärtsgerichtet
verwenden. Zur Demontage drücken Sie die Entriegelungstaste (29) und ziehen gleichzeitig den Sicherheits-
29
44 45
bügel aus der Führung.
Demontage/ Verstauung des 5-Punkt-Gurtsystems
Um den Kindersitz vorwärtsgerichtet verwenden zu können,
muss zuerst das 5-Punkt-Gurtsystem verstaut werden.
WARNUNG! Eine vorwärtsgerichtete Verwendung
!
mit dem 5-Punkt-Gurtsystem ist nicht zugelassen!
CONVERTING FROM REARWARD TO FORWARD
FACING USE
In order to use the car seat in the forward-facing position,
you must observe the following points:
Disassembly of the rebound bar
The rebound bar is only required for rearward facing use of
the car seat. It must be removed before using the seat forward facing. To remove please press the release button (29)
while pulling the rebound bar out of the guide simultaneously.
Disassembly/ stowage of the 5-point-belt-system
First you have to stow away the 5-point harness system,
before you can use the car seat forward facing.
WARNING! Use of the 5-point belt system in the
!
forward-facing position is not permitted!
PASSAGGIO DALL'USO CONTRO IL SENSO DI
MARCIA ALL'USO NEL SENSO DI MARCIA
Per usare il seggiolino auto nel senso di marcia,
osservare i punti seguenti:
Smontaggio della barra antirimbalzo
La barra antirimbalzo è necessaria solo per l'uso del
seggiolino auto contro il senso di marcia. Rimuoverla
prima di usare il seggiolino nel senso di marcia. Per far
ciò premere il pulsante di rilascio (29) estraendo contemporaneamente la barra antirimbalzo dalla guida.
Smontaggio/ deposito del sistema di cinture a 5 punti
Prima di usare il seggiolino auto nel senso di marcia, metter da parte prima di tutto il sistema di cinture a 5 punti.
AVVERTIMENTO! L'uso del sistema di cinture a 5
!
punti nel senso di marcia non è consentito!
DEENIT
Page 24

• Führen Sie die Kopfstütze zuerst in die oberste
Position.
• Lockern Sie die Schultergurte (23), indem Sie den
23
24
27
26
25
38
31
30
32
26
46 47
Zentralversteller (24) betätigen, und ziehen Sie beide
Schultergurte (23) soweit es Ihnen möglich ist heraus.
• Önen Sie das Gurtschloss (26) durch Drücken der
roten Taste.
• Ziehen Sie den Bezug im Sitzbereich hoch, bis das
Fach für das Gurtsystem frei zugänglich ist.
• Ziehen Sie die Schulterpolster (25) von den
Schultergurte (23) und dem Gurtschloss (26) ab.
• Ziehen Sie das Gurtschloss durch den Sitzbezug.
• Önen Sie die rote Abdeckung (30) des
Aufbewahrungsfachs (31) in der Sitzäche, und legen
Sie das Gurtschloss (26) ein.
• Verstauen Sie die Schlosszungen (27) der
Schultergurte in den vorgesehenen Vertiefungen (38) in
der Rückenlehne.
Hinweis! Erst wenn das Gurtschloss (26) im
Aufbewahrungsfach (31) verstaut wurde, lässt sich der
Sitz in die vorwärtsgerichtete Position drehen.
• Schließen Sie die rote Abdeckung (30), und beziehen
Sie die Sitzäche wieder. Bewahren Sie die Gurtpolster
stets gribereit auf.
• Nehmen Sie nun den mitgelieferten Fangkörper (32)
aus der Verwahrung.
WARNUNG! Eine vorwärtsgerichtete Verwendung
!
mit dem 5-Punkt-Gurtsystem ist nicht zugelassen!
• First bring the headrest in to the highest position.
• Loosen the shoulder belts (23) by activating the central
adjuster (24) and pull both shoulder belts (23) out as far
as you can.
• Open the belt buckle (26) by pressing the red button.
• Pull up the cover in the sitting area until the storage
compartment for the Harness Buckle can be accessed.
• Detach the shoulder pads (25) from the shoulder belts
(23) and the belt buckle (26).
• Now pull the harness buckle through the seat cover.
• Open the red cover (30) of the storage compartment (31)
in the seat and place the belt buckle (26) inside.
• Store away the sholder belt‘s belt tongues (27) in the
designated recess (38) in the backrest.
Note! The seat cannot be rotated to the forward-facing
position until the belt buckle (26) has been stowed in the
storage compartment (31).
• Close the red cover (30) and re-apply the seat cover.
Always keep the shoulder pads handy.
• Now take the provided impact shield (32) out of the
storage.
WARNING! Use of the 5-point belt system in the
!
forward-facing position is not permitted!
• Portare prima il poggiatesta nella posizione più alta.
• Allentare le cinture per le spalle (23) attivando il
pulsante di regolazione centrale (24) e allungare quanto
più possibile entrambe le cinture per le spalle (23).
• Aprire la bbia della cintura (26) premendo il
pulsante rosso.
• Sollevare il rivestimento nell‘area di seduta nché il
vano per riporre la bbia delle cinture è accessibile.
• Staccare i cuscinetti per le spalle (25) dalle cinture per
le spalle (23) e la bbia (26).
• Slare la bbia dal rivestimento.
• Aprire la copertura rossa (30) del vano di deposito
(31) del seggiolino e riporvi la bbia della cintura (26).
• Riporre le bbie a linguetta (27) delle cinture per
le spalle nell’apposito alloggiamento (38) nello
schienale.
Nota! Il seggiolino non può essere ruotato nella
posizione rivolta nel senso di marcia nché la bbia della
cintura (26) non è stata riposta nell‘apposito vano (31).
• Chiudere la copertura rossa (30) e riposizionare il
rivestimento sul seggiolino. Tenere sempre a portata
di mano i cuscinetti delle spalle.
• Ora estrarre dal vano di deposito la protezione
antiurto (32) in dotazione.
AVVERTIMENTO! L'uso del sistema di cinture a
!
5 punti nel senso di marcia non è consentito!
DEENIT
Page 25

VORWÄRTSGERICHTETE VERWENDUNG
MAX.
76 CM 105 CM
4
Eine vorwärtsgerichtete Verwendnung ist nur dann
zugelassen, wenn:
• das Kind > 76 cm groß ist.
und
• das Kind mindestens im 16. Lebensmonat ist.
und
• die korrekt eingestellte Kopfstütze (20) den Indikator (4)
verdeckt.
HINWEIS! Unfallstatistiken belegen, dass ein rückwärtsgerichteter Transport Ihres Kindes im Fahrzeug am
sichersten ist. Deshalb empfehlen wir den Kindersitz so
lange wie möglich rückwärtsgerichtet zu verwenden.
HINWEIS! Die Kopfstütze (20) muss so eingestellt
werden, dass nicht mehr als maximal 3 cm (ca. 2 Finger)
20
breit zwischen Schulter des Kindes und Kopfstütze (20)
frei bleiben. Bitte lesen Sie hierzu das Kapitel „ANPASSEN AN DIE KÖRPERGRÖSSE“:
HINWEIS! Bei vorwärtsgerichtetem Transport ist
48 49
zwingend der Fangkörper zu verwenden.
FORWARDFACING USE 76 CM 105 CM
The seat may only be used forward-facing, if:
• the child is > 76 cm tall.
and
• the child is min. 16 months old.
and
• the correctly adjusted headrest (20) covers the indicator (4)
NOTE! Accident statistics prove that the safest way to
transport your child in the vehicle is in the rearward-facing
position. Therefore we recommend to use the car seat in
the rearward-facing position for as long as possible.
NOTE! The headrest (20) has to be adjusted in a way
that the distance between the child‘s shoulders and the
headrest (20) doesn‘t exceed 3 cm (approx. 2 ngers
width). For further information, please read section „ADJUSTING TO BODY SIZE“.
NOTE! For forward-facing transportation, use the
impact shield.
USO NEL SENSO DI MARCIA 76 CM 105 CM
Il seggiolino può essere usato nel senso di marcia solo se:
• il bambino ha un'altezza > 76 cm.
e
• il bambino ha compiuto i 16 mesi di vita.
e
• il poggiatesta (20) se regolato correttamente copre
l'indicatore (4)
NOTA! Le statistiche sugli incidenti dimostrano che il
modo più sicuro per trasportare il vostro bambino in un
veicolo è la posizione contro il senso di marcia. Perciò
consigliamo di usare il seggiolino auto quanto più a lungo
possibile contro il senso di marcia.
NOTA! Il poggiatesta (20) deve essere regolato in modo
tale che la distanza tra le spalle del bambino e il poggiatesta (20) non superi i 3 cm (circa 2 dita di larghezza).
Per ulteriori informazioni leggere il paragrafo "ADATTAMENTO ALL'ALTEZZA".
NOTA! Per il trasporto nel senso di marcia usare la
protezione antiurto.
DEENIT
Page 26

REGOLAZIONE DELLA PROTEZIONE ANTIURTO
La regolazione avviene tirando le cinture di regolazione
(33) sul lato anteriore della protezione antiurto (32). La
protezione antiurto dovrebbe essere quanto più vicina
possibile al bambino, ma senza opprimerlo.
NOTA! La protezione antiurto ore protezione e
comfort massimi per il vostro bambino solo se
regolata correttamente. Non far indossare abiti
invernali ingombranti.
Per sbloccare le cinture di regolazione (33) premere
i pulsanti di rilascio corrispondenti (34) e estrarre le
linguette della bbia della protezione antiurto (32).
32
33
EINSTELLEN DES FANGKÖRPERS
Durch Ziehen der beiden Verstellgurte (33) an der
Vorderseite des Fangkörpers (32) kann er so verstellt
werden, dass er stra anliegt, jedoch nicht auf den Körper
Ihres Kindes drückt.
HINWEIS! Nur ein richtig eingestellter Fangkörper bietet
maximalen Schutz und Komfort für Ihr Kind. Dicke
Winterkleidung sollte zum Anschnallen abgelegt werden.
Um die Verstellgurte (33) am Fangkörper zu lockern
drücken Sie gleichzeitig die Entriegelungstaste an den
Gurtverstellern (34) des Fangkörpers (32) und ziehen Sie
die Schlosszungen aus dem Fangkörper.
ADJUSTING THE IMPACT SHIELD
Pulling the adjustment belts (33) on the front side of the
impact shield (32) allows you to adjust it. This should be
tight but not pressing against the child´s body.
NOTE! The impact shield oers maximum protection and
comfort for your child only when it has been correctly
adjusted. Thick winter clothing must not be worn.
To release the adjustment belts (33) press the release
buttons of the belt adjusters (34) and pull out the buckle
tongues of the impact shield (32).
34
50 51
DEENIT
Page 27

MAX.
20
33
32
17
36
52 53
ANSCHNALLEN MITTELS FANGKÖRPER
• Önen Sie die Verriegelung des Fangkörpers (32) an der
Sitzschale (17) durch Drücken der Entriegelungstaste (35).
HINWEIS! Alternativ kann der Fangkörper (32) einseitig
gelöst und zur Seite geklappt werden, um Ihrem Kind das
35
Einsteigen zu erleichtern.
Setzen Sie nun Ihr Kind nach Einstellen der Kopfstütze
(20) und des Fangkörpers (32) in die Sitzschale (17).
• Stecken Sie die Metallzunge (36) des Fangkörpers in das
zugehörige Gurtschloss, und achten Sie dabei darauf,
dass dieses mit einem hörbaren „KLICK“ einrastet.
• Überprüfen Sie durch Ziehen am Fangkörper (32), ob
dieser auch ordnungsgemäß eingerastet ist.
• Spannen Sie den Fangkörper (32) indem Sie beide
Gurtenden (33) gleichzeitig schräg nach hinten ziehen.
Der Fangkörper ist dann ausreichend festgezogen,
wenn gerade noch eine Hand zwischen Kind und
Fangkörper passt.
HINWEIS! Die Gurtschlösser müssen frei von Verunreinigungen und anderen Gegenständen gehalten werden.
Nur saubere Gurtschlösser rasten hörbar und sicher ein.
WARNUNG! Der Fangkörper (32) darf nur bei vor-
!
wärtsgerichteter Verwendung zur Sicherung Ihres
Kindes (von 76 cm bis 105 cm) eingesetzt werden.
STRAPPING WITH THE IMPACT SHIELD
• Open the impact shield locking device (28) on the seat
shell (17) by pressing the release button (35).
NOTE! Alternatively the impact shield (32) can be
disengaged on one side only and folded to the other side.
This will make it easier to put your child into the seat.
After adjusting the headrest (20) and the impact shield
(32), put your child into the seat shell (17).
• Put the metal tongue (36) of the impact shield into the
corresponding buckle and make sure that the buckle
locks into place with an audible „CLICK“.
• Pull on the impact shield (32) to check whether it has
locked into place correctly.
• Tighten the impact shield (32) by pulling backwards on
the two belt ends (33). The impact shield is correctly
tightened when it‘s just possible to push the hand in
between the child and the impact shield.
NOTE! The buckles must be kept free of dirt and other
objects. Only clean buckles lock audibly and securely.
WARNING! To ensure the safety of your child (from
!
76 cm to 105 cm), the impact shield (32) must be
used only in the forward-facing position.
ALLACCIARE LE CINTURE DELLA PROTEZIONE
ANTIURTO
• Sganciare la protezione antiurto (28) dalla scocca del
seggiolino (17) premendo il pulsante di rilascio (35).
NOTA! In alternativa la protezione antiurto (32) può essere
sganciata da un solo lato e appoggiata sull'altro. Così sarà
più facile adagiare il vostro bambino nel seggiolino.
Dopo aver regolato il poggiatesta (20) e la protezione
antiurto (32) adagiare il vostro bambino nella scocca del
seggiolino (17).
• Inserire la linguetta in metallo (36) della protezione
antiurto nella bbia corrispondente e accertarsi che la
bbia venga chiusa con un "CLIC" udibile.
• Tirare la protezione antiurto (32) per controllare che sia
stata agganciata correttamente.
• Stringere la protezione antiurto (32) tirando all'indietro le
estremità delle due cinture (33). La protezione antiurto
è stretta correttamente se è appena possibile inlare la
mano tra il bambino e la protezione antiurto stessa.
NOTA! Prestare attenzione che sulle bbie non siano
presenti sporco e altri oggetti. Solo bbie pulite si chiudo-
no in modo udibile e sicuro.
AVVERTIMENTO! Per garantire la sicurezza del vostro
!
bambino (da 76 cm a 105 cm), la protezione antiurto
(32) deve essere usata solo nel senso di marcia.
DEENIT
Page 28

IS YOUR CHILD PROPERLY SECURED?
MAX.
MAX.
To guarantee the maximum safety for your child, please
make sure that:
• The ISOFIX connectors are correctly fastened to the
g h
vehicle and the supporting le
installed.
• The seat shell has been locked into the correct position.
as been correctly
• The headrest has been adjusted to the correct height.
• In rearward-facing use: The 5-point belt system has
been correctly adjusted to the size of the child, the
shoulder belts have not been twisted and the belt system
has been locked.
• in forward-facing use: the impact shield has been
correctly adjusted to the size of the child and sit slow on
the pelvis.
• Newborns and infants who are not yet able to sit up by
themselves (up to around 1 year) should, for orthopedic
and safety reasons, always be transported in the flattest
recline position rearward-facing.
CLICK!
IST IHR KIND RICHTIG GESICHERT?
Um die bestmögliche Sicherheit Ihres Kindes zu
gewährleisten, prüfen Sie bitte immer vor Beginn der
Fahrt, ob…
• die ISOFIX- Konnektoren ordnungsgemäß mit dem
Fahrzeug verbunden sind und der Stützfuß korrekt
installiert wurde.
• die Sitzschale in korrekter Position eingerastet ist.
• die Position der Kopfstütze ordnungsgemäß eingestellt
wurde.
• bei rückwärtsgerichteter Verwendung das 5-Punkt-
Gurtsystem an die Körpergröße Ihres Kindes angepasst
wurde, die Schultergurte nicht verdreht sind und das
Gurtsystem geschlossen ist.
• bei vorwärtsgerichteter Verwendung der Fangkörper
an die Körpergröße Ihres Kindes angepasst wurde und
niedrig an der Hüfte anliegt.
• Neugeborene und Kleinkinder, die noch nicht
selbstständig sitzen können (bis ca. 1 Jahr), sollten aus
orthopädischen und sicherheitstechnischen Gründen
immer in der flachsten Liegeposition rückwärtsgerichtet
transportiert werden.
54 55
AVETE ALLACCIATO CORRETTAMENTE IL VOSTRO
BAMBINO?
Per garantire massima sicurezza per il vostro bambino
controllare i seguenti punti:
• I correttori ISOFIX sono stati fissati correttamente
al veicolo e il piede di supporto
correttamente.
• La scocca del seggiolino è stata bloccata nella
posizione corretta.
• Il poggiatesta è stato regolato alla giusta altezza.
è stato montato
• In caso di uso contro il senso di marcia: Il sistema di
cinture a 5 punti è stato adattato correttamente all'altezza
del bambino, le cinture delle spalle non sono attorcigliate
e il sistema di cinture è stato agganciato e sedersi
lentamente sul bacino.
• In caso di uso nel senso di marcia: la protezione antiurto
è stata adattata correttamente all'altezza del bambino.
• Neonati e bambini che non sono ancora in grado di
sedersi da soli (fino all'incirca all'età di un anno) per
motivi ortopedici e di sicurezza dovrebbero essere
sempre trasportati contro il senso di marcia con la
maggiore inclinazione possibile.
DEENIT
Page 29

ENTFERNEN DES BEZUGES
Entfernen
Der Bezug am Kindersitz besteht aus 7 Teilen
(Gurtpolster, Kopfstützenbezug, Hauptbezug, Fangkörper-
23
Bezug). Die Sitzbezüge sind in den am Rand des
26
56 57
Kindersitzes verlaufenden Bezugführungen versenkt und/
oder an mehreren Stellen mit Druckknöpfen am Kindersitz
befestigt. Sobald Sie alle Befestigungen lösen, können die
Einzelteile aus den Bezugführungen gezogen werden.
WARNUNG! Der Kindersitz darf keinesfalls ohne
!
Bezug verwendet werden.
ENTFERNEN DER GURTPOLSTER
Önen Sie das Gurtschloss (26) des 5-Punkt
Gurtsystems und entfernen Sie die Gurtpolster
nach Önen der Druckknöpfe. Fädeln Sie nun die
Schultergurte (23) aus dem Bezug.
ENTFERNEN DES BEZUGS VON DER KOPFSTÜTZE
Ziehen Sie den Bezug nach vorne über die Kopfstütze ab.
ENTFERNEN DES HAUPTBEZUGS
Önen Sie den Reißverschluss auf der Rückseite des
Sitzes und ziehen Sie den Bezug nach vorne über die
Kopfstütze ab.
ENTFERNEN DES BEZUGS VOM FANGKÖRPER
Önen Sie den Reißverschluss auf der Vorderseite und
ziehen Sie den Bezug nach hinten von dem Fangkörper ab.
Anbringen
Führen Sie die zuvor beschriebenen Handgrie in
umgekehrter Reihenfolge aus, um den Bezug wieder zu
befestigen.
REMOVING THE COVER
Removal
The cover of the car seat consists of 7 parts (belt pads,
headrest cover, main seat cover, impact shield cover).
The covers are tted into the cover attachment channels
on the edge of the car seat and are held in position at
several places by press-studs. Once all studs have been
released, the single parts of the cover can be removed
from the cover attachment channels.
WARNING! The car seat must never be used
!
without the cover.
REMOVING THE BELT PADS
Open the belt buckle (26) of the 5-point belt system and
open the snap buttons to remove the belt pads. Now you
thread the shoulder belts (23) out of the cover.
REMOVING THE COVER FROM THE HEADREST
Pull the cover from back to front over the headrest.
REMOVING THE MAIN SEAT COVER
Open the zipper at the back of the seat and pull the cover
from back to front over the headrest.
REMOVING THE COVER FROM THE IMPACT SHIELD
Open the zipper on the front side and pull the cover
backwards from the impact shield.
Attaching
In order to put the covers back onto the car seat, proceed
in the reverse order as shown before.
RIMOZIONE DEI RIVESTIMENTI
Rimozione
Il rivestimento del seggiolino auto è composto da 7
elementi (cuscinetti delle cinture, rivestimento poggiatesta,
rivestimento sedile principale, rivestimento protezione
antiurto). I rivestimenti vengono inseriti negli appositi
canali di montaggio posti sul bordo del seggiolino auto e
sono ssati in diversi punti con bottoni a pressione. Una
volta rimossi tutti i bottoni, è possibile staccare i singoli
elementi del rivestimento dai relativi canali di montaggio.
AVVERTIMENTO! Non usare mai il seggiolino auto
!
senza i rivestimenti.
RIMOZIONE DEI CUSCINETTI DELLE CINTURE
Per rimuovere i cuscinetti delle cinture aprire la bbia
della cintura (26) del sistema di cinture a 5 punti e i
bottoni a pressione. Ora slare le cinture per le spalle
(23) dal rivestimento.
RIMOZIONE DEL RIVESTIMENTO DEL POGGIATESTA
Slare il rivestimento dal poggiatesta procedendo dal lato
posteriore a quello anteriore.
RIMOZIONE DEL RIVESTIMENTO DELLA BASE
Aprire la cerniera sul retro del seggiolino e slare
il rivestimento dal poggiatesta procedendo dal lato
posteriore a quello anteriore.
RIMOZIONE DEL RIVESTIMENTO DELLA
PROTEZIONE ANTIURTO
Aprire la cerniera sul lato anteriore e slare il rivestimento
della protezione antiurto tirandola all'indietro.
Montaggio
Per riapplicare i rivestimenti del seggiolino auto, procedere
nella sequenza inversa a quella mostrata precedentemente.
DEENIT
Page 30

REINIGUNG
Es ist darauf zu achten, dass nur ein original Sitzbezug
verwendet wird, da auch der Bezug ein wesentlicher
Bestandteil der Funktion ist. Ersatzbezüge erhalten Sie
im Fachhandel.
WARNUNG! Der Bezug darf bei 30°C im Schon-
!
waschgang gewaschen werden. Sollten Sie mit
mehr als 30°C waschen, kann es zu Ausfärbungen
kommen. Bitte den Bezug gesondert von anderer
Wäsche waschen und keinesfalls maschinell
trocknen! Den Bezug keinesfalls in der prallen
Sonne trocknen! Die Kunststoteile können mit
einem milden Reinigungsmittel und warmen Wasser
gewaschen werden.
WARNUNG! Bitte auf keinen Fall chemische Reini-
!
gungs- oder Bleichmittel verwenden!
CLEANING
It is important to use an original seat cover only since the
cover is an essential part of the function. You may obtain
spare covers at your retailer.
WARNING! Please wash the cover before you use it
!
the rst time. Seat covers are machine washable at
max. 30°C on delicate cycle. If you wash it at higher
temperature, the cover fabric may lose colour.
Please wash the cover separately and never dry it
mechanically! Do not dry the cover in direct sunlight!
You can clean the plastic parts with a mild detergent
and warm water.
WARNING! Please do not use chemical detergents
!
or bleaching agents under any circumstances!
PULIZIA
È importante che vengano usati solo i rivestimenti
originali del seggiolino perché questi contribuiscono in
modo essenziale al suo corretto funzionamento. Presso i
rivenditori sono reperibili rivestimenti di ricambio.
AVVERTIMENTO! Lavare i rivestimenti prima di
!
usarli la prima volta. I rivestimenti del seggiolino
possono essere lavati in lavatrice a max. 30 °C
con programma di lavaggio per delicati. Lavandoli
a temperature superiori il tessuto può scolorirsi.
Lavare i rivestimenti separatamente e non asciugare mai meccanicamente! Non far asciugare i
rivestimenti esponendoli alla luce diretta del sole!
Gli elementi in plastica possono essere puliti con un
detergente delicato e acqua calda.
AVVERTIMENTO! Non usare in nessun caso
!
detergenti chimici o agenti sbiancanti!
DEENIT
58
59
Page 31

PFLEGE
Um die größtmögliche Schutzwirkung Ihres Kindersitzes
zu gewährleisten, ist es unbedingt notwendig, dass Sie
Folgendes beachten:
• Alle wichtigen Teile des Kindersitzes sollten
regelmäßig auf Beschädigungen kontrolliert werden.
Die mechanischen Bauteile müssen einwandfrei
funktionieren.
• Es ist unbedingt notwendig darauf zu achten, dass der
Kindersitz nicht zwischen harten Teilen wie Fahrzeugtür,
Sitzschiene usw. eingeklemmt wird und dadurch
beschädigt werden könnte.
• Achten Sie darauf, dass kein Schmutz in den Spalt
zwischen Sitz und Basis gelangt. Dies kann die
Funktionalität des Arretierungsmechanismus negativ
beeinussen. Sollte dies dennoch vorkommen sollte der
Schmutz entfernt werden.
• Der Kindersitz muss nach einem Sturz, Unfall oder
einer anderen Form der direkten Beeinträchtigung
unbedingt vom Hersteller überprüft werden.
WARNUNG! Der Bezug ist integraler Bestandteil
!
des Kindersitz-Sicherheitskonzeptes. Der Kindersitz
darf aus diesem Grund keinesfalls ohne Bezug
oder mit dem Bezug eines anderen Kindersitzes
verwendet werden.
CLEANING
To guarantee that your car seat provides the maximum
protection, it is essential to comply with the following points:
• All major components of the car seat must be regularly
checked for damage. The mechanical parts must work
without problems.
• Make sure that the car seat is not jammed between
hard parts such as the car door, seat rails etc., which
can damage it.
• Avoid getting any dirt or sand in between the upper seat
shell and the base. This can have a negative impact
on the performance of the rotation and recline function.
Should this happen, the dirt should be removed before
rotating and reclining the seat any further to avoid any
permanent damage of the seat.
• If e.g. the car seat is dropped, it must be tested by the
manufacturer before being used again.
WARNING! The cover is an integral component
!
of the car seat‘s safety design. The car seat must
therefore never be used without the cover or with a
cover of a dierent car seat.
PULIZIA
Per poter godere della massima protezione del seggiolino
auto è essenziale rispettare i punti seguenti:
• Controllare periodicamente tutti i componenti più
importanti del seggiolino auto per escludere la presenza
di danni. Gli elementi meccanici devono funzionare in
modo impeccabile.
• Accertarsi che il seggiolino auto non venga incastrato
tra oggetti duri come la portiera del veicolo, le guide dei
sedili, ecc. in quanto ciò potrebbe danneggiarlo.
• Evitare che sporco o sabbia penetri tra la scocca
superiore del seggiolino e la base. Ciò può avere
un impatto negativo sulla funzione di rotazione e di
inclinazione. Se ciò si verica rimuovere lo sporco
prima di ruotare e reclinare ulteriormente il seggiolino
per evitare che quest'ultimo subisca danni permanenti.
• Se ad es. il seggiolino auto cade, farlo controllare dal
costruttore prima di riusarlo.
AVVERTIMENTO! I rivestimenti sono parte
!
integrante del concetto di sicurezza del seggiolino
auto. Perciò non usare mai il seggiolino auto senza
i rivestimenti o con rivestimenti di un seggiolino auto
diverso.
DEENIT
60
61
Page 32

37
VERHALTEN NACH EINEM UNFALL
WARNUNG! Aufgrund eines Unfalls können am
!
Kindersitz Beschädigungen auftreten, die mit
bloßem Auge nicht erkennbar sind. Bitte tauschen
Sie nach einem Unfall unbedingt den Sitz aus.
WARNUNG! Der Sitz verfügt über ein integriertes
!
Sicherheitssystem (37), das im Falle eines Unfalls
bei bestimmter Krafteinwirkung automatisch aktiviert
wird.
WHAT TO DO AFTER AN ACCIDENT
WARNING! An accident may cause damage to the
!
car seat that is not visible to the naked eye. Please
exchange the seat without fail after an accident.
WARNING! The car seat is equipped with an
!
integrated safety system (37) which will fold out
automatically in case of an accident under certain
load.
COSA FARE DOPO UN INCIDENTE
AVVERTIMENTO! Un incidente può danneggiare il
!
seggiolino auto in modo non visibile ad occhio nudo.
Sostituire in ogni caso il seggiolino dopo un incidente.
AVVERTIMENTO! Il seggiolino auto è equipaggiato
!
con un sistema di sicurezza (37) integrato che si
aprirà automaticamente in caso di incidente di una
certa gravità.
DEENIT
PRODUKTINFORMATION
Bei Fragen wenden Sie sich zuerst an Ihren Händler.
Folgende Angaben sollten Ihnen vorliegen:
• Seriennummer (siehe Aufkleber)
• Marke und Typ des Autos und die Position des Sitzes,
auf dem der Kindersitz benutzt wird
• Gewicht, Alter und Größe des Kindes
Weitere Informationen zu unseren Produkten nden Sie
auch unter www.cybex-online.com.
62
PRODUCT INFORMATION
If you have any questions contact your retailer rst. You
should have the following details ready:
• Serial number (see sticker)
• Make and model of the vehicle and the position of the
vehicle seat on which the car seat is used
• Weight, age and height of the child
Further information about our products can be found at
www.cybex-online.com.
INFORMAZIONI SUL PRODOTTO
Per qualsiasi domanda rivolgersi in primo luogo al
rivenditore. Tenere a portata di mano i seguenti dettagli:
• Numero di serie (vedi adesivo)
• Tipo e modello del veicolo e la posizione del sedile del
veicolo su cui il seggiolino auto viene usato
• Peso, età e altezza del bambino
Per ulteriori informazioni sui nostri prodotti consultare il
sito web www.cybex-online.com.
63
Page 33

PRODUKTLEBENSDAUER
Der Kindersitz ist so ausgelegt, dass er für den gesamten
Verwendungszeitraum von ca. 4 Jahren seine Eigenschaften erfüllt. Da jedoch in Fahrzeugen sehr große Temperaturschwankungen und unvorhersehbare Belastungen auftreten
können, ist es notwendig, folgende Punkte zu beachten:
• Wenn das Fahrzeug längere Zeit der prallen Sonne ausgesetzt ist, muss der Kindersitz aus dem Fahrzeug entfernt
werden oder mit einem hellen Tuch abgedeckt werden.
• Prüfen Sie regelmäßig alle Kunststo- und Metallteile des
Sitzes auf Beschädigung oder Veränderung von Form
oder Farbe. Stellen Sie eine Veränderung fest, ist der
Kindersitz unbedingt zu entsorgen oder er muss vom Hersteller geprüft und gegebenenfalls ausgetauscht werden.
• Veränderungen des Stoes, insbesondere das Ausblei-
chen, sind bei Verwendung in einem Fahrzeug normal und
stellen keine Beeinträchtigung dar.
ENTSORGUNG
Aus Umweltschutzgründen bitten wir den Benutzer zu Beginn (Verpackung) und am Ende (Produktteile) der Lebensdauer des Kindersitzes, den anfallenden Abfall zu trennen
und zu entsorgen. Die Abfallentsorgung kann kommunal
unterschiedlich geregelt sein. Um eine vorschriftsmäßige
Entsorgung des Kindersitzes zu gewährleisten, setzen Sie
sich mit Ihrer kommunalen Abfallentsorgung bzw. Verwaltung lhres Wohnortes in Verbindung. Beachten Sie auf jeden
Fall die Entsorgungsbestimmungen lhres Landes.
WARNUNG! Bewahren Sie Verpackungsmaterial
!
aus Kunststo außer Reichweite Ihres Kindes auf,
da Erstickungsgefahr besteht!
64
PRODUCT DURABILITY
The car seat is designed to meet its specications for
the entire service life of approximately 4 years. However,
as there can be very large temperature uctuations and
unpredictable strains in vehicles, the following points must
be observed:
• If the vehicle is directly exposed to sunlight for a longer
time, the child car seat must be removed from the vehicle
or covered with a light cloth.
• Regularly check all plastic and metal parts of the seat for
damage, deformation or change of colour. If you discover
any changes, the car seat must be disposed or checked
and possibly replaced by the manufacturer.
• Changes to fabric, especially bleaching, are perfectly
normal when used in a vehicle and do not impair the
seat’s function.
DISPOSAL
To protect the environment we ask the user to separate and
dispose the waste arising at the start (packaging) and the
end (product parts) of the car seat’s lifespan. Waste removal
is arranged dierently depending on the local authorities.
In order to ensure that the car seat is disposed o in accor-
dance with regulations, contact your area’s waste removal
agency or local authority. Always observe your country’s
waste disposal regulations.
WARNING! Keep plastic packaging material out of
!
your child’s reach: danger of suocation!
DURATA DEL PRODOTTO
Il seggiolino auto è concepito in modo che possa soddisfare
le speciche per l'intera vita del prodotto di circa 4 anni. Tuttavia, poiché i veicoli possono subire grandi sbalzi di tempe-
ratura e sollecitazioni impreviste, osservare i seguenti punti:
• Se il veicolo è esposto alla luce diretta del sole per un
lungo periodo di tempo, rimuovere il seggiolino auto dal
veicolo o coprirlo con un telo leggero.
• Controllare periodicamente tutti gli elementi di plastica e
di metallo del seggiolino per individuare eventuali danni,
deformazioni o cambiamenti di colore. Se vengono riscontrati dei cambiamenti, smaltire il seggiolino auto o farlo
controllare ed eventualmente sostituire dal costruttore.
• Cambiamenti del tessuto, in particolare scolorimento, sono
del tutto normali in caso di uso del seggiolino in un veicolo
e non ne compromettono il funzionamento.
SMALTIMENTO
A tutela dell'ambiente, l'utente è pregato di smaltire separa-
tamente i riuti che si vengono a formare all'inizio (imballo) e
alla ne (elementi del prodotto) del ciclo di vita del seggiolino
auto. La raccolta dei riuti è organizzata in modo diverso in
base alle prescrizioni delle autorità locali. Per esser certi di
smaltire il seggiolino auto in modo conforme ai regolamenti,
contattare l'ente competente della vostra regione o le autorità locali. Rispettare sempre le normative sullo smaltimento
dei riuti del proprio Paese.
AVVERTIMENTO! Tenere il materiale di imbal-
!
laggio in plastica fuori della portata dei bambini:
pericolo di soocamento!
DEENIT
65
Page 34

GARANTIEBESTIMMUNGEN
Die nachfolgenden Garantiebestimmungen gelten nur
in dem Land, in dem dieses Produkt erstmalig über den
Einzelhandel an einen Verbraucher verkauft wurde.
1. Die Garantie deckt sämtliche Herstellungs- und Materialfehler
ab, die im Zeitpunkt des Kaufs bestanden haben oder die
innerhalb von drei (3) Jahren nach dem Erstverkauf dieses
Produkts über den Einzelhandel an einen Verbraucher
in Erscheinung getreten sind (Herstellergarantie). Bitte
überprüfen Sie das Produkt nach dem Kauf oder wenn es
im Versandhandel gekauft wurde nach Erhalt umgehend auf
Vollständigkeit, Herstellungs- und Materialfehler.
2. Falls Schäden vorhanden sind, darf das Produkt nicht mehr benutzt
werden. Um Leistungen im Rahmen dieser Garantie in Anspruch
nehmen zu können, muss das Produkt in einem vollständigen und
sauberen Zustand an den Einzelhändler zurückgegeben werden,
der es erstmalig verkauft hat und ein Nachweis über den Kauf
(Kaufbeleg oder Rechnung) im Original vorgelegt werden. Bitte
bringen oder schicken Sie das Produkt nicht direkt zum Hersteller!
3. Die Garantie deckt keine Schäden ab, die durch Fehlgebrauch,
äußere Einüsse (Wasser, Feuer, Unfälle o.ä.), normalen
Verschleiß oder durch Behandlung und Benutzung
entstanden sind, die im Gegensatz zu den Instruktionen dieser
Gebrauchsanweisung stehen. Die Garantie wird nur gewährt,
wenn Reparaturen oder Veränderungen ausschließlich durch
Personen vorgenommen wurden, die hierzu befugt waren und
stets nur originale Bau- und Zubehörteile verwendet wurden.
4. Durch diese Garantie werden weder bestehende
Verbraucherrechte noch Rechte gegen den Verkäufer wegen
WARRANTY
The following warranty applies solely in the country where
this product was initially sold by a retailer to a customer.
1. The warranty covers all manufacturing and material
defects, existing and appearing, at the date of purchase
or appearing within a term of three (3) years from the
date of purchase from the retailer who initially sold
the product to a consumer (manufacturer’s warranty).
Please check the product with respect to completeness
and manufacturing or material defects immediately at
the date of purchase or immediately after receipt. Please
always keep your dated proof of purchase.
2. In case of a defect, stop using the product immediately.
To obtain the warranty please take or ship the product to
the original retailer, who initially sold this product to you
in a clean and complete condition and submit an original
proof of purchase (sales receipt or invoice). Please do
not take or ship the product to the manufacturer directly.
3. This warranty does not cover any damages which
result from misuse, environmental inuence (water, re,
accidents etc.), normal wear and tear or failure to comply
with the instructions provided in this user manual. The
warranty does not apply if modications and services
were performed by unauthorized persons or if nonoriginal components and accessories were used.
4. This warranty does not aect any statutory consumer
rights, including claims in tort and claims with respect to
a breach of contract, which the buyer may have against
the seller or the manufacturer of the product.
Vertragswidrigkeit des Produkts beeinusst.
66
GARANZIA
La seguente garanzia vale esclusivamente nel Paese
in cui il prodotto è stato inizialmente venduto da un
rivenditore a un cliente.
1. La garanzia copre tutti i difetti di materiale e di
produzione, riscontrati in data di acquisto o entro un
limite di tre (3) anni dalla data di acquisto presso il
rivenditore che inizialmente ha venduto il prodotto a
un consumatore (garanzia del costruttore). Controllare
immediatamente che il prodotto sia completo e che non
presenti difetti di materiale o di produzione al momento
dell'acquisto o subito dopo la consegna. Conservare
sempre la prova di acquisto provvista di data.
2. In caso di difetti non usare più il prodotto. Per far valere
i diritti di garanzia portare o spedire il prodotto pulito
e completo al rivenditore originario che inizialmente vi
ha venduto il prodotto e allegare una prova d'acquisto
originale (scontrino scale o fattura). Non portare o
spedire il prodotto direttamente al costruttore.
3. Questa garanzia non copre danni derivanti da uso
improprio, fattori di inuenza ambientali (acqua, fuoco,
incidenti, ecc.), usura e logoramento normali o mancato
rispetto delle istruzioni fornite in questo manuale utente.
La garanzia decade se sono state eseguite modiche e
riparazioni da persone non autorizzate o se sono stati
usati componenti e accessori non originali.
4. Questa garanzia non intacca diritti del consumatore
stabiliti per legge, inclusi reclami in torto e reclami per
infrazione di contratto che l‘acquirente possa avere nei
confronti del venditore o del costruttore del prodotto.
DEENIT
67
Page 35

SIRONA Q I-SIZE
SIRONA Q i-Size
i-Size Universal ISOFIX
45-105cm
max. 18 kg
1
129 - 010014
UN Regulation
No. 129/01
CYBEX GmbH
Riedingerstr. 18, 95448 Bayreuth
Germany
68 69
HOMOLOGATION
CYBEX Sirona Q i-Size –
ECE R 129
Taille : 45-105 cm
Poids : jusqu’à 18 kg
HOMOLOGATIE
CYBEX Sirona Q i-Size –
ECE R 129
Maat: 45 - 105 cm
Gewicht: tot max. 18 kg
HOMOLOGACJA
CYBEX Sirona Q i-Size –
ECE R 129
Rozmiar: 45–105 cm
Masa ciała: do 18 kg
CHER CLIENT
Nous vous remercions d’avoir acheté le Sirona Q i-Size.
Lors du processus de développement du siège-auto,
nous assurons avoir mis l’accent sur la sécurité, le
confort et la facilité d’emploi. Le produit a été fabriqué
sous une surveillance particulière de la qualité et répond
aux exigences de sécurité les plus sévères.
AVERTISSEMENT !
!
vous devez utiliser et installer le siège-auto confor-
mément aux instructions indiquées par ce manuel. Il
est interdit de modier le siège.
AVERTISSEMENT !
!
à la route avant les 15 mois du bébé, ni avant qu’il ait
atteint la taille de 76 cm.
REMARQUE ! Veuillez toujours conserver le manuel
d’instruction prêt à l’emploi et le ranger dans la poche
prévue à cet eet à l’arrière du siège.
REMARQUE ! L’insert nouveau-né protège votre enfant.
Vous devez l’utiliser jusqu’à ce que l’enfant ait atteint 60 cm.
REMARQUE ! Les caractéristiques du produit peuvent
varier en fonction des normes locales.
Pour protéger votre enfant,
N’utilisez pas la position face
GEACHTE KLANT,
Hartelijk dank voor uw aankoop van de Sirona Q
i-Size. Bij de ontwikkeling van het autozitje is speciaal
gelet op veiligheid, comfort en gebruiksvriendelijkheid.
Bij de vervaardiging van het product zijn speciale
kwaliteitscontroles uitgevoerd. Het voldoet aan de
strengste veiligheidseisen.
WAARSCHUWING!
!
autozitje volgens de in deze handleiding gegeven
instructies om uw kind optimale veiligheid te bieden.
Aanpassingen van het zitje zijn niet toegestaan.
WAARSCHUWING!
!
voorwaartse stand als het kind 15 maanden oud is
en een lengte van 76 cm heeft bereikt.
LET OP! Houd de handleiding altijd bij de hand door het
boekje aan de achterkant van het zitje in de hiervoor
bedoelde bewaarplek te bewaren.
LET OP! De stoelverkleiner beschermt uw pasgeboren
baby. Gebruik hem tot de baby een lengte van 60 cm
heeft bereikt.
LET OP! Op grond van culturele verschillen en andere
normering kan het product regionaal anders zijn uitgevoerd.
Gebruik en installeer het
Zet het autozitje pas in de
SZANOWNI KLIENCI,
serdeczne dziękujemy za zakup fotelika Sirona Q i-Size.
Zapewniamy, że projektując go mieliśmy na uwadze
bezpieczeństwo, komfort i wygodę obsługi. Produkt
został wyprodukowany pod ścisłym nadzorem i spełnia
najsurowsze wymogi bezpieczeństwa.
OSTRZEŻENIE!
!
ochrony Twojego dziecka, niezwykle ważne jest, aby
fotelik został zamontowany zgodnie z zaleceniami
niniejszej instrukcji. Zabrania się wprowadzania
jakichkolwiek zmian w foteliku.
OSTRZEŻENIE!
!
skierowanej przodem do kierunku jazdy przed
ukończeniem przez dziecko 15 miesięcy oraz zanim
dziecko osiągnie wzrost 76 cm.
WSKAZÓWKA! Zawsze miej instrukcję pod ręką i
przechowuj ją w specjalnej kieszeni z tyłu fotelika.
WSKAZÓWKA! Wkładka dla noworodka chroni Twoje
dziecko. Należy ją stosować, dopóki dziecko nie osiągnie
wzrostu 60 cm.
WSKAZÓWKA! Szczegółowe wykonanie produktu może
się różnić w zależności od przepisów lokalnych.
Dla zapewnienia prawidłowej
Nie używaj fotelika w pozycji
FRNLPL
Page 36

SOMMAIRE INHOUD SPIS TREŚCIFR
NL
PL
HOMOLOGATION ...................................................................................................70
PREMIERE INSTALLATION ..................................................................................74
PROTECTION DU VEHICULE .............................................................................74
BONNE POSITION DANS LE VEHICULE .........................................................76
SECURITE DANS LE VEHICULE ........................................................................80
UTILISATION DU SIEGE DANS LA VOITURE .................................................82
INSTALLATION DU SIEGE-AUTO DANS LE VEHICULE ..............................86
REGLAGE DE LA JAMBE DE FORCE ...............................................................90
DESINSTALLATION DU SIEGE-AUTO DU VEHICULE..................................90
REGLAGE DES PROTECTIONS LATERALES ................................................92
REGLAGE DE L’ASSISE ET DE L’INCLINAISON ............................................94
ROTATION A 360° ....................................................................................................96
UTILISATION DOS A LA ROUTE (45 CM - 105 CM) .......................................100
REGLAGE A LA TAILLE DE L’ENFANT .............................................................102
ATTACHE AVEC LE SYSTEME DE HARNAIS ...............................................106
CHANGEMENT DE L’UTILISATION DOS A LA ROUTE -
A LA POSITION FACE A LA ROUTE..................................................................108
UTILISATION FACE A LA ROUTE (76 CM - 105 CM) ..................................... 11 2
REGLAGE DU BOUCLIER D’IMPACT ..............................................................11 4
ATTACHE AVEC LE BOUCLIER D’IMPACT ....................................................116
VOTRE ENFANT EST-IL BIEN ATTACHE ? ..................................................... 118
ENLEVEMENT DU REVETEMENT ...................................................................120
NETTOYAGE ..........................................................................................................122
QUE FAIRE APRES UN ACCIDENT..................................................................126
INFORMATION SUR LE PRODUIT ...................................................................126
DURABILITE DU PRODUIT ................................................................................128
ÉLIMINATION .........................................................................................................128
GARANTIE ..............................................................................................................130
70 71
HOMOLOGATIE .......................................................................................................70
EERSTE PLAATSING .............................................................................................75
BESCHERM UW AUTO ..........................................................................................75
CORRECTE POSITIE IN HET VOERTUIG........................................................77
VEILIGHEID IN HET VOERTUIG .........................................................................81
GEBRUIK IN DE STOEL IN DE AUTO ................................................................ 83
INSTALLEREN VAN HET AUTOZITJE IN HET VOERTUIG ..........................87
STEUNPOOT INSTELLEN ....................................................................................91
HET AUTOZITJE UIT HET VOERTUIG VERWIJDEREN ...............................91
VERSTELLEN VAN DE ZIJBESCHERMERS ...................................................93
VERSTELLEN VOOR ZITTEN EN LIGGEN ......................................................95
360° ROTATIE ........................................................................................................... 97
ACHTERWAARTS GERICHT GEBRUIK (45 CM - 105 CM) .........................101
AFREGELEN OP DE LICHAAMSLENGTE......................................................103
VASTZETTEN MET HET HARNAS-SYSTEEM .............................................107
OMZETTEN VAN ACHTERWAARTS NAAR VOORWAARTS GERICHT
GEBRUIK ................................................................................................................109
VOORWAARTS GERICHT GEBRUIK (76 CM - 105 CM) .............................. 113
HET AANPASSEN VAN HET IMPACTSCHILD ............................................... 115
VASTZETTEN MET HET IMPACTSCHILD ...................................................... 117
ZIT UW KIND VEILIG VAST? ..............................................................................119
DE HOES VERWIJDEREN ..................................................................................121
REINIGEN ...............................................................................................................123
WAT TE DOEN NA EEN ONGEVAL ...................................................................127
PRODUCTINFORMATIE......................................................................................127
DUURZAAMHEID VAN HET PRODUCT ..........................................................129
AFVOEREN .............................................................................................................129
GARANTIE ..............................................................................................................131
HOMOLOGACJA .....................................................................................................70
PIERWSZY MONTAŻ ..............................................................................................75
ZABEZPIECZENIE POJAZDU ..............................................................................75
PRAWIDŁOWA POZYCJA W POJEŹDZIE ........................................................77
BEZPIECZEŃSTWO W POJEŹDZIE ..................................................................81
KORZYSTANIE Z FOTELIKA W SAMOCHODZIE ........................................... 83
MONTAŻ FOTELIKA W POJEŹDZIE ..................................................................87
REGULACJA PODPORY ....................................................................................... 91
DEMONTAŻ FOTELIKA Z POJAZDU..................................................................91
REGULACJA PODPÓR BOCZNYCH .................................................................93
REGULACJA POZYCJI SIEDZĄCEJ I LEŻĄCEJ .............................................95
OBRÓ T O 360°..........................................................................................................97
TYŁEM DO KIERUNKU JAZDY (45 CM–105 CM) ..........................................101
DOSTOSOWANIE DO ROZMIARU CIAŁA ......................................................103
PRZYPINANIE DZIECKA .....................................................................................107
PRZESTAWIANIE Z POZYCJI „TYŁEM DO KIERUNKU JAZDY”
NA „PRZODEM DO KIERUNKU JAZDY” ..........................................................109
PRZODEM DO KIERUNKU JAZDY (76 CM - 105 CM) ..................................11 3
REGULACJA OSŁONY OCHRONNEJ ............................................................. 115
PRZYPINANIE DZIECKA Z OSŁONĄ OCHRONNĄ ......................................117
CZY TWOJE DZIECKO JEST PRAWIDŁOWO ZAPIĘTE? ..........................11 9
DEMONTAŻ OBICIA..............................................................................................121
CZYSZCZENIE .......................................................................................................123
CO ZROBIĆ PO WYPADKU ................................................................................127
INFORMACJE O PRODUKCIE ..........................................................................127
TRWAŁOŚĆ PRODUKTU ....................................................................................129
USUWANIE .............................................................................................................129
GWARANCJA .........................................................................................................131
FRNLPL
Page 37
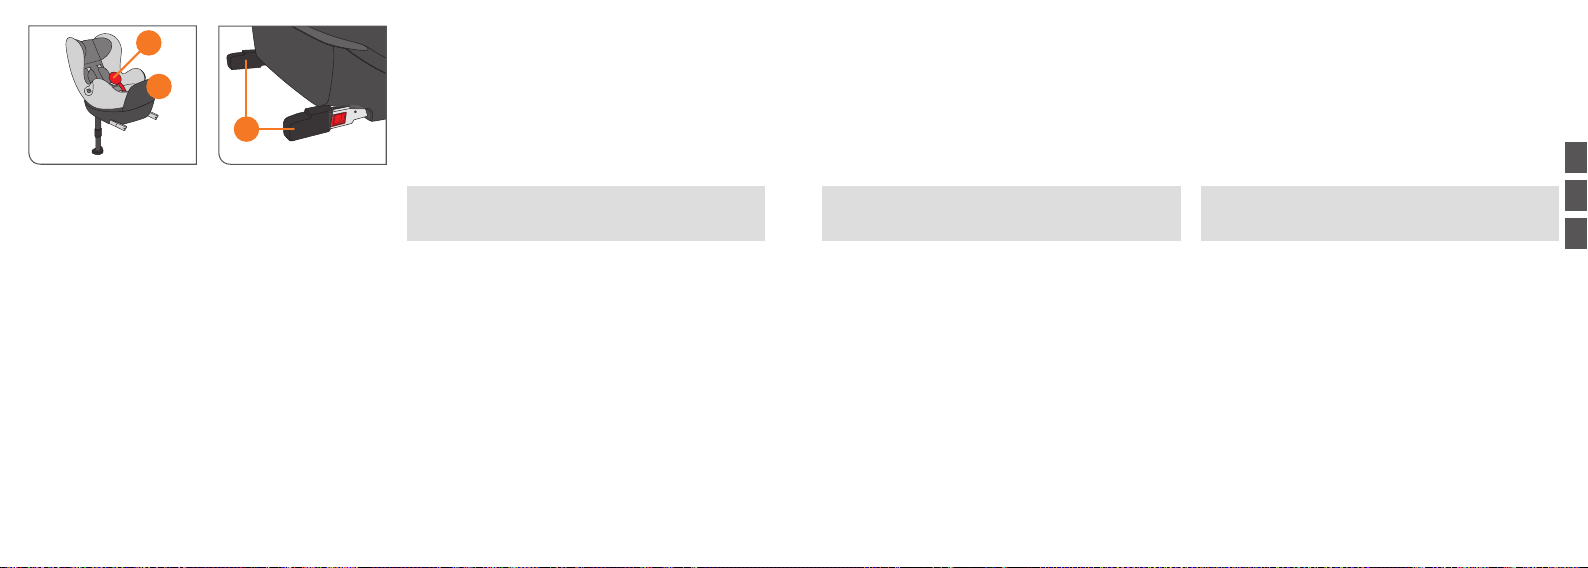
1
3
2
PREMIERE INSTALLATION
REMARQUE ! Avant la première utilisation du siège, vous
devez enlever la protection de transport (1) et les capots
de protection (2). Enlevez le lm apposé avant la livraison
pour activer les fonctions de sécurité supplémentaires
du CYBEX SIRONA Q i-SIZE. Conservez les capots de
protection dans le sac de rangement fourni. Installez la
barre anti-rebond (3). Pour plus de détails, voir le point
« UTILISATION DOS A LA ROUTE
AVERTISSEMENT ! Ne pas utiliser le CYBEX
!
SIRONA Q i-SIZE tant que la protection de transport
(1) n’a pas été enlevée !
(45-105 cm)
».
EERSTE PLAATSING
LET OP! Als u het autozitje voor de eerste keer gebruikt,
moet u de transportbeveiliging (1) en de beschermhoezen
(2) verwijderen. Als de folie voor de levering wordt
verwijderd, activeert dit extra veiligheidsfuncties van de
CYBEX SIRONA Q i-SIZE. Bewaar de beschermhoezen in
de bijgeleverde bewaarzak. De rebound-beugel (3) moet
worden geplaatst. Zie voor meer informatie het gedeelte
„ACHTERWAARTS GERICHT GEBRUIK (45-105 cm)“.
WAARSCHUWING! CYBEX SIRONA Q i-SIZE mag
!
pas worden gebruikt nadat de transportbeveiliging (1)
is verwijderd!
PIERWSZY MONTAŻ
WSKAZÓWKA! Przed pierwszym użyciem fotelika wyjmij
zabezpieczenie transportowe (1) i pokrywki ochronne (2).
Zdjęcie folii założonej przed dostawą aktywuje dodatkowe
funkcje bezpieczeństwa fotelika CYBEX SIRONA Q
i-SIZE. Przechowuj pokrywki ochronne w dołączonej
torebce. Zamontuj osłonę odbojową (3). Więcej informacji
podano w rozdziale „FOTELIK SKIEROWANY DO TYŁU
(45-105 cm)
“.
OSTRZEŻENIE! Nie wolno używać fotelik CYBEX
!
SIRONA Q i-SIZE, dopóki nie zostanie wymontowane zabezpieczenie transportowe (1)!
FRNLPL
PROTECTION DU VEHICULE
Des traces d’usure et/ou des décolorations peuvent
apparaître sur certains sièges-auto faits en matériaux
sensibles (p.ex. en velours, cuir, etc.) lorsque les sièges-
auto sont utilisés. Vous pouvez éviter ces phénomènes
en plaçant une couverture ou une serviette, p.ex., sous le
siège-auto. Voir également les instructions de nettoyage
à ce sujet. Vous devez les suivre avant la première
utilisation du siège-auto.
72 73
72
BESCHERM UW AUTO
Er kunnen gebruikssporen en/of verkleuringen
achterblijven op autostoelen gemaakt van kwetsbare
materialen (bijv. velours, leer etc.) als hier autozitjes
op worden bevestigd. U kunt dit voorkomen door
bijvoorbeeld een deken of een handdoek onder het zitje
te leggen. Raadpleeg ook onze reinigingsinstructies
met tips. Als u deze van begin af aan opvolgt, blijven uw
stoelen lang mooi.
ZABEZPIECZENIE POJAZDU
Niektóre fotele samochodowe wykonane z wrażliwych
materiałów (np. welur, skóra itp.) mogą odbarwiać się
lub wykazywać ślady użytkowania po zamontowaniu
na nich fotelika samochodowego. Można temu
zapobiec podkładając np. ręcznik lub koc pod fotel.
Należy również wziąć pod uwagę nasze wskazówki
dotyczące czyszczenia. Zasadnicze znaczenie ma
ich przestrzeganie przed pierwszym użyciem fotelika
samochodowego.
Page 38

BONNE POSITION DANS LE VEHICULE
Ceci est un système de retenue pour enfant « i-Size ». Il
est homologué ECE R 129 pour une utilisation dans un
véhicule « compatible i-Size » dans les positions d’assise
indiquées par les fabricants du véhicule dans le manuel
d’utilisation du véhicule.
Si votre véhicule ne dispose pas de position d’assise
i-Size, veuillez consulter la liste de types de véhicules
fournie ou notre site internet pour vérier si l’installation
est autorisée.
Si votre véhicule n’est pas équipé du système ISOFIX,
veuillez consulter le fabricant du véhicule.
Dans certains cas exceptionnels, vous pouvez utiliser le
siège-auto sur le siège du passager avant. Dans ce cas,
veuillez noter les éléments suivants :
• Vériez si le siège du passager est équipé du système
ISOFIX. Si le siège n’est pas équipé du système
ISOFIX, nous ne devez pas utiliser le siège-auto.
• Désactivez l’airbag passager. Si cette action n’est pas
possible dans votre véhicule, il est interdit d’utiliser le
siège-auto côté passager.
• Vous devez absolument vous conformer aux
recommandations du fabricant du véhicule.
Les bagages et autres objets non xés dans le véhicule
pouvant provoquer des blessures en cas d’accident
doivent toujours être bloqués et sécurisés. Ils peuvent
se transformer en projectiles mortels en cas d’accident
CORRECTE POSITIE IN HET VOERTUIG
Dit is een „i-Size“ kinderbeveiligingssysteem. Het is ECE
R 129-goedgekeurd voor gebruik in „i-Size-compatibele“zitplaatsen in het voertuig, zoals aangegeven door de
fabrikant in de gebruikershandleiding van het voertuig.
Als het voertuig geen i-Size-zitplaatsen heeft, kijk dan in
de toegevoegde typelijst, of bijvoorbeeld op onze website,
of installatie in het voertuig toegestaan is.
Als uw auto niet met een ISOFIX-bevestiging is toegerust,
neem contact dan op met de fabrikant van het voertuig.
In uitzonderlijke gevallen kan het autozitje echter wel op
de voorste bijrijdersstoel worden gebruikt. Let in dit geval
op de volgende punten:
• Controleer of deze stoel misschien met ISOFIX is
uitgerust. Als er geen ISOFIX-bevestiging aanwezig is,
mag het autozitje niet worden gebruikt.
• Deactiveer de airbag van de passagiersstoel. Als dit
niet mogelijk is in uw voertuig, mag het autozitje niet op
de bijrijdersstoel worden gebruikt.
• Het is van levensbelang dat u de aanbevelingen van de
autofabrikant opvolgt.
Bagage en andere losse objecten in het voertuig die
verwondingen kunnen veroorzaken tijdens een ongeval,
moeten altijd veilig worden vastgezet. Deze kunnen
anders in dodelijke projectielen veranderen.
PRAWIDŁOWA POZYCJA W POJEŹDZIE
Jest to fotelik bezpieczeństwa typu „i-Size”. Jest
on zatwierdzony zgodnie z normą ECE R 129 do
użytkowania w siedzeniach „kompatybilnych z i-Size”,
zgodnie z informacjami zamieszczonymi w instrukcji
pojazdu przez jego producenta.
Jeżeli Twój pojazd nie ma siedzenia kompatybilnego
z i-Size, sprawdź na liście modeli pojazdów lub np. na
naszej stronie internetowej, czy montaż tego fotelika w
tym pojeździe jest dozwolony.
Jeżeli twój pojazd nie jest wyposażony w uchwyty
ISOFIX, skontaktuj się z jego producentem.
W wyjątkowych sytuacjach można jednak korzystać z
fotelika samochodowego na przednim fotelu. W takim
wypadku należy przestrzegać następujących punktów:
• Sprawdzić, czy fotel pasażera jest wyposażony w
uchwyty ISOFIX. Jeżeli pojazd nie jest wyposażony w
ISOFIX, nie można używać fotelika samochodowego.
• Wyłącz poduszkę powietrzną pasażera. Jeżeli w Twoim
pojeździe jest to niemożliwe, nie wolno używać fotelika
na fotelu pasażera.
• Bezwzględnie przestrzegaj zaleceń producenta
pojazdu.
Zabezpiecz w sposób niezawodny bagaż oraz inne
przedmioty, które mogłyby spowodować obrażenia
w razie wypadku. Podczas wypadku mogą one
przemieszczać się z dużą prędkością, raniąc pasażerów.
de voiture.
74 75
FRNLPL
Page 39

AVERTISSEMENT ! Ne laissez jamais un enfant
!
sans surveillance dans le véhicule. Les pièces
en plastique du système de retenue pour enfant
s’échauent au soleil et peuvent brûler l’enfant.
Protégez votre enfant et le siège-auto de l’exposition
directe au soleil (en les couvrant, p.ex., avec un habit
légèrement coloré).
AVERTISSEMENT ! Le siège-auto n’est pas adapté
!
pour être utilisé avec une ceinture de sécurité de
siège normale. Si le siège-auto n’est pas homologué
pour une ceinture de sécurité normale de véhicule, l’enfant et les autres occupants du véhicule
pourraient être blessés gravement ou tués en cas
d’accident.
AVERTISSEMENT ! Il est interdit d’utiliser le
!
siège-auto sur des sièges de véhicule installés à la
perpendiculaire du sens de la conduite. N’utilisez pas
le siège-auto sur des sièges le dos à la route, dans
un van ou un minibus, par exemple.
76 77
WAARSCHUWING! Laat uw kind nooit alleen
!
achter in het voertuig. De plastic onderdelen van
het kinderbeveiligingssysteem worden heet in de
zon, waardoor uw kind brandwonden kan oplopen.
Bescherm uw kind en het autozitje voor directe
blootstelling aan de zon (bijv. door ze af te dekken
met een doek in een lichte kleur).
WAARSCHUWING! Het autozitje is niet geschikt
!
voor gebruik met een normale autogordel. Als het
autozitje met de autogordel wordt bevestigd, kunnen
zowel het kind als andere passagiers ernstig gewond
raken en misschien zelfs gedood worden.
WAARSCHUWING! Het autozitje mag niet gebruikt
!
worden op voertuigstoelen die haaks op de rijrichting
zijn geplaatst. Het autozitje is niet geschikt voor gebruik op stoelen die naar achteren gericht zijn, zoals
bij een busje of een minibus.
OSTRZEŻENIE! Nigdy nie pozostawiaj dziecka w
!
pojeździe bez nadzoru. Elementy fotelika wykonane
z tworzywa sztucznego nagrzewają się na słońcu i
dziecko może doznać oparzeń. Chroń swoje dziecko
oraz fotelik przed bezpośrednim nasłonecznieniem
(np. osłaniając go tkaniną w jasnym kolorze).
OSTRZEŻENIE! Ten fotelik nie jest przeznaczony
!
do użycia z normalnymi samochodowymi pasami
bezpieczeństwa. Zamocowanie fotelika normalnymi
pasami bezpieczeństwa może w razie wypadku
spowodować poważne obrażenia, a nawet śmierć
dziecka lub innych osób w pojeździe.
OSTRZEŻENIE! Nie wolno używać fotelika w sied-
!
zeniach samochodowych, które są montowane pod
kątem prostym względem kierunku jazdy. Z fotelika
nie należy korzystać w siedzeniach skierowanych do
tyłu, np. w vanach lub minibusach.
FRNLPL
Page 40

SECURITE DANS LE VEHICULE
AVERTISSEMENT ! N’utilisez jamais le siège-auto
!
sur un siège de véhicule avec l’airbag avant activé.
Ceci ne vaut pas pour les airbags dits latéraux.
AVERTISSEMENT ! Le siège-auto doit toujours
!
être bloqué correctement dans le véhicule même
lorsque ce dernier n’est pas utilisé. En cas de
freinage d’urgence ou d’accident, les sièges-auto non
bloqués peuvent vous blesser ou d’autres passagers.
Pour garantir la meilleure sécurité possible pour tous les
passagers, assurez-vous que ...
• les dossiers repliables du véhicule sont bloqués en
position remontée.
• en cas d’installation du siège-auto sur le siège du
passager avant, réglez le siège du véhicule dans la
position la plus en arrière possible.
• vous avez bloqué tous les objets susceptibles de
provoquer des blessures en cas d’accident.
• tous les passagers du véhicule ont attaché leur
ceinture.
78 79
VEILIGHEID IN HET VOERTUIG
WAARSCHUWING! Gebruik het autozitje nooit
!
op een stoel in het voertuig waar zich een actieve
airbag voor bevindt. Dit is niet van toepassing op
zogenaamde zij-airbags.
WAARSCHUWING! Het autozitje moet altijd goed
!
worden bevestigd in het voertuig, ook als het niet
in gebruik is. Bij een noodstop of ongeval kan
een niet goed bevestigd autozitje uzelf of andere
passagiers verwonden.
Om de best mogelijke veiligheid voor alle passagiers te
waarborgen is het van belang dat u ervoor zorgt dat...
• omklapbare rugleuningen in het voertuig rechtop zijn
vastgezet.
• als u het autozitje op de voorste bijrijdersstoel bevestigt,
moet de stoel zo ver mogelijk naar achteren staan.
• zet alle voorwerpen die letsel kunnen veroorzaken goed
vast.
• alle passagiers de gordel dragen.
BEZPIECZEŃSTWO W POJEŹDZIE
OSTRZEŻENIE! Nigdy nie używać fotelika
!
dziecięcego w fotelu, w którym włączona jest
przednia poduszka powietrzna. Nie dotyczy to tzw.
bocznych poduszek powietrznych.
OSTRZEŻENIE! Podczas jazdy należy prawidłowo
!
zamocować fotelik, nawet gdy nikt w nim nie siedzi.
W razie hamowania awaryjnego lub wypadku, niez-
abezpieczony fotelik może spowodować obrażenia
innych pasażerów lub kierowcy.
Aby zagwarantować maksymalny poziom bezpieczeństwa
wszystkim osobom w pojeździe, upewnij się, że...
• składane oparcia w pojeździe są zablokowane w
pozycji pionowej.
• Podczas montowania fotelika na fotelu pasażera, ustaw
ten fotel w maksymalnie cofniętej pozycji.
• Dobrze zabezpiecz wszystkie przedmioty, które mogą
spowodować obrażenia podczas wypadku.
• Wszystkie osoby w pojeździe muszą mieć zapięte pasy.
FRNLPL
Page 41

UTILISATION DU SIEGE DANS LA VOITURE
Le siège-auto peut être utilisé pour une assise face à la
route ou dos à la route en fonction de l’âge et de la taille
de l’enfant.
REMARQUE ! Les statistiques d’accident attirent
l’attention sur le fait que le transport dos à la route est
le plus sûr pour votre enfant. C’est pourquoi nous vous
conseillons d’utiliser le siège-auto le plus longtemps
possible en position dos à la route.
AVERTISSEMENT ! La position dos à la route
!
est obligatoire jusqu’à l’âge de 15 mois et une
taille de 75 cm. Le transport dos à la route est le
plus sûr même au-delà de cette limite. Pour plus
d’informations, veuillez lire le point : « UTILISATION
DOS A LA ROUTE ».
GEBRUIK IN DE STOEL IN DE AUTO
Afhankelijk van leeftijd en lengte mag de autostoel in de
voor- en de achterwaartse stand worden gebruikt.
LET OP! Ongeval-statistieken bevestigen dat vervoer in
de achterwaarts gerichte stand, de veiligste manier is om
uw kind te vervoeren. Daarom raden we ook aan om het
zitje zo lang mogelijk in achterwaartse stand te gebruiken.
WAARSCHUWING! Het is verplicht om de ach-
!
terwaartse stand tot een leeftijd van 15 maanden
en een lengte van 75 cm te blijven gebruiken. En
ook hierna is vervoer in de achterwaartse stand het
veiligst. Lees voor meer informatie hierover: „ACHTERWAARTS GERICHT GEBRUIK“.
KORZYSTANIE Z FOTELIKA W SAMOCHODZIE
W zależności od wieku dziecka i rozmiaru samochodu,
fotelik może być ustawiony przodem lub tyłem do
kierunku jazdy.
WSKAZÓWKA! Według statystyk, podczas wypadku
najbezpieczniejszy jest transport dziecka tyłem do
kierunku jazdy. Dlatego zalecamy korzystanie z fotelika
jak najdłużej tyłem do kierunku jazdy.
OSTRZEŻENIE! Ustawienie tyłem do kierunku
!
jazdy jest obowiązkowe w wieku do 15 miesięcy
oraz do osiągnięcia wzrostu 75 cm. Nawet później
transport tyłem do kierunku jazdy jest najbezpieczniejszy. Więcej informacji podano w rozdziale:
„TYŁEM DO KIERUNKU JAZDY”.
FRNLPL
Utilisation dos à la route (45 cm - 105 cm)
Nous vous conseillons d’utiliser la position dos à la route
jusqu’à la taille de 105 cm et un poids maximum de 18 kg.
80 81
Achterwaarts gericht gebruik (45 cm - 105 cm)
Wij raden aan om het autozitje in achterwaarts gerichte
positie te gebruiken tot een lengte van 105 cm en max. 18 kg.
Tyłem do kierunku jazdy (45 cm–105 cm)
Zalecamy korzystanie z fotelika samochodowego tyłem
do kierunku jazdy do osiągnięcia przez dziecka wzrostu
105 cm i masy ciała maks. 18 kg.
Page 42

Utilisation face à la route (76 cm - 105 cm)
L’utilisation du siège dans la position face à la route est
4
autorisée lorsque l’enfant à plus de 16 mois et est grand
d’au moins 76 cm.
REMARQUE ! L’indicateur sur l’appuie-tête (4) ache
le poids de l’enfant à partir duquel le siège peut être
modié en position face à la route le plus tôt. Pour plus
d’informations, veuillez lire le point : « UTILISATION
FACE A LA ROUTE (76 cm - 105 cm) ».
REMARQUE ! Les nouveau-nés et les enfants pas
encore capables de tenir assis d’eux-mêmes (jusqu’à
environ 1 an) doivent toujours être transportés, pour des
raisons orthopédiques et de sécurité, dans la position
rectiligne la plus plate, dos à la route.
REMARQUE ! L’enfant doit être débarrassé de toute
pièce mobile lors des réglages du siège-auto. Tenez les
enfants éloignés du siège-auto lors de son installation
et de sa désinstallation dans le véhicule. Les doigts des
enfants pourraient être coincés et blessés par des actions
de cisaillement inévitables.
82 83
Voorwaarts gericht gebruik (76 cm - 105 cm)
Gebruik van het zitje in voorwaarts gerichte stand is
toegestaan vanaf het moment dat het kind 16 maanden of
ouder is en een minimale lengte van 76 cm heeft bereikt.
LET OP! De indicator op de hoofdleuning (4) geeft de
lengte aan die het kind bereikt moet hebben, voordat het
zitje in voorwaarts gerichte stand gebruikt mag worden.
Lees voor meer informatie hierover: „VOORWAARTS
GERICHT GEBRUIK (76 cm - 105 cm)“.
LET OP! Pasgeborenen en kinderen die nog niet
zelfstandig rechtop kunnen zitten (tot ongeveer 1 jaar
oud) moeten, om orthopedische en veiligheidsredenen,
altijd in de meest vlakke positie worden vervoerd en in
achterwaarts gerichte stand.
LET OP! Maak het kind los voordat u het autozitje
verstelt. Houd kinderen uit de buurt van het autozitje
tijdens de installatie van het zitje in en het verwijderen
ervan uit het voertuig. Het gevaar bestaat, dat vingers
van kinderen vast komen te zitten en gewond raken door
onvermijdelijke scharende bewegingen.
Przodem do kierunku jazdy (76 cm–105 cm)
Używanie fotela przodem do kierunku jazdy jest
dozwolone, gdy dziecko jest starsze niż 16 miesięcy i ma
min. wzrost 76 cm.
WSKAZÓWKA! Na zagłówku (4) oznaczono wzrost
dziecka, od którego można najwcześniej przejść
na ustawienie fotelika przodem do kierunku jazdy.
Więcej informacji podano w rozdziale: „PRZODEM DO
KIERUNKU JAZDY (76 cm–105 cm)“.
WSKAZÓWKA! Noworodki i niemowlęta, które jeszcze
nie siedzą samodzielnie (mniej więcej do ukończenia 1
orku) ze względów ortopedycznych i bezpieczeństwa
należy zawsze transportować w pozycji maksymalnie
poziomej, w foteliku skierowanym tyłem do kierunku jazdy.
WSKAZÓWKA! Podczas regulacji fotelika
samochodowego dziecko nie może dotykać żadnych
luźnych elementów. Podczas montażu i demontażu
fotelika samochodowego z pojazdu dzieci nie mogą
zbliżać się do niego. Istnieje ryzyko przycięcia palców
dzieci lub zranień w miejscach grożących zgnieceniem.
FRNLPL
Page 43
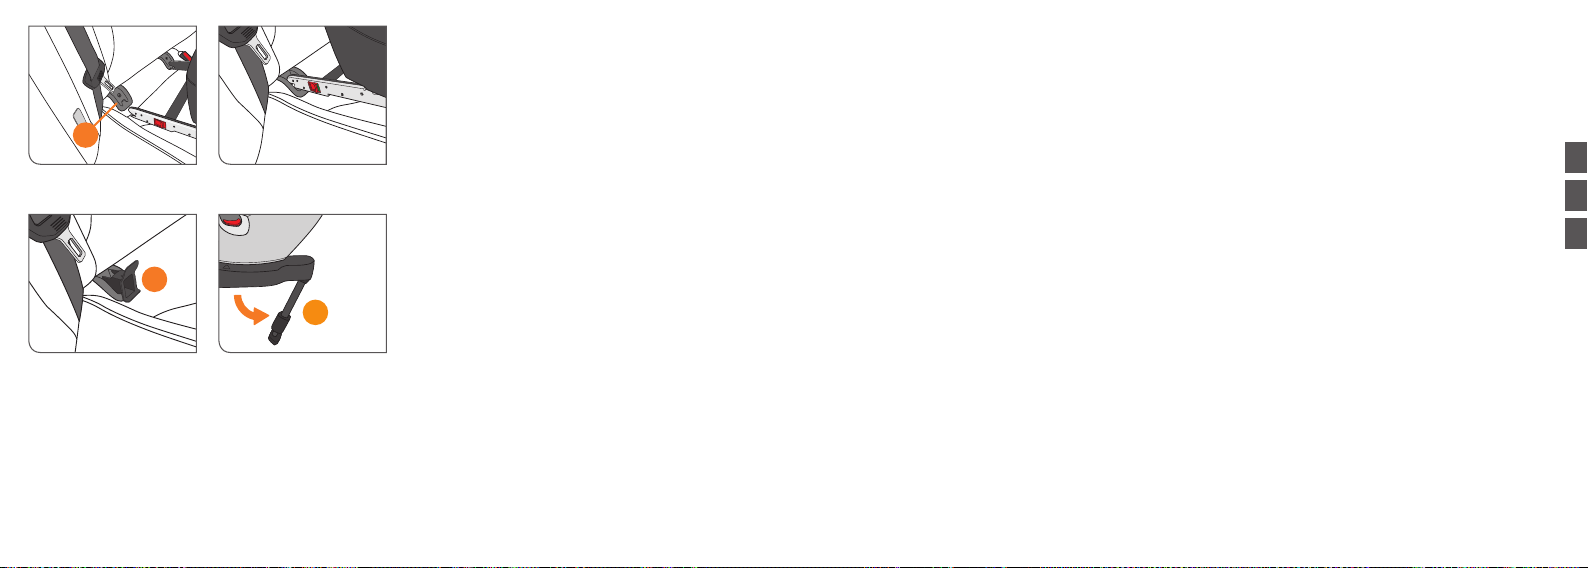
INSTALLATION DU SIEGEAUTO DANS LE VEHICULE
Veuillez choisir un siège du véhicule adapté.
REMARQUE ! Si votre voiture n’est pas équipée d’une
position d’assise i-Size, veuillez consulter la liste de types
jointe au produit.
5
6
7
84 85
Le système ISOFIX vous permet de toujours xer le
siège-auto en toute sécurité dans la voiture.
REMARQUE ! Les points d’ancrage du système ISOFIX
(5) sont deux anses par siège situés entre le dossier et le
siège du véhicule. En cas de doute, veuillez consulter le
manuel d’instruction de la voiture.
• Si les points d’ancrage du système ISOFIX (5) de votre
voiture sont diciles à atteindre, utilisez les guides de
liaison ISOFIX (6) fournis pour éviter d’endommager le
capot.
• Si besoin, xez les guides de liaison ISOFIX (6) fournis
à l’anse orienté vers le haut dans les deux points
d’ancrage ISOFIX (5).
• Dépliez toujours la jambe de force (7) jusqu’à son
verrouillage.
INSTALLEREN VAN HET AUTOZITJE IN HET VOERTUIG
Kies eerst een geschikte stoel in het voertuig uit.
LET OP! Als uw auto niet is uitgerust met een i-Size-
stoelpositie, kijk dan in de bij het product geleverde typelijst.
Het ISOFIX-systeem zorgt voor een veilige bevestiging
in de auto.
LET OP! De ISOFIX-xatiepunten (5) bestaan uit twee
metalen ogen per stoel en bevinden zich tussen de
rugleuning en de zitting van de betreende autostoel. Als
u twijfelt, kijk dan in de gebruiksaanwezig van uw auto
voor meer informatie.
• Als de ISOFIX-xatiepunten (5) in uw auto moeilijk
bereikbaar zijn, kunt u het best de ISOFIX-connectoren
(6) gebruiken om schade aan de bekleding te
voorkomen.
• Bevestig zonodig de bijgeleverde ISOFIX-connectoren
(6) met de langere lus omhoog gericht in beide ISOFIXxatiepunten (5).
• Klap altijd de steunpoot uit (7) en zorg dat hij vastklikt.
MONTAŻ FOTELIKA W POJEŹDZIE
Wybierz odpowiednie siedzenie w pojeździe.
WSKAZÓWKA! Jeżeli Twój pojazd nie jest wyposażony
w siedzenie kompatybilne z i-Size, sprawdź listę modeli
pojazdów załączoną do produktu.
System ISOFIX pozwala bezpiecznie zamocować fotelik
w samochodzie.
WSKAZÓWKA! Punkty mocowania ISOFIX (5) to dwa
metalowe ucha na każdym siedzeniu, umieszczone
między oparciem a siedziskiem. Jeżeli masz jakiekolwiek
wątpliwości, sprawdź instrukcję obsługi swojego pojazdu.
• Jeżeli punkty mocowania ISOFIX (5) w twoim
samochodzie są trudno dostępne, skorzystaj z
dostarczonych prowadnic ISOFIX (6), które zapobiegają
uszkodzeniu pokrywy.
• Jeżeli jest to konieczne, zamocuj w obu punktach
mocowania ISOFIX (5) dostarczone prowadnice ISOFIX
(6) w pozycji z większą wypustką skierowaną do góry.
• Zawsze pamiętać o rozłożeniu podpory (7) do
zablokowania.
FRNLPL
Page 44
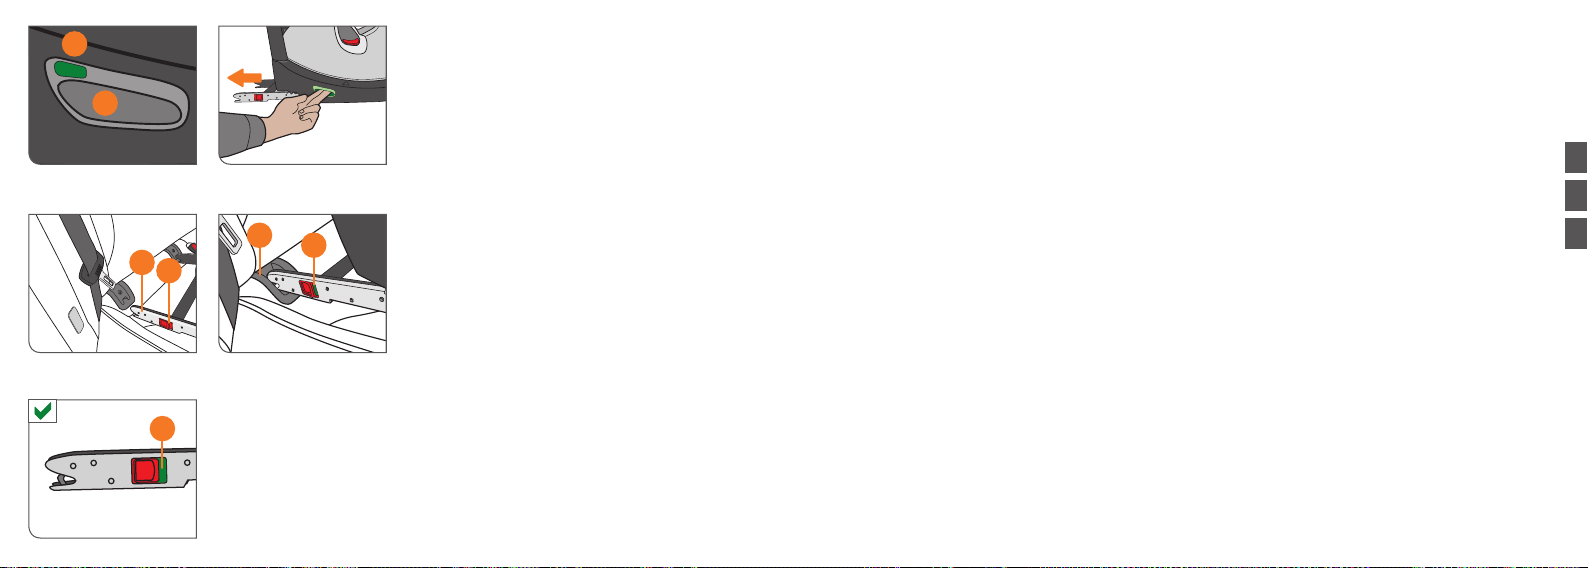
9
10
5
8
12
11
11
86 87
REMARQUE ! Ne mettez jamais aucun objet dans
l’espace pour les pieds à l’avant du siège-auto.
• Pour activer les connecteurs ISOFIX (8), appuyez sur les
boutons verts (9) de chaque côté et levez les poignées de
réglage ISOFIX (10).
• Maintenez la poignée de réglage (10) appuyée tout en
tirant, de l’autre main, les connecteurs ISOFIX (8) hors du
siège jusqu’en butée.
REMARQUE ! Assurez-vous que les deux indicateurs
de sécurité verts (11) sur les connecteurs ISOFIX (8) ne
soient pas visibles avant l’installation. Relâchez-les, si
besoin, en appuyant sur le bouton de déblocage ISOFIX
(12) tout en tirant le connecteur vers l’arrière.
• Les deux connecteurs ISOFIX (8) doivent se
verrouiller dans les points d’ancrage ISOOFIX (5)
avec un clic audible.
• Assurez-vous que le siège reste bien en place en
essayant de sortir les guides de connexion ISOFIX.
• L’indicateur de sécurité vert (11) doit être clairement
visible sur les deux boutons de déblocage ISOFIX (12).
• Réactivez les poignées de réglage Isox (10) pour
pousser le siège-auto vers le dossier du véhicule
jusqu’en contact.
• Appuyez alors doucement le châssis du siège-auto
contre l’habillage du siège du véhicule jusqu’au
verrouillage des poignées de réglage ISOFIX (10).
• Continuez avec « REGLAGE DE LA JAMBE DE FORCE ».
LET OP! Zet geen voorwerpen op de vloer voor het
kinderzitje.
• Om de ISOFIX-connectoren (8) te activeren, drukt u op de
groene knoppen (9) aan beide kanten en tilt u de ISOFIXverstelhendels (10) omhoog.
• Houd één verstelhendel (10) ingedrukt en trek met de
andere hand de ISOFIX-connectoren (8) tot aan de
aanslag uit de stoel.
LET OP! Zorg dat beide groene veiligheidsindicatoren
(11) op de ISOFIX-connectoren (8) niet zichtbaar zijn
voor de installatie. Maak ze zonodig los door de ISOFIXontgrendelknop (12) in te drukken en tegelijk de connector
naar achteren te trekken.
• Beide ISOFIX-connectoren (8) moeten hoorbaar in de
ISOFIX-xatiepunten (5) vastklikken.
• Controleer of het zitje goed op zijn plek blijft zitten door te
proberen het uit de ISOFIX-connectorgeleiders te trekken.
• De groene veiligheidsindicator (11) moet duidelijk
zichtbaar zijn op beide ISOFIX-ontgrendelknoppen (12).
• Activeer Isox-regelhendels (10) opnieuw en duw de
autostoel in de richting van de rugleuning van het voertuig
te duwen tot de hendels elkaar raken.
• Druk het frame van het autozitje nu voorzichtig tegen
de bekleding van de autostoel tot beide ISOFIXaanpassingshendels (10) hoorbaar vastklikken.
• Ga verder met "STEUNPOOT INSTELLEN".
WSKAZÓWKA! Nie kłaść żadnych przedmiotów w miejscu
na nogi przed fotelikiem.
• Aby aktywować ISOFIX (8), nacisnąć zielone przyciski (9) po
obu stronach i podnieść dźwignie regulacyjne ISOFIX (10).
• Nadal przytrzymać wciśniętą jedną z dźwigni
regulacyjnych (10), wyciągając złącza ISOFIX (8) do
ogranicznika drugą przytrzymanego drugą ręką.
WSKAZÓWKA! Upewnić się, że oba zielone wskaźniki
bezpieczeństwa (11) na złączach ISOFIX (8) nie są
widoczne przed montażem. W razie potrzeby zwolnić je
naciskając przycisk zwalniania ISOFIX (12), jednocześnie
wyciągając złącze do tyłu.
• Oba złącza ISOFIX (8) muszą zablokować się w punktach
mocowania ISOFIX (5) ze słyszalnym kliknięciem.
• Upewnij się, że fotelik jest dobrze zamocowany, próbując
uwolnić go z prowadnic ISOFIX.
• Zielony wskaźnik bezpieczeństwa (11) musi być wyraźnie
widoczny przy obu przyciskach zwalniających ISOFIX (12).
• Pociągnij znów dźwignie regulacyjne ISOFIX (10),
pociągając fotelik w kierunku oparcia pojazdu do
momentu, gdy fotelik i oparcie zetkną się.
• Teraz ostrożnie popchnij podstawę fotelika w kierunku
siedziska pojazdu, aż obie dźwignie regulacyjne ISOFIX
(10) zablokują się ze słyszalnym kliknięciem.
• Przejść do punktu „REGULACJA PODPORY”.
FRNLPL
Page 45

REGLAGE DE LA JAMBE DE FORCE
Assurez-vous que la jambe de force (7) est xée en
position avant. Levez le bouton de réglage (13) sur la
7 13
CLICK!
8
88 89
12
jambe de force et appuyez-le pour tirer la jambe de
force (7) jusqu’en contact avec le sol du véhicule. Sortez
alors le pied à la prochaine position de verrouillage pour
assurer une bonne transmission de la force. L’indicateur
de la jambe de force (14) sur la base passe au VERT et
vous entendez un « CLIC » caractéristique.
REMARQUE ! Assurez-vous que le siège-auto est
toujours bien à plat sur le siège du véhicule.
AVERTISSEMENT ! La jambe de force doit
!
toujours être en contact avec le sol. Il est interdit de
14
placer des objets sous la jambe de force. Pour plus
d’informations sur les compartiments de rangement
dans la zone des pieds, veuillez contacter le fabri-
cant de votre véhicule.
DESINSTALLATION DU SIEGEAUTO DU VEHICULE
Suivez la procédure d’installation dans l’ordre inverse.
• Déverrouillez les connecteurs ISOFIX (8) en appuyant
et tirant vers l’arrière les boutons de déblocage (12).
• Sortez la base des points d’ancrage ISOFIX.
• Repliez les connecteurs ISOFIX (8) dans leur position
initiale.
• Appuyez sur le bouton sur la jambe de force (7) et
repoussez-le dans sa position initiale.
• Repliez la jambe de force.
STEUNPOOT INSTELLEN
Zorg dat de steunpoot (7) in de voorwaartse positie
gexeerd is. Druk de verstelknop (13) op de steun
omhoog en druk erop om de steunpoot (7) uit te trekken
totdat deze de vloer van het voertuig raakt. Trek de poot
vervolgens uit tot de volgende vergrendelpositie om
voor een optimale krachtoverbrenging te zorgen. De
steunpootindicator (14) aan de onderkant moet groen zijn
en er moet een karakteristieke ‚KLIK‘ te horen zijn.
LET OP! Zorg dat het autozitje nog steeds vlak op de
autostoel rust.
WAARSCHUWING! De steunpoot moet altijd direct
!
contact maken met de vloer. Het is niet toegestaan
om objecten onder de draagpoot te plaatsen. Voor
meer informatie over de opslagcompartimenten in
het voetengedeelte kunt u contact opnemen met de
fabrikant van uw voertuig.
HET AUTOZITJE UIT HET VOERTUIG VERWIJDEREN
Voer de installatieprocedure in omgekeerde volgorde uit.
• Maak de ISOFIX-connectoren (8) los door de rode
ontgrendelknoppen (12) in te drukken en naar achteren
te trekken.
• Trek het onderstel los van de ISOFIX-xatiepunten.
• Klap de ISOFIX-connectoren (8) terug naar de
uitgangspositie.
• Druk op de knop op de steunpoot (7) en duw hem terug
naar de originele positie.
• Klap de steunpoot naar achteren.
REGULACJA PODPORY
Upewnij się, że podpora (7) jest zablokowana w pozycji do
przodu. Naciśnij przycisk regulacyjny (13) na podporze do
góry i wciśnij go, aby wyciągnąć podporę (7) do zetknięcia
się z podłogą pojazdu. Następnie wysuń podporę dalej
do następnej pozycji blokowania, aby była mocno oparta.
Wskaźnik podpory (14) w podstawie fotelika zmienia kolor
na ZIELONY i może być słyszalne kliknięcie.
WSKAZÓWKA! Upewnij się, że fotelik spoczywa płasko
na siedzisku samochodu.
OSTRZEŻENIE! Podpora zawsze musi
!
bezpośrednio stykać się z podłogą. Nie wolno kłaść
żadnych przedmiotów pod podporą. Aby uzyskać
informacje na temat postępowania, gdy w przestrzeni na nogi znajdują się schowki, skontaktuj się z
producentem pojazdu.
DEMONTAŻ FOTELIKA Z POJAZDU
Wykonaj czynności takie same, jak w przypadku
montażu, ale w odwrotnej kolejności.
• Odblokuj złącza ISOFIX (8) naciskając i pociągając do
tyłu czerwone przyciski zwalniania (12).
• Wyciągnij podstawę z punktów mocowania ISOFIX.
• Odchyl złącza ISOFIX (8) do tyłu do pozycji
początkowej.
• Naciśnij przycisk na podporze (7) i wsuń ją z powrotem
do poprzedniej pozycji.
• Złóż podporę.
FRNLPL
Page 46

REGLAGE DES PROTECTIONS LATERALES
Le siège-auto est équipé du système « Linear Side-
Impact Protection » (L.S.P.). Ce système augmente la
sécurité de votre enfant en cas d’impact latéral.
REMARQUE ! Assurez-vous que L.S.P. Est xé par un
15
a
b
c
90 91
« CLIC » audible.
Le L.S.P. Dispose de 3 positions. Sortez le L.S.P. au
moins en position (a). Pour une meilleure protection,
sortez le L.S.P. le plus possible vers la porte de la voiture
à proximité du siège de l’enfant.
Si le L.S.P. dépasse l’espace prévu et touche la porte
dans sa position la plus longue (c), utilisez la position
inclinée (b).
Vous y parvenez en sortant complètement le L.S.P., puis
en appuyant sur le bouton de verrouillage (15) et en
déplaçant le L.S.P. en position inclinée.
Pour remettre le L.S.P. dans le siège, appuyez sur le
bouton de verrouillage (15) tout en poussant le L.S.P.
vers le siège.
REMARQUE ! Si vous utilisez le siège sur la position
centrale du véhicule, il est interdit de sortir la protection
latérale.
AVERTISSEMENT ! Il est interdit d’utiliser la
!
protection latérale pour porter ou attacher le
siège-auto.
VERSTELLEN VAN DE ZIJBESCHERMERS
Het autozitje is uitgerust met het „Linear Side-Impact
Protection“-systeem (L.S.P.). Dit systeem verbetert de
veiligheid van uw kind bij een zijwaartse botsing.
LET OP! Controleer of het L.S.P.-systeem met een
hoorbare „KLIK" is vastgezet.
Het L.S.P. heeft 3 standen. Zet het L.S.P. tenminste in stand
(a). Voor de beste bescherming trekt u het L.S.P. zo veel
mogelijk naar de autodeur direct naast het kinderzitje toe.
Als het L.S.P. meer plaats inneemt, en de deur in zijn
meest uitgetrokken positie raakt (c), dan moet de
gekantelde stand (b) worden toegepast.
Trek het L.S.P. hiervoor helemaal uit en druk vervolgens
de vergrendelknop (15) in, om de L.S.P. in de schuine
stand te zetten.
Om het L.S.P. terug in de zitting te drukken duwt u op de
vergrendelknop (15) en tegelijk drukt u het L.S.P. richting
de zitting.
LET OP! Wanneer u het autozitje in het midden van het
voertuig gebruikt, is het verboden om de zijbeschermer
uit te schuiven.
WAARSCHUWING! De zijbeschermer mag niet
!
worden gebruikt om het autozitje te dragen of het
ergens aan te bevestigen.
REGULACJA PODPÓR BOCZNYCH
Fotelik jest wyposażony w system ochrony przed
uderzeniem bocznym (L.S.P.). System ten zwiększa
bezpieczeństwo Twojego dziecka w przypadku uderzenia
z boku.
WSKAZÓWKA! Upewnij się, że system L.S.P.
zablokował się słyszalnym kliknięciem.
System L.S.P. ma 3 pozycje. Wyciągnij L.S.P. co
najmniej do pozycji (a). Dla najlepszej ochrony, wyciągnij
maksymalnie L.S.P. w stronę drzwi pojazdu znajdujących
się najbliżej fotelika.
Jeżeli podpora L.S.P. zajmuje za dużo miejsca i dotyka
drzwi w najbardziej wysuniętej pozycji (c), ustaw ją w
pozycji środkowej (b).
W tym celu wyciągnij całkowicie L.S.P., a następnie
naciśnij przycisk blokujący (15) i przesuń L.S.P. do
środkowej pozycji.
Aby wsunąć L.S.P. z powrotem do fotelika, naciśnij
przycisk blokujący (15) i jednocześnie popchnij L.S.P. w
stronę fotelika.
WSKAZÓWKA! Jeżeli fotelik znajduje się na środkowym
siedzeniu, nie wolno wysuwać podpór bocznych.
OSTRZEŻENIE! Zabrania się używania podpór
!
bocznych do przenoszenia lub mocowania fotelika.
FRNLPL
Page 47

16
REGLAGE DE L’ASSISE ET DE L’INCLINAISON
CYBEX SIRONA Q i-SIZE ore jusqu’à 7 positions
d’assise et d’inclinaison diérentes pour le transport
sécurisé et confortable de votre enfant dans la voiture.
vous pouvez activer la poignée de réglage de la
position (16) à l’avant du siège-auto et mettre ainsi le
CYBEX SIRONA Q I-SIZE dans la position d’inclinaison
souhaitée. Assurez-vous toujours que la coque du siège
(17) s’enclenche en position avec un clic audible.
VERSTELLEN VOOR ZITTEN EN LIGGEN
De CYBEX SIRONA Q i-SIZE biedt tot 7 verschillende ziten ligstanden om uw kind veilig en comfortabel in de auto
te vervoeren. Gebruik de hendel (16) aan de voorkant
van het kinderzitje om de CYBEX SIRONA Q I-SIZE in de
gewenste stand te zetten. Controleer altijd of de zitschaal
(17) hoorbaar vastklikt.
REGULACJA POZYCJI SIEDZĄCEJ I LEŻĄCEJ
Fotelik CYBEX SIRONA Q i-SIZE można ustawić w
maksymalnie 7 pozycjach siedzących i leżących, co
umożliwia bezpieczne i wygodne przewożenie dziecka w
samochodzie. W razie potrzeby pociągnij dźwignię regulacji
pozycji (16) z przodu fotelika i przestaw fotelik CYBEX
SIRONA Q I-SIZE w wybranej pozycji. Zawsze upewnij się,
że górna część fotelika (17) zablokowała się słyszalnie.
1716
92 93
FRNLPL
Page 48

ROTATION A 360°
Vous pouvez faire tourner le siège-auto à 360° pour
16
16
18
94 95
mettre l’enfant dans le véhicule et l’en sortir plus
facilement. Vous pouvez ainsi modier la position du
siège de dos à la route à face à la route. Voir également
à ce sujet le point « CHANGER POUR L’UTILISATION
FACE A LA ROUTE ».
• Pour pouvoir tourner la coque du siège, vous devez
d’abord appuyer sur la poignée de réglage de la
position (16) et amener, tout en maintenant la poignée
appuyée, le siège en position complètement redressée
indiquée par des repères sur les côtés du châssis (18)
de la coque du siège.
REMARQUE ! Vous ne pouvez tourner le siège-auto que
si le repère sur le châssis (18) est aligné avec le repère
sur la coque d siège.
• Vous pouvez alors tourner la coque du siège vers
la porte et attacher l’enfant sans problème. Voir le
point « SECURISATION AVEC LE SYSTEME DE
HARNAIS ».
REMARQUE ! Avant de prendre la route, vous devez
retourner la coque du siège dans sa position initiale et
la bloquer.
• Retournez la coque du siège dans sa position d’origine.
Dès que la position neutre est atteinte, vous devez
verrouiller le siège au moins sur la première position
d’assise. Vous devez alors entendre un « CLIC ».
REMARQUE ! Assurez-vous que la coque du siège est
bien verrouillée en position en essayant de la tourner sans
appuyer sur la poignée de réglage de la position (16).
360° ROTATIE
Het autozitje kan 360° gedraaid worden, zodat u uw
kind gemakkelijker in de auto kunt leggen en er weer
uithalen. Op dezelfde manier kunt u de stand van het
zitje van achterwaarts naar voorwaarts gericht wijzigen.
Zie voor dit onderwerp het gedeelte „OMZETTEN NAAR
VOORWAARTS GERICHT GEBRUIK".
• Om de zitschaal te laten draaien, moet u eerst de
positie-regelhendel (16) indrukken en, terwijl u deze
vasthoudt, de zitschaal helemaal rechtop zetten. De
juiste stand staat aangegeven met markeringen aan de
zijkant van het hoofdframe (18) en van de zitschaal.
LET OP! Het autozitje kan alleen worden gedraaid als
de markering op het hoofdframe (18) is uitgelijnd met de
markering op de zitschaal.
• Nu kunt u de zitschaal draaien richting de deur en
het kind zonder moeite vastmaken. Zie het gedeelte
"VEILIG VASTZETTEN MET HET HARNASSYSTEEM".
LET OP! Voordat u start met uw reis, moet u de zitschaal
weer terug in een van de basisstanden zetten, zodat het
zitje op z'n plaats klikt.
• Draai de zitschaal terug naar de oorspronkelijke positie.
Zodra de neutrale positie is bereikt, moet het zitje
tenminste in de eerste zitstand worden vastgeklikt. De
"KLIK" is duidelijk hoorbaar.
LET OP! Zorg dat de zitschaal goed vastgeklikt zit door
deze proberen te draaien, zonder daarbij de positieverstelhendel (16) in te drukken.
OBRÓT O 360°
Fotelik samochodowy można obrócić o 360°, aby łatwiej
włożyć lub wyjąć dziecko z samochodu. W ten sposób
można też zmienić pozycję fotelika z „tyłem do kierunku
jazdy” na „przodem do kierunku jazdy”. Więcej informacji
podano w rozdziale „PRZODEM DO KIERUNKU JAZDY”.
• Aby obrócić górną część fotelika, najpierw naciśnij
dźwignię regulacji pozycji (16) i przytrzymując ją ustaw
górną część fotelika całkowicie pionowo. Pozycja ta jest
sygnalizowana przez oznaczenia po bokach podstawy
(18) oraz górnej części fotelika.
WSKAZÓWKA! Fotelik można obrócić tylko wtedy,
gdy oznaczenie na podstawie (18) jest wyrównane z
oznaczeniem na górnej części fotelika.
• Teraz można obrócić górną część fotelika w stronę
drzwi i wygodnie przypiąć dziecko. Patrz rozdział
„PRZYPINANIE DZIECKA”.
WSKAZÓWKA! Przed rozpoczęciem jazdy obróć górną
część fotelika z powrotem do pozycji podstawowej.
• Obróć górną część fotelika z powrotem do poprzedniej
pozycji. Po ustawieniu fotelika w pozycji neutralnej,
zablokuj go przynajmniej w pierwszej pozycji siedzącej.
Jest to sygnalizowane słyszalnym kliknięciem.
WSKAZÓWKA! Upewnij się, że górna część fotelika
jest prawidłowo zablokowana, próbując ją obrócić bez
naciskania dźwigni regulacji pozycji (16).
FRNLPL
Page 49

REMARQUE ! Évitez toute impureté ou du sable entre
la coque du siège supérieure et la base. Ceci peut avoir
un impact négatif sur les performances des fonctions
de rotation et d’inclinaison. Si cela arrive, enlevez les
impuretés avant de tourner et d’incliner le siège an
d’éviter d’endommager le siège.
AVERTISSEMENT ! Pendant la route, le siège-
!
auto doit toujours être verrouillé en position dos à
la route ou face à la route. N’utilisez jamais le siège
en position de charge ni dans aucune autre position
intermédiaire pendant la route.
96 97
LET OP! Voorkom dat er zand of vuil tussen het
onderstel en de zitschaal komt te zitten. Het zitje zal
hier stroever door gaan draaien en kantelen. Verwijder
mogelijk vuil voordat het zitje wordt gedraaid of gekanteld
om permanente schade aan het zitje te voorkomen.
WAARSCHUWING! Tijdens het rijden moet het
!
autozitje altijd vastgeklikt zijn in de achterwaarts of
voorwaarts gerichte positie. Gebruik het zitje nooit in
de zijwaartse in-/uitstapstand of in enige andere niet
vastgeklikte positie tijdens het rijden.
WSKAZÓWKA! Uważaj, aby między górną część
fotelika a podstawę nie dostał się brud ani piach. Może
to zakłócić działanie funkcji obracania i przechylania.
Jeżeli tak się zdarzy, usunąć brud przed dalszym
obróceniem i pochyleniem fotelika, aby uniknąć jego
trwałego uszkodzenia.
OSTRZEŻENIE! Podczas jazdy samochodem,
!
fotelik musi być zawsze zablokowany w pozycji
przodem lub tyłem do kierunku jazdy. Nigdy nie
używaj fotelika w pozycji przypinania lub jakiejkolwiek innej pozycji pośredniej podczas jazdy.
FRNLPL
Page 50

3
CLICK!
19
4
98 99
UTILISATION DOS A LA ROUTE 45 CM 105 CM
Fixation de la barre anti-rebond
Tournez le siège dos à la route. Veuillez sortie la barre
anti-rebond fournie (3) de l’emballage. Insérez la barre
anti-rebond dans les encoches prévues à cet eet (19) à
l’arrière du siège-auto. Assurez-vous que le côté doté des
têtes de vis sur la barre anti-rebond (3) est orienté vers
l’arrière du véhicule. Un « CLIC » audible vous indique
que la barre anti-rebond est bien verrouillée.
AVERTISSEMENT ! Pour des raisons de sécurité,
!
vous devez installer la barre anti-rebond pour
l’utilisation dos à la route du siège-auto.
AVERTISSEMENT ! La position dos à la route est
!
obligatoire jusqu’à l’âge de 15 mois et une taille de
75 cm. Le transport dos à la route est le plus sûr
même au-delà de cette limite.
REMARQUE ! L’indicateur sur l’appuie-tête (4) ache
le poids de l’enfant à partir duquel le siège peut être
modié en position face à la route le plus tôt. Pour plus
d’informations, veuillez lire le point : « UTILISATION
FACE A LA ROUTE (76 cm - 105 cm) ».
AVERTISSEMENT ! L’utilisation du bouclier d’impact
!
n’est pas autorisée en position dos à la route !
ACHTERWAARTS GERICHT GEBRUIK 45 CM 105 CM
De rebound-beugel vastmaken
Draai het zitje zodat het naar achteren gericht is. Haal
de bijgeleverde rebound-beugel (3) uit de verpakking.
Steek de rebound-beugel in de juiste gleuven (19) aan
de achterkant van het autozitje. Zorg dat de kant met de
schroefkoppen op de rebound-beugel (3) naar de achterkant van de auto is gericht. Een duidelijk hoorbare „KLIK"
geeft aan dat de rebound-beugel goed vastzit.
WAARSCHUWING! Om veiligheidsredenen moet
!
de rebound-beugel altijd worden geplaatst als het
autozitje in achterwaarts gerichte positie wordt
gebruikt.
WAARSCHUWING! Het is verplicht om de achter-
!
waartse stand tot een leeftijd van 15 maanden en een
lengte van 75 cm te blijven gebruiken. En ook hierna
is vervoer in de achterwaartse stand het veiligst.
LET OP! De indicator op de hoofdleuning (4) geeft de
lengte aan die het kind bereikt moet hebben, voordat het
zitje in voorwaarts gerichte stand gebruikt mag worden.
Lees voor meer informatie hierover: „VOORWAARTS
GERICHT GEBRUIK (76 cm - 105 cm)“.
WAARSCHUWING! In de achterwaarts gerichte
!
positie is het gebruik van het impactschild niet
toegestaan!
TYŁEM DO KIERUNKU JAZDY 45 CM105 CM
Mocowanie osłony odbojowej
Obróć fotelik tyłem do kierunku jazdy. Wyjmij dostarczoną
w komplecie osłonę odbojową (3) z opakowania. Wetknij
osłonę odbojową do odpowiednich otworów (19) w pod-
stawie fotelika. Upewnij się, ze strona osłony odbojowej,
po której znajdują się łby wkrętów (3) jest skierowana do
tyłu pojazdu. Słyszalne kliknięcie sygnalizuje, że osłona
odbojowa jest prawidłowo zablokowana.
OSTRZEŻENIE! Ze względów bezpieczeństwa,
!
przy ustawieniu fotelika tyłem do kierunku jazdy
musi być zamontowana osłona odbojowa.
OSTRZEŻENIE! Ustawienie tyłem do kierunku
!
jazdy jest obowiązkowe w wieku do 15 miesięcy
oraz do osiągnięcia wzrostu 75 cm. Nawet
później transport tyłem do kierunku jazdy jest
najbezpieczniejszy.
WSKAZÓWKA! Na zagłówku (4) oznaczono wzrost
dziecka, od którego można najwcześniej przejść na
ustawienie fotelika przodem do kierunku jazdy. Więcej
informacji podano w rozdziale: „PRZODEM DO KIERUNKU JAZDY (76 cm–105 cm)“.
OSTRZEŻENIE! Korzystanie z osłony ochronnej w
!
pozycji tyłem do kierunku jazdy jest zabronione!
FRNLPL
Page 51

MAX.
20
21
REGLAGE A LA TAILLE DE L’ENFANT
Réglage de l’appuie-tête
REMARQUE ! L’insert nouveau-né protège votre enfant.
Vous devez l’utiliser jusqu’à ce que l’enfant ait atteint 60 cm.
REMARQUE ! L’appuie-tête
(20)
ne garantit la meilleure
protection possible de votre enfant. Que s’il est réglé à
la taille idéale. Le réglage permet 12 positions en hauteur.
• Vous devez régler l’appuie-tête
(20)
de manière à ce
que la distance entre les épaules de l’enfant et l’appuietête ne dépasse pas 3 cm (env. 2 largeurs de doigt).
• Activez la poignée de réglage (21) sur le bas de
l’appuie-tête (20) et déplacez-le dans la position
souhaitée.
AFREGELEN OP DE LICHAAMSLENGTE
De hoofdsteun aanpassen
LET OP! De stoelverkleiner beschermt uw pasgeboren
baby. Gebruik hem tot de baby een lengte van 60 cm
heeft bereikt.
LET OP! De hoofdsteun
(20)
kan alleen dan de best
mogelijke bescherming van uw kind garanderen, als deze
op de lengte van uw kind is ingesteld. Er zijn 12 mogelijke
hoogte-instellingen.
(20)
• Stel de hoofdsteun
zo in, dat de afstand tussen de
schouders van het kind en de hoofdsteun niet meer dan
3 cm bedraagt (ongeveer 2 vingers breed).
• Gebruik de verstelhendel (21) onderaan de hoofdsteun
(20) en zet hem in de juiste stand.
100 101
DOSTOSOWANIE DO ROZMIARU CIAŁA
Regulacja zagłówka
WSKAZÓWKA! Wkładka dla noworodka chroni Twoje
dziecko. Należy ją stosować, dopóki dziecko nie osiągnie
wzrostu 60 cm.
WSKAZÓWKA! Zagłówek
(20)
zapewnia Twojemu
dziecku najlepszą ochronę jedynie, jeżeli jest ustawiony
na optymalnej wysokości. Wysokość można ustawić na
jednym z 12 stopni.
(20)
• Ustaw zagłówek
w taki sposób, aby odległość
między ramionami dziecka a zagłówkiem nie
przekraczała 3 cm (szerokość ok. 2 palców).
• Pociągnij za dźwignię regulacyjną (21) w dolnej części
zagłówka (20) i przesuń do żądanej pozycji.
FRNLPL
Page 52

22
Enlèvement de l’insert nouveau-né
L’insert nouveau-né préinstallé assiste le couchage
confortable et convient aux bébés les plus petits. L’insert
nouveau-né (22) doit être ôté dès que l’enfant atteint 61 cm
(env. 3 mois) pur orir plus de place à l’enfant. Pour enlever
l’insert nouveau-né (22), ouvrez les boutons-pression du
revêtement de l’appuie-tête. Retirez d’abord le revêtement
de l’appuie-tête, puis l’insert nouveau-né. Une fois le
revêtement de l’appuie-tête remis en place, régler les
ceintures d’épaules, puis refermez les boutons-pression.
Avant de mettre le réducteur nouveau-né en machine,
merci de retirer la mousse du réducteur via les endroits
dédiés. Vous pourrez réinsérer la mousse dans le
réducteur une fois que celui-ci est lavé et sec.
De stoelverkleiner verwijderen
De meegeleverde stoelverkleiner voor pasgeborenen
helpt bij het ondersteunen en verbetert de pasvorm voor
de kleinste baby's. De stoelverkleiner (22) kan worden
verwijderd zodra de baby 61 cm lang is (met ongeveer
3 maanden) om uw kind wat meer plaats te geven.
Om de stoelverkleiner (22) te verwijderen maakt u de
drukknoppen van de hoofdsteunhoes los. Verwijder
nu eerst de hoofdsteunhoes en haal vervolgens de
stoelverkleiner uit de stoel. Doe de hoofdsteunhoes weer
over het zitje, plaats de schoudergordels terug en sluit de
drukknoppen uiteindelijk weer.
Voordat u de inleg voor pasgeborenen wast, dient u het
schuim van de inleg via de daarvoor bestemde gleuven
te verwijderen. Na het wassen en drogen van de inleg
Wyjmowanie wkładki dla noworodka
Zamontowana w foteliku wkładka dla noworodka zwiększa
wygodę dziecka i lepiej dopasowuje jego rozmiar ciała
do fotelika. Wkładkę dla noworodka (22) można wyjąć,
gdy dziecko osiągnie wzrost 61 cm (ok. 3 miesiące), aby
dziecko miało wystarczającą ilość miejsca. Aby usunąć
wkładkę dla noworodka (22), rozepnij zatrzaski obicia
zagłówka. Teraz wyciągnij obicie zagłówka, a następnie
wyjmij wkładkę dla noworodka. Potem załóż osłonę
zagłówka z powrotem w poprzednie miejsce, ustaw z
powrotem pasy ramienne i zapnij zatrzaski.
Przed wypraniem wkładki dla noworodka, należy usunąć
gąbkę znajdująca się we wkładce poprzez specjalne
otwory. Po wypraniu i całkowitym wysuszeniu wkładki,
gąbkę należy ponownie umieścić w środku.
voor pasgeborenen kunt u het schuim weer in die
gleuven schuiven.
102 103
FRNLPL
Page 53

23
24
28
25
27
26
104 105
ATTACHE AVEC LE SYSTEME DE HARNAIS
REMARQUE ! Assurez-vous que l’appuie-tête est bien
verrouillé en position avant d’utiliser le siège-auto.
REMARQUE ! Assurez-vous que le siège-auto est
exempt de jouets et d’objets durs.
Les ceintures d’épaules (23) sont xées à l’appuie-tête
et ne doivent pas être réglées séparément. Assurez-vous
que l’appuie-tête est bien verrouillé en position avant
d’utiliser le siège.
• Desserrez les ceintures d’épaules (23) en appuyant sur
le bouton de réglage du dispositif d'ajustement central
(24) tout en levant les deux ceintures d’épaules.
REMARQUE ! Pour lever, tirez toujours sur la ceinture
d’épaules (23) et non sur les coussinets (25).
• Détachez la boucle de la ceinture (26) en appuyant
fortement sur le bouton rouge.
REMARQUE ! Assurez-vous que les ceintures d’épaules
(23) ne sont pas vrillées.
• Placez votre enfant dans le siège-auto.
• Mettez les ceintures d’épaules (23) directement sur les
épaules de votre enfant.
• Prenez les deux languettes de la boucle (27) et
verrouillez-les dans la boucle de la ceinture (26), vous
devez entendre un « CLIC ».
• Tirez légèrement sur la sangle de réglage central (28)
pour serrer les ceintures d’épaules (23) et les adapter
au corps de votre enfant.
REMARQUE ! Pour assurer la meilleure protection possible
du siège-auto, les ceintures d’épaules (23) et les ceintures de
hanche doivent être le plus près possible du corps de l’enfant.
VASTZETTEN MET HET HARNASSYSTEEM
LET OP! Zorg dat de hoofdsteun correct op de plaats is
vastgeklikt voordat u het autozitje gebruikt.
LET OP! Zorg dat de zitting vrij is van speelgoed en
harde voorwerpen.
De schoudergordels (23) zitten stevig vast aan de
hoofdsteun en mogen niet afzonderlijk worden afgesteld.
Zorg dat de hoofdsteun correct zit vastgeklikt voordat u
het zitje gebruikt.
• Maak de schoudergordels (23) los door op de
verstelknop op de centrale versteller (24) te drukken en
tegelijkertijd beide schoudergordels omhoog te trekken.
LET OP! Zorg dat u aan de schoudergordels (23) trekt en
niet aan de gordelkussens (25).
• Maak de riemgesp (26) los door stevig op de rode knop
te drukken.
LET OP! Controleer of de schoudergordels (23) niet
gedraaid zitten.
• Plaats uw kind in het autozitje.
• Plaats de schoudergordels (23) direct over de
schouders van uw kind.
• Pak de uiteinden van de riemen (27) bij elkaar en
klik ze met een duidelijk hoorbare "KLIK" vast in de
riemgesp (26).
• Trek voorzichtig aan de centrale stelgordel (28) om de
schoudergordels (23) aan te trekken, totdat deze over
het lichaam van uw kind passen.
LET OP! De schoudergordels (23) en heupgordels
moeten zo dicht mogelijk tegen het lichaam aan zitten om
optimale bescherming te kunnen bieden.
PRZYPINANIE DZIECKA
WSKAZÓWKA! Przed korzystaniem z fotelika sprawdź,
czy zagłówek jest prawidłowo zamontowany.
WSKAZÓWKA! Sprawdź, czy w foteliku nie ma zabawek
ani innych twardych przedmiotów.
Pasy ramienne (23) są przytwierdzone na stałe do
zagłówka i nie trzeba ich regulować oddzielnie. Przed
rozpoczęciem korzystania z fotelika sprawdź, czy
zagłówek jest prawidłowo zablokowany.
• Poluzuj pasy ramienne (23) naciskając przycisk
regulacji na centralnym mechanizmie (24) i
jednocześnie pociągnij oba pasy ramienne do góry.
WSKAZÓWKA! Zawsze ciągnij za pasy (23), a nie za ich
osłony (25).
• Rozepnij sprzączkę (26) naciskając mocno czerwony
przycisk.
WSKAZÓWKA! Sprawdź, czy pasy ramienne (23) nie są
skręcone.
• Włóż dziecko do fotelika.
• Umieść pasy ramienne (23) bezpośrednio nad
ramionami dziecka.
• Połącz obie części sprzączki (27) i zablokuj je w
gnieździe (26), musi być słyszalne kliknięcie.
• Ostrożnie pociągnij za centralny pas regulacyjny (28),
aby zacisnąć pasy ramienne (23), aż będą mocno
opinały ciało dziecka.
WSKAZÓWKA! Aby fotelik samochodowy zapewniał
maksymalną ochronę, pasy ramienne (23) i biodrowe
muszą jak najciaśniej opinać dziecko.
FRNLPL
Page 54

CHANGEMENT DE L’UTILISATION DOS A LA ROUTE
A LA POSITION FACE A LA ROUTE
Pour utiliser le siège-auto en position face à la route,
vous devez respecter les points suivants :
Démontage de la barre anti-rebond
La barre anti-rebond ne sert que pour l’utilisation dos à la
route du siège-auto. Elle doit être enlevée avant d’utiliser
le siège face à la route. Pour l’enlever, appuyez sur le
bouton de déblocage (29) tout en tirant la barre anti-
rebond hors du guide.
29
106 107
Démontage / rangement du système de ceinture à 5
points
Vous devez ranger le système de harnais à 5 points
avant de pouvoir utiliser le siège-auto face à la route.
AVERTISSEMENT ! L’utilisation du système de
!
ceinture à 5 points n’est pas autorisée en position
face à la route !
OMZETTEN VAN ACHTERWAARTS NAAR VOOR
WAARTS GERICHT GEBRUIK
Let op de volgende punten als u het autozitje in de
voorwaarts gerichte positie wilt gebruiken:
Demonteren van de rebound-beugel
De rebound-beugel is alleen nodig bij achterwaarts
gericht gebruik van het autozitje. De beugel moet worden
verwijderd voordat u het zitje in de voorwaarts gerichte
positie gebruikt. Druk op de ontgrendelknop (29) terwijl u
tegelijkertijd de rebound-beugel uit de houder trekt.
Verwijderen/ opbergen van het 5-punts-gordelsysteem
Eerst moet u het 5-punts-harnas systeem opbergen,
voordat u het autozitje in de voorwaarts gerichte stand
kunt gebruiken.
WAARSCHUWING! Het is niet toegestaan om het
!
5-punts-gordelsysteem in de voorwaarts gerichte
positie te gebruiken!
PRZESTAWIANIE Z POZYCJI „TYŁEM DO KIERUN
KU JAZDY” NA „PRZODEM DO KIERUNKU JAZDY”
Aby korzystać z fotelika przodem do kierunku jazdy,
trzeba wykonać kilka czynności:
Demontaż osłony odbojowej
Osłona odbojowa jest potrzebna tylko, gdy fotelik jest
skierowany tyłem do kierunku jazdy. Przed przestawieniem fotelika przodem do kierunku jazdy należy
ją zdjąć. Aby wymontować osłonę odbojową, naciśnij
przycisk zwalniania (29) jednocześnie wyciągając osłonę
odbojową z prowadnicy.
Demontaż / schowanie pasów 5-punktowych
Przed użyciem fotelika w pozycji przodem do kierunku
jazdy, należy schować pasy 5-punktowe.
OSTRZEŻENIE! Korzystanie z pasów 5-punk-
!
towych w pozycji przodem do kierunku jazdy jest
zabronione!
FRNLPL
Page 55

• Mettez d’abord l’appuie-tête dans la position la plus
haute.
• Desserrez les ceintures d’épaules (23) en activant le
23
24
27
26
25
38
31
30
32
26
108 109
dispositif d’ajustement central (24) et éloignez les deux
ceintures d’épaules (23) le plus possible.
• Ouvrez la boucle de la ceinture (26) en appuyant sur le
bouton rouge.
• Levez le revêtement de la zone d’assise jusqu’à ce que
le compartiment de rangement de la boucle de harnais
soit accessible.
• Enlevez les coussinets d’épaules (25) des ceintures
d’épaules (23) et la boucle de la ceinture (26).
• Tirez maintenant la boucle de harnais à travers la housse.
• Ouvrez le capot rouge (30) du compartiment de
rangement (31) dans le siège et mettez-y la boucle de
la ceinture (26).
• Rangez les protèges harnais (27) dans le compartiment
prévu à cet eet (38) dans le dossier.
Remarque ! Vous ne pouvez pas tourner le siège
en position face à la route tant que la boucle de la
ceinture (26) n’est pas rangée dans le compartiment de
rangement (31).
• Fermez le capot rouge (30) et remettez le revêtement
du siège en place. Gardez toujours les coussinets
d’épaules à portée de main.
• Sortez alors le bouclier d’impact fourni (32) du
compartiment.
AVERTISSEMENT ! L’utilisation du système de
!
ceinture à 5 points n’est pas autorisée en position
face à la route !
• Breng eerst de hoofdsteun in de hoogste stand.
• Maak de schoudergordels (23) los door de centrale
versteller (24) te activeren en beide schoudergordels
(23) zo ver mogelijk uit te trekken.
• Open de riemgesp (26) door op de rode knop te drukken.
• Trek de hoes in het zitvlak omhoog tot het
opbergcompartiment voor de gesp van het harnas
zichtbaar wordt.
• Haal de schouderpads (25) los van de schoudergordels
(23) en de riemgesp (26).
• Trek nu de gesp door de zittinghoes.
• Op het rode deksel (30) van het opbergcompartiment
(31) in het zitje en leg de riemgesp (26) erin.
• Berg de gordeltongen (27) van de schouderriem op in
de daarvoor bestemde ruimte (38) in de rugleuning.
Let op! Het zitje kan niet naar de voorwaarts gerichte
positie worden gedraaid tot de riemgesp (26) in het
opbergcompartiment (31) is opgeborgen.
• Sluit het rode deksel (30) en breng de hoes van het
zitje weer goed aan. Let op dat u de schouderpads
niet kwijtraakt.
• Haal nu het meegeleverde impactschild (32) uit de
bewaarplek.
WAARSCHUWING! Het is niet toegestaan om het
!
5-punts-gordelsysteem in de voorwaarts gerichte
positie te gebruiken!
• Najpierw ustaw zagłówek w maksymalnie podniesionej
pozycji.
• Poluzuj pasy ramienne (23) naciskając centralny
mechanizm regulacji (24) i wyciągnij jak najdalej oba
pasy ramienne (23).
• Rozepnij sprzączkę (26) naciskając czerwony przycisk.
• Podnieś osłonę w stree siedziska, aby uzyskać dostęp
na schowek na sprzączkę.
• Odepnij osłony (25) pasów ramiennych (23) i
sprzączkę (26).
• Teraz przeciągnij sprzączkę przez pokrycie fotelika.
• Otwórz czerwoną pokrywę (30) schowka (31) w fotelu i
schowaj tam sprzączkę pasa (26).
• Przechowuj pasy naramienne (27) w przeznaczonej do
tego wnęce (38) w oparciu.
Wskazówka! Nie wolno obracać fotelika w pozycji
przodem do kierunku jazdy, dopóki sprzączka (26) nie
zostanie włożona do schowka (31).
• Zamknij czerwoną pokrywę (30) i załóż z powrotem
osłonę fotelika. Przechowuj osłony pasów ramiennych
w łatwo dostępnym miejscu.
• Teraz wyjmij dostarczoną w komplecie osłonę ochronną
(32) ze schowka.
OSTRZEŻENIE! Korzystanie z pasów 5-punk-
!
towych w pozycji przodem do kierunku jazdy jest
zabronione!
FRNLPL
Page 56

UTILISATION FACE A LA ROUTE76 CM 105 CM
MAX.
4
vous ne pouvez utiliser le siège en position face à la
route que si :
• la taille de l’enfant est > 76 cm.
et
• l’enfant a au moins 16 mois.
et
• l’appuie-tête (20) placé correctement recouvre l’indicateur (4)
REMARQUE ! Les statistiques d’accident démontrent
que la manière la plus sûre de transporter un enfant dans
un véhicule est en position dos à la route. Nous vous
conseillons donc d’utiliser le siège-auto en position dos à
la route le plus longtemps possible.
REMARQUE ! Vous devez régler l’appuie-tête (20) de
manière à ce que la distance entre les épaules de l’enfant
20
et l’appuie-tête (20) ne dépasse pas 3 cm (env. 2 largeurs
de doigt). Pour plus d’information, voir le point « REGLAGE A LA TAILLE DE L’ENFANT ».
REMARQUE ! Pour le transport face à la route, utilisez le
110 111
bouclier d’impact.
VOORWAARTS GERICHT GEBRUIK 76 CM 105 CM
Het zitje mag alleen voorwaarts gericht zijn als:
• het kind langer is dan 76 cm.
en
• het kind min. 16 maanden oud is.
en
• de correct afgestelde hoofdsteun (20) de indicator (4)
bedekt
LET OP! Ongevallenstatistieken wijzen uit, dat u uw kind
het veiligst in de achterwaarts gerichte stand in een auto
vervoert. Daarom raden wij u aan om het autozitje zolang
mogelijk in de achterwaarts gerichte positie te gebruiken.
LET OP! De hoofdsteun (20) moet zodanig worden afgesteld dat de afstand tussen de schouders van het kind
en de hoofdsteun (20) niet groter is dan 3 cm (ongeveer
2 vingers breed). Lees voor meer informatie het gedeelte
„AANPASSEN AAN DE LICHAAMSGROOTTE“.
LET OP! Gebruik voor het vervoer in voorwaarts gerichte
stand het impactschild.
PRZODEM DO KIERUNKU JAZDY 76 CM 105 CM
Z fotela można korzystać wyłącznie przodem do kierunku
jazdy, jeżeli:
• dziecko ma wzrost > 76 cm.
i
• dziecko ma co najmniej 16 miesięcy.
i
• prawidłowo wyregulowany zagłówek (20) zakrywa
wskaźnik (4)
WSKAZÓWKA! Ze statystyk wynika, że najbezpieczniejsze jest przewożenie dziecka tyłem do kierunku jazdy.
Dlatego zalecamy korzystanie z fotelika jak najdłużej w
pozycji tyłem do kierunku jazdy.
WSKAZÓWKA! Ustaw zagłówek (20) w taki sposób, aby
odległość między ramionami dziecka a zagłówkiem (20) nie
przekraczała 3 cm (szerokość ok. 2 palców). Więcej informa
cji, patrz punkt „DOSTOSOWANIE DO ROZMIARU CIAŁA”.
WSKAZÓWKA! W przypadku przewożenia dziecka przodem do kierunku jazdy zamontuj osłonę ochronną.
-
FRNLPL
Page 57

32
33
REGLAGE DU BOUCLIER D’IMPACT
Tirez sur les sangles de réglage (33) à l’avant du bouclier
d’impact (32) pour le régler. Il doit être serré mais ne pas
comprimer le corps de l’enfant.
REMARQUE ! Le bouclier d’impact n’ore une protection
et un confort maximum pour l’enfant que s’il est réglé
correctement. L’enfant ne doit pas porter de vêtements
d’hiver épais.
Pour détacher les sangles de réglage (33), appuyez sur
les boutons de déblocage du dispositif d'ajustement de
ceinture (34) et retirez les languettes de la boucle du
bouclier d’impact (32).
HET AANPASSEN VAN HET IMPACTSCHILD
Stel het impactschild af door aan de afstelriemen (33)
aan de voorzijde van het impactschild (32) te trekken. Dit
moet wel strak zitten, maar mag niet tegen het lichaam
van het kind drukken.
LET OP! Het impactschild biedt maximale bescherming
en comfort voor uw kind, maar alleen als deze goed is
afgesteld. Dikke winterkleding kan beter niet worden
gedragen in het zitje.
Om de afstelriemen (33) los te maken, drukt u op de
ontgrendelknoppen van de gordelverstellers (34) en trekt
u de uiteinden van de gordels uit het impactschild (32).
REGULACJA OSŁONY OCHRONNEJ
Pociągając paski regulacyjne (33) z przodu osłony
ochronnej (32) można ją wyregulować. Osłona powinna
być ułożona ściśle, jednak nie może naciskać na dziecko.
WSKAZÓWKA! Osłona ochronna zapewnia dziecku
maksymalną ochronę i wygodę jedynie wtedy, gdy jest
prawidłowo ustawiona. Dziecko nie może mieć na sobie
grubej odzieży zimowej.
Naciśnij przyciski zwalniające regulatorów pasa (33) i
wyciągnąć klamry osłony ochronnej (34), aby zwolnić
paski regulacyjne (32).
34
112 113
FRNLPL
Page 58
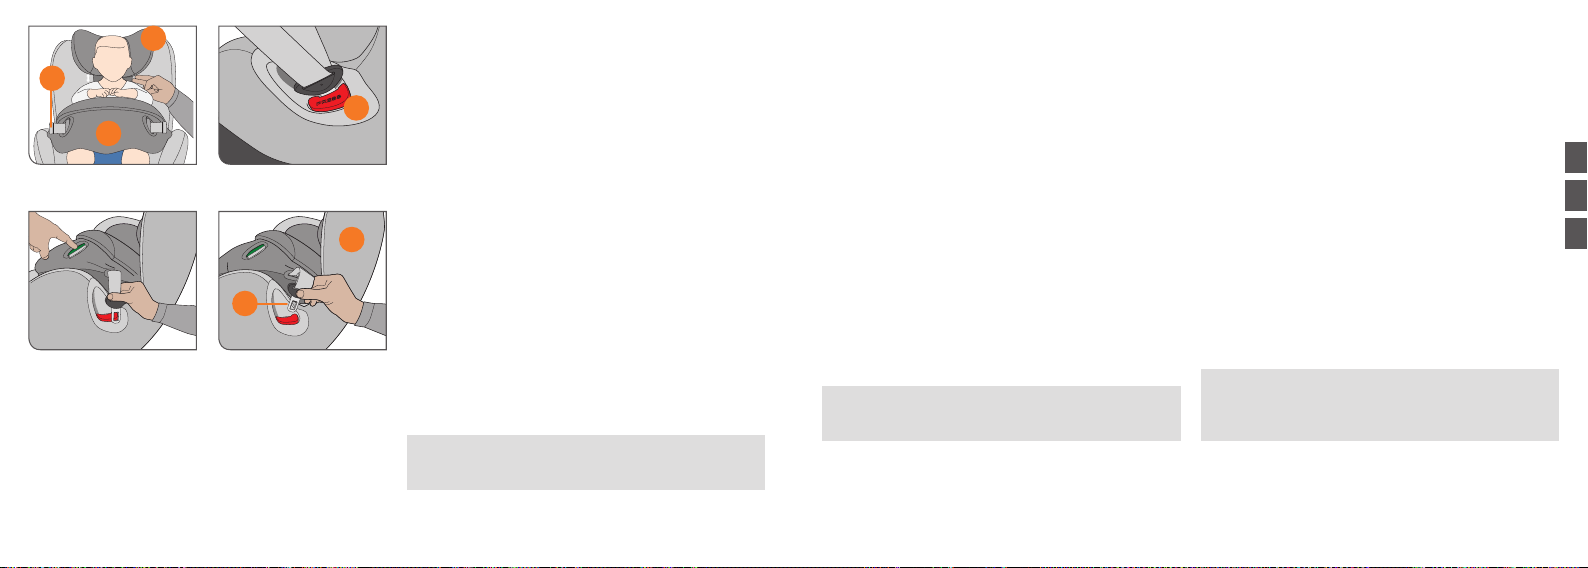
MAX.
20
33
32
17
36
114 115
ATTACHE AVEC LE BOUCLIER D’IMPACT
• Ouvrez le dispositif de verrouillage du bouclier d’impact
(28) sur la coque du siège (17) en appuyant sur le bouton
de déblocage (35).
REMARQUE ! Vous pouvez également désengager le
35
bouclier d’impact (32) d’un côté, puis le replier vers l’autre
côté. Il est ainsi plus facile de mettre votre enfant dans
le siège.
Une fois l’appuie-tête (20) et le bouclier d’impact (32)
réglés, mettez votre enfant dans la coque du siège (17).
• Mettez la languette en métal (36) du bouclier d’impact
dans la boucle correspondante et assurez-vous que la
boucle s’enclenche avec un « CLIC » audible.
• Tirez sur le bouclier d’impact (32) pour vérier qu’il est
bien verrouillé en place.
• Serrez le bouclier d’impact (32) en tirant les deux
extrémités de ceinture (33) vers l’arrière. Le bouclier
d’impact est serré correctement lorsqu’il n’est
possible de ne passer qu’une main entre l’enfant et le
bouclier d’impact.
REMARQUE ! Les boucles doivent être exemptes d’im-
puretés et d’objets. Seules les boucles propres peuvent
se verrouiller de manière audible et en toute sécurité.
AVERTISSEMENT ! Pour assurer la sécurité de
!
votre enfant (de 76 cm à 105 cm), n’utilisez le bouclier d’impact (32) qu’en position face à la route.
VASTZETTEN MET HET IMPACTSCHILD
• Open de vergrendeling van het impactschild (28) op de
zitschaal (17) door op de ontgrendelknop (35) te drukken.
LET OP! Het impactschild (32) kan ook slechts aan
één kant worden losgemaakt en naar de andere kant
worden geklapt. Hierdoor kunt u het kind gemakkelijk in
het zitje plaatsen.
Nadat u de hoofdsteun (20) en het impactschild (32) heeft
aangepast, plaatst u het kind in de zitschaal (17).
• Stop de metalen lip (36) van het impactschild in de
corresponderende gesp en zorg dat deze op zijn plaats
klikt met een duidelijk hoorbare „KLIK“.
• Trek aan het impactschild (32) om te controleren of dit
goed vastgeklikt zit.
• Trek het impactschild (32) strak door de twee uiteinden
van de gordels (33) naar achteren te trekken. Het
impactschild zit goed vast als er nog net een hand tussen
uw kind en het impactschild past.
LET OP! De gespen moeten vrij blijven van zand en andere vuil. Alleen schone gespen sluiten hoorbaar en veilig.
WAARSCHUWING! Voor de veiligheid van uw kind
!
(van 76 cm tot 105 cm) mag het impactschild alleen
gebruikt worden in de voorwaarts gerichte positie.
PRZYPINANIE DZIECKA Z OSŁONĄ OCHRONNĄ
• Zwolnij blokadę osłony ochronnej (28) w górnej części
fotelika (17), naciskając przycisk zwalniania (35).
WSKAZÓWKA! Zamiast tego można odblokować osłonę
ochronną (32) tylko po jednej stronie i rozłożyć na drugą.
Dzięki temu będzie łatwiej włożyć dziecko do fotelika.
Po wyregulowaniu zagłówka (20) i osłony ochronnej (32),
włóż dziecko do fotelika (17).
• Wciśnij metalowy języczek (36) osłony ochronnej w
odpowiednią klamrę i upewnij się, że zablokował się
słyszalnym kliknięciem.
• Pociągnij za osłonę ochronną (32), aby sprawdzić, czy
jest prawidłowo zablokowana.
• Zaciśnij osłonę ochronną (32), pociągając do tyłu oba
końce paska (33). Osłona ochronna jest prawidłowo
ściągnięta, gdy można jeszcze włożyć dłoń między
dziecko a osłonę.
WSKAZÓWKA! Klamry należy utrzymywać w czystości.
Tylko czyste klamry zatrzaskują się skutecznie i słyszalnie.
OSTRZEŻENIE! Aby zagwarantować bezpieczeń-
!
stwo dziecka (od 76 cm do 105 cm), należy korzystać osłony ochronnej (32) wyłącznie, gdy fotelik
jest ustawiony przodem do kierunku jazdy.
FRNLPL
Page 59

MAX.
MAX.
CLICK!
VOTRE ENFANT ESTIL BIEN ATTACHE?
Pour assurer la meilleure sécurité pour votre enfant,
assurez-vous que:
• Les connecteurs ISOFIX sont bien fixés au véhicule et
que la jambe de force
• La coque du siège est verrouillée dans la bonne
position.
• L’appuie-tête a été réglé à la bonne hauteur.
a été installée correctement.
• En utilisation dos à la route: Le système de ceinture à
5 points a été réglé correctement à la taille de l’enfant,
les ceintures d’épaules ne sont pas vrillées et le système
de ceinture est verrouillé.
• En utilisation face à la route: le bouclier d’impact est
réglé correctement à la taille de l’enfant.
• Les nouveau-nés et les enfants pas encore capables de
tenir assis d’eux-mêmes (jusqu’à environ 1 an) doivent
toujours être transportés, pour des raisons orthopédiques
et de sécurité, dans la position rectiligne la plus plate,
ZIT UW KIND VEILIG VAST?
Om de maximale veiligheid voor uw kind te waarborgen,
zorgt u ervoor dat:
• De ISOFIX-connectoren goed zijn vastgemaakt in het
goed
voertuig en dat de steunpoot
• De zitschaal in de juiste positie zit vastgeklikt.
is geplaatst.
• De hoofdsteun aangepast is aan de correcte hoogte.
• In achterwaarts gericht gebruik: Het 5-punts-
gordelsysteem goed aangepast is aan de lengte van
het kind, de schoudergordels niet gedraaid zijn en het
gordelsysteem vastzit.
• In voorwaarts gericht gebruik: of het impactschild correct
is aangepast aan de lengte van het kind.
• Pasgeborenen en kinderen die nog niet zelfstandig
rechtop kunnen zitten (tot ongeveer 1 jaar oud) moeten,
om orthopedische en veiligheidsredenen, altijd in de
meest vlakke positie worden vervoerd en in achterwaarts
gerichte stand.
dos à la route.
116 117
CZY TWOJE DZIECKO JEST PRAWIDŁOWO ZAPIĘTE?
Aby zagwarantować Twojemu dziecku maksymalne
bezpieczeństwo, upewnij się, że:
• Złącza ISOFIX są dobrze zamocowane do pojazdu, a
jest prawidłowo zamontowana.
podpora
• Górna część fotelika została zablokowana w
prawidłowej pozycji.
• Zagłówek został wyregulowany na prawidłową wysokość.
• W pozycji tyłem do kierunku jazdy: 5-punktowe pasy
zostały prawidłowo dopasowane do rozmiarów ciała
dziecka, pasy ramienne nie są skręcone, a system pasów
został zablokowany.
• W pozycji przodem do kierunku jazdy: osłona ochronna
została prawidłowo dopasowana do rozmiarów ciała dziecka.
• Noworodki i niemowlęta, które jeszcze nie siedzą
samodzielnie (mniej więcej do ukończenia 1 orku) ze
względów ortopedycznych i bezpieczeństwa należy
zawsze transportować w pozycji maksymalnie poziomej,
w foteliku skierowanym tyłem do kierunku jazdy.
FRNLPL
Page 60

ENLEVEMENT DU REVETEMENT
Enlèvement
Le revêtement du siège-auto est composé de 7 pièces (coussinets
de ceinture, revêtement de l’appuie-tête, revêtement du siège
principal, revêtement du bouclier d’impact). Les revêtements
23
26
118 119
sont xés dans les canaux de xation des revêtements, sur
les arêtes du siège-auto et sont maintenus en position par des
boutons-pression à plusieurs endroits. Une fois tous les boutons-
pression ouverts, vous pouvez détacher les diérentes pièces du
revêtement des canaux de xation du revêtement.
AVERTISSEMENT ! Vous ne devez jamais utiliser
!
le siège-auto sans le revêtement.
ENLEVEMENT DES COUSSINETS DE CEINTURE
Ouvrez la boucle de ceinture (26) du système de ceinture
à 5 points et ouvrez les boutons-pression pour enlever
les coussinets de ceinture. Vous pouvez alors enlever les
ceintures d’épaules (23) du revêtement.
ENLEVEMENT DU REVETEMENT DE L’APPUIE-TETE
Enlevez le revêtement de l’arrière vers l’avant de
l’appuie-tête.
ENLEVEMENT DU REVÊTEMENT DU SIÈGE
PRINCIPAL
Ouvrez la fermeture éclair à l’arrière du siège et enlevez
le revêtement de l’arrière vers l’avant de l’appuie-tête.
ENLEVEMENT DU REVETEMENT DU BOUCLIER
D’IMPACT
Ouvrez la fermeture éclair à l’avant et enlevez le
revêtement vers l’arrière du bouclier d’impact.
Fixation
Pour remettre les revêtements sur le siège-auto, suivez la même
procédure qu’indiqué au préalable, mais dans l’ordre inverse.
DE HOES VERWIJDEREN
Verwijderen
De hoes van het autozitje bestaat uit 7 onderdelen
(riemkussens, hoofdsteunhoes, zittinghoes, hoes
impactschild). De hoezen zitten rondom vast in
hoesbevestigingsgroeven langs de rand van het autozitje
en worden op verschillende plaatsen vastgezet met
drukknopen. Zodra alle drukknopen zijn losgemaakt
kunnen de losse hoezen uit de groeven worden gehaald.
WAARSCHUWING! Het autozitje mag nooit zonder
!
de hoes worden gebruikt.
DE GORDELKUSSENS VERWIJDEREN
Open de riemgesp (26) van het 5-punts-gordelsysteem
en open de drukknoppen om de gordelkussens te
verwijderen. Nu haalt u de schoudergordels (23) uit de
hoes.
DE HOES VAN DE HOOFDSTEUN VERWIJDEREN
Trek de hoes van achter naar voren over de hoofdsteun.
DE ZITTINGHOES VERWIJDEREN
Open de ritssluiting aan de achterkant van het zitje en
trek de hoes van achter naar voren over de hoofdsteun.
DE HOES VAN HET IMPACTSCHILD HALEN
Open de ritssluiting aan de voorzijde en trek de hoes naar
achteren van het impactschild af.
Vastmaken
Volg u de eerdere aanwijzingen in omgekeerde volgorde
om de hoezen weer op het autozitje aan te brengen.
DEMONTAŻ OBICIA
Demontaż
Obicie fotelika składa się z 7 części (osłony pasów
ramiennych, obicie zagłówka, obicie centralnej części
fotela, obicie osłony ochronnej). Obicia są zamocowane
w specjalnych kanałach na krawędziach fotelika i
w kilku miejscach przez zatrzaski. Po zwolnieniu
wszystkich zatrzasków, można zdjąć pojedyncze osłony
z kanałów mocujących.
OSTRZEŻENIE! Nigdy nie wolno korzystać z
!
fotelika bez obicia.
DEMONTAŻ OSŁON PASÓW RAMIENNYCH
Zwolnij klamrę (26) pasów 5-punktowych i otworzyć
zatrzaski, aby zdjąć osłony pasów ramiennych. Teraz
wyciągnij pasy ramienne (23) z osłon.
DEMONTAŻ OBICIA ZAGŁÓWKA
Ściągnij obicie z zagłówka od tyłu do przodu.
DEMONTAŻ OBICIA ŚRODKOWEJ CZĘŚCI FOTELIKA
Otwórz zamek błyskawiczny z tyłu fotelika i ściągnij obicie
z tyłu do przodu przez zagłówek.
DEMONTAŻ OBICIA Z OSŁONY OCHRONNEJ
Otwórz zamek błyskawiczny z przodu i ściągnij obicie do
tyłu z osłony ochronnej.
Montaż
Aby zamontować obicia z powrotem na foteliku, wykonuj
wszystkie czynności podane powyżej w odwrotnej
kolejności.
FRNLPL
Page 61

NETTOYAGE
Il est primordial d’utiliser le revêtement d’origine du
siège car le revêtement est une partie intégrante du
fonctionnement. Vous pouvez acquérir des revêtements
de siège de rechange auprès de votre distributeur.
AVERTISSEMENT ! Veuillez laver le revêtement
!
avant sa première utilisation. Les revêtements de
siège peuvent être lavés à la machine à 30°C max.
avec un programme pour linge délicat. Si vous le
lavez à une température plus élevée, le tissu du
revêtement peut se décolorer. Veuillez laver le revêtement séparément et ne pas le sécher au sèchelinge ! Ne séchez pas le revêtement directement au
soleil ! Vous pouvez laver les pièces en plastique à
l’aide d’un détergent doux et d’eau chaude.
AVERTISSEMENT ! N’utilisez jamais de détergent
!
chimiques ni d’agents blanchissants !
120 121
REINIGEN
Het is belangrijk om een originele zittinghoes te gebruiken
omdat de hoes essentieel is voor de functionaliteit. De
wederverkoper heeft ook reserve hoezen te koop.
WAARSCHUWING! Was de hoes voor het eerste
!
gebruik. De hoezen kunnen in de wasmachine
met een jnwas-programma bij max. 30°C worden
gewassen. Bij hogere temperaturen kan de stof
zijn kleur verliezen. Was de hoezen apart en droog
ze niet in een wasdroger! Droog de hoezen niet
in direct zonlicht! De plastic onderdelen kunnen
met een mild schoonmaakmiddel en warm water
gereinigd worden.
WAARSCHUWING! Gebruik onder geen enkele
!
omstandigheden chemische schoonmaakmiddelen
of middelen met bleek.
CZYSZCZENIE
Bardzo ważne jest używanie oryginalnego obicia,
ponieważ ma ono istotny wpływ na skuteczność fotelika.
Zamienne obicia można nabyć u sprzedawcy.
OSTRZEŻENIE! Przed pierwszym użyciem wypierz
!
obicie. Obicia można myć w pralce automatycznej
przy temperaturze maks. 30°C, pranie delikatne.
Pranie w wyższej temperaturze może spowodować
odbarwienie obicia. Pierz obicie oddzielnie, bez
wirowania! Nie susz obicia bezpośrednio na słońcu!
Części z tworzywa sztucznego można umyć ciepłą
wodą z łagodnym środkiem czyszczącym.
OSTRZEŻENIE! Pod żadnym pozorem nie używaj
!
chemicznych detergentów ani wybielaczy!
FRNLPL
Page 62

NETTOYAGE
Pour garantir que votre siège-auto apporte la protection
maximale, vous devez respecter les points suivants :
• Vous devez vérier régulièrement l’absence de dommages
sur les principaux composants du siège-auto. Les pièces
mécaniques doivent fonctionner sans problème.
• Assurez-vous que le siège-auto n’est pas coincé entre
des objets durs tels que la porte du véhicule, les rails
des sièges, etc. pouvant l’endommager.
• Évitez toute impureté ou du sable entre la coque du
siège supérieure et la base. Ceci peut avoir un impact
négatif sur les performances des fonctions de rotation
et d’inclinaison. Si cela arrive, enlevez les impuretés
avant de tourner et d’incliner le siège an d’éviter
d’endommager durablement le siège.
• Si le siège-auto tombe, e. a., faites le vérier par le
fabricant avant de le réutiliser.
AVERTISSEMENT ! Le revêtement fait partie inté-
!
grante de la conception de sécurité du siège-auto.
Vous ne devez donc jamais utiliser le siège-auto
sans revêtement, ni avec le revêtement d’un autre
siège-auto.
122 123
REINIGEN
Om te zorgen dat uw autozitje de maximale bescherming
biedt, is het belangrijk om de volgende punten op te volgen:
• Alle belangrijke onderdelen van het autozitje moeten
regelmatig gecontroleerd worden op schade. De
mechanische onderdelen moeten soepel werken.
• Zorg dat het autozitje niet tussen harde delen bekneld
komt te zitten, zoals de autodeur, de stoelrails etc.
waardoor het beschadigd zou kunnen raken.
• Voorkom dat er zand of vuil tussen het onderstel en de
zitschaal komt te zitten. Het zitje zal hier stroever door
gaan draaien en kantelen. Mocht dit toch gebeuren,
moet het vuil verwijderd moeten worden voordat het
zitje gedraaid of gekanteld wordt om permanente
schade te voorkomen.
• Als het autozitje bijvoorbeeld is gevallen moet het
getest worden door de fabrikant voordat het opnieuw
wordt gebruikt.
WAARSCHUWING! De hoes vormt een essentieel
!
onderdeel van het veiligheidsontwerp van het
autozitje. Het autozitje mag daarom nooit zonder
de hoes of met de hoes een ander autozitje worden
gebruikt.
CZYSZCZENIE
Aby fotelik zapewniał maksymalną ochronę, muszą być
spełnione następujące warunki:
• Wszystkie główne podzespoły fotelika należy regularnie
kontrolować pod kątem uszkodzeń. Elementy
mechaniczne muszą działać bez zakłóceń.
• Upewnij się, że fotelik nie jest przytrzaśnięty między
twardymi elementami takimi jak drzwi pojazdu,
podłokietniki itp., które mogą go uszkodzić.
• Uważaj, aby między górną część fotelika a podstawę
nie dostał się brud ani piach. Może to zakłócić działanie
funkcji obracania i przechylania. Jeżeli tak się zdarzy,
usunąć brud przed dalszym obróceniem i pochyleniem
fotelika, aby uniknąć jego trwałego uszkodzenia.
• W razie np. upuszczenia fotelika, przed jego ponownym
użyciem należy zlecić jego kontrolę przez producenta.
OSTRZEŻENIE! Obicie jest integralną częścią kon-
!
cepcji bezpieczeństwa fotelika. Dlatego nigdy nie
wolno korzystać z fotelika bez obicia lub z obiciem z
innego modelu fotelika.
FRNLPL
Page 63

37
QUE FAIRE APRES UN ACCIDENT
AVERTISSEMENT ! Les accidents peuvent
!
provoquer des dommages invisibles à l’œil nu sur
le siège-auto. Veuillez impérativement échanger le
siège-auto après un accident.
AVERTISSEMENT ! Le siège-auto est équipé d’un
!
système de sécurité (37) intégré qui se déploie automatiquement en cas d’accident sous une certaine
charge.
WAT TE DOEN NA EEN ONGEVAL
WAARSCHUWING! Een ongeval kan schade aan
!
het autozitje veroorzaken die niet met het blote oog
zichtbaar is. Vervang het zitje altijd na een ongeval.
WAARSCHUWING! Het autozitje is uitgerust met
!
een integraal veiligheidssysteem (37) dat automatisch uitvouwt als er een ongeval gebeurt waarbij
een bepaalde kracht wordt uitgeoefend.
CO ZROBIĆ PO WYPADKU
OSTRZEŻENIE! Podczas wypadku fotelik może
!
ulec uszkodzeniu w sposób niewidzialny gołym
okiem. Po wypadku zawsze wymień fotelik na nowy.
OSTRZEŻENIE! Fotelik samochodowy jest
!
wyposażony w zintegrowany system bezpieczeństwa (37), które automatycznie rozkłada się przy
określonym przeciążeniu podczas wypadku.
FRNLPL
INFORMATION SUR LE PRODUIT
En cas de question, veuillez contacter d’abord votre
distributeur. Ayez les informations suivantes à portée
de main :
• Numéro de série (voir l’étiquette)
• Marque et modèle de véhicule et position du siège du
véhicule sur lequel vous utilisez le siège-auto
• Poids, âge et taille de l’enfant
Vous trouverez plus d’informations sur nos produits sur
www.cybex-online.com.
124 125
PRODUCTINFORMATIE
Als u vragen heeft, neem dan eerst contact op met uw
detailhandelaar. Hou de volgende gegevens bij de hand:
• Serienummer (zie sticker)
• Merk en model van het voertuig en de positie waarin
het autozitje wordt gebruikt
• Gewicht, leeftijd en lengte van het kind
Meer informatie over onze producten zijn te vinden op
www.cybex-online.com.
INFORMACJE O PRODUKCIE
W razie jakichkolwiek pytań skontaktuj się ze
sprzedawcą. Przygotuj następujące dane:
• Numer seryjny (patrz naklejka)
• Marka i model pojazdu oraz miejsce w pojeździe, w
którym używany jest fotelik
• Masa ciała, wiek i wzrost dziecka
Więcej informacji na temat naszych produktów znajdziesz
na stronie www.cybex-online.com.
Page 64

DURABILITE DU PRODUIT
Le siège-auto est conçu pour répondre aux spécications
pendant toute sa durée d’utilisation d’environ 4 ans. Cependant, les températures pouvant varier énormément et des
contraintes imprévisibles survenir dans les véhicules, vous
devez observer les points suivants :
• En cas d’exposition prolongée du véhicule en plein soleil,
veuillez enlever le siège-auto du véhicule ou le recouvrir
d’un tissu léger.
• Vériez régulièrement toutes les pièces en plastique et
en métal du siège pour constater l’absence de dommages, de déformations ou de colorations. En cas de
changements, vous devez faire vérier le siège-auto par
le fabricant pour son élimination, son contrôle, voire son
remplacement.
• Les modications du tissu, en particulier la décoloration,
sont parfaitement normales et n’entravent en rien le fonctionnement du siège.
ÉLIMINATION
Pour la protection de l’environnement, nous prions l’utilisateur
de séparer et d’éliminer les déchets du début (emballage)
à la n (pièces du produit) de la durée de vie du siège-auto.
L’élimination des déchets varie en fonction des réglementations locales. Pour assurer l’élimination du siège-auto dans
les règles, veuillez contacter l’agence d’élimination des
déchets la plus proche ou les autorités locales. Respectez les
réglementations d’élimination des déchets de votre pays.
AVERTISSEMENT ! Éloignez le matériel d’em-
!
ballage hors de la portée des enfants : risque
d’étouement !
126 127
DUURZAAMHEID VAN HET PRODUCT
Het autozitje is ontworpen om tijdens zijn volledige levens-
duur van ongeveer 4 jaar aan zijn specicaties te voldoen.
Aangezien er echter veel grote temperatuurswisselingen en
onvoorspelbare krachten in voortuigen kunnen voorkomen,
dienen de volgende punten in acht te worden genomen:
• Als het voertuig voor een langere tijd blootgesteld wordt
aan direct zonlicht moet het kinderzitje worden verwijderd
uit het voertuig, of worden bedekt met een doek in een
lichte kleur.
• Controleer regelmatig alle plastic en metalen onderdelen
van het zitje op schade, vervormingen of verkleuringen.
Als u enige veranderingen ontdekt moet het autozitje worden weggegooid of gecontroleerd en mogelijk vervangen
door de fabrikant.
• Veranderingen aan de stof, zoals uitbleken, zijn volkomen
normaal bij gebruik in een auto en doet verder niets af aan
de functionaliteit van het zitje.
AFVOEREN
Om het milieu te beschermen vragen we de gebruiker om
afval dat aan het begin (verpakkingsmaterialen) en aan het
einde (productonderdelen) van de levensduur van het autozitje
optreedt te recyclen. Regels wat betreft afvalverwerking zijn afhankelijk van de plaatselijke overheid. Om ervoor te zorgen dat
het autozitje volgens de voorschriften wordt afgevoerd, dient
u contact op te nemen met de plaatselijke afvalverwerkingsdienst. Volg altijd de regels voor afvalverwerking in uw land op.
WAARSCHUWING! Houd plastic verpakkingsma-
!
teriaal buiten het bereik van kinderen: verstikkingsgevaar!
TRWAŁOŚĆ PRODUKTU
Fotelik samochodowy został zaprojektowany tak, aby działał
prawidłowo przez cały swój okres żywotności wynoszący
ok. 4 lat. Mimo to ze względu na duże wahania temperatur
oraz nieprzewidywalne obciążenia w pojeździe, przestrzegaj
następujących warunków:
• Jeżeli pojazd będzie przez dłuższy czas na słońcu, wyjmij
fotelik z pojazdu lub zakryj go tkaniną o jasnym kolorze.
• Regularnie kontroluj, czy żadne elementy fotelika wykonane z tworzywa sztucznego lub metalu nie są uszkodzone,
nie odkształciły się ani nie zmieniły koloru. W przypadku
stwierdzenia jakichkolwiek zmian w foteliku, należy go
oddać do utylizacji lub sprawdzić i ew. oddać go producen-
towi do wymiany.
• Z kolei zmiany w tkaninie, zwłaszcza blaknięcie, są nor-
malnymi objawami wynikającymi z korzystania z fotelika i
nie mają wpływ na jego działanie.
USUWANIE
Dla zapewnienia ochrony środowiska, prosimy użytkownika
o segregację i usunięcie odpadów powstających od początku użytkowania (opakowanie) aż do jego końca (części
produktu). Sposób usunięcia odpadów zależy od przepisów
lokalnych. Aby upewnić się, że fotelik zostanie usunięty
w sposób zgodny z przepisami, skontaktuj się z lokalnym
przedsiębiorstwem komunalnym lub organami samorządowymi. Zawsze przestrzegaj przepisów dotyczących usuwania odpadów obowiązujących w Twoim kraju.
OSTRZEŻENIE! Trzymaj materiały opakowaniowe
!
z tworzywa sztucznego poza zasięgiem dzieci:
niebezpieczeństwo uduszenia!
FRNLPL
Page 65

GARANTIE
La garantie suivante s'applique uniquement dans le pays
où ce pays a initialement été vendu par un détaillant ou
un client.
1. La garantie couvre tous les défauts de fabrication et de
matériau, existants ou apparus ultérieurement, à la date
d'achat ou apparaissant dans les trois (3) années à compter
de la date d'achat par le détaillant l'ayant vendu initialement
au consommateur (garantie du fabricant). Veuillez vérier
que le produit est complet et qu'il ne comporte aucun défaut
de fabrication ou de matériau à la date d'achat ou dès
réception. Veuillez conserver la preuve d'achat datée.
2. En cas de défaut, arrêtez immédiatement d'utiliser le
produit. Pour faire jouer la garantie, veuillez déposer ou
envoyer le produit complet et en bon état chez le détaillant
auprès duquel vous l'avez initialement acheté et remettre
une preuve d'achat originale (ticket de caisse ou facture).
N'envoyez pas ou ne déposez pas le produit directement
chez le fabricant.
3. Cette garantie ne couvre pas les dommages résultant d'une
utilisation incorrecte, d'inuences extérieures (eau, feu,
accidents etc.), d'une usure normale ou de l'inobservation
des instructions fournies dans ce mode d'emploi. La garantie
ne s'applique pas si des modications et un entretien ont
été eectués par des personnes non autorisées ou si des
composants et accessoires non originaux ont été utilisés.
4. Cette garantie n'aecte pas les droits des consommateurs, y
compris les droits en matière de responsabilité délictueuse
en rapport avec une rupture de contrat, dont l'acheteur
GARANTIE
De volgende garantie is alleen van toepassing in het land
waar dit product oorspronkelijk door een detailhandelaar
aan een klant is verkocht.
1. De garantie dekt alle productie- en materiaalfouten, die aanwezig
waren op de datum van aankoop of blijken binnen een termijn
van drie (3) jaar na de datum van aankoop bij een detailhandelaar
die het product oorspronkelijk aan een consument heeft verkocht
(fabrieksgarantie). Controleer of het product compleet is en of er
sprake is van defecten in de productie of het materiaal die direct op
de datum van aankoop of onmiddellijk na ontvangst al zichtbaar
zijn. Bewaar altijd het bonnetje als bewijs van aankoop.
2. In geval van een defect dient u direct te stoppen met het gebruik van
het product. Om van de garantie gebruik te kunnen maken verstuurt
u het product of brengt u het in complete en schone toestand naar
de originele detailhandelaar die u het product heeft verkocht en laat
het originele bewijs van aankoop zien (bonnetje of factuur). Stuur of
breng het product niet direct naar de fabrikant zelf.
3. Deze garantie dekt geen schade die is ontstaan door verkeerd
gebruik, invloeden van buitenaf (water, vuur, ongevallen etc.)
normale slijtage en het niet naleven van de instructies die in
deze gebruikershandleiding staan beschreven. Deze garantie
is niet van toepassing als er aanpassingen en diensten zijn
uitgevoerd door onbevoegde personen of als er niet-originele
onderdelen zijn gebruikt.
4. Deze garantie heeft geen eect op de wettelijke rechten van
de consument, inclusief schade- en andere vorderingen,
die de koper tegen de verkoper of fabrikant van het product
aanhangig kan maken.
pourrait disposer contre le vendeur ou le fabricant du produit.
128 129
GWARANCJA
Poniższe warunki gwarancji obowiązują wyłącznie w
kraju, w którym produkt został pierwotnie sprzedany
klientowi przez sprzedawcę.
1. Gwarancja obejmuje wszystkie wady produkcyjne i
materiałowe, istniejące i ujawnione w momencie zakupu
lub ujawniające się w okresie trzech (3) lat od daty nabycia
od sprzedawcy, który jako pierwszy sprzedał produkt
konsumentowi (gwarancja producenta). W dniu zakupu
lub natychmiast po jego odebraniu sprawdź, czy produkt
jest kompletny i czy jest wolny od wad produkcyjnych i
materiałowych. Zachowaj dowód zakupu wraz z datą.
2. W przypadku usterki natychmiast przerwij korzystanie z
produktu. Aby zgłosić roszczenie gwarancyjne, dostarcz
lub wyślij produkt do pierwszego sprzedawcy w stanie
czystym i kompletnym i prześlij oryginalny dowód zakupu
(paragon lub fakturę). Nie dostarczaj ani nie wysyłaj
produktu bezpośrednio do producenta.
3. Niniejsze gwarancja nie obejmuje jakichkolwiek uszkodzeń
wynikających z nieprawidłowego użycia, wpływów
otoczenia (woda, ogień, wypadek itp.), normalnego użycia
czy nieprzestrzegania zaleceń niniejszej instrukcji obsługi.
Gwarancja jest wykluczona w przypadku dokonania
jakichkolwiek modykacji lub prac serwisowych przez
osoby nieupoważnione lub użycia nieoryginalnych
podzespołów i akcesoriów.
4. Ta gwarancja nie ma wpływu na żadne ustawowe prawa
konsumenta, w tym prawa do roszczeń deliktowych i
związanych z naruszeniem umowy, które kupujący może
zgłaszać sprzedawcy lub producentowi wyrobu.
FRNLPL
Page 66

SIRONA Q I-SIZE
SIRONA Q i-Size
i-Size Universal ISOFIX
45-105cm
max. 18 kg
1
129 - 010014
UN Regulation
No. 129/01
CYBEX GmbH
Riedingerstr. 18, 95448 Bayreuth
Germany
130 131
EGYSÉGESÍTÉS
CYBEX Sirona Q i-Size –
ECE R 129
Méret: 45-105 cm
Súly: maximum 18 kg
HOMOLOGACE
CYBEX Sirona Q i-Size –
ECE R 129
Velikost: 45-105 cm
Hmotnost: až do 18 kg
HOMOLOGIZÁCIA
CYBEX Sirona Q i-Size –
ECE R 129
Veľkosť: 45-105 cm
hmotnosť: do 18 kg
TISZTELT VÁSÁRLÓNK!
Köszönjük, hogy a Sirona Q i-Size termék mellett döntött.
Biztosítjuk Önt arról, hogy az autóülés fejlesztése
során a biztonság, a kényelem és a felhasználóbarát
kivitel volt a középpontban. A terméket különleges
minőségellenőrzés mellett gyártottuk és megfelel a
legszigorúbb biztonsági követelményeknek.
FIGYELMEZTETÉS!
!
méhez elengedhetetlen, hogy az autóülést a jelen
kézikönyvben leírtaknak megfelelően használja és
telepítse. Az ülés minden típusú módosítása tilos.
FIGYELMEZTETÉS!
!
testhossz alatt ne használja az előre néző terméket.
MEGJEGYZÉS! Kérjük, hogy tartsa elérhető helyen a
kézikönyvet és az ülés hátoldalán erre a célra kialakított
nyílásban tárolja azt.
MEGJEGYZÉS! Az újszülöttvédő betét védelmet nyújt
gyermekének. 60 cm testhossz felett használható.
MEGJEGYZÉS! A helyi előírásoknak megfelelően a
terméktulajdonságok eltérőek lehetnek.
Gyermeke megfelelő védel-
15 hónapos kor és 76 cm
VÁŽENÝ ZÁKAZNÍKU,
děkujeme za nákup dětské autosedačky Sirona Q
i-Size. Ujišťujeme vás, že jsme se při vývoji autosedačky
zaměřili na bezpečnost, pohodlí a snadné používání
uživatelem. Produkt je vyráběn pod speciálním dohledem
na kvalitu a splňuje nejpřísnější bezpečnostní požadavky.
VÝSTRAHA!
!
je nutné používat a instalovat autosedačku podle
pokynů uvedených v tomto návodu. Jakékoli úpravy
na sedačce jsou zakázány.
VÝSTRAHA!
!
směřující dopředu dříve, než bude dítěti 15 měsíců a
dosáhne velikosti 76 cm.
POZNÁMKA! Mějte tento návod neustále po ruce a
skladujte jej na vyhrazeném místě na zadní straně sedačky.
POZNÁMKA! Novorozenecká vložka chrání vaše dítě.
Měla by se používat, dokud je výška dítěte 60 cm.
POZNÁMKA! Podle místních zákonů se mohou
vlastnosti produktu lišit.
Pro řádnou ochranu vašeho dítěte
Nepoužívejte nastavení polohy
VÁŽENÝ ZÁKAZNÍK
Ďakujeme vám, že ste sa rozhodli o kúpu sedačky Sirona
Q i-Size. Uisťujeme vás, že počas vývoja autosedačky
sme sa zameriavali na bezpečnosť, pohodlie a
používateľský komfort. Tento produkt je vyrábaný pod
špeciálnym dohľadom zameraným na kvalitu a splnia
prísne bezpečnostné požiadavky.
UPOZORNENIE! Pre náležitú ochranu vášho dieťaťa
!
je dôležité, aby bola autosedačka používaná a
namontovaná v súlade s pokynmi uvedenými v tomto
návode. Akékoľvek úpravy sedačky sú zakázané.
UPOZORNENIE!
!
v smere jazdy pokiaľ nedosiahlo vaše dieťa vek 15
mesiacov a nemá výšku 76 cm.
POZOR! Vždy máte príručku poruke a uschovávajte ju
v špeciálnej priehradke na zadnej strane sedačky.
POZOR! Novorodenecká vložka chráni vaše dieťa.
Vložka by sa mala používať do výšky dieťaťa 60 cm.
POZOR! Charakteristiky produktu sa môžu líšiť v
závislosti od požiadaviek miestnej legislatívy.
Nepoužívajte montáž sedačky
HUCZSK
Page 67

TARTALOM OBSAH OBSAHHU
CZ
SK
EGYSÉGESÍTÉS ...................................................................................................134
ELSŐ TELEPÍTÉS .................................................................................................138
A JÁRMŰ VÉDELME .............................................................................................138
MEGFELELŐ ELHELYEZÉS A JÁRMŰBEN ...................................................140
BIZTONSÁG A JÁRMŰBEN ................................................................................144
AZ ÜLÉS HASZNÁLATA AZ AUTÓBAN ............................................................146
A GYERMEKÜLÉS TELEPÍTÉS A JÁRMŰBE.................................................150
A TÁMASZTÓLÁB BEÁLLÍTÁSA ........................................................................154
A GYERMEKÜLÉS ELTÁVOLÍTÁSA A JÁRMŰBŐL ......................................154
AZ OLDALSÓ VÉDŐELEMEK BEÁLLÍTÁSA ..................................................156
ÜLŐ ÉS HÁTRADÖNTÖTT HELYZETEK BEÁLLÍTÁSA ..............................158
360°-OS ELFORGATÁS........................................................................................160
HASZNÁLAT HÁTRA NÉZŐ HELYZETBEN (45 CM - 105 CM) ...................164
BEÁLLÍTÁS A TESTMÉRETHEZ .......................................................................166
BECSATOLÁS ÖVRENDSZERREL ..................................................................170
ÁTALAKÍTÁS HÁTRA NÉZŐRŐL ELŐRE NÉZŐ HASZNÁLATRA ............172
HASZNÁLAT ELŐRE NÉZŐ HELYZETBEN (76 CM - 105 CM) ...................176
AZ ÜTKÖZÉSVÉDŐ BEÁLLÍTÁSA ....................................................................178
BECSATOLÁS AZ ÜTKÖZÉSVÉDŐVEL ..........................................................180
GYERMEKE MEGFELELŐEN BE VAN CSATOLVA? ...................................182
A HUZAT ELTÁVOLÍTÁSA ...................................................................................184
TISZTÍTÁS ...............................................................................................................186
TEENDŐK BALESETET KÖVETŐEN ..............................................................190
TERMÉKINFORMÁCIÓK .....................................................................................190
A TERMÉK TARTÓSSÁGA ..................................................................................192
LESELEJTEZÉS ....................................................................................................192
SZAVATOSSÁG......................................................................................................194
132 133
HOMOLOGACE .....................................................................................................134
PRVNÍ INSTALACE ...............................................................................................139
OCHRANA VOZU ..................................................................................................139
SPRÁVNÉ UMÍSTĚNÍ VE VOZIDLE .................................................................141
BEZPEČNOST VE VOZIDLE ..............................................................................145
POUŽÍVÁNÍ SEDAČKY VE VOZIDLE ...............................................................147
INSTALACE AUTOSEDAČKY DO VOZIDLA ...................................................151
NASTAVENÍ OPĚRNÉ NOHY .............................................................................155
VYJÍMÁNÍ AUTOSEDAČKY Z VOZIDLA ..........................................................155
NASTAVENÍ BOČNÍCH CHRÁNIČŮ .................................................................157
NASTAVENÍ PRO POLOHY SEZENÍ A NAKLONĚNÍ ....................................159
OTÁČENÍ O 360° ....................................................................................................161
POUŽITÍ V POLOZE SMĚŘUJÍCÍ DOZADU (45 CM – 105 CM) ..................165
NASTAVENÍ VÝŠKY TĚLA ...................................................................................167
UPEVNĚNÍ POMOCÍ POSTROJŮ .....................................................................171
ZMĚNA POUŽITÍ Z POLOHY SMĚŘUJÍCÍ DOZADU NA POLOHU
SMĚŘUJÍCÍ DOPŘEDU .......................................................................................173
POUŽITÍ V POLOZE SMĚŘUJÍCÍ DOPŘEDU (76 CM - 105 CM)................177
NASTAVENÍ ŠTÍTU PROTI NÁRAZU ................................................................179
UPEVNĚNÍ POMOCÍ ŠTÍTU PROTI NÁRAZU ...............................................181
JE VAŠE DÍTĚ ŘÁDNĚ ZAJIŠTĚNÉ? ...............................................................183
ODNÍMÁNÍ KRYTU ................................................................................................185
ČIŠTĚNÍ ...................................................................................................................187
CO DĚLAT PO NEHODĚ .....................................................................................191
INFORMACE O VÝROBKU .................................................................................191
TRVANLIVOST VÝROBKU ..................................................................................193
LIKVIDACE ..............................................................................................................193
ZÁRUKA ...................................................................................................................195
HOMOLOGIZÁCIA.................................................................................................134
PRVÁ MONTÁŽ ......................................................................................................139
OCHRANA VOZIDLA ............................................................................................139
SPRÁVNA POLOHA VO VOZIDLE ....................................................................141
BEZPEČNOSŤ VO VOZIDLE .............................................................................145
POUŽÍVANIE AUTOSEDAČKY VO VOZIDLE .................................................147
MONTÁŽ AUTOSEDAČKY VO VOZIDLE ........................................................151
NASTAVENIE PODPERY.....................................................................................155
VYBRATIE AUTOSEDAČKY Z VOZIDLA .........................................................155
NASTAVENIE BOČNÝCH CHRÁNIČOV ..........................................................157
NASTAVENIE PRE SED A SKLOPENIE ...........................................................159
OTOČENIE O 360° .................................................................................................161
POUŽITIE V PROTISMERE JAZDY (45 CM - 105 CM) .................................165
PRISPÔSOBENIE NA VÝŠKU............................................................................167
PRIPUTANIE POSTROJOVÝM SYSTÉMOM .................................................171
PRESTAVOVANIE Z POUŽITIA V PROTISMERE JAZDY
NA POUŽITIE V SMERE JAZDY ........................................................................173
V SMERE JAZDY (76 CM - 105 CM) ..............................................177
POUŽITIE
NASTAVENIE NÁRAZOVÉHO ŠTÍTU ..............................................................179
UPNUTIE NÁRAZOVÝM ŠTÍTOM .....................................................................181
JE VAŠE DIEŤA NÁLEŽITE ZAISTENÉ? .........................................................183
ODSTRÁNENIE POŤAHU ...................................................................................185
ČISTENIE ................................................................................................................187
ČO TREBA UROBIŤ PO NEHODE ....................................................................191
INFORMÁCIA O VÝROBKU ................................................................................191
ŽIVOTNOSŤ VÝROBKU ......................................................................................193
LIKVIDÁCIA .............................................................................................................193
ZÁRUKA ...................................................................................................................195
HUCZSK
Page 68

1
3
2
ELSŐ TELEPÍTÉS
MEGJEGYZÉS! Az ülés első használata előtt távolítsa
el a szállítási védőelemet (1) és a védőkupakokat (2).
A CYBEX SIRONA Q i-SIZE termék használata előtt
távolítsa el a terméken lévő védőfóliát. A védőborításokat
a mellékelt táskában tárolja. Szerelje fel a rugalmas
védőelemet (3). További információkat itt találhat:
„HÁTRA NÉZŐ TERMÉK HASZNÁLATA
FIGYELMEZTETÉS! A CYBEX SIRONA Q i-SIZE
!
terméket tilos úgy használni, hogy nem távolította el
a szállítási védőelemet (1)!
(45-105 cm)
“.
PRVNÍ INSTALACE
POZNÁMKA! Než budete sedačku používat poprvé,
musíte odstranit přepravní zabezpečení (1) a ochranné
kryty (2). Sejmutí fólie nainstalované před dodáním
aktivuje další bezpečnostní funkce autosedačky CYBEX
SIRONA Q i-SIZE. Skladujte ochranné kryty v úložném
vaku, který je součástí dodávky. Musí být nainstalována
tyč pro zpětný odraz (3). Pro další podrobnosti viz oddíl
„POUŽITÍ V POLOZE SMĚŘUJÍCÍ DOZADU (45-105 cm)“.
VÝSTRAHA! CYBEX SIRONA Q i-SIZE se nesmí
!
používat, dokud nebude odstraněno přepravní
zabezpečení (1)!
PRVÁ MONTÁŽ
POZOR! Pred prvým použitím autosedačky treba
odstrániť prepravné zaistenie (1) a ochranné kryty (2).
Odstránením fólie umiestnenej pred dodaním aktivujete
dodatočné bezpečnostné funkcie CYBEX SIRONA
Q i-SIZE. Uschovajte ochranné kryty v špeciálnom
dodávanom vrecku. Treba umiestniť nárazovú závoru (3).
Podrobnosti pozri v časti „POUŽITIE V PROTISMERE
JAZDY
(45-105 cm)
UPOZORNENIE! Autosedačka CYBEX SIRONA Q
!
i-SIZE nesmie byť používaná, ako nie je prepravné
zaistenie (1) odstránené!
“.
HUCZSK
A JÁRMŰ VÉDELME
Az ülés használata során az érzékeny anyagokból készült
járműüléseken nyomok és/vagy elszíneződések jelenhetnek
meg (pl. velúr, bőr, stb.). Ennek elkerülése érdekében
helyezzen pl. egy lepedőt, vagy törülközőt az ülés alá.
Olvassa el a tisztításra vonatkozó útmutatásokat is. Az ülés
első használata előtt feltétlenül hajtsa végre ezeket.
134 135
OCHRANA VOZU
Pokud se používá autosedačka, mohou se na některých
sedadlech vozidla vyrobených z jemných materiálů (např.
velur, kůže, atd.) vyskytnout stopy a/nebo zbarvení. Tomu
lze předejít tím, že např. pod autosedačku položíte deku
nebo ručník. V této souvislosti si rovněž prostudujte naše
pokyny o čištění. Je nezbytné je dodržovat před prvním
použitím autosedačky.
OCHRANA VOZIDLA
V prípade použitia autosedačiek sa na niektorých
automobilových sedadlách vyrobených z citlivých
materiálov (napr. velúr, koža atď.) môžu objavovať
stopy po použitiu a/alebo strata sfarbenia. Môžete tomu
zabrániť umiestnením napr. prikrývky alebo uteráka pod
autosedačku. V tejto súvislosti preštudujte naše pokyny
pre čistenie. Dodržanie týchto pokynov pred prvým
použitím autosedačky je dôležité.
Page 69

MEGFELELŐ ELHELYEZÉS A JÁRMŰBEN
Ez egy „i-méretű“ biztonsági gyermekülés rendszer.
Az ECE R 129 előírásai szerint „i-méret kompatibilis“
üléshelyzetű járművekben használható, ezt a jármű
gyártója a felhasználói kézikönyvben jelölte meg.
Amennyiben az Ön járműve nem rendelkezik i-méretű
üléshelyzettel, ellenőrizze a honlapunkon lévő jármű
típuslistában, hogy az Ön járművébe beszerelhető-e ez
a termék.
Ha az Ön járműve nincs felszerelve ISOFIX rendszerrel,
kérjük lépjen kapcsolatba a jármű gyártójával.
Kivételes esetekben a termék az első utasülésen is
elhelyezhető. Ilyen esetekben tartsa be a következő
pontokat:
• Ellenőrizze, hogy az utasülésen van-e ISOFIX rendszer.
Ha nincs ISOFIX rendszer, akkor itt nem használható
a termék.
• Kapcsolja ki az utasoldali légzsákot. Ha ez az Ön
járművében nem lehetséges, akkor tilos az első
utasülésen használni a terméket.
• Feltétlenül tartsa be a jármű gyártójának javaslatait.
Baleset alkalmával a csomagok és a járműben lévő
egyéb szabad tárgyak sérüléseket okozhatnak, ezért
feltétlenül rögzíteni kell ezeket. Baleset során ezek
halálos sérüléseket okozó repülő testekké válhatnak.
136 137
SPRÁVNÉ UMÍSTĚNÍ VE VOZIDLE
Toto je dětský zádržný systém „i-Size“. Splňuje nařízení
ECE R 129 pro použití v poloze sedadel vozidla, která
je „kompatibilní se sedačkou i-Size“, jak uvádějí výrobci
vozů v návodu k použití vozidla.
Pokud vaše vozidlo nemá polohou sedadel vhodnou pro
i-Size, pročtěte si prosím přiložený seznam typů nebo
se podívejte na příklad na naší domácí stránce, abyste
zjistili, zda je instalace možná.
Pokud váš vůz není vybaven systémem ISOFIX, obraťte
se prosím na výrobce vozidla.
Ve výjimečných případech lze však autosedačku
použít na předním sedadle. V tomto případě dodržujte
následující body:
• Zkontrolujte, zda je sedadlo spolujezdce vybaveno
systémem ISOFIX. Pokud není ISOFIX nainstalován,
autosedačku nelze použít.
• Deaktivujte airbag spolujezdce. Pokud to ve vašem
vozidle není možné, je zakázáno používat autosedačku
na straně spolujezdce.
• Je nutné dodržovat doporučení výrobce vozu.
Zavazadla a další volné předměty ve vozidle, které
by mohly způsobit zranění při nehodě, musí být vždy
bezpečně zajištěny. V případě dopravní nehody se
mohou stát smrtícími střelami.
SPRÁVNA POLOHA VO VOZIDLE
Toto je systém zachytenia dieťaťa „i-Size“. Systém je
schválený podľa ECE R 129 na použitie s sedadlami
vozidiel kompatibilnými s polohami „i-Size“ ako je
uvedené výrobcami vozidiel v používateľskej príručke.
Ak nemá vaše vozidlo polohu sedadla i-Size, skontrolujte
typovú špecikáciu vozidla, alebo napr. našu web
stránku, aby ste sa presvedčili, že je montáž povolená.
Ak nie je vaše vozidlo vybavené systémom ISOFIX,
kontaktuje výrobcu vozidla.
Vo výnimočných prípadoch môže byť autosedačka
umiestnená na predné sedadlo spolujazdca. V tomto
prípade dodržujte nasledujúce pokyny:
• Skontrolujte, či je sedadlo spolujazdca vybavené
systémom ISOFIX. Ak nemá vozidlo systém ISOFIX,
potom sa autosedačka nesmie používať.
• Vypnite airbag spolujazdca. Ak nemá vaše vozidlo
funkciu vypnutia airbagu, použitie autosedačky na
strane spolujazdca je zakázané.
• Musíte dodržiavať odporúčania výrobcu vozidla.
Batožina a iné voľne uložené predmety vo vozidle, ktoré
by mohli spôsobiť úraz v prípade nehody, musia byť vždy
spoľahlivo upevnené. V prípade autonehody sa môžu
premeniť na smrtiace projektily.
HUCZSK
Page 70

FIGYELMEZTETÉS! Gyermekét soha ne hagyja
!
felügyelet nélkül a járműben. A napon a gyermekülés
műanyag alkatrészei felmelegedhetnek és égési
sérülést okozhatnak a gyermek számára. Védje gyermekét és az ülést a közvetlen napsütéstől (pl. vékony
anyagú színes kendővel).
FIGYELMEZTETÉS! Az ülés normál biztonsági
!
övvel nem használható együtt. Ha baleset történik,
normál biztonsági övvel történő rögzítéskor a gyermek és az utasok súlyos, vagy akár halálos sérülést
is szenvedhetnek.
FIGYELMEZTETÉS! A gyermekülés nem használ-
!
ható olyan üléseken, melyek a menetirányhoz képest
derékszögben vannak beépítve a járműbe. A gyermekülés nem használható hátrafelé néző ülésekkel,
például furgonokban, vagy kisbuszokban.
138 139
VÝSTRAHA! Nikdy nenechávejte děti bez dozoru
!
ve voze. Plastové díly zádržného systému dítěte
se na slunci zahřívají a dítě může utrpět popáleniny. Chraňte své dítě a autosedačku před přímým
slunečním zářením (např. zakryjte ji světlým textilem).
VÝSTRAHA! Autosedačka není vhodná pro použití
!
s běžným bezpečnostním pásem vozidla. Pokud
je autosedačka zajištěna běžným bezpečnostním
pásem, může se dítě a ostatní cestující ve vozidla v
případě nehody vážně zranit nebo usmrtit.
VÝSTRAHA! Není povoleno používat autosedačku
!
na sedadlech vozů, která jsou umístěna v pravém
úhlu vůči směru jízdy. Autosedačka by se neměla
používat na sedadlech směřujících dozadu, například
v dodávce nebo mikrobusu.
UPOZORNENIE! Nikdy nenechávajte vaše dieťa
!
vo vozidle bez dohľadu. Plastové diely systému
zachytenia dieťaťa sa na slnku zohrievajú a môžu
spôsobiť popáleniny u dieťaťa. Chráňte vaše dieťa
a autosedačku pred priamym pôsobením slnečného
žiarenia (napr. zakryte ju látkou svetlej farby).
UPOZORNENIE! Autosedačka nie je vhodná na
!
použitie s normálnym bezpečnostným pásom. Ak je
sedačka zaistená bežným bezpečnostným pásom,
potom v prípade nehody môže dôjsť k úrazom alebo
úmrtiu dieťaťa a iných cestujúcich vo vozidle.
UPOZORNENIE! Nie je povolené používať
!
autosedačku na sedadlách vozidla, ktoré sú
inštalované pod pravým uhlom k smeru jazdy.
Autosedačka by sa mala používať na sedadlách v
protismere jazdy, napr. v vane alebo minibuse.
HUCZSK
Page 71

BIZTONSÁG A JÁRMŰBEN
FIGYELMEZTETÉS! Ne használja a gyermekülést
!
bekapcsolt első légzsák esetén. Ez nem vonatkozik
az úgynevezett oldalsó légzsákokra.
FIGYELMEZTETÉS! A gyermekülést minden eset-
!
ben szabályosan kell rögzíteni a járműben, akkor is
ha nincs használatban. A nem rögzített gyermekülés
vészfékezéskor, vagy balesetnél Ön vagy az utasok
sérülését okozhatja.
Az utasok számára a lehető legnagyobb biztonság
érdekében gondoskodjon a következőkről:
• A járműben lévő lehajtható háttámlák függőleges
helyzetben legyenek rögzítve.
• Ha a gyermekülést az első utasülésre helyezi, akkor
állítsa az ülést a leghátsóbb helyzetbe.
• Rögzítse az összes olyan tárgyat, amely balesetben
sérülést okozhat.
• A járműben utazó összes utas kösse be magát.
140 141
BEZPEČNOST VE VOZIDLE
VÝSTRAHA! Nikdy nepoužívejte autosedačku na
!
sedadle vozidla, když je aktivovaný airbag. To však
neplatí pro tzv. boční airbagy.
VÝSTRAHA! Autosedačka musí být ve vozidle vždy
!
řádně zabezpečena i tehdy, když se nepoužívá. V
případě nouzového zabrzdění nebo nehody může
nezajištěná sedačka poranit ostatní cestující nebo vás.
Pro zaručení nejlepší možné bezpečnosti pro všechny
cestující se ujistěte, že...
• sklopná opěradla ve vozidle jsou zablokována ve svislé
poloze.
• jste při instalaci autosedačky na přední sedadlo
posunuli sedadlo vozidla co nejdále dozadu.
• jste řádně zabezpečili všechny předměty, které by
mohly způsobit zranění v případě nehody.
• všichni cestující ve vozidle jsou připoutáni
bezpečnostními pásy.
BEZPEČNOSŤ VO VOZIDLE
UPOZORNENIE! Nikdy nepoužívajte autosedačku
!
na sedadle vozidla, pri ktorom je aktivovaný predný
airbag. To neplatí pre tzv. bočné airbagy.
UPOZORNENIE! Autosedačka musí byť vždy
!
správne zaistené vo vozidle, aj keď sa nepoužíva.
V prípade núdzového brzdenia alebo nehody môže
nezaistená autosedačka spôsobiť úraz iným spolu-
jazdcom alebo vám.
S cieľom zaručiť maximálnu možnú bezpečnosť všetkých
spolujazdcov uistite sa, že:
• sklopné operadlá vo vozidle sú zaxované v zvislej
polohe.
• ak montujete autosedačku na prednom sedadle
spolujazdca, odsuňte sedadlo čo najviac dozadu.
• ste náležite zaistili všetky predmety, ktoré by mohli
spôsobiť úraz v prípade nehody.
• všetci spolujazdci sú pripútaní bezpečnostnými pásmi.
HUCZSK
Page 72

AZ ÜLÉS HASZNÁLATA AZ AUTÓBAN
Életkortól és testmagasságtól függően a gyermekülés
előre-, vagy hátra néző helyzetben is használható.
MEGJEGYZÉS! A baleseti statisztikák azt igazolják,
hogy gyermeke számára a hátra néző helyet a
legbiztonságosabb. Ezért azt javasoljuk, hogy a lehető
legtovább hátra néző helyzetben használja a gyermekülést.
FIGYELMEZTETÉS! 15 hónapos kor és 75 cm test-
!
magasság alatt a hátra néző helyzet kötelező. E felett
is a hátra néző szállítási helyzet a legbiztonságosabb.
További információkat a következő részben találhat:
„HASZNÁLAT HÁTRA NÉZŐ HELYZETBEN”.
POUŽÍVÁNÍ SEDAČKY VE VOZIDLE
V závislosti na věku a výšce dítěte se může autosedačka
používat v poloze směřující dopředu i dozadu
POZNÁMKA! Statistiky nehod potvrzují, že v poloze
směřující dozadu při přepravě ve vozidle je bezpečnost
dítěte nejvyšší. Proto doporučujeme používat
autosedačku pokud možno v poloze směřující dozadu.
VÝSTRAHA! Je povinností používat polohu
!
směřující dozadu, dokud věk dítěte nedosáhne
15 měsíců a výšku 75 cm. I po dosažení této
hranice je přeprava v poloze směřující dozadu stále
nejbezpečnější. Pro další podrobnosti si přečtěte
oddíl: „POUŽITÍ V POLOZE SMĚŘUJÍCÍ DOZADU“.
POUŽÍVANIE AUTOSEDAČKY VO VOZIDLE
V závislosti od veku a výšky dieťaťa môže byť autosedačka
umiestňovaná v smere alebo protismere jazdy.
POZOR! Podľa štatistík z nehôd je preukázané,
že preprava vášho dieťaťa v protismere jazdy je
najbezpečnejšia. Preto vám odporúčame používať
autosedačku v protismere jazdy tak dlho, kým je to možné.
UPOZORNENIE! Umiestnenie sedačky v protis-
!
mere jazdy je povinné v prípade použitia pre dieťa
vo veku do 15 mesiacov a pri výške do 75 cm.
Dokonca aj v prípade staršieho vyššieho dieťaťa
je preprava v protismere jazdy najbezpečnejšia.
Podrobnosti pozri v časti: „POUŽITIE V PROTIS-
MERE JAZDY“.
HUCZSK
Használat hátra néző helyzetben (45 cm - 105 cm)
105 cm testhosszig és max. 18 kg testsúlyig az ülés
hátra néző helyzetben történő használatát javasoljuk.
142 143
Použití v poloze směřující dozadu (45 cm - 105 cm)
Doporučujeme používat autosedačku v poloze směřující
dozadu do výšky dítěte 105 cm a hmotnosti max. 18 kg.
Použitie v protismere jazdy (45 cm - 105 cm)
Odporúčame používať autosedačku v protismere jazdy
do výšky 105 cm a pri hmotnosti max. 18 kg.
Page 73

Használat előre néző helyzetben (76 cm - 105 cm)
Abban az esetben, ha a gyermek 16 hónaposnál idősebb
4
és legalább 76 cm magas, a gyermekülés előre néző
helyzetben is használható.
MEGJEGYZÉS! A fejtámlán (4) lévő jelzés a gyermek
magasságát jelöli, ez alapján eldönthető, hogy előre
néző helyzetben használhatja-e a gyermekülést. További
információkat a következő részben találhat: „HASZNÁLAT
ELŐRE NÉZŐ HELYZETBEN (76 cm - 105 cm)”
MEGJEGYZÉS! Az olyan újszülötteket és
kisgyermekeket, akik még nem képesek maguktól felülni
(körülbelül 1 éves korig), ortopédiai és biztonsági okokból
minden esetben hátra néző helyzetben, a leginkább
elfektetve szállítsuk.
MEGJEGYZÉS! Az ülés beállítása esetén a gyermek
környezetében ne legyen szabadon lévő alkatrészek.
Telepítéskor és eltávolításkor a gyermekeket tartsuk
távol a gyermeküléstől. Fennáll annak kockázata, hogy
a gyermek ujja becsípődhet és az elkerülhetetlen nyíró
Použití v poloze směřující dopředu (76 cm - 105 cm)
Používání autosedačky v poloze směřující dopředu je
povoleno, když je dítě starší 16 měsíců a vysoké min. 76
cm.
POZNÁMKA! Ukazatel na opěrce hlavy (4) zobrazuje
výšku dítěte, kdy lze nejdříve polohu sedačky změnit
na polohu směřující dopředu. Pro další podrobnosti
si přečtěte oddíl: „POUŽITÍ V POLOZE SMĚŘUJÍCÍ
DOPŘEDU (76 cm - 105 cm)“.
POZNÁMKA! Novorozeňata a kojenci, kteří ještě
neumí sedět sami (přibližně do věku 1 roku), by měli
být z ortopedických a bezpečnostních důvodů vždy
přepravováni v co nejvíce ploché poloze směřující dozadu.
POZNÁMKA! Okolo dětí by neměly být přítomné žádné
volné části, když pro ně připravujete autosedačku. Při její
instalaci a odinstalování ve vozidle udržujte děti mimo
autosedačku. Hrozí nebezpečí, že by se prsty dítěte
zachytily, anebo by se nevyhnutelnými pohyby zranily,
resp. pořezaly.
Použitie v smere jazdy (76 cm - 105 cm)
Použitie sedačky v smere jazdy je povolené v prípade, ak
je dieťa staršie ako 16 mesiacov a má výšku min. 76 cm.
POZOR! Indikátor na opierke hlavy (4) zobrazuje výšku
dieťaťa, od ktorej najskôr môže byť sedačka premiestnená
do polohy v smere jazdy. Podrobnosti pozri v časti:
„POUŽITIE V PROTISMERE JAZDY (76 cm - 105 cm)“.
POZOR! Novorodenci a maloleté osoby, ktoré nie sú ešte
schopné sami sedieť (do veku cca 1 rok) by sa mali z
ortopedických a bezpečnostných dôvodov prepravovať v
maximálne rovnej ležatej polohe v smere proti jazdy.
POZOR! Dieťa nesmie mať uvoľnené predmety odevu
pri nastavovaní autosedačky. Dieťa nesmie byť v
autosedačky počas jej montáže a demontáže vo vozidle.
V tom prípade môže byť nebezpečie zachytenia prstov
dieťaťa a spôsobenie úrazu.
mozgások miatt megsérülhet.
144 145
HUCZSK
Page 74

A GYERMEKÜLÉS TELEPÍTÉS A JÁRMŰBE
Kérjük válassza ki a járműhöz megfelelő ülést.
MEGJEGYZÉS! Ha az Ön járműve i-méretű
üléshelyzettel nem kompatibilis, akkor kérjük ellenőrizze
a termékhez mellékelt típuslistát.
5
6
7
146 147
Az ISOFIX rendszer lehetővé teszi az ülés biztonságos
telepítését az autóba.
MEGJEGYZÉS! Az ISOFIX rögzítési pont (5)
ülésenként két fémfül, melyek a háttámla és az
ülőpárna között találhatók. Ha kétségei vannak,
tájékozódjon járműve kézikönyvéből.
• Ha az Ön autójában az ISOFIX rögzítési pontok (5)
nehezen hozzáférhető helyen vannak, akkor a huzatok
sérülésének elkerülése érdekében használja az ISOFIX
csatlakoztatási segédeszközöket (6).
• Szükség esetén csatlakoztassa a felfelé mutató
hosszabb fülekkel rendelkező ISOFIX csatlakoztatási
segédeszközöket (6) az ISOFIX rögzítési pontokhoz (5).
• Hajtsa ki a támasztólábat (7), amíg az a helyére nem pattan.
INSTALACE AUTOSEDAČKY DO VOZIDLA
Vyberte prosím vhodné sedadlo ve vozidle.
POZNÁMKA! Pokud vaše auto není vybaveno polohou
sedadel vhodnou pro i-Size, pročtěte si prosím seznam
typů přiložený k produktu.
Systém ISOFIX vám umožňuje bezpečně připevnit
autosedačku do vozidla.
POZNÁMKA! Kotevní úchyty ISOFIX (5) jsou dvě kovové
patky na každé sedadlo a nachází se mezi opěradlem a
sedadlem vozu. Pokud jste na pochybách, prostudujte si
návod k použití vašeho vozidla.
• Pokud je obtížné se dostat ke kotevním úchytům
ISOFIX (5) ve vašem voze, měli byste použít spojovací
vodítka ISOFIX (6), která jsou součástí systému, aby se
nepoškodil kryt.
• V případě potřeby připevněte spojovací vodítka ISOFIX
(6), kterými je systém opatřen, k delší kovové patce
směřující nahoru u obou kotevních úchytů ISOFIX (5).
• Vždy rozložte opěrnou nohu (7), dokud nezaklapne.
MONTÁŽ AUTOSEDAČKY VO VOZIDLE
Zvoľte vhodne sedadlo vo vozidle.
POZOR! Ak nie je vaše vozidlo vybavené polohou sedačky
i-Size, skontrolujte špecikáciu dodávanú s výrobkom.
Systém ISOFIX umožňuje spoľahlivé upevnenie
autosedačky vo vozidle.
POZOR! Kotevné body ISOFIX (5) majú dve kovové
oká na každom sedadle a sú umiestnené medzi zadným
operadlom a sedadlom vozidla. Ak máte akékoľvek
pochybnosti, prečítajte si návod od vozidla.
• Ak sú kotevné body ISOFIX (5) vo vašom vozidle ťažko
dostupné, mali by ste použiť dodávané spojovacie
vedenia ISOFIX (6), aby ste nepoškodili poťah.
• V prípade potreby pripojte dodávané spojovacie
vedenia ISOFIX (6) s predlženým okom nasmerovaným
hore do obidvoch kotevných bodov ISOFIX (5).
• Vždy vytiahnite podperu (7), kým sa nezafixuje.
HUCZSK
Page 75

9
10
5
8
12
11
11
148 149
MEGJEGYZÉS! Ne helyezzen tárgyakat a gyermekülés
előtti lábtérbe.
• Az ISOFIX csatlakozók (8) aktiválásához nyomja meg
a két oldalon lévő zöld gombokat (9) és emelje meg az
ISOFIX beállítókarokat (10).
• Tartsa lenyomva az egyik beállítókart (10), eközben
másik kezével az ütközőig húzza ki az ülésből az ISOFIX
csatlakozókat (8).
MEGJEGYZÉS! Biztosítsa, hogy a telepítés előtt az
ISOFIX csatlakozókon (8) egyik zöld biztonsági jelzés (11)
se legyen látható. Szükség esetén az ISOFIX kioldógomb
(12) lenyomásával és ezzel egyidőben a csatlakozók hátra
húzásával oldja ki ezeket.
• Mindkét ISOFIX csatlakozónak (8) hallható kattanással
kell rögzülnie az ISOFIX rögzítési pontokhoz (5).
• Az ISOFIX csatlakoztatási segédeszközök meghúzásával
ellenőrizze a stabil rögzítettséget.
• Mindkét ISOFIX kioldógombon (12) tisztán láthatónak kell
lennie a zöld biztonsági jelzésnek (11).
• Ismét aktiválja az ISOFIX beállítókarokat (10) és tolja
az ülést a jármű háttámlájának irányába amíg azok
egymáshoz nem érnek.
• Ekkor noman nyomja neki az ülés vázát a jármű
üléspárnájának, amíg az ISOFIX beállítókarok (10) hallható
kattanással függetlenül a helyükre nem pattannak.
• Folytassa a „TÁMASZTÓLÁB BEÁLLÍTÁSA” résszel.
POZNÁMKA! Nevkládejte žádné předměty do nohy před
dětskou sedačkou.
• Pro aktivaci konektorů ISOFIX (8), stiskněte zelená
tlačítka (9) na obou stranách a zdvihněte stavitelná
držadla ISOFIX (10).
• Stále držte jedno stavitelné držadlo (10) stisknuté, přitom
druhou rukou tahejte konektory ISOFIX (8) pryč od
sedačky k dorazu.
POZNÁMKA! Před instalací se ujistěte, že oba zelené
bezpečnostní ukazatele (11) na konektorech ISOFIX (8)
nejsou vidět. Uvolněte je v případě potřeby stisknutím
uvolňovacího tlačítka ISOFIX (12) a zároveň táhněte
konektor dozadu.
• Oba konektory ISOFIX (8) se musí zablokovat v kotevních
úchytech ISOFIX (5) slyšitelných zacvaknutím.
• Ujistěte se, že autosedačka sedí pevně na svém místě
tím, že se pokusíte táhnout za spojovací vodítka ISOFIX.
• Zelený bezpečnostní ukazatel (11) musí být zřetelně vidět
na obou uvolňovacích tlačítkách ISOFIX (12).
• Znovu aktivujte stavitelná držadla ISOFIX (10), abyste
zatlačili autosedačku ve směru opěradla vozu, dokud se
nebudou vzájemně dotýkat.
• Nyní jemně stiskněte hlavní rám autosedačky proti
polstrování sedadla vozu, dokud se stavitelná
držadla ISOFIX (10) nezablokují samostatně
slyšitelným zacvaknutím.
• Pokračujte v „NASTAVENÍ OPĚRNÉ NOHY“.
POZOR! Neumiestňujte žiadne predmety do podpery ani
pred autosedačku.
• Za účelom aktivácie prípojok ISOFIX (8) zatlačte
zelené tlačidlá (9) na obidvoch stranách a zodvihnite
nastavovacie rukoväte ISOFIX (10).
• Udržujte nastavovacie rukoväte (10) stlačené a zároveň
vytiahnite prípojky ISOFIX (8) zo sedačky nadoraz
druhou rukou.
POZOR! Uistite sa, že obidva zelené bezpečnostné
indikátory (11) na prípojkách ISOFIX (8) nie sú viditeľné
pred montážou. V prípade potreby ich uvoľnite stlačením
tlačidla uvoľnenia ISOFIX (12) a súčasným vytiahnutím
prípojky dozadu.
• Obidve prípojky ISOFIX (8) musia byť zaxované v
kotevných bodoch ISOFIX (5) s počuteľným kliknutím.
• Uistite sa, že sedačka je pevne udržiavaná na svojom
mieste tak, že sa pokúsite ju vytiahnuť z prípojok ISOFIX.
• Zelený bezpečnostný indikátor (11) musí byť viditeľný na
obidvoch uvoľňovacích tlačidlách ISOFIX (12).
• Znovu aktivujte nastavovacie rukoväte ISOFIX (10) za
účelom zatlačenia sedačky v smere zadnej strany vozidla
tak, aby sa dotýkali.
• Teraz zľahka stlačte hlavný rám autosedačky smerom
k sedadlu vozidla, kým nebudú nastavovacie rukoväte
ISOFIX (10) nezávisle zaxované s počuteľným kliknutím.
• Vykonajte „NASTAVENIE PODPERY“.
HUCZSK
Page 76
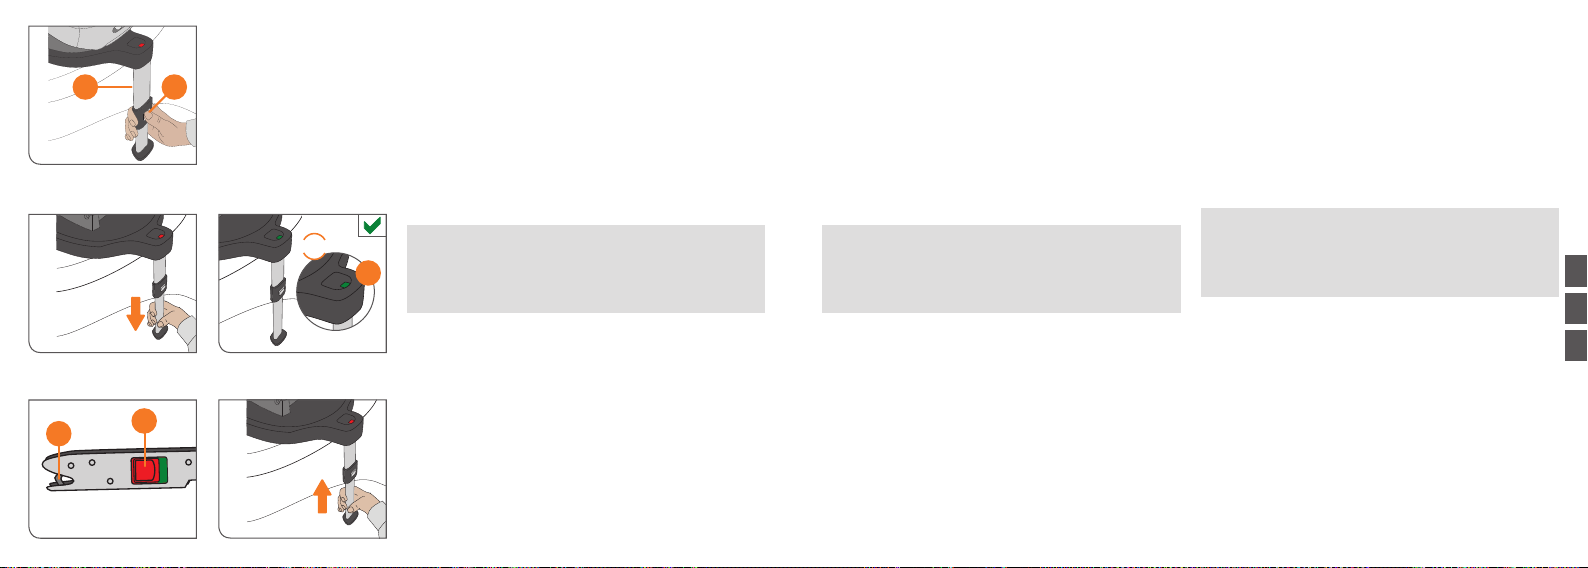
A TÁMASZTÓLÁB BEÁLLÍTÁSA
Biztosítsa, hogy a támasztóláb (7) első helyzetben
legyen rögzítve. Nyomja felfelé a támasztólábon lévő
7 13
CLICK!
8
150 151
12
beállítógombot (13), nyomja meg és húzza kifelé
a támasztólábat (7) amíg az hozzá nem ér a jármű
padlójához. Ezt követően, az optimális erőközlés
érdekében húzza ki a lábat a következő zárási helyzetig.
Az alsó részen lévő támasztóláb jelzés (14) ZÖLD színű
lesz és jellegzetes 'KATT' hang hallható.
MEGJEGYZÉS! Biztosítsa, hogy a gyermekülés
továbbra is rásimuljon az autó ülésére.
FIGYELMEZTETÉS! A támasztólábnak minden
!
esetben közvetlenül hozzá kell érnie a padlóhoz.
14
A támasztóláb alá tilos tárgyakat tenni. A lábtérben
lévő tárolórekeszek használatával kapcsolatosan
tájékozódjon a jármű gyártójától.
A GYERMEKÜLÉS ELTÁVOLÍTÁSA A JÁRMŰBŐL
Fordított sorrendben végezze el a telepítés lépéseit.
• A piros kioldógombok (12) lenyomásával és
visszahúzásával oldja ki az ISOFIX csatlakozókat (8).
• Húzza ki az alaprészt az ISOFIX rögzítési pontokból.
• Hajtsa hátra kiindulási helyzetükbe az ISOFIX
csatlakozókat (8).
• Nyomja meg a támasztólábon (7) lévő gombot és tolja
vissza azt eredeti helyzetébe.
• Hajtsa be a támasztólábat.
NASTAVENÍ OPĚRNÉ NOHY
Ujistěte se, že je opěrná noha (7) pevně zajištěna v
poloze dopředu. Stlačte nastavovací tlačítko (13) nahoru
na opěrné noze a stiskněte jej, abyste stáhli opěrnou
nohu (7), dokud se nedotkne podlahy vozidla. Poté
vytáhněte nohu do další zajišťovací polohy, abyste zajistili
optimální přenášení síly. Ukazatel opěrné nohy (14) na
základně zobrazí ZELENÉ světlo a vydá typický zvuk‚
můžete uslyšet „ZACVAKNUTÍ“.
POZNÁMKA! Ujistěte se, že autosedačka stále spočívá
naplocho na sedadle vozu.
VÝSTRAHA! Opěrná noha se musí vždy přímo
!
dotýkat podlahy. Není povoleno klást předměty pod
opěrnou nohu. Pro informace o úložném prostoru v
oblasti chodidel prosím kontaktujte výrobce vašeho
vozidla.
VYJÍMÁNÍ AUTOSEDAČKY Z VOZIDLA
Postup instalace se provádí v obráceném pořadí.
• Odblokujte konektory ISOFIX (8) stisknutím a stáhnutím
červených uvolňovacích tlačítek zpět (12).
• Vytáhněte základnu z kotevních úchytů ISOFIX.
• Sklopte konektory ISOFIX (8) do výchozí polohy.
• Stiskněte tlačítko na opěrné noze (7) a zasuňte jej zpět
do původní polohy.
• Sklopte opěrnou nohu.
NASTAVENIE PODPERY
Uistite sa, že podpera (7) je zaxovaná v polohe v smere
jazdy. Zatlačte regulačné tlačidlo (13) nahor na podperu
a stlačte ju za účelom vytiahnutia podpery (7) tak, aby sa
dotýkala podlahy vozidla. Potom vytiahnite podperu do
nasledujúcej xovanej polohy, aby sa zabezpečil optimálny
prenos sily. Indikátor podpery (14) na základne zobrazí
ZELENÚ indikáciu a bude počuť charakteristické kliknutie.
POZOR! Uistite sa, že autosedačka ešte stále rovná na
sedačke.
UPOZORNENIE! Podpera musí mať vždy kontakt
!
s podlahou. Nie je povolené umiestňovať predmety
pod podperu. Ohľadne informácií o odkladacích
priehradkách v oblasti päty kontaktuje výrobcu
vášho vozidla.
VYBRATIE AUTOSEDAČKY Z VOZIDLA
Vykonajte postup montáže v opačnej postupnosti.
• Odomknite prípojky ISOFIX (8) zatlačením a
pritiahnutím červených uvoľňovacích tlačidiel (12) späť.
• Vytiahnite základňu z kotevných bodov ISOFIX.
• Umiestnite prípojky ISOFIX (8) do východiskovej polohy.
• Stlačte tlačidlo na podpere (7) a zatlačte ju späť do
východiskovej polohy.
• Zložte podperu späť.
HUCZSK
Page 77

AZ OLDALSÓ VÉDŐELEMEK BEÁLLÍTÁSA
A gyermekülés fel van szerelve „lineáris oldalsó
ütközésvédelemmel” (L.S.P.). Ez a rendszer oldalsó
ütközések esetén fokozott biztonságot nyújt gyermekének.
MEGJEGYZÉS! Biztosítsa, hogy az L.S.P. rendszer
15
a
b
c
152 153
hallható „KATT” hanggal rögzüljön a helyére.
Az L.S.P. 3 helyzettel rendelkezik. Legalább (a) helyzetbe
húzza ki az L.S.P. rendszert. A legnagyobb védelem
érdekében a lehető legjobban húzza ki az L.S.P. rendszer
a gyermekhez közelebbi ajtó irányába.
Abban az esetben, ha az L.S.P. a leghosszabb helyzetében
(c) túlnyúlik a rendelkezésre álló helyen és hozzáér az
ajtóhoz, akkor a döntött helyzetet (b) kell használni.
Ez az L.S.P. teljes kinyitásával, a zárógomb (15)
megnyomásával és az L.S.P. döntött helyzetbe állításával
érhető el.
Az L.S.P. ülésbe történő visszanyomásához nyomja meg
a zárógombot (15) és ezzel egy időben nyomja az L.S.P.
rendszer az ülés felé.
MEGJEGYZÉS! Ha az autóban a középső helyzetben
használja a gyermekülést, ne nyissa ki az oldalsó
védőelemet.
FIGYELMEZTETÉS! Az oldalsó védőelemet tilos
!
a gyermekülés mozgatására, vagy rögzítésére
használni.
NASTAVENÍ BOČNÍCH CHRÁNIČŮ
Autosedačka je vybavená systémem „lineární ochrany
před bočním nárazem“ (L.S.P.). Tento systém zvyšuje
bezpečnost vašeho dítěte v případě bočního nárazu.
POZNÁMKA! Ujistěte se, že je systém L.S.P. připevněný
slyšitelným „ZACVAKNUTÍM“.
L.S.P. disponuje 3 polohami. V každém případě vytáhněte
systém L.S.P. do polohy (a). Pro nejlepší ochranu
vytáhněte L.S.P. co nejvíce ke dveřím vozidla, blízko
dětské sedačky.
Pokud systém L.S.P. překročí vyhrazený prostor a
dotkne se dveří ve své nejdelší poloze (c), je třeba použít
nakloněnou polohu (b).
To lze provést úplným vytažením systému L.S.P. a
následně stisknout blokovací tlačítko (15) a posunout
L.S.P. do nakloněné polohy.
Pro zatlačení systému L.S.P. zpět do sedadla stiskněte
blokovací tlačítko (15) a současně zatlačte L.S.P. směrem
k sedadlu.
POZNÁMKA! Při použití autosedačky uprostřed vozidla
je zakázáno vytahovat boční chránič.
VÝSTRAHA! Je zakázáno používat boční chránič k
!
podepření nebo upevnění autosedačky.
NASTAVENIE BOČNÝCH CHRÁNIČOV
Autosedačka je vybavená systémom „Ochrany pred
lineárnym bočným nárazom“ (L.S.P.). Tento systém zvyšuje
bezpečnosť vášho dieťaťa v prípade bočného nárazu.
POZOR! Uistite sa, že L.S.P. je zaxovaný s
počuteľným kliknutím.
L.S.P. má 3 polohy. Minimálne vytiahnite L.S.P. do polohy
(a). Za účelom zaistenia lepšej ochrany, vytiahnite L.S.P.
čo najviac smerom k dverám vozidla pri autosedačke.
V prípade, ak prevyšuje L.S.P. určený priestor a dotýka
sa dverí v svojej najdlhšej polohe (c), treba použiť
sklonenú polohu (b).
To sa dá urobiť prostredníctvom úplného vytiahnutia
L.S.P. a následného zatlačenia tlačidla (15) a presunu
L.S.P. do sklonenej polohy.
Ak chcete zatlačiť L.S.P. späť do sedačky, stlačte tlačidlo
(15) a zároveň zatlačte L.S.P. smerom k sedačke.
POZOR! Ak sa autosedačka používa v strednej polohe
vo vozidle, je zakázané predlžovať bočný chránič.
UPOZORNENIE! Je zakázané používať bočný chránič
!
za účelom prenosu alebo upevnenia autosedačky.
HUCZSK
Page 78

16
ÜLŐ ÉS HÁTRADÖNTÖTT HELYZETEK BEÁLLÍTÁSA
Gyermeke biztonságos és kényelmes szállítása
érdekében a CYBEX SIRONA Q i-SIZE termék 7
különböző ülő és hátradöntött helyzettel rendelkezik.
Igény esetén a gyermekülés első részén lévő beállítókar
(16) használatával állítsa a CYBEX SIRONA Q I-SIZE
ülést a kívánt döntött helyzetbe. Minden esetben
győződjön meg róla, hogy az üléshéj (17) hallható
kattanással rögzült a helyén.
NASTAVENÍ PRO POLOHY SEZENÍ A NAKLONĚNÍ
CYBEX SIRONA Q i-SIZE nabízí až 7 různých poloh
sezení a naklonění pro bezpečnou a pohodlnou přepravu
vašeho dítěte ve vozidle. Pokud chcete, aktivujte polohu
stavitelného držadla (16) na přední části dětské sedačky,
abyste uvedli CYBEX SIRONA Q I-SIZE do požadované
nakloněné polohy. Vždy se ujistěte, že se skořápka
sedačky (17) zablokuje v poloze slyšitelným zacvaknutím.
NASTAVENIE PRE SED A SKLOPENIE
CYBEX SIRONA Q i-SIZE ponúka až 7 rôznych polôh
sedenia a sklopenia operadla pre bezpečnú a pohodlnú
prepravu vášho dieťaťa vo vozidle. V prípade potreby
manipulujte s rukoväťou nastavenia polohy (16) v
prednej časti autosedačky, aby ste nastavili požadovaný
sklopenie CYBEX SIRONA Q I-SIZE. Vždy sa uistite, že
sa teleso sedačky (17) zaxovalo s počuteľným kliknutím.
1716
154 155
HUCZSK
Page 79

360°OS ELFORGATÁS
Gyermeke behelyezéséhez és kivételéhez a gyermekülés
16
16
18
156 157
360°-kal elforgatható. Ez lehetővé teszi az előre és hátra
néző helyzetek közötti átváltást is. Erről bővebben a
következő szakaszban olvashat: „ÁTÁLLÍTÁS ELŐRE
NÉZŐ HASZNÁLATRA”.
• Az üléshéj elforgatásához elsőként nyomja le a
beállítókart (16) és a nyomva tartás közben állítsa
teljesen függőleges helyzetbe az üléshéjat, melyet
az üléshéj vázának két oldalán lévő jelölések (18)
jeleznek.
MEGJEGYZÉS! A gyermekülés csak akkor forgatható
el, ha a vázon (18) lévő jelölés egy vonalban van az
üléshéjon lévő jelöléssel.
• Ekkor elforgathatja az üléshéjat az ajtó felé és
könnyedén becsatolhatja a gyermeket. Lásd a
következő részben: „RÖGZÍTÉS ÖVRENDSZERREL”.
MEGJEGYZÉS! Az utazás megkezdése előtt állítsa
vissza az üléshéjat alaphelyzetbe és rögzítse azt.
• Forgassa vissza az üléshéjat eredeti helyzetébe. A
semleges helyzet elérésekor az ülést legalább az
első üléshelyzetben kell rögzíteni. Ezt egy jellegzetes
„KATT” hang jelzi.
MEGJEGYZÉS! Elforgatási próbálkozással ellenőrizze,
hogy az ülés megfelelően rögzítve van-e, e közben ne
nyomja le a beállítókart (16).
OTÁČENÍ O 360°
Autosedačku lze otočit o 360°, abyste do ní mohli vložit
dítě, a abyste mohli vyjmout dítě z vozidla. To vám také
umožňuje měnit polohu sedačky ze směřující dozadu do
směřující dopředu. Ohledně této možnosti si pročtěte oddíl
„ZMĚNA POUŽITÍ NA POLOHU SMĚŘUJÍCÍ DOPŘEDU“.
• Abyste mohli otáček skořápku sedačky, musíte nejdříve
stisknout polohovací stavitelné držadlo (16) a zatímco
je držadlo stlačené, uveďte skořápku sedačky do zcela
vzpřímené polohy. To udávají značky po stranách
hlavního rámu (18) a u skořápky sedačky.
POZNÁMKA! Teprve poté, co budou značky na hlavním
rámu (18) zarovnány se značkami na skořápce sedačky,
lze autosedačku otočit.
• Nyní můžete otáčet skořápku sedačky ke dveřím
a bez obtíží zajistit dítě pomocí popruhů. Viz oddíl
„ZABEZPEČENÍ POMOCÍ POSTROJŮ“.
POZNÁMKA! Než se vydáte na cestu, musíte otočit
skořápku sedačky do základní polohy a zablokovat ji v ní.
• Otočte zadní stranu skořápky sedačky do její původní
polohy. Jakmile dosáhnete neutrální polohy, sedačku
je třeba zablokovat alespoň do první polohy sezení.
Upozorní vás na to slyšitelné „ZACVAKNUTÍ“.
POZNÁMKA! Ujistěte se, že je skořápka sedačky
správně zablokovaná na místě, tím, že se ji pokusíte
otočit, přitom však netlačte na polohovací stavitelné
držadlo (16).
OTOČENIE O 360°
Autosedačka môže byť otočená o 360°, aby sa uľahčilo
umiestnenie vášho dieťaťa do vozidla a jeho vybranie z
vozidla. Otočenie tiež umožní zmeniť polohu umiestnenia
sedačky v protismere jazdy do polohy v smere jazdy.
Podrobnosti pozri v časti „PRESTAVOVANIE Z POUŽITIA V
PROTISMERE JAZDY NA POUŽITIE V SMERE JAZDY“.
• Ak chcete umožniť otáčanie telesa sedačky, najskôr
stlačte rukoväť nastavovania polohy (16) a pri stlačenej
rukoväti umiestnite teleso sedačky do úplne zvislej
polohy, ktorá je označená značkami na bočných
stranách hlavného rámu (18) a telesa sedačky.
POZOR! Autosedačka sa môže otáčať len v tom prípade,
ak sa označenie na hlavnom rámu (18) zhoduje s
označením na telese sedačky.
• Teraz môžete otočiť teleso sedačky smerom ku dverám
a pripútať dieťa bez problémov. Pozri časť „ZAISTENIE
PROSTREDNÍCTVOM UPÍNACIEHO SYSTÉMU.“
POZOR! Pred jazdou musíte vrátiť teleso sedačky do
základnej zaxovanej polohy.
• Otočte teleso sedačky späť do pôvodnej polohy. Ak
je neutrálna poloha dosiahnutá, musí byť sedačka
zaxovaná aspoň v prvej polohe sedu. Bude to
jednoznačne jasné podľa počuteľného kliknutia.
POZOR! Uistite sa, že teleso sedačky je správne
zaxované na mieste tak, že ho skúsite otočiť bez
stlačenia rukoväte regulácie polohy (16).
HUCZSK
Page 80

MEGJEGYZÉS! Akadályozza meg, hogy szennyeződés
és homok juthasson a felső üléshéj és az alaprész
közé. Ez hátrányosan befolyásolhatja a forgatási és
döntési funkciót. Ha mégis megtörténik, akkor az ülés
károsodásának elkerülése érdekében a forgatás és
döntés előtt távolítsa el a szennyeződést.
FIGYELMEZTETÉS! Utazás közben az ülésnek
!
minden esetben rögzítve kell lennie előre, vagy
hátra néző helyzetben. Utazás közben tilos az ülést
berakási, vagy egyéb más nyitott helyzetekben
használni.
158 159
POZNÁMKA! Zabraňte tomu, aby se nečistoty nebo
písek dostaly mezi horní částí skořápky sedačky a
základnu. To může být negativní dopad na fungování
otáčení a funkci polohování. Pokud k tomu dojde, je třeba
nečistoty odstranit před tím, než budete sedačku otáčet a
naklánět dále, aby nedošlo k jejímu trvalému poškození.
VÝSTRAHA! Při jízdě musí být vždy autosedačka
!
zablokována buď v poloze směřující dozadu, nebo
dopředu. Nikdy během jízdy nepoužívejte sedačku
v poloze zatížení nebo jakékoliv neuzamčené
prostřední poloze.
POZOR! Zabráňte tomu, aby sa medzi horné teleso
sedačky a základňu dostalo akékoľvek znečistenie alebo
piesok. Týmto sa môže nepriaznivo ovplyvniť funkcia
točenia a polohovania. Ak došlo k vniknutiu znečistenia,
treba znečistenie odstrániť pred vykonaním otočenia
a polohovania sedačky, aby sa zabránilo trvalému
poškodeniu sedačky.
UPOZORNENIE! Počas jazdy musí byť
!
autosedačka vždy zafixovaná v polohe v protismere
alebo v smere jazdy. Nikdy nepoužívajte sedačku v
zavádzacej polohe alebo v akejkoľvek nezafixovanej
strednej polohe počas jazdy.
HUCZSK
Page 81

3
CLICK!
19
4
160 161
HASZNÁLAT HÁTRA NÉZŐ HELYZETBEN 45 CM 105 CM
A rugalmas védőelem felszerelése
Forgassa az ülést hátra néző helyzetbe. Vegye ki a melléklet rugalmas védőelemet (3) a csomagolásból. Illessze
be a rugalmas védőelemet a gyermekülés hátsó részén
lévő megfelelő nyílásba (19). Biztosítsa, hogy a rugalmas
védőelem (3) azon oldala, ahol a csavarfejek vannak,
az autó hátsó része felé nézzen. A rugalmas védőelem
megfelelő záródását jellegzetes „KATT” hang jelzi.
FIGYELMEZTETÉS! A gyermekülés hátra néző
!
használatakor biztonsági okokból fel kell szerelni a
rugalmas védőelemet.
FIGYELMEZTETÉS! 15 hónapos kor és 75 cm
!
testmagasság alatt a hátra néző helyzet kötelező. E
felett is a hátra néző szállítási helyzet a legbiztonsá-
gosabb.
MEGJEGYZÉS! A fejtámlán (4) lévő jelzés a gyermek
magasságát jelöli, ez alapján eldönthető, hogy előre
néző helyzetben használhatja-e a gyermekülést. További
információkat a következő részben találhat: „HASZNÁLAT
ELŐRE NÉZŐ HELYZETBEN (76 cm - 105 cm)”
FIGYELMEZTETÉS! Hátra néző helyzetben az
!
ütközésvédő használata nem engedélyezett!
POUŽITÍ V POLOZE SMĚŘUJÍCÍ DOZADU 45 CM 105 CM
Připevnění tyče pro zpětný odraz
Otočte sedačku, aby směřovala dozadu. Vyjměte dodanou tyč pro zpětný odraz (3) z obalu. Vložte tyč pro
zpětný odraz do příslušných drážek (19) v zadní části
autosedačky. Ujistěte se, že strana s hlavou šroubů na
tyči pro zpětný odraz (3) směřuje k zadní části vozu.
Slyšitelné „ZACVAKNUTÍ“ oznamuje, že tyč pro zpětný
odraz byla řádně zajištěna.
VÝSTRAHA! Z bezpečnostních důvodů musí být
!
tyč pro zpětný odraz nainstalována pro použití
autosedačky směřující dozadu.
VÝSTRAHA! Je povinností používat polohu
!
směřující dozadu, dokud věk dítěte nedosáhne
15 měsíců a výšku 75 cm. I po dosažení této
hranice je přeprava v poloze směřující dozadu
stále nejbezpečnější.
POZNÁMKA! Ukazatel na opěrce hlavy (4) zobrazuje
výšku dítěte, kdy lze nejdříve polohu sedačky změnit
na polohu směřující dopředu. Pro další podrobnosti
si přečtěte oddíl: „POUŽITÍ V POLOZE SMĚŘUJÍCÍ
DOPŘEDU (76 cm - 105 cm)“.
VÝSTRAHA! Není povoleno používat štít proti
!
nárazu v poloze směřující dozadu!
POUŽITIE V PROTISMERE JAZDY 45 CM 105 CM
Pripojenie nárazovej závory
Preveďte sedačku do polohy v protismere jazdy. Vyberte
dodávanú nárazovú závoru (3) z obalu. Pripojte nárazo-
vú závoru do príslušných prehĺbení (19) v zadnej časti
autosedačky. Uistite sa, že strana s hlavami skrutiek na
nárazovej závore (3) sa lícuje so zadnou stranou vozidla.
Počuteľné kliknutie znamená, že bola nárazová závora
správne zamknutá.
UPOZORNENIE! Z bezpečnostných dôvodov musí
!
byť nárazová závora inštalovaná len v prípade
použitia autosedačky v protismere jazdy.
UPOZORNENIE! Umiestnenie sedačky v protis-
!
mere jazdy je povinné v prípade použitia pre dieťa
vo veku do 15 mesiacov a pri výške do 75 cm.
Dokonca aj v prípade staršieho vyššieho dieťaťa je
preprava v protismere jazdy najbezpečnejšia.
POZOR! Indikátor na opierke hlavy (4) zobrazuje výšku
dieťaťa, od ktorej najskôr môže byť sedačka premiestnená do polohy v smere jazdy. Podrobnosti pozri v časti:
„POUŽITIE V PROTISMERE JAZDY (76 cm - 105 cm)“.
UPOZORNENIE! V prípade umiestnenia sedačky
!
v protismere jazdy nie je použitie nárazového štítu
povolené!
HUCZSK
Page 82

BEÁLLÍTÁS A TESTMÉRETHEZ
MAX.
20
21
A fejtámla beállítása
MEGJEGYZÉS! Az újszülöttvédő betét védelmet nyújt
gyermekének. 60 cm testhossz felett használható.
MEGJEGYZÉS! A fejtámla
(20)
csak akkor biztosítja a
megfelelő védelmet gyermeke számára, ha optimális
magasságba van állítva. A fejtámlán 12 magassághelyzet
állítható be.
(20)
• Úgy kell beállítani a fejtámlát
hogy a gyermek válla
és a fejtámla közötti távolság ne haladja meg a 3 cm-t
(körülbelül 2 ujjszélesség).
• Aktiválja a fejtámla (20) alsó részén lévő beállítókart
(21) és állítsa a megfelelő helyzetbe.
162 163
NASTAVENÍ VÝŠKY TĚLA
Nastavení opěrky hlavy
POZNÁMKA! Novorozenecká vložka chrání vaše dítě.
Měla by se používat, dokud je výška dítěte 60 cm.
POZNÁMKA! Opěrka hlavy
(20)
zajišťuje nejlepší
možnou ochranu pro vaše dítě pouze v případě, pokud
je nastavena na optimální výšku. Lze nastavit 12 poloh
výšky.
(20)
• Opěrka hlavy
musí být nastavena tak, aby
vzdálenost mezi rameny dítěte a opěrkou hlavy
nepřevýšila 3 cm (cca šířka 2 prstů).
• Aktivujte stavitelné držadlo (21) na spodní straně
opěrky hlavy (20) a uveďte do požadované polohy.
PRISPÔSOBENIE NA VÝŠKU
Nastavenie opierky hlavy
POZOR! Novorodenecká vložka chráni vaše dieťa.
Vložka by sa mala používať do výšky dieťaťa 60 cm.
POZOR! Opierka hlavy (20) zaisťuje najlepšiu
možnú ochranu vášho dieťaťa len v tom prípade, ak
je nastavená na optimálnu výšku. Opierka má 12
výškových polôh pre nastavenie.
• Opierka hlavy
(20)
musí byť nastavená tak, aby
neprevyšovala vzdialenosť medzi ramenami dieťaťa a
opierkou hlavy 3 cm (cca. šírka 2 prstov).
• Aktivujte nastavovaciu rukoväť (21) na spodnej strane
opierky hlavy (20) a posuňte ju do požadovanej polohy.
HUCZSK
Page 83

22
Az előre behelyezett újszülött betét támogatja a legkisebb
babák fekvését és kényelmét. Amikor a baba eléri a 61
cm testhosszt (kb. 3 hónapos korban) a nagyobb hely
érdekében el lehet távolítani az újszülött betétet (22). Az
újszülött betét (22) eltávolításához nyissa ki a fejtámla
huzatán lévő patenteket. Távolítsa el a fejtámla huzatát
és vegye ki az újszülött betétet. Ez követően helyezze
vissza a fejtámla huzatát, állítsa be a vállöveket és végül
zárja be a patenteket.
Mielőtt kimosná az újszülöttbetétet, az erre kialakított
résen keresztül vegye ki a benne lévő szivacsbetétet.
Miután kimosta és megszárította, az újszülöttbetétet a
résen keresztül teheti vissza.
164 165
Az újszülött betét eltávolítása
Vyjmutí novorozenecké vložky
Předem nainstalovaná novorozenecká vložka pomáhá
zlepšovat pohodlí při ležení a je vhodná pro nejmenší
děti. Novorozeneckou vložku (22) lze vyjmout poté, co
je výška dítěte 61 cm (cca ve 3 měsících věku), abyste
dítěti poskytli více prostoru. Pro vyjmutí novorozenecké
vložky (22) otevřete stiskací knoíky potahu opěrky hlavy.
Teď nejdříve sejměte potah opěrky halvy a poté vyjměte
novorozeneckou vložku. Poté nasaďte potah zpět na
opěrku hlavy, vraťte ramenní pásy a nakonec znovu
zavřete stiskací knoíky.
Před vypráním novorozenecké vložky z ní nejdříve vyjměte
pěnové části. Po vyprání a vysušení novorozenecké vložky
můžete pěnové části vrátit zpět na původní místo.
Odstránenie novorodeneckej vložky
Predbežne umiestnená novorodenecká vložka pomáha
zabezpečiť pohodlie pri ležaní a prispôsobená najmenším
bábätkám. Novorodeneckú vložku (22) môžete odstrániť po
tom, čo bábätko dosiahne výšku 61 cm (cca 3 mesiace), aby
malo dieťa viac miesta. Ak chcete vybrať novorodeneckú
vložku (22) rozopnite gombíky poťahu opierky hlavy.
Teraz stiahnite poťah opierky hlavy a následne odstráňte
novorodeneckú vložku. Potom natiahnite poťah opierky
hlavy späť na svoje miesto, premiestnite ramenné pruhy a
na záver znova zapnite gombíky.
Pred praním novorodeneckej vložky z nej najskôr vyberte
penové časti. Po vypraní a vysušení novorodeneckej vložky
vráťte tieto penové časti späť na pôvodné miesto.
HUCZSK
Page 84

23
24
28
25
27
26
166 167
BECSATOLÁS ÖVRENDSZERREL
MEGJEGYZÉS! Az ülés használata előtt biztosítsa, hogy
a fejtámla megfelelően rögzítve legyen a helyén.
MEGJEGYZÉS! Biztosítsa, hogy a gyermekülésben ne
legyenek játékok és kemény tárgyak.
A vállövek (23) szorosan csatlakoznak a fejtámlához és ezeket
tilos külön beállítani. Az ülés használata előtt biztosítsa, hogy a
fejtámla megfelelően rögzítve legyen a helyén.
• A középső beállítón (24) lévő beállítógomb
lenyomásával oldja ki a vállöveket (23) és ezzel egy
időben húzza felfelé ezeket.
MEGJEGYZÉS! Kérjük, hogy mindig a vállövet húzza
(23) és ne az övpárnákat (25).
• A piros gomb erős lenyomásával nyissa ki az övcsatot
(26).
MEGJEGYZÉS! Biztosítsa, hogy a vállövek (23) ne
legyenek megcsavarodva.
• Helyezze be gyermekét a gyermekülésbe.
• Helyezze a vállöveket (23) közvetlenül a gyermek válla
fölé.
• Illessze össze a csat mindkét nyelvét (27) és helyezze
be ezeket az övcsatba (26), melybe jellegzetes „KATT”
hanggal rögzülnek.
• A vállövek (23) meghúzásához óvatosan húzza
a középső beállítóövet (28) addig, amíg ez nem
illeszkedik gyermeke testéhez.
MEGJEGYZÉS! Annak érdekében, hogy a gyermekülés
megfelelő védelmet biztosítson, a vállöveknek (23) és a
csípőöveknek a testhez lehető legközelebb kell futniuk.
UPEVNĚNÍ POMOCÍ POSTROJŮ
POZNÁMKA! Před použitím autosedačky se ujistěte, zda
se opěrka hlavy správně zarazila na místě.
POZNÁMKA! Ujistěte se, že v autosedačce nejsou
hračky a tvrdé předměty.
Ramenní pásy (23) jsou pevně připojeny k opěrce hlavy a
nesmí být nastavovány nezávisle na sobě. Před použitím
sedačky se ujistěte, zda se opěrka hlavy správně zarazila
na místě.
• Stisknutím nastavovacího tlačítka na centrálním
seřizovači (24) současným tažením obou ramenních
pásů nahoru uvolněte ramenní pásy (23).
POZNÁMKA! Vždy prosím tahejte za ramenní pás (23),
ne za vycpávky pásu (25).
• Pevně stiskněte červené tlačítko, abyste otevřeli přezku
pásu (26).
POZNÁMKA! Ujistěte se, že ramenní pásy (23) nejsou
překroucené.
• Vložte dítě do autosedačky.
• Umístěte ramenní pásy (23) přímo přes ramena dítěte.
• Spojte oba jazýčky přezky (27) k sobě a zablokujte je v
přezce pásu (26) slyšitelným „ZACVAKNUTÍM“.
• Opatrně zatáhněte za prostřední nastavovací pás (28),
abyste utáhli ramenní pásy (23), dokud „neupevní“ tělo
dítěte.
POZNÁMKA! Aby autosedačka umožňovala optimální
ochranu, ramenní pásy (23) a kyčelní pásy by měly co
nejvíce přiléhat k tělu.
PRIPUTANIE POSTROJOVÝM SYSTÉMOM
POZOR! Pred použitím autosedačky sa uistite, že opierka
hlavy je správne zaxovaná v náležitej polohe.
POZOR! Uistite sa, že na autosedačke nie sú hráčky ani
iné tvrdé predmety.
Ramenné pruhy (23) sú pevne pripojené k opierke hlavy
a nesmú byť nastavované osobitne. Pred použitím
autosedačky sa uistite, že opierka hlavy je správne
zaxovaná v náležitej polohe.
• Povoľte ramenné pruhy (23) zatlačením regulačného
tlačidla na centrálnom regulátore (24) a súčasne
vytiahnite obidva ramenné pruhy.
POZOR! Vždy ťahajte za ramenný pruh (23), nie za
podložky pruhov (25).
• Otvorte sponu pásu (26) pevným stlačením červeného
tlačidla.
POZOR! Zabezpečte, aby neboli ramenné pruhy (23)
pretočené.
• Umiestnite vaše dieťa na autosedačku.
• Umiestnite ramenné pruhy (23) priamo na ramená
vášho dieťaťa.
• Spojte obidve západky spony (27) a zaxujte ich v
príslušnom mieste v spone pásu (26) tak, aby bolo
počuť kliknutie.
• Opatrne potiahnite za centrálny regulačný pás (28), aby
ste mohli zatiahnuť ramenné pruhy (23) a prispôsobiť
ich k telu dieťaťa.
POZOR! Aby mohla autosedačka zaistiť optimálnu
ochranu by mali byť ramenné pruhy (23) a bederné pruhy
by mali čo najtesnejšie priliehať na telo.
HUCZSK
Page 85

ÁTALAKÍTÁS HÁTRA NÉZŐRŐL ELŐRE NÉZŐ HAS
ZNÁLATRA
A gyermekülés előre néző helyzetben történő használata
érdekében vegye gyelembe a következő pontokat:
A rugalmas védőelem leszerelése
A rugalmas védőelem csak a gyermekülés hátra néző
használata esetén kötelező. Előre néző helyzetben le
kell szerelni. Eltávolításához nyomja meg a kioldógombot
(29) és ezzel egy időbe húzza ki a rugalmas védőelemet
a vezetőből.
29
168 169
Az 5-pontos övrendszer szétszerelése / tárolása
A gyermekülés előre néző helyzetben történő használatához elsőként el kell raknia az 5-pontos övrendszert.
FIGYELMEZTETÉS! Hátra néző helyzetben az
!
5-pontos övrendszer használata nem engedélyezett!
ZMĚNA POUŽITÍ Z POLOHY SMĚŘUJÍCÍ DOZADU
NA POLOHU SMĚŘUJÍCÍ DOPŘEDU
Abyste mohli používat autosedačku v poloze směřující
dopředu, musíte dodržovat následující body:
Demontáž tyče pro zpětný odraz
Tyč pro zpětný odraz je pouze potřebná pro použití pro
polohu sedačky směřující dozadu. Je třeba ji odstranit
před použitím polohy sedačky směřující dopředu. Pro
vyjmutí stiskněte uvolňovací tlačítko (29) a zároveň
táhněte tyč pro zpětný odraz z vodítka.
Demontáž/skladování 5bodového pásového systému
Nejprve musíte odložit 5bodový systém postrojů před tím,
než použijete autosedačku ve směru jízdy.
VÝSTRAHA! Není povoleno používat 5bodový
!
pásový systém v poloze směřující dopředu!
PRESTAVOVANIE Z POUŽITIA V PROTISMERE
JAZDY NA POUŽITIE V SMERE JAZDY
Ak chcete používať autosedačku v smere jazdy, treba
dodržať nasledujúce pokyny:
Demontáž nárazovej závory
Nárazová závora je potrebná len v prípade použitia
autosedačky s protismere jazdy. Pred použitím
autosedačky v smere jazdy musí byť nárazová závora
odstránená. Za týmto účelom stlačte uvoľňovacie tlačidlo
(29) a zároveň vytiahnite nárazovú závoru z držiaku.
Demontáž / odloženie 5-bodového upínacieho systému
Aby ste mohli používať autosedačku v smere jazdy, treba
najskôr odložiť 5-bodový upínací systém.
UPOZORNENIE! V prípade umiestnenia sedačky v
!
smere jazdy nie je použitie 5-bodového upínacieho
systému povolené!
HUCZSK
Page 86

• Nejdříve uveďte opěrku hlavy do nejvyšší polohy.
• Uvolněte ramenní pásy (23) tím, že aktivujete centrální
seřizovač (24) a vytáhněte oba ramenní pásy (23) co
nejdále.
• Stiskněte červené tlačítko, abyste otevřeli přezku
pásu (26).
• Vytáhněte kryt v místě sezení, dokud nebude možné se
dostat k úložnému prostoru pro přezku.
• Oddělte ramenní polstrování (25) z ramenních pásů
(23) a přezky pásu (26).
• Nyní protáhněte přezku skrz potah sedáku
autosedačky.
• Otevřete červený kryt (30) úložného prostoru (31) v
sedačce a umístěte přezku pásu (26) dovnitř.
• Uložte jazyky ramenních pásů (27) do příslušného
umístění (38) v opěrce zad.
Poznámka! Sedačku nelze otáčet do polohy směřující
dopředu, dokud přezku pásu (26) neumístíte do úložného
prostoru (31).
• Zavřete červený kryt (30) a znovu nasaďte kryt sedačky.
Vždy mějte po ruce ramenní vycpávky.
• Nyní vyjměte přítomný štít proti nárazu (32) z
úložného prostoru.
VÝSTRAHA! Není povoleno používat 5bodový
!
pásový systém v poloze směřující dopředu!
• Najskôr umiestnite opierku hlavy do najvyššej polohy.
• Povoľte ramenné pruhy (23) aktiváciou centrálneho
regulátora (24) a potiahnite obidva ramenné pruhy (23)
tak ďaleko, ako sa vám bude dať.
• Otvorte sponu pásu (26) pevným stlačením červeného
tlačidla.
• Vytiahnite poťah v sedacej časti, aby ste získali prístup
k odkladacej priehradke upínacej spony.
• Odpojte podložky (25) od ramenných pruhov (23) a
spony (26).
• Teraz potiahnite sponu popruhu cez kryt sedadla.
• Otvorte červený poťah (30) odkladacej priehradky (31)
v sedačke a umiestnite dovnútra sponu (26).
• Uložte pásové remeňové pásy ramena (27) do
označeného výklenku (38) v operadle.
Pozor! Sedačka sa nemôže otáčať pri polohe v smere
jazdy, pokiaľ je spona (26) uložená v odkladacej
priehradke (31).
• Zatvorte červený poťah (30) a znovu natiahnite poťah
sedačky. Vždy držte podložky pruhov poruke.
• Teraz vyberte dodaný nárazový štít (32) zo
skladovacieho miesta.
UPOZORNENIE! V prípade umiestnenia sedačky v
!
smere jazdy nie je použitie 5-bodového upínacieho
systému povolené!
26
30
23
27
25
38
24
31
• Elsőként állítsa a fejtámlát a legmagasabb helyzetbe.
• A középső beállító (24) használatával oldja ki a
vállöveket (23) és a lehető legjobban húzza ki mindkét
vállövet (23).
• A piros gomb erős lenyomásával nyissa ki az
övcsatot (26).
• Addig húzza felfelé az ülőpárna huzatát amíg hozzá
nem fér az övcsat tárolóhelyéhez.
• Válassza le a vállövekről (23) és az övcsatról (26) a
vállpárnákat (25).
• Húzza át a vállövet az ülés huzatán.
• Az ülésben nyissa fel a tárlórekesz (31) piros burkolatát
(30) és helyezze bele az övcsatot (26).
• A vállövek övnyelveit (27) a háttámla erre a célra
kialakított rekeszében (38) tárolja.
Megjegyzés! Az ülés addig nem forgatható el előre
néző helyzetbe, amíg az övcsat (26) nincsen benne a
tárolórekeszben (31).
• Zárja be a piros borítást (30) és helyezze vissza
az üléshuzatot. Mindig tartsa elérhető helyen a
vállpárnákat.
• Ekkor vegye ki a melléklet ütközésvédőt (32) a
tárolóhelyről.
FIGYELMEZTETÉS! Hátra néző helyzetben az
!
5-pontos övrendszer használata nem engedélyezett!
32
26
170 171
HUCZSK
Page 87

HASZNÁLAT ELŐRE NÉZŐ HELYZETBEN 76 CM 105 CM
MAX.
4
Az ülés a következő esetekben használható előre néző
helyzetben:
• gyermek magassága > 76 cm.
és
• a gyermek legalább 16 hónapos.
és
• a helyesen beállított fejtámla (20) eltakarja a jelzést (4)
MEGJEGYZÉS! A baleseti statisztikák azt igazolják,
hogy gyermeke szállításához a hátra néző helyet a
legbiztonságosabb. Ezért azt javasoljuk, hogy a lehető
leghosszabb ideig hátra néző helyzetben használja a
gyermekülést.
MEGJEGYZÉS! Úgy kell beállítani a fejtámlát (20) hogy
a gyermek válla és a fejtámla (20) közötti távolság ne
20
haladja meg a 3 cm-t (körülbelül 2 ujjszélesség). További
információk érdekében olvassa el a következő részt:
„BEÁLLÍTÁS A TESTMÉRETHEZ”.
MEGJEGYZÉS! Az előre néző szállításhoz használja az
172 173
ütközésvédőt.
POUŽITÍ V POLOZE SMĚŘUJÍCÍ DOPŘEDU 76 CM 105 CM
Sedačku lze pouze používat v poloze směřující dopředu,
pokud:
• je dítě vyšší než > 76 cm
a
• je věk dítě min. 16 měsíců
a
• řádně nastavená opěrka hlavy (20) zakrývá ukazatel (4)
POZNÁMKA! Statistiky nehod dokládají, že
nejbezpečnější způsob přepravy pro vaše dítě ve vozidle je v pozici směřující dozadu. Proto doporučujeme
používat autosedačku v poloze směřující dozadu tak
dlouho, jak je to možné.
POZNÁMKA! Opěrka hlavy (20) musí být nastavena tak,
aby vzdálenost mezi rameny dítěte a opěrkou hlavy (20)
nepřevýšila 3 cm (cca šířka 2 prstů). Pro další informace
si přečtěte oddíl „NASTAVENÍ VÝŠKY TĚLA“.
POZNÁMKA! Pro přepravu v poloze směřující dopředu
použijte štít proti nárazu.
POUŽITIE
V SMERE JAZDY 76 CM 105 CM
Sedačka smie byť používaná v smere jazdy, ak:
• dieťa je > 76 cm vysoké.
a
• dieťa má min. 16 mesiacov.
a
• správne nastavená opierka hlavy (20) zakrýva indikátor (4)
POZOR! Podľa štatistík z nehôd je preukázané, že preprava vášho dieťaťa v protismere jazdy je najbezpečnejšia.
Preto vám odporúčame používať autosedačku v protismere jazdy tak dlho, kým je to možné.
POZOR! Opierka hlavy (20) musí byť nastavená tak,
aby neprevyšovala vzdialenosť medzi ramenami dieťaťa
a opierkou hlavy (20) 3 cm (cca. šírka 2 prstov). Ďalšie
informácie sú uvedené v kapitole „PRISPÔSOBENIE
VEĽKOSTI TELA“.
POZOR! V prípade umiestnenia sedačky v smere jazdy
používajte nárazový štít.
HUCZSK
Page 88

NASTAVENIE NÁRAZOVÉHO ŠTÍTU
Vytiahnutím nastavovacích popruhov (33) na čelnej strane
nárazového štítu (32) môžete vykonať nastavenie štítu.
Štít by mal byť priliehavý, ale nesmie tlačiť na telo dieťaťa.
POZOR! Nárazový štít ponúka vášmu dieťaťu maximálnu
bezpečnosť a pohodlie len v prípade správneho
nastavenia. Dieťa nesmie mať na sebe hrubý zimný odev.
Ak chcete povoliť nastavovacie popruhy (33), stlačte
uvoľňovacie tlačidlá regulátorov popruhov (34) a
vytiahnite západky spôn nárazového štítu (32).
32
33
AZ ÜTKÖZÉSVÉDŐ BEÁLLÍTÁSA
Az ütközésvédő (32) első oldalán lévő beállítószíjakkal
(33) állíthatja be azt. Ennek szorosnak kell lennie, de ne
nyomódjon a gyermek testének.
MEGJEGYZÉS! Az ütközésvédő csak akkor nyújt
maximális védelmet és kényelmet gyermekének, ha
megfelelően be van állítva. Tilos vastag téli ruhát viselni.
A beállítóövek (33) kioldásához nyomja meg
az övbeállítók kioldógombját (34) és húzza ki a
csatnyelveket az ütközésvédőből (32).
NASTAVENÍ ŠTÍTU PROTI NÁRAZU
Vytažení nastavovacích pásů (33) na přední straně štítu
proti nárazu (32) umožňuje jeho nastavení. Měl by být
těsný, ale netlačit na tělo dítěte.
POZNÁMKA! Štít proti nárazu nabízí maximální ochranu
a pohodlí pro vaše dítě pouze, pokud je správně
nastaven. Dítě na sobě nesmí mít silné zimní oblečení.
Pro uvolnění nastavovacích pásů (33) stiskněte
uvolňovací tlačítka seřizovačů pásu (34) a vytáhněte
jazýčky přezky ze štítu proti nárazu (32).
34
174 175
HUCZSK
Page 89

MAX.
20
33
32
17
36
176 177
BECSATOLÁS AZ ÜTKÖZÉSVÉDŐVEL
• A kioldógomb (35) megnyomásával nyissa ki az
ütközésvédő zárószerkezetét (28) az üléshéjon (17).
MEGJEGYZÉS! Az ütközésvédő (32) kioldható csak
az egyik oldalon és áthajtható a másik oldalra. Ez
35
megkönnyíti gyermek ülésbe történő behelyezését.
A fejtámla (20) és az ütközésvédő (32) beállítását
követően helyezze be gyermekét az üléshéjba (17).
• Az ütközésvédő fémnyelvét (36) helyezze bele a
megfelelő csatba és győződjön meg róla, hogy a csat egy
jellegzetes „KATT” hanggal a helyére pattan.
• Meghúzással ellenőrizze, hogy a ütközésvédő (32)
megfelelően rögzítve van-e.
• A két szíjvég (33) visszafelé húzásával állítsa
szorosabbra az ütközésvédőt (32). Az ütközésvédő akkor
van megfelelően meghúzva, ha be tudja csúsztatni a
kezét a gyermek és az ütközésvédő közé.
MEGJEGYZÉS! A csatokba nem kerülhet be
szennyeződés és idegen tárgy. Csak a tiszta csatok
pattannak össze biztonságosan és hallhatóan.
FIGYELMEZTETÉS! Gyermeke biztonsága
!
érdekében (76 cm - 105 cm) előre néző helyzetben
ütközésvédelmet (32) kell használni.
UPEVNĚNÍ POMOCÍ ŠTÍTU PROTI NÁRAZU
• Otevřete aretační zařízení štítu proti nárazu (28)
na skořápce sedačky (17) stisknutím uvolňovacího
tlačítka (35).
POZNÁMKA! Případně lze také uvolnit štít proti nárazu
(32) pouze na jedné straně a sklopit ho na druhou stranu.
To usnadní umístění vašeho dítěte do sedačky.
Po nastavení opěrky hlavy (20) a štítu proti nárazu (32)
umístěte vaše dítě do skořápky sedačky (17).
• Vsuňte kovový jazýček (36) štítu proti nárazu do
příslušné přezky a ujistěte se, že přezka zacvakla v
daném místě slyšitelným „ZACVAKNUTÍM“.
• Zatáhněte za štít proti nárazu (32), abyste zkontrolovali,
zda se řádně zarazil v místě.
• Utáhněte štít proti nárazu (32) tažením dozadu za dva
konce pásu (33). Štít proti nárazu je správně utažen,
pokud lze vložit ruku mezi dítě a štít proti nárazu.
POZNÁMKA! Přezky je třeba udržovat bez nečistot a
jiných předmětů. Jen čisté přezky se zarazí slyšitelně a
bezpečně.
VÝSTRAHA! K zajištění bezpečnosti vašeho dítěte
!
(od 76 cm do 105 cm) musí být štít proti nárazu (32)
používán pouze v poloze směřující dopředu.
UPNUTIE NÁRAZOVÝM ŠTÍTOM
• Uvoľnite blokovacie zariadenie (28) nárazového štítu na
telese sedačky (17) stlačením uvoľňovacieho tlačidla (35).
POZOR! Alternatívne môže byť nárazový štít (32)
uvoľnený len na jednej strane a sklopený na druhej
strane. Týmto sa zjednoduší umiestnenie vášho dieťaťa
do sedačky.
Po nastavení opierky hlavy (20) a nárazového štítu (32)
usaďte vaše dieťa do telesa sedačky (17).
• Vložte kovovú západku (36) nárazového štítu do
príslušnej spony a uistite sa, že spona dosadla na svoje
miesto s počuteľným kliknutím.
• Potiahnite nárazový štít (32), aby ste skontrolovali, či je
správne zaxovaný.
• Utiahnutie nárazový štít (32) potiahnutím dvoch koncov
popruhu (33) dozadu. Nárazový štít je utiahnutý správne,
ak je možné vtlačiť ruku medzi dieťa a nárazový štít.
POZOR! Na sponách nesmú byť znečistenia ani iné
predmety. Len čisté spony sa dajú zapnúť spoľahlivo s
počuteľným kliknutím.
UPOZORNENIE! Nárazový štít (32) na zaistenie
!
bezpečnosti vášho dieťaťa (výška 76 cm až 105
cm) musí byť používaný len v prípade umiestnenia
sedačky v smere jazdy.
HUCZSK
Page 90
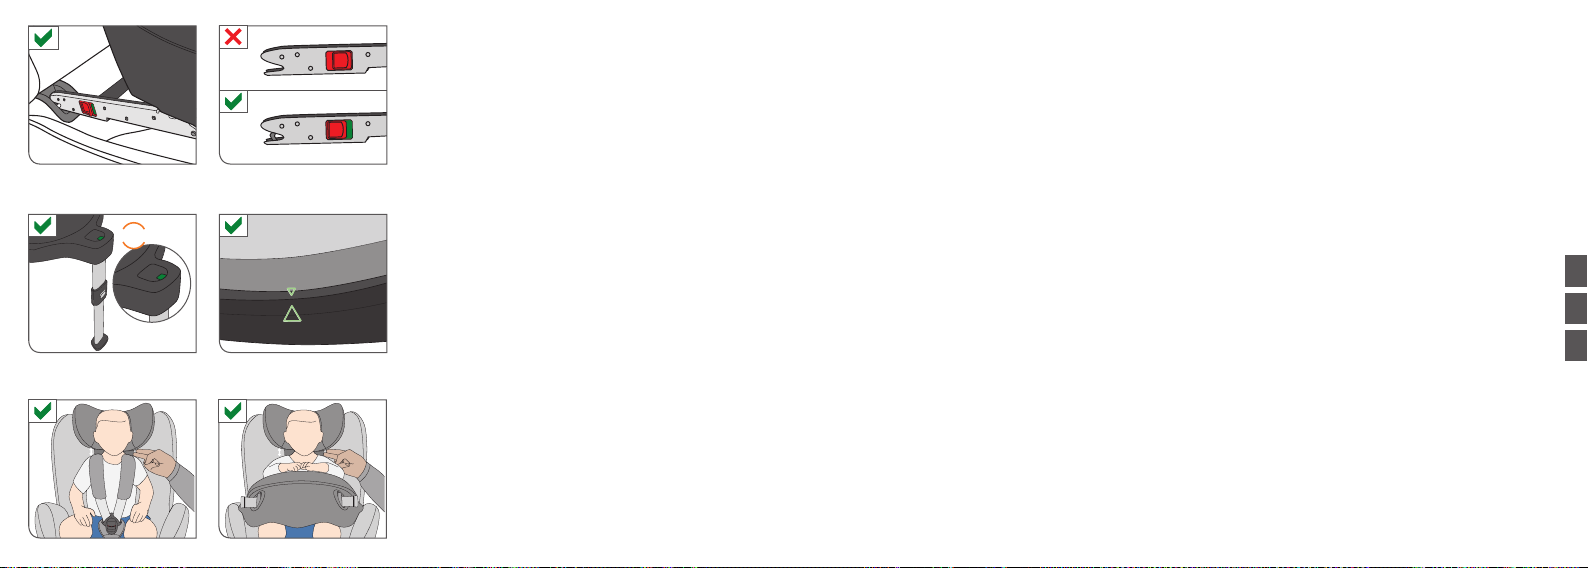
GYERMEKE MEGFELELŐEN BE VAN CSATOLVA?
MAX.
MAX.
Gyermeke maximális védelme érdekében győződjön
meg a következőkről:
• Az ISOFIX csatlakozók megfelelően rögzítve vannak a
járműhöz és a támasztóláb
• Az ülés rögzítve van a megfelelő helyzetben.
jól van felszerelve.
• A fejtámlát beállította a megfelelő magasságra.
• Hátra néző használat: Az 5-pontos övrendszer
megfelelően be van állítva a gyermek méretéhez, a
vállövek nincsenek megcsavarodva és az övrendszer
nincs lezárva.
CLICK!
• Előre néző használat: megfelelően beállította az
ütközésvédőt a gyermek méretéhez.
• Az olyan újszülötteket és kisgyermekeket, akik még
nem képesek maguktól felülni (körülbelül 1 éves korig),
ortopédiai és biztonsági okokból minden esetben hátra
néző helyzetben, a leginkább elfektetve szállítsuk.
178 179
JE VAŠE DÍTĚ ŘÁDNĚ ZAJIŠTĚNÉ?
Pro zaručení maximální bezpečnosti pro vaše dítě se
prosím ujistěte, že:
• Konektory ISOFIX jsou řádně upevněny k vozidlu a
opěrná noha
• Skořápka sedačky se zablokovala ve správné poloze.
byla řádně nainstalována.
• Opěrka hlavy byla nastavena na správnou výšku.
• Při použití v poloze směřující dozadu: 5bodový pásový
systém byl řádně nastaven na velikost dítěte, ramenní
pásy nebyly zkrouceny a pásový systém byl zablokován.
• Při použití v poloze směřující dopředu: štít proti nárazu byl
řádně nastaven na velikost dítěte.
• Novorozeňata a kojenci, kteří ještě neumí sedět sami
(přibližně do věku 1 roku), by měli být z ortopedických a
bezpečnostních důvodů vždy přepravováni v co nejvíce
ploché poloze směřující dozadu.
JE VAŠE DIEŤA NÁLEŽITE ZAISTENÉ?
Aby ste zaistili maximálnu bezpečnosť vášho dieťaťa,
presvedčite sa, že:
• Prípojky ISOFIX sú správne pripevnené k vozidlu a
bola správne nainštalovaná.
podpera
• Teleso sedačky bolo zafixované v správnej polohe.
• Výška opierky hlavy bola správne nastavená.
• V prípade umiestnenia sedačky v protismere jazdy:
5-bodový upínací systém bol správne nastavený na výšku
dieťaťa, ramenné pruhy nie sú pretočené a upínací systém
bol zafixovaný.
• v prípade umiestnenia sedačky v smere jazdy:nárazový
štít bol náležite nastavený podľa výšky dieťaťa.
• Novorodenci a maloleté osoby, ktoré nie sú ešte
schopné sami sedieť (do veku cca 1 rok) by sa mali z
ortopedických a bezpečnostných dôvodov prepravovať v
maximálne rovnej ležatej polohe v smere proti jazdy.
HUCZSK
Page 91

A HUZAT ELTÁVOLÍTÁSA
Eltávolítás
A gyermekülés huzata 7 részből áll (övpárnák, fejtámasz
huzat, fő üléshuzat, ütközésvédő huzat). A huzatok
23
26
180 181
a gyermekülés szélén futó huzattartó csatornákhoz
illeszkednek és több szegecs tartja egy ezeket. Az összes
szegecs kioldását követően a huzat különálló részei
eltávolíthatók a csatornákról.
FIGYELMEZTETÉS! A gyermekülést tilos huzat
!
nélkül használni.
AZ ÖVPÁRNÁK ELTÁVOLÍTÁSA
Nyissa ki az 5-pontos övrendszer övcsatját (26), nyissa
ki a patenteket és vegye ki az övpárnákat. Fűzze ki a
vállöveket (23) a huzatból.
A FEJTÁMLA HUZATÁNAK ELTÁVOLÍTÁSA
Háturól előre húzza le a huzatot a fejtámláról.
A FŐ ÜLÉSHUZAT ELTÁVOLÍTÁSA
Nyissa ki az ülés hátoldalán lévő cipzárat és hátulról előre
húzza le a fejtámla felett a huzatot.
AZ ÜTKÖZÉSVÉDŐ HUZATÁNAK ELTÁVOLÍTÁSA
Nyissa ki az első oldalon lévő cipzárat és húzza le hátra a
huzatot az ütközésvédőről.
Felhelyezés
A huzatok visszahelyezéséhez hajtsa végre fordított
sorrendben a korábban leírt műveleteket.
ODNÍMÁNÍ KRYTU
Odnímání
Kryt autosedačky tvoří 7 částí (vycpávka pásu, potah
opěrky hlavy, hlavní potah sedačky, potah štítu proti
nárazu). Potahy se vloží do prolů upevnění potahu
na hraně autosedačky a v místě drží díky několika
patentkám. Po uvolnění všech patentek lze jednotlivé
části potahu vyjmout z prolů upevnění potahu.
VÝSTRAHA! Autosedačka se nesmí nikdy používat
!
bez potahu.
SEJMUTÍ VYCPÁVEK PÁSU
Otevřete přezku pásu (26) 5bodového pásového systému
a otevřete stiskací knoíky, abyste sňali vycpávky pásu.
Nyní vyvlékněte ramenní pásy (23) z potahu.
SEJMUTÍ POTAHU Z OPĚRKY HLAVY
Táhněte potah zezadu dopředu přes opěrku hlavy.
SEJMUTÍ HLAVNÍHO POTAHU SEDAČKY
Otevřete zip na zadní straně sedačky a vytáhněte kryt
zezadu dopředu přes opěrku hlavy.
SEJMUTÍ POTAHU ZE ŠTÍTU PROTI NÁRAZU
Otevřete zip na přední straně a vytáhněte potah zezadu
ze štítu proti nárazu.
Připevnění
Pro vrácení potahů zpět na autosedačku postupujte v
opačném pořadí, než které bylo popsáno dříve.
ODSTRÁNENIE POŤAHU
Odstránenie
Poťah autosedačky sa skladá z 7 dielov (podložky
pásov, poťah opierky pre hlavu, hlavný poťah sedačky,
poťah nárazového štítu). Poťahy sú osadené do drážok
pripojenia poťahov na okraji autosedačky a sú xované
na niekoľkých miestach gombíkmi. Až po uvoľnení
všetkých gombíkov je možné vybrať jednotlivé diely
poťahu z drážok pripojenia poťahov.
UPOZORNENIE! Autosedačka sa nesmie používať
!
bez poťahu.
ODSTRÁNENIE PODLOŽIEK PÁSOV
Otvorte sponu pásu (26) 5-bodového upínacieho systému
a otvorte gombíky, aby ste mohli vybrať podložky pásov.
Teraz vyvlečte ramenné pruhy (23) z poťahu.
ODSTRÁNENIE POŤAHU Z OPIERKY PRE HLAVU
Stiahnite poťah zozadu dopredu cez opierku pre hlavu.
ODSTRÁNENIE HLAVNÉHO POŤAHU AUTOSEDAČKY
Rozopnite zips na zadnej strane autosedačky a stiahnite
poťah zozadu dopredu cez opierku pre hlavu.
ODSTRÁNENIE POŤAHU Z NÁRAZOVÉHO ŠTÍTU
Rozopnite zips na prednej strane a stiahnite poťah
dozadu z nárazového štítu.
Navlečenie
Ak chcete navliecť poťahy späť na autosedačku,
postupujte v opačnej postupnosti.
HUCZSK
Page 92

TISZTÍTÁS
Mivel a huzat alapvető funkciót lát el, fontos hogy
eredeti üléshuzatot használjon. Csere üléshuzatokat
kiskereskedőjénél vásárolhat.
FIGYELMEZTETÉS! Az első használat előtt mos-
!
sa ki a huzatot. Az üléshuzatok kímélő programmal,
max. 30°C hőmérsékleten moshatók. Ha magasabb
hőmérsékleten mossa, a huzat anyaga elveszítheti
a színét. Kéjük, hogy a huzatot külön mossa és mechanikusan ne szárítsa! Közvetlen napsütésben ne
szárítsa a huzatot! A műanyag alkatrészeket kímélő
tisztítószerrel és meleg vízzel tisztítsa.
FIGYELMEZTETÉS! Semmilyen körülmé-
!
nyek között ne használjon vegyi tisztító-, vagy
fehérítőszereket!
182 183
ČIŠTĚNÍ
Je důležité používat pouze originální potah sedačky,
neboť potah představuje zásadní část jejího fungování.
Náhradní potahy může získat u svého prodejce.
VÝSTRAHA! Potah prosím vyperte, než jej
!
použijete poprvé. Potahy na sedačku lze prát v
pračce při max. teplotě 30°C na jemné prádlo.
Pokud jej vyperete při vyšší teplotě, textilie může
ztratit barvu. Potah prosím perte odděleně a nikdy
jej neždímejte! Nesušte potah na přímém slunci!
Plastové díly můžete vyčistit s teplou vodou a
jemným saponátem.
VÝSTRAHA! Za žádných okolností nepoužívejte
!
chemické čisticí prostředky nebo bělicí činidla!
ČISTENIE
Je dôležité, aby ste používali originálny poťah sedačky,
pretože tento je podstatnou súčasťou jej funkcie.
Náhradné poťahy sú k dispozícii u vášho distributéra.
UPOZORNENIE! Pred prvým použitím poťahy
!
operte. Poťahy sedačky sa dajú prať v práčke pri
max. teplote 30°C s využitím programu pre citlivú
bielizeň. Ak by ste prali pri vyššej teplote, môže
dôjsť ku strate sfarbenia látky poťahu. Perte poťah
osobitne od inej bielizne a nikdy ho nesušte v
sušičke! Nesušte poťah na priamom slnku! Na umývanie plastových dielov použite mierne pôsobiaci
čistiaci prostriedok a vlažnú vodu.
UPOZORNENIE! Za žiadnych okolností
!
nepoužívajte chemické čistiace prostriedky alebo
bieliace činidlá!
HUCZSK
Page 93

TISZTÍTÁS
Annak érdekében, hogy az ülés maximális védelmet
biztosítson, fontos betartani a következő pontokat:
• Rendszeresen ellenőrizze a gyermekülés összes fő
komponensének sérüléseit. A mechanikus alkatrészek
kifogástalanuk kell hogy működjenek.
• Biztosítsa, hogy az ülés ne csípődjön be olyan kemény
alkatrészek közé, mint a járműajtó, az ülés sínjei, stb.,
melyek kárt tehetnek benne.
• Akadályozza meg, hogy szennyeződés és homok
juthasson a felső üléshéj és az alaprész közé. Ez
hátrányosan befolyásolhatja a forgatási és döntési
funkciót. Ha mégis megtörténik, akkor az ülés
károsodásának elkerülése érdekében a forgatás és
döntés előtt távolítsa el a szennyeződést.
• Ha például leejti a gyermekülést, akkor a használat előtt
a gyártónak tesztelnie kell azt.
FIGYELMEZTETÉS! A huzat az ülés biztonsági
!
tervezésének lényeges eleme. Ezért az ülést tilos
huzat nélkül, vagy más ülés huzatjával használni.
184 185
ČIŠTĚNÍ
Aby bylo zajištěno, že vaše autosedačka poskytuje
maximální ochranu, je nezbytné dodržovat
následující body:
• Všechny hlavní součásti autosedačky je nutno
pravidelně kontrolovat, zda nejsou poškozené.
Mechanické části musí fungovat bez problémů.
• Ujistěte se, že se autosedačka nezablokovala mezi
těžkými částmi jako např. dveře vozu, lišty sedačky
atd., které ji mohou poškodit.
• Zabraňte tomu, aby se nečistoty nebo písek dostaly
mezi horní částí skořápky sedačky a základnu. To může
být negativní dopad na fungování otáčení a funkci
polohování. Pokud k tomu dojde, je třeba nečistoty
odstranit před tím, než budete sedačku otáčet a
naklánět dále, aby nedošlo k jejímu trvalému poškození.
• Pokud např. autosedačka spadne, je třeba ji před
opětovným použitím nechat otestovat výrobcem.
VÝSTRAHA! Potah představuje nedílnou součást
!
bezpečnostní funkce této autosedačky. Autosedačka
proto nesmí být nikdy používána bez potahu nebo s
potahem z jiné autosedačky.
ČISTENIE
Aby sa zaručila maximálna ochranná funkcia autosedačky,
je dôležité, aby ste dodržiavali nasledujúce pokyny:
• Treba pravidelne kontrolovať všetky väčšie komponenty
autosedačky z hľadiska poškodení. Mechanické diely
musia pracovať bez problémov.
• Uistite sa, že autosedačka nie je zaseknutá medzi
pevnými dielmi, ako napr. dvere vozidla, vodiace lišty
sedadiel a pod., ktoré ju môžu poškodiť.
• Zabráňte tomu, aby sa medzi horné teleso sedačky a
základňu dostalo akékoľvek znečistenie alebo piesok.
Týmto sa môže nepriaznivo ovplyvniť funkcia točenia
a polohovania. Ak došlo k vniknutiu znečistenia,
treba znečistenie odstrániť pred vykonaním otočenia
a polohovania sedačky, aby sa zabránilo trvalému
poškodeniu sedačky.
• V prípade pádu autosedačky musí ju skontrolovať
výrobca pred tým, ako sa použije znova.
UPOZORNENIE! Poťah je neoddeliteľnou
!
súčasťou bezpečnostného návrhu autosedačky.
Preto sa autosedačka nesmie nikdy používať bez
poťahu alebo s poťahom z inej autosedačky.
HUCZSK
Page 94

37
TEENDŐK BALESETET KÖVETŐEN
FIGYELMEZTETÉS! Baleset során szabad
!
szemmel nem látható sérülések keletkezhetnek az
ülésen. Ezért baleset után a látszólag hibátlan ülést
is cserélje ki.
FIGYELMEZTETÉS! Az ülés el van látva integrált
!
biztonsági rendszerrel, mely balesetnél, bizonyos
terhelés hatására automatikusan kinyílik (37).
CO DĚLAT PO NEHODĚ
VÝSTRAHA! Nehoda může poškodit autosedačku
!
tak, že vada není pozorovatelná pouhým okem. Po
nehodě prosím sedačku určitě vyměňte.
VÝSTRAHA! Autosedačka je vybavená zabudo-
!
vaným bezpečnostním systémem (37), který
se automaticky vyklopí v případě nehody a při
určitém zatížení.
ČO TREBA UROBIŤ PO NEHODE
UPOZORNENIE! Nehoda môže mať za následok
!
poškodenie autosedačky, ktoré nie je viditeľné
voľným okom. Vymeňte autosedačku po nehode, aj
keď nie je porušená.
UPOZORNENIE! Autosedačka je vybavená
!
integrovaným bezpečnostným systémom (37),
ktorý sa automaticky vyklopí v prípade nehody
z dôvodu pôsobenia určitého zaťaženia.
HUCZSK
TERMÉKINFORMÁCIÓK
Kérdés esetén először a kiskereskedővel vegye fel a
kapcsolatot. Készítse elő a következő információkat:
• Sorozatszám (lásd a matricán)
• A jármű gyártmánya és modellje és az ülés helyzete,
amelyen a gyermekülést használta
• A gyermek súlya, kora és magassága
Termékeinkről további információkat a következő
honlapon találhat: www.cybex-online.com.
186 187
INFORMACE O VÝROBKU
V případě dotazů se nejdříve obraťte na prodejce. Měli
byste mít připraveny následující údaje:
• sériové číslo (viz štítek)
• značku a model vozidla a polohu sedadla ve vozidle, na
němž se autosedačka používá
• hmotnost, věk a výška dítěte
Další informace o našich výrobcích naleznete na
www.cybex-online.com.
INFORMÁCIA O VÝROBKU
Ak máte akékoľvek otázky, kontaktuje predovšetkým
vášho predajcu. Pripravte pritom nasledujúce údaje:
• Výrobné číslo (pozri nálepku)
• Značka a model vozidla a poloha sedadla vozidla, na
ktorom sa autosedačka montuje
• Hmotnosť, vek a výška vášho dieťaťa
Ďalšie informácie o našich výrobkoch nájdete na
www.cybex-online.com.
Page 95

A TERMÉK TARTÓSSÁGA
A gyermekülés úgy terveztük meg, hogy körülbelül 4
éves élettartamáig megfeleljen a specikációnak. Mivel
azonban a járműben nagy hőmérséklet-ingadozások és
nem várt terhelések léphetnek fel, vegye gyelembe a
következő szempontokat:
• Ha a járművet hosszabb ideig közvetlen napsütés éri,
akkor ki kell venni a gyermekülést a járműből, vagy le kell
fedni egy vékony kendővel.
• Rendszeresen ellenőrizze az ülés összes műanyag
és fém alkatrészének sérülését, deformációját, vagy
elszíneződését. Ha bármilyen változást észlel, akkor
az ülést le kell selejtezni, vagy ellenőriztetni kell és
valószínűleg ki kell cseréltetni a gyártóval.
• Autóban történő használatkor a szövet színének változása, különösen a fakulás teljesen természetes és ez nem
befolyásolja az ülés működését.
LESELEJTEZÉS
A környezet védelme érdekében azt kérjük a felhasználótól, hogy a használat kezdetén (csomagolás) és az ülés
élettartamának végén (alkatrészek) keletkező hulladékokat
elkülönítve selejtezze le. A hulladékkezelés a helyi szabályozásoknak megfelelően eltérő lehet. Az ülés szabályos
leselejtezése érdekében vegye fel a kapcsolatot egy
hulladékkezelő vállalattal, vagy az önkormányzattal. Minden
esetben vegye gyelembe az adott ország hulladékkezelési
szabályozásait.
FIGYELMEZTETÉS! A csomagolóanyagot tartsa
!
gyermekektől elzárva: fulladásveszély!
188 189
TRVANLIVOST VÝROBKU
Autosedačka je navržena tak, aby splňovala specikací po
celou dobu životnosti, tj. přibližně 4 roky. Nicméně vzhledem k tomu, že může docházet k velmi velkým teplotním
výkyvům a nepředvídatelným pnutím ve vozidle, je třeba
dodržovat následující body:
• Pokud je vozidlo přímo vystaveno slunečnímu záření delší
dobu, dětskou autosedačku je třeba vyjmout z vozu a
zakrýt světlou látkou.
• Pravidelně kontrolujte všechny plastové a kovové části
sedačky, zda nejsou poškozené, zdeformované nebo zda
nedošlo ke změně barvy. Pokud zjistíte jakékoliv změny,
je třeba autosedačku zlikvidovat nebo zkontrolovat a
případně nechat vyměnit výrobcem.
• Změny týkající se textilií, zejména odbarvení, jsou zcela
v pořádku, pokud se používají ve vozidle a nenarušují
funkčnost sedačky.
LIKVIDACE
K ochraně životního prostředí žádáme uživatele, aby třídil
a zlikvidoval odpad na začátku (rozbalení) a na konci
životnosti (díly výrobku) autosedačky. Likvidace odpadu se
provádí různě v závislosti na ustanovení místních orgánů.
Abyste zajistili, že autosedačka bude zlikvidována v souladu
s nařízeními, obraťte se na místní sběrný dvůr nebo orgán.
Vždy dodržujte předpisy pro likvidaci odpadů ve vaší zemi.
VÝSTRAHA! Udržujte plastový obalový materiál z
!
dosahu vašeho dítěte: nebezpečí udušení!
ŽIVOTNOSŤ VÝROBKU
Autosedačka je navrhnutá tak, aby jej životnosť bola cca
4 roky. Avšak v prípade značných teplotných rozdielov a
nepredvídateľných mechanických napätí vo vozidle treba
dbať na nasledujúce aspekty:
• Ak je vozidlo vystavované dlhšiu dobu pôsobeniu priameho slnečného žiarenia, treba autosedačku vybrať z vozidla
alebo zakryť ju svetlou látkou.
• Pravidelne kontrolujte všetky plastové a kovové diely
autosedačky z hľadiska poškodenia, deformácie alebo
zmeny farby. V prípade zistenia akýchkoľvek zmien musí
byť autosedačka zlikvidovaná alebo skontrolovaná a
prípadne vymenená výrobcom.
• Zmeny sfarbenia, hlavne blednutie farieb, sú absolútne
bežným javom pri používaní vo vozidle a nemajú vplyv na
funkcie sedačky.
LIKVIDÁCIA
Za účelom ochrany životného prostredia žiadame
používateľa, aby triedil a likvidoval odpady, ktoré vznikajú
na začiatku (obal) a na konci (diely výrobku) životnosti
autosedačky. Likvidácia odpadov sa zabezpečuje rôznymi
spôsobmi v závislosti od požiadaviek miestnych orgánov.
Aby ste zlikvidovali autosedačku v súlade s nariadeniami,
kontaktuje miestne orgány poverené spracovaním odpadov
alebo miestne úrady. Vždy dodržujte nariadenia na likvidáciu
odpadov platné vo vašej krajine.
UPOZORNENIE! Uchovávajte platové obaly mimo
!
dosahu vašich detí: nebezpečenstvo udusenia!
HUCZSK
Page 96

SZAVATOSSÁG
A következő szavatosság kizárólag abban az országban
érvényes, melyben a terméket a kiskereskedő először
értékesítette a vevőnek.
1. A szavatosság minden olyan gyártási hibára és anyagkárra
vonatkozik, mely a kiskereskedőtől történő első megvásárlás
vásárlás napján, vagy a vásárlás időpontjáról számított
három (3) éven belül keletkezik (gyártói szavatosság). A
vásárlás napján, vagy az átvételkor azonnal ellenőrizze a
termék hiánytalanságát és anyagának sérüléseit. Kérjük,
hogy őrizze meg a vásárlást igazoló bizonylatot.
2. Hiba esetén azonnal szüntesse be a termék használatát. A
szavatosság érvényesítése érdekében tiszta és hiánytalan
állapotban szállítsa el vagy csomagküldéssel juttassa el
a terméket annak az eredeti kiskereskedőnek, aki eladta
Önnek ezt a terméket és mellékelje hozzá a vásárlást igazoló
eredeti bizonylatot (nyugtát, vagy számlát). Kérjük, hogy a
terméket ne küldje el közvetlenül a gyártónak.
3. Ez a szavatosság nem vonatkozik az olyan károkra, melyet
helytelen használat, környezeti behatás (víz, tűz, baleset,
stb.), normál kopás, vagy elhasználódás, vagy a jelen
kézikönyvben lévő útmutatások gyelmen kívül hagyása
okozott. A szavatosság nem vonatkozik az olyan esetekre,
melyeknél engedéllyel nem rendelkező személy végzett
módosítást, vagy javítást a készüléken, vagy ha nem eredeti
alkatrészeket és kiegészítőket használtak a készülékhez.
4. Ez a szavatosság érvényben hagy minden olyan törvényes
fogyasztói jogot, ideértve a jogsértési és szerződésszegési
igényeket, melyet a vevő érvényesíthet a termék eladójával,
ZÁRUKA
Následující záruka se vztahuje pouze na zemi, kde byl
tento produkt původně prodán prodejcem zákazníkovi.
1. Záruka zahrnuje veškeré výrobní a materiálové vady,
které existovaly a objevily se ke dni nákupu nebo se
objevily během období tří (3) let od data zakoupení od
prodejce, který původně prodal produkt zákazníkovi
(záruka výrobce). Zkontrolujte prosím výrobek s
ohledem na úplnost a výrobní a materiálové vady ihned
v den zakoupení nebo ihned po převzetí výrobku. Vždy
mějte uschovaný datovaný doklad o koupi.
2. V případě závady okamžitě přestaňte výrobek používat.
Abyste získali záruku, vezměte nebo odešlete výrobek
původnímu prodejci, který vám prodal tento výrobek na
začátku v čistém a kompletní stavu a předložte originál
doklad o koupi (účtenku nebo fakturu). Neodnášejte, ani
neposílejte tento produkt přímo výrobci.
3. Tato záruka nezahrnuje škody, které vyplývají ze
zneužití, vlivu okolního prostředí (voda, požár, nehody
atd.), běžného obnošení nebo opotřebení nebo
nedodržení pokynů uvedených v tomto návodu k
použití. Záruka není platná, pokud změny nebo služby
provedly neoprávněné osoby, nebo pokud byly použity
neoriginální díly a příslušenství.
4. Tato záruka neovlivňuje žádná jiná zákonná práva
spotřebitele, včetně nároků v občanskoprávních
deliktech a nároků s ohledem na porušení smlouvy,
které může kupující uplatňovat na prodejci nebo
výrobci produktu.
vagy gyártójával szemben.
190 191
ZÁRUKA
Dolu uvedená záruka platí výlučne v krajine, kde bol
výrobok pôvodne predaný distributérom zákazníkovi.
1. Záruka sa vzťahuje na všetky výrobné a materiálové
vady, existujúce a vzniknuté k dátumu predaja alebo
vzniknuté v priebehu troch (3) rokov od dátumu predaja
distributérom, ktorý prvý predal výrobok zákazníkovi
(záruka výrobcu). Skontrolujte výrobok z hľadiska
úplnosti a výrobných alebo materiálových vád okamžite
v deň kúpy alebo okamžite po prevzatí. Uschovajte
prosím doklad o kúpe s dátumom predaja.
2. V prípade vady okamžite ukončite používať výrobok.
Ak chcete využiť záruku, zaneste alebo odošlite
výrobok pôvodnému distributérovi, ktorý pôvodne
predal tento výrobok vám, v čistom a úplnom stave a
predložte pôvodný doklad o kúpe (blok alebo faktúru).
Nedoručujte ani neposielajte výrobok priamo výrobcovi.
3. Táto záruka sa nevzťahuje na akékoľvek poškodenia,
ktoré sú výsledkom nesprávneho používania,
poveternostných vplyvov (voda, požiar, nehoda
atď.), normálneho opotrebovania a namáhania alebo
nedodržania pokynov uvedených v tejto používateľskej
príručke. Záruka neplatí v prípade úprav a zásahov
realizovaných neoprávnenými osobami alebo v prípade
použitia neoriginálnych komponentov a príslušenstva.
4. Táto záruka neovplyvňuje žiadne zákonné
práva spotrebiteľa vrátane nárokov v prípade
občianskoprávnych sporov a nárokov v súvislosti s
porušením zmluvy, ktoré môže kupujúci vzniesť voči
predajcovi alebo výrobcovi.
HUCZSK
Page 97

SIRONA Q I-SIZE
SIRONA Q i-Size
i-Size Universal ISOFIX
45-105cm
max. 18 kg
1
129 - 010014
UN Regulation
No. 129/01
CYBEX GmbH
Riedingerstr. 18, 95448 Bayreuth
Germany
192 193
HOMOLOGACIÓN
CYBEX Sirona Q i-Size –
ECE R 129
Estatura: 45-105 cm
Peso: hasta 18 kg
HOMOLOGAÇÃO
CYBEX Sirona Q i-Size –
ECE R 129
Tamanho: 45-105 cm
Peso: até 18 kg
ESTIMADO CLIENTE:
Muchas gracias por adquirir la silla Sirona Q i-Size.
Tenga por seguro que, durante el proceso de desarrollo
de esta silla de coche, nos hemos centrado en la
seguridad, el confort y la facilidad de uso. Este producto
se fabrica bajo un control de calidad especial, y satisface
los requisitos de seguridad más exigentes.
¡ADVERTENCIA!
!
del niño, es fundamental que utilice e instale la silla
de coche según las instrucciones contenidas en el
presente manual. Está prohibido realizar cualquier
tipo de modicación en la silla.
¡ADVERTENCIA!
!
de la marcha antes de que el niño haya cumplido 15
meses y mida, al menos, 76 cm.
NOTA: Tenga siempre a mano el manual de instrucciones
y guárdelo en el compartimento correspondiente situado
en la parte de atrás de la silla.
NOTA: El reductor para recién nacidos protege al bebé.
Debe utilizarse para bebés que midan menos de 60 cm.
NOTA: Las características del producto pueden variar
según las normas locales.
Para una protección adecuada
No instale la silla en el sentido
PREZADO CLIENTE
Muito obrigado pela compra do Sirona Q i-Size. Nós
asseguramos que no processo de desenvolvimento da
cadeirinha de automóvel nós focalizamos na segurança,
no conforto e na facilidade de utilização. O produto é
fabricado sob uma especial vigilância de qualidade e
cumpre com os requisitos de segurança mais rigorosos.
AVISO! Para a proteção adequada do seu lho, é
!
essencial utilizar e instalar a cadeirinha de automóvel
de acordo com as instruções dadas neste manual.
Quaisquer modicações no assento são proibidas.
AVISO!
!
NOTA! Por favor, tenha sempre o manual de instruções
à mão e guarde-o no espaço previsto para tal na parte
traseira da cadeirinha.
NOTA! O redutor para recém-nascidos protege o seu
lho. Ele deve ser usado até o tamanho de 60 cm.
NOTA! De acordo com os códigos locais, a característica
do produto pode ser diferente.
Não a use virada para a frente antes de a
criança ter 15 meses de idade e atingir um tamanho
de 76 cm.
ESPT
Page 98

CONTENIDO CONTEÚDOES
PT
HOMOLOGACIÓN.................................................................................................196
PRIMERA INSTALACIÓN ....................................................................................200
PROTECCIÓN DEL VEHÍCULO ........................................................................200
POSICIÓN CORRECTA EN EL VEHÍCULO ....................................................202
SEGURIDAD EN EL VEHÍCULO ........................................................................206
USO DE LA SILLA EN EL COCHE .....................................................................208
INSTALACIÓN DE LA SILLA EN EL VEHÍCULO ............................................212
AJUSTE DE LA PATA DE SOPORTE ................................................................216
DESINSTALACIÓN DE LA SILLA EN EL VEHÍCULO ....................................216
AJUSTE DE LOS PROTECTORES LATERALES ..........................................218
AJUSTE DE LA POSICIÓN SENTADA Y RECLINADA .................................220
ROTACIÓN DE 360° ..............................................................................................222
USO EN SENTIDO CONTRARIO AL DE LA MARCHA (45 CM – 105 CM) 226
AJUSTE A LA ESTATURA DEL NIÑO ................................................................228
SUJECIÓN MEDIANTE ARNÉS .........................................................................232
CONVERSIÓN DEL SENTIDO CONTRARIO AL DE LA MARCHA AL
SENTIDO DE LA MARCHA .................................................................................234
USO EN EL SENTIDO DE LA MARCHA (76 CM - 105 CM) ..........................238
AJUSTE DEL COJÍN DE SEGURIDAD ............................................................240
SUJECIÓN DEL NIÑO CON EL COJÍN DE SEGURIDAD ............................242
¿SE HA SUJETADO DEBIDAMENTE AL NIÑO? ............................................244
QUITAR LA FUNDA ...............................................................................................246
LIMPIEZA .................................................................................................................248
QUÉ HACER DESPUÉS DE UN ACCIDENTE ...............................................252
INFORMACIÓN DE PRODUCTO ......................................................................252
VIDA ÚTIL DEL PRODUCTO ..............................................................................254
ELIMINACIÓN ........................................................................................................254
GARANTÍA ..............................................................................................................256
194 195
HOMOLOGAÇÃO ..................................................................................................196
PRIMEIRA INSTALAÇÃO.....................................................................................201
PROTEÇÃO DO VEÍCULO..................................................................................201
POSIÇÃO CORRETA NO VEÍCULO .................................................................203
SEGURANÇA NO VEÍCULO ...............................................................................207
USO DA CADEIRINHA NO CARRO ..................................................................209
INSTALAÇÃO DA CADEIRINHA DE AUTOMÓVEL NO VEÍCULO ............213
AJUSTE DO PÉ DE APOIO .................................................................................217
REMOÇÃO DA CADEIRINHA DE AUTOMÓVEL DO VEÍCULO .................217
AJUSTE DOS PROTETORES LATERAIS .......................................................219
AJUSTE PARA SENTAR E RECLINAR ............................................................221
ROTAÇÃO DE 360° ...............................................................................................223
UTILIZAÇÃO VIRADA PARA TRÁS (45 CM - 105 CM) ..................................227
AJUSTE AO TAMANHO DO CORPO ................................................................ 229
FIXAÇÃO COM O SISTEMA DE ARNÉS .........................................................233
CONVERSÃO DO USO PARA TRÁS PARA USO PARA A FRENTE .........235
USO VIRADO PARA A FRENTE (76 CM - 105 CM) ........................................239
AJUSTE DO ESCUDO DE IMPACTO ...............................................................241
FIXAÇÃO COM O ESCUDO DE IMPACTO .....................................................243
A SUA CRIANÇA ESTÁ FIXADA ADEQUADAMENTE? ...............................245
REMOÇÃO DA COBERTURA............................................................................. 247
LIMPEZA ..................................................................................................................249
O QUE FAZER APÓS UM ACIDENTE ..............................................................253
INFORMAÇÃO DO PRODUTO ..........................................................................253
DURABILIDADE DO PRODUTO ........................................................................255
ELIMINAÇÃO ..........................................................................................................255
GARANTIA ..............................................................................................................257
ESPT
Page 99

1
3
2
PRIMERA INSTALACIÓN
NOTA: Antes de usar la silla por primera vez, quite el
protector de transporte (1) y las cubiertas protectoras (2).
Al eliminar la cubierta instalada antes de la entrega se
activan funciones de seguridad adicionales de la CYBEX
SIRONA Q i-SIZE. Guarde las cubiertas protectoras en
la bolsa de almacenamiento incluida. Se debe instalar
el sistema antivolteo (3). Para más detalles, consulte
la sección "USO EN SENTIDO CONTRARIO AL DE LA
MARCHA
(45-105 cm)
¡ADVERTENCIA! La silla CYBEX SIRONA Q i-SIZE
!
no debe utilizarse hasta que se haya retirado el
protector de transporte (1).
".
PRIMEIRA INSTALAÇÃO
NOTA! Antes de utilizar a cadeirinha pela primeira
vez, se deve retirar a proteção de transporte (1) e as
coberturas de proteção (2). Destacar a folha instalada
antes da entrega, ativa funções de segurança adicionais
da CYBEREX SIRONA Q i-SIZE. Manter as coberturas
de proteção no saco de armazenamento incluído. A
barra de rechaço (3) deve ser instalada. Para obter mais
detalhes, consulte a seção "USO VIRADO PARA TRÁS
(45-105 cm)
".
AVISO! CYBEX SIRONA Q i-SIZE não deve ser
!
utilizada a não ser que a proteção de transporte (1)
tenha sido removida!
PROTECCIÓN DEL VEHÍCULO
En las tapicerías de algunos vehículos fabricadas en
materiales delicados (p. ej., terciopelo, cuero, etc.),
el uso de sillas de coche puede dejar marcas de uso
o provocar decoloración. Puede evitar este problema
colocando, p. ej., una manta o una toalla bajo la silla. A
este respecto, consulte también nuestras instrucciones
de limpieza. Es fundamental seguir dichas instrucciones
antes de usar la silla por primera vez.
196 197
PROTEÇÃO DO VEÍCULO
Podem aparecer vestígios de uso e / ou descoloração
em alguns assentos de veículo feitos de materiais
delicados (por exemplo, veludo, couro, etc.) se forem
utilizados cadeirinhas de automóvel. Se pode evitar isso,
colocando, p. ex. um cobertor ou uma toalha debaixo da
cadeirinha de automóvel. Neste contexto, veja também
as nossas instruções de limpeza. É essencial que
estas sejam seguidas antes da primeira utilização da
cadeirinha de automóvel.
ESPT
Page 100

POSICIÓN CORRECTA EN EL VEHÍCULO
Este sistema es un sistema de retención infantil "i-Size".
Está aprobado según la norma ECE R 129 para su uso
en las plazas de asiento del vehículo "compatibles con
i-Size" según lo indique el fabricante del vehículo en el
manual de usuario del vehículo.
Si su vehículo no dispone de ninguna plaza de asiento
i-Size, compruebe la lista de modelos de vehículo que se
incluye o consulte en nuestra página web si la instalación
está permitida.
Si su vehículo no está equipado con ISOFIX, póngase en
contacto con el fabricante del vehículo.
En casos excepcionales, la silla puede utilizarse en el
asiento del copiloto. En dichos casos, tenga en cuenta
los siguientes puntos:
• Compruebe que el asiento del copiloto esté equipado
con anclajes ISOFIX. Si no está equipado con anclajes
ISOFIX, la silla no se podrá utilizar.
• Desactive el airbag del copiloto. Si no fuera posible en
su vehículo, estará prohibido usar la silla en el asiento
del copiloto.
• Es obligatorio que cumpla las recomendaciones del
fabricante del vehículo.
Los bultos de equipaje y otros objetos sueltos en el
interior del vehículo que pudieran causar lesiones en
caso de accidente deben sujetarse siempre de forma
segura. Pueden convertirse en proyectiles letales en
POSIÇÃO CORRETA NO VEÍCULO
Este é um sistema de retenção infantil "i-Size". Ele é
aprovado para ECE R 129, para o uso em posições de
assento de veículos "compatíveis com i-Size", como
indicado pelos fabricantes de veículos no manual de
usuário do veículo.
Se o seu veículo não tiver uma posição de assento
i-Size, por favor verique a lista de tipos do veículo que
está incluída ou, por exemplo, a nossa homepage, para
ver se a instalação é permitida.
Se o seu automóvel não estiver equipado com ISOFIX,
entre em contacto com o fabricante do veículo.
Em casos excepcionais, no entanto, a cadeirinha de
automóvel pode ser usada no banco do passageiro da
frente. Nesse caso, observe os seguintes pontos:
• Verique se o banco do passageiro está equipado com
ISOFIX. Se o ISOFIX não estiver montado, a cadeirinha
de automóvel não pode ser usada.
• Desative o airbag do passageiro. Se isto não for
possível no seu veículo, é proibido o uso da cadeirinha
de automóvel no lado do passageiro.
• É imprescindível cumprir as recomendações do
fabricante do carro.
Os itens de bagagem e outros objetos soltos no veículo,
que poderiam causar ferimentos em um acidente, devem
sempre ser xos de forma segura. Eles podem se tornar
projéteis mortais no caso de um acidente de carro.
caso de accidente.
198 199
ESPT
 Loading...