

Page 1
SIRONA M2 i-SIZE
ECE R-129, 45 cm - 105 cm, ma x. 19 kg (Birth - ca . 4 Y)
User guide
DE
FR ENNL ITPL
HU
CZ
SK
ESPT
Page 2
DE: rückwärtsgerichtet (45 cm - 105 cm, max. 19 kg) EN: rearward-facing (45 cm - 105 cm, max. 19 kg)
MAX.
CLICK!
IT: senso contrario alla marcia (45 cm - 105 cm, max. 19 kg) FR: orienté vers l΄arrière (45 cm - 105 cm, max. 19 kg)
NL: naar achter kijkend (45 cm - 105 cm, max. 19 kg) PL: tyłem do kierunku jazdy (45 cm - 105 cm, max. 19 kg)
HU: menetiránnyal szemben beszerelve (45 cm - 105 cm, max. 19 kg) CZ: proti směru jízdy (45 cm - 105 cm, max. 19 kg)
SK: proti smeru jazdy (45 cm - 105 cm, max. 19 kg) ES: Sentido contrario a la marcha (45 cm - 105 cm, max. 19 kg)
PT: Sentido contrário ao da marcha (45 cm - 105 cm, max. 19 kg)
2
Page 3

DE- WARNUNG! Die folgende Kurzanleitung dient nur der Übersicht. Um maximale Sicherheit und maximalen Komfort für Ihr
Kind zu erreichen, ist es unbedingt notwendig, die gesamte Gebrauchsanleitung aufmerksam zu lesen.
EN - WARNI NG! This short manual serves as an overview only. For maximum protection and best comfort for your child it is
essential to read and follow the entire instruction manual carefully.
8 | INHALT
9 | CONTENT
DE
IT - ATTENZIONE! Queste istruzioni sono solo un sommario. Per garantire la massima sicurezza e comfort al Vostro
bambino è molto importante leggere attentamente ed interamente il manuale e seguirne scrupolosamente le indicazioni.
FR - AVERTISSEMENT! Pour un maximum de protection et de confort, il est essentiel de lire et de suivre correctement le
manuel d‘instructions dans son intégralité.
NL - WAARSCHUWI NG! De volgende korte handleiding dient enkel als overzicht! Voor een maximale bescherming en een
optimaal komfort voor uw kind, is het essentieel de volledige handleiding zorgvuldig te lezen en te volgen.
PL - OSTRZEŻENIE! Instrukcja ta jest tylko obrazkowym streszczeniem! Aby zagwarantować swojemu dziecku maksymalne
bezpieczeństwo i wygodę, należy uważnie przeczytać całą instrukcję.
HU - FIGYELEM! Gyermeke maximális védelme és kényelme érdekében elengedhetetlen, hogy a teljes tájékoztatótalaposan
elolvassa.
CZ - VAROVÁNÍ! Tento stručný návod slouží pouze jako přehled. Pro maximální ochranu a nejlepší pohodlí pro Vaše dítě je
nezbytné přečíst a dodržovat pečlivě veškeré pokyny v návodu k použití.
SK - VAROVANIE! Tento stručný návod slúži iba ako prehľad. Pre maximálnu ochranu a najlepšie pohodlie pre Vaše dieťa je
nevyhnutné prečítať a dodržiavať starostlivo všetky pokyny v návode na použitie.
ES - ¡ADVERTENCIA! Este breve manual es sólo un resumen. Para obtener la máxima protección y mejor confort para su
hijo es esencial leer y seguir el manual de instrucciones.
PT - ATENÇÃO! Este manual serve apenas como resumo. Para máxima proteção e conforto das crianças é essencial ler e
consultar o manual completo.
9 | ARGOMENTI
58 | CONTENU
59 | INHOUD
59 | SPIS TR EŚCI
108 | TARTALOM
109 | OBSAH
109 | OBSAH
158 | CONTENIDO
159 | CONTEÚDO
FR ENNL ITPL
HU
CZ
SK
ESPT
3
Page 4
DE: vorwärtsgerichtet (76 cm - 105 cm, max. 19 kg) EN: forward-facing (76 cm - 105 cm, max. 19 kg)
MAX.
CLICK!
IT: senso di marcia (76 cm - 105 cm, max. 19 kg) FR: orienté vers l΄avant (76 cm - 105 cm, max. 19 kg)
NL: naar voor kijkend (76 cm - 105 cm, max. 19 kg) PL: przodem do kierunku jazdy (76 cm - 105 cm, max. 19 kg)
HU: menetirányban beszerelve (76 cm - 105 cm, max. 19 kg) CZ: ve směru jízdy (76 cm - 105 cm, max. 19 kg)
SK: v smere jazdy (76 cm - 105 cm, max. 19 kg ES: Sentido favorable a la marcha (76 cm - 105 cm, max. 19 kg)
PT: Sentido a favor da marcha (76 cm - 105 cm, max. 19 kg)
4
Page 5

DE- WARNUNG! Die folgende Kurzanleitung dient nur der Übersicht. Um maximale Sicherheit und maximalen Komfort für Ihr
Kind zu erreichen, ist es unbedingt notwendig, die gesamte Gebrauchsanleitung aufmerksam zu lesen.
EN - WARNI NG! This short manual serves as an overview only. For maximum protection and best comfort for your child it is
essential to read and follow the entire instruction manual carefully.
8 | INHALT
9 | CONTENT
DE
IT - ATTENZIONE! Queste istruzioni sono solo un sommario. Per garantire la massima sicurezza e comfort al Vostro
bambino è molto importante leggere attentamente ed interamente il manuale e seguirne scrupolosamente le indicazioni.
FR - AVERTISSEMENT! Pour un maximum de protection et de confort, il est essentiel de lire et de suivre correctement le
manuel d‘instructions dans son intégralité.
NL - WAARSCHUWI NG! De volgende korte handleiding dient enkel als overzicht! Voor een maximale bescherming en een
optimaal komfort voor uw kind, is het essentieel de volledige handleiding zorgvuldig te lezen en te volgen.
PL - OSTRZEŻENIE! Instrukcja ta jest tylko obrazkowym streszczeniem! Aby zagwarantować swojemu dziecku maksymalne
bezpieczeństwo i wygodę, należy uważnie przeczytać całą instrukcję.
HU - FIGYELEM! Gyermeke maximális védelme és kényelme érdekében elengedhetetlen, hogy a teljes tájékoztatótalaposan
elolvassa.
CZ - VAROVÁNÍ! Tento stručný návod slouží pouze jako přehled. Pro maximální ochranu a nejlepší pohodlí pro Vaše dítě je
nezbytné přečíst a dodržovat pečlivě veškeré pokyny v návodu k použití.
SK - VAROVANIE! Tento stručný návod slúži iba ako prehľad. Pre maximálnu ochranu a najlepšie pohodlie pre Vaše dieťa je
nevyhnutné prečítať a dodržiavať starostlivo všetky pokyny v návode na použitie.
ES - ¡ADVERTENCIA! Este breve manual es sólo un resumen. Para obtener la máxima protección y mejor confort para su
hijo es esencial leer y seguir el manual de instrucciones.
PT - ATENÇÃO! Este manual serve apenas como resumo. Para máxima proteção e conforto das crianças é essencial ler e
consultar o manual completo.
9 | ARGOMENTI
58 | CONTENU
59 | INHOUD
59 | SPIS TR EŚCI
108 | TARTALOM
109 | OBSAH
109 | OBSAH
158 | CONTENIDO
159 | CONTEÚDO
FR ENNL ITPL
HU
CZ
SK
ESPT
5
Page 6
SIRONA M2 i-Size
i-Size Universal ISOFIX
45-105cm
max. 19 kg
129 - 000002
UN Regulation
No. 129/00
CYBEX GmbH
Riedinger Str. 18, 95448 Bayreuth
Germany
Approved for CYBEX
Base M i-Size
6
HINWEIS! Bitte bewahren Sie die Gebrauchsanleitung
immer in dem dafür vorgesehenen Fach an der Rückseite
der Rückenlehne auf.
ZULASSUNG CYBEX SIRONA M2 ISIZE
ECE R129 Größe: 45 cm - 105 cm
Gewicht: bis 19 kg
!
WARNUNG! Erst wenn Ihr Kind mindestens 15
1
Monate alt ist, und eine Größe von 76 cm erreicht hat,
dürfen Sie den Sitz vorwärtsgerichtet verwenden.
!
WARNUNG! Um den optimalen Schutz für Ihr Kind zu
gewährleisten, muss der CYBEX SIRONA M2 i-Size
Kindersitz unbedingt so verwendet werden, wie es in
dieser Gebrauchsanleitung beschrieben ist.
HINWEIS! Die Neugeboreneneinlage dient dem Schutz
Ihres Kindes und sollte bis zu einer Körpergröße von 60 cm
verwendet werden.
Page 7
NOTE! Always keep the User Guide handy in the slot
provide for it under the cover, on the back of the backrest.
HOMOLOGATION CYBEX SIRONA M2 ISIZE
ECE R129 Size: 45 cm – 105 cm
Weight: up to 19 kg
!
WARNING! Do not use forward-facing before the
child is 15 months old and reached a size of 76 cm.
!
WARNING! To ensure the optimum protection for
your child, the CYBEX SIRONA M2 i-Size child seat
must be used exactly as described in the User Guide.
NOTE! The newborn inlay protects your child. It should be
used up to size of 60 cm.
NOTA BENE! Tenere sempre a portata di mano il Manuale
istruzioninell'apposito scomparto sotto il rivestimento, nel
retro dello schienale.
OMOLOGAZIONE CYBEX SIRONA M2 I-SIZE
ECE R129 Altezza: 45 cm – 105 cm
Peso: fino a 19 kg
!
ATTENZIONE! Non usare rivolto nel senso di marcia
prima che il bambino abbia raggiunto un‘età di 15
mesi e l‘altezza di almeno 76 cm.
!
ATTENZIONE! Per assicurare la protezione ottimale
per il bambino CYBEX SIRONA M2 i-Size deve
essere usato come descritto nel Manuale Istruzioni.
NOTA BENE! L‘inserto per neonati serve a proteggere il
vostro bambino e dovrebbe essere utilizzato fino ad una
statura di 60 cm.
DE
EN
IT
7
Page 8

SEHR GEEHRTE KUNDIN,
SEHR GEEHRTER KUNDE!
Vielen Dank, dass Sie sich bei der Wahl eines Kindersitzes
für den CYBEX SIRONA M2 i-Size entschieden haben.
Wir haben bei der Entwicklung des CYBEX SIRONA M2
i-Size Kindersitzes größten Wert auf Sicherheit, Komfort
und Bedienfreundlichkeit gelegt. Das Produkt wird unter
besonderer Qualitätsüberwachung hergestellt und erfüllt
strengste Sicherheitsanforderungen.
DE INHALT
KURZANLEITUNG RÜCKWÄRTSGERICHTET ...........................................2
KURZANLEITUNG VORWÄRTSGERICHTET ...............................................4
ZULASSUNG CYBEX SIRONA M2 ISIZE ......................................................... 6
DER RICHTIGE PLATZ IM FAHRZEUG .............................................................10
VERWENDUNGSMÖGLICHKEITEN IM FAHRZEUG ...............................14
SICHERHEIT BEIM EINBAU INS FAHRZEUG ..............................................18
EINBAU DES KINDERSITZES ................................................................................20
EINSTELLEN DES STÜTZFUSSES ......................................................................24
MONTAGE DES SITZES AUF DER BASE ........................................................26
AUSBAU DER BASE AUS DEM FAHRZEUG .................................................28
SITZ UND LIEGEVERSTELLUNG .......................................................................28
EINSTELLEN DER SEITENPROTEKTOREN .................................................. 30
RÜCKWÄRTSGERICHTETE VERWENDUNG ..............................................32
ANSCHNALLEN MITTELS GURTSYSTEM .................................................... 34
VORWÄRTSGERICHTETE VERWENDUNG .................................................36
IST IHR KIND RICHTIG GESICHERT? .............................................................38
ENTFERNEN DER NEUGEBORENENEINLAGE .......................................40
REINIGUNG ....................................................................................................................40
ENTFERNEN DES BEZUGES ................................................................................42
PFLEGE ............................................................................................................................. 44
VERHALTEN NACH EINEM UNFALL ..................................................................46
PRODUKTLEBENSDAUER.....................................................................................46
ENTSORGUNG ............................................................................................................ 48
KONTAKT .......................................................................................................................... 48
GARANTIEBEDINGUNGEN .................................................................................. 50
8
Page 9

DEAR CUSTOMER! GENTILE CLIENTE,
Thank you for purchasing the CYBEX SIRONA M2 i-Size.
We assure you that in the process of developing the
CYBEX SIRONA M2 i-Size we have focused on safety,
comfort and functionality. The product is manufactured
under special quality surveillance and complies with the
strictest safety standards.
EN CONTENT IT ARGOMENTI
BRIEF INSTRUCTIONS REARWARDFACING .............................................2
BRIEF INSTRUCTIONS FORWARDFACING .................................................4
HOMOLOGATION CYBEX SIRONA M2 ISIZE ..............................................7
THE RIGHT POSITION IN THE CAR ...................................................................11
USE OF THE SEAT IN THE CAR ............................................................................15
SAFE INSTALLATION IN THE CAR .......................................................................19
INSTALLATION OF THE CHILD SEAT .................................................................21
ADJUSTING THE SUPPORTING LEG................................................................25
INSTALLATION OF THE SEAT ON BASE ..........................................................27
DEINSTALLATION OF THE BASE FROM THE CAR...................................29
ADJUSTMENT FOR SITTING AND RECLINING ...........................................29
ADJUSTING THE SIDE PROTECTORS .............................................................31
REARWARDFACING USE ......................................................................................33
SECURING BY MEANS OF HARNESS SYSTEM ........................................35
FORWARDFACING USE .........................................................................................37
IS YOUR CHILD PROPERLY SECURED? ...................................................... 39
REMOVING THE NEWBORN INLAY ..................................................................41
CLEANING ........................................................................................................................41
REMOVAL OF THE COVER .....................................................................................43
PRODUCT CARE ..........................................................................................................45
WHAT TO DO AFTER AN ACCIDENT ...............................................................47
PRODUCT DURABILITY ............................................................................................47
DISPOSAL ....................................................................................................................... 49
CONTACT ......................................................................................................................... 49
WARRANTY ......................................................................................................................51
Grazie di avere scelto CYBEX SIRONA M2 i-Size. Le
assicuriamo che nel progettare CYBEX SIRONA M2 i-Size
i nostri principali obiettivi sono stati la sicurezza, il comfort
e la facilità di utilizzo. Il prodotto è stato elaborato sotto uno
stretto controllo qualitativo e risponde ai più severi standard
di sicurezza.
SOMMARIO ISTRUZIONI- CONTRO IL SENSO DI MARCIA ...................... 2
SOMMARIO ISTRUZIONI NEL SENSO DI MARCIA ......................................... 4
OMOLOGAZIONE CYBEX SIRONA M2 ISIZE ..............................................7
LA POSIZIONE GIUSTA NELL'AUTO ..................................................................11
USO DEL SEGGIOLINO NELLA VETTURA ....................................................15
INSTALLAZIONE SICURA NELL'AUTO ..............................................................19
INSTALLAZIONE DEL SEGGIOLINO .................................................................21
REGOLAZIONE DEL PIEDE DI SUPPORTO .................................................25
INSTALLAZIONE DEL SEGGIOLINO SULLA BASE ...................................27
DISINSTALLAZIONE DELLA BASE DALL'AUTO ............................................29
REGOLAZIONE PER LA SEDUTA E LA RECLINAZIONE .......................29
REGOLAZIONE DELLE PROTEZIONI LATERALI .........................................31
USO CONTRO IL SENSO DI MARCIA ..............................................................33
ALLACCIARE IL BAMBINO CON LE CINTURE ............................................35
USO NEL SENSO DI MARCIA ...............................................................................37
IL BAMBINO E' ALLACCIATO CORRETTAMENTE?................................... 39
RIMOZIONE DELL‘INSERTO PER NEONATI .................................................41
PULIZIA ...............................................................................................................................41
RIMOZIONE DEL RIVESTIMENTO ......................................................................43
MANUTENZIONE ..........................................................................................................45
COSA FARE A SEGUITO DI UN INCIDENTE ...................................................47
DUREVOLEZZA DEL PRODOTTO .......................................................................47
SMALTIMENTO .............................................................................................................. 49
CONTATTO ...................................................................................................................... 49
GARANZIA ........................................................................................................................51
DE
EN
IT
9
Page 10
DER RICHTIGE PLATZ IM FAHRZEUG
Dies ist ein Kinderrückhaltesystem der Kategorie „i-Size“.
Es ist nach der Regelung ECE R 129 zur Verwendung auf
solchen Fahrzeugsitzen genehmigt worden, die gemäß den
Angaben des Fahrzeugherstellers im Fahrzeughandbuch für
i-Size-Rückhaltesysteme geeignet sind.
Verfügt Ihr Fahrzeug über keinen i-Size Sitzplatz überprüfen
Sie bitte anhand der beigelegten bzw. auf der Homepage
befindlichen Typenliste ob der Einbau erlaubt ist.
Falls Ihr Auto nicht mit ISOFIX ausgestattet ist, wenden Sie
sich an den Hersteller.
In Ausnahmefällen kann der Kindersitz auch vorne auf dem
Beifahrersitz verwendet werden. Beachten Sie dabei bitte
die folgenden Punkte:
• Überprüfen Sie, ob der Beifahrersitz mit
ISOFIX- Anbindungspunkten ausgestattet ist. Ohne
ISOFIX ist eine Verwendung nicht möglich.
• Deaktivieren Sie den Beifahrerairbag! Sollte dies in Ihrem
Fahrzeug nicht möglich sein, ist eine Verwendung auf der
Beifahrerseite untersagt.
• Die Empfehlungen des Fahrzeugherstellers sind
unbedingt zu befolgen!
Gepäckstücke oder andere Gegenstände im Fahrzeug, die
bei einem Unfall Verletzungen verursachen können, müssen
immer gut befestigt werden. Andernfalls können Sie sich zu
tödlichen Geschossen im Fahrzeug verwandeln.
10
Page 11

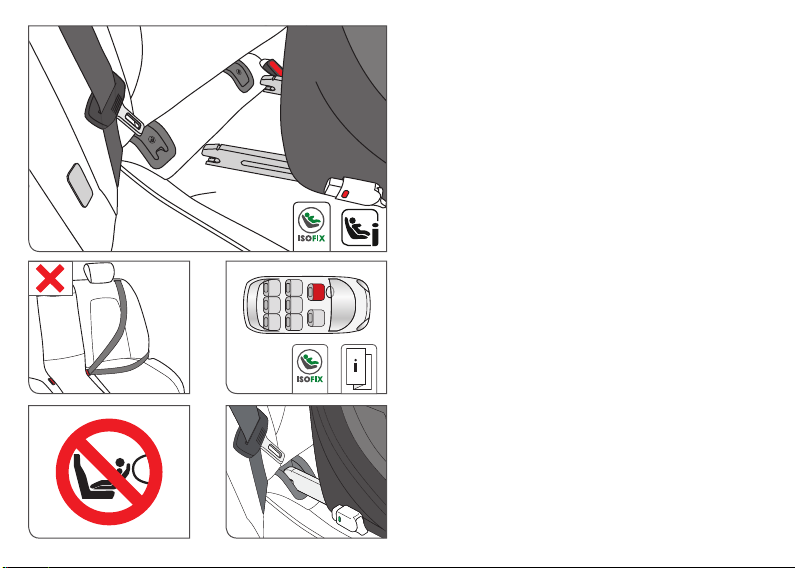
THE RIGHT POSITION IN THE CAR LA POSIZIONE GIUSTA NELL'AUTO
This is an „i-Size“ Child Restraint System. It is approved to
ECE R 129, for use in, „i-Size compatible“ vehicle seating
positions as indicated by vehicle manufacturers in the
vehicle users’ manual.
If your vehicle does not have an i-Size seating position,
please check the vehicle typelist that is included or for
example on our homepage whether the installation is allowed.
If your car is not equipped with ISOFIX, please contact the
vehicle manufacturer.
In exceptional cases, however, the child seat can be used
on the front passenger seat. In this case, observe the
following points:
• Check whether the passenger seat is fitted with ISOFIX.
If ISOFIX is not fitted, the child seat may not be used.
• Deactivate the passenger airbag. If this is not possible in
your car, use of the child seat on the passenger side is
prohibited.
• It is imperative that you comply with the car
manufacturer‘s recommendations.
Items of luggage and other loose objects in the car, which
could cause injury in an accident, must always be safely
secured. They can become deadly projectiles in the case of
a car accident.
Questo è un sistema di ritenuta „i-Size“. Approvato secondo
ECE R 129, per l'uso in sedili di veicoli "i-Size compatibili",
secondo le indicazioni della casa automobilistica produttrice
contenute nel manuale istruzioni della vettura.
Se la vettura non è dotata di una posizione di seduta i-Size,
preghiamo verificare gli elenchi delle vetture inclusi o
meglio quelle nel nostro sito per verificare se l'installazione
è permessa.
Se la vettura non è dotata di ISOFIX, preghiamo contattare il
produttore della vettura.
In casi eccezionali, comunque, il seggiolino può essere
utilizzato sul sedile passeggero anteriore. In questo caso
tenere conto di quanto segue:
• Controllase se il sedile è dotato di ISOFIX. Se il sedile
non è dotato di ISOFIX il seggiolino non può essere
installato in questa posizione.
• Disattivare l'airbag passeggero frontale. Se ciò non
fosse possibile, l'uso del seggiolino nel lato passeggero
anteriore è vietato.
• E' comunue fondamentale attenersi alle raccomandazioni
del produttore della vettura.
Bagagli o altri oggetti presenti nel veicolo che possano
causare lesioni in caso di incidente dovranno essere sempre
fissati saldamente. In caso di incidente possono diventare
proiettili letali se lasciati liberi.
DE
EN
IT
11
Page 12

!
WARNUNG!
unbeaufsichtigt im Fahrzeug zurück. Die Kunststoffteile
der Kindersitzes heizen sich in der Sonne auf. Ihr Kind
kann sich daran verbrennen. Schützen Sie Ihr Kind und
den Kindersitz vor intensiver Sonneneinstrahlung (z.B.
indem Sie ein helles Tuch über die Schale legen).
WARNUNG! Dieser Sitz ist nicht für die Verwendung
mit einem normalen Fahrzeuggurt geeignet. Wenn
Sie versuchen, den Sitz mit dem Gurt zu sichern,
kann es bei einem Unfall zu schweren oder gar
tödlichen Verletzungen des Kindes sowie der übrigen
Fahrzeuginsassen kommen.
WARNUNG! A
zur Fahrtrichtung angeordnet sind, ist die
Verwendung des Kindersitzes nicht zulässig. Auf
rückwärtsgerichteten Fahrzeugsitzen, wie z.B. in
einem Van oder Minibus, ist die Verwendung ebenfalls
nicht erlaubt. Der Kindersitz muss auch dann, wenn
er nicht benutzt wird, immer mit dem ISOFIX- System
befestigt sein. Bereits bei einer Notbremsung oder
einem geringen Aufprall kann ein unbefestigter Sitz
andere Mitfahrer und Sie selbst verletzen.
12
Bitte lassen Sie Ihr Kind nie
uf Fahrzeugplätzen, die quer
Page 13

! !
WARNING! Never leave your child unattended in the
car. The plastic parts in the child restraint system heat
up in sun and the child may sustain burns. Protect
your child and the car seat from direct sun exposure
(e.g. by covering it with a light colored cloth).
WARNING! The seat is not suitable for use with a
normal car seatbelt. If the seat is secured with normal
car seatbelt, in case of an accident the child and other
occupants of the car may be severely injured or killed.
WARNING! The child seat is not allowed to be used
on vehicle seats, which are installed at right angles
to the direction of travel. The child seat should not be
used on rearward-facing seats, for example in a van
or minibus. The child seat must always be secured in
place with the ISOFIX system, even when not in use.
If you have to perform an emergency stop or if you are
involved in a minor collision, an unsecured seat can
injure you and other passengers.
ATTENZIONE! Non lasciare mai il bambino
incustodito nel veicolo. Le parti in plastica del
seggiolino tendono a riscaldarsi se esposte al sole
diretto con pericolo di scottature per il bambino.
Proteggere il bambino ed il seggiolino da un'eccessiva
esposizione al sole diretto (per esempio stendendo un
telo chiaro sopra il seggiolino).
ATTENZIONE! Il seggiolino non può essere installato
con la normale cintura di sicurezza dell'auto. Se il
seggiolino viene fissato con la cintura di sicurezza, in
caso di incidente il bambino e gli altri occupanti della
vettura possono subire lesioni gravi o letali.
ATTENZIONE! Il seggiolino non è utilizzabile sui sedili
rivolti lateralmente rispetto alla direzione di marcia.
L'uso del seggiolino non è ammesso sui sedili rivolti
all'indietro, ad esempio nei van o minibus. Il seggiolino
deve sempre essere fissato con il sistema ISOFIX,
anche quando non in uso. In caso di frenata brusca o
di incidente anche minore, un seggiolino non allacciato
potrebbe ferire altri passeggeri o il guidatore.
DE
EN
IT
13
Page 14
VERWENDUNGSMÖGLICHKEITEN IM FAHRZEUG
Abhängig von Körpergröße und Alter kann der
CYBEX SIRONA M2 i-Size vorwärtsgerichtet und
rückwärtsgerichtet verwendet werden.
HINWEIS! Unfallstatistiken belegen, dass ein
rückwärtsgerichteter Transport Ihres Kindes im Fahrzeug
am sichersten ist. Deshalb empfehlen wir, den CYBEX
SIRONA M2 i-Size so lange wie möglich rückwärtsgerichtet
zu verwenden.
Rückwartsgerichtete Verwendung (45 cm - 105 cm)
1
14
Wir empfehlen CYBEX SIRONA M2 i-Size bis zu einer
Körpergröße von 105 cm und max. 19 kg gegen die
Fahrtrichtung zu verwenden.
!
WARNUNG!
und einer Körpergröße von 75cm ist dies zwingend
vorgesehen. Doch auch darüber hinaus ist ein
rückwärtsgerichteter Transport Ihres Kindes am
sichersten. Für nähere Details lesen Sie bitte
den Abschnitt: „RÜCKWÄRTSGERICHTETE
VERWENDUNG (45 cm -105 cm)“.
Vorwärtsgerichtete Verwendung (76 cm – 105 cm)
Eine vorwärtsgerichtete Verwendung ist frühestens ab dem
16.Lebensmonat und bei mind. 76 cm Körpergröße zulässig.
HINWEIS! Der Indikator an der Kopfstütze (1) zeigt
zusätzlich an, ab welcher Größe des Kindes ein Umbau auf
vorwärtsgerichtet frühestens empfohlen werden kann
Für nähere Details lesen Sie bitte den Abschnitt:
„VORWARTSGERICHTETE VERWENDUNG (76 cm 105 cm und älter als 15 Monate)“.
Bis zu einem Alter von 15 Monaten
Page 15

USE OF THE SEAT IN THE CAR USO DEL SEGGIOLINO NELLA VETTURA
Depending on age and size the CYBEX SIRONA M2 i-Size
may be used forward-facing and rearward-facing.
NOTE! Accident statistics verify that in a vehicle the
rearward-facing transport of your child is the safest.
Therefore we recommend to use the CYBEX SIRONA M2
i-Size as long as possible in rearward-facing position.
Rearward-facing use (45 cm - 105 cm)
We recommend to use CYBEX SIRONA M2 i-Size in
rearward-facing position up to size of 105 cm and max. 19 kg.
!
WARNING!
up to an age of 15 months and a size of 75 cm.
Even beyond this limit a rearward-facing transport
is the safest. For more details please read section:
„REARWARD-FACING USE (45 cm - 105 cm)“
Foward-facing use (76 cm – 105 cm)
Use of the seat in forward-facing position is permitted when
the child is older than 15 months and min. 76 cm tall.
NOTE! The indicator on the headrest (1) shows the height
of the child, from which the seat can be changed to the
forward-facing use at the earliest. For more details please
read section: „FOWARD-FACING USE (76 cm - 105 cm
and older than 15 months)“.
It is mandatory to use rearward-facing
Secondo l'età e la corporatura del bambino CYBEX
SIRONA M2 i-Size può essere usato contro il senso di
marcia o nel senso di marcia.
NOTA BENE! Le statistiche incidenti rivelano che il
trasporto dei bambini in auto in posizione contraria a quella
di marcia è la più sicura. Pertanto raccomandiamo l'uso
di CYBEX SIRONA M2 i-Size nella posizione contraria al
senso di marcia il più a lungo possibile.
Uso contro il senso di marcia (45 cm - 105 cm)
Raccomandiamo l'uso di CYBEX SIRONA M2 i-Size nella
posizione contro il senso di marcia fino all'altezza di 105 cm
ed un peso di al massimo 19 kg.
!
ATTENZIONE!
marcia fino all'età di 15 mesi e un'altezza di almeno
75 cm. Oltre questi limiti il trasporto contro il senso
di marcia resta comunque l'opzione più sicura. Per
maggiori dettagli vedere la sezione: „USO CONTRO IL
SENSO DI MARCIA (45 cm - 105 cm)“
Uso nel senso di marcia (76 cm – 105 cm)
L'uso del seggiolino nella posizione nel senso di marcia è
ammessa per bambini di età superiore ai 15 mesi ed un
altezza di almeno 76 cm.
NOTA BENE! L'indicatore sul pogiatesta (1) mostra
l'altezza minima della testa del bambino da cui sarà possibile
effettuare l'eventuale cambio nel senso di marcia. Per
maggiori dettagli vedere la sezione: „USO NEL SENSO DI
MARCIA (76 cm - 105 cm e età superiore ai 15 mesi)“.
E'obbligatorio l'uso contro il senso di
DE
EN
IT
15
Page 16

HINWEIS! Neugeborene und Kleinkinder, die noch nicht
selbstständig sitzen können (bis ca. 1 Jahr), sollten aus
orthopädischen und sicherheitstechnischen Gründen
immer in der flachsten Liegeposition rückwärtsgerichtet
transportiert werden.
HINWEIS! Achten Sie darauf, dass das Kind außerhalb
der Reichweite der beweglichen Teile ist, während Sie
den Sitz verstellen. Halten Sie das Kind vom Sitz fern,
wenn dieser aus dem Fahrzeug ausgebaut oder in das
Fahrzeug eingebaut wird. Es besteht ansonsten die Gefahr,
dass die Finger des Kindes eingeklemmt oder durch die
Scherwirkung verletzt werden.
16
Page 17

NOTE! Newborns and infants who are not yet able to sit up
by themselves (up to around 1 year) should, for orthopedic
and safety reasons, always be transported in the flattest
recline position rearward-facing.
NOTE! The child should be clear of any loose parts while
making adjustments with the seat. Keep children away from
the seat, during the installation and de-installation in the car.
There is a risk that child`s fingers can be trapped and are
injured by unavoidable scissoring actions.
NOTA BENE! I neonati ed i bambini piccoli non ancora
in grado di stare seduti da soli (fino ad 1 anno circa)
dovrebbero, per motivi di sicurezza ed ortopedici, essere
sempre trasportati nella posizione reclinata più piana
possibile contro il senso di marcia.
NOTA BENE! Il bambino non deve entrare in contatto con
parti libere durante le regolazioni del seggiolino. Durante le
operazioni di installazione e disinstallazione del seggiolino
nell'auto, tenere i bambini a distanza. Pericolo per le dita
del bambino che potrebbero restare intrappolate e ferite
dall'inevitabile azione tagliente.
DE
EN
IT
17
Page 18
SICHERHEIT BEIM EINBAU INS FAHRZEUG
Achten Sie zum Schutz aller Fahrzeuginsassen stets
darauf, dass…
• die umklappbaren Rückenlehnen der Fahrzeugsitze
eingerastet sind und sich in einer aufrechten Position
befinden.
• bei Einbau des SIRONA M2 i-Size auf dem Beifahrersitz,
dieser in der hintersten Position steht.
• im Fahrzeug alle beweglichen Gegenstände gesichert sind.
• alle Personen im Fahrzeug angeschnallt sind.
!
WARNUNG!
i-Size nie auf einem Sitz, auf dem ein Frontairbag
aktiviert ist. Dies gilt nicht für sogenannte Seitenairbags.
18
Verwenden Sie CYBEX SIRONA M2
Page 19

SAFE INSTALLATION IN THE CAR INSTALLAZIONE SICURA NELL'AUTO
For the protection of all occupants of the car, always
ensure that...
• foldable backrests in the car are locked in their upright
position.
• when installing the SIRONA M2 i-Size on the front
passenger seat, adjust the car seat in rearmost position.
• you properly secure all objects likely to cause injury in the
case of an accident.
• all passengers in the car are buckled up.
Per garantire la massima sicurezza di tutti i passeggeri
nell'auto è indispensabile…
• verificare che tutti gli schienali reclinabili siano ben fissati
nella posizione eretta.
• nel caso SIRONA M2 i-Size sia installato sul sedile
passeggero anteriore, verificare che questo si trovi nella
posizione più arretrata.
• assicurare in modo appropriato tutti gli oggetti che
potrebbero costituire pericolo in caso di incidente.
• che tutti i passeggeri del veicolo abbiano le cinture
allacciate.
DE
EN
IT
!
WARNING! Never use the CYBEX SIRONA M2
i-Size on a car seat with an activated front airbag. This
does not apply to so-called side airbags.
!
ATTENZIONE!
i-Size su sedili anteriori dotati di airbag frontale attivato.
Quest'avvertenza non si applica agli airbag laterali.
Non utilizzare mai CYBEX SIRONA M2
19
Page 20
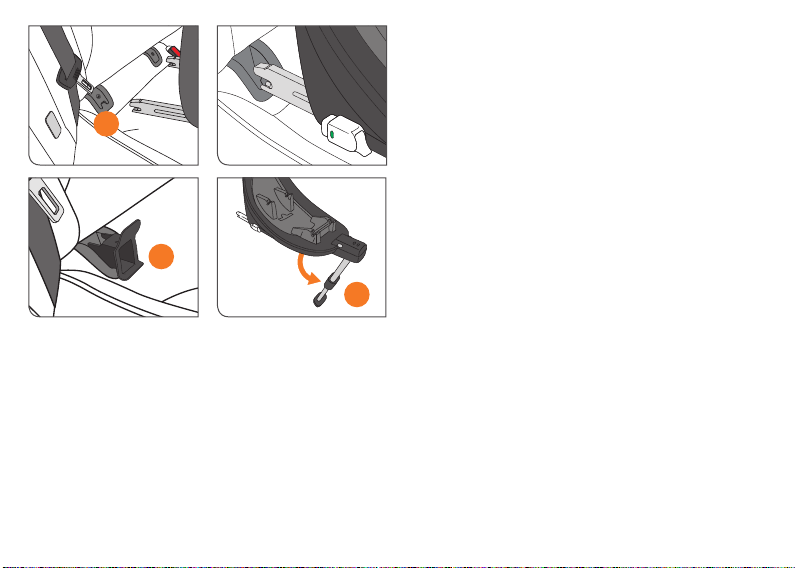
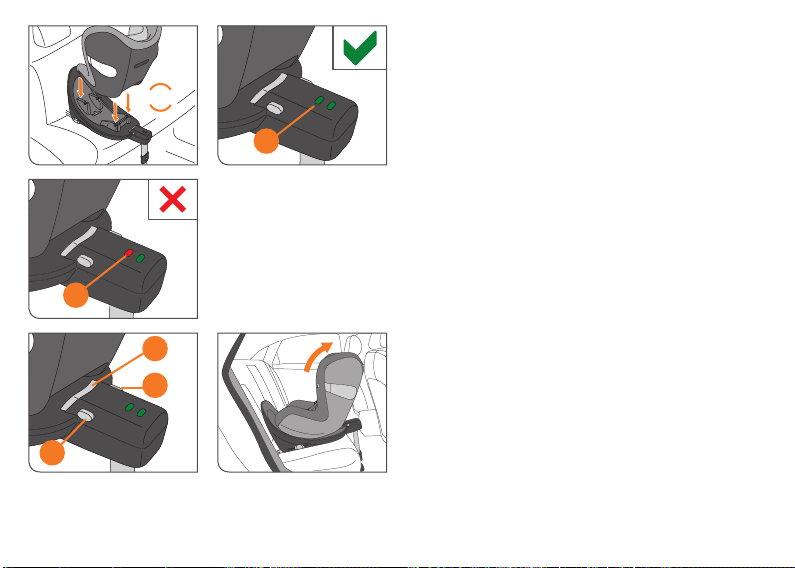
EINBAU DES KINDERSITZES
HINWEIS! Verfügt Ihr Fahrzeug über keinen i-Size Sitzplatz
überprüfen Sie bitte anhand der beiliegenden Typenliste ob
der Einbau erlaubt ist.
Mit dem ISOFIX- System können Sie CYBEX SIRONA M2
2
3
20
i-Size fest mit dem Fahrzeug verbinden.
Einbau der Base im Fahrzeug
• Wählen Sie einen zulässigen Fahrzeugsitz.
HINWEIS! Die ISOFIX-Befestigungspunkte (2) sind zwei
Metalllaschen pro Sitzplatz und befinden sich zwischen
Rückenlehne und Sitzfläche des Fahrzeugsitzes. Im
Zweifelsfall nehmen Sie die Bedienungsanleitung Ihres
Fahrzeugs zu Hilfe.
• Sind die ISOFIX- Befestigungspunkte (2) Ihres Fahrzeugs
4
schwer zugänglich, sollten Sie zur Schonung des
Bezuges die mitgelieferten Einführhilfen (3) verwenden.
• Falls erforderlich, hängen Sie die mitgelieferten
Einführhilfen (3) mit der längeren Lasche nach oben
in die beiden ISOFIX- Befestigungspunkte (2) ein. In
manchen Fahrzeugen eignet sich eine entgegengesetzte
Einbaurichtung der Einführhilfen (3) besser.
• Klappen Sie immer den Stützfuß (4) aus, bis er vorne
einrastet.
Page 21

INSTALLATION OF THE CHILD SEAT INSTALLAZIONE DEL SEGGIOLINO
NOTE! If your car is not equipped with an i-Size seating
position, please check the typelist attached to the product.
The ISOFIX system allows you to fit the CYBEX SIRONA
M2 i-Size securely into the car.
NOTA BENE! Se la vettura non è dotata di una posizione
i-Size, verificate nell'elenco allegato al prodotto.
Il sistema ISOFIX permette di installare CYBEX SIRONA
M2 i-Size fermamente nell'auto.
Installing the Base Installazione della Base
• Select an authorised car seat. • Scegliere un sedile autorizzato.
NOTE! The ISOFIX anchorage points (2) are two metal
lugs per seat and are located between the backrest and the
seat of the car. If you are in any doubt, consult your car‘s
instruction manual for assistance.
• If the ISOFIX anchorage points (2) in your car are
difficult to access, you should use the connect guides (3)
provided in order to avoid damaging the cover.
• If necessary attach the connect guides (3) provided
with the longer lug pointing upwards into both ISOFIX
anchorage points (2). In many cars it is more effective to
install the connect guides (3) in an opposing direction.
• Always fold out the supporting leg (4) until it locks.
NOTA BENE! I punti di ancoraggio ISOFIX (2) sono due
clip metalliche per ogni sedile, posizionate tra lo schienale e
la seduta del sedile del veicolo. In caso di dubbio consultare
il manuale istruzioni della vettura.
• Se i punti di ancoraggio ISOFIX (2) della vettura sono
difficili da raggiungere, preghiamo utilizzare le guide (3)
in dotazione che permettono di evitare di danneggiare i
rivestimenti dei sedili.
• Se necessario è possibile fissare le guide (3) con la
parte allungata rivolta verso l'alto in entrambi i punti
di ancoraggio ISOFIX (2). In molti veicoli è preferibile
montare le guide (3) in direzione opposta.
• Portare in posizione il piede di supporto (4) fino a quando
si blocca.
DE
EN
IT
21
Page 22
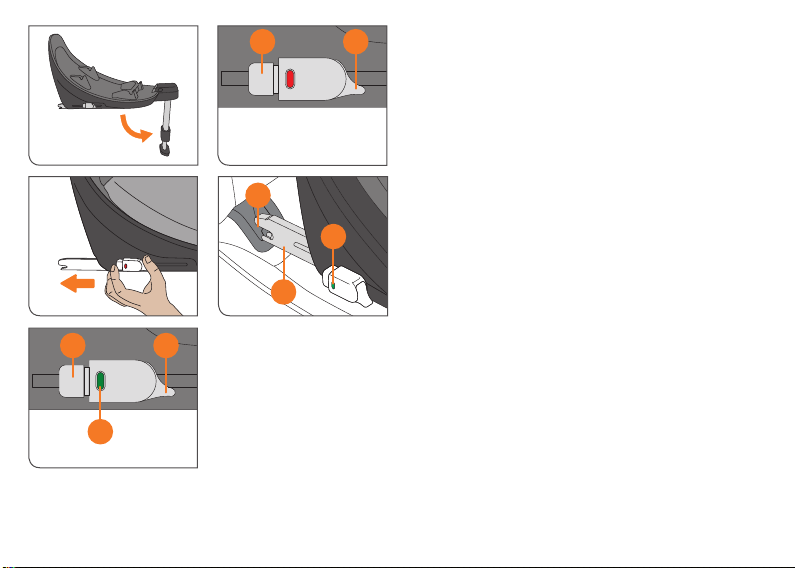
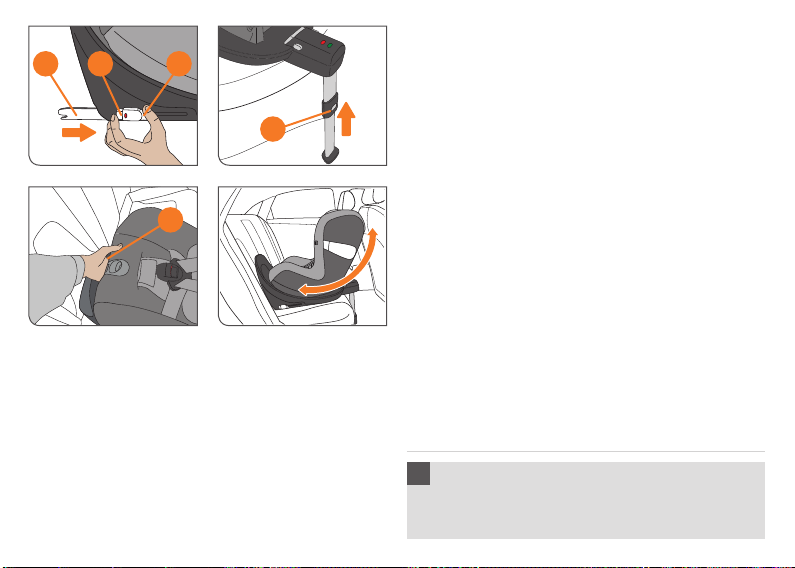
HINWEIS! Stellen Sie keine Gegenstände in den Fußraum
65
vor den Kindersitz.
• Lösen Sie die Arretierung der ISOFIX- Konnektoren.
Beide Arretierungen lassen sich unabhängig voneinander
verstellen. Betätigen sie beide Tasten (5 und 6)
gleichzeitig und ziehen die ISOFIX Arretierung bis zum
Anschlag aus der Basis.
• Die ISOFIX Konnektoren (7) müssen hörbar an den
beiden ISOF IX- Befestigungspunkten (2) einrasten.
2
8
7
65
8
22
• Vergewissern Sie sich, dass der Sitz gut hält, indem
Sie versuchen ihn aus den ISOFIX- Einführhilfen
herauszuziehen.
• Der grüne Sicherheitsindikator (8) muss an den beiden
ISOFIX- Entriegelungstasten gut sichtbar sein.
• Anschließend schieben Sie die Base in Richtung
Rückenlehne, bis diese fest und vollflächig anliegt.
• Jetzt können Sie mit dem Kapitel „EINSTELLEN DES
STÜTZFUSSES“ fortfahren.
HINWEIS! An einigen Autositzen aus empfindlichem
Material (z.B. Velours, Leder, etc.) können durch die
Benutzung von Kindersitzen mögliche Gebrauchsspuren
und/oder Abfärbungen auftreten. Um das zu vermeiden,
können Sie z.B. eine Decke oder ein Handtuch unterlegen.
Ferner weisen wir in diesem Zusammenhang auf unsere
Reinigungshinweise hin, die vor der ersten Verwendung des
Sitzes unbedingt beachtet werden sollten.
Page 23

NOTE! Do not put any objects in the foot area in front of the
child seat.
• Release the lock of the ISOFIX connectors. Both locks
can be adjusted independently. Push both buttons (5
and 6) simultaneously and pull the ISOFIX connectors
out of the base to the endstopper.
• The ISOFIX connectors (7) have to lock into the ISOFIX
anchorage points (2) with an audible click.
• Make sure that the seat stays firmly in place by trying to
pull it out of the ISOFIX connect guides.
• The green safety indicator (8) must be clearly visible on
both ISOFIX release buttons.
• Next, push the base in the direction to the backrest until it
is fully aligned with the backrest.
• You can now carry on with the chapter, “ADJUSTING
THE SUPPORTING LEG“.
NOTE! It is possible that some car seats that are made
of soft material (e.g. velour, leather, etc.) may show signs
of usage and/or discoloration. In order to avoid this, you
could for example, place a cover or towel underneath it. In
this context we would also like to refer you to our cleaning
instructions, which must be absolutely followed before the
first use of the seat.
NOTA BENE! Non lasciare nessun oggetto nell'area piedi
di fronte al seggiolino.
• Sbloccare la chiusura dei connettori ISOFIX. Entrambe lo
chiusure possono essere regolate singolarmente. Premere
entrambi i pulsanti (5 e 6) contemporaneamente ed
estrarre i connettori ISOFIX dalla base fino a fine corsa.
• I connettori ISOFIX (7) devono agganciarsi saldamente ai
punti di ancoraggio ISOFIX (2) con un sonoro "CLICK".
• Verificate che il seggiolino sia fissato fermamente
cercando di tirarlo verso la parte opposta alle guide di
connessione ISOFIX.
• L'indicatore di sicurezza verde (8) deve essere ora
chiaramente visibile su entrambi i pulsanti di rilascio.
• Quindi, spingere la base verso lo schienale fino a quando
si trova perfettamente allineata con esso.
• Ora è possibile procedere con la sezione, “REGOLARE
IL PIEDE DI SUPPORTO“.
NOTA BENE! I sedili con rivestimenti particolarmente
delicati (velluto, pelle, ecc.) potrebbero essere danneggiati
dall'uso di seggiolini di sicurezza. Per prevenire
eventualisegni di usura consigliamo di disporre un telo sotto
al seggiolino per proteggere il sedile. In questo contesto,
desideriamo anche rimandarvi alle istruzioni per la pulizia,
che devono assolutamente essere seguite prima del primo
utilizzo del seggiolino.
DE
EN
IT
23
Page 24
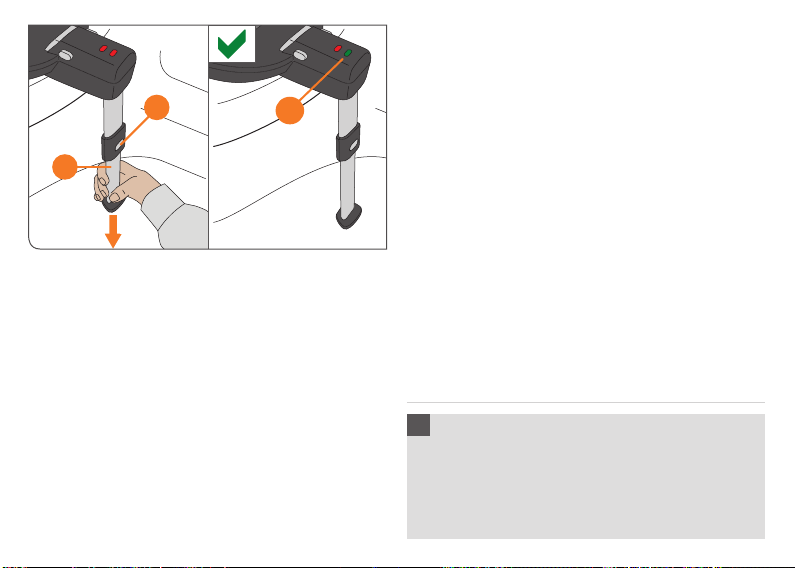
EINSTELLEN DES STÜTZFUSSES
Drücken Sie die Verstelltaste (9) und ziehen Sie den
Stützfuß (4) soweit heraus, bis dieser den Fahrzeugboden
berührt. Ziehen Sie den Stützfuß zur nächsten Verrastung
9
10
4
aus, um eine optimale Kraftaufnahme zu gewährleisten. Der
Stützfußindikator (10) an der Basis schaltet dann auf GRÜN
um, dabei ist ein charakteristisches Klicken zu hören.
HINWEIS! Achten Sie darauf, dass CYBEX SIRONA M2
i-Size weiterhin flächig auf dem Fahrzeugsitz aufliegt.
!
WARNUNG! Der Stützfuß (4) muss immer direkten
Bodenkontakt haben. Es dürfen keine Gegenstände
oder Hohlräume zwischen Fahrzeugboden und dem
Stützfuß sein. Besitzt ihr Auto Staufächer im Fußraum,
wenden Sie sich unbedingt an den Fahrzeughersteller.
24
Page 25
ADJUSTING THE SUPPORTING LEG REGOLAZIONE DEL PIEDE DI SUPPORTO
Push the adjustment button (9) and pull the supporting leg
(4) out until it touches the vehicle floor. After this, pull the
foot out to the next locking position to ensure optimal force
transmission. The supporting leg indicator (10) on the base
will show GREEN and a characteristic ‚CLICK‘ may be heard.
NOTE! Make sure that CYBEX SIRONA M2 i-Size still
rests flat on the car seat.
Premere il di
fino a quando appoggia bene sul pavimento dell'auto. A
questo punto allungare leggermente per fissare il piede di
supporto nel foro di blocco immediatamente successivo,
per garantire la trasmissione ottimale delle forze d'impatto.
L'indicatore del piede di supporto (10) sulla base apparirà di
colore VERDE e si potrà udire un sonoro "CLICK".
NOTA BENE! Assicurarsi che CYBEX SIRONA M2 i-Size
sia in posizione piana sul sedile dell'auto.
pulsanti
(9) e estrarre
il piede di supporto (4)
DE
EN
IT
!
WARNING! T
in direct contact with the vehicle floor. There must be
no objects or spaces between the vehicle floor and
the supporting leg. If there are storage compartments
in the floor of the vehicle you must contact the
vehicle manufacturer.
he supporting leg (4) must always be
!
ATTENZIONE! Il piede di supporto (4) dev'essere
sempre a contatto diretto con il pavimento della
vettura. Non ci devono essere oggetti o spazio tra il
pavimento della vettura ed il piede di supporto. Se
nel pavimento sono presenti scomparti portaoggetti è
necessario contattare il produttore della vettura.
25
Page 26
CLICK!
11
11
MONTAGE DES SITZES AUF DER BASE
Einrasten des CYBEX SIRONA M2 i-Size Sitzes
HINWEIS! Stellen Sie sicher, dass die Oberfläche der
Base M i-Size frei von Fremdkörpern ist.
Platzieren Sie den CYBEX SIRONA M2 i-Size in der
gewünschten Fahrtrichtung auf der Base M i-Size. Stellen
Sie sicher, dass beide Raststangen mit einem hörbaren
„KLICK“ verriegeln. Kontrollieren Sie anschließend, ob der
Indikator (11) an der Base M i-Size GRÜN zeigt. Sollte
der Indikator ROT zeigen, ist der Sitz nicht ausreichend
verriegelt. Wiederholen sie ggf. den Vorgang.
12
13
13
26
Lösen des CYBEX SIRONA M2 i-Size Sitzes
Drücken Sie gleichzeitig die zentrale Entriegelungstaste (12)
und eine der seitlichen Entriegelungstasten (13), um den
CYBEX SIRONA M2 i-Size von der Base zu entriegeln.
Kippen Sie den Sitz etwas an. Der Indikator (11) zeigt nun ROT.
Nun können Sie die Entriegelungstasten (12) und (13)
loslassen und den CYBEX SIRONA M2 i-Size von der
Base M i-Size abheben.
Page 27

INSTALLATION OF THE SEAT ON BASE INSTALLAZIONE DEL SEGGIOLINO SULLA BASE
Locking of the CYBEX SIRONA M2 i-Size car seat Fissare il seggiolino CYBEX SIRONA M2 i-Size
NOTE! Please ensure that the surface of the Base M i-Size
is free of objects.
Put the CYBEX SIRONA M2 i-Size in the required direction
onto the Base M i-Size. Ensure that both rods lock with an
audible „CLICK“. Next control if the indicator (11) on the
Base M i-Size shows GREEN. If the indicator shows RED
the seat is not locked well. Repeat the process if necessary.
NOTA BENE! Assicuratevi che la superficie della Base M
i-Size sia completamente libera da qualsiasi oggetto.
Collocare CYBEX SIRONA M2 i-Size rivolto nella direzione
richiesta sulla Base M i-size. Assicuratevi che entrambe
le barre siano ben agganciate, dovrete sentire un sonoro
„CLICK“. Controllare quindi che l'indicatore (11) sulla Base
M i-Size sia VERDE. Se l'indicatore è ROSSO significa che
il seggiolino non è correttamente agganciato. Se necessario
ripetere l'operazione.
Releasing the CYBEX SIRONA M2 i-Size car seat Disinstallare il seggiolino CYBEX SIRONA M2 i-Size
Push the central release button (12) and one of the release
buttons on the side (13) simultaneously to unlock the
CYBEX SIRONA M2 i-Size from the base.
Tilt the seat a little. The indicator (11) now shows RED.
Now you can release the unlocking buttons (12) and (13) to
lift the CYBEX SIRONA M2 i-Size off the Base M i-Size.
Premere il pulsante di rilascio centrale (12) e uno dei
pulsanti di rilascio laterali (13) contemporaneamente per
sbloccare CYBEX SIRONA M2 i-Size dalla base.
Inclinare leggermente il seggiolino. L'indicatore (11) ora è di
colore ROSSO.
A questo punto si possono rilasciare i pulsanti di sblocco
(12) e (13) e sollevare CYBEX SIRONA M2 i-Size dalla
Base M i-Size.
DE
EN
IT
27
Page 28
7 5 6
28
14
AUSBAU DER BASE AUS DEM FAHRZEUG
Führen Sie die Einbauschritte in umgekehrter
Reihenfolge durch.
• Entriegeln Sie nacheinander beide ISOFIX Konnektoren
(7) durch gleichzeitiges Betätigen der Tasten (5 und 6),
und ziehen diese aus den Einführhilfen.
9
• Schieben Sie die Konnektoren (7) in die
Ausgangsposition zurück.
• Durch Drücken der Verstelltaste (9) können Sie den
Stützfuß wieder in seine Ausgangsposition schieben und
danach platzsparend zurückklappen.
SITZ UND LIEGEVERSTELLUNG
CYBEX SIRONA M2 i-Size bietet bis zu fünf unterschiedliche
Sitz- und Liegepositionen zum sicheren und komfortablen
Transport Ihres Kindes im Fahrzeug. Falls gewünscht,
betätigen Sie die Positionsverstelltaste (14) an der
Vorderseite des Kindersitzes, um CYBEX SIRONA M2 i-Size
in eine der gewünschten Liegepositionen zu führen. Achten
Sie immer darauf, dass die Sitzschale hörbar einrastet.
HINWEIS! Neugeborene und Kleinkinder, die noch nicht
selbstständig sitzen können (bis ca. 1 Jahr), sollten aus
orthopädischen und sicherheitstechnischen Gründen
immer in der flachsten Liegeposition rückwärtsgerichtet
transportiert werden.
!
WARNUNG!
und Liegeposition während der Fahrt ist aus
sicherheitstechnischen Gründen ausdrücklich untersagt!
Die Verstellung zwischen Sitz-
Page 29
DEINSTALLATION OF THE BASE FROM THE CAR DISINSTALLAZIONE DELLA BASE DALL'AUTO
Carry out the installation steps in the reverse order.
• Unlock both ISOFIX connectors (7) through pushing the
buttons (5 and 6) simultaneously and pull them out of the
ISOFIX connect guides.
• Push the connectors (7) back into the original position.
• By pressing the adjustment button (9) you can push back
the supporting leg into its original position and then fold it
back to save space.
ADJUSTMENT FOR SITTING AND RECLINING
CYBEX SIRONA M2 i-Size offers up to five different
sitting and reclining positions for the safe and comfortable
transport of your child in the car. If wanted, activate the
position adjustment handle (14) on the front of the child
seat, to put the CYBEX SIRONA M2 i-Size in the required
reclining positions. Always make sure that the seat shell
locks into place with an audible „CLICK“.
NOTE! Newborns and infants who are not yet able to sit up
by themselves (up to around 1 year) should, for orthopedic
and safety reasons, always be transported in the flattest
recline position rearward-facing.
Seguire il procedimento per l'installazione nell'ordine
inverso.
• Sbloccare entrambi i connettori ISOFIX (7) premendo
i pulsanti (5 e 6) contemporaneamente ed estrarli dalle
guide ISOFIX.
• Spingere i connettori (7) per farli rientrare nella
posizione originaria.
• Premendo la maniglia di pulsanti (9) è possibile fare
rientrare il piede di supporto nella posizione originaria e
quindi ripiegarlo per salvare spazio.
REGOLAZIONE PER LA SEDUTA E LA RECLINAZIONE
CYBEX SIRONA M2 i-Size offre ben 5 possibili regolazioni
di seduta e reclinazione per il trasporto sicuro e confortevole
del bambino in auto. E' sufficiente, quando serve, agire sulla
maniglia di regolazione della posizione (14), che si trova
sulla parte frontale del seggiolino, per inclinare CYBEX
SIRONA M2 i-Size nelle posizioni di reclinazione desiderate.
Verificare sempre che la scocca si blocchi in posizione con
un sonoro "CLICK".
NOTA BENE! I neonati e i bambini piccoli non ancora
in grado di stare seduti da soli (fino a un anno circa)
dovrebbero, per ragioni di sicurezza e ortopediche, viaggiare
sempre nella posizione reclinata più piana possibile contro il
senso di marcia.
DE
EN
IT
!
WARNING! For safety reasons adjusting between
sitting and reclining positions during travel is strictly
prohibited!
!
ATTENZIONE! Per ragioni di sicurezza è
assolutamente vietato effettuare le regolazioni della
seduta e della reclinazione con l'auto in movimento!
29
Page 30
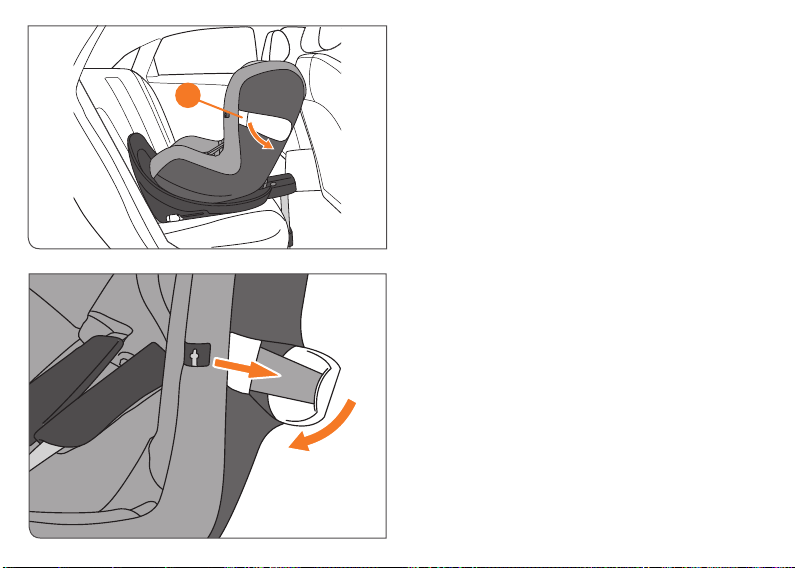
EINSTELLEN DER SEITENPROTEKTOREN
Im CYBEX SIRONA M2 i-Size ist das „Linear Side-Impact
Protection“ Systems (L.S.P.) verbaut. Dieses System erhöht
15
30
die Sicherheit Ihres Kindes im Falle eines seitlichen Aufpralls.
Um die bestmögliche Schutzwirkung zu erzielen, klappen
Sie das L.S.P. auf der zur Fahrzeugtüre zeigenden Seite des
Sitzes aus. Drücken Sie hierfür den Auslöseknopf (15).
HINWEIS! Achten Sie darauf, dass der ausklappbare Teil
einrastet. Dies ist durch ein „KLICK“ hörbar.
Sollte das L.S.P. an der Türe anstehen, klappen sie es wieder
ein. Eine Verwendung mit ordnungsgemäß verstautem L.S.P.
ist zulässig.
Das L.S.P. lässt sich wieder komplett in den Sitz verstauen,
indem Sie es nach innen drücken und anschließend
einklappen, bis es mit einem hörbaren „KLICK“ einrastet.
HINWEIS! Beim Einbau des SIRONA M2 i-Size
auf einem mittleren Sitzplatz dürfen Sie den linearen
Seitenaufprallschutz (L.S.P.) nicht ausklappen.
Der ausgeklappte Seitenaufprallschutz (L.S.P.) dient nicht
als Tragegriff oder Einstiegshilfe.
Page 31

ADJUSTING THE SIDE PROTECTORS REGOLAZIONE DELLE PROTEZIONI LATERALI
CYBEX SIRONA M2 i-Size is equipped with the „ Linear
Side-impact Protection“ system (L.S.P.). This system
increases the safety of your child in case of side impact.
Pull the L.S.P. out to the nearest position on the door side
for having the best possible safety. To release it push the
release button (15).
NOTE! Make sure, that the L.S.P. is fixed with an audible
„CLICK“.
In case the L.S.P. touches the door, it ought to be stored
away properly. It‘s allowed to be used in this position. In
order to push back the L.S.P. into the seat, push the L.S.P.
and fold it, until it locks with an audible „CLICK“.
When using the SIRONA M2 i-Size on a middle
NOTE!
position in the vehicle, it‘s prohibited to fold out the
(L.S.P.) device.
Using the (L.S.P.) device for carrying or climbing into the
SIRONA M2 i-Size is prohibited.
CYBEX SIRONA M2 i-Size è dotato del sistema "Linear
Side-Impact Protection" (L.S.P.). Questo sistema migliora
la sicurezza del bambino in caso di incidente con impatto
laterale. Estrarre la protezione L.S.P. fino alla posizione più
prossima sul lato portiera per garantire la massima sicurezza
possibile. Per sbloccare, premere il pulsante di rilascio (15).
NOTA BENE! Assicuratevi che l'L.S.P. sia ben fissato in
posizione, dovrete sentire un sonoro „CLICK“.
Nel caso la protezione laterale L.S.P. arrivi a contatto con
la portiera, dovrebbe essere riposto correttamente. E'
consentito l'uso in questa posizione. Per spingere indietro
l'L.S.P. nel seggiolino, estrarlo e piegarlo, finchè non si
blocca con un sonoro "CLICK".
NOTA BENE!
centrale nel veicolo, è vietato estrarre il dispositivo L.S.P.
E' assolutamente vietato utilizzare il dispositivo L.S.P. per
Se SIRONA M2 i-Size è installato in un sedile
trasportare SIRONA M2 i-Size o per appoggiarsi durante
l'ingresso.
DE
EN
IT
31
Page 32

32
MAX.
RÜCKWÄRTSGERICHTETE VERWENDUNG
(45 cm - 105 cm)
Anpassen der Kopfstütze
HINWEIS! Die Neugeboreneneinlage dient dem Schutz
Ihres Kindes und sollte bis zu einer Körpergröße von 60 cm
verwendet werden.
HINWEIS! Nur eine in optimaler Höhe eingestellte
Kopfstütze (16) gewährt Ihrem Kind größtmöglichen Schutz
und Komfort. Es stehen 12 verschiedene Positionen zur
Verfügung.
• Die Kopfstütze (16) muss so eingestellt werden, dass
nicht mehr als maximal zwei Finger breit zwischen
Schulter des Kindes und Kopfstütze (16) frei bleiben.
16
1
• Betätigen Sie die Einstelltaste (17) an der Unterkante der
Kopfstütze (16), und führen Sie diese in die gewünschte
17
Position.
Der Indikator an der Kopfstütze (1) zeigt zusätzlich an, ab
welcher Größe des Kindes ein Umbau auf vorwärtsgerichtet
frühestens empfohlen werden kann.
Eine vorwärtsgerichtete Verwendnung ist nur dann
zugelassen, wenn:
• das Kind > 76 cm groß ist.
und
• das Kind mindestens im 16. Lebensmonat ist. Es
wird empfohlen, den Sitz so lange wie möglich in der
rückwärts gerichteten Position zu verwenden.
und
• die korrekt eingestellte Kopfstütze (16) den Indikator (1)
verdeckt.
Page 33

REARWARDFACING USE USO CONTRO IL SENSO DI MARCIA
(45 cm - 105 cm) (45 cm - 105 cm)
Adjusting the headrest Regolazione del poggiatesta
NOTE! The newborn inlay protects your child. It should be
used up to size of 60 cm.
NOTE! Only when adjusted to the most suitable height,
the headrest (16) offers your child the best protection and
safety. The height of the headrest can be adjusted to 12
different positions.
• The headrest (16) must be adjusted to leave a maximum
space of two fingers width between the child‘s shoulders
and the headrest (16).
• Activate the adjustable handle (17) on the bottom side of
the headrest (16) and move it into the required position.
The indicator on the headrest (1) shows the height of the
child from which the seat is recommended for forwardfacing use at the earliest.
The seat may only be used forward-facing, if:
• the child is > 76 cm tall.
and
• the child is min. 16 months old. We recommend to use
the seat as long as possible in rearward-facing position.
and
• the correctly adjusted headrest (16) covers the indicator
(1).
NOTA BENE! L‘inserto per neonati serve a proteggere il
vostro bambino e dovrebbe essere utilizzato fino ad una
statura di 60 cm.
NOTA BENE!
sicurezza e protezione maggiore solo se regolato nella
Il poggiatesta (16) offre il grado di
posizione corretta. Il poggiatesta può essere regolato in
12 diverse posizioni.
• Il poggiatesta (16) deve essere regolato in modo che
tra le spalle del bambino e la base del poggiatesta (16)
possano passare al massimo due dita.
• Agire sulla maniglia di regolazione (17) che si trova nella
parte inferiore del poggiatesta (16) e spostarlo nella
posizione desiderata.
La marcatura sul poggiatesta (1) mostra l'altezza minima
da cui è eventualmente possibile passare alla posizione nel
senso di marcia.
Il seggiolino potrà essere usato rivolto nel senso di marcia
soltanto se:
• il bambino ha superato l'altezza di 76 cm.
e
• ha raggiunto almeno l'età di 16 mesi. Raccomandiamo di
proseguire l'utilizzo in senso contrario alla marcia il più a
lungo possibile.
e
• il poggiatesta (16) regolato nella posizione corretta
supera la marcatura (1).
DE
EN
IT
33
Page 34

18
23
20
19
24
21
CLICK!
34
ANSCHNALLEN MITTELS GURTSYSTEM
Die Schultergurte sind mit der Kopfstütze fest verbunden
und müssen nicht separat eingestellt werden. Achten Sie
darauf, dass die Kopfstütze ordnungsgemäß eingerastet ist,
bevor Sie den Sitz verwenden.
HINWEIS! Sorgen Sie dafür, dass der Kindersitz frei von
Spielsachen und harten Objekten ist.
• Lockern Sie die Schultergurte (18), indem Sie die
Verstelltaste am Zentralversteller (19) betätigen und
gleichzeitig beide Schultergurte (18) nach oben ziehen.
• Öffnen Sie das Gurtschloss (20) durch kräftiges Drücken
der roten Taste.
• Die Schlosszungen (21) können seitlich am Bezug, auf
22
dem dafür gekennzeichneten Bereich (22), fixiert werden.
HINWEIS! Bitte ziehen Sie immer am Schultergurt (18)
und nicht an den Gurtpolstern (23).
• Setzen Sie Ihr Kind in den Kindersitz und führen Sie die
Schultergurte (18) gerade über die Schultern Ihres Kindes.
HINWEIS! Achten Sie darauf, dass die Schultergurte (18)
nicht verdreht sind.
• Führen Sie die beiden Schlosszungen (21) zusammen,
und rasten Sie diese im Gurtschloss (20) mit einem
hörbaren „KLICK“ ein.
• Ziehen Sie behutsam am Zentralverstellgurt (24), um die
Schultergurte (18) soweit zu straffen, bis diese am Körper
Ihres Kindes anliegen.
HINWEIS! Für den optimalen Schutz durch den CYBEX
SIRONA M2 i-Size sollten die Schultergurte so nahe wie
möglich am Körper anliegen.
Beckengurte möglichst tief verlaufen, sodass sie eng am
Becken anliegen.
Achten sich darauf, dass die
Page 35

The shoulder belts are firmly attached to the headrest and
must not be adjusted separately. Make sure that the headrest
is correctly locked in place before you use the seat.
NOTE! Make sure that the child seat is free of toys and hard
objects.
• Loosen the shoulder belts (18) by activating the
adjustment handle on the central adjuster (19) and
simultaneously pulling both shoulder belts (18) upwards.
• Open the belt buckle (20) by pressing firmly on the red
button.
• The belt tongues (21) can be fixed sideward on the cover
(22).
NOTE! Always pull on the shoulder belt (18); never pull the
shoulder pads (23).
• Put the child in the child seat and adjust the shoulder
belts (18) to fit exactly over your child‘s shoulders.
NOTE! Make sure that the shoulder belts (18) are not
twisted or crossed over.
• Bring both belt tongues (21) together and lock them into
place in the belt buckle (20) with an audible „CLICK“.
• Gently and cautiously pull on the central adjuster belt
(24), in order to tighten the shoulder belts (18) until they
lie against the body of your child.
NOTE! In order to gain optimum protection from the
CYBEX SIRONA M2 i-Size, the shoulder belts should lie
as close as possible to the body. Please assure that the lap
belts lie close to the hip and are appropriately tight.
ALLACCIARE IL BAMBINO CON LE CINTURESECURING BY MEANS OF HARNESS SYSTEM
Le cinture per le spalle sono saldamente fissate al
poggiatesta e non devono essere regolate separatamente.
Assicuratevi che il poggiatesta sia bloccato correttamente in
posizione prima di utilizzare il seggiolino.
NOTA BENE! Assicuratevi che il seggiolino sia libero da
oggetti duri e/o giocattoli.
• Allentare le cinture (18) premendo il pulsante
di regolazione centrale (19) quindi tirare
contemporaneamente entrambe le cinture (18) verso l'alto.
• Aprire la fibbia (20) premendo con forza sul pulsante rosso.
• Le linguette delle cinture (21) possono essere fissate sul
rivestimento ai lati del seggiolino (22).
NOTA BENE! Tirare sempre direttamente le cinture (18)
non i cuscinetti (23).
• Sedere il bambino nel seggiolino e regolare le cinture
per le spalle (18) in modo che appoggino perfettamente
sopra le spalle del bambino.
NOTA BENE! Assicuratevi che le cinture (18) non siano
invertite o attorcigliate.
• Unire le due linguette delle cinture (21) ed inserirle nella
fibbia (20) dove si fisseranno con un sonoro „CLICK“.
• Tirare la cintura di regolazione centrale (24), delicatamente
per stringere le cinture per le spalle (18) fino a quando
non saranno appoggiate al corpo del bambino.
NOTA BENE! Per garantire la protezione ottimale di
CYBEX SIRONA M2 i-Size, le cinture per le spelle devono
appoggiare il più vicino possibile al corpo. Verificare che le
cinture ventrali siano appoggiate vicino alle anche e siano
adeguatamente tese.
DE
EN
IT
35
Page 36

VORWÄRTSGERICHTETE VERWENDUNG
(76 cm - 105 cm und älter als 15 Monate)
Eine vorwärtsgerichtete Verwendung ist zugelassen, wenn
Ihr Kind älter als 15 Monate und mindestens 76 cm groß
ist. Um Ihrem Kind den bestmöglichen Schutz zu bieten,
empfehlen wir CYBEX SIRONA M2 i-Size so lange wie
möglich rückwärtsgerichtet zu verwenden. Sollte aber,
unter oben genannten Voraussetzungen, der Platz für die
Beine Ihres Kindes nicht mehr ausreichend sein, können
Sie den CYBEX SIRONA M2 i-Size auch vorwärtsgerichtet
verwenden. Wie Sie ihr Kind anschnallen, erfahren sie im
Kapitel „ANSCHNALLEN MITTELS GURTSYSTEM“.
HINWEIS! Unfallstatistiken belegen, dass ein
rückwärtsgerichteter Transport Ihres Kindes im Fahrzeug
am sichersten ist. Deshalb empfehlen wir, den CYBEX
SIRONA M2 i-Size so lange wie möglich rückwärtsgerichtet
zu verwenden.
HINWEIS! Der Indikator an der Kopfstütze (1) zeigt
zusätzlich an, ab welcher Größe des Kindes ein Umbau auf
1
16
36
vorwärtsgerichtet frühestens empfohlen werden kann.
Eine vorwärtsgerichtete Verwendnung ist nur dann
zugelassen, wenn:
• das Kind > 76 cm groß ist.
und
• das Kind mindestens im 16. Lebensmonat ist. Es
wird empfohlen, den Sitz so lange wie möglich in der
rückwärts gerichteten Position zu verwenden.
und
• die korrekt eingestellte Kopfstütze (16) den Indikator (1)
verdeckt.
Page 37

FORWARDFACING USE USO NEL SENSO DI MARCIA
(76 cm - 105 cm and older than 15 months) (76 cm - 105 cm ed età superiore ai 15 mesi)
Using the seat in forward-facing position is permitted if
the child is older than 15 months and min. 76 cm tall. In
order to offer your child the highest level of protection,
we recommend to use CYBEX SIRONA M2 i-Size in the
rearward-facing position for as long as possible. If there
is not enough room for your child´s legs you can use the
CYBEX SIRONA M2 i-Size in the forward-facing position.
Learn more about how to secure your child in section
„SECURING BY MEANS OF HARNESS SYSTEM“.
NOTE!
Accident statistics prove that the safest way to
transport your child in the car is in the rearward-facing position.
Therefore we recommend to use CYBEX SIRONA M2 i-Size
in the rearward-facing position for as long as possible.
NOTE! The indicator on the headrest (1) shows the body
height of the child, from which the seat can be changed to
L'uso nel senso di marcia è ammesso soltanto se il bambino
ha superato l'età di 15 mesi e l'altezza di 76 cm. Per offrire
al bambino il massimo livello di sicurezza raccomandiamo
di usare CYBEX SIRONA M2 i-Size nella posizione contro
il senso di marcia il più a lungo possibile. Soltanto quando
lo spazio non sarà più sufficiente potrete ruotare CYBEX
SIRONA M2 i-Size nella direzione di marcia. Maggiori
informazioni su come allacciare il bambino nella sezione
„ALLACCIARE IL BAMBINO CON IL SISTEMA DI CINTURE“.
NOTA BENE!
Le statistiche sugli incidenti dimostrano
che il modo più sicuro per trasportare i bambini in auto
è nella posizione contro il senso di marcia. Per questo
raccomandiamo di continuare ad utilizzare CYBEX
SIRONA M2 i-Size nella posizione contraria alla marcia il
più a lungo possibile.
the forward-facing use at the earliest. NOTA BENE! L'indicatore del poggiatesta (1) mostra
The seat may only be used forward-facing, if:
• the child is > 76 cm tall.
and
• the child is min. 16 months old. We recommend to use
the seat as long as possible in rearward-facing position.
and
• the correctly adjusted headrest (16) covers the indicator
(1).
l'altezza minima che il bambino deve avere superato per
poter utilizzare il seggiolino nel senso di marcia.
L'uso nel senso di marcia è possibile soltanto se:
• il bambino ha un altezza superiore a 76 cm.
e
• ha superato l'età di 16 mesi. Raccomandiamo l'uso
contro il senso di marcia il più a lungo possibile.
e
• il poggiatesta (16) correttamente regolato, si sovrappone
all'indicatore (1).
DE
EN
IT
37
Page 38

CLICK!
CLICK!
7
4
CLICK!
38
IST IHR KIND RICHTIG GESICHERT?
Um die bestmögliche Sicherheit Ihres Kindes zu
gewährleisten, prüfen Sie bitte immer vor Beginn der
Fahrt, ob…
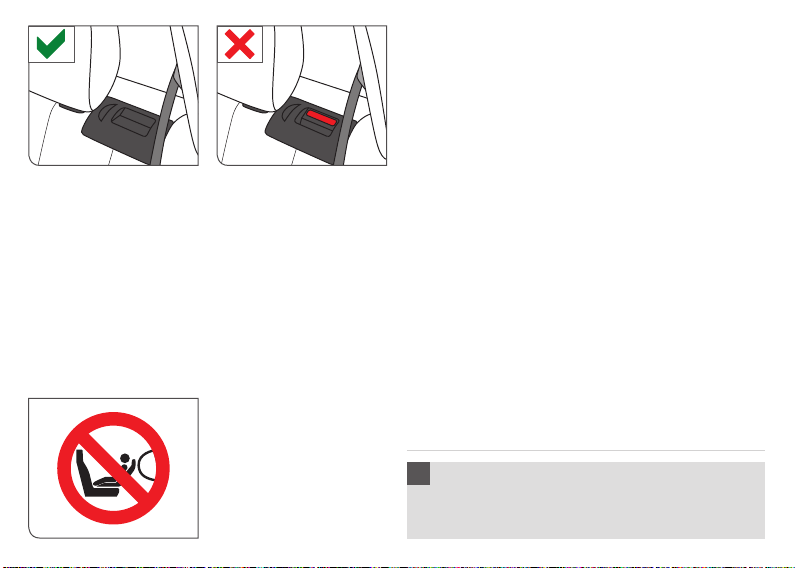
• die ISOF IX- Konnektoren (7) ordnungsgemäß mit dem
Fahrzeug verbunden sind und der Stützfuß (4) korrekt
installiert wurde.
• der Sitz in korrekter Position in der Basis eingerastet ist.
• die Position der Kopfstütze ordnungsgemäß eingestellt
wurde.
• das 5-Punkt-Gurtsystem an die Körpergröße Ihres
Kindes angepasst wurde, die Schultergurte nicht verdreht
sind und das Gurtsystem geschlossen ist.
• Neugeborene und Kleinkinder, die noch nicht
selbstständig sitzen können (bis ca. 1 Jahr), sollten aus
orthopädischen und sicherheitstechnischen Gründen
immer in der flachsten Liegeposition rückwärtsgerichtet
transportiert werden.
Page 39

IS YOUR CHILD PROPERLY SECURED?
To guarantee the maximum safety for your child, please
make sure that:
• The ISOFIX connectors (7) are correctly fastened to the
vehicle and the supporting leg (4) has been correctly
installed.
• The seat has been locked into the correct position in
the base.
• The headrest has been adjusted to the correct height.
• The 5-point belt system has been correctly adjusted to
the size of the child, the shoulder belts have not been
twisted and the belt system has been locked.
• Newborns and infants who are not yet able to sit up by
themselves (up to around 1 year) should, for orthopedic
and safety reasons, always be transported in the flattest
recline position rearward-facing.
IL BAMBINO E' ALLACCIATO CORRETTAMENTE?
Per garantire la massima sicurezza del bambino è
necessario verificare che:
• I connettori ISOFIX (7) siano agganciati saldamente
al veicolo e che il piede di supporto (4) sia installato
correttamente.
• La seduta sia fissata saldamente nella posizione corretta
sulla base.
• Il poggiatesta sia regolato alla giusta altezza.
• Che le cinture a 5 punti siano regolate correttamente
secondo la corporatura del bambino, che le cinture per
le spalle non siano attorcigliate e che il sistema di cinture
sia bene allacciato.
• I neonati ed i bambini non ancora in grado di stare
seduti da soli (fino a 1 anno circa) dovrebbero essere
sempre trasportati nella posizione reclinata più piana
possibile contro il senso di marcia, per motivi ortopedici
e di sicurezza.
DE
EN
IT
39
Page 40

ENTFERNEN DER NEUGEBORENENEINLAGE
Die bereits bei Auslieferung in der Schale integrierte
Neugeboreneneinlage gibt Ihrem noch kleinen Baby die
notwendige Unterstützung, mehr Liegekomfort und Halt.
Ab 61cm (ca. 3 Monaten) sollte die Neugeboreneneinlage (25)
entfernt werden, um ausreichend Platz für ihr Kind zu schaffen.
25
40
Zur Entfernung der Neugeboreneneinlage (25) öffnen
Sie die Druckknöpfe am Kopfstützenbezug. Anschließend
können Sie den Kopfstützenbezug abziehen die
Neugeboreneneinlage entfernen. Bringen Sie anschließen
erneut den Kopfstützenbezug an, bringen die Schultergurte
in Position, und schließen erneut die Druckknöpfe.
REINIGUNG
Es ist darauf zu achten, dass nur ein original CYBEX
Sitzbezug und original CYBEX Polsterteile verwendet
werden, da diese für eine uneingeschränkte Funktionalität
sorgen. Ersatzteile sind im Fachhandel erhältlich.
Kunststoffteile, das Gurtsystem, sowie die Antirutschbeschichtung
der Schultergurte, können mit einem feuchten Tuch gereinigt
werden. Die Neugeboreneneinlage ist nicht waschbar.
HINWEIS! Bitte den Bezug vor der ersten Verwendung
waschen. Der Bezug darf bei 30° C im Schonwaschgang
gewaschen werden. Sollten Sie mit mehr als 30° C oder
mit der Hand waschen, kann es zu Ausfärbungen des
Bezugstoffes kommen. Bitte den Bezug gesondert von
anderer Wäsche waschen und keinesfalls maschinell
trocknen! Den Bezug keinesfalls in direkter Sonne trocknen!
!
WARNUNG! Bitte auf keinen Fall chemische
Reinigungs- oder Bleichmittel verwenden.
Page 41

REMOVING THE NEWBORN INLAY RIMOZIONE DELL‘INSERTO PER NEONATI
The preinstalled newborn inlay helps to support lying
comfort and fit for the smallest babies.
The newborn inlay (25) may be removed after the baby is 61
cm (approx. 3 months) to provide more space for the child.
To remove the newborn inlay (25) open the snap buttons of
the headrest cover. Now first pull off the headrest cover and
then remove the newborn insert. After that put the headrest
cover back in place, reposition the shoulder belts and finally
close the snap buttons again.
CLEANING
Make sure that only an original CYBEX seat cover is
used on the seat because the cover is also a fundamental
component of the good functioning of the child seat.
Replacement covers may be purchased at authorised dealer.
Plastic parts, the harness system as well as the antislidecoating of the shoulder belts can be cleaned with a
wet cloth.
Do not wash the newborn inlay.
NOTE! P
lease wash the cover before you use it the first time.
The cover should be washed at 30° C in a delicate wash
cycle. Washing at higher temperatures than 30° C or by hand
may result in color bleeding. Wash separately from other
items and never tumble dry! Never dry in strong sunlight!
!
WARNING! Never use chemical cleaning or
bleaching agents.
L‘inserto per neonati integrato nel guscio già al momento della
consegna, offre al vostro neonato il supporto necessario, nonché
una maggiore sensazione di benessere e un migliore appoggio.
A partire dai 61cm di statura (circa 3 mesi), l‘inserto per neonati
(25) deve essere rimosso, al fine di consentire spazio sufficiente
al vostro bambino. Per rimuovere l‘inserto per neonati (25), aprire
i bottoni a pressione presenti sul rivestimento del poggiatesta.
Successivamente, togliere il rivestimento del poggiatesta e
rimuovere l‘inserto per neonati. Al termine, fissare nuovamente il
rivestimento del poggiatesta, riposizionare la cinghia che trattiene
la bretella delle spalle e richiudere i bottoni a pressione.
PULIZIA
Utilizzare soltanto rivestimenti originali CYBEX, in quanto
il rivestimento rappresenta un elemento fondamentale
per il corretto funzionamento del seggiolino. I rivestimenti
originali possono essere acquistati presso i nostri rivenditori
autorizzati. Le parti in plastica, il sistema di cinture ed il
rivestimento anti-scivoloamento delle cinture per le spalle
possono essere puliti con un panno umido.
L‘inserto per neonati non è lavabile.
NOTA BENE!
utilizzo. Il rivestimento dovrà essere lavato a max 30° C con
ciclo delicato. L'uso di temperature più elevate o il lavaggio
a mano può scolorire i tessuti. Lavare separatamente e non
asciugare mai a macchina! Non lasciare mai asciugare alla
luce solare diretta e intensa!
!
ATTENZIONE! Non usare mai detergenti aggressivi
o sbiancanti!
Consigliamo il lavaggio prima del primo
DE
EN
IT
41
Page 42

ENTFERNEN DES BEZUGES
Der Bezug besteht aus sieben Teilen, die mittels
Klettverschluss, Gummiband, Druckknöpfen oder Haken am
26
20
27
42
Sitzgestell befestigt sind. Sobald Sie alle Befestigungen
lösen, können die Einzelteile abgenommen werden.
HINWEIS! Vor dem Abziehen aller Einzelteile des Bezuges
achten Sie bitte darauf, dass dieser oberhalb der silbernen
Dekorteile liegt.
Gehen Sie wie folgt vor:
• Öffnen Sie das Gurtschloss (20) des
5- Punkt- Gurtsystems.
• Öffnen Sie die Druckknöpfe aller Gurtpolster und
Bezugsteile (26).
• Haken Sie die Schulterpolster von ihrer Aufhängung (27)
aus.
• Entfernen Sie alle Gurtpolster.
• Fädeln Sie nun die Schultergurte aus dem
Kopfstützenbezug.
• Sie können nun den Bezug der Kopfstütze und den
Sitzbezug nach vorne hin abziehen.
• Um die Bezüge wieder zu befestigen, verfahren Sie in
umgekehrter Reihenfolge.
HINWEIS! Achten Sie bei der Wiederanbringung der
Schulterpolster unbedingt darauf, dass...
• die geschlossene Seite zum Hals hin zeigt.
• die Schulterpolster vollständig in ihrer Aufhängung (27)
eingehakt sind.
• die Schultergurte im Schulterpolster geführt sind.
Page 43

REMOVAL OF THE COVER RIMOZIONE DEL RIVESTIMENTO
The cover consists of seven components fixed to the seat
shell by hook and loop fastener, elastic piping, snap buttons
and brackets. Once you have released all the fastenings,
you can remove the individual components for washing.
NOTE! Before detaching the cover please pull out the
elastics under silver decorative parts to avoid damage.
Proceed as follows:
• Open the belt buckle (20) of the 5-point belt system.
• Open all snap buttons of the pads and cover parts (26).
• Unhook the shoulder pads from the brackets (27).
• Remove all belt pads.
• Thread the shoulder belts out of the cover.
• Remove the cover by pulling it forwards.
• To fix the cover again on the seat carry out the steps in
reverse order.
NOTE! When remounting the shoulder pads, it is essential
to ensure that...
• the closed side faces towards the childs neck.
• the shoulder pads are perfectly mounted on the brackets
(27).
• the shoulder belts are guided inside the shoulder pads.
Il rivestimento è composto da 7 parti fissate alla scocca
con Chiusura tipo «velcro», collegamenti elastici, bottoni a
pressione e staffe. Una volta sganciati tutti i punti di fissaggio
è possibile rimuovere ciadscuna delle parti per il lavaggio.
NOTE! Prima di staccare il rivestimento estrarre gli
elastici da sotto le decorazioni argentate per evitare
danneggiamenti.
Procedere come di seguito descritto:
• Aprire la fibbia (20) del sistema di citure a 5 punti.
• Slacciare tutti i bottoni a pressione dei cuscinetti e del
rivestimento (26).
• Sganciare i cuscinetti per le spalle dalle staffe (27).
• Togliere tutti i cuscinetti delle cinture.
• Sfilare le cinture per le spalle dal rivestimento.
• Togliere il rivestimento tirandolo in avanti.
• Per riposizionare il rivestimento sul seggiolino, ripetere i
passaggi precedentemente descritti nell'ordine inverso.
NOTA BENE! Per riposizionare i cuscinetti per le spalle è
indispensabile verificare che...
• la parte chiusa sia rivolta verso il collo del bambino.
• i cuscinetti per le spalle siano perfettamente installati
sulle staffe (27).
• le cinture per le spalle siano infilate correttamente nei
cuscinetti per le spalle.
DE
EN
IT
43
Page 44

PFLEGE
Um die größtmögliche Schutzwirkung Ihres
Kindersitzes zu gewährleisten, ist es unbedingt
notwendig, dass Sie Folgendes beachten:
• Alle wichtigen Teile des Kindersitzes sollten
regelmäßig auf Beschädigungen kontrolliert werden.
Die mechanischen Bauteile müssen einwandfrei
funktionieren.
• Es ist unbedingt notwendig darauf zu achten, dass der
Kindersitz nicht zwischen harten Teilen wie Fahrzeugtür,
Sitzschiene usw. eingeklemmt wird und dadurch
beschädigt werden könnte.
• Achten Sie darauf, dass kein Schmutz in den Spalt zwischen
Sitz und Basis gelangt. Dies kann die Funktionalität des
Arretierungsmechanismus negativ beeinflussen.
Sollte dies dennoch vorkommen sollte der Schmutz entfernt
werden. Entfernen Sie dafür den Sitz von der Basis.
Der Kindersitz muss nach einem Sturz, Unfall oder einer
anderen Form der direkten Beeinträchtigung unbedingt vom
Hersteller überprüft werden.
!
WARNUNG! Der Bezug ist integraler Bestandteil des
CYBEX SIRONA M2 i-Size Sicherheitskonzeptes.
Der Kindersitz darf aus diesem Grund keinesfalls ohne
Bezug verwendet werden.
44
Page 45

PRODUCT CARE MANUTENZIONE
To guarantee that your child seat provides the
maximum protection, it is essential to comply with the
following points:
• All major components of the child seat must be regularly
checked for damage. The mechanical parts must work
without problems.
• Make sure that the child seat is not jammed between
hard parts such as the car door, seat rails etc, which can
damage it.
• Avoid getting any dirt or sand in between the upper seat
shell and the base.This can have a negative impact on
the performance of the rotation and recline function.
Should this happen the dirt should be removed before
rotating and reclining the seat any further to avoid any
permanent damage of the seat.
After a drop, accident or any other form of direct impact,
it must be tested by the manufacturer before being used
again.
Per garantire che il seggiolino offra la massima
protezione è imperativo osservare quanto segue:
• Tutte le parti principali del seggiolino dovrebbero essere
controllate regolarmente alla ricerca di eventuali danni. Le
parti meccaniche devono funzionare correttamente.
• Prestare sempre la massima attenzione affinchè il
seggiolino non resti compresso tra oggetti rigidi, per
esempio la portiera dell'auto, le guide dei sedili, ecc. che
possono danneggiarlo.
• Evitare assolutamente che sporco o sabbia penetrino
tra la scocca della seduta e la base. Ciò potrebbe
compromettere le funzioni di rotazione e di reclinazione.
Nel caso dovesse accadere, raccomandiamo di non
forzare la rotazione o la reclinazione, ma di rimuovere
prima lo sporco, per evitare danni permanenti al
seggiolino.
Dopo una caduta, un incidente, o qualsiasi altra forma di
impato diretto, il seggiolino dovrà essere controllato dal
produttore prima di poter essere utilizzato nuovamente.
DE
EN
IT
!
WARNING!
CYBEX SIRONA M2 i-Size safety design. The child
seat must therefore never be used without the cover.
The cover is an integral component of the
!
ATTENZIONE! Il rivestimento è una parte integrante
della funzine di sicurezza di CYBEX SIRONA M2
i-Size. Il seggiolino non deve mai essere usato senza
il rivestimento.
45
Page 46

VERHALTEN NACH EINEM UNFALL
Sollten Sie einen Unfall gehabt haben, können am
Kindersitz Beschädigungen auftreten, die nicht unbedingt
offensichtlich erkennbar sind. In diesem Fall muss
der Kindersitz unbedingt vom Hersteller geprüft und
gegebenenfalls ausgetauscht werden.
PRODUKTLEBENSDAUER
Der CYBEX SIRONA M2 i-Size ist so ausgelegt, dass
er für die gesamte maximale Verwendungszeit von ca.
vier Jahren seine Eigenschaften erfüllt. Da jedoch in
Fahrzeugen sehr große Temperaturschwankungen und
unvorhersehbare Belastungen auftreten können, ist es
notwendig folgende Punkte zu beachten:
• Wenn das Fahrzeug längere Zeit der prallen Sonne
ausgesetzt ist, muss der Kindersitz aus dem Fahrzeug
entfernt oder mit einem hellen Tuch abgedeckt werden.
• Prüfen Sie regelmäßig alle Kunststoff- und Metallteile des
Sitzes auf Beschädigung oder Veränderung von Form oder
Farbe. Stellen Sie eine Veränderung fest, ist der Kindersitz
unbedingt zu entsorgen, oder er muss vom Hersteller
geprüft und gegebenenfalls ausgetauscht werden.
• Veränderungen des Stoffes, insbesondere das
Ausbleichen, sind nach jahrelanger Verwendung in einem
Fahrzeug normal und stellen keine Beeinträchtigung dar.
46
Page 47

WHAT TO DO AFTER AN ACCIDENT COSA FARE A SEGUITO DI UN INCIDENTE
If you are involved in an accident, the child seat may sustain
damage that is not visible to the naked eye. If this is the
case, the child seat must be examined by the manufacturer
In caso di incidente il seggiolino può essere soggetto a
danni non immediatamente visibili. Il seggiolino dovrà essere
esaminato dal produttore e se necessario sostituito.
and replaced if necessary.
PRODUCT DURABILITY DUREVOLEZZA DEL PRODOTTO
The CYBEX SIRONA M2 i-Size has been designed to
fulfil its intended functions for a maximum of four years
of total use. However, since vehicles are subject to very
great fluctuations in temperature and to unpredictable
strains, the following points must be observed:
• If the car is exposed to the bright sun the child seat
must be removed from the car or covered with a lightcolored cloth.
• Check all plastic and metal parts of the seat regularly for
damage or alterations in shape or color. If you discover any
alteration, the child seat must be disposed or it must be
checked by the manufacturer and replaced if necessary.
• Alteration in the fabric of the upholstery, in particular
fading, are normal after some years of use and do not
represent damage.
CYBEX SIRONA M2 i-Size è progettato per soddisfare
le proprie funzioni specifiche per un massimo di 4 anni.
Tuttavia, alla luce delle possibili fluttuazioni massicce
di temperatura e degli sforzi imprevedibili nei veicoli,
devono essere tenuti in considerazione i punti seguenti:
• Se il veicolo è lasciato sotto il sole per un periodo di
tempo prolungato, il seggiolino deve essere rimosso dal
veicolo o coperto con un panno chiaro.
• Controllare regolarmente tutte le parti di plastica e
metallo del seggiolino alla ricerca di danni, deformazioni
o cambiamenti di colore. Qualora si scopra qualsiasi
cambiamento, il seggiolino dovrà essere smaltito o
controllato dal roduttore e, se necessario, sostituito.
• Modifiche ai tessuti, in particolare lo sbiadimento, sono
considerate normali dopo qualche anni di uso e non
costituiscono un difetto.
DE
EN
IT
47
Page 48

ENTSORGUNG
Am Ende der Produktlebensdauer des Kindersitzes muss er
ordnungsgemäß entsorgt werden. Die Abfalltrennung kann
kommunal unterschiedlich sein. Um eine vorschriftsgemäße
Entsorgung des Kindersitzes zu gewährleisten, setzen
Sie sich mit Ihrer kommunalen Abfallentsorgung bzw.
Verwaltung Ihres Wohnortes in Verbindung. Beachten Sie
auf jeden Fall die Entsorgungsbestimmungen Ihres Landes!
KONTAKT
CYBEX GmbH
Riedinger Str. 18 / 95448 Bayreuth / Germany
www.cybex-online.com / info@cybex-online.com
www.facebook.com/cybex.online
48
Page 49

DISPOSAL SMALTIMENTO
At the end of its product life the child seat must be properly
disposed. Waste separation may vary in different localities.
In order to make sure that the child seat is disposed in
proper way, contact your local waste disposal authority or
administration of your place of residence. In all cases you
may have a look to your national disposal regulations.
Al termine della sua vita utile il seggiolino dovrà essere smaltito
correttamente. Le norme per lo smaltimento differiscono da
nazione a nazione. Al fine di garantire lo smaltimento corretto
preghiamo contattare gli uffici competenti della vostra città
per le informazioni necessarie. In ogni caso, seguire sempre le
normative della nazione di residenza.
CONTACT CONTATTO
CYBEX GmbH
Riedinger Str. 18 / 95448 Bayreuth / Germany
CYBEX GmbH
Riedinger Str. 18 / 95448 Bayreuth / Germany
DE
EN
IT
www.cybex-online.com / info@cybex-online.com
www.facebook.com/cybex.online
www.cybex-online.com / info@cybex-online.com
www.facebook.com/cybex.online
49
Page 50

GARANTIEBEDINGUNGEN
Die nachfolgenden Garantiebestimmungen gelten nur
in dem Land, in dem dieses Produkt erstmalig über den
Einzelhandel an einen Verbraucher verkauft wurde.
1. Die Garantie deckt sämtliche Herstellungs- und Materialfehler ab, die im Zeitpunkt des Kaufs bestanden
haben oder die innerhalb von drei (3) Jahren nach dem
Erstverkauf dieses Produkts über den Einzelhandel an
einen Verbraucher in Erscheinung getreten sind (Herstellergarantie). Bitte überprüfen Sie das Produkt nach
dem Kauf oder wenn es im Versandhandel gekauft wurde
nach Erhalt umgehend auf Vollständigkeit, Herstellungsund Materialfehler.
2. Falls Schäden vorhanden sind, darf das Produkt nicht
mehr benutzt werden. Um Leistungen im Rahmen dieser
Garantie in Anspruch nehmen zu können, muss das
Produkt in einem vollständigen und sauberen Zustand
an den Einzelhändler zurückgegeben werden, der es
erstmalig verkauft hat und ein Nachweis über den Kauf
(Kaufbeleg oder Rechnung) im Original vorgelegt werden. Bitte bringen oder schicken sie das Produkt nicht
direkt zum Hersteller!
3. Die Garantie deckt keine Schäden ab, die durch Fehlgebrauch, äußere Einflüsse (Wasser, Feuer, Unfälle o.ä.),
normalen Verschleiß oder durch Behandlung und Benutzung entstanden sind, die im Gegensatz zu den Instruktionen dieser Gebrauchsanweisung stehen. Die Garantie
wird nur gewährt, wenn Reparaturen oder Veränderungen
ausschließlich durch Personen vorgenommen wurden,
50
Page 51

WARRANTY GARANZIA
The following warranty applies solely in the country where
this product was initially sold by a retailer to a customer.
1. The warranty covers all manufacturing and material defects,
existing and appearing, at the date of purchase or appearing
within a term of three (3) years from the date of purchase
from the retailer who initially sold the product to a consumer
(manufacturer’s warranty). Please check the product with
respect to completeness and manufacturing or material de
fects immediately at the date of purchase or immediately after
receipt. Please always keep your dated proof of purchase.
2. In case of a defect, stop using the product immediately.
To obtain the warranty please take or ship the product to
the original retailer, who initially sold this product to you
in a clean and complete condition and submit an original
proof of purchase (sales receipt or invoice). Please do
not take or ship the product to the manufacturer directly.
3. This warranty does not cover any damages which result
from misuse, environmental influence (water, fire, accidents etc.), normal wear and tear or failure to comply with
the instructions provided in this user manual. The warranty does not apply if modifications and services were
performed by unauthorized persons or if non-original
components and accessories were used.
4. This warranty does not affect any statutory consumer
rights, including claims in tort and claims with respect to
a breach of contract, which the buyer may have against
the seller or the manufacturer of the product.
La seguente garanzia vale unicamente nella nazione in cui
il prodotto è stato inizialmente venduto da un rivenditore al
consumatore.
1. La garanzia copre eventuali difetti di fabbricazione e di
materiali riscontrati all’acquisto o entro un periodo di 3 anni
dalla data di acquisto presso il rivenditore (garanzia del
produttore). La garanzia è valida soltanto se il prodotto è
-
stato sottoposto ad un accurato controllo di completezza,
funzionalità all’acquisto e se eventuali manchevolezze di
produzione o di materiali sono state prontamente segnalate
dopo il ricevimento del prodotto. Conservare accuratamente
la prova di acquisto con la data.
2. In caso si riscontri qualsiasi danneggiamento smettere
di utilizzare il prodotto Per avere diritto alla garanzia è
necessario riportare o spedire il prodotto pulito e completo
al rivenditore presso il quale è stato acquistato ed è
indispensabile fornire la prova di acquisto (scontrino fiscale,
fattura, ecc.) in originale. Preghiamo di non riportare o
spedire il prodotto direttamente al produttore.
3. La garanzia non copre danni provocati da utilizzo improprio
o cause ambientali (acqua, fuoco, incidenti stradali, ecc.),
dal normale deperimento d’uso o dall'innosservanza delle
indicazioni fornite in questo manuale d'uso. La garanzia
non è valida in caso di modifiche o riparazioni effettuate da
personale non autorizzato e se non sono state utilizzate parti
ed accessori originali.
DE
EN
IT
51
Page 52

die hierzu befugt waren und stets nur originale Bau- und
Zubehörteile verwendet wurden.
4. Durch diese Garantie werden weder bestehende Verbraucherrechte noch Rechte gegen den Verkäufer wegen
Vertragswidrigkeit des Produkts beeinflusst.
52
Page 53

4. Questa garanzia non esclude, limita o comunque pregiudica eventuali diritti legali dei consumatori, comprese
istanze in caso di torto e in caso di una violazione del
contratto che l'acquirente può avere nei confronti del
rivenditore o del produttore.
DE
EN
IT
53
Page 54

SIRONA M2 i-Size
i-Size Universal ISOFIX
45-105cm
max. 19 kg
129 - 000002
UN Regulation
No. 129/00
CYBEX GmbH
Riedinger Str. 18, 95448 Bayreuth
Germany
Approved for CYBEX
Base M i-Size
54
NOTE ! Conservez toujours ce manuel à portée de main dans
la fente prévue à cet effet sous la housse à l‘arrière du dossier.
HOMOLOGATION CYBEX SIRONA M2 ISIZE
ECE R129 Size: 45 cm – 105 cm
Poids: jusque 19 kg
!
ATTENTION! Ne pas utilise la position face à la route
avant 15 mois et 76 cm.
1
!
ATTENTION! Pour assurer une protection optimale à
votre enfant, le CYBEX SIRONA M2 i-Size doit être
utilisé conformément à la notice.
NOTE ! Le réducteur pour nouveau-né est conçu pour la
protection de votre bébé et ne doit pas être utilisé au-delà
d’une taille de 60 cm.
Page 55

LET OP! Houd de handleiding altijd handig opgeborgen in
het vak onder de hoes op de achterkant van de rugleuning.
GOEDKEURING CYBEX SIRONA M2 ISIZE
ECE R 129 lengte: 45 cm – 105 cm
Gewicht: tot 19 kg
!
BELANGRIJK! Niet voorwaarts gericht gebruiken
voordat het kind 15 maanden en 76 cm lang is.
!
BELANGRIJK!
kind moet u het CYBEX SIRONA M2 i-Size-autostoeltje
precies volgens deze handleiding gebruiken.
LET OP! Het inlegkussen voor pasgeboren baby’s
beschermt uw kind en is te gebruiken tot een lichaamslengte
van 60 cm.
Voor optimale bescherming van uw
UWAGA! Dobrze jest mieć instrukcję zawsze w zasięgu ręki.
Radzimy, aby przechowywać ją w przeznaczonym do tego
miejscu znajdującym się pod fotelikiem samochodowym.
HOMOLOGACJA CYBEX SIRONA M2 ISIZE
ECE R129 wysokość dziecka: 45 cm – 105 cm
Waga dziecka: do 19 kg
!
OSTRZEŻENIE! Nie przewoź dziecka przodem do
kierunku jazdy dopóki nie ukończy 15 miesiąca życia i
nie osiągnie 76 cm wzrostu.
!
OSTRZEŻENIE! W celu zapewnienia optymalnego
bezpieczeństwa Twojemu dziecku, korzystaj z fotelika
CYBEX SIRONA M2 i-Size tak jak opisano to w
niniejszej instrukcji obsługi.
UWAGA! Wkładka dla noworodka służy do ochrony
Państwa dziecka i należy ją stosować do momentu
uzyskania przez dziecko wzrostu 60 cm.
FRNLPL
55
Page 56

CHER CLIENT !
Merci d´avoir acheté le CYBEX SIRONA M2 i-Size. Soyez
assuré que lors du processus d΄élaboration du CYBEX
SIRONA M2 i-Size, nous avons accordé une grande
importance à la sécurité, au confort et à la fonctionnalité.
Ce produit est fabriqué dans le cadre d΄un processus
de contrôle qualité spécifique et répond aux normes de
sécurité les plus strictes.
FR SOMMAIRE
BRÈVES INSTRUCTIONS DOS À LA ROUTE ............................................. 2
BRÈVES INSTRUCTIONS FACE À LA ROUTE .............................................. 4
HOMOLOGATION CYBEX SIRONA M2 ISIZE ........................................... 54
LA BONNE POSITION DANS LA VOITURE ................................................... 58
UTILISATION DU SIÈGE DANS LA VOITURE .................................................62
INSTALLATION EN TOUTE SÉCURITÉ .............................................................. 66
INSTALLATION DU SIÈGE AUTO ......................................................................... 68
RÉGLAGE DE LA JAMBE DE FORCE ................................................................72
INSTALLATION DU SIÈGE SUR LA BASE ........................................................74
DÉSINSTALLATION DE LA BASE ..........................................................................76
RÉGLAGE DE L´ASSISE ET DE L´INCLINAISON ......................................... 76
RÉGLAGE DES PROTECTIONS LATÉRALES ...............................................78
UTILISATION DOS À LA ROUTE .......................................................................... 80
SÉCURISATION AVEC LE SYSTÈME DE HARNAIS ...................................82
UTILISATION FACE À LA ROUTE ......................................................................... 84
VOTRE ENFANT ESTIL CORRECTEMENT SÉCURISÉ? ...................... 86
RETIRER LE RÉDUCTEUR POUR NOUVEAUNÉ ......................................88
NETTOYAGE .................................................................................................................... 88
RETRAIT DE LA HOUSSE ........................................................................................ 90
ENTRETIEN DU PRODUIT ........................................................................................92
EN CAS D´ACCIDENT .............................................................................................. 94
DURÉE DE VIE DU PRODUIT ................................................................................ 94
ÉLIMINATION .................................................................................................................. 96
CONTACT ......................................................................................................................... 96
GARANTIE ........................................................................................................................ 98
56
Page 57

BESTE KLANT! DROGI KLIENCIE!
Het verheugt ons dat u de CYBEX SIRONA M2 i-Size
hebt gekocht. U kunt erop vertrouwen dat we ons bij de
ontwikkeling van de CYBEX SIRONA M2 i-Size hebben
gericht op veiligheid, comfort en functionaliteit. Dit product
is aan een bijzonder strenge kwaliteitscontrole onderworpen
en voldoet aan de strengste veiligheidsnormen.
Dziękujemy za zakup fotelika samochodowego
CYBEX SIRONA M2 i-Size. Pragniemy zapewnić, iż
bezpieczeństwo, wygoda i łatwa obsługa to wartości
nadrzędne przyświecające nam podczas projektowania
fotelika CYBEX SIRONA M2 i-Size. Ten produkt
wytwarzany jest pod nadzwyczajną kontrolą jakości i spełnia
najbardziej rygorystyczne normy bezpieczeństwa.
NL INHOUD PL SPIS TREŚCI
KORTE HANDLEIDING ACHTERWAARTS GERICHT .......................... 2
KORTE HANDLEIDING VOORWAARTS GERICHT ............................... 4
GOEDKEURING CYBEX SIRONA M2 ISIZE ................................................55
DE JUISTE POSITIE IN DE AUTO ......................................................................... 59
GEBRUIK VAN HET STOELTJE IN DE AUTO ...................................................63
VEILIGE INSTALLATIE IN DE AUTO ......................................................................67
INSTALLATIE VAN HET AUTOSTOELTJE ...........................................................69
DE STEUNVOET AANPASSEN ..............................................................................73
DE ZITTING OP DE BASIS PLAATSEN ..............................................................75
DE BASIS UIT DE AUTO VERWIJDEREN .........................................................77
ZIT EN KANTELVERSTELLING .............................................................................77
AANPASSEN VAN DE ZIJBESCHERMERS ....................................................79
ACHTERWAARTS GERICHT GEBRUIK ..........................................................81
VASTMAKEN MET HET GORDELSYSTEEM ...................................................83
VOORWAARTS GERICHT GEBRUIK................................................................85
IS UW KIND GOED VASTGEMAAKT? ...............................................................87
INLEGKUSSEN VOOR PASGEBOREN BABY’S VERWIJDEREN ........ 89
REINIGING ......................................................................................................................89
DE HOES VERWIJDEREN .......................................................................................91
ONDERHOUD ................................................................................................................93
NA EEN ONGEVAL .....................................................................................................95
PRODUCT DUURZAAMHEID ................................................................................95
VERWIJDERING ............................................................................................................ 97
CONTACT ..........................................................................................................................97
GARANTIE ........................................................................................................................ 99
KRÓTKA INSTRUKCJA TYŁEM DO KIERUNKU JAZDY ......................... 2
KRÓTKA INSTRUKCJA PRZODEM DO KIERUNKU JAZDY ................ 4
HOMOLOGACJA CYBEX SIRONA M2 ISIZE ...............................................55
UŻYTKOWANIE W AUCIE ....................................................................................... 59
POPRAWNE KORZYSTANIE Z FOTELIKA .......................................................63
BEZPIECZEŃSTWO W SAMOCHODZIE.......................................................67
INSTALACJA FOTELIKA ............................................................................................. 69
REGULACJA NOGI FOTELIKA ...............................................................................73
MONTAŻ FOTELIKA NA BAZIE ..............................................................................75
DEMONTAŻ BAZY Z SAMOCHODU ..................................................................77
REGULACJA POZYCJI SIEDZĄCEJ I ODCHYLANIE ................................. 77
REGULACJA OSŁON BOCZNYCH ....................................................................79
MONTAŻ TYŁEM DO KIERUNKU JAZDY ..........................................................81
ZAPINANIE DZIECKA PASAMI ZINTEGROWANYMI Z FOTELIKIEM ...83
MONTAŻ FOTELIKA PRZODEM DO KIERUNKU JAZDY .........................85
POPRAWNA INSTALACJA FOTELIKA ................................................................87
WYJMOWANIE WKŁADKI DLA NOWORODKA ..........................................89
CZYSZCZENIE.............................................................................................................. 89
ZDEJMOWANIE TAPICERKI FOTELIKA ............................................................91
PIELĘGNACJA PRODUKTU ....................................................................................93
CO ZROBIĆ Z FOTELIKIEM, KTÓRY BRAŁ UDZIAŁ W WYPADKU......95
TRWAŁOŚĆ PRODUKTU .........................................................................................95
UTYLIZACJA .....................................................................................................................97
CONTACT ..........................................................................................................................97
GWARANCJA ................................................................................................................. 99
FRNLPL
57
Page 58

LA BONNE POSITION DANS LA VOITURE
Ce produit est un siège auto „i-Size“. Il est homologué
ECE R 129, pour utilisation sur les positions approuvées
des véhicules „i-Size“ conformément aux instructions du
constructeur indiquées dans le manuel du véhicule.
Si votre véhicule n´est pas équipé d´une position i-Size,
merci de vérifier la liste sur notre site web afin de savoir si
l´installation est autorisée.
Si votre véhicule n´est pas équipé du système ISOFIX,
contactez votre constructeur.
Toutefois des des cas exceptionnels, le siège auto peut être
utilisé sur la place passager avant. Dans ce cas, respectez
les points suivants:
• Vérifiez que le siège passager est équipé du système
ISOFIX. Si ce n΄est pas le cas, le siège auto ne peut pas
être utilisé.
• désactivez l΄airbag passager. Si votre véhicule ne permet
pas cette désactivation, l΄utilisation du siège auto sur le
siège passager avant est interdite.
• Il est impératif que vous vous conformiez aux
recommandations du constructeur du véhicule.
Les bagages et autres objets dans l´habitacle pouvant
causer des blessures en cas d‘accident doivent toujours
être bien arrimés. Ils peuvent devenir des projectiles mortels
en cas d‘accident.
58
Page 59

DE JUISTE POSITIE IN DE AUTO UŻYTKOWANIE W AUCIE
Dit is een “i-Size” kinderbeveiligingssysteem. Het is
goedgekeurd conform ECE R 129 voor gebruik met “i-Size
compatibele” autostoelposities zoals door de autofabrikant
aangegeven in de handleiding van het voertuig.
Als uw voertuig geen i-Size-stoelpositie heeft, controleer
dan op het overzicht van voertuigtypes dat is meegeleverd of
bijvoorbeeld op onze homepage of de installatie is toegestaan.
Als uw auto geen ISOFIX heeft, neem dan contact op met
de autofabrikant.
In uitzonderlijke gevallen mag het autostoeltje ook op de
passagiersstoel voorin worden gebruikt. Let daarbij dan op
het volgende:
• Controleer of de passagiersstoel ISOFIX heeft. Als
die geen ISOFIX heeft, mag het autostoeltje niet
worden gebruikt.
• Deactiveer de airbag van de passagiersstoel. Als dat niet
mogelijk is in uw auto, is gebruik van het autostoeltje aan
de passagierskant verboden.
• Het is van essentieel belang dat u de aanbevelingen van
de autofabrikant opvolgt.
Bagage en andere losse voorwerpen in de auto, die letsel
kunnen veroorzaken tijdens een ongeval, moeten altijd
veilig zijn vastgemaakt. Ze kunnen tijdens een auto-ongeval
veranderen in dodelijke projectielen.
To jest fotelik samochodowy zgodny z regulacją „i-Size“.
Fotelik zgodny z regulacją ECE R 129, przeznaczony do
użytku w samochodach „i-Size kompatybilnych“ jak wskazuje
instrukcja obsługi producenta samochodu.
Jeśli Twój samochód nie posiada pozycji siedzącej i-Size,
proszę sprawdź na dołączonej liście marek samochodów czy
jest pozwolenie na montaż fotelika w samochodzie.
Jeśli Twój samochód nie jest wyposażony w ISOFIX,
skontaktuj się z producentem samochodu.
W wyjątkowych przypadkach, fotelik można zamontować na
przednim fotelu pasażera. W tym przypadku zwróć uwagę
na następujące punkty:
• Sprawdź, czy siedzenie pasażera wyposażone jest w
ISOFIX. Jeżeli ISOFIX nie jest zainstalowany, nie można
korzystać z fotelika.
• Wyłącz poduszkę bezpieczeństwa pasażera. Jeśli w
Twoim samochodzie nie można deaktywować poduszki
bezpieczeństwa, wtedy nie można korzystać z fotelika
samochodowego na siedzeniu pasażera.
• Konieczne jest, aby stosować się do zaleceń
producenta pojazdu.
Wszystkie rzeczy znajdujące się wewnątrz samochodu
należy zabezpieczyć w sposób, który nie narazi pasażerów
na uszkodzenia ciała a nawet śmierć w razie wypadku/
ostrego hamowania.
FRNLPL
59
Page 60

!
ATTENTION ! Ne laissez jamais votre enfant sans
surveillance dans la voiture. Les pièces en plastique
du siège auto se réchauffent en plein soleil et l’enfant
peut subir des brûlures. Protégez votre enfant et
le siège auto de l´exposition directe au soleil (en
couvrant le siège avec un linge par exemple).
ATTENTION ! Le siège n΄est pas adapté pour une
utilisation avec la ceinture de sécurité normale de la
voiture. Si vous êtes impliqués dans un accident et
que le siège est fixé à l‘aide de la ceinture de sécurité
de la voiture, l΄enfant et les autres occupants de la
voiture peuvent être gravement blessés ou tués.
ATTENTION !
sur les sièges installés perpendiculairement au sens de
la marche. Le siège enfant ne doit pas être utilisé sur
les sièges orientés vers l΄arrière, comme par exemple
dans une camionnette ou un minibus. Le siège auto
doit toujours être fixé avec le système ISOFIX, même
lorsqu´il n΄est pas utilisé. Si vous devez effectuer un
freinage d΄urgence ou si vous êtes impliqué dans
une collision mineure, un siège non fixé peut être
dangereux pour vous et les autres passagers.
60
Le siège auto ne doit pas être utilisé
Page 61

!
BELANGRIJK! Laat uw kind nooit alleen in de
auto achter. De kunststof onderdelen van het
kinderbeveiligingssysteem kunnen warm worden in de
zon en het kind brandwonden bezorgen. Bescherm uw
kind en het autostoeltje tegen directe blootstelling aan
de zon (bijvoorbeeld door er een lichte doek overheen
te leggen).
BELANGRIJK! Het autostoeltje is niet geschikt voor
gebruik met een gewone autogordel. Als het stoeltje
met de gewone autogordel wordt vastgemaakt,
kunnen het kind en andere inzittenden tijdens een
ongeval ernstig of dodelijk letsel oplopen.
BELANGRIJK! Dit autostoeltje mag niet worden
gebruikt op autostoelen die haaks op de rijrichting
staan. Het autostoeltje mag niet worden gebruikt
op achterwaarts gerichte stoelen, zoals in een
bestelwagen of (mini)busje. Ook als het autostoeltje
niet wordt gebruikt, dient het altijd met het ISOFIXsysteem te zijn vastgemaakt. Een niet-vastgemaakt
autostoeltje kan andere passagiers en uzelf
verwonden wanneer u op de rem moet trappen of zelfs
bij een kleine botsing.
!
OSTRZEŻENIE! Nigdy nie zostawiaj dziecka bez opieki
w samochodzie. Plastikowe elementy fotelika nagrzewają
się pozostawione w nasłonecznionym miejscu. Uważaj,
gdyż mogą oparzyć dziecko. Chroń swoje dziecko jak i
fotelik przed bezpośrednim przebywaniem na słońcu (np.
przykrywając fotelik tkaniną).
OSTRZEŻENIE!
samochodowym pasem bezpieczeństwa. W
razie wypadku, gdy fotelik jest przypięty pasem
bezpieczeństwa, dziecko oraz inni pasażerowie mogą
doznać poważnych a nawet śmiertelnych obrażeń ciała.
OSTRZEŻENIE! Fotelik CYBEX SIRONA M2
i-Size jest przeznaczony do montażu wyłącznie
na fotelach samochodowych zamontowanych
przodem do kierunku jazdy. Fotelika nie wolno
montoważ na fotelach/kanapach samochodowych
zamontowanych tyłem do kierunku jazdy. Spotyka
się je np. w vanach lub minibusach. Fotelik musi
zawsze być zabezpieczony przy pomocy ISOFIX,
nawet wtedy kiedy nie przewozimy w nim dziecka.
W przypadku ostrego hamowania lub wypadku/
kolizji, nieprzymocowany fotelik może poważnie zranić
któregoś z pasażerów/kierowcę.
Fotelika nie można przypinać
FRNLPL
61
Page 62

UTILISATION DU SIÈGE DANS LA VOITURE
Selon l´âge et la taille de l´enfant, le CYBEX SIRONA M2
i-Size peut être utilisé dos ou face à la route.
NOTE ! Les statistiques d´accidents prouvent que la
position dos à la route est la plus sûre pour le transport de
votre enfant. Par conséquent, nous recommandons d’utiliser
le CYBEX SIRONA M2 i-Size aussi longtemps que
possible dos à la route.
Utilisation dos à la route (45 cm - 105 cm)
1
62
Nous recommandons l´utilisation du CYBEX SIRONA M2
i-Size dos à la route jusque 105 cm et 19 kg max.
!
ATTENTION !
route jusqu’à l’âge de 15 mois et la taille de 75 cm.
Même au-delà de cette limite, la position dos à la
route est la plus sûre. Pour plus d´informations, lire la
rubrique: «Utilisation dos à la route (45 cm - 105 cm)“.
Utilisation face à la route (76 cm – 105 cm)
L’utilisation du siège auto en position face à la route est
permise lorsque l’enfant est âgé de plus de 15 mois et
mesure 76 cm minimum.
NOTE ! L’indicateur sur l’appui-tête (1) montre la taille de
l’enfant minimale où le siège peut être modifié pour être
installé face à la route. Pour plus d´informationm, lire la
rubrique: „Utilisation face à la route (76 cm - 105 cm et plus
de 15 mois)“.
Il est obligatoire de l´utiliser dos à la
Page 63

GEBRUIK VAN HET STOELTJE IN DE AUTO POPRAWNE KORZYSTANIE Z FOTELIKA
Afhankelijk van de leeftijd en lengte kan de CYBEX
SIRONA M2 i-Size voorwaarts en achterwaarts gericht
worden gebruikt.
LET OP! Uit ongevallenstatistieken blijkt dat achterwaarts
gericht vervoer van uw kind in een voertuig het veiligst is.
Daarom raden we aan de CYBEX SIRONA M2 i-Size zo
lang mogelijk achterwaarts gericht te gebruiken.
Achterwaarts gericht gebruik (45 cm – 105 cm)
Wij raden aan de CYBEX SIRONA M2 i-Size achterwaarts
gericht te gebruiken tot een lengte van 105 cm en
maximaal 19 kg.
!
BELANGRIJK! Het is verplicht het stoeltje tot 15
maanden of een lengte van 75 cm achterwaarts
gericht te gebruiken.
gericht vervoer het veiligst.
“ACHTERWAARTS GERICHT GEBRUIK
lezen in:
(45 cm – 105 cm)”.
Foward-facing use (76 cm – 105 cm)
Het stoeltje mag voorwaarts gericht gebruikt worden als het
kind ouder dan 15 maanden en minimaal 76 cm lang is.
LET OP! De indicator op de hoofdsteun (1) geeft aan
vanaf welke lengte van het kind het stoeltje op zijn vroegst
voorwaarts gericht kan worden gebruikt. Meer informatie
kunt u lezen in: “VOORWAARTS GERICHT GEBRUIK
(76 cm – 105 cm en ouder dan 15 maanden)”.
Ook daarna is achterwaarts
Meer informatie kunt u
W zależności od wieku oraz wzrostu dziecka, fotelik CYBEX
SIRONA M2 i-Size można używać tyłem lub przodem do
kierunku jazdy.
UWAGA! Statystyki wypadkowe potwierdzają, że
najbezpieczniej przewozić dzieci tyłem do kierunku jazdy.
Dlatego rekomendujemy przewożenie dziecka w foteliku
CYBEX SIRONA M2 i-Size najdłużej jak to możliwe tyłem
do kierunku jazdy.
Tyłem do kierunku jazdy (45 cm - 105 cm)
Rekomendujemy korzystanie z fotelika CYBEX SIRONA
M2 i-Size tyłem do kierunku jazdy do momentu aż dziecko
osiągnie 105 cm wzrostu i maksymalnie 19 kg wagi.
!
OSTRZEŻENIE!
tyłem do kierunku jazdy do chwili ukończenia przez
nie 15. miesiąca życia oraz jednocześnie osiągnięcia
75 cm wzrostu. Nawet po osiągnięciu przez nie
powyższych wskazań, przewożenie tyłem do kierunku
jazdy pozostaje najbezpieczniejsze. Aby dowiedzieć
się więcej, przeczytaj sekcję: „TYŁEM DO KIERUNKU
JAZDY (45 cm - 105 cm)“.
Przodem do kierunku jazdy (76 cm – 105 cm)
Dziecko można przewozić w foteliku przodem do kierunku
jazdy wyłącznie w chwili ukończenia przez nie 15 miesiąca
życia oraz jednocześnie osiągnięcia 75 cm wzrostu.
UWAGA! Wskaźnik znajdujący się na zagłówku (1) pokazuje
wysokość dziecka od której można rozpocząć korzystanie
z fotelika przodem do kierunku jazdy. Szczegóły w sekcji:
„Przodem do kierunku jazdy (76 cm - 105 cm i ukończone
15 miesięcy)“.
Dziecko można przewozić wyłącznie
FRNLPL
63
Page 64

NOTE ! Les nouveau-nés et les enfants qui ne sont pas
encore en mesure de se tenir assis seuls (jusque 1 an
environ) doivent, pour des raisons orthopédiques et de
sécurité, toujours être transportés dans le siège orienté dos
à la route dans la position inclinée.
NOTE ! Aucune pièce mobile ne doit être laissée à la
portée de l’enfant lors du réglage du siège. Tenir les enfants
à l’écart du siège pendant l’installation et le retrait du siège
dans la voiture. Il existe un risque d’écrasement et de
cisaillement des doigts.
64
Page 65

LET OP! Pasgeborenen en baby’s die nog niet uit zichzelf
rechtop kunnen zitten (tot ongeveer 1 jaar) dienen om
orthopedische en veiligheidsredenen altijd in de vlakst
mogelijke achterwaarts gerichte stand te worden vervoerd.
LET OP! Er mogen geen losse onderdelen tegen het kind
aan liggen als u het stoeltje verstelt. Houd kinderen uit de
buurt als u het stoeltje in de auto installeert of eruit haalt.
Door onvermijdelijke schaarbewegingen van onderdelen
kunnen de vingers van het kind bekneld en verwond raken.
UWAGA! Noworodki i niemowlęta, które nie są jeszcze w
stanie samodzielnie siedzieć (do około 1 roku życia), należy,
ze względów bezpieczeństwa i ortopedycznych zawsze
przewozić tyłem do kierunku jazdy i w pozycji półleżącej
którą umożliwia fotelik.
UWAGA! Podczas usadzania dziecka w foteliku, dziecko nie
powinno mieć przy sobie żadnych pojedynczych elementów,
które mogłyby gdzieś upaść/wsunąć się pod dziecko a
następnie uwierać je podczas podróży. Podczas montażu i
demontażu fotelika w samochodzie trzymaj dziecko zdala od
fotelika. Istnieje ryzyko przycięcia paluszków dziecku.
FRNLPL
65
Page 66

INSTALLATION EN TOUTE SÉCURITÉ
Pour la protection de tous les occupants de la voiture,
veillez toujours à ce que:
• Les dossiers inclinables des banquettes soient relevés
dans leur position initiale droite.
• Lors de l΄installation du siège SIRONA M2 i-Size sur le
siège passager avant, ce dernier soit reculé au maximum.
• Que tous les objets susceptibles de causer des
blessures en cas d´accident soient correctement rangés
dans l‘habitacle.
• Que tous les passagers du véhicule aient bouclé leur
ceinture de sécurité.
!
ATTENTION ! N΄utilisez jamais le siège CYBEX
SIRONA M2 i-Size sur un siège pour lequel l΄airbag
est activé. Les airbags latéraux ne sont pas concernés.
66
Page 67

VEILIGE INSTALLATIE IN DE AUTO BEZPIECZEŃSTWO W SAMOCHODZIE
Zorg ter bescherming van alle inzittenden van de auto
altijd dat...
• neerklapbare rugleuningen in de auto rechtop staan en
zijn vergrendeld.
• de passagiersstoel zo ver mogelijk naar achteren staat
als u de SIRONA M2 i-Size op de passagiersstoel
installeert.
• u alle voorwerpen die letsel kunnen veroorzaken tijdens
een ongeval goed vastmaakt.
• alle passagiers in de auto in de gordel zitten.
W celu zapewnienia możliwie najlepszego
bezpieczeństwa wszystkim pasażerom upewnij się, że:
• składane oparcia w samochodzie są zablokowane w
pozycji pionowej.
• montując fotelik na przednim siedzeniu samochodu, na
fotelu pasażera, odsuń fotel samochodowy maksymalnie
do tyłu;
• wszystkie rzeczy znajdujące się wewnątrz samochodu
zostały zabezpieczone w należyty sposób i nie spowodują
uszkodzeń/nie zranią pasazerów w razie wypadku.
• wszyscy pasażerowie mają zapięte pasy bezpieczeństwa.
FRNLPL
!
BELANGRIJK! Plaats de CYBEX SIRONA M2 i-Size
nooit op een stoel met een geactiveerde voorairbag.
Dit geldt niet voor zogeheten zij-airbags.
!
OSTRZEŻENIE! Nie korzystaj z fotelika na fotelu
pasażera z włączoną przednią poduszką powietrzną
Nie dotyczy to bocznych poduszek powietrznych tzw.
kurtyn powietrznych.
67
Page 68

INSTALLATION DU SIÈGE AUTO
NOTE ! Si votre véhicule n´est pas équipé de sièges i-Size,
merci de vérifier la liste de compatibilité du produit.
Le système ISOFIX vous permet d´installer le CYBEX
2
3
68
SIRONA M2 i-Size dans votre véhicule en toute sécurité.
Installation de la base
• Choisissez une position autorisée.
NOTE ! les points d΄ancrage ISOFIX (2) se composent de
deux pattes métalliques par siège et sont situés entre le
dossier et le siège de la voiture. En cas de doute, consultez
le mode d΄emploi de votre voiture pour plus d΄informations.
• Si les points d΄ancrage ISOFIX (2) de votre voiture sont
difficiles d΄accès, utilisez les guides de fixation (3) fournis
afi n d΄éviter d‘endommager la housse.
• Si nécessaire, fixez les guides (3) fournis à l΄aide de
4
la patte la plus longue pointant vers le haut au niveau
des deux points d΄ancrage ISOFIX (2). Dans beaucoup
de voitures, il est plus efficace d‘installer les guides de
fixation (3) en direction opposée.
• Toujours déplier la jambe de force (4) jusqu`à son
vérouillage.
Page 69

INSTALLATIE VAN HET AUTOSTOELTJE INSTALACJA FOTELIKA
Als uw auto niet is uitgerust met een
LET OP!
i-Size-autostoel, controleer dan de bij het product
meegeleverde typelijst.
Dankzij het ISOFIX-systeem kunt u de CYBEX SIRONA M2
i-Size veilig in de auto installeren.
De basis installeren
• Kies een goedgekeurde autostoel uit.
LET OP! De ISOFIX-ankerpunten (2) zijn twee metalen
beugels per stoel, die geplaatst zijn tussen de rugleuning
en zitting van de auto. Als u twijfelt, lees dan de handleiding
van uw auto voor hulp.
• Als de ISOFIX-ankerpunten (2) in uw auto
slecht toegankelijk zijn, dient u de meegeleverde
montagehulpen (3) te gebruiken om beschadiging van de
bekleding te voorkomen.
• Indien nodig kunt u de meegeleverde montagehulpen
(3) met de langere nok naar boven in de ISOFIXankerpunten (2) plaatsen. In veel auto’s is het effectiever
om de montagehulpen (3) omgekeerd te installeren.
• Klap de steunvoet (4) altijd uit tot deze vergrendelt.
UWAGA! Jeśli Twój samochód nie posiada pozycji
siedzącej i-Size, sprawdź załączoną listę pojazdów.
Dzięki systemowi ISOFIX bezpiecznie zainstalujesz fotelik
CYBEX SIRONA M2 i-Size w samochodzie.
Instalacja bazy
• Wybierz w samochodzie miejsce, które jest wyznaczone
przez producenta do montażu fotelika typu i-Size.
UWAGA! Są dwa punkty wczepu ISOFIX (2)
Zlokalizowane są pomiędzy oparciem a siedziskiem fotela
samochodowego. Jeśli są jakiekolwiek wątpliwości,
skonsultuj je z samochodową instrukcją obsługi.
• Jeśli punkty zaczepu ISOFIX (2) w Twoim samochodzie
są ciężko dostępne, skorzystaj z konektorów załączonych
do fotelika (3). Unikniesz uszkodzenia tapicerki fotela
samochodowego.
• Wepnij łączniki (3) w punkty wczepu ISOFIX (2) tak,
żeby ich dłuższy fragment znajdował się na górze. W
wielu samochodach jest to bardziej skuteczne, aby
zainstalować łaczniki (3) w przeciwnym kierunku.
• Zawsze otwieraj nogę fotelika (4) do chwili zablokowania
w pozycji otwarcia.
FRNLPL
69
Page 70

NOTE ! N‘entreposez aucun objet sur le plancher de la
65
voiture au niveau du siège auto.
• Relâchez le verrouillage des connecteurs ISOFIX. Les
deux verrous peuvent être indépendamment réglés.
Poussez les deux boutons (5 et 6) simultanément tout en
tirant les connecteurs ISOFIX de la base jusqu´à la butée.
• Les connecteurs ISOFIX (7) doivent s´enclencher dans
les points d´ancrage ISOFIX (2) avec un click audible.
• Assurez-vous que le siège reste bien en place en
2
8
7
65
8
70
essayant de l’extraire.
• L’indicateur de sécurité vert (8) doit être clairement
visible au niveau des deux boutons de déverrouillage
ISOFIX.
• Poussez ensuite la base dans la direction sur le dossier
jusqu’à ce qu’elle soit entièrement alignée avec le dossier
de la banquette.
• Vous pouvez désormais passer à la section, “RÉGLAGE
DE LA JAMBE DE FORCE“.
NOTE ! Il est possible que certaines banquettes faites
en matière fragile (par ex. velours, cuir, etc.) montrent
des signes d’usure et/ou de décoloration. Afin d’éviter ce
problème, vous pouvez, par exemple, mettre une couverture
ou une serviette sous le siège auto. Dans ce cas, merci
de vous reporter à votre notice de nettoyage, qui doit
absolument être respectée avant la première utilisation du
siège auto.
Page 71

LET OP! Leg geen voorwerpen in het voetgedeelte aan de
voorkant van het autostoeltje.
• Ontgrendel de ISOFIX-grijparmen. Beide
vergrendelingen kunnen afzonderlijk worden versteld.
Druk beide knoppen (5 en 6) gelijktijdig in en trek de
ISOFIX-grijparmen uit de basis tot de eindstop.
• De ISOFIX-grijparmen (7) dienen met een hoorbare KLIK
te vergrendelen op de ISOFIX-ankerpunten (2) .
• Zorg dat het stoeltje goed vastzit door te proberen het uit
de ISOFIX-montagehulpen te trekken.
• De groene veiligheidsindicator (8) moet nu goed
zichtbaar zijn op beide ISOFIX-ontgrendelingsknoppen.
• Duw nu de basis naar de rugleuning toe tot deze volledig
aansluit op die rugleuning.
• Nu kunt u verder met hoofdstuk “DE STEUNVOET
AANPASSEN”.
LET OP! Het is mogelijk dat autostoelen die met zacht
materiaal (zoals velours en leer) zijn bekleed gebruikssporen
en/of verkleuringen laten zien. Om dit te voorkomen kunt
u er bijvoorbeeld een deken of handdoek op leggen.
In dit verband verwijzen we u ook graag naar onze
reinigingsinstructies, die u zonder meer dient op te volgen
vóór het eerste gebruik van het stoeltje.
UWAGA! W miejscu, gdzie rozstawiona będzie noga
fotelika na podłodze samochodowej nie mogą znajdować
się żadne elementy.
• Zwolnij blokadę złączy ISOFIX. Obie blokady mogą być
regulowane niezależnie od siebie. Jednocześnie wciśnij
przycisk (5 i 6) i pociągnij łączniki ISOFIX z bazy możliwie
do końca.
• Łączniki ISOFIX (7) muszą się zapiąć do punktów
mocujących ISOFIX (20 słyszalnym kliknięciem.
• Upewnij się, że fotelik pozostaje na swoim miejscu,
starając się wyciągnąć go z łączników ISOFIX.
• Zielony wskaźnik bezpieczeństwa (8) musi być wyraźnie
widoczny po obu stronach przycisków zwalniających
blokadę ISOFIX.
• Następnie dopchnij bazę w kierunku oparcia fotela
samochodowego, do momentu aż nie zostanie w pełni
przyrównana do oparcia.
• Teraz przejdź do sekcji: “REGULACJA NOGI
FOTELIKA“.
UWAGA! Niektóre tapicerki samochodowe wykonane z
delikatnego materiału jak (np. welur, skóra) mogą nosić
oznaki zużycia/przetarcia lub wytarcia. Aby uniknąć
zniszczenia tapicerki, zabezpiecz ją podkładając pod fotelik
pokrowiec lub ręcznik. Zachęcamy do zapoznania się z
zaleceniami dotyczącymi czyszczenia fotelika oraz jego
tapicerki. Należy ich bezwzględnie przestrzegać przed
pierwszym skorzystaniem z fotelika.
FRNLPL
71
Page 72

RÉGLAGE DE LA JAMBE DE FORCE
Pressez le bouton (9) et tirez sur la jambe de force (4)
jusqu`à ce qu´elle atteigne le plancher du véhicule. Fixez
ensuite le pied dans la position de verrouillage pour un
9
10
4
72
maintien sécurisé. L´indicateur de la jambe de force (10) sur
la base doit etre VERT et un ‘CLICK’ audible caractéristique
doit etre entendu.
NOTE ! Assurez-vous que le siège CYBEX SIRONA M2
i-Size soit toujours bien à plat sur la banquette du véhicule.
!
ATTENTION !
soit toujours être en contact direct avec le plancher
du véhicule. Il ne doit y avoir aucun objet ni
espace entre le plancher du véhicule et la jambe
de force. Si des compartiments de stockage sont
intégrés dans le plancher, vous devez contacter le
constructeur du véhicule.
La jambe de force (4) doit toujours
Page 73

DE STEUNVOET AANPASSEN REGULACJA NOGI FOTELIKA
Druk de knop (9) in en trek de steunvoet (4) uit tot deze
op de bodem van de auto staat. Trek daarna de steunvoet
naar het volgende vergrendelingsniveau voor optimale
krachtengeleiding. De indicator (10) op de steunpoot zal
groen worden en een duidelijke “KLIK” laten horen.
LET OP! Zorg dat de CYBEX SIRONA M2 i-Size nog
steeds vlak op de autostoel staat. UWAGA! Upewnij się, że fotelik CYBEX SIRONA M2 i-Size
Naciśnij przycisk (9) i wyciągnij nogę (4) do momentu
aż bezpiecznie oprze się o podłogę samochodową.
Następnie wyciągnij stopę tak, aby znalazła oparcie o
podłogę. Wskaźnik nogi fotelika (10) znajdujący się na
bazie będzie pokazywał kolor ZIELONY. Słyszalne będzie
charakterystyczne kliknięcie.
spoczywa płasko na fotelu samochodowym.
FRNLPL
!
BELANGRIJK!
contact maken met de bodem van de auto. Er
mogen geen voorwerpen of ruimten tussen de
bodem en de steunvoet zijn. Als er opbergvakken in
de bodem van het voertuig zijn, dient u contact op te
nemen met de autofabrikant.
De steunvoet (4) moet altijd direct
!
OSTRZEŻENIE! Noga wspierająca fotelik (4)
musi być zawsze oparta o podłogę samochodową.
Pomiędzy nogą wspierającą a podłogą samochodu
nie mogą znajdować się ani żadne przedmioty
ani przerwa/brak styczności z podłożem. Jeśli w
podłodze jest schowek podłogowy, skontaktuj się z
producentem samochodu.
73
Page 74

CLICK!
11
11
INSTALLATION DU SIÈGE SUR LA BASE
Vérouillage du siège auto CYBEX SIRONA M2 i-Size
NOTE ! Assurez-vous que la surface de la Base M i-Size ne
contient pas d´objet.
Mettez le CYBEX SIRONA M2 i-Size dans la direction
voulue sur la Base M i-Size. Veillez à ce que les deux côtés
se verrouillent avec un «CLICK» audible. Vérifiez ensuite
si l´indicateur (11) sur la Base M i-Size est bien VERT. Si
l´indicateur reste ROUGE, le siège n´est pas correctement
vérouillé. Répétez l´opération si nécessaire.
12
13
13
74
Retrait du siège auto CYBEX SIRONA M2 i-Size
Pressez le bouton de retrait central (12) et l´un des boutons
de retrait sur le côté (13) simultanément pour débloquer le
CYBEX SIRONA M2 i-Size de la base.
Inclinez légèrement le siège. L´indicateur (11) est
maintenant ROUGE.
Vous pouvez maintenant relâcher les boutons de
déverrouillage (12) et (13) pour soulever le CYBEX
SIRONA M2 i-Size de la Base M i-Size.
Page 75

DE ZITTING OP DE BASIS PLAATSEN MONTAŻ FOTELIKA NA BAZIE
Het CYBEX SIRONA M2 i-Size-autostoeltje vergrendelen Wpinanie fotelika CYBEX SIRONA M2 i-Size
LET OP! Zorg dat het oppervlak van de Base M i-Size vrij
van voorwerpen is.
Plaats de CYBEX SIRONA M2 i-Size in de vereiste richting
op de Base M i-Size. Zorg dat beide stangen met een
duidelijk hoorbare KLIK vergrendelen. Controleer vervolgens
of de indicator (11) op de Base M i-Size GROEN is. Als
de indicator ROOD is, is de zitting niet goed vergrendeld.
Herhaal het proces zo nodig.
UWAGA! Upewnij się, że na powierzchni bazy „Base M
i-Size” nie znajdują się żadne przedmioty.
Ustaw fotelik CYBEX SIRONA M2 i-Size na bazie „Base
M i-Size”. Upewnij się, że obydwa metalowe elementy
zostały zapięte. Potwierdzi to wyraźnie słyszalne kliknięcie.
Następnie sprawdź czy wskaźnik (11) na bazie „Base
M i-Size” pokazuje kolor ZIELONY. Jeśli wskazuje kolor
CZERWONY to oznacza, że fotelik nie został poprawnie
wpięty na bazie. Powtórz kroki jeśli zajdzie taka potrzeba.
Het CYBEX SIRONA M2 i-Size-autostoeltje verwijderen Wypinanie fotelika CYBEX SIRONA M2 i-Size
Druk de centrale ontgrendelingsknop (12) en een van de
ontgrendelingsknoppen aan de zijkant (13) tegelijkertijd
in om de CYBEX SIRONA M2 i-Size van de basis af te
kunnen halen.
Kantel de zitting iets. De indicator (11) is nu ROOD.
Nu kunt u de ontgrendelingsknoppen (12) en (13) loslaten om
de CYBEX SIRONA M2 i-Size van de Base M i-Size te tillen.
Wciśnij jednocześnie centralny przycisk zwalniający (12)
oraz jeden z przycisków bocznych (13). Dzięki temu będziesz
mógł wypiąć fotelik CYBEX SIRONA M2 i-Size z bazy.
Odchyl trochę fotelik do tyłu. Wskaźnik (11) pokazuje kolor
CZERWONY.
Zwolnij przyciski (12) i (13) i podnieś fotelik CYBEX
SIRONA M2 i-Size z bazy „Base M i-Size”.
FRNLPL
75
Page 76

7 5 6
DÉSINSTALLATION DE LA BASE
Effectuez les étapes d’installation dans l’ordre inverse.
• Dévérouillez les deux connecteurs ISOFIX (7) en
appuyant sur les boutons (5 et 6) simultanément et les
sortir des guides ISOFIX.
9
• Poussez les connecteurs (7) dans leur position d´origine.
• En appuyant sur la poignée de bouton (9) vous pouvez
replacer la jambe de force dans sa position initiale, puis
la replier pour gagner de la place.
14
76
RÉGLAGE DE L´ASSISE ET DE L´INCLINAISON
Le CYBEX SIRONA M2 i-Size offre jusqu’à cinq positions
différentes d´inclinaison pour un transport sûr et confortable
de votre enfant en voiture. Si vous le souhaitez, activez la
poignée de réglage (14) sur le devant du siège auto afin
de placer le CYBEX SIRONA M2 i-Size dans les positions
d’inclinaison souhaitées. Veillez toujours à ce que la coque
du siège s΄enclenche par un click audible.
NOTE ! Les nouveau-nés et les enfants qui ne sont pas
encore en mesure de se tenir assis seuls (jusque 1 an
environ) doivent, pour des raisons orthopédiques et de
sécurité, toujours être transportés dos à la route dans la
position la plus inclinée.
!
ATTENTION ! Pour des raisons de sécurité, le
réglage entre positions assises et couchées pendant
le voyage est strictement interdit!
Page 77

DE BASIS UIT DE AUTO VERWIJDEREN DEMONTAŻ BAZY Z SAMOCHODU
Voer de stappen van de installatie in omgekeerde
volgorde uit.
• Ontgrendel beide ISOFIX-grijparmen (7) door de
knoppen (5 en 6) tegelijkertijd in te drukken en trek ze uit
de ISOFIX-montagehulpen.
• Duw de grijparmen (7) terug in hun uitgangspositie.
• Door op de knop (9) te drukken kunt u de steunvoet in de
uitgangspositie terugbrengen en deze terugklappen om
ruimte te besparen.
ZIT EN KANTELVERSTELLING REGULACJA POZYCJI SIEDZĄCEJ I ODCHYLANIE
De CYBEX SIRONA M2 i-Size biedt vijf verschillende ziten kantelstanden voor het veilige en comfortabele vervoer
van uw kind in de auto. Trek aan de verstelgreep (14) aan
de voorkant van het autostoeltje om de CYBEX SIRONA
M2 i-Size in de gewenste kantelstand te brengen. Zorg
altijd dat het stoeltje met een hoorbare KLIK in de juiste
stand vergrendelt.
LET OP! Pasgeborenen en baby’s die nog niet uit zichzelf
rechtop kunnen zitten (tot ongeveer 1 jaar) dienen om
orthopedische en veiligheidsredenen altijd in de vlakst
mogelijke achterwaarts gerichte stand te worden vervoerd.
Wykonaj czynności instalacyjne w odwrotnej kolejności.
• Odblokuj oba złącza ISOFIX (7), jednocześnie naciskając
przyciski (5 i 6), następnie wyciągnij je z prowadnic ISOFIX.
• Wepchnij łączniki (7) do pozycji początkowej.
• Naciskając dźwignię przycisk (9) można odepchnąć
wspierającą nogę do pozycji wyjściowej, a następnie
złożyć ją z powrotem, aby fotelik zajmował mniej miejsca
po wyjęciu z samochodu.
Fotelik CYBEX SIRONA M2 i-Size można ustawić w
jednej z pięciu różnych pozycji siedzących/odchylenia. W
celu regulacji pochylenia fotelika CYBEX SIRONA M2
i-Size, aktywuj uchwyt służący do regulacji pozycji (14)
znajdujący się z przodu fotelika. Zawsze upewnij się, że
fotelik jest poprawnie przytwierdzony do bazy. Potwierdzi to
wyraźne kliknięcie.
UWAGA! Noworodki i niemowlęta, które nie są jeszcze
w stanie samodzielnie usiąść (do około 1 roku), należy,
ze względów bezpieczeństwa i ortopedycznych, zawsze
przewozić w możliwie najbardziej płaskiej pozycji półleżącej,
tyłem do kierunku jazdy.
FRNLPL
!
BELANGRIJK! Om veiligheidsredenen is het
verboden om de zit- en kantelstand tijdens het rijden
te verstellen!
!
OSTRZEŻENIE! Regulacja pozycji siedzącej w
trakcie jazdy samochodem jest surowo zabroniona.
77
Page 78

RÉGLAGE DES PROTECTIONS LATÉRALES
Le CYBEX SIRONA M2 i-Size est équipé du système de
«Protection Linéaire contre les Impacts Latéraux» (L.S.P.).
15
78
Ce système accroît la sécurité de votre enfant en cas
d’impact latéral. Sortez au maximum le L.S.P. du côté de la
portière. Pour le rétracter, pressez le bouton (15) .
NOTE ! Assurez-vous que le L.S.P. est en place avec un
„CLICK“ audible.
Si le L.S.P. Touche la portière, il doit etre correctement
rangé. Il est autorisé de l´utiliser dans cette position. Afin de
renter le L.S.P. dans le siége, le pousser et le plier jusqu´à
ce qu´il se vérouille avec un „CLICK“ aubdible.
Lorsque vous utilisez le SIRONA M2 i-Size sur
NOTE !
la position centrale arrière, il est interdit de déplier le
dispositif (L.S.P.).
Il est interdit d´utiliser le dispositif (L.S.P.) pour porter ou
grimper dans le SIRONA M2 i-Size.
Page 79

AANPASSEN VAN DE ZIJBESCHERMERS REGULACJA OSŁON BOCZNYCH
De CYBEX SIRONA M2 i-Size is uitgerust met het Linear
Side-Impact Protection-systeem (L.S.P.). Dit systeem
vergroot de veiligheid van het kind bij een zijdelingse
botsing. Trek de L.S.P. uit naar de stand die het dichtst bij
het portier is voor de grootst mogelijke veiligheid. U kunt
hem weer inklappen door op de knop (15) te drukken.
LET OP! Zorg dat de L.S.P. met een duidelijke KLIK
CYBEX SIRONA M2 i-Size jest wyposażony w system
ochrony bocznej przed kolizją (L.S.P.). System ten zwiększa
bezpieczeństwo dziecka w przypadku wystąpienia kolizji
bocznej. Dla zapewnienia najlepszej ochrony, wyciągnij
osłonę L.S.P. najdalej jak się da w kierunku drzwi, które są
najbliżej fotelika dziecka. Aby zwolnić go wciśnij przycisk
zwalniający (15).
vergrendelt. UWAGA! Upewnij się, że osłony L.S.P. są zablokowane.
In het geval dat de L.S.P. de deur raakt moet deze worden
teruggestopt. Het is toegestaan de L.S.P. te gebruiken in de
weggestopte positie. Om de L.S.P. weg te stoppen; druk
deze aan de achterzijde in en klap de L.S.P. terug in de stoel
totdat deze vergrendelt met een hoorbare “KLIK”.
Als u de SIRONA M2 i-Size op de middenstoel
LET OP!
gebruikt in het voertuig is het verboden om de L.S.P. uit
te klappen.
De L.S.P. mag niet worden gebruikt om de SIRONA M2
i-Size te dragen of om erin te klauteren.
Potwierdzi to słyszalne kliknięcie.
W przypadku, gdy osłona L.S.P. rozłożona w najdłuższej
pozycji dotyka drzwi samochodu, złóż ją do kolejnej
długości. W tym celu wyciągnij osłonę L.S.P. kompletnie a
następnie, wciśnij przycisk i złóż do kolejnego kliknięcia.
UWAGA! Przy instalacji fotelika na środku kanapy/
środkowym siedzeniu, nie wysuwamy osłon bocznych
(L.S.P.).
Zakazane jest używanie ochraniaczy (L.S.P.) jako uchwytu
do przenoszenia lub przypinania fotelika.
FRNLPL
79
Page 80

80
MAX.
UTILISATION DOS À LA ROUTE
(45 cm - 105 cm)
Réglage de l’appui-tête
NOTE ! Le réducteur pour nouveau-né est conçu pour la
protection de votre bébé et ne doit pas être utilisé au-delà
d’une taille de 60 cm.
NOTE ! L´appui-tête (16) n΄offre une protection et une
sécurité optimales à votre enfant que lorsqu΄il est réglé à la
bonne hauteur. La hauteur de l´appui-tête peut être réglée
dans 12 positions différentes.
• L´appui-tête (16) doit être ajusté de manière à laisser
un espace équivalant à deux doigts maximum entre les
épaules de l’enfant et l’appui-tête (16).
16
1
• activez la manette de réglage (17) située sous l´appuitête (16) et placez le dans la position souhaitée.
17
Sur l’appui-tête, l’indicateur (1) indique à partir de quelle
taille l’enfant peut être installé face à la route.
Le siège peut être face à la route uniquement si:
• L´enfant dépasse la taille de > 76 cm.
et
• L´enfant a au minimum 16 mois. Nous recommandons
d’utiliser le siège le plus longtemps possible dos à la route.
et
• L´appui-tête correctement ajusté (16) masque
l´indicateur (1).
Page 81

ACHTERWAARTS GERICHT GEBRUIK MONTAŻ TYŁEM DO KIERUNKU JAZDY
(45 cm – 105 cm) (45 cm-105 cm)
De hoofdsteun verstellen REGULACJA ZAGŁÓWKA
LET OP! Het inlegkussen voor pasgeboren baby’s
beschermt uw kind en is te gebruiken tot een lichaamslengte
van 60 cm.
LET OP! Alleen als de hoofdsteun (16) op de juiste hoogte
is ingesteld, biedt deze uw kind de grootste mate van
bescherming en veiligheid. De hoogte van de hoofdsteun
kan in 12 standen worden ingesteld.
• De hoofdsteun (16) moet zo ingesteld zijn dat er een
ruimte van maximaal twee vingers breed is tussen de
schouder van het kind en de hoofdsteun (16).
• Trek aan de verstellus (17) aan de onderkant van de
hoofdsteun (16) en breng de hoofdsteun in de vereiste
stand.
De indicator op de hoofdsteun (1) geeft aan vanaf welke
lengte van het kind het stoeltje op zijn vroegst voor
voorwaarts gericht gebruik wordt aanbevolen.
Het stoeltje mag alleen voorwaarts gericht worden
gebruikt als:
• het kind langer dan 76 cm is.
en
• het kind minstens 16 maanden oud is. We raden aan het
stoeltje zo lang mogelijk achterwaarts gericht te gebruiken.
en
• de juist ingestelde hoofdsteun (16) bedekt de indicator
(1).
UWAGA! Wkładka dla noworodka służy do ochrony
Państwa dziecka i należy ją stosować do momentu
uzyskania przez dziecko wzrostu 60 cm.
UWAGA! Zagłówek (16) zapewnia najlepszą ochronę jeśli
dopasowany jest do wzrostu dziecka. Wysokość zagłówka
można dostosować w 12 różnych pozycjach.
• Przy poprawnie ustawionym zagłówku (16), można
swobodnie wsunąć dwa złączone palce pomiędzy ramię
dziecka a zagłówek (16).
• Aktywując rączkę (17) znajdującą się na dole zagłówka
(16) możesz dostosować wysokość zagłówka do
pożądanej wysokości.
Znajdujący się na zagłówku wskaźnik (1) pokazuje wysokość
dziecka od której najwczesniej można zacząć korzystać z
fotelika przodem do kierunku jazdy.
Dziecko może być przewożone w foteliku przodem do
kierunku jazdy, jeśli:
• ma > 76 cm wzrostu
i
• ma minimum 16 miesięcy. Zalecamy korzystać z fotelika
tyłem do kierunku jazdy najdłużej jak to możliwe.
i
• poprawnie ustawiony zagłówek (16) zakrywa wskaźnik
(1).
FRNLPL
81
Page 82

18
23
20
19
24
21
CLICK!
82
SÉCURISATION AVEC LE SYSTÈME DE HARNAIS
Les sangles d´épaule sont fermement fixées à l´appui-tête et
ne doivent pas être ajustées séparément. Assurez-vous que
la têtière est correctement verrouillée avant d‘utiliser le siège.
NOTE ! Vérifiez qu‘aucun jouet ni aucun objet dur ne se
trouvent dans le siège.
• Détachez les sangles d´épaule (18) en actionnant la
manette de réglage au niveau du réglage central (19) tout
en tirant dans le même temps vers le haut sur les deux
sangles (18).
• Ouvrez la boucle de la ceinture (20) en appuyant
fermement sur le bouton rouge.
• La languette de la ceinture (21) peut être fi xée sur le
22
côté de la housse (22).
NOTE ! Tirez toujours sur les sangles d´épaules (18); ne
jamais tirer sur les protèges harnais (23).
• Installez l’enfant dans le siège et réglez les sangles
d´épaule (18) pour qu’elles s´ajustent parfaitement.
NOTE ! Assurez-vous que les sangles d´épaule (18) ne
soient pas vrillées.
• Rassemblez les deux languettes de ceinture (21) et
verrouillez-les en position ensemble dans la boucle de
ceinture (20) avec un „CLICK“ audible.
• enclenchez doucement et prudemment le réglage central
(24), afin de tendre les sangles d´épaule (18) jusqu΄à ce
qu΄elles touchent sur le corps de l΄enfant.
NOTE ! Pour garantir la protection optimale du siège
CYBEX SIRONA M2 i-Size, les sangles d´épaule doivent
être le plus près possible du corps de l΄enfant Assurezvous que les ceintures ventrales se trouvent à proximité des
hanches et soient correctement serrées.
Page 83

VASTMAKEN MET HET GORDELSYSTEEM
De schouderriemen zijn stevig aan de hoofdsteun bevestigd
en mogen niet afzonderlijk worden versteld. Zorg dat de
hoofdsteun in de juiste stand is vergrendeld voordat u het
autostoeltje gebruikt.
LET OP! Zorg dat er geen speelgoed en harde voorwerpen
in het autostoeltje liggen.
• Maak de schouderriemen (18) losser door aan de
verstelgreep op de centrale verstelling (19) te trekken en
tegelijkertijd beide schouderriemen (18) omhoog te trekken.
• Open het gordelslot (20) door stevig op de rode knop
te drukken.
• De gordeltongen (21) kunnen aan de zijkant aan de hoes
worden vastgemaakt (22).
LET OP! Trek altijd aan de schouderriem (18), nooit aan de
schouderpads (23).
• Zet uw kind in het autostoeltje en verstel de
schouderriemen (18) zodat die goed rond de schouders
van uw kind liggen.
LET OP! Zorg dat de schouderriemen (18) niet gedraaid of
gekruist zijn.
• Plaats beide gordeltongen (21) tegen elkaar en vergrendel
ze met een duidelijke KLIK in het gordelslot (20).
• Trek voorzichtig aan de centrale verstelriem
(24) om de schouderriemen (18) aan te trekken totdat ze
tegen het lichaam van uw kind liggen.
LET OP! Om te zorgen dat de CYBEX SIRONA M2 i-Size
optimale bescherming biedt, dienen de schouderriemen
zo dicht mogelijk tegen het lichaam te liggen. Zorg dat de
buikriemen dicht tegen de heup liggen en strak genoeg zitten.
ZAPINANIE DZIECKA PASAMI ZINTEGROWANYMI
Z FOTELIKIEM
Pasy naramienne są zintegrowane z zagłówkiem fotelika
i nie należy regulować ich osobno. Przed rozpoczęciem
korzystania z fotelika upewnij się, że zagłówek znajduje się w
zablokowanej pozycji.
UWAGA! Upewnij się, że w foteliku nie znajdują się zabawki
dziecka ani żadne ostre elementy.
• Poluzuj pasy naramienne (18) naciskając przycisk
znajdujący się na centralnym regulatorze (19) i
równocześnie pociągnij oba pasy naramienne (18) w górę.
• Pasy rozpinamy poprzez mocne wciśnięcie czerwonego
przycisku (20).
• Klamerki pasów można zaczepić (21) po obu stronach
fotelika, dzięki magnetycznym zaczepom (22).
UWAGA! Zawsze pociągaj za pasy naramienne (18), nigdy
za nakładki (23).
• Umieść dziecko w foteliku. Umieść pasy naramienne (18)
tuż nad ramionami dziecka.
UWAGA! Upewnij się, że pasy naramienne (18) nie są
poskręcane ani skrzyżowane.
• Wprowadź dwa zapięcia pasów (21) i wepnij je w klamrę
(20). Usłyszysz wyraźne „kliknięcie”.
• Delikatnie i ostrożnie pociągnij za centralny pas (24), w
celu ściągnięcia pasów naramiennych (18) jak najbliżej
ciała dziecka.
UWAGA! W celu zapewnienia maksymalnej ochrony w
foteliku CYBEX SIRONA M2 i-Size, pasy naramienne
powinny znajdować się jak najbliżej ciała dziecka. Upewnij
się, że pasy biodrowe przebiegają blisko bioder oraz, że są
odpowiednio mocno naciągnięte.
FRNLPL
83
Page 84

UTILISATION FACE À LA ROUTE
(76 cm - 105 cm et plus de 15 mois)
L΄utilisation du siège face à la route est autorisée lorsque
l΄enfant a 15 mois et fait au minimum 76 cm. Afin de garantir
la protection de votre enfant, nous vous recommandons
d΄utiliser le siège CYBEX SIRONA M2 i-Size le plus
longtemps possible dos à la route. Si votre enfant n΄a plus
assez d΄espace pour mettre ses jambes, vous pouvez
utiliser le siège CYBEX SIRONA M2 i-Size face à la route.
Vous pourrez trouver plus d´informations sur la manière de
sécuriser votre enfant à la rubrique «SÉCURISER AVEC LE
SYSTÈME DE HARNAIS».
NOTE ! Les statistiques d´accidents montrent que
la position dos à la route est le moyen le plus sûr de
transporter votre enfant en voiture. Par conséquent, nous
vous recommandons d΄utiliser le siège CYBEX SIRONA M2
i-Size dos à la route le plus longtemps possible.
NOTE ! Sur l’appui-tête, l’indicateur (1) montre à partir de
quelle taille l’enfant peut être installé face à la route.
1
16
84
Le siège peut être face à la route uniquement si:
• L´enfant dépasse la taille de > 76 cm.
et
• L´enfant a au minimum 16 mois. Nous recommandons
d’utiliser le siège le plus longtemps possible dos à la route.
et
• L´appui-tête correctement ajusté (16) masque
l´indicateur (1).
Page 85

VOORWAARTS GERICHT GEBRUIK MONTAŻ FOTELIKA PRZODEM DO KIERUNKU JAZDY
(76 cm – 105 cm en ouder dan 15 maanden)
Het stoeltje mag voorwaarts gericht gebruikt worden als
het kind ouder dan 15 maanden en minimaal 76 cm lang
is. Om uw kind de grootste bescherming te bieden, raden
we aan de CYBEX SIRONA M2 i-Size zo lang mogelijk
achterwaarts gericht te gebruiken. Als er onvoldoende
ruimte voor de benen van uw kind is, kunt u de CYBEX
SIRONA M2 i-Size voorwaarts gericht gebruiken. U leest
meer over het vastmaken van uw kind in “VASTMAKEN MET
HET GORDELSYSTEEM”.
LET OP! Uit ongevallenstatistieken blijkt dat de
achterwaarts gerichte positie de veiligste manier is om
uw kind in de auto te vervoeren. Daarom raden we aan de
CYBEX SIRONA M2 i-Size zo lang mogelijk achterwaarts
gericht te gebruiken.
LET OP! De indicator op de hoofdsteun (1) geeft aan
vanaf welke lengte van het kind het stoeltje op zijn vroegst
voorwaarts gericht kan worden gebruikt.
Het stoeltje mag alleen voorwaarts gericht worden gebruikt
als:
• het kind langer dan 76 cm is.
en
• het kind minstens 16 maanden oud is. We raden aan
het stoeltje zo lang mogelijk achterwaarts gericht te
gebruiken.
en
• de juist ingestelde hoofdsteun (16) bedekt de indicator (1).
(76 cm-105 cm i ukończony 15. miesiąc życia)
Dziecko może korzystać z fotelika przodem do kierunku
jazdy tylko i wyłącznie jeśli ukończyło 15 miesiąc życia i
posiada minimum 76 cm wzrostu. W celu zapewnienia
dziecku maksymalnego bezpieczeństwa, rekomendujemy
przewożenie dziecka tyłem do kierunku jazdy w foteliku
CYBEX SIRONA M2 i-Size najdłużej jak to możliwe.
Jeżeli już faktycznie dziecku zaczyna brakować miejsca na
nóżki oraz zostaną spełnione pozostałe wymogi dotyczące
wysokości oraz wieku dziecka, dopiero wtedy należy
zamontować fotelik CYBEX SIRONA M2 i-Size przodem do
kierunku jazdy. Dowiedz się więcej na temat jak poprawnie
przewozić dziecko w samochodzie w sekcji „ZAPINANIE
DZIECKA PASAMI ZINTEGROWANYMI Z FOTELIKIEM”.
UWAGA! Statystyki wypadków dowodzą, że
najbezpieczniejszym sposobem przewożenia dziecka jest
tyłem do kierunku jazdy. Dlatego rekomendujemy korzystanie
z fotelika CYBEX SIRONA M2 i-Size w pozycji tyłem do
kierunku jazdy możliwie jak najdłużej.
UWAGA! Wskaźnik znajdujący się na zagłówku (1) pokazuje
wysokość ciała dziecka od której najwcześniej można
rozpocząć przewożenie dziecka przodem do kierunku jazdy.
W foteliku można przewozić dziecko przodem do kierunku
jazdy wyłacznie, gdy:
• dziecko ma > 76 cm wzrostu
i
• ma minimum 16 miesięcy. Rekomendujemy przewozić
dziecko tyłem do kierunku jazdy najdłużej jak to możliwe.
oraz
• poprawnie ustawiony zagłówek (16) zakrywa wskaźnik (1).
FRNLPL
85
Page 86

CLICK!
CLICK!
7
VOTRE ENFANT ESTIL CORRECTEMENT SÉCURISÉ?
Pour garantir la sécurité maximale de votre enfant,
veuillez vérifier les points suivants:
• Les connecteurs ISOFIX (7) sont correctement fixés
au véhicule et la jambe de force (4) est correctement
installée.
• Le siège est correctement vérouillé sur la base.
• L´appui-tête est réglé dans la bonne position.
• Le système de harnais à 5 points est correctement réglé
en fonction de la taille de l΄enfant, les sangles d´épaule
épaulières ne sont pas vrillées et le système de ceinture
est verrouillé.
• Les nouveau-nés et les enfants qui ne sont pas encore
en mesure de se tenir assis seuls (jusque 1 an environ)
doivent, pour des raisons orthopédiques et de sécurité,
toujours être transportés dans le siège dos à la route
dans la position la plus inclinée.
4
CLICK!
86
Page 87

IS UW KIND GOED VASTGEMAAKT? POPRAWNA INSTALACJA FOTELIKA
Controleer om de maximale veiligheid van uw kind te
garanderen of:
• De ISOFIX-grijparmen (7) juist zijn verankerd aan het
voertuig en of de steunvoet (4) juist is geïnstalleerd.
• De zitting in de juiste stand is vergrendeld op de basis.
• De hoofdsteun op de juiste hoogte is afgesteld.
• Het 5-puntsgordelsysteem juist is afgesteld op de lengte
van het kind en of de schouderriemen niet gedraaid zitten
en het gordelsysteem dicht zit.
• Pasgeborenen en baby’s die nog niet uit zichzelf
rechtop kunnen zitten (tot ongeveer 1 jaar) dienen om
orthopedische en veiligheidsredenen altijd in de vlakst
mogelijke achterwaarts gerichte stand te worden vervoerd.
Przez wzgląd na bezpieczeństwo dziecka, upewnij się
czy:
• złącza ISOFIX (7) zostały poprawnie wpięte a noga
stabilizująca (4) poprawnie zainstalowana.
• fotelik został poprawnie wpięty na bazie.
• zagłówek został ustawiony do odpowiedniej wysokości.
• 5-punktowe pasy bezpieczeństwa zostały poprawnie
wyregulowane do wysokości dziecka, pasy naramienne
nie są poskręcane i zapięte.
• Ze względów ortopedycznych oraz bezpieczeństwa,
dzieci, które nie są w stanie jeszcze same usiąść (ok.
rok) należy przewozić tyłem do kierunku jazdy w możliwie
najbardziej pozycji leżącej.
FRNLPL
87
Page 88

RETIRER LE RÉDUCTEUR POUR NOUVEAUNÉ
Le réducteur pour nouveau-né intégré dans la coque lors de la
livraison apporte à votre bébé le soutien dont il a tant besoin,
ainsi qu’un grand confort en position couchée et un excellent
maintien. À partir de 61cm (env. 3 mois), il est conseillé de
retirer le réducteur pour nouveau-né (25) afin d’offrir plus de
place à votre enfant. Pour retirer le réducteur pour nouveau-
25
88
né (25), ouvrez les boutons-pression situés sur la housse de
l‘appuie-tête. Retirer ensuite la housse de l‘appuie-tête, puis
le réducteur pour nouveau-né. Remettez ensuite la housse de
l‘appuie-tête, replacez le harnais de sécurité, puis refermez les
boutons-pression.
NETTOYAGE
Veillez à n΄utiliser que la housse d΄origine du siège CYBEX,
car il s΄agit également d΄un composant essentiel au bon
fonctionnement du siège enfant. Des housses de rechange
sont disponibles auprès de nos revendeurs.
Les parties plastiques, le mécanisme de ceinture et les
revetements des sangles doit etre nettoyer avec un ligne
humide. Ne pas laver le réducteur pour nouveau-né.
NOTE ! Merci de laver la housse avant la première
utilisation. La housse doit être lavée à 30° C programme
délicat. Le lavage à une température supérieure à 30° C ou
à la main peut entraîner une décoloration. Lavez séparément
et ne jamais passer au sèche-linge! N‘étendez jamais la
housse en plein soleil!
!
ATTENTION ! N΄utilisez jamais de détergents
chimiques ou d´agents blanchissants.
Page 89

INLEGKUSSEN VOOR PASGEBOREN BABY’S VER
WIJDEREN
Het inlegkussen voor pasgeboren baby’s is al bij levering
in het stoeltje geïntegreerd en geeft uw nog kleine baby
de nodige ondersteuning en extra ligcomfort. Vanaf
61 cm (ca. 3 maanden) dient u het inlegkussen voor
pasgeboren baby’s (25) te verwijderen zodat uw kind
meer ruimte krijgt. Open voor het verwijderen van het
inlegkussen (25) de drukknopen van de hoofdsteunhoes.
Nu kunt u de hoofdsteunhoes loshalen en het inlegkussen
voor pasgeboren baby’s verwijderen. Vouw vervolgens
de hoofdsteunhoes weer terug op zijn plaats, breng de
schouderbandjes in positie en zet de drukknopen vast.
REINIGING
Zorg dat er alleen een originele CYBEX-zittinghoes wordt
gebruikt op de zitting, omdat de hoes bijdraagt aan het goed
functioneren van het autostoeltje.Vervangingshoezen zijn te
verkrijgen bij erkende verkooppunten. De plastic delen, het
harnessysteem en de anti-slip coating van de gordelbeschermers
kunnen met een vochtige doek afgenomen worden. Het
inlegkussen voor pasgeboren baby’s is niet wasbaar.
Was de bekleding voordat u deze voor de eerste
LET OP!
keer gaat gebruiken. De bekleding moet op 30° C worden
gewassen met een fijnwasprogramma. Als u warmer dan
30° C of op de hand wast, kunnen de kleuren doorlopen.
Was de bekleding apart en droog deze nooit in de droger!
Nooit in fel zonlicht drogen!
BELANGRIJK! Gebruik nooit chemische
!
schoonmaakmiddelen of bleekmiddel.
WYJMOWANIE WKŁADKI DLA NOWORODKA
Zintegrowana z nosidełkiem w chwili dostawy wkładka
dla noworodka zapewni Państwa małemu niemowlęciu
niezbędne wsparcie, większy komfort leżenia i stabilność.
Od momentu uzyskania przez dziecko wzrostu 61cm (ok. 3
miesiące) należy usunąć wkładkę dla noworodka (25) w celu
przygotowania wystarczającej ilości miejsca dla dziecka. W
celu usunięcia wkładki dla noworodka (25) proszę odpiąć
znajdujące się na pokrowcu zagłówka zatrzaski. Teraz mogą
Państwo zdjąć pokrowiec zagłówka i usunąć wkładkę dla
noworodka. Następnie proszę ponownie nałożyć pokrowiec
zagłówka, umieścić pasy naramienne we właściwej pozycji i
zapiąć zatrzaski.
CZYSZCZENIE
Należy używać tylko oryginalnej tapicerki fotelika CYBEX
ponieważ jest ona niezbędna do jego poprawnego
funkcjonowania. Dodatkowe tapicerki można zakupić w
sklepie, w którym dokonano zakupu fotelika.
Platikowe części fotelika oraz pasy można czyścić wilgotną
szmatką. Wkładka dla noworodka nie nadaje się do prania.
UWAGA! Przed pierwszym użyciem tapicerkę należy
wyprać. Tapicerkę można prać w pralce, maksymalnie w
temperaturze 30° C, delikatny cykl prania. Piorąc tapicerkę
w wyższej temperaturze, narażasz ją na utratę koloru.
Tapicerkę należy prać osobno i nigdy nie suszyć w suszarce.
Nie susz tapicerki w bezpośrednim słońcu!
!
OSTRZEŻENIE! Nie stosować chemicznych
środków do czyszczenia ani wybielaczy!
FRNLPL
89
Page 90

RETRAIT DE LA HOUSSE
la housse se compose de sept éléments, fixés à la coque
du siège par Fermeture auto-agrippante, des élastiques,
26
20
27
90
des boutons pression et des goujons. Une fois que vous
avez retiré toutes les fixations, vous pouvez retirer les
composants individuels pour le nettoyage.
NOTE ! Avant d΄ôter tous les composants individuels de
la housse, assurez-vous de retirer les élastiques sous les
parties argentées pour éviter tout dommage.
Procédez comme suit:
• Ouvrez la boucle de ceinture (20) du système de harnais
5 points.
• Ouvrez tous les boutons pression des protections et des
pièces de la housse (26).
• Retirez les protège-harnais (27).
• Retirez tous les protèges ceinture.
• Otez les sangles d´épaule de la housse.
• Retirez la housse en la tirant vers vous.
• Pour replacer la housse, effectuez ces étapes dans
l’ordre inverse.
NOTE ! Pour replacez les protèges harnais, Il est essentiel
de vous assurer que...
• Le côté fermé est tourné vers le cou de l’enfant.
• Les protèges harnais sont parfaitement installés sur les
supports (27).
• Les sangles d´épaules passent dans les protèges
harnais.
Page 91

DE HOES VERWIJDEREN ZDEJMOWANIE TAPICERKI FOTELIKA
De bekledinghoes bestaat uit zeven onderdelen, met
Klittenbandbevestiging, elastiek, haakjes en drukknopen
vastgemaakt aan de schaal van de zitting. Zodra u alle
bevestigingspunten hebt losgemaakt, kunt u de afzonderlijke
onderdelen verwijderen om te wassen.
LET OP! Verwijder het elastiek onder zilverkleurige
sierelementen voordat u de hoes verwijdert om
beschadiging te voorkomen.
Ga als volgt te werk:
• Open het gordelslot (20) van het 5-puntsgordelsysteem.
• Open alle drukknopen van de pads en hoesonderdelen
(26).
• Haal de schouderpads van de haakjes (27).
• Verwijder alle riempads.
• Haal de schouderriemen met de gesptongen uit de hoes.
• Verwijder de hoes door deze naar voren te trekken.
• Om de hoes weer aan te brengen op de zitting voert u de
stappen in omgekeerde volgorde uit.
LET OP! Als u de schouderpads weer aanbrengt, let dan
op dat:
• de gesloten kant naar de nek van het kind wijst.
• de schouderpads precies zijn opgehangen aan de
haakjes (27).
• de schouderriemen door de schouderpads zijn gevoerd.
Tapicerka składa się z siedmiu elementów przymocowanych
do Zapięcie na rzepy, skorupy fotelika elastycznymi
drucikami, zapinanymi guzikami i zaczepami. Poszczególne
elementy tapicerki można zdjąć do prania dopiero po
rozpięciu wymaganych zapięć.
UWAGA! Przed zdjęciem tapicerki proszę wyciągnąć gumki
znajdujące się pod srebrnymi elementami dekoracyjnymi.
W celu zdjęcia tapicerki, proszę postępować zgodnie z
poniższą instrukcją:
• Rozepnij zapięcie (20) 5-punktowych pasów
bezpieczeństwa.
• Rozepnij wszystkie guziki znajdujące się na tapicerce
oraz nakładkach na pasy (26).
• Wypnij nakładki naramienne (27).
• Zdejmij wszystkie nakładki z pasów.
• Przeciągnij pasy naramienne przez tapicerkę.
• Ściągnij tapicerkę ciągnąc ją do przodu.
• Aby założyć tapicerkę, ponów kroki opisane powyżej w
odwrotnej kolejności.
UWAGA! Zakładając ponownie nakładki naramienne na
pasy, upewnij się czy:
• nakładka została zamontowana zamkniętą stroną w
kierunku szyi dziecka.
• zostały poprawnie założone na klamrach (27).
• pas poprowadzony jest wewnątrz nakładki naramiennej.
FRNLPL
91
Page 92

ENTRETIEN DU PRODUIT
Afin de protéger au maximum votre enfant, il est
primordial de respecter les points suivants:
• Tous les principaux composants du siège enfant doivent
être régulièrement contrôlés pour vous assurer qu΄ils ne
sont pas endommagés. Les pièces mécaniques doivent
fonctionner sans problème.
• Assurez-vous que le siège auto ne soit pas coincé entre
des parties dures, comme la portière de la voiture, les
rails des sièges, etc, qui peuvent l’endommager.
• Evitez que des saletés ou du sable ne pénètrent entre la
coque supérieure du siège et la base, car cela pourrait
gêner l’inclinaison du siège.
Le cas échéant, retirez la saleté avant d’incliner à
nouveau le siège afin de ne pas endommager le siège de
manière irréversible.
Après un choc, accident ou tout autre forme d´impact, le produit
doit etre testé par le fabricant avant d´etre utilisé à nouveau.
!
ATTENTION ! La housse est un composant à part
entière du dispositif de sécurité du siège CYBEX
SIRONA M2 i-Size. Le siège auto ne doit donc jamais
être utilisé sans sa housse.
92
Page 93

ONDERHOUD PIELĘGNACJA PRODUKTU
Om te garanderen dat uw autostoeltje de maximale
bescherming biedt, is het uiterst belangrijk dat u het
volgende in acht neemt:
• Alle hoofdonderdelen van het autostoeltje moeten
regelmatig worden gecontroleerd op schade. De
mechanische onderdelen moeten probleemloos
functioneren.
• Let op dat de kinderstoel niet klem komt te zitten tussen
bijvoorbeeld de deur en de auto waardoor deze kan
beschadigen.
• Vermijd dat er vuil of zand tussen de bovenste schaal en
de basis komt.Dat kan een negatieve invloed hebben op
de draai- en kantelfunctie.
Als dat toch gebeurt, dient u het vuil te verwijderen
voordat u de zitting verder draait of kantelt om blijvende
schade aan het stoeltje te vermijden.
Na een ongeval, het laten vallen van de stoel of welke
andere vorm van directe impact dan ook moet de kinderstoel
opnieuw door de producent getest worden.
Aby zagwarantować maksymalne bezpieczeństwo
swojemu dziecku, zwracaj uwagę na następujące
rzeczy:
• Wszystkie ważne części fotelika powinny być
regularnie sprawdzane. Części mechaniczne powinny
działać bez zarzutu.
• Upewnij się, że fotelik nie jest zakleszczony między
twardymi elementami takimi jak drzwi samochodu, szyny
siedzeń itp., które mogłyby go uszkodzić.
• Pomiędzy fotelem a bazą nie mogą znajdywać się żadne
elementy jak również np. okruchy, piasek. Może to mieć
negatywny wpływ na sprawne funkcjonowanie np.
odchylenia fotelika.
Jeśli jednak coś dostanie się pomiędzy bazę a fotelik,
należy wypiąć fotel z bazy i wyczyścić powierzchnie.
Niezastosowanie się do tego zalecenia, może skutkować
poważnym uszkodzeniem fotelika.
Po upuszczeniu fotelika, wypadku lub jakiejkolwiek innej
formie zdarzenia mogącej mieć bezpośredni wpływ na
późniejsze bezpieczeństwo, fotelik musi zostać sprawdzony
przez producenta przed ponownym użyciem.
FRNLPL
!
BELANGRIJK! De bekledinghoes maakt
onlosmakelijk deel uit van het veiligheidsontwerp van
de CYBEX SIRONA M2 i-Size. Het autostoeltje mag
daarom nooit worden gebruikt zonder bekleding.
!
OSTRZEŻENIE! T
odpowiedzialną za bezpieczeństwo w foteliku CYBEX
SIRONA M2 i-Size. Z fotelika nie można korzystać
bez tapicerki.
apicerka jest integralną częścią
93
Page 94

EN CAS D´ACCIDENT
Si vous êtes impliqué dans un accident, le siège auto peut
subir des dommages non visibles à l΄oeil nu. Si tel est
le cas, le siège auto doit être contrôlé par le fabricant et
remplacé si nécessaire.
DURÉE DE VIE DU PRODUIT
Le CYBEX SIRONA M2 i-Size été conçu pour satisfaire
ses fonctions initiales pendant une durée d΄utilisation
maximale de quatre ans. Cependant, les voitures étant
soumises à d΄importantes variations de température
et à des pressions imprévisibles, les points suivants
doivent être observés:
• Si la voiture est exposée pendant de longues périodes en
plein soleil, le siège auto doit être retiré de la voiture ou
recouvert d΄un linge de couleur claire.
• Vérifiez régulièrement que les pièces en plastique et en
métal du siège ne présentent aucun dommage ni aucune
altération de forme ou de couleur Si vous constatez une
altération, le siège auto doit être mis au rebut ou vérifié
par le fabricant et remplacé si nécessaire.
• Les altérations au niveau du tissu, notamment la
décoloration, sont normales dans une voiture après plusieurs
années d΄utilisation et ne représentent pas de dommages.
94
Page 95

NA EEN ONGEVAL CO ZROBIĆ Z FOTELIKIEM, KTÓRY BRAŁ UDZIAŁ
Als u betrokken bent bij een ongeval, kan het autostoeltje
schade oplopen die niet voor het blote oog zichtbaar is. In
dat geval moet het autostoeltje door de fabrikant worden
onderzocht en zo nodig worden vervangen.
W WYPADKU
W trakcie wypadku fotelik może doznać uszkodzeń, które
nie będą widoczne na pierwszy rzut oka. W tym przypadku
należy przeprowadzić inspekcję fotelika.
PRODUCT DUURZAAMHEID TRWAŁOŚĆ PRODUKTU
De CYBEX SIRONA M2 i-Size is ontworpen om zijn
functie gedurende maximaal vier jaar van totaal
gebruik te vervullen. Aangezien de temperatuur in
voertuigen flink kan schommelen en ze blootstaan aan
onverwachte spanning, dienen de volgende punten in
acht genomen te worden:
• Als het voertuig blootstaat aan direct zonlicht, moet het
autostoeltje uit de auto worden verwijderd dan wel met
een lichte doek worden afgedekt.
• Controleer regelmatig alle kunststof en metalen
onderdelen van het stoeltje op schade, vervorming of
verkleuring. Als u veranderingen constateert, moet u
het autostoeltje wegdoen of laten controleren door de
fabrikant en mogelijk vervangen.
• Veranderingen in de bekledingsstof, in het bijzonder
vervagende kleuren, zijn normaal na enkele gebruiksjaren
en zijn geen beschadiging.
Fotelik CYBEX SIRONA M2 i-Size został zaprojektowany
w sposób, który pozwala na bezpieczne korzystanie
z niego przez cztery lata. Jako że fotelik może być
narażony na duże wahania temperatur podczas jego
eksplatacji w samochodzie oraz inne nieprzewidziane
sytuacje, należy stosować się do poniższych zaleceń:
• Jeśli samochód będzie zaparkowany w bezpośrednim
słońcu przez dłuższy czas, powinno się przykryć fotelik
samochodowy materiałem lub wyjąć z samochodu.
• Raz do roku sprawdzaj, czy plastikowe elementy fotelika
nie są uszkodzone lub czy nie zmienił się ich kształt
lub kolor. Przy stwierdzeniu jakichkolwiek zmian, należy
skonsultować się ze sprzedawcą.
• Zmiany wyglądu tapicerki, w szczególności blaknięcie
kolorów, nie są wadą wyrobu, ale normalnym efektem
eksploatacji.
FRNLPL
95
Page 96

ÉLIMINATION
Au terme de sa durée de vie, le siège auto doit être
correctement éliminé. Le tri des déchets peut varier selon
la localité où vous vous trouvez. Afin de vous assurer que
le siège auo est éliminé de façon appropriée, contactez le
centre de traitement des déchets le plus proche ou la mairie
de votre lieu de résidence. Dans tous les cas, respectez
les réglementations nationales en vigueur en matière
d΄élimination des déchets.
CONTACT
CYBEX GmbH
Riedinger Str. 18 / 95448 Bayreuth / Germany
www.cybex-online.com / info@cybex-online.com
www.facebook.com/cybex.online
96
Page 97

VERWIJDERING UTYLIZACJA
Aan het eind van zijn levensduur moet het autostoeltje juist
worden afgevoerd. Afvalscheiding kan verschillen per plaats.
Om te zorgen dat u het autostoeltje op de juiste wijze
afvoert, kunt u het best contact opnemen met uw lokale
afvalverwerkingsbedrijf of de gemeente. In alle gevallen kan
het zijn dat u de nationale afvalrichtlijnen dient te bekijken.
CONTACT CONTACT
CYBEX GmbH
Riedinger Str. 18 / 95448 Bayreuth / Germany
Dla ochrony środowiska należy zutylizować wszystkie
niepotrzebne elementy fotelika (najpierw opakowanie, a po
zakończeniu użytkowania – cały fotelik) zgodnie z przepisami
obowiązującymi w danym kraju. Przepisy regulujące sposoby
utylizacji mogą się różnić w zależności od kraju. Skontaktuj
się z lokalną firmą zajmującą się gospodarką odpadami, aby
we właściwy sposób zutylizować fotelik. Zawsze stosuj się
do przepisów dotyczących postępowania z odpadami w
swoim kraju.
CYBEX GmbH
Riedinger Str. 18 / 95448 Bayreuth / Germany
FRNLPL
www.cybex-online.com / info@cybex-online.com
www.facebook.com/cybex.online
www.cybex-online.com / info@cybex-online.com
www.facebook.com/cybex.online
97
Page 98

GARANTIE
Les conditions de garantie suivantes ne sont valables que
dans le pays dans lequel, ce produit a été vendu à l’origine
par un détaillant à un consommateur.
1. La garantie couvre tous les défauts de fabrication et de
matériaux, qui existaient au moment de l‘achat ou qui sont
devenus apparents dans les 3 ans suivant l‘achat initial
auprès d‘un détaillant par un consommateur (garantie fabricant). Vous devez vérifier sans délai à réception que le
produit est complet et qu‘il ne présente aucun défaut de
fabrication ni aucun défaut matériel. Vous devez toujours
conserver votre preuve d´achat.
2. En cas de défaut, arrêtez immédiatement d’utiliser le produit. Pour toute réclamation dans le cadre de la garantie,
le produit doit être retourné au détaillant auprès duquel il
a été acheté propre et complet accompagné de l´original
de la preuve d´achat (ticket de caisse ou facture). Ne pas
expédier le produit directement au fabricant.
3. La garantie ne couvre pas les dommages provoqués
par une mauvaise utilisation, des influences extérieures
(eau, feu, accidents de la route, etc.), l´usure normale ou
un problème résultant d´une utilisation non conforme au
manuel d´utilisation. La garantie ne s´applique pas si des
réparations ou modifications ont été effectuées par des
personnes non-autorisées ou si des pièces et accessoires employés ne sont pas sont d’origine.
4. La présente garantie ne saurait en aucun cas invalider ou
limiter les droits du consommateur ou les droits de re
98
-
Page 99

GARANTIE GWARANCJA
Deze garantie is uitsluitend van toepassing in het land waar
dit product oorspronkelijk door een verkooppunt is verkocht
Niniejsza gwarancja obowiązuje wyłącznie w kraju, w którym
dokonano sprzedaży produktu.
aan een klant.
1. Gwarancja obejmuje wszelkie wady materiałowe i
1. De garantie dekt alle fabricage- en materiaalfouten die
bestaan of zichtbaar worden op de aankoopdatum of
zichtbaar worden binnen een periode van 3 jaar na de
datum van aankoop bij het verkooppunt dat het product
oorspronkelijk aan een consument heeft verkocht
(fabrieksgarantie). U dient het product onmiddellijk op
de aankoopdatum of onmiddellijk na ontvangst te con-
produkcyjne istniejące w momencie zakupu czy wykryte
w ciągu 3 lat od daty zakupu produktu w sklepie detalicznym przez pierwszego właściciela (gwarancja producenta). Prosimy o sprawdzenie produktu pod kątem jego
kompletności lub jakichkolwiek wad w chwili jego zakupu.
W przypadku sprzedaży wysyłkowej - natychmiast po
jego otrzymaniu. Zachowaj dowód zakupu.
troleren op compleetheid en fabrieks- of materiaalfouten.
Bewaar altijd uw aankoopbewijs met datum.
2. In geval van een defect dient u het gebruik van het product te staken. Om voor garantie in aanmerking te komen,
dient u het product in schone en volledige toestand te
retourneren aan het verkooppunt dat het oorspronkelijk
aan u heeft verkocht en een origineel aankoopbewijs (kas
sabon of factuur) te overleggen. Verstuur het product niet
rechtstreeks naar de fabrikant en lever het niet daar af.
3. Deze garantie dekt geen schade veroorzaakt door verkeerd
gebruik, omgevingsfactoren (zoals water, brand, ongeluk
ken, etc.) of normale slijtage of nalatigheid om de instructies in de handleiding op te volgen. De garantie geldt niet
als er aanpassingen of onderhoudswerkzaamheden zijn
uitgevoerd door onbevoegde personen of als niet-originele
onderdelen en accessoires zijn gebruikt.
2. W przypadku stwierdzenia wady należy zaprzestać użytkowania produktu i dostarczyć lub odesłać go do sklepu,
w którym został po raz pierwszy zakupiony. Zgłaszany do
reklamacji w ramach gwarancji produkt powinien zostać
dostarczony czysty i kompletny wraz z oryginałem dowodu zakupu (paragon lub faktura). Prosimy nie wysyłać
-
produktu bezpośrednio do producenta.
3. Gwarancja nie obejmuje uszkodzeń wynikających z
niewłaściwego użytkowania, czynników zewnętrznych
(woda, ogień itp.) lub standardowego zużycia wynikają-
-
cego z eksploatacji. Gwarancja nie obowiązuje również
w przypadku, gdy produkt był użytkowany niezgodnie z
instrukcją użytkowania, jeśli był naprawiany lub modyfikowany przez nieuprawnione osoby oraz, gdy użyto w tym
celu nieoryginalnych części i akcesoriów.
4. Niniejsza gwarancja nie wyłącza, nie ogranicza ani nie
zawiesza uprawnień kupującego wynikających z niezgodności towaru z umową konsumencką.
FRNLPL
99
Page 100

100
cours contre le revendeur sur la base d´une infraction au
contrat d’achat tel qu’autorisé par la législation en vigueur.
 Loading...