

•
Cybex and the Cybex logo are registered trademarks of Cybex International, Inc. Stableflex and the Stableflex logo are registered
trademarks of Cybex International, Inc. Safety
SentryTM
is a registered trademarkofCybex international, Inc. Polar is a registered
trademark
of
Polar. -
DISCLAIMER:
Cybex
International,
Inc.
makesnorepresentationsorwarranties
regarding
the
contentsofthis
manual.
We
reserve
the
righttorevise
this
documentatany
timeorto
make
changestothe
product
described
withinitwithout
notice
or
obligationtonotify
any
personofsuch
revisionsorchanges
.
•
2003, Cybex International, Inc. All rights reserved. Printed in United States
of
America.
~
0 Trotter Drive Medway,MA02053 • 800-766-3211 • 508-533-4300 •
FAX
508-533-5183
www.eCybex.com.techhelp@cybexintl.com.techpubs@cybexintl.com
• LT-17730-4 Rev 0 • April 2003
•
•
•
•
•
•
•
•
•
•
•
•
•
•
•
•
•
•
•
•
•
•
•
-.
•
•
•
•
•
•
•
•
•
•
•
•
•
•
•
•
•
•
•
CYBEXin
ternational
.
Defining
Fitness
Cybex
Pro+
Treadmill
Owner's
&
Service
Manual
Cardiovascular Systems
Part Number LT-17730-4 Rev 0
•
•
•
:.
•
•
•
•
•
•
•
•
•
•
•
•
•
•
•
:.
•
•
•
•
•
•
•
•
•
•
•
•
•
•
•
•
••
•
•
•
Cybex
Pro+
Treadmill
Owner's&Service
Manual
An Owner's & Service Manual is shipped with each Cybex Pro+ Treadmill.Topurchase
additional copies
of
this manualorany other Cybex manual, pleasedooneofthe following:
• Order online
at
www.eCybex.com
• Fax your orderto508-533-5183
• For customers living within
the
USA,
contact
Cybex
Customer
Service at 800-766-3211
then press 63
• For customers living outside the USA,
contact
Cybex Customer Service at
508-533-4300
To
contact Cybex with
comments
about
this manual you
may
send email
to
techpubs@cybexintl.com.
! WARNING:
Changesormodifications
to
this
unit
not
expressly
approved
by
the
party
responsible
for
compliance
could
void
the
user's
authoritytooperate
the
equipment.
This equipment has been tested and foundtocomply
with the limits for a Class B digital
device, pursuant
to
Part 15ofthe
FCC Rules. These limits are designedtoprovide reasonable
protection against harmful interference in a residential installation. This equipment generates,
uses and can radiate radio frequency energy and, if not installed and used in accordance with
the instructions, may cawse harmful interference
to
radio communications. However, there is
no guarantee
that
interference will
not
occurina particular installation. If this equipment does
cause harmful interference
to
radioortelevision reception (which can be determined
by
turning the equipment
off
and on) the user is encouragedtotrytocorrect the interference by
one
or
moreofthe following measures:
Reorient
or
relocate the receiving antenna.
Increase
the
separation between the equipment and receiver.
Connect
the
equipment
into an outlet on a circuit different from thattowhich the
receiver is connected.
Consult the dealer
or
an experienced radio TV technician
for
help.
Page
i
Page ii
Cybex
Pro+
Treadmill
Owner's&Service
Manual
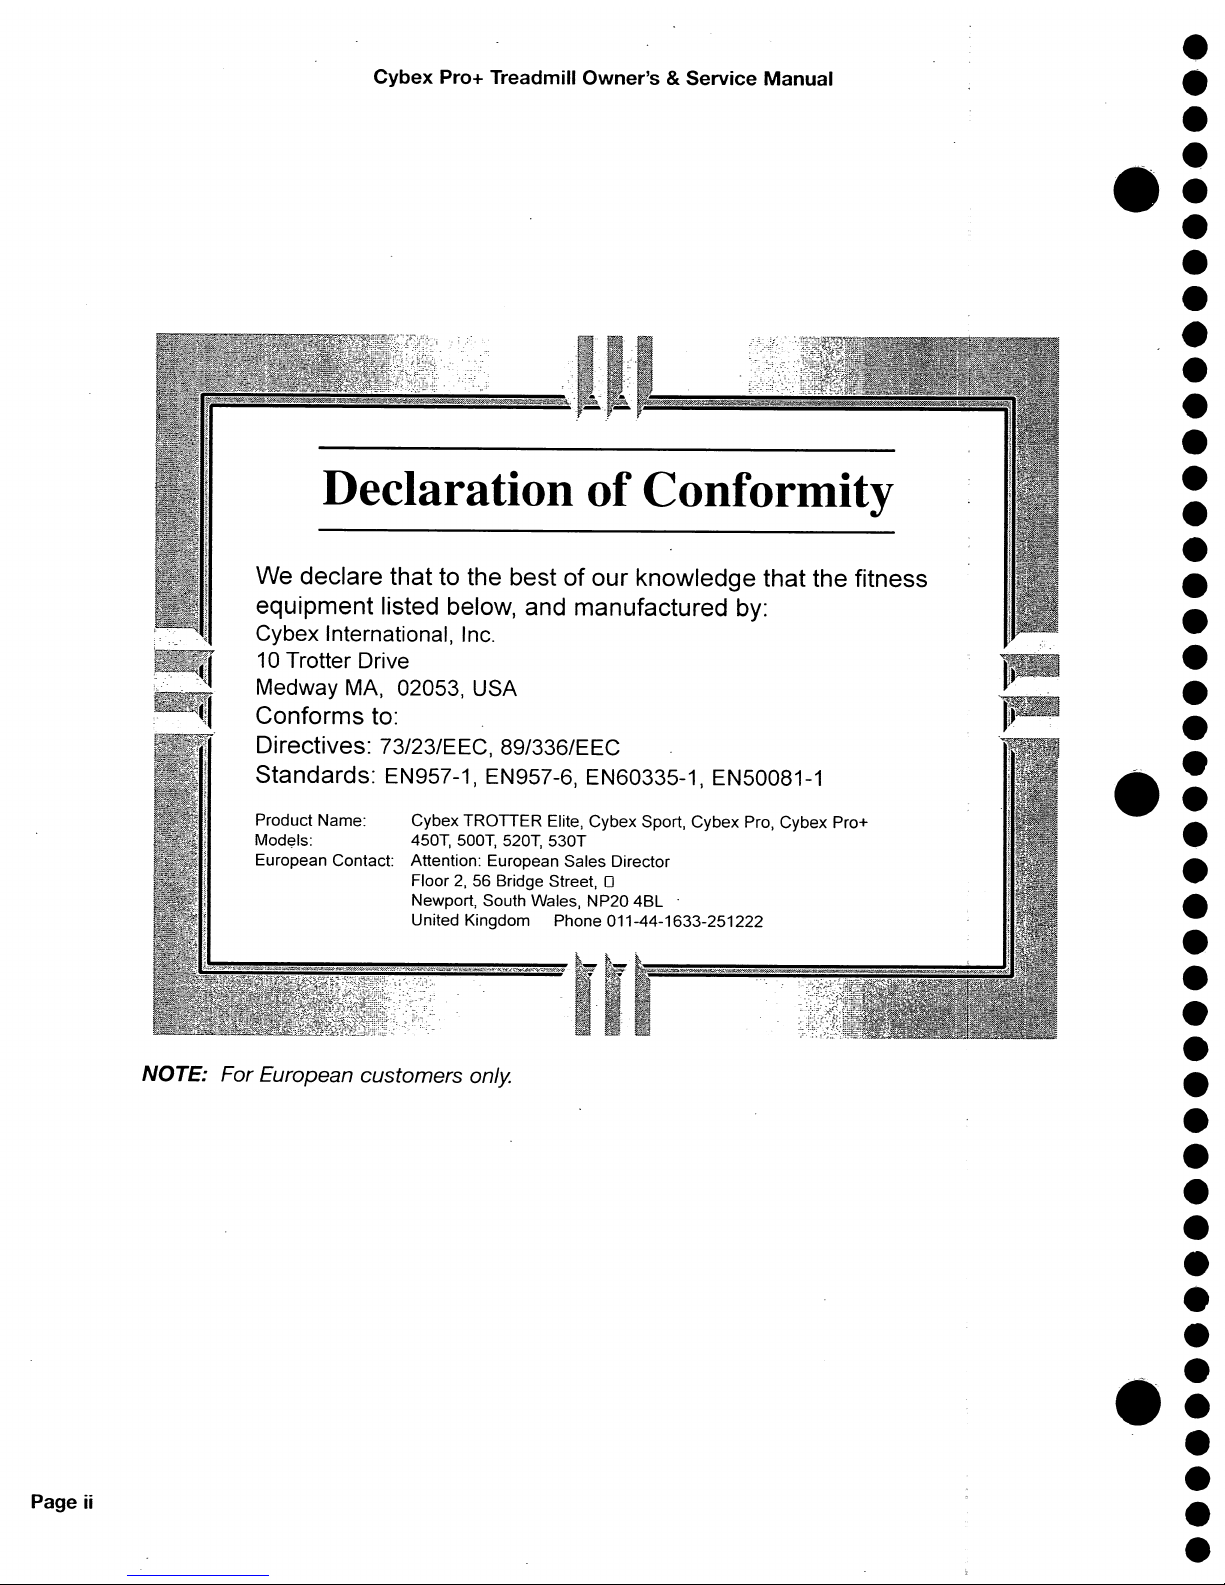
Declaration
of
Conformity
We declare that to the bestofour knowledge that the fitness
equipment listed below, and manufactured by:
Cybex International, Inc.
10 Trotter Drive
Medway MA, 02053, USA
Conforms to:
Directives: 73/23/EEC, 89/336/EEC
Standards: EN957-1, EN957-6, EN60335-1, EN50081-1
Product Name: Cybex TROTTER Elite, Cybex Sport, Cybex Pro, Cybex Pro+
Models: 450T, 500T, 520T, 530T
European Contact: Attention: European Sales Director
Floor
2,
56 Bridge Street, 0
Newport, South Wales, NP20
4BL
.
United Kingdom Phone 011-44-1633-251222
NOTE: For European customers only.
•
•
•
•
•
•
•
•
•
•
•
•
•
•
•
•
•
•
•
•
•
•
•
•
•
•
•
•
•
•
•
•
•
•
•
•
•
•
•
•
•
•
•
•
•
Cybex Pro+ Treadmill Owner's & Service Manual
Table of Contents
•
•
•
•
••
•
•
•
•
•
•
•
•
•
•
•
•
•
•
•
:.
•
•
•
•
•
•
•
•
•
•
•
•
•
•
•
•
••
•
•
•
Front Pages
Abo·ut this Manual i
FCC Compliance Information i
Declaration
of
Conformity
ii
TableofContents iii
1 Safety
Important Voltage Information 1-1
Grounding Instructions 1-1
Important Safety Instructions
1-2
Warning Decals 1-4
Caution Decals
1-7
Emergency
Stop
Key (e-stop) 1-8
2 Technical Specifications
Specifications 2-1
3 Operation
Terms & Symbols Used 3-1
Quick Operation Guide
3-2
Detailed Operation Guide
3-2
Stopping the Treadmill
3-5
-Immobilization
Method
3-5
Emergency Dismount 3-5
Emergency
Stop
o'
••••••••
3-5
Safety Sentry
3-5
Control During Operation
3-5
Data Readouts
3-6
Displaying Heart Rate
~
3-6
Heart Rate LED
3-6
Use
of
Programs
3-7
Manual
Mode
3-8
The Workout Profile
3-8
Meaning
of
% Grade
3-9
5K Run 3-10
9 Holes
3-12
Heart Rate 3-14
Cardio 3-16
Weight Loss 3-18
Manual
3-19
4 Preventive
Maintenance
Warnings/Cautions
4-1
Regular Maintenance Activities
4-1
Cleaning Your Treadmill
4-1
Running Belt Maintenance
4-2
Other Preventive Maintenance
4-6
Service Schedule 4-7
Log Sheet ' 4-8
5 Setup & Assembly
Warnings/Cautions 5-1
Choosing & Preparing a Site 5-1
Electrical Power Requirements
5-2
Assembling the Treadmill 5-2
Testing the Treadmill Operation
5-11
Setting Operation Options
5-12
6
Customer
Service
Contacting Service
6-1
Serial Number & Voltage 6-1
Return Material Authorization (RMA)
..
6-1
Damaged Parts . . . . . . . . . . . . . . . . . . 6-3
Ordering Parts
6-3
7 Service
Warnings/Cautions
7-1
Test Mode
7-2
LED Functions 7-3
.Key Functions
..
>
••••••••••••••••••
7-3
Error Codes 7-4
Motor
Current & Voltage 7-4
Speed Sensor Adjustment
7-6
IR
Compensation 7-8
Speed Calibration
7-9
Running Belt & Deck
7-10
Rear Roller 7-11
Front Roller
7-12
Drive Belt
7-13
Drive
Motor
7-15
Motor
Brushes 7-18
Elevation
Motor
. . . . . . . . . . . . . . . . .
7-19
Lower
Control
Board
7-23
Power Cord
7-26
Power Switch
7-26
Line Filter 7-27
Upper
Display Board 7-29
Contact
Heart Rate Board 7-31
Contact Heart Rate Grips 7-31
CSAFE Board 7-33
Display Cable 7-34
Display Overlays
7-37
Parts List . . . . . . . . . . . . . . . . . . . . . .
7-38
Exploded View 7-41
Schematic . . . . . . . . . . . . . . . . . . . . .
7-42
Page iii
. This
page
intentionally
left
blank
•
•
•
.:
•
•
•
•
•
•
•
•
•
•
•
•
•
•
•
.:
•
•
•
•
•
•
•
•
•
•
•
•
•
•
•
.:
•
•
•
Cybex
Pro+
Treadmill
Owner's&Service
Manual
IMPORTANT: Read all instructions
and
warnings before using the treadmill.
Safety
Page
1-1
This treadmill is for use on a nominal
115
VAG
±5%,
60 Hz and 20 amps,
208/220
VAG,60Hz,
15 ampsor230
VAG
±5%, 50 Hz and 15 amps and a
grounded, dedicated circuit. Make sure
that the treadmill is connected
to
an
! DANGER:
Improper
connection
of
the
equipment-grounding
conductor
can
result
inariskofelectric
shock.
Check
withaqualified
electrician
or
service
providerifyou
areindoubt
as
to
whether
the
treadmill
is
properly
grounded.
Seekaqualified
electriciantoperform
any
modifications
to
the
cordorplug.
Cybexisnot
responsible
for
injuries
or
damages
as
a
resultofcord
or
plug
modification.
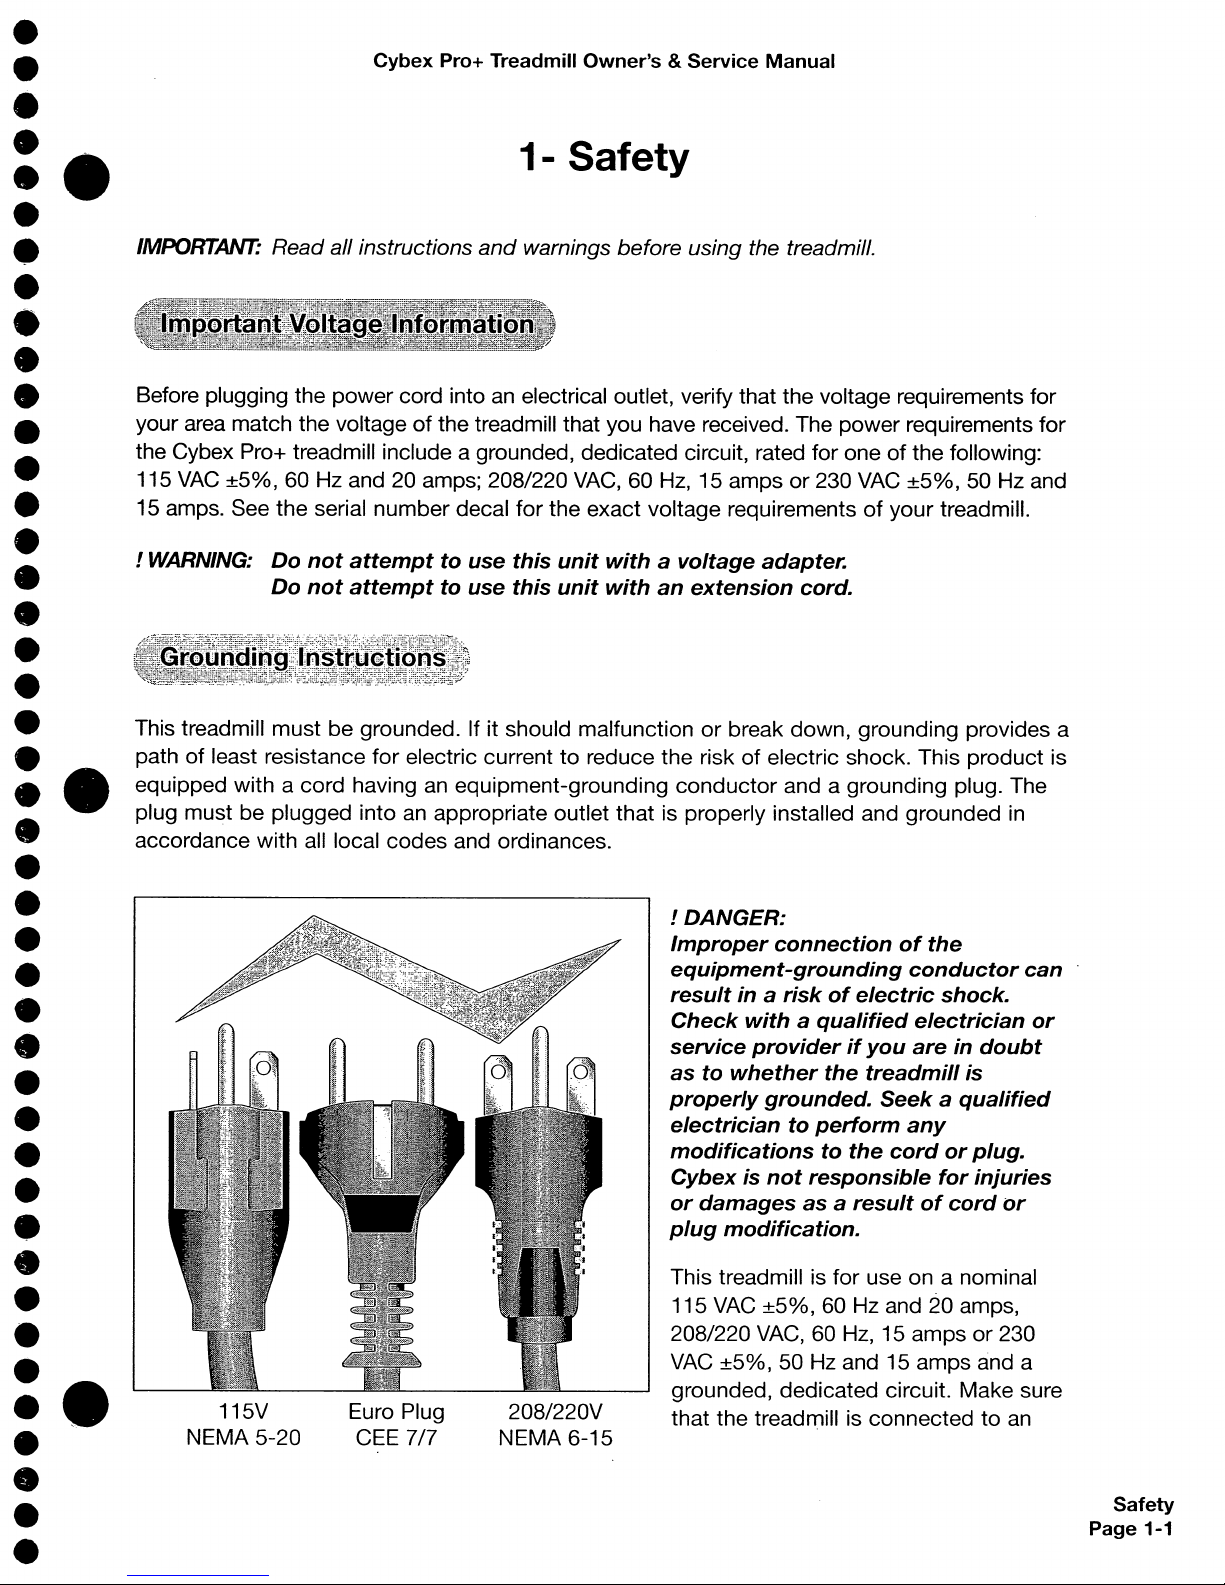
208/220V
NEMA 6-15
Euro Plug
GEE
717
115V
NEMA 5-20
1-
Safety
Before plugging the power cord intoanelectrical outlet, verify that the voltage requirements for
your area match the voltage
of
the treadmill that you have received. The power requirements for
the Cybex Pro+ treadmill include a grounded, dedicated circuit, rated for one
of
the following:
115
VAC
±5%, 60 Hz and 20 amps; 208/220
VAC,60Hz,
15 ampsor230
VAC
±5%,
50 Hz and
15 amps. See the serial number decal for the exact voltage requirements
of
your treadmill.
This treadmill must be grounded. If it should malfunction
or
break down, grounding provides a
path
of
least resistance for electric currenttoreduce the riskofelectric shock. This product is
equipped with a cord having
an
equipment-grounding conductor and a grounding plug. The
plug must be plugged into
an
appropriate outlet that is properly installed and grounded
in
accordance with all local codes and ordinances.
! WARNING:
Do
not
attempttouse
this
unit
withavoltage
adapter.
Do
not
attempttouse
this
unit
with
an
extension
cord.
•
•
•
:.
•
•
•
•
•
•
•
•
•
•
•
•
•
•
•
:.
•
•
•
•
•
•
•
•
•
•
•
•
•
•
•
•
••
•
•
•
Safety
Page 1-2
Cybex
Pro+
Treadmill
Owner's&Service
Manual
outlet having the same configuration as the plug. Do not use a ground plug adaptertoadapt
the power cord
to
a non-grounded outlet.
(Save These Instructions)
! DANGER:
To
reduce
the
riskofelectric
shock,
always
unplug
this
treadmill
from
the
electrical
outlet
immediately
after
usingitand
before
cleaning
it.
! WARNING:
Serious
injury
could
occurifthese
precautions
are
not
observed.Toreduce
the
riskofburns,
fires,
electric
shock,orinjury:
User
Safety
Precautions
• DO NOT wear looseordangling clothing while
u.sing
the treadmill.
• Use the treadmill handrails
for
support andtomaintain balance.
• Stop exercising if you feel faint, dizzy, or experience pain at any time.
• Obtain a medical exam before beginning any exercise program.
• Read and understand emergency stop procedures.
• Replace any warning labels if damaged, worn
or
illegible.
• Report any malfunctions, damageorrepairstothe facility.
• Place your feet on the
two
top
steps when startingorstopping the treadmill.
• Stop and place the treadmill at 0 degrees incline (level) after each use.
• Keep children away from the treadmill. Teenagers and disabled persons must be
supervise~
while using.
• Obtain instruction before using.
• Keep all body parts, hair, towels, water bottles and the like free and clear
of
moving parts.
• Read and understand the Owner's Manual and all warnings posted on the unit before using.
.•
DO NOT use the unit if you exceed 400 Ibs.
(181
kg). This is the rated maximum user weight.
Facility
Safety
Precautions
• Instruct all users on
howtoclip the e-stop clip onto their clothing and carefully test it prior
to using the treadmill.
•
•
•
•
•
•
•
•
•
•
•
•
•
•
•
•
•
•
•
•
•
•
•
•
•
•
•
•
•
•
•
•
•
•
•
•
•
•
•
•
•
•
•
•
•
•
.-
•
•
•
•
•
•
•
•
•
•
•
•
•
•
•
•
•
•
•
•
•
•
•
•
•
•
•
•
•
•
•
•
•
•
•
•
•
•
•
•
•
•
•
•
Cybex
Pro+ Treadmill
Owner's&Service
Manual
• Instruct all users to use caution when mounting and dismounting the treadmill.
• Disconnect all power before servicing the treadmill.
• Use a dedicated line when operating the treadmill.
• Connect the freadmill
to
a properly grounded outlet only.
• DO NOT operate electrically powered treadmills in
damporwet locations.
• Keep the running belt clean and
dry
at all times.
• Use this treadmill
for
commercial use only.
• DO NOT leave the treadmill unattended when plugged in and running. NOTE: Before
leaving the treadmill unattended, always wait until the treadmill comes to
a complete stop
and
is
level.
Then,
turn all controls to the STOPorOFFposition
and
remove the
plug
from
the outlet. Remove the e-stop key from the treadmill.
• Immobilize the treadmill (when notinuse)byremoving the e-stop
key.
• Inspect the treadmill for wornorloose components before each use. Do not use until worn
or damaged parts are replaced.
• Maintain and replace worn parts regularly. Refer
to
"Preventive Maintenance" section
of
Owner's Manual.
• DO NOT operate the treadmill if:
(1)
the cord is damaged;
(2)
the treadmill is not working
properly
or
(3)
if the treadmill
h~s
been droppedordamaged. Seek service from a qualified
technician.
• DO NOT place the cord near heated surfacesorsharp edges.
• DO NOT use the treadmill outdoors.
• DO NOT operate the treadmill around or where aerosol (spray)
or
where oxygen products
are being used.
• Read and understand the Owner's Manual completely before using the treadmill.
• Ensure all users wear proper footwear on
or
around all Cybex equipment.
• Set up and operate the treadmill on a solid, level surface. Do not operateinrecessed areas
oronplush carpet.
• Provide the following clearances: 19.7 inches (0.5
m)
at each side, 39 inches (1.0
m)
at the
back and enough room for safe access and passage at the front
of
the treadmill. Be sure
your treadmill is clear
of
walls, equipment and other hard surfaces.
• DO NOT attempt repairs, electrical
or
mechanical. Seek qualified repair personnel when
servicing. If you live
in
the USA, contact Cybex Customer Service at 800-766-3211 (then
press
64).
If you live outside the USA, contact Cybex Customer Service~t508-533-4300.
Safety
Page
1-3
Safety
Page
1-4
Cybex Pro+ Treadmill Owner's & Service Manual
• Use Cybex factory parts when replacing partsonthe treadmill.
• DO
NOT
modify the treadmillinany way.
• DO
NOT
use attachments unless recommended for the treadmill by Cybex.
• Ensure
all
User and Facility safety precautions are observed.
• Carefully read and understand the following before using the Cybex Pro+ treadmill:
• Warning Decals
• Caution Decals
To
replace any worn or damaged decals do one of the following: Visit eCybex.com to shop
for parts online, fax your order to
508-533-5183
or contact Cybex Customer Service at
800-766-3211.Ifyou live outside of the USA, call
508-533-4300.
For location or part number
of labels, see the parts list and exploded-view diagram. This information can be foundinthe
Service chapter
in
this manual oronCybex web site at ecybex.com.
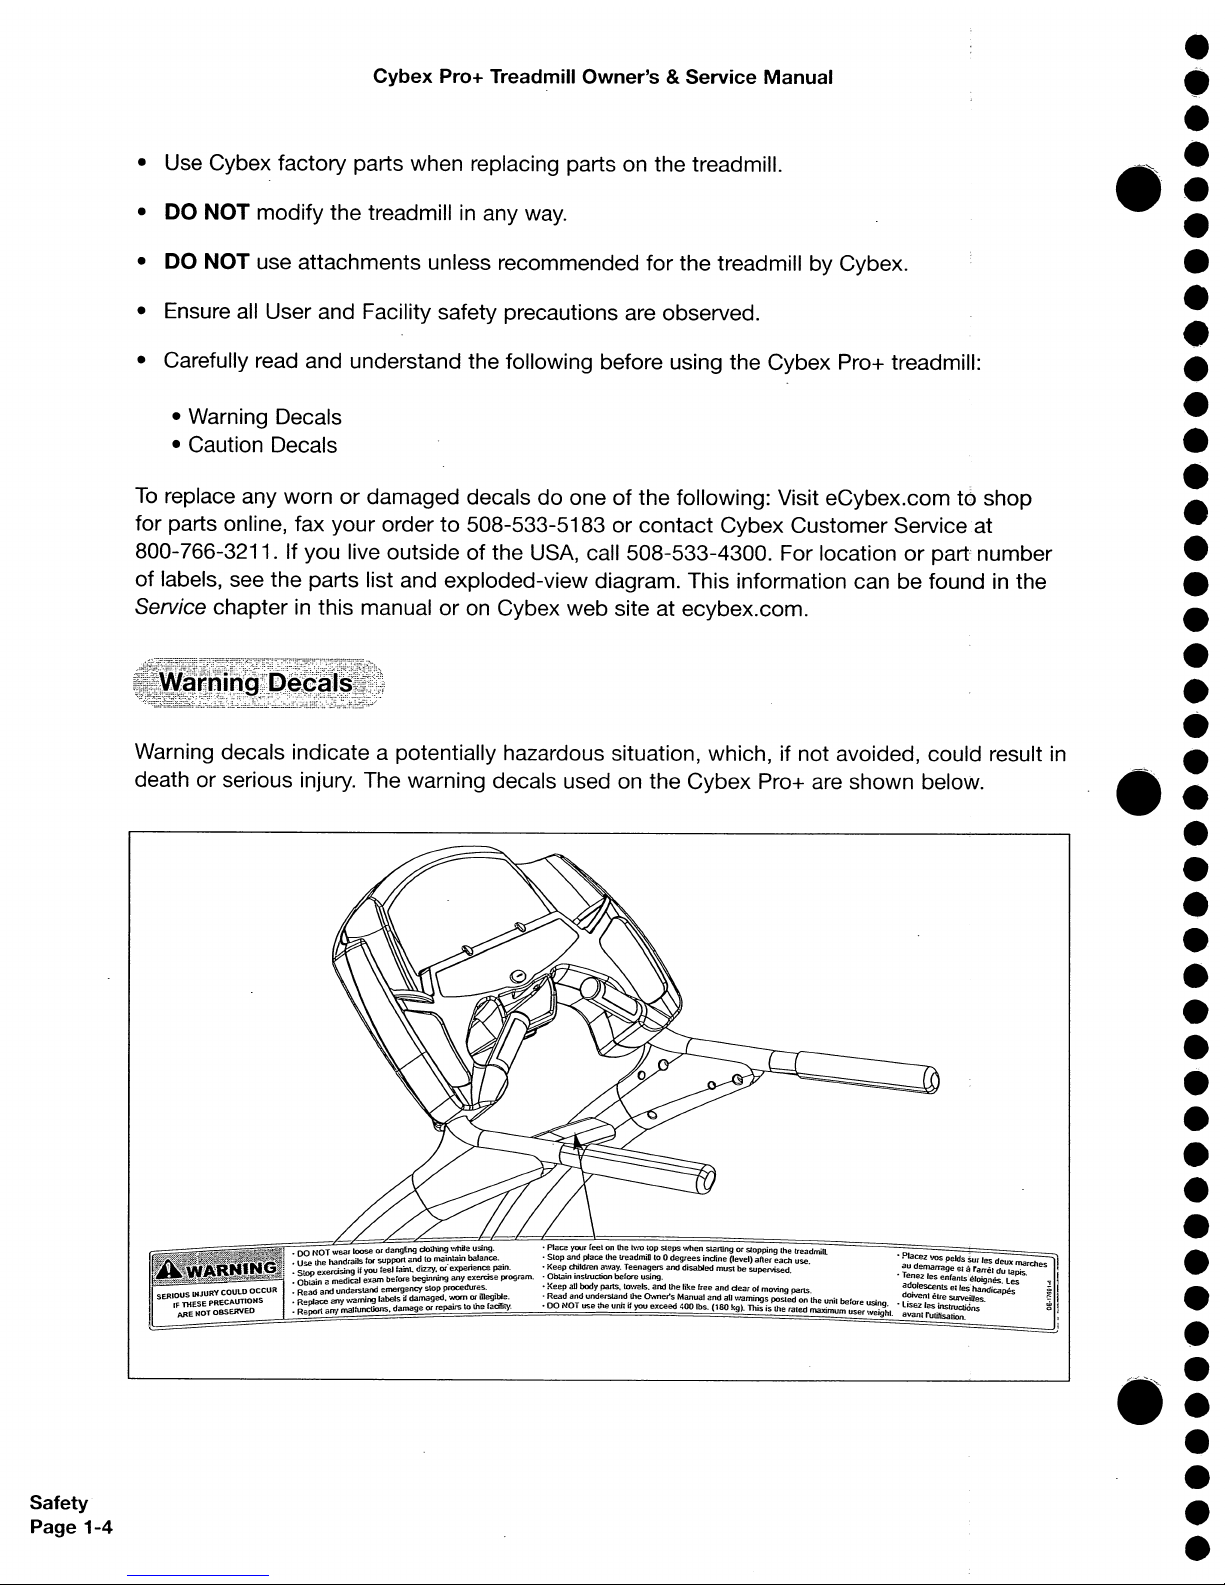
Warning decals indicate a potentially hazardous situation, which,ifnot avoided, could result
in
death or serious
injury.
The warning decals usedonthe Cybex Pro+ are shown below.
T
:-
loose
or
dangling clothing
while
using. • Placeyour feet on the 1\':0 lOp steps
when
startingorstopping the
treadmill
"
·
D?
NO
..:~r
'Is for support
and
to maintain balance. • Stopand place the lreadmiD to 0
degrees
indine
(level)
after
each use. • Placez 'los pelds Sur
les
deux
march
:
Use
th~
~~a\j
you
feel faint, dizzy,
oi
experien~
pain. • Keetl.ct:Uldren
~way.
Teena~ers
and disabled
mustbesupervised. •audemarragesta
farrel
du
laPIS. es
•
~:i~Xa
medi~1
exam
before beginning
any
exerase
program. •
~btalO
IOslrudJon before
USIng.
. .
~e;~
les
enfanls eloignes. Les
•
Read
and
undars~I=~~~~:r~m;e~~b1e.
:
~:~
~~~=~:r~':~:n"=r'~~:u:~=n~n~IJ~~~~~~o':~~:='the
unit
be'
.
~~~:
::"~~~icapes
:
~:=~':nctions.
damageorrepairstothe facility.
·00
NOT
use
ihe
unit
it you exceed
400
Ibs. (180 kg). Thisisthe rated
maximum-~~;
:~:ht..~~':II~~~~ons
•
•
•
•
•
•
•
•
•
•
•
•
•
•
•
•
•
•
•
•
•
•
•
•
•
•
•
•
•
•
•
•
•
•
•
•
•
•
•
•
•
•
•
•
•
DE-16609-4
Safety
Page
1-5
Date Mileage Service Initials
Cybex
Pro+ Treadmill
Owner's&Service
Manual
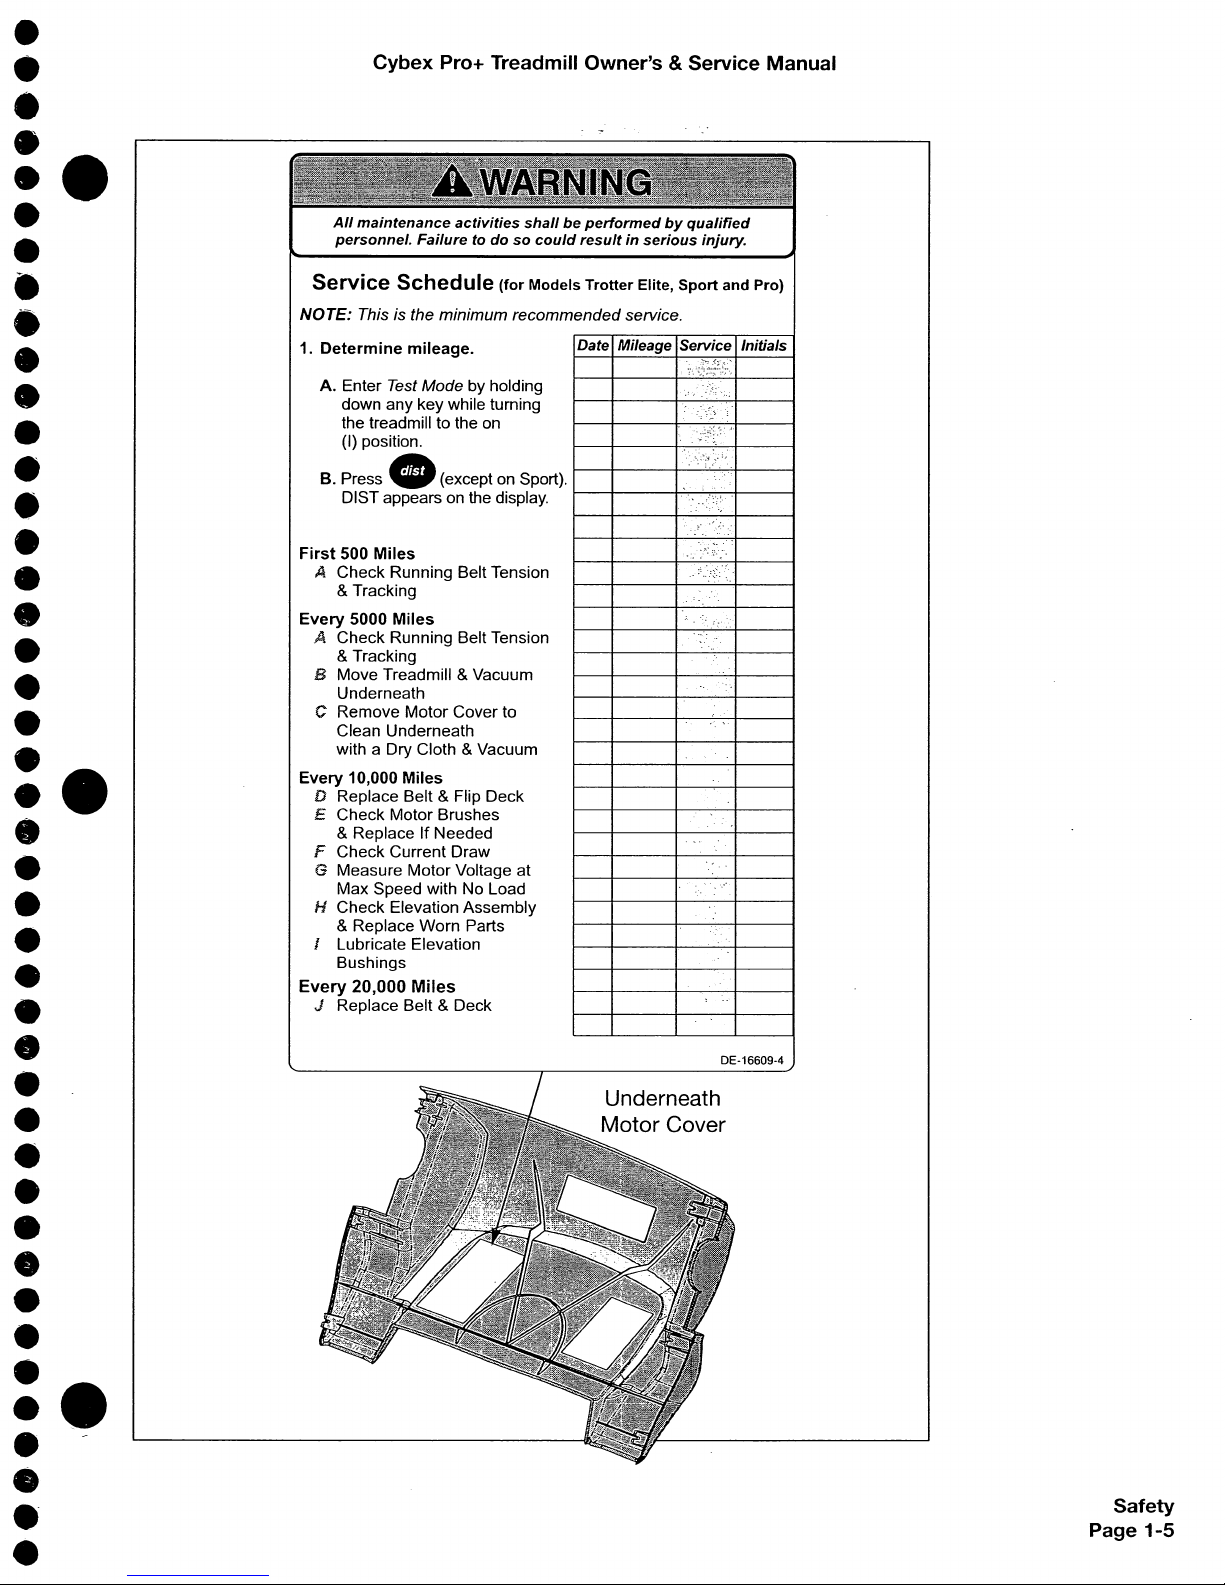
All
maintenance
activities
shallbeperformedbyqualified
personnel.
Failuretodosocould
resultinserious
injury.
A. Enter Test Mode by holding
down any key while tuming
the treadmill to the on
(I) position.
B.
press.
(except on Sport).
1--~--_I----'-'--"-'-I-----1
DIST appears on the display.
Service
Schedule
(for
Models
Trotter
Elite,
Sport
and
Pro)
NOTE:
This is the minimum recommended service.
1.
Determine
mileage.
First
500
Miles
A Check Running Belt Tension
&Tracking
Every
5000
Miles
A Check Running Belt Tension
&Tracking
B Move Treadmill & Vacuum
Underneath
C Remove Motor Coverto
Clean Underneath
with a Dry Cloth
&Vacuum
Every
10,000
Miles
D Replace Belt &Flip Deck
E Check Motor Brushes
& Replace If Needed
F Check Current Draw
G Measure Motor Voltage at
Max Speed with No Load
H Check Elevation Assembly
& Replace Worn Parts
Lubricate Elevation
Bushings
Every
20,000
Miles
J Replace Belt & Deck
•
•
•
•
••
•
•
•
•
•
•
•
•
•
•
•
•
•
•
•
:.
•
•
•
•
•
•
•
•
•
•
•
•
•
•
•
•
••
•
•
•
•
•
•
•
•
•
•
•
•
•
•
•
•
•
•
•
•
•
•
•
•
•
•
•
•
•
•
•
•
•
•
•
•
•
•
•
•
•
•
•
•
•
•
•
•
•
~I!E~(J)illi'~
KOPPLA
~~~
IFRAN
tJJJTl'~("o
STROMMEN
INNAN SERVICE
UTFORS.
DE·16928
[
VOR CORTE LA
SERVICEAR- ENERGIA
BEITEN ELECTRICA
NETZSTECKER ANTES DE
ZIEHEN.
REPARAR.
DEB
RAN
CHEZ
L'ALIMENTATION
AVANTDEFAIRE
L'ENTRETIEN
Cybex Pro+ Treadmill Owner's & Service Manual
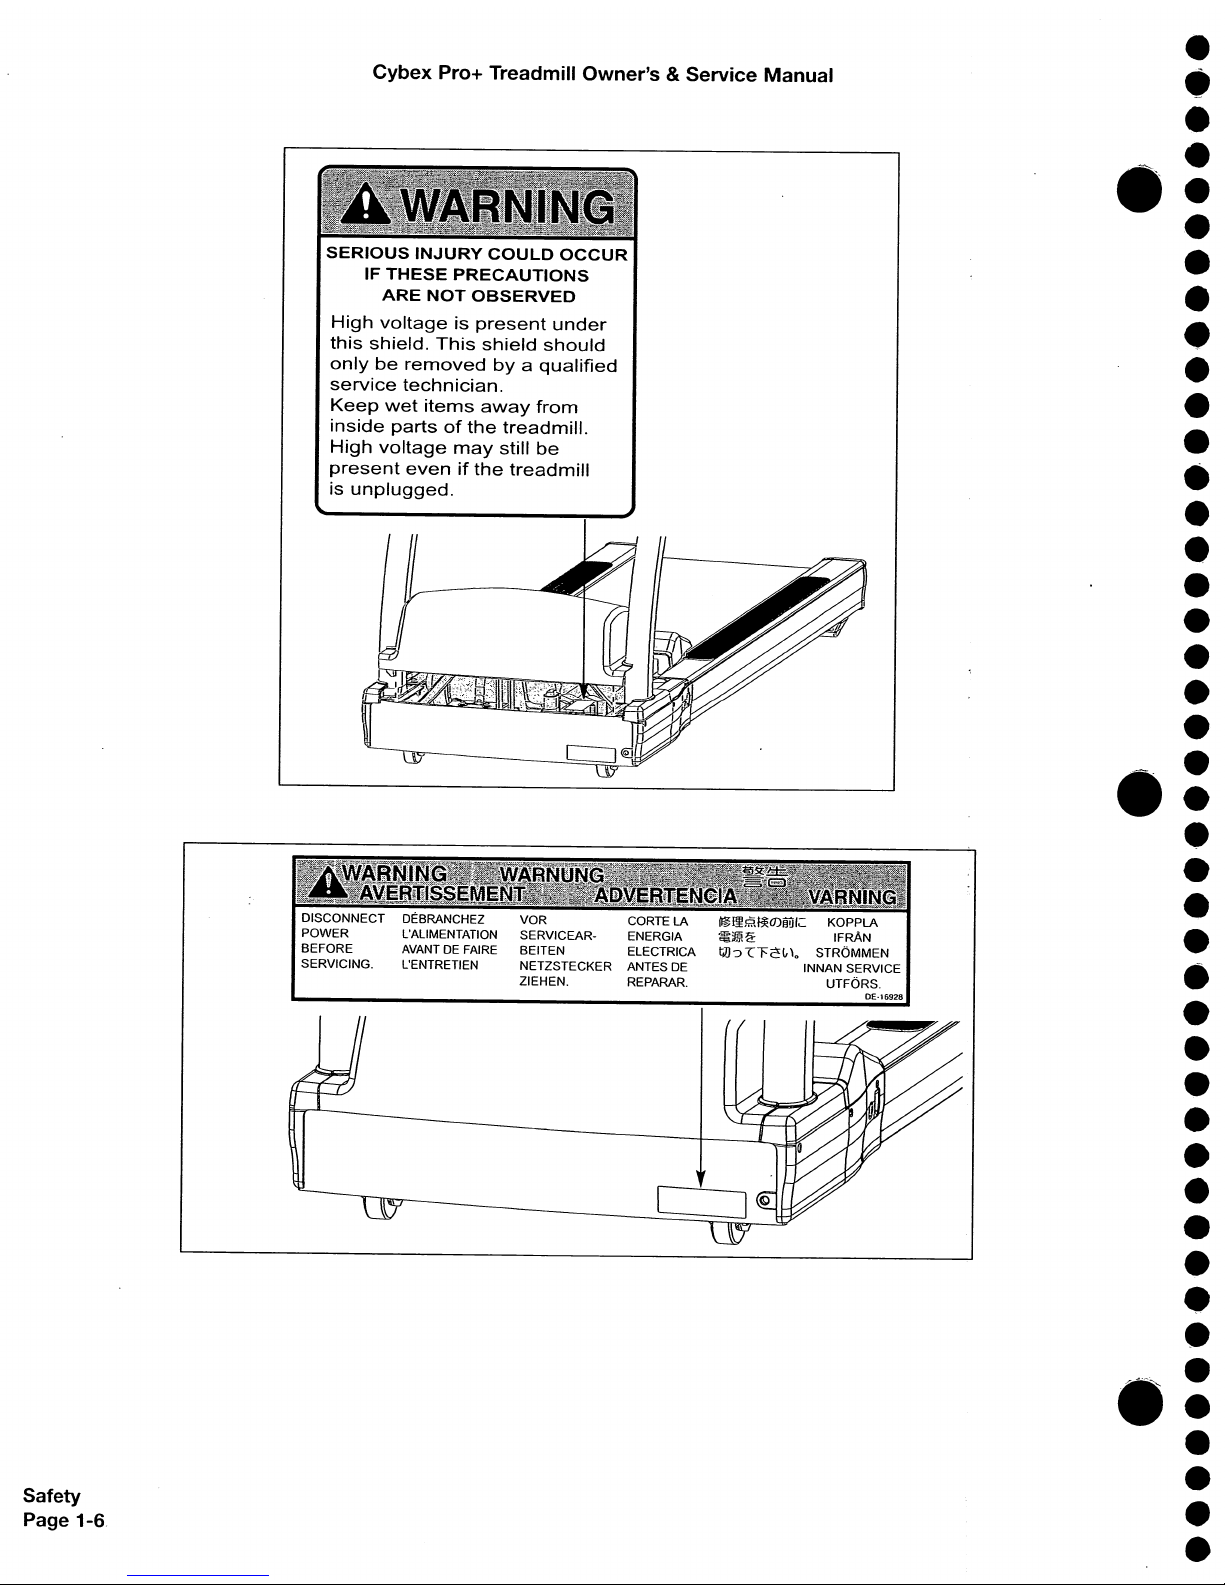
SERIOUS
INJURY
COULD
OCCUR
IF
THESE
PRECAUTIONS
ARE
NOT
OBSERVED
High
voltageispresent
under
this
shield.
This
shield
should
onlyberemoved
byaqualified
service
technician.
Keep
wet
items
away
from
inside
partsofthe
treadmill.
High
voltage
may
still
be
present
evenifthe
treadmill
is
unplugged.
DISCONNECT
POWER
BEFORE
SERVICING.
Safety
Page
1-6.

•
•
•
•
••
•
••
•
•
•
•
•
•
•
•
•
•
•
•
•
•
••
•
•
•
•
•
•
•
•
•
•
•
•
•
•
•
•
••
•
•
•
Cybex
Pro+
Treadmill
Owner's&Service
Manual
Caution decals indicate a potentially hazardous situation, which, if not avoided, may result
in
minor or moderate injury. There are no caution decals used on the Cybex Pro+ treadmill.
However, there is a caution
in
the installation instructions for initial installation only. See below.
Safety
Page
1-7
Safety
Page
1-8
Cybex
Pro+
Treadmill
Owner's&Service
Manual
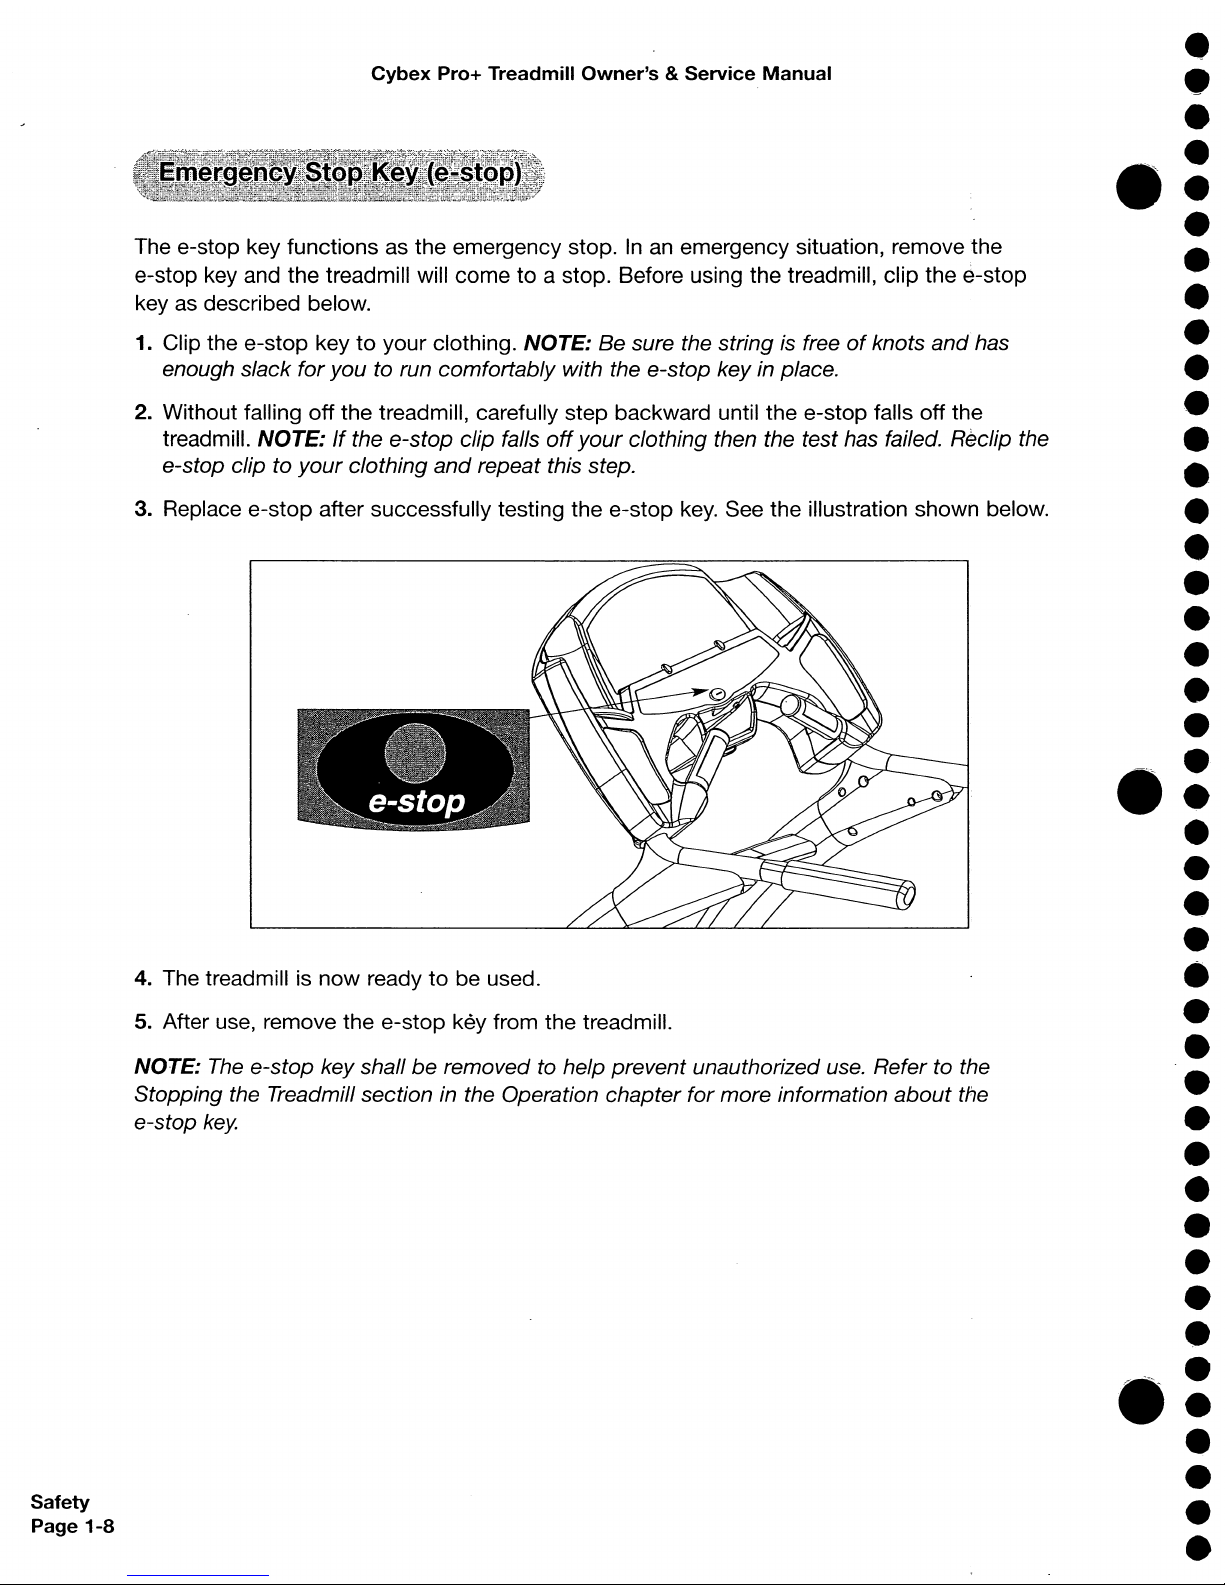
The e-stop key functions as the emergency stop.Inan
emergency situation, remove
the
e-stop key and the treadmill will come to a stop. Before using the treadmill, clip the e-stop
key as described below.
1. Clip the e-stop key
to
your clothing. NOTE:
Be
sure the string is freeofknots
and
has
enough slack
for
you to run comfortably with the e-stop key in place.
2. Without falling
off
the treadmill, carefully step backward until
the
e-stop falls off the
treadmill. NOTE:Ifthe e-stop clip falls
off
your clothing then the test has failed. Reclip the
e-stop clip to
your
clothing
and
repeat this
step_
3. Replace e-stop after successfully testing the e-stop
key.
See the illustration shown below.
4. The treadmill is
now
readytobe used.
5. After use, remove the e-stop key from the treadmill.
NOTE:
The
e-stop key shallberemoved to help prevent unauthorized use. Refer to the
Stopping the Treadmill section in the Operation chapter for more information
about
tfle
e-stop
key.
•
•
•
•
•
•
•
•
•
•
•
•
•
•
•
•
•
•
•
•
•
•
•
•
•
•
•
•
•
•
•
•
•
•
•
•
•
•
•
•
•
•
•
•
Cybex
Pro+
Treadmill
Owner's&Service
Manual
Programs: Quick Start plus Manual, Cardio, 9 Holes, SK Run,
Heart Rate and Weight Loss
Standard Features: Safety
SentryTM,
Contact Heart Rate, Polar and CSAFE, frame color
choices include white texture, black texture, silver vein,
black chrome and platinum sparkle
Optional Features: Full length handrails, unlimited custom colors available
Power Requirement: Grounded, dedicated circuit and one
of
the following:
• 115
VAG
±S,
60_
Hz and 20 amps,
•
208/220
VAG,
60 Hz 15 amps
• 230
VAG
±S,
SO
Hz and
1S"
amps
Motor: 3.0 hp, DC continuous duty
Emergency Stop: Pull the emergency
stop
key (lanyard)
Maximum User Weight: 400 Ibs.
(181
kg)
Specifications
Page
2-1
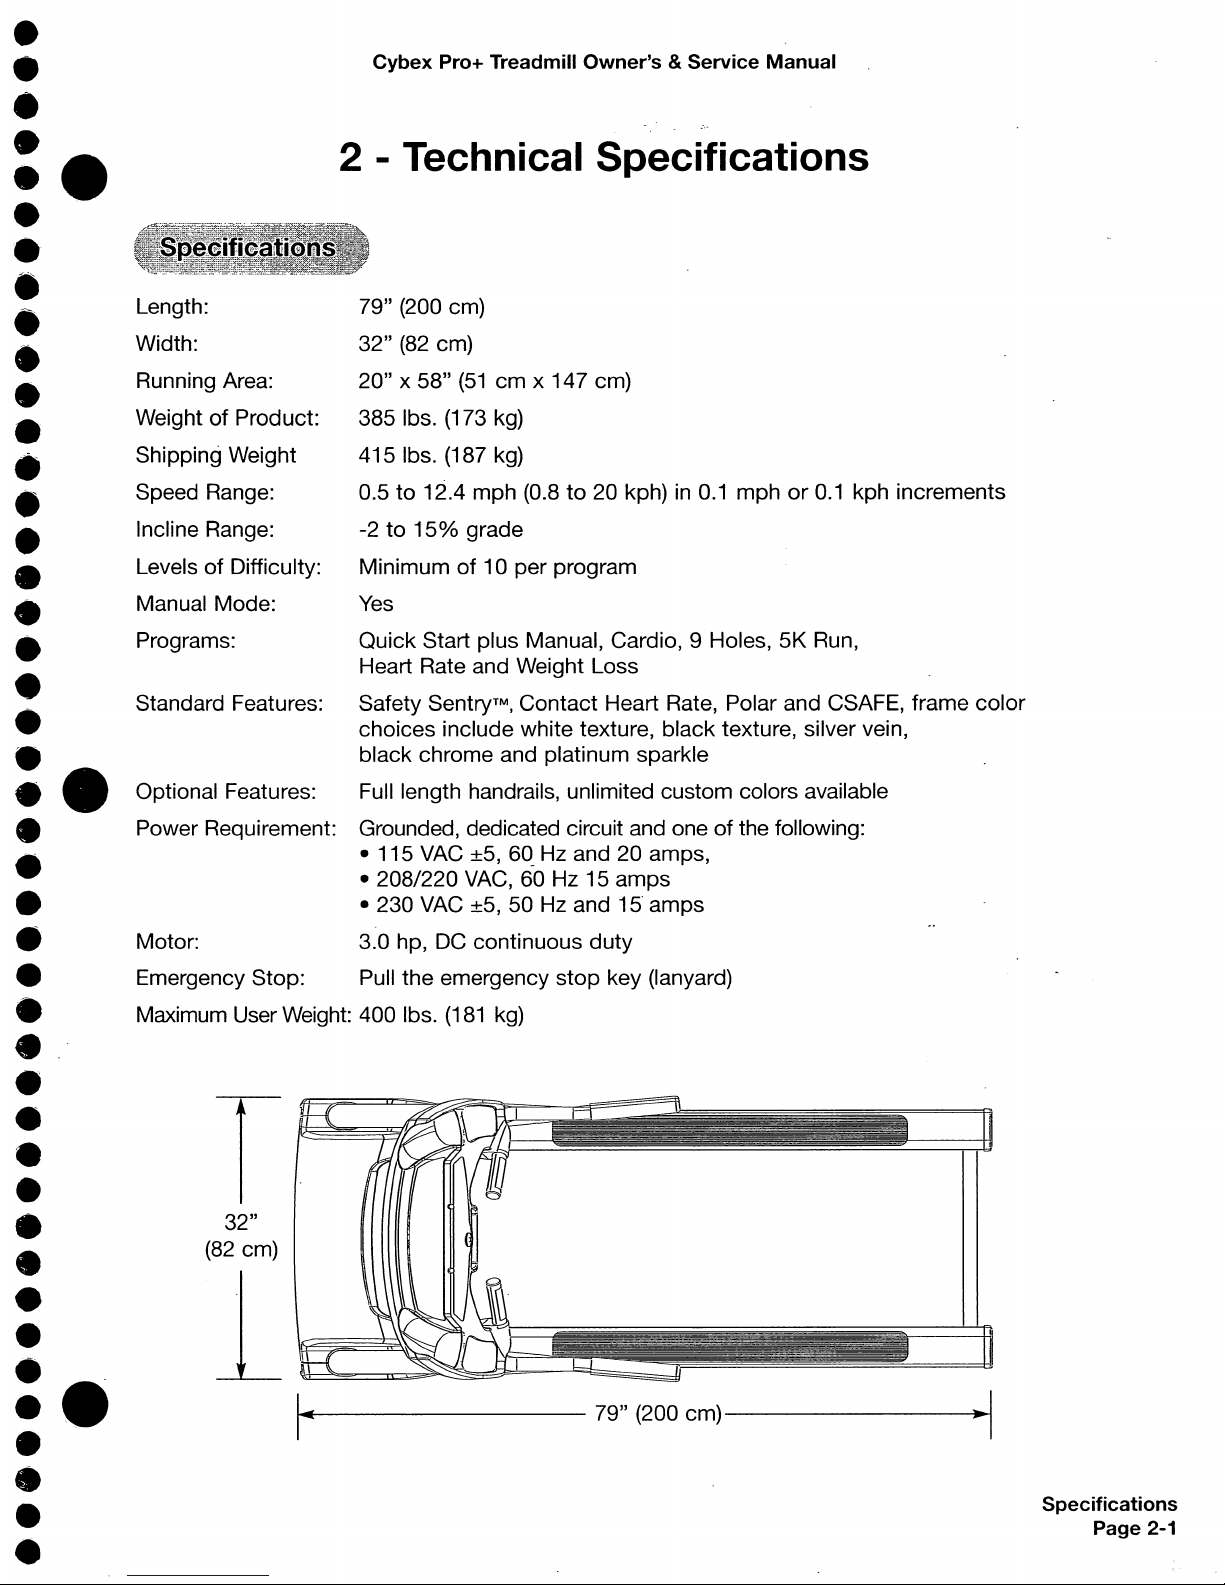
79" (200 cm)
32"
(82
cm)
20" x 58"
(51
cm
x 147 cm)
385 Ibs. (173 kg)
415
Ibs. (187 kg)
0.5
to
12.4 mph (0.8to20 kph)in0.1
mphor0.1
kph increments
-2
to
15%
grade
Minimumof10 per program
Yes
2 - Technical
Specifications
32"
(82
cm)
Length:
Width:
Running Area:
Weight
of
Product:
Shipping Weight
Speed Range:
Incline Range:
Levels
of
Difficulty:
Manual Mode:
•
•
•
•
••
•
•
•
•
•
•
•
•
•
•
•
•
•
•
•
•
••
•
•
•
•
•
•
•
•
•
•
•
•
•
•
•
•
••
•
•
•
Specifications
Page 2-2 .
Cybex
Pro+
Treadmill
Owner's&Service
Manual
.~"
This
page
intentionally
left
blank
•
•
•
•
•
•
•
•
•
•
•
•
•
•
•
•
•
•
•
•
•
•
•
•
•
•
•
•
•
•
•
•
•
•
•
•
•
•
•
•
•
•
•
•
•
•
•
•
•
••
•
•
•
•
•
•
•
•
•
•
•
•
•
•
•
•
••
•
•
•
•
•
•
•
•
•
•
•
•
•
•
•
•
••
•
•
•
Cybex
Pro+
Treadmill
Owner's&Service
Manual
3 -
Operation
Read and understand all instructions and warnings priortousing the treadmill. See allofthe
safety related information
loca~ed
in
chapter
1.
This section lists someofthe common terms and symbols usedinthis chapter. Other terms
and symbols are listed
in
this chapter as appropriate.
Dormant
Mode
- This occurs when the treadmill is plugged in, turnedtothe on
(I)
position
and not
in
use. The control panel will display a beating heart when the treadmill is
in
Dormant Mode.
Program
Setup
Mode
- This begins after pressing any program
key.
Upon entering a
program the LEOs flash, prompting the user
to
adjust
the
appropriate settings.
Active
Mode
- This begins immediately after pressing the
Quick
Start
key (Manual Mode),
or
after the Program Setup Mode. The beginningofActive
Mode
is marked by the 3 second
countdown and running belt acceleration. Active
Mode
continues until you reach the endofa
program, disengage the e-stop key
or
press the
Stop
key.
Quick
Start
- This beginsbypressing the
Quick
Start
key. Quick Start skips the Program
Setup Mode and begins immediately
in
Manual Mode.
Manual
Mode
- This begins immediately after pressing the
Quick
Start
key.InManual
Mode you can customize your workout Time, Speed,
Incline
and enter your
Weight
by
pressing those keys.
You
can also begin Manual
Modebypressing the
Manual
program key
(and be prompted
to
enter your weight).
Workout
Review
- This begins after pressing the
Stop
key once, at the endofa program
or
when the treadmill detects that you are not there (see Safety Sentry in this chapter). The
workout statistics accumulated during the previous workout session will display for 20
seconds (default setting)
or
until
Stop
is pressed again. NOTE:
You
can change the 20
second default. See Setting Operation Options in chapter
5.
Pause
Mode
- This begins when the treadmill detects that you
are"
not there and enters
Workout Review (see Safety Sentry in this chapter). While in Workout Review you can press the
Quick
Start
keytoresume your workout. The time, calories burned and other accumulated
data is remembered_ and added to.
...T - These keys adjust
Time,
Level,
WeightorAge
upordown.
t.J
- These keys adjust
Incline
higherorlower.
+ - - These keys adjust
Speed
up (+)ordown
(-).
Operation
Page
3-1;
Operation
Page
3-2
Cybex
Pro+
Treadmill
Owner's&Service
Manual
f~·rr&'II\~iikIJ)
NOTE: Maximum user weight is 400 Ibs.
(181
kg).
The following is a
quick
overviewofthe operationofthe treadmill. For more information read
Detailed Operation Guide in this chapter. NOTE: Times specified in this chapter refleGt the
treadmills defaults.
To
change the defaults see Setting Operation Options in chapter
5.
1. Place your feet on the
two
top
steps located on each sideofthe running belt.
! CAUTION:
Do
not
stand
on
the
running
belt
when
starting
the
treadmill.
Always
place
your
feet
on
the
two
top
steps
when
beginningaworkout.
2.
Clip the
e-stop
clip
onto
your
clothing and test it as described under Emergency Stop
in
the Safety chapter.
3.
.Press
any program keyorpress
Quick
Start
to
skip the settings and begin Manual
Mode
immediately.
4.
If you pressed a program keytoselect a program, you will
now
be prompted
for
workout
Time, Weight, Level and
Age
as appropriate. Adjust these settings with
the.
T arrows
and press
Enter
to
proceed.
5.
The treadmill begins a countdown, "3
...2...
1," after which it accelerates the belt
to
1.0 mph (1.6 kph) (for Manual Mode) or the speedofthe program that you selected.
6. Hold the handrails while you step onto the running belt and begin walking.
7. Press the
Speed
+ - keys
to
change the belt speed at any time. The right display will
show the current speed.
8. Press the
Incline
t f. keys
to
change the incline at any time. The left display will
show
the current incline.
9. Press the
Stop
key at any time.
NOTE: Maximum user weight is 400 Ibs.
(181
kg).
1. Plug the treadmill power cord into a power outlet from a grounded, dedicated circuit, rated
for oneofthe following: 115
VAG
±5%,
60 Hz and 20 amps; 208/220 VAC, 60 Hz, 15 amps
or
230 VAC
±5%,
50 Hz and 15 amps.
2. Locate the on/off (I/O)
power
switch on the left sideofthe treadmill. Toggle ittothe on
(I)
positiontosupply
powertothe internal treadmill
components
and illuminate the
control panel.
•
•
•
•
•
•
•
•
•
•
•
••
•
•
•
•
•
•
•
•
•
•
•
•
•
•
•
•
•
•
•
•
•
•
•
•
•
•
•
•
•
••
•
•
•

•
•
•
•
••
•
.'
•
•
•
•
•
•
•
•
'.
•
•
•
'.
•
••
•
•
•
•
•
•
•
•
•
•
•
•
•
•
•
•
••
•
•
•
Cybex
Pro+ Treadmill
Owner's&Service
Manual
! CAUTION:
Do
not
stand
on
the
running
belt
when
starting
the
treadmill.
Always
place
your
feet
on
the
two
top
steps
when
beginningaworkout.
3.
Place your feet on the
two
top
steps located on each sideofthe running belt.
4. Clip the
e-stop
clip onto your clothing and carefully test the e-stop key to ensure it will fall
off properly
in
caseofan
emergency. See Emergency Stop Key (e-stop)inchapter 1 for
properly testing the e-stop
key.
Also, see Stopping the Treadmillinthis chapter for further
information about the e-stop
key.
NOTE:
Be
sure the string is freeofknots
and
has
enough slack for
you
to run comfortably with the e-stop key in place.
5.
You
now have the optiontoselect a programorenter Manual Mode.
To
select a program, press a program key and follow the prompts. Upon entering a
program the LEOs flash, prompting you
to
adjust the appropriate settings. This is referred
to
as Program Setup Mode. If the
Quick
Start
key is pressed now, all defaults for that
program will be accepted. After 10 seconds, if no key has been pressed, the first default
will be accepted. After another 10 seconds the second default will be accepted and so on
until the last default. The program will not enter Active Mode until you press the
Enter
or
Quick
Start
key.
If no key has been pressed
for
20 seconds after displaying the last
default, then the treadmill will return
to
the Dormant Mode.
If you choosetoenter Manual
Mode
insteadofchoosing a program, press the
Quick
Startorthe
Manual
key.
NOTE: No
prompts
will
occur
when you press
Quick
Start
WhileinManual Mode, customize your workout
Time,
Speed,
Incline
and enter your
Weightbypressing those keys.
NOTE: For the
most
accurate calorie count, you
must
set
your
correct weight before
beginning
your
workout (including clothing).
NOTE:
You
must
press
Enter
after
each
adjustment.
6. The treadmill begins a countdown, "3...2...1" and sounds a tone for each count. When it
reaches one
(1)
the treadmill gives a longer tone and then starts accelerating the belt.
In
Manual
Mode
the belt will begin acceleratingto1 mph (1.6 kph) and the incline will remain
at zero percent.
In
a program the belt will begin accelerating and the incline will change
to
the corresponding speed and inclineofthe program and level you selected.
NOTE:
The
left display will flash the actual incline until the desired incline is reached
and
then revert to time. The right display will
show
the speed set point.
The
top center
window
begins showing
your
program profileatthe left side.
Operation
Page
3-3
•
•
Operation
Page
3-4
Cybex
Pro+
Treadmill
Owner's&Service
Manual
7. Hold the handrails while you step onto the running belt and begin walking.
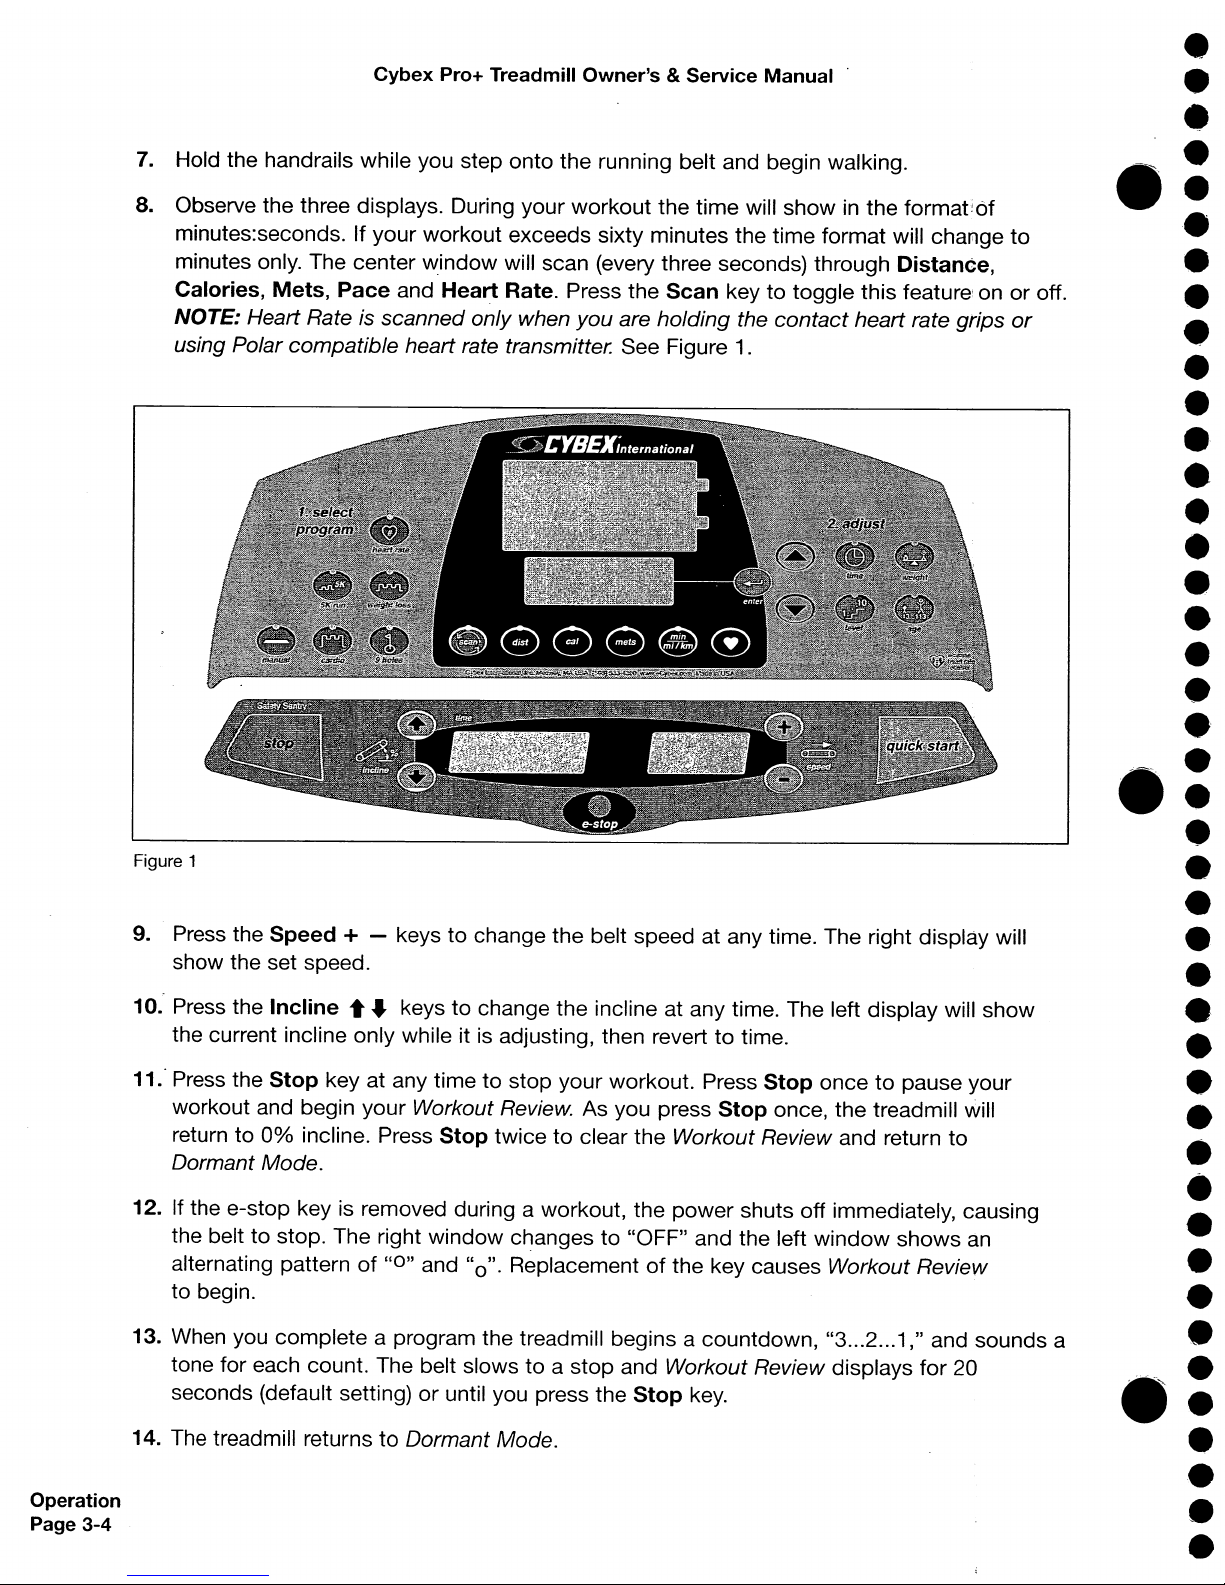
8. Observe the three displays. During your workout the time will show
in
the
format~6f
minutes:seconds. If your workout exceeds sixty minutes the time format will
chaJilge
to
minutes only. The center
~indow
will scan (every three seconds) through
Distance,
Calories,
Mets,
Pace
and
Hea~
Rate. Press the
Scan
key to toggle this feature: on or off.
NOTE: Heart Rate is scanned only when
you
are holding the
contact
heart rate grips
or
using Polar compatible heart rate transmitter. See Figure
1.
Figure 1
9. Press the
Speed
+ - keys to change the belt speed at any time. The right display will
show the set speed.
10. Press the
Incline
t _ keys
to
change the incline at any time. The left display will show
the current incline only while it is adjusting, then revert
to
time.
11.· Press the
Stop
key at any timetostop your workout. Press
Stop
oncetopause your
workout and begin your Workout Review. As you press
Stop
once, the treadmill will
return
to
0%
incline. Press
Stop
twicetoclear the Workout Review and return to
Dormant Mode.
12. If the e-stop key is removed during a workout, the power shuts off immediately, causing
the belt
to
stop. The right window
c~anges
to
"OFF" and the left
window
shows an
alternating pattern
of
"0"
and
"0".
Replacementofthe key causes Workout Review
to begin.
13. When you complete a program the treadmill begins a countdown,"3...2...
1,"
and sounds a
tone for each count. The belt slows
to
a stop and Workout Review displays
for
20
seconds (default setting)
or
until you press the
Stop
key.
14. The treadmill returns
to
Dormant Mode.
•
•
•
•
•
•
•
•
•
•
•
•
•
•
•
•
•
•
•
•
.'
•
•
•
•
•
•
•
•
•
•
•
•
•
•
•
•
•
•
•
•
•
•
•
•
Operati.on
Page
3-5
Figure 3
Cybex
Pro+
Treadmill
Owner's&Service
Manual
Press
Stop
a second
timetointerrupt
workout
data
from cycling andtochange
the
display
to
Dormant Mode.
The
emergency
dismount:
Follow the steps listed below if
you experience pain, feel faint
or
needtostop
your treadmill Figure 2
in
an emergency situation:
Press
Stop
oncetopause your
workout
for 20 seconds (default setting) andtoenter the
W.orkout Review. The belt will
stop
and the elevation will returnto0%,
but
all
workout
settings
and data will remain in memory
for
the pre-selected time. Press the
Quick
-Start key within 20
seconds
to
continue
your
workoutatthe speed and elevation where you left off. If the
Quick
Start
key has
not
been pressed during the 20 second pause, workout
data
will
be
cleared
and the display will change
to
Dormant Mode .
1. Grip handrails
for
support.
2. Step
onto
the
top
steps.
3. Pull the
e-stop
key off the console.
The
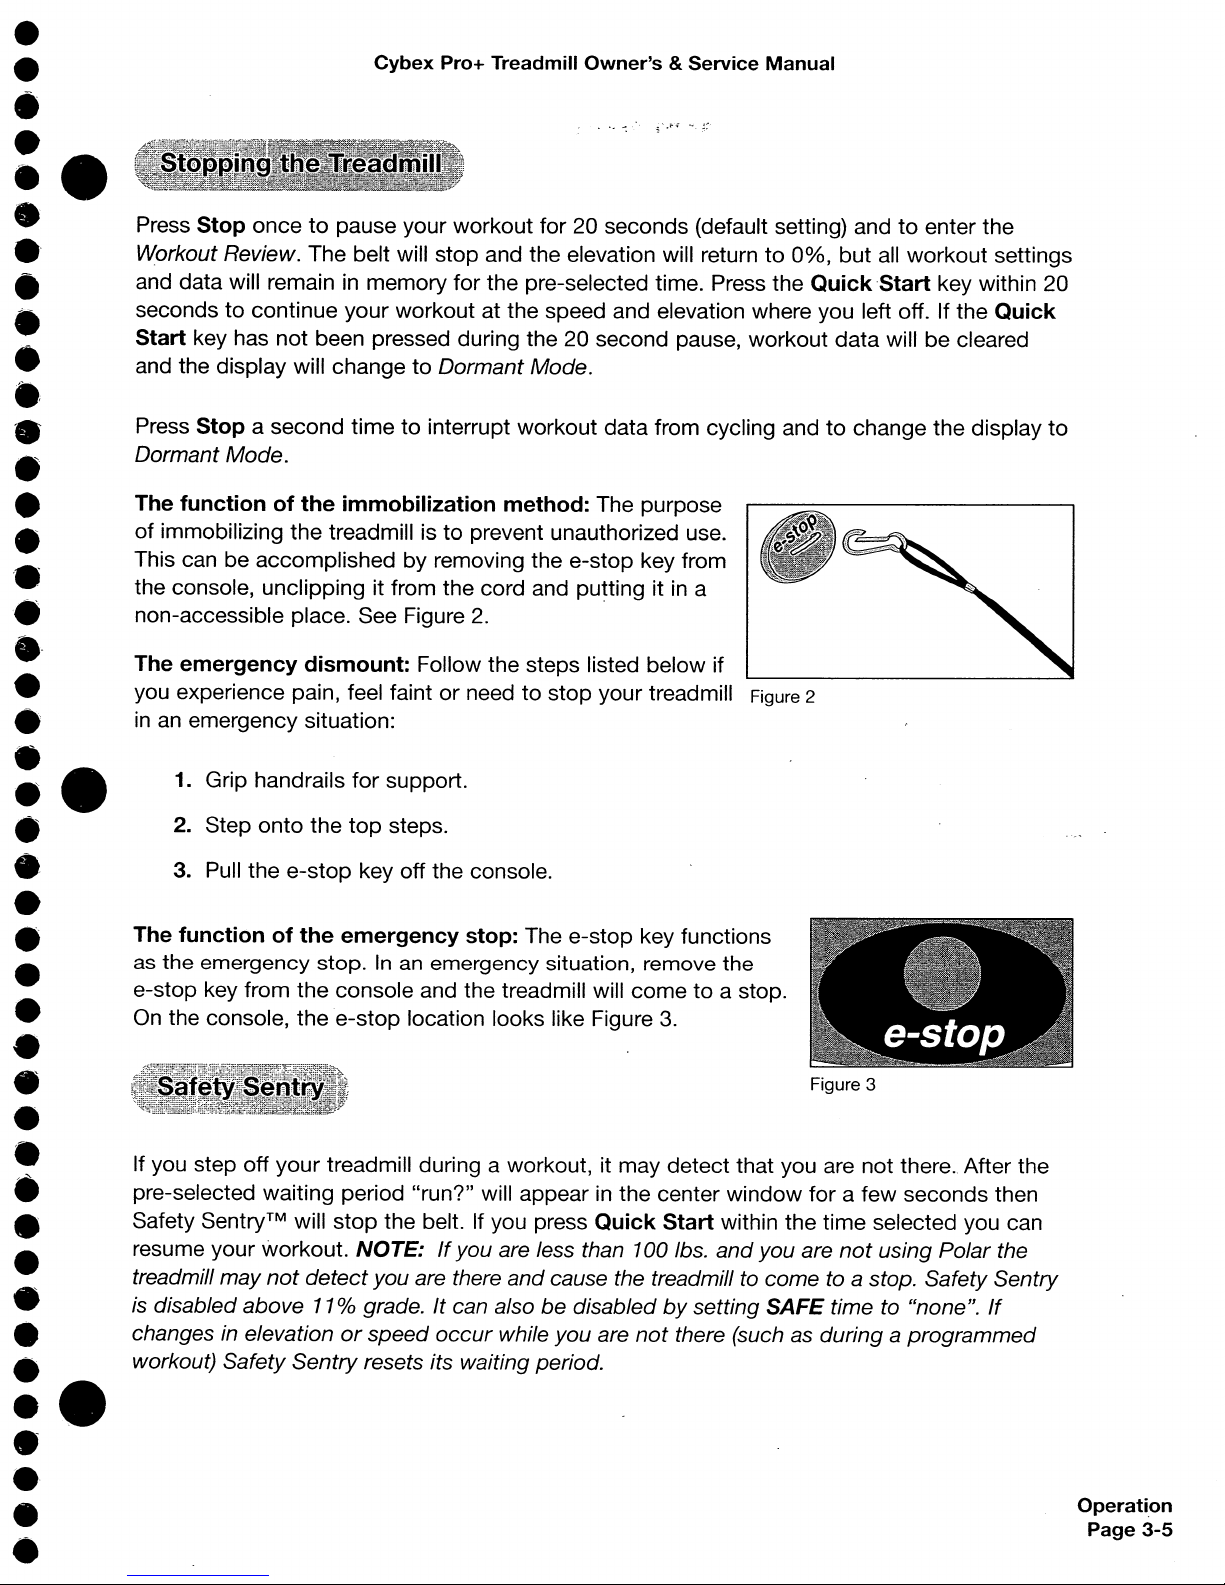
functionofthe
immobilization
method:
The purpose
of
immobilizing
the
treadmill istoprevent unauthorized use.
This can be accomplished by removing the
e-stop
key from
the console, unclipping it from the cord and
pu~ting
itina
non-accessible place. See Figure 2.
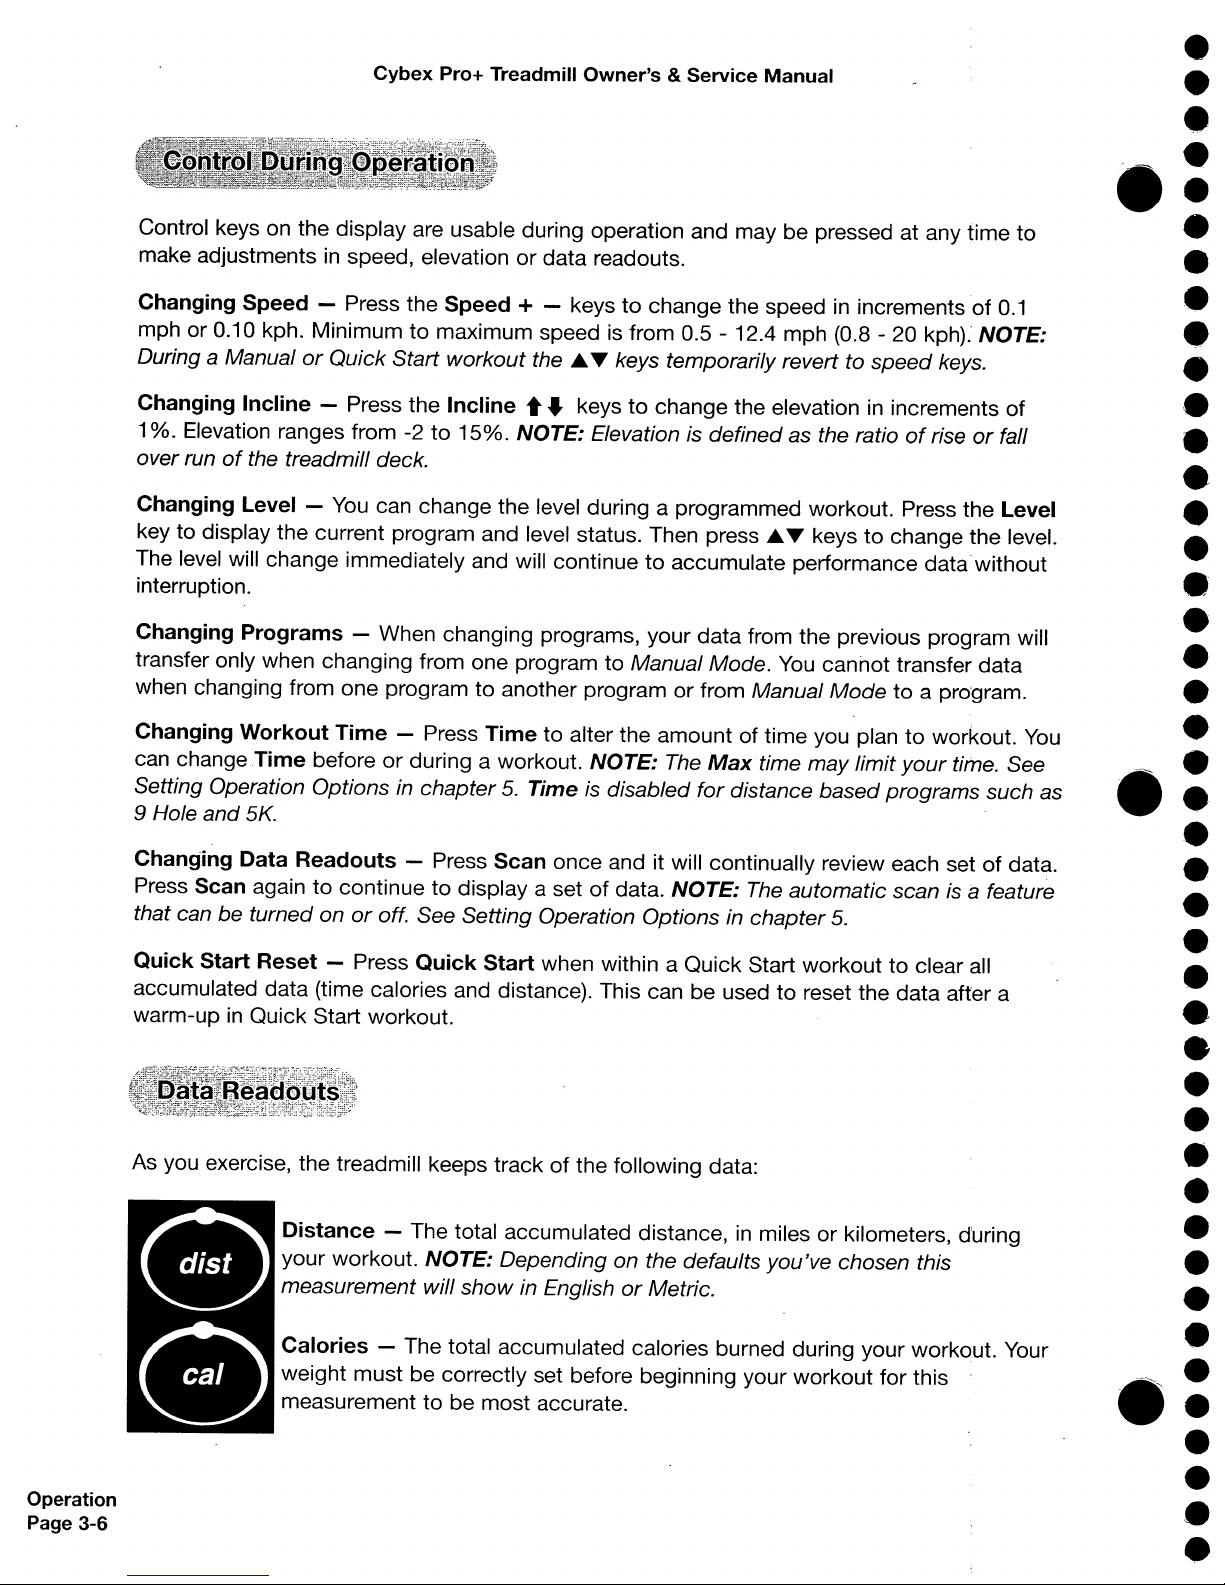
The
functionofthe
emergency
stop:
The
e-stop
key functions
as
the
emergency
stop.Inan
emergency
situation,
remove
the
e-stop key from
the
console and the treadmill will
cometoa stop.
On the console,
the
e-stop
location looks like Figure 3.
If you step
off
your
treadmill during a workout, it may
detect
that you are
not
there..After the
pre-selected waiting period "run?" will appear in the center
window
forafew
seconds
then
Safety
SentryTM
will
stop
the belt. If you press
Quick
Start
within the time selected you can
resume your workout.
NOTE:Ifyou are less than 100 Ibs.
and
you are
not
using Polar the
treadmill may
not
detectyou are there and cause the treadmill to come to a stop. Safety Sentry
is
disabled above
11
% grade.
It
can alsobedisabledbysetting SAFE time to "none".
If
changes in elevationorspeed
occur
while you are
not
there (such as during a programmed
workout) Safety Sentry resets its waiting period.
•
•
•
•
•
•
•
•
e·
•
•
•
• i
•
•
•
•
'.
•
e-
•
e'
•
•
•
•
•
•
•
e
•
•
•
•
•
•
•
•
•
•
•
•
e,
•
•
•
•
•
•
•
•
•
•
•
•
•
•
•
•
•
•
.'
•
•
•
•
•
•
•
•
•
•
•
•
•
•
•
•
•
•
•
•
•
•
•
•
•
•
•
Calories
- The total accumulated calories burned during your workout. Your
weight must be correctly set before beginning your workout for this
measurement
to
be most accurate.
Distance
- The total accumulated distance,inmilesorkilometers,
d1uring
your workout. NOTE: Depending on the defaults you've chosen this
measurement will
show
in EnglishorMetric.
As you exercise, the treadmill keeps trackofthe following data:
Cybex
Pro+
Treadmill
Owner's&Service
Manual
Quick
Start
Reset
- Press
Quick
Start
when within a Quick Start workout to clear all
accumulated data (time calories and distance). This can be used
to
reset the data after a
warm-up
in
Quick Start workout.
Changing
Data
Readouts
- Press
Scan
once and it will continually review each setofdata.
Press Scan again
to
continuetodisplay a setofdata. NOTE:
The
automatic scanisa feature
that can be turned on
or
off. See Setting Operation Options in chapter
5.
Control keys on the display are usable during operation and may be pressed at any time
to
make adjustmentsinspeed, elevationordata readouts.
Changing
Level -
You
can change the level during a programmed workout. Press the Level
key to display the current program and level status. Then press
~
T keystochange the level.
The level will change immediately and will continuetoaccumulate performance data'without
interruption.
Changing
Speed
- Press the
Speed
+ - keys
to
change the speed in increments
of
0.1
mph or 0.10 kph. Minimumtomaximum speed is from 0.5 - 12.4 mph (0.8 -
20
kph): NOTE:
During
a Manual
or
Quick Start workout the
~
T keys temporarily revert to speed keys.
Changing
Incline
- Press the
Incline
t.J
keystochange the elevationinincrements
of
1%. Elevation ranges from -2to15%.
NOTE: Elevation is defined as the ratioofriseorfall
overrun
of
the treadmill deck.
Changing
Programs
- When changing programs, your data from the previous program will
transfer only when changing from one program to Manual Mode.
You
cannot transfer data
when changing from one program
to
another program or from Manual
Mode
to
a pro'gram.
Changing
Workout
Time
- Press
Timetoalter the amount of time you plantoworkout.
You
can change.Time beforeorduring a workout. NOTE: The
Max
time may limit
your
time. See
Setting Operation Options in chapter
5.
Time
is
disabled for distance based programs such as
9 Hole and 5K.
Operation
Page 3-6
Cybex
Pro+ Treadmill
Owner's&Service
Manual
NOTE: Cybex does
not
recommend continuous holding
onto
the
contact
heart rate grips
during exercise.
Operation
Page
3-7
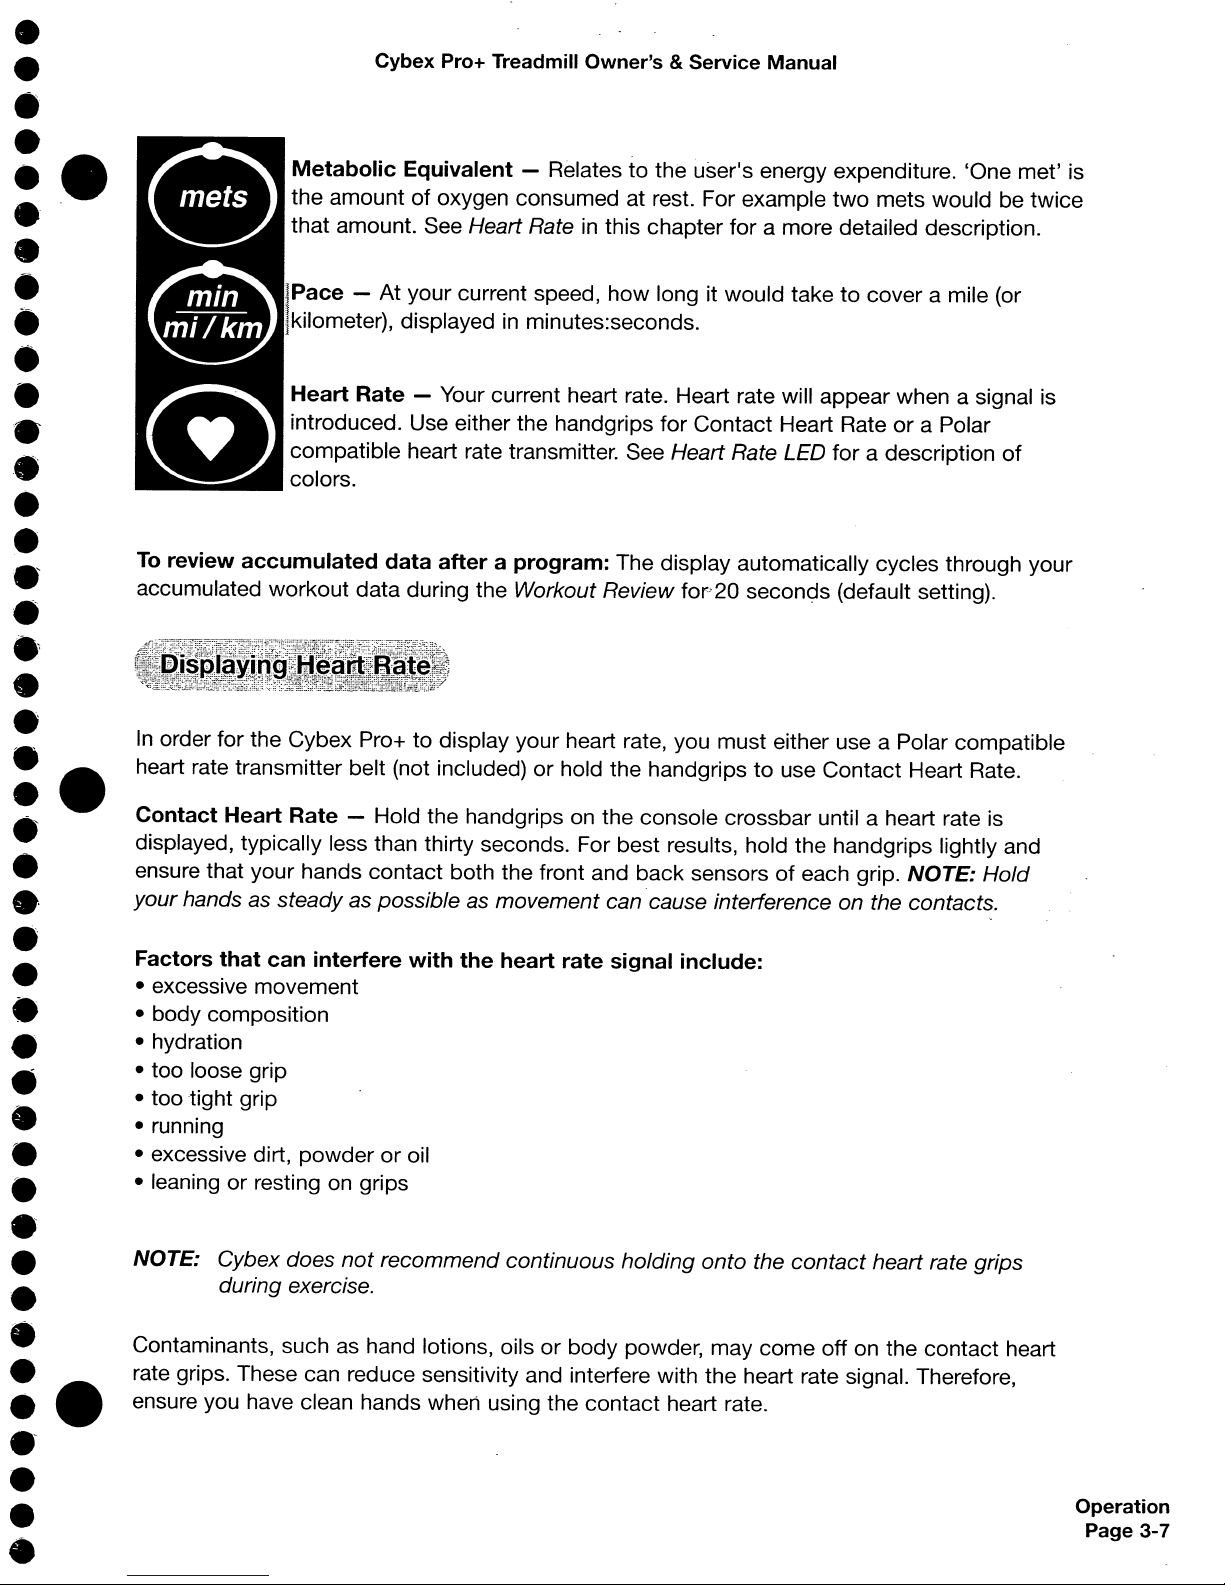
Metabolic
Equivalent
- Relates
to
the user's energy expenditure. 'One met' is
the amount
of
oxygen consumed at rest. For example
two
mets would be twice
that amount. See
Heart Rate
in
this chapter for a more detailed description.
Pace
- At your current speed,
how
long it would taketocover a mile (or
kilometer), displayed
in
minutes:seconds.
Heart
Rate
- Your current heart rate. Heart rate will appear when a signal is
introduced. Use either the handgrips for Contact Heart Rate
or
a Polar
compatible heart rate transmitter. See
Heart Rate LED for a description
of
colors.
To
review
accumulated
data
afteraprogram:
The display automatically cycles through your
accumulated workout data during the
Workout Review
fOfy20
secon<;js
(default setting).
In
order for the Cybex Pro+ to display your heart rate, you must either use a Polar compatible
heart rate transmitter belt (not included) or hold the handgrips
to
use Contact Heart Rate.
Factors
that
can
interfere
with
the
heart
rate
signal
include:
• excessive movement
• body composition
• hydration
• too loose grip
• too tight grip
• running
• excessive dirt, powder
or
oil
• leaning or resting on grips
Contaminants, such as hand lotions, oils
or
body powder, may come off on the contact heart
rate grips. These can reduce sensitivity and interfere with the heart rate signal. Therefore,
ensure you have clean hands when using the contact heart rate.
Contact
Heart
Rate
- Hold the handgrips on the console crossbar until a heart rate is
displayed, typically less than thirty seconds. For best results, hold the handgrips lightly and
ensure that your hands contact both the front and back sensors
of
each grip. NOTE:
Hold
your
hands as steady as possible as movement can cause interference on the contacts.
•
•
•
•
•
•
e·
•
•
•
•
•
.;.
••
•
•
•
•
.~
•
•
•
•
•
•
•
.'
•
•
•
•
•
•
•
•
•
•
•
•
•
•
•
.'
•
•
Cybex
Pro+
Treadmill
Owner's&Service
Manual
NOTE: When wearing a Polar compatible transmitter, the
contact
heart rate will dominate
only when the grips are held.
•
•
•
•
•
•
•
•
•
•
•
•
•
•
•
•
•
te
•
•
•
.'
•
•
I.
.'
•
•
•
•
•
•
•
•
•
•
•
•
•
•
•
•
•
•
•
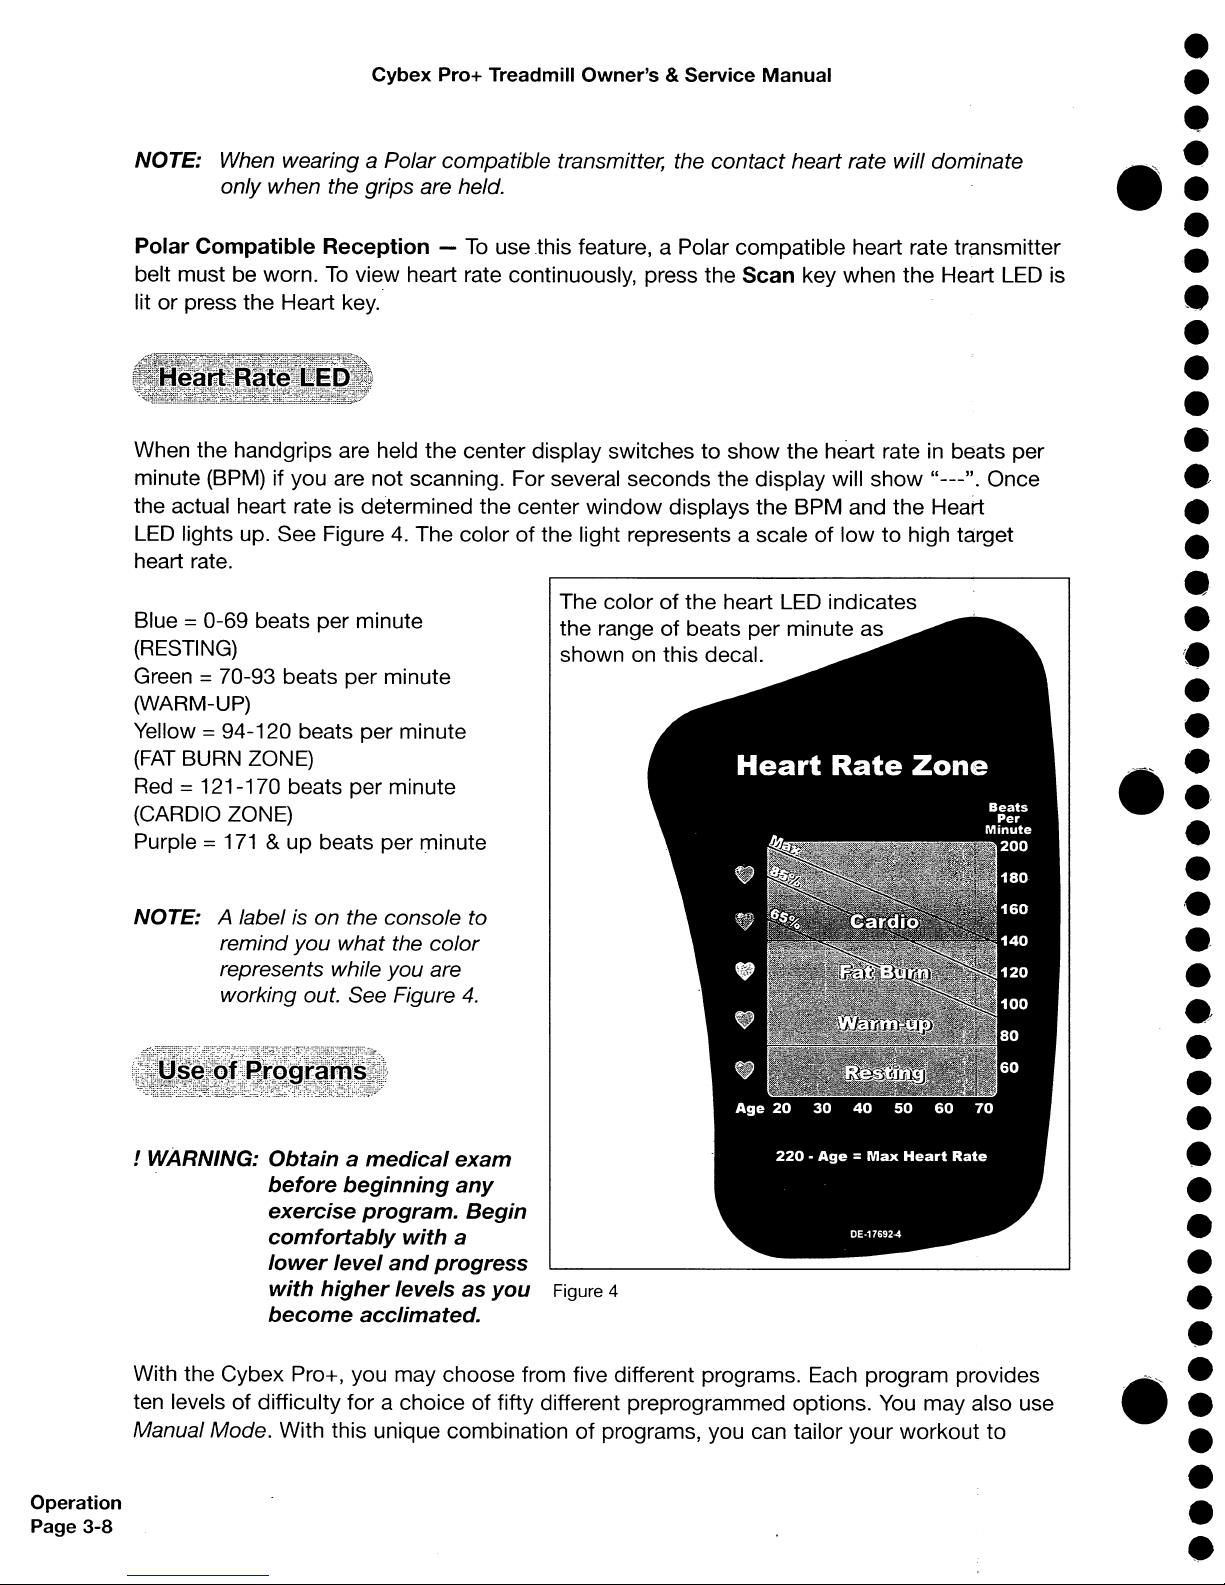
The colorofthe heart LED indicates
the range
of
beats per minute as
shown on this decal.
With the Cybex Pro+, you may choose from five different programs. Each program provides
ten levels of difficulty for a choice
of
fifty different preprogrammed options.
You
may also use
Manual Mode. With this unique combinationofprograms, you can tailor your workout
to
When the handgrips are held the center display switchestoshow the heart rateinbeats per
minute (BPM) if you are
not
scanning. For several seconds the display will
show
" ". Once
the actual heart rate is determined the center
window
displays the BPM and the Heart
LED lights up. See Figure
4.
The colorofthe light represents a scaleoflowtohigh target
heart rate.
NOTE: A label is on the console to
remind
you
what the
color
represents while you are
working out. See Figure
4.
Blue = 0-69 beats per minute
(RESTING)
Green
= 70-93 beats per minute
(WARM-UP)
Yellow =94-120 beats per minute
(FAT
BURN ZONE)
Red = 121-170 beats per minute
(CARDia
ZONE)
Purple =
171
& up beats per
r)1inute
Polar
Compatible
Reception
-
To
use
this
feature, a Polar compatible heart rate
tr~nsmitter
belt must be worn.Toview heart rate continuously, press the
Scan
key when the Heart
LED
is
lit or press the Heart key.
! WARNING:
Obtainamedical
exam
before
beginning
any
exercise
program.
Begin
comfortably
with
a
lower
level
and
progress
with
higher
levelsasyou
Figure 4
become
acclimated.
Operation
Page
3-8
Cybex
Pro+
Treadmill
Owner's&Service
Manual
Press the
Quick
Start
key to workout
in
Manual Mode.
To
increaseordecrease the speed
while
in
Manual Mode use the
Speed
+ - keys.
To
increase or decrease the incline while
in
Manual Mode use the
t.
arrows.
Operation
Page
3-9
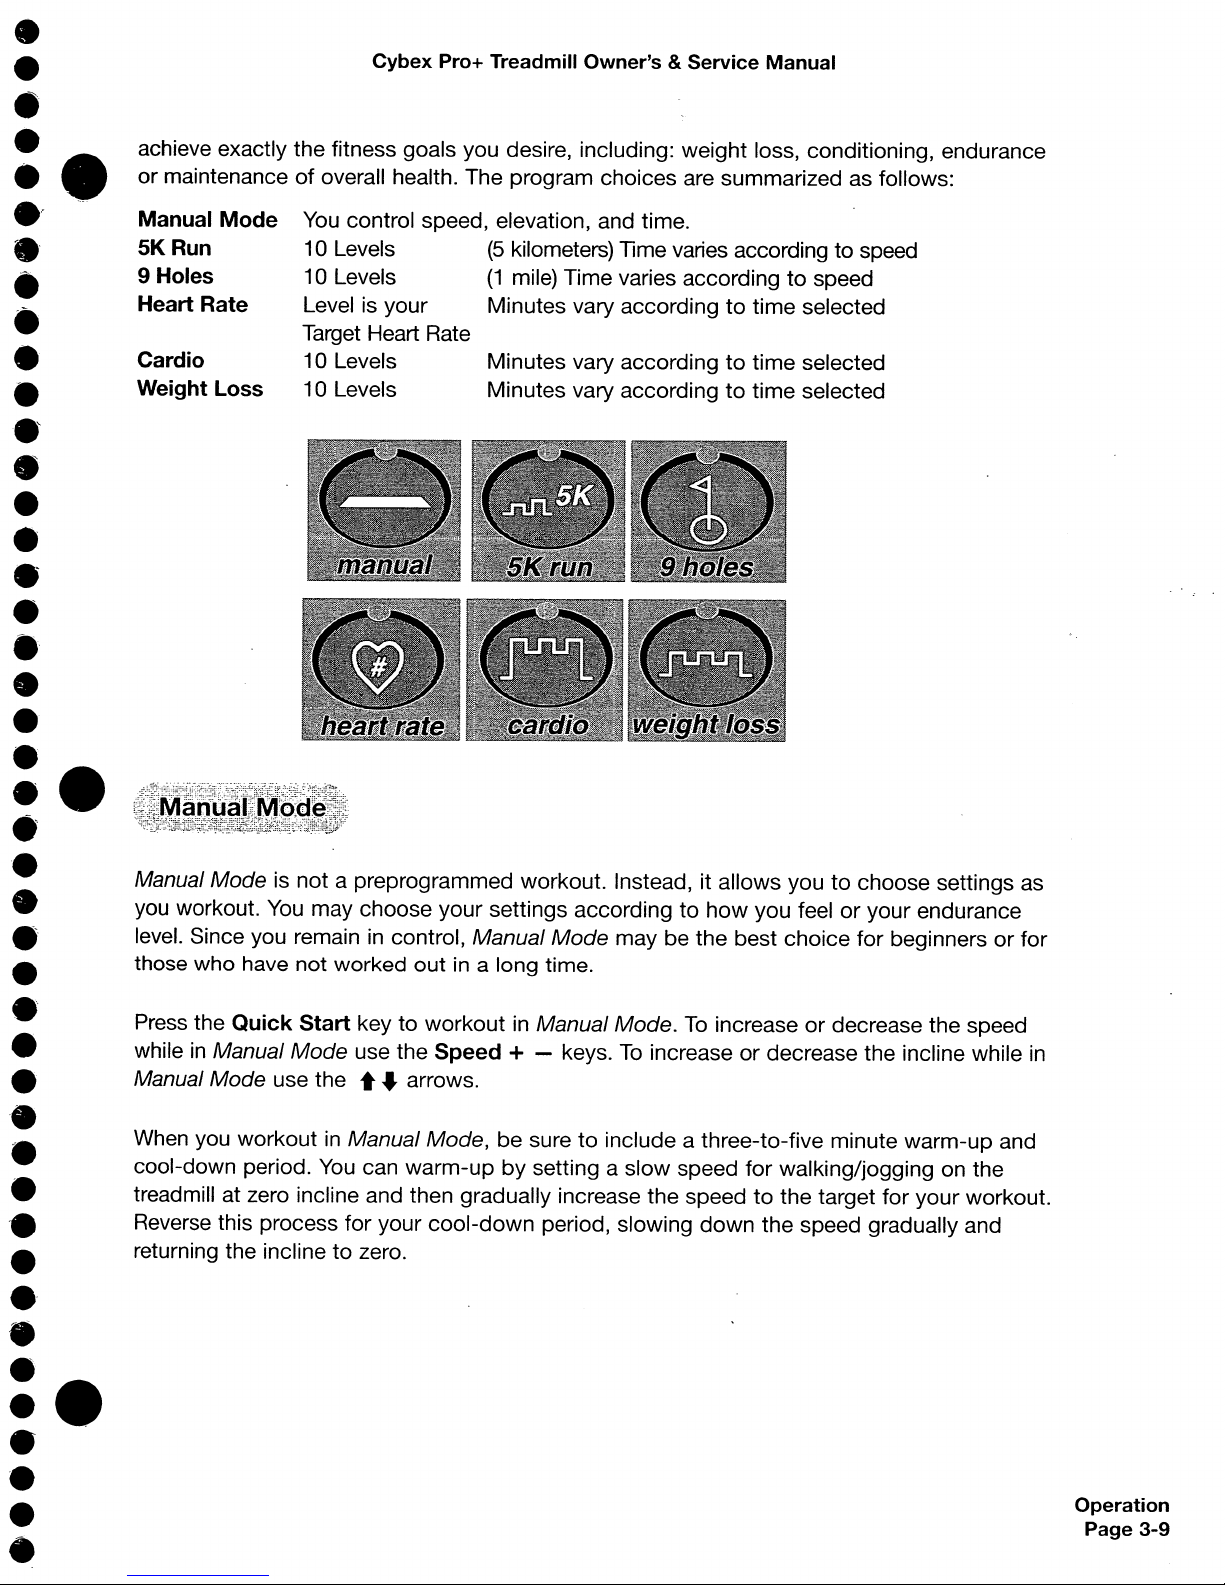
Minutes vary accordingtotime selected
Minutes vary according
to
time selected
You
control speed, elevation, and time.
10 Levels
(5
kilometers) Time varies according to speed
10 Levels
(1
mile) Time varies accordingtospeed
Level is your Minutes vary according
to
time selected
Target Heart Rate
10 Levels
10 Levels
Cardio
Weight
Loss
achieve exactly the fitness goals you desire, including: weight loss, conditioning, endurance
or maintenance
of
overall health. The program choices are summarized as follows:
Manual
Mode
5KRun
9 Holes
Heart Rate
When you workout
in
Manual Mode, be sure
to
include a three-to-five minute warm-up and
cool-down period.
You
can warm-upbysetting a slow speed for walking/jogging on the
treadmill at zero incline and then gradually increase the speed
to
the target for your workout.
Reverse this process for your cool-down period, slowing down the speed gradually and
returning the incline
to
zero.
Manual Mode is not a preprogrammed workout. Instead, it allows you
to
choose settings as
you workout.
You
may choose your settings according to
how
you feeloryour endurance
level. Since you remain
in
control, Manual Mode may be the best choice for beginnersorfor
those
who
have
not
worked
out
in a
long
time.
•
•
•
•
••
.'.
.'
•
•
•
•
•
•
•
•
•
•
.'
•
•
•
••
•
'.
•
.'
•
.'
•
•
'.
•
•
-.
•
.'
•
•
••
•
•
•
•
Operation
Pag-e
3-10
Cybex
Pro+
Treadmill
Owner's&Service
Manual
The Workout Profile matrix in
the
centerofthe
display
uses
columnsoflightstoshow
the
progressofyour
workout.
The heightofthe column
represent~
METS, specifically the highest
METS you reached in
that
period. Each column represents 1 minuteofyour
total
workout
time
when
in
Manual
Mode
and 15
seconds
in every
other
program.
NOTE:Itis
conceivable to have two segmentsofdifferent speed
and
elevation combinations
in
the same
met
range.
A 1% grade is
not
the
same as a 1 degree incline.The %
gradeisthe
relationshipofthe
measurementofrise
over
the
measurementofrun (also called slope).
For
example,a'1
foot
(meter) rise in height
over
a lengthof100 feet (meters) is a 1% grade. Expressed as a
mathematical formula,
the
grade is calculated as follows:
1
ft.
(m)
I 100 ft.
(m)
= 0.01 = 1%
With respecttotreadmills,
the
pe-rcent grade is roughly equaltothe
increase in height (rise)
of
the
treadmill dividedbythe
length (run)ofthe
treadmill.
The degree
of
incline can be related
to
% grade
by
taking
the
Tangentofthe
grade. For
instance,
15%
grade
is equalto8.53 Degrees (Tan(.15)=8.53°). The
oppositeistrue
to
determine % Grade from Degreeofincline (ArcTan (8.53°)=.15).
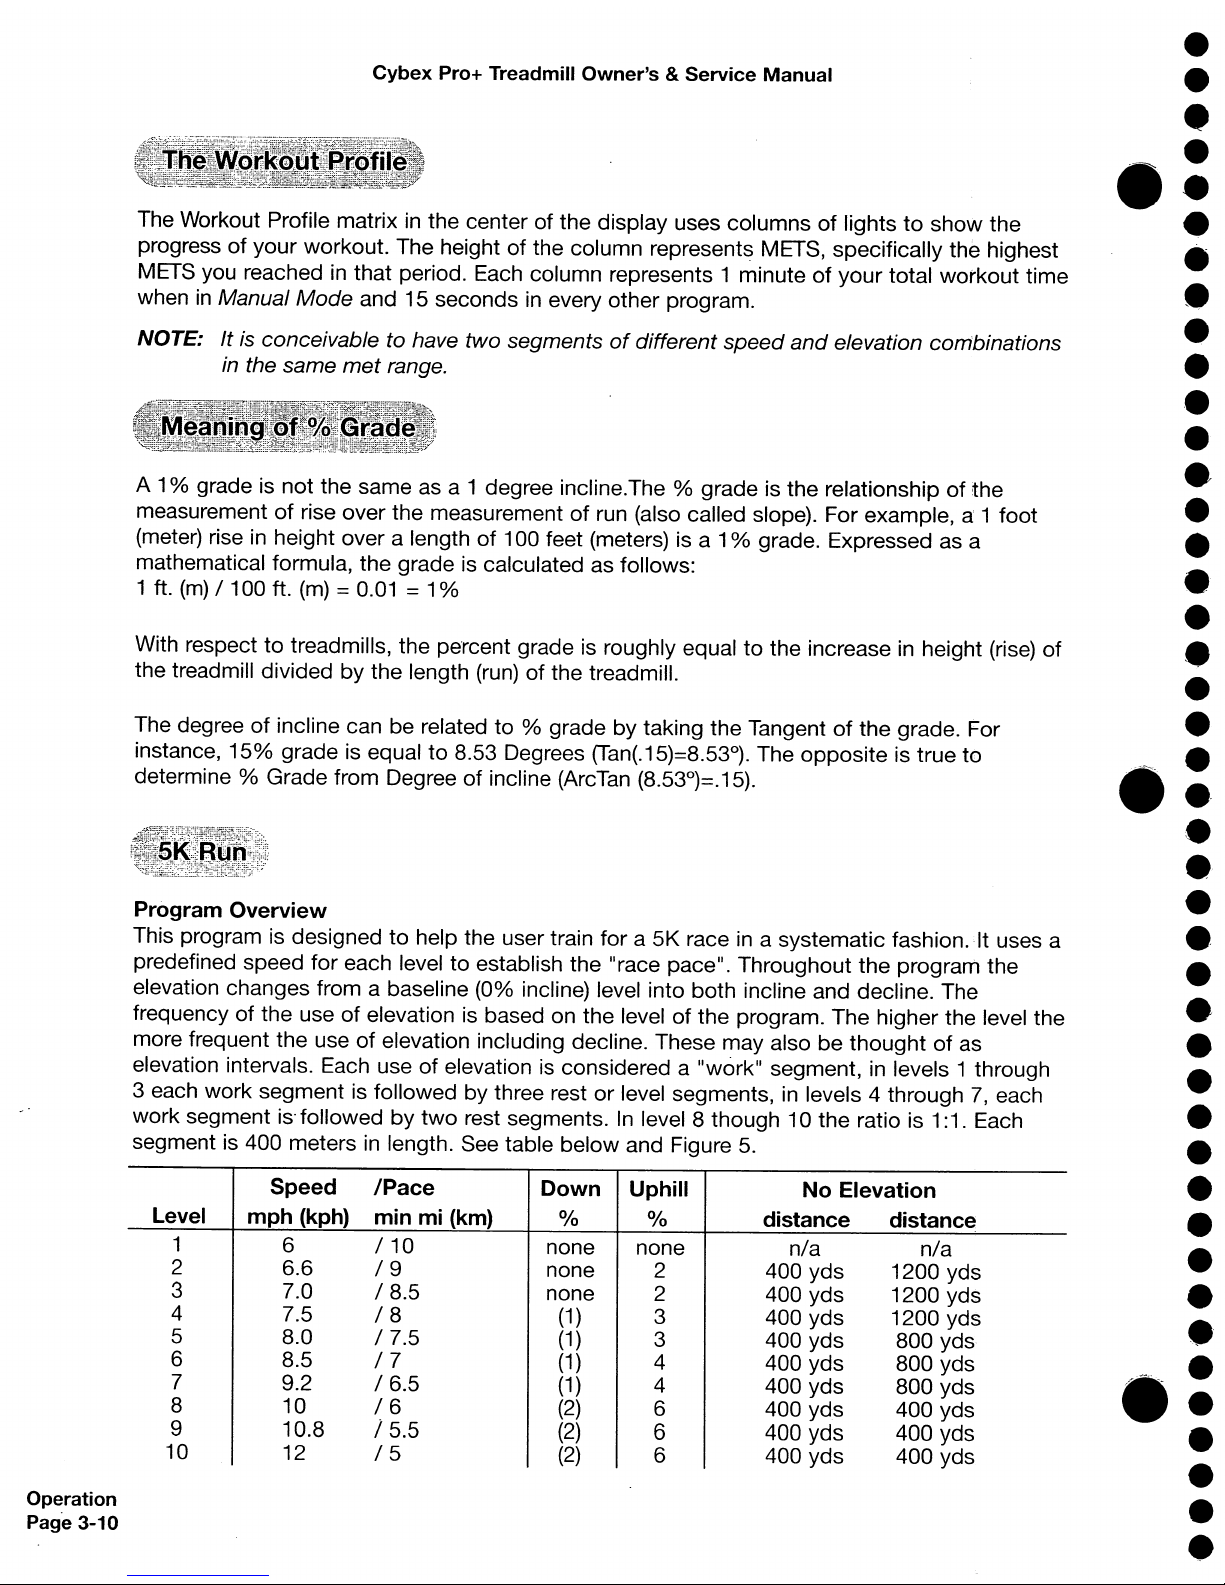
Program
Overview
This program is designedtohelp the user train
fora5K
race in a
systematic
fashion. It uses a
predefined
speed
for
each leveltoestablish
the
"race pace".
Throughout
the
program
the
elevation changes from a baseline (0% incline) level into
both
incline and decline. The
frequency
of
the
useofelevation is based on
the
levelofthe
program.
The
higher the level
the
more frequent
the
useofelevation including decline. These
may
alsobethoughtofas
elevation intervals. Each use
of
elevation is considered a
"work"
segment, in levels 1 through
3 each
work
segment
is followedbythree restorlevel segments, in levels 4 through7,each
work
segment
is·
followedbytwo
rest segments.Inlevel 8
though10the
ratio is 1:1. Each
segment is 400 meters in length. See table
below
and Figure 5.
Speed
/Pace
Down
Uphill
No
Elevation
Level
mph
(kph)
minmi(km)
0/0
0/0
distance
distance
1 6
/10
none
none
n/a
nla
2 6.6
/9
none 2
400
yds
1200
yds
3 7.0
/ 8.5
none 2 400
yds
1200
yds
4 7.5
18
(1
) 3
400
yds
1200
yds
5 8.0
I 7.5
(1
)
3 400
yds
800
yds
6
8.5
/7
(1
)
4 400
yds
800
yds
7 9.2
/ 6.5
(1
)
4
400
yds
800
yds
8 10
16
(2)
6
400
yds
400
yds
9
10.8
/5.5
(2)
6
400
yds
400 yds
10
12
15
(2)
6 400
yds
400
yds
•
•
•
•
•
•
•
•
•
•
•
•
'.
•
•
•
•
•
•
•
•
•
•
••
•
•
•
••
•
•
•
•
•
•
•
•
•
•
.'
•
•
•
•
•
Operation
Page
3-11
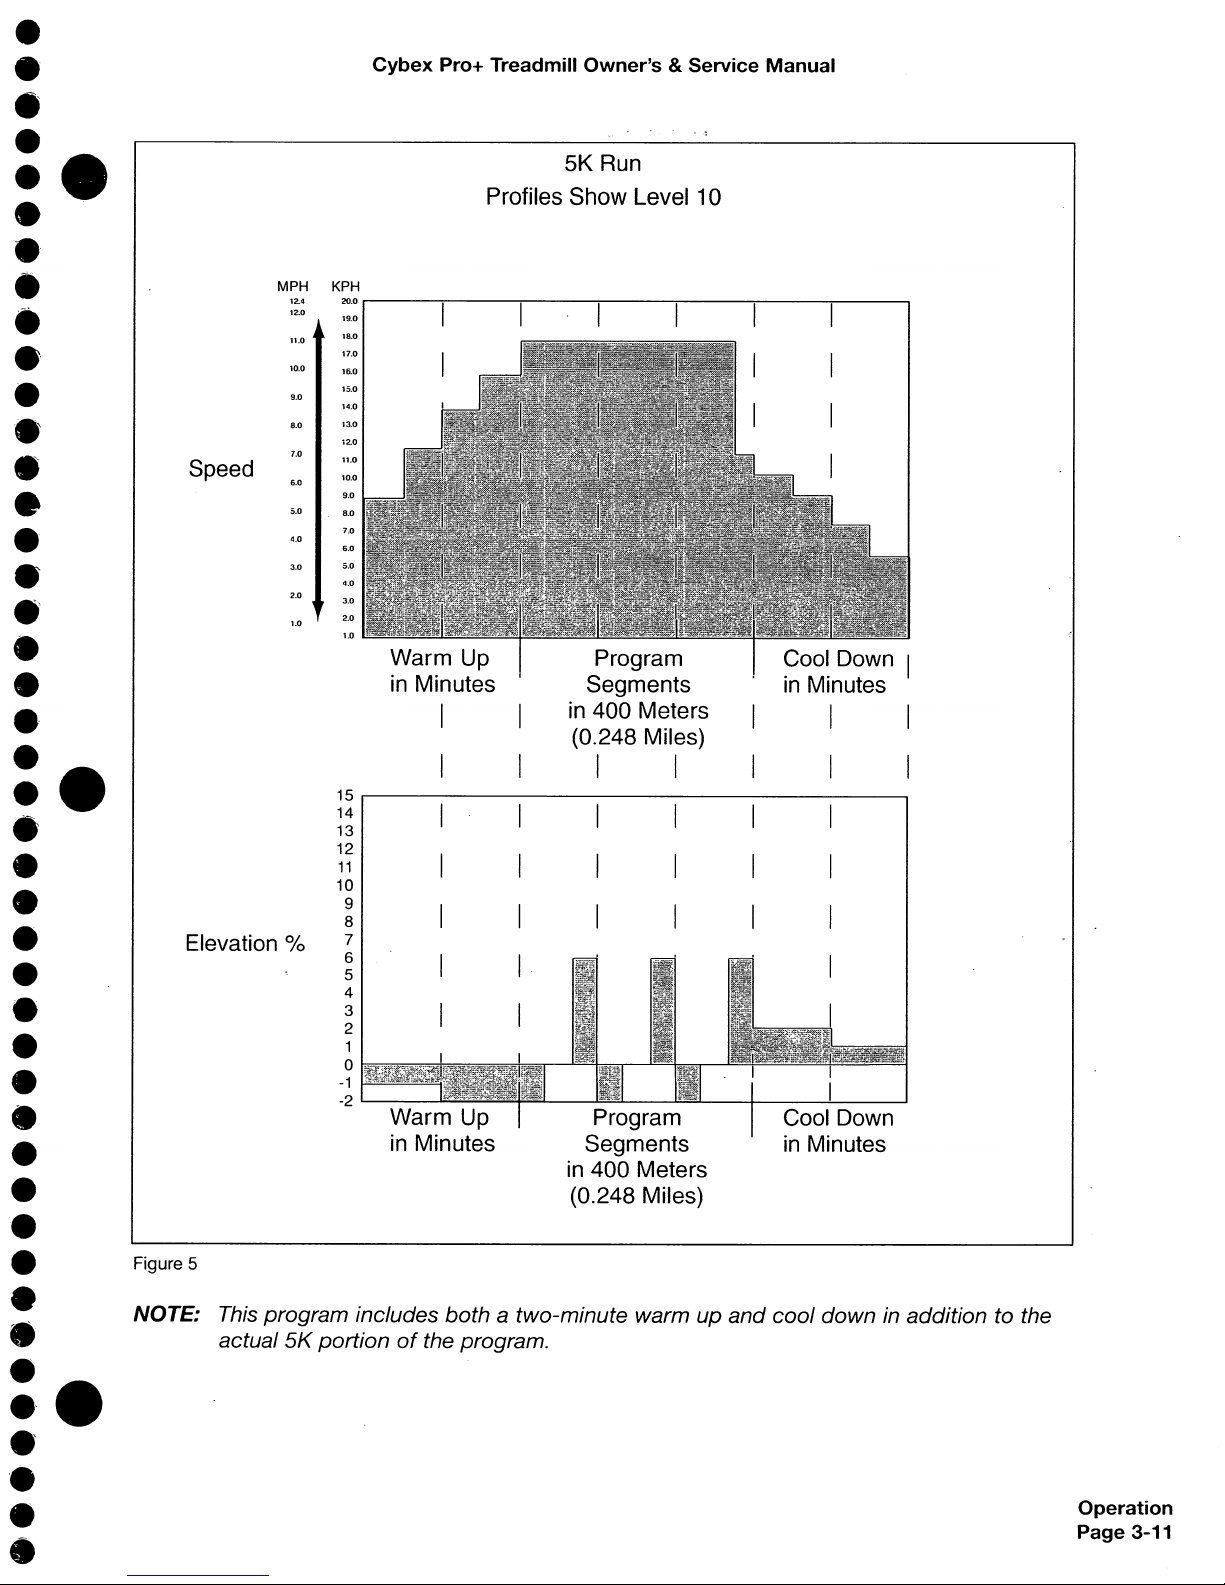
5K Run
Profiles Show Level 10
Cybex
Pro+
Treadmill
Owner's&Service
Manual
Figure 5
NOTE: This program includes
both
a two-minute warm up
and
cool down in addition to the
actual
5K
portionofthe program.
MPH
KPH
12.4
20,0
I
12.0
19.0
11.0
18.0
17.0
10.0
16.0
15.0
9.0
14.0
8.0
13.0
12.0
7.0
11.0
Speed
6.0
10.0
9.0
5.0
8.0
7.0
4.0
3.0
5.0
.
2.0
3.0
1.0
2.0
1.0
.
Program
Cool Down
I
Segments
in
Minutes
in
400 Meters
I I
(0.248 Miles)
•
I I I I
15
14
I
I I
13
12
I I
I
11
10
9
I
I I
8
Elevation
0/0
7
6
I
5
4
3
I
2
1
0
I
-1
I
-2
Program Cool Down
Segments
in
Minutes
in
400 Meters
(0.248 Miles)
•
••
•
•
••
•
.'
•
•
.'
•
•
•
•
•
•
.'
•
•
.'
•
•
•
•
•
•
•
•
•
•
•
•
•
•
•
•
•
•
.'
•
•
'.
•
•
•
•
•
••
•
•
•
•
•
•
•
.'
•
•
•
•
•
•
•
.:
•
•
•
.-
•
.'
•
•
•
•
•
•
•
•
•
.:
•
•
•
•
o
Elevation
Patterns
and
DistanceinMeters
(1600 meters =1 mile)
Cybex
Pro+
Treadmill
Owner's&Service
Manual
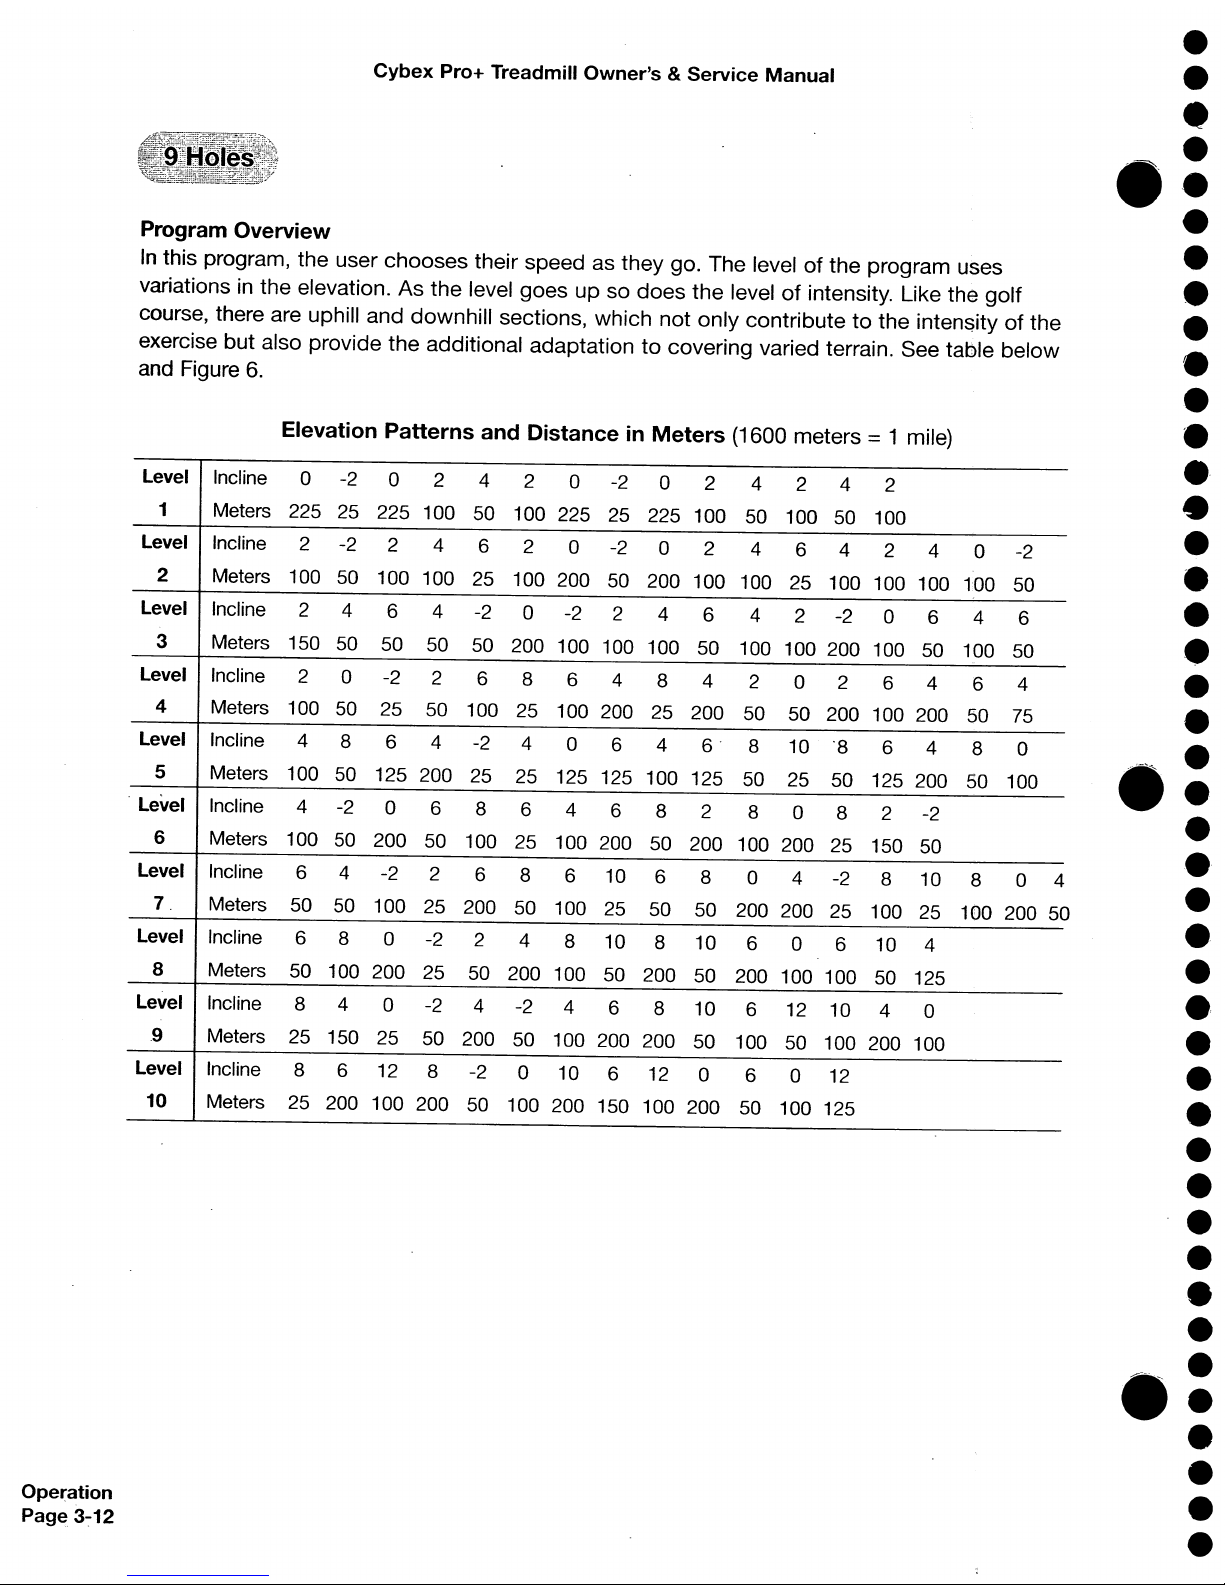
Program
Overview
In
this program, the user chooses their speed as they go. The levelofthe program uses
variations
in
the elevation. As the level goes
up
so does the levelofintensity. Like the
golf
course, there are uphill and downhill sections, which not only contributetothe inten$ityofthe
exercise but also provide the additional adaptation
to
covering varied terrain. See table below
and Figure
6.
Level Incline 0
-2
0
2
4
2 0
-2
0 2
4 2
4 2
1
Meters 225 25
225 100
50 100 225 25 225 100 50 100
50
100
Level Incline
2
-2
2
4 6 2 0
-2
0 2
4 6 4 2 4
0
-2
2
Meters
100 50
100 100 25 100 200 50 200
100
100 25 100
100 100
tOO
50
Level
Incline
2 4 6 4
-2
0
-2
2 4 6 4 2
-2
0 6 4
6
3
Meters
150
50 50 50 50
200 100 100
100 50 100 100 200
100 50 100
50
Level
Incline
2 0
-2
2
6
8 6
4 8 4 2
0
2
6 4
6 4
4
Meters 100 50
25
50 100
25 100 200 25
200
50
50 200 100 200
50
75
Level
Incline
4
8 6 4
-2
4 0 6
4
6'
8
10
"8
6
4
8
0
5
Meters 100 50 125 200
25 25 125 125 100 125
50
25
50 125 200 50
100
. Level
Incline
4
-2
0 6 8 6
4 6
8
2
8 0 8 2
-2
6
Meters 100 50 200 50 100 25 100 200 50
200
100 200 25
150 50
Level Incline
6 4
-2
2
6 8 6 10 6 8
0
4
-2
8
10 8
0 4
7.
Meters 50 50 100 25 200
50 100
25
50 50 200 200 25
100 25 100 200 5
Level Incline 6 8 0
-2
2
4 8 10 8
10 6
0 6
10
4
8
Meters 50
100 200
25
50
200 100 50 200 50 200 100 100
50 125
Level Incline 8 4 0
-2
4
-2
4 6 8
10 6 12 10
4
0
.9
Meters 25 150 25 50
200
50 100 200 200
50 100
50 100 200 100
Level Incline 8 6 12 8
-2
0 10 6 12
0
6 0 12
10
Meters 25
200
100 200
50
100 200 150 100 200 50 100 125
Ope~ation
Page,
3~12
Operation
Page
3-13
I I
I I
Cybex
Pro+ Treadmill Owner's & Service Manual
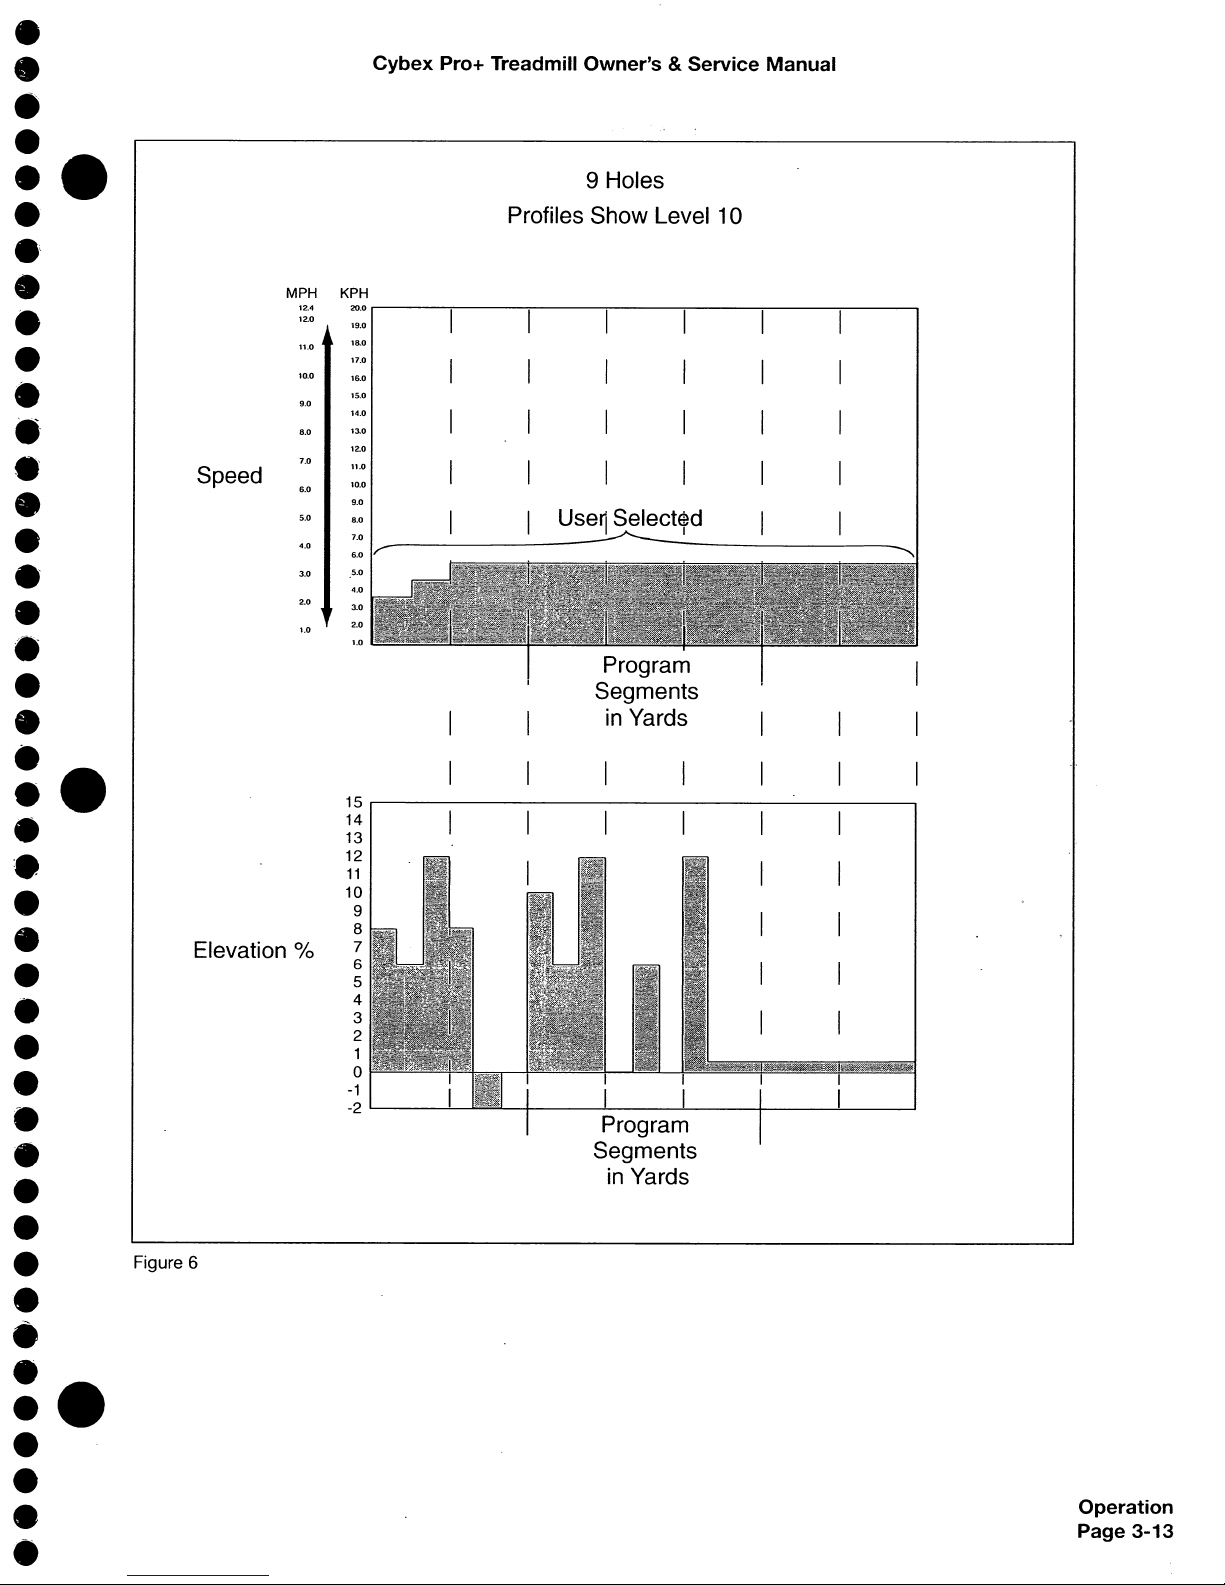
9
Holes
Profiles
Show
Level
10
Program
Segments
in
Yards
15
r----------------------,
14
13
12
11
10
9
8
7
6
5
4
3
2
1
o
-1
-2
"---------'---
MPH
KPH
12.4
20,0
12.0
19.0
10.0
16.0
15.0
9.0
14.0
8.0
13.0
12.0
7.0
Speed
6.0
10.0
9.0
5.0
Us~t~d
3.0
5.0
4.0
2.0
3.0
1.0
2.0
Elevation
0/0
Figure 6
•
•
•
•
••
•
.~
•
•
•
•
.'
.'
•
•
.'
•
•
•
•
••
•
•
:.
•
•
•
•
•
•
•
•
•
•
•
•
•
•
••
•
•
•

•
Operation
Page
3-14
Cybex
Pro+
Treadmill
Owner's&Service
Manual
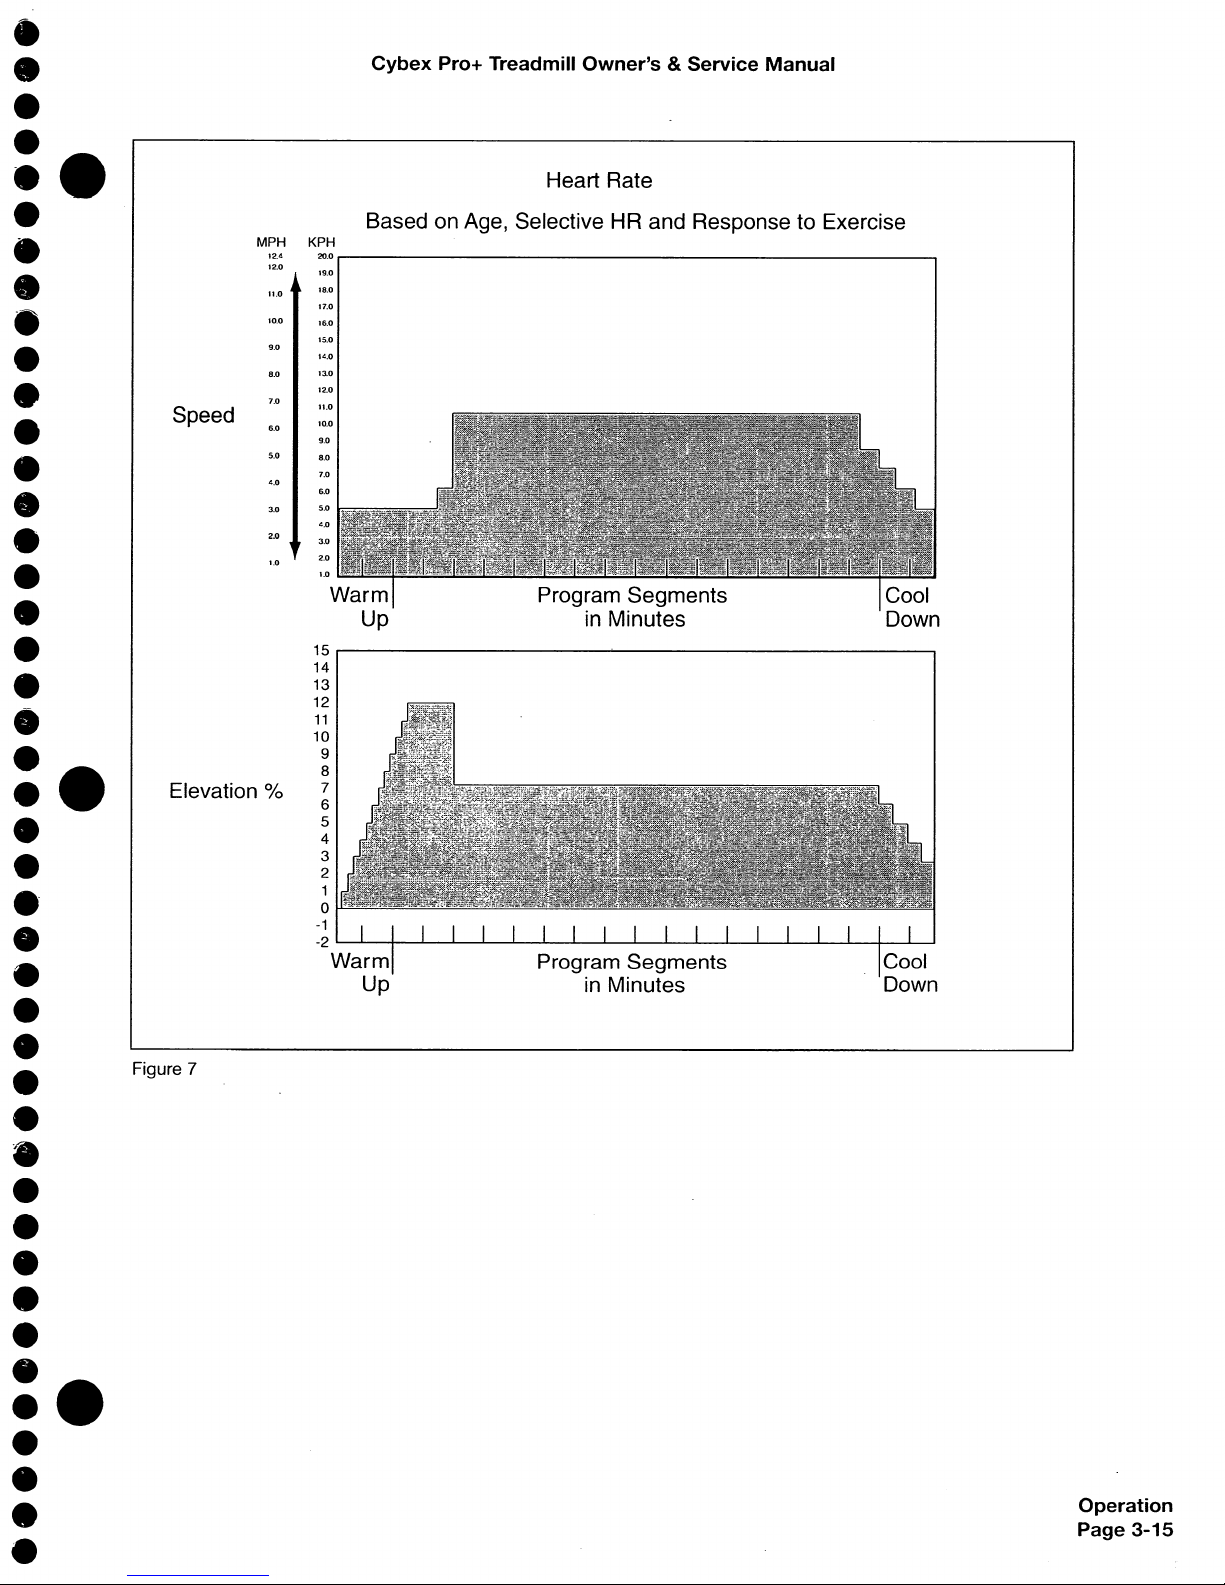
Program
Overview
The Heart Rate Control program is interactive. By selecting a predetermined heart rate, the
treadmill will adapt the elevation and speed
to
keep the users heart rate at that level. This
program is exceptionally useful for those individuals just starting out as well as the athlete. By
maintaining the predetermined heart rate, the user is less likely
to
overorunder exert
themselves thereby ensuring they get all they should out
of
their training. Over time, the user
will notice that as their fitness level improves and using a given time and heart rate that they
will see more ground covered, more calories burned and a higher MET level during the
program. See Figure
7.
A MET is·a basic unitofmeasurement that is usedtocompare relative work between
individuals and activities. One MET is the amount
of
oxygenanindividual consumes at rest. If
an
individual were working at four METs he/she would be consuming oxygen at a rate equal
to four times their resting consumption.
METs
can be usedtocompare walking on a grade
with running
or
eventocycling and other activities.
•
•
•
•
•
•
•
•
•
•
•
•
•
•
•
•
•
•
•
•
•
•
•
•
•
•
•
•
•
•
•
•
•
•
•
•
•
•
•
•
•
•
•
•
•
Operation
Page
3-15
Heart Rate
Based
on
Age, Selective
HR
and ResponsetoExercise
Cybex
Pro+ Treadmill Owner's & Service Manual
15
,..---------------------------,
14
13
12
11
10
9
8
7
6
5
4
3
2
1
o
-1
-2
L.....-...L~-----..II....--.L...--.L.--...I....--...I-.-....L..-...L...-......I.....---'-----L---1-----l----L-----L....--L...-__t_--L....----'
Warm
Up
Elevation %
Figure 7
•
MPH
KPH
12.4
20.0
12.0
19.0
18.0
17.0
16.0
14.0
8.0
7.0
Speed
10.0
9.0
5.0
8.0
6.0
3.0
2.0
3.0
•
•
•
•
•
•
•
•
•
•
•
•
•
•
•
•
•
•
•
•
:.
•
•
••
•
•
•
•
•
•
•
•
•
•
•
•
:.
•
•
•
 Loading...