

Page 1

CyberLink
PowerDVD 20
PC Mode
User's Guide
Revision date: 5/4/2020
Page 2

Copyright and Disclaimer
All rights reserv ed.
To the ex tent allowed by law, PowerDVD IS PROVIDED “AS IS”, W ITHOUT WARRANTY OF ANY
KIND, EITHER EXPRES S OR IMPLIED, INCLUDING WITHOUT LIMITATION ANY W ARRANTY FO R
INFORM ATION, SERVICES, OR PRODUCTS PROVIDED THROUGH OR IN CONNECTION W ITH
PowerDVD AND ANY IMPLIED WARRANTIES OF ME RCHANTABILITY, FITNES S FOR A
PARTICULAR PURPOSE , EXPECTATION O F PRIVACY, OR NON-INFRINGEME NT.
BY USING THIS SO FTW ARE, YOU AGRE E THAT CYBERLINK WILL NOT BE LIABLE FOR ANY
DIRECT, INDIRECT, O R CONSEQ UENTIAL LOSS ARISING FROM THE USE O F THIS SO FTW ARE
OR M ATERIALS CONTAINED EITHER IN THIS PACKAGE.
The terms and conditions here under shall be governed and construed in accordance with the
laws of Taiwan.
PowerDVD is a registered trademark along with other company and product names mentioned
in this publication, used for identification purposes and remain the ex clusiv e property of their
respectiv e owners.
Manufactured under license from Dolby Laboratories. Dolby, Dolby Audio, and the double-D
symbol are trademarks of Dolby Laboratories. Confidential unpublished works. Copyright
1995- 2015 Dolby Laboratories. All rights reserv ed.
Manufactured under license under U.S. Patent #’s: 5,451,942; 5,956,674; 5,974,380; 5,978,76 2;
6,226,616; 6 ,487,535; 7,003,467; 7,212,872 & other U.S . and worldwide patents issued &
pending. DTS and DTS Digital Surround are registered trademarks and the DTS logos, Sy mbol
and DTS 96 /24 are trademarks of DTS, Inc. © 1996-2007 DTS , Inc. All Rights Reserv ed.
Manufactured under license under U.S. Patent #’s: 5,451,942; 5,956,674; 5,974,380; 5,978,76 2;
6,226,616; 6 ,487,535 & other U.S. and worldwide patents issued & pending. DTS is a registered
trademark and the DTS logos, Sy mbol, DTS-HD and DTS-HD Master Audio are trademarks of
DTS, Inc. © 1996-2007 DTS, Inc. All Rights Reserv ed.
International Headquarters
Mailing Address CyberLink Corporation
15F., No. 100, Minquan Rd., Xindian Dist.
New Taipei City 231, Taiwan (R.O.C.)
Web Site https://www.cyberlink.com
Telephone 886-2-8667-1298
Fax 886-2-8667-1385
Copyright © 2020 CyberLink Corporation. All rights reserved.
Page 3

Contents
1 IntroductionChapter 1:
1 Welcome
4 Minimum System Requirements
11 PowerDVD Media LibraryChapter 2:
11 Importing Media into the Media Library
12 Media Library Overview
14 Sharing Media in the Library
21 PowerDVD WorkspaceChapter 3:
21 Media Panel
27 Media Window
38 PowerDVD Modes
39 PowerDVD Settings
39 Playback Controls
40 Playing Media in PowerDVDChapter 4:
40 Playing Movie Discs
44 Playing Movie Files and TV Shows
47 Playing Videos
48 Viewing Photos
49 Playing Music
52 Creating Media Playlists
55 Playing Media Shared From Other PCs
57 Playing Media Stored on CyberLink Cloud
59 Playing Online Videos
62 Playing Media on Connected USB Devices
63 Playing Media on DLNA Devices
i
Page 4

66 PowerDVD VR Mode (Virtual Reality)Chapter 5:
66 Setting Up and Entering VR Mode
67 Playing Media in VR Mode
Chapter 6:
Playing Media on Another Display or Device
68
(Play to)
69 Casting Media to a Streaming Device
73 Playing Media on Extended Displays
74 Streaming Media to Digital Media Renderers
76 Playback ControlsChapter 7:
76 Movie Disc Playback Controls
82 Video Playback Controls
89 Photo Playback Controls
95 Music Playback Controls
101 Play Speed Navigator
101 Other UI Controls
108 Media Playback Menu
113 Express Menu
122 Playback Menu
125 Playback FeaturesChapter 8:
125 TrueTheater Enhancements
129 360° Media Playback
133 Adding Bookmarks
135 More Functions
138 Taking Photo Snapshots
139 External and Embedded Subtitles
Chapter 9:
Sharing, Uploading, and Syncing Media in
141
the Media Library
141 Sharing Media to Other Devices
ii
Page 5

144 Uploading Media to CyberLink Cloud
149 Sharing Media on Social Networks
152 Syncing Media to Connected USB Device
155 Sharing Media on DLNA Network
156 PowerDVD Settings - Player SettingsChapter 10:
156 General Settings
160 Video, Audio, Subtitles Settings
173 Blu-ray Disc Settings
175 CyberLink Cloud Settings
176 My Shared Media Settings
177 Hotkeys/Mouse Wheel Settings
177 Movie Info Settings
178 Information
180 PowerDVD Settings - PreferencesChapter 11:
180 UI Customization Preferences
186 Media Library Preferences
192 DLNA Devices Preferences
194 PowerDVD HotkeysChapter 12:
198 Licensing and Copyright InformationChapter 13:
204 Technical SupportChapter 14:
204 Before Contacting Technical Support
205 Web Support
205 Help Resources
iii
Page 6

CyberLink PowerDVD 20
Note: this document is for reference and informational use only. Its content
and the corresponding program are subject to change without notice.
Note: if you previously had CyberLink PowerDVD installed, you will be asked
if you want to import your personal settings into the new version. Select Yes,
I would like to import my personal settings from my previous PowerDVD
setup to import the media library, playlists, preference settings, and more.
Note: users who purchased the 365 edition get 100 GB of cloud storage space
as part of their subscription.
Chapter 1:
Introduction
This chapter provides an introduction to the CyberLink PowerDVD program. It
outlines all of the latest features, available editions, and reviews the minimum
system requirements for the program.
Welcome
Welcome to the CyberLink family of digital media tools. CyberLink PowerDVD is the
world's number one movie disc and digital media player, providing you with
feature-rich controls, for an interactive and tailored viewing experience on your
computer.
The first time you launch the program you will see a dialog welcoming you to
CyberLink PowerDVD. In the welcome dialog you can click on the Video Tutorials
link to view videos that outline the latest features in CyberLink PowerDVD. To review
a list of all the new features, see New Features in PowerDVD. Or click Next step to
proceed.
For users who have purchased the Ultra edition of CyberLink PowerDVD, click the
Redeem CyberLink Cloud Now button to get 100 GB of cloud storage free for one
year. When ready, click Next step to proceed.
1
Page 7

Introduction
Note: you can always change your selection later in General settings. See
CyberLink Product Improvement Program for more information.
Note: select the Remember my selection option if you want your chosen
mode to be your default mode every time you launch CyberLink PowerDVD.
Once selected, you will not be prompted to choose a mode when PowerDVD
is launched. See Switching to TV Mode for information on switching modes.
In the next dialog you are asked to participate in the CyberLink Product
Improvement Program. Select Yes, I would like to participate to help make
PowerDVD better. CyberLink will use the information collected to improve the
PowerDVD program and to develop new features.
Click Confirm to continue and launch CyberLink PowerDVD.
PC Mode or TV Mode
When you launch the program from the start menu, or the CyberLink PowerDVD
shortcut on the desktop, you are prompted to choose one of the following modes:
·
PC Mode: this mode lets you experience the ultimate in immersive
entertainment and includes all of the available CyberLink PowerDVD features
in your edition. Continue reading this help file for more information on all of
PC mode's features.
·
TV Mode: this mode helps you recreate a cinema experience in your own
home. See the separate help file within in TV mode for detailed information
about that mode's available features.
New Features in PowerDVD
Here is a list of some of the new features in the latest version CyberLink PowerDVD.
·
Share media library files on a home network for playback on other connected
devices.
·
Upload media library files to CyberLink Cloud for playback anywhere.
·
Use FaceMe® AI face recognition* to auto detect and tag the faces in your
photos.
2
Page 8

CyberLink PowerDVD 20
Note: * this feature is not available in some editions of CyberLink PowerDVD
20.
·
Watch YouTube videos with up to 8K resolution within PowerDVD.
·
Support for HDR 10 video file (HEVC, VP9 10-bit) playback on SDR monitors.
PowerDVD Editions
The features that are available in CyberLink PowerDVD are completely dependent
on the edition you have installed on your computer. Click the CyberLink PowerDVD
logo in the top left (or press Ctrl+Shift+A on your keyboard) to determine the
version, edition, and build number for your copy of CyberLink PowerDVD.
To view the PowerDVD version table, please go to our web site:
https://www.cyberlink.com/products/powerdvd-ultra/compareversions_en_US.html
PowerDVD 365
PowerDVD 365 is a subscription based version of CyberLink PowerDVD that provides
the most complete multimedia player for home theaters & PCs, and so much more.
With a PowerDVD 365 subscription, you get:
·
All the award-winning features of CyberLink PowerDVD.
·
Cloud storage space on CyberLink Cloud, for instant media access anywhere.
·
Guaranteed updates to the latest version of CyberLink PowerDVD.
PowerDVD 365 is the must-have solution to access and play all your movies, videos,
photos and music at their best.
CyberLink Cloud
CyberLink Cloud* is a cloud storage service from CyberLink where users can upload
movies, TV shows, videos, photos, and music to make it available anywhere for
playback on a portable device using PowerPlayer. See CyberLink Cloud for more
information.
3
Page 9

Introduction
Note: you must connect to the Internet to use this feature.
Updating Your Software
Software upgrades and updates (patches) are periodically available from CyberLink.
CyberLink PowerDVD automatically prompts you when either is available.
To update your software, do this:
1. Open the Notification Center by doing one of the following:
·
click the button when it's enabled.
·
press the I key on your keyboard.
·
click the Upgrade button in the About or PowerDVD Settings window.
2. Click the feature you would like to upgrade to, or the patch you want to
update to.
3. A web browser window opens, where you can purchase product upgrades or
download the latest patch update.
Minimum System Requirements
The system requirements listed below are recommended as minimums. The system
requirements for CyberLink PowerDVD vary depending on the movie content you
are watching.
CyberLink PowerDVD optimizes performance by selecting the appropriate video deinterlacing algorithm for the available processing power. CyberLink PowerDVD
maintains its support for processors below 1.6 GHz by ensuring that some
CyberLink TrueTheater technologies are turned off by default. CyberLink
PowerDVD's advanced audio and video technologies function better when used
with processors above 2.4 GHz.
4
Page 10

CyberLink PowerDVD 20
Operating System
Ultra HD Blu-ray
·
Microsoft Windows 10 (64-bit with Fall Creators Update 2017 Oct. updates).
HDR 10 Video file Playback
·
Windows 10 (64-bit with October 2018 Update) and turn on the “Play HDR
games and apps” in Settings > System > Display > Windows HD Color
settings.
8K Video Playback
·
Microsoft Windows 10 (64-bit with Fall Creators Update 2017 Oct. updates).
TrueTheater for video resolutions greater than Full HD
·
Microsoft Windows 10 (64-bit with Fall Creators Update 2017 Oct. updates).
VR Mode
·
Microsoft Windows 10/8.1/7 with Service Pack 1.
Blu-ray Disc, DVD, and TrueTheater Playback
·
Microsoft Windows 10/8.1/7 with Service Pack 1.
Processor (CPU)
Ultra HD Blu-ray
·
Intel 7th generation (Kaby Lake) Core i processors and above that support the
Intel Software Guard Extensions (Intel SGX) technology.
5
Page 11

8K Video Playback
Note: ** some Fox titles released from Jul. 2013 will not support TrueTheater
HD.
Note: CyberLink PowerDVD supports 4K Ultra HD video in H.264 / MP4 format
at bitrates up to 60 Mbps.
·
Intel 7th Generation Core i7 (Kaby Lake) with HD (UHD) Graphics 630.
VR Mode
·
Intel i5-4590, AMD FX 8350 equivalent.
Blu-ray Disc, DVD, and TrueTheater Playback
·
Blu-ray Disc playback: Intel Core 2 Duo E6750 (2.66GHz), AMD Phenom 9450
(2.10GHz).
·
TrueTheater HD** for Blu-ray and HD video: Intel Core i5 (with 4 Cores), AMD
Phenom II X6.
·
DVD playback: Pentium 4 (2.4 GHz), Athlon 64 2800+ (1.8 GHz), AMD Fusion Eseries & C-series.
Introduction
4K Ultra HD with Hardware Acceleration
·
Intel 3rd generation Core i5.
TrueTheater for video resolutions greater than Full HD
·
Intel 7th Generation Core i5 (Kaby Lake) with HD (UHD) Graphics 630.
Media Library Sharing on Home Network
·
Intel 7th Generation Core i5 for single 1080p video real-time transcoding.
6
Page 12

CyberLink PowerDVD 20
Note: CyberLink PowerDVD supports 8K Ultra HD video (up to 7680 × 4320
resolution, 30 FPS) in HEVC 8/10bits , VP9 8/10bits (depend on GPU ability).
Note: Ultra HD Blu-ray is supported only if a display is powered by Intel
Graphics and supports HDCP 2.2. If your computer includes more than one
graphics processor, Ultra HD Blu-ray is supported only on the display that is
connected and powered by Intel Graphics.
Graphics Processor (GPU)
8K Ultra HD Video with Hardware Acceleration
·
NVIDIA GTX 10 series; Intel 7th Generation Core i7 (Kaby Lake) with HD (UHD)
Graphics 630.
·
8K video output: GPU and 8K monitor with DisplayPort 1.4 or HDMI 2.1
support.
Ultra HD Blu-ray
·
Intel 7th generation (Kaby Lake) Core i processors integrated with Intel HD
Graphics 630, Intel Iris™ Graphics 640.
VR Mode
·
NVIDIA GeForce GTX 970, AMD Radeon R9 290 equivalent.
HDR 10 Video Playback
·
to view High Dynamic Range (HDR) effects from HDR10 Videos, Intel 7th
Generation (Kaby Lake) Core i Processors integrated with Intel HD Graphics 630
or Intel Iris Graphics 640, AMD Radeon RX 400 series; RX 500 Series; RX Vega
Series, and NVIDIA GTX 950/960, 1000 series (for HEVC HDR 10), RTX 2000 series,
GTX 1080 Ti, GTX 1050, GTX 1050 Ti, or GT 1030 (for VP9 HDR 10).
7
Page 13

4K Ultra HD Video with Hardware Acceleration
Note: we strongly recommend that you update your graphics card driver to
the latest version.
·
H.264/AVC: 3rd Generation Intel Core i5 (Ivy Bridge).
·
H.265/HEVC (8bits): 5th Generation Intel Core i5 (Broadwell) or NVIDIA GTX 960.
·
H.265/HEVC (10bits): 7th Generation Intel Core i5 (Kaby Lake) or NVIDIA GTX
1060.
TrueTheater for video resolutions greater than Full HD
·
Intel HD/UHD Graphics 630 or Intel Iris Graphics 640 for 4K 30 fps video.
·
NVIDIA GTX 1060 or AMD RX580 for 4K 60 fps video.
Blu-ray Disc, DVD, and TrueTheater HD Playback
·
Intel HD Graphics, ATI Radeon HD 5000, NVIDIA GeForce 9500GT.
Introduction
DVD Playback
·
PCI Express graphic accelerator supporting DirectX 9.0.
Mainboard (Motherboard)
Ultra HD Blu-ray
·
A mainboard is required which supports the Intel Software Guard Extensions
(Intel SGX) technology. The Intel SGX feature needs to be enabled in the BIOS
settings and allocated with 128 MB or above memory space. To view the HDR
10 effect of Ultra HD Blu-ray movies, a mainboard that supports exporting
HDR 10 signal is required.
8
Page 14

CyberLink PowerDVD 20
Note: to enable the High Dynamic Range (HDR) feature of Ultra HD Blu-ray
movies, the display device must support the HDR display feature and 10-bit
color depth display capability with an HDMI 2.0a/DisplayPort 1.4 connection
interface. If your display device doesn't support the HDR feature, PowerDVD
will play back the Ultra HD Blu-ray movie under Standard Dynamic Range
(SDR) mode.
HDR 10 Video Playback
·
To view HDR 10 video, a mainboard that supports exporting HDR 10 signal is
required.
Memory
·
4 GB (6 GB recommended).
Hard Disk Space
·
1 GB for product installation.
Display Device
Ultra HD Blu-ray
·
Display device with HDMI 2.0a/DisplayPort 1.3 connection interface, and must
support HDCP 2.2.
·
Screen resolution: Ultra HD resolution (3840 x 2160).
·
Display connection: HDMI 2.0a/DisplayPort 1.3 version cable without any
adapters/splitters/repeaters.
Blu-ray Disc, DVD, and TrueTheater Playback
·
For Blu-ray titles with AACS and DVD titles with CPRM playback, PowerDVD 20
only allows output to display devices using DVI, HDMI and DisplayPort
connector in order to be compliant with copy protection (HDCP).
9
Page 15

·
For other DVD and Blu-ray Disc playback: HDCP compliant display for digital
output. TV or computer monitor for analog output.
Video Output
VR Mode
·
HDMI 1.4, DisplayPort 1.2.
Disc Drive
·
Ultra HD Blu-ray playback: optical disc drives that are certified for Ultra HD
Blu-ray playback.
·
Blu-ray Disc playback: BD-ROM/BD-RE or Super Multi Blu combo disc drive.
·
DVD playback: DVD-ROM, DVD+-R/RW, DVD-RAM or DVD Super Multi combo
disc drive.
Internet Connection
Introduction
·
Required for sharing media library over a home network. Also required for
initial software and file format activation, first-time play of an Ultra HD Blu-ray
movie, and online services.
10
Page 16

CyberLink PowerDVD 20
Chapter 2:
PowerDVD Media Library
The PowerDVD media library is comprised of all the movies, TV shows, and other
media files that you import from your computer's hard drive and connected
network devices. It is also where you can play back your movie discs and access the
latest movie information from the Internet.
To ensure the PowerDVD media library has all of your media, make sure that you
tell CyberLink PowerDVD where it is so it can be imported. For information on
importing movies, TV shows, and other media files in to the media library, see
Importing Media into the Media Library.
Once in the media library, you can organize, play, and share your movies, TV shows,
and media, and much more. For a detailed overview of the media library itself, and
what each tab contains, see Media Library Overview.
Importing Media into the Media Library
To import media into the PowerDVD media library, do this:
1. Click Media Library and then navigate to the media type you want to import
(Movies/TV, Videos, Photos, Music).
2. In the selected media window, click the Add Now link to open the Media
Library Preferences window.
3. For each media type, follow the steps outlined at the following links to select
the media folders that contain your media.
·
Movie Files
·
TV Shows
·
Videos and Photos
·
Music
4. Click OK to close the window. CyberLink PowerDVD will scan the folders for
media and import it into the your media library.
11
Page 17

PowerDVD Media Library
Note: if you don't import media into the PowerDVD media library you can still
access it on your computer's hard drive via the My Computer tab of
PowerDVD.
Once the movies, TV shows, and other media files are in the media library, you can
easily play them back, share them on a network or CyberLink Cloud, stream them to
other devices, and much more. For more information on the PowerDVD media
library and its available features, see Media Library Overview.
Media Library Overview
Click on the Media Library tab to access to all of the media you have imported into
the media library and play back movie discs. The media library consists of four
main sections: Movies/TV, Videos, Photos, and Music.
See the relevant sections in Playing Media in PowerDVD for detailed information on
playing back the media in the media library.
Movies/TV in the Media Library
Click on Media Library > Movies/TV to play back movie discs, movie files, TV shows,
and access the latest movie information from CyberLink's movie information
services. The Movies/TV tab has four sections: Movie Info, Movie Discs, Movie
Library, and TV Shows.
Movie Info
The Movie Info (iPower) section of the media library provides access to movie
information from the internet. To view the latest movie releases and other
information in the media window, click . In the pages, you can use iPower
to collect or keep the movies watched list.
12
Page 18

CyberLink PowerDVD 20
Note: * this feature is not available in some editions of CyberLink PowerDVD
20.
Movie Discs
Click to access the Movie Discs section of the Movies/TV tab, which is
where you play back video discs in CyberLink PowerDVD. See Playing Movie Discs
for information on the playback of discs in CyberLink PowerDVD.
Movie Library
Click on to open the Movie Library section and access all the movie files
in CyberLink PowerDVD. Movie files are Ultra HD Blu-ray*/Blu-ray Disc*/DVD folders,
Ultra HD Blu-ray/Blu-ray Disc/DVD ISO* files, and individual video files (movie files
you recorded with a PVR) that are saved on your computer's hard drive. By
importing them into the Movie Library section of the media library you can view
movie cover art, rating information, and more. See Browsing Through Movies in the
Movie Library for more information.
See Playing Movie Files for more information on playing movie files in CyberLink
PowerDVD.
TV Shows
The TV Shows section is where TV show video files you recorded with a PVR are
found in the PowerDVD media library. Click to access, organize, and play
them back. See Browsing Through TV Shows for more information.
Videos in the Media Library
Click on Media Library > Videos to play back the video clips that are in your media
library. These videos are home movies and other short clips that you may not want
to include in the Movie Library. See Browsing Through Video Folders for more
information.
13
Page 19

PowerDVD Media Library
See Playing Videos for information on the playback of video files in CyberLink
PowerDVD.
Photos in the Media Library
Click on Media Library > Photos to view all of the photos that are in your media
library. You can view these photos one at a time, in slideshows, and even share
them or print them out. See Browsing Through Photo Folders for more information.
See Viewing Photos for information on the photo features that are available in
CyberLink PowerDVD.
Music in the Media Library
Click on Media Library > Music to play back the music that is in your media library.
You can also view album art for your music collection and create music playlists for
playback. The audio that is in the music library does not have to be just music. It
can be any type of supported audio that you want to play back in CyberLink
PowerDVD. See Browsing Through Music for more information.
See Playing Music for information on the music playback features that are available
in CyberLink PowerDVD.
Sharing Media in the Library
You can share movie files and TV shows in collections, and videos, photos, music in
folders, on a home network* with other users that have:
·
CyberLink PowerDVD (365 or 20 Ultra) installed on a computer.
·
CyberLink PowerPlayer installed on a computer or iOS/Android device.
·
A web browser on a PC or Mac connected to the same home network.
Once shared, the media files are viewable on the My Shared Media (To Other
Devices) tab in CyberLink PowerDVD, where you can manage the collections and
folders. For other computers/devices on the network, the shared media is displayed
on the Shared Media (From Other PC) tab. For computers on the same home
network that do not have CyberLink PowerDVD or PowerPlayer installed, the media
can be accessed in web browser at the following URL:
https://powerplayer.cyberlink.com. See Playing Shared Media in a Web Browser for
more information.
14
Page 20

CyberLink PowerDVD 20
Note: * this feature is only available in some editions of CyberLink PowerDVD
20.
Note: movie discs, disc folders, and ISO files cannot be shared on a network.
You can also upload the media files in your media library to CyberLink Cloud* for
playback anywhere in CyberLink PowerPlayer or in a web browser. Uploaded media
files are viewable on the CyberLink Cloud tab in CyberLink PowerDVD.
Sharing Movies and TV Shows in Collections
You can share the movie files and TV shows in your media library on a home
network. As you are sharing them, you can organize them in collections.
Sharing Movie Files
To share movie files, do this:
1. Click Media Library > Movies/TV > to view the movie files in the
media library.
2. To share a movie file, do either of the following:
·
right click on a movie file in the media library and then select Share on Local
Home Network.
·
double-click on a movie file in the media library, click , and then select
Share on Local Home Network.
3. In the Add to Collection window select an existing movie collection to add the
movie to, and then click OK. Or click Add New Collection to first add a new
collection. After adding the new collection, click OK.
4. Repeat the steps to add more movies to your collections. When you are done,
go to the My Shared Media (To Other Devices) tab to view and manage all the
shared movies.
15
Page 21

PowerDVD Media Library
Sharing TV Shows
To share TV shows, do this:
1. Click Media Library > Movies/TV > to view the TV shows in the media
library.
2. To share a TV show, do either of the following:
·
right click on a TV show in the media library and then select Share on Local
Home Network.
·
double-click on a TV show in the media library, click , and then select
Share on Local Home Network.
3. In the Add to Collection window select an existing TV show collection to add
the TV show to, and then click OK. Or click Add New Collection to first add a
new collection. After adding the new collection, click OK.
4. Repeat the steps to add more TV shows to your collections. When you are
done, go to the My Shared Media (To Other Devices) tab to view and manage
all the shared TV shows.
Sharing Videos, Photos, Music
You can share video and photo folders and the music in your media library on a
network.
Sharing Video Folders
To share video folders, do this:
1. Click Media Library > Videos to view the video files in the media library.
2. Right-click on a video folder that contains the videos you want to share and
then select Share on Local Home Network.
3. Repeat the steps to share more video folders. When you are done, go to the
My Shared Media (To Other Devices) tab to view and manage all the shared
videos.
16
Page 22

CyberLink PowerDVD 20
Note: movie discs, disc folders, and ISO files cannot be uploaded to
CyberLink Cloud.
Sharing Photo Folders
To share photo folders, do this:
1. Click Media Library > Photos to view the photos in the media library.
2. Right-click on a photo folder that contains the photos you want to share and
then select Share on Local Home Network.
3. Repeat the steps to share more photo folders. When you are done, go to the
My Shared Media (To Other Devices) tab to view and manage all the shared
photos.
Sharing Music
To share music, do this:
1. Click Media Library > Music to view the music in the media library.
2. Right-click on an artist, album, or individual song, and then select Share on
Local Home Network.
3. Repeat the steps to share more music. When you are done, go to the My
Shared Media (To Other Devices) tab to view and manage all the shared music.
Uploading Movies and TV Shows to CyberLink Cloud
You can upload media files to CyberLink Cloud for playback on CyberLink
PowerPlayer.
Uploading Movies to CyberLink Cloud
To upload movie files, do this:
17
Page 23
PowerDVD Media Library
1. Click Media Library > Movies/TV > to view the movie files in the
media library.
2. To upload a movie file, do either of the following:
·
right click on a movie file in the media library and then select Upload to
CyberLink Cloud.
·
double-click on a movie file in the media library, click , and then select
Upload to CyberLink Cloud.
3. In the Add to Collection window select an existing movie collection to add the
movie to, and then click OK. Or click Add New Collection to first add a new
collection. After adding the new collection, click OK.
4. In the Transfer and Upload window, configure the following options:
·
Transcode quality: set the quality of the uploaded file. The larger the file, the
longer it may take to download and play it back on other devices.
·
Imprint subtitles: select this option if you want to include any available
subtitles with the uploaded file, and then select the file from the drop-down
list.
·
Select audio language: if the movie file has more than one language available,
select this option and which audio language you want to include in the
upload from the drop-down list.
5. When you are done configuring the options, click Start to upload the movie
file. When the upload is complete, go to the CyberLink Cloud tab to view,
manage, and get the share links for all the uploaded movie files.
Uploading TV Shows to CyberLink Cloud
To upload movie files, do this:
1. Click Media Library > Movies/TV > to view the TV shows in the media
library.
2. To upload a TV show, do either of the following:
·
right click on a TV show in the media library and then select Upload to
CyberLink Cloud.
18
Page 24

CyberLink PowerDVD 20
·
double-click on a TV show in the media library, click , and then select
Upload to CyberLink Cloud.
3. In the Transfer and Upload window, configure the following options:
·
Transcode quality: set the quality of the uploaded file. The larger the file, the
longer it may take to download and play it back on other devices.
·
Imprint subtitles: select this option if you want to include any available
subtitles with the uploaded file, and then select the file from the drop-down
list.
·
Select audio language: if the TV shows have more than one language
available, select this option and which audio language you want to include in
the upload from the drop-down list.
4. When you are done configuring the options, click Start to upload the TV
shows. When the upload is complete, go to the CyberLink Cloud tab to view,
manage, and get the share links for all the uploaded TV show files.
Uploading Videos, Photos, Music to CyberLink Cloud
You can upload videos, photos, and music in your media library to CyberLink
Cloud.
Uploading Videos
To upload video files, do this:
1. Click Media Library > Videos to view the video files in the media library.
2. Right-click on a video folder or an individual video file in the folder that you
want to upload and then select Upload to CyberLink Cloud.
3. When the upload is complete, go to the CyberLink Cloud tab to view, manage,
and get the share links for all the uploaded videos.
Uploading Photos
To upload photos, do this:
19
Page 25

PowerDVD Media Library
1. Click Media Library > Photos to view the photos in the media library.
2. Right-click on a photo folder or an individual photo file in the folder that you
want to upload and then select Upload to CyberLink Cloud.
3. When the upload is complete, go to the CyberLink Cloud tab to view, manage,
and get the share links for all the uploaded photos.
Uploading Music
To upload music, do this:
1. Click Media Library > Music to view the music in the media library.
2. Right-click on an artist, album, or individual song, and then select Upload to
CyberLink Cloud.
3. When the upload is complete, go to the CyberLink Cloud tab to view, manage,
and get the share links for all the uploaded music.
20
Page 26
CyberLink PowerDVD 20
Chapter 3:
PowerDVD Workspace
This chapter outlines the CyberLink PowerDVD program workspace and its available
features.
When you launch the program it displays as follows:
A - Media P anel, B - Media Window, C - Access PowerDVD Learning Center and Hel p, D - Search for
Medi a, E - Configure PowerDVD Settings, F - Switch to TV Mode, G - Media Window Vi ew, H Playbac k Controls
Media Panel
The media panel is where you can play back movies discs and access all the
imported photos, video clips, movie files, TV shows, and music in the CyberLink
PowerDVD media library. The media panel also lets you watch online videos
(YouTube and Vimeo), play media on portable devices and media servers* on your
home network, create media playlists, access CyberLink Cloud*, and much more.
21
Page 27

PowerDVD Workspace
Note: * this feature is not available in some editions of CyberLink PowerDVD
20.
Note: CyberLink PowerDVD supports the Dropbox, Google Drive, and
OneDrive cloud storage services. Make sure the cloud storage service's
desktop app is installed, running, synced, and enabled in preferences.
Media Library
The Media Library tab of the media panel provides access to all of the media you
have imported into the media library and is where you can play back movie discs.
See PowerDVD Media Library for more detailed information.
My Computer
Click on the My Computer tab to view all of the folders on your computer's hard
drive, and any connected USB devices, network drives, and installed cloud storage
services. This tab mirrors the view seen when you click on Computer in Windows
Explorer, including the default Windows library shortcuts. This lets you access and
play back any media that you did not import into the media library.
Resuming From Last Scene of Videos Not in
the Media Library
When you play video files via the My Computer tab, or using the Play with
CyberLink PowerDVD 20 in the Windows right-click menu, you can resume
playback from the last scene you watched the next time PowerDVD is launched. To
do this, just hover your mouse over the video's thumbnail in CyberLink PowerDVD.
22
Page 28

CyberLink PowerDVD 20
Note: see Sharing Media to Other Devices for detailed information on how to
share your media on a home network. * this feature is only available in some
editions of CyberLink PowerDVD 20.
Click to play it back from the beginning, or to play it from the last scene
you viewed.
Playlists
On the Playlists tab of CyberLink PowerDVD you can create media playlists that
contain music, videos, and photos. See Creating Media Playlists for more
information.
My Shared Media (To Other Devices)
Click on the My Shared Media (To Other Devices)* tab to view all the media that you
have shared on a home network.
Managing Shared Media
You can manage the media that you have shared on a home network on the My
Shared Media (To Other Devices) tab.
Click My Shared Media (To Other Devices) > Movies or TV Shows and then right
click on the shared collections to:
·
Rename Collection: lets you rename a previously created collection.
·
Add Media to Collection: select this option if you want to add more movies/TV
shows to a collection. After selecting all the media files you want to add, click
OK.
23
Page 29

PowerDVD Workspace
Note: * this feature is only available in some editions of CyberLink PowerDVD
20.
Note: see Uploading Media to CyberLink Cloud for detailed information on
how to upload your media to CyberLink Cloud. * this feature is not available
in some editions of CyberLink PowerDVD 20.
·
Remove Selected Collection: removes the collection from your shared media.
·
Set Pin Code: select this option if you want to protect the media with a pin
code. Enter a 4-digit pin code in the field provided, and then click OK.
If you want to remove a specific movie or TV show from a collection, double click
on the collection to open it. Next, right click on the movie/TV show and then select
Remove From Collection.
In My Shared Media (To Other Devices) > Videos, Photos, or Music sections, you can
right click on a folder, artist, album, song and then select Remove From Shared to
remove from your shared media.
Shared Media (From Other PCs)
On the Shared Media (From Other PCs)* tab you can play back the media files that
were shared on computers on the same network running CyberLink PowerDVD or
PowerPlayer. For more detailed information, see Playing Media Shared From Other
PCs.
CyberLink Cloud
Click on the CyberLink Cloud* tab to view all the media that you have uploaded to
the cloud service from CyberLink.
Click on the Information section to view the details of the uploaded media and how
much free space there is available.
24
Page 30

CyberLink PowerDVD 20
Managing CyberLink Cloud Media
You can manage the media that you have uploaded to CyberLink Cloud on the
CyberLink Cloud tab.
Click CyberLink Cloud > Movies or TV Shows and then right click on the uploaded
collections to:
·
Rename Collection: lets you rename a previously created collection.
·
Remove Selected Collection: deletes the collection and all of its media off of
CyberLink Cloud.
If you want to remove a specific movie or TV show from a collection, double click
on the collection to open it. Next, right click on the movie/TV show and then select
Remove From Collection.
In CyberLink Cloud > Videos, Photos, or Music sections, you can right click on a
folder, media file, playlist, etc. and then select Delete From CyberLink Cloud to
delete it off of the CyberLink Cloud server.
Sharing a Link to Your CyberLink Cloud
Media
To share your CyberLink Cloud media with others, do this:
1. Click the CyberLink Cloud tab, and then select the section where your media is
located (Movies, TV Shows, Videos, Photos, Music).
2. Right click on the collection, folder, media file, playlist you want to share and
then select Share Link.
3. In the Share Link window, select the Enable share by link option and then
configure the following options:
·
Set expiration date: select this option if you want the link to have an
expiration date. If required, click on the calendar icon to set the expiration
date for the shared media. After this date, users can no longer use the link to
access the shared media.
·
Protect with pin code: select this option if you want to protect the media with
a pin code. If required, enter a 4-digit pin code in the field provided.
25
Page 31

PowerDVD Workspace
Note: to share the URL link, just press the Ctrl+V keys on your keyboard to
paste the copied share info in e-mails, text messages, etc.
Note: * this feature is not available in some editions of CyberLink PowerDVD
20.
Note: by default, this tab is not displayed. To display it, select the DLNA
Devices option on the Media Panel tab of UI Customization Preferences.
4. Click the Copy Share Info button (or either of the individual Copy buttons) to
copy the URL link and pin code to your clipboard.
5. Click OK.
Online Video
The Online Video* tab of the media panel lets you watch videos on YouTube and
Vimeo, without leaving the program interface.
See Playing Online Videos for more information about using this feature.
USB Devices
On the USB Devices tab of CyberLink PowerDVD, you can access and play back
media that is on any device connected via USB. You can also sync all the media in
the media library to a device that is connected via a USB cable.
See Playing Media on Connected USB Devices for more information on playing
back media on USB devices, or Syncing Media to Connected USB Device to learn
more about syncing media to USB connected devices.
DLNA Devices
On the DLNA Devices tab of CyberLink PowerDVD, you can access and play back
media that is on any DLNA media server that is connected to a home Wi-Fi network.
See Playing Media on DLNA Devices for more information on playing back shared
media on a network.
26
Page 32

CyberLink PowerDVD 20
Note: when browsing through and viewing media in the media window,
CyberLink PowerDVD will remember your place for you when you close the
program. The next time you launch CyberLink PowerDVD, you will be
brought back to the last media you were viewing for your added
convenience.
Note: use the zoom slider on the playback controls to use Instant Scale to
dynamically resize the movie cover art to a desired size. If you are not seeing
the latest movie files in the media library, just click to refresh.
Media Window
The media window of CyberLink PowerDVD is where you view all of the media
folders, files, and watch content during playback. Just select a tab in the media
panel to display media files and folders in the media window.
Browsing Through Movies in the Movie Library
Click Media Library > Movies/TV > to browse through the movies files in
your media library. When browsing through the movie files, you can view their
movie cover art, rating information, and more. Click the down arrow in the top
right of the window to filter the movies by 10 Recently Played Movies, Movies Not
Watched Yet, or by Genre, Year, Rating if required.
You can edit the movie info for any of the movie files in your media library by right
clicking on them and then selecting Edit Movie Info. Make the required changes,
and then click Save. Click Reset if you want to revert the info back to the default
data downloaded from MoovieLive.
If a movie file does not have any movie info associated to it, right click on it and
then select Match Movie Info. If the current matched info is incorrect, right click
and then select Change Matching Movie Info. Check if any of the suggested titles
match the movie file, or search for the correct title using the field provided. Once
you find the correct movie info, select it and then click OK to set the changes.
27
Page 33

PowerDVD Workspace
Note: if the cover art for a movie file in the library is incorrect, you can right
click on it and select Hide Online Info to remove it and the related movie
information.
Note: use the zoom slider on the playback controls to use Instant Scale to
dynamically resize the TV show cover art to a desired size. If you are not
seeing the latest TV shows in the media library, just click to refresh.
If you want to change the cover art for a movie file, you can insert an image file (in
the JPG or PNG format) in the movie file's folder and name it “folder” to use it as the
cover art. You can also right click on the movie file and then select Set Cover Art. In
the Select Image dialog, browse to and then select an image on your computer's
hard drive to use as the cover art.
Right-click on a movie file thumbnail in the media window and then select Locate
on Disk to view the folder where the file is located in Windows Explorer. If you'd like
to remove a movie file from the media library (and from your computer's hard
drive), just right click on it and select Delete from Disk.
Browsing Through TV Shows
Click Media Library > Movies/TV > to browse through the TV shows in
your media library. When browsing through TV Shows, you can view their cover art,
rating information, and more. Click the down arrow in the top right of the window
to filter the movies by 10 Recently Played TV Shows, TV Shows Not Watched Yet, or
by Genre, Year, Rating if required.
CyberLink PowerDVD automatically organizes TV shows by show, season, and
episode for easy browsing. If you find that the TV shows are not displaying
correctly, you may need to update the file and folder names. See Organizing TV
Shows for more information.
You can edit the TV show info for any of the TV shows in your media library by right
clicking on them and then selecting Edit TV Info. Make the required changes, and
then click Save. Click Reset if you want to revert the info back to the default data
downloaded from MoovieLive.
If a TV show file does not have any info associated to it, right click on it and then
select Match TV Info. If the current matched info is incorrect, right click and then
28
Page 34

CyberLink PowerDVD 20
Note: if the cover art for a TV show in the library is incorrect, you can right
click on it and select Hide Online Info to remove it and the related TV show
information.
Note: if you are not seeing the latest video files in the media library, just click
to refresh.
select Change Matching TV Info. Check if any of the suggested titles match the TV
show, or search for the correct title using the field provided. Once you find the
correct TV show info, select it and then click OK to set the changes.
If you want to change the cover art for a TV show, you can insert an image file (in
the JPG or PNG format) in the TV show's folder and name it “folder” to use it as the
cover art. You can also right click on the TV show and then select Set Cover Art. In
the Select Image dialog, browse to and then select an image on your computer's
hard drive to use as the cover art.
Right-click on a TV show thumbnail in the media window and then select Locate on
Disk to view the folder where the file is located in Windows Explorer.
Browsing Through Video Folders
Click Media Library > Videos to browse through the video files in your media library.
To change the browsing view, just click the down arrow in the top right of the
window and select the one of the following options:
·
List view: displays videos and their folders in a list, which is easily sortable by
clicking on the list headings.
·
Folder view: displays videos and their folders as thumbnails, which can be
resized.
·
Calendar view: displays videos in a calendar. Providing a timeline for your
media, just double click on a date to view all the videos that were shot on that
day.
29
Page 35

PowerDVD Workspace
Note: use the zoom slider on the playback controls or Gesture Controls to
change the calendar view to show more than one month, or click on a year at
the top of the window to view videos from a different year. Click to view
any videos that were created on today's date.
Note: when browsing through videos in a folder, right click on one and then
select Set as Cover to set it as the thumbnail cover image for its folder.
When browsing through the folders on the Videos tabs in folder view, you can
hover your mouse over a folder thumbnail to use Instant View to preview all the
videos inside by dragging the slider that appears.
To view the videos in a folder, just double-click on it (or right click on it for more
options). To play videos, just select them in the media window and then click the
play button. For more information on playing videos, see Playing Videos.
Right-click on a video thumbnail in the media window and then select Locate on
Disk to view the folder where the file is located in Windows Explorer. If you'd like to
remove a video file from the media library (but not from your computer's hard
drive), just right click on it and select Remove from Library. Click Delete from Disk
if you want to remove it from the library and delete it from your computer's hard
drive.
30
Page 36

CyberLink PowerDVD 20
Note: use the zoom slider on the playback controls to use Instant Scale to
dynamically resize the folder and video thumbnails to a desired size.
Note: if you are not seeing the latest photos in the media library, just click
to refresh.
Note: use the zoom slider on the playback controls or Gesture Controls to
change the calendar view to show more than one month, or click on a year at
the top of the window to view photos from a different year. Click to view
any photos that were created on today's date.
Browsing Through Photo Folders
Click Media Library > Photos to browse through the photos in your media library..
To change the browsing view, just click one of the following three tabs at the top of
the photo media window:
·
can be resized.
·
for your photos, just double click on a date to view all the photos that were
shot on that day.
·
faces. See Tagging Faces in Photos for detailed information.
When browsing through the folders on the Photos tabs in folder view, you can
hover your mouse over a folder thumbnail to use Instant View to preview all the
photos inside by dragging the slider that appears.
- folder view displays photos and their folders as thumbnails, which
- calendar view displays photos in a calendar. Providing a timeline
- face view displays the photos in the media library with tagged
31
Page 37

PowerDVD Workspace
Note: when viewing a single photo, click to view the instant photo
thumbnails for all the photos in the current folder. Right-click on the photo
while viewing it and then select Copy to Clipboard if you want to paste the
photo in another program outside CyberLink PowerDVD.
Note: when browsing through photos in a folder, right click on one and then
select Set as Cover to set it as the thumbnail cover image for its folder.
To view the photos in a folder, just double-click on it (or right click on it for more
options).
To play photos in a folder in a slideshow, just select them in the media window and
then click the play button. For more information on playing photo slideshows, see
Viewing Photos.
Right-click on a photo thumbnail in the media window and then select Locate on
Disk to view the folder where the file is located in Windows Explorer. If you'd like to
remove a photo from the media library (but not from your computer's hard drive),
just right click on it and select Remove from Library. Click Delete from Disk if you
want to remove it from the library and delete it from your computer's hard drive.
32
Page 38

CyberLink PowerDVD 20
Note: use the zoom slider on the playback controls to use Instant Scale to
dynamically resize the folder and media thumbnails to a desired size.
Note: * this feature is not available in some editions of CyberLink PowerDVD
20, and only available on computers running Windows 64-bit.
Tagging Faces in Photos
CyberLink PowerDVD uses FaceMe® AI face recognition* to auto detect and tag the
faces in your photos. To have CyberLink PowerDVD tag all the faces in your media
library photos, do this:
1. Click Media Library > Photos > to open the faces tab.
2. Click the Tag Faces button.
3. When the analysis process is complete, all the detected faces are organized in
folders.
Managing Tagged Faces
After CyberLink PowerDVD has tagged the faces in your media library photos, you
can manage them by doing the following:
·
click on + Name to edit the face name. Enter the name of the person tagged,
and then click OK to save the changes.
·
if you need to edit a face name, right click on the folder and then select Edit
Name.
·
if a face tag is incorrect in a tagged faces folder, right click on the photo in the
folder and then select Not This Person.
·
if you want to hide a face tagged in your photos, right click on its folder and
then select Hide This Face. To show a hidden face, right click on the media
window and then select Show Hidden Faces. Next, right click on the hidden
face and then deselect the Hide This Face option.
33
Page 39

PowerDVD Workspace
Note: use the zoom slider on the playback controls to use Instant Scale to
dynamically resize the album cover art to a desired size. If you are not seeing
the latest music in the media library, just click to refresh.
·
if there are two face tags for the same person, after editing the face name for
the first one, right click on the second and then select Merge With. Select the
face name of the first one to merge the tags faces into the same folder.
·
to hide any remaining face tags you don't want it your library, right click in
the media window and then select Hide All Unnamed Faces.
Browsing Through Music
Click Media Library > Music tab to view the music in your library. CyberLink
PowerDVD automatically loads and displays the album art for all music that is
imported into the media library, if available.
You can also click to view the music by the recording artist, or
to view all of the individual songs in the media library. Click to return to
album view.
Right-click on an album, artist, or song in the media window and then select Locate
on Disk to view the folder where the music files are located in Windows Explorer. If
you'd like to remove music from the media library (but not from your computer's
hard drive), just right click on it and select Remove from Library. Click Delete from
Disk if you want to remove music from the library and delete it from your
computer's hard drive.
To view the songs in an album or for an artist, just double-click on it (or right click
on it for more options). To play a song, just select it in the media window and then
click the play button. For more information on playing music files and other audio,
see Playing Music.
Editing Tags
If some music is not displaying the album art or is displayed as "Unknown Artist",
just right click on it and select Edit Tags to fix it.
34
Page 40

CyberLink PowerDVD 20
Note: you can edit the tags for each song one at a time, or for an entire
album by selecting multiple music files.
Note: the edit music tags feature is supported for AAC, MP3, FLAC audio files
only.
Note: * this feature is not available in some editions of CyberLink PowerDVD
20.
Note: you can also add album art for the extracted audio by clicking on the
album art box and then browsing to and locating an image on your hard
drive to use it as the album art.
In the Edit Tags dialog you can modify the Artist, Album, and Genre fields if
required. For the album art, just click on the album art box and then browse to and
locate an image on your hard drive to use it as the album art. Click Save to update
the information in the music library.
Extracting Audio From Video
You can extract* just the audio track of a video (movie file, TV show, video clip) and
import it into the media library. To extract audio from a video, do this:
1. Find the video in the media library. You can extract audio from movie files, TV
shows, and from your personal video clips.
2. Right-click on the video you want to extract the audio from, and then select
Extract Audio.
3. In the Extract Audio dialog, enter a Title, or name for the audio file that will be
created. If required, you can also modify the Artist, Album, and Genre fields.
4. Click the More Settings button to configure the extract audio settings as
follows:
·
Destination directory: set the folder on your computer where the extracted
audio will be stored by clicking the Change button and selecting the new
folder.
35
Page 41

PowerDVD Workspace
Note: if you select a folder that it is not in the media library, CyberLink
PowerDVD will auto add the folder and the extracted audio into the media
library for you.
Note: you can extract the audio from more than one video at one time. Just
click the Hide button in the Extract Audio dialog and then repeat the above
steps, or select multiple video files for audio extraction. You can also rightclick on a video folder in media library to extract the audio from all the videos
in that folder at once.
Note: click to clear the search results and display all the media in the
window.
·
Format: select the preferred audio file format of the extracted audio.
·
Bitrate: set the quality of the extracted audio files.
Click OK to close the More Settings dialog.
5. Click the Extract button to extract the audio and import it into the media
library.
Searching for Media
If you are looking for specific media in the PowerDVD media library, you can use
the search function to find it.
To search for media, do this:
1. Enter in a keyword in the search field located in the top right of the media
window.
2. CyberLink PowerDVD filters the media in the media window based on the
keywords entered.
36
Page 42

CyberLink PowerDVD 20
Note: you can only see the Rating column for videos and photos if you are in
list view. For music, you can see the Rating column when viewing all the
songs in an album or for an artist.
Rating Media
When browsing though the media in the PowerDVD media library you can rate each
media file by assigning it a rating from 1 and 5 stars.
To rate media, do this:
1. Select the media file in the PowerDVD media library you want to rate.
2. To rate it, do any of the following:
·
when watching a movie file, click stop to view the current rating for that
movie. Click on the current rating to go to the movie page on MoovieLive,
where you can set your rating for the movie.
·
right click on a video, photo, or music (song) file, select Rate, and then the
star rating you want to set.
·
when viewing videos and music in list/all songs view, in the Rating column
hover your mouse over the rating you want to apply to the media file, and
then click on the star rating to set it.
Setting 360 Projection Format
When 360 videos and photos are imported into the PowerDVD media library, you
may need to change their projection format. If CyberLink PowerDVD did not detect
your 360° media file and you are sure it has been produced for viewing, you can
manually set the 360 projection format. See Setting 360 Projection Format for more
information.
37
Page 43

PowerDVD Workspace
Note: * this feature is not available in some editions of CyberLink PowerDVD
20.
PowerDVD Modes
CyberLink PowerDVD has four different modes available for playing back your
media content: PC mode, TV mode, VR mode, and Mini Player mode*.
PC mode
PC mode is the main mode of CyberLink PowerDVD and contains all of the features
listed in this document.
TV mode
TV mode is for users who wish to view movies at a distance (10 foot) with a remote
control, or utilize touch screen playback on the latest generation of Ultrabooks and
tablets.
VR mode
If you have a supported virtual reality (VR) headset, you can play your media in
PowerDVD VR mode.
Mini Player mode
There is a mini player available when playing movies, TV shows, videos, music and
when viewing photos.
Switching to TV Mode
To switch to TV mode, click the button on the title bar. TV mode helps you
recreate a cinema experience in your own home.
38
Page 44

CyberLink PowerDVD 20
Note: TV mode has less features than PC mode. See the help file within the TV
mode of CyberLink PowerDVD for a detailed description of its available
features.
PowerDVD Settings
Click on at any time to configure the player settings and preferences of
CyberLink PowerDVD. For a complete list of all the available options and features
you can customize, see both PowerDVD Settings - Player Settings and PowerDVD
Settings - Preferences.
Playback Controls
The CyberLink PowerDVD playback controls provide effortless navigation of discs
and media files in the media library, and quick access to all of the program's
playback features. You can also use the controls to share the media in the library.
See Playback Controls for a detailed description of all the available controls you can
use with your media, and Sharing Media for information on sharing media on
YouTube, Vimeo, or on a network.
39
Page 45

Playing Media in PowerDVD
Note: see Supported Disc Formats for a list of the supported discs that can be
played in CyberLink PowerDVD. Ultra HD Blu-ray playback requires PowerDVD
20 Ultra or 365, Windows 10, and the latest Ultra HD Blu-ray compatible
hardware for your computer’s CPU, GPU, motherboard, and display device.
Be sure to double check the latest minimum system requirements on our
web site to confirm your computer supports playback:
https://www.cyberlink.com/products/powerdvd-ultra/spec-ultra_en_US.html
Note: see Movie Disc Controls for a list and description of the controls
available during movie playback. You can also play movies in the mini player.
See Playing Movies in the Mini Player for more information.
Chapter 4:
Playing Media in
PowerDVD
CyberLink PowerDVD supports the playback of a variety of different media. From
high definition content and DVDs, to movie files and TV shows, home videos, audio
CDs, photo slideshows, and music, CyberLink PowerDVD provides you with the
complete digital media playback experience.
Playing Movie Discs
When you insert a video disc into your disc drive, CyberLink PowerDVD plays it
automatically. If there is a disc already in your disc drive when you opened
CyberLink PowerDVD, do this:
1. Click on Media Library > Movies/TV and then .
2. Click the play button.
40
Page 46

CyberLink PowerDVD 20
Note: the auto-resume feature is not available for BD-J Blu-ray Disc playback.
Optical Disc Types
File Formats
Ultra HD Blu-ray*
BDMV
Blu-ray Discs*
BDAV, BDMV
DVD
DVD-Video, AVCHD*, AVCREC*, DVD-VR, DVD+VR
CD
VCD, SVCD
Note: * this feature is not available in some editions of CyberLink PowerDVD
20.
Auto-Resume
If you stop or close CyberLink PowerDVD during DVD disc playback, and even play
other media or discs afterward, the next time you play that specific disc title, you
may resume playback from the last viewed scene.
The auto-resume feature remembers exactly where you left off the last time you
watched the disc. It includes the following options:
·
select Resume to continue from the point where you previously stopped
watching.
·
select Restart to watch the disc from the beginning.
If you don't want CyberLink PowerDVD to prompt you every time a disc is inserted,
you can disable the auto-resume function in settings. See the Auto-Resume setting
section of General Settings for more information.
Supported Disc Formats
The optical disc formats that CyberLink PowerDVD supports are listed below:
41
Page 47

Playing Media in PowerDVD
Note: * this feature is not available in some editions of CyberLink PowerDVD
20.
Note: some disc titles will not allow you to select menus other than the Root
Menu. Users will need to access the settings from within the Root Menu if this
is the case.
Note: when you enter the disc menu during disc playback and you are done
selecting the desired options, right-click on the media window and then
select Resume to return to the point where you left off. Note that this resume
from menu function is not available if you stopped playback.
Accessing Disc Menus in PowerDVD
When playing discs with CyberLink PowerDVD you can access the disc menus in a
variety of ways. Whether it is the title, root, chapter, or audio menu, you can easily
access them from anywhere within the program during playback.
CyberLink PowerDVD also provides access to pop-up menus for Blu-ray Discs*, as
well as for menus on DVD-VR discs.
Menus on Commercial Discs
During the playback of most commercial discs, you can access the Title Menu, Root
Menu (for special features), Subtitles Menu, Audio Menu, Angle Menu, or the
Chapter Menu from various locations.
To access these menu items:
·
click on in the playback controls during DVD playback and then select
either Title Menu or Root Menu.
·
click on in the playback controls during playback and then choose Select
Menu. The available disc menus are dependent on how the disc was authored.
·
right-click on the media window during playback to access the express menu,
and then choose Select Menu.
42
Page 48

CyberLink PowerDVD 20
Note: * this feature is not available in some editions of CyberLink PowerDVD
20.
Note: if playlists are available, they are available for selection here too.
Pop-up Menu for Blu-ray Discs
Most Blu-ray Disc* titles have a pop-up menu that provides quick access to scene
selection and other features during playback.
If there is a pop-up menu available for the Blu-ray Disc title you are watching, you
can access it by doing one of the following:
·
during playback, click the button on the playback controls.
·
during playback, press the M key on your keyboard.
Blu-ray Disc Mouse Solution
Some Blu-ray Disc titles do not allow you to use a mouse to navigate through the
pop-up menu. If this is the case when you are playing a Blu-ray Disc in CyberLink
PowerDVD, click during disc playback to open the More Functions dialog, and
then use the navigation controls to navigate through the pop-up menu.
Using the Menus in DVD-VR Format
You can use the Program Set Viewer to access and navigate the menus for discs in
the DVD-VR video format.
1. Click on the playback controls.
2. Select Menu > Program Set Viewer to visually view the first frame of every
title/chapter.
3. Click on the thumbnail that represents the title/chapter in order to begin
playback or click Close to exit the viewer.
43
Page 49

Playing Media in PowerDVD
Note: see Supported Movie File/TV Show Formats for a list of the supported
video file formats that can be played in CyberLink PowerDVD.
Note: see Video Playback Controls for a list and description of the controls
and playback features available during movie file and TV show playback. You
can also play movie files and TV shows in the mini player. See Playing Videos
in the Mini Player for more information.
Note: the auto-resume feature is also available for DVD files on the hard drive
if an IFO file is present and they are in the media library.
Playing Movie Files and TV Shows
Click on Media Library > Movies/TV, and then to play back the movie files
in the media library, or to play the TV shows.
Movie files are Ultra HD Blu-ray*/Blu-ray Disc*/DVD folders, and individual video
files (movie files you recorded with a PVR) that are saved on your computer's hard
drive. TV shows are videos you recorded with a PVR.
Auto-Resume
If you stop or close CyberLink PowerDVD when playing movie files or TV shows in
the media library, the next time you play that specific video file, you may resume
playback from the last viewed scene.
The auto-resume feature remembers exactly where you left off the last time you
watched the movie file/TV show. It includes the following options:
·
select Resume to continue from the point where you previously stopped
watching.
·
select Restart to watch the movie file/TV show from the beginning.
44
Page 50

CyberLink PowerDVD 20
Note: * this feature is not available in some editions of CyberLink PowerDVD
20.
Note: * this feature is not available in some editions of CyberLink PowerDVD
20.
Supported Movie File/TV Show Formats
In CyberLink PowerDVD you can play back movie files/TV shows in the following
formats:
Movie file formats: 264, 265*, 26L, 3G2, 3GP, 3GP2, 3GPP, ASF, AVC, AVI, DVR-MS,
FLV, H264*, H265*, HEVC*, JSV, JVT, M1V, M2P, M2T, M2TS, M2V, M4V, MKV, MOD,
MOV (H.264/alpha PNG*), MP4, MP4V, MPE, MPEG, MPG, MPV, MTS, QT, TOD, TP,
TPD, TRP, TS, TTS, VC1*, VOB, VRO, WEBM* (VP9+Opus) (VP9+Vorbis), WM, WMV,
WTV.
Playing Movie Files in PowerDVD
You can play back movie files by doing any of the following:
·
drag and drop a movie file directly onto the CyberLink PowerDVD user
interface or the PowerDVD desktop icon.
·
to play a movie file in your media library, click Movies/TV in the media panel,
and then . Browse to the folder that contains your movie files, and
then double-click on a movie file to begin playback.
·
if you want to play an Ultra HD Blu-ray*/Blu-ray*/DVD folder that is not in the
media library, click , browse to and select the folder, and then click the
play button.
·
to play a movie file on your hard drive, click the My Computer tab in the
media panel, and then browse to the folder that contains your movie file.
Double-click on a movie file to begin playback.
45
Page 51

Playing Media in PowerDVD
Note: you can now resume playback on movie files played via the My
Computer tab. See Resuming From Last Scene of Videos Not in the Media
Library for more information.
Note: you can also play movie files that are on a USB device or network
(DLNA/DTCP-IP) media server.
Note: you can now resume playback on TV shows played via the My
Computer tab. See Resuming From Last Scene of Videos Not in the Media
Library for more information.
Note: you can also play TV shows that are on a USB device or network
(DLNA/DTCP-IP) media server.
·
if CyberLink PowerDVD is set as the default player for a movie file on your
computer (see File Association for more information), you can also just
double-click on a file in Windows Explorer to play it back.
Playing TV Shows in PowerDVD
You can play back TV shows by doing any of the following:
·
drag and drop a TV show directly onto the CyberLink PowerDVD user interface
or the PowerDVD desktop icon.
·
to play a TV show in your media library, click Movies/TV in the media panel,
and then . Browse to the folder that contains your TV shows, and
then double-click on a TV show to begin playback.
·
to play a TV show on your hard drive, click the My Computer tab in the media
panel, and then browse to the folder that contains your TV show. Double-click
on a TV show to begin playback.
·
if CyberLink PowerDVD is set as the default player for a TV show on your
computer (see File Association for more information), you can also just
double-click on a file in Windows Explorer to play it back.
46
Page 52

CyberLink PowerDVD 20
Note: see Video Playback Controls for a list and description of the controls
and playback features available during video file playback. You can also play
video files in the mini player. See Playing Videos in the Mini Player for more
information.
Note: * this feature is not available in some editions of CyberLink PowerDVD
20.
Playing Videos
Click on Media Library > Videos in the media panel to play back video files in the
media library.
Supported Video Formats
In CyberLink PowerDVD you can play back videos in the following file formats:
Video formats: 264, 265*, 26L, 3G2, 3GP, 3GP2, 3GPP, ASF, AVC, AVI, DVR-MS, FLV,
H264*, H265*, HEVC*, JSV, JVT, M1V, M2P, M2T, M2TS, M2V, M4V, MKV, MOD, MOV
(H.264/alpha PNG*), MP4, MP4V, MPE, MPEG, MPG, MPV, MTS, QT, TOD, TP, TPD,
TRP, TS, TTS, VC1*, VOB, VRO, WEBM* (VP9+Opus) (VP9+Vorbis), WM, WMV, WTV.
Playing Videos in PowerDVD
You can play back videos files by doing any of the following:
·
drag and drop a video file directly onto the CyberLink PowerDVD user
interface or the PowerDVD desktop icon.
·
to play a video file in your media library, select Videos in the media panel, and
then browse to the folder that contains your videos. Double-click on a video
file to begin playback.
·
to play a video file on your hard drive, click the My Computer tab in the media
panel, and then browse to the folder that contains your video file. Doubleclick on a video file to begin playback.
47
Page 53

Playing Media in PowerDVD
Note: you can now resume playback on video files played via the My
Computer tab. See Resuming From Last Scene of Videos Not in the Media
Library for more information.
Note: you can also play video files that are on a USB device or network
(DLNA/DTCP-IP) media server.
Note: see Photo Controls for a list and description of the controls and
playback features available when viewing photos and playing slideshows.
You can also view photos in the mini player. See Viewing Photos in the Mini
Player for more information.
Note: * this feature is not available in some editions of CyberLink PowerDVD
20.
·
if CyberLink PowerDVD is set as the default player for a video file on your
computer (see File Association for more information), you can also just
double-click on a file in Windows Explorer to play it back.
Viewing Photos
Click on Media Library > Photos to view the photos in your media library and play
them in a slideshow.
Supported Photo Formats
In CyberLink PowerDVD you can view photos in the following photo file formats:
Photo formats: ARW, BMP, CR2, CRW, DCR, DNG, ERF, GIF, GIF (89a), HEIF (.HEIC)*,
JPEG, JPG, KDC, MEF, MRW, NEF, ORF, PEF, PNG, RAF, RAW, RW2, SR2, SRF, TIF, TIFF,
X3F.
Playing Photo Slideshows
To play back your photos in a slideshow, do one of the following. If you just want
to view a photo in the PowerDVD window, just double click on it.
48
Page 54

CyberLink PowerDVD 20
Note: if you are already playing music in CyberLink PowerDVD, it continues to
play while you view photos and play slideshows. If you are already playing a
movie, video, slideshow, or music you can also view photos in another
instance of CyberLink PowerDVD by accessing them from your hard drive
(right-click and select Play with CyberLink PowerDVD 20).
Note: you can also play a slideshow with photos that are on a USB device or
network (DLNA/DTCP-IP) media server.
Note: see Music Controls for a list and description of the controls and
playback features available during music playback. You can also play music
in the mini player. See Playing Music in the Mini Player for more information.
Optical Disc Types
File Formats
·
drag and drop photos directly onto the CyberLink PowerDVD user interface or
the PowerDVD desktop icon, and then click the play button.
·
to play a slideshow with photos in your media library, select Photos in the
media panel, and then browse to the folder that contains your photos. Select
a photo and then click the play button to play a slideshow with all the photos
in the folder.
·
to play a slideshow with photos on your hard drive, click the My Computer tab
in the media panel, and then browse to the folder that contains your photos.
Select a photo and then click the play button to play a slideshow with all the
photos in the folder.
Playing Music
Click on Media Library > Music section of CyberLink PowerDVD to play audio CDs
and files in the media library.
Supported Audio Formats
In CyberLink PowerDVD you can play back audio in the following audio formats:
49
Page 55

Playing Media in PowerDVD
CD
Audio, Karaoke
Note: * this feature is not available in some editions of CyberLink PowerDVD
20.
Note: when you play music in CyberLink PowerDVD, it continues to play if
you view photos and play slideshows, and browse through media on the
other tabs. Playback stops if you start movie file, video, or movie disc
playback.
Note: you can rip the audio on CD to your computer's hard drive using
CyberLink PowerDVD. See Ripping Audio from a CD for more information.
Audio file formats: AAC, AC3, ADTS, ALAC, AOB, APE, DSD Audio* (DSF, DFF), DTS,
FLAC, M4A, MID, MKA, MP2, MP3, MPA, OGG, RMI, WAV, WMA.
Playing Audio Discs and Music in the Library
To play back audio in CyberLink PowerDVD, do one of the following:
·
insert an audio CD into your disc drive and CyberLink PowerDVD will play it
automatically. If there is a disc already in your disc drive when you opened
CyberLink PowerDVD, click the My Computer tab in the media panel, browse
to and select the disc drive, and then click play to begin playback.
·
drag and drop audio files directly onto the CyberLink PowerDVD user
interface.
·
to play an audio file in your media library, select Music in the media panel,
and then browse to the folder that contains your audio. Double-click on an
audio file to begin playback.
·
to play audio files on your hard drive, click the My Computer tab in the media
panel, and then browse to the folder that contains your audio files. Doubleclick on an audio file to begin playback.
50
Page 56

CyberLink PowerDVD 20
Note: you can also play audio files that are on a USB device or network
(DLNA/DTCP-IP) media server.
Note: if the album art is not displayed, just click on the album art box and
then browse to and locate an image on your hard drive to use it as the album
art.
Note: if you select a folder that is not in media library, CyberLink PowerDVD
will auto add the folder and the ripped audio into the media library for you.
Ripping Audio from a CD
In CyberLink PowerDVD you can rip the audio from an audio CD. To rip an audio CD
using CyberLink PowerDVD, do this:
1. Place the audio CD in the disc tray and then close it.
2. If required, select Music in the media panel to display the tracks on the CD.
3. Click the Rip CD button.
4. In the Rip CD dialog, ensure that the artist and album information is correct.
You can modify the Artist, Album, and Genre fields if required.
5. Select the tracks that you want to rip from the audio CD by ensuring the check
box next to the track name is selected.
6. Click the More Settings button to configure the rip audio settings as follows:
·
Destination directory: set the folder on your computer where the ripped audio
will be stored by clicking the Change button and selecting the new folder.
·
Format: select the preferred audio file format (AAC*, FLAC, MP3) of the ripped
audio.
·
Bitrate: set the quality of the ripped audio files.
Click OK to close the More Settings dialog.
7. Click the Rip button to rip the audio from CD and import it into the media
library.
51
Page 57

Playing Media in PowerDVD
Note: * this feature is not available in some editions of CyberLink PowerDVD
20.
Note: you can add music, videos, and photos all in the same media playlist,
but you cannot add tracks from an audio CD.
Playing a Karaoke Disc
You can use CyberLink PowerDVD to play back Karaoke DVDs or VCDs. Be sure to
look for the Karaoke Logo on the DVD/VCD title package before starting playback.
Selecting Karaoke Options
1. Upon inserting your karaoke disc, be sure your microphone is properly
connected.
2. Click the play button to display the menu screen.
3. Click and then select More Functions to use the navigation buttons on
the menu pad or choose a song by clicking on it with your mouse.
4. During playback, click the button within More Functions or right-click to
call the Express Menu and select Karaoke.
5. Select from dual vocal channels on (Both Channels), either Left Channel or
Right Channel.
6. If playing a karaoke VCD, select the desired audio channel for the voice and
music mixing in the Express Menu.
Creating Media Playlists
In the Playlists section of CyberLink PowerDVD you can create a playlist that
contains your music, videos, and photos. You can also add media that is not in
your media library to your playlists, by dragging and dropping folders and files
from the My Computer tab or from Windows File Explorer.
To create a custom media playlist, do this:
52
Page 58

CyberLink PowerDVD 20
Note: hover your mouse over the Playlists section and then click to
export the playlist you created in the M3U, M3U8, and PLS formats. Select a
playlist and then click to delete it from the list.
1. Click Playlists, and then click on New Playlist.
2. Enter a Name for the new playlist in the field provided, and then click OK.
3. Browse to the media that you want to add to the playlist. Note that you can
add folders and files from the My Computer tab or from Windows File Explorer
directly as well.
4. To add media to the playlist, just drag and drop it on the playlist name in the
Playlists section of the media panel. You can also right click on a media file in
the media library, select Add to, and then the playlist name to include it in the
playlist.
5. If required, you can drag and drop the media in your created playlist to new
positions in the playlist to change the playback order.
Smart Playlists
CyberLink PowerDVD also auto creates smart playlists with the media in your
PowerDVD media library. Smart playlists are like any other playlists, and are always
available on the Playlists section.
The smart playlists in CyberLink PowerDVD include:
·
Top Rated: is a playlist made up of all the highest rated media in the library.
See Rating Media for more information on rating media.
·
Recently Played: is a playlist made up of the most recently played videos,
music, and photos.
·
Recently Added: is a playlist made up of all the media that was most recently
imported in the PowerDVD media library.
Importing Playlists
You can import a playlist you created outside of CyberLink PowerDVD for playback,
including WPL playlists created in Windows Media Player.
53
Page 59

Playing Media in PowerDVD
Note: when you import a playlist, the media files are not imported with it. Go
to Media Library Preferences to ensure you have imported all of your media
files before importing your playlists.
Note: you can import playlists in the M3U, M3U8, PLS, and WPL formats.
Note: when you upload a media playlist, all the media in the playlist is also
uploaded to CyberLink Cloud.
To import a playlist, do this:
1. Hover your mouse over the Playlists tab of the media panel, and then click
.
2. Select Import.
3. Browse to and select the playlist file on your computer you want to import.
4. Click Open to import the playlist.
Playing Back Media Playlists
Media playlists can contain three types of media: music, videos, and photos. To
play back media in a playlist, do this:
1. Select the playlist you want to play in the media panel and then click the play
button.
2. CyberLink PowerDVD will play all the files in the playlist.
3. Use the available buttons to control the playback of the playlist. See Playback
Controls for detailed information on the available controls.
Uploading Playlists to CyberLink Cloud
You can upload your media playlists to CyberLink Cloud* for playback on other
devices. To upload a media playlist, do this:
1. Click Playlists.
54
Page 60

CyberLink PowerDVD 20
Note: * this feature is only available in some editions of CyberLink PowerDVD
20.
Note: * this feature is only available in some editions of CyberLink PowerDVD
20.
2. Right click on the created playlist that you want to upload and then select
Upload to CyberLink Cloud.
3. When the upload is complete, click OK and then go to the CyberLink Cloud
tab to view, manage, and get the share links for all the uploaded media.
Playing Media Shared From Other PCs
You can play back the media files that were shared on computers on the same
home network* running PowerDVD or PowerPlayer. It can be played using your
version of CyberLink PowerDVD, or use the PowerPlayer web player in a web
browser.
Playing the Shared Media with PowerDVD
To play back the media shared on a home network using CyberLink PowerDVD, do
this:
1. Click Shared Media (From Other PCs) in the media panel and then select the
connected device in the list.
2. Click on Movies, browse to the collection that contains the movie you want to
play, and then double-click on it to begin playback. See Video Playback
Controls for a description of the available playback controls when playing
movies.
3. Click on TV Shows, browse to the collection that contains the TV show you
want to play, and then double-click on it to begin playback. See Video
Playback Controls for a description of the available playback controls when
playing TV shows.
55
Page 61

Playing Media in PowerDVD
Note: the computer you are using and the PowerDVD/PowerPlayer computer
must both be on the same home network and connected to the external
Internet to use this feature.
4. Click on Videos, browse to the folder that contains the video you want to play,
and then double-click on it to begin playback. See Video Playback Controls for
a description of the available playback controls when playing videos.
5. Click on Photos, browse to the folder that contains the photo you want to
view, and then double-click on it to view it. See Photo Playback Controls for a
description of the available playback controls when viewing photos.
6. Click on Music, browse to the folder that contains the song you want to play,
and then double-click on it to begin playback. See Music Playback Controls
for a description of the available playback controls when playing music.
Playing the Shared Media in a Web Browser
To play back the media shared on a home network with a computer that does not
have CyberLink PowerDVD (365 or 20 Ultra) or PowerPlayer installed, do this:
1. Launch your web browser on the computer.
2. Go to the following URL: https://powerplayer.cyberlink.com
3. Sign in with your CyberLink account.
4. Select your PowerDVD/PowerPlayer as your source location.
5. Click on Movies, browse to the collection that contains the movie you want to
play, and then click on it to begin playback. See Video Playback Controls for a
description of the available playback controls when playing movies.
6. Click on TV Shows, browse to the collection that contains the TV show you
want to play, and then click on it to begin playback. See Video Playback
Controls for a description of the available playback controls when playing TV
shows.
7. Click on Videos, browse to the folder that contains the video you want to play,
and then click on it to begin playback. See Video Playback Controls for a
description of the available playback controls when playing videos.
56
Page 62

CyberLink PowerDVD 20
Note: * this feature is not available in some editions of CyberLink PowerDVD
20.
Note: when playing media that is stored on CyberLink Cloud, the playback
controls that are available depend on the type of media you are playing. See
Playback Controls for a description of the available controls and playback
features for each media type.
8. Click on Photos, browse to the folder that contains the photo you want to
view, and then click on it to view it. See Photo Playback Controls for a
description of the available playback controls when viewing photos.
9. Click on Music, browse to the folder that contains the song you want to play,
and then click on it to begin playback. See Music Playback Controls for a
description of the available playback controls when playing music.
Playing Media Stored on CyberLink Cloud
You can play the media that you have uploaded to CyberLink Cloud* with
CyberLink PowerDVD, or with the PowerPlayer web player in a web browser.
See Uploading Media to CyberLink Cloud for detailed information on how to upload
your media to CyberLink Cloud.
Playing CyberLink Cloud Media with PowerDVD
To play a media file that is on CyberLink Cloud with CyberLink PowerDVD, do this:
1. Click on the CyberLink Cloud tab in the media panel.
2. Select either Movies, TV Shows, Videos, Photos, or Music, and then browse to
the media file that you want to play. For Videos, Photos, Music, you can click
on to view and playback any uploaded playlists.
3. Double-click on the media file to begin playback. To play multiple files, select
each of them and then click the play button.
57
Page 63

Playing Media in PowerDVD
Note: it may take a few moments before the playback of media begins, as
CyberLink PowerDVD must download most media files from the CyberLink
Cloud server before playback. When playing videos (in the MP4, M2TS, MTS,
TS, MKV, or MPG format), CyberLink PowerDVD streams the video from the
CyberLink Cloud server.
Note: you can set the folders on your computer where the media is
downloaded to in CyberLink Cloud Settings.
Note: when playing media that is stored on CyberLink Cloud, the playback
controls that are available depend on the type of media you are playing. See
Playback Controls for a description of the available controls and playback
features for each media type.
Downloading Media from CyberLink Cloud
You can download the media that is stored on CyberLink Cloud to your computer.
To download media from CyberLink Cloud, do this:
1. Click on the CyberLink Cloud tab, and then the type of media you want to
download (Movies, TV Shows, Videos, Photos, Music).
2. Select a collection, media folder, or the individual media files in the folder,
that you want to download.
3. Right click on the file and then select Download. You can also click on the
button in the bottom right corner of the CyberLink PowerDVD window to
start downloading the selected folders/files.
4. Click OK once the download is complete.
Playing CyberLink Cloud Media in a Web Browser
To play a media file that is on CyberLink Cloud on computer that does not have
CyberLink PowerDVD (365 or 20 Ultra) or PowerPlayer installed, do this:
58
Page 64

CyberLink PowerDVD 20
Note: * this feature is not available in some editions of CyberLink PowerDVD
20.
Note: if required, hover your mouse over the YouTube section, and then click
on to sign in to your account on YouTube so you can view your
subscriptions, favorites, and any videos you have uploaded.
1. Launch your web browser on the computer.
2. Go to the following URL: https://powerplayer.cyberlink.com.
3. Sign in with your CyberLink account.
4. Select your CyberLink Cloud as your source location.
5. Select either Movies, TV Shows, Videos, Photos, or Music, and then browse to
the media file that you want to play.
6. Click on the media file to begin playback.
Playing Online Videos
In CyberLink PowerDVD you can watch videos on YouTube and Vimeo, without
leaving the program. Select the Online Video tab to begin watching videos on these
social media web sites.
Watching Videos on YouTube
You can watch YouTube* videos, including 8K*, 4K, HDR, 360, and live videos,
directly from within the Online Video tab of CyberLink PowerDVD.
To watch videos on YouTube, do this:
1. Click Online Video in media panel and then select YouTube.
2. Use the tabs at the top of the media window to filter the videos from
YouTube, or use the search field to search for videos you want to watch.
3. Select a video and then click the play button to begin playing it back. See
Video Playback Controls for a description of the available playback controls
when playing YouTube videos.
59
Page 65

Playing Media in PowerDVD
Note: the quality options that are available is dependent on those available
from YouTube.
Note: you can import external subtitles during the playback of pinned
YouTube videos.
4. When watching videos on YouTube, you can set the quality of the video. To
do this, click the button, select Quality, and then the desired resolution
from the list.
Pinning YouTube Videos
When browsing through the videos available on the tabs in the YouTube section,
you can pin the videos that you want to watch later. These pinned videos can be
played when you are not connected to the Internet.
To pin a YouTube video, do this:
1. In the media window browse to the YouTube video that you want to pin.
2. Do either of the following:
·
hover your mouse over the video thumbnail and then click .
·
right-click on the video thumbnail and then select Pin.
3. Select the video quality you want for the pinned video from the available list.
4. In the dialog that displays, click OK.
Playing Pinned YouTube Videos
To play back videos that you previously pinned, select Online Video, YouTube, and
then select . Select the video you want to play, and then click the play
button.
See Video Playback Controls for a description of the available playback controls
when playing YouTube videos.
60
Page 66

CyberLink PowerDVD 20
Note: the YouTube videos on the pinned videos tab can be reordered before
playback by dragging them to a new position.
Note: you can also add album art for the extract audio by double clicking on
the album art box and then browsing to and locating an image on your hard
drive to use it as the album art.
Note: if you select a folder that it is not in the media library, CyberLink
PowerDVD will auto add the folder and the extracted audio into the media
library for you.
Extracting Audio from Pinned YouTube Videos
You can extract just the audio track from a pinned YouTube video and import it
into the media library. To extract audio from a pinned YouTube video, do this:
1. Media Library > Online Video > YouTube, and then select .
2. Right-click on the video you want to extract the audio from, and then select
Extract Audio.
3. In the Extract Audio dialog, enter a Title, or name for the audio file that will be
created. If required, you can also modify the Artist, Album, and Genre fields.
4. Click the More Settings button to configure the extract audio settings as
follows:
·
Destination directory: set the folder on your computer where the extracted
audio will be stored by clicking the Change button and selecting the new
folder.
·
Format: select the preferred audio file format of the extracted audio.
·
Bitrate: set the quality of the extracted audio files.
Click OK to close the More Settings dialog.
5. Click the Extract button to extract the audio and import it into the media
library.
61
Page 67

Playing Media in PowerDVD
Note: * this feature is not available in some editions of CyberLink PowerDVD
20.
Note: you must have a Vimeo account to watch videos. If you don't have one,
click the Sign up to Vimeo link in the Vimeo Account Authentication window.
Note: the quality options that are available is dependent on those available
from Vimeo and for your Vimeo account.
Watching Videos on Vimeo
You can watch Vimeo* videos, including 360 videos, directly from within the Online
Video tab of CyberLink PowerDVD.
To watch videos on Vimeo, do this:
1. Click Online Video in the media panel and then select Vimeo.
2. Sign in to your account so you can view your videos, likes, and more.
3. Use the tabs at the top of the media window to filter the videos from Vimeo.
4. Select a video and then click the play button to begin playing it back. See
Video Playback Controls for a description of the available playback controls
when playing Vimeo videos.
5. When watching videos on Vimeo, you can set the quality of the video. To do
this, click the button, select Quality, and then the desired resolution from
the list.
Playing Media on Connected USB Devices
You can play back the media files on a connected USB device* in CyberLink
PowerDVD.
62
Page 68

CyberLink PowerDVD 20
Note: you must first connect your device to the computer (via USB port)
running CyberLink PowerDVD before you can play the media on it. * this
feature is not available in some editions of CyberLink PowerDVD 20.
Note: depending on the type of device connected, you may have to put your
media in folders on the device named Video, Photo, Music for it to be seen by
CyberLink PowerDVD.
Note: when playing shared media on a network or device, the playback
controls that are available depend on the type of media you are playing. See
Playback Controls for a description of the available controls and playback
features for each media type. * this feature is not available in some editions of
CyberLink PowerDVD 20.
To play back the media on a connected device, do this:
1. Click USB Devices in the media panel and then select the connected device in
the list.
2. Click on Videos, browse to the folder that contains the video you want to play,
and then double-click on it to begin playback. See Video Playback Controls for
a description of the available playback controls when playing videos.
3. Click on Photos, browse to the folder that contains the photo you want to
view, and then double-click on it to view it. See Photo Playback Controls for a
description of the available playback controls when viewing photos.
4. Click on Music, browse to the folder that contains the song you want to play,
and then double-click on it to begin playback. See Music Playback Controls
for a description of the available playback controls when playing music.
Playing Media on DLNA Devices
In CyberLink PowerDVD you can play videos, listen to music, and view photos that
are shared on network (DLNA, DTCP-IP) media servers*.
63
Page 69

Playing Media in PowerDVD
Note: by default, this tab is not displayed. To display it, select the DLNA
Devices option on the Media Panel tab of UI Customization Preferences.
Note: * this feature is not available in some editions of CyberLink PowerDVD
20.
Note: by default, this tab is not displayed. To display it, select the DLNA
Devices option on the Media Panel tab of UI Customization Preferences.
Note: if you are wanting to play media that is on a computer running
CyberLink PowerDVD, you must first share the media in the PowerDVD media
library. See Sharing Media on a Network for more information.
Supported File Formats
CyberLink PowerDVD supports the playback of shared media on a network in the
following file formats:
Video:
264, 26L, 3G2, 3GP, 3GP2, 3GPP, ASF, AVC, AVI, DAT, FLV, H264, JSV, JVT, M1V, M2P,
M2T, M2TS, M2V, M4V, MKV, MOD, MOV, MP4, MP4V, MPE, MPEG, MPG, MPV, MTS,
QT, TOD, TP, TPD, TRP, TS, TTS, VC1, VOB, VRO, WM, WMV.
Photo: BMP, HEIF (.HEIC)*, JPEG, JPG, PNG.
Audio: AAC*, AC3, ADTS*, AOB*, DTS, LPCM, M4A, MKA, MP2, MP3, MPA, WAV,
WMA.
Playing Shared Media
To play a media file that is on a network (DLNA, DTCP-IP) media server, do this:
1. Click DLNA Devices in the media panel.
2. Select the server/device in the list that contains the media you want to play.
64
Page 70

CyberLink PowerDVD 20
Note: * this feature is not available in some editions of CyberLink PowerDVD
20.
Note: if you are wanting to download media that is on a computer running
CyberLink PowerDVD, you must first share the media in the PowerDVD media
library. See Sharing Media on a Network for more information.
Note: if the download button is hidden, just hover your mouse over the
available buttons in the bottom right to display it.
3. Select the type of media you want to play, and then navigate to the location
of the media file on the device.
4. Double-click on the media file to begin playback.
Downloading Shared Media
When streaming media from a network (DLNA, DTCP-IP) media server, you can
download it to the current computer you are using.
To download shared media, do this:
1. Click DLNA Devices in the media panel.
2. Select the server/device in the list that contains the media you want to
download.
3. Select the type of media you want to download, and then navigate to the
location of the media file on the device.
4. Select the media file and then click on the button in the bottom right
corner of the CyberLink PowerDVD window.
5. In the dialog that opens, click the Browse button and then select the location
on your computer where you want to save the media.
6. Click Download to download it to your computer.
65
Page 71

PowerDVD VR Mode (Virtual Reality)
Note: * this feature is not available in some editions of CyberLink PowerDVD
20.
Note: you can also select media in the media library, click and then
select VR Headset to enter VR mode.
Chapter 5:
PowerDVD VR Mode
(Virtual Reality)
In CyberLink PowerDVD, if you have a supported virtual reality (VR) headset, you can
play your media in VR* mode.
Setting Up and Entering VR Mode
Before attempting to enter PowerDVD's VR mode, please ensure that:
·
your supported VR headset is connected to your computer.
·
you have installed all the necessary tools and programs provided by the VR
headset manufacturer.
·
your VR headset is turned on, if required.
To enter VR mode, click the button and then select Enter VR Mode. You can
now put on your VR headset to enjoy the content in VR mode.
Select the Mirror VR View in PowerDVD Window option if you want what you see
when wearing the VR headset to also be shown in the CyberLink PowerDVD media
window.
66
Page 72

CyberLink PowerDVD 20
Note: for help on what controls are available in VR mode, look left when you
have the VR headset on to view the on screen hints. While media is playing
back, pull the trigger/click on the trackpad (depending on your type of VR
headset) to view the player controls and on screen hints.
Note: for help on what controls are available in VR mode, look left when you
have the VR headset on to view the on screen hints. While media is playing
back, pull the trigger/click on the trackpad (depending on your type of VR
headset) to view the player controls and on screen hints.
Note: the playback of discs, CyberLink Cloud media, home media (DLNA), ISO
files, or disc folders is not available in VR mode.
Playing Media in VR Mode
When playing 360 videos, photos, and YouTube videos in VR mode, you are fully
immersed in a 360 virtual reality environment. When playing non 360 media, the
media is viewed on a large virtual screen in your private screening room within the
VR environment.
You can play most of the media in your media library in VR mode, including your
music and videos on YouTube. You can also access the media files on your hard
drive by accessing My Computer, and also content on Steam through SteamVR.
67
Page 73

Playing Media on Another Display or Device (Play to)
Note: * this feature is not available in some editions of CyberLink PowerDVD
20.
Chapter 6:
Playing Media on Another
Display or Device (Play to)
You can click the button to play media to:
·
a VR headset. See PowerDVD VR Mode (Virtual Reality) for more information.
·
a Chromecast, Apple TV, Amazon Fire TV, or Roku streaming device*
connected to the same Wi-Fi network. See Casting Media to a Streaming
Device for more information.
·
an extended Miracast-certified device*. See Playing Media on Extended
Displays for more information.
·
an extended display that is connected via an HDMI, DisplayPort, DVI, D-Sub
connection*. See Playing Media on Extended Displays for more information.
·
a digital media renderer over a DLNA* network. See Streaming Media to Digital
Media Renderers for more information.
·
a computer/device running CyberLink PowerDVD or PowerPlayer. See
Streaming Media to Digital Media Renderers for more information.
To play media on another display or device, do this:
1. Select all of the media files you want to play.
2. Click the button to display a list of connected devices.
3. Select the device in the list you want to play the media to. CyberLink
PowerDVD streams the media and starts playing back the media on the
selected device.
4. Click to return to the media library.
68
Page 74

CyberLink PowerDVD 20
Note: to ensure the best compatibility with all streaming devices, 5.1 channel
audio or above is downmixed to 2 channel during media casting. * this
feature is not available in some editions of CyberLink PowerDVD 20.
Note: Blu-ray Discs, DVDs, movie folders, and ISO files cannot be casted to a
streaming device.
Casting Media to a Streaming Device
In CyberLink PowerDVD, you can cast* the following media to a streaming device
connected to the same Wi-Fi network as the computer running your version of
CyberLink PowerDVD:
·
Movie files, TV shows, and videos in the media library.
·
Photos and music in the media library.
·
Media accessed via the My Computer tab.
·
Pinned YouTube videos via the Online Video tab.
·
Media playlists.
These streaming devices are usually connected to a TV, and the media you cast to
the device will play back on the connected TV. The supported streaming devices
include:
·
Chromecast: a line of digital media players developed by Google. For more
detailed information about Chromecast and the types of players available,
please visit this web site: https://www.google.com/intl/en_us/chromecast/
·
Apple TV: a digital media player developed and sold by Apple Inc. For more
detailed information about Apple TV, please visit its web site:
https://www.apple.com/tv/
·
Amazon Fire TV: a digital media player developed by Amazon. For more
detailed information about Amazon Fire TV and the types of players available,
please visit this web site: https://www.amazon.com/all-new-amazon-fire-tv-4kuhd-streaming-media-player/dp/B01N32NCPM
69
Page 75

Playing Media on Another Display or Device (Play to)
Note: before you can cast video to a Roku device, you'll need to install the
PowerDVD Casting channel from the Roku store.
Note: volume control for casted media is controlled by the destination
device/TV.
Note: ** H.265 video codec supported for MKV, MP4, M2TS video files.
·
Roku: a series of digital media player set-top boxes manufactured by Roku,
Inc. For more detailed information Roku players, please visit the following
web site: https://www.roku.com/
To cast media to one of these devices, you must first:
·
connect the computer with CyberLink PowerDVD 20 installed to a wireless
network.
·
turn on the streaming device and connect it to the same wi-fi network.
Once you ensure these tasks are completed, the streaming device will be available
in the play to menu when you click the button. Just select the device to begin
playback.
Video Casting Details
When casting video to a streaming device, the following is some information you
may find helpful.
Supported Formats
The following file formats are supported for video casting:
3G2, 3GP, 3GP2, 3GPP, ASF, AVI, DAT, DVR-MS, FLV, M2P, M2T, M2TS**, M4V, MKV**,
MOD, MOV, MP4**, MP4V, MPE, MPEG, MPG, MPV, MTS, QT, TOD, TP, TPD, TRP, TS,
TTS, VOB, VRO, WM, WMV, WTV
70
Page 76

CyberLink PowerDVD 20
Note: you can also use some of the controls on the Apple TV/Roku remote to
control playback.
Note: the following external subtitle file formats are supported with video
casting: ASS, PSB, SSA, SMI, SRT, SUB. See External and Embedded Subtitles
for more information on importing and enabling external subtitles.
Embedded subtitles are not supported due to limitations of the streaming
devices.
Note: TrueTheater Motion, TrueTheater Noise Reduction, and TrueTheater
Stabilizer are not available on casted video. The TrueTheater display modes
are not available for some video files.
Video Playback Options
The following video playback options are available during video casting.
Playback Controls
During playback, the standard player controls are available (play, pause, stop,
previous, next, and seek). Click the button to change the audio language and
enable subtitles. You can also select the quality of the streamed video by clicking
on the quality menu to the right of the player controls. Right-click on the media
window for more playback controls, including video shuffle and repeat.
TrueTheater Enhancements
Click the button to apply TrueTheater video enhancements during playback.
TrueTheater is video and audio enhancement technologies from CyberLink that
provide better than original quality viewing during the playback of videos. See
TrueTheater Enhancements for more details.
71
Page 77

Playing Media on Another Display or Device (Play to)
Note: you can also use some of the controls on the Apple TV/Roku remote to
control playback.
Audio Casting Details
When casting audio to a streaming device, the following is some information you
may find helpful.
Supported Formats
The following file formats are supported for audio casting:
APE, FLAC, M4A (AAC, ALAC codec), MP3, OGG, WAV
Audio Playback Options
During playback, the standard player controls are available (play, pause, stop,
previous, next).
You can also click to play the music in a folder in random order, or during
playback to repeat one or all of the songs in a folder. When the button
displays as , the repeat function is off.
Photo Casting Details
When casting photos to a streaming device, the following is some information you
may find helpful.
Supported Formats
The following file formats are supported for photo casting:
ARW, BMP, CR2, CRW, DCR, DNG, ERF, JPG, JPEG, KDC, MEF, MRW, NEF, ORF, PEF,
PNG, RAF, RAW, RW2, SR2, SRF, TIF, TIFF, X3F
72
Page 78

CyberLink PowerDVD 20
Note: you can also use some of the controls on the Apple TV/Roku remote to
control playback.
Note: * this feature is not available in some editions of CyberLink PowerDVD
20.
Note: to play movie discs to an extended display, start the disc playback,
right-click on the media window, select Play to, and then the extended
display in the list.
Photo Playback Options
While casting photos, only the previous and next player controls are available.
You can also click to view instant photo thumbnails to help you browse
through all the photos in the current folder.
Playing Media on Extended Displays
CyberLink PowerDVD lets you play the following media on extended* Miracastcertified devices and displays connected via an HDMI, DisplayPort, DVI, D-Sub
connection:
·
Movie discs (both DVD and Blu-rays).
·
Movie files, TV shows, and videos in the media library.
·
Photos in the media library.
·
Media accessed via the My Computer tab (excluding audio files).
·
Pinned YouTube videos via the Online Video tab.
·
Media playlists (excluding audio files).
73
Page 79

Playing Media on Another Display or Device (Play to)
Note: before you can play media on an extended display, make sure it is
properly setup and connected, and that you enabled extend desktop in the
Windows Display Properties Settings (press Windows+P on your keyboard and
select Extend). See the Windows help and device manufacturer user manual
for more detailed instructions.
Note: * this feature is not available in some editions of CyberLink PowerDVD
20.
Note: Blu-ray Discs, DVDs, and YouTube videos cannot be streamed to a
Digital Media Renderer.
When playing media on an extended display, you can fully control the playback
with the CyberLink PowerDVD playback controls. See Playback Controls for a
description of the available controls and playback features for each media type.
Streaming Media to Digital Media Renderers
CyberLink PowerDVD lets you stream the following media to a digital media
renderer* (DMR):
·
Movie files, TV shows, and videos in the media library.
·
Photos and music in the media library.
·
Media accessed via the My Computer tab.
·
Media playlists.
Digital media renderers are DLNA compliant media players or other devices that are
connected to the same network as your computer running CyberLink PowerDVD.
DMRs play content as instructed by a digital media controller (such as CyberLink
PowerDVD) and may include:
·
A copy of CyberLink PowerDVD 12 or above connected to the same Wi-Fi
network.
74
Page 80

CyberLink PowerDVD 20
Note: you can also set CyberLink PowerDVD as a DMR in Access Control
Preferences.
Note: you may also have to give permission on the DLNA complaint
computer/device for another computer to control its media player before you
can play media on it.
·
Other DLNA compliant computers, media players, and devices connected to a
network.
To set your copy of CyberLink PowerDVD as a DMR, do this:
1. Hover your mouse over the DLNA Devices tab.
2. Click to access the home media options.
3. Select the Allow Home Media Controller to Control My Player option to enable.
75
Page 81

Playback Controls
Note: the below table includes the hotkey for each specific button on the
playback controls, if available. For a complete list of all the hotkeys in
PowerDVD and the corresponding behavior, see PowerDVD Hotkeys.
Icon
Button
Hotkey
Description
A
Elapsed time
Displays the time elapsed
for the current movie.
Hover your mouse over it
to reveal two buttons that
let you jump backward and
forward in the movie. Click
to quickly jump back 8
seconds, or to skip
forward 30 seconds. If you
want these two buttons to
Chapter 7:
Playback Controls
The CyberLink PowerDVD playback controls provide effortless navigation of discs
and other media, and easy access to all of the program's playback features.
Depending on the type of media you are playing, and whether media is playing or
playback is paused or stopped, the buttons available on the playback controls
display differently.
Movie Disc Playback Controls
When playing back a movie disc in the BD/DVD Movie section of the Media Library
tab, the playback controls display as follows:
76
Page 82

CyberLink PowerDVD 20
always be available, you
can enable them in UI
preferences.
B
Navigational slider
Visually displays elapsed
playback time. Click along
the navigational slider to
jump to different moments
in the movie, or click and
drag it to use Instant Seek
to quickly browse and find
specific scenes in your
movie. Hover your mouse
over the slider to use
Instant Thumbnails to
quickly find scenes you
previously viewed during
DVD playback.
C
Access DVD menu
controls/Pop-up
menu (Blu-ray*
playback only)
M
During DVD playback, this
button provides quick
access to the title and root
menus on the DVD. See
Accessing Disc Menus in
PowerDVD for more
information. During Blu-ray
Disc* playback, the pop-up
menu button displays here.
Click or press M on
your keyboard to display
the pop-up menu over the
disc content.
D
Rewind/Step
backward (when
paused)
[
During playback click this
button to reverse through
content and access the
Play Speed Navigator.
When playback is paused,
use the button to step
backward.
77
Page 83

Playback Controls
E
StopSStops playback of media.
F
NextNJumps to the next chapter
on the movie disc.
G
Mute/Volume
adjustment
Q / + and -
Click to mute the volume;
click again to turn mute
off. To manually adjust the
volume, hover your mouse
over this button and then
use the slider to increase or
decrease the volume.
H
Crop to fill
When watching 2:35:1 Bluray movies on an ultra wide
21:9 monitor, click this
button to crop out the
black areas on all four sides
of the video for a better fit.
Click to restore the
view and reset it to the
default aspect ratio.
I
PowerDVD settings
menu
Opens the PowerDVD
settings menu, where you
can access player settings
and PowerDVD
preferences. See PowerDVD
Settings - Player Settings
and PowerDVD Settings -
Preferences for more
information.
J
Movie
duration/Remaining
time
Click to toggle between
movie duration and
remaining playback time.
K
Go to full screen
Z
Click to enter full screen
mode.
L
Enter VR mode
Click to enter PowerDVD VR
Mode.
78
Page 84

CyberLink PowerDVD 20
M
Zoom
Ctrl+mouse
wheel**
Click on this button and
then drag the slider to use
Instant Zoom to digitally
zoom in or out on a DVD
movie's video image (Note:
this feature is not available
during Ultra HD Bluray/Blu-ray Disc playback).
When zoomed in, you can
click and drag on the video
image to view different
areas of the image. Click
to access the zoom menu
where you can quickly
select a zoom amount, or
select Fit Window to resize
the video image to fit in
the window.
Note: this feature is not
supported on videos that
have a resolution greater
than 3300x1900, or when
the output display is
greater than 3300x1900. **
note that this hotkey can
be modified in settings, so
the behavior may differ.
N
Fast forward/Step
forward (when
paused)
]
During playback click this
button to fast forward
through content and
access the Play Speed
Navigator. When playback
is paused, use the
button to go to the next
frame of video.
O
Play/Pause
Space bar
Plays and pauses media
playback.
79
Page 85
Playback Controls
P
Previous
P
Returns to the previous
chapter on the movie disc.
Q
Media playback
menu
During playback, this
button provides access to
the media playback menu.
See Media Playback Menu.
R
TrueTheater effects
Click to enable TrueTheater
Enhancements.
S
Return to previous
window
Backspace
Click to stop playback and
return to the media library.
More buttons
When the CyberLink
PowerDVD UI and playback
controls are reduced in
size, the more button
displays. Just click it to
reveal buttons that are
hidden to accommodate
the reduced program
window size.
See Playing Movies in the
Mini Player for more
information about the UI
and controls available.
Restore from full
screen
Z / Esc
Click to exit full screen
mode.
Eject disc
Ctrl+E
When playback is stopped,
this button is displayed.
Click it to eject the disc in
the selected disc drive.
80
Page 86

CyberLink PowerDVD 20
Note: * this feature is not available in some editions of CyberLink PowerDVD
20.
Playing Movies in the Mini Player
When playing movie discs in PC mode, you can drag the edges of the CyberLink
PowerDVD window to reduce it in size.
It can be reduced down to 204 pixels, but once the UI size is below 600 pixels, only
the main player controls are available.
81
Page 87

Playback Controls
Note: the below table includes the hotkey for each specific button on the
playback controls, if available. For a complete list of all the hotkeys in
PowerDVD and the corresponding behavior, see PowerDVD Hotkeys.
Icon
Button
Hotkey
Description
A
Elapsed time
Displays the time elapsed
for the current video. Hover
your mouse over it to
reveal two buttons that let
Click to keep the mini player on top of all other Windows applications during
playback.
Video Playback Controls
When playing back movie files or TV shows in the Movies/TV section, video files in
the Videos tab of the media library, or YouTube and Vimeo videos in the Online
Video tab, the playback controls display as follows:
82
Page 88

CyberLink PowerDVD 20
you jump backward and
forward in the video. Click
to quickly jump back 8
seconds, or to skip
forward 30 seconds. If you
want these two buttons to
always be available, you
can enable them in UI
preferences.
B
Navigational slider
Visually displays elapsed
playback time. Click along
the navigational slider to
jump to different moments
in the video, or click and
drag it to use Instant Seek
to quickly browse and find
specific scenes in your
video. Hover your mouse
over the slider to use
Instant Preview to quickly
find scenes you previously
viewed during movie file
playback.
C
Media playback menu
During playback, this
button provides access to
the media playback menu.
See Movie File/TV
Show/Video Playback
Menu.
D
Previous
P
Returns to the previous
video file in a
folder/playlist.
E
Play/Pause
Space bar
Plays and pauses media
playback.
F
Fast forward/Step
forward (when
paused)
]
During playback click this
button to fast forward
through content and
83
Page 89

Playback Controls
access the Play Speed
Navigator. When playback
is paused, use the
button to go to the next
frame of video.
G
Zoom
Ctrl+mouse
wheel**
Click on this button and
then drag the slider to use
Instant Zoom to digitally
zoom in or out on the
video image. When
zoomed in, you can click
and drag on the video
image to view different
areas of the image. Click
to access the zoom menu
where you can quickly
select a zoom amount, or
select Fit Window to resize
the video image to fit in
the window.
Note: this feature is not
supported on videos that
have a resolution greater
than 3300x1900, or when
the output display is
greater than 3300x1900. **
note that this hotkey can
be modified in settings, so
the behavior may differ.
H
Enter VR mode
Click to enter PowerDVD VR
Mode.
I
Share
When browsing through
video files in the Videos
section of the media
library, click this button to
share the video on
YouTube or Vimeo. See
Sharing Media on Social
84
Page 90
CyberLink PowerDVD 20
Networks for more
information.
J
Video
duration/Remaining
time
Click to toggle between
movie duration and
remaining playback time.
K
Full screen
Z
Click to enter full screen
mode.
L
Play to
Select a movie file, TV
show, or video in the
media library and then
click this button to play it
on another device or
display. See Playing Media
on Another Display or
Device (Play to) for more
information.
M
PowerDVD settings
menu
Opens the PowerDVD
settings menu, where you
can access player settings
and PowerDVD
preferences. See PowerDVD
Settings - Player Settings
and PowerDVD Settings -
Preferences for more
information.
N
Crop to fill
When watching videos on
an ultra wide 21:9 monitor,
click this button to crop
out the black areas on all
four sides of the video for a
better fit. Crop to fill can
also be used on standard
16:9 monitors to zoom in
on the video.
Click to restore the
view and reset it to the
default aspect ratio.
85
Page 91

Playback Controls
O
Mute/Volume
adjustment
Q / + and -
Click to mute the volume,
or to turn mute off. To
manually adjust the
volume, hover your mouse
over this button and then
use the slider to increase or
decrease the volume.
P
NextNJumps to next video file in
a folder/playlist.
Q
StopSStops playback of media.
R
Rewind/Step
backward (when
paused)
[
During playback click this
button to reverse through
content and access the
Play Speed Navigator.
When playback is paused,
use the button to step
backward. Note: this
feature is not available for
some video file formats.
S
TrueTheater effects
Click to enable TrueTheater
Enhancements.
T
Return to previous
window
Backspace
Click to stop playback and
return to the media library.
More buttons
When the CyberLink
PowerDVD UI and playback
controls are reduced in
size, the more button
displays. Just click it to
reveal buttons that are
hidden to accommodate
the reduced program
86
Page 92

CyberLink PowerDVD 20
window size.
See Playing Videos in the
Mini Player for more
information about the UI
and controls available.
Rotate right
Ctrl+.
When playing back or
browsing video files in the
Videos section of the
media library, click to
rotate the current video 90
degrees in the clockwise
direction.
Restore from full
screen
Z / Esc
Click to exit full screen
mode.
Note: * this feature is not available in some editions of CyberLink PowerDVD
20.
Playing Videos in the Mini Player
When playing movie files, TV shows, video files, and videos on YouTube/Vimeo, you
can drag the edges of the CyberLink PowerDVD window to reduce it in size.
87
Page 93
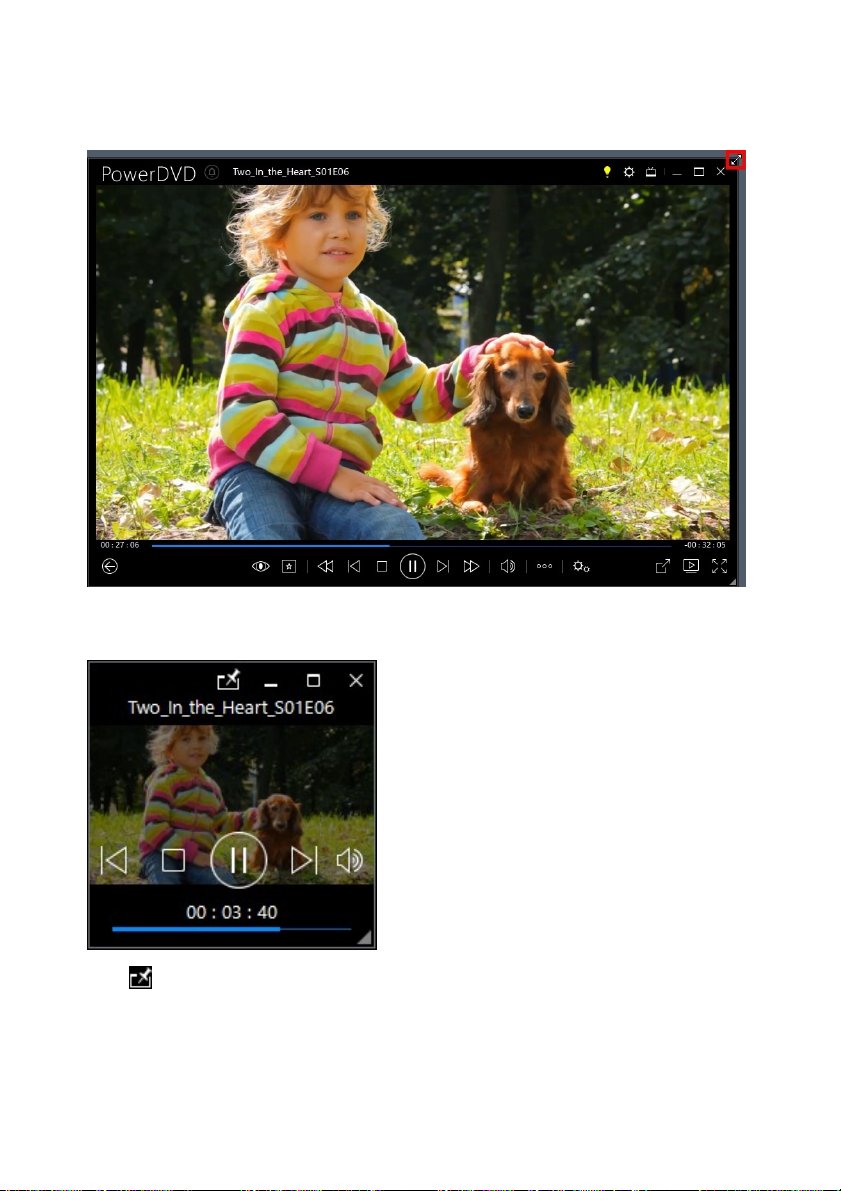
Playback Controls
It can be reduced down to 204 pixels, but once the UI size is below 600 pixels, only
the main player controls are available.
Click to keep the mini player on top of all other Windows applications during
playback.
88
Page 94
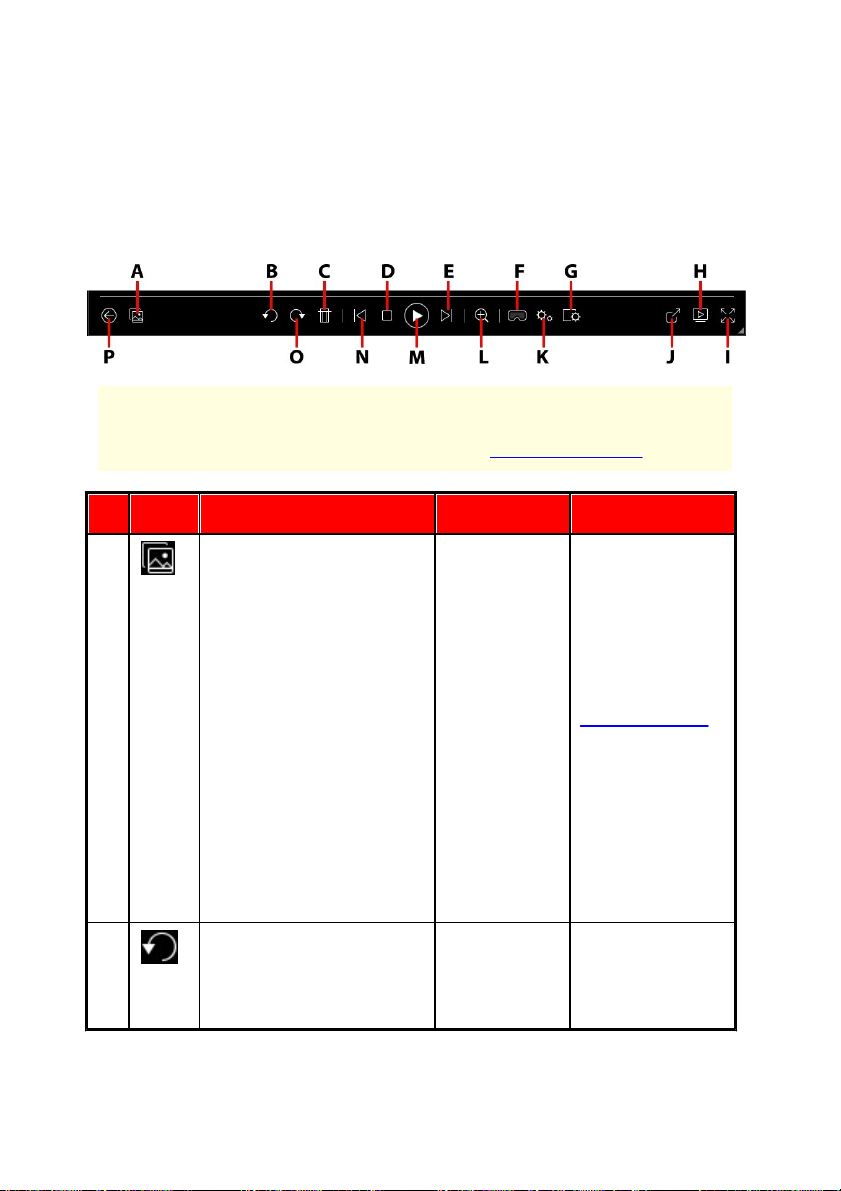
CyberLink PowerDVD 20
Note: the below table includes the hotkey for each specific button on the
playback controls, if available. For a complete list of all the hotkeys in
PowerDVD and the corresponding behavior, see PowerDVD Hotkeys.
Icon
Button
Hotkey
Description
A
Enable instant photo
thumbnails
When viewing a
single photo, click
to view the instant
photo thumbnails
for all the photos
in the current
folder. Once
enabled, use
gesture controls,
your mouse's
scroll wheel, the
navigational
slider, or the
arrow keys on the
keyboard to
browse through
all the photos in a
folder.
B
Rotate left
Ctrl+,
Click to rotate the
current photo 90
degrees in the
Photo Playback Controls
When viewing photos and playing slideshows on the Photos tab of the media
library, the playback controls display as follows:
89
Page 95
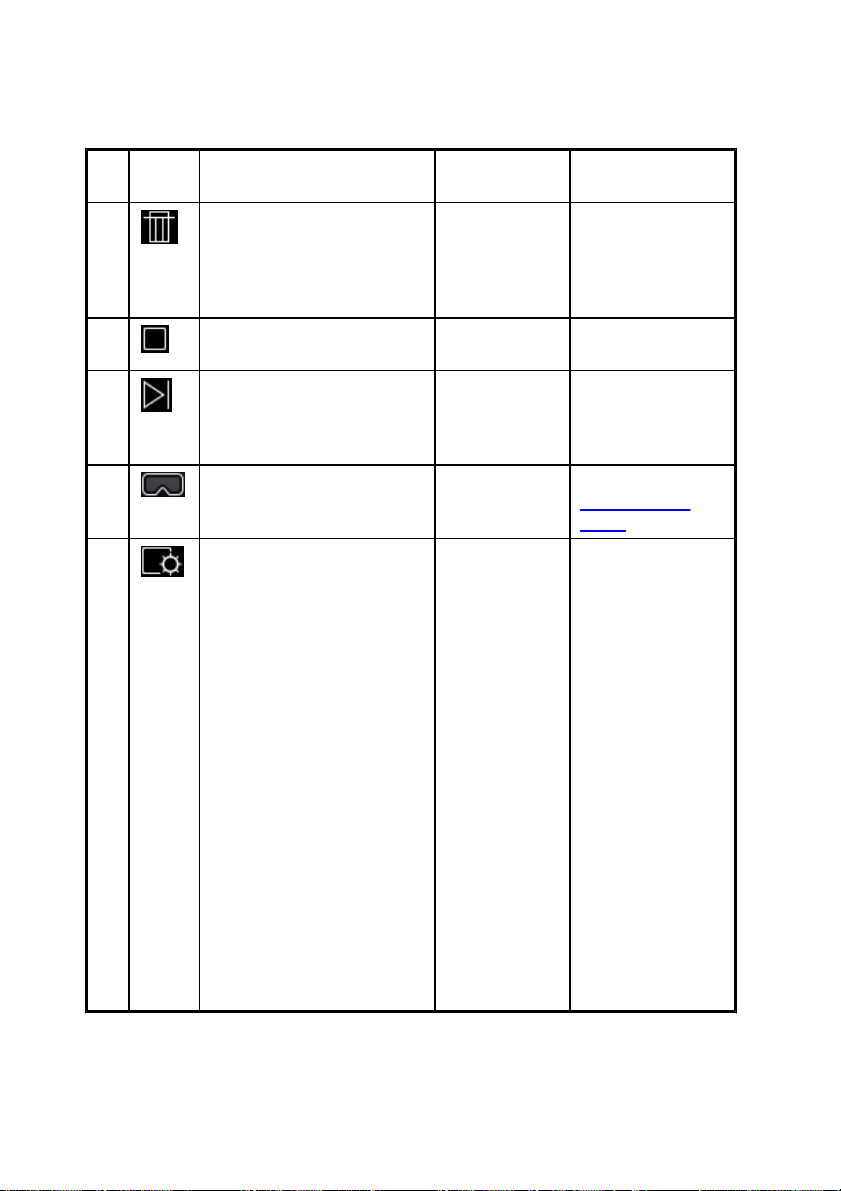
Playback Controls
counterclockwise
direction.
C
Delete photo
Delete
Deletes the
current photo
from your
computer's hard
drive.
D
StopSStops playback of
slideshow.
E
NextNJumps to next
photo in the
folder or
slideshow.
F
Enter VR mode
Click to enter
PowerDVD VR
Mode.
G
Configure slideshow
preferences
Click this button
to adjust
slideshow
preferences.
Select the
Duration each
photo displays
before advancing
to the next photo.
Select the Effect
applied to your
slideshow. Motion
adds pans and
zooms on each
photo, while Fade
adds a fade effect
between the
photos. Select
None if you don't
want any
transition effect to
be used.
90
Page 96

CyberLink PowerDVD 20
H
Play to
Select a photo
album or photo in
the media library
and then click this
button to view it
on another device
or display. See
Playing Media on
Another Display
or Device (Play to)
for more
information.
I
Full screen
Z
Click to enter full
screen mode.
J
Share, e-mail, print, or
open photo in another
program
Click to share the
photo by
selecting E-mail
to launch your
default mail client
and attach it to a
new e-mail
message. Select
Print to print the
current photo out
on a connected
printer. When
clicked, the photo
is sent to your
computer's
default photo
viewer for
printing. Proceed
to use your
computer's
default photo
viewer to print off
the photo as
required. If you'd
like to open the
photo you are
91
Page 97

Playback Controls
viewing in
another program,
select Open with
and then select
the desired
program.
K
PowerDVD settings menu
Opens the
PowerDVD
settings menu,
where you can
access player
settings and
PowerDVD
preferences. See
PowerDVD
Settings - Player
Settings and
PowerDVD
Settings Preferences for
more information.
L
Zoom
Ctrl+mouse
wheel**
Click on this
button and then
drag the slider to
use Instant Zoom
to zoom in or out
on the photo.
When zoomed in,
you can click and
drag on the photo
to view different
areas of the
photo. Click to
access the zoom
menu where you
can quickly select
a zoom amount,
or select Fit
Window to resize
the photo to fit in
92
Page 98

CyberLink PowerDVD 20
the window. **
note that this
hotkey can be
modified in
settings, so the
behavior may
differ.
M
Play/Pause
Space bar
Plays and pauses
slideshow
playback.
N
Previous
P
Returns to
previous photo in
the folder or
slideshow.
O
Rotate right
Ctrl+.
Click to rotate the
current photo 90
degrees in the
clockwise
direction.
P
Return to previous window
Backspace
Click to stop
playback and
return to the
media library.
Restore from full screen
Z / Esc
Click to exit full
screen mode.
Note: * this feature is not available in some editions of CyberLink PowerDVD
20.
Viewing Photos in the Mini Player
When viewing photos and playing slideshows, you can drag the edges of the
CyberLink PowerDVD window to reduce it in size.
93
Page 99

Playback Controls
It can be reduced down to 204 pixels, but once the UI size is below 600 pixels, only
the main player controls are available.
Click to keep the mini player on top of all other Windows applications during
playback.
94
Page 100

CyberLink PowerDVD 20
Note: the below table includes the hotkey for each specific button on the
playback controls, if available. For a complete list of all the hotkeys in
PowerDVD and the corresponding behavior, see PowerDVD Hotkeys.
Icon
Button
Hotkey
Description
A
Navigational slider
Visually displays
elapsed playback
time. Click along
the navigational
slider to jump to
different moments
in the song.
B
Elapsed time
Displays the time
elapsed in the
current song.
Hover your mouse
over it to reveal
two buttons that
let you jump
backward and
forward in the
song.
Click to quickly
jump back 8
seconds, or to
skip forward 30
Music Playback Controls
When playing music on the Music tab, the playback controls display as follows:
95
 Loading...