

Page 1
Whole House Water
Filtration
Installation and operating instructions
Models WH-S100-O/WH-S200-C
Sistema de filtración
de agua completo para
el hogar
Instrucciones de instalación y uso
Modelos WH-S100-0/WH-S200-C
Système de filtration de
l'eau pour toute la maison
Guide d'installation et d'utilisation
Modèles WH-S100-0 et WH-S200-C
WHOLE HOUSE | RESIDENCIA COMPLETA | TOUTE LA MAISON
Page 2

2
PRECAUTIONS
WARNING: Do not use with water that is microbiologically unsafe or of unknown source/quality without
adequate disinfection before or after the system.
CAUTION: Filter housing must be protected against freezing temperatures, frost, snow, sleet, and ice.
Exposure to these elements can produce cracks and product failures.
CAUTION: The rubber O-Ring provides the water-tight seal between the filter head and the housing.
It is important that the O-Ring be properly seated in the O-Ring groove or a water leak will occur.
CAUTION: This product has a limited service life. We recommend that a record be kept regarding the
date of install and any other performed maintenance. In addition, the entire filter housing should be
routinely inspected for signs of stress marks, cracking, chipping, warping, and discoloration. If this
filtration system shows any of these signs of wear, the entire unit should be replaced immediately.
CAUTION: Clear housings may crack or warp over time causing failure and leakage if exposed to
organic solvents, such as those found in aerosol sprays for cleaning products and insecticides.
• For cold water use only. Do not use on hot water line or in areas where the temperature surrounding
the unit exceeds 100°F.
• Keep out of direct sunlight. UV rays can weaken the integrity of the filter housing, and also promotes
biological growth within the unit.
• Make certain that installation complies with all state and local laws and regulations.
• The contaminants or other substances removed or reduced by the selected cartridge are not
necessarily in your water. Ask your local water municipality for a copy of their water analysis,
or have your water tested by a reputable water testing lab.
• After prolonged periods of non-use (such as during a vacation) it is recommended that the system
be flushed thoroughly. Let water run for 5–6 minutes before using.
• All filter cartridges recommended for use with this system carry a limited service life. Changes in
taste, odor, color, and/or flow of the water being filtered indicate that the cartridge should be replaced.
• Some harmless bacteria may attack cellulose media cartridges. If your cartridge seems to disintegrate
or develops a musty or moldy odor, switch to a synthetic media cartridge or consult the manufacturer.
SPECIFICATIONS
WH-S100-O
Pressure Range: 30 –125 psi (2.1– 8.6 bar)
Temperature Range: 40 –100°F (4.4 – 37.7°C)
WH-S200-C
Pressure Range: 30 –100 psi (2.1– 6.9 bar)
Temperature Range: 40 –100°F (4.4 – 37.7°C)
OPTIONAL MATERIALS
WH-S100-O
SOLD SEPARATELY:
• BR-O Mounting Bracket
• OR-150 Replacement O-Ring
WH-S200-C
SOLD SEPARATELY:
• OR-150 Replacement O-Ring
TOOLS REQUIRED
• Pipe Cutter or Hacksaw
• 2 Adjustable Wrenches
• File
• Pencil
PARTS
INCLUDED:
• Filter Housing
• WR-S Housing Wrench
• P5 Filter
• BR-C Mounting Bracket (WH-S200-C Model)
• Filter Life Monitor (WH-S200-C Model)
• Timer Battery (Pre-Installed)
NOT INCLUDED:
• Installation Fittings
• Teflon
®
Tape
NOTE: Galvanized fittings must be used for
installation on galvanized pipe.
18007217360 MONDAYFRIDAY 8:00AM4:30PM CST
X2
OR
English
Page 3
3
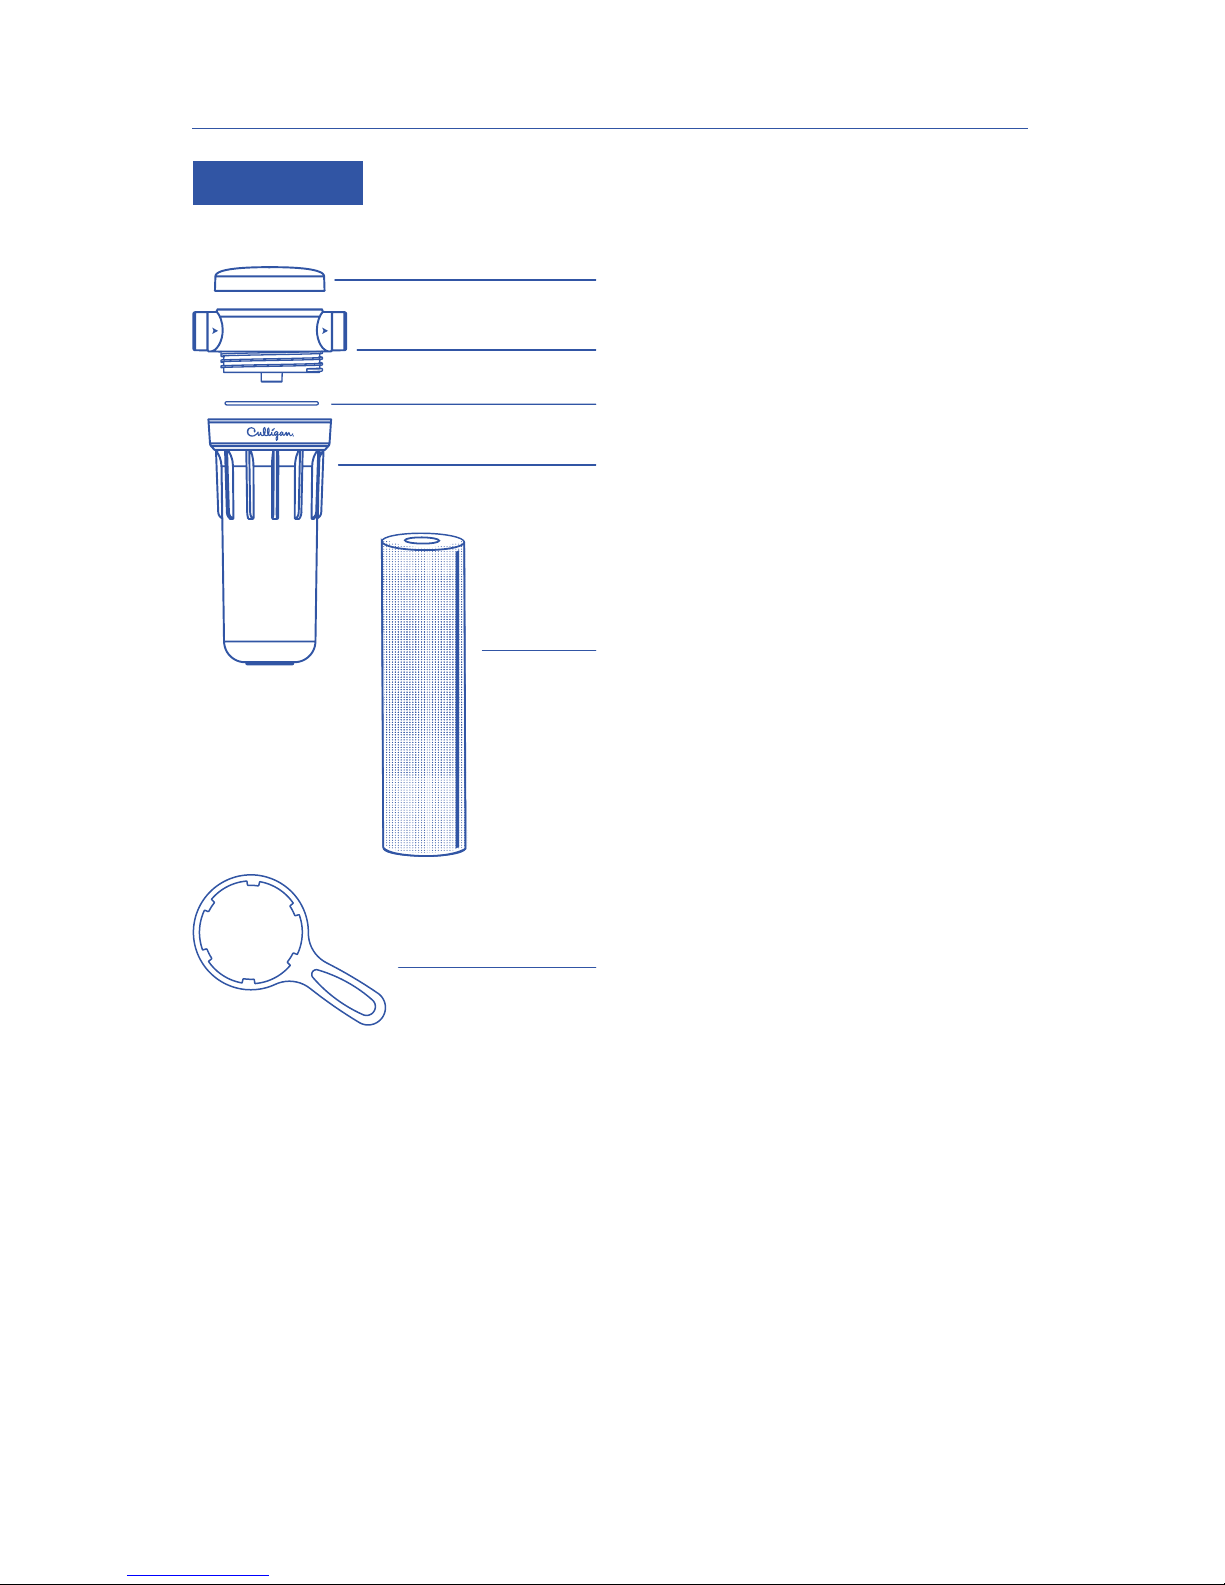
WHS100O
PARTS INCLUDED:
Filter Head
Head Cap
OR150 ORing
Housing
WRS Housing Wrench
P5 Filter
WHOLE HOUSE SYSTEMS
Page 4

4
WHS200C
PARTS INCLUDED:
Bypass Valve
Filter Life Indicator Holder
Filter Head
Filter Life Indicator
OR150 ORing
Housing
WRS Housing Wrench
BR-C Mounting Bracket
Mounting Screws
P5 Filter
Page 5
5
INSTALLATION
• Install filter after water meter or pressure tank.
• Only Teflon
®
tape is recommended for fitting connections.
• Note differences between WH-S100-O and WH-S200-C.
• Instructions are for installing 3/4˝ compression fittings (separate fittings required for other sizes
and non-copper pipe).
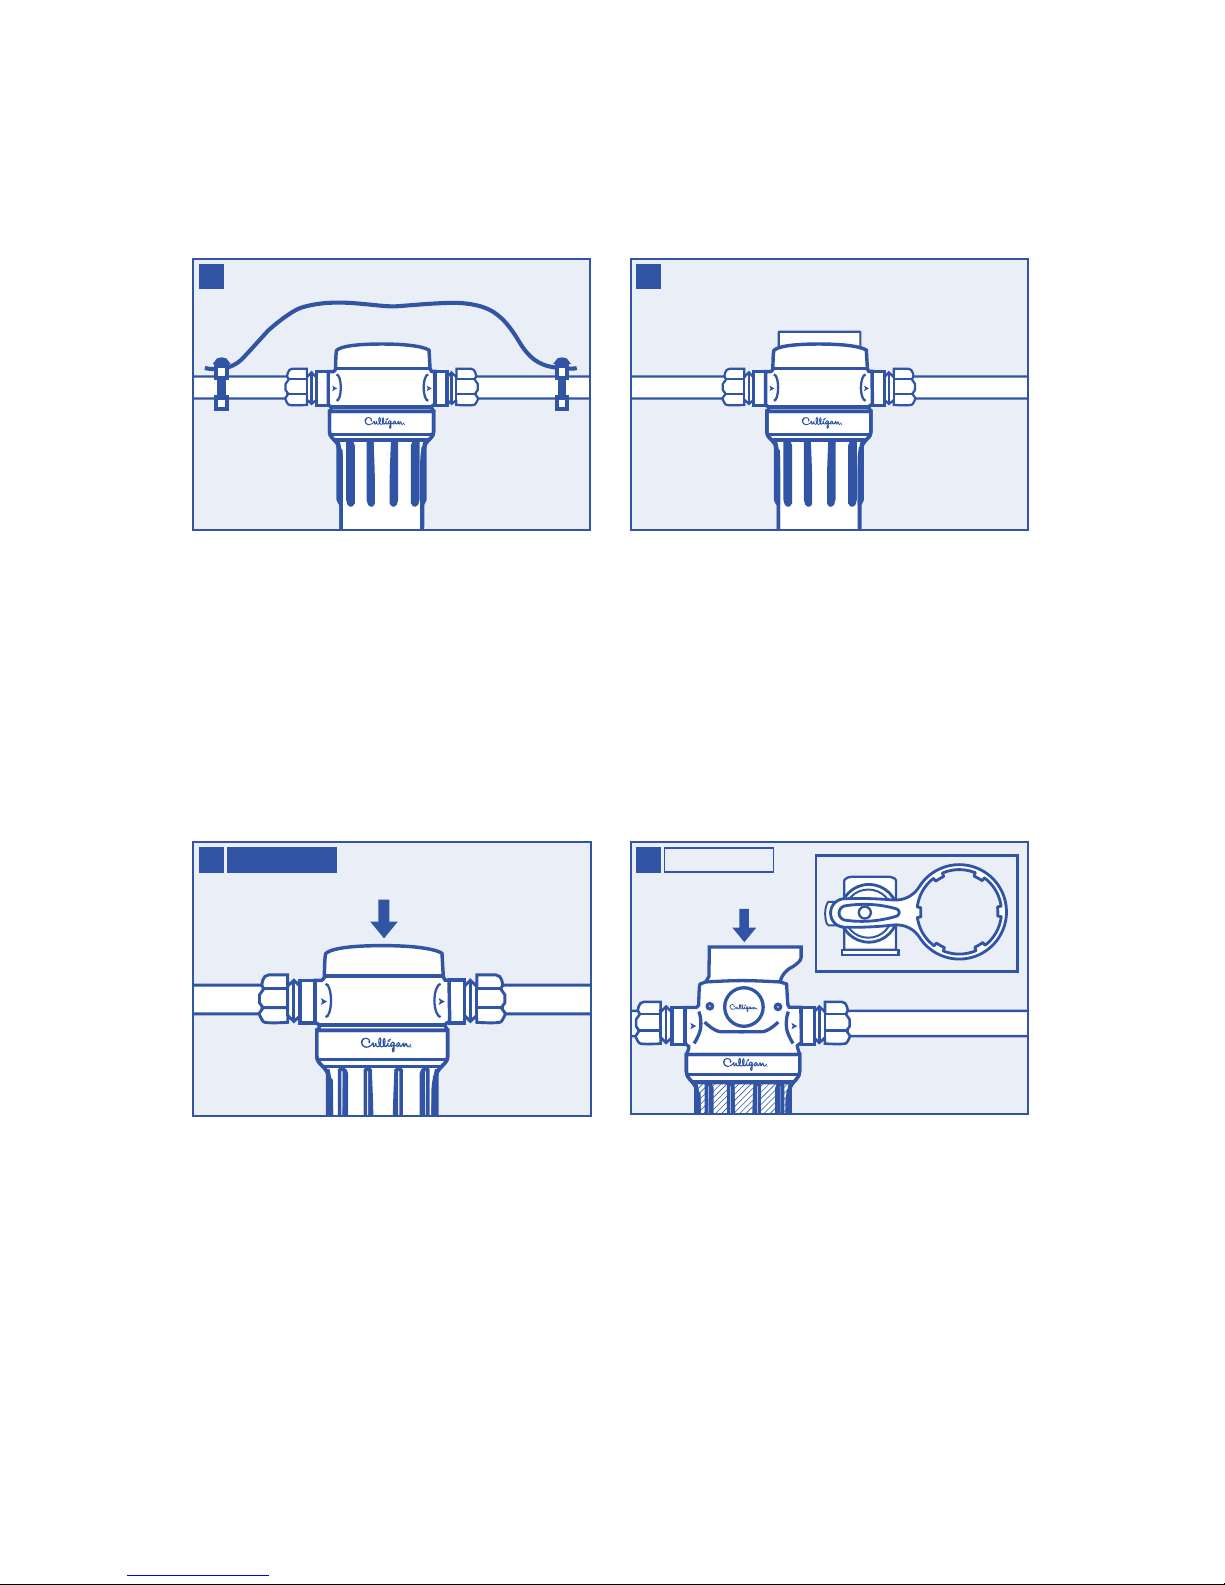
Turn off water supply (A) and open nearest
faucet to drain pipes before installation.
Apply about 6˝ of Teflon
®
tape (B) in clockwise
direction to pipe threads of each adapter.
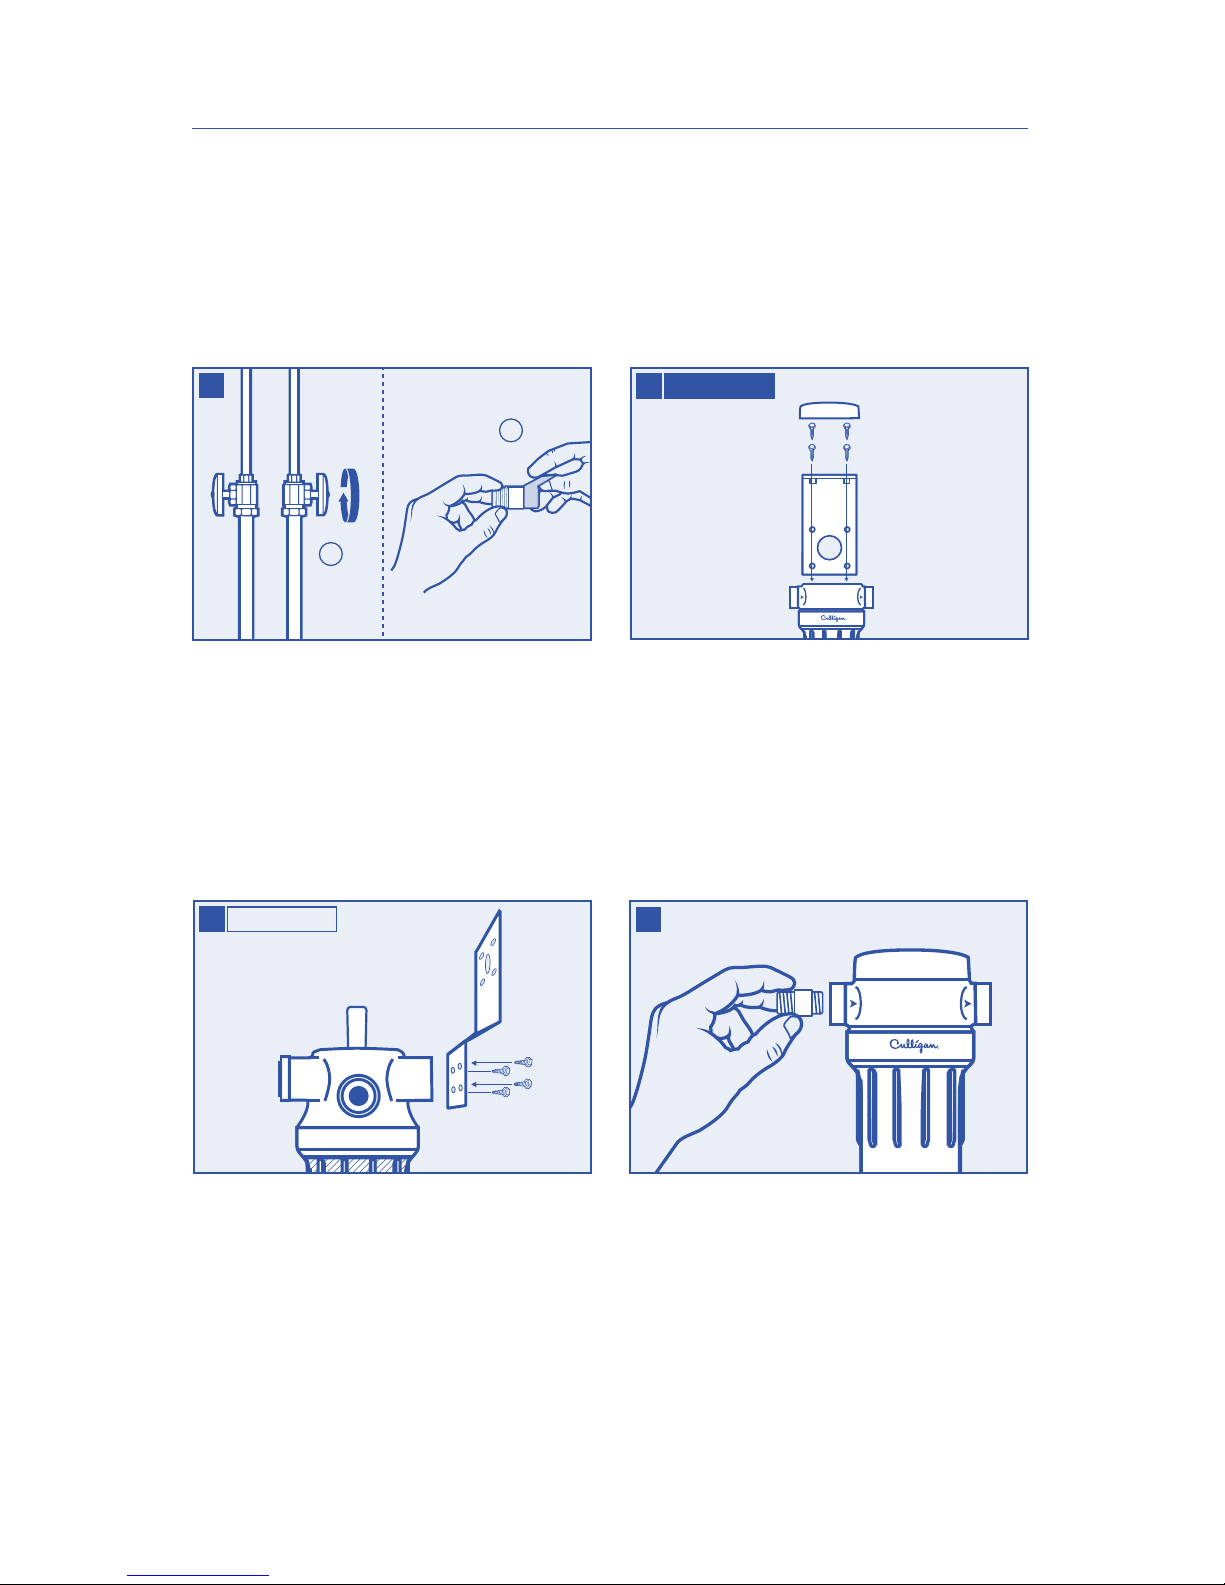
IMPORTANT: When choosing location allow
1-1/2˝– 2˝ clearance below housing to allow
for filter changes.
If using optional BR-O mounting bracket (sold
separately), start by making sure the arrows
facing you on the system are consistent with the
direction of your water flow. Remove head cap
and align the holes in the bracket with the holes
in the filter head. Insert four mounting screws
through the bracket and into the filter head until
tight. Replace head cap. Otherwise skip to step 3.
If using optional BR-C mounting bracket, start by
making sure the arrows facing you on the system
are consistent with the direction of your water
flow. If necessary, remove filter life indicator
holder if on the back side of the unit, and move
it to the front. Align the holes of the bracket with
the holes on the back of the filter head. Insert four
mounting screws through the bracket and into the
filter head until tight. Otherwise skip to step 3.
Assemble all fittings. Start adapters (not
included) into filter head by hand. Use a wrench
to tighten firmly.
DO NOT OVER-TIGHTEN.
3
1
A
B
2 WH-S200-C
WH-S100-O
2
Page 6
6
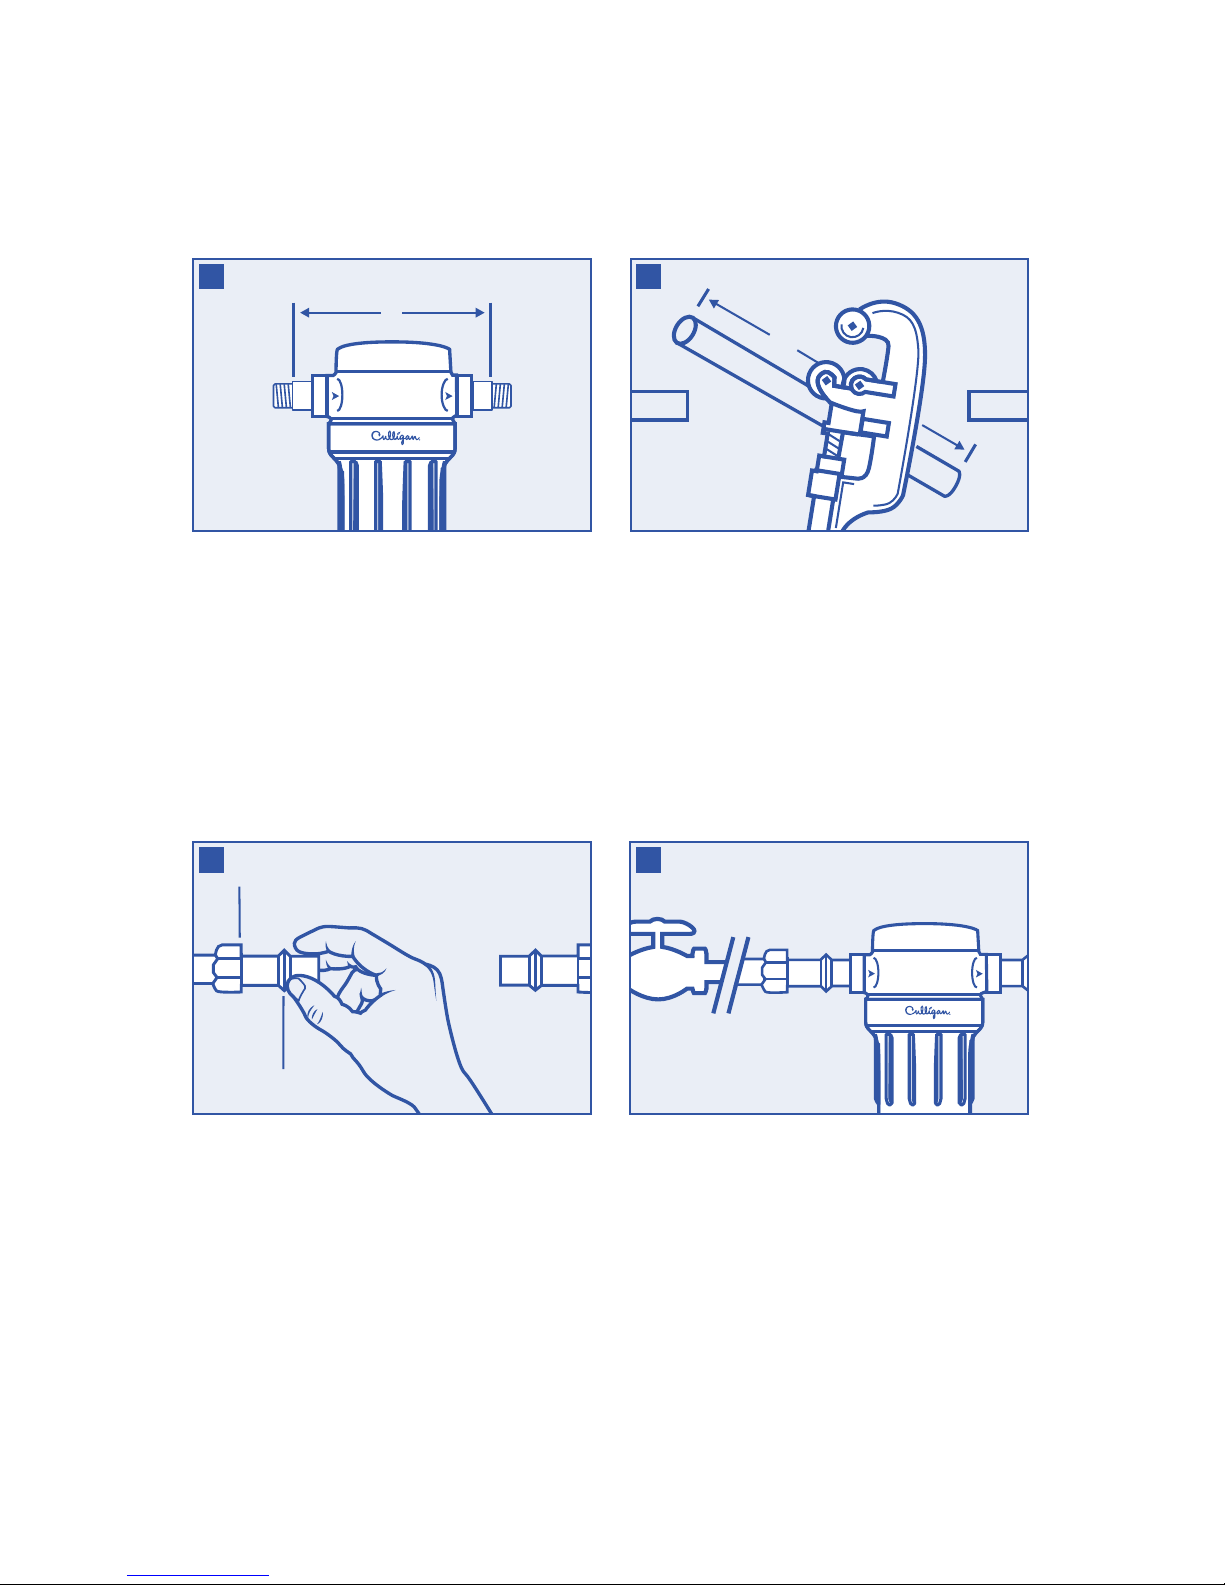
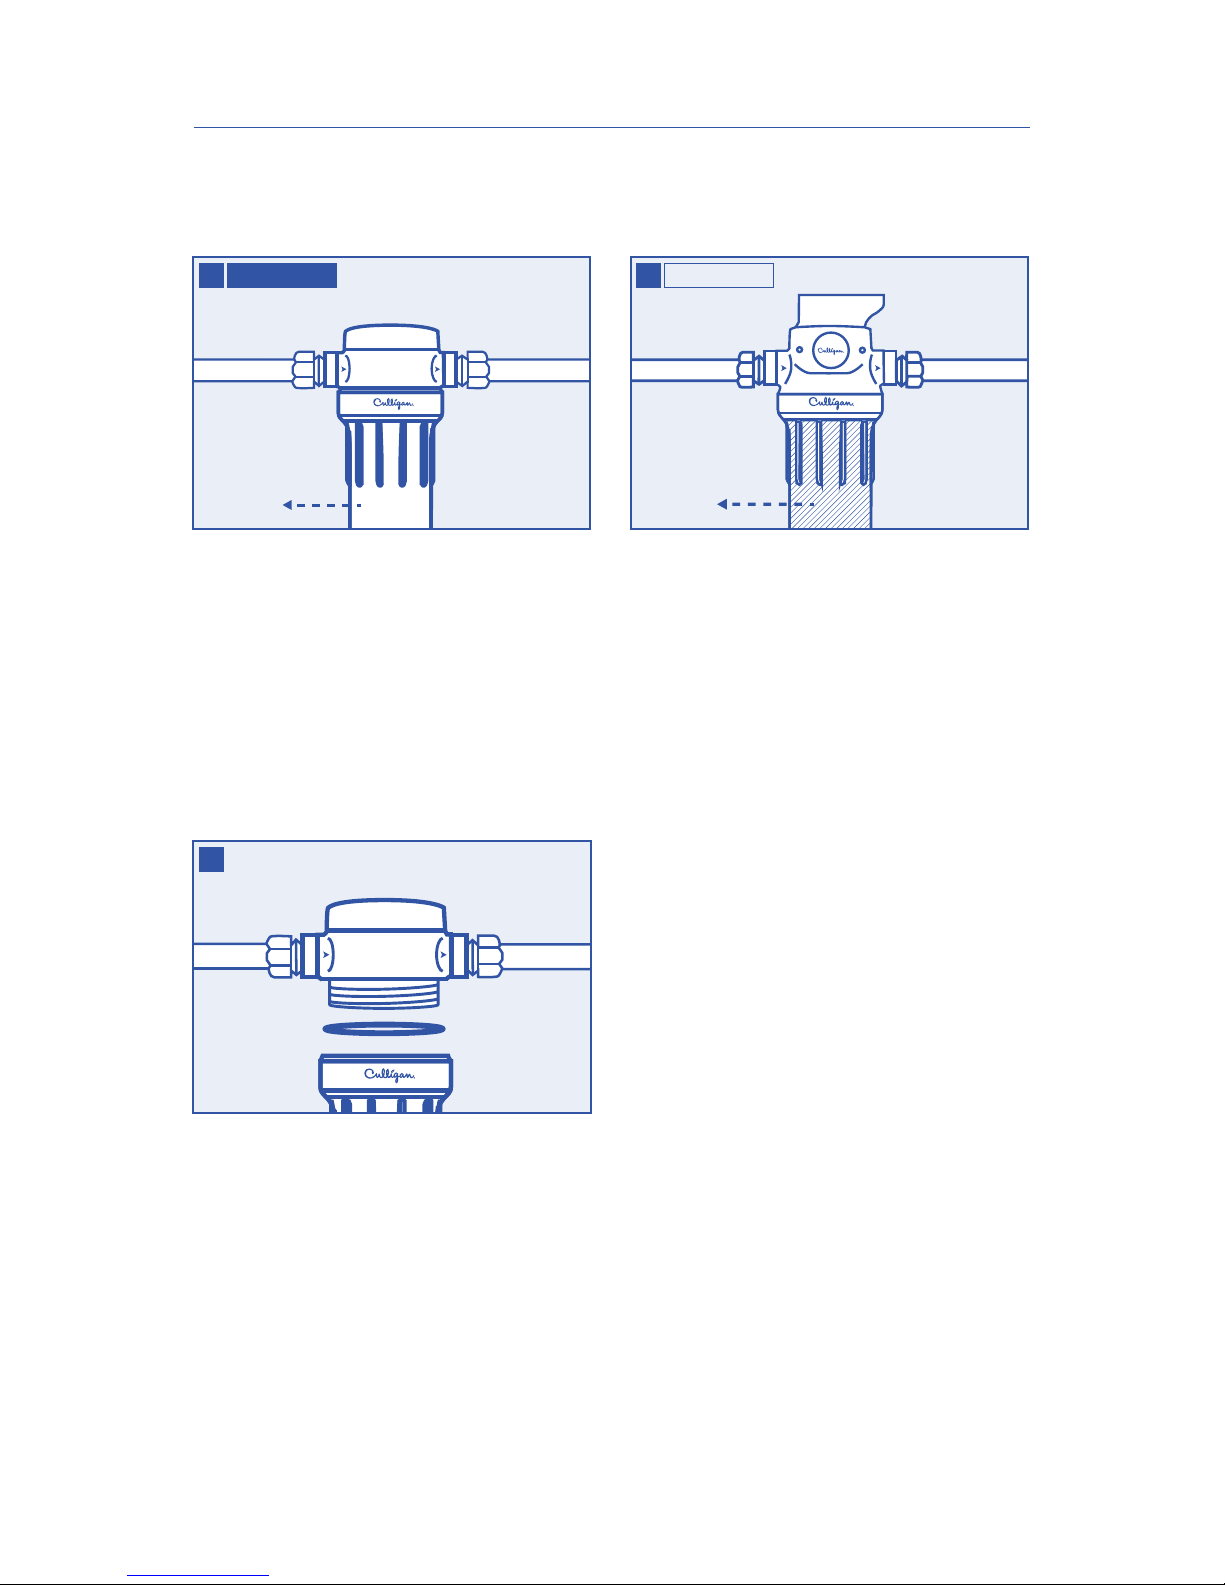
Slip brass compression nut and ferrule onto each
end of 3/4˝ pipe.
BRASS COMPRESSION NUT
FERRULE
Using a pipe cutter or hacksaw, cut and remove
marked section of pipe. File or sand sharp edges
on remaining pipe.
Measure overall length of configured system
with adapters attached.
Reduce this measurement enough to allow for
full engagement of the pipe into the adapters and
determine how much pipe to remove (X).
Mark section of pipe to be removed.
X
X
4
5
6
Align filter assembly with ends of pipe, making
certain your water flow is in the same direction as
the arrows on your filter head. It will be necessary
to spread ends of pipe apart to install filter
assembly. Using two adjustable wrenches, hold
incoming fitting securely with one wrench and
tighten nut with second wrench. Repeat process
for outgoing fitting.
7
Page 7
7
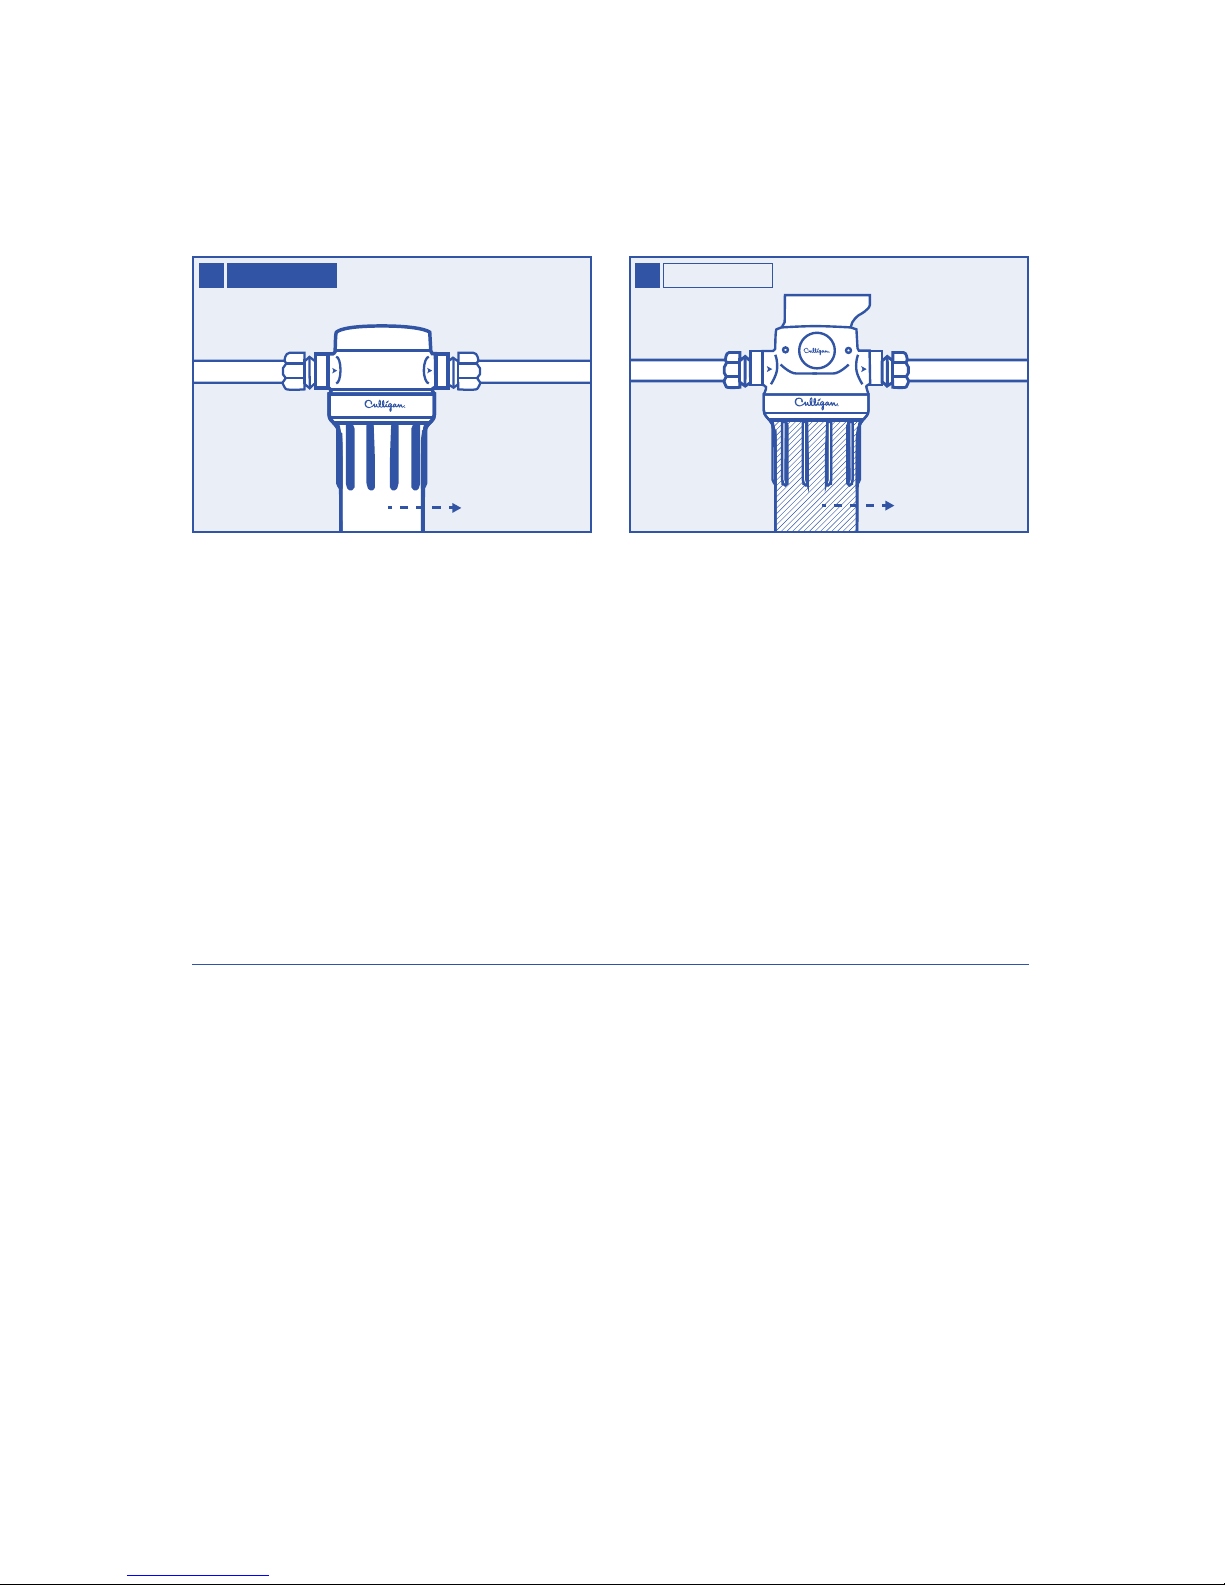
Ensure the filter housing has been properly
tightened using the housing wrench provided.
Slowly turn on main water supply.
Slowly press red pressure-relief button on top
of filter to release trapped air. Check for leaks.
Open nearest faucet and flush filter cartridge
for 5 minutes.
CAUTION: If water pipes are used to ground
electrical systems, appliances or phones, be
certain to install a jumper wire.
If using optional mounting bracket attach
it to the wall using four mounting screws
(not included).
8 9
Ensure the filter housing has been properly
tightened using the housing wrench provided.
Turn bypass valve to “Filter” mode using wrench,
then slowly turn on main water supply.
Slowly press red pressure-relief button on top
of filter to release trapped air. Check for leaks.
Open nearest faucet and flush filter cartridge
for 5 minutes.
Reset filter life indicator (hold reset button
for 2 seconds).
10 WH-S100-O 10 WH-S200-C
Page 8
8
FILTER CARTRIDGE REPLACEMENT
• Note differences between WH-S100-O and WH-S200-C.
Lubricate O-Ring with a coating of clean
food-grade silicone grease. Insert O-Ring back
into groove and smooth into place with finger.
NOTE: This step is important to ensure proper
housing seal. Make certain O-Ring is seated
level in the groove.
Insert new cartridge into housing.
Make certain it slips over the standpipe
at the bottom of the housing.
2
Turn off water supply to filter.
Press red pressure-relief button to relieve
pressure. Unscrew bottom of housing. Remove
O-Ring from groove in housing and wipe clean
and set aside. Discard used cartridge.
Rinse out housing and fill 1/3 with water.
Add 2 tablespoons of bleach and scrub with
nonabrasive brush or sponge. Rinse thoroughly.
Turn water off by rotating bypass valve to
“Off” or “Bypass.”
NOTE: Turning bypass to “Off” will shut off all
water flow within the household.
Press red pressure-relief button to relieve
pressure. Unscrew bottom of housing. Remove
O-Ring from groove in housing and wipe clean
and set aside. Discard used cartridge.
Rinse out housing and fill 1/3 with water.
Add 2 tablespoons of bleach and scrub with
nonabrasive brush or sponge. Rinse thoroughly.
OPEN
1 WH-S100-O
OPEN
1 WH-S200-C
Page 9
9
TIMER APPLICATION INSTRUCTIONS
AND BATTERY REPLACEMENT WHS200C MODEL
APPLICATION AND RESET
After new battery is installed or filter is changed, push and hold the filter life reset button for
approximately 2 seconds until green light flashes. The light will flash red in 90 days to remind you that it
is time to change the filter.
BATTERY REPLACEMENT
1. Insert small screwdriver on the base of the indicator holder to remove it from the housing.
2. Insert small screwdriver on the bottom flat side of the filter life indicator. Gently pry open and separate
timer base from cap.
3. Carefully remove the circuit board and slide old battery out of holder. Change battery (#2032).
4. Carefully line up and place circuit board back into housing.
5. Line up the base and cap and snap back together. Place indicator back into housing.
6. Reset filter life indicator to start timer (hold reset button for 2 seconds). It is recommended that you
change the battery every year to ensure your indicator works properly.
Screw the bottom of housing onto the cap until
tight. DO NOT OVER-TIGHTEN. Make certain
standpipe in filter head slips into cartridge.
Turn on water supply slowly to allow filter to fill
with water. Slowly press red pressure-relief
button to release trapped air. Check for leaks.
NOTE: Flush filter cartridge for 5 minutes
before use.
Screw the bottom of housing onto the cap until
tight. DO NOT OVER-TIGHTEN. Make certain
standpipe in filter head slips into cartridge.
Slowly turn bypass valve to “Filter” to allow
system to fill with water. Slowly press red
pressure-relief button to release trapped air.
Check for leaks.
Reset filter life indicator (hold reset button
for 2 seconds).
NOTE: Flush filter cartridge for 5 minutes
before use.
CLOSE
3 WH-S100-O
CLOSE
WH-S200-C3
Page 10
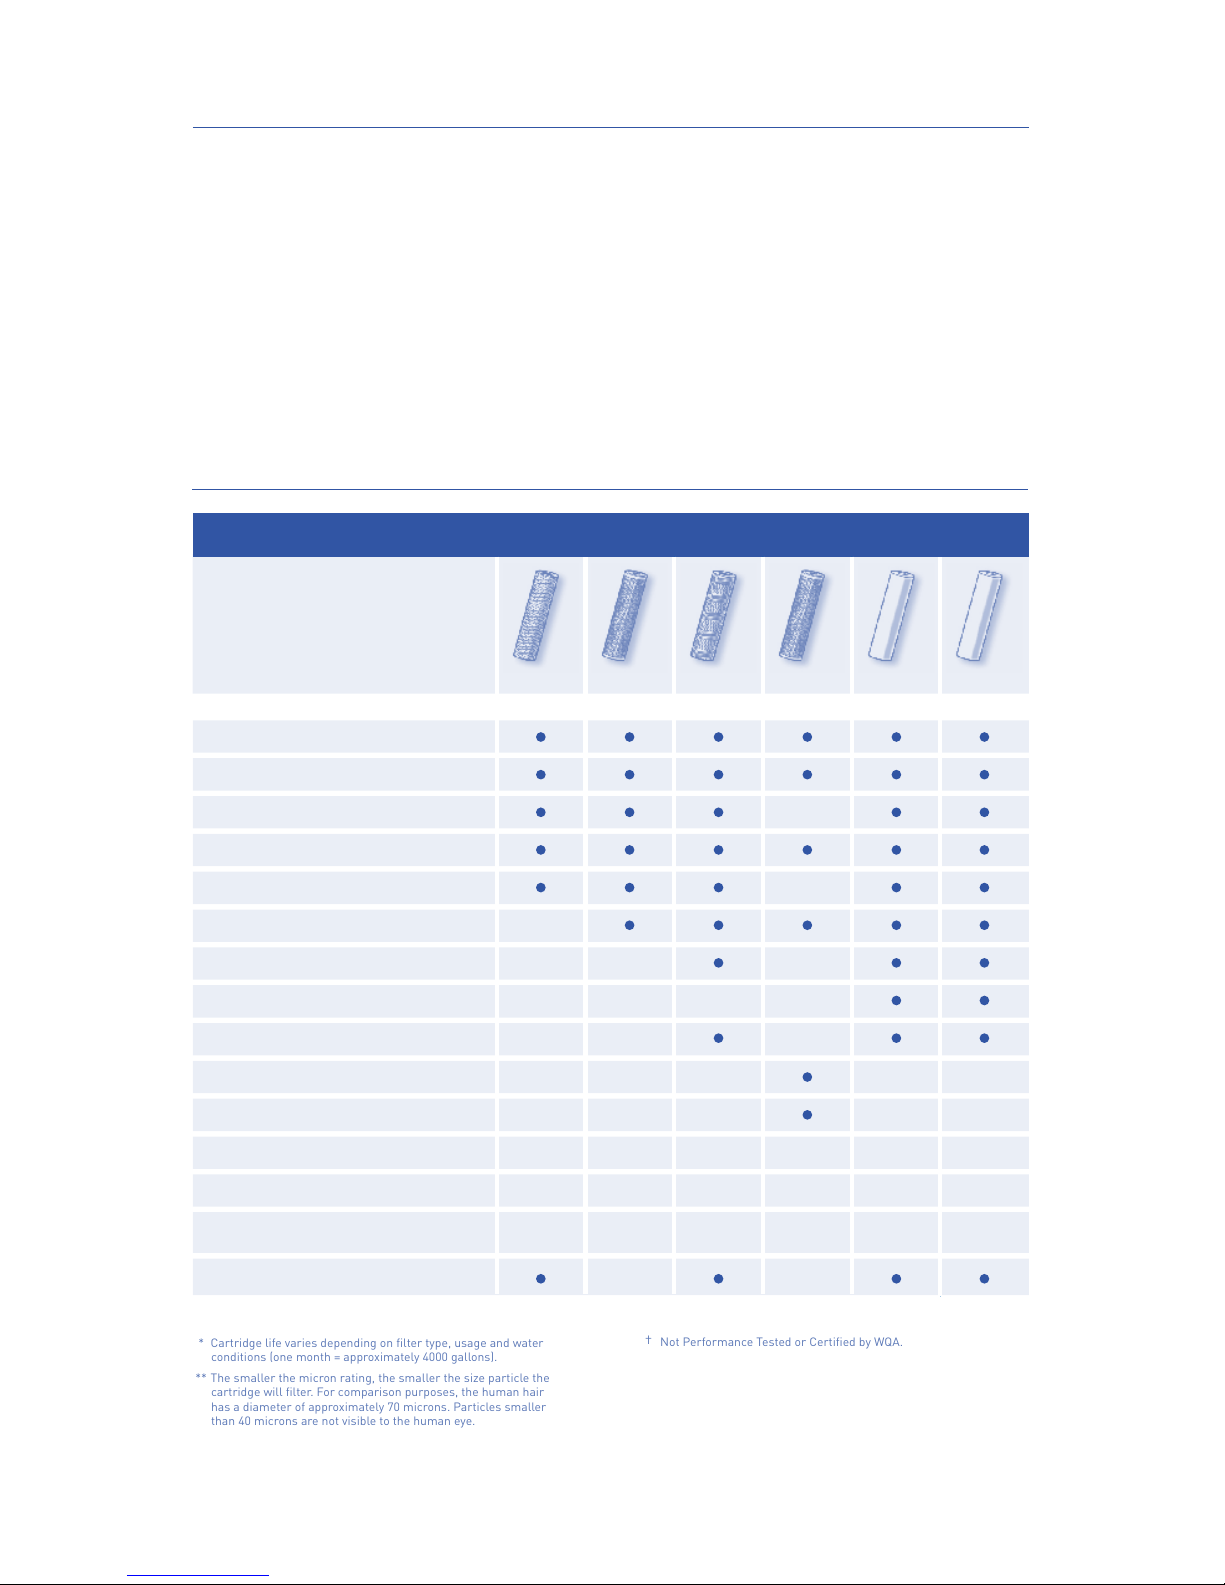
10
* Cartridge life varies depending on filter type, usage and water
conditions (one month = approximately 4000 gallons).
** The smaller the micron rating, the smaller the size particle the
cartridge will filter. For comparison purposes, the human hair
has a diameter of approximately 70 microns. Particles smaller
than 40 microns are not visible to the human eye.
†
Not Performance Tested or Certified by WQA.
CW-MF S-1A CW-F P5 P1
PROBLEMS
Sediment
†
Rust
†
Scale
†
Dirt
†
Coarse Sand
†
Sand
†
Fine Sand
†
Extra Fine Sand
†
Silt
†
Bad Taste & Odor
†
Aesthetic Chlorine Taste & Odor
†
Cartridge Life *
†
Micron Rating **
†
Cartridge Material
Recommended for Well Water
3 months
12,000 gallons
4 months
16,000 gallons
3 months
12,000 gallons
2 months
8,000 gallons
2 months
8,000 gallons
Wound
Polypropylene
Pleated
Cellulose
Wound
Polypropylene
Spun
Polypropylene
Spun
Polypropylene
30 20 10 5
SCWH-5
3 months
15,000 gallons
Carbon
Wrapped
5 1
Select the right cartridge
for your water
FILTER SELECTION GUIDE
FILTER CARTRIDGE SELECTION GUIDE
TROUBLESHOOTING
LEAKS BETWEEN FILTER HEAD AND HOUSING:
1. Turn off water supply and press the red pressure-relief button. Remove bottom of housing.
2. Clean O-Ring and O-Ring groove (located directly beneath threads of housing). Lubricate O-Ring
with clean silicone grease and replace securely into groove. Screw housing into filter head and
hand-tighten. DO NOT OVER-TIGHTEN.
LEAKS FROM INLET/OUTLET CONNECTIONS:
1. Turn off water supply. For brass fittings, tighten nut snugly about 1/2-turn with a wrench.
2. Turn on water supply. If leaks persist, or if there are other leaks on system, turn off water supply.
Call Technical Support at 1-800-721-7360.
Page 11

11
TWOYEAR LIMITED WARRANTY: WHS100O/ WHS200C
This warranty applies to the Filter Housing. It does NOT apply to any disposable filter cartridge where
life expectancy varies with the water being filtered. This warranty covers defects in material and
workmanship only for 2 full years from the original date of delivery. Culligan will replace any part
which in Culligan’s opinion is defective, unless: (1) any part of the unit has been subjected to any type of
tampering, alteration, or improper use after delivery, or (2) it has been repaired by anyone not approved
by Culligan. Culligan is not responsible for damage in transit, and claims for such damage should be
presented to the carrier by the customer. This warranty does not cover any labor, transportation, or
shipping expenses incurred. The hiring of any individual or service to install or maintain this product
is done at the discretion and expense of the purchaser.
This product has been designed solely for use as a housing for a disposable filter cartridge. It is NOT
warranted against freezing, and neither this product nor its parts is warranted against defects or
deterioration caused by uses for which this product was not expressly intended.
THE FOREGOING WARRANTY IS EXCLUSIVE AND IN LIEU OF ALL OTHER WARRANTIES, EXPRESSED
OR IMPLIED, WHETHER ORAL OR ARISING BY USAGE OF TRADE OR COURSE OF DEALING, INCLUDING,
WITHOUT LIMITATION, ANY WARRANTIES OF FITNESS OR MERCHANTABILITY. THIS WARRANTY IS THE
PURCHASER’S SOLE AND EXCLUSIVE REMEDY, IN NO EVENT SHALL CULLIGAN BE LIABLE FOR ANY
ANTICIPATED OR LOST PROFITS, INCIDENTAL DAMAGES, CONSEQUENTIAL DAMAGES, COSTS, TIME
CHARGES OR OTHER LOSSES, WHETHER BASED ON BREACH OF CONTRACT, TORTIOUS CONDUCT OR
ANY OTHER THEORY, INCURRED IN CONNECTION WITH THE PURCHASE, INSTALLATION, REPAIR OR
OPERATION OF THIS PRODUCT. CULLIGAN DOES NOT AUTHORIZE ANYONE TO ASSUME FOR IT ANY
LIABILITY OR TO MAKE ON ITS BEHALF ANY ADDITIONAL WARRANTIES IN CONNECTION WITH THE
FILTER HOUSING OR ANY PART THEREOF.
For servicing under this warranty, return any defective part to YOUR RETAILER within the 2 year period
referred to above. Be sure that you complete the online warranty registration within 30 days of purchase
and keep your original receipt, order form, or bill of sale to serve as a proof of purchase before returning.
PRODUCT REGISTRATION
Please be sure to go online within 30 days of purchase and register your product at
www.register.culligan.com.
The WH-S100-O and WH-S200-C with P5 cartridge are tested and certified by WQA
against NSF/ANSI 372 for low lead compliance, CSA B483.1, and NSF/ANSI 61 for
material safety only.
Page 12

12
PRECAUCIONES
ADVERTENCIA: No utilice este producto con agua que sea microbiológicamente no segura o cuya fuente o nivel de
calidad se desconozca sin desinfectar primero el sistema de forma adecuada antes o después de la instalación.
PRECAUCIÓN: Se debe proteger la cubierta del filtro de las temperaturas muy bajas, la escharcha, la nieve, el aguanieve y el
hielo. Si se expone a estas condiciones, se pueden producir grietas y fallas en el producto.
PRECAUCIÓN: La junta tórica de caucho permite un cierre hermético entre el cabezal y la cubierta del filtro.
Es importante que la junta tórica se coloque correctamente en la ranura tórica ya que, de otro modo, podría ocurrir
una pérdida de agua.
PRECAUCIÓN: Este producto tiene una vida útil limitada. Se recomienda mantener un registro que indique la fecha de
instalación y todo tipo de mantenimiento que se realice. Además, la cubierta del filtro se debe revisar completamente de
forma regular para verificar que no haya indicios de presión, marcas, grietas, corrosión, pandeo y decoloración. Si este
sistema de filtración muestra alguno de estos indicios de desgaste, se debe reemplazar la unidad completa de inmediato.
PRECAUCIÓN: Si las cubiertas limpias se exponen a solventes orgánicos, como aquellos presentes en insecticidas o
productos de limpieza en aerosol, pueden agrietarse o pandearse con el transcurso del tiempo y ocasionar fallas y pérdidas.
• Este producto se debe utilizar únicamente con agua fría. No utilice el producto en la red de agua caliente ni en áreas
donde la temperatura alrededor de la unidad supere los 100°F.
• Manténgalo alejado de la luz solar directa. Los rayos UV pueden afectar la integridad de la cubierta del filtro y,
además, favorecen la proliferación de microorganismos dentro de la unidad.
• Asegúrese de que la instalación se realice de conformidad con todas las leyes y reglamentaciones estatales y locales.
• Los contaminantes u otras sustancias que el cartucho seleccionado quita o reduce no se encuentran
necesariamente en el agua. Solicítele a la compañía de agua local una copia del análisis del agua, o bien pídale a un
laboratorio reconocido que realice una prueba del agua.
• Se recomienda enjuagar bien el sistema después de largos períodos en los que no se utiliza (por ejemplo, durante las
vacaciones). Deje que el agua corra entre 5 y 6 minutos antes de utilizarlo.
• Todos los cartuchos del filtro recomendados para utilizar con este sistema tienen una vida útil limitada. Si se
observan cambios en el sabor, el olor, el color o el flujo del agua filtrada, se debe reemplazar el cartucho.
• Algunos tipos de bacterias inofensivas pueden deteriorar los cartuchos de medios de celulosa. Si el cartucho parece
desintegrarse o despide olor a humedad o a moho, reemplácelo por un cartucho de medios sintéticos o comuníquese
con el fabricante.
ESPECIFICACIONES
WH-S100-O
Rango de presión: 30 a 125 psi (2.1 a 8.6 bar)
Rango de temperatura: 40 a 100°F (4.4 a 37.7°C)
WH-S200-C
Rango de presión: 30 a 100 psi (2.1 a 6.9 bar)
Rango de temperatura: 40 a 100°F (4.4 a 37.7°C)
MATERIALES OPCIONALES
WH-S100-O
SE VENDEN POR SEPARADO:
• Soporte de montaje BR-O
• Junta tórica OR-150 de repuesto
WH-S200-C
SE VENDEN POR SEPARADO:
• Junta tórica OR-150 de repuesto
HERRAMIENTAS NECESARIAS
• Cortatubos o sierra para metales
• 2 Llaves inglesas
• Lima
• Lápiz
PIEZAS
INCLUIDAS:
• Cubierta del filtro
• Llave WR-S para filtro
• Filtro P5
• Soporte de montaje BR-C (Modelo WH-S200-C)
• Control de vida útil del filtro (Modelo WH-S200-C)
• Batería del temporizador (instalada previamente)
NO INCLUYE LO SIGUIENTE:
• Accesorios de Instalación
• Cinta de Teflón
®
NOTA: Se deben utilizar accesorios galvanizados
para la instalación en tuberías galvanizadas.
18007217360 8:00 A.M. A 4:30 P.M. CST
X2
O BIEN
Español
LUNES A VIERNES
Page 13

13
WHS100O
PIEZAS INCLUIDAS:
Cabezal del filtro
Tapa del cabezal
Junta tórica OR150
Cubierta
Llave WR-S para filtro
Filtro P5
SISTEMAS COMPLETOS PARA EL HOGAR
Page 14

14
WHS200C
PIEZAS INCLUIDAS:
Válvula de paso
Soporte para indicador de vida útil del filtro
Cabezal del filtro
Indicador de vida útil del filtro
Junta tórica OR-150
Cubierta
Llave WR-S para filtro
Soporte de montaje BR-C
Tornillos para montaje
Filtro P5
Page 15

15
INSTALACIÓN
• Instale el filtro después del medidor de agua o el tanque de presión.
• Se recomienda utilizar solo cinta de Teflón
®
para instalar los accesorios.
• Tenga en cuenta las diferencias entre los modelos WH-S100-O y WH-S200-C.
• Las instrucciones corresponden a la instalación de accesorios de compresión de 3/4 in (se requieren
otros accesorios para tuberías de tamaños diferentes y tuberías que no sean de cobre).
Si utiliza un soporte de montaje BR-C opcional,
asegúrese primero de que las flechas marcadas
en el sistema coincidan con la dirección del flujo
de agua. Si es necesario, retire el soporte para
indicador de vida útil del filtro si se encuentra en
la parte posterior de la unidad y colóquelo en la
parte delantera. Alinee los orificios del soporte
con los orificios en la parte posterior del cabezal
del filtro. Coloque cuatro tornillos para montaje
a través del soporte y en el cabezal del filtro y
ajústelos bien. De lo contrario, vaya al paso 3.
Ensamble todos los accesorios. Coloque
manualmente los adaptadores (no incluidos)
en el cabezal del filtro. Utilice una llave para
ajustarlos bien.
NO AJUSTE DEMASIADO.
3
2 WH-S200-C
1
A
B
WH-S100-O
2
Corte el suministro de agua (A) y abra el grifo más
cercano para drenar las tuberías antes de comenzar
con la instalación. Envuelva las roscas de cada
adaptador con, aproximadamente, 6 in de cinta de
Teflón
®
(B) en el sentido de las agujas del reloj.
IMPORTANTE: Cuando seleccione la ubicación, deje
un espacio de entre 1-1/2 y 2 in debajo de la cubierta,
de modo que pueda realizar cambios del filtro.
Si utiliza un soporte de montaje BR-O opcional
(se vende por separado), asegúrese primero de
que las flechas marcadas en el sistema coincidan
con la dirección del flujo de agua. Quite la tapa del
cabezal y alinee los orificios en el soporte con los
orificios en el cabezal del filtro. Coloque cuatro
tornillos para montaje a través del soporte y en el
cabezal del filtro y ajústelos bien. Vuelva a colocar
la tapa del cabezal. De lo contrario, vaya al paso 3.
Page 16

16
Deslice una tuerca de compresión de latón y un
casquillo en cada extremo de la tubería de 3/4 in.
Con un cortatubos o una sierra para metales,
corte y retire la sección marcada de la tubería.
Lime o lije los bordes filosos en los extremos
de la tubería.
Mida la longitud total del sistema configurado con
los adaptadores acoplados.
Reduzca esta medida lo necesario para lograr
que la tubería se una completamente con los
adaptadores y calcule qué porcentaje de la tubería
debe quitar (X).
Marque la sección de la tubería que se debe quitar.
Alinee el ensamblaje del filtro con los extremos
de la tubería y asegúrese de que el flujo de agua
corra en la misma dirección que las flechas en
el cabezal del filtro. Será necesario que separe
los extremos de la tubería para instalar el
ensamblaje del filtro. Utilice dos llaves inglesas;
con una de ellas, sujete bien el accesorio
entrante y, con la otra, ajuste la tuerca.
Repita el proceso con el accesorio saliente.
X
X
4
5
TUERCA DE COMPRESIÓN DE LATÓN
FÉRULA
6 7
Page 17

17
Asegúrese de que la cubierta del filtro se haya
ajustado correctamente con la llave para filtro
provista. Abra el suministro de agua lentamente.
Presione suavemente el botón rojo de liberación
de presión que se encuentra en la parte superior
del filtro para liberar el aire atrapado en el interior.
Verifique que no haya pérdidas. Abra el grifo más
cercano y deje correr el agua por el cartucho del
filtro durante 5 minutos.
PRECAUCIÓN: Si se utilizan tuberías de agua
para conectar a tierra sistemas eléctricos,
electrodomésticos o teléfonos, asegúrese de
instalar un cable de puente.
Si utiliza un soporte de montaje opcional, fíjelo
a la pared con cuatro tornillos para montaje
(no incluidos).
8 9
Asegúrese de que la cubierta del filtro se haya ajustado
correctamente con la llave para filtro provista.
Con la llave, coloque la válvula de paso en la posición
“Filtro”; luego, abra lentamente el suministro de agua.
Presione suavemente el botón rojo de liberación de
presión que se encuentra en la parte superior del filtro
para liberar el aire atrapado en el interior. Verifique
que no haya pérdidas. Abra el grifo más cercano y deje
correr el agua por el cartucho del filtro durante
5 minutos.
Reinicie el indicador de vida útil del filtro (mantenga
presionado el botón de reinicio durante 2 segundos).
10 WH-S100-O 10 WH-S200-C
Page 18

18
REEMPLAZO DEL CARTUCHO DEL FILTRO
• Tenga en cuenta las diferencias entre los modelos WH-S100-O y WH-S200-C.
Lubrique la junta tórica con una capa de grasa
de silicona limpia de grado alimenticio. Coloque
la junta tórica nuevamente en la ranura y
acomódela en su lugar con el dedo.
NOTA: Este paso es importante para asegurar
que la carcasa se cierre correctamente.
Asegúrese de que la junta tórica esté nivelada
correctamente en la ranura.
Coloque un cartucho nuevo en la cubierta.
Asegúrese de que se deslice por el tubo vertical
en la parte inferior de la cubierta.
2
Corte el suministro de agua que pasa por el filtro.
Presione el botón rojo de liberación de presión
para liberar la presión. Desatornille la parte
inferior de la cubierta. Quite la junta tórica de la
ranura en la cubierta, límpiela y déjela a un lado.
Deseche el cartucho usado.
Enjuague la cubierta y llene 1/3 de esta con agua.
Agregue 2 cucharadas de lejía y refriegue con una
esponja o un cepillo no abrasivos. Enjuague bien.
Corte el suministro de agua moviendo la válvula
de paso a la posición “Cerrada” o “Paso.”
NOTA: Si la coloca en la posición “Cerrada,”
se cortará todo el suministro de agua dentro
del hogar.
Presione el botón rojo de liberación de presión
para liberar la presión. Desatornille la parte
inferior de la cubierta. Quite la junta tórica de la
ranura en la cubierta, límpiela y déjela a un lado.
Deseche el cartucho usado.
Enjuague la cubierta y llene 1/3 de esta con agua.
Agregue 2 cucharadas de lejía y refriegue con una
esponja o un cepillo no abrasivos. Enjuague bien.
ABRIR
1 WH-S100-O
ABRIR
1 WH-S200-C
Page 19

19
INSTRUCCIONES PARA APLICAR EL TEMPORIZADOR Y
REEMPLAZAR LA BATERÍA MODELO WHS200C
APLICACIÓN Y REINICIO
Después de instalar una batería o un filtro nuevos, mantenga presionado el botón de reinicio de vida útil
del filtro durante, aproximadamente, 2 segundos hasta que se encienda una luz verde. La luz se tornará
de color rojo dentro de 90 días. De este modo, le recuerda que debe cambiar el filtro.
REEMPLAZO DE LA BATERÍA
1. Introduzca un destornillador pequeño en la base del soporte para indicador para retirarlo de la cubierta.
2. Introduzca el destornillador pequeño en la parte inferior plana del indicador de vida útil del filtro.
Ábralo ejerciendo una suave presión y separe la base del temporizador de la tapa.
3. Quite cuidadosamente el panel de circuito y retire la batería del soporte para indicador. Reemplace la
batería (n.° 2032).
4. Alinee cuidadosamente el panel de circuito y colóquelo nuevamente en la cubierta.
5. Alinee la base y la tapa y ajústelas en su lugar. Coloque el indicador en la cubierta nuevamente.
6. Reinicie el indicador de vida útil del filtro para iniciar el temporizador (mantenga presionado el botón
de reinicio durante 2 segundos). Se recomienda cambiar la batería cada año para asegurarse de que
el indicador funcione de manera correcta.
Atornille la parte inferior de la cubierta a la tapa y
ajuste con firmeza. NO AJUSTE DEMASIADO.
Asegúrese de que el tubo vertical en el cabezal
del filtro se deslice dentro del cartucho.
Abra el suministro de agua lentamente para
permitir que el filtro se llene de agua. Presione
suavemente el botón rojo de liberación de presión
para liberar el aire atrapado en el interior.
Verifique que no haya pérdidas.
NOTA: Deje que el agua fluya por el cartucho
durante 5 minutos antes de utilizarlo.
CERRAR
3 WH-S100-O
CERRAR
WH-S200-C3
Atornille la parte inferior de la cubierta a la tapa y
ajuste con firmeza. NO AJUSTE DEMASIADO.
Asegúrese de que el tubo vertical en el cabezal
del filtro se deslice dentro del cartucho.
Mueva lentamente la válvula de paso a la posición
“Filtro” para permitir que el sistema se llene de
agua. Presione suavemente el botón rojo de
liberación de presión para liberar el aire atrapado
en el interior. Verifique que no haya pérdidas.
Reinicie el indicador de vida útil del filtro
(mantenga presionado el botón de reinicio
durante 2 segundos).
NOTA: Deje que el agua fluya por el cartucho
durante 5 minutos antes de utilizarlo.
Page 20

20
* La vida útil del cartucho varía según el tipo de filtro, el uso y las
condiciones del agua (un mes equivale a, aproximadamente,
4,000 galones).
** Mientras más baja sea la clasificación en micras, menor será el
tamaño de la partícula que filtrará el cartucho. Un ejemplo que
sirve para comparar es el del cabello humano, que tiene un
diámetro aproximado de 70 micras. Las partículas inferiores
a 40 micras no son perceptibles para el ojo humano.
†
WQA no comprobó ni certificó su desempeño.
CW-MF S-1A CW-F P5 P1
PROBLEMAS
Sedimentos
†
Óxido
†
Sarro
†
Impurezas
†
Arena gruesa
†
Arena
†
Arena fina
†
Arena Muy fina
†
Cieno
†
Mal olor y mal sabor
†
Olor y sabor a cloro aceptable
†
Vida útil del cartucho *
†
Clasificación en micras **
†
Material del cartucho
Recomendado para agua de pozo
3 meses;
12,000 galones
4 meses;
16,000 galones
3 meses;
12,000 galones
2 meses;
8,000 galones
2 meses;
8,000 galones
Polipropileno
enrollado
Celulosa
plegada
Polipropileno
enrollado
Polipropileno
envolvente
Polipropileno
envolvente
30 20 10 5
SCWH-5
3 meses;
15,000 galones
Cubierto de
carbono
5 1
Seleccione el cartucho adecuado
para el agua que consume
GUÍA DE SELECCIÓN DEL FILTRO
GUÍA DE SELECCIÓN DEL CARTUCHO DEL FILTRO
RESOLUCIÓN DE PROBLEMAS
PÉRDIDAS ENTRE EL CABEZAL DEL FILTRO Y LA CUBIERTA:
1. Cierre el suministro de agua y presione el botón rojo de liberación de presión. Retire la parte inferior
de la cubierta.
2. Limpie la junta tórica y la ranura tórica (ubicada justo debajo de las roscas de la cubierta). Lubrique
la junta tórica con grasa de silicona limpia y vuelva a colocarla en la ranura. Atornille la cubierta en
el cabezal del filtro y ajuste manualmente. NO AJUSTE DEMASIADO.
PÉRDIDAS DE LAS CONEXIONES DE ENTRADA/SALIDA:
1. Corte el suministro de agua. En el caso de los accesorios de latón, ajuste la tuerca con firmeza,
aproximadamente, 1/2 vuelta con una llave.
2. Abra el suministro de agua. Si la pérdida continúa o si hay otra pérdida en el sistema, corte el
suministro de agua. Comuníquese con el servicio de soporte técnico al 1-800-721-7360.
Page 21

21
GARANTÍA LIMITADA DE DOS AÑOS WHS100O/WHS200C
La garantía se aplica a la cubierta del filtro. NO incluye los cartuchos del filtro desechables cuya
expectativa de vida útil depende del tipo de agua que se filtre. La garantía cubre los defectos en el
material y la fabricación solo durante dos años completos desde la fecha original de entrega. Culligan
reemplazará cualquier pieza que considere defectuosa, con las siguientes excepciones: (1) si algún
componente de la unidad estuvo sujeto a algún tipo de manipulación, alteración o uso inapropiados
después de la entrega, o bien (2) si se reparó en una agencia que no cuenta con la aprobación de
Culligan. Culligan no asume responsabilidad alguna por los daños durante el transporte, y en caso
de algún reclamo debido a dichos daños, el cliente deberá presentar el reclamo ante el transportista.
Esta garantía no cubre ningún tipo de gastos de envío, transporte o mano de obra en los que se haya
incurrido. La contratación de una persona o un servicio para la instalación o mantenimiento del
producto es responsabilidad del comprador y queda a su exclusivo criterio.
Este producto se diseñó únicamente para que se lo utilice como cubierta de un cartucho del filtro
desechable. NO se ofrece garantía por congelamiento; asimismo, ni el producto ni sus piezas tienen
garantía alguna por fallas o deterioros ocasionados por el uso no previsto de este.
LA GARANTÍA ANTERIORMENTE ESPECIFICADA ES EXCLUSIVA Y SUSTITUYE CUALQUIER OTRA
GARANTÍA, EXPRESA O IMPLÍCITA, YA SEA UNA GARANTÍA VERBAL O UNA QUE DERIVE DEL USO O
LA PRÁCTICA COMERCIAL, INCLUIDA, DE MANERA NO TAXATIVA, CUALQUIER GARANTÍA DE APTITUD
O COMERCIABILIDAD. ESTA GARANTÍA ES EL ÚNICO RECURSO EXCLUSIVO DEL COMPRADOR. BAJO
NINGUNA CIRCUNSTANCIA CULLIGAN ASUMIRÁ RESPONSABILIDAD POR LAS GANANCIAS PREVISTAS
O LAS PÉRDIDAS, LOS DAÑOS CIRCUNSTANCIALES O INDIRECTOS, LOS COSTOS, LOS CARGOS
TEMPORALES U OTRO TIPO DE PÉRDIDAS, INDEPENDIENTEMENTE DE QUE SE RELACIONEN CON EL
INCUMPLIMIENTO DEL CONTRATO, UNA CONDUCTA INADECUADA U OTRA ACCIÓN, EN RELACIÓN
CON LA COMPRA, LA INSTALACIÓN, LA REPARACIÓN O EL FUNCIONAMIENTO DE ESTE PRODUCTO.
CULLIGAN NO AUTORIZA A NINGUNA PERSONA A ASUMIR RESPONSABILIDADES U OTORGAR
GARANTÍAS ADICIONALES EN SU NOMBRE EN RELACIÓN CON LA CUBIERTA DEL FILTRO O CON
ALGUNA DE LAS PIEZAS DE ESTA.
Para obtener un servicio conforme a esta garantía, deberá devolver cualquier pieza defectuosa a SU
COMERCIANTE dentro del plazo de dos años especificado anteriormente. Asegúrese de completar el
registro de garantía en línea dentro de los 30 días a partir de la compra y conserve la factura original,
la orden de compra o el comprobante de venta, ya que sirven como prueba de la compra para poder
realizar una devolución.
REGISTRO DEL PRODUCTO
Asegúrese de ingresar al sitio web www.register.culligan.com y registrar su producto dentro de los
30 días a partir de la compra.
WQA comprobó y certificó las cubiertas WH-HD100-O y WH-HD200-C conforme a las normas
NSF/ANSI 372 sobre bajo contenido de plomo, CSA B483.1 y NSF/ANSI 42 sobre el uso de
materiales seguros e integridad estructural únicamente.
Page 22

22
PRÉCAUTIONS
AVERTISSEMENT : N'utilisez pas ce dispositif avec de l'eau de source ou de qualité inconnue ou qui présente des
dangers microbiologiques sans l'avoir désinfectée avant ou après avoir utilisé le système.
ATTENTION : Le boîtier doit être conservé à l'abri des températures glaciales, du frimas, de la neige, du grésil et
de la glace. L'exposition à ces éléments peut entraîner des fissures et défauts de produit.
ATTENTION : Le joint d'étanchéité fourni sert à sceller l'espace entre la tête du filtre et le boîtier. Il est important
de s'assurer que le joint d'étanchéité soit bien calé dans la rainure pour éviter les fuites d'eau.
ATTENTION : Ce produit a une durée d'utilisation limitée. Nous vous recommandons de noter la date d'installation
et de tout entretien. De plus, le boîtier doit être inspecté régulièrement pour tout signe de stress, comme la
présence de fêlures, l'accumulation de copeaux, la déformation du boîtier et la décoloration du plastique. Si le
système de filtration présente l'un des signes précédents, l'appareil au complet doit être immédiatement changé.
ATTENTION : Les boîtiers transparents peuvent craquer ou se déformer s'ils sont exposés à des solvants, comme
ceux trouvés dans les nettoyants et insecticides à aérosol, de façon routinière.
• Pour l'eau froide, seulement. Ne pas utiliser sur la tuyauterie à eau chaude dans les endroits où la température
autour de l'unité dépasse 100°F.
• Garder à l'abri des rayons du soleil. Les rayons ultraviolets peuvent réduire l'intégrité du boîtier. Ils causent aussi
la pousse de matière organique dans l'unité.
• Assurez-vous que l'installation est conforme aux lois locales et provinciales.
• Les contaminants et autres substances pouvant être retirés ou réduits par le filtre sélectionné peuvent ne pas
être présents dans votre eau. Demandez à votre municipalité une copie de l'analyse d'eau ou faites examiner un
échantillon d'eau par un laboratoire.
• Il est recommandé, après de longues périodes d'inactivité (si vous partez en vacances, par exemple), de vidanger
le système au complet. Laissez l'eau couler 5 à 6 minutes avant de l'utiliser.
• Tous les filtres recommandés pour utilisation avec le présent système ont une durée d'utilisation limitée. Tout
changement de goût, d'odeur, de couleur ou d'écoulement de l'eau indique que la cartouche doit être remplacée.
• Les cartouches de cellulose peuvent être endommagées par des bactéries non nocives. Si votre cartouche
semble se désintégrer ou si elle développe une odeur moisie, passez à une cartouche faite de matière synthétique
ou contactez le fabricant.
CARACTÉRISTIQUES
WH-S100-O
Intervalle de pression : 30 à 125 psi (2,1 à 8,6 bar)
Intervalle de température :
40 à 100°F (4,4 à 37,7°C
)
WH-S200-C
Intervalle de pression : 30 à 100 psi (2,1 à 6,9 bar)
Intervalle de température : 40 à 100°F (4,4 à 37,7°C)
MATÉRIEL FACULTATIF
WH-S100-O
VENDU SÉPARÉMENT :
• Support de fixation BR-O
• Joints de rechange O-150
WH-S200-C
VENDU SÉPARÉMENT :
• Joints de rechange O-150
OUTILS NÉCESSAIRES
• Coupe-tuyau ou scie à métaux
• 2 Clés à molette
• Lime
• Crayon
PIÈCES
COMPRISES :
• Boîtier
• Clé à boîtier WR-S
• Filtre P5
• Support de fixation BR-C [Modèle WH-S200-C]
• Témoin de filtre [Modèle WH-S200-C]
• Batterie de la minuterie [Préinstallée]
NON COMPRISES :
• Raccords d'installation
• Ruban Teflon
MD
REMARQUE : Des raccords galvanisés doivent être
utilisés lors de l'installation sur des tuyaux galvanisés.
1 800 7217360 LUNDI AU VENDREDI 8 H À 16 H 30 HNC
X2
OU
Français
Page 23

23
WHS100O
PIÈCES COMPRISES :
Tête du filtre
Couvercle
Joint d'étanchéité OR-150
Boîtier
Clé à boîtier WR-S
Filtre P5
SYSTÈMES POUR TOUTE LA MAISON
Page 24

24
WHS200C
PIÈCES COMPRISES :
Robinet de dérivation
Support pour le témoin de durée de vie du filtre
Tête du filtre
Témoin de durée de vie du filtre
Joint d'étanchéité OR-150
Boîtier
Clé à boîtier WR-S
Support de fixation BR-C
Vis de fixation
Filtre P5
Page 25

25
INSTALLATION
• Installer le filtre après le compteur d'eau ou le réservoir à pression.
• Le ruban Teflon
MD
est le seul ruban recommandé lors de la connexion de raccords.
• Remarquer les différences entre les modèles WH-S100-O et WH-S200-C.
• Ces instructions concernent l'installation de raccords de compression de 3/4 po (d'autres raccords
sont nécessaires pour toute autre taille de tuyau et les tuyaux en matériaux autres que le cuivre).
Fermer l'alimentation d'eau (A) et ouvrir le
robinet le plus près afin de vidanger les tuyaux
avant l'installation. Appliquer 6 po de ruban
Teflon
MD
(B) sur le filetage des tuyaux, dans le
sens horaire, pour chaque raccord.
IMPORTANT : Choisir un emplacement laissant
un espace de 1-1/2 à 2 po sous le boîtier afin de
permettre le changement aisé du filtre.
Lors de l'utilisation du support de fixation BR-O
facultatif (vendu séparément), s'assurer tout
d'abord que les flèches sur le boîtier représentent
bel et bien la direction de l'eau. Retirer le
couvercle et aligner les trous du support de
fixation avec les trous de la tête du filtre. Insérer
quatre vis de fixation dans le support et le filtre
et serrer. Replacer le couvercle. Sinon, passer à
l'étape 3.
Lors de l'utilisation du support de fixation BR-C
facultatif, s'assurer tout d'abord que les flèches
sur le boîtier représentent bel et bien la direction
de l'eau. Au besoin, retirer le support du témoin
de durée de vie du filtre de l'arrière de l'unité et le
placer à l'avant. Aligner les trous du support aux
trous à l'arrière de la tête du filtre. Insérer quatre
vis de fixation dans le support et le filtre et serrer.
Sinon, passer à l'étape 3.
Assembler tous les raccords. Fixer d'abord les
adaptateurs (vendus séparément) à la tête du
filtre à la main. Serrer à l'aide d'une clé.
NE PAS TROP SERRER.
3
2 WH-S200-C
1
A
B
WH-S100-O
2
Page 26

26
Glisser l'écrou de compression et la bague en
laiton sur le bout de chaque tuyau de 3/4 po.
À l'aide du coupe-tuyau ou de la scie à métaux,
couper et retirer les sections de tuyau marquées.
Limer ou sabler les bouts de tuyau restants.
Mesurer la longueur totale du système configuré
avec les adaptateurs attachés.
Réduire cette mesure en prévision des tuyaux à
être insérés dans les adaptateurs et déterminer
quelle longueur de tuyau retirer (X).
Marquer les sections de tuyau à retirer.
Aligner le filtre assemblé et les bouts des tuyaux,
en s'assurant que la direction de l'écoulement d'eau
correspond à la direction des flèches sur la tête du
filtre. Il est nécessaire d'écarter les tuyaux pour
installer le filtre assemblé correctement. À l'aide de
deux clés à molette, retenir fermement le raccord
d'entrée d'une clé et serrer l'écrou de l'autre.
Répéter le processus avec le raccord de sortie.
X
X
4
5
ÉCROU EN LAITON DE COMPRESSION
VIROLE
6 7
Page 27

27
S'assurer que le boîtier est bien serré, à l'aide
de la clé à boîtier fournie. Lentement rétablir
l'alimentation d'eau.
Doucement enfoncer le bouton d'échappement
pour libérer l'air emprisonné. S'assurer qu'il n'y
a pas de fuites. Ouvrir le robinet le plus près et
vidanger le filtre pendant 5 minutes.
ATTENTION : Si les tuyaux servent à mettre à
terre le système électrique, les électroménagers
ou le système téléphonique, s'assurer d'installer
un fil volant.
Lors de l'utilisation du support de fixation
facultatif, fixer celui-ci au mur à l'aide de quatre
vis de fixation (vendues séparément).
8 9
S'assurer que le boîtier est bien serré, à l'aide
de la clé à boîtier fournie. Ouvrir le robinet de
dérivation au mode « Filter » (filtre) et rétablir
l'alimentation d'eau principale.
Doucement enfoncer le bouton d'échappement
pour libérer l'air emprisonné. S'assurer qu'il n'y
a pas de fuites. Ouvrir le robinet le plus près et
vidanger le filtre pendant 5 minutes.
Réamorcer le témoin de durée de vie du filtre
(enfoncer le bouton « reset » pendant 2 secondes).
10 WH-S100-O 10 WH-S200-C
Page 28

28
SUBSTITUTION DES CARTOUCHES DE FILTRE
• Remarquer les différences entre les modèles WH-S100-O et WH-S200-C.
Lubrifier le joint d'étanchéité à l'aide d'une
petite quantité de graisse silicone de qualité
alimentaire. Insérer le joint d'étanchéité dans
la rainure et l'enfoncer à l'aide des doigts.
REMARQUE : Cette étape est très importante
pour assurer que le boîtier est bien scellé.
S'assurer que le joint d'étanchéité est à niveau
dans la rainure.
Insérer la nouvelle cartouche dans le boîtier.
S'assurer qu'elle glisse sur le tuyau au fond
du boîtier.
2
Fermer l'alimentation d'eau vers le filtre.
Enfoncer le bouton d'échappement pour libérer
la pression. Dévisser le bas du boîtier. Retirer le
joint d'étanchéité de la rainure, l'essuyer et le
réserver. Jeter la cartouche usée.
Rincer le boîtier et le remplir d'eau au 1/3.
Ajouter 2 cuillerées de javellisant et frotter à
l'aide d'une brosse ou d'une éponge non abrasive.
Rincer abondamment.
Fermer l'alimentation en tournant le
robinet de dérivation de « Off » (arrêt) à
« Bypass » (dérivation).
REMARQUE : La mise du robinet de dérivation
à la position « Off » interrompra l'alimentation
pour toute la maison.
Enfoncer le bouton d'échappement pour libérer
la pression. Dévisser le bas du boîtier. Retirer le
joint d'étanchéité de la rainure, l'essuyer et le
réserver. Jeter la cartouche usée.
Rincer le boîtier et le remplir d'eau au 1/3.
Ajouter 2 cuillerées de javellisant et frotter à
l'aide d'une brosse ou d'une éponge non
abrasive. Rincer abondamment.
OUVRIR
1 WH-S100-O
OUVRIR
1 WH-S200-C
Page 29

29
INSTRUCTIONS RELATIVES AU TÉMOIN ET AU CHANGEMENT
DES BATTERIES MODÈLE WHS200C
MISE EN PLACE ET RÉAMORÇAGE
Suite à l'installation d'une nouvelle batterie ou du changement du filtre, enfoncer le bouton de réamorçage
de la durée de vie du filtre et le tenir pendant 2 secondes; jusqu'à ce que le témoin vert clignote. Le témoin
passera au rouge dans 90 jours, pour vous rappeler qu'il est temps de changer de filtre.
CHANGEMENT DES BATTERIES
1. Insérer un petit tournevis dans la base du support à témoin et le retirer du boîtier.
2. Insérer un petit tournevis dans le bout plat du témoin de durée de vie du filtre. Doucement ouvrir
celui-ci et séparer la base du témoin de son couvercle.
3. Retirer le circuit imprimé et la batterie du boîtier. Changer la batterie (no 2032).
4. Aligner le circuit imprimé avec soin et le replacer dans son boîtier.
5. Aligner le fond et le couvercle et les réassembler. Replacer le témoin dans le boîtier principal.
6. Réamorcer le témoin de durée de vie du filtre pour démarrer la minuterie (enfoncer le bouton
« reset » pendant 2 secondes). Il est recommandé de changer la batterie chaque année pour
assurer le bon fonctionnement du témoin.
Visser le fond du boîtier. NE PAS TROP SERRER.
S'assurer que le tuyau dans la tête du filtre se
glisse dans la cartouche.
Ouvrir l'alimentation d'eau lentement et permettre
au filtre de s'emplir d'eau. Doucement enfoncer le
bouton d'échappement pour libérer l'air emprisonné.
S'assurer qu'il n'y a pas de fuites.
REMARQUE : Vidanger la cartouche pendant
5 minutes avant toute utilisation.
Visser le fond du boîtier. NE PAS TROP SERRER.
S'assurer que le tuyau dans la tête du filtre se
glisse dans la cartouche.
Lentement mettre le robinet de dérivation en
position « Filter » (filtre) afin de permettre au
système de s'emplir d'eau. Doucement enfoncer
le bouton d'échappement pour libérer l'air
emprisonné. S'assurer qu'il n'y a pas de fuites.
Réamorcer le témoin de durée de vie du filtre
(enfoncer le bouton « reset » pendant 2 secondes).
REMARQUE : Vidanger la cartouche pendant
5 minutes avant toute utilisation.
FERMER
3 WH-S100-O
FERMER
WH-S200-C3
Page 30

30
* La durée de vie de la cartouche dépend du type de filtre, de son
usage et de la condition de l'eau [un mois = env. 4 000 gallons].
** Plus le degré de filtration est bas, plus les particules filtrées par la
cartouche seront petites. Pour faire une comparaison simple, un
cheveu humain présente un diamètre d'environ 70 microns. Les
particules plus petites que 40 microns sont invisibles à l'œil humain.
†
N'a pas subi d'épreuve fonctionnelle ni certifié par la WQA.
CW-MF S-1A CW-F P5 P1
PROBLÈMES
Sédiments
†
Rouille
†
Tartre
†
Terre
†
Gros sable
†
Sable
†
Sable fin
†
Sable très fin
†
Boue
†
Mauvais goût et odeur
†
Goût et odeur de chlore
†
Durée de vie de la cartouche *
†
Degré de filtration **
†
Matériel de la cartouche
Recommandé pour l'eau de puits
3 mois
12 000 gallons
4 mois
16 000 gallons
3 mois
12 000 gallons
2 mois
8 000 gallons
2 mois
8 000 gallons
Polypropylène
bobiné
Cellulose
plissée
Polypropylène
bobiné
Polypropylène
filé
Polypropylène
filé
30 20 10 5
SCWH-5
3 mois
15 000 gallons
Enrobé de
carbone
5 1
Choisir la bonne cartouche pour
votre eau
GUIDE DE SÉLECTION DU FILTRE
GUIDE DE SÉLECTION DE LA CARTOUCHE DE FILTRE
DÉPANNAGE
FUITES ENTRE LA TÊTE DU FILTRE ET LE BOÎTIER :
1. Fermer l'alimentation d'eau et enfoncer le bouton d'échappement rouge. Retirer le bas du boîtier.
2. Nettoyer le joint d'étanchéité et sa rainure (directement sous le filetage du boîtier). Lubrifier le joint
d'étanchéité à l'aide de graisse silicone et le replacer dans la rainure. Visser le boîtier à la tête du
filtre à la main. NE PAS TROP SERRER.
FUITES DES CONNEXIONS D'ENTRÉE / DE SORTIE :
1. Fermer l'alimentation d'eau. Pour les raccords en laiton, serrer l'écrou d'un demi-tour à l'aide
d'une clé.
2. Ouvrir l'alimentation d'eau. Si les fuites persistent ou si d'autres fuites apparaissent dans le
système, fermer l'alimentation d'eau. Appeler le service de soutien technique au 1 800 721-7360.
Page 31

31
GARANTIE LIMITÉE DE DEUX ANS : WHS100O / WHS200C
La présente garantie s'applique au boîtier du filtre. Elle n'est PAS applicable aux filtres jetables
dont la durée de vie varie selon l'eau qui y est filtrée. Cette garantie couvre les défauts matériels et
de fabrication, pendant la période de 2 ans après la date originale de livraison. Culligan s'engage à
remplacer toute pièce qui, à son avis, est défectueuse, sauf : (1) si une partie de l'unité a subi une
altération, modification ou utilisation inadéquate après sa livraison ou (2) elle a été réparée par une
personne non approuvée par Culligan. Culligan rejette toute responsabilité des dommages survenus en
transport, et toute demande relative à de tels dommages doit être présentée par le client à la société de
transport. La présente garantie ne couvre aucuns frais de main-d'œuvre, de transport ou de livraison.
Le recours à un individu ou un service pour l'installation ou l'entretien de ce produit est pris à la
discrétion et aux frais seuls de l'acheteur.
Ce produit est conçu pour utilisation en tant que boîtier pour un filtre jetable. Il n'est PAS garanti contre
le gel. Le produit et ses parties ne sont pas non plus garantis contre les défauts et la détérioration
causés par toute utilisation non explicitement prévue.
LA PRÉCÉDENTE GARANTIE EST EXCLUSIVE, EN LIEU DE TOUTE AUTRE GARANTIE, EXPRIMÉE OU
IMPLICITE, DE MANIÈRE ORALE OU DANS LE CADRE D'UNE VENTE, Y COMPRIS SANS TOUTEFOIS
S'Y LIMITER TOUTE GARANTIE DE CONVENANCE OU DE QUALITÉ MARCHANDE. LA PRÉSENTE
GARANTIE CONSTITUE LE RECOURS SEUL ET EXCLUSIF OFFERT AU CLIENT, CULLIGAN REJETTE
LA RESPONSABILITÉ DE TOUTE PERTE DE PROFITS ANTICIPÉE OU RÉELLE; DE DOMMAGES
ACCESSOIRES ET CONSÉCUTIFS; DE FRAIS MONÉTAIRES, TEMPORELS OU AUTRES; QU'ILS
DÉCOULENT D'UNE RUPTURE DE CONTRAT, DE COMPORTEMENT ILLÉGAL OU DE TOUTE AUTRE
THÉORIE, LIÉS À L'ACHAT, L'INSTALLATION, LA RÉPARATION OU L'UTILISATION DE CE PRODUIT.
CULLIGAN N'AUTORISE PERSONNE À ASSUMER CES RESPONSABILITÉS EN SON NOM OU OFFRIR DES
GARANTIES SUPPLÉMENTAIRES EN LIEN AVEC LE BOÎTIER DE FILTRE OU L'UNE DE SES PARTIES.
Pour le service couvert par la présente garantie, renvoyer toute pièce défectueuse à VOTRE DÉTAILLANT
à l'intérieur de la période de 2 ans indiquée ci-dessus. Remplir la carte d'enregistrement en ligne dans
les 30 jours suivant l'achat et conserver le reçu, bon de commande ou contrat de vente original, pour
servir de preuve d'achat avant le retour.
ENREGISTREMENT DE PRODUIT
Enregistrer le produit en ligne dans les 30 jours suivant l'achat au www.register.culligan.com.
Les produits WH-S100-O et WH-S200-C avec cartouche P5 ont été soumis à des épreuves
fonctionnelles et certifiés par la WQA conformément à la norme NSF/ANSI 372 pour la
conformité au plomb et à la norme NSF/ANSI 61 pour la sûreté matérielle.
Page 32

©2014 Culligan International Company 08/14 01027419/01027420
Culligan International Company
Rosemont, Illinois 60018
www.culligan.com
Technical Support M–F 8:00AM–4:30PM (CST)
Servicio de soporte técnico disponible de lunes a viernes, de 8:00 A.M. a 4:30 P.M. (CST)
Soutien technique L–V 8 H à 16 H 30 (HNC)
1-800-721-7360
 Loading...