

Culligan WSH-C125, HSH-C135, WHR-140 Installation Manual
A
CULLIGAN
Congratulations on your purchase of a Culligan®Filtered Showerhead!
A refreshing shower is something we all look forward to every day and
sometimes more than once a day. Now that you’ll be showering in
filtered water, your shower experience will be even more enjoyable!
Here’s why:
®
• Chlorine is an irritant. Your Culligan
filtered showerhead reduces
99% of the Chlorine that may be present in your water.
• Depending on your water source, you may notice the odor of sulfur
in your shower water. We can all agree that the smell of “rotten
eggs” is not something we hope to experience in our daily shower!
Your Culligan
®
filtered showerhead reduces this odor for a fresher
shower.*
®
• The patented filter media used in your Culligan
filtered showerhead
reduces the build-up of scale*
®
•Your filtered showerhead helps to prevent dry, itchy skin and scalp
by reducing the impurities found in some water. It also helps
prevent chlorine damage to hair texture and helps color-treated
hair retain the color longer.**
®
•Your Culligan
shower filter contains 5 spray settings so you can
enjoy the shower of your choice. Clear, filtered water leaves you
refreshed and cleaner than ever!
INSTALLATION G
OWNER'S MA
CULLIGAN®MODEL WSH-C125
CULLIGAN®MODEL HSH-C135
CULLIGAN®MODEL WHR-140
SHOWER FILTER REPLACEMENT CARTRIDGE
ENJOY S
www.culligan.com www.culligan-store.com
OFTER, CLEANER S
CULLIGAN®CUSTOMER SERVICE:
1-800-634-1455 M-F 7:30 AM-5:00 PM CST
UIDE AND
N
UAL FOR:
WALL MOUNT SHOWERHEAD
HAND HELD SHOWERHEAD
KIN AN
*As tested by KDF Fluid Treatment,Inc.
**Not tested or certified by NSF.
5SPRAY SETTINGS
Full Body Spray
for maximum water coverage
Soft Rain Spray
for gentle water delivery
Invigorating Pulse
for an energizing muscle massage
Full Body Spray/Rain Combo
for ultimate relaxation
Full Body Spray/Pulse Combo
for all-over warmth with massage
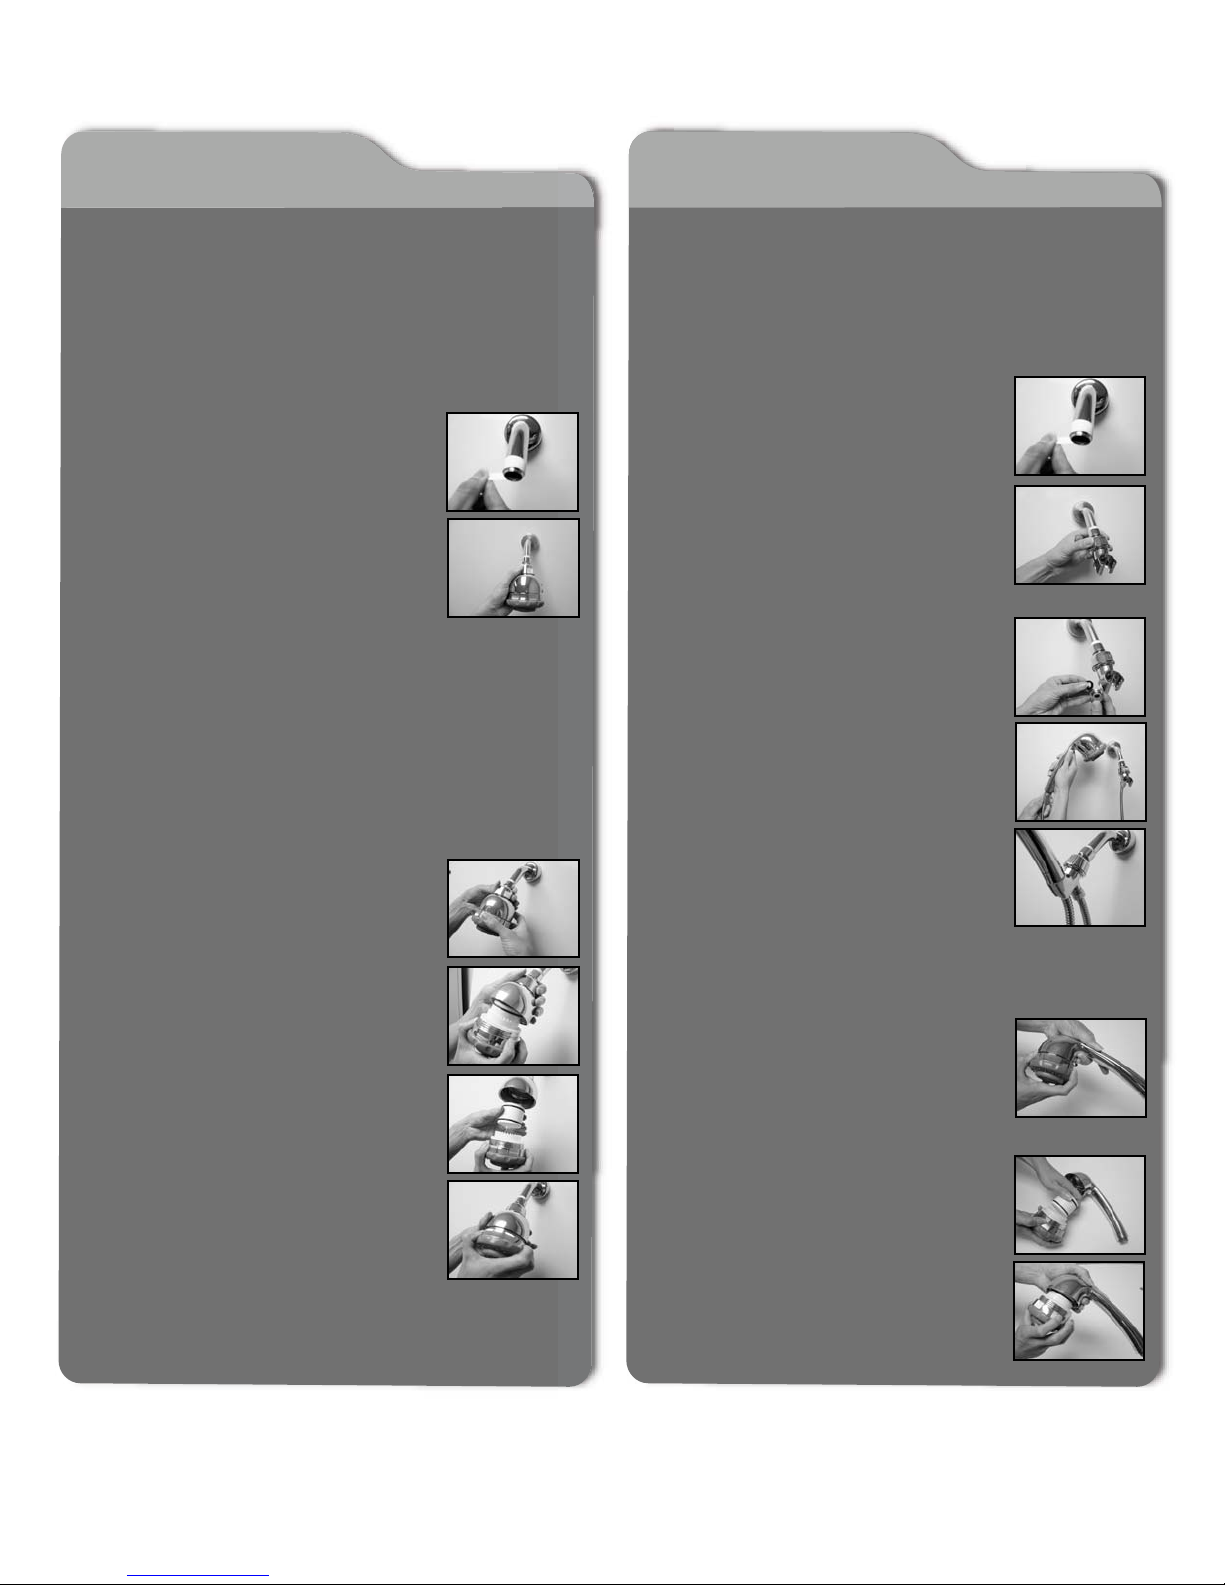
INSTALLATION INSTRUCTIONS
for Wall Mount Showerhead, Model WSH-C125:
INSTALLATION INSTRUCTIONS
for Hand Held Showerhead, Model HSH-C135:
1
Installs on any standard
/2” threaded shower arm
Functions only with shower filter cartridge in place; see insert procedure below
1. Remove existing showerhead from
shower arm by turning counterclockwise.
2. Clean any debris that may be present
on the threaded pipe.
3. Wrap included Teflon tape tightly
around shower pipe threads.
4. Place Culligan
®
showerhead on shower
arm and tighten by hand, turning clockwise.
5. If additional tightening is necessary,
use a soft cloth on the nut to protect
the finish and then tighten with a wrench.
6. Check for leaks and tighten as needed.
CARTRIDGE INSERTION PROCEDURE
for Filter Cartridge, Model WHR-140:
1. Hold the body of the showerhead
firmly in one hand. With other hand,
turn the ribbed ring behind the face
counterclockwise to unscrew.
Installs on any standard
1
/2” threaded shower arm
Functions only with shower filter cartridge in place; see insert procedure below
1. Remove existing showerhead from
shower arm by turning counterclockwise.
2. Clean any debris that may be present
on the threaded pipe.
3. Wrap included Teflon tape tightly
around shower pipe threads.
4. Place mounting bracket on shower arm
and tighten by hand turning clockwise.
5. If additional tightening is necessary,
use a soft cloth on the nut to protect
the finish and then tighten with a wrench.
6. Insert one black rubber washer (included) into
the smaller threaded end of the shower hose
and attach hose to the mounting bracket.
7. Insert remaining black rubber washer (included)
into the larger threaded end of the shower hose
and attach to the threaded end of the
showerhead handle.
8. Position showerhead in mounting bracket,
test system for leaks and tighten fittings
as needed.
CARTRIDGE INSERTION PROCEDURE
for Filter Cartridge, Model WHR-140:
2. Grasp white filter cartridge and pull
cartridge up and to the side to remove.
3. REMOVE STICKER FROM BOTH SIDES OF
CARTRIDGE BEFORE INSTALLING. Place new
filter cartridge into position by pushing cartridge
down into cavity until seated
4. Align threads until faceplate clicks
into cavity, then turn entire faceplate
clockwise until secure
1. Hold the handle of the showerhead
firmly in one hand. With other hand,
turn the ribbed ring behind the face
counterclockwise to unscrew.
2. Grasp white filter cartridge and pull
cartridge up and to the side to remove.
3. REMOVE STICKER FROM BOTH SIDES OF
CARTRIDGE BEFORE INSTALLING. Place new
filter cartridge into position by pushing cartridge
down into cavity until seated.
4. Align threads until faceplate clicks
into cavity, then turn entire faceplate
clockwise until secure.
TROUBLE-SHOOTING
Wall mount showerhead, model WSH-C125:
SYMPTOM:
The water flow from my filtered showerhead has been fine but has suddenly
changed and less water seems to be flowing from the showerhead.
REMEDY:
When water pressure drops suddenly, follow these Filter Cartridge Back
Flush Instructions: Occasionally, you may notice reduced water flow through
your shower filter. This is normal in areas with high levels of sediment in
the water supply or if your water is supplied by private well. This reduced
flow is easily remedied.
Your Culligan
®
shower filter cartridge has a life of 10,000 gallons,
estimated to be 6 months depending on household usage. If you notice a
flow reduction within this period of time, open your shower head according
to the Cartridge Change Procedure contained in this manual.
With the showerhead open, remove the filter cartridge, rotate the cartridge
180 degrees and then flip the cartridge front to back. Replace the cartridge
in this new orientation and then replace the faceplate and tighten. Move
out of the path of the water and then turn the shower on. You may notice
discolored water coming from the showerhead for a brief time. This is the
built up sediment that was clogging the screens in the cartridge and causing
the flow reduction. The filter cartridge is reversible and may be used in
either direction. Once you have completed this procedure, your cartridge
will continue to supply clear, clean water for the full 10,000 gallons.
SYMPTOM:
Upon installation of my filtered showerhead, the water pressure is not
sufficient to provide adequate water flow or a comfortable shower
experience.
REMEDY:
In areas of low water pressure, follow these Flow Restrictor Removal
Instructions: Your product contains a water-saving flow restrictor which
restricts the flow to a maximum of 2.5 gallons per minute (gpm). If your
water flow is below 2.5 gpm, you may remove the flow restrictor easily to
improve your flow rate and enjoy a better shower experience by coming up
to the recommended flow rate.
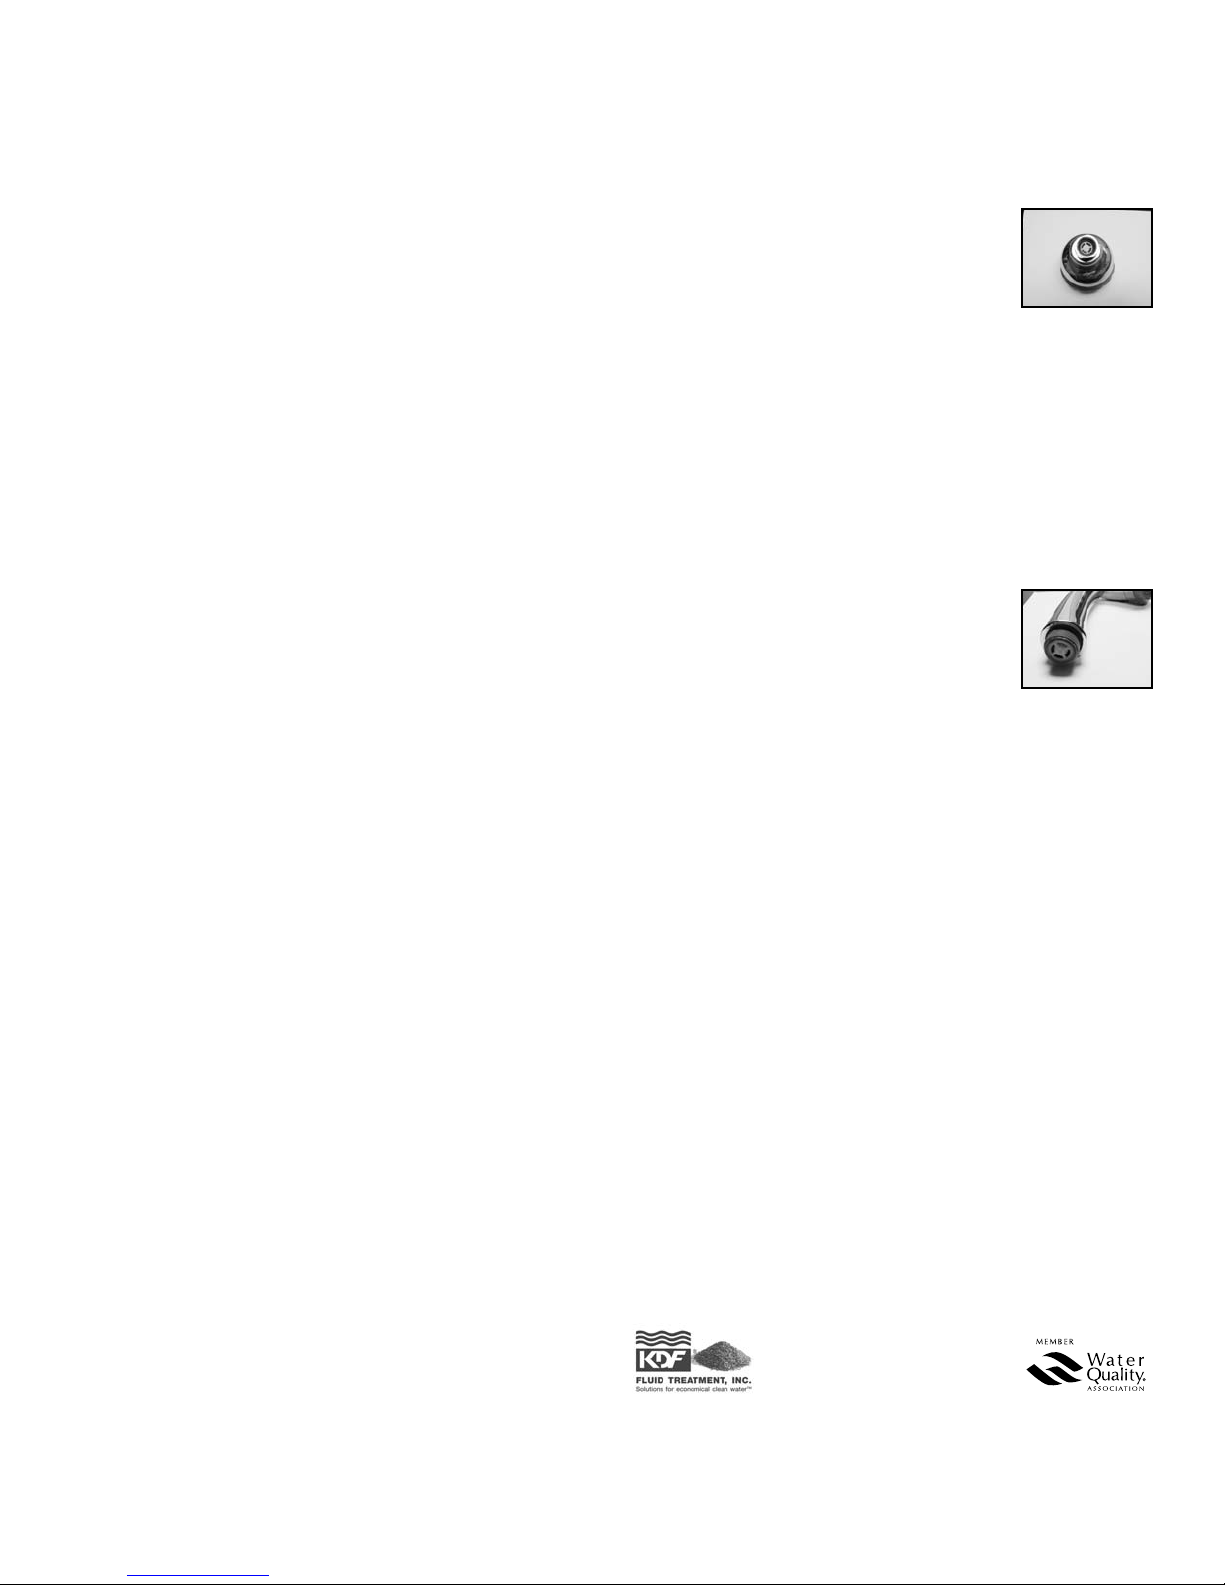
The flow restrictor is located in the threading
connection, under a black O-ring. Remove your
showerhead from the shower arm and locate the
white disk in the connection.
Using a tweezers, small scissor or needle-nose pliers, first remove the black
O-ring and retain. Next, pop the white disk out of its location. Note the
small black O-ring under the white disk. The small O-ring and the white disk
can be discarded. Replace the large black O-ring and then re-attach your
showerhead to the shower arm, tightening and checking for leaks according
to the original installation instructions contained in this manual.
Hand held showerhead, model HSH-C-135:
The flow restrictor is located in the handle of the
showerhead within the hose connection. Remove the
hose from the showerhead, retaining the large black
O-ring used for hose connection.
Next, locate the white disk in the handle. Using a tweezers, small scissor or
needle-nose pliers, pop the white disk out
of its location. Note the small black O-ring under the white disk. The small
O-ring and the white disk can be discarded. Re-attach the hose to the
showerhead, including the large O-ring, tightening and checking for leaks
according to the original installation instructions contained in this manual.
Caution: Filter must be protected against freezing which can cause cracking
of the filter and water leakage. Do not use harsh chemicals or abrasives
such as chlorine bleach, cleaning fluids or abrasive pads to clean the
showerhead.
Warning: Do not use with water that is microbiologically unsafe or of
unknown quality without adequate disinfection before or after the unit. Do
not pull on showerhead or use showerhead or shower arm for support. The
contaminants or other substances removed or reduced by this water
treatment device may not necessarily be in your water.
*As tested by
KDF Fluid Treatment,Inc.
 Loading...