

Page 1
Under-Sink Water Filter
¸
Installation and Operating Instructions
Model US-600A
Before proceeding with installation, choose the appropriate filter cartridge and install in
housing according to the cartridge replacement instructions (p. 2). See Filter Cartridge
Selection Guide on p. 3 to determine the best cartridge for your filtration needs.
Specifications
Pressure Range: 30–125 psi (2.1–8.6 bar)
Temperature Range: 40–100°F (4.4– 37.7°C)
Parts Included
• filter housing assembly with built-in mounting bracket and quick-connect fittings
• 3⁄8 inch (10 mm) tubing
• (2) quick-connect elbows
• SW-5A housing wrench
• D-20A cartridge
Tools Required
• screwdriver
• file
• pencil
• pipe cutter or hacksaw
Optional Materials
• faucet (FCT-1) for use with D-40A filter
cartridge
Precautions
Do not use with water that is microbiologically unsafe or of unknown
quality without adequate disinfection before or after the system. Systems certified for
cyst reduction may be used on disinfected waters that may contain filterable cysts.
Filter must be protected against freezing, which can cause cracking of the
filter and water leakage.
The rubber O-ring provides the water-tight seal between the cap and the
bottom of the housing. It is important that the O-ring be properly seated in the groove
below the threads of the housing or a water leak could occur.
Because of the product’s limited service life and to prevent costly repairs or
possible water damage, we strongly recommend that the bottom of all plastic housings
be replaced every ten years. If the bottom of your housing has been in use for longer
than this period, it should be replaced immediately. Date the bottom of any new or
replacement housing to indicate the next recommended replacement date.
NOTE:
• For cold water use only.
• Make certain that installation complies with all state and local laws and regulations.
• The contaminants or other substances removed or reduced by the selected cartridge
are not necessarily in your water. Ask your local water municipality for a copy of
their water analysis, or have your private well tested by a reputable water testing
lab.
• After prolonged periods of non-use (such as during a vacation) it is recommended
that the system be flushed thoroughly. Let water run for 5–6 minutes before using.
• The filter cartridge used with this system has a limited service life. Changes in
taste, odor, color, and/or flow of the water being filtered indicate that the cartridge
should be replaced.
• Some harmless bacteria may attack cellulose media cartridges (such as the D-10).
If your cartridge seems to disintegrate or develops a musty or moldy odor, switch to
a synthetic media cartridge or call Technical Support.
The US-600A with D-20A has been tested and certified by NSF International against
NSF/ANSI Standard 42 for the reduction of Aesthetic Chlorine Taste and Odor.
Systems tested and certified by NSF International with cartridges D-10, D-20A, D-30A,
and D-40A. See Performance Data Sheet, in manual, for specific claims.
Installation
NOTE:
• For standard under-sink installation on 3⁄8 inch (10 mm) cold water line (copper or
PVC pipe).
• Please read all instructions and precautions before installing and using your
US-600A under-sink filter.
• Install filter cartridge in filter housing before proceeding with installation (see Filter
Cartridge Replacement on p. 2).
• Numbered diagrams correspond with numbered steps.
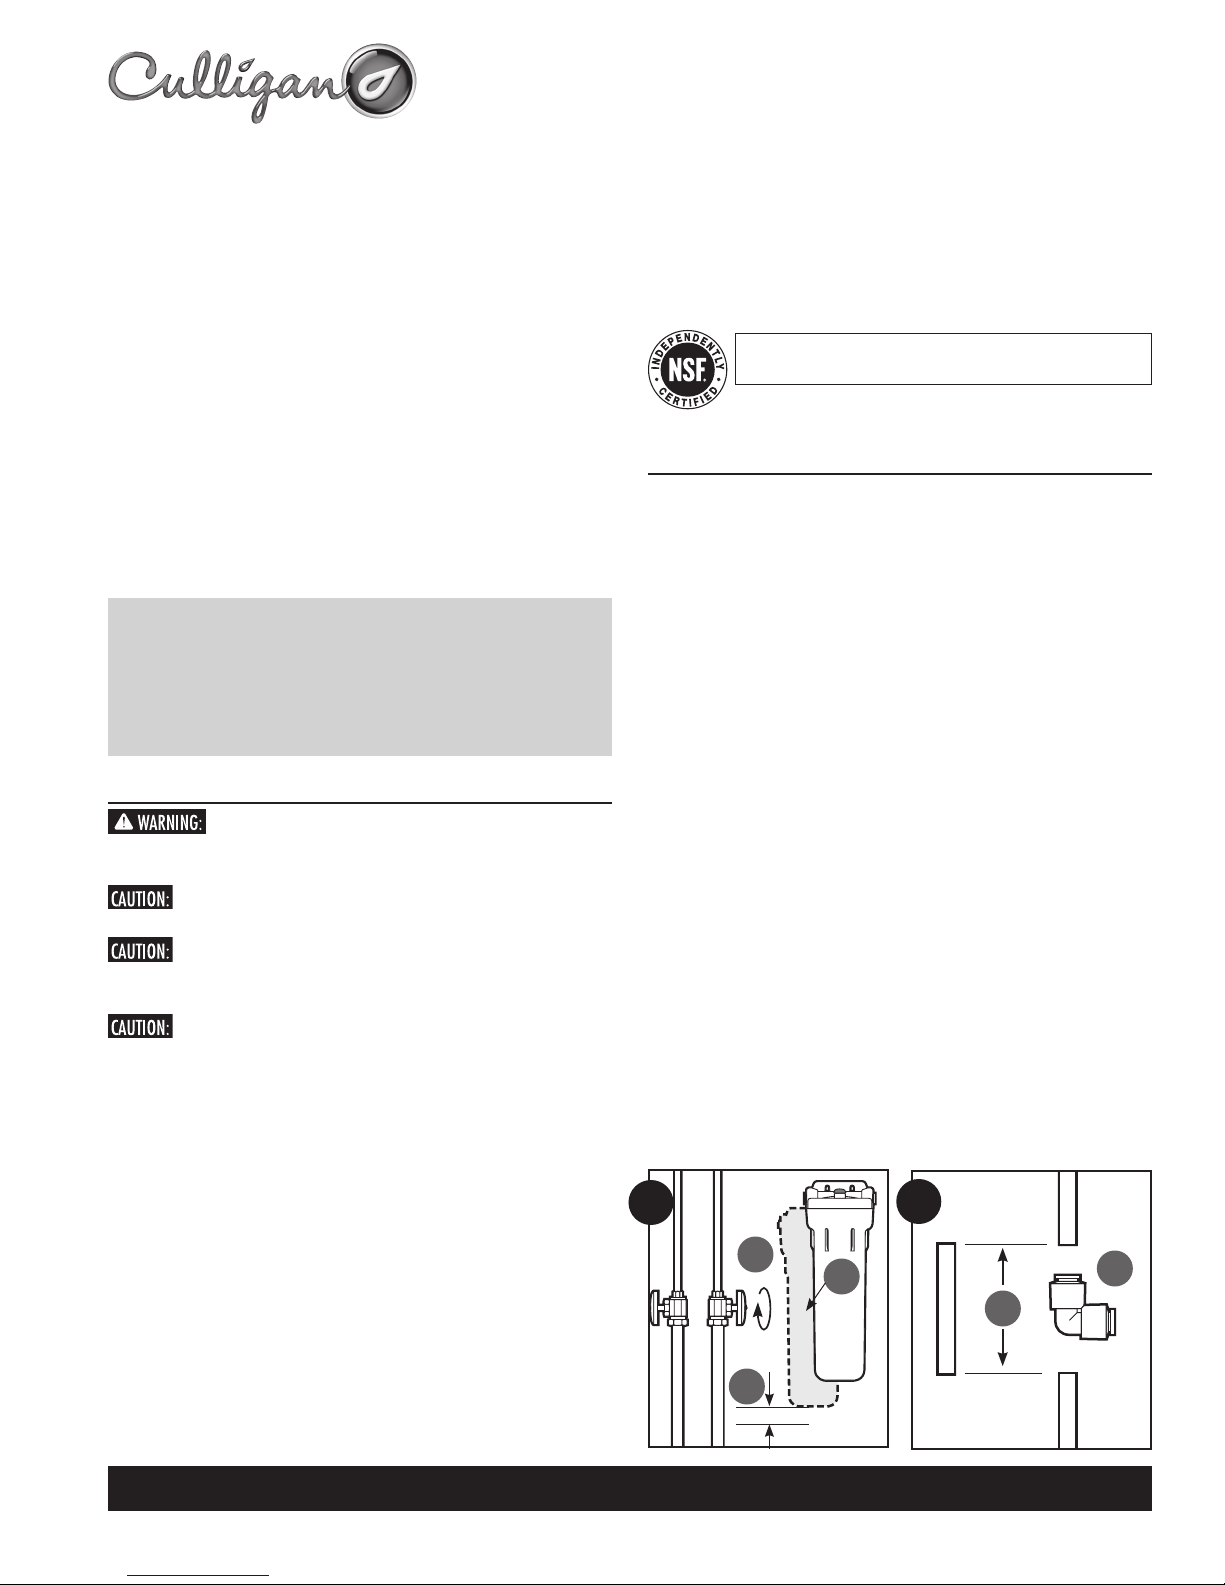
1. (A) Turn off cold water supply and open nearest faucet to release pressure in pipes
before starting installation. Place a tray or towels under the cold water line to catch
excess water. (B) Select location under sink where filter is to be mounted. Use
mounting bracket as a template to mark screw locations. Mount filter in marked
location using mounting bracket.
NOTE: (C) Allow 11⁄2 inches (33 mm) clearance below housing to enable filter
cartridge changes.
2. Using a pipe cutter or hacksaw, remove a 3-inch (76 mm) section of pipe (A) from
the 3⁄8 inch (10 mm) cold water line. Deburr ends of remaining pipe with a file. (B)
Push a quick-connect elbow onto each end of remaining cold water line. Be sure to
push elbow onto pipe until you hit a hard stop.
3. Determine the lengths of tubing needed to connect the inlet and outlet sides of
filter to the quick-connect fittings on the cold water line. Measure tubing short
enough to prevent kinking. Cut the tubing squarely between the closest set of
black guide arrows. Assemble as shown in Figure 3 on page 2, inserting tubing into
appropriate inlet or outlet quick-connect fitting until it stops (inlet and outlet are
marked “IN” and “OUT” on cap).
NOTE: When cut between a set of black guide arrows, the tubing should be pushed
1
A
B
C
1 1⁄2"
2
B
A
Technical Support: 1-800-721-9243 (M-F 8:00 am - 4:30 pm CST)
01020691 REV A 06/09
Page 2
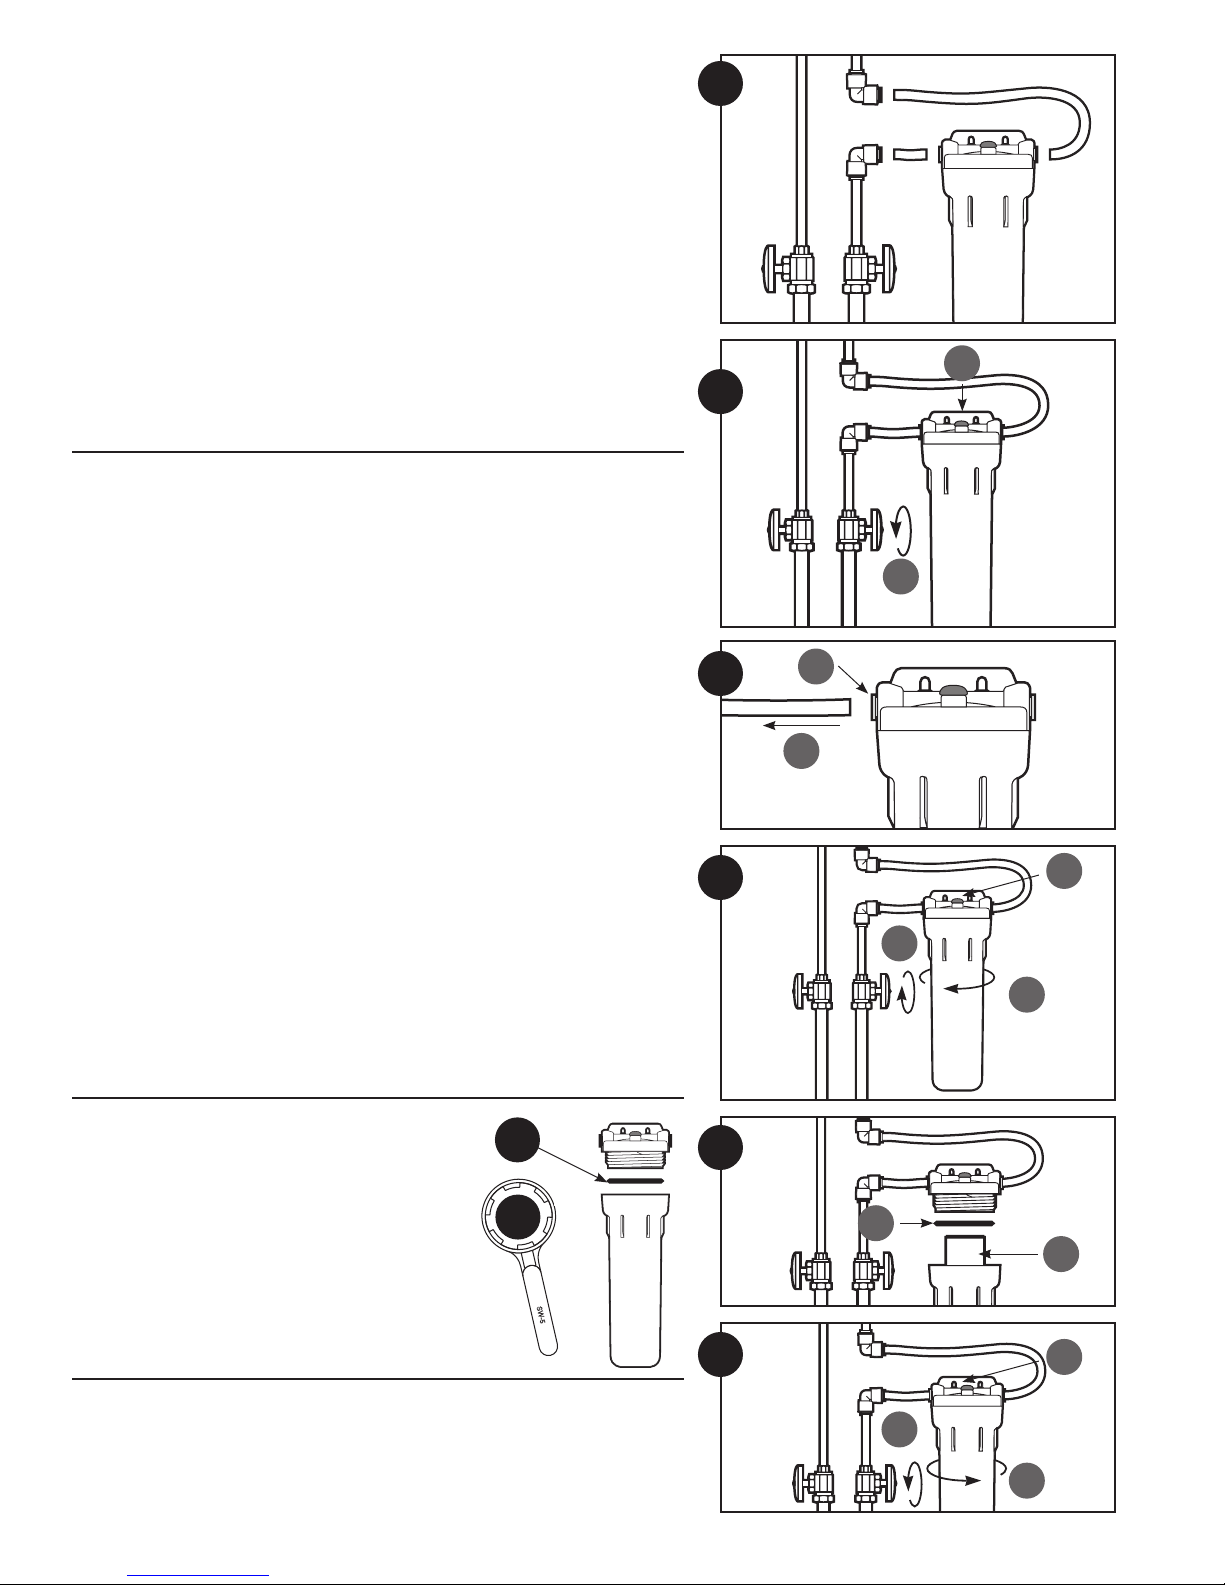
into the fitting so that the entrance of the fitting falls between the next set of guide arrows (approximately 5⁄8 inch [16 mm]).
4. Slowly turn on the water supply (A) to allow filter to fill with water, then press the red pressure-relief
button (B) on top of filter to release trapped air. Check for leaks before leaving installation.
NOTE: A drinking water cartridge may contain carbon fines (very fine black powder). After installation,
flush the cartridge for 15 minutes to remove the fines before using the water. It is recommended that
you run the tap at least 20 seconds prior to using water for drinking or cooking purposes.
5. NOTE: Disconnecting the Tubing from the Quick-Connect Fittings.
Routine maintenance and cartridge replacement will not require that you disconnect the tubing from
the filter cap; however, tubing may be quickly and easily removed from the fittings if necessary. First,
turn off the water supply to the filter and open faucet to drain the pipes. Then simply depress the gray
collar (A) around the inlet fitting of the housing while pulling the tubing (B) with your other hand.
Repeat for the outlet fitting.
Filter Cartridge Replacement
A. (1) Turn off water supply to filter and place a tray or towel under the system to catch any water that
spills during removal of the filter cartridge.
(2) Depress red pressure-relief button, then
(3) unscrew and remove bottom of filter housing (See Fig. A.)
NOTE: If turning off water supply to filter will also turn off water supply to the rest of the home, be
sure to fill a bucket of water first to allow you to clean housing after it has been removed.
B. Locate and remove large O-ring (1), wipe clean of lubricant, and set aside. Discard used filter cartridge
(2). Rinse out bottom of filter housing and fill 1⁄3 full with water. Add 2 tablespoons of bleach and
scrub bottom of housing with nonabrasive sponge or cloth. Rinse thoroughly. Lubricate O-ring with
clean silicone grease. Insert O-ring in groove and press into place.
NOTE: This step is important to ensure a proper housing seal. Make certain the O-ring is seated level
in the groove.
Insert new filter cartridge in bottom of housing. Cartridges with one gasket should be inserted with
the gasketed end toward the threads of the housing (gasketed end would point upwards if housing is
mounted as shown in Fig. B).
C. (1) Screw bottom of housing onto the cap and hand-tighten. DO NOT OVER-TIGHTEN.
(2) Slowly turn on the water supply to allow filter to fill with water, then
(3) press the red pressure-relief button on top of filter to release trapped air. Check for leaks before
leaving installation.
NOTE: A drinking water cartridge may contain carbon fines (very fine black powder). After installation,
flush the cartridge for 15 minutes to remove the fines before using the water. It is recommended that
you run the tap at least 20 seconds prior to using water for drinking or cooking purposes.
3
4
4
A
B
A
A
B
2
1
3
Replacement Parts
1 01020827 OR-233 O-ring
2 01020823 SW-5A housing wrench not shown
For replacement parts, contact your nearest retailer or call
Culligan Consumer Services at 1-888-777-7962.
Maintenance
Contact your area retailer or local water treatment professional for replacement cartridge pricing.
1
2
B
1
2
C
2
2
3
1
Page 3
Filter Cartridge Selection Guide
Select the right cartridge for
your water needs
sediment • •
bad taste & odor • • • •
aesthetic chlorine: taste & odor • • • •
Giardia • •
Cryptosporidium • •
Lead/Mercury •
Lindane/Atrazine •
Particulate Class II •
Particulate Class I • •
filter life in gallons (months)*
service flow rate gpm (Lpm)** 1.0 (3.8) 1.0 (3.8) 0.9 (3.4) 0.6 (2.3)
* Filter cartridge life varies depending on filter type, usage and water conditions.
** Flow rates measured at 60 psi (4.1 bar).
† If not plumbed into separate tap, flow rate may be less than 0.5 gpm for direct connect systems.
NOTE: Substances reduced are not necessarily in your water. Filter must be maintained according to
manufacturer’s instructions, including replacement of filter cartridges.
D-10 D-20A D-30A D-40A†
250
(3)
1000
(12)
1000
(12)
600
(6)
Troubleshooting
Leaks between cap and bottom of filter housing
1. Turn off water supply and press the red pressure-relief button. Remove bottom of
housing.
2. Clean O-ring and O-ring groove (located directly beneath threads of housing). Lubri-
cate O-ring with silicone grease and replace securely into groove. Screw bottom of
housing onto cap and hand-tighten. DO NOT OVER-TIGHTEN.
Leaks on inlet/outlet connections
1. Turn off water supply and turn on faucet to release pressure in pipes. Remove
tubing from fitting (see #3 under Installation) and make sure end of tubing is cut
squarely and free of burrs. Reinsert tubing into quick-connect fittings, making sure
to push securely until tubing hits a hard stop.
2. Turn on water supply. If leaks persist, or if there are other leaks on system, turn off
water supply. Call Technical Support at 1-800-721-9243.
Performance Data
Model US-600A
Important Notice: Read this performance data and compare the capabilities of this system with your actual water treatment needs. It is recommended that, before installing
a water treatment system, you have your water supply tested to determine your actual
water treatment needs.
This system has been tested according to NSF/ANSI 42 and 53 for the reduction of the
substances listed below. The concentration of the indicated substances in water entering
the system was reduced to a concentration less than or equal to the permissible limit
for water leaving the system, as specified in NSF/ANSI 42 and 53.
D-20A Cartridge
Max.
Substance
Standard 42 Aesthetic Effects
Chlorine 2.0 mg/L±10% ≥50% 95.7%
Flow Rate=1 gpm (3.78 Lpm) Capacity=1000 gallons (3785 L) or 12 months
Influent Challenge
Concentration
Permissible
Product Water
Concentration
Reduction
Requirements
Minimum
Reduction
Average
Concentration
D-30A Cartridge
Substance
Standard 42 Aesthetic Effects
Chlorine 2.0 mg/L±10% ≥50% 97.4%
Particulates
(0.5– <um)
Class I
Standard 53 Health Effects
Cysts†
Turbidity 11 ± 1 NTU 0.5 NTU 95.5% 98.2%
Asbestos
Flow Rate = 0.9 gpm (3.4 Lpm) Capacity=1000 gallons (3785 L) or 12 months
Influent Challenge
Concentration
at least 10,000
particles/mL
Minimum
50,000/L
107 to 108
fibers/L>10
micrometers in length
Max Permissible
Product Water
Concentration
Reduction
Requirements
≥85% 99.9%
99.95% 99.99% 99.99%
Minimum
Reduction
99% >99.9% >99%
Concentration
Average
D-40A Cartridge
Substance
Standard 42 Aesthetic Effects
Chlorine 2.0 mg/L±10% ≥50% 99.1%
Particulates
(0.5– <um)
Class I
Standard 53 Health Effects
Cysts†
Turbidity 11 ± 1 NTU 0.5 NTU 95.5% 98.2%
Asbestos
Lead 6.5 pH 0.15 mg/L ±10% 0.010 mg/L 99.3% 99.3%
Lead 8.5 pH 0.15 mg/L±10% 0.010 mg/L 99.3% 99.3%
Mercury 6.5 pH 0.006 mg/L±10% 0.002 mg/L 96.6% 95.0%
Mercury 8.5 pH 0.006 mg/L±10% 0.002 mg/L 94.1% 88.5%
Atrazine 0.009 mg/L±10% 0.003 mg/L 94.3% 94.3%
Lindane 0.002 mg/L±10% 0.0002 mg/L 97.6% 97.6%
Flow Rate = 0.6 gpm (2.27 Lpm) Capacity=600 gallons (2271 L) or 6 months
If not plumbed into separate tap, flow rate may be less than 0.5 gpm for direct connect systems.
† Based on the use of microspheres or Cryptosporidium parvum oocysts.
Testing was performed under standard laboratory conditions, actual performance may vary.
Influent Challenge
Concentration
at least 10,000
particles/mL
Minimum
50,000/L
107 to 108
fibers/L>10
micrometers in length
Max Permissible
Product Water
Concentration
Reduction
Requirements
≥85% 99.9%
99.95% 99.99% 99.99%
Minimum
Reduction
99% >99% >99%
Concentration
Average
D-10 Cartridge
Max.
Substance
Standard 42 Aesthetic Effects
Chlorine 2.0 mg/L±10% ≥50% 95%
Particulates
(1– <5µm)
Class II
Flow Rate=1 gpm (3.78 Lpm) Capacity=250 gallons (946 L) or 3 months
Influent Challenge
Concentration
at least 10,000
particles/mL
Permissible
Product Water
Concentration
Reduction
Requirements
Minimum
Reduction
≥85% 85%
Average
Concentration
3
Page 4

State of California
Department of Public Health
Water Treatment Device
Certificate Number
Date Issued: June 22, 2009
Trademark/Model Designation
Replacement Elements
199409-
US-600A with D-30A cartridge D-30A
Manufacturer:
Culligan International Company
The water treatment device(s) listed on this certificate have met the testing requirements pursuant to Section
116830 of the Health and Safety Code for the following health related contaminants:
Cysts
Turbidity
Asbestos
None
Microbiological Contaminants and Turbidity Inorganic/Radiological Contaminants
Organic Contaminants
Do not use where water is microbiologically unsafe or with water of unknown quality, except that systems certified
for cyst reduction may be used on disinfected waters that may contain filterable cysts.
1000 gal
Rated Service Capacity:
0.9 gpm
Rated Service Flow:
Conditions of Certification:
State of California
Department of Public Health
Water Treatment Device
Certificate Number
Date Issued: June 22, 2009
Trademark/Model Designation
Replacement Elements
199309-
US-600A with D-40A cartridge
D-40A
Manufacturer:
Culligan International Company
The water treatment device(s) listed on this certificate have met the testing requirements pursuant to Section
116830 of the Health and Safety Code for the following health related contaminants:
Cysts
Turbidity
Asbestos
Lead
Mercury
Atrazine
Lindane
Microbiological Contaminants and Turbidity Inorganic/Radiological Contaminants
Organic Contaminants
Do not use where water is microbiologically unsafe or with water of unknown quality, except that systems certified
for cyst reduction may be used on disinfected waters that may contain filterable cysts.
600 gal
Rated Service Capacity:
0.6 gpm
Rated Service Flow:
Conditions of Certification:
¸
Performance Data continued
Test Conditions
Flow Rate = As noted for each individual
filter cartridge
Inlet Pressure = 60 psi (4.1 bar)
pH = 7.5 ± 1
Temperature = 68°F ± 5°F (20°C ± 2.5°C)
Suggested Retail Price for Replacement Filter Cartridges:
D-30A: $23.09
D-40A: $38.84
NOTE: Price subject to change. Contact your local retailer or call 1-888-777-7962 for replacement
cartridge pricing.
Operating Requirements
Pressure: = 30–125 psi (2.1-8.6 bar)
Temperature = 40–100°F (4.4–37.7°C)
Turbidity = 5 NTU Max.
Warranty
This warranty applies to the Filter Housings only. It does NOT apply to any disposable filter cartridge, which
has a life expectancy that varies with the water being filtered. This warranty covers defects in materials and
workmanship only for five full years from original date of delivery. Culligan will replace any part which in
Culligan’s opinion is defective, unless: (1) any part of the system has been subjected to any type of tampering, alteration, or improper use after delivery, or (2) any part of the system has been repaired by anyone not
approved by Culligan. Our obligation does not include the cost of shipment of materials. Culligan is not responsible for damage in transit, and claims for such damage should be presented to the carrier by the customer.
This product has been designed solely for use as a housing for a disposable filter cartridge. It is NOT warranted
against freezing, and neither this product nor its parts is warranted against defects or deterioration caused by
uses for which this product was not expressly intended.
THE FOREGOING WARRANTY IS EXCLUSIVE AND IN LIEU OF ALL OTHER WARRANTIES, EXPRESSED OR
IMPLIED, WHETHER ORAL OR ARISING BY USAGE OF TRADE OR COURSE OF DEALING, INCLUDING, WITHOUT
LIMITATION, ANY WARRANTIES OF FITNESS OR MERCHANTABILITY. THIS WARRANTY IS THE PURCHASER’S
SOLE AND EXCLUSIVE REMEDY. IN NO EVENT SHALL Culligan BE LIABLE FOR ANY ANTICIPATED OR LOST
PROFITS, INCIDENTAL DAMAGES, CONSEQUENTIAL CHARGES OR OTHER LOSSES, WHETHER BASED ON
BREACH OF CONTRACT, TORTIOUS CONDUCT OR ANY OTHER THEORY, INCURRED IN CONNECTION WITH THE
PURCHASE, INSTALLATION, REPAIR OR OPERATION OF THE OPAQUE FILTER HOUSING. Culligan DOES NOT
AUTHORIZE ANYONE TO ASSUME FOR IT ANY LIABILITY OR MAKE ON ITS BEHALF ANY ADDITIONAL WARRANTIES IN CONNECTION WITH THE OPAQUE FILTER HOUSING OR ANY PART THEREOF.
For servicing under this warranty, return any defective part to YOUR RETAILER within the five-year period
referred to above.
SEE BELOW INDIVIDUAL WARRANTY AS IT PERTAINS TO YOUR CULLIGAN PRODUCT.
5-YEAR: US-600A
IOWA RESIDENTS ONLY:
Culligan International Company
9399 W. Higgins Road, Suite 1100
Rosemont, Illinois 60018
www.culligan.com
©2009 Culligan International Company, Assembled in China 01020691 Rev A 06/09
Store or seller’s name
Address
City State Zip
Telephone
Seller’s signature
Customer’s signature Date
The US-600A with D-10 is Tested and Certified by NSF International against NSF/ANSI
Standard 42 for the reduction of aesthetic Chlorine Taste and Odor and nominal
Particulate Class II.
The US-600A with D-20A is Tested and Certified by NSF International against NSF/ANSI
Standard 42 for the reduction of aesthetic Chlorine Taste and Odor.
The US-600A with D-30A is Tested and Certified by NSF International against NSF/ANSI
Standard 42 for the reduction of aesthetic Chlorine Taste and Odor and nominal
Particulate Class I. Standard 53 - Cyst, Turbidity, and Asbestos reduction.
The US-600A with D-40A is Tested and Certified by NSF International against NSF/ANSI
Standard 42 for the reduction of aesthetic Chlorine Taste and Odor and nominal
Particulate Class I. Standard 53 - Lead, Cyst, Turbidity, Mercury, Lindane, Atrazine
and Asbestos reduction.
Customer Service M-F 8:00 a.m – 4:30 p.m. CST
Phone: 1-800-721-7360 Fax: 1-800-721-7390
International: Phone (920) 457-2726 • Fax (920) 457-7366
Sales & Marketing Correspondence
P.O. Box 1086 • Sheboygan, WI 53082-1086
Fax (920) 457-7366
e-mail: sales-marketing@culligan.com
Page 5

Filtro de Agua Debajo del Fregadero
¸
Instrucciones para la Instalación y el Funcionamiento
Modelo US-600A
Antes de proceder con la instalación, seleccione el cartucho filtrante apropiado e inserte
lo en el porta-filtro de acuerdo con las instrucciones como reemplazar el cartucho en la
página 2. Par seleccionar el mejor cartucho filtrante para satisfacer sus necesidades, mire
el diagrama en la página 3.
Especificaciones
Margen de Presión: 30-125 psi/2,1-8,6 bar
Margen de Temperatura: 40-100°F/4,4-37,7°C
Piezas Incluidas
• equipo de un porta filtro (carcaza) con un soporte de montaje incorporado y
accesorios para una conexión rápida.
• tubería de 3⁄8 pulgada/ 10 mm.
• 2 codos para una conexión rápida.
• llave de porta filtro SW-5A
• cartucho D-20A
Herramienta Necesaria
• destirnillador
• fila
• lápiz
• cortatubos o sierra para metales
Materiales Opcionales
• grifo (FCT-1) para uso con el cartucho
filtrante D-40A
Precauciones
no use con agua que tiene peligro de microbiología, o la calidad
del agua es desconocida sin desinfectar la adecuadamente antes o después del sistema
filtrante. Sistemas certificados para la reducción de quistes, se pueden usar en aguas
desinfectadas que pueden contener quistes filtrables.
Fracaso de hacerlo puede resultar en grietas en el pocillo causando goteras.
pocillo. Es muy importante que la arandela se sienta nivelada en la ranura del pocillo o
goteras pueden ocurrir.
costosos o posibles daños causados por el agua, nosotros recomendamos fuertemente
que todos los pocillos plásticos de todos los porta filtros (carcazas) se reemplazan cada
cinco años los pocillos transparentes y cada diez años los pocillos opacos. Si el pocillo se
ha usado por más de este tiempo, se debe reemplazar inmediatamente.
NOTA:
• Para uso con agua fria solamente.
• Asegúrese de que la instalación conforma con todas las reglas y regulaciones locales
y estatales.
• Los contaminantes u otras substancias que se quitan o que son reducidas por los
cartuchos filtrantes que usted selecciona no se encuentran en su agua necesariamente. Pregunte por una copia del análisis del agua de su municipalidad de agua local,
u obtenga un análisis de su pozo privado por un laboratorio respetable de analizar
agua.
• Después de periodos extendidos sin uso (p. ej. Durante vacaciones) es recomendado
fluir el sistema completamente. Deje fluir el agua por 5-6 minutos antes de usarla.
• El cartucho filtrante usado con este sistema tiene una duración limitada. Cambios
en el sabor, olor, color y/o flujo del agua que está filtrando indica que el cartucho
este porta filtro (carcaza) tiene que protegerse contra congelación.
la arandela de caucho provee un sello hermético entre la tapa y el
debido a la duración limitada de este producto y para prevenir reparos
filtrante se debe reemplazar.
• Alguna bacteria innocua puede atacar el cartucho hecho con agente celuloso (p.
ej. El D-10). Si parece que su cartucho filtrante se des integra o adquiere un olor
a moho, cambie a un cartucho filtrante hecho con agente sintético o llame al
departamento de ayuda técnica.
El US-600A ha sido probado y certificado con el D-20A por el NSF internacional con el
estándar 42 de NSF/ANSI para la reducción del gusto y del olor estéticos de la clorina.
Los sistemas probaron y certificaron por NSF International con cartuchos D-10, D-20A, D-30A, y
D-40A. Véase la hoja de datos de rendimiento en el manual para obtener declaraciones específicas.
Instalación
NOTA:
• Para una instalación nomal en una tubería de abastecimiento de agua fria de 3⁄8 de
pulgada/10 mm (tubería de cobre o PVC) debajo del fregadero.
• Por favor lea todas las instrucciones y precauciones antes de instalar o de usar el
sistema filtrante US-600A debajo del fregadero.
• Instale el cartucho filtrante en el pocillo antes de proceder con la instalación (mire la
sección Reemplazo del Cartucho Filtrante en la página 2).
• El número en el diagrama corresponde con el número del paso.
1. (A) Cierre el abastecimiento de agua fria y abra el grifo más cercano para dejar
escapar el aire entre la tubería antes de empezar la instalación. Ponga un balde
debajo de la tubería de agua fria para acumular el exceso de agua, y prevenir que
se derrame. (B) Seleccione el lugar debajo del fregadero donde desea instalar
el sistema filtrante. Instale el sistema filtrante en el lugar que a marcado con el
soporte de montaje.
NOTA: (C) deje un espacio mínimo de 11⁄2 pulgada/38 mm debajo del pocillo para
facilitar el cambio del cartucho filtrante.
2. Usando un corta tubos o una sierra de metales, corte 3 pulgadas/ 76 mm de la
tubería (A) para el agua fria con un diámetro de 3⁄8 de pulgada/10 mm (B) tiene
que rebabar las puntas de la tubería sobrante con una fila. Empuje el codo de
conexión rápida, entre cada punta de la tubería de agua fria sobrante. Asegúrese de
empujar el tubo entre el codo hasta cuando llegar a un pare seco.
3. Determine la longitud del tubo necesario para conectar la entrada y la salida del
filtro al accesorio de conexión rápida en la tubería de agua fria. Mida el tubo
suficientemente corto para prevenir dobladuras o retorcimientos. Corte el tubo en
un ángulo recto entre las dos flechas de guía más cerca. Tiene que armarlo como se
demuestra en la Fig 3, inserte el tubo en la entrada o salida apropiada del accesorio
para una conexión rápida hasta cuando pare en seco (la entrada está marcada con
la palabra “IN” y la salida está marcada con la palabra “OUT” en la tapa).
1
A
B
C
1 1⁄2"
2
B
A
Technical Support: 1-800-721-9243 (M-F 8:00 am - 4:30 pm CST)
01020691 Rev A 06/09
Page 6

NOTA: cuando usted corta entre las dos flechas, el tubo debe ser empujado entre el accesorio cosa que la
entrada del accesorio caiga entre las dos flechas de guía siguientes (aproximadamente 5⁄8 pulgadas / 16 mm).
4. Lentamente, abra el abastecimiento de agua (A) fria para permitir que el filtro se llene de agua. Des-
pués, oprima el botón rojo encima de la tapa de aliviar presión (B) para dejar escapar el aire atrapado
en la tubería. Inspeccione por goteras antes de dejar la instalación.
NOTA: un cartucho filtrante para el agua potable puede contener pedazos muy finos de carbón (polvo
muy fino negro). Para remover estos, después de la instalación usted debe fluir el cartucho filtrante por
15 minutos antes de usarlo. Se recomienda fluir el cartucho filtrante mínimo por 20 segundos antes de
usarlo para beber o cocinar.
5. NOTA: desconectando el tubo de los accesorios de conexión rápida. Mantenimiento rutino y reemplazo
de los cartuchos filtrantes no requiere que usted desconecte el tubo de la tapa; de cualquier modo, el
tubo se puede quitar facilmente de los accesorios si lo es necesario. Primero, cierre el abastecimiento
de agua al filtro y abra el grifo para desaguar la tubería. Después, simplemente oprima el collar (A)
gris al rededor del accesorio a la entrada del tapa, halando el tubo (B) con la otra mano. Repita para el
accesorio de salida.
Reemplazo del Cartucho filtrante
A. (1) Cierre el abastecimiento de agua fria al filtro y ponga un balde debajo del sistema para acumular el
agua que se derrama cuando cambia el cartucho filtrante. (2) Oprima el botón rojo de aliviar presión,
(3) después destornille y quite el pocillo (mire la Fig. A).
NOTA: si cuando usted cierra el abastecimiento de agua al filtro, usted tambien cierra el abastecimiento
de agua para el resto de la casa, asegúrese de tener un balde de agua para que pueda lavar los pocillos
después de que los quite.
B. Localice y quite la arandela redonda grande (1), límpiala del lubricante, y póngala a un lado. Deseche
del cartucho filtrante usado (2). Enjuague el pocillo y llénelo con 1⁄3 de agua. Agregue 2 cucharadas de
descoloran te y restriegue el pocillo con una esponja o un trapo sin abrasivo. Enjuague lo completamente. Tiene que lubricar la arandela redonda con grasa de silicona. Localícelo en la ranura y oprima la en
su lugar.
NOTA: este paso es muy importante para asegurar un sello apropiado del pocillo. Asegúrese de que la
arandela se sienta nivelada en la ranura. Inserte el cartucho filtrante nuevo entre el pocillo. Cartuchos
filtrantes con una aran del la se deben instalar cosa que el lado con la aran del la esté hacia las roscas
del porta filtro (el lado con la aran del la debe apuntar hacia arriba si el porta filtro está instalado como
lo demostramos en la Fig. B).
C. (1) Atornille el pocillo entre la tapa y apriételo manualmente. ASEGÚRESE DE NO SOBRE APRETAR.
(2) Lentamente abra el abastecimiento de agua para permitir que el filtro se llene con agua,
(3) después oprima el botón rojo de presión encima de la tapa del filtro para permitir que se escape
todo el aire atrapado. Inspeccione por goteras antes de dejar la instalación.
NOTA: un cartucho filtrante para el agua potable, puede contener pedazos muy finos de carbón (polvo
muy fino negro). Para remover estos, después de la instalación usted debe fluir el cartucho filtrante por
15 minutos antes de usar el agua. Se recomienda fluir el cartucho filtrante mínimo por 20 segundos
antes de usarlo para beber o cocinar.
3
4
4
A
B
A
A
B
2
1
3
Piezas de Repuesto
1 01020827 OR-233 arandela
2 01020823 SW-5A llave no se demuestra
Por piezas de reemplazo, póngase en contacto con el minorista
más cerca a usted o llame gratis al departamento de servicios
Culligan 1-888-777-7962.
Ajustes y Reparaciones
Contacte al minorista más cercano o un profesional para el tratamiento de agua por el precio del los
cartuchos filtrantes.
1
2
B
1
2
C
2
2
3
1
Page 7

Diagrama para Seleccionar
Seleccione el cartucho filtrante a
pro pi ado para las necesidades
de su agua
Sedimento
Sabor desagradable y olor
estético chloro sabor y olor
Giardia
Cryptosporidium
Plomo/Mercurio
Lindane/Atrazine
Partículas de Clase II
Partículas de Clase I
Duración del filtro en Galones/
meses*
Régimen de Flujo drante
servicioLpm)**
* Duración del cartucho filtrante varía dependiendo en su clase, uso y condiciones del agua.
** Régimen de flujo medido a 60 psi/4,1 bar.
† Si no esta conectado en linea separadas, los índices de corriente pueden ser menos de 0.5 gpm que es
para sistemas que se conectan directo.
D-10 D-20A D-30A D-40A†
• • •
• • • •
• • • •
• •
• •
•
•
•
• •
250
(3)
1.0 (3.8) 1.0 (3.8) 0.9 (3.4) 0.6 (2.3)
1000
(12)
1000
(12)
600
(6)
NOTA: substancias reducidas no se encuentran en su agua necesariamente. El sistema y el cartucho
filtrante se deben mantener de acuerdo con las instrucciones del fabricante.
Reparaciones
Goteras entre la tapa y el pocillo
1. Cierre el abastecimiento de agua y oprima el botón rojo de aliviar presión. Quite el pocillo.
2. Limpia la arandela redonda y la ranura (localizada directamente debajo de las
roscas del pocillo). Lubrique la arandela redonda con grasa de silicona y póngala de
nuevo asegurada mente entre la ranura. Atornille el pocillo entre la tapa y apriételo
manualmente. NO SOBRE APRIETE.
Goteras en las conexiones de entrada o salida del sistema
1. Cierre el abastecimiento de agua y abra el grifo para dejar escapar la presión en
la tubería. Quite la tubería del accesorio (mire #3 bajo Instalación) y asegúrese
de cortar la punta del tubo lo más derecho posible y de no tener re babas. Vuelva
a insertar el tubo entre los accesorios para conexión rápida, asegurando se de
empujar asegurada mente hasta que llegue a un pare seco.
2. Abra el abastecimiento de agua. Si las goteras persisten, o si tiene otras goteras
en el sistema, cierre el abastecimiento de agua. Llame gratis al Departamento de
Ayuda Técnica 1-800-721-9243.
Datos de Funcionamiento
Modelo US-600A
Aviso importante: lea estos datos de funcionamiento y compare la capacidad de este
filtro con las necesidades actuales de su agua. Recomendamos que antes de instalar
este sistema de tratamiento de agua, usted obtenga un análisis de su abastecimiento de
agua, para determinar sus necesidades actuales.
Este sistema ha sido probado de acuerdo a las normas NSF 42 y 53 de ANSI para la reducción de las substancias indicadas a continuación. La concentración de las substancias
indicadas en el agua entrante al sistema se redujo a una concentración inferior o igual
al límite permitido para el agua que sale del sistema, según se especifica en las normas
NSF 42 y 53 de ANSI.
Cartucho Filtrante D-10
Concentratción
Substancia
Norma 42 Efectos Estéticos
Chloro 2.0 mg/L±10% ≥50% 95%
Particulas (1– <
5µm) Clase II
desafiante del
afluente
por lo menos
10,000
particulas por mL
Concentratción
máxima del pro-
ducto permitida
en el agua
Requisitos de
reducción
≥85% 85%
Minimo de
reducción
Premedio
de reducción
3
Caudal = 1 gpm (3.78 Lpm) Capacidad = 250 galones (946 L) ó 3 meses
Cartucho Filtrante D-20A
Concentratción
Substancia
Norma 42 Efectos Estéticos
Chloro 2.0 mg/L±10% ≥50% 95.7%
Caudal = 1 gpm (3.78 Lpm) Capacidad = 1000 galones (3785 L) ó 12 meses
desafiante del
afluente
Concentratción
máxima del producto permitida
en el agua
Requisitos de
reducción
Minimo de
reducción
Premedio de
reducción
Cartucho Filtrante D-30A
Concentratción
Substancia
Norma 42 Efectos Estéticos
Chloro 2.0 mg/L±10% ≥50% 97.4%
Particulas
(0.5– <um)
Clase I
Norma 53 Efectos De Salud
Quistes† Minimo 50,000/L 99.95% 99.99% 99.99%
Turbiedad 11 ± 1 NTU 0.5 NTU 95.5% 98.2%
Asbestos
Caudal = 0.9 gpm (3.4 Lpm) Capacidad = 1000 galones (1890 L) ó 12 meses
desafiante del
afluente
por lo menos
10,000
particulas por mL
107 to 108
fibras/L>10
Longitud en micras
Concentratción
máxima del producto permitida
en el agua
Requisitos de
reducción
≥85% 99.9%
Minimo de
reducción
99% >99% >99%
Premedio de
reducción
Cartucho Filtrante D-40A
Concentratción
Substancia
Norma 42 Efectos Estéticos
Chloro 2.0 mg/L±10% ≥50% 99.1%
Particulas
(0.5– <um)
Clase I
Norma 53 Efectos De Salud
Quistes† Minimo 50,000/L 99.95% 99.99% 99.99%
Turbiedad 11 ± 1 NTU 0.5 NTU 95.5% 98.2%
Asbestos
Plomo 6.5 pH 0.15 mg/L ±10% 0.010 mg/L 99.3% 99.3%
Plomo 8.5 pH 0.15 mg/L±10% 0.010 mg/L 99.3% 99.3%
Mercurio 6.5 pH 0.006 mg/L±10% 0.002 mg/L 96.6% 95.0%
Mercurio 8.5 pH 0.006 mg/L±10% 0.002 mg/L 94.1% 88.5%
Atrazine 0.009 mg/L±10% 0.003 mg/L 94.3% 94.3%
Lindane 0.002 mg/L±10% 0.0002 mg/L 97.6% 97.6%
Caudal = 0.6 gpm (2.27 Lpm) Capacidad = 600 galones (2271 L) ó 6 meses
Si no esta conectado en linea separadas, los índices de corriente pueden ser menos de 0.5 gpm que es
para sistemas que se conectan directo.
† Basado en el uso de microesferas u oocistos de protozoos del parásito Cryptosporidium.
Las pruebas se realizaron bajo condiciones normales de laboratorio; el rendimiento real pudiera variar.
desafiante del
afluente
por lo menos
10,000
particulas por mL
107 to 108
fibras/L>10
Longitud en micras
Concentratción
máxima del producto permitida
en el agua
Requisitos de
reducción
≥85% 99%
Minimo de
reducción
99% >99% >99%
Premedio de
reducción
Page 8

State of California
Department of Public Health
Water Treatment Device
Certificate Number
Date Issued: June 22, 2009
Trademark/Model Designation
Replacement Elements
199409-
US-600A with D-30A cartridge D-30A
Manufacturer:
Culligan International Company
The water treatment device(s) listed on this certificate have met the testing requirements pursuant to Section
116830 of the Health and Safety Code for the following health related contaminants:
Cysts
Turbidity
Asbestos
None
Microbiological Contaminants and Turbidity Inorganic/Radiological Contaminants
Organic Contaminants
Do not use where water is microbiologically unsafe or with water of unknown quality, except that systems certified
for cyst reduction may be used on disinfected waters that may contain filterable cysts.
1000 gal
Rated Service Capacity:
0.9 gpm
Rated Service Flow:
Conditions of Certification:
State of California
Department of Public Health
Water Treatment Device
Certificate Number
Date Issued: June 22, 2009
Trademark/Model Designation
Replacement Elements
199309-
US-600A with D-40A cartridge
D-40A
Manufacturer:
Culligan International Company
The water treatment device(s) listed on this certificate have met the testing requirements pursuant to Section
116830 of the Health and Safety Code for the following health related contaminants:
Cysts
Turbidity
Asbestos
Lead
Mercury
Atrazine
Lindane
Microbiological Contaminants and Turbidity Inorganic/Radiological Contaminants
Organic Contaminants
Do not use where water is microbiologically unsafe or with water of unknown quality, except that systems certified
for cyst reduction may be used on disinfected waters that may contain filterable cysts.
600 gal
Rated Service Capacity:
0.6 gpm
Rated Service Flow:
Conditions of Certification:
¸
Datos de Funcionamiento
Condiciones de Prueba
Régimen de Flujo = Como se indica en cada
cartucho filtrante
Presión de Entrada = 60 psi/ 4.1 bar
pH = 7.5 ± 1
Temperatura = 68°F ± 5°F/ 20°C ± 2.5°C
Precio sugerido para vender cartuchos filtrantes al por menor:
D-30
D-40
NOTA: el precio es sugerido a cambio. Llame al distributor minorista local o llame gratis 1-888-777-7962 por el
precio corriente de los cartuchos filtrantes.
A: $23.09
A: $38.84
Requisitos para el
Funcionamiento
Presión = 30–125 psi (2.1-8.6 bar)
Temperatura = 40–100°F (4.4–37.7°C)
Turbiedad = Máximo 5 NTU
Garantia
Esta garantía es aplicable al porta filtro (carcaza) solamente. NO es aplicable a los cartuchos filtrantes
desechables, donde la duración expectativa varía con el agua que está filtrando. Esta garantía cubre defectos
en los materiales y fabricación solamente por cinco años desde la fecha de entrega. Culligan reemplazará
cualquier pieza la cual en la opinión de Culligan es defectuosa, al menos que: (1) cualquier pieza del sistema
haya sido sujetado a cualquier clase de interferencia, alteración, o uso inapropiado después de entrega, o (2)
cualquier pieza del sistema ha sido reparada por alguien que no ha sido autorizado por Culligan. Nuestra obligación no incluye el costo de flete de los materiales. Culligan no es resposable por daños causados durante
transportación, y reclamos de esa clase se deben hacer al portador por el consumi-dor directamente.
Este producto ha sido diseñado solamente para uso como recipiente para los cartuchos filtrantes desechables.
NO ESTÁ garantizado contra congelación, y ni este producto o sus piezas son garantizados contra defectos o
deterioros causados por usos los cuales este producto ha sido expresamente proyectado.
LA GARANTÍA PREVIA ES EXCLUSIVA Y REEMPLAZA CUALQUIER OTRA GARANTÍA, EXPRESADA O IMPLICITADA,
SEA ORAL, O RESULTADO POR USO COMÚN O UN ACUERDO MUTUO, INCLUYENDO, SIN LIMITACIÓN, CUALQUIER GARANTÍA DE OPORTUNIDAD DE MEDIDA O CONDICIONES VENDIBLES. ESTA GARANTÍA ES EXCLUSIVA
Y ES EL ÚNICO RECURSO LEGAL DEL COMPRADOR. DE NINGUNA MANERA Culligan SERÁ RESPONSIBLE POR
CUALQUIER PÉRDIDA DE GANANCIAS O GANANCIAS ANTICIPADAS, DAÑOS INCIDENTALES, DAÑOS CONSECUENTES, U OTROS PÉRDIDAS, SEAN SOBRE UN INCUMPLIMIENTO DE UN CONTRATO, IMCUMPLIMIENTO DE
ACCIONES O CUALQUIER OTRA TEORÍA, INCURRIDAS EN CONEXIÓN CON LA COMPRA, INSTALACIÓN, REPAROS
O FUNCIONAMIENTO DEL PORTAFILTRO (CARCAZA) OPACO. CULLIGAN NO AUTORIZA A NADIE A ASUMIR POR
ELLA CUALQUIER RESPONSABILIDAD O HACER POR ELLA CUALQUIER GARANTÍA ADICIONAL EN CONEXÍON CON
EL PORTAFILTRO (CARCAZA) OPACO O CUALQUIERA DE SUS PIEZAS.
Tiene que devolver cualquier pieza defectuosa a SU MINORISTA durante el periodo de cinco años referído arriba.
MIRE ABAJO POR LA GARANTÍA INDIVIDUAL APROPIADA A SU PRODUCTO CULLIGAN.
5 AÑOS: US-600A
Residentes de IOWA solmente:
Culligan International Company
9399 W. Higgins Road, Suite 1100
Rosemont, Illinois 60018
www.culligan.com
©2009 Culligan International Company, Ensamblado en China 01020691 Rev A 06/09
Nombre de la tienda o del vendedor
Dirección
Ciudd Estado Código Postal
Teléfono
Firma de Vendedor
Firma del Comprador Fecha
El US-600A/D-10 ha sid probdo y certificao por NSF Internacional bajo la norma 42 de
NSF/ANSI para la reducción de sabor y olor, estético cloro y sustantivo partículas de
clase II.
El US-600A/D-20A ha sido probado y certificado por NSF International bajo la morma
42 de NSF/ANSI para la reducción de sabor y olor, estético chloro.
El US-600A/D-30A ha sido probado y certificado por NSF Internacional bajo l norma 42
de NSSF/ANSI para la reducción de sabor ya olor, estético chlor y sustantivo partículas
de clase I y la norma 53, para reducción de quistes, turbiedad y asbestos.
El US-600A/D-40A ha sido probado y certificado por NSF Internacional bajo la norma 42 de
NSF/ANSI para la reducción de sabor y olor, estético cloro y , sustantivo partículas de clse
I y la norma 53, para reducción de plomo, quistes, turbiedad, asbestos, lindane, atrazine
y mercurio.
Customer Service M-F 8:00 a.m – 4:30 p.m. CST
Phone: 1-800-721-7360 Fax: 1-800-721-7390
International: Phone (920) 457-2726 • Fax (920) 457-7366
Sales & Marketing Correspondence
P.O. Box 1086 • Sheboygan, WI 53082-1086
Fax (920) 457-7366
e-mail: sales-marketing@culligan.com
 Loading...