


INSTRUCTION BOOKLET
Cuisinart® Coffee Center™ |
SS-15 Series |
|
|
For your safety and continued enjoyment of this product, always read the instruction book carefully before using.

IMPORTANT
SAFEGUARDS
When using electrical appliances, basic safety precautions should always be taken to reduce the risk of fire, electric shock and/or injury to persons, including the following:
1.READ ALL INSTRUCTIONS.
2.Do not touch hot surfaces. Use handles and knobs.
3.To protect against electric shock, do not place cord, plug, or base unit in water or other liquids.
4.This appliance should not be used by or near children or individuals with certain disabilities.
5.Always unplug from outlet when not in use and before cleaning. Allow to cool before putting on or taking off parts and before cleaning the appliance.
6.Do not operate any appliance with a damaged cord or plug or after the appliance
malfunctions or has been dropped or damaged in any manner. Return appliance to the nearest Cuisinart Repair Center for examination, repair, and electrical or mechanical adjustment.
7.The use of accessory attachments not recommended by Cuisinart may cause injuries.
8.Do not use outdoors.
9.Do not let cord hang over edge of table or counter, or touch hot surfaces.
10.Do not place on or near a hot gas or electric burner, or in a heated oven.
11.Always fill water reservoir first, then plug cord into the wall outlet. To disconnect, push the Off button, then remove plug from wall outlet.
12.Do not use appliance for other than its intended use.
13.Snap lid securely onto carafe before serving any beverages.
14.Scalding may occur if the lid is removed during the brewing cycle.
15.The glass carafe is designed for use with this appliance only. It must never be used on the range top.
16.Do not set a hot carafe on a wet or cold surface.
17.Do not use a cracked carafe or a carafe having a loose or weakened handle.
18.Do not lift handle to open the lid of the Coffeemaker while brewing is in progress.
19.Do not overfill the water reservoir with water. Use ONLY WATER in this appliance! Do not put any other liquids or foods in the water reservoir except as instructed in the cleaning instructions in this guide.
20.Do not clean carafe, heating plate or single serve drip tray with harsh cleansers, steel wool pads, or other abrasive materials.
21.WARNING: TO REDUCE THE RISK OF FIRE OR ELECTRIC SHOCK, DO NOT REMOVE THE BASE PANEL. NO USER-SERVICEABLE PARTS ARE INSIDE. REPAIR SHOULD BE DONE ONLY BY AUTHORIZED PERSONNEL.
22.Do not place cloth or otherwise restrict airflow beneath Coffeemaker.
23.Use only the Cuisinart® Gold-Tone Commercial-Style Filter or standard cone-shaped paper filter with this unit. OTHER GOLD TONE PERMANENT FILTERS MAY CAUSE THE COFFEEMAKER TO OVERFLOW.
24.Do not operate your appliance in an appliance garage or under a wall cabinet. When storing in an appliance garage always unplug the unit from the electrical outlet. Not doing
so could create a risk of fire, especially if the appliance touches the walls of the garage or the door touches the unit as it closes.
SAVE THESE INSTRUCTIONS
FOR HOUSEHOLD USE ONLY
2
WARNING: RISK OF FIRE OR ELECTRIC SHOCK
The lightning flash with arrowhead symbol within an equilateral triangle is intended to alert the user to the presence of uninsulated dangerous voltage within the product’s enclosure that may be of sufficient magnitude to constitute a risk of fire or electric shock to persons.
The exclamation point within an equilateral triangle is intended to alert the user to the presence of important operating and maintenance (servicing) instructions in the literature accompanying
the appliance.
SPECIAL CORD SET INSTRUCTIONS
A short power-supply cord is provided to reduce the risks resulting from becoming entangled in or tripping over a longer cord.
Longer extension cords may be used if care is exercised.
If a long extension cord is used, the marked electrical rating of the extension cord must be at least as great as the electrical rating of the appliance, and the longer cord should be arranged so that it will not drape over the countertop or tabletop, where it can be pulled on by children or tripped over.
NOTICE
This appliance has a polarized plug (one blade is wider than the other). To reduce the risk of electric shock, this plug will fit into a polarized outlet only one way. If the plug does not fit fully into the outlet, reverse the plug. If it still does not fit, contact a qualified electrician. Do not modify the plug in any way.
OPERATING NOTICE
Clogging and backing up of water and/or coffee in the filter basket can occur under any or a combination of any of the following
conditions: the use of too finely ground coffee; using two or more paper filters; using the gold tone filter in conjunction with a paper filter; not properly cleaning coffee grounds from the gold tone filter, or allowing coffee grounds to spill over the filter.
Caution: Never open the filter basket during the brewing cycle, even if no water is draining from the filter basket, since extremely hot water/coffee can spill out from the filter basket and cause injury. If water/coffee is not draining from the filter basket during the brewing cycle, unplug the unit and wait 10 minutes before opening and checking the filter basket.
WARNING |
RISK OF FIRE OR ELECTRIC SHOCK |
DO NOT OPEN |
WARNING: TO REDUCE THE RISK OF FIRE OR ELECTRIC SHOCK,
DO NOT REMOVE COVER (OR BACK)
NO USER-SERVICEABLE PARTS INSIDE
REPAIR SHOULD BE DONE BY AUTHORIZED SERVICE PERSONNEL ONLY
3

CONTENTS
Important Safeguards . . . . . . . . . . . . . . . . . . .2 Unpacking Instructions . . . . . . . . . . . . . . . . . .4 The Quest for the Perfect Cup of Coffee . . . .4 Features and Benefits . . . . . . . . . . . . . . . . 5–6 Control Panel . . . . . . . . . . . . . . . . . . . . . . . . . .7 Charcoal Water Filter . . . . . . . . . . . . . . . . . . . .8
12-Cup Coffeemaker Instructions
Setting Up Your 12-Cup Coffeemaker . . . . . .8
Programming Your 12-Cup Coffeemaker . . . .8
Brewing Coffee . . . . . . . . . . . . . . . . . . . . . . . .9
Brew Pause™ Feature. . . . . . . . . . . . . . . . . . . .9
12-Cup Coffeemaker Cleaning
& Maintenance . . . . . . . . . . . . . . . . . . . . . . .10
Single-Serve Coffeemaker Instructions
Setting Up Your Single-Serve
Coffeemaker. . . . . . . . . . . . . . . . . . . . . . . . . . 11 Using the Single-Serve Coffeemaker . . . . . . 11 Brewing with a Reusable Filter Cup . . . . . . .12 Single-Serve Cleaning and Maintenance . . .13 Warranty. . . . . . . . . . . . . . . . . . . . . . . . . . . . .15
UNPACKING
INSTRUCTIONS
1.Place the box on a large, sturdy, flat surface.
2.Remove the instruction book and any other literature.
3.Turn the box so that the back side of the Coffeemaker is down and slide the Coffeemaker from the box.
4.After the Coffeemaker has been removed, place the box out of the way and lift off the packing material.
5.Grasp the carafe by its handle, remove it from the heating plate, and remove the polybag.
6.Remove the polybag covering the Coffeemaker.
Save all packing materials in case you have to ship the machine in the future.
KEEP ALL PLASTIC BAGS AWAY
FROM CHILDREN.
THE QUEST
FOR THE PERFECT CUP OF COFFEE
ELEMENT 1: WATER
Hot beverages are made up primarily of water. If water doesn’t taste good from the tap, it won’t taste good in your drink. Cuisinart includes charcoal water filters in its water reservoirs to remove chlorine, bad tastes and odors, for the purest flavors, every time you brew.
ELEMENT 2: COFFEE
The flavor of your beverage comes
from the coffee, tea, cocoa – or whatever you’re brewing. To achieve the best taste, always use the best ingredients. Select fresh, high-quality beans or ground coffee, and only the best single serve capsules.
ELEMENT 3: GRIND
The grind of coffee, or the refinement of tea leaves, is critical for proper flavor extraction. Pre-ground ingredients in
top-quality single serve capsules ensure excellent, flavorful results. When using beans or pre-ground coffee to brew into the carafe or use in the HomeBaristaTM Reusable Filter Cup, the grind is just
as critical. If it’s too fine, over-extraction will result in bitterness and may clog the filter. If too coarse, maximum flavor is not extracted. We recommend a medium-fine grind.
ELEMENT 4: PROPORTION
Coffee that is too strong or too weak is always a disappointment. Follow the recommended portions of ground coffee in the instructions under Brewing Coffee for the drip side or under Brewing with
a Reusable Filter Cup for the single serve side. You can later adjust the amount to suit your taste.
4
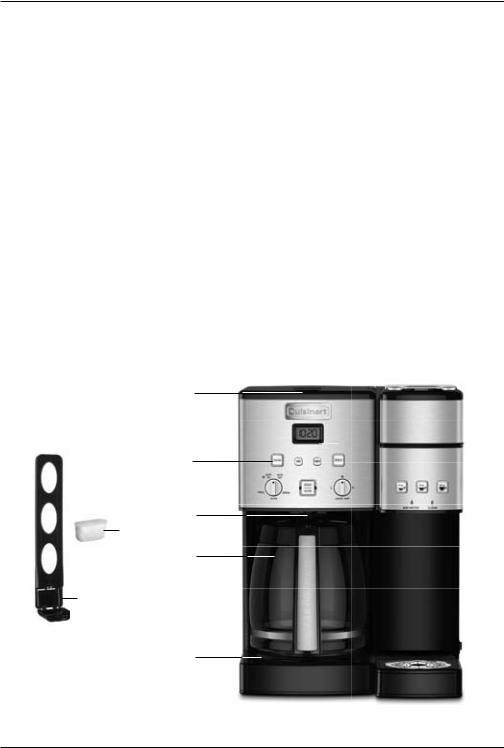
12-CUP COFFEEMAKER FEATURES AND BENEFITS
1.Coffeemaker Reservoir Cover
Flips back for easy filling.
2.Coffeemaker Water Reservoir (not shown)
With water level indicator window.
3.Showerhead (not shown)
Distributes water evenly over coffee, reducing temperature loss as water passes through grounds.
4.Coffeemaker Control Panel
See detailed illustration, page 7.
5.Brew PauseTM
Stops flow of coffee from basket when carafe is removed from the heater plate, so a cup can be poured mid-brew.
6.Carafe
The easy-pour, no-drip, 12-cup carafe has an ergonomic handle and brewed coffee markings.
7.Charcoal Water Filter Holder
Holds filter firmly in place.
1
4
5
8
6
8.Charcoal Water Filter
Eliminates chlorine, bad tastes and odors from tap water.
9.Adjustable Heater Plate
Keeps brewed coffee at desired temperature. Scratch resistant with nonstick coating.
10.Cord Storage (not shown)
11.Filter Basket (not shown)
Holds a #4 paper filter or a permanent filter.
12.Filter Basket Holder (not shown)
13.Ready Tone (not shown)
Signals the end of the brew cycle with five beeps.
14.Power Loss Back-Up System (not shown)
One-minute protection if a breaker trips, unit is unplugged, or power fails. Holds all programmed information, including time of day, Auto On time and Auto Off time.
7
9
*All materials that come in contact with coffee or water are BPA free.
5
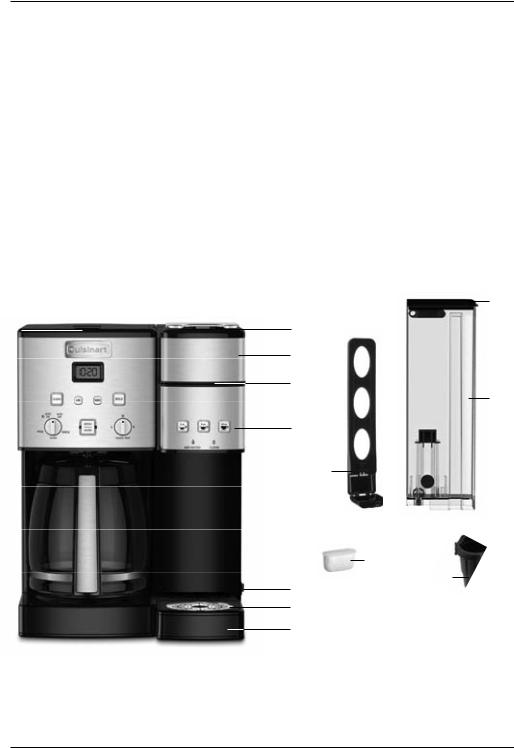
SINGLE-SERVE COFFEEMAKER FEATURES AND BENEFITS
15.Brewer Handle
16.Brew Head
17.Brewing Chamber
Holds Removable Capsule Holder or reusable filter cup.
18.Control Panel
6 oz. button; 8 oz. button; 10 oz. button; Add Water and Clean indicators.
19.Power Switch
20.Removable Drip Tray Plate
21.Removable Drip Tray
22.Charcoal Water Filter Holder
23.Charcoal Water Filter
24.Reservoir Lid
25.40-Ounce Water Reservoir
26.Removable Capsule Holder
27.Power Cord (not shown)
28.Energy-Saving Mode (not shown)
Unit lights will dim after 30 minutes of being idle. To reactivate, press any button. To turn off completely, turn power switch to the OFF position.
24
15
16
17
25
18
22
23
26
19
20
21
*All materials that come in contact with coffee or water are BPA free.
6
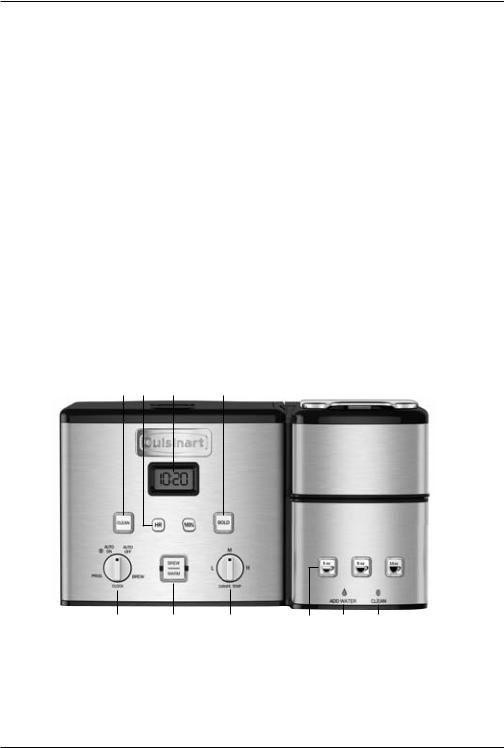
GETTING TO KNOW YOUR CONTROL PANEL
12-CUP COFFEEMAKER CONTROLS
Detailed programming and use instructions are on pages 8–10.
1.Power Switch (not shown)
Located on the right side of your brewer. Use to turn your Coffeemaker on and off.
2.Clock Display
Displays time of day, Auto On, and Auto Off times.
3.Clean Indicator
Indicates time to clean Coffeemaker to remove calcium buildup.
4.Hour and Minute Buttons
Use to set hours and minutes for time of day, Auto On, and Auto Off times.
5.BOLD Cup Setting with Indicator
Use to select bolder coffee flavor strength.
6.BREW/WARM Button
Top half of button “BREW” will be lit when unit is ready to brew. The top half will flash slowly while brewing. The bottom half of button “WARM” will be lit at end of
a carafe brew cycle to indicate Keep Warm is activated.
3 |
4 |
2 |
5 |
7.Function Knob
a.PROG
Select to program Auto On time. Coffeemaker can be programmed to automatically start brewing up to 24 hours in advance.
b.AUTO ON
Select to automatically start brewing coffee at the time you’ve programmed.
c.AUTO OFF
Select to program your Coffeemaker to automatically shut off Keep Warm mode up to 4 hours after brewing.
d.BREW
Select to begin brew cycle when BREW button is pressed.
e.CLOCK
Select to set time of day.
8.Carafe Temperature Knob
Set the heater plate to Low (L), Medium (M), or High (H) to keep coffee in the carafe at the temperature you prefer.
7 |
6 |
8 |
9 |
10 |
11 |
SINGLE-SERVE COFFEEMAKER CONTROLS
Detailed use instructions are on pages 11–14.
9.Brew Buttons
6 oz. button; 8 oz. button; 10 oz. button.
10.Add Water Indicator
Indicates the need to add water to brew.
11.Clean Indicator
Indicates it is time to clean the Coffeemaker to remove calcium buildup.
7
CHARCOAL
WATER FILTER
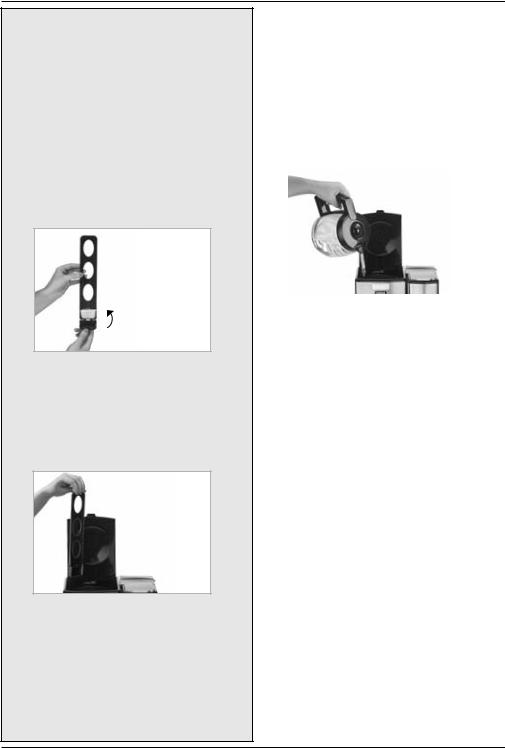
INSERTING THE WATER FILTER
1.Remove the filter from the polybag and soak, fully immersed, in cold tap water for 15 minutes.
2.Lift the water filter holder out of the water reservoir the 12-Cup Coffeemaker side.
3.Press down on the filter compartment and pull toward you to open.
4.Place filter into the holder and snap closed. Be careful – improper placement can tear the filter skin.
5.Flush filter by running cold tap water through holes in bottom of compartment for 10 seconds.
6.Allow the filter to drain completely.
7.Slide the water filter holder back into the channel in the water reservoir, pushing down to the base of the unit.
NOTE: Repeat steps 1-7 above on the Single-Serve side.
NOTE: We recommend changing the water filter every 60 days or after 60 uses, and more often if you have hard water.
Replacement filters can be purchased in stores, by calling Cuisinart Consumer Service, or at www.cuisinart.com
SETTING UP YOUR 12-CUP COFFEEMAKER
INITIAL CLEANING
Perform an initial cleaning before making your first beverage. Follow these instructions, without adding coffee.
1.Insert charcoal water filter if you haven’t already. Instructions above.
2.Fill water reservoir.
3.Make sure carafe is in place.
4.If you haven’t already, plug the power cord into an independent outlet. Power on unit by pressing the power switch on side of the unit.
5.Turn function knob to BREW.
6.Press the BREW button and allow brew cycle to run.
7.The one-time cleaning process is complete. Discard hot water. Your Coffeemaker is ready to use.
PROGRAMMING YOUR 12-CUP COFFEEMAKER
SETTING THE CLOCK
When the Coffeemaker is plugged in and power switch is turned on, 12:00 will flash.
Turn the Function knob to CLOCK
Press Hour and Minute buttons to select the desired time. Hold buttons down to scroll through the digits, or press and release
to advance one digit at a time. When scrolling, the numbers will advance slowly and then speed up. When the number displayed approaches the desired time, press and release to advance one digit at a time.
Be sure the PM indicator is on if a PM time is desired.
To finish setting the clock, turn the Function knob to any other setting or simply wait until the numbers stop blinking.
8

SETTING THE AUTO-ON TIME
When you turn the Function knob to PROG, the previously selected Auto On time, or the default time (12:00) will flash.
1.Turn the Function knob to PROG. Use the Hour and Minute buttons as above to program your start-brew time.
2.Turn the Function knob to AUTO ON.
Press the BREW/WARM button to activate the program. When you press BREW/WARM, the AUTO ON blue light will illuminate, indicating the AUTO ON function has been activated. LCD will display the current time.
3.AUTO-ON brew cycle begins. The blue light around BREW will flash slowly when the brew cycle begins at the time you have selected. When the brew cycle ends, WARM will illuminate indicating Keep Warm cycle. Lights will turn off when the Keep Warm cycle ends and BREW will come back on indicating the coffeemaker is ready for the next brew.
NOTE: To start brew time at the same time the next day, simply make sure the Function knob is at AUTO ON and press and release Brew/Warm button once more. The blue Auto On light will turn on.
SETTING THE AUTO-OFF TIME
Turn the Function knob to AUTO OFF
Use the Hour and Minute buttons as above to program your Coffeemaker to shut off from 0 to 4 hours after brew cycle is finished.
SETTING THE CARAFE TEMPERATURE
Use this feature to control the temperature of the coffee in the pot. Turn the carafe TEMP knob to set your desired temperature High, Medium or Low.
Plug the cord into an electrical outlet.
4.Set preferences
a.Push the BOLD button if would like a stronger brew. BOLD button will illuminate.
b.Turn the Carafe Temperature dial to Low (L), Medium (M), or High (H) and heater plate will keep coffee at the temperature
you select.
5.Add the ground coffee
Remove the filter basket by grasping the handle and lifting straight up. Insert a #4 paper filter or permanent filter. Be sure that a paper filter is completely open and fully inserted in the basket. It may help to fold and flatten the seams of a paper filter beforehand. Add 1 level scoop of ground coffee per cup. Adjust the amount according to taste.
NOTE: The maximum capacity for ground coffee is 15 tablespoons for this Coffeemaker. Exceeding this amount may cause overflow if the coffee is too finely ground.
Replace the filter basket in the filter basket holder and press firmly on cover to be sure it closes securely.
6.Brewing coffee
Turn the Function knob to BREW, press the BREW/WARM button, and the blue indicator light will flash slowly. Or, set the AUTO ON function (see page 9) and the Auto On indicator will light.
7.After brewing
When the brewing cycle has been completed, coffee will continue to stream from the filter for several seconds. When streaming completely stops, five beeps will sound and you can now enjoy your coffee.
NOTE: Reservoir cover may be hot during and directly after brewing. Wait at least 10 minutes before opening.
BREWING COFFEE
Follow instructions in Setting Up Your 12-Cup Coffeemaker on page 8.
1.Insert charcoal water filter
Follow directions for the preparation and insertion of the filter on page 8.
2.Fill the water reservoir
Open the Coffeemaker reservoir cover by lifting it up. Pour in the desired amount of water, using the water level indicator located at the side of the Coffeemaker.
3.Before brewing
Make sure the glass carafe is in position on the heater plate and the top cover is closed.
BREW PAUSE™ FEATURE
This feature interrupts the flow of coffee from the basket to let you pour that first cup mid-brew. Because the flavor profile of coffee brewed at the start of a cycle differs from that brewed toward the end, be aware that using this feature will weaken the flavor strength of the finished pot.
NOTE: Removing carafe for more than 20 seconds may cause filter basket to overflow.
9

12-CUP COFFEEMAKER CLEANING AND MAINTENANCE
Always turn unit off and remove the plug from the electrical outlet before cleaning.
Lift up the Coffeemaker reservoir cover. Remove and discard the paper filter and ground coffee. The filter basket can be washed in warm, soapy water and rinsed thoroughly, or cleaned in the upper rack of the dishwasher. Dry all parts after use.
Do not put any water in the unit once the filter basket has been removed. Wipe the area under the filter basket with a damp cloth.
Remove the carafe from the heating plate. Discard any remaining coffee. The carafe and lid can be washed in warm, soapy water and rinsed thoroughly, or placed in a dishwasher. The carafe and carafe lid should be placed on the upper rack only.
Do not use any scouring agents or harsh cleansers on any part of the Coffeemaker.
Never immerse base unit in water or other liquids. To clean base, simply wipe with a clean, damp cloth and dry before storing. Fingerprints and other blemishes on the housing can be washed off with soap and water or a nonabrasive cleaning solution. Wipe heater plate with a clean, damp cloth. Never use rough, abrasive materials or cleansers to clean the heater plate. Do not dry the inside of the water reservoir with a cloth, as lint may remain.
Maintenance: Any other servicing should be performed by an authorized service representative.
DESCALING
Descaling refers to the removal of calcium deposits that form over time on the metal parts of the Coffeemaker.
To Descale Your Coffeemaker
Depending on the mineral content of water in your area, calcium deposits (scale) may build up in your Coffeemaker. Though scale is not toxic, it can affect performance. Descaling the Coffeemaker when the indicator signals it is time to do so will help protect the heating element and other parts that come into contact with water.
For optimal performance, descale Coffeemaker every 3 to 6 months. If calcium deposits build up faster, the CLEAN light will illuminate, indicating 12-cup Coffeemaker should be descaled.
To clean:
1.Fill the water reservoir to capacity with a mixture of 1⁄3 white vinegar and 2⁄3 water.
2.Press and hold the CLEAN button. When the CLEAN LED indicator flashes, the coffeemaker is in Clean mode. Release the button.
3.When the cycle is completed, 5 beeps will sound and the coffeemaker will shut off.
4.If the CLEAN indicator illuminates once more, repeat the cleaning procedure with a fresh solution of vinegar and water.
NOTE: One cleaning cycle is usually sufficient.
5.When the CLEAN indicator remains off, run one cycle with a full reservoir of fresh, cold water to rinse the unit.
6.Return the charcoal water filter to the holder inside the water reservoir and your coffeemaker is ready to brew!
MAINTENANCE
Any other servicing should be performed by an authorized service representative.
10
 Loading...