


CRE3860GBBB

Use Care
I T
Electric nge
ES200 Control, Self=Cleaning Oven
with Coil Cooktop
Welcome .......................................... 2
Important Safety Instructions ..... 3-4
Features at a Glance ...................... 5
Before Setting Oven Controls .... 6-7
Setting Surface Controls ............... 8
Oven Control Functions ................ 9
Setting Oven Controls ............ 10-12
Self Cleaning ........................... 13-14
General Care & Cleaning ....... 15-18
Adjusting Oven Temperature ....... 18
Before You Call
Solutions to Common Problems ................ 19-20
Warranty ......................... Back Page
READ AND SAVE THESE INSTRUCTIONS pin 316417046 (0707)

.... -.]
I
FOR PRODUCT I
iNFORMATiON CONTACT: I
336-761-1212
CrosJey Corporation
111 Cloverleaf Dr.
Winston-Salem, NC 27103
Www.cros_e .y___om
-- I
Please attach sales receipt
here for future reference.
L
Congratulations on your purchase of a new range! At Crosley Corporation, we
are very proud of our product and are completely committed to providing you with
the best servtce possible.Your satisfaction is our number one priority.
We know you'll enjoy your new range and ThankYou for choosing our product.
We hope you consider us for future purchases
PLEASE CAREFULLY READ AND SAVE THESE iNSTRUCTiONS
This Use & Care Manual provides specific operating instructions for your
model. Use your range only as instructed in this manual. These instructions are
not meant to cover every possible condition and situation that may occur.
Common sense and caution must be practiced when installing, operating and
maintaining any appliance.
Please record your model and serial numbers below for future reference.
Model Number:
Serial Number:
Purchase Date:
Serial plate location:
Open storage drawer some models_
or remove outer lower panel _some models_.
Register Your Product
The self-addressed PRODUCT
REGISTRATION CARD should
be filled in completely, signed
and returned to Crosley
Corporation.
The product serial plate will provide you both the model number and serial
number for your range. You can find the serial plate on your range at one of the
locations illustrated above.
This Use & Care Manual contains general operating instructions for your range
and feature information for several models. Your range may not have all the
described features. The graphics shown are representational. The graphics on
your range may not look exactly like those shown.

important Safety instructions
Read all instructions before using this appliance. Save these instructions for future reference.
This manual contains mportant safety symbols and instructions.Please pay attention to these symbols andfollowall instructionsgiven.
This symbol will help alert you to situations that may cause serious bodily harm, death or property damage.
This symbol will help alert you to situations that may cause bodily injury or property damage.
. Remove all tape and packaging before using the range.
Destroy the carton and plastic bags after unpacking the
range. Never allow children to play with packaging material.
. Proper Installation--Be sure your appliance is properly
installed and grounded by a qualified technician in
accordance with the National Electrical Code ANSI/
NFPA No. 70 latest edition and local electrical code
requirements, installonly per installation instructions provided
in the literature package for this range.
Ask your dealer to recommend a qualified technician and an
authorized repair service. Know howtodisconnect the power
to the range at the circuit breaker or fuse box in case of an
emergency.
. User servicing--Do not repair or replace any part of the
appliance unless specifically recommended in the
manuals. All other servicing should be done only by a
qualified technician. This may reduce the risk of personal
injury and damage to the range.
. Never modify or alter the construction of a range by
removing leveling legs, panels, wire covers, anti=tip
brackets/screws, or any other part of the product.
• All ranges can tip,
• Injury to persons could result.
• Install anti-tip device packed with range.
• See Installation instructions.
_To reduce the risk of
tipping, the rangemust be secured by
properly installed anti-tip bracket provided
with the range. To check if the bracket is
installed properly, visually check that rear
leveling leg is inserted into and fully
secured by the anti-tip bracket by
removing lower panel or storage drawer.
For models with a warmer drawer, grasp
the top rear edge of the range and
carefully attempt to tilt it forward. Refer to
the installation instructions for proper anti-
tip bracket installation.
Stepping, leaning orsitting on the doors or
drawers of this range can result in serious injuries and
also cause damage to the range. Do not allow children to
climb or play around the range. Theweight of achild on an open
door may cause the range to tip, resulting in serious burns or
other injury.
Do not store items of interest to children in
the cabinets above a range or on the backguard of a
range. Children climbing on the range to reach items could be
seriously injured.
Do not use the oven or warmer drawer (if
equipped) for storage.
Never Use Your Appliance for Warming or
Heating the Room.
. Storage in or on Appliance--Flammable materials
should not be stored in an oven, warmer drawer, near
surface units or in the storage drawer. This includes
paper, plastic and cloth items, such as cookbooks, plasticware
and towels, as well as flammable liquids. Do not store
explosives, such as aerosol cans, on or near the range.
. Do Not Leave Children Alone--Children should not be
left alone or unattended in the area where appliance is
in use. They should never be allowed to sit or stand on any
part of the appliance.
. DO NOTTOUCH SURFACE UNITS,AREAS NEARTHESE
UNITS, HEATING ELEMENTS OR INTERIOR SURFACES
OF THE OVEN. Both surface units and oven heating elements
may be hot even though they are dark in color. Areas near
surface units may become hot enough to cause burns. During
and after use, do not touch, or let clothing or otherfiammable
materials touch these areas until they have had sufficient time
to cool. Among these areas are the cook top, surfaces facing
the cook top, the oven vent openings and surfaces near these
openings, oven door and window.
. Wear ProperAppareI--Loose-fitting orhanging garments
should never be worn while using the appliance. Do not
let clothing or otherflammable materials contact hot surfaces.
. Do Not Use Water or Flour on Grease Fires--Smother
the fire with a pan lid, or use baking soda, a dry
chemical or foam-type extinguisher.
. When heating fat or grease, watch it closely. Fat or
grease may catch fire if allowed to become too hot.
. Use Only Dry Potholders - Moist or damp potholders on
hot surfaces may result in burns from steam. Do not let
potholders touch hot heating elements. Do not use atowel or
other bulky cloth instead of a potholder.
. Do Not Heat Unopened Food Containers = Buildup of
pressure may cause container to burst and result in
injury.
. Remove the oven door from any unused range if it is to
be stored or discarded.
IMPORTANT--Do not attempt to operate the range during
a power failure. If the power fails, always turn off the range.
If the range is not turned off and the power resumes, the range
will begin to operate again. Once the power resumes, reset the
clock and oven function.

iMPORTANT iNSTRUCTiONS FOR USINGYOUR
COOKTOP
• Knowwhich knob controls each surface heating unit. Place a
pan of food on the unit before turning it on, and turn the unit off
before removing the pan.
=Use Proper Pan Size--This appliance is equipped with one or
more surface units of different sizes. Select utensils having flat
bottoms large enough to cover the surface unit heating element.
The use of undersized utensils will expose a portion of the
heating element to direct contact and may result in ignition of
clothing. Proper relationship of utensil to element will also
improve efficiency.
• Utensil Handles Should Be Turned Inward and Not Extend Over
Adjacent Surface Elements--To reduce the risk of burns, ignition
of flammable materials, and spillage due to unintentional contact
with the utensil, the handle of the utensil should be positioned so
that it isturned inward, and does not extend over adjacent surface
units.
• Never Leave Surface Elements Unattended at High Heat
Settings--Boilovers cause smoking and greasy spillovers that
may ignite, or a pan that has boiled dry may melt.
• Do Not immerse or Soak Removable Heating Elements--
Heating elements should never be immersed in water. Heating
elements clean themselves during normal operation.
• Glazed Cooking Utensils--Only certain types of glass, glass/
ceramic, ceramic, earthenware, or other glazed utensils are
suitable for cook top service without breaking due to the
sudden change in temperature. Check the manufacturer's
recommendations for cook top use.
• When flaming foods undera ventilating hood, turn the fan on.
IMPORTANT INSTRUCTIONS FOR USING YOUR
OVEN
• Use Care When Opening Oven Door or Warmer Drawer (if
equipped)--Stand to the side of the range when opening the door
of a hot oven. Let hot air or steam escape before you remove or
replace food in the oven.
• Keep Oven Vent Ducts Unobstructed. The oven vent is located
under the left rear surface element if your model is equipped with
coil elements. The oven vent is located below the backguard for
models equipped with ceramic-glass cook tops. Touching the
surfaces in this area when the oven is operating may cause
severe burns. Also, do not place plastic or heat-sensitive items
on or near the oven vent. These items could melt or ignite.
• Placement of Oven Racks. Always place oven racks in desired
location while oven is cool. If rack must be moved while oven is
hot use extreme caution. Use potholders and grasp the rack with
both hands to reposition. Do not let potholders contact the hot
heating elements in the oven. Remove all utensils from the rack
before moving.
• Do not use the broiler pan without its insert. The broiler pan and
its insert allow dripping fat to drain and be kept away from the high
heat of the broiler.
• Do not cover the broiler insertwith alumin urn foil. Exposed fat
and grease could ignite.
• Protective Liners--Do not use aluminum foil to line the oven
bottom. Only use aluminum foil as recommended in this manual.
Improper installation of these liners may result in risk of electric
shock, or fire.
SELF CLEANING OVENS
• Clean in the self=cleaning cycle only the parts listed in this Use & Care Manual. Before self cleaning the oven, remove the broiler
pan and any utensils or foods from the oven.
• Do Not Use Oven Cleaners--No commercial oven cleaner or oven liner protective coating of any kind should be used in or around
any part of the oven.
• Do Not Clean Door Gasket--The door gasket is essential for agood seal. Care should be taken not to rub, damage or move the gasket.
•The health of some birds is extremely sensitive to the fumes given off during the self-cleaning cycle of any range. Move birds to another
well-ventilated room.
IMPORTANT INSTRUCTIONS FOR CLEANING YOUR RANGE
• Clean the range regularly to keep all parts free of grease that could catch fire. Pay particular attention to the area underneath each
surface element. Do not allow grease to accumulate.
• Kitchen cleaners and aerosols--Always follow the manufacturer's recommended directions for use. Be aware that excess
residue from cleaners and aerosols may ignite causing damage and injury.
• Clean Ventilating Hoods Frequently--Grease should not be allowed to accumulate on the hood orfilter. Follow manufacturer's
instructions for cleaning.
COiL COOK TOP MODELS
• Make Sure Reflector Pans or Drip Bowls Are in Place--Absence of these pans or bowls during cooking may subject wiring or
components underneath to damage.
• Protective Liners--Do not use aluminum foil to line surface unit drip bowls, or reflector pans. Only use aluminum foil as recommended
in this manual. Improper installation of these liners may result in risk of electric shock, or fire. Improper installation of these liners
may result in risk of electric shock, or fire.
important Safety Notice
The California Safe Drinking Water and Toxic Enforcement Act requires the Governor of California to publish a list of
substances known to the state to cause cancer, birth defects or other reproductive harm, and requires businesses to warn
customers of potential exposure to such substances.
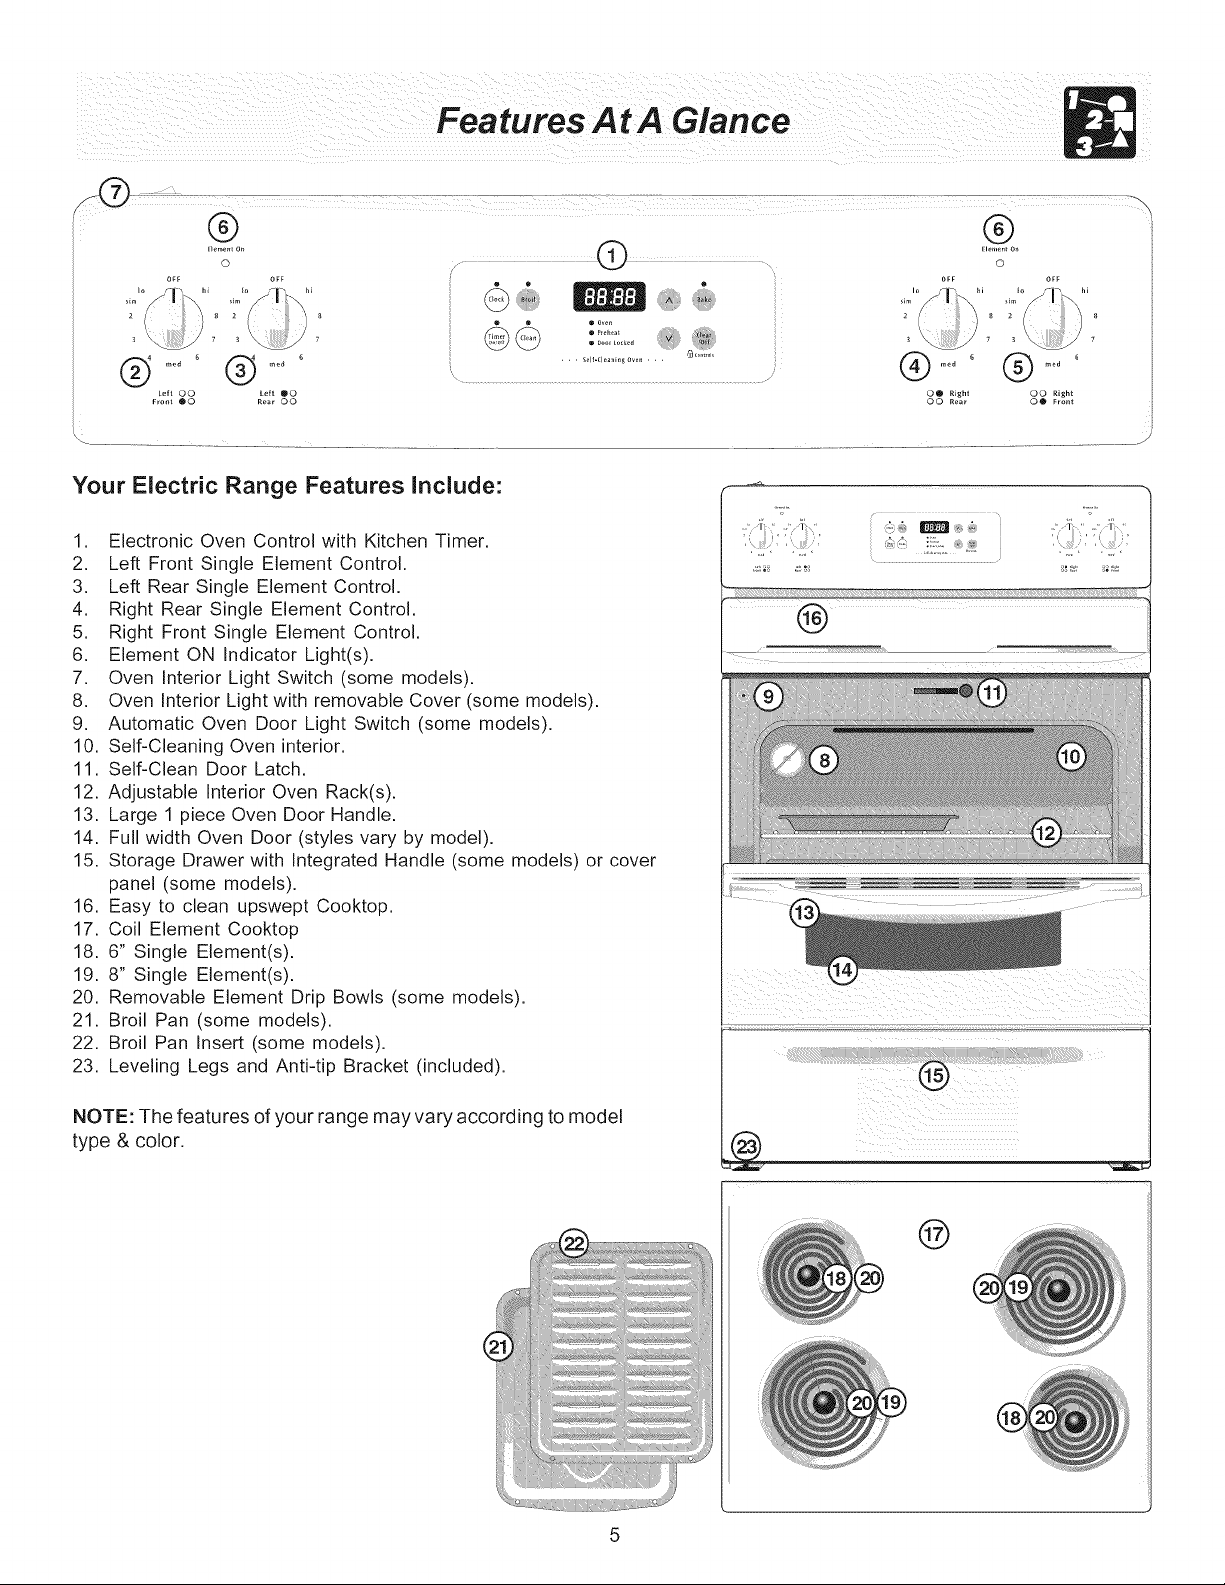
Features At A Glance
®
OFF
<9
o • • wo_
'< /
Your Electric Range Features Include:
1. Electronic Oven Control with Kitchen Timer.
2. Left Front Single Element Control.
3. Left Rear Single Element Control.
4, Right Rear Single Element Control.
5, Right Front Single Element Control.
6, Element ON Indicator Light(s).
7. Oven Interior Light Switch (some models).
8, Oven Interior Light with removable Cover (some models).
9, Automatic Oven Door Light Switch (some models).
10. Self-Cleaning Oven interior,
11. Self-Clean Door Latch.
12. Adjustable Interior Oven Rack(s).
13. Large 1 piece Oven Door Handle.
14, Full width Oven Door (styles vary by model).
15, Storage Drawer with Integrated Handle (some models) or cover
panel (some models).
16, Easy to clean upswept Cooktop,
17. Coil Element Cooktop
18. 6" Single Element(s).
19. 8" Single Element(s).
20, Removable Element Drip Bowls (some models).
21. Broil Pan (some models).
22. Broil Pan Insert (some models).
23, Leveling Legs and Anti-tip Bracket (included).
, ,
< }, ': :,
NOTE: The features of your range may vary according to model
type & color,
®
5
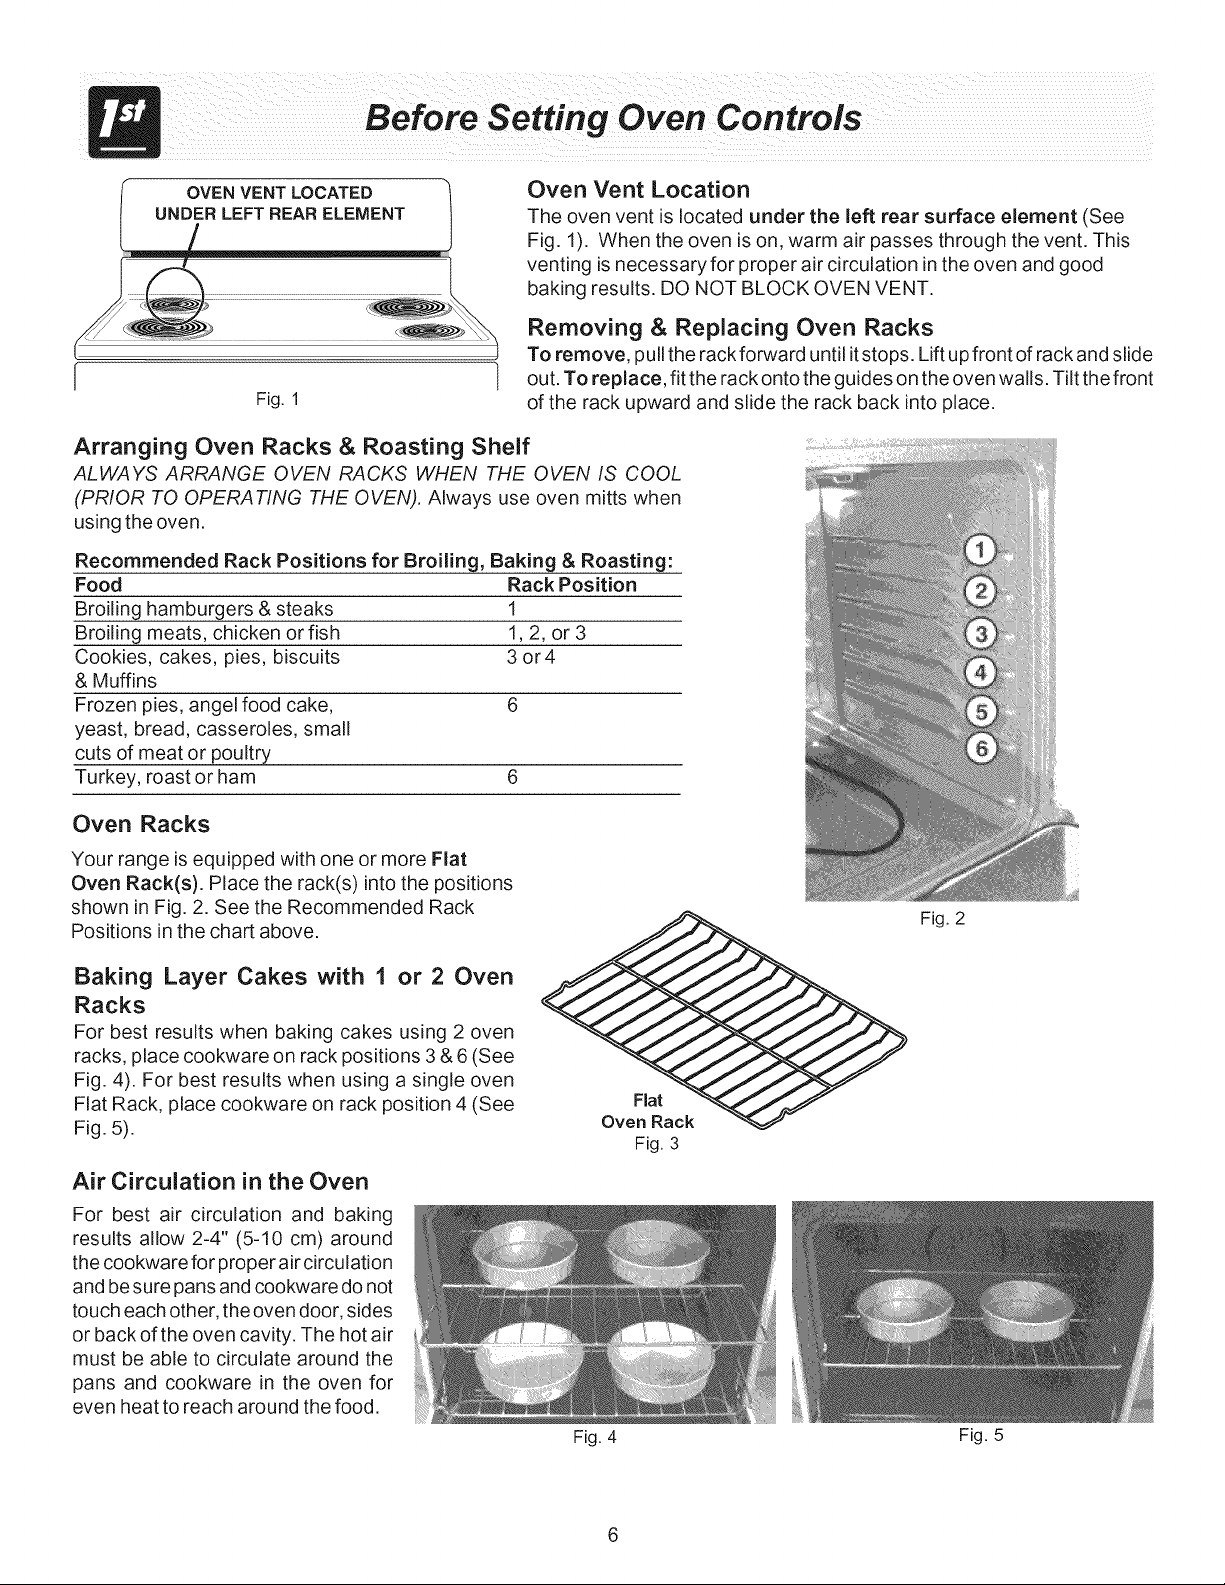
OVEN VENT LOCATED
UNDER LEFT REAR ELEMENT
Fig. 1
Oven Vent Location
The oven vent is located under the left rear surface element (See
Fig. 1). When the oven is on, warm air passes through the vent. This
venting is necessary for proper air circulation in the oven and good
baking results. DO NOT BLOCK OVEN VENT.
Removing & Replacing Oven Racks
To remove, pullthe rack forward until itstops. Lift upfront of rack and slide
out. To replace, fit the rack onto the guides on the oven walls. Tilt the front
of the rack upward and slide the rack back into place.
Arranging Oven Racks & Roasting Shelf
ALWAYS ARRANGE OVEN RACKS WHEN THE OVEN IS COOL
(PRIOR TO OPERATING THE OVEN). Always use oven mitts when
using the oven.
Recommended Rack Positions for Broiling, Baking & Roasting:
Food Rack Position
Broiling hamburgers & steaks 1
Broiling meats, chicken or fish 1,2, or 3
Cookies, cakes, pies, biscuits 3 or4
& Muffins
Frozen p_es,angel food cake, 6
yeast, bread, casseroles, small
cuts of meat or poultry
Turkey, roast or ham 6
Oven Racks
Your range is equipped with one or more Flat
Oven Rack(s). Place the rack(s) into the positions
shown in Fig. 2. See the Recommended Rack
Positions in the chart above.
Baking Layer Cakes with 1 or 2 Oven
Racks
For best results when baking cakes using 2 oven
racks, place cookware on rack positions 3 &6(See
Fig. 4). For best results when using a single oven
Flat Rack, place cookware on rack position 4 (See
Fig. 5).
Air Circulation in the Oven
For best air circulation and baking
results allow 2-4" (5-10 cm) around
the cookware for proper aircirculation
and besure pans and cookware do not
touch each other, the oven door, sides
or back of the oven cavity. The hot air
must be able to circulate around the
pans and cookware in the oven for
even heat to reach around the food.
Flat
Oven Rack
Fig. 3
Fig. 4
Fig. 2
Fig. 5
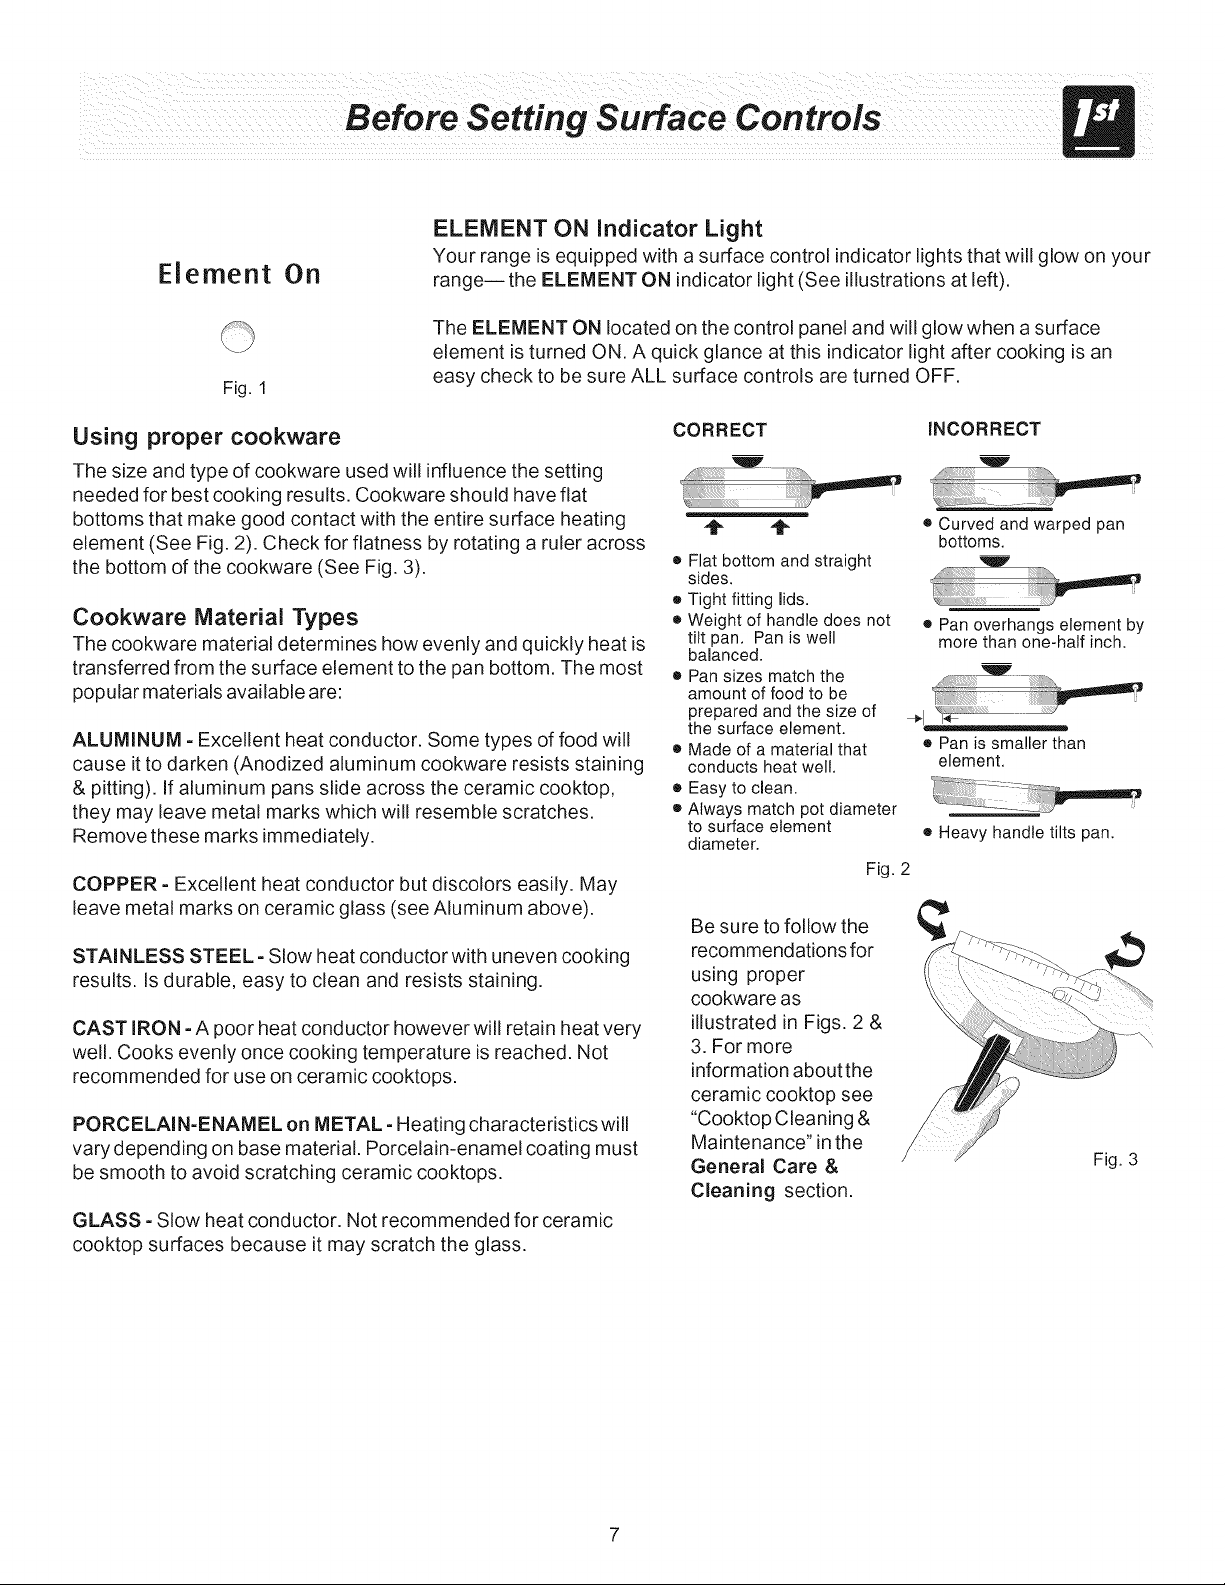
Element On
ELEMENT ON Indicator Light
Your range is equipped with a surface control indicator lights that will glow on your
range--the ELEMENT ON indicator light (See illustrations at left).
Fig. 1
The ELEMENT ON located on the control panel and will glow when a surface
element is turned ON. A quick glance at this indicator light after cooking is an
easy check to be sure ALL surface controls are turned OFF.
Using proper cookware
The size and type of cookware used will influence the setting
needed for best cooking results. Cookware should have flat
bottoms that make good contact with the entire surface heating
element (See Fig. 2). Check for flatness by rotating a ruler across
the bottom of the cookware (See Fig. 3).
Cookware Material Types
The cookware material determines how evenly and quickly heat is
transferred from the surface element to the pan bottom. The most
popular materials available are:
ALUMINUM =Excellent heat conductor. Some types of food will
cause it to darken (Anodized aluminum cookware resists staining
& pitting). If aluminum pans slide across the ceramic cooktop,
they may leave metal marks which will resemble scratches.
Remove these marks immediately.
COPPER =Excellent heat conductor but discolors easily. May
leave metal marks on ceramic glass (see Aluminum above).
STAINLESS STEEL =Slow heat conductor with uneven cooking
results. Is durable, easy to clean and resists staining.
CAST IRON - A poor heat conductor however will retain heat very
well. Cooks evenly once cooking temperature is reached. Not
recommended for use on ceramic cooktops.
PORCELAIN=ENAMEL on METAL =Heating characteristics will
vary depending on base material. Porcelain-enamel coating must
be smooth to avoid scratching ceramic cooktops.
GLASS =Slow heat conductor. Not recommended for ceramic
cooktop surfaces because it may scratch the glass.
CORRECT
• Fiat bottom and straight
sides.
e Tight fitting lids.
• Weight of handle does not
tilt pan. Pan is well
balanced.
• Pan sizes match the
amount of food to be
prepared and the size of
the surface element.
• Made of a material that
conducts heat well.
• Easy to clean.
e Always match pot diameter
to surface element
diameter.
Fig. 2
Be sure to follow the
recommendations for
using proper
cookware as
illustrated in Figs. 2 &
3. For more
information aboutthe
ceramic cooktop see
"Cooktop Cleaning &
Maintenance" in the
General Care &
Cleaning section.
INCORRECT
• Curvedand warped pan
bottoms.
® Pan overhangs element by
more than one-half inch.
÷1
• Panis smallerthan
element.
® Heavy handle tilts pan,
Fig. 3
 Loading...