


Use & Care Manual
Side by Side
Refrigerator |
WELCOME & CONGRATULATIONS.................... |
2 |
IMPORTANT SAFETY INSTRUCTIONS................. |
3 |
INSTALLATION......................................... |
4-5 |
CONNECTING HOUSEHOLD WATER SUPPLY TO |
|
REFRIGERATOR.......................................... |
6 |
DOOR REMOVAL INSTRUCTIONS..................... |
7 |
DOOR HANDLE MOUNTING INSTRUCTIONS......... |
8 |
TEMPERATURE CONTROLS........................ |
9-11 |
LOOKING INSIDE.................................... |
12-13 |
AUTOMATIC ICE & WATER DISPENSER......... |
14-18 |
FOOD STORAGE & ENERGY SAVING IDEAS......... |
19 |
NORMAL OPERATING SOUNDS & SIGHTS.......... |
20 |
CARE & CLEANING................................. |
21-22 |
WARRANTY.............................................. |
23 |
BEFORE YOU CALL................................. |
24-27 |
|
|
|
READ AND SAVE THESE INSTRUCTIONS |
PN: 242111500 (April 2010) |
|
Welcome & Congratulations
Congratulations on your purchase of a new refrigerator! We here at Crosley Corporation are very proud of our product and we are completely committed to providing you with the best service possible. Your satisfaction is our #1 priority.
Please read this Use & Care Manual very carefully. It contains valuable information on how to properly maintain your new refrigerator.
We know you’ll enjoy your new refrigerator and Thank You for choosing our product. We hope you consider us for future purchases.
please read and save these instructions
This Use & Care Manual provides specific operating instructions for your model. Use your refrigerator only as instructed in
this manual. These instructions are not meant to cover every possible condition and situation that may occur. Common sense and caution must be practiced when installing, operating and maintaining any appliance.
Please record your model and serial numbers below for future reference. This information is found on the serial plate located inside the refrigerator compartment.
NOTE
Use only soap and water to clean serial plate.
For product information contact:
336-761-1212
Crosley Corporation
111 Cloverleaf Dr.
Suite 200
Winston-Salem, NC 27103 www.crosley.com
Please attach sales receipt here for future reference.
Safety Precautions
Do not attempt to install or operate your unit until you have read the safety precautions in this manual. Safety items throughout this manual are labeled with a Danger, Warning, or Caution based on the risk type.
ENGLISH
Model Number:
Serial Number:
Purchase Date:
Please complete and mail in the Product Registration Card included with your refrigerator.
Definitions
 This is the safety alert symbol. It is used to alert you to potential personal injury hazards. Obey all safety messages that follow this symbol to avoid possible injury or death.
 DANGER
DANGER indicates an imminently hazardous situation which, if not avoided, will result in death or serious injury.
 WARNING
WARNING indicates a potentially hazardous situation which, if not avoided, could result in death or serious injury.
 CAUTION
CAUTION indicates a potentially hazardous situation which, if not avoided, may result in minor or moderate injury.
IMPORTANT
Indicates installation, operation, or maintenance information which is important but not hazard-related.
2

Important Safety Instructions
WARNING |
WARNING |
Please Read All Instructions Before Using This |
These Guidelines Must Be Followed To Ensure That |
Refrigerator. |
Safety Mechanisms In This Refrigerator Will Operate |
|
Properly. |
FOR YOUR SAFETY |
Electrical information |
•Do not store or use gasoline, or other flammable liquids in the vicinity of this or any other appliance. Read product labels for warnings regarding flammability and other hazards.
•Do not operate the refrigerator in the presence of explosive fumes.
•Avoid contact with any moving parts of automatic ice maker.
•Remove all staples from the carton. Staples can cause severe cuts, and also destroy finishes if they come in contact with other appliances or furniture.
child safety
Destroy or recycle the carton, plastic bags, and any exterior wrapping material immediately after the refrigerator is unpacked. Children should never use these items to play. Cartons covered with rugs, bedspreads, plastic sheets or stretch wrap may become airtight chambers, and can quickly cause suffocation.
proper disposal of your refrigerator or freezer
Risk of child entrapment
Child entrapment and suffocation are not problems of the past. Junked or abandoned refrigerators or freezers are still dangerous – even if they will sit for “just a few days.” If you are getting rid of your old refrigerator or
freezer, please follow the instructions below to help prevent accidents.
Before you throw away your old refrigerator/ freezer:
•Remove doors.
•Leave shelves in place so children may not easily climb inside.
•Have refrigerant removed by a qualified service technician.
3
•The refrigerator must be plugged into its own dedicated 115 Volt, 60 Hz., 15 Amp, AC only electrical outlet. The power cord of the appliance is equipped with a three-prong grounding plug for your protection against electrical shock hazards. It must be plugged directly
into a properly grounded three prong receptacle. The receptacle must be installed in accordance with local codes and ordinances. Consult a qualified electrician.
Avoid connecting refrigerator to a Ground Fault Interruptor (GFI) circuit. Do not use an extension cord or adapter plug.
•If the power cord is damaged, it should be replaced by an authorized service technician to prevent any risk.
•Never unplug the refrigerator by pulling on the power cord. Always grip the plug firmly, and pull straight out from the receptacle to prevent damaging the power cord.
•Unplug the refrigerator before cleaning and before replacing a light bulb to avoid electrical shock.
•Performance may be affected if the voltage varies by
10% or more. Operating the refrigerator with insufficient power can damage the compressor. Such damage is not covered under your warranty.
•Do not plug the unit into an electrical outlet controlled by a wall switch or pull cord to prevent the refrigerator from being turned off accidentally.
IMPORTANT
Pressing and holding the On/Off button for 3 seconds, located on the left side of the temperature control panel (Electronic controls), or turning the Freezer and Fresh Food controls
to “0” (Mechanical controls) will disable your refrigerator’s cooling system, but does not disconnect the power to the light bulb and other electrical components. To turn off power to your refrigerator you must unplug the power cord from the electrical outlet.
ENGLISH
Installation
ENGLISH
This Use & Care Manual provides general operating instructions |
Tabs |
|
for your model. Use the refrigerator only as instructed in this |
||
|
||
Use & Care Manual. Before starting the refrigerator, follow |
|
|
these important first steps. |
|
Location
•Choose a place that is near a grounded electrical outlet.
Do Not use an extension cord or an adapter plug.
•If possible, place the refrigerator out of direct sunlight and away from the range, dishwasher or other heat sources.
•The refrigerator must be installed on a floor that is level and strong enough to support a fully loaded refrigerator.
•Consider water supply availability for models equipped with an automatic ice maker.
 CAUTION
Do Not install the refrigerator where the temperature will drop below 55°F (13°C) or rise above 110°F (43°C). The compressor will not be able to maintain proper temperatures inside the refrigerator.
Do Not block the toe grille on the lower front of your refrigerator. Sufficient air circulation is essential for the proper operation of your refrigerator.
Installation
Installation Clearances
•Allow the following clearances for ease of installation, proper air circulation, and plumbing and electrical connections:
Sides & Top-------------------- |
3/8” |
Back------------------------------ |
1” |
NOTE
If your refrigerator is placed with the door hinge side against a wall, you may have to allow additional space so the door can be opened wider.
door opening
Your refrigerator should be positioned to allow easy access to a counter when removing food. For best use of drawers and freezer baskets, the refrigerator should be in a position where both the refrigerator and freezer doors can be fully opened.
TOE GRILLE INSTALLATION/removal
To Install Toe Grille:
1Open freezer and fresh food compartment doors.
2Line up toe grille at base of refrigerator, making sure the four bottom tabs are resting through holes at base of cabinet.
3Starting from left side of toe grille, press in on first top tab using your thumb and push toe grille forward until it snaps in place. Continue this process until all tabs are snapped in place and toe grille is secured to refrigerator.
Tab
Toe
Grille
To Remove Toe Grille:
1Open freezer and fresh food compartment doors.
2Working from left side of toe grille, slip your fingers between top of toe grille and cabinet. Gently pull forward until first set of tabs are free.
Slide your hand down |
Cabinet |
|
past the free tabs and |
||
|
||
pull forward again until |
|
|
the second set of tabs |
Toe |
|
are free. Continue this |
||
process until all tabs |
Grille |
are free and the toe grille can be removed. (See graphic at top of page in right column.)
LEVELING
NOTE
The refrigerator doors are designed to shut by themselves within a 20 degree opening.
Your refrigerator should be positioned to allow easy access to a counter or table when removing food. For best use of drawers and freezer baskets, the refrigerator should be in a position where both the refrigerator and freezer doors can be fully opened.
Guidelines for final positioning of your refrigerator:
•All four corners of the cabinet must rest firmly on the floor.
•The cabinet should be level at the front and rear.
•The sides should tilt ¼ inch (6 mm) from front to back (to ensure that doors close and seal properly).
•Doors should align with each other and be level.
All of these conditions can be met by raising or lowering the adjustable front rollers.
4
Installation |
|
|
|
To level the cabinet using the front rollers: |
|
|
|
1 Open both doors and remove the toe grille (see “Toe |
|
|
Open Door |
|
|
|
|
Grille Installation and Removal” in the “Installation” |
7/16” Wrench |
|
|
section). |
and 3/32” Hex Key |
Door Stop |
|
(some models) |
|
||
Flange |
|
||
|
Hinge |
||
2 Close the doors and use a flat-blade screwdriver or 3/8 |
|
||
|
|
||
|
|
Flange |
|
inch socket wrench to raise or lower the front rollers. |
|
|
Set Screw |
|
|
|
|
3 Ensure both doors are bind-free with their seals touching |
|
|
(some models) |
the cabinet on all four sides. |
|
|
Hinge |
|
6 Replace the toe grille by fitting it into place (see “Toe |
||
|
Grille Installation and Removal” in the “Installation” |
||
|
section). |
|
|
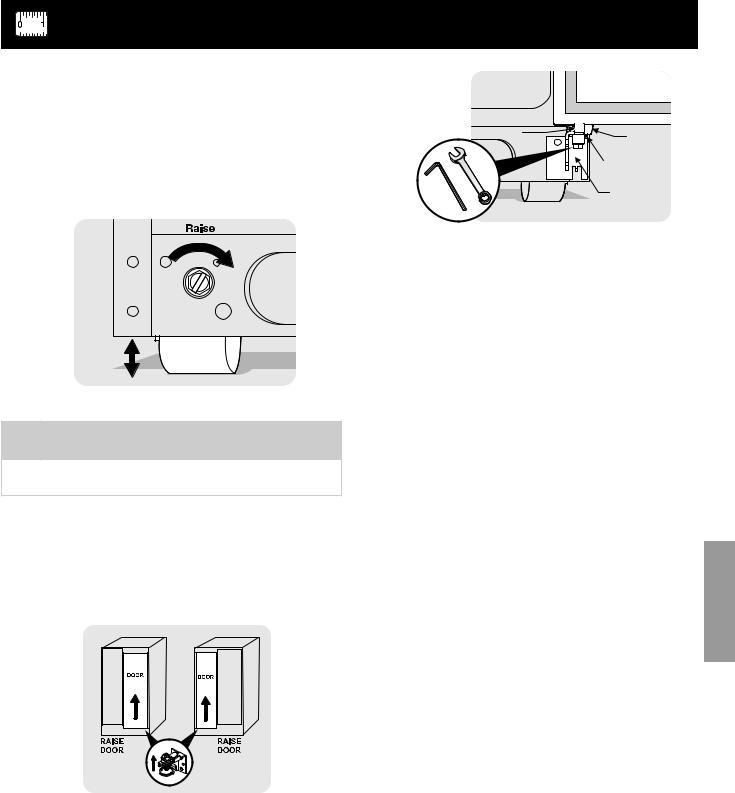
To level the doors using the adjustable lower hinge:
NOTE
Some models will not have a set screw. For those models follow steps 2 through 4.
1Before leveling either door, remove set screw that locks door height into position. (The door cannot be adjusted without set screw removed).
2If the refrigerator door is lower than the freezer door, raise the refrigerator door by turning the adjustment
screw clockwise using a 7/16 inch wrench. (See illustration.)
3If the freezer door is lower than the refrigerator door, raise the freezer door by turning the adjustment screw clockwise using a 7/16 inch wrench. (See illustration.)
4After leveling, verify door stop contacts lower hinge and top of door does not contact upper hinge through full movement of door (from fully closed to fully open).
5Reinstall set screw, locking the door height.
5
ENGLISH

Connecting household Water Supply to refrigerator
ENGLISH
 WARNING
To avoid electric shock,which can cause death or severe personal injury,disconnect the refrigerator from electrical power before connecting a water supply line to the refrigerator.
 CAUTION
To Avoid Property Damage:
•Copper or stainless steel braided tubing is recommended for the water supply line.Water supply tubing made of ¼” plastic is not recommended to be used. Plastic tubing greatly increases the potential for water leaks, and the manufacturer will not be responsible for any damage if plastic tubing is used for supply line.
•DO NOT install water supply tubing in areas where temperatures fall below freezing.
•Chemicals from a malfunctioning softener can damage the ice maker. If the ice maker is connected to soft water, ensure that the softener is maintained and working properly.
IMPORTANT
Ensure that your water supply line connections comply with all local plumbing codes.
Before Installing The Water Supply Line,You Will Need:
•Basic Tools: adjustable wrench, flat-blade screwdriver, and PhillipsTM screwdriver.
•Access to a household cold water line with water pressure between 30 and 100 psi.
•A water supply line made of ¼ inch (6.4 mm) OD, copper or stainless steel tubing. To determine the length of tubing needed, measure the distance from the ice maker inlet valve at the back of the refrigerator to your cold water pipe. Then add approximately 7 feet (2.1 meters), so the refrigerator can be moved out for cleaning (as shown).
•A shutoff valve to connect the water supply line to your household water system. DO NOT use a self-piercing type shutoff valve.
•A compression nut and ferrule (sleeve) for connecting a copper water supply line to the ice maker inlet valve.
NOTE
Check with your local building authority for recommendations on water lines and associated materials prior to installing your new refrigerator. Depending on your local/state building codes, Electrolux recommends for homes with existing valves its Smart
Choice water line kit 5305513409 (with a 6 ft. stainless steel water line) and for homes without an existing valve, Electrolux recommends its Smart Choice water line kit 5304410264 (with a 20 ft. copper water line with self-tapping saddle valve). Please refer to www.CROSLEY.com/store for more information.
To Connect Water Supply Line To Ice Maker Inlet Valve
1Disconnect refrigerator from electric power source.
2Place end of water supply line into sink or bucket. Turn
ON water supply and flush supply line until water is clear.
Turn OFF water supply at shutoff valve.
3Remove plastic cap from water valve inlet and discard cap.
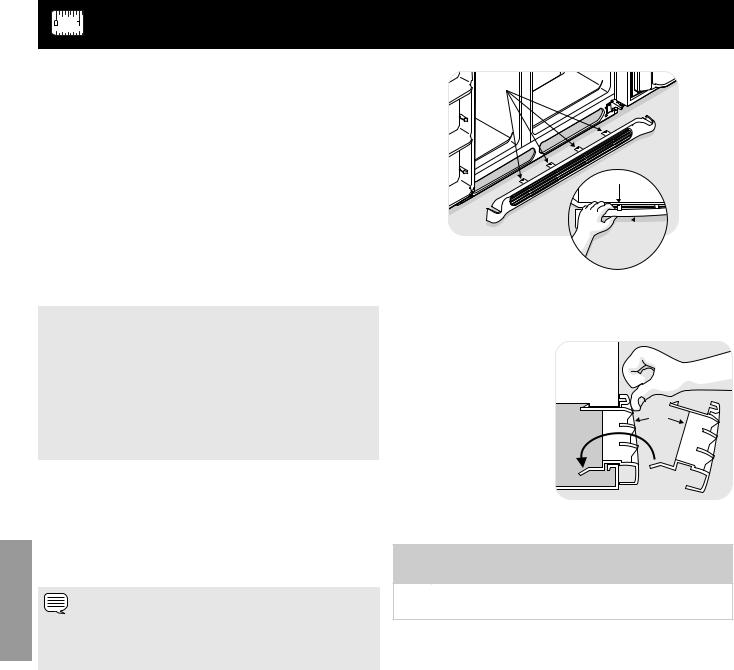
4If you use copper tubing - Slide brass compression nut, then ferrule (sleeve) onto water supply line. Push water supply line into water valve inlet as far as it will go (¼ inch/6.4 mm). Slide ferrule (sleeve) into valve inlet and finger tighten compression nut onto valve. Tighten another half turn with a wrench; DO NOT over tighten. See Figure 1.
If you use stainless steel tubing - The nut and ferrule are already assembled on the tubing. Slide compression nut onto valve inlet and finger tighten compression nut onto valve. Tighten another half turn with a wrench; DO NOT over tighten. See Figure 2.
5With steel clamp and screw, secure water supply line (copper tubing only) to rear panel of refrigerator as shown.
6Coil excess water supply line (copper tubing only) about 2½ turns behind refrigerator as shown and arrange coils so they do not vibrate or wear against any other surface.
7Turn ON water supply at shutoff valve and tighten any connections that leak.
8Reconnect refrigerator to electrical power source.
9To turn ice maker on, lower wire signal arm (side mounted) or set the ice maker’s On/Off power switch to the “I” position (rear mounted).
|
Steel |
Water Tubing |
Clamp |
to Ice Maker |
Brass |
Fill Tube |
|
|
Compression |
|
Nut |
|
Ferrule |
|
(Sleeve) |
|
Copper |
|
water line |
|
Water Valve |
|
Bracket |
|
Valve Inlet |
|
Water Valve |
Copper water line |
|
from household water supply |
|
(Include enough tubing in loop to allow |
|
moving refrigerator out for cleaning.) |
|
Figure 1 |
Figure 2 |
IMPORTANT
After connecting the water supply, refer to “How to Prime the Water Supply System” for important information about priming an empty water supply system.
Your refrigerator’s water supply system includes several tubing lines, a water filter, a water valve, and a water tank.To ensure that your water dispenser works properly, this system must be completely filled with water when your refrigerator is first connected to the household water supply line.
6
Door Removal Instructions
Getting through narrow spaces
If your refrigerator will not fit through an entrance area, you can reduce its size by removing the doors. Check first by measuring the entrance.
Required Tools
You will need the following tools:
Top Hinge |
Top Hinge |
Tools Necessary: |
Cover Front |
Cover Rear |
|
Screw |
Screw |
|
Top |
Bottom |
|
|
|
|
Hinge |
AND |
OR |
OR |
|
|
Screw |
Hinge |
|
|||
|
Screw |
|
Socket |
|
3/8” Fixed |
|
|
|
|
||
|
|
Phillips™ Head |
Wrench Set |
W |
Wrench |
To prepare for removing the doors:
1 Make sure the electrical power cord is unplugged from the wall outlet.
2 Open both doors and remove the toe grille (as explained in the Installation Instructions that came with your appliance).
3 Remove any food from the door shelves.
4 Close the doors.
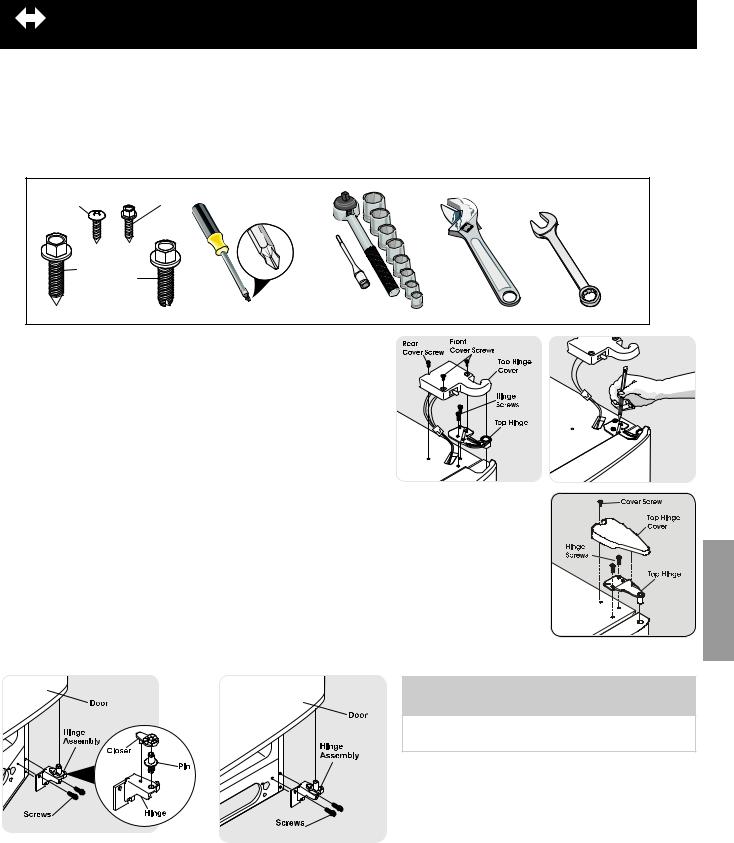
To remove the refrigerator top hinge cover:
1 Remove the three screws from each cover over the top door hinges. 2 Lift hinge cover straight up and off.
To remove the refrigerator door:
1 Trace lightly around the door’s top hinge with a pencil. This makes reinstallation easier.
2 Remove the two screws from the top hinge. Lift the door off of the bottom hinge and set it aside. 3 Remove the two bottom hinge screws and hinge if necessary.
To reinstall the refrigerator door, reverse the above steps.

 CAUTION
Be sure doors are set aside in a secure position where they cannot fall and cause personal injury.
Adjustable Hinge
(some models) Non-Adjusting Hinge (some models)
ENGLISH
7

Door HANDLE mOUNTING Instructions
Door Handle Mounting Instructions
1.Remove handles from cartoning and any other protective packaging.
2.Position freezer handle end caps over upper and lower
preinstalled shoulder bolts (A) that are fastened into door, ensuring the holes for the set screws are facing towards the refrigerator door.
3.While holding handle firmly against door, fasten upper and lower allen set screws (B) with supplied allen wrench.
4.Repeat steps 2 and 3 to install refrigerator handle. Ensure the holes for the set screws are facing towards the freezer door.
5. NOTE: All set screws should be tightened and subflush (allen set screw should be seated just below the surface of the end cap) of handle end cap. The end caps should be drawn tight to freezer and refrigerator doors with no gaps.
ENGLISH
Freezer Upper End Cap |
Refrigerator Upper End Cap |
Freezer Lower End Cap |
Refrigerator Lower End Cap |
8

electronic Temperature Controls
Allowing Cooling Time Before Use
To ensure safe food storage, allow your refrigerator to operate with the doors closed for at least 8 to 12 hours before placing food inside. During this cooling period, you do not need to adjust the controls, which are preset at the factory.
Setting Cooling Temperatures
Your refrigerator comes with a state-of-the-art electronic digital control system. The system’s control panel is located at the top of the fresh food compartment.
The two digital displays on the left half of the control panel indicate the current settings or temperatures of your freezer and fresh food compartments. The models with a 2-digit temperature display are for reference only, and do not display the current accurate compartment temperature. Should you desire to see what the current accurate temperature is, place a separate thermometer inside the freezer or fresh food compartment in the desired location.
(Single Digit Display - Features may vary.) |
NOTE
The advanced electronic control system in your refrigerator includes additional display modes that service professionals can use to rapidly diagnose performance issues.
To adjust the temperature to a higher or lower setting, press the Up (Cold) or Down (Colder) button closest to the display. The first time you press the button, the display shows current setting you entered. Each press of the button after that changes the setting by one.
The display shows your new setting momentarily, then changes back to the current temperature.
ENGLISH
9
 Loading...