

Page 1
LCD SPORTS WATCH
LCD SPORTS WATCH
Operation and Safety Notes
LCD SPORTKARÓRA
Kezelési és biztonsági utalások
SPORTOVNÍ LCD
HODINKY
Pokyny pro obsluhu a
bezpečnostní pokyny
IAN 34232
SPORTOWY ZEGAREK LCD
Wskazówki dotyczące obsługi
i bezpieczeństwa
ŠPORTNA URA Z LC-
PRIKAZOVALNIKOM
Navodila za upravljanje in
varnostna opozorila
LCD-ŠPORTOVÉ
HODINKY
Pokyny pre obsluhu a
bezpečnostné pokyny
34232_LCD-Sportuhr_cover_GB_PL_HU_SI_CZ_SK.indd 2 12.03.14 10:49
Page 2
34232_LCD-Sportuhr_cover_GB_PL_HU_SI_CZ_SK.indd 3 12.03.14 10:49
GB Operation and Safety Notes Page 4
PL Wskazówki dotyczące obsługi i bezpieczeństwa Strona 27
HU Kezelési és biztonsági utalások Oldal 50
SI Navodila za upravljanje in varnostna opozorila Stran 73
CZ Pokyny pro obsluhu a bezpečnostní pokyny Strana 96
SK Pokyny pre obsluhu a bezpečnostné pokyny Strana 118
Page 3
4
1
34232_LCD-Sportuhr_content_GB_PL_HU_SI_CZ_SK.indd 3 12.03.14 10:49
3
2
3
Page 4

Intended use ........................................................................Page 5
Description of Parts .......................................................Page 5
General Safety Instructions ..................................Page 5
Safety Instructions for Batteries .......................Page 5
Watertightness ..................................................................Page 6
Preparations for use
Changing the battery ..................................................................Page 7
Operation
Time Mode ..................................................................................Page 7
Alarm ...........................................................................................Page 9
Stopwatch Mode ........................................................................Page 12
Compass Mode ..........................................................................Page 15
Altimeter Mode ...........................................................................Page 19
Background contrast lighting .....................................................Page 24
Troubleshooting...........................................................................Page 24
Cleaning and Care ..........................................................Page 24
Disposal ....................................................................................Page 24
Warranty.................................................................................Page 25
4 GB
34232_LCD-Sportuhr_content_GB_PL_HU_SI_CZ_SK.indd 4 12.03.14 10:49
Page 5
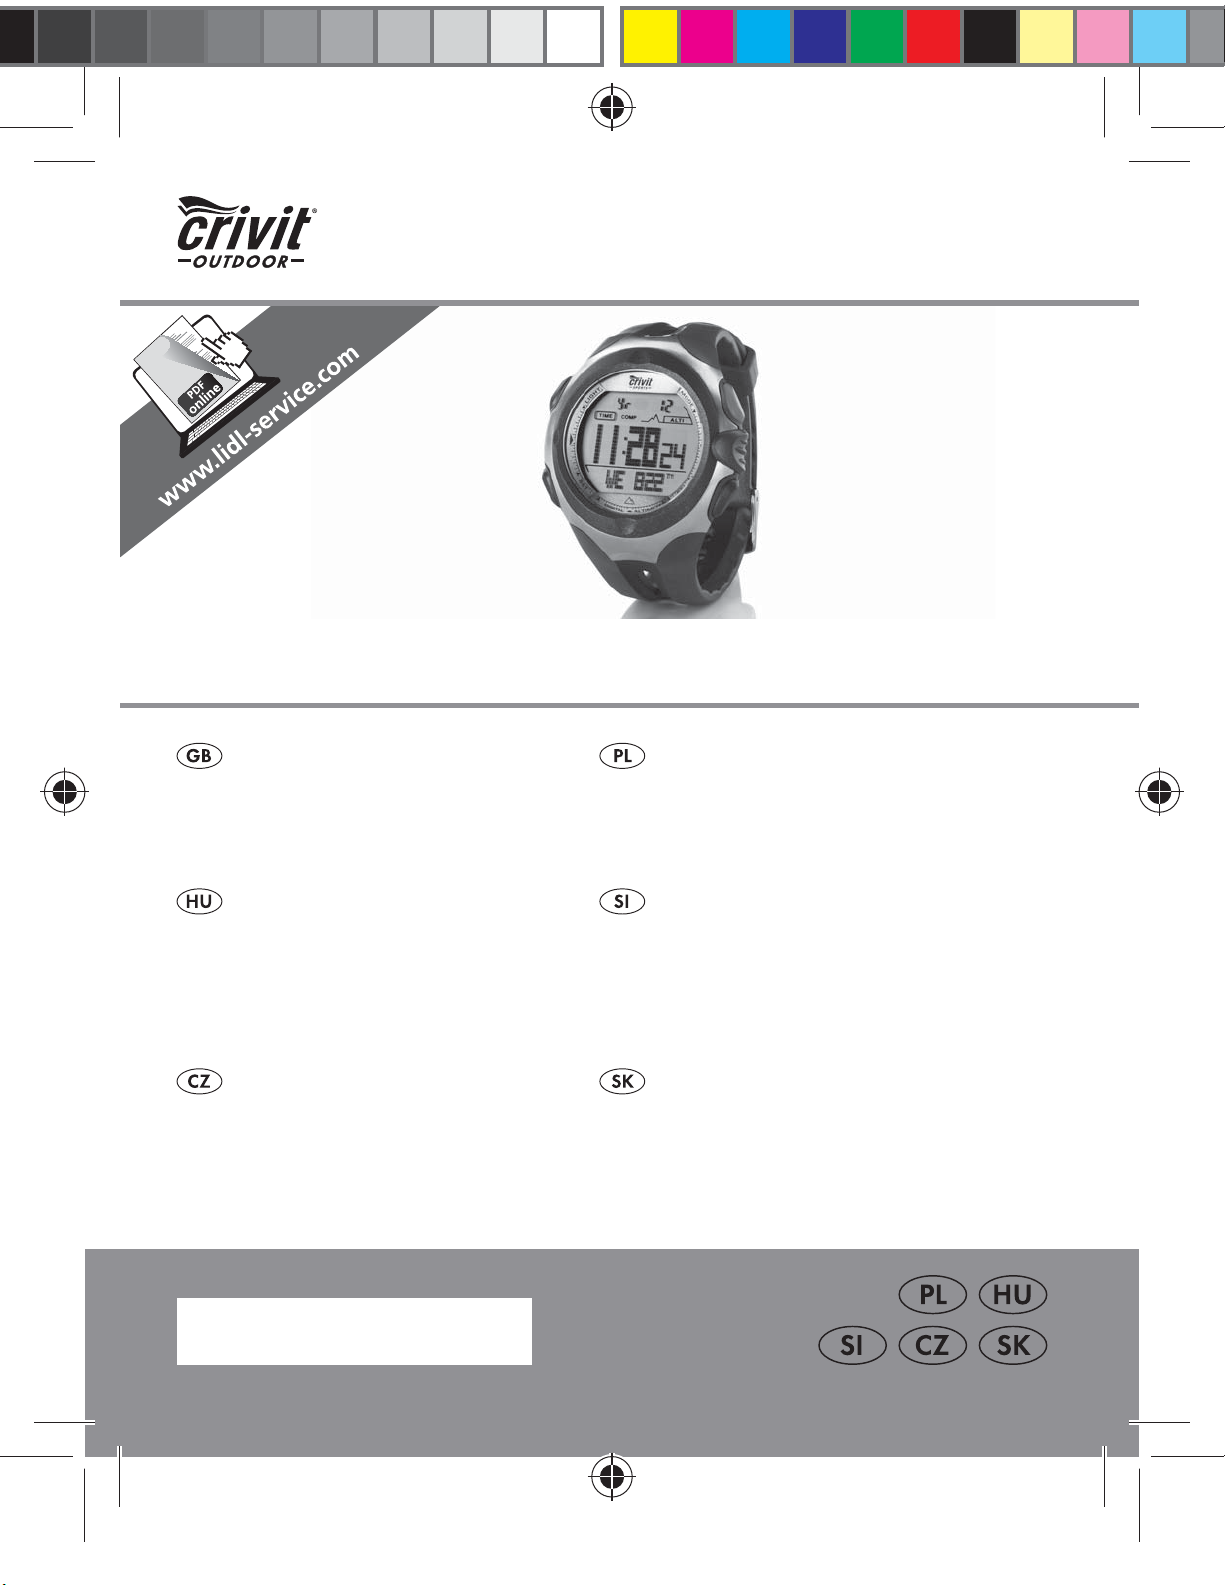
LCD Sports Watch
Intended use
The wrist watch shows the time and date and has alarm, stopwatch,
altitude measurement and compass functions. The product is not intended
for commercial use.
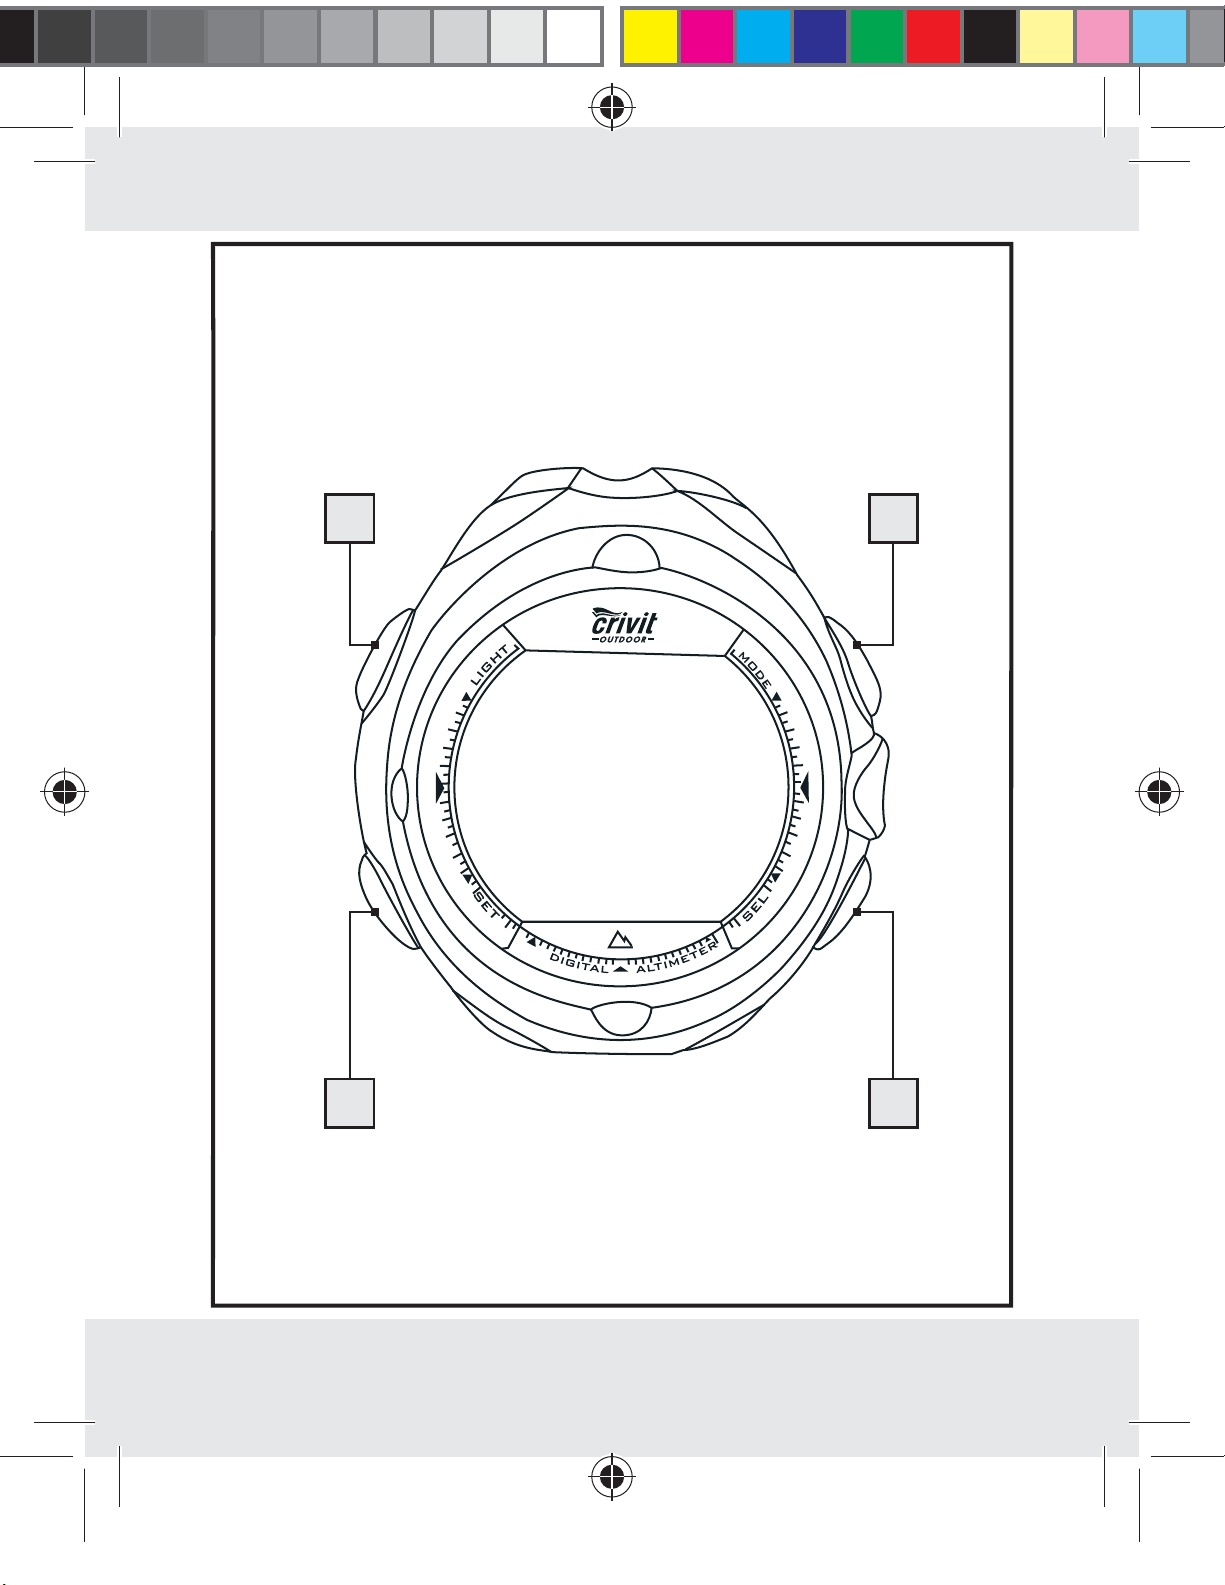
Description of Parts
1
MODE button
2
SELECT button (SPLIT) (selection)
3
SET button (ST / SP) (setting)
4
LIGHT button (light)
General Safety Instructions
PLEASE RETAIN ALL SAFETY INFORMATION AND INSTRUCTIONS
FOR FUTURE REFERENCE!
Safety Instructions for Batteries
DANGER TO LIFE! Batteries / rechargeable batteries
could be swallowed, which could pose a lethal hazard. Keep batteries /
rechargeable batteries away from small children If a battery / rechargeable batteries has been swallowed, seek medical help immediately.
5 GB
34232_LCD-Sportuhr_content_GB_PL_HU_SI_CZ_SK.indd 5 12.03.14 10:49
Page 6
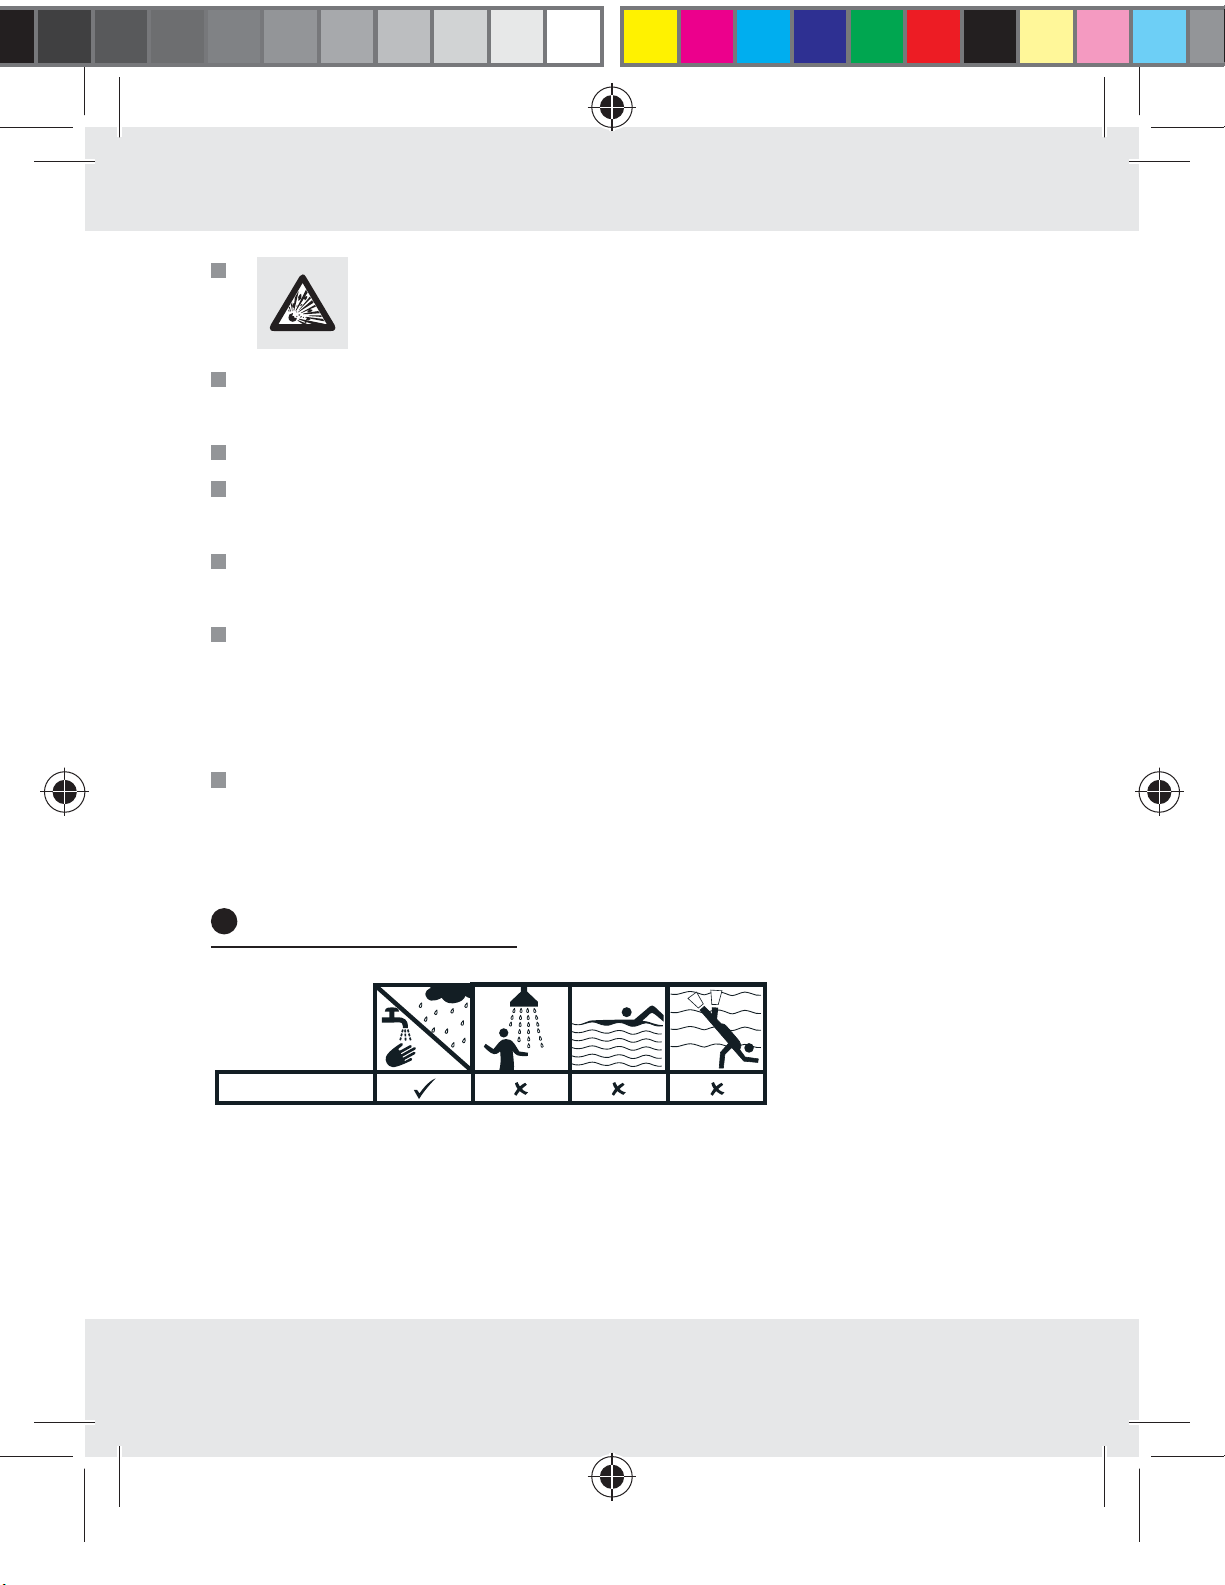
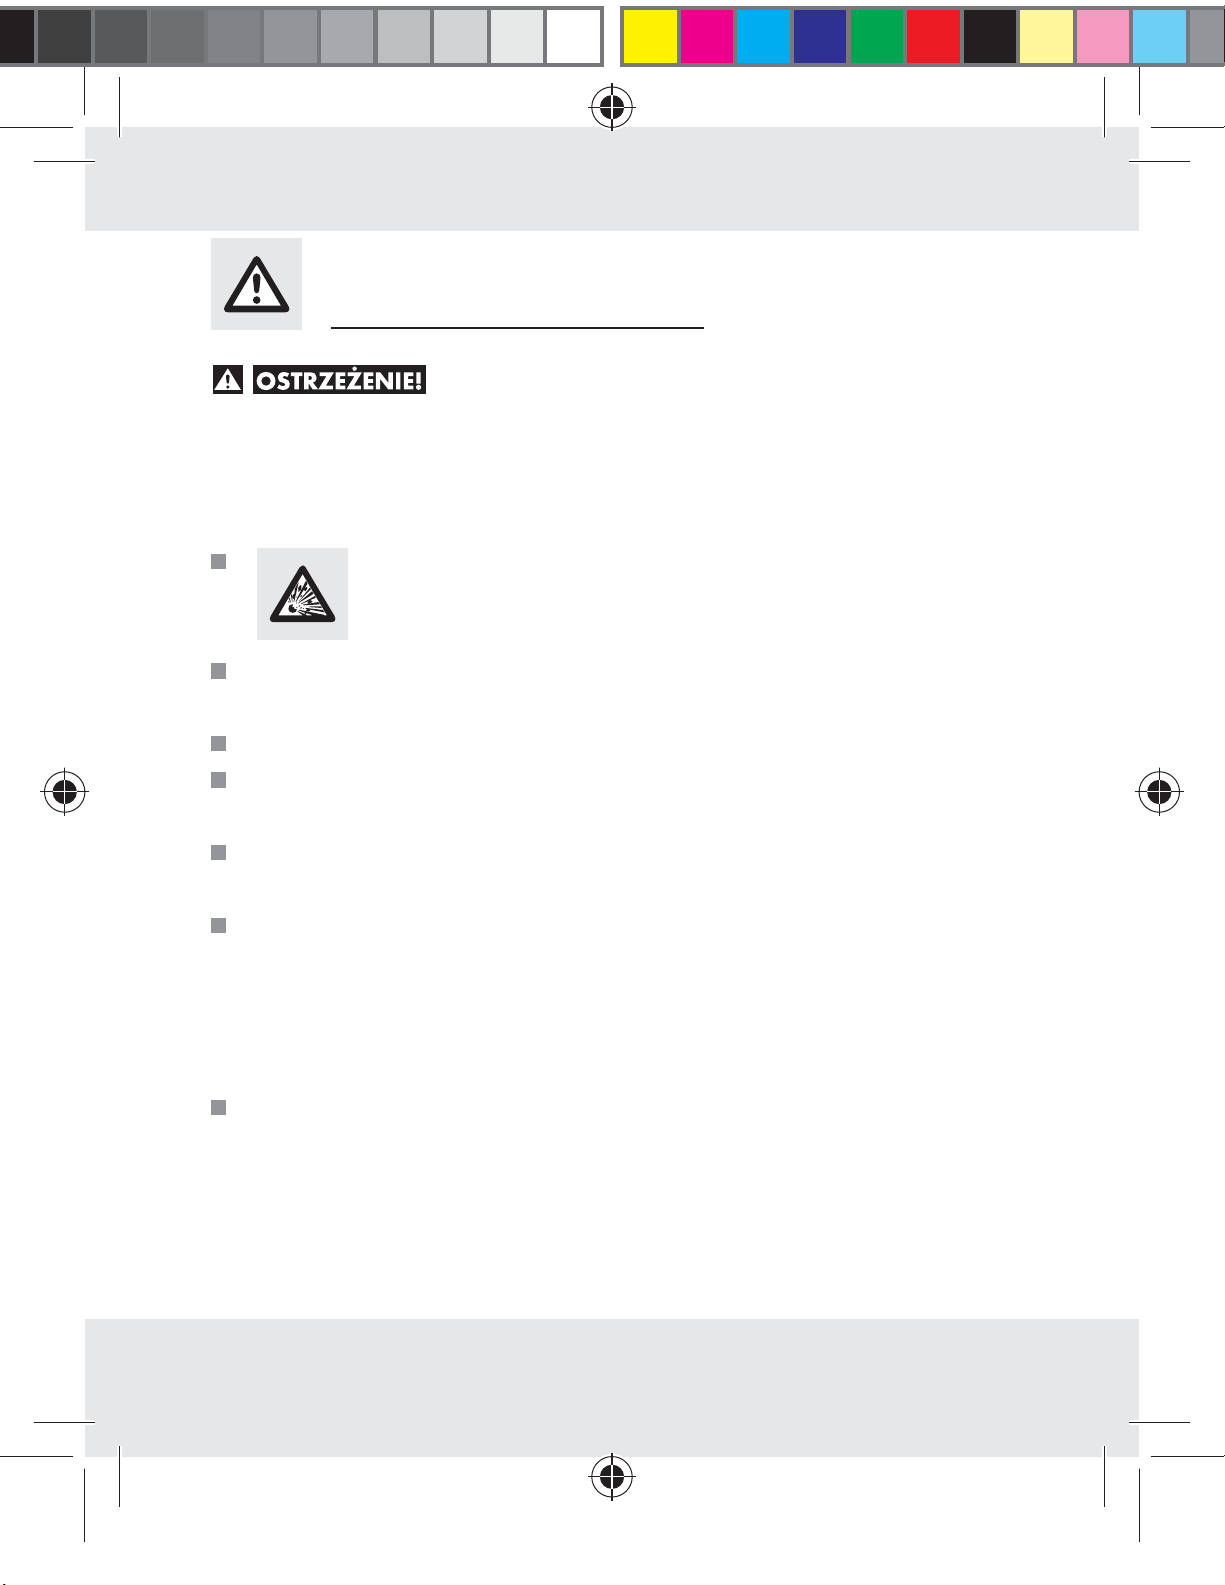
CAUTION! EXPLOSION HAZARD! The batteries
must never be recharged!
Remove a spent battery immediately from the device. There is an
increased danger of leaks!
Batteries must not be disposed of in the normal domestic waste!
Every consumer is legally obliged to dispose of batteries in the proper
manner!
Keep batteries away from children. Do not throw batteries into a fire.
Never short-circuit them or take them apart.
If you do not observe these instructions, the battery could be discharged
beyond the cut-off voltage. There is then a danger of leaking. If the
battery has leaked inside your device, you should remove it immediately
in order to prevent damage to the device!
Avoid contact with the skin, eyes and mucous membranes. Any parts
of the body coming into contact with battery acid should be rinsed off
with copious amounts of water and / or a doctor contacted if necessary!
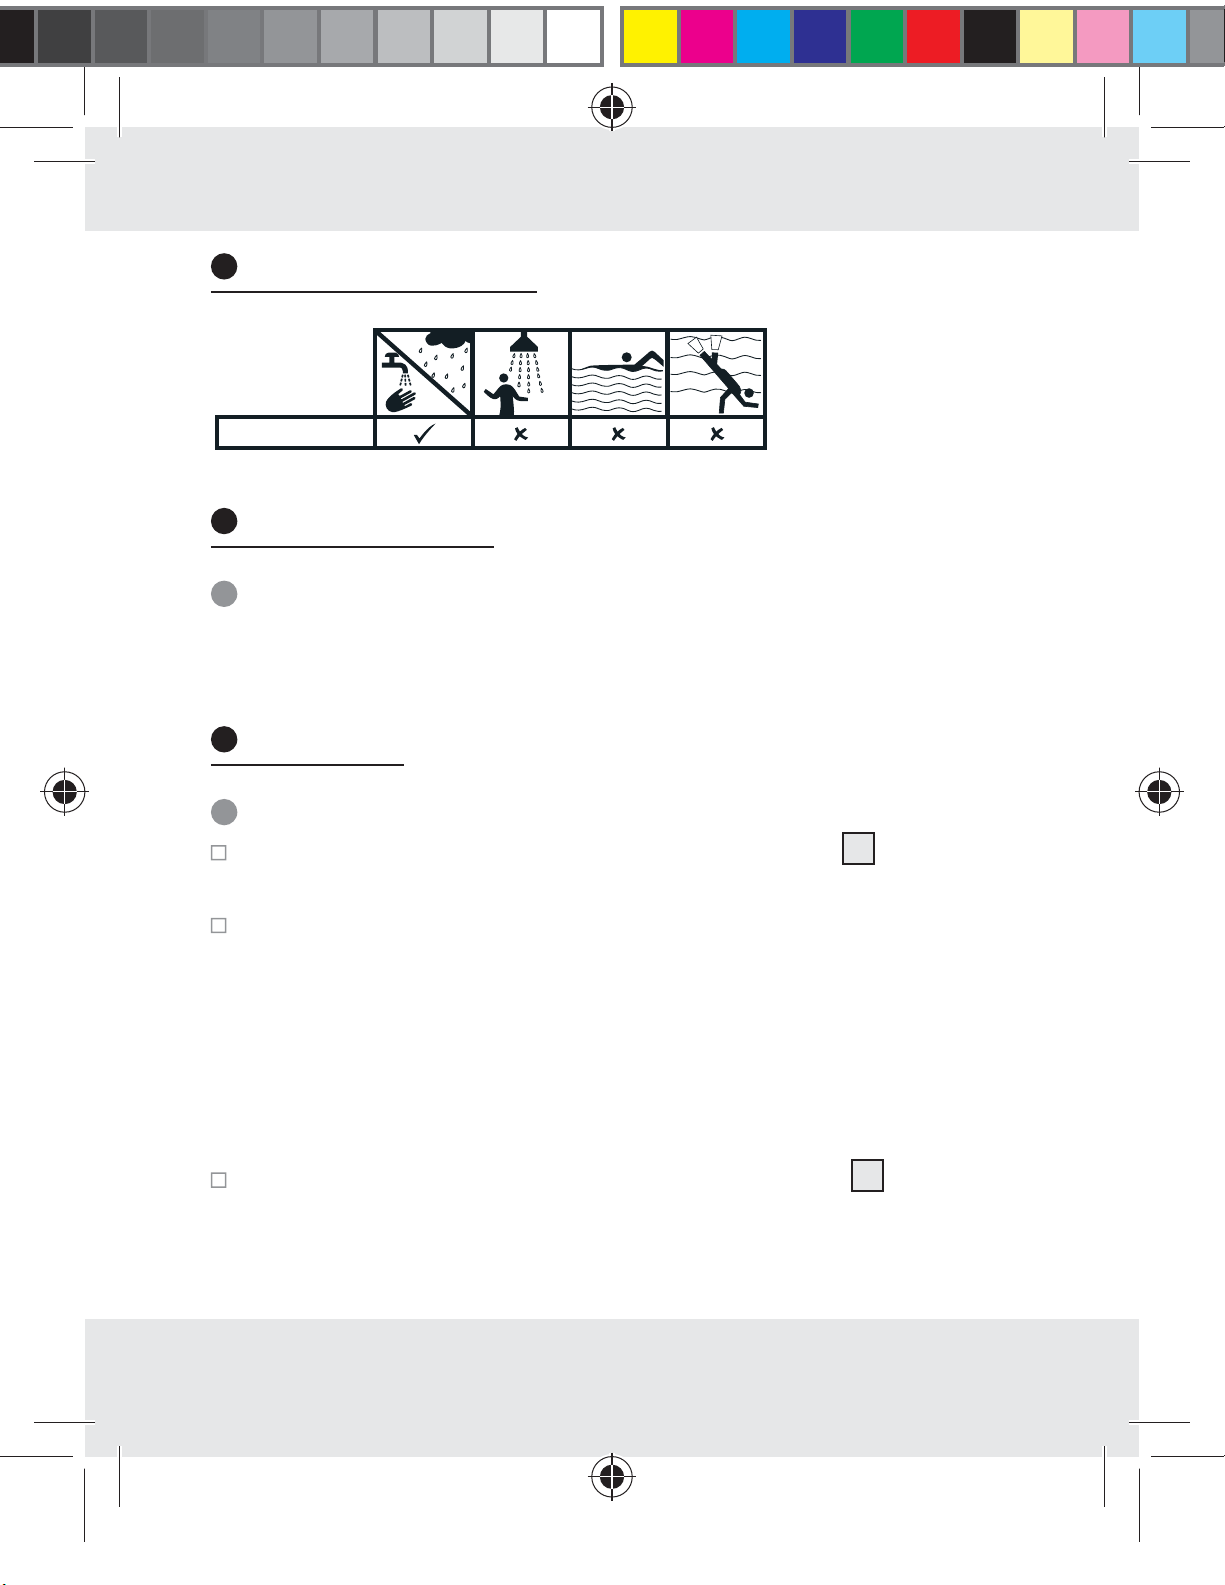
Watertightness
1 bar
6 GB
34232_LCD-Sportuhr_content_GB_PL_HU_SI_CZ_SK.indd 6 12.03.14 10:49
Page 7

Preparations for use
Changing the battery
Note: Have batteries changed in a specialist shop.
Operation
Time Mode
Press the MODE button 1 until the display „TIME“ appears to proceed
to the time mode.
By pressing the SELECT button in time mode, you can switch between
the following functions:
– Time (TIME)
– Alarm (ALARM)
– Countdown-Timer (TIMER)
Time (TIME)
Press the SELECT button 2 in time mode until the display „TIME“
appears.
In time mode, the year is displayed in the top area and the weekday and
date are displayed in the bottom area.
7 GB
34232_LCD-Sportuhr_content_GB_PL_HU_SI_CZ_SK.indd 7 12.03.14 10:49
Page 8
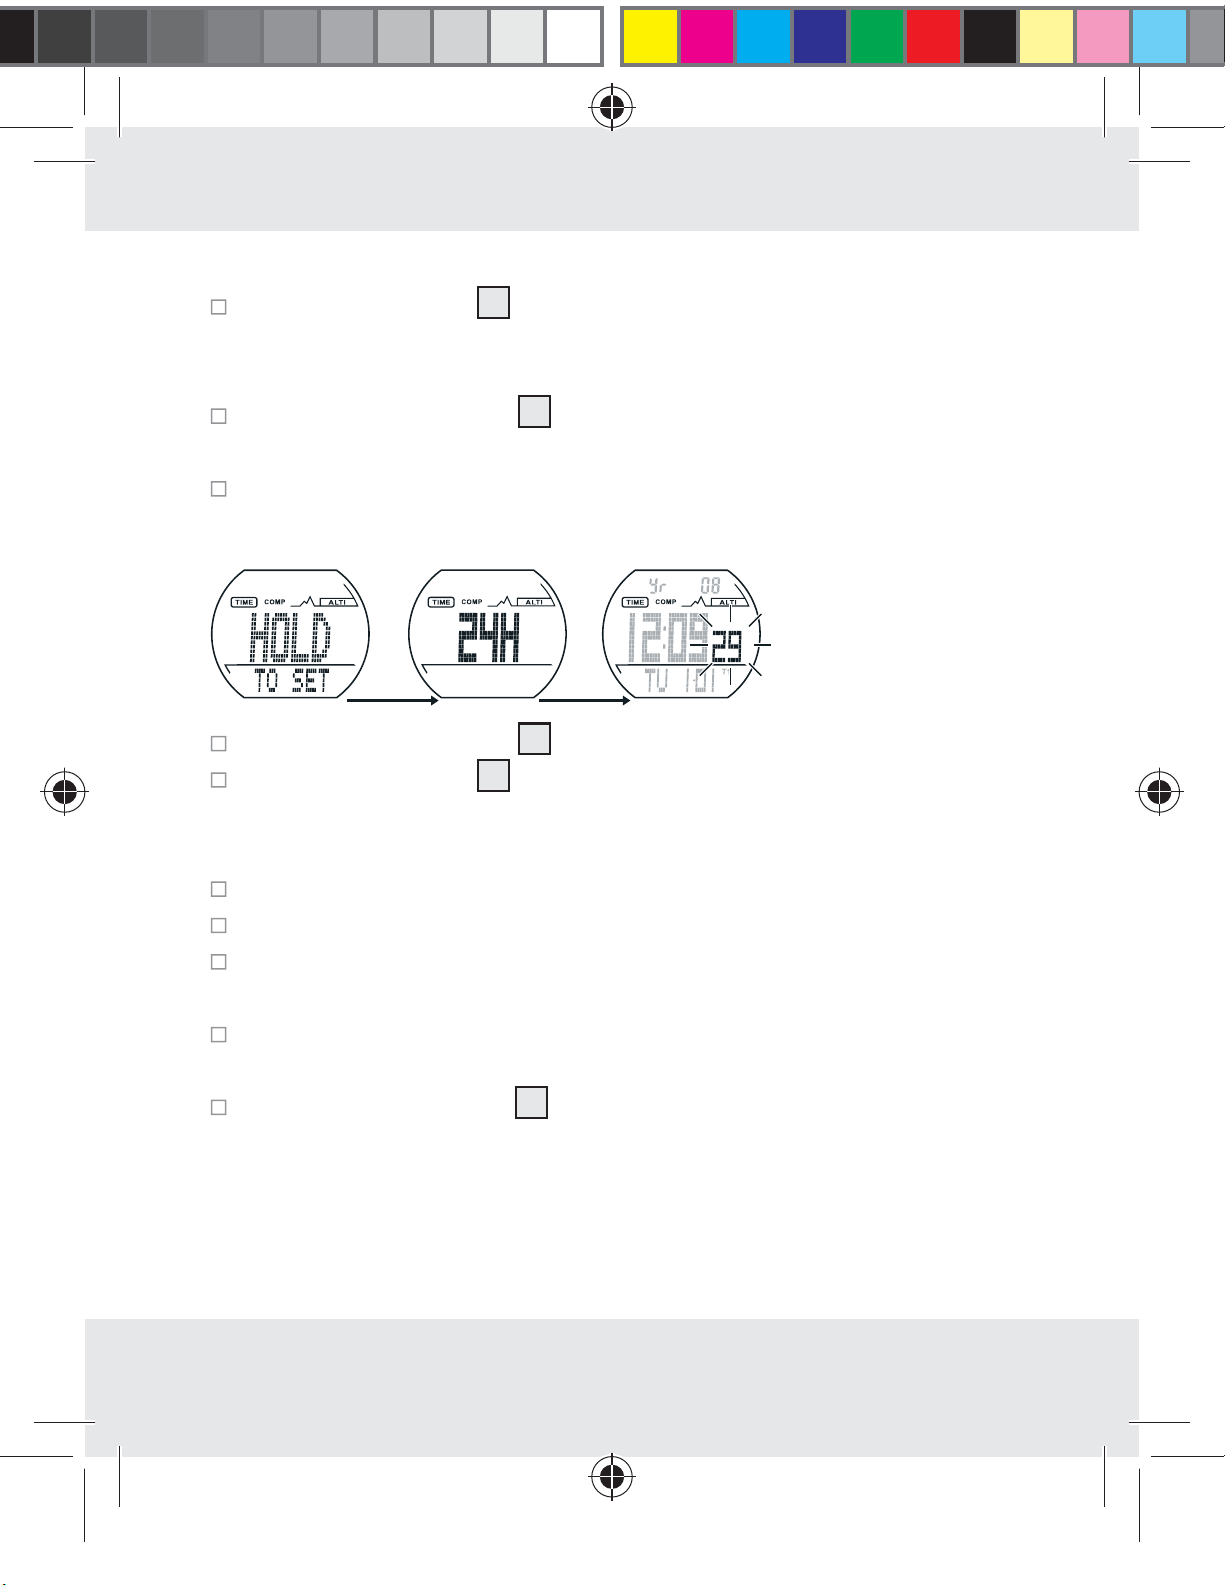
Setting the time (T1)
Press the SET button 3 and hold for about 3 seconds. „HOLD TO
SET“ will appear in the display and the hour format „24H“ begins to
flash.
Press the SELECT button 2, to switch between the 12 and 24 hour
format.
Press the SET button to confirm your entry. The second display of the
time display will flash.
Press the SELECT button 2 to set the second value to 0.
Press the SET button 3 to confirm your entry.
Note: You can hold the SELECT button pressed down to change the
settings faster
.
Press the SELECT button to set the minute display.
Press the SET button to confirm your entry.
Set the hours, the year, the month and the day the same manner. The
measurement unit then starts to flash.
Press the SELECT button to set the desired measurement unit
(METRIC = metric system / IMPERIAL = British system).
Press the MODE button 1. All settings will be saved.
8 GB
34232_LCD-Sportuhr_content_GB_PL_HU_SI_CZ_SK.indd 8 12.03.14 10:49
Page 9

Second time (T2)
Press the SELECT button 2 in time mode and hold down for about
3 seconds. The second time (T2) appears in the bottom area of the
display.
To set the second time (T2), proceed in the same manner as for the
setting of the first time (T1) (see chapter „Setting the time (T1)“).
Press the SELECT button and hold down for about 3 seconds. The time
display switches back to normal time (T1).
Alarm
There are five individual alarm signals that can be individually activated
or deactivated according to your wishes. Each alarm can be set for five
different purposes.
a) Alarm on a specific date (alarm at 10 am on 19. June)
(A1)
b) Daily alarm in a specific month (alarm every day at
10 am in June) (A2)
c) Monthly alarm (alarm at 10 am on the 19. of every
month) (A3)
d) Daily alarm (alarm every day at 10 am) (A4)
9 GB
34232_LCD-Sportuhr_content_GB_PL_HU_SI_CZ_SK.indd 9 12.03.14 10:49
Page 10
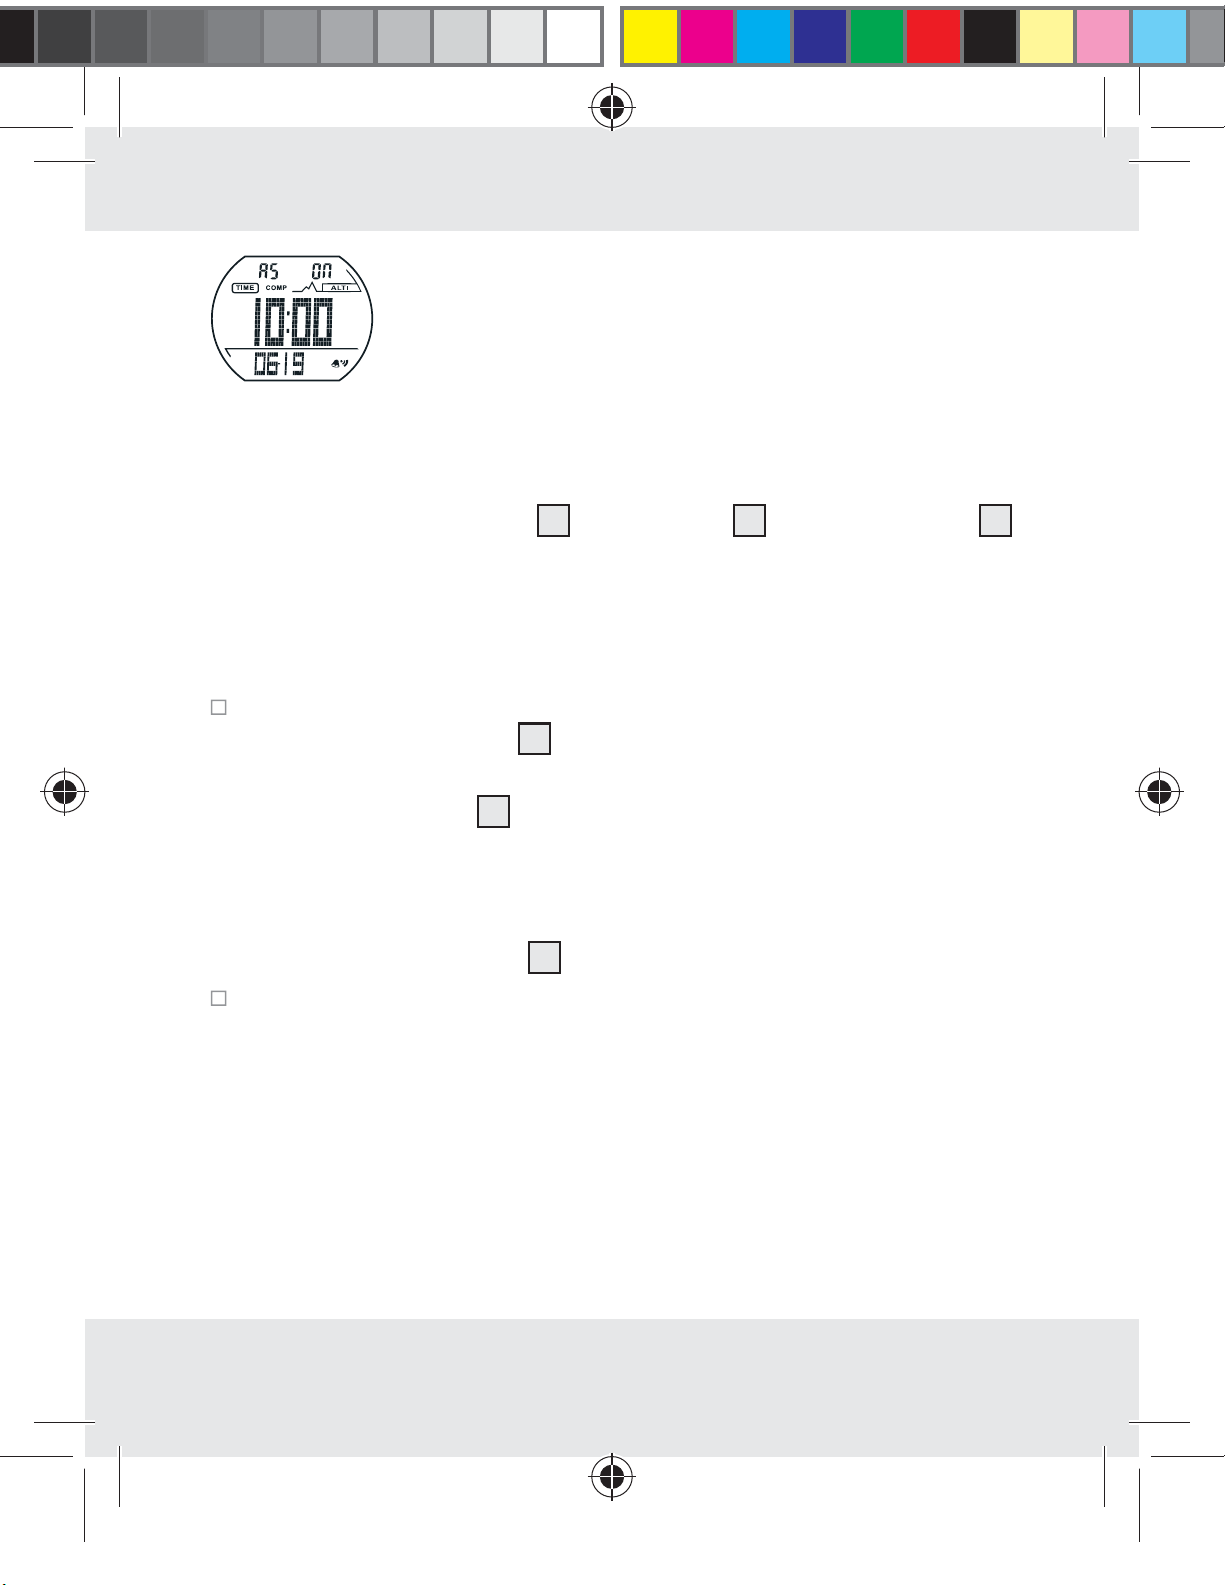
e) Hourly alarm (alarm every clock hour) (A5)
When the alarm is switched on, at the set time an alarm signal will buzz
for 30 seconds.
2
Note: Press the SELECT button
, the SET button 3 or the LIGHT button 4
to stop the alarm signal. Otherwise it will buzz for another four times at
intervals of 2minutes.
If the hourly alarm is switched on, there will be a beep tone every full hour.
Set the alarm as shown below:
2
1. Press the SELECT button
in time mode until the display „ALARM“
appears.
3
2. Press the SET button
to select between the alarm signals A1 to A5.
3. Hold the SET button pressed down to proceed to the setting of the
selected alarm.
4. Press the SET button again to make the alarm settings.
1
5. Press thee MODE button
to save the settings.
To do this, follow Steps 1 to 6:
10 GB
34232_LCD-Sportuhr_content_GB_PL_HU_SI_CZ_SK.indd 10 12.03.14 10:49
Page 11
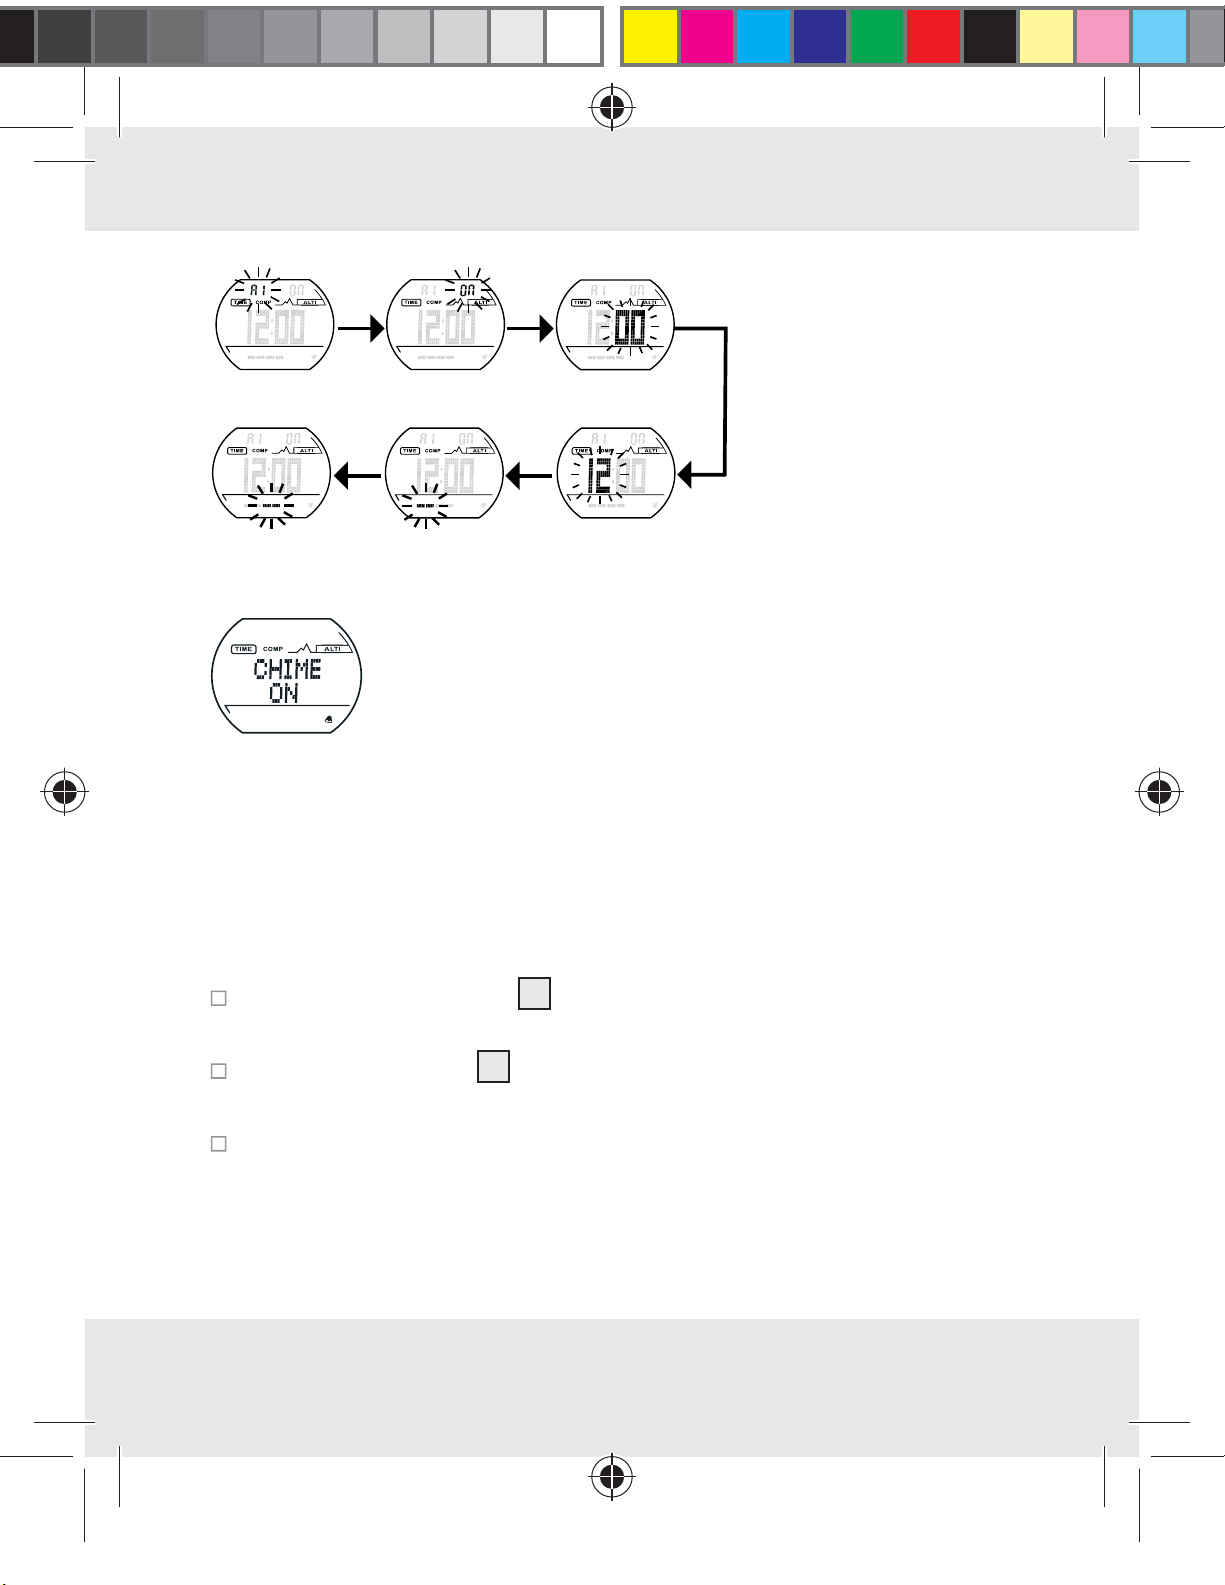
Alarm A1
Step 1
Alarm on
Step 2
minute
Step 3
Date
Step 6
month
Step 5
Hourly alarm on
hour
Step 4
Note: The set alarm is determined by the current time selected (T1 or T2).
Timer
The watch is equipped with a countdown timer and a countup timer.
Basic setting: 0:01·00 (1minute)
Press the SELECT button 2 in time mode until the display „TIMER“
appears.
Press the SET button 3 until the display „HOLD TO SET“ appears
and the countdown timer can be set.
34232_LCD-Sportuhr_content_GB_PL_HU_SI_CZ_SK.indd 11 12.03.14 10:49
Press the SELECT button to set the minutes. Press the SET button to
proceed to the next setting (hours).
11 GB
Page 12

Press the SELECT button to set the hours. Press the SET button to
proceed to the next setting “Cd r”.
The countdown can be set at maximum 23 hours and 59 minutes.
Confirm your setting by pressing the MODE button 1.
Timer Types:
r: The timer begins to count down the previously set time until 0 is
reached.
U: The timer begins to count up the previously set time until 0 is reached.
S: The timer stops as soon as 0 is reached.
The following applies to all three timer types:
Press the SET button 3. The timer starts.
Press the SET button again. The timer stops.
Press the SET button again. The timer continues to count.
Press the SET button again and hold for about 3 seconds. In this way,
the timer is set back to the originally set time.
When the timer reaches 0, an alarm signal buzzes for 15 seconds.
2
Press the SELECT button
to stop the alarm signal.
, the SET button 3 or the MODE button 1
Stopwatch Mode
Press the MODE button 1 until the display „CHRONO“ appears to
proceed to the stopwatch mode.
12 GB
34232_LCD-Sportuhr_content_GB_PL_HU_SI_CZ_SK.indd 12 12.03.14 10:49
Page 13
You can choose between the following sub-function in the stopwatch mode:
CHRONO (Stopwatch)
DATA RECALL (data recall)
Stopwatch
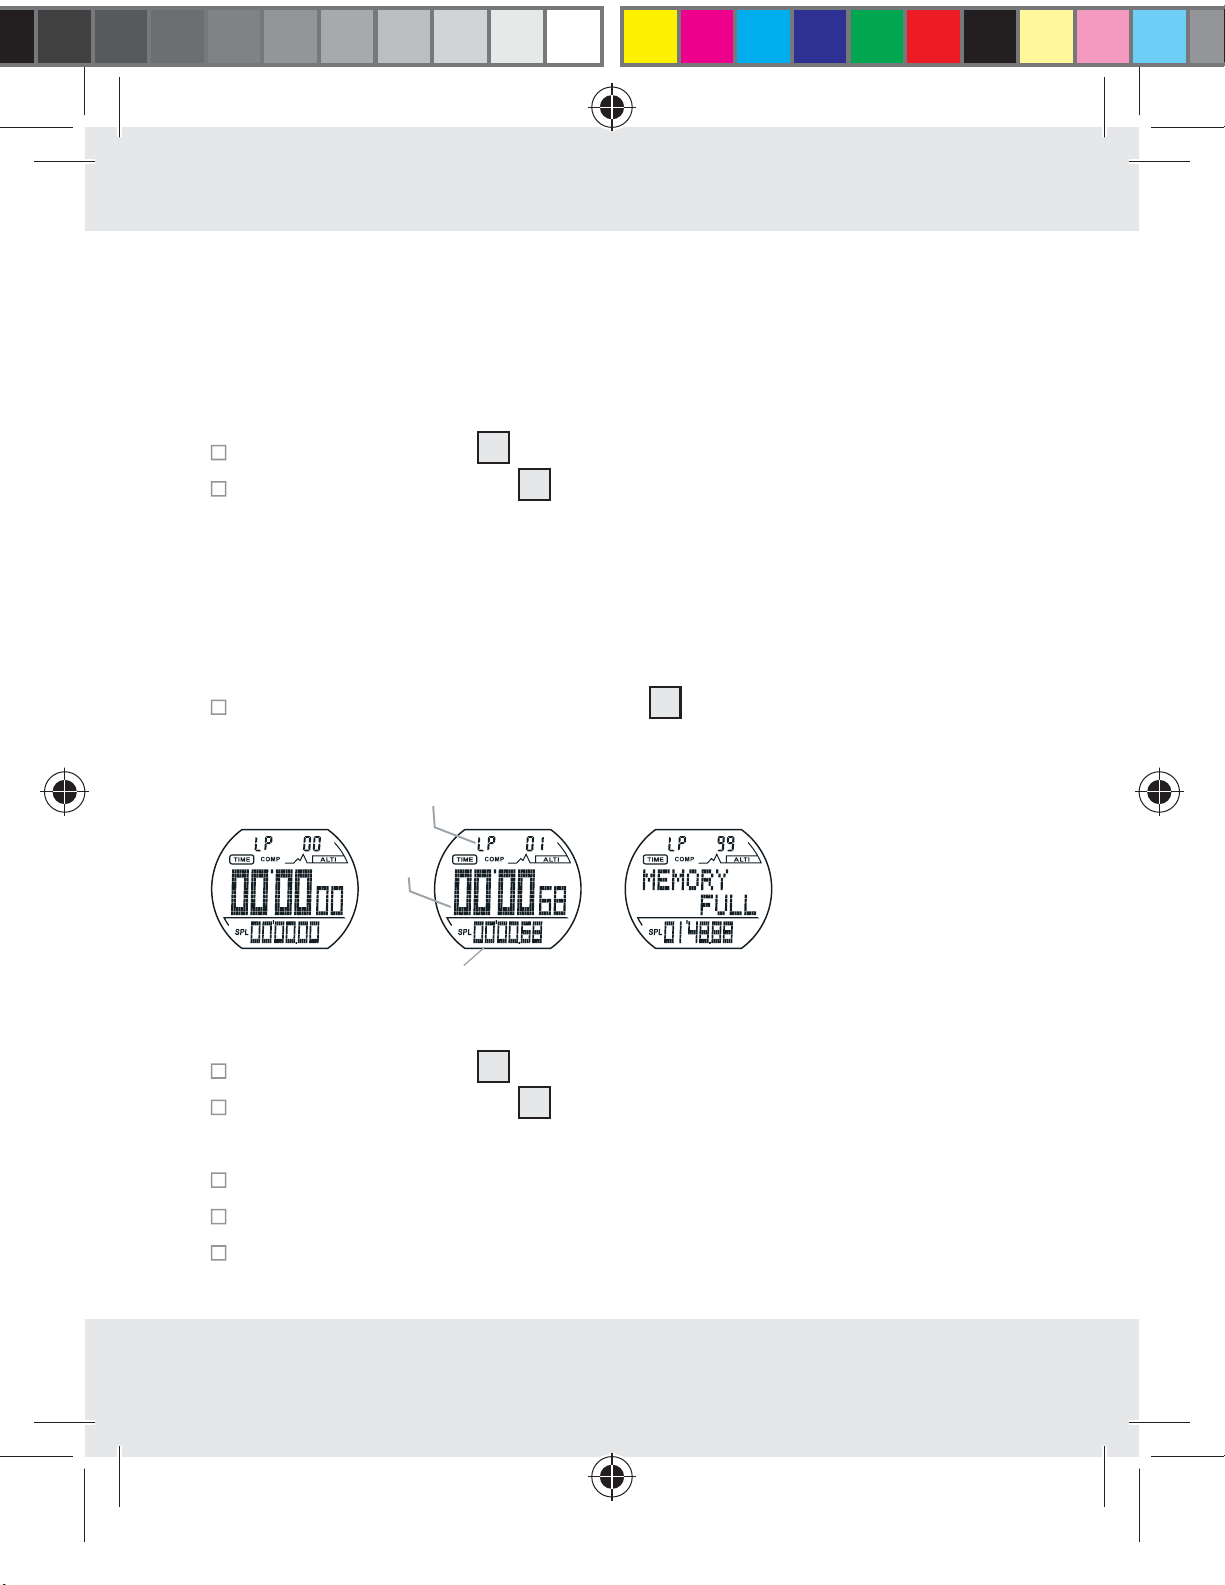
Press the SET button 3 to start / stop the stopwatch..
Press the SELECT button 2 to record a lap time in the lap memory
while the stopwatch is running.
Note: 99 laps can be saved. „MEMORY FULL“ will appear in the
display when the lap memory is full.
Note: You can only switch between „CHRONO“ and „DATA
RECALL“ if at least one lap has been recorded / stopped.
Press and hold down the SET button 3 to reset the stopwatch display
and the lap counter to 0.
Lap memory
Lap
time
Stopwatch mode Total time Lap memory full
Stopwatch memory recall
Press the SET button 3 to stop the stopwatch.
Press the SELECT button 2 to proceed to the memory recall mode. In
the display „BEST LAP“ and the records of the BEST LAPS will appear.
Press the SET button to read the different lap memories.
Press the SELECT button to leave the memory recall mode.
Follow the diagrams to carry out a standard measurement, a lap time
measurement and a memory recall:
13 GB
34232_LCD-Sportuhr_content_GB_PL_HU_SI_CZ_SK.indd 13 12.03.14 10:49
Page 14
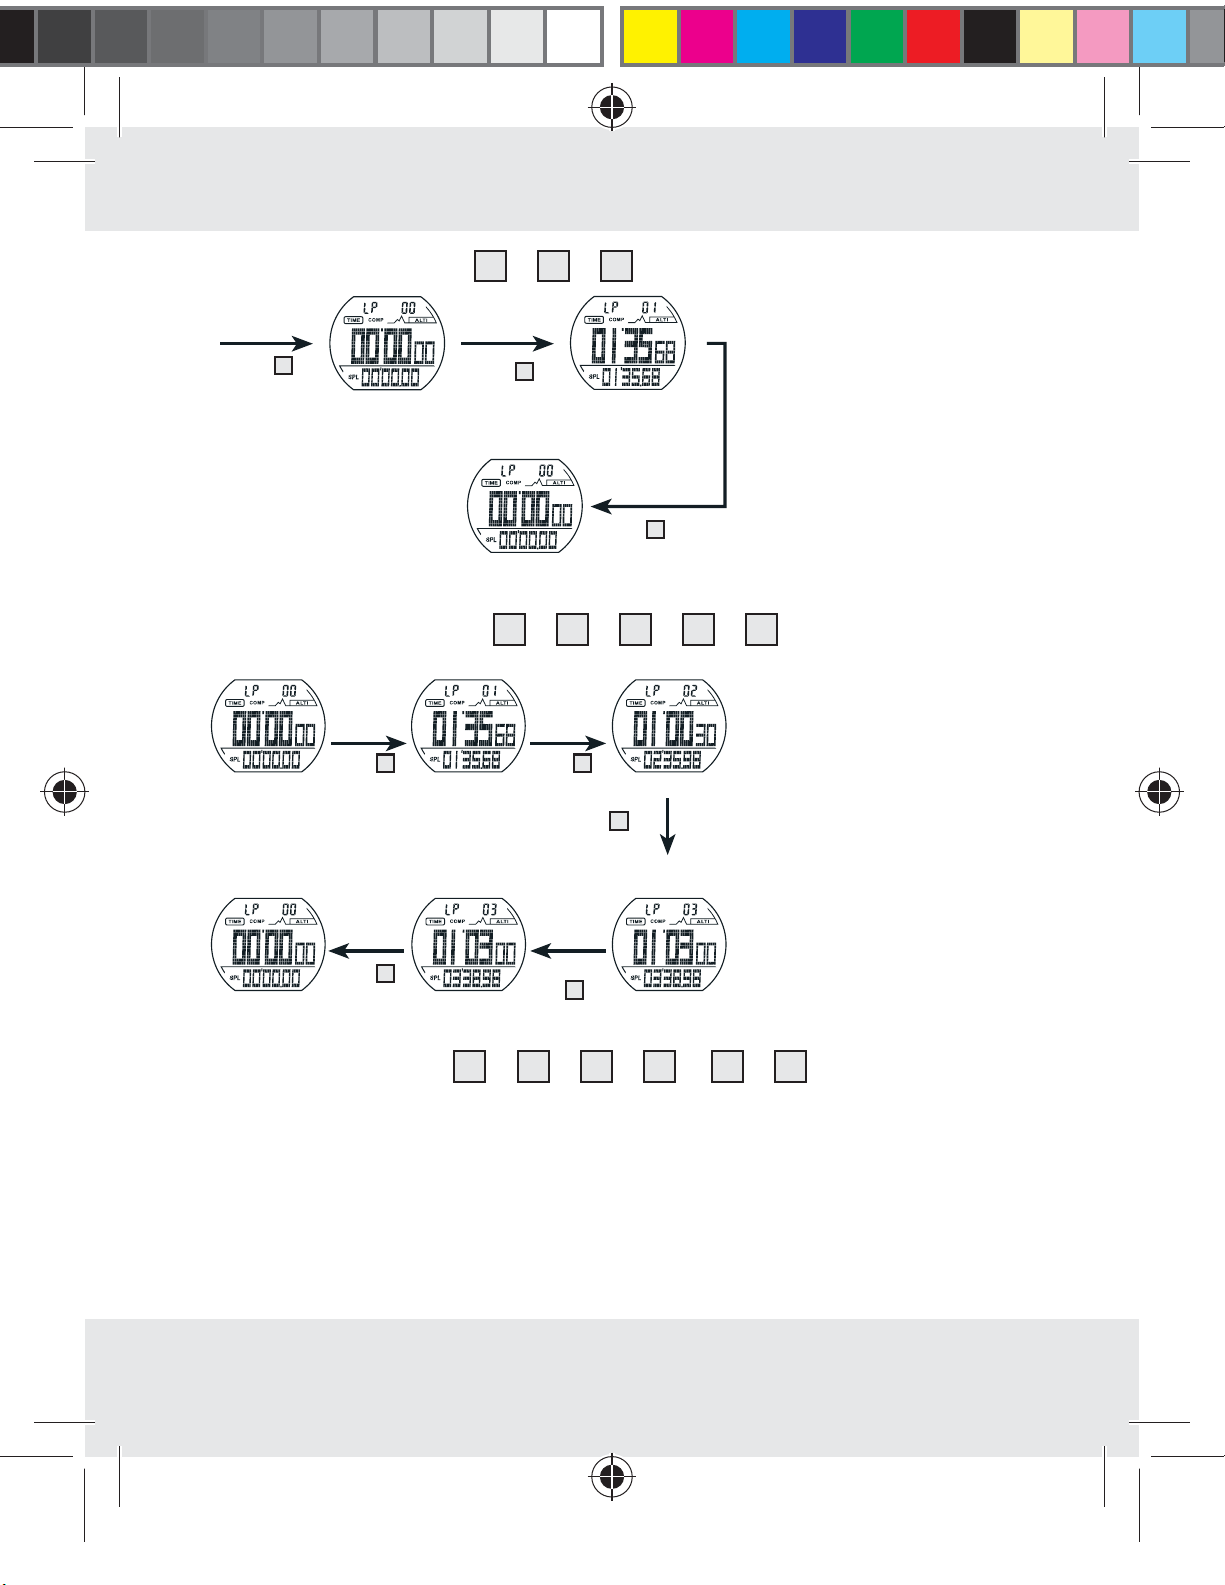
Standard measurement: 3 – 3 –
START STOP
3
Press
Press
3
3
RESET
Hold 3 pressed
down
Measurement of lap time: 3 – 2 – 2 – 3 –
Lap 2
2
Lap 3
START
3
Press
Hold 3
pressed down
Lap 1
Press
STOPRESET
2
Press
Press
3
3
Recall of lap memory: 3 – 2 – 3 – 3 … 2 –
3
34232_LCD-Sportuhr_content_GB_PL_HU_SI_CZ_SK.indd 14 12.03.14 10:49
14 GB
Page 15
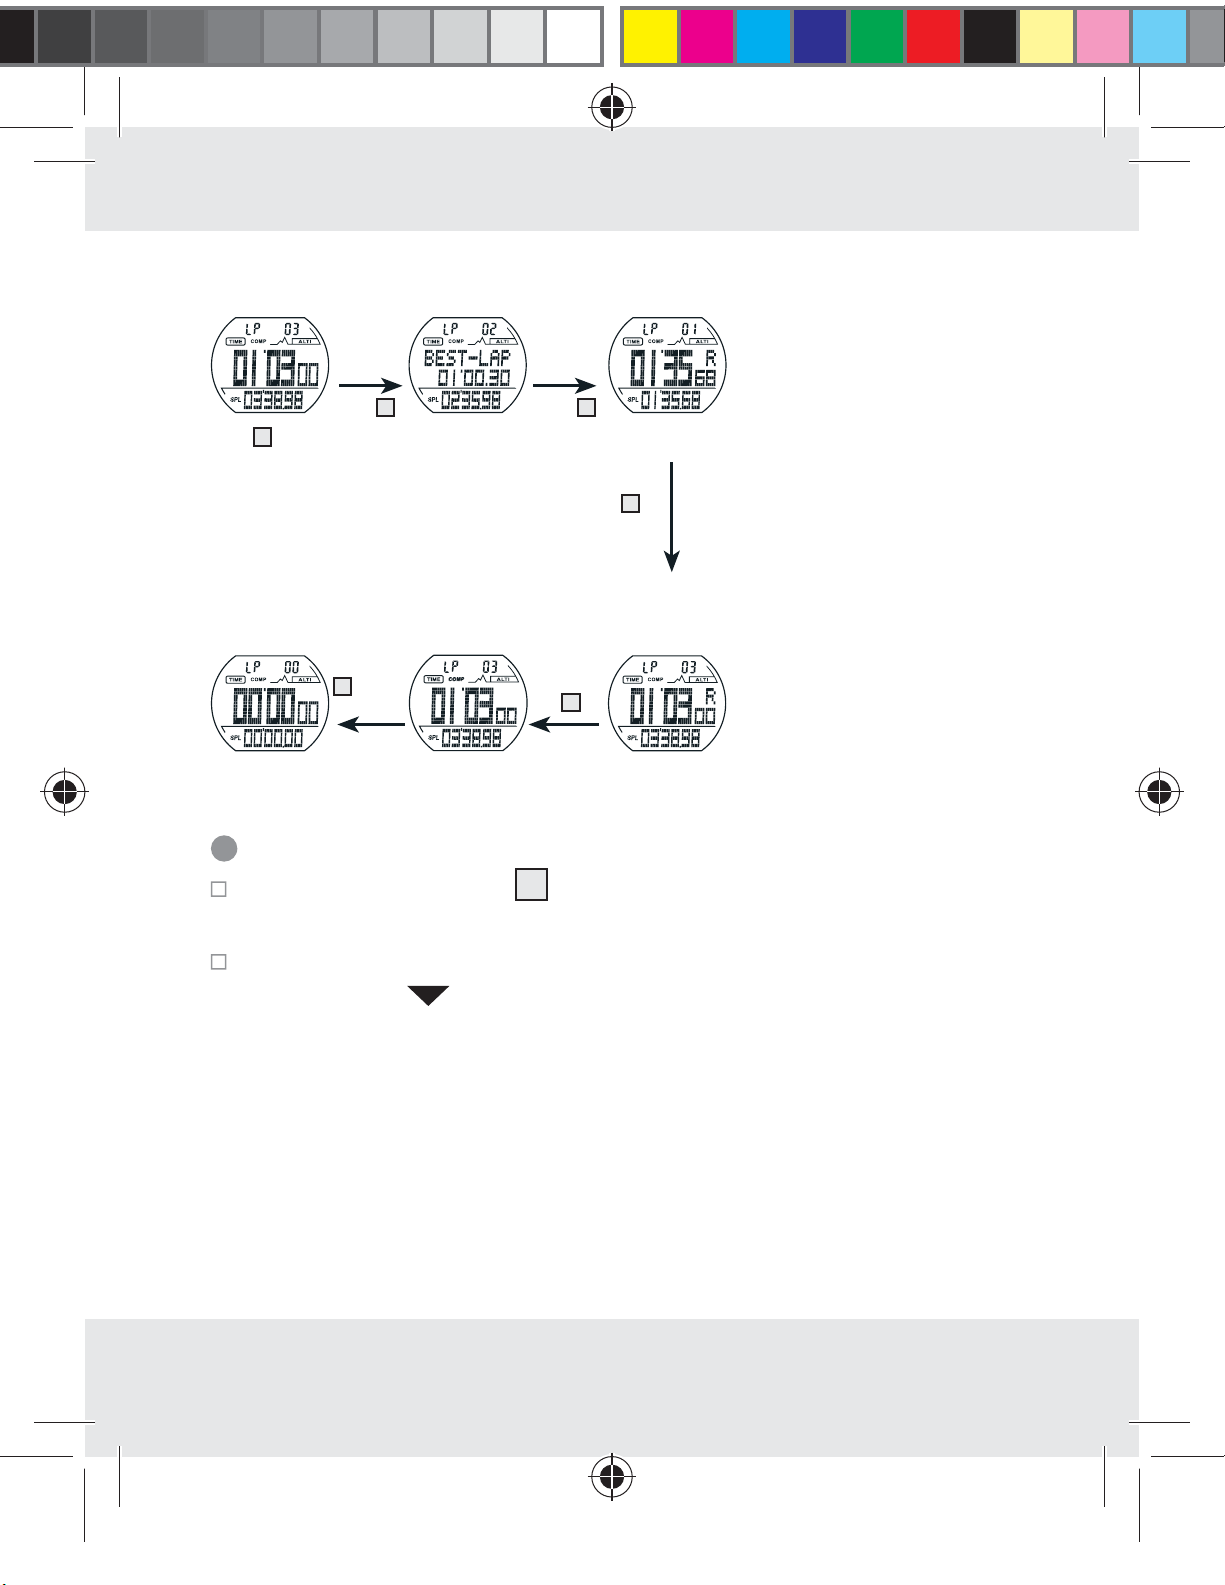
STOPWATCH
MODE
RECALL OF FIRST
LAP
Press 3 to stop
the stopwatch
RESET
(set to 0)
Press
Hold
3
pressed
down
2
BACK TO STOPWATCH MODE
Press
Press
3
Press
2
3
RECALL OF LAST
LAP
Compass Mode
Press the MODE button 1 until the display „COMP“ appears to
proceed to the compass mode.
Hold the compass in a horizontal position and mark the required
34232_LCD-Sportuhr_content_GB_PL_HU_SI_CZ_SK.indd 15 12.03.14 10:49
direction with
.
There are two display formats: display with large digit and detailed display.
Display with large digits
There are two lines in this display format.
The compass appears in the first line.
The compass direction and the cardinal point appear in the second line
15 GB
Page 16
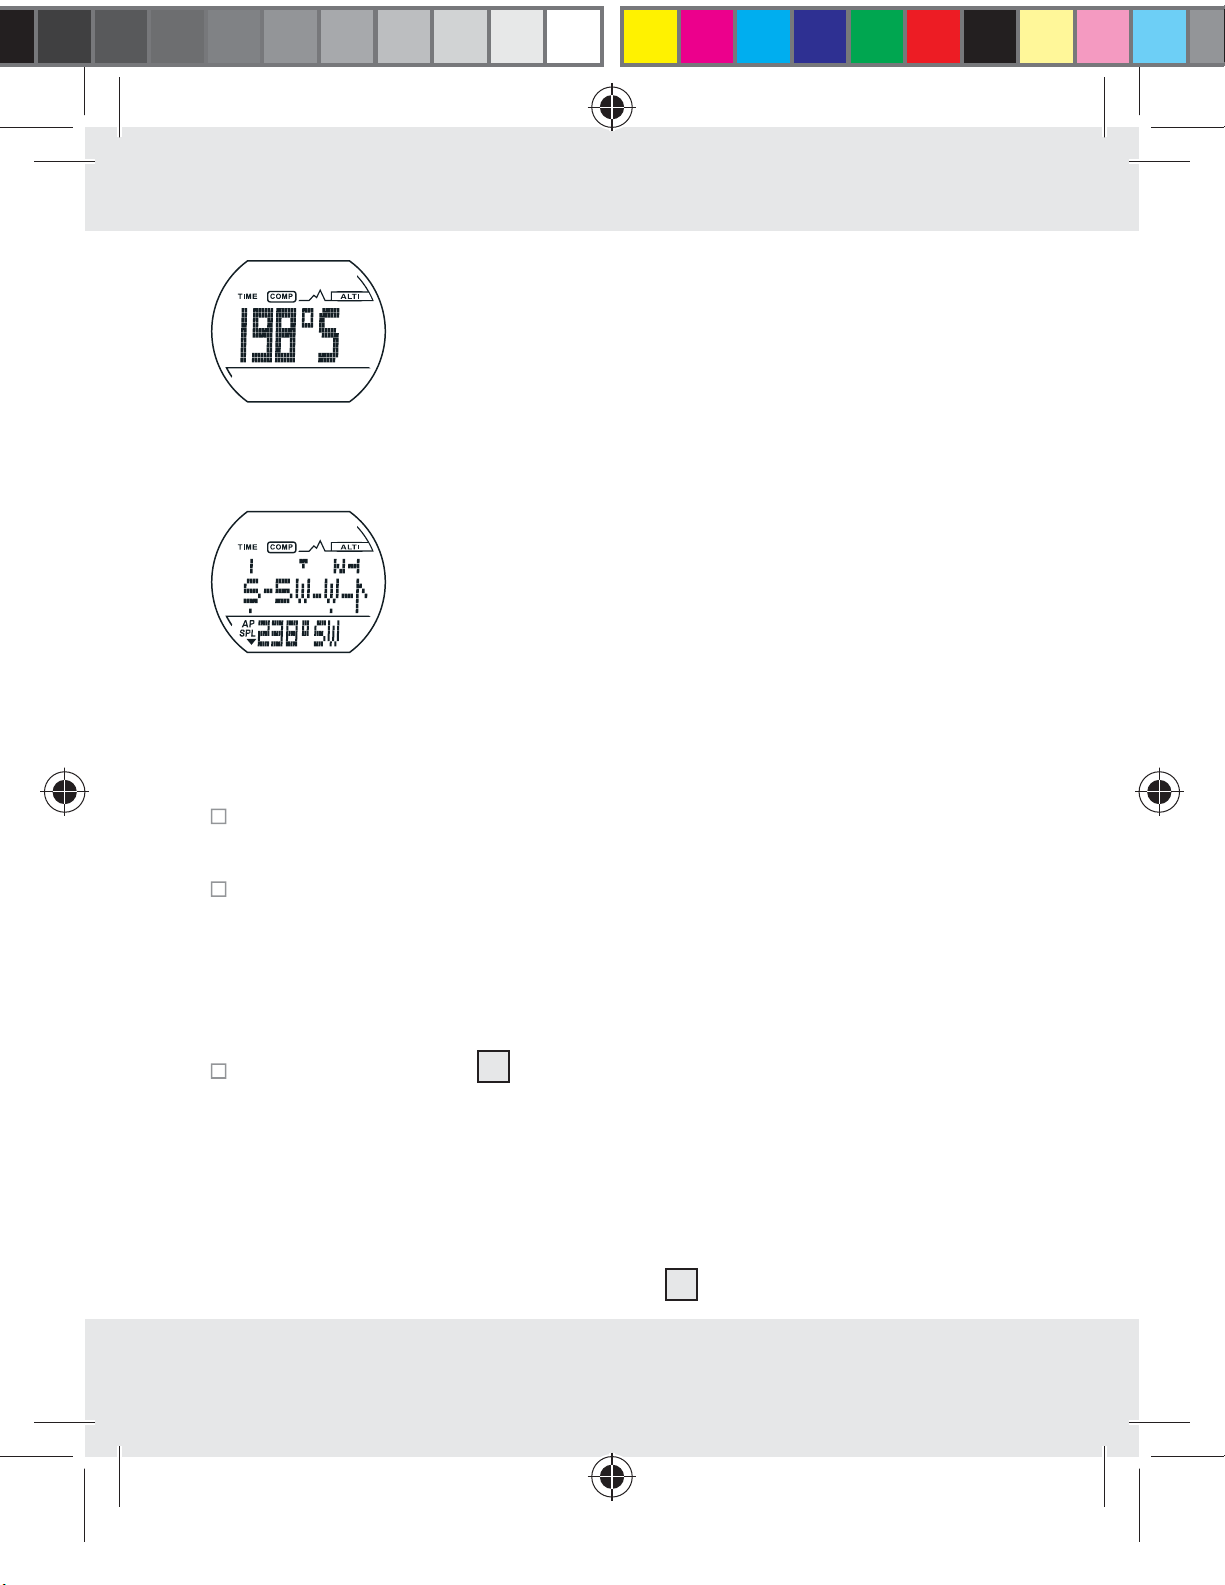
Detail display
There are four lines in this display format.
R
– The compass appears in the first line.
– An arrow appears in the second line pointing the shortest route to the
north.
When „← N“ appears on the left side of the display, go left to reach
north faster.
When „N →“ appears on the right side of the display, go right to
reach north faster.
– The bearing appears in the third line.
– The compass with the direction and the cardinal point appear in the
34232_LCD-Sportuhr_content_GB_PL_HU_SI_CZ_SK.indd 16 12.03.14 10:49
fourth line.
Press the SET button 3 to switch between the two display formats.
The compass switches off automatically to save energy:
in idle state after 3 minutes.
in continuous operation after 5 minutes
Note: To reactivate, press the SET button
3
.
16 GB
Page 17
Ambient interference
– Digital compasses operate with the magnetic field of the earth. Hence
these devices react very sensitively to various ambient influences, that
distort the magnetic field of the earth, for example, when approaching
heavy metal, household devices, computers and power cables.
Never use the compass in the proximity of another compass or a
metal or magnetic object.
To obtain accurate information on the direction of movement, recali-
brate the compass (see chapter „Calibration of the device), if
1. „ERROR“ permanently appears in the display.
2. The direction details indicate an error of more than 10 degrees.
3. The device is used in a vehicle for the first time.
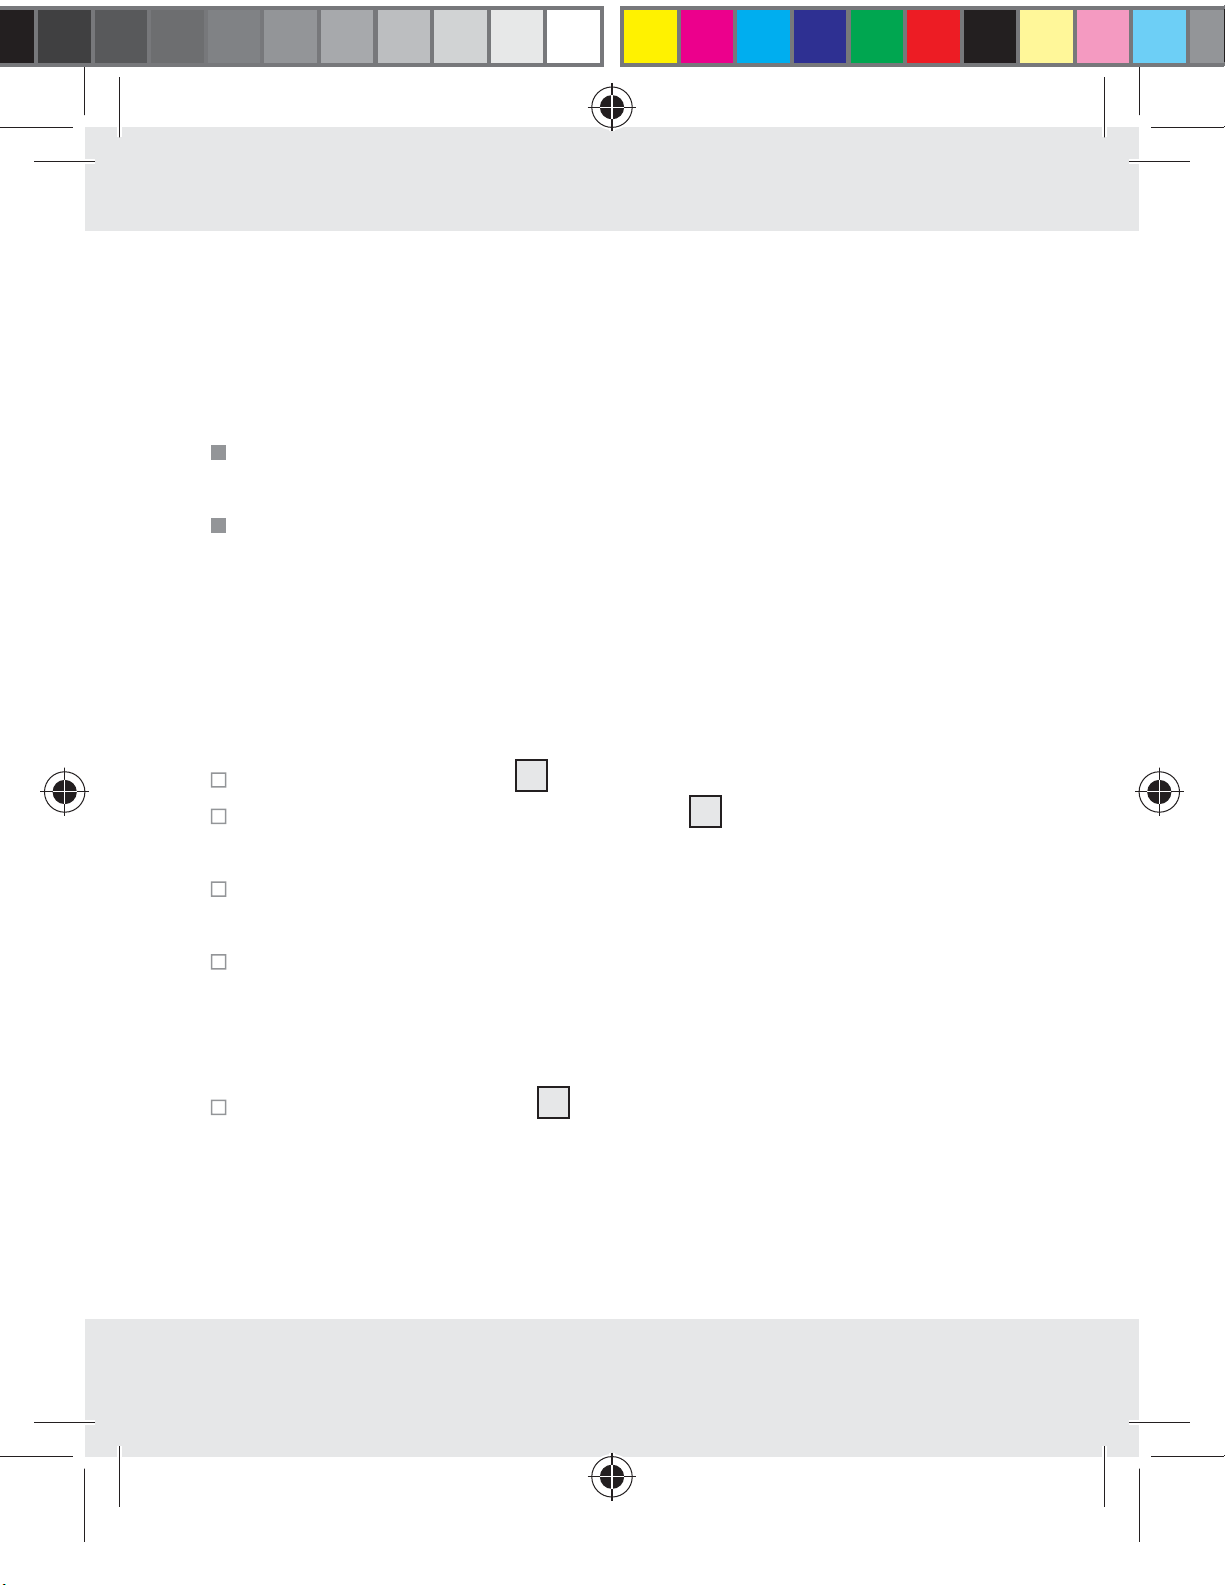
Calibration of the device
Press the MODE button 1 to proceed to compass mode.
Press and hold down the SELECT button 2 to proceed to calibration
mode. „CAL“ appears in the display.
Press the SELECT button once again to start the calibration. A rotating
ring appears in the display.
Rotate the device twice in a clockwise direction on a level surface that
is free from metal plates, household devices, computers, power cables
etc. Always rotate in the same direction. Ensure that you take at least
20 seconds for each rotation but not longer than one minute.
Then press the SET button 3 to complete the calibration.
Note: If the calibration is not performed correctly, inaccurate informa-
tion could be the consequence. Perform the calibration once again if
any detail seems to be erroneous.
17 GB
34232_LCD-Sportuhr_content_GB_PL_HU_SI_CZ_SK.indd 17 12.03.14 10:49
Page 18
2
Press
R
Calibration mode
Press 3 to
confirm
When the ring moves, turn the watch clockwise in two rotations
Press
2
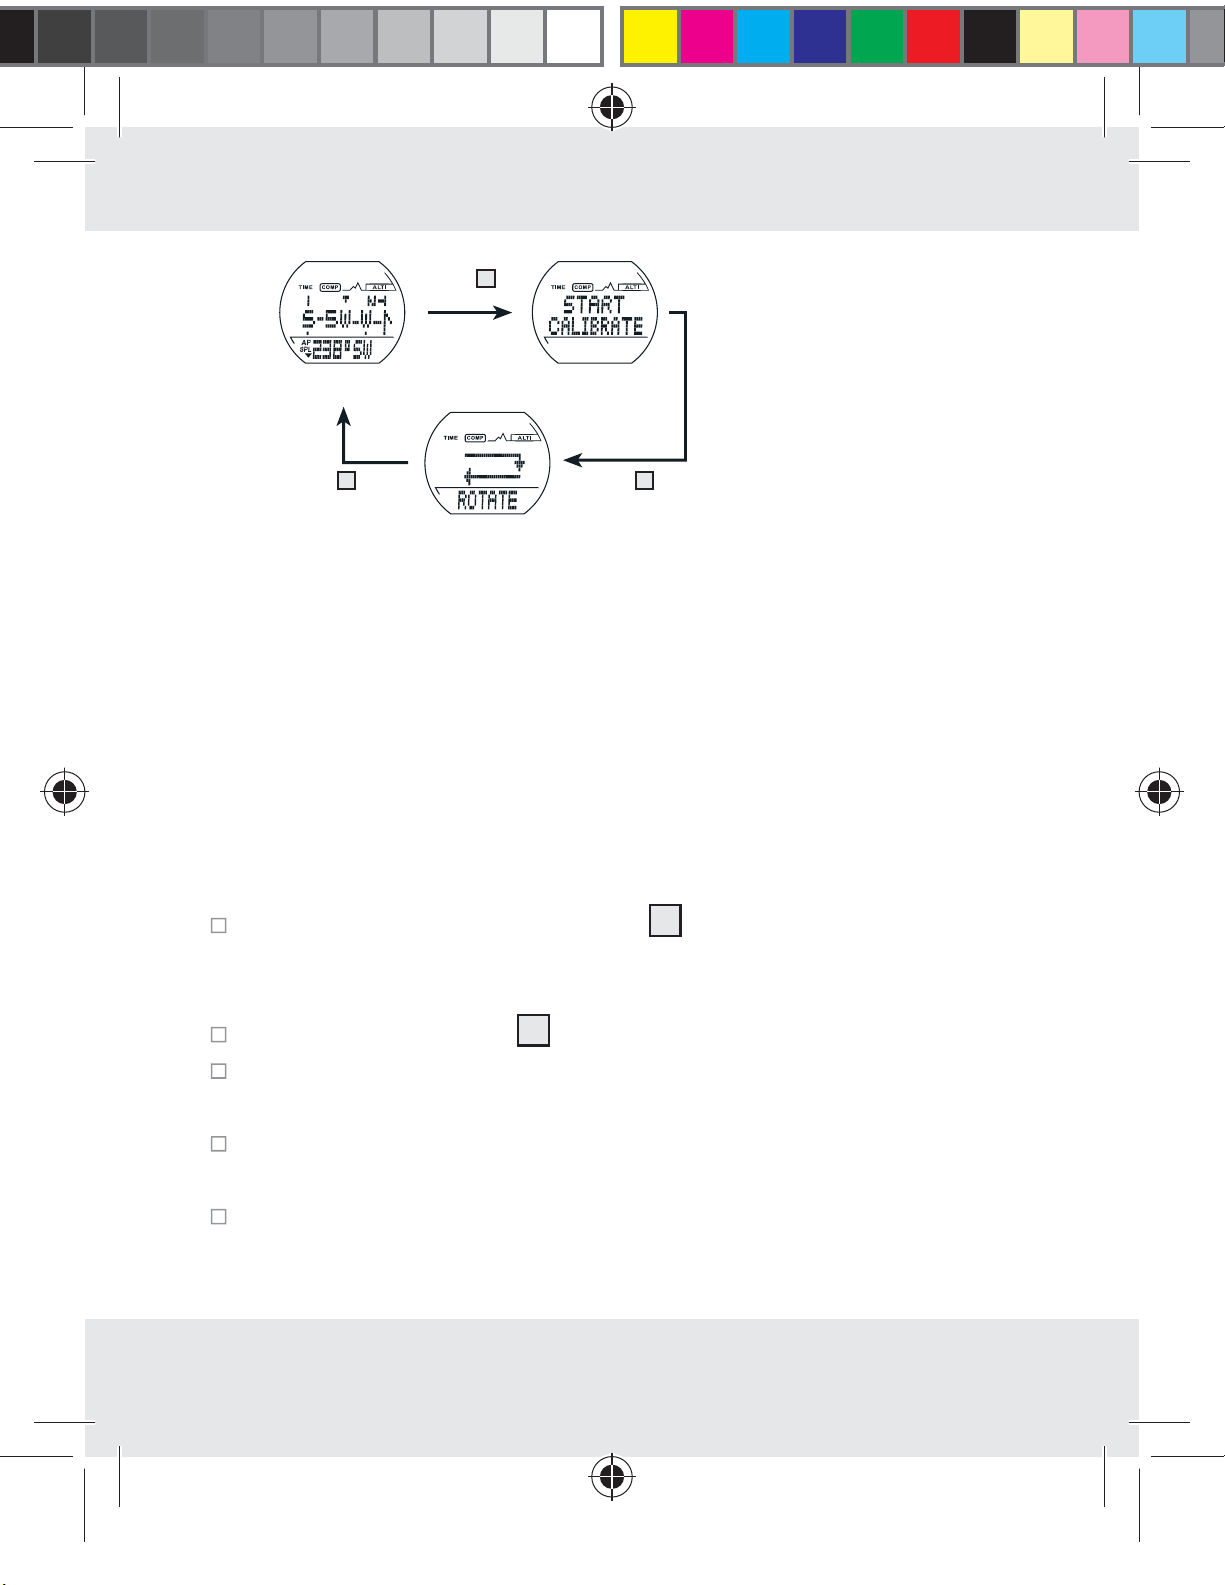
Entry of declination angle for the geographic north
(True North)
– The declination indicates the difference between the magnetic north
and the geometric north direction at your location.
– The local declination is marked at the edge of the map either as east
plus declination (E) or as west minus declination (W). During the orien-
tation, the direction on the map is corrected by subtraction of the plus
declination or addition of the minus declination.
Press and hold down the SET button 3 to proceed to the setting
mode for the declination. The letter „E“ appears in the display and
begins to flash.
Press the SELECT button 2 to select the direction east (E) or west (W).
34232_LCD-Sportuhr_content_GB_PL_HU_SI_CZ_SK.indd 18 12.03.14 10:49
Press the SET button again to confirm your entry The digit for the decli-
nation angle begins to flash.
Press the SELECT button to set the angle that should be adjusted. Press
the SET button to confirm your entry.
Press the SELECT button to switch the declination function on or off
“ON” or “OFF” appears in the bottom area of the display.
18 GB
Page 19
Press the MODE button 1 to confirm the setting. You will now return
to compass mode.
Please read the following example to understand the declination
effect: The current direction is N 10 degrees. If the declination angle is
set at 30 degrees, the final direction is changed to NW 340 degrees.
Note: You will find information on the declination data for your location
positioning in the Internet.
Altimeter Mode
Press the MODE button 1 to proceed to altimeter mode. „ALTI“
appears in the display.
Press the SELECT button 2 in altimeter mode. You can choose
between the following sub-functions:
– Clock (ALTI)
– Memory of maximum altitude (HIGH)
– Memory of minimum altitude (LOW)
– Total height gain (UP)
– Total height loss (DOWN)
– Number of hills (HILL)
– Record (RECORD)
19 GB
34232_LCD-Sportuhr_content_GB_PL_HU_SI_CZ_SK.indd 19 12.03.14 10:49
Page 20
Setting the altimeter
Press the SELECT button 2 in altimeter mode until the display „ALTI“
appears.
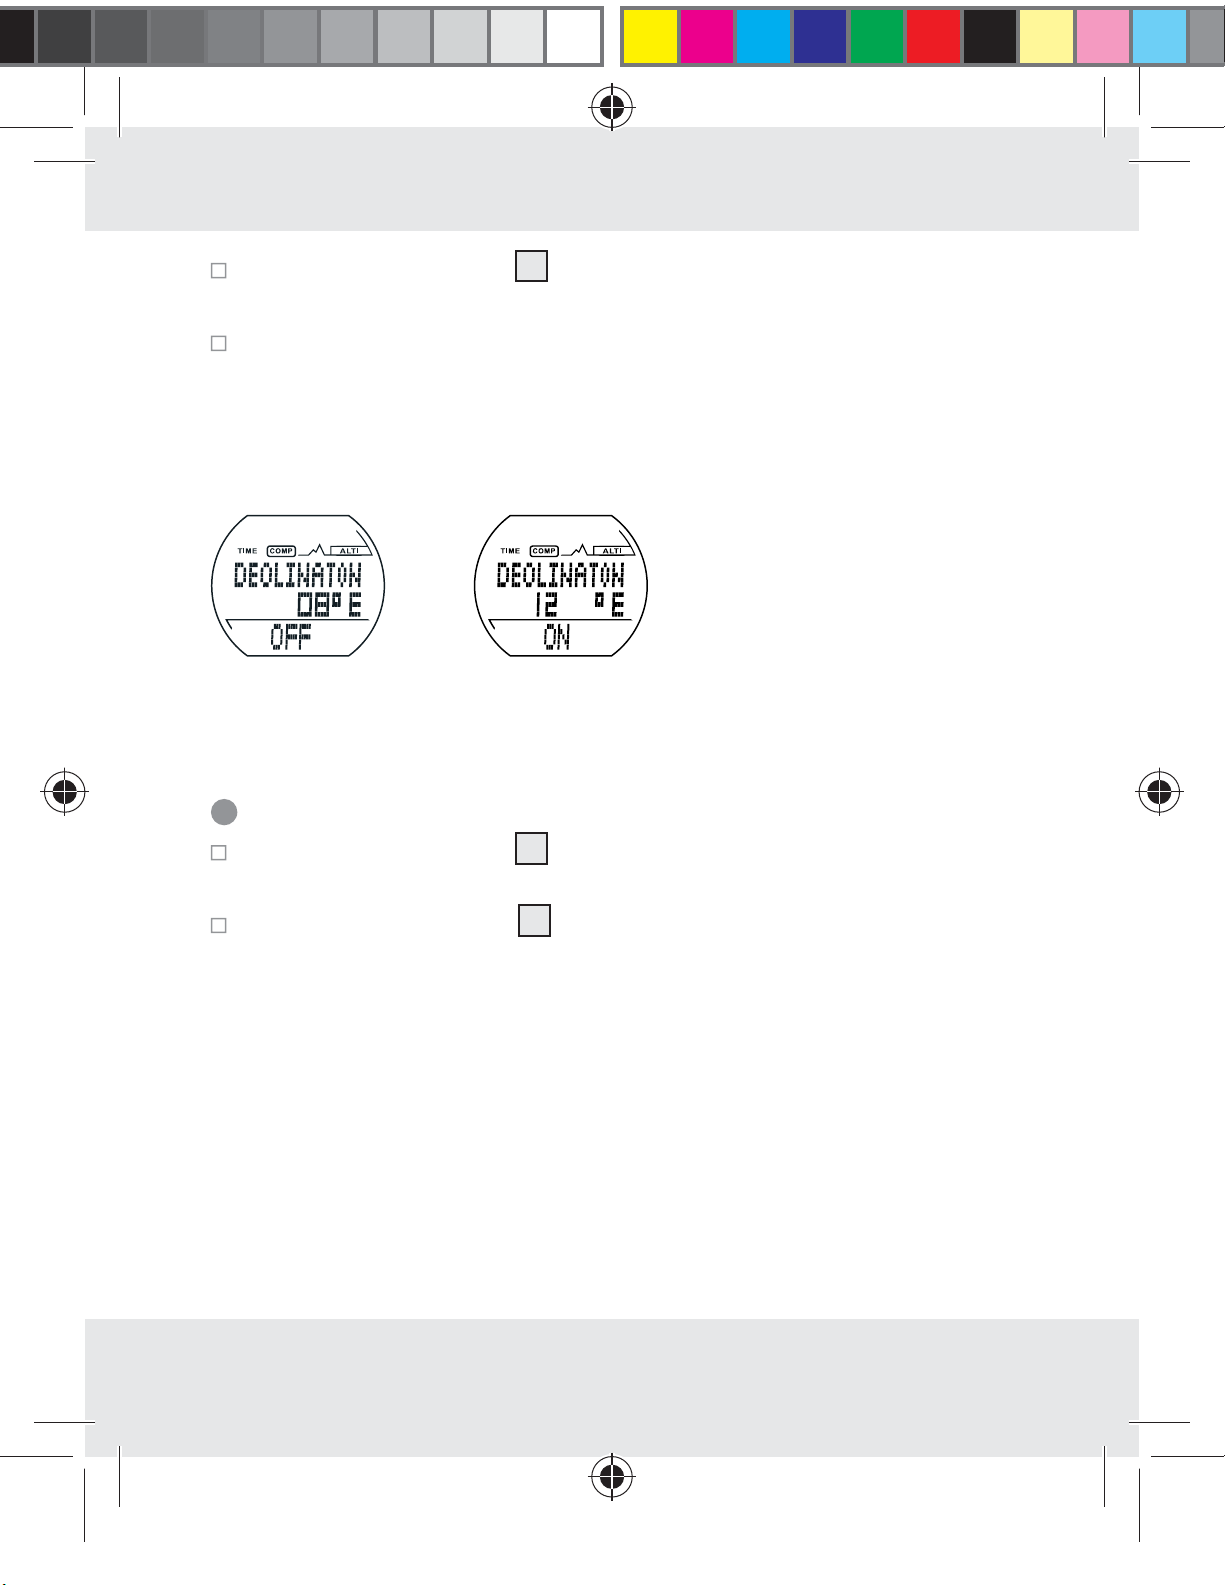
Press the SET button 3 and hold for about 3 seconds. “HOLD TO
SET” appears in the display The altitude display then starts to flash.
Press the SELECT button to set the altimeter.
Press the SET button to proceed to the next digit.
Press the MODE button 1 to confirm the setting.
Note: Press the SELECT button 2 to select the desired display in altime-
3
ter mode. If you then press the SET button
, the following data appears
in the middle area of the display: temperature, time and graphic altitude
display.
Time
Note: You can have your current location displayed in different ways:
1. Simple display mode: current altitude and time,
2. Detailed display mode: temperature, time, current altitude and graphic
altitude display.
Press the SET button 3 to proceed to simple display mode.
Press the SELECT button 2 until the display „CLOCK“ appears. The
current time appears in the bottom area of the display, the current
altitude appears in the middle.
20 GB
34232_LCD-Sportuhr_content_GB_PL_HU_SI_CZ_SK.indd 20 12.03.14 10:49
Page 21
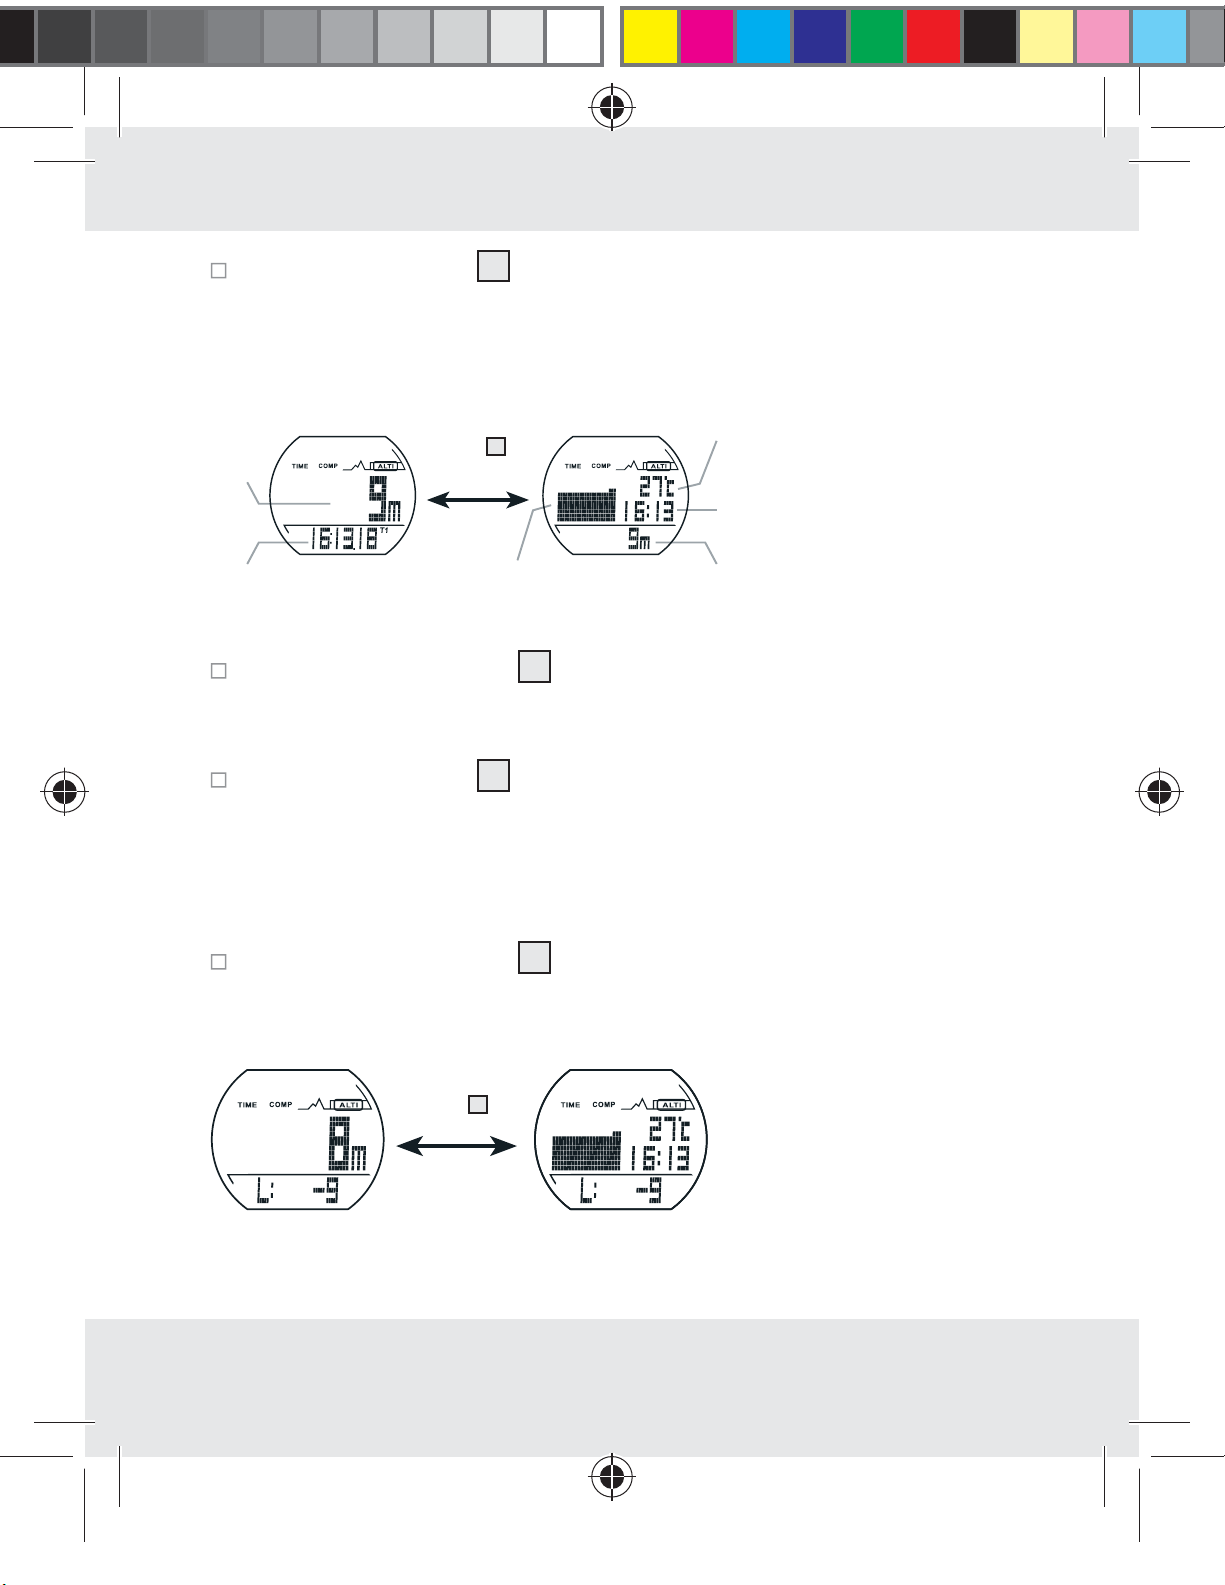
Press the SET button 3 to proceed to detailed display mode. The
current altitude appears in the bottom area of the display.
Simple display Detailed display
current
height
Press
3
Temperature
current
time
time
Graphic altitude display
current
height
Memory of maximum altitude (HIGH)
Press the SELECT button 2 in altimeter mode until the display „HIGH“
appears. The maximum altitude appears in the bottom area of the
display, the current altitude appears in the middle.
Press the SET button 3 and hold for about 3 seconds. “HOLD TO
RESET” appears in the bottom area of the display. The last recorded
maximum altitude then appears in the bottom area of the display.
Memory of minimum altitude (LOW)
Press the SELECT button 2 in altimeter mode until the display „LOW“
appears. The minimum altitude memory appears in the bottom area of
the display, the current altitude appears in the middle.
3
Press
34232_LCD-Sportuhr_content_GB_PL_HU_SI_CZ_SK.indd 21 12.03.14 10:49
21 GB
Page 22
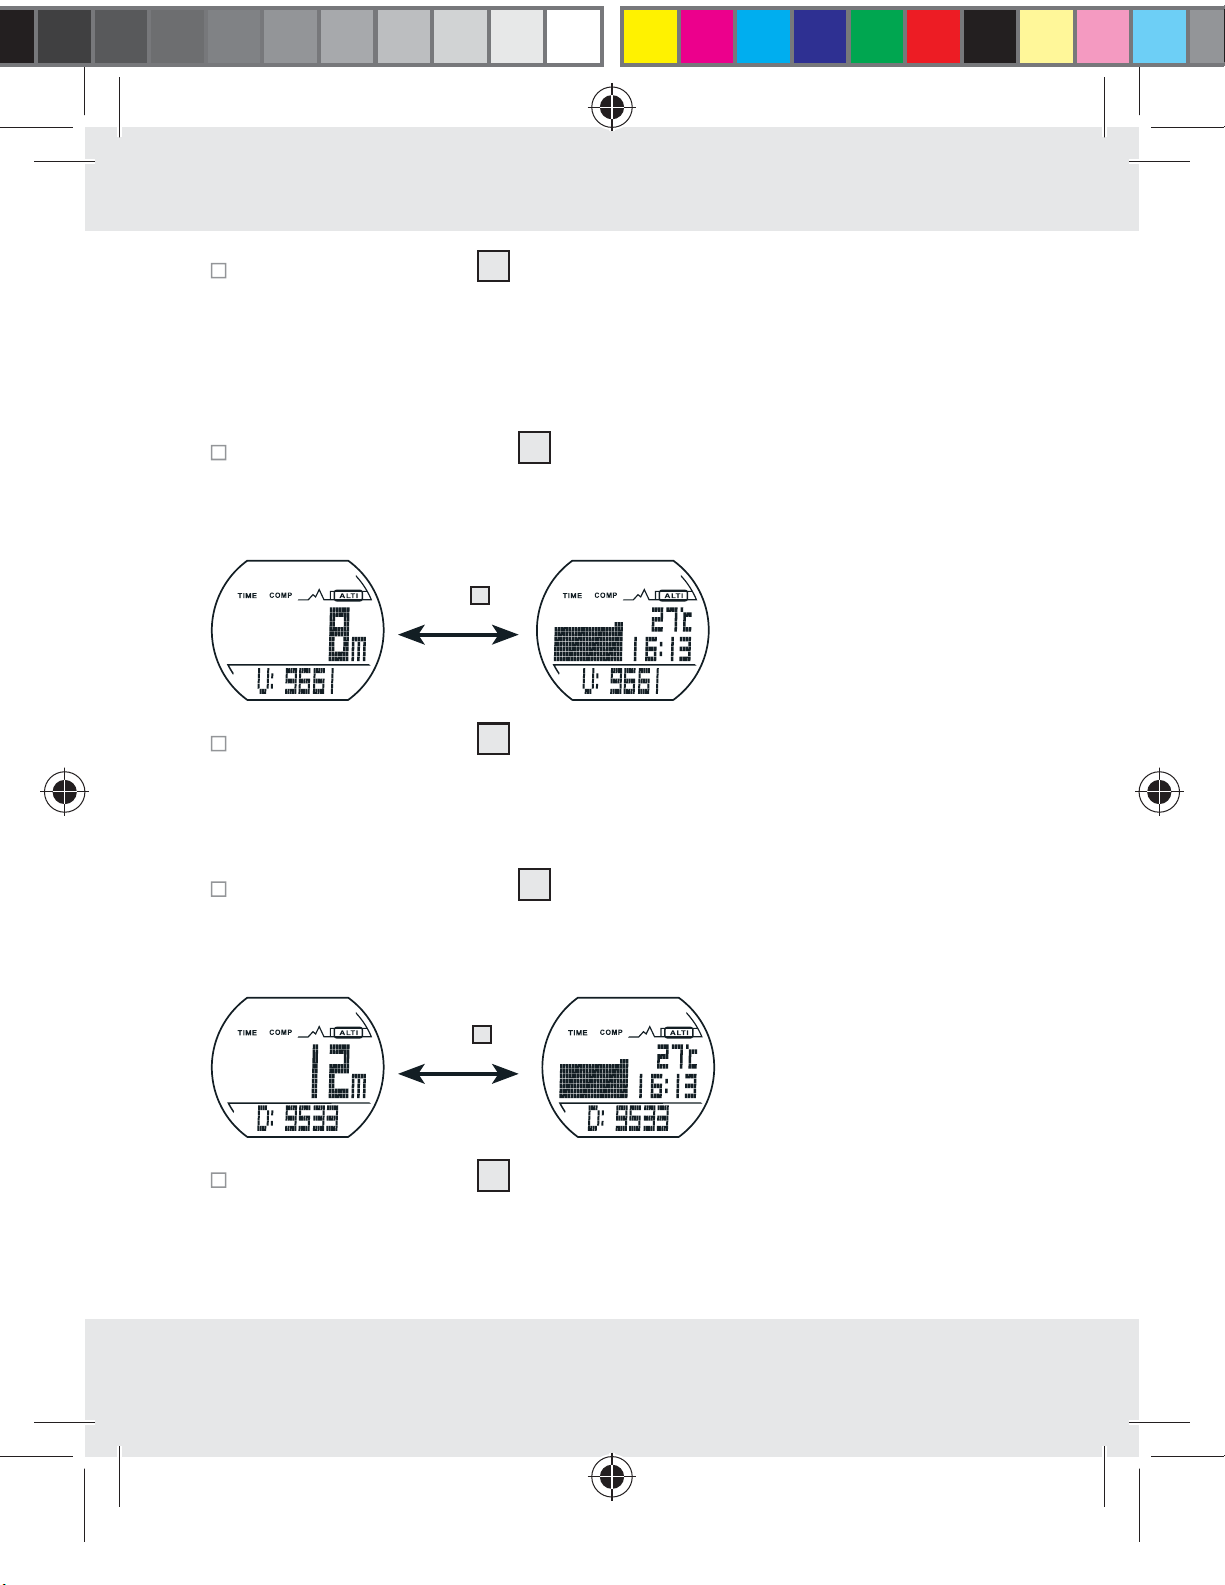
Press the SET button 3 and hold for about 3 seconds. “HOLD TO
RESET” appears in the bottom area of the display. The last recorded
altitude then appears in the bottom area of the display.
Total height gain (UP)
Press the SELECT button 2 in altimeter mode until the display „UP“
appears. The total height gain appears in the bottom area of the
display, the current altitude appears in the middle.
3
Press
Hold the SET button 3 pressed down to reset the minimum altitude to
0. “HOLD TO RESET” appears in the display
Total height loss (DOWN)
Press the SELECT button 2 in altimeter mode until the display
„DOWN“ appears. The total height loss appears in the bottom
area of the display, the current altitude appears in the middle.
3
Press
Hold the SET button 3 pressed down to reset the minimum altitude to
0. “HOLD TO RESET” appears in the display
22 GB
34232_LCD-Sportuhr_content_GB_PL_HU_SI_CZ_SK.indd 22 12.03.14 10:49
Page 23
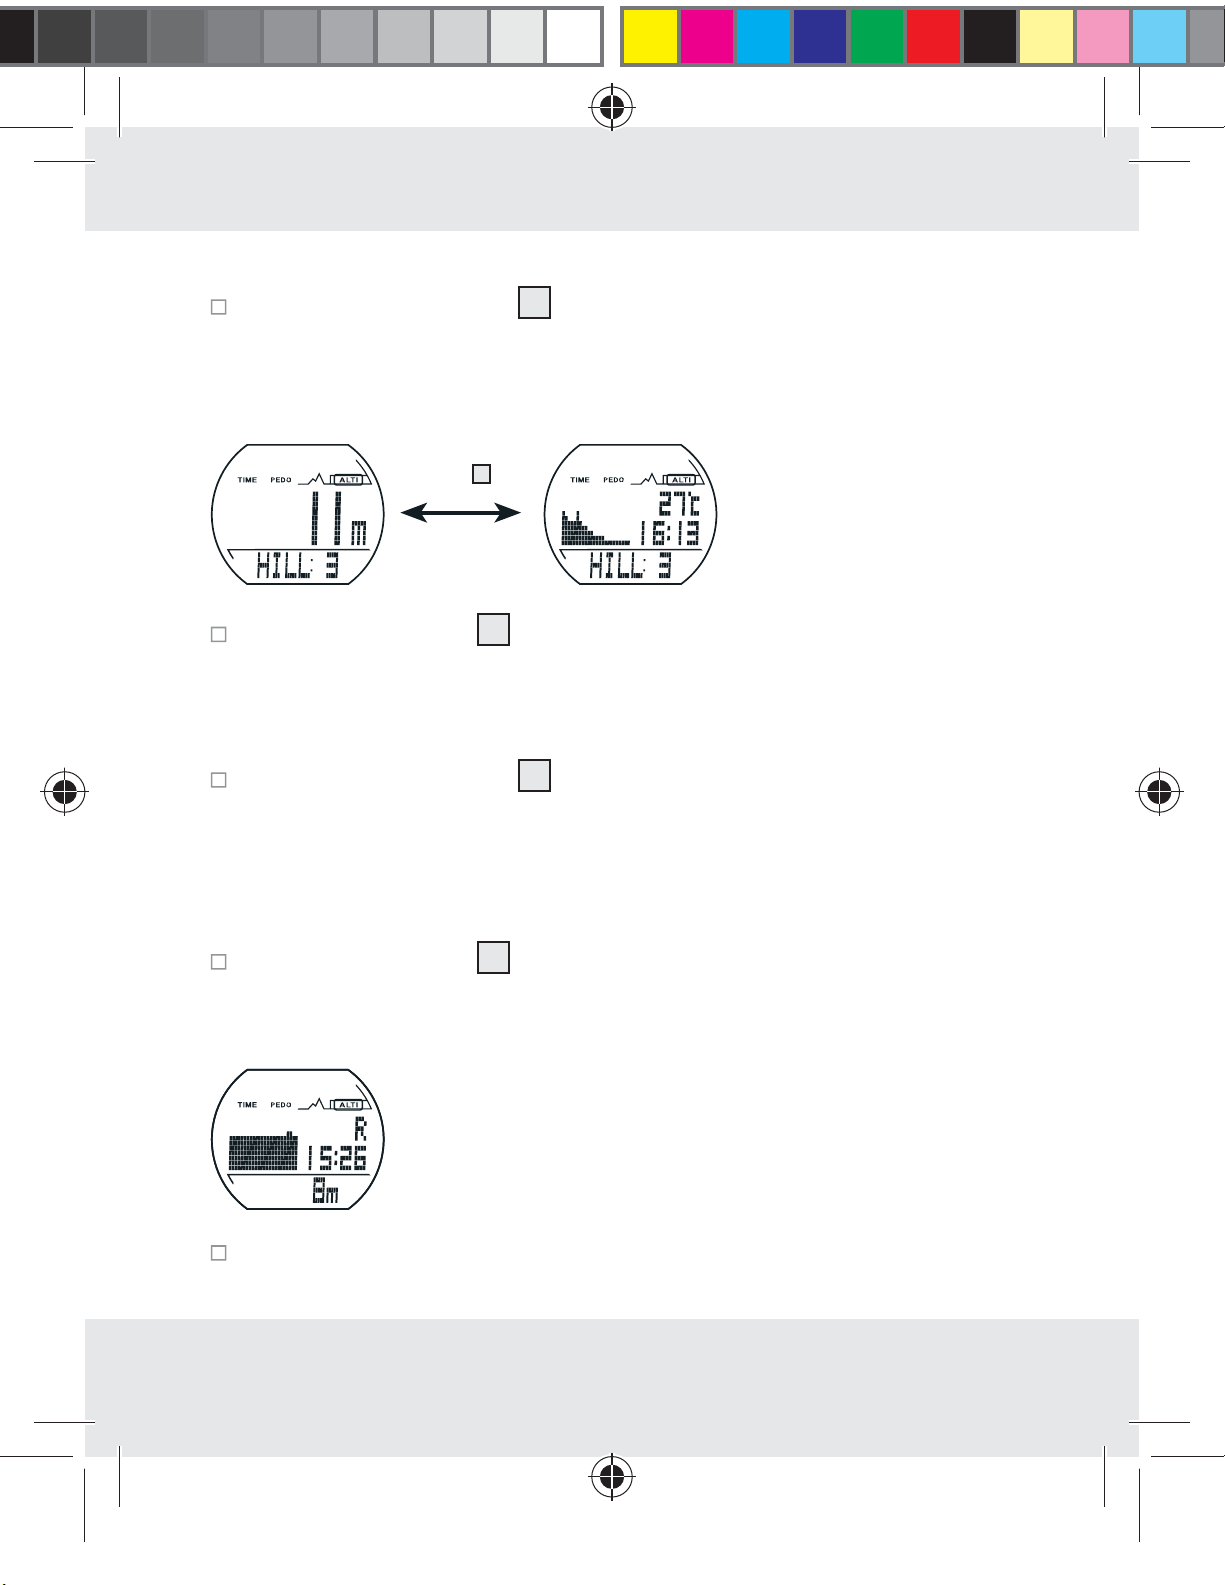
Counting the number of hills (HILL)
Press the SELECT button 2 in altimeter mode until the display „HILL“
appears. The number of hills appears in the bottom area of the display,
the current altitude appears in the middle.
3
Press
Hold the SET button 3 pressed down to reset the number of hills to 0.
“HOLD TO RESET” appears in the display
Record
Press the SELECT button 2 in altimeter mode until the display
„RECORD“ appears. The current altitude appears in the bottom area
of the display, the graphic altitude display appears in the middle. The
altitude variation and graphic display record the change in altitude
within the last 8 hours.
Press the SET button 3 to recall the altitude record for a specific
location during the last 8 hours. The time of recording is displayed for
every single altitude record.
Hold the SET button pressed down to start a new altitude recording.
“HOLD TO RESET” appears in the display
23 GB
34232_LCD-Sportuhr_content_GB_PL_HU_SI_CZ_SK.indd 23 12.03.14 10:49
Page 24
Background contrast lighting
Press the LIGHT button 4 to switch on the background lighting for
approx. 2 seconds. A permanent lighting of the display is not possible.
Troubleshooting
Altitude measurement
All altimeters are influenced by air pressure (unless they are controlled via
GPS etc), as the altitude is calculated with the air pressure.
Therefore check and adjust the altimeter. Make sure
that you adjust the altimeter in a place the altitude of which you can
enter as a reliable reference point.
Temperature
The temperature of the inside of the housing is displayed This is also influenced by the body temperature.
Cleaning and Care
Clean the product with a dry, non-fluffing cloth. A spectacle cleaning
cloth is ideal
Disposal
The packaging is made entirely of recyclable materials which
you can dispose of at your local recycling facilities.
Contact your local waste disposal authority for more details on how to
dispose of the product when it is no longer needed.
24 GB
34232_LCD-Sportuhr_content_GB_PL_HU_SI_CZ_SK.indd 24 12.03.14 10:49
Page 25
To help protect the environment, please properly dispose of
the product when it has reached the end of its useful life, not
through household waste.
Faulty or used batteries must be recycled in accordance with Directive
2006 / 66 / EC.
Environmental damage through incorrect disposal
Pb
of the batteries!
Never dispose of batteries in your household waste. They may contain
toxic heavy metals and are subject to hazardous waste regulations. The
chemical symbols of the heavy metals are: Cd = cadmium, Hg = mercury,
Pb = lead. Therefore dispose of used batteries through your local collection site.
Warranty
The device has been manufactured to strict quality guidelines and meticulously examined before delivery. In the event of product defects you have
legal rights against the retailer of this product. Your legal rights are not limited in any way by our warranty detailed below.
The warranty for this device is 3 years from the date of purchase. Should
34232_LCD-Sportuhr_content_GB_PL_HU_SI_CZ_SK.indd 25 12.03.14 10:49
this device show any fault in materials or manufacture within 3 years from
date
the
of purchase, we will repair or replace it – at our
choice – free of
charge to you.
25 GB
Page 26
The warranty period begins on the date of pur
chase.
Please keep the original
sales receipt in a safe location.
This document is required as your proof of
purchase. This warranty becomes void if the device has been damaged or
improperly used or maintained.
The warranty applies to faults in material or manufacture. This warranty
does not cover product parts subject to normal wear, thus possibly considered con
sumables (e.g. batteries) or for damage to fragile
parts, e.g. switches,
rechargeable batteries or glass parts.
The warranty further excludes a reduction in water tightness. The state of
water tightness is not a permanent property and should therefore be
regularly maintained. Please note, opening and repairs performed by
unauthorized individuals will void any warranty.
34232_LCD-Sportuhr_content_GB_PL_HU_SI_CZ_SK.indd 26 12.03.14 10:49
26 GB
Page 27
Użytkowanie zgodne
zprzeznaczeniem
......................................................... Strona 28
Opis części ............................................................................ Strona 28
Ogólne wskazówki dotyczące
bezpieczeństwa
..............................................................Strona 28
Wskazówki dotyczące
bezpieczeństwa związane zbateriami
..Strona 29
Wodoszczelność ............................................................. Strona 30
Uruchomienie
Wymiana baterii .......................................................................Strona 30
Obsługa
Tryb czasu .................................................................................Strona 30
Alarm .........................................................................................Strona 32
Tryb stopera ..............................................................................Strona 36
Tryb kompasu ............................................................................Strona 38
Tryb wysokościomierza ............................................................Strona 42
Kontrastowe podświetlenie tła .................................................Strona 47
Źródła błędów ..........................................................................Strona 47
Czyszczenie ipielęgnacja .....................................Strona 48
Utylizacja ..............................................................................Strona 48
Gwarancja ........................................................................... Strona 49
27 PL
34232_LCD-Sportuhr_content_GB_PL_HU_SI_CZ_SK.indd 27 12.03.14 10:49
Page 28
Sportowy zegarek LCD
Użytkowanie zgodne zprzeznaczeniem
Niniejszy zegarek wskazuje czas idatę, jest również wyposażony wfunkcje
alarmu, stopera, wysokościomierza ikompasu. Produkt nie jest przeznaczony
do użytku komercyjnego.
Opis części
1
Przycisk MODE
2
Przycisk SELECT (SPLIT) (Wybór)
3
Przycisk SET (ST / SP) (Ustawienia)
4
Przycisk LIGHT (Podświetlenie)
Ogólne wskazówki
dotyczące bezpieczeństwa
WSZYSTKIE WSKAZÓWKI DOTYCZĄCE BEZPIECZEŃSTWA
IINSTRUKCJE NALEŻY ZACHOWAĆ DO WYKORZYSTANIA
WPRZYSZŁOŚCI!
28 PL
34232_LCD-Sportuhr_content_GB_PL_HU_SI_CZ_SK.indd 28 12.03.14 10:49
Page 29
Wskazówki dotyczące bezpieczeństwa
związane zbateriami
NIEBEZPIECZEŃSTWO UTRATY ŻYCIA! Połknię-
cie baterii / akumulatorów może stanowić zagrożenie dla życia.
Należy zapobiec dostępowi dzieci do baterii / akumulatorów. W
przypadku połknięcia baterii / akumulatora należy natychmiast skorzystać z pomocy lekarskiej.
UWAGA! NIEBEZPIECZEŃSTWO WYBUCHU! Nie
ładować baterii ponownie!
Wyczerpaną baterię należy natychmiast wyjąć zurządzenia. Wprze-
ciwnym razie istnieje zwiększone ryzyko wycieku elektrolitu!
Baterii nie należy wyrzucać razem zodpadami domowymi!
Każdy użytkownik jest ustawowo zobowiązany do należytej utylizacji
baterii!
Baterie należy przechowywać wmiejscu niedostępnym dla dzieci, nie
wrzucać ich do ognia, nie rozbierać na części ani nie zwierać.
Wprzypadku nieprzestrzegania wskazówek baterie mogą zostać
rozładowane poniżej ich napięcia granicznego. Istnieje wówczas
niebezpieczeństwo wycieku elektrolitu. Wprzypadku wystąpienia
wycieku zbaterii znajdującej się wurządzeniu należy ją natychmiast
wyjąć, aby zapobiec uszkodzeniu urządzenia!
Unikać kontaktu ze skórą, oczami ibłonami śluzowymi. Wrazie kon-
taktu zelektrolitem przemyć dotknięte miejsce dużą ilością wody
i / lub zasięgnąć porady lekarza!
29 PL
34232_LCD-Sportuhr_content_GB_PL_HU_SI_CZ_SK.indd 29 12.03.14 10:49
Page 30
Wodoszczelność
1bar
Uruchomienie
Wymiana baterii
Wskazówka: Wsprawie wymiany baterii należy zwrócić się do placówki
specjalistycznej.
Obsługa
Tryb czasu
Aby przejść do trybu czasu, naciskać przycisk MODE 1 tak długo,
aż wyświetli się powiadomienie „TIME“.
Poprzez naciśnięcie przycisku SELECT wtrybie czasu można wybierać
pomiędzy następującymi funkcjami:
– Czas (TIME)
– Alarm (ALARM)
– Countdown-Timer (TIMER)
Czas (TIME)
Wtrybie czasu tak długo naciskać na przycisk SELECT 2, aż pojawi
się powiadomienie „TIME“.
30 PL
34232_LCD-Sportuhr_content_GB_PL_HU_SI_CZ_SK.indd 30 12.03.14 10:49
Page 31

Wtrybie czasu wgórnej części wyświetlacza pojawi się rok, awdolnej
dzień tygodnia idata.
Ustawienia czasu (T1)
Nacisnąć przycisk SET 3 iprzytrzymać przez ok. 3sekundy. Na
wyświetlaczu pojawi się komunikat „HOLD TO SET“ izacznie migać
format godziny „24H“.
Nacisnąć przycisk SELECT 2, aby wybrać format 12- lub 24-godzinny.
Aby potwierdzić ustawienia, nacisnąć przycisk SET. Wskaźnik sekund
wpolu czasu zacznie migać.
Nacisnąć przycisk SELECT 2, aby wyzerować wskaźnik sekund.
34232_LCD-Sportuhr_content_GB_PL_HU_SI_CZ_SK.indd 31 12.03.14 10:49
Potwierdzić wprowadzone dane, naciskając przycisk SET 3.
Wskazówka: Aby szybciej zmieniać ustawienia,
można trzymać
przycisk SELECT stale wciśnięty.
Nacisnąć przycisk SELECT, aby ustawić wskaźnik minut.
Potwierdzić wprowadzone dane, naciskając przycisk SET.
Godzinę, rok, miesiąc idzień należy ustawić wten sam sposób.
Wskaźnik jednostki miary zaczyna migać.
31 PL
Page 32

Nacisnąć przycisk SELECT, aby nastawić żądaną jednostkę miary
(METRIC = system metryczny / IMPERIAL = system brytyjski).
Nacisnąć przycisk MODE 1. Wszystkie ustawienia zostaną zapisane.
Drugi czas (T2)
Wtrybie czasu nacisnąć przycisk SELECT 2
3sekundy.
Ustawiając drugi czas (T2), należy postępować wten sam sposób jak
podczas ustawiania czasu pierwszego (T1) (patrz rozdz. „Ustawienia
czasu (T1)“).
Nacisnąć przycisk SELECT itrzymać go przez ok. 3sekundy. Wskaźnik
czasu wróci do wyświetlania normalnego czasu (T1).
Drugi czas (T2) pojawia się wdolnym obszarze wyświetlacza.
itrzymać przez ok.
Alarm
Istnieje pięć oddzielnych alarmów, które można wdowolny sposób włączać
lub wyłączać. Każdy alarm można ustawić w pięciu różnych celach.
a) Alarm ustawiony na konkretną datę (alarm ogodz.
10:00 wdniu 19 czerwca) (A1).
b) Alarm codzienny wkonkretnym miesiącu (działający
34232_LCD-Sportuhr_content_GB_PL_HU_SI_CZ_SK.indd 32 12.03.14 10:49
każdego dnia ogodz. 10:00 wmiesiącu czerwcu)
(A2).
c) Alarm miesięczny (działający ogodz. 10:00 w19.
dniu każdego miesiąca) (A3).
32 PL
Page 33

d) Alarm codzienny (działający każdego dnia ogodz.
10:00) (A4).
e) Alarm godzinny (działający okażdej pełnej godzinie)
(A5).
Jeśli alarm jest włączony, ookreślonej porze zabrzmi przez 30sekund
dźwięk alarmu.
Wskazówka: Aby wyłączyć dźwięk alarmu, należy nacisnąć przycisk
2
SELECT
, SET 3 lub LIGHT 4. Wprzeciwnym razie dźwięk zabrzmi
jeszcze czterokrotnie w2-minutowych odstępach.
Jeśli ustawiony jest alarm godzinny, okażdej pełnej godzinie zabrzmi
podwójny krótki sygnał (piknięcie).
Ustawić alarm wnastępujący sposób:
2
1. Wtrybie czasu tak długo naciskać na przycisk SELECT
, aż pojawi
się powiadomienie „ALARM“.
3
2. Nacisnąć przycisk SET
, aby wybrać jeden zalarmów wzakresie
od A1 do A5.
3. Przytrzymać przycisk SET, aby przejść do ustawień wybranego
alarmu.
4. Ponownie nacisnąć przycisk SET, aby wprowadzić ustawienia alarmu.
1
5. Nacisnąć przycisk MODE
, aby zapisać ustawienia.
Przestrzegać wtym celu kolejności kroków od 1do 6:
33 PL
34232_LCD-Sportuhr_content_GB_PL_HU_SI_CZ_SK.indd 33 12.03.14 10:49
Page 34

Alarm A1
Krok 1
Alarm włączony
Krok 2
Minuta
Krok 3
Data
Krok 6
Miesiąc
Krok 5
alarm godzinny włączony
Godzina
Krok 4
Wskazówka: Ustawiony alarm zależy od aktualnie wybranego czasu
(T1 lub T2).
Minutnik
Zegarek wyposażony jest wCountdown-Timer (licznik odejmujący)
iCountup-Timer (licznik przyrostowy).
Ustawienie podstawowe: 0:01·00 (1minuta)
Wtrybie czasu naciskać przycisk SELECT 2 tak długo, aż pojawi się
powiadomienie „TIMER“.
34232_LCD-Sportuhr_content_GB_PL_HU_SI_CZ_SK.indd 34 12.03.14 10:49
Naciskać przycisk SET 3 do momentu, wktórym pojawi się powia-
domienie „HOLD TO SET“ ibędzie można ustawić Countdown-Timer.
Nacisnąć przycisk SELECT, aby ustawić minuty. Nacisnąć przycisk SET,
aby przejść do kolejnych ustawień (godziny).
34 PL
Page 35

Nacisnąć przycisk SELECT, aby ustawić godziny. Nacisnąć przycisk
SET, aby przejść do kolejnych ustawień „Cdr“.
Teraz może zostać ustawione odliczanie od 23godzin i59minut
(wartość maksymalna).
Potwierdzić ustawienia poprzez naciśnięcie przycisku MODE 1.
Typy minutnika:
r: Minutnik rozpoczyna odliczanie uprzednio zaprogramowanego czasu,
aż osiągnie 0.
U: Gdy minutnik osiągnie 0, rozpoczyna naliczanie czasu wzwyż.
S: Gdy minutnik osiągnie 0, zatrzymuje się.
Poniższe dotyczy wszystkich trzech typów minutnika:
Nacisnąć przycisk SET 3. Timer rozpoczyna odliczanie.
Nacisnąć ponownie przycisk SET. Timer wstrzymuje odliczanie.
Nacisnąć ponownie przycisk SET. Timer wznawia odliczanie.
Nacisnąć ponownie przycisk SET iprzytrzymać przez ok. 3sekundy.
Timer zostaje wten sposób przestawiony na pierwotnie ustalony czas.
Gdy timer osiągnie zero, na 15sekund rozlegnie się dźwięk alarmu. Aby
2
zatrzymać alarm, nacisnąć przycisk SELECT
1
przycisk MODE
.
, przycisk SET 3 lub
35 PL
34232_LCD-Sportuhr_content_GB_PL_HU_SI_CZ_SK.indd 35 12.03.14 10:49
Page 36

Tryb stopera
Aby przejść do trybu stopera, naciskać przycisk MODE 1 tak długo,
aż pojawi się powiadomienie „CHRONO“.
Wtrybie stopera można wybrać jedną zponiższych funkcji podrzędnych:
CHRONO (stoper)
DATA RECALL (ponowne wywoływanie danych)
Stoper
Nacisnąć przycisk SET 3, aby uruchomić / zatrzymać stoper.
Nacisnąć przycisk SELECT 2, aby zapisać czas okrążenia wpamięci
okrążeń, podczas gdy stoper jest uruchomiony.
Wskazówka: można zapisać 99 okrążeń. Jeśli pamięć okrążeń
jest pełna, na wyświetlaczu pojawia się komunikat „MEMORY FULL“.
Wskazówka: Można przełączać tryby „CHRONO“ i„DATA
RECALL“ tylko wówczas, gdy przynajmniej jedno okrążenie zostało
zapisane / zatrzymane.
Nacisnąć itrzymać przycisk SET 3, aby wyzerować wskaźnik stopera
ilicznik okrążeń.
Pamięć okrążeń
Okrążenia –
czas
Tryb stopera Czas całkowity Pamięć okrążeń
pełna
Przywołanie pamięci stopera
Aby zatrzymać stoper, nacisnąć przycisk SET 3.
36 PL
34232_LCD-Sportuhr_content_GB_PL_HU_SI_CZ_SK.indd 36 12.03.14 10:49
Page 37

Nacisnąć przycisk SELECT 2, aby przejść do trybu przywołania
pamięci. Na wyświetlaczu pojawi się komunikat „BEST LAP“ izapis
NAJLEPSZYCH OKRĄŻEŃ.
Nacisnąć przycisk SET, aby odczytać różne pamięci okrążeń.
Nacisnąć przycisk SELECT, aby opuścić tryb przywoływania pamięci.
Aby dokonać standardowego pomiaru czasu okrążenia iprzywołania
pamięci, postępować zgodnie zponiższymi rysunkami:
Standardowy pomiar:
START STOP
Nacisnąć
3
3
Nacisnąć
– 3 –
3
3
RESET
Przytrzymać
3
Pomiar czasu okrążenia: 3 – 2 – 2 – 3 –
OKRĄŻENIE 2
2
2
START
Nacisnąć
OKRĄŻENIE 1
3
Nacisnąć
Nacisnąć
3
34232_LCD-Sportuhr_content_GB_PL_HU_SI_CZ_SK.indd 37 12.03.14 10:49
Przytrzymać 3
OKRĄŻENIE 3
STOPRESET
Nacisnąć
3
37 PL
Page 38

Przywołanie pamięci okrążeń: 3 – 2 – 3 – 3 … 2 –
PRZYWOŁAJ PIERWSZE
OKRĄŻENIETRYB STOPERA
3
Nacisnąć 3,
aby zatrzymać
stoper
RESET
(ustawić na 0)
Nacisnąć
Przytrzymać
3
2
POWRÓT DO
TRYBU STOPERA
Nacisnąć
3
Nacisnąć
PRZYWOŁAJ OSTATNIE
Nacisnąć
2
3
OKRĄŻENIE
Tryb kompasu
Aby przejść do trybu kompasu, naciskać przycisk MODE 1 tak
długo, aż wyświetli się powiadomienie „COMP“.
Trzymać kompas poziomo izaznaczyć żądany kierunek za pomocą
34232_LCD-Sportuhr_content_GB_PL_HU_SI_CZ_SK.indd 38 12.03.14 10:49
.
Do wyboru są dwa formaty wyświetlania: Wyświetlanie dużych cyfr
iwyświetlanie szczegółowe.
Wyświetlacz zdużymi cyframi
Wtym formacie wyświetlania widoczne są dwa wiersze.
Wpierwszym wierszu wyświetlany jest kompas.
38 PL
Page 39

Wdrugim wierszu wyświetlane są stopnie ikierunek świata.
Wyświetlanie szczegółowe
Wtym formacie wyświetlania widoczne są cztery wiersze.
R
– Wpierwszym wierszu wyświetlany jest kompas.
– Wdrugim wierszu widoczna jest strzałka wskazująca najkrótszą drogę
na północ.
Gdy po lewej stronie pojawi się powiadomienie „← N“, należy skiero-
wać się wlewo, aby szybciej dotrzeć na północ.
Gdy po prawej stronie pojawi się powiadomienie „N →“, należy
skierować się wprawo, aby szybciej dotrzeć na północ.
– Wtrzecim wierszu wyświetlany jest pomiar głębokości.
– Wczwartym wierszu wyświetlane są stopnie ikierunek świata.
Nacisnąć przycisk SET 3, aby wybrać jeden zdwóch formatów
wyświetlania.
Kompas wyłącza się automatycznie wcelu oszczędności energii:
wczasie spoczynku po 3minutach.
wczasie ciągłej pracy po 5minutach.
39 PL
34232_LCD-Sportuhr_content_GB_PL_HU_SI_CZ_SK.indd 39 12.03.14 10:49
Page 40

Wskazówka: Aby ponownie włączyć kompas, nacisnąć przycisk SET 3.
Zakłócenia związane zotoczeniem
– Cyfrowe kompasy pracują wg pola magnetycznego Ziemi. Dlatego
urządzenia te reagują zwysoką czułością na różnorakie czynniki oto-
czenia, które zakłócają ziemskie pole magnetyczne, np. zbliżenie do
metalu, urządzeń AGD, komputerów, kabli zasilających.
Nigdy nie używać kompasu wpobliżu innego kompasu bądź przed-
miotu metalowego lub posiadającego własności magnetyczne.
Aby otrzymać dokładne informacje na temat kierunku, należy ponownie
skalibrować kompas (patrz rozdz. „Kalibracja urządzenia“), jeśli
1. na wyświetlaczu pojawi się powiadomienie „ERROR“.
2. wyświetlana liczba stopni zawiera błąd przekraczający 10 stopni.
3. urządzenie jest użyte po raz pierwszy wsamochodzie.
Kalibracja urządzenia
Nacisnąć przycisk MODE 1, aby przejść do trybu kompasu.
Nacisnąć iprzytrzymać przycisk SELECT 2, aby przejść do trybu
kalibracji. Na wyświetlaczu pojawi się „CAL“.
Ponownie nacisnąć przycisk SELECT, aby rozpocząć kalibrację. Na
wyświetlaczu pojawi się wirujący pierścień.
Obrócić urządzenie dwa razy zgodnie zruchem wskazówek zegara na
równej powierzchni, zdala od przedmiotów zmetalu, urządzeń AGD,
komputerów, przewodów zasilających itd. Wykonywać obroty wtym
samym kierunku. Należy pamiętać, aby jeden obrót trwał przynajmniej
20sekund, ale nie dłużej niż minutę.
Aby zakończyć kalibrację, nacisnąć przycisk SET 3.
40 PL
34232_LCD-Sportuhr_content_GB_PL_HU_SI_CZ_SK.indd 40 12.03.14 10:49
Page 41

Wskazówka: Jeśli kalibracja nie zostanie przeprowadzona prawi-
dłowo, kierunki mogą być wyświetlane błędnie. Jeśli kierunki podawane
są nieprawidłowo, należy ponownie wykonać kalibrację.
Nacisnąć
R
Nacisnąć 3, aby
potwierdzić
Jeśli pierścień się rusza, obrócić zegarek odwa obroty zgodnie zruchem wskazó-
wek zegara.
2
Tryb kalibracji
Nacisnąć
2
Wprowadzenie kąta deklinacji dla północy geograficznej
(True North)
– Deklinacja pokazuje różnicę pomiędzy północą magnetyczną ageo-
graficzną waktualnym miejscu przebywania.
– Lokalna deklinacja podana jest na marginesie mapy jako wschodnia
deklinacja dodatnia (E) lub zachodnia deklinacja ujemna (W).
Podczas orientacji kierunek na mapie zostaje skorygowany poprzez
34232_LCD-Sportuhr_content_GB_PL_HU_SI_CZ_SK.indd 41 12.03.14 10:49
dodanie deklinacji dodatniej iodjęcie deklinacji ujemnej.
Nacisnąć iprzytrzymać przycisk SET 3, aby przejść do trybu ustawień
deklinacji. Na wyświetlaczu pojawia się litera „E“ izaczyna migać.
Nacisnąć przycisk SELECT 2, aby wybrać kierunek wschodni (E) lub
zachodni (W).
Aby potwierdzić wprowadzone ustawienia, nacisnąć ponownie
przycisk SET. Liczby kąta deklinacji zaczynają migać.
Nacisnąć przycisk SELECT, aby ustawić kąt
Aby potwierdzić
wprowadzone ustawienia, nacisnąć przycisk SET.
, który ma zostać wyrównany.
41 PL
Page 42

Nacisnąć przycisk SELECT, aby włączyć lub wyłączyć funkcję deklinacji.
Wdolnym obszarze wyświetlacza pojawi się „ON“ lub „OFF“.
Nacisnąć przycisk MODE 1, aby potwierdzić ustawienia. Następuje
ponowne przejście do trybu kompasu.
Aby zrozumieć efekt deklinacji, należy zapoznać się zponiższymi
przykładami: Aktualny kierunek to 10stopni N. Jeśli kąt deklinacji
zostanie ustawiony na 30stopni, kierunek ostateczny zmieni się na
340stopni NW.
Wskazówka: Informacje odeklinacji dla aktualnej lokalizacji
dostępne są wInternecie.
Tryb wysokościomierza
Nacisnąć przycisk MODE 1, aby przejść do trybu wysokościomierza.
Na wyświetlaczu pojawi się „ALTI“.
Po wejściu wtryb wysokościomierza nacisnąć przycisk SELECT 2.
Można wybrać jedną zponiższych funkcji podrzędnych:
– Godzina (ALTI)
– Pamięć największej wysokości (HIGH)
– Pamięć najniższej wysokości (LOW)
– Całkowity przyrost wysokości (UP)
– Całkowita utrata wysokości (DOWN)
– Liczba wzniesień (HILL)
– Zapis (RECORD)
42 PL
34232_LCD-Sportuhr_content_GB_PL_HU_SI_CZ_SK.indd 42 12.03.14 10:49
Page 43

Ustawienia wysokościomierza
Po wejściu wtryb wysokościomierza naciskać przycisk SELECT 2, aż
na wyświetlaczu pojawi się „ALTI“.
Nacisnąć itrzymać przez ok. 3sekundy przycisk SET 3. Na wyświe-
tlaczu pojawi się „HOLD TO SET“. Wskaźnik wysokości zaczyna migać.
Nacisnąć przycisk SELECT, aby ustawić wysokościomierz.
Nacisnąć przycisk SET, aby przejść do kolejnej liczby.
Na koniec nacisnąć przycisk MODE 1, aby potwierdzić ustawienia.
Wskazówka: Aby wybrać żądany wskaźnik wtrybie wysokościomie-
2
rza, należy nacisnąć przycisk SELECT
. Po naciśnięciu przycisku SET 3
wśrodkowym obszarze wyświetlacza będą zawsze wyświetlane: temperatura, czas igraficzny zapis wysokości.
Czas
Wskazówka: Wysokość aktualnej lokalizacji może być wyświetlana na
różne sposoby:
1. prosty tryb wyświetlania: aktualna wysokość igodzina,
2. szczegółowy tryb wyświetlania: temperatura, godzina, aktualna
wysokość igraficzny zapis wysokości.
Nacisnąć przycisk SET 3, aby przejść do prostego trybu wyświetlania.
Następnie naciskać przycisk SELECT 2 aż na wyświetlaczu pojawi
się „CLOCK“. Wdolnym obszarze wyświetlacza pojawi się aktualny
czas, ana środku aktualna wysokość.
43 PL
34232_LCD-Sportuhr_content_GB_PL_HU_SI_CZ_SK.indd 43 12.03.14 10:49
Page 44

Nacisnąć przycisk SET 3, aby przejść do szczegółowego trybu
wyświetlania. Wdolnym obszarze wyświetlacza pojawi się aktualna
wysokość.
proste powiadomienie szczegółowe powiadomienie
aktualna
wysokość
Nacisnąć
3
Temperatura
aktualny
czas
Czas
graficzny zapis wysokości
aktualna
wysokość
Pamięć największej wysokości (HIGH)
Wtrybie wysokościomierza naciskać przycisk SELECT 2, aż na
wyświetlaczu pojawi się „HIGH“. Wdolnym obszarze wyświetlacza
pojawia się zapis maksymalnej wysokości, ana środku – aktualna
wysokość.
Nacisnąć przycisk SET 3 itrzymać przez ok. 3sekundy. Wdolnym
obszarze wyświetlacza pokaże się na krótko napis „HOLD TO RESET“.
Na koniec wdolnym obszarze wyświetlacza pojawi się ostatnio zapisana najwyższa wysokość.
Pamięć najniższej wysokości (LOW)
Wtrybie wysokościomierza naciskać przycisk SELECT 2, aż na
wyświetlaczu pojawi się „LOW“. Wdolnym obszarze wyświetlacza
pojawia się zapis minimalnej wysokości, ana środku – aktualna
wysokość.
34232_LCD-Sportuhr_content_GB_PL_HU_SI_CZ_SK.indd 44 12.03.14 10:49
44 PL
Page 45

Nacisnąć
3
Nacisnąć itrzymać przez ok. 3sekundy przycisk SET 3. Wdolnym
obszarze wyświetlacza pokaże się na krótko napis „HOLD TO RESET“.
Na koniec wdolnym obszarze wyświetlacza pojawi się ostatnio
zapisana wysokość.
Całkowity przyrost wysokości (UP)
Wtrybie wysokościomierza naciskać przycisk SELECT 2, aż na
wyświetlaczu pojawi się komunikat „UP“. Wdolnym obszarze
wyświetlacza pojawi się całkowity przyrost wysokości, ana środku
aktualna wysokość.
Nacisnąć
3
Wcisnąć iprzytrzymać przycisk SET 3, aby wyzerować minimalną
wysokość. Na wyświetlaczu pojawi się komunikat „HOLD TO RESET“.
Całkowita utrata wysokości (DOWN)
Wtrybie wysokościomierza naciskać przycisk SELECT 2, aż na
wyświetlaczu pojawi się „DOWN“. Wdolnym obszarze wyświetlacza
pojawi się całkowita utrata wysokości, ana środku aktualna wysokość.
45 PL
34232_LCD-Sportuhr_content_GB_PL_HU_SI_CZ_SK.indd 45 12.03.14 10:49
Page 46

Nacisnąć
3
Wcisnąć iprzytrzymać przycisk SET 3, aby wyzerować minimalną
wysokość. Na wyświetlaczu pojawi się komunikat „HOLD TO RESET“.
Liczba wzniesień (HILL)
Wtrybie wysokościomierza naciskać przycisk SELECT 2, aż na
wyświetlaczu pojawi się „HILL“. Wdolnym obszarze wyświetlacza
pojawi się liczba wzniesień, ana środku – aktualna wysokość.
Nacisnąć
3
Trzymać przycisk SET 3, aby wyzerować liczbę wzniesień. Na
wyświetlaczu pojawi się komunikat „HOLD TO RESET“.
Zapis
Wtrybie wysokościomierza naciskać przycisk SELECT 2, aż na
wyświetlaczu pojawi się komunikat „RECORD“. Wdolnym obszarze
wyświetlacza pojawi się aktualna wysokość, ana środku graficzny zapis
wysokości. Wykres wysokości izapis graficzny wskazują zmiany
wysokości wostatnich 8godzinach.
34232_LCD-Sportuhr_content_GB_PL_HU_SI_CZ_SK.indd 46 12.03.14 10:49
46 PL
Page 47

Nacisnąć przycisk SET 3, aby przywołać zapis wysokości dla
konkretnego miejsca zostatnich 8godzin. Dla każdego zapisu
wysokości wyświetlany jest czas zapisu.
Wcisnąć iprzytrzymać przycisk SET, aby rozpocząć nowy zapis
wysokości. Na wyświetlaczu pojawi się komunikat „HOLD TO RESET“.
Kontrastowe podświetlenie tła
Nacisnąć przycisk LIGHT 4, aby włączyć podświetlenie na ok.
2sekundy. Stałe podświetlenie wyświetlacza nie jest możliwe.
Źródła błędów
Pomiar wysokości
Na wszystkie wysokościomierze ma wpływ ciśnienie atmosferyczne (chyba
że są sterowane przez GPS itp.), gdyż na jego podstawie obliczana jest
wysokość.
Dlatego wysokościomierz należy sprawdzić iwyregulować. Należy
pamiętać otym, aby regulować wysokościomierz wmiejscu, którego
wysokość można wprowadzić jako stały punkt odniesienia.
Temperatura
Podawana jest temperatura wewnątrz obudowy urządzenia. Ma na nią
również wpływ temperatura ciała.
47 PL
34232_LCD-Sportuhr_content_GB_PL_HU_SI_CZ_SK.indd 47 12.03.14 10:49
Page 48

Czyszczenie ipielęgnacja
Produkt należy czyścić suchą, niestrzępiącą się ścierką. Najlepiej
służy do tego celu ściereczka do czyszczenia okularów.
Utylizacja
Opakowanie wykonane jest wyłącznie zmateriałów przyjaznych dla środowiska, które można przekazać doutylizacji
wmiejscowym punkcie przetwarzania surowców wtórnych.
Informacji na temat możliwości utylizacji wyeksploatowanego produktu
udziela urząd gminy lub miasta.
Wcelu ochrony środowiska naturalnego nie należy wyrzucać
wyeksploatowanego produktu razem zodpadami domowymi,
lecz przekazać go do utylizacji wspecjalistycznym zakładzie.
Uszkodzone lub zużyte baterie muszą być poddane procesowi recyklingu
zgodnie zdyrektywą 2006 / 66 / WE.
Niewłaściwa utylizacja baterii stwarza
Pb
zagrożenie dla środowiska naturalnego!
Baterii nie należy wyrzucać razem zodpadami domowymi. Mogą one
zawierać trujące metale ciężkie idlatego należy je traktować jak odpady
niebezpieczne. Symbole chemiczne metali ciężkich są następujące:
Cd = kadm, Hg = rtęć, Pb = ołów. Dlatego też zużyte baterie należy
przekazywać do punktów zbiórki odpadów niebezpiecznych.
48 PL
34232_LCD-Sportuhr_content_GB_PL_HU_SI_CZ_SK.indd 48 12.03.14 10:49
Page 49

Gwarancja
Urządzenie wyprodukowano według wysokich standardów jakości i
poddano skrupulatnej kontroli przed wysyłką. W przypadku wad produktu
nabywcy przysługują ustawowe prawa. Gwarancja nie ogranicza ustawowych praw nabywcy urządzenia.
Szanowny kliencie, uzyskują Państwo na niniejsze urządzenie 3 lata
gwarancji od daty zakupu. Gwarancja wygasa w razie zawinionego
przez użytkownika uszkodzenia produktu, niewłaściwego użycia lub
konserwacji.
W przypadku wystąpienia w ciągu 3 lat od daty zakupu wad materiałowych lub fabrycznych, dokonujemy – według własnej oceny – bezpłatnej
naprawy lub wymiany urządzenia.
Świadczenie gwarancyjne obejmuje wady materiałowe i fabryczne.
Gwarancja nie obejmuje części produktu ulegających normalnemu zużyciu, uznawanych za części zużywalne (np. baterie) oraz uszkodzeń części
łamliwych, np. przełączników, akumulatorów lub wykonanych ze szkła.
Gwarancja wyłącza także spadek wodoszczelności. Stan wodoszczelności nie jest cechą stałą i dlatego powinien podlegać regularnej konserwacji. Proszę uwzględnić, że poprzez otwieranie i naprawę przez osoby
nieupoważnione wygasają roszczenia gwarancyjne.
49 PL
34232_LCD-Sportuhr_content_GB_PL_HU_SI_CZ_SK.indd 49 12.03.14 10:49
Page 50

Rendeltetésszerű használat .................................Oldal 51
Alkatrészleírás ..................................................................Oldal 51
Általános biztonsági utasítások .......................Oldal 51
Biztonsági tudnivalók az
elemekkel kapcsolatban .........................................Oldal 51
Vízállóság...............................................................................Oldal 52
Üzembe helyezés
Az elem cseréje ...........................................................................Oldal 53
Használat
Idő-mód .......................................................................................Oldal 53
Riasztás ........................................................................................Oldal 55
Stopperóra-mód ..........................................................................Oldal 58
Iránytű-mód .................................................................................Oldal 61
Magasságmérő-mód ..................................................................Oldal 65
Háttér-kontrasztvilágítás .............................................................Oldal 70
Hibaforrások ...............................................................................Oldal 70
Tisztítás és ápolás ...........................................................Oldal 70
Mentesítés ..............................................................................Oldal 71
Garancia ..................................................................................Oldal 71
50 HU
34232_LCD-Sportuhr_content_GB_PL_HU_SI_CZ_SK.indd 50 12.03.14 10:49
Page 51

LCD sportkaróra
Rendeltetésszerű használat
A karóra mutatja az időt és a dátumot, valamint rendelkezik ébresztő,
stopper, magasságmérő és iránytű funkciókkal. A terméket nem közületi
felhasználásra szánták.
Alkatrészleírás
1
MODE-gomb (Mód)
2
SELECT-gomb (SPLIT) (Kiválasztás)
3
SET-gomb (ST / SP) (Beállítás)
4
LIGHT-gomb (Világítás)
Általános biztonsági utasítások
ŐRIZZEN MEG MINDEN BIZTONSÁGI TUDNIVALÓT ÉS UTASÍTÁST
A JÖVŐBENI FELHASZNÁLÁS CÉLJÁBÓL!
Biztonsági tudnivalók az
elemekkel kapcsolatban
ÉLETVESZÉLY! Az elemek/akkuk lenyelése élet-
veszélyes lehet. Az elemeket/akkukat kisgyermekek számára elérhetetlen helyen tárolja. Ha valaki egy elemet/akkut lenyelt, azonnal
orvosoz kell fordulnia.
51 HU
34232_LCD-Sportuhr_content_GB_PL_HU_SI_CZ_SK.indd 51 12.03.14 10:49
Page 52

VIGYÁZAT! ROBBANÁSVESZÉLY! Soha ne töltse fel
újra az elemeket!
A lemerült elemeket azonnal távolítsa el a készülékből. Az elemek
fokozott kifolyásveszélye áll fenn!
Az elemek nem a háztartási szemétbe valók!
A törvény minden fogyasztót kötelez arra, hogy az elemeket szabály-
szerűen semmisítse meg!
Tartsa az elemeket a gyermekektől távol, azokat ne dobja tűzbe,
valamint ne zárja rövidre és ne szedje szét.
Ha nem veszi figyelembe az útmutatásokat, akkor az elemek a végső
feszültségük alá merülhetnek le. Ebben az esetben kifolyás veszélye
áll fenn. Abban az esetben, ha az elemek a készülékében kifolynak,
azonnal távolítsa el azokat, hogy megelőzze a készülék károsodását!
Kerülje el a kifolyt elemeknek a bőrrel, a szemmel és a nyálkahártyá-
val való érintkezését. Ha az elemsavhoz hozzáér, mossa le az érintett
helyet bőv vízzel és / vagy forduljon orvoshoz!
Vízállóság
1 bar
52 HU
34232_LCD-Sportuhr_content_GB_PL_HU_SI_CZ_SK.indd 52 12.03.14 10:49
Page 53

Üzembe helyezés
Az elem cseréje
Tudnivaló: Az elemek cseréjéhez forduljon szaküzlethez.
Használat
Idő-mód
Az Idó-módba lépéshez tartsa lenyomva a MODE-gombot 1
egészen addig, míg a „TIME“ (idő) felirat megjelenik.
Az idő-módban SELECT-gomb lenyomásával a következő funkciók
közül választhat:
– Idő (TIME)
– Riasztás (ALARM)
– Visszaszámláló (TIMER)
Idő (TIME)
Az idő-módba lépéshez tartsa lenyomva a SELECT-gombot 2, míg a
„TIME“ felirat megjelenik.
Az idő-módban a képernyő felső részén az év, az alsó részén pedig a hét
napjai és a dátum jelenik meg.
53 HU
34232_LCD-Sportuhr_content_GB_PL_HU_SI_CZ_SK.indd 53 12.03.14 10:49
Page 54

Idő beállítása (T1)
Nyomja meg a SET-gombot 3, majd tartsa lenyomva körülbelül 3
másodpercig. A kijelzőn megjelenik a „HOLD TO SET“ felirat, majd az
óraformátum „24H“ villogni kezd.
Nyomja meg a SELECT-gombot 2,így választhat a 12 és 24 órás
formátumok között.
A bevitele megerősítéséhez nyomja meg a SET-gombot. A másodperc-
mutató villog a kijelzőn.
Nyomja meg a SELECT-gombot 2 a másodpercmutató lenullázásához.
Erősítse meg bevitelét a SET-gomb 3 megnyomásával.
Tudnivaló: A SELECT-gombot lenyomva tarthatja, hogy a beállításo-
kat gyorsabban változtassa.
Nyomja meg a SELECT-gombot, hogy beállítsa a percmutatót.
Erősítse meg bevitelét a SET-gomb megnyomásával.
Ugyanígy állítsa be az órát, az évet, a hónapot és a napot. A mérték-
egység kijelző ezután villogni kezd.
A kívánt mértékegység (METRIC= metrikus rendszerű/ IMPERIAL= brit
rendszerű) beállításához nyomja meg a SELECT-gombot.
Nyomja meg a MODE-gombot 1. Minden beállítás tárolódik.
Második idő (T2)
Nyomja meg az idő-módban a SELECT-gombot 2, majd tartsa
lenyomva körülbelül 3 másodpercig. A második idő (T2) megjelenik a
kijelző alsó részén.
54 HU
34232_LCD-Sportuhr_content_GB_PL_HU_SI_CZ_SK.indd 54 12.03.14 10:49
Page 55

A második idő beállításánál (T2) ugyanúgy járjon el, mint az első idő
beállításánál (T1) (lásd: „Idő beállítása (T1)“ fejezet).
Nyomja meg a SELECT-gombot, majd tartsa lenyomva körülbelül
3 másodpercig. Az idő kijelző ismét a normál időre vált (T1).
Riasztás
Öt különböző riasztási jel létezik, melyek kívánság szerint egyénileg
aktiválhatóak vagy inaktiválhatóak. Minden egyes riasztás öt különböző
célra használható.
a) Riasztás egy meghatározott időpontban. (Riasztás
10:00 órakor 19-én. Június) (A1)
b) Riasztás naponta egy meghatározott hónapban.
(Riasztás minden nap 10 órakor júniusban) (A2)
c) Riasztás havonta (Riasztás 10 órakor minden egyes
hónap 19. napján) (A3)
d) Riasztás naponta (Riasztás minden egyes nap 10
órakor) (A4)
e) Riasztás óránként (Riasztás minden egyes óra
egészkor) (A5)
55 HU
34232_LCD-Sportuhr_content_GB_PL_HU_SI_CZ_SK.indd 55 12.03.14 10:49
Page 56

Ha a riasztás be van kapcsolva, akkor a beállított riasztási időpontokban
megszólal 30 másodperc hosszú egy riasztási hang.
Tudnivaló: Nyomja meg a SELECT-gombot
4
a LIGHT-gombot
, hogy leállítsa a riasztási jelzést. Máskülönben négy-
2
, a SET-gombot 3 vagy
szer felhangzik még a riasztás 2 perces időközönként.
Bekapcsolt óránkénti riasztás esetén minden egész órakor dupla sípszó
hangzik fel.
Állítsa be a risztást a következőknek megfelelően:
2
1. Nyomja meg az idő-módban a SELECT-gombot
, míg a kijelzőn
megjelenik az „ALARM“ felirat.
3
2. Nyomja meg a SET-gombot
, hogy válasszon a riasztási jelzések
közül A1-től A5-ig.
3. Tarta lenyomva a SET-gombot, hogy beállítsa a kiválasztott riasztást.
4. Nyomja le ismét a SET-gombot, hogy a riasztási beállításokat végrehajtsa.
1
5. Nyomja meg a MODE-gombot
, hogy mentse a beállításokat.
Kövesse a lépéseket 1-től 6-ig:
34232_LCD-Sportuhr_content_GB_PL_HU_SI_CZ_SK.indd 56 12.03.14 10:49
Riasztás A1
1. lépés
Dátum
6. lépés
56 HU
Riasztás be
2. lépés
Hónap
5. lépés
Perc
3. lépés
Óra
4. lépés
Page 57

óránkénti riasztás be
Tudnivaló: A beállított riasztás a válsztott aktuális időhöz (T1 vagy T2)
igazodik.
Számláló
Az óra egy visszaszámlálóval és egy előre számlálóval felszerelt óra.
Alapbeállítás: 0:01·00 (1perc)
Nyomja le az idő módban a SELECT-gombot 2, míg a „TIMER“
felirat megjelenik.
Nyomja meg a SET-gombot 3, míg a „HOLD TO SET“ felirat megje-
lenik és a visszaszámláló beállíthatóvá válik.
Nyomja meg a SELECT-gombot, hogy beállítsa a perceket. Nyomja
meg a SET-gombot, hogy a következő beállításhoz (órák) léphessen.
Nyomja meg a SELECT-gombot, hogy beállítsa az órákat. Nyomja
meg a SET-gombot, hogy a következő beállításhoz „Cd r“-re léphessen. Egy visszaszámláló maximum 23 óra 59 perctől állítható be.
Erősítse meg bevitelét a MODE-gomb 1 megnyomásával.
57 HU
34232_LCD-Sportuhr_content_GB_PL_HU_SI_CZ_SK.indd 57 12.03.14 10:49
Page 58

Számláló-típusok:
r: A számláló a korábban beállított időt elkezdi visszaszámolni egészen
nulláig.
U: Amint a számláló elérte a nullát, elkezd előre számolni.
S: A számláló megáll, ha elérte a nullát.
Mind a három típusra érvényes:
Nyomja meg a SET-gombot 3. A számláló elindul.
Ismételten nyomja meg a SET-gombot. A számláló megáll.
Ismételten nyomja meg a SET-gombot. A számláló tovább számol.
Ismételten nyomja meg a SET-gombot, majd tartsa lenyomva körülbelül
3 másodpercig. A számláló ebben az esetben az eredetileg beállított
időre áll vissza.
Ha a számláló eléri a nullát, 15 másodpercen át felhangzik egy riasz-
2
tási jelzés. Nyomja meg a SELECT-gombot
1
vagy a MODE-gombot
, hogy leállítsa a riasztási jelzést.
, a SET-gombot 3
Stopperóra-mód
Ahhoz, hogy a stopperóra-módba eljusson, nyomja le a MODE-
1
gombot
A stopperóra-módban a következő alfunkciók közül választhat:
CHRONO (Stopperóra)
DATA RECALL (Adatlehívás)
Stopperóra
Nyomja meg a SET-gombot 3, hogy a stopperórát elindítsa/
megállítsa.
58 HU
addig, míg megjelenik a „CHRONO“ felirat.
34232_LCD-Sportuhr_content_GB_PL_HU_SI_CZ_SK.indd 58 12.03.14 10:49
Page 59

Nyomja meg a SELECT-gombot 2, hogy egy köridőt feljegyezzen a
memóriába miközben a stopperóra megy.
Tundivaló: 99 kör menthető. A kijelzőn megjelenik a „MEMORY
FULL“ (memória megtelt), ha a köröket tároló memória megtelt.
Tudnivaló: „CHRONO“ és „DATA RECALL“ között csak akkor
válthatunk, ha legalább egy kört feljegyeztünk/megállítottunk.
Nyomja meg a SET-gombot 3, majd tartsa lenyomva, míg a stopper-
óra kijelzóje és a körszámláló nullára visszaáll.
Körmemória
Körök
Idő
Stopperóra-mód Összidő Körmemória
megtelt
A stopperóra memóriájának lehívása
Nyomja meg a SET-gombot 3, hogy megállítsa a stopperórát.
Nyomja meg a SELECT-gombot 2, hogy a memórialehívó-módba
léphessen. A képernyőn megjelenik a „BEST LAP“ felirat, valamint a
LEGJOBB KÖRÖK feljegyzései.
Nyomja meg a SET-gombot, hogy különböző körmemóriákat leolvasson.
Nyomja meg a SELECT-gombot,hogy a memórialehívó-módból kilépjen.
Egy szintmérés, egy köridőmérés és a memórialehívás elvégzéséhez a
kövesse az ábrákat:
34232_LCD-Sportuhr_content_GB_PL_HU_SI_CZ_SK.indd 59 12.03.14 10:49
59 HU
Page 60

Szintmérés: 3 – 3 –
START STOP
3
Nyomja meg
3
Nyomja meg
3
Tartsa lenyomva
Köridő mérése: 3 – 2 – 2 – 3 –
1. kör
START
Nyomja meg
3
Nyomja meg
2
Nyomja meg
STOPRESET
RESET
3
3
2. kör
2
3. kör
60 HU
Tartsa lenyomva
3
Nyomja meg
3
34232_LCD-Sportuhr_content_GB_PL_HU_SI_CZ_SK.indd 60 12.03.14 10:49
Page 61

Memória lehívása: 3 – 2 – 3 – 3 … 2 –
3
STOPPERÓRA-
MÓD
Nyomja meg 3
a stopperóra
megállításához
ÚJRAINDÍTÁS
(lenullázás)
Nyomja meg
Tartsa
lenyomva
3
2
VISSZA A
STOPPERÓRA-
MÓDHOZ
Nyomja meg
Nyomja meg
Nyomja
meg
ELSŐ LEHÍVÁS
KÖR
3
3
UTOLSÓ
LEHÍVÁS KÖR
2
Iránytű-mód
Az iránytű-módba lépéshez nyomja le a MODE-gombot 1, míg a
„COMP“ felirat megjelenik.
Tartsa az irénytűt vízszintesen és jelölje ki a kívánt irányt .
Két kijelzőformátum lehetésges: Kijelző nagy számjegyekkel és részletekkel.
Kijezlő nagy számjegyekkel
Ennél a kijelzőformátumnál két sort láthatunk.
Az első sorban megjelenik az iránytű.
A második sorban megjelenik az irányszám és az égtáj.
61 HU
34232_LCD-Sportuhr_content_GB_PL_HU_SI_CZ_SK.indd 61 12.03.14 10:49
Page 62

Részletező kijelző
Ennél a formátumnál négy sort láthatunk.
R
– Az első sorban megjelenik az iránytű.
– A második sorban megjelenik egy nyíl, ami megmutatja a legrövidebb
utat észak felé.
Ha a kijelző bal oldalán megjelenik az „← N“ , menjen balra, hogy
az északi irányt gyorsabban elérje.
Ha a kijelző jobb oldalán megjelenik az „N “, menjen jobbra, hogy
az északi irányt gyorsabban elérje.
– A harmadik sorban megjelenik az iránymeghatározás.
– A negyedik sorban megjelenik az iránytű irányszzámokkal és égtájakkal.
34232_LCD-Sportuhr_content_GB_PL_HU_SI_CZ_SK.indd 62 12.03.14 10:49
Nyomja meg a SET-gombot 3, hogy a kijelzőformátumok között váltson.
Az iránytű automatikusan kikapcsol, hogy energiát takarítson meg:
nyugalmi állapotban 3 perc után.
tartós használat során 5 perc után.
Tudnivaló: Visszakapcsoláshoz nyomja meg a SET gombot
3
.
62 HU
Page 63

Környezeti zavarok
– A digitális iránytűk a föld mágneses mezejét használják. Éppen ezért
ezek a készülékek nagyon érzékenyen reagálnak a különböző környezeti befolyásokra, amik eltorzítják a föld mágneses mezejét, például
nehéz fémek, háztartási gépek, számítógépek és erősáramú kábelek
megközelítése.
Soha ne használja az iránytűt másik iránytű, fémes vagy mágneses
tárgyak közelében.
A mozgási irány pontos adatainak megtartásához kalibrálja az
iránytűt újra (lásd: „A készülék kalibrálása“ fejezet), ha
1. „ERROR“ jelentés tartósan megjelenik a kijelzőn.
2. az irányszámadatok több, mint 10 fok eltérést mutatnak.
3. a készülék először egy járműben kerül használatra.
A készülék kalibrálása
Nyomja meg a MODE-gombot 1, hogy az iránytű-módba léphessen.
Nyomja meg a SELECT-gombot 2, majd tartsa lenyomva, hogy a
kalibrálási módba lépjen. A kijelzőn megjelenik a „CAL“ felirat.
Nyomja meg újra a SELECT-gombot, hogy elindítsa a kalibrálást. A
kijelzőn megjelenik egy kör, ami forog.
Forgassa a készüléket a két körben az óramutató járásval megegye-
zően egy sík felmöleten, ami mentes fémlemezektől, háztartási gépektől, számítógépektől, erős áramú kábelektől, stb. A körmozgást mindig
ugyanabba az irányba végezze. Ügyeljen arra, hogy minden kör
legalább 20 másodpercig és legfeljebb egy percig tarthat.
Végezetül nyomja meg a kalibrálás bezárásához a SET-gombot 3.
Tudnivaló: A kalibrálás helytelen végrehajtása pontatlan irányada-
tokat eredményezhet. Hajtsa végre újra a kalibrálást, ha egy irányadat
hibásan jelenik meg.
63 HU
34232_LCD-Sportuhr_content_GB_PL_HU_SI_CZ_SK.indd 63 12.03.14 10:49
Page 64

Nyomja meg
R
2
Kalibrálás-mód
Nyomja meg 3 a meg-
erősítéshez
Ha a kör mozog, forgassa el az órát két körben az óramutató járásával megegyező-
sen
Nyomja meg
2
Az elhajlási szög bevitele a fölrajzi északhoz(True North)
– Az elhajlás megmutatja a különbséget a tarzózkodási helyén a
mágneses és a geometriai északi irány között.
– A helyi elhajlást a térkép szélén jelölik, vagy keleti plusz elhajlásként
(E) vagy nyugati mínusz elhajlásként (W). A tájékozódás közben az
irány a térképen korrigálásra kerül, a plusz elhajlás kivonódik, a
mínusz elhajlás pedig hozzáadódik.
Nyomja meg a SET-gombot 3, majd tartsa lenyomva, hogy az elhaj-
lási beállításokba léphessen. A kijelzőn megjelenik az „E“ betű és
villogni kezd.
Nyomja meg a SELECT-gombot 2, hogy kiválassza a keleti (E) vagy
a nyugati (W) irányt.
Bevitele megerősítéséhez nyomja meg a SET-gombot. Az elhajlási
34232_LCD-Sportuhr_content_GB_PL_HU_SI_CZ_SK.indd 64 12.03.14 10:49
szög számjegyei villogzni kezdenek.
Nyomja meg a SELECT-gombot, hogy beállítsa a szöget, melynek
egyenletesnek kell lennie. Bevitele megerősítéséhez nyomja meg a
SET-gombot.
Nyomja meg a SELECT-gombot, hogy be- vagy kikapcsolja az elhaj-
lási funkciót. A kijelző alsó részén megjelenik az „ON“ vagy az
„OFF“ felirat.
64 HU
Page 65

A beállítás megerősítéséhez nyomja meg a MODE-gombot 1. Ismét
az iránytű-módba lép.
Az elhajlási effektusok megértéséhez kérjük olvassa el a következő
példát: Az aktuális irány N (É) 10 fok. Ha az elhajlási szög 30 fokra
van beállítva, akkor véglegesen megváltozik az irány NW (ÉNY)
340 fokra.
Tudnivaló: Tartózkodási helye pozícionálásának elhajlási adatairól az
interneten talál információkat.
Magasságmérő-mód
Nyomja meg a MODE-gombot 1, hogy a magasságmérő-módba
léphessen. A kijelzőn megjelenik az „ALTI“ felirat.
Nyomja meg a magasságmérő-módban a SELECT-gombot 2. Az
alábbi alfunkciók közül választhat:
– Óra (ALTI)
– Maximális magasság tárolása (HIGH)
– Minimális magasság tárolása (LOW)
– Szintemelkedés összesen (UP)
– Szintcsökkenés összesen(DOWN)
– Hegyek száma (HILL)
– Kimutatás (RECORD)
65 HU
34232_LCD-Sportuhr_content_GB_PL_HU_SI_CZ_SK.indd 65 12.03.14 10:49
Page 66

Magasságmérő beállíása
Nyomja meg a magasságmérő-módban a SELECT-gombot 2, míg a
kijelzőn megjelenik az „ALTI“ felirat.
Nyomja meg a SET-gombot 3, majd tartsa azt lenyomva körülbelül.
3 másodpercig. A kijelzőn megjelenik a „HOLD TO SET“ felirat. A
magasság kijelző ezután villogni kezd.
A magasságmérő beállításához nyomja meg a SELECT-gombot.
Nyomja meg a SET-gombot, hogy a következő számjegyhez léphessen.
Végül nyomja meg a MODE-gombot 1, hogy a beállításokat meg-
erősítse.
Tudnivaló: Magasságmérő-módban a kívánt kijelző kiválasztásához
2
nyomja meg a SELECT-gombot
. Végül ha a SET-gombot 3 megnyomja, a kijelző középső részén megjelennek a következő adatok:
hőmérséklet, idő és egy grafikus magasságábra.
Idő
Tudnivaló: Az Ön aktuális tartózkodási helyének magasságát
különböző módokban jelezheti:
1. egyszerű kijelző-mód: aktuális magasság és idő,
2. részletes kijelző-mód: hőmérséklet, idő, aktuális magasság és grafikus
magasságábra.
Nyomja meg a SET-gombot 3, hogy az egyszerű kijelző-módba
léphessen.
66 HU
34232_LCD-Sportuhr_content_GB_PL_HU_SI_CZ_SK.indd 66 12.03.14 10:49
Page 67

Nyomja le a SELECT-gombot 2, míg a kijelzőn megjelenik a
„CLOCK“ felirat. A kijelző alsó részén megjelenik az aktuális idő, a
középső részén pedig az aktuális magasság.
Nyomja meg a SET-gombot, hogy a részletes kijelző-módba léphes-
sen. A kijelző alsó részén megjelenik az aktuális magasság.
egyszerű kijelző részletes kijelző
aktuális
magasság
Nyomja meg
3
Hőmérséklet
aktuális
idő
idő
grafikus magasságábra
aktuális
magasság
Maximális magasság tárolása (HIGH)
A magasságmérő-módban nyomja le a SELECT-gombot 2, míg meg-
jelenik a kijelzőn a „HIGH“ felirat. A kijelző alsó részén megjelenik a
maximális magasság tárolója, középen pedig az aktuális magasság.
Nyomja meg a SET-gombot 3, majd tartsa lenyomva körülbelül
3 másodpercig. A kijelző alsó részén megjelenik rövid ideig a „HOLD
TO RESET“ felirat. Végül megjelenik a kijelző alsó részén az utoljára
tárolt maximális magasság.
A minimális/legkisebb magasság tárolása (LOW)
A magasságmérő-módban nyomja meg a SELECT-gombot 2, míg
megjelenik a kijelzőn a „LOW“ felirat. A kijelző alsó részén megjelenik a legkisebb magasság tárolója, középen pedig az aktuális
magasság.
34232_LCD-Sportuhr_content_GB_PL_HU_SI_CZ_SK.indd 67 12.03.14 10:49
67 HU
Page 68

Nyomja meg
3
Nyomja meg a SET-gombot 3, majd tartsa lenyomva körülbelül
3 másodpercig. A kijelző alsó részén megjelenik rövid ideig a „HOLD
TO RESET“ felirat. Végül a kijelző alsó részén megjelenik az utoljára
tárolt magasság.
Szintemelkedés összesen (UP)
Nyomja meg a magasságmérő-módban a SELECT-gombot 2, míg a
kijelzőn megjelenik az „UP“ felirat. A kijelző alsó részén megjelenik a
szintemelkedés összessége, a középső részen pedig az aktuális
magasság.
Nyomja meg
3
Tartsa lenyomva a SET-gombot 3; hogy a minimális magasságot
lenullázza. A kijelzőn megjelenik a „HOLD TO RESET“ felirat.
Szintcsökkenés összesen (DOWN)
A magasságmérő-módban nyomja meg a SELECT-gombot 2; míg
megjelenik a „DOWN“ felirat. A kijelző alsó részén megjelenik a
szintcsökkenés összessége, a középső részen pedig az aktuális
magasság.
68 HU
34232_LCD-Sportuhr_content_GB_PL_HU_SI_CZ_SK.indd 68 12.03.14 10:49
Page 69

Nyomja meg
3
Tartsa lenyomva a SET-gombot 3; hogy a minimális magasságot
lenullázza. A kijelzőn megjelenik a „HOLD TO RESET“ felirat.
A hegyek számlálása (HILL)
A magasságmérő-módban nyomja meg a SELECT-gombot 2; míg a
kijelzőn megjelenik a „HILL“ felirat. A kijelző alsó részén megjelenik a
hegyek száma, a középső részen pedig az aktuális magasság.
Nyomja meg
3
Tartsa lenyomva a SET-gombot 3; hogy a hegyek számát lenullázza.
A kijelzőn megjelenik a „HOLD TO RESET“ felirat.
Kimutatás
A magasságmérő-módban nyomja le a SELECT-gombot 2; míg a
kijelzőn a „RECORD“ felirat megjelenik. A kijelző alsó részén megjelenik az aktuális magasság, a középső részen pedig a grafikus magasságábra. A magasság alakulása és a grafikus ábrázolás megmutatják
az utolsó 8 óra szintváltozását.
Nyomja meg a SET-gombot 3; hogy az elmúlt 8 óra szintkkimutatását
egy adott pontra lehívja. Minden egyes szintkimutatásnál látható
egyenként a feljegyzés ideje.
34232_LCD-Sportuhr_content_GB_PL_HU_SI_CZ_SK.indd 69 12.03.14 10:49
69 HU
Page 70

A szintkimutatás újbóli indításához tartsa lenyomva a SET-gombot. A
kijelzőn megjelenik a „HOLD TO RESET“ felirat.
Háttér-kontrasztvilágítás
Nyomja meg a „LIGHT“ gombot 4; hogy a háttérvilágítást körülbelül
2 másodpercre bekapcsolja. A kijelző tartós világítása nem lehetséges.
Hibaforrások
Szintmérés
Minden magasságmérőt érnek befolyásoló tényezők, mint például a
légnyomás (hacsak nem GPS által vezérelt eszköz), mivel a magasság
légnyomásával számolnak.
Ezért ellenőrizze és kalibrálja a magasságmérőt. Ügyeljen arra, hogy
a magasságmérőt egy olyan helyen kalibrálja, aminek magasságát
egy megbízható fix pontként megadhat.
34232_LCD-Sportuhr_content_GB_PL_HU_SI_CZ_SK.indd 70 12.03.14 10:49
Hőmérséklet
A készülék tok belső hőmérsékletét mutatja. Ezt a test hőmérséklete is
befolyásolja.
Tisztítás és ápolás
Tisztítsa a terméket egy száraz és szöszmentes kendővel. Egy
szemüvegtisztítő kendő ideális erre a célra.
70 HU
Page 71

Mentesítés
A csomagolás környezetbarát anyagokból készült, amelyeket
a helyi újrahasznosító helyeken adhat le ártalmatlanítás
céljából.
A kiszolgált termék megsemmisítésének lehetőségeiről tájékozódjon a
községi vagy városi önkormányzatnál.
A környezete érdekében, ne dobja a kiszolgált terméket a háztartási szemétbe, hanem adja le szakszerű ártalmatlanításra.
A hibás vagy elhasznált elemeket a 2006 / 66 / EC irányelv értelmében
újra kell hasznosítani.
Az elemek helytelen megsemmisítése miatt
Pb
környezeti károsodások keletkeznek!
Az elemeket nem szabad a háztartási szemétbe dobni. Mérgező hatású
nehézfémeket tartalmazhatnak, ezért különleges kezelést igénylő hulladéknak számítanak. A nehézfémek vegyjelei a következők: Cd = kadmium,
Hg = higany, Pb = ólom. Ezért az elhasznált elemeket egy községi gyűjtőhelyre juttassa el.
Garancia
A készüléket szigorú minőségi előírások betartásával
és szállítás előtt lelkiismerete
sen ellenőriztük. Ha a készüléken hiányosságot
tapasztal, akkor a termék eladójával szemben törvényes jogok illetik meg
gondosan gyártottuk,
71 HU
34232_LCD-Sportuhr_content_GB_PL_HU_SI_CZ_SK.indd 71 12.03.14 10:49
Page 72

Önt. Ezeket a törvényes jogokat a következőkben ismertetett garancia
vállalásunk nem korlátozza.
Ön erre a készülékre a vásárlás időpontjától számított 3 év garanciát kap.
A garanciális idő a vásárlás dátumával kezdődik. Kérjük, jól őrizze meg a
pénztári blokkot. Ez a bizonylat szükséges a vásárlás tényének az igazolásához.
Ha a készülék vásárlásától számított 3 éven belül anyag- vagy gyártási
hiba merül fel, akkor a választásunk szerint a készüléket ingyen megjavítjuk vagy kicseréljük. A garancia megszűnik, ha a terméket megrongálták,
nem szakszerűen kezelték vagy tartották karban.
A garancia az anyag- vagy gyártáshibákra vonatkozik. A garancia nem
terjed ki azokra a termékrészekre, melyek normál kopásnak vannak kitéve
és ezért fogyóeszköznek tekinthetők (pl. elemek), vagy a törékeny részekre
sérülésére, pl. kapcsolók, akkuk, vagy üvegből készült részek.
Ugyanígy nem garanciális a vízhatlanság elveszítése. A vízhatlanság
állapota nem maradandó tulajdonság és ezért rendszeresen karban kell
tartani. Kérjük, vegye figyelembe, hogy amennyiben arra nem hivatott személyek felnyitják, vagy javítják az órát, úgy az Ön garanciajogosultsága
megszűnik.
72 HU
34232_LCD-Sportuhr_content_GB_PL_HU_SI_CZ_SK.indd 72 12.03.14 10:49
Page 73

Predvidena uporaba ...................................................Stran 74
Opis delov ..............................................................................Stran 74
Splošni varnostni napotki .......................................Stran 74
Varnostni napotki za uporabo baterij .......Stran 74
Vodotesnost .........................................................................Stran 75
Začetek uporabe
Zamenjava baterije .....................................................................Stran 75
Uporaba
Časovni način..............................................................................Stran 76
Alarm ...........................................................................................Stran 78
Način štoparice ..........................................................................Stran 81
Način kompasa ..........................................................................Stran 84
Način višinomera ........................................................................Stran 87
Kontrastna osvetlitev ozadja ......................................................Stran 92
Viri napak ....................................................................................Stran 92
Čiščenje in nega ................................................................Stran 92
Odstranitev ...........................................................................Stran 92
Garancija ................................................................................Stran 93
Garancijski list....................................................................Stran 94
73 SI
34232_LCD-Sportuhr_content_GB_PL_HU_SI_CZ_SK.indd 73 12.03.14 10:49
Page 74

Športna ura z LC-prikazovalnikom
Predvidena uporaba
Zapestna ura prikazuje čas in datum in ima funkcijo alarma, štoparice,
višinomera in kompasa. Izdelek ni predviden za poslovno uporabo.
Opis delov
1
Tipka MODE
2
Tipka SELECT (SPLIT) (izbira)
3
Tipka SET (ST / SP) (nastavitev)
4
Tipka LIGHT (luč)
Splošni varnostni napotki
VSE VARNOSTNE NAPOTKE IN NAVODILA SHRANITE ZA
PRIHODNJO UPORABO!
Varnostni napotki za uporabo baterij
SMRTNA NEVARNOST! Baterije so lahko v primeru
zaužitja smrtno nevarne. Baterije shranite nedosegljivo za majhne
otroke. Če je nekdo pogoltnil baterijo, je potrebno takoj poiskati
zdravniško pomoč.
74 SI
34232_LCD-Sportuhr_content_GB_PL_HU_SI_CZ_SK.indd 74 12.03.14 10:49
Page 75

POZOR! NEVARNOST EKSPLOZIJE! Baterij nikoli
ponovno ne polnite!
Iztrošeno baterijo takoj odstranite iz naprave. Obstaja nevarnost
iztekanja!
Baterije ne sodijo med gospodinjske odpadke!
Vsak potrošnik je po zakonu dolžan baterije odstraniti skladno s
predpisi!
Baterijo hranite izven dosega otrok, ne mečite je v ogenj, ne povzro-
čite kratkega stika in je ne razstavljajte.
V primeru neupoštevanja teh napotkov se baterija lahko sprazni še
bolj, kot je njena končna napetost. V tem primeru obstaja nevarnost
iztekanja. Če bi baterija v vaši napravi iztekala, jo takoj vzemite ven,
da preprečite škodo na napravi!
Izogibajte se stiku s kožo, z očmi in s sluznicami. Če pridete v stik s
kislino iz baterij, prizadeto mesto sperite z veliko vode in / ali poiščite
zdravniško pomoč!
Vodotesnost
1 bar
Začetek uporabe
Zamenjava baterije
Napotek: Za zamenjavo baterije se obrnite na strokovnjaka.
75 SI
34232_LCD-Sportuhr_content_GB_PL_HU_SI_CZ_SK.indd 75 12.03.14 10:49
Page 76

Uporaba
Časovni način
Da preidete v časovni način, pritiskajte tipko MODE 1 tako dolgo,
da se na zaslonu pojavi „TIME“.
S pritiskanjem tipke SELECT v časovnem načinu lahko preklapljate
med naslednjimi funkcijami:
– Čas (TIME)
– Alarm (ALARM)
– Odštevalnik (TIMER)
Čas (TIME)
V časovnem načinu pritiskajte tipko SELECT 2 tako dolgo, da se na
zaslonu pojavi „TIME“.
V časovnem načinu se v zgornjem delu prikaza prikaže leto, v spodnjem
delu pa dan v tednu in datum.
Nastavitev časa (T1)
Pritisnite tipko SET 3 in jo držite pritisnjeno približno 3 sekunde. Na
prikazu se prikaže „HOLD TO SET“ in format ure „24H“ začne utripati.
Pritisnite tipko SELECT 2, da izberete med 12- in 24-urnim formatom
prikaza.
76 SI
34232_LCD-Sportuhr_content_GB_PL_HU_SI_CZ_SK.indd 76 12.03.14 10:49
Page 77

Pritisnite tipko SET za potrditev vnosa. Prikaz sekund v prikazu časa
utripa.
Pritisnite tipko SELECT 2, da prikaz sekund nastavite na nič.
Vnos potrdite s pritiskom na tipko SET 3.
Napotek: Tipko SELECT lahko držite pritisnjeno, da lahko hitreje
spremenite nastavitev.
Pritisnite tipko SELECT za nastavitev minutnega prikaza.
Vaš vnos potrdite s pritiskom na tipko SET.
Nastavite ure, leto, mesec in dan na enak način. Nato začne utripati
prikaz merske enote.
Pritisnite tipko SELECT, da nastavite želeno mersko enoto
(METRIC = metrični sistem / IMPERIAL = britanski sistem).
Pritisnite tipko MODE 1. Vse nastavitve se shranijo.
Drugi čas (T2)
V časovnem načinu pritisnite tipko SELECT 2 in jo držite pritisnjeno
približno 3 sekunde. Drugi čas (T2) se prikaže v spodnjem delu
zaslona.
Pri nastavitvi drugega časa (T2) postopajte enako, kot pri nastavitvi
prvega časa (T1) (glejte poglavje „Nastavitev časa (T1)“).
Pritisnite tipko SELECT in jo držite pritisnjeno približno 3 sekunde.
Prikaz časa se znova preklopi v običajni čas (T1).
77 SI
34232_LCD-Sportuhr_content_GB_PL_HU_SI_CZ_SK.indd 77 12.03.14 10:49
Page 78

Alarm
Obstaja pet posameznih alarmnih sporočil, ki jih lahko po želji vklopite ali
izklopite. Vsak alarm lahko nastavite za 5 različne namene.
a) Alarm na določen datum (alarm ob 10:00 uri
19. junija) (A1)
b) dnevni alarm v določenem mesecu (alarm vsak dan ob
10:00 uri v juniju) (A2)
c) mesečni alarm (alarm ob 10:00 uri 19. vsak mesec)
(A3)
b) dnevni alarm (alarm vsak dan ob 10:00 uri) (A4)
e) alarm vsako uro (alarm ob vsaki polni uri) (A5)
Ko je alarm vključen, se vklopi ob nastavljenem času alarma
za 30 sekund.
2
Napotek: Pritisnite tipko SELECT
da zaustavite alarmni signal. V nasprotnem primeru se oglasi še štirikrat v
razmiku dveh minut.
78 SI
, tipko SET 3 ali tipko LIGHT 4,
34232_LCD-Sportuhr_content_GB_PL_HU_SI_CZ_SK.indd 78 12.03.14 10:49
Page 79

Če je vklopljen alarm vsako uro, se ob vsaki polni uri zasliši dvojni pisk.
Alarm nastavite, kot sledi:
2
1. V časovnem načinu pritiskajte tipko SELECT
tako dolgo, da se na
zaslonu pojavi „ALARM“.
3
2. Pritisnite tipko SET
za izbiro med alarmnimi sporočili A1 do A5.
3. Tipko SET držite pritisnjeno, da pridete do nastavitve izbranega
alarma.
4. Znova pritisnite tipko SET, da izvedete nastavitve alarma.
1
5. Pritisnite tipko MODE
, da shranite nastavitve.
Za to sledite korakom od 1 do 6:
Alarm A1
1. korak
Datum
6. korak
Vklop alarma
2. korak
Mesec
5. korak
alarm ob uri vklopljen
Minuta
3. korak
Ura
4. korak
Napotek: Nastavljeni alarm se ravna po izbranem dejanskem času
(T1 ali T2).
79 SI
34232_LCD-Sportuhr_content_GB_PL_HU_SI_CZ_SK.indd 79 12.03.14 10:49
Page 80

Časovnik
Ura je opremljena s časovnikom za odštevanje (odštevalnik) in časovnikom
za prištevanje (prištevalnik).
Osnovna nastavitev: 0:01·00 (1minuta)
V časovnem načinu pritiskajte tipko SELECT 2 tako dolgo, da se na
zaslonu pojavi „TIMER“.
Pritiskajte tipko SET 3, da se na zaslonu pojavi „HOLD TO SET“,
nato lahko nastavite časovnik za odštevanje.
Pritisnite tipko SELECT, da nastavite minute. Pritisnite tipko SET, da
pridete do naslednje nastavitve (ure).
Pritisnite tipko SELECT, da nastavite ure. Pritisnite tipko SET, da pridete
do naslednje nastavitve „Cd r“. Nastavite lahko odštevanje od največ
23 ur in 59 minut.
Nastavitev potrdite s pritiskom na tipko MODE 1.
34232_LCD-Sportuhr_content_GB_PL_HU_SI_CZ_SK.indd 80 12.03.14 10:49
Vrste časovnika:
r: Časovnik začne odštevati vnaprej nastavljen čas, dokler ne doseže
nič.
U: Ko je dosežena nič, začne časovnik prištevati.
S: Časovnik se ustavi, takoj ko je dosežena nič.
Za vse tri vrste časovnika velja:
Pritisnite tipko SET 3. Časovnik se zažene.
80 SI
Page 81

Znova pritisnite tipko SET. Časovnik se ustavi.
Znova pritisnite tipko SET. Časovnik nadaljuje s štetjem.
Znova pritisnite tipko SET in jo držite pritisnjeno približno 3 sekunde.
Časovnik bo na ta način ponastavljen na prvotno nastavljen čas.
Ko časovnik doseže nič, se za 15 sekund zasliši alarmni signal. Priti-
2
snite tipko SELECT
vite alarmni signal.
, tipko SET 3 ali tipko MODE 1, da zausta-
Način štoparice
Da preidete v način štoparice, pritiskajte tipko MODE 1 tako dolgo,
da se na zaslonu pojavi „CHRONO“.
V načinu štoparice lahko izbirate med naslednjimi dodatnimi funkcijami:
CHRONO (štoparica)
DATA RECALL (priklic podatkov)
Štoparica
Pritisnite tipko SET 3 za zagon / ustavitev štoparice.
Pritisnite tipko SELECT 2 za shranjevanje časa kroga v pomnilnik kro-
gov, medtem ko štoparica deluje.
Napotek: shranite lahko 99 krogov. Ko je pomnilnik krogov poln, se
na zslonu prikaže „MEMORY FULL“ (pomnilnik poln).
Napotek: Med „CHRONO“ in „DATA RECALL“ lahko preklapljate
samo, če je bil shranjen / ustavljen najmanj en krog.
Pritisnite tipko SET 3 in jo držite pritisnjeno, da ponastavite prikaz
štoparice in števec krogov na nič.
81 SI
34232_LCD-Sportuhr_content_GB_PL_HU_SI_CZ_SK.indd 81 12.03.14 10:49
Page 82

Pomnilnik krogov
Čas kroga
Način štoparice Skupni čas Pomnilnik krogov
poln
Priklic pomnilnika štoparice
Pritisnite tipko SET 3, da zaustavite štoparico.
Pritisnite tipko SELECT 2, da preidete v način za priklic pomnilnika.
Na zaslonu se prikaže „BEST LAP“ in shranjeni NAJBOLJŠI KROGI.
Pritisnite tipko SET, da prikažete različne pomnilnike krogov.
Pritisnite tipko SELECT, da zapustite način za priklic pomnilnika.
Za izvedbo standardne meritve, meritve časa kroga in priklic pomnil-
nika glejte naslednje slike:
Standardna meritev:
START STOP
3
Pritisnite
3
– 3 –
Pritisnite
3
3
34232_LCD-Sportuhr_content_GB_PL_HU_SI_CZ_SK.indd 82 12.03.14 10:49
RESET
Držite pritisnjeno
3
82 SI
Page 83

Merjenje časa kroga: 3 – 2 – 2 – 3 –
1. krog
START
2. krog
3
Pritisnite
3
Pritisnite
2
Pritisnite
2
3. krog
STOPRESET
Držite
pritisnjeno
3
Pritisnite
3
Priklic pomnilnika krogov: 3 – 2 – 3 – 3 … 2 –
NAČIN ŠTOPA-
RICE
Za ustavitev što-
parice pritisnite
3
Pritisnite
2
Pritisnite
PRIKLIC PRVEGA
3
Pritisnite
KROGA
3
3
34232_LCD-Sportuhr_content_GB_PL_HU_SI_CZ_SK.indd 83 12.03.14 10:49
PONASTAVITEV
(ponastavite na nič)
Držite
pritisnjeno
3
NAZAJ V
NAČIN ŠTOPA-
RICE
PRIKLIC ZADNJEGA
KROGA
Pritisnite
2
83 SI
Page 84

Način kompasa
Da preidete v način kompasa, pritiskajte tipko MODE 1 tako dolgo,
da se na zaslonu pojavi „COMP“.
Kompas držite vodoravno in označite želeno smer z .
Na voljo sta dva formata prikaza: prikaz z velikimi številkami in podrobni
prikaz.
Prikaz z velikimi številkami
V tem formatu prikaza sta dve vrstici.
V prvi vrstici se pojavi kompas.
V drugi vrstici se pojavita smerni indeks in stran neba.
Podrobni prikaz
V tem formatu prikaza so štiri vrstice.
R
– V prvi vrstici se pojavi kompas.
– V drugi vrstici se prikaže puščica, ki kaže najkrajšo pot proti severu.
Če se na levi strani zaslona prikaže „← N“, pojdite na levo, da boste
hitreje prispeli na sever.
84 SI
34232_LCD-Sportuhr_content_GB_PL_HU_SI_CZ_SK.indd 84 12.03.14 10:49
Page 85

Če se na desni strani zaslona prikaže „N →“, pojdite na desno, da
boste hitreje prispeli na sever.
– V tretji vrstici se prikaže smer.
– V četrti vrstici se prikaže kompas s smernim indeksom in stranjo neba.
Pritisnite tipko SET 3 za preklop med obema formatoma prikaza.
Kompas se samodejno izklopi, da varčuje z energijo:
v stanju mirovanja po 3 minutah.
med trajno uporabo po 5 minuta.
Napotek: Za ponovni vklop pritisnite tipko SET
3
.
Motnje, pogojene z okolico
– Digitalni kompasi delujejo zaradi magnetnega polja zemlje. Zato so te
naprave zelo občutljive na različne vplive okolja, ki popačijo magnetno polje zemlje, npr. ko se približate težkim kovinam, gospodinjskim
aparatom, računalnikom in kablom za jaki tok.
Kompasa nikoli ne uporabljajte v bližini drugih kompasov ali kovinskih
ter magnetnih predmetov.
Za ohranitev natančnih podatkov o smeri gibanja znova umerite kom-
pas (glejte poglavje „Umerjanje naprave), če
1. se na zaslonu trajno pojavi sporočilo „ERROR“.
2. podatki smernega indeksa kažejo napako več kot 10 stopinj.
3. napravo prvič uporabljate v vozilu.
Umerjanje naprave
34232_LCD-Sportuhr_content_GB_PL_HU_SI_CZ_SK.indd 85 12.03.14 10:49
Pritisnite tipko MODE 1, da preidete v način kompasa.
Pritisnite tipko SELECT 2 in jo držite pritisnjeno, da pridete v način za
umerjanje. Na zaslonu se pojavi „CAL“.
85 SI
Page 86

Znova pritisnite tipko SELECT, da zaženete umerjanje. Na zaslonu se
prikaže vrteči se obroč.
Zavrtite napravo za dva obrata v smeri urinega kazalca na ravni povr-
šini, v bližini katere ni kovinskih plošč, gospodinjskih aparatov, računalnikov, kablov za jaki tok ipd. Krožne premike vedno izvajajte v isti
smeri. Pazite, da bo vsak obrat trajal najmanj 20 sekund, vendar ne
več kot eno minuto.
Nato za zaključek umerjanja pritisnite tipko SET 3.
Napotek: Če umerjanje ni izvedeno pravilno, so lahko posledica
nenatančni podatki smeri. Znova izvedite umerjanje, če se vam zdi, da
je podatek o smeri napačen.
Pritisnite
R
Za potrditev pritisnite
Ko se obroč premika, zavrtite uro za dva obrata v smeri urinega kazalca
3
2
Način za umerja-
nje
Pritisnite
2
Vnos kota odstopanja za geografski sever (True North)
– Odstopanje kaže razliko med magnetnim severom in geometrično
smerjo severa na kraju, kjer se nahajate.
– Lokalno odstopanje je navedeno ob robu zemljevida kot pozitivno
odstopanje od vzhoda (E) ali negativno odstopanje od zahoda (W).
Med orientacijo se smer na zemljevidu popravlja, tako da se pozitivno
odstopanje odšteje in negativno odstopanje prišteje.
34232_LCD-Sportuhr_content_GB_PL_HU_SI_CZ_SK.indd 86 12.03.14 10:49
86 SI
Page 87

Pritisnite tipko SET 3 in jo držite pritisnjeno, da pridete v način za
nastavitev odstopanja. Na zaslonu se pojavi črka „E“ in začne utripati.
Pritisnite tipko SELECT 2, da izberete smer vzhod (E) ali zahod (W).
Za potrditev vnosa znova pritisnite tipko SET. Številka kota odstopanja
začne utripati.
Pritisnite tipko SELECT, da nastavite kot, ki ga je treba izravnati. Za
potrditev vnosa pritisnite tipko SET.
Pritisnite tipko SELECT, da vklopite oz. izklopite funkcijo odstopanja. V
spodnjem delu zaslona se prikaže „ON“ ali „OFF“.
Pritisnite tipko MODE 1, da potrdite nastavitev. Znova preidete v
način kompasa.
Za razumevanje učinka odstopanja preberite naslednji primer: Dejan-
ska smer je N 10 stopinj. Če nastavite kot odstopanja na 30 stopinj,
se končna smer spremeni v NW 340 stopinj.
Napotek: Informacije o podatkih odstopanja za vaš položaj najdete na
spletu.
Način višinomera
Pritisnite tipko MODE 1, da preidete v način višinomera. Na zaslonu
se pojavi „ALTI“.
V načinu višinomera pritisnite tipko SELECT 2. Izbirate lahko med
naslednjimi dodatnimi funkcijami:
– Ura (ALTI)
– Pomnilnik maksimalne višine (HIGH)
87 SI
34232_LCD-Sportuhr_content_GB_PL_HU_SI_CZ_SK.indd 87 12.03.14 10:49
Page 88

– Pomnilnik minimalne višine (LOW)
– Skupna pridobitev višine (UP)
– Skupna izguba višine (DOWN)
– Število hribov (HILL)
– Posnetek (RECORD)
Nastavitev višinomera
V načinu višinomera pritisnite tipko SELECT 2, da se prikaže „ALTI“.
Pritisnite tipko SET 3 in jo držite pritisnjeno pribl. 3 sekunde. Na
zaslonu se pojavi „HOLD TO SET”. Nato začne utripati prikaz višine.
Pritisnite tipko SELECT, da nastavite višinomer.
Pritisnite tipko SET, da preidete na drugo številko.
Nato pritisnite tipko MODE 1, da potrdite nastavitev.
Napotek: Za izbiro ustreznega prikaza v načinu višinomera pritisnite
2
tipko SELECT
. Če nato pritisnete tipko SET 3, se v sredini zaslona
vedno prikažejo naslednji podatki: temperatura, čas in grafični prikaz
višine.
Čas
Napotek: Dejansko nadmorsko višino vaše trenutne točke lahko prika-
žete na različne načine:
1. enostavni način prikaza: dejanska višina in čas,
2. podroben način prikaza: temperatura, čas, dejanska višina in grafični
prikaz višine.
88 SI
34232_LCD-Sportuhr_content_GB_PL_HU_SI_CZ_SK.indd 88 12.03.14 10:49
Page 89

Pritisnite tipko SET 3, da preidete v enostaven način prikaza.
Zdaj pritiskajte tipko SELECT 2, da se na zaslonu pojavi „CLOCK“.
V spodnjem delu zaslona se prikaže dejanski čas, v sredini pa trenutna
višina.
Pritisnite tipko SET, da preidete v podroben način prikaza. V spodnjem
delu zaslona se prikaže trenutna višina.
enostavni prikaz podrobni prikaz
trenutna
višina
Pritisnite
3
Temperatura
trenutni
čas
Čas
grafični prikaz višine
trenutna
višina
Pomnilnik maksimalne višine (HIGH)
V načinu višinomera pritisnite tipko SELECT 2, da se prikaže „HIGH“.
V spodnjem delu zaslona se prikaže pomnilnik maksimalne višine, v
sredini pa trenutna višina.
Pritisnite tipko SET 3 in jo držite pritisnjeno približno 3 sekunde. V
spodnjem delu zaslona se na kratko prikaže „HOLD TO RESET“. Nato
se v spodnjem delu zaslona prikaže nazadnje shranjena maksimalna
višina.
Pomnilnik minimalne višine (LOW)
V načinu višinomera pritisnite tipko SELECT 2, da se prikaže „LOW“.
V spodnjem delu zaslona se prikaže pomnilnik minimalne višine, v sredini pa trenutna višina.
34232_LCD-Sportuhr_content_GB_PL_HU_SI_CZ_SK.indd 89 12.03.14 10:49
89 SI
Page 90

3
Pritisnite
Pritisnite tipko SET 3 in jo držite pritisnjeno približno 3 sekunde. V
spodnjem delu zaslona se na kratko prikaže „HOLD TO RESET“. Nato
se v spodnjem delu zaslona prikaže nazadnje shranjena višina.
Skupna pridobitev višine (UP)
V načinu višinomera pritisnite tipko SELECT 2, da se prikaže „UP“. V
spodnjem delu zaslona se prikaže skupno pridobljena višina, v sredini
pa trenutna višina.
3
Pritisnite
Pritisnite tipko SET 3 in jo držite pritisnjeno, da ponastavite minimalno
višino na nič. Na zaslonu se pojavi „HOLD TO RESET”.
Skupna izguba višine (DOWN)
V načinu višinomera pritisnite tipko SELECT 2, da se prikaže
„DOWN“. V spodnjem delu zaslona se prikaže skupno izgubljena
višina, v sredini pa trenutna višina.
Pritisnite
3
90 SI
34232_LCD-Sportuhr_content_GB_PL_HU_SI_CZ_SK.indd 90 12.03.14 10:49
Page 91

Pritisnite tipko SET 3 in jo držite pritisnjeno, da ponastavite minimalno
višino na nič. Na zaslonu se pojavi „HOLD TO RESET”.
Štetje števila hribov (HILL)
V načinu višinomera pritisnite tipko SELECT 2, da se prikaže „HILL“.
V spodnjem delu zaslona se prikaže število hribov, v sredini pa trenutna višina.
3
Pritisnite
Pritisnite tipko SET 3 in jo držite pritisnjeno, da ponastavite število
hribov na nič. Na zaslonu se pojavi „HOLD TO RESET”.
Posnetek
V načinu višinomera pritisnite tipko SELECT 2, da se prikaže
„RECORD“. V spodnjem delu zaslona se prikaže trenutna višina, v
sredini pa grafični prikaz višine. Potek nadmorske višine in grafični
prikaz označujeta spremembo višine v zadnjih 8 urah.
Pritisnite tipko SET 3, da prikličete posnetek višine na določenem
mestu v zadnjih 8 urah. Za vsak posamezen posnetek višine se
prikaže čas posnetka.
91 SI
34232_LCD-Sportuhr_content_GB_PL_HU_SI_CZ_SK.indd 91 12.03.14 10:49
Page 92

Pritisnite tipko SET in jo držite pritisnjeno, da zaženete novo snemanje
višine. Na zaslonu se pojavi „HOLD TO RESET”.
Kontrastna osvetlitev ozadja
Pritisnite tipko LIGHT 4, da vklopite osvetlitev ozadja za pribl.
2 sekundi. Trajna osvetlitev prikaza ni mogoča.
Viri napak
Merjenje višine
Na vse višinomere vpliva zračni tlak (razen, če so krmiljeni prek GPS-a
ipd.), saj se s pomočjo zračnega tlaka izračuna nadmorska višina.
Zato je treba višinomer preveriti in prilagoditi. Pazite, da višinomer
nastavljate na kraju, čigar nadmorsko višino lahko zanesljivo vnesete
kot orientacijsko točko.
Temperatura
Prikazana je temperatura v notranjosti ohišja naprave. Na to vpliva tudi
telesna temperatura.
Čiščenje in nega
Izdelek čistite s suho krpo, ki ne pušča vlaken. Krpa za čiščenje očal je
idealna.
Odstranitev
Embalaža je narejena iz naravi prijaznih materialov, ki jih
lahko odvržete v lokalne zbiralnike za recikliranje odpadkov.
92 SI
34232_LCD-Sportuhr_content_GB_PL_HU_SI_CZ_SK.indd 92 12.03.14 10:49
Page 93

O možnostih odstranjevanja dotrajanih naprav povprašajte pri svoji
občinski ali mestni upravi.
Ko je vaš izdelek dotrajan, ga zaradi varovanja okolja ne
odvrzite med gospodinjske odpadke, temveč ga oddajte na
ustreznem zbirališču tovrstnih odpadkov.
Pokvarjene ali iztrošene baterije je treba reciklirati v skladu z Direktivo
2006 / 66 / ES.
Škoda na okolju zaradi napačnega
Pb
odstranjevanja baterij!
Baterij ne smete odstraniti skupaj z gospodinjskimi odpadki. Vsebujejo
lahko strupene težke kovine in so podvržene določbam za ravnanje z
nevarnimi odpadki. Kemični simboli težkih kovin so naslednji: Cd = kadmij,
Hg = živo srebro, Pb = svinec. Zato iztrošene baterije oddajte na komunalnem zbirnem mestu.
Garancija
Iz garancije je prav tako izključeno popuščanje vodotesnosti. Stanje vodotesnosti ni stalna lastnost in ga je zato treba redno vzdrževati. Upoštevajte,
da z odprtjem in popravilom vaše ure s strani oseb, ki za to niso
pooblaščene, preneha veljavnost vaše garancije.
34232_LCD-Sportuhr_content_GB_PL_HU_SI_CZ_SK.indd 93 12.03.14 10:49
93 SI
Page 94

OWIM GmbH & Co. KG
Stiftsbergstraβe 1
74167 Neckarsulm
Deutschland
Servisna telefonska številka: 00386 (0) 80 28 60
Garancijski list
1. S tem garancijskim listom jamčimo Owim GmbH & Co. KG, da bo
izdelek v garancijskem roku ob normalni in pravilni uporabi brezhibno deloval in se zavezujemo, da bomo ob izpolnjenih spodaj
navedenih pogojih odpravili morebitne pomanjkljivosti in okvare
zaradi napak v materialu ali izdelavi oz. po svoji presoji izdelek
zamenjali ali vrnili kupnino.
2. Garancija je veljavna na ozemlju Republike Slovenije.
3. Garancijski rok za proizvod je 3 leta od dneva izročitve balga. Dan
izročitve blaga je enak dnevom prodaje, ki je razviden iz računa.
4. Kupec je dolžan okvaro javiti pooblaščenemu servisu oz. se informi-
rati o nadaljnjih postopkih na zgoraj navedeni telefonski številki.
Svetujemo vam, da pred tem natančno preberete navodila o sestavi
in uporabi izdelka.
5. Kupec je dolžan pooblaščenemu servisu predložiti garancijski list in
račun, kot potrdilo in dokazilo o nakupu.
6. V primeru, da proizvod popravlja nepooblaščeni servis ali oseba,
kupec ne more uveljavljati zahtevkov iz te garancije.
94 SI
34232_LCD-Sportuhr_content_GB_PL_HU_SI_CZ_SK.indd 94 12.03.14 10:49
Page 95

7. Vzroki za okvaro oz. nedelovanje izdelka morajo biti lastnosti stvari
same, in ne vzroki, ki so zunaj proizvajalčeve oz. prodajalčeve sfere.
Kupec ne more uveljavljati zahtevkov iz te garancije, če se ni držal
priloženih navodil za sestavo in uporabo izdelka ali, če je izdelek
kakorkoli spremenjen ali nepravilno vzdrževan.
8. Jamčimo servisiranje in rezervne dele za minimalno dobo, ki je
zahtevana s strani zakonodaje.
9. Obrabni deli oz. potrošni material so izvzeti iz garancije.
10. Vsi potrebni podatki za uveljavljanje garancije se nahajajo na dveh
ločenih dokumentih (garancijski list, račun).
11. Ta garancija proizvajalca ne izključuje pravic potrošnika, ki izhajajo
iz odgovornosti prodajalca za napake na blagu.
34232_LCD-Sportuhr_content_GB_PL_HU_SI_CZ_SK.indd 95 12.03.14 10:49
Prodajalec:
Lidl d.o.o.k.d., Pod lipami 1, SI-1218 Komenda
95 SI
Page 96

Použití ke stanovenému účelu .......................Strana 97
Popis dílů .............................................................................Strana 97
Všeobecné bezpečnostní pokyny ............... Strana 97
Bezpečnostní pokyny pro baterie .............. Strana 97
Vodotěsnost ..................................................................... Strana 98
Uvedení do provozu
Výměna baterie .......................................................................Strana 98
Obsluha
Režim času ..............................................................................Strana 99
Alarm ....................................................................................... Strana 101
Režim stopek ...........................................................................Strana 104
Režim kompasu .......................................................................Strana 107
Režim výškoměru ....................................................................Strana 111
Kontrastní podsvícení displeje ................................................Strana 115
Příčiny chyb .............................................................................Strana 115
Čistění a ošetřování .................................................. Strana 116
Likvidace .............................................................................Strana 116
Záruka ...................................................................................Strana 117
96 CZ
34232_LCD-Sportuhr_content_GB_PL_HU_SI_CZ_SK.indd 96 12.03.14 10:49
Page 97

Sportovní LCD hodinky
Použití ke stanovenému účelu
Náramkové hodinky ukazují čas a datum a mají kdispozici funkci buzení,
stopek, měření výšky a kompasu. Výrobek není určen k průmyslovému využití.
Popis dílů
1
Tlačítko MODE
2
Tlačítko SELECT (SPLIT) (výběr)
3
Tlačítko SET (ST / SP) (nastavení)
4
Tlačítko LIGHT (světlo)
Všeobecné bezpečnostní pokyny
USCHOVEJTE VŠECHNY BEZPEČNOSTNÍ POKYNY A INSTRUKCE
PRO POUŽITÍ VBUDOUCNOSTI!
Bezpečnostní pokyny pro baterie
OHROŽENÍ ŽIVOTA! Baterie nebo akumulátory
mohou při spolknutí ohrozit život. Skladujte baterie nebo akumulátory
na místě nepřístupném pro děti. V případě spolknutí baterie nebo
akumulátoru je nezbytné okamžitě vyhledat lékařskou pomoc.
97 CZ
34232_LCD-Sportuhr_content_GB_PL_HU_SI_CZ_SK.indd 97 12.03.14 10:49
Page 98

POZOR! NEBEZPEČÍ EXPLOZE! Baterie nikdy znovu
nenabíjejte!
Vybitou baterii okamžitě nechte odstranit zpřístroje. Jinak hrozí
zvýšené nebezpečí, že baterie vyteče!
Baterie nepatří do domovního odpadu!
Každý spotřebitel je ze zákona povinen baterie náležitě zlikvidovat!
Chraňte baterie před dětmi, neodhazujte baterie do ohně, nezkratujte
je a nerozebírejte je.
Vpřípadě nedodržení těchto pokynů se baterie může vybít svým
koncovým napětím. Hrozí nebezpečí, že baterie vyteče. Vpřípadě, že
ve vašem zařízení vytekla baterie, okamžitě ji nechte vyjmout, aby se
zabránilo poškození zařízení!
Vyhněte se kontaktu s pokožkou, očima a sliznicemi. Vpřípadě kon-
taktu skyselinou zbaterie opláchněte postižené místo dostatečným
množstvím vody a vyhledejte lékaře!
Vodotěsnost
1 bar
Uvedení do provozu
Výměna baterie
Upozornění: Za účelem výměny baterie se obraťte na odborný obchod.
98 CZ
34232_LCD-Sportuhr_content_GB_PL_HU_SI_CZ_SK.indd 98 12.03.14 10:49
Page 99

Obsluha
Režim času
Abyste se dostali do režimu času, tiskněte tlačítko MODE 1 tak
dlouho, dokud se na displeji neobjeví „TIME“.
Tisknutím tlačítka SELECT můžete vrežimu času přepínat mezi těmito
funkcemi:
– čas (TIME)
– alarm (ALARM)
– odečítací časovač (TIMER)
Čas (TIME)
Tiskněte vrežimu času tak dlouho tlačítko SELECT 2, dokud se na
displeji neobjeví „TIME“.
Vrežimu času se vhorní části displeje zobrazí rok a ve spodní části displeje
den vtýdnu a datum.
Nastavení času (T1)
Stiskněte tlačítko SET 3 a držte je stisknuté po dobu cca 3vteřin. Na
displeji se zobrazí „HOLD TO SET“ a začne blikat hodinový formát
„24H“.
Stiskněte tlačítko SELECT 2 pro volbu mezi 12hodinovým a 24hodi-
novým formátem času.
99 CZ
34232_LCD-Sportuhr_content_GB_PL_HU_SI_CZ_SK.indd 99 12.03.14 10:49
Page 100

Pro potvrzení svého zadání stiskněte tlačítko SET. Zobrazení vteřin
zobrazení času bliká.
Stiskněte tlačítko SELECT 2 za účelem nastavení zobrazení vteřin na
nulu.
Potvrďte své zadání stisknutím tlačítka SET 3.
Upozornění: Můžete tlačítko SELECT
držet stisknuté, aby se nasta-
vení urychlilo.
Stiskněte tlačítko SELECT pro nastavení zobrazení minut.
Potvrďte své zadání stisknutím tlačítka SET.
Stejným způsobem nastavte hodiny, rok, měsíc a den. Poté začne
blikat zobrazení měrné jednotky.
Stiskněte tlačítko SELECT pro nastavení požadované měrné jednotky
(METRIC = metrický systém / IMPERIAL = britský systém).
Stiskněte tlačítko MODE 1. Všechna nastavení se uloží.
Druhý čas (T2)
Stiskněte vrežimu času tlačítko
cca 3vteřin.
Druhý čas (T2) se zobrazí ve spodní části displeje.
SELECT 2 a držte je stisknuté po dobu
Za účelem nastavení druhého času (T2) postupujte stejně jako při
nastavení prvního času (T1) (viz kapitola „Nastavení času (T1)“).
Stiskněte tlačítko SELECT a držte je stisknuté po dobu cca 3vteřin.
34232_LCD-Sportuhr_content_GB_PL_HU_SI_CZ_SK.indd 100 12.03.14 10:49
Zobrazení času se opět přepne na normální čas (T1).
100 CZ
 Loading...