

Page 1

done by Mukade Technical Documentationpage size: A5
4 MAN TENT
4 MAN TENT
Assembly and safety advice
DUŻY NAMIOT 4-OSOBOWY
Wskazówki dotyczące montażu oraz bezpieczeństwa
OWIM GmbH & Co. KG
Stiftsbergstraße 1
D-74167 Neckarsulm
Model No.: Z31983
Version: 02/2014
IAN 96531
96531_14_Crivit_IE_PL_CZ_01.indb 1-2 6/1/14 11:07 am
IAN 96531
STAN
Pokyny k montáži a bezpečnostní pokyny
4-PERSONEN-GROSSRAUMZELT
Aufbau- und Sicherheitshinweise
Page 2

GB/IE Assembly and safety advice Page 3
PL Wskazówki dotyczące montażu oraz bezpieczeństwa Strona 6
CZ Pokyny k montáži a bezpečnostní pokyny Strona 9
DE/AT/CH Aufbau- und Sicherheitshinweise Seite 12
96531_14_Crivit_IE_PL_CZ_01.indb 3 6/1/14 11:07 am
Page 3
4 MAN TENT
§ Proper use
This product is suitable for use as accommodation
when travelling and camping. The product is not
intended for commercial use.
Cat. A camping tent in accordance with
ISO 5912
Performance level 1: for infrequent and short-term
use.
§ Description of parts
1
Outer tent
2
Inner tent for 4 people
3
Pole, diameter 11mm, approx. 545 mm (red)
4
Pole, diameter 9.5 mm, approx. 460 mm (blue)
5
Pole, diameter 7.0 mm, approx. 210 mm (green)
6
Guy rope
7
Tent peg
8
Detachable ground sheet
9
Carry bag
10
Pole clips
11
Removable partition wall
12
Entrance support pole:
approx. 16 x 1900 mm (Ø x H)
§ Technical data
Dimensions:
Outer tent dimension:
approx. 460 x 260 x 190 cm (L x W x H)
Inner tent dimension:
approx. 220 x 240 x 155 cm (L x W x H)
Max. standing height:
approx. 185 cm (see fig. F)
m CAUTION! RISK OF INJURY! Ensure
that all parts are undamaged and have been
assembled appropriately. Risk of injury exists
if assembled incorrectly. Damaged parts can
effect safety and function.
Select a piece of land that is as flat and firm
as possible to assemble your tent.
The intactness of all connection points and
the guy ropes should be checked regularly,
as should the firmness of the tent pegs in the
ground.
Do not use any insect spray in or on the tent.
Small leaks on the seams can be repaired
with a seam spray and impregnation spray
can be used for the tent skin.
m CAUTION! DANGER OF POISONING
AND DAMAGE TO PROPERTY! Do not
light any fires within the product and keep it
away from sources of heat.
You should also familiarize yourself with the
local fire protection regulations (e.g. camping
site, tent pitch).
§ Fire precautions
Camp safely. Follow these
commonsense rules:
Do not place hot appliances near the walls,
roof or curtains.
Always observe the safety instructions for
these appliances.
Never allow children to play near hot
appliances.
Keep exits clear. Do not block the exit with
objects.
Make sure you know the fire precaution
arrangements on the site.
§ Safety advice
KEEP INSTRUCTION IN A SAFE PLACE.
SUBMIT ALL DOCUMENTS TO A THIRD
PARTY IF DISTRIBUTING THE PRODUCT.
GB/IE
3
96531_14_Crivit_IE_PL_CZ_01.indb 3 6/1/14 11:07 am
Page 4
§ Tent assembly
Please ensure that the product is only
assembled by people with the appropriate
skills.
Note: The polyester material of the tent
consists of water-repellent material.
It is possible that during the first rainfall
the tent will not be completely watertight.
However, the threads of the tent will contract
when exposed to water so that after a short
time the tent will become watertight.
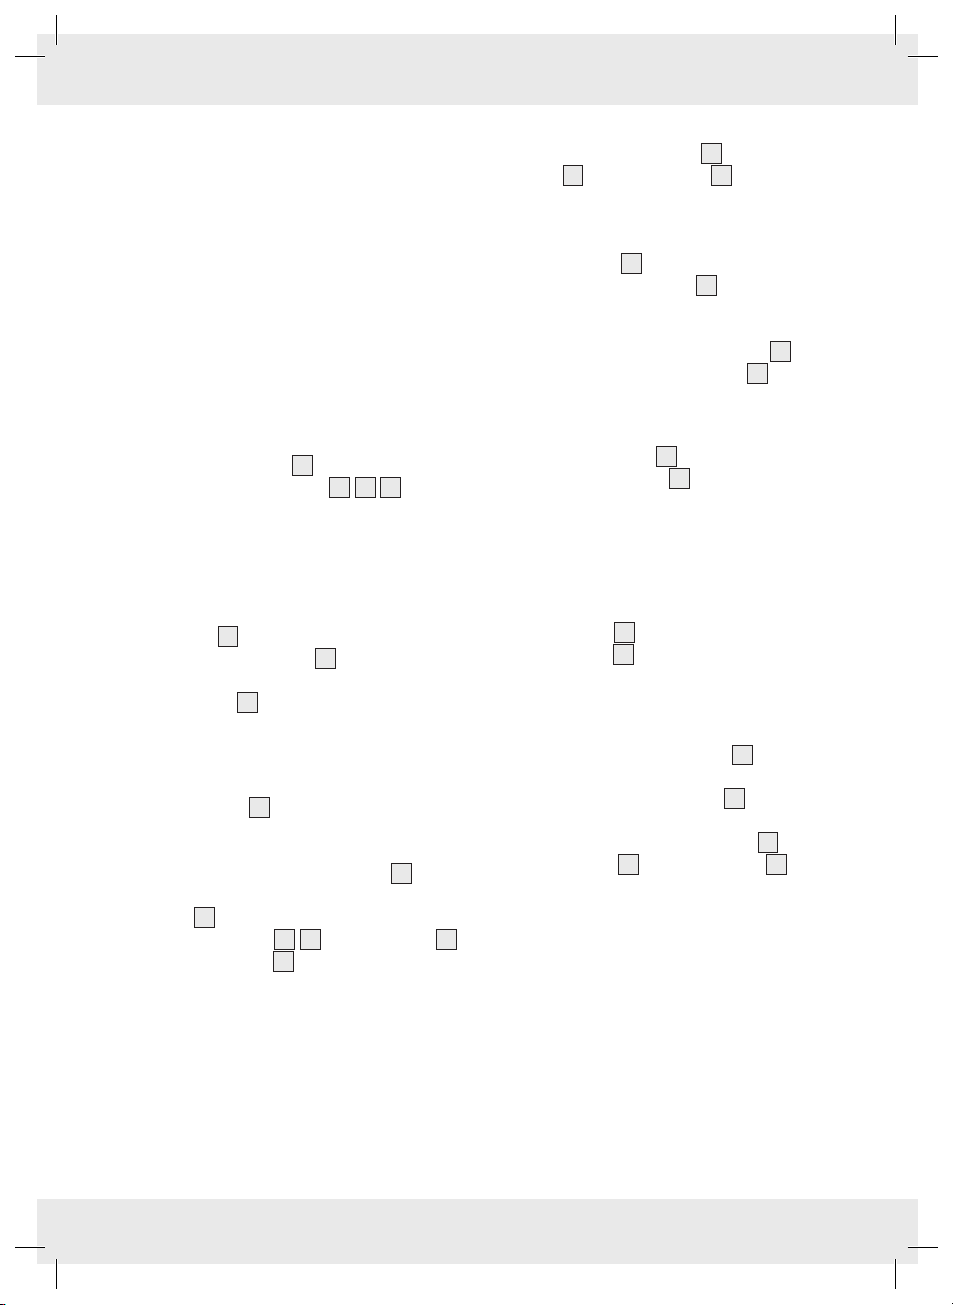
Erect the product in accordance with the
illustrations A to E.
Illustration A:
1. Place the outer tent 1 flat on the ground.
The holders for the poles 3 4 5 must be
facing upwards.
2. Push the poles marked in different colours
carefully through the holders marked with the
same colour.
Illustration B:
3. For pole 5, insert the two ends of pole into
the eyelets on the pole
door.
4. Set the tent 1 up and fix the poles to the
ground sleeve of the floor fastening.
Illustration C:
5. Fix one side of the tent in the ground with
the tent pegs 7. Then take hold of the other
end of the tent and pull it apart in such a
way that the tent is taut.
6. Secure the other side of outer tent 1 by
tensioning the floor fastenings with the tent
pegs 7.
7. Secure the poles 3
by the pole clips 10.
5
sleeves for front
4
to the outer tent
1
Illustration D:
8. Now secure the outer tent 1 with the guy
ropes 6 and the tent pegs 7.
9. Open the sunroof (entrance), roll it and
attach it with the two fasteners.
10. Stretch the tent until taut, pull all of the corners
and guy ropes 6 until they are tight. Do not
over-tighten the guy ropes 6, if the strength
of the wind increases the attachment point
and seam of the tent might tear.
11. Lay out the detachable groundsheet
under the living room, peg down 7 the
groundsheet at the eyelets of corners.
Illustration E:
12. Hang the inner tent 2 into the plastic “O”
rings of the outer tent 1 that are designated
for that purpose, the sequence is from back
to the front.
13. Peg down the 4 corners of groundsheet
of inner tent at the plastic “O” rings. The
sequence is from back to the front as well.
14. In case you need simply hang the separate
partition wall 11 into the plastic “O” rings of
the inner tent 2 that are designated for that
purpose.
Illustration F:
15. In order to use the entrance as a sunshade,
put the entrance support poles 12 into
each other and fasten the pointy end
of the entrance support poles 12 to the
corresponding holes of the sunshade.
16. Secure the entrance support poles 12 with
the guy ropes 6 and the tent pegs 7.
17. If it rains, close the sunshade to avoid water
puddles on top of the sunshade.
8
GB/IE
4
96531_14_Crivit_IE_PL_CZ_01.indb 4 6/1/14 11:07 am
Page 5

§ Taking down the tent
Clean the tent both inside and outside before
you take the tent down. The tent must be
dismantled in the reverse order to the manner
in which it has been erected.
The product may lose some of its ability to
keep out water with frequent use. Therefore
you should spray the tent regularly with a
waterproofing agent (available in DIY shops,
camping shops etc.).
§ Packing the tent together
m CAUTION! Please ensure that the tent is
completely dry before you pack it together.
Otherwise this may result in stains and
damage to the fabric.
m CAUTION! The tent pegs
individual parts must be packed separately in
the bags provided. Otherwise the tent pegs
7
might damage the tent.
Always fold the outer tent 1 together in
such a way that the floor of the tent is facing
outwards.
Then fold the inner tent 2 and roll it
together.
Collect all of the parts together carefully
before you pack the tent. You should count
the parts in order to ensure that none of them
have been mislaid or lost.
After the tent has been rolled up, pack it
carefully into the carrying bag.
7
and other
§ Cleaning and Care
m CAUTION! Never wash the tent in a
washing machine. Otherwise the product
may lose some of its ability to keep out water.
m CAUTION! Never use petrol, solvent or
other cleaning agents. Otherwise there is a
danger of damage to the product.
Condensation can form in all synthetic tents;
you should therefore air the tent as frequently as
possible in order to counteract this.
Remove any dirt from the tent with a soft
sponge and clean water.
Please allow all parts to dry thoroughly
before you repack the tent. This will prevent
the formation of mould, bad odours and
discolouration. .
If the zipper sticks when being opened or
closed, spray it with silicone spray.
§ Disposal
The packaging is made entirely of
recyclable materials, which you may
dispose at local recycling facilities.
Contact your local refuse disposal authority for
more details of how to dispose of your worn-out
product.
§ Warranty
The device has been manufactured to strict
quality guidelines and meticulously examined
before delivery. In the event of product defects
you have legal rights against the retailer of this
product. Your legal rights are not limited in any
way by our warranty detailed below.
The warranty for this device is 3 years from the
date of purchase. Should this device show any
fault in materials or manufacture within three
years from the date of purchase, we will repair or
replace it - at our choice - free of charge to you.
The warranty period begins on the date of
purchase. Please keep the original sales receipt in
a safe location. This document is required as your
proof of purchase. This warranty becomes void
if the device has been damaged or improperly
used or maintained.
The warranty applies to faults in material or
manufacture. This warranty does not cover
product parts subject to normal wear, thus
possibly considered consumables (e.g. batteries)
or for damage to fragile parts, e.g. switches,
rechargeable batteries or glass parts.
GB/IE
5
96531_14_Crivit_IE_PL_CZ_01.indb 5 6/1/14 11:07 am
Page 6

DUŻY NAMIOT 4-OSOBOWY
§ Prawidłowe użycie
Produkt ten służy jako zakwaterowanie podczas
podróżowania i biwakowania. Produkt ten nie
jest przeznaczony do użytku komercyj nego.
Kat. Namiot biwakowy zgodny z normą
ISO 5912
Poziom wydajności 1: do użytku sporadycznego i
krótkoterminowego.
§ Opis części
1
Namiot zewnętrzny
2
Namiot wewnętrzny dla 4 osób
3
Rura, średnica 11 mm, ok. 545 mm (czerwona)
4
Rura, średnica 9,5 mm, ok. 460 mm (niebieska)
5
Rura, średnica 7,0 mm, ok. 210 mm (zielona)
6
Linka namiotowa
7
Śledź namiotowy
8
Odpinana płachta na ziemię
9
Torba transportowa
10
Zaciski rur
11
Odpinane przepierzenie
12
Rura wspornikowa wejścia:
ok. 16 x 1900 mm (Ø x wys.)
§ Dane techniczne
Wymiary:
Zewnętrzne wymiary namiotu:
ok. 460 x 260 x 190 cm (dł. x szer. x wys.)
Wewnętrzne wymiary namiotu:
ok. 220 x 240 x 155 cm (dł. x szer. x wys.)
Maks. wysokość po rozstawieniu:
ok. 185 cm (patrz rys. F)
§ Zalecenia dotyczące
bezpieczeństwa
INSTRUKCJE NALEŻY PRZECHOWYWAĆ
W BEZPIECZNYM MIEJSCU. JEŚLI
PRODUKT JEST SPRZEDAWANY OSOBIE
TRZECIEJ, NALEŻY DOŁĄCZYĆ DO
NIEGO CAŁĄ DOKUMENTACJĘ.
m UWAGA! RYZYKO ODNIESIENIA
OBRAŻEŃ! Upewnić się, że żadna z
części nie jest uszkodzona oraz że wszystkie
elementy zostały prawidłowo złożone. Jeśli
namiot złożony jest nieprawidłowo, istnieje
ryzyko odniesienia obrażeń. Uszkodzone
części mogą naruszyć funkcjonalność
wyrobu oraz bezpieczeństwo użytkowania.
W celu rozstawienia namiotu wybrać
miejsce, w którym ziemia jest tak płaska i
twarda, jak to tylko możliwe.
Należy regularnie sprawdzać, czy wszystkie
punkty połączeniowe oraz linki namiotowe
znajdują się w nienaruszonym stanie.
Regularnie należy też sprawdzać, czy
śledzie są twardo wbite w ziemię.
Sprayów na owady nie wolno stosować w
ani rozpylać ich na namiot.
Małe przecieki na szwach można naprawić
za pomocą sprayu do szwów oraz sprayu
impregnującego. Należy spryskać nimi
płachtę namiotu.
m UWAGA! NIEBEZPIECZEŃSTWO
ZATRUCIA I USZKODZENIA MIENIA!
Nie rozpalać ognia w wyrobie i trzymać
wyrób z dala od źródeł ciepła.
Użytkownik powinien zapoznać się z
miejscowymi przepisami przeciwpożarowymi
(np. obowiązującymi w miejscu biwakowym,
w miejscu rozstawiania namiotu).
§ Środki ostrożności dotyczące
bezpieczeństwa pożarowego
Biwakuj bezpiecznie. Należy
przestrzegać poniższych zasad
zdrowego rozsądku:
Nie kłaść gorących urządzeń w pobliżu
ścian, dachu i zasłon.
Należy zawsze przestrzegać instrukcji
bezpieczeństwa tych urządzeń.
Nigdy nie pozwalać dzieciom bawić się w
pobliżu gorących urządzeń.
Nie zastawiać wyjścia. Nie blokować
wyjścia przedmiotami.
Upewnić się, że znane są środki
bezpieczeństwa dotyczące bezpieczeństwa
przeciwpożarowego obowiązujące w danym
miejscu.
PL
6
96531_14_Crivit_IE_PL_CZ_01.indb 6 6/1/14 11:07 am
Page 7

§ Rozstawianie namiotu
Prosimy upewnić się, że wyrób rozstawiają
wyłącznie osoby z odpowiednimi
umiejętnościami.
Wskazówka: Tworzywo poliestrowe, z
którego wyprodukowano namiot zawiera
materiał wodoodporny.
Możliwe, że podczas ulewnych deszczów
namiot nie będzie w pełni wodoodporny.
Jednakże nici namiotu skurczą się pod
wpływem wody, więc po krótkim czasie
namiot będzie wodoodporny.
Rozstawić produkt zgodnie z rysunkami od
A do E.
Rysunek A:
1. Rozłożyć namiot zewnętrzny 1 płasko na
podłożu. Uchwyty rurek 3 4 5 muszą
być skierowane do góry.
2. Ostrożnie wsunąć rurki przez uchwyty
oznaczone tymi samymi kolorami.
Rysunek B:
3. W przypadku rurki 5 wsunąć oba jej
końce w oczka na rękawach do rurek 5,
aby utworzyć frontowe drzwi.
4. Postawić namiot 1 i przymocować rurki do
rękawa mocowania do podłoża.
Rysunek C:
5. Przymocować jedną stronę namiotu do
ziemi za pomocą śledzi 7. Następnie
należy przytrzymać drugi koniec namiotu
i pociągnąć w taki sposób, aby namiot był
naprężony.
6. Przymocować drugą stronę namiotu
zewnętrznego 1, naprężając mocowanie
podłogi za pomocą śledzi 7.
7. Przymocować rurki 3 4 do namiotu
zewnętrznego 1 za pomocą zacisków do
rurek 10.
Rysunek D:
8. Teraz należy zabezpieczyć namiot
zewnętrzny 1 za pomocą linek
namiotowych 6 oraz śledzi 7.
9. Otworzyć wejście, podwinąć i zaczepić za
pomocą dwóch klamer.
10. Naciągnąć namiot, wszystkie rogi i liny
namiotowe, 6 aż będą dobrze naprężone.
Nie naciągać nadmiernie linek
namiotowych 6, ponieważ jeśli zwiększy
się siła wiatru, punkty mocowania oraz szwy
namiotu mogą się rozerwać.
11. Rozłożyć odpinaną płachtę na ziemię 8 w
głównej części namiotu i 7 przymocować
ją do ziemi, wbijając śledzie przez oczka w
rogach.
Rysunek E:
12. Zawiesić namiot wewnętrzny 2 na
specjalnie do tego przeznaczonych,
plastikowych pierścieniach namiotu
zewnętrznego 1. Należy zacząć z tyłu
namiotu i kierować się do przodu.
13. Za plastikowe pierścienie przymocować
śledziami do ziemi 4 rogi płachty podłoża
namiotu wewnętrznego. Teraz także należy
zacząć z tyłu namiotu i kierować się do
przodu.
14. W razie potrzeby należy zawiesić
przepierzenie 11 za specjalnie do tego
przeznaczone plastikowe pierścienie 2.
Rysunek F:
15. Aby używać wejścia jako osłony
przeciwsłonecznej, należy wsunąć rurki
wspornikowe wejścia 12 jedna w drugą i
przymocować ich spiczaste końce 12 do
odpowiednich otworów w osłonie.
16. Przymocować rurki wspornikowe
wejścia 12 za pomocą linek
namiotowych 6 oraz śledzi 7.
17. Jeśli pada, osłonę przeciwsłoneczną należy
zamknąć, aby zapobiec gromadzeniu się
wody.
PL
7
96531_14_Crivit_IE_PL_CZ_01.indb 7 6/1/14 11:07 am
Page 8

§ Składanie namiotu
Przed złożeniem namiotu należy wyczyścić
jego zewnętrzną oraz wewnętrzną część.
Namiot należy złożyć, wykonując kroki w
sposób odwrotny niż przy montażu.
§ Pakowanie namiotu
m UWAGA! Przed spakowaniem należy
upewnić się, że namiot jest całkowicie
suchy. W przeciwnym razie może dojść do
tworzenia się plam oraz do uszkodzenia
materiału.
m UWAGA! Śledzie namiotu
pojedyncze części należy spakować osobno
w dołączonych torebkach. W przeciwnym
razie śledzie 7 mogą uszkodzić namiot.
Namiot zewnętrzny należy składać 1
w taki sposób, aby podłoga namiotu
skierowana była na zewnątrz.
Następnie należy złożyć namiot
wewnętrzny 2 i zwinąć je razem.
Przed spakowaniem namiotu ostrożnie
zebrać wszystkie części razem. Należy
policzyć części, aby upewnić się, że
żadna z nich nie została umieszczona w
nieodpowiednim miejscu lub zgubiona.
Po zwinięciu namiotu należy ostrożnie
spakować go do torby transportowej.
7
i inne
§ Czyszczenie i konserwacja
m UWAGA! Nigdy nie prać namiotu w
pralce. W przeciwnym razie namiot może w
pewnym stopniu utracić swoje wodoodporne
właściwości.
m UWAGA! Nigdy nie stosować benzyny,
rozpuszczalników ani innych środków
czyszczących. W przeciwnym razie istnieje
ryzyko uszkodzenia produktu.
We wszystkich syntetycznych namiotach może
dojść do kondensacji. Dlatego też w ramach
działań zapobiegawczych należy wietrzyć
namiot tak często, jak to możliwe.
Usunąć wszelkie zabrudzenia z namiotu za
pomocą miękkiej gąbki i czystej wody.
Należy pozostawić wszystkie części do
całkowitego wyschnięcia przed ponownym
spakowaniem namiotu. Pomoże to zapobiec
formowaniu się pleśni, brzydkim zapachom i
przebarwieniom. .
Jeśli zamek zatnie się przy zamykaniu lub
otwieraniu, należy popryskać go sylikonem
w sprayu.
Namiot może w pewnym stopniu utracić
swoje wodoodporne właściwości, jeśli
jest często stosowany. Dlatego też należy
regularnie pryskać namiot wodoodpornym
środkiem (dostępne w sklepach z
narzędziami, sklepach kempingowych itp.).
§ Usuwanie
Opakowanie wykonane jest z
materiałów przyjaznych środowisku,
które można usuwać w miejscowych
punktach przetwarzania materiałów
wtórnych.
Informacje o możliwościach dotyczących
wyrzucania otrzymać można w urzędzie
miejskim lub gminnym.
§ Gwarancja
Urządzenie wyprodukowano według wysokich
standardów jakości i poddano skrupulatnej
kontroli przed wysyłką. W przypadku wad
produktu nabywcy przysługują ustawowe prawa.
Gwarancja nie ogranicza ustawowych praw
nabywcy urządzenia.
Szanowny kliencie, uzyskują Państwo na niniejsze
urządzenie 3 lata gwarancji od daty zakupu.
Gwarancja wygasa w razie zawinionego
przez użytkownika uszkodzenia produktu,
niewłaściwego użycia lub konserwacji.
W przypadku wystąpienia w ciągu trzech
lat od daty zakupu wad materiałowych lub
fabrycznych, dokonujemy – według własnej
oceny – bezpłatnej naprawy lub wymiany
urządzenia.
Świadczenie gwarancyjne obejmuje wady
materiałowe i fabryczne. Gwarancja nie
obejmuje części produktu ulegających
normalnemu zużyciu, uznawanych za części
zużywalne (np. baterie) oraz uszkodzeń części
łamliwych, np. przełączników, akumulatorów lub
wykonanych ze szkła.
PL
8
96531_14_Crivit_IE_PL_CZ_01.indb 8 6/1/14 11:07 am
Page 9

STAN
§ Použití podle určení
Tento výrobek je vhodný jako ubytování na
cestách a ke kempování. Výrobek není určen pro
komerční použití.
Kategorie A podle DIN EN ISO 5912
Výkonnostní stupeň 1: pro příležitostní a
krátkodobé použití
§ Částečný popis
1
Vnější stan
2
Vnitřní stan pro 4 osoby
3
Tyč Ø 11 mm, cca 545 mm (červená)
4
Tyč Ø 9,5 mm, cca 460 mm (modrá)
5
Tyč Ø 7,0 mm, cca 210 mm (zelená)
6
Napínací šňůra
7
Stanový kolík
8
Odnímatelná podlahová plachta
9
Ukládací taška
10
Upevňovací úchytky
11
Vyjímatelná přepážka (spací oddíl)
12
Instalační tyč: cca. 16 x 1900 mm (Ø x V)
§ Technická data
Rozměry:
Vnější stan:
cca 460 x 260 x 190 cm (D x Š x V)
Vnitřní stan:
cca 220 x 240 x 155 cm (D x Š x V)
Max. výška ve smontovaném stavu:
cca 185 cm (viz Obr. F)
§ Bezpečnostní pokyny
TENTO NÁVOD DOBŘE USCHOVEJTE. PŘI
PŘEDÁNÍ VÝROBKU TŘETÍM OSOBÁM
PŘEDEJTE ROVNĚŽ VEŠKERÉ PODKLADY.
m POZOR! NEBEZPEČÍ PORANĚNÍ!
Zajistěte, aby byly všechny části nepoškozené
a namontovány odborně. Při neodborné
montáži existuje nebezpečí zranění.
Poškozené části mohou ovlivnit bezpečnost
a funkci.
Zvolte pokud možno pevné, rovné podloží
jako stanoviště.
Kontrolujte pravidelně integritu všech
spojovacích míst a přezkoušejte napnutí a
pevné uložení stanových kolíků.
Nepoužívejte žádný sprej na hmyz uvnitř
nebo na stanu.
Malá netěsná místa na švech mohou
být odstraněna spomocí spreje na švy.
Na svrchní vrstvu stanu může být použit
impregnační sprej.
m POZOR! NEBEZPEČÍ OTRAVY A
NEBEZPEČÍ POŠKOZENÍ VĚCI! Uvnitř
výrobku nezapalujte oheň a udržujte ho
daleko od zdrojů tepla.
Navíc se seznamte snařízeními o požární
ochraně na místě (např. kempink, tábořiště).
§ Preventivní opatření proti
požáru
Pro bezpečné táboření je třeba
následovat následující pravidla
zdravého lidského rozumu:
Neinstalovat žádné zapnuté elektronické
přístroje vblízkosti stěn, střechy nebo závěsů.
Vždy dbejte bezpečnostních pokynů pro tato
zařízení.
Nikdy nedovolte dětem, aby si hrály
vblízkosti zapojených přístrojů.
Nechte prostupy volné. Nezatarasujte
výstupy spomocí předmětů.
Informujte se o zařízeních a opatřeních proti
požáru na stanovišti.
CZ
9
96531_14_Crivit_IE_PL_CZ_01.indb 9 6/1/14 11:07 am
Page 10

§ Výstavba stanu
Dbejte na to, aby byl výrobek montován
pouze odborníky.
Upozornění: Polyesterový materiál
vnějšího stanu je zvodu odpuzujícího
materiálu.
Vprůběhu prvního použití při dešti je možné,
že stan nebude zcela nepromokavý. Vlhkostí
se ale stáhnou vlákna stanu a tak se stan
stane po krátké době nepromokavým.
Smontujte výrobek podle Obrázků A až E.
Obrázek A:
1. Položte vnější stan 1 naplocho na zem.
Kanály pro tyče 3 4 5 musí směřovat
nahoru.
2. Prostrčte barevně označené tyče opatrně
skrz příslušně barevně označené kanály.
Obrázek B:
3. Postrčte tyč 5 barevně označeným
kanálem. Potom zasuňte konce tyčí 5 do
zapuštěných kovových kroužků:
4. Vyrovnejte vnější stan 1 a upevněte tyče na
kroužcích upevnění kzemi.
Obrázek C:
5. Upevněte jednu stranu stanu spomocí
stanových kolíků 7 kzemi. Poté se
postarejte o druhou stranu stanu a
roztáhněte ji tak, aby byl stan napnut.
6. Zajistěte vnější stan 1 tak, že napnete
spomocí stanových kolíků 7 upnutí kzemi.
7. Upevněte nyní vnější stan 1 na
tyčích 3 4 spomocí předem
namontovaných upevňovacích úchytek 10.
Obrázek D:
8. Nyní zajistěte vnější stan 1 spomocí
napínacích šňůr 6 a stanových kolíků 7.
9. Otevřete střešní okno (vstup), sviňte ho a
upevněte spomocí obou upevnění.
10. Napněte stan a utáhněte všechny rohy
spomocí napínacích šňůr 6. Nenapínejte
napínací šňůry 6 příliš silně. Při zesilujícím
větru se mohou upevňovací body a švy celty
natrhnout.
11. Rozložte odnímatelnou podlahovou
plachtu 8 vpřední části stanu a upevněte
ji spomocí stanových kolíků 7 vproto
určených okách.
Obrázek E:
12. Zavěste vnitřní stan 2 na ktomu určené
kroužky zumělé hmoty na vnitřní straně
vnějšího stanu 1. Upevňování se musí
provádět zezadu ve směru ke vstupu do
stanu.
13. Upevněte podlahovou plachtu umístěnou
na vnitřním stanu ve všech čtyřech rozích
spomocí dodaných stanových kolíků 7. I
zde se musí upevňování provádět zezadu ve
směru ke vstupu do stanu.
14. V případě potřeby můžete zavěsit
samostatnou přepážku 11 na ktomu
opatřené umělohmotné kroužky na vnitřní
straně vnitřního stanu 2.
Obrázek F:
15. Chcete-li použít vchod jako stříšku proti
slunci, složte instalační tyče 12 a nasuňte
špičatý konec instalačních tyčí 12 vždy do
otvorů, které jsou k tomu účelu ve stříšce proti
slunci.
16. Nyní zajistěte instalační tyče 12 spomocí
napínacích šňůr 6 a stanových kolíků 7.
17. Za deště stříšku proti slunci zavřete, aby se
zabránilo hromadění vody na ní.
CZ
10
96531_14_Crivit_IE_PL_CZ_01.indb 10 6/1/14 11:07 am
Page 11

§ Demontáž stanu
Než stan zdemontujete, očistěte ho zevnitř
a zvenku. Demontáž stanu se musí provádět
vobráceném pořadí kmontáži.
§ Sbalení stanu
m POZOR! Zajistěte, aby byl stan kompletně
suchý dříve než ho sbalíte. Jinak mohou
vzniknout skvrny a poškození tkaniny.
m POZOR! Dbejte na to, abyste stanové
7
kolíky
určených. Jinak mohou stanové kolíky 7
stan poškodit. Zabalte ostatní jednotlivé části
rovněž do kapes ktomu určených.
Vždy vnější stan 1 skládejte tak, aby dno
stanu směřovalo ven.
Potom složte vnitřní stan 2 a sviňte ho.
Před balením pečlivě shromážděte všechny
části. Spočítejte je, abyste zajistili, že jsou
nějaké části založené nebo se ztratily.
Potom srovnejte svinutý stan pečlivě do
odnosné tašky.
zabalil zvlášť do kapes ktomu
§ Čištění a péče
m POZOR! Nikdy stan neperte vpračce.
Jinak může být negativně ovlivněna jeho
nepromokavost.
m POZOR! Nikdy nepoužívejte benzin,
rozpouštědla nebo jiné čistící prostředky.
Jinak hrozí poškození výrobku.
Ve všech syntetických stanech může docházet
ktvorbě kondenzátu, proto ho pokud možno co
nejčastěji větrejte, abyste tento následek zeslabili.
Odstraňte nečistotu ze stanu měkkou houbou
a čistou vodou.
Nechte všechny části důkladně uschnout,
než stan zase zabalíte. To předchází plísním,
zápachu a zabarvením.
Nastříkejte zipy silikonovým sprejem, když se
při otvírání nebo zavírání zasekává.
Při častém používání může být
nepromokavost výrobku negativně ovlivněna.
Proto stan pravidelně stříkejte impregnačním
sprejem (ke dostání v stavebním nebo
vodborném obchodě).
§ Likvidace do odpadu
Balení je vyrobeno z ekologických
materiálů, které můžete odstranit do
odpadu v místních sběrnách tříděného
odpadu.
Informujte se o možnostech odstranění použitého
výrobku do odpadu u Vaší místní obecní nebo
městské správy.
§ Záruka
Výrobek byl vyroben s nejvyšší pečlivostí podle
přísných kvalitativních směrnic a před odesláním
prošel výstupní kontrolou. V případě závad máte
možnost uplatnění zákonných práv vůči prodejci.
Vaše práva ze zákona nejsou omezena naší níže
uvedenou zárukou.
Vážený zákazníku, na tento výrobek dostáváte
3 roky záruku ode dne zakoupení. Záruční lhůta
začíná od data zakoupení. Uschovejte si dobře
originál pokladní stvrzenky. Tuto stvrzenku budete
potřebovat jako doklad o zakoupení.
Pokud se do tří let od data zakoupení tohoto
výrobku vyskytne vada materiálu nebo výrobní
vada, výrobek Vám – dle našeho rozhodnutí –
bezplatně opravíme nebo vyměníme. Tato záruka
zaniká, jestliže se výrobek poškodí, neodborně
použil nebo neobdržel pravidelnou údržbu.
Záruka platí na vady materiálu a výrobní vady.
Tato záruka se nevztahuje na díly výrobku
podléhající opotřebení (např. na baterie), dále
na poškození křehkých, choulostivých dílů, např.
vypínačů, akumulátorů nebo dílů zhotovených ze
skla.
CZ
11
96531_14_Crivit_IE_PL_CZ_01.indb 11 6/1/14 11:07 am
Page 12

4-PERSONEN-GROSSRAUMZELT
§ Bestimmungsgemäße
Verwendung
Dieses Produkt ist als Unterkunft auf Reisen und
zum Campen geeignet. Das Produkt ist nicht für
den gewerblichen Einsatz bestimmt.
Kategorie A gemäß DIN EN ISO 5912
Leistungsstufe 1: Für gelegentlichen und
kurzfristigen Einsatz
§ Teilebeschreibung
1
Außenzelt
2
Innenzelt für 4 Personen
3
Stange Ø 11 mm, ca. 545 mm (rot)
4
Stange Ø 9,5 mm, ca. 460 mm (blau)
5
Stange Ø 7,0 mm, ca. 210 mm (grün)
6
Abspannleine
7
Hering
8
Abnehmbare Bodenplane
9
Aufbewahrungstasche
10
Befestigungsclips
11
Herausnehmbare Trennwand (Schlafkabine)
12
Aufstellstange: ca. 16 x 1900 mm (Ø x H)
§ Technische Daten
Maße:
Außenzelt: ca. 460 x 260 x 190 cm (L x B x H)
Innenzelt: ca. 220 x 240 x 155 cm (L x B x H)
Max. Standhöhe: ca. 185 cm (siehe Abb. F)
§ Sicherheitshinweise
BEWAHREN SIE DIESE ANLEITUNG GUT
AUF. HÄNDIGEN SIE ALLE UNTERLAGEN
BEI WEITERGABE DES PRODUKTS AN
DRITTE EBENFALLS MIT AUS.
m VORSICHT! VERLETZUNGSGEFAHR!
Stellen Sie sicher, dass alle Teile
unbeschädigt und sachgerecht montiert
sind. Bei unsachgemäßer Montage besteht
Verletzungsgefahr. Beschädigte Teile können
die Sicherheit und Funktion beeinflussen.
Wählen Sie einen möglichst festen,
ebenerdigen Untergrund als Standplatz.
Kontrollieren Sie regelmäßig die
Unversehrtheit aller Verbindungsstellen und
überprüfen Sie Abspannungen und den
festen Sitz der Heringe.
Verwenden Sie kein Insekten-Spray in oder
auf dem Zelt.
Kleine undichte Stellen an den Nähten
können mit einem Nahtspray behoben
werden. Für die Zelthaut kann ein
Imprägnierspray verwendet werden.
m VORSICHT! VERGIFTUNGSGEFAHR UND
GEFAHR DER SACHBESCHÄDIGUNG!
Entzünden Sie kein Feuer innerhalb
des Produkts und halten Sie es von
Wärmequellen fern.
Machen Sie sich zudem mit den
Brandschutzbestimmungen vor Ort (z.B.
Campingplatz, Zeltplatz) vertraut.
§ Vorsichtsmaßregeln gegen
Feuer
Zum sicheren Campen sind
folgende Regeln des gesunden
Menschenverstandes zu befolgen:
Keine eingeschalteten elektronischen Geräte
in der Nähe der Wände, des Daches oder
der Vorhänge aufstellen.
Immer die Sicherheitsinstruktionen für diese
Geräte beachten.
Niemals Kindern erlauben, in der Nähe von
eingeschalteten Geräten zu spielen.
Lassen Sie die Durchgänge frei. Stellen Sie
die Ausgänge nicht mit Gegenständen zu.
Erkundigen Sie sich nach den Einrichtungen
und Vorkehrungen gegen Feuer auf dem
Gelände.
DE/AT/CH
12
96531_14_Crivit_IE_PL_CZ_01.indb 12 6/1/14 11:07 am
Page 13

§ Zelt aufbauen
Achten Sie darauf, dass das Produkt nur von
fachkundigen Personen montiert wird.
Hinweis: Das Polyestermaterial des
Außenzeltes ist aus wasserabweisendem
Material.
Während der ersten Verwendung bei Regen
ist es möglich, dass das Zelt nicht vollständig
wasserdicht ist. Durch die Nässe ziehen
sich aber die Fäden des Zeltes zusammen
und so wird das Zelt nach einer kurzen Zeit
wasserdicht.
Montieren Sie das Produkt gemäß den
Abbildungen A bis E.
Abbildung A:
1. Legen Sie das Außenzelt 1 flach auf den
Boden. Die Kanäle für die Stangen 3 4
5
müssen nach oben zeigen.
2. Schieben Sie die farbig markierten Stangen
vorsichtig durch die entsprechend farbig
gekennzeichneten Kanäle.
Abbildung B:
3. Schieben Sie die Stange 5 durch
den farbig gekennzeichneten Kanal.
Anschließend stecken Sie die Enden der
Stange 5 in die eingelassenen Metallringe.
4. Richten Sie das Außenzelt 1 auf und
befestigen Sie die Stangen an den Ringen
der Bodenhalterungen.
Abbildung D:
8. Sichern Sie nun das Außenzelt 1 mit den
Abspannleinen 6 und den Heringen 7.
9. Öffnen Sie das Sonnendach (Eingang),
rollen Sie es auf und befestigen Sie es mit
den beiden Halterungen.
10. Spannen Sie das Zelt und ziehen Sie alle
Ecken und Abspannleinen 6 fest. Spannen
Sie die Abspannleinen 6 nicht zu stark
fest. Bei zunehmendem Wind können
Befestigungspunkt und Zeltnaht einreißen.
11. Legen Sie die abnehmbare Bodenplane 8
im vorderen Bereich des Zeltes aus. Fixieren
Sie diese mit Hilfe der Heringe 7 an den
vorgesehenen Ösen.
Abbildung E:
12. Hängen Sie das Innenzelt 2 in die
dafür vorgesehenen Kunststoffringe an
der Innenseite des Außenzeltes 1. Die
Befestigung muss von hinten in Richtung ZeltEingang erfolgen.
13. Befestigen Sie die am Innenzelt angebrachte
Bodenplane an allen vier Ecken mit Hilfe der
mitgelieferten Heringe 7. Auch hier muss
die Fixierung von hinten in Richtung ZeltEingang erfolgen.
14. Bei Bedarf können Sie die separate
Trennwand 11 in die dafür vorgesehenen
Kunststoffringe an der Innenseite des
Innenzeltes 2 einhängen.
Abbildung C:
5. Fixieren Sie eine Seite des Zeltes mit den
Heringen 7 am Boden. Greifen Sie dann
das andere Ende des Zeltes. Ziehen Sie es
so auseinander, dass das Zelt gespannt wird.
6. Sichern Sie das Außenzelt 1, indem Sie
mit den Heringen 7 die Bodenhalterungen
spannen.
7. Befestigen Sie nun das Außenzelt 1 mit
Hilfe der vormontierten Befestigungsclips 10
an den Stangen 3 4.
Abbildung F:
15. Um den Eingang als Sonnendach zu
verwenden, stecken Sie die
Aufstellstangen 12 ineinander und
befestigen das spitze Ende der
Aufstellstangen 12 jeweils in den dafür
vorgesehenen Löchern des Sonnendachs.
16. Sichern Sie die Aufstellstangen 12 mit den
Abspannleinen 6 und den Heringen 7.
17. Schließen Sie bei Regen das Sonnendach,
um Wasseransammlungen auf dem
Sonnendach zu vermeiden.
DE/AT/CH
96531_14_Crivit_IE_PL_CZ_01.indb 13 6/1/14 11:07 am
13
Page 14

§ Zelt abbauen
Reinigen Sie das Zelt von innen und außen,
bevor Sie das Zelt abbauen. Der Abbau des
Zeltes muss in umgekehrter Reihenfolge zum
Aufbau erfolgen.
§ Zelt zusammenpacken
m VORSICHT! Stellen Sie sicher, dass das
Zelt komplett trocken ist, bevor Sie es
zusammenpacken. Andernfalls können
Flecken und Gewebeschäden die Folge sein.
m VORSICHT! Achten Sie darauf, dass
Sie die Heringe 7 separat in die
dafür vorgesehenen Taschen packen.
Ansonsten können die Heringe 7
das Zelt beschädigen. Packen Sie die
übrigen Einzelteile ebenfalls in die dafür
vorgesehenen Taschen.
Falten Sie das Außenzelt 1 immer so
zusammen, dass der Zeltboden nach außen
zeigt.
Dann falten Sie das Innenzelt 2 und rollen
es zusammen.
Sammeln Sie alle Teile vor dem Verpacken
sorgfältig zusammen. Zählen Sie diese durch
um sicherzustellen, dass keine Teile verlegt
oder verloren gegangen sind.
Verstauen Sie anschließend das
zusammengerollte Zelt sorgfältig in der
Tragetasche.
§ Reinigung und Pflege
m VORSICHT! Waschen Sie das Zelt niemals
in einer Waschmaschine. Andernfalls kann
die Wasserdichtigkeit negativ beeinflusst
werden.
m VORSICHT! Benutzen Sie niemals Benzin,
Lösungsmittel oder andere Reinigungsmittel.
Andernfalls drohen Beschädigungen des
Produkts.
In allen synthetischen Zelten kann es zu
Kondensbildung kommen; lüften Sie also
so häufig wie möglich, um den Effekt
abzuschwächen.
Entfernen Sie Schmutz vom Zelt mit einem
weichen Schwamm und klarem Wasser.
Lassen Sie alle Teile gründlich trocknen,
bevor Sie das Zelt wieder verpacken. Dies
beugt Schimmel, Geruch und Verfärbungen
vor.
Sprühen Sie die Reisverschlüsse mit
Silikonspray ein, wenn diese beim Öffnen
oder Schließen haken.
Bei häufiger Verwendung kann die
Wasserdichtigkeit des Produkts negativ
beeinflusst werden. Sprühen Sie das Zelt
daher regelmäßig mit einem Imprägnierspray
(im Baumarkt, Fachhandel erhältlich) ein.
§ Entsorgung
Die Verpackung besteht aus umweltfreundlichen
Materialien, die Sie über die örtlichen
Recyclingstellen entsorgen können.
Möglichkeiten zur Entsorgung des ausgedienten
Produkts erfahren Sie bei Ihrer Gemeinde oder
Stadtverwaltung.
§ Garantie
Das Produkt wurde nach strengen
Qualitätsrichtlinien sorgfältig produziert und vor
Anlieferung gewissenhaft geprüft. Im Falle von
Mängeln dieses Produkts stehen Ihnen gegen
den Verkäufer des Produkts gesetzliche Rechte
zu. Diese gesetzlichen Rechte werden durch
unsere im Folgenden dargestellte Garantie nicht
eingeschränkt.
Sie erhalten auf dieses Gerät 3 Jahre Garantie
ab Kaufdatum. Die Garantiefrist beginnt mit dem
Kaufdatum. Bitte bewahren Sie den Original
Kassenbon gut auf. Diese Unterlage wird als
Nachweis für den Kauf benötigt.
Tritt innerhalb von drei Jahren ab dem
Kaufdatum dieses Produkts ein Material- oder
Fabrikationsfehler auf, wird das Produkt von uns
– nach unserer Wahl – für Sie kostenlos repariert
oder ersetzt. Diese Garantie verfällt, wenn das
Produkt beschädigt, nicht sachgemäß benutzt
oder gewartet wurde.
Die Garantieleistung gilt für Material- oder
Fabrikationsfehler. Diese Garantie erstreckt sich
nicht auf Produktteile, die normaler Abnutzung
ausgesetzt sind (z. B. Batterien) und daher als
Verschleißteile angesehen werden können oder
für Beschädigungen an zerbrechlichen Teilen,
z. B. Schalter, Akkus oder die aus Glas gefertigt
sind.
DE/AT/CH
14
96531_14_Crivit_IE_PL_CZ_01.indb 14 6/1/14 11:07 am
Page 15

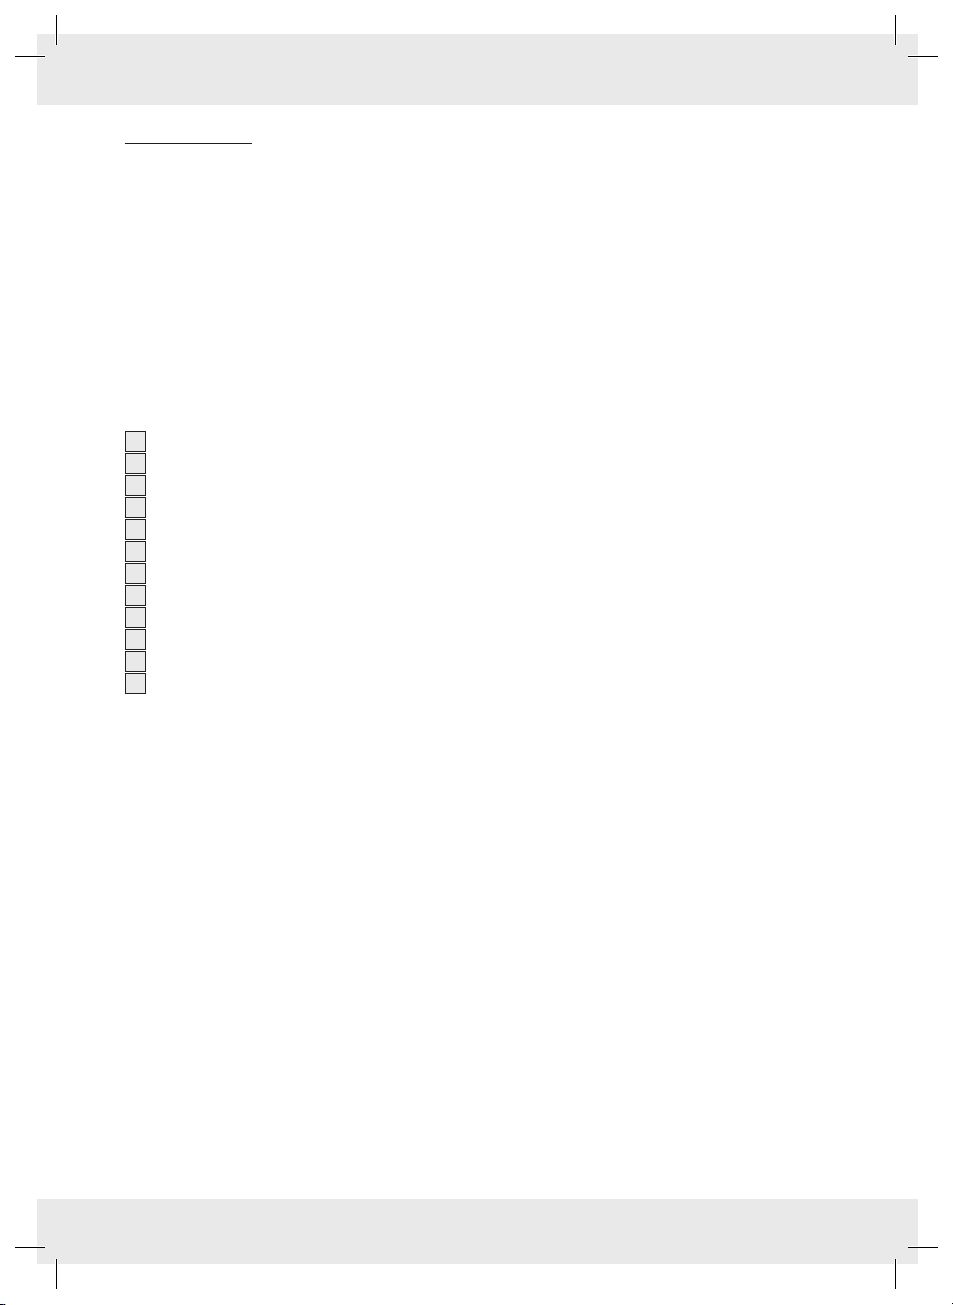
You need • Potrzebujecie • Potřebujete:
ø 11 mm
ca. / approx. 5460 mm
10
ø 9,5 mm
ca. / approx. 4620 mm
37
11
ø 7,1 mm
ca. / approx. 2130 mm
ø 16 mm
15
96531_14_Crivit_IE_PL_CZ_01.indb 15 6/1/14 11:07 am
Page 16

16
96531_14_Crivit_IE_PL_CZ_01.indb 16 6/1/14 11:07 am
Page 17

10
17
96531_14_Crivit_IE_PL_CZ_01.indb 17 6/1/14 11:07 am
Page 18

11
18
96531_14_Crivit_IE_PL_CZ_01.indb 18 6/1/14 11:07 am
 Loading...