


Tumble Dryer

Tumble Dryer
Instruction Book
5kg Models
You must read these instructions prior to using the
appliance and retain them for future reference.
2
Safety Advice 3-4
Electrical Requirements 5
Features - Get to know the main parts of your Dryer 6
Where to put and vent your Dryer 7-8
How to use your Dryer 9
The Controls 10-13
Sorting your laundry 14
Wash Care Labels 15
Items not suitable for tumble drying 15
Items requiring special attention 16
Speedy Iron Programme 17
Guide to Drying Times 18
How to remove and clean the fluff filter 19
Caring for your Dryer 20
If something goes wrong 22
Key Contacts Back Cover
Contents
Retention of this Instruction Book
This Instruction Book must be kept handy for reference as it contains important details on
the safe and proper use of the appliance.
If you sell or pass the appliance to someone else, or move house and leave it behind, make
sure this Book is also provided so the new owner can become familiar with the appliance
and safety warnings.
If the Book is lost or damaged a copy may be obtained from:
GDA Ltd., Morley Way, Peterborough, PE2 9JB

3
For your safety
NEVER ● Allow children to play with or otherwise interfere with the dryer.
NEVER ● Allow the air inlet at the back of the dryer, the air outlet or vent hose
to be obstructed.
NEVER ● Direct the vent hose outlet towards the air intake at the back of the
machine.
NEVER ● Allow the tumble dryer to recycle exhaust air.
NEVER ● Switch the machine off leaving a hot load in the drum.
NEVER ● Tumble dry without the filter in position.
NEVER ● Exceed the maximum load capacity recommended or place
dripping wet items in the drum.
NEVER ● Use the dryer on a carpeted floor where the pile height would
prevent air from entering the dryer from the base.
NEVER ● Allow lint to collect around the dryer.
NEVER ● Add liquid or sheet fabric conditioner to the dryer, use liquid
conditioner in the final rinse of your wash.
NEVER ● Use the dryer for commercial drying, the dryer is only suitable for
domestic use.
NEVER ● Dry Acrylics on the high heat setting.
NEVER ● Tumble dry articles that have NOT been well washed in water and
detergent then well rinsed and spun.
NEVER ● Tumble dry articles that have had chemicals used for cleaning.
NEVER ● Dry articles that are contaminated with flammable substances such
as: petrol, oil, paint, hair lacquer, creams, cooking fat or oil.
NEVER ● Tumble dry: rubber, foam rubber, plastic, plastic foam, nappy pants
or liners, polythene or paper.
Large, very bulky items including duvets and sleeping bags.
NEVER ● Never attempt to stand on top of your dryer, it is not designed for
such use and you could injure yourself or damage the dryer by such
abuse.
NEVER ● Switch electricity On or Off with wet hands.
IMPORTANT
Using your Tumble Dryer is easy.
Nevertheless, for your own safety and to get the best results it is important to know your
Dryer by reading right through this handbook before using your dryer for the first time.
A CHILD COULD CLIMB INTO OR TAMPER WITH AN UNATTENDED
TUMBLE DRYER.
WHEN THE MACHINE IS NOT IN USE SWITCH OFF, REMOVE THE PLUG AND
CLOSE THE DOOR.
IMPORTANT
4
For your safety
ALWAYS ● When the dryer is not in use, switch off at the wall, remove plug
and close the door.
ALWAYS ● Comply with the specified electrical requirements.
ALWAYS ● Ensure that your dryer is installed correctly and has adequate
ventilation. (see, "Where to put and vent your dryer.")
ALWAYS ● Use the vent hose for optimum drying performance.
ALWAYS ● Finish every programme with the cool tumble cycle provided on
the control.
ALWAYS ● Clean the filter, it is essential that the filter is kept clear of fluff
after EACH drying cycle.
ALWAYS ● Observe the rules for drying garments:
In particular woollen articles should not be dried in a
tumble dryer unless they are labelled ‘Superwash’,
‘Machine washable’ or have the ‘May be tumble dried’
symbol:
If in any doubt do not dry wool in the machine.
Unlike other materials, the mechanism of wool
shrinkage is irreversible, i.e. it will not stretch back to
the original size and shape.
ALWAYS ● Buy genuine accessories and spares.
CAUTION:WHEN THE DRYER IS IN USE AVOID
TOUCHING THE REAR OF THE DRYER AS IT MAY BE
HOT.
Electrical Requirements
Supply
Changing
the fuse
Moulded plug
Changing
the plug
Rewirable plug
Changing the
mains cable
WARNING:This appliance must be earthed!
REFER TO THE RATING PLATE FOR VOLTAGE AND CURRENT
REQUIREMENTS. (see diagram for location.)
The flexible mains lead is supplied fitted with a BS1363 plug and
with a 13 amp BS1362 fuse.
The plug should be connected to the mains supply via a suitable
switched socket which is accessible after installing your dryer.
If it is necessary to fit a replacement fuse, it must be a 13 amp
ASTA approved to BS1362 type.
If a replacement fuse holder/cover is required, it must be of the
same colour coding or wording as shown on the base of the plug.
Replacements are available from your Spares stockist.
The wires in the mains lead are coloured in accordance with the
following:
GREEN/YELLOW - EARTH
BLUE - NEUTRAL
BROWN - LIVE
If a replacement plug is to be fitted, the appropriate wire must be
connected to the correct terminal,as follows:
Connect:
Green/Yellow to terminal marked Earth or Green or
Blue to terminal marked Neutral or N or Black
Brown to terminal marked Live or L or Red.
If the plug being replaced is a non-rewirable type then the cut-off
plug must be disposed of safely. DO NOT leave where it can be
inserted into a socket and create a shock hazard.
Should the mains lead ever require replacing at any time please
contact your nearest Service Centre. A charge will be made for the
replacement of the mains lead or if you require a longer lead.
The mains lead must only be replaced by a specially prepared
cable obtainable from your Spares Stockist and fitted by a
qualified electrician.
WARNING:The plug must not be used without a fuse cover.
NOTE: IF IN DOUBT ABOUT ANY OF THE ABOVE CONSULT A
QUALIFIED ELECTRICIAN.
GREEN &
YELLOW TO
EARTH
13 AMP
FUSE
BROWN
TO LIVE
CORD
CLAMP
BLUE TO
NEUTRAL
5
6
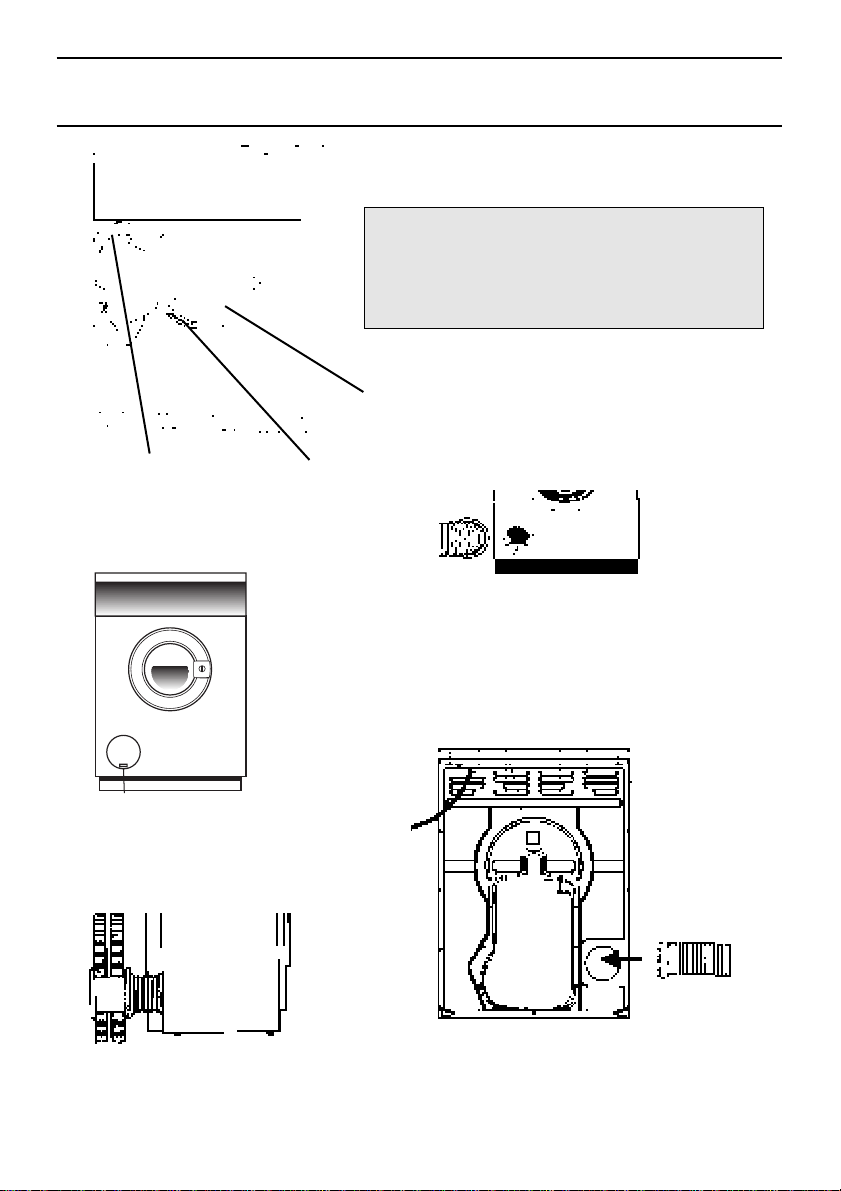
Features - Get to know the main parts of your dryer
Model and
serial numbers
Vent Cover
Fig. 4
Wall/window vent
(Vent cover at front)
NOTE: if your dryer is new wipe out
the inside of the drum before you first
use it to remove any dust which may
have accumulated during transit.
See “The Controls”
FLUFF FILTER
Clean after
each use
Front vent with hose
(Vent cover at rear)
Rating Plate
Air Intake
grill
Vent hose
fitted here
Caution
Hot
Fig. 3
Rear venting with hose
(Vent cover at front)
Drum
Fig. 2
Fig. 1

7
Where to put and vent your dryer
Stacking it on your
washing machine
Venting options
Your tumble dryer should NOT be located adjacent to a gas hob,
cooker, heater, or eye level grill as flames from the burners could
cause damage to your machine.
When the dryer is fitted under a work surface, allow space for air
to enter the rear grille, 10mm above the dryer minimum.
If you are using this dryer adjacent or stacked on top of a
washing machine SEPARATE mains plugs and sockets must be
used for each appliance. DO NOT use 2-way adaptors or
extension leads.
Both your tumble dryer and front loading washing machine are
similar in design allowing the tumble dryer to be permanently
stacked on top saving you valuable floor space. A special
stacking kit complete with instructions is available from your
retailer or nearest Spares Centre.
IMPORTANT:
Only use genuine stacking kits. When ordering you must
state the model numbers of both your Washing Machine and
your Tumble Dryer. Unsuitable kits may result in potential
hazard and will invalidate your warranty rights.
Some models are designed to give the option of venting the moist
air from the front of the dryer. The dryer as supplied is rear
venting. Some models can be converted to front venting by
removing the vent cover from the aperture on the front (Fig. 1) of
the dryer and fitting it in the aperture at the back.
When operating the dryer, there has to be adequate ventilation to
avoid the back flow of gases into the room from appliances
burning other fuels, including open fires.
A vent hose is recommended for optimum performance.
A vent hose must be used if the rear venting option is used.
(If this is not supplied it can be obtained from your retailer or
Spares Centre).
When front venting without a hose a window must always be
opened to reduce condensation.
The hose must be fitted securely into the dryer, as shown on the
diagrams on the previous page.If possible it is always best to con-
nect the hose to a permanent outlet close to the dryer (see
instructions on next page).
Ensure that the end of the hose is not directed towards the
air intake grille at the rear of the dryer.
If permanent installation is not possible, the dryer will work just as
well with the hose passed through a partly opened window. (See
diagram on next page).
NOTE:The vent hose should not exceed 2.4 metres in length,
and should be kept free of any possible accumulation of fluff
lint (and water) by frequently shaking it out. Always ensure
that the hose is not squashed.
●
●
●
●
●
●
●
●
●
●
●

8
Where to put and vent your dryer
In conjunction with the vent hose we recommend the use of a
Wall/Window Vent Kit. These are available from your retailer or
nearest Spares Centre.
Fitting instructions are supplied with the kits, which can be mounted
through a wall or window. Details of positioning for wall mounting
are as follows:- Break a hole through the wall to the left of the
proposed position for the dryer. Keep the hose as short and straight
as possible to prevent condensed moisture running back into the
dryer. Similarly the duct inserted into the wall should slope
downwards to the outside. For window venting with stacked dryer,
the hole in the window should ideally be made below the outlet and
the hose should be kept as short as possible.
Depending on the frequency of use, it is essential that the areas
A and B in the illustrations are checked periodically and any fluff
or debris removed.
It is particularly important that the vent hose adaptor is fitted
securely thus preventing any moisture laden air from being
emitted back into the room.
NOTE: The dryer should not be pushed so far back that the
hose adaptor is pulled out of position or the hose squashed.
The hose should be kept clear of the air intake grille and kinks
or ‘U’ bends avoided as these will obstruct the hose or trap
condensation.
For open window venting it must be possible for the end of the hose
to be directed downwards to prevent warm, moist air condensing in
the room or in the dryer.
Permanent
Venting
Wall/Window
Venting
WARNING:
1. ENSURE THAT THE DRYER IS ADEQUATELY
VENTILATED AND THAT THE END OF THE VENT HOSE
IS NOT DIRECTED TOWARDS THE AIR INTAKE DUCT.
2. THE DRYER MUST NOT RECYCLE EXHAUST AIR.
3. THE VENT HOSE MUST ALWAYS BE FITTED FOR
OPTIMUM PERFORMANCE.
4. MAKE SURE THAT THE VENT HOSE AND AIR INTAKE
GRILLES ARE NOT OBSTRUCTED OR BLOCKED.
5. MISUSE OF A TUMBLE DRYER MAY CREATE A FIRE
HAZARD.
6. DO NOT DISCHARGE THE EXHAUST AIR INTO A FLUE
WHICH IS USED FOR EXHAUSTING FUMES FROM
OTHER APPLIANCES BURNING GAS OR OTHER FUELS.
A
B
Storm cover
 Loading...