

Page 1
Owner's Manual
®
10 TON HYDRAULIC LOG SPLITTER
Model No. 486.24540
CAUTION:
Before using this product,
read this manual and follow
all Safety Rules and
Operating Instructions.
IMPORTANT - READ THIS FIRST!!!
For Missing Parts or Assembly Questions
Please Call 1-866-576-8388
Mon.-Fri. 7am - 5pm CST.
FAX 217-728-2032 or email info@agri-fab.com
Missing parts will be sent UPS in 24 hours directly to your home.
Sears, Roebuck and Co., Hoffman Estates, IL 60179 U.S.A.
www.sears.com/craftsman
. FORM NO. 49668 (11/1/05)
• Safety
• Assembly
• Operation
• Maintenance
• Parts
Page 2

TABLE OF CONTENTS
SAFETY RULES
CARTON CONTENTS
FULL SIZE HARDWARE CHART
ASSEMBLY
2
3
4
5
OPERATION
MAINTENANCE
REPAIR PARTS LIST
PARTS ORDERING/SERVICE
WARRANTY
LIMITED ONE YEAR WARRANTY ON CRAFTSMAN HYDRAULIC LOG SPLITTER
For on year from the date of purchase, when this log splitter is maintained an lubricated according to the operating and
maintenance instructions in the owner's manual, Sears will repair any defect in material or workmanship free of charge. If
this log splitter is used for commercial or rental purposes, this warranty applies for only 90 days from the date of purchase.
This warranty does not cover repairs necessary because of operator negligence or abuse, including the failure to maintain
the equipment according to instructions contained in the owner's manual.
WARRANTY SERVICE IS AVAILABLE BY CONTACTING THE NEAREST SEARS SERVICE CENTER/DEPARTMENT IN
THE UNITED STATES.
This warranty applies only while product is in the United States.
This warranty gives you the specific legal rights, and you may also have other rights which vary from state to state.
6
6
7
8
Sears, Roebuck and Co. D/817 WA. Hoffman Estates, Chicago, IL 60179
SAFETY RULES
WARNING: When using hydraulic equipment, basic safety precautions should always be followed
to reduce the risk of personal injury and hazards due to over pressurization. READ ALL
INSTRUCTIONS BEFORE USING THIS TOOL!
1. KEEP WORK AREA CLEAN. Cluttered areas invite injuries.
2. OBSERVE WORK AREA CONDITIONS. Do not use tools in damp, wet, or poorly lit locations. Don't expose to rain.
Keep work area well lit.
3. KEEP CHILDREN AWAY. Children must never be allowed in the work area.
4. STORE IDLE EQUIPMENT. When not in use, log splitter should be stored in a dry location to inhibit rust.
5. DO NOT FORCE THE TOOL. It will do the job better and more safely at the rate for which it was intended. Do not use
inappropriate attachments in an attempt to exceed the tool's capacities.
6. USE THE RIGHT TOOL FOR THE JOB. Do not attempt to force a small tool or attachment to do the work of a larger
industrial tool. Do not use a tool for a purpose for which it was not intended.
7. DRESS PROPERLY. Do not wear loose clothing or jewelry as they can be caught in moving parts.
8. USE EYE AND EAR PROTECTION. Wear ANSI approved goggles when operating log splitter.
9. DO NOT OVERREACH. Keep proper footing and balance at all times. Do not reach over or across running machines
10.MAINTAIN TOOLS WITH CARE. Keep tools sharp and clean for better and safer performance. The handles must be
kept clean, dry, and free from oil and grease at all times.
11. Keep hands, face and body away from log when it is being split.
2
Page 3
12. STAY ALERT. Watch what you are doing, use common sense. Do not operate any tool when you are tired.
13. CHECK DAMAGED PARTS. Before using any tool, any part that appears damaged should be carefully checked to
determine that it will operate properly and perform its intended function. Check for alignment and binding of moving
parts; any broken parts or mounting fixtures; and any other condition that may affect proper operation. Any part that
is damaged should be properly repaired or replaced by a qualified technician.
14. REPLACEMENT PARTS AND ACCESSORIES. When servicing, use only identical replacement parts. Use of any other
parts will void the warranty. Only use accessories intended for use with this tool.
15. DO NOT OPERATE TOOL IF UNDER THE INFLUENCE OF ALCOHOL OR DRUGS. Read warning labels on
prescriptions to determine if your judgment or reflexes are impaired while taking drugs. If there is any doubt, do not
operate the tool.
16. Do Not exceed maximum tire pressure found on side wall of tire.
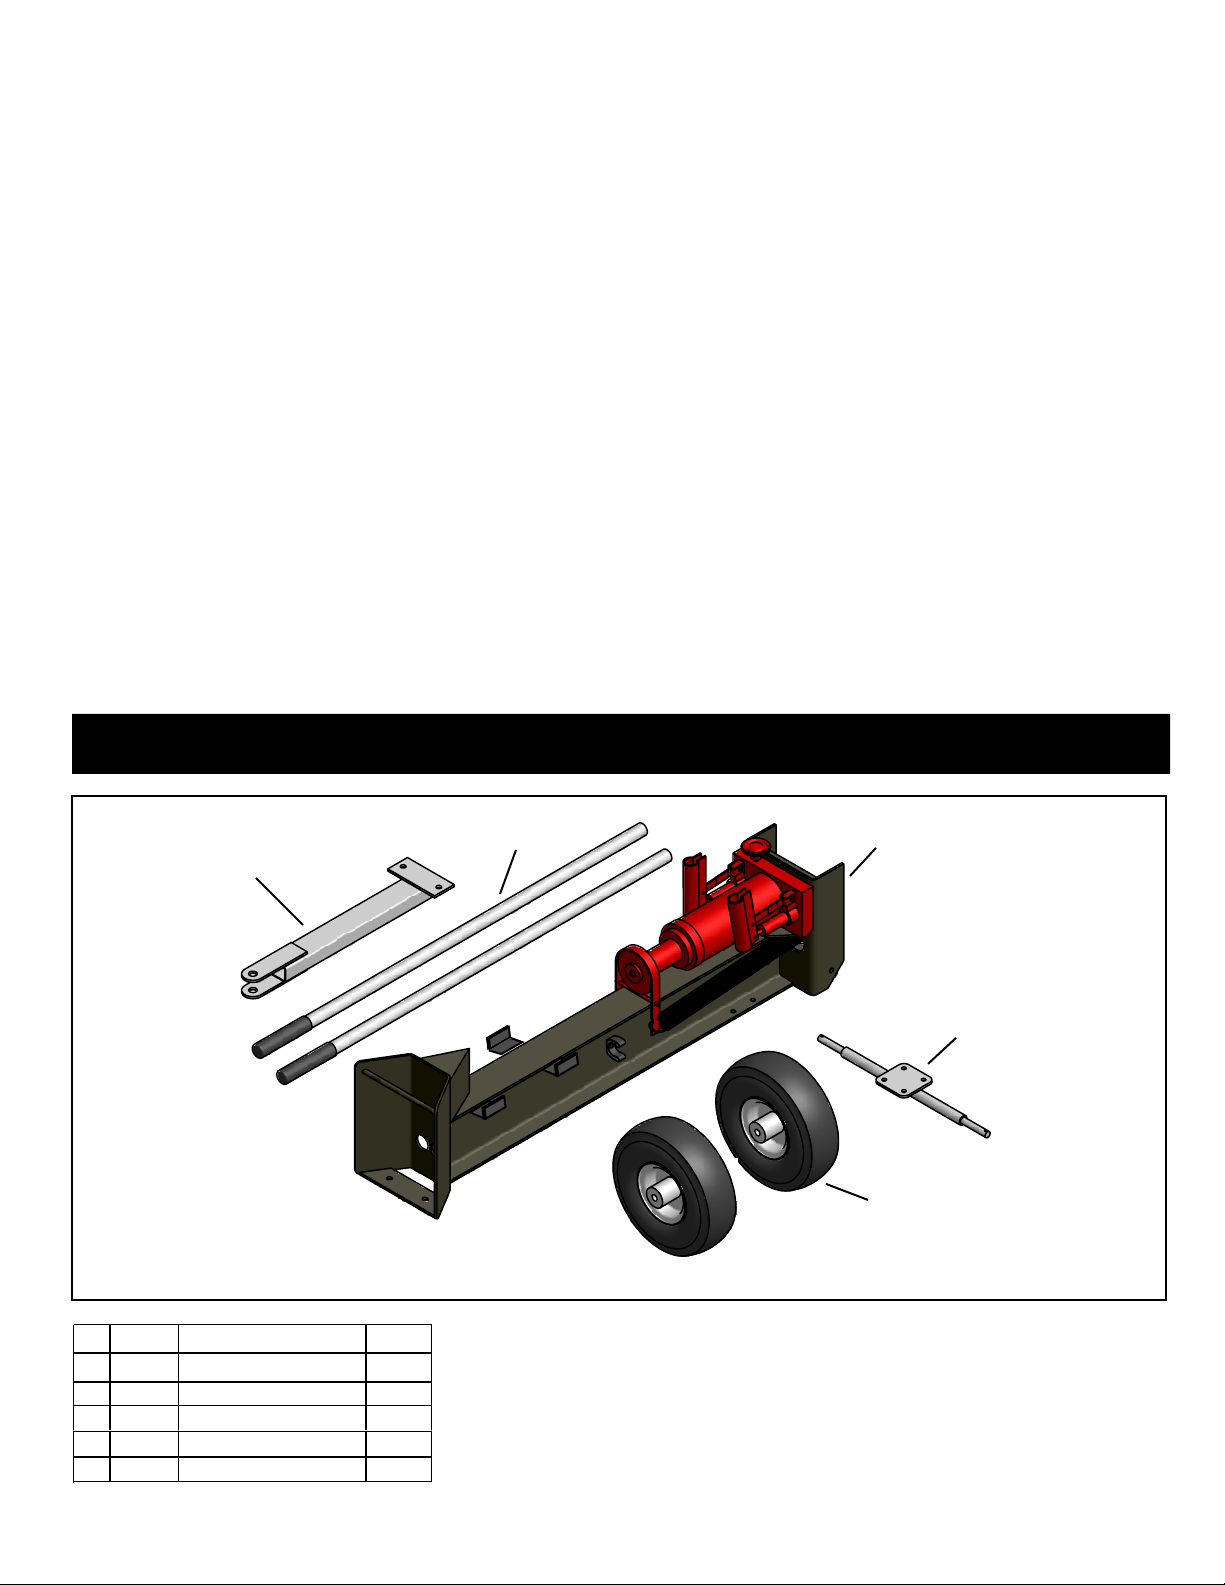
CARTON CONTENTS
2
3
1
4
5
# PART # DESCRIPTION QTY
1 65238 HITCH ASSY 1
2 65240 HANDLE ASSY 2
3 65237 LOG SPLITTER 1
4 65239 AXLE ASSY 1
5 46503 WHEEL 2
3
Page 4

PARTS PACKAGE
7
8
9
17
6
12
15
16
# PART # DESCRIPTION QTY
6
49659
7
49664
8
49667
R19171616
9
BOLT, HEX M10 x 25
BOLT, HEX M8 x 25
NUT, NYLOCK M8
WASHER, FLAT 1/2
# PART # DESCRIPTION QTY
2
4
4
2
12
15
16
17
47810M
43343
23353
43010
NUT, NYLOCK M10
COTTER, HAIRPIN
PIN, HITCH
COTTER, PIN
2
1
1
2
4
Page 5

1
3
6
12
5
4
8
Figure 1
7
ASSEMBLY INSTRUCTIONS
Tools Needed:
(2) 17mm Open End Wrench
(1) 14mm Open End Wrench
(1) 13mm Open End Wrench
(1) Pliers
1. Verify that all parts and all fasteners (Shown full
size) on page 4 are included in the carton and
parts bag. Refer to page 4 to identify fasteners
used in the following instructions.
2. With the Log Splitter(3) standing on end, attach
the Hitch Assy(1) using two M10 x 25 Hex Bolts(6),
and secure with two M10 Hex Nuts(12).
Be sure that all bolts are tight. (Figure 1)
4
17
9
Figure 2
3.
Attach Axle Assy(4) to the Log Splitter(3) using four
M8 x 25 Hex Bolts(7), and secure with four M8 Hex
Nuts(8). Be sure that all bolts are tight. (Figure 1)
4. Slide the Wheel(5) on to the Axle Assy(4) with the
long hub facing inwards. Slide a 1/2 Flat Washer(9)
onto the outside of the axle. Secure with Cotter
Pin(17), bend the ends with a pair of pliers.
(Repeat for other wheel) (Figure 2)
5. This Log Splitter will attach and tow behind any standard
lawn and garden tractor. Use the supplied Hitch Pin,
and Haircotter Pin to attach to tractor. In addition there
is a hitch located on the rear of the unit, which allows
you to tow a cart behind the Log Splitter.
6. As shown during assembly this unit will stand on its
end for easy storage.
5
Page 6

OPERATION
1.
HANDLE
Gather the logs you wish to split. Make sure the maximum
length of each log does not exceed 18". If the log does
exceed that measurement, you must cut the log to fit the
maximum length of the tool.
RELEASE
SCREW
Figure 3
MAINTENANCE
After every use, wipe down the Hydraulic Log Splitter to
remove any tree sap or dirt left behind. This will extend
the life of the tool.
Bleeding The Log Splitter
1. Operate the log splitter to extend the Piston Rod to its
maximum length.
2. Remove the Oil Filling Plug.
3. Turn the Release Screw counterclockwise as fast as
possible, the Piston Rod will retract and push air
from the cylinder out of the Oil Filling Plug.
4. Replace the Oil Filling Plug. Repeat steps 1-4 as
necessary.
2.
Make sure the Piston Rod is fully retracted into the cylinder.
If necessary, turn the RELEASE SCREW counterclockwise
to release the hydraulic pressure. Tighten the RELEASE
SCREW.
3.
Place the log between the Wedge and Piston Assembly.
Rest the log in the metal bracket Cradle.
4.
Wear eye proctection (goggles) when operating the
Hydraulic Log Splitter
5.
It is recommended you operate the Log Splitter in the
following manner. Stand behind the log splitter and grip
one Handle in each hand and pump the Handles in a
back-and-forth motion with one Handle fully forward
and one fully rearward as shown in figure 3.
Repeat Step "5" to advance the Piston Rod forward. This
6.
will push the log against the Wedge and Split it.
When you have split the log, remove the split pieces.
7.
Turn the RELEASE SCREW counterclockwise to draw the
8.
piston rod back into the cylinder. Tighten the RELEASE
SCREW when the piston rod has retracted fully.
When you are done, it is recommended you store your
9.
Hydraulic Log Splitter with the RELEASE SCREW opened
to relieve any hydraulic pressure during non-use.
SPECIFICATIONS
Maximum Log Length:
Ram Stroke:
Cradle Dimensions:
Base Dimensions:
18"
8-1/16"
3-3/4" x 4" x 4"
42-1/8"L x 8-1/16"W x 37"H
Adding Oil
CAUTION:
!!
If you should need to add hydraulic oil to the Log Splitter,
turn the release screw counterclockwise to retract the
piston rod, remove the Oil Filling Plug, and add oil until
the oil is 1/2" from top (when log splitter is laying down).
DO NOT ADD OIL WITH
PISTON ROD EXTENDED
TROUBLE SHOOTING
1.
If hydraulic cylinder does not move forward when pumping
handles.
A. Check to see if Release Screw is tightened in the
closed position.
B. Check to see if you need to add hydraulic oil.
6
Page 7

REPAIR PARTS FOR HYDRAULIC LOG SPLITTER - MODEL 486.24540
15
16
21
22
6
10
18
25
23
28
14
10
27
26
7
29
30
24
6
31
20
19
12
1
# PART # DESCRIPTION QTY
1
65238
4
65239
5
46503
6
49659
7
49664
8
49667
R19171616
9
10
43003
12
47810M
14
43070
15
43343
16
23353
17
43010
18
49644
Hitch Assembly
Axle Assembly
Wheel
Hex, Bolt M10 x 25
Hex, Bolt M8 x 25
Nut, Nylock M8
Washer, Axle
Washer, Lock 3/8"
Nut, Nylock M10
Washer, Flat 3/8"
Hairpin Cotter
Hitch Pin
Cotter Pin
Spring
4
5
1
1
2
4
4
4
2
4
2
2
1
1
2
2
19
20
21
22
23
24
25
26
27
28
29
30
31
32
32
8
# PART # DESCRIPTION QTY
49657
49658
49642
49645
49643
44101
49647
49648
49660
49641
47397
49650
49651
49734
Operating Lever
Grip
Ram Assembly
U-Clamp
Jack Top Plate
Cotter Pin, 3/32 x 3/4"
Spacer
Clevis Pin
Hex, Hex M10
Frame
Handle Clamp
Bolt, Hex M5 x 10
Nut, Hex M5
Bushing, Wheel
32
5
9
17
2
2
1
1
1
1
1
1
2
1
2
1
1
2
7
Page 8

Get it fixed, at your home or ours!
For repair of major brand appliances in your own home…
no matter who made it, no matter who sold it!
1-800-4-MY-HOME
(1-800-469-4663)
www.sears.com
SM
Anytime, day or night
To bring in products such as vacuums, lawn equipment and electronics
for repair, call for the location of your nearest
Sears Parts & Repair Center.
1-800-488-1222 Anytime, day or night
www.sears.com
For the replacement parts, accessories and owner’s manuals
that you need to do-it-yourself, call Sears PartsDirect
SM
1-800-366-PART 6 a.m. – 11 p.m. CST,
(1-800-366-7278) 7 days a week
www.sears.com/partsdirect
!
To purchase or inquire about a Sears Service Agreement:
1-800-827-6655
7 a.m. – 5 p.m. CST, Mon. – Sat.
Para pedir servicio de reparación a domicilio,
y para ordenar piezas con entrega a domicilio:
1-888-SU-HOGAR
(1-888-784-6427)
SM
HomeCentral
® Registered Trademark / ™Trademark of Sears, Roebuck and Co.
© Sears, Roebuck and Co.
® Marca Registrada / ™Marca de Fábrica de Sears, Roebuck and Co.
Au Canada pour service en français:
1-877-LE-FOYER
(1-877-533-6937)
SM
SM
 Loading...