

Page 1
More than you thought possible
5
Getting started
CorelDRAW Graphics Suite X5 is an intuitive graphic design application that gives designers an enjoyable work experience.
Whether you ®work in advertising, printing, publishing, sign making, engraving or manufacturing, CorelDRAW X5 offers the
tools you need to create accurate and creative vector illustrations and professional-looking page layouts.
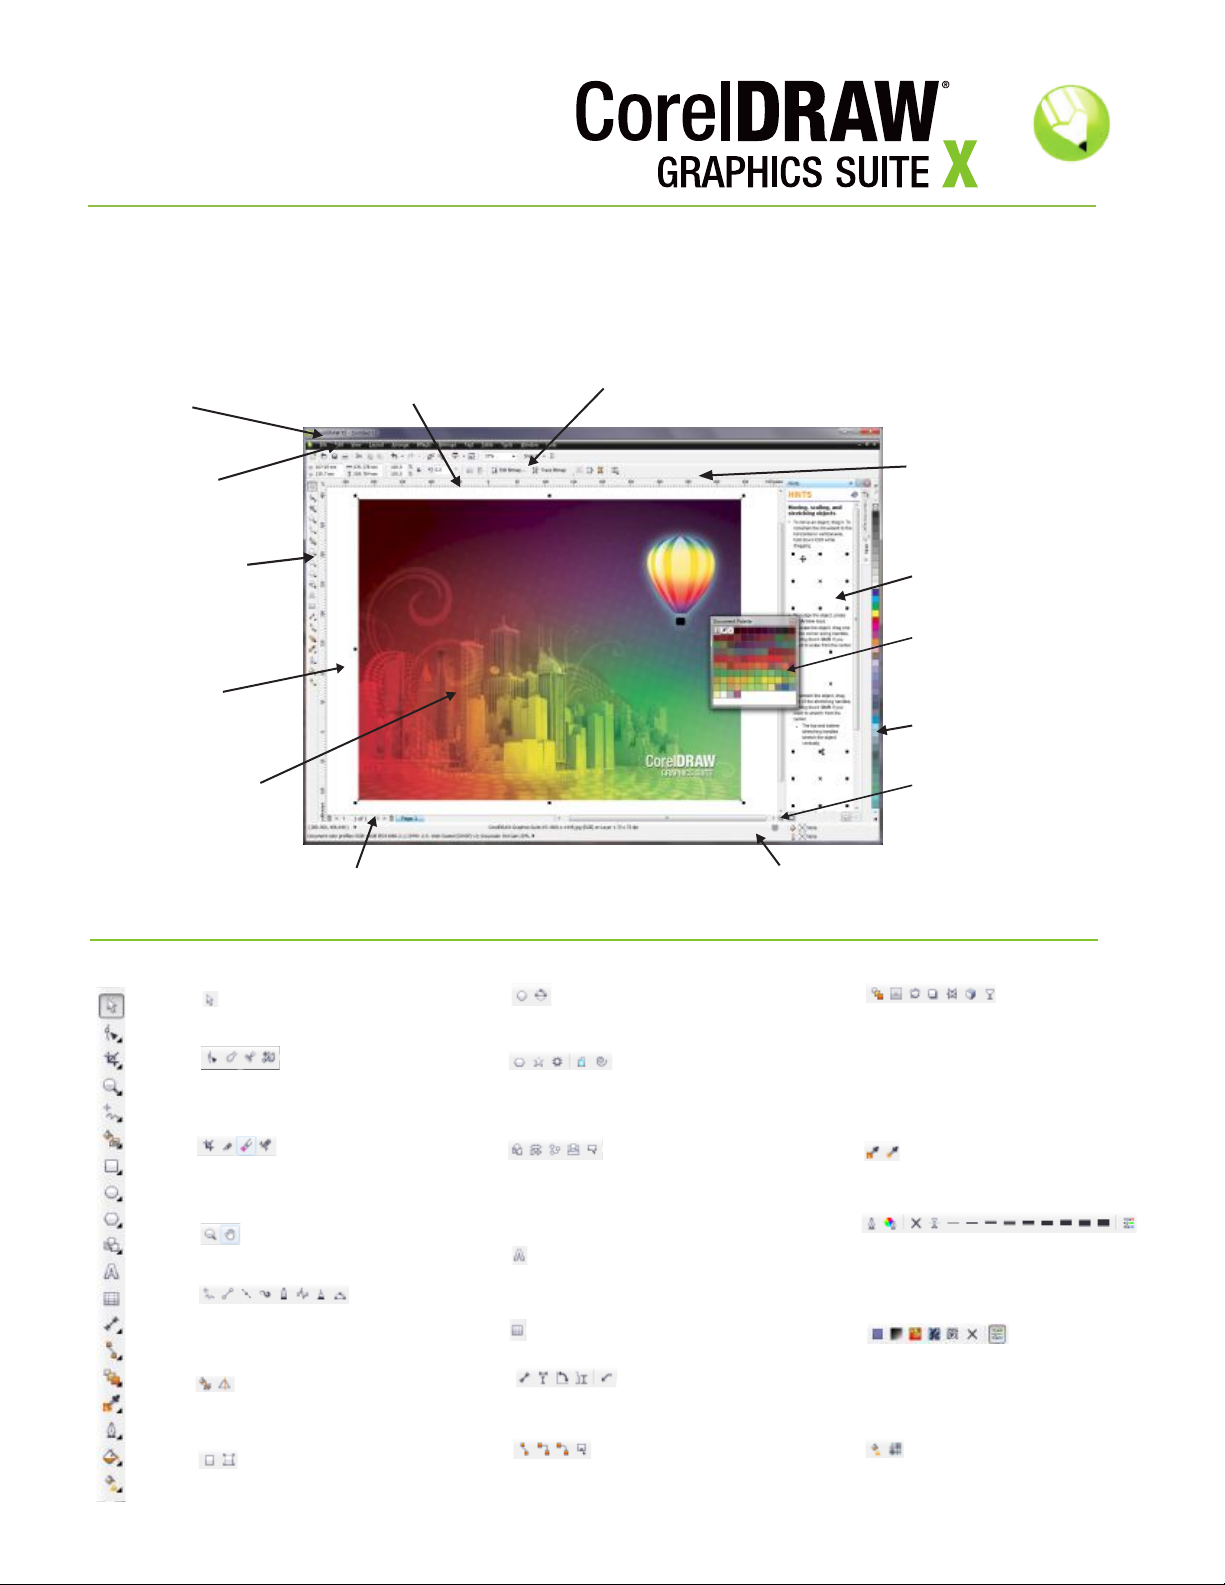
Here’s a snapshot:
Title bar: Displays the title of
the open document.
Menu bar: The area
containing pull-down
menu options.
Toolbox: A floating bar
with tools for creating,
filling, and modifying
objects in the drawing.
Drawing window: The
area outside the drawing
page bordered by the
scroll bars and
application controls.
Drawing page: The
rectangular area inside
the drawing window. It is
the printable area of your
work area.
®
Rulers: Used to determine the size
and position of objects in a drawing.
Standard toolbar: A detachable bar that contains shortcuts to
menu and other commands, such as opening, saving and printing.
Property bar: A
detachable bar with
commands that relate to
the active tool or object.
Docker: A window
containing available
commands and settings
relevant to a specific tool
or task.
Document palette: A
palette specific to the
current open document.
Color palette: A
dockable bar that
contains color swatches.
Navigator: A button at
the lower-right corner
that opens a smaller
display to help you move
around a drawing.
Document navigator: The area at the bottom left of the application
window that contains controls for moving between pages and adding pages.
CorelDRAW X5 toolbox
A. The Pick tool lets you select and
A
size, skew and rotate objects.
B
B. The Shape edit flyout
C
lets you access the Shape, Smudge
D
brush, Roughen brush and Free
transform tools.
E
C. The Crop tool flyout lets
F
you access the Crop, Knife, Eraser,
G
and Virtual segment delete tools.
H
I
D. The Zoom flyout lets you
J
access the Zoom and Hand tools.
K
E. The Curve
L
flyout lets you access the Freehand,
2-Point line, Bézier, Artistic media, Pen,
M
B-spline, Polyline and the 3-Point curve.
N
O
F. The Smart tools flyout lets you
access the Smart fill and Smart
P
drawing tools.
Q
G. The Rectangle flyout lets you
R
access the Rectangle and 3-Point
S
Rectangle tools.
H. The Ellipse flyout lets you
access the Ellipse and 3-Point Ellipse
tools.
I. The Object flyout
lets you access the Polygon, Star,
Complex Star, Graph paper and
Spiral tools.
J. The Basic Shapes
flyout lets you access the Basic
shapes, Arrow shapes, Flowchart
shapes, Banner shapes and Callout
shapes tools.
K. The Text tool lets you type words
directly on the screen as artistic or
paragraph text.
L. The Table tool lets you draw
and edit tables.
M. The Dimension tool
lets you draw Parallel, Vertical, Horizontal
Angular, Segment and 3-Point callouts.
N. Straight Line Connector tool
lets you access the Straight Line, Right Angle,
Right Angle Rounded and Edit Anchor tool.
Status bar: Contains information about object properties such as
type, size, color, fill and resolution. The status bar also shows the
current mouse position.
O. The Interactive
tools flyout lets you access the
Interactive blend, Interactive contour,
Interactive distortion, Interactive
drop shadow, Interactive envelope,
Interactive extrude and Interactive
transparency tools.
P. The Eydropper flyout lets you
access the Color eyedropper and the
Attributes eyedropper tools.
Q.
Outline
The flyout lets you access the
pen
Outline and Outline color dialog
boxes, a selection of outlines of various
widths and the Color Docker window.
R. The Fill flyout
lets you access the Fill color, Fountain
fill, Pattern fill, Texture fill and
PostScript fill dialog boxes, indicate no
fill and the Color Docker.
S. The Interactive fill flyout lets
you access Interactive fill and
Interactive mesh fill tools.
Page 2

The welcome screen
The Welcome screen provides users with a centralized location to
access recently-used documents, templates and learning tools,
which include Tips & Tricks and video tutorials. The Welcome screen
also includes a gallery that showcases designs created by
CorelDRAW Graphics Suite users around the world.
Opens recent files
so you can
continue working
where you left off.
Allows you to
open an existing
file.
®
Starts a new
graphic with the
current default
template.
Starts a new
graphic using the
template of your
choice.
Templates and search capability
When starting a new project, you can easily find
the right template. You can browse, preview or
search for templates by name, category,
keywords or notes. You can also view useful
information about the template, such as category
and style.
CorelDRAW ConceptShare
CorelDRAW ConceptShare™ is a valuable collaboration tool that lets
® ™
®
you share designs and ideas and receive real-time feedback from
clients in a Web-based environment. You can create multiple
workspaces, upload your designs, and invite others to post comments.
Working with pages
You can begin working on a drawing by specifying settings for the
size of the page (standard or custom) and the orientation
(landscape or portrait). You can also add and delete pages.
To access the Page Property bar, use the Pick tool to click in the
Drawing Window
Calibrating the rulers
You can have one inch on your screen equal one inch of “real”
distance. You need a clear plastic ruler for comparing real-world and
on-screen distances.
Click Tools; in Options under Workspaces,
select Toolbox and click Zoom/Hand tool
Click Calibrate Rulers. Place a clear
plastic ruler under the on-screen
horizontal ruler
Click the up or down arrows on the
Horizontal box to match one unit of
measurement on the actual ruler
Repeat for the vertical ruler
Setting up the grid
The grid is a series of intersecting dashed lines or dots that you
can use to precisely align and position objects in the drawing window.
To set up the grid dimensions, click View menu, Grid and Ruler Setup.
Guidelines
Guidelines are lines that can be placed anywhere in the drawing window to aid in object
placement. After you add a guideline, you can
select it, move it, rotate it, lock it in place or
delete it.
Add guidelines by dragging from the vertical or
horizontal rulers into the drawing window or
click View menu, Guideline Setup.
Dynamic guides
Dynamic guides help you precisely move, align and draw objects in
relation to other objects. Dynamic guides are temporary guidelines that
you can pull from object snap points, such as edge, node, center,
midpoint and quadrant.
To activate dynamic guides, move an
object over the snap point of the object
that you are aligning with.
Snapping
You can have objects snap to grid lines, guidelines or other objects,
so that when an object is moved near a snapping point, the target will be
highlighted and releasing the object will lock it to the snapping point.
Choose a
preset
page size in
the Paper
list box.
Go to the
previous page
Go to the
first page
Set the page orientation
to Landscape or Portrait
Specify a custom page
size by type values in the
Width and Height boxes.
Add a new
page
Open Go To
Page dialog
Use the Page Tab to go to a
specific page
Go to the
next page
Go to the
last page
Use the Current Page
button to set the page
size and orientation for
an individual page in a
multi-page document
Right-click a page tab to
open the context menu
Select the
Unit of
Measure
you want
to work in
Working with pages and layout tools
You can customize and display page rulers, grids and guidelines to
help you organize objects and place them exactly where you want.
To view or hide grids, guidelines and rulers, open the View menu and
toggle the check mark next to the layout command.
Working with layers
Layers are edited independently for each page of
your document. Local, independent guidelines can
be added for individual pages and master guidelines
can be added for the entire document.
grouped
objects
visible
printable
editable
layer
name
Working with objects
Before you can change an object, you must select it by clicking on it
with the Pick tool (Use SHIFT to select multiple objects). This
activates the Sizing handles. Clicking on a selected object activates
the Rotation handles.
When you group two or more objects, they are treated as a single
unit. Grouping lets you apply the same formatting, properties,
and other changes to all the objects within the group at the same time.
Sizing handles let
you change the
dimensions of an
object proportionally
by preserving its
aspect ratio.
Stretching handles
let you change an
object’s vertical and
horizontal dimensions
non proportionally.
Center of
The
Rotation
dragged to a new
location to change
the effect of the
Rotation handles.
You can position a selected object by
dragging its to a
new location, or by nudging it using the
Arrow Keys, (+ CTRL = Nudge ÷ 2 or
SHIFT = Nudge X 2).
45° (1.5 in)
can be
Positioning handle
Dynamic Guides help you precisely
move, align and draw objects in
relation to other objects.
Rotation handles
let you spin an
object around its
rotation.
Skewing handles
let you slant an
object.
Page 3

Objects in a drawing exist in a stacking
order, usually the order in which they
are created or imported. To change the
order of selected objects, use the
Arrange / Order menu.
Working with tables
A table provides a structured layout that lets you present
text or images within a drawing. You can draw a table, or
you can create a table from paragraph text. You can easily
change the look of a table by modifying the table properties
and formatting. In addition, because tables are objects, you
can manipulate them in various ways. You can also import
existing tables from a text file or a spreadsheet.
To create a table:
Click the Table tool
Type values in the Number of Rows and Columns boxes on the
Property bar
Drag diagonally to draw the table
Drawing lines and curves
CorelDRAW X5 provides various drawing tools that let you draw
curved and straight lines, and lines containing both curved and
straight segments. The line segments are connected by nodes,
which are depicted as small squares. The line tools can be
accessed through the Curve flyout.
The Freehand and Polyline tools from the Curve
flyout let you draw freehand lines as if you were
sketching on a sketchpad.
Complex shapes
You can use the Object flyout to draw polygons, grids, spirals
and two types of stars: perfect and complex. Use the Property
bar of each tool to change the number of sides, points, columns,
rows and revolutions.
Predefined shapes
Using the Perfect Shapes collection, you can
draw Basic, Arrow, Flowchart, Banner and Callout
shapes. Use the shape’s type picker on the
Property bar to select a specific shape from the
category. You can then drag a to modify
the appearance of some shapes.
glyph
Adding and formatting text
There are two types of text you can add to drawings: artistic
text and paragraph text. You can also import existing text from
an external file or paste from Windows clipboard.
Artistic text
Artistic text can be used to add short lines of
text to which you can apply a wide range of
B
effects, such as drop shadows or envelopes.
You can also
closed path.
add artistic text to an open or
Fit text to a path
To fit text to a path, select text, go
to Text menu and click Fit Text to
Path. Use the dynamic preview to
position text on the desired path and
click to attach text to the path.
Tip: Click the text tool and
point to a path, when the
cursor changes to Fit to
Path, click to add text
The Bézier and Pen tools let
you draw lines one segment at a
time by placing each node with
precision and controlling the shape
of each curved segment.
To draw a straight segment, click where you want to
start the line segment, and then click where you want
to end it
To draw a curved segment, click where you want to
start the segment and drag across the drawing page
The B-spline tool lets you draw curved lines by
setting control points that shape the curve
without breaking it into segments.
Drawing Shapes
CorelDRAW offers a wide variety of tools for drawing shapes.
Rectangles
By dragging diagonally with the Rectangle tool, you
can draw a rectangle or a square (when constrained
with the CTRL key).
The 3-Point Rectangle tool lets you quickly draw
rectangles at an angle.
Ellipses
You can draw an ellipse or circle (when using the CTRL
key) by dragging diagonally with the Ellipse tool, which
you can then change to an arc or pie shape by using
the Property bar.
Easy font identification
You can quickly identify the font in a client’s artwork by capturing a
sample and sending it to the WhatTheFont page of the MyFonts
website (available in English only): www.myfonts.com/WhatTheFont.
Paragraph text
Paragraph text can be used for larger
bodies of text that have greater formatting
requirements. When adding a paragraph
frame, you must first drag the text tool to
create a text frame.
Tip: Click the Text tool and
position the cursor inside the
shape’s outline. When the cursor
changes to the text cursor, click to
add text.
Eyedropper and Paintbucket
When you sample color with the Eyedropper tool in CorelDRAW X5, the
Apply Color mode is automatically activated so that you can
immediately apply the sampled color.
An eyedropper tool is also conveniently located throughout in various
color dialog boxes to let you sample and match colors from a document
without closing the dialog box.
The 3-Point Ellipse tool lets you quickly create an
ellipse at an angle, eliminating the need to rotate
the ellipse.
Page 4

Shaping objects
To start changing the shape of an object, click it with the
Shape tool to display its nodes. Each type of object
provides a specialized set of shaping methods.
Objects created using the basic shape tools, such as
Rectangle, Ellipse or Polygon tools have unique shaping
methods and often provide a glyph or oversized node to
adjust their particular shape properties.
Rounded rectangles
Select Rectangle with Shape tool
Click and drag any corner node to adjust
rounding
Filling and outlining objects
You can add colored fills to the inside of objects or
other enclosed areas, as well as change the color
of their outlines.
Choosing color from a palette
To fill a selected closed object with a solid (uniform) color, leftclick a color swatch from the color palette
To change the outline color, right-click a color swatch
Mix colors by selecting an object, pressing Ctrl, and clicking
another color on the color palette
Click and hold a color swatch to select a neighboring color
Shaping ellipses:
To create a pie shape from an
ellipse, click and drag a node,
keeping the pointer inside the
ellipse.
To create an arc from an
ellipse, click and drag a node,
keeping the pointer outside of
the ellipse.
Shaping polygons and stars:
To shape a polygon by mirror editing, click
and drag a node in any desired direction
Drag in to center for star shape
Converting to curves:
Objects created with Shape tools like the Rectangle tool need to be
converted to curves in order to edit the Rectangle tool nodes. To convert
an object to curves do the following:
Select object with Pick tool
Go to Arrange menu and click Convert to Curves or use shortcut
key CTRL + Q
Shaping lines and curves
You can shape curve and line objects by manipulating their nodes
and segments, and by adding and deleting nodes.
Add a node:
Double-click on the path to add a new node, or click on the
path and press the Add Node button on the Property bar.
Delete a node:
Select the nodes to remove and press Delete, or select
the node(s) and press Delete Node from Property bar
Starting node
Node
Ending node
(Indicates curve direction)
Drag and drop color
To change an outline color, drag a color swatch
onto an object and drop it when the outline
cursor appears.
To change the fill of a closed object, drag a
color swatch onto an object and drop when the
fill cursor appears
Color dialog
Select the Pen Outline dialog from
the Pen Tool flyout menu on the
Toolbox
Select the Fill Color dialog or the
Fountain Fill from the Fill tool on
the toolbox
Adding 3D effects
You can create the illusion of three-dimensional depth in objects by
adding contour, perspective, extrusion, bevel, or drop shadow
effects.
Contour
Open the Contour Docker from the
Tools menu
Select an object and adjust the
Contour Docker settings and click Apply
Direction: Outside, Offset: 0.03
Steps: 3, Fill Color: Yellow
Drop Shadow
Open the Interactive Tools flyout, and
click the Interactive Drop Shadow tool
Click an object
Drag from the center or side of the
object until the drop shadow is the
size you want, or select a preset
from the Property bar
Specify attributes on the Property bar
When you add a Drop Shadow,
you can change its perspective
and you can adjust attributes
such as color, opacity, fade
level, angle and feathering
Control handle
Control point
Reduce nodes
Marquee select nodes with Shape tool
Click Reduce Nodes on Property bar
Bevel effect
before
Bevel effects can contain both spot
and process (CMYK) colors, so they
are ideal for printing.
Created using CorelDRAW Graphics Suite X5 by AdArt Graphics - Ottawa, Canada
emboss
soft edge
Open the Bevel Docker from the
Windows, Dockers menu. You can
choose from the following bevel
styles:
Soft Edge – creates beveled
surfaces that appear shaded in some
areas
Emboss – makes an object appear
as a relief
Page 5

What’s new and enhanced in CorelDRAW Graphics Suite X5
®
Corel CONNECT™
Corel CONNECT™ is a full-screen browser that
synchronizes with both CorelDRAW X5 and
Corel PHOTO-PAINT™ X5. Corel CONNECT
provides an easy and quick way of finding
content on your computer, local network, Corel
content DVD and selected websites. You can
browse or search for clipart, photo images,
fonts, symbols, objects and file formats that are
supported, as well as content that is not
supported by CorelDRAW Graphics Suite X5.
®
®
®
®
®
Pixels view
The new Pixels view lets you create drawings in actual pixel units,
providing a more accurate representation of how a design will appear on
the Web. Accessible from the View menu, the Pixels view mode helps
you align objects more accurately.
Export for Web dialog box
The new Export for Web dialog box provides a single access point for
common export controls, eliminating the need to open additional dialog
boxes when preparing a file for export. It
also lets you compare the results of
various filter settings before you commit
to an output format, making it easier to
achieve optimal results. In addition, you
can specify object transparencies and
matting colors for anti-aliased edges—all
with real-time preview.
Convert to grayscale
Corel PHOTO-PAINT X5 provides greater control when converting
images to grayscale by letting you choose the range of colors used in the
conversion. This eliminates results that appear washed out because of
predominant blues or reds in the original photo. The new dialog box
provides a preview window, which lets you adjust the colors to create a
more realistic conversion.
Corel PowerTRACE X5
Convert your bitmap images into high-quality vector objects with even
more precision and smoothness, thanks to the greatly enhanced Corel
PowerTRACE. You can trace an image in one step by using the Quick
Trace command. Alternatively, you can choose a suitable tracing method
and preset style and then use the Corel PowerTRACE controls to
preview and adjust the traced results. CorelDRAW Graphics Suite X5
offers two methods for tracing bitmaps: Centerline trace and Corel
Outline trace. CorelDRAW offers two methods for tracing bitmaps:
Centerline Trace and Outline Trace. Centerline tracing with Corel
PowerTRACE produces more accurate curves or strokes for tracing
technical illustrations, line drawings, or signatures. Improved smoothing,
color, and corner control help you
optimize traced results.
® ®
Drawing tools
A collection of new and enhanced
drawing tools includes a B-Spline
tool, an Object Coordinates docker,
scalable arrowheads, enhanced
Connector and Dimension tools, and
the new Segment Dimension tool.
The B-Spline tool lets you create
smooth curves with fewer nodes than curves drawn by using freehand
paths. For maximum precision, the Object Coordinates
docker lets you specify both the size of a new object and its location
on the page.
B-Spline
Round corners
You can now create chamfered, scalloped or round
corners from the Rectangle Property bar. When you
stretch a rectangle rounded corners are preserved
without distortion, and the original radius of a corner is
maintained during scaling. In addition, corners are
now expressed in units of true radii, which makes
them easier to work with. You can stretch rectangles
with scalloped, chamfered and round corners without
distorting the corners.
Mesh Fill tool
The Mesh Fill tool lets you design multicolored
filled objects with more fluid color transitions. The
Smooth Mesh Color option on the Property bar,
and the Eyedropper and Color Picker, make it
easier to select or sample color for the mesh, so
you can achieve color transitions that retain the
color richness.
One other addition of note is the Transparency
Per Node option, which allows you to reveal
objects behind individual nodes or patches in a
mesh.
Document/Image dialog box
CorelDRAW X5 introduces a Create a New Document dialog box,
which provides a selection of presets for page size, document
resolution, preview mode, color mode and color profiles.
Color Palette Manager docker
The enhanced Color Palette Manager Docker includes new
PANTONE profiles such as the PANTONE Goe™
system and the Fashion+Home palette. The Color
Palette Manager makes it easier to create, organize
and show or hide both default and custom color
palettes. You can create Web-specific RGB palettes
or print-specific CMYK palettes. For optimal color
consistency, you can also add third-party color
palettes when working with multiple applications.
® ®
Document/Image palettes
With both CorelDRAW X5 and Corel PHOTO-PAINT
X5, a custom color palette is automatically created
on the fly for each design project. The palette is saved with the file,
which gives you quick access to this project’s colors in the future.
Global color management
For CorelDRAW Graphics Suite X5, the color management engine
has been completely redesigned. The new Default Color
Management Settings dialog box lets you set default color profiles,
policies and rendering intents for each application. This new
approach helps you easily achieve accurate color representation
while also providing greater control for more advanced users.
Document Color Settings
With the introduction of the Document Color Settings dialog box, you
can adjust color settings that apply only to the current document.
These document-specific settings override the
default application settings while you are working
on that file.
Color proof settings
All color proof settings are grouped within a single
docker, which lets you save presets and prepare
artwork for various output devices more efficiently.
The docker helps you save time by providing a list
of output devices which you can choose from to preview the output.
When seeking approval from clients, you can easily export soft
proofs and print hard proofs from the docker.
Color sampling options
The addition of the Eyedropper tool to various color dialog boxes
lets you conveniently sample and
match colors from a document
without closing the dialog box. The
Eyedropper tool is also available on
color palettes, as well as in color
pickers on the Property bar.
Page 6

Discover raster editing features
CorelDRAW Graphics Suite X5 offers a large number of features to
®
and efficiently manipulate many raster formats.effectively
Importing and exporting files
C orelDRAW allows you to import or export a wide variety of file
formats.
RAW camera file support
When importing RAW files directly from your digital camera, you
can view information about file properties and camera settings,
adjust image color and tone, and improve image quality. Interactive
controls let you preview changes quickly.
Image Straightening Lab
The Straighten image dialog box lets you
straighten bitmap images quickly. This feature is
useful for straightening photos that were taken or
scanned at an angle.
Histogram feedback
Edit images more efficiently by previewing changes and comparing
results in real time as you adjust image tone, apply effects or process
RAW camera files.
Image Adjustment Lab
The Image Adjustment Lab consists of automatic and manual controls,
which are organized in a logical order for image correction. By starting in
the upper-right corner and working your way down, you can select only
the controls you need to correct the problems specific to your image. It is
best to crop or retouch any areas of the image before beginning the color
and tone corrections.
Importing files
CorelDRAW
applications. For example, you can import a Portable Document
Format (PDF), JPEG, or Adobe Illustrator (AI) file. You can import a
file and place it in the active application window as an object. You
can also resize and center a file as you import it. The imported file
becomes part of the active file.
lets you import files (Ctrl+I) created in other
®
®
While importing a bitmap, you can resample it to
reduce the file size, or crop it to eliminate unused
areas of the photo. You can also crop a bitmap to
select only the
exact area and
size of the
image you want
to import.
To make importing easier, you can sort the file
types by most recent, extension, text or
description.
Exporting files
You can export (Ctrl+E) and save images to a variety of file
formats that can be used in other applications. For example, you
can export a file to the Adobe Illustrator (AI) or GIF format.
Some file formats may not support all the features that a
CorelDRAW (CDR) file has, so it is a good idea to save the
original file as a CorelDRAW (CDR) file before exporting it.
TIP: If you are importing a text
file, have the Text tool selected
when you import. This will filter
out any non-text file types in the
list box.
Keyboard shortcuts
File
Open . . . . . . . . . . . . . . . . . . . . . . . . Ctrl+O
Save . . . . . . . . . . . . . . . . . . . . . . . . . Ctrl+S
New Document. . . . . . . . . . . . . . . . . Ctrl+N
Import . . . . . . . . . . . . . . . . . . . . . . . . Ctrl+I
Export. . . . . . . . . . . . . . . . . . . . . . . . Ctrl+E
Print . . . . . . . . . . . . . . . . . . . . . . . . . Ctrl+P
Text
Align to Baseline . . . . . . . . . . . . . . . Alt+F12
Bulleted Text . . . . . . . . . . . . . . . . . . Ctrl+M
Convert Text . . . . . . . . . . . . . . . . . . Ctrl+F8
Edit Text . . . . . . . . . . . . . . . . . . . . . . Ctrl+Shift+T
Format Text . . . . . . . . . . . . . . . . . . . Ctrl+T
Edit
Copy. . . . . . . . . . . . . . . . . . . . . . . . . Ctrl+C
Copy Properties From . . . . . . . . . . .
. . . . . . . . . . . . . . . . . . . . . . . . . . . . . Ctrl+Shift+A
Cut . . . . . . . . . . . . . . . . . . . . . . . . . . Ctrl+X
Delete. . . . . . . . . . . . . . . . . . . . . . . . Delete
Duplicate . . . . . . . . . . . . . . . . . . . . . Ctrl+D
Paste . . . . . . . . . . . . . . . . . . . . . . . . Ctrl+V
Redo. . . . . . . . . . . . . . . . . . . . . . . . . Ctrl+Shift+Z
Repeat . . . . . . . . . . . . . . . . . . . . . . . Ctrl+R
Step & Repeat . . . . . . . . . . . . . . . . . Ctrl+Shift+D
Undo. . . . . . . . . . . . . . . . . . . . . . . . . Ctrl+Z
To view all shortcut keys, go to: Tools, Options, Commands, Shortcut Keys, View All
Toolbox
Toggle between
Pick & Last Used . . . . . . . . . . . . . Space
Pick & Text . . . . . . . . . . . . . . . . . . Ctrl+Space
View
Refresh Window. . . . . . . . . . . . . . . . Ctrl+W
Full Screen . . . . . . . . . . . . . . . . . . . . F9
Toggle Display . . . . . . . . . . . . . . . . . Shift+F9
Pan Screen . . . . . . . . . . . . . . . . . . . Alt+Arrow
Marquee Zoom In. . . . . . . . . . . . . . . F2
Zoom Out . . . . . . . . . . . . . . . . . . . . . F3
Zoom to:
All Objects . . . . . . . . . . . . . . . . . . . F4
Page. . . . . . . . . . . . . . . . . . . . . . . . Shift+F4
Selection . . . . . . . . . . . . . . . . . . . . Shift+F2
Arranged Selected
Group . . . . . . . . . . . . . . . . . . . . . . . . Ctrl+G
Ungroup . . . . . . . . . . . . . . . . . . . . . . Ctrl+U
Break Apart . . . . . . . . . . . . . . . . . . . Ctrl+K
Combine. . . . . . . . . . . . . . . . . . . . . . Ctrl+L
Convert to Curves . . . . . . . . . . . . . . Ctrl+Q
Order:
Back One . . . . . . . . . . . . . . . . . . . . . Ctrl+PgDn
Forward. . . . . . . . . . . . . . . . . . One Ctrl+PgUp
To Back . . . . . . . . . . . . . . . . . . . . . . Shift+PgDn
To Front . . . . . . . . . . . . . . . . . . . . . . Shift+PgUp
Keyboard alignment shortcuts
C - Center
T - Top
L - Left R - RightP - Center of PageE - Even
B - Bottom
Function keys
F1 F4F3F2
SHIFT+ What’s This? Zoom to Sel. Change Case Zoom to Page
CTRL+ View Docker
ALT+ Linear Dim Lens Docker Exit
SHIFT+
CTRL+ Styles Docker Next Window Convert Text
ALT+ Move Docker Rotate Docker
SHIFT+ Toggle Disp. Uniform Fill Outline Color
CTRL+ Text Options Symbols Spell Check
ALT+ Scale Docker Size Docker VBA Editor Align to Base
Help Zoom In Zoom Out Zoom to All
F5 F8F7F6
Last Tool Rectangle Ellipse Text
F9 F12F11F10
Full Screen Shape Fountain Fill Outline Pen
 Loading...