

Page 1

Page 2

Page 3

Contents
Quick start
Welcome to Corel AfterShot Pro
Library and catalogs
File System mode
Editing photos
................................................................................................... 1
................................................................................................... 9
................................................................................................... 14
Corel AfterShot Pro workspace
................................................................................................... 16
Understanding non-destructive editing
................................................................................................... 18
Understanding the Library
................................................................................................... 20
Supported file formats
................................................................................................... 21
................................................................................................... 23
Importing images
................................................................................................... 25
Managing your Library
................................................................................................... 29
................................................................................................... 30
Working in File System mode
................................................................................................... 31
................................................................................................... 32
About adjustment tools
................................................................................................... 35
Standard tools
................................................................................................... 40
Color tools
................................................................................................... 46
Tone tools
................................................................................................... 47
Detail tools
................................................................................................... 51
Metadata tools
................................................................................................... 54
Plugins
................................................................................................... 56
Selective editing
................................................................................................... 64
Retouching with Heal and Clone
................................................................................................... 67
Cropping and straightening
................................................................................................... 69
Presets
Co nten t s I
Page 4

................................................................................................... 73
Copying and pasting settings
................................................................................................... 73
Using the History palette
................................................................................................... 74
Editing photos in an external image editor
Organizing, keywords, and metadata
Outputting images
Printing
................................................................................................... 75
................................................................................................... 76
Versions
................................................................................................... 79
Stacks
................................................................................................... 82
Thumbnail indicators
................................................................................................... 83
Sorting and filtering
................................................................................................... 85
Labels, ratings, and flags
................................................................................................... 87
Working with keywords
................................................................................................... 91
Working with metadata
................................................................................................... 94
Finding photos by using metadata
................................................................................................... 97
................................................................................................... 98
Using Save File As
................................................................................................... 99
Using batches
................................................................................................... 101
Managing batches
................................................................................................... 103
Understanding settings for batches
................................................................................................... 110
Web Galleries
................................................................................................... 111
Using batches to copy files
................................................................................................... 113
................................................................................................... 114
Working with print batches
................................................................................................... 117
Managing print batches
................................................................................................... 119
Print settings
II
Co rel A ft erS hot Pro Us er Gu ide
Page 5

Quick start
This section introduces some of the basic tasks that you can
accomplish in Corel® AfterShot™ Pro. If you're looking for a quick
way to start working with the application, take a few minutes to go
through the steps below. The steps include handy shortcuts and
tips that help you work quickly.
There are three main steps:
1. Open your photos in Corel AfterShot Pro.
2. Select and edit one or more photos.
3. Output your edited photos individually or as a batch.
Before you begin, see
overview of the workspace.
Step one: Open your photos
To get you started quickly, we're going to work directly from the
folders on your computer. After you're familiar with the application,
you can choose to build a Library by importing photos into Corel
AfterShot Pro. When you're ready for more information, see
Und e rstand in g th e Lib rary
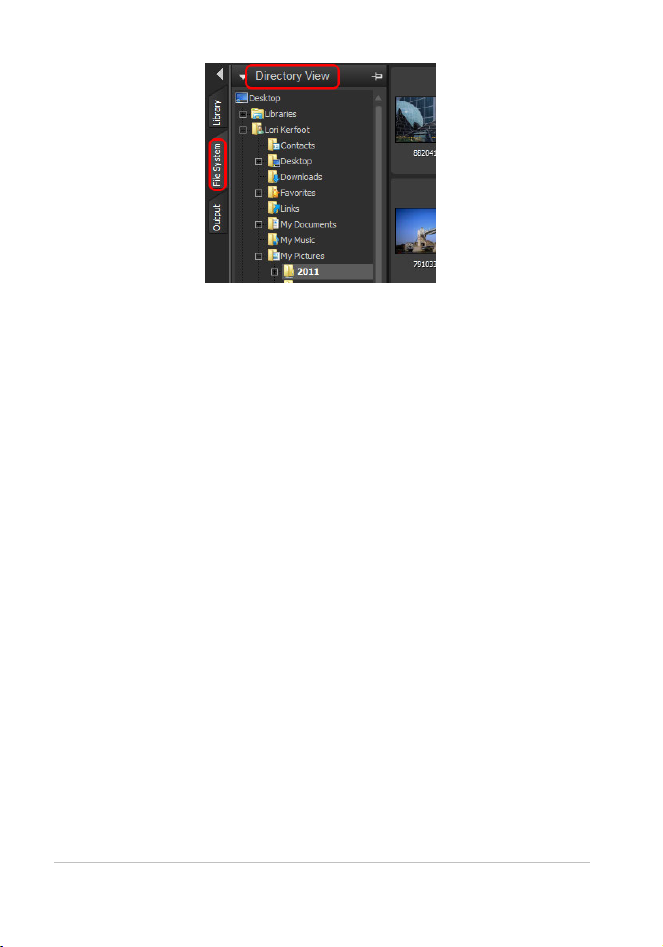
To navigate to your photos
In Corel AfterShot Pro, click the File System tab, and navigate to
your folder in the Directory View.
When you click a folder, the photos from the folder are displayed
as thumbnails in the Thumbnail panel.
Corel Afte rSh o t P ro workspace
.
for a quick
1Qu ick star t
Page 6
Step two: Selecting and editing photos
To view and adjust images, you need to select them. The Thumbnail
panel displays thumbnails of the photos that are in the active folder.
When you select a thumbnail, the Preview panel displays a larger
view of the photo. When you edit a photo, the original file (master
file) is never altered — edit information is saved separately and what
you see onscreen is a master version, a preview that shows your
edits. You can edit the entire photo or a selected area of the photo.
When you are finished editing a photo, you can simply move on to
the next photo, or you can save your changes as a new version. This
means that you capture the edits as a variation of the original file.
The
ve rsion
can be viewed as a thumbnail or in the Preview panel. It
can also be output.
To preview and select photos
1. In the Browse panel, click the File System tab.
2. Navigate to the folder you want. The Thumbnail panel displays the
photos that are in the folder.
3. Click a thumbnail to display it in the Preview panel.
2
Co rel A ft erS hot Pro Us er Gu ide
Page 7

Before you start editing, you can choose between viewing the
You can also
Scroll quickly
through
thumbnails
Press [ or ].
Compare two or
more photos (or
versions) in the
Preview panel
Click the Toggle Multi-Image View button
(or press M), and Ctrl + click or Command-click
the thumbnails. The Preview panel displays the
selected photos.
You can also select a sequence of photos by
using Shift + arrow keys.
This is a great way to select and flag the best
photo in a series of similar photos. For more
information about flagging and organizing
your photos, see
O rg an izin g, k eyw ords, an d
metadata
.
Select all
thumbnails
Press Ctrl + A or Command-A.
Deselect
thumbnails
Click a background area of the Thumbnail panel
or press Ctrl + D or Command-D.
edits directly on the master version of your file, or creating a new
version for editing by pressing Insert or by right-clicking the
thumbnail and choosing Version > New Version from Defaults.
No te : The last image you select is called the active image. While
in Multi-Image View mode, metadata changes, adjustments, and
other edits apply only to the active image.
3Qu ick star t
Page 8
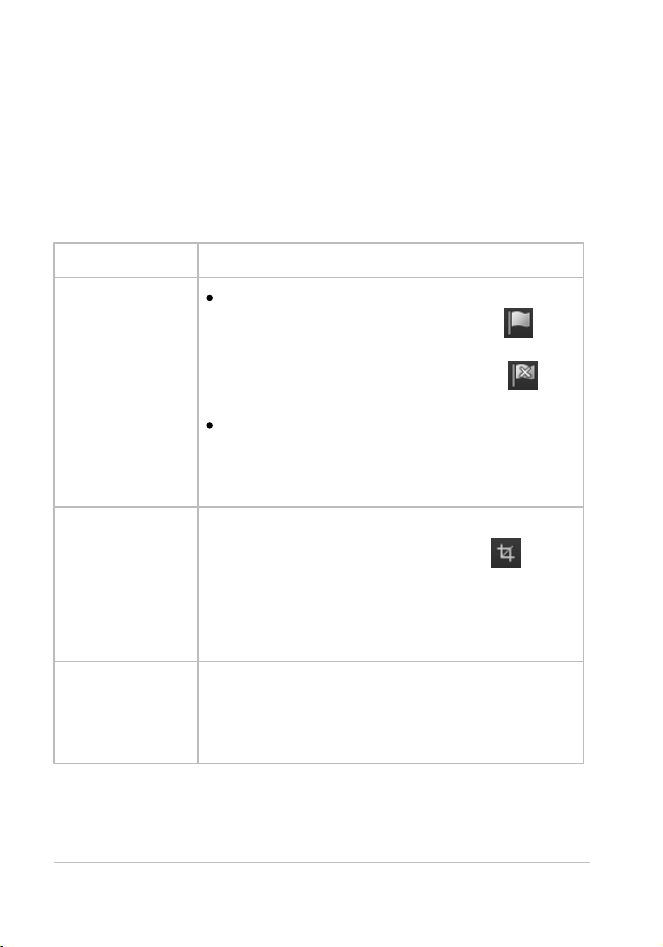
To edit a photo
To
Do th e following
Flag or add
keywords (i.e.
add metadata)
Flag — click a thumbnail and on the To p
toolbar click the Flag as Pick button or
press . (period key). To mark a photo as a
reject, click the Flag as Reject button or
press , (comma key).
Keywords — on the Tools panel, click the
Metadata tab, click inside the Keywords box,
and type one or more keywords, separated
by commas.
Crop a photo
On the AfterShot Pro toolbar at the bottom of
the Preview panel, click the Crop tool . In
the Crop palette, adjust the settings that you
want, and in the Preview panel, drag the crop
area over the area that you want to preserve.
Click Done in the Crop palette.
Adjust the color,
tone, or
sharpness of the
entire photo
In the Tools panel, click the Standard tab, and
adjust the settings you want in the Basic
Adjustments section.
1. In the Browse panel, navigate to the folder you want.
The Thumbnail panel displays the photos that are in the folder.
2. Click a thumbnail to display it in the Preview panel.
3. Experiment by trying any of the editing actions in the following
table.
4
Co rel A ft erS hot Pro Us er Gu ide
Page 9
Edit a selected
area only
1. Click the Open Layer Manager button in
the upper-right corner of the window.
2. In the Layers palette, click the +Adjust button
at the top of the palette. A new editing layer
is created.
3. Click a Region tool, such as the Circle Region
tool, click an area that you want to adjust,
and adjust the Size, Feather, or other settings
at the bottom of the Layers palette.
4. In the Basic Adjustments section of the Tools
panel, adjust any of the settings you want —
the changes apply to the selected area(s) of
the current layer.
Tip: There are some handy ways to undo actions. Here are a few
you can try:
To undo one action at a time, press Ctrl + Z or Command-Z.
To reset a Tools panel slider to its original setting, double-click
the slider name.
To clear all the changes that you've made to a photo, right-click
the thumbnail, and choose Settings > Apply Default Settings
from the context menu.
To show your edits on a new version
In the Thumbnail panel, right-click or Control-click an edited photo
(master version), and from the context menu, choose Version >
New Version from Current.
No te : You can confirm that a photo has been edited by looking
for the Edit icon in the upper-right corner of the thumbnail.
5Qu ick star t
Page 10
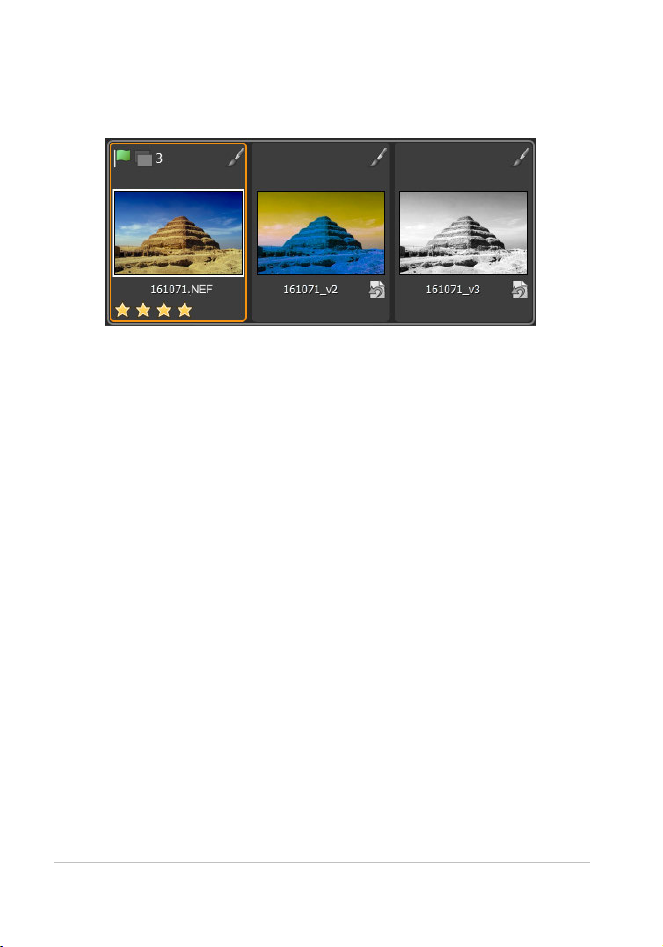
A new thumbnail appears next to the thumbnail of the master
version. By default, versions use the following naming
convention: original file name + version number (_v2, _v3, ...).
Thre e edite d ve rsions base d on the same maste r file
You can now return to the master version and edit it in a new way
and create another version. To start from the original settings, you
can clear the edits made to the master version by right-clicking or
Control-clicking the thumbnail, and choosing Settings > Apply
Default Settings from the context menu.
Tip: Whether you choose to create a new version before or after
editing a master version depends on your workflow. For
example, if you know that you want to make several versions
from the outset, you can create a version before you start
editing, so you can always see how the original master file looks.
If you want to quickly fix a photo, you can simply edit the master
version—you can create other versions later if you want. The
non-destructive nature of editing in Corel AfterShot Pro gives
you maximum flexibility.
For more information about editing photos, see
Editing pho to s
.
6
Co rel A ft erS hot Pro Us er Gu ide
Page 11

Step three: Outputting photos for sharing and
After you organize and edit your photos, you
can share your work by outputting your
photos. Outputting lets you save your photos
to a standard file format so that you can share
your work on the Web, via email, or use your
files in other applications. You can also
output your files to print. There are a number
of standard output choices, called batches,
that let you output quickly, but you can also
create a custom batch. For example, you can
choose file type, quality, color space, and
image size. You can also set a naming
convention to rename the files when they are
output and you can apply presets. For more
information about outputting, see
O u tp utting im ages
.
print
To get you started quickly, let's use standard batches to save to JPEG
and print a couple of 5 x 7 inch photos.
To output to a full-sized JPEG
1. In the Thumbnail panel, select one or more photos that you want
to output.
2. Do one of the following:
In the Browse panel, click the Output tab, and in the Batch Output
section, drag the thumbnails to JPEG Full Size.
Press F (shortcut key assigned to JPEG Full Size batch).
7Qu ick star t
Page 12

3. In the Select a Destination dialog box, choose a folder where the
files will be saved.
After you select a destination folder, files are saved automatically to
that folder for the rest of the session. You can change the
destination and access other output settings by double-clicking a
batch name in the Batch Output or Printing section.
To print to a standard print size
1. In the Thumbnail panel, select two photos that you want to print.
2. In the Browse panel, click the Output tab, and in the Printing
section, drag the thumbnails to a batch name, such as 5x7 Qty.2.
3. Double-click the batch name to preview the print job in the Print
Settings dialog box.
4. In the Print Layout section, enable the Scale crop or Scale reduce
option (matches the photos to the selected print ratio) and
preview the results.
5. Choose your printer from the drop-down list in the bottom left
corner.
6. Click Print.
Moving on
Now that you have been introduced to the basics, here are some
additional topics that will provide you with more detailed
information:
Und e rstand in g th e Lib rary
M anaging yo ur Lib rary
Editing pho to s
O rg an izin g, k eyw ord s, an d me tadata
O u tp utting im ages
8
Co rel A ft erS hot Pro Us er Gu ide
Page 13

Welcome to Corel AfterShot Pro
What is Corel® AfterShot™ Pro?
Corel AfterShot Pro is a fast, flexible workflow application for digital
photos, including RAW formats, JPEG, and TIFF. Corel AfterShot Pro
is designed to help you organize, optimize, and output your photos.
You can work with individual photos or tap into powerful and
flexible multi-image processing options that let you adjust and
output your photos so you can print them or share them via email
or the Web. Corel AfterShot Pro is completely non-destructive; your
original image files are always safe. You can use Corel AfterShot Pro
on its own, or with your favorite image editing software.
What's in this user guide?
This user guide includes basic information to help you get started
quickly. It includes a quick start section as well as some background
information that will help you understand how the application
works and what you can do with it. This user guide is meant to
accompany the full information set that is available in the Help that
is accessible from within the application. For a full list of learning
resources, from the menu bar choose Help > Learning Center.
How is Corel AfterShot Pro different from other
image-editing software?
There are a few things that set Corel AfterShot Pro apart from
traditional image-editing software. Let's take a look at these
differences.
9Welcom e to Cor el After Sh ot Pro
Page 14

Acti o n
Trad iti onal
imag e-e d i to r
Corel A f terShot P ro
Open
files that
you want
to edit
File > Open File,
open one or
more files.
As a workflow application, you tend
to work with folders, so click the File
System tab, and click a folder. You
can then right-click to import the
folder to the Library or click a
thumbnail and start editing.
Edit files
Start editing
each open file,
when finished,
the editing
information is
saved to the
file.
Start editing, creating one or more
looks (versions) for each photo. The
edits are saved automatically to a
sidecar file (XMP) so that your
original file is never affected. You can
really experiment, even between
editing sessions.
Save the
files
File > Save File
As, usually for
each file that
you want to
output, save to
the file format
you want (such
as JPEG). You
either overwrite
your existing
file, or create a
new file.
Select as many thumbnails (photos
or looks) as you want, and to save
out to a standard JPEG, press F. Want
TIFF? Press T. New files are created,
your original file is never affected.
*Corel AfterShot Pro lets you output
multiple files at one time, and offers
a range of settings that let you
customize your output.
10
Co rel A ft erS hot Pro Us er Gu ide
Page 15

What is photo workflow?
Photo workflow refers to all the activities that occur between the
initial image capture and the final photo output. Photographers
have very different workflows, depending on the volume of photos
they take and what they do with the photos. Your workflow might
be as simple as downloading images from your camera's memory
card and printing them on a printer that is attached to your
computer. A photo workflow might also include any of the
following:
organizational tasks, such as adding keywords and star ratings so
you can search and sort your images
editing and adjusting photos to correct, enhance, or creatively
manipulate photos
backing up and archiving photos
sharing photos through email or on the Web
printing photos in-house, through online printing services,
service bureaus, or prepress facilities
Corel AfterShot Pro supports a wide range of workflow options and
working styles to ensure that you can get the best quality from your
photos in the least amount of time.
11Welc om e to Co rel Af terShot Pr o
Page 16
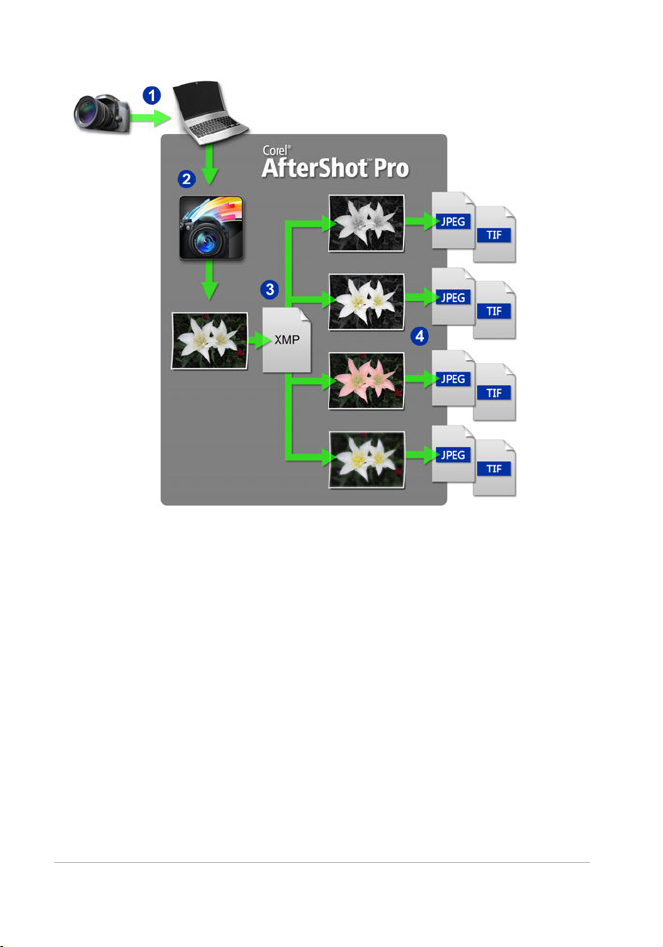
P hot o workflow : 1. Transfe r ph oto s from you r c ame ra to yo ur compute r, 2. Imp ort the
ph oto s into Co rel A fte rShot Pro , 3. Edit y our pho to s, cre ating one or mo re ve rsio ns, 4.
Ou tp ut a ve rsion to a JPEG or TIFF file .
Corel AfterShot Pro is organized into three workflow areas: Asset
management, Image editing, and Output generation.
12
Co rel A ft erS hot Pro Us er Gu ide
Page 17
Asset management lets you catalog your
original digital photos as master files and
view, add, browse and search photo
metadata. As your photo library grows
from hundreds to thousands of photos,
maintaining a coherent, organized,
searchable library becomes critical. Corel
AfterShot Pro provides all the tools needed
to catalog your current photographs, and
makes it easy to add to your library.
Image editing lets you adjust and correct
elements such as exposure, white balance,
detail, and distortions. You can get
creative with a variety of editing features
that you can apply to an entire photo or a
selected area. For example, you can use
selective editing to select one color area in
your photo and apply a color to that area
without affecting the rest of the photo.
Output generation lets you share the
photos that you have worked on in Corel
AfterShot Pro. Your photos can be output
in a wide range of formats that you can
print, email, or share on the Web. The
powerful Batch Conversion feature lets you
take advantage of multi-image processing.
13Welc om e to Co rel Af terShot Pr o
Page 18
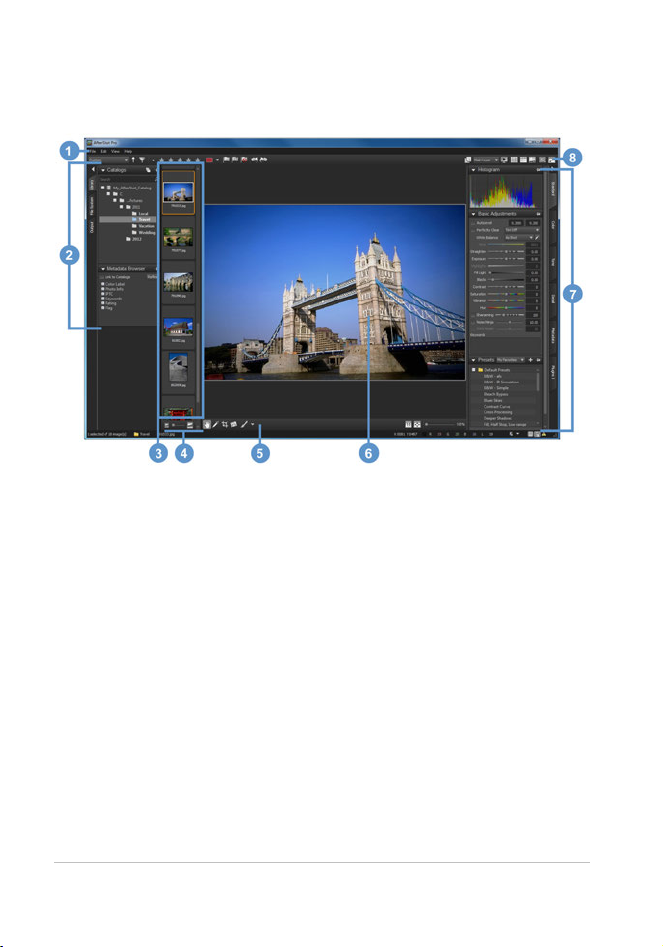
Corel AfterShot Pro workspace
The Corel AfterShot Pro workspace includes the following elements:
1. Menu bar
The menu bar is used to access common functions and features. For
example, you can import folders, set your preferences, or access the
Help.
2. Browse panel
The Browse panel is your main access point for your photos. The
panel has tabs for the Library, File System, and Output pages. Some
pages are further divided into sections. For example, the Library
page consists of a Catalogs section and a Metadata Browser section.
The Browse panel can be hidden so that more room is available for
viewing your images. Just click the left arrow at the top of the
Browse panel tabs to hide or show the panel.
14
Co rel A ft erS hot Pro Us er Gu ide
Page 19
3. Thumbnail panel
At the top of the main Corel AfterShot Pro window, this panel
shows thumbnails for the folder, container, search or browse
category selected with the Browse panel. All the images in the folder
are initially visible in the Thumbnail panel, but you can filter the
images to show only the thumbnails that match a specific set of
criteria.
4. Thumb Zoom toolbar
This toolbar contains the Thumbnail Size control which lets you
adjust the size of the thumbnails in the Thumbnail panel.
5. AfterShot Pro toolbar
This toolbar contains editing tools and viewing options for the
Preview panel.
6. Preview panel
The Preview panel lets you view a large version of the photo that is
selected in the Thumbnail panel. When Multi-Image View is enabled,
the Preview panel displays previews of all the selected thumbnails.
You can view image adjustments and zoom into or out of the
selected images.
7. Tools panel
Like the Browse panel, the Tools panel has tabs for pages that
contain a number of sections. For example, the Standard page
displays the Histogram, Basic Adjustments, and Presets sections.
Sections can be pinned so they stay visible.
15Welc om e to Co rel Af terShot Pr o
Page 20

The Tools panel can be hidden so that more room is available for
viewing your images. Just click the left arrow at the top of the Tools
panel tabs to hide or show this panel.
8. Top toolbar
This toolbar contains a variety of search, metadata, layer, and
viewing commands.
There are many ways to adjust and customize the Corel AfterShot
Pro workspace. For more information, see
Ad ju s ting th e worksp a ce
Understanding non-destructive editing
Corel AfterShot Pro is a non-destructive image editor, meaning that
adjustments you make to your images in Corel AfterShot Pro will
never alter the data in the original image. You are free to
experiment as much as you want, knowing that you can always
revert to the original version. As a non-destructive image editor, the
adjustments you create are stored either in a sidecar XMP file, within
the Corel AfterShot Pro catalog database, or both. This means that
when you're ready to share or export your work, you need to output
the versions you want to a standard file format.
When you edit a photo in Corel AfterShot Pro, a new version is
created that contains the adjustments you've made. Corel AfterShot
Pro allows more than one set of image adjustments to be made on
a single photo, allowing you to efficiently make many versions of a
single image. Creating a new version does not make a copy of the
original master file, but rather just allows you to apply different
image adjustments and metadata to the same Master file.
.
16
Co rel A ft erS hot Pro Us er Gu ide
Page 21

XMP files
Corel AfterShot Pro stores its settings in an XMP file that is slightly
different from other popular image editors and photo management
applications. We do this to prevent Corel AfterShot Pro from
overwriting settings created by other applications and to circumvent
limitations inherent in the current XMP standard (such as only being
able to export the metadata from one version at a time, or the
inability to save different settings for a RAW file and a JPEG that
were created in camera as a RAW+JPEG pair).
Corel AfterShot Pro uses a similar, but slightly different filename to
store this enhanced XMP data. The XMP filename is created by
simply adding ".xmp" to the end of the complete filename of the
image file it describes (while many other applications build the XMP
filename by first dropping the image file extension (like "jpg", "nef"
or "cr2") before adding "xmp"). So a Corel AfterShot Pro XMP file
would look like img_0000.jpg.xmp while an XMP from other
applications for the same image would simply be img_0000.xmp.
Corel AfterShot Pro lets you create a standard XMP file that other
applications will read, but this limits the settings to those officially
supported by the XMP standard (one set of metadata per image
file).
Shared XMP data
Other applications store image adjustments in sidecar XMP files,
and metadata added in other applications can be imported into
Corel AfterShot Pro. These include:
Star ratings
Color labels
Flags (called 'Picks' or 'Selects' in other applications)
Keywords and categories
IPTC and EXIF data
17Welc om e to Co rel Af terShot Pr o
Page 22

Likewise, applying any of these settings to images in Corel AfterShot
Pro will write this data back to the XMP file for those images. Many
applications allow you sync settings from XMP files with the settings
they hold in their internal databases. After the sync process is
complete, adjustments made in Corel AfterShot Pro appear in those
applications as well.
For more information, see
O rg an izin g, k eyw ord s, an d me tadata
.
Understanding the Library
Your Library is where you store one or more catalogs of photos. It is
a key part of the asset management system. It lets you access the
master files (original photos) as well as all the versions that you
create. You can read photo metadata, and search and browse for
photos based on the associated metadata.
Review the information in this section, and when you're ready to
start importing, see
Im portin g image s
.
The Corel AfterShot Pro Library and catalogs
If you choose to use Corel AfterShot Pro's asset management
features, you will start by importing images into a catalog. This
catalog is where data and metadata for your photos will be stored.
The Library consists of one or more catalogs, which store data such
as:
Links to original master files (path information and file
information)
Metadata for image searching and browsing
Image adjustment settings, and a complete editing history
Previews and thumbnails
Catalog-specific settings
18
Co rel A ft erS hot Pro Us er Gu ide
Page 23

Asset management is optional
Although importing your photos to the Library is recommended, it
is not required. You can still view and edit photos and use the RAW
file conversion features without adding files to your Library. How?
You simply click the File System tab and navigate to the photos in
the Directory View.
When would I not want to import photos?
Here are some examples of cases where you may choose not to
import photos:
If you simply want to see what photos are on a memory card or
other storage device. For example, if you want to grab a few RAW
files from your friend's memory card, you can use the File System
tab to find and view the photos. You can then copy only the
photos that you want to your computer and import those photos.
If you already have an asset management application and don't
want to replace it. For example, perhaps you have third-party
software that copies and builds an image folder structure.
If you have many photos that you need to import and you simply
want to get started quickly.
Features available after importing photos to the Library
After you import your photos to a catalog in your Library, you have
full access to the following features:
Browsing multiple folders — select multiple folders and view all
the thumbnails in the folders and subfolders in one flat view.
Full editing history — an editing log is maintained for every
change that you make to photos and versions over time. If you
do not import your photos, the edit log is maintained only for the
current session (the log is cleared when you exit the application).
19Welc om e to Co rel Af terShot Pr o
Page 24

Image search — find images by searching for filename, EXIF, IPTC
or other metadata.
Metadata browsing — browse through your catalog using EXIF,
IPTC or other metadata.
Image stacks — group versions from one or many master files
together into stacks.
Offline image browsing — find and manage images that are stored
on offline media like CDs, DVDs or external hard drives.
Initial image settings — Corel AfterShot Pro stores the first set of
adjustments found for every image when you import. This lets
you quickly revert to these settings at any time. The Initial Settings
might be the same as the Default Settings, or they might be
different because they include any edits or adjustments made in
Corel AfterShot Pro before importing.
Supported file formats
You can read (open and view) or write (save and export) to a wide
range of file formats.
RAW files from a wide array of digital cameras are supported as well
as JPEG and TIFF files. The table in the Help lists many supported
cameras, but for a list that includes the latest cameras, please visit
www.corel.com, and from the Support page, click Get Answers. Enter
the product name and search for RAW in the Knowledgebase.
20
Co rel A ft erS hot Pro Us er Gu ide
Page 25

Library and catalogs
In this section, you'll learn about
the Library
creating catalogs
About the Library
Your Library is where you store one or more catalogs of photos. It is
a key part of the asset management system. It lets you access the
master files (original photos) as well as all the versions that you
create.
A catalog is a collection of photos and their associated image data.
In essence, a catalog is a database that can be managed within
Corel AfterShot Pro. Catalogs contain master files, thumbnails and
preview images, image settings, image adjustments, and catalogspecific preferences.
The Library can be accessed from the Browse panel. The Library page
contains the Catalogs section which lists all the folders and photos
that you have cataloged by importing. For more information about
importing to the Library, see
Im portin g image s
.
21Lib r ar y and c atalog s
Page 26

The Library page in th e Bro w se pane l con tains the Se arch box , th e Catalog se ctio n, and
th e M etadata Bro wse r.
About catalogs
When images are first imported into a Corel AfterShot Pro catalog,
the initial settings used for that image are taken from a Corel
AfterShot Pro XMP file if one exists. If no Corel AfterShot Pro XMP
file is found, metadata settings (keywords, rating, labels, IPTC or
XMP tags) are read from standard XMP files, or the image file itself.
Catalog versus XMP
After images have been imported into a Corel AfterShot Pro catalog,
changes to any image or metadata settings are stored within the
22
Co rel A ft erS hot Pro Us er Gu ide
Page 27

Corel AfterShot Pro catalog. The changes can be written back to the
AfterShot Pro XMP files manually by selecting the thumbnails for
the images you want, right-clicking one of the thumbnails, and
selecting XMP > Write AfterShot XMP files. Alternately, you may
choose to have Corel AfterShot Pro always keep the XMP files up to
date. You can do so in the General preferences by enabling the
Allow automatic AfterShot .xmp creation for photos in Catalogs check
box.
Multiple catalogs
Most people can easily work with one catalog. All photos are
imported to the default catalog, and you can easily search and filter
to find the photos your want in the catalog. However, if you take
photos for different reasons, professional versus personal for
example, you can create separate catalogs. Corel AfterShot Pro lets
you build, open, and work with many catalogs from your Library
simultaneously. This allows you to group, backup, and manage sets
of files as catalogs, while preserving the ability to browse, search,
and access any image in any open catalog. For more information
about creating catalogs, see
M anaging catalo gs
.
Importing images
When you import images into Corel AfterShot Pro, they are added
to a catalog. You can choose to import an entire folder, a folder and
all the subfolders it contains, or you can selectively import one or
more files within a folder.
Importing is a process that you control. If you add a new folder or
subfolder to your computer, you must import the new folders if you
want to add them to your Library. If you have added several
subfolders or individual images to an existing folder structure, you
can reimport from the root folder to ensure that you catch all the
23Lib r ar y and c atalog s
Page 28

new items — duplicate catalog entries are not created if you import
a photo from the same source location more than once.
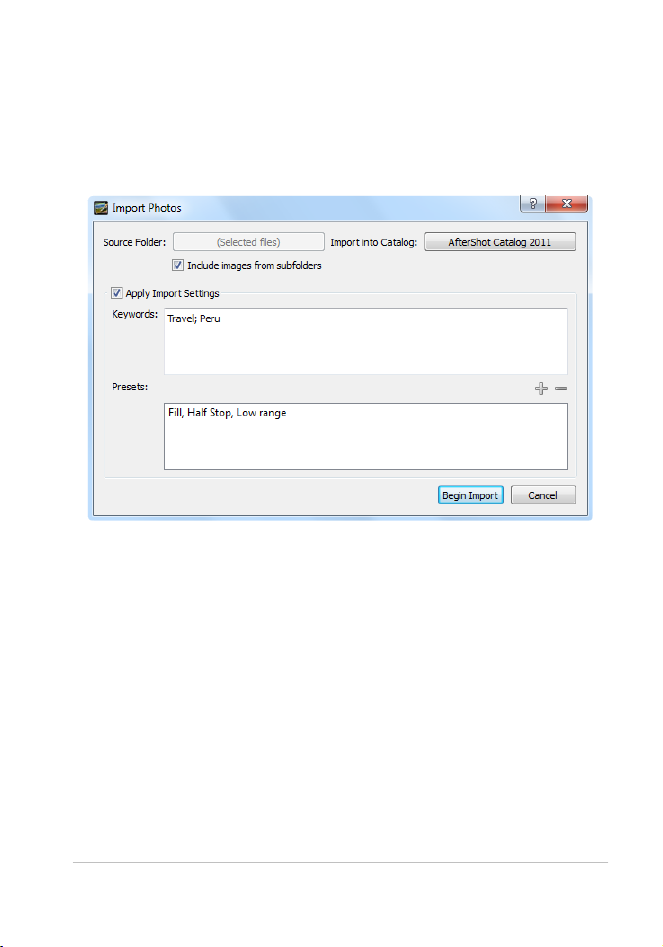
To import a folder
1. Do one of the following
Click File > Import Photos from Folder. In the dialog box,
navigate to the folder you want and click the Select Folder
button.
In the Browse panel, click the File System tab, and in the
Directory View, right-click the folder you want, and choose
Import Folder from the context menu.
2. In the Import Photos dialog box, confirm that the Source Folder
button displays the name of your folder.
To include subfolders, enable the Include images from subfolders
check box.
3. Confirm that the Import into Catalog button displays the name of
the catalog you want to use. If you want to create a new catalog,
click the button.
4. (Optional) Enable the Apply Import Settings check box and enter
any keywords that you want to apply to all the photos within the
folder. You can also apply presets in the same way.
5. Click Begin Import.
No te : All the photos in the folder are cataloged. To check your
catalog, click the Library tab, and navigate to your folders in the
Catalogs section. Note that the files are not copied when they are
cataloged — they are referenced from their original location.
24
Co rel A ft erS hot Pro Us er Gu ide
Page 29
Tip: If you don't want to import all the photos in a folder, you
can open the folder, and in the Thumbnail panel, select the
thumbnails for the photos that you want to import. Click File >
Import Selected Files, and choose the import settings you want in
the Import Photos dialog box.
The Impo rt P hotos dialog b ox
Managing your Library
Your Library consists of catalogs and the files and versions that each
catalog contains. You can move, copy, rename, and delete one or
more files or versions at a time to get organized. You can also
manage your Library by creating more than one catalog, and control
which catalogs are accessible by opening or closing catalogs.
For more information about versions, see
Vers io n s.
25Lib r ar y and c atalog s
Page 30

Moving and copying versions
You can move or copy versions to a new location.
No te : When you move or copy a version, the master file and all
related versions are copied or moved.
To move or copy versions
Do one of the following:
To move a version, drag the thumbnail from the Thumbnail
panel to the folder of your choice in the Browse panel.
To copy a version, hold Ctrl or Command while dragging the
thumbnail from the Thumbnail panel to the folder of your
choice in the Browse panel.
Renaming versions
You can choose to rename your versions by using renaming formats
if you want to rename several versions at one time with a consistent
format.
26
Co rel A ft erS hot Pro Us er Gu ide
Page 31

The Rename Versions dialog box has the following controls and
features:
Format — choose from a list of existing formats.
New Name — lets you enter a renaming format. For example, if
you use [jobname] or [jobseq] in the New Name box, you can
enter a job name in the Job Name. The sequence [jobseq] format
remembers the last number used in any previous renaming for
this job name, and will continue numbering where it left off.
Next [rseq] — if you include [rseq] in the New Name box, that text
will be replaced with a unique, incrementing sequence number
that will start over the next time you rename versions. This control
allows you to set the number.
Reset [jobseq] — restart the numbering for the job name
sequence selected.
Rename all Versions derived from Master Versions — enable this
check box to number the master versions sequentially and any
related versions with the same name (adds "_v1", "_v2" etc to each
version). If you do not check this option, each version is given a
unique name.
For more information about how to use renaming formats, see
Re n aming fo rm ats
.
To rename one or more versions
1. Select the thumbnails for the versions that you want to rename.
2. Press F2 or right-click and select Version > Rename Version.
3. Edit the New Name field, using text or renaming formats like
[date]. Or, select an existing renaming format from the Format
drop-down list.
The Preview updates as you edit the New Name field to show you
the results of the renaming format.
27Lib r ar y and c atalog s
Page 32

Deleting versions
You can delete a master version (which represents the original
photo, or master file) at any time, but different things happen when
you delete a master version versus other types of versions.
Deleting a master version
When you delete a master version, all associated versions are also
deleted. The original master files are moved to your computer's
Recycle Bin. Review any messages that appear to confirm the action.
Deleting non-master versions
When you delete versions which are not master versions, there is no
impact to the original master file — the version thumbnail and
associated data is removed from the sidecar XMP file.
No te : When Multi-Image View is enabled, only the single active
version is removed, not the entire selection.
To delete a master file or version
Select the thumbnails of the master versions that you want to
delete and do one of the following:
Press Delete.
Right-click a thumbnail and choose Version > Remove Version.
If you have selected a master version, a message appears to warn
you that the original file for the master version will be moved to
the Recycle Bin.
28
Co rel A ft erS hot Pro Us er Gu ide
Page 33

File System mode
Fi l e System mode lets you access and edit uncataloged photos. It
is a quick way to access any supported image file on your computer,
without needing to import images into a catalog. It's a good way to
access photos that you may not keep, but when you don't import
photos, you'll miss out on some features that are only possible
when working on images in a Corel AfterShot Pro catalog. If you
start working with photos in File Sys tem mode, you have the
option of importing the photos to a catalog later.
For more information about Fi l e System mode, see
th e Lib rary
.
Image settings in File System mode
Since the File System mode does not maintain a persistent catalog,
the image adjustment and metadata settings are written to a Corel
AfterShot Pro XMP file after each adjustment. Each time you browse
to a new folder, Corel AfterShot Pro will scan the folder, removing
any files from Corel AfterShot Pro that have been deleted from your
computer, adding any new images found, and refreshing the
settings for all existing files with the latest settings found in the
XMP files. This ensures that what you see in Corel AfterShot Pro in
File System Mode matches exactly what is saved on your computer.
This also means that the edit history (as seen in the History palette)
is reset between each session.
Und e rstand in g
No te : If you're editing in File System mode and Library mode, it
can cause issues — edits to photos may not be visible if you edit
the same file in both File System mode and Library mode (the
information is written to the file in a different way). Therefore, it
is recommended that after you import a file into a Library
catalog, you always access the file from the Library.
29Fi le Sy s tem m ode
Page 34

Working in File System mode
In File System mode, finding images in Corel AfterShot Pro is the
same as finding images in Windows® Explorer, Mac® Finder® or
other file manager applications.
Whether you choose to work from File System mode or Library
mode, you can manage your files is the same way. For more
information, see the following topics:
M ovin g an d co pyin g vers io n s
Re n aming versions
Deletin g versio n s
30
Co rel A ft erS hot Pro Us er Gu ide
Page 35

Editing photos
The image editor in Corel AfterShot Pro is completely nondestructive, so you are free to experiment and edit your images as
much as you want, knowing that you can always revert to the
original version. All the edits that you make and metadata that you
add is stored either in a sidecar XMP file, within a Corel AfterShot
Pro catalog, or both.
To view or use your image adjustments in other applications, you
need to output the image. For more information about outputting
your files, see
O u tp utting im ages
.
The orig in al file is alw ay s prote cte d. The maste r ve rsion is based o n the orig inal file , but
yo u can cr e ate as many version s as you like .
Because your original file is always protected (as a master file), when
you edit a photo, your edits are viewable within Corel AfterShot Pro
on a representation of the master file called a master version. You
31Edit ing pho tos
Page 36

can create as many additional versions as you like. When you create
Most editing tools and controls can be
found in the Tools panel. When you click the
Standard tab, you can access the Basic
Adjustments section, which contains the
most common adjustment controls. Other
tabs, such as Color, Tone, Detail, and
Metadata, let you access additional tools and
more advanced controls and options. For
example, the Basic Adjustments section
includes Fill Light. Fill Light also appears in
the Exposure section of the Tone page. In
the Exposure section, there is an additional
control, Range, that lets you fine-tune the Fill
Light adjustment. Adjusting Fill Light in one
place will update the Fill Light setting in all
sections — these are just different views of
the same control.
a version, the application does not need to make a copy of the
master file, the information is efficiently stored in the XMP file or
catalog, so you can create as many versions as you like without
taking up much storage space.
About adjustment tools
32
Co rel A ft erS hot Pro Us er Gu ide
Page 37

The image shows the Basic Adjustments section of the Tools panel
To
Do th e following
To resize the
Tools panel
Position your pointer along the left edge of the
panel, and drag when your pointer changes to
the resizing arrows.
and some common controls. The Tools panel can be resized, sections
can be pinned, and you can choose to hide or show the panel.
There are different ways to adjust the controls in the Tools panel.
You can also reset controls to their original setting and hide or
show the results of a setting.
Why are some tools and controls not available?
Some tools and controls are not available under the following
conditions:
The file that you are trying to edit is not available (for example,
the files are stored on an external drive that is not currently
connected to the computer)
If you have a layer or selection and the tool or control can be
applied only to entire images
The tool is not compatible with the file format. For example, the
following tools can be applied only to RAW files:
Highlight Recovery
Custom White Balance (Temp and Tint sliders)
White Balance Presets (Sunny, Cloudy, Incandescent, etc...)
Noise Ninja™ (only Auto Profile is available for other file types)
To resize, pin, or hide the Tools panel
33Edit ing pho tos
Page 38

To
Do th e following
Pin a section so
that it displays
regardless of
which page is
active
Display the section you want, and click the Pin
icon in the upper-right corner. To unpin
the section, click the icon again.
Hide the Tools
panel
Click the Toggle Right Panel button at the
top of the panel.
To adjust a setting
Do one of the following:
Drag the slider
Double-click the corresponding number for the setting and
type a new value
Using a mouse with a wheel, position your pointer over the
control name or slider, and roll the mouse wheel to adjust the
setting
To reset a slider to its original setting
Double-click the slider or control name.
To hide or show the results of a setting
In the Tools panel, mark or unmark the check box to the left of the
adjustment tool.
34
Co rel A ft erS hot Pro Us er Gu ide
Page 39

Standard tools
When you click the Standard tab on the Tools panel, you can access
some of the most commonly used image editing tools. Grouping
these frequently used adjustments together in one place means that
you can perform basic edits quickly without switching between tabs.
The controls are divided into three sections: Histogram, Basic
Adjustments, and Presets.
Histogram
A histogram is a visual representation of the data that makes up
your image. The left side represents the darker areas in your image,
the right side represents the highlights, and the height of the
colored curves shows you how many pixels of a given value are
found in your image.
Basic Adjustments
This section holds the most commonly used image adjustment
controls. Many photographers will likely find most of the controls
they need in this section.
AutoLevel
AutoLevel examines the tonal range of your image and sets the black
and white points to be at points such that a fixed percent of the
35Edit ing pho tos
Page 40

image will be pure black and pure white. There are two edit boxes
in AutoLeve l : the left box sets the percentage of the image to be
set to pure black and the right box sets the percentage to be set to
pure white.
Perfectly Clear®
Perfectly Clear®, powered by Athentech Technologies Inc., is a
simple way to quickly optimize your images. Perfectly Clear is awardwinning technology that automatically optimizes the lighting for
each and every pixel while maintaining true color and zero clipping.
Perfectly Clear also removes abnormal tint and restores faded
photos. It also uses medical imaging technology to improve contrast
and sharpen.
White Balance
For RAW images, you can select among several preset white balance
settings, such as As Shot, Click White, and Custom Kelvin.
Different light sources have different characteristics or warmth that
affects how your camera captures images. White Balance lets you
adjust the overall color in the image, ensuring that colors are
accurately reproduced in your photos. You can select a White
Balance preset, such as Sunny, Shady, Tungsten, or Flash, or you can
use the Click White tool (on RAW, JPEG, or TIFF files) to select a
neutral colored object in your image (something that should appear
as a neutral gray) which will adjust all the colors in your image to
make the point that you clicked neutrally colored.
To set white balance with the Click White tool
1. In the White Balance section of the Basic Adjustments page, click
the Enable the Click White tool button or press I.
36
Co rel A ft erS hot Pro Us er Gu ide
Page 41

2. In the Preview panel, experiment by clicking a neutral area of your
photo. The ideal place to click is on a neutral grey that is not
overexposed (pure white) or underexposed (pure black) on the
image you want to adjust. Clicking different spots will result in
different corrections.
3. To fine-tune the white balance, adjust this with the Temp slider.
Straighten
Straighten rotates your image to level a horizon or otherwise
straighten your image. For more information, see
Straig htening
.
Exposure
Exposure performs an overall exposure correction, either brightening
or darkening all portions of your image.
Highlights
Recovers detail from apparently overexposed portions of the image.
Fill Light
Fill Light brightens shadows and the darker portions of the image
without overexposing highlights, and with minimal effect on
midtones.
Blacks
Blacks controls the black point in the image. Values lower than zero
remove black from the image; values higher than zero darken the
image. The Histogram section displays the changes in the image.
Saturation
Saturation adjusts the intensity of the colors in the image. High
saturation settings boost colors and provide rich, vivid color. Low
saturation settings produce pastel and more muted colors. Setting
37Edit ing pho tos
Page 42

Saturation to zero produces a pure monochrome, black-and-white
image.
Vibrance
Vibrance is a version of saturation that performs a more gentle
correction to skin and other image areas that are already richly
saturated.
Hue
Hue changes the colors in an image, rotating the "color circle" by the
amount indicated by the slider. For example, if the Hue slider is set
to 60, then 60 is added to the original hues in your image, so
greens become cyan, blues become magenta, and reds become
yellow.
Contrast
Increasing Contrast makes the dark areas in the image darker, and
the bright areas brighter.
Sharpening
Sharpening an image makes the high detail portions of the image
stand out more by making the edge details more pronounced.
38
Co rel A ft erS hot Pro Us er Gu ide
Page 43

No te : Fine detail control tools like Sharpening should be applied
and evaluated while looking at a 100% Zoom of the image,
either in the Preview panel or by using the Magnifier.
Noise Ninja™
Noise Ninja is a state-of-the-art noise reduction system developed
by PictureCode Inc. that can be used as a stand-alone product or
within Corel AfterShot Pro. Noise Ninja technology achieves an
unprecedented balance between noise suppression and detail
preservation, providing natural-looking results without artifacts,
and is built into Corel AfterShot Pro. The check box enables or
disables Noise Ninja noise reduction, and the slider sets the
strength of the noise reduction effect.
For more control, use the Registered Noise Ninja section.
No te : Fine-detail control tools, like Noise Ninja, should be
applied and evaluated while looking at a 100% Zoom of the
image, either in the main Preview panel or by using the
Magnifier.
RAW Noise
RAW Noise reduces noise in RAW files only.
Keywords
The bottom of the Basic Adjustments section includes a Keywords
area that shows the keywords for all selected versions. When you
have multiple versions selected, the following color coding is used:
red — the keywords apply only to some of the selected versions
green — the keywords apply only to the active version
no color — the keywords apply to all selected versions
39Edit ing pho tos
Page 44

Presets
Presets are a great way to help speed up your workflow. You can
save your favorite adjustments to presets, create keyword presets, or
combine a wide range of photo editing in a preset that can be
applied with one click.
For more information, see
Pre s e ts
.
Color tools
The Color tab in the Tools panel lets you access tools focused on
color control. The controls are organized into five sections: Curves,
Color Correction, Color Balance, White Balance, and Color Management.
Curves
The Curves section is an intelligent combination of standard Curves
and Levels tools found in many image editing programs.
40
Co rel A ft erS hot Pro Us er Gu ide
Page 45

The Curves section includes the following controls:
Apply Curves — enables or disables Curves.
RGB drop-down — allows selecting of individual color channels,
or the combined RGB mode.
Before/After drop-down — switches the display from showing the
histogram before curve adjustments are applied and after
adjustments are applied
Left White Arrow — sets the input 255 (white) point. Dragging
this arrow down shifts the histogram left, making the image
darker.
Bottom White Arrow — sets the output 255 (white) point.
Dragging this arrow to the left brightens your image, but it can
clip highlight details.
Left Black Arrow — sets the input 0 (black) point. Dragging this
arrow down shifts the histogram to the left, making the image
darker.
Bottom Black Arrow — sets the output 0 (black) point. Dragging
this arrow to the right deepens the shadows, and can clip
shadow detail.
Bottom Grey Arrow — sets the output 128 (gray) point. Dragging
this arrow to the right shifts the midtones to higher values,
brightening the image; dragging the arrow to the left darkens
the image.
Click inside the Curve tool — click inside the curve tool itself to set
or adjust the curve. You can set multiple points and drag to finetune your tone control.
41Edit ing pho tos
Page 46

AutoContrast — click this button to set the output white and black
points based on image content. It uses the AutoLevel values
(highlight and shadow) to perform a one-time adjustment to
increase contrast. The main difference between this tool and
AutoLevel is that the output white and black values can be more
easily adjusted than the AutoLevel values.
Black Point tool , Gray Point tool , White Point tool
click a tool, then click the image in the Preview panel to set the
black, gray, or white point to the values of the pixel that you click.
Reset All and Reset Current — Reset All restores the curve
values to a flat curve. Reset Current resets the current RGB channel
only.
Color Correction
The Color Correction section of the Color page in the Tools panel lets
you adjust your image selectively based on colors that you sample
from your image or colors that you set in the Color Picker. The colors
you select are stored in color wells. The first six color wells (top row)
are preset to the primary and secondary colors. The second set of
color wells (bottom row) can be set to any color you choose.
42
Co rel A ft erS hot Pro Us er Gu ide
Page 47

To pick a color as the starting point for a color correction
1. In the Tools panel, click the Color tab, and open the Color
Correction section.
2. Click any adjustable Color Well that isn't assigned a color
(white wells in the second row).
3. Click the Color Picker that appears next to the Hue slider and
click anywhere within your photo to select a color that will be
used for color adjustment.
After your starting color is selected, you can adjust the Hue,
Saturation, or Luminance of that color within your image.
4. Adjust Range to control the color tolerance. A small range adjusts
only colors very close to your selected color; a higher range
adjusts a larger color range in your image.
In this e xample , Se lective Co lo r w as u sed to sample th e dre ss. The H ue w as ad ju ste d to
ch an ge th e color of th e dre ss.
43Edit ing pho tos
Page 48

Tip: You can also assign a new color to a color well by clicking
the color well that displays to the left of the Color Picker .
This opens a color selector window where you can pick a color as
your adjustment color.
Color Balance
This section in the Tools panel lets you precisely balance the colors in
your image. You can use the following controls:
Cyan/Red, Magenta/Green and Yellow/Blue — shifts the color along
the color axis.
Saturation — aadjusts the intensity of the colors in the image.
High saturation settings boost colors and provide rich, vivid color.
Low saturation settings produce pastel and more muted colors.
Vibrance — applies a gentle version of Saturation that avoids the
oversaturation of skin colors and image areas that are already
richly saturated.
Hue changes the colors in an image, rotating the color wheel
by the amount indicated on the slider. For example, if the Hue
slider is set to 60, this value is added to the original hues in your
image, so greens become cyan, blues become magenta, and reds
become yellow.
44
Co rel A ft erS hot Pro Us er Gu ide
Page 49

HSL/HSV — choose between correcting images in HSL (Hue /
Saturation / Luminance) and HSV (Hue / Saturation / Value) color
spaces.
White Balance
White Balance provides several preset white balance settings, such
as As Shot, Click White, and Custom Kelvin.
Different light sources have different characteristics or warmth that
effects how objects appear to you camera. White Balance lets you
adjust the overall color in the image, ensuring that colors are
accurately reproduced in your photos. You can select a White
Balance preset, such as Sunny, Shady, Tungsten, or Flash, or you can
use Click White to select a neutral colored object in your image
(something that should appear as a neutral gray) which adjusts all
the colors in your image to make the point that you clicked neutrally
colored.
To set white balance with the Click White tool
1. In the White Balance section of the Basic Adjustments page, click
the Enable the Click-White tool button or press I.
2. In the Preview panel, experiment by clicking a neutral area of your
photo. The ideal place to click is on a neutral grey that is not
overexposed (pure white) or underexposed (pure black) on the
image you want to adjust. Clicking different spots will result in
different corrections.
3. To fine-tune the white balance, adjust the Temp slider.
45Edit ing pho tos
Page 50

Color Management
This tool controls the color management mode applied to the active
version.
Color Mgmt — enables color management when set to an ICC
profile. Switching this to None-Linear still applies color
management, but leaves the image in a linear color space.
Custom Input Profile — advanced users can choose to create an
input profile from the linear data associated with a camera
profile.
For more information, see
Ab o ut co lo r manag e men t
in the Help.
Tone tools
The Tone tab on the Tools panel lets you access controls that let you
fine-tune image tone. All the tools are organized in the Exposure
section.
Exposure
The Exposure section combines all the tonal adjustments into a
single area. Many of the same controls can be accessed by clicking
the Standard tab. For more information see
see
Ton e to ols
in the Help.
Basic Adjustme n ts
or
46
Co rel A ft erS hot Pro Us er Gu ide
Page 51

Detail tools
The Detail tab on the Tools panel lets you access controls that let you
sharpen, blur, adjust noise, apply lens corrections or distortions,
and add effects, such as vignette or color inversion. The controls are
organized into six sections: Sharpening, RAW Noise, Noise Ninja
Standard, Noise Ninja Registered, Lens Correction, and Mirror and
Invert.
Sharpening
The Sharpening section lets you adjust how sharp or how soft the
details are in your image. Amount adjusts the overall sharpness,
while Sensitivity limits what portions of your image are sharpened.
47Edit ing pho tos
Page 52

A high Sensitivity value results in less of your image being
sharpened. If sharpening your image makes noise or highly detailed
areas too distracting or too sharp, then try raising the Sensitivity
value.
No te : Fine-detailed control tools, like Sharpening, should be
applied and evaluated while looking at the image at the 100%
zoom level, either in the Preview panel or with the Magnifier
RAW Noise
RAW Noise is an image improvement process that you can use very
early in the image editing workflow to provide the highest quality
final images. The feature can be applied only to RAW files.
Raw Impulse Noise Removal — enables the automatic detection
and removal of impulse noise (single black, white, or colored
pixels).
Raw Noise — reduces noise. You can control the strength of the
noise reduction.
Threshold — sets the level of sensitivity for noise detection in the
image.
No te : Applying RAW Noise enables RAW Impulse Noise Removal,
but you can apply RAW Impulse Noise Removal without enabling
RAW Noise.
Noise Ninja
Noise Ninja is a state-of-the-art noise reduction system developed
by PictureCode, Inc. Noise Ninja Standard is included in Corel
AfterShot Pro. To use the Noise Ninja Registered section, you must
purchase a Noise Ninja license and register with PictureCode. Noise
Ninja technology achieves an unprecedented balance between noise
48
Co rel A ft erS hot Pro Us er Gu ide
Page 53

suppression and detail preservation, providing natural-looking
results without artifacts. In the Noise Ninja Standard section, the
check box enables or disables Noise Ninja noise reduction, and the
slider sets the strength of the noise reduction effect. For more
information about Noise Ninja, visit the PictureCode website at
http://www.picturecode.com.
Noise Ninja Registered includes the following controls:
Enable — toggles Noise Ninja on or off.
Coarse Noise — removes low-frequency noise in the Chroma
channel.
Auto Profile — creates a noise profile for this image instead of
using the default profiles. The profiles provided with Corel
AfterShot Pro are built using controlled conditions and usually
provide results superior to the Auto Profile results.
Turbo Mode — increases the speed of noise reduction. Enabling
this option can degrade the quality of the noise reduction.
The lower section of the tool has separate Strength, Contrast, and
Smooth controls for Luma noise and Chroma noise. Luma noise is
seen as bright or dark speckles in an image, while chroma noise is
seen as colored speckles. The following controls are included for
both Luma and Chroma:
Strength — controls the overall level of noise reduction applied to
the image.
Contrast — adjusts the noise detection procedure by controlling a
scaling factor to edges.
49Edit ing pho tos
Page 54

Smooth — increases or decreases the noise levels estimated by the
noise profile. Usually the default setting is adequate, but if you
see isolated specks in smooth areas, try increasing the
smoothness setting.
All noise reduction technology causes at least a slight drop in
sharpness; the Noise Ninja Registered tool contains its own
sharpening tool on the USM tab to apply an unsharp mask
sharpening procedure after applying noise reduction. The USM tab
lets you access the following controls:
Amount — controls the strength of the sharpening.
Radius — adjusts how much of the image will be affected by the
USM control.
The last tab, Profile, shows what profile is being used in the noise
reduction process and tools to create custom noise profiles.
Lens Correction
Lens correction fixes lens distortion. While zoom lenses with a large
range of focal lengths show the greatest lens distortion, even fixedfocal length, or "prime" lenses, can cause some types of distortion.
The following types of lens distortion can quickly and easily be
corrected in Corel AfterShot Pro: Barrel and Pin Cushion distortion,
Chromatic Aberration, and Vignetting. For more information, see
Le n s Co rrectio n
in the Help.
50
Co rel A ft erS hot Pro Us er Gu ide
Page 55

Mirror and Invert
This simple tool allows you to:
Mirror your image (from left to right).
Invert the colors (like a film negative). This option can be useful
when working with scanned negatives.
Metadata tools
The Metadata tab contains tools that let you view and edit the
metadata associated with your images. This metadata includes
camera data, EXIF and IPTC data, as well as information that you add
51Edit ing pho tos
Page 56

to your files, such as keywords, star ratings, and captions. The
controls are organized into three sections: Metadata, Keywords, and
Keyword Sets.
Metadata
This tool shows EXIF and IPTC metadata assigned to the Active
Version, and allows you to add, remove or edit the IPTC data from
all selected images.
You can select different metadata sets from the drop-down list at
the top of the Metadata section, which changes the type of
metadata that is shown. Some metadata is read-only, like Shutter
Speed and ISO Rating, while other metadata is editable, like Caption,
Rating, and Date.
Keywords
This section shows all keywords assigned to the active version and
all selected versions. You can add and remove keywords from all
selected images.
52
Co rel A ft erS hot Pro Us er Gu ide
Page 57

No te : Adding or removing keywords from the Keywords section
affects all selected images, while the keywords displayed in the
section reflect only the active version.
Keyword Sets
This section provides a fast and easy way to assign multiple
keywords to you photos. You can group similar keywords together
in a set and show that set in the Keyword Sets section.
For more information about Metadata tools, see the following
topics:
Wo rk in g with m e tadata
Wo rk in g with ke ywo rd s
Find in g ph otos b y u s in g m e tadata
53Edit ing pho tos
Page 58

Plugins
The Plugin tab lets you access plugins, including plugins developed
by third-party developers. These unique image adjustment tools are
designed to work directly within Corel AfterShot Pro. The plugins
are totally non-destructive, like all of Corel AfterShot Pro's built-in
image adjustment tools, and are compatible with Corel AfterShot
Pro's selective editing tools.
As you install other plugins, additional tools appear on the Plugins
tab. Additional tabs are created automatically as you install more
plugins.
For more information about plugins available for Corel AfterShot
Pro, visit www.corel.com.
Installing and updating plugins
Plugins are distributed as Corel AfterShot Pro .bzplug files — a single
file that contains all the files and information necessary for the
plugin to run. A single plugin bundle can be installed on
Windows®, Mac, or Linux® (if the developers have built the plugin
for all three versions).
To install a plugin
Do one of the following:
Double-click a Corel AfterShot Pro plugin bundle (which ends
with the .bzplug file extension).
Drag and drop a .bzplug bundle into the Browse panel.
Click File > Install Plugin and choose the .bzplug bundle that you
want to install.
54
Co rel A ft erS hot Pro Us er Gu ide
Page 59

No te : Corel AfterShot Pro checks to make sure the plugin you
are trying to install supports your version of Corel AfterShot Pro
and your computer type. In some cases, an updated version of
the plugin will be installed. You must restart Corel AfterShot Pro
to complete the installation process. You can restart immediately
after installing or updating a plugin, or you can restart later.
Corel AfterShot Pro Black & White Plugin
Corel AfterShot Pro includes the Black & White Plugin which lets you
choose from a variety of color mixing options and use an innovative
spot color tool that restores one or two colors to your black and
white image.
This plugin includes the following controls:
Enable Black & White — turns the effect on or off.
Channel Mixer drop-down list — lets you choose from several
color mixes used to determine the black and white value.
First Spot Color and Second Spot Color tabs — sets the spot color
restoration options.
55Edit ing pho tos
Page 60

Enable — turns the spot color effect on or off.
Hue — specifies the hue to be restored. You can also click the
Color Well to choose a color.
Fuzziness — sets the range for the restoration based on how
close the colors are to the selected hue.
Selective editing
Selective Editing lets you isolate adjustments or edits to a specified
area of a photo. For example, you can select and lighten an area that
you want to highlight in a photo, or select an area that you want to
edit by using Heal or Clone. For more information about Heal and
Clone, see
Selective Editing has three main steps:
1. Create a layer — See
2. Select one or more areas to edit by creating regions — See
3. Apply adjustments — See
Review the information below to learn about layers, regions, and
adjustments that can be used with selective editing.
Re tou ch in g with Heal and Clo ne
create a re g io n
To cre a te an ad ju stm en t laye r
.
To ad ju s t a layer
.
.
To
.
Layers
Layers are collections of regions and adjustments. A layer can
contain a single region and adjustment, or it can contain many
regions and adjustments. All regions in a single layer will have the
same adjustments applied. For example, if you want to brighten
several faces in a photo, you can create circle regions over each face,
and then adjust the Fill Light setting for the layer, thereby
brightening the shadows for all the selected faces at one time. You
can apply other adjustments to the layer as well, but at the point
56
Co rel A ft erS hot Pro Us er Gu ide
Page 61

where you don't want the adjustments to apply to all the selected
regions, or you want to adjust a new region, you must create a new
layer and select one or more regions that you want to adjust.
The upper area of the Layers palette contains the main commands
for creating and managing layers, including the Region tools. You
can add, delete, duplicate, invert, and rename layers. You can also
copy and paste layers — the selected areas and layer settings are
copied.
The Name list on the Layers palette shows all the layers associated
with the current version of the photo. You can choose a layer to
view the selected regions in the Preview panel. You can also choose
which layers and regions to show or hide.
57Edit ing pho tos
Page 62

The lower area of the Layers palette is context-sensitive. It displays
settings that you can use to control and fine-tune the active tool.
Regions
Regions are selected areas of a photo that you create by using one
of the Region tools:
Circle Region tool — creates a circular region.
Polygon Region tool — creates a polygon region (triangle,
square, rectangle...). The enclosed shape is determined by clicking
the image to set points which are connected by straight lines.
Curve Region tool — creates an irregular curvy shape. The
enclosed shape is determined by clicking the image to set points
which are connected by curved lines.
Brush Region tool — creates a freehand shape. Brushstrokes
determine the selected region. You can create the entire region
with a brush, or use a brush to add to a region. For example, you
can use the Polygon Region tool to select a large area of a
background and then use the Brush Region tool to add small
brushstrokes around the borders of the background to ensure
that you have complete coverage.
Regions have two areas: the main area and the feather area. The
main area is the portion within the solid lines of a region, and this is
where the full effect of editing applies. Along the edge of the main
area is the feather area. This is the transition area where the selected
area blends with the background — from 100% at the inside edge,
to 0% at the outer edge of the dashed line.
58
Co rel A ft erS hot Pro Us er Gu ide
Page 63

To have a smooth, gentle fade between a region and the rest of the
image, use a large feather size. To make sharp, crisp regions that
affect only the selected area inside a region, use a very small feather
size.
The main par t of the re gion is enclo sed by a solid black line . The fe athe r are a is e nclosed
by a dashe d white line.
Regions can also be inverted, so that the edits applied to the layer
containing a region will apply to the portion of the image that is
ou tside
the selected area.
Adjusting regions
After you have created a layer with one or more regions that you
want to edit, you can use controls in the Tools panel to apply
adjustments.
Some adjustments and editing tools are designed to work on the
entire image and cannot be applied to a layer. The following
adjustments and tools affect the entire image:
Image Rotation
Straightening
Lens Distortion Correction
Color Management
AutoLevels
All Metadata settings (keywords, ratings, labels, IPTC data, etc)
59Edit ing pho tos
Page 64

To create an adjustment layer
1. In the upper-right corner of the application window, click the
Open Layer Manager button .
2. In the Layers palette, click Add Layer button .
A new layer appears in the Name list, below Main Layer.
To set layer opacity
In the Layers palette, click a layer name, and adjust the Opacity
slider at the bottom of the palette.
To rename a layer
In the Layers palette, double-click a layer name in the Name list,
and type a name.
Tip: You can name your layer according to the type of
adjustment you want to make. Later, if you want to make the
same adjustment to another region, it will be easy to choose the
existing layer and add a region.
To duplicate a layer
In the Layers palette, click the layer that you want to duplicate
and click the Duplicate button .
To hide or show a layer or region
In the Layers palette, click the box to the left of a layer or region
name in Name list.
A check mark appears in the box when the layer or region is
visible. The box is empty when the layer or region is hidden.
60
Co rel A ft erS hot Pro Us er Gu ide
Page 65

To delete a layer or region
Tool
Instruction s
Circle Region
In the Preview panel, click the image to set the
position of the circle. At the bottom of the
Layers palette, adjust the Size and Feather
settings.
Polygon Region
In the Preview panel, click the image to set each
point of your shape (the points are connected
by straight lines). Double-click to complete the
polygon. At the bottom of the Layers palette,
adjust the Feather settings.
Curve Region
In the Preview panel, click the image to set each
point of your shape (the points are connected
by curved lines). Double-click to complete the
shape. At the bottom of the Layers palette,
adjust the Feather settings.
1. In the Layers palette, click the name of the layer or region that
you want to delete.
2. Click the Delete button at the top of the Layers palette.
To create a region
1. In the Layers palette, create or select a layer to which you want to
add a region.
2. Click one of the following Region tools and follow the
instructions in the table.
61Edit ing pho tos
Page 66

Tool
Instruction s
Brush Region
In the Layers palette, enable the Show Strokes
check box. Adjust the Size and Intensity settings
for your brush, and drag in the Preview panel to
apply your brushstrokes. When you are finished,
you can disable the Show Strokes check box. To
fine-tune your brushstrokes, toggle between
the Erase Brush and Normal Brush mode.
If you want to change the color of your
brushstrokes, click the Color well and select a
color.
To invert a layer
In the Layers palette, click a layer name in the Name list and click
the Invert button
.
The outline for the main area of a region changes from black to
white when you invert.
To adjust a layer
In the Layers palette, click a layer name in the Name list, and in
the Tools panel, adjust the settings you want.
For information about which adjustments can be applied, see
Ad ju s ting reg io ns
.
Editing regions
Editing regions is just as easy as creating regions. You can edit a
region by adding, deleting, or moving points on polygon and
curved shapes. You can also move a region, adjust the size, or adjust
the feathering.
62
Co rel A ft erS hot Pro Us er Gu ide
Page 67

To add a point to a polygon or curved region
1. In the Layers palette, click a region name in the Name list.
2. Hold down the Shift key down and in the Preview panel, position
your pointer over the region outline where you want to add a
point.
3. When a red circle appears at the correct position, click to add a
point.
To delete a point from a polygon or curved region
1. In the Layers palette, click a region name in the Name list.
2. Hold down the Alt key down (or Alt+Shift on some Linux systems)
and in the Preview panel, position your pointer over the point
that you want to remove.
3. When a red circle appears on the point, click to delete the point.
To move a point on a polygon or curved region
1. In the Layers palette, click a region name in the Name list.
2. In the Preview panel, position your pointer over the point that you
want to move.
3. When a red circle appears on the point, drag the point to a new
location.
To move a region
1. In the Layers palette, click a region name in the Name list.
2. In the Preview panel, position your pointer over the region.
3. Drag the region to a new location.
63Edit ing pho tos
Page 68

To resize a region
In the Preview panel, position your pointer over a region and roll
your mouse wheel to make it larger or smaller.
Blending layers
Blending allows you to "cut out" sections of a region by creating new
regions below the initial region and setting Blending to Subtractive.
This will subtract the lower regions from any areas where they
overlap with higher regions. A Subtractive region that does not
overlap with Additive regions above it will have no effect. You can
check layer order by looking at the Name list in the Layers palette.
To use a Subtractive layer when blending layers
1. In the Layers palette, click the name of the layer that you want to
change to Subtractive or create a new layer.
2. Choose a Region tool, and from the Blending drop-down list,
choose Subtractive.
3. Create a region that protects lower regions from the Additive
layers above it.
Retouching with Heal and Clone
The Heal and Clone tools let you remove small, distracting elements
from your photos. They use layers and Region tools in a similar way
to selective editing.
Healing is best used for small blemishes in smooth, low detail
areas, such as a small blemish on skin, or a small bird in the sky. It
is limited only to circular regions created with the Circle tool, and
unlike cloning, it does not require that you to set a source.
64
Co rel A ft erS hot Pro Us er Gu ide
Page 69

Cloning is the process of copying a part of an image in order to
cover up a distracting or unwanted feature in the picture. Cloning
takes image content from a source region and places it in the
selected area.
Each version can have only one Heal/Clone layer. Copying and
pasting a Heal/Clone layer replaces any existing Heal/Clone layer.
Switch between Heal and Clone
You can use the Circle tool in Heal or Clone mode. To switch
between these modes, simply choose Heal or Clone the Mode drop-
down list in the Layers palette. The control is visible only when you
create a Circle region.
To remove a spot with Heal
1. Click the Open Layer Manager button .
2. In the Layers palette, click the +Heal/Clone button.
3. Click the Circle Region tool, and in the Preview panel, click the
spot that you want to remove.
4. In the lower-left corner of the Layers palette, choose Heal from
the Mode drop-down menu.
If you want to adjust the size of the circle or how the edges of the
circle blend, drag the Size or Feather sliders at the bottom of the
Layers palette.
65Edit ing pho tos
Page 70

The He al m ode w as u se d to re move a small w hite spo t fro m a flo w er
To cover or copy image areas by cloning
1. In the Layers palette, choose an existing Heal/Clone layer or click
the +Heal/Clone button to create a Heal/Clone layer.
2. Click a Region tool.
3. Select the portion of your image that you want to clone out. This
is the destination area for the cloning. If you used the Circle tool,
make sure the Mode is set to Clone. For information about using
regions tools, see
4. After you finish creating your destination region, a source region
is automatically created (outlined in red). Click and drag the
source region to position it over the image content that you want
to copy.
Tip: When cloning, you can click the Swap Source button at the
bottom of the Layers palette to swap the source region with the
destination region. This is useful when you want to duplicate
content in an image instead of using cloning to remove image
content.
To cre a te a region
.
66
Co rel A ft erS hot Pro Us er Gu ide
Page 71

Cropping and straightening
You can improve the composition of your images by cropping or
straightening images in Corel AfterShot Pro.
Cropping
Cropping lets you recompose your photo, remove unwanted edge
areas, or change the aspect ratio to match a print output. For
information about preferences related to cropping, see
prefe ren ces
.
To crop a photo
1. Click the Crop tool on the AfterShot Pro toolbar or press C.
2. In the Cropping palette, do one of the following:
Choose a preset from the crop preset drop-down menu.
Choose Aspect or Pixels from the Crop mode drop-down menu,
and type values in the Height and Width boxes.
3. Drag the edges of the cropping grid that appears in the Preview
panel to adjust the crop area.
Cro p
4. Click inside the cropping grid to reposition the crop area.
5. In the Cropping palette, click Done.
67Edit ing pho tos
Page 72

You can also
Automatically maximize
the crop region to the
edges of the photo
Click the Fit button.
Display or hide the
cropping grid
Click the Enable Crop check box.
Switch the orientation
of the cropping grid
Click the Switch height and width button
.
Lock the aspect ratio of
the cropping grid
Click the Lock button
.
Add a crop preset to
the preset drop-down
list
In the Cropping palette, enter the Aspect
or Pixel values you want, and click the
Add button
Tip: You can use the scroll wheel on a mouse to resize the
cropping grid.
Straightening
Straightening lets you correct tilted horizons or apply a creative tilt
to your photos.
To straighten a photo
1. Select the Straighten tool from the AfterShot Pro toolbar or
press S.
2. Drag in the Preview panel to draw a horizontal or vertical line that
you want to use as a reference for straightening the photo.
3. Release the mouse button to apply the changes.
68
Co rel A ft erS hot Pro Us er Gu ide
Page 73

The Straigh te n too l le ts you ch oose a re fe rence p oint (e mph asize d abov e by a r e d line ) fo r
straighte ning
No te : When you straighten a photo, the photo is not cropped
automatically, so you will see white areas along the edges of the
photo.
Presets
Using presets is a great way to speed up your workflow. You can
save your favorite adjustments to presets, create keyword presets, or
combine a range of photo editing in a preset that can be applied
with one click.
Presets are saved as XMP files in the Corel AfterShot Pro user folder
on your computer:
C [a main drive]:\Users\[User name]\AppData\Local\Corel\AfterShot
Pro\Presets
This makes it easy to copy presets from one computer to another, or
to share presets with others.
69Edit ing pho tos
Page 74

Applying and managing presets
Applying a preset essentially applies all the commands and
information to the selected files. All the actions appear in the
History palette, making it easy to remove any settings that cause an
undesired effect.
Many presets can be applied to an image, and each subsequent
preset replaces the settings of previous presets with the settings
contained in the last preset.
Corel AfterShot Pro includes quite a few presets, but you are
encouraged to create your own presets.
To apply a preset
1. In the Thumbnail panel, select the image or images that you want
to edit.
2. In the Tools panel, click the Standard tab.
3. In the Presets section, click a preset in the list. Presets are applied
to all selected images, except when in Multi-Image View mode.
To create a preset
1. Edit an image, using all the commands and settings that you
want to save to the preset.
70
Co rel A ft erS hot Pro Us er Gu ide
Page 75

2. In the Tools panel, click the Standard tab.
3. In the Presets section, click the Add Preset button
.
4. In the Save Presets dialog box, pick a name for the settings, and
choose which settings you want to save.
3. Click OK to save the preset. The preset name appears in the preset
list immediately.
Managing presets
You can manage your presets. When you open the Manage mode,
you can create preset folders and move, rename, delete, and view
preset settings. Corel AfterShot Pro includes several default presets,
all of which are found in the Default Presets folder. You can create
as many additional folders as you need to categorize and organize
your photos. You can also choose which presets display in the My
Favorites list (the drop-down list on the Presets section title bar).
To access the Manage mode for presets
1. In the Tools panel, click the Standard tab, and open the Presets
section.
2. Click the Manage button in the lower right corner of the section.
71Edit ing pho tos
Page 76

To add or remove a preset to the My Favorites list
In the Show in Menu column, mark a check box to display the
corresponding preset in the My Favorites drop-down list; unmark
the check box to remove the preset from the list.
To create folders for presets
1. In the Presets Manage mode, click the Add Folder button .
2. Double-click the new folder that appears at the bottom of the
preset list and type a name for the folder.
To move presets
In the Presets Manage mode, drag a preset from one folder to
another folder.
To rename presets or preset folders
In the Manage mode, double-click a preset or folder in the list,
and type a new name.
To delete presets or preset folders
In the Manage mode, click the preset or folder that you want to
delete, and click the Delete button or press Delete on your
keyboard.
Tip: You can undelete a preset by clicking Edit > Undo or by
pressing Ctrl + Z.
To view the settings for a preset
In the Manage mode, click the preset and click the View preset
settings button .
72
Co rel A ft erS hot Pro Us er Gu ide
Page 77

Copying and pasting settings
You can copy some or all the settings from one photo and paste the
settings to other photos. For example, you can adjust the exposure,
color, noise, and sharpness of a photo and apply metadata and
keywords. After the photo is perfect, you can copy the settings and
paste them to as many similar photos as you want. This is a great
way to edit and optimize many images very quickly. For more
information, see
Cop ying a n d p a s ting s e ttin gs
in the Help.
Using the History palette
Corel AfterShot Pro keeps a list of all the edits and adjustments you
make to every image in your catalogs. At any time, you can open
the History palette to see what changes have been made to the
active version.
If you are working in File System mode, then the History palette
contains only the edits from the current session — previous edits
are not retained.
Histo ry pale tte
To open the History palette
From the View menu, click History.
73Edit ing pho tos
Page 78

To review edits with the History palette
In the History palette, click an editing action in the list. The photo
will temporarily display the state of the photo up to the selected
editing action — hiding all the edits you've performed between
the action you selected and the most recent edit.
To return to the last edit step, simply click the last step in the list.
Editing photos in an external image editor
You can edit photos in another image editor. At any point, you can
open an image editor from within Corel AfterShot Pro. You can set
the external editor to use in the Preferences. For more information,
see
External Ed ito r p reference s .
To open a photo in the external image editor
In the Thumbnail panel, right-click or Control-click a thumbnail, and
choose Edit with [external editor].
Tip: You can also access the external editor from the menu bar,
Edit > Edit with [external editor].
74
Co rel A ft erS hot Pro Us er Gu ide
Page 79

Organizing, keywords, and metadata
This chapter describes the metadata features in Corel AfterShot Pro.
Photo metadata, or information about your pictures, can make
searching and finding your images much faster and easier.
Metadata simply refers to the information about your images,
including data recorded by your camera, such as the time, date,
exposure, shutter speed, and aperture. You can also add your own
metadata to photos to record what the subject is, where you took
the photos, and professional photographers can include client
information.
Types of metadata
Some metadata is standardized so it can be accessed by a wide
range of devices and software. EXIF and IPTC are the most common
metadata standards:
EXIF (Exchangeable Image File Format): Data typically recorded by
the camera about the settings used for a photo. Most EXIF
metadata is not editable. The EXIF data from the original photo
(master file) is used for all versions that are derived from the
master file (same source). Some examples of EXIF metadata are
shutter speed, aperture, ISO, date, and time.
IPTC (International Press Telecommunications Council): Data added
by the photographer such as image description, photographer
information, copyright, and caption.
75Organ izin g, key wo rds , and met adata
Page 80

Corel AfterShot Pro also supports other metadata, some of which
can be shared between different applications. This metadata
includes:
Keywords
Ratings
Color Labels
Flags
Corel AfterShot Pro stores its settings in an XMP file that is slightly
different than other popular image editors. For more information,
see
XM P files.
Versions
Versions are used in Corel AfterShot Pro to represent your master
files and any variations derived from your master files. When you
make edits and image adjustments in Corel AfterShot Pro, you are
creating and editing versions, not the original master file. This
means you can make as many different versions from a single
master file as you like, without ever affecting the original image.
Versions created from the same master file share the same content
and are shown in a stack — a set of thumbnails that can be
grouped together so that only the top thumbnail shows in the
Thumbnail panel. All settings and options can be different, allowing
you to make different interpretations, crops or other image
adjustments to each version. Versions maintain their own edit
history, and can each be assigned unique metadata. The settings for
all versions from a single master file are stored inside a single Corel
AfterShot Pro XMP file.
76
Co rel A ft erS hot Pro Us er Gu ide
Page 81

Many operations are possible with versions, and many of these are
available on the context menu, found by right-clicking on a
thumbnail and selecting the Version menu option.
Creating versions
Corel AfterShot Pro automatically creates a master version for each
master file in the folder you are viewing. There are several ways to
create another version of a photo.
77Organ izin g, key wo rds , and met adata
Page 82

In the e x ample abov e , th e thu mbn ail on th e le ft is the maste r ve rsio n. To the right are
tw o additio nal ve rsions that have b e en ed ite d. The nu mbe r 3 appe ars on th e upp e r le ft
co rne r of th e maste r ve rsio n th umb nail to in dicate the to tal nu mbe r of version s.
To create a version
In the Thumbnail panel, right-click an existing version, click Version
in the context menu, and choose one of the following options:
New Version from Current — creates a new version with the
same settings as the selected. version's current settings
New Version from Master — creates a new version with the same
settings as the master version's current settings.
New Version from Import — creates a new version with the same
settings that the selected version had when it was imported.
New Version from Defaults — creates a new version with the
default image settings for this type of image. For more
information, see
Default Se ttin gs
.
No te : When Multi-Image View is enabled, only the active version
is the source for the new version.
What happens when a version is deleted?
Deleting a version removes the settings and adjustments made to
that version, and removes that version from Corel AfterShot Pro. If
the version you are deleting is a master version, then the master file
78
Co rel A ft erS hot Pro Us er Gu ide
Page 83

is moved to the Recycle Bin. For more information about deleting
versions, see
Deletin g versio n s
.
Stacks
Stacks are a visual means of grouping similar images together.
Stacks are either Open — with all images in the stack visible, or
Closed — with only the topmost image in the stack exposed. Stacks
are groupings of versions, and each stack is contained in one
catalog.
At the top is a close d stac k. You can open and close stac ks b y clickin g t he icon in th e
up pe r- le ft corner of the maste r version .
Using stacks
In File System mode, stacks are used only to group multiple versions
from one master file.
In the Library, stacks can serve many purposes and you can use them
for a variety of organizational tasks. For example, you can use stacks
to group shots from a burst of images (continuous shooting) or
made from exposure bracketing. You can select the best shot from
79Organ izin g, key wo rds , and met adata
Page 84

the group to display as the top image. You can also stack a set of
images that you will use to build a multi-image panorama or that
you will otherwise combine into a single image in another
application. Or, you can use stacks to group similar images together
so it's easier to browse through your images.
When you create a new version from an existing version, the
versions are placed in the same stack. You can remove these
versions from the stack if you want.
To create a stack
1. Select the versions that you want to stack.
2. Right-click and choose Stacking > Stack or from the menu bar,
click Edit > Stacking > Stack.
No te : You can make new stacks only when viewing a single
folder and not when viewing catalog folders recursively.
To add versions to a stack
1. Select the versions you want to add to a stack.
2. Do one of the following:
Drag and drop that version onto a stack.
Right-click a stack and select Stacking > Stack.
From the menu bar, select Edit > Stacking > Stack.
80
Co rel A ft erS hot Pro Us er Gu ide
Page 85

To remove versions from a stack
1. Select the versions that you want to remove from the stack.
2. Do one of the following:
Drag and drop the version outside the stack.
Right-click and select Stacking >Unstack.
From the menu bar, select Edit > Stacking > Unstack.
To merge two or more stacks
1. Select the versions in the stacks that you want to merge.
2. Right-click and select Stacking > Stack.
Sorting stacks
When sorting the thumbnails in the Thumbnail panel, versions within
stacks are not sorted. This is to maintain the manual sort order that
you can specify for a stack and ensures the top version stays on top.
The entire stack is sorted in the Thumbnail panel in the location
specified by the top image.
You can change the sorting order within a stack by dragging-anddropping the versions, or by using the commands in the context
menu.
Editing images in a closed stack
When editing the top image in a closed stack, only the top version is
modified. This includes changes to metadata and ratings.
81Organ izin g, key wo rds , and met adata
Page 86

Thumbnail indicators
Thumbnail
Fu n ction
Indicates the image is a duplicate version.
Indicates that Corel AfterShot Pro cannot find
the master file associated with this image, and
is thus "offline". You can view a preview of the
image, if one exists, and can still edit metadata,
but you cannot make other types of edits.
Indicates the version has Flag as Pick applied
Indicates the version has Flag as Reject applied"
The Thumbnail panel and the thumbnails themselves show a great
deal of information about your images and the metadata applied to
them. Consider the following example:
Thumbnail P ane l sh ow in g thumbnail badge s
The first three images are all versions of the same master file, and as
such are shown in a stack, as indicated by the outline, and the 3
indicator at the top left corner of the top image in the stack. The
table below explains the thumbnail indicators:
82
Co rel A ft erS hot Pro Us er Gu ide
Page 87

Indicated the version has been cropped
Indicates the version has had image
adjustments applied
The number of stars indicates the Rating that
has been set for this version
Indicates the Color Label that's been applied
Indicates the version is the top image in a stack
of three images
Sorting and filtering
Sorting
You can sort thumbnails by a wide range of attributes. For a list of
sortable attributes, see
Sorting
in the Help.
Custom sort order
Besides the sort orders based on metadata (like name or rating),
you can also specify a manual sort order to put your images in any
order you want.
Custom sorting is only possible when:
viewing a single folder (not recursive)
filtering is disabled
To apply a custom sort order to your images
1. Select a single folder, disable filtering, and turn off recursive
folder browsing.
83Organ izin g, key wo rds , and met adata
Page 88

2. Then, switch the Select Sorting to Custom.
3. Drag the thumbnails into the order you want.
Filtering
Filtering thumbnails temporarily removes them from the Thumbnail
panel, allowing you to focus on a smaller set of images. You can use
simple filtering rules, like "Rating–More than or equals–3 stars" or
you can use more complex filtering.
To filter images
1. Ensure that the images you want to filter are displayed in the
Thumbnail panel.
2. On the AfterShot Pro toolbar, click the Show Filter Tool button .
3. Modify any of the following settings:
Rating, Label, and Flag check boxes enable or disable the
filtering for those items, while the drop-down menus and
buttons on the right let you select the conditions and what to
show
Always show selected versions — lets you add the filter results
to the currently selected images. If you unmark this check box,
only the filter results display in the Thumbnail panel.
84
Co rel A ft erS hot Pro Us er Gu ide
Page 89

Require all of the conditions above — requires that all Rating,
Label, and Flag conditions match in order for those images to
appear in the Thumbnail panel. This is equivalent to an AND
search. If this option is unchecked, then versions meeting ANY
of the conditions show in the Thumbnail panel.
No te : Filtering remains on until you unmark the Rating, Label,
and Flag check boxes.
Labels, ratings, and flags
Color labels, star ratings, and flags are the quickest way to help you
find what your looking for more quickly.
Color labels
Color labels let you categorize your images visually. There are five
colors and the unlabeled state. Color labels are often used to
categorize images by purpose or edit status. For example, you can
assign a red label to images that need post-processing or heavy
retouching. You can assign a blue label to images that are part of a
panorama or another series.
85Organ izin g, key wo rds , and met adata
Page 90

To assign a color label
1. In the Thumbnail panel, select the images that you want to label.
2. On the Top toolbar, click the Label drop-down menu and choose
a color.
The color labels appear in the lower-right corner of the
thumbnails.
Tip: You can also assign a color label to a thumbnail by
positioning your pointer over the bottom right corner of a
thumbnail and clicking the color label icon to display and
choose a color.
Star ratings
Star ratings are a great way to help you to find your best images
quickly. You can assign ratings to images in your catalog to quickly
select or filter images.
To assign star ratings
1. In the Thumbnail panel, select the images that you want to rate.
2. Do one of the following:
Click one of the stars on the Top toolbar.
Press Ctrl + [1,2,3,4, or 5].
Flags
You can use flags to pick (Flag as Pick) or reject (Flag as Reject)
images. You can also clear flags that you assign (Clear Flag).
Flagging is a great way to quickly assess images. You can also use
flags to mark images that you are in the process of editing or you
can flag several images with similar content so you can quickly select
86
Co rel A ft erS hot Pro Us er Gu ide
Page 91

and compare them when trying to select the best version.
To flag images
1. In the Thumbnail panel, select the images that you want to flag.
2. Do one of the following:
Click the Flag as Pick or Flag as Reject buttons on the
Top toolbar.
Press . (period key) to pick or press , (comma key) to reject
images.
If you want to clear a flag, click the Clear Flag button
.
Working with keywords
Keywords are words that you associate with your image files. They
are used to help you and others search through many images to
find what you are looking for. You can use standard keywords or
custom keywords. For example, you can add keywords to identify
image content, client or job, or the location where images were
taken.
There are two ways to assign keywords in Corel AfterShot Pro: type
keywords in the Keywords section or assign keywords that you've
added to the Keyword Manager and then apply them by choosing
them in the Keyword Sets section. You can delete keywords from
your images and delete keywords or keyword sets from the Keyword
Manager at any time. You can also assign shortcut keys to your
keywords and keyword sets.
87Organ izin g, key wo rds , and met adata
Page 92

The Ke yword M anage r h e lps you org anize you r ke ywords
To assign a keyword by typing it in the Keywords section
1. In the Thumbnail panel, select the images to which you want to
add keywords.
2. In the Tools panel, click the Metadata tab.
88
Co rel A ft erS hot Pro Us er Gu ide
Page 93

3. In the Keywords section, type the keywords that you want to
assign. Use the following syntax:
Use commas (,) to separate keywords (for example: Mom, Paris,
vacation)
Use semi-colons (;) to create keyword subcategories (hierarchy)
(for example: Travel; France; Paris)
4. Press Enter.
To assign a keyword by choosing it from a keyword set
1. In the Thumbnail panel, select the images to which you want to
add keywords.
2. In the Tools panel, click the Metadata tab.
3. In the Keyword Sets section, choose a keyword set from the drop-
down menu in the title bar.
4. Click a keyword in the main area of the Keywords Sets section to
apply it to the selected images.
To create a keyword set
1. In the Tools panel, click the Metadata tab.
2. In the Keyword Sets section, click the Manage button.
3. In the left pane of the Keyword Manager, do one of the following:
89Organ izin g, key wo rds , and met adata
Page 94

Find existing keywords that you want to add to your set.
Add keywords as a subcategory of an existing hierarchy. For
example, to add the names of family members, you could click
Subject > People > Family, and click the Add Child Keyword
button . Type a name to add it as a subcategory of Family.
Create a new hierarchy by clicking the Add Keyword button
and typing a keyword. To create subcategories, select a
keyword and click the Add Child Keyword button .
4. When you know that you have all the keywords for your set, click
the Add Set button below the right pane and type a name for
your keyword set. You can type any name, it does not need to
match any existing keywords.
5. From the keyword list in the left pane, drag the keywords to the
set name in the right pane. The keywords that you drag are what
you will see in the set list, regardless of their place in the
hierarchy (does not affect hierarchy in any way).
6. Click the Close button at the top of the Keyword Manager window.
Your set now appears in the Keyword Sets drop-down menu.
To remove a keyword from an image
1. In the Tools panel, click the Metadata tab.
2. In the Thumbnail panel, select an image.
3. In the Keywords section, select the keywords that you want to
remove and press Delete.
No te : When you delete a keyword, look at any remaining
hierarchy references to see if you need to delete the entire
hierarchy associated with the keyword.
90
Co rel A ft erS hot Pro Us er Gu ide
Page 95

To delete a keyword or keyword set from the Keyword
Manager
1. In the Keyword Sets section, click the Manage button.
2. In the Keyword Manager, do one of the following:
Click a keyword in the left pane and click the Delete Keyword
button .
Click a keyword set name in the right pane and click the
Remove Set button .
To assign a shortcut to a keyword or keyword set
1. In the Keyword Sets section, click the Manage button.
2. In the Shortcut column, double-click the cell that aligns with the
keyword or keyword set you want.
An entry box appears
3. On your keyboard, press the key or key combination that you
want to use as a shortcut.
If the shortcut has already been assigned, a message appears and
lets you accept or cancel the keyword change.
4. Click the Accept icon to apply the shortcut.
Tip: You can remove a shortcut from a keyword or keyword set
by clicking the Remove icon
Working with metadata
Corel AfterShot Pro includes all the tools to you need to add, edit
and view IPTC 4 XMP metadata as well as EXIF and other metadata.
91Organ izin g, key wo rds , and met adata
Page 96

Much of this metadata is also available in the Browse panel so you
can quickly find any image shot at a specific location, annotated by
a specific person, or otherwise labeled with metadata.
Corel AfterShot Pro divides the metadata into several groups to
make it easier to view and work with the metadata. You can create
as many additional groups of metadata as you like so you can
display or edit the information more easily.
Viewing metadata
Select the Metadata tab from the Tools panel, then choose which
metadata group you want to view from the drop-down list at the
top of the Metadata section.
Editing metadata
All of the metadata fields shown in the Metadata section are
editable by clicking to the right of the heading that you want to
edit. Some metadata is read-only, such as EXIF information related
to shutter speed and aperture.
Editing metadata affects only the active version.
92
Co rel A ft erS hot Pro Us er Gu ide
Page 97

Managing metadata sets
Creating and editing metadata sets lets you view and edit the
metadata you want quickly. Click the Manage button in the lowerright corner of the Metadata section to open the Metadata Manager.
The left column lists all metadata entries available in Corel AfterShot
Pro. The right column lists metadata sets and their current content.
M e tadata Se t M an age r
The Metadata Set Manager allows you to pick what metadata is
shown in each metadata set, and to create new sets.
To add a new metadata set
Click the Add a new Set button . A new set with the default
name "New Set" is created at the end of the Metadata Sets list.
93Organ izin g, key wo rds , and met adata
Page 98

To remove a metadata set
Select the set you want to remove and click the Remove Set
button .
To add metadata to a metadata set
Select the metadata entry in the left column, and drag it to the
metadata set in the right column.
Finding photos by using metadata
Assigning metadata to your images makes them much easier to find
when you use the Search or the Metadata Browser. Both features
only find images that have been imported into the Library. The
catalogs must be open in the Library to use these features.
Searching for images
If you know exactly what keywords you are looking for, you can
search your catalog for that content. Simply type the term you want
to search for into the Search box at the top of the Catalogs section in
the Browse panel, and press Enter to perform the search. The results
are shown in the Thumbnail panel.
Browsing for images
You can use the Metadata Browser section to quickly find images
shot on a specific date, with a particular camera, or any combination
of the most common shooting information that is captured in the
metadata fields or keywords. The number in parentheses beside the
94
Co rel A ft erS hot Pro Us er Gu ide
Page 99

metadata category name indicates how many versions meet the
criteria. The Metadata Browser is more precise than Search.
Link to catalogs
The contents and counts in the Metadata Browser are determined by
the status of the Link to Catalogs check box at the top of the
Metadata Browser:
unchecked — the Metadata Browser shows contents and counts
for all catalogs currently open in your Library.
checked — the Metadata Browser shows only contents and counts
for versions in the catalogs and folders that are selected in the
Catalogs section. This can provide a very concise view of the
metadata for the images in one or more folders.
With this control, you can filter out the metadata for portions of
your Library. For example, if you have your Library organized by
clients, you can select a specific client's folder in the Library. Then, by
enabling Link to Folders, you can show only the keywords, cameras,
dates, and other metadata for images shot for that client.
95Organ izin g, key wo rds , and met adata
Page 100

Refine
You can use Refine to limit what is shown in the Metadata Browser.
Refining works by selecting an entry in the Metadata Browser, then
clicking the Refine button to limit the search results that match the
entry.
You can add entries as you refine in any order you want. For
example, you can select three, four, and five stars from the Ratings
metadata entry, then click Refine. The results show only your best
images — the images that you have tagged with three or more
stars. Then, you can select a year or month entry from the Date/Time
area, and click Refine again to display your best images from a
specific time frame. To remove an entry when refining, click the X
button next to the entry.
The items you refine are highlighted in the Metadata Browser to
remind you that only a portion of your Library is listed in the counts
and contents of the Metadata Browser.
96
Co rel A ft erS hot Pro Us er Gu ide
 Loading...