

CONDTROL UniX 360 Pro
ОПИСАНИЕ ПРИБОРА 27
УКАЗАНИЯ ПО ТЕХНИКЕ БЕЗОПАСНОСТИ 28
РАБОТА С ПРИБОРОМ 29
ТЕХНИЧЕСКИЕ ХАРАКТЕРИСТИКИ 30
ПРОВЕРКА ТОЧНОСТИ 31
УХОД И ЭКСПЛУАТАЦИЯ 34
ГАРАНТИЙНЫЕ ОБЯЗАТЕЛЬСТВА 35
СЕРВИС И КОНСУЛЬТАЦИОННЫЕ УСЛУГИ 35
EN CONTENTS
PROD UCT DESCRIPT ION 9
SET 9
SAFETY REGULATIONS 10
OPERATION 11
SPECIFICATIONS 12
ACCU RACY CHECK 13
CARE AND MAINTENANCE 16
UTILIZATION 16
WARRANTY 17
DE INHALT
BESTIMMUNGSGEMAESSER GEBRAUCH 18
LIEFERUMFANG 18
SICHERHEITSHINWEISE 19
BETRIEB 20
TECHNISCHE SPEZIFIKATIONEN 21
UEBERPRUEFUNG 22
PFLEGE 25
ENT SORGUNG 25
GARANTIE 26
WARTUNG UND REPARATUR 26
RU СОДЕРЖАНИЕ
КОМПЛЕКТАЦИЯ 27
УТ ИЛИЗАЦИЯ 35
3
CONDTROL UniX 360 Pro CONDTROL UniX 360 Pro
A
C
B
D
4
5
CONDTROL UniX 360 Pro CONDTROL UniX 360 Pro
E
F
G
1
8
1
2
9
4
3
5
6
7
6
7
User manual
CROSS LINE L ASER
CONDTROL UniX 360 Pro
EN
CONDTROL UniX 360 Pro
H
17
16
11
10
12
14
13
15
8
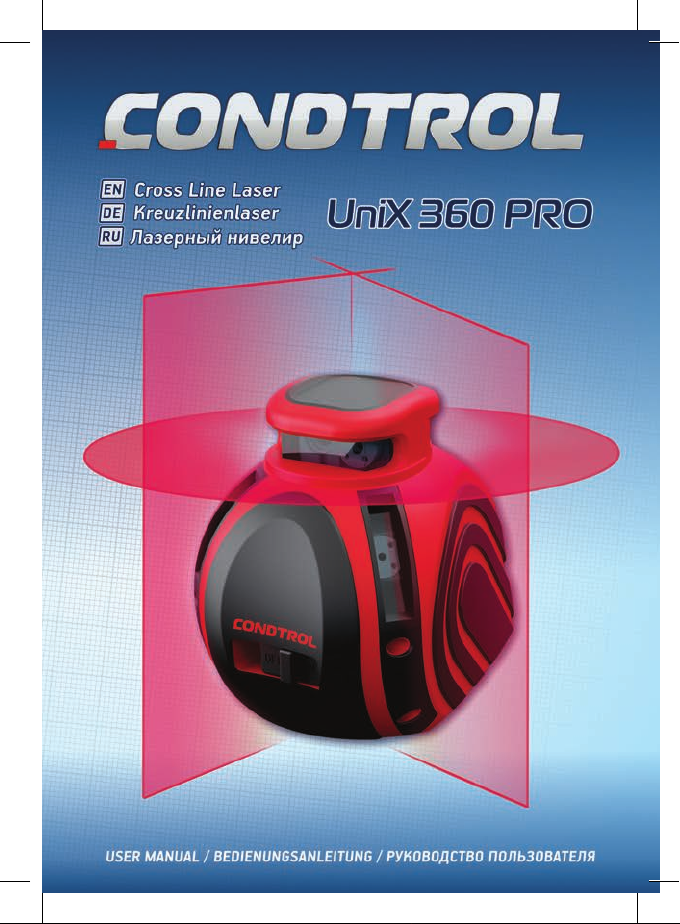
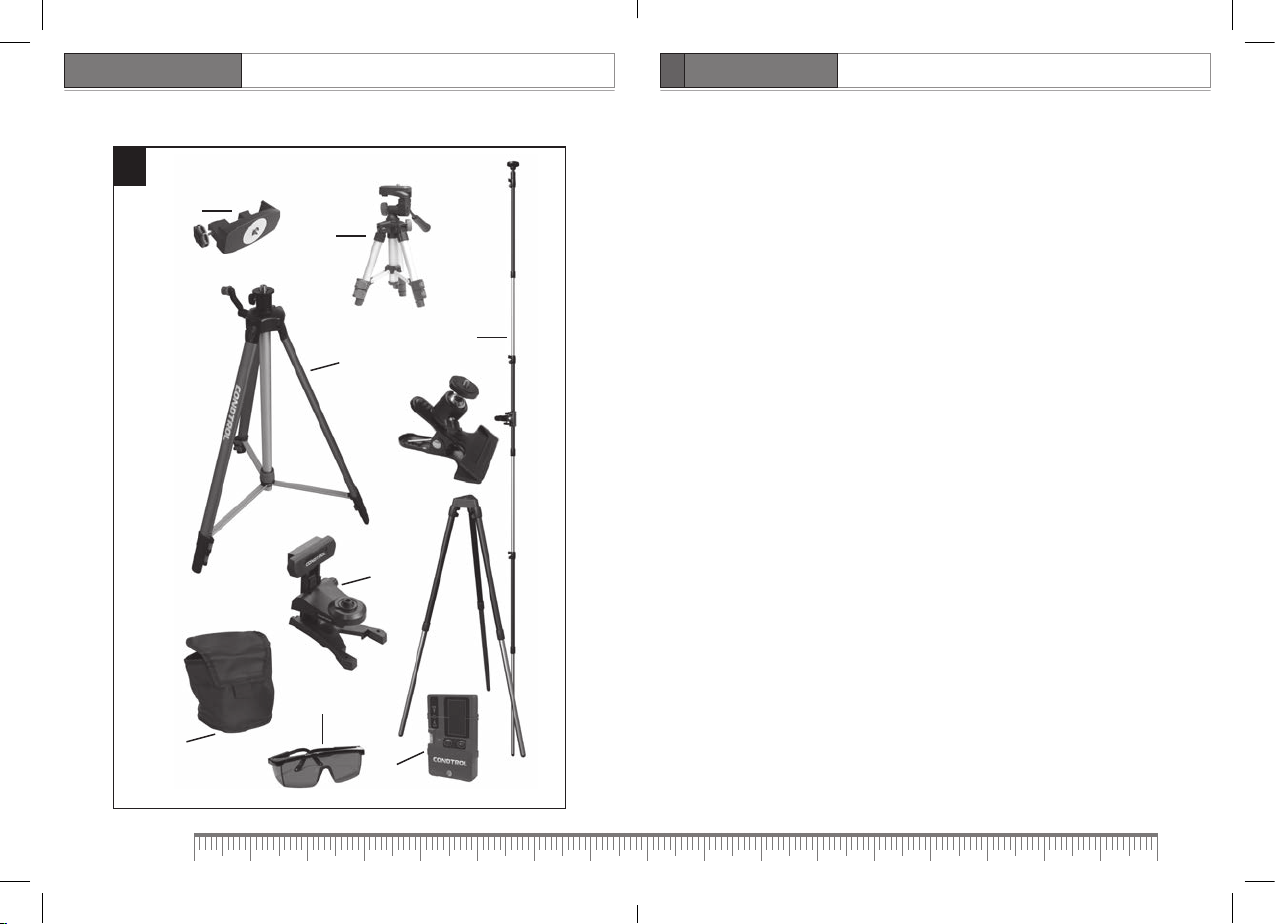
PRODUCT DESCRIPTION
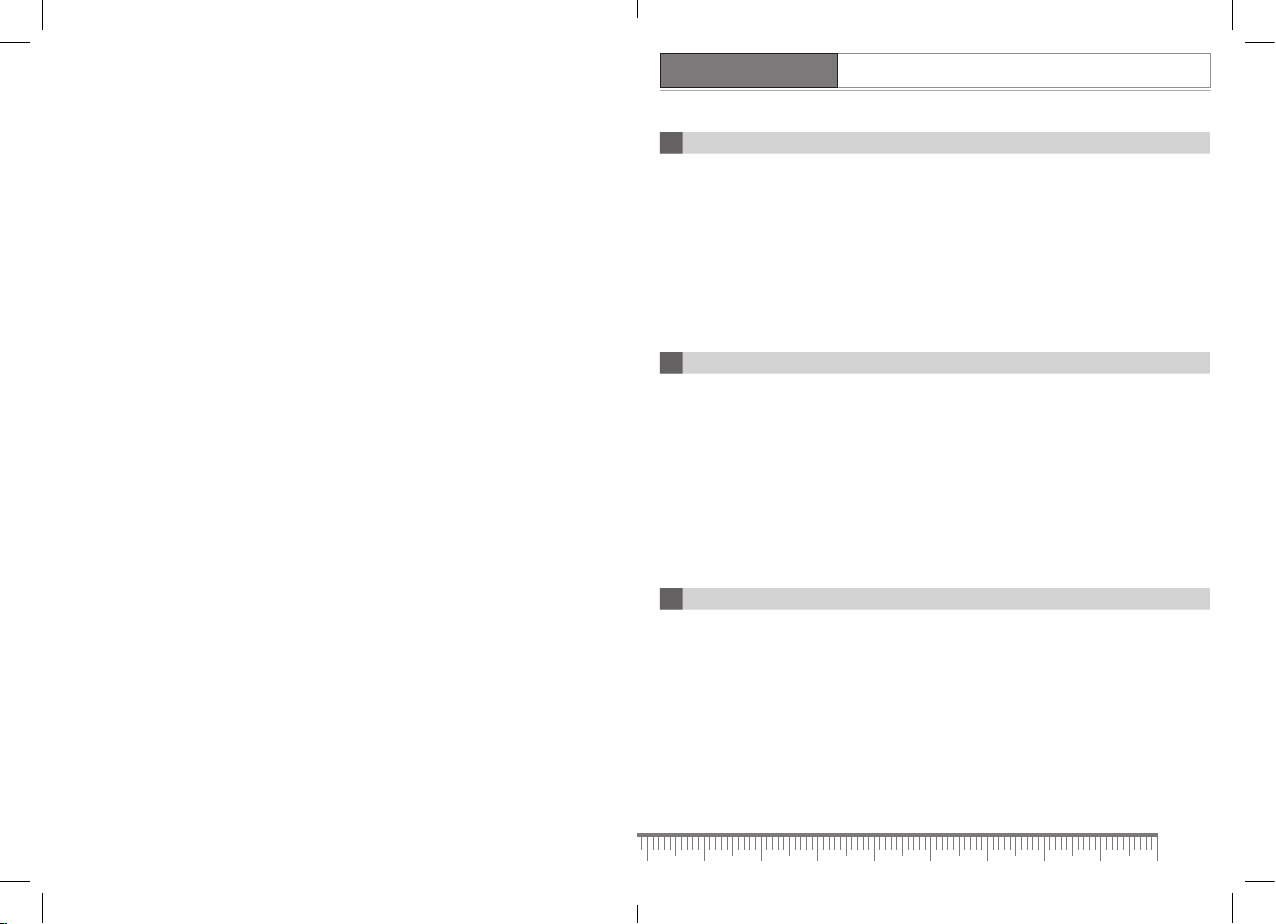
This cross line laser UNIX 360 Pro CONDTROL is intended for determining and checking
horizontal and vertical lines. (see figure A- C). This mode allows constructing inclined planes
(see figure D).
The measuring instrument is suitable for operation in enclosed working sites and outdoor.
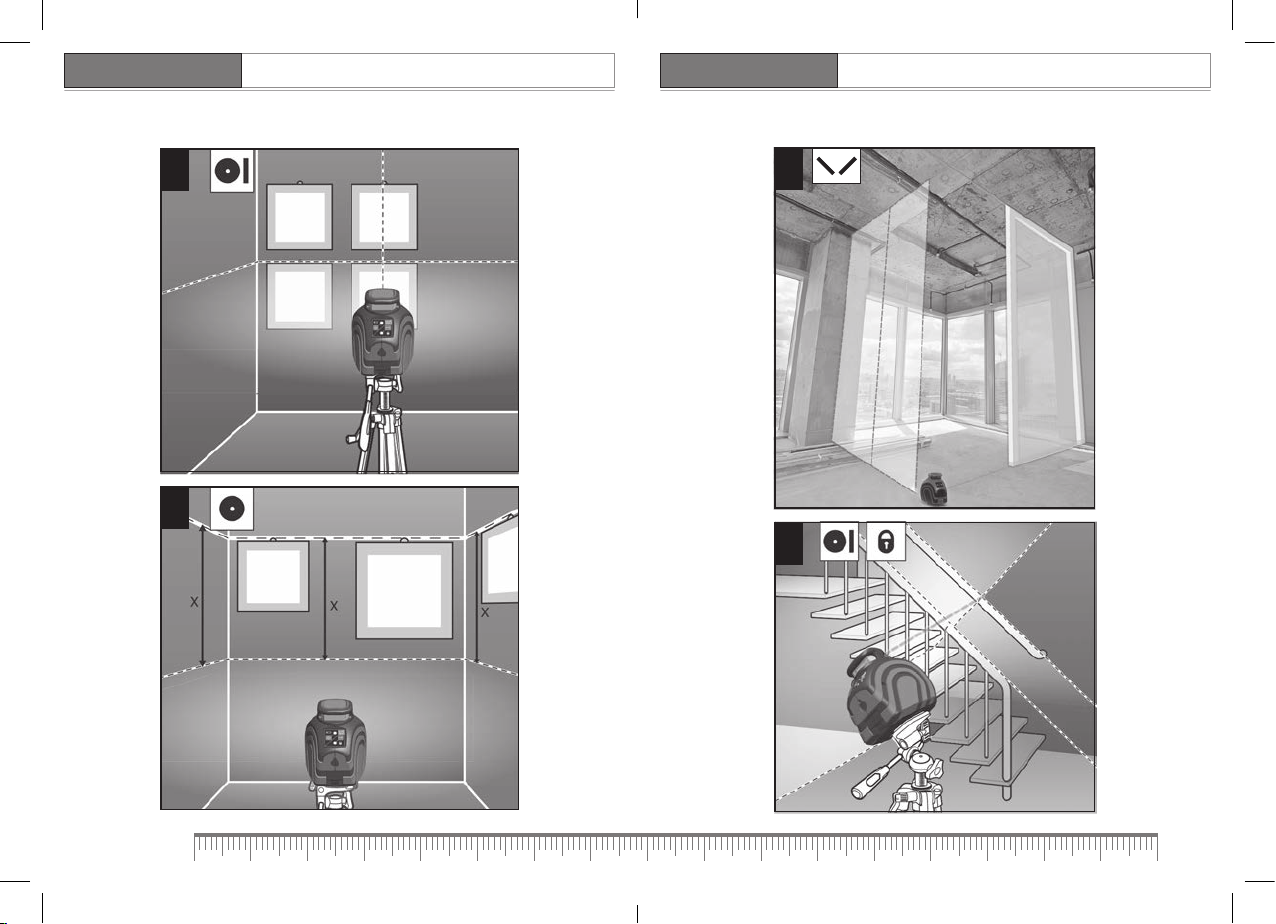
It has 2 operation modes:
- working with automatic levelling. Levelling function automatically compensates
irregularities
within the self-levelling range of ±4°(see f igure E,F).
- working without automatic levelling for inclined planes. (see figure D)
PULSE mode allows to use laser receiver to increase a working range of the instrument or to
work when laser is hard to define in bright lighting conditions.
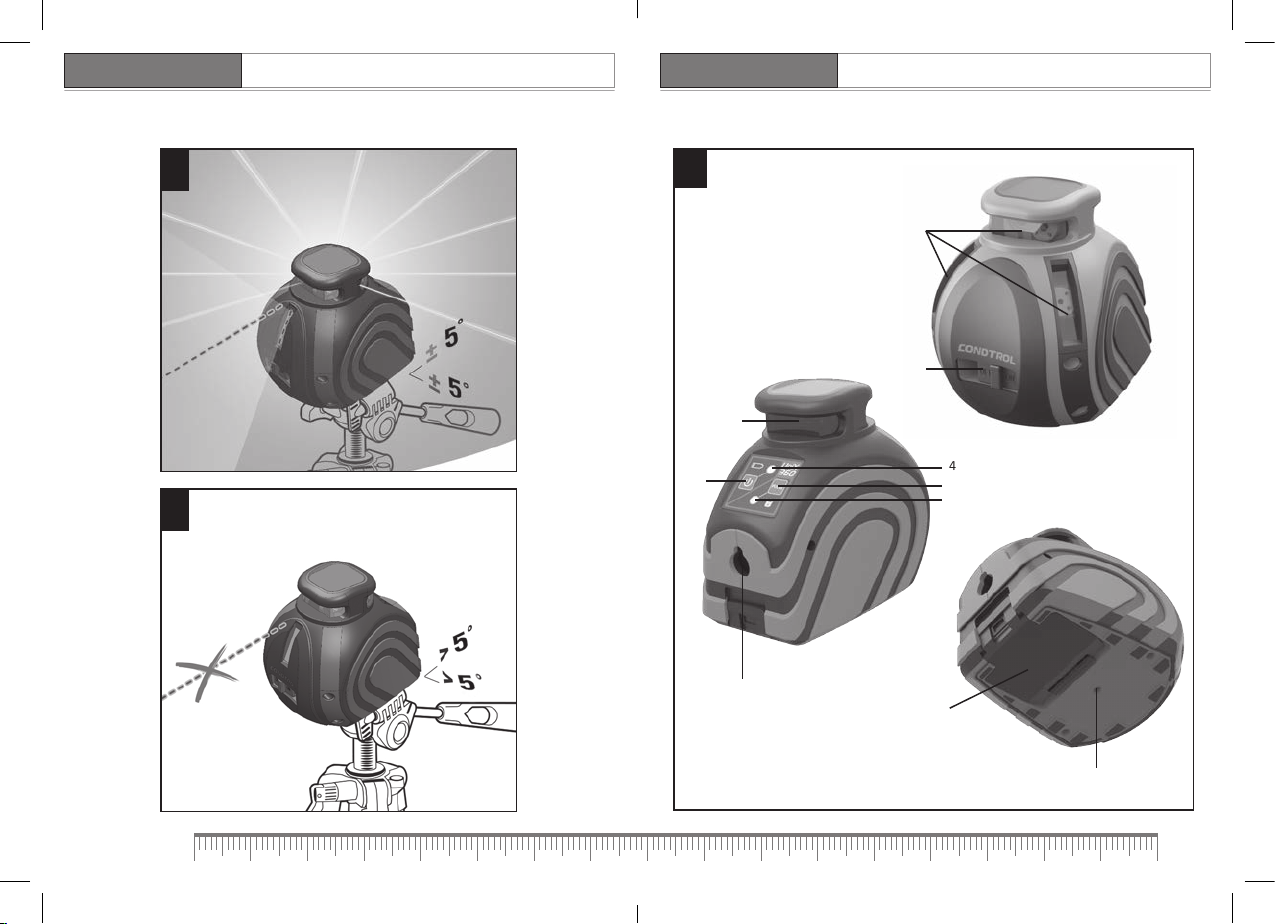
1 - Laser lines apertures
2 - Mode switching button
3 - Switch on/off pulsed mode button / automatic levelling switch on/off
4 - Low Battary indication
5 - Pulse mode indication
6 - Battery cover
7 - Tripod mount 1/4’’
8 - On/Off switch
9 - Crew mount
10 - Tripod 1/4’’*
11 - Tripod-Transformer*
12 - Universal Wall Mount *
13 - Pouch
14 - Laser intensive Glasses*
15 - Electronic Receiver*
16 - Tripod-mini*
17 - Universal mount Clamp*
* The accessories illustrated or described are not included as standard delivery set.
SET
Cross line Laser – 1 pc.
Pouch – 1 pc.
Power supply (AA) – 3pcs.
User manual – 1pc.
9

User manual
CROSS LINE L ASER
CONDTROL UniX 360 Pro
User manual
CROSS LINE L ASER
CONDTROL UniX 360 Pro
EN EN
SAFET Y REGULAT ION S
The user manual should be read carefully before you use the product for the first time.
Unintended use of the product can be dangerous for human’s health and cause serious injury.
Keep this user manual. If the product is given to somebody for temporary use, be sure to
enclose user manual to it.
- Do not misuse the product
- Do not remove warning signs and protect them from abrasion, because they contain
- Do not look into the laser beam or its reflection, with unprotected eye or through an optical
instrument. Do not point the laser beam at p eople or animals wi thout the need. You can dazzle
them.
- To protect your eyes close them or look aside.
- It is prohibited to disassemble or repair the product yourself. Intrust product repair to
qualified personnel and use original spare parts only.
- Do not use the product in explosive environment, close to flammable materials.
- Avoid heating the batteries to avoid the risk of explosion and electrolyte leakage. In case of
liquid contact with skin, wash it immediately with soap and water. In case of contact with eyes,
flush with clean water during 10 minutes and consult the doctor.
information about safe operation of the produc t.
The device belongs to laser product class 2 in
accordance with
EN 60825 -1 with a 630-670 nm wavelength.
OPERATION
Remove the battery cover. Inser t the batteries, observing correct polarity.
Put the bat tery cover back. Place an instrument on a tripod or on a firm and stable surface.
To switch on an instrument, move compensator (8) to the right position to release. By
consecutive pressing of the Mode switching button (2) the instrument is switched to the
different operating modes. To use Electronic Receiver press button (3) switch on/off pulse
mode.
The following 2 operating modes are available:
- Operation with the automatic compensation to project horizontal and vertical laser lines
and planes. The compensator automatically aligns instrument ’s position within the range of
compensation ±5°. The laser beam starts to blink when the instrument is out of the range of
the automatic compensation.
- Without Automatic Levelling mode to construc t inclined planes.
To switch on/off automatic levelling press and hold (no less than 2 sec.) button (3). At the
switched off automatic compensation you can freely hold the instrument in your hand or place
it on a suitable surface. Laser beams will work stable without blinking, no sound alarm to signal.
To switch off the instrument and/or prepare it for transportation move compensator (8) to the
left position, the levelling unit is blocked. When the battery indicator (4) and laser planes are
blinking, the batteries must be replaced.
10
11

User manual
CROSS LINE L ASER
CONDTROL UniX 360 Pro
User manual
CROSS LINE L ASER
CONDTROL UniX 360 Pro
EN EN
SPECIFICATIONS
Working range/with detector 40 m / 80 m*
Leveling accuracy ± 0,2 mm/m
Self-leveling range ±5°
Leveling duration, typically <3 s
Receiver mode √
inclined planes mode √
Operating temperature +5°с…+40°с
Storage temperature -30 °с…+80°с
Relative air humidity, max 90%
Laser type 635 nm, <1mW
Laser class 2
Tripod mount 1/4''
Batteries 3x1,5V LR6 (AA)
Operating life time 10 h
Weight 620 g
Dimensions 140х104х125mm
ACCURACY CHECK
Checking of the horizontal line
Checking of the horizontal line
For this check, a free measuring distance of 5 meters on a firm surface between two walls A
and B is required.
1. Mount the instrument onto a tripod or place it on a firm and level surface close to wall A
(see figure I). Switch on the instrument. Select cross-line operation with automatic leveling
Direct the laser against the close wal l A and allow the instrument to level in. Make A1 mark at
the centre of the point where the laser lines cross each other on the wall (point I).
Mark point B on the opposite wall.
2. Turn the instrument by 90°. Check whether the horizontal line is in level with point B1
within
±1 mm (see figure J). If deviation between the laser line and the B1 mark is greater than ±1
mm, apply to service centre.
3. Repeat step 2 for 2 more times, turning the instrument in one direction.
4. Without turning the instrument, position it close to wall B. Make B2 mark at the centre
of the point where the laser lines cross each other on the wall (B1 and B2 mark s should be
placed on the same Vertical line) (see figure K)
5. Turn the instrument by 180° and direct it against the wall A, place A2 mark for the cross
point of the laser lines on the wall (see figure L). (B1 and B2 marks should be placed on the
same Vertical line).
6. Check the distance dA, dB between marked points A1, A2 and B1, B2 accordingly (see
figure L).
When the maximum deviation exceeds 2 mm, you should contact CONDTROL service centre.
* An operating range can be dif ferent from the stated above subject to light conditions.
12
Checking of the vertical line
Place the instrument at a distance of 1,5m from the instrument (see figure M).
Fix plumb bob on the wall, making sure that the bob can swing free.
Switch on the device and align the vertical laser to the plumb line.
Accept able deviation b etween the laser l ine and the plumb lin e is not greater than ± 0.2 mm per
1m of the plumb bob leng th (for the 2.5m plumb bob, acceptable deviation is 0.5mm).
13

User manual
CROSS LINE L ASER
CONDTROL UniX 360 Pro
User manual
CROSS LINE L ASER
CONDTROL UniX 360 Pro
EN EN
I
J
K
L
M
14
15

User manual
CROSS LINE L ASER
CONDTROL UniX 360 Pro
User manual
CROSS LINE L ASER
CONDTROL UniX 360 Pro
EN EN
CARE AND MAINTENANCE
Attention! The instrument is a precision device and requires careful handling. The following
recommendations will extend the life of the product:
- Do not point the product at the sun
- Protect the product from bumps, falls, excessive vibration; do not let liquids, construction
dust and foreign objects get inside the product.
- Do not expose the product to extreme temperatures.
- If liquids get inside the product first remove the batteries, then contact a service center.
- Do not store or use the product under high humidit y conditions for a long time.
- Clean the product with soft wet cloth.
- Keep device optics clean and protect it from mechanical damage.
- Сarry out control measurements occasionally, especially if the product is subject to
excessive mechanical or other impact, before and after taking important measurements.
UTILIZATION
Expired tools, accessories and package should be passed for waste recycle. Please send the
produc t to the following address for proper recycle:
CONDTROL GmbH
Wasserburger Strasse 9
84427 Sankt Wolfgang
Germany
Do not throw the product in municipal waste!
According to European directive 2002/96/ЕC expired measuring tools and their components
must be collected separately and submitted to environmentally friendly recycle of wastes.
WARRANTY
All CONDTROL GmbH products go through post-production control and are governed by the
following warranty terms. The buyer’s right to claim about defects and general provisions of
the current legislation do not expire.
1) CONDTROL GmbH agrees to eliminate all defects in the product, discovered during the
warrant y period, that represent the defect in material or workmanship in full volume and at
its own expense.
2) The warranty period is 12 months and starts from the date of purchas e by the end consumer
(see the original supporting document).
3) The Warranty does cover defects resulting from wear and tear or improper use, malfunction
of the produc t caused by failure to observe the instructions of this user manual, untimely
maintenance and service and insuf ficient care, the use of non-original accessories and spare
part s. Modifica tions in design of the product re lieves the seller f rom responsib ility for warr anty
works. The warranty does not cover cosmetic damage, that doesn’t hinder normal operation
of the product.
4) CONDTROL GmbH reser ves the right to decide on replacement or repair of the device.
5) Other claims not mentioned above, are not covered by the warranty.
6) After holding warranty works by CONDTROl GmbH warranty period is not renewed or
extended.
7) CONDTROL GmbH is not liable for loss of profit or inconvenience associated with
a defect of the device, the rental cost of alternative equipment for the period of repair.
This warranty applies to German law except provision of the United Nations Convention on
contracts for the international sale of goods (CISG).
In warranty case please return the product to retail seller or send it with defect description to
the following address:
CONDTROL GmbH
Wasserburger Strasse 9
84427 Sankt Wolfgang
Germany
16
17

Bedienungsanleitung
KREUZLINIENLASER
CONDTROL UniX 360 Pro
Bedienungsanleitung
KREUZLINIENLASER
CONDTROL UniX 360 Pro
DE DE
BESTIMMUNGSGEMAESSER GEBRAUCH
Der Multiline –Kreuzlinienlaser Unix 360 CONDTROL wird zur Ermittlung und Ueberpruefung
von horizontalen und vertikalen Linien (Siehe Abb. A – C), sowie von Ebenen mit jeglicher
Neigung (Siehe Abb. D). verwendet. Er ist fuer den Innen- und Außenbereich geeignet.
Das Gearet hat zwei Betriebsarten:
- Mit Nivellierautomatik der Gehaeuseneigung bis zum ±5° zum Erzeugen waagrechten und
senkrechten Laser- Linien und –Ebenen (Siehe Abb. E,F).
- Zum Erzeugen Laser- Linien und –Ebene mit jeglichen Neigungen (Siehe Abb. D);
Empfaengerbetrieb ist dazu bestimmt, Laserstrahlen von Linienlaser zu lokalisieren.
Die Darstellung des Messwerkzeuges und seines Zubehoers ist auf den Abb. G,H.
1 - Austrittsöffnung Laserstrahlung
2 - Betriebsarten-Taste
3 - Taste zum Abschalten Empfaengerbetrieb / Nivellierautomatik
4 - Akku-Ladezustandsanzeige
5 - Anzeige Betriebsart
6 - Batteriefachdeckel
7 - Stativaufnahme 1/4’’
8 - Ein-/Ausschalter
9 - 1/4’’-Schraube der Halterung
10- 1/4’’-Kurbelstativ *
11 - Teleskopstange Transformer*
12 - Universalhalterung Wall Mount*
13 - Schutztasche
14 - Laser - Sichtbrille (rot)*
15 - Laser – Empfaenger*
16 - Mini - Stativ 1/4’’*
17 - Universalhalterung Clamp*
* Das Zubehör gehört nicht zum Standard-Lieferumfang
LIEFERUMFANG
Kreuzlinienlaser – 1 St.
Schutztasche – 1 St.
Batterien – 3 St.
Bedienungsanleitung – 1 St.
SICHERHEITSHINWEISE
Bitte lesen und befolgen Sie alle Anweisungen fuer die sichere Verwendung Ihres Geraets.
Nichtbeachten der Anleitung kann zu Verletzungen, Materialschaeden, finanziellem oder
oekologischem Schaden fuehren.
Bewahren Sie diese Bedienungsanleitung auf. Bei der Uebergabe des Geraetes legen Sie diese
Anleitung bei.
Das Geraet darf nur zweckmaessig ver wendet werden.
Warnschilder muessen stets sichtbar und erkennbar am Geraet angebracht sein.
Sie erhalten Ihr Geraet mit einem Warnschild in Englisch. Bit te beachten Sie das hier
abgebildete Warnschild in Deutsch.
Sie koennen Strahlung ausgesetzt sein, wenn Sie die Anweisungen dieser Bedienungsanleitung
nicht befolgen.
- Richten Sie den Laserstrahl nicht auf Personen oder Tiere. Blicken Sie selbst nicht in
Laserstrahl, insbesondere nicht mit optischen Instrumenten. Ihr Augenlicht ist in Gefahr.
- Die Reparatur und Wartung darf nur durch qualifiziertes Fachpersonal erfolgen, das originale
Ersatzkomponenten einsetzt. Kinder duerfen das Geraet nur unter Aufsicht benutzen, um die
Sicherheit fuer sie selbst und andere Personen zu gewaehrleisten.
- Verwenden Sie das Geraet nicht in der Naehe von brennbaren Stoffen, da im Geraet Funken
entstehen koennen, und halten Sie ausreichend Abstand zu Waermequellen.
- Platzieren Sie die Batterien des Geraets nie in der Naehe von Hitze oder Feuer, um das Risiko
von Explosionen und Verletzungen zu reduzieren.
- Im Fall einer Explosion der Batterien besteht das Risiko von Verletzungen durch Truemmer
und Chemikalien. Loeschen Sie die Stellen sofor t mit Wasser. Unter extremen Bedingungen
koennen Batterien auslaufen. Bei Kontakt der Fluessigkeit mit Augen, reinigen Sie diese sofort
mindestens zehn Minuten lang mit sauberem Wasser und suchen Sie anschliessend einen Arzt
auf.
Das Gera et erzeugt St rahlung der L aserklasse 2 ge maess
IEC60825-1 mit der Wellenlaenge 630 - 670 nm
18
19

Bedienungsanleitung
KREUZLINIENLASER
CONDTROL UniX 360 Pro
Bedienungsanleitung
KREUZLINIENLASER
CONDTROL UniX 360 Pro
DE DE
BETRIEB
Oeffnen Sie das Batteriefach. Setzen Sie beide Bat terien ein. Achten Sie dabei auf die richtige
Polung.
Stellen Sie das Messwerkzeug auf einen Stativ oder eine stabile Ober flaeche.
Schieben Sie die Ein/Ausschalter – Taste (8) nach rechts, das Geraet schaltet sich ein, die
Pendelsperre wird geloest.
Bei niedrigem Batteriestand blinken der Batterieanzeiger und Laserstrahlen gleichzeitig.
Druecken Sie kurz die Betriebsarten – Taste (2) und schalten Sie die noetigen L aserstrahlen ein.
Kurzes Druecken der Taste 3 schaltet ein/ab den Empfaengermodus. Folgende Betriebsarten
stehen zur Auswahl:
- Mit Nivellierautomatik zum Erzeugen waagrechten und senkrechten Laser- Linien und –
Ebenen. Befindet sich die Neigung vom Gehaeuse außerhalb des Selbstnivellierbereiches von
± 5°, beginnen Laserstrahle zu blinken, das Geraet emit tiert den Ton.
- Modus zum Erzeugen geneigten Laserlinien und –Ebenen (Siehe Abb. D).
Druecken Sie die Taste (3) mindestens 2 Sekunden lang, um in den Modus zu wechseln.
Wenn der Modus aktiviert ist, blinken die Laserlinien bei der Neigung außerhalb des
Selbstnivellierbereiches nicht mehr, das Geraet emittiert den Ton nicht.
Sperren Sie das Pendel immer waehrend des Transports und nach dem Ausschalten: schieben
Sie den Schalter nach links - das Geraet schaltet sich aus, der Pendel ist gesperr t.
TECHNISCHE SPEZIFIKATIONEN
Rechweite (ohne /mit Empfaenger) 40 m / 80 m*
Genauigkeit ± 0,2 mm/m
Selbstnivellierung ±5°
Nivellierzeit <3 Sekunden
Empfaengermodus √
Erzeugen geneigten Ebenen √
Betriebstemperatur +5°с…+40°с
Lagertemperatur -30 °с…+80°с
Luftfeuchtigkeit, max 90%
Lasertyp 635 nm, <1 mW
Laserklasse 2
Stativaufnahme 1/4''
Batterien 3x1,5V LR6 (AA)
Betriebsdauer 10 Stunden
Gewicht 620 g
Masse 140х104х125 mm
* Die Reichweite kann durch ungünstige Umgebungsbedingungen (z.B. direkte
Sonneneinstrahlung) verringert werden.
20
21

Bedienungsanleitung
KREUZLINIENLASER
CONDTROL UniX 360 Pro
Bedienungsanleitung
KREUZLINIENLASER
CONDTROL UniX 360 Pro
DE DE
UEBERPRUEFUNG
Ueberpruefung der horizontaler Linie
Fuer dies e Ueberpruefu ng ist eine freie M essdistanz vo n 5 Metern auf eine r festen Oberf laeche
zwischen zwei Waenden A und B not wendig.
1. Montieren Sie das Instrument auf einem Stativ oder platzieren Sie es auf einer festen und
ebenen Oberflaeche in der Naehe der
Wand A (Siehe A bb.I). Schalten Si e das Geraet ein. A ktivieren S ie die horizonta le und vertika le
Linie bei geloester Pendelsperre. Richten Sie den
Laser auf die Wand und warten Sie, bis das Geraet nivellier t ist. Markieren Sie den Punkt A1,
in dem sich die horizontale und vertikale Linie schneiden.
An der gegenüberliegenden Wand markieren Sie den Punkt B1.
2. Drehe n Sie das Geraet um 90°, messen Si e die Abweichung der Strahlachs e von dem Punkt
В1 (Siehe Abb. J). Uebersteigt die Abweichung
1 mm, kontak tieren Sie bitte Ihren Haendler oder eine autorisierte Servicestelle.
3. Wiederholen Sie den im Punkt 2 beschriebenen Vorgang zwei Mal. Drehen Sie dabei das
Geraet in die gleiche Richtung.
Positionieren Sie das Geraet nahe an die gegenueberliegende Wand. Markieren Sie den
Punkt B2, in dem sich die horizontale und ver tikale
Linie schneiden (Punkte В1 und В2 sollen in derselben Vertikalebene liegen) (Siehe Abb.K).
4. Drehen Sie das Geraet um 180° und markieren Sie an der gegenueber liegend en Wan d den
Punkt A2, in dem sich die horizontale und vertikale Linie schneiden. (Punkte A1, A2 sollen in
derselben Vertikalebene liegen) (Siehe Abb. L).
Messen Sie die Abstaende dA, dB zwischen den markierten Punkten А1, А2 und В1, В2 (Siehe
Abb. L). Übersteigt die Differenz zwischen den beiden
Werten dA und dB 2 mm, kontaktieren Sie bitte Ihren Haendler oder eine autorisier te
Servicestelle.
Ueberpruefung der vertikalen Linie
Fuer diese Ueberpruefung ist ein Senklot notwendig. Stellen Sie das Gerät 1,5 m von dem
Senklot entfernt auf (Siehe Abb.M). Loesen Sie die Pendelsperre
und schalten Sie die Vertikallinie ein. Bringen Sie die Vertikallinie genau über die Lotschnur bis
zum Senklot. Überprüfen
Sie, dass die Vertikallinine über die ganze Länge genau die Lotschnur triff t. Ist die Vertikallinie
mehr als 0,2 mm auf 1 m Laenge von der Lotschnur
entfernt (z.B. fuer eine Lotschnur 2,5 m lang soll die maximale Abweichung nicht mehr als 0,5
mm sein) – muss das Gerät zu einem autorisierten Servicezen- trum gebracht werden.
22
I
J
K
23

Bedienungsanleitung
KREUZLINIENLASER
CONDTROL UniX 360 Pro
Bedienungsanleitung
KREUZLINIENLASER
CONDTROL UniX 360 Pro
DE DE
- Behandeln Sie das Geraet mit Sorgfalt, so wie Sie eine Kamera, ein Fernglas oder ein
L
M
PFLEGE
Achtung! Unix 360 ist ein präzises optisch-mechanisches Gerät und soll stets vorsichtig
behandelt werden. Prüfen Sie den Zustand des Gerätes, bevor Sie es verwenden. Überprüfen
Sie die Genauigkeit des Gerätes, nachdem es fallen gelassen wurde oder anderen mechanischen
Belastungen ausgesetzt war.
Schalten Sie das Geraet nach der Verwendung wieder ab, da andere Personen oder Tiere von
den Laserstrahlen geblendet werden koennen.
anderes optisches Geraet verwenden.
- Vermeiden Sie Stoesse, staendige Vibrationen und extreme Temperaturen.
- Verwenden Sie die Batterie entsprechend den Sicherheitsvorschriften.
- Tauchen Sie das Geraet nicht unter Wasser.
- Wischen Sie Schmutz mit einem feuchten, weichen Tuch ab.
- Verwenden Sie keine aggressiven Reinigungs- oder Loesungsmittel.
- Behandeln Sie das Geraet wie ein Teleskop oder eine Kamera.
ENTSORGUNG
Geraete, Zubehoer und die Verpackung sollen recycelt werden (Wiederverwertung). Zum
Recycling schicken Sie das Geraet bitte an:
Condtrol GmbH
Wasserburger Strasse 9
84427 Sankt Wolfgang
Deutschland
Werfen Sie das Geraet nicht in den Restmuell. Gemaess der Europaeischen Richtlinie
2002/96/EG ueber Altgeraete mit Elek tronik und ihrer Umsetzung in nationales Recht sind Sie
verpflichtet, nicht mehr gebrauchsfaehige Messwerkzeuge getrennt zu sammeln und zu einer
Recyclingstelle zu bringen.
24
25

Руководство пользователя
ЛАЗЕРНЫЙ НИВЕЛИР
CONDTROL UniX 360 Pro
RU
Bedienungsanleitung
KREUZLINIENLASER
CONDTROL UniX 360 Pro
DE
GARANTIE
Alle Geraete der Condtrol GmbH werden vor dem Verlassen der Produktion geprueft und
unterliegen den folgenden Garantiebestimmungen. Maengelhaftungsansprue che des Kaeufers
und gesetzliche Rechte bleiben davon unberuehrt.
1) Die Condtrol GmbH verpflichtet sich zur kostenlosen Behebung der Maengel am Geraet,
falls diese nachweislich innerhalb der Garantiezeit auf einen Material- oder Produktionsfehler
zurueckzufuehren sind.
2) Die Garantiezeit betraegt 24 Monate bei gewerblichen Produkten und beginnt am Datum
des Kaufs an den ersten Endabnehmer (siehe Originalbeleg).
3) Die Garantie trifft nicht fuer Teile zu, deren Fehlfunk tion auf Gebrauch oder
Verschleiss zurueckzufuehren ist. Fuer Maengel am Geraet, die durch Nichtbeachten der
Bedienungsanleitung, nicht bestimmungsgemaessen Gebrauch, unzureichenden Service und
Pflege, Verwendung von Nicht- Condtrol GmbH-Zubehoer oder Ersatzteilen entstehen, gilt die
Garantie nicht. Durch Veraenderungen oder Zusaetze am Geraet erlischt die Garantie. Fuer
Maengel, die den normalen Gebrauch des Geraets nicht beeintraechtigen, gilt die Garantie
nicht.
4) Die Condtrol GmbH behaelt sich das Recht vor, nach eigener Entscheidung das Geraet zu
reparieren oder zu ersetzen.
5) Andere Ansprueche als die oben genannten werden nicht ueber die Garantie abgedeckt.
6) Nach Garantieleistungen durch die Condtrol GmbH wird die Garantiezeit nicht erneuert und
auch nicht verlaengert.
7) Die Condtrol GmbH uebernimmt keine Verantwor tung fuer Gewinnverlust und andere
Umstaende, die mit dem defekten Geraet in Verbindung stehen. Die Condtrol GmbH
uebernimmt keine Kosten fuer Miet- oder Leihgeraete waehrend der Reparatur.
Fuer die Garantie gilt deutsches Recht. Ausgeschlossen ist das CISG (Uebereinkommen der
Vereinten Nationen ueber den internationalen Warenkauf). Aenderungen vorbehalten.
WARTUNG UND REPARATUR
Falls das Geraet defekt ist, bringen Sie es bit te zu Ihrem Haendler zurueck. Falls Sie das Geraet
nic ht bei ei nem Hae ndler gekauf t haben, schi cken Si e es mit ei ner Feh lerbesc hreib ung bitte an:
Condtrol GmbH
Wasserburger Strasse 9
84427 Sankt Wolfgang
Deutschland
Waehrend d es Tr ansports un d der Aufbewahr ung sollte das Ger aet in seiner Tasche o der Koffer
sein. Sa eubern Sie besonders die A ustrittsf enster der Lase rstrahlen und ve rmeiden Sie die do rt
Fusselbildung. Die Saeuberung mit Reinigungs- und Loesungsmittel ist untersagt. Verwenden
Sie anstelle ein weiches, feuchtes Tuch. Halten Sie das Geraet nicht unter Wasser oder in
andere Fluessigkeiten. Das eigenstaendige Oeffnen des Geraets ist untersagt. Es darf nur von
einem autorisierten Servicezentrum geoeffnet werden
ОПИСАНИЕ ПРИБОРА
Мультипризменный лазерный нивелир UNIX 360 Pro CONDTROL предназначен для
построения и контроля вертикальных и горизонтальных плоскостей и линий (см. рис. A-C),
а также линий и плоскостей с произвольным наклоном (см. рис. D). Прибор пригоден как
для эксплуатации в закры тых помещениях, так и на открытых с троительных площадках.
Прибор имеет 2 режима работы:
- с автоматической компенсацией наклона корпуса прибора до ±5° для построения
горизонтальных и вертикальных плоскостей и линий (см. рис. E, F).
- для построения плоскостей и линий под произвольными углами (см. рис. D);
Импульсный режим позволяет использовать детектор для увеличения дальности
работы, а также для работы в условиях хорошей освещенности, когда лазерный луч
плохо виден.
Изображения прибора, аксессуаров представлены на рис. G, H.
1 – Окна лазерных излучателей
2 – Кнопка переключения режимов работы
3 – Кнопка импульсного режима / режима построения наклонных плоскос тей
4 – Индикатор питания
5 – Индикатор импульсного режима
6 – Крышка батарейного отсека
7 - Резьба крепления на шт атив 1/4’’
8 – Движок блокиратора
9 – Крепление под гвоздь/саморез
10 – Штатив с элевационной головкой*
11 – Штатив-штанга трансформер*
12 – Универсальное крепление Wall Mount*
13 – Сумка
14 – Очки для работы с лазерным инструментом (красные)*
15 – Электронный отражатель (детектор)*
16 - Мини-штатив 1/4’’*
17 - Универсальное крепление Clamp*
* Не входят в комплект поставки
КОМПЛЕКТАЦИЯ
Лазерный нивелир – 1 шт.
Сумка – 1 шт.
Элемент питания – 3 шт.
Руководство пользователя – 1 шт.
26
27

Руководство пользователя
ЛАЗЕРНЫЙ НИВЕЛИР
CONDTROL UniX 360 Pro
Руководство пользователя
ЛАЗЕРНЫЙ НИВЕЛИР
CONDTROL UniX 360 Pro
RU RU
УКАЗАНИЯ ПО ТЕХНИКЕ БЕЗОПАСНОСТИ
Перед началом работы с прибором внимательно изучите данную инструкцию.
Неправильное обращение с прибором может привести к тяжелой травме, нанести
значительный ущерб. Сохраняйте данную инструкцию. При передаче прибора во
временное пользование обязательно прилагайте к нему данную инструкцию.
- Не используйте прибор не по назначению.
- Не удаляйте предупреждающие таблички и предохраняйте их от стирания, т.к. они
содержат информацию по безопасной эксплуатации прибора.
Вы приобрели прибор с нанесенными на него предупреждающими табличками на
английском и немецком языках. Пожалуйста, ознакомьтесь с содержанием табличек на
русском языке:
Лазерное излучение
Не направляйте в глаза
Лазер класса 2
<1 мВт, 630-670нм
EN 60825 -1: 2007-03
Прибор относится ко 2 к лассу лазерных изделий в соответствии с IEC60825-1 с длиной
волны 630-670 нм.
-Не смотрите в лазерный луч, а также в его отражение, как незащищенным глазом, так
и через оптические устройства. Не направ ляйте лазерный луч на людей и животных без
необходимости. Вы можете их ослепить.
-Защита глаз обычно ос ущес твляется путем отведения взгляда или закрытием век.
-Запрещено разбирать и проводить самостоятельный ремонт прибора. Ремонт
прибора поручайте только квалифицированному персоналу и только с использованием
оригинальных запасных частей.
-Запрещается эксплуатация прибора во взрывоопасной среде, вблизи
легковоспламеняющихся материалов.
-Не допускайте нагревания элементов питания во избежание риска взрыва и вытекания
электролита. При попадании жидкости на кожу немедленно промойте пораженный
уч аст ок во дой с мыл ом. В сл уча е по пад ани я в гла за, про мой те и х чис той вод ой в те чение
10 минут, затем обратитесь к врачу.
РАБОТА С ПРИБОРОМ
Перед началом работы установите элементы питания, соблюдая полярность.
Установите прибор на штатив или твердую устойчивую поверхность. Переместите
движок блокиратора (8) вправо, прибор включится, компенсатор разблокируется.
При низком уровне заряда элементов питания мигает индикатор питания одновременно
с лазерными излучателями.
Кратковременными нажатиями кнопки переключения режимов (2) включите
необходимые для работы лазерные излучатели.
Кратковременное нажатие кнопки (3) включает/выключает режим работы с детектором.
Прибор имеет 2 режима работы:
- режим автоматической компенсации – для построения горизонтальных и
вертикальных плоскостей и линий. Если наклон корпуса прибора превышает диапазон
самовыравнивания (до ±5°), лазеры начинают мигать.
- режим построения плоскостей и линий под произвольными углами.
Чтобы включить/выключить режим нажмите и удерживайте кнопку (3) не менее
2 сек. Если режим включен, то при наклоне корпуса прибора больше диапазона
самовыравнивания свечение лазеров не прерывается, звукового предупреждения не
происходит.
После окончания работы или перед перемещением прибора переместите движок
блокиратора влево, прибор выключится, компенсатор заблокируется.
28
29

Руководство пользователя
ЛАЗЕРНЫЙ НИВЕЛИР
CONDTROL UniX 360 Pro
Руководство пользователя
ЛАЗЕРНЫЙ НИВЕЛИР
CONDTROL UniX 360 Pro
RU RU
ТЕХНИЧЕСКИЕ ХАРАКТЕРИСТИКИ
Рабочий диапазон
(визуальный /с детектором)
Точность выравнивания ± 0,2 мм/м
Диапазон выравнивания ±5°
Время выравнивания <3 c
Режим работы с детектором √
Построение наклонных плоскостей √
Рабочая температура +5°с…+40°с
Температура хранения -30 °с…+80°с
Относительная влажность воздуха не более 90%
Тип лазера 635 нм, <1 мвт
Класс лазера 2
Тип резьбы д ля установки на штатив 1/4''
Элемент питания 3x1,5B щелочной LR6 (A A)
Продолжительность работы (ориентировочно) 10 ч
Вес 620 г
Габаритные размеры 140х104х125 мм
* Рабочий диапазон может отличаться от заявленного в зависимости от условий
освещенности.
40 м / 80м*
ПРОВЕРКА ТОЧНОСТИ
Проверка горизонтали
Для проверки необходимы 2 параллельные вертикальные стены расположенные друг
напротив друга на расстоянии 5 м.
1. Установите прибор максимально близко к одной из стен (см. рис.I). Включите
вертикальный и горизонтальный излучатели, разблокируйте компенсатор. Разверните
прибор излучателями в сторону ближней стены, чтобы пересечение лазерных линий
на стене располагалось напротив прибора. Отметьте положение точки пересечения
лазерных линий метка А1. На дальней стене напротив прибора отметьте точку B1.
2. Поверните прибор на 90°, измерьте отклонение оси лу ча от отметки В1 (см. рис.J).
Если отклонение превышает 1 мм – обратитесь в сервисный центр.
3. Повторите пункт 2 еще 2 раза, поворачивая прибор в одном направлении.
4. Перенесите прибор к противоположной стене, отметьте пересечение лазерных
линий меткой В2 (метки В1, В2 должны находиться на одной вертикали) (см. рис.K).
5. Поверните прибор на 180° и отметьте на противоположной стене пересечение
лазерных линий меткой A2 (метки A1, A2 должны находиться на одной вертикали) (см.
рис.L).
6. Измерьте расстояния dA, dB между метками А1, А2 и В1, В2 соответственно (см. рис.
L). Если разница между значениями dA, dB превышает 2 мм – обратитесь в сервисный
центр.
Проверка вертикали
В качестве эталона вертикали используйте отвес. Установите прибор на расстоянии
порядка 1,5 м от отвеса (см. рис. M).
1. Разблокируйте компенсатор, включите вертикальный излучатель, совместите ось
вертикальной лазерной линии с нижней точкой отвеса.
2. Если отклонение оси вертикальной линии от подвеса превышает 0,2 мм на 1 м длины
подвеса (например, для отвеса длиной 2,5 м – максимальное отклонение не должно
превышать 0,5 мм) – обратитесь в сервисный центр.
30
31

Руководство пользователя
ЛАЗЕРНЫЙ НИВЕЛИР
CONDTROL UniX 360 Pro
Руководство пользователя
ЛАЗЕРНЫЙ НИВЕЛИР
CONDTROL UniX 360 Pro
RU RU
I
J
K
L
M
32
33

Руководство пользователя
ЛАЗЕРНЫЙ НИВЕЛИР
CONDTROL UniX 360 Pro
Руководство пользователя
ЛАЗЕРНЫЙ НИВЕЛИР
CONDTROL UniX 360 Pro
RU RU
УХОД И ЭКСПЛУАТАЦИЯ
Внимание! Прибор является точным оптико-механическим устройством и требует
бережного обращения. Перед началом работ, а также после механических воздействий
(падение, удары) проводите проверку точности прибора.
Для увеличения времени работы, а также для уменьшения риска непреднамеренного
ослепления следует выбирать минимально необходимое количество включенных
лазерных модулей.
При работе вблизи объек тов или воздушных потоков отличающихся по температуре от
окружающей среды из-за неоднородности атмосферы возможно дрожание лазерной
линии. При увеличении расстояния эффект усиливается.
С увеличением расстояния ширина лазерной линии увеличивается. Разметку следует
производить по оси лазерной линии.
Для получения максимальной точности используйте средний у часток лазерной линии.
Следует учитывать, что форма лазерных линий на поверхности объекта (например, на
стенах, перекрытиях и пр.) зависит от кривизны и наклона поверхности по отношению к
лазерной плоскости.
Соблюдение следующих рекомендаций продлит срок с лужбы прибора:
- Перемещайте прибор только с заблокированным компенсатором.
- Оберегайте прибор от ударов, падений, сильных вибраций, не допускайте попадания
внутрь прибора влаги, строительной пыли, посторонних пред метов.
- В случае попадания в прибор влаги в первую очередь выньте элементы питания,
затем обратитесь в сервисный центр.
- Не храните и не используйте прибор в течение длительного времени в условиях
повышенной влажности.
- Чистку прибора следует производит ь влажной мягкой салфеткой.
Несоблюдение следующих правил может п ривести к вытеканию электролита из
элементов питания и порче прибора:
- Вынимайте элементы питания из прибора, если он не используется в течение
длительного времени.
- Не используйте элементы питания разного вида, с разным уровнем заряда.
- Не ост авляйте в приборе разряженные элементы питания.
УТИЛИЗАЦИЯ
Отслужившие свой срок приборы, принадлежности и упаковка должны быть
утилизированы согласно действующим законам вашей страны.
Не выбрасывай те аккумуляторы/батареи в коммунальный мусор, не бросайте их в огонь
или воду. Аккумуляторы/бат ареи следует собирать и с давать на рекуперацию или на
экологически чистую утилизацию.
Только для стран -члено в ЕС:
Не выбрасывайте инс трументы в коммунальный мусор!
Согласно Европейской Директиве 2002/96/ЕС о старых электрических и электронных
инструментах и приборах и ее претворению в национальное право, отслужившие свой
срок измерительные инструменты должны собираться отдельно и быть переданы на
экологически чистую рекуперацию отходов.
Неисправные или пришедшие в негодность аккумуляторы/батареи должны быть
утилизированы согласно Директиве 2006/66/Е.
ГАРАНТИЙНЫЕ ОБЯЗАТЕЛЬСТВА
Гарантийный период составляет 24 месяца с даты продажи. Срок службы прибора - 36
месяцев.
Производитель гарантирует соответствие прибора заявленным характеристикам при
условии соблюдения правил эксплуатации и хранения, установленных в настоящем
руководстве по эксплуатации.
Гарантия распространяется на недостатки и дефекты, являющиеся заводским браком
или возникшие в результате заводского брака.
Гарантия не распространяется на неисправности, возникшие в результате интенсивной
эксплуатации и естественного износа, а также на элементы питания.
Производитель оставляет за собой право вносить изменения в конструкцию и
комплектацию прибора, не ухудшающие его основные характеристики.
СЕРВИС И КОНСУЛЬТАЦИОННЫЕ УСЛУГИ
Контакты д ля связи, конс ультации можно получить на сайте ww w.condtrol.ru.
34
35

 Loading...