


CONDTROL Super RotoLaser
EN CONTENTS
SAFETY INSTRUCTIONS 4
INT ENDE D USE 5
SET 5
TECHNICAL SPECIFICATIONS 6
PROD UC T DES CRI PTI ON 7
OPERATION MODES 13
ACCU RAC Y CH ECK 17
CARE AND MAINTENANCE 20
UTILIZATION 22
WARR ANT Y 22
RU СО ДЕРЖ АНИЕ
У КА З АН ИЯ ПО ТЕ Х НИ КЕ БЕ ЗО П АС НО С ТИ 24
НАЗНАЧЕНИЕ ПРИБОРА 25
КОМПЛЕКТАЦИЯ 25
ТЕХНИЧЕСКИЕ ХАРАКТЕРИСТИКИ 26
ОПИСАНИЕ ПРИБОРА 27
РАБ ОТА С П РИБО РОМ 31
РЕЖИМЫ РАБОТЫ 33
ПРОВЕРКА ТОЧНОСТИ 38
УХОД И ЭКСПЛУАТАЦИЯ 41
ГАРАНТИЙНЫЕ ОБЯЗАТЕЛЬСТВА 42
СЕР ВИС И КОН СУЛЬТА ЦИОН НЫЕ УС ЛУГ И 43
УТ ИЛИЗА ЦИЯ 43
3
ROTA RY LAS ER ROTA RY LAS ER
user manual user manual
EN EN
CONDTROL Super RotoLaser CONDTROL Super RotoLaser
SAFETY INSTRUCTIONS
Attention! This use r manual is an essen tial part of this p roduct.
The use r manual sho uld be rea d carefu lly befor e you use the produ ct
for the f irst tim e. If the pro duct is gi ven to som eone for te mporar y
use, be sur e to enclose use r manual to it .
- Do not mis use the produc t
- Do not rem ove warni ng signs and protec t them from abrasi on,
becau se they con tain info rmation a bout saf e operat ion of the
produc t.
-Do not l ook into th e laser be am or its re flect ion, wit h unprote cted
eye or thro ugh an opt ical ins trument . Do not po int the las er beam at
peopl e or animals witho ut the need. You can da zzle them.
-To protect yo ur eyes close the m or look asi de.
- Always i nstall t he produ ct in such a w ay, so that las er line is be low
or above e ye level.
- Do not le t unauthorized p eople enter th e zone of produc t operation .
- Store the p roduc t beyond r each of chi ldren and u nautho rized
people.
- It is proh ibited to disa ssemble or re pair the produ ct yourself. E ntrust
product repair to qualified personnel and use original spare parts
only.
- Do not us e the produc t in explosive e nvironmen t, close to fla mmable
materials.
- Laser i ntensive glasses a re used fo r better r ecogni tion of the l aser
4 5
beam, do n ot use them f or other pu rposes . Laser glasses do n ot
protect from laser radiation as well as ultraviolet radiation and reduce
color perception.
- Avoid hea ting the ba tterie s to avoid th e risk of exp losion a nd
elect rolyt e leakage. I n case of li quid cont act wi th skin, was h it
immedi ately wit h soap and wa ter. In case of c ontac t with eyes , flush
with cle an water during 10 mi nutes and consu lt the doctor.
INTENDED USE
CONDTROL Super RotoLaser – self-levelling rotary laser level,
designed for construction workers, plasterers, and contractors
intended to build vertical and horizontal planes, plumb lines (zenith,
nadir). The product has scan function that allows building only a part
of laser plane defined by user, as well as build inclined planes tilted up
to ±10% fo r the axes X an d Y.
The pro duct is su itable f or use at bo th indoo r and outdo or build ing
areas.
SET
Rotar y laser – 1 pc.
Batte ries – 4 pcs.
Reser ve battery un it – 1 pc.
Batte ry charger – 1 pc .
Laser r eceiver – 1 pc.
Mount fo r laser receiver – 1 pc.
Laser intensive glasses – 1 pc.
Magnet ic target board – 1 p c.
Remote co ntrol – 1 pc.
User manu al – 1 pc.
Plasti c case – 1 pc.
ROTA RY LAS ER ROTA RY LAS ER
user manual user manual
EN EN
CONDTROL Super RotoLaser CONDTROL Super RotoLaser
TECHNICAL SPECIFICATIONS
Working range with receiver 500 m (in d iameter)
Accuracy 20” (±0,1 m m/1 m)
Self-levelling range ±5°
Tilt an gle for axes Х и Y ±10%
Laser type Class II 6 35 nm < 1 mW
Rotation speed 0, 60,120,300,60 0 rpm
Scan mo de Scan se ctor 0°, 10°; 45°; 90°; 180 °
Remote control operating
distance
Operation temperature -200C ~ +500C
Power sup ply of rot ary lase r
Power sup ply of remo te control 2 х АА 1,5 V L R6 (alkaline)
Power sup ply of lase r receiver 1 x 9 V 6LR61/6F 22 (alkaline)
Continuous working time up to 20 h
Waterproof and dustproof IP 54
Tripod mount 5/8"
Dimensions 160 X 160 X 18 5 mm
Weight 2,11 kg (wit h batter ies)
6 7
60 m
Rechargeable
DC4.8-6 V (4 x 4000 mA h SC Ni-MH)
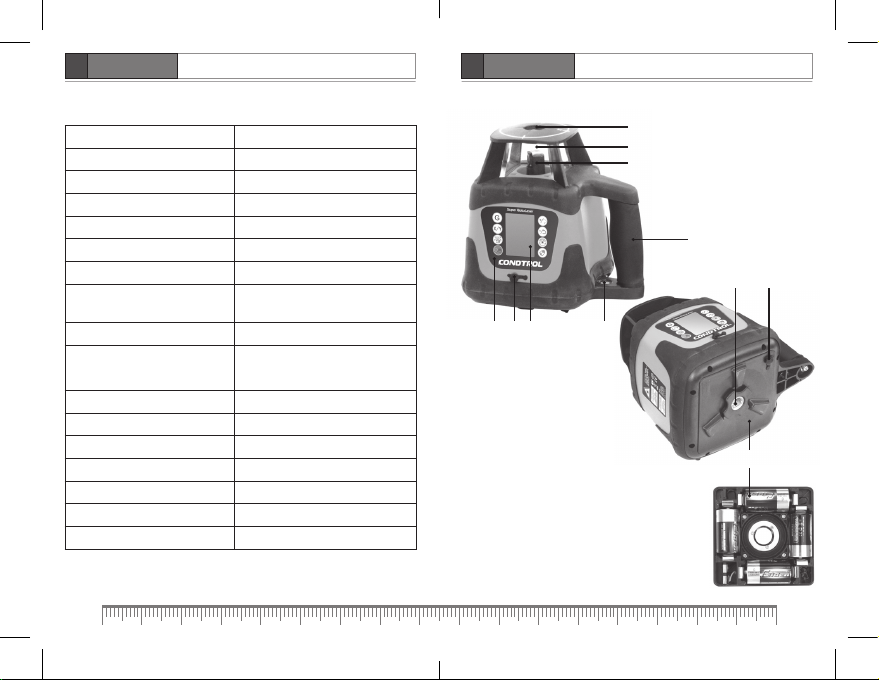
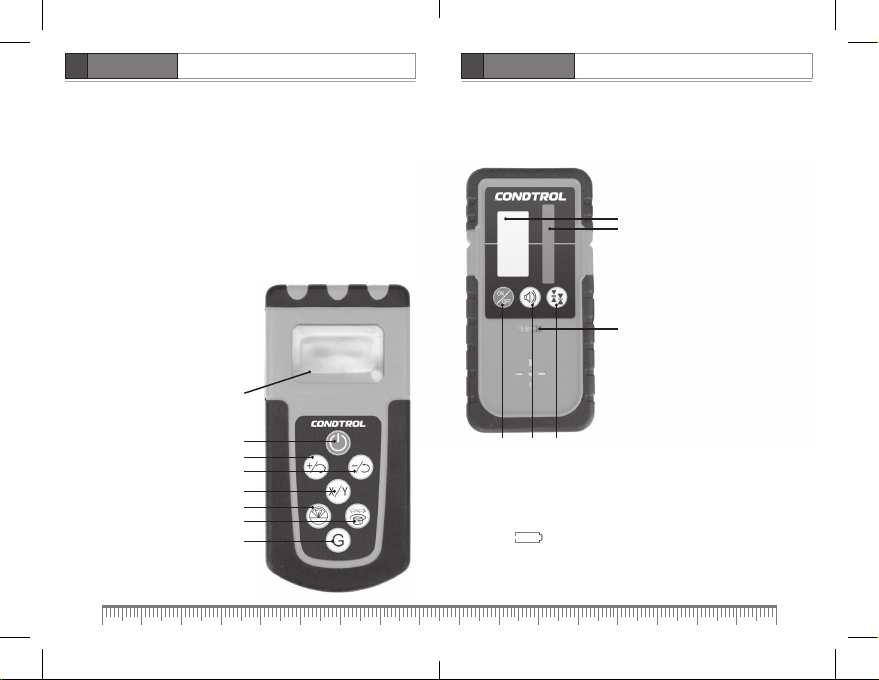
PRODUCT DESCRIPTION
4 56
1. Lase r output window
2. Rotary head
3. Aperture for plumb line (zenith)
4. Contr ol panel
5. Display
6. Batt ery charger ja ck
7. Batter y unit
8. Tripod th read 5/8” / aperture
for plumb line (nadir)
9. Vial
10. Handle
9
3
1
2
10
8 6
7
ROTA RY LAS ER ROTA RY LAS ER
user manual user manual
EN EN
CONDTROL Super RotoLaser CONDTROL Super RotoLaser
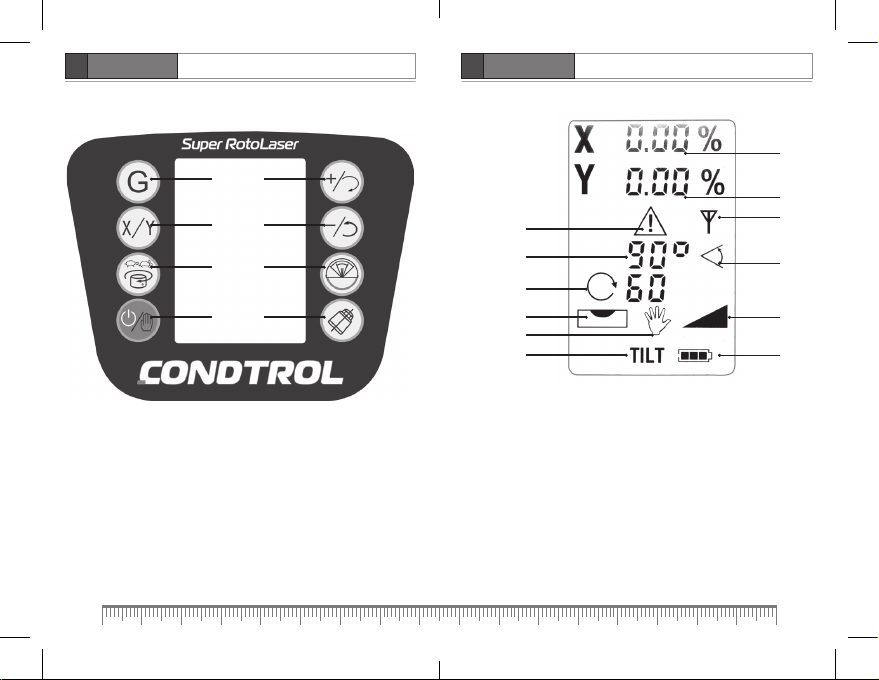
Control panel
1. Turn on/of f
2. Change r otation spee d
3. Adjus tment of tilt angl e for axes X and Y
4. Inclined planes mode
5. Move las er dot/scan sec tor clockw ise/ tilt a ngle adju stment
6. Move la ser dot/sc an sector cou nterclockw ise/ tilt angle
adjustment
7. Scan mode/s can sector
8. Tilt m ode
8 9
4
5
3
6
2
7
1
8
Display
12
8
8
5
3
6
2
1. Power indication
2. Tilt mode indication
3. Indication of self-levelling
4. Indication of inclined planes mode
5. Rotation speed indication
6. Manual mode indication
7. Scan sector indication
8. Scan s ector angle in dication
9. Tilt an gle for axis Х
10. Tilt a ngle for axis Y
11. Indication of remote control
12. Indication of unbalanced product in tilt mode
9
10
11
7
4
1
ROTA RY LAS ER ROTA RY LAS ER
user manual user manual
EN EN
CONDTROL Super RotoLaser CONDTROL Super RotoLaser
Remote control
Use remo te control to mana ge the product at distance up to 60 m.
Symbol s that appe ar on the dis play of rem ote contr ol are simil ar to
symbols that appear on the product display.
1. Display
Keyboard:
2. Turn on/of f
3. Move las er dot/scan sec tor clockw ise/ tilt angle ad justment
4. Move las er dot/scan sec tor counterc lockwise/ ti lt angle
adjustment
5. Adjus tment of til t angle for axes
X and Y
6. Scan m ode/scan sect or
7. Change rotation speed/stop rotation
8. Incli ned planes mode
10 11
1
2
3
4
5
6
7
8
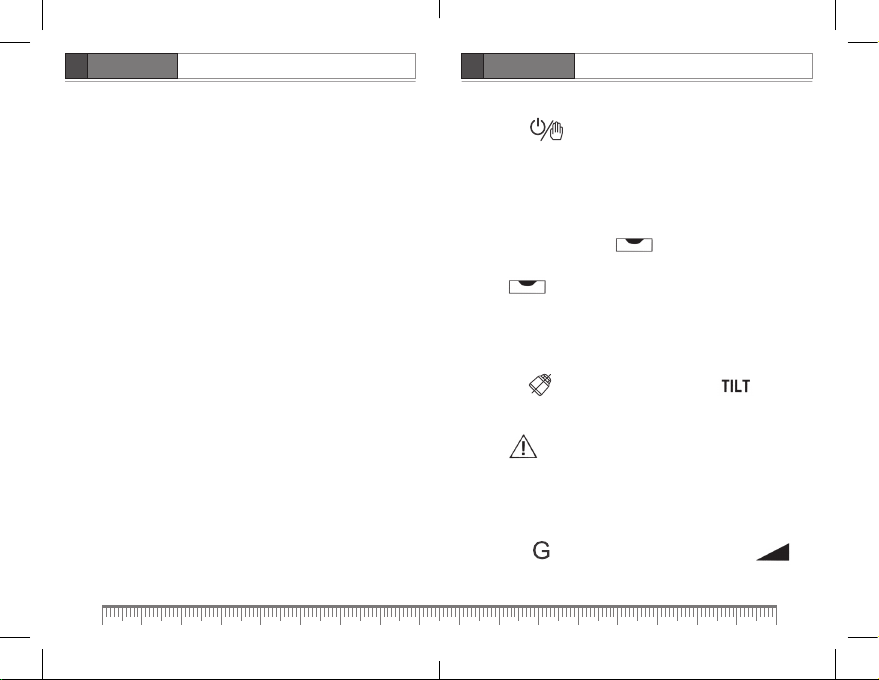
Laser receiver
Laser r eceiver a llows usi ng the pro duct ou tdoor as we ll as while
intensive sunshine at distance up to 500 m (in diameter) when it’s
difficult to recognize laser beam.
1
5
6
1. Display
Keyboard:
2. Turn on/of f
3. Turn on/of f sound sig nal
4. High/normal accuracy mode
5. Receiver sensor
2 3 4
OPERATION
Battery charging
If symbol starts flashing on the product display while opearion
please c harge the batte ries.
Produc t has 2 bat tery ch arger jac ks – under c ontrol p anel and on
batte ry unit. Res erve batt ery unit inc luded in the se t, allows oper ation
6. Vial
ROTA RY LAS ER ROTA RY LAS ER
user manual user manual
EN EN
CONDTROL Super RotoLaser CONDTROL Super RotoLaser
even if main battery unit is discharged/being charged.
For char ging use batte ry charger inc luded in the set.
Full charging takes approximately 5 hours. While charging red light
indica tor on bat tery charger wi ll be on. A s soon as in dicator become s
green, batteries are fully charged, battery charger can be unplugged.
Take batter ies out of t he produc t if it is no t used for a l ong time. A ll
batte ries shou ld be of the s ame typ e and brand w ith the same char ge
level. D o not leave discha rged batteri es in the produc t.
Replace batteries in laser receiver
Batte ry compart ment is loc ated on the back si de of laser recei ver.
Remove ba tter y cover, take ou t dischar ged bat teries an d install new
ones, ob serving cor rect polari ty. Put batter y cover back.
Use alkaline 9 V 6LR61/6F2 2 b atteries only. Rem ove the batterie s
from las er recei ver if it is n ot used for a l ong peri od of time t o avoid
corrosion and battery discharging. All batteries should be replaced
simult aneousl y. All bat teries sh ould be of th e same ty pe and bra nd
with the s ame charge level .
Replace batteries in remote control
Batte ry compart ment is loc ated on the back si de of remote cont rol.
Remove th e batter y cover: slide ou t the batt ery cove r and remove it.
Inser t the bat teries, o bserv ing corr ect pol arity. Sl ide the cov er back
until a cl ick is hear d.
Use alka line AA batteri es only. Remo ve the bat teries f rom remot e
contro l if it is not used fo r a long period o f time to avoid corr osion and
battery discharging. All batteries should be replaced simultaneously.
All bat teries sh ould be of t he same t ype and br and with th e same
charge level.
12 13
Turn on/off t he produ ct
Press bu tton , to turn on/of f the produc t.
OPERATION MODES
Automatic mode (build horizontal/vertical plane)
Place the produ ct on a fl at su rface or tripod 5/8” in horizon tal or
vertical position.
Turn on the product. Symbol on t he displa y as well as las er
beam flash while self-levelling. As soon as self-levelling is finished
symbo l turns of f, rotar y head sta rts rot ating cl ockwi se at
600 rp m.
If the pro duct is o ut of self- levell ing range (5°), the pro duct wil l emit
sound signal. Laser beam will flash as well, rotary head will not rotate.
Turn off th e product and tu rn it on again.
Press bu tton to s witch to ti lt mode. Sy mbol app ears on
the display. If the product is unbalanced by some external influence,
it will not perform self-levelling again. You will hear sound signal,
symbo l will appe ar on the dis play. Turn off t he produ ct, then
turn it on a nd repeat opera tion.
Build inclined planes
This mode allows building inclined planes tilted up to ±10% for the
axes X and Y.
Press bu tton to ente r inclined pl anes mode. Sym bol will
appear on th e display. Valu e of tilt angl e for axis X is f lashing i n the
 Loading...