

Page 1
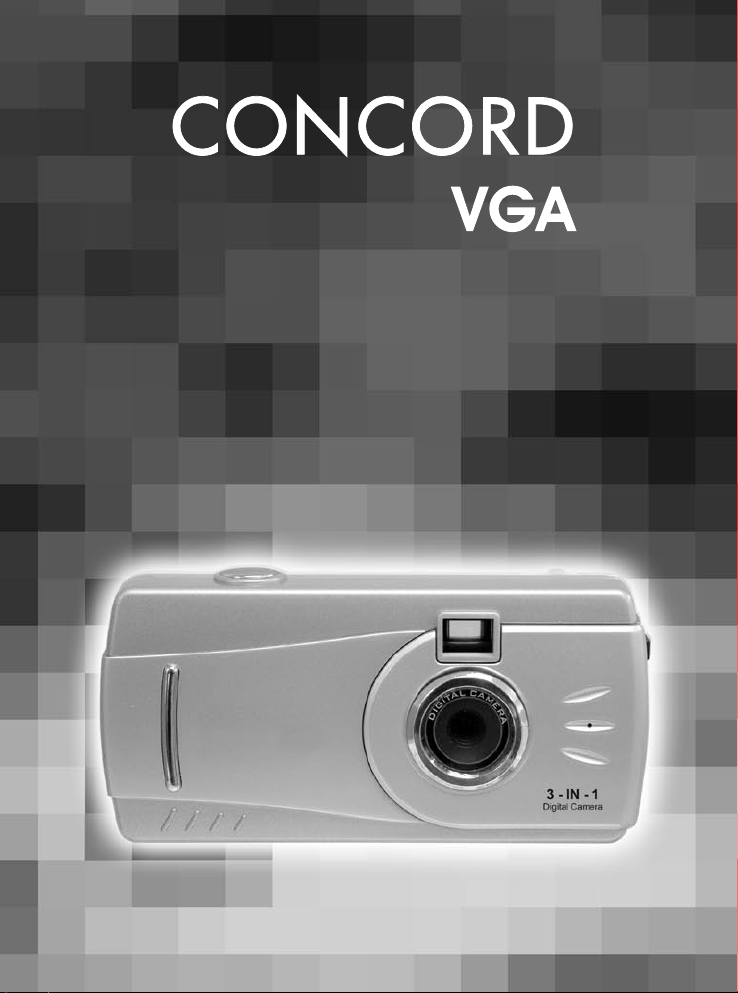
User’s Guide
User’s Guide
Page 2

.....................................................................................................................
..............................................................................................................................................
.......................................................................................................................................
......................................................................................................................................
4
......................................................................................................
......................................................................................................
..............................................................................................................................................
...........................................................................................................................
................................................................................................................................
.......................................................................................
..........................................................................................................................
........................................................................................................
........................................................................................................
....................................................................................................................................
................................................................................................................
.........................................................................
.................................................................................................................................
..........................................................................
Viewing the Panorama Picture
......................................................................................................................
.....................................................................................................................................
........................................................................................................................................................
.....................................................................................................................................
Page 3
2
ENGLISH
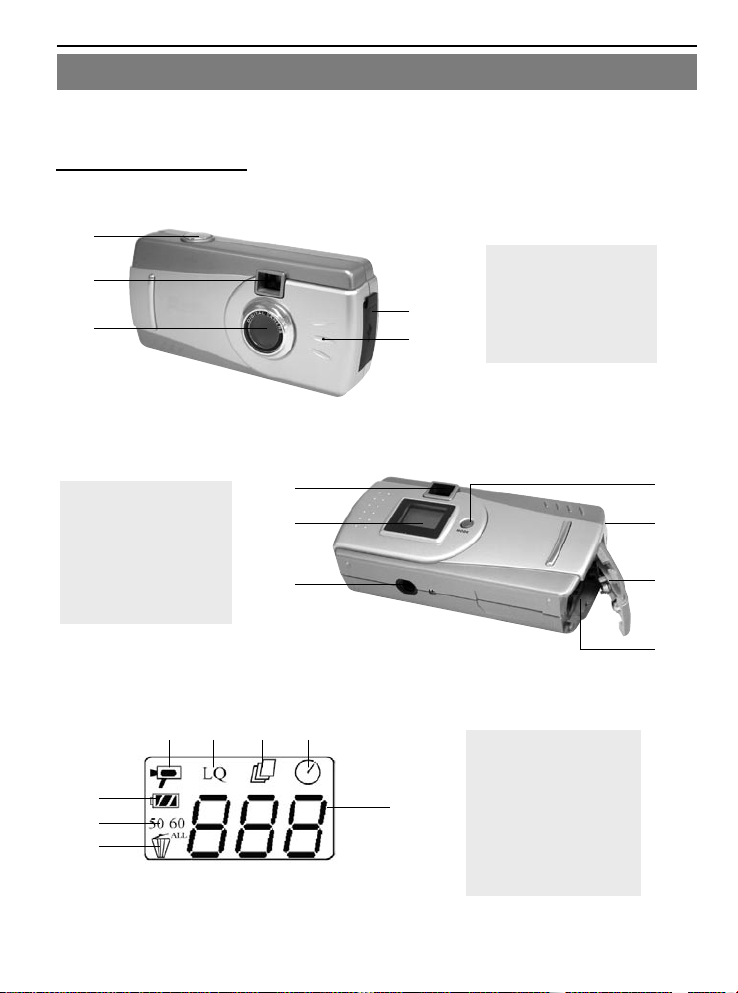
PRODUCT OVERVIEW
Front/Top
Bottom/Back
1. Shutter Button
2. Viewfinder
3. Lens
4. USB Port
5. Buzzer
6. Viewfinder Eyepiece
7. LCD Panel
8. Tripod Socket
9. Mode Button
10. Wrist Strap Holder
11. Battery Door
12. Battery Compartment
LCD Icon
1. AVI Video Mode
2. Low Resolution Mode
3. Continuous Shot Mode
4. Self Timer Mode
5. Battery Level
6. Frequency Option
7. Delete One/All Mode
8. Frame Number
1
2
3
4
5
6
7
8
10
11
12
9
1 2 3 4
5
6
7
8
PRODUCT OVERVIEW
Page 4

3
GETTING STARTED
Congratulations on your purchase of your camera. This camera is featured with 2MB of internal SD RAM
memory for storing still images and/or short video clips in the camera. Please read this manual before
operating the camera to become familiar with the features of this versatile digital camera.
Computer System Requirements
1) Compatible with Microsoft Windows 98SE/ME/2000/XP
2) Pentium II 166MHz or Pentium compatible processor
3) USB Port
4) 64MB RAM or higher
5) 200MB free hard disk space
6) CD-ROM drive
7) Color monitor with high color (16-bit) graphic capability or higher
8) Standard mouse and keyboard
9) Modem and communication software for Internet connection
Camera Features
• Capable of recording images at VGA Resolution (640 x 480 pixels) or QVGA Resolution (320 x 240 pixels)
• Auto exposure control
• Auto white balance
• Focus Free
• 2MB internal memory
• USB connection
• Web Camera Functionality
• Video Clip Functionality
IMPORTANT INFORMATION
The Concord Eye-Q VGA camera uses a type of memory that continually draws power to retain pictures
and/or video clips in the camera s internal memory, even when the camera is powered off. If the battery
power is depleted and you have not transferred your images to the computer, you will lose them. It is
strongly recommended that you transfer your images and/or video clips to the computer promptly, then
remove the batteries to preserve power.
If you have not transferred your pictures to your computer and your batteries are low, immediately
connect your camera to the computer via a USB cable (included). While connected to the PC, you
can change the batteries and transfer the images. If you attempt to change the batteries BEFORE
connecting to the PC, you will lose all files stored in the camera!
Always use fresh batteries and we strongly recommend you use NiMH rechargeable batteries (not
included) to optimize the performance of your camera.
GETTING STARTED
Page 5

4
LOADING THE BATTERIES
The camera uses two AAA batteries as power supply.
1. Slide open the battery cover.
2. Insert 2x AAA batteries according to the polarity directions ( + ) ( – ) indicated on the inner side of the
battery door.
3. Shut the battery door.
Extending the Power Supply
To extend battery life, remove the batteries from the camera when it is not in use. Remember to transfer your
pictures to your computer BEFORE removing batteries, otherwise you will lose them.
Note:
• Always transfer your pictures to your computer before replacing the batteries.
• You may lose images stored in the camera if the battery power is insufficient.
• Do not use different types of batteries together.
• Soiling, such as fingerprints on the battery terminals, can significantly reduce battery life.
• Do not use new and used batteries together.
• Different brands of batteries will yield different results.
• The battery life of alkaline batteries may be shortened when exposed to temperatures of 10ºC or
below.
Low Battery Indication
When the batteries are nearly exhausted, the battery icon ( ) will blink, and a Beep sound can be heard.
The camera will be turned off automatically soon after. At this stage, the batteries would be too weak to take
a picture. Please connect the camera to your computer immediately so that you can transfer your pictures
to your computer and replace the batteries. Do not replace batteries if the camera is not connected to the
computer, otherwise the stored pictures would be lost!
TURNING THE CAMERA ON/OFF
1. Press and hold the Mode button for about 3 seconds to turn the camera on. The
LCD shows as below:
• When the camera is powered on, a beep sound can be heard.
2. The camera will be automatically powered off after 30 seconds of inactivity.
To turn the camera off manually,
• If there is no any icon blinking on the LCD, press and hold the Mode button for about 3 seconds to turn
the camera off.
• If there is icon blinking on the LCD, press the Mode button repeatedly until none of the icons are
blinking, then press and hold the Mode to turn the camera off.
Note: When the camera is powered off, no indicator displays on the LCD.
GETTING STARTED
Page 6

5
TAKING PICTURES
BASIC OPERATION
1. Turn on the camera.
2. Frame the subject in the viewfinder.
3. Press the Shutter button to take the picture.
• You will hear a beep when a picture is taken.
• The frame number will increase by one frame on the LCD panel. For example, if it s the first time to
power on the camera, the frame number will be changed from 00 to 01 after the first picture is taken.
Note: To ensure a clear and sharp picture, hold your camera steady when pressing the Shutter button or
mount the camera on a tripod.
TAKING PICTURES IN SELF-TIMER MODE
1. Turn on the camera.
2. Frame the subject in the viewfinder.
3. Place the camera on a flat surface or tripod.
4. Press the Mode button repeatedly until the Self-Timer Mode icon ( ) is blinking.
5. Press the Shutter button.
• The camera will take a picture automatically after 10 seconds. The Buzzer will beep slowly for about 7
seconds and then rapidly for about 3 seconds.
• The Self-Timer will be deactivated once the picture is taken.
Note: While the Self-Timer icon ( ) is blinking, the Shutter button must be pressed within about 10
seconds, otherwise the Self-Timer will be deactivated.
TAKING PICTURES IN CONTINUOUS SHOT MODE
1. Turn on the camera.
2. Press the Mode button repeatedly until the Continuous Shot Mode icon ( ) is blinking.
3. Press the Shutter button to confirm selection of the mode. When Continuous Shot Mode is set, the icon
( ) will stop blinking.
4. Frame the subject in the viewfinder.
5. Press the Shutter button to take three consecutive pictures. Three beep sounds can be heard.
To exit Continuous Shot Mode:
1. Press the Mode button repeatedly until the Continuous Shot Mode icon ( ) is blinking, then press the
Shutter button. The Continuous Shot Mode icon ( ) will disappear.
Or
2. Press and hold the Mode button for a few seconds to power the camera off first, and then press and hold
the Mode button to turn it back on.
Note: You can shoot continuous pictures in Self-Timer mode, Low Resolution mode, 50 Hz mode, and 60
Hz mode.
TAKING PICTURES
Page 7

6
TAKING PICTURES IN LOW RESOLUTION MODE
By default, the image resolution is 640 x 480 pixels. You may change the image resolution to low resolution,
that is 320 x 240 pixels, to reduce the size of the image to enable the camera to store more pictures.
1. Turn on the camera.
2. Press the Mode button repeatedly until the LQ indicator ( ) is blinking.
3. Press the Shutter button to confirm selection of the mode. The LQ indicator will stop blinking.
4. Frame the subject in the viewfinder.
5. Press the Shutter button to take a low-resolution picture.
To exit the Low Resolution mode, please
Press the Mode button repeatedly until the Low Resolution icon ( ) is blinking, then press the Shutter
button. The Low Resolution icon ( ) will disappear.
Note: You may take Low Resolution pictures in Self-Timer Mode and Continuous Shot Mode as well.
TAKING VIDEO CLIPS
The camera can take video clips in AVI format at about 9 frames per seconds in QVGA (320 x 240) resolution.
1. Press and hold the Mode button for about 3 seconds to turn the camera on.
2. Press the Mode button repeatedly until the video icon ( ) is blinking.
3. Press the Shutter button to confirm selection of the mode. The video icon ( ) will stop blinking.
4. Press and hold the Shutter button to record video clip. A long beep sound can be heard.
5. Release the Shutter button to stop recording. Otherwise, some time later the LCD will display “FUL” which
indicates the memory is full and recording is finished.
• When a video clip is taken, the frame counter will advance one frame.
• The Video Clip mode will be deactivated once a video clip is taken. To take one more video clip, repeat
steps 2-5 mentioned above.
Note: The camera is designed to record video clips regardless of lighting sufficiency. Thus, you would
need to pay special attention to the lighting conditions to optimize video quality.
TAKING PICTURES / TAKING VIDEO CLIPS
Page 8

7
SETTING PC CAMERA FREQUENCY
The choice of 50Hz or 60Hz is necessary only when image quality in PC-Camera mode is degraded, due to
frequency difference in different countries. Selecting between 50Hz and 60Hz depends on the voltage that
is adopted in your country. In countries (such as USA, Canada, and Japan) with 110V power supply, 60Hz
should be used; whereas for countries (such as France and Germany) with 220V power supply, 50Hz should
be selected so as to optimize the camera s performance.
Power Supply in your Country Set the camera to
220V, 50 Hz 50 Hz mode
110V, 60 Hz 60 Hz mode
To set the Frequency
1. Press and hold the Mode button for about 3 seconds to turn the camera on.
2. Press the Mode button repeatedly until the 50 frequency indicator ( ) or 60 frequency indicator ( )
is blinking.
3. Press the Shutter button to confirm selection of the mode.
DELETE FILES
DELETING ONE
1. Turn on the camera.
2. Press the Mode button repeatedly until the icon ( ) is blinking.
3. Press the Shutter button to confirm mode selection.
4. Press the Shutter button again. The last stored file will be deleted from the memory.
Note: After deleting one picture or video clip, the Delete One mode will be deactivated. To delete more,
please repeat step 2-4 mentioned above.
DELETING ALL
1. Turn on the camera.
2. Press the Mode button repeatedly until the icon ( ) is blinking.
3. Press the Shutter button to confirm mode selection. The icon ( ) will stop blinking, but the Frame
Counter will start changing in circle and blinking at the same time.
4. Within 5 seconds, press and hold the Shutter button until 00 is shown on the LCD. All stored pictures/
video clips will be deleted from the memory.
Note: If you do not press and hold the Shutter button to delete all the files while the Frame Counter is
blinking, the Delete All operation will be cancelled in a few seconds.
MEMORY FULL MESSAGE
If [ FUL ] is displayed on the LCD panel, you cannot take pictures/video clips anymore, as the memory in the
camera is used up. To take more pictures, you must free the memory space by transferring stored pictures to
the computer.
SETTING PC CAMERA FREQUENCY / DELETE FILES / MEMORY FULL MESSAGE
Page 9
8
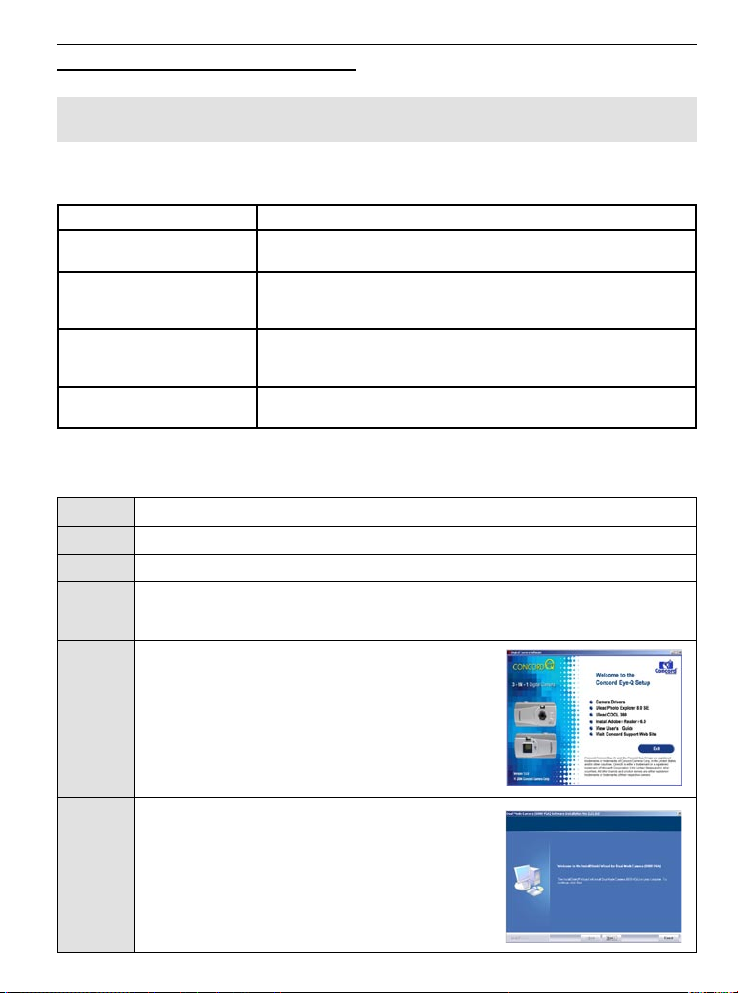
SOFTWARE INSTALLATION GUIDE
Note: Do not connect the camera to your computer via the supplied USB cable BEFORE successfully
installing the camera’s drivers and software.
INTRODUCTION TO THE SUPPLIED SOFTWARE APPLICATIONS
Option Description
Camera Driver The driver enables you to download pictures/video clips from the camera
to your computer.
Ulead Photo Explorer 8.0 SE Enables you to transfer the files from the camera to your computer, to
use the camera as PC camera, and to organize, edit and share photos
etc.
Ulead COOL 360 Enables you to transform a series of photos into a complete 360°
panoramic or wide-angle panoramic scene for an immersive viewing
experience.
Adobe Acrobat Reader 5 Adobe Acrobat Reader enables you to view the electronic version of the
User s Guide.
INSTALLING THE CAMERA DRIVER
Step 1 Make sure that your camera is not connected to the computer.
Step 2 Make sure the computer is powered on and Windows 98SE, ME, 2000 or XP is running.
Step 3 Close any other applications or software you may be running.
Step 4 Insert the supplied CD-ROM into the CD-ROM drive. The installer will pop up automatically.
Note: If the installer does not appear automatically, double click ‘My Computer’, and then
double click the CD-ROM driver.
Step 5 Click ‘Camera Driver’
Step 6 Click [Next] to start Installing the Camera Driver.
SOFTWARES INSTALLATION GUIDE
Page 10

9
Step 7 Click [Next].
Step 8 Click [Install].
Step 9 Installation starts.
Step 10 Click [Finish].
Note for Windows XP users: While installing the camera driver, screen
as below may appear. Click “Continue Anyway” to continue the driver
installation.
If the screen appears again when you are using Ulead Photo Explorer to
download pictures or to use the camera as PC camera, please insert the
supplied CD-ROM into your CD driver first, and then click Continue Anyway
to install the camera driver.
SOFTWARES INSTALLATION GUIDE
Page 11

10
INSTALLING THE ULEAD PHOTO EXPLORER 8.0 SE
Step 1 Make sure that your camera is not connected to the computer.
Step 2 Make sure the computer is powered on and Windows 98SE, ME, 2000 or XP is running.
Step 3 Close any other applications or software you may be running.
Step 4 Insert the supplied CD-ROM into the CD-ROM drive. The installer will pop up automatically.
Note: If the installer does not appear automatically, double click ‘My Computer’, and then
double click the CD-ROM driver.
Step 5 Click ‘Ulead Photo Explorer 8.0 SE’.
Step 6 Select the language for installing Ulead Photo Explore
8.0, then click [Next].
Step 7 Click [Next].
Step 8 Read the agreement, and then click [Yes].
SOFTWARES INSTALLATION GUIDE
Page 12

11
Step 9 Click [Next].
Step 10 Click [Next]. The Ulead Photo Explorer will be installed
in the default C drive. You can click on [Browse] to
change the folder.
Step 11 Choose the Shortcut location, then click [Next].
Note: To unselect the shortcut location, click on the box
with the “v” mark.
Step 12 Click [Next].
Step 13 Click [Next].
SOFTWARES INSTALLATION GUIDE
Page 13

12
Step 14 If you do not want to read the Readme file after the
Ulead Photo Explorer installation, click on the box with
“v” mark to unselect it, and then click [Next]. Otherwise,
click [Next].
Step 15 Installing starts. Please
wait for a few seconds.
Note: If you selected to read the Readme file in step 15, the Readme window will pop up.
Close the window after reading.
Step 16 Click [Next].
Step 17 Click [Finish].
(For Win 98SE/ME) (For Win 2000/XP)
Note: If you selected to register online, the computer will start online registration. Follow
the register wizard to complete the registration. However, if you selected to register online
but your computer isn’t connected to Internet, ‘offline’ message or ‘Internet Connection
Wizard” will appear. You may either connect to the Internet and then re-try or cancel the
operation by closing the message window.
(For Win 98SE/2000/ME)
SOFTWARES INSTALLATION GUIDE
Page 14

13
INSTALLING THE ULEAD COOL 360 (OPTIONAL)
Step 1 Make sure that your camera is not connected to the computer.
Step 2 Make sure the computer is powered on and Windows 98SE, ME, 2000 or XP is running.
Step 3 Close any other applications or software you may be running.
Step 4 Insert the supplied CD-ROM into the CD-ROM drive. The installer will pop up automatically.
Note: If the installer does not appear automatically, double click ‘My Computer’, and then
double click the CD-ROM driver.
Step 5 Click ‘Ulead Cool 360.’
Step 6 Click on ‘Install Ulead Cool 360’.
Step 7 Select Language, then click [OK].
Step 8 Click [Next].
Step 9 Read the agreement, and then click [Yes].
SOFTWARES INSTALLATION GUIDE
Page 15

14
Step 10 Choose the folder using to store the Ulead Cool 360 by
clicking on [Browse], then click [Next].
Step 11 Click [Next].
Step 12 Click [Next].
Step 13 Installation starts.
Step 14 If you do not want to install Internet Explore Plugin, click
[No]. Otherwise, click [Yes].
Step 15 Choose the setup type by clicking on the check box, the
click [Next].
SOFTWARES INSTALLATION GUIDE
Page 16

15
Step 16 Click [Next].
Step 17 Click [Finish].
Note: If your computer isn’t connected to Internet,
Internet connection wizard or offline message will
appear. Follow the on-screen information to complete
the rest steps.
Step 18 Click [Exit].
INSTALLING ADOBE ACROBAT READER 5 (OPTIONAL)
Step 1 Make sure that your camera is not connected to the computer.
Step 2 Make sure the computer is powered on and Windows 98SE, ME, 2000 or XP is running.
Step 3 Close any other applications or software you may be running.
Step 4 Insert the supplied CD-ROM into the CD-ROM drive. The installer will pop up automatically.
Note: If the installer does not appear automatically, double click ‘My Computer’, and then
double click the CD-ROM driver.
Step 5 Click ‘Install Adobe Reader 5’ .
SOFTWARES INSTALLATION GUIDE
Page 17

16
Step 6 Status bar.
Step 7 Click [Next >].
Step 8 The files will be saved into C:\Program Files\Adobe\
Acrobat 5 automatically.
OR
You may change the default folder by clicking [Browse ]
and selecting a different folder in your computer.
Click [Next >]
Step 9 Installation progress.
Step 10 Click [OK]
Note:
1. Depending on the version of your operating system, some of the procedures described above might not
exactly match with the windows/dialog boxes that appear on your screen. When in doubt, follow on-screen
instructions and/or refer to the user documentation that comes with your operating system.
2. For Windows 2000/XP users, the message “The software you are going to install doesn’t contain the
Microsoft signature, and may not work properly. Do you want to continue? Yes/No” may appear when you
are installing the software and driver. In this case, please click “Yes” to continue.
SOFTWARES INSTALLATION GUIDE
Page 18

17
CONNECTING THE CAMERA TO THE COMPUTER
• DO NOT connect the camera to your computer via the USB cable BEFORE successful installation of the
software and camera driver. (page 8)
• To avoid potential short circuit, please DO NOT connect the both ends of the USB cable to the computer’s
USB ports.
CONNECT THE CAMERA TO A USB PORT ON THE COMPUTER
Plug one end of the USB cable into your camera and the other end into the USB port of your computer.
• The camera will automatically be powered on as soon as the camera is properly connected to the
computer.
• The camera s LCD panel will display [PC].
Note: For initial connection (i.e. camera connecting to computer for the first time), the computer will
automatically recognize your camera. Found New Hardware message will pop up. For Windows 98SE users,
the following message may appear soon after:
Please insert the supplied CD-ROM into the CD driver and click “OK” to
continue.
CHECKING CONNECTION OF YOUR CAMERA
For Windows 98SE/ME:
Double click “My Computer” icon ( ) Ë Control Panel Ë System Ë
Device Manager Ë Imaging Device.
• If you see Concord Eye-Q VGA then your camera is now installed.
For Windows 2000/XP:
Double click “My Computer” icon ( ) (Windows 2000) or go to Start
Button and select “My Computer” (Windows XP) Ë Control Panel Ë
System Ë Hardware Ë Device Manager Ë Imaging Device.
• If you see Concord Eye-Q VGA, then your camera is now installed.
UNINSTALLING SOFTWARE
1. Click “Start” on the task bar and choose “Settings”.
2. Choose “Control Panel” and double click “Add/Remove Programs”.
3. Select the program to be uninstalled : “Ulead Photo Explorer 8.0 SE”, “Ulead COOL 360 1.0”, or Concord
Eye-Q VGA.
4. Click “Remove Program” and follow the instructions on screen.
CONNECTING THE CAMERA TO THE COMPUTER
Page 19

18
USING THE ULEAD PHOTO EXPLORER 8.0
The Photo Explorer can be used to download the pictures/video clips from the camera to computer, to edit and
enhance the pictures, to play video clips, to create slide show, and to use the camera as a PC camera.
DOWNLOADING THE FILES FROM THE CAMERA TO YOUR COMPUTER
1. Make sure that your camera is securely connected to your PC.
Note: Do not connect the camera to the computer before successful installation of the camera s drivers
and software. (see page 8).
2. Launch the Ulead Photo Explorer 8.0 by double clicking the icon on
the desktop, or via Start > Programs > Ulead Photo Explorer 8.0 Basic.
3. Choose the folder using to store the file. (See fig. 1.1)
4. Double click the TWAIN Acquire icon . Or click File Ë TWAIN
Acquire Ë Acquire Now. The Ulead Instant Viewer screen pops up.
5. Click the icon to download the picture/video clips from camera.
After downloading is completed, the thumbnail view of the files is shown
on the right side of the screen. The file type will be shown (“Img” for
pictures, “AVI” for video clips).
6. Click on the arrow icon to view all the files.
7. Choose the file you would like to save by clicking on the file, and then click “Transfer” ( ).
• You may also click “Transfer All” ( ) to save all the files.
8. Before saving a video clip, the computer will ask you to define the file
name.
Type in file name, and then click “Save”.
(fig. 1.1)
(fig. 1.2)
(fig. 1.3)
(fig. 1.4)
(fig. 1.5)
USING THE ULEAD PHOTO EXPLORER 8.0
Page 20

19
9. After transferring all the files you would like to keep, you can click “Erase
All” to delete all the files. Before deleting, the computer will ask “Are you
sure”? Click “Yes” if it is confirmed. Otherwise, click “No”.
10. Click “Exit” ( ) to close the Ulead Instant View window. All the pictures
that are downloaded just now will display in the browse pane. (fig. 1.1)
11. Click “File > Exit” or click the to exit Ulead Photo Explorer 8.0.
REVIEW/EDITING THE PICTURES
1. Launch the Ulead Photo Explorer 8.0.
2. Click on the folder where the pictures you want to edit were saved. The thumbnail view of the pictures in
the folder will be shown.
3. Click on the picture you would like to edit. The picture will be shown in
the small window on the left bottom screen.
4. Double click the picture, a separate window will pop up. Now you can
• Click on or to enlarge or zoom out the picture.
• Click on or to rotate the picture.
• Click on to add description for the picture and then click on
to save the description.
• Click on to save the picture.
When editing is complete, click on to exit picture editing.
PLAYING VIDEO CLIPS
1. Launch the Ulead Photo Explorer 8.0.
2. Click on the folder that contains the video clips saved. (p.18) All the video clips will be shown in the
Thumbnail.
3. Click on a video clip file. The video clip will be shown on the left bottom
screen.
4. Click on “►” to start playing the video clip.
(fig. 1.6)
USING THE ULEAD PHOTO EXPLORER 8.0
Page 21

20
CREATING A SLIDE SHOW
You can create a slide show of Image files and Video files.
1. Launch the Ulead Photo Explorer 8.0.
2. Click on the icon. A rectangle window will appear in the bottom side
of the screen.
3. Choose the picture/video clip that is to be used from the thumbnail view
window and then click to add it to the Slide Show window.
• You may click on to delete the picture/video clip, and click to
adjust the sequence of the files.
4. When completed, click on to test play the Slide Show.
5. Click on to save the Slide Show file.
Note: A Slide Show folder will be created when you created a Slide Show.
USING THE CAMERA AS A PC CAMERA
1. Connect the camera to your PC.
Note: Do not connect the camera to the computer before successful installation of the camera s drivers
and software. (see page 8).
2. Launch the Ulead Photo Explorer 8.0 by double clicking the icon on
the desktop, or via Start > Programs > Ulead Photo Explorer 8.0 Basic.
3. Double click the TWAIN Acquire icon . Or click File Ë TWAIN
Acquire Ë Acquire Now. The Ulead Instant Viewer screen pops up.
4. Click the to adjust the properties of live view.
USING THE ULEAD PHOTO EXPLORER 8.0
Page 22

21
5. Click the icon to prepare to record a Video Clip. A small window
as below will appear.
6. Click on “Set Avi File” ( ) to assign file name.
Note: If you press “Start” before assigning a file name, the message
below will appear. Please assign file name.
7. Click “Start” ( ) to start recording live Video Clip.
8. Click the icon again to stop recording.
Note: You may also click on the “Snap Shot” ( ) icon to take pictures.
USING THE ULEAD PHOTO EXPLORER 8.0
Page 23

22
USING THE ULEAD COOL 360
Transforming a Series of Photos into a Panorama Picture
1. Double click the COOL 360 icon ( ) on your desktop to open the
program.
2. Click the “New Project” icon ( ), the “New Project Wizard” will
appear.
3. Type in project name, and then click “Next”.
4. Choose the folder where the pictures that will be used to create the
panorama picture are saved. Then select the picture. A preview of the
picture is shown (fig. 1.3).
5. Click “Add”. The screen shows as below:
Note: You may click “Add All” to select all the pictures in the folder. You
may also click “Acquire” to get picture from camera.
6. Repeat steps 4-6 to add more pictures.
Note: The size of the image (i.e. the image resolution you set when the
pictures were taken) must be the same. Otherwise you will not be able to
proceed to the next step. 2)
USING THE ULEAD COOL 360
Page 24

23
7. Click “Next”.
8. Click “Finish”.
9. Adjust the panorama with the control buttons on the right side of the
screen. (fig. 1.7)
10. Click the “Viewer” icon ( ) to have a preview of the panorama
picture.
11. Close the viewer window.
12. Click “Finish” ( ).
13. Click “Save” to save the newly created panorama picture.
14. Click “ ” to exit Ulead Cool 360.
VIEWING THE PANORAMA PICTURE
1. Launch the Ulead Cool 360 Viewer by double clicking on the ( ) icon on the desktop.
2. Click “File > Open …” to open the panorama picture you saved.
Note: For details, please refer to the program’s Help.
USING THE ULEAD COOL 360
Page 25

24
HOLDING VIDEO CONFERENCE
1. Connect the camera to your computer by using the supplied USB cable.
2. Launch “NetMeeting” by clicking on “Start > Program > Accessories > Communication > NetMeeting”.
• The first time the NetMeeting is launched, a simple Setup procedure
will appear on the screen:
Click on [Next] and follow the wizard to tune your audio setting. When
you have tuned your settings, the screen below appears.
3. Type in the other party s IP address in the address bar and click the dial
icon ( ).
4. After the other party accepted your calling, you can hold Video
conference with him/her.
Refer to “Help” to get know more about the NetMeeting.
HOLDING VIDEO CONFERENCE
Page 26

25
TROUBLESHOOTING
The troubleshooting guide is designed to help you solve common problems. If the problem encountered is not
included in this section, please contact your local customer support hotline.
SYMPTOM PROBLEM SOLUTION
All the images I have
taken do not appear.
Insufficient battery
power.
Download all images to your PC as soon as possible.
Refer to “Important Information” section on page 3.
Batteries were removed
before the camera
was connected to the
computer.
To retain images in the camera while changing
batteries, you must first connect the camera to a
computer via the USB cable. The connection will
supply power to the camera, allowing for replacement
of batteries without the risk of losing stored pictures.
I cannot upload
images to the PC.
Connection failure. Make sure all cable connections are properly and
securely plugged in.
The camera driver is
not correctly installed on
your computer
Un-install the software and camera driver first (p.17),
and then re-install. (p.8)
GETTING HELP
Should you need help with your camera, refer to the “Troubleshooting” section of this manual. If the problem
encountered is not included in the “Troubleshooting” section, please visit our customer support website at
www.concord-camera.com to view Frequently Asked Questions (FAQ) by clicking the picture of your
model in the “Camera Support” Section. Most questions can be answered in the FAQ section.
You can also send an e-mail to us by clicking the e-mail address that is linked to the customer support center
in the “Contact Us” section.
For Camera Support please contact:
Toll Free in the US and Canada:
• (866) 522-6372
Web: www.concord-camera.com
Email: For Camera Support via E-mail, please contact us at www.concord-camera.com.
Toll Free in Europe:
• UK: 0800-1696482
• Spain: 900-973195
• Germany: 0800-1800563
• Italy: 800-781883
• France: 0800-917599
Toll:
• +31-53-4829779
For detailed information on how to work with Photo Explorer 8.0 and Cool 360, please contact
www.ulead.com.
TROUBLESHOOTING / GETTING HELP
Page 27

26
SPECIFICATIONS
Image Resolution VGA (640 x 480 pixels), CMOS Sensor
Lens F 2.8, f =5.0 mm
Operating System Microsoft Windows 98 SE / ME / 2000 / XP
White Balance Auto
Exposure Control Auto
Continuous Shooting 3 Pictures / Second
Internal Memory 2 MB internal SDRAM memory
Image Storage 640 x 480 pixels (VGA) -- 20 pictures
320 x 240 pixels (QVGA) -- 80 pictures
Frame Rate VGA ( 640 x 480 ) 10 fps
(Depends on system QVGA ( 320 x 240 ) 25 ~ 30 fps
performance)
Video Capture AVI frame rate is 9fps and in VGA or QVGA mode
PC Interface USB 1.1
Power 2 x AAA Batteries
Dimension 103 x 50 x 31mm
Accessories • USB cable
• Wrist Strap
• Quick Start Guide
• Registration Card and Warranty Card
• CD-ROM for Windows
- Ulead Photo Exploere 8.0 SE
- Ulead Cool 360
- Camera Driver
- Adobe Acrobat Reader
- User’s Guide
SPECIFICATIONS
Page 28

27
CLEANING AND MAINTENANCE
Be sure to read this information to ensure that you use your camera correctly.
Places to Avoid
Do not store or use the camera in the following places or locations:
• Very humid, dirty or dusty places.
• In direct sunlight or in places subject to extreme increases in temperature such as in a closed vehicle
during summer.
• Extremely cold places.
• Places subject to strong vibrations.
• Places affected by smoke or steam.
• Places subject to strong magnetic fields (such as near motors, transformers or magnets.)
• Avoid contact with chemicals such as pesticides, next to rubber or vinyl products.
• Do not expose the camera to sand. In sandy locations such as beaches or deserts, or in locations where
there is wind-borne sand, ensure that the camera is not exposed to sand. This can cause irrepairable
damage.
Storing the camera
If you do not intend to use the camera for a prolonged period of time, transfer the pictures from your camera
to your computer (if necessary), then remove the batteries before storing the camera.
Cleaning your Camera
Use a blower brush to remove dust from the lens and LCD surface, then wipe lightly with a soft, dust-free-dry
cloth. If any soiling remains, apply a small amount of lens cleaning liquid to a piece of lens cleaning paper and
wipe gently.
Do not scratch hard objects against the lens, LCD screen or viewfinder, as these surfaces can easily be
damaged. Clean the body of the camera with a soft, dust-free-dry cloth. Do not use volatile substances such
as thinners, benzine or insecticide, as these may cause chemical reaction with the camera s body, thereby
causing deformaties or removes the coating of the camera.
When traveling overseas
Do not place your camera in the check-in baggage. Baggage handling at airports may subject the camera to
violent shocks and the camera may be damaged internally even when no external damage is visible.
CLEANING AND MAINTENANCE
Page 29

28
PRECAUTIONS
Test Shots
Always take a test photograph first to check that the camera is functioning normally. The liability for any
incidental losses (such as the cost of photography or the loss of income from photography) incurred as a
result of fault with this product cannot be accepted.
Notes on Copyright
Images recorded using your digital camera system cannot be used in ways that infringe copyright laws
without the consent of the owner unless intended only for personal use. Note that some restrictions apply to
photographing stage performances, entertainment and exhibits, even when intended purely for personal use.
Users are also asked to note that the transfer of camera memory containing images or data protected under
copyright laws is only permissible within the restrictions imposed by those copyright laws.
Liquid Crystal
If the liquid crystal display (LCD) monitor or LCD panel is damaged, take particular care with the liquid crystal
in the monitor or panel. If any of the following situations arise, take the appropriate action as described. If
liquid crystal:
• comes into contact with skin, wipe the area with a cloth, then thoroughly wash with water and soap;
• gets into your eyes, flush the eyes with clean water for at least 15 minutes, then seek medical assistance;
• is swallowed, flush your mouth thoroughly with clean water. Drink large quantities of water and induce
vomiting. Seek medical assistance.
Notes on Electrical Interference
If the camera is used in hospital or aircrafts, please note that it may cause interference with other equipment
in the hospital or aircraft. For details, please check with the applicable regulation in that area.
REGULATORY INFORMATION
FCC STATEMENT
This device complies with part 15 the FCC Rules. Operation is subject to the following two conditions: (i)
This device may not cause harmful interference, and (ii) this device must accept any interference received,
including interference that may cause undesired operation.
CAUTION
NOTE: This equipment has been tested and found to comply with the limits for a class B digital device,
pursuant to Part 15 of the FCC Rules. These limits are designed to provide reasonable protection against
harmful interference in a residential installation. This equipment generates, uses and can radiate radio
frequency energy and, if not installed and used in accordance with the instructions, may cause harmful
interference to radio communications. However, there is no guarantee that interference will not occur in
a particular installation. If this equipment does cause harmful interference to radio or television reception,
which can be determined by turning the equipment on and off, the user is encouraged to try to correct the
interference by one or more of the following measures:
• Reorient or relocate the receiving antenna.
• Increase the separation between the equipment and receiver.
• Connect the equipment into an outlet on a circuit different from that to which the receiver is connected.
• Consult the dealer or an experienced radio/TV technician for help.
Concord, Concord Eye-Q and the Concord Eye-Q logo are registered trademarks or trademarks of Concord Camera Corp., in the United States
and/or other countries. Microsoft and Windows are either registered trademarks or trademarks of Microsoft Corporation in the United States
and/or other countries. Mac and Macintosh are registered trademarks or trademarks of Apple Computer, Inc. in the U.S. and other countries. All
other brands and product names are either registered trademarks or trademarks of their respective owners.
PRECAUTIONS / REGULATORY INFORMATION
Page 30

Visit Concord on the Internet
www.concord-camera.com
Concord Eye-Q VGA User’s Guide
Copyright 2004 Concord Camera Corp.
Version 2.0
515347-01
R1
 Loading...