


CONCORD Eye-Q 4363z
User’s Guide
LANGUAGES
ENGLISH
FRANÇAIS
DEUTSCH
ESPAÑOL

En
ENGLISH
CONGRATULATIONS
Congratulations on the purchase of your new camera. Your camera has been carefully engineered and manufactured to give you dependable operation. Read this manual before operating the camera to become more familiar with it.
This manual has been written and formatted with depth and detail so that you can easily follow the instructions to maximize the features of your camera.
1

CAMERA OVERVIEW
CAMERA OVERVIEW
Top/Front
1 |
2 |
3
4
5 |
6 |
7 |
8 |
9 |
10
11
1. |
Power Button |
8. |
Red-eye |
2. |
Shutter Button |
|
Reduction LED/ |
3. |
Flash |
|
Self-Timer LED/ |
4. |
Lens/ Lens Door |
|
AF Assist Light |
5. |
Viewfinder |
9. |
Port Cover |
6. |
Flash Sensor |
10. |
Mini-USB port |
7. |
Microphone |
11. |
TV-Out port |
|
|
|
|
12. |
Flash Ready LED |
24. |
Wrist Strap Holder |
||
13. |
Auto-Focus LED |
25. |
Move to right / |
||
14. |
Viewfinder |
|
Macro ( ) Button |
||
15. |
LCD |
26. |
Speaker |
||
16. |
LCD On/Off Button |
27. |
Move down / |
||
17. |
Tripod Socket |
|
Self-timer ( ) |
||
18. |
Battery/Memory |
|
Button |
||
|
Card Door |
28. |
Memory Card Slot |
||
19. |
Mode Switch |
29. |
Battery |
||
20. |
Thumbnail/Wide/ |
|
Compartment |
||
|
Tele Zoom Button |
30. |
Move to left / |
||
21. |
MENU Button |
|
Continuous ( |
|
) |
22. |
Move up / |
|
Shot Button |
||
|
Flash ( ) Button |
31. |
Reset Button |
||
23. |
OK Button |
32. Delete Button |
|||
|
|
|
|
|
|
Bottom/Back
12
13
14
15
16
17
18
19
20
21
22
23
24
25
26
27
28
29
30
31
32
En
LCD ICONS |
|
|
|
|
|
|
|
A |
|
|
|
F |
|
|
|
B |
A |
3M |
0001/0014 |
G |
A |
3M |
0001/0014 |
C |
H |
|
|
I |
|
D |
AWB |
J |
AWB |
E |
|
K |
|
A. Resolution |
G. Frame Counter |
|
|
|
: Single Shot |
|
|
|
|||
B. Camera Mode |
H. Macro |
|
|
|
: Continuous Shot |
C. Flash / Scene |
I. Zoom Bar |
|
|
|
|
Selection |
J. Self-Timer |
|
: Review |
||
D. White Balance |
K. Memory Card |
|
: Video Clips |
||
E. Battery Level |
|
|
|
|
|
|
|
|
|
|
|
F. Image Quality |
|
|
|
|
: Sport |
|
|
|
|
|
|
Camera Features
•4.0 Megapixels, 2272 x 1704 Resolution
•1.5” Color LCD
•3x Optical Zoom
•6x Digital Zoom
•AVI Movie with Sound at 30fps
•7 Preset Scenes
•Macro Mode
•Continuous Shooting Mode
•Self-timer
•Multi-area/Center-spot Auto Focus
•16MB Internal Memory, SD Card Slot
•Compatible with Windows® 98/98SE/ 2000/ME/XP and Mac OS 9.0 or higher
2

En
|
TABLE OF CONTENTS |
|
CAMERA OVERVIEW ........................................................................................................................................... |
2 |
|
Top/Front......................................................................................................................................................... |
2 |
|
Bottom/Back ................................................................................................................................................... |
2 |
|
LCD Icons....................................................................................................................................................... |
2 |
|
Camera Features............................................................................................................................................ |
2 |
|
GETTING STARTED.............................................................................................................................................. |
5 |
|
Attaching the Wrist Strap................................................................................................................................ |
5 |
|
Loading the Batteries ..................................................................................................................................... |
5 |
|
Turning the Camera On and Off..................................................................................................................... |
5 |
|
Removing the Protective Plastic Film............................................................................................................. |
5 |
|
Setting the Language, Date and Time............................................................................................................ |
6 |
|
Checking the Battery Level ............................................................................................................................ |
7 |
|
Turning the LCD On and Off .......................................................................................................................... |
7 |
|
Internal memory / Inserting the Memory Card ............................................................................................... |
8 |
|
Setting the camera’s operational mode.......................................................................................................... |
9 |
|
TAKING A PICTURE.............................................................................................................................................. |
9 |
|
Taking Pictures with the viewfinder ................................................................................................................ |
9 |
|
Taking Pictures with the LCD ...................................................................................................................... |
10 |
|
Using the Auto Focus Lock ........................................................................................................................... |
11 |
|
Setting the Flash .......................................................................................................................................... |
12 |
|
Using the Optical Zoom................................................................................................................................ |
13 |
|
Using the Digital Zoom ................................................................................................................................. |
13 |
|
Taking Pictures in Macro Mode .................................................................................................................... |
14 |
|
Taking Pictures in Continuous Mode ........................................................................................................... |
14 |
|
Taking Pictures in Self-timer Mode............................................................................................................... |
15 |
|
Using the main menu in Camera mode ....................................................................................................... |
16 |
|
• |
Setting Capture mode ........................................................................................................................... |
17 |
• Taking Pictures in Sport Mode .............................................................................................................. |
17 |
|
• |
Setting Image Quality ........................................................................................................................... |
18 |
• |
Setting Image Resolution...................................................................................................................... |
18 |
• |
Selecting Scene Modes ........................................................................................................................ |
20 |
• |
Setting White Balance .......................................................................................................................... |
21 |
• |
Selecting Photo Effect ......................................................................................................................... |
21 |
• |
Setting EV Compensation..................................................................................................................... |
22 |
• |
Setting ISO Sensitivity .......................................................................................................................... |
23 |
• |
Setting Metering Method....................................................................................................................... |
24 |
• |
Setting AF Mode .................................................................................................................................. |
24 |
TAKING VIDEO CLIPS ........................................................................................................................................ |
25 |
|
Taking Video Clips ....................................................................................................................................... |
25 |
|
Taking Video Clips in Self-timer Mode ......................................................................................................... |
26 |
|
Using the Main Menu in Video Clip Mode.................................................................................................... |
26 |
|
Setting Video Resolution .............................................................................................................................. |
27 |
|
REVIEWING YOUR FILES .................................................................................................................................. |
28 |
|
Using Review Mode ..................................................................................................................................... |
28 |
|
Reviewing Pictures/Video Clips.................................................................................................................... |
28 |
|
3

En
Enlarging Stored Picture .............................................................................................................................. |
29 |
|
Using Thumbnail View.................................................................................................................................. |
30 |
|
Using the Delete Button ............................................................................................................................... |
30 |
|
Using the main menu in Review Mode ........................................................................................................ |
32 |
|
• |
Deleting Files ........................................................................................................................................ |
33 |
• |
Using slide show ................................................................................................................................... |
34 |
• Transferring Files from Internal Memory to SD Card............................................................................ |
36 |
|
CUSTOMIZING THE CAMERA SETTINGS......................................................................................................... |
37 |
|
Setup Menu and Features............................................................................................................................ |
39 |
|
Setting the Auto Off Time ............................................................................................................................. |
39 |
|
Setting the Language ................................................................................................................................... |
40 |
|
Setting the Date and Time............................................................................................................................ |
40 |
|
Setting the LCD Brightness .......................................................................................................................... |
40 |
|
Formatting memory card .............................................................................................................................. |
41 |
|
Turning Beep On or Off ................................................................................................................................ |
42 |
|
Setting Quick View Interval .......................................................................................................................... |
42 |
|
Setting AF Assist Light.................................................................................................................................. |
43 |
|
RESTORE THE CAMERA TO FACTORY DEFAULT SETTINGS....................................................................... |
44 |
|
SOFTWARE INSTALLATION GUIDE.................................................................................................................. |
45 |
|
Computer System Requirements ................................................................................................................. |
45 |
|
Installation Requirements ............................................................................................................................. |
45 |
|
Using the Installer Splash Screen ................................................................................................................ |
46 |
|
Flow Diagram for Software Installation ........................................................................................................ |
47 |
|
Identifying your Operating System ............................................................................................................... |
48 |
|
Installing the Driver and DirectX 9 - Windows 98/98SE............................................................................... |
49 |
|
Installing DirectX 9 - Windows 2000 ............................................................................................................ |
51 |
|
Installing ArcSoft PhotoImpression - all Windows users .............................................................................. |
52 |
|
Installing Adobe Acrobat Reader 5 - all Windows users (optional) .............................................................. |
54 |
|
CONNECTING THE CAMERA TO THE COMPUTER ........................................................................................ |
56 |
|
Downloading Pictures and Video Clips onto your Computer ....................................................................... |
56 |
|
Using ArcSoft PhotoImpression.................................................................................................................... |
57 |
|
Unplugging your Camera from the Computer .............................................................................................. |
58 |
|
TV MODE ............................................................................................................................................................. |
59 |
|
Connecting the camera to the television ...................................................................................................... |
59 |
|
Using the TV as a Live Viewfinder ............................................................................................................... |
59 |
|
Reviewing pictures and video clips on your TV ........................................................................................... |
59 |
|
ERROR MESSAGES ........................................................................................................................................... |
60 |
|
TROUBLESHOOTING ......................................................................................................................................... |
61 |
|
GETTING HELP................................................................................................................................................... |
65 |
|
CAMERA SPECIFICATIONS............................................................................................................................... |
66 |
|
SAFETY TIPS AND MAINTENANCE.................................................................................................................. |
69 |
|
REGULATORY INFORMATION........................................................................................................................... |
72 |
|
4
En
GETTING STARTED
GETTING STARTED
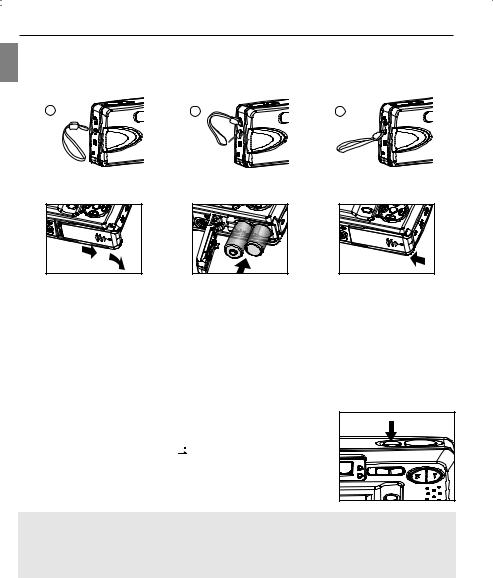
ATTACHING THE WRIST STRAP
Please attach the wrist strap to prevent dropping the camera.
1 |
2 |
3 |
LOADING THE BATTERIES
fig.1.1 |
fig.1.2 |
fig.1.3 |
The camera can use 2x AA alkaline, lithium or rechargeable batteries to operate. Rechargeable Batteries (NiMh) are highly recommended.
1.Slide the Battery/Memory Card door in the direction of the arrow, and lift it open. (fig.1.1)
2.Insert the batteries according to the polarity indication engraved on the battery contact. (fig.1.2)
3.Shut the Battery/Memory Card door by sliding it in the opposite direction of the arrow, and close it securely. (fig.1.3)
TURNING THE CAMERA ON AND OFF
The Power button is located on the top of the camera.
1.Press and hold the Power button (  ) for more than 1 second to turn the camera on.
• The Concord logo will show on the LCD for about 2 seconds.
•If the camera is in Camera Mode ( 

 ) or Video Clip Mode (
  ), the lens cover will open, and the lens will extend out automatically to the
wide-angle position. Do not block the lens from extending out.
• The LCD will turn on automatically and display live viewfinder. 2. To turn the camera off, press the Power (  ) button.
Note: To extend battery life,
•The LCD will be off after 1 minute of inactivity. After the LCD is automatically turned off, the Flash Ready LED blinks. Press any button to reactivate the LCD.
•The camera will automatically power off after 2 minutes of inactivity. Press and hold the Power (  ) button for more than 1 second to turn the camera back on.
REMOVING THE PROTECTIVE PLASTIC FILM
To prevent the LCD from damaging during transportation, the LCD is covered with a clear plastic film. To get a clearer view of the subject while taking pictures, please remove the protective film.
5

GETTING STARTED
SETTING THE LANGUAGE, DATE AND TIME
When the camera is powered on for the first time, the Language, Date and Time menus will appear.
 DATE/TIME SETUP
01 - 01 - 2004
01 : 01 AM
MM - DD - YYYY 12 - HOUR
RETURN 
 OK SET
fig. 1.1 |
fig. 1.2 |
1.Press  or
or  to highlight the language you would like to use. (fig. 1.1)
2.Press the OK button to select. The next screen shows date/time setup page. (fig. 1.2)
3.Press  to highlight the Date field, the Time field, the Date Format field or the Time Format field. The selected segment will blink.
4.Press  or
or  to change the number in the blinking position, and press
  to go to other fields.
5.Press the OK button to exit date/time setting. The next screen displays live viewfinder.
Note:
1.Each language will set the default setting for date format and TV option. To change the TV setting, please refer to page 59.
En
Language(s) |
Date Format Setting |
TV Option |
English / Español / |
MM/DD/YYYY |
NTSC |
Francis / Deutsch |
DD/MM/YYYY |
PAL |
/Italiano/ Nederlands/Português |
|
|
|
YYYY/MM/DD |
PAL |
2.If the battery is removed or dead for about 4 minutes, the date/time will return to its default setting. When you power on the camera again, the Date/Time setup screen will show on the LCD. You can either reset date/time by following steps 3-5 above or skip the date/time setting first by pressing the OK button and then set the date/time when you like by referring to p.40.
6

GETTING STARTED
En
CHECKING THE BATTERY LEVEL
The battery level indicator represents the level of power of the batteries. The meaning of each icon is as follows:
|
Batteries are fully |
|
Battery power is not |
|
Battery power is |
|
|
|
|||
|
|
full, but sufficient for |
|
||
|
charged. |
|
usage. |
|
running low. |
|
|
|
|
|
|
|
Battery power is low, |
|
Batteries are empty |
|
|
|
need to be replaced |
|
|
|
|
|
or recharged |
|
and need to be |
|
|
|
(rechargeable |
|
replaced. |
|
|
|
batteries only) soon. |
|
|
|
|
Note:
•The camera’s battery level indicator may not accurately reflect the state of rechargeable batteries even when the rechargeable batteries have been fully recharged due to the inherent problem with rechargeable batteries. For better performance, please use Ni-MH rechargeable batteries.
•Remove the batteries from the camera if they will not be used for an extended period of time to prevent corrosion or battery leaks.
TURNING THE LCD/ICONS ON AND OFF
The camera has a 1.5” LCD which can frame subjects for image and video clip capture, review stored images, video clips and display the current camera settings.
|
|
|
|
|
A |
4 |
28/45 |
|
|
|
|
|
AWB |
|
N |
Î |
Icons off |
Î |
LCD off |
Î |
LCD on with icons |
||
Use the ( 
 ) button to toggle the LCD mode. The LCD mode changes each time the button is pressed.
Note:
•To save battery power, you may turn off the LCD display.
•The LCD will also automatically power off after one minute of inactivity. The flash LED blinks when the
LCD is auto-powered off. Press any button to turn the LCD back on.
• In ( 

 ) Review Mode, only the LCD icons can be turned on or off.
7

INTERNAL MEMORY/INSERTING THE MEMORY CARD
Internal Memory
The camera is equipped with 16MB of internal memory, which can be used right away.
Status |
Memory in Use |
Memory card is not inserted. |
Internal Memory |
|
|
Memory card is inserted. |
Memory Card |
|
|
GETTING STARTED
En
NOTE!: The files stored in the internal memory will remain in the internal memory until the Transferring Files feature is selected. Please refer to the Transferring Files section on page 36.
Inserting the Memory Card
fig.1.1 |
fig.1.2 |
fig.1.3 |
In addition to having a 16MB internal memory, the camera can use Secure Digital (SD) memory cards to store images and video clips.
1.Slide the Battery/Memory Card door in the direction of arrow (fig. 1.1), and lift it open.
2.Insert the memory card in the direction as shown in fig.1.2, and push it firmly into the SD card slot as far as it will go. A click sound can be heard when the SD card is fully engaged.
3.Close the Battery/Memory Card door. (fig. 1.3) Make sure it is closed securely.
Removing the Memory Card
1.Press the memory card with finger-tip, the card will eject up.
2.Pull the card out.
Note:
•The camera can support SD cards up to 512 MB.
•When the SD card is inserted, power on the camera, the camera will first check if the SD card is valid. If yes, it will set the SD card as storage; otherwise it will request for formatting. Format the SD card (refer to p.41) if you want to use the SD card as storage, or else the memory locked icon will be shown on the LCD and Shutter button will be disabled.
•If the SD card is locked, when the camera is powered on, no image can be taken by pressing the Shutter button. In this case, please power off the camera first, then take out the SD card and unlock the SD card, and then reload the SD card.
8
En
GETTING STARTED / TAKING A PICTURE
SETTING THE CAMERA’S OPERATIONAL MODE
The camera has 3 operational modes: Camera Mode, Review Mode and Video Clip Mode.
To change the camera operational mode, slide the mode switch horizontally to the corresponding position.
Camera Mode |
Use the camera mode to take pictures or to customize your camera settings for picture taking.


 Review Mode
Use the review mode to browse through images and video clips, to delete images and video clips, to play a slide show, or to transfer the images/video clips from the internal memory to the SD card.
Video Clip Mode
Use video clip mode to capture video clips with sound or to customize your camera settings for video clip recording.
TAKING PICTURES
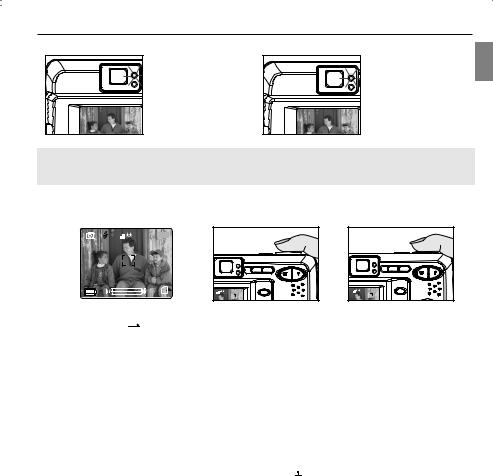
TAKING PICTURES WITH THE VIEWFINDER
|
4 |
28/45 |
fig.1.1 |
fig.1.2 |
|
A |
4 |
28/45 |
|
|
|
fig.1.3 |
|
|
1. |
Turn the camera on. |
|
|
2. |
Set the camera to ( |
) Camera mode. |
|
|
The LCD can be switched off to save battery power by pressing the ( |
) button. |
|
3. |
Frame the subject in the viewfinder. (fig.1.1) |
|
|
4. |
Press the shutter button half-way to activate the auto-focus until the green AF LED stops blinking. (fig.1.2) |
||
|
• The camera will automatically determine the best focus, and a rapid click sound can be heard. |
||
|
Note: For more information on Focus Lock, please go to page 11. To change AF mode, please refer to p. 24. |
||
5.Press the shutter button fully to capture the image. (fig.1.3)
•The camera will make a click sound.
•The camera will beep when the image is captured.
•When the image has been captured, the Flash Ready LED next to the viewfinder will blink to indicate that the image is being stored.
9
TAKING A PICTURE
About Flash Ready LED
En
Steady |
Blinking |
The camera is |
The flash is recharging, or |
capturing a video clip. |
LCD is auto powered off. |
Note: Do not power the camera off or change camera mode while the camera is capturing or storing a picture or video clip. Otherwise, the picture or video clip may be corrupted.
TAKING PICTURES WITH THE LCD
A |
3M |
28/45 |
|
|
|
|
|
AWB |
|
|
|
|
|
4 |
28/45 |
A |
4 |
28/45 |
fig. 1.1 |
fig. 1.2 |
fig. 1.3 |
1. Set the camera to (  ) camera mode.
2.Frame the subject in the LCD. (fig.1.1)
3.Press the shutter button half-way to activate the auto-focus lock until the green AF LED stops blinking and the AF frame turns green. (fig.1.2)
• The camera will automatically determine the best focus, and a rapid click sound can be heard.
Note: For more information on Focus Lock, please go to p. 11. To change AF mode, please refer to p. 24.
4.Press the shutter button fully to capture the image. (fig.1.3)
•The camera will make a click sound.
•The camera will beep when the image is captured.
•When the image has been captured, the Flash Ready LED next to the viewfinder will blink to indicate that the image is being stored.
•A preview of the image will be displayed on the LCD for a second. To change the preview interval, please refer to p.42.
•The picture counter number displayed in the LCD will be updated.
5.If you are not satisfied with the image, you may simply press (  ) button to delete the image before it is saved. For details, please refer to p.30.
10

En
TAKING A PICTURE
USING AUTO-FOCUS LOCK
This feature can be used to freeze the focus when the subject is not located in the center of the picture.
About Auto-Focus LED
When the shutter button is pressed half-way, the auto-focus feature will be activated and the Auto Focus (green) LED will display the status of the auto focus lock.
Steady |
|
Blinking |
The subject is in |
The camera is setting |
|
focus. |
|
the focus. |
About Auto-Focus Frame |
|
|
A |
3M |
28/45 |
|
|
|
|
AWB |
Auto-Focus Frame |
||
|
|
|||
|
|
|
||
|
|
|
|
|
|
|
|
||
|
AF Frame Color |
Description |
||
|
White |
No focus. |
||
|
|
|
||
|
Green |
The subject(s) is in focus. |
||
|
|
|
||
Using the focus lock: |
|
|||
A |
3M |
28/45 |
A |
3 |
M |
28/45 |
|
|
AWB |
|
AWB |
|
28/45 |
|
fig. 1.1 |
fig. 1.2 |
fig. 1.3 |
28/45 |
fig. 1.4
1.Position the subject in the frame center. (fig.1.1)
2.Press the shutter button halfway down until the AF frame turns green and the green AF LED stops blinking. (fig.1.2)
3.Recompose your picture. (fig.1.3)
Keep the shutter pressed half-way while recomposing the picture.
4.Press the shutter button fully to capture the picture. (fig.1.4)
Note: The AF LED will continue blinking in the following conditions:
1.There are several subjects at different distances within the focus lock area. Recompose the picture by moving the camera slightly.
2.There is no color contrast. Recompose the picture with a subject that contains more color.
3.There is insufficient lighting. Increase the lighting in the surrounding area.
4.Please refer to P.24 to change AF assist light setting.
11

TAKING A PICTURE
SETTING THE FLASH
A |
3M |
28/45 |
3M |
28/45 |
|
|
|
|
En
AWB |
AWB |
fig. 1.1 fig. 1.2 fig. 1.3
How to set the flash:
Press  / repeatedly until the desired indicator appears on the LCD.
Flash Mode |
Description |
|
A Auto Flash (Default) |
The camera judges if a flash is required. If the environment is too dark, |
|
|
|
the flash will fire. |
A |
Auto + Red-Eye |
Use this mode to significantly reduce the occurrence of “red-eye” in flash |
|
|
photography. The camera will automatically detect when the flash is needed |
|
|
and the flash will fire after a short delay. |
|
Flash ON |
Flash will fire in any lighting condition. The “red-eye” reduction function is |
|
|
included also. |
|
Flash off |
The flash will not fire in this mode. Please use this mode if you want to |
|
|
capture the mood of the ambient lighting or to use the available light in |
|
|
places where flash photography is prohibited, such as museums. |
|
|
• To prevent blurry pictures in low light situations, hold the camera steady |
|
|
when pressing the Shutter button or mount the camera on a tripod. |
|
|
|
Note:
•The flash needs to recharge after it is fired. If the Shutter button is pressed while the flash is charging, the Flash Ready LED will blink. Please wait a few moments and press the Shutter button again to take a picture.
•Some of the Scene Selection Modes will deactivate the flash setting. Please refer to p.20 for more information.
12

En
TAKING A PICTURE
USING THE OPTICAL ZOOM
The camera provides up to 3x optical zoom to take pictures.
3 |
M |
28/45 |
|
3 |
M |
28/45 |
|
A |
|
||||
|
|
|
|
|
|
AWB |
AWB |
fig. 1.1 |
fig. 1.2 |
fig. 1.3 |
1.Press T (Tele) to zoom in your subject.
The optical zoom status is shown on the LCD by the zoom bar in white color ( 


 ).
).
2.Press W (Wide) to zoom out.
USING THE DIGITAL ZOOM
The camera also provides 6x Digital Zoom (six times). Combined with the 3x optical zoom, it can give up to 18x magnification to your pictures.
|
A |
3M |
28/45 |
|
|
6x DIGITAL ZOOM |
|
|
|
|
|
|
AWB |
|
|
fig. 1.1 |
fig. 1.2 |
|
fig. 1.3 |
How to use digital zoom:
1.Turn the LCD on.
2.Press T until the white optical zoom bar reached the mid-marker ( 


 ).
).
3.Continue to press T to activate the digital zoom. The zoom bar will turn blue ( 

 ) first. When digital zoom reaches 6x, the zoom bar will change to red (


 ) and the focus mark will change as show in fig. 1.3. The captured area is within the red arrows.
• There will be a short delay before the digital zoom is activated.
4.Press W to zoom out.
Activating/Deactivating Digital Zoom
CAMERA MODE |
SETUP |
|
DIGITAL ZOOM |
||
SETUP |
|
FORMAT |
|
YES |
|
|
|
DATE/TIME SETUP |
NO |
|
|
|
|
DIGITAL ZOOM |
|
|
|
|
|
BEEP |
|
|
|
|
|
QUICK VIEW |
|
|
|
RETURN |
SELECT |
RETURN |
SELECT |
RETURN |
OK SET |
fig. 1.1 |
|
fig. 1.2 |
|
fig. 1.3 |
|
1.In Camera Mode, press MENU to display the Main Menu.
2.Press  until SETUP is highlighted, then press
  to enter its submenu.
3.Press  until Digital Zoom is highlighted, then press
  to enter its submenu.
4. Press  or
or  to highlight Yes or No.
• The default setting is Yes.
5.Press OK to select.
13

|
TAKING A PICTURE |
|
|
Important: |
|
|
|
|
En |
||
1. |
Hold your camera steady while using Digital Zoom to prevent blurriness in the photograph due to camera |
|
|
|
movement. It is recommended to either place your camera on a steady surface or use a tripod. |
|
|
2. |
For best results, stand at least 2 ft (0.6m) away from the subject in normal mode. |
|
|
3. |
The image quality may degrade slightly with Digital Zoom. |
|
|
4. |
Digital Zoom can only be monitored with the LCD and not through the optical viewfinder. |
|
|
TAKING PICTURES IN MACRO MODE (CLOSE-UP SHOOTING)
This mode enables the camera to capture pictures in close distances.
A |
3M |
28/45 |
|
|
AWB
1. Press the  button. The Macro icon (
  ) will be displayed on the LCD.
2.Frame the subject in the LCD.
• The best shooting range is from 10 cm to 60 cm. (4 in. – 23.6 in.)
3.Press the shutter button half-way to activate the focus until the green AF LED stops blinking and the AF frame turns green.
4.Press the shutter button fully to take the picture.
Note:
1.When Macro mode is selected, the camera will turn the LCD on if it is turned off automatically.
2.Zoom buttons will not work in Macro mode.
TAKING CONTINUOUS PICTURES
A |
3M |
28/45 |
|
|
AWB
1. Press the  button. The Continuous Shot icon (
 ) will be displayed on the LCD.
2.Frame the subject in the LCD screen and press the shutter button half-way to activate the focus until the green AF LED stops blinking and the AF frame turns green.
3.Press the shutter button fully to capture the pictures.
• The camera will automatically capture 7 continuous images at approximately 3 images per second in 1600 x 1200 resolution.
4. If you do not want to take continuous pictures anymore, press the  button once until the Continuous Shot icon (


 ) disappears from the LCD.
Note:
•In continuous shooting mode the flash is disabled as the recharging time will slow it down.
•The camera will only capture pictures in 1600 x 1200 resolution in continuous shooting mode.
•The LCD will be blank when the images are taken in the Continuous Shooting Mode.
14

TAKING A PICTURE
TAKING PICTURES WITH SELF-TIMER
En
A |
3M |
28/45 |
|
|
AWB
1. In (  ) Camera Mode, press
  button, the self-timer icon (
  ) appears on the LCD.
2.Place the camera on a flat surface or tripod.
3.Use the LCD to compose the picture, and then press the Shutter button to activate the Self-Timer.
The Self -timer LED will blink slowly for 7 seconds, faster for the remaining 3 seconds and then the image will be captured.
Note:
•The Self-Timer is automatically deactivated once the image is taken.
•To deactivate the Self-Timer before taking a picture, press  button until the self-timer icon (
  ) disappears.
Photography Hints -
Since the Self-Timer LED indicator on the front of the camera flashes, you have time to join in the photograph and know when the camera is done taking a picture when the Self-Timer LED light stops blinking.
15
TAKING A PICTURE
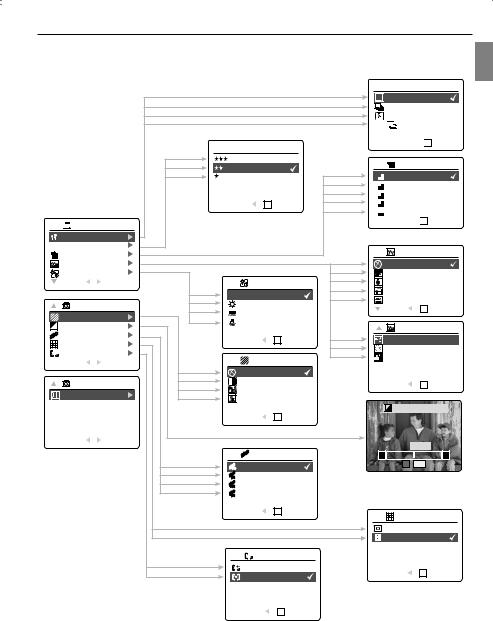
USING THE MAIN MENU IN CAMERA MODE
En
 CAPTURE MODE


 CAMERA MODE
CAPTURE MODE
Q QUALITY SETUP
IMAGE SIZE
Q QUALITY SETUP |
|
FINE |
|
NORMAL |
|
ECONOMY |
|
RETURN |
OK SET |
 +
+ 


RETURN
 OK SET
IMAGE SIZE
4M 2272 x 1704
3M 2048 x 1536
2M 1600 x 1200
1M 1280 x 960
V 640 x 480
RETURN 
 OK SET
 SCENE SELECTION
|
SCENE SELECTION |
|
|
OFF |
|
|
|
WHITE BALANCE |
|
|
PARTY / INDOOR |
||
|
RETURN |
SELECT |
WHITE BALANCE |
SNOW |
|
|
|
|
|
AWB AUTO |
|
BEACH |
|
|
|
|
|
SUNSET |
|
|
|
CAMERA MODE |
SUNNY |
|
|
||
|
|
RETURN |
OK SET |
|||
|
|
|
FLUORESCENT |
|||
|
PICTURE EFFECT |
|
|
|||
|
TUNGSTEN |
|
|
|
||
+— EV COMPENSATION |
|
SCENE SELECTION |
||||
|
|
|||||
|
ISO |
|
RETURN |
OK SET |
NIGHT LANDSCAPE |
|
|
METERING |
|
||||
|
|
|
|
FIREWORKS |
||
AF |
AUTO FOCUS |
|
|
|
||
|
RETURN |
SELECT |
PICTURE EFFECT |
NIGHT PORTRAIT |
||
|
|
|
||||
|
|
|
|
|
||
|
|
|
OFF |
|
|
|
|
CAMERA MODE |
B&W |
|
RETURN |
OK SET |
|
|
SOLARIZE |
|
||||
|
SETUP |
|
|
|
|
|
|
|
SEPIA |
|
|
|
|
|
|
|
|
|
|
|
|
|
|
|
|
+— EV COMPENSATION |
|
|
|
|
RETURN |
OK SET |
|
|
|
RETURN |
SELECT |
|
|
|
00 EV |
|
|
|
|
|
— |
|
|
|
|
ISO |
|
+ |
|
|
|
|
AUTO |
|
OK |
SET |
|
|
|
|
|
|
|
|
|
|
100 |
|
|
|
|
|
|
200 |
|
|
|
|
|
|
400 |
|
|
|
|
|
|
RETURN |
OK SET |
METERING |
|
|
|
|
|
|
||
|
|
|
|
|
SPOT |
|
|
|
|
|
|
MATRIX |
|
|
|
|
AF AUTO-FOCUS |
|
|
|
|
|
|
CENTER SPOT |
RETURN |
OK SET |
|
|
|
|
MULTI-AREA |
|
||
|
|
|
|
|
|
|
|
|
|
RETURN |
OK SET |
|
|
|
|
|
16 |
|
|
|
En
TAKING A PICTURE
USING THE MAIN MENU IN CAMERA MODE
Follow the steps below to set the advanced shooting options in the camera through the Main Menu.
1.Turn the camera on.
2.Set the mode switch to ( 

 ) Camera mode.
3.Press the MENU button to display the main menu.
4.Press  or
or  until the desired option is highlighted.
5.Press  to enter the submenu.
6.Press  or
or  in the submenu to toggle between the options.
7.Press the OK button to make a selection.
• All selections will be marked by a red check mark.
8.To return to the previous menu, press  .
.
9.To exit the menu at any time, press the MENU button.
SETTING CAPTURE MODE
The capture mode menu has 4 features to choose from for taking pictures.
Capture Mode Option |
Description |
|||||||
( |
|
|
) Single |
The camera will take 1 picture at a time. |
||||
( |
|
|
)Continuous Shooting |
The camera will take 7 pictures (at 1600 x 1200 resolution) in a row when |
||||
|
|
|
|
|
|
|
|
the shutter button is fully pressed. The flash is disabled in this mode. |
( |
|
|
) Sport |
The camera will take 1 picture at a time in Sport mode. |
||||
( |
|
+ |
|
|
|
) Continuous Shooting |
|
|
|
|
|
|
|
|
|
with Sport |
The camera will take 7 pictures in a row in Sport mode |
|
|
|
|
|
|
|
|
|
Note: Flash will be deactivated in continuous shot.
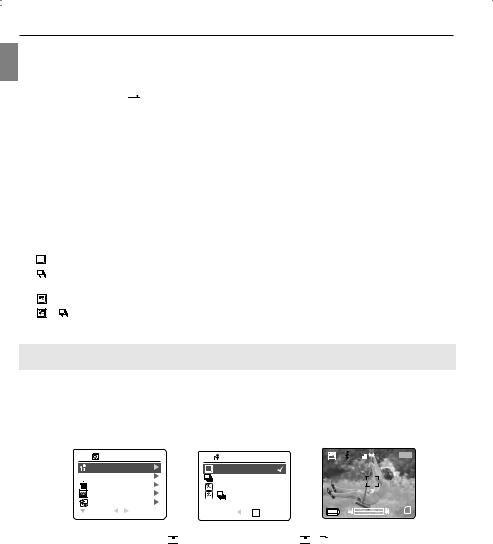
TAKING PICTURES IN SPORT MODE
This mode is used to shoot sports and other high-speed activities. The camera will automatically choose a higher shutter speed and wider aperture to capture fast-moving action without blur.
Setting Sport Mode:
CAMERA MODE |
CAPTURE MODE |
A |
3M |
28/45 |
||
|
|
|||||
CAPTURE MODE |
|
|
|
|
|
|
Q QUALITY SETUP |
|
|
|
|
|
|
IMAGE SIZE |
|
|
|
|
|
|
SCENE SELECTION |
+ |
|
AWB |
|
|
|
WHITE BALANCE |
|
|
|
|
||
RETURN |
SELECT |
RETURN |
OK |
SET |
|
|
1.In the main menu, press  to enter the capture mode submenu.
2.Press  or
or  to highlight Sport (


 ) or Sport + Continuous shot (


 +
+ 


 ).
).
3.Press OK to enter the mode.
Taking a picture in Sport Mode:
1.Frame the subject in the LCD.
2.Press the shutter button half-way to activate the focus until the green AF LED stops blinking and the AF frame turns green.
3.Press the shutter button fully to take the picture.
17

TAKING A PICTURE
Note: Hold your camera steady to prevent blurriness. It is recommended to either place your camera on a steady surface or use a tripod.
SETTING IMAGE QUALITY
The Image Quality setting determines the amount of compression used to reduce the size of the stored image file in order to economize space in the memory.
En
A 3M |
28/45 |
CAMERA MODE |
Q QUALITY SETUP |
||
|
|
CAPTURE MODE |
FINE |
|
|
|
Q |
QUALITY SETUP |
NORMAL |
|
|
|
|
IMAGE SIZE |
|
ECONOMY |
|
|
|
SCENE SELECTION |
|
|
|
AWB |
|
WHITE BALANCE |
|
|
|
|
|
RETURN |
SELECT |
RETURN |
OK SET |
Quality |
JPEG Compression Ratio |
Description |
Fine |
4.5:1 |
Fine image quality can be used for making prints. |
Normal |
11:1 |
Normal image quality can be used for general purpose pictures. |
(Default) |
|
|
Economy |
17:1 |
Economy image quality can be used for pictures that will be sent |
|
|
via e-mail. |
How to change the quality: |
|
|
1. When ( Q ) Quality is highlighted, press |
to enter the ( Q ) Quality Setup submenu. |
|
2.Press  or
or  until the desired setting is highlighted.
3.Press the OK button to select the Quality mode.
4.Press the MENU button to return to picture taking mode.
SETTING IMAGE RESOLUTION
Image Resolution determines the size of a captured image. Higher resolution images contain more details and have larger file sizes.
|
|
A |
3M |
28/45 |
|
|
|
|
|
CAMERA MODE |
|
|
IMAGE SIZE |
|||||
|
|
|
|
|
|
|
|
|
|
|
|
|
|
|
|
|
|
|
|
|
|
|
|
|
|
CAPTURE MODE |
|
4M |
2272 x 1704 |
|
|
||||||
|
|
|
|
|
|
|
Q QUALITY SETUP |
|
3M |
2048 x 1536 |
|
|
||||||
|
|
|
|
|
|
|
IMAGE SIZE |
|
|
2M |
1600 x 1200 |
|
|
|||||
|
|
|
|
|
|
|
SCENE SELECTION |
|
1M |
1280 x 960 |
|
|
||||||
AWB |
|
|
|
WHITE BALANCE |
|
V |
640 x 480 |
|
|
|||||||||
|
|
|
|
|
|
|
RETURN |
SELECT |
|
|
RETURN |
OK SET |
||||||
|
|
|
|
|
|
|
|
|||||||||||
Images Stored on 16MB memory (approx.): |
|
|
|
|
|
|
|
|||||||||||
|
|
|
|
|
|
|
|
|
|
|
|
|
|
|
|
|
|
|
Resolution |
|
|
4MP |
3MP |
2MP |
|
1.3MP |
VGA |
||||||||||
Quality |
|
(2272 x 1704) |
(2048 x 1536) |
(1600 x 1200) |
(1280 x 960) |
(640 x 480) |
||||||||||||
|
|
|
|
|
|
|
|
|
|
|
|
|
|
|
|
|
|
|
Fine |
|
|
14 |
16 |
|
|
|
|
23 |
|
33 |
94 |
||||||
Normal |
|
|
32 |
37 |
|
|
|
|
52 |
|
77 |
200 |
||||||
Economy |
|
|
46 |
53 |
|
|
|
|
81 |
|
110 |
248 |
||||||
|
|
|
|
|
|
|
|
|
|
|
|
|
|
|
|
|
|
|
18
En
TAKING A PICTURE
Images Stored on 32MB memory (approx.):
Resolution |
4MP |
3MP |
2MP |
1.3MP |
VGA |
Quality |
(2272 x 1704) |
(2048 x 1536) |
(1600 x 1200) |
(1280 x 960) |
(640 x 480) |
|
|
|
|
|
|
Fine |
27 |
31 |
45 |
63 |
188 |
Normal |
64 |
74 |
105 |
144 |
378 |
Economy |
93 |
102 |
145 |
202 |
478 |
|
|
|
|
|
|
Images Stored on 64MB memory (approx.):
Resolution |
4MP |
3MP |
2MP |
1.3MP |
VGA |
Quality |
(2272 x 1704) |
(2048 x 1536) |
(1600 x 1200) |
(1280 x 960) |
(640 x 480) |
|
|
|
|
|
|
Fine |
54 |
62 |
93 |
130 |
372 |
Normal |
129 |
147 |
217 |
288 |
774 |
Economy |
186 |
204 |
290 |
404 |
956 |
Images Stored on 128MB memory (approx.): |
|
|
|
||
|
|
|
|
|
|
Resolution |
4MP |
3MP |
2MP |
1.3MP |
VGA |
Quality |
(2272 x 1704) |
(2048 x 1536) |
(1600 x 1200) |
(1280 x 960) |
(640 x 480) |
|
|
|
|
|
|
Fine |
111 |
127 |
181 |
257 |
776 |
Normal |
254 |
300 |
434 |
603 |
1565 |
Economy |
372 |
378 |
605 |
893 |
1980 |
|
|
|
|
|
|
How to change the resolution:
1.When Resolution is highlighted in the Main Menu, press  to enter the (
 ) Resolution submenu.
2.Press  or
or  until the desired setting is highlighted.
3.Press the OK button to select the mode
4.Press the MENU button to return to picture taking mode.
Note: The default image resolution is 4MP.
19

TAKING A PICTURE
SELECTING SCENE MODES
The preset scene modes are helpful to quickly optimize the various settings to get the best capture of specific scenes.
A 3M |
28/45 |
CAMERA MODE |
SCENE SELECTION |
||
|
|
CAPTURE MODE |
OFF |
|
|
|
Q |
QUALITY SETUP |
PARTY / INDOOR |
||
|
|
IMAGE SIZE |
|
SNOW |
|
|
|
SCENE SELECTION |
BEACH |
|
|
AWB |
|
WHITE BALANCE |
SUNSET |
OK SET |
|
|
|
RETURN |
SELECT |
RETURN |
|
En
Preset Scene |
Description |
Off (default) |
No Scene Selection. |
Party/Indoor |
Use this mode to capture the details of candlelit scenes or other indoor |
|
background light conditions. |
Snow |
Use this mode to capture the details in snow scene, since the snow reflects more |
|
of the light and would make the images look darker if the camera is set at Off |
|
mode. |
Beach |
Use this mode to capture the details in shining water scene. |
Sunset |
This mode captures the deep hues and color variations in sunsets and |
|
sunrises. |
Night Landscape |
A slow shutter speed is used to capture the lights in night scenes. |
|
Photography Tip: With the slow shutter speed there is a possibility of getting |
|
blurry images due to camera movement. |
|
To reduce blurring, you may do the following: |
|
1. Set your camera to Night Landscape mode. |
|
2. Place your camera on a tripod or sturdy surface area. |
|
3. Set the camera to Self-Timer mode. |
|
4. Press the shutter button. |
Fireworks |
Use this mode to capture the burst of light from fireworks with a slower shutter |
|
speed. |
Night Portrait |
Use this mode to capture a subject illuminated with the lights in a night scene with |
|
a slow shutter speed. |
|
• Due to the slow shutter speed, place the camera on a tripod for better |
|
picture quality. |
|
|
How to set the scene selection:
1.When Scenes Select is highlighted, press  to enter its submenu.
2.In the Scene menu, press  or
or  to choose between the options.
3.Press the OK button to select the Scene mode.
4.Press the MENU button to return to picture taking mode.
Note: Any change of the flash setting will cancel the scene selected in Scene Selection.
20

En
TAKING A PICTURE
SETTING WHITE BALANCE
By default the camera uses Auto White Balance to best reproduce colors under different lighting conditions. For mixed lighting conditions you can use the Auto White Balance.
A 3M |
28/45 |
CAMERA MODE |
WHITE BALANCE |
||
|
Q |
CAPTURE MODE |
AWB AUTO |
|
|
|
QUALITY SETUP |
SUNNY |
|
||
|
|
IMAGE SIZE |
|
FLUORESCENT |
|
|
|
SCENE SELECTION |
TUNGSTEN |
|
|
AWB |
|
WHITE BALANCE |
|
|
|
|
|
RETURN |
SELECT |
RETURN |
OK SET |
|
White Balance Mode |
Description |
|
|
A Auto |
The camera will automatically choose the white balance setting. Use this |
|
|
|
|
setting in variable light conditions. |
|
|
Sunny |
Use outdoors with sufficient sunlight. |
|
|
Fluorescent |
Use indoors with fluorescent or ambient light conditions. |
|
|
||
|
|
Tungsten |
Use indoors with tungsten light conditions. |
|
|
|
|
How to change the White Balance:
1.When White Balance is highlighted, press  to enter its submenu.
2.Press  or
or  until the desired setting is highlighted.
3.Press the OK button to select the White Balance mode.
4.Press the MENU button to return to picture taking mode.
SELECTING THE PICTURE EFFECT
You can shoot with different picture effects.
Picture Effect |
Description |
OFF (Default) |
Taking pictures without effect. |
B&W |
Taking pictures in black and white. |
SOLARIZE |
Taking pictures with clear light intensity like illustrations. |
SEPIA |
Taking pictures in sepia tones like old pictures. |
|
|
CAMERA MODE |
PICTURE EFFECT |
||
PICTURE EFFECT |
OFF |
|
|
+— EV COMPENSATION |
B&W |
|
|
ISO |
|
SOLARIZE |
|
METERING |
|
SEPIA |
|
AF AUTO FOCUS |
|
|
|
RETURN |
SELECT |
RETURN |
OK SET |
How to set photo effect:
1.When Picture Effect is highlighted, press  to enter its submenu.
2.Press  or
or  until the desired setting is highlighted.
3.Press the OK button to select the picture effect.
4.Press the MENU button to return to picture taking mode.
21
 Loading...