

Page 1

Polaroid
EZ1800
35MM AUTOMATIC WINDING CAMERA WITH MANUAL ZOOM
OPERATION MANUAL
Page 2
Rewinding the film
1. After the last available picture on the film has been taken and the camera
will not advance the film anymore. Slide the rewind switch (16) towards
the " " direction to rewind the film cassette, see figure 8.
2. Open the back cover after the rewinding stops and remove the film for
processing.
8
12
1
Page 3
Fill-in flash
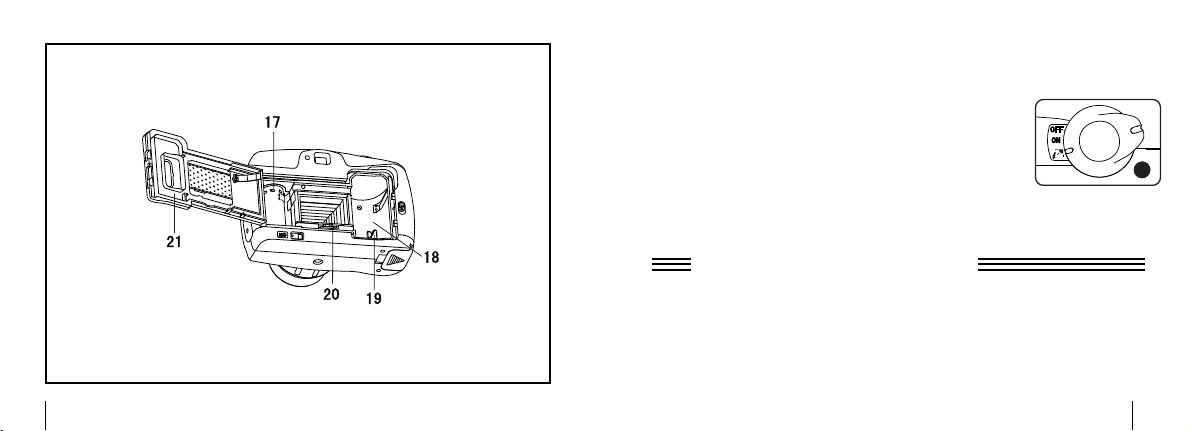
1. Turn the
2. Wait a few seconds for the flash ready indicator to light up and take your picture.
mode dial to the
In this mode the camera will take a picture with the flash,
even under bright daylight conditions. Use this mode if the
subject (person) is under shade or in a shadow, for example
under a tree.
FILL IN flash mode,
see figure 7.
7
Red eye reduction lamp
The red eye reduction lamp (5) will be active while taking pictures using the
flash (Auto and Fill In flash modes). The lamp helps to reduce the unpleasant
red reflection, visible sometimes on pictures with flash.
1. Press the shutter button half way down to active the red eye reduction lamp.
2. Wait a moment and press all way down to take a picture.
2
11
Page 4

Taking pictures
1.
Set the mode dial (1) to the ON position, see figure 4.
2. Hold the camera steady, and compose your picture
looking through the viewfinder eye piece (11).
3. Turn the zoom ring (7) to zoom in on the
photographed scene, as you desire.
4. Press the shutter release button to take a picture.
Note:
After taking your pictures, set the mode dial to the
OFF position. That prevents the camera from
taking unintentional pictures. See figure 5.
Aim your subject with the sunshine behind you,
if possible
your subject for proper focusing.
. Keep at least 1.2m (4 feet) distance from
Loading batteries
1. Slide the battery cover (14) and open the battery
compartment.
2. Insert two AA size alkaline batteries. Follow the
steps in figures 1 and 2. Make sure that the batteries
' + ' and ' - ' terminals are in the correct position.
3. Close the battery cover.
Note:
Use only AA, alkaline batteries, do not use
rechargeable batteries and do not mix different types.
Replace the batteries if the recycle time on the
flash exceeds 15 seconds.
Turn OFF the flash after taking pictures, to extend
the battery life.
2
8
5
Page 5

Loading the film
Use typical, 35mm color or B/W negative films with ISO 100, ISO 200,
ISO 400 speed.
1. Slide the back co v er latch (13) and open the back cov er (21).
2. Insert the film cartridge into the film chamber (18).
3. Pull out about 50 mm ( 3 inches ) of the film from the cartridge and position
the tip of the film above the take up spool until it reaches the ' film tip ' mark
on the body, see figure 3.
6
4. Close the back cover.
5. Turn the mode dial to the ON position. Press the shutter release button (2) twice.
The
motor will advance the film and #1 will appear inside the exposure counter (15).
The camera is now ready for taking the first picture.
Note:
If #1 does not appear inside the exposure window, then the film was probably
not loaded correctly. Repeat the film-loading procedure.
TOO MUCH FILM LOADING
CORRECT
7
Page 6

Specification
Camera type : 35mm film, manual zoom motorized camera
Frame format : 24x36mm
Lens : 33mm to 50mm range zoom, aspherical lens
Focus : fixed focus, 1.2 m ( 4 feet ) to infinity
Exposure : F/10.5 to F/13.5 within 33mm to 50 mm zoom lens
Shutter speed : 1/125 sec.
Viewfindfer : Real image, zoom, clear viewfinder
Flash : Built in. Auto and Fill-in modes.
Flash range : with ISO 100 film, up to 2.5 m ( 8 feet )
ISO 200 film, up to 3 m ( 10 feet )
ISO 400 film, up to 3.5 m ( 12 feet )
Film advancing : Automatic
Film rewinding : Power rewinding
Power source : two AA Alkaline batteries
❥ Specifications subject to change without notice.
4
f33mm
f50mm
9
Page 7

Taking pictures with flash
Auto-flash
1. Turn the mode dial to the ON position.
In this mode the camera is set to the AUTO flash mode.
The camera will fire a flash automatically, depending on
the brightness of the scene and speed of the used film.
2. Wait a few seconds for the flash ready indicator (10) to light up.
3. Compose your picture and press the shutter release button. The camera
will take a picture and the flash will fire, only if necessary.
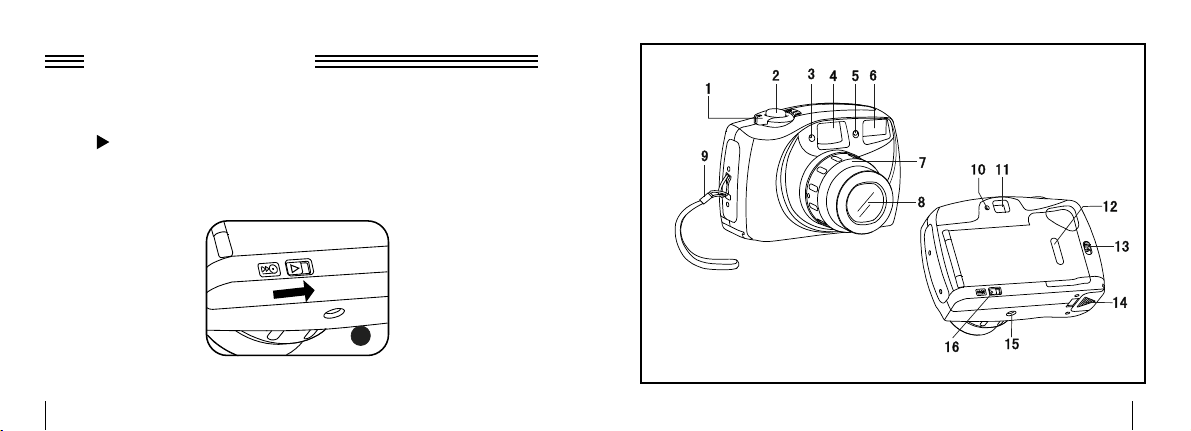
1. Mode dial
2. Shutter release button
3. CDS sensor
4. Viewfinder
5. Red-eye reduction lamp
6. Flash
7. Zoom ring
8. Lens
9. Whrist strap
10. Flash ready indicator
11. Viewfinder eye piece
12. Film type window
13. Back cover latch
14. Battery cover
15. Exposure counter
16. Film rewind switch
17. Film take up spool
18. Film chamber
19. Film rewind shaft
20. Film sprocket wheel
21. Back cover
10
3
Page 8

Please read this manual
carefully, before using the camera.
Camera care and storage
1. Do not disassemble the camera, there is a risk of electronic shock.
2. Do not e xpose the camera to e xtreme high or low temperature and humidity,
this may cause serious damage to the camera.
3. If necessary, clean the lens by gently wiping it with a clean, lint-free cloth.
Do not use chemicals or other cleaning agents. Remove the dust from
the film compartment by using an air blower.
4. Choking hazard and small parts, not for children under 6 years.
5. Do not take pictures toward the sun directly, this is harmful to your eyes.
6. Remove batteries if you do not plan to use camera for a long time.
7.Keep it in a cool and dry environment.
13
 Loading...