

Page 1
Page 2

ENGLISH
CONGRATULATIONS
Congratulations on the purchase of your new
camera. Your camera has been carefully engineered
and manufactured to give you dependable
operation. Read this manual before operating the
camera to become more familiar with it.
This manual has been written and formatted with
depth and detail so that you can easily follow the
instructions to maximize the features of your
camera.
1
Page 3

Table of Contents
Important Information......................................................................................4
Camera Features ..............................................................................................6
System Requirements ......................................................................................6
1. The Camera
Overview of your Concord Eye-Q Go LCD Camera ..........................................7
Loading the Battery ........................................................................................8
Turning the Camera On and Off ......................................................................9
LCD Menus Screens ........................................................................................10
LCD Messages ................................................................................................12
Turning the LCD On and Off ..........................................................................13
Camera Ready LED Status..............................................................................13
Camera Memory..............................................................................................14
Using the Memory Card..................................................................................15
2. Camera Mode
Taking Pictures................................................................................................16
Main Menu......................................................................................................16
Mode Select ..............................................................................................17
Video Clips Mode ................................................................................17
Self-timer ..............................................................................................18
Image Quality ............................................................................................19
Slide Switch ..............................................................................................20
Flash ..........................................................................................................21
White Balance ..........................................................................................22
LCD Brightness ..........................................................................................23
Setup ........................................................................................................24
2X Digital Zoom ............................................................................................27
3. Review Mode
2X Enlargement ..............................................................................................28
Video Clip Playback ......................................................................................28
Main Menu ....................................................................................................29
Delete ........................................................................................................29
Thumbnail ..................................................................................................31
Brightness ..................................................................................................31
2
Page 4

4. Transferring Files to the Computer
Installing the Software ..................................................................................32
Connecting the Camera to the Computer......................................................33
Disconnecting the Camera from the Computer ............................................33
Viewing files on your computer ....................................................................34
TWAIN/WDM Drivers ..................................................................................35
Mass Storage ............................................................................................36
For Windows ........................................................................................36
For Macintosh ......................................................................................37
Using PhotoImpression Software ..................................................................38
5. Special Features
PC Video Clips................................................................................................39
Web Camera ..................................................................................................40
TV Mode ........................................................................................................41
6. Camera Maintenance
Cleaning the Eye-Q Go LCD............................................................................43
7. Tips and Troubleshooting ..............................................................................44
8. Getting Help ..................................................................................................48
9. Camera Specifications ....................................................................................49
10. Warranty Information ....................................................................................52
3
Page 5

IMPORTANT INFORMATION
FCC INFORMATION
FCC WARNING: This equipment meets the limits for a Class B digital device,
pursuant to Part 15 of FCC rules. Only the cables supplied with the camera
should be used. Operation with other cables is likely to result in interference to
radio and TV reception and could void the user’s authorization to operate this
equipment. This device complies with Part 15 of the FCC Rules. Operation is
subject to the following two conditions:
• This device may not cause harmful interference.
• This device must accept any interference received, including interference
that may cause undesired operation.
Tested To Comply
With FCC Standards
for HOME OR OFFICE USE
Changes or modifications not expressly approved by the manufacturer may void
the user’s authority to operate this equipment.
USER INFORMATION
NOTE: This equipment has been tested and found to comply with the limits for
a Class B digital device, pursuant to Part 15 of the FCC Rules. These limits are
designed to provide reasonable protection against harmful interference in a
residential installation. This equipment generates, uses and can radiate radio
frequency energy and if not installed and used in accordance with the
instructions, may cause harmful interference to radio communications. However,
there is no guarantee that interference will not occur in a particular installation.
If this equipment does cause harmful interference to radio or television
reception, which can be determined by turning the equipment on and off, the
user is encouraged to try to correct the interference by one or more of the
following measures:
•Reorient or relocate the receiving antenna.
•Increase the separation between the equipment and receiver.
• Connect the equipment into an outlet on a circuit different from that to
which the receiver is connected.
• Consult the dealer or an experienced radio/TV technician for help.
4
Page 6

VCCI INFORMATION
This is a Class B product, to be used in a domestic environment, based on the
Technical Requirements of the Voluntary Control Council for Interference from
Information Technology Equipment (VCCI). If this is used near a radio or
television receiver in a domestic environment, it may cause radio interference.
Please install and use the equipment according to the instruction manual.
PRECAUTIONS
Be sure to observe the following precautions when using the camera:
•Do not open the case of the camera or attempt your own repairs. Always
leave this service to authorized repair facilities.
•Keep the camera away from water and other liquids, and never let it get
wet. Never use outdoors when it is raining or snowing.
•Should foreign matter or water get into the unit, immediately turn the
power off and contact your local authorized service center.
•Physical damage and malfunction of this unit can cause the image data
stored in its memory to be deleted. Be sure to always keep backup copies
of data by transferring them to a personal computer.
•Under the environment with electrostatic discharge, the camera may
malfunction and require the user to reset the camera.
•Do not leave the camera in places subject to extremely high temperatures,
such as in a closed vehicle or in direct sunlight.
•Remove the battery when camera is not used for long periods of time.
•Use CR123 lithium batteries only.
•Dispose of the battery in a manner that complies with applicable laws.
•Do not place the camera in unstable locations where the camera may fall
and be damaged.
•Do not touch or press on the lens.
•Do not unplug the camera from the TV or computer while the camera is in
operation, otherwise the memory may be corrupted.
•Do not turn the power off or open the battery compartment when the
camera ready LED is on or blinking, otherwise the image or video clip may
not get stored.
5
Page 7

Camera Features
•Stores approximately 14 Fine, 33 Normal or 54 Economy mode images with
7MB internal memory
•Virtually unlimited storage using the removable MultiMediaCard (MMC) or
Secure Digital (SD). MMC/SD memory cards can be purchased separately at
most computer or electronic retailers.
• 1.6" Color LCD
• 1280 x 960 pixel resolution (1.3 Mega Pixels)
•Focus free from 0.65m to infinity
• 2X Digital Zoom
•Slide switch with Macro (Close-up photography), Indoor (Auto Flash) and
Outdoor (No Flash) modes
•Video Clip Mode
•Self-timer
• PC Video Clips (Windows only)
•Web Camera (Windows only)
• TV On Screen Display (OSD) menu
• TV connection (NTSC and PAL)
• USB connection and cable
•Tripod socket
•Multi-language menu
System Requirements
PC:
•Microsoft Windows 98SE/ME/2000 and XP
• IBM PC/AT or compatible, 200 Mhz or higher
•Minimum 32MB RAM (64MB recommended)
• USB Port
• 640 x 480 monitor, minimum 16 bit color (1024 x 768 24 bit color
recommended)
• 175MB free hard disk space
• 56K or faster modem, ISDN, or LAN connection (for the Web Camera
feature only)
• CD-ROM drive
Macintosh:
•Mac OS 9 or higher
•Macintosh Power PC or higher, Minimum 64MB of RAM
• USB Port
• 100MB of available Hard Disk Space
6
Page 8
1. The Camera
Overview of Your Concord Eye-Q Go LCD Camera
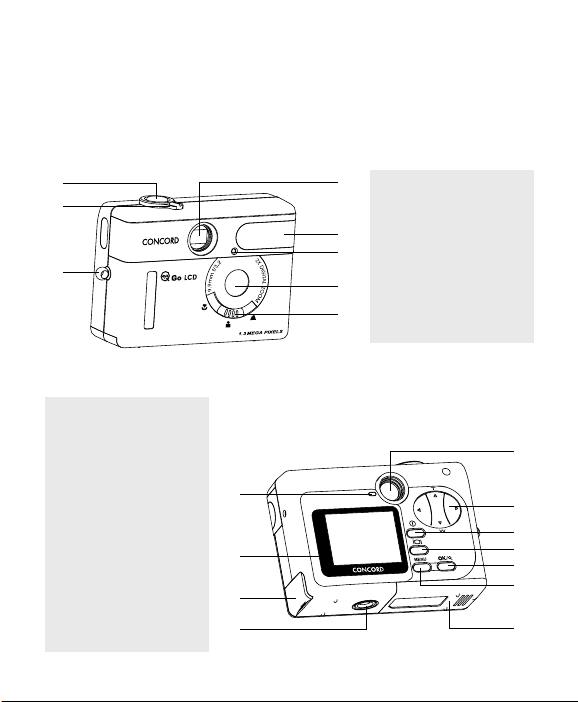
FRONT/TOP
1
2
3
9. Camera Ready LED
10. LCD
11. USB/TV Out/Phone Ports
(Optional)
12. Tripod Socket
13. Viewfinder
14. Navigation Button
15. Power Button
16. LCD On/Off Button
17. OK Button
18. Menu Button
19. Battery Door
BACK/BOTTOM
9
10
11
12
7
4
1. Shutter Button
2. Rotary Switch
3. Neck/Wrist Strap Mount
5
4. Viewfinder
6
5. Flash
6. Self-timer LED
7
7. Lens
8
8. Slide Switch
13
14
15
16
17
18
19
Page 9
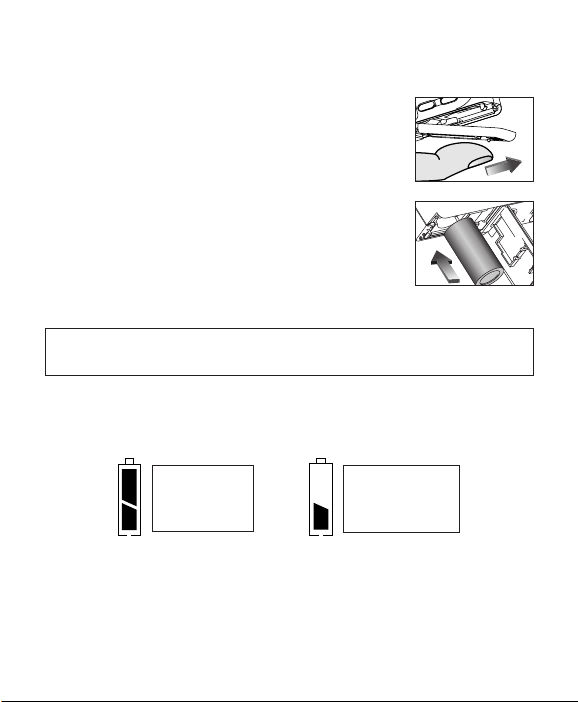
Loading the Battery
The Concord Eye-Q Go LCD uses one 3V (CR123) lithium battery.
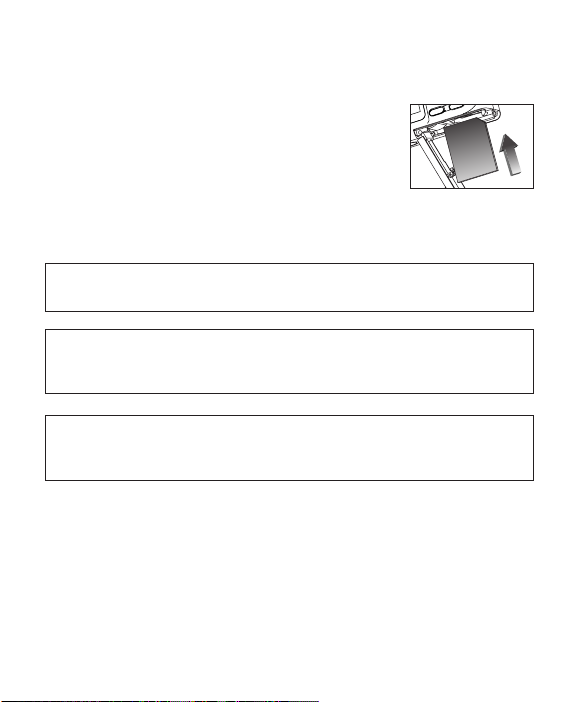
Loading the Battery:
1. Locate the battery door on the bottom of the
camera.
2. Slide the battery door outwards, as indicated by
the arrow and lift the battery door to open.
(fig.1.1)
3. Insert the 3V (CR123) lithium battery with the
positive terminal (+) toward the inside of the
battery compartment.
4. Close the battery door, press down on it and slide
it towards the center of the camera until it snaps
into place.
Note: Take extra care in opening or closing the battery door so as to
prevent the battery from falling out.
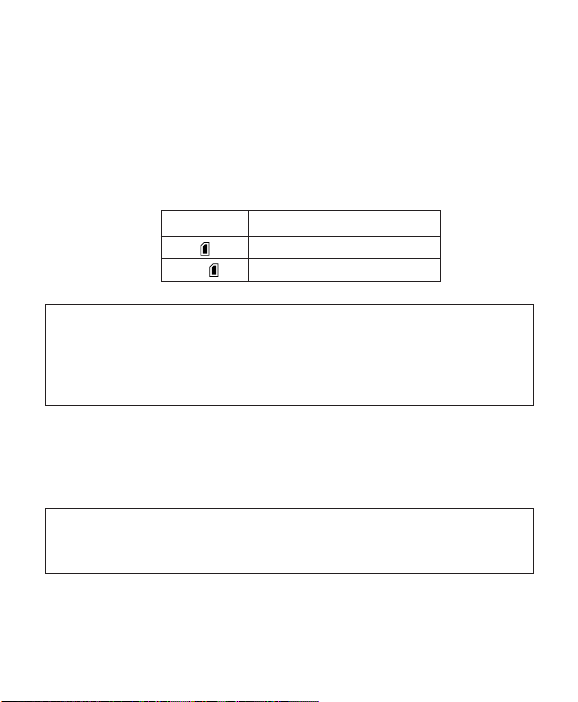
Checking the Battery
The camera has a battery indicator that shows the current battery level.
fig.1.1
fig.1.2
FULL
Battery is full and
ready for use.
LOW
Battery is low in
power and it needs
to be replaced soon.
8
Page 10
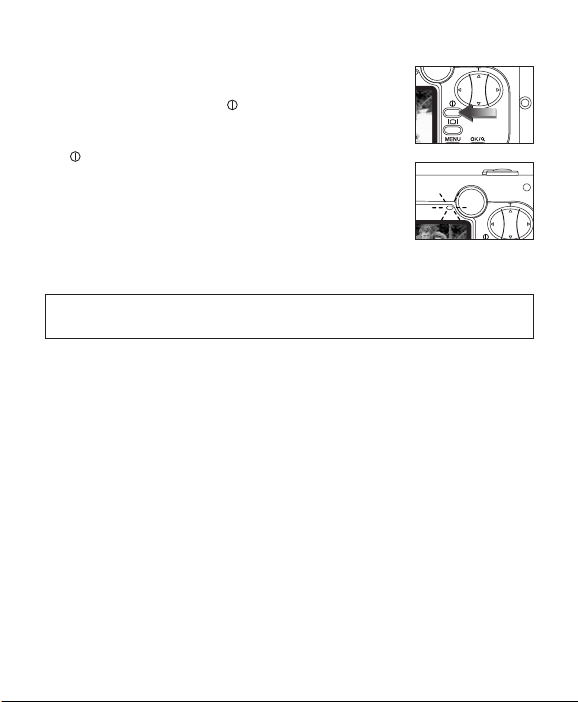
Turning the Camera on and of f
To turn the camera on and off:
1. Press the On/Off button for a few seconds.
The camera will beep when it is turned on.
2. To turn the camera off, press the On/Off button
for a few seconds.
Note: Please peel off the thin protective plastic film on the LCD before
use.
fig.1.3
fig.1.4
9
Page 11
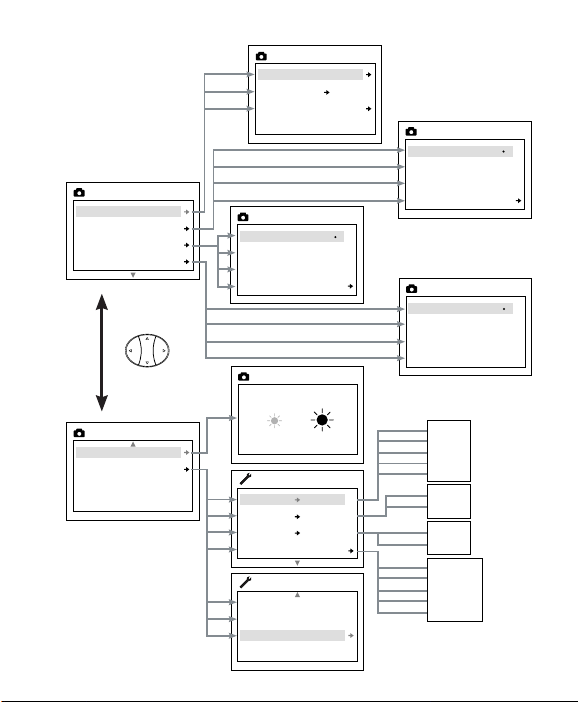
Brightness
BRIGHTNESS
AWB
Sunny
Fluoresent
Tungsten
WB
Auto
Flash
Flash Off
Main Menu
FLASH
Fine
Normal
Economy
Main Menu
QUALITY
Video Clip
Self-timer Off
Main Menu
MODE
Timeout 15S
Driver PC
TV NTSC
Language
SETUP
Default
Format
Main Menu
SETUP
Mode
Quality
Flash
WB
MAIN MENU
Brightness
Setup
Exit
MAIN MENU
PC
HDD
NTSC
PAL
15S
30S
60S
90S
Non
English
Français
Español
Deutsch
Italiano
LCD MENU SCREENS
10
Page 12

Delete One
Delete All
Main Menu
DELETE
Brightness
BRIGHTNESS
Delete
Thumbnail
Brightness
Exit
MAIN MENU
THIS FILE
No
Yes
DELETE ONE
No
Yes
DELETE ALL
11
Page 13
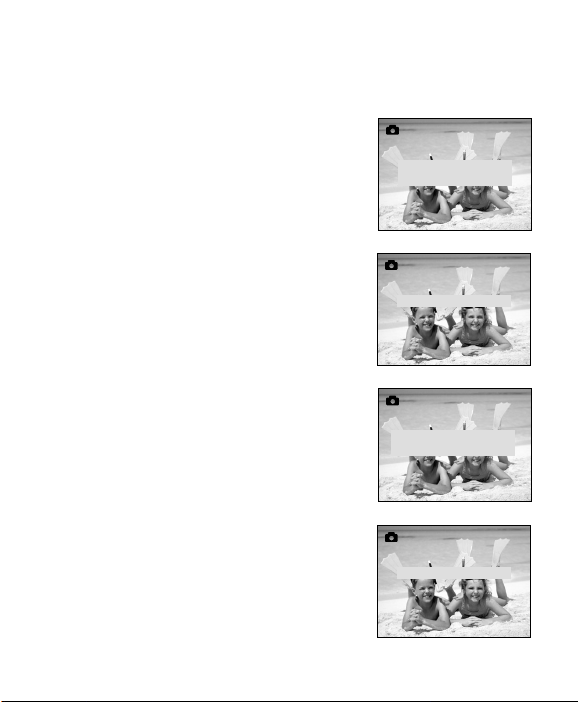
LCD Messages
Message(s) will be prompted on the LCD screen when the memory is full
or if there is a problem with the memory.
1. MMC MEMORY IS INSUFFICIENT:
If the file in the internal memory is larger
than the available memory space in the
MMC/SD memory card, the file will not be
transferred and this message will appear.
Please insert a MMC/SD memory card with
sufficient memory or delete files.
MMC MEMORY IS
INSUFFICIENT
2. MMC/SD IS FULL:
The MMC/SD memory card is full. Please
insert a new MMC/SD memory card or delete
files.
3. INTERNAL MEMORY IS FULL:
The internal memory is full. Please insert an
MMC/SD memory card or delete files.
4. ERROR:
The camera’s internal memory or the
MMC/SD memory card memory may be
corrupted. Delete all files or format the
memory to continue.
12
MMC FULL!
INTERNAL MEMORY
FULL
ERROR!
Page 14
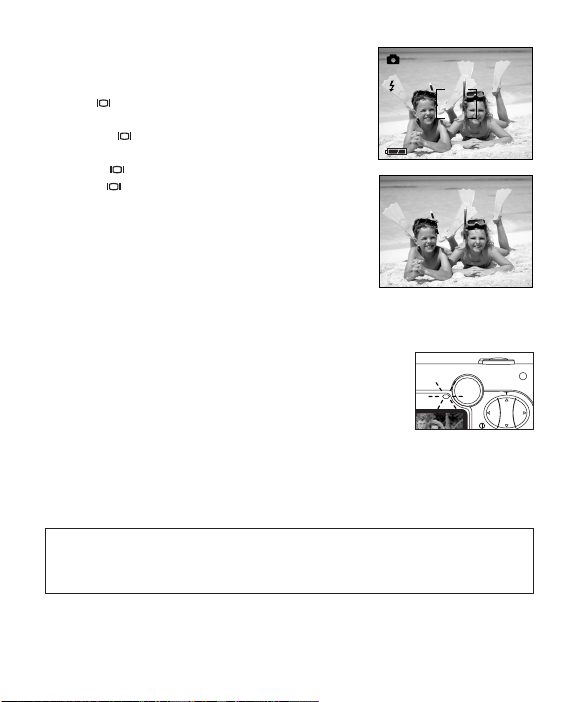
Turning the LCD On and Off
The LCD automatically turns on when the
camera is powered on. Press the LCD On/Off
FINE
A
button to turn the LCD on or off.
Using the Display ON/OFF Button:
1. Press once to turn the LCD icons off.
005/080
2. Press to turn the LCD off.
3. Press to turn the LCD on.
Camera Ready LED Status
When the Camera Ready LED is:
1. Steady
The camera is in capture mode. Please hold the
camera steadily during this time, otherwise the
image may come out blurry. (fig.1.5)
2. Blinking
The flash is recharging or the camera is in background storage mode. You
may move the camera. (fig.1.5)
Note: Do not open the battery door or turn the power off while the
Camera Ready LED is steady or blinking, otherwise the images or
video clips in the camera may be damaged.
fig.1.5
13
Page 15
Camera Memory
The Concord Eye-Q Go LCD can store images in one of two ways using
either the camera’s 7MB internal memory or the removable MultiMediaCard
or Secure Digital memory card (MMC/SD).
• When the MMC/SD memory card is inserted, the images and video
clips in the internal memory will be transferred automatically onto the
memory card.
LCDDefault Memory
MMC/SD
No Internal Memory (7MB)
Note: If a MMC/SD memory card with insufficient memory is inserted,
there will only be a partial transfer and the memory card will be filled.
The files that were not transferred will remain in the internal memory.
Please insert a memory card with sufficient memory or delete files.
Please refer to the Deleting Files section for instruction.
When the camera’s internal memory or the MMC/SD is full, you will need
to delete files to continue to take images. Please refer to the Deleting
Images section for instructions, or use a new MMC/SD with free space.
Note: There may be available storage space by using a lower image
quality setting. Refer to the Quality Images section to change the
image quality settings.
14
Page 16
Using the MultiMediaCard or the Secure Digital Memory Card
Inserting the memory card:
1. Locate the battery cover on the bottom of the
camera.
2. Slide the battery door away from the camera
body and lift the battery door to open.
3. Insert the MMC or SD memory card as indicated
by the arrow. (fig.1.6)
4. Close the battery door. Press down on it and
slide it towards the center of the camera until it snaps into place.
Note: Please use MMC/SD memory cards with 16 MB of storage or
higher.
Note: If the internal memory or the MMC/SD is corrupted, the LCD will
display Error! The memory needs to be formatted. Please format all
files to continue. (P.25)
Note: MMC/SD memory cards are sold separately and can be
purchased from major electronic or computer retailers. The cost will
vary depending on the size of the memory card.
fig.1.6
15
Page 17
2. Camera Mode
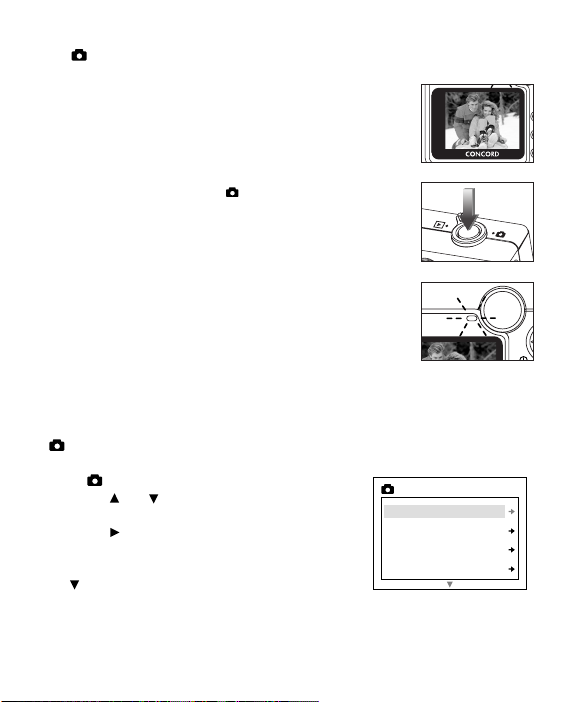
The default mode for taking images is the fine quality
setting. Please refer to the Image Quality section to
learn how to change the settings of your camera.
(fig.2.1)
Taking Still Images:
1. Set the Mode switch to .
2. Position the subject in the LCD or the viewfinder.
3. Gently press the Shutter button (fig.2.2) and keep
the camera still when the camera ready LED next
to the viewfinder is lit. This indicates that the
image is being captured. (fig.2.3)
4. When the image has been captured, the camera
ready LED next to the viewfinder will blink. This
indicates that the image is being stored in the
memory. You may move the camera at this time.
5. A preview of the image will be displayed on the
LCD for 1 second and the file counter number
displayed in the LCD will be updated.
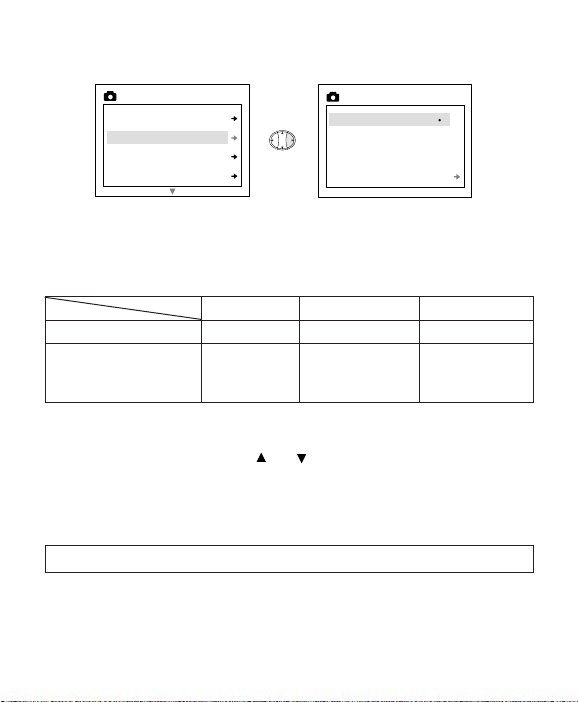
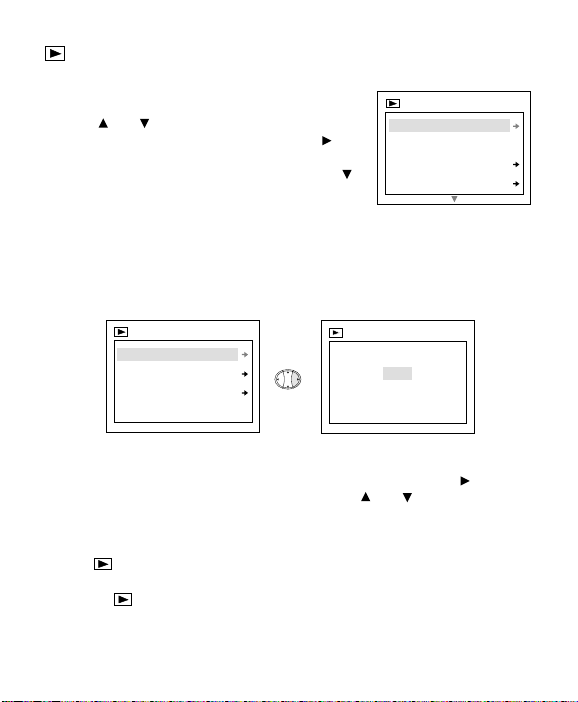
MAIN MENU
1. In Mode, press MENU.
2. Press or to toggle between the
options.
3. Press to view the sub-menu of the
selected option.
4. If you would like to exit any menu, press
until Main Menu is highlighted and
press OK to return to the Main Menu.
OR
5. Press MENU to exit.
fig.2.1
fig.2.2
fig.2.3
MAIN MENU
Mode
Quality
Flash
WB
16
Page 18
MODE MENU
Mode
Quality
Flash
WB
MAIN MENU
Video Clip
Self-timer Off
Main Menu
MODE
PRESS SHUTTER TO STOP
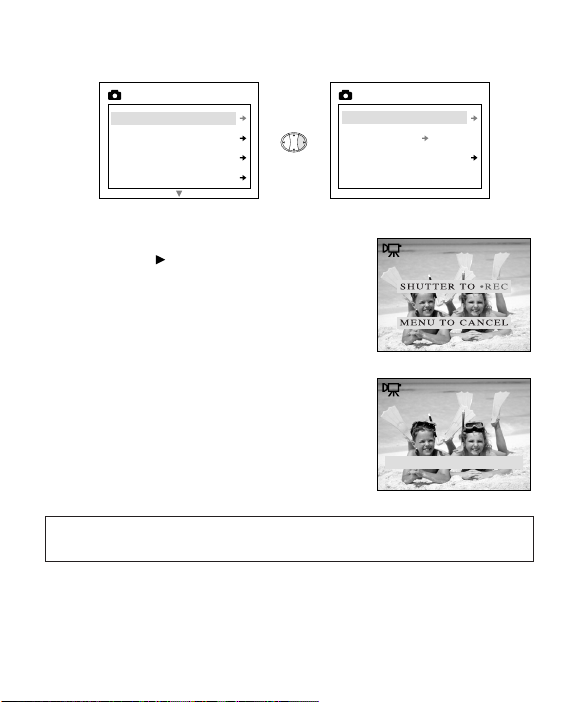
Taking Video Clips
1. When Video Clip is highlighted in the MODE
menu, press .
2. Press the Shutter button to begin recording
a continuous video clip. (fig.2.4)
3. Press the Shutter button again to stop
recording. (fig.2.5)
OR
4. The camera will continue recording until the
memory is almost full.
5. When the recording is completed, the
camera will return to still image taking
mode.
Note: To exit video clip mode before recording, press MENU to return
to still image taking mode.
17
fig.2.4
fig.2.5
Page 19
Video Clip
Self-timer On
Main Menu
MODE
A
005/080
FINE
Mode
Quality
Flash
WB
MAIN MENU
Video Clip
Self-timer Off
Main Menu
MODE
+
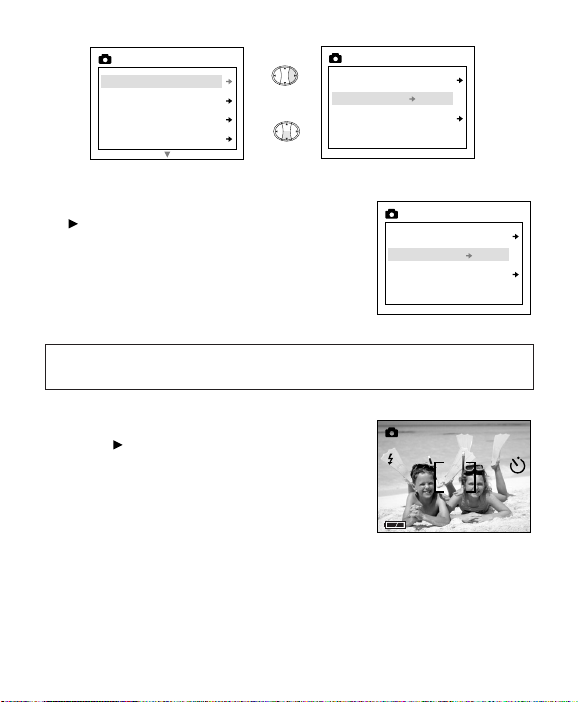
To use the Self-timer:
1. Highlight Self-timer in the MODE menu, press
to switch to On. (fig.2.6)
2. Press MENU to return to Still Image Capture
Mode.
3. Position the subject in the camera.
4. Press the Shutter button.
5. The self-timer LED will blink for 10 seconds
and then the image will be captured.
Note: The self-timer is automatically deactivated once the image is
taken.
To cancel the Self-timer:
1. Highlight Self-timer in the MODE menu,
press to switch to Off. (fig.2.7)
2. Press MENU to return to still image capture
mode.
18
fig.2.6
fig.2.7
Page 20
QUALITY
Mode
Quality
Flash
WB
MAIN MENU
Fine
Normal
Economy
Main Menu
QUALITY
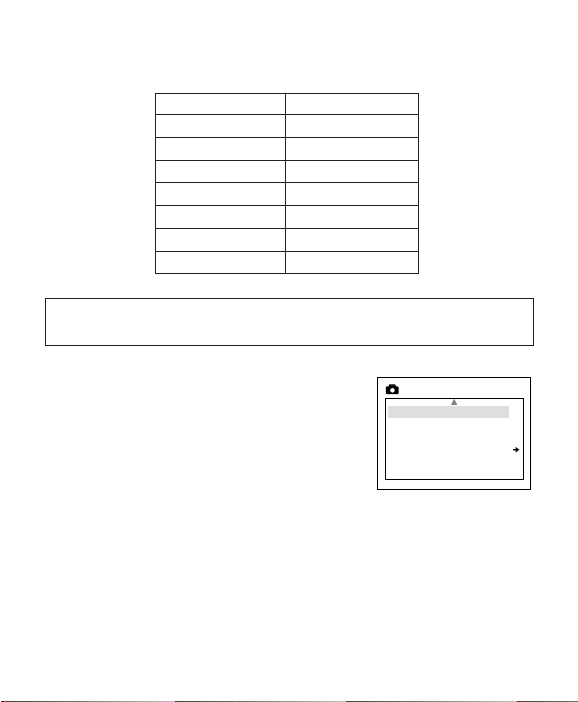
Images can be captured in one of three quality modes: fine, normal or
economy. These modes differ in image file size and different image (JPEG)
compression ratios.
FINE NORMAL ECONOMY
JPEG ratio 5.5:1 12:1 24:1
Images taken
with 7MB of 14 33 54
Memory (approx.)
Setting the Image Quality Mode:
1. In the QUALITY menu, press or to toggle between Fine, Normal
and Economy.
2. Press OK to select the quality mode and press MENU to return to Still
image taking mode.
Note: The selected option will be marked by (
).
•
19
Page 21
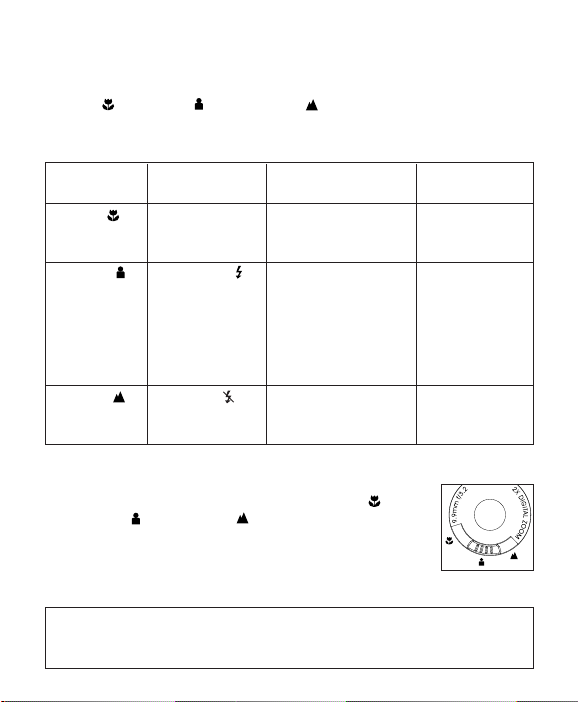
SLIDE SWITCH
The camera has a Slide Switch that has 3 image taking modes:
macro ( ), portrait ( ) and distant ( ). The current flash setting is
displayed in the upper left corner of the LCD.
Slide Switch Flash Status Conditions Distance from
Position subject
Macro ( ) Auto Flash ( A ) Use this option to 0.65m to 1.4m
Portrait ( ) Auto Flash ( ) Use this option in 1.4m to 3.2m
Distant ( ) No Flash ( ) Use this option in 1.4m to infinity
Using the slide switch:
1. Position the Slide switch towards the macro ( ),
take close
photography.
A
variable lighting
conditions. The
camera will
automatically detect
when the flash is
needed.
outdoor or bright
light conditions.
portrait ( ) or distant ( ) icon until the switch
clicks into place. (fig.2.8)
2. To ensure accurate focus, refer to the chart above to
make sure that the subject is within the distance
range in the mode that you selected.
fig.2.8
Note: The default flash mode is set by the Slide Switch. To manually
override the slide switch flash mode, the setting must be changed on the
Flash menu on the LCD. Please refer to p. 21 for further information.
20
Page 22
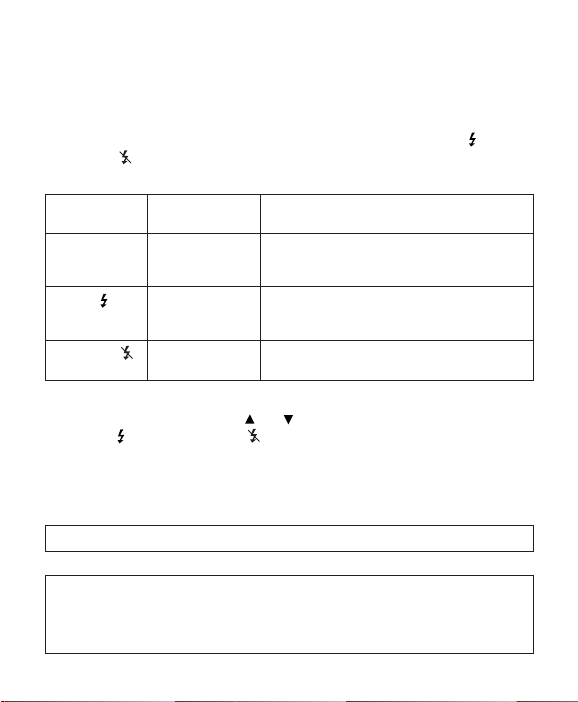
FLASH
This feature enables the camera to override the flash mode that is set by
the Slide Switch.
In the flash mode, there are 3 flash options: Auto ( A ), Flash ( ) or
Flash Off ( ).
Flash Option Distance from Lighting Condition
Auto ( A ) 8.5ft (2.5m) and Use this option in variable lighting
Flash ( ) 8.5ft (2.5m) and Use this option in backlight or low light
Flash Off ( ) 3.9ft (1.2m) to Use this option in outdoor or bright
subject
3.9ft (1.2m). conditions. The camera will automatically
detect when the flash is needed.
3.9ft (1.2m). conditions. The flash will work in bright
and dark conditions.
infinity light conditions.
1. In the FLASH menu, press or to choose between Auto ( A ),
Flash ( ), and Flash Off ( ).
2. Press OK to select the flash mode and press MENU to exit.
3. Position the subject in the camera.
4. Take the image.
5. The flash mode will return to the default setting on the Slide Switch.
Note: The selected option will be marked by (
).
•
Note: The flash may need time to recharge between photos. While it is
charging the Camera Ready LED blinks. When it stops blinking the
camera is ready to take another image. If the batteries are low, the
flash will not work. Please insert fresh batteries.
21
Page 23
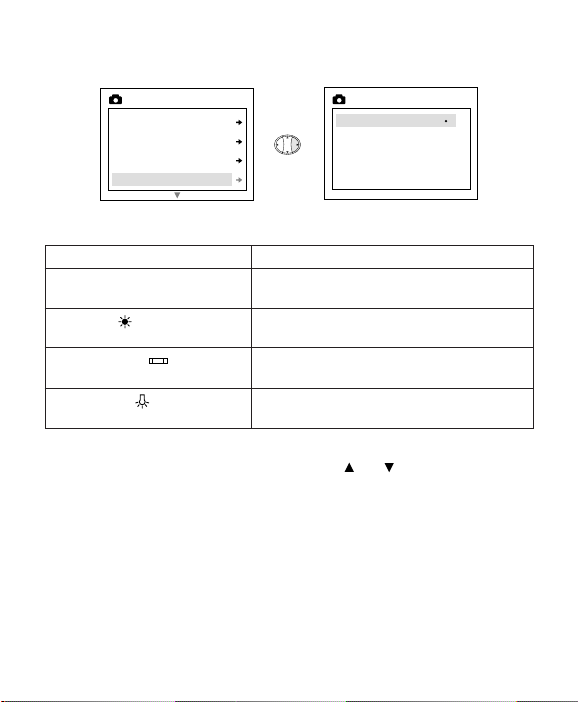
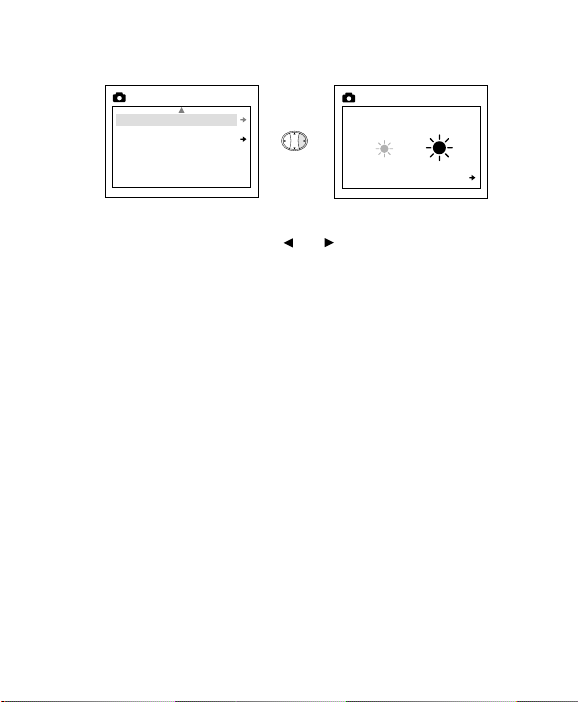
WHITE BALANCE
Mode
Quality
Flash
WB
MAIN MENU
AWB
Sunny
Fluoresent
Tungsten
WB
White Balance Option Explanation
Auto White Balance (AWB) The camera will automatically
Sunny ( ) To be used outdoors with sufficient
Fluorescent ( ) To be used indoors with fluorescent
Tungsten ( ) To be used indoors with tungsten
1. In the WB (WHITE BALANCE) menu, press or to choose between
AWB, Sunny, Fluorescent or Tungsten.
2. Press OK to select the white balance mode and press MENU to exit.
choose the white balance setting.
sunlight.
light conditions.
light conditions.
22
Page 24
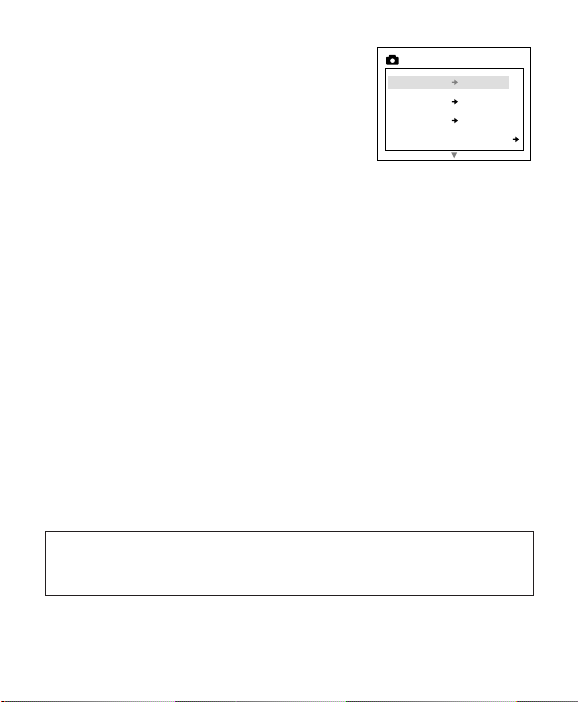
LCD BRIGHTNESS
Brightness
Setup
MAIN MENU
Brightness
Main Menu
BRIGHTNESS
Use this option to change the LCD brightness.
1. In the BRIGHTNESS menu, press or to toggle between both
options.
2. Press MENU to exit.
23
Page 25

SETUP
Setup Option Selection Options Explanation
Timeout 15, 30, 60, 90 Sets the automatic power off option.
None Deactivates the automatic power off
Driver PC (Windows only) Use this mode to
HDD (Windows and Macintosh) Mass
TV NTSC Sets the mode to adapt with your TV.
PAL
Language English, Sets the language in your camera.
Format Formats the internal memory or the
Default Sets all camera settings to the factory
Using the SETUP menu:
1. Use or to toggle between the options.
2. When the option is highlighted, use to change the setting.
3. Press to select and scroll to the next option or press MENU to
exit.
Français,
Español,
Deutsch,
Italiano
option.
view your images and video clips
using the WDM/TWAIN drivers. (p.35)
Storage mode. Use this mode to view
your images and video clips using the
Mass Storage driver. (p.36)
MMC/SD memory card by deleting all
files.
default.
24
Page 26
TIME-OUT
Time-out 30S
Driver PC
TV NTSC
Language
SETUP
To extend battery life, the camera will
automatically power off after 30 seconds of
inactivity. Use this option to change the
default setting.
DRIVER
Please refer to the Transferring Files to the Computer section on P. 31 for
further information.
TV
Please refer to the TV Mode section on P. 38 for further information.
LANGUAGE
Use this option to change the language setting in your camera. All menus
and messages will be displayed in the selected language.
FORMAT
Formatting deletes all files. Use this option to format the internal
memory or the MMC/SD memory card.
To format the:
•Internal memory – The MMC/SD card must not be in the camera.
• MMC/SD card – Insert the memory card into the camera.
Note: If ERROR! is displayed on the LCD screen, this means that the
internal memory or the memory in the MMC/SD is corrupted. Please
format the memory to continue.
25
Page 27
DEFAULT
Default
Format
Main Menu
SETUP
Mode Default Setting
Flash Auto ( A )
White Balance AWB
Quality Fine
Timeout 30
Driver PC
TV NTSC
Language English
Note: The default version for TV mode will vary depending on the
country where the camera was purchased.
To set your camera to its default settings:
1. When the Default option is highlighted,
press OK.
2. The camera will reset to the factory defaults.
3. Press MENU to exit.
26
Page 28

2X Digital Zoom
The Concord Eye-Q Go LCD can use 2X Digital Zoom to take images.
Setting the 2X Digital Zoom Mode:
1. In still image mode, press (T) to zoom into the subject.
2. Press (W) to zoom out and to return to normal mode.
27
Page 29
3. REVIEW MODE
A
005/080
FINE
008/080
AV I
Press OK to Play AVI
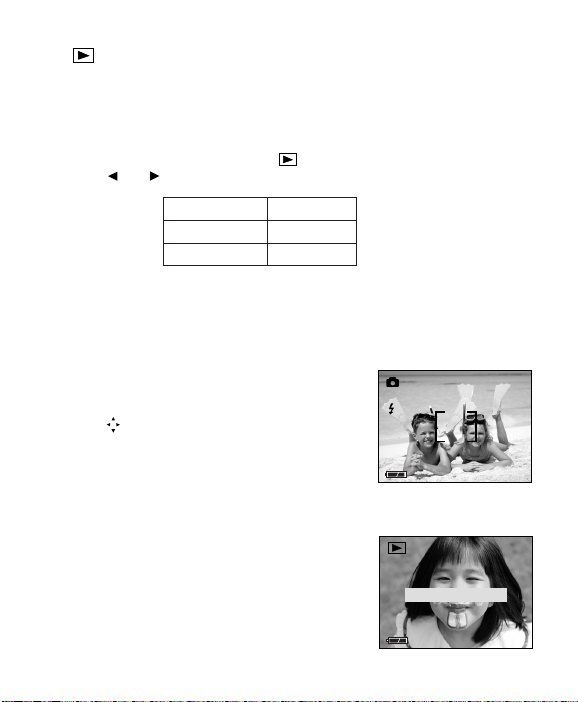
In review mode, you can review your captured images and video clips
through the LCD.
Using REVIEW mode:
1. Slide the Rotary switch towards .
2. Press or to scroll through each file.
File Type Format
Image JPG
Video Clip AVI
2X Enlargement (JPEG only)
When viewing images, you may use 2X enlargement to zoom into the
stored image.
To use 2X Enlargement:
1. While viewing a JPEG file, press OK to enter
2X Enlargement Mode.
2. Press to navigate in the image.
3. Press OK to exit 2X Enlargement mode and
to return to the original image.
Viewing Video Clips (AVI)
To view video clips:
1. Press OK to play the video clip.
28
Page 30
MAIN MENU
Delete
Thumbnail
Brightness
Setup
MAIN MENU
Delete One
Delete All
Main Menu
DELETE
THIS FILE?
No
Yes
DELETE ONE
To use the MAIN MENU in Review Mode:
1. Press MENU to enter the MAIN MENU.
2. Use or to toggle between the options.
3. When the option is highlighted, press to
enter its submenu.
4. If you would like to exit any menu, press
until Exit is highlighted and then press OK
to return to the previous menu.
OR
5. Press MENU to exit.
DELETE
To delete ONE file from the internal memory:
1. When Delete One is highlighted in the DELETE menu, press .
2. The next screen will read "This File?", press or to highlight No
or Yes.
3. Press OK to select.
4. If Yes is selected, the file will be deleted and the camera will return to
the Main Menu.
5. If No is selected, no change will be made, and the camera will return
to the Main Menu.
29
Page 31

DELETE ALL
Delete One
Delete All
Main Menu
DELETE
No
Yes
DELETE ALL
To delete ALL files from the internal memory:
1. When Delete All is highlighted in the DELETE menu, press .
2. The next screen will read "All Files?" Press or to highlight No
or Yes.
3. Press OK to select.
4. If Yes is selected, ALL FILES will be deleted and the camera will return
to the Main Menu.
5. If No is selected, no change will be made, and the camera will return
to the Main Menu.
To Delete Files from the MMC/SD Memory Card:
1. Insert the MMC/SD into the camera.
2. Follow the steps above.
Note: Once images have been deleted, you will not be able to recover
them.
30
Page 32

THUMBNAIL
Delete
Thumbnail
Brightness
MAIN MENU
OK
1. When Thumbnail is highlighted in the Main Menu, press OK to
enter Thumbnail mode.
2. Use to navigate between all of the stored files.
3. Press OK to view the selected file.
LCD BRIGHTNESS
Please refer to the Brightness section on P. 23.
31
Page 33

4. Transferring files to the Computer
You can view and store the images and video clips you captured with the
Concord Eye-Q Go LCD camera using your PC. For Windows users, to
download the files for viewing, you must first install the software that
comes with your camera.
NOTE: Do not connect the camera to your computer before installing
the CD-ROM software.
Installing the software and downloading the camera drivers:
1. Insert the CD-Rom included with your Concord Eye-Q Go LCD package
into your computer’s CD-Rom drive.
2. The installation screen will automatically appear on the computer’s
monitor. Follow the on-screen instructions to install the software.
3. When the CD-Rom installation is finished, connect your camera to the
computer to complete.
4. Follow the on-screen instructions to complete the installation.
NOTE: If your computer’s CD-Rom auto-run function is disabled, click
on MY COMPUTER and locate the CD-Rom Drive.
Double click on the CD-Rom Drive icon to show its contents. Double
click on the file named SETUP.EXE and follow the on-screen
instructions.
Note for Mac users: It is not necessary to install the software in the
CD-Rom. Please refer to the Mass Storage section on p. 36-37 for
details on how to view stored images and video clips on your
computer.
32
Page 34

Connecting the Camera to the Computer:
1. When the camera is connected to the computer
for the first time, the camera’s driver installation
will begin. Please follow the on-screen
instructions to complete the installation.
2. Plug the rectangular end of the USB cable that is
included with the Concord Eye-Q Go LCD into
your PC’s USB port. (fig.4.1)
3. Open the Cable Connection panel on the Concord
fig.4.1
Eye-Q Go LCD, by lifting the door and then
sliding the door out.
4. Plug the square end of the USB cable into the USB connector located
inside the Cable Connection panel.
Unplugging the Camera From the Computer
(Windows ME/2000/XP)
1. Click once on the "Unplug or Eject Hardware" icon on the
right hand side of your task bar. (fig.4.2)
2. Select "Stop Concord Eye-Q Go LCD USB Driver V 0.1".
fig.4.2
3. Click [OK] when the "Safe to Remove Hardware" prompt appears.
4. Unplug the USB from the camera.
33
Page 35

Viewing files on your computer
The Concord Eye-Q Go LCD has 2 driver modes: TWAIN/WDM (PC) and
Mass Storage (HDD).
Driver Driver Mode in Feature available Feature available
TWAIN to PC No
download
still images
WDM for video
conferencing or
PC video clips
Mass Storage HDD
feature
the camera in PC in Mac
Yes. This mode
allows you to view
stored images on
your camera, to
take video clips on
your computer and
to use the camera
as a web camera.
Software installation
is required.
Yes. In this mode
the camera
becomes an
external hard disk
drive (HDD) which
enables you to view
or download
images and video
clips stored in your
camera’s internal
memory or MMC/SD
memory card onto
your computer.
Software installation
is required.
Yes, the computer
will automatically
detect the camera
when it is
connected to the
computer. No
software installation
is required.
34
Page 36

Windows Only
Brightness
Setup
Exit
MAIN MENU
Time-out 30S
Driver PC
TV NTSC
Language
SETUP
TWAIN/WDM Drivers (PC Mode)
This mode allows you to view images and to take video clips on your
computer and use the camera as a web camera. Please refer to the
Special Features section for more information. (p.39)
This function must be set before you connect the camera to the computer.
Setting PC Mode in your camera:
1. Turn the camera on.
2. In the Setup menu, press until Driver is highlighted.
3. Press to change the setting to PC.
4. Turn the camera off.
5. Connect the camera to the computer.
Note for Windows users: When switching between PC and HDD mode,
please unplug your camera from the computer first.
35
Page 37

Windows and Mac Users:
Mass Storage (HDD)
This mode allows the camera to become an external hard disk drive
(HDD) and you may view or download images and video clips stored in
your camera’s internal memory or MMC/SD memory card on your
computer.
This function must be set before you connect the camera to the computer.
Setting Mass Storage, HDD (Hard Disk Drive) in your camera:
1. Turn the camera on.
2. In the Setup menu, press until Driver is highlighted.
3. Press to change the setting to HDD.
4. Turn the camera off.
5. Connect the camera to the computer.
For Windows Users:
Using the Mass Storage mode to view the files in the internal memory:
1. Set your camera to HDD Mode.
2. Connect your camera to the computer.
3. Open My Computer to locate the removable disk drive that contains
the files in your camera’s internal memory or MMC/SD memory card.
4. You may view or download files.
Using the Mass Storage mode to view the files in the MMC/SD memory
card:
1. Before connecting the camera to the computer, insert the MMC/SD
memory card into the camera.
2. Follow the steps above.
NOTE: Please refer to your computer’s documentation for more
information on the location of the USB port of your computer.
36
Page 38

For Mac Users:
Using the Mass Storage mode to view the files in the internal memory:
1. Set your camera to HDD Mode.
2. Connect your camera to the computer.
3. After a few moments, the external hard drive will appear on the
desktop.
4. Open the "untitled" removable drive that is on your desktop and open
DCIM > 100GOPL to view your files.
5. Click on the file that you would like to view.
Using the Mass Storage mode to view the files in the MMC/SD memory
card:
1. Before connecting the camera to the computer, insert the MMC/SD
memory card into the camera.
2. Follow the steps above.
Unplugging the camera from the computer:
1. Drag the "untitled" removable drive icon on the desktop to the Trash.
2. Unplug the USB cable from the camera.
Note for Mac users: For better performance, please use the USB port
located in the back of your computer.
37
Page 39

Windows Only
Using Software to view images (PC Mode)
1. Launch ArcSoft PhotoImpression
software by clicking on StartPrograms-ArcSoft Camera Suite
and choose PhotoImpression from
the application list on your screen.
(fig.4.3)
2. Click on the [Camera/Scanner]
button. (fig.4.3 a)
3. Click on the drop-down list under
SELECT SOURCE and choose
Concord EYE-Q Go LCD. (fig.4.3 b)
4. Click on the Camera/Scanner Icon.
(fig.4.3 c) A second window will appear showing the contents (images)
of your camera’s memory, and options on how to handle them.
(fig.4.3 d)
5. Select the image(s) you want to retrieve, by pressing the Ctrl key on
your keyboard and clicking once on each thumbnail.
OR
6. Click on Edit-Select All.
7. Click on Acquire and the selected images will be transferred. (fig.4.3 e)
OR
8. Click on Edit-File Transfer.
9. The images just retrieved will be placed as thumbnails on the bottom
of your application window. To open them, double-click on the
thumbnail. (fig.4.3 f )
You are now ready to print, store or further enhance your images. Please
refer to ArcSoft’s Software Guide for a tutorial on all the features
PhotoImpression offers.
Note: For better viewing performance use VideoImpression to view
videos. Please see the PC Video Clip section.
fig.4.3
38
Page 40

5. Special Features
Windows Only
PC Video Clips (PC Mode)
The Concord Eye-Q Go LCD has the ability to capture live video clips on
your computer by using the ArcSoft VideoImpression software.
To Capture Video Clips on the Computer:
1. Launch the ArcSoft VideoImpression software by clicking on StartPrograms-ArcSoft Camera Suite and choose VideoImpression from the
application list on your screen.
2. Click on the NEW icon.
3. Click on the CAPTURE icon.
Note: If the video is not being displayed, select "Concord Eye-Q
Go LCD Video Clips" in the Driver List and click on the Live icon to
view live video.
Recording Video Clips:
1. Follow steps 1-3 above.
2. Click on the RECORD icon. To stop recording, press the ESC button on
your keyboard or click the PAUSE icon on your screen.
3. To save your video, click on the SAVE icon and follow the onscreen
instructions.
Note: To edit, manipulate or create video clips using all the features
that VideoImpression offers, refer to ArcSoft’s software guide for
further instructions.
39
Page 41

Windows Only
Web Camera (PC Mode only)
You may also use the Concord Eye-Q Go LCD as a Web Camera and a
video conferencing camera. It will work with many popular video
conferencing software titles.
Using the camera as a Web Camera:
1. Launch Microsoft NetMeeting software.
2. To start the video, click on the start video icon.
3. Follow the NetMeeting on-screen instructions, or refer to NetMeeting’s
Help section.
NOTE: If the video does not show up right away, go to Tools-OptionsVideo. Then select the Concord Eye-Q Go LCD driver under the video
Properties section and then click OK.
NOTE: If you do not have NetMeeting already installed on your
computer, please visit www.microsoft.com for instructions on how to
obtain a copy.
40
Page 42

TV Mode
Brightness
Setup
Exit
MAIN MENU
Time-out 30S
Driver HDD
TV NTSC
Language
SETUP
The Concord Eye-Q Go LCD camera allows you to view stored files and to
record clips on your television. To begin, check your television
documentation to determine what video standard you should set your
camera to, either NTSC or PAL.
+
Changing the TV Mode setting:
1. In the Setup menu press until TV is highlighted
2. Press to change the setting to NTSC or PAL.
Connecting to the television:
1. Connect the AV cable supplied with your camera
into the jack marked VIDEO or VIDEO IN on your
television.
2. Turn on your television.
3. Set the television to video mode according to
the instructions in the owner’s manual. (This is
usually channel 3, 4 or AV)
4. Turn the camera on by pressing the Power
button.
5. Connect the other end of the cable into the VIDEO
port located underneath the cable connection panel. (fig.5.1)
41
fig.5.1
Page 43

Using TV Mode
1. Connect the camera to the TV.
2. Turn the camera on.
3. Slide the Rotary Switch to .
4. The TV will become a live viewfinder.
Note: You may record your TV Mode session by using your VCR. Please
refer to your VCR documentation to learn more about recording.
Using the TV Menu
1. In TV Mode, slide the Rotary Switch to .
2. Press MENU to view the TV MENU.
FW Version
This will display the FW Version that your camera is using.
Delete One
1. When you are viewing a file, press MENU.
2. Press or to highlight Delete One.
3. Press OK and the file that is in the background will be deleted.
Thumbnail
1. In the TV MENU, press or to highlight Thumbnail.
2. Press OK to view your files in Thumbnail mode.
3. In Thumbnail mode, use the to navigate through your files.
4. Press OK to view the selected file.
Time-out
1. In the TV MENU, press or to highlight Time-out.
2. Press to change the Time-out setting.
42
Page 44

6. Camera maintenance
Cleaning the Concord Eye-Q Go LCD:
Clean the outside of the camera by wiping it with a clean, soft and
dry cloth.
Cleaning the lens, viewfinder and LCD:
1. Blow gently on the lens and/or viewfinder to remove dust and dirt.
2. Breathe lightly on the lens and/or viewfinder to moisten them.
3. Wipe the lens and/or viewfinder gently with a soft, lint-free cloth or an
untreated lens-cleaning tissue.
Note: Do not use cleaning solutions unless they are designed
specifically for camera lenses. Do not wipe the camera lens or
viewfinder with chemically treated eyeglass lens tissues as these may
scratch it.
43
Page 45

7. Tips and Troubleshooting
SYMPTOM
POWER
Cannot turn on the
camera.
The camera is on
and it is not
responding.
WHITE BALANCE
There is something
wrong with the
color of the
captured image.
LCD
The LCD monitor is
not clear.
The LCD is not
displaying
anything.
DOWNLOADING PICTURES TO PC
Camera is not
responding during
image downloading
to PC.
POSSIBLE
CAUSE
Battery was not installed
correctly.
Battery is empty or weak.
Battery compartment
was not closed correctly.
The camera needs to be
reset.
White Balance is not set
properly.
The LCD plastic monitor
cover is dirty.
LCD is turned off.
The battery level is low.
The operating system
may not be allocating
adequate resources to
download the image.
POSSIBLE
SOLUTION
Install battery correctly
using the direction
indicators on the inside
of the battery cover.
Replace battery.
Close the battery
compartment properly.
Reset the camera by
removing and reinserting the battery.
Reset White Balance.
You should clean the
LCD monitor cover.
Turn on the LCD by
pressing .
Replace batteries.
Reset the camera by
opening and closing the
battery door. Reset the
computer.
44
Page 46

Tips and Troubleshooting
SYMPTOM
TAKING IMAGES
Flash image taken
is too light.
Flash image taken
is too dark.
Flash did not work
Image taken has
poor quality.
POSSIBLE
CAUSE
Subject is too close.
Subject is too far away.
Flash is not on.
There was sufficient
light for the shot and
the flash was not
needed.
Camera’s flash has been
turned off.
Flash did not charge.
Battery is empty.
Subject or camera
moved as image was
taken.
POSSIBLE
SOLUTION
Move the camera further
from the subject.
Move camera closer to
the subject.
Turn flash on.
This is normal as your
Cameras electronic light
sensor is programmed to
only fire the flash when
needed.
Turn on Automatic Flash.
Verify that the LED has
stopped blinking before
taking the image.
Replace the battery.
Hold camera steady until
image is taken.
45
Page 47

Tips and Troubleshooting
SYMPTOM
TAKING IMAGES/VIDEO CLIPS
Daylight
image/video clip
taken is too dark.
Cannot take an
image/video clip.
Image is blurred
when looking
through the
viewfinder.
Part of the
image/video clip is
missing
POSSIBLE
CAUSE
The subject is in front
of bright light.
Memory is full.
Camera is not set to
image/video clip taking
mode.
Power is off.
Camera is in "Auto
Power Off " mode.
Viewfinder is dirty.
Something was
blocking the lens when
taking the image.
POSSIBLE
SOLUTION
Change the position of
the subject.
Delete all images and
continue shooting.
Download images to
your PC and delete
images from the
Insert an MMC/SD card
with available memory
space.
Set the unit to
image/video clip taking
mode.
Turn power on.
Turn power on.
Clean the viewfinder
with a soft cloth or
cotton swab. See the
Camera maintenance
section.
Keep hands, fingers, etc.
away from the lens.
46
Page 48

Tips and Troubleshooting
SYMPTOM
WEB CAMERA
The video quality is
poor.
The video is too
slow.
WEB CAMERA/IMAGES/VIDEO CLIPS
Web camera
video/image/video
clip has poor
quality.
Cannot take a web
camera video/
image/video clip.
POSSIBLE
CAUSE
The video quality
setting needs to be
changed.
Poor lighting.
Lens is dirty.
Subject is too close.
Battery is dead or
weak.
POSSIBLE
SOLUTION
Go to Tools-OptionsVideo. In the Video
Quality section, move the
arrow towards "Better
quality" or "Faster
video" for better results.
Take web camera/image/
video clip in better
lighting.
Clean lens with a soft
cloth. See the Camera
maintenance section.
Stand at least 3.9ft
(1.2m) away from the
subject.
Replace battery.
47
Page 49

8. Getting Help
If you need help with your camera, refer to the Troubleshooting section of
this manual. If you still cannot find the solution, visit our Web site at
www.support.concordcam.com. Most support issues are answered
in the Frequently Asked Questions (FAQ) section.
Toll Free in the US and Canada:
• (866) 522-6372
Toll Free in Europe:
• UK: 0800-1696482 • Spain: 900-973195
•Germany: 0800-1800563 • Italy: 800-781883
•France: 0800-917599
Toll:
• 31-53-4829779
For Software Technical Support, please contact:
I
n the USA
ArcSoft, Inc.
46601 Fremont Blvd.
Fremont, CA 94538
Monday – Friday
8:30AM - 5:30PM (PST)
Tel: (510) 440-9901 Fax: (510) 440-1270
E-mail: support@arcsoft.com
Web: www.arcsoft.com
I
n Europe:
Arcsoft, Inc.
Unit, Shannon Industrial
Estate
Shannon, Co. Clare, Ireland
Tel: +353 (0) 61 702087 Fax: +353 (0) 61 702001
E-mail: europe@arcsoft.com
and Canada:
48
Page 50

9. Camera Specifications
Lens
Focusing
Image Sensor
Image Size
Image Quality
Sensor Output
Sensitivity
Exposure
Digital Zoom
Image Storage
(Approximate)
Removable Storage
Output file format
9.9 mm f/3.2 glass lens, 5 elements in 5 groups,
(Equivalent to 44mm lens on 35mm format)
Distant (flash off): from 1.4m to infinity (with
aperture, f/5.6)
Portrait: from 1.4m to 3.2m (with aperture f/3.2)
Macro: from 0.65m to 1.4m (with aperture, f/8)
CMOS (1288x1024 active pixel), Pixel Pitch 5.2um x
5.2um, 9.67mm array Diagonal.
Notes: Reference supplier specification sheet
http://www.ovt.com
6.66mm x 5.32mm
Three different image qualities to be selected by user.
All images are 1.3MP with 3 different JPEG
compression ratios.
Fine- 1280 x 960, JPEG 5.5:1
Normal - 1280 x 960, JPEG 12:1
Economy - 1280 x 960, JPEG 24:1
1288 x 968, 24 bit color depth output
Sensitivity ISO 100 equivalent with _2EV latitude
(increase gain to ISO 400)
1/14s to 1/1000s with Auto exposure, Auto white
balance
Up to 2X
7MB non-volatile memory (approximate):
- Fine, 14 images
- Normal, 33 images
- Economy, 54 images
MMC/SD card slot
JPEG, AVI compression
49
Page 51

Camera Specifications
Optical Viewfinder
Image Review
On Screen Display
(OSD)
Menu on LCD
Frame Counter
Self-timer
Flash Unit
Power Source
Battery Life
Power Management
Reversed Galilean type with 85% coverage and 0.45x
magnification
On 1.6" TFT LCD (resolution 312 x 230) with white
LED back lighting and 2X enlargement capability
Display: Frame counter, Battery status
User selectable: Flash mode, self-timer, image quality,
NTSC/PAL TV mode, image delete indicator, camera
life view mode and review mode, video clip, white
balance (auto white balance, sunny, fluorescent,
tungsten), brightness (2 levels), Time-out period
driver (TWAIN/WDM and Mass storage), format
memory, digital zoom (1x, 1.25x 1.5x and 2x)
LCD, counting forward
Approx. 9s delay with blinking red LED (6s slow and
3s fast)
-Flash-off-mode (outdoor, with the selection switch is
set to "DISTANT")
-Auto Flash (with the selection switch is set to
"PORTRAIT" or "MACRO")
- Always Flash (for user use in backlight condition)
- When the USB cable is plugged-in, flash charging is
disabled
- 3m (10ft) maximum distance
- Charge time is less than 7 seconds at room
temperature when using new Kodak Battery
One CR123 Lithium Battery
Up to 120 Images (approx.)
Auto-power-off after 15, 30, 60, 90 seconds or no
auto time out (User Programmable) without activity
50
Page 52

Camera Specifications
Dimensions
Weight
Connectivity
Web Camera and
Video Mode
System
Connectivity
PC Software
Image Refresh Rate
for Web Camera
Video Resolution
Accessories
86mm x 61mm x 32.5mm
115g (without battery and MMC or SD card)
USB 1.1 connector direct to PC or Mac
MMC/SD card slot to accept MMC or SD card
Video connector direct to TV
Serial, IrDA (optional, transfer speed: 115KPS,
protocols supported on top of IrDA for image transfer
"IrOBEX").
WDM for mini port stream driver
TWAIN Driver, WDM Driver and Mass Storage Driver
for Windows 98SE, 2000 service pack 2, ME, XP
Mass Storage Driver for Mac OS 9 or higher
Arcsoft PhotoImpression, Arcsoft VideoImpression
30fps
QVGA, Record & Playback
CD ROM including Multilingual User Manual PDF
format
Mini-USB Cable
TV Cable
Wrist Strap
CR123 Lithium battery
Pouch
Multilingual User's Guide
Multilingual Quick Start Guide
51
Page 53

10. Warranty Information
LIMITED WARRANTY
The manufacturer warrants your Concord Eye-Q Go LCD camera for a period of 1
year from the date of purchase to be free from defects in material and
workmanship. The warranty period shall be extended accordingly if applicable
mandatory legislation in effect on the date of purchase requires a longer
warranty period. The manufacturer, at its option, will repair or replace or have
repaired or replaced, at a location selected by the manufacturer, each product
which is proven to the satisfaction of the manufacturer to be defective in
material or workmanship. This warranty shall be limited to the camera for
defects which were not caused by misuse, abuse, improper handling, tampering
or attempts to repair by the owner or any unauthorized repair service or repair
man. This warranty is limited solely to the above and applies only for the
period set forth. We will not be liable for any loss or damage, incidental or
consequential of any kind, whether based on warranty, contract or negligence
arising in connection with the sale, use or repair of the product. Our maximum
liability shall not in any case exceed the sale price. This warranty is for the
benefit of the original purchaser only. This warranty gives you specific legal
rights and may vary from jurisdiction to jurisdiction. The manufacturer makes
no representation or warranties with regard to the contents of the User's Guide
and Quick Start Guide. Non-Concord brand equipment and software and the
Concord Eye-Q Go LCD WDM/TWAIN and Mass Storage drivers distributed with
your Concord Eye-Q Go LCD camera are sold "as is" and without warranty of
any kind from Concord, including any implied warranty regarding
merchantability, fitness for a particular purpose, and non-infringement of third
party rights, and all such warranties are disclaimed. The sole warranty, if any,
for non-Concord branded items, if any, is given by the manufacturer or
producer thereof.
Concord, Concord Eye-Q and the Concord Eye-Q logo are registered trademarks or
trademarks of Concord Camera Corp., in the United States and/or other countries. Microsoft
and Windows are either registered trademarks or trademarks of Microsoft Corporation in the
United States and/or other countries. Mac and Macintosh are registered trademarks or
trademarks of Apple Computer, Inc. in the U.S. and other countries. All other brands and
product names are either registered trademarks or trademarks of their respective owners.
Copyright 2002 Concord Camera Corp.
52
511185-00
Page 54

Technical Support Hot Line:
Toll Free In the USA & Canada
1-866-522-6372
Toll Free In Europe
UK: 0800-169-6482
BELGIUM: 0800-787-57
FRANCE: 0800-917-599
GERMANY: 0800-1800-563
SPAIN: 900-973-195
ITALY: 800-781-883
All Other Countries - Toll
31-53-482-9779
Page 55

Page 56

FRANÇAIS
FELICITATIONS
Vous venez d'acquérir une nouvelle caméra. Nous
vous en félicitons. Votre caméra a été conçue avec
soin et fabriquée de manière à vous donner toute
satisfaction. Avant de l'utiliser, familiarisez-vous
avec ses principales fonctions en lisant le présent
manuel.
Ce manuel est très détaillé et est présenté de
manière à vous permettre de suivre aisément les
instructions afin d'exploiter de manière optimale
des fonctions de votre caméra.
1
Page 57

Table des matières
Informations importantes ................................................................................4
Fonctions de la caméra....................................................................................6
Configuration minimale....................................................................................6
1. La caméra
Présentation de votre caméra Concord Eye-Q Go LCD....................................7
Chargement de la batterie ..............................................................................8
Mise sous tension/hors tension de la caméra ................................................9
Ecrans de menu LCD ......................................................................................10
Menus à l'écran ..............................................................................................12
Mise sous tension/hors tension de l'écran....................................................13
Statut du témoin lumineux "prêt" de la caméra ..........................................13
Mémoire de la caméra....................................................................................14
Utilisation de la carte MMC ou SD ................................................................15
2. Mode Caméra
Pour prendre des photos ..............................................................................16
Menu Principal................................................................................................16
Mode Menu (Menu Mode) ........................................................................17
Mode Video Clip (Séquence vidéo) ......................................................17
Self-timer (Minuterie auto) ..................................................................18
Quality (Qualité) ........................................................................................19
Commutateur coulissant ..........................................................................20
Flash ..........................................................................................................21
White Balance (Equilibrage des blancs) ..................................................22
LCD Brightness (Luminosité de l'écran) ..................................................23
Setup (Configuration)................................................................................24
2X Digital Zoom (Zoom numérique 2X) ........................................................27
3. Mode Visionnage
2X Enlargement (Agrandissement 2X) ..........................................................28
Video Clip Playback (Lecture de séquences vidéo) ......................................28
Main Menu (Menu principal)..........................................................................29
Delete (Suppression) ................................................................................29
Thumbnail (Miniature) ..............................................................................31
Brightness (Luminosité) ............................................................................31
2
Page 58

4. Transfert de fichiers sur l'ordinateur
Installation du logiciel ..................................................................................32
Connexion de la caméra à l'ordinateur ........................................................33
Déconnexion de la caméra de l'ordinateur ..................................................33
Visualisation des fichiers sur l'ordinateur ....................................................34
Pilotes TWAIN/WDM ..................................................................................35
Mass Storage ............................................................................................36
Pour Windows ......................................................................................36
Pour Macintosh ....................................................................................37
Utilisation du logiciel PhotoImpression ........................................................38
5. Fonctions spéciales
PC Video Clips (Séquences vidéo sur PC) ....................................................39
Web Camera (Webcam)..................................................................................40
Mode TV..........................................................................................................41
6. Entretien de la caméra
Nettoyage d'Eye-Q Go LCD ..........................................................................43
7. Astuces et dépannage ..................................................................................44
8. Si Vous Avez Besoin d’Aide ..........................................................................48
9. Spécifications de la caméra ..........................................................................49
10. Informations sur la Garantie..........................................................................52
3
Page 59

INFORMATIONS IMPORTANTES
INFORMATIONS FCC
AVERTISSEMENT FCC: le présent équipement respecte les limites imposées aux
dispositifs numériques de Classe B conformément au chapitre 15 des règles FCC.
Seuls les câbles fournis avec la caméra peuvent être utilisés. Si vous utilisez la
caméra avec d'autres câbles, ceci peut entraîner des interférences entravant la
réception TV et radio et peut annuler votre autorisation d'utilisation de cet
équipement. Ce dispositif est conforme au chapitre 15 des règles FCC. Son
utilisation est soumise aux deux conditions suivantes :
• Ce dispositif ne peut pas causer d'interférence nuisible.
•Ce dispositif doit accepter toutes les interférences reçues, y compris celles
susceptibles de provoquer un comportement indésirable de l'appareil.
Testé pour Conformité
pour UNE UTILISATION PRIVEE OU PROFESSIONNELLE
Les modifications qui n'ont pas été expressément approuvées par le fabricant
peuvent annuler l'autorisation qu'a l'utilisateur d'employer le présent équipement.
INFORMATIONS UTILISATEUR
REMARQUE : le présent équipement a été testé et déclaré conforme aux limites
relatives aux appareils numériques de classe B conformément au chapitre 15 des
règles FCC. Ces limites visent à garantir une protection raisonnable contre les
interférences nuisibles dans les installations résidentielles. Le présent équipement
génère, utilise et peut irradier des fréquences radio et, s'il n'est pas installé et
utilisé conformément aux instructions, il peut provoquer des interférences nuisibles
pour les communications radio. Toutefois, nous ne pouvons garantir l'absence
totale d'interférences pour tous les appareils.
Si le présent équipement entraîne des interférences nuisibles à la réception radio
ou télévision, ce qui peut être déterminé en mettant l'équipement sous et hors
tension, l'utilisateur est encouragé à résoudre le problème en prenant au moins
une des mesures suivantes :
• Rréorienter et déplacer l'antenne de réception ;
• augmenter la distance entre l'équipement et le récepteur ;
• raccorder l'équipement à une prise reliée à un circuit autre que celui du récepteur ;
• demander l'aide de son revendeur ou d'un technicien radio/TV expérimenté.
avec les normes FCC
4
Page 60

INFORMATIONS VCCI
Le présent équipement est un produit de classe B destiné à être utilisé dans un
environnement domestique, sur la base des exigences techniques du VCCI (Voluntary
Control Council for Interference from Information Technology Equipement). S'il est
utilisé à proximité d'un récepteur radio ou d'un récepteur de télévision dans un
environnement domestique, il se peut qu'il provoque des interférences.
Veuillez installer et utiliser l'équipement conformément au manuel d'utilisation.
PRECAUTIONS
Veuillez observer les précautions suivantes lorsque vous utilisez la caméra:
•N'ouvrez pas le boîtier de la caméra et n'essayez pas d'apporter des réparations
vous-même. Adressez-vous à des techniciens agréés.
•Tenez votre caméra à l'abri de l'eau et d'autres liquides. Ne la laissez jamais être
mouillée. Ne l'utilisez jamais à l'extérieur lorsqu'il pleut ou qu'il neige.
•Si des corps étrangers ou de l'eau pénètrent dans l'unité, mettez celle-ci
immédiatement hors tension et contactez le centre de maintenance agréé le plus
proche.
•Tout dommage physique ou panne peut entraîner la suppression des images
enregistrées dans la mémoire de l'appareil. Veillez à toujours conserver des copies
de sauvegarde des données en les transférant sur un ordinateur personnel.
•Dans un environnement sujet aux décharges électrostatiques, il est possible que la
caméra présente des dysfonctionnements et que l'utilisateur doive la réinitialiser.
•Ne laissez pas la caméra dans des endroits soumis à des températures
extrêmement élevées, tels qu'un véhicule fermé ou un emplacement exposé à la
lumière directe du soleil.
•Retirez la batterie lorsque vous n'utilisez pas la caméra pendant une longue
période.
• N'utilisez que des batteries CR123 lithium.
•Eliminez la batterie conformément aux lois en vigueur.
•Ne placez pas la caméra en position instable, sans quoi elle pourrait tomber et
être endommagée.
•Ne touchez pas l'objectif et n'appuyez pas dessus
•Ne débranchez pas la caméra de la TV ou de l'ordinateur lorsqu'elle fonctionne,
sans quoi sa mémoire pourrait être corrompue.
•Ne mettez pas la caméra hors tension et n'ouvrez pas le compartiment batterie
lorsque le témoin lumineux "prêt" clignote, sans quoi l'image ou la séquence
vidéo pourrait ne pas être enregistrée.
5
Page 61

Fonctions de la caméra
•Enregistrement d'environ 14 images de qualité supérieure, 33 images de qualité
normale ou 54 images de qualité économique avec une mémoire interne de 7 Mo.
•Stockage virtuellement illimité grâce aux cartes MCC (MultiMediaCard) et SD
(Secure Digital) amovibles. Ces cartes peuvent être achetées séparément chez la
plupart des détaillants de matériel informatique ou électronique.
•Ecran couleur à cristaux liquides 1.6"
• Résolution 1280 x 960 pixels (1,3 Mega Pixels)
•Mise au point libre de 0,65 m à l'infini
•Zoom numérique 2X
• Commutateur coulissant permettant d'activer les modes Macro (gros plan), Indoor
(flash automatique) et Outdoor (flash désactivé).
•Mode Séquence vidéo
•Minuterie auto
• Séquences vidéo sur PC
•Webcam (Windows uniquement)
•Menu TV OSD (On Screen Display, Affichage à l'écran)
• Raccordement TV (NTSC et PAL)
• Raccordement et câble USB
•Socle permettant la fixation d'un trépied
•Menu multilingue
Configuration minimale
PC:
•Microsoft Windows 98SE/ME/2000 et XP
• IBM PC/AT ou compatible, 200 MHz ou supérieur
•Minimum 32 Mo RAM (64 Mo recommandés)
•Port USB
•Moniteur 640 x 480, minimum 16 bits couleur (1024 x 768 24 bits couleur
recommandés)
• 175 Mo d'espace disque
•Modem 56K ou supérieur, connexion RNIS ou LAN (pour la fonction Webcam
uniquement)
• Lecteur de CD-ROM
Macintosh:
•Mac OS 9 ou version supérieure
•Macintosh Power PC ou supérieur, minimum 64 Mo de RAM
•Port USB
• 100 Mo d'espace disque
6
Page 62

1. La caméra
Présentation de votre caméra Concord Eye-Q Go LCD
AVANT/HAUT
1
2
3
9. Indicateur Lumineux Prêt
à l’Emploi de Votre
Appareil-Photo
10. LCD
11. Panneau de Branchement
du Câble
12. Prise d’Adaptation sur
Trépied
13. Viseur
14. Bouton de Fleches
15. Bouton d’Alimentation
16. Écran LCD Sous
tension/Hors tension
17. Bouton OK
18. Bouton Menu
19. Trappe du Compartiment
à Piles
ARRIERE/BAS
9
10
11
12
1. Déclencheur
4
2. Bouton Mode
3. Fixation pour dragonne
5
4. Viseur
6
5. Flash
6. Indicateur Lumineux de la
7
Minuterie Automatique
8
7. Objectif
8. Slide Switch
13
14
15
16
17
18
19
7
Page 63

Chargement de la batterie
La caméra Concord Eye-Q Go LCD utilise une batterie lithium 3V (CR123).
Pour charger la batterie:
1. Localisez le couvercle du compartiment batterie à
la base de l'appareil.
2. Faites glisser le couvercle vers l'extérieur, comme
l'indique la flèche, et soulevez-le pour ouvrir.
(fig.1.1)
3. Insérez la batterie lithium 3V (CR123) avec la
borne positive (+) vers l'intérieur du
compartiment.
4. Refermez le couvercle, appuyez dessus en
exerçant une pression vers le bas, faites-le glisser
vers le centre de la caméra jusqu'à ce qu'il se
mette en place avec un déclic.
Remarque: Veillez à ce que la batterie ne tombe pas lorsque vous
ouvrez ou fermez le couvercle du compartiment.
Vérification de la batterie
La caméra possède un témoin de batterie qui indique le niveau actuel de
celle-ci.
fig.1.1
fig.1.2
CHARGEE
La batterie est
chargée et prête à
l'emploi.
FAIBLE
La batterie est faible
et devra bientôt être
remplacée.
8
Page 64

Mise sous tension/hors tension de la caméra
Pour mettre la caméra sous tension/hors tension:
1. Appuyez sur le bouton Marche/Arrêt pendant
quelques secondes. La caméra émet un signal
sonore lorsqu'elle est allumée.
2. Pour mettre la caméra hors tension, appuyez sur
le bouton Marche/Arrêt pendant quelques
secondes.
Remarque: Veuillez ôter le film plastique qui protège l'écran avant
utilisation.
fig.1.3
fig.1.4
9
Page 65

Luminosité
LUMINOSITE
AWB
Soleil
Fluorescent
Tungstène
WB
Auto
Actif
Inactif
Menu
FLASH
Sup.
Normale
Eco
Menu
QUALITÉ
Clip vidéo
Minuterie Non
Menu
MODE
PC
HDD
NTSC
PAL
15S
30S
60S
90S
Non
Veille 15S
Pilote PC
TV NTSC
Langue
CONFIG.
Défaut
Formater
Menu
CONFIG.
Mode
Qualité
Flash
WB
MENU
Luminosité
Config.
Sortie
MENU
English
Français
Español
Deutsch
Italiano
ECRANS DE MENU LCD
10
Page 66

Suppr. Un
Luminositél
Menu
SUPPR.
Luminosité
LUMINOSITE
Suppr
Miniature
Luminosité
Sortie
MENU
CE FICHIER?
Non
Oui
SUPPR. UN
Non
Oui
SUPPR TOUT
11
Page 67

MESSAGES A L'ECRAN
Des messages apparaissent à l'écran lorsque la mémoire est saturée ou
lorsque celle-ci présente un problème.
1. MMC/SD MEMORY IS INSUFFICIENT
(MEMOIRE MMC/SD INSUFFISANTE):
Si le fichier dans la mémoire interne est plus
volumineux que l'espace mémoire disponible
dans la carte MMC/SD, il n'est pas transféré,
et ce message s'affiche. Veuillez insérer une
carte MMC/SD avec une mémoire suffisante
ou supprimer des fichiers.
2. MMC/SD IS FULL (MMC/SD PLEINE):
La mémoire de la carte MMC/SD est saturée.
Veuillez insérer une nouvelle carte MMC/SD
ou supprimer des fichiers.
3. INTERNAL MEMORY IS FULL
(MEMOIRE INTERNE PLEINE):
La mémoire interne est saturée. Veuillez
insérer une carte MMC/SD ou supprimer des
fichiers.
4. ERROR (ERREUR):
La mémoire interne de la caméra ou la carte
MMC/SD sont peut-être corrompues.
Supprimez tous les fichiers ou formatez la
mémoire pour continuer.
MMC MEMORY IS
INSUFFICIENT
MEMOIRE PLEINE!
INTERNE MEMORIRE
PLEINE
ERREUR!
12
Page 68

Mise sous tension/hors tension de l'écran
L'écran s'allume automatiquement lorsque la
caméra est mise sous tension. Appuyez sur le
SUP.
A
bouton Marche/Arrêt de l'écran pour le mettre
sous tension ou hors tension.
Pour utiliser le bouton MARCHE/ARRET de
l'écran:
1. Appuyez une fois pour désactiver les icônes
005/080
de l'écran.
2. Appuyez pour mettre l'écran hors tension.
3. Appuyez pour mettre l'écran sous tension.
Statut du témoin lumineux "prêt" de la caméra
Lorsque le témoin est:
1. fixe
La caméra est en mode de capture. Veillez à ce que
l'appareil reste immobile, sans quoi la photo risque
d'être floue. (fig.1.5)
2. clignotant
Le flash se recharge ou la caméra est en mode de stockage d'arrière-plan.
Vous pouvez déplacer la caméra sans risque. (fig.1.5)
Remarque: n'ouvrez pas le couvercle du compartiment batterie et ne
mettez pas la caméra sous tension lorsque le témoin est fixe ou
clignote. Vous risqueriez d'endommager les images et les séquences
vidéo enregistrées dans la caméra.
fig.1.5
13
Page 69

Mémoire de la caméra
La caméra Concord Eye-Q Go LCD peut enregistrer des images de l'une des
deux manières suivantes : soit en les stockant dans sa propre mémoire
interne de 7 Mo soit en les stockant sur une carte MMC ou SD.
• Lorsque la carte mémoire MMC/SD est insérée, les images et les
séquences vidéo sont transférées automatiquement sur la carte
mémoire.
Ecran Mémoire par défaut
MMC/SD
Pas de Mémoire interne (7 Mo)
Remarque: si une carte MMC/SD avec une mémoire insuffisante est
insérée, le transfert est partiel, et la mémoire de la carte est remplie.
Les fichiers qui ne sont pas transférés restent dans la mémoire
interne. Veuillez insérer une carte avec une mémoire suffisante ou
supprimer des fichiers. Pour ce faire, reportez-vous aux instructions
de la section Suppression de fichiers.
Lorsque la mémoire interne de la caméra ou la carte MMC/SD est remplie,
il est nécessaire de supprimer des fichiers pour continuer à enregistrer
des images. Pour ce faire, reportez-vous aux instructions de la section
Suppression de fichiers. Vous pouvez aussi utiliser une nouvelle carte
MMC/SD.
Remarque: il est possible de retrouver de l'espace mémoire en
utilisant une qualité d'image inférieure. Reportez-vous à la section
Prise de vues pour sélectionner les paramètres relatifs à la qualité de
l'image.
14
Page 70

Utilisation de la carte MMC (MultiMediaCard) ou SD (Secure Digital)
Pour insérer la carte mémoire:
1. Localisez le couvercle du compartiment batterie à
la base de l'appareil.
2. Faites glisser celui-ci vers l'extérieur et soulevezle pour ouvrir.
3. Insérez la carte MMC ou SD dans le sens indiqué
par la flèche. (fig.1.6)
4. Refermez le couvercle, appuyez dessus en exerçant une pression vers
le bas, faites-le glisser vers le centre de la caméra jusqu'à ce qu'il se
mette en place avec un déclic.
Remarque: utilisez des cartes MMC/SD avec une capacité d'au moins
16 Mo.
Remarque: si la mémoire ou la carte MMC/SD est corrompue, l'écran
affiche Error! (Erreur!). La mémoire doit être formatée. Formatez tous
les fichiers pour pouvoir continuer. (P. 25)
Remarque: les cartes MMC/SD peuvent être achetées séparément chez
la plupart des détaillants de matériel informatique ou électronique.
Leur coût varie en fonction de leur capacité.
fig.1.6
15
Page 71

2. Mode Caméra
Par défaut, les photos sont prises en qualité supérieure.
Consultez la section Qualité des images pour savoir
comment modifier les paramètres de votre caméra. (fig.2.1)
Pour prendre des photos:
1. Réglez le commutateur de mode sur .
fig.2.1
2. Positionnez le sujet dans l'écran ou dans le viseur.
3. Appuyez doucement sur le bouton Déclencheur
(fig.2.2) et veillez à ce que la caméra ne bouge
pas lorsque le témoin situé à côté du viseur
s'allume. Ceci indique que l'appareil est en train
de prendre la photo. (fig.2.3)
fig.2.2
4. Lorsque la photo est prise, le témoin situé à côté
du viseur clignote. Ceci indique que la photo est
en cours d'enregistrement dans la mémoire. Vous
pouvez déplacer la caméra sans risque.
5. Un aperçu de la photo apparaît à l'écran pendant
une seconde, et le compteur de vues affiché à
fig.2.3
l'écran est mis à jour.
MAIN MENU (MENU PRINCIPAL)
1. Dans le mode , appuyez sur MENU.
2. Appuyez sur ou sur pour basculer
entre les options.
3. Appuyez sur pour consulter le sousmenu de l'option sélectionnée.
4. Si vous souhaitez quitter un menu, appuyez
sur jusqu'à ce que le menu principal
apparaisse en surbrillance, puis sur OK pour retourner au menu principal.
Ou
5. Appuyez sur MENU pour quitter le menu.
MENU
Mode
Qualité
Flash
WB
16
Page 72

MODE MENU (MENU MODE)
Mode
Qualité
Flash
WB
MENU
Clip vidéo
Minuterie Non
Menu
MODE
DÉCLENCHEUR POUR • ENREGISTRE
MENU POUR ARRÊTER
DÉCL POUR ARRÊTER
Enregistrement de séquences vidéo
1. Lorsque Video Clip (Séquence vidéo) du
menu MODE est en surbrillance, appuyez
sur .
2. Appuyez sur le bouton Déclencheur pour
commencer à enregistrer une séquence vidéo
continue. (fig.2.4)
3. Appuyez une nouvelle fois sur le bouton
Déclencheur pour arrêter l'enregistrement.
(fig.2.5)
Ou
4. La caméra continue l'enregistrement jusqu'à
ce que la mémoire soit presque pleine.
5. Une fois l'enregistrement terminé, la caméra
retourne en mode photo.
Remarque: pour quitter le mode vidéo avant l'enregistrement, appuyez
sur MENU pour retourner au mode photo.
17
fig.2.4
fig.2.5
Page 73

Clip vidéo
Minuterie Oui
Menu
MODE
A
005/080
SUP.
Mode
Qualité
Flash
WB
MENU
Clip vidéo
Minuterie Non
Menu
MODE
+
Self-timer (Minuterie auto)
1. Sélectionnez Self-timer (Minuterie auto) dans
le menu MODE, puis appuyez sur pour
activer cette option. (fig.2.6)
2. Appuyez sur MENU pour retourner au mode
photo.
3. Cadrez le sujet.
4. Appuyez sur le bouton Déclencheur.
5. Le témoin correspondant clignote pendant 10
secondes, puis la photo est prise.
Remarque: cette fonction est désactivée automatiquement après
chaque photo.
Pour désactiver l'option Self-timer (Minuterie
auto)
1. Sélectionnez Self-timer (Minuterie auto) dans
le menu MODE, puis appuyez sur pour
désactiver cette option. (fig.2.7)
2. Appuyez sur MENU pour retourner au mode
photo.
18
fig.2.6
fig.2.7
Page 74

QUALITY (QUALITE)
Mode
Qualité
Flash
WB
MENU
Sup.
Normale
Eco
Menu
QUALITE
Les photos peuvent être prises dans l'un des trois modes de qualité
suivants : supérieure, normale ou économique. Les différences entre ces
modes se marquent dans la taille du fichier image et dans les taux de
compression de l'image (JPEG).
FINE NORMAL ECONOMY
(supérieure) (normale) (économique)
Compression JPEG 5.5:1 12:1 24:1
Photos prises avec
7 Mo de mémoire 14 33 54
(environ)
Réglage du mode Image Quality (Qualité de l'image):
1. Dans le menu QUALITY (QUALITE), appuyez sur ou pour basculer
entre Fine (Supérieure), Normal (Normale) et Economy (Economique).
2. Appuyez sur OK pour sélectionner la qualité, puis sur MENU pour
retourner au mode photo.
Remarque: l'option sélectionnée est indiquée par (
19
).
•
Page 75

COMMUTATEUR COULISSANT
La caméra comporte un commutateur coulissant permettant de choisir
entre trois modes photo : macro ( ), portrait ( ) et distant ( ).
L'état actuel du flash s'affiche dans le coin supérieur gauche de l'écran.
Position Etat du flash Conditions Distance du
Macro ( ) Auto Flash ( A ) Utilisez cette option pour 0,65 m à 1,4 m
Portrait ( ) Auto ( ) Utilisez cette option 1,4 m à 3,2 m
Distant ( ) Pas de flash Utilisez cette option 1,4 m à l'infini
Utilisation du commutateur coulissant :
1. Faites glisser le commutateur coulissant sur l'icône
A
( ) pour prendre une photo
prendre une photo de près.
pour prendre une photo
dans des conditions de
luminosité variables.
La caméra détecte
automatiquement si le
flash est nécessaire.
à l'extérieur ou par
bonne luminosité.
sujet
Macro ( ), Portrait ( ) ou Distant ( ) jusqu' ce
que vous entendiez un déclic.
2. Pour une mise au point précise, reportez-vous au
tableau ci-dessus pour vous assurer que le sujet est à
la distance idéale pour le mode sélectionné. (fig.2.8)
fig.2.8
Note: Le mode de flash de défaut est placé par le commutateur
coulissant. Pour dépasser manuellement le mode de flash de
commutateur coulissant, l'arrangement doit être changé sur le menu
flash sur LCD. Se rapportent à p. 21 pour de plus amples informations.
20
Page 76

FLASH
Ce dispositif permet à l'appareil-photo de dépasser le mode flash qui est
placé par le commutateur coulissant.
Le mode Flash propose 3 options : Auto (flash automatique) ( A), Flash
(flash systématique) ( ) ou Flash Off (pas de flash) ( ).
Option Distance du Luminosité
Auto ( A ) 8.5ft (2,5m) et
Flash ( ) 8.5ft (2,5m) et
Flash Off ( ) 3.9ft (1,2m) à
(Flash désactivé) l'infini
1. Dans le menu FLASH, appuyez sur ou pour choisir entre
Auto ( A ), Flash ( ) et Flash Off (Flash désactivé) ( ).
2. Appuyez sur OK pour sélectionner le mode du flash, puis sur MENU
pour sortir.
3. Placez le sujet dans LCD.
4. Prenez l'image.
5. Le mode flash reviendra au défaut plaçant sur le contact coulissant.
sujet
3.9ft (1,2m).
3.9ft (1,2m).
Utilisez cette option pour prendre une
photo dans des conditions de luminosité
variables. La caméra détecte
automatiquement si le flash est nécessaire.
Utilisez cette option pour prendre une
photo à contre-jour ou s'il fait sombre. Le
flash fonctionne, qu'il fasse clair ou sombre.
Utilisez cette option pour prendre une
photo à l'extérieur ou par bonne luminosité.
Remarque: l'option sélectionnée est indiquée par (
).
•
Remarque: il est possible que le flash ait besoin d'un peu de temps
pour se recharger entre les photos. Pendant qu'il charge, le témoin de
la caméra clignote. Lorsqu'il cesse de clignoter, vous pouvez prendre
une autre photo. Si la batterie est faible, le flash ne fonctionne pas.
Remplacez la batterie.
21
Page 77

WHITE BALANCE (Equilibrage des blancs)
Mode
Qualité
Flash
WB
MENU
AWB
Soleil
Fluorescent
Tungstène
WB
Equilibrage des blancs Explication
Auto White Balance (AWB) La caméra règle automatiquement
(Automatique) l'équilibrage des blancs.
Sunny ( ) (Soleil) A utiliser à l'extérieur avec une lumière
Fluorescent ( ) A utiliser à l'intérieur avec une lumière
Tungsten (Tungstène) ( ) A utiliser à l'intérieur avec une lumière
1. Dans le menu WB (Equilibrage des blancs), appuyez sur ou
pour basculer entre AWB (Automatique), Sunny (Soleil), Fluorescent et
Tungsten (Tungstène).
2. Appuyez sur OK pour sélectionner le mode d'équilibrage des blancs,
puis sur MENU pour sortir.
du jour suffisante.
fluorescente.
au tungstène.
22
Page 78

LCD BRIGHTNESS (LUMINOSITE DE L'ECRAN)
Luminosité
Config.
MENU
Luminosité
Menu
LUMINOSITE
Utilisez cette option pour modifier la luminosité de l'écran.
1. Dans le menu BRIGHTNESS (Luminosité), appuyez sur ou pour
basculer entre les deux options.
2. Appuyez sur MENU pour sortir.
23
Page 79

SETUP (CONFIGURATION)
Rubrique Options de sélection Explication
Time-out
(Temporisation)
Pilote PC
TV NTSC
Language English, Définit la langue de votre caméra.
(Langue) Français,
Format Formate la mémoire interne de la
(Formater) caméra ou la carte MMC/SD en
Default Réinitialise les paramètres par défaut
(Défaut) de la caméra.
Utilisation du menu SETUP (CONFIGURATION):
1. Utilisez ou pour basculer entre les options.
2. Lorsque l'option est en surbrillance, utilisez pour modifier le
paramètre.
3. Appuyez sur pour sélectionner les options et passer à l'option
suivante ou appuyez sur MENU pour sortir.
15, 30, 60, 90
None
HDD
PAL
Español,
Deutsch,
Italiano
Définit l'option de mise hors tension
automatique.
Définit l'option de mise hors tension
automatique.
(Windows uniquement) Utilisez ce mode
pour visualiser vos images et vos
séquences vidéo à l'aide des pilotes
WDM/TWAIN. (p.35)
(Windows et Macintosh) Mode "Mass
Storage" (Stockage de masse). Utilisez ce
mode pour visualiser vos images et vos
séquences vidéo à l'aide du pilote Mass
Storage. (p.36)
Définit le mode permettant d'adapter la
caméra à votre TV.
supprimant tous les fichiers.
24
Page 80

TIME-OUT (TEMPORISATION)
Veille 30S
Pilote PC
TV NTSC
Langue
CONFIG.
Pour préserver la batterie, la caméra s'éteint
automatiquement après une période
d'inactivité de 30 secondes. Utilisez cette
option pour modifier le paramètre par défaut.
DRIVER (PILOTE)
Veuillez vous reporter à la section Transfert de fichiers sur l'ordinateur à
la page 31 pour de plus amples informations.
TV
Veuillez vous reporter à la section Mode TV à la page 38 pour de plus
amples informations.
LANGUAGE (LANGUE)
Utilisez cette option pour modifier la langue de votre caméra. Tous les
menus et messages s'affichent dans la langue sélectionnée.
FORMAT (FORMATAGE)
Le formatage supprime tous les fichiers. Utilisez cette option pour
formater la mémoire interne ou la carte MMC/SD.
Pour formater:
• la mémoire interne – La carte MMC/SD ne doit pas se trouver dans la
caméra.
• la carte MMC/SD – insérez la carte dans la caméra.
Remarque: si ERROR! (ERREUR !) s'affiche à l'écran, ceci signifie que la
mémoire interne ou la mémoire de la carte MMC/SD est corrompue.
Formatez la mémoire pour pouvoir continuer.
25
Page 81

DEFAULT (DEFAUT)
Défaut
Formater
Menu
CONFIG.
Mode Réglage par défaut
Flash Auto ( A )
White Balance AWB
(Equilibrage des blancs)
Quality (Qualité) Fine (supérieure)
Time-out (Temporisation) 30
Pilote PC
TV NTSC
Language English
Remarque: la version par défaut du mode TV varie en fonction du
pays où la caméra a été achetée.
Pour réinitialiser les paramètres par défaut de
la caméra:
1. Lorsque l'option Default (Défaut) est en
surbrillance, appuyez sur OK.
2. Les paramètres par défaut de la caméra sont
réinitialisés.
3. Appuyez sur MENU pour sortir.
26
Page 82

2X Digital Zoom (Zoom numérique 2X)
La Concord Eye-Q Go LCD peut utiliser un zoom numérique 2X (2X Digital
Zoom) pour prendre des photos.
Réglage du mode 2X Digital Zoom (Zoom numérique 2X):
1. Dans le mode Still image (Photo), appuyez sur (T) pour agrandir le
sujet.
2. Appuyez sur (W) pour réduire le sujet et retourner au mode normal.
27
Page 83

3. Review Mode (Mode Visionnage)
005/080
SUP.
JPEG
008/080
AV I
OK pour lire AVI
En mode Review (Visionnage), vous pouvez revoir les images et
séquences vidéo enregistrées par le biais de l'écran à cristaux liquides.
Utilisation du Mode REVIEW (VISIONNAGE):
1. Faites pivoter le commutateur rotatif sur .
2. Appuyez sur ou pour parcourir les fichiers
Type de fichier Format (Formater)
Image JPG
Séquence vidéo AVI
2X Enlargement (Agrandissement 2X) (JPEG)
Lorsque vous consultez des images, vous pouvez utiliser la fonction 2X
Enlargement (Agrandissement 2X) pour agrandir l'image enregistrée.
Pour activer cette option:
1. Lorsque vous visionnez un fichier JPG,
appuyez sur OK pour passer au mode 2X
Enlargement (Agrandissement 2X).
2. Appuyez sur pour naviguer dans l'image.
3. Appuyez sur OK pour quitter le mode 2X
Enlargement (Agrandissement 2X) et
retourner à l'image d'origine.
Lecture de séquences vidéo (AVI)
Pour visualiser des séquences vidéo:
1. Appuyez sur OK pour lancer la lecture de la
séquence vidéo.
28
Page 84

MAIN MENU (MENU PRINCIPAL)
Suppr
Miniature
Luminosité
Config.
MENU
Suppr. Un
Suppr. Tout
Menu
SUPPR.
CE FICHIER?
Non
Oui
SUPPR. UN
Utilisation du MAIN MENU (Menu principal) en
mode Review (Visionnage):
1. Appuyez sur MENU pour consulter le MENU
PRINCIPAL (MAIN MENU).
2. Utilisez ou pour basculer entre les
options.
3. Lorsque l'option est en surbrillance, utilisez
pour entrer dans le sous-menu correspondant.
4. Si vous souhaitez quitter un menu, appuyez sur jusqu'à ce que Exit
apparaisse en surbrillance pour retourner au menu précédent.
Ou
5. Appuyez sur MENU pour sortir.
DELETE (SUPPRESSION)
Pour supprimer UN SEUL fichier de la mémoire interne:
1. Lorsque l'option Delete One (Supprimer une fois) du menu DELETE
(SUPPRESSION) est en surbrillance, appuyez sur .
2. L'écran suivant indique "This File?" ("Fichier en cours ?"), appuyez sur
ou pour mettre No (Non) ou Yes (Oui) en surbrillance.
3. Appuyez sur OK pour valider la sélection.
4. Si vous avez choisi Yes (Oui), le fichier est supprimé, et la caméra
retourne au menu principal .
5. Dans le cas contraire, aucune modification n'est apportée, et vous
retournez au menu principal .
29
Page 85

DELETE ALL (SUPPRIMER TOUT)
Suppr. Un
Suppr. Tout
Menu
SUPPR.
Non
Oui
SUPPR TOUT
Pour supprimer TOUS les fichiers de la mémoire interne:
1. Lorsque l'option Delete All (Supprimer tout) du menu DELETE
(SUPPRESSION) est en surbrillance, appuyez sur .
2. L'écran suivant indique "This File?" ("Fichier en cours ?"). Appuyez sur
ou pour mettre No (Non) ou Yes (Oui) en surbrillance.
3. Appuyez sur OK pour valider la sélection.
4. Si vous avez choisi Yes (Oui), TOUS LES FICHIERS sont supprimés, et la
caméra retourne au menu principal .
5. Dans le cas contraire, aucune modification n'est apportée, et vous
retournez au menu principal .
Pour supprimer des fichiers de la carte MMC/SD:
1. Insérez la carte MMC/SD dans la caméra.
2. Suivez les étapes ci-dessus.
Remarque: Oune fois les images supprimées, il est impossible de les
récupérer.
30
Page 86

THUMBNAIL (MINIATURE)
Suppr
Miniature
Luminosité
Config.
MENU
OK
1. Lorsque Thumbnail (Miniature) apparaît en surbrillance dans le menu
principal, appuyez sur OK pour activer ce mode .
2. Appuyez sur pour naviguer dans les fichiers enregistrés.
3. Appuyez sur OK pour consulter le fichier sélectionné.
LCD BRIGHTNESS (LUMINOSITE DE L'ECRAN)
Reportez-vous à la section Luminosité à la p.23.
31
Page 87

4. Transfert de fichiers sur l'ordinateur
Vous pouvez visualiser et stocker les images et séquences vidéo
enregistrées avec la caméra Concord Eye-Q Go LCD sur votre PC. Avant
de pouvoir télécharger les fichiers pour les visualiser, les utilisateurs de
Windows doivent d'abord installer le logiciel livré avec la caméra.
Remarque: ne raccordez pas la caméra à l'ordinateur avant d'avoir
installé le logiciel contenu sur le CD-ROM.
Installation du logiciel et téléchargement des pilotes de la caméra:
1. Insérez le CD-Rom fourni avec la caméra Concord Eye-Q Go LCD dans
votre lecteur de CD-Rom.
2. L'écran d'installation apparaît automatiquement. Suivez les instructions
affichées pour installer le logiciel.
3. Une fois les procédures indiquées par le CD-Rom accomplies, raccordez
votre caméra à l'ordinateur pour terminer l'installation.
4. Suivez les instructions affichées pour terminer l'installation.
Remarque: si la fonction "auto-run" de votre ordinateur est
désactivée, cliquez sur POSTE DE TRAVAIL et recherchez le lecteur de
CD-ROM.
Double-cliquez sur l'icône du lecteur de CD-ROM pour consulter son
contenu. Double-cliquez sur le fichier appelé SETUP.EXE et suivez les
instructions affichées à l'écran.
Remarque à l'attention des utilisateurs de MacIntosh: il n'est pas
nécessaire d'installer le logiciel du CD-Rom. Veuillez vous reporter à la
P. 36 pour obtenir des instructions concernant la définition de la
fonction Mass Storage et à la P. 37 pour savoir comment consulter
les fichiers enregistrés sur votre ordinateur.
32
Page 88

Connexion de la caméra à l'ordinateur :
1. Lorsque la caméra est raccordée à l'ordinateur
pour la première fois, l'installation du pilote de
la caméra est lancée. Suivez les instructions
affichées pour terminer l'installation.
2. Branchez l'extrémité rectangulaire du câble USB
fourni avec la Concord Eye-Q Go LCD dans le
port USB de votre PC. (fig.5.1)
3. Ouvrez le panneau de connexion des câbles de
fig.4.1
votre Concord Eye-Q Go LCD, en faisant glisser le
couvercle vers le bas, puis soulevez-le.
4. Raccordez l'autre extrémité du câble au port USB situé sur le panneau
de connexion.
Déconnexion de la caméra de l'ordinateur:
(Windows ME/2000/XP)
1. Cliquez une fois sur l'icône "Unplug or Eject Hardware"
(Débrancher ou éjecter matériel) située à droite de votre
barre des tâches. (fig.5.2)
fig.4.2
2. Sélectionnez "Stop Concord Eye-Q Go LCD USB Driver V 0.1" (Arrêter
pilote Concord Eye-Q Go LCD USB Driver V0.1).
3. Cliquez sur [OK] lorsque le message "Safe to Remove Hardware" (Vous
pouvez maintenant retirer le matériel en toute sécurité) apparaît.
4. Débranchez le câble USB de la caméra.
33
Page 89

Visualisation des fichiers sur l'ordinateur
La Concord Eye-Q Go LCD propose deux types de pilote : TWAIN/WDM
(PC) et Mass Storage (HDD).
Pilote Mode Fonction Fonction disponible
TWAIN pour PC Non
télécharger
des photos
WDM pour les
vidéoconférences
ou les séquences
vidéo sur PC
Fonction Mass HDD
Storage
disponible sur PC sur Mac
Oui, avec le pilote
logiciel
WDM/TWAIN
Oui. Le pilote
logiciel
correspondant doit
être installé, et la
fonction doit être
activée sur la
caméra.
Oui. Il n'est pas
nécessaire d'installer
le logiciel.
L'ordinateur détecte
automatiquement la
caméra quand celle-ci
lui est raccordée.
34
Page 90

Windows uniquement:
Luminosité
Config.
Sortie
MENU
Veille 30S
Pilote PC
TV NTSC
Langue
CONFIG.
Pilotes TWAIN/WDM (Mode PC)
Ce mode vous permet de visualiser des images, d'enregistrer des
séquences vidéo et d'utiliser la caméra comme webcam. Pour plus
d'informations, reportez-vous à la section Fonctions spéciales. (P.39)
Cette fonction doit être activée avant que vous ne connectiez la caméra
au PC.
Configuration du mode PC dans votre caméra:
1. Activez la caméra.
2. Dans le menu Setup (Configuration), appuyez sur jusqu'à ce que
Driver (Pilote) apparaisse en surbrillance.
3. Appuyez sur pour passer à PC.
4. Désactivez la caméra.
5. Connectez la caméra à votre ordinateur.
Remarque à l'attention des utilisateurs de Windows : si vous
commutez entre les modes PC et HDD, veuillez d'abord débrancher
votre caméra de l'ordinateur.
35
Page 91

Remarque à l'attention des utilisateurs de MacIntosh et de Windows:
Mass Storage (HDD)
Dans ce mode, la caméra devient un disque dur externe (HDD), et vous
pouvez visualiser ou télécharger sur votre ordinateur des images et des
séquences vidéo enregistrées dans la mémoire interne de la caméra ou
sur la carte MMC/SD.
Cette fonction doit être activée avant que vous ne connectiez la caméra
au PC.
Définition du pilote Mass Storage HDD sur votre caméra:
1. Activez la caméra.
2. Dans le menu Setup (Configuration), appuyez sur jusqu'à ce que
Driver (Pilote) apparaisse en surbrillance.
3. Appuyez sur pour passer à HDD.
4. Désactivez la caméra.
5. Connectez la caméra à votre ordinateur.
A l'attention des utilisateurs de Windows :
Utilisation du mode Mass Storage pour visualiser les fichiers de la
mémoire interne:
1. Paramétrez votre caméra en mode HDD.
2. Connectez la caméra à votre ordinateur.
3. Ouvrez Poste de travail pour rechercher le disque amovible qui
contient les fichiers de la mémoire interne ou de la carte MMC/SD de
la caméra.
4. Vous pouvez visualiser ou télécharger les fichiers.
Utilisation du mode Mass Storage pour visualiser les fichiers de la carte
MMC/SD:
1. Avant de raccorder la caméra à l'ordinateur, insérez la carte MMC/SD
dans la caméra.
2. Suivez les étapes ci-dessus.
Remarque: reportez-vous à la documentation de votre ordinateur pour
plus d'informations sur l'emplacement du port USB.
36
Page 92

A l'attention des utilisateurs de Mac:
Utilisation du mode Mass Storage pour visualiser les fichiers de la
mémoire interne:
1. Paramétrez votre caméra en mode HDD.
2. Connectez la caméra à votre ordinateur.
3. Après quelques instants, le disque dur externe apparaît sur le bureau.
4. Ouvrez le disque amovible "sans titre" situé sur le bureau, puis
DCIM>100GOPL pour consulter vos fichiers.
5 Cliquez sur le fichier que vous souhaitez afficher.
Utilisation du mode Mass Storage pour visualiser les fichiers de la carte
MMC/SD:
1. Avant de raccorder la caméra à l'ordinateur, insérez la carte MMC/SD
dans la caméra.
2. Suivez les étapes ci-dessus.
Pour débrancher la caméra de l'ordinateur:
1. Faites glisser l'icône du disque amovible "sans titre" du bureau à la
corbeille.
2. Déconnectez le câble USB de la caméra.
Remarque à l'attention des utilisateurs de MacIntosh: pour de
meilleures performances, utilisez le port USB situé à l'arrière de votre
ordinateur.
37
Page 93

Windows uniquement
Utilisation du logiciel de visualisation d'images (Mode PC)
1. Lancez le logiciel ArcSoft
PhotoImpression en cliquant sur
Démarrer – Programmes - ArcSoft
Camera Suite et en choisissant
PhotoImpression dans la liste
d'applications affichée à l'écran.
(fig.4.3)
2. Cliquez sur le bouton
[Camera/Scanner]. (fig.4.3 a)
3. Cliquez sur la liste déroulante
SELECT SOURCE (SELECTIONNER LA
SOURCE) et choisissez Concord EYE-Q
Go LCD. (fig.4.3 b)
4. Cliquez sur l'icône Camera/Scanner. (fig.4.3 c) Une deuxième fenêtre
apparaît. Elle indique le contenu (images) de la mémoire de votre caméra,
ainsi que les options permettant de les traiter. (fig.4.3 d)
5. Sélectionnez les images que vous souhaitez récupérer en appuyant sur la
touche CTRL de votre clavier et en cliquant une fois sur chaque miniature.
Ou
6. Cliquez sur Edit - Select All (Edition – Sélectionner tout).
7. Cliquez sur Acquire (Acquérir), et les images sélectionnées sont transférées.
(fig.4.3 e)
Ou
8. Cliquez sur Edit - File Transfer (Edition – Transférer fichier).
9. Les images transférées apparaissent en bas de la fenêtre d'application sous
la forme de miniatures. Pour les ouvrir, double-cliquez sur la miniature ad
hoc. (fig.4.3 f )
Vous pouvez maintenant imprimer, enregistrer ou optimiser vos images. Le
Guide de l'utilisateur du logiciel ArcSoft vous propose un didacticiel concernant
toutes les fonctions offertes par PhotoImpression.
Remarque: pour de meilleures performances de visualisation, utilisez
VideoImpression pour regarder les vidéos. Veuillez vous reporter à la
section Séquences vidéo sur PC.
fig.4.3
38
Page 94

5. Fonctions spéciales
Windows uniquement
Séquences vidéo sur PC (Mode PC uniquement
La caméra Concord Eye-Q Go LCD permet de capturer des séquences
vidéo live sur votre ordinateur à l'aide du logiciel ArcSoft
VideoImpression.
Pour capturer des séquences vidéo sur l'ordinateur:
1. Lancez le logiciel ArcSoft VideoImpression en cliquant sur Démarrer –
Programmes - ArcSoft Camera Suite et en choisissant VideoImpression
dans la liste d'applications affichée à l'écran.
2. Cliquez sur l'icône NEW (NOUVEAU).
3. Cliquez sur l'icône CAPTURE.
Remarque: si la vidéo n'apparaît pas, sélectionnez "Concord Eye-Q Go
LCD Video Clips" dans la liste des pilotes et cliquez sur l'icône "Live"
pour visualiser la vidéo en live.
Pour enregistrer des séquences vidéo:
1. Suivez les étapes 1 à 3 ci-dessus.
2. Cliquez sur l'icône RECORD (ENREGISTRER). Pour arrêter
l'enregistrement, appuyez sur le bouton ESC de votre clavier ou cliquez
sur l'icône PAUSE de votre écran.
3. Pour enregistrer votre vidéo, cliquez sur l'icône SAVE (ENREGISTRER) et
suivez les instructions affichées à l'écran.
Remarque: pour modifier, manipuler ou créer des séquences vidéo à
l'aide de toutes les fonctions qu'offre VideoImpression, reportez-vous
au Guide de l'utilisateur du logiciel ArcSoft pour de plus amples
informations.
39
Page 95

Windows uniquement
Webcam (mode PC uniquement)
Vous pouvez également utiliser la caméra Concord Eye-Q Go LCD comme
webcam ou caméra de vidéoconférence. Elle peut être employée avec
beaucoup de logiciels de vidéoconférence courants.
Utilisation de la caméra en tant que webcam:
1. Lancez le logiciel Microsoft NetMeeting.
2. Pour lancer la vidéo, cliquez sur l'icône de démarrage.
3. Suivez les instructions de NetMeeting affichées à l'écran ou reportezvous à la section Aide de NetMeeting.
REMARQUE: si la vidéo n'apparaît pas tout de suite, allez à Outils Options – Vidéo. Ensuite, sélectionnez le pilote Concord Eye-Q Go LCD
sous la rubrique Propriétés, puis cliquez sur OK.
REMARQUE: si NetMeeting n'est pas installé sur votre ordinateur,
veuillez visiter le site www.microsoft.com pour savoir comment en
obtenir une copie.
40
Page 96

Mode TV
Luminosité
Config.
Sortie
MENU
Veille 30S
Pilote HDD
TV NTSC
Langue
CONFIG.
La caméra Concord Eye-Q Go LCD vous permet de visualiser les fichiers
enregistrés et d'enregistrer des séquences vidéo sur votre télévision. Pour
commencer, vérifiez la documentation de votre télévision afin de savoir
sur quelle norme vous devez régler votre caméra (NTSC ou PAL).
+
Pour modifier le paramétrage du mode TV:
1. Dans le menu Setup (Configuration), appuyez sur jusqu'à ce que TV
apparaisse en surbrillance.
2. Appuyez sur pour passer à NTSC ou à PAL.
Pour raccorder la caméra à la télévision
1. Connectez le câble AV fourni avec votre caméra
dans la prise VIDEO ou VIDEO IN de votre
télévision.
2. Allumez votre télévision.
3. Réglez la télévision au mode vidéo,
conformément aux instructions du manuel de
l'utilisateur. (Il s'agit généralement du canal 3,
4 ou AV)
4. Allumez la caméra en appuyant sur le bouton
Alimentation.
5. Raccordez l'autre extrémité du câble au port VIDEO situé sous le
panneau de connexion. (fig.5.1)
41
fig.5.1
Page 97

Utilisation du Mode TV
1. Connectez la caméra à votre téléviseur.
2. Activez la caméra.
3. Faites glisser le commutateur de mode sur .
4. Votre téléviseur devient un viseur actif.
Remarque: vous pouvez enregistrer votre session en mode TV à l'aide
de votre magnétoscope. Veuillez vous reporter à la documentation de
votre magnétoscope pour en savoir davantage sur les enregistrements.
Utilisation du menu TV :
1. Dans le mode TV, faites glisser le commutateur de mode sur .
2. Appuyez sur MENU pour consulter le MENU TV.
Version FW
Cette option permet d'afficher la version FW utilisée par votre caméra.
Delete One (Supprimer une fois)
1. Lorsque vous visionnez un fichier, appuyez sur MENU.
2. Appuyez sur ou sur jusqu'à ce que Delete One (Supprimer une
fois) apparaisse en surbrillance.
3. Appuyez sur OK. Le fichier en arrière-plan est supprimé.
Thumbnail (Miniature)
1. Dans TV MENU (MENU TV), appuyez sur ou jusqu'à ce que
Thumbnail (Miniature) apparaisse en surbrillance.
2. Appuyez sur OK pour consulter tous les fichiers en mode Thumbnail
(Miniature).
3. Dans le mode Thumbnail (Miniature), utilisez les pour parcourir les
fichiers.
4. Appuyez sur OK pour consulter le fichier sélectionné.
Time-out (Temporisation)
1. Dans TV MENU (MENU TV), appuyez sur ou jusqu'à ce que Timeout (Temporisation) apparaisse en surbrillance.
2. Appuyez sur pour modifier la configuration de la temporisation.
42
Page 98

6. Entretien de la caméra
Nettoyage d'Eye-Q Go LCD:
Nettoyez l'extérieur de la caméra en l'essuyant avec un chiffon doux,
propre et sec.
Nettoyage de l'objectif, du viseur et de l'écran à cristaux liquides:
1. Soufflez doucement sur l'objectif et/ou sur le viseur pour éliminer la
poussière et la saleté.
2. Expirez doucement sur l'objectif et/ou sur le viseur pour les humidifier.
3. Essuyez l'objectif et/ou le viseur doucement à l'aide d'un chiffon doux,
non-pelucheux ou d'une lingette non-traitée destinée à cet usage.
Remarque: n'utilisez pas de solutions nettoyantes, à moins que cellesci soient conçues spécifiquement pour les objectifs photographiques.
N'essuyez pas l'objectif ou le viseur de la caméra à l'aide d'une
lingette destinée au nettoyage des lunettes ou lentilles
ophtalmologiques, sans quoi vous risqueriez de les griffer.
43
Page 99

7. Conseils Pratiques et Guide en Cas de Problèmes
SYMPTOME
CAUSE
POSSIBLE
ALIMENTATION
Vous n'arrivez pas à
mettre la caméra
sous tension.
La caméra est sous
tension, mais ne
répond pas.
La batterie n'a pas été
installée correctement.
La batterie est déchargée
ou faible.
Le compartiment batterie n'a
pas été fermé correctement.
La caméra doit être
réinitialisée.
Balance des Blancs
La couleur de l'image
capturée est normale.
La balance des blancs n'est
pas réglée correctement.
LCD
L'écran LCD est
brouillé.
L'écran à cristaux
liquides n'affiche
rien.
Le couvercle en plastique de
l'écran LCD est sale.
Il est désactivé.
Les piles sont en perte de
puissance et l’appareil-photo.
TELECHARGEMENT DES PHOTOS SUR VOTRE PC
L’appareil-photo ne
répond pas lorsque
vous procédez au
téléchargement de
vos photos sur votre
PC.
Le système d’exploitation
n’alloue pas les ressources
adéquates pour le transfert
des images.
44
SOLUTION
POSSIBLE
Installez la batterie
correctement à l'aide des
indications situées à
l'intérieur du couvercle du
compartiment batterie.
Remplacez la batterie.
Fermez le compartiment
correctement.
Réinitialisez la caméra en
retirant et en réinsérant la
batterie.
Réglez la balance des
blancs.
Veuillez nettoyer le
couvercle de l'écran LCD.
Activez-le en appuyant sur
son bouton MARCHE/
ARRÊT .
Remplacez les piles.
Réinitialisez l’appareil-photo
en ouvrant et en refermant
la trappe du compartiment
à piles. Eteignez et remettez
votre ordinateur en marche.
Page 100

Conseils Pratiques et Guide en Cas de Problèmes
SYMPTOME
PRISE DE VUES
La photo prise au
flash est trop claire.
La photo prise au
flash est trop
sombre.
Le flash n'a pas
fonctionné.
La qualité des
photos est
médiocre.
CAUSE
POSSIBLE
Le sujet est trop prêt.
Le sujet est trop loin.
Le flash n'est pas activé.
La lumière était
suffisante, et le flash
n'était pas nécessaire.
Le flash est désactivé.
Le flash ne s'est pas
rechargé.
La batterie est
déchargée.
Le sujet ou la caméra a
bougé quand la photo a
été prise.
SOLUTION
POSSIBLE
Eloignez la caméra du
sujet.
Rapprochez la caméra
du sujet.
Activez le flash.
Ce phénomène est
normal. Le capteur
photo-électronique de
votre caméra est
programmé pour ne se
déclencher que lorsque
le flash est nécessaire.
Activez le flash
automatique.
Vérifiez que le témoin a
cessé de clignoter avant
de prendre la photo.
Remplacez la batterie.
Veillez à ce que la
caméra reste immobile
jusqu'à ce que la photo
soit prise.
45
 Loading...