

Page 1

Congratulations on the purchase of your new
camera. Your camera has been carefully
engineered and manufactured to give you
dependable operation. Read this manual
before operating the unit to become more
familiar with it and obtain the performance
that will bring you continued enjoyment for
many years.
This manual has been written and formatted
with such depth and detail so you can
maximize the features of your camera, yet
easily follow the instructions.
11
CONGRATULATIONS
Page 2

Table of Contents.........................................................................................2
Important Information..................................................................................3
FCC Information ......................................................................................3
User Information.....................................................................................3
Precautions...................................................................................................4
Location of Controls.....................................................................................5
Front/Top.................................................................................................5
Bottom/Rear............................................................................................6
Display....................................................................................................6
Getting Started.............................................................................................7
Loading the Battery................................................................................7
Turning the Camera On and Off.............................................................7
Checking the Battery ..............................................................................8
Setting the Time and Date .....................................................................8
Setting the Flash ...................................................................................11
Setting the Image Quality .....................................................................11
Taking Pictures ...........................................................................................12
Taking Pictures......................................................................................12
Using the Self-Timer..............................................................................14
Pictures Remaining ...............................................................................14
Auto Power Off......................................................................................15
Reviewing/Deleting Pictures .......................................................................16
Reviewing Pictures................................................................................16
Deleting Individual Pictures From Memory...........................................16
Deleting All Pictures From Memory ......................................................18
Computer Connection.................................................................................19
Installing the Eye-Q3X Camera Software..............................................19
Connecting Your Camera to Your PC and Downloading Pictures.........19
Downloading Your Pictures Directly to Windows using the
“My Camera” Device .............................................................................21
Troubleshooting Guide...............................................................................22
Care and Maintenance ...............................................................................24
Software Customer Care ............................................................................25
2
TABLE OF CONTENTS
Page 3

FCC INFORMATION
FCC WARNING: This equipment meets the limits for a class B digital device,
pursuant to Part 15 of FCC rules. Only the cable supplied with the camera
should be used. Operation with other cables is likely to result in interference to
radio and TV reception and could void the user’s authorization to operate this
equipment. This device complies with Part 15 of the FCC Rules. Operation is
subject to the following two conditions:
• This device may not cause harmful interference.
• This device must accept any interference received, including interference
that may cause undesired operation.
Tested To Comply
With FCC Standards
for HOME OR OFFICE USE
Changes or modifications not expressly approved by the manufacturer may void
the user’s authority to operate this equipment.
USER INFORMATION
NOTE: This equipment has been tested and found to comply with the limits for
a class B digital device, pursuant to Part 15 of the FCC Rules. These limits are
designed to provide reasonable protection against harmful interference in a
residential installation. This equipment generates, uses and can radiate radio
frequency energy and, if not installed and used in accordance with the
instructions, may cause harmful interference to radio communications. However,
there is no guarantee that interference will not occur in a particular installation.
If this equipment does cause harmful interference to radio or television
reception, which can be determined by turning the equipment on and off, the
user is encouraged to try to correct the interference by one or more of the
following measures:
•Reorient or relocate the receiving antenna.
•Increase the separation between the equipment and receiver.
• Connect the equipment into an outlet on a circuit different from that to
which the receiver is connected.
• Consult the dealer or an experienced radio/TV technician for help.
3
IMPORTANT INFORMATION
Page 4

Be sure to observe the following precautions when using the camera:
•Never try to take pictures or use the built-in display when
operating a motor vehicle or while walking.
•Never try to open the case of the camera or attempt your own
repairs. Always leave service to authorized repair facilities.
•Keep the camera away from water and other liquids, and never
let it get wet. Never use when it is raining or snowing.
•Should foreign matter or water get into the unit, immediately
turn the power off and contact your local authorized service
center.
•Physical damage and malfunction of this unit can cause the
image data stored in its memory to be deleted. Be sure to
always keep backup copies of data by transferring them to a
personal computer.
•Under the environment with electrostatic discharge, the unit
may require the user to reset
•Do not leave the camera in places subject to extremely high
temperatures, such as a sealed vehicle or in direct sunlight.
•Disconnect the battery when camera is not used for long periods
of time.
•Use 3V Lithium Battery (CR
123A) only.
•Dispose of battery promptly and in a manner that complies with
applicable laws.
•Do not place the camera in unstable locations, such as a sloping
surface or unstable table where the camera may fall.
•Do not touch or press on the display or lens.
4
IMPORTANT INFORMATION
Page 5
1. Flash
2. Self-Timer LED Indicator
3. Image Quality Button
4. Flash/Infinity Focus Button
5. Zoom In/Up (+) Button
6. Zoom Out/Down (–) Button
7. CAMERA/REVIEW/Power Button
8. Shutter/OK Button
9. Liquid Crystal Display
10. Self Timer Button
11. Lens
5
LOCATION OF CONTROLS
FRONT/TOP
1
2
3
4
5
6
7
11
10
9
8
Page 6
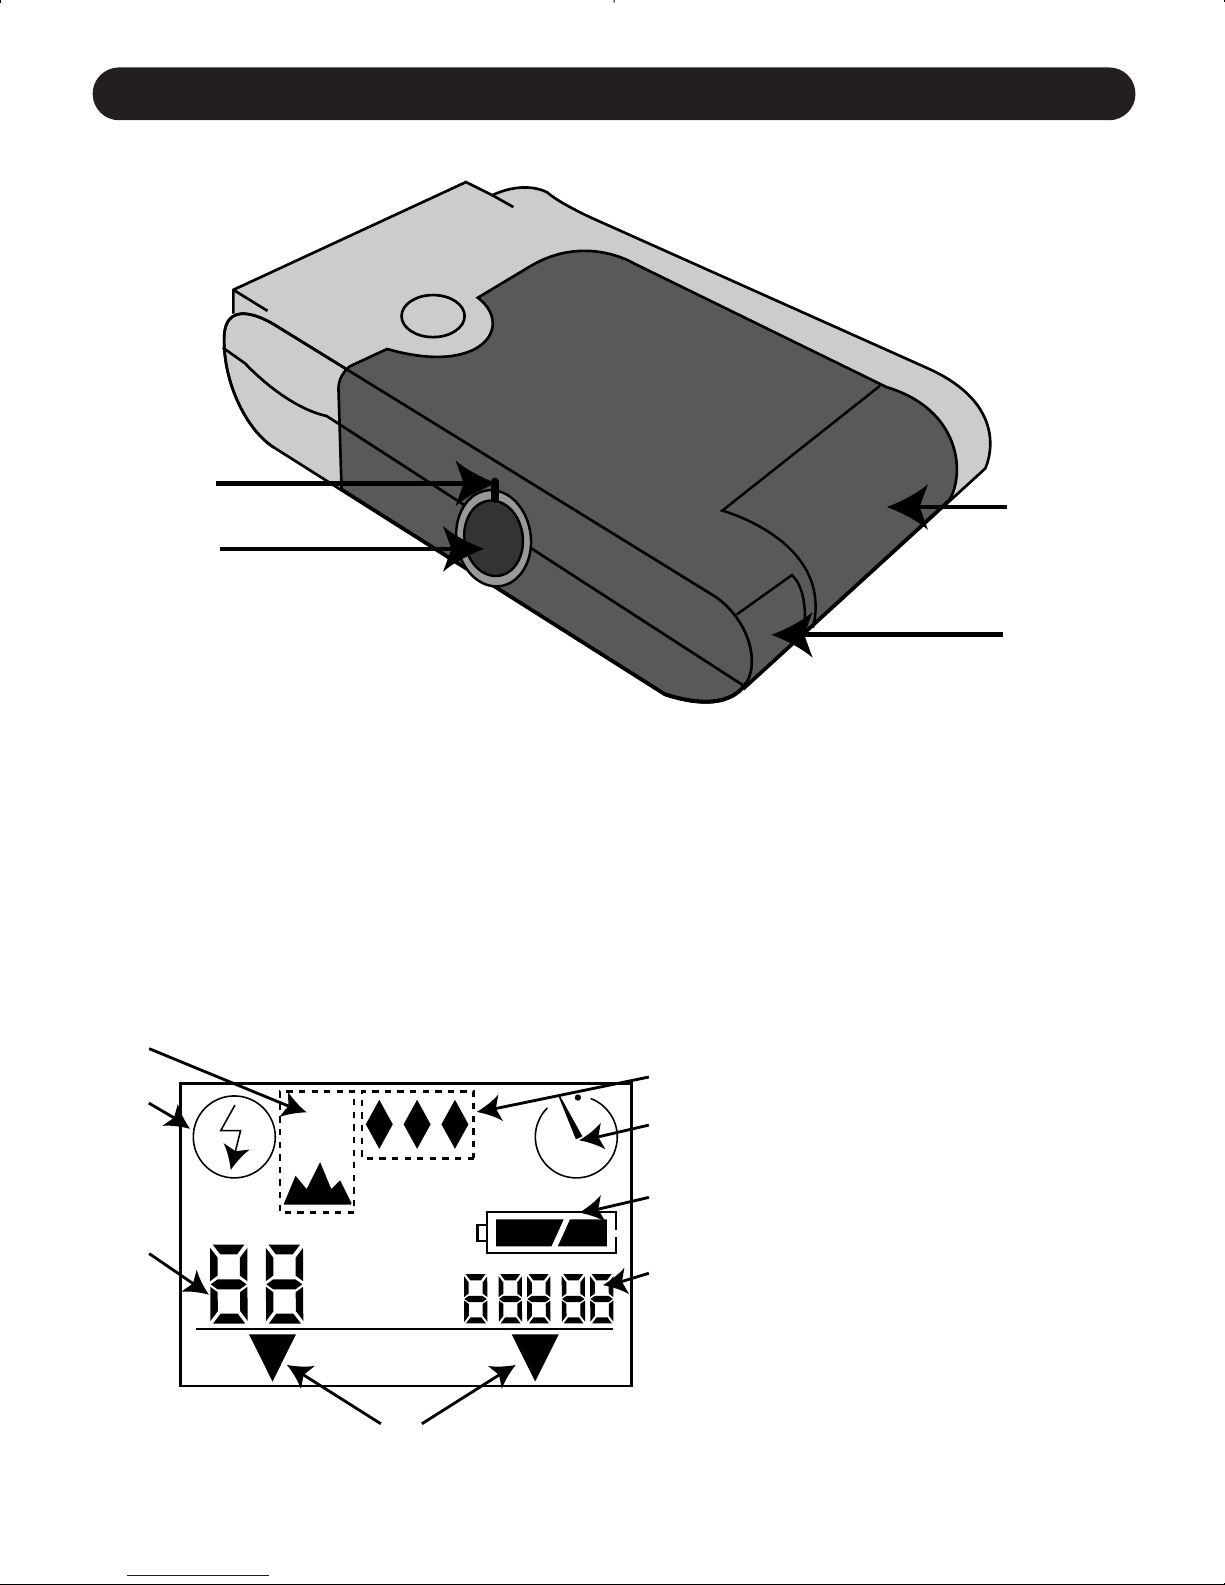
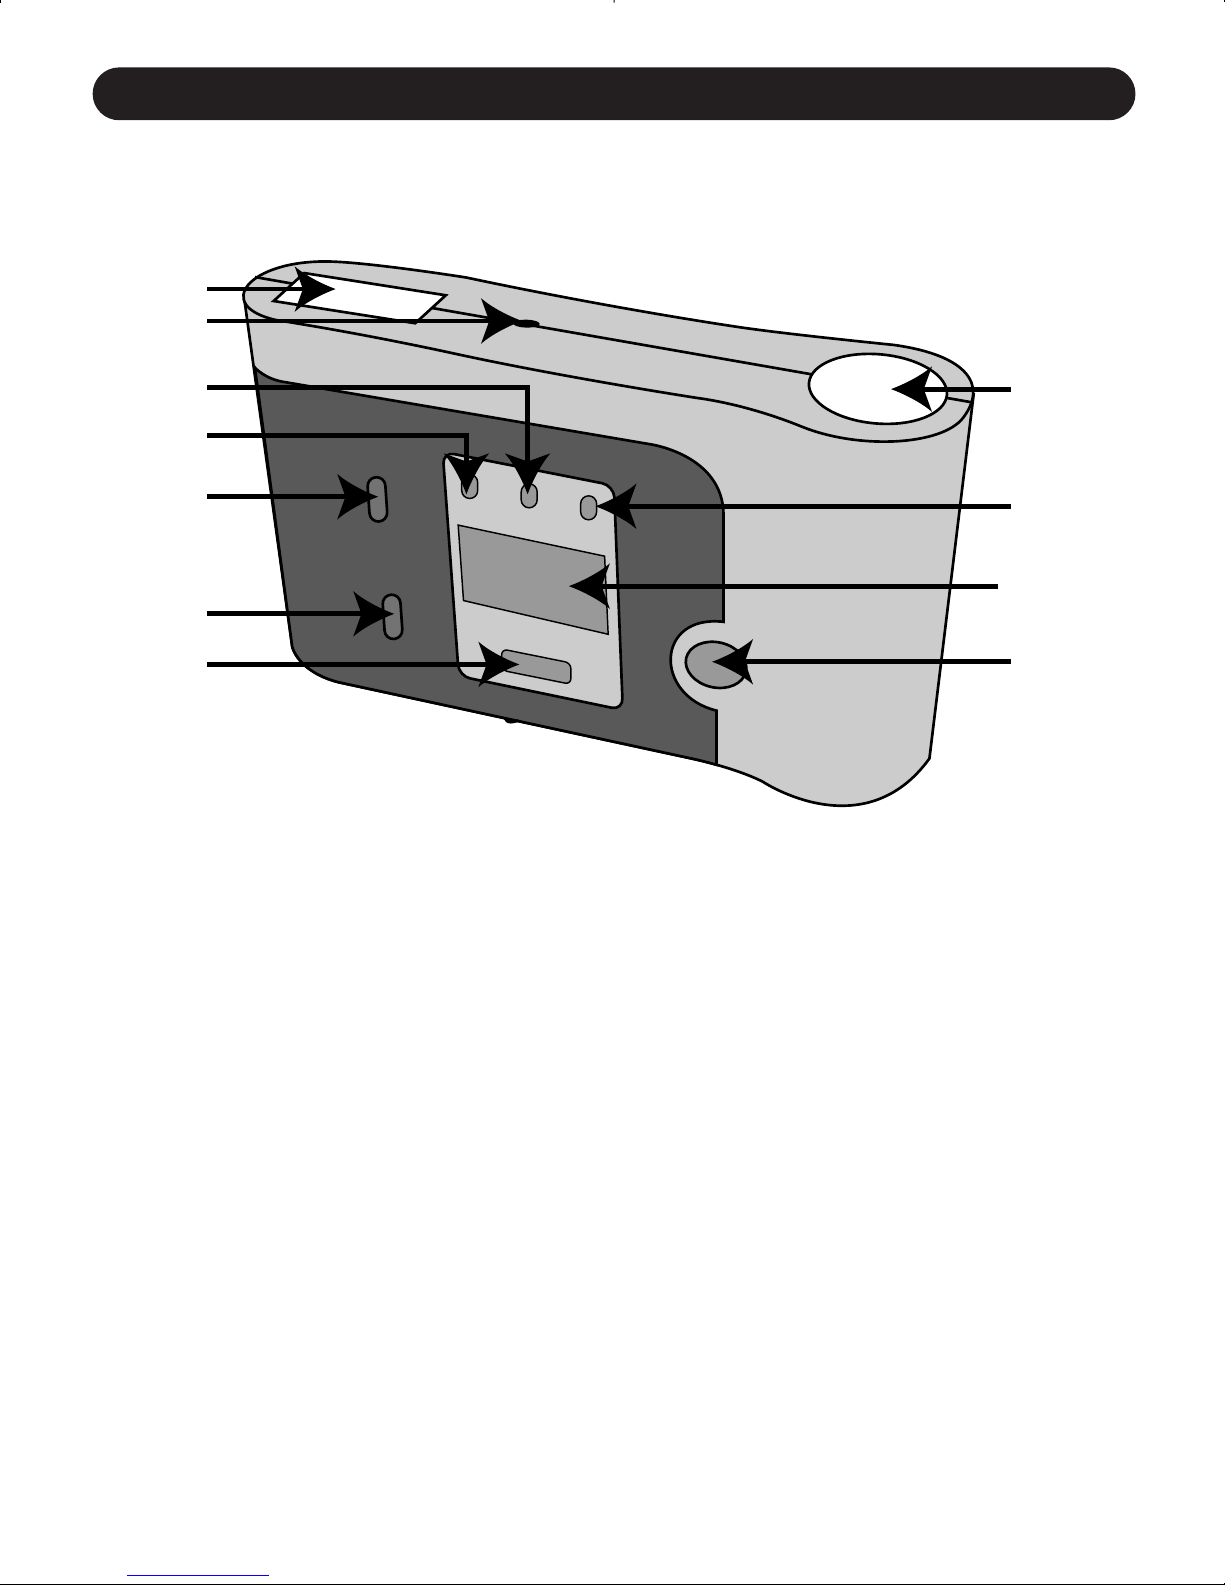
LOCATION OF CONTROLS (CONTINUED)
6
12. Viewfinder Sharpness
Adjustment Ring
13. Viewfinder
14. Battery Compartment
15. USB Port Connection (To
PC)
BOTTOM/REAR
A. Flash Mode Indicators
B. Pictures Remaining
Indicator
C. Mode Indicators
D. Time/Date Indicator
E. Battery Indicator
F. Self-Timer Indicator
G. Image Quality Indicator
H. Focus Mode Indicator
DISPLAY
12
13
14
15
H
A
A
B
G
F
E
D
C
Page 7
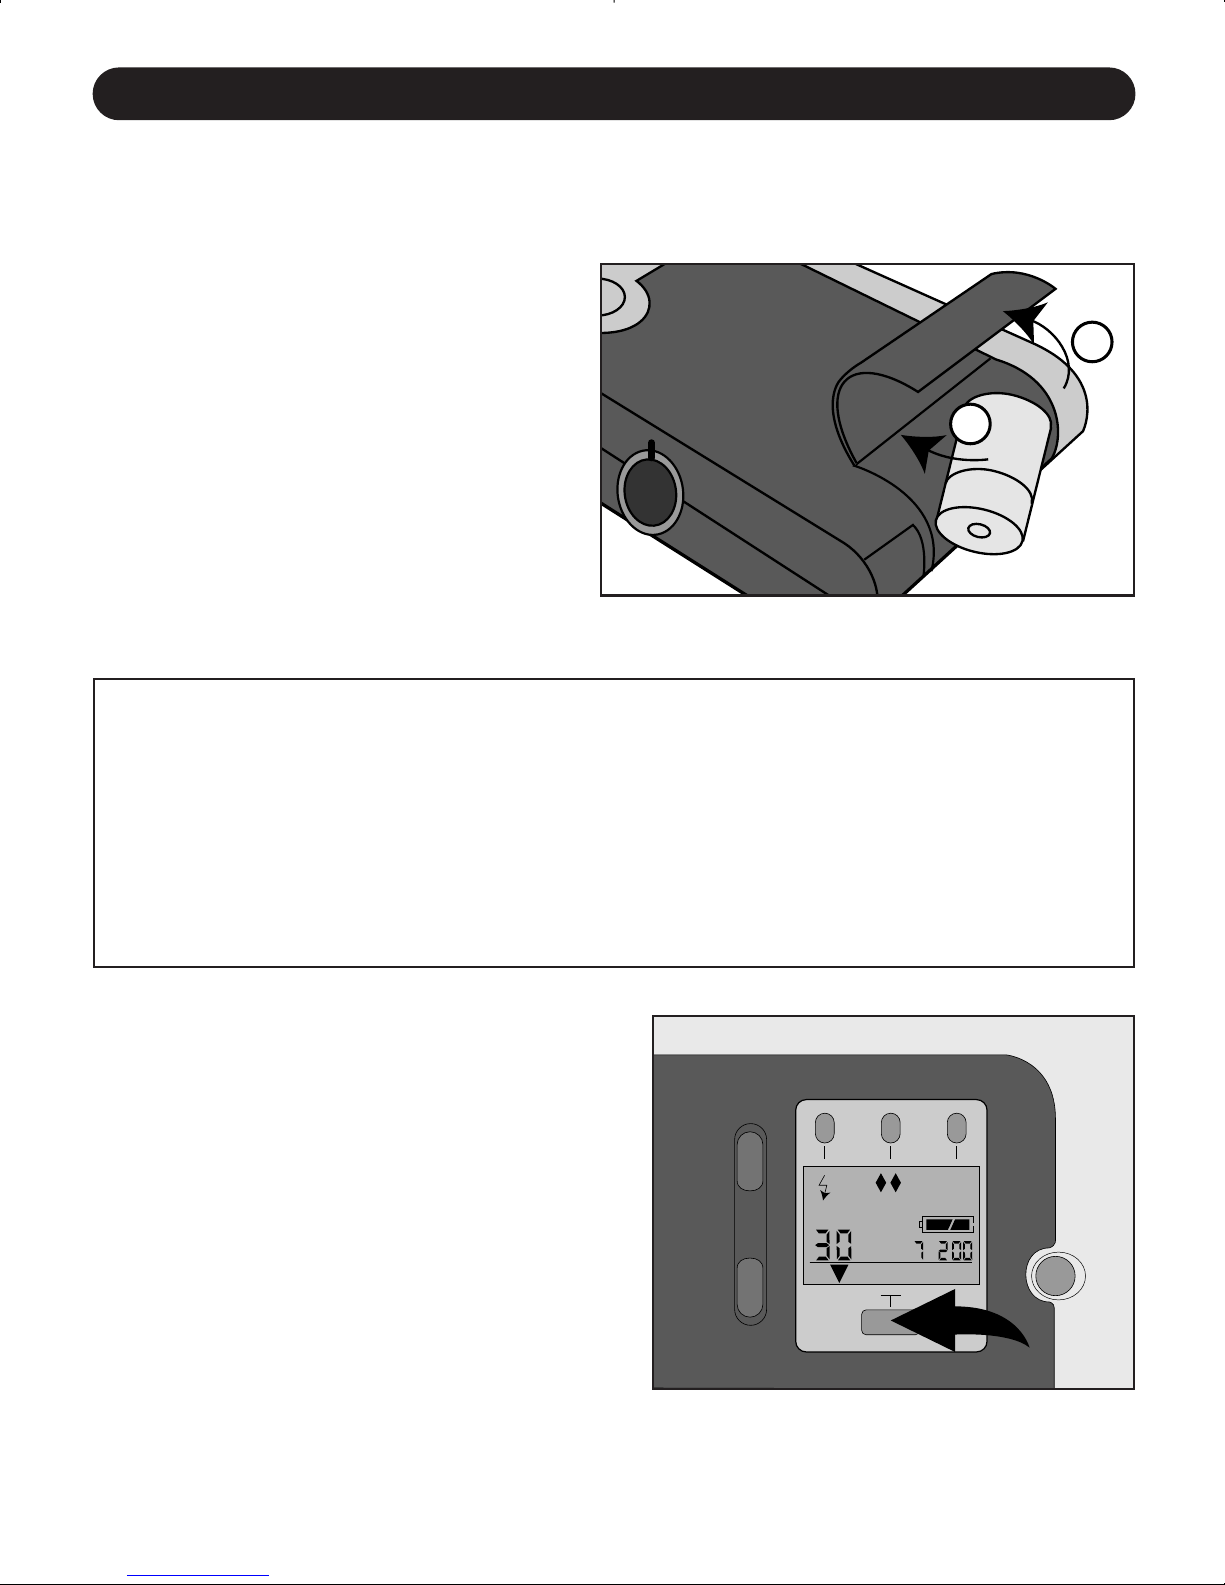
LOADING THE BATTERY
Before taking pictures, insert a CR
123A3
V lithium battery (supplied)
into your camera's battery
compartment, as follows:
1. Using your fingernail, open
the battery compartment.
2. Insert the 3V lithium battery
into the battery compartment,
observing the polarity marks
(+ / – ) as indicated in fig.
1.
3. Close the battery compartment.
BATTERY PRECAUTIONS
Follow these precautions when using a battery in your camera:
1. Use only the size and type of battery specified.
2. Be sure to follow the correct polarity when installing the battery. A
reversed battery may cause damage to your camera.
3. If not using your camera for a long period of time, remove the battery
to prevent damage or injury from possible battery leakage.
TURNING THE CAMERA ON AND OFF
•To turn your camera on, press
the CAMERA/REVIEW/Power
button
❶; the LCD screen will
turn on.
•To turn your camera off, press
and hold the CAMERA/
REVIEW/Power button
❶ for
3
seconds; the LCD screen will
turn blank.
7
GETTING STARTED
FFIIGGUURREE
11
FFIIGGUURREE
22
1
–
2
+
+
A
–
CAMERA REVIEW
1
Page 8

GETTING STARTED (CONTINUED)
8
Turn your camera on by pressing
the CAMERA/REVIEW/Power button
❶ and make sure it is in the
CAMERA mode (mode arrow will
point to the word CAMERA). If it is
not, press the CAMERA/REVIEW/
Power button ❶ again so the mode
arrow points to the word CAMERA.
1
Press and hold the Self-Timer
button ❶ for 5 seconds to enter
the Clock Set mode; the 12/24
hour setting will start blinking.
Press the Zoom In/Up++or Zoom
Out/Down ––button ❷ to cycle
between the 12 or 24 hour mode.
2
CHECKING THE BATTERY
The camera has a battery indicator that shows the current battery
level, regardless of the mode the camera is in.
Do not attempt to use the camera once the “Empty” battery indicator
appears in the display. Replace the battery immediately in this case. It is a
good idea to always keep a spare battery together with your camera kit.
SETTING THE TIME AND DATE
FULL
Battery has full
power and is ready
to use.
EMPTY
Battery has very little
power and must be
replaced.
LOW
Battery has low
power and will need
to be replaced soon.
+
A
1
2
+
–
CAMERA REVIEW
1
2
–
A
CAMERA REVIEW
Page 9

GETTING STARTED (CONTINUED)
9
Press the Self-Timer button ❶ and
the minutes will blink. Press the
Zoom In/Up ++or Zoom Out/Down
––
button ❷ to adjust the minute
setting until the present minute
appears.
3
Press the Self-Timer button ❶ and
the hours will blink. Press the Zoom
In/Up ++or Zoom Out/Down ––button
❷ to adjust the hour setting until
the present hour appears. Make sure
to set the correct AM/PM setting
when setting the hours.
4
Press the Self-Timer button ❶ and
the date format will blink. Press
the Zoom In/Up ++or Zoom
Out/Down ––button ❷ to adjust
the date format until the desired
format appears. m/d/y is the
standard format in the US.
5
Press the Self-Timer button ❶ and
the year will blink. Press the Zoom
In/Up ++or Zoom Out/Down
––
button ❷ to adjust the year
setting until the present year
appears.
6
1
2
+
–
2
A
CAMERA REVIEW
1
2
+
–
2
A
CAMERA REVIEW
1
2
+
–
2
A
CAMERA REVIEW
1
2
+
–
2
A
CAMERA REVIEW
Page 10

GETTING STARTED (CONTINUED)
10
Press the Self-Timer button ❶ and
the months will blink. Press the
Zoom In/Up ++or Zoom Out/Down
––
button ❷ to set the present
month. Repeat this procedure to
set the present day.
7
Press the Self-Timer button ❶ and
the time and date will be set. Your
camera will return to the Camera
mode.
8
NOTES:
•Your camera must be in the Camera mode (arrow pointing at the
word CAMERA) to set the time and date.
• After entering the Clock Set mode, a button must be pressed
within 30 seconds, or the unit will revert back to the Camera
mode.
• While setting, press and hold the Zoom In/Up ++and/or Zoom
Out/Down ––buttons for faster setting. This is useful when setting
the hours and minutes.
• When setting the day, your camera will automatically know how
many days are in the selected month and cycle back to 1 when it
has been reached. For example, if the month set is July and you
try to increase the day past 31, the day will cycle back to 1.
1
2
+
–
2
A
CAMERA REVIEW
1
+
–
A
CAMERA REVIEW
Page 11

GETTING STARTED (CONTINUED)
11
SETTING THE FLASH
Your camera is equipped with an automatic sensor flash, which eliminates the
need of turning it on or off depending on light conditions. The flash range is
approximately 18 inches to 6 feet (50cm to 2m). The shooting range is
approximately 18 inches to infinity (50cm to infinity). The flash is programmed
for 3 different settings, as follows:
Flash Off is a great feature that allows you to utilize only existing light, such as
a sunset. This feature is also called "museum mode", as many museums do
not allow flash photography inside their premises.
SETTING THE IMAGE QUALITY
The higher the image quality, the larger the file size, thus reducing the number
of pictures you will be able to store into the camera's internal memory. Select
from the 3 Image Quality Settings:
: Standard Quality photo saved at high compression, and at 640 x 480
resolution. Use this setting if you are going to use the pictures online or e-mail
them (storage capacity: approximately 81 pictures).
: Fine Quality photo saved at medium compression and at 640 x 480
resolution. Use this setting for everyday pictures (storage capacity: approximately
58 pictures).
: Super Fine Quality (1280 x 960) photo saved at standard compression
and at 1280 x 960 resolution. Use this setting when a very detailed picture is
needed (storage capacity: approximately 42 pictures).
NOTE: The Flash Mode and Image Quality settings will revert back to the
factory default (Auto Flash and Fine Quality mode) every time the camera is
turned off.
AUTO FLASH
Flash fires
automatically, as
needed.
FLASH OFF /
INFINITY FOCUS
Flash off, camera set
to infinity focus.
FLASH OFF
Flash is off.
A
Page 12

TAKING PICTURES
12
Turn your camera on and make
sure it is in the CAMERA mode
(mode arrow will appear over the
word CAMERA). If it is not, press
the CAMERA/REVIEW/Power button
❶ again so the mode arrow
appears over the word CAMERA.
1
If desired, press the Flash button
❶ to set the flash mode of your
choice (see previous page).
If desired, press the Image Quality
button ❷ to set the image quality
of your choice (see previous
page).
2
Look into the viewfinder and use
the Zoom In/Up ++or Zoom
Out/Down ––button to zoom in or
out and frame the subject as
desired.
4
For added convenience, your camera
is equipped with a diopter (Viewfinder
Sharpness Adjustment Ring). Look
through the viewfinder and if the
image you see appears blurred, rotate
the diopter ring left or right until the
image is focused to your satisfaction.
This adjustment has to be done only
once, however, if another person uses
your camera, they may need to
readjust it to their vision. You will
then have to readjust the viewfinder
to your preferred setting once again.
3
+
–
A
CAMERA REVIEW
1
1
+
–
A
CAMERA REVIEW
2
1
1
+
–
1
A
CAMERA REVIEW
Page 13

TAKING PICTURES (CONTINUED)
13
Now you are ready to take your picture!
Press the SHUTTER/OK button ❷ all the way
down and release:
- The viewfinder will then temporarily turn black
while the camera is focusing your picture and
capturing it into memory.
- The image just captured will then be displayed
on the Microdisplay (Review mode) for about 5
seconds, and then the camera will revert to
"Camera Mode”. You are now ready to shoot
another picture!
IMPORTANT: Do not move the camera while the
viewfinder is black,. Wait until the image just taken
appears on the Microdisplay.
5
While looking into the viewfinder, observe the red LED ❶ status. The red
LED indicates the following:
LED IS OFF:
OK to proceed.
LED IS BLINKING:
- Indicates that Flash is Charging. Wait until LED turns
completely off (approx. 4 seconds) before taking your
picture
Note: (The Flash Icon on the LCD Display will also be
blinking while the flash is being charged).
LED IS LIT:
This indicates one of the two possibilities (or both):
A: Memory is Full. Download Pictures to the PC or delete a
few pictures from memory before continuing.
B: Battery is weak. Replace the battery with a new one
before continuing.
1
1
A
ERA REVIEW
2
Page 14

TAKING PICTURES (CONTINUED)
14
Turn your camera on and make
sure it is in the CAMERA mode
(mode arrow will point to the word
CAMERA). If it is not, press the
CAMERA/REVIEW/Power button ❶
again so the mode arrow points to
the word CAMERA.
1
Press the Self-Timer button ❶; the
Self-Timer indicator ( ) will
appear.
Press the SHUTTER/OK button ❷
to start the Self-Timer.
2
The Red LED inside and on the
front of the camera will blink to
indicate the camera is set to take
a picture. When 4seconds are left,
the LED will blink faster.
3
When the countdown reaches
1
second, the RED LED will light
solid and then take the picture.
4
USING THE SELF-TIMER
+
–
A
CAMERA REVIEW
1
A
CAMERA REVIEW
1
2
Page 15

TAKING PICTURES (CONTINUED)
15
PICTURES REMAINING
The leftmost number in the display indicates how many pictures are
available in the selected Image Quality mode. As pictures are taken,
this number decreases.
If “0” is blinking, it indicates that the memory is full and there is no
more space for additional pictures (at any image quality mode).
If “0” is lit solid, then there are still more pictures available at a
lower level of quality.
It is normal for the picture counter not to decrease when taking a
picture. This is because the Image Quality setting did not take up
sufficient memory space to decrease the remaining number counter.
AUTO POWER OFF
In order to extend the battery life, your camera is equipped with an
auto-shut off circuitry that will automatically shut off the power when
the camera is left unattended or untouched for more than 30
seconds.
Page 16

REVIEWING/DELETING PICTURES
16
Turn the unit on and press the
CAMERA/REVIEW/Power button ❶
so the mode arrow points to the
word REVIEW.
1 2
REVIEWING PICTURES
Repeat the "Reviewing Pictures"
steps 1 and 2 above . Once you
have found the picture you want
to delete, press the Shutter/OK
button ❶ once.
1
The file menu will appear. The white arrow
will point to the active menu selection.
To SCROLL through the menu choices,
use the Zoom In/Up + or Zoom
Out/Down – buttons. The arrow will
move up or down through the choices.
To EXECUTE it, press the Shutter/OK
button when the arrow is pointing to
the desired function.
2
DELETING INDIVIDUAL PICTURES FROM MEMORY
Look into the viewfinder, the last
picture taken will be displayed, first
as a rough image, and then as a
sharper version in a vertical sweep
motion. Use the Zoom In/Up + or
Zoom Out/Down – button to scroll
through the pictures stored in
memory to review them.
+
–
CAMERA REVIEW
1
+
–
A
CAMERA REVIEW
1
34 KB
SVI_0007
FILE INFO
DELETE
DELETE ALL
DONE
Page 17

17
REVIEWING/DELETING PICTURES (CONTINUED)
Select DELETE: Erases the frame
shown in the bottom right of the
screen.
3
A Confirmation screen will appear.
Select OK to proceed, or to go
back, select CANCEL.
4
Once the picture is erased, the
previous menu will appear. Select
DONE to exit. Repeat the process
if you wish to delete more
individual pictures.
5
FILE INFO
DELETE
DELETE ALL
DONE
34 KB
SVI_0007
CONTINUE DELETE?
OK
CANCEL
FILE INFO
DELETE
DELETE ALL
DONE
34 KB
SVI_0007
Page 18

18
REVIEWING/DELETING PICTURES
On Picture Review mode, press
the Shutter/OK button ❶ once and
the File Info menu will appear.
While looking into the viewfinder,
select a picture to delete using
the Zoom In/Up ++or Zoom
Out/Down ––button ❷.
1
Select DELETE ALL:Erases the
picture displayed plus ALL
PICTURES stored in memory.
2
A Confirmation screen will appear.
Select OK to proceed, or to go
back, select CANCEL.
3
While the pictures are being erased, the
message "DELETING PICTURES" will be
displayed on the screen. This process
should last 15 seconds, then the camera
will revert to CAMERA MODE. You are
now ready to take pictures again!
Note: If you press the REVIEW button
after deleting all pictures, the viewfinder
will display the "NO IMAGES” message,
indicating that the memory is clean.
4
DELETING ALL PICTURES FROM MEMORY
2
+
FILE INFO
DELETE
DELETE ALL
DONE
2
–
CAMERA REVIEW
1
CONTINUE DELETE
OF ALL IMAGES?
34 KB
SVI_0007
DELETING IMAGES
Page 19

INSTALLING YOUR EYE-Q3X CAMERA SOFTWARE:
You must first install the Eye-Q 3x software before you can download
pictures from your camera into your PC.
1. Insert the Eye-Q 3x CD-ROM into your computer’s CD-ROM Drive.
2. The installation screen will appear. Follow the software installation
instructions on your screen to install the software.
If your computer has the CD-ROM automatic installation disabled, click
on START, select MY COMPUTER and locate the CD-ROM Drive. Then,
Double-Click on the CD-ROM Drive icon to show its contents, double-click
on the file named SETUP.EXE and follow the instructions on your screen.
CONNECTING YOUR CAMERA TO YOUR PC AND DOWNLOADING PICTURES
Before you can use your camera to download images to your computer, you
need to install the Eye-Q 3x Software on your computer (see “Installing Your
Eye-Q 3X Camera Software” section above).
Once you have taken a few pictures with your Eye-Q 3X camera or as soon
as the camera’s memory is full, you can download the pictures into your
computer to print, e-mail, store or to manipulate them in creative and fun
ways, utilizing the bonus imaging software that accompanies your Eye-Q 3x.
First, connect your camera to the PC, following these simple steps:
1. Using your fingernail, open the USB port door to access your camera's
USB cable connector.
2. Plug the square end of the (supplied) USB cable to the USB connector in
your camera.
3. Plug the rectangular end of
the USB cable to your PC's
USB port (please refer to
your PC's documentation if
you do not know where the
USB port is located).
4. Turn your Eye-Q 3x
Camera’s power on.
19
COMPUTER CONNECTION
TO COMPUTER
Page 20

5. Launch ArcSoft PhotoImpression software by clicking on Start–Programs
and choose PhotoImpression from the application list on your screen.
6. Follow these steps to retrieve your pictures from the camera:
A- Click on GET PHOTOS
icon.
B- Click on the CAMERA/
SCANNER button
C- Click on drop-down
list under SELECT
SOURCE and choose
Concord EYE-Q.
D- Click on the Camera
/Scanner Icon. A
second window will
appear showing the
contents (pictures) of
your camera’s memory,
and options on how to handle them.
E- Select the picture(s) you want to retrieve, by pressing the Ctrl
key on your keyboard and clicking once on each thumbnail.
OR
F- Click on SELECT ALL (all pictures displayed will be retrieved).
G- Click on GET PHOTOS.
H- The pictures just retrieved will be placed as thumbnails on the
bottom of your application window. To open them, just double-click
on the thumbnail.
You are now ready to print, store or further enhance /manipulate your
pictures. Refer to ArcSoft ’s Software Guide for a tutorial on all
the features PhotoImpression offers.
20
COMPUTER CONNECTION (CONTINUED)
Page 21

DOWNLOADING YOUR PICTURES DIRECTLY TO WINDOWS USING THE
“MY CAMERA” DEVICE:
The Eye-Q software offers a simple method to download your pictures
“on the fly” without launching an application as follows:
1. Connect your
camera to the PC
(see “CONNECTING
YOUR CAMERA TO
YOUR PC AND
DOWNLOADING
PICTURES”
section) and turn
your camera's
power on.
2. Click on START on
your PC and select
MY COMPUTER
3. A list of devices
will appear. Double
Click on the “MY
CAMERA” Icon. The “MY CAMERA” device will automatically look for the
camera through the USB Port, and will list its contents (pictures) as files.
Simply select all or some of the files (pictures) listed and copy them into a
folder of your choice.
4. It is recommended that you create a new folder and name it “MY PICTURES”,
so that you can always find the pictures you downloaded from your Eye-Q
3x Camera. To continue using the camera, simply disconnect it from the
USB cable.
NNOOTTEE::
Downloading the pictures from “MY CAMERA” does not erase the
pictures from your camera's memory! (If the Eye-Q 3X ’s memory is full, now it
would be a good time to clear the memory by erasing some or all pictures.)
For instructions on how to erase images, please refer to “REVIEWING/DELETING
PICTURES” section of this guide.
21
COMPUTER CONNECTION (CONTINUED)
Page 22

TROUBLESHOOTING GUIDE
22
SYMPTOM
POWER
Display not on.
TAKING PICTURES
Picture taken is
poor quality.
Image is blurred
when looking
through the
viewfinder.
Flash picture taken
is too light.
POSSIBLE
CAUSE
Power is off.
Battery dead or weak.
Battery not installed
correctly.
Poor lighting.
Lens is dirty.
Subject too close.
Subject or camera
moved as picture was
taken.
Subject is too far away
for flash to have effect
.
Sharpness adjustment
ring needs to be
refocused.
Lens is dirty or smeared.
Viewfinder is dirty.
Subject is too close.
POSSIBLE
SOLUTION
Turn power on.
Replace battery.
Install battery correctly.
Take picture in better lighting and/or use the flash at
a reasonable distance.
Clean lens with a soft cloth. See
Care & Maintenance section.
Move subject further away.
Hold camera steady until
picture is taken.
Move subject closer.
Adjust the sharpness adjustment
ring while looking through the
viewfinder until image is focused
(See Taking Pictures, Step 3).
Clean the lens with a soft
cloth.
Clean the viewfinder with a
soft cloth or cotton swab. See
Care & Maintenance section.
Move subject further away.
Page 23

23
TROUBLESHOOTING GUIDE (CONTINUED)
SYMPTOM
Flash picture
taken is too dark.
Daylight picture
taken is too dark.
Can’t take
picture.
Flash did not
work.
Can’t take
picture.
POSSIBLE
CAUSE
Subject is too far away.
Flash is not on.
The subject is in front of
bright light.
Memory is full.
Power is off.
There was sufficient light
for the shot, flash was
not needed.
Flash is not on.
Flash did not charge
fully.
Battery is empty.
Unit is not set to
Camera mode.
POSSIBLE
SOLUTION
Move subject closer.
Turn flash on.
Change the subject’s
position.
Delete unwanted pictures
and continue shooting, or
download all pictures to
the PC and then delete all
pictures from camera
memory (see Reviewing/
Deleting Pictures).
Turn power on.
This is normal as your camera’s
electronic light sensor is
programmed to only fire
the flash when needed.
Turn flash on.
Press The shutter/camera/
review button and verify
that the LED has stopped
blinking before taking the
picture.
Replace the battery.
Set the unit to Camera
mode.
Page 24

24
TROUBLESHOOTING GUIDE (CONTINUED)
CLEANING THE LENS AND VIEWFINDER
Do not use cleaning solutions unless they are designed specifically
for camera lenses.
Do not wipe the camera lens or viewfinder with chemically treated
eyeglass lens tissue as it may scratch them.
To clean:
1. Blow gently on the lens and/or viewfinder to remove dust and
dirt.
2. Breathe lightly on the lens and/or viewfinder to moisten them.
3. Wipe the lens and/or viewfinder gently with a soft, lint-free cloth
or an untreated lens-cleaning tissue.
CARE AND MAINTENANCE
SYMPTOM
Part of the picture is missing.
GENERAL
Picture number
does not decrease
after taking a
picture.
Cannot set time
or date.
Date is not in
proper format.
POSSIBLE
CAUSE
Something was blocking
the lens.
Image not centered
when taking picture.
Zoom set too close.
Image Quality setting
did not take up sufficient
space to decrease the
remaining number.
Camera is in the Review
mode.
Date format not set
properly.
POSSIBLE
SOLUTION
Keep hands, fingers, etc.
away from the lens.
Make sure image is centered in the viewfinder.
Zoom out a little.
This is normal.
Set camera to the Camera
mode.
Change the date format.
Page 25

25
IN USA AND CANADA
ArcSoft, Inc.
46601 Fremont Blvd.
Fremont, CA 94538
Monday – Friday
8:30AM - 5:30PM (PST)
Tel: 510-440-9901
Fax: 510-440-1270
E-Mail: support@arcsoft.com
Web: www.arcsoft.com
www.photoisland.com
IN EUROPE:
ArcSoft, Inc.
Unit 14, Shannon Industrial
Estate
Shannnon, Co. Clare, Ireland
Tel: +353 (0) 61-702087
Fax: +353 (0) 61-702001
E- Mail: europe@arcsoft.com
Web: www.arcsoft.com
www.photoisland.com
FOR SOFTWARE TECHNICAL SUPPORT, PLEASE CONTACT:
Copyright 2000 Concord Camera
Page 26

Technical Support Hot Line:
Toll Free In the USA & Canada
1-866-522-6372
Toll Free In Europe
UK: 0800-169-6482
BELGIUM: 0800-787-57
FRANCE: 0800-917-599
GERMANY: 0800-1800-563
SPAIN: 900-973-195
ITALY: 800-781-883
All Other Countries - Toll
31-53-482-9779
 Loading...