

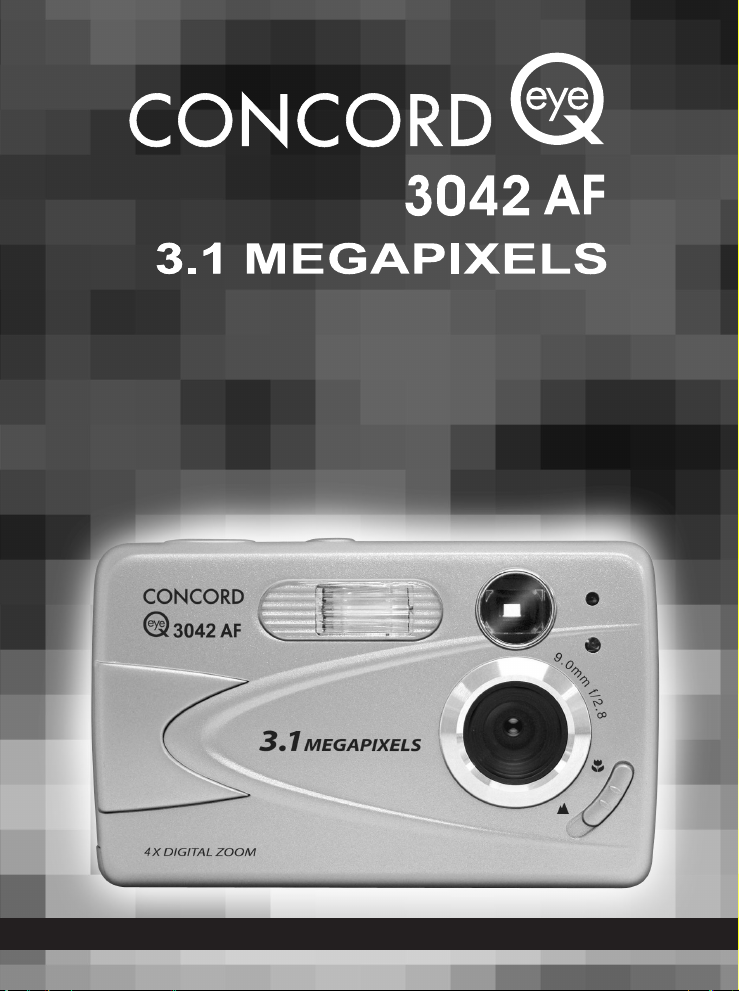
Page 1
Quick Start Guide
Quick Start Guide
• ENGLISH • FRANÇAIS • DEUTSCH • ESPAÑOL • ITALIANO • DUTCH
www.concord-camera.com
Page 2

LANGUAGES
ENGLISH................................................................................................................1
FRANÇAIS ............................................................................................................7
DEUTSCH ............................................................................................................13
ESPAÑOL ............................................................................................................19
ITALIANO ............................................................................................................25
NEDERLANDS ....................................................................................................31
Page 3
5
6
7
8
9
10
1
2
3
4
11
17
18
19
20
21
23
22
24
25
12
13
14
15
16
QUICK START GUIDE
ENGLISH
This Quick Start Guide provides a quick reference for operating your
new digital camera. Refer to the User’s Guide, which can be found on
the CD-ROM and a hard copy in your Concord Eye-Q 3042AF box, for
detailed instructions on how to use all of your camera’s features. Before
using the camera, make sure to read all safety instructions and
precautions outlined in the User’s Guide.
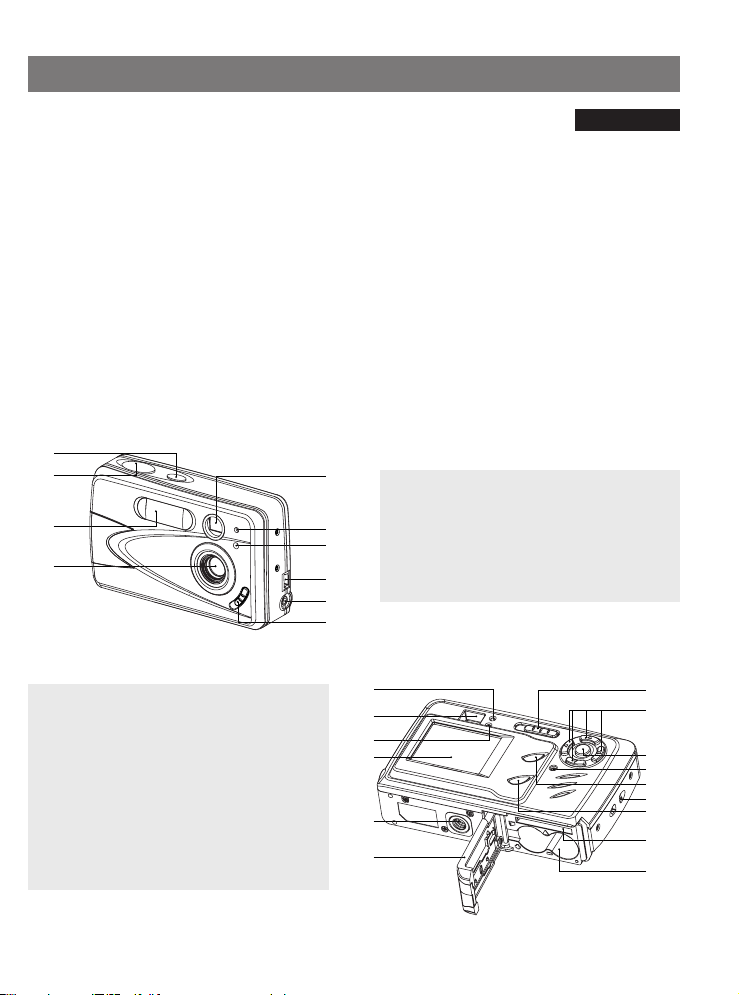
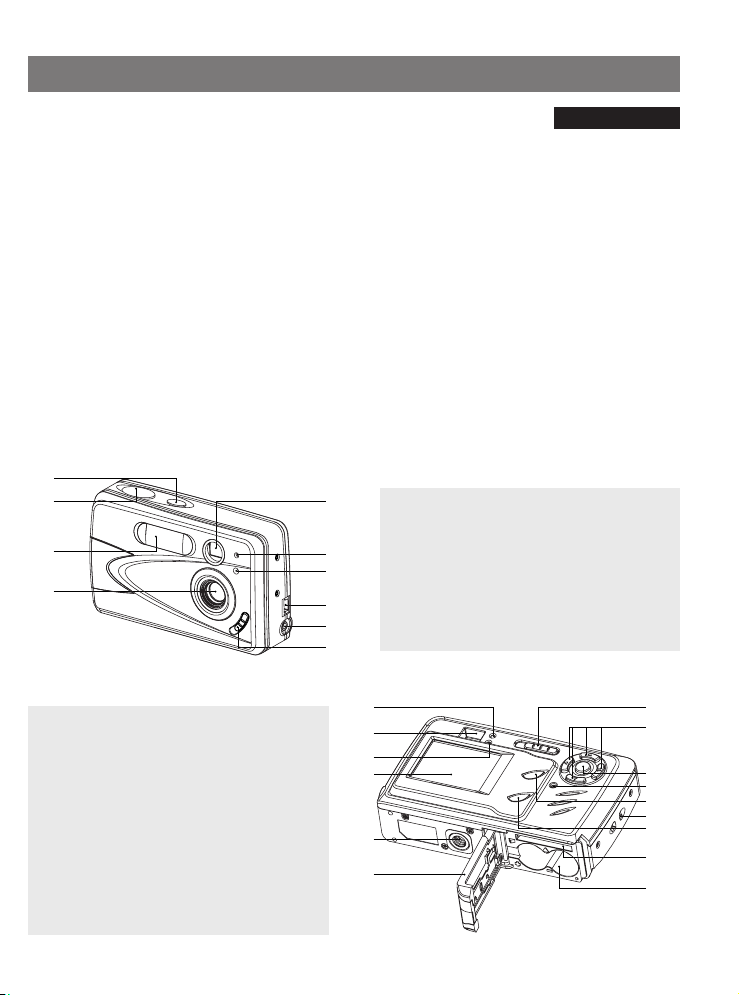
CAMERA OVERVIEW
Top/Front
11. Flash Ready LED
12. Viewfinder
13. Auto-Focus LED
14. LCD
15. Tripod Socket
16. Battery/Memory
Card Door
17. Mode Switch
18. Navigation Arrow
buttons/Zoom
buttons/Flash button
19. OK button/
Enlargement button
20. Reset Button
21. MENU Button
22. Wrist Strap Holder
23. LCD On/Off Button
24. Memory Card Slot
25. Battery
Compartment
1. Power Button
2. Shutter Button
3. Flash
4. Lens
5. Viewfinder
6. Flash Sensor
Bottom/Back
1
7. Red-eye Reduction
LED/Self-Timer LED
8. Mini-USB port
9. Video/TV-Out port
10. Macro Mode Switch
Page 4
3
M
003/016
3
M
003/016
G
I
A
B
C
H
J
K
F
A
AWB
AWB
D
E
A
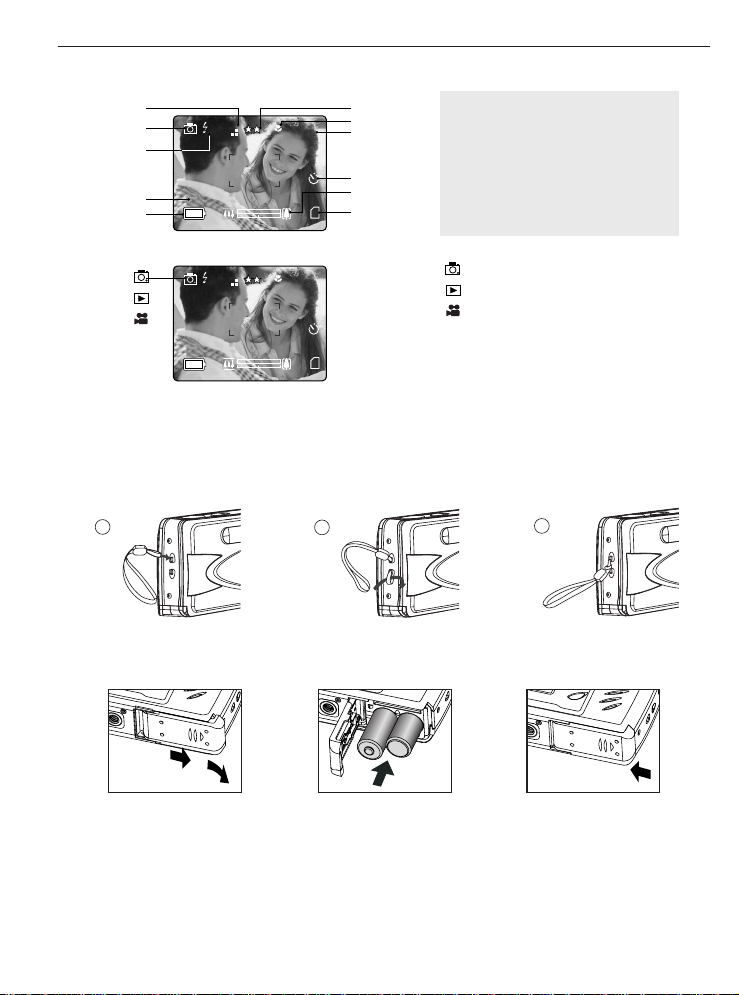
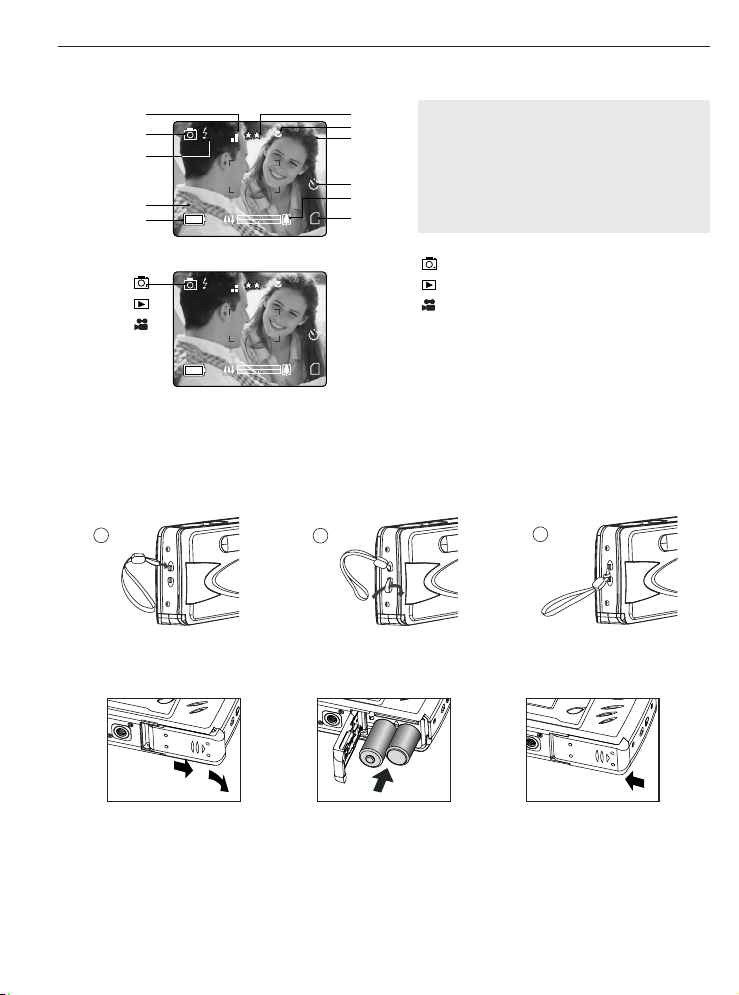
LCD ICONS
1
2
3
: Single Shot
: Review
: Video Clips
CAMERA OVERVIEW
Attaching the Wrist Strap
Please attach the wrist strap to prevent dropping the camera.
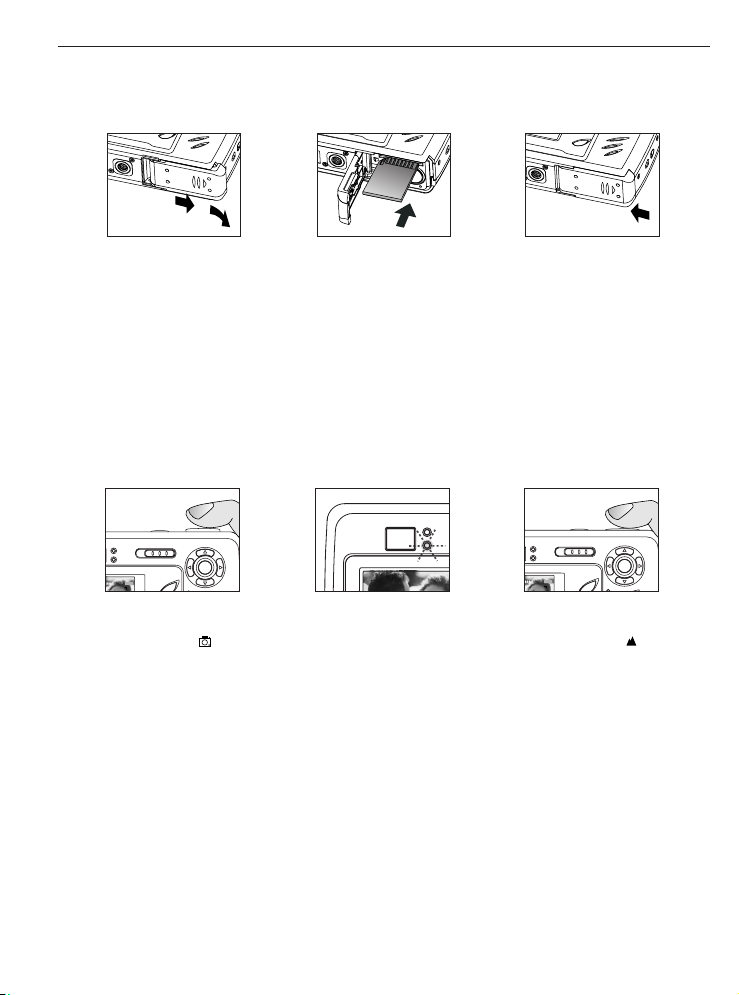
LOADING THE BATTERIES
A. Resolution
B. Camera Mode
C. Flash
D. White Balance
E. Battery Level
F. Image Quality
G. Macro
H. Frame Counter
I. Self-Timer
J. Zoom Bar
K. Memory Card
fig.1.1 fig.1.2
The camera can use 2x AA alkaline, lithium or NiMH rechargeable batteries.
1. Open the Battery/Memory Card door. (fig.1.1)
fig.1.3
• Slide the door in the direction of the arrow, and lift it open.
2. Insert the batteries according to the polarity indicators on the top edge of the battery compartment. (fig.1.2)
3. Shut the Battery/Memory Card door by sliding it in the opposite direction of the arrow marked on it, and
close it securely. (fig.1.3)
2
Page 5
GETTING STARTED
A
AWB
⁄ ⁄
English
Français
Deutsch
Italiano
Español
RETURN SET
LANGUAGE OPTION
OK
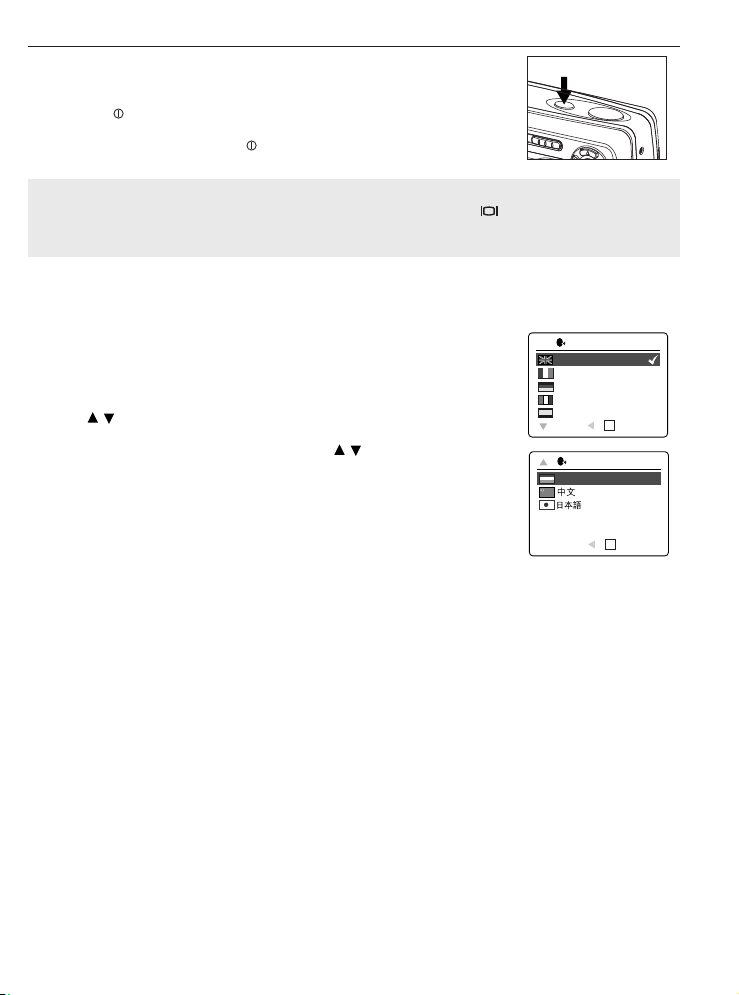
TURNING THE CAMERA ON AND OFF
The Power Button is located on the top of the camera. (fig.1.1)
1. Press the ( ) Power Button to power the camera on.
• The LCD will turn on automatically
2. To turn the camera off, press the ( ) Power Button.
fig.1.1
Note:
To extend battery life, the LCD will be off after 1 minute of inactivity, press ( ) button to reactivate the
LCD. The camera will automatically power off after 2 minutes of inactivity, press the Shutter Button to power
the camera back on.
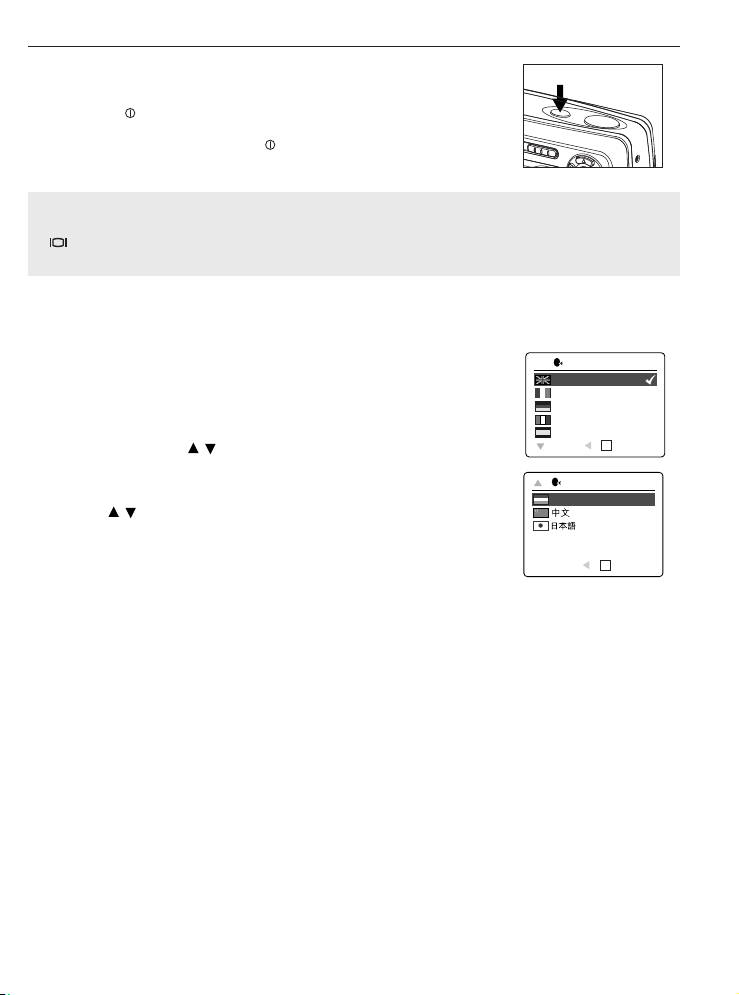
SETTING THE LANGUAGE
When the camera is powered on for the first time, the Language menu will appear.
Setting the Language
1. Turn the camera on.
• The Language Setup screen will appear on the LCD.
2. Press to highlight the language you would like to use.
3. Press the OK button to select.
4. The next screen will read “Are You Sure?” press to select No or Yes.
5. Press the OK button to confirm the selection.
• If you select No, you will return to the Language select screen.
• If you select Yes, all menu screens will be displayed in the new language.
LANGUAGE OPTION
Nederlands
RETURN SET
OK
3
Page 6
GETTING STARTED
A
AWB
A
AWB
INTERNAL MEMORY/INSERTING THE MEMORY CARD
The camera has 7MB internal memory that can be used right away. The camera can also use secure digital
(SD) memory cards (not included) to store images and video clips.
fig.1.1
1. Open the Battery/Memory Card door.
• Slide the door in the direction of the arrow marked on it, and lift it open. (fig.1.1)
fig.1.2
fig.1.3
2. Insert the memory card as indicated by the diagram. (fig.1.2)
• Please insert the card in straight, not on an angle.
3. Shut the Battery/Memory Card door by sliding it in the opposite direction of the arrow marked on it, and
close it securely. (fig.1.3)
•To eject the card, push the card in and release, then pull it out.
TAKING A PICTURE
TAKING A PICTURE WITH THE VIEWFINDER OR LCD
28/45
fig.1.1
fig.1.2
1. Turn the camera on.
2. Set the camera to ( ) Camera Mode and make sure the Macro Mode Switch is set to the ( ) Distant
Mode located on the front of the camera. (fig.1.1)
3. Frame the subject in the viewfinder or LCD.
4. Press the shutter button half-way to activate the auto-focus until the green AF LED lights up. (fig.1.2)
5. Press the shutter button fully to capture the image. (fig.1.3)
28/45
fig.1.3
4
Page 7
GETTING STARTED / TICKING PICTURES
3
M
003/016
A
AWB
003/016
AWB
28 SEC
28 SEC
3
M
003/016
AWB
28 SEC
28 SEC
A
AWB
⁄ ⁄
A
AWB
⁄ ⁄
A
AWB
A
AWB
A
AWB
⁄ ⁄
A
AWB
⁄ ⁄
A
AWB
A
AWB
Press Shutter to Record
28 SEC
28 SEC
A
AWB
⁄ ⁄
A
AWB
⁄ ⁄
SETTING THE FLASH
1. Press repeatedly until the desired indicator appears on the LCD.
TAKING A VIDEO CLIP
To record a video clip:
1. Slide the Mode Switch to ( ) Video Clip Mode.
2. Position the subject in the viewfinder or LCD.
3. Press the shutter button fully to capture a continuous video clip.
4. To stop recording, press the shutter button again.
Note: There is a time limit for each video clip. The time will vary depending on the amount of available
memory space. The alloted amount of recording time will appear on the top right hand corner of the
screen. The video clip capture will stop automatically when it reaches its time limit.
Video Clip Information
Resoluton: 512 x 384
Frame rate: 10fps
File Format: AVI (Motion Picture)
Note: The Flash Ready LED will turn red when the camera is storing the video clip. Do not open the
battery door or turn the camera off while recording, or the video clip may not be stored.
5
Page 8
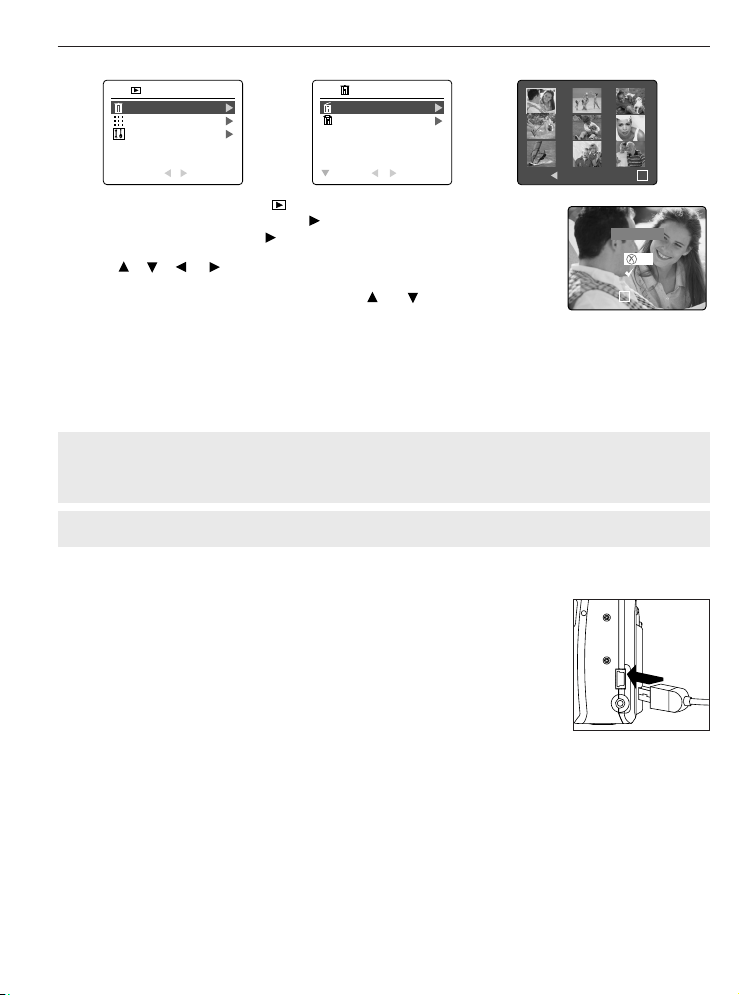
TICKING PICTURES
DELETE FILES
THUMBNAIL
SETUP
RETURN SELECT
REVIEW
MENU DELETE
OK
Are You Sure?
No
Yes
SELECT
OK
DELETE ONE
DELETE ALL
RETURN SELECT
DELETE FILES
DELETE ONE FILE
1. Slide the Mode Switch towards ( ).
2. When Delete File is highlighted, press to enter the Delete File submenu.
3. In the Delete File menu, press when Delete One is highlighted.
4. The next screen will display the stored pictures and video clips as thumbnails.
Press , , , to highlight the file you want to delete.
5. Press the OK button to select.
6. The next screen will read "Are You Sure?" press or to highlight No or
Yes.
7. Press the OK button to select.
• If No is selected, no change will be made, and you will return to the Delete One thumbnail view.
• If Yes is selected, the selected file will be deleted.
DOWNLOADING PICTURES AND VIDEO CLIPS ONTO YOUR COMPUTER
Note: Windows 98SE users must install the camera driver first. Windows 2000 users must install DirectX
in order to view video clips on the computer. Please refer to the Installation Guide section on page 30 in the
User's Guide for more information on installing the drivers and other software found on the CD-ROM.
Caution: Do not insert or remove the memory card when the camera is connected to the computer.
Downloading files from the camera:
• Internal memory: Do not insert the memory card.
• Memory Card: Insert the memory card.
FOR WINDOWS USERS
1. Connect the camera to the computer.
2. Double-click on My Computer>Removable Disk>DCIM>100CD_3042.
• The stored pictures (JPG) and video clips (AVI) stored in the memory card will
be displayed
3. Click and drag the files into a directory in your computer to save them.
•To select all files, click Edit > Select all.
FOR MACINTOSH USERS
1. Power on the camera.
2. Connect the camera to the computer.
After a few moments, the external hard drive “untitled” will appear on the desktop.
3. Double-click on untitled>DCIM>100_3042.
• The stored pictures (JPG) and video clips (AVI) stored in the memory card will be displayed.
4. Drag and drop the image you want to save in the computer.
•To select all files, click Edit > Select all.
Concord, Concord Eye-Q and the Concord Eye-Q logo are registered trademarks or trademarks of Concord Camera Corp., in the United States
and/or other countries. Microsoft and Windows are either registered trademarks or trademarks of Microsoft Corporation in the United States
and/or other countries. Mac and Macintosh are registered trademarks or trademarks of Apple Computer, Inc. in the U.S. and other countries. All
other brands and product names are either registered trademarks or trademarks of their respective owners.
6
Page 9
GUIDE DE DEMARRAGE RAPIDE
5
6
7
8
9
10
1
2
3
4
11
17
18
19
20
21
23
22
24
25
12
13
14
15
16
FRANÇAIS
Les références de ce guide de démarrage rapide vous permettent
d’utiliser rapidement votre nouvel appareil digital. Pour des explications
plus détaillées sur toutes les caractéristiques de votre appareil, veuillez
lire le guide de l’utilisateur qui se trouve sur le CD-ROM situé dans le
coffret du Concord Eye-Q 3042AF. Avant d’utiliser l’appareil, veuillez lire
toutes les instructions de sécurité et de précaution décrites dans ce
guide.
VUE D’ENSEMBLE DE L’APPAREIL PHOTO
Vue du haut/devant
11. DEL de flash
12. Viseur
13. DEL auto-focus
14. LCD
15. Écrou du trépied
16. Porte d’accès aux
piles et à la carte
mémoire
17. Cadran de sélection
de mode
18. Bouton de navigation/
bouton zoom / bouton
Flash
19. bouton OK / Bouton
d’agrandissement
20. Bouton de remise à
zéro
21. Bouton du menu
22. Dragonne
23. Interrupteur
arrêt/marche de l’ACL
24. Logement de la carte
mémoire
25. Compartiment à piles
Vue du dessous/ derrière
7
1. Bouton d’alimentation
2. Bouton de l’obturateur
3. Flash
4. Objectif
5. Viseur
6. Capteur du flash
7. DEL du retardateur /
de du réducteur des
yeux rouges
8. Port USB
9. Port de sortie
Vidéo/TV
10. Commutateur de
mode Macro
Page 10
1
2
3
ICÔNES DE L’AFFICHAGE À CRISTAUX LIQUIDES
: Photo Individuelle
: Visonnage
: Séquences vidéo
3
M
003/016
3
M
003/016
G
I
A
B
C
H
J
K
F
A
AWB
AWB
D
E
A
VUE D’ENSEMBLE DE L’APPAREIL PHOTO
Fixation de la dragonne
Pour éviter d’échapper l’appareil, veuillez attacher la dragonne.
CHARGEMENT DES PILES DANS L’APPAREIL
A. Résolution
B. Mode Caméra
C. Flash
D. Équilibrage de blancs
E. Piles
F. Qualité
G. Macro
H. Compteur de fichiers
I. Retardateur
J. La barre du zoom
K. Mémoire
fig.1.1 fig.1.2
Pour utiliser l’appareil photo numérique, vous pouvez utiliser 2 piles alcalines, au lithium ou rechargeables.
1. Ouvrez la porte d’accès aux piles et à la carte mémoire. (fig.1.1)
• Pour ouvrir, déplacer le volet dans le sens indiqué par la flèche et le soulever.
2. Insérer les piles selon les indicateurs de polarité sur la partie supérieure du logement des piles. (fig.1.2)
3. Bien fermer le volet de la carte mémoire et des piles en le déplaçant dans le sens opposé de la flèche.
(fig.1.3)
fig.1.3
8
Page 11
DESCRIPTION ET PRÉPARATION DE L’APPAREIL PHOTO
A
AWB
⁄ ⁄
003/016
A
AWB
003/016
AWB
28 SEC
28 SEC
003/016
AWB
28 SEC
28 SEC
MISE EN MARCHE ET ARRÊT DE L’APPAREIL PHOTO
Le bouton d’alimentation est situé sur le dessus de l’appareil. (fig.1.1)
1. Presser le ( ) bouton d’alimentation pour allumer l’appareil.
•L’ACL s’allumera automatiquement.
2. Pour éteindre l’appareil, presser le ( ) bouton d’alimentation.
fig.1.1
Remarque:
Pour allonger la durée de vie des piles, l’écran LCD s’éteint après 1 minute d’inactivité ; presser le bouton
( ) pour réactiver l’écran LCD. L’appareil s’éteindra automatiquement après 2 minutes d’inactivité,
presser le bouton de déclenchement pour rallumer l’appareil.
SÉLECTION DE LA LANGUE
Lorsque l’appareil photo est mis sous tension pour la première fois, le menu se
rapport à la langue d’utilisation, est affiché.
Sélection de la langue
1. Mettez en marche l’appareil photo.
•L’écran de sélection de la langue apparaîtra sur l’ACL.
2. Appuyez sur le bouton , afin de mettre en surbrillance la langue que
vous désirez utiliser.
3. Appuyez sur le bouton OK pour effectuer votre choix.
4. Le prochain écran qui apparaîtra se lira « Êtes-vous certain? » appuyez sur
le bouton pour choisir entre Oui et Non.
5. Appuyez sur le bouton OK pour effectuer votre choix.
• Si vous avez indiqué Non, vous reviendrez à l’écran de sélection de la
langue.
• Si vous avez indiqué Oui, tous les écrans de menu seront dorénavant
affichés dans la nouvelle langue choisie.
OPTION LANGUE
English
Français
Deutsch
Italiano
Español
RETOUR CONFIG
OK
OPTION LANGUE
Nederlands
RETOUR CONFIG
OK
9
Page 12

DESCRIPTION ET PRÉPARATION DE L’APPAREIL PHOTO / PRISE DE PHOTO
A
AWB
A
AWB
3
M
003/016
A
AWB
003/016
AWB
28 SEC
28 SEC
3
M
003/016
AWB
28 SEC
28 SEC
A
AWB
⁄ ⁄
A
AWB
⁄ ⁄
MÉMOIRE INTERNE/INSERTION DE LA CARTE MÉMOIRE
L'appareil photo dispose de 7Mo de mémoire interne qui peuvent être utilisés immédiatement. L'appareil photo
peut utiliser des cartes de mémoire SD pour enregistrer des photos et des clips vidéo.
fig.1.1
1. Ouvrez la porte d’accès aux piles/à la carte mémoire.
• Pour ouvrir, déplacer le volet dans le sens indiqué par la flèche et le soulever. (fig.1.1)
fig.1.2
fig.1.3
2. Insérez la carte mémoire tel qu’indiqué sur le diagramme. (fig.1.2)
• Lors de l’insertion de la carte, assurez-vous qu’elle soit parfaitement droite par rapport à l’ouverture et
non pas en angle.
3. Refermez la porte d’accès aux piles/à la carte mémoire en le déplaçant dans le sens opposé de la flèche.
(fig.1.3)
• Pour éjecter la carte, enfoncer la carte et relacher, puis la retirer.
PRISE DE PHOTO
PRISE DE PHOTO AVEC LE VISEUR OU ACL
28/45
fig.1.3
fig.1.1
28/45
fig.1.2
1. Mettez l’appareil en marche.
2. Mettre l’appareil en mode Photo ( ) et s’assurer que le commutateur de mode Macro est placé sur le
mode Distant ( ) situé à l’avant de l’appareil. (fig.1.1)
3. Cadrez le sujet à l’aide du viseur ou ACL.
4. Pour effectuer la mise au point automatique, appuyer à mi-chemin sur le déclencheur jusqu’à ce que
s’allume le témoin vert AF. (fig.1.2)
5. Enfoncez à fond le bouton de l’obturateur afin de saisir l’image. (fig.1.3)
COMMENT RÉGLER LE FLASH
1. Appuyer à plusieurs reprises sur jusqu’à ce que le mode souhaité s'affiche au moniteur ACL.
10
Page 13

PRISE DE PHOTO / SUPPRESSION DES FICHIERS
Déclencheur pour enreg.
28 SEC
SUPPRIMER
VIGMETTES
CONFIGURER
RETOUR SÉLECTION
MODE VISUALISATION
003/016
A
AWB
003/016
AWB
28 SEC
28 SEC
MENU
SUPPRIMER
OK
28 SEC
28 SEC
Êtes-vous sûr ?
Non
Oui
CONFIG
OK
28 SEC
CETTE PHOTO
TOUT
RETOUR SÉLECTION
SUPPRIMER
003/016
AWB
28 SEC
28 SEC
A
AWB
⁄ ⁄
A
AWB
⁄ ⁄
A
AWB
A
AWB
A
AWB
⁄ ⁄
A
AWB
⁄ ⁄
A
AWB
A
AWB
PRISE DE SÉQUENCES VIDÉO
Pour enregistrer une séquence video:
1. Déplacer le commutateur de mode en mode ( ) Séquence vidéo.
2. Placez le sujet dans le viseur ou ACL.
3. Enfoncez completement le bouton de l’obturateur pour débuter l’enregistrement d’un séquence vidéo non
interrompue.
4. Pour arrêter de filmer, appuyez à nouveau sur l’obturateur.
Remarque : Il y a une limite de durée pour chaque vidéoclip. Cette durée varie en fonction de la mémoire
disponible. La durée de filmage figure au coin supérieur droit de l’écran. Le tournage du vidéoclip
s’arrêtera automatiquement lorsque la limite de durée aura été atteinte.
Renseignements sur la séquence vidéo
Résolution : 512 x 384
Fréquence de trames : 10ips
Format du fichier : AVI
Remarque: Le DEL indiquant que le flash est prêt se mettra à clignoter lorsque l’appareil est en train de
mémoriser la séquence vidéo. Évitez d’ouvrir la porte d’accès aux piles ou de couper l’alimentation de
l’appareil pendant que le DEL clignote, à défaut de quoi la séquence vidéo ne pourra être enregistrée en
mémoire.
SUPPRESSION DES FICHIERS
1. Régler le commutateur de mode à ( ).
2. Lorsque Supprimer est en surbrillance, appuyez sur le bouton .
3. Lorsque Supprimer est en surbrillance, appuyez sur le bouton pour accéder
4. Le prochain écran affichera, sous forme vignette, les photos et séquences
5. Appuyez sur OK pour effectuer votre choix.
6. Le prochain écran affichera: « Êtes-vous sûr? ». Appuyez sur le bouton ou
7. Appuyez sur OK pour effectuer votre choix.
Cette Photo.
vidéo stockées en mémoire. Appuyez sur le bouton , , , pour
mettre en surbrillance le fichier que vous désirez supprimer.
selon le cas, pour mettre en surbrillance Non ou Oui.
• Si vous choisissez Non, aucune modification ne sera apportée et vous retournerez au menu de
• Si vous choisissez Oui, le fichier que vous avez sélectionné sera supprimé.
Supprimer Un.
11
Page 14

CONNEXION DE L’APPAREIL PHOTO À L’ORDINATEUR
TRANSFERT DE PHOTOS ET DE SÉQUENCES VIDÉO VERS VOTRE ORDINATEUR
Remarque destinée aux utilisateurs de Windows 98SE: vous devez d’abord installer le pilote de
l’appareil photo. Remarque destinée aux utilisateurs de Windows 2000 doit installer DirectX 9 pour regarder
les clips videos sur l'ordinateur. Référez-vous à la section de guide d'installation à la page 86 du Manuel
d'Utilisateur pour plus d'information sur installer les conducteurs et l'autre logiciel a trouvé sur le CD-ROM.
Attention: Lorsque l’appareil photo est relié à l’ordinateur, vous devez éviter d’insérer la carte mémoire
dans l’appareil ou de la retirer de celui-ci.
Téléchargement des dossiers de l'appareil-photo:
• Mémoire interne: N'insèrent pas la carte de mémoire
• Carte De Mémoire: Insérez la carte de mémoire
POUR LES UTILISATEURS DE WINDOWS
1. Reliez l’appareil photo à l’ordinateur.
2. Double-cliquez sur My Computer>Removable Disk>DCIM>100_3042.
• Les images (JPG) et séquences vidéo (AVI) enregistrées sur la carte mémoire
seront affichées.
3. Cliquez et déplacer les fichiers vers un répertoire de votre ordinateur afin de les
sauvegarder.
• Si vous désirez sauvegarder tous les fichiers, cliquez sur Edit > Select all.
POUR LES UTILISATEURS DE MACINTOSH
1. Mettez l’appareil photo sous tension.
2. Reliez l’appareil photo à l’ordinateur.
Après quelques instants, le lecteur de disque dur externe sera affiché à l’écran.
3. Double-cliquez sur le lecteur amovible Sans nom>DCIM>100_3042.
• Les images (JPG) et séquences vidéo (AVI) enregistrées sur la carte mémoire seront affichées.
4. Glissez et déposez dans votre ordinateur l’image que vous désirez sauvegarder.
• Pour sauvegarder tous les fichiers, cliquez sur Edit > Select all.
Concord, Concord Eye-Q et le logo Concord Eye-Q sont des marques de commerce déposées ou non aux États-Unis et/ou dans d’autres pays
et appartenant à Concord Camera Corp. Microsoft et Windows sont des marques de commerce déposées ou non aux États-Unis et/ou dans
d’autres pays et appartenant à Microsoft Corporation. Mac et Macintosh sont des marques de commerce déposées ou non aux États-Unis et/ou
dans d’autres pays et appartenant à Apple Computer, Inc. Toutes les autres marques et noms de produits sont soit des marques de commerce
déposées ou des marques de commerce appartenant à leurs propriétaires respectifs.
12
Page 15

KURZANLEITUNG
5
6
7
8
9
10
1
2
3
4
11
17
18
19
20
21
23
22
24
25
12
13
14
15
16
DEUTSCH
Diese Kurzanleitung gibt Ihnen einen schnellen Überblick über die
Arbeitsweise Ihrer neuen Digitalkamera. Schauen Sie in der
Bedienungsanleitung nach, die sich auf der mit der Kamera gelieferten
CD-ROM befindet oder der ebenfalls mitgelieferten umfangreichen
Druckversion, wenn Sie weitere, detailliertere Informationen über Ihre
Concord Eye-Q 3042AF und die vielfältige Ausstattung erhalten möchten.
Bevor Sie die Kamera in Betrieb nehmen, sollten Sie in jedem Fall die
Sicherheitshinweise und–anweisungen sowie die Vorsichtsmaßnahmen
deren Einhaltung wir ausdrücklich empfehlen, gelesen haben. Diese
werden in der Bedienungsanleitung erläutert.
KAMERABESCHREIBUNG
Oberseite/Front
11. BlitzbereitschaftsLED
12. Sucher
13. Auto-Fokus LED
14. LCD
15. Stativanschluss
16. Batterie/
Speicherkartenabdeckung
17. Modusschalter
18. Pfeiltasten zur
Navigation/zoomSchalter/Blitz-Schalter
19. OK Schalter/
Vergrößerungstaste
20. Reset-Schalter
21. Menü-Schalter
22. Befestigung für
23. LCD An/Aus-Schalter
24. Speicherkarten-Slot
25. Batteriefach
Unterseite/Rückseite
13
1. Hauptschalter
2. Auslöser
3. Blitz
4. Objektiv
5. Sucher
6. Blitzsensor
7. Rote Augen
Reduzierung LED/
Selbstauslöser LED
8. Mini-USB Port
9. Video/TV-Ausgang
10. Makromodusschalter
Page 16

1
2
3
LCD ICONS
: Einzelne Aufnahmen
: Betrachten
: Videoclips
3
M
003/016
3
M
003/016
G
I
A
B
C
H
J
K
F
A
AWB
AWB
D
E
A
KAMERABESCHREIBUNG
A. Auflösung
B. Kamera-Modus
C. Blitz
D. Weißabgleich
E. Batterieanzeige
F. Bildqualität
G. Makro
H. Bildzähler
I. Selbstauslöser
J. Zoom-Bar
K. Speicherkarte
Anbringen der Handschlaufe
Bitte bringen Sie die Handschlaufe an der Kamera an. Richtig benutzt kann Sie das Herunterfallen der Kamera
verhindern.
EINLEGEN DER BATTERIEN
fig.1.1 fig.1.2
Die Kamera arbeitet mit 2x AA Alkali Mangan, Lithiumzellen oder wiederaufladbaren Batterien.
fig.1.3
1. Öffnen Sie die Batteriefachabdeckung/Speicherkartenabdeckung. (fig.1.1)
• Schieben Sie die Abdeckung in Pfeilrichtung um diese zu öffnen.
2. Legen Sie die Batterien der Polaritätsanzeige folgend, ein. fig.1.1 Die Markierung befindet sich neben den
Aufnahmeöffnungen für die Batterien (fig.1.2).
3. Schließen Sie die Batteriefach/SD-Speicherkartenabdeckung durch schieben entgegen der Pfeilrichtung und
schließen Sie die Abdeckung dann vorsichtig. (fig.1.3)
14
Page 17

LOS GEHT’S
A
AWB
⁄ ⁄
EIN- UND AUSSCHALTEN DER KAMERA
Der Hauptschalter befindet sich auf der Oberseite der Kamera.(fig.1.1)
1. Drücken Sie den ( ) Hauptschalter, um die Kamera anzuschalten.
• Das LCD wird sich automatisch einschalten.
2. Drücken Sie den ( ) Hauptschalter, um die Kamera auszuschalten.
fig.1.1
Hinweis:
Um die Batteriekapazität zu schonen, wird der LCD-Bildschirm nach 1 Minute Inaktivität abgeschaltet.
Drücken Sie die Taste ( ), um das Display wieder zu aktivieren. Die Kamera wird nach 2 Minuten
Inaktivität automatisch ausgeschaltet. Drücken Sie den Auslöser, um die Kamera wieder anzuschalten
EINSTELLEN VON SPRACHE
Wenn die Kamera zum ersten Mail eingeschaltet wird, erscheinen die Menüs
zum Einstellen von Sprache, im LCD.
Einstellen der Sprache
1. Schalten Sie die Kamera ein.
• Das Spracheinstellungsmenü wird im LCD erscheinen.
2. Betätigen Sie um die Sprache die wählen wollen, einzustellen.
3. Betätigen Sie OK zur Auswahl.
4. In der nächsten Anzeige werden Sie gefragt „Sind Sie sicher?” Betätigen Sie
um entweder Nein oder Ja auszuwählen.
5. Betätigen Sie OK zur Auswahl.
•Wenn Sie Nein auswählen, kehrt die Anzeige automatisch in die vorherige
Anzeige zurück.
•Wenn sie Ja auswählen, werden von nun alle Anzeigen in der
eingestellten Sprache angezeigt.
SPRACHAUSWAHLOPTION
English
Français
Deutsch
Italiano
Español
ZURÜCK SET
OK
SPRACHAUSWAHLOPTION
Nederlands
ZURÜCK SET
OK
15
Page 18

LOS GEHT’S / FOTOGRAFIEREN
A
AWB
A
AWB
3
M
003/016
A
AWB
003/016
AWB
28 SEC
28 SEC
3
M
003/016
AWB
28 SEC
28 SEC
A
AWB
⁄ ⁄
A
AWB
⁄ ⁄
INTERNER SPEICHER/EINLEGEN DER SD-SPEICHERKARTE
Die Kamera ist mit einem 7MB großen internen Speicher ausgestattet, der von vornherein verwendet werden
kann. Die Kamera kann außerdem mit SD-Speicherkarten betrieben werden (nicht im Lieferumfang enthalten)
um die Bilder und Videoclips abzuspeichern.
fig.1.1
1. Öffnen Sie die Batterie/Speicherkartenabdeckung.
• Schieben Sie die Abdeckung in Pfeilrichtung und klappen Sie diese nach oben. (fig.1.1)
2. Legen Sie eine SD-Speicherkarte wie im Diagramm angezeigt ein. (fig.1.2)
• Legen Sie Karte bitte gerade und keinesfalls verkantet ein.
3. Schließen Sie die Abdeckung durch Schieben entgegen der Pfeilrichtung und verschließen Sie diese
vorsichtig. (fig.1.3)
• Um die Speicherkarte zu entnehmen, drücken Sie sie in das Fach, bis die Sperre aufgehoben ist und ziehen
Sie die Karte danach heraus.
fig.1.2
fig.1.3
FOTOGRAFIEREN
FOTOGRAFIEREN MIT DEM SUCHER DEM LCD-MONITOR
28/45
fig.1.1
1. Schalten Sie die Kamera ein.
2. Stellen Sie den Kameramodus ( )ein und versichern Sie sich, dass der Makro-Schalter auf der
Vorderseite der Kamera auf Distanzmodus ( ) gestellt ist. (fig.1.1)
3. Wählen Sie das Motiv im Sucher oder dem LCD.
4. Betätigen Sie den Auslöser zum Einschalten des Autofokus so lange halb nach unten bis die grüne
Autofokus-LED aufleuchtet. (fig.1.2)
5. Betätigen Sie den Auslöser ganz durch um die Aufnahme zu machen. (fig.1.3)
fig.1.2
28/45
fig.1.3
EINSTELLEN DES BLITZ
1. Drücken Sie bis die gewünschte Anzeige im LCD erscheint.
16
Page 19

FOTOGRAFIEREN / EINE DATEI LÖSCHEN
28 SEC
28 SEC
Auslöser zum REC
ORDNER LÖSCHEN
THUMBNAIL
SETUP
ZURÜCK WÄHLEN
WIEDERGABEMODUS
MENU LÖSCHEN
OK
OK
Sind Sie sicher?
Nein
Ja
WÄHLEN
EIN BILD LÖSCHEN
ALLES LÖSCHEN
ZURÜCK WÄHLEN
ORDNER LÖSCHEN
A
AWB
⁄ ⁄
A
AWB
⁄ ⁄
A
AWB
A
AWB
A
AWB
⁄ ⁄
A
AWB
⁄ ⁄
A
AWB
A
AWB
VIDEOAUFNAHMEN
Wie Sie einen Videoclip aufzeichnen:
1. Stellen Sie den Modusschalter auf ( ) Videoclip-Modus.
2. Positionieren Sie das Motiv im LCD.
3. Betätigen Sie den Auslöser ganz um die Aufnahme des Videoclips zu beginnen.
4. Den Knopf für die Sektorenblende drücken, wenn nicht mehr gefilmt werden soll.
Hinweis: Jeder Videoclip hat eine zeitliche Begrenzung. Diese Zeit hängt vom zum Verfügung stehenden
Speicherplatz ab. Die verstrichene Aufnahmezeit wird oben in der rechten Bildschirmecke angezeigt. Die
Videoaufzeichnung hält automatisch an, wenn die Zeitgrenze erreicht ist.
Information zu Videoclips
Auflösung: 512 x 384
Bilder pro Sekunde: 10fps
Dateiformat: AVI
Hinweis: Solange die Kamera den Videoclip aufzeichnet wird die Blitzbereitschafts-LED aufleuchten.
Während die LED blinkt öffnen Sie solange keinesfalls die Batterieabdeckung. Ansonsten wird der Videoclip
nicht aufgezeichnet.
EINE DATEI LÖSCHEN
1. Stellen Sie den Moduswählschalter auf ( ).
2. Im Menü Datei löschen, drücken Sie wenn „eine löschen“ hervorgehoben
dargestellt wird. So gelangen Sie in das Untermenü.
3. In der nächsten Anzeige werden die gespeicherten Bilder und Videoclips als
Thumbnails angezeigt. Drücken Sie um die Datei auszuwählen, die Sie
löschen möchten.
4. In der nächsten Anzeige werden Sie gefragt „Sind Sie sicher?". Betätigen Sie
, , , um entweder Nein oder Ja auszuwählen.
5. Betätigen Sie den OK-Schalter um die Auswahl zu bestätigen.
6. In der nächsten Anzeige werden Sie gefragt „Sind Sie sicher?“.
7. Betätigen Sie den OK-Schalter um die Auswahl zu bestätigen.
• Wenn Nein ausgewählt ist, wird keine Veränderung vorgenommen und die Anzeige wird in die
Thumbnail-Übersicht zum Löschen einer Aufnahme zurückkehren.
• Wenn Ja ausgewählt ist, wird die ausgewählte Datei gelöscht.
17
Page 20

VERBINDEN DER KAMERA MIT DEM COMPUTER
DOWNLOAD VON BILDERN UND VIDEOCLIPS AUF IHREN COMPUTER
Hinweis: Windows 98SE Nutzer müssen zunächst den Kameratreiber installieren. Windows 2000 Nutzer
müssen zunächst DirectX installieren, wenn das Anschauen von Videoclips gewünscht wird. Bitte schauen
Sie in der Installationsanleitung auf Seite 142 der Bedienungsanleitung nach, wenn Sie weitere
Informationen zum Installieren der Treiber und der im Lieferumfang befindlichen Software auf der CD-ROM
erhalten möchten.
ACHTUNG: Versuchen Sie keinesfalls eine SD-Speicherkarte in den Slot einzuschieben oder diese zu
entnehmen, solange die Kamera mit dem Computer verbunden ist.
Download von Dateien von der Kamera:
• Interner Speicher: Legen Sie keine SD-Speicherkarte ein.
• SD-Speicherkarte: Legen Sie eine SD-Speicherkarte ein.
FÜR WINDOWS NUTZER:
1. Verbinden Sie die Kamera mit dem Computer.
2. Doppelklicken Sie auf „Arbeitsplatz“, >auswechselbarer Datenträger,
>DCIM>100CD_3042.
• Die gespeicherten Bilder (JPG) und Videoclips (AVI) im Speicher oder auf SD-
Speicherkarte werden im LCD angezeigt.
3. Klicken Sie auf die Dateien und ziehen Sie diese in das gewünschte Unterverzeichnis auf Ihrem Computer
um sie dort zu sichern.
• Um die Dateien auszuwählen, klicken Sie auf Edit > Select all.
FÜR MACINTOSH NUTZER
1. Schalten Sie die Kamera ein.
2. Verbinden Sie die Kamera mit dem Computer. Nach wenigen Sekunden, erscheint auf dem Desktop
„untitled drive“.
3. Doppelklicken Sie auf untitled>DCIM>100_3042.
• Die gespeicherten Bilder (JPG) und Videoclips (AVI) im Speicher oder auf SD-Speicherkarte werden im
LCD angezeigt.
4. Ziehen Sie die Bilder die Sie auf Ihrem Computer sichern wollen in das gewünschte Unterverzeichnis („drag
and drop“).
• Um alle Dateien auszuwählen, klicken Sie auf Edit > Select all.
Concord, Concord Eye-Q und das Concord Eye-Q Logo sind eingetragene Warenzeichen oder Warenzeichen der Concord Camera Corp. in den
Vereinigten Staaten und/oder anderen Ländern. Microsoft, Microsoft NetMeeting und Windows sind entweder eingetragene Warenzeichen oder
Warenzeichen von Microsoft Corporation in den Vereinigten Staaten und/oder anderen Ländern. Mac, Macintosh und Power Mac sind
eingetragene Warenzeichen oder Warenzeichen von Apple Computer, Inc. in den Vereinigten Staaten und/oder anderen Ländern. Alle anderen
Handelsmarken und Produktnamen sind entweder eingetragene Warenzeichen oder Warenzeichen Ihrer entsprechenden Eigentümer.
18
Page 21

GUÍA DE INICIO RÁPIDO
5
6
7
8
9
10
1
2
3
4
11
17
18
19
20
21
23
22
24
25
12
13
14
15
16
ESPAÑOL
Esta guía de inicio rápido proporciona las instrucciones para poner en
funcionamiento la cámara digital de una forma rápida. Una guía completa
del usuario de encuentra en forma de CD-ROM dentro de la caja de la
cámara Concord Eye-Q 3042AF. Leer con atención las instrucciones de
seguridad y las precauciones a tener en cuenta, que se encuentran en la
Guía del Usuario, antes de poner la cámara en funcionamiento.
VISTA GENERAL DE LA CAMARA
Parte Superior/Frontal
11. LED de Flash Listo
12. Visor
13. LED Auto-Enfoque
14. LCD
15. Enchufe para Trípode
16. Puerta Batería/Tarjeta
de Memoria
17. Interruptor de Modo
18. Botones de la flecha
de navegación/
Zoom/Flash
19. BotónOK/Botón de
aumento
20. Botón de
Restablecimiento
21. Botón de Menú
22. Soporte Correa de
Muñeca
23. Botón de LCD
Encendido/
Apagado
24. Ranura de Tarjeta de
Memoria
25. Compartimiento de
Batería
Parte Inferior/ Posterior
19
1. Botón de encendido
2. Botón Disparador
3. Flash
4. Lente
5. Visor
6. Sensor de Flash
7. Disparador Automático/
LED Reducción de Ojos
Rojos Boton de Macro
8. Mini-puerto USB
9. Puerto de salida para
la TV/Video
10. Interruptor del Modo
Macro
Page 22

1
2
3
ICONOS LCD
: Toma Individual
: Modo de Revisión
: Modo de Clips de Videos
3
M
003/016
3
M
003/016
G
I
A
B
C
H
J
K
F
A
AWB
AWB
D
E
A
VISTA GENERAL DE LA CAMARA
A. Resolución
B. Modo de Cámara
C. Flash
D. Balance Blanco
E. Nivel de Batería
F. Calidad de Imagen
COLOCANDO LA CORREA DE LA MUÑECA
Sírvase colocarse la correa de la muñeca para prevenir que la cámara se caiga.
COLOCANDO LAS BATERÍAS
G. Macro
H. Contador de archivos
I. Disparador Automático
J. Barra de Zoom
K. Memoria
fig.1.1 fig.1.2
La cámara puede usar y funciona con baterías alcalinas 2x AA, de litio o recargables.
1. Abra la puerta de las Baterías/Tarjeta de Memoria. (fig.1.1)
fig.1.3
• Deslice la tapa en el sentido que indica la flecha y ábrala.
2. Inserte las pilas de acuerdo con los indicadores de polaridad situados en el borde superior del
compartimiento de las pilas (fig.1.2).
marcada (fig.1.3).
3. Cierre firmemente la tapa de la tarjeta de memoria/pilas deslizándola en el sentido contrario de la flecha
20
Page 23

INICIACION
A
AWB
⁄ ⁄
ENCENDIENDO Y APAGANDO LA CAMARA
El botón de encendido está ubicado en la parte superior de la cámara.(fig.1.1)
1. Presione el ( )Botón de Encendido para encender la cámara.
• La pantalla LCD se enciende automáticamente.
2. Para apagar la cámara, presione el ( )Botón de encendido.
fig.1.1
Nota:
Para prolongar la vida de las pilas, la LCD se apagará después de 1 minuto de inactividad, presione el
botón ( ) para reactivar la LCD. La cámara se apagará automáticamente después de 2 minutos de
inactividad, presione el Botón del Obturador para volver a encender la cámara.
SELECCION DEL IDIOMA
Cuando la cámara se enciende por primera vez, aparecerá el menu de Idioma.
Seleccionando el Idioma
1. Encienda la cámara.
• La pantalla de Selección de Idioma aparecerá en el LCD.
2. Presione para resaltar el idioma que se desea usar.
3. Presione adentro OK para seleccionar.
4. La siguiente pantalla mostrará (“Are you sure?”) ¿Está usted seguro?, presione
para seleccionar No o Si. (No or Yes)
5. Presione OK para seleccionar.
• Si selecciona No, usted regresará a la ventana de selección de Idioma.
• Si usted selecciona (Yes) Si, todas las ventanas de los menus se
visualizarán en el Nuevo Idioma.
OPCIÓN IDIOMA
English
Français
Deutsch
Italiano
Español
VOLVER CONFIG.
OPCIÓN IDIOMA
Nederlands
VOLVER CONFIG.
OK
OK
21
Page 24

INICIACION / TOMA DE FOTOGRAFIAS
A
AWB
A
AWB
3
M
003/016
A
AWB
003/016
AWB
28 SEC
28 SEC
3
M
003/016
AWB
28 SEC
28 SEC
A
AWB
⁄ ⁄
A
AWB
⁄ ⁄
MEMORIA INTERNA/INSERCIÓN DE LA TARJETA DE MEMORIA
La cámara está equipada con una memoria interna de 7 MB, lista para usar. La cámara puede usar tarjetas de
memoria Secure Digital (SD) para almacenar fotos y clips de vídeo.
fig.1.1
1. Abra la tapa de la tarjeta de memoria/pilas.
• Deslice la tapa en el sentido que indica la flecha y ábrala. (fig.1.1)
2. Inserte la tarjeta de memoria tal como se indica en el diagrama (fig.1.2).
• No incline la tarjeta al insertarla.
3. Cierre firmemente la tapa de la tarjeta de memoria/pilas deslizándola en el sentido contrario de la flecha
marcada (fig.1.3).
fig.1.2
fig.1.3
• Para eyectar la tarjeta, empuje la tarjeta hacia adentro y suelte, luego quítela.
TOMA DE FOTOGRAFIA
CÓMO TOMAR UNA FOTO CON EL VISOR O EL LCD.
28/45
fig.1.1
1. Encienda la cámara.
2. Ajuste la cámara en el modo Cámara ( ) y compruebe que el interruptor del modo Macro esté situado en
el modo Panorámico ( ). (fig.1.1)
3. Encuadre el sujeto en el visor o el LCD.
4. Pulse el botón del obturador hasta la mitad para activar el enfoque automático - el LED AF de color verde
se encienda. (fig.1.2).
5. Presione el botón disparador a fondo para capturar la imagen. (fig.1.3)
fig.1.2
28/45
fig.1.3
MODO DE FLASH
1. Pulse repetidamente hasta que aparezca en la pantalla LCD el indicador deseado.
22
Page 25

TOMA DE FOTOGRAFIAS / BORRANDO SUS ARCHIVOS
28 SEC
Cerrar para grabar
ELIMINAR
THUMBNAIL
CONFIG.
RETURN SELECT
MODO REVISAR
28 SEC
28 SEC
MENU
ELIMINAR
OK
¿Está seguro?
No
Si
CONFIG.
OK
ELIM. UNO
ELIM. TODOS
VOLVER SELECC.
ELIMINAR
28 SEC
A
AWB
⁄ ⁄
A
AWB
⁄ ⁄
A
AWB
A
AWB
A
AWB
⁄ ⁄
A
AWB
⁄ ⁄
A
AWB
A
AWB
TOMA DE CLIPS DE VIDEO
Para grabar clips de video:
1. Deslice el Interruptor de Modo a ( ) Modo de Clip de Video.
2. Posicione el sujeto en el visor o LCD.
3. Presione a fondo el botón disparador para capturar el clip de video continuo.
4. Para detener la grabación, pulse nuevamente el botón del obturador.
Nota: Para cada videoclip hay un límite de tiempo. El tiempo variará dependiendo del espacio de memoria
disponible. El tiempo de grabación asignado aparecerá en la esquina superior derecha de la pantalla. La
toma del video clip se detendrá automáticamente cuando se alcance el tiempo límite.
Información de los Clips de Video
Resolución: 512 x 384
Rango de Marcos: 10fps
Formato: AVI
Nota: El LED del Flash Listo parpadeará cuando la cámara está almacenando el clip de video. No abra la
puerta de la batería ni apague la cámara mientras el LED esté parpadeando porque en ese caso el clip de
video no se almacenará.
BORRANDO SUS ARCHIVOS
1. Deslice el conmutador de modo hasta ( ).
2. Cuando (Delete File) Borrar Archivo es resaltado, presione para entrar al
submenu de Borrar Archivo.
3. En el menu de (Delete File) Borrar Archivo, presione cuando (Delete One)
Borre Uno, es seleccionado.
4. La siguiente pantalla exhibirá las fotografías y clips de video almacenados
como imágenes reducidas/mini-imágenes/tipo diapositivas. Presione
, , , para resaltar el archivo que desea borrar.
5. Presione OK para seleccionar.
6. La siguiente pantalla mostrará (¿Está seguro?), presione para resaltar (No or Yes) No o Si.
7. Presione OK para seleccionar.
• Si NO es seleccionado, no se hará cambio y usted regresará a la pantalla de Delete One.
• Si (YES) Si, es seleccionado, el archivo seleccionado se borrará.
23
Page 26

CONECTANDO LA CAMARA AL COMPUTADOR
DESCARGANDO FOTOGRAFÍAS Y CLIPS DE VIDEO A SU COMPUTADOR
Nota: Los usuarios de Windows 98SE deben instalar el control de mando
(driver) de la cámara primero. Los usuarios de Windows 2000 debe instalar DirectX 9 para ver los clips de
video en la computadora. Refiera por favor a la sección de la guía de la instalación en la página 198 en la
Manual del Usuario para más información sobre la instalación de los conductores y del otro software
encontrados en el CD-ROM.
Precaución: No inserte o extraiga la memoria interna/tarjeta de memoria de la cámara cuando la cámara
esté conectada al computador.
Descargar archivos de la cámara fotográfica:
• Memoria interna: No inserte la tarjeta de memoria.
•Tarjeta De Memoria: Inserte la tarjeta de memoria.
PARA USUARIOS DE WINDOWS
1. Conecte la cámara al computador.
2. Haga clic en dos veces en My Computer>Removable disk>DCIM>100_3042.
• Se visualizarán las fotografías almacenadas (JPG) y clips de video (AVI)
almacenados en la tarjeta de memoria.
3. Haga clic en y (drag) jale, con el mouse presionado, los archivos a un directorio del computador para
salvarlos.
• Para salvar todos los archivos, haga clic en Edit (Editar) (>) Select all (Seleccione todo).
PARA USUARIOS DE MACINTOSH
1. Encienda la cámara.
2. Conecte la cámara al computador.
• Después de unos momentos, el controlador duro externo (hard drive) aparecerá en la pantalla.
3. Haga clic en dos veces el controlador removible (drive) untitled>DCIM>100_3042.
• Se visualizarán las fotografías almacenadas (JPG) y los clips de video (AVI) almacenados en la tarjeta de
memoria.
4. Jale con el mouse y suelte la imagen que desea salvar en el computador.
• Para seleccionar todos los archivos, haga clic en Edit (Editar) (>) y Select all (Seleccione todo).
Concord, Concord Eye-Q y el logo Concord Eye-Q son marcas registradas o marcas comerciales de Concord Camera Corp., en los Estados
Unidos y/o otros países. Microsoft y Windows son marcas registradas o marcas comerciales de Microsoft Corporation en los Estados Unidos y/o
otros países. Mac and Macintosh son marcas registradas o marcas comerciales de Apple Computer Inc. en los Estados Unidos y/o otros
países. Todos los demás nombres de compañías y productos son marcas registradas o marcas comerciales de sus respectivos propietarios.
24
Page 27

GUIDA RAPIDA
5
6
7
8
9
10
1
2
3
4
11
17
18
19
20
21
23
22
24
25
12
13
14
15
16
ITALIANO
Questa Guida Rapida fornisce le indicazioni essenziali per utilizzare la
macchina fotografica digitale. Consultare il Manuale Utente che si trova
sul CD-ROM e, in forma di libro, nella confezione del Concord Eye-Q
3042AF, per istruzioni dettagliate su come usare tutte le funzioni della
macchina fotografica. Prima di usare l'apparecchio, leggere tutte le
istruzioni e le precauzioni di sicurezza sottolineate nel Manuale Utente.
PANORAMICA DELLA FOTOCAMERA
Vista superiore/anteriore
11. Spia della messa a
fuoco automatica
12. Mirino
13. Spia di flash pronto
14. Monitor LCD
15. Attacco per cavalletto
16. Sportello batterie/
scheda di memoria
17. Interruttore di modalità
18.
Pulsanti di navigazione
a freccia/pulsante
Zoom/pulsante Flash
19. pulsante OK/Pulsante
di ingrandimento
20. Pulsante di ripristino
21. Pulsante MENU
22. Cinghietta da polso
23. Pulsante di
accensione e
spegnimento dello
schermo LCD
24. Alloggiamento per
scheda di memoria
25. Scomparto batterie
Vista inferiore/posteriore
25
1. Pulsante di
accensione
2. Pulsante di scatto
3. Flash
4. Obiettivo
5. Mirino
6. Sensore del flash
7. Sistema riduzione
effetto occhi rossi Spia
autoscatto
8 Porta mini USB
9. Porta Video/TV-Out
10.Interruttore modalità
Macro
Page 28

1
2
3
ICONE LCD
: Scatto singolo
: Rassegna
: Videoclip
3
M
003/016
3
M
003/016
G
I
A
B
C
H
J
K
F
A
AWB
AWB
D
E
A
PANORAMICA DELLA FOTOCAMERA
A. Risoluzione
B. Modalità fotocamera
C. Flash
D. Bilanciamento del
bianco
E. Livello di carica delle
batterie
F. Qulità immagine
Fissaggio della cinghietta da polso
Fissare la cinghietta da polso per evitare di far cadere la fotocamera.
INSERIMENTO DELLE BATTERIE
G. Macro
H. Contafotogrammi
I. Autoscatto
J. Indicatore dello zoom
K. Memoria
fig.1.1 fig.1.2
Per il funzionamento, la fotocamera necessita di 2 batterie alcaline di tipo AA, al litio o ricaricabili.
1. Aprire lo sportello batterie/scheda di memoria. (fig.1.1).
fig.1.3
• Far scorrere lo sportello nella direzione della freccia contrassegnata e sollevarlo per aprire.
2. Inserire le batterie rispettando gli indicatori di polarità nella parte interna dello sportello batterie. (fig.1.2)
3. Chiudere lo sportello batterie/scheda di memoria facendolo scorrere nella direzione opposta a quella della
freccia e chiuderlo saldamente. (fig.1.3)
26
Page 29

INTRODUZIONE
A
AWB
⁄ ⁄
ACCENSIONE E SPEGNIMENTO DELLA FOTOCAMERA
Il pulsante di accensione si trova sulla parte superiore della macchina
fotografica. (fig.1.1)
1. Premere il pulsante ( ) di accensione per accendere la macchina
fotografica.
• Il monitor LCD si accenderà automaticamente.
2. Per spegnere la macchina fotografica, premere il pulsante ( ) di
accensione.
fig.1.1
Nota:
Per prolungare la durata delle batterie, il display LCD si spegnerà dopo 1 minuto di inattività. Premere il
pulsante ( ) per riaccenderlo. La macchina fotografica si spegnerà dopo 2 minuti di inattività. Premere il
pulsante di scatto per riaccenderla.
IMPOSTAZIONE DI LINGUA
Alla prima accensione della fotocamera, vengono visualizzati i menu di lingua.
Impostazione della lingua
1. Accendere la fotocamera.
• Nello schermo LCD verrà visualizzato il menu d'impostazione della lingua.
2. Premere fino a evidenziare la lingua desiderata.
3. Premere il pulsante OK per selezionare.
4. Alla comparsa del messaggio "Are You Sure?" ("Confermare?"), premere
per selezionare No o Yes (Sì).
5. Premere il pulsante OK per confermare la selezione.
• Selezionando No, si viene riportati alla schermata di selezione della lingua.
• Selezionando Yes (Sì), tutte le schermate dei menu verranno visualizzate
nella nuova lingua.
OPZIONE LINGUA
English
Français
Deutsch
Italiano
Español
INDIETRO IMPOSTA
OK
OPZIONE LINGUA
Nederlands
INDIETRO IMPOSTA
OK
27
Page 30

INTRODUZIONE / ACQUISIZIONE DI IMMAGINI
A
AWB
A
AWB
3
M
003/016
A
AWB
003/016
AWB
28 SEC
28 SEC
3
M
003/016
AWB
28 SEC
28 SEC
A
AWB
⁄ ⁄
A
AWB
⁄ ⁄
MEMORIA INTERNA/INSERIMENTO DELLA SCHEDA DI MEMORIA
La macchina fotografica ha una memoria interna di 7MB che permette di usarla subito. La macchina fotografica
può anche usare Memory Cards secure digital (SD), non fornite, per memorizzare immagini e video clips.
fig.1.1
1. Aprire lo sportello del vano batterie/Memory Card.
• Far scorrere lo sportello in direzione della freccia e sollevarlo. (fig.1.1)
fig.1.2
fig.1.3
2. Inserire la Memory Card come indicato nello schema. (fig.1.2)
3. Chiudere il vano batterie/Memory Card facendolo scorrere in direzione opposta a quella indicata dalla
freccia, fino allo scatto. (fig.1.3)
• Per espellere la Memory Card, premerla e rilasciarla, quindi tirarla fuori.
COME SCATTARE UNA FOTO
SCATTARE UNA FOTO CON IL MIRINO O IL DISPLAY LCD
fig.1.1
28/45
fig.1.2
28/45
fig.1.3
1. Accendere la macchina fotografica.
2. Impostare il modo ( ) Macchina Fotografica e accertarsi che il selettore del modo macro sia nella
posizione Lontano ( ). (fig.1.1)
3. Inquadrare il soggetto nel mirino o nel display LCD.
4. Premere il pulsante di scatto a metà per attivare l'autofocus, finché il LED autofocus verde si accende.
(fig.1.2)
5. Premere completamente il pulsante di scatto per catturare l'immagine. (fig.1.3)
IMPOSTAZIONE DEL FLASH
1. Premere più volte finché l'indicatore desiderato appare sul display LCD.
28
Page 31

ACQUISIZIONE DI IMMAGINI / CANCELLAZIONE DI UN FILE
A
AWB
⁄ ⁄
A
AWB
⁄ ⁄
A
AWB
A
AWB
A
AWB
⁄ ⁄
A
AWB
⁄ ⁄
A
AWB
A
AWB
07 ⁄ 04 ⁄ 2003 02:40
28 SEC
Premere il pulsante di scatto
per avviare l'acquisizione
Elimina file
Miniatura
Setup
INDIETRO SELEZIONA
RASSEGNA
MENU
ELIMINA
OK
No
Si
SELEZIONA
OK
Confermare?
Elimina uno
Elimina tutti
INDIETRO SELEZIONA
ELIMINA FILE
REGISTRAZIONE DI VIDEOCLIP
Per registrare un video clip:
1. Impostare il selettore di modo nel modo ( ) Video Clip.
2. Posizionare il soggetto nel mirino o nel display LCD.
3. Premere il pulsante di scatto completamente per iniziare a registrare il video clip.
4. Per terminare la registrazione, premere nuovamente il pulsante di scatto.
Nota: C'è un limite di durata per ogni video clip. La durata varia a seconda dello spazio disponibile di
memoria. Il tempo disponibile di registrazione appare nell'angolo superiore destro dello schermo. La
registrazione del video clip terminerà automaticamente una volta raggiunto il limite di durata.
Informazioni sulla funzione Video Clip
Risoluzione: 512 x 384
Velocità: 10 fotogrammi al secondo
Formato del file: AVI
Nota: Il LED di flash pronto si accenderà quando la macchina fotografica registra il video clip. Non aprire il
vano batterie e non spegnere la macchina durante la registrazione, altrimenti il video clip potrebbe non
venire memorizzato.
CANCELLAZIONE DI UN FILE
1. Porre il selettore del modo verso ( ).
2. Quando Cancella File è evidenziato, premere per entrare nel sottomenu
Cancella File.
3. Nel menu Cancella File, premere quando è evidenziato Cancella un file.
4. La prossima schermata visualizzerà le foto e i video clips in grandezza ridotta.
Premere , , , per evidenziare il file che si vuole cancellare.
5. Premere il pulsante OK per selezionarlo.
6. La prossima schermata chiederà "Sei sicuro?" premere o per scegliere
No o Si.
7. Premere il pulsante OK per selezionare.
• Se si sceglie No, nessuna variazione avverrà e si ritornerà al menu di scelta del file da cancellare.
• Se si sceglie Si, il file selezionato verrà cancellato.
29
Page 32

COLLEGAMENTO DELLA FOTOCAMERAAL COMPUTER
DOWNLOAD DI IMMAGINI E VIDEOCLIP NEL COMPUTER
Nota: Gli utenti di Windows 98SE devono prima installare i driver della macchina fotografica. Gli utenti di
Windows 2000 devono installare DirectX per poter vedere i video clip sul computer. Consultare la Sezione
Guida di Installazione a pagina 254 del manuale utente per maggiori informazione sull'installazione di
drivers e altro software posto sul CD-ROM.
Attenzione: Non inserire o estrarre la Memory Card mentre la macchina fotografica è collegata al
computer.
Download di file dalla fotocamera:
• Memoria interna: non inserire la scheda di memoria.
• Scheda di memoria: inserire la scheda di memoria.
PER GLI UTENTI WINDOWS
1. Collegare la macchina fotografica al computer.
2. Cliccare su My Computer>Removable Disk>DCIM>100CD_3042.
• Le foto (JPG) e i video clips (AVI) memorizzate nella Memory Card verranno
visualizzati.
3. Cliccare e trascinare i file in una cartella del computer per salvarli.
• Per selezionare tutti i files, cliccare su Edit > Select all.
PER UTENTI MACINTOSH
1. Spegnere la fotocamera.
2. Collegare la macchina fotografica al computer.
Dopo alcuni istanti, il disco rigido esterno “untitled” apparirà sul desktop.
3. Cliccare su untitled>DCIM>100_3042.
• Le foto (JPG) e i video clips (AVI) memorizzate nella Memory Card verranno visualizzati.
4. Cliccare e trascinare le immagini che si vogliono salvare sul computer.
• Per selezionare tutti i files, cliccare su Edit > Select all.
Concord, Concord Eye-Q e il logo Concord Eye-Q sono marchi registrati o marchi di Concord Camera Corp. negli Stati Uniti e/o negli altri paesi.
Microsoft e Windows sono marchi registrati o marchi di Microsoft Corporation negli Stati Uniti e/o in altri paesi. Mac e Macintosh sono marchi
registrati o marchi di Apple Computer, Inc. negli Stati Uniti e in altri paesi. Tutti gli altri nomi di prodotti citati nel presente manuale sono marchi
registrati o marchi dei rispettivi proprietari.
30
Page 33

VLUGE START GIDS
5
6
7
8
9
10
1
2
3
4
11
17
18
19
20
21
23
22
24
25
12
13
14
15
16
Nederlands
Deze Vluge Start Gids verzorgt een vluge referentie voor bedienen je
nieuw digitaal fototoestel. Verwijs naar de Gebruiker’s Gids, welk op de
CD-ROM en een computeruitdraai in je Concord Eye-Q 3042AF doos,
voor gedetailleerde instructies op hoe gevonden worden kan alle van je
fototoestel te gebruiken’s kenmerken. Voor het gebruik vergewist het
fototoestel, zich ervan alle Veiligheidsinstructies te lezen en
voorzorgsmaatregelen schetsten in de Gebruiker’s Gids.
OVERZICHT CAMERA
Boven/Voor
11. LED automatische
scherpstelling
12. Zoeker
13. LED flitser klaar
14. LCD
15. Statiefaansluiting
16. Batterij/Geheugenkaartklep
17. Standenschakelaar
18. Navigatietoetsen of
pijltjestoetsen/Zoomkn
op/Flitserknop
19. OK-knop/Toest
vergroten
20. Terugstelknop
21. Menuknop
22. Polsbandbevestiging
23. LCD Aan-/Uitknop
24. Geheugenkaartsleuf
25. Batterijruimte
31
1. Aan/uit-toets
2. Sluiterknop
3. Flitser
4. Lens
5. Zoeker
6. Flitsersensor
Achter/Onder
7. Rode ogen reductie LED/
LED zelfontspanner
8. Mini-USB-poort
9. Video/TV-uitgang
10. Macroschakelaar
Page 34

1
2
3
LCD ICONEN
: Enkele opname
: Bekijken
: VideoClips
3
M
003/016
3
M
003/016
G
I
A
B
C
H
J
K
F
A
AWB
AWB
D
E
A
OVERZICHT CAMERA
De polsband bevestigen
Bevestig de polsband zodat de camera niet kan vallen.
DE BATTERIJEN PLAATSEN
A. Resolutie
B. Camerastand
C. Flitser
D. Witbalans
E. Batterijniveau
F. Beeldkwaliteit
G. Macro
H. Opnameteller
I. Timer
J. Zoombalk
K. Geheugen
fig.1.1 fig.1.2
De camera werkt op 2x AA batterijen van het type alkaline, lithium of oplaadbaar.
1. Open de batterij-/geheugenkaartklep. (fig.1.1)
fig.1.3
• Schuif de klep in de richting van de erop aangebracht pijl en trek hem omhoog.
2. Plaats de batterijen met de polen fig.1.1 zoals aangegeven op de bovenrand van het batterijvak. (fig.1.2)
3. Sluit de Batterij-/Geheugenkaartklep door hem in de tegengestelde richting van de daarop aangebrachte pijl
te schuiven en stevig aan te drukken. (fig.1.3)
32
Page 35

BEGINNEN
A
AWB
⁄ ⁄
DE CAMERA AAN- EN UITZETTEN
De aan/uit-toets bevindt zich aan de bovenzijde van de camera.
1. Druk op de ( ) aan/uit-toets om de camera aan te schakelen.
(fig.1.1)
• De LCD gaat automatisch aan.
2. Om de camera uit te schakelen, drukt u op de ( ) aan/uit-toets.
(fig.1.2)
fig.1.1
N.B.:
Om ervoor te zorgen dat de batterijen zo lang mogelijk meegaan, wordt de LCD uitgeschakeld zodra deze
één minuut lang niet wordt gebruikt. Druk op de toets ( ) om de LCD opnieuw te activeren. Wanneer de
camera twee minuten lang geen activiteit registreert, dan schakelt het toestel zichzelf automatisch uit. Druk
op de sluitertoets om de camera opnieuw aan te schakelen.
TAAL, INSTELLEN
Als de camera voor het eerst wordt aangezet, verschijnen de menu's voor het
instellen van de taal.
De taal instellen
1. Zet de camera aan.
• Het taalmenu verschijnt op het LCD-scherm.
2. Druk op tot de gewenste taal oplicht.
3. Druk op de knop OK om te selecteren.
4. Op het volgende scherm verschijnt "Weet u het zeker?" Druk op
om Nee of Ja te kiezen.
5. Druk op de knop OK om de keuze te bevestigen.
• Als u Nee kiest, gaat u terug naar het taalkeuzescherm.
• Als u Ja kiest, verschijnen alle menuschermen in de nieuwe taal.
TAALKEUZE
English
Français
Deutsch
Italiano
Español
TERUG STEL
OK
TAALKEUZE
Nederlands
TERUG STEL
OK
33
Page 36

BEGINNEN / OPNAMES MAKEN.
A
AWB
A
AWB
3
M
003/016
A
AWB
003/016
AWB
28 SEC
28 SEC
3
M
003/016
AWB
28 SEC
28 SEC
A
AWB
⁄ ⁄
A
AWB
⁄ ⁄
INTERN GEHEUGEN/DE GEHEUGENKAART PLAATSEN
Behalve in het interne geheugen van 7MB kan de camera ook foto's en videoclips opslaan op Secure Digital
(SD) geheugenkaarten.
fig.1.1
1. Open de batterij-/geheugenkaartklep.
• Schuif de klep in de richting van de erop aangebracht pijl en trek hem omhoog. (fig.1.1)
fig.1.2
fig.1.3
2. Plaats de geheugenkaart zoals in het schema aangegeven. (fig.1.2)
• Steek de kaart er recht in, niet schuin.
3. Sluit de Batterij-/Geheugenkaartklep door hem in de tegengestelde richting van de daarop aangebrachte pijl
te schuiven en stevig aan te drukken. (fig.1.3) fig.1.2
• Om de kaart uit het toestel te halen, drukt u de kaart in, laat ze los en vervolgens trekt u de kaart eruit.
OPNAMES MAKEN.
EEN FOTO MAKEN MET HET LCD-SCHERM OP AFSTAND
28/45
fig.1.3
fig.1.1
28/45
fig.1.2
1. Zet de camera aan.
2. Zet de camera op ( ) Camerastand en zorg dat de Macrostand-schakelaar ingesteld is op ( ) Afstand.
(fig.1.1)
3. Zorg dat het onderwerp goed in de zoeker staat of LCD.
4. Druk de sluiterknop half in om de automatische scherpstelling te activeren totdat de groene LED AF oplicht.
(fig.1.2)
5. Druk de sluiterknophelemaal in om de foto te maken. (fig.1.3)
DE FLITSER INSTELLEN
1. Druk een aantal keren tot de gewenste indicator op het LCD-scherm verschijnt.
34
Page 37

OPNAMES MAKEN. / BESTANDEN WISSEN ÉÉN
A
AWB
⁄ ⁄
A
AWB
⁄ ⁄
A
AWB
A
AWB
A
AWB
⁄ ⁄
A
AWB
⁄ ⁄
A
AWB
A
AWB
⁄ ⁄
28 SEC
07 ⁄ 04 ⁄ 2003 02:40
Sluiter naar Rec
28 SEC
⁄ ⁄
28 SEC
WIS ÉÉN
WIS ALLES
TERUG KIEZEN
WIS BESTAND
MENU WIS
OK
⁄ ⁄
28 SEC
VIDEOCLIPS MAKEN.
Een videoclip opnemen:
1. Schuif de standenschakelaar naar ( ) Videoclipstand.
2. Zorg dat het onderwerp goed in de zoeker staat.
3. Druk de sluiterknop half in tot de groene LED AF oplicht.
4. Druk de Sluiterknop helemaal in om een doorlopende videoclip op te nemen.
N.B.: Er is een tijdslimiet voor elke videoclip. De hoeveelheid tijd is afhankelijk van het beschikbare vrije
geheugen. Hoeveel opnametijd er is, wordt in de rechter bovenhoek van het scherm weergegeven.
Opname van de videoclip stopt automatisch zodra de tijdslimiet is bereikt.
Videoclipgegevens
Resolutie: 512 x 384
Beeldsnelheid: 10 bps
Bestandsformaat: AVI (Film)
Opmerking: De LED flitser klaar knippert terwijl de camera de videoclip aan het opslaan is. Open de
batterijklep niet en zet de camera niet uit terwijl de LED knippert, want dan wordt de videoclip misschien
niet opgeslagen.
BESTANDEN WISSEN ÉÉN
BEKIJKEN
WIS BESTAND
THUMBNAIL
SETUP
TERUG KIEZEN
1. Schuif de standenschakelaar naar ( ).
2. Als Wis Bestand oplicht, druk dan op om naar het submenu Wis Bestand te
gaan.
3. Druk in het menu Wis Bestand op als Wis één oplicht.
4. Op het volgende scherm verschijnen de opgeslagen opnamen en videoclips als
kleine afbeeldingen.Druk op , , , zodat het bestand oplicht dat u
wilt wissen.
5. Druk op de knop OK om te selecteren.
6. Op het volgende scherm verschijnt "Weet u het zeker?" Druk op of om Nee of Ja te kiezen.
7. Druk op de knop OK om te selecteren.
• Als u Nee selecteert wordt er niets veranderd en gaat u terug naar het de kleine afbeeldingen van Wis
een.
• Als u Ja selecteert wordt het gekozen bestand gewist.
35
Weet u het zeker?
OK
Nee
Ja
KIEZEN
Page 38

DE CAMERA OP DE COMPUTER AANSLUITEN
DE CAMERA OP DE COMPUTER AANSLUITEN
Merk op: [Windows 98SE] moeten gebruikers de fototoestel bestuurder eerst installeren. Windows 2000
gebruikers moeten installeren DirectX om Videoklemmen op de computer te bekijken. Verwijs naar
alstublieft de Installatie Gids paragraaf over pagina 309 in de Handleiding voor meer informatie over, die de
bestuurder en anderze software installeert, vond op de CD-ROM.
PAS OP: Doe niet de klep van het batterij-/geheugenvak open om de geheugenkaart en/of de batterijen te
plaatsen of uit te nemen terwijl de camera met de computer is verbonden.
Bestanden van de camera overbrengen:
• Intern geheugen: Plaats de geheugenkaart niet.
• Geheugenkaart: Plaats de geheugenkaart.
VOOR WINDOWS-GEBRUIKERS
1. Sluit de camera op de computer aan.
2. Dubbelklik op Mijn Computer>Verwijderbare Schijf>DCIM>100_3042.
• De opnames (JPG) en de videoclips (AVI) die zijn opgeslagen op de
geheugenkaart verschijnen.
3. Klik en sleep de bestanden naar een map op uw computer om ze te bewaren.
• Om alle bestanden te selecteren klikt u op Bewerken > Alles selecteren
VOOR MACINTOSH-GEBRUIKERS
1. Zet de camera aan.
2. Sluit de camera op de computer aan.
• Na een paar seconden verschijnt de externe vaste schijf op het bureaublad.
3. Dubbelklik op de “naamloze” verwijderbare schijf op uw bureaublad>DCIM>100_3042.
• De opnames (JPG) en de videoclips (AVI) die zijn opgeslagen op de geheugenkaart verschijnen.
4. Sleep de opname die u wilt bewaren naar de computer.
• Om alle bestanden te selecteren klikt u op Bewerken > Alles selecteren.
Concord, Concord Eye-Q en het Concord Eye-Q logo zijn geregistreerde handelsmerken of handelsmerken van Concord Camera Corp., in de
Verenigde Staten en/of andere landen. Microsoft en Windows zijn geregistreerde handelsmerken of handelsmerken van Microsoft Corporation in
de Verenigde Staten en/of andere landen. Mac en Macintosh zijn geregistreerde handelsmerken of handelsmerken van Apple Computer, Inc. in
de V.S. en andere landen. Alle andere merken en productnamen zijn ofwel geregistreerde handelsmerken of handelsmerken van hun respectieve
eigenaars.
36
Page 39

Visit Concord on the Internet
www.concord-camera.com
Concord Eye-Q 3042AF Quick Start Guide
Copyright 2003 Concord Camera Corp.
Version 1.0
513441-00
Page 40

Technical Suppor t Hot Line:
Toll Free In the USA & Canada
1-866-522-6372
Toll Free In Europe
UK: 0800-169-6482
BELGIUM: 0800-787-57
FRANCE: 0800-917-599
GERMANY: 0800-1800-563
SPAIN: 900-973-195
ITALY: 800-781-883
All Other Countries - Toll
31-53-482-9779
 Loading...