

Page 1
User’s Guide
User’s Guide
www.concord-camera.com
Page 2

ENGLISH
CONGRATULATIONS
Congratulations on the purchase of your new camera. Your camera has been carefully engineered and
manufactured to give you dependable operation. Read this manual before operating the camera to
become more familiar with it.
This manual has been written and formatted with depth and detail so that you can easily follow the
instructions to maximize the features of your camera.
1
Page 3

Table of Contents
GETTING STARTED ............................................................................................................4
Package Contents ............................................................................................................................. 4
System Requirements ......................................................................................................................5
Camera Overview. ............................................................................................................................. 6
Loading the Batteries ........................................................................................................................ 9
Inserting an SD Card (Optional) ....................................................................................................... 9
Turning the Camera On and Off ..................................................................................................... 10
Setting the Date, Time and Date Stamp ......................................................................................... 10
TAKING PICTURES AND VIDEO CLIPS .......................................................................... 11
Taking Pictures ................................................................................................................................ 11
Taking Pictures in Macro Mode ....................................................................................................... 11
Taking Video Clips .......................................................................................................................... 12
Taking Continuous Pictures ............................................................................................................ 12
Taking Pictures with Self-Timer ....................................................................................................... 12
Using the Digital Zoom .................................................................................................................... 13
Setting the Flash ............................................................................................................................. 13
Setting White Balance ..................................................................................................................... 14
Setting Exposure Compensation .................................................................................................... 14
Setting Size/Resolution ................................................................................................................... 15
Customizing Your Camera Settings ................................................................................................ 15
REVIEWING YOUR FILES ................................................................................................18
Viewing Files ................................................................................................................................... 18
Magnifying Pictures ......................................................................................................................... 18
Thumbnail View ............................................................................................................................... 18
Running Slide Show ........................................................................................................................ 19
DELETING STORED FILES ..............................................................................................20
Deleting One ................................................................................................................................... 20
Deleting All ...................................................................................................................................... 20
Formatting the Internal Memory or SD Card .................................................................................. 21
PRINTING STORED PICTURES .......................................................................................22
Selecting Pictures for Printing ......................................................................................................... 22
Printing Pictures Directly ................................................................................................................. 23
2
Page 4

SOFTWARE INSTALLATION ............................................................................................24
Installing Your Camera Driver ......................................................................................................... 24
Installing the Ulead Photo Explorer 8.0 .......................................................................................... 25
Installing the Ulead Cool 360 .......................................................................................................... 29
Installing Adobe Acrobat Reader –For all Windows Users(optional) .............................................. 32
DOWNLOADING PICTURES AND VIDEO CLIPS ONTO YOUR COMPUTER ...............34
Preparing to Download Files to Your Computer ............................................................................. 34
Downloading Files to The Computer ..............................................................................................34
USING JENOPTIK C 3.1 SL AS A WEB CAMERA ..........................................................36
UNPLUGGING YOUR CAMERA FROM THE COMPUTER .............................................39
CONNECTING THE CAMERA TO TV ...............................................................................40
Setting TV Mode ............................................................................................................................. 40
Connecting the Camera to the Television ....................................................................................... 40
Using the TV as a Live Viewfinder ..................................................................................................40
Reviewing pictures and video clips on your TV .............................................................................. 40
TROUBLESHOOTING .......................................................................................................41
SPECIFICATIONS ..............................................................................................................43
GETTING HELP .................................................................................................................44
SAFETY TIPS AND MAINTENANCE ................................................................................45
REGULATORY INFORMATION .........................................................................................48
3
Page 5
GETTING STARTED
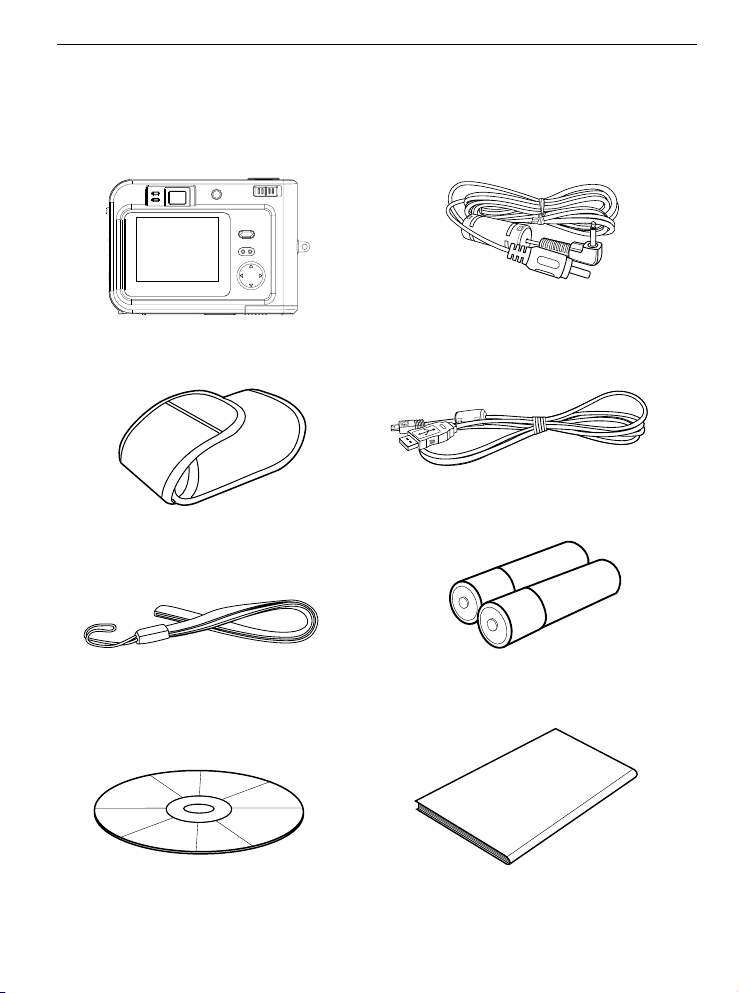
PACKAGE CONTENTS
Check that all of the items shown below are included with your camera.
• Digital Camera
• Camera Case
GETTING STARTED
• TV Cable
• USB Cable
• Wrist Strap
• CD-ROM(Includes Camera Driver,
Photo editing software, multi-lingual
User’s Guide etc.)
• 2X AAA Batteries
• Quick Start Guide
4
Page 6

GETTING STARTED
SYSTEM REQUIREMENTS
Windows:
• PC with processor better than MMX Pentium 300 MHz
• Windows XP/2000/ME/98SE
• Minimum 128 MB RAM
• USB port
• CD-ROM driver
• 1024 x 768 monitor, 24-bit color (true color)
Macintosh:
• Mac OS 10 or later
Specifications are subject to change without prior notice.
5
Page 7
GETTING STARTED
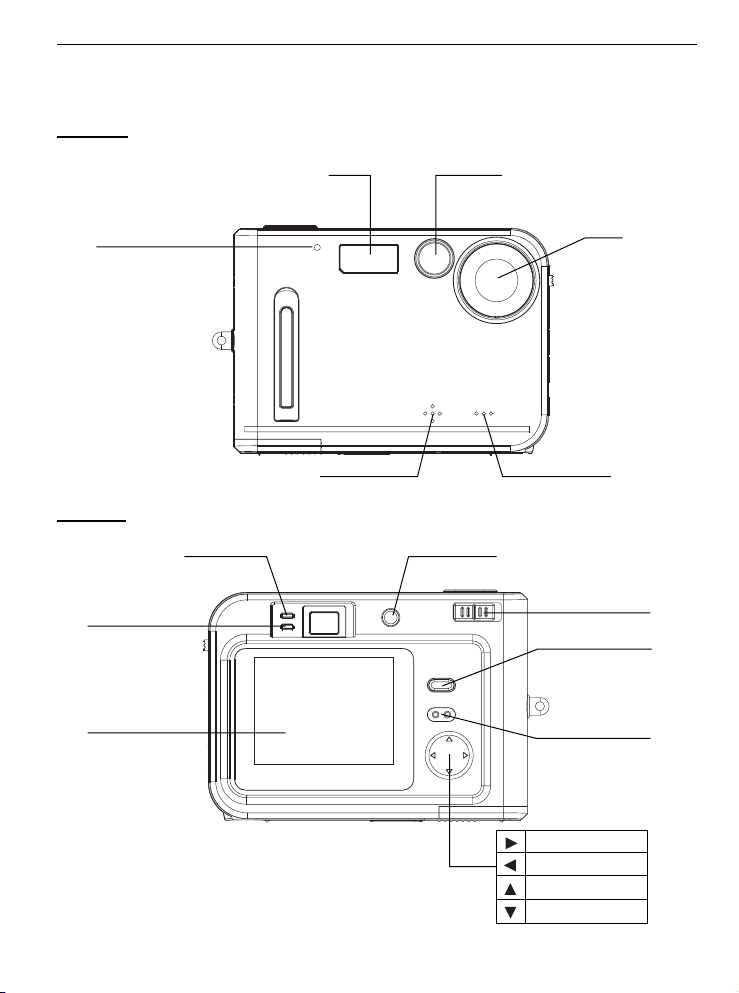
CAMERA OVERVIEW
Camera
The following illustrations show the names of each component, button and switch on the camera.
Front View
Self-Timer/Red-eye
Reduction Lamp
Back View
Indicator Lamp
LCD Monitor
Power Lamp
Flash
Speaker
Viewfinder
Lens
Mic
Power Button
Function Switch
Menu Botton
Enter Botton
Right Arrow/Zoom In
Left Arrow/Zoom Out
Up Arrow/Flash
Down Arrow/mode
6
Page 8
GETTING STARTED
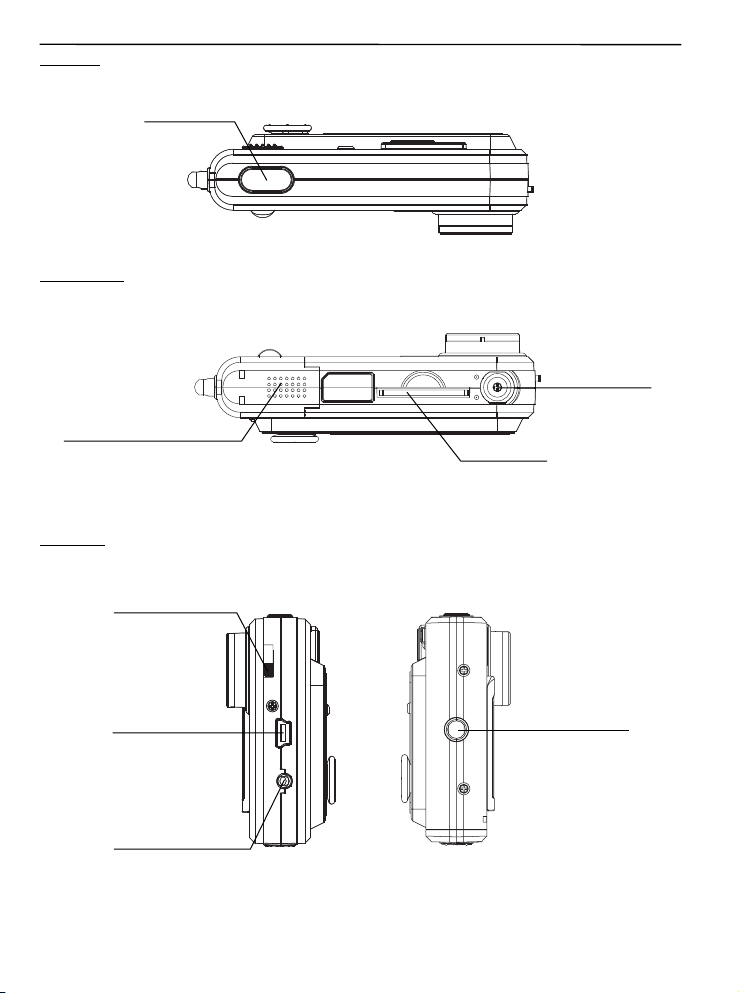
Top View
Bottom View
Shutter Button
Tripod Socket
Battery Door
Side View
USB Port Terminal
SD Card Slot
Macro Switch
Strap Eyelet
TV OUT Terminal
7
Page 9
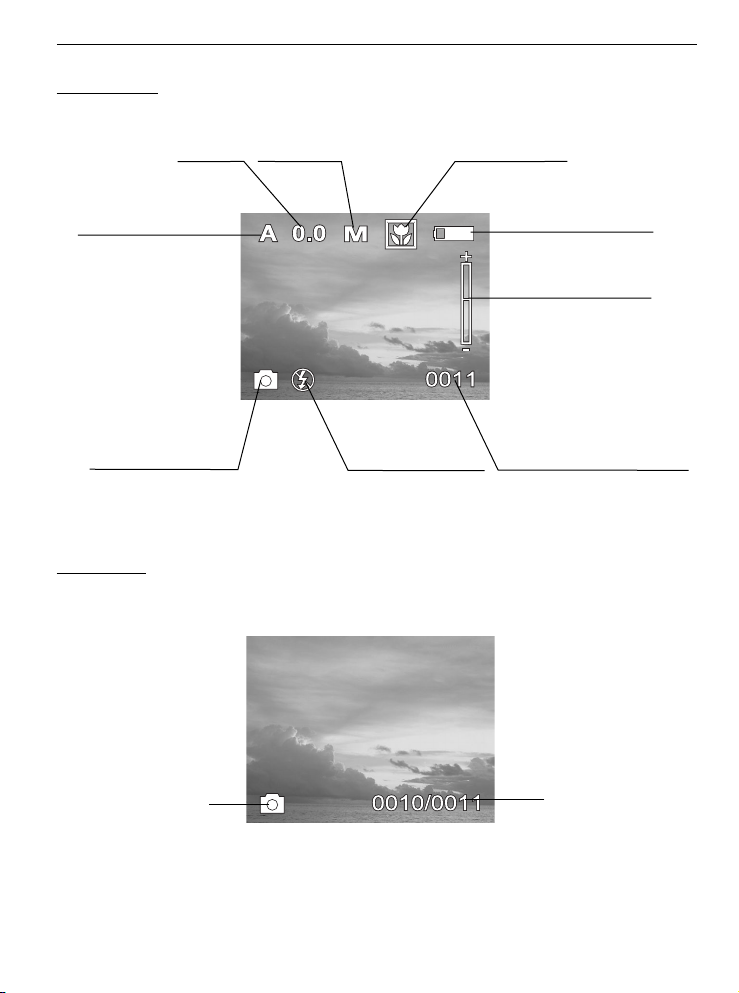
LCD indications
Shooting Mode
GETTING STARTED
White Balance Indicator
Capture Mode Indicator
Review Mode
.
EV Value
Pictuire Size Macro Indicator
Battery Capacity
Memory Capacity (Remaining
Flash Mode Indicator
Number of Storable Pictures)
Zoom Indicator
File Type Indicator
Frame Number/Total
Number of Files
8
Page 10
GETTING STARTED
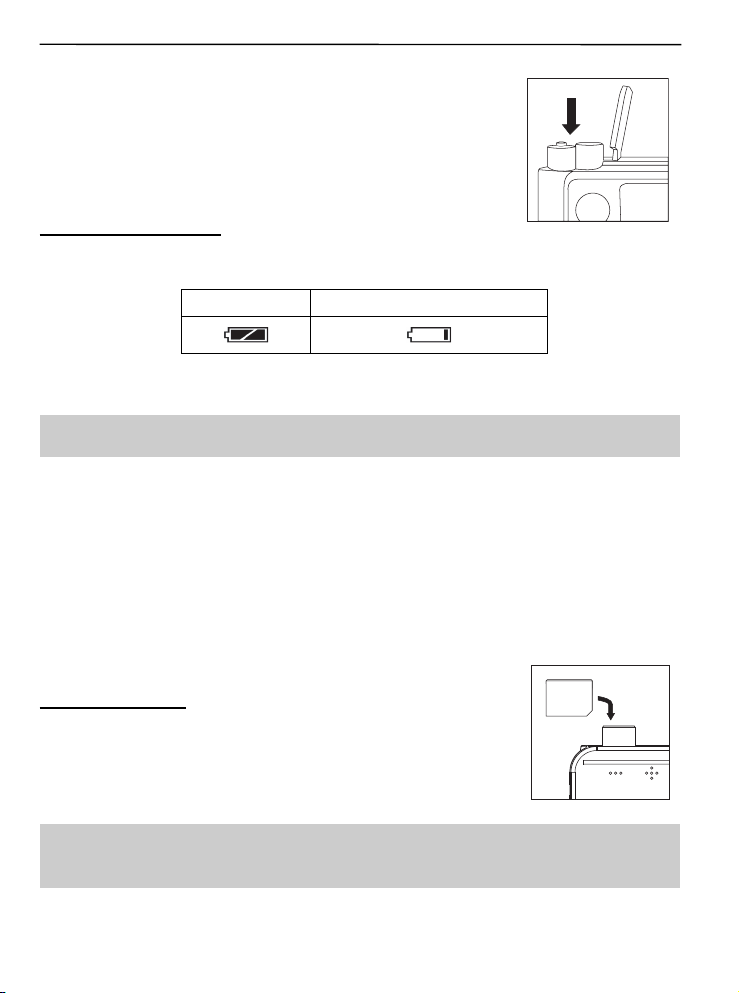
LOADING THE BATTERIES
The camera uses 2x AAA alkaline or rechargeable batteries.
1. Slide the battery door and lift it open.
2. Insert the batteries according to the polarity indication engraved on the
battery contact as shown.
3. Close the battery door.
Checking the Battery Level
The battery level indicates the power of the batteries.
Full (white) Low (red, can not use flash)
When “Low Battery” is shown on the LCD, replace thebatteries with the new ones.
Tips:If you will not use the camera for a long time, remove the batteries.
INSERTING AN SD CARD (OPTIONAL)
The camera is equipped with 16 MB of internal memory that can be used for storage as soon as
you start taking pictures or recording video clips. Besides, the camera can use a Secure Digital (SD)
memory card to store images and/or video clips. If no SD card is inserted in the camera,
all pictures/video clips recorded by the camera will be stored in the internal memory. When SD card is
inserted in the camera, all pictures and video clips recorded by the camera will be stored on the SD
card.
To insert the SD card:
Insert the memory card in the direction as shown in figure, then gently but
firmly push the SD card into the SD card slot as far as possible. When the
card is fully engaged, a click can be heard.
Note:NEVER forcefully push the card into the camera to avoid damaging both the card and/or the
camera.
9
Page 11
GETTING STARTED
To remove the SD card:
Press the memory card into the slot then release. When the card is partially ejected, pull it out.
Note:If the “Memory Full! ” warning message appears on the LCD, it means the SD card or
internal memory is full. Please remove the memory card and insert a new one or transfer all
images to your computer.
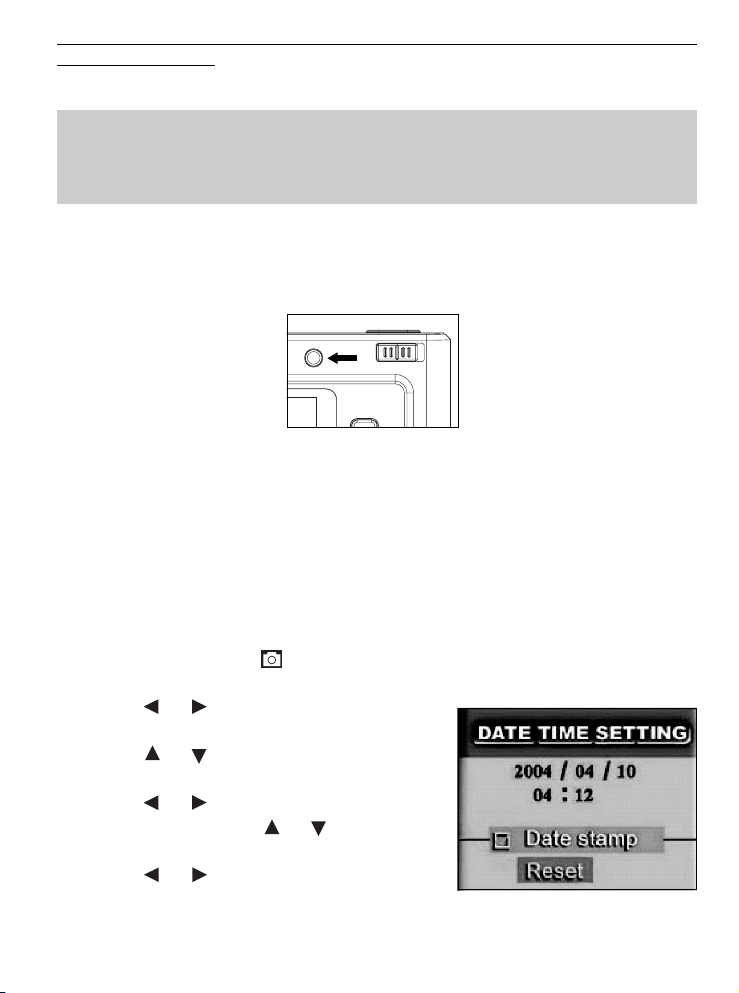
TURNING THE CAMERA ON AND OFF
Press the Power button to turn the camera on. The green Power lamp will light up, the LCD will turn
on automatically.
After one minute of inactivity, the LCD will automatically power off. Then the camera will automatically
power off after being idled for around 3 minutes by default. To power off the camera sooner, press the
Power button.
SETTING TIME AND DATE STAMP
When you first use your camera or when the batteries are removed for an extended time
(approximately 120 minutes), you will need to set the Date and Time . The date and time information
will be displayed on the picture if date stamp is turned on.
1. Slide the Function switch to
2. Press the MENU button.
3. Press the
then press the Enter button to enter its sub-menu.
4. Press the
then press the Enter button.
5. Press the
changed, and then press the
value.
6. Press the
press the Enter button to turn the function on.
7. When the setting is completed, press the MENU button to return to capture mode.
or button to select Ad (Advance), and
or button to select Date Time, and
or button to highlight the field to be
or button to highlight Date stamp, then
(Capture mode).
or button to set the
10
Page 12

TAKING PICTURES AND VIDEOS CLIPS
TAKING PICTURES AND VIDEOS CLIPS
TAKING PICTURES
1. Power on the camera.
2. Slide the Function switch to
Note: In picture taking mode, the icon will be shown on the lower
left side of the LCD. If this icon is not shown, press the
repeatedly until the
icon is shown.
3. Frame your subject with the LCD or viewfinder.
4. Hold the camera still and press the Shutter button to take the picture.
(Capture mode).
button
1
3
2
• The
and icon will be shown briefly on the LCD after the Shutter button is pressed, which
indicates that the camera is saving the picture. Do not power the camera off or remove the
batteries before the picture is saved.
Note: If Quick View function is turned on(See ‘Customizing Your Camera Settings’), the LCD will
show the image just taken and the options of:
Save: Press the Enter button to save the image.
Delete: Press the
button to select “delete” and then press the Enter button to delete the image.
If no action is taken, the picture will be saved in 15 seconds or so.
TAKING PICTURES IN MARCO MODE
This mode enables the camera to take pictures in close distances.
1. Slide the Macro Switch to
position. The Macro icon ( ) will be
Macro Switch
displayed on the LCD.
2. Frame the subject in the LCD.
• The best shooting range is between 40 cm to 50 cm (15.76 in. – 19.89
inches.)
3. Press the Shutter button to take the picture.
Important: When Macro shooting is not needed, remember to slide the Macro Switch back to
Landscape (
) mode. Otherwise your pictures taken with shooting range go beyond 50 cm
might be blurry.
11
Page 13
TAKING PICTURES AND VIDEOS CLIPS
TAKING VIDEO CLIPS
The camera can capture video clips with sound( Sound playback only on
1
4
TV&PC).
1. Turn on the camera.
2. Slide the Function switch to
3. Press the
button repeatedly until the Video Mode icon
(Capture mode).
2
appears on the LCD.
4. Use the viewfinder or LCD to frame your subject.
5. Press the Shutter button to start recording the video.
• During recording, the recording time is displayed.
6. Press the Shutter button again to stop recording. Otherwise the
3
camera will keep recording until the memory is full.
Note: The resolution for video clips can be set between VGA (640 x 480) and QVGA (320 x 240).
To set the desired resolution, please see page 15.
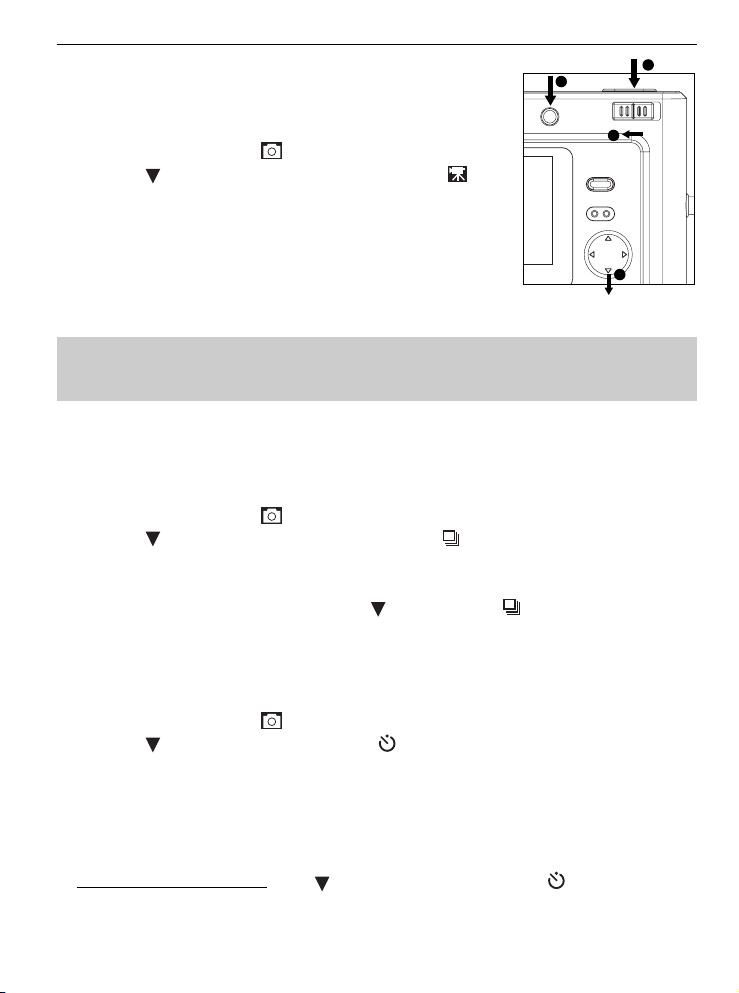
TAKING CONTINUOUS PICTURES
The camera can capture 3 consecutive pictures in 1024x768 resolution when the Shutter button is
pressed.
1. Slide the Function switch to
2. Press the
button until the Continuous Shooting icon ( ) is shown on the LCD.
3. Press the Shutter button to take 3 continuous pictures in 1024x768 resolution.
To exit the Continuous Shooting mode, press the button until the ( ) icon disappears from the
LCD.
(Capture mode).
TAKING PICTURES WITH SELF-TIMER
This function is useful for taking pictures where you want to be included in the photograph.
1. Slide the Function switch to
2. Press the
button until the Self-Timer icon ( ) is shown on the LCD.
(Capture mode).
3. Press the Shutter button to activate the Self-Timer.
While the self-timer is functioning, the self -timer lamp on the front of the camera will blink. As
the time to take the picture is closer, the lamp blinks faster, normally for 7 seconds, fast for the
following 3 seconds, then the image will be captured.
To deactivate the Self-Timer, press
button until the Self-Timer icon ( ) disappears from
the LCD.
12
Page 14
TAKING PICTURES AND VIDEOS CLIPS
USING THE DIGITAL ZOOM
The camera provides up to 4x digital zoom.
In Video mode, when picture size is set to QVGA only 2x digital zoom can
be achieved.
1. Press the
to zoom in. The digital zoom bar will be shown on the
LCD.
2. Press the
to zoom out or return to the normal mode.
Important:
1. Hold your camera steady when using Digital Zoom to prevent blurred pictures, caused by jittery
movement. It is recommended to either place your camera on a steady surface or mount it on a
tripod.
2. The image quality may degrade slightly with Digital Zoom.
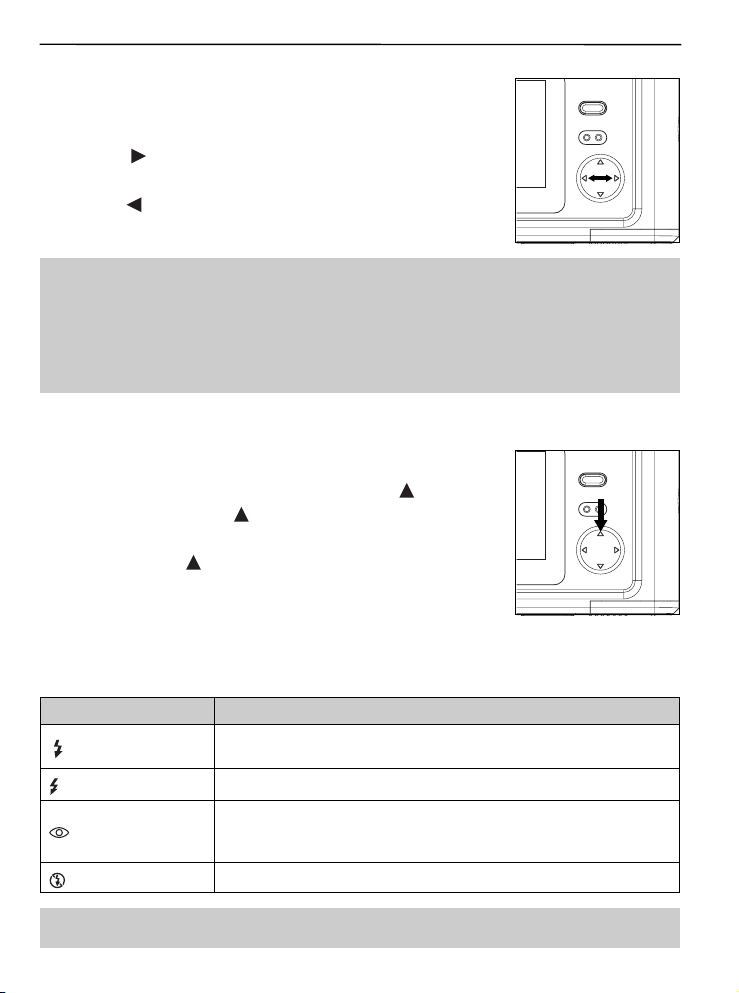
SETTING THE FLASH
By default, the flash is set at OFF mode. When taking pictures at night,
indoor, or outdoor in heavy shadows, you may press the
to turn the flash on. Press the
button repeatedly until the desired
indicator appears on the LCD.
• When pressing the
button for the first time, the LCD will be black
for a while due to the flash being charged.
• When the flash is under charging, the orange lamp located next to the
viewfinder will blink. When the flash is ready for taking pictures, the orange lamp will light steadily.
Please wait until the flash stops blinking before proceeding to take pictures.
button
Flash Mode Flash Fires
Auto Flash
A
Fill Flash
The camera judges if a flash is required. If the environment is too dark,
the flash will fire.
Flash will fire in any lighting condition.
Use this mode to reduce the occurrence of “red-eyes” when taking
Red-eye reduction
pictures with a flash. The camera will automatically detect when the
flash is needed and the flash will fire after a short delay.
Off
In this mode, the flash will not fire, regardless of the lighting condition.
Note: Flash is not available in Video mode , Macro mode and Continuous Shooting mode.
13
Page 15
TAKING PICTURES AND VIDEOS CLIPS
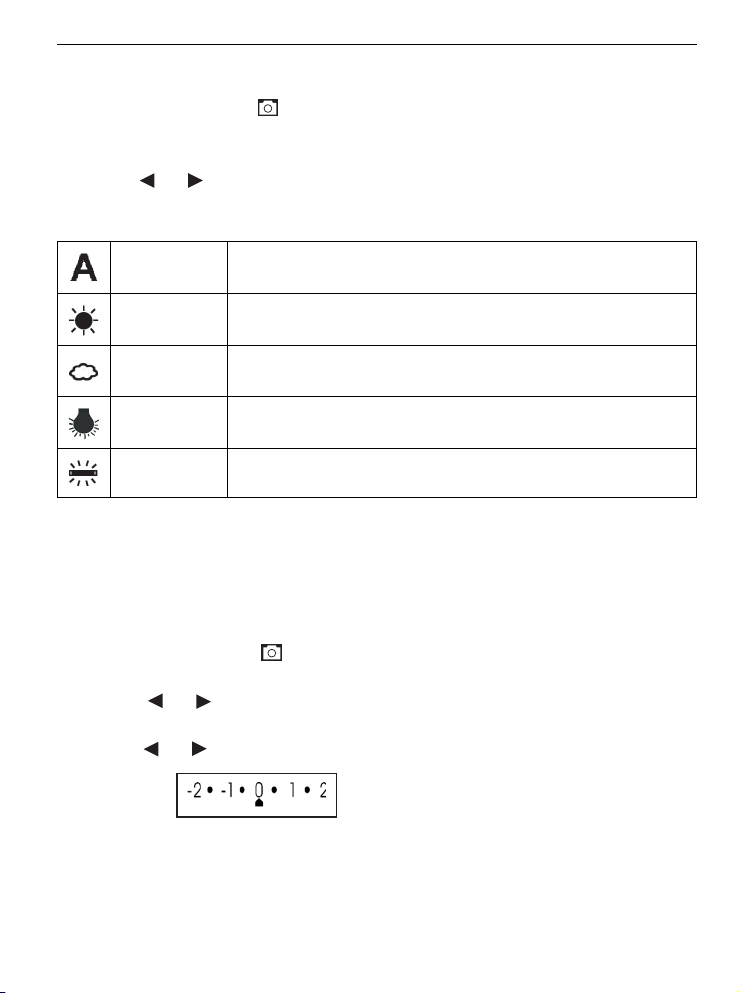
SETTING WHITE BALANCE
When the white balance is set to match the light source, the camera can take picture more accurately.
1. Slide the Function switch to
2. Press the MENU button, the LCD will show White Bal (White Balance) in highlight.
3. Press the Enter button to enter its submenu.
4. Press the
5. Press the MENU or ENTER button to exit.
or button to select the desired white balance mode.
(Capture mode).
Auto (Default)
Daylight Use when shooting outdoors in sunlight on a clear day.
Cloudy
Tungsten For shooting under tungsten lighting.
Fluorescent For shooting under fluorescent lighting.
The camera sets the white balance automatically according to shooting
conditions.
Use when shooting outdoors and the sunlight is not enough such as
under cloudy skies, in shade or at dusk.
SETTING EXPOSURE COMPENSATION
Exposure compensation lets you change the exposure setting EV value manually to suit the lighting
condition of your subject. This feature helps to achieve better result when recording a backlit subject, a
strongly lit subject indoors, or a subject that is against a dark background.
1. Slide the Function switch to
2. Press the MENU button.
3. Press the
submenu.
4. Press the
or button to highlight EV (Exp Val) and then press ENTER to enter its
or button to select desired exposure value.
(Capture mode).
(Note: The ‘•‘ mark represents ‘0.5’)
5. Press the Enter or MENU button to exit.
14
Page 16

TAKING PICTURES AND VIDEOS CLIPS
SETTING SIZE / RESOLUTION
1. Slide the Function switch to (Capture mode).
2. press the MENU button.
3. Press the
4. Press the
5. Press the Enter or MENU button to exit.
Size/Resolution options in different modes:
Mode Indicator Size Description
or
Note: The setting remains until you change it.
or to select PS (Pict Size) and then press the Enter button.
or button to select the desired size/resolution.
L2400 x 1800
M2048 x 1536
S 1024 x 768
VGA 640 x 480 Standard Video resolution.
QVGA 320 x 240 Best for e-mail.
(none) 1024 x 768 Not selectable.
Large picture size: produces higher picture resolution and
larger file size.
Standard picture size: produces normal picture resolution
and moderate file size.
Small picture size: pictures are of lower resolution and file
size is small.
CUSTOMIZING YOUR CAMERA SETTINGS
Use Advance to customize your camera settings.
1. Slide the Function switch to
2. Press the MENU button.
3. Press the
4. Press the
highlight the desired setting.
5. Press the Enter button to confirm.
6. Press the Menu button to return to shooting status.
or button to select Ad (Advance) and then press the Enter button.
and to highlight the item you want to adjust, and then press the and to
(Capture mode).
15
Page 17

Setup menu and features
TAKING PICTURES AND VIDEOS CLIPS
Beeper(
):
ON
OFF (Default)
Auto Power Off(
ON
OFF (Default)
Quick Review(
ON
OFF (Default)
Self-Timer( ):
10 sec (Default)
15 sec
20 sec
When Beeper is set on, a beep sound can be heard when the camera
is powered on .
No beep sound can be heard if Beeper is set at OFF mode.
):
When Auto Power Off is activated, after one minute of inactivity, the
LCD will automatically power off. Then the camera will automatically
power off after being idled for around 3 minutes.
The camera will not power off automatically in this setting.
):
When Quick View is set at ON mode, a preview of the picture/video just
taken as well as the options of ‘save’ and ‘delete’ will be shown on the
LCD. This is very convineint for deciding save the picture or not.
No preview of the picture/video just taken will be shown in this mode.
Setting the timer for a 10 seconds’ delay between the Shutter button is
pressed and the moment when picture is actually taken.
Setting the timer for a 15 seconds’ delay.
Setting the timer for a 20 seconds’ delay.
Quality(
TV(
):
Super Fine
Fine (Default)
Normal
):
Setting the picture quality to super fine. (Lower compression, bigger file
size)
Setting the picture quality to fine.
Setting the picture quality to normal. (Smaller file size)
PAL Setting the TV video signal format to PAL.
NTSC (Default) Setting the TV video signal format to NTSC.
16
Page 18

TAKING PICTURES AND VIDEOS CLIPS
Language( ):
English (Default) Setting the language to English.
Français Setting the language to French.
Deutsch Setting the language to German.
Español Setting the language to Spanish.
Italiano Setting the language to Italian.
Nederlands Setting the language to Dutch.
Português Setting the language to Portuguese.
Flicker(
flicker of the light source will decrease the image quality. To overcome this phenomenon, you can
change the light frequency setting to suit the light source.
50Hz (Default) Setting the flicker frequency to 50 Hz.
60Hz Setting the flicker frequency to 60 Hz.
Date Time(
Reset(
Turning the LCD On or Off:
In Capture mode, the LCD can be turned on or off:
1. Press the ENTER button to turn off the icons on the LCD.
2. Press the ENTER button once more to turn the LCD off.
3. Press the ENTER button a third time to turn the LCD back on.
Note: The LCD cannot be turned off in the Playback mode.
): While taking pictures or recording video clips under indoor florescent lighting, the
):
YES
):
YES
Setting the Date, Time, and Date Stamp. (p.10 )
Restore the settings of the camera to default setting.
17
Page 19

REVIEWING YOUR FILES
REVIEWING YOUR FILES
VIEWING FILES
1. Slide the Function switch to (Playback mode). The last picture or video clip will be shown on
the LCD. The file type will be shown on the lower left corner of the LCD:
= Picture, = Video Clip
2. Press the button to skip to the previous file, press the button to skip to the next file.
3. To review video clips, press the Enter button.
• While playing video clips, you may press the Enter button to pause or resume the playing.
• When the whole video clip is played over, it will stop automatically. To stop playing the video clip
sooner and skip to other file, press the
4. While reviewing pictures, you can press the
button to zoom out or return to the normal.
MAGNIFYING PICTURES
Use the Magnify feature to zoom in a specific area of the selected picture.
1. Slide the Function switch to
2. Press the
3. Press the MENU button.
4. Press the
frame will be shown on the LCD.
5. Press the
button.
• The selected area will be displayed at 2x magnification.
6. Press
7. Press the Enter button to exit.
or button to select the picture that you want to magnify.
or button to highlight Zm (Zoom) and then press the Enter button. A light blue
, , or to locate the area to be magnified and then press the Enter
, , or to navigate to different parts of the picture.
(Playback mode).
or button.
button to enlarge the picture and then press the
Note: Video clips cannot be enlarged.
THUMBNAIL VIEW
The camera provides index viewing, that is, to view six pictures at a time on the LCD so that you can
search pictures quickly.
1. Slide the Function switch to
2. Press the MENU button.
3. Press the
or button to highlight Vw (View) and then press the Enter button. The LCD
(Playback mode).
18
Page 20

REVIEWING YOUR FILES
shows options as below:
Single To display one picture each time.
Thumbnails To display up to six files on the LCD at a time.
Slide Show To play a slide show of all the stored files one by one.
4. Press the or button to select ([Thumbnail]) and then press the Enter button.
• Up to six thumbnail view files appears on the LCD. For video clips, only the first frame can be
seen.
5. Press the
• The selected picture or video clip is highlighted in blue.
• If total number of the stored picture/video clips exceeds six, you may press the
button to display the thumbnail files in the previous or next screen.
6. Press the Enter button to display selected picture or video clip in full screen.
or button to select specific picture/video that is shown in the current screen.
or
RUNNING SLIDE SHOW
Start the Slide Show features to sequentially display the images on the camera LCD monitor, on a
television screen, or on any external display devices equipped with a video input port.
1. Slide the Function switch to
2. Press the MENU button.
3. Press the
4. Press the
or button to highlight Vw (View) and then press the Enter button.
or button to select (Slide Show) and then press the Enter button.
(Playback mode).
• The slide show will start at once from the first picture or video clips on. Each file will be displayed
once.
Note: Only the first frame of the video clips will be displayed.
5. The slide show will stop automatically when the last file is shown. To stop the slide show sooner,
press the Enter button.
19
Page 21

DELETING STORED FILES
Note: Once file is deleted, it cannot be recovered.
DELETING ONE FILE
1. Slide the Function switch to (Playback mode).
2. Press the
MENU button.
3. Press the
shows options as below:
or button to select the picture or video you want to delete, and then press the
or button to highlight Del (Delete) and then press the Enter button. The LCD
Delete One To delete the current picture or video.
Delete All To delete all pictures and videos.
Format To format the internal memory or SD card.
DELETING STORED FILES
4. Press the
• The selected file will be deleted.
or button to select [Delete One], and then press the Enter button.
DELETING ALL FILES
1. Slide the Function switch to (Playback mode).
2. Press the MENU button.
3. Press the
4. Press the
• All stored pictures and video clips will be deleted. The LCD will show “NO PICTURE!” when all
files are deleted.
or button to highlight Del (Delete) and then press the Enter button.
or button to select (Delete All), and then press the Enter button.
20
Page 22

DELETING STORED FILES
FORMATTING THE INTERNAL MEMORY OR SD CARD
Caution:
1. Formatting will delete all pictures and video clips from the memory.
2. During the formatting process, never remove the memory card or batteries, as it will damage
the card and/or the camera.
3. When a memory card is not inserted into the camera, selecting the formatting function will
format the internal memory instead. All pictures and video clips stored in the internal memory
will be deleted.
1. Slide the Function switch to
2. Press the MENU button.
3. Press the
4. Press the or button to select ([Format]), and then press the Enter button.
• The internal memory or SD card will be formatted in a few seconds. The “NO PICTURE!”
message will then appear on the LCD.
or button to highlight Del (Delete) and then press the Enter button.
(Playback mode).
21
Page 23

PRINTING STORED PICTURES
PRINTING STORED PICTURES
SELECTING PICTURES FOR PRINTING
You can select pictures for direct printing by a photo developing service center or on a direct print
compatible printer.
1. Insert the SD card.
2. Slide the Function switch to
3. Press the
4. Press the MENU button.
5. Press the
shows options as below:
1
A
1
A
or button to select the picture you want to print.
or button to highlight Pr (Print) and then press the Enter button. The LCD
Print One To print the current picture.
Print All To print all pictures.
Cancel One To cancel the print setting for the current picture.
Cancel All To cancel the print setting for all pictures.
(Playback mode).
6. Press the
• The icon
selected for direct printing.
To print all the pictures on the SD card:
1. Repeat step 1-5 above.(Note: Step 3 can be bypassed.)
2. Press the
• All the pictures stored on the SD card will have an
To cancel direct printing settings:
1. Repeat step 1-5 above.
2. Press the
the Enter button.
• The
Note: The direct printing supports SD card only.
or button to highlight
P
will appear on the bottom left corner of the LCD, which indicates the picture is
or button to highlight A(Print All) and then press the Enter button.
or button to highlight
P
icon will disappear, which means the direct printing setting is deleted.
1
(Print One) and then press the Enter button.
1
(Cancel One) orA(Cancel All) and then press
22
P
icon.
Page 24

PRINTING STORED PICTURES
PRINTING PICTURES DIRECTLY
1. Select the desired pictures (see ‘Selecting Pictures for Printing’ section).
2. Take the SD card out of the camera.
3. Insert the SD card into the SD card slot of a direct printing compatible printer.
4. Refer to the instruction manual of the printer to print the pictures.
23
Page 25

SOFTWARE INSTALLATION (FOR WINDOWS USERS)
SOFTWARE INSTALLATION (FOR WINDOWS USERS)
Option Description
Enable the camera to become an external drive on your computer
Camera Drivers
Ulead Photo Explorer 8.0SE
Ulead COOL 360
Adobe Acrobat Reader Enables you to view the electronic version of the User’s Guide.
User’s Guide
Concord Support Website
INSTALLING YOUR CAMERA DRIVER
Step 1 Make sure that your camera is not connected to the computer.
Step 2 Make sure the computer is powered on and Windows 98SE/ME/2000/XP is running.
Step 3 Close any other applications or software you may be running.
Insert the supplied CD-ROM into the CD-ROM drive. The installer will pop up
Step 4
automatically.
Note: If the installer does not appear automatically, double click “My Computer”, and
then double click the CD-ROM drive.
Click “Camera Driver”.
under Windows 98SE, and enables the PC-Cam function under any
of required Windows systems.
Enables you to playback and transfer the files(pictures and video
clips) from the camera to your computer, to use the camera as PC
camera, and to organize, edit and share photos etc.
Enables you to transform a series of photos into a complete 360°
panoramic or wide-angle panoramic scene for an immersive viewing
experience.
Direct link to the electronic version of the User’s Guide in different
languages. (All User’s Guides are saved in PDF format.)
Direct link to our camera support website. Ensure that an internet
connection is established before clicking on the link.
Note:To avoid compatibility issues, we
Step 5
Step 6 Follow the on-screen instructions to complete the installation.
recommend users of W98 and WME to
upgrade their OS through microsoft’s
website before installing the camera driver.
24
Page 26

SOFTWARE INSTALLATION (FOR WINDOWS USERS)
To ensure the complete installation and enable the camera to function well, please do
select “restart your computer”.
Step 7
INSTALLING THE ULEAD PHOTO EXPLORER 8.0
Step 1 Make sure that your camera is not connected to the computer.
Step 2 Make sure the computer is powered on Windows 98SE, ME, 2000 or XP is running.
Step 3 Close any other applications or software you may be running.
Insert the supplied CD-ROM into the CD-ROM drive. The installer will pop up
Step 4
Step 5
automatically.
Note: If the installer does not appear automatically, double click ‘My Computer’, and
then double click the CD-ROM drive.
Click “Ulead Photo Explorer 8.0SE”.
Step 6
Select the language for installing Ulead Photo Explore 8.0, then click [Next].
25
Page 27

Step 7
Step 8
Step 9
SOFTWARE INSTALLATION (FOR WINDOWS USERS)
Click [Next].
Read the agreement, and then click [Yes].
Click [Next].
Step 10
Click [Next].
26
Page 28

SOFTWARE INSTALLATION (FOR WINDOWS USERS)
Click [Next].
Step 11
Click [Next].
Step 12
Click [Next].
Step 13
Step 14
Click [Next].
27
Page 29

Step 15
Step 16
SOFTWARE INSTALLATION (FOR WINDOWS USERS)
Installing stars. Please wait for a few seconds.
(For Win 98SE/2000/ME)
Note: If you selected to read the Readme file in step 15, the Readme window will pop
up. Close the window after reading.
Click [Next].
Step 17
Click [Finish].
Remember to restart your computer to ensure successful installation.
28
Page 30

SOFTWARE INSTALLATION (FOR WINDOWS USERS)
INSTALLING THE ULEAD COOL 360 (OPTIONAL)
Step 1 Make sure that your camera is not connected to the computer.
Step2 Make sure the computer is powered on and Windows 98SE, ME, 2000 or XP is running.
Step 3 Close any other applications or software you may be running.
Insert the supplied CD-ROM into the CD-ROM drive. The installer will pop up
Step 4
Step 5
Step 6
automatically.
Note: If the installer does not appear automatically, double click “My Computer”, and
then double click the CD-ROM driver.
Click “Ulead Cool 360”.
Click on “Install Ulead Cool 360”.
Step 7
Step 8
Select language, then click [OK].
Click [Next].
29
Page 31

Step 9
Step 10
Step 11
SOFTWARE INSTALLATION (FOR WINDOWS USERS)
Read the agreement, and then click [Yes].
Click [Next].
Click [Next].
Step 12
Click [Next].
30
Page 32

SOFTWARE INSTALLATION (FOR WINDOWS USERS)
Installation starts.
Step 13
If you do not want to install Internet Explorer Plugin, click [No].Otherwise, click [Yes].
Step 14
Click [Next].
Step 15
Click [Next].
Step 16
Step 17
Click [Finish].
31
Page 33

SOFTWARE INSTALLATION (FOR WINDOWS USERS)
Click [Exit].
Step 18
INSATLLING ADOBE ACROBAT READER (OPTIONAL)
Step 1 Make sure that your camera is not connected to the computer.
Step 2 Make sure the computer is powered on and Windows 98SE, ME, 2000 or XP is running.
Step 3 Close any other applications or software you may be running.
Insert the supplied the CD-ROM into the CD-ROM drive. The installer will pop up
Step 4
Step 5
automatically.
Note: If the installer does not appear automatically, double click “My Computer”, and
then double click the CD-ROM drive.
Click “Install Adobe Reader”.
Step 6
Step 7
Status bar.
Click [Next].
32
Page 34

SOFTWARE INSTALLATION (FOR WINDOWS USERS)
The files will be saved into C:\Program Files\Adobe Reader automatically.
OR
You may change the default folder by clicking [Browse] and selecting a different folder
in your computer.
Click [Next].
Step 8
Installation progress.
Step 9
Click [OK].
Step 10
33
Page 35

DOWNLOADING PICTURES AND VIDEO CLIPS ONTO YOUR COMPUTER
DOWNLOADING PICTURES AND VIDEO CLIPS ONTO
YOUR COMPUTER
PREPARING TO DOWNLOAD FILES TO YOUR COMPUTER
Note: For Win 98SE, you must install the driver before downloading files.
1. Slide the Function switch to
2. Turn on the camera.
3. Connect the camera to the computer with the Mini-USB cable included with the camera by plugging
the larger end of the Mini-USB cable into your PC’s USB port first and then plug the small end of
the Mini-USB cable into the USB port of the camera.
Downloading files from the camera:
• Internal memory: Do not insert the memory card.
• Memory Card: Insert the memory card.
(Playback mode).
DOWNLOADING FILES TO THE COMPUTER
FOR WINDOWS USERS
1. Double-click on My Computer.
2. Double-click Removable Disk.
3. Double-click DCIM.
4. Double-click the folder that contains the desired images to view.
• The stored pictures (JPG) and video clips (AVI) stored in the memory will be displayed.
5. Click and drag the files into a directory in your computer to save them.
• To select all files, click Edit > Select all.
Note: If you’ve installed the Ulead Photo Explorer 8.0 ,when the camera is connected to the
computer, the Ulead Photo Explorer 8.0 will automatically run and appear as below.
You may click “Cancel” to close the “Digital Camera Wizard” then close the Ulead Photo Explorer 8.0.
34
Page 36

DOWNLOADING PICTURES AND VIDEO CLIPS ONTO YOUR COMPUTER
FOR MACINTOSH USERS
1. Connect the camera to the computer.
• After a few moments, the external hard drive will appear on the desktop.
2. Double-click the “Removable Disk” removable drive that is on your desktop.
3. Double-click DCIM.
4. Double-click the folder that contains the desired images to view.
• The stored pictures (JPG) and video clips (AVI) stored in the memory will be displayed.
5. Drag and drop the image you want to save in the computer.
• To select all files, click Edit > Select all.
Note: You may also transfer the stored pictures and video clips on your memory card onto your
computer by using a memory card reader (sold separately.)
35
Page 37

USING JENOPTIK C 3.1 SL AS A WEB CAMERA (FOR WINDOWS ONLY)
USING JENOPTIK C 3.1 SL AS A WEB CAMERA (FOR
WINDOWS ONLY)
Note : You must install the camera’s driver before using the web camera.
1. Slide the Function switch to
2. Make sure that the camera is securely connected to your computer .
3. Turn on your camera.
• The computer will automatically find your camera and install it for the first time connecting the
camera to your computer, the installation message will vary on the different Windows Operating
Systems(See the “INSTALLATION MESSAGE”).
4. Launch Microsoft NetMeeting software.
Note: For Win ME/2000, click on “Start>Program>Accessories>Communication>NetMeeting”
to launch NetMeeting software.
For Win 98SE/XP, click “Start>Run”, type “conf” to launch NetMeeting software.
Or
If you do not have NetMeeting already installed on your computer, please visit www.microsft.com
for instructions on how to download it onto your computer.
(Capture mode).
INSTALLATION MESSAGE
For Win 98SE
1. The following message will pop up, indicating that the
Windows system recognizes a new device and is searching
for the driver.
2. The following message will pop up to ask for insertion of
Windows 98SE CD-ROM. Insert the Windows 98SE CD-
ROM into the CD-ROM drive, then click “OK”.
3. Click “Browse” to find the driver.
36
Page 38

USING JENOPTIK C 3.1 SL AS A WEB CAMERA (FOR WINDOWS ONLY)
4. Make sure the drive option is CD-ROM drive, then locate
and double click Win98 folder, then click “OK” .
5. Click “OK” to continue and complete the installation.
For Win 2000
1. The installation message will pop up. Click “Next”.
2. The warning message of “Digital Signature Not Found”
will pop up. Click “Yes” to continue to complete the
installation.
Note: The above installation may occur twice, just repeat
step 1 and step 2 to complete the whole installation.
For Win XP
1. The installation message will pop up. Click “ Next”.
37
Page 39

USING JENOPTIK C 3.1 SL AS A WEB CAMERA (FOR WINDOWS ONLY)
2. The “ Hardware Installation” warning will appear, click
“Continue Anyway” to proceed.
Note: The message of “Hardware Installation” will occur
2 times successively, just click “Continue Anyway” to
proceed.
3. Click “Finish” to complete the installation.
38
Page 40

UNPLUGGING YOUR CAMERA FROM THE COMPUTER
UNPLUGGING YOUR CAMERA FROM THE COMPUTER
Windows 98SE:
Unplug the Mini-USB from the camera directly.
Windows ME/2000/XP:
1. Turn the camera off.
2. Click once on the “Unplug or Eject Hardware” icon on the right hand side
of your task bar. (fig. 1.1)
3. Select “Stop Concord camera USB Mass Storage Device”
4. Click [OK] in the “Safe to Remove Hardware” prompt.
5. Unplug the Mini-USB from the camera. (fig. 1.2)
Macintosh:
1. Drag the “Removable Disk” removable drive icon on the desktop to the
Trash.
2. Unplug the Mini-USB cable from the camera.
fig.1.1
fig.1.2
39
Page 41

CONNECTING THE CAMERA TO TV
CONNECTING THE CAMERA TO TV
SETTING TV MODE
The camera allows you to view individual files and to take pictures or record clips on the television. To
begin, check your television documentation to determine the suitable type of TV broadcast standard:
NTSC or PA L.
1. Slide the Function switch to
2. Press the MENU button.
3. Press the
4. Press the
PAL .
Note: The selection of NTSC or PAL is according to video system used in the country where you
are.
5. Press the Enter button to confirm.
6 Press the Menu button to exit.
or button to select Ad (Advance) and then press the Enter button.
and button to highlight TV and then press the and to select NTSC or
CONNECTING THE CAMERA TO THE TELEVISION
1. Plugging the one end of the supplied Video Cable to the VIDEO or VIDEO IN jack on your
television, then connect the other end of the Video Cable to the VIDEO port on the camera.
2. Turn on your television.
3. Set the television to video mode according to the instructions in the owner’s manual. (This is
usually channel 3, 4 or AV).
(Capture mode).
USING THE TV AS A LIVE VIEWFINDER
1. Connect the camera to the TV with the supplied video cable .
2. Turn the camera on.
3. Slide the Function Switch to
4. The TV will become a Live Viewfinder.
(Capture mode).
REVIEWING PICTURES AND VIDEO CLIPS ON YOUR TV
1. Connect the camera to the TV.
2. Turn the camera on.
3. Slide the Function Switch to
4. Press the
• When video file is displayed on the TV, press the Enter button to view the video clip.
5. To view more options, press the MENU button to display the menu on the TV screen.
and button to scroll through the saved pictures and video clips.
(Playback mode).
40
Page 42

TROUBLE SHOOTING
TROUBLE SHOOTING
Problem Possible Cause Possible Solution
Press the Power button to turn the camera
on.
See “Loading the Batteries”.
Replace with unused alkaline or fully
recharged batteries (two AAA-size
batteries).
Close the cover correctly and securely.
The camera is not
running.
The power is not on.
The batteries were not
loaded properly.
Batteries are depleted.
The battery cover is not
closed properly.
The camera is in the
Playback Function mode.
The flash is charging.
The camera is not
taking pictures.
The SD card or internal
memory is already full.
The SD card is not
formatted correctly.
Picture is not clear. The lens is dirty. Clean the lens.
Picture is too dark. No enough light.
Viewfinder is dirty.
The pictures are
blurred.
The pictures show on
the LCD very slowly.
The flash doesn’t fire.
There is something
wrong with the color of
the photographs.
Hands were not steady
when taking the picture.
The picture subject was not
in the focus range of the
camera.
The picture size is large.
The flash mode is set to
Off.
White balance is not
properly.
Slide the function switch to Capture
Function mode.
Wait until the flash finishes charging.
Press the shutter button when the indicator
glows a steady orange.
• Obtain a new SD card and insert it.
• Download images to your computer, and
then erase them from the card to free
up more space.
• Delete unwanted files.
• Format the SD card with the camera.
• Ask SD card manufacturer for assistance.
• Use Fill flash during night time.
• Use Auto flash during daytime.
Clean the viewfinder with a soft cloth
or cotton swab. See the Camera
maintenance section.
Ensure hands are steady when taking
picture and remain steady one second
after clicking the Shutter button.
Keep a minimum distance of 60 inches
between the subject and the camera lens
to stay in the focus range of the camera.
Select a smaller picture size, M picture
size recommended.
Set the flash to any other mode except
Off.
Reset the white balance feature to Auto, or
for the specific lighting in the surrounding
area.
41
Page 43

Cannot take a picture
or a video clip when
using an SD memory
card.
Part of the picture/
video clip is missing.
Camera is not
responding during
picture capture.
The LCD is not
displaying anything.
The camera does not
recognize your SD
card.
The computer cannot
download files from the
camera.
The SD card is locked or
write protected.
Something was blocking
the lens when taking the
picture.
The picture was not
centered correctly in the
viewfinder.
Remove the SD card from the card slot
and slide the lock switch to off.
Keep hands, fingers, etc. away from the
lens when taking a picture.
Leave space around the subject when
centering the picture in the viewfinder.
The battery level is low
and the camera does not
have sufficient power to
Replace batteries.
complete picture capture.
LCD is turned off.
Turn the LCD on, by pressing the ENTER
button repeatedly until the LCD is on.
The battery level is low. Replace the batteries.
The card may not be SD
certified.
The card may be corrupted.
Reformat the card.
No card is inserted in the
camera.
Purchase a certified SD card.
Caution: Formatting erases all pictures on
the card. (See P.21)
Insert a card into the card slot. (See P. 9)
Camera power is off. Turn on the camera.
USB cable is not securely
connected.
Camera’s mode is in
capture
mode .
Connect cable to camera and computer
port.
Shift the mode in
TROUBLE SHOOTING
playback mode.
42
Page 44

SPECIFICATION
SPECIFICATION
Image Sensor CMOS Sensor (2048 x 1536 pixel), Sensor area 1 / 2 “
Lens Specification F 2.8, f = 8.34 mm
Focus Range
Operating System
Flash Strobe Yes, (Auto, Flash On, Flash Off, Red Eye Reduction)
White Balance Automatic / Daylight / Cloudy / Fluorescent / Tungsten
Exposure Control Auto / Manual (-2EV ~ +2EV)
Video Mode
Storage Capacity (for 16 MB
Built-In Memory) (approx.)
Compression JPEG / MJPEG (AVI)
Zoom 4x Digital Zoom(max.)
Display 1.8” TFT LCD
RTC(Real-Time Clock) Built-in (Date and Time)
PC Interface USB 1.1
Video Output NTSC/PAL
Storage Type Built-in 16MB Flash Memory + SD Card Slot (Card Not Included)
Power AAA 1.5V Batteries x 2
Bundled Software Ulead Photo Explorer 8.0 SE and COOL 360
Normal: 1.5 m (4.92 ft.) to Infinity, Macro:40 cm - 50 cm (1.31 ft
- 1.64 ft)
Microsoft Windows 98SE / 2000 / ME / XP
Support Image Download for MAC OS 10 or Later
VGA, 640 x 480 Pixels, Up to 20fps
QVGA 320 x 240 Pixels, Up to 25 fps
Images Stored (approx.):
Image
Quality
Fine
Normal
Economy
2400 x 1800 2048 x 1536 1024 x 768
459
81119
13 17 29
Image Size
43
Page 45

GETTING HELP
GETTING HELP
TROUBLESHOOTING SECTION IN THIS USER’S GUIDE
Please refer to the Troubleshooting section first, as it contains some of the most common problems
that users encounter.
WEBSITE CUSTOMER SUPPORT/FAQ
For problems that are not listed in the Troubleshooting section, please visit our customer support
website at www.concord-camera.com to view the Frequently Asked Questions (FAQ) by clicking the
appropriate camera model picture in the “Camera Support” Section. Most of the latest support issues
are posted and answered in the FAQ section. If the problem you are encountering is not listed either
in the troubleshooting section of this User’s Guide or the FAQ section on our website, you can also
E-mail us by clicking the E-mail address link to the customer support center in the “Camera Support”
Section.
CUSTOMER SUPPORT
Before You E-mail or Call us
If you have questions concerning the operation of the camera or software installation that are not listed
either in the troubleshooting section of this User’s Guide or the FAQ section on our website, feel free
to speak to or email a customer service representative. Before emailing or calling us, please have the
following information ready:
Camera Information: Computer Information:
Name of camera model Operating System
Camera Serial Number Computer Maker and Model
Exact Error message received
44
Page 46

SAFETY TIPS AND MAINTENANCE
SAFETY TIPS AND MAINTENANCE
Cleaning the camera body
Please use a soft dry cloth to clean the camera.
Cleaning the lens and LCD
1. Blow off dirt or dust with a blower or canned air.
2. Gently wipe the lens and/or LCD with a micro-fiber cloth.
3. To remove dirt or residue, moisten the cloth with lens cleaning fluid and gently wipe the lens and/or
LCD.
CAUTION: Do not apply the fluid directly onto the lens or LCD.
Cleaning the battery contacts
As a matter of routine operation and handling, should any debris or foreign contaminant deposit itself
on the battery contacts in the camera and/or on the batteries, follow steps below to clean the battery
contacts to ensure proper electrical operation:
1. Wet the tip of a cotton bud/swab with rubbing alcohol and squeeze the excess alcohol from the
bud/swab.
2. Wipe the battery contacts inside the camera battery compartment and both ends of the batteries
lightly with the damp bud.
3. Allow the contacts to dry before placing batteries in the camera.
Caution:
1) Do not press hard during cleaning, as this will cause damage to the battery contacts.
2) Do not use water to clean the contacts, as this will increase the chance of oxidation.
3) Do not use Acetone or Nail Polish remover to clean the contacts as this may adversely affect
camera operation.
SAFETY TIPS
Precautions for the camera
• Do not attempt to modify this camera in any way. This may cause a fire, electric shock or severe
damage to the camera.
• Do not use the flash in close proximity to people or animals.
• When taking photographs, never point the lens of the camera directly into very strong light.
• Please do not use this product in close proximity to flammable or explosive gases as this could
increase the risk of explosion.
• For safety reasons keep this product and accessories out of reach of children or animals to prevent
accidents.
45
Page 47

SAFETY TIPS AND MAINTENANCE
• Do not swallow batteries or small camera accessories.
• Keep the camera away from water and other liquids, and never let it get wet. Do not use outdoors
when it is raining or snowing.
• Should any form of liquid enter the camera, do not use it. Switch the camera off, and then remove
the batteries. Do not continue to use the camera as this may cause a fire or electric shock.
• Do not insert or drop metallic or inflammable foreign objects into the camera through access points
e.g. card slot and battery chamber. This may cause a fire or electric shock.
• Do not operate this camera with wet hands. This could pose a risk of electric shock.
• Under the environment with electrostatic discharge, the camera may malfunction and require the
user to reset the camera.
• Under the environment with electrical fast transients (EFT), the camera may lose function and
require user to reset the camera.
• Shielded cables must be used with this unit to ensure compliance with the Class B FCC limits.
• Please avoid using the camera in high or low temperature. Operation temperature range 32°F-
104°F(0°C-40°C).
• It is normal that the temperature of the camera body rises after being in use for a long period.
• Do not leave this camera in places subject to extremely high temperatures such as in a sealed
vehicle, direct sunlight or other places with extreme variances in temperature. Exposure to extreme
temperatures may adversely affect the camera’s internal components and could cause a fire.
• Always use the camera and its accessories in a well-ventilated area.
• Allowing dust to accumulate in the camera over a long period of time is hazardous and in extreme
circumstances may cause a fire. It is best to clean your camera prior to seasonal periods of high
humidity.
Precautions for batteries
• Dispose of the battery in a manner that complies with applicable laws.
• Leakage, overheating, or burst battery could result in fire or injury.
• Do not short circuit, heat or dispose of batteries in fire.
• Ensure the battery is positioned correctly with regard to polarity.
• Battery may lose power if kept inside the camera for a long time without using. Please remove the
battery while the camera is not in use.
• Batteries may not work normally under 32°F(0°C).
Precautions for SD Memory Cards
• In the event of malfunction or damage, it is possible that data may be lost. Concord Camera is not
responsible in any way for such data loss.
• Do not touch the terminals with hands or metal objects.
• Keep dust, water and foreign objects away from the terminal section.
46
Page 48

SAFETY TIPS AND MAINTENANCE
• Avoid heat, liquid and direct sunlight when using and for when storing.
• Do not open the battery/card cover or remove the SD Memory Card while data is being read or
written.
• Do not dismantle or modify.
• The recorded data may be lost if the card is affected by strong static electricity, electrical shock,
during card repair or malfunction.
• When using SD Memory Cards do not change the attributes (read-only, etc.) of the files (pictures
(JPEG) or video clips (AVI) on the card. Doing so may prevent the camera from working properly
when deleting, etc.
• Do not change the file names or the directory name of the pictures or video clips using a computer
or save files other than pictures or video clips taken by this camera onto the SD memory card.
Pictures or video clips that have been edited or added to the SD memory card with the computer
may not play back and it may cause the camera to malfunction.
• The SD Memory Card includes a write-protect switch. Sliding this switch downward prevents data
from being written to the card and pictures and video clips saved on the card are protected.
• Please note that pictures and video clips cannot be taken or deleted when the write-protect switch
is on.
• When using a large-capacity card, writing, reading and deleting may take some time.
• Do not store the card in places with high humidity, dusty places or where static electricity or
electromagnetic fields are likely to occur.
• Images stored in the memory card may be ruined or damaged if you turn off the camera while it is
in process of reading, writing or formatting etc.
• SD cards are delicate electronic devices. Please do not bend or drop them
• Please do not place the SD card in or near to an environment of strong electronic or magnetic
fields such as loud speakers or TV receivers.
• Please keep the SD card in its bag or case when not in use.
• It’s normal that the SD card is warm after use.
• Please make sure you switch off the camera before you remove the SD card.
• Do not open the battery/memory card door or remove the SD Memory Card while the camera is
reading, writing or formatting the card.
47
Page 49

REGULATORY INFORMATION
REGULATORY INFORMATION
FCC INFORMATION
FCC WARNING: This equipment meets the limits for a Class B digital device, pursuant to Part 15
of FCC rules. Only the cable supplied with the camera should be used. Operation with other cables
is likely to result in interference to radio and TV reception and could void the user’s authorization to
operate this equipment. This device complies with Part 15 of the FCC Rules. Operation is subject to
the following two conditions:
• This device may not cause harmful interference.
• This device must accept any interference received, including interference that may cause undesired
operation.
Tested to comply
with FCC standards
for HOME OR OFFICE USE
Changes or modifications not expressly approved by the manufacturer may void the user’s authority to
operate this equipment.
USER INFORMATION
NOTE: This equipment has been tested and found to comply with the limits for a class B digital device,
pursuant to Part 15 of the FCC Rules. These limits are designed to provide reasonable protection
against harmful interference in a residential installation. This equipment generates uses and can
radiate radio frequency energy and, if not installed and used in accordance with the instructions, may
cause harmful interference to radio communications. However, there is no guarantee that interference
will not occur in a particular installation.
If this equipment does cause harmful interference to radio or television reception, which can
be determined by turning the equipment on and off, the user is encouraged to try to correct the
interference by one or more of the following measures:
• Reorient or relocate the receiving antenna.
• Increase the separation between the equipment and receiver.
• Connect the equipment into an outlet on a circuit different from that to which the receiver is
connected.
• Consult the dealer or an experienced radio/TV technician for help.
- This product is in conformity with Directive 89/336/EEC.
The Jenoptik trademark is used by Concord Camera Corp. and its subsidiaries under license. Microsoft and Windows
are either registered trademarks or trademarks of Microsoft Corporation in the United States and/or other countries.
Mac and Macintosh are registered trademarks or trademarks of Apple Computer, Inc. in the U.S. and other countries.
All other brands and product names are either registered trademarks or trademarks of their respective owners.
48
Page 50

Visit Concord on the Internet
www.concord-camera.com
JENOPTIK C 3.1 SL User’s Guide
Copyright 2005 Concord Camera Corp.
Version 1.0
583091-00
R1
 Loading...