


NEDERLANDS
Conceptronic C54PSERVUM
Gebruikershandleiding
Gefeliciteerd met de aanschaf van uw Conceptronic Draadloze Multifunctionele Printer Server.
In deze handleiding wordt stap voor stap uitgelegd hoe u de Conceptronic Multifunctionele Printer Server installeert en gebruikt.
In geval van problemen, adviseren we u onze support website te bezoeken (ga naar www.conceptronic.net en klik op ‘Support’). Hier vind u een database met veelgestelde vragen waar u hoogstwaarschijnlijk de oplossing voor uw probleem kunt vinden.
Heeft u andere vragen over uw product waarvan u het antwoord niet op onze website kunt vinden, neem dan contact met ons op via e-mail: support@conceptronic.net.
Voor meer informatie over Conceptronic producten kunt u terecht op de Conceptronic website: www.conceptronic.net.
1. Inhoud van de verpakking
De volgende onderdelen dienen in de verpakking van de Conceptronic C54PSERVUM aanwezig te zijn:
xConceptronic C54PSERVUM Draadloze Multifunctionele Printer Server
xAntenne voor C54PSERVUM
xVoedingsadapter (12V DC, 1.0A)
xRJ45 Netwerkkabel
xProduct CD-ROM
xDeze gebruikershandleiding
1

NEDERLANDS
2.Opmerkingen en waarschuwingen
x Probeer de bijgeleverde voedingsadapter niet te demonteren. Dit kan tot verwondingen leiden als gevolg van hoog voltage. Indien de adapter gerepareerd moet worden, dient u contact op te nemen met uw dealer of de Conceptronic helpdesk.
xGebruik het apparaat niet in ruimtes met een hoge vochtigheid.
xStel het apparaat niet bloot aan en dompel het niet onder in vloeistof.
xOntkoppel de voedingsadapter indien u van plan bent het apparaat voor een langere tijd niet te gebruiken.
xVoorkom gebruik van het apparaat nabij licht ontvlambare objecten.
xZorg ervoor dat het apparaat nooit valt, ergens tegenaan stoot of geschud wordt.
xBedek het apparaat in geen geval, dit om oververhitting te voorkomen.
xGebruik het apparaat niet buitenshuis.
|
|
3. Standaard instellingen |
x |
IP-adres |
: 192.168.0.55 |
x |
Subnet masker |
: 255.255.255.0 |
x |
Standaard gateway |
: 192.168.0.1 |
Let op: Dit is alleen van toepassing indien er geen DHCP server in het netwerk aanwezig is. Indien dat wel het geval is, zal de C54PSERVUM automatisch een IP adres toegewezen krijgen van de DHCP server.
x |
Gebruikersnaam |
: admin |
x |
Wachtwoord |
: admin |
x |
MF Printer Server naam |
: C54PSERVUM |
x |
Werkgroep |
: Workgroup |
De bovenstaande instellingen zijn de standaard instellingen voor de C54PSERVUM. Als u terug wilt gaan naar de standaard fabrieksinstellingen, dient u de volgende stappen uit te voeren:
A.Houdt de INIT button op de C54PSERVUM ingedrukt (zie hoofdstuk 4).
B.Ontkoppel de spanning van de C54PSERVUM en sluit deze opnieuw aan, terwijl u de INIT knop ingedrukt houdt.
C.Houdt de INIT knop ongeveer 10 seconden ingedrukt, terwijl de USB LED knippert.
D.Ontkoppel de spanning, laat de INIT Knop los en sluit de spanning opnieuw aan.
De C54PSERVUM is nu hersteld naar de standaard fabrieksinstellingen.
2
NEDERLANDS
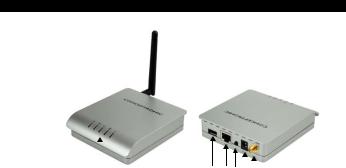
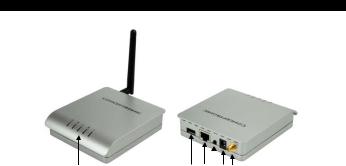
4. Product overzicht
Vooraanzicht |
Achteraanzicht |
|
1 |
2 |
3 |
4 |
5 |
6 |
Beschrijving van de nummers |
|
|
|
|
|
|
1. Status LED’s |
(‘Power’, ‘Wireless’, ‘Act’, ‘Status’ en ‘USB’) |
|
||||
2.USB aansluiting
3.RJ45 LAN netwerk aansluiting
4. |
Init. knop |
(herstel de C54PSERVUM naar de standaard fabrieksinstellingen) |
|
5. |
Aansluiting voor voedingsadapter |
(12v DC, 1A) |
|
6. |
Aansluiting voor antenne (Reverse SMA aansluiting) |
||
|
|
|
|
Hieronder vindt u de STATUS LED beschrijving, waarbij de LED’s van links naar rechts zijn beschreven.
Status LED |
Beschrijving |
Mogelijke status |
POWER |
Spanningsindicatie |
Uit / Aan |
WIRELESS |
Toont draadloze activiteit |
Uit / Aan / Knippert |
ACT |
Toont netwerk ativiteit |
Uit / Aan / Knippert |
STATUS |
Toont apparaat activiteit |
Uit / Aan / Knippert |
USB |
Toont USB aansluiting |
Uit / Aan / Knippert |
|
|
|
3

NEDERLANDS
5. Installatie voorbereiding
5.1 Hardware installatie
Voor u de C54PSERVUM kunt instellen en gebruiken dient u eerst de C54PSERVUM aan te sluiten op uw printer en het netwerk.
Let op: Om de C54PSERVUM draadloos te kunnen gebruiken dient u deze eerst in te stellen. Om de C54PSERVUM in te stellen voor gebruik op uw draadloze network moet u het apparaat eerst met een netwerkkabel (RJ45) aansluiten op uw bestaande netwerk.
A.Sluit de USB kabel van uw printer aan op de USB poort van de C54PSERVUM.
B.Sluit de meegeleverde netwerk kabel aan op de C54PSERVUM en op uw netwerk (router, switch, etc.) of op uw computer.
C.Sluit de meegeleverde voedingsadapter aan op de C54PSERVUM en op een vrij stopcontact.
Wanneer de bovenstaande hardware installatie gereed is kunt u doorgaan bij hoofdstuk 5.2 voor de software installatie.
4

NEDERLANDS
5.2 Software installatie
Wanneer de C54PSERVUM is aangesloten op uw printer en uw netwerk moet u de software installeren. Via de software kunt u eenvoudig de C54PSERVUM vinden en instellen. De software is te vinden op de meegeleverde CD-ROM.
Let op: De software moet geïnstalleerd worden op elke computer die gebruik wil maken van de C54PSERVUM en de aangesloten printer.
A.Plaats de CD-ROM in uw CD-ROM speler. Het Autorun Menu zal automatisch verschijnen. Als het Autorun Menu niet getoond wordt, ga dan naar “Mijn Computer” en dubbelklik op de CD-ROM speler om het Autorun Menu te starten.
B.Selecteer de optie “Install Software” in het Autorun menu.
C.De Setup Wizard zal gestart worden. Klik op “Next” om door te gaan.
D.Geef uw naam (en eventueel bedrijfsnaam) in en klik op “Next” om door te gaan.
E.Wijzig de installatiemap met de “Change” knop, of behoudt de standaard installatiemap. Klik op “Next” om door te gaan.
F.Klik op “Install” om de software voor de MF Printer Server op uw computer te installeren.
G.Klik, wanneer de Setup Wizard gereed is, op “Finish” om de Setup Wizard te sluiten.
5
NEDERLANDS
6. MFP Server Control Panel
Wanneer de hardware en software installatie afgerond is kunt u doorgaan met de configuratie van de C54PSERVUM.
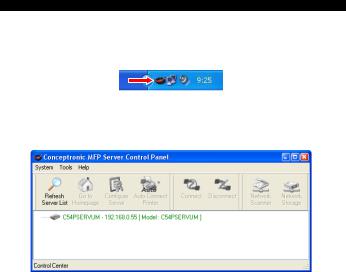
De MFP Control Panel software zal automatisch gestart worden wanneer uw computer opstart. De software kunt u herkennen aan het rode Conceptronic icon in de systeembalk:
Open het MF Printer Server Control Panel met de snelkoppeling op het bureaublad, via het Start Menu of door de klikken op het rode Conceptronic icon in de systeembalk.
Het MFP Server Control Panel zal op uw scherm verschijnen en toont alle aanwezige Multifunctionele Printer Servers in uw netwerk:
Als de C54PSERVUM niet in het MFP Server Control Panel getoond wordt kunt u op “Refresh Server List” klikken om opnieuw te zoeken naar aanwezige MF Printer Servers in uw netwerk.
Wanneer de C54PSERVUM is aangesloten op een netwerk met een aanwezige DHCP Server (zoals een router), zal deze automatisch een IP adres in de juiste netwerkrange krijgen.
6
NEDERLANDS
Wanneer u gebruik maakt van statische (vaste) IP adressen, en er is geen DHCP server beschikbaar, zal de C54PSERVUM werken op het standaard IP adres: 192.168.0.55.
U kunt eenvoudig zien of de C54PSERVUM in uw netwerkrange aanwezig is: dit is te zien aan de kleur van de tekst.
Wanneer de C54PSERVUM in Groen wordt weergegeven zit deze in de verkeerde netwerkrange.
Wanneer de C54PSERVUM in Blauw wordt weergegeven zit deze in de juiste netwerkrange.
6.1 Basis C54PSERVUM configuratie
Voordat u de C54PSERVUM kunt gebruiken dient u enkele basis instellingen te wijzigen.
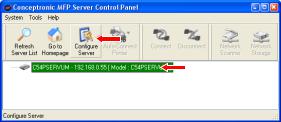
A.Selecteer de C54PSERVUM in het MFP Server Control Panel en klik op “Configure Server”.
B.De C54PSERVUM zal een gebruikersnaam en wachtwoord vragen. Voer de gebruikersnaam en wachtwoord in en klik op “Login”.
Let op: De standaard gebruikersnaam is: “admin”.
Het standaard wachtwoord is: “admin”.
7
NEDERLANDS
De basis instellingen die in de configuratie van de C54PSERVUM gewijzigd moeten worden zijn:
x |
General Configuration |
(Algemene instellingen) |
x |
TCP/IP |
(Netwerk instellingen) |
x |
Wireless |
(Draadloze netwerk instellingen) |
x |
User Accounts |
(Gebruikers instellingen) |
General Configuration (Algemene instellingen)
In de algemene instellingen kunt u de volgende opties wijzigen:
xServer name: Naam van de server in het netwerk
xWorkgroup: Werkgroep waarin de server zich bevindt
xDescription: Beschrijving van de server
Klik, na het wijzigen van bovenstaande opties, op “Apply” om de wijzigingen op te slaan.
TCP/IP Configuration (Netwerk instellingen)
In de netwerk instellingen kunt u de C54PSERVUM instellen op een automatisch IP adres of een statisch (vast) IP adres. Het huidige IP adres wordt ook getoond in dit venster.
Klik, na het wijzigen van de netwerk instellingen, op “Apply” om de wijzigingen op te slaan.
8
NEDERLANDS
Wireless Configuration (Draadloze netwerk configuratie)
In de draadloze netwerk configuratie kunt u de draadloze MF Printer Server instellen om met uw (bestaande) draadloze netwerk te verbinden.
U kunt de volgende instellingen wijzigen:
x |
Region of Domain: |
Selecteer uw regio. |
x |
Netwerk Type: |
Selecteer uw netwerk: Infrastructure of Ad-Hoc. |
|
|
Wanneer u de C54PSERVUM wilt verbinden met een bestaand |
|
|
draadloos netwerk kiest u voor Infrastructure. Als u een directe |
|
|
verbinding met een draadloze pc wilt maken kiest u voor Ad-Hoc. |
x |
SSID: |
Voer de naam (SSID) in van uw bestaande draadloze netwerk, of |
|
|
geef een nieuwe naam voor uw directe verbinding (Ad-Hoc). |
x |
Channel No: |
Kies een kanaal voor uw draaloze netwerk (alleen bij Ad-Hoc!). |
x |
Security System: |
Schakel de beveiliging op uw draadloze verbinding in of uit. |
|
|
U kunt kiezen tussen WEP 64Bit, WEP128Bit of WPA-PSK. |
|
|
Let op: Wanneer u een Ad-Hoc verbinding maakt, kunt u niet |
|
|
kiezen voor de beveiliging WPA-PSK. |
Klik, na het wijzigen van de instellingen, “Apply” om de wijzigingen op te slaan.
User Accounts (gebruikers instellingen)
In de gebruikers instellingen kunt u de gebruikersnaam en wachtwoord van de beheerder van de C54PSERVUM wijzigen.
Geef een nieuwe gebruikersnaam op in het veld “New Administrator”. Geef een nieuw wachtwoord op in het veld “New Password”.
Wanneer u een nieuw wachtwoord heft ingesteld dient u deze nogmaals op te geven in het veld “Retype Password”.
Klik, wanneer u de gebruikers instellingen heeft gewijzigd, op “Set” om de wijzigingen op te slaan.
Wanneer de configuratie van de C54PSERVUM gereed is kunt u de configuratie instellingen verlaten.
Let op: De C54PSERVUM heeft meer instellingen dan de beschreven basis instellingen. Deze instellingen zijn voor gevorderde gebruikers en niet beschreven in deze handleiding.
9
NEDERLANDS
6.2 Nieuwe printer installatie
Wanneer de C54PSERVUM is geconfigureerd kunt u beginnen met de printerinstallatie op uw computer.
Let op: Wij adviseren om een nieuwe printer installatie uit te voeren op uw computer. Als u de huidige printer installatie wilt behouden en deze wilt wijzigen voor gebruik met de C54PSERVUM kunt u verder gaan bij hoofdstuk 6.3.
A.Plaats de CD-ROM van uw printer in uw CD-ROM speler. Het Autorun Menu zal automatisch verschijnen. Als het Autorun Menu niet getoond wordt, ga dan naar “Mijn Computer” en dubbelklik op de CD-ROM speler om het Autorun Menu te starten.
B.Installeer de printer via de CD-ROM van uw printer.
Tijdens de installatie van de software en stuurprogramma’s van uw printer zal setup wizard vragen of u de printer wilt aansluiten op de computer.
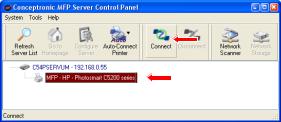
C.Open het MFP Server Control Panel door te klikken op het icoon in de systeembalk.
D.Selecteer de printer die verbonden is met de C54PSERVUM en klik op “Connect”.
Uw computer zal de printer herkennen als “normale” USB printer en de software van de printer zal verdergaan met de installatie.
Wanneer de software installatie is voltooid is uw printer geïnstalleerd als netwerk printer en gereed voor gebruik.
Let op: U dient op “Disconnect” te klikken voordat u de printer op een andere computer kunt installeren.
10
NEDERLANDS
6.3 Bestaande printer installatie
Wanneer de printer al op uw computer was geïnstalleerd hoeft u de software voor uw printer niet opnieuw te installeren. Het MFP Server Control Panel kan de bestaande geïnstalleerde printer eenvoudig omzetten naar een netwerk printer.
A.Volg de stappen van hoofdstuk 5.1 om de printer en de C54PSERVUM op uw netwerk aan te sluiten.
B.Open het MFP Server Control Panel door te klikken op het icoon in de systeembalk.
C.Selecteer de printer die verbonden is met de C54PSERVUM en klik op “Connect”.
Uw computer zal de printer herkennen als “normale” USB printer en zal de bestaande stuurprogramma’s en software toewijzen aan de netwerk printer.
Na de “Nieuwe Hardware” detectie en installatie door Windows zal de printer geïnstalleerd zijn als netwerk printer en klaar zijn voor gebruik.
Let op: U dient op “Disconnect” te klikken voordat u de printer op een andere computer kunt installeren.
11

NEDERLANDS
7. Uw netwerk printer gebruiken
Wanneer uw printer via de C54PSERVUM succesvol is geïnstalleerd op uw computer kunt u beginnen met het gebruik van uw netwerk printer.
U kunt op 2 manieren verbinden met uw netwerk printer:
x |
Auto Connect: |
Wanneer u meerdere printer gebruikers heeft in uw netwerk, |
|
|
adviseren wij om gebruik te maken van de ‘Auto Connect’ optie. |
|
|
De ‘Auto Connect’ optie maakt automatisch verbinding met de |
|
|
printer wanneer er een printopdracht binnenkomt en verbreekt |
|
|
automatisch de verbinding wanneer een andere gebruiker de printer |
|
|
wil gebruiken. |
Let op: De ‘Auto Connect’ optie werkt alleen voor de print functie van uw (multifunctionele) printer. Wanneer u gebruik wilt maken van de overige mogelijkheden van uw (multifunctionele) printer, dient u te kiezen voor de optie ‘Manual Connect’ optie in het MFP Server Control Panel, zoals beschreven in hoofdstuk 7.2.
xManual Connect: Verbindt handmatig met uw printer wanneer een verbinding nodig
is. Wanneer u gebruik maakt van de ‘Manual Connect’ optie, kunt u alle mogelijkheden van uw (multifunctionele) printer gebruiken.
Let op: Wanneer u gebruik maakt van de ‘Manual Connect’ optie kunnen andere gebruikers in het netwerk pas verbinden met de printer wanneer u handmatig de verbinding verbroken heeft. Zorg daarom dat u, als u handmatig verbonden bent, u de verbinding weer verbreekt als u klaar bent met de netwerk printer.
Om het verbinden en verbreken eenvoudiger te maken kunt u gebruik maken van de ‘Auto Connect’ optie, zoals beschreven in hoofdstuk 7.1.
7.1 Auto Connect (dynamisch gebruik, alleen voor printen)
U kunt het MFP Server Control Panel instellen om automatisch verbinding te maken met de printer wanneer dit nodig is. Het inschakelen van de ‘Auto connect’ optie heeft diverse voordelen:
xAutomatische verbinding met de printer wanneer een printopdracht wordt gegeven.
xAutomatische verbreking van de verbinding wanneer een andere computer in het netwerk probeert te verbinden met de printer.
12

NEDERLANDS
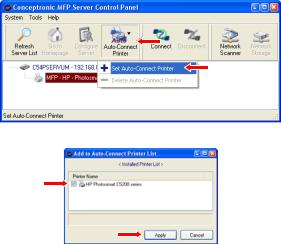
Om de ‘Auto Connect’ optie te activeren kunt u de volgende stappen volgen:
A.Open het MFP Server Control Panel door te klikken op het icoon in de systeembalk.
B.Klik op “Auto-Connect Printer” en selecteer “Set Auto-Connect Printer”.
C.Selecteer uw printer door op de checkbox voor uw printer te klikken en klik op “Apply”.
Het MFP Server Control Panel zal nu automatisch een verbinding maken met uw printer wanneer een printopdracht gegeven wordt.
13

NEDERLANDS
7.2 Manual Connect (statisch gebruik, voor printen, scannen, etc.)
Een multifunctionele printer kan meer functies bieden dan alleen printen, zoals:
xScanner
xFax
xKaartlezer
xUSB Host Poort
Als uw multifunctionele printer is voorzien van deze mogelijkheden, kunt u deze opties ook gebruiken via uw netwerk.
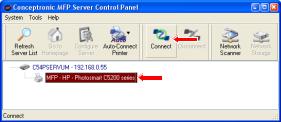
A.Open het MFP Server Control Panel door te klikken op het icoon in de systeembalk.
B.Selecteer de printer die verbonden is met de C54PSERVUM en klik op “Connect”.
Wanneer u klaar bent met printen, scannen, etc. kunt u klikken op “Disconnect”. Hiermee maakt u de printer beschikbaar voor andere gebruikers in uw netwerk, wanneer deze de printer nodig hebben.
Veel plezier met het gebruik van uw
Draadloze Multifunctionele Printer Server!
14

ENGLISH
Conceptronic C54PSERVUM
User Manual
Congratulations on the purchase of your
Conceptronic Wireless Multifunctional Printer Server.
This Quick Installation Guide gives you a step-by-step explanation how to install and use the Conceptronic Multifunctional Printer Server.
When problems occur, we advise you to visit our support-site (go to www.conceptronic.net and click on ‘Support’). Here you will find the Frequently Asked Questions Database.
When you have other questions about your product from which you cannot find the answer at our website, contact us by e-mail: support@conceptronic.net.
For more information about Conceptronic products, please visit the Conceptronic website: www.conceptronic.net.
1. Package contents
The following items should be present in the package of the Conceptronic C54PSERVUM:
xConceptronic C54PSERVUM Wireless Multifunctional Printserver
xAntenna
xPower supply (12V DC, 1.0A)
xRJ45 Network cable
xProduct CD-ROM
xThis User Manual
15

ENGLISH
2.Notes & cautions
x Do not attempt to disassemble the included power adapter. This may cause high-voltage injuries. If the adapter needs to be fixed, please contact your dealer or the Conceptronic helpdesk.
xKeep the device away from excessive moisture.
xDo not immerse in or expose to liquids.
xDisconnect the power adapter if you do not intend to use the device for an extended period of time.
xAvoid using the device in a location near combustibles.
xNever drop, shake or bump the device.
xTo prevent overheating, do not cover the device.
xDo not use the device outdoors.
3.Default values
x |
IP Address |
: 192.168.0.55 |
x |
Subnet Mask |
: 255.255.255.0 |
x |
Default Gateway |
: 192.168.0.1 |
Note: This only applies when there is no DHCP Server in the network. When a DHCP Server is present, the C54PSERVUM will get an IP address from the DHCP Server.
x |
Username |
: admin |
x |
Password |
: admin |
x |
MF Printer Server name |
: C54PSERVUM |
x |
Workgroup |
: Workgroup |
The above values are factory default values for the C54PSERVUM. If you need to go back to the factory default values, follow the instructions below:
A.Press and hold the INIT button on the C54PSERVUM (See chapter 4).
B.Disconnect and reconnect the power from the C54PSERVUM, while holding the INIT button.
C.Hold the INIT button for 10 seconds, while the USB LED is blinking.
D.Disconnect the power, release the INIT button and reconnect the power.
The C54PSERVUM is now set back to the factory default values.
16
ENGLISH
4. Product overview
Front View |
Back View |
1 |
2 |
3 |
4 |
5 |
6 |
Description of the numbers |
|
|
|
|
|
1. Status LED’s |
(‘Power’, ‘Wireless’, ‘Act’, ‘Status’, and ‘USB’) |
||||
2.USB Connector
3.RJ45 LAN Connector
4. |
Init. Button |
(Reset the C54PSERVUM to factory default settings) |
5. |
Power Connector |
(12v DC, 1A) |
6. |
Wireless antenna connector (Reverse SMA) |
|
|
|
|
Below you will find the Status LED description, described from left to right.
Status LED |
Description |
Possible status |
POWER |
Show power state |
Off / On |
WIRELESS |
Show wireless activity |
Off / On / Blink |
ACT |
Show network activity |
Off / On / Blink |
STATUS |
Show device activity |
Off / On / Blink |
USB |
Show USB connection |
Off / On / Blink |
|
|
|
17

ENGLISH
5. Installation preparation
5.1 Hardware installation
Before you can start the configuration and use of the C54PSERVUM, you need to connect the C54PSERVUM to your printer and network.
Note: To use the C54PSERVUM wireless, you need to configure it first. To configure the C54PSERVUM for your wireless network, you need to connect it wired (with RJ45 network cable) to your network first.
A.Connect USB cable of your printer to the USB port of the C54PSERVUM.
B.Connect the supplied network cable to the C54PSERVUM and to your network (router, switch, etc.) or computer.
C.Connect the supplied power supply to the C54PSERVUM and to a free power socket.
When the hardware installation is complete, you can proceed to Chapter 5.2 for the software installation.
18
ENGLISH
5.2 Software installation
When the C54PSERVUM is connected to your printer and network, you need to install the software. Through the software, you can easily find and configure the C54PSERVUM. The software can be found on the CD-ROM included in your package.
Note: You need to install the software on each computer where you want to use the printer which is connected to the C54PSERVUM.
A.Insert the CD-ROM in your CD-ROM Drive. The Autorun should appear automatically. If the Autorun menu does not appear, navigate to “My Computer” and double-click on the CD-ROM drive to start the Autorun menu.
B.Select the option “Install Software” in the Autorun menu.
C.The Setup Wizard will be started. Click “Next” to continue.
D.Enter your name and company in the fields and click “Next” to continue.
E.Modify the installation destination with the “Change” button, or keep the default installation destination. Click “Next” to continue.
F.Click “Install”to start the installation of the software for the MF Printer Server on your computer.
G.When the Setup Wizard is completed, click “Finish” to exit the Setup Wizard.
19

ENGLISH
6. MFP Server Control Panel
When the hardware and software installation is finished, you can proceed with the configuration of the C54PSERVUM.
The MFP Control Panel software will automatically start when your computer is starting, and can be recognized by the red Conceptronic icon in the system tray.
Open the MF Printer Server Control Panel with the shortcut on the desktop, through the shortcut in the Start Menu or by clicking the red Conceptronic icon in the system tray.
The MFP Server Control Panel will appear on your screen, listing the available Multifunctional Printer Servers in your network:
If the C54PSERVUM is not listed in the MFP Server Control Panel, click the “Refresh Server List” button to scan again for MF Printer Servers in your network.
When the C54PSERVUM is connected to a network with an available DHCP Server (like a router), it will receive an IP address in your network range automatically.
20
ENGLISH
If you are using static IP addresses, and there is no DHCP Server, the C54PSERVUM will operate on the factory default IP Address: 192.168.0.55.
You can easily see if the C54PSERVUM is in your network range by the colour of the text. When the C54PSERVUM is isted in Green, they are in the wrong network range.
When the C54PSERVUM is listed in Blue, they are in the correct network range.
6.1 Basic C54PSERVUM configuration
Before you can use the C54PSERVUM, you need to change the basic configuration.
A.Select the C54PSERVUM in the MFP Server Control Panel and click the “Configure Server” button.
B.The C54PSERVUM will ask for a username and password. Enter the username and password and click “Login”.
Note: The default username is: “admin”.
The default password is: “admin”.
21
ENGLISH
The basic settings which needs to be configured for your C54PSERVUM are:
xGeneral Configuration
xTCP/IP
xWireless
xUser Accounts
General Configuration
In the General Configuration, you can change the following settings:
xServer name: Name of the server in the network
xWorkgroup: Workgroup where the server is in
xDescription: Description of the server
After changing above settings, click “Apply” to save the settings.
TCP/IP Configuration
In the TCP/IP Configuration, you can set the C54PSERVUM to Automatic IP or Static IP. The Current IP address is also displayed.
After changing the TCP/IP Configuration, click “Apply” to save the settings.
22
ENGLISH
Wireless Configuration
In the Wireless Configuration, you can configure the Wireless MF Printer Server to connect wireless to your existing wireless network.
You can change the following settings:
x |
Region or Domain: |
Set your Region. |
x |
Network Type: |
Select between Infrastructure or Ad-Hoc. |
|
|
When you want to add the C54PSERVUM to your existing wireless |
|
|
network, select Infrastructure. If you want to make a point-to- |
|
|
point connection to a client, select Ad-Hoc. |
x |
SSID: |
Enter the SSID of your existing wireless Infrastructure, or a new |
|
|
SSID name for your Ad-Hoc wireless network. |
x |
Channel No: |
Set the channel of your wireless network (Ad-Hoc only!). |
x |
Security System: |
Enable or Disable the wireless security of the C54PSERVUM. |
|
|
You can select between WEP 64Bit, WEP128Bit or WPA-PSK. |
|
|
Note: When you use an Ad-Hoc configuration, WPA-PSK is not |
|
|
available. |
After changing the Wireless Configuration, click “Apply” to save the settings.
User Accounts
In the User Accounts Configuration, you can change the administrator username and password.
You can set a new Administrator login at the field “New Administrator”. You can set a new Administrator password at the field “New Password”.
When you set a new password, you need to retype it in the field “ Retype Password”.
When the administrator account is changed, click the “Set” button to save the settings.
When the configuration of the C54PSERVUM is complete, you can exit the configuration pages.
Note: The C54PSERVUM has more settings than the described basic settings. These settings are for experienced users and not described in this manual.
23

ENGLISH
6.2 New printer installation
When the C54PSERVUM is configured, you can install the printer on your computer.
Note: It is advised to make a new printer installation on your computer. If you want to keep the existing installation and adjust the existing installation to the C54PSERVUM, please continue to Chapter 6.3.
A.Insert the CD-ROM of your printer in your CD-ROM Drive. The Autorun should appear automatically. If the Autorun menu does not appear, navigate to “My Computer” and double-click on the CD-ROM drive to start the Autorun menu.
B.Install the printer through the CD-ROM of your printer.
During installation of the software and drivers of your printer, most installation software will ask you to connect the printer to the computer.
C.Open the MFP Server Control Panel by clicking on the system tray icon.
D.Select the printer connected to the C54PSERVUM and click the “Connect” button.
Your computer will recognize the printer as “normal” USB printer and the software of your printer will continue the installation.
After the software installation is finished, your printer is installed as network printer and ready to use.
Note: You need to click the “Disconnect” button before you can install the printer on another computer.
24

ENGLISH
6.3 Existing printer installation
If you have your printer already installed on your computer, it is not necessary to install the software again. The MFP Server Control Panel and Windows can easily adapt your existing installed printer to a network printer.
A.Follow the steps in Chapter 5.1 to connect the printer and the MF Printer Server to the network.
B.Open the MFP Server Control Panel by clicking on the system tray icon.
C.Select the printer connected to the C54PSERVUM and click the “Connect” button.
Your computer will recognize the printer as “normal” USB printer and assigns the existing drivers and software to the network printer.
After the “New Hardware” detection and installation by Windows, your printer is installed as network printer and ready to use.
Note: You need to click the “Disconnect” button before you can install the printer on another computer.
25

ENGLISH
7. Using your network printer
When your printer is successfully installed on your computer through the C54PSERVUM, you can start using your network printer.
You can connect to your network printer in 2 different ways:
x |
Auto Connect: |
If you have multiple printer users in your network, it is advised to |
|
|
use the Auto Connect option. The Auto Connect option will |
|
|
automatically connect to the printer when a printing command is |
|
|
received and automatically disconnects when another user wants to |
|
|
print. |
Note: The Auto Connect feature only works for the print function of your (multifunctional) printer. If you want to use other features of your (multifunctional) printer, you need to use the “Manual Connect” option in the MFP Server Control Panel, as described in Chapter 7.2.
xManual Connect: Manually connect to your printer when a connection to the printer is
needed. When using the Manual Connect feature, you can also use the other features of your (multifunctional) printer.
Note: When you use the manual connect feature, other users in your network can only connect when you manually disconnect. When you are connected manually, make sure that you disconnect from the network printer when you are finished with the network printer.
To make connecting and disconnecting easier, you can set the printer to “Auto Connect” connect (see Chapter 7.1).
7.1 Auto Connect (dynamic use, for printing only)
You can set the MFP Server Control Panel to autoconnect to the printer each time you need to print. Enabling the auto connect feature on your computers has multiple advantages:
xAutomatic connection to the printer when a print command is received.
xAutomatic disconnection when another computer in the network tries to connect to the printer.
26
ENGLISH
To enable the auto connect feature on your computer(s), follow the steps below:
A.Open the MFP Server Control Panel by clicking on the system tray icon.
B.Click the button “Auto-Connect Printer” and select “Set Auto-Connect Printer”.
C.Check the checkbox in front of your printer and click “Apply”.
The MFP Server Control Panel will now connect automatically to your printer when a print or fax command is received.
27
ENGLISH
7.2Manual Connect (static use, for printing, scanning, etc.)
A Multifunctional printer can offer more functions than printing only, like:
xScanner
xFax
xCardreader
xUSB Host Port
If your multifunction printer is equipped with these features, you can use these features too through the network.
A.Open the MFP Server Control Panel by clicking on the system tray icon.
B.Select the printer connected to the C54PSERVUM and click the “Connect” button.
When you are finished with printing, scanning, etc. click the “Disconnect” button. This allows other users in your network to access the printer when needed.
Enjoy the use of your Wireless Multifunctional Printer Server!
28

ESPAÑOL
C54PSERVUM de Conceptronic
Manual del usuario
Felicidades por la compra de su
servidor de impresora multifunción inalámbrico de Conceptronic
Esta Guía de instalación rápida le ofrece una descripción paso a paso acerca de cómo instalar el servidor de impresora multifuncional de Conceptronic.
En caso de surgir cualquier problema, visite nuestra página web de asistencia técnica (haga clic en el apartado “Soporte” de www.conceptronic.net). En esa sección podrá consultar la base de datos de Preguntas Frecuentes (FAQ).
Si tiene otras preguntas sobre su producto y no las encuentra en nuestro sitio web, póngase en contacto con nosotros por correo electrónico: apoyo@conceptronic.net.
Si desea información adicional sobre los productos de Conceptronic, visite nuestro sitio web: www.conceptronic.net.
1. Contenido del paquete
El paquete del C54PSERVUM de Conceptronic contiene los elementos siguientes:
xServidor de impresora multifunción inalámbrico C54PSERVU de Conceptronic
xAntena
xFuente de alimentación (12V CC, 1A)
xCable de red RJ45
xCD-ROM del producto
xEste manual del usuario
29

ESPAÑOL
2.Notas y avisos
x No intente desmontar el adaptador de corriente que incluye el paquete. El alto voltaje puede causar lesiones. En caso de que el adaptador deba repararse, póngase en contacto con su distribuidor o con el servicio de atención al cliente de Conceptronic.
xMantenga el dispositivo alejado de ambientes excesivamente húmedos.
xNo sumerja o coloque el dispositivo en sustancias líquidas.
xDesconecte el adaptador de corriente si no va a utilizar el dispositivo durante un largo período de tiempo.
xEvite utilizar el dispositivo en lugares cercanos a sustancias combustibles.
xNunca deje caer, sacuda o golpee el dispositivo.
xPara evitar su sobrecalentamiento, no cubra el dispositivo.
xNo utilice el dispositivo al aire libre.
3.Valores predeterminados
x |
Dirección IP |
: 192.168.0.55 |
x |
Máscara de subred |
: 255.255.255.0 |
x |
Puerta de enlace predeterminada |
: 192.168.0.1 |
Nota: Esto es aplicable sólo cuando no haya ningún servidor DHCP en la red. Cuando haya un servidor DHCP, el C54PSERVUM obtendrá una dirección IP del servidor DHCP.
x |
Nombre de usuario |
: admin |
x |
Contraseña |
: admin |
x Nombre del servidor de impresora MF |
: C54PSERVUM |
|
x |
Grupo de trabajo |
: Workgroup |
Estos valores son los valores de fábrica del C54PSERVUM. Para restablecer estos valores de fábrica, siga las siguientes instrucciones:
A.Pulse y mantenga pulsado el botón INIT del C54PSERVUM (véase la sección 4).
B.Desconecte y vuelva a conectar la alimentación eléctrica del C54PSERVUM mientras mantiene pulsado el botón INIT.
C.Mantenga pulsado el botón INIT durante 10 segundos, mientras parpadea el LED de USB.
D.Desconecte la alimentación eléctrica, suelte el botón INIT y vuelva a conectar la alimentación.
El C54PSERVUM vuelve a tener ahora los valores predeterminados de fábrica.
30
 Loading...