

Page 1

Page 2

Notice
The information in this publication is subject to change without notice.
COMPAQ COMPUTER CORPORATION SHALL NOT BE LIABLE FOR
TECHNICAL OR EDITORIAL ERRORS OR OMISSIONS CONTAINED
HEREIN, NOR FOR INCIDENTAL OR CONSEQUENTIAL DAMAGES
RESULTING FROM THE FURNISHING, PERFORMANCE, OR USE OF
THIS MATERIAL. THIS INFORMATION IS PROVIDED “AS IS” AND
COMPAQ COMPUTER CORPORATION DISCLAIMS ANY
WARRANTIES, EXPRESS, IMPLIED OR STATUTORY AND
EXPRESSLY DISCLAIMS THE IMPLIED WARRANTIES OF
MERCHANTABILITY, FITNESS FOR PARTICULAR PURPOSE, GOOD
TITLE AND AGAINST INFRINGEMENT.
This publication contains information protected by copyright. No part of this
publication may be photocopied or reproduced in any form without prior
written consent from Compaq Computer Corporation.
© 1999 Compaq Computer Corporation. All rights reserved.
Printed in the USA.
The software described in this guide is furnished under a license agreement
or nondisclosure agreement. The software may be used or copied only in
accordance with the terms of the agreement.
Compaq and Deskpro are registered in the United States Patent and
Trademark Office.
Microsoft, MS-DOS, Windows, Windows NT, and other names of Microsoft
products referenced herein are trademarks or registered trademarks of
Microsoft Corporation.
Intel and Pentium are registered trademarks of Intel Corporation. Celeron
and MMX are trademarks of Intel Corporation.
Product names mentioned herein may be trademarks and/or registered
trademarks of their respective companies.
Compaq Deskpro EC Series of Personal Computers
User’s Guide
First Edition (September 1999)
Part Number 157743-001
Page 3

Contents
chapter 1
Introduction to the User’s Guide
Symbols and Conventions.......................................................................................................................1–3
Environmental Commitment...................................................................................................................1–3
chapter 2
Solving Common Computer Problems
Organization............................................................................................................................................2–1
Helpful Hints...........................................................................................................................................2–2
Basic Problems........................................................................................................................................2–3
Audio Problems ......................................................................................................................................2–4
CD-ROM Drive/Compact Disk Problems ..............................................................................................2–7
Computer (F2) Setup Problems ..............................................................................................................2–8
Diskette Drive Problems .........................................................................................................................2–9
DVD-ROM Problems ...........................................................................................................................2–10
Hard Drive Problems ............................................................................................................................2–11
Hardware Installation Problems............................................................................................................2–12
Internet Problems..................................................................................................................................2–13
Keyboard Problems...............................................................................................................................2–14
Memory Problems.................................................................................................................................2–15
Microsoft Software Problems ...............................................................................................................2–16
Modem/Fax Problems...........................................................................................................................2–17
Network Problems ................................................................................................................................2–22
Pointing Device Problems.....................................................................................................................2–24
Printer Problems....................................................................................................................................2–25
Product Key Problems ..........................................................................................................................2–26
Screen and Display Problems ...............................................................................................................2–27
Software Problems................................................................................................................................2–29
USB Problems.......................................................................................................................................2–30
chapter 3
Compaq QuickRestore
System Restore........................................................................................................................................3–1
Selective Restore ....................................................................................................................................3–2
Reinstalling Drivers ................................................................................................................................3–3
chapter 4
Upgrading Your Computer
Opening Your Computer.........................................................................................................................4–2
Removing the Computer Access Panel.............................................................................................4–3
Removing the Front Bezel ................................................................................................................4–4
User’s Guide iii
Page 4

Removing Bezel Blanks....................................................................................................................4–5
Removing an Expansion Slot Cover .................................................................................................4–6
Installing an Expansion Board................................................................................................................4–7
Removing an Expansion Board ..............................................................................................................4–8
Installing Additional Memory.................................................................................................................4–9
Installing Additional Drives..................................................................................................................4–11
Using the Cable-Select Feature with Ultra ATA Devices ..............................................................4–11
Installing a Drive into the Drive Bay ..............................................................................................4–12
Removing a Drive from the Drive Bay...........................................................................................4–14
Replacing the Battery............................................................................................................................4–15
Reassembling the Computer .................................................................................................................4–17
When to Reconfigure the Computer .....................................................................................................4–18
chapter 5
Computer Setup
..................................................................................................................................................5–1
chapter 6
Getting Help
Compaq Web Site ...................................................................................................................................6–1
Telephone Numbers................................................................................................................................6–1
CarePAQ .................................................................................................................................................6–1
appendix A
Agency Regulatory Notices
...............................................................................................................................A–1
appendix B
Power Cord Set Requirements
.......................................................................................................................... B–1
appendix C
Electrostatic Discharge
..................................................................................................................................... C–1
Index .................................................................................................................................................................... I–1
iv User’s Guide
Page 5

chapter
1
Introduction to the User’s Guide
The User’s Guide includes general information about your computer,
troubleshooting, upgrades, diagnostics information, and technical
specifications.
Your Compaq computer comes with Windows 98 already installed on
the hard drive. After you set up your computer according to the Setup
Poster, refer to “Setting up Your Software” in the Getting Started
Guide for a screen-by screen description of software setup on your
Compaq computer. If you are already familiar with the setup process,
you should still refer to the hints in this section prior to beginning the
process.
You will need the following information during the setup process:
■ Regional settings (the language you want to use during the setup
process). Your software language is determined by the product
that you ordered.
■ Information about your name and company
■ Product Key number from the Certificate of Authenticity
✎ You will find the Product Key printed in a bar code on your
Certificate of Authenticity, which appears on the front of the
Windows 98 booklet that came with your computer.
Your time zone, the date, and the time
■
User’s Guide 1–1
Page 6

Throughout the setup process, follow these hints:
■ Always use the left mouse button during the selection process.
■ Do NOT install a printer, printer drivers, or any other type of
drivers until AFTER the initial setup process is complete.
Attempts to do so will disrupt the setup process.
CAUTION: Installing a printer may disrupt the setup process. Aviod
printer installation until after the initial setup process is complete.
■ If you get a Printer Install screen, select Cancel.
■ Prior to or during the setup process, do not attempt to install
additional software or to attach any external devices or drives
(such as printers and ZIP drives, or printer drivers on CD).
■ Once the setup process begins, do not interrupt the process, turn
the power off, or bump or unplug the power cord. If the process is
abruptly stopped or interrupted, you may have to install the
system using the Quick Restore CD, which will take longer.
■ If the screen goes blank or nothing appears to be happening, look
at the drive activity light or the screen for an hourglass. If lights
are blinking or you see an hourglass, the setup process is
continuing. If the computer locks up for more than one hour and
will not continue the setup process, restart the computer to
continue setup. Turn the computer off by pressing the Power
button. Do not use Ctrl+Alt+Del to turn off your computer.
1–2User’s Guide
If you have other questions related to your Windows 98 software,
refer to your software documentation.
Page 7

Symbols and Conventions
The following format conventions distinguish elements of the text
throughout this guide:
■ When keys must be pressed at the same time, the action is
represented by the key names and the plus (+) symbol.
■ An arrow (→) indicates a sequence of actions. You will follow the
sequence through a series of menus or screens. During the
sequence, you may need to click or double-click on an item to
proceed.
■ When you need to make a selection with a mouse, you are
directed to “select” or “click” the information.
The following words and symbols mark special messages throughout
this guide:
WARNING: Text set off in this manner indicates that failure to
!
follow directions could result in bodily harm or loss of life.
CAUTION: Text set off in this manner indicates that failure to
follow directions could result in damage to equipment or loss of
information.
Environmental Commitment
✎ Text set off in this manner presents clarifying information, specific
instructions, commentary, sidelights, or other points of information.
Compaq is committed to making environmentally friendly products.
Your computer was produced in a chlorofluorocarbons (CFC)-free
factory. All plastics used in the product are stamped with material
composition to make recycling more efficient. Reduce, reuse, and
recycle are words to live by at Compaq.
User’s Guide 1–3
Page 8

1–4User’s Guide
Page 9

chapter
2
Solving Common Computer Problems
If you have a problem with your computer, look to the problems and
possible solutions in this section to save time and money. If the
problem appears to be related to a software application, also check the
documentation provided with the software. If the problem persists,
contact your Compaq authorized service provider or the Customer
Support Center. You can also visit the Troubleshooting section of the
Compaq website at http://www.compaq.com.
Or, troubleshoot using Computer Diagnostics or Compaq Diagnostics
for Windows. See the “Running Diagnostic Tests” chapter for more
information.
Organization
After the “Helpful Hints” and “Basic Problems” sections, this chapter
is organized alphabetically according to the following topic headings:
■ Audio Problems
■ CD-ROM Drive/Compact Disk Problems
■ Computer (F2) Setup Problems
■ Diskette Drive Problems
■ DVD-ROM Problems
■ Hard Drive Problems
■ Hardware Installation Problems
■ Internet Problems
■ Memory Problems
User’s Guide 2–1
Page 10

Microsoft Software Problems
■
■ Modem/Fax Problems
■ Network Problems
■ Pointing Device Problems
■ Printer Problems
■ Product Key Problems
■ Screen and Display Problems
■ Software Problems
■ USB Problems
Helpful Hints
Before looking at specific troubleshooting sections, go through the
following checklist to see if you can find a solution:
■ Is your computer connected to a working electrical outlet?
■ Is your computer turned on and is the power light on?
■ Are all cables connected and secured properly?
■ Is your monitor on and are the brightness and contrast controls set
appropriately?
■ Is your keyboard working? Press and hold any key. If the system
beeps, then your keyboard should be operating correctly.
■ Did the diskette drive contain a nonbootable disk when you
turned your computer on?
■ Have you installed all the necessary drivers? For example, if you
are using a printer, you may need to install a printer device driver.
■ Did you exit properly from Windows before shutting off your
computer? Failure to do so can result in file corruption.
2–2User’s Guide
Page 11

Basic Problems
Basic Problems
Problem Possible Cause Solution
Have you scanned your computer for viruses?
■
■ Have you reconfigured your computer after installing a non Plug
and Play expansion board or other option, such as a diskette
drive? See “Hardware Installation Problems” in this chapter for
further instructions.
Computer won’t turn on The computer is not connected
to an external power source.
The cables to the external power
source are unplugged.
A defective PCI or ISA card has
been installed.
Computer display date and time
is incorrect
Computer pauses periodically The network driver is loaded and
The real-time clock (RTC) battery
needs to be replaced. Battery life
is approximately 5 years.
no network connection is
established.
Connect the computer to an external
power source.
Ensure that the cables connecting the
computer and the external source are
plugged in properly.
Remove any adapter card that was
just installed.
First reset the date and time under
the Control Panel. If the problem
persists, replace the RTC battery.
Refer to the “Upgrading Your
Computer” chapter for instructions on
installing a new battery, or contact
your Compaq authorized dealer or
reseller for RTC battery replacement.
Establish a network connection, or
use a Computer Setup or Windows
Device Manager to disable the
network controller.
User’s Guide 2–3
Page 12

Audio Problems
Audio Problems
Problem Possible Cause Solution
No sound Audio drivers are not installed. Remove the audio device in the
Device Manager and restart the
computer. Refer to the audio driver
documentation for instructions on
installing audio drivers for third party
drivers. For Compaq drivers, refer to
the Selective Restore procedure in
the “Compaq QuickRestore” chapter.
Cannot record any sound. The
microphone does not work
No volume and no sound can be
heard. You have verified that your
speaker connections and audio
drivers are installed correctly
No sound in Windows 98 There is a conflict with the audio
No sound from DOS applications DOS has different drivers than
The microphone has no volume
because the Mute Volume option
is enabled under the Microsoft
Volume Control applet.
Either the Mute All or the Mute
Volume option is enabled under
the Microsoft Volume Control
applet.
card.
those included with your
computer. DOS mode drivers are
not installed or are not working
correctly.
Launch the Volume Control applet.
Select Options→Properties. Under
Show the Following Volume Controls,
select Microphone→OK. Under the
Microphone control, disable the Mute
option by clicking on Mute so that the
box beside it is no longer checked.
Launch the Volume Control applet.
Under each of the controls look at the
Mute option. If Mute All or Mute is
enabled (i.e. checked) for any control,
disable it by clicking on Mute.
Remove existing audio drivers and
restart the computer.
From the original audio driver
diskette, verify that DOS mode drivers
are installed in CONFIG.SYS.
2–4User’s Guide
Page 13

Audio Problems (Continued)
Problem Possible Cause Solution
Speakers do not produce any
sound
External microphone does not
work
The volume controls on your
computer have been set too low.
The audio line is in the wrong
jack.
Headphones are connected to
the stereo headphone jack.
Speakers are connected
incorrectly or are not plugged in.
The microphone is not
compatible with your computer.
The microphone is not connected
properly.
Adjust the volume of the stereo
speakers using the volume controls.
Access the volume control.
Click Start→Programs→
Accessories→Multimedia→Volume
Control.
Adjust the volume using the Volume
Control icon on the taskbar.
Check line input connection. Ensure
that the audio line is in the correct
jack.
Disconnect the headphones.
Reconnect speakers to the line-out
jack.
Check to see that you are using a
monophonic electric condenser
microphone with a 3.5 mm plug.
Ensure that the microphone plug is
connected to the microphone line-in
jack properly. The microphone jack
includes a picture of a microphone.
No sound is coming from a
program that should have sound
A sound source is not selected. Ensure that the microphone is
selected as the recording source in
Control Panel→Multimedia and that
the recording level is adjusted.
The audio settings are not
correct.
The volume on your computer is
turned down.
The headphones are connected. Use or disconnect the headphones.
Check the game program’s audio
settings.
Adjust the speaker volume control on
your computer.
User’s Guide 2–5
Page 14

Audio Problems (Continued)
Problem Possible Cause Solution
No sound is coming from the
headphones
Volume is too low or too loud Volume and/or mixing controls
CD is not working during audio
setup
Need sound drivers for Windows NTUnit not shipped with Windows
The volume or mixing controls
are set incorrectly.
A sound source is not selected. Verify that the sound source is
The headphones are connected
to the wrong jack.
are set incorrectly.
Improper speaker connection. Reconnect speakers. If this does not
NT.
Use the volume control and mixing
features available in Control
Panel→Multimedia.
selected in Control Panel→
Multimedia.
Check your connection with the
components listed in “Introducing
Your Computer
Started Guide.
correct port.
Check the volume and mixing
controls in Control Panel→
Multimedia.
solve the problem, remove and
reinstall the audio drivers.
Obtain drivers from the Compaq Web
site at www.compaq.com.
” in the Getting
Reconnect to the
2–6User’s Guide
Page 15

CD-ROM Drive/ Compact Disk Problems
CD-ROM/Compact Disk Problems
Problem Possible Cause Solution
CD-ROM drive cannot read a CD The CD is not seated properly in
the drive.
The CD has been loaded upside
down.
The CD is dirty or scratched. Clean the CD and reload it, or load
System will not boot from
CD-ROM drive
The computer cannot find the
CD-ROM drive
Cannot eject CD The CD is not loaded properly in
The CD-ROM boot is not enabled
through the Computer Setup.
The CD-ROM drive is not
connected properly, it was not
terminated properly, or the CDROM driver is not loaded.
the drive.
Eject the CD, reseat it, and close the
tray.
Eject the CD, turn it over, and close
the tray.
another CD.
Refer to the “Computer Setup”
chapter.
Reconnect the cables to the
CD-ROM drive.
Refer to the Selective Restore
procedure in the “Compaq
QuickRestore” chapter.
Turn your computer off and insert a
thin metal rod into the emergency
eject hole on the front bezel of the
CD-ROM drive. Press firmly. Slowly
pull the tray out from the drive until
the tray is fully extended; then
remove the CD.
User’s Guide 2–7
Page 16

Computer (F2) Setup Problems
Computer (F2) Setup Problems
Problem Possible Cause Solution
Refer to the “Computer Setup” chapter for more information about
✎
this utility.
Unable to exit Computer Setup
and enter Windows 98
Unable to disable Power
Management in Computer Setup
in Windows 98, or screen blacks
out after 15-20 minutes
Cannot set NumLock key poweron state
Not using the arrow keys to
navigate.
Power Management is enabled. Go to Computer Setup; under Power
NumLock is not set in Computer
Setup.
Go to the Menu bar, select Exit, and
follow the on-screen instructions.
Management, set to Disabled.
Go to Computer Setup; select
Advanced. Select Boot Settings
Configuration. NumLock power-on
state can be set using the arrow keys.
2–8User’s Guide
Page 17

Diskette Drive Problems
Diskette Drive Problems
Problem Possible Cause Solution
You may need to reconfigure the computer when you add or remove
✎
hardware, such as an additional diskette drive. Refer to the
“Hardware Installation Problems” section of this chapter.
Diskette drive light stays on The diskette is inserted
incorrectly.
The diskette is damaged. In Windows 98, run Scan Disk.
Diskette drive cannot write to a
diskette
Diskette drive cannot read a
diskette
The diskette is write-protected. Use another diskette or remove the
Your computer is writing to the
wrong drive.
Not enough space is left on the
diskette.
The diskette drive is disabled. Click Control Panel→System, and
The diskette is not formatted or is
formatted incorrectly.
Remove the diskette and reinsert.
Click
Start→Programs→Accessories→
System Tools→ScanDisk.
write protection by sliding the black
tab on the corner of the diskette until
the window is closed.
Check your application to see which
drive it is trying to access; then
change the drive letter or the path if
necessary.
Use another diskette that has more
free disk space.
select the Device Manager tab. Click
the diskette drive On.
Format the diskette.
From the Windows 98 desktop,
double-click My Computer→3.5"
Floppy→File→Format. Fill in the
appropriate information. Press Start.
Reformatting the diskette will destroy
all data on the diskette.
Error message appears while
information is writing to the
diskette drive
The diskette is the wrong type for
the drive.
The diskette was removed while
the drive light was on.
Use the correct diskette type. LS-120
disks will not work in a diskette drive.
Diskette or files may be damaged.
Recopy the information onto a new or
reformatted diskette.
User’s Guide 2–9
Page 18

DVD-ROM Problems
DVD-ROM Problems
Problem Possible Cause Solution
✎
This feature is not currently available for Windows NT.
Certain files on a DVD disk will
not play using the MediaPlayer
A DVD disk inserted in the DVDROM drive with DVD Player
running will not play
The MediaPlayer does not initiate
the authentication process
necessary for playback of DVD
files. Attempts to play these files
will result in no video being
played.
In the drivers for most DVD-ROM
drives there is an Auto-Insert
Notification option that is turned
on by default. This option lets the
operating system know when a
DVD or compact disk is inserted
into the DVD-ROM drive. The
purpose of the feature is to begin
running software or to begin
playback of a disk when it is first
inserted into the drive without the
need for running an application.
If this option is turned off, the
DVD Player application does not
know that you inserted a DVD
disk.
Use the DVD Player to play all
content. This is the correct way to
view all DVD files.
To turn this option on, use the
following procedure:
1. Click Start→Settings→Control
Panel.
2. Double-click the System icon;
then select the Device Manager
tab.
3. Locate the CD-ROM listing, and
click the entry for your DVDROM drive.
4. Click the Properties button and
then the Settings tab.
5. Locate and click the checkbox
labeled Auto Insert Notification.
6. Click OK to save the change.
7. Restart Windows 98, if
necessary, for the change to
become active.
When playing a DVD, you get an
“invalid/illegal region code”
message
2–10 User’s Guide
The DVD does not match the
region code for your player.
Set the correct region code for your
region.
If you have already selected a region
code permanently, you will be unable
to change it.
Page 19

Hard Drive Problems
Hard Drive Problems
Problem Possible Cause Solution
CAUTION: Reformatting the hard drive erases all of your files
permanently; be sure to make backup diskettes of your information
before reformatting the drive. Compaq also recommends that you
have a backup of your pre-installed software before reformatting
the hard drive.
Hard drive error occurs The hard drive has bad sectors
or has failed.
If you are running Windows 98, press
Start→Programs→Accessories→
System Tools→ScanDisk. Place a
check in the Automatically Fix Errors
box. Start the ScanDisk utility.
Reformat the hard drive.
Contact your Compaq authorized
dealer, reseller, or service provider or
the Compaq Customer Support
Center for assistance.
User’s Guide 2–11
Page 20

Hardware Installation Problems
Hardware Installation Problems
Problem Possible Cause Solution
You may need to reconfigure your computer when you add or remove
hardware, such as an additional diskette drive. If you install a Plug
and Play device, Windows 98 automatically recognizes the device and
configures the computer.
If you install a non Plug and Play device, you must reconfigure the
computer after installing the new hardware. In Windows 98, select the
Add Hardware icon in the Control Panel and follow the instructions
that appear on the screen.
New external hardware device is
not working properly
Second Ultra ATA hard drive
does not perform optimally
Your computer did not
automatically configure the new
device.
The cable(s) for the new external
device are loose, or the power
cables are unplugged.
The power switch of the new
external device is not turned on
or was turned on after your
computer was turned on.
The device was plugged in while
your computer was on and was
not recognized by your computer.
The cable is the wrong type for
the drive type.
Check the documentation that came
with the device to see if any device
drivers need to be installed. If
necessary, install the correct device
drivers.
Ensure that all cables are connected
properly and securely, and verify that
pins in the cable and the connector
are not bent down.
Turn your computer off, turn the
external device on, and then turn your
computer on to allow the computer to
recognize the new device.
Turn your computer off.
Reattach the external device and turn
it on; then turn your computer on. This
allows your computer to see the new
device.
Reinstall the second Ultra ATA hard
drive using an 80-conductor cable.
2–12 User’s Guide
Page 21

Internet Problems
Internet Problems
Problem Possible Cause Solution
✎
Go to the Welcome to Windows 98 Screen and click on Connect to
the Internet for information on setting up an Internet account and
Browser.
Cannot register Windows 98
when attempting a Web-based
online registration
Not connecting to Internet Dialup is not configured correctly
Cannot connect to Internet
Service Provider, or no Internet
access
Unable to set up the ISP
Microsoft Network (MSN), or
receive vxd error after trying to
install MSN
Cannot access a particular Web
site
You do not have an ISP account. Choose an ISP and install
for the Internet.
ISP connection problem. Call your ISP for support.
Compaq does not support third
party ISP such as MSN.
Internet site filtering is enabled. Set the desired level of Internet
appropriate software provided by the
ISP before accessing the Internet.
Configure Internet setup using the
Internet Connection Wizard.
Contact Microsoft Network (MSN) for
support of their product.
security and filtering. Refer to your
Web browser software
documentation.
User’s Guide 2–13
Page 22

Keyboard Problems
Keyboard Problems
Problem Possible Cause Solution
Keyboard does not work The keyboard was connected
after your computer was turned
on.
Turn your computer off, reconnect the
keyboard; then turn your computer
on.
2–14 User’s Guide
Page 23

Memory Problems
Memory Problems
Problem Possible Cause Solution
Memory count during Power-On
Self-Test (POST) is incorrect
Insufficient memory error during
operation
The system will not boot or does
not function properly after
installing additional memory
modules
The memory modules are
installed incorrectly.
Your computer ran out of memory
for the application.
The memory configuration is not
set up correctly.
The memory module is not the
correct type or speed for the
system.
Ensure that the memory modules
have been installed correctly. Use
only SDRAM DIMM modules.
Close all unnecessary applications.
Check the memory requirements for
your application, or add more
memory to the computer.
Use the Device Manager to check the
memory configuration.
Click Start→Settings→Control
Panel→System→Device Manager
tab→System Devices→double-click
Direct Memory Access Controller.
Check device status.
Replace the module with an industrystandard, SPD-compliant 168-pin
Synchronous Dynamic Random
Access Memory (SDRAM) DIMM that
meets the following requirements:
• 66 MHz System Bus
Rated for 66 MHz or faster operation.
Has an access time (CLK to Q) of 9 ns
or less.
Supports CAS latency 2 or 3
operation, or
• 100 MHz System Bus
Rated for 100 MHz or faster
operation.
Has an access time (CLK to Q) of 6 ns
or less.
Supports CAS latency 2 or 3
operation.
User’s Guide 2–15
Page 24

Microsoft Software Problems
Microsoft Software Problems
Problem Possible Cause Solution
If you are unable to find the information you need here, refer to the
✎
“Software Problems” section of this chapter.
Internet Explorer will not set up Explorer is not configured
properly.
While installing software, you are
prompted for a Windows 98 CD
and you do not have one
A Windows 98 CD is not
provided because it is included
on your QuickRestore CD. The
files that you need are preloaded on your system.
Refer to your ISP for support.
Use the following path:
C:\Windows\Options\CABS.
2–16 User’s Guide
Page 25

Modem/Fax Problems
If you have installed a modem, and are experiencing problems, this
section may provide helpful information. Be sure to refer also to the
documentation that came with your modem.
The following factors may affect the modulation speed at which your
computer communicates:
■ The maximum communication speed of a call is determined by
the speed of the slowest modem on the connection. Many
modems automatically negotiate the fastest possible speed with
the modem you dial.
■ Phone line conditions may affect the speed at which your modem
actually communicates on any call. Many modems are designed
to establish a reliable connection automatically at a lower speed,
if required, to overcome noise or other problems with the phone
line.
If you are unable to resolve a problem, contact your modem
manufacturer or supplier.
User’s Guide 2–17
Page 26

Modem/Fax Problems
Problem Possible Cause Solution
No dial tone The modem is connected
incorrectly.
Phone service is not connected
to the telephone wall jack.
The phone is connected to a
digital PBX jack.
The modem is not responding to
commands from your computer.
Refer to the documentation that came
with your modem for proper
installation instructions.
Verify service from your local
telephone company.
1. Unplug the modem cable from
the telephone wall jack.
2. Connect a telephone to the jack,
pick up the headset, and listen
for a dial tone. If there is a dial
tone, reconnect the modem to
the telephone wall jack with the
telephone cable and make sure
all connections are secure. If
there is still no dial tone, contact
your local phone company or
building manager.
Plugging the modem into a digital line
results in no dial tone. Reconnect the
modem cable to an analog phone
jack; then reestablish the connection.
Verify that the modem and your
computer are connected.
1. Click Start→Programs→
Accessories→HyperTerminal.
2. Go to Terminal Mode; then type
AT and press Enter.
3. If the modem displays OK, the
modem and your computer are
working together. If the modem
displays ERROR or does not
respond, restart your computer
and repeat Steps 1 and 2.
4. Type ATDT and listen for a dial
tone.
5. Type ATHO to hang up.
2–18 User’s Guide
Page 27

Modem/Fax Problems (Continued)
Problem Possible Cause Solution
Modem/fax loses connection
The telephone line is very noisy
and the call is cut off, or you
encounter garbled or missing
characters or slow data transfer
speed
Lost carrier. Redial the number and try to
reconnect.
The connection from the phone
line to the modem is loose.
Call waiting has not been
disabled.
Another telephone on the same
phone line is off the hook.
Excessive line noise. Contact your local telephone
Disconnect; then reconnect the
phone cable. Reestablish the
connection.
To disable call waiting:
1. Click Start→Control
Panel→Modem.
2. From the General tab of the
Modem Properties page, click
Dialing Properties.
3. From the My Location tab of the
Dialing Properties page, check
the box labeled This Location
has Call Waiting; then select *70,
70#, or 1170 from the drop-down
list to disable Call Waiting for
your dialing area.
Be sure that all telephones connected
to your modem/fax are hung up
properly.
company for a phone line filter. Check
your telephone and modem cable
connections. Loose connections can
cause noise on the line.
Modem fails to connect to the
ISP or remote system
Modem fails to completely send
fax
Recurring prompt to confirm
country selection
An error was encountered during
the modem connection process.
An error was encountered during
transmission.
Current Country modem
selection does not match the
initial default.
Redial the number and try to
reconnect. If the problem persists,
contact your ISP’s technical support
hotline or your system administrator.
Re-send fax.
To disable these reminders, change
the Home Country selection to match
the Current Country selection.
User’s Guide 2–19
Page 28

Modem/Fax Problems (Continued)
Problem Possible Cause Solution
Unable to connect the internal
modem at speeds above 33.6
Kbps (56K modems only)
Difficulty using the modem/fax The modem/fax software may be
The site called does not support
56K or supports an incompatible
56K implementation.
The phone line used does not
support 56K implementation.
The phone line used is noisy. The 56K protocol will fall back to
There is more than one analog
connection in the transmission
link.
conflicting with other
applications.
The internal modem supports K56flex
and V.90. Information about ISPs that
support these protocols can be found
on the Compaq website at
www.compaq.com.
This site also contains information
about updates that may be available
for the 56K code in your modem and
a 56K White Paper about 56K
technology.
The 56K protocol requires that the
phone line used must contain no
more than one analog-to-digital
conversion. Try connecting from an
alternate phone line.
lower speeds if the phone line is too
noisy for a high-speed connection. Try
switching to another phone line.
None. The modem is functioning
properly.
Certain applications may conflict with
the computer’s built-in modem/fax
software. Exit from any applications
that you are running but are not using.
Modem/fax does not respond to
modem/fax software
2–20 User’s Guide
More than one device is
assigned to a COM port.
1. Click Start→Settings→Control
Panel→Modem.
2. Double-click the Modem icon and
verify that each COM port has
only one device assigned to it. To
change a modem’s COM port,
open the Modem Properties
dialog box and select a different
COM port.
Page 29

Modem/Fax Problems (Continued)
Problem Possible Cause Solution
Modem does not work when
using MS-DOS-based
communications software
(controllerless modems only)
No dial tone or the modem will
not dial
Modem reports improper setup The modem is not set up
Your modem type is not listed,
and you do not have an options
diskette
Unable to insert phone line in
modem
When starting a dialup
connection, your phone number
comes up first
Real mode MS-DOS does not
contain the code necessary to
run a controllerless modem.
The modem does not respond to
the AT command. Modem
worked its way loose.
properly.
Your modem is not listed in the
menu of modem brands/types.
Attempting to use the wrong jack. Plug the telephone line into the jack
Dialing properties were
configured incorrectly.
Try running MS-DOS communications
software in a MS-DOS prompt
window, rather than in a real mode
MS-DOS, or
Upgrade the communications
software. Purchase software
specifically designed to work with the
Windows 98 operating system.
Reseat the modem and attempt to
redial.
Ensure that networking protocols and
dialup networking are configured
correctly.
Select Standard Modem if no other
choice matches your modem type.
marked Line. Plug the phone receiver
into the jack marked Phone.
Check dialing properties, especially
the number to reach an outside line.
User’s Guide 2–21
Page 30

Network Problems
Network Problems
Problem Possible Cause Solution
If you have installed a network interface card (NIC), and are
experiencing problems, this section may provide helpful information.
Be sure to refer also to the documentation that came with your NIC.
Remote Wakeup feature is not
working
Network status link does not turn
on or flash
Diagnostics reports a failure The cable is not connected
The Remote Wakeup feature is
not enabled.
No active network is detected. Check the cabling and network
The system is configured for the
AUI connection.
The network driver is not loaded
properly.
securely.
The cable is attached to an
incorrect connector.
There is a problem with the cable
or with a device at the other end
of the cable.
The network controller is
defective.
Enable Remote Wakeup. Refer to the
“Computer Setup” chapter for more
information.
equipment for the proper connection.
No solution; the link LED does not
apply to the AUI connections.
Reinstall the network drivers.
Ensure that the cable is attached
securely to the network connector
and that the other end of the cable is
attached securely to the correct
device.
Ensure that the cable is attached to
the correct connector.
Ensure that the cable and the device
at the other end are operating
correctly.
Contact your Compaq authorized
service provider.
2–22 User’s Guide
The network controller detects a
conflict between the resource
settings and an expansion board.
Click Start→Settings→Control
Panel→Device Manager tab. Doubleclick NIC. If there is a NIC problem,
NIC will appear in the list with a yellow
circle and an exclamation point
beside it. Double-click NIC to see the
device status and a list of problems.
Resolve all resource issues.
Page 31

Network Problems (Continued)
Problem Possible Cause Solution
Diagnostics passes, but the
computer does not communicate
with the network
Network controller stopped
working when an expansion
board was added to the
computer
The network controller stopped
working without an apparent
cause
The network drivers are not
loaded, or the driver parameters
do not match the current
configuration.
The network controller is not
configured for this computer.
The network controller detects a
conflict between the resource
settings and an expansion board.
The network controller requires
drivers.
The files containing the network
drivers are corrupted.
The files containing the network
drivers are corrupted.
Make sure that the network drivers
are loaded and that the driver
parameters match the configuration
of the network controller.
Select the Network icon in the Control
Panel.
Click Start→Settings→Control
Panel→Device Manager tab. Doubleclick NIC. If there is a NIC problem,
NIC will appear in the list with a yellow
circle and an exclamation point
beside it. Double-click NIC to see the
device status and a list of problems.
Resolve all resource issues.
Verify that drivers were not
accidentally deleted when drivers for
a new expansion board were
installed.
Reinstall the network drivers using
your backup diskettes.
Reinstall the network drivers using
your backup diskettes, or refer to the
Selective Restore procedure in the
“Compaq QuickRestore” chapter.
The cable is not connected
securely.
The network controller is
defective.
Ensure that the cable is attached
securely to the network connector
and that the other end of the cable is
attached securely to the correct
device.
Contact your Compaq authorized
service provider.
User’s Guide 2–23
Page 32

Pointing Device Problems
Pointing Device Problems
Problem Possible Cause Solution
Device driver is loaded but
pointing device does not work
The wrong mouse has been
selected.
If you are running Windows 98, click
Start→Settings→Control Panel→Add
New Hardware; then use the arrow
keys to highlight the Mouse icon in
the selection box and choose the
correct mouse hardware.
2–24 User’s Guide
Page 33

Printer Problems
Printer Problems
Problem Possible Cause Solution
✎
Please contact your printer manufacturer if you have trouble
installing your printer.
Printer will not turn on The cables are not connected
properly, or the printer is
unplugged.
Printer will not print The printer is not turned on or is
offline.
The correct printer drivers for
your application are not installed.
You are on a network and are not
mapped to the correct printer.
Printer is offline The printer is out of paper. Fill the paper tray with paper. Set the
Printer prints garbled information The correct printer drivers for
your application are not installed.
The cables are not connected
properly.
Printer is listed in Windows as
having its own drivers, but it
prints garbled information after
setup
Printer drivers are incorrect. Remove and reinstall the printer
Ensure that the cables are connected
properly and that the power plug is
connected to a working electrical
outlet.
Turn the printer on and verify that it is
online.
If you are running Windows 98, install
the necessary printer drivers using the
Add New Hardware wizard.
Map to the correct network printer.
printer to online.
Install the correct printer driver for your
application.
Reconnect all cables.
drivers.
Cannot install printer drivers Installation process is not
correct.
Refer to the documentation provided
with the printer drivers or to the MS
Windows manual.
User’s Guide 2–25
Page 34

Product Key Problems
Product Key Problems
Problem Possible Cause Solution
Product Key is not accepted Incorrect or incomplete Product
Key.
Ensure that you have typed the
correct Product Key for the
application or operating system that
you are installing.
For Windows 98 the Product Key is
located on the front cover of the
Windows User Guide.
2–26 User’s Guide
Page 35

Screen and Display Problems
Screen and Display Problems
Problem Possible Cause Solution
Blank screen The monitor is not turned on, and
the monitor light is not on.
The cable connections are not
correct.
The Video Power Down feature
has been enabled.
The Red, Green, Blue (RGB)
input switch on the back of the
monitor is set incorrectly.
You are using a fixed-sync
monitor, and it will not sync with
the chosen resolution.
Screen goes blank after 15-20
minutes
Screen goes blank Brightness and contrast need
Video Power Down is enabled. Go to Computer Setup and select
adjusting.
Turn the monitor on and check that
the monitor light is on.
Check the cable connection from the
monitor to the computer and to the
electrical outlet.
Go to Computer Setup and select
Power. Select Video Power Down and
use the arrow keys to make changes.
Go to Exit and Save Changes.
Set the monitor’s input switch to 75
ohms, and if there is a sync switch,
set it to “external.” Refer to the
documentation included with your
monitor.
Be sure that the monitor can accept
the same sweep rate as the chosen
resolution.
Power. Select Video Power Down and
use the arrow keys to make changes.
Go to Exit and Save Changes.
Adjust the monitor brightness and
contrast.
Screen save has been initiated,
or Power Management is
enabled.
Press any key to return the screen to
normal.
User’s Guide 2–27
Page 36

Screen and Display Problems (Continued)
Problem Possible Cause Solution
Characters on computer display
appear dim
Monitor overheats There is insufficient ventilation
Blurry display, or the requested
resolution cannot be set
The picture is broken up or it
rolls, jitters, or blinks
The brightness and/or contrast
controls are not set properly.
The cables are not connected
properly.
The RGB switch on the back of
the monitor is set incorrectly.
space for proper airflow.
If the graphics controller was
upgraded, the correct display
drivers may not be loaded.
The monitor connections are
incomplete, or the monitor is
adjusted incorrectly.
Adjust the monitor brightness and
contrast controls.
Verify that the video cable is
connected securely to the video card
and the monitor.
Set the RGB switch (and, if available,
the sync options) to 75 ohms, with the
sync set to “external.” Refer to
documentation included with the
monitor.
Leave at least 3 inches (7.6 cm) of
ventilation space. Be sure nothing is
sitting on top of the monitor
obstructing airflow.
Install the display drivers included in
the upgrade kit on the diskette.
Verify that the monitor cable is
connected securely to the computer.
In a two-monitor system or if another
monitor is in close proximity, move the
computers farther apart to ensure
that they are not interfering with each
other’s electromagnetic fields.
2–28 User’s Guide
Page 37

Software Problems
Software Problems
Problem Possible Cause Solution
✎
If you are unable to find the information you need here, refer to the
“Microsoft Software Problems” section of this chapter.
Most software application or installation problems occur as a result of
one or more of the following:
■ The application was not installed correctly.
■ Memory was not allocated correctly.
■ There is a conflict between applications.
Application will not run There is not enough memory for
the application.
Cannot run DOS application from
current directory
The application has not been
added to the PATH statement in
the AUTOEXEC.BAT file.
Check the documentation that came
with the software for memory
requirements. If necessary, install
additional memory.
Call Compaq Customer Support for
help with memory optimization.
Using Windows Notepad, add the
application directory with the full path
name to the PATH settings in the
AUTOEXEC.BAT file.
User’s Guide 2–29
Page 38

USB Problems
USB Problems
Problem Possible Cause Solution
External device connected to a
USB connector does not work
External device connected to
USB connector does not work
during startup (before Windows
98 loads)
External devices on lower tiers
do not work
Note: External USB keyboards will not function until the operating system has been booted.
The operating system limits
external devices connected by
USB to two tiers, which can
include no more than two hubs
on the first tier and no more than
one keyboard and one pointing
device on the first or second tier.
During Startup, only two tiers are
supported by the USB connector.
An unpowered hub is connected
to another unpowered hub.
Reduce the number of connected
external USB devices to no more
than two hubs on the first tier and no
more than one keyboard and one
pointing device on the first or second
tier.
Use the external device only after
Windows 98 has loaded.
Reduce the number of connected
external USB devices to no more
than two hubs on the first tier and no
more than one keyboard and one
pointing device on the first or second
tier.
Use only powered hubs.
Verify that all unpowered hubs are
immediately preceded by powered
hubs in the USB chain.
2–30 User’s Guide
Page 39

chapter
3
Compaq QuickRestore
To protect your software from loss or damage, you should keep a
backup copy of all system software, applications, and related files
stored on your hard drive. Refer to your operating system or backup
utility documentation for instructions on making backup copies of
your personal data files.
The QuickRestore CD allows you to choose one of the following
solutions:
■ System Restore—Reformats the hard drive and then returns the
computer to its original preinstalled software state.
■ Selective Restore—Allows you to select specific Compaq drivers
or Compaq applications to reinstall without reformatting the hard
drive.
System Restore
System Restore reformats the hard drive and reinstalls the operating
system and all Compaq drivers and applications. All third party
software is provided with your system and may be reinstalled as
desired.
CAUTION: System Restore destroys all data on the computer’s
hard disk. If you have added personal files, software, or data since
you purchased the computer, backup or copy this data before
proceeding.
✎ Once the System Restore is complete, you will need to provide the
startup information again to complete the Windows operating
system setup.
User’s Guide 3–1
Page 40

To perform a System Restore on your computer, complete the
following steps:
1. Insert the QuickRestore CD into your CD drive.
Selective Restore
2. Click Start
3. Carefully read the notice that is displayed; then click the Enter
button to begin the System Restore if you wish to continue.
4. When the Restoration Complete message is displayed, remove
the QuickRestore CD from the computer. Press Enter to restart the
computer.
5. Read and follow the on-screen prompts to continue the
installation process. The computer may restart several times
depending on the hardware components that are present.
6. After installation of the operating system is complete, install any
additional software that came with the computer. It is
recommended that you restart the computer if prompted to do so
by the installation application.
Selective Restore allows you to select the specific Compaq drivers or
applications you want to reinstall without reformatting the hard drive.
To perform a Selective Restore on your computer, complete the
following steps:
1. Insert the QuickRestore CD into your CD drive. The CD will
automatically start. You can also access the Selective Restore
applications by clicking Start
QR→QuickRestore.
→Shut Down→Restart the Computer.
→Programs→
3–2User’s Guide
2. Click the Selective Restore button.
3. On the Selective Restore menu, click the application or driver that
you want to reinstall.
4. Restart the computer if prompted to do so by the installation
application.
5. Repeat this procedure to reinstall as many applications or drivers
as you need.
Page 41

Reinstalling Drivers
Drivers make it possible for you to run various components of your
computer. If a driver is accidentally deleted or if the operating system
is reinstalled, the driver subdirectory allows you to restore the
individual drivers rather than restore all of the original software. If
you purchased after sale options, the drivers may not be available on
the QuickRestore CD. Refer to the option documentation for
instructions on installing any applicable drivers. The drivers that you
can restore are:
■ Audio
■ Video
■ Display
■ CD ROM
Drivers can be reinstalled from the QuickRestore CD through
Selective Restore, or from the hard drive.
To reinstall a driver from the hard drive, complete the following steps:
1. From the Windows desktop, click Start
→Programs→Windows
Explorer.
2. Navigate to the CPQDRV folder on the hard drive and
double-click on it.
3. Double-click on the driver that you would like to reinstall.
4. Follow the on-screen instructions.
User’s Guide 3–3
Page 42

3–4User’s Guide
Page 43

1. Processor
2. Power Supply
3. AGP Slot
4. PCI Slots
5. ISA Slot
6. Memory Slots
chapter
4
Upgrading Your Computer
Your computer comes with the following slots for internal
components that you might want to add. The locations of these slots
are illustrated in the following figure. The number and position of
expansion slots may vary by model.
Internal Components
User’s Guide 4–1
Page 44

This chapter explains how to disassemble and reassemble your
computer to install the following optional upgrade and replacement
equipment:
■ Additional memory
■ Expansion boards
■ Optional drives
This chapter also explains when to reconfigure the computer to ensure
that it recognizes the new equipment.
Contact a Compaq authorized dealer, reseller, or service provider for
information on purchasing optional hardware and upgrades for your
computer. If you prefer, you can order optional hardware and
upgrades for your system via the Internet at www.compaq.com.
Opening Your Computer
Depending on the upgrade you are making, you may need to complete
any or all of the following tasks:
■ Remove the computer access panel
■ Remove the front bezel
■ Remove bezel blanks
■ Remove expansion slot covers
CAUTION: Static electricity can damage the electronic
components of the computer or optional equipment. Before
starting these procedures, ensure that you are discharged of static
electricity by touching a grounded metal object briefly. Refer to for
Appendix C for more information.
4–2User’s Guide
Page 45

Removing the Computer Access Panel
1. Turn the computer and all external devices off. Disconnect the
power cord from the wall outlet.
CAUTION: When the unit is plugged in, the power supply always
has 5V applied to the system board even when the unit is turned
off. Failure to disconnect the power cord can result in damage to
the system.
2. Disconnect the keyboard, monitor, and any other external
equipment that is connected to the computer.
CAUTION: Before removing the computer access panel, verify that
the computer is turned off and that all power cord(s) are
disconnected from the electrical outlets.
3. Remove the screws that secure the access panel to the computer
chassis, as shown in the following figure.
4. Slide the access panel back about 1 inch (2.5 cm); then lift it up
and off the unit.
Removing the Computer Access Panel
User’s Guide 4–3
Page 46
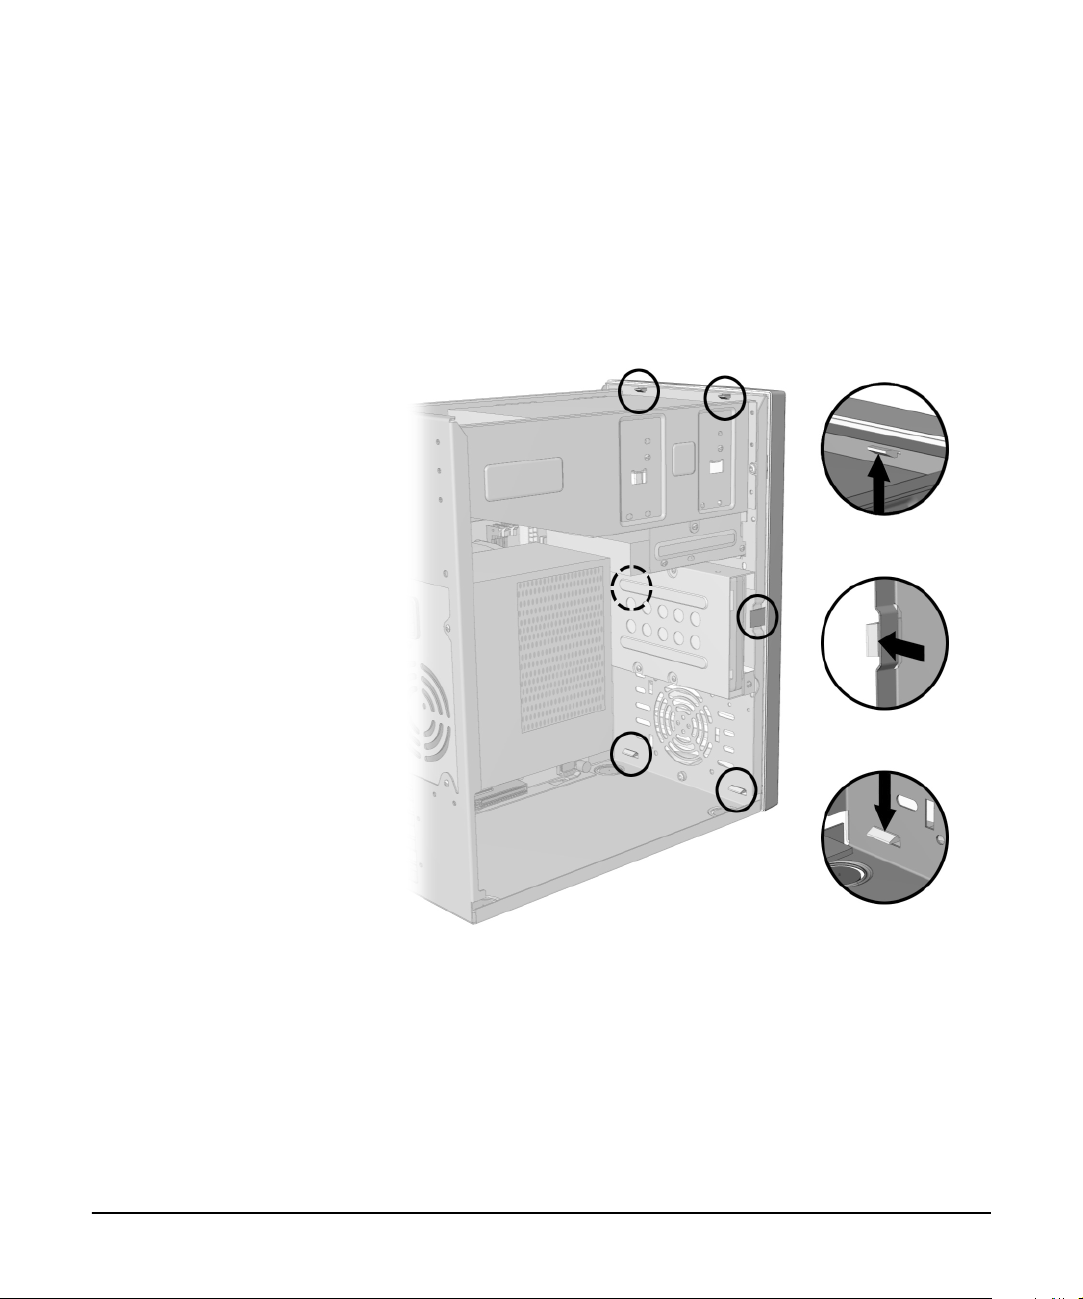
Removing the Front Bezel
1. Complete the steps in the “Removing the Computer Access
Panel” section of this chapter.
2. Push the two tabs on the top of the front bezel in; pull the two tabs
on the sides of the front bezel out; push the two tabs on the
bottom of the front bezel in.
3. Pull the front bezel away from the chassis.
4–4User’s Guide
Removing the Front Bezel
Page 47

Removing Bezel Blanks
1. Complete the steps in the “Removing the Front Bezel” section of
this chapter.
2. Gently pull the subpanel, with the bezel blanks secured in it,
away from the front bezel; then remove the desired bezel blank,
as shown in the following figure.
CAUTION: Hold the subpanel straight when you pull it away from
the front bezel. Pulling the subpanel away at an angle might
damage the pins that align it within the front bezel.
Removing Bezel Blanks from the Subpanel
User’s Guide 4–5
Page 48

Removing an Expansion Slot Cover
1. Complete the steps in the “Removing the Computer Access
Panel” section of this chapter.
2. In the computer chassis, locate the correct vacant slot.
3. Remove the screw that is securing the slot cover; then remove the
expansion slot cover from the slot as shown in the following
figure.
4–6User’s Guide
Removing the Screw and Expansion Slot Cover
Page 49

Installing an Expansion Board
1. Complete the steps in the “Opening Your Computer” section of
this chapter.
2. Slide the expansion board into the expansion slot, and press it into
place firmly, as shown in the following figure.
✎ Press firmly on the board to seat the whole connector in the
expansion board slot properly.
3. Replace the screw at the side of the expansion slot.
4. Complete the steps in the “Reassembling the Computer” section
of this chapter.
5. Connect the external cables to the installed board, if necessary.
Installing an Expansion Board
User’s Guide 4–7
Page 50

Removing an Expansion Board
1. Complete the steps in the “Opening Your Computer” section of
this chapter.
2. Disconnect all cables that are attached to the expansion board.
3. Remove the screw at the side of the expansion slot, as shown in
the following figure.
4–8User’s Guide
Removing an Expansion Board
4. Hold the board at each end and rock it back and forth carefully
until the connectors pull free from the slot.
CAUTION: Be careful not to scrape the board against the other
components.
5. Store the board in an anti-static packaging.
6. Install an expansion slot cover to close the open slot.
7. Complete the steps in the“Reassembling the Computer” section
of this chapter.
Page 51

Installing Additional Memory
The computer comes with Synchronous Dynamic Random Access
Memory (SDRAM) Dual-Inline Memory Modules (DIMMs)
installed. You can expand this memory by adding additional DIMMs,
keeping in mind the following restrictions:
■ The SDRAM DIMMs must support CAS Latency 2 or 3 (CL = 2
or CL = 3).
■ The DIMMs must contain the mandatory Joint Electronic Device
Engineering Council (JEDEC) Serial Presence Detect (SPD)
information. DIMMs constructed with x4 SDRAM are not
supported; the system will not start if you are using unsupported
DIMMs.
■ Your DIMM sockets have gold metal contacts. Use DIMMs with
gold metal contacts (not tin-lead) to prevent corrosion and/or
oxidation when incompatible metals come into contact with one
another.
CAUTION: Static electricity can damage the electronic
components of the computer or optional boards. Before starting
these procedures, ensure that you are discharged of static
electricity by touching a grounded metal object briefly. Refer to
Appendix C for more information.
1. Complete the steps in the “Opening Your Computer” section of
this chapter.
2. Locate the DIMM sockets, as shown in the following figure.
User’s Guide 4–9
Page 52

4–10 User’s Guide
Installing a DIMM Module
3. Open both latches ➊ of the DIMM socket; then insert the memory
module ➋ into the socket as follows:
■ Match the notch in the module with the tab on the memory
socket.
■ Push the module down into the socket until the latches snap
into place, ensuring that the module is inserted fully and
seated properly.
Page 53

CAUTION: When handling a memory module, do not touch any of
the contacts or the memory module may be damaged.
✎ When adding memory, you can install DIMMs in either of the two
banks using different sizes of DIMMs in each bank. BIOS detects
the size and type of installed memory.
4. Complete the steps in the “Reassembling the Computer” section
of this chapter.
✎ Your computer will automatically recognize additional memory.
Installing Additional Drives
Using the Cable-Select Feature with Ultra ATA Devices
The computer supports up to two drives that may be installed in
various configurations. When installing additional drives, follow
these guidelines:
■ For optimal performance, connect hard drives to the primary
controller. Connect expansion devices, such as CD-ROM and
diskette drives, to the secondary controller.
■ You may install either a third-height or a half-height drive into a
half-height bay.
Optional drives with special drive cables are available in kits from
Compaq. The drive configuration uses a cable-select feature that
identifies the drives as Device 0 (primary drive) or Device 1
(secondary drive).
The Device 0 drive is connected to the short segment of the drive
cable (or that connector closest to the system board); the Device 1
drive is connected to the long segment of the drive cable.
Drive installation requires that no jumper settings change on the
existing or optional drives. All Compaq drives have the jumpers
preset for cable-select installation.
✎ If installing a second drive on the primary controller, you must use
an 80-conductor Ultra ATA cable for optimal performance. This
cable is available as a Compaq option.
User’s Guide 4–11
Page 54

Installing a Drive into the Drive Bay
1. Complete the steps in the “Opening Your Computer” and
“Removing the Front Bezel” sections of this chapter.
2. Install the drive in the desired drive bay by sliding it into the front
of the drive cage, as shown in the following figure.
✎ Be sure that the drive screws line up with the guide slots in the drive
cage.
4–12 User’s Guide
Aligning the Guide Screws and Installing the Optional Drive
3. Match the screw hole on the drive (or drive bracket if it is a ZIP
drive) with the screw holes on the computer’s chassis.
4. Insert two screws into each side of the drive.
5. Connect the drive power and signal (and audio if it is a CD/DVD
drive) cables, as shown in the following figure.
Page 55
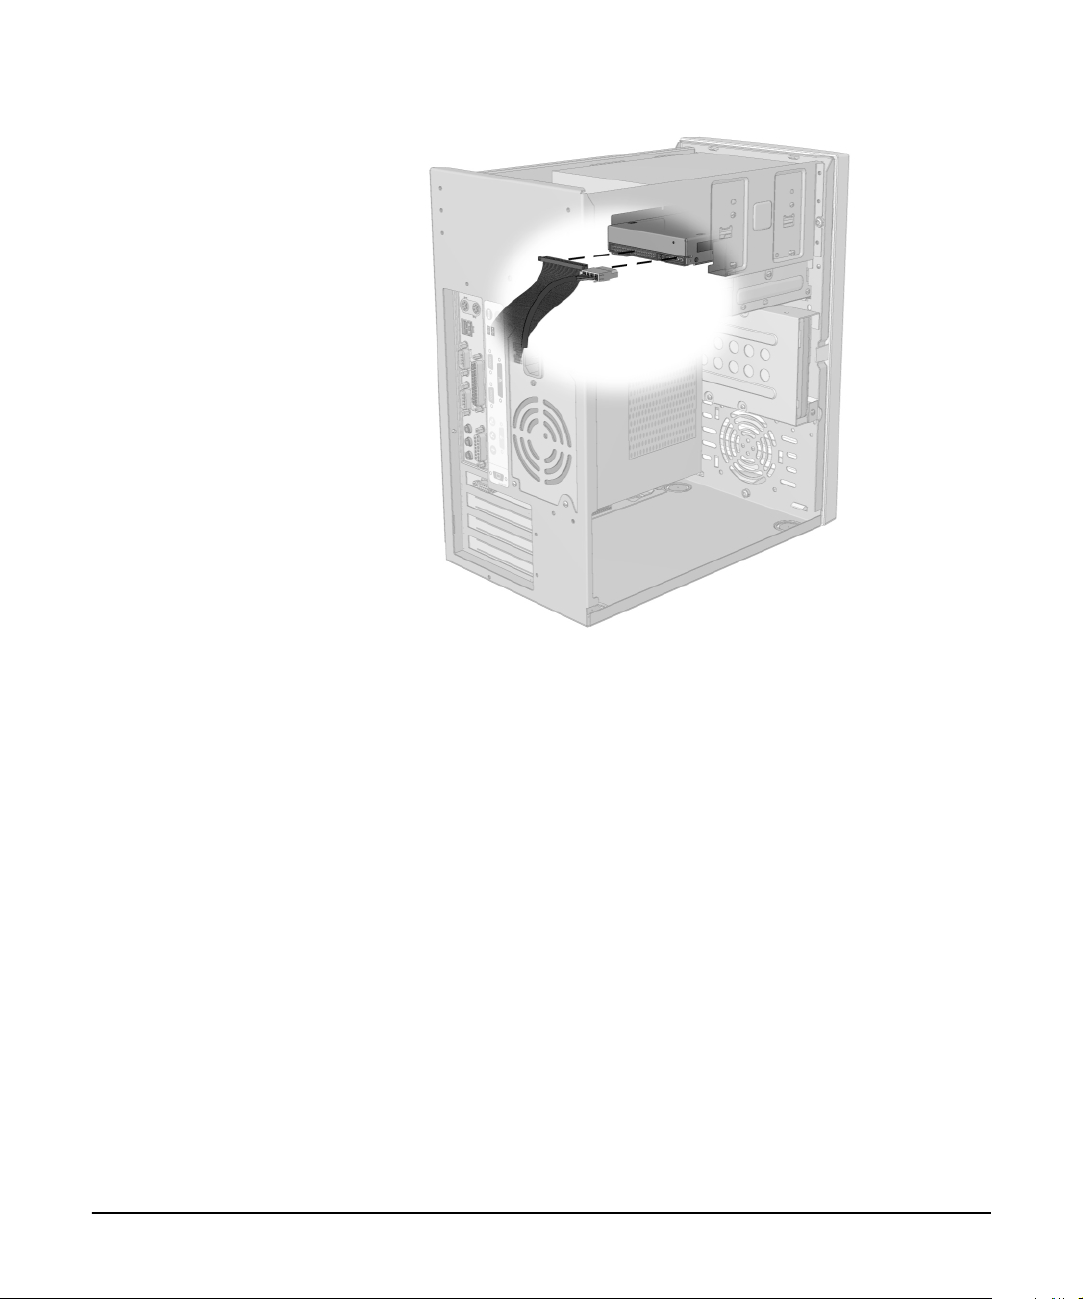
Connecting the Cables to an Optional Drive
6. Remove the appropriate bezel blank from the subpanel inside the
front bezel. Refer to the “Removing Bezel Blanks” section of this
chapter.
7. Complete the steps in the “Reassembling the Computer” section
of this chapter.
User’s Guide 4–13
Page 56

Removing a Drive from the Drive Bay
1. Complete the steps in the “Opening Your Computer” and
“Removing the Front Bezel” sections of this chapter.
2. Disconnect the drive power and signal cables.
✎ If you are disconnecting a CD-ROM or DVD-ROM drive,
disconnect the audio connector.
3. Remove the screws from the side of the drive bay, as shown in the
previous figure.
4. Remove the drive from the drive bay, and store it in anti-static
packaging.
5. If necessary, replace the bezel blank.
Ensure that the aligning pins and any remaining bezel blanks are
in their proper orientation.
4–14 User’s Guide
Removing a Drive from the 5.25-inch Drive Bay
Page 57

Replacing the Battery
The computer battery that comes with your computer provides power
to the real-time clock and has a lifetime of about five years. To replace
the battery, use an equivalent 3-volt lithium, coin-cell battery.
1. Complete the steps in the “Opening Your Computer” section of
this chapter.
✎ It may be necessary to remove an expansion board to gain access to
the battery.
2. Remove the Floppy Drive.
3. Locate the battery on the system board, as shown in the following
figure.
Locating the Battery on the System Board
4. Gently lift the tab on the side of the battery ➊ and lift the battery
from its holder ➋.
User’s Guide 4–15
Page 58

Removing the Coin-Cell Battery
5. Slide the replacement battery into position. The battery holder
automatically secures the battery in its proper position.
6. Complete the steps in the “Reassembling the Computer” section
of this chapter.
7. Plug the computer in and turn the power on.
8. Reset the time and date, your passwords, and any special system
setups you have made.
9. Dispose of the old battery.
WARNING: This computer contains a lithium-ion battery pack.
!
There is a risk of fire and chemical burn if the battery pack is not
handled properly. Do not disassemble, crush, puncture, short
external contacts, dispose of in water or fire, or expose to
temperatures higher than 60°C (140°F).
4–16 User’s Guide
Page 59

Reassembling the Computer
In North America, dispose of nickel metal hydride or
lithium-ion batteries by taking advantage of the Compaq
battery recycling program. You will be provided with a
postage-paid battery pack mailer preaddressed to a
reclamation facility where the metals are recycled. Call the
telephone number for your location listed in the “Getting
Help” chapter for more information. In Europe, do not
dispose of batteries with general household waste. Dispose
of or recycle them by using the public collection system or
returning them to Compaq, your authorized Compaq
partners, or their agents.
CAUTION: Static electricity can damage the electronic
components of the computer or optional equipment. Before
starting these procedures, ensure that you are discharged of static
electricity by briefly touching a grounded metal object. Refer to
Appendix C for more safety information.
1. If necessary, replace the front bezel.
Ensure that the aligning pins and any remaining bezel blanks are
in their proper orientation.
2. Lift the access panel and place it on the computer chassis.
3. Slide the access panel forward about one inch (2.5 cm) until it fits
on the chassis securely.
4. Replace the screws that secure the access panel to the computer
chassis.
5. Reconnect the keyboard, monitor, and any other external
equipment.
6. Plug the computer in and turn the power on.
7. Reconfigure the computer, if necessary. Refer to the “When to
Reconfigure the Computer” section of this chapter.
User’s Guide 4–17
Page 60

When to Reconfigure the Computer
System configuration is the process of specifying the devices and
programs that make up a computer system. When you add or remove
optional equipment, or add a second drive, you must reconfigure the
computer to recognize the new equipment.
If you install a Plug and Play device, Windows 98 automatically
recognizes the device and configures the computer. You may be
prompted to insert the Windows Installation CD or diskettes. If this
occurs, type C:\Windows\Options\CABS at the prompt.
If you install a non-Plug and Play device, or if the device is not
detected automatically after installation, you must reconfigure the
computer after completing installation of the hardware. Select the
Add New Hardware icon in the Control Panel and follow the
instructions on the screen.
4–18 User’s Guide
Page 61

chapter
5
Computer Setup
Computer Setup (F2) contains utilities that give you an overall picture
of the computer hardware configuration, aid in troubleshooting, and
allows you to set custom features.
✎ If you have difficulty accessing F2, try again after shutting down
and restarting your computer. Click Start
1. Turn on or restart the computer by clicking
→Shut Down→Restart the Computer.
Start
2. When the F2 Setup message appears in the corner of the screen,
press F2.
✎ If you do not press the F2 key while the message is displayed, you
must turn the computer off, then on again, to access the utility.
3. If you have previously enabled a setup password, enter it when
prompted.
→Shut Down→Restart.
4. Press Enter to bypass the title screen, if necessary.
5. Select the option you want (as described in the table later in this
chapter) and press Enter.
6. Make the necessary changes.
7. When you have finished making all changes, select Exit
Saving Changes.
If you selected an option that automatically restarted the
computer, changes were applied at that time. If you made changes
that you do not want applied, select Exit
If you have already applied changes that you now want to
eliminate, select Exit
the original system defaults.
→Load Setup Defaults. This option restores
→Exit Discard Changes.
→Exit
User’s Guide 5–1
Page 62

✎ The following table lists your options in the Computer Setup
Utility:
Computer Setup Utilities
Heading Option Description
Main System Information Lists the BIOS version, processor type and speed, Cache
RAM, total memory, memory type in each bank, language,
cache bus ECC, and memory configuration.
Set Time and Date Allows you to set the system time and date.
Set Defaults and Exit Restores the factory default settings.
Save Changes and Exit Saves changes to the system configuration and exits
Computer Setup.
Ignore Changes and Exit Exits the Computer Setup without applying or saving any
changes.
Advanced Boot Settings Configuration Allows you to set boot settings such as NumLock ON or OFF,
Plug and Play Yes or No, and Plug and Play data cleared on
boot.
Peripheral Configuration Allows you to configure the serial ports, parallel port, audio
device, and USB support.
IDE Configuration Allows you to disable or enable the primary and secondary
IDE devices.
Diskette Configuration Allows you to enable the diskette controller, select the diskette
drive type, and enable/disable diskette write protect.
Event Log Configuration Allows you to configure the Event Log so that you can view
events, clear all events, enable logging, and mark events as
read.
Video Configuration Allows you to enable/disable palette snooping and set the
AGP aperture size.
Resource Configuration Allows you to reserve or make available upper blocks of
memory.
Security Setup Password Enables the Setup password.
Setup Supervisor Password Enables the Setup supervisor password.
5–2User’s Guide
Page 63

Computer Setup Utilities (Continued)
Heading Option Description
Power Power Management Allows you to enable or disable the BIOS power management
feature.
Inactivity Time Allows you to set the amount of time the system needs to be
inactive before entering Standby mode.
Hard Drive Enables the hard drive to be power managed during Standby
and Suspend modes.
Video Power Down Allows you to power manage the video so that the monitor is
placed in a low power state during periods of inactivity.
Boot Quiet Boot While disabled, it displays normal POST messages. When
enabled, it displays only the logo.
Quick Boot Allows BIOS to skip certain tests, decreasing the time needed
to boot.
Scan User Flash Area Allows BIOS to scan the Flash ROM for user binaries.
After Power Failure Allows you to determine the mode of operation if a power loss
occurs. The options are: Stays Off, Last State, and Power On.
On Modem Ring Allows you to determine the action of the system when the
system power is off and the modem is ringing.
On LAN Determines the action of the system when a LAN wake up
event occurs.
On PME Determines the action of the system when a PCI Power
Management Enable wake up event occurs.
List of Boot Devices Allows you to select the order in which your devices will boot
(up to four devices).
Exit Exit Saving Changes Saves Setup data to CMOS and exits the utility.
Exit Discarding Changes Exits the utility without saving changes to CMOS.
Load Setup Defaults Default Setup values are loaded and displayed.
Load Custom Defaults Loads settings from NVRAM.
Save Custom Defaults Saves settings into NVRAM.
Discard Changes Discards changes made in the current Setup session but does
not exit the utility.
User’s Guide 5–3
Page 64

5–4User’s Guide
Page 65

chapter
6
Getting Help
Your Compaq desktop computer has many tools that make computing
easier. If you have a computer problem, refer to the “Solving
Common Computer Problems” chapter for suggestions on how to fix
the problem. Next, review the tools in this section. Finally, look in the
Compaq Warranty Statement included with your computer to find
your local Compaq Service telephone number.
Compaq Web Site
Telephone Numbers
CarePAQ
You can access the Compaq Web Site by logging on to the Internet at
http://www.compaq.com. The Compaq Web Site has information on
this product as well as on Drivers and Flash ROM Images.
For Compaq technical support phone numbers, refer to your Warranty
document or visit theCompaq Web Site at:
http://www.compaq.com.
CarePAQs are pre-packaged, value-priced services for businesscritical computing environments. They are well integrated and
supported by Compaq to provide customers with a single point of
contact for service and support of their computing environments
without the expense of maintaining an in-house technical staff. This
broad range of quality services is designed for easy purchase and
administration. Offers range from products to improve your personal
productivity to services that minimize hardware downtime in
business-critical environments.
Our service portfolio includes:
■ Hardware Services to support critical service coverage needs of
the products most important to your business.
■ Software Services to provide incremental software support of
your day-to-day business applications.
User’s Guide 6–1
Page 66

Hardware Installation/Startup Services to ensure ease of setup
■
and full functionality, right out of the box.
To order, contact your nearest Compaq authorized reseller.
6–2User’s Guide
Page 67

appendix
A
Agency Regulatory Notices
Federal Communications Commission Notice
Modifications
This equipment has been tested and found to comply with the limits
for a Class B digital device, pursuant to Part 15 of the FCC Rules.
These limits are designed to provide reasonable protection against
harmful interference in a residential installation. This equipment
generates, uses, and can radiate radio frequency energy and, if not
installed and used in accordance with the instructions, may cause
harmful interference to radio communications. However, there is no
guarantee that interference will not occur in a particular installation.
If this equipment does cause harmful interference to radio or
television reception, which can be determined by turning the
equipment off and on, the user is encouraged to try to correct the
interference by one or more of the following measures:
■ Reorient or relocate the receiving antenna.
■ Increase the separation between the equipment and the receiver.
■ Connect the equipment into an outlet on a circuit different from
that to which the receiver is connected.
■ Consult the dealer or an experienced radio or television
technician for help.
Cables
The FCC requires the user to be notified that any changes or
modifications made to this device that are not expressly approved by
Compaq Computer Corporation may void the user’s authority to
operate the equipment.
Connections to this device must be made with shielded cables with
metallic RFI/EMI connector hoods to maintain compliance with FCC
Rules and Regulations.
User’s Guide A–1
Page 68

Mouse Compliance Statement
This device complies with Part 15 of the FCC Rules. Operation is
subject to the following two conditions:
1. This device may not cause harmful interference, and
2. This device must accept any interference received, including
interference that may cause undesired operation.
Declaration of Conformity for Products Marked with the FCC Logo
(United States only)
This device complies with Part 15 of the FCC Rules. Operation is
subject to the following two conditions:
1. This device may not cause harmful interference, and
2. This device must accept any interference received, including
interference that may cause undesired operation.
For questions regarding your product, contact:
Compaq Computer Corporation
P. O. Box 692000, Mail Stop 530113
Houston, Texas 77269-2000
Or, call 1-800-652-6672 (1-800-OK COMPAQ).
A–2User’s Guide
For questions regarding this FCC declaration, contact:
Compaq Computer Corporation
P. O. Box 692000, Mail Stop 510101
Houston, Texas 77269-2000
Or, call (281) 514-3333.
To identify this product, refer to the part, series, or model number
found on the product.
Page 69

ENERGY STAR Compliance
Compaq Deskpro Personal Computers marked with the ENERGY
S
TAR Logo are compliant with the U.S. Environmental Protection
Agency (EPA) E
E
NERGY STAR Logo does not imply endorsement by the EPA. As an
E
NERGY STAR Partner, Compaq Computer Corporation has
determined the products marked with the E
the E
The E
promote energy efficiency and reduce air pollution through more
energy-efficient equipment in homes, offices, and factories. Compaq
products achieve this by reducing the power consumption when not in
use. Instructions for using the energy saving features of your
computer are located in the “Keeping Your System Running” chapter
of the Getting Started Guide.
The power management feature of your computer is compatible with
any network operating system or environment that supports APM1.2.
This means the users in those environments will not be disconnected
from the network during the low-power operating state.
The Power Management feature, when used in conjunction with an
external E
down features of the monitor. The Power Management feature allows
an external monitor to go into low-power mode when the energy save
timeout occurs. To take advantage of this energy savings, the monitor
Power Management feature has been preset to power down the
monitor after 15 minutes of system inactivity. Refer to the “Keeping
Your System Running” chapter of the Getting Started Guide for
instructions on modifying or disabling this feature.
NERGY STAR Computers Program 2.0. The EPA
NERGY STAR Logo meet
NERGY STAR guidelines for energy efficiency.
NERGY STAR Computers Program was created by the EPA to
NERGY STAR compliant monitor, will support the power-
CAUTION: Using the Energy Save Monitor feature with
non–E
NERGY STAR compliant monitors may cause video distortion
when the Energy Save timeout occurs.
User’s Guide A–3
Page 70

European Notice
Canadian Notice
Avis Canadien
Products with the CE Marking comply with both the EMC Directive
(89/336/EEC) and the Low Voltage Directive (73/23/EEC) issued by
the Commission of the European Community.
Compliance with these directives implies conformity to the following
European Norms:
■ EN55022 (CISPR 22)—Radio Frequency Interference
■ EN50082-1 (IEC801-2, IEC801-3, IEC801-4)—Electromagnetic
Immunity
■ EN60950 (IEC950)—Product Safety
This Class B digital apparatus meets all requirements of the Canadian
Interference-Causing Equipment Regulations.
Cet appareil numérique de la classe B respecte toutes les exigences du
Règlement sur le matériel brouilleur du Canada.
A–4User’s Guide
German Ergonomics Notice
Compaq Deskpro Personal Computers, when combined with Compaq
Brand keyboards and monitors that bear the “GS” approval mark,
meet the requirements of ZH 1/618 (German Safety Regulations for
Display Work Places in the Office Sector). The installation guides
included with the monitor provide configuration information.
Japanese Notice
Page 71

Laser Safety
CDRH Regulations
All Compaq systems equipped with CD-ROM drives, LS-120 diskette
drives, or PD-CD Drives comply with the appropriate safety
standards, including IEC 825. With specific regard to the laser, the
equipment complies with laser product performance standards set by
government agencies as a Class 1 laser product. It does not emit
hazardous light; the beam is totally enclosed during all modes of
customer operation and maintenance.
The Center for Devices and Radiological Health (CDRH) of the U.S.
Food and Drug Administration implemented regulations for laser
products on August 2, 1976. These regulations apply to laser products
manufactured from August 1, 1976. Compliance is mandatory for
products marketed in the United States.
WARNING: Use of controls or adjustments or performance of
!
procedures other than those specified herein may result in
hazardous radiation exposure.
WARNING: Because the internal laser beam may cause eye
!
damage, do not open the cabinet. Wearing glasses and contact
lenses, etc., increases the hazard. All maintenance should be
performed by an authorized Compaq service provider.
User’s Guide A–5
Page 72

Laser Information
The removable laser product is classified as a CLASS 1 LASER
PRODUCT. These labels are located on the outside of the laser
product:
This system is classified as a CLASS 1 LASER PRODUCT. This
label is located on the outside of your system. A similar label also
appears on the internal laser product installed in your system.
If you have an LS-120 drive, this label is located next to the Class 1
Laser Product label on your system.
■ Laser Type: Semiconductor GaAIAs
■ Wave Length: 780 +/- 35 nm
■ Divergence Angle: 53.5 Degree +/- 5 Degree
■ Output Power: 0.4 mW - 2.9 mW
A–6User’s Guide
■ Polarization: Circular
■ Numerical Aperture: 0.45 +/- 0.04
Only authorized technicians trained by Compaq should attempt to
repair this equipment. All troubleshooting and repair procedures are
detailed to allow only subassembly/module level repair. Because of
the complexity of the individual boards and subassemblies, no one
should attempt to make repairs at the component level or to make
modifications to any printed wiring board. Improper repairs can
create a safety hazard.
Page 73

Battery Notice
WARNING: This computer contains a lithium-ion battery pack.
!
There is a risk of fire and chemical burn if the battery pack is
handled improperly. Do not disassemble, crush, puncture, short
external contacts, dispose of in water or fire, or expose it to
temperatures higher than 60ºC (140ºF).
In North America, dispose of nickel metal hydride or
lithium-ion batteries by taking advantage of the Compaq
battery recycling program. You will be provided with a
postage-paid battery pack mailer preaddressed to a
reclamation facility where the metals are recycled. Call the
telephone number listed for your location in the “Getting
Help” chapter of the User’s Guide for more information.
In Europe, do not dispose of batteries with general
household waste. Dispose of or recycle them by using the
public collection system or returning them to Compaq,
your authorized Compaq partners, or their agents.
User’s Guide A–7
Page 74

A–8User’s Guide
Page 75

appendix
B
Power Cord Set Requirements
Power Cord Set Requirements
General Information
Line switching allows the computer to operate from either a
100-120V or 220-240V input line.
The power cord set (power cord) you received with your computer
meets the requirements of the country where you purchased the
system. If you use the computer in another country, you must use a
power cord that meets the requirements of that country. For more
information on power cord set requirements, contact your Compaq
authorized dealer, reseller, or service provider. The following
information explains the requirements for power cord set selection:
1. The cord set must be approved for the country where it will be
used.
2. The appliance coupler (that is, the connector to the device itself,
not the wall plug) must have a configuration for mating with a
EN60 320 appliance inlet (Standard Sheet C14).
3. The length of the cord set must be as follows:
■ Minimum: 6.50 ft (2.0 m)
■ Maximum: 9.75 ft (3.0 m)
User’s Guide B–1
Page 76

U.S. and Canada
Japan
1. The cord set must be UL-Listed and CSA-Certified.
2. The minimum specifications for the flexible cord are:
■ No. 18 AWG
■ Type SJ
■ 3-conductor
3. The cord set must have a rated current capacity of at least 10 A.
4. The attachment plug must be an earth-grounding type with a
NEMA 5-15P (15 A, 125 V) or NEMA 6-15P (15 A, 250 V)
configuration.
1. All components of the cord set (cord, connector, and plug) must
bear a “T” mark and registration number in accordance with the
Japanese Dentori Law.
2. The minimum specifications for the flexible cord are:
■ .75 mm
■ Type VCT or VCTF
2
conductors
B–2User’s Guide
■ 3-conductor
3. The cord set must have a minimum rated current capacity of 7 A.
4. The attachment plug must be a two-pole, grounded type with a
Japanese Industrial Standard C8303 (15 A, 125 VAC)
configuration.
Page 77

Other Countries
1. The cord set fittings must bear the certification mark of the
agency responsible for evaluation in a specific country.
Acceptable agencies include:
■ BSI (United Kingdom)OVE (Austria)
■ CEBEC (Belgium)SEMKO (Sweden)
■ DEMKO (Denmark)SETI (Finland)
■ EANSW (Australia)SEV (Switzerland)
■ MQ (Italy)UTE (France)
■ KEMA (The Netherlands)VDE (Germany)
■ NEMKO (Norway)
2. The flexible cord must be of a HAR (harmonized) type HO5VV-F
3-conductor cord with a minimum conductor size of 0.03 square
inches (1.0 square millimeter).
3. The cord set must have a current capacity of at least 10 A and a
nominal voltage rating of 125 or 250 VAC.
User’s Guide B–3
Page 78

B–4User’s Guide
Page 79

appendix
C
Electrostatic Discharge
A discharge of static electricity from a finger or other conductor may
damage system boards or other static-sensitive devices. This type of
damage may reduce the life expectancy of the device.
Preventing Electrostatic Damage
Grounding Methods
To prevent electrostatic damage, observe the following precautions:
■ Avoid hand contact by transporting and storing products in static-
safe containers.
■ Keep electrostatic-sensitive parts in their containers until they
arrive at static-free workstations.
■ Place parts on a grounded surface before removing them from
their containers.
■ Avoid touching pins, leads, or circuitry.
■ Always be properly grounded when touching a static-sensitive
component or assembly.
There are several methods for grounding. Use one or more of the
following methods when handling or installing electrostatic-sensitive
parts:
■ Use a wrist strap connected by a ground cord to a grounded
workstation or computer chassis. Wrist straps are flexible straps
with a minimum of 1 megohm +/- 10 percent resistance in the
ground cords. To provide proper ground, wear the strap snug
against the skin.
■ Use heelstraps, toestraps, or bootstraps at standing workstations.
Wear the straps on both feet when standing on conductive floors
or dissipating floor mats.
User’s Guide C–1
Page 80

Use conductive field service tools.
■
■ Use a portable field service kit with a folding static-dissipating
work mat.
If you do not have any of the suggested equipment for proper
grounding, contact your Compaq authorized dealer, reseller, or
service provider.
✎ For more information on static electricity, contact your Compaq
authorized dealer, reseller, or service provider.
C–2User’s Guide
Page 81

Index
A
access panel, removing, 4–3
assistance, calling Compaq, 6–1
audio problems, 2–4
B
bezel
removing blanks, 4–5
removing the front, 4–4
C
calling Compaq, 6–1
CD-ROM problems, 2–7
checklist, troubleshooting, 2–2
Compaq
telephone numbers, 6–1
Web Site, 6–1
computer setup problems, 2–8
computer setup utilities, 5–2
advanced, 5–2
boot, 5–3
exit, 5–3
instructions for, 5–1
main, 5–2
power, 5–3
security, 5–2
D
diagnostics
problems, 2–22
dial tone problems, 2–18
diskette drive problems, 2–9
display and screen problems, 2–27
drivers, reinstalling, 3–3
DVD-ROM problems, 2–10
E
electrostatic discharge, C–1
grounding methods, C–1
preventing damage, C–1
Energy Star compliance, A–3
expansion slots
location, 4–1
removing the cover, 4–6
external device problems, 2–30
F
F2 setup problems, 2–8
Fax/Modem problems, 2–17
fixing problems, 2–1
G
grounding methods, C–1
H
hard drive problems, 2–11
hardware installation
adding new, 2–12
problems, 2–12
headphone problems, 2–6
help, calling Compaq, 6–1
I
installation
hardware, 2–12
printer, problems with, 2–25
Internet Explorer problems, 2–16
Internet problems
connections, 2–13
online registration, 2–13
setting up an accoun, 2–13
Web site access, 2–13
K
keyboard problems, 2–14
M
memory
User’s Guide I–1
Page 82

installing additional, 4–9
memory problems, 2–15
microphone problems, 2–4, 2–5
Microsoft software problems, 2–16
modem problems, 2–17
Modem/Fax problems, 2–17
N
network
communication problems, 2–23
controller problems, 2–23
problems, 2–22
NumLock key problems, 2–8
O
opening your computer, 4–2
P
pointing device problems, 2–24
power cord
set requirements, B–1
power management problems, 2–8
printer problems, 2–25
problems
audio, 2–4
basic, 2–3
CD-ROM, 2–7
computer setup, 2–8
computer won’t turn on, 2–3
date and time, 2–3
diagnostics, 2–22
diskette drive, 2–9
display and screen, 2–27
DVD-ROM, 2–10
external device, 2–30
F2, 2–8
Fax/Modem, 2–17
hard drive, 2–11
hardware installation, 2–12
headphones, 2–6
Internet, 2–13
Internet Explorer, 2–16
keyboard, 2–14
memory, 2–15
microphone, 2–4, 2–5
Microsoft software, 2–16
modem, 2–17
Modem/Fax, 2–17
network, 2–22
network communication, 2–23
network controller, 2–23
no dial tone, 2–18
NumLock key, 2–8
pointing device, 2–24
power management, 2–8
printer, 2–25
product key, 2–26
Remote Wakeup, 2–22
saving a file to a diskette, 2–9
screen and display, 2–27
software, 2–16, 2–29
speakers, 2–5
system will not boot, 2–15
telephone line, 2–19
USB, 2–30
volume, 2–6
problems, fixing, 2–1
product key problems, 2–26
protecting your software, 3–1
Q
quick restore
selective restore, 3–2
system restore, 3–1
QuickRestore, 3–1
R
Remote Wakeup problems, 2–22
removable media
write control, 3–1
removing
bezel blanks, 4–5
computer access panel, 4–3
expansion slot cover, 4–6
front bezel, 4–4
restore
selective, 3–1, 3–2
system, 3–1
S
screen and display problems, 2–27
selective restore, 3–1, 3–2
service, calling Compaq, 6–1
I–2User’s Guide
Page 83

software problems, 2–16, 2–29
sound problems (see audio problems), 2–4
speaker problems, 2–5
system restore, 3–1
T
technical support, 6–1
telephone line problems, 2–19
troubleshooting
audio problems, 2–4
basic problems, 2–3
CD-ROM, 2–7
checklist, 2–2
computer setup, 2–8
computer won’t turn on, 2–3
date and time, 2–3
diagnostics, 2–22
diskette drive, 2–9
display and screen, 2–27
DVD-ROM, 2–10
external device, 2–30
F2, 2–8
Fax/Modem, 2–17
hard drive, 2–11
hardware installation, 2–12
headphones, 2–6
Internet, 2–13
Internet Explorer, 2–16
keyboard, 2–14
memory, 2–15
microphone, 2–4, 2–5
Microsoft software, 2–16
modem, 2–17
Modem/Fax, 2–17
network, 2–22
network communication, 2–23
network controller, 2–23
no dial tone, 2–18
NumLock key, 2–8
pointing device, 2–24
power management, 2–8
printer, 2–25
product key, 2–26
Remote Wakeup, 2–22
saving a file to a diskette, 2–9
screen and display, 2–27
software, 2–16, 2–29
speaker, 2–5
system will not boot, 2–15
telephone line, 2–19
USB, 2–30
volume, 2–6
U
upgrades
opening your computer, 4–2
removing an expansion slot cover, 4–6
removing bezel blanks, 4–5
removing the computer access panel, 4–3
removing the front bezel, 4–4
USB problems, 2–30
V
volume problems, 2–6
User’s Guide I–3
Page 84

I–4User’s Guide
 Loading...