

Page 1
OUTDOOR CPE ALL-IN-ONE WIRELESS 5GHz
ART. 48086
Please read this manual thoroughly before use, and keep for future reference
Via Don Arrigoni, 5 24020 Rovetta S. Lorenzo (Bergamo)
http://www.comelitgroup.com e-mail:export.department@comelit.it
Page 2
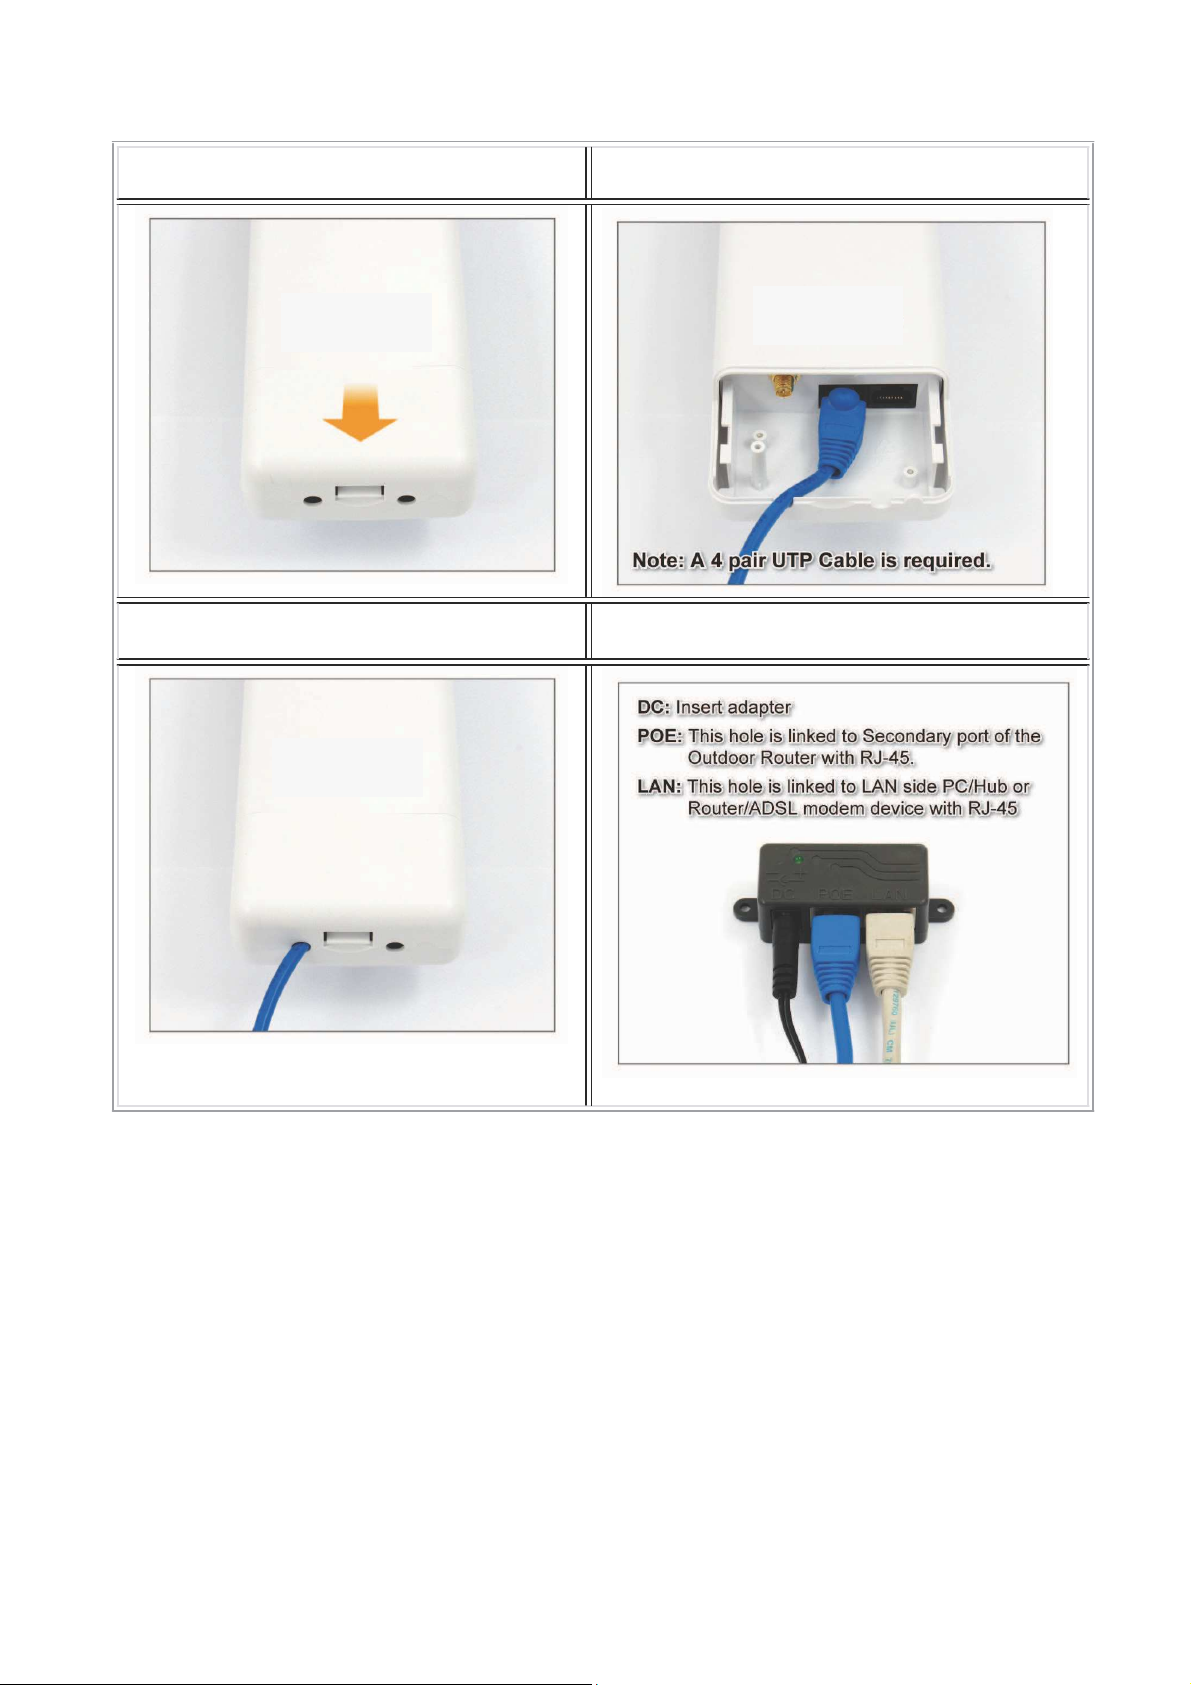
1. Installation:
1. Push the button in the side to remove
upper housing.
3. Install the upper housing and make
sure the housing is well installed.
2. Pass through Ethernet cable from the hole;
insert the cable to Secondary port”.
4. Install POE Injector.
Page 3

2. Powering On the device and setup
After turning on the device, wait two minutes before connecting to allow the device to complete
the boot operations.
The default IP address is 192.168.1.1
Give your PC an address in the same class of the CPE.
2.1 Check of the own IP address
The IP address of PC must be included between 192.168.1.2 and 192.168.1.254, the subnet mask
must be 255.255.255.0
To check your IP address type on the keyboard:
(key Windows of the keyboard) +
R
The following window appears:
Type cmd and click on the button OK.
The following window appears:
Page 4
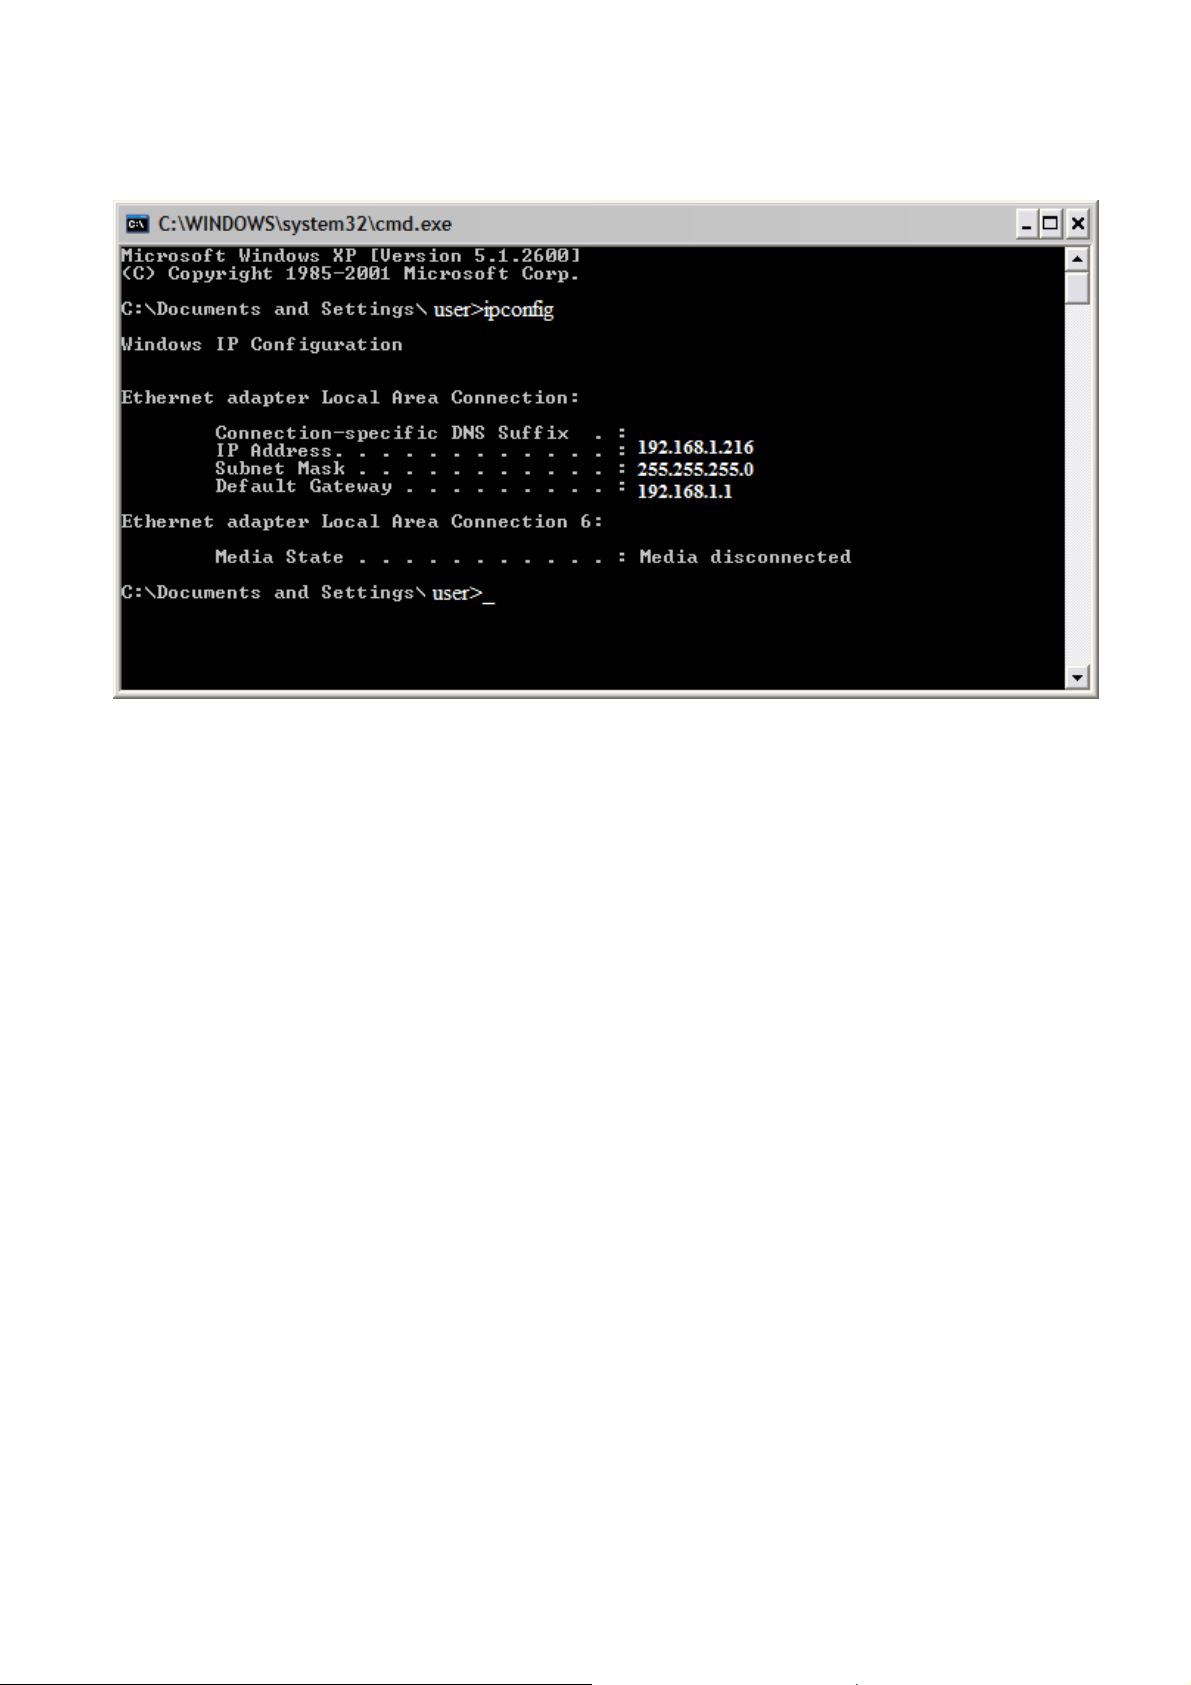
Type ipconfig and press the Enter key on the keyboard.
The following window appears:
Read the IP address in the “Ethernet adapter Local area Connection” section, “IP address” subsection.
If the address, as in the case in example, is in the range indicated at the beginning of paragraph, go
to the next section, otherwise will need to change the IP address as explained below:
1) Click the button “start”
2) Select Settings Control Panel
3) Select Network connection center (Network connections with Windows XP)
4) Click with the right button of the mouse on Local Area Connection
5) Select Properties
6) Select Internet protocol (TCP/IP)
7) Click on the Properties button
Page 5

Type the IP address and the Subnet
mask. Gateway and DNS in this phase
are not necessary.
Click on the OK button in either first and
second window, return to the beginning
of the paragraph and verify your IP
address.
At this point, make sure that there isn’t
another device connected to the network
with the same IP address of the CPE. In
the case of multiple bridges connect one
at a time and change the IP address.
2.2 Check for presence other devices on the network
SKIP THIS SECTION IF YOU CONNECT THE ART. 48086 DIRECTLY TO YOUR PC OR IN A NETWORK IN
WHICH THERE ARE NO OTHER DEVICES.
To verify that in the same network there aren’t other devices with the same IP address that the art.
48086 you must open the command window by typing on the keyboard:
(key Windows of the keyboard) +
The following window appears:
Type cmd and click on the button OK.
R
Page 6

The following window appears:
“Reply from 192.168.1.1”, disconnect the device
window above)
Type ping 192.168.1.1
In case the command will provide the answer
with this IP address.
In case the command will provide the answer: "Request timed out" (like in the
go to next section.
Page 7

2.3 Connection to the device
To connect to the device, type, with the web browser Internet Explorer, http://192.168.1.1
Note.: check in advance (in Internet Explorer select Tools Internet Options Connections LAN
settings) that are not enabled any proxy server, otherwise you need to disable them (see pictures
below).
Page 8

The default user name is: admin
The default password is: airlive
Select System Configuration and Device IP Setting.
Assign the new IP address to the CPE.
Click on Apply.
The following window appears:
Page 9

Click on OK.
Enter a valid DNS address or the same as the gateway, otherwise you can not change the IP
address.
Type in Internet Explorer the set address and proceed to configure the operating mode.
2.4 Setting the operating mode
Choose the operating mode depending on the topology of the system.
The most common application is the radio link between two LANs, or between one or more
cameras and recording server.
Take note before installing of all the WIRELESS MAC ADDRESS found on the label affixed to
the device.
Page 10

Select OPERATION MODE:
Enable the WDS mode and click on Change Mode.
After the rebooting of the device, set in the same way all other devices.
With all devices in WDS mode, re-enter the menu Operation Mode and click on the SETUP button.
Select SITE SURVEY
Page 11

Locate in the list, the MAC address of the device with which you want to communicate, select it
and press the ADD button.
Insert a common SSID to all the devices and a unique name for each.
Press the "ADD" button and make sure that the MAC address appears in the lower table.
Repeat the same operation for the other devices up to a maximum of 4 for each CPE for a total of
up to 8 devices connected together in wifi.
In case you must manage more than 8 CPE, is necessary to separate them into groups of 8.
2.5 Security
By following the above steps, you can not set any encryption key because the communication
takes place only between the authorized MAC.
If you wish, you can define a key wep dedicated.
To change the password to access the bridge select SYSTEM CONFIGURATION and PASSWORD
SETTINGS.
Enter the current password and the new repeating it in the confirmation field.
Page 12

Reset
To RESET the bridge, should no longer be able to log in, press the RESET button for at least 5
seconds with the bridge powered on.
Via Don Arrigoni, 5 24020 Rovetta S. Lorenzo (Bergamo)
http://www.comelitgroup.com e-mail:export.department@comelit.it
 Loading...