


Cobra PR 2000 manual M(4217)A 8/17/00 2:18 PM Page 1
How to Use Your Cobra  Professional 2-Way Radio
Contents |
|
Features.................................................................................................. |
1 |
The GMRS Story.................................................................................. |
A1 |
FCC Warnings |
|
Included Accessories |
|
Controls & Indicators ....................................................................... |
A2 |
Our Thanks to You ............................................................................. |
A3 |
Customer Support.......................................................................... |
A3 |
Operating your microTalk |
|
Battery Installation......................................................................... |
2 |
Turning On........................................................................................ |
3 |
LCD Display....................................................................................... |
4 |
Auto Battery Power Saver............................................................ |
5 |
Hi/Lo Power...................................................................................... |
5 |
Select Main Channel (1-7)........................................................... |
6 |
Select CTCSS Subchannel (00-38)............................................ |
7 |
Battery Low....................................................................................... |
9 |
Talking To Another Party ............................................................. |
10 |
Talk Confirmation Tone................................................................ |
11 |
Listening For Another Party ....................................................... |
11 |
Calling Another Party.................................................................... |
12 |
Auto Squelch.................................................................................... |
14 |
Maximum Range Extender......................................................... |
14 |
External Microphone/Speaker Jack ......................................... |
15 |
Advanced Features........................................................................... |
16 |
Listening to Weather Channels................................................. |
16 |
Programming Memory Locations............................................ |
20 |
Scan Function.................................................................................. |
26 |
Memory Scan Function................................................................ |
29 |
Tone Settings................................................................................... |
31 |
Lock Function.................................................................................. |
33 |
Dual Watch........................................................................................ |
34 |
microTalk Range ................................................................................ |
37 |
Making Life Easier And Safer ....................................................... |
38 |
Frequency Ranges............................................................................. |
40 |
Caring for Your microTalk ............................................................. |
42 |
microTalk Professional Specifications .................................... |
43 |
Limited Two Year Warranty........................................................... |
44 |
Optional Accessories ....................................................................... |
45 |
Order Form ........................................................................................... |
46 |
If You Think You Need Service..................................... |
Back Cover |
Features of This Product
•UHF FM Frequencies
•10 Weather Channels
•Weather Alert
•No Air Time Fees
•Up to 5 Mile Range
•15 GMRS Channels
(7 shared FRS Channels)
•38 CTCSS Subchannels
•LCD Function Display
•Talk Confirmation Tone
•Call/Ring Button
•Auto Battery Saver Circuity
•Auto Squelch
•10 Memory Locations
•Memory Scan
•Dual Watch
•Channel and CTCSS Scan
•Lock Key
•Call Notification
•Belt Clip
•Rubberized Cabinet Grips
1

Cobra PR 2000 manual M(4217)A 8/17/00 2:18 PM Page 2
Operation
Battery |
Install Batteries |
Installation |
|
Note
Use high quality“AA” batteries, such as alkaline, NiMH or Ni-Cad.
Incorrect positioning can damage both the batteries and the unit.
See Accessories on page 45. Charge ports are located on side of unit.
Note
When batteries are low or need charging the ( ) BATT LOW indicator will blink. Replace alkaline batteries.
 Pull lock tab down and lift door up (towards you) to remove battery cover.
 Insert six “AA” batteries. Position batteries according to polarity markings.
Turning On Your microtalk Professional
TURN KNOB
CLOCKWISE
Turn the Volume control clockwise to switch power on. Set volume to desired level. Turn the Volume control counter-clockwise to turn power off.
Antenna
The radio is equipped with a SMA female antenna connector and a matching UHF antenna. Place top of unit with antenna on connector, turning clockwise until tight.You can replace this antenna with an optional mobile antenna when using the radio inside a car, or a base antenna in a fixed location.
PLACE ON CONNECTOR. TURN CLOCKWISE
Operation
Turning On Your microTalk Professional
Note
Whenever the unit is on, you can receive communications.
Antenna
2 |
|
3 |
|
||
|
|
|
|
|
|
|
|
|
|
|
|
|
|
|
|
|
|
|
|
|
|
|
|
|
|
|
|
|
|
Cobra PR 2000 manual M(4217)A 8/17/00 2:18 PM Page 4
|
Operation |
Operation |
|
||
|
||
|
|
|
Illuminating |
Illuminating the Display |
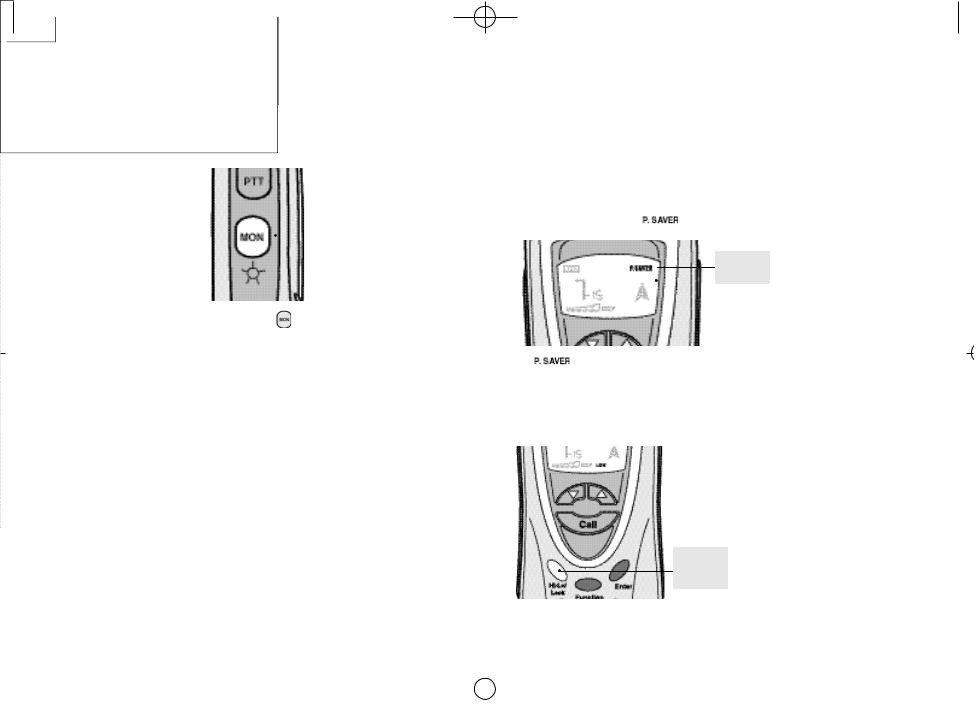
Auto Battery Power Saver |
|
||
the Display |
|
|
|
Your microTalk Professional has a unique circuit |
|
|
|
|
|
designed to extend battery life. If there are no |
|
|
|
|
|
transmissions within 10 seconds, the unit will |
|
|
|
|
|
automatically switch to |
mode. |
|
|
|
PRESS AND |
||
|
|
|
|
|
|
|
|
|
RELEASE |
|
|
|
|
|
|
|
|
POWER
SAVER
Press and release MON Button to illuminate display for ten seconds.
The |
icon will flash. |
High/Low Power Switch
When in close proximity to other party, or during clear weather conditions you can switch from High to Low Power to extend battery life.
Press & Release the
lock button and it
will switch from
High to Low
PRESS AND
RELEASE
QUICKLY
Auto Battery
Power Saver
Note
The Auto Battery Save Circuit
does not effect the unit’s ability
to receive incoming
transmissions.
High/Low
Power Switch
4 |
|
5 |
|
||
|
|
|
|
|
|
|
|
|
|
|
|
|
|
|
|
|
|
|
|
|
|
|
|
|
|
|
|
|
|

Cobra PR 2000 manual M(4217)A 8/17/00 2:18 PM Page 6
Operation
Select
Channels
Note
Units must be on same
channel and subchannels to
communicate.
Note
Press and hold  Channel
up or down Buttons for fast
channel advance.
Select Channels (1-15)
Channels 1-7 are shared with FRS radios.
 Turn on microTalk Professional. An audible “tone” will indicate the unit is on and the LCD will self-test for 3 seconds and then go to Operational Mode.
PRESS
UP OR DOWN
 Select channel by pressing and releasing the Channel button up or down.
Operation
Select CTCSS Subchannel (00-38)
The CTCSS (Continuous Tone Controlled Squelch System) is a great convenience when you are in an area with many radios. It acts like a gate to transmissions from other radios. Once your radio is set to a CTCSS code, you will only hear transmissions from other radios on the same channel and the same CTCSS code.
 Turn on the microTalk Professional. An audible “tone”will indicate the unit is on and then the LCD will self-test for 3 seconds and then go to Operational Mode.
PRESS
UP OR DOWN
Select CTCSS
Subchannel
Note
CTCSS (Continuous Tone Controlled Squelch System) is an advanced subcoding system that allows segmentation of a main channel.
Note
If you push and hold the Mode Button,the LCD display will cycle through the different functions.
 Select main channel by pressing the
Channel button up or down.
continued
6 |
|
7 |
|
||
|
|
|
|
|
|
|
|
|
|
|
|
|
|
|
|
|
|
|
|
|
|
|
|
|
|
|
|
|
|

Cobra PR 2000 manual M(4217)A 8/17/00 2:18 PM Page 8
|
Operation |
Operation |
|
||
|
||
|
|
|
|
Select CTCSS |
Select CTCSS Subchannel |
|
Subchannel |
|
Note
Press and hold Channel
Button up or down for fast chan-
nel advance.
PRESS AND
RELEASE
 Press and release Function Button. Small numbers flash next to channel display on LCD.
|
|
PRESS |
|
|
|
UP OR DOWN |
|
|
|
|
|
Select subchannel number by pressing and |
|||
releasing the |
Channel Button up or down. |
||
PRESS AND
RELEASE
When desired subchannel is displayed press and release Enter Button. If key audible tone is on, an audible tone will confirm your selection.
Battery Low
When in normal use the ( ) icon may begin flashing. This is a warning to you that your batteries are getting low.
Replace alkaline batteries as soon as possible.
Battery Low
Note
When battery capacity is at the 1/4 level it is recommended that you replace alkaline batteries,or recharge (if you are using RECHARGEABLE batteries) using CA-45C charger adapter.
8 |
|
9 |
|
||
|
|
|
|
|
|
|
|
|
|
|
|
|
|
|
|
|
|
|
|
|
|
|
|
|
|
|
|
|
|
Cobra PR 2000 manual M(4217)A 8/17/00 2:18 PM Page 10
Operation
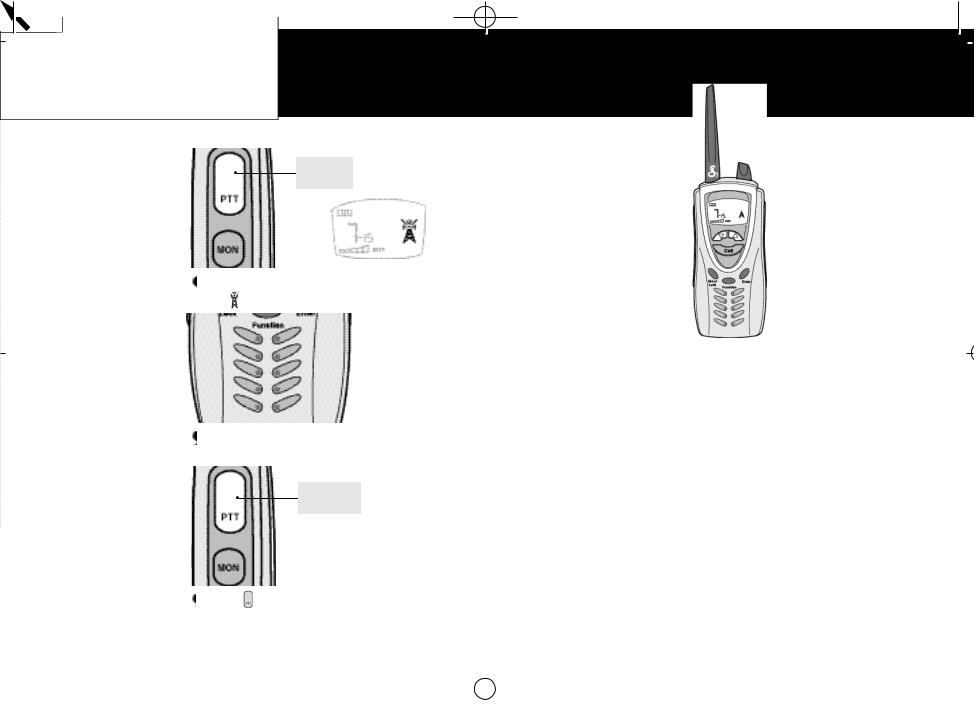
Talking to
Another
Party
Note
While PTT Button is depressed you cannot receive incoming calls.
Note
When you release the PTT Button,the person you are talking to will hear a tone indicating that it’s ok to talk. See Talk Confirmation Tone section on page 11.
PRESS AND
HOLD
Press and hold  PTT Button. The ( ) icon will appear.
Hold mic about 2 inches from mouth. Speak in a normal voice.
RELEASE FOR
RESPONSE
Release PTT Button and listen for response.
Talk Confirmation Tone
Your listener will hear an audible tone when you release
the  PTT Button.
This alerts the other party that you are finished talking and it’s OK for them to begin talking.
Standby Mode
When finished talking, Release
  PTT Button to receive incoming transmissions.
Your microTalk Professional is always in the standby mode when the  PTT Button is not pressed and you are not in function mode. See Advanced Features section on page 16.
Operation
Talk
Confirmation
Tone
Standby Mode
10 |
11 |
|
|||
|
|
|
|
|
|
|
|
|
|
|
|
|
|
|
|
|
|
|
|
|
|
|
|
|
|
|
|
|
|

Cobra PR 2000 manual M(4217)A 8/17/00 2:18 PM Page 12
Operation
Calling
Another
Party
Calling Another Party
To alert another party that you wish to communicate:
TURN KNOB
CLOCKWISE
 Turn on your microTalk Professional 2-way radio. An audible “tone” will indicate the unit is on. The LCD will self-test for 3 seconds and then to operational mode.
PRESS
UP OR DOWN
 Select desired channel by pressing and releasing Channel Button up or down. Both the calling and receiving units must be on same channel and subchannel for the call function to work.
Operation
PRESS AND
RELEASE
 Press and release Call Button. The ( ) indicator icon will flash and the (
 ) icon will remain on for 3 seconds. The unit you are calling will hear a 2 second ring tone.
 Your microTalk Professional is always in the standby mode when the
  PTT Button is not depressed.
Note
Your incoming“Call” audio ring-
ing level is dependent on your
unit’s volume setting.
12 |
|
13 |
|
||
|
|
|
|
|
|
|
|
|
|
|
|
|
|
|
|
|
|
|
|
|
|
|
|
|
|
|
|
|
|
Cobra PR 2000 manual M(4217)A 8/17/00 2:18 PM Page 14
Operation
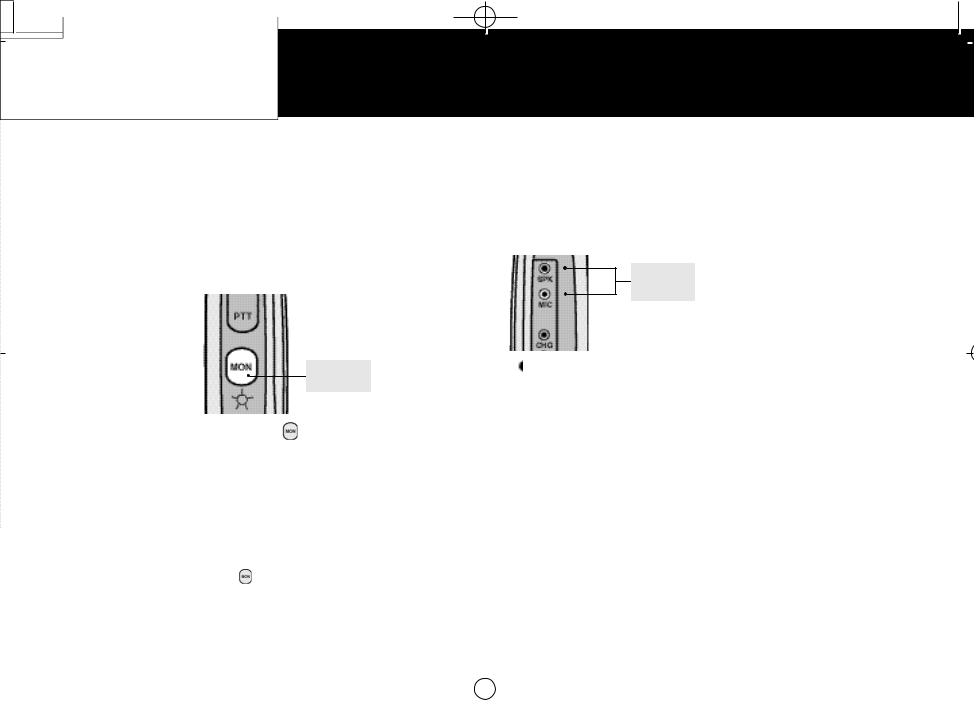
Auto Squelch
Maximum
Range
Extender
Auto Squelch
Your microTalk Professional is equipped with Auto Squelch, which automatically shuts off weak transmissions and unwanted noise due to terrain conditions or if you have reached your range limit.
Maximum Range Extender
Auto squelch can be temporarily removed to allow all signals to enter (Maximum Range Extender).
Note
To learn more about the range of your microTalk Professional, see page 37.
Range is dependent on battery condition and geographic territory.
Auto Monitor
PRESS AND
HOLD
 Press and hold Button to allow all signals to enter.
Auto Monitor
When the signal you want to hear is consistently weak, you may place the radio in Maximum Range mode without having to constantly hold the button: Press and hold the  Button for five seconds. You will hear an audible beep confirmation. To return to normal operation,momentarily press the Button again or change channels.
External Microphone/Speaker Jack
External Microphone/Speaker Jack
Your microTalk Professional 2-Way Radio can be fitted with a variety of accessories, (not included) freeing your hands for other tasks.
To attach an external microphone/speaker accessory:
PLUG IN
HERE
External
Microphone/
Speaker Jack
Note
External microphone/speaker (item #FA-SM) is not included with this unit. See Accessories Section on page 45.
Insert plug into  SPK/MIC hole on side of unit.
14 |
|
15 |
|
||
|
|
|
|
|
|
|
|
|
|
|
|
|
|
|
|
|
|
|
|
|
|
|
|
|
|
|
|
|
|

Cobra PR 2000 manual M(4217)A 8/17/00 2:18 PM Page 16
Advanced Features
Listening to Weather Channels
Listening to Weather Channels
 Turn on your microTalk Professional 2 -way radio. An audible “tone” will indicate the unit is on. The LCD will go through a 3 second self test and then go to operational mode.
|
|
|
PRESS AND |
|
|
|
|
RELEASE |
|
|
|
|
||
|
|
|
|
|
Press and release |
Function Button until |
|||
weather icon appears. The last weather |
||||
channel tuned will be displayed. |
||||
Press |
Channel Button up or down to |
|||
select the appropriate channels for your area.
PRESS AND
RELEASE
Advanced Features
To exit weather reception,press the Enter |
Listening to |
||
Button. The radio will go to the last channel |
Weather |
||
and CTCSS sub-channel. |
Channels |
||
|
|
PRESS AND |
|
|
|
|
|
|
|
RELEASE |
|
16 |
|
17 |
|
||
|
|
|
|
|
|
|
|
|
|
|
|
|
|
|
|
|
|
|
|
|
|
|
|
|
|
|
|
|
|
 Loading...