

Page 1

Clickfree C2 Portable Backup Drive User
Guide
for Microsoft Windows users
Page 2

Clickfree C2 Portable Backup Drive User Guide Contents
Contents
USING THE CLICKFREE PORTABLE BACKUP DRIVE 8
Starting a DVD backup 8
Package contents 8
Definitions
8
INTRODUCING CLICKFREE PORTABLE BACKUP DRIVE (HD) 10
Main Features
10
BASICS (HD) 12
HOW DOES CLICKFREE WORK?
W
HAT GETS BACKED UP? 12
Clickfree backs up content
Does Clickfree back up all of my content every time? 13
What content categories does Clickfree
HAT DO I NEED BEFORE I START? 13
W
back up? 13
BACKING UP MY CONTENT (HD)
HOW DO I START USING MY CLICKFREE PORTABLE BACKUP DRIVE? 14
12
12
14
ZERO EFFORT BACKUP – REALLY!
Backup progress 16
WHAT IF CLICKFREE DOESN’T START UP AUTO
What if the Vista Autoplay Window appears? 18
HOW DO I CHANGE HOW CLICKFREE DOES BA
Choosing categories of content to be backed up – required 20
Choosing locations to search for conten
Choosing complete folders to be backed up – optional 23
WHAT IF THERE IS NOT ENOUGH SPACE ON MY
MATICALLY? 17
CKUPS? 19
t – required 21
CLICKFREE PORTABLE BACKUP DRIVE? 26
16
Copyright © 2009 Storage Appliance Corporation. 2
Page 3

Clickfree C2 Portable Backup Drive User Guide Contents
RESTORING MY CONTENT (HD) 28
WHAT IF MY COMPUTER’S INTERNAL HARD DRIVE STOPS WORKING, OR I WOULD LIKE TO TRANSFER MY
CONTENT TO A NEW COMPUTER
WHAT DO I NEED BEFORE I CAN USE CLICKFREE TO RESTORE MY CONTENT? 28
HO
W DO I GET MY CONTENT BACK? 28
What gets restored, and to where? 29
HOW DO I LET CLICKFREE RESTORE DECIDE WHAT TO RESTORE AND WHERE? 29
HO ES CONTENT? 32
W DO I CHANGE HOW CLICKFREE RESTOR
Restoring content 33
? 28
Choosing the computer to restore from
Choosing categories of content to be restored 34
33
Choosing where to restore content to 34
HOW DO I RESTORE FILES FROM MULTIPLE COMPUTERS? 36
R
ESTORE COMPLETED WITH EXCEPTIONS 36
HO
W DO I FIND FILES THAT WERE RESTORED 37
My program cannot find the restored files – what should I do? 37
BROWSIN G MY FILES (HD) 38
Starting from the Welcome screen
G, SEARCHING & VIEWIN
38
From the Backup Summary screen 38
HOW DO I VIEW AND USE PHOTOS? 39
HOW DO I BROWSE MY BACKED-UP FILES? 42
HOW DO I SEARCH FOR MY BACKED-UP FILES? 43
WHA N I DO WITH FILES FROM BROWSE, SEARCH AND VIEW PHOTOS 45
T CA
Copyright © 2009 Storage Appliance Corporation. 3
Page 4

Clickfree C2 Portable Backup Drive User Guide Contents
A
DVANCED TOPICS
(HD) 46
HOW DO I STA RT A DVD BACKUP OR RESTORE? 46
NON-ADMINISTRATOR USERS 47
Non-administrator user – first use
OW DO I IMPORT MUSIC FROM MY IPOD TO MY COMPUTER? 48
H
HOW DO I UNDO A RESTORE?
WHAT IF THERE IS MORE THAN ONE USER ON MY COMPUTER? 52
W ?
HAT IF I HAVE MORE THAN ONE COMPUTER 53
How is backup different when I have more than one computer? 53
WHAT IF I USE MORE THAN ONE PORTABLE BACKUP DRIVE? 55
How do I make m 55
ultiple backups?
47
51
HAT ARE ‘FACTORY SETTINGS’ A 55
W
L 56
ICKFREE TOOLS
C
ND HOW DO I USE THEM?
How do I use password protection? 57
Updating Clickfree software
61
Master Reset 62
SCHEDULER AND THE CLICKFREE ICON 63
Scheduler
OW DO I ADD/REMOVE/EDIT FILETYPES 66
H
HOW DO I CHOOSE INDIVIDUAL FILE TYPES FO
R BACKUP? 69
64
CAN I EXCLUDE A FILE FROM BACKUP? 69
HOW DO I OOSE INDIVIDUAL FILES FOR RESTORE? 70
CH
HO ANOTHER DRIVE AND/OR FOLDER TO RESTORE TO?
I CHOOSE 73
W DO
Copyright © 2009 Storage Appliance Corporation. 4
Page 5

Clickfree C2 Portable Backup Drive User Guide Contents
TRODUCING
IN ACKUP DRIVE (DVD) 75
Main Features 75
CLICKFREE PORTABLE B
BASIC
S (DVD) 77
HOW DOES CLICKFREE WORK? 77
W
HAT GETS BACKED UP? 77
Clickfree backs up content 77
Does Clickfree back up all of my content
every time? 78
What content categories does Clickfree back up? 78
WHAT DO I NEED BEFORE I START? 78
BACKING UP MY CONTENT (DVD) 79
HO ABLE BACKUP DRIVE (DVD)? 79
W DO I START USING MY CLICKFREE PORT
ZE 79
RO EFFORT BACKUP
W
HAT IF CLICKFREE DOESN’T START UP AUTOMATICALLY? 82
– REALLY!
HOW DO I CHANGE HOW CLICKFREE DOES BA
CKUPS? 83
Choosing categories of content to be backed up – required 84
Choosing locations to search for content – required 85
Choosing complete folders to be backed up – optional 87
RES
TORING MY CONTENT (DVD) 92
WHAT IF MY COMPUTER’S INTERNAL HARD DR
MY CONTENT TO A NEW COMPUTER
T D
WHA O I NEED BEFORE I CAN USE CLICKFREE TO RESTORE OR TRANSFER MY CONTENT? 92
? 92
IVE STOPS WORKING, OR I WOULD LIKE TO TRANSFER
HOW DO I GET MY CONTENT BACK? 93
What gets restored, and to where?
HO WHAT TO RESTORE AND WHERE? 94
W DO I LET CLICKFREE RESTORE DECIDE
93
Copyright © 2009 Storage Appliance Corporation. 5
Page 6

Clickfree C2 Portable Backup Drive User Guide Contents
HO TORES CONTENT?
W DO I CHANGE HOW CLICKFREE RES 97
Restoring content
Choosing the computer to restore from 98
Choosing categories of content to be restored
Choosing where to restore content t
HOW DO I RESTORE FROM MULTIPLE COMPUTERS
o 99
ND HOW CAN I UNDO A RESTORE? 101
? A
97
98
Restore completed with exceptions 102
How do I undo a restore? 103
How do I find files that were restored 103
BROWSING, SEARCHING & VIEWING MY FILES (DVD) 105
Starting from the Welcome screen 105
OW DO AND USE PHOTOS
H I VIEW ? 106
H
OW DO I - ? 109
OW DO SEARCH FOR MY BACKED-UP FILES? 110
H I
BROWSE MY BACKED UP FILES
WHAT CAN I DO WITH FILES FROM BROWSE, ARCH AND VIEW PHOTOS 111
SE
ADVANCED TOPICS (DVD) 112
WHAT IF THERE IS MORE THAN ONE USER ON MY COMPUTER? 112
WHAT IF I HAVE MORE THAN ONE COMPUTER? 112
How is backup different when I have more than one computer? 113
HOW DO I RESTORE MY FILES USING ONLY THE B
HAT ARE
W I USE THEM? 115
‘FACTORY SETTINGS’ AND HOW DO
HOW DO I CHANGE THE INTERFACE LANGUAGE? 11
OW DO MAKE MULTIPLE BACKUPS 6
H I ? 11
W
HA T A RE THE CLICKFREE TOOLS, AND HOW DO I USE THEM? 117
Master Reset
ACKUP DISKS? 114
6
117
Updating Clickfree software 118
Verify 119
Copyright © 2009 Storage Appliance Corporation. 6
Page 7

Clickfree C2 Portable Backup Drive User Guide Contents
HOW DO I ADD/REMOVE/EDIT FILETYPES? 120
HOW DO I CHOOSE INDIVIDUAL FILE TYPES FOR BACKUP? 121
HOW DO I CHOOSE INDIVIDUAL FILES FOR RESTORE? 122
HOW DO I CHOOSE ANOTHER DRIVE AND/OR FOLDER TO RESTORE TO? 126
DELAYED WRITE FAILED 128
LEGAL STUFF 129
Copyright © 2009 Storage Appliance Corporation. 7
Page 8

Clickfree C2 Portable Backup Drive User Guide Using the Clickfree C2 Portable Backup Drive
Using the Clickfree C2 Portable Backup Drive
The Clickfree C2 Portable Backup Drive has dual personalities. You can:
• use the built-in hard drive for backups, or
• use CDs/DVDs for backups, in which case your C2 Portable Backup Drive acts just
like the Clickfree DVD Transformer.
As a result, this document has two divisions, one for using the built-in hard drive for
backups (starting with “Introducing Clickfree C2 Portable Backup Drive (HD)” on page 10)
and the other for using CDs/DVDs for backups (starting with “Introducing Clickfree C2
Portable Backup Drive (DVD)” on page 75).
Each chapter title has either “(HD)” or “(DVD)” at the end so you can easily tell which
division you are in.
TA RTING A DVD BACKUP
S
DVD backup is started from an HD backup screen. See “How do I start a DVD backup or
restore?” on page 46 in the Advanced topics (HD) chapter.
P
ACKAGE CONTENTS
Your Clickfree backup package contains:
• one Clickfree C2 Portable Backup Drive
• one USB cable to attach the C2 Portable Backup Drive to your computer
• one quick start guide
Note: Because of software updates, what appears on your screen may look slightly
different from what appears in this document.
DEFINITIONS
Just to make sure that the user guide is clear, we’re going to define a couple of terms that
are used throughout the guide.
Administrator
“Administrator” is a special login name for the user who can make system-wide changes to
the computer, has full control, and can access all of the files on the computer. Most home
users are automatically the Administrator of their computer. If you don’t know if you are
the Administrator, or how to log in as Administrator, you might need to talk to the person
who set up the computer for you. If no one set up your computer for you, then by default,
you are the Administrator.
Copyright © 2009 Storage Appliance Corporation. 8
Page 9

Clickfree C2 Portable Backup Drive User Guide Using the Clickfree C2 Portable Backup Drive
Back up and Restore
Backing up is making copies of data so that a copy can be used to restore the original after
the data is lost or destroyed. Backups are used to restore data after loss of or damage to
your computer’s hard drive, and to restore files that have been accidentally deleted or
corrupted.
Making a backup of your content only copies it from your computer to your C2 Portable
Backup Drive /CDs/DVDs, and does not delete it from the computer’s hard drive.
Restoring your content from a backup only copies it from your C2 Portable Backup Drive
/CDs/DVDs to your computer, and does not delete it from the these media.
Important: Clickfree never erases or replaces content on your computer’s hard drive, unless
you ask it to replace a file during restore.
Clickfree never erases anything other than the backups it has performed. Any
other data stored on your C2 Portable Backup Drive /CDs/DVDs is left untouched
and is never erased.
And unless you ask it to remove backed-up content, Clickfree never erases or
replaces content on your C2 Portable Backup Drive. Clickfree never erases or
replaces content on your CDs or DVDs.
Your Clickfree backups are also handy for moving or copying data from one computer to
another.
Content
Normally you don’t use Clickfree to back up your programs or operating system
(Windows), only the data that you have created or copied to your computer – music,
photos, letters, emails, tax information etc. In this guide we refer to this data as content.
File
Information used by your computer and stored in a specific place on your hard drive. A file
may be content, a program or part of a program, or information a program uses in some
way.
Sometimes the relationship between content and file is clear: a photo or a letter is usually a
single file. On the other hand, a single email message may be just a part of a large file that
contains many messages, and related information such as email addresses, calendar events
etc. However, you don’t need to be concerned about this because Clickfree takes care of all
the details for you.
Copyright © 2009 Storage Appliance Corporation. 9
Page 10

Clickfree C2 Portable Backup Drive User Guide Introducing Clickfree C2 Portable Backup Drive (HD)
Introducing Clickfree C2 Portable Backup Drive
(HD)
Thank you for buying the Clickfree C2 Portable Backup Drive – the easiest way to keep the
valuable information on your computer safe.
Clickfree is an easy-to-use computer backup system that automatically searches for and
backs up content stored on your computer. No hardware configuration or software
installation is required. The backup procedure begins once the C2 Portable Backup Drive
has been attached to your computer.
Caution: Please remember that a backup is meant to be a second copy of your computer
data, not the only copy of your data. Having two copies (redundancy) is what
keeps your important data safe. Please use your Clickfree C2 Portable Backup
Drive to keep a safe copy of your data.
MAIN FEATURES
Clickfree backup technology
• Automatically starts when connected to your computer
• Does not require any software installation or setup
• Automatically searches for and backs up the important data from your computer –
hundreds of types of data used by many thousands of computer programs
• For most users the automatic search finds and backs up everything that matters
Customizable backup options
• Includes options for custom file types and full folder backup
• Still runs as Clickfree, even after customizing settings
• Remembers your customized settings for each computer you use it with
Multi-PC backup
• Can hold the backups for as many computers as you like, depending only on the
available space on the C2 Portable Backup Drive
Easy restore to same or other computer
• Backed-up content can quickly and easily be restored
• You can just as easily ‘restore’ content to a different computer as to the original one
• This makes Clickfree a great way to move your content from your old computer to
your new one
• Allows you to undo a restore, in case you accidentally overwrote a file you need to
keep
Copyright © 2009 Storage Appliance Corporation. 10
Page 11

Clickfree C2 Portable Backup Drive User Guide Introducing Clickfree C2 Portable Backup Drive (HD)
How it backs up
• The first time you connect a Clickfree C2 Portable Backup Drive to your computer
it searches for, finds, backs up and organizes all of your important content
• Each subsequent time you connect Clickfree to your computer, it just does an
update:
• Any new files since your last backup are added to the backup
• Any files that were changed since your last backup are updated on the
backup
• Any files that were deleted from your computer since the last backup, are
left on the backup
Photo Viewer
• Conveniently view backed-up photos in thumbnail and expanded view
Import music
• Easily import music from your iPod to your computer, and to iTunes
Non-Admin users
• Users without administrator privileges can perform backups and restores
Copyright © 2009 Storage Appliance Corporation. 11
Page 12

Clickfree C2 Portable Backup Drive User Guide Basics (HD)
Basics (HD)
HOW DOES CLICKFREE WORK?
All you need to do to keep your projects, photos, videos, music etc. safe is to plug the
Clickfree C2 Portable Backup Drive in to your computer and let it work!
No need to install software or to configure anything. Your computer knows when
Clickfree has been plugged in, and it runs the backup program automatically each time it
is connected.
You can back up as many computers as you like with the Clickfree C2 Portable Backup
Drive. The same thing happens each time you plug it into a new computer. And each of
your backed-up computers is kept separate on your C2 Portable Backup Drive.
When Clickfree has finished backing up each computer, just unplug the C2 Portable
Backup Drive and store in a safe place, or leave it plugged in if you are using the Clickfree
Scheduler to run automatic backups. See “Scheduler and the Clickfree icon” on page 63.
If your data is lost for any reason (hard disk crash, laptop lost or stolen, content
accidentally deleted), you’ll be really happy that you bought and used Clickfree. Your
backed-up content is safe on your Clickfree backup, waiting to be restored when you have
a working computer again.
A Clickfree backup is also ideal for transferring your content from an old computer to a
new one.
Sometimes, for a variety of reasons, the program may not run by itself – it may need a little
help. If this happens to you, don’t worry – it’s easy to get things going. We’ll show you
how a little later. For details, see “What if Clickfree doesn’t start up automatically?” on
page 17.
WHAT GETS BACKED UP?
CLICKFREE BACKS UP CONTENT
At Clickfree we want to protect our customers from losing things that are irreplaceable.
That’s why Clickfree finds and backs up all of the content from wherever it is on your
computer.
When it runs automatically, Clickfree searches your computer for all of the content that
you have either created or placed in your computer. This includes photos, music, video,
office documents, financial data, email, and so much more - over 400 types of files. To see a
list of the categories of content that Clickfree backs up automatically, see “What content
categories does Clickfree back up?” on page 13. Most likely, this means that it will back up
everything that matters to you right out of the box without you having to do anything but
plug it in.
Copyright © 2009 Storage Appliance Corporation. 12
Page 13

Clickfree C2 Portable Backup Drive User Guide Basics (HD)
Unless you explicitly ask it to do so, Clickfree does not back up the programs or the
operating system. This means that your backup won’t need nearly as much space as the
size of your computer’s hard drive since your content may only take up a small portion of
your hard drive’s capacity, and we only look for the content.
D
OES CLICKFREE BACK UP ALL OF MY CONTENT EVERY TIME?
The first time you back up your computer Clickfree backs up all of the content it finds,
which might take some time – it just depends on how much you have. Each time you use
Clickfree after that, it only backs up the new or changed content, so it will be much
quicker.
HAT CONTENT CATEGORIES DOES CLICKFREE BACK UP?
W
Clickfree backs up content in these categories:
• Photos – including common graphic formats such as JPEG and RAW
• Music – including CD audio, MP3, MIDI
• Emails – including Thunderbird, Eudora, and those from Microsoft Office
• Text Documents – usually from word-processing programs such as Microsoft Word,
Open Office, and WordPerfect
• Spreadsheets – for example, Microsoft Excel, Open Office, and Lotus 123
• Presentations – for example, Microsoft Powerpoint and Corel Show
• Artwork and Drawings – such as Corel Draw, Visio and Paintshop images
• Video – for example, AVI, MPEG, Shockwave Flash
• Favorite Websites – internet shortcuts and address books
• Other – including zip and RAR files, XML, and comma-separated values files
• Financial – such as those from QuickBooks and tax programs
Want to know more? You can look at the details by following the steps in “How do I
Change how Clickfree does backups” on page 19 without making any changes.
WHAT DO I NEED BEFORE I START?
All you need to start your backup is the Clickfree C2 Portable Backup Drive and the
included USB cable. Before you start your first Restore, you should read through the
“Restoring my content (HD)” chapter of this manual.
For Clickfree to work, your computer needs to be running one of these operating systems:
• Microsoft Windows® Vista® (any editions)
• Microsoft Windows® XP (any editions)
• Mac OSX 10.5 Leopard running on an Intel processor
In addition you need:
• One free USB port on your computer
• At least 100 MB of free space on your computer
Copyright © 2009 Storage Appliance Corporation. 13
Page 14

Clickfree C2 Portable Backup Drive User Guide Backing up my content (HD)
Backing up my content (HD)
HOW DO I START USING MY CLICKFREE C2 PORTABLE BACKUP DRIVE?
Note: If you are a non-administrator user, or are an administrator setting up a Clickfree
C2 Portable Backup Drive for a non-administrator user, see “Non-administrator
users” on page 47 before you begin using the C2 Portable Backup Drive for the first
time.
♦ To start using your Clickfree C2 Portable Backup Drive:
1. Make sure that your computer is switched on and has finished starting up.
2. Log in, if that is what you normally do.
3. Attach the Clickfree C2 Portable Backup Drive to your computer by connecting one
end of the USB cable to the drive and the other end to a USB port on your computer.
A USB port usually looks like this:
it. USB ports are usually found at the front of a desktop computer, often in pairs. On a
laptop computer they may be at the back, front or side.
Please try to connect to a USB port on the computer itself, using a USB hub may not
provide enough power.
4. Wait for the Clickfree window to appear. You may have to wait up to a full minute for
your computer to recognize the Clickfree C2 Portable Backup Drive.
5. If your C2 Portable Backup Drive is password protected, you are prompted to enter the
password to access the drive for backup or restore.
• If you do not remember your password, click Show Hint and use the hint to help
you enter your password.
• If you still do not remember your password, see “What if I forget my password?: on
page 60 in the Advanced topics (HD) chapter.
and frequently has a symbol beside
Copyright © 2009 Storage Appliance Corporation. 14
Page 15

Clickfree C2 Portable Backup Drive User Guide Backing up my content (HD)
After you enter the password, Clickfree loads.
The first time you attach Clickfree to your computer, some messages appear on the
screen telling you that your computer has found new hardware. The messages may
mention ClickFree, Disk drive, and/or CD-ROM drive. You don’t need to do anything
about these messages. Most likely you will not see these messages when you attach
Clickfree the next time.
6. If a major software update is available, Clickfree prompts you to install it:
Just click
When Clickfree starts to run, a
Update and follow the instruction on the screen.
Welcome window appears and shows the number of
seconds left before the backup starts automatically:
Note: After you have backed up content on your C2 Portable Backup Drive,
and Restore/Transfer buttons appear at the bottom of the screen beside Options.
View Files
Copyright © 2009 Storage Appliance Corporation. 15
Page 16

Clickfree C2 Portable Backup Drive User Guide Backing up my content (HD)
ZERO EFFORT BACKUP – REALLY!
Unless you stop the countdown by clicking a button, at the end of the countdown period
Clickfree starts the backup.
• If you want to let Clickfree decide what needs to be backed up from where, then
you’re done: just relax and let Clickfree work.
Without any effort on your part, Clickfree is safeguarding your valuable content!
For details, see “What gets backed up?” on page 12.
• If you want to make changes to how backup is done, click
I Change how Clickfree does backups” on page 19
B
ACKUP PROGRESS
Clickfree displays some screens to show progress:
Options and see “How do
Copyright © 2009 Storage Appliance Corporation. 16
Page 17

Clickfree C2 Portable Backup Drive User Guide Backing up my content (HD)
The
Backup Summary screen shows you how many files in each category were
backed up this time (
this time (
Total column). The Space Used column shows the amount of space that
files from all backups for this computer take up on the C2 Portable Backup Drive.
New column) and for all backups for this computer, including
When you see the
Backup Summary screen, simply unplug the Clickfree C2
Portable Backup Drive and store it in a safe place.
WHAT IF CLICKFREE DOESN’T START UP AUTOMATICALLY?
There could be a couple of reasons why Clickfree does not run when you plug in the
Clickfree C2 Portable Backup Drive:
• If you are connecting the C2 Portable Backup Drive to a USB hub (which could be in
your monitor or keyboard), the hub may not provide enough power for a C2
Portable Backup Drive. Try connecting to a USB port on the computer itself.
• You may see a message telling you that “Clickfree
you do not have the required permissions. Please re-login to this computer as
the Administrator
1. Log out.
2. Unplug the Clickfree C2 Portable Backup Drive.
3. Log in again as Administrator.
4. Plug the Clickfree C2 Portable Backup Drive in again.
The backup then starts automatically.
.”:
™ Backup cannot start because
• Your computer settings may prevent Clickfree from running automatically because
“Autorun” is turned off.
To fix this problem, follow these steps. You only need to do this once, not every
time you use Clickfree.
Copyright © 2009 Storage Appliance Corporation. 17
Page 18

Clickfree C2 Portable Backup Drive User Guide Backing up my content (HD)
♦ To turn on Autorun – Windows XP:
1. Download the “autoplay repair wizard” from the Microsoft website.
2. Run the program.
♦ To turn on Autorun – Windows Vista:
1. Click the Start button on your computer, then click Control Panel.
2. In the window that appears, click
3. Scroll to the bottom of the
4. Click
Save.
Autoplay window and select Restore all defaults.
Autoplay.
As an alternative, you can temporarily bypass autorun. If you use this method, you will
have to follow this procedure every time you use the Clickfree C2 Portable Backup Drive.
♦ To temporarily bypass Autorun – Windows XP/Vista:
1. Wait for two minutes after you connect your C2 Portable Backup Drive to your
computer:
2. Click the
Computer (Vista).
or
3. In the window that appears, find
4. Right-click and select
5. Double-click
HAT IF THE VISTA AUTOPLAY WINDOW APPEARS?
W
Start button on your computer, then click My Computer (WindowsXP/2000)
Clickfree_System.
Explore.
StartClickFreeBackup.exe.
In Windows Vista, if the AutoPlay window appears:
1. Check
2. Click
Always do this for software and games.
Start ClickFree Backup.
You only need to do this once, not every time you use Clickfree.
Copyright © 2009 Storage Appliance Corporation. 18
Page 19

Clickfree C2 Portable Backup Drive User Guide Backing up my content (HD)
HOW DO I CHANGE HOW CLICKFREE DOES BACKUPS?
You can change:
• The categories of content Clickfree backs up
• The file types/extensions that Clickfree searches for – see “How do I choose
individual file types for backup” on page 69 in the “Advanced topics” chapter
• Where Clickfree looks for this content
You can also tell Clickfree to back up all of the files in a folder.
Note: Changes you make to how Clickfree does backups are “sticky”: they are stored
and applied again to later backups on this computer unless you modify them, or
use factory settings – see “What are ‘factory settings’ and how do I use them?” on
page 55 in the “Advanced topics” chapter.
What do the Cancel, Next, and Back buttons do?
As you go from one step to the next to back up content, the screens you see usually have
buttons for
Cancel abandons the changes you have made and returns you to the Manage Settings and
PCs
screen.
Cancel, Next >, and Back>.
Next > accepts the decisions you have made so far, then moves on to the next step and the
next decision.
Back > sends you back to the previous step so that you can change a decision you already
made. Until you click
Start or Cancel there is no limit to how often you can go back and
make changes.
♦ To review or change what gets backed up:
1. Follow steps 1 to 4 of the procedure “How do I start using my Clickfree C2 Portable
Backup Drive?” on page 14.
2. Before the countdown reaches zero, click
Options.
Copyright © 2009 Storage Appliance Corporation. 19
Page 20

Clickfree C2 Portable Backup Drive User Guide Backing up my content (HD)
The Manage Settings and PCs screen is displayed:
3. Now click
Change Backup Settings.
HOOSING CATEGORIES OF CONTENT TO BE BACKED UP – REQUIRED
C
4. All of the categories are selected by default. Choose the categories of content to be
backed up, for example, Text Documents, Photos, and Videos.
• To include a category, for example, Photos, in the backup, make sure that the box to
the left of the category name is checked:
. If it isn’t, click the box to check
it. You can add and remove the checkmark by clicking in the box.
• To exclude a category, for example, Music, from the backup, make sure that the box
to the left of the category name is unchecked:
If it is checked, click the
box to uncheck it.
Note: You can make a finer selection by choosing file types within each category. For
details, see “How do I choose individual file types for backup” on page 69 in the
“Advanced topics” chapter.
5. If you use Microsoft Outlook or Outlook Express for your email, and you want to back
up files that are attached to email messages, check the Extract email attachments …
checkbox.
Copyright © 2009 Storage Appliance Corporation. 20
Page 21

Clickfree C2 Portable Backup Drive User Guide Backing up my content (HD)
6. When you are finished choosing content categories, click Next >.
Note: You must choose at least one file type or category – you cannot leave all file types
and categories unchecked.
C
HOOSING LOCATIONS TO SEARCH FOR CONTENT – REQUIRED
7. Choose where you want Clickfree to search for the categories you chose earlier –
Clickfree can either:
• look through your entire computer (the default setting)
• or
• look only in certain folders
♦ To look through the entire computer
• Choose Search the entire computer
Clickfree can optionally skip temporary folders and/or folders that Windows uses
for its own files:
• Check or uncheck
Skip TEMP directories to skip or not skip temporary
folders.
• Check or uncheck
Skip Windows System folders to skip or not skip folders
that Windows uses for its own files.
Copyright © 2009 Storage Appliance Corporation. 21
Page 22

Clickfree C2 Portable Backup Drive User Guide Backing up my content (HD)
♦ To look only in certain folders:
• Choose Search selected folders only then select
folders from
• To search the entire
• To see details of a folder under
My Documents. and My Computer.
My Documents folder, make sure that the checkbox is
checked
checkbox. This expands
.
My Documents, click the + to the left of the
My Documents to show the folders that it contains,
and changes the + to a -. Click the – when you want to collapse the folder
again.
Each folder with a
+ beside it can also be expanded.
• You can now choose the individual folders you want to be searched by
adding and removing checkmarks in the checkboxes. For example, to search
only the Music folder, uncheck the
My Documents checkbox, then check
only Music:
• Do the same for
My Computer.
Note: You must choose a location – you cannot leave all locations unchecked.
Copyright © 2009 Storage Appliance Corporation. 22
Page 23

Clickfree C2 Portable Backup Drive User Guide Backing up my content (HD)
8. When you have made your choices, click Next >.
C
HOOSING COMPLETE FOLDERS TO BE BACKED UP – OPTIONAL
9. Choose complete folders to be backed up in addition to categories and locations.
The folders you choose here are completely copied - except for files whose file types
were unchecked in “Choosing locations to search for content – required” on page 21.
Complete folders are backed up in addition to the file types in the locations you already
chose.
• To add the entire
is checked
• To see details of a folder under
My Documents folder to the backup, make sure that the checkbox
.
My Documents, click the + to the left of the
checkbox. This expands My Documents to show the folders that it contains, and
changes the + to a -. Click the
– when you want to collapse the folder again.
Each folder with a
+ beside it can also be expanded.
Copyright © 2009 Storage Appliance Corporation. 23
Page 24

Clickfree C2 Portable Backup Drive User Guide Backing up my content (HD)
• You can now choose the individual folders you want to include in the backup by
adding and removing checkmarks in the checkboxes. For example, within My
Documents if you want to include only the folder with Music, uncheck the My
Documents checkbox, then check only
• Do the same for My Computer.
Music:
10. When you have made your choices, click
Next >.
11. Click
Done then Close to continue with the countdown.
You can click
Start at this time to go to the backup right away without waiting for the
rest of the countdown.
Clickfree searches for content to back up
Before actually backing up any content, Clickfree searches the locations you chose for your
chosen categories of content:
Copyright © 2009 Storage Appliance Corporation. 24
Page 25

Clickfree C2 Portable Backup Drive User Guide Backing up my content (HD)
It adds up the sizes of all of the content it finds, then adds the sizes of the files in the
complete folders you also chose. See “What if there is not enough space on my Clickfree C2
Portable Backup Drive?” on page 26.
Clickfree backs up your content
If there is enough space on your C2 Portable Backup Drive, Clickfree then backs up the
content and complete folders you chose to your C2 Portable Backup Drive:
At the end of the backup, a
Backup Summary screen is displayed:
The
Backup Summary screen shows you how many files in each category were backed up
this time (
column). The
New column) and from all backups for this computer, including this one (Total
Space Used column shows the amount of space that files from all backups for
this computer take up on the C2 Portable Backup Drive.
When you see the
Backup Summary screen, simply unplug the Clickfree C2 Portable
Backup Drive and store it in a safe place.
Copyright © 2009 Storage Appliance Corporation. 25
Page 26

Clickfree C2 Portable Backup Drive User Guide Backing up my content (HD)
WHAT IF THERE IS NOT ENOUGH SPACE ON MY CLICKFREE C2 PORTABLE BACKUP
DRIVE?
While Clickfree is searching for content to back up, it adds up the amount of disk space
needed and compares that with the free space on the C2 Portable Backup Drive. If there is
not enough free space for your content, Clickfree prompts you to change the files selected
for backup:
Either:
• unselect one or more content categories by unchecking their
until the
• use the
backup:
Start Backup button is enabled (turns orange), or
Browse, Search, and/or Photo tabs to choose files not to be included in the
Include checkboxes,
Copyright © 2009 Storage Appliance Corporation. 26
Page 27

Clickfree C2 Portable Backup Drive User Guide Backing up my content (HD)
When the Start Backup button is enabled (turns orange):
click
Start Backup.
Backup proceeds as described in “Backup progress” on page 16.
As an alternative, if you have backups from an old computer that you don’t need to keep
any more, you could cancel the backup, remove the old computer, (for details, see “To
remove a computer” on page 54), and restart the backup.
Copyright © 2009 Storage Appliance Corporation. 27
Page 28

Clickfree C2 Portable Backup Drive User Guide Restoring my content (HD)
Restoring my content (HD)
WHAT IF MY COMPUTER’S INTERNAL HARD DRIVE STOPS WORKING, OR I WOULD LIKE
TO TRANSFER MY CONTENT TO A NEW COMPUTER
All computer hard drives fail eventually, sometimes without warning. Occasionally,
computers suffer damage that affects the hard drive. Sometimes, laptop computers get lost
or stolen. Sometimes, also, you may delete content by mistake. When these things happen,
other computer users may lose valuable, sometimes irreplaceable, data.
But if you lose content you’ll be really happy that you bought and used Clickfree. Your
backed-up content is safe on your Clickfree backup, and can be restored when you have a
working computer again.
A Clickfree backup is also ideal for transferring your content from an old computer to a
new one.
WHAT DO I NEED BEFORE I CAN USE CLICKFREE TO RESTORE MY CONTENT?
?
Note: If you are not an administrator, or are an administrator setting up a Clickfree C2
Portable Backup Drive for a non-administrator user, see “Non-administrator
users” on page 47 before you begin using the C2 Portable Backup Drive for the first
time.
Before you can restore your content, your computer needs to be working – at the very least
it needs to be able to start up and display the desktop.
Of course, you can ‘restore’ your content to any computer that meets the system
requirements (see “What do I need before I start?” on page 13), not just to the computer
whose content you backed up.
The easiest way to copy content between computers is to plug the Clickfree C2 Portable
Backup Drive in to your new computer. When the Clickfree application launches, just click
the
Restore button at the bottom of the countdown screen.
HOW DO I GET MY CONTENT BACK?
To get your content back you don’t need to do much more than you did to back the content
up – it just takes a couple of clicks.
As with Clickfree backup, you can either make some choices – whether to restore all, or
just selected content, and where the content is restored to – or you can allow Clickfree to
make the choices for you.
Copyright © 2009 Storage Appliance Corporation. 28
Page 29

Clickfree C2 Portable Backup Drive User Guide Restoring my content (HD)
WHAT GETS RESTORED, AND TO WHERE?
When Clickfree restore runs without you changing any options, it restores all of the
content that was backed up, and puts it in the same folders on your computer that it was
backed up from. This is the best choice if you have a new computer, or if you have repaired
your old computer and all of the content was erased.
On the other hand, if you have files on the computer, the restored files replace files of the
same name in the same location, but only after asking your permission.
If you prefer, you can easily tell Clickfree restore to restore your files to a place on your
computer’s hard drive where they will not replace the files you already have.
For details, see:
• “How do I let Clickfree restore decide what to restore and where?” on page 29
• “How do I change how Clickfree restores content?” on page 32
HOW DO I LET CLICKFREE RESTORE DECIDE WHAT TO RESTORE AND WHERE?
You can allow Clickfree to make the decisions about what to restore and to where, but you
need to confirm what Clickfree plans to do.
♦ To let Clickfree decide what to restore and to where:
1. Make sure that your computer is switched on and has finished starting up.
2. Log in, if that is what you normally do.
3. Connect the Clickfree C2 Portable Backup Drive to your computer by connecting one
end of the USB cable to the drive and the other end to a USB port on your computer.
Please try to connect to a USB port on the computer itself, as a USB hub may not
provide enough power.
Clickfree starts up just as it did when you used it to back up your content.
4. Wait for the Clickfree window to appear – this may take up to 60 seconds.
The Clickfree
used it to back up your content.
But this time you are not going to allow Clickfree to start the backup.
Welcome window appears with the countdown, just as it did when you
Copyright © 2009 Storage Appliance Corporation. 29
Page 30

Clickfree C2 Portable Backup Drive User Guide Restoring my content (HD)
Because you have backed-up content on your C2 Portable Backup Drive, the
countdown screen now shows buttons at the bottom to allow you to
Restore files.
View Files and
5. Before the countdown gets to zero, click
Restore/Transfer. The Restore screen appears.
Note that all of the categories that have backed-up content are checked off in the
Category
6. Before you click
restored, look at the computer name in the
column.
Start Restore to restore all of your content, or select categories to be
Restore From box:
.
Select
If your C2 Portable Backup Drive contains backups created on the computer that you
are using, the
Restore From box by default contains the name of this computer, and,
unless you change it, the content to be restored will come from this computer.
7. Click the arrow at the right of the
The drop-down list contains the names of all of the computers that have been backed
up on your C2 Portable Backup Drive.
Copyright © 2009 Storage Appliance Corporation. 30
Restore From box:
Page 31

Clickfree C2 Portable Backup Drive User Guide Restoring my content (HD)
8. Select the name of the computer whose content you want to restore.
9. Since you are going to restore all of your content, simply click
Start Restore.
Clickfree confirms how many files will be restored, and where they are going to be
restored to.
As Clickfree restores your content, it shows you what is happening and how far it has
gotten in the process.
Warning: During restore, if Clickfree overwrites any files it finds with the same name and
from the same location as those that were backed up.
Copyright © 2009 Storage Appliance Corporation. 31
Page 32

Clickfree C2 Portable Backup Drive User Guide Restoring my content (HD)
When all of your content has been restored, Clickfree tells you that it is done.
10. Click
Close.
Note: After a restore, Clickfree gives you the chance to undo the restore. If you want to
undo, see “How do I undo a restore?” on page 51.
Note: Your content has not been deleted from your Clickfree backup: it is still safe on the
C2 Portable Backup Drive.
11. Now, simply unplug the Clickfree C2 Portable Backup Drive and store it in a safe
place.
HOW DO I CHANGE HOW CLICKFREE RESTORES CONTENT?
By making choices at several steps in the restore process you can affect which content is
restored and where it is restored to.
What do the
As you go from one step to the next to restore content, the screens you see usually have
buttons for
Cancel completely stops the restore, and returns you to the countdown screen.
Cancel, Next, and Back buttons do?
Cancel, Next >, and Back>.
Next > accepts the decisions you have made so far, then moves on to the next step and the
next decision.
Back > sends you back to the previous step so that you can change a decision you already
made. Until you click
and make changes.
Copyright © 2009 Storage Appliance Corporation. 32
Restore Now or Cancel there is no limit to how often you can go back
Page 33

Clickfree C2 Portable Backup Drive User Guide Restoring my content (HD)
RESTORING CONTENT
♦ To change how Clickfree restores content:
1. Follow steps 1 to 5 of the previous section “How do I let Clickfree restore decide what
to restore and where?” on page 29.
Restore screen appears:
The
If your C2 Portable Backup Drive contains backed-up content from the computer that
you are using, the
Restore From box by default contains the name of this computer,
and, unless you change it, the content that will be restored will be from this computer.
C
HOOSING THE COMPUTER TO RESTORE FROM
2. Click the arrow at the right of the
Restore From box:
and select the name of the computer whose content you want to restore.
3. To restore content from more than one computer simply repeat the restore process
choosing a different computer each time in step 2.
4. Choose
Advanced Restore .
5. What you do next depends on whether you want to restore all or only some of your
files.
• If you want to restore only some of your files, continue with step 6.
• If you want to restore all of your files, click
Start Restore and go to step 7.
Copyright © 2009 Storage Appliance Corporation. 33
Page 34

Clickfree C2 Portable Backup Drive User Guide Restoring my content (HD)
CHOOSING CATEGORIES OF CONTENT TO BE RESTORED
6. Note that all of the categories that contain files (with the number of files in parentheses
after the category name) have checkboxes that you can check off in the Select Category
column.
For each category whose content you want to restore, click the checkbox to select the
category.
7. Click
Next >.
You can also choose to restore content of individual file types within each category. For
details see “How do I choose individual files for restore” on page 70 in the “Advanced
topics” chapter.
HOOSING WHERE TO RESTORE CONTENT TO
C
8. What you do next depends on whether you want to restore your content to its original
locations or to somewhere else.
• If you want to restore your content to its original locations, leave
automatically restore my files to their original location
selected:
Clickfree will
, and continue
with step 9.
If you want to restore your files to a different location, see “How do I choose another
drive and/or folder to restore to” on page 73 in the “Advanced topics” chapter.
Copyright © 2009 Storage Appliance Corporation. 34
Page 35

Clickfree C2 Portable Backup Drive User Guide Restoring my content (HD)
9. Click Start Restore.
As Clickfree restores your content, it shows you what is happening and how far it has
gotten in the process.
If you are restoring files to somewhere other than the original locations, before it
overwrites an existing file on your computer with one of the same name from the
backed-up files, Clickfree asks if you want to replace the existing file with the samename file from the backup:
10. You can choose to:
• Keep both copies of this one file – click
up file by adding ‘ (2)’ to the end of the file name, then restores the renamed file.
• Keep both copies of all same-name files – check
click
Keep Both. Clickfree, without asking you , renames the remaining backed-up
files by adding ‘ (2)’ to the ends of the file names, then restores the renamed files.
• Not replace this one file – click
Skip
• Not replace any same-name files – check
Skip. Clickfree skips all remaining same-name files without asking you.
• Replace just this file – click
• Replace all same-name files – check
Replace
Do this for all duplicate files and click Replace.
Clickfree replaces all remaining same-name files without asking you.
If two files have the same size (KB) and same date modified, it is likely to be safe to
skip.
If you skip any files, Clickfree completes “with exceptions”. For details see “Restore
completed with exceptions” on page 36.
Keep Both. Clickfree renames the backed-
Do this for all duplicate files and
Do this for all duplicate files and click
Copyright © 2009 Storage Appliance Corporation. 35
Page 36

Clickfree C2 Portable Backup Drive User Guide Restoring my content (HD)
When all of your content has been restored, Clickfree tells you that it is done:
11. Click
Note: After a restore, Clickfree gives you the chance to undo the restore. If you want to
Note: Your content has not been deleted from your Clickfree backup: it is still safe on the
Close.
undo, see “How do I undo a restore?” on page 51.
C2 Portable Backup Drive.
Now, simply unplug the Clickfree C2 Portable Backup Drive and store it in a safe
place.
HOW DO I RESTORE FILES FROM MULTIPLE COMPUTERS?
The process of restoring is described in “How do I let Clickfree restore decide what to
restore and where?” on page 29, or “How do I change how Clickfree restores content?” on
page 32.
To restore files from more than one computer, simply repeat the restore process choosing a
different computer each time.
RESTORE COMPLETED WITH EXCEPTIONS
If you skip any files during a restore, the Restore Complete screen has an Exceptions link
at the bottom left. Click the link to see a list of the files that were not restored.
Copyright © 2009 Storage Appliance Corporation. 36
Page 37

Clickfree C2 Portable Backup Drive User Guide Restoring my content (HD)
HOW DO I FIND FILES THAT WERE RESTORED
If Clickfree restored your files to a folder that was not their original location, Clickfree
puts an icon on your desktop so that you can quickly and easily get to the restored content:
♦ To find files that were restored:
Double-click the icon to open a Windows Explorer at the folder where your content was
restored.
You can now use
M
Y PROGRAM CANNOT FIND THE RESTORED FILES – WHAT SHOULD I DO?
Note: Some programs, especially those like
Explorer to move the files to a more convenient folder.
Outlook in which you do not open files from
a file open dialog, expect to find their files in a particular folder. If you restore files
to a folder other than the original location, your program may not be able to find
them.
If your program displays an error message telling you that it cannot find its files, or if the
program starts up but your data is missing, you will need to move the files to the proper
folder.
Unfortunately, this is different for every application and you may need to consult the
program’s Help or user guide to find out where the files need to be moved to.
Copyright © 2009 Storage Appliance Corporation. 37
Page 38

Clickfree C2 Portable Backup Drive User Guide Browsing, Searching & Viewing my files (HD)
Browsing, Searching & Viewing my files (HD)
From the Backup Summary screen you can:
• Browse your backup(s) for files
• Search your backup(s) for files
• View backed-up files
TARTING FROM THE WELCOME SCREEN
S
♦ To browse and search for files, or view photos:
Before the countdown gets to zero, click View Files. The Backup Summary screen is
displayed.
F
ROM THE BACKUP SUMMARY SCREEN
Copyright © 2009 Storage Appliance Corporation. 38
Page 39

Clickfree C2 Portable Backup Drive User Guide Browsing, Searching & Viewing my files (HD)
♦ To browse and search for files, or view photos:
1. In the Current PC box select the name of the computer whose files you want to search
for/browse for/view.
2. Do one of the following:
• Click the name of a category , and follow ”How do I search for my backed-up files”
on page 43
Note: If the Category you click is
page 39
• Click the Photos tab, and follow “How do I view and use photos” on page 39
• Click the
Browse Files tab, and follow “How do I browse my backed-up files” on
page 42
• Click the
Search Files tab, and follow ”How do I search for my backed-up files” on
page 43
HOW DO I VIEW AND USE PHOTOS?
1. On the Backup Summary screen, in the Current PC box, select the name of the
computer whose files you want to search for/browse for/view.
2. Click the
The photo viewer shows “thumbnails”, or miniature views of your photos and videos.
Photos tab
Photos, follow “How do I view and use photos” on
3. Select one or more photos and use the buttons at the bottom of the screen to:
• Print them on your own printer
• Share them on Facebook or Myspace
• Email them (if you use Outlook or Outlook Express for your email)
You can also select one photo and use it as wallpaper for your computer.
Copyright © 2009 Storage Appliance Corporation. 39
Page 40

Clickfree C2 Portable Backup Drive User Guide Browsing, Searching & Viewing my files (HD)
♦ To select photos:
Click the photo so that the checkbox at the top right is checked. As you continue to click
photos, they are added to the selection.
♦ To use a photo as wallpaper:
1. Click the photo. Make sure that only one photo is selected.
2. Click
♦ To print photos:
Wallpaper. The chosen photo becomes your computer Wallpaper:
1. Select the photos.
2. Click
Print @ Home and select the Print Style:
3. Set the
Printer Options, then click Print.
Copyright © 2009 Storage Appliance Corporation. 40
Page 41

Clickfree C2 Portable Backup Drive User Guide Browsing, Searching & Viewing my files (HD)
♦ To share photos:
1. Select the photos.
2. Click
3. Click
♦ To email photos:
Share Photos:
facebook or myspace.com and log in.
If you use Outlook or Outlook Express for your email, you can create a blank email
message and attach your photos.
1. Select the photos.
2. Click
Email:
Your email program opens a new blank message with the photos included as
attachments:
3. Address and send the message as you would normally do.
Copyright © 2009 Storage Appliance Corporation. 41
Page 42

Clickfree C2 Portable Backup Drive User Guide Browsing, Searching & Viewing my files (HD)
♦ To open a photo:
Double-click the photo. It opens in your usual program for working with photos:
HOW DO I BROWSE MY BACKED-UP FILES?
♦ To browse for files that you have backed up:
1. On the Backup Summary screen, in the Current PC box, select the name of the
computer whose files you want to search for/browse for/view.
2. Click the
Browse Files tab.
3. Expand and collapse the folders on the left side of the screen:
• Click the +
to expand the view
• Click ‘+’ to the left of a collapsed folder to expand it
• Click ‘-’ to the left of an expanded folder to collapse it
• Click a folder or the folder name to view the list of contents
To find out more about what you can do with the files that are displayed, see “What can
I do with files from browse, search and view photos” on page 45.
Copyright © 2009 Storage Appliance Corporation. 42
Page 43

Clickfree C2 Portable Backup Drive User Guide Browsing, Searching & Viewing my files (HD)
HOW DO I SEARCH FOR MY BACKED-UP FILES?
1. On the Backup Summary screen, in the Current PC box, select the name of the
computer whose files you want to search for/browse for/view.
2. Do one of the following:
• Click the name of a category other than
Note: If the Category you click is
Photos, follow “How do I view and use photos” on
page 39
• Click the Search Files tab
If you clicked the
Search Files tab, the Search screen looks like this:
If you clicked a category name, the
category, regardless of
File Date or File Name, are displayed.
Photos.
File Type is already filled in, and all files of that
3. Enter search factors to find the files you want.
♦ To search for files:
1. Use the combination of File Type, File Date, and File Name that you think should match
the file(s) you want to find:
Copyright © 2009 Storage Appliance Corporation. 43
Page 44
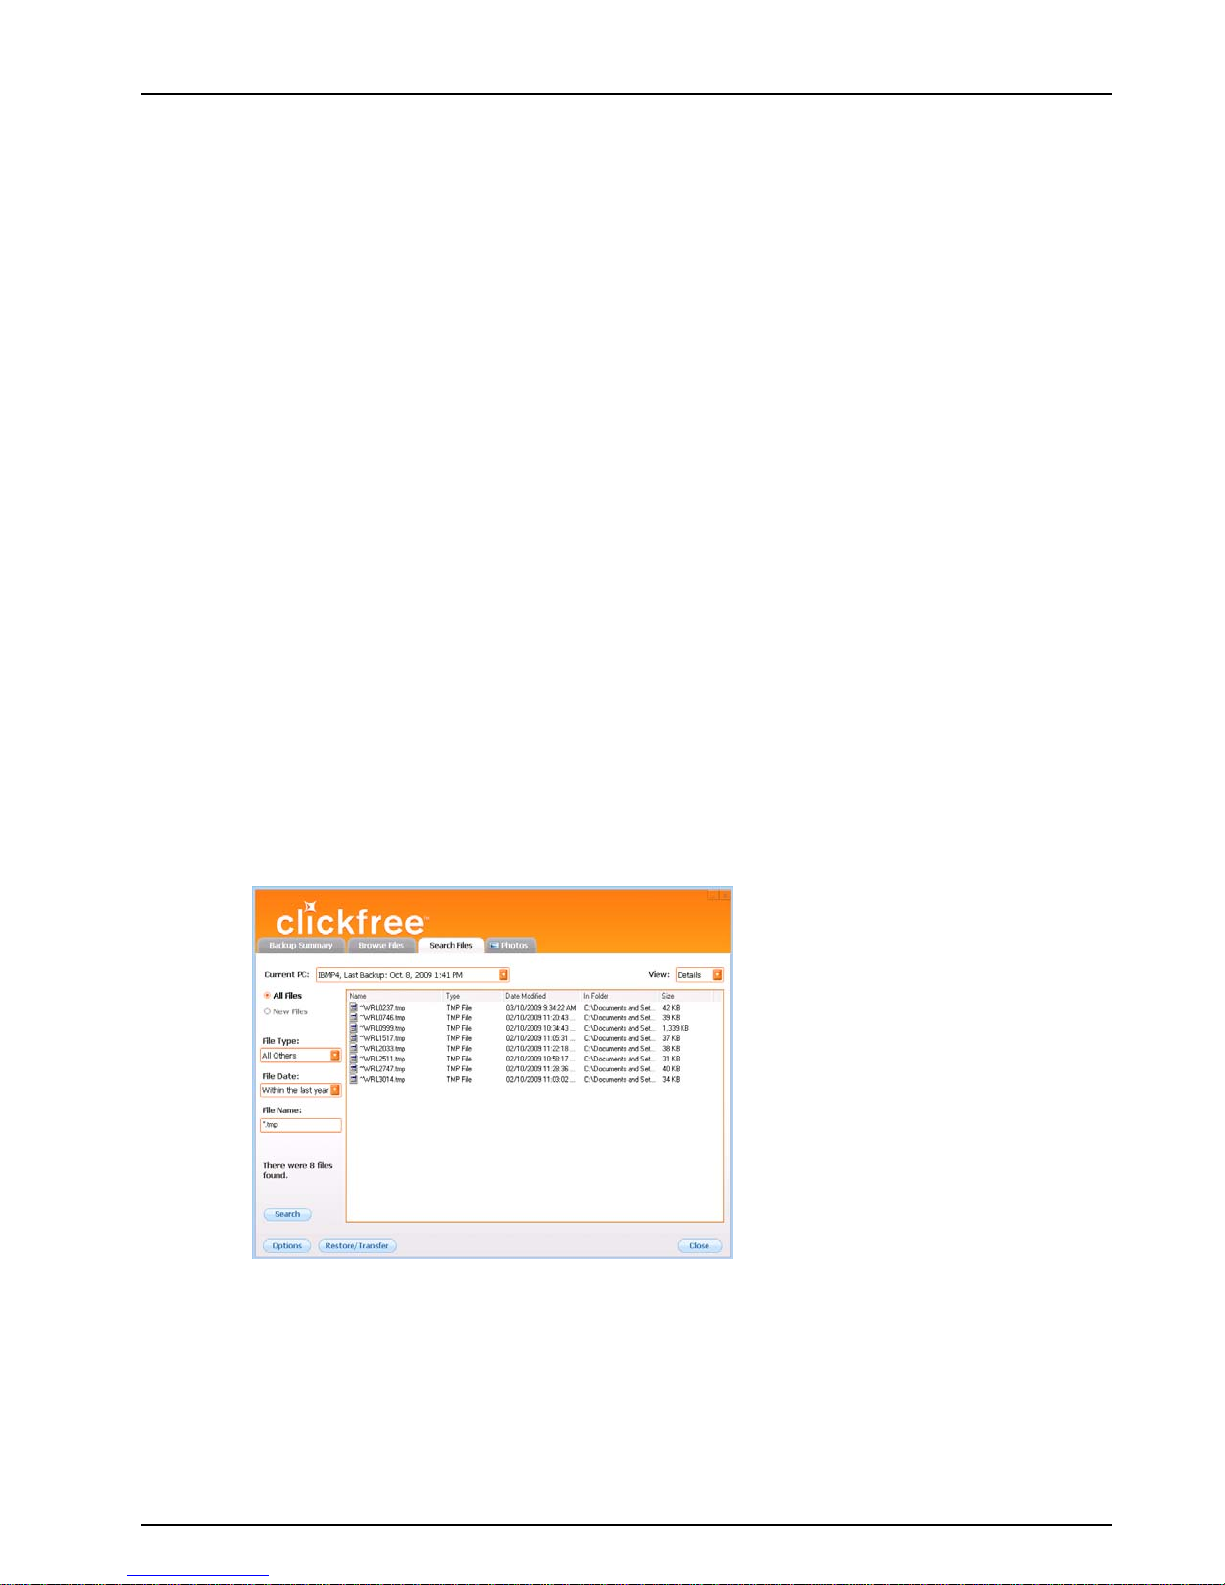
Clickfree C2 Portable Backup Drive User Guide Browsing, Searching & Viewing my files (HD)
These selections are combined so that only files that match all of them are found – in
this case only files in the category
year, and with names ending with ‘tmp’.
File Type – select a category, or ‘Any’ if you want all categories to be searched
•
•
File Date – select the time period within which the files were created or changed, or
‘All’ if you want the date to be ignored
•
File Name – type a “mask” to select files. A blank file name matches all files.
Type whatever you can remember of the file names you want to find, and
substitute:
• ? for one character, meaning that character can be anything at all
• * for any number of characters, meaning these characters can be anything at
all
All Others, and created/last changed within the last
For example (assuming that the
File Type and File Date selections you made would
include them):
• To find all files whose names begin with ‘08Dec’, type ‘08Dec*’ – this will
find 08Dec_LetterToMary.doc, but not 2008DecemberExpenses.xls
• To find all files with ‘Dec’ anywhere in the name, type ‘*Dec*’ – this will find
08Dec_LetterToMary.doc, 2008DecemberExpenses.xls, etc
• To find all files with ‘n’ as the second character of the name, type ‘?n*’ – this
will find IndiaSlides.ppt, inukshuk5.jpg, but not 5inukshuk.jpg
• To find all files of type ‘doc’ or ‘docx’, type ‘*.doc*’ – of course, this will also
find any files that have type ‘doczzz’ as well
2. Click
Search.
Files that match all of your search factors are displayed.
For information about what you can do with the files that are displayed, see “What can
I do with files from browse, search and view photos” on page 45.
Copyright © 2009 Storage Appliance Corporation. 44
Page 45

Clickfree C2 Portable Backup Drive User Guide Browsing, Searching & Viewing my files (HD)
WHAT CAN I DO WITH FILES FROM BROWSE, SEARCH AND VIEW PHOTOS
When you have files displayed in the browse, search or photo view screens, you can either:
• double-click a file to open it with the program that your computer normally uses for
files of this type
• right-click a file and choose one of several actions as shown below
If you select more than one file, some of the actions act on all of the selected files.
♦ To work with the file(s) you have selected:
1. Right-click the file (or one of the files) to bring up a menu.
2. Select one of the menu items:
Open – to open the file with the program that your computer normally uses for files
•
of this type
•
Open with (not for photos in the View Photos screen) – to choose the program that
you want
•
Restore file to your computer – to restore that file to a location you choose. See
“Restoring content” on page 33 to continue with the restore.
•
Restore file to original location – to restore that file to its original location. See
“Restoring content” on page 33 to continue with the restore.
•
Delete selected files from the backup – to delete files from the backup and
optionally exclude them from all later backups:
Windows to use to open the file
•
Print this picture (only for photos in the View Photos screen) – takes you to the
same
Print Style screen as you see when you click Print @ Home, but this time to
print only one photo
Copyright © 2009 Storage Appliance Corporation. 45
Page 46

Clickfree C2 Portable Backup Drive User Guide Advanced topics (HD)
Advanced topics (HD)
HOW DO I ST ART A DVD BACKUP OR RESTORE?
The DVD backup/restore is started from the Options screen.
♦ To start a DVD backup or restore
1. Follow steps 1 to 4 of the procedure “How do I start using my Clickfree C2 Portable
Backup Drive?” on page 14.
2. Before the countdown reaches zero, click
Manage Settings and PCs screen is displayed:
The
Options.
3. Now click
The DVD backup program starts up.
Go to the DVD section of this guide for details:
• For an introduction to the use of the DVD features of your C2 Portable Backup
Drive, see “Introducing Clickfree C2 Portable Backup Drive (DVD)” on page 75,
and “Basics (DVD)” on page 77
• To begin using the DVD features, see “Backing up my content (DVD)” on page
79
DVD Backup.
Copyright © 2009 Storage Appliance Corporation. 46
Page 47

Clickfree C2 Portable Backup Drive User Guide Advanced topics (HD)
NON-ADMINISTRATOR USERS
Non-administrator users are subject to certain limitations:
• The first time that a non-administrator user uses the C2 Portable Backup Drive,
an administrative user password is required.
• If your C2 Portable Backup Drive is password protected, a non-administrator
user cannot backup or restore files.
• A non-administrator user can back up only those files that are visible to the user.
Normally that means only files that belong to that user, or that are shared by all
users.
• A non-administrator user can restore files only to locations that are visible to the
user.
N
ON-ADMINISTRATOR USER – FIRST USE
1. Follow steps 1 to 3 of “How do I start using my Clickfree C2 Portable Backup
Drive?” on page 14.
2. When you see the prompt:
enter the login name and password of an administrative user, then click
OK.
3. Continue with step 4 of “How do I start using my Clickfree C2 Portable Backup
Drive?” on page 14.
Copyright © 2009 Storage Appliance Corporation. 47
Page 48

Clickfree C2 Portable Backup Drive User Guide Advanced topics (HD)
HOW DO I IMPORT MUSIC FROM MY IPOD TO MY COMPUTER?
You can use your Clickfree C2 Portable Backup Drive to copy music from your
iPod/iPhone to your computer.
1. Follow steps 1 to 4 of “How do I start using my Clickfree C2 Portable Backup
Drive?” on page 14.
2. Before the countdown reaches zero, click
The
Manage Settings and PCs screen is displayed:
Options.
3. Now click
Import Music.
Copyright © 2009 Storage Appliance Corporation. 48
Page 49

Clickfree C2 Portable Backup Drive User Guide Advanced topics (HD)
4. Attach your iPod/iPhone to a USB port on your computer.
5. Click
Import Music.
6. Select the iPod/iPhone to import music from, and click
Next.
Copyright © 2009 Storage Appliance Corporation. 49
Page 50

Clickfree C2 Portable Backup Drive User Guide Advanced topics (HD)
7. Select the music to be copied by checking and unchecking a combination of the
Playlists on the left, and individual Titles on the right, or, to import all of the music
on the iPod/iPhone, ensure that the
A grey checkmark in a playlist’s checkbox means that some of its titles are selected.
Note that, since a title may be included in more than one playlist, checking or
unchecking any given playlist may result in a change in the selection status of other
playlists.
Import All Music checkbox is checked.
Note: You can use the controls at the bottom left of the screen to play any title from
your iPod through your computer’s sound system. If the title will not play in
Windows Media Player, the appropriate program opens to play it.
8. If you do not want to import the music to iTunes, uncheck the Automatically add
imported music to your iTunes library
9. Click
10. Click
Browse to select the location to copy the music files to.
Start Copy.
checkbox.
The music files are imported to your computer.
11. Click
12. If you are adding the imported music to your iTunes library, wait until the
Close.
new music …
Adding
box closes.
Copyright © 2009 Storage Appliance Corporation. 50
Page 51

Clickfree C2 Portable Backup Drive User Guide Advanced topics (HD)
HOW DO I UNDO A RESTORE?
If you realize, after restoring your files, that the restore accidentally overwrote a file you
need to keep, Clickfree allows you to undo the latest restore.
♦ To undo the latest restore:
1. On the Options screen:
Restore/Transfer:
click
2. Click
Undo Restore:
Copyright © 2009 Storage Appliance Corporation. 51
Page 52

Clickfree C2 Portable Backup Drive User Guide Advanced topics (HD)
3. Click Start.
The latest Restore is undone:
4. To see what files were replaced by undoing the restore, click
undo log
:
WHAT IF THERE IS MORE THAN ONE USER ON MY COMPUTER?
This matters only if each user has a separate user login name for the computer. If every
user logs in with the same user name, all of their content is backed up and restored at
the same time regardless of who is logged in.
When Clickfree runs, it can only back up the content that you can access from your
login, and restore content to locations you have access to. Because
Windows XP and Windows Vista maintain a separate Documents or My Documents
folder for each user name, Clickfree can back up only the corresponding content that
belong to the person who is logged in, unless that person logs in as the Administrator.
Click here to view
Windows 2000,
Administrator
“Administrator” is a special login name for the user who can make system-wide changes
to the computer, has full control, and can access all of the files on the computer. Most
home users are automatically the Administrator of their computer. If you don’t know if
you are the Administrator, or how to log in as Administrator, you might need to talk to
the person who set up the computer for you. If no one set up your computer for you,
then by default, you are the Administrator.
Copyright © 2009 Storage Appliance Corporation. 52
Page 53

Clickfree C2 Portable Backup Drive User Guide Advanced topics (HD)
WHAT IF I HAVE MORE THAN ONE COMPUTER?
Clickfree C2 Portable Backup Drive can back as many computers as you like: you are
limited only by the amount of space on your C2 Portable Backup Drive.
Clickfree creates a unique identifier for each computer that it is used with, regardless of
the computer’s name. This allows Clickfree to back up content for more than one
computer without the files getting mixed up with each other, even if all of the computers
have the same name.
You can change the name of a computer after backup to make it easier to remember
which computer is which.
You change a computer’s name from the Clickfree
H
OW IS BACKUP DIFFERENT WHEN I HAVE MORE THAN ONE COMPUTER?
It makes no difference at all - just plug the C2 Portable Backup Drive in to each
computer to back it up.
Each time you back up a computer for the first time, its name is added to the drop down
list of computers that you see on the
screens.
♦ To find the name of a computer:
1. Follow steps 1 to 4 of “How do I start using my Clickfree C2 Portable Backup
Drive?” on page 14.
2. When you see the countdown, click
Manage Settings and PCs screen.
Backup Summary, Restore Summary, and Options
Options.
All of the computers that Clickfree has backed up on your C2 Portable Backup Drive
are shown at the left side of the screen, with the computer names underneath.
Copyright © 2009 Storage Appliance Corporation. 53
Page 54

Clickfree C2 Portable Backup Drive User Guide Advanced topics (HD)
When you click one of the computers, Clickfree shows:
• the computer name
• the amount of space taken up by backed-up content for that computer
• the date and time of last backup
♦ To rename a computer:
On the Manage Settings and PCs screen:
1. Click the computer whose name you want to change.
2. Click
Rename PC.
3. Type the new name for the computer and click
Note: Use only letters, numbers and hyphens for the computer name.
♦ To remove a computer:
If you no longer want to keep content backed up from a computer (for example, you
may no longer have that computer, and have already restored its content to another
computer), you can free up space on your C2 Portable Backup Drive by removing the
old computer from Clickfree.
Warning: If you have not restored the content and you still want to keep it, do not remove
the computer from Clickfree: you cannot restore content from a computer that
you have removed.
On the Options screen:
1. Click the computer you want to remove.
Save.
2. Click
Remove PC.
Copyright © 2009 Storage Appliance Corporation. 54
Page 55

Clickfree C2 Portable Backup Drive User Guide Advanced topics (HD)
3. If you really want to remove the computer from Clickfree, check the checkbox and
Remove.
click
Warning: Once you have removed a computer from Clickfree there is no way to recover
that computer’s content from the C2 Portable Backup Drive.
Clickfree may take several minutes to erase the data, depending on the amount of
content backed up on the C2 Portable Backup Drive.
To see how to remove the content from all computers, see ”Master Reset” on page
62.
WHAT IF I USE MORE THAN ONE C2 PORTABLE BACKUP DRIVE?
You can use as many C2 Portable Backup Drives as you like – as far as Clickfree is
concerned, each C2 Portable Backup Drive (and the backups on it) is independent of the
others.
H
OW DO I MAKE MULTIPLE BACKUPS?
If you want to keep multiple backups of a computer, use multiple C2 Portable Backup
Drives for that computer.
The first time you back up a computer onto any C2 Portable Backup Drive, Clickfree
makes a full backup. The next time you use the same C2 Portable Backup Drive it backs
up only new and changed content.
So if you use a second C2 Portable Backup Drive with the same computer, Clickfree
starts off with a full backup again.
WHA T ARE ‘FACTORY SETTINGS’ AND HOW DO I USE THEM?
Factory settings can be used in Clickfree in two places:
• When choosing categories and file types to be backed up – see “Choosing
categories of content to be backed up – required” on page 20
Use Factory Settings for categories and files types means that all categories and
the corresponding file types are included.
• When choosing locations to search – see “Choosing locations to search for
content – required” on page 21
Use Factory Settings for locations means that the entire computer is searched,
except for temporary folders and folders that
Windows uses for its own files.
Copyright © 2009 Storage Appliance Corporation. 55
Page 56

Clickfree C2 Portable Backup Drive User Guide Advanced topics (HD)
♦ To reset categories and file types to factory settings:
1. On the Choose File Types screen click Use Factory Settings.
2. Click
♦ To reset locations to search to factory settings:
Next > and continue with choosing locations to be searched.
1. On the Choose File Locations screen click Use Factory Settings.
2. Click
Next > and continue with choosing complete folders.
CLICKFREE TOOLS
Several tools are available for working with Clickfree:
•
Clickfree Password – prevents unauthorized access to your C2 Portable Backup
Drive
•
Software Update – upgrades the Clickfree software
Language – changes the language used in the Clickfree screens
•
Master Reset - removes all backed-up content from your C2 Portable Backup
•
Drive, and erases any changes you have made to the backup settings
♦ To use Clickfree tools:
1. Connect Clickfree to your computer as described in “How do I start using my
Clickfree C2 Portable Backup Drive?” on page 14.
2. When you see the countdown screen, click
zero:
Options before the countdown reaches
Copyright © 2009 Storage Appliance Corporation. 56
Page 57

Clickfree C2 Portable Backup Drive User Guide Advanced topics (HD)
3. Click the Tools tab to show the available tools.
H
OW DO I USE PASSWORD PROTECTION?
Do my files need password protection?
If your Clickfree C2 Portable Backup Drive is lost or stolen, anyone with a computer
that meets the hardware and software prerequisites can restore files from your C2
Portable Backup Drive simply by connecting the C2 Portable Backup Drive to their
computer, unless the C2 Portable Backup Drive is protected by a password.
You should protect your files using a password if the content you have backed up is
sensitive in any way, for example, contains trade secrets, or if it would be embarrassing
to you if it got into the wrong hands, and there is any possibility that the C2 Portable
Backup Drive could be lost or stolen.
Note: You cannot run backups as a non-administrator (see “Non-administrator users”
on page 47)if your C2 Portable Backup Drive is password protected.
Note: If you set a password, a scheduled backup is delayed until you enter the
password. See “Scheduler and the Clickfree icon” on page 63 for details of
scheduled backups.
How do I choose a password?
Choose your password according to the sensitivity of the content you are protecting.
Advice on passwords is easy to come by – just google “choose password” to find as
much advice as you could possibly use. Clickfree imposes no restrictions on the
password, and treats upper-case and lower-case letters as identical.
Warning: Be sure to pick a password that would be difficult for anyone else to discover
and that you will be able to remember – if you forget your password there is no
way to recover any backed-up content from the C2 Portable Backup Drive.
Copyright © 2009 Storage Appliance Corporation. 57
Page 58

Clickfree C2 Portable Backup Drive User Guide Advanced topics (HD)
How do I enable password protection?
You can enable password protection from the
♦ To enable password protection:
1. Click Enable Password.
Tools screen.
2. Type your password in both the
New Password and Retype Password fields.
3. Optionally set a hint. See below for details.
4. Click
OK.
How does setting a ‘hint’ help me?
If you forget your password, then, as noted in the warning above, you have effectively
lost access to all of the backups on your C2 Portable Backup Drive.
Clickfree gives you a second chance to remember the password, in the form of a hint.
If you choose to set a hint, then when Clickfree asks you for your password you can
click the Show hint link and see the hint you entered when you enabled password
protection.
However, don’t forget that anyone who finds or steals your C2 Portable Backup Drive
can also click the link and see your hint. This means that your hint should be as difficult
to use as possible for anyone other than yourself – in fact, it means that your hint should
be as secure as your password. There is no point at all in having a strong password but
using a hint that gives it away to anyone who clicks the link.
Copyright © 2009 Storage Appliance Corporation. 58
Page 59

Clickfree C2 Portable Backup Drive User Guide Advanced topics (HD)
Warning: Be sure to pick a hint that would be difficult for anyone else to interpret and
that you will be able to remember – if you forget your password and cannot
remember it using the hint there is no way to recover any backed-up content
from the C2 Portable Backup Drive.
For example, if my password is ‘J@ntetelc0’ (Jantetelco is a town in Mexico with a
population of about 500), then my hint could be ‘Lugar de la patria’ – a title by which
Jantetelco is known only to people who live near there – and by you!
Can I change my password?
The way to change your password is simply to disable security from the
Summary
screen, as shown in “How do I disable password protection?” on page 59,
then to re-enable it as shown in “How do I enable password protection?” on page 58.
How do I disable password protection?
You can disable password protection from the
♦ To disable password protection:
Click Disable Password:
Backup
Tools screen.
then click
Yes when asked if you are sure.
You can re-enable password protection from the
password protection?” on page 58.
Copyright © 2009 Storage Appliance Corporation. 59
Tools screen. See “How do I enable
Page 60

Clickfree C2 Portable Backup Drive User Guide Advanced topics (HD)
What if I forget my password?
If you have forgotten your password, and cannot remember it from the hint you set
when you enabled password protection, your only choice is to reset the C2 Portable
Backup Drive and lose all of your backed-up content.
♦ To reset the C2 Portable Backup Drive
1. When prompted to type your password, click Forgot My Password.
You can:
• erase the backed-up content and re-enable password protection – go to step 2
• erase the backed-up content and disable password protection – go to step 6
2. Leave
3. Type a new password (that you will remember) in both the
Retype Password fields.
Erase backed up data and re-enable security selected.
New Password and
4. Optionally set a hint.
5. Click
Erase and Enable security,
and continue with step 8.
6. Select
Erase all backed up data but do not re-enable security.
Copyright © 2009 Storage Appliance Corporation. 60
Page 61

Clickfree C2 Portable Backup Drive User Guide Advanced topics (HD)
7. Click Erase
and continue with step 8.
8. Click
Yes to confirm that you are sure you want to erase all backed-up content.
Clickfree shows you how far it has got with erasing data, then tells you that your C2
Portable Backup Drive has been reset.
PDATING CLICKFREE SOFTWARE
U
From time to time Clickfree software is upgraded to provide new or enhanced features.
You can:
• Have Clickfree check for updates each time you connect it to your computer –
this is the default action, you don’t need to do anything
• Manually check for updates
In both cases your computer needs to be connected to the internet for updated software
to be found and installed.
♦ To check automatically for updates:
Clickfree automatically looks for updates when it is connected to your computer and
you have a connection to the internet. To ensure this feature is on, make sure that the
checkbox
Automatically check for software updates is checked on the Tools screen:
.
Every time that you connect Clickfree to your computer it automatically checks for
updated software and, if an update is available, prompts you to download and install it.
♦ To stop checking automatically for updates:
Make sure that the checkbox Automatically check for software updates is unchecked on
Tools screen: .
the
Copyright © 2009 Storage Appliance Corporation. 61
Page 62

Clickfree C2 Portable Backup Drive User Guide Advanced topics (HD)
♦ To check manually for updates:
1. On the Tools screen click Update. Clickfree checks for available updates.
If the software in your Clickfree C2 Portable Backup Drive and your computer is up
to date, click
2. If an update is available, Clickfree shows you what progress is being made in
downloading the update and updating your software:
OK on the dialog that pops up.
Warning: While a software update is taking place it is very important for you not to
remove the Clickfree C2 Portable Backup Drive from your computer and not to
turn off or restart the computer until the update is complete.
3. When the software update is complete, you need to unplug the Clickfree C2
Portable Backup Drive and plug it in again for the update to take effect.
ASTER RESET
M
Master Reset is used to remove all backed-up content from all computers that have been
backed up on your C2 Portable Backup Drive, and to apply factory settings – see “What
are ‘factory settings’ and how do I use them?” on page 55.
After you perform a
Master Reset you can no longer restore any previously backed-up
content. However, your C2 Portable Backup Drive can still be used for new backups.
Note: Clickfree never erases anything other than the backups it has performed.
If you want to remove only the content that was backed up from one computer, see “To
remove a computer” on page 54.
Copyright © 2009 Storage Appliance Corporation. 62
Page 63

Clickfree C2 Portable Backup Drive User Guide Advanced topics (HD)
♦ To remove all backed up content:
1. On the Tools screen click Master Reset.
2. If you really want to remove all backed-up content from Clickfree, check the
checkbox and click
Warning: Once you have removed content from Clickfree using Master Reset there is no
way to recover any backed-up content from the C2 Portable Backup Drive.
Reset.
Clickfree may take several minutes to erase all of the content, depending on the amount
of content backed up on the C2 Portable Backup Drive.
SCHEDULER AND THE CLICKFREE ICON
The Clickfree scheduler can either run a backup automatically (if the C2 Portable
Backup Drive is attached) or remind you to back up your files.
The first time you close the Clickfree program on a computer, you are prompted to
install the scheduler:
When you install the scheduler it puts an icon in the bottom right corner of your screen.
From this icon you can set the backup schedule or start a backup.
Copyright © 2009 Storage Appliance Corporation. 63
Page 64

Clickfree C2 Portable Backup Drive User Guide Advanced topics (HD)
SCHEDULER
♦ To install the scheduler:
1. Connect Clickfree to your computer as described in “How do I start using my
Clickfree C2 Portable Backup Drive?” on page 14.
2. When you see the countdown screen, click
zero:
3. Click the
Scheduler tab.
Options before the countdown reaches
4. Click
Install Backup Scheduler.
The Clickfree icon is installed in the bottom right corner of your computer screen,
and allows you to set, disable, or uninstall the reminder, or start a backup
immediately.
Copyright © 2009 Storage Appliance Corporation. 64
Page 65

Clickfree C2 Portable Backup Drive User Guide Advanced topics (HD)
♦ To set the number of days before Clickfree reminds you to back up:
1. Look for the Clickfree icon in the bottom right corner of your computer screen, and
click it to show a menu:
2. Click
Set Interval:
3. Enter the interval after which you want to be reminded to back up, and click
♦ To temporarily disable reminders:
1. Click the Clickfree icon in the bottom right corner of your computer screen:
2. Click
Exit:
OK.
The icon disappears, and reminders are disabled until you next start your computer.
♦ To stop getting reminders:
1. Click the Clickfree icon in the bottom right corner of your computer screen:
2. Click
Uninstall.
The icon disappears, and reminders are disabled.
If you want to see reminders in the future, you can install them again.
Copyright © 2009 Storage Appliance Corporation. 65
Page 66

Clickfree C2 Portable Backup Drive User Guide Advanced topics (HD)
Automatic backups
If the backup scheduler is installed, and the C2 Portable Backup Drive is connected to
your computer, a backup is started automatically, with no intervention from you, when
the time interval since the last backup is greater than the interval set in the scheduler.
However:
• If an automatic update occurs before the scheduled backup, and you have not
allowed the update to take place, the backup is delayed until the update has
completed.
For this reason it is recommended that you turn off automatic updates during
any period in which a scheduled backup should take place. See “Updating
Clickfree software” on page 61 for details on turning off automatic updates.
• Although a scheduled backup will wake your computer from sleep mode, it will
not run if the computer is hibernating.
• If your C2 Portable Backup Drive uses password protection, the scheduled
backup is delayed until you enter the password. See “How do I disable password
protection?” on page 59 for details on turning off password protection.
•
HOW DO I ADD/REMOVE/EDIT FILETYPES
In addition to allowing you to choose to back up pre-defined file types within the predefined categories, Clickfree has a category called Custom Extensions to which you can
add file types that are not included in the pre-defined categories.
You can add, remove, and change file types using the
Choose File Types screen:
Copyright © 2009 Storage Appliance Corporation. 66
Page 67

Clickfree C2 Portable Backup Drive User Guide Advanced topics (HD)
♦ To add a file type:
1. Click Add File Type:
2. Type the extension for the new file type, and click
The new file type is added to
Custom Extensions:
Save.
Copyright © 2009 Storage Appliance Corporation. 67
Page 68

Clickfree C2 Portable Backup Drive User Guide Advanced topics (HD)
♦ To remove a file type:
1. Click a file type in Custom Extensions, and click Remove File Type:
2. Click
Yes.
The file type is removed from
♦ To change a file type:
1. Click a file type in Custom Extensions, and click Edit File Type:
2. Type the new extension for the file type, and click
The file type in
Custom Extensions is modified.
3. When you are finished working with custom extensions, click
with choosing locations to be searched.
Custom Extensions:
Save.
Next > and continue
Copyright © 2009 Storage Appliance Corporation. 68
Page 69

Clickfree C2 Portable Backup Drive User Guide Advanced topics (HD)
HOW DO I CHOOSE INDIVIDUAL FILE TYPES FOR BACKUP?
You already saw how to choose file categories for backup in “Choosing categories of
content to be backed up – required” on page 20.
You can also expand each category and select or unselect individual file types that make
up that category.
Note: When a category is selected or unselected by checking or unchecking its checkbox, all
of the file types that make up that category are also selected or unselected.
♦ To select one or more file types in a category:
1. Click the + to the left of the checkbox. This expands the category list to show the file
types that make up that category, and changes the + to a -:
2. You can now choose the individual types of file you want to include in the backup
by adding and removing checkmarks in the checkboxes.
You collapse the category again by clicking the - .
3. If you need to back up file types that are not in any category, see “How do I
Add/Remove/Edit filetypes” on page 66 for details of how to add a new file type.
4. When you are finished selecting file categories and file types, click
continue with choosing locations to be searched.
CAN I EXCLUDE A FILE FROM BACKUP?
After you have completed a backup, you can review the backed-up files and not only
delete individual files from the backup, but ensure that these files are never backed up
again.
For details, see “To work with the file(s) you have selected” on page 45.
Next > and
Copyright © 2009 Storage Appliance Corporation. 69
Page 70

Clickfree C2 Portable Backup Drive User Guide Advanced topics (HD)
HOW DO I CHOOSE INDIVIDUAL FILES FOR RESTORE?
On the advanced Restore Summary screen you can click checkboxes to select the
category whose files you want to restore.
You can also:
• Select backed-up files within a category
• Browse through folders that contain backup files
• Search for backed-up files by file type, file date, and file name
Files selected by each of these means are included in the restore.
♦ To select files within a category:
1. Click Advanced Restore.
2. Click the category name.
All files in that category are shown in the
Search Files screen.
Copyright © 2009 Storage Appliance Corporation. 70
Page 71

Clickfree C2 Portable Backup Drive User Guide Advanced topics (HD)
3. Select the files to be restored, and click Next >.
You are returned to the
Restore Summary screen where you can make more
selections.
4. If you are finished selecting files, click
♦ To select files by browsing:
1. Click the Browse Files tab then click the + to expand the view.
2. Select the files to be restored, and click
Next >.
Next >.
You are returned to the
Restore Summary screen where you can make more
selections.
3. If you are finished selecting files, click
♦ To select files by searching:
1. Click the Search Files tab.
Next >.
Copyright © 2009 Storage Appliance Corporation. 71
Page 72

Clickfree C2 Portable Backup Drive User Guide Advanced topics (HD)
2. Select the combination of File Type, File Date, and File Name that should find the
files you want to restore:
These selections are combined so that only files that match all of them are found – in
this case only files in the category Photos, and created/last changed within the last
year, and with names starting with ‘inuk’.
File Type – select a category
•
•
File Date – select the time period within which the files were created or changed
File Name – type a “mask” to select files:
•
Type whatever you can remember of the file names you want to find, and
substitute:
• ? for one character, meaning that character can be anything at all
• * for any number of characters, meaning these characters can be anything
at all
• For example, assume that the File Type and File Date selections would include
them:
• To find all files whose names begin with ‘08Dec’, type ‘08Dec*’ – this will find
08Dec_LetterToMary.doc, but not 2008DecemberExpenses.xls
• To find all files with ‘Dec’ anywhere in the name, type ‘*Dec*’ – this will find
08Dec_LetterToMary.doc, 2008DecemberExpenses.xls, etc
• To find all files with ‘n’ as the second character of the name, type ‘?n*’ – this will
find IndiaSlides.ppt, inukshuk5.jpg, but not 5inukshuk.jpg
• To find all files of type ‘doc’ or ‘docx’, type ‘*.doc*’ – of course, this will also find
any files that have type ‘doczzz’ as well
Copyright © 2009 Storage Appliance Corporation. 72
Page 73

Clickfree C2 Portable Backup Drive User Guide Advanced topics (HD)
3. Click Search.
Files that match all of your search criteria are displayed.
4. Select the files to be restored, and click
You are returned to the
Restore Summary screen where you can make more
Next >.
selections.
5. If you are finished selecting files, click
Next >.
HOW DO I CHOOSE ANOTHER DRIVE AND/OR FOLDER TO RESTORE TO?
After you choose file categories and, optionally, individual files to restore, on the Select
Location to Restore Files
• To restore files to their original locations, or
• the disk drive to restore content to (if you have more than one)
• the folder on that drive to use
If any drive does not have enough space for the content to be restored, the drive letter
and free space are ‘greyed’:
screen you can choose:
Copyright © 2009 Storage Appliance Corporation. 73
Page 74

Clickfree C2 Portable Backup Drive User Guide Advanced topics (HD)
♦ To select another drive and/or folder to restore to:
1. On the Select Location to Restore Files screen, click I will choose a specific location
to restore my files to
2. Select the drive to restore to.
.
The folder that will be used is shown below the drives.
3. To change the folder, click
Change Folder and select the folder you want.
As usual, click + to expand a folder, - to collapse the folder again.
4. To create a new subfolder, click
5. Click
Next >, and continue with “Choosing categories of content to be restored” on
New Folder, type the folder name, and click OK.
page 34.
Copyright © 2009 Storage Appliance Corporation. 74
Page 75

Clickfree C2 Portable Backup Drive User Guide Introducing Clickfree C2 Portable Backup Drive (DVD)
Introducing Clickfree C2 Portable Backup Drive
(DVD)
Thank you for buying the Clickfree C2 Portable Backup Drive – the easiest way to keep
the valuable information on your computer safe.
Clickfree is an easy-to-use computer backup system that automatically searches for and
backs up content stored on your computer. No hardware configuration or software
installation is required. The backup procedure begins once the C2 Portable Backup Drive
has been attached to your computer.
Caution: Please remember that a backup is meant to be a second copy of your computer
data, not the only copy of your data. Having two copies (redundancy) is what
keeps your important data safe. Please use your Clickfree C2 Portable Backup
Drive to keep a safe copy of your data.
MAIN FEATURES
Clickfree backup technology
• Does not require any software installation or setup
• Automatically searches for and backs up the important data from your computer
– hundreds of types of data used by many thousands of computer programs
• For most users the automatic search finds and backs up everything that matters
Customizable backup options
• Includes options for custom file types and full folder backup
• Still runs as Clickfree, even after customizing settings
• Remembers your customized settings for each computer you use it with
Multi-PC backup
• Holds information about all of the backups you make while using it. It can hold
the information for any number of computers
Note: You need separate recordable media for each computer – each CD or DVD can
be used for only one backup.
Copyright © 2009 Storage Appliance Corporation. 75
Page 76

Clickfree C2 Portable Backup Drive User Guide Introducing Clickfree C2 Portable Backup Drive (DVD)
Easy restore to same or other computer
• Backed-up content can quickly and easily be restored
• You don’t need the C2 Portable Backup Drive to restore content – if necessary, a
restore can be done using only the recordable media containing the backed-up
files. However, unless the C2 Portable Backup Drive is not available, you should
always use it for a restore.
• You can just as easily ‘restore’ content to a different computer as to the original
one
• This makes Clickfree a great way to move your content from your old computer
to your new one
How it backs up
• The first time you use a Clickfree C2 Portable Backup Drive to back up your
computer to CD/DVD it searches for, finds, backs up and organizes all of your
important content
• Each subsequent time you connect Clickfree to your computer, you can choose
to just do an update:
• Any new files since your last backup are added to the backup
• Any files that were changed since your last backup are updated on the
backup
• Any files that were deleted from your computer since the last backup, are
ignored
Photo Viewer
• Conveniently view backed-up photos in thumbnail and expanded view
Backup disks
Generally, throughout this guide, the recordable media (CDs and DVDs) used to back
up your content are referred to as backup disks.
History
Important: Although the C2 Portable Backup Drive backs up all of your content to backup
disks, and all of your content can be restored using the backup disks alone (that
is, without using the C2 Portable Backup Drive), if possible you should always
perform restores and transfers with the C2 Portable Backup Drive plugged in.
This is because backup history is stored on the C2 Portable Backup Drive.
This includes information about which disk holds which files, and, in particular, which
disk has the most up-to-date version of a file that has been backed up more than once.
Without the C2 Portable Backup Drive, to restore your files you will likely need to run
restore from multiple backups to be sure that you can restore all of your files in their
most current versions.
Copyright © 2009 Storage Appliance Corporation. 76
Page 77

Clickfree C2 Portable Backup Drive User Guide Basics (DVD)
Basics (DVD)
HOW DOES CLICKFREE WORK?
All you need to do to keep your projects, photos, videos, music etc. safe is to plug the C2
Portable Backup Drive in to your computer, start the DVD backup (see “Starting a DVD
backup” on page 8), supply recordable media when prompted, and let it work!
No need to install software or to configure anything.
You can back up as many computers as you like with the Clickfree C2 Portable Backup
Drive. The same thing happens each time you plug it into a new computer. And
information about each of your backed-up computers is kept separate on the C2 Portable
Backup Drive.
When Clickfree has finished backing up each computer, just unplug the C2 Portable
Backup Drive and store it and the backup disks in a safe place. We recommend that you do
not leave the Clickfree C2 Portable Backup Drive plugged into your computer: your
content is safer if the C2 Portable Backup Drive and your backup disks are kept separately
from the computers you have backed up.
If your data is lost for any reason (hard disk crash, laptop lost or stolen, content
accidentally deleted), you’ll be really happy that you bought and used Clickfree. Your
backed-up content is safe on your backup disks, waiting to be restored when you have a
working computer again.
A Clickfree backup is also ideal for transferring your content from an old computer to a
new one.
Sometimes, for a variety of reasons, the program may not run by itself – it may need a little
help. If this happens to you, don’t worry – it’s easy to get things going. We’ll show you
how a little later. For details, see “What if Clickfree doesn’t start up automatically?” on
page 82.
WHAT GETS BACKED UP?
CLICKFREE BACKS UP CONTENT
At Clickfree we want to protect our customers from losing things that are irreplaceable.
That’s why Clickfree finds and backs up all of the content from wherever it is on your
computer.
When it runs automatically, Clickfree searches your computer for all of the content that
you have either created or placed in your computer. This includes photos, music, video,
office documents, financial data, email, and so much more - over 400 types of files. To see a
list of the categories of content that Clickfree backs up automatically, see “What content
categories does Clickfree back up?” on page 78. Most likely, this means that it will back up
everything that matters to you right out of the box without you having to do anything but
plug it in.
Copyright © 2009 Storage Appliance Corporation. 77
Page 78

Clickfree C2 Portable Backup Drive User Guide Basics (DVD)
Unless you explicitly ask it to do so, Clickfree does not back up the programs or the
operating system. This means that your backup won’t need nearly as much space as the
size of your computer’s hard drive since your content may only take up a small portion of
your hard drive’s capacity, and we only look for the content.
D
OES CLICKFREE BACK UP ALL OF MY CONTENT EVERY TIME?
The first time you back up your computer Clickfree backs up all of the content it finds,
which might take some time – it just depends on how much you have. Each time you use
Clickfree after that, you can choose to back up only the new or changed content, so it will
be much quicker.
HAT CONTENT CATEGORIES DOES CLICKFREE BACK UP?
W
Clickfree backs up content in these categories:
• Photos – including common graphic formats such as JPEG and RAW
• Music – including CD audio, MP3, MIDI
• Emails – including Thunderbird, Eudora, and those from Microsoft Office
• Text Documents – usually from word-processing programs such as Microsoft Word,
Open Office, and WordPerfect
• Spreadsheets – for example, Microsoft Excel, Open Office, and Lotus 123
• Presentations – for example, Microsoft Powerpoint and Corel Show
• Artwork and Drawings – such as Corel Draw, Visio and Paintshop images
• Video – for example, AVI, MPEG, Shockwave Flash
• Favorite Websites – internet shortcuts and address books
• Other – including zip and RAR files, XML, and comma-separated values files
• Financial – such as those from QuickBooks and tax programs
Want to know more? You can look at the details by following the steps in “How do I
Change how Clickfree does backups?” on page 83 without making any changes.
WHAT DO I NEED BEFORE I START?
All you need to start your backup is the Clickfree C2 Portable Backup Drive and blank
backup disks. Before you start your first Restore, you should read through the “Restoring
my content (DVD)” chapter of this manual.
For Clickfree to work, your computer needs to be running one of these operating systems:
• Microsoft Windows® Vista® (any editions)
• Microsoft Windows® XP (any editions)
• Microsoft Windows® 2000 (with SP4)
• Mac OSX 10.5 Leopard running on an Intel processor (products manufactured after
Jan 1, 2009)
In addition you need:
• One free USB port on your computer
• At least 100 MB of free disk space on your computer
• A DVD or CD writer
• Recordable media – CDs or DVDs
Copyright © 2009 Storage Appliance Corporation. 78
Page 79

Clickfree C2 Portable Backup Drive User Guide Backing up my content (DVD)
Backing up my content (DVD)
HOW DO I START USING MY CLICKFREE C2 PORTABLE BACKUP DRIVE (DVD)?
♦ To start using your Clickfree C2 Portable Backup Drive for DVD backup:
1. Follow the instructions in “How do I start a DVD backup or restore?” on page 46.
2. Wait for the Clickfree window to appear.
When Clickfree starts to run, a
seconds left before the backup starts automatically:
Note: The
View / Restore button does not appear until you have backed up content
using your C2 Portable Backup Drive.
ZERO EFFORT BACKUP – REALLY!
Unless you stop the countdown by clicking a button, at the end of the countdown period
Clickfree starts the backup.
Welcome window appears and shows the number of
• If you want to let Clickfree decide what needs to be backed up from where, then
you’re done: just relax and let Clickfree work.
All you need to do is to put recordable media in your CD/DVD writer when
prompted.
Without any effort on your part, Clickfree is safeguarding your valuable content!
For details, see “What gets backed up?” on page 77.
• If you want to make changes to how backup is done, click
I Change how Clickfree does backups?” on page 83
Copyright © 2009 Storage Appliance Corporation. 79
Options and see “How do
Page 80

Clickfree C2 Portable Backup Drive User Guide Backing up my content (DVD)
Clickfree displays some screens to show progress:
• Click
OK.
• Choose whether you are backing up onto CD or DVD.
Clickfree tells you how many disks are needed.
If you previously backed up this computer, you can choose whether to backup only
files that are new or have changed since the last backup.
Copyright © 2009 Storage Appliance Corporation. 80
Page 81

Clickfree C2 Portable Backup Drive User Guide Backing up my content (DVD)
• Click I’m Ready-Start Backup.
Clickfree prompts you when to put recordable media in your CD/DVD writer:
and starts the backup:
Clickfree tells you when the backup is complete:
Copyright © 2009 Storage Appliance Corporation. 81
Page 82

Clickfree C2 Portable Backup Drive User Guide Backing up my content (DVD)
• Click OK.
The
Backup Summary screen shows you how many files in each category were
backed up this time (
column). The
backups take up on their respective backup disks.
Space Used column shows the amount of space that files from all
New column) and from all backups, including this one (Total
When you see the
Portable Backup Drive, eject and label the backup disk(s), and store them in a safe
place.
Note: Clickfree tells you to label the disk with a number and date.
If you have more than one computer to back up, you should also write the
computer’s name (seen on the Backup Summary screen) on the disk.
In addition, since Clickfree identifies backups by number, date, and time, you
should also write the time of backup if it is possible that you may make more than
one backup in a day.
Backup Summary screen, simply unplug the Clickfree C2
WHAT IF CLICKFREE DOESN’T START UP AUTOMATICALLY?
If you see a message telling you that ”Clickfree™ Backup cannot start because you do not
have the required permissions. Please re-login to this computer as the Administrator.”:
1. Log out.
2. Unplug the Clickfree C2 Portable Backup Drive.
3. Log in again as Administrator.
4. Plug the Clickfree C2 Portable Backup Drive in again.
The backup then starts automatically.
Copyright © 2009 Storage Appliance Corporation. 82
Page 83

Clickfree C2 Portable Backup Drive User Guide Backing up my content (DVD)
HOW DO I CHANGE HOW CLICKFREE DOES BACKUPS?
You can change:
• The categories of content Clickfree backs up
• The file types/extensions that Clickfree searches for – see “How do I choose
individual file types for backup?” on page 121 in the “Advanced topics (DVD)”
chapter.
• Where Clickfree looks for this content.
You can also tell Clickfree to back up all of the files in a folder, regardless of what category
or file type they are.
Note: Changes you make to how Clickfree does backups are “sticky”: they are stored
and applied again to later backups on this computer, unless you modify them or
apply factory settings – see “What are ‘factory settings’ and how do I use them?”
on page 115 in the “Advanced topics (DVD)” chapter.
What do the Cancel, Next, and Back buttons do?
As you go from one step to the next to back up content, the screens you see usually have
buttons for
Cancel, Next >, and Back>.
Cancel abandons the changes you have made and returns you to the Manage Settings and
PCs
screen.
Next > accepts the decisions you have made so far, then moves on to the next step and the
next decision.
Back > sends you back to the previous step so that you can change a decision you already
made. Until you click
Start or Cancel there is no limit to how often you can go back and
make changes.
♦ To review or change what gets backed up:
1. Follow the procedure “How do I start using my Clickfree C2 Portable Backup Drive
(DVD)?” on page 79.
2. Before the countdown reaches zero, click
Options.
Copyright © 2009 Storage Appliance Corporation. 83
Page 84

Clickfree C2 Portable Backup Drive User Guide Backing up my content (DVD)
The Manage Settings and PCs screen is displayed:
3. Now click
Change Backup Settings.
C
HOOSING CATEGORIES OF CONTENT TO BE BACKED UP – REQUIRED
4. All of the categories are selected by default. Choose the categories of content to be
backed up, for example, Text Documents, Photos, and Videos.
• To include a category, for example, Photos, in the backup, make sure that the box to
the left of the category name is checked
. If it isn’t, click the box to check
it. You can add and remove the checkmark by clicking in the box.
• To exclude a category, for example, Music, from the backup, make sure that the box
to the left of the category name is unchecked
. If it is checked, click the
box to uncheck it.
Note: You can make a finer selection by choosing file types within each category. For
details, see “How do I choose individual file types for backup?” on page 121 in the
“Advanced topics (DVD)” chapter.
Copyright © 2009 Storage Appliance Corporation. 84
Page 85

Clickfree C2 Portable Backup Drive User Guide Backing up my content (DVD)
5. When you are finished choosing content categories, click Next >.
Note: You must choose at least one file type or category – you cannot leave all file types
and categories unchecked.
HOOSING LOCATIONS TO SEARCH FOR CONTENT – REQUIRED
C
6. Choose where you want Clickfree to search for the categories you chose earlier –
Clickfree can either:
• look through your entire computer (the default setting)
or
• look only in certain folders
♦ To look through the entire computer:
• Choose Search the entire computer .
Clickfree can optionally skip temporary folders and/or folders that Windows uses
for its own files:
• Check or uncheck
Skip TEMP directories to skip or not skip temporary
folders.
• Check or uncheck
Skip Windows System folders to skip or not skip folders
that Windows uses for its own files.
Copyright © 2009 Storage Appliance Corporation. 85
Page 86

Clickfree C2 Portable Backup Drive User Guide Backing up my content (DVD)
♦ To look only in certain folders:
• Choose Search selected folders only then select folders
from
My Documents. and My Computer.
• To search the entire
checked
• To see details of a folder under
checkbox. This expands
and changes the + to a -. Click the – when you want to collapse the folder
again.
My Documents folder, make sure that the checkbox is
.
My Documents, click the + to the left of the
My Documents to show the folders that it contains,
Each folder with a
+ beside it can also be expanded.
• You can now choose the individual folders you want to be searched by
adding and removing checkmarks in the checkboxes. For example, to search
only the folder with the Help and Manual projects, uncheck the
Documents checkbox, then check only My HelpAndManual Projects:
• Do the same for
My Computer.
Note: You must choose a location – you cannot leave all locations unchecked.
My
Copyright © 2009 Storage Appliance Corporation. 86
Page 87

Clickfree C2 Portable Backup Drive User Guide Backing up my content (DVD)
7. When you have made your choices, click Next >.
C
HOOSING COMPLETE FOLDERS TO BE BACKED UP – OPTIONAL
8. Choose complete folders to be backed up in addition to categories and locations.
The folders you choose here are completely copied -, all of their files are backed up
regardless of file type. Complete folders are backed up in addition to the file types in
the locations you already chose.
• To add the entire
is checked
• To see details of a folder under
My Documents folder to the backup, make sure that the checkbox
.
My Documents, click the + to the left of the
checkbox. This expands My Documents to show the folders that it contains, and
changes the + to a -. Click the
– when you want to collapse the folder again.
Each folder with a
+ beside it can also be expanded.
Copyright © 2009 Storage Appliance Corporation. 87
Page 88

Clickfree C2 Portable Backup Drive User Guide Backing up my content (DVD)
• You can now choose the individual folders you want to include in the backup by
adding and removing checkmarks in the checkboxes. For example, within My
Documents if you want to include only the folder with the photos of your hike,
uncheck the My Documents checkbox, then check only
• Do the same for My Computer.
HikePhotos:
9. When you have made your choices, click
Next >.
10. Click
Done then Close to continue with the countdown. You can click Start at this time
to go to the backup right away without waiting for the rest of the countdown.
Clickfree searches for content to back up
Before actually backing up any content, Clickfree searches the locations you chose for your
chosen categories of content:
Copyright © 2009 Storage Appliance Corporation. 88
Page 89

Clickfree C2 Portable Backup Drive User Guide Backing up my content (DVD)
11. Click
OK.
Clickfree backs up your content
12. Choose whether you are backing up onto CD or DVD.
Clickfree tells you how many disks are needed.
If you previously backed up this computer, you can choose whether to backup only
files that are new or have changed since the last backup.
13. Click
I’m Ready-Start Backup.
Clickfree prompts you when to put recordable media in your CD/DVD writer:
Clickfree then backs up the content and complete folders you chose to your backup
disks:
Copyright © 2009 Storage Appliance Corporation. 89
Page 90

Clickfree C2 Portable Backup Drive User Guide Backing up my content (DVD)
14. Click
OK.
At the end of the backup, a
Backup Summary screen is displayed:
The
Backup Summary screen shows you how many files in each category were backed
up this time (
Space Used column shows the amount of space that files from all backups take up on
New column) and from all backups, including this one (Total column). The
their respective backup disks.
When you see the
Backup Drive, eject and label the backup disk(s), and store them in a safe place.
Copyright © 2009 Storage Appliance Corporation. 90
Backup Summary screen, simply unplug the Clickfree C2 Portable
Page 91

Clickfree C2 Portable Backup Drive User Guide Backing up my content (DVD)
Note: Clickfree tells you to label the disk with a number and date.
If you have more than one computer to back up, you should also write the
computer’s name (seen on the Backup Summary screen) on the disk.
In addition, since Clickfree identifies backups by number, date, and time, you
should also write the time of backup if it is possible that you may make more than
one backup in a day.
Copyright © 2009 Storage Appliance Corporation. 91
Page 92

Clickfree C2 Portable Backup Drive User Guide Restoring my content (DVD)
Restoring my content (DVD)
WHAT IF MY COMPUTER’S INTERNAL HARD DRIVE STOPS WORKING,
OR I WOULD LIKE TO TRANSFER MY CONTENT TO A NEW COMPUTER?
All computer hard drives fail eventually, sometimes without warning. Occasionally,
computers suffer damage that affects the hard drive. Sometimes, laptop computers get lost
or stolen. Sometimes, also, you may delete content by mistake. When these things happen,
other computer users may lose valuable, sometimes irreplaceable, data.
But if you lose content you’ll be really happy that you bought and used Clickfree. Your
backed-up content is safe on your Clickfree backup, and can be restored when you have a
working computer again.
A Clickfree backup is also ideal for transferring your content from an old computer to a
new one. For details, see “How do I restore from multiple computers? And how can I undo
a restore?” on page 101.
WHAT DO I NEED BEFORE I CAN USE CLICKFREE TO RESTORE OR TRANSFER MY
CONTENT
?
Before you can restore your content, your computer needs to be working – at the very least
it needs to be able to start up and display the desktop.
You need the CDs or DVDs that were used to back up your computer. In addition you
should have the C2 Portable Backup Drive you used to back up your content. You can
restore files without the C2 Portable Backup Drive, but it is more difficult to restore all of
your files without the C2 Portable Backup Drive. See “How do I restore my files using only
the backup disks?” on page 114 in the Advanced topics (DVD) chapter.
Of course, you can ‘restore’ your content to any computer that meets the system
requirements (see “What do I need before I start?” on page 78), not just to the computer
whose content you backed up.
The easiest way to copy content between computers is to have your backup disks handy
and plug the C2 Portable Backup Drive in to your new computer. When the Clickfree
application launches, just click the
and follow the procedure to restore content in “How do I let Clickfree restore decide what
to restore and where?” on page 94.
Restore button at the bottom of the countdown screen
Copyright © 2009 Storage Appliance Corporation. 92
Page 93

Clickfree C2 Portable Backup Drive User Guide Restoring my content (DVD)
HOW DO I GET MY CONTENT BACK?
To get your content back you don’t need to do much more than you did to back the content
up – it just takes a couple of clicks, and the insertion of backup disks when asked.
As with Clickfree backup, you can either make some choices – whether to restore all, or
just selected content, and where the content is restored to – or you can allow Clickfree to
make the choices for you.
Note: At the start of a restore, Clickfree asks you to insert a backup disk with a particular
number and date.
In addition, as the restore proceeds, if you have backed up the computer more than
once, Clickfree may ask you to insert one or more other backup disks with a
particular numbers and dates.
WHAT GETS RESTORED, AND TO WHERE?
When Clickfree restore runs without you changing any options, it restores all of the
content that was backed up, and puts it in the same folders on your computer that it was
backed up from. This is the best choice if you have a new computer, or if you have repaired
your old computer and all of the content was erased.
On the other hand, if you have files on the computer, the restored files replace files of the
same name in the same location, but only after asking your permission.
If you prefer, you can easily tell Clickfree restore to restore your files to a place on your
computer’s hard drive where they will not replace the files you already have.
For details, see:
• “How do I let Clickfree restore decide what to restore and where?” on page 94
• “How do I change how Clickfree restores content?” on page 97.
Copyright © 2009 Storage Appliance Corporation. 93
Page 94

Clickfree C2 Portable Backup Drive User Guide Restoring my content (DVD)
HOW DO I LET CLICKFREE RESTORE DECIDE WHAT TO RESTORE AND WHERE?
You can allow Clickfree to make the decisions about what to restore and to where, but you
need to confirm what Clickfree plans to do.
♦ To let Clickfree decide what to restore and to where:
1. Follow the instructions in “How do I start a DVD backup or restore?” on page 46.
2. Wait for the Clickfree window to appear.
Because you have backed up content to CD/DVD using your C2 Portable Backup
Drive, the countdown screen now shows a button at the bottom to allow you to
Restore files:
View or
3. Before the countdown gets to zero, click
View/Restore. The Restore Summary screen
appears.
Note that all of the categories that have backed-up content are checked off in the
Category
4. Before you click
the
column.
Next, or select categories to be restored, look at the computer name in
Restore From box: .
Select
If your C2 Portable Backup Drive was used to back up the computer that you are using,
the
Restore From box by default contains the name of this computer, and, unless you
change it, the content to be restored will come from this computer.
Copyright © 2009 Storage Appliance Corporation. 94
Page 95

Clickfree C2 Portable Backup Drive User Guide Restoring my content (DVD)
5. Click the arrow at the right of the Restore From box:
The drop-down list contains the names of all of the computers that have been backed
up using the C2 Portable Backup Drive.
6. Select the name of the computer whose content you want to restore.
7. Click
Next >.
Clickfree confirms how many files will be restored, and where they are going to be
restored to (original locations, if the same locations exist on this computer), and which
backup disk is needed.
8. Insert the requested backup disk and click
Restore.
As Clickfree restores your content, it shows you what is happening and how far it has
gotten in the process.
Copyright © 2009 Storage Appliance Corporation. 95
Page 96

Clickfree C2 Portable Backup Drive User Guide Restoring my content (DVD)
9. Before it overwrites an existing file on your computer with one of the same name from
the backed-up files, Clickfree asks if you want to replace the existing file with the one
from the backup:
10. You can choose to:
• Not replace this one file – click
• Not replace any same-name files – check
Skip. Clickfree skips all remaining same-name files without asking you.
• Replace just this file – click Replace
Skip
Do this for all duplicate files and click
• Replace all same-name files – check Do this for all duplicate files and click Replace.
Clickfree replaces all remaining same-name files without asking you.
If two files have the same size (KB) and same date modified, it is likely safe to skip.
If you skip any files, Clickfree completes “with exceptions”. For details see “Restore
completed with exceptions” on page 102.
11. When all of your content has been restored, Clickfree tells you that it is done, and, if it
has replaced files on your computer, gives you a chance to undo the restore.
If you want to undo, see “How do I undo a restore?” on page 103.
Warning: There is no way to undo after you close this dialog.
Copyright © 2009 Storage Appliance Corporation. 96
Page 97

Clickfree C2 Portable Backup Drive User Guide Restoring my content (DVD)
12. If you do not want to undo the restore, click Close.
Note: Your content has not been deleted from your Clickfree backup disks.
13. When you see the Restore Summary screen, simply unplug the Clickfree C2 Portable
Backup Drive, eject the backup disk(s), and store them in a safe place.
HOW DO I CHANGE HOW CLICKFREE RESTORES CONTENT?
By making choices at several steps in the restore process you can choose which content is
restored and where it is restored to.
What do the
Cancel, Next, and Back buttons do?
As you go from one step to the next to restore content, the screens you see usually have
buttons for
Cancel completely stops the restore, and returns you to the countdown screen.
Next > accepts the decisions you have made so far, then moves on to the next step and the
Cancel, Next >, and Back>.
next decision.
Back > sends you back to the previous step so that you can change a decision you already
made. Until you click
Restore or Cancel there is no limit to how often you can go back and
make changes.
R
ESTORING CONTENT
♦ To change how Clickfree restores content:
1. Follow steps 1 to 3 of the previous section “How do I let Clickfree restore decide what
to restore and where?” on page 94.
The
Restore Summary screen appears:
Copyright © 2009 Storage Appliance Corporation. 97
Page 98

Clickfree C2 Portable Backup Drive User Guide Restoring my content (DVD)
2. Before you click Next, or select categories to be restored, look at the computer name in
Restore From box: .
the
If your C2 Portable Backup Drive was used to back-up the computer that you are using,
the
Restore From box by default contains the name of this computer, and, unless you
change it, the content that will be restored will be from this computer.
HOOSING THE COMPUTER TO RESTORE FROM
C
3. Click the arrow at the right of the
Restore From box:
and select the name of the computer whose content you want to restore.
4. To restore content from more than one computer simply repeat the restore process
choosing a different computer each time in step 2.
5. What you do next depends on whether you want to restore all or only some of your
files.
• If you want to restore only some of your files, continue with step 6.
• If you want to restore all of your files, click
C
HOOSING CATEGORIES OF CONTENT TO BE RESTORED
Next and go to step 8.
6. Note that all of the categories that contain files (with the number of files in parentheses
after the category name) have the checkboxes checked in the Select Category column.
For each category whose content you do not want to restore, click the checkbox to
deselect the category.
You can also choose to restore content of individual file types within each category. For
details see “How do I choose individual files for restore?” on page 122 in the
“Advanced topics (DVD)” chapter.
Copyright © 2009 Storage Appliance Corporation. 98
Page 99

Clickfree C2 Portable Backup Drive User Guide Restoring my content (DVD)
7. Click Next >.
C
HOOSING WHERE TO RESTORE CONTENT TO
8. What you do next depends on whether you want to restore your content to its original
locations (if the same locations exist on this computer) or to somewhere else.
• If you want to restore your files to a location where they will not overwrite existing
files on your hard drive, see “How do I choose another drive and/or folder to
restore to?” on page 126 in the “Advanced topics (DVD)” chapter.
•
If you want to restore your content to its original locations, click Next>.
A summary screen shows you how many files will be restored, where they will be
restored to, and which backup disk is needed.
Copyright © 2009 Storage Appliance Corporation. 99
Page 100

Clickfree C2 Portable Backup Drive User Guide Restoring my content (DVD)
9. Insert the requested backup disk and click Restore.
As Clickfree restores your content, it shows you what is happening and how far it has
gotten in the process.
Before it overwrites an existing file on your computer with one of the same name from
the backed-up files, Clickfree asks if you want to replace the existing file with the samename file from the backup:
10. You can choose to:
• Not replace this one file – click
• Not replace any same-name files – check
Skip. Clickfree skips all remaining same-name files without asking you.
• Replace just this file – click Replace
• Replace all same-name files – check Do this for all duplicate files and click Replace.
Clickfree replaces all remaining same-name files without asking you.
If two files have the same size (KB) and same date modified, it is likely to be safe to
skip.
If you skip any files, Clickfree completes “with exceptions”. For details see “Restore
completed with exceptions” on page 102.
Copyright © 2009 Storage Appliance Corporation. 100
Skip
Do this for all duplicate files and click
 Loading...