

Page 1

Clear-Com MS-232 Two-Channel Main Station
INTRODUCTION
Congratulations on choosing this Clear-Com product. Clear-Com was established in 1968 and remains
the market leader in providing intercom for entertainment, educational, broadcast and industrial applications. The ruggedness and high build-quality of Clear-Com products is the industry standard. In fact,
many of our original beltpacks and main stations are still in daily use around the world.
The MS-232 Two-Channel Main Station is a powerful, yet user friendly unit that can serve as the heart
of a Clear-Com system. We recommend that you read through this manual completely to better understand the functions of the MS-232. If you encounter a situation or have a question that this manual
does not address, contact your dealer or call Clear-Com directly at the factory. Our applications support and service people are standing by to assist you. Thank you for selecting Clear-Com for your
communications needs.
Description
TM
The Clear-Com PL-Pro
trucks, production studio consoles, theatre, live performances, and small TV facilities. It features excellent speech intelligibility in all noise levels and can be tailored to your needs through its programmable options.
Selectable two-channel talking and/or listening allows the operator to communicate on either of the intercom channels separately or on both at once. The illuminated dual-action talk buttons are electronic
momentary or latching. Monitoring can be done through the headset, the integral speaker, or both at
once. The MS-232 offers both visual and audible call signaling to attract the attention of operators who
have removed their headsets or turned off their speakers. The Remote Mic Kill (RMK) feature provides
the ability to turn off all open mics on Series 500 beltpacks.
MS-232 is a two-channel, one rack space main station ideal for ENG and EFP
The MS-232 can control a paging speaker for studio announcements. A front panel button activates
this function and an associated relay. A balanced program input allows monitoring external audio using
the headset or speaker.
TM
This main station accepts dynamic headsets, such as the Clear-Com PL-Pro
Series. Individual sidetone controls for each intercom channel allow the operator to vary the level of his/her own voice as
heard in the headset and speaker. It also accepts Clear-Com gooseneck panel microphones.
The integral speaker can be turned on or off by a convenient front panel switch. An automatic speaker
dipping circuit will lower the level of the speaker when the announce button, talk buttons or program interrupt are activated. This feature helps minimize feedback.
The MS-232 also incorporates a dual-channel program interrupt system (IFB). When activated, one or
more stations can interrupt the program audio to another intercom station or a talent wearing ClearCom's wired or wireless talent receivers. Clear-Com's stand-alone IFB system can also be connected
to this station.
The MS-232 provides 30-Volt DC power to operate Clear-Com beltpacks and remote stations. This
power is distributed between the two channels, and will support up to 60 headset stations or 20 speaker
stations. Clear-Com's new fail-safe design automatically shuts down the power to a channel when a
short circuit or electronic overload is sensed on that channel. The other channel will continue to operate normally. Once the fault condition is removed, the MS-232's fail-safe circuit will restore power,
even under full load conditions. LED indicators signal a short or overload on either channel.
The MS-232 will operate from any AC line voltage between 90 and 240 Volts AC at 50 or 60 Hz. The
MS-232 installs in a standard 19" equipment rack, using only one rack space. The unitized aluminum
chassis and extra-thick front panel with integral rack ears result in reduced size and a lighter weight
package that maintains legendary Clear-Com ruggedness. Three 3-pin XLR connectors are provided
for connection to each intercom channel.
The MS-232 is compatible with all Clear-Com Party-Line intercoms.
1
Page 2
Clear-Com MS-232 Two-Channel Main Station
QUICK START
1 Unpack the unit and inspect for any damage that may have occurred in shipping. Connect the
proper AC Mains cable.
TM
2 Install the MS-232. (For additional information, refer to the Clear-Com PL-Pro
tion Manual.)
3 Connect the AC to the Mains circuit. Connect the intercom lines.
4 Set the two termination switches on the rear panel to ON.
5 Set the Option switches to the default (up) position.
6 Switch POWER ON. The green power light should be ON and the two red short lights should be
OFF.
7 Set Listen Levels and Sidetones. (Refer to the Listen Level and Sidetone setting topics in the
Operation section of this manual.)
8 The intercom system should now be operating properly.
Read the rest of this manual for further information.
System Installa-
OPERATION
Normal operation of the MS-232 Main Station only requires access to the front panel controls. The
controls located elsewhere on the unit are intended to be set-and-forget in nature. For intercom operation, set the Listen level controls for each channel to the desired level and press the Talk buttons when
talking. If a headset is used, set the Sidetone control for each channel for the desired amount of sidetone in the earphone. If the Panel Mic and Speaker are being used, set the sidetone controls for minimum feed-through to the speaker to prevent feedback.
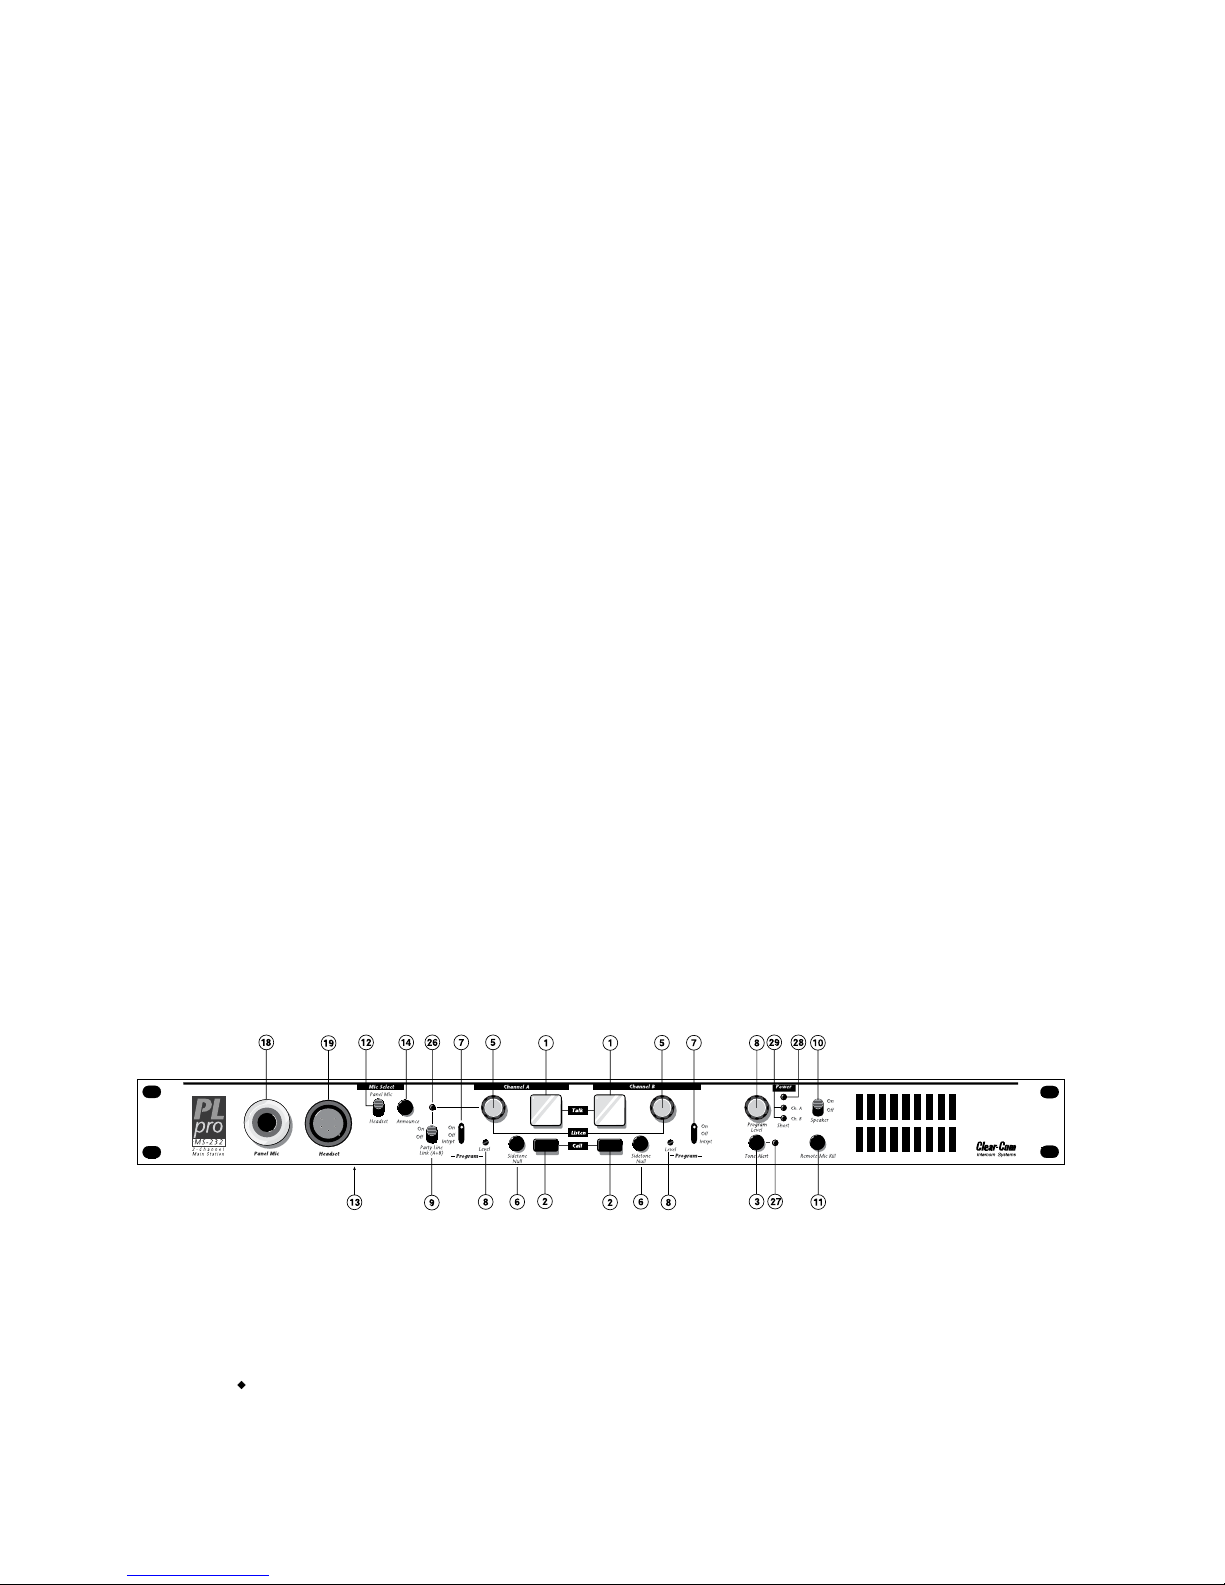
Front Panel
The controls, indicators, and connectors found on the MS-232 front panel are shown in the following
figure and are described by the following text. The numbers in the left column refer to Figure 1.
Figure 1 - Front Panel
1 Talk Buttons: Each channel has an illuminated Talk button for activating the microphone
feed to that channel. Each Talk button has a dual action (momentary or latching) depending
upon how the button is pressed. If desired, the latching function for each channel can be defeated using the option switches on the rear panel. The following describes the various functions of these multi-purpose buttons.
MOMENTARY: Press and hold the Talk button while you are speaking. Release it when
you are finished.
2
Page 3

Clear-Com MS-232 Two-Channel Main Station
LATCHING: Press the button quickly to latch the Talk function. Press the button again to
turn off the Talk function.
TALK INDICATION: The Talk button will illuminate dimly whenever the Talk function is
activated.
CALL INDICATION: The Talk button will flash brightly when a Call signal is received on
that channel.
CALL ON TALK: Each channel can optionally be set to send a Call signal whenever you
press the Talk button. This function is used to activate program interrupts or any other
Call-activated function available on other stations. Option switches on the rear panel will
enable this function.
SPEAKER MUTE: If the front panel speaker is turned on, pressing either Talk button will
reduce the speaker output level to avoid feedback.
The Talk buttons can be labeled to indicate their function. To label the Talk buttons, use the
following procedure:
1 Pull the Talk button straight off.
2 Insert a small flat blade screwdriver into the slot between the cap and the body of the but-
ton and gently twist. This will remove the cap.
3 Remove the square white diffuser from the cap.
4 Insert a 1/2" X 1/2" square of thin paper with the needed description into the cap. Follow it
up with the square white diffuser and press the cap onto the body of the button. Press the
button back into the front panel.
2 Call Buttons: Each channel has its own Call button. Pressing a Call button will send a Call
signal on that channel. All the call lights on that channel will flash. Call signals can also be
sent while talking if required. The Talk button will flash while the Call button is pressed, indicating the presence of a Call signal on the line.
3 Tone Alert: An audible tone alert can be enabled to sound when a Call signal is received on
either channel. This can be useful when the operator's attention has been drawn away from
the MS-232 indicator panel. Press the Tone Alert button to alternately enable or disable the
audible tone alert. The green indicator next to this button is lit when the audible Tone Alert is
enabled. When enabled, the Tone Alert will sound when a Call button on a beltpack or station
is pressed. The Tone Alert will not sound if a Call signal is originated at the MS-232 station.
The level can be adjusted by the control on the rear panel (4).
5 Listen Level Controls: Each channel has a separate Listen level control. Turn these con-
trols to set the listen level you need on each channel. Turn the control completely counterclockwise to silence a channel.
6 Sidetone Controls: Each channel has a Sidetone Null control. Sidetone is the level of your
own voice that you hear while talking on the intercom. Setting a comfortable level of sidetone
will ensure that the intercom line sounds alive and also helps you modulate your voice relative
to other voices on the line.
Typically, different Sidetone Null settings are needed depending upon whether you are using
the gooseneck panel microphone along with the speaker or not. Use one the following procedures to correctly set the Sidetone level controls.
Sidetone Adjustment Procedure for Gooseneck Microphone with Speaker turned on:
1 Turn off the Party Line Link (A+B) switch.
2 Turn the Level control for Channel B all the way down. Set the Level control for Channel
A to a comfortable level.
3
Page 4

Clear-Com MS-232 Two-Channel Main Station
3 Press the Channel A Talk button and speak into the microphone while turning the Sidetone
Null control for Channel A slowly back and forth. There should be a point where your
voice (and any accompanying acoustic feedback) disappears. This is the null point.
4 Repeat this procedure for Channel B by turning the Channel A Level control down and ad-
justing the Channel B controls.
Sidetone Adjustment Procedure for Headset:
1 Turn off the Party Line Link (A+B) switch.
2 Turn the Level control for Channel B all the way down. Set the Level control for Channel
A to a comfortable level by having someone talk to you from another station.
3 Press the Channel A Talk button and speak into the microphone while turning the Sidetone
Null control for Channel A slowly back and forth until you hear your voice at a comfortable
level in the headset.
4 Repeat this procedure for Channel B by turning the Channel A Level control down and ad-
justing the Channel B controls.
7 Program ON-OFF-INTRPT Switches: The Program ON-OFF-INTRPT switches are used to
manually or automatically control program audio feed into the intercom lines. The settings are
as follows:
ON: The channel will receive program audio when the switch is set to ON. The audio level
for each channel can be adjusted with the Program Level trimpots as described in the
following paragraph.
OFF: The channel will not receive program audio when the switch is set to OFF.
INTRPT: Pressing the Talk button will interrupt the program when this switch is set to
INTRPT.
8 Program Level Controls: Adjust the Program Level controls to set the program audio level
heard on the intercom. There are three Program Level controls. The Program Level knob to
the left of the Speaker On-Off switch adjusts the level of program heard in the headset or
panel speaker.
The program levels heard on each intercom channel line can be individually adjusted, but this
is intended to be a one time setting made when the MS-232 is set up. This is done using the
screwdriver level adjustment trimpots adjacent to the Program ON-OFF-INTRPT switches on
Channels A and B. Set the Sidetone Null controls and the Program Level knob fully counterclockwise when adjusting the individual channel Program Level trimpots. After the Program
Level trimpots are properly adjusted, use the procedure listed in the Sidetone Controls section on this page to set the sidetone level.
: Do not force the trimpots past their stop points. This will damage them.
NOTE
9 Party Line Link (A+B) Switch: The Party Line Link (A+B) switch is used to combine both in-
tercom channels into one, for example, for rehearsals. When this switch is set to the ON position, the green lamp directly above the switch will light, and all of the stations on the B channel
will be moved onto the A intercom line. This will allow communication between everyone on
both channels at once.
In this mode, the Channel B controls and switches will be inactive. Since the wiring for the B
channel has been now added to the A channel, the Sidetone Null control for Channel A may
require some readjustment.
10 Speaker ON/OFF Switch: The Speaker ON/OFF Switch turns the front panel speaker on or
off. This switch does not affect whether the Tone Alert is heard through the speaker. The
speaker volume will automatically dip whenever the panel or headset microphone is on.
4
Page 5

Clear-Com MS-232 Two-Channel Main Station
11 Remote Mic Kill Switch: The Remote Mic Kill (RMK) switch will turn off the Talk function of
every beltpack on channels A and B. If the Talk functions of a large number of beltpacks have
inadvertently been left activated, incidental noise and talking can make it difficult or impossible to communicate on the party line intercom. The Remote Mic Kill switch can be pressed to
quiet the line in this situation. Those needing to communicate can then set their Talk functions
ON as needed.
: The Remote Mic Kill switch can only function if the MS-232 Main Station is
NOTE
powering all of the stations in the system. The switch momentarily interrupts power
to the other beltpacks and stations in the system. If there are other power supplies or
main stations in the system, then the Remote Mic Kill switch cannot interrupt power
and therefore cannot work.
12 Mic Select Switch: Set the Mic Select switch to select whether the panel microphone or the
headset microphone is active.
13 Panel Mic Gain: This control is located on the underside of the MS-232 chassis. It may be
used to increase or decrease the sensitivity of the panel microphone. It has no effect on the
sensitivity of the headset microphone. Use a small screwdriver to turn the control clockwise to
increase sensitivity or counterclockwise to decrease sensitivity.
14 Announce: Press the Announce button to make stage or PA system announcements. It di-
rects the audio from the selected headset or panel microphone to the Annc Out rear panel
connector and activates the Announce Relay. Simultaneously, if the program audio feed to
the Announce Output is enabled, it is interrupted by the announcement. Program audio feed
to the Announce Output is selected by setting jumper JP2 on the Main board to the ON position. Optionally, pressing the Announce button can also disconnect the selected headset or
panel microphone audio from the intercom line(s). This option is controlled by the Interrupt
Announce option switch.
19 Headset Connector: The headset connector is located on the front panel. All Clear-Com
headsets are recommended for use with the MS-232. The following is a description of the
characteristics of a suitable headset:
Mic Type --- Dynamic; 150 to 250 ohms impedance; -55 dB output level
Headphone --- Dynamic; 50 to 2000 ohms impedance
The wiring of the headset is to be as follows:
Pin 1 --- Mic common
Pin 2 --- Mic hot
Pin 3 --- Headphone common
Pin 4 --- Headphone hot
The mic and headphone wiring in the headset cord must be individually shielded. Do not
connect Pins 1 and 3 together. Headset extension cords or headset "Y" cables are not recommended because they will increase crosstalk between channels.
18 Panel Mic Connector: Clear-Com recommends the GM-9 and GM-18 plug-in panel micro-
phones for use with the MS-232. The GM-9 is 9 inches long and the GM-18 is 18 inches long.
The microphone is an electret type. The 1/4 inch phone jack on the microphone mates with
the Panel Mic receptacle on the front panel of the MS-232.
To install a GM-9 or GM-18 microphone, use the following steps:
1 Check and unscrew the set screw in the mic mounting flange to make sure it is clear of the
threads in the bushing.
2 Screw the microphone into the bushing hand tight.
3 Turn the set screw on top of the mic mounting flange clockwise to lock the microphone in
place.
5
Page 6
Clear-Com MS-232 Two-Channel Main Station
26 Party Line Link (A+B) LED: This green LED is lit when the Party Line Link (A+B) switch is
ON, to provide a visual indication that party line Channels A and B are linked together.
27 Tone Alert LED: This green LED lights when the Tone Alert function is enabled. Tone Alert
is an audible indication that a Call signal is active. Toggle the Tone Alert function ON or OFF
using the Tone Alert button.
28 Power LED: This green LED lights when the MS-232 is receiving AC power and the power
switch on the rear panel is turned on.
29 Short LEDs: There is one red LED for Channel A and one for Channel B. These LEDs light
when the MS-232 senses a short or overload on the associated channel. When the fault is removed, the MS-232 will automatically reset and the LED will go out.
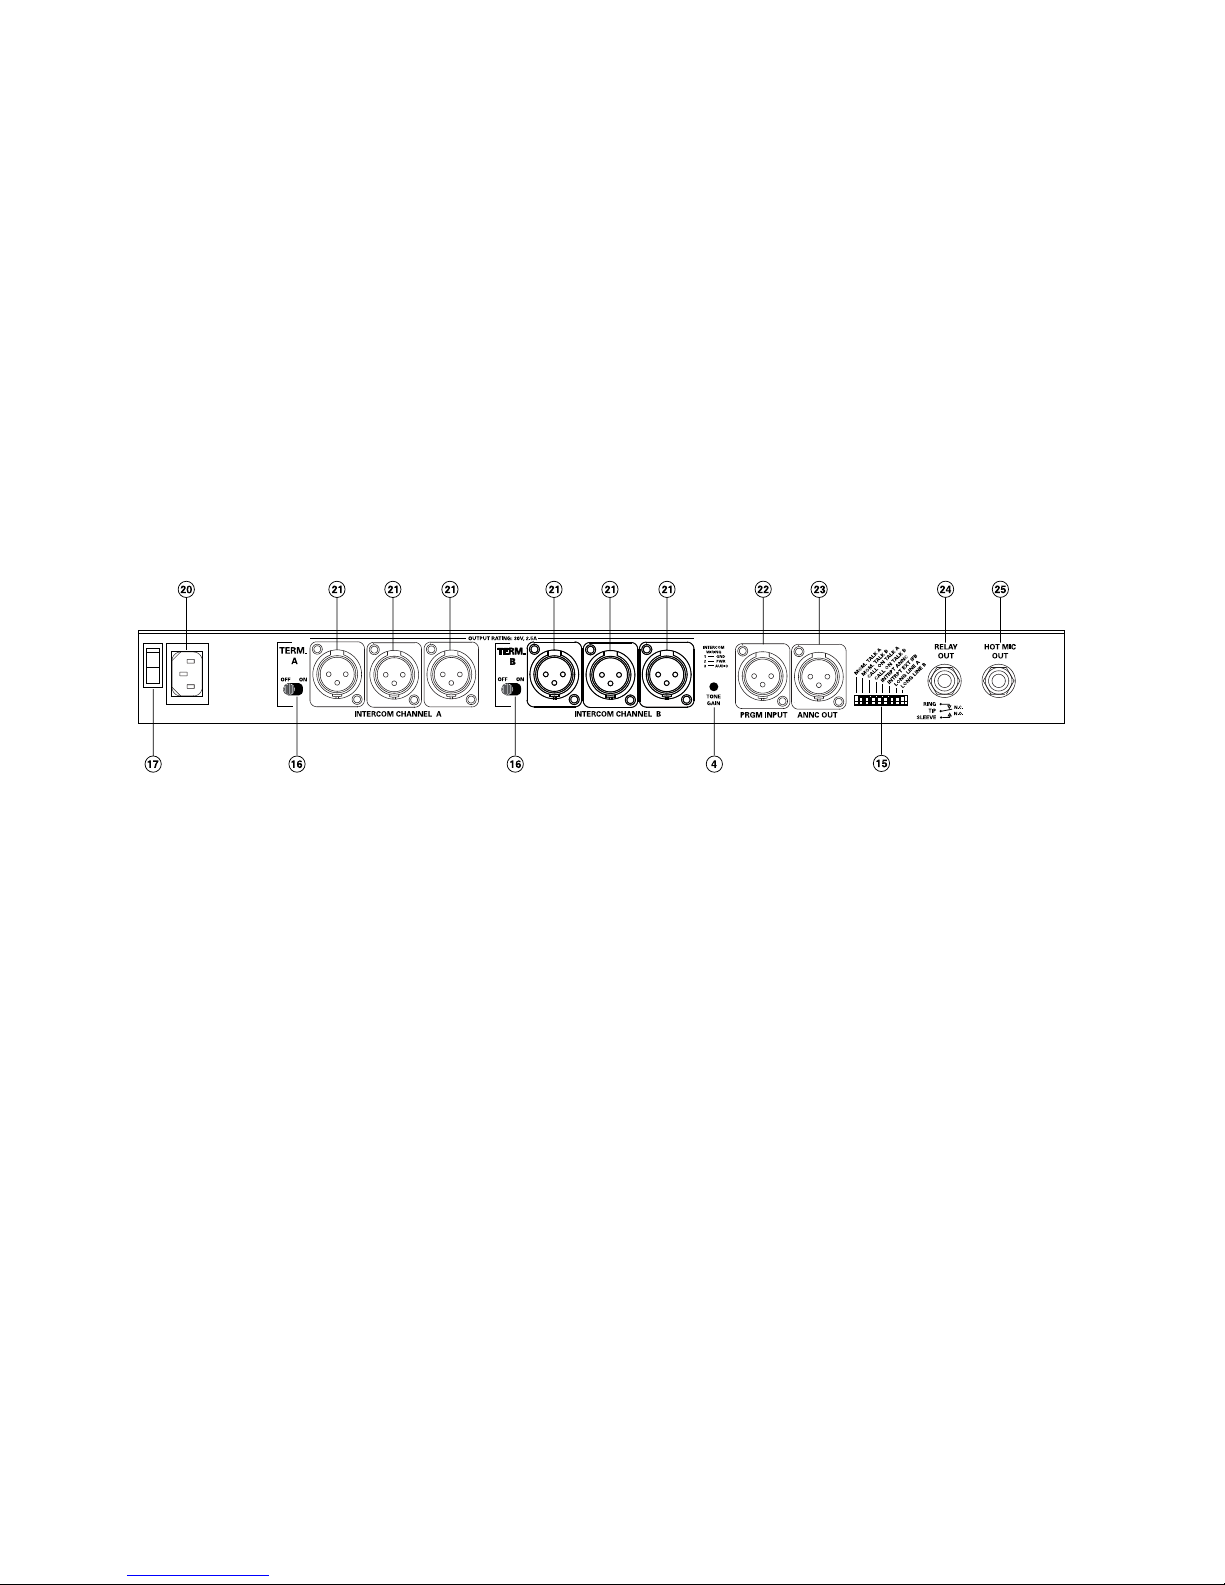
Rear Panel
The controls and connectors found on the MS-232 rear panel are shown in the following figure and
briefly described by the following text. The numbers in the left column refer to Figure 2.
Figure 2 - Rear Panel
4 Tone Alert Volume Control: This control adjusts the volume of the Tone Alert sound. This
is normally adjusted when the system is set up and there should be no need to adjust it in normal operation.
15 Option Switches: Eight Option switches are provided on the rear panel. They should be
configured when the system is set up, but are not changed in normal operation. The default
position of the switches is in the OFF (up) position. The function of each switch is as follows:
1 MOM TALK A: Setting the Momentary Talk A switch to the ON position will disable the
latching function of the Channel A Talk button. In this mode, the Talk button must always
be held in continuously while the operator is talking on Channel A.
2 MOM TALK B: Setting the Momentary Talk B switch to the ON position will disable the
latching function of the Channel B Talk button. In this mode, the Talk button must always
be held in continuously while the operator is talking on Channel B.
3 CALL ON TALK A: If the Call On Talk A switch is set to the ON position, a Call signal will
be placed on Channel A whenever the Talk function is activated. This can be used to activate any Call activated functions available on other stations.
4 CALL ON TALK B: If the Call On Talk B switch is set to the ON position, a Call signal will
be placed on Channel B whenever the Talk function is activated. This can be used to activate any Call activated functions available on other stations.
5 INTRPT ANNC: If the Interrupt Announce switch is set to the ON position, pressing the
Announce button will disconnect the microphone from the intercom line(s). This will allow
announcements to be made without being heard over the intercom channels.
6 INTRPT EXT IFB: When the Hot Mic output is connected to Clear-Com's IFB System and
the Interrupt External IFB switch is set to the ON position, pressing a key on the IFB
6
Page 7

Clear-Com MS-232 Two-Channel Main Station
System will disconnect the selected headset or panel microphone from the intercom
line(s). This allows the MS-232 microphone to be used to cue talent without affecting intercom line communication.
7 LONG LINE A: If a long cable run on Channel A is unavoidable and approaches 1,000
feet or more, set the Long Line A option switch to the ON position. The ability to set a
sidetone null on Channel A depends upon properly setting this switch.
8 LONG LINE B: If a long cable run on Channel B is unavoidable and approaches 1,000
feet or more, set the Long Line B option switch to the ON position. The ability to set a
sidetone null on Channel B depends upon properly setting this switch.
16 Termination Switches: These switches provide switchable terminations for channels A and
B. In most systems, both terminations on the MS-232 should be in the ON position (default
setting). The fundamental concept of Clear-Com Party-Line intercom is that all channels are
terminated in one location, preferably at a main station or power supply. The termination
switches on the MS-232 rear panel should be set to the OFF position only if the channel is terminated by another main station or power supply in the system. If there are no other main
stations, power supplies, or other terminations on the line, set the rear panel switches
labeled TERM A and TERM B to the ON position.
: All intercom lines must be terminated only once, whether they are used or not.
NOTE
Never "double-terminate" a line.
17 Power Switch: The power switch can be used to turn AC power to the MS-232 on and off.
When in the ON position, the Power LED on the front panel will be illuminated.
20 AC Power Connection: An IEC type 320 connector is provided to interface to the appropri-
ate AC power cord to be used. Voltages from 90 to 240 VAC at 50 or 60 Hz are acceptable.
The MS-232 will automatically adjust for the power applied, so there are no manual switches
to set power line voltage or frequency.
21 Intercom Line Connection: The MS-232 contains three 3-pin male XLR connectors for each
intercom line. These connectors are wired in parallel. Any single-channel station or channel
of a multi-channel station connected on a line plugged into Channel A of the MS-232 will be
"party-lined" with all the other stations on that channel. In a multi-channel system, the goal is
to assign specific people to the correct group, i.e. the other people they need to be in contact
with the most. This is particularly important when the party line users are on a single-channel
beltpack or station; less so if they are on multi-channel stations. The pinout of the intercom
connectors is as follows:
Pin 1 --- Ground (Shield)
Pin 2 --- Power (+30 VDC)
Pin 3 --- Audio
22 Program Input: A 3-pin XLR female connector provides the main program input to the sta-
tion. Program can be fed to the headphone or speaker as well as to either or both of the intercom channels. The level to the speaker or headphone is controlled by the Program Level
control. The Program ON-OFF-INTRPT switches control whether each intercom channel receives program audio. The program audio levels on each intercom channel can be adjusted
using the individual Program Level trimpots. The Program Input accepts a balanced or unbalanced line-level audio signal from -20 dBv to +10 dBv. An option is to feed program audio to
the Announce Output. This is selected by setting jumper JP2 on the Main board to the ON position. When this option is selected, a 0 dBv signal on the Program Input will produce a 0dBv
signal on the Announce Output.
The pinout of the Program Input connector is as follows:
Pin 1 --- Ground (Shield)
Pin 2 --- + Signal
Pin 3 --- - Signal
7
Page 8

Clear-Com MS-232 Two-Channel Main Station
23 Announce Out: A 3-pin XLR male connector is provided as a feed to a studio PA amplifier.
Pressing the Announce button on the front panel places the audio from the selected headset
or panel microphone on the Annc Out rear panel connector. Optionally, pressing the Announce button can also disconnect the selected headset or panel microphone from the intercom line(s). This option is controlled by the Interrupt Announce option switch.
Simultaneously, if the program audio feed to the Announce Output is enabled, it is interrupted
by the announcement. Program audio feed to the Announce Output is selected by setting
jumper JP2 on the Main board to the ON position. The pinout of the Announce Out connector
is as follows:
Pin 1 --- Ground (Shield)
Pin 2 --- - Signal
Pin 3 --- + Signal
The audio output is balanced and transformer isolated. It has a 600 ohm impedance and a
nominal output level of 0 dBV. A shielded twisted pair cable should be used in the cable wired
to this connector.
24 Relay Out: A dry set of relay contacts is provided through a 1/4 inch jack to activate external
switching as needed when the Announce button is pressed. These contacts can be used to
control an external device such as a PA amplifier to another room. The contacts are rated for
2.0 Amps at 24 VDC. The contacts are wired as follows:
Ring --- Normally Closed Contact
Tip --- Common Contact
Sleeve --- Normally Open Contact
25 Hot Mic Out / IFB System: This connection is a 1/4 inch phone jack. It provides a 0 dBV
output signal from the selected headset or panel microphone. This output is intended interface with the External Line In jack on Clear-Com's IFB System. The jack is wired as follows:
Ring --- Ext. IFB Control Signal Input
Tip --- Hot Mic Audio Output
Sleeve --- Ground (Shield)
8
Page 9

Clear-Com MS-232 Two-Channel Main Station
MS-232 Block Diagram
The following is a block diagram of the MS-232:
Figure 3 - MS-232 Block Diagram
Headset
Mic
Panel Mic
Tone
Alert
Balanced
Program
Input
Interrupt
Annc. IFB
EQ/
LIM
EQ/
LIM
Green
Alert
Volume
Option Switches
Call on
Talk
Talk
Momentary
A B A B A B
Control Logic
Program
Feed on
Announce
Option
Long
Line
Headset
Select
Program
Level A
Program
Level
Program
Level B
Announce
Power
On/Off
Talk
Int. On/Off
Talk
Int. On/Off
Switching Power
Supply
Hot Mic
Out
Call
Light
Call
Send
Call
Light
Call
Send
Sidetone
Sidetone
Announce
Output
Remote
Mic Kill
Channel A
Listen
Channel B
Listen
Announce
Relay
Ch. A Ch. B
Red
Short
Short Circuit Protection
Term.
Sw.
Speaker
Dip/Mute
Speaker
On/Off
A+B
Link
Term.
Sw.
Station
Power
Green
OK
Headset
Output
Speaker
Ch. A
Output
Ch. B
Output
TROUBLESHOOTING
Problem: System does not operate. Green POWER LED is not illuminated and no
SHORT LED's are illuminated
Cause 1: No AC power to the MS-232.
Solution 1: Make sure the power switch on the rear panel is turned ON. Check the AC connec-
tion and cable. Plug into a dependable AC source.
Cause 2: The MS-232 has an internal power supply failure.
Solution 2: Unit requires servicing.
Problem: System does not operate when power switch is turned on. Green POWER
LED and red SHORT LED wink
Cause: Direct short on the intercom channel indicated by the red Short LED.
Solution: Remove the intercom line cables one at a time from that channel until the faulty
line is located. Once the short is removed, the MS-232 will reset automatically and
power will come back up within several seconds. Check for shorts between pins 1
and 2 or improper cable wiring.
9
Page 10

Clear-Com MS-232 Two-Channel Main Station
Problem: Red SHORT LED illuminated
Cause 1: Short or overload on that channel due to a shorted or miswired cable.
Solution 1: Remove the intercom line cables one at a time from the system until the faulty line
is located. (The red Short LED will then turn off.) Check for shorts between pins 1
and 2 or improper cable wiring. Once the short is removed, the MS-232 will reset
automatically and power will come back up within several seconds.
Cause 2: Defective remote station.
Solution 2: Check the remote station and replace if necessary.
Problem: Both red SHORT LEDs are illuminated
Cause 1: System is overloaded.
Solution 1: Remove the intercom line cables one at a time from the system to help determine
where the excess current requirements lie. Re-evaluate the system current needs.
Cause 2: Short in multipair cable.
Solution 2: Remove the intercom line cables one at a time from system until the faulty line is
located. Check for shorts between pins 1 and 2 or improper cable wiring.
Problem: Hum or buzz in system
Cause 1: Inductive pickup caused by close proximity of this main station or connected re-
mote stations to power lines or transformers.
Solution 1: Relocate the offending unit.
Cause 2: 10 Ohm chassis ground resistor is open.
Solution 2: Check the DC resistance for 10 Ohms between the chassis and pin 1 of any inter-
com connector.
If this condition occurs, it is because the system ground came into contact with something that
was "HOT" with respect to the power supply earth ground. Carefully check the system ground
and AC distribution in the area.
WARNING
: THIS IS A POTENTIALLY DANGEROUS SITUATION. A SHOCK HAZARD
MAY EXIST BETWEEN A REMOTE STATION HEADSET AND GROUND.
Problem: System feedback (Acoustical)
Cause 1: Listen Level control at this station or a remote station is set too high.
Solution 1: Adjust.
Cause 2: Sidetone Null control at this station or a remote station is not adjusted correctly.
Solution 2: Adjust. Refer to the procedure in the Front Panel section of this manual.
Cause 3: Channel unterminated.
Solution 3: Set the MS-232 termination switch for that channel to the ON position.
Cause 4: A headset extension cord was used.
Solution 4: Headset extension cords are not recommended.
Problem: Excessive crosstalk
Cause 1: High DC resistance in ground return.
Solution 1: Use heavier cable; add additional conductor(s) to ground return.
Cause 2: MULTI-CHANNEL cable pairs are not individually shielded.
Solution 2: Replace cable with individually shield pairs.
Cause 3: Headset cables are not wired properly or shielded properly.
Solution 3: Correct wiring. Use headsets with properly shielded wiring.
Problem: Program signal sounds distorted.
Cause: Overload of Program Input circuit.
Solution: Reduce Program Input level or reduce the gain of the program signal at the source,
such as an audio mixer.
10
Page 11

Clear-Com MS-232 Two-Channel Main Station
Problem: Call signals do not function.
Cause 1: Excessive DC loading of intercom line.
Solution 1: Remove any audio transformers or other equipment which may be connected
across the intercom line. If equipment other than Clear-Com intercom equipment
must be connected to the intercom line, please contact Clear-Com application or
service personnel for advice.
Cause 2: Far too many terminations on the intercom line.
Solution 2: Check all Main Stations and Power Supplies to make sure each intercom channel
is terminated at only one point.
PARTS LISTS
Front Panel PCB Layout
Parts List for MS-232 Front Panel PCB and Chassis
Capacitors
Value Type Volts Tol. Part # Designator
.1 uF Monolithic 50V 10% 150035 C301
Resistors
Value Power Type Tol. Part # Designator
4.7K OHM 1/4 Carbon Film 5% 410013 R300
10K OHM 1/4 Carbon Film 5% 410016 R312 R313
36K OHM 1/4 Carbon Film 5% 410163 R303
Diodes and Transistors
Device Description Part # Designator
LED RED, ROUND, FLAT TOP LED 390044 LED301 LED303
LED GREEN, ROUND, FLAT TOP LED 390045 LED302 LED300 LED304
Diode 1N4148 SIGNAL 10MA 75PIV 480000 D301
Miscellaneous
Device Description Part # Designator
Button FLAT TOP GREY KEYCAP 240064 S300 S301
Button ROUND MINIATURE 240081 S304 S305 S311
Button RECT. MINIATURE 240082 S306 S307
Knob GREY INSERT 6X4.5MM HOLE .45DIA 240089 R306 R307 R308
Assembly 65 W 30 V SWITCHING POWER SUP. 400013
Relay SPDT 24V MINI PC RELAY 450004 K301
Pot 50K TRIM POT H MTG. 470018 R309 R310
Pot 5K TRIMPOT H MTG. 470063 R304 R305
Pot 50K 25MM FLATTED SHAFT 470070 R306 R307 R308
Switch DPDT SLIDE SWITCH 510090 S302 S303 S308
Switch PUSH BUTTON SWITCH W/32V LAMP 510104 S300 S301
11
Page 12

Clear-Com MS-232 Two-Channel Main Station
Miscellaneous (Continued)
Device Description Part # Designator
Switch DPDT MINIATURE 510107 S304 S305 S306 S307 C311
Switch POWER SWITCH, SPST SNAP-IN 510119
Switch SPDT ON-OFF-ON 510120 S309 S310
Cord IEC POWER CORD 610022
Cable POWER ENTRY HARNESS 740063
Cable DC POWER CABLE, MS-232 & PS-464 740064
Cable ASSY, CABLE, HEADSET, MS-232 740065
Cable ASSY, CABLE, PLUG-IN MIC, MS-232 740066
Speaker SPEAKER ASSY, MS-232 740067
Cable RIBBON, 3 CONN 770021 J16 J18
Cable RIBBON, 16-PIN 770023
12
Page 13

Page 14

Clear-Com MS-232 Two-Channel Main Station
Parts List for MS-232 Audio / Logic PCBs
Capacitors
Value Type Volts Tol. Part # Designator
1 uF Aluminum NP 50V 10% 150002 C1 C62 C68 C69 C79 C83 C84 C85
C109 C114
22 uF Aluminum 16V 150010 C14 C136 C137
.01 uF Ceramic Disc 30V 20% 150012 C4 C5 C6 C21 C23 C46 C47 C95
C96 C107 C108
470 pF Ceramic Disc 50V 10% 150014 C57 C74 C75 C78 C92 C93 C123
39 pF Ceramic Disc 50V 5% 150026 C51 C49
.01 uF Ceramic Disc 1.4KV 20% 150029 C81
.22 uF Monolithic 50V 10% 150034 C38 C48 C80 C89
.1 uF Monolithic 50V 10% 150035 C2 C3 C27 C28 C29 C30 C31 C32
C41 C53 C55 C59 C60 C76 C77 C82
C97 C101 C102 C103 C106 C116
C124 C125 C126 C127 C128 C129
C130 C131 C132 C133 C134 C135
220 uF Aluminum 50V 150037 C122
47 pF Ceramic Disc 50V 10% 150041 C54 C58 C72 C110
.0022 uF Mylar 100V 5% 150045 C115
200 pF Ceramic Disc 100V 5% 150063 C87 C86
10 uF Aluminum 50V 150064 C35 C119 C120
2.2 uF Aluminum NP 50V 150065 C19 C20 C99
47 uF Aluminum 35V 150081 C56 C73
4.7 uF Aluminum NP 50V 150087 C50 C52
1000 uF Aluminum 35V 150092 C17
22 pF Ceramic Disc 50V 10% 150098 C117
820 pF Monolithic 50V 5% 150101 C112 C118
.0047 uF Mylar 50V 5% 150114 C67 C70 C71 C94 C10O C104
1 uF Tantalum 35V 20% 150116 C63
.01 uF Metal Film 100V 2% 150122 C98
.047 uF Mylar 100V 5% 150131 C22 C39 C61 C64 C65 C66 C88
C105
100 uF Aluminum 35V 150136 C7 C8 C90 C91 C121
.47 uF Aluminum NP 50V 150151 C24 C25
Resistors
Value Power Type Tol. Part # Designator
10 OHM 1/4 Carbon Film 5% 410002 R127
22 OHM 1/4 Carbon Film 5% 410004 R107 R116 R199
220 OHM 1/4 Carbon Film 5% 410007 R75 R146 R159 R194 R196
39 OHM 1/4 Carbon Film 5% 410008 R72 R74 R137 R138
1K OHM 1/4 Carbon Film 5% 410010 R6 R7 R10 R11 R22 R174 R198
4.7K OHM 1/4 Carbon Film 5% 410013 R18 R32 R35 R58 R125 R128 R186
R195 R197
2K OHM 1/4 Carbon Film 5% 410014 R39 R46 R98 R130 R180 R227
3.3K OHM 1/4 Carbon Film 5% 410015 R19 R148 R153 R164
10K OHM 1/4 Carbon Film 5% 410016 R24 R93 R94 R102 R118 R147 R151
R152 R158 R170 R177
15K OHM 1/4 Carbon Film 5% 410017 R144
33K OHM 1/4 Carbon Film 5% 410020 R2 R3 R4 R168 R169 R188
100K OHM 1/4 Carbon Film 5% 410024 R47 R48 R49 R50 R51 R52 R97
R103 R108 R122 R124 R132 R226
68K OHM 1/4 Carbon Film 5% 410025 R68 R69 R87
220K OHM 1/4 Carbon Film 5% 410028 R57 R59 R84
470K OHM 1/4 Carbon Film 5% 410030 R41 R44 R45 R91 R109 R133 R134
R149 R154 R155 R156
6.8K OHM 1/4 Carbon Film 5% 410036 R145 R165 R171 R217 R218
680 OHM 1/4 Carbon Film 5% 410044 R150
5 OHM 5 Wirewound 10% 410051 R5
14
Page 15

Clear-Com MS-232 Two-Channel Main Station
Resistors (Continued)
Value Power Type Tol. Part # Designator
120 OHM 1/4 Carbon Film 5% 410053 R105 R106
1M OHM 1/4 Carbon Film 5% 410058 R9 R16 R83 R85 R163
2.2K OHM 1/2 Carbon Film 5% 410068 R20 R21
820K OHM 1/4 Carbon Film 5% 410070 R23
.39 OHM 2 Carbon Film 5% 410073 R28
120K OHM 1/4 Carbon Film 5% 410079 R135 R136
43K OHM 1/4 Carbon Film 5% 410084 R25
20.0K OHM 1/4 Carbon Film 1% 410086 R12 R13 R117 R120 R121 R129
R139 R140 R182 R187 R201 R202
R205 R206 R207 R208 R212 R213
R215 R216
820 OHM 1/4 Carbon Film 5% 410096 R123
9.1K OHM 1/4 Carbon Film 5% 410100 R14 R15 R17 R119 R141 R142 R224
47.5K OHM 1/8 Metal Film 1% 410105 R99 R100 R126 R166 R167 R209
R210 R211 R214
430 OHM 1/4 Carbon Film 5% 410106 R1 R115 R131 R160
2.2 OHM 1/4 Carbon Film 5% 410113 R191 R173 R225
6.2K OHM 1/4 Carbon Film 5% 410137 R96 R101
60.4K OHM 1/4 Metal Film 1% 410164 R71 R73
1.5 OHM 1/4 Carbon Film 5% 410208 R225
100K OHM X 9 SIP BUSSED 415002 RP1 RP2
220K OHM X 4 SIP ISOLATED 415007 RP3
Diodes and Transistors
Device Description Part # Designator
Diode 1N4148 SIGNAL 10MA 75PIV 480000 D1 D3 D7 D8 D9 D11 D16 D19 D20
D21 D22 D26 D27 D33 D34 D43 D45
D46 D48
Transistor MPS-A13 NPN 30V DARL 480004 Q11 Q14 Q15 Q16 Q17 Q18 Q19
Diode 1N5401 RECT 3A 100PIV 480005 D5 D6
Transistor MPS-A63 PNP 30V DARL 480008 Q12 Q13
Diode 1N957B ZENER 6.8V .4W 5% 480026 D12 D14
Transistor MPS-A55 PNP 60V 480050 Q2 Q3 Q4 Q5 Q6
Transistor MPS-A05 NPN 60V 480052 Q8 Q23
Diode 1N4003 RECT 1A 200PIV 480058 D2 D4 D10 D13 D15 D47
Transistor 2N5639 JFET NCHAN 8V VGS 480069 Q25
Transistor J174 JFET PCHAN 8V VGS 480079 Q21 Q22
Transistor TIP41 NPN 40V 6A TO-220 POWER 480099 Q24
Transistor TIP35C NPN 100V 25A TO-218 480228 Q9 Q10
Integrated Circuits
Device Description Part # Designator
IC LM384 POWER 4W AMP 480012 IC14
IC 555 TIMER 480017 IC1
IC LM340-15 POS 15V REGULATOR 480024 IC8
IC RC4559NB DUAL OP AMP 480056 IC16 IC17 IC20 IC23
IC 4071 CMOS QUAD 2 IN OR GATE 480081 IC7
IC 4584B CMOS HEX SCMITT TRIG 480090 IC2 IC9
IC 4040 CMOS 12 STAGE CONVERTER 480108 IC12
IC 4011 CMOS QUAD 2 IN NAND GATE 480111 IC5
IC 4001 CMOS QUAD 2 IN NOR GATE 480112 IC4
IC 4013 CMOS DUAL D TYPE FLIP FLOP 480171 IC3 IC13
IC LM833N DUAL OP AMP 480175 IC15 IC18 IC19
IC DG444 QUAD ANALOG SWITCH 480212 IC21 IC22 IC24
IC 4556 CMOS DUAL 1 OF 4 DECODER 480236 IC10
15
Page 16

Clear-Com MS-232 Two-Channel Main Station
Miscellaneous
Device Description Part # Designator
Inductor 100UH 2A 180010 L1
Connector 1/4 IN STEREO JACK 210135 P11 J20
Connector HEADER MULTI-PIN 210217 J3(6) P1 P3(3) P4(3) P7(3) P8(3)
Connector JUMP JACK .1IN 210226 JP1 JP2
Connector HEADER .156IN PIN 210234 J2(3)
Connector 3 PIN MALE 210245 P5 P6 P10 P12 P13 P14 P15
Connector 3 PIN FEMALE 210246 P9
Connector SINGLE ROW RT ANG HEADER 210253 JP1(3) JP2(3)
Connector DUAL ROW HEADER 8 POS. .230IN 210276 P17
Connector DUAL ROW HEADER 17 POS. .230IN 210279 P16 P22
Connector DUAL ROW HEADER 7 POS. .320IN 210282 J25
Connector 7 POS DUAL ROW SOCKET .635 TALL 210349 J26
Relay SPDT 24V MINI PC RELAY 450004 K2
Pot 2K TRIMPOT H MTG. 470029 R161
Pot 50K TRIMPOT 470059 R193
Switch DIP SWITCH PIANO 8 POS. 510110 S1
Switch DPDT R/A SLIDE SWITCH 510121 S12 S13
Transformer 600CT/600CT 560018 T1
Cable 34 PIN FLAT, 2 CONN. 770018 J23
16
Page 17

CLEAR-COM
INTERCOM SYSTEMS
R
PROGRAM
INPUT
OUTPUT
OUTPUT
ANNOUNCE
NOTES: (UNLESS OTHERWISE SPECIFIED)
1. ALL RESISTORS ARE 1/4W 5% LISTED IN OHMS
3. ALL DIODES ARE 1N4148
DIP LEVEL
4,5,
10,11,
12,13
PANEL
MIC
GAIN
HOT MIC
DIP EN
*CALL B
*CALL A
*PRG INT B
*PRG INT A
ALERT TONE
ALT TONE EN
ANN RELAY
LINK B OUT
LINK B LN DRV
LINK A LN DRV
SPK MUTE
To J23 on
Logic Board
CHL A POWER
CHL B POWER
KILL RLY CONT
KILL RLY COIL
CHL A
TERMINATION
CHL B
TERMINATION
ONOFFONOFF
ALERT TONE
LEVEL
CW
CW
HEADSET
PANEL
MIC
SPEAKER
INTERCOM
CHANNEL A
INTERCOM
CHANNEL B
ANNOUNCE
OUTPUT
ANNOUNCE OUT +
ANNOUNCE OUT -
PROGRAM IN +
PROGRAM IN -
ANNOUNCE
RELAY
Spares:
2
1
13
15
5
7
PROGRAM
VOLUME
CW
2
P17/J17
J17/P17
J17/P17
J17/P17
P17/J17
J17/P17
5
7
13
15
CW
SIDETONE A
P17/J17
J17/P17
1
22
CW
SIDETONE B
J17/P17
44
P17/J17
66
88
10 10
12 12
P17/J17
J17/P17
J17/P17CW
CW
LISTEN
LEVEL B
LISTEN
LEVEL A
P17/J17
14 14
PRGM FEED
A LEVEL
PRGM FEED
B LEVEL
LONG LINE A
LONG LINE B
99
J23/P22J16/P16
422
P22/J23
P22/J23
P16/J16
P16/J16
10 10 23 5
11 11 24 6
PARTY LINE
LINK A+B
16 16
FRONT PANEL PCA
GROUND PLANE
J18/P16 J23/P22
33 11
SPK ON-OFF
(CLOSE ON)
PANEL SEL
HEADSET SEL
IFB MUTE
ANNOUNCE
TALK SEL B
TALK SEL A
REMOTE
MIC KILL
J18/P16 J23/P22
5 5 25 25
J16/P16
J18/P16
J23/P22
J23/P22
2828
27271
16 16
19
CH A
FAULT
(RED)
CH B
FAULT
(RED)
HEADSET CABLE ASS'Y
P/N 740065
PANEL MIC CABLE ASS'Y
P/N 740066
PANEL
SPEAKER ASS'Y
P/N 740067
65W SWITCHING
POWER SUPPLY
POWER ON-OFF
POWER ENTRY
HARNESS ASS'Y
P/N 740063
DC POWER
CABLE ASS'Y
P/N 740064
2. ALL CAPACITORS ARE LISTED IN MICROFARADS
TEST
MS-232 2-Channel Main Intercom Station Schematic
SHEET 1 OF 2
IFB INPUT
X0459.DSN
PROGRAM FEED ON
ANNOUNCE OPTION
Clear-Com MS-232 Two-Channel Main Station
17
+30V
+30V
BIAS
+30V
+30V
+30V
+30V
+30V
+30V
+30V
VDD
VDD
+30V
BIAS
BIAS
BIAS
BIAS
BIAS
VDD
+30V
+30V
+30V
VDD
VDD
+30V
VDD
+30V+30V
+30V
BIAS
+30V
+30V
BIAS
BIAS
BIAS
BIAS
BIAS
BIAS
BIAS
BIAS
BIAS
VSS
BIAS
BIAS
BIAS
BIAS
BIAS
VSS
VSS
VSS
VSS
BIAS
BIAS
BIAS
BIAS BIAS
BIAS
BIAS
BIAS
VSSVSS
VSS
VSS
VSS
+30V
VDD
C83
1uF NP
C124
.1uF
IC21C
DG444
11910
R24
10K
R163
1M
P15
XLR-3M
132
4
R131
430
R32
4.7K
P5
XLR-3M
132
4
C84
1uF NP
+
C91
100uF
+
C14
22uF
R126
47.5K*
P13
XLR-3M
132
4
C71
.0047uF
IC19B
LM833
5
6
7
P14
XLR-3M
132
4
C93
470pF
C85
1uF NP
C65
.047uF
R139
20K*
C69
1uF
C4
.01uF
C76
.1uF
C68
1uF
IC15A
LM833
3
2
1
84
C49
39pF
T1
1 6
5
3 4
2
R127
10
Q8
MPSA05
3
2
1
C92
470pF
R132
100K
C81
.01uF 1.4KV
R202
20K*
R152
10K
R140
20K*
IC17A
4559
3
2
1
84
R19
3.3K
D7
R99
47.5K*
IC20A
4559
3
2
1
84
IC24B
DG444
687
R142
9.1K
R18
4.7K
R208
20K*
D26
P10
XLR-3M
132
4
R100
47.5K*
Q25
2N5639
3
2 1
R96
6.2K
C52
4.7uF
IC15B
LM833
5
6
7
J3
12345
6
C82
.1uF
R207
20K*
R224
9.1K
P9
XLR3-F
132
4
R115
430
C86
200pF
R206
20K*
R151
10K
R17
9.1K
R226
100K
R135
120K
R201
20K*
R205
20K*
C100
.0047uF
+
C63
1uF
C64
.047uF
R209
47.5K*
C132
.1uF
D8
R227
2K
R146
220
R180
2K
R210
47.5K*
C130
.1uF
D1
C131
.1uF
R216
20K*
IC16B
4559
5
6
7
C128
.1uF
IC24D
DG444
141615
R212
20K*
R118
10K
R214
47.5K*
C129
.1uF
C66
.047uF
R8
0
R130
2K
R21
2.2K 1/2W
R213
20K*
R186
4.7K
C78
470pF
R20
2.2K 1/2W
R215
20K*
R211
47.5K*
R11
1K
R187
20K*
Q10
TIP35
213
+
C56
47uF
C105
.047
R12
20K
Q9
TIP35
213
IC21A
DG444
312
13
4
5
12
R10
1K
R105
120
C108
.01uF
J20
R217
6.8K
R13
20K
S12
SW SPDT
R14
9.1K
C104
.0047uF
R218
6.8K
R144
15K
S13
SW SPDT
R15
9.1K
R145
6.8K
IC22A
DG444
312
13
4
5
12
R6
1K
Q19
MPSA13
3
2
1
IC22D
DG444
141615
R225
1.5
C67
.0047uF
R7
1K
R188
33K
IC24C
DG444
11910
IC19A
LM833
3
2
1
84
P22
1
2
3
4
5
6
7
8
9
10
11
12
13
14
15
16
17
18
19
20
21
22
23
24
25
26
27
28
29
30
31
32
33
34
R171
6.8K
R28
.39 2W
+
C121
100uF
C77
.1uF
C2
.1uF
C57
470pF
C3
.1uF
Q2
MPSA55
1
2
3
IC21D
DG444
141615
Q3
MPSA55
1
2
3
Q6
MPSA55
123
Q5
MPSA55
123
R133
470K
Q21
J174
2
31
D4
1N4003
R134
470K
P8
1
2
3
R137
39
D2
1N4003
JP2
R138
39
C118
820pF
C6
.01uF
C5
.01uF
R147
10K
R194
220
Q4
MPSA55
1
2
3
R196
220
+
C8
100uF
R197
4.7K
+
C136
22uF
R128
4.7K
R195
4.7K
C112
820pF
+
C7
100uF
IC16A
4559
3
2
1
84
C106
.1uF
R129
20K*
C79
1uF NP
R119
9.1K
R125
4.7K
R102
10K
R120
20K*
R308
50K
POT
+
C119
10uF
C54
47pF
C109
1uF NP
+
C120
10uF
R303
36K
D10
1N4003
P7
1
2
3
+
C90
100uF
R121
20K*
L1
100uH
R4
33K
C55
.1uF
R117
20K*
R3
33K
R304
5K
POT
R310
50K
POT
C107
.01uF
R2
33K
P3
1
2
3
R309
50K
POT
Q24
TIP41
2
1
3
D5
1N5401
+
C137
22uF
R191
2.2
D6
1N5401
C80
.22uF
IC23B
4559
5
6
7
R166
47.5K*
C116
.1uF
P4
1
2
3
R173
2.2
R123
820
C62
1uF NP
R174
1K
K2
RELAY SPDT
R106
120
R305
5K
POT
R307
50K
POT
C301
.1uF
R306
50K
POT
D47
1N4003
C101
.1uF
C51
39pF
IC24A
DG444
312
13
4
5
12
IC23A
4559
3
2
1
84
D15
1N4003
IC20B
4559
5
6
7
R101
6.2K
C87
200pF
R136
120K
RP1
100K SIP
123456789
10
C88
.047uF
R165
6.8K
C117
22pF
R122
100K
IC22B
DG444
687
R148
3.3K
U22C
DG444
11910
XLR-4M
124
5
3
C115
.0022uF
S1-7
OPTION
C89
.22uF
S1-8
OPTION
P11
470pF
1KV
R103
100K
R153
3.3K
470pF
1KV
S303
R109
470K
R168
33K
C61
.047uF
D45
K301
RELAY SPDT
R169
33K
R170
10K
Q23
MPSA05
3
2
1
S308
SW DPDT
D43
LED304
C70
.0047uF
R149
470K
R182
20K*
C97
.1uF
D301
1N4003
C95
.01uF
R154
470K
R193
50K POT
R313
10K
8 OHM
R97
100K
C96
.01uF
R150
680
1
2
C72
47pF
R116
22
C114
1uF NP
C103
.1uF
1
2
3
R107
22
R159
220
+
C73
47uF
Q22
J174
2
31
IEC 320 MALE
C102
.1uF
R1
430
C53
.1uF
R167
47.5K*
R98
2K
J2
1
2
3
R158
10K
C110
47pF
-
+
IC14
LM384
6
2
8
7
3
1
14
+
C17
1000uF
R164
3.3K
C59
.1uF
C74
470pF
C98
.01Uf
R155
470K
R108
100K
R124
100K
R141
9.1K
+
C122
220uF
R156
470K
IC17B
4559
5
6
7
C58
47pF
C75
470pF
R161
2K
IC18A
LM833
3
2
1
84
R5
5 5W
C60
.1uF
IC18B
LM833
5
6
7
R160
430
IC1
555
253
7
6
4
TRCVQ
DIS
THR
R
C123
470pF
D46
C99
2.2uF
S301
R25
43K
R199
22
D26
P12
XLR-3M
132
4
R23
820K
C50
4.7uF
R198
1K
IC21B
DG444
687
R22
1K
D7
P6
XLR-3M
132
4
IFB MUTE
SPK MUTE
DIP EN
ALERT TONE
ALERT TONE EN
PRG INT A
HEADSET SEL
PANEL SEL
TALK SEL A
TALK SEL B
PRG INT B
CALL A
CALL B
ANNOUNCE
ANN RELAY
CHL A POWER CHL B POWER
CHL A POWER
CHL B POWER
SPK MUTE
PANEL SEL
HEADSET SEL
ANNOUNCE
TALK SEL B
TALK SEL A
DIP EN
IFB MUTE
ANN RELAY
CALL B
CALL A
PRG INT B
PRG INT A
ALERT TONE
ALERT TONE EN
CHL A POWER
CHL B POWER
LINK A LN DRV
LINK B LN DRV
LINK B OUT
LINK B OUT
LINK B LN DRV
LINK A LN DRV
KILL RLY COIL
KILL RLY CONT
CHL B POWER
CHL A POWER
Page 18

CALL A
SENSE
CALL B
SENSE
CALL B
SEND
SEND
CLEAR-COM
INTERCOM SYSTEMS
CALL A
+15V VDD SOURCE
ANNOUNCE RELAY
ALERT TONE
ALT TONE EN
LINK B OUT
LINK B LN DRV
LINK A LN DRV
CALL B
CALL A
DIP ENABLE
TALK SEL B
TALK SEL A
PRG INT B
PRG INT A
SPK MUTE
PANEL SEL
HEADSET SEL
IBF MUTE
ANNOUNCE
+30V
VDD
+30V
VDD
VSS
VSS
POWER ON
RESET
CHL A POWER
CHL B POWER
J16/P16
J18/P16
11 29
11 11
J25/P26
J25/P26
44
66
P26/J25
P26/J25
33
55
J25/P26 P26/J25
11 99
2 2 10 10
MOMENTARY
ONLY CH A
P26/J25
P26/J25
77
88
INTRPT ANNC
INTRPT EXT IFB
J25/P26 P26/J25
MOMENTARY
ONLY CH B
CALL ON TALK A
CALL ON TALK B
CALL A
CALL B
J16/P16
J16/P16
927
725
TALK A
TALK B
TONE ALERT
J18/P16
99
PANEL MIC / HEADSET
(CLOSE-PANEL)
J16/P16
10 28
P16/J18
77
TONE ALERT
(GREEN)
TALK A
(IN TALK A SW)
TALK B
(IN TALK B SW)
P16/J16
P16/J18
1230
10 10
J16/P16
J16/P16
J18/P16
J18/P16
131431
32
131213
12
PROGRAM
FEED A
ENABLE
PROGRAM
FEED B
ENABLE
PROGRAM
INTERRUPT
A ENABLE
PROGRAM
INTERRUPT
B ENABLE
PROGRAM A
SELECT
PROGRAM B
SELECT
11
J16/P16
826
ANNOUNCE
J18/P16
J18/P16
P16/J16
P16/J16
31421
14
15 33
FRONT
PANEL
PCA
SHOWN ON
SHEET 1
SHOWN ON
SHEET 1
ALERT TONE DELAY
NONE (OPEN) - 2 SEC (CLOSED)
RMK SW
MS-232 2-Channel Main Intercom Station Schematic
SHEET 2 OF 2
X0460.DSN
R
18
Clear-Com MS-232 Two-Channel Main Station
+30V
+30V
VDD
VDD
VDD
+30V
VCC
+30V
VDD
VDD
VDD
VDD
VDD
VDD
VDD
VDD
VDD
VDD
VDD
VDD
VDD
VDD
+30V
+30V
VDD
VDD
+30V
VDD
VSS
VSS
VSS
VSS
VSS
VSS
VSS
VSS
VSS
VSS
VSS
VSS VSS
VSS VSS VSS
VSS VSS VSS
VSS
VSS
VSS
VSS
VSS
VSS
VSS
VSS
VSS
VSS
VSS
VSS
VSS
VSS
+
C35
10uF
R91
470K
C41
.1uF
(IC9)
S300
R41
470K
S301
IC8
LM340-15
VI
GND
VO
IC5D
4011
12
13
11
C126
.1uF
(IC10)
RP2-7
100K SIP
S305
C27
.1uF
(IC1)
RP2-5
100K SIP
C28
.1uF
(IC2)
C29
.1uF
(IC3)
IC4D
4001
12
13
11
C30
.1uF
(IC4)
RP2-4
100K SIP
C31
.1uF
(IC5)
RP2-6
100K SIP
C32
.1uF
(IC7)
RP2-3
100K SIP
IC13A
4013
531
2
64
D
CLK
Q
Q
SR
R45
470K
IC4C
4001
8
9
10
IC13B
4013
91113
12
810
D
CLK
Q
Q
SR
S302
IC2B
4584
3 4
IC2C
4584
5 6
Q18
MPSA13
3
2
1
RP2-2
100K SIP
IC2A
4584
1 2
Q15
MPSA13
3
2
1
S1-1
OPTION
LED300
IC2D
4584
9 8
Q14
MPSA13
3
2
1
S1-6
OPTION
R300
4.7K
R44
470k
D27
Q11
MPSA13
3
2
1
S1-5
OPTION
IC4B
4001
5
6
4
Q16
MPSA13
3
2
1
S1-2
OPTION
IC4A
4001
1
2
3
C46
.01uF
Q17
MPSA13
3
2
1
S1-4
OPTION
S304
S1-3
OPTION
IC10A
4556
2
3
1
4
5
6
7
A
B
E
Q0
Q1
Q2
Q3
IC2E
4584
11 10
IC10B
4556
14
13
15
12
11
10
9
A
B
E
Q0
Q1
Q2
Q3
RP2-10
100K SIP
R93
10K
IC2F
4584
13 12
IC7D
4071
12
13
11
LAMP301
C21
.01uF
IC7A
4071
1
2
3
LAMP302
IC7B
4071
5
6
4
R16
1M
C134
.1uF
C23
.01uF
IC7C
4071
8
9
10
D16
IC12
4040
10119
7
6
5
3
2
4
13
12
14
15
1
CLK
RST
Q1
Q2
Q3
Q4
Q5
Q6
Q7
Q8
Q9
Q10
Q11
Q12
R74
39
R73
60.4K*
R9
1M
C127
.1uF
(IC12)
R94
10K
C1
1uF
C38
.22uF
C133
.1uF
(IC13)
C125
.1uF
RP3C
220K SIP
5 6
C19
2.2uF
D9
RP3A
220K SIP
12
C20
2.2uF
R72
39
D3RP3B
220K SIP
34
C25
.47uF
RP3D
220K SIP
7 8
C24
.47uF
R35
4.7K
R84
220K
R83
1M
R48
100K
JP1
R39
2K
C48
.22uF
RP2-9
100K SIP
R87
68K
RP2-8
100K SIP
C94
.0047
R85
1M
IC3A
4013
531
2
64
D
CLK
Q
Q
SR
Q12
MPSA63
1
2
3
C47
.01uF
R177
10K
IC3B
4013
91113
12
810
D
CLK
Q
Q
SR
D33
S306IC5B
4011
5
6
4
D34
S307
IC5A
4011
1
2
3
J23
1
2
3
4
5
6
7
8
9
10
11
12
13
14
15
16
17
18
19
20
21
22
23
24
25
26
27
28
29
30
31
32
33
34
R49
100K
R75
220
R50
100K
D19
D20
R58
4.7K
D21
D22
R51
100K
IC9A
4584
1 2
R68
68K
IC9B
4584
3 4
D11
IC9C
4584
5 6
C39
.047uF
IC9D
4584
9 8
IC9E
4584
11 10
D12
6.8V ZD
D48
R59
220K
R47
100K
R46
2K
D14
6.8V ZD
R57
220K
IC9F
4584
13 12
Q13
MPSA63
1
2
3
R71
60.4K*
R69
68K
R52
100K
C22
.047uF
C135
.1uF
IC5C
4011
8
9
10
S309
D13
1N4003
S310
CALL A
CALL B
TALK SEL A
TALK SEL B
IFB MUTE
TALK SEL B
TALK SEL A
SPK MUTE
HEADSET SEL
PANEL SEL
PANEL SEL
HEADSET SEL
ANNOUNCE RELAY
ANNOUNCE
ANNOUNCE
ANNOUNCE RELAY
ANNOUNCE
IFB MUTE
IFB MUTE
DIP ENABLE
DIP ENABLE
CALL SENSE A
CALL SENSE B
CALL SENSE A
CALL SENSE B
PRG INT B
PRG INT A
ALERT TONE
ALERT TONE
ALT TONE EN
ALT TONE EN
CALL A
CALL B
PRG INT A
PRG INT B
ANNOUNCE
TALK SET A
TALK SET B
TALK SET A
TALK SET B
Page 19

Clear-Com MS-232 Two-Channel Main Station
CLEAR-COM LIMITED WARRANTY
The Clear-Com warranty does not cover any defect, malfunction or failure caused beyond the control of
Clear-Com, including unreasonable or negligent operation, abuse, accident, failure to follow instructions
in the manual, defective or improper associated equipment, attempts at modification and repair not
authorized by Clear-Com, and shipping damage. Products with their serial numbers removed or defaced are not covered by this warranty.
This warranty is the sole and exclusive express warranty given with respect to Clear-Com products. It is
the responsibility of the user to determine before purchase that this product is suitable for the user's intended purpose.
Any and all implied warranties, including the implied warranty of merchantability are limited to the duration of this express limited warranty. Neither Clear-Com nor the dealer who sells Clear-Com products
is liable for incidental or consequential damages of any kind.
For your own records fill in the information below:
* Model No.________________________________ * Serial No.______________________
Date Purchased_____________________________
Purchased from (dealer)______________________________________________________
Address___________________________________________________________________
City_________________________________State___________________Zip____________
Factory Service
All equipment returned for repair must be accompanied by documentation stating your return address,
telephone number and date of purchase, along with a description of the problem.
Note: Do not return any equipment to the factory without first obtaining a Return
Authorization Number.
Send equipment to be repaired to:
Customer Service Department
Clear-Com Intercom Systems
4065 Hollis St.
Emeryville, CA 94608-3505
Telephone: (510) 496-6666
Telefax: (510) 496-6699
Warranty Repairs - If in warranty, no charge will be made for the repairs. Equipment being returned for
warranty repair must be sent prepaid and will be returned prepaid.
Non-Warranty Repair - Equipment that is not under warranty must be sent prepaid to Clear-Com. If requested, an estimate of repair costs will be issued prior to service. Once your approval for repair, and
repair of equipment is completed, the equipment will be shipped freight collect from the factory to the
customer.
19
Page 20

Clear-Com MS-232 Two-Channel Main Station
TECHNICAL SPECIFICATIONS
HEADSET MICROPHONE PRE-AMP
Input Type: Dynamic
Impedance: 1K
Input Level: -55 dBV nominal; -10 dBV max.
Gain from headset mic to intercom line: +41 dB
PANEL MICROPHONE PRE-AMP
Input Type: Electret
Input Level: -45 dBV nominal
Gain from panel mic to intercom line: +31 dB
PRE-AMP RESPONSE CURVE
Frequency Response: 250 Hz - 12 KHz, contoured for intelligibility
Limiter Range: 20 dB
HEADPHONE/SPEAKER AMPLIFIER
Ω
Load Impedance Range: 50 - 2 K
Output Level: at least +20 dBV across 600
Distortion: < 0.2% THD @ 1 KHz
Frequency Response: 200 Hz - 18 KHz, 2 dB
Gain from intercom line: +37 dB
Power Output: 110 dB SPL
PROGRAM AMPLIFIER
(Transformerless, balanced differential input)
Input Level: -20 dBV
Input Impedance: > 100 K
Frequency Response: 150 Hz - 18 KHz, 2 dB
TERMINATION IMPEDANCE
Impedance: 200 , switchable
POWER SUPPLY
Type: Switching, with overcurrent limiting and reset circuitry
Output Voltage: 30 volts DC
Output Current: 2 amps peak, 1.75 amps max, distributed over both channels
Short Circuit Reset Time: < 15 sec.
Hum & Noise: < -80 dBv
STATION CAPACITY
Capacity: Maximum of 60 headset stations or 20 speaker stations, distributed over both channels
Ω
Ω Ω
Ω
±
Ω
±
REAR PANEL CONNECTORS
Intercom: (6) XLR-3M (3 per channel)
Announce Out: (1) XLR-3M (Audio)
Announce Relay: (1) 1/4" Phone Jack (Relay)
Program: (1) XLR-3F
Hot Mic / IFB Interface: (1) 1/4" Phone Jack
AC Power: IEC 320 Connector
REAR PANEL CONTROLS
(2) Termination On-Off switches; (8) Option switches; (1) Power switch; (1) Tone Alert Volume control
20
Page 21

Clear-Com MS-232 Two-Channel Main Station
FRONT PANEL CONNECTORS
Panel Mic: (1) 1/4" panel mounting jack
Headset: (1) XLR-5F
FRONT PANEL CONTROLS & INDICATORS
(1) Panel / Headset Mic switch; (1) Announce button; (1) Party Line Link switch; (2) Program On-Off-
Interrupt switches; (3) Program Level controls; (2) Listen controls; (2) Sidetone Null controls; (2) Talk
buttons; (2) Call buttons; (1) Tone Alert button; (1) RMK button; (1) Speaker On-Off switch
(2) Short LEDs; (1) Power on LED; (1) Party Line Link LED; (1) Tone Alert LED
POWER REQUIREMENTS
90 - 240 VAC, 50 - 60 Hz, 60 VA
ENVIRONMENTAL
o
32 - 122
F (0 - 50o C)
DIMENSIONS
19" W x 1.75" H x 6.5" D (483 mm x 44 mm x 165 mm)
WEIGHT
5.0 lbs. (2.75 kg)
NOTICE ABOUT SPECIFICATIONS
While Clear-Com makes every attempt to maintain the accuracy of the information contained in its product manuals, that information is subject to change without notice. Performance specifications included
in this manual are design-center specifications and are included for customer guidance and to facilitate
system installation. Actual operating performance may vary.
MS-232 Manual P/N 810212
(C) 1998 Clear-Com Systems
All Rights Reserved
21
 Loading...