

Page 1

DVD PLAYER/RECORDER
DVD-R 612 - GB 29.01.04 16:30 Uhr Page 1
Page 2

CAUTION
"VENTILATION SHOULD NOT BE IMPEDED BY COVERING THE
VENTILATION OPENINGS WITH ITEMS, SUCH AS NEWSPAPER,
TABLE-CLOTHS, CURT AINS, ETC."
"NO NAKED FLAME SOURCES, SUCH AS LIGHTED CANDLES,
SHOULD BE PLACED ON THE APP ARA TUS."
"THE APPARATUS SHALL NOT BE EXPOSED TO DRIPPING OR
SPLASHING AND THA T NO OBJECTS FILLED WITH LIQUIDS, SUCH
AS VASES, SHALL BE PLACED ON THEAPP ARATUS."
"THE MAINS PLUG IS USED AS THE DISCONNECT DEVICE AND
SHALL BE REMAIN READIL Y OPERABLE."
General Information
Please note :
There is no ShowView, VPS or DV-IN
function for the model DVD-R 612.
Features
• DVD player built-in Dolby Digital
Logic and Virtual Surround.
• 5.1 channel audio out
• TV tuner receiver.
• Conforming DVD, SVCD, VCD1.1, VCD2.0, MP3, CDR, CDRW
discs.
• DVD navigation and SVCD, VCD 2.0 PBC controlling functions.
• VFD front panel display and OSD menu dis play.
• Full function remote control.
*2
decorder, supporting Dolby Pro
DVD region code
DVD players and discs are designed with region numbers which
dictate the region (printed on the rear panel). If the region number
does not match the region number in your DVD player, you will not be
able to play the disc. If you try to play the DVD, the message WRONG
REGION will appear on OSD.
The region number for this DVD player is 2.
Disc can be playbacked
• DVDs
multi-titles. Titles may be subdivided
into chapters.
• Video CDs
Disc are general divided
into tracks.
• Audio CDs and MP3
Disc are divided into tracks.
Note
• You cannot play CD-G, CD-EXTRA, , CD-ROM and DVD-ROM
discs.
• You cannot play illegally produced discs.
• You cannot play scratched discs.
• You cannot play disc that are dusty, soiled or marked with finger-
prints.
DISCS can be recordedDISCS can be recorded
DISCS can be recorded
DISCS can be recordedDISCS can be recorded
DVD+RW/R
GlossarGlossar
Glossar
GlossarGlossar
y ofy of
y of
y ofy of
disc ter disc ter
disc ter
disc ter disc ter
msms
ms
msms
• Title (DVD)
The longest sections of a picture or a music piece on a DVD; a
movie, ect., for a picture piece on a video software; or an album,
etc., for a music piece on and audio software. Each title is assigned a title number enabling you to locate the title you want.
• Chapter (DVD)
Sections of a picture or a music piece that are smaller than titles.
A title is composed of several chapters. Each chapter is assigned a chapter number enabling you to locate the chapter you
want. Depending on the disc, no chapters may be recorded.
• Track (Video or audio CD)
Sections of a picture or a music piece on a VIDEO or a CD. Each
track is assigned a track number enabling you to locate the track
you want.
Conventions about this manual
• Instructions in this manual describe the controls on the system.
You can also use the controls on the remote control if they have
the same or similar names as those on the system.
• The types of functions and operations that can be used for a
particular disc vary depending on the features of that disc. In
some cases, these functions and operations may differ from the
descriptions given in this Operations Manual. In this event, follow
the instructions given on the screen. This Operations Manual only
covers basic disc operations.
• For some operations, the icon may appear on the the screen.
This indicates that the operation described in this Operations
Manual is not permitted for the current disc.
• The drawings about the TV screen and front panel display used
in this Operations Manual are purely for the purposes of explanation. The actual displays may differ slightly from what are shown
here.
2
Page 3

General Information (Continued)
Notes on disc
Disc handling precautions
• To keep the disc clean, handle the disc by its edge. Do not touch
the surface.
• Do not stick paper or tape on the disc.
If there is glue (or a similar substance) on the disc, remove the glue
completely before using the disc.
• Do not expose the disc to direct sunlight or sources such as hot
air ducts, or leave it in a car parked in direct sunlight as there can
be considerable rise in temperature inside the car.
• After playing, store the disc in its case.
• Do not write on the label side with a ball-point pen or other writing
utensils.
• Be careful not to drop or bend the disc.
AccessorAccessor
Accessor
AccessorAccessor
Check that you have the following items:
yy
y
yy
• RF antenna cable(1)
• RCA cable( RCAx1 pair)
• Remote control (1)
• AA batteries (2)
• Scart cable(x1)
• IB(x1)
InserInser
Inser
InserInser
ControlControl
Control
ControlControl
You can control the system using the supplied remote. Insert two
batteries by matching the + and - on the batteries. When using the
remote, point it at the remote sensor on the front panel of this system.
ting Bating Ba
ting Ba
ting Bating Ba
tteries into the Rtteries into the R
tteries into the R
tteries into the Rtteries into the R
emoteemote
emote
emoteemote
Disc cleaning precautions
• Before playing, clean the disc with a cleaning cloth. Wipe the disc
from the center to out.
• Do not use solvents such as benzine, thinner, commerically
avaiable cleaners or anti-static spray intended for viny1 LPs.
Disc installing precautions
• Do not install more than 1 disc on disc tray.
• Do not place the disc on the tray up-side down.
• Do not try to close the disc tray when the disc is not installed
properly.
Note
• Do not leave the remote in an extermely hot or humid place.
• Do not use a new battery with an old one.
• Do not drop any foreign object into the remote casing. particularly
when replacing the batteries.
• Do not expose the remote sensor to direct sunlight or lighting
apparatuses. Doing so many cause a malfunction.
• If you will not use the remote for an extended period of time,
remove the batteries to avoid possible damage from battery leakage and corrosion.
3
Page 4

Function OvFunction Ov
Function Ov
Function OvFunction Ov
erer
er
erer
vievie
vie
vievie
ww
w
ww
Front panel
1
1
STANDBY/ON
To switch the Unit to standby and power on mode.
2
OPEN/CLOSE
Press to open/close disc tray.
3
RECORD
Press to record.
4
DV IN Not for the model DVD-R 612
Connect the audio/video (game console ,camcorder,etc.)
5
S-VIDEO IN
S-video input jack
6
CVBS IN
Video input jack
7
AUDIO IN (L)
Audio input jack (left channel)
8
AUDIO IN (R)
Audio input jack (Right channel)
10 11 12 13
2
10
11
12
13
14
15
3
EARTHPHONE
9
Plug/unplug in the earphone to enjoy sound
CHANNEL(-)
Press to select previous TV channel
CHANNEL(+)
Press to select next TV channel.
REC MODE
Select the record mode.
PREV
Press it to select the previous track or chapter.
NEXT
Press it to select the next track or chapter.
STOP
Press to stop playback exept for timer recording.
4
5
15
1614
8 9
7
6
BACK PANEL
1 2 3 4 5 6
12 11 10
PLA Y/PAUSE
16
Press it to play or pause the playback.
7 8
9
!
4
Page 5

1 COMPONENT VIDEO OUT
Component video out jack
If your TV or monitor has COMPONENT VIDEO IN jack ,
Connect them with a component video cable.
2 CVBS IN(VIDEO IN)
Video input jack
3 AUDIO IN(Land R)
2.1 channel Audio input jack
4 SCART OUT
Scart out jack
If your TV have S-cart jack , connect them with Scart cable,
then you can enjoy a clear picture.
5 VIDEO OUT(CVBS)
Video input jack.
6 COAXIAL /OPTICAL OUT
DIGITAL output jack
If the digital signal , use the OPTICAL/Coaxial cable to connect
compoent DIGIT AL INPUT.
7 Audio out
Connect the Amplifier Audio input .
8 SCART IN
S-cart in jack
9 SUBWOOFER
Connect the Amplifier Sub terminals
10 S-VIDEO OUT
S-video out put jack
connect TV S-video input jack .
11 S-VIDEO IN
S-video output jack .
12 ANTENNA
Connect RF ANTENNA to TV set .
5
Page 6

Remote control
•EQ: access various camera angles on DVD.
•OPEN/CLOSE: open or close the disc tray.
•A-B:use to mark a DVD or mp3 segment to repeat betweeen A
and B.
•REPEAT:allow you to repeat a title,a chapter, a song or all
songs on the disc(usally used on music discs).
•SETUP:: enter into the SETUP menu.
•TITLE: displays the title menu if present on the disc (DVD
only)
•SUBTITLE:access various subtitle language in DVD..
•DIRECTION BUTTON:used in DVD menu and Audio CD track
selection.
•PROG:to program the tracks based on your own order (only VCD
and CD)
•SLOW:makes the picture forward or backward in slow motion.
•NEXT SKIP: skip to next chapter or track.
•PREV SKIP: skip to previous chapter or track.
•STEP:to see the picture slowly (frame by frame)
•ZOOM: press to enlarge the picture.
•NUMBER KEYS:used in DVD menu and Audio CD track selection.
•EDIT:press to edit what you record.
•CLEAR: to clear what you select or input.
•RECORD: to record.
•RECORD MODE: before record, to select the record mode you
want.
•CHANNEL+: press to transfer to upper TV program channel.
•MUTE: immediately turns off the sound ,when press again to
restore the sound.
•POWER: switches the player from STANDBY to ON or ON to
STANDBY(if main POWER on the set is ON).
•.INTRO:allows you to scan all the tracks with 10 seconds for each
track.(CD ,VCD only).
•.SHUFFLE:to play the tracks at random.
•MENU/PBC:press to select the subtitle(root) menu (if avaible on
your disc)
•LANGUAGE:select a different Audio language or director narration.
•ENTER: to enter a command or confirm a selection.
•AUDIO: changes the audio channels of a VCD or CD if present on
the disc,or selects stereo,left or right audio channel of a VCD disc.
• PLAY/PAUSE: press to start play or pause play.
•STOP:stops by momentarily or fully.
•BACKWARD: searches backward through a disc.
•FORWARD: searches forward through a disc.
•RETURN: return back to the menu (VCD only)
•GOTO: goto the desired starting time,track or title.
•DISPLAY: to show the elapsed playing time, the track number and
other menu items.
•SELECT: to switch between Scart RGB in,Scart video in,S video
1,AV 1,S video 2,AV2,DV-IN
•SLEEP: to set the timer on your DVD..
•N/P: to switches between the PAL and NTSC system.
•TIMER: press this button to transfer to TV programmes.
•CHANNEL-: allows you to transfer to a lower TV program channel.
6
DW8010 IB 06-09.P65 2003/9/10, ¤U¤È 03:576
Page 7
Connect your DVD recorder to TV
set
1 If your TV set have the SCART socket,
Connect your TV with a Scart cable .
(configuration C)
1) Insert ANTENNA cable into ANTENNA socket at the back of the
DVD recorder
2)Insert one end of the supplied aerial cable to the TV socket at the
back of the DVD recorder and the other eand into the aerial input
socket at the back of the TV set.
3) plug scart cable into the corresponding scart socket at the back
of the TV set and the scart socket (SCART OUT )
!
7
DW8010 IB 06-09.P65 2003/9/10, ¤U¤È 03:577
Page 8

2. If your TV set have the S-Video socket,
Connect your TV with a S-Video cable .
(Configuration B)
1) Insert ANTENNA cable into ANTENNA socket at the back of the
DVD recorder
2)Insert one end of the supplied aerial cable to the TV
socket at the back of the DVD recorder and the other eand into the
aerial input socket at the back of the TV set.
3) Plug one end of a S-Video cable into the S-Video 1 output socket
at the back of the DVD recorder and the other end into the S-Video
input socket on the TV set .
4) Insert one end of the supplied Audio cable into the Red/White
socket OUT L AUDIO R at the back of the DVD recorder and the
other end into the Audio input (usually red/white )socket on the TV
set
8
DW8010 IB 06-09.P65 2003/9/10, ¤U¤È 03:578
!
Page 9

3. If your TV set have the VIDEO OUT
socket, Connect you TV with a Video
cable .
(Configuration C)
4. If your TV set have the COMPONENT
VIDEO OUT socket, Connect you TV with
Component video cable .
(Configuration D)
1) Insert ANTENNA cable into ANTENNA socket at the back of the
DVD recorder
2)Insert one end of the supplied aerial cable to the TV
socket at the back of the DVD recorder and the other eand into the
aerial input socket at the back of the TV set.
3) Plug one end of the suppled Video cable into the yellow Video
(CVBS) output socket or at the back of the DVD recorder and the
other end into the Video in or AV in socket on the TV set .
4) Insert one end of the supplied Audio cable into the Red/White
socket OUT L AUDIO R at the back of the DVD recorder and the
other end into the Audio input (usually red/white )socket on the TV
set
1) Insert ANTENNA cable into ANTENNA socket at the back of the
DVD recorder
2)Insert one end of the supplied aerial cable to the TV socket at
the back of the DVD recorder and the other eand into the aerial
input socket at the back of the TV set.
3) Plug one end of the Video cable into the Green /Blue/ Red
Component Video output socket at the back of the DVD recorder
and the other end into the Video in or AV in socket on the TV set .
4) Insert one end of the supplied Audio cable into the Red/White
socket OUT L AUDIO R at the back of the DVD recorder and the
other end into the Audio input (usually red/white )socket on the TV
set
DW8010 IB 06-09.P65 2003/9/10, ¤U¤È 03:579
!
9
Page 10

Connect your DVD recorder to
additional devices ,using second
Scart socket
(configuration A)
Connect your DVD recorder to
additional devices ,using Video
socket
(configuration B/C)
You can connect additional devises such as decorders, DVD
player, etc. to the SCART IN ,then you can see the picture from
the additional device on your TV set. At same time , you can
recorder the program from the additional device .
You can connect additional devises such as decorders,
camcorders, etc. to the S-video /Video and Audio in ,then you can
see the picture from the additional device on your TV set. At same
time , you can recorder the program from the additional device .
10
DW8010 IB 10-12.P65 2003/9/10, ¤U¤È 03:5810
!
Page 11

Connect your DVD recorder analogue Audio sockets to Audio devices.
(Configuration D)
Connect your DVD recorder the
digital audio socket to Audio devices.
(Configuration E)
T Analogue audio sockets AUDIO OUT are located at the back of
the DVD recorder
These can be used connect the following :
1) a receiver with Bolby Surround Pologic
2) a receiver with two - channel analogue stereo
At ht back of the DVD decorder there are digital output socket
DIGITAL OUT for Optical / coaxial cable .
There can be used to connect the following :
1)an A/V receiver or A/V amplifier with digital muti-channel channel
sound decorder
2) a receiver with two channel digital stereo
DW8010 IB 10-12.P65 2003/9/10, ¤U¤È 03:5811
!
11
Page 12

Connect Camcorder to the front
Socket
To copy camcorder recordings, you can use the front sockets
.These scokets are located behind the flap on the left hand side .
Very good picture Quility (Configuration A/C)
If you have H18 or S-VHS (c) camcorder , connect the S-Video 2
of the DVD recorder to the S-VHS output on the camcorder.
you must aslo connect the audio input L AUDIO R on the DVD
recorder to Audio output on the camcorder .
Good picture Quility (configuration B/C)
If your camcorder only have a single Video output (compositeVideo
, CVBS) , connect the Video(AV 2) of the DVD recorder to the
Video output on the camcorder.
you must aslo connect the audio input L AUDIO R on the DVD
recorder to Audio output on the camcorder
12
DW8010 IB 10-12.P65 2003/9/10, ¤U¤È 03:5912
Page 13

•BASIC SETUP
In the top Menu select the setup menu option to make desired
setup options.
Play/Edit disc
In main setup menu select play/edit disc then press ENTER
button,the OSD will display as below
Play/Ediit disc
Record Program
Setup Menu
Press SETUP to exit
In setup menu ,select setup Menu option to make desired setup
options. For purposes of this manual the setup options are
decribed from top to bottom order,beginnging with the Setup Menu.
You may want to record the settings you make so you have a
record.Having a record can substantially shorten the item required
to re-enter your settings should you need to do so later because a
setting did not work as expected or you had to reset the DVD
recorder.
Some settings interact .What you choose in one menu can affect
how other selection work.If you see a selection that is greyed out,
that means that the selection interacts with one or more other
selections that are set in such a way to render the greyed out
selection inoperable.For example,in the Audio setup ProLogicII
controls are only available when ProLogic II mode is set to Music or
Custom. In addtion ,only three of the Pro Logic II controls are
available when Music is selected.
Play/Ediit disc Play/Ediit Titles
Record Program
Setup Menu
Press SETUP to exit
In Play/Edit page Play/Edit titles and Edit disc are available.
Edit Disc
•Play/Edit titles
Select Play/Edit titles and confirm with ENTER button then it wil
back to the TITLE menu. In title menu press Play/pause button to
play desired title or press EDIT button to edit titles you want.
•Edit disc
Select Edit disc and confirm with ENTER button on your remote
control then Edit disc page will present.These options are available.
•Edit disc
•Format disc
•Erase disc
•Finalise disc(only available for DVD+R disc)
•Disc lock
Notice:1.Edit disc option havefunctions only when DVD+R/RW discs
are on the disc tray.
2.you must stop two times , then can EDIT disc
Record program
In this record program record status, show view and record
list are available.
1)Press SETUP menu on remote control then enter into the top
menu.
2)Move hilight to Record program using up or down direction
button and confirm with right direction button.
13
Page 14
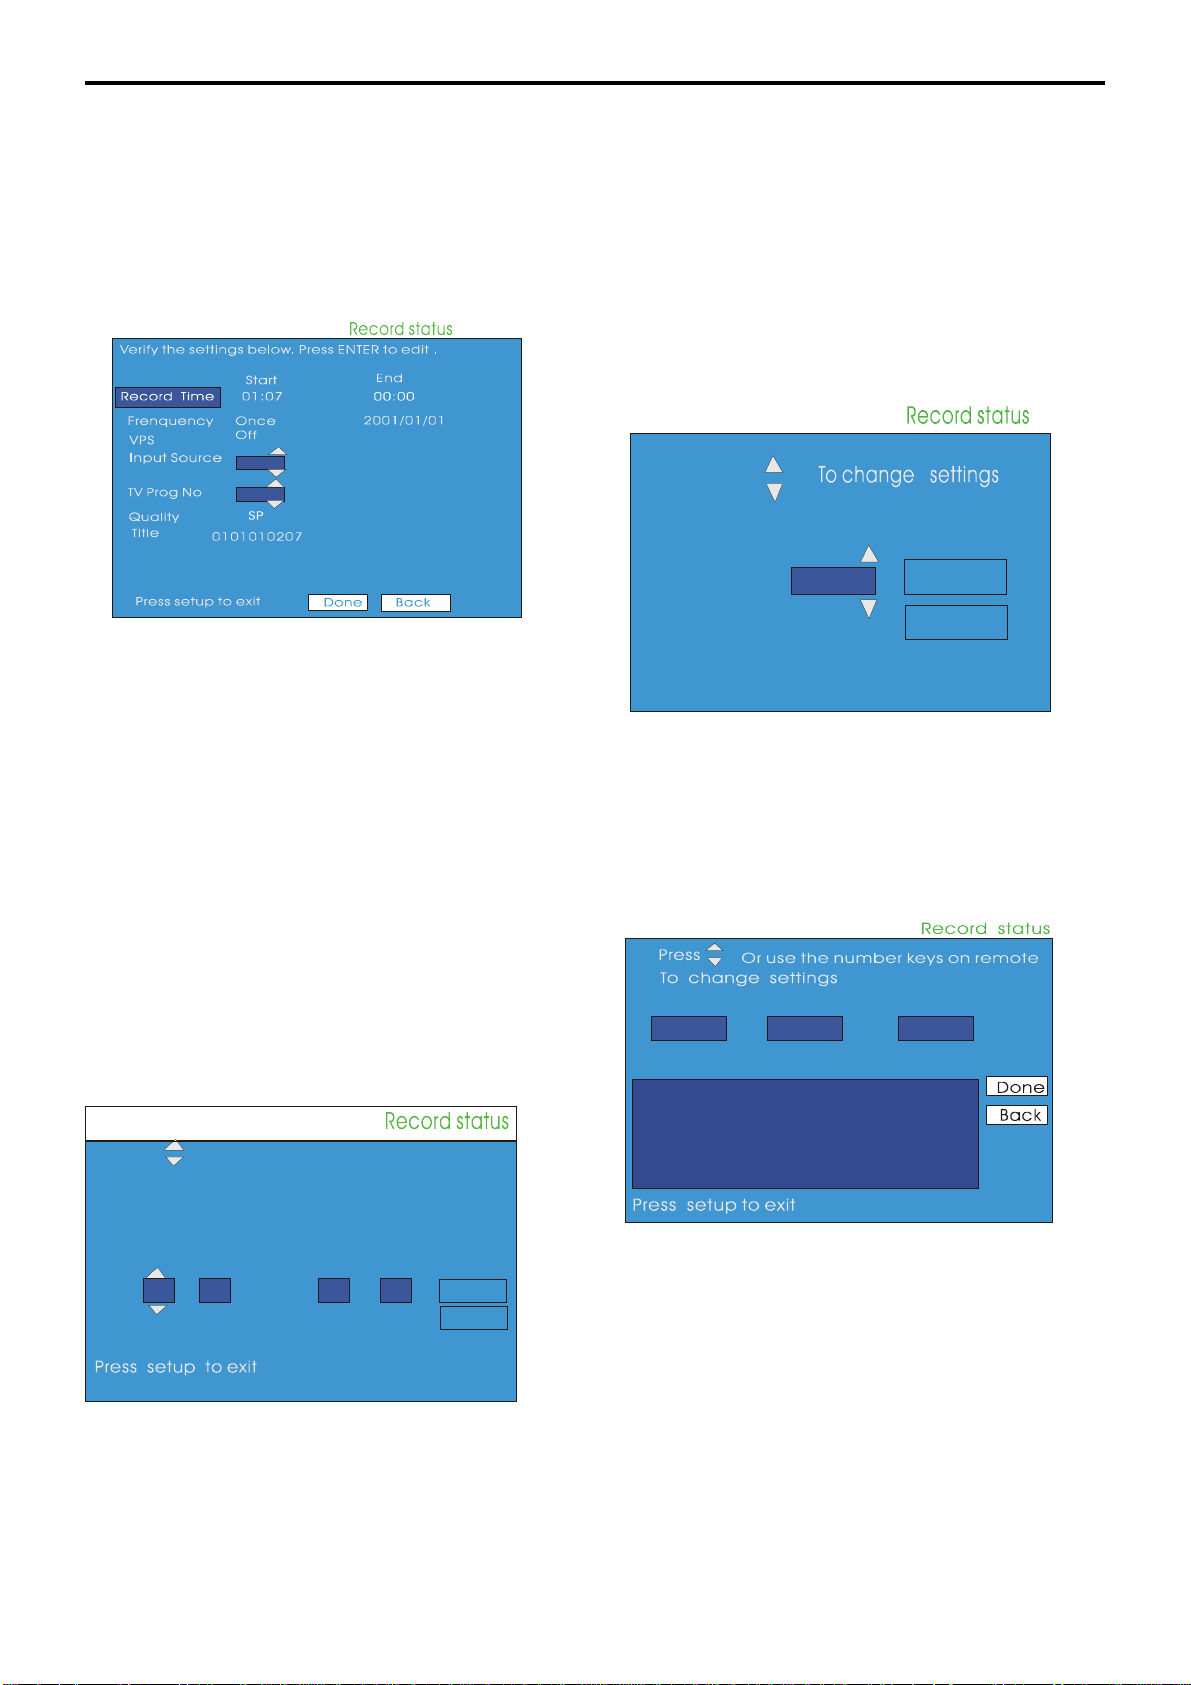
•Record status
Y
Before recording, all recording settings are needed to make
clear. All recording settings are available in the record status page.
The page is below.
•How often
In this record status page the DVD recorder needs to know
how often the desired recording will make.
Here two options are allowed:Repeat and Once
The how often setting page is below:
Press
Back
1)Press setup menu to get access the top menu;
2)Move the hilight to the record program and confirm with right
direction button;
3)Using up or down direction button to choose record status
and confirm with enter button;
4)In this record status setting page make all settings which are
necessary to a record.
Notice: In record status page these settings are available:
Record time; How often; Source;Channel; VPS; Quality; Title
•Record Time
Before a record starts, the DVD recorder needs to know when
to record, so the record time is necessary to set in this record time
page.The page is below:
Press
Control to change settings. Use the
International Time for the hour(00-23)
Or use the number keys on remote
How often Once
Once
Continue
Back
Press setup to exit
1)When you select once to record ,move the hilight to continue
confirming it with enter button then get into the time page to set the
once record time in your DVD recorder. the once time setting page
is below:
ear
2001
S
M
T
145
78
14 15 16 17 18
21 22
28 29 30 31
2
9
23
Month
01
WTH
3
10 11
24
25 26
Day
01
Sa
F
6
13
12
20
19
27
00
00
Minute
:
00
00
Done
Back
In the once time setting page after finishing your once recording
time then back to the previous how often page.
2) when you select repeat way to have a record, the repeat
Hour Minute Hour
25
Start
02
00
:
25
End
record time setting page will show on the OSD as below:
1)move to the individual entries and use the numerical
button to set the value of an entry.
2)when finished ,move to Done and press enter button.
14
Page 15

Press enter button to select the days or
Press enter button twice to desired days
•Input Source
Before a record starts the DVD recorder needs to know which
channel the input signal is from.So it is necessary to select the
input signal channel. In record status page move hilight to Source
and confirm with ENTER button then get into the source page.The
source page is below.
S
S
M
Press setup to exit
In the repeat recording time setting page make all entries of your
setting and then back to the previous page.
Notice: the repeat time settings allows you to make a record with
repeat times which you set in your DVD recorder.
T
T
W
WTH
F
FSaM
Th
SA
Done
Back
Press
Input Source
Press setup to exit
Notice:Souce contains these input channel:
Change settings
Done
Back
•Scart RGB
•Scart CVBS
•S Video1
•CVBS 1
•S-Video 2
•CVBS 2
• Tuner
15
Page 16

• Channel
If the input signal is TV program, then select channel to set the
channel for DVD recorder to record.The channel contains TV
channels from 1 to 50.The channel page is below
Press
Remote to change settings
Channel
Press setup to exit
In the channel number input field enter the channel number which
has stored in this DVD recorder to make your reocrding. In this
setting just follow the instructions showing on the OSD .
Notice: 1)If the channel number you input is wrong then the OSD
will display : the channel selected is either not available or
inactive.
Or use the n umb er keys on
Done
Back
• Quality
In the record show menu select Quality option .this setting will
permit you to choose one kind of quality which you select to make
a record.There are total 5 kinds of quality for your record in this
DVD recorder.
1.HQ(60 mins)
2.SP(120 mins)
3.LP(180 mins)
4.EP (240 mins)
5.EP+(360 mins)
• Title
In this Record Status menu select Title then you can play or
edit title which has been recored before.The Title page is below:
Press Enter to Edit the title . The title is
generat ed base d on the da te you set
Title
Press setup to exit
16
Page 17

•Record list
All recording programmes will be listed in My record list.
In this record list you can delete any program desired by
press the CLEAR button on your remote control.
Title date start Source
In this recording setup menu all setting information in detail is
below:
•Recording quality
Quality setting for recording clips.Each recording quality includes
both Recording quality and Recording time.The longer time the
recording has, the lower recording quality it will be.While which
recording quality to select based on your order.
• HQ(60 MINS)
• SP(120 MINS)
• LP(180 MINS)
• EP(240 MINS)
• EP+(360 MINS)
•Auto chapter
Press setup to exit
Note:Press ENTER key, you can Eidt the Title which you
select.
Setup menu
In top menu move the hilight to Setup menu to set below
settings desired.
• Recording setup
• DVD control
• General
• Video
• Audio
•Recording setup
Before record the recording setup is needed. This page
Include:
•Recording Quality
•Auto chapter
• Set clock
•Channel Setup
•5Min
•10Min
•15Min
•20Min
•30Min
you can select the time of your recording each chapter .
•Set clock
Use the entries on this page to set the data and time desired.(usally
this is your local time and date,corresponding to the time television
programs are broadcast in your viewing area.)
steps:
a. Move to the individual entries and use the numeral buttons to set
the value of an entry.
b.When finish, move to Done and press ENTER.
The set clock page is below:
Set Clock Setup
Select a field then use
Hour Minute Year Month Day
00
00 50
50
2003
2003 Dec 30
To edit
Dec
30
Recordin g Quality
Auto Chapter
Set Clock
Channel Setup
Press setup to exit
HQ < 60Min
SP < 120 M in
LP <180 Min
EP <240Min
EP+ <360Min
Current selection
Press setup to exit
Done
Back
17
Page 18

Basic Setup(continue)
•Channel setup
Use this page to select an automatic scan of all the channels
present at the antenna or to choose the channel setup option to
delete channels you do not want to watch (after channels have
been successfully scanned).You may wish to delete channels
because of poor reception or simply a lack of interest in the
programming.
•Auto CH Scan
When you select Auto CH Scan you see a progress bar at the
bottom of the menu as the channels are scanned.When scanning
finishes you see a message at the bottom of the menu that reports
the total numbers of channels found.The page is below:
Recording Quality
Auto chapter
Setup Clock
Channel S etup
Auto CH Scan
Channel List
•Channel List
After scanning for channels ,you have the option of disabling
channels you are not interested in watching and selecting favorite
channels that are easy to select.
To disable a channel,move the hilight to an unwanted channel and
press the ENTER
A checkmark appears to the left of the channel ,Now,when you
select Watch live TV you can repidly move through the favorites
you have selected.Refer to watching live TV.
TV Prog Channel
P01 Channel
P02
P03
P04
P05
P06
P07
Channel
Channel
Channel
Channel
Channel
Channel
33 Enabled
31
22
12
11
17
18
Enabled
Enabled
Enabled
Enabled
Enabled
Enabled
Press enter to enable
Scanning..........
Recording Quality
Auto chapter
Setup Clock
Channel S etup
Total Channels found:19
Auto CH Scan
Channel List
DVD control
In the basic setup menu get into this DVD control menu to make
the DVD settings according to your requirements. the options are:
Disc menu
Angle mark
parental control
language preference
The DVD control setup page is below:
DVD Control Setup
Disc menu
Angle Mark
Language Preference
Parental Control
Press setup to exit
Current selection
On
Off
18
DW8010 IB 18-21.P65 2003/9/10, ¤U¤È 04:0018
Page 19

•Angle mark
Use to access various camera angles on a DVD.
The options are: ON or OFF.
•Language Preference
This is the language which your DVD recorder will
give you directions or instructions during use.This is not the
language in which the movie actors will talk.
The default setting is : German
the options are:
German
English
Dutch
Spanish
Italian
Choose country
Delete
0 1 2 3 4 5 6 7 8 9
a b c d e f g h I j
k l m n o p q r s t
u v w x y z space
Done
Press setup to exit
Clear
Cancel
Steps:
1)Press setup button on the remote control getting into the top
menu.
2)Move the hilight to setup menu, press right direction button to get
into the setup menu.
3)Use up or down direction button to choose the DVD control and
press enter button to confirm to get into the DVD control settting
page.
4)In the DVD control setting page use up or down direction button
to choose the Language Preference .
5)To exit the language preference page just press the left direction
button to back to the setup menu and press the setup menu to exit.
•Parental Control
To prevent children from viewing movies not suitable for their
ages,you can lock your DVD player to prevent children from
viewing higher-rated movies even when you are not at home.
The parental control allows you to have below control options.
Choose country
Choose rating
Set password
DVD Control Setup
Disc menu
Angle Mark
Language Preference
Parental Con tro l
Press setup to exit
Choose country
Choose rating
Set passw o r d
Current selection
Choose country
China
Germany
Choose rating
Set password
Hongkong
Japan
TaiWan
USA
Press setup to exit
Current selection
1)Press setup button on your remote control and then get into the
top menu.
2)Use down or up direction button to move the hilight to setup
menu then use right direction button to enter into the setup menu
page.
3)In setup menu page use down or up direction button to choose
DVD control and confirm with enter button to access the DVD
control page.
4)In DVD control page use up or down direction
button to move the hilight to the parantal control and confirm with
right direction button .
5)Use up or down direction button to select choose country
and confirm with enter button.
6)The password entries page will represent indicating you to
enter the password,the default password is:3308.
7)after you enter the password you will be permitted to get into the
choose country page.
8)In the choose country page just choose the country you are in
using up or down direction button and confirm with enter button.
9)To exit press setup menu on your remote control.
DW8010 IB 18-21.P65 2003/9/10, ¤U¤È 04:0019
19
Page 20

Choosing Rating
1)Press setup button on your remote control and then get into the
top menu.
2)Use down or up direction button to move the hilight to setup
menu then use right direction button to enter into the setup menu
page.
3)In setup menu page use down or up direction button to choose
DVD control and confirm with enter button to access the DVD
control page.
4)In DVD control page use up or down direction
button to move the hilight to the parantal control and confirm with
right direction button .
5)Use up or down direction button to select choose rating and
confirm with enter button.
6)The password entries page will represent indicating you to
enter the password,the default password is:3308.
7)After you enter the password you will be permitted to get into the
choose rating page.
8)In the choose rating page just choose the rating using up or
down direction button and confirm with enter button.
9)To exit press setup menu on your remote control.
Set password
1)Press setup button on your remote control and then get into the
top menu.
2)Use down or up direction button to move the hilight to setup
menu then use right direction button to enter into the setup menu
page.
3)In setup menu page use down or up direction button to choose
DVD control and confirm with enter button to access the DVD
control page.
4)In DVD control page use up or down direction button to move
the hilight to the parantal control and confirm with right direction
button .
5)Use up or down direction button to select set password and
confirm with enter button
6)The password entries page will represent indicating you to
enter the password,the default password is:3308.
7)After you enter the old password and confirm it with enter
button ,then move the hilight to done and confirm by pressing
enter button.
8)Then the new password page will represent and remind you to
enter your new password.
Delete Clear
0 1 2 3 4 5 6 7 8 9
a b c d e f g h I j
k l m n o p q r s t
u v w x y z space
Done
Press setup to exit
Cancel
Choose country
Choose rating
Set password
Press setup to exit
1G
2
3PG
4PG 13
5
7 NC-17
8 ADULT
NO PARENTAL
Current selec tion
9)After finishing entering your new password move the hilight to
done and back to previous page by pressing enter button.
New
Press setup to exit
8 characters
Delete
0 1 2 3 4 5 6 7 8 9
a b c d e f g h I j
k l m n o p q r s t
u v w x y z space
Done
Clear
Cancel
20
DW8010 IB 18-21.P65 2003/9/10, ¤U¤È 04:0020
Page 21

Delete
0 1 2 3 4 5 6 7 8 9
a b c d e f g h I j
k l m n o p q r s t
u v w x y z space
Done
Press setup to exit
Clear
Cancle
Notice: In the password enteries page when you want to delete
the former number or character you have entered just move the
hilight to delete and confirm it by pressing enter button, while if
you want to clear the whole password just move the hilight to
clear and confirm it by pressing enter button.if you do not make
any enter in this page then you can move the hilight to cancle and
confirm it by pressing the enter button then it will back to the
previous page.
Notice:The new password is top to 8 digits characters
DW8010 IB 18-21.P65 2003/9/10, ¤U¤È 04:0021
21
Page 22

GENERAL SETUP
VIDEO setup
1 Press SETUP ,then Use / to enter SETUP MENU.
2 Use / / / to select the General .
3 Press ENTER to confirm a highlighted selection.
4 To exit setup menu, press SETUP.
IN General setup, you can select the below options .
Menu Language :
a.Germany
b.English
c.Dutch
d.Spanish
e.Italian
Menu Language
Factory Defaults
Press Se tup to exit Current selection
German
English
Dutch
Spanis h
Italian
Setting the TV display
you can select the aspect ratio of the TV to be connected
TV Display
Normal/LB
Wide TV
Video output
Press S etup to exit Current selection
• MULTI system
If you connected TV is multi system, select this mode. The output
format will be in accordance with the video signal of the disc.
• NTSC
If you connected TV is NTSC system, select this mode. It will
change the video signal of a PAL disc and output in NTSC format.
This function allows you to select the desired language. The default
setting is Germany.
Reset as DEFAULTS
Select the Defaults and press ENTER, items in setup menu will be
reseted to default setting.
Menu Language
Factory Defaults
Press Setup to exit Current selection
Defaults
• PAL
If your connected TV is PAL system, select this mode. It will
change the video signal of a NTSC disc and output in PAL format.
You can also select via the remote control.
Note
• You can change the colour system of the unit temporarily using
PAL/NTSC button on the remote control.
22
Page 23

Setting the color system
You can setup the colour system of this unit to match up your connected TV set. If the colour system of this unit is different from that of
the TV set, the images can not be displayed normally on the screen.
The default setting is PAL.
Video output
TV Display
TV Display
NTSC
Video output
Press Setup to exit Current selection
• MULTI
If you connected TV is multi system, select this mode. The output
format will be in accordance with the video signal of the disc.
• NTSC
If you connected TV is NTSC system, select this mode. It will
change the video signal of a PAL disc and output in NTSC format.
• PAL
If you connected TV is P AL syste m, select this mode. It will cha nge
the video signal of a NTSC disc and output in PAL format.
PAL
Video output
Press Se tup to exit Current selection
a.S-video :
Select this when your TV or monitor is connected via the S-
VIDEOjack .
video singal is output from the VIDEO OUT ja ck a nd A V CONNEC-
TOR, while S_VIDEO signal is output from the S-VIDEO jack .
b.YPbPr:
Select this when TV or monitor is compatible with
PrPbY/YPbPr .The video signal is output from the PrPbY/YPbPr.
c.Scart:
Select this when TV or monitor is compatible with
Scart.The video signal is output from the AV CONNENTOR.
S-video
Y Pb Pr
Scart
You can also select via the remote control.
Note
• You can change the colour system of the unit temporarily using
PAL/NTSC button on the remote control.
23
Page 24

Setting speaker
Down MIX
To play a DVD disc recorded with surround multi-channel audio
correctly, select either one according to your audio system.
Center Delay
Selects the center Chanel delay time for Doby Digital audio .the
Options are 5 ft,4 ft,3 ft,2 ft,1 ft off.
Down Mix
Rear
Subwoofer
Center Delay
Stereo
VSS
Off
Press Setup to exit Current selectio n
a.Stereo
2-channel stereo output , for stereo listening through the analog
left and right outputs .
Select this when the unit is conntcted to TV, stereo amplifer, CD
recorder,etc.
b. VSS
2-channel virtual surround outputs
c..off
The Downmix setting has no effect
Noted : Depending on the disc , the actual outputs may not match
your selection.
Down Mix
Rear
Subwoofer
Center Delay
Press S et up to exit Current selection
5 ft
4 ft
3 ft
2 ft
1 ft
Off
Rear Delay
Selects the Rear Chanel delay time for Doby Digital audio .the
Options are 15 ft,12 ft,9 ft,6 ft,3 ft off.
Down Mix
Center,rear ,Subwoofer
a.on
b.off
Down Mix
On
Rear
Subwoofer
Center Delay
Press Setup to exit Current selection
Off
Rear
Subwoofer
Center Delay
Press Setup to exit Current selection
15 ft
12 ft
9 ft
6 ft
3 ft
Off
24
Page 25

Audio setup
Digital out :
Select the audio output format
a.off
b.on
Digital o ut
Ful l
3 / 4
1 / 2
1 / 4
Off
Digital out
Press S et up to e xit Current se lection
The default setting is Off.
Off
On
Dynamic range setting
In many listening situations, it is objectionable to allow the sound to
become very loud, and thus the loudest sounds must be compressed
downwards in level. Likewise, the very quiet sounds would be inaudible and must be brought upwards in level to be heard. Dolby Digital
satisfies these needs through the dynamic range controlling.
Press Setup to exit Current selection
• FULL: Audio with fully compressed dynamic range.
• 7/8~1/8:Audiowithpartiallycompresseddynamic range.
• OFF: Audio with uncompressed dynamic range.
Prologic
a.on
b.off
c.auto
Digital out
Pro Logic
On
Off
Auto
Selects the dynamic range compression to fit the individual listening
situation of the audience. The variable range is from FULL, 7/8 to 1/8,
or OFF .
Press Setup to exit Current selection
The default setting is Auto.
25
Page 26

Recording Part
Record a program
This DVD recorder is making your life more convinient and more
colorful. You can make a record for the progarmmes what you are
interested in.
Record without show view functioin
Besides show view function record this DVD recorder can also
have a real time record.
In this part you make a record without show view recording.
Before record,pls make all recording settings ready. You should
enter into the record setting system to make a recording settings
which are based on your orders.
After finishing your setting, place a DVD+RW/R disc into the disc
tray of this DVD recorder, and after you have made all your
connections ready, you are sure to make a record now. please
follow the steps below:
1) Press Record button on the remote control or on the front panel.
the OSD will show monitor indicating the DVD recorder is
searching the input signal which you want to record.
2)After finishing monitoring the input signal the DVD recorder will
display the input signal.
3)Press the record button on the remote control or on the front
panel then the OSD will disply recording indicating that this DVD
recorder is recording the programmes .
4)After you finishing your recording,then press stop button on the
remote control or on the front panel to close the recording.
5)As the DVD recorder completing the closing it will back to the
title menu page and the OSD will represent STOP for 2 seconds.
Recording to 120 MIN
Untitled Disc
01 untitled
02 untitled
03 untitled
04 untitled
PREV
PREV
PLAY NEXT
PLAY
Notice: 1)When you begin to make a recording, the DVD recorder
will take 4-5 seconds to monitor the input signal before the
recording really starts.
2)During recording, if you do not want to record some programmes
such as advertise .etc, you can press the stop button to
stop the current recording.
00:10
00:31
00:43
00:45
NEXT
Monitoring
Recording
26
......
......
3)Before record something on your DVD+R/RW disc you can
format or erase these discs if you do not want to save the
recording programmes which you have recorded before.
DW8010 IB 26-27.P65 2003/9/10, ¤U¤È 04:0226
Page 27

One Touch Recording(OTR)
Use this function to make a one touch recording which means
that the recording quality is not needed to set for record.During the
recording you are allowed to press the RECORD button on your
remote control or on the front panel to have a duration of recording
from 30mitutes to 120 minutes.
In this one touch recording mode each pressing record
button can add 30 minutes to your record.While the longest
duration time in this mode is 120 minutes.
Recording to 120 MIN
Edit a recording
During playback a recording programme which has been
recorded before press the title button to back to its title menu .
the editing titles page is below:
Untitled Disc
Recording to 30 MIN
Recording to 60 MIN
Recording to 90MIN
01 untitled
02 untitled
03 untitled
04 untitled
PREV
PREV
In the title menu page press EDIT button on remote control then the
EDIT page will show up as below:
PLAY NEXT
PLAY
PLAY TITLE
TITLE DELETE
TITLE RENAME
CANCEL
00:10
00:31
00:43
00:45
NEXT
DW8010 IB 26-27.P65 2003/9/10, ¤U¤È 04:0227
In the EDIT page these editing choices are available:
PLAY TITLE
TITLE DELETE
TITLE RENAME
CANCEL
Move the hilight to the disired option and confirm with ENTER
button.
27
Page 28

Playing Discs
General operation
Repeat A - B
1 When you complete all the connections, plug the AC power cord
of the player
2 Press POWER to switch ON the main power.
3 Press Source to select the input source.
4 Press OPEN/CLOSE to open the disc tray, press again to close
the disc tray.
5 Press TV or AV receiver to increase or decrease the volume
level.
6 Press MUTE to shut off the sound. To restore the volume, press
it again.
Basic playback
Start playback
• Press PLAY/PAUSE /ll . To interrupt playback, press /ll again.
Note
• Some discs will start playing automatically, and others will display
the menu on the TV screen. use the / / / to select the
track, or press the number keys (0 ~ 9, >10) to go to the desired
track/chapter.
This function can play a specific section in a chapter/track repeatedly.
1 Press A - B at the statring portion you want.
2 Press A - B again at the end portion you want. The specific
section will now repeat continuously.
3 Press A - B the third time to normal playback.
Note
• The A and B can be set only within the same chapter/track.
Slow motion play
Press SLOW l to play in slow motion.
• For DVD discs
Press it repeatedly to select the slow motion speed:
SF (forward) : SF 2x, SF 4x, SF 8x.
SR (reverse) : SR 2x, SR 4x, SR 8x.
• For VCD discs
Press it repeatedly to select the slow motion speed:
SF (forward) : SF 1x, SF 2x, SF 3x.
Stop playback
• Press STOP .
Skip to another track/chapter
• Press l / l repeatedly during playback to skip to next or
previous track/chapter.
Fast search
1 Press and hold l / l more than 1 second to fast reverse or
fast forward.
• For DVD / MP3 discs
FF(fast forword) : FF2x, FF 4x, FF 6x, FF 8x..
FR(fast reverse) : FR 2x, FR 4x, FR 6x, FR 8x.
• For VCD / CD discs
FF(fast forward) : FF 1x, FF 2x, FF 3x, FF 4x.
FR(fast reverse) : FR 1x, FR 2x, FR 3x, FR 4x.
2 To resume normal play, press PLAY/PAUSE /ll.
Repeat
• For DVD/VCD/CD /MP3 discs
Press REPEAT repeatedly to select the following:
REPEAT 1 : repeat the current track
REPEAT : re pe at the entire disc
28
DW8010 IB 28-31.P65 2003/9/10, ¤U¤È 04:0328
Page 29

Playing Video CDs with PBC
When playing Video CDs (Version 2.0) with PBC functions, you can
enjoy simple interactive operations, operations with search functions, etc.
PBC playback allows you to play Video CDs interactively, following
the menu on the TV screen.
Using the menu for each DVD
Using the title menu
1 Press the TITLE while playing a DVD disc.
The TITLE MENU will be shown on TV screen for a moment, and
then the title menu appears. The contents of the menu vary from
disc to disc.
1 Press MENU/PBC to set PBC function is on.
2 Start playing a Video CD with PBC functions, the system will
enter PBC playback automatically. The menu appears on the TV
screen.
3 Use the / / / buttons to select the item you want.
For some discs, you can only select the items using the number
buttons.
4 Press the ENTER to execute your selection.
5 Follow the instructions on the menu screen for interactive opera-
tions.
Refer to the instructions supplied with the disc, as the operating
procedure may differ according to the Video CD.
To go back to the menu screen
Press the RETURN when playing a disc with PBC. The Go BACK TO
MAIN PAGE is shown on the TV screen, and then the menu appears.
Note
• If the PBC function of this system is set to off, pressing the
RETURN button is useless.
2 Use the / / / buttons to select the title (or chapter) you
want to play.
Depending on the disc, you can use the number buttons (0~9 /
>10) to select the title (or chapter).
3 Press ENTER to start playback.
Note
• Depending on the DVD disc, you may not be able to select the title
or chapter.
• Depending on the DVD disc, a Title menu may simply be called a
menu or root menu in the instructions supplied with the disc.
• For some DVD disc, when you press the TITLE, the playback will
restart from the beginning of the disc.
Using the root menu
1 Press the RETURN while playing a VCD disc.
The ROOT MENU will be shown on TV screen for a moment, and
then the root menu appears. The contents of the menu vary from
disc to disc.
2 Use the / / / buttons to select the title (or chapter) you
want to play.
Depending on the disc, you can use the number buttons (0~9 /
>10) to select the title (or chapter).
3 Press the ENTER to playback.
To cancel PBC playback function and play a Video CD with
PBC functions in Continuous Play mode.
• Press the MENU/PBC PBC OFF will appear on the TV screen.
If a disc is playing, the playback will stop.
• Press the to start (or restart) playing the disc in Continuous
Play mode.
Using the DVD menu
1 Press the TITLE while playing a DVD disc.
The DVD menu appears on the TV screen. The contents of the
menu vary from disc to disc.
2 Use the / / / buttons to select the item you want to
change.
Depending on the disc, you can use the number buttons (0~9 /
>10) to select the item.
3 To change other items, repeat Step 1 ~ 2.
4 Press the ENTER to start playback.
29
DW8010 IB 28-31.P65 2003/9/10, ¤U¤È 04:0329
Page 30
Checking the information
Y ou can check information about the disc, such as the total number of
the titles or chapters or tracks or time, using the Display function. The
information you want appears on the TV screen or/and on the front
panel display.
When playing back a MP3
1 Press the DISPLAY repeatedly to show on TV screen as the
following:
The display will disappear after a few seconds.
When playing back a DVD
1 Press the DISPLAY repeatedly to show on TV screen as the
following:
The display will disappear after a few seconds.
TITLE 02 / 05 CHAPTER 001 / 006
00 : 34 : 56
TITLE REMAIN
00 : 34 : 56
CHAPTER ELAPSED
00 : 01 : 23
CHAPTER REMAIN
00 : 03 : 21
2 Press the DISPLAY again, the information display is off.
Note
• Depending on the DVD, the title number or chapter number or time
may not appear or you may not be able to change the display.
SINGLE ELAPSED
00 : 01 : 23
2 Press the DISPLAY again, the information display is off.
When playing back a Video CD or CD
1 Press the DISPLAY repeatedly to show on TV screen as the
following:
The display will disappear after a few seconds.
SINGLE ELAPSED
00 : 01 : 23
SINGLE REMAIN
00 : 03 : 21
TOT AL ELAPSED
00 : 12 : 34
TOT AL REMAIN
00 : 54 : 32
2 Press the DISPLAY again, the information display is off.
30
DW8010 IB 28-31.P65 2003/9/10, ¤U¤È 04:0330
Page 31
Selecting the start time
Program play
This function allows you to start playing at any chosen time on the
disc.
When playing DVD disc
1 Press the GOTO repeatedly, the following menu appears on the
TV screen.
TITLE 02 / 05 CHAPTER 001 / 006
TITLE 02 / 05 TIME - - : - - : - -
2 Use the number buttons (0~9 / >10) to input the title or chapter
number you want.
3 Press ENTER to start from your selection.
4 Press GOTO again to exit.
5 Use the or to select title number or chapter number.
TITLE 02 / 05 CHAPTER 002/ 006
You can play the contents of the disc in the order you want by
programming the order of the tracks to be played. UP to 99 tracks can
be stored.
1 While playback is stopped, select or press PROG to enter pro-
gram mode.
2 Use the number buttons (0 ~ 9, >10) to input the track number in
the order you want.
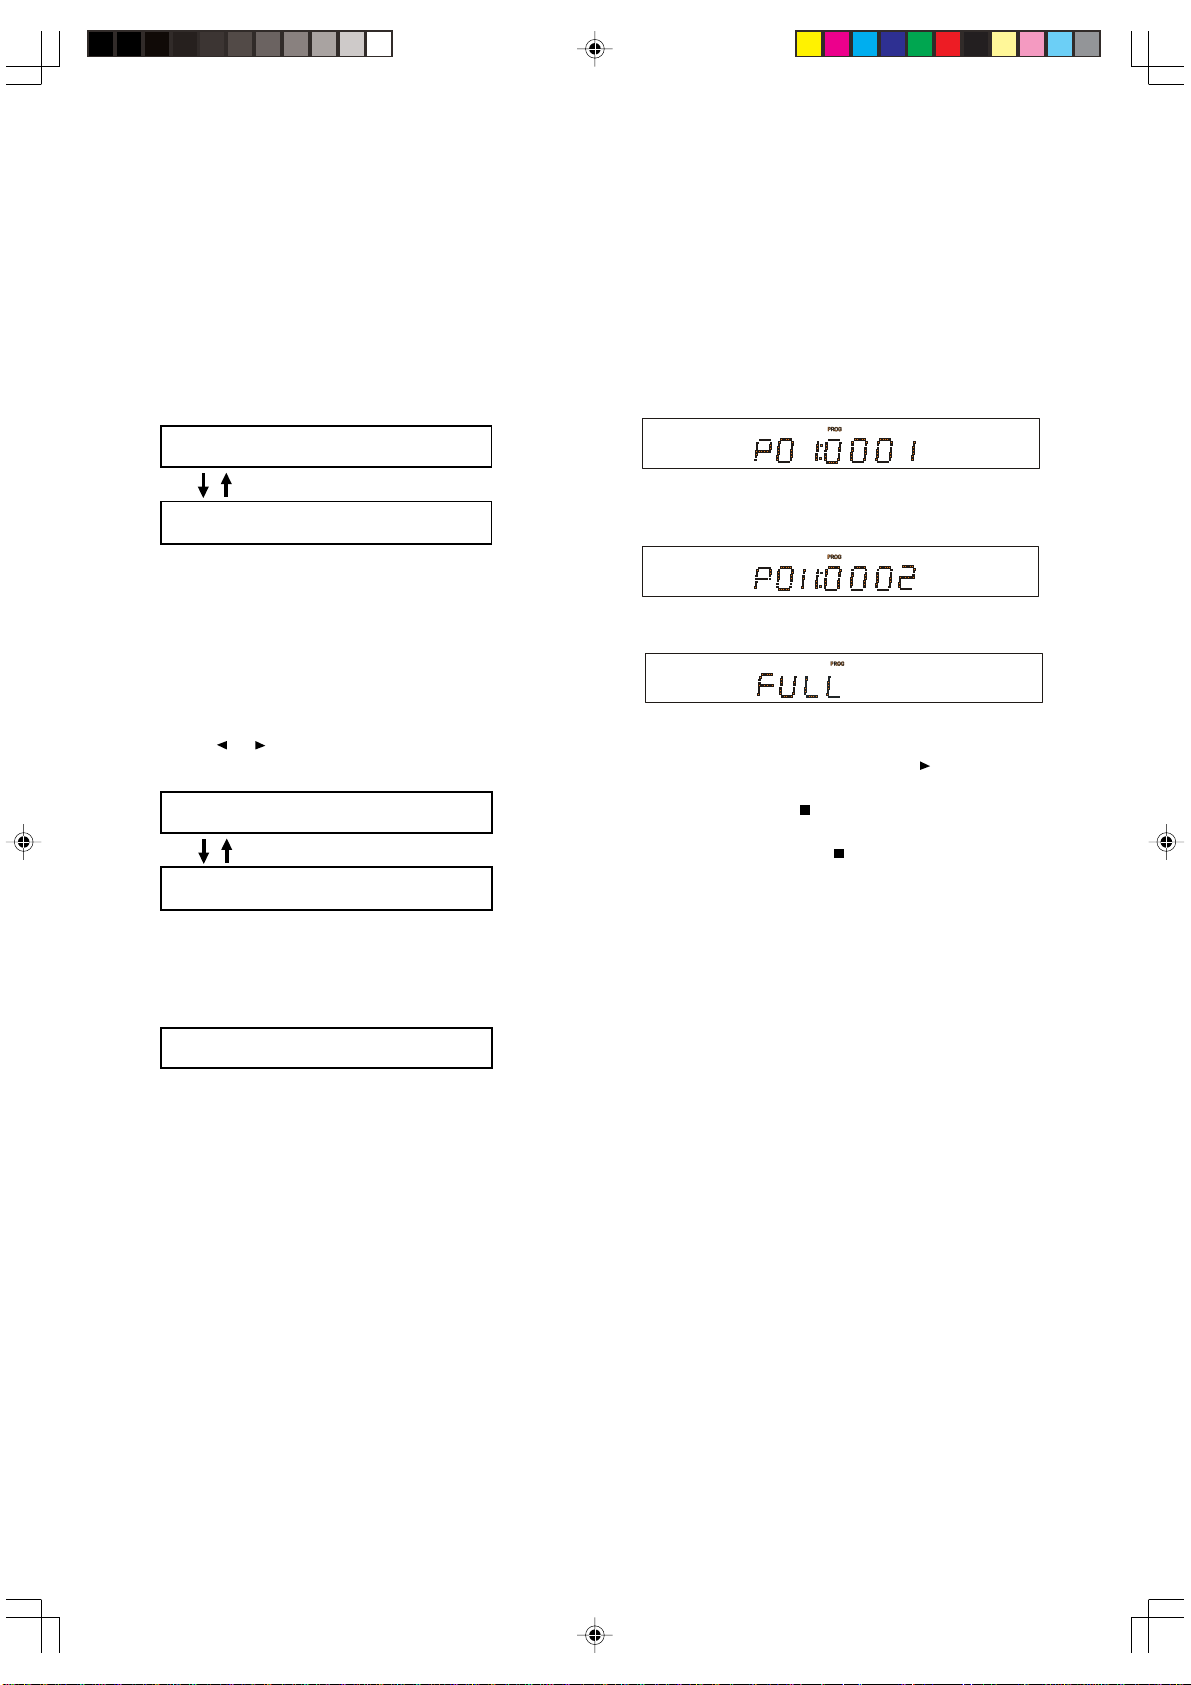
If you attempt to program more than 99 tracks, the FULL will be
displayed.
3 Repeat step 2 to store other tracks.
4 To start program play, press PLAY/PAUSE
5 To stop playback, press once.
/ll.
TITLE 001/ 05 CHAPTER 001 / 006
When playing Video CD disc
1 Press the GOTO, the following menu appears on the TV screen.
GOTO : - - : - - : - -
2 Use the number buttons (0~9 / >10) to input the time you want.
3 Press GOTO again to exit.
6 To cancel the program, press again.
DW8010 IB 28-31.P65 2003/9/10, ¤U¤È 04:0331
31
Page 32

This device has been tested according to all relevant current CE guidelines,
such as electromagnetic compatibility and low voltage directives, and has been constructed in accordance with
the latest safety regulations.
Subject to technical changes without prior notice!
Guarantee
The device supplied by our Company is covered by a 24
month guarantee starting on the date of purchase (receipt).
During the life of the guarantee any fault of the device or
its accessories *) ascribable to material or manufacturing
defects will be eliminated free of charge by repairing or,
at our discretion, by replacing it. The guarantee services
do not entail an extension of the life of the guarantee nor
do they give rise to any right to a new guarantee!
Proof of the guarantee is provided by the proof of purchase. Without proof of purchase no free replacement or repair will be carried out.
For repairs or replacement during the life of the guarantee return the device in its original packing together with
the proof of purchase to your dealer.
*) Damage to accessories does not mean automatic free
replacement of the whole machine. In such cases please
contact our hotline. Broken glass or breakage of plastic
parts are always subject to a charge.
Defects to consumables or parts subject to wearing (e.g.
motor pistons, kneading blades, drive shafts, spare remote control, spare toothbrushes, saw blades, etc.) as well
as cleaning, maintenance or the replacement of said
parts are not covered by the guarantee and hence are to
be paid!
The guarantee lapses in case of unauthorized tampering.
After the expiry of the guarantee
After the expiry of the guarantee repairs can be carried
by the competent dealer or repair service against the
payment of the ensuing costs.
32
DVD-R 612 - GB 30.01.2004 10:40 Uhr Page 32
D-47906 Kempen/Germany · Industriering Ost 40
Internet: http://www.clatronic.de · email: info@clatronic.de
 Loading...