

Page 1

Bedienungsanleitung/Garantie
Gebruiksaanwijzing/Garantie • Instrucciones de servicio/Garantía
Istruzioni per l’uso/Garanzia • Instruction Manual/Guarantee
Instrukcja obsługi/Gwarancja • Návod k použití/Záruka
A használati utasítás/Garancia
Autoradio mit CD-Player
Autoradio met CD-speler • Autoradio con lettore CD
Rádio para automóveis com leitor de CDs • Car radio with CD player
Radio samochodowe z odtwarzaczem CD • Autorádio s přehrávačem CD
Autórádió CD-lejátszóval
AR 686 CD
05-AR 686 + CZ 1 01.09.2005, 11:08:22 Uhr
Page 2
Inhalt
Übersicht der Bedienelemente ....................... 3
Bedienungsanleitung .......................................4
Technische Daten ..........................................11
Garantie..........................................................15
Stichwortverzeichnis – Index............................ 17
D
Seite
Contents
Overview of the Components .........................3
Instruction Manual..........................................60
Technical Data...............................................67
Guarantee ......................................................71
Index.................................................................73
GB
Page
Inhoud
Overzicht van de bedieningselementen...........3
Gebruiksaanwijzing........................................ 18
Technische gegevens ....................................25
Garantie..........................................................29
Trefwoordenregister - index..............................31
Indice
Indicación de los elementos de manejo..........3
Instrucciones de servicio ...............................32
Datos técnicos................................................39
Garantia..........................................................43
Índice................................................................45
Indice
Elementi di comando .......................................3
Istruzioni per l’uso..........................................46
Dati tecnici......................................................53
Garanzia.........................................................57
Elenco tematico - Indice................................... 59
2
NL
E
I
Pagina
Página
Pagina
Spis treści
Przegląd elementów obłsugi............................3
Instrukcja obsługi ...........................................74
Dane techniczne ............................................81
Gwarancja......................................................85
Indeks rzeczowy............................................... 87
Obsah
Přehled ovládacích prvků ................................3
Návod k použití ..............................................88
Technické údaje.............................................95
Záruka ............................................................99
Heslový rejstřík - Index................................101
Tartalom
A kezelő elemek áttekintéseé.......................... 3
A hasznalati utasítás....................................102
Műszaki adatok............................................109
Garancia.......................................................113
Címszójegyzék – Index ..................................115
PL
CZ
H
Strona
Strana
Oldal
05-AR 686 + CZ 2 01.09.2005, 11:08:26 Uhr
Page 3
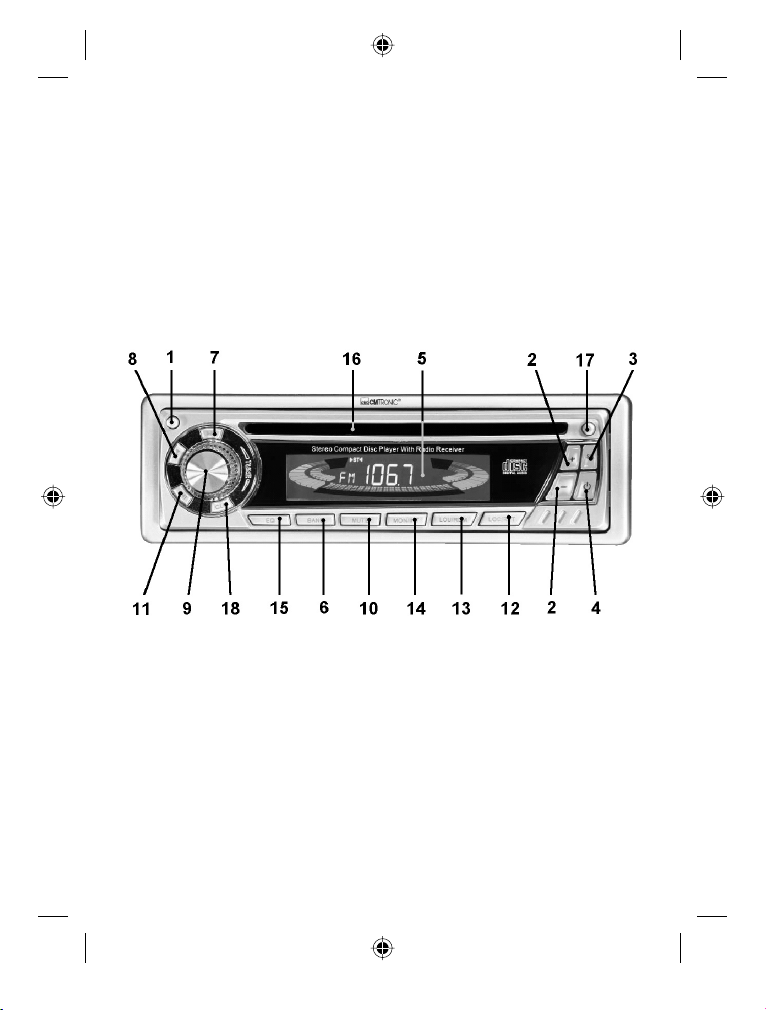
Übersicht der Bedienelemente
Overzicht van de bedieningselementen • Indicación de los elementos de manejo
Elementi di comando • Overview of the Components
Przegląd elementów obłsugi • Přehled ovládacích prvků
A kezelő elemek áttekintéseé
3
05-AR 686 + CZ 3 01.09.2005, 11:08:27 Uhr
Page 4
D
Verwenden Sie das Gerät nur für den vorgesehenen Zweck.
Das Gerät so einbauen, dass vorhandene Lüftungsöffnungen nicht verdeckt
werden.
Niemals das Gehäuse des Gerätes öffnen. Durch unsachgemäße Reparaturen
können erhebliche Gefahren für den Benutzer entstehen. Bei Beschädigung des
Gerätes, das Gerät nicht mehr in Betrieb nehmen, sondern von einem Fachmann
reparieren lassen.
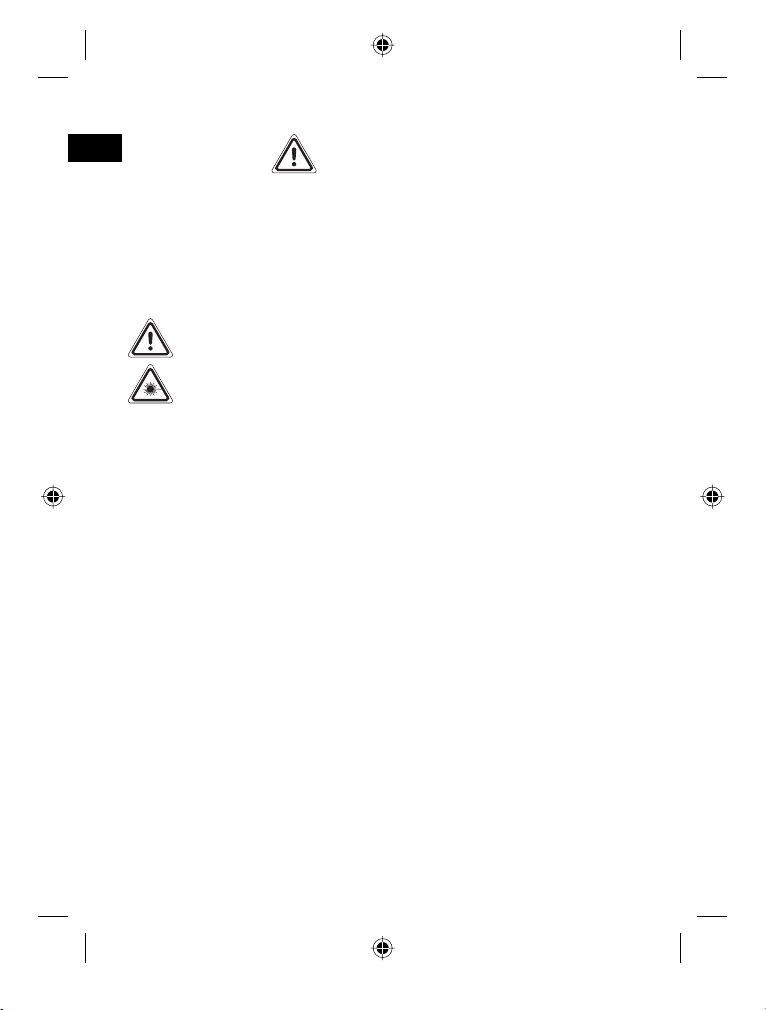
Das Symbol mit Ausrufezeichen soll den Benutzer auf wichtige
Bedienungs- oder Wartungs-Hinweise in den Begleitpapieren hinweisen.
Geräte mit diesem Symbol arbeiten mit einem „Klasse 1-Laser“ zur Abtastung der CD. Die eingebauten Sicherheitsschalter sollen verhindern,dass
der Benutzer gefährlichem, für das menschliche Auge nicht sichtbarem
Laserlicht ausgesetzt wird, wenn das CD-Fach geöffnet ist.
Diese Sicherheitsschalter sollten auf keinen Fall überbrückt oder manipuliert werden, sonst besteht die Gefahr, dass Sie sich dem Laser-Licht aussetzen.
Sicherheitshinweise
Verkehrssicherheit
• Die Verkehrssicherheit ist oberstes Gebot. Benutzen Sie daher Ihre Autoradioanlage immer so, dass Sie stets der aktuellen Verkehrssituation gewachsen
sind.
• Bedenken Sie, dass Sie bei einer Geschwindigkeit von 50 km/h in der Sekunde 14 m fahren.
• In kritischen Situationen raten wir von einer Bedienung ab.
• Die Warnhinweise z.B. von Polizei und Feuerwehr müssen im Fahrzeug rechtzeitig und sicher wahrgenommen werden können.
• Hören Sie deshalb während der Fahrt Ihr Programm nur in angemessenerer
Lautstärke.
Für die Dauer der Montage und des Anschlusses beachten
Sie bitte folgende Sicherheitshinweise.
• Zuerst den Minuspol, dann den Pluspol der Batterie abklemmen. (Anklemmen
in umgekehrter Reihenfolge.)
Bitte beachten: Ist die Batterie vom Netz, verlieren alle fl üchtigen Speicher
ihre Informationen. Beachten Sie die Sicherheitshinweise des KFZ- Herstellers.
• Die Hauptsicherung muss möglichst nahe (maximal nach 30 cm) am Pluspol
der Batterie installiert werden, damit das Auto vor einem eventuellen Kabel-
4
05-AR 686 + CZ 4 01.09.2005, 11:08:27 Uhr
Page 5

brand z.B. durch Unfall geschützt ist. Sollte die Installation dieser Vorgabe
nicht entsprechen, erlischt der Versicherungsschutz.
• Der Querschnitt des Plus- und Minuskabels darf 1,5 mm² nicht unterschreiten.
• Beim Bohren von Löchern darauf achten, dass keine Fahrzeugteile beschädigt
werden.
Installationstipps:
• Kabelschutztüllen schützen Kabel vor Durchscheuern an scharfen Karosserieteilen.
• Die Isolierung der Kabel darf bei der Installation nicht beschädigt werden.
• Das richtige Werkzeug ist bei einer Car-HiFi-Installation selbstverständlich.
Je nach Bauart kann Ihr Fahrzeug von dieser Beschreibung abweichen. Für
Schäden durch Einbau- oder Anschlussfehler und für Folgeschäden übernehmen
wir keine Haftung.
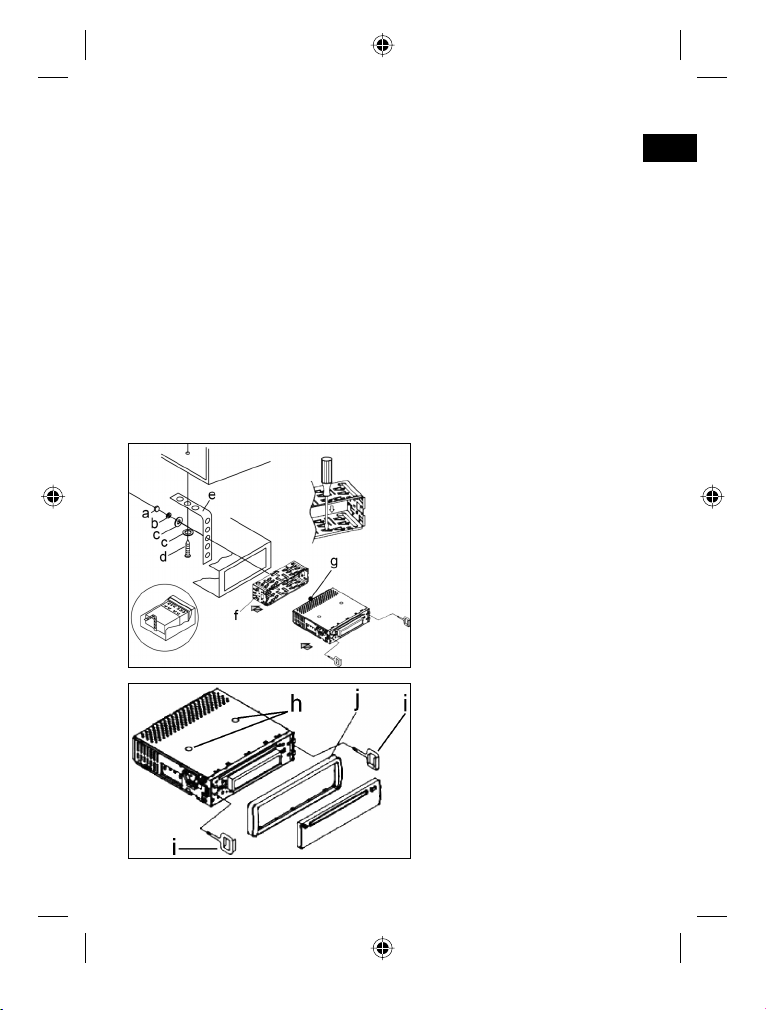
Installation
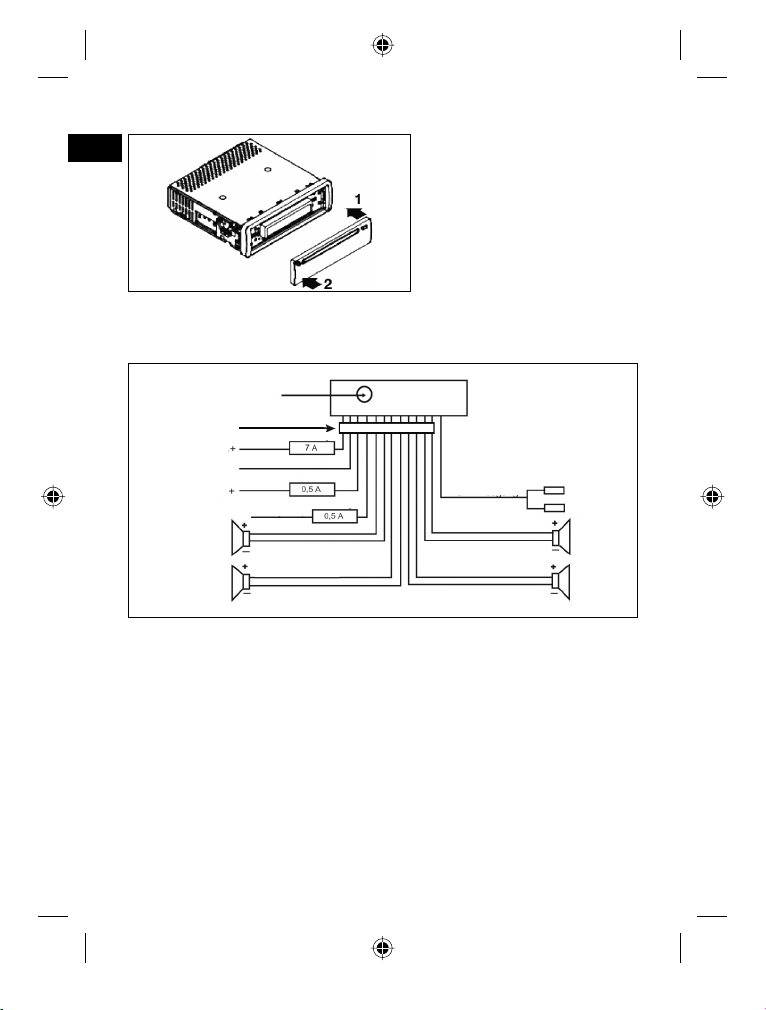
Montieren Sie das Radiogerät gemäß folgender Darstellungen.
a Mutter
b Federscheibe
c Unterlegscheibe
d Schraube
e Montagewinkel
f Einschubgehäuse
g Gewindebolzen
Achtung!
h Schrauben der Transport-
sicherung (Bitte vor der
Montage entnehmen)
i Ausziehwerkzeug (Schlüssel
für die Demontage)
j Blendrahmen
D
5
05-AR 686 + CZ 5 01.09.2005, 11:08:28 Uhr
Page 6

D
Setzen Sie die Bedienblende
erst an der rechten Seite an und
rasten Sie diese dann auf der
linken Seite ein.
Anschluss
Stellen Sie die Anschlüsse gemäß des Schaubildes her.
Achtung:
• Setzen Sie das abnehmbare Bedienfeld erst nach dem Anschluss der Kabel
auf.
• Verwenden Sie Lautsprecher mit einer Impedanz von 4 Ohm.
Wichtige Zusatzinformation
zum Einbau Ihres Autoradios!
1. Die Schrauben (h) der Transportsicherung bitte vor der Montage entfernen, da sonst die CD nicht eingezogen werden kann.
2. Das Gerät ist für den Minuspol der Batterie ausgelegt, der an die Fahrzeugkarosserie angeschlossen sein muss. Dies bitte vor Installation überprüfen.
6
05-AR 686 + CZ 6 01.09.2005, 11:08:29 Uhr
Page 7
3. Bitte beachten Sie beim Einbau/Anschluss Ihres Gerätes, dass nicht jedes
Fahrzeug mit einem “ISO Anschluss“ versehen ist. In diesem Fall empfehlen
wir Ihnen den Einsatz eines KFZ spezifi schen ISO Adapter.
Adapter erhalten Sie im Autozubehörhandel und/oder bei Ihrer KFZ Werkstatt.
4. Bei der Belegung des “Dauer +“ (Dauerstromanschluss) kann es je nach
Fahrzeugtyp zu Abweichungen kommen. (Dies ist jedoch für die Speicherung
der Senderstationen notwendig.)
Um alle Funktionen zu gewährleisten ist der Einbau entsprechend dieser An-
leitung zwingend erforderlich. Im Zweifel wenden Sie sich an eine autorisierte
KFZ Werkstatt.
5. Der maximale Neigungswinkel beim Einbau Ihres Autoradios darf 20° nicht
überschreiten, da bei größeren Einbauwinkeln die Funktion Ihres Autoradios
(CD-Player) nicht mehr gewährleistet ist.
6. Je nach Fahrzeugtyp können in Ausnahmefällen Störgeräusche im Radio/CD
Betrieb auftreten. Diese lassen sich mit einem zusätzlichen
entsprechend beseitigen. Ihr Gerät ist bereits serienmäßig mit einem Entstörfi lter ausgerüstet. Trotzdem kann es fahrzeugbedingt zu Beeinträchtigungen
kommen.
Entstörfi lter erhalten Sie im Autozubehörhandel und/oder bei Ihrer KFZ Werkstatt.
7. Bitte achten Sie beim Einbau Ihres Radios darauf, dass die Rückseite des
Radios genügend Freiraum hat, damit eine ausreichende Kühlung gewährleistet ist.
8. Beim Antennenanschluss gibt es zwei verschiedene Normen. Erstens den
alten (50 Ohm) mit langem, herausstehendem Rundkontakt fahrzeugseitig und
einer Rundbuchse auf der Radioseite. Zweitens ISO-genormte Antennenstecker (150 Ohm). Adapter für beide Formate bieten Zubehörhersteller und/oder
Ihrer KFZ Werkstatt an.
Bei VW/Audi unbedingt beachten: die aktive Antenne benötigt Spannung auf
der Abschirmung des Antennen-Koaxialkabels, ohne die der Empfang unzureichend ist. Ein Antennen-Adapter mit Phantomspeisung löst dieses Problem.
Entstörfi lter
Bedienhinweise
1. Wenn die vordere Bedientafel während des Radio- oder CD-Betriebs abgenommen wird, wird das Gerät automatisch ausgeschaltet.
2. Wenn das Fahrzeuginnere extrem heiß ist, z.B. nach einer längeren Parkdauer
in praller Sonne, den Player nicht einschalten, bis das Fahrzeug nach einer
kurzen Fahrzeit im Inneren etwas abgekühlt ist.
3. Um das abnehmbare Bedienteil sicher aufzubewahren, stets die dafür vorgesehene Schutzhülle verwenden.
4. Die Wiedergabe anwenderseitig erstellter CD kann durch die Vielzahl der
verfügbaren Software und CD-Medien nicht garantiert werden.
D
7
05-AR 686 + CZ 7 01.09.2005, 11:08:30 Uhr
Page 8
D
1. -Taste
Drücken Sie die
2. +/-Tasten (Lautstärke)
Im normalen Spielbetrieb dienen die Tasten zur Einstellung der Lautstärke.
In Verbindung mit der zuvor gedrückten SEL-Taste können Änderungen in
Menüs z.B. dem Klangmodus vorgenommen werden.
3. SEL-Taste (Auswahl)
Drücken Sie die SEL-Taste kurz, um in das Auswahlmenü des Klangmodus
zu gelangen. Im Display erscheint „VOL“ zur Einstellung der Lautstärke.
Durch wiederholtes Drücken der SEL- Taste können Sie nun die einzelnen
Menüpunkte wie VOL (Lautstärke), bAS (Bässe), TRE (Höhen), bAL (Balance)
und FAd (Überblendregelung) anwählen. Sie ändern die Einstellungen der
einzelnen Menüpunkte mit Hilfe der „+“- oder „-“–Taste.
Hinweis: Sind unter EQ Equalizereinstellungen wie z.B. POP, ROC(K) ge-
wählt, können bAS und TRE nicht eingestellt werden.
Ein-/ Ausschaltknopf
4.
Zum Ein- bzw. Ausschalten des Gerätes diese Taste drücken.
5. LCD-Display (Flüssigkristallanzeige)
6. BAND-Taste
a) Radio-Betrieb
Drücken Sie kurz die BAND-Taste, um zwischen der FM- (UKW) Ebenen
und der AM (Mittelwelle) umzuschalten. Die Bezeichnung der entsprechenden Ebene FM, AM wird in der LCD-Anzeige angezeigt.
b) CD-Betrieb
Durch drücken der BAND-Taste im CD-Betrieb gelangen Sie in den RadioModus zurück.
7./8.
I / I-Tasten TRACK UP/DOWN
Im CD-Modus:
Zum Vor- bzw. Rückwärtsspringen die Taste I bzw. I kurz drücken. Zum
Spulen von Titeln die Pfeiltaste I bzw. I gedrückt halten.
9. TUNE-Regler
Durch Drehen des TUNE-Regler stellen Sie die gewünschte Radiofrequenz
ein. Die aktuelle Frequenz wird im Display angezeigt.
10. MUTE-Taste (Stummschalten)
Drücken Sie die MUTE-Taste, um die Lautsprecher für kurze Zeit stumm zu
schalten. MUTE erscheint im Display. Drücken Sie diese Taste erneut, um
diese Funktion wieder aufzuheben.
-Taste zum Herausnehmen des vorderen Bedienfeldes.
Bedienung
8
05-AR 686 + CZ 8 01.09.2005, 11:08:30 Uhr
Page 9
11. II-Taste
Drücken Sie diese Taste um bei eingelegter CD vom Radio-Betrieb in den
CD-Betrieb zu wechseln. Drücken Sie die II-Taste, um das Abspielen der CD
zu unterbrechen (Pausenfunktion). Drücken Sie diese Taste erneut, um diese
Funktion wieder aufzuheben.
Hinweis: Die Wiedergabe anwenderseitig erstellter CD kann durch die Viel-
zahl der verfügbaren Software und CD-Medien nicht garantiert werden.
Bitte beachten: Hinweis zum Abspielen von CDs und CDRs im MP3 For-
mat! Das Gerät ist nicht MP3 fähig. Die CD beginnt zwar zu drehen, der
Ton kann aber nicht wiedergegeben werden.
12. LOC/RPT-Taste
a) Radio-Betrieb
• Durch Drücken der LOC/RPT-Taste wird, in Regionen wo das Signal
zu stark ist, der Empfang verbessert. Im Display erscheint die Anzeige
„LOC“.
• Durch erneutes Drücken der LOC/RPT-Taste wird wieder in den DISTANT Modus umgeschaltet. In Regionen mit zu schwachem Signal wird
der Empfang verbessert. Die Anzeige „LOC“ im Display erlischt.
b) CD-Betrieb
Drücken Sie die LOC/RPT-Taste. Der aktuelle gespielte Titel wird wiederholt. Drücken Sie diese Taste erneut um diese Funktion wieder aufzuheben.
13. LOU/RDM-Taste
Ein- und Ausschalten der LOUDNESS-Funktion.
Im niedrigen Lautstärkebereich wird mit der Funktion LOUDNESS (LOUD) das
Klangbild erweitert. Höhen und Bässe werden angehoben.
Halten Sie die LOU/RDM-Taste im CD-Betrieb für ca. 3 Sek. gedrückt. Die
CD Titel werden in zufälliger Reihenfolge abgespielt. Drücken Sie diese Taste
erneut (ca. 3 Sek.) um diese Funktion wieder aufzuheben.
14. MON/INT-Taste
a) Radio-Betrieb
STEREO/MONO Umschaltung
b) CD-Betrieb
Drücken Sie die MON/INT-Taste. Jeder Titel der CD wird jeweils
10 Sekunden lang angespielt. Drücken Sie diese Taste erneut, um die
Suche abzubrechen. Der aktuell angewählte Titel wird abgespielt.
15. EQ-Taste (Equalizer)
Durch Drücken der EQ-Taste können Sie die Equalizereinstellungen POP, CLS
(CLASSICS) und ROC(K) wählen. (DSP erscheint im Display.) Schalten Sie
DSP aus um eigene Einstellungen vorzunehmen. Siehe auch Pkt. 3.
D
9
05-AR 686 + CZ 9 01.09.2005, 11:08:31 Uhr
Page 10

16. CD-Schlitz
D
17. Auswurftaste
Zum Auswerfen der CD diese Taste drücken.
18. CLK-Taste (Uhrzeit)
a) Drücken Sie die CLK-Taste um für ca. 5 Sek. die aktuelle Uhrzeit angezeigt
zu bekommen.
b) Zum Einstellen der Uhrzeit halten Sie die CLK-Taste für ca. 3 Sek.
gedrückt. Die Uhrzeit blinkt im Display. Drücken Sie anschließend die I-
Taste (7) um die Minuten, und die I-Taste (8) um die Stunde einzustellen. Zum Abspeichern drücken Sie erneut kurz die CLK-Taste.
19. Blinkende LED-Anzeige (ohne Abbildung)
Beim Abnehmen der vorderen Bedientafel blinkt diese Anzeige.
10
05-AR 686 + CZ 10 01.09.2005, 11:08:31 Uhr
Page 11

Technische Daten
Allgemeines
Netzspannung ..........................................................................................DC 13,8 V
Stromverbrauch.......................................................................................... 7 A max.
Leistung........................................................................................................ 4 x 7 W
FM-Bereich
Frequenzbereich................................................................ 87,5 MHz bis 108,0 MHz
Nutzbare Empfi ndlichkeit.................................................................................10 µV.
I.F. Frequenz.............................................................................................. 10,7 MHz
AM-Bereich
Frequenzbereich.....................................................................514 kHz bis 1640 kHz
(Line-Out)
Ausgang ............................................................................................ max. 2000 mV
Impedanz....................................................................................................600 Ohm
CD-Player
System........................................................................................ CD Audio - System
Verwendbare CDs .............................................................. CD/CD-R/CD-RW Disks
Anzahl der Quantizierungsbits...........................................................................1 bit.
Signalformat ..................................................................... Musterfrequenz 44,1 kHz
Frequenzcharakteristika .............................................................20 – 100 Hz ≤ 8 dB
..............................................................10 – 20 kHz ≤ 8 dB
Signal-Rausch-Verhältnis ....................................................................50 dB (1 kHz)
Anzahl der Kanäle ...........................................................................2 Stereo-Kanäle
Gehäuseabmessungen ...........................................................178 B x 50 H x 157 T
D
11
05-AR 686 + CZ 11 01.09.2005, 11:08:32 Uhr
Page 12
D
Bevor Sie die Checkliste durchgehen, bitte zunächst den Anschluss fertig stellen.
Wenn nach erfolgtem Durchprüfen der Checkliste immer noch Fragen offen sind,
wenden Sie sich bitte an Ihre nächstgelegene Kundendienststelle.
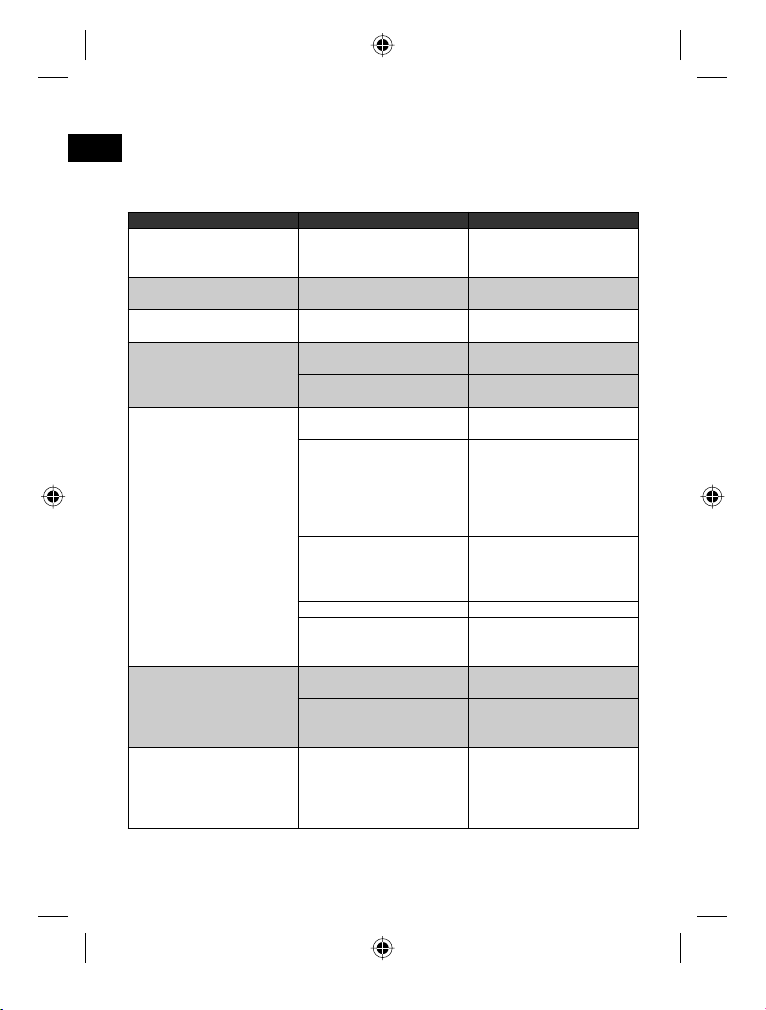
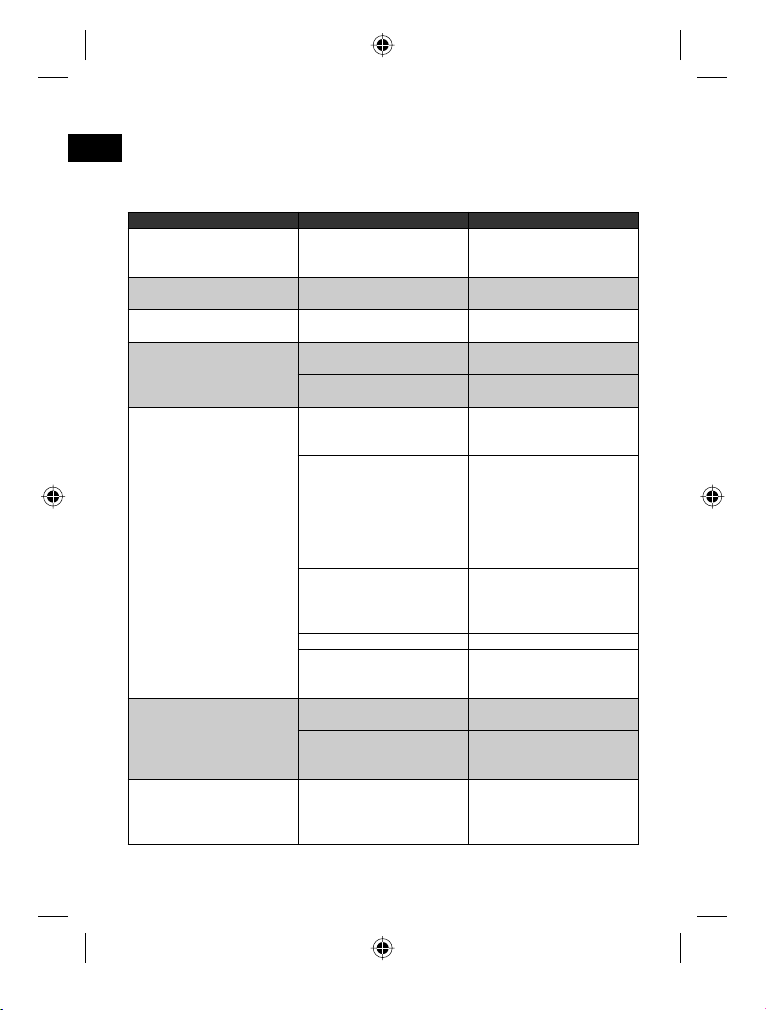
Fehlersymptom Grund Lösung
CDs werden nur bis zur Hälfte in
den CD Schacht eingezogen.
„Err“ wird im Display angezeigt.
CD lässt sich über die
nicht anwählen.
Nach Einlegen in das Gerät läuft
die CD oder Kassette nicht.
CD setzt aus.
Keine Funktion.
Gerät lässt sich nicht über
die Zündung „Ein“ bzw. „Aus“
Schalten.
Störungsbehebung
Die Schrauben der Transportsicherung sind nicht entfernt
worden.
Die CD ist falsch herum
eingelegt.
II
-Taste
Es ist keine CD eingelegt. Legen Sie eine CD ein.
Der Lautstärkeregler ist zu leise
eingestellt.
Die Anschlüsse sind nicht
korrekt ausgeführt.
Die Straßenoberfl äche ist rau.
Das Gerät ist nicht fest
eingebaut.
Die CD ist defekt.
Die CD ist verschmutzt. Die CD reinigen.
Ggf. ist das Gerät zu steil im
Fahrzeug eingebaut.
Die Zündung ist ausgeschaltet.
Eine oder mehrere Sicherungen
sind durchgebrannt.
Fehlanschluss
(jeder KFZ Hersteller belegt den
ISO Anschluss im Fahrzeug
anders).
Entfernen Sie die Schrauben der
Transportsicherung.
Legen Sie die CD richtig herum
ein.
Den Lautstärkeregler höher
einstellen.
Den +12V- sowie den Masseanschluss überprüfen.
Zum Abspielen der CD warten,
bis die Straße glatter wird.
Das Gerät fest einbauen.
Sicherstellen, dass die hintere
Befestigung verwendet wird,
wenn das Fahrzeug keine geeignete Aufnahme für den hinteren
Geräteteil bietet.
Eine andere CD ausprobieren.
Wenn diese korrekt läuft, ist
die erste CD wahrscheinlich
beschädigt.
Beachten Sie das ein max. Neigungswinkel von 20° Grad nicht
überschritten werden sollte!
Den Zündschlüssel auf „ON“
oder „ACC“ drehen.
Die Sicherung durch eine andere
7 A /0,5 A/0,5 A-Sicherung
ersetzen.
Bitte setzen Sie sich mit
Ihrer KFZ Werkstatt oder einem
Autospezialisten in Verbindung,
wegen KFZ spezifi sche
Anschlussadapter.
12
05-AR 686 + CZ 12 01.09.2005, 11:08:32 Uhr
Page 13
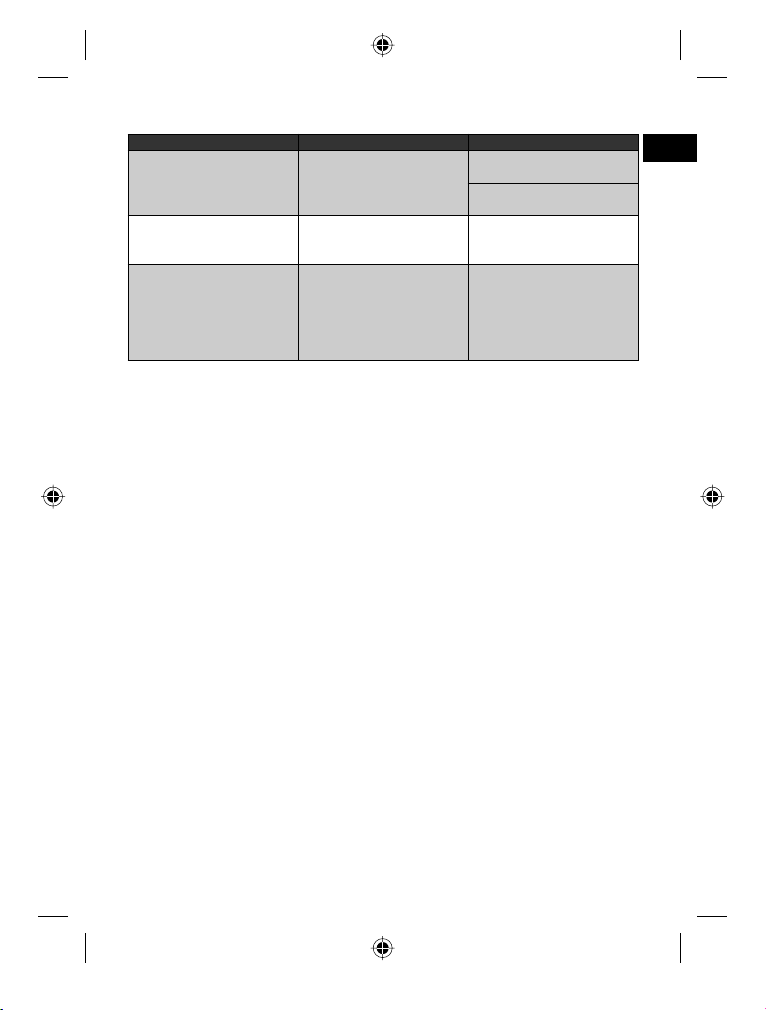
Fehlersymptom Grund Lösung
Das Gerät funktioniert
nicht richtig (EJECT,
LOAD, PLAY).
Kein Radioempfang.
Schlechter Radioempfang.
Der Mikrocomputer wurde durch
elektromagnetische Felder
gestört.
Das Antennenkabel ist nicht
angeschlossen.
Ggf. hat Ihr Fahrzeug eine
spezielle Antenne (Phantom
gespeiste Antenne.)
Die CD oder Kassette herausnehmen und wieder einlegen.
Das Gerät aus- und dann wieder
einschalten.
Das Antennenkabel fest in die
Antennenbuchse des Gerätes
stecken.
Bitte setzten Sie sich mit
Ihrer KFZ Werkstatt oder einem
Autospezialisten in Verbindung.
(Für „Fremdfabrikate“ gibt es
spezifi sche Einspeisweichen
bzw. Spannungsadapter.)
D
13
05-AR 686 + CZ 13 01.09.2005, 11:08:32 Uhr
Page 14
D
• Überprüfen Sie alle CDs auf Risse, Kratzer und Verwellungen, bevor Sie sie
abspielen. CDs mit derartigen Beschädigungen können unter Umständen nicht
richtig abgespielt werden. Sie sollten diese CDs nicht verwenden.
• Verwenden Sie nur handelsübliche kreisrunde CDs mit 12 cm Durchmesser!
CDs mit 8 cm Durchmesser oder CDs, die Konturen, z.B. eines Schmetterlings oder Herzens haben, sind zur Wiedergabe nicht geeignet. Es besteht
Zerstörungsgefahr der CD und des Laufwerks. Für Beschädigungen durch
ungeeignete CDs können wir keine Haftung übernehmen.
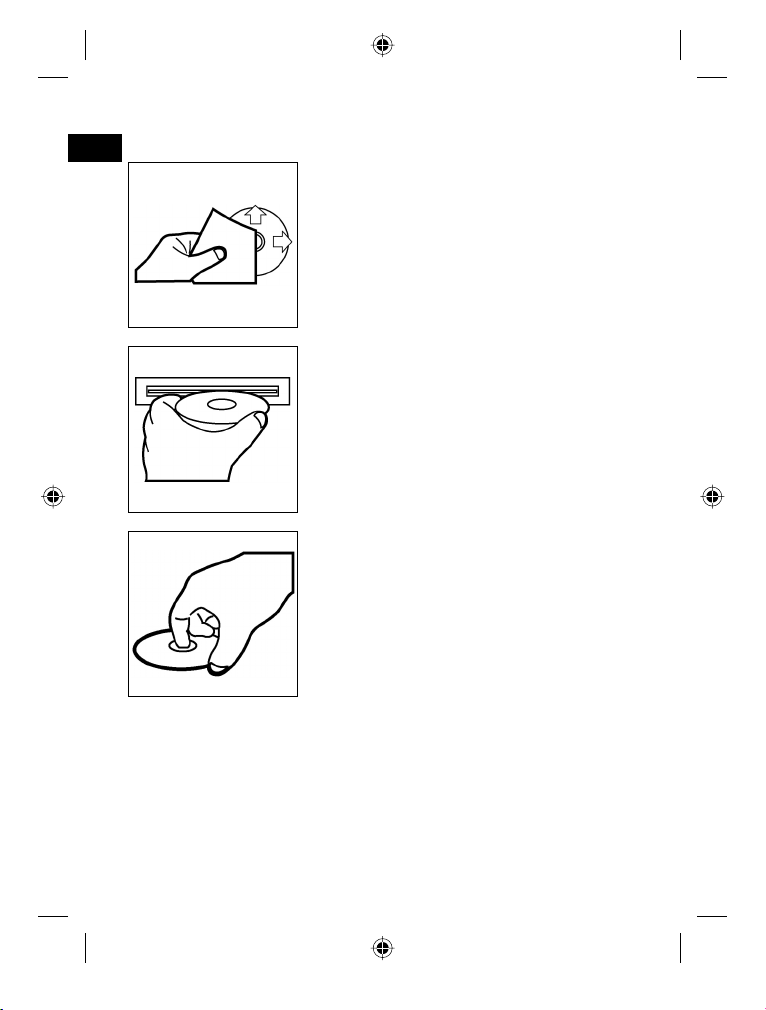
Handhabung einer CD
Reinigen der CD
Vor dem Abspielen, die CD mit einem sauberen,
staubfreien Reinigungstuch abwischen. Die CD in
Pfeilrichtung abziehen.
Hinweis: Keine Lösungsmittel wie Benzin oder
Verdünner verwenden. Die allgemein erhältlichen
Reinigungsmittel oder Anti-Statiksprays beschädigen das Gerät.
Einlegen der CD
Wenn die CD mit dem Aufdruck nach unten eingelegt wird, kann das Gerät beschädigt werden.
CD immer mit dem Label nach oben einlegen.
Hinweis: Wenn sich bereits eine CD im CD-Schlitz
befi ndet, nicht versuchen, eine weitere CD einzulegen. Dies kann zu Schäden am Gerät führen.
Anfassen der CD
Die CD stets am Rand anfassen. Um die CD sauber zu halten, nicht an der Oberfl äche anfassen.
• Keine Aufkleber oder Klebeband auf die CD
kleben.
• Die CD nicht direkter Sonneneinstrahlung oder
Wärmequellen wie Heizungsrohren aussetzen
und sie auch nicht im Auto lassen, wenn dieses
in praller Sonne geparkt wird, da dies zu einem
beträchtlichen Temperaturanstieg führt.
14
05-AR 686 + CZ 14 01.09.2005, 11:08:33 Uhr
Page 15

Dieses Gerät wurde nach allen zutreffenden, aktuellen CE-Richtlinien geprüft, wie
z.B. elektromagnetische Verträglichkeit und Niederspannungsdirektive und wurde
nach den neuesten sicherheitstechnischen Vorschriften gebaut.
Technische Änderungen vorbehalten!
Garantie
Wir übernehmen für das von uns vertriebene Gerät eine Garantie von 24 Monaten
ab Kaufdatum (Kassenbon).
Innerhalb der Garantiezeit beseitigen wir unentgeltlich die Mängel des Gerätes
oder des Zubehörs*), die auf Material- oder Herstellungsfehler beruhen, durch
Reparatur oder, nach unserem Ermessen, durch Umtausch. Garantieleistungen
bewirken weder eine Verlängerung der Garantiefrist, noch beginnt dadurch ein
Anspruch auf eine neue Garantie!
Als Garantienachweis gilt der Kaufbeleg. Ohne diesen Nachweis kann ein kostenloser Austausch oder eine kostenlose Reparatur nicht erfolgen.
Im Garantiefall geben Sie bitte das komplette Gerät in der Originalverpackung
zusammen mit dem Kassenbon an Ihren Händler.
*) Schäden an Zubehörteilen führen nicht automatisch zum kostenlosen Umtausch
des kompletten Gerätes. Wenden Sie sich in diesem Fall bitte an unsere Hotline!
Glasbruchschäden bzw. Brüche von Kunststoffteilen sind grundsätzlich kostenpfl ichtig!
Sowohl Defekte an Verbrauchszubehör bzw. Verschleißteilen (z.B. Motorkohlen,
Knethaken, Antriebsriemen, Ersatzfernbedienung, Ersatzzahnbürsten, Sägeblättern usw.), als auch Reinigung, Wartung oder der Austausch von Verschleißteilen,
fallen nicht unter die Garantie und sind deshalb kostenpfl ichtig!
Die Garantie erlischt bei Fremdeingriff.
Nach der Garantie
Nach Ablauf der Garantiezeit können Reparaturen kostenpfl ichtig vom entsprechenden Fachhandel oder Reparaturservice ausgeführt werden.
Service
Sehr geehrter Kunde,
ca. 95% aller Reklamationen sind leider auf Bedienungsfehler zurück zu führen
und könnten ohne Probleme behoben werden, wenn Sie sich telefonisch oder
über E-mail mit unserer für Sie eingerichteten Service-Hotline in Verbindung
setzen.
D
15
05-AR 686 + CZ 15 01.09.2005, 11:08:33 Uhr
Page 16
Wir bitten Sie daher, bevor Sie Ihr Gerät an den Händler zurückgeben, diese
D
Hotline zu nutzen. Hier wird Ihnen, ohne das Sie Wege auf sich nehmen müssen,
schnell geholfen.
Für technische Fragen haben wir für Sie folgende Telefon-Hotline eingerichtet:
Verschleißteile und Ersatzteile für unsere Unterhaltungselektronik (soweit diese
nicht vom Fachmann ausgewechselt werden müssen) wie z. B. Fernbedienungen,
Bedienteilklappen, Lautsprecherblenden usw. können Sie mit Angabe des Gerätetyps unter folgender E-mail-Adresse bestellen:
Interessieren Sie sich für weitere Clatronic-Produkte?
Besuchen Sie doch einmal unsere Homepage unter
Clatronic International GmbH
Industriering Ost 40
D-47906 Kempen/Germany
0 21 52 / 20 06 – 666
hotline@clatronic.de
www.clatronic.de oder www.clatronic.com
Bedeutung des Symbols „Mülltonne“
Schonen Sie unsere Umwelt, Elektrogeräte gehören nicht in den Hausmüll.
Nutzen Sie die für die Entsorgung von Elektrogeräten vorgesehenen Sammelstel-
len und geben dort Ihre Elektrogeräte ab die Sie nicht mehr benutzen werden.
Sie helfen damit die potenziellen Auswirkungen, durch falsche Entsorgung, auf die
Umwelt und die menschliche Gesundheit zu vermeiden.
Sie leisten damit Ihren Beitrag zur Wiederverwertung, zum Recycling und zu
anderen Formen der Verwertung von Elektro- und Elektronik-Altgeräten.
Informationen, wo die Geräte zu entsorgen sind, erhalten Sie über Ihre Kommu-
nen oder die Gemeindeverwaltungen.
In vielen Ländern der EU ist die Entsorgung von Elektro- und Elektronik-Altgeräten
über den Haus- und/oder Restmüll ab 13.8.2005 verboten.
In Deutschland ab 23.3.2006.
16
05-AR 686 + CZ 16 01.09.2005, 11:08:34 Uhr
Page 17

Stichwortverzeichnis – Index
Anschluss ...........................................................6
Anspielfunktion (siehe INTRO)...........................9
Ausschalten........................................................8
Auswurftaste.....................................................10
Bedienhinweise ..................................................7
Bedienung ..........................................................8
Bedienteil abnehmen..........................................8
BAND Taste........................................................8
CD auswerfen...................................................10
CD Handhabung...............................................14
CLK Taste.........................................................10
DSP (siehe EQ)..................................................9
Einschalten.........................................................8
EQ (Equalizereinstellung)...................................9
Garantie............................................................15
H
Handhabung einer CD......................................14
Installation ..........................................................5
Installationstipps.................................................5
INTRO (MON/INT)..............................................9
Lautstärke einstellen...........................................8
LOC (LOCAL) .....................................................9
LOU (Loudness) .................................................9
A
B
C
D
E
G
I
L
M
D
Mono Umschaltung.............................................9
Montage (Sicherheitshinweise) ..........................4
MUTE Taste (Stummschalten)............................8
P
Play / Pause (II)...............................................9
R
RANDOM (RDM) (Zufallswiedergabe) ...............9
REPEAT (RPT) (Wiederholen)...........................9
S
SEL Taste ...........................................................8
Service .............................................................15
Sicherheitshinweise............................................4
Stereo Umschaltung...........................................9
Störungsbehebung ...........................................12
Stummschalten (siehe MUTE Taste)..................8
T
Technische Daten.............................................11
TUNE-Regler......................................................8
U
Uhrzeit (siehe CLK) ..........................................10
V
Verkehrssicherheit..............................................4
W
Wichtige Zusatzinformationen zum Einbau ........6
Wiederholen (RPT).............................................9
Z
Zufallswiedergabe (RDM) .................................. 9
17
05-AR 686 + CZ 17 01.09.2005, 11:08:34 Uhr
Page 18
NL
Gebruik het apparaat uitsluitend voor het daarvoor bestemde doel.
Monteer het apparaat zodanig dat voorhanden ventilatieopeningen niet worden
afgedekt.
Open nooit de behuizing van het apparaat. Door ondeskundige reparaties kunnen
aanzienlijke gevaren voor de gebruiker ontstaan. Neem het apparaat in geval van
beschadigen niet meer in gebruik, maar laat het door een vakman repareren.
Het symbool met het uitroepteken verwijst naar belangrijke
bedienings- en onderhoudsinstructies in de begeleidende documentatie.
Apparaten met dit symbool werken met een „klasse 1-laser„ voor de
aftasting van de CD. De ingebouwde veiligheidsschakelaars moeten
voorkomen dat de gebruiker wordt blootgesteld aan gevaarlijke, voor het
menselijk oog onzichtbaar laserlicht wanneer het CD-vak geopend is.
Deze veiligheidsschakelaars mogen in geen geval overbrugd of gemanipuleerd
worden omdat u anders gevaar loopt, aan het laserlicht te worden blootgesteld.
Veiligheidsinstructies
Verkeersveiligheid
• De verkeersveiligheid heeft absolute prioriteit. Gebruik daarom uw autoradioinstallatie zodanig dat u de actuele verkeerssituatie altijd onder controle hebt.
• Denk erom dat u bij een snelheid van 50 km/h maar liefst 14 m per seconde
rijdt.
• Wij raden u aan, het apparaat in kritieke situaties niet te bedienen.
• De waarschuwingsaanwijzingen van bijv. politie en brandweer moet u in de
auto op tijd kunnen horen en/of zien.
• Beluister uw programma daarom tijdens het rijden alléén met gepaste geluidssterkte.
Voor de montage en de aansluiting dient u de volgende
veiligheidsinstructies in acht te nemen.
• Klem eerst de minpool en dan de pluspool van de accu af. (Het aanklemmen
geschiedt in omgekeerde volgorde.)
Let op: wanneer de accu afgeklemd is, worden alle tijdelijke geheugens
gewist. Let op de veiligheidsinstructies van de autofabrikant.
• De hoofdzekering moet zo dicht mogelijk (maximaal na 30 cm) aan de
pluspool van de accu worden geïnstalleerd, zodat de auto tegen een eventuele
kabelbrand bijv. door een ongeluk beschermd is. Wanneer u dit voorschrift niet
in acht neemt, komt de verzekeringsdekking te vervallen.
18
05-AR 686 + CZ 18 01.09.2005, 11:08:34 Uhr
Page 19
• De doorsnede van de plus- en de minkabel mag niet minder dan 1,5 mm²
bedragen.
• Let bij het boren van gaten op dat geen auto-onderdelen worden beschadigd.
Installatietips:
• Met beschermtules kunt u voorkomen dat kabels aan scherpe carrosseriedelen doorschuren.
• De isolatie van de kabel mag tijdens de installatie niet worden beschadigd.
• Het gebruik van het juiste gereedschap is bij de installatie van een autoradio
vanzelfsprekend.
Al naargelang de bouwwijze kan uw auto van deze beschrijving afwijken. Voor
schade op grond van montage- of aansluitfouten en voor volgschade zijn wij niet
aansprakelijk.
Installatie
Monteer het radioapparaat volgens de onderstaande afbeeldingen
a Moer
b Veerring
c Onderlegplaatje
d Schroef
e Montagehoek
f Inschuifbehuizing
g Schroefdraadbout
Let op!
h Schroeven van de trans-
portbeveiliging (a.u.b. vóór
de montage verwijderen)
i Uittrekgereedschap (sleutel
voor de demontage)
j Raamwerk
NL
19
05-AR 686 + CZ 19 01.09.2005, 11:08:35 Uhr
Page 20
NL
Zet het bedieningselement eerst
aan tegen de rechterzijde en klik
het vervolgens aan de linkerzijde
in.
Aansluiting
Breng de aansluiting tot stand volgens de afbeelding.
antenneaansluiting
ISO-aansluiting
permanente
stroomaansluiting
massa
ontsteking
autom. antenne (blauw)
luidspreker
links voor
links achter
Opgelet:
• Plaats het verwijderbare bedieningselement pas na de aansluiting van de
kabels.
• Gebruik luidsprekers met een impedantie van 4 Ohm.
geel
zwart
rood
wit
wit / zwart
groen
groen / zwart
zekering
zekering
zekering
RCA-uitgang
grijs
grijs / zwart
violet
violet / zwart
rood R
wit L
luidspreker
rechts voor
rechts achter
Belangrijke aanvullende informatie
voor de montage van uw autoradio!
1. Verwijder vóór de montage a.u.b. de schroeven (h) van de transportbeveiliging omdat in het andere geval de CD niet kan worden geladen.
2. Het apparaat is geconcipieerd voor de minpool van de accu die aan de carrosserie van het voertuig dient te zijn aangesloten. U dient dit vóór de installatie te
controleren.
20
05-AR 686 + CZ 20 01.09.2005, 11:08:36 Uhr
Page 21

3. Let bij de montage/aansluiting van uw apparaat op dat niet iedere auto over
een originele „ISO ANSCHLUSS“ beschikt. In dat geval adviseren wij het
gebruik van een auto specifi eke ISO-adapter.
Adapters zijn verkrijgbaar in een zaak voor autotoebehoren en/of bij uw garage.
4. Bij de toewijzing van de Tijdsduur +“ (Permanente stroomaansluiting) kunnen
echter al naargelang het voertuigtype afwijkingen optreden. (Dit is echter
noodzakelijk voor de opslag van de zenderstations).
Om alle functies te kunnen waarborgen dient de montage absoluut volgens
deze handleiding te geschieden. Neem in geval van twijfel contact op met een
geautoriseerde garage.
5. De maximale hellingshoek bij de montage van uw autoradio mag niet meer
dan 20° bedragen omdat bij een grotere montagehoek de functie van uw
autoradio (CD-speler) niet meer gewaarborgd is.
6. Al naargelang het voertuigtype kunnen in uitzonderingsgevallen stoorgeluiden
in de radio/CD-modus optreden. Deze kunnen worden verholpen met een
ontstoorfi lter. Uw apparaat is standaard reeds uitgerust met een ont-
extra
stoorfi lter. Desondanks kunnen er afhankelijk van het voertuigtype storingen
optreden.
Ontstoorfi lters zijn verkrijgbaar kunt in een zaak voor autotoebehoren en/of bij
uw garage.
7. Let bij de montage van uw autoradio op dat de achterzijde van de radio over
genoeg vrije ruimte beschikt, zodat voldoende ventilatie gewaarborgd is.
8. Voor de antenne bestaan twee verschillende normaansluitingen. De oude (50
Ohm) met lang, uitstekend rond contact aan de auto en een ronde bus aan de
radio en de ISO-genormeerde antennesteker (150 Ohm). Adapters voor beide
formaten zijn verkrijgbaar en/of bij uw garage.
Bij VW/Audi dient absoluut in acht te worden genomen: de actieve
antenne vereist spanning op de afscherming van de coaxiale antennekabel,
zonder deze spanning is de ontvangst onvoldoende. Een antenneadapter met
fantoomvoeding lost dit probleem op.
Bedieningsinstructies
1. Wanneer het voorste bedieningselement tijdens de radio- en CD-modus wordt
verwijderd, wordt het apparaat automatisch uitgeschakeld.
2. Wanneer het extreem heet in het voertuig is, bijv. nadat de auto gedurende
een langere tijd in de zon geparkeerd stond, dient u de CD-speler pas in te
schakelen nadat het na een korte rijduur een beetje is afgekoeld.
3. Gebruik steeds de voorhanden beschermhoes om het afneembare bedieningselement veilig te bewaren.
4. De weergave van een door de gebruiker gemaakte CD kan op grond van de
vele beschikbare programma’s en CD-media niet worden gegarandeerd.
NL
21
05-AR 686 + CZ 21 01.09.2005, 11:08:37 Uhr
Page 22
NL
1. -toets
Druk op de
2. +/- toetsen (geluidssterkte)
In de normale speelmodus zijn deze toetsen bedoeld voor het instellen van
de geluidssterkte. In combinatie met de tevoren ingedrukte SEL-toets kunnen
veranderingen in menu’s, bijv. de klankmodus, worden uitgevoerd.
3. SEL-toets (selectie)
Druk kort op de SEL-toets om naar het selectiemenu van de klankmodus te
schakelen. Op het display verschijnt „VOL“ voor de instelling van de geluidssterkte. Door herhaaldelijk op de SEL-toets te drukken kunt u nu de afzonderlijke menupunten zoals VOL (geluidssterkte), bAS (bass), TRE (treble), bAL
(balance) en FAd (faderregeling) selecteren. U kunt de instellingen van de
afzonderlijke menupunten veranderen met behulp van de „+“- of „-“-toets.
Opmerking: wanneer onder EQ equalizerinstellingen zoals bijv. POP, ROC(K)
geselecteerd zijn, kunnen bAS en TRE niet worden ingesteld.
Aan-/uitschakelknop
4.
Druk op deze toets om het apparaat in- of uit te schakelen.
5. LCD-display (vloeibaar-kristaldisplay)
6. BAND-toets
a) Radio-modus
Druk kortstondig op de BAND-toets om tussen de FM- (UKW)-niveaus en
AM- (middengolf) heen en weer te schakelen. De benaming van de desbetreffende niveaus FM, AM, wordt op het LCD-display weergegeven.
b) CD-modus
Door het indrukken van de BAND-toets in de CD-modus keert u terug naar
de radiomodus.
7./8.
I / I-toetsen TRACK UP/DOWN
In CD-modus:
druk kortstondig op de toetsen I of I om voorruit of achteruit te springen. Om titels voorruit of achteruit te spoelen houdt u de pijltoetsen I of
I ingedrukt.
9. TUNE-regelaar
Door het draaien aan de TUNE-regelaar stelt u de gewenste radiofrequentie
in. De huidige frequentie wordt op het display weergegeven.
10. MUTE-toets (stomschakeling)
Druk op de MUTE -toets om de luidsprekers kortstondig uit te schakelen.
MUTE verschijnt op het display. Druk de toets opnieuw in om de functie weer
te deactiveren.
-toets om het voorste bedieningselement te verwijderen.
Bediening
22
05-AR 686 + CZ 22 01.09.2005, 11:08:37 Uhr
Page 23

11. II-toets
Druk op deze toets om bij geplaatste CD over te schakelen van radio- naar
CD-modus. Druk op de II-toets om het afspelen van de CD te onderbreken
(pauzefunctie). Druk de toets opnieuw in om de functie weer te deactiveren.
Opmerking: de weergave van een door de gebruiker gemaakte CD kan op
grond van de vele beschikbare programma’s en CD-media niet worden gegarandeerd.
Belangrijke opmerking over CD’s en CDR’s in MP3-formaat! Dit apparaat
is niet geschikt voor MP3. De CD begint weliswaar te draaien, maar er
kan geen geluid worden weergegeven.
12. LOC/RPT-toets
a) Radio-modus
• Door het indrukken van de LOC/RPT-toets wordt in gebieden waar
het signaal te sterk [zwak] is, de ontvangst verbeterd. Op het display
verschijnt de melding ‘LOC’.
• Door het opnieuw indrukken van de LOC/RPT-toets wordt weer teruggeschakeld naar de DISTANT-modus. In gebieden met een te zwak
signaal wordt de ontvangst verbeterd. De melding ‘LOC’-op het display
dooft.
b) CD-modus
Druk op de LOC/RPT-toets. De actuele titel wordt herhaald. Druk de toets
opnieuw in om de functie weer te deactiveren.
13. LOU/RDM-toets
Aan- en uitschakelen van de LOUDNESS-functie.
In het lagere volumebereik wordt door middel van de functie LOUDNESS
(LOUD) het geluidsbeeld uitgebreid. Hoogten en bassen worden versterkt.
Houd de LOU/RDM-toets in de CD-modus ca. 3 sec. lang ingedrukt. De CD-
titels worden in willekeurige volgorde afgespeeld. Druk de toets opnieuw (ca.
3 sec) in om de functie weer te deactiveren.
14. MON/INT-toets
a) Radio-modus
STEREO/MONO-omschakeling
b) CD-modus
Druk op de MON/INT-toets. Iedere titel van de CD wordt gedurende
10 seconden afgespeeld. Druk opnieuw op deze toets om de zoekfunctie
af te breken. De actueel geselecteerde titel wordt afgespeeld.
15. EQ-toets (Equalizer)
Door het indrukken van de EO-toets kunt u de equalizer- instellingen POP,
CLS (CLASSICS) en ROC(K) kiezen. (Op het display verschijnt ‘DSP’). Selecteer DSP om eigen instellingen uit te voeren. Zie hiervoor ook punt 3.
NL
23
05-AR 686 + CZ 23 01.09.2005, 11:08:38 Uhr
Page 24

16. CD-sleuf
NL
17. Uitwerptoets
Druk op deze toets om de CD uit te werpen.
18. CLK-toets (tijd)
a) Druk de CLK-toets in om ca. 5 seconden lang de tijd op het display te
kunnen afl ezen.
b) Voor het instellen van de tijd houdt u de CLK-toets ca. 3 seconden lang
ingedrukt. De kloktijd knippert op het display. Druk vervolgens de Itoets (7) in om de minuten in te stellen en de I-toets (8) om het uur in te
stellen. Druk opnieuw de CLK-toets in om de tijd op te slaan.
19. Knipperende LED-weergave (zonder afbeelding)
Deze weergave knippert wanneer u het voorste bedieningselement verwijdert.
24
05-AR 686 + CZ 24 01.09.2005, 11:08:38 Uhr
Page 25

Technische gegevens
Algemeen
Netspanning .............................................................................................DC 13,8 V
Stroomverbruik ........................................................................................... 7 A max.
Vermogensuitgang........................................................................................ 4 x 7 W
FM-bereik
Frequentiebereik.................................................................87,5 MHz tot 108,0 MHz
Effectieve gevoeligheid....................................................................................10 µV.
I.F. frequentie ............................................................................................ 10,7 MHz
AM-bereik
Frequentiebereik..................................................................... 514 kHz tot 1640 kHz
(Line-Out)
Uitgang .............................................................................................. max. 2000 mV
Impedantie..................................................................................................600 Ohm
CD-speler
Systeem........................................................................................ CD-audiosysteem
Afspeelbare CD‘s.................................................................CD/CD-R/CD-RW disks
Aantal kwantifi ceringsbits .................................................................................1 bit.
Signaalformaat ............................................................. Monsterfrequentie 44,1 kHz
Frequentiekarakteristiek .............................................................20 – 100 Hz ≤ 8 dB
..............................................................10 – 20 kHz ≤ 8 dB
Signaal-ruis-verhouding.......................................................................50 dB (1 kHz)
Aantal kanalen.................................................................................2 Stereo-Kanäle
Apparaatbehuizing.................................................................. 178 B x 50 H x 157 D
NL
25
05-AR 686 + CZ 25 01.09.2005, 11:08:39 Uhr
Page 26
NL
Voer eerst alle aansluitingen uit voordat u de checklist doorloopt. Wanneer u na
controle aan de hand van de checklist nog steeds vragen hebt, neem dan a.u.b.
contact op met de dichtstbijzijnde klantenservice.
Storingssymptoom Reden Oplossing
CD‘s worden maar tot de helft in
de CD-sleuf getrokken.
„Err“ wordt op het display
weergegeven.
De CD kan niet via de
worden geselecteerd.
Na het plaatsen in het apparaat
loopt de CD of de cassette niet.
De CD stokt.
Geen functie.
Het apparaat kan niet via de ontsteking “In” of “Uit” geschakeld
worden.
Verhelpen van storingen
De schroeven van de transportbeveiliging werden niet
verwijderd.
De CD is verkeerd om geplaatst. Plaats de CD correct.
II
-toets
Er is géén CD geplaatst. Plaats een CD.
De volumeregelaar is te zacht
ingesteld.
De aansluitingen zijn niet correct
uitgevoerd.
Het wegdek is ruw.
Het apparaat is niet vast
gemonteerd.
De CD is defect.
De CD is verontreinigd. Reinig de CD.
Eventueel is het apparaat te
schuin in de auto gemonteerd.
De ontsteking is uitgeschakeld.
Een of meerdere zekeringen zijn
doorgebrand.
Verkeerde aansluiting
(iedere autofabrikant voert
de ISO-aansluiting in de auto
anders uit).
Verwijder de schroeven van de
transportbeveiliging.
Stel de volumeregelaar hoger in.
Controleer de +12V- en de
massa-aansluiting.
Wacht met het afspelen van de
CD totdat het wegdek vlakker
wordt.
Bouw het apparaat vast in.
Waarborg dat de achterste
bevestiging wordt gebruikt
wanneer het voertuig niet over
een geschikte opname voor
het achterste apparaatgedeelte
beschikt.
Probeer een andere CD. Wanneer deze correct functioneert
is de eerste CD waarschijnlijk
beschadigd.
Let op dat de max. inbouwhoek
van 20° niet mag worden
overschreden!
Draai ontstekingssleutel naar de
stand „ON“ of „ACC“.
Vervang de zekering door
een andere 7 A /0,5 A/0,5 Azekering.
Neem contact op met uw garage
of een autospecialist i.v.m. autospecifi eke aansluitadapters.
26
05-AR 686 + CZ 26 01.09.2005, 11:08:39 Uhr
Page 27

Storingssymptoom Reden Oplossing
Het apparaat functioneert niet
correct
(EJECT, LOAD, PLAY).
Geen radio-ontvangst.
Slechte radio-ontvangst.
De microcomputer werd door
elektromagnetische velden
gestoord.
De antennekabel is niet
aangesloten.
Eventueel beschikt uw auto over
een speciale antenne (antenne
met fantoomvoeding.)
Verwijder de CD of cassette en
plaats deze weer.
Schakel het apparaat uit- en
weer in.
Steek de antennekabel vast in
de antennebus van het apparaat.
Neem contact op met uw garage
of een autospecialist. (Voor
“fabrikaten van derden” zijn
specifi eke scheidingsfi lters resp.
spanningsadapters verkrijgbaar.)
NL
27
05-AR 686 + CZ 27 01.09.2005, 11:08:39 Uhr
Page 28

NL
• Controleer alle CD’s op scheuren, krassen en oneffenheden voordat u deze
afspeelt. CD’s met een dergelijke beschadiging kunnen eventueel niet correct
worden afgespeeld. Gebruik deze CD’s niet.
• Gebruik alléén in de handel verkrijgbare cirkelvormige CD’s met een diameter
van 12 cm. CD’s met een diameter van 8 cm of CD’s die over contouren beschikken, bijv. in de vorm van een vlinder of een hart, zijn niet geschikt voor de
weergave. Het gevaar bestaat dat de CD en het station onherstelbaar worden
beschadigd. Voor schade door een ongeschikte CD zijn wij niet aansprakelijk.
Handling van een CD
Reinigen van de CD
Reinig de CD vóór het afspelen met een schone,
stofvrije reinigingsdoek. Verwijder het stof van de
CD in pijlrichting.
Opmerking: gebruik géén oplosmiddelen zoals
benzine of verdunner. De algemeen verkrijgbare
reinigingsmiddelen of antistatische sprays beschadigen het apparaat.
Plaatsen van de CD
Wanneer de CD met de opdruk naar beneden
wordt geplaatst, kan het apparaat beschadigd
worden.
Plaats de CD altijd met het label naar boven.
Opmerking: tracht niet, een Cd te plaatsen wan-
neer zich reeds een CD in de CD-sleuf bevindt.
Hierdoor kan het apparaat worden beschadigd.
Vastpakken van de CD
Grijp de CD altijd aan de rand vast. Om de Cd
schoon te houden, mag u deze niet aan het oppervlak vastpakken.
• Plak geen papier of plakband op de CD.
• Stel de CD niet bloot aan directe zoninstraling
of warmtebronnen zoals verwarmingsbuizen en
laat de CD ook niet in de auto liggen wanneer
deze in de zon geparkeerd staat omdat dit een
aanzienlijke temperatuurstijging tot gevolg heeft.
28
05-AR 686 + CZ 28 01.09.2005, 11:08:40 Uhr
Page 29

Dit apparaat is gekeurd conform de op dit moment van toepassing zijnde CErichtlijnen zoals bijvoorbeeld elektromagnetische compatibiliteit en laagspanningsvoorschriften en is geconstrueerd volgens de nieuwste veiligheidstechnische
voorschriften.
Technische wijzigingen voorbehouden!
Garantie
Voor het door ons geleverde apparaat verlenen wij een garantie van 24 maanden
vanaf koopdatum (kassabon).
Eventuele gebreken aan het apparaat of aan het toebehoren*) die zijn ontstaan
door productie- of materiaalfouten verhelpen wij binnen deze periode kosteloos
door middel van reparatie of, naar ons oordeel, door vervanging. Eventuele
garantiegevallen verlengen noch de geldigheidsduur van de garantie, noch begint
daardoor een nieuwe garantieperiode!
Het koopbewijs geldt als garantiebewijs. Zonder dit bewijs kan geen kosteloze
reparatie of vervanging plaatsvinden.
Geef in garantiegevallen het complete apparaat in de originele verpakking
samen met de kassabon af bij uw handelaar.
*) Schade aan onderdelen leidt niet automatisch tot kosteloze vervanging van het
complete apparaat. Neem in dit geval contact op met onze hotline! De reparatie
van glasbreuk of breuk van kunststofonderdelen wordt altijd berekend!
Niet defecten aan de hulpstukken of aan de slijtende onderdelen (bijv. koolborstels, deeghaken, drijfriemen, reserveafstandsbediening, reservetandenborstels,
zaag bladen enz.), maar ook reiniging, onderhoud of de vervanging van slijtende
delen vallen niet onder de garantie en geschieden altijd tegen berekening!
Bij ingrepen door derden komt de garantieverlening te vervallen.
Na de garantieperiode
Na afl oop van de garantieperiode kunnen reparaties tegen berekening worden
uitgevoerd door de betreffende vakhandelaar of de technische dienst.
NL
29
05-AR 686 + CZ 29 01.09.2005, 11:08:40 Uhr
Page 30
NL
Betekenis van het symbool
“Vuilnisemmer”
Bescherm ons milieu, elektrische apparaten horen niet in het huisafval.
Maak voor het afvoeren van elektrische apparaten gebruik van de voorgeschreven
verzamelpunten en geef daar de elektrische apparaten af die u niet meer gebruikt.
Daardoor helpt u de potentiële effecten te voorkomen die een verkeerde afvoer op
het milieu en de menselijke gezondheid kunnen inwerken.
Op deze wijze levert u uw bijdrage aan het hergebruik, de recycling en andere
verwerkingsvormen voor oude elektronische en elektrische apparaten.
Voor informatie over verzamelpunten voor uw apparaten kunt u contact opnemen
met uw gemeente of gemeenteadministratie.
In veel landen van de EU is de afvoer van oude elektronische en elektrische appa-
raten via het huisafval en/of het grof vuil sinds 13.08.2005 verboden.
In Duitsland vanaf 23.03.2006.
30
05-AR 686 + CZ 30 01.09.2005, 11:08:41 Uhr
Page 31

Trefwoordenregister - index
A
Aansluiting........................................................20
Aanspeelfunctie (zie INTRO)............................ 23
B
BAND-toets.......................................................22
Bediening..........................................................22
Bedieningsinstructies........................................21
Bedieningselement verwijderen........................22
Belangrijke extra informatie voor de montage..20
C
CD -handling.....................................................28
CD uitwerpen....................................................22
CLK-toets..........................................................24
D
DSP (zie EQ)....................................................23
E
EQ (equalizerinstelling) ....................................23
G
Garantie............................................................29
Geluidsterkte instellen ......................................22
H
Handling van een CD .......................................28
Herhalen (RPT) ................................................23
I
Inschakelen ......................................................22
Installatie ..........................................................19
Installatietips.....................................................19
INTRO (MON/INT)............................................23
L
NL
LOC / LOCAL....................................................23
LOU (loudness) ................................................23
M
Mono-omschakeling .........................................23
Montage (veiligheidsinstructies) .......................18
MUTE-toets (stomschakeling) ..........................22
P
Play / Pauze (II).............................................23
R
RANDOM (RDM) (toevallige weergave) ...........23
REPEAT (RPT) (herhalen) ...............................23
S
SEL-toets ..........................................................22
Stereo-omschakeling........................................ 23
Stomschakeling (zie MUTE-toets)....................22
T
Technische gegevens.......................................25
Tijd (zie CLK).................................................... 24
Toevallige weergave (RDM) .............................23
TUNE-regelaar .................................................22
U
Uitschakelen.....................................................22
Uitwerptoets......................................................24
V
Veiligheidsinstructies........................................18
Verhelpen van storingen...................................26
Verkeersveiligheid ............................................18
31
05-AR 686 + CZ 31 01.09.2005, 11:08:41 Uhr
Page 32

E
Utilice el aparato únicamente para la fi nalidad para la que ha sido construido.
Monte el equipo de tal manera que no se tapen las aberturas de ventilación disponibles.
Jamás se abrirá la carcasa del cuerpo del aparato. Las reparaciones mal hechas
pueden generar considerables peligros para el usuario. En el caso de daños en el
equipo no siga utilizándolo, sino déjelo reparar por un experta.
El símbolo con el signo de exclamación advierte al usuario que hay instrucciones de manejo y de mantenimiento importantes en la documentación que va adjunta.
Aparatos que llevan puesto este símbolo operan con un ”Lector Clase 1”
para explorar el CD. Los interruptores de seguridad incorporados sirven
para impedir que el usuario esté expuesto a luz láser invisible peligrosa
para la vista del usuario cuando está abierto el compartimiento del CD.
Bajo ningún concepto se ha de hacer un puenteado sobre estos interruptores de
seguridad ni deben ser manipulados. De hacerlo, existe el peligro de que Vd. esté
expuesto a la luz láser.
Avisos de Seguridad
Seguridad en el Transporte
• La seguridad en el transporte es el aspecto más importante. Le rogamos que
siempre utilice el radio de automóvil de tal manera, que Ud. esté capaz en
cada momento de adaptarse a la situación de tráfi co actual.
• Por favor observe que a una velocidad de 50 km/h el automóvil conduce 14 m
por segundo.
• Le recomendamos que no utilice el equipo en situaciones críticas.
• Es necesario que pueda percibir las advertencias, por ejemplo de la policía y
los bomberos, en el vehículo a tiempo.
• Por esta razón, por favor solamente escuche los programas a un volumen
apropiado.
Durante el montaje y la conexión por favor observe
los siguientes avisos de seguridad
• Primero desconecte el polo negativo y luego el polo positivo de la batería.
(Conectar por orden contrario.)
Por favor observe: Si la batería no está conectada toda la información graba-
da provisionalmente se perderá. Por favor observe los avisos de seguridad del
fabricante de automóviles.
• El fusible principal tiene que ser instalado muy cerca (con una distancia máxima
30 cm) en el polo positivo de la batería, para que el vehículo esté protegido contra
32
05-AR 686 + CZ 32 01.09.2005, 11:08:41 Uhr
Page 33

un eventual incendio de los cables, por ejemplo por un accidente. Si la instalación
no concuerda con este prerequisito, se perderá la cobertura del seguro.
• La sección transversal del cable positivo y negativo respectivamente no debe
ser inferior a 1,5 mm².
• Al hacer agujeros, le rogamos que observe que no se dañen ningunas partes
del vehículo.
Consejos para la instalación:
• Capas protectoras para cables impiden que ellos desollen en las partes agudas de la carrocería.
• El material aislante del cable no debe ser dañado en la instalación.
• Para la instalación de equipos Car-HiFi siempre hay que utilizar las herramientas adecuadas.
Según el sistema de construcción, el vehículo puede divergir de esta descripción. No asumimos ninguna responsabilidad por daños causados por errores de
instalación o conexión y daños resultantes.
Instalación
Monte el receptor de radio
según las siguientes presentaciones.
a Tuerca
b Arandela elástica
c Arandela
d Tornillo
e Angulo de montaje
f Carcasa de unidad en-
chufable
g Perno roscado
Atención!
h Tornillos para el transporte
seguro
(Se ruega retirarlos antes
de iniciar el montaje)
i Herramienta extractora
(Llave para el desmontaje)
j Marco
E
33
05-AR 686 + CZ 33 01.09.2005, 11:08:42 Uhr
Page 34

E
Primero asiente el panel de
control en el lado derecho para
poder encajarlo en la parte
izquierda.
Conexión
Realice las conexiones según la presentación.
Conexión de antena
Conexión-ISO
Conexión de corriente
convencional
Medidas
Encendido
Antena automática (Azul)
Altavoces izquierda
parte delantera
izquierda parte
posterior
Atención:
• No coloque el panel de control desmontable hasta haber conectado los
cables.
• Haga uso de altavoces con una impedancia de 4 ohmios.
Amarillo
Negro
Rojo
Blanco
Blanco/ Negro
Verd e
Verde/ Negro
fusible
fusible
fusible
Salida-RCA
Gris
Gris/ Negro
Violeta
Violeta/ Negro
Rojo R
BlancoL
Altavoces
derecha parte
delantera
derecha parte
posterior
¡Informaciones adicionales de importancia
para el montaje de su autorradio!
1. Se ruega retirar los tornillos (h) para el transporte seguro antes de iniciar
el montaje, ya que si no el disco compacto no se podrá colocar.
2. El aparato está expuesto al polo negativo de la pila que debe estar conectado
a la carrocería del coche. Se ruega controlar esto antes de iniciar la instalación.
34
05-AR 686 + CZ 34 01.09.2005, 11:08:43 Uhr
Page 35

3. En la instalación/conexión del equipo le rogamos que observe que no todos
los vehículos disponen de una „conexión ISO“. En este caso le recomendamos que utilice un adaptador ISO específi co para automóviles.
Puede adquirir adaptadores en el comercio de accesorios automovilísticos y/o
en su taller automovilístico.
4. En la puesta en estado de ocupación de “Duración +“ (Conexión de corriente
convencional) se podrían originar, dependiendo del tipo de vehículo, irregularidades. (Pero esto es necesario para la memorización de las estaciones de las
emisoras).
Para garantizar todas las funciones es absolutamente necesario que la
instalación se efectúe según este manual de usuario. En el caso de que tenga
dudas le rogamos que se dirija a un taller automovilístico autorizado.
5. El máximo ángulo de inclinación al instalar su autorradio no debe sobrepasar los 20°, ya que en caso de ángulos de inclinación superiores no estaría
garantizada la función de su autorradio (Reproductor de CD).
6. Dependiendo del tipo de vehículo podrían producirse en casos excepcionales
interferencias en el funcionamiento Radio/CD. Estas se eliminan con un correspondiente fi ltro adicional
equipado de serie con un fi ltro eliminador de interferencias. De todas formas
se pueden originar perturbaciones a causa del tipo de vehículo.
Los fi ltros eliminadotes de interferencias se obtienen en negocios de piezas
de recambio para el coche y/o en su taller de coches.
7. Al incorporar su radio se ruega prestar atención de que la parte posterior de la
radio tenga sufi ciente espacio libre, para que se pueda garantizar una refrigeración sufi ciente.
8. Referente a la conexión de la antena hay dos normas diferentes. Primero, existe
la conexión antigua (50 Ohm) con un largo contacto redondo que sale de la
parte del vehículo y un enchufe redondo en la parte de la radio. Segundo, hay el
enchufe de la antena según la norma ISO (150 Ohm). Fabricantes de accesorios y/o su taller automóvilístico disponen de adaptadores para ambos formatos.
En los casos de VW/Audi es absolutamente necesario que observe lo
siguiente: la antena activa necesita tensión en la protección de la antena
coaxial, sin la que la recepción está inadecuada. Por medio de un adaptador
antena con tensión en modo fantasma soluciona este problema.
eliminador de interferencias. Su aparato ya está
E
Avisos de Manejo
1. Al retirar el panel de control frontal durante el funcionamiento de radio o de
disco compacto, se desconectará el aparato de forma automática.
2. Cuando el interior del coche se caliente mucho, p.ej. al estar aparcado durante
un tiempo a pleno sol, se ruega no conectar el player, hasta que el coche se
haya enfriado levemente por haber conducido un poco.
35
05-AR 686 + CZ 35 01.09.2005, 11:08:44 Uhr
Page 36

3. Para guardar de forma segura el panel de control desmontable, se ruega
E
utilizar siempre la funda protectora.
4. No se puede garantizar la reproducción de discos compactos producidos
por parte del usuario, ya que existe multitud de software y medios de discos
compactos disponibles.
Manejo
1. Tecla-
Presione la tecla-
2. Teclas +/- (Volumen)
En el funcionamiento normal de reproducción sirven las teclas para ajustar el
volumen. En conexión con el tecla SEL pulsado anteriormente pueda efectuar
cambios en menús, por ejemplo del modo de sonido.
3. Tecla-SEL (Selección)
Pulse brevemente el tecla SEL, para llegar al menú de selección del modo
de sonido. En el display aparece „VOL“ para ajustar el volumen. Al presionar
repetidamente la tecla-SEL podrá seleccionar ahora los puntos de menú uno
por uno, como VOL (Volumen), bAS (Bajos), TRE (Altos), bAL (Balance) y FAd
(Ajuste de encadenado). Podrá cambiar los ajustes de cada punto de menú
con la tecla „+“- o „-“.
Nota: Si en los ajustes de ecualizador EQ están ajustados p.ej. POP, ROC(K),
no se podrán ajustar bAS o TRE.
Conector / Interruptor
4.
Para la conexión o desconexión del aparato presione esta tecla.
5. Display-LCD (Visualizador de cristal líquido)
6. Tecla-BAND
a) Funcionamiento de radio
Presione brevemente la tecla-BAND, para conmutar entre las bandas FM
(ondas ultracortas) y AM (ondas medias). La denominación de la banda
correspondiente FM, AM se indicará en la indicación LCD.
b) Funcionamiento-CD
Presionando la tecla-BAND en el modo CD volverá al modo-Radio.
7./8.
Teclas-I / I TRACK UP/DOWN
En el modo CD:
Para saltar en avance o en retroceso presione brevemente la tecla I es
decir I. Para bobinar títulos mantenga presionada la tecla de fl echa
I es decir I.
9. Regulador-TUNE
Girando el regulador-TUNE ajustará la frecuencia de radio deseada. La frecuencia actual se indicará en el display.
para sacar el panel de control frontal.
36
05-AR 686 + CZ 36 01.09.2005, 11:08:44 Uhr
Page 37

10. Tecla-MUTE (Ensordecer)
Pulse el tecla MUTE, para ensordecer los altavoces durante un tiempo corto.
MUTE aparece en el display. Pulse este botón de nuevo, para terminar esta
función.
11. Tecla-II
Pulse la tecla para cambiar, al estar un CD introducido, del modo-Radio al
modo-CD. Presione la tecla-II, para interrumpir la reproducción del disco
compacto (Función de pausa). Presione esta tecla de nuevo, para anular esta
función.
Nota: No se puede garantizar la reproducción de discos compactos produ-
cidos por parte del usuario, ya que existe multitud de software y medios de
discos compactos disponibles.
¡Se ruega tener atención con la nota referente a la reproducción de CDs
y CDRs en el formato MP3! El aparato no es apropiado para el formato
MP3. El disco comenzará a girarse, pero no se podrá reproducir el sonido.
12. Tecla-LOC/RPT
a) Funcionamiento de radio
• Pulsando la tecla LOC/RPT, en regiones donde la señal es muy fuerte,
se mejorará la recepción. En el display aparece la indicación „LOC“.
• Pulsando de nuevo la tecla LOC/RPT se conmutará de nuevo en el
modo DISTANT. En regiones con una señal muy débil se mejorará la
recepción. La indicación „LOC“ en el display se apagará.
b) Funcionamiento-CD
Presione la tecla-LOC/RPT. Se repetirá el título actualmente reproducido.
Presione esta tecla de nuevo, para anular esta función.
13. Tecla-LOU/RDM
Conexión y desconexión de la función-LOUDNESS.
En el campo de volumen bajo se amplia el sonido con la función LOUDNESS
(LOUD). Los tonos altos y bajos se aumentan.
Mantenga la tecla-LOU/RDM en el modo-CD durante aprox. 3 segundos puls-
ada. Los títulos del disco compacto se reproducirán en un orden casual. Pulse
de nuevo la tecla (aprox. 3 segundos) para suprimir esta función.
14. Tecla-MON/INT
a) Funcionamiento de radio
Conmutación STEREO/MONO
b) Funcionamiento-CD
Presione la tecla-MON/INT. Cada título del disco compacto se reproducirá unos 10 segundos. Presione esta tecla de nuevo, para interrumpir la
búsqueda. Se reproducirá el título seleccionado actualmente.
E
37
05-AR 686 + CZ 37 01.09.2005, 11:08:45 Uhr
Page 38

15. Tecla-EQ (Ecualizador)
E
Pulsando la tecla-EQ puede seleccionar los ajustes de ecualizador POP, CLS
(CLASSICS) y ROC(K). (DSP aparece en el display.) Desconecte DSP para
realizar ajustes propios. Vea también el punto 3.
16. Ranura-CD
Tecla de expulsión
17.
Para expulsar el disco compacto presione esta tecla.
18. Tecla-CLK (Hora)
a) Pulse la tecla-CLK para dejarse indicar la hora actual durante aprox. 5
segundos.
b) Para ajustar la hora mantenga pulsada la tecla-CLK durante aprox. 3 se-
gundos. La hora parpadea en el display. A continuación pulse la tecla-I
(7) para ajustar los minutos, y la tecla-I (8) para ajustar la hora. Para
memorizar pulse brevemente la tecla-CLK.
19. Visualizador-LED parpadeando (sin presentación)
Al retirar el panel de control frontal parpadea esta indicación.
38
05-AR 686 + CZ 38 01.09.2005, 11:08:45 Uhr
Page 39

Datos técnicos
Generalidades
Tensión de alimentación...........................................................................DC 13,8 V
Consumo de corriente ................................................................................ 7 A max.
Potencia........................................................................................................ 4 x 7 W
Gama-FM
Gama de frecuencias ...........................................................87,5 MHz y 108,0 MHz
Sensibilidad utilizable ......................................................................................10 µV.
Frecuencia I.F. ...........................................................................................10,7 MHz
Gama-AM
Gama de frecuencias ............................................................... 514 kHz y 1640 kHz
(Line-Out)
Salida................................................................................................. max. 2000 mV
Impedancia.................................................................................................600 Ohm
CD-Player
Sistema........................................................................................ Sistema CD Audio
Afspeelbare CD‘s.............................................................. Discos CD/CD-R/CD-RW
Cantidad de bits de cuantifi cación.....................................................................1 bit.
Formato de señal...................................................Frecuencia de muestra 44,1 kHz
Características de frecuencia .....................................................20 – 100 Hz ≤ 8 dB
.....................................................10 – 20 kHz ≤ 8 dB
Relación señal/ruido............................................................................50 dB (1KHz)
Cantidad de los canales ............................................................... 2 canales estéreo
Medidas de la carcasa............................................ 178 ancho x 50 alto x 157 largo
E
39
05-AR 686 + CZ 39 01.09.2005, 11:08:46 Uhr
Page 40

E
Antes de revisar el recordatorio, se ruega concluir la conexión. Si después de
haber revisado el recordatorio, existen todavía cuestiones pendientes, contacte
por favor su próximo servicio técnico.
Síntoma de error Causa Solución
Los discos compactos sólo se
introducen hasta la mitad del
portadisco.
„Err“ se indica en el display.
No se puede elegir CD por el
II
.
botón
Después de la introducción en el
aparato el disco compacto o el
casete no se reproduce.
El CD para.
Ninguna función.
El equipo no deja encenderse o
apagarse por el encendido.
Reparación de averías
Los tornillos para el transporte
seguro no se han retirado.
El lado incorrecto del CD ha sido
insertado.
No se ha insertado ningún CD. Inserte un CD.
El regulador de volumen está
regulado muy bajo.
Las conexiones no se han llevado a cabo correctamente.
La superfi cie de rodadura es
áspera.
El aparato no está instalado de
forma fi ja.
El CD está defecto.
El CD está sucio. Limpie el CD.
Es probable que el equipo haya
sido montado de manera demasiado empinada en el vehículo.
El encendido está desconectado.
Uno o varios fusibles se han
fundido.
Conexión fallada
(cada fabricante automovilísto
tiene la conexión ISO en otro
sitio.)
Retire los tornillos para el
transporte seguro.
Inserte el lado correcto del CD.
Regule el regulador de volumen
más alto.
Revise la conexión +12V así
como el circuito de tierra.
Para la reproducción del CD
espere hasta que la calle esté
más lisa.
Instale el aparato de forma fi ja.
Asegúrese que se utilice la
fi jación trasera, si el vehículo
no ofreciese ninguna fi jación
adecuada para la parte posterior
del aparato.
Pruebe otro CD. Si está se
reproduce correctamente,
posiblemente esté el primer CD
dañado.
¡Por favor observe que no
sobrepase un ángulo máximo de
20° grados!
Gire la llave de contacto a „ON“
o „ACC“.
Sustituya el fusible por otro
fusible-7 A /0,5 A/0,5 A.
Por favor contacte a su taller
automovilístico o un experta
automovilístico por adaptadores
de conexión específi cos para
vehículos
40
05-AR 686 + CZ 40 01.09.2005, 11:08:46 Uhr
Page 41

Síntoma de error Causa Solución
El aparato no funciona correctamente (EJECT,LOAD, PLAY).
No hay recepción de radio.
Recepción insufi ciente de radio.
La microcomputadora se ha
perturbado a causa de campos
electromagnéticos.
El cable de antena no está
conectado.
Es posible que su vehículo tenga
una antena especial (antena con
tensión en modo fantasma)
Extraiga el CD o el casete para
introducirlo de nuevo.
Desconecte el aparato y después conéctelo de nuevo.
Introduzca bien el cable de
antena en el jack de antena del
aparato.
Por favor contacte a su taller
automovilístico o un experta
automovilístico. (Para vehículos
“extranjeros” hay vías específi cas de alimentación o adaptadores especiales de tensión.)
E
41
05-AR 686 + CZ 41 01.09.2005, 11:08:46 Uhr
Page 42

E
• Antes de la reproducción de cada CD compruebe que no tenga grietas, arañazos y líneas onduladas. CDs con tales daños eventualmente no puedan ser
reproducidos correctamente. Le recomendamos que no utilice estos CDs.
• ¡Sólo utilice CDs normales redondos con un diámetro de 12 cm! CDs con un
diámetro de 8 cm o con contornos, por ejemplo una mariposa o un corazón,
no están apropiados para la reproducción. Existe el peligro de destrucción del
CD y del disco del reproductor. No podemos asumir ninguna responsabilidad
por daños causados por CDs inapropiados.
Manejo de un CD
Limpieza del CD
Antes de reproducir el CD, limpie el CD con un
paño de limpieza limpio y sin polvo. Pase el paño
al CD en dirección de la fl echa.
Nota: No utilice disolventes como bencina o
diluyente. Los detergentes en general o sprays
antiestáticos estropean el aparato.
Introducción del CD
Si introduce el CD con la sobreimpresión hacia
abajo, se podría estropear el aparato.
Siempre introduzca el CD con el etiquetado hacia
arriba.
Nota: Si ya se encuentra un CD en el portadisco,
no intente introducir otro CD más. Esto podría
ocasionar daños al aparato.
Coger un CD
Agarre el CD siempre por el borde. Para mantener
el CD limpio, no toque la superfi cie.
• No pegue sobre el CD adhesivos o cinta adhesiva.
• No exponga el CD a la radiación solar directa o
a fuentes de calor, como podrían ser los tubos
de la calefacción, ni tampoco deje el CD en el
coche, cuando esté aparcado a pleno sol, ya
que esto conlleva a un considerable aumento
de temperatura.
42
05-AR 686 + CZ 42 01.09.2005, 11:08:47 Uhr
Page 43

Este aparato se ha examinado según las normativas actuales y vigentes de la
Comunidad Europea, como p.ej. compatibilidad electromagnética y directiva de
baja tensión y se ha construido según las más nuevas especifi caciones en razón
de la seguridad.
No reservamos el derecho de efectuar modifi caciones técnicas.
Garantía
Para el aparato comercializado por nosotros nos responsabilizamos con una
garantía de 24 meses a partir de la fecha de compra (factura de compra).
Durante el período de garantía nos encargamos gratuítamente de los defectos del
aparato y de los accesorios*), que se hayan originado por defectos del material o
de la fabricación. Dependiendo de nuestra estimación se realizará una reparación
o un cambio. ¡Los servicios de garantía no prolangan la garantía, ni se incia por
ello un período nuevo de garantía!
Como comprobante para la garantía es válido la factura de compra. Sin este
comprobante no se podrá realizar un cambio o una reparación gratuíta.
En caso de garantía entregue el aparato completo en su embalaje original junto
con la factura a su agente comerciante.
*) Defectos en las piezas de accesorio, no signifi can automáticamente el recambio
gratuito del aparato completo. ¡En este caso dirijase por favor a nuestra linea
de atención al cliente! ¡Rotos de vidrio o roturas en las piezas de plástico deben
pagarse siempre por el cliente !
Defectos en los accesorios de uso o en las piezas de desgaste (p.ej. escobillas de
carbón del motor, varillas amasadoras, correas de transmisión, mando a distancia
de repuesto, cepillos de dientes de repuesto, hojas de sierra etc.), como también
la limpieza, mantenimiento o el recambio de piezas de desgaste no recaen en la
garantía e irán al cargo del cliente!
En caso de intervención ajena se expira la garantía.
Después de la garantía
Después de haber expirado la garantía se pueden realizar las reparaciones por
el concesionario o por el servicio de reparaciones. Los gastos irán al cargo del
cliente.
E
43
05-AR 686 + CZ 43 01.09.2005, 11:08:47 Uhr
Page 44

E
Signifi cado del símbolo „Cubo de basura“
Proteja nuestro medio ambiente, aparatos eléctricos no forman parte de la basura
doméstica.
Haga uso de los centros de recogida previstos para la eliminación de aparatos
eléctricos y entregue allí sus aparatos eléctricos que no vaya a utilizar más.
Ayudará en evitar las potenciales consecuencias, a causa de una erronéa eliminación de desechos, para el medio ambiente y la salud humana.
Con ello, contribuirá a la recuperación, al reciclado y a otras formas de reutilización de los aparatos viejos eléctricos y electrónicos.
La información cómo se debe eliminar los aparatos, se obtiene en su ayuntamiento o su administración municipal.
En varios países de la UE se prohibe a partir del 13.8.2005 la eliminación de
aparatos viejos eléctricos y electrónicos a través de la basura doméstica y/o del
vertido residual.
En Alemania a partir del 23.3.2006.
44
05-AR 686 + CZ 44 01.09.2005, 11:08:47 Uhr
Page 45

Índice
A
Ajustar el volumen............................................36
Apagar..............................................................36
Avisos de manejo .............................................35
Avisos de Seguridad.........................................32
B
BAND tecla.......................................................36
C
CD (manejo del CD) .........................................42
CLK tecla..........................................................38
Conexión ..........................................................34
Consejos para la instalación.............................33
D
Datos técnicos..................................................39
Desmontar el elemento de mando ...................36
DSP (vea EQ)...................................................38
E
Encender ..........................................................36
Ensordecer (vea botón MUTE).........................37
EQ (Ajustes del Ecualizador)............................38
Estéreo intercalador .........................................37
Expulsar CD .....................................................38
F
Función de probar (vea INTRO).......................38
G
Garantía............................................................43
H
Hora (vea CLK).................................................38
I
E
Importantes informaciones
adicionalespara la instalación...........................34
Instalación ........................................................33
INTRO (MON/INT)............................................37
L
LOC / LOCAL....................................................37
LOU (Loudness) ...............................................37
M
Manejo..............................................................36
Manejo de un CD..............................................42
Mono intercalador.............................................37
Montaje (avisos de seguridad) .........................32
MUTE tecla (ensordecer) .................................37
P
Play / Pause tecla (II).....................................37
R
RANDOM (RDM) (Reproducción casual).........37
Reparación de averías......................................40
REPEAT (RPT) (Repetir)..................................37
Repetir (RPT) ...................................................37
Reproducción casual (RDM) ...........................37
S
Seguridad en el transporte ...............................32
SEL tecla ..........................................................35
T
Tecla de expulsión............................................38
TUNE regulador................................................36
45
05-AR 686 + CZ 45 01.09.2005, 11:08:48 Uhr
Page 46

I
Utilizzare l’apparecchio solo per l’uso previsto.
Montare l’apparecchio in modo che le aperture per la ventilazione presenti non
vengano coperte.
Non togliere mai la protezione dell’apparecchio. Riparazioni non a regola d’arte
possono causare notevoli pericoli per l’utente. Nel caso di danneggiamento
dell’apparecchio non metterlo più in funzione ma farlo riparare da un esperto.
Il simbolo con il punto esclamativo fa presente all’utente la presenza di
importanti avvertenze per l’uso e la manutenzione nei fogli di accompagnamento dell’apparecchio.
Gli apparecchi dotati di questo simbolo lavorano con un „Laser classe 1“
per riprodurre i CD. Gli interruttori di sicurezza integrati hanno lo scopo
di impedire che l’utente venga esposto alla luce non visibile del laser,
pericolosa per l’occhio umano, aprendo lo scomparto per i CD.
Questi interruttori di sicurezza non devono mai essere cavallottati né manipolati
perché altrimenti sussiste il rischio di esposizione alla luce del laser.
Avvertenze di sicurezza
Sicurezza della circolazione
• La sicurezza della circolazione è sempre l’obiettivo principale. Quindi utilizzare
sempre l’autoradio in modo da essere sempre pronti a far fronte alla situazione
stradale attuale.
• Tenere conto che ad una velocità di 50 km/h si percorrono 14 m al secondo.
• In situazioni critiche se ne sconsiglia il comando.
• Le avvertenze, p.e. della polizia e dei vigili del fuoco, devono poter essere
sempre percepite tempestivamente e con sicurezza nel veicolo.
• Per questa ragione durante il viaggio ascoltate sempre il vostro programma
con un volume adeguato.
Per la durata del montaggio e del collegamento
osservare le seguenti avvertenze di sicurezza
• Scollegare prima il polo negativo poi quello positivo della batteria. (Collegare in
ordine inverso.)
Attenzione: Se la batteria è staccata dalla rete, tutte le memorie volatili perdo-
no le loro informazioni. Per cortesia osservare le avvertenze di sicurezza del
produttore del veicolo.
• La sicura principale deve essere installata possibilmente vicina (max. dopo
30 cm) al polo positivo della batteria affi nché, in caso di incidente, l’auto sia
46
05-AR 686 + CZ 46 01.09.2005, 11:08:48 Uhr
Page 47

protetta da un eventuale incendio dei cavi. Se l’installazione non dovesse corrispondere a questa direttiva di produzione, la protezione assicurativa cessa.
• La sezione trasversale del cavo positivo e negativo non deve essere inferiore a
1,5 mm².
• Durante la foratura di buchi fare attenzione che non vengano danneggiate parti
del veicolo.
Consigli per l’installazione:
• I tubi di protezione per cavi proteggono i cavi dall’abrasione su parti spigolose
della carrozzeria.
• L’isolamento dei cavi non deve essere danneggiato durante l’installazione.
• Ovviamente nell’installazione di un HiFi per auto si devono usare gli utensili
corretti.
A seconda del tipo di costruzione il vostro veicolo può differire da questa descrizione. Decliniamo ogni responsabilità per danni insorti a causa di errori di montaggio o collegamento e per danni successivi.
Installazione
Montare la radio operando
conformemente alle illustrazioni
seguenti
a Dado
b Rosetta elastica
c Rondella
d Vite
e Squadra di montaggio
f Alloggiamento di inserimento
g Tirante fi lettato
Attenzione!
h Viti del sistema di si-
curezza per il trasporto
(da rimuovere prima del
montaggio)
i Dispositivo di estrazione
(chiave per le operazioni di
smontaggio)
j Fissaggio
I
47
05-AR 686 + CZ 47 01.09.2005, 11:08:49 Uhr
Page 48

I
Appoggiare prima il frontalino
con i comandi sul lato destro e
poi innestarlo in posizione sul
lato sinistro.
Allacciamento
Realizzare l’allacciamento conformemente a quanto indicato dal grafi co.
Collegamento
per antenna
Collegamento ISO
Collegamento di
corrente permanente
Massa
Accensione
Antenna automatica (Blu)
Altoparlante a
sinistra davanti
a sinistra dietro
Attenzione:
• Il pannello di comando rimovibile deve essere montato soltanto dopo aver
effettuato l’allacciamento del cavo.
• Si consiglia di utilizzare altoparlanti con un’impedenza pari a 4 ohm.
Giallo
Nero
Rosso
Bianco
Bianco/nero
Verde
Verde/nero
fusibile
fusibile
fusibile
Uscita RCA
Grigio
Grigio/nero
Viola
Viola/nero
Rosso R
Rosso L
Altoparlante
a destra
davanti
a destra dietro
Informazioni importanti per il montaggio
della vostra autoradio!
1. Le viti della sicura di trasporto (h) devono essere rimosse prima del
montaggio altrimenti il CD non entra.
2. L’apparecchio è confi gurato per il polo negativo della batteria, il quale deve
essere collegato alla carrozzeria del veicolo. Accertarsene prima di procedere
all’installazione.
48
05-AR 686 + CZ 48 01.09.2005, 11:08:49 Uhr
Page 49

3. Durante il montaggio/collegamento del vostro apparecchio tener conto che non
ogni veicolo è dotato di un “collegamento ISO”. In questo caso consigliamo
l’impiego di un adattatore ISO specifi co per autoveicoli.
Gli adattatori sono disponibili nei negozi di accessori per auto e/o presso la
vostra offi cina di fi ducia.
4. Nel caso di „Durata +“ (Collegamento di corrente permanente), a seconda del
tipo di veicolo possono esserci differenze. (Questo è necessario per memorizzare le stazioni emittenti).
Per garantire tutte le funzioni è assolutamente necessario eseguire il mon-
taggio conformemente a queste istruzioni. In caso di dubbio rivolgersi ad
un’offi cina autorizzata.
5. L’angolo di inclinazione massimo nel montaggio dell’autoradio non deve superare i 20° perché nel caso di angoli di montaggio maggiori il funzionamento
dell’autoradio (Lettore CD) non è più garantito.
6. A seconda del tipo di veicolo in casi eccezionali possono presentarsi disturbi
nel funzionamento Radio/CD. Questi si possono eliminare con un fi ltro anti-
disturbo supplementare
in serie di un fi ltro antidisturbo, possono esserci ugualmente limiti dovuti alla
vettura.
Potete avere questo fi ltro nei negozi di accessori auto e/o presso la vostra
offi cina di fi ducia.
7. Durante il montaggio della radio fare attenzione che il retro della radio abbia
abbastanza spazio affi nché sia garantita una ventilazione suffi ciente.
8. Nel collegamento dell’antenna ci sono due norme diverse. Prima la spina
vecchia (50 Ohm) con contatto radio lungo sporgente verso l’esterno sul lato
veicolo e una presa rotonda sul lato radio. Poi la spina antenna ISO (150
Ohm). Adattatori per entrambi i formati sono disponibili presso i produttori di
accessori e/o presso la vostra offi cina autorizzata.
Con VW/Audi osservare assolutamente: l’antenna attiva ha bisogno di ten-
sione sulla schermatura del cavo coassiale antenna senza cui la ricezione è
insuffi ciente. Un adattatore antenna con alimentazione artifi ciale risolve questo
problema.
. Malgrado il vostro apparecchio CD sia già dotato
Avvertenze per l’uso
1. Nel caso in cui il quadro comandi anteriore venga rimosso durante il funzionamento della radio o del lettore CD, l’apparecchio si disattiva automaticamente.
2. Nel caso in cui la temperatura all’interno dell’abitacolo del veicolo sia particolarmente elevata, per esempio quando il veicolo sia rimasto parcheggiato
a lungo al sole, si consiglia di non attivare il lettore fi nché la temperatura
dell’abitacolo non sia diminuita in seguito a un breve periodo di marcia.
I
49
05-AR 686 + CZ 49 01.09.2005, 11:08:50 Uhr
Page 50

3. Affi nché il pannello di comando rimovibile possa essere conservato in condi-
I
zioni di sicurezza, si consiglia di utilizzare a tale scopo l’involucro protettivo
appositamente previsto allo scopo.
4. A causa della molteplicità di software disponibili e di media CD, la riproduzione
di CD creati dall’utente non può essere garantita.
Funzionamento
1. Tas to
Premere il tasto
2. Tasti +/- (volume)
Durante il funzionamento dell’apparecchio, questi pulsanti servono ai fi ni della
regolazione del volume. In collegamento con il tasto SEL premuto prima si
possono apportare modifi che nei menu, p.e. nella modalità del suono.
3. Tasto SEL (selezione)
Premere brevemente il tasto SEL per entrare nel menu di scelta della modalità del
suono. Sul display viene visualizzato „VOL“ ai fi ni dell’impostazione del volume.
Azionando ripetutamente il tasto SEL, è quindi possibile selezionare le singole
opzioni di menu quali, per esempio, VOL (Volume), bAS (Bassi), TRE (Alti), bAL
(Balance) e FAd (Regolazione dissolvenza). Per poter modifi care le impostazioni
delle varie opzioni di menu, è suffi ciente servirsi dei pulsanti „+“ oppure „-“.
Nota: se sono state selezionate impostazioni dell’equalizzatore in EQ , p.e.
POP, ROC(K), non si possono impostare bAS e TRE .
Tasto on/off
4.
Premere questo pulsante per attivare e disattivare l’apparecchio.
5. Display LCD (display a cristalli liquidi)
6. Tasto BAND
a) Modalità radio
Premere brevemente il tasto BAND, per commutare tra le bande FM (ultracorta) e AM (onda media). La denominazione delle corrispndenti onde FM,
AM viene indicata nell‘ indicazione LCD.
b) Modalità CD
Premendo il tasto BAND nel funzionamento CD, si può ritornare al modo
radio.
7./8.
Tasti I / I TRACK UP/DOWN
Nella modalità CD:
per avanzare o tornare indietro, premere brevemente il tasto I oppure I.
Per poter scorrere i titoli, tenere premuto il tasto direzionale I oppure I.
9. Manopola TUNE
Girando la manopola TUNE si può impostare la frequenza radio desiderata. La
frequenza attuale viene indicata nel display.
50
per staccare il campo di comando anteriore.
05-AR 686 + CZ 50 01.09.2005, 11:08:51 Uhr
Page 51

10. Tasto MUTE (mute)
Premere il tasto MUTE per sopprimere temporaneamente il volume. Nel display appare MUTE. Premere di nuovo questo tasto per ripristinare il volume.
11. Tasto II
Per cambiare il funzionamento da radio a CD, con il CD inserito, premere
questo tasto. Premere il tasto II allo scopo di interrompere la riproduzione
del CD (funzione di pausa). Per avviare nuovamente la riproduzione del CD,
azionare nuovamente questo pulsante.
Nota: A causa della molteplicità di software disponibili e di media CD, la ripro-
duzione di CD creati dall’utente non può essere garantita.
Prestare attenzione a questa avvertenza per la riproduzione di CD e CDR
in formato MP3! L’apparecchio non è adatto a MP3. Sebbene il CD inizi a
girare, non è possibile riprodurre la funzione audio.
12. Tasto LOC/RPT
a) Modalità radio
• Premendo il tasto LOC/RPT si migliora la ricezione in regioni dove il
segnale è troppo forte. Nel display appare l‘ indicazione „LOC“.
• Premendo nuovamente il tasto LOC/RPT si commuta di nuovo nel
modo DISTANT. Nelle regioni con un segnale troppo debole si migliora
la ricezione. L‘ indicazione „LOC“ nel display si spegne.
b) Modalità CD
Premere il tasto LOC/RPT. Il brano corrispondente al titolo corrente viene
ripetuto. Per annullare questa funzione, premere nuovamente questo
pulsante.
13. Tasto LOU/RDM
Accendere e spegnere della funzione LOUDNESS.
Con la funzione LOUDNESS (LOUD) si espandono le catratteristiche del
suono quando il volume è basso; si aumentano così gli alti e bassi.
Tenere premuto il tasto LOU/RDM per ca. 2 secondi nel funzionamento CD. I
brani corrispondenti ai titoli del CD vengono riprodotti in una sequenza casuale. Per sopprimere questa funzione, tenere premuto nuovamente questo tasto
(ca. 3 Sek.).
14. Tasto MON/INT
a) Modalità radio
STEREO/MONO commutazione
b) Modalità CD
Premere il tasto MON/INT. Ognuno dei brani del CD viene riprodotto per
10 secondi. Per interrompere la ricerca, azionare nuovamente questo
pulsante. Viene in questo modo riprodotto il brano corrispondente al titolo
correntemente selezionato.
I
51
05-AR 686 + CZ 51 01.09.2005, 11:08:52 Uhr
Page 52

15. Tasto EQ (Equalizer)
I
Premendo il tasto EQ, si possono selezionare le impostazioni dell‘ equalizar
POP, CLS (CLASSICS) e ROC(K). (Nel display appare DSP.) Per realizzare le
proprie impostazioni, spegnere DSP. V. anche il punto 3.
16. Apertura per CD
Tasto di espulsione
17.
Premere questo pulsante per estrarre il CD.
18. Tasto CLK (ora)
a) Per verifi care l‘ ora attuale, premere il tasto CLK per ca. 5 sec.
b) Per impostare l‘ ora tenere premuto il tasto CLK per ca. 3 sec. L‘ ora
indicata si illumina nel display. In seguito premere il tasto I (7) per
impostare i minuti, e il tasto I (8) per impostare l’ ora. Per memorizzare
premere di nuovo brevemente il tasto CLK.
19. Display luminoso (LED) lampeggiante (senza immagine)
Allorché si rimuove il quadro comandi anteriore, questo display lampeggia.
52
05-AR 686 + CZ 52 01.09.2005, 11:08:52 Uhr
Page 53

Dati tecnici
Generalità
Tensione di rete ........................................................................................DC 13,8 V
Consumo di corrente .................................................................................. 7 A max.
Potenza ........................................................................................................ 4 x 7 W
Ambito FM
Ambito di frequenza...............................................................87,5 MHz - 108,0 MHz
Sensibilità utile.................................................................................................10 µV.
Frequenza I.F ............................................................................................ 10,7 MHz
Ambito AM
Ambito di frequenza...................................................................514 kHz - 1640 kHz
(Line-Out)
Uscita................................................................................................. max. 2000 mV
Impedenza..................................................................................................600 Ohm
Lettore CD
Sistema.........................................................................................Sistema audio CD
CD utilizzabili........................................................................CD/CD-R/CD-RW Disk
Numero di bit di quantifi cazione .......................................................................1 bit.
Formato del segnale....................................................Frequenza modello 44,1 kHz
Caratteristiche di frequenza........................................................20 – 100 Hz ≤ 8 dB
........................................................10 – 20 kHz ≤ 8 dB
Rapporto segnale-disturbo ..................................................................50 dB (1 kHz)
Numero di canali................................................................................ 2 canali stereo
Dimensioni dell’alloggiamento.................................................178 L x 50 H x 157 P
I
53
05-AR 686 + CZ 53 01.09.2005, 11:08:52 Uhr
Page 54

I
Prima di esaminare la lista di riscontro, completare in primo luogo l’allacciamento.
Nel caso in cui vi siano ancora domande in seguito alla verifi ca sulla base della
lista di riscontro, si consiglia di rivolgersi al centro di assistenza tecnica più vicino.
Anomalie Causa Soluzione
I CD´s vengono inseriti solo fi no
a metà nel vano CD.
Il display visualizza „Err“.
Non è possibile selezionare il CD
tramite il tasto
In seguito all’inserimento
nell’apparecchio, il CD o la
cassetta non funziona.
Il CD salta.
Nessuna funzione.
Non è possibile accendere l’apparecchio tramite
l’accensione on/off.
Eliminazione delle anomalie
Le viti e la sicura per il trasporto
non sono stati rimossi.
Il CD non è inserito correttamente.
II
.
Non c’è nessun CD inserito. Inserire un CD.
Il regolatore del volume è impo-
stato su un valore troppo basso.
Gli allacciamenti non sono stati
effettuati in modo corretto.
La superfi cie della strada aspra.
L’apparecchio non è stato
montato in modo saldo.
Il CD è difettoso.
Il CD è sporco. Pulire il CD.
Eventualmente l’apparecchio
è montato troppo inclinato nel
veicolo.
Il sistemadi accensione è
disattivato.
Una o più sicure sono fuse.
Collegamento errato
(ogni produttore di automobili
occupa il collegamento ISO nel
veicolo diversamente).
Rimuovere le viti e la sicura per
il trasporto.
Inserire il CD correttamente.
Impostare un valore più elevato
per il regolatore del volume.
Controllare il collegamento da
+12V e il collegamento di massa.
Prima di mettere in funzione
il CD attendere che la strada
diventi piana.
Montare l’apparecchio
saldamente.Accertarsi che
venga utilizzato il sistema di
fi ssaggio posteriore nel caso in
cui il veicolo non disponga di
supporti appropriati per la parte
posteriore dell’apparecchio.
Provare con un altro CD. Qualora quest’ultimo non presenti
anomalie, il CD precedente è
probabilmente danneggiato.
Non superare l’angolo di inclinazione max. di 20° gradi!
Ruotare la chiave di accensione
su „ON“ oppure „ACC“.
Sostituire il dispositivo di
sicurezza con un altro da
7 A /0,5 A/0,5 A.
Contattare la propria offi cina
o un esperto in automobili per
un adattatore di collegamento
specifi co per auto.
54
05-AR 686 + CZ 54 01.09.2005, 11:08:52 Uhr
Page 55

Anomalie Causa Soluzione
L’apparecchio non funziona
correttamente
(EJECT, LOAD, PLAY).
Non vi è alcuna ricezione radio.
Pessima ricezione radio.
Il microcomputer è stato disturbato da campi elettromagnetici.
Il cavo dell’antenna non è
collegato.
Eventualmente il vostro veicolo
ha un’antenna speciale (antenna
ad alimentazione artifi ciale).
Estrarre il CD o la cassetta
in oggetto, quindi effettuare
nuovamente l’inserimento.
Disattivare l’apparecchio e
riattivarlo nuovamente.
Inserire correttamente il cavo
dell’antenna nella presa corrispondente dell’apparecchio.
Contattare la propria offi cina
o un esperto in automobili.
(Per “fabbricati di terzi” ci sono
scambi di alimentazione specifi ci
ovvero adattatori di tensione.)
I
55
05-AR 686 + CZ 55 01.09.2005, 11:08:53 Uhr
Page 56

I
• Controllare che tutti i CD non presentino crepe, graffi e rigonfi amenti prima
di riprodurli. I CD con tali danni eventualmente non possono essere riprodotti
correttamente. Non impiegare questi CD.
• Impiegare solo i CD rotondi comunemente in commercio con un diametro di
12 cm! I CD con un diametro di 8 cm o CD che hanno contorni, p.e. di farfalla
o cuore, non si prestano per la riproduzione. Pericolo di distruzione del CD e
dell’unità. Decliniamo ogni responsabilità per danni dovuti a CD non idonei.
Utilizzo di un CD
Pulizia dei CD
Prima di attivare il lettore CD, pulire il CD con un
panno pulito e privo di polvere. Tirare il CD nel
senso indicato dalla freccia.
Avvertenza: non utilizzare solventi quali la benzina
o diluenti. I comuni detergenti o gli spray antistatici
danneggiano l’apparecchio.
Inserimento CD
Se si inserisce il CD con le scritte rivolte verso il
basso, l’apparecchio può essere danneggiato.
Inserire sempre i CD con l’etichetta rivolta verso
l’alto.
Avvertenza: nel caso in cui nell’apposita apertura
per CD sia già presente un CD, si raccomanda
di non tentare di inserire un ulteriore CD. In caso
contrario, si potrebbe danneggiare l’apparecchio.
Toccare il CD
I CD devono essere afferrati sempre sul bordo. Affi nché i CD possano mantenersi puliti, non afferrarli
sulla superfi cie.
• Non incollare etichette o nastri adesivi sui CD.
• Non esporre i CD ai raggi solari o a fonti di
calore quali, per esempio, i tubi di riscaldamento. Non lasciarli inoltre in auto, quando
quest’ultima è parcheggiata al sole, poiché si
potrebbe verifi care un considerevole aumento
della temperatura.
56
05-AR 686 + CZ 56 01.09.2005, 11:08:53 Uhr
Page 57

Questo apparecchio è stato controllato sulla base di tutte le direttive CE attuali in
vigore in questo settore, quali per esempio la normativa in materia di compatibilità
elettromagnetica e la direttiva in materia di bassa tensione, ed è stato costruito
conformemente alle norme di sicurezza più moderne.
Con riserva di apportare modifi che tecniche.
Garanzia
Per l’apparecchio da noi messo in commercio ci assumiamo una garanzia di
24 mesi dalla data di acquisto (scontrino).
Durante la garanzia noi ci impegniamo ad eliminare gratuitamente i guasti
dell’apparecchio o degli accessori*), dovuti a difetti di materiale o di fabbricazione,
riparandoli o, a nostra discrezione, sostituendoli. Le prestazioni in garanzia danno
luogo a una proroga della garanzia né danno diritto ad una nuova garanzia!
Per la garanzia è suffi ciente lo scontrino di acquisto. Senza questo scontrino non
sussiste il diritto né ad una sostituzione né ad una riparazione gratuita.
Nel caso si ricorra alla garanzia, restituire al rivenditore l’apparecchio completo in
ogni sua parte, nell’imballaggio originale unitamente allo scontrino.
*) Danni agli accessori non giustifi cano automaticamente lo scambio gratuito
dell’apparecchio completo. Si prega di mettersi in contatto con la nostra centrale
telefonica. Danni alle parti di vetro oppure fratture ai pezzi di materia plastica sono
obbligatoriamente a spese del cliente.
La riparazione di pezzi d’uso ovvero soggetti a logoramento (cursori, ganci
impastatori, cinghie di trasmissione, telecomandi di ricambio, spazzolini di ricambio, lame di seghe ecc.) come anche operazioni di pulizia e manutenzione o la
sostituzione di pezzi soggetti a logoramento non rientrano nella garanzia e quindi
sono a pagamento!
La garanzia si annulla nel caso di intervento da parte di terzi.
Dopo la garanzia
Al termine della garanzia le riparazioni possono essere eseguite dietro pagamento
dal corrispettivo negozio specializzato o servizio riparazioni.
I
57
05-AR 686 + CZ 57 01.09.2005, 11:08:54 Uhr
Page 58

I
Signifi cato del simbolo „Eliminazione“
Salvaguardare l’ ambiente, gli elettrodomestici non vanno eliminati come rifi uti
domestici.
Per l’ eliminazione degli elettrodomestici, fare uso die posti di raccolta previsti per
questo tipo e porre quegli elettrodomestici che non sono più in uso.
Si contribuisce così ad evitare un effetto potenziale sull’ ambiente e sulla salute,
dovuto magari ad una eliminazione sbagliata.
Questo signifi ca un contributo personale alla riutilizzazione, al riciclaggio e altre
forme di utilizzazione di elettrodomestici ed apparecchi elettronici usati.
Si possono trovare le corrispondenti informazioni sugli appositi luoghi di raccolta,
nelle amministrazioni die comuni.
In molti paesi della Comunità Europea l’ eliminazione di elettrodomestici oppure
apparecchi elettronici è vietata se eseguita insieme ai rifi uti domestici. Questo vale
a partire dal 13.8.2005.
In Germania a partire dal 23.3.2006.
58
05-AR 686 + CZ 58 01.09.2005, 11:08:54 Uhr
Page 59

Elenco tematico - Indice
A
Accensione.......................................................50
Allacciamento ...................................................48
Avvertenze di sicurezza....................................46
Avvertenze per l’uso.........................................49
B
BAND tasto.......................................................50
C
CD uso .............................................................56
CLK tasto..........................................................52
Consigli per l’installazione ................................47
D
Dati tecnici........................................................53
DSP (v. EQ)......................................................52
E
Eliminazione delle anomalie.............................54
EQ (impostazione equalizer) ............................52
Espulsione CD..................................................52
Espulsione tasto ...............................................52
F
Funzionamento ................................................50
Funzione Intro (v. INTRO).................................51
G
Garanzia...........................................................57
I
Importanti informazioni
aggiuntive per il montaggio...............................48
Impostare il volume ..........................................50
Installazione......................................................47
INTRO (MON/INT)............................................51
L
I
LOC / LOCAL....................................................51
LOU (suono).....................................................51
M
Mono commutazione ........................................51
Montaggio (avvertenze di sicurezza)................ 46
MUTE tasto (Mute) ...........................................51
Mute (v. tasto MUTE)........................................ 51
O
Ora (v. CLK)......................................................52
P
Play / Pause (II).............................................51
R
RANDOM (RDM) (riproduzione casuale) .........51
REPEAT (RPT) (ripetere) .................................51
Ripetere (RPT) .................................................51
Riproduzione casuale (RDM) ..........................51
S
SEL tasto..........................................................50
Sicurezza della circolazione .............................46
Smontare l‘ elemento di comando....................50
Spegnere..........................................................50
Stereo commutazione.......................................51
T
TUNE regolatore ..............................................50
U
Utilizzo di un CD...............................................56
59
05-AR 686 + CZ 59 01.09.2005, 11:08:55 Uhr
Page 60

GB
Use the device only for the intended purpose.
The device should be installed in such a way that existing ventilation holes are not
covered.
Never open the housing of the device. Incorrect repairs can constitute a conside-
rable risk for the user. If the device is damaged it should not be used, but repaired
by a specialist.
The symbol with an exclamation mark should advise the user of
important operation or maintenance instructions in the accompanying
documentation.
Devices bearing this symbol work with a „class 1 laser“ for tracing the
CD. The built-in safety switches should prevent the user being exposed
to dangerous laser light, which is invisible to the human eye, when the
CD compartment is opened.
Under no circumstances should these safety switches be bypassed or manipulated, as this could result in a danger of exposure to the laser light.
Safety Information
Road Safety
• Road safety is of paramount importance. You should therefore use your car
radio at all times in such a way that you are able to cope with the current traffi c
situation.
• Please remember that at a speed of 30 mph (50 kph) you travel 15 yards
(14 metres) in one second.
• We advise you not to operate the radio in critical situations.
• It must be possible to hear the sirens of police and fi re brigade vehicles etc.
from inside the vehicle in good time.
• When driving you should therefore not turn the radio volume up excessively.
When installing and connecting the radio please note
the following safety information.
• First disconnect the minus pole and then the plus pole of the battery. (connection in the reverse order.)
Please note: Once the battery has been disconnected the information is lost
from all volatile memory. Please note the safety information provided by the
vehicle manufacturer.
60
05-AR 686 + CZ 60 01.09.2005, 11:08:55 Uhr
Page 61

• The main fuse must be installed as closely as possible (not more than 30 cm
away) to the plus pole of the battery so that the car is protected from any cable
fi re caused, for example, by an accident. If the above is not complied with the
insurance protection no longer applies.
• The cross-section of the plus and minus cable must not exceed 1.5 mm².
• When drilling holes please ensure that none of the vehicle components are
damaged.
Installation Tips:
• Cable protection sleeves protect cables against fraying on sharp body parts.
• The insulation of the cables must not be damaged during installation.
• It is essential to use the correct tools when installing car hi-fi .
Depending on the model, your vehicle may deviate from the above description. We
do not accept any liability for damage caused by installation or connection errors
or for consequential damage.
Installation
Please install the car radio as
shown below
a Nut
b Spring washer
c Plain washer
d Screw
e Mounting bracket
f Slide-in housing
g Threaded bolt
Note:
h Retaining screws during
transport (please remove
before installation)
I Extraction tool (spanner for
dismantling)
j Frame
GB
61
05-AR 686 + CZ 61 01.09.2005, 11:08:56 Uhr
Page 62

GB
First place the operating panel
in position on the right-hand side
and then lock it into place on
the left.
Connection
Connect the device as shown in the diagram.
Antenna connection
ISO connection
Constant current
connection
Earth
Ignition
Automatic antenna (Blue)
Loudspeaker,
front left
rear left
Yellow
Black
Red
White
White/black
Green
Green/black
fuse
fuse
fuse
RCA output
Grey
Grey/black
Violet
Violet/black
Note:
• Do not attach the removable control panel until after connection of the cables.
• Please use loudspeakers with an impedance of 4 ohm.
Important Information for installing your carradio!
1. The screws (h) of the transport locking device should be removed before
installation, as otherwise the CD cannot be inserted.
2. The device is designed for the minus pole of the battery, which must be connected to the body of the vehicle. Please check this before installation.
3. When installing/connecting your device please note that not every vehicle is
equipped with an “ISO connection“. In this case we recommend the use of an
ISO adapter specifi cally designed for your vehicle.
Red R
White L
Loudspeaker,
front right
rear right
62
05-AR 686 + CZ 62 01.09.2005, 11:08:56 Uhr
Page 63

Adapters are available from car accessory shops and/or from your vehicle
workshop.
4. Depending on the specifi c car type, different wiring connection of the
„Duration +” wire (Constant current connection) are available. (However, this is
necessary for storing the radio stations).
In order to guarantee all functions, installation in line with these instructions is
essential. In cases of doubt please contact an authorised car workshop.
5. The angle of inclination when a car radio is installed must not exceed 20°,
as in the case of greater angles of inclination the function of the car radio
(CD Player) can no longer be guaranteed.
6. Depending on the specifi c car type, interferences can be possibly arise during
radio/CD operation. These interferences can avoided easily with an additional
Interferences fi lter. Your car radio is originally prepared with an Interference
Filter already.
In these case, please contact your authorized car dealer.
7. When installing your radio please ensure that there is enough space at the
rear of the radio to ensure suffi cient cooling.
8. For the antenna connection there are two different norms. The fi rst of these is
the old (50 ohm) version with a long protruding round contact on the vehicle
and a round socket on the radio end. The second is the ISO-standardised antenna plug (150 ohm). Adapters for both formats are available from accessory
manufacturers and/or your car workshop.
Important information for VW/Audi vehicles: The active antenna requires
voltage on the shielding of the antenna coaxial cable, without which reception
is unsatisfactory. An antenna adapter with phantom power supply will solve this
problem.
Operating Instructions
1. If the front control panel is removed while the radio or CD is on, the device is
automatically switched off.
2. If the interior of the vehicle becomes very hot, for example after standing in
direct sunlight for a prolonged period, do not switch on the player until the
inside of the vehicle has cooled down a little after you have been driving for a
few minutes.
3. In order to keep the removable control panel in a safe place you should always
use the protective case provided.
4. Playback of CDs produced by the user cannot be guaranteed due to the large
variety of software and CD media available.
GB
63
05-AR 686 + CZ 63 01.09.2005, 11:08:57 Uhr
Page 64

GB
1.
Button
Press the
2. +/- Button (Volume)
During normal playback these buttons are used to set the volume. If the SEL
button is pressed beforehand, changes can be made in the menus, e.g. sound
mode.
3. SEL Button (Select)
Press the SEL button briefl y to access the sound mode selection menu.
The letters „VOL“ appear in the display for setting the volume. By repeatedly
pressing the SEL button you can now select the individual menu items such as
VOL (Volume), bAS (Bass), TRE (Treble), bAL (Balance) and FAd (Fade). The
settings of the individual menu items are changed using the „+“ or „-“ button.
Note: If equaliser settings such as POP and ROC(K) have been selected
under EQ it is not possible to adjust the bAS and TRE .
On/Off Button
4.
Press this button to switch the device on and off.
5. LCD (liquid crystal display)
6. BAND button
a) Radio Operation
Press the BAND button briefl y in order to switch between the FM levels and
AM (medium wave). The designation of the corresponding level FM or AM
appears in the LCD display.
b) CD Operation
By pressing the BAND button during CD operation you can return to radio
mode.
7./8.
I / I Buttons TRACK UP/DOWN
In CD mode:
Press the I or I button briefl y to jump forwards or backwards. If you
would like to scroll the titles of the tracks keep the I or I arrow button
pressed.
9. TUNE Control
By turning the TUNE control you can set the desired radio frequency. The
current frequency is shown in the display.
10. MUTE Button (Mute)
Press the MUTE button to switch off the loudspeakers for a short period.
MUTE appears in the display. Press this button again to cancel the mute
function.
button to remove the front operating panel.
Operation
64
05-AR 686 + CZ 64 01.09.2005, 11:08:57 Uhr
Page 65

11. II Button
Press this button when a CD is inserted to change from radio operation to CD
operation. Press the II button to interrupt playback of the CD (pause function). Press this button again to continue listening to the CD.
Note: Playback of CDs produced by the user cannot be guaranteed due to the
large variety of software and CD media available.
Please note these instructions for playing back CDs and CDRs in MP3
format! The device is not able to play back MP3 fi les. The CD begins to
turn, but the sound cannot be heard.
12. LOC/RPT Button
a) Radio Operation
• In regions where the signal is too strong, press the LOC/RPT button to
improve reception. The letters „LOC“ appeared in the display.
• Press the LOC/RPT button again to return to the DISTANT mode. Reception is now improved in regions where the signal is too weak. The
letters „LOC“ disappear from the display.
b) CD Operation
Press the LOC/RPT button. The track currently being played is repeated.
Press this button again to cancel this function.
13. LOU/RDM Button
Switching the LOUDNESS function on and off.
When the volume is low the LOUDNESS function (LOUD) expands the sound
characteristics by increasing the treble and bass sounds.
Keep the LOU/RDM button pressed down in CD mode for approximately 3 se-
conds. The CD tracks are played at random. Press this button again (approx. 3
seconds) to cancel this function.
14. MON/INT Button
a) Radio Operation
STEREO/MONO switching
b) CD Operation
Press the MON/INT button. Each track on the CD is played for 10 seconds.
Press this button again to stop searching. The currently selected track is
played.
15. EQ Button (Equalizer)
By pressing the EQ button you can select the equaliser settings POP, CLS
(CLASSICS) and ROC(K). (DSP appears in the display.) Turn DSP off to make
your own settings. See also section 3.
16. CD Slit
GB
65
05-AR 686 + CZ 65 01.09.2005, 11:08:58 Uhr
Page 66

17.
GB
Eject Button
Press this button to eject the CD.
18. CLK Button (Time)
a) Press the CLK button to display the current time for approximately 5
seconds.
b) In order to set the time keep the CLK button pressed for approximately 3
seconds. The time fl ashes in the display. Then press the I button (7) in
order to set the minutes, and the I button (8) to set the hours. To store
the time press the CLK button again briefl y.
19. Flashing LED (not shown)
When the front control panel is removed this display fl ashes.
66
05-AR 686 + CZ 66 01.09.2005, 11:08:59 Uhr
Page 67

Technical data
General
Supply voltage..........................................................................................DC 13,8 V
Power consumption.................................................................................... 7 A max.
Power ........................................................................................................... 4 x 7 W
FM band
Frequency range .................................................................87,5 MHz to 108,0 MHz
Effective sensitivity ..........................................................................................10 µV.
I.F. frequency.............................................................................................10,7 MHz
AM band
Frequency range ..................................................................... 514 kHz to 1640 kHz
(Line-Out)
Output................................................................................................ max. 2000 mV
Impedance..................................................................................................600 Ohm
CD player
System.......................................................................................... CD Audio System
Suitable CDs........................................................................CD/CD-R/CD-RW disks
Number of quantising bits..................................................................................1 bit.
Signal format ..............................................................Sampling frequency 44,1 kHz
Frequency characteristics ..........................................................20 – 100 Hz ≤ 8 dB
..........................................................10 – 20 kHz ≤ 8 dB
Signal-to-noise ratio.............................................................................50 dB (1 kHz)
Number of channels ..................................................................... 2 stereo channels
Housing dimensions ...................................................... 178 x 50 x 157 (W x H x D)
GB
67
05-AR 686 + CZ 67 01.09.2005, 11:08:59 Uhr
Page 68

GB
Before going through the checklist please make all the connections fi rst. If you
still have questions after going through the checklist, please consult your local
customer service representative.
Fault Symptoms Cause Solution
CDs are drawn only half way into
the CD tray.
„Err“ is shown in the display.
CD cannot be selected using the
II
button.
After being inserted into the
device the CD or cassette does
not turn.
CD works intermittently
(dropouts).
No function.
Device cannot be switched on or
off via the ignition.
The device does not work correctly (EJECT, LOAD, PLAY).
Troubleshooting
The transport screws have not
been removed.
The CD is inserted the wrong
way round.
There is no CD inserted. Insert a CD.
The volume control is set too
low.
The device has not been correctly connected.
The surface of the road is
uneven.
The device is not fi rmly installed.
The CD is damaged.
The CD is dirty. Clean the CD.
The device may have been
installed in the vehicle at the
wrong angle.
The ignition is switched off.
One or more fuses have blown.
Incorrect connection (each
car manufacturer wires the
ISO connection in the vehicle
differently).
The microcomputer has been
interfered with by electromagnetic fi elds.
Remove the transport screws.
Insert the CD right way round.
Turn up the volume.
Check the +12V and earth
connection.
Wait until the road becomes
smoother before playing the CD.
Install the device fi rmly.
Ensure that the rear attachment
is used if the vehicle does not
have any suitable retainer for the
rear section of the device.
Try another CD. If this works
correctly, the fi rst CD is probably
damaged.
Please note that a maximum
inclination of 20° degrees should
not be exceeded!
Turn the ignition key to „ON“ or
„ACC“.
Replace the fuse by another
7 A /0,5 A/0,5 A fuse.
Please contact your car
workshop or a vehicle specialist
for connection adapters may
specifi cally for your model.
Remove the CD or cassette and
reinsert it.
Switch the device off and on
again.
68
05-AR 686 + CZ 68 01.09.2005, 11:08:59 Uhr
Page 69

Fault Symptoms Cause Solution
No radio reception.
Poor radio reception.
The antenna cable is not
connected.
It is possible that your vehicle
has a special antenna (phantompowered antenna.)
Insert the antenna cable fi rmly
into the antenna socket of the
device.
Please contact your car workshop or a vehicle specialist. (For
other manufacturers there are
specifi c phantom power supply
adapters and voltage adapters
available.)
GB
69
05-AR 686 + CZ 69 01.09.2005, 11:09:00 Uhr
Page 70

GB
• Check all CDs for cracks, scratches and warping before you play them. It is
possible that CDs that are damaged in this way cannot be played back correctly. Such CDs should not be used.
• Use only standard commercially available circular CDs with a 12 cm diameter!
CDs with an 8 cm diameter or CDs with contours, e.g. of a butterfl y or heart,
are not suitable. It is possible that such CDs may not only be destroyed
themselves, but may also destroy the drive of the CD player. We cannot accept
liability for damage caused by the use of unsuitable CDs.
Handling a CD
Cleaning the CD
Before playing a CD, wipe it off with a clean, dustfree cleaning cloth. Pull out the CD in the direction
of the arrow.
Note: Do not use any solvents such as petrol or
thinning agents. Commercially available cleaning
substances or antistatic sprays will damage the
device.
Inserting the CD
If the CD is inserted with the printed side facing
downwards, the device may be damaged.
Always insert the CD with the label facing upwards.
Note: If there is already a CD in the CD slit, do not
try to insert a second CD. This may damage the
device.
Touching the CD
Always hold CDs by the edge. In order to keep the
CD clean do not touch the surface.
• Do not attach any stickers or adhesive tape to
the CD.
• Do not expose the CD to direct sunlight or sources of heat such as heating pipes. Do not leave
CDs in the car if it is parked in direct sunlight
as this will lead to a considerable rise in the
temperature inside the car.
70
05-AR 686 + CZ 70 01.09.2005, 11:09:00 Uhr
Page 71

This device has been tested according to all relevant current CE guidelines,
such as electromagnetic compatibility and low voltage directives, and has been
constructed in accordance with the latest safety regulations.
Subject to technical changes without prior notice!
Guarantee
The device supplied by our Company is covered by a 24 month guarantee starting
on the date of purchase (receipt).
During the life of the guarantee any fault of the device or its accessories *) ascribable to material or manufacturing defects will be eliminated free of charge by
repairing or, at our discretion, by replacing it. The guarantee services do not entail
an extension of the life of the guarantee nor do they give rise to any right to a new
guarantee!
Proof of the guarantee is provided by the proof of purchase. Without proof of
purchase no free replacement or repair will be carried out.
If you wish to make a claim under the guarantee please return the entire machine
in the original packaging to your dealer together with the receipt.
*) Damage to accessories does not mean automatic free replacement of the whole
machine. In such cases please contact our hotline. Broken glass or breakage of
plastic parts are always subject to a charge.
Defects to consumables or parts subject to wearing (e.g. motor pistons, kneading
blades, drive shafts, spare remote control, spare toothbrushes, saw blades, etc.)
as well as cleaning, maintenance or the replacement of said parts are not covered
by the guarantee and hence are to be paid!
The guarantee lapses in case of unauthorized tampering.
After the expiry of the guarantee
After the expiry of the guarantee repairs can be carried by the competent dealer or
repair service against the payment of the ensuing costs.
GB
71
05-AR 686 + CZ 71 01.09.2005, 11:09:01 Uhr
Page 72

GB
Meaning of the “Dustbin” Symbol
Protect our environment: do not dispose of electrical equipment in the domestic
waste.
Please return any electrical equipment that you will no longer use to the collection
points provided for their disposal.
This helps avoid the potential effects of incorrect disposal on the environment and
human health.
This will contribute to the recycling and other forms of reutilisation of electrical and
electronic equipment.
Information concerning where the equipment can be disposed of can be obtained
from your local authority.
In many EU countries the disposal of electrical and electronic equipment in the
domestic waste is prohibited from August 13, 2005 on.
In Germany from March 23, 2006 on.
72
05-AR 686 + CZ 72 01.09.2005, 11:09:01 Uhr
Page 73

Adjusting the volume ........................................64
A
B
BAND Button ....................................................64
C
CD Handling .....................................................70
CLK Button ......................................................66
Connection .......................................................62
D
DSP (see EQ)...................................................65
E
Eject button.......................................................66
Ejecting the CD.................................................66
EQ (Equalizer Adjustment)...............................65
G
Guarantee.........................................................71
H
Handling a CD ..................................................70
I
Important Additional Installation Information ....62
Installation ........................................................61
Installation (Safety Information)........................ 60
Installation Tips.................................................61
INTRO (MON/INT)............................................65
L
LOC / LOCAL....................................................65
LOU (Loudness) ...............................................65
Index
M
MUTE Button (MUTE) ......................................64
Mute (see MUTE Button)..................................64
O
Operating instructions.......................................63
Operation..........................................................64
P
Play / Pause (II).............................................65
R
RANDOM (RDM) (Random Playback) .............65
Random Playback (RDM) ................................65
Removing the control panel..............................64
REPEAT (RPT).................................................65
Road Safety......................................................60
S
Safety Information ...........................................60
Scan function (see INTRO) ..............................65
SEL Button ......................................................64
Switching off .....................................................64
Switching on .....................................................64
Switching to Mono ............................................65
Switching to Stereo...........................................65
T
Technical Data .................................................67
Time (see CLK) ................................................66
Troubleshooting ................................................68
TUNE control....................................................64
GB
73
05-AR 686 + CZ 73 01.09.2005, 11:09:01 Uhr
Page 74

PL
Urządzenie należy używać tylko zgodnie z jego przeznaczeniem.
Urządzenie wbudować uważając, aby nie zasłonić otworów wentylacyjnych.
Nigdy nie wolno otwierać obudowy urządzenia. Niefachowo przeprowadzone na-
prawy mogą być groźne w skutkach dla użytkownika. Nie włączać uszkodzonego
urządzenia, jedynie przekazać go fachowcowi do naprawy.
Symbol z wykrzyknikiem ma zwrócić uwagę użytkownika na znajdujące
się w załączonych dokumentach ważne wskazówki związane z obsługą i
konserwacją urządzenia.
Urządzenia z tym symbolem używają do odczytywania dźwięku z płyty
kompaktowej „Lasera klasy A“. Wbudowany wyłącznik bezpieczeństwa
ma zapobiec temu, żeby użytkownik w czasie otwierania kieszeni
odtwarzacza płyt kompaktowych został poddany niebezpiecznemu dla
ludzkich oczu oddziaływaniu niewidocznego światła lasera.
Wyłącznika tego nie należy w żadnym wypadku zmostkować lub też przy nim
manipulować, ponieważ grozi to niebezpieczeństwem, że użytkownik poddany
zostanie oddziaływaniu niebezpiecznego dla ludzkich oczu niewidocznego światła
lasera.
Wskazówki bezpieczeństwa
Bezpieczeństwo ruchu drogowego
• Bezpieczeństwo ruchu drogowego jest najważniejszym przykazaniem. Dlatego
też z odbiornika samochodowego należy korzystać tak, aby w pełni panować
nad aktualnymi sytuacjami drogowymi.
• Należy pamiętać o tym, że przy prędkości jazdy 50 km/h w ciągu sekundy
pojazd pokonuje 14 m.
• W krytycznych sytuacjach odradzamy obsługę radia.
• Wskazówki bezpieczeństwa np. policji lub straży pożarnej muszą być w
pojeździe odbierane niezwłocznie i świadomie.
• Słuchania wybranego programu należy podczas jazdy dokonywać wyłącznie z
odpowiednim nastawienia głośności.
Kroki bezpieczeństwa podczas montażu
i instalacji połączeń
• Od baterii odłączać najpierw biegun ujemny, a następnie dodatni. (Podłączać
w odwrotnym kierunku.)
Uwaga: Przy odłączonej baterii następuje wygaszenie wszystkich informacji
niestałej pamięci. Należy postępować wg wskazówek bezpieczeństwa producenta pojazdu.
74
05-AR 686 + CZ 74 01.09.2005, 11:09:02 Uhr
Page 75

• Bezpiecznik główny musi być zainstalowany możliwie blisko (maks. 30 cm)
bieguna dodatniego baterii w celu zabezpieczenia samochodu przed ewentualnym pożarem kabla spowodowanym np. wypadkiem. Postępowanie niezgodne
z powyższym powoduje wygaszenie gwarancji.
• Średnica kabli Plus i Minus nie może być mniejsza od 1,5 mm².
• Przy wierceniu otworów należy uważać, aby nie uszkodzić żadnych części
pojazdu.
Porady instalacyjne:
• Tulejki ochrony kabla zabezpieczają kabel przed przecieraniem na ostrych
częściach karoserii.
• Izolacja kabla nie może być uszkodzona podczas instalacji.
• Podczas instalacji Car-HiFi niezbędne są właściwe narzędzia.
W zależności od rodzaju budowy pojazdu możliwe są odchyłki od niniejszego
opisu. Nie przejmujemy żadnej odpowiedzialności za uszkodzenia spowodowane
błędnym wbudowaniem i podłączeniem oraz za uszkodzenia będące rezultatem
powyższego.
Instalacja
Radioodbiornik należy
zamontować zgodnie z poniższą
ilustracją
a nakrętka
b podkładka sprężysta
c podkładka
d śruba
e kątownik montażowy
f wsuwana obudowa
g kołki gwintowane
Uwaga!
h śruby zabezpieczające na
czas transportu (przed
montażem usunąć)
i narzędzie do wysuwa-
nia sprzętu (klucz do
demontażu)
j Ramka przesłony
PL
75
05-AR 686 + CZ 75 01.09.2005, 11:09:02 Uhr
Page 76

PL
Zaślepkę panelu sterowania
proszę przyłożyć najpierw po
prawej stronie i wcisnąć ją, aż
zaskoczy po stronie lewej.
Podłączenie
Wykonać połączenia zgodnie ze schematem.
Przyłącze antenowe
Przyłącze ISO
Przyłącze
prądu ciągłego
Masa
Zapłon
Automatyczna antena (niebieski)
Głośnik lewy
przedni
lewy tylny
żółty
czarny
czerwony
biały
biały/czarny
zielony
zielony/czarny
bezpiecznik
bezpiecznik
bezpiecznik
Wyjście RCA
szary
szary/czarny
fi oletowy
fi oletowy/czarny
Uwaga:
• Zdejmowany panel obsługi należy założyć dopiero po podłączeniu kabli.
• Należy stosować głośniki o impedancji 4 ohm.
Ważne informacje dodatkowe, dotyczące instalacji
Waszego radioodbiornika samochodowego!
1. Śruby (h) zabezpieczające w transporcie proszę usunąć przed
montażem, gdyż inaczej CD nie będzie wciągana.
2. Urządzenie dostosowane jest do podłączenia do ujemnego bieguna akumulatora, który musi być podłączony do karoserii pojazdu. Prosimy o sprawdzenie
tego przez instalacją.
czerwony R
biały L
Głośnik
prawy przedni
prawy tylny
76
05-AR 686 + CZ 76 01.09.2005, 11:09:03 Uhr
Page 77

3. Podczas instalacji/podłączania odbiornika zwróci uwagę na fakt, że nie każdy
pojazd wyposażony jest „łącze ISO”. W takim przypadku zalecamy zastosowanie specyfi cznego dla pojazdu adaptera normy ISO.
Adapter jest do nabycia w ośrodkach handlowych części samochodowych
i/albo w warsztatach samochodowych.
4. Przy zajęciu „czas trwania +“ (Przyłącze prądu ciągłego), w zależności od typu
pojazdu, może dojść do odchyleń. (Potrzebne jednak do zapisywania stacji
nadawczych do pamięci).
Dla zapewnienia wszystkich funkcji niezbędne jest postępowanie zgodne z
instrukcją. W niepewnych przypadkach należy skontaktować się z autoryzowanym warsztatem samochodowym.
5. Maksymalny kąt nachylenia przy montażu radioodbiornika samochodowego
nie może przekraczać 20°, ponieważ przy większym kącie nachylenia instalowanego radia (Odtwarzacz CD) jego funkcjonowanie nie jest zagwarantowane.
6. W zależności od typu pojazdu w wyjątkowych sytuacjach mogą wystąpić
szumy zakłócające w trybie Radia/CD. Można je odpowiednio usunąć przez
dodatkowy
nie wyposażony jest w fi ltr przeciwzakłóceniowy, to w zależności od pojazdu
może dojść do pogorszonego odbioru.
Otrzymają je Państwo w handlu z akcesoriami samochodowymi i/lub w Was-
zym warsztacie samochdowym.
7. Podczas instalacji radioodbiornika proszę zwrócić uwagę na to, by jego tył miał
wystarczająco dużo wolnej przestrzeni, aby zagwarantowane było dostateczne
chłodzenie.
8. Przy podłączeniu anteny istnieją dwie różne normy. W pierwszym przypadku;
stare (50 Ohm) z długim, wystającym, okrągłym kontaktem po stronie pojazdu
i okrągłym gniazdem po stronie radia. W drugim przypadku wtyk antenowy wg
normy ISO (150 Ohm). Adaptery dla każdego z tych przypadków są do nabycia u producentów części samochodowych i/albo w warsztatach samochodowych.
Do niezbędnej uwagi przy VW/Audi: aktywna antena wymaga napięcia
dla ekranizacji kabla współosiowego anteny, brak napięcia oznacza niepełny
odbiór. Adapter antenowy z zasilaniem pozornym stanowi rozwiązaniem tego
problemu.
fi ltr przeciwzakłóceniowy. Mimo tego, że Wasz aparat już seryj-
Instrukcja obsługi
1. Jeżeli podczas pracy w trybie radia lub CD zostanie zdjęty panel przedni,
nastąpi automatyczne wyłączenie urządzenia.
2. Jeżeli wnętrze pojazdu jest bardzo nagrzane, np. na skutek dłuższego parkowania w mocno nasłonecznionym miejscu, to nie należy wówczas włączać
odtwarzacza CD, do momentu ochłodzenia się wnętrza w trackie jazdy.
PL
77
05-AR 686 + CZ 77 01.09.2005, 11:09:04 Uhr
Page 78

3. W celu bezpiecznego przechowywania panela przedniego, należy stosować
PL
przeznaczone do tego celu etui.
4. Ze względu na dużą ilość dostępnego oprogramowania i rodzajów nośników,
nie gwarantujemy prawidłowego odtwarzania płyty CD, nagranej przez
użytkownika.
Obsługa
1. Przycisk
Proszę wcisnąć przycisk w celu wyjęcia przedniego panelu sterowania.
2. Przyciski +/- (głośność)
Podczas normalnego trybu odtwarzania przyciski te służą do ustawiania
głośności. W połączeniu z uprzednio naciśniętym przyciskiem SEL możliwe
jest przeprowadzanie zmian w menu np. tryb dźwięku.
3. Przycisk SEL (wybór)
Nacisnąć krótko przycisk SEL w celu otwarcia trybu dźwięku w menu wyboru.
Kiedy na wyświetlaczu LCD pojawi się „VOL” możemy ustawić głośność.
Ponowne naciśnięcie przycisku SEL pozwala nam na wybranie jednego z
punktów menu, jak: VOL (głośność), bAS (tony niskie), TRE (tony wysokie),
bAL (balans) i FAd (regulacja wyciszania). Ustawienie poszczególnych punktów menu zmienia się za pomocą przycisku „+” lub „-„.
Wskazówka: Jeżeli pod EQ wybrane zostały ustawienia korektora
częstotliwości, takie jak np.: POP, ROC(K), to nie można ustawić bAS i TRE .
Guzik Wł./Wył.
4.
Do włączania/wyłączania odbiornika.
5. Wyświetlacz LCD (wyświetlacz ciekłokrystaliczny)
6. Przycisk BAND
a) Tryb radia
Naciśnij na chwilę przycisk BAND, aby przełączyć zakres: FM (UKF) lub
AM (zakres fal średnich). Na wskaźniku LCD zostanie wyświetlony wybrany
zakres: FM lub AM.
b) Tryb CD
Nacięcie przycisku BAND podczas odtwarzania płyty CD powoduje powrót
do trybu radioodbiornika.
7./8.
Przyciski I / I TRACK UP/DOWN
W trybie CD:
w celu przeskoczenia do przodu lub do tyłu należy nacisnąć przycisk I lub
I. W celu przewijania utworów należy nacisnąć i przytrzymać przycisk ze
strzałką: I lub I.
9. Regulator TUNE
Regulator TUNE służy do ustawiania częstotliwości wybranej stacji. Aktualna
częstotliwość jest wyświetlana na wskaźniku.
78
05-AR 686 + CZ 78 01.09.2005, 11:09:04 Uhr
Page 79

10. Przycisk MUTE (wyciszenie głośnika)
Nacisnąć przycisk MUTE w celu przyciszenia głośników na krótki okres czasu.
Na wskaźniku wyświetlany jest napis MUTE. Ponowne naciśnięcie tego przycisku powoduje przerwanie tej funkcji.
11. Przycisk II
Naciśnij ten przycisk, aby przejść z trybu radioodbiornika na odtwarzanie
CD (jeżeli włożona jest jakaś płyta CD). W celu przerwania odtwarzania CD
nacisnąć przycisk II (pauza). Ponowne naciśnięcie tego przycisku wznowi
odtwarzanie płyty.
Uwaga: ze względu na dużą ilość dostępnego oprogramowania i rodzajów
nośników, nie gwarantujemy prawidłowego odtwarzania płyty CD, nagranej
przez użytkownika.
Proszę uwzględnić tą wskazówkę odnośnie odtwarzania płyt CD i CDR
w formacie MP3! Urządzenie to nie obsługuje formatu MP3. Wprawdzie
płyta kompaktowa zaczyna się kręcić, jednak dźwięk nie jest odtwarzany.
12. Przycisk LOC/RPT
a) Tryb radia
• Naciśnięcie przycisku LOC/RPT poprawia odbiór w regionach, w których
sygnał jest za silny. Na wskaźniku wyświetlany jest napis „LOC“.
• Ponowne naciśnięcie przycisku LOC/RPT powoduje przełączenie z
powrotem na tryb DISTANT. W tym trybie lepszy jest odbiór w regionach,
w których sygnał jest za słaby. Gaśnie napis „LOC“ na wskaźniku.
b) Tryb CD
Nacisnąć przycisk LOC/RPT. Aktualnie odtwarzany utwór zostanie powtórzony. Ponowne naciśnięcie tego przycisku spowoduje unieważnienie tej
funkcji.
13. Przycisk LOU/RDM
Włączanie i wyłączanie funkcji LOUDNESS.
W niskim przedziale głośności przy użyciu funkcji LOUDNESS (LOUD) poszerza się obraz dźwięku. Tony wysokie i niskie zostają podwyższone.
Podczas odtwarzania płyty CD, przytrzymaj przycisk LOU/RDM wciśnięty
przez ok. 3 sekund. Utwory będą odtwarzane w przypadkowej kolejności.
Naciśnij ten przycisk jeszcze raz (ok. 3 sek.), aby wyłączyć tę funkcję.
14. Przycisk MON/INT
a) Tryb radia
Przełączanie STEREO / MONO
b) Tryb CD
Nacisnąć przycisk MON/INT. Każdy tytuł będzie odtwarzany przez
10 sekund. Ponowne naciśnięcie przycisku oznacza przerwanie procesu
wyszukiwania i odtworzony zostanie aktualnie wybrany utwór.
PL
79
05-AR 686 + CZ 79 01.09.2005, 11:09:05 Uhr
Page 80

15. Przycisk EQ (Equalizer)
PL
Naciskając przycisk EQ, można wybrać jedno z ustawień korektora: POP, CLS
(CLASSICS) lub ROC(K). (Na wskaźniku zostanie wyświetlony napis DSP.)
Wyłącz DSP, aby wprowadzić indywidualne ustawienia. Patrz również Pkt. 3.
16. Otwór na płyty CD
Przycisk wysuwania
17.
Aby wysunąć płytę CD należy nacisnąć ten przycisk.
18. Przycisk CLK (Czas)
a) Naciśnij przycisk CLK, aby przez 5 sekund oglądać na wskaźniku
wyświetlony czas zegarowy.
b) Aby ustawić czas zegarowy, przytrzymaj przycisk CLK wciśnięty przez ok.
3 sek. Na wskaźniku zacznie migać aktualny czas zegarowy. Następnie
naciśnij przycisk I (7) aby ustawić minuty i przycisk I (8), aby
ustawić godzinę. Aby zapisać ustawiony czas, naciśnij na chwilę i puść
przycisk CLK.
19. Migająca dioda LED (bez ilustracji)
Dioda ta miga przy zdejmowaniu panela przedniego.
80
05-AR 686 + CZ 80 01.09.2005, 11:09:05 Uhr
Page 81

Dane techniczne
Ogólne
napięcie zasilania .....................................................................................DC 13,8 V
pobór prądu ...............................................................................................7 A maks.
moc............................................................................................................... 4 x 7 W
Zakres FM
zakres częstotliwości..........................................................87,5 MHz do 108,0 MHz
czułość używalna.............................................................................................10 µV.
częstotliwość pośrednia............................................................................. 10,7 MHz
Zakres AM
zakres częstotliwości..............................................................514 kHz do 1640 kHz
(Line-Out)
wyjście..............................................................................................maks. 2000 mV
impedancja ................................................................................................600 Ohm
Odtwarzacz CD
system ............................................................................................. Układ Audio CD
czytane formaty ....................................................................płyty CD/CD-R/CD-RW
ilość bitów kwantowania ...................................................................................1 bit.
format sygnału.............................................................................................44,1 kHz
cechy charakterystyczne częstotliwości .....................................20 – 100 Hz ≤ 8 dB
......................................10 – 20 kHz ≤ 8 dB
stosunek sygnału do szumów..............................................................50 dB (1 kHz)
ilość kanałów .................................................................................... 2 kanały stereo
wymiaru obudowy.....................................................178 szer. x 50 wys. x 157 głęb.
PL
81
05-AR 686 + CZ 81 01.09.2005, 11:09:06 Uhr
Page 82

PL
Przed skorzystaniem z listy kontrolnej należy najpierw sprawdzić, czy urządzenie
jest właściwie podłączone. Jeżeli po sprawdzeniu całej listy kontrolnej usterka
nie zostanie w pełni usunięta, należy skonsultować się z najbliższym punktem
serwisowym.
Oznaki usterki Powód Sposób usunięcia usterki
Płyty kompaktowe wciągane
są do otworu na CD tylko do
połowy.
„Err“ na wyświetlaczu.
CD nie można wybierać klawis-
II
.
zem
Brak odtwarzania po włożeniu do
odtwarzacza płyty CD lub kasety.
Przerwy w odtwarzaniu CD.
Brak funkcjonowania.
Odbiornika nie można zapłonem
„Wł.” lub „Wył.”.
Usuwanie usterek
Śruby zabezpieczające w transporcie nie zostały usunięte.
CD włożona została w złym
kierunku.
Nie włożono żadnej CD. Włożyć CD.
Za mały poziom głośności
ustawionej na regulatorze.
Nieprawidłowo wykonane
przyłącza.
Powierzchnia drogi jest
nierówna.
Urządzenie nie jest zamontowane na stałe.
Uszkodzona płyta CD.
Brudna płyta CD. Wyczyścić CD.
Ew. urządzenie zostało wbudowane do pojazdu pod za dużym
kątem.
Włączony zapłon.
Nastąpiło przepalenie jednego
lub kilku bezpieczników.
Błędne podłączenie
(każdy producent samochodów
rozmieszcza inaczej podłączenie
ISO w pojeździe).
Proszę usunąć śruby
zabezpieczające w transporcie.
Włóż CD poprawnie.
Zwiększyć poziom głośności.
Sprawdzić przyłącze +12V i
masę.
W celu odtworzenia CD
zaczekać aż droga stanie się
bardziej równa.
Zabudować urządzenie na stałe.
Upewnić się, że w przypadku,
gdy pojazd nie oferuje odpowiedniego podparcia dla tylnej części
urządzenia, zastosowano tylne
mocowanie.
Sprawdzić inną płytę CD. Jeżeli
będzie ona działać prawidłowo,
to być może poprzednia CD jest
uszkodzona.
Uważać, aby maks. kąt pochylenia nie przekraczał 20°!
Obrócić kluczyk zapłonu w
pozycję „ON” lub „ACC”.
Wymienić bezpiecznik na inny
bezpiecznik 7 A /0,5 A/0,5 A.
Skontaktować się z warsztatem
lub specjalistą własnego
samochodowym z zapytaniem o
specyfi czny dla pojazdu adapter
82
05-AR 686 + CZ 82 01.09.2005, 11:09:06 Uhr
Page 83

Oznaki usterki Powód Sposób usunięcia usterki
Urządzenie nie działa
prawidłowo (EJECT, LOAD,
PLAY).
Brak odbioru radiowego. Niepodłączony kabel antenowy.
Słaby odbiór radiofoniczny.
Nastąpiło zakłócenie mikrokomputera przez pola elektromagnetyczne.
Ew. pojazd wyposażony jest
w specjalną antenę (Antenę
pochodnie zakodowaną.)
Wyjąć i ponownie włożyć CD
lub kasetę.
Wyłączyć i ponownie włączyć
odbiornik.
Mocno wetknąć kabel antenowy
w złącze antenowe na
urządzeniu.
Skontaktować się z warsztatem
lub specjalistą własnego
samochodowym. (W przypadku
„obcych fabrykatów” istnieją
specyfi czne zwrotnice zasilania
wzgl. adaptery napięciowe.)
PL
83
05-AR 686 + CZ 83 01.09.2005, 11:09:07 Uhr
Page 84

PL
• Przed rozpoczęciem odtwarzania należy wszystkie CD skontrolować pod
• Stosować wyłącznie specyfi czne dla handlu, dokładnie okrągłe CD o średnicy
84
Postępowanie z dyskami kompaktami (CD)
Czyszczenie CD
Przed odtworzeniem, płytę CD należy przetrzeć
czystą, niezakurzoną chusteczką do czyszczenia.
Uwaga: nie stosować żadnych rozpuszczalników
jak benzyny lub substancje rozcieńczające. Powszechnie dostępne środki czyszczące lub spraye
antystatyczne powodują uszkodzenie urządzenia.
Wkładanie płyty CD
Włożenie płyty CD zadrukowaną stroną do dołu
może spowodować uszkodzenie urządzenia.
CD należy zawsze wkładać etykietą zwróconą do
góry.
Uwaga: jeżeli w kieszeni CD znajduje się już płyta,
nie należy usiłować wkładać tam kolejnej płyty,
ponieważ może to spowodować uszkodzenie
urządzenia.
Chwytanie płyty CD
Płyty CD należy zawsze chwytać za krawędzie.
Aby zapewnić czystość płyty, nie należy dotykać jej
powierzchni.
• Nie naklejać na płytach CD żadnych naklejek,
ani taśm klejących.
• Nie wystawiać płyt CD na bezpośrednie
działanie promieni słonecznych lub źródeł
ciepła jak rury grzewcze oraz nie pozostawiać
ich w samochodzie, jeżeli pojazd jest parkowany w miejscu nasłonecznionym, ponieważ
powoduje to znaczny wzrost temperatury.
względem rysów, zadrapań i zagięć. Tak uszkodzone CD nie mogą być poprawnie odtwarzane. Nie należy używa takich CD.
12 cm! CD o średnicy 8 cm lub wykazujące kontury, np. motylki lub sercance
nie nadają się do odtwarzania. Istnieje zagrożenia uszkodzenia CD i napędu
odtwarzacza. Za uszkodzenie spowodowane stosowaniem niewłaściwych CD
nie przejmujemy żadnej odpowiedzialności.
05-AR 686 + CZ 84 01.09.2005, 11:09:07 Uhr
Page 85

Niniejsze urządzenie odpowiada wymaganiom normy bezpieczeństwa
użytkowania oraz spełnia wymagania dyrektywy niskonapięciowej i
kompatybilności elektromagnetycznej.
Zastrzega się prawo do zmian technicznych!
WARUNKI GWARANCJI
Przyznajemy 24 miesiące gwarancji na produkt licząc od daty zakupu.
W tym okresie będziemy bezpłatnie usuwać w terminie 14 dni od daty dostarc-
zenia wadliwego sprzętu z kartą gwarancyjną do miejsca zakupu wszystkie uszkodzenia powstałe w tym urządzeniu na skutek wady materiałów lub wadliwego
wykonania, naprawiając oraz wymieniając wadliwe części lub (jeśli uznamy za
stosowne) wymieniając całe urządzenie na nowe.
Sprzęt do naprawy powinien być dostarczony w komplecie wraz z dowodem
zakupu oraz z ważną kartą gwarancyjną do sprzedawcy w miarę możliwości
w oryginalnym opakowaniu lub innym odpowiednim dla zabezpieczenia przed
uszkodzeniem. W razie braku kompletnego opakowania fabrycznego, ryzyko uszkodzenia sprzętu podczas transportu do i z miejsca zakupu ponosi reklamujący.
Naprawa gwarancyjna nie dotyczy czynności przewidzianych w instrukcji obsługi,
do wykonania których zobowiązany jest użytkownik we własnym zakresie i na
własny koszt.
Gwarancja nie obejmuje:
• mechanicznych, termicznych, chemicznych uszkodzeń sprzętu i wywołanych
nimi wad,
• uszkodzeń powstałych w wyniku działania sił zewnętrznych takich jak
wyładowania atmosferyczne, zmiana napięcia zasilania i innych zdarzeń
losowych,
• nieprawidłowego ustawienia wartości napięcia elektrycznego, zasilanie z
nieodpowiedniego gniazda zasilania,
• sznurów połączeniowych, sieciowych, żarówek, baterii, akumulatorów,
• uszkodzeń wyrobu powstałych w wyniku niewłaściwego lub niezgodnego z
instrukcją jego użytkowania, przechowywania, konserwacji, samowolnego
zrywania plomb oraz wszelkich przeróbek i zmian konstrukcyjnych dokonanych
przez użytkownika lub osoby niepowołane,
• roszczeń z tytułu parametrów technicznych wyrobu, o ile są one zgodne z
podanymi przez producenta,
• prawidłowego zużycia i uszkodzeń, które mają nieistotny wpływ na wartość lub
działanie tego urządzenia.
Karta gwarancyjna bez pieczątki sklepu, daty sprzedaży, nie wypełniona,
źle wypełniona, ze śladami poprawek, nieczytelna wskutek zniszczenia, bez
możliwości ustalenia miejsca sprzedaży oraz dołączonego dowodu zakupu jest
nieważna.
PL
85
05-AR 686 + CZ 85 01.09.2005, 11:09:08 Uhr
Page 86

Korzystanie z usług gwarancyjnych nie jest możliwe po upływie daty ważności
PL
gwarancji. Gwarancja na części lub całe urządzenie, które są wymieniane kończy
się, wraz z końcem gwarancji na to urządzenie.
Wszystkie inne roszczenia, wliczając w to odszkodowania są wykluczone chyba,
że prawo przewiduje inaczej. Roszczenia wykraczające poza tą umowę nie są
uwzględniane przez tą gwarancję.
Gwarancja na sprzedany towar konsumpcyjny nie wyłącza, nie ogranicza ani
nie zawiesza uprawnień kupującego wynikających z niezgodności towaru z
umową.
Gwarancja oraz zawarte w niej warunki obowiązują na terenie Rzeczpospolitej
Polskiej.
Znaczenie symbolu „Pojemnik na śmieci“
Proszę oszczędzać nasze środowisko, sprzęt elektryczny nie należy do śmieci
domowych.
Proszę korzystać z punktów zbiorczych, przewidzianych do zdawania sprzętu
elektrycznego, i tam proszę oddawać sprzęt elektryczny, którego już nie będą
Państwo używać.
Tym sposobem pomagają Państwo unikać potencjalnych następstw niewłaściwego
usuwania odpadów, mających wpływ na środowisko i zdrowie ludzi.
Tą drogą przyczyniają się Państwo do ponownego użycia, do recyklingu i do
innych form wykorzystania starego sprzętu elektrycznego i elektronicznego.
Informacje, gdzie można zdać sprzęt, otrzymają Państwo w swoich urzędach
komunalnych lub w administracji gminy.
W wielu krajach UE usuwanie starego sprzętu elektrycznego i elektronicznego do
śmieci domowych i/lub resztkowych jest zakazane od 13.8.2005.
W Niemczech od 23.3.2006.
86
05-AR 686 + CZ 86 01.09.2005, 11:09:08 Uhr
Page 87

Indeks rzeczowy
B
BAND, przycisk.................................................78
Bezpieczeństwo ruchu drogowego...................74
C
CD, postępowanie z .........................................84
CLK, przycisk....................................................80
Czas (patrz CLK)..............................................80
D
Dane techniczne...............................................81
DSP (patrz EQ) ................................................80
E
EQ (nastawy equalizera) ..................................80
F
Funkcja odtwarzania próbek (patrz INTRO).....79
G
Gwarancja ........................................................85
I
Instalacja ..........................................................75
Instrukcja obsługi..............................................77
INTRO (MON/INT)............................................79
L
LOC / LOCAL....................................................79
LOU (Głośność)................................................79
M
Mono, przełączenie ..........................................79
Montaż (wskazówki bezpieczeństwa)...............74
MUTE, przycisk (ciche dostrajanie)..................79
O
Obsługa ............................................................78
Odtwarzanie przypadkowe (RDM) ...................79
P
PL
Play / Pause (II).............................................79
Podłączenie......................................................76
Porady instalacyjne ..........................................75
Postępowanie z CD..........................................84
Powtórka (RPT)................................................79
R
RANDOM (RDM) (odtwarzanie przypadkowe).79
Regulacja głośności..........................................78
REPEAT (RPT) (powtórka)...............................79
S
SEL, przycisk....................................................78
Stereo, przełączenie.........................................79
T
TUNE, regulator strojenia ................................78
U
Usuwanie usterek.............................................82
W
Włączenie.........................................................78
Ważne informacje dodatkowe
dotyczące wbudowania ....................................76
Wskazówki bezpieczeństwa.............................74
Wyłączenie .......................................................78
Wyciszenie głośnika (patrz przycisk MUTE).....79
Wytrącania, przycisk.........................................80
Wytrącanie CD .................................................80
Z
Zdejmowanie panelu sterowania......................78
87
05-AR 686 + CZ 87 01.09.2005, 11:09:08 Uhr
Page 88

CZ
Přístroj použijte pouze pro účel, pro který je určen.
Přístroj zabudujte tak, aby existující větrací otvory nebyly zakryty.
Nikdy neotvírejte plášť přístroje. Nesprávná oprava může uživateli způsobit značné
nebezpečí. Při poškození přístroje ho již neuvádějte do provozu, ale nechte ho
opravit odborníkem.
Značka s vykřičníkem má uživatele odkázat na důležitá upozornění v
průvodní dokumentaci týkající se obsluhy či údržby.
Přístroje, u kterých je tato značka, pro přehrávání CD, používají „laser
třídy 1“ Zabudované bezpečnostní spínače mají zabránit tomu, aby se
uživatel při otevření zásobníku na CD nevystavoval nebezpečnému
laserovému světlu, který není pro lidské oči viditelný.
U tohoto bezpečnostního spínače nesmí v žádném případě dojít ke zkratování či
manipulaci, jinak hrozí nebezpečí, že se vystavíte laserovému světlu.
Bezpečnostní upozornění
Bezpečnost provozu
• Bezpečnost provozu je krajně důležitá. Používejte proto Vaše autorádiové
zařízení vždy tak, aby to vždy odpovídalo dopravní situaci.
• Uvědomte si, že při rychlosti 50 km/h ujedete za vteřinu 14 m.
• V kritických situacích Vám obsluhu nedoporučujeme.
• Na výstražná upozornění např. od policie či hasičů musí vůz včas a bezpečně
reagovat.
• Během jízdy proto Váš program poslouchejte pouze při přiměřené hlasitosti.
Vzhledem k délce montáže a připojení dbejte prosím
následujících bezpečnostních upozornění
• Nejdříve vložte do svorek záporného pólu, poté kladného pólu baterie. (Vložení
do svorek v opačném pořadí.)
Zapamatujte si prosím: Pokud je baterie mimo síť, ztratí všechny dočasné
paměti své informace. Dbejte bezpečnostních upozornění výrobce automobilu.
• Hlavní jistič je nutné instalovat co nejblíže kladnému pólu baterie (maximálně
30 cm), aby bylo auto chráněno proti případnému požáru kabelů např. při
nehodě. Pokud by instalace tomuto požadovanému postupu neodpovídala,
pojistné krytí ztrácí platnost.
• Příčný řez kladným a záporným kabelem nesmí dosahovat 1,5 mm
• Při vrtání otvorů dbejte na to, aby nebyly poškozeny žádné části vozu.
2
.
88
05-AR 686 + CZ 88 01.09.2005, 11:09:09 Uhr
Page 89

Tipy pro instalaci:
• Nálevky ochrany kabelu chrání kabel, aby se neprodřel ostrými díly karoserie.
• Izolace kabelu nesmí být při instalaci poškozena.
• Při instalaci Car-HiFi je samozřejmé použití správných nástrojů.
Podle druhu konstrukce se může Váš vůz od tohoto popisu lišit. Neručíme za
škody způsobené chybou montáže či připojení ani za škody, které z toho vyplývají.
Instalace
Rozhlasový přijímač namontujte podle následujících zobrazení.
a Matice
b Pružná podložka
c Podložka pod matici
d Šroub
e Montážní úhel
f Plášť panelu
g Svorník se závitem
Pozor!
h Šrouby pro zajištění
přepravy (před montáží
prosím vyjměte)
i Vytahovací nástroj
(klíč pro demontáž)
j Osazovací rám
CZ
89
05-AR 686 + CZ 89 01.09.2005, 11:09:10 Uhr
Page 90

CZ
Přiložte držák ovládací lišty
nejdříve na pravou stranu a poté
ji na levé straně zaklapněte.
Připojení
Proveďte připojení podle nákresu.
Připojení antény
Připojení ISO
Trvalý přívod proudu
Hmota
Zapalování
Automat. anténa (Modré)
Reproduktor
vpředu vlevo
vzadu vlevo
Žluté
Černé
Červené
Bílé
Bílé/Černé
Zelené
Zelené/Černé
Pojistka
Pojistka
Pojistka
Výstup RCA
Šedé
Šedé/Černé
Fialové
Fialové/Černé
Pozor:
• Nasaďte odnímatelný ovládací panel teprve po připojení kabelu.
• Použijte reproduktor o impedanci 4 Ohm.
Důležité dodatečné informace pro montáž Vašeho autorádia!
1. Šrouby (h) pro zajištění přepravy před montáží prosím odstraňte, neboť
jinak nebude možné CD vložit.
2. Přístroj je dimenzován pro záporný pól baterie a musí být připojen na karoserii
vozu. Toto zkontrolujte před instalací.
3. Při montáži/připojení Vašeho přístroje pamatujte prosím, že ne každý vůz je
vybaven „připojením ISO“. V tomto případě Vám doporučujeme použít automobilový adaptér specifi kovaný podle ISO.
Červené R
Bílé L
Reproduktor
vpředu vpravo
vzadu vpravo
90
05-AR 686 + CZ 90 01.09.2005, 11:09:10 Uhr
Page 91

Takový adaptér můžete zakoupit u prodejců autopříslušenství a/nebo ve
Vašem automobilovém servisu.
4. Při označení „Trvalé + “ (trvalý přívod proudu) může podle typu vozu dojít k
odchylkám. (To je však nutné pro ukládání vysílacích stanic do paměti.)
Aby byly zajištěny všechny funkce, je nutná montáž v souladu s tímto návo-
dem. V případě pochybností se obraťte na autorizovaný automobilový servis.
5. Maximální úhel sklonu při montáži Vašeho autorádia nesmí přesáhnout 20°,
neboť při větším úhlu zabudování již nebude zajištěna funkce Vašeho autorádia (přehrávače CD).
6. Podle typu vozu se při provozu rádia/CD mohou ve výjimečných případech
vyskytnout rušivé šumy. Tyto je možné vhodně odstranit dodatečným
odrušovacím fi ltrem. Váš přístroj je již sériově vybaven odrušovacím fi ltrem.
Přesto může dojít k narušením, která jsou vázána na vůz.
Odrušovací fi ltr můžete zakoupit u prodejců autopříslušenství a/nebo ve
Vašem automobilovém servisu.
7. Při montáži Vašeho rádia dbejte prosím na to, aby na zadní straně rádia byl
dostatek volného prostoru, aby bylo zajištěno dostatečné chlazení.
8. Pro připojení antény existují dvě různé normy. Nejprve starý (50 Ohm) s
dlouhým, vyčnívajícím kulatým kontaktem na straně vozu a s kulatou zásuvkou
na straně rádia. Za druhé anténní spojku v souladu s normou ISO (150 Ohm).
Adaptér pro oba formáty nabízejí výrobci příslušenství a/nebo Váš automobilový servis.
U VW/Audi věnujte pozornost: aktivní anténa vyžaduje napětí na odstínění
antén koaxiálního kabelu bez toho, aby kabel příjmu byl dostačující. Adaptér
antény se sdruženým napájením tento problém vyřeší.
Pokyny pro obsluhu
1. Pokud bude během provozu rádia či CD odebrán přední ovládací panel,
přístroj se automaticky vypne.
2. Pokud je vnitřek vozu příliš teplý, např. po delší době parkování na prudkém
slunci, přehrávač nezapínejte, dokud vnitřek vozu po krátké jízdě trochu
nevychladne.
3. Aby byla odnímatelná ovládací část bezpečně uchována, vždy použijte ochranné pouzdro, které je pro tento účel určeno.
4. Přehrávání CD vytvořených pro uživatele není možné kvůli rozmanitosti
dostupných softwarů a médií CD zaručit.
CZ
91
05-AR 686 + CZ 91 01.09.2005, 11:09:11 Uhr
Page 92

CZ
1. Tlačítko
Pro vyjmutí předního ovládacího panelu stiskněte tlačítko .
2. Tlačítka +/– (Hlasitost)
Při normálním přehrávání slouží tlačítka pro nastavení hlasitosti. Ve spojení s
dříve stisknutým tlačítkem SEL je možné provést změny v menu, např. režimu
zvuku.
3. Tlačítko SEL (Volba)
Krátce stiskněte tlačítko SEL, tím se dostanete do menu výběru režimu zvuku.
Na displeji se objeví „VOL“ pro nastavení hlasitosti. Opakovaným stisknutím
tlačítka SEL můžete nyní navolit jednotlivé body menu - jako VOL (hlasitost),
bAS (basy), TRE (výšky), bAL (Balance – vyrovnávání) a FAd (Cross-Fades
– prolínání signálů). Nastavení jednotlivých bodů menu můžete změnit pomocí
tlačítka „+“- či „-“.
Upozornění: Pokud jsou pod EQ zvoleny nastavení ekvalizéru jako např. POP,
ROC(K), není možné nastavit bAS a TRE.
Tlačítko zapínání / vypínání
4.
Pro zapnutí, resp. vypnutí přístroje stiskněte toto tlačítko.
5. Displej LCD (Displej z tekutých krystalů)
6. Tlačítko BAND
a) Provoz rádia
Krátkým stisknutím tlačítka BAND (pásmo) můžete přepínat mezi úrovněmi
FM (VKV) a AM (SV). Označení příslušných úrovní FM (VKV), AM (SV) se
zobrazí na displeji LCD.
b) Přehrávání CD
Stisknutím tlačítka BAND v přehrávání CD se dostanete zpět do režimu
rádia.
7./8.
Tlačítka I / I TRACK UP/DOWN
V režimu CD:
Pro krok dopředu, resp. dozadu stiskněte krátce tlačítko I, resp. I. Pro
procházení titulů držte stisknuté tlačítko se šipkou I, resp. I.
9. Regulátor TUNE (ladění)
Otočením regulátoru TUNE nastavíte požadovanou rádiovou frekvenci.
Aktuální frekvence se zobrazí na displeji.
10. Tlačítko MUTE (Vypnutí zvuku)
Stiskněte tlačítko MUTE, tím na krátkou dobu vypnete zvuk reproduktoru.
Na displeji se objeví MUTE. Pro opětovné zrušení této funkce, stiskněte znovu
toto tlačítko.
Obsluha
92
05-AR 686 + CZ 92 01.09.2005, 11:09:12 Uhr
Page 93

11. Tlačítko II
Stisknutím tohoto tlačítka budete moci u vloženého CD přepínat mezi režimem
rádia a CD. Stiskněte tlačítko II, tím dojde k přerušení přehrávání CD (funkce
pauzy). Pro opětovné zrušení této funkce, stiskněte znovu toto tlačítko.
Upozornění: Přehrávání CD, vytvořených pro uživatele není možné kvůli
rozmanitosti dostupných softwarů a médií CD zaručit.
Zapamatujte si prosím: Upozornění pro přehrávání CD a CDR ve formátu
MP3! Přístroj není schopen přehrávat MP3. Sice se CD začne otáčet, zvuk
však není možné reprodukovat.
12. Tlačítko LOC/RPT
a) Provoz rádia
• Stisknutím tlačítka LOC/RPT, v regionech, kde je signál velmi silný, je
příjem lepší. Na displeji se objeví upozornění „LOC“.
• Opakovaným stisknutím tlačítka LOC/RPT dojde opět k přepnutí do
režimu DISTANT. V regionech, kde je signál velmi slabý, je příjem
horší. Upozornění „LOC“ na displeji zmizí.
b) Přehrávání CD
• Stiskněte tlačítko LOC/RPT. Bude opakován aktuálně hraný titul Pro
opětovné zrušení této funkce, stiskněte znovu toto tlačítko.
13. Tlačítko LOU/RDM
Zapnutí a vypnutí funkce LOUDNESS (HLASITOST).
V sektoru nižší hlasitosti se pomocí funkce LOUDNESS (LOUD) zvukový
rozsah rozšíří. Dojde ke zvýšení výšek a basů.
Nechte při přehrávání CD tlačítko LOU/RDM-stisknuté cca 3 vteřiny. Tituly CD
budou přehrávány v náhodném pořadí. Abyste tuto funkci opět zrušili, stiskněte
toto tlačítko znovu (cca 3 vteřiny).
14. Tlačítko MON/INT
a) Provoz rádia
Přepínání STEREO/MONO
b) Přehrávání CD
Stiskněte tlačítko MON/INT. Každý titul CD bude vždy zahrán po dobu
10 vteřin. Stiskněte znovu toto tlačítko, tím se vyhledávání přeruší. Bude
přehráván aktuálně navolený titul.
15. Tlačítko EQ (Equalizer)
Stisknutím tlačítka EQ můžete zvolit nastavení ekvalizéru POP, CLS (CLASSICS) a ROC(K). (Na displeji se objeví DSP.) Vypnutím DSP se provede
vlastní nastavení. Viz také bod 3.
16. Spirálová drážka CD
CZ
93
05-AR 686 + CZ 93 01.09.2005, 11:09:12 Uhr
Page 94

17.
CZ
Uvolňovací klávesa
Pro uvolnění CD stiskněte toto tlačítko.
18. Tlačítko CLK (Čas)
a) Stisknutím tlačítka CLK na cca 5 vteřin se Vám zobrazí aktuální čas.
b) Pro nastavení času nechte tlačítko CLK stisknuté cca 3 vteřiny.
Na displeji bliká čas. Stiskněte poté tlačítko I (7) a tím nastavíte minuty,
stisknutím tlačítka I (8) nastavíte hodiny. Pro uložení stiskněte znovu
krátce tlačítko CLK.
19. Blikající displej LED (bez obrázku)
Toto upozornění bliká při odejmutí předního ovládací panelu.
94
05-AR 686 + CZ 94 01.09.2005, 11:09:13 Uhr
Page 95

Technické údaje
Obecně
Síťové napětí .................................................................Stejnosměrný proud 13,8 V
Spotřeba proudu......................................................................................... max. 7 A
Výkon............................................................................................................ 4 x 7 W
Rozsah FM (VKV)
Frekvenční rozsah..............................................................87,5 MHz až 108,0 MHz
Užitečné napětí................................................................................................10 µV.
Frekvence I.F. ............................................................................................10,7 MHz
Rozsah AM (SV)
Frekvenční rozsah.................................................................. 514 kHz až 1640 kHz
(Line-Out)
Výstup................................................................................................ max. 2000 mV
Impedance..................................................................................................600 Ohm
Přehrávač CD
Systém........................................................................................... CD audio systém
Použitelná CD..................................................................... Disky CD/CD-R/CD-RW
Počet kvantování bitů .........................................................................................1 bit
Formát signálu.............................................................Vzorková frekvence 44,1 kHz
Frekvenční charakteristika..........................................................20 – 100 Hz ≤ 8 dB
.......................................................... 10 – 20 kHz ≤ 8 dB
Poměr signálu-šumu............................................................................50 dB (1 kHz)
Počet kanálů..................................................................................... 2 stereo kanály
Rozměry pláště ......................................................................178 š. x 50 v. x 157 h.
CZ
95
05-AR 686 + CZ 95 01.09.2005, 11:09:13 Uhr
Page 96

CZ
Dříve než si projdete seznam, dokončete nejdříve připojení. Pokud po provedení
prozkoušení tohoto seznamu zůstanou ještě nějaké otázky otevřené, obraťte se
prosím na Vaše nejbližší zákaznické středisko.
Popis závady Důvod Řešení
CD jsou do mechaniky vložena
pouze částečně.
Na displeji je zobrazeno „Err“. CD je špatně vloženo. Vložte CD správně.
Pomocí tlačítka
navolit CD.
Po vložení do přístroje se CD ani
kazeta nepohybuje.
CD vynechává.
Bez funkce.
Přístroj není možné pomocí
zapalování „zapnout“, resp.
„vypnout“.
II
není možné
Odstranění poruch
Šrouby pro zajištění přepravy
nebyly odstraněny.
Není vloženo žádné CD. Vložte CD.
Regulátor hlasitosti je nastaven
příliš slabě.
Připojení nejsou správně
provedena.
Povrch silnice není rovný.
Přístroj není pevně zabudován.
CD je poškozené.
CD je zašpiněné. Očistěte CD.
Pravděpodobně je přístroj v autě
namontován našikmo.
Zapalování je vypnuto.
Jedna či více pojistek jsou
spáleny.
Chybné připojení
(každý výrobce automobilů
dokládá připojení ISO ve voze
jiným způsobem).
Odstraňte šrouby pro zajištění
přepravy.
Regulátorem hlasitosti nastavte
vyšší hodnotu.
Zkontrolujte jak +12V, tak i
připojení.
Pro přehrávání CD počkejte,
dokud nebude silnice opět rovná.
Přístroj pevně zamontujte.
Zajistěte, aby se použilo zadní
upevnění, když vůz nenabízí
žádné vhodné zachycení pro
zadní část přístroje.
Vyzkoušejte jiné CD. Když se
toto druhé pohybuje správně,
je první pravděpodobně
poškozeno.
Dbejte na to, aby úhel sklonu
nepřesáhl 20°!
Otočte klíček zapalování na „ON“
či „ACC“.
Nahraďte pojistku jinou
7A /0,5A/0,5A.
Spojte se prosím s Vaším
automobilovým servisem či odborníkem na automobily ohledně
přípojného adaptéru specifi ckém
pro daný vůz.
96
05-AR 686 + CZ 96 01.09.2005, 11:09:13 Uhr
Page 97

Popis závady Důvod Řešení
Přístroj nefunguje správně
(EJECT, LOAD, PLAY).
Bez rádiového příjmu. Anténní kabel není připojen.
Špatný rádiový příjem.
Na mikropočítači došlo k
poruchám prostřednictvím
elektromagnetických polí.
Váš vůz má pravděpodobně
speciální anténu (anténa se
sdruženým napájením).
CD či kazetu vyjměte a opět
vložte.
Přístroj vypněte a poté opět
zapněte.
Anténní kabel vložte pevně do
anténní zdířky přístroje.
Spojte se prosím s Vašim
automobilovým servisem či
odborníkem na automobily. (Pro
„cizí výrobní značky“ existují specifi cké napájecí výhybky, resp.
adaptéry napětí.)
CZ
97
05-AR 686 + CZ 97 01.09.2005, 11:09:14 Uhr
Page 98

CZ
• Dříve než budete CD přehrávat, zkontrolujte je, zda nemají trhliny, nejsou
poškrábaná či zvlněná. CD s takovýmito poškozeními nemusí za jistých okolností správně přehrávat. Tato CD byste neměli používat.
• Používejte pouze běžná „kulatá“ CD s průměrem 12 cm! CD s průměrem 8 cm
či CD ve tvaru motýla či srdce nejsou pro přehrávání vhodná. Hrozí nebezpečí
zničení CD a diskové jednotky. Za poškození způsobená nevhodnými CD
neručíme.
Manipulace s CD
Čištění CD
Před přehráváním CD otřete čistou, bezprašnou
látkou. CD očistěte ve směru šipky.
Upozornění: Nepoužívejte rozpouštědla jako jsou
benzín či ředidlo. Všeobecně dostupné čisticí
prostředky či antistatické spreje poškozují přístroj.
Vkládání CD
Pokud je CD vloženo potištěnou stranou dolů,
může dojít k poškození přístroje.
CD vkládejte vždy potištěnou stranou nahoru.
Upozornění: Pokud se již CD nachází v drážce,
nepokoušejte se vkládat další CD. To může vést ke
škodám na přístroji.
Uchopení disku
CD uchopte vždy za okraj. Abyste CD udržovali
čisté, nedotýkejte se jeho povrchu.
• Na CD nelepte samolepky či lepící pásky.
• CD nevystavujte přímému slunečnímu záření
či zdrojům tepla, jako je topné těleso a nenechávejte ho v autě, pokud je zaparkováno na
prudkém slunci, neboť to vede ke značnému
zvýšení teploty.
98
05-AR 686 + CZ 98 01.09.2005, 11:09:14 Uhr
Page 99

Tento přístroj byl testován podle všech příslušných, v současné době platných směrnic CE, jako je např. elektromagnetická kompatibilita a direktiva o
nízkonapěťové bezpečnosti, a byl zkonstruován podle nejnovějších bezpečnostnětechnických předpisů.
Vyhrazujeme si technické změny!
Záruka
Na námi prodaný přístroj poskytujeme záruku v trvání 24 měsíců od data prodeje
(pokladní doklad).
Během záruční lhůty odstraníme bezplatně všechny vady přístroje nebo
příslušenství*), které vzniknou v důsledku vad materiálu nebo výrobních vad, a to
opravou nebo, podle našeho uvážení, formou výměny. Záruční plnění nemají za
následek ani prodloužení záruční doby ani tím nevzniká nárok na novou záruku!
Jako záruční doklad slouží doklad o koupi. Bez tohoto dokladu nelze uskutečnit
bezplatnou výměnu nebo bezplatnou opravu.
V případě uplatnění záruky předejte, prosím, kompletní přístroj v originálním
obalu spolu s pokladním dokladem Vašemu obchodníkovi.
*) Poškození příslušenství není automaticky důvodem pro bezplatnou výměnu
kompletního přístroje. V takovém případě se obraťte na naši Hotline! Prasklé
skleněné resp. plastové díly zásadně podléhají povinnosti úhrady!
Jak na vady na spotřebním příslušenství, resp. dílech podléhajících rychlému
opotřebení (např. uhlíky motoru, hnětací háky, hnací řemeny, náhradní dálkové
ovládání, náhradní zubní kartáčky, pilové listy atd.), tak i na čištění, údržbu nebo
výměnu dílů podléhajících rychlému opotřebení se záruka nevztahuje a je proto
nutno je uhradit!
Záruka zaniká v případě, že dojde k zásahu neautorizovanou osobou.
Po uplynutí záruky
Po uplynutí záruční doby je možno za úplatu provést opravy v příslušném odborném obchodě nebo opravně.
CZ
99
05-AR 686 + CZ 99 01.09.2005, 11:09:14 Uhr
Page 100

CZ
Význam symbolu „Popelnice“
Chraňte naše životní prostředí, elektropřístroje nepatří do domovního odpadu.
Pro likvidaci elektropřístrojů použijte určených sběrných míst a odevzdejte zde
elektropřístroje, jestliže už nebudete používat.
Pomůžete tak předejít možným negativním dopadům na životní prostředí a lidské
zdraví, ke kterým by mohlo dojít v důsledku nesprávné likvidace.
Přispějete tím ke zhodnocení, recyklaci a dalším formám zhodnocení starých
elektronických a elektrických přístrojů.
Informace o tom, kde lze tyto přístroje odevzdat k likvidaci, obdržíte
prostřednictvím územně správních celků nebo obecního úřadu.
V mnoha zemích Evropské unie bude odevzdávání elektrických a elektronických
přístrojů do domovního a/nebo komunálního odpadu od 13.8.2005 zakázáno.
V Německu od 23.3.2006.
100
05-AR 686 + CZ 100 01.09.2005, 11:09:15 Uhr
 Loading...