

Page 1

OWNER’S MANUAL
CDP.3
CD Player
ENGLISH ..........................................................................1
FRANÇAIS
......................................................................3
DEUTSCH
........................................................................6
ESPAÑOL
........................................................................9
NEDERLANDS
..........................................................12
............................................................................15
SPECIFICATIONS
........................................................17
V1.0
Page 2
STOP
PLAY/PAUSE
CLEARREPEAT
7890
34
1 2 DISPLAY
56
PROG
Figure 2 – Remote handset – front and rear
PLAY / PAUSESTOP
POWER
LOAD
MODEL CDP .3
Figure 1 – Front and rear views
Page 3

1
THANK YOU FROM EVERYONE AT
CLASSÉ
Thank you for purchasing the Classé Audio
CDP.3 compact disk player.
We take great pride in offering components
that combine exceptional sonic performance and
long-term reliability. To do that, we have invested
in extraordinary design and manufacturing
facilities. We trust that you will enjoy your
purchase for many years to come.
CLASSÉ DESIGN PHILOSOPHY
All of our components benefit from the same
rigorous design goal: All Classé products must
reproduce music with the harmonic and spatial
integrity typical of fine instruments heard in a
live, unamplified performance.
Single Circuit Design
To this end, we make extensive use of
carefully optimized versions of the same basic
circuit precisely matched to specific power
requirements. This means that all Classé line
level components and power amplifiers benefit
from years of refinement. However, our efforts
do not stop here.
Listening: The Critical Design Element
Once we determine general circuit values
for a particular application, we listen carefully
while exchanging and mixing different parts
(transistors, capacitors, wiring, PC boards, etc.)
and adjusting specific operating voltages within
proper engineering ranges.
Extended Real-World Lifespan
Every Classé component, even the most
affordable, benefits from our painstaking
approach to design parameters. The result is an
optimum balance between the often-conflicting
demands of exceptional performance and longterm reliability. Our most expensive components
gain from even tighter tolerance parts and highly
segmented and exceptionally robust power
supplies with large reserve-current capabilities.
Our Pride in Manufacturing, Your Pride
in Ownership
We build all of our components to the highest
possible standards. From multi-layer glass-epoxy
circuit boards, the full sized power-supplies, and
the massive faceplates, every Classé product is
a tribute to both the science and art of sound
reproduction. We hope that you derive as much
pleasure and satisfaction in using your Classé as
we did in producing it.
UNPACKING & SET-UP
WARNING: THE CDP.3 IS NOT TO BE OPERATED
WITH THE COVER OPENED.
THERE IS INVISIBLE LASER RADIATION WHEN THE
COVER IS OPENED.
AVOID DIRECT EXPOSURE TO THE LASER BEAM.
Safety Instructions
1. WATER AND MOISTURE: This product should
not be used near water. To prevent fire or shock
hazard, do not expose this product to rain or
moisture.
2. HEAT: This product should be situated away
from heat sources such as radiators, heat
registers, stoves, or other appliances which
produces heat.
3. POWER SOURCES: This product should be
connected to an AC power source of the proper
rated voltage. The original shipping container
and the serial number tag at the back of the unit
will stipulate the AC voltage from which this unit
can operate correctly.
4. SERVICING: Do not open this unit for any
reason. No user serviceable parts inside. Refer
servicing to an authorized service technician.
5. NON-USE PERIODS: The power cord of this
unit should be unplugged from the AC outlet
when left unused for an extended period of time.
6. DO NOT REMOVE THE TOP COVER while the
unit is “on” or connected to an AC outlet, there
is a SHOCK HAZARD, also, foreign objects could
fall in the unit and cause severe damage to
internal components, the player may also leak
invisible laser radiation. AVOID DIRECT
EXPOSURE TO THE BEAM.
1. Unpacking and Accessories
The Classé CDP.3 has been carefully wrapped in
heavy gauge plastic, packed in semi-rigid foam
and contained in a special box. To remove the
unit, open and spread the top flaps of the box.
By its sides, lift the CDP.3 out along with its
attached foam packing. Remove each foam side
by pulling them straight out. Remove the plastic
wrap and inspect the unit for any concealed
damage. Report any concealed damage to
your dealer promptly.
Apart from this owner's manual, please ensure
the following is also included:
• Detachable A.C. power cord.
• Remote control handset
(along with two (2) type “AAA” batteries).
Please report any missing parts to your
dealer promptly.
2. Setup
The CDP.3 CD player must be operated on a
horizontal platform (see specifications for details)
such as a table or, preferably, specialized audio
furniture to extract the best performance. Like
fine turntables and interconnect cables, the final
location of the CDP.3 should be free of any huminducing magnetic fields, such as those caused
by power amplifiers, AC line filters and other
regulation devices. Such locations can introduce
noise into an audio system, which inevitably
degrades sound quality. Ideally, a few feet should
separate the CDP.3 from the power amplifier.
As well, keep low-level interconnect cables
away from the power amp and separate from
A.C. power cords. The CDP.3 generates negligible
amounts of heat. Therefore, air space around the
CDP.3 for ventilation need not be a concern.
Important! Check the Serial Number sticker on
the back of the unit for the correct operating
voltage. Regardless of the voltage, the fuse
rating should be a 3/8 AMP SLO-BLO type.
A.C. LINE POWER
The ON/OFF (POWER) switch on the CDP.3 is
located on the front panel of the unit, at the
left, besides the CD drawer. While thoroughly
musical shortly after turn-on, the CDP.3 will
exhibit “sonic growth” for the first 300 hours
of use.
For optimum sonic performance, you should
consider use of the optional CLASSÉ REFERENCE
A.C. LINE CORD. Consult your dealer regarding
this accessory.
CAUTION: “Floating the ground”, or defeating
the ground on a 3-prong line cord may create a
shock hazard. Connect all interconnect cables
between the electronics before connecting the
A.C. line cords to the wall outlets. This will
reduce the potential shock hazard. In addition,
please read the warranty section of this owner's
manual.
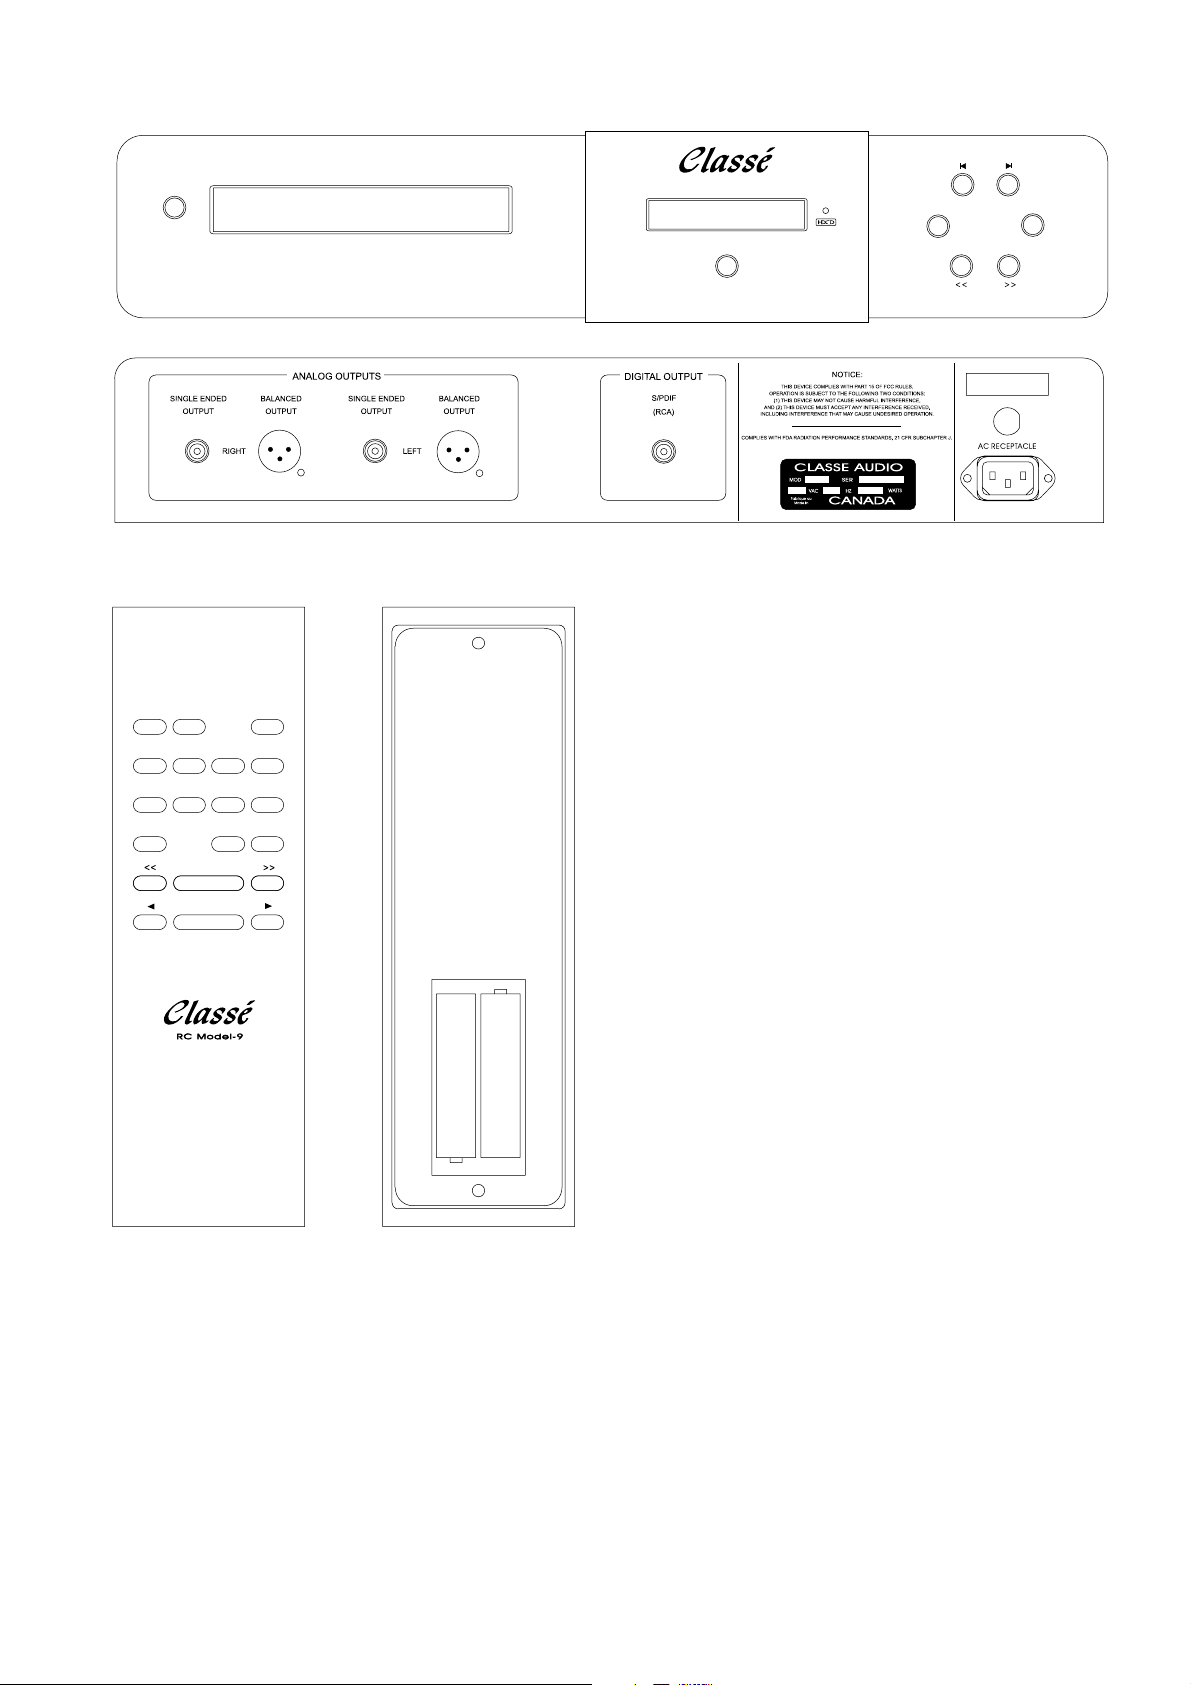
REAR PANEL CONNECTIONS AND
FUNCTIONS
The CDP.3 compact disk player is equipped with
both BALANCED and REGULAR RCA (single
ended) analog outputs. Connecting the CDP.3 to
your audio system requires a pair of BALANCED
or REGULAR RCA type interconnects and the
supplied AC power cord. The CDP.3 is also
equipped with a SINGLE ENDED (S/PDIF) data
output connector. To use this output, you
require a SINGLE-ENDED (REGULAR) DIGITAL
cable and an S/PDIF input connector on your
digital processor. Refer to Fig. 1 for visual aid.
A note about the connecting cables
The overall performance of the CD PLAYER will
vary dramatically with the quality and type of
cables chosen. Selection of the highest quality
digital output cables combined with proper
output interconnects is recommended for
maximum performance of the Classé CDP.3.
AC Line Input
In addition to the analog and digital outputs,
the remaining connection on the rear panel of
the CDP.3 is the AC input connector. Connect
the supplied AC power cord to this input. As
the CAUTION section on the previous page
indicates, it is always a wise PRECAUTION
to connect all interconnect cables before
attaching the AC power cords.
Page 4

2
DISPLAY, FUNCTIONS AND
OPERATIONS
1. Functions
The front panel of the CDP.3 has six buttons that
perform all the basic necessary functions. The
remote control contains all the basic functions
found on the front panel (except the LOAD and
POWER buttons) as well as all advanced
programming features.
Using Figure 1, the front panel controls are (from
left to right):
POWER: Press this button to turn the unit ON
or OFF.
LOAD: Press this button once to open the disk
tray. Pressing it again will close the tray.
PREVIOUS (<): Pressed once during playback,
the CDP.3 will start playing the previous track.
Pressing it sequentially will cause the CDP.3 to
go back one track each time it is pressed. This
button is also used to select tracks to play and
program into memory.
NEXT (>): Each time this button is pressed, the
CDP.3 will advance one track i.e. press it twice to
advance two tracks, three for three tracks, etc.
If pressed during playback, the CDP.3 resumes
playing from the desired track. If pressed while
stopped, the CDP.3 will await further commands.
PLAY/PAUSE: Press this button to start playback.
Pressing it again will pause the music until it is
pressed once more.
In addition to all the above functions, the remote
handset of the CDP.3 contains the following
additional functions (see Fig.2):
NUMERIC KEYPAD (digits 0 through 9): This is
a convenient alternative to the PREVIOUS and
NEXT buttons. Pressing the desired track number
on the numeric keypad is usually faster than the
PREVIOUS and NEXT buttons. For example, if
you just inserted a disk and wish to play track 8,
pressing 8 followed by PLAY is easier than
pressing the NEXT button eight times, and then
PLAY.
REPEAT: Repeats the whole disk, the
programmed tracks or just the single track
being heard.
PROG: Stores selected tracks into memory
for playback.
CLEAR: Will clear the last track entered
into memory.
DISPLAY: When pressed once, the display will
count backwards giving the total remaining time
on the disc or the programmed tracks. If pressed
once more, the display will count upwards the
total time on the disc or the programmed tracks.
If pressed once again, the display will return to
it’s normal function.
FORWARD (>>) AND REVERSE (<<) SEARCH:
The CDP.3 employs a convenient 2-speed search.
These buttons allow you to quickly search
through the disk in both directions. Press and
hold down the desired SEARCH button. The time
counter will approximately double in speed, and
the track heard will be reduced in volume. Once
the desired point is reached, release the SEARCH
button, playback will resume.
If the SEARCH button is held for more than
4 seconds, the CDP.3 goes into a high-speed
search mode, and the time counter advances very
rapidly. During high-speed search, the volume is
completely muted.
NOTE: There is no variable output on the CDP.3.
2. Display Information and Various Modes
of Operation
To insert a disk, press LOAD to open the CD tray.
Gently place the disk with the label side up on
the tray, and press LOAD again, the tray will
close, and several seconds later the display will
indicate the total number of tracks on the disk
with the total playing time. If the disk has not
been properly inserted, or is inserted upside
down, ZEROs (0 0 00) will appear on the display.
Disks with bad scratches, pinholes, or other
severe manufacturing defects might also not
be useable.
Once the display confirms the number of tracks
and playing time, the CDP.3 is in STOP mode.
At this point, you can carry out several different
playback modes. Each is described in
detail below.
Playback from the beginning or from a
selected track
To play an entire disk from the beginning, press
PLAY. The CDP.3 will start playing in a few
seconds, and will play the entire disk. To play
from a desired track onwards, select the desired
track using the NEXT (>) and/or PREVIOUS (<)
buttons, or with the numeric keypad on the
remote control. Then press PLAY. The disk will
play from that point on until the end of the disk.
While playing, the display will show each track
currently playing along with the elapsed time
from the beginning of that track. Once the disk
is over, the CDP.3 will return to STOP mode.
Playback of only selected tracks
You can program the CDP.3 to play any
combination of tracks on a disk, up to a
maximum of 20. Using the NEXT (>) and
PREVIOUS (<) buttons, or the numeric keypad,
find the first desired track on the display. Then
press the PROG button. Repeat this procedure
until all desired tracks have been stored.
As each track is being stored, the display
indicates the total playing time of all tracks
currently programmed. Press PLAY. Playback will
commence from the first programmed track, and
all programmed tracks will play in the order they
were stored. Please note that:
• If you try to program more than 20 tracks, no
more tracks will be entered into memory.
• During programmed playback, the numeric
keypad is disabled; use NEXT and PREVIOUS
to change tracks.
• The programmed tracks don't have to be in
ascending numerical order; i.e. you can
program track 2 to play after track 6.
• If you programmed a track by accident,
simply press CLEAR, that track will be
deleted from memory.
• To clear all the tracks programmed in memory,
press the STOP button twice if the CDP.3 is
already playing, or once if it is not. If you
intend on changing the disk, simply opening
the disk tray automatically erases all
programmed tracks from memory.
Playback using REPEAT
Pressing the REPEAT button will have the unit
repeating the entire disk. Once the REPEAT mode
is chosen, press PLAY.
The REPEAT feature can also be used with
tracks programmed in memory in the same
way as above.
TECHNICAL DESCRIPTION
The Classé CDP.3 compact disk player is high
quality unit utilizing the latest innovations in
digital audio reproduction. The philosophy
behind the CDP.3 is advanced technology for
extracting the maximum musical performance,
but also embraces the time proven idea of
simplicity, in accordance with the saying
“simpler is better.”
No effort has been spared in the development
of the CDP.3. The chassis is of exceptionally
thick gauge metal, and has been designed to
resist vibration through solid construction and
proper isolation from sources of vibration. The
3/8 inch thick faceplate is a tribute to its
construction and aesthetics.
Inside, main power is provided by a custom highcurrent toroidal transformer. The power supply
of the CDP.3 is generously oversized to assure
that regardless how much current is drawn,
the circuitry will remain unaffected by any
fluctuations. Numerous power supplies are used,
to assure the elimination of interference caused
by fluctuations often induced by heavy current
draw on shared supplies. The CDP.3 inherently
has a low power consumption, but microinformation is easily contaminated when
traditional power supplies clip due to their
inadequate output. This is the general idea
behind the high current, stable supply that
powers the CDP.3.
The disk transport itself is the Sanyo CD91F7.
This mechanism employs a newly-developed
linear tracking laser pickup which is fast, quiet,
and long lasting. The CD91F7 is of very high
quality, and its outstanding construction using
highly efficient, long life motors assures excellent
long-term reliability. In addition, this compact
Page 5

3
disk player is designed not to require periodic
calibration, assuring that long-term alignment
will always be right on specification.
Jitter, also known as errors in the time domain,
is the prime factor in performance degradation,
and Classé has addressed this problem from
every perspective. One aspect is the outstanding
power supply described above; another is the
exceptional reclocking circuitry. Using a 16.9344
MHz crystal oscillator to generate the digital
output, the final jitter measured at the output
is typically so low it can barely be detected.
There is a single SPDIF single-ended digital
output on an RCA connector. A final technical
highlight of the CDP.3 is the custom remote
handset. It features an exceptionally wide
transmission angle to the IR receiver on the
CDP.3, and is engineered to last an extremely
long time.
The CDP.3 features an HDCD decoder that,
in addition to allowing full HDCD decoding,
functions as a state of the art 8X oversampling
filter if the input data is not encoded in HDCD
format. The CDP.3 employs a high performance
20-bit digital-to-analog converter, which serves
to decode both left and right channel
information. The digital information is
oversampled by the HDCD decoder to a rate that
is 8 times higher than the original sampling
frequency. Oversampling the digital data to such
a high rate allows the analog filter following the
DAC to have far fewer poles than would be
otherwise required. This allows a simpler analog
filter to follow the DAC which reduces the errors
that are associated with “brick wall” analog
filters, and also minimizes the number of
components in the signal path. With non-HDCD
encoded data, the decoder exhibits performance
to common digital filter IC’s. The stop band
attenuation is greater than -120dB, and the
internal calculations are carried out with 27-bit
accuracy. If the data is encoded in HDCD
encoded format, the filter will detect it and
decode it, extracting all of the additional
information available with an HDCD recording.
The HDCD indicator on the front panel will dome
on if the HDCD encoded data is detected. The
indicator will be off for a normally encoded CD.
The analog gain is increased by 6dB
automatically when an HDCD disc is detected, as
suggested by Pacific Microsonics, Inc. The HDCD
filter also performs de-emphasis filtering for discs
encoded with preemphasis.
The output of the Burr Browm 20-bit 1702 DACs
is followed by a 3-pole, linear phase, low pass
filter to remove any artifacts beyond the audio
frequency range from the analog audio signal.
The last stage of the filter is a passive 6dB
attenuator to provide the proper HDCD levels.
The latest generation Burr brown OPA 2604
output buffer stage, biased in class A, is used in
the output stage.
The output is followed by relays to protect
outside equipment from power-on transients
as well as to protect the CDP.3 from other
equipment when the CDP.3 is not powered.
Great care has been used throughout the design
and layout of the CDP.3 to meet FCC class B
requirements. This will ensure that the CDP.3 will
be insensitive to noisy components in a system,
and in turn will not cause harmful interference
to other components.
Every CDP.3 undergoes rigorous computerized
testing that measures each critical performance
parameter, and is burned in for several days to
ensure the consistency of performance over time.
Every unit has to pass more than 100 separate
tests before leaving the factory.
Notice to all Classé Product owners:
Thank you for your purchase of a Classé Audio
component.
All of us at Classé have taken extreme care to
ensure that your purchase will become a prized
investment. We are proud to inform you that all
Classé Audio components have been officially
approved for the European Community CE mark.
This means that your Classé product has been
subjected to the most rigorous manufacturing
and safety tests in the world, and have proven
to meet or exceed all European Community CE
requirements for unit to unit consistency and
consumer safety.
All of us at Classé Audio wish you many years of
musical enjoyment.
As of July 18, 1996, Classé Audio has been
granted Certificate No: C401CLA1.MGS, which
indicates CE approval for all models of the
Classé Audio product line.
CLASSÉ AUDIO
5070 Francois-Cusson
Lachine, Québec
Canada H8T 1B3
Telephone: +1 (514) 636-6385
Fax: +1 (514) 636-1428
FRANÇAIS
TOUTE L’ÉQUIPE DE CLASSÉ VOUS
REMERCIE !
Nous vous remercions pour l’achat de ce lecteur
de CD Classé CDP.3
Nous prenons un soin jaloux à concevoir et
proposer des maillons qui associent une
musicalité exceptionnelle avec une fiabilité hors
pair. Pour cela, nous avons choisi un dessin très
original pour nos appareils, et l’avons équipé de
nombreuses fonctions particulièrement
ergonomiques. Nous sommes ainsi certains que
vous profiterez de votre achat pendant de très
nombreuses années.
PHILOSOPHIE DE CONCEPTION
CLASSÉ
Tous nos maillons sont conçus dans le même
souci de perfection et de rigueur : les appareils
Classé doivent reproduire intégralement la
Musique, avec tous ses harmoniques, et le
respect total de la position et de l’ampleur des
instruments dans l’espace. Exactement comme
dans une écoute en direct, sans amplification
électronique aucune.
Un circuit électronique unique
Pour cela, nous utilisons principalement un circuit
électronique de conception unique, reprenant sur
tous nos maillons les mêmes principes de base
adaptés aux demandes en puissance de chaque
appareil. C’est ainsi que tous les
préamplificateurs Ligne et amplificateurs de
puissance Classé bénéficient depuis des années
de la même qualité sonore. Cependant, nos
efforts ne s’arrêtent pas là.
L’écoute : l’élément le plus critique pendant
la conception
Une fois que nous avons déterminé les valeurs
précises de chaque circuit électronique, en
fonction de chaque application particulière, nous
procédons à de très nombreuses écoutes
attentives en modifiant et en associant certains
composants (transistors, condensateurs, câblage,
cartes circuits imprimés, etc.). Puis nous réglons
très précisément les différentes tensions
nécessaires au parfait fonctionnement de ces
composants.
Une durée de vie exceptionnelle
Chaque maillon Classé, même le plus abordable,
bénéficie de cette très soigneuse approche dans
la conception. Le résultat est un équilibre parfait
entre les demandes souvent opposées que
représentent une musicalité exceptionnelle et une
fiabilité à toute épreuve. Dans ces deux
domaines, les gains sont obtenus par l’utilisation
de composants aux tolérances très strictes, avec
une implantation large et soignée, et l’emploi
d’alimentations exceptionnellement robustes,
disposant toujours de très grandes réserves de
courant.
Page 6

Notre fierté est dans la fabrication. La vôtre
est dans la possession
Nous construisons donc tous nos maillons selon
les standards en vigueur les plus élevés. Qu’il
s’agisse des circuits imprimés multicouches en
verre époxy, des alimentations surdimensionnées,
ou des très épaisses faces avant des appareils,
chaque appareil Classé devient une référence
dans l’art de maîtriser à la fois la technique
électronique et celui de la reproduction sonore et
musicale. Nous espérons que vous tirerez autant
de plaisir et de satisfaction à utiliser votre
nouveau Classé que nous en avons eu à le
concevoir et à le fabriquer.
DÉBALLAGE ET MISE EN SERVICE
ATTENTION : LE CDP.3 NE DOIT PAS
FONCTIONNER CAPOT RETIRÉ. IL Y A EN EFFET
UN RAYON LASER INVISIBLE PENDANT SON
FONCTIONNEMENT. ÉVITER TOUTE EXPOSITION
DIRECTE AVEC CE RAYON LASER.
Précautions d’utilisation
1. EAU ET HUMIDITÉ : Cet appareil ne doit pas se
trouver près d’une source humide. Pour éviter
tout risque d’incendie ou d’électrocution, ne pas
exposer cet appareil à la pluie ou à l’humidité.
2. CHALEUR : Cet appareil ne doit pas se trouver
près de sources de chaleur telles qu’un radiateur,
un four, ou tout autre appareil produisant de la
chaleur.
3. SOURCE D’ALIMENTATION : Cet appareil doit
être relié à une source d’alimentation de la
tension requise. L’emballage externe ainsi qu’une
étiquette apposée à l’arrière de l’appareil
indiquent la tension d’alimentation sur laquelle
l’appareil doit fonctionner.
4. RÉPARATIONS : Ne jamais ouvrir l’appareil. Il
n’y a à l’intérieur aucune commande susceptible
d’être modifiée par l’utilisateur. En cas de
problème, adressez-vous immédiatement à un
technicien qualifié et agréé.
5. PÉRIODES DE NON UTILISATION : Le câble
d’alimentation secteur doit être débranché
pendant les longues périodes de non-utilisation
de l’appareil.
6. NE JAMAIS RETIRER LE CAPOT SUPÉRIEUR
lorsque l’appareil est branché sur le secteur, sous
peine de RISQUE D’ÉLECTROCUTION ; de même,
la chute d’objet à l’intérieur entraîne le risque de
dommages internes irréversibles. Le lecteur émet
un rayon laser invisible. ÉVITER TOUTE
EXPOSITION DIRECTE À CE RAYON LASER.
1. Déballage et accessoires
Votre lecteur de Cd Classé CDP.3 est emballé
dans une coquille moulée semi-rigide, placée
dans un carton spécial. Pour sortir l’appareil,
ouvrez et repliez tous les rabats supérieurs du
carton, tirez l’ensemble appareil plus protection
interne et posez-le sur une surface plane. Ôtez le
sac plastique de protection et inspectez
soigneusement l’appareil pour repérer tout
dommage éventuel.
En plus de ce manuel d’utilisation, vous trouverez
également dans l’emballage :
• Câble secteur détachable
• Télécommande (avec ses deux piles type
"AAA")
Veuillez signaler le plus rapidement possible à
votre revendeur l’absence éventuelle d’un de ces
éléments.
2. Installation
Le lecteur de CD CDP.3 doit fonctionner sur une
surface horizontale, telle une table, ou mieux un
meuble Haute fidélité spécifique, permettant
d’en tirer les meilleures performances. Comme
pour tous les maillons de hautes performances et
leurs câbles de liaison, cet endroit doit être
exempt de parasites et champs magnétiques, tels
ceux générés par les amplificateurs de puissance,
filtres secteur ou autres systèmes de régulation.
De tels parasites entraînent des dégradations
sonores plus ou moins audibles. De manière
idéale, le CDP.3 doit être éloigné de quelques
dizaines de centimètres des autres maillons de
l’installation. De même, éloignez le plus possible
les câbles de liaison de modulation des câbles
d’alimentation secteur. Le CDP.3 génère très peu
de chaleur. L’espace nécessaire autour de lui pour
une bonne ventilation n’est donc pas critique.
Important ! Vérifiez l’étiquette portant le numéro
de série, à l’arrière de l’appareil ; elle indique la
tension d’alimentation secteur à respecter
impérativement. Quelle que soit cette tension, le
fusible de protection est de type 3/8 ampère à
fusion retardée.
ALIMENTATION SECTEUR
L’interrupteur de mise sous tension ON/OFF
(Power) se trouve sur la face avant, à gauche,
près du tiroir de chargement du disque. Bien
qu’il soit rapidement opérationnel après sa
première mise sous tension, le CDP.3 fournira le
meilleur de lui-même qu’après environ 300
heures d’utilisation.
Pour des performances musicales optimales, nous
vous conseillons de le compléter par le câble
d’alimentation optionnel CLASSÉ REFERENCE
A.C. LINE CORD. Consultez votre revendeur pour
l’acquisition de cet accessoire.
ATTENTION : L’utilisation d’une masse
"flottante", ou l’absence de branchement
effectif de la terre peut être cause
d’électrocution. Branchez toujours tous les cbles
de liaison entre les différents maillons
électroniques avant de brancher les cbles secteur
dans les prises murales. Cela réduit les risques
potentiels d’électrocution.
BRANCHEMENTS ET COMMANDES EN
FACE ARRIÈRE
Le lecteur de CD CDP.3 est équipé de sorties
analogiques au standard symétrique (BALANCED)
et asymétrique conventionnel (prise RCA). Le
branchement du CDP.3 à votre système requiert
donc une paire de câbles symétriques ou
asymétriques, et le câble secteur fourni. Le CDP.3
est également équipé d’une prise de sortie
numérique directe au standard S/PDIF (prise RCA)
à relier éventuellement à l’entrée correspondante
d’un convertisseur numérique/analogique
externe. Voir figure 1 pour l’emplacement de ces
prises.
Remarque concernant les câbles de liaison
Les performances finales d’un lecteur de CD
peuvent considérablement varier en fonction de
la qualité et du type de câbles de liaison choisis.
Sélectionnez toujours un câble de liaison
numérique de la meilleure qualité possible,
équipé également des meilleures prises.
Entrée alimentation secteur
En plus de ces prises de liaison modulation, la
prise restante en face arrière est celle de
l’alimentation secteur. Branchez le cordon fourni
dans cette prise. Comme déjà indiqué dans les
mesures de précaution, il faut toujours effectuer
tous les autres branchements avant de relier
effectivement l’appareil au secteur.
AFFICHEUR, FONCTIONS ET
COMMANDES
1. Commandes
La face avant du CDP.3 présente six boutons qui
suffisent au fonctionnement de base. La
télécommande reprend ces fonctions (sauf les
touches LOAD (tiroir) et POWER (mise sous
tension)), plus d’autres touches donnant accès à
des fonctions avancées.
En vous reportant à la figure 1, ces touches sont
(de gauche à droite) :
POWER (mise sous tension) : chaque pression
sur cette touche permet d’allumer et d’éteindre
l’appareil.
LOAD (chargement du disque) : Une pression
sur cette touche ouvre le tiroir du disque. Une
seconde pression le referme.
PREVIOUS (<) (précédent) : Chaque pression à
l’arrêt entraîne le passage à la plage
précédemment choisie, avec avance à la plage
précédente à chaque nouvelle pression. Pendant
la lecture, une pression entraîne au retour au
début de la plage lue.
NEXT (>) (suivant) : Chaque pression pendant
la lecture entraîne la lecture de la plage suivante
sur le disque, avec avance à la plage suivante à
chaque nouvelle pression. Cette touche est
également utilisée pour la sélection des plages
mises en mémoire lors d’une programmation.
PLAY/PAUSE (lecture/mise en pause) : Pressez
cette touche pour démarrer la lecture. Une
seconde pression met la lecture en mode de
pause ; une autre pression redémarre la lecture là
où elle avait été mise en pause.
En plus des touches décrites ci-dessus, la
télécommande propose les touches suivantes :
4
Page 7

CLAVIER NUMÉRIQUE (touches de "0" à "9") :
Ces touches numérotées constituent une
alternative pour le passage à une autre plage du
disque. Elles permettent l’accès direct à une
plage, de manière plus rapide qu’en utilisant les
touches "Previous" et "Next". Par exemple, si
vous désirez lire la plage 8 d’un disque que vous
venez d’insérer dans le tiroir, il est plus aisé de
presser les touches "8" puis "Play" que de
presser huit fois de suite sur la touche "Next",
puis presser "Play".
REPEAT (lecture en mode répétition) : Permet
de répéter la lecture du disque en entier, des
plages programmées ou d’une simple plage.
PROG (mise en mémoire) : Permet de mettre en
mémoire les plages sélectionnées pour leur
programmation et lecture combinée.
CLEAR (effacement) : Permet d’effacer la dernière
plage mise en mémoire.
DISPLAY (afficheur) : La première pression sur
cette touche donne le temps restant en lecture
sur tout le disque ou l’ensemble des plages
programmées. Une seconde pression donne le
temps déjà écoulé sur le disque en lecture ou
l’ensemble des plages programmées. Une
pression supplémentaire retourne à l’affichage
d’origine.
FORWARD (>>) et REVERSE (<<) SEARCH
(recherche rapide en avant (>>) et en arrière
(>>) ) : Le CDP.3 utilise un système de recherche
très pratique, à deux vitesses. Pressez et
maintenez la pression sur une de ces deux
touches SEARCH. Le compteur double
approximativement de vitesse et le volume
sonore est volontairement réduit. Une fois le
point désiré atteint, relâchez la touche et la
lecture normale repart.
Si la pression sur une touche SEARCH est
maintenue pendant plus de 4 secondes, vous
entrez en mode de recherche à haute vitesse : le
compteur avance alors très rapidement et le son
est volontairement totalement coupé.
NOTE : il n’y a pas de sortie à niveau réglable sur
le CDP.3.
2. Informations dans l’afficheur et divers
modes de fonctionnement
Pour insérer un disque, pressez la touche repérée
LOAD et le tiroir s’ouvre. Placez délicatement le
disque dans le tiroir, étiquette au-dessus, puis
pressez de nouveau la touche LOAD pour
refermer le tiroir. Quelques secondes plus tard,
l’afficheur indique le nombre total de plages
contenues sur le disque avec sa durée totale de
lecture. Si le disque n’a pas été correctement
inséré (par exemple avec l’étiquette vers le bas),
des zéros (0 0 00) apparaissent sur l’afficheur.
Des disques comportant des rayures, des trous ou
même des défauts de pressage peuvent aussi
s’avérer illisibles. Une fois que l’afficheur a
confirmé le nombre de plages et la durée totale
de lecture, le CDP.3 est en mode d’arrêt STOP. À
ce niveau, vous pouvez choisir entre différents
modes de lecture. Chacun de ceux-ci est décrit
ci-dessous en détail.
Lecture à partir du début d’une plage choisie
Pour lire tout le disque depuis son début, pressez
simplement la touche PLAY. Le CDP.3 démarre en
lecture au bout de quelques secondes, et lit tout
le disque. Pour ne lire immédiatement qu’une
plage sélectionnée, utilisez les touches NEXT (>)
ou PREVIOUS (<), ou le clavier numérique de la
télécommande, pour afficher le numéro de cette
plage, puis pressez PLAY. La lecture démarrera au
début de cette plage sélectionnée, puis
continuera jusqu’à la fin du disque. Pendant, la
lecture, l’afficheur indique le numéro de la plage
réellement en cours de lecture ainsi que le temps
écoulé sur cette plage depuis le début de sa
lecture. Une fois la lecture du disque terminée, le
CDP.3 se remet automatiquement en mode
d’arrêt STOP.
Lecture uniquement de plages sélectionnées
Vous pouvez programmer le CDP.3 pour qu’il ne
lise qu’une sélection particulière de plages,
jusqu’à un maximum de 20. En utilisant les
touches NEXT (>) ou PREVIOUS (<), ou le clavier
numérique de la télécommande, sélectionnez la
première plage voulue sur l’afficheur. Puis pressez
la touche de mise en mémoire PROG. Répétez
cette procédure pour toutes les plages que vous
désirez mettre en mémoire dans la
programmation. À chaque nouvelle mise en
mémoire, l’afficheur indique la durée totale de
lecture de toutes les plages programmées. Presse
la touche PLAY : la lecture démarre sur la
première plage mise en mémoire, puis toutes les
plages sont lues les unes derrière les autres, dans
l’ordre selon lequel elles ont été programmées.
Veuillez noter les points suivants :
• Si vous essayez de programmer plus de
20 plages, les plages suivantes refusent d’être
mises en mémoire.
• Pendant la lecture d’une programmation de
plages, le clavier numérique de la
télécommande est automatiquement désactivé.
• Vous n’êtes pas obligé de programmer les
plages en ordre ascendant. Par exemple, vous
pouvez programmer la plage 2 après la
plage 6.
• Si vous programmez une plage par erreur,
pressez la touche repérée CLEAR et cette plage
programmée sera effacée de la mémoire.
• Pour effacer toutes les plages mémorisées,
pressez la touche STOP deux fois de suite si le
CDP.3 est déjà en mode de lecture, ou une fois
s’il est à l’arrêt. Si vous souhaitez changer de
disque, le simple fait de demander l’ouverture
du tiroir stoppe la lecture et efface
intégralement la programmation en cours.
Lecture en mode de répétition REPEAT
En pressant la touche REPEAT, la lecture
reprendra indéfiniment sur le disque en entier.
Une fois le mode REPEAT choisi, pressez la
touche de lecture PLAY.
Ce mode de répétition concerne éventuellement
toute programmation mise en mémoire,
uniquement sur les plages mémorisées.
DESCRIPTION TECHNIQUE
Le lecteur de disque compact CDP.3 est un
appareil de très haute qualité, utilisant les toutes
dernières innovations dans le domaine de la
reproduction audionumérique. La philosophie
ayant présidé à sa conception consiste à extraire
toutes les informations nécessaires à une
musicalité parfaite, mais en conservant une
grande simplicité d’utilisation, selon le principe
"Le plus simple est toujours le meilleur".
Rien n’a été négligé lors du développement du
CDP.3. Le châssis est entièrement métallique et
d’une épaisseur inhabituelle, et a été
spécialement conçu pour être insensible à toutes
les formes de vibrations, grâce à son inertie
propre mais aussi à une suspension isolante
spéciale. La face avant d’une épaisseur d’environ
1 cm est la rançon de cette rigidité mais concourt
également à son esthétique.
À l’intérieur, l’alimentation principale est fournie
par un transistor torique de forte puissance.
L’alimentation entière est d’ailleurs largement
surdimensionnée afin de garantir une stabilité
parfaite du circuit quelles que soient les
demandes en courant. Plusieurs alimentations
indépendantes coexistent, afin d’éliminer tout
risque d’interférences entre les circuits internes,
et notamment les problèmes d’induction. Même
si la consommation d’énergie du CDP.3 n’est pas
très élevée, cela assure une reproduction parfaite
des micro-informations, ce qui n’est pas le cas si
l’alimentation fournit une sortie mal adaptée aux
demandes réelles de l’électronique. Voilà
pourquoi une alimentation à forte réserve de
courant et d’une stabilité parfaite a présidé à la
conception du CDP.3.
Le mécanisme de transport du disque est un
modèle Sanyo CD91F7. Il utilise une nouvelle tête
de lecture à déplacement linéaire à la fois plus
rapide et plus silencieuse. De plus la mécanique
CD91F7 est particulièrement bien construite, avec
des moteurs longue durée garantissant une
remarquable fiabilité. De plus, ce lecteur de CD
ne nécessite pas de réglages périodiques,
l’alignement de la tête restant constant même
après de très nombreuses heures d’utilisation.
La distorsion de jitter, également connue sous le
nom d’erreur par décalage temporel, est le
premier facteur de dégradation de la qualité
sonore. Classé a donc particulièrement traité ce
problème. Une des solutions pour lutter contre le
jitter est l’alimentation décrite plus haut ; une
autre est la présence d’un circuit de recalibrage
d’horloge extrêmement précis. Utilisant un
oscillateur avec un cristal de 19,9344 MHZ pour
régénérer la sortie numérique, le jitter mesuré en
sortie devient si bas qu’il est totalement
négligeable.
5
Page 8

La sortie numérique proposée se fait via une
prise coaxiale RCA au standard S/PDIF. Un des
derniers raffinements techniques du CDP.3 est sa
télécommande : elle fonctionne selon un angle
très large, et a été fabriquée pour résister sans
problème aux épreuves du temps.
Le CDP.3 intègre également un décodeur HDCD,
permettant le décodage supplémentaire HDCD,
avec suréchantillonnage 8 fois même sur les
disques codés normalement. Le CDP.3 utilise un
convertisseur numérique-analogique 20 bits, qui
décode simultanément les informations des
canaux gauche et droit. L’information numérique
est ensuite suréchantillonnée par le décodeur
HDCD, à 8 fois la valeur d’échantillonnage
originelle. Ce suréchantillonnage facilite le travail
du filtre analogique suivant le décodage.
Volontairement plus simple, il réduit les erreurs
présentes avec des filtres analogiques à pente
trop élevée, et minimise aussi le nombre de
composants présents sur le trajet du signal. Sur
des données non codées en HDCD, le décodeur
présente des performances identiques aux
décodeurs intégrés traditionnels. La réjection des
fréquences indésirables est supérieure à
– 120 dB, et le calculateur interne présente une
précision de 27 bits. Si les données sont codées
HDCD, le filtre les détecte et les décode,
extrayant toutes les informations
supplémentaires présentes sur un enregistrement
codé HDCD. L’indicateur correspondant reste
éteint avec les disques CD conventionnels. Le
gain en sortie analogique est automatiquement
augmenté de 6 dB lorsqu’un disque codé HDCD
est détecté, selon les normes suggérées par le
concepteur Pacific Microsonics, Inc. Le filtre
HDCD se charge également de la
désaccentuation pour les disques enregistrés avec
préaccentuation.
La sortie du convertisseur N/A Burr Brown 1702
20 bits se fait via un filtre passe-bas à trois pôles,
phase linéaire, destiné à éliminer tous les
artefacts inutiles en traitement analogique final
du signal audio. Le dernier étage est un filtre
passif atténuateur de 6 dB pour fournir les
niveaux conformes au traitement HDCD. La
dernière génération des étages-tampons de
sortie Burr Brown OPA2604 est enfin présent en
sortie ; il fonctionne en Classe A.
La sortie est protégée par des relais, pour éviter
les problèmes de surtension externes aussi bien
que pour protéger le CDP.3 de tout parasite
provenant d’un autre maillon, lorsqu’il n’est pas
sous tension.
Le plus grand soin a été porté lors de la
conception et de la fabrication du CDP.3 afin
qu’il satisfasse parfaitement aux normes FCC
classe B. Cela lui garantit une parfaite
insensibilité aux composants éventuellement mal
isolés intégrés dans le système, et inversement
l’absence de pollution de sa part sur les autres
maillons.
Chaque CDP.3 doit subit des tests informatisés
très rigoureux, mesurant chacun de ses
paramètres les plus critiques, et subit un essai de
plusieurs jours pour garantir sa fiabilité parfaite.
En tout, c’est plus de 100 tests séparés que doit
subir chaque appareil avant de quitter l’usine.
Certification CE
Le 18 juillet 1996, tous les appareils du
constructeur Classé Audio ont reçu l’agrément
CE de la Communauté Européenne :
Certificat N° C401CLA1.MGS.
Cet agrément prouve que votre appareil Classé a
subi les tests de qualité de fabrication et de
sécurité électrique les plus rigoureux au monde,
et satisfait ou excède les normes désormais
exigées dans tous les pays de la Communauté
Européenne.
DEUTSCH
VIELEN DANK
Wir möchten Ihnen herzlich danken, dass Sie sich
für den Classé-CD-Player CDP.3 entschieden
haben.
Wir sind stolz darauf, Ihnen Komponenten mit
außergewöhnlicher Klangqualität und
langfristiger Zuverlässigkeit bieten zu können.
Um dazu in der Lage zu sein, arbeiten wir stets
an Verbesserungen hinsichtlich der Entwicklung
und Herstellung unserer Produkte. Wir sind
sicher, dass Sie in den nächsten Jahren viel
Freude an Ihrem Gerät haben werden.
DIE CLASSÉ-PHILOSOPHIE
Bei der Entwicklung unserer Komponenten
haben wir stets die originalgetreue Wiedergabe
von Musik im Auge. Unser Ziel sind Produkte, die
Musik mit derselben Harmonie und räumlichen
Abbildung darbieten, die charakteristisch für
Live-Konzerte mit feinsten Musikinstrumenten
ohne Verstärkereinsatz sind.
Einzigartiges Platinenlayout
An diesem Punkt arbeiten wir an der
Optimierung des Platinenlayouts, um dieses exakt
an die gestellten Leistungsanforderungen
anzupassen. Das bedeutet, dass alle ClasséGeräte im Zuge jahrelanger Entwicklungsarbeit
stetig verbessert worden sind. Ein Prozess, der
natürlich kontinuierlich weiter fortgesetzt wird.
Hörtests: Das entscheidende Element bei der
Entwicklung
Haben wir die allgemeinen Platinenparameter für
einen besonderen Anwendungsfall festgelegt,
machen wir intensive Hörtests. Dabei werden
verschiedene Bauteile (Transistoren,
Kondensatoren, Kabel, Platinen usw.)
ausgetauscht und miteinander kombiniert und
bei bestimmten Betriebsspannungen innerhalb
der technischen Grenzen aufeinander
abgestimmt.
Extrem hohe Lebensdauer
Ausnahmslos jedes Classé-Produkt profitiert von
unserem unermüdlichen Streben nach
Optimierung der Konstruktionsparameter. Das
Ergebnis ist ein optimales Gleichgewicht
zwischen den oftmals im Widerspruch
zueinander stehenden Bemühungen um eine
außergewöhnliche Leistungsfähigkeit bei
gleichzeitig langfristiger Zuverlässigkeit. Unsere
exklusiveren Komponenten profitieren darüber
hinaus von noch enger tolerierten Bauteilen und
außergewöhnlich stabilen Netzteilen mit enormer
Stromlieferfähigkeit.
Erstklassige Ergebnisse
Unsere Komponenten werden nach den höchsten
Standards gefertigt. Von den mehrschichtigen
Glas-Epoxyd-Platinen, den großzügig
dimensionierten Netzteilen bis hin zu den
massiven Frontplatten repräsentiert jedes
Classé-Produkt in puncto Musikwiedergabe den
6
Page 9

Stand der Technik. Wir hoffen, dass Sie so viel
Freude an Ihrem Classé-Produkt haben werden,
wie wir bei seiner Herstellung hatten.
AUSPACKEN & SETUP
WARNUNG: DER CDP.3 DARF NICHT BEI
GEÖFFNETEM DECKEL IN BETRIEB GENOMMEN
WERDEN. DABEI SETZEN SIE SICH UNSICHTBARER
LASERSTRAHLUNG AUS.
Sicherheitshinweise
1. WASSER UND FEUCHTIGKEIT: Dieses Produkt
sollte nicht in der Nähe von Wasser benutzt
werden. Um Feuer oder einem Stromschlag
vorzubeugen, setzen Sie dieses Produkt weder
Regen noch Feuchtigkeit aus.
2. WÄRME: Dieses Produkt sollte in sicherer
Entfernung zu Heizungen, Öfen oder sonstigen
wärmeerzeugenden Geräten aufgestellt werden.
3. SPANNUNGSVERSORGUNG: Die Netzspannung
muss der Betriebsspannung des Gerätes
entsprechen. Die Betriebsspannung ist auf der
Geräterückseite und auf dem Versandkarton
angegeben.
4. SERVICE: Öffnen Sie das Gerät auf keinen Fall.
Im Innern befinden sich keine vom Bediener zu
wartenden Teile. Servicearbeiten sind
ausschließlich von einem autorisierten Fachmann
durchzuführen.
5. ZEITEN DER NICHTBENUTZUNG: Das Netzkabel
sollte von der Wandsteckdose getrennt werden,
wenn das Gerät für eine längere Zeit nicht in
Betrieb genommen wird.
6. DIE OBERE ABDECKUNG DARF WÄHREND DES
BETRIEBES ODER SOLANGE DAS GERÄT AN DAS
NETZ ANGESCHLOSSEN IST NICHT ENTFERNT
WERDEN. ES BESTEHT DIE GEFAHR EINES
STROMSCHLAGES. Außerdem können
Gegenstände in das Gerät gelangen und zu
schwerwiegenden Beschädigungen der internen
Bauteile führen und es kann unsichtbare
Laserstrahlung austreten. SETZEN SIE SICH
NIEMALS DIREKT DIESER STRAHLUNG AUS.
1. Auspacken und Zubehör
Ihr CLASSÉ-CDP.3 ist von einem stabilen
Kunststoffbeutel und halbstarrem Dämmmaterial
umgeben sicher in einem Spezialkarton verpackt.
Möchten Sie das Gerät aus der Verpackung
nehmen, öffnen Sie die oberen Kartonlaschen
und klappen diese zur Seite. Greifen Sie das
Gerät an beiden Seiten und heben Sie es
komplett mit dem Dämmmaterial aus dem
Karton. Ziehen Sie das Dämmmaterial gerade
vom Gerät ab und entfernen Sie den
Kunststoffbeutel. Prüfen Sie, ob das Gerät
versteckte Beschädigungen aufweist.
Neben der Bedienungsanleitung befindet sich
folgendes Zubehör im Karton:
• Abnehmbares Netzkabel.
• Fernbedienung (2 Batterien Typ:
AAA liegen bei).
Bitte setzen Sie sich bei fehlenden Teilen
umgehend mit Ihrem Fachhändler in Verbindung.
2. Setup
Der CDP.3 muss auf eine horizontale Oberfläche,
wie einen Tisch oder vorzugsweise HiFi-Mobiliar,
gestellt werden, damit eine optimale
Klangqualität gewährleistet ist. Wie erstklassige
Plattenspieler und Verbindungskabel sollte der
CDP.3 in sicherem Abstand zu Magnetfeldern
platziert werden. Vermeiden Sie es daher, den
CDP.3 neben Endstufen, Netzfiltern usw.
aufzustellen. Auch die Audio-Signalkabel sollten
in sicherem Abstand zur Endstufe und getrennt
von den Netzkabeln verlegt werden.
Vom CD-Player wird praktisch keine Wärme
erzeugt. Daher brauchen Sie sich keine
Gedanken über eine ausreichende Luftzirkulation
zu machen.
Wichtig! Bevor Sie das Gerät in Betrieb nehmen,
prüfen Sie, ob die Betriebsspannung mit der
örtlichen Netzspannung übereinstimmt. Die
Betriebsspannung ist an der Rückseite des
Gerätes angegeben.
ANSCHLUSS AN DAS NETZ
An der Gerätefront befindet sich der POWERSchalter des CDP.3, über den das Gerät ein- und
ausgeschaltet werden kann. Obwohl die
Klangqualität schon nach dem Anschließen an
das Netz hervorragend ist, entwickelt der CDP.3
sein volles Klangpotential nach den ersten 300
Betriebsstunden.
Zur Optimierung der Klangqualität sollten Sie das
separat erhältliche CLASSÉ REFERENCE-Netzkabel
einsetzen. Lassen Sie sich diesbezüglich von
Ihrem Fachhändler beraten.
VORSICHT: Trennen Sie das Netzkabel vom Netz,
wenn Sie Anschlüsse herstellen oder
Verbindungen ändern möchten. Stellen Sie erst
alle Verbindungen zwischen den einzelnen
Komponenten her, bevor Sie die Netzkabel mit
den Wandsteckdosen verbinden. Dies vermindert
die Gefahr eines Stromschlages.
ANSCHLÜSSE AN DER
GERÄTERÜCKSEITE UND
FUNKTIONEN
Der CDP.3 ist mit SYMMETRISCHEN und
UNSYMMETRISCHEN Ausgängen ausgestattet.
Um den CDP.3 mit Ihrem Audiosystem zu
verbinden, benötigen Sie die entsprechenden
Anschlusskabel und das beiliegende Netzkabel.
Ferner verfügt der CDP.3 über einen
unsymmetrischen S/PDIF-Ausgangsanschluss. Um
diesen Ausgang nutzen zu können, benötigen Sie
ein UNSYMMETRISCHES DIGITALkabel und einen
S/PDIF-Eingangsanschluss an Ihrem
Digitalprozessor (siehe Abbildung 1).
Ein Hinweis zu den Anschlusskabeln
Die Klangqualität des CD-PLAYERS hängt stark
von der Qualität und dem Typ des ausgewählten
Kabels ab. Um eine optimale Klangqualität zu
gewährleisten, sollten daher nur hochwertige
Kabel eingesetzt werden.
Netzeingang
Neben den analogen und digitalen Ausgängen
befindet sich an der Rückseite des CDP.3 der
Netzeingang. Schließen Sie das Netzkabel an
diesen Eingang an. Wie Sie dem Abschnitt
VORSICHT oben entnehmen können, sollten Sie
vor dem Netzkabel erst alle Verbindungskabel
anschließen.
FUNKTIONEN,
DISPLAYINFORMATIONEN UND
BETRIEBSMODI
1. Funktionen
An der Gerätefront des CDP.3 befinden sich
verschiedene Tasten, über die alle
Grundfunktionen aktiviert werden können. Die
Fernbedienung verfügt mit Ausnahme der Tasten
LOAD und POWER über alle Funktionen, die Sie
auch an der Gerätefront finden und darüber
hinaus über alle Programmierfunktionen.
An der Gerätefront und/oder auf der
Fernbedienung stehen die folgenden
Bedienelemente zur Verfügung:
POWER: Drücken Sie diese Taste, um das Gerät
ein- und auszuschalten.
LOAD: Drücken Sie diese Taste zum Öffnen der
CD-Schublade. Durch erneutes Drücken wird die
Schublade geschlossen.
TRACK-Tasten: Wird die linke Track-Taste
während der Wiedergabe einmal gedrückt,
startet der CDP.3 mit der Wiedergabe des
vorherigen Titels. Drücken Sie die Taste mehrmals
hintereinander, so springt der CDP.3 mit jedem
Drücken um einen Titel zurück. Diese Taste wird
auch zur Auswahl von Titeln für die Wiedergabe
oder das Programmieren von Titeln genutzt.
Mit jedem Drücken der rechten Track-Taste
springt der CDP.3 um einen Titel weiter. Drücken
Sie zweimal, so springt das Gerät um zwei Titel;
drücken Sie dreimal, so springt das Gerät um drei
Titel usw. Wird die Taste während der
Wiedergabe gedrückt, beginnt der CDP.3 mit der
Wiedergabe des gewünschten Titels. Wird die
Taste im Stoppmodus gedrückt, so ist die Eingabe
weiterer Befehle erforderlich.
PLAY/PAUSE: Drücken Sie diese Taste, um die
Wiedergabe zu beginnen. Drücken Sie die Taste
noch einmal, so aktivieren Sie den PAUSE-Modus
solange, bis Sie die PLAY/PAUSE-Taste noch
einmal drücken.
STOP: Drücken Sie diese Taste, um die
Wiedergabe zu stoppen.
ZIFFERNTASTEN (0 bis 9): Die Zifferntasten sind
eine bequeme Alternative zu den Track-Tasten.
Über die Zifferntasten können die Titel in der
Regel schneller aufgerufen werden als über die
Track-Tasten. Haben Sie beispielsweise eine CD
eingelegt und möchten Sie Titel 8 spielen, so ist
das Drücken der Zifferntaste 8 gefolgt von PLAY
schneller durchgeführt als die rechte Track-Taste
achtmal hintereinander und anschließend die
PLAY-Taste zu drücken.
7
Page 10

REPEAT: Sie können die gesamte CD,
programmierte Titel oder nur einen einzigen Titel
wiederholen.
PROG (STORE): Ausgewählte Titel können für
die Wiedergabe gespeichert werden.
CLEAR: Mit Drücken dieser Taste können Sie den
letzten gespeicherten Titel löschen.
DISPLAY: Wird die DISPLAY-Taste einmal
gedrückt, erscheint im Display die gesamte noch
verbleibende Spieldauer auf der CD oder die
noch verbleibende Spieldauer des
programmierten Titels. Wird diese Taste ein
weiteres Mal gedrückt, wird im Display die
gesamte, von der CD oder dem programmierten
Titel bereits gespielte Zeit aufwärts gezählt. Nach
erneutem Drücken der DISPLAY-Taste kehrt das
Display zu seinem normalen Anzeigemodus
zurück.
SEARCH-Tasten (<< und >>): Beim CDP.3
stehen für den Suchlauf zwei Geschwindigkeiten
zur Verfügung. Mit den Search-Tasten können Sie
die CD in beiden Richtungen durchsuchen.
Drücken Sie eine der Search-Tasten und halten
diese gedrückt. Die Suchgeschwindigkeit erhöht
sich nahezu auf das Doppelte. Der gerade
gespielte Titel ist mit reduzierter Lautstärke zu
hören. Ist der gewünschte Punkt erreicht, lassen
Sie die Search-Taste los. Die Wiedergabe wird
fortgesetzt.
Wird die Search-Taste länger als 4 Sekunden
gedrückt, schaltet der CDP.3 in den
Hochgeschwindigkeits-Suchmodus und die
Zeitanzeige zählt sehr schnell weiter. Während
der Hochgeschwindigkeitssuche ist kein Ton zu
hören.
2. Displayinformationen und verschiedene
Betriebsmodi
Möchten Sie eine CD einlegen, drücken Sie die
LOAD-Taste, um die CD-Lade zu öffnen. Legen
Sie die CD vorsichtig mit der Etikettseite nach
oben in die Lade. Drücken Sie noch einmal die
LOAD-Taste, um die CD-Lade zu schließen. Einige
Sekunden später erscheint im Display die
Gesamtzahl der Titel auf der CD mit der
Gesamtspieldauer. Liegt die CD nicht mittig in
der Lade oder ist sie verkehrt herum eingelegt,
erscheinen NULLEN (0 0 00) im Display. Weisen
die CDs Kratzer, Löcher oder sonstige schwere
Herstellungsfehler auf, können sie nicht
abgespielt werden.
Bestätigt das Display die Anzahl der Titel und die
Spieldauer, befindet sich der CDP.3 im STOPPModus. An diesem Punkt können Sie mehrere
verschiedene Wiedergabemodi aktivieren. Jeder
ist im folgenden detailliert beschrieben.
Wiedergabe mit dem Anfang der CD oder
einem ausgewählten Titel beginnend
Drücken Sie die PLAY-Taste, um die CD von
Anfang an zu spielen. Der CDP.3 beginnt
innerhalb weniger Sekunden mit der Wiedergabe
der gesamten CD. Möchten Sie die Wiedergabe
mit einem bestimmten Titel beginnen, wählen
Sie den Titel über die Track-Tasten oder über die
Zifferntasten der Fernbedienung aus. Drücken Sie
danach PLAY. Die CD wird von diesem Punkt an
bis zum Ende gespielt. Während der Wiedergabe
erscheint im Display jeder gerade gespielte Titel
zusammen mit der seit dem Anfang dieses Titels
vergangenen Zeit. Ist die CD bis zum Ende
wiedergegeben worden, schaltet der CDP.3 in
den STOPP-Modus.
Wiedergabe nur ausgewählter Titel
Sie können den CDP.3 so programmieren, dass
die Titel in beliebiger Reihenfolge abgespielt
werden können. Maximal können 20 Titel
gespeichert werden. Wählen Sie den ersten Titel
über die Track-Tasten oder die Zifferntasten auf
der Fernbedienung. Die Nummer des Titels
erscheint im Display. Drücken Sie anschließend
die PROG-Taste. Wiederholen Sie diesen
Vorgang, bis alle gewünschten Titel gespeichert
sind. Da jeder Titel gespeichert wird, erscheint im
Display die Gesamtspieldauer aller derzeit
gespeicherten Titel. Drücken Sie die PLAY-Taste.
Die Wiedergabe beginnt mit dem ersten
gespeicherten Titel. Alle Titel werden in der
Reihenfolge wiedergegeben, in der sie
gespeichert worden sind. Bitte beachten Sie:
• Sie können nicht mehr als 20 Titel speichern.
• Während der Programmwiedergabe können die
Zifferntasten nicht genutzt werden. Nutzen Sie
die TRACK-Tasten, um die Titel zu ändern.
• Die programmierten Titel müssen nicht in
steigender Reihenfolge eingegeben werden.
Das heißt, Sie können Titel 2 nach Titel 6
eingeben.
• Haben Sie den falschen Titel eingegeben, so
drücken Sie einfach die CLEAR-Taste, um
diesen Titel aus dem Speicher zu löschen.
• Um alle gespeicherten Titel zu löschen,
drücken Sie während der Wiedergabe zweimal
und im Nicht-Wiedergabemodus einmal die
STOP-Taste.
• Möchten Sie eine andere CD einlegen, so
werden einfach durch Öffnen der CD-Lade
automatisch alle Titel aus dem Speicher
gelöscht.
Wiedergabe bei aktivierter REPEAT-Funktion
Haben Sie die REPEAT-Taste gedrückt, so
wiederholt das Gerät die gesamte CD. Haben Sie
den gewünschten REPEAT-Modus ausgewählt,
drücken Sie die PLAY-Taste.
Das REPEAT-Feature kann auch für die
Wiedergabe gespeicherter Titel, wie oben
beschrieben, genutzt werden.
TECHNISCHE BESCHREIBUNG
Der Classé-CD-Player CDP.3 ist ein qualitativ
hochwertiges Gerät, das mit den neuesten
Innovationen in der digitalen Audio-Wiedergabe
ausgestattet ist. Neben seiner ausgeklügelte
Technologie, dank der er durch
außergewöhnliche Klangeigenschaften besticht,
überzeugt der CDP.3 durch seine Einfachheit.
Bei der Entwicklung des CDP.3 sind alle
Gesichtspunkte berücksichtigt worden. Das
Metallgehäuse ist äußerst stabil ausgeführt und
daher gegen Vibrationen geschützt.
Im Innern des Gerätes befindet sich ein
leistungsstarker Ringkerntransformator. Das
Netzteil des CDP.3 ist ausgesprochen großzügig
dimensioniert und stabil ausgeführt.
Das Laufwerk selbst ist ein Sanyo CD91F7,
dessen neu entwickelter linearer Laser-Pick-up
schnell, ruhig und langlebig ist. Das CD91F7 ist
ausgesprochen hochwertig. Langlebige Motoren
sorgen hier für maximale Zuverlässigkeit. Ferner
muss dieser CD-Player nicht regelmäßig kalibriert
werden, so dass langfristig ein zuverlässiger
Betrieb den Spezifikationen gemäß gewährleistet
ist.
Eine weitere Besonderheit des CDP.3 ist der
S/PDIF(Cinch)-Anschluss. Und last, not least steht
mit der Fernbedienung des CDP.3 ein weiteres
Highlight zur Verfügung, das über einen extrem
weiten Übertragungswinkel zum IR-Empfänger
am CDP.3 verfügt und auf langfristige
Zuverlässigkeit ausgelegt ist.
In den CDP.3 ist ein HDCD-Decoder integriert,
der neben der HDCD-Decodierung als 8fachOversampling-Filter dient, wenn die
Eingangsdaten nicht im HDCD-Format codiert
sind. Der CDP.3 verfügt über einen
leistungsstarken 20-Bit-D/A-Wandler, der zur
Decodierung der Informationen für den linken
und rechten Kanal genutzt wird. Das
Oversampling der Digitalinformation durch den
HDCD-Decoder ist um 8mal höher als die
Original-Samplingrate. Dadurch kann dem D/AWandler ein einfacherer Analogfilter
nachgeschaltet werden, was wiederum zu
geringeren Fehlerraten führt als es bei
komplizierteren Ausführungen der Fall ist. Ferner
wird dadurch die Anzahl der Komponenten im
Signalpfad reduziert. Die Sperrbereichdämpfung
liegt über -120dB und die internen
Berechnungen werden mit einer Genauigkeit von
27 Bit durchgeführt. Sind die Daten im HDCDFormat codiert, erkennt das Filter dies und
decodiert die Daten. Die auf HDCD-Aufnahmen
verfügbaren Zusatzinformationen werden
herausgefiltert. Die HDCD-LED an der
Gerätefront beginnt zu leuchten, wenn HDCDcodierte Daten erfasst werden. Bei einer normal
codierten CD leuchtet die LED nicht. Das HDCDFilter führt ferner eine Deemphasis-Filterung für
CDs durch, die mit Preemphasis codiert sind.
Dem Ausgang der 20-Bit-1702-D/A-Wandler von
Burr Brown ist ein 3-poliger, linearphasiger LowPass-Filter nachgeschaltet. Die letzte Stufe des
Filters ist ein passives 6-dB-Dämpfungsglied, um
korrekte HDCD-Pegel zu gewährleisten.
Dem Ausgang sind Relays nachgeschaltet, um
andere Geräte vor Stromspitzen beim Einschalten
und umgekehrt den CDP.3 vor dem Einfluss
anderer Geräte zu schützen.
Der CDP.3 ist mit größter Sorgfalt entwickelt und
konstruiert worden, um den FCC-Anforderungen
8
Page 11

Class B zu entsprechen. Dadurch ist
gewährleistet, dass dieser CD-Player nicht
störanfällig ist und es auch nicht zu Interferenzen
mit anderen Komponenten kommt.
Jeder CDP.3 durchläuft umfangreiche
Computertests, bei denen jedes
Leistungsparameter kritisch gemessen wird. Diese
Tests dauern mehrere Tage, um sicherzustellen,
dass die Zuverlässigkeit auch langfristig
gewährleistet ist. Jedes Gerät durchläuft mehr als
100 verschiedene Tests, bevor es das Werk
verlässt.
Hinweis für alle Besitzer eines
Classé-Produktes:
Vielen Dank, dass Sie sich für ein Produkt von
Classé Audio entschieden haben.
Alle Mitarbeiter von Classé haben mit äußerster
Sorgfalt gearbeitet, um Ihnen als Käufer ein
zuverlässiges Gerät anbieten zu können. Wir sind
stolz darauf, dass alle Komponenten von Classé
Audio offiziell für das CE-Zeichen der
Europäischen Gemeinschaft zertifiziert sind. Das
bedeutet, dass alle Classé-Produkte die weltweit
strengsten Herstellungs- und
Sicherheitsprüfungen erfolgreich bestanden
haben.
Classé Audio wünscht Ihnen für viele Jahre
echten Musikgenuss.
Am 18. Juli 1996 erhielt Classé Audio die
Zertifizierungs-Nr.: C401CLA1.MGS, die für eine
CE-Zertifizierung aller Modelle der Produktlinie
von Classé Audio steht.
ESPAÑOL
GRACIAS POR HABER CONFIADO EN
CLASSÉ
Gracias por haber adquirido el Reproductor de
Discos Compactos Classé Audio CDP.3.
Nos esforzamos mucho para ofrecer productos
que combinen prestaciones sonoras
excepcionales y fiabilidad a largo plazo. Para
conseguirlo, hemos invertido muchos recursos en
la puesta a punto de unas instalaciones de diseño
y fabricación extraordinarias. Confiamos en que
durante los próximos años disfrutará con el
producto que acaba de adquirir.
LA FILOSOFIA DE DISEÑO DE CLASSÉ
Todos nuestros componentes se benefician de un
mismo y riguroso criterio de diseño: todos los
productos Classé deben ser capaces de
reproducir la música con un nivel de integridad
armónica y espacial equiparable al percibido en
una interpretación en directo ejecutada con
instrumentos no amplificados de la máxima
calidad posible.
Diseño circuital único
En Classé Audio hacemos un uso intensivo de
versiones cuidadosamente optimizadas del mismo
circuito de base que han sido precisamente
adaptadas a las necesidades específicas de cada
diseño. Esto quiere decir que todos los
preamplificadores, fuentes de sonido y
amplificadores de Classé se benefician de años y
años de refinamiento continuado. Aún así,
nuestros esfuerzos no se detienen aquí.
La escucha: el elemento de diseño crítico
Una vez que hemos determinado los valores
circuitales genéricos para una aplicación
particular, procedemos a una cuidadosa y
exhaustiva evaluación auditiva del mismo
intercambiando y mezclando distintos
componentes (transistores, condensadores,
cables, placas de circuito impreso, etc.) y
ajustando tensiones eléctricas de funcionamiento
específicas en rangos adecuados calculados con
un elevado grado de precisión.
Una fiabilidad extraordinaria
Cada componente Classé, incluso el más
asequible, se beneficia de nuestro riguroso y
perfeccionista enfoque de los parámetros de
diseño. El resultado es un óptimo equilibrio entre
las a menudo conflictivas exigencias derivadas de
reunir prestaciones excepcionales y fiabilidad a
largo plazo. En el caso concreto de nuestros
productos de mayor nivel, las mejoras son aún
más radicales como consecuencia del empleo de
componentes con tolerancias muy estrictas y
fuentes de alimentación altamente segmentadas
y excepcionalmente robustas que poseen una
enorme capacidad de entrega de corriente.
Nuestro orgullo por fabricarlo. Su orgullo
por poseerlo.
Construimos todos nuestros productos
respetando los más altos estándares de calidad
posibles. Desde las placas de circuito impreso
multicapa de vidrio epoxy, las fuentes de
alimentación sobredimensionadas y los chasis y
paneles frontales masivos, cada producto de
Classé Audio es por igual un tributo a la ciencia y
al arte de la reproducción sonora. Esperamos que
durante la utilización de su producto Classé
experimente el mismo placer y la misma
satisfacción que nosotros al construirlo.
DESEMBALAJE Y PUESTA A PUNTO
ADVERTENCIA: EL CDP.3 NO DEBE FUNCIONAR
SIN SU CUBIERTA SUPERIOR.
CUANDO SE QUITA LA CUBIERTA SUPERIOR HAY
RADIACION LASER INVISIBLE.
EVITE LA EXPOSICIÓN DIRECTA AL HAZ LASER.
Instrucciones de seguridad
1. AGUA Y HUMEDAD: Este producto no debería
ser utilizado cerca del agua. Para prevenir la
presencia de fuego o descargas eléctricas, no
exponga este producto a la lluvia o la humedad.
2. CALOR: Este producto debería instalarse
alejado de todo tipo de fuentes de calor, como
por ejemplo radiadores, estufas, cocinas o
cualquier electrodoméstico que produzca calor.
3. FUENTES DE ENERGIA: Este producto debería
ser conectado a una fuente de corriente alterna
de la tensión adecuada. En el embalaje original y
la etiqueta del panel posterior del aparato en la
que figura el número de serie se especifica la
tensión de alimentación alterna necesaria para
que este producto funcione correctamente.
4. MANTENIMIENTO: No abra este aparato por
ninguna razón puesto que en su interior no hay
partes manipulables por el usuario. Para
cualquier reparación u operación de
mantenimiento, solicite la ayuda de un técnico
autorizado.
5. PERIODOS DE NO UTILIZACION: El cable de
alimentación de este aparato debería
desenchufarse de la red eléctrica cuando vaya a
dejar de ser utilizado durante un largo período
de tiempo.
6. NO QUITE LA CUBIERTA SUPERIOR mientras el
aparato esté activado o conectado a una toma
de corriente eléctrica alterna ya que puede
producirse una descarga eléctrica. Además,
podrían caer objetos extraños en el interior del
aparato y causar serios daños a sus componentes
externos; asimismo, pueden producirse fugas de
radiación láser invisible. EVITE EL CONTACTO
DIRECTO CON EL HAZ LASER.
1. Desembalaje y accesorios
Su reproductor de discos compactos Classé CDP.3
está envuelto en plástico de gran grosor y ha
sido embalado en una espuma semi-rígida de alta
densidad colocada en una caja de cartón
especial. Para sacar el producto del embalaje,
abra y extienda las aletas superiores de la caja
sujetándolas a continuación por los lados de ésta,
levante la totalidad del aparato y colóquelo sobre
una superficie plana. Quite la bolsa protectora de
9
Page 12

plástico e inspeccione el preamplificador para
asegurarse de que no haya sufrido ningún daño
durante su transporte. Aparte del presente
manual, asegúrese de que en el embalaje
también figuran los siguientes elementos:
• Un (1) cable de red extraíble
• Un mando a distancia
(con 2 pilas de tipo AAA incluidas)
Le rogamos que informe de inmediato a su
detallista autorizado sobre cualquier daño o
ausencia que detecte.
2. Puesta a punto
El reproductor de discos compactos CDP.3
debería ser ubicado sobre una plataforma
perfectamente horizontal (para más detalles,
diríjase a la sección en la que figuran las
características técnicas del aparato), como por
ejemplo una mesa o, mejor aún, una base
específicamente diseñada para componentes de
audio con el fin de aprovechar al máximo sus
posibilidades. Al igual que sucede con los
mejores giradiscos y cables de interconexión, la
ubicación final del CDP.3 debería estar libre de
campos magnéticos susceptibles de inducir
zumbidos, como es el caso de los generados por
las etapas de potencia, los filtros de red o los
dispositivos de regulación. Tales ubicaciones
pueden introducir ruido en el sistema de audio,
lo que inevitablemente degrada la calidad del
sonido. Idealmente, debería haber una distancia
de alrededor de medio metro entre el CDP.3 y la
etapa de potencia. Asimismo, aleje los cables de
interconexión que transporten señales de bajo
nivel de la etapa de potencia y sepárelos de los
cables de red. El calor generado por el CDP.3 es
despreciable, por lo que no es necesario
preocuparse por dejar un mínimo de espacio
libre alrededor del aparato.
¡Importante! Verifique el Número de Serie en la
etiqueta autoadhesiva que figura en el panel
posterior del CDP.3 para conocer el valor
correcto de la tensión de alimentación.
Independientemente de cual sea la tensión de
alimentación, el valor del fusible interno debería
ser de 3/8 A de acción lenta.
CONEXION A LA RED ELECTRICA
El conmutador de PUESTA EN MARCHA (ON/OFF)
del CDP.3 se encuentra situado en la parte
izquierda el panel frontal del aparato, justo al
lado de la bandeja de transporte del CD. A pesar
de exhibir una gran musicalidad inmediatamente
después de haber sido puesto en marcha por vez
primera, el CDP.3 irá mejorando progresiva y
perceptiblemente sus cualidades musicales a lo
largo de sus 300 primeras horas de uso.
Para conseguir unas prestaciones óptimas,
debería considerar el uso del cable de
alimentación opcional CLASSE REFERENCE A.C.
LINE CORD. Consulte a su detallista para que le
proporcione más información sobre este
accesorio.
PRECAUCION: Antes de llevar a cabo cualquier
conexión, desconecte el cable de alimentación. El
establecimiento de una “masa flotante” o la
desconexión del cable de masa en un cable de
red de tres clavijas puede provocar una descarga
eléctrica. Conecte todos los cables de
interconexión entre las diferentes electrónicas del
equipo antes de conectar el cable de
alimentación a una toma de corriente eléctrica
alterna. De este modo se reducirán las
posibilidades de que se produzca una descarga
eléctrica.
FUNCIONES Y CONEXIONES DEL
PANEL POSTERIOR
El reproductor de discos compactos CDP.3 está
equipado con entradas analógicas
BALANCEADAS y NO BALANCEADAS (RCA). La
conexión del CDP.3 a su equipo de audio
requiere la utilización de un par de cables de
interconexión BALANCEADOS o NO
BALANCEADOS, así como del cable de
alimentación suministrado de serie. El CDP.3
también incluye un conector NO BALANCEADO
(formato S/PDIF) para la salida de datos digitales
de audio. Para utilizar esta salida, necesitará un
cable DIGITAL NO BALANCEADO, así como un
conector de entrada en el formato S/PDIF en su
procesador digital (consulte la figura 1 para
conocer con detalle la conexión a realizar).
Nota sobre los cables de conexión
Las prestaciones globales del REPRODUCTOR DE
DISCOS COMPACTOS variarán drásticamente con
el tipo y calidad de los cables elegidos. En
consecuencia, se recomienda utilizar los mejores
cables de interconexión analógicos y digitales
para explotar al máximo las posibilidades del
Classé CDP.3.
Entrada de corriente alterna
Además de las salidas analógicas y digitales, hay
en el panel posterior del CDP.3 una última
conexión destinada a la entrada de corriente
eléctrica alterna. Conecte el cable de
alimentación suministrado de serie a esta
entrada. Tal y como se indica en la PRECAUCION
que figura en la página anterior, siempre es
recomendable conectar todos los cables de
interconexión antes de proceder a la instalación
de los de alimentación.
FUNCIONES DISPONIBLES Y SISTEMA
DE VISUALIZACION
1. Funciones
El panel frontal del CDP.3 tiene seis botones que
se encargan de gestionar todas las funciones
básicas que sean necesarias. Por su parte, el
mando a distancia contiene todas las funciones
básicas que figuran en el panel frontal (la
excepción son los botones LOAD y POWER) del
aparato, así como todas las funciones de
programación avanzadas.
Tomando como referencia la figura 1, los
controles del panel frontal son, de izquierda a
derecha, los siguientes:
POWER: Pulse este botón para ACTIVAR o
DESACTIVAR el aparato.
LOAD: Pulse este botón una sola vez para abrir
la bandeja de transporte. Una nueva pulsación
cerrará dicha bandeja.
PREVIOUS (<): Si este botón se pulsa una sola
vez durante la lectura, el CDP.3 iniciará la lectura
de la pista anterior. Si se pulsa de manera
secuencial, hará que el CDP.3 retroceda una pista
cada vez que sea pulsado. Este botón también se
utiliza para seleccionar pistas a reproducir y
programarlas en la memoria del CDP.3.
NEXT (>): Cada vez que se pulse este botón, el
CDP.3 avanzará una pista (si se pulsa dos veces
avanzará dos pistas mientras que si se pulsa tres
veces avanzará tres pistas y así sucesivamente). Si
se pulsa durante la lectura, el CDP.3 reiniciará la
reproducción en la pista deseada. Si se pulsa con
el aparato parado, este último esperará nuevas
órdenes de control.
PLAY/PAUSE: Pulse este botón para iniciar la
lectura. Púlselo de nuevo para detener
temporalmente la lectura hasta que vuelva a ser
pulsado de nuevo.
Además de las funciones que se acaban de
reseñar, el mando a distancia del CDP.3 contiene
las siguientes funciones adicionales (ver figura 2):
NUMERIC KEYPAD (“TECLADO NUMERICO”)
(dígitos de 0 a 9): Es una alternativa muy
cómoda a los botones PREVIOUS y NEXT ya que
pulsar el número de pista deseado en el teclado
numérico es generalmente más rápido que pulsar
los botones NEXT y PREVIOUS. Por ejemplo, si
usted acaba de colocar un disco en la bandeja de
transporte y desea reproducir la pista 8, siempre
es más fácil pulsar 8 seguido de PLAY que pulsar
NEXT ocho veces y a continuación pulsar PLAY.
REPEAT: Repite la totalidad del disco, las pistas
programadas o simplemente la pista que está
siendo escuchada.
PROG: Guarda en memoria pistas seleccionadas
para su posterior reproducción.
CLEAR: Borrará la última pista almacenada en la
memoria.
DISPLAY: Cuando este botón se pulsa una sola
vez, el visualizador de funciones contará en
sentido descendente, mostrando el tiempo
restante del disco o programa en curso de
reproducción. Si se pulsa una vez más, el
visualizador de funciones contará en sentido
ascendente, mostrando por tanto el tiempo
transcurrido del disco o programa en curso de
reproducción. Si pulsa una vez más, el
visualizador de funciones volverá a su modo de
funcionamiento normal.
10
Page 13

BUSQUEDA EN SENTIDO DIRECTO (>>) E
INVERSO (<<): El CDP.3 incorpora un cómodo
sistema de búsqueda de 2 velocidades. Estos
botones le permitirán buscar rápidamente y en
las dos direcciones posibles a través del disco.
Pulse y mantenga pulsado el botón SEARCH
deseado. El contador de tiempo doblará
aproximadamente su velocidad y la pista será
explorada a un nivel de volumen reducido.
Cuando se alcance el punto deseado, libere el
botón SEARCH y la lectura se reiniciará.
Si el botón SEARCH se mantiene pulsado durante
más de 4 segundos, el CDP.3 se situará en un
modo de exploración de alta velocidad y el
contador de tiempo avanzará muy rápidamente.
Durante la búsqueda a alta velocidad, el nivel de
volumen se silenciará por completo.
NOTA: El CDP.3 no incluye salida analógica
variable.
2. Modos de funcionamiento disponibles e
información suministrada por el visualizador
de funciones
Para cargar un disco, pulse LOAD para abrir la
bandeja de transporte. Coloque suavemente el
disco en la bandeja con la cara de la etiqueta
orientada hacia arriba y pulse LOAD de nuevo; la
bandeja de transporte se cerrará y unos segundos
después el visualizador de funciones indicará el
número total de pistas contenidas en el disco y la
duración total de las mismas. Si el disco no ha
sido adecuadamente colocado o ha sido colocado
con la cara de la etiqueta orientada hacia abajo,
aparecerá una sucesión de CEROS (0 0 00) en el
visualizador de funciones. Es posible que algunos
discos con rayaduras profundas, que estén
agujereados o que contengan otros defectos de
frabricación graves tampoco sean aceptados por
el CDP.3.
Una vez que el visualizador e funciones haya
confirmado el número de pistas y el tiempo total
de reproducción, el CDP.3 se situará en su modo
STOP. A partir de este punto, usted pude optar
por varios modos de reproducción, cada uno de
los cuales se describe a continuación.
Reproducción desde el principio o desde una
pista seleccionada
Para leer un disco entero desde el principio, pulse
PLAY. El CDP.3 iniciará la lectura al cabo de unos
pocos segundos y leerá la totalidad del disco.
Para iniciar la lectura desde una determinada
pista, seleccione esta última utilizando los
botones NEXT (>) o PREVIOUS (<) o el teclado
numérico del mando a distancia. A continuación
pulse PLAY. El disco será leído desde este punto
hasta el final. Durante la lectura, el visualizador
de funciones mostrará la pista que se esté
reproduciendo junto con el tiempo transcurrido
de la misma. Una vez finalizada la lectura del
disco, el CDP.3 regresará al modo STOP.
Reproducción de pistas seleccionadas
Usted puede programar el CDP.3 para que
reproduzca cualquier combinación de pistas
-hasta un máximo de 20- de un determinado
disco. Con ayuda de los botones NEXT (>) y
PREVIOUS (<) o el teclado numérico del mando a
distancia, seleccione la primera pista deseada; su
número aparecerá en el visualizador de
funciones. A continuación pulse el botón PROG.
Repita este procedimiento hasta que todas las
pistas deseadas hayan sido memorizadas.
A medida que cada pista vaya siendo
memorizada, el visualizador de funciones indica
el tiempo total de reproducción de las pistas ya
programadas. Pulse PLAY. La lectura comenzará
en la primera pista programada, reproduciéndose
todas las pistas en el orden en que fueron
programadas. Tenga en cuenta que:
• Si intenta programar más de 20 pistas, el CDP.3
se lo impedirá.
• Durante la reproducción programada, el
teclado numérico no funciona; utilice los
botones NEXT y PREVIOUS para cambiar de
pista.
• Las pistas programadas no tienen por qué estar
en orden numérico ascendente; por ejemplo,
usted puede programar que la pista 2 se
reproduzca después de la 6.
• Si usted programa una determinada pista por
accidente, basta con que pulse CLEAR para que
la misma sea borrada de la memoria.
• Para borrar todas las pistas programadas, pulse
dos veces el botón STOP si el CDP.3 está en
curso de lectura o una sola vez si no lo está. Si
quiere cambiar de disco, la apertura de la
bandeja de transporte borrará
automáticamente todas las pistas programadas
de la memoria del aparato.
Reproducción utilizando REPEAT
La pulsación del botón REPEAT hará que el
aparato repita la totalidad del disco. Una vez
haya seleccionado el modo REPEAT, pulse PLAY.
La función REPEAT también puede utilizarse del
mismo modo que se acaba de describir con pistas
programadas en la memoria.
DESCRIPCION TECNICA
El reproductor de discos compactos Classé Audio
CDP.3 es un componente de alta calidad que
utiliza las innovaciones más avanzadas en el
campo de la reproducción digital de señales de
audio. La filosofía que está detrás del CDP.3 se
fundamenta en el empleo de la tecnología más
avanzada del momento para obtener las más
altas prestaciones de audio posibles y a la vez
adopta la demostrada validez de la simplicidad
en sintonía con el popular dicho “más simple
significa mejor”.
No se han escatimado esfuerzos en el desarrollo
del CDP.3. El chasis del aparato está constituido
en su totalidad por placas de metal de gran
grosor y ha sido diseñado para resistir todo tipo
de vibraciones gracias a una construcción de
gran solidez y a un adecuado aislamiento de las
fuentes de vibración. El panel frontal de casi
1 centímetro de grosor es un tributo a la calidad
constructiva y estética del aparato.
En el interior, la fuente de alimentación principal
está organizada alrededor de un transformador
toroidal de alta capacidad en corriente diseñado
a medida. La fuente de alimentación del CDP.3
está generosamente sobredimensionada para
garantizar que la circuitería interna del aparato
no se vea afectada por ningún tipo de
fluctuación provocada por las demandas de
corriente asociadas a un determinado mensaje
musical. Se utilizan numerosas fuentes de
alimentación con el fin de asegurar la eliminación
de las interferencias causadas por fluctuaciones a
menudo inducidas por fuertes demandas de
corriente en fuentes de alimentación
compartidas. El consumo de energía del CDP.3 es
inherentemente bajo pero las microinformaciones
son fácilmente contaminadas cuando las señales
procedentes de las fuentes de alimentación
tradicionales se recortan (“clipping”) como
consecuencia de su inadecuada salida. Esta es la
idea que subyace detrás del suministro de
energía estable y de alta capacidad en corriente
del CDP.3.
El mecanismo de transporte propiamente dicho
es un Sanyo CD91F7. Este mecanismo emplea un
cabezal láser de arrastre lineal de última
generación que destaca por su funcionamiento
rápido y silencioso y su elevada fiabilidad. El
CD91F7 es una mecánica de muy alta calidad y
su sobresaliente construcción, basada en el uso
de motores altamente eficientes y larga vida útil,
asegura una excelente fiabilidad a largo plazo.
Además, este reproductor de discos compactos
está diseñado para no requerir ninguna
calibración periódica, lo que significa que sus
especificaciones técnicas originales se satisfarán
permanentemente.
El “jitter”, también conocido como error en el
dominio del tiempo, es el factor que más influye
en la degradación de las prestaciones de los
componentes digitales de audio; de ahí que
Classé haya tratado este problema desde todas
las perspectivas posibles. Uno de los aspectos
considerados es el empleo de la excepcional
fuente de alimentación que se acaba de describir;
otro es el uso de una circuitería de resincronismo
de altísima calidad. Gracias al empleo de un
oscilador de cuarzo que opera a 16’9344 MHz
para generar la salida digital, la tasa de “jitter”
medida en la salida del CDP.3 es tan baja que
apenas puede ser detectada.
Se dispone de una única salida digital en formato
S/PDIF (eléctrica) que utiliza un conector RCA. Un
último aspecto tecnológico del CDP.3 que merece
ser destacado es el mando a distancia
suministrado de serie. Del mismo destaca el
excepcionalmente amplio ángulo de transmisión
al receptor de infrarrojos del aparato y la
robustez de su construcción.
El CDP.3 incorpora un decodificador HDCD
(“High Definition Compatible Digital”) que,
además de facilitar la decodificación de discos
compactos codificados en dicho sistema,
funciona como un filtro digital de óctuple
sobremuestreo de última generación si los datos
procesados no están codificados en HDCD. El
CDP.3 utiliza un decodificador D/A (digital a
analógico) de altas prestaciones con resolución
11
Page 14

de 20 bits reales que sirve para decodificar la
información correspondiente a los canales
izquierdo y derecho. La información digital es
sobremuestreada por el decodificador HDCD a
una velocidad que es 8 veces superior a la de la
frecuencia de muestreo original. El
sobremuestreo de los datos digitales a tal
velocidad hace posible que el filtro analógico que
sigue al convertidor D/A tenga menos polos de
los que serían necesarios sin utilizar dicha
técnica. Esto permite que el mencionado filtro
analógico tenga una estructura más simple,
reduciéndose de este modo los errores asociados
a los filtros analógicos de pendiente muy abrupta
(“brick-wall”) y a la vez minimizándose el
número de componentes presentes en el trayecto
recorrido por la señal de audio. Cuando opera
con datos no codificados en HDCD, el
decodificador HDCD exhibe unas prestaciones
comparables a las de los circuitos digitales
integrados en los que se implementan los filtros
digitales de audio. La atenuación de la banda
atenuada es superior a 120dB y los cálculos
internos son ejecutados con una precisión de 27
bits. Si los datos están codificados en el formato
HDCD, el filtro los detectará y decodificará,
extrayendo de este modo toda la información
adicional disponible en una grabación HDCD. El
indicador luminoso HDCD del panel frontal se
activará cada vez que se detecten datos
codificados en dicho sistema, permaneciendo
apagado con los CD estándar. Cuando se detecta
un disco codificado en HDCD, la ganancia
analógica se incrementa automáticamente siguiendo las indicaciones de Pacific Microsonics,
Inc.- en 6dB. El filtro HDCD también ejecuta las
operaciones de desénfasis para los discos
codificados con preénfasis.
La salida de los convertidores D/A con resolución
de 20 bits Burr-Brown PCM1702 es acompañada
por un filtro analógico paso bajo de 3 polos y
fase lineal que envía los parásitos generados a
una zona del espectro de audio situada mucho
más allá de la gama audible. La última etapa del
filtro es un atenuador pasivo de 6dB que se
encarga de proporcionar los niveles HDCD
adecuados. En la sección de salida se utiliza una
etapa separadora Burr-Brown OPA2604 de última
generación polarizada en Clase A.
La circuitería de salida es acompañada asimismo
por relés para proteger el equipo asociado de los
transitorios de puesta en marcha, así como para
proteger el CDP.3 de otros componentes cuando
el mismo está apagado.
También se ha puesto un gran esmero en todas
las etapas del diseño y fabricación del CDP.3 para
que el aparato satisfaga las exigencias de la FCC
(“Comisión Federal de Comunicaciones”)
relativas al grupo de productos de Clase B. Esto
garantizará que el CDP.3 sea insensible a la
presencia de componentes ruidosos en un
determinado equipo y a la vez que no cause
interferencias molestas en otros aparatos.
Cada CDP.3 ha sido sometido a rigurosas
pruebas llevadas a cabo mediante ordenador
para medir cada uno de sus parámetros críticos y
ha sido evaluado durante varios días para
garantizar la consistencia de sus prestaciones a
largo plazo. Antes de abandonar la factoría de
Classé Audio, cada CDP.3 ha tenido que superar
no menos de 100 pruebas independientes.
Nota para todos los propietarios de
Productos Classé:
Gracias por adquirir un componente de Classé
Audio.
Todos en Classé hemos cuidado especialmente
que su compra se convierta en una preciada
inversión. Nos enorgullece informarle de que
todos los productos de Classé Audio han sido
oficialmente autorizados para que incorporen la
marca de calidad CE de la Comunidad Europea.
Esto significa que su producto Classé ha sido
sometido a los procesos de fabricación y
evaluación más rigurosos del mundo y ha
demostrado que satisface o excede todas las
exigencias de la Comunidad Europea en lo que
respecta a la homogeneidad entre las
especificaciones técnicas de un mismo producto
y la seguridad del consumidor.
Le deseamos sinceramente que disfrute muchos
años escuchando su música favorita a través de
este producto Classé.
Con fecha de 18 de Julio de 1996, Classé Audio
ha recibido la Certificación Número
C401CLA1.MGS, que indica el cumplimiento de
la normativa de la CE para todos los modelos de
la gama de productos de Classé Audio.
CLASSÉ AUDIO
5070 François Cusson
Lachine, Quebec
Canadá H8T 1B3
Teléfono: +1-514-636-6384
Fax: +1-514-636-1428
NEDERLANDS
NAMENS IEDEREEN BIJ CLASSÉ,
BEDANKT!
Dank u voor het kiezen van de Classé CDP.3
CD-speler.
Wij zijn er trots op componenten te fabriceren
waarin uitzonderlijke klank en betrouwbaarheid
op lange termijn wordt gecombineerd. Daarvoor
hebben we geïnvesteerd in een buitengewoon
ontwerp en dito fabricage faciliteiten. Wij zijn
ervan overtuigd dat u vele jaren plezier zult
hebben van uw aankoop.
CLASSÉ ONTWERP FILOSOFIE
Al onze componenten hebben één belangrijk
pluspunt: alle Classé producten zijn gemaakt om
muziek te reproduceren met de harmonie en
ruimtelijke werking die kenmerkend zijn voor de
instrumenten in werkelijkheid, bij een niet
versterkte uitvoering.
Enkelvoudige opzet
Om dat te bereiken maken we uitgebreid gebruik
van een zorgvuldig voor elk doel
geoptimaliseerde en identieke schakeling,
aangepast aan het gevraagde vermogen. Dat wil
zeggen dat alle Classé lijnniveau componenten
en eindversterkers profiteren van die vele jaren,
steeds verder gaande verfijning.
Luisteren: Kritische Factor in het Ontwerp
Zijn de algemene eisen die aan een schakeling
gesteld moeten worden voor een bepaalde
toepassing eenmaal vastgesteld, dan wordt
zorgvuldig geluisterd naar steeds wisselende en
combinatie van onderdelen – transistoren,
condensatoren, bedrading, printplaten,
enzovoort – en het aanpassen van de
bedrijfsspanning binnen de vastgelegde bereiken.
Zeer Lange Levensduur
Elke Classé component, ook de meest
betaalbare, profiteert van onze uiterst
zorgvuldige benadering van de ontwerpcriteria.
Het resultaat is een optimale balans tussen de
vaak tegenstrijdige eisen voor uitzonderlijke
prestaties en lange termijn betrouwbaarheid. In
onze duurste componenten worden onderdelen
met nog nauwere toleranties gebruikt, naast
ruim gesegmenteerde en bijzonder robuuste
voedingen met grote stroomreserves.
Onze trots, uw kostelijk bezit.
Al onze componenten worden gebouwd op het
hoogst denkbare niveau. Dat geldt zowel voor de
meerlaags printplaten van epoxieglas, de zwaar
uitgevoerde voedingen, als de solide frontplaten:
elk Classé product is een ode zowel aan de
wetenschap, als aan muziekweergave. Wij hopen
dat u evenveel plezier beleeft aan het luisteren
naar uw Classé als wij aan het fabriceren ervan!
12
Page 15

UITPAKKEN & OPSTELLEN
1. Uitpakken en Toebehoren
De Classé CDP.3 CD-speler is zorgvuldig verpakt
in zwaar plastic, beschermd door piepschuim
schalen, het geheel in een speciale doos. Om het
apparaat uit de doos te halen klapt u beide flaps
van de doos open. Til het apparaat er aan de
zijkanten uit en laat de piepschuim schalen
intact. Verwijder elke schaal door deze er recht af
te trekken. Verwijder de plastic bescherming en
controleer het apparaat op eventuele
beschadigingen.
Buiten deze handleiding dient het volgende
aanwezig te zijn:
• Afneembaar netsnoer
• Afstandsbediening met 2 AAA batterijen.
Meld elke schade of het ontbreken van een of
ander direct aan uw leverancier.
2. Opstellen
Plaats de CDP.3 CD-speler op een horizontale
ondergrond (zie technische gegevens voor
details) op een tafel of, voor optimale prestaties,
op een speciaal audiorack. Net als bij de betere
platenspelers is het belangrijk een plaats voor de
CDP.3 te vinden waar geen brom wordt opgepikt,
door magnetische velden van bijvoorbeeld
eindversterkers en voedingstransformatoren,
lichtnetfilters en dergelijke. Houd indien mogelijk
de CD-speler een halve meter uit de buurt van
zulke apparaten. Houd ook de signaalkabels uit
de buurt van eindversterkers en lichtnetsnoeren.
De CDP.3 produceert een verwaarloosbare
hoeveelheid warmte en heeft daarom geen
ventilatie nodig. Controleer het typeplaatje op de
achterzijde op de juiste netspanning. De CDP.3
heeft één externe netzekering; de juiste waarde
daarvan is 400 mA traag.
NETSPANNING
De netschakelaar (POWER) bevindt zich links op
de voorzijde van de CDP.3, naast de CD-lade.
Hoewel de speler direct na de in gebruik name al
uiterst muzikale prestaties levert, zullen deze
gedurende de eerste 300 uur nog merkbaar
verbeteren.
Voor optimale prestaties raden we u aan de extra
leverbare CLASSÉ REFERENCE netkabel te
gebruiken.
WAARSCHUWING: Neem de stekker uit het
stopcontact wanneer u iets aan de verbindingen
verandert. Maak alle verbindingen voordat u de
stekker in het stopcontact steekt. Zo wordt de
kans op ongelukken en schade verminderd. Zie
ook de garantie bepalingen. Het is verstandig het
apparaat te aarden.
AANSLUITINGEN
De CDP.3 compact disc speler is voorzien van
zowel symmetrische (balanced) als normale cinch
(asymmetrisch) aansluitingen. Voor het aansluiten
van de CDP.3 op uw audiosysteem heeft u
daarom een paar symmetrische of een normale
cinch stereokabel nodig, naast het bijgeleverde
netsnoer. Verder is de CDP.3 uitgerust met een
S/PDIF data output aansluiting. Om deze uitgang
te gebruiken heeft u een normale digitale kabel
nodig en een S/PDIF ingang op uw digitale
processor. Zie afb. 1.
Over het aansluiten
Naast de analoge en digitale uitgangen op de
achterzijde, heeft de CDP.3 nog een
lichtnetaansluiting. Sluit het bijgeleverde
netsnoer hierop aan. Zoals eerder gesteld is het
verstandig altijd eerst alle verbindingen te maken
alvorens de stekker in het stopcontact te steken.
DISPLAY, BEDIENINGSORGANEN &
GEBRUIK
1. Bedieningsorganen
Op het frontpaneel van de CDP.3 bevinden zich
zes toetsen die de basisfuncties besturen. De
afstandsbediening bevat alle functies van het
frontpaneel (behalve laden en de netschakelaar),
plus een paar bijzondere functies.
In afb. 1 ziet u het frontpaneel met van links
naar rechts de volgende functies:
POWER: indrukken om in te schakelen;
nogmaals indrukken om weer uit te schakelen.
LOAD: indrukken om de lade te openen;
nogmaals indrukken om te sluiten.
VOORGAAND |< : eenmaal indrukken tijdens
afspelen om de CDP.3 naar het voorafgaande
nummer te laten gaan. Door meermaals op deze
toets te drukken gaat de speler even zovele
nummers terug. Deze toets wordt ook gebruikt
voor het programmeren van nummers in het
geheugen.
VOLGEND >| : eenmaal indrukken tijdens
afspelen om de CDP.3 naar het volgende
nummer te laten gaan. Door meermaals op deze
toets te drukken gaat de speler even zovele
nummers verder. Deze toets wordt ook gebruikt
voor het programmeren van nummers in het
geheugen. Vanuit stop wacht de speler op
nadere instructie: weergave of opslaan.
PLAY/PAUSE (weergave/pauze): indrukken om
weergave te starten; nogmaals indrukken om de
weergave tijdelijk te onderbreken. Om de
weergave vanaf hetzelfde punt te vervolgen
nogmaals indrukken.
Naast de hiervoor genoemde functies biedt de
afstandsbediening van de CDP.3 nog de volgende
extra functies (afb. 2):
CIJFERTOETSEN (0 – 9): een praktisch alternatief
voor de toetsen VOORGAAND |< en
VOLGEND >|, omdat de cijfertoetsen meestal
sneller werken.
REPEAT: herhaalt de gehele disc, het programma
of het lopende nummer.
PROG: slaat de geprogrammeerde nummers op
in het geheugen.
CLEAR: wist het laatstgekozen nummer uit het
geheugen.
DISPLAY: eenmaal indrukken om terug te tellen
vanaf de totaaltijd van de disc of het totaal van
de geprogrammeerde nummers. Nogmaals
indrukken voor de verstreken tijd van de gehele
disc of de geprogrammeerde nummers.
Nogmaals indrukken om naar de normale functie,
verstreken tijd per nummer, terug te keren.
VOORUIT (>>) – ACHTERUIT (<<) ZOEKEN: de
CDP.3 heeft een gemakkelijke zoekfunctie met
twee snelheden en met deze beide toetsen kan
zowel voor- als achteruit worden gezocht. Houd
daarvoor de toets voor de gewenste richting
ingedrukt. De weergave verloopt dan ongeveer
op dubbele snelheid op gereduceerd niveau. Is
het gewenste punt bereikt laat de toets dan los
en de weergave wordt vervolgd. Houdt u de
zoektoets langer dan 4 seconden vast dan gaat
de CDP.3 sneller zoeken. Tijdens zoeken op hoge
snelheid is de weergave geheel uitgeschakeld.
OPMERKING: de CDP.3 heeft geen regelbare
uitgang.
2. Display Indicaties & Bediening
Druk op LOAD om de lade te openen een disc in
te leggen. Leg de disc met het etiket naar boven
in de lade en druk nogmaals op LOAD om de
lade te sluiten. Een paar seconden later geeft de
display het totaal aantal nummers en de
totaaltijd aan. Wanneer de disc niet correct is
ingelegd geeft de display 0 0 00 aan. Een disc
met ernstige beschadigingen of vlekken kan
eveneens worden geweigerd.
Op het moment dat de display het aantal
nummers en de speelduur aangeeft staat de
speler op STOP; op dat moment kan uit
verscheidene weergavefuncties worden gekozen.
Elke functie wordt hieronder in detail beschreven.
Weergave vanaf het begin of vanaf een
bepaald nummer
Om de gehele disc vanaf het begin af te spelen
drukt u op PLAY, waarop de speler na een paar
seconden start en de disc tot het einde afspeelt.
Om het afspelen vanaf een bepaald nummer af
te spelen kiest u dat nummer met >> of <<, dan
wel met de cijfertoetsen op de afstandsbediening
en u drukt op PLAY. De speler start dan bij het
gekozen nummer en speelt tot het einde. Tijdens
het afspelen geeft de display de verstreken tijd
vanaf het begin van elk nummer aan, tenzij een
andere displayfunctie is gekozen. Aan het einde
van de disc stopt de speler automatisch.
Weergave van bepaalde nummers
De CDP.3 kan geprogrammeerd worden om elke
combinatie van nummers op een disc
automatisch af te spelen, maximaal 20. Vanuit
STOP wordt met >> en << of de cijfertoetsen een
nummer gekozen, dat in het geheugen wordt
opgeslagen door op PROG te drukken. Herhaal
dat tot alle gewenste nummers in het geheugen
13
Page 16

zijn opgeslagen. Druk op PLAY om het
programma af te spelen. De weergave begint en
alle nummers worden afgespeeld in de volgorde
waarin ze werden geprogrammeerd.
Opmerkingen:
• Na 20 nummers worden geen nummers meer
in het geheugen opgeslagen.
• Tijdens geprogrammeerd afspelen zijn de
cijfertoetsen uitgeschakeld: gebruik >> en <<
om naar andere nummers te gaan.
• De geprogrammeerde nummers hoeven niet
oplopend in volgorde te zijn: nummer 2 kan
uitstekend na nummer 6 worden
geprogrammeerd.
• Heeft u een foutief nummer geprogrammeerd,
druk dan op CLEAR om dat nummer uit het
geheugen te wissen.
• Om alle nummers uit het geheugen te
verwijderen drukt u tweemaal op STOP terwijl
de CDP.3 speelt, eenmaal wanneer deze nog
stilstaat. Ook het openen van de lade wist het
programma.
Herhaalfunctie (REPEAT)
Door op REPEAT te drukken zal de gehele disc
worden herhaald. Druk daarna op PLAY om te
starten.
Herhalen kan ook worden gebruikt om de
geprogrammeerde nummers te herhalen.
TECHNISCHE BESCHRIJVING
De Classé CDP.3 compact disc speler is een
hoogwaardig apparaat dat gebruik maakt van de
nieuwste innovaties in digitale audio reproductie.
De filosofie achter de CDP.3 is het gebruik van
de modernste technologie in dienst van
muziekweergave, maar wil de realisatie ervan
ook eenvoudig houden: “eenvoud is kenmerk
van het ware”.
Geen enkele moeite is gespaard bij de
ontwikkeling van de CDP.3: het chassis is van
uitzonderlijk dik metaal en is zo ontwikkeld dat
de zware constructie en de grondige isolatie alle
trillingen buiten houdt. De 10 mm dikke
frontplaat draagt daar ook aan bij èn aan het
fraaie uiterlijk.
De voeding is opgebouwd rond een speciale
gefabriceerde toroïdale transformator en is
ruimschoot overbemeten, zodat de schakelingen
ongeacht de gevraagde stroom op geen enkele
manier in hun werking belemmerd worden.
Meerdere voedingen worden gebruikt om interne
interferentie tegen te gaan, die vaak ontstaan
door hoge belasting op een gemeenschappelijke
voeding. De CDP.3 neemt slechts weinig stroom
op, maar ook op laag niveau is ongewenste
overdracht van stoorsignalen mogelijk, zeker bij
overbelasting van te krap bemeten conventionele
voedingen. Dit alles verklaard waarom de
voeding van de CDP.3 fors en stabiel is
uitgevoerd.
Het toegepaste loopwerk is de Sanyo CD91F7,
dat gebruik maakt van een nieuw ontwikkelde
lineaire laser pickup, die zowel snel, als stil en
duurzaam is. De CD91F7 is van bijzonder hoge
kwaliteit en de fraaie constructie is zeer efficiënt:
de aandrijving heeft een lange levensduur en is
uitermate betrouwbaar. Bovendien is het hele
mechanisme zo ontworpen dat het gedurende de
gehele levensduur niet gesmeerd hoeft te
worden en zo steeds op specificatie blijft.
Jitter is een verschijnsel dat het gevolg is van
fouten in het tijddomein, en een van de
belangrijkste oorzaken van verminderde
signaalkwaliteit en is door Classé van alle
denkbare zijden benaderd. We noemden al de
bijzondere voeding, een ander de schakeling die
de klok corrigeert. Dankzij een kristaloscillator
van 16,9344 MHz voor de digitale sturing is de
uiteindelijke jitter in het uitgangssignaal
nauwelijks nog meerbaar.
De CDP.3 heeft een SPDIF digitale uitgang op
een cinch aansluiting. Een belangrijk technisch
punt van de CDP.3 is de speciale
afstandsbediening. Deze heeft een uitzonderlijk
brede signaalhoek naar de sensor op de CDP.3
en is gemaakt op een zeer lange levensduur.
De CDP.3 heeft een HDCD decoder die, naast
een volledige HDCD decodering, een state-ofthe-art 8 voudig oversampling filter voor data die
niet in HDCD worden gedecodeerd. De CDP.3
heeft een hoogwaardige 20 bit digitaal/analoog
converter die zowel het rechter als linker kanaal
decodeert. De digitale informatie wordt
achtvoudig oversampled door de HDCD decoder
ten opzicht van de oorspronkelijke sampling
frequentie. Door zo hoog te oversamplen kan het
analoge filter achter de DAC veel gematigder zijn
dan anders het geval zou zijn geweest. Een
eenvoudig analoog filter volgt nu na de DAC en
om het signaal te zuiveren, in plaats van een steil
(“brick wall”) filter dat hoorbare, negatieve
effecten heeft. Bovendien wordt daardoor het
aantal componenten in de signaalweg
gereduceerd. Voor niet-HDCD signalen gedraagt
het filter zich als normale digitale filter IC’s. De
onderdrukking daarboven is bedraagt meer dan 120dB en de interne berekeningen worden
uitgevoerd met een nauwkeurigheid van 27 bit.
Worden data aangeboden in het HDCD formaat,
dan wordt dat gesignaleerd en wordt de decoder
geactiveerd om alle extra informatie van de
HDCD opname hoorbaar te maken. De HDCD
indicatie op de voorzijde licht op zodra HDCD
data worden gesignaleerd. Het analoge niveau
wordt automatisch 6dB opgehaald wanneer een
HDCD disc wordt afgespeeld, zoals ook door
Pacific Microsonics, Inc. wordt aanbevolen. Het
HDCD filter zorgt ook voor de deëmfasis bij discs
die met preëmfasis zijn opgenomen.
Het uitgangssignaal van de Burr Brown 20-bit
1702 DAC’s wordt gevolgd door een driepolig
laagdoorlaat filter met lineaire fase, waarmee alle
restanten boven de hoorbare frequenties uit het
audiosignaal worden verwijderd. De laatste trap
van het filter is ene passieve 6dB verzwakker om
het juiste niveau voor HDCD te krijgen. In de
uitgangstrap wordt de nieuwste generatie Burr
Brown OPA 2604 uitgang, ingesteld in klasse A,
toegepast.
De uitgang wordt tenslotte gevolgd door relais
die de aangesloten apparatuur moet beschermen
tegen inschakelklikken en tevens de CDP.3
beveiligt tegen ongewenste signalen van andere
apparatuur, wanneer de CDP.3 is uitgeschakeld.
Veel zorg is ook besteed aan de opzet en de layout van de CDP.3 om te voldoen aan de
Amerikaanse FCC klasse B regulering. Die zorgt
ervoor dat de CDP.3 ongevoelig is voor instraling
van buitenaf en op zijn beurt geen instraling op
andere apparaten veroorzaakt.
Elke CDP.3 wordt onderworpen aan uitgebreide
computertests, waarbij elke belangrijke
parameter wordt gemeten en bovendien wordt
het apparaat enige dagen ingespeeld om zeker
te zijn van een consistente kwaliteit over langere
termijn. Elk apparaat ondergaat meer dan
100 tests voordat het de fabriek verlaat.
Belangrijk voor alle eigenaren van een
Classé product:
Dank u voor de aanschaf van een Classé Audio
product.
Iedereen bij Classé heeft zich volledig ingezet om
er voor te zorgen dat uw nieuwe aanwinst u
optimaal plezier zal bezorgen. En we zijn er trots
op dat alle Classé Audio producten officieel zijn
goedgekeurd om het CE merk van de Europese
Unie te dragen. Dit betekent dat uw Classé
product onderworpen werd aan de meest
rigoureuze tests op kwaliteit en veiligheid ter
wereld, en dat werd vastgesteld dat aan alle CE
eisen van de Europese Unie omtrent
constantheid van productei en veiligheid werd
voldaan of dat deze zelfs werden overtroffen.
Wij van Classé Audio wensen u vele jaren
ongestoord luisterplezier.
M.i.v. 18 juli 1996 werd Classé Audio het
certificaat nr. C401CLA1.MGS verleend, dat de
CD goedkeuring aangeeft voor alle modellen van
het Classé Audio programma.
CLASSÉ AUDIO
5070 François-Cusson
Lachine, Quebec
Canada H8T 1B3
Telefoon: 00-1-514-636-6384
Fax: 00-1-514-636-1428
14
Page 17

15
Page 18

16
Page 19

CDP.3 SPECIFICATIONS
Wow and Flutter
Jitter
Digital outputs
Frequency response
Signal to noise
D/A
Dynamic range
THD+Noise
Channel separation
Offset voltage
Clock Jitter
Laser semiconductor
Sampling rate
Disc rotation velocity
Quantization
Error correction
Number of channels
POWER REQUIREMENTS
Europe/UK
Canada/USA/Japan
WEIGHT AND DIMENSIONS
Dimensions: Gross
Net
Weight: Gross
Net
Operating temperature
Storage temperature
Operating position
Below measurement level
Below measurement level
SINGLE-ENDED on RCA connector
75 ohms, 0.5 Volt peak to peak output
DC to 20 Khz, + 0.1 dB, 20khz 1.4 dB.
-100 dB typical
Burr Brown 20 bit PCM 1702
16 bit linear
Better than -90dB @ 1Khz
Better than -100 dB @ 1Khz
Better than ± 0.005 VDC
Less than 50 picoseconds RMS, 20Hz to 40Khz
GaAIAs, 0.5 mw, continuous, 790 nm
352.8 Khz
200-500 rpm (constant linear velocity)
16 bits linear
CIRC principle
2 channels, stereo
180-260 VAC, 50 Hz, 18 Watts typ.
90-130 VAC, 60 Hz, 18 Watts typ.
25”x 19 1/2” x 9 (63.5x50x23)cm
19” x 12 7/8” x 3 3/4” (48.2x32.7x9.5)cm
24 lbs. (10.9kg)
20 lbs. (9kg)
0ºC to + 40ºC
-20ºC to + 60ºC
Horizontal, up to ±5º inclination in any direction
17
 Loading...