

Page 1

Owner’s Manual
CA-5100
Power Amplifier
ENGLISH
Manuel d’utilisation
CA-5100
Amplificateur de Puissance
Bedienungsanleitung
CA-5100
Endstufe
Manuale di Istruzioni
CA-5100
Amplificatore finale di potenza
Manual de Instrucciones
CA-5100
Etapa de Potencia
FRANÇAIS
DEUTSCH
ITALIANO
ESPAÑOL
Manual de Instruções
CA-5100
Amplificador de potência
Gebruiksaanwijzing
CA-5100
Vijf Kanaals Eindversterker
Инструкция пользователя
Classe CA-5100
Усилитель мощности
PORTUGUÊS
NEDERLANDS
РУССКИЙ
Page 2
WARNING: TO REDUCE THE RISK OF FIRE OR ELECTRIC SHOCK, DO
NOT EXPOSE THIS APPLIANCE TO RAIN OR MOISTURE.
ENGLISH
CAUTION
RISK OF ELECTRIC SHOCK
DO NOT OPEN
CAUTION: TO REDUCE THE RISK OF ELECTRICAL SHOCK, DO
NOT REMOVE COVER. NO USER-SERVICEABLE PARTS INSIDE.
REFER SERVICING TO QUALIFIED PERSONNEL.
The lightning flash with arrowhead symbol, within an equilateral triangle, is intended to alert the
user to the presence of uninsulated dangerous voltage within the product’s enclosure that may be of
sufficient magnitude to constitute a risk of electric shock to persons.
The exclamation point within an equilateral triangle is intended to alert the user to the presence of
important operating and maintenance (servicing) instructions in the literature accompanying the
appliance.
Marking by the “CE” symbol (shown left) indicates compliance of this device with the EMC
(Electromagnetic Compatibility) and LVD (Low Voltage Directive) standards of the European
Community.
Classe products are designed to comply with international directives on the Restriction of Hazardous
Substances (RoHS) in electrical and electronic equipment and the disposal of Waste Electrical and
Electronic Equipment (WEEE). The crossed wheelie bin symbol indicates compliance and that the
products must be appropriately recycled or processed in accordance with these directives.
NOTICE
All of us at Classé take extreme care to ensure that your purchase will remain a prized investment. We are proud to inform you that all
Classé components have been officially approved for the European Community (CE) mark.
This means that your Classé product was subjected to the most rigorous manufacturing and safety tests in the world. The CE mark certifies
that your purchase meets or exceeds all European Community requirements for unit-to-unit consistency and consumer safety.
This equipment has been tested and found to comply with the limits for a Class B digital device, pursuant to Part 15 of the FCC Rules.
These limits are designed to provide reasonable protection against harmful interference in a residential installation. This equipment gener
ates, uses and can radiate radio frequency energy and, if not installed and used in accordance with the instructions, may cause harmful
interference to radio communications. However, there is no guarantee that interference will not occur in a particular installation. If this
equipment does cause interference to radio or television reception, which can be determined by turning the equipment on and off, the user
is encouraged to try to correct the interference by one or more of the following measures:
• Reorient or relocate the receiving antenna;
• Increase the separation between the equipment and the receiver;
• Connect the equipment into an outlet on a circuit different from that to which the receiver is connected;
• Consult the dealer or an experienced radio/TV technician for help.
CAUTION: Changes or modifications to this equipment not expressly approved by the manufacturer could void the user’s authority to
operate the equipment.
The information contained in the manual is subject to change without notice. The most current version of this manual will be posted on
our web site at http://www.classeaudio.com.
-
2
Page 3

Important Safety Instructions
Caution:
Please read and observe all warnings and instructions in this owner’s manual and all those
marked on the unit. Retain this owner’s manual for future reference.
1. Do not attempt to service this product yourself. Do not open the cover for any reason. There are no
user-serviceable parts inside. An open unit, particularly if it is still connected to an AC source, presents
a potentially lethal shock hazard. Refer all questions to authorized service personnel only.
2. To prevent fire or shock hazard, do not expose the unit to water or moisture. If a liquid does enter
your component, immediately disconnect it from the AC mains and take it to your Classé dealer for a
thorough check-up.
3. Do not place your component near any heat-producing device such as a radiator, stove, etc., Keep
it away from direct sunlight.
4. Connect your component only to an AC source of the proper voltage. The shipping container and
the rear panel serial number tag will indicate the proper voltage. Use of any other voltage may damage
the unit and void the warranty.
5. AC cords should be routed so that they are not likely to be walked on or pinched by items
placed upon or against them. Do not stress the AC cord by stretching it to reach a plug. If damage
does occur to the AC cord, take it to your Classé dealer for a thorough check-up and proper repair or
replacement.
ENGLISH
6. If your component will be out of use for an extended period of time (vacation, etc. ), you may wish
to unplug the power cord from the AC source to prevent any chance of problems from a voltage surge
or lightning strike.
7. NEVER wet the inside of this product with any liquid.
8. NEVER pour or spill liquids directly onto this unit.
9. NEVER block air flow through ventilation slots or heatsinks.
10. NEVER bypass any fuse.
11. NEVER replace any fuse with a value or type other than that specified.
12. NEVER attempt to repair this product. If a problem occurs, contact your Classé dealer.
13. NEVER expose this product to extremely high or low temperatures.
14. NEVER operate this product in an explosive atmosphere.
15. ALWAYS unplug sensitive electronic equipment during lightning storms.
Please record the serial number of your new Classé component here for future reference.
Serial #: __________________
3
Page 4

ENGLISH
Contents
Welcome to the Classé family ..........................................................................5
a word about installation .......................................................................... 5
Unpacking and Placement ...............................................................................6
unpacking your amplifier ......................................................................... 6
placement ................................................................................................ 6
ventilation ................................................................................................ 6
custom installations .................................................................................. 7
serial number ........................................................................................... 7
register your purchase! ............................................................................. 7
operating voltage ...................................................................................... 7
warm up/break-in period .......................................................................... 8
please read this manual… ........................................................................ 8
Special Design Features ...................................................................................9
highly refined circuit design ..................................................................... 9
extensive listening tests ............................................................................ 9
extraordinary longevity .......................................................................... 10
robust protection .................................................................................... 10
Front Panel .....................................................................................................11
Rear Panel .....................................................................................................13
Initial Setup ...................................................................................................18
configuring balanced/single-ended operation .................................. 18
configuring amplifier turn-on delay/amp no. .................................... 19
Care and Maintenance ...................................................................................20
Troubleshooting .............................................................................................21
Specifications ................................................................................................23
Dimensions .................................................................................................178
4
Page 5

Welcome to the Classé family
Congratulations on your purchase of a Classé product. It is the result of many
years of continuous refinement, and we are sure that you will enjoy it for many
years to come.
We value our relationship with our customers. Please allow us to stay in touch
with you by returning your warranty card now, before you pack up the shipping
carton of your new product and forget all about it. Doing so will enable us to
let you know about any possible future upgrades or updates that might become
available for your Classé component.
Sending in your warranty card also registers your product with us so that
warranty service can be obtained easily and quickly, even if you have mislaid
your original sales slip.
Please, take a few minutes to fill out the warranty registration
card, and drop it in the mail.
You will find the warranty registration card at the end of the separate warranty
policy booklet, enclosed.
ENGLISH
a word about installation Every effort has been made to make the Classé CA-5100 simple and
straightforward to install and use.
Still, we have no way to evaluate many other variables such as the size and shape
of your room, its acoustics, and the associated equipment you have chosen to use
with your amplifier. All of these factors influence the ultimate performance of
your system.
For this reason, we strongly encourage you to have your system
installed and calibrated by your dealer, whose experience,
training, and specialized equipment can make a profound
difference in the final performance of the system.
5
Page 6

unpacking your amplifier Carefully unpack your power amplifier according to the supplied instructions,
ENGLISH
Unpacking and Placement
and remove all accessories from the carton. Please take care when lifting the
amplifier, as it is quite heavy.
Important! Keep all packing materials for future transport of your Classé
product. Shipping your new component in anything other than
its purpose-designed packing material may result in damage
that is not covered by the warranty.
placement There are two options when placing your power amplifier: you may place it close
to the speakers, requiring longer interconnecting cables from the preamplifier; or
place it close to the preamplifier, requiring longer speaker cables.
Although either approach will yield excellent performance, you might consider
the first option for two reasons. First, signal quality degrades more easily when
transmitted as a combination of both high voltage and high current, suggesting
that speaker cables should be kept as short as practical. Second, high quality
amplifiers use massive power supplies which inevitably radiate some degree of
magnetic fields. Ideally, one would separate these fields from sensitive source
components by a reasonable distance.
If it is more convenient for you to place the amplifier in an equipment rack,
along with your other components, we suggest placing it at the bottom of the
rack, well away from your source components and preamplifier. This location
will also be more stable than placing such a heavy component near the top of a
rack, which might make it top-heavy.
Note that adequate clearance for the AC cord and connecting cables
must be left behind the CA-5100. We suggest leaving eight inches
(20 cm) of free space behind your power amplifier to allow all cables
sufficient room to bend without crimping or undue strain.
ventilation Your Classé power amplifier generates a certain amount of heat in the course
of normal operation. Be sure to allow six inches of clearance above it and
three inches to each side to allow heat dissipation through air circulation. The
vents on both the bottom and the top of the CA-5100 must be kept free from
any obstruction which would reduce the flow of air through the unit. Avoid
placement on soft surfaces that would restrict airflow (such as plush carpeting).
6
Page 7
custom installations Drawings are included in this manual to facilitate special installations and
custom cabinetry (see the section
rack mount kit is available for this product. Contact your Classé dealer for more
information.
serial number The serial number for your power amplifier is found on the rear of the unit.
Please note and record this number on the page entitled Important Safety
Instructions for your future reference.
register your purchase! Having found the serial number, now would be a good time to fill out the
registration card. Please register your purchase so we can advise you of updates
and other items of interest.
It will take only a minute or so. Please complete the card now, before you forget.
operating voltage The CA-5100 power amplifier is set at the factory (internally) for 100V, 120V,
230V, or 240V AC mains operation, as appropriate for the country in which
it is to be sold (230V only in European Union countries, in compliance with CE
regulations). The voltage setting may not be changed by the user or dealer.
Dimensions). An optional, purpose-designed
ENGLISH
Make sure that the label on the rear panel of your power amplifier indicates
the correct AC operating voltage for your location. Attempting to operate your
power amplifier at an incorrect voltage may damage the unit.
Warning: The voltage setting of your power amplifier may not be changed
by the user. There are no user-serviceable parts within the
unit. Please refer any problems to an authorized Classé service
center.
If the AC mains voltage indicated on your power amplifier is incorrect, please
contact your local, authorized Classé dealer or distributor.
The CA-5100 can easily be powered by a normal 15-ampere AC mains line. If
other devices are also powered from the same AC line, their additional power
consumption should be taken into account.
7
Page 8

ENGLISH
warm up/break-in period Your new Classé power amplifier will deliver outstanding performance
The CA-5100 includes protection circuitry that will prevent the amplifier from
operating at dangerously high or low voltages.
• At startup: the AC mains voltage must be within a range of
approximately -15% to +10% of its nominal value at startup, or
the amplifier will not turn on. For example, a 120V unit requires
the AC mains to be between approximately 95V–135V in order to
turn on.
• Over-voltage during operation: if the AC mains voltage surges
by roughly 10% or more during operation, the amplifier will enter
protection mode and shut down. The Standby LED will flash to
indicate the protection mode has been engaged.
• Under-voltage during operation: if the AC mains voltage sags by
15% or more, the amplifier will continue to play (since this does
not present a particular danger to the amplifier), but note that
it may not be able to achieve its usual standard of performance
under these compromised conditions. The Standby LED
flash to indicate the condition.
immediately. However, you should expect to hear it improve somewhat as
it reaches its normal operating temperatures and its various components
“break-in.” It has been our experience that the greatest changes occur within the
first 300 hours, as the amplifier reaches thermal equilibrium and the capacitors
fully form. After this initial break-in period, the performance of your new
product should remain quite consistent for years to come.
will
The only exception to this rule is if the unit is placed in standby
for an extended period of time, allowing it to cool down. Depending on the
degree of cooling involved, you should expect a brief warm-up period before the
power amplifier’s sound quality is at its best. Unless your amplifier was allowed
to become quite chilled, subsequent thermal re-stabilization should not take
long. Fortunately, you should never have to repeat the initial 300 hour break-in
period.
please read this manual… Please take a few minutes to review this manual, and to familiarize yourself with
your new amplifier. We understand that you are anxious to plug everything in
and get started. However, reading this manual and following the advice it gives
will ensure that you get all the benefits you deserve from having purchased such
a fine piece of equipment.
or unplugged
8
Page 9

Special Design Features
ENGLISH
highly refined
circuit design
extensive listening tests Excellent measured performance is to be expected in world-class products, and
All Classé analog amplification stages are based on circuits that have been
extensively optimized over many years of continuous development.
By starting with excellent circuit designs and working with them over the years,
we are able to discover the many small refinements that add up to superlative
performance, in a variety of applications. Altering a voltage here, or using a
slightly different part there, may make all the difference between solid and
absolutely outstanding performance.
This level of refinement only comes with a great deal of experience, and is
not available to those who flit from one trendy notion to the next. It accounts
in no small measure for both the consistency of sonic performance among
Classé products (as they are all based on similar analog gain stages), and for the
consistently excellent reviews those products receive by owners and reviewers
alike.
Classé products deliver that performance. However, experience has shown that
technical excellence alone is insufficient to guarantee subjectively musical results.
For this reason, all Classé products are laboriously fine-tuned during the
development process by carefully controlled listening tests. Our ears are still
some of the finest laboratory test instruments available, and nicely complement
more traditional engineering test equipment. In the course of optimizing the
circuitry for a product, hundreds of decisions are made based on the subjective
impression given by substituting one high quality part for another.
As an example, we may listen to half a dozen 0.1% film resistors of the same
value, from several different companies. Standard tests may show them all to
provide identical results in terms of noise, distortion, and so forth. Yet, almost
invariably, one selection yields some small improvement in the subjective
reaction to the performance of the product under development. Less often, even
a single such change can result in a surprisingly large improvement.
Multiply those various improvements by the dozens or even hundreds of such
decisions that must be made before the product can be finalized for production,
and you have a remarkable improvement, indeed—all based on careful listening
tests, which we view as a necessary complement to the solid engineering you
might rightly expect from Classé.
9
Page 10

ENGLISH
extraordinary longevity Another benefit of having worked with highly refined circuit designs so
extensively over many years is that we have vast experience in what works well
over the long term.
By using only the highest quality parts to begin with, and then using them in an
informed way as a result of both accelerated aging experiments and actual longterm experience, we are able to design and manufacture products which we are
confident will stand the test of time.
We are confident that your new Classé product will give you many years of
trouble-free reliability and musical enjoyment, just as previous Classé products
have given their owners.
robust protection Finally, your new Classé amplifier incorporates a variety of protection circuits, all
designed to protect both the amplifier and your loudspeakers against dangerous
fault conditions. Significantly, these protection circuits do not intrude upon
or limit the normal performance of the amplifier; rather, they simply put the
amplifier into protection mode when confronted with abnormal conditions.
These conditions include:
• output overload
• DC offset
• AC mains voltage (outside of normal tolerances)
• excessive operating temperatures
If any of the first three conditions occurs on either channel
might harm either your amplifier or possibly your loudspeakers), the amplifier will
immediately go into protection mode. In such a case, a
will blink red, indicating the channel with the fault, and the sound will be
muted until the fault can be righted.
If the fault is not channel-related, e.g. AC mains voltage out of range, the
Standby LED will blink. In all cases, the unit will need to be re-started once the
cause of the fault condition has been rectified.
(any of which
Channel LED indicator
10
Page 11
BALANCED
SINGLE-ENDED
1 2 3 4 5
SELECT
MODE
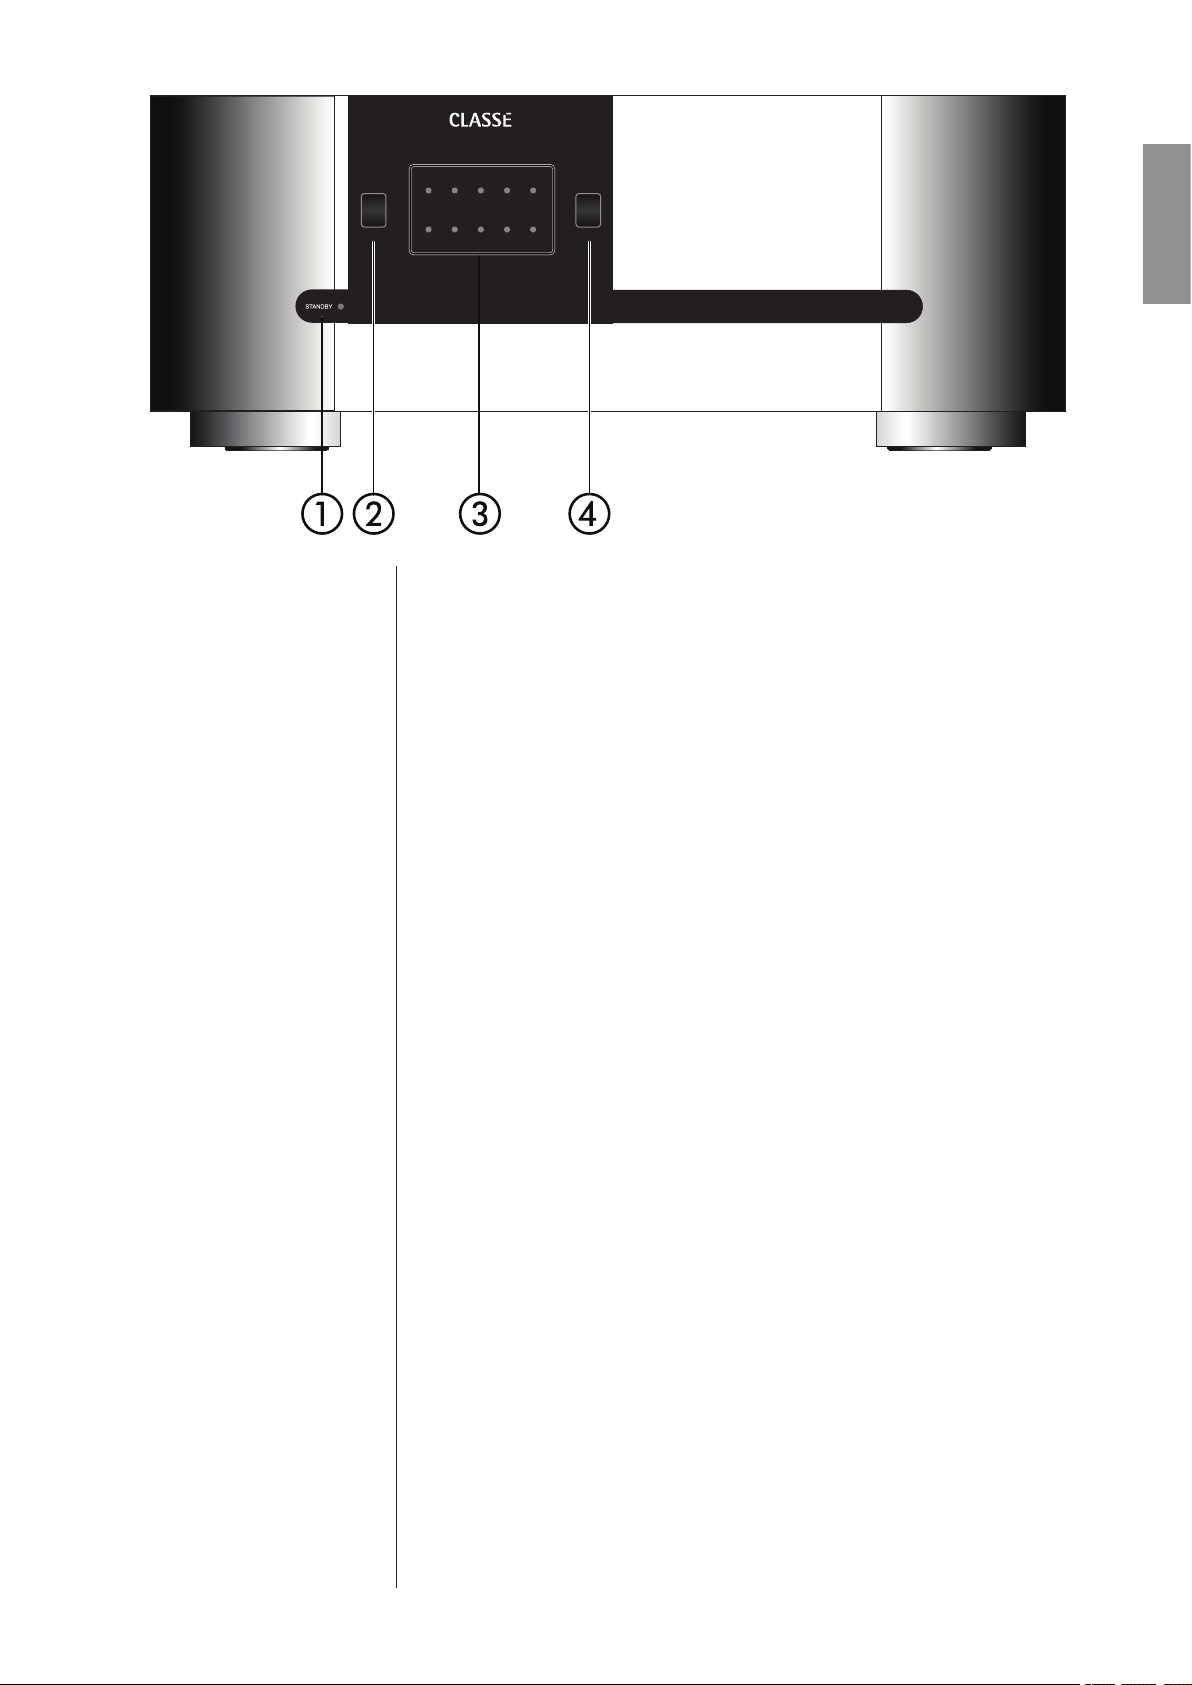
Front Panel
1 Standby button & LED indicator
The front panel Standby button will toggle the amplifier between operate,
its fully operational state, and a standby mode that leaves the amplifier off,
yet ready to respond to system commands via any of the supported control
options (e.g. IR input, DC trigger, CAN Bus, or RS-232).
ENGLISH
The current state of the amplifier is indicated by the
LED indicator in the
center of the Standby button. The state of this LED indicates the
following:
• on = standby
• flashing (on power-up) =
initialization
• off + Channel LED on = operate
• flashing (after power-up) = AC mains voltage out of range
When in standby, the amplifier’s gain stages are powered down. Only a
small power supply and control circuit remain on, consuming relatively
little power. Fortunately, since the output stages by their nature conduct a
great deal of current, they warm up and sound their best very quickly.
If you are not going to use the amplifier for an extended period of time,
perhaps while traveling for a vacation, we suggest you disconnect it from
the AC mains. Please be certain that the amplifier is in standby
prior to
disconnecting it from the AC mains.
Also, it is a good practice to physically disconnect any and all valuable
electronics from the AC mains during electrical storms, as a lightning
strike anywhere near your home can put a tremendous surge on the AC
mains that can easily damage any piece of electronics, no matter how well
designed and protected. The best protection in the case of severe electrical
storms is to simply remove the electronics from any connection with the
power grid.
11
Page 12
ENGLISH
2 Select button
The Select button is used (along with the Mode button) when configuring
the amplifier for either balanced or single-ended operation. It is also used
when configuring the turn-on delay or amplifier number for an amplifier
connected to a Classé preamplifier by the DC Trigger or CAN Bus control
systems.
3 Channel status LED indicators
Each amplifier channel has two
indicate the use of either balanced (XLR) or single-ended (RCA) inputs for
that channel.
These indicators are also used to indicate fault conditions in your amplifier,
should any ever arise. If a channel’s LED indicators blink red, there is a
problem in that particular channel. If all the
red, there may be a systemic problem that is not specific to a particular
channel.
Caution! If you see any Channel LED Indicator blinking red, please
disconnect the amplifier from the AC mains immediately and
check that all external connections are cleanly made and
secure. If the AC mains are not easily accessible, you can press
and hold the Standby button for three seconds to reset the
amplifier. If no fault is immediately obvious, please call your
authorized Classé dealer for assistance.
Channel LED indicators. They are used to
Channel LEDs are blinking
4 Mode button
The Mode button is used (along with the Select button) when configuring
the amplifier for either balanced or single-ended operation. It is also used
when configuring the turn-on delay and amplifier number of the amplifier
when it is connected to a Classé preamplifier by the CAN Bus
communications or Trigger systems.
12
Page 13
�
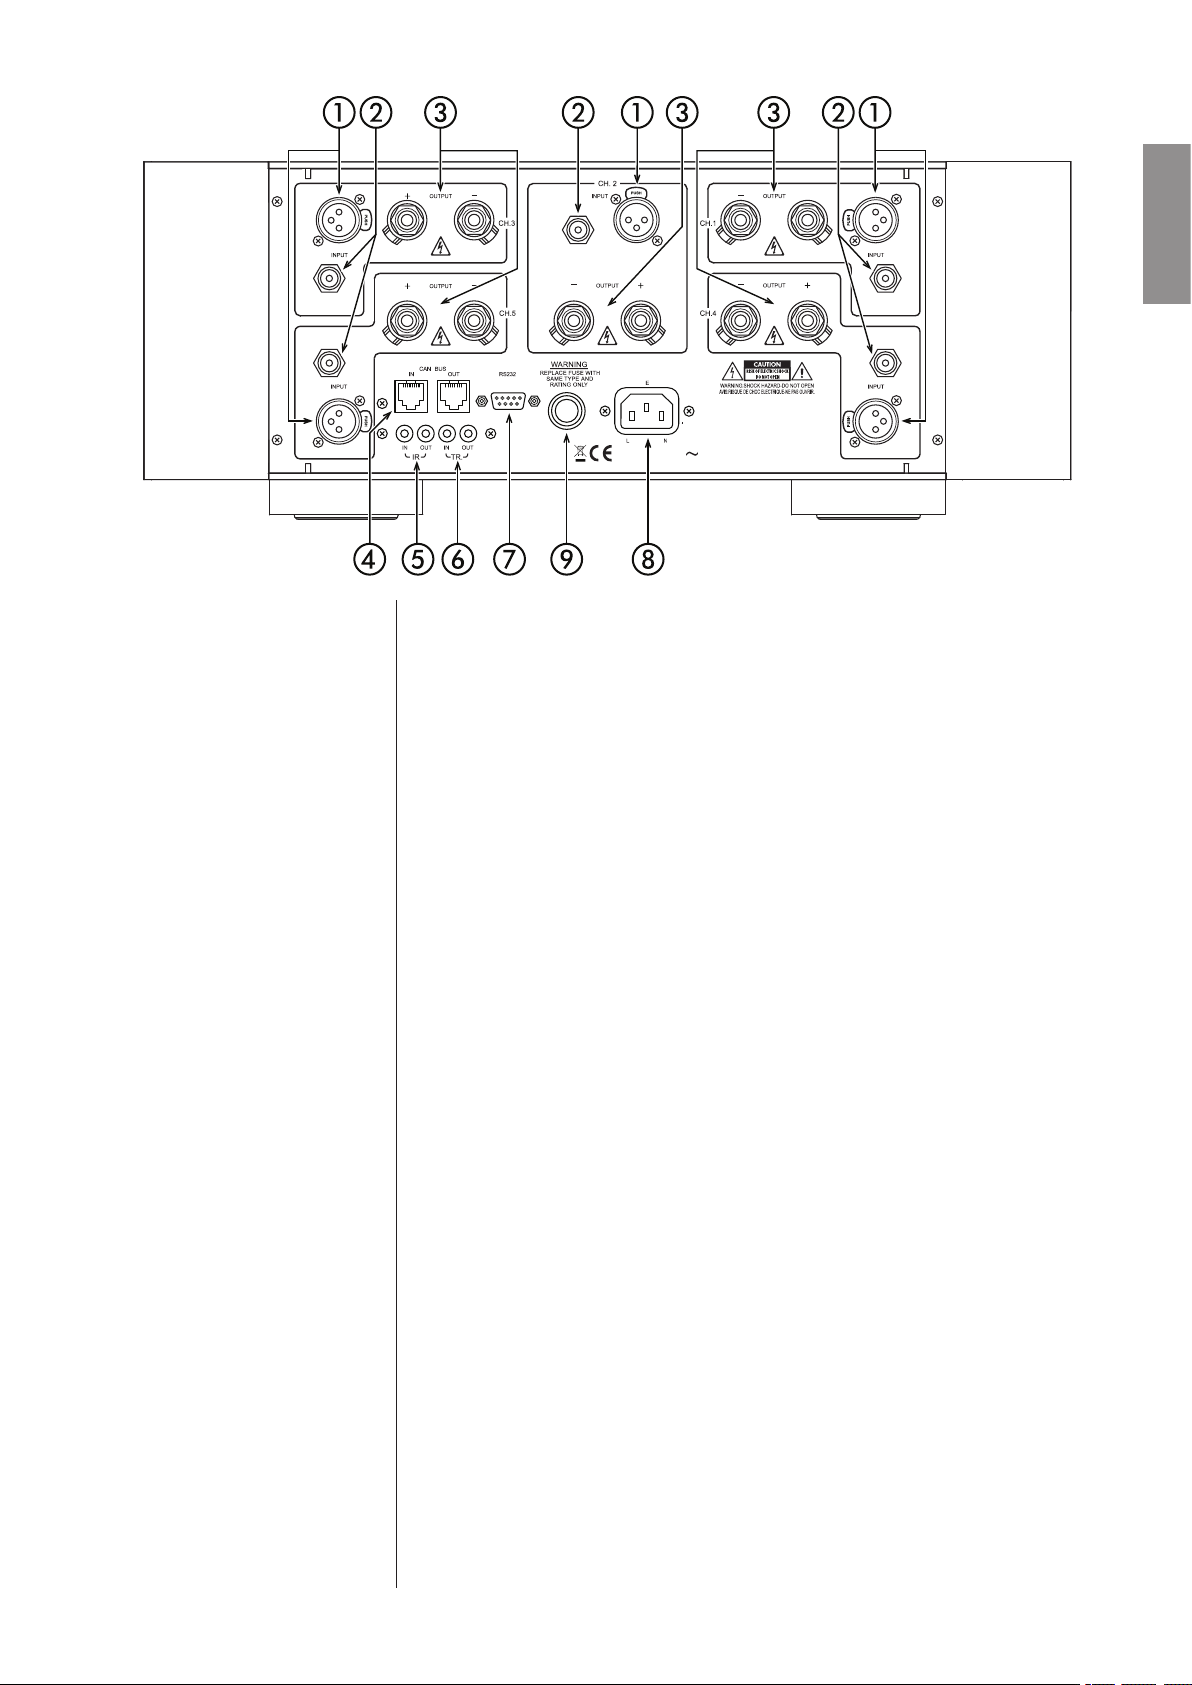
Rear Panel
The following descriptions are intended as a quick reference, should you have
any questions about your new product. Please see the next section (entitled
Initial Setup) for specific advice on incorporating your new amplifier into your
system.
ENGLISH
1 Balanced (XLR) Input
Balanced audio interconnections were originally developed in the
professional audio world, for preserving the delicate nuances of extremely
small microphone-level signals. For many years now, they have also been
used by performance-oriented consumer companies like Classé to preserve
every nuance of the finest audio performances in your collection.
Technically, balanced audio interconnections provide two distinct benefits:
they double the signal’s strength as it travels from one component to the
next, increasing the potential signal to noise ratio by 6 dB; they also do an
excellent job of rejecting noise and interference that might otherwise be
picked up between the components, due to either EMI (electromagnetic
interference) or RFI (radio frequency interference). In the world of wireless
telecommunications, there is more potential interference around than ever
before—it makes sense to keep it out of music and movie soundtracks.
For this reason, we strongly recommend using the balanced analog
interconnections between your Classé components wherever possible.
13
Page 14

ENGLISH
The pin assignments of these XLR input connectors are:
Pin 1: Signal ground
Pin 2: Signal + (non-inverting)
Pin 3: Signal – (inverting)
Connector ground lug: chassis ground
These pin assignments are consistent with the standard adopted by the
Audio Engineering Society (AES14-1992).
If you are using your Classé power amplifier with a Classé preamplifier,
you’re all set – just take standard balanced interconnect cables and plug
them in.Then engage that input on the power amplifier by configuring it
as described in Initial Setup.
If you are using another brand of preamplifier, please refer to the operating
manual of your balanced-output preamplifier to verify that the pin
assignments of its output connectors correspond to your amplifier. If not,
have your dealer wire the cables so that the appropriate output pin
connects to the equivalent input pin.
2 Single-Ended (RCA) Input
Single-ended cables using RCA connectors are the most common form of
analog connection used in consumer electronics. When implemented
carefully and with use of high quality interconnecting cables, this standard
can provide excellent performance. Classé has gone to extraordinary effort
to ensure that the single-ended (RCA) inputs of your power amplifier are
as good as possible. However, this connection standard cannot offer the
immunity from interference that balanced interconnection does—hence
our recommendation to use the balanced inputs when possible.
If you elect to use the single-ended inputs of your Classé power amplifier,
you need to engage them by configuring the amplifier as described in
Initial Setup
3 Speaker Outputs
A pair of high quality five-way binding posts is provided for each channel
of the amplifier.
Although the binding posts on your Classé amplifier will accept bare wire
connections, we strongly recommend the use of high quality spade or hook
lugs, crimped and soldered onto the ends of your speaker wires. Using high
quality connectors will ensure that your speaker connections do not
gradually deteriorate from fraying and oxidizing bare wires. It also helps
prevent accidental short-circuits from poorly-terminated connections.
.
14
Page 15
4 Classé CAN Bus Control Ports
These RJ-45 connectors are reserved for future control and communication
applications using Classé Audio’s implementation of the Controller Area
Network (CAN) Bus specification.
ENGLISH
5 IR Input and Output
1/8th
Your Classé amplifier includes two
-inch mini mono-jacks in order to
support the IR remote controls that are ubiquitous today. IR commands
exist for toggling the amplifier between operate
discrete command codes for either operate
and standby, as well as
or standby. These codes may be
used in “macros” for sophisticated remote control systems, facilitating the
control of the amplifier in the larger context of a complete system.
Actually, this IR Input and Output
description is a bit of a misnomer: the
input supplied to these plugs is electrical in nature, not IR. It is obtained by
using standard IR receivers, distribution amplifiers, and emitters (available
from your dealer) to translate the remote’s flashes of infrared light into
corresponding pulses of electricity. The big advantages here include being
able to easily route the signals anywhere they might need to go, and the
reliability of a solid electrical connection.
Since an IR distribution system such as your dealer may design for you
usually must control many products, your amplifier includes both an IR
input (for the control of this product) and an IR output (so as to pass
along the same signal to the next product). This allows you to “daisy chain”
your control wires from one product to the next.
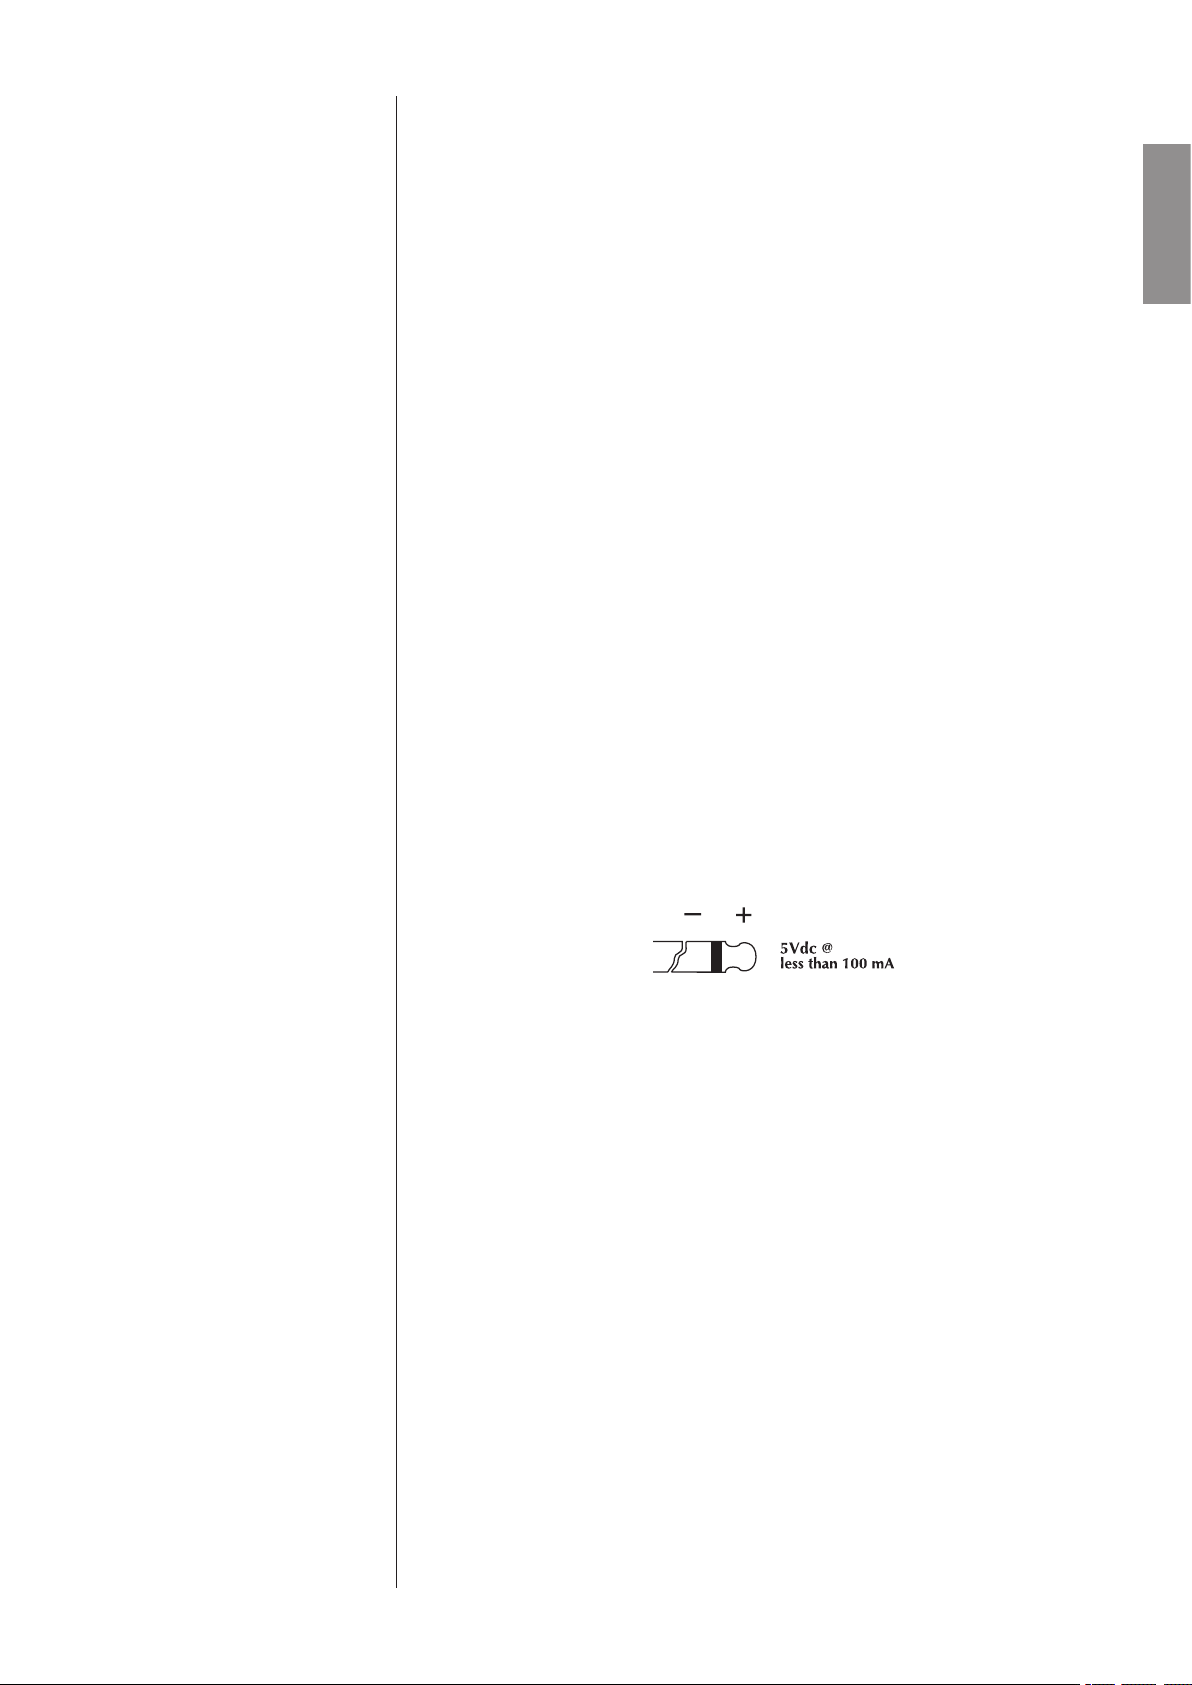
The amplifier is designed to respond to IR commands of 5 Volts DC, with
the tip of the mini mono-plugs defined to be “positive” relative to the
shank of the plug.
15
Page 16

ENGLISH
6 DC Trigger Input and Output
Many audio/video preamplifiers can supply a DC control voltage to
associated equipment in order to induce desired behavior. Your Classé
amplifier can take advantage of these capabilities in order to be switched
between operate
and standby automatically, perhaps in concert with the
A/V preamp itself.
1/8th
Two
(that is, toggling between operate
-inch mini mono-jacks provide this remote-controlled turn-on
and standby) of the amplifier. These jacks
provide a simple pass-through of the control voltage from one to the other,
allowing you to “daisy-chain” a series of amplifiers quite easily.
The remote trigger will be operated by the presence of 5–12 Volts DC,
with tip polarity as shown below:
7 RS-232 Control Port
This DB-9 connector has two purposes:
• downloading new operating software into your amplifier (should
new features ever be added, for example)
• for external control of your amplifier by systems such as
i-Command™, AMX® and Crestron
™
For more information, please contact your dealer and ask about home
automation systems.
8 AC Mains Input
An IEC standard power cord is used with the CA-5100. Plug the cord into
the IEC receptacle on the rear panel, and the other end into a suitable wall
outlet.
9 AC Mains Fuse
Your Classé power amplifier has an AC mains fuse, accessible on the rear
panel. If you suspect that your AC fuse has blown, disconnect your
amplifier from the AC mains, as well as from its input connections and
speaker connections, and refer to the appropriate item of the section
entitled Troubleshooting.
Do not open your amplifier. There are no user-serviceable parts within
this product.
16
Page 17

Danger! Potentially dangerous voltages and current capabilities exist
within your power amplifier, even when disconnected from AC
mains. Do not attempt to open any portion of the amplifier’s
cabinet. There are no user-serviceable parts inside your power
amplifier. All service of this product must be referred to a
qualified Classé dealer or distributor.
ENGLISH
17
Page 18

ENGLISH
Initial Setup
Your new Classé amplifier is quite simple to set up and enjoy. Please follow the
steps outlined below in order to safely set up and use your new amplifier.
Important: The AC mains connection should be the last connection you
make on your new power amplifier. In addition, it is always
a good idea to power up your power amplifier(s) last, after
everything else has been powered up and has stabilized.
Conversely, it is good practice to power the amplifier(s) down
first when shutting down the system, as this prevents any
transients from other components from getting through to
your loudspeakers.
1. Unpack everything according to the included instructions.
Be careful when doing so, as this amplifier is quite heavy.
2. Place your amplifier (be sure to read “Unpacking and Placement”)
and connect it to the AC mains.
This includes deciding on the location, making sure you have adequate
ventilation, and adequate clearance for all the wires behind the amplifier.
Once accomplished, connect the amplifier directly to the AC mains. Do
not use extension cords, as most are not suitable for the current sometimes
required by your amplifier.
.
configuring balanced/
single-ended operation
3. Configure your amplifier.
The Select and Mode buttons are used when configuring your amplifier
for how you would like it to operate.
While in standby, pressing the Select button will cause the Channel LEDs
to light up, indicating how the amplifier is currently configured (either
balanced or single-ended) for each channel.
One of the
may select either balanced or single-ended operation for that channel. Press
the Mode button to toggle between either the balanced mode or the singleended mode of operation, as indicated by which of the two channel LEDs
for that channel is blinking.
Press the Select button again to select the next channel, and repeat the pro
cess until the amplifier is configured as you desire. To finish, continue to
press and release the Select
Make sure you configure the amplifier to use the type of input connection
you will be using for each channel. You may safely use any combination of
single-ended and balanced input connections your system requires.
Channel LED indicators will be blinking, indicating that you
-
button until all the Channel LEDs are off.
18
Page 19

configuring amplifier
turn-on delay/amp no.
In a system that contains multiple Classé amplifiers, you may set the
number of seconds of turn-on delay for each amplifier, allowing each to
turn on in the order you have specified, rather than all at once. (Having
several powerful amplifiers all turning on at the same time can sometimes stress
the AC mains in your home, potentially leading to nuisance tripping of circuit
breakers). This number also acts as an ID when using the CAN Bus.
For example, to set the delay for two seconds (and to designate a particular
amplifier as #2):
ENGLISH
• Place the amplifier in standby
• Press and hold the Mode
When released, the LEDs will blink to indicate the turn-on delay
and current number of the amplifier (e.g. once to indicate a one
second delay and amplifier #1).
• If you want to change the current amplifier number setting, press
and hold the Mode button again until the Channel LEDs are
on.
• While continuing to hold the Mode button, press the Select
button two times (the same number as the desired delay in
seconds and the amplifier number);
• Release the Mode button. The amplifier will confirm your choice
by blinking the Channel LEDs twice.
4. Make your preamp connections.
With the amplifier in standby (or disconnected from the AC mains), and
using high quality interconnecting cables, make the appropriate
connections with the balanced or single-ended connectors (as configured in
).
Step 3
Make sure all the connections are snug, even if it means gently squeezing
the outer shell of the RCA with pliers and reinserting it to tighten the
connection.
(Standby LED on)
button until the Channel LEDs are lit.
5. Make your speaker connections.
Make the connection between the output terminals of the amplifier and
your loudspeakers, using high quality speaker wires.
Connect the black (–) terminals on the amplifier to the black (–) terminals
on your speaker, and the red (+) terminals on the amplifier to the red (+)
terminals on your speaker.
If bi-wiring, run a total of four conductors between each amplifier channel
and its corresponding loudspeaker: two separate +/– leads, one for the bass
and the other for the mids and treble. Make sure that no wires cross
between the red (+) and black (–) terminals, at either end.
Make sure all the connections are snug and cannot be easily wiggled free,
but do not overtighten them. If you can give the speaker wires a reasonable
tug without movement, they are snug. Further tightening will not make a
better connection, and (taken to the extreme) may damage the connectors.
19
Page 20

6. Double-check all your connections.
We understand that this step sounds redundant, but it is worth the extra
minute or two it might take just to ensure that all connections are correct
and secure before plugging the power cables to the AC outlets..
ENGLISH
7. Turn on all the other components in your system, and then turn
on your amplifier.
It is always good practice to turn any power amplifier on last, and to turn it
off first. Doing so prevents any turn-on/turn-off transients that might
originate in other components from damaging your loudspeakers.
Care and Maintenance
To remove dust from the cabinet of your amplifier, use a feather duster or a lintfree soft cloth. To remove dirt and fingerprints, we recommend isopropyl alcohol
and a soft cloth. Dampen the cloth with alcohol first and then lightly clean the
surface of the amplifier with the cloth. Do not use excessive amounts of alcohol
that might drip off the cloth and into the amplifier.
Caution! At no time should liquid cleaners be applied directly to
the amplifier, as direct application of liquids may result in
damage to electronic components within the unit.
20
Page 21

Troubleshooting
In general, you should refer any service problems to your Classé dealer. Before
contacting your dealer, however, please check to see if the problem is listed here.
1. No sound, and no Channel LED is lit.
• The amplifier is not plugged into the AC mains, or the AC
mains are down (circuit breaker, fuse).
• A brown-out or short-term loss of power might require the
internal microprocessor to be reset. Unplug the unit for at least
30 seconds and then plug it in again and try powering it up.
• The AC mains fuse is blown. See Troubleshooting #4, below (or
contact your Classé dealer).
• The AC mains is out of range. Check the voltage specified on the
rear panel.
2. No sound, and one or more Channel LEDs is blinking red.
• Your protection circuitry may have been engaged. To reset the
amplifier, press and hold the Standby button for 3 seconds
to power down the amplifier. Then disconnect all inputs and
outputs.
• Then try powering up the amplifier by pressing the Standby
button. If the
in the amplifier itself. It should be powered down, disconnected
from the AC mains and taken to your Classe dealer for service.
• If it powers up without any difficulty, power it back down and
reconnect only the inputs. Then restart the amplifier. If it goes
into its blinking protection mode, something is wrong with a
component “upstream” of the amplifier—probably a DC offset
or similar problem. Your amplifier is trying to protect your
loudspeakers (even small amounts of DC can damage woofers in
relatively little time). Try different source components to discover
whether the problem is limited to a single source, or exists all the
time (which would indicate a problem with the preamplifier).
Contact your dealer for help with the appropriate component.
LED continues to blink, there is a fault condition
ENGLISH
3. The amplifier keeps shutting off.
• Make sure you are providing adequate ventilation to the
amplifier, and that the ambient room temperature is below
105°F (40°C).
• Run through the troubleshooting sequence outlined above
(assuming the amplifier is going into its protection mode).
21
Page 22

4. The AC mains fuse is blown.
There is a specific troubleshooting procedure for a blown AC mains fuse,
since this rare occurrence sometimes indicates a significant problem. Please
follow the following steps, in order:
ENGLISH
a. Disconnect your amplifier from the AC mains, as well as from its
input connections and speaker connections, and remove the fuse
cover on the rear of the unit.
b. If the fuse appears to be blown, replace it only with a fuse of
the same type and rating (specified below). Using any other type
of fuse, particularly a larger-value fuse, can result in permanent
damage to your amplifier. If you are uncomfortable replacing the
fuse yourself, contact your Classé dealer for assistance.
Mains voltage: 100/120VAC
Fuse type: MDA slo-blow
Rating: 12A
Mains voltage: 230/240VAC
Fuse type: MDA slo-blow
Rating: 10A
c. After replacing the fuse and fuse cover, reconnect the amplifier to
the AC mains only and turn it on without reconnecting either the
inputs or the speaker wires. If the fuse blows again, disconnect it
from the AC mains and contact your Classé dealer for assistance.
d. If everything seems fine, place the amplifier back into standby
and carefully reconnect the input cable and power the amplifier
up. If the fuse then blows (or the amplifier goes into protection),
you may have a serious fault with your preamplifier/processor.
Contact your Classé dealer.
e. Finally, if everything is still fine, place the amplifier in standby
and carefully reconnect the speaker wires. Check
the speaker wires for possible short circuits. Then power up the
amplifier again. If the amplifier remains functional (the fuse
does not blow), then the original fuse probably blew in order to
protect the amplifier from a large AC mains surge. If it blows
again, contact your Classé dealer for assistance.
5. The Standby LED is flashing quickly, and a Channel LED is flashing
red.
• Try resetting the unit by disconnecting it from the AC mains
power, waiting a few seconds, and reconnecting the amplifier to
power. If this does not solve the problem, contact your Classé
dealer for assistance.
both ends of
22
Page 23

Specifications
Classé Audio reserves the right to make improvements without notice.
■ Power output 100W/ch continuous rms @ 8Ω
(all channels driven) 200W/ch continuous rms @ 4
■ Frequency response 10Hz – 22kHz (+0/-0.1dB)
10Hz – 155kHz (+0/-3.0dB)
■ Phase better than -10° @ 22kHz
■ Signal-to-noise ratio 105dB
(ref. full ouput, 10Hz – 80kHz)
■ Channel separation better than 80dB @ 20kHz
■ Noise floor (FFT) all peaks less than -95dBV
(10Hz – 80kHz)
■ Distortion (THD + noise) 0.003% @ 8Ω
(unweighted, 0.8Vrms/1kHz input, 10Hz – 500kHz)
■ Voltage gain 29.1dB
■ Sensitivity 1.0Vrms for rated output @ 8Ω
■ Input Impedance 100kΩ
■ Rated power consumption (as per IEC60065 para. 2.3.10) 684W
■ Idle power consumption 204W
■ Mains voltage specified on rear panel
(cannot be changed by dealer or user)
■ Dimensions (not incl. controls or connectors) Width: 17.5” (445mm)
Height: 6.75” (171mm)
Depth: 18.5” (470mm)
■ Shipping weight 88 lbs (40kg)
■ Net weight 75 lbs (34kg)
Ω
ENGLISH
.
For more information, see your Classé dealer, or contact:
Classé Audio
5070 François Cusson
Lachine, Quebec
Canada H8T 1B3
Telephone +1 (514) 636-6384
FAX +1 (514) 636-1428
http://www.classeaudio.com
email: cservice@classeaudio.com
Classé and the Classé logo are trademarks of Classé Audio Inc. of Lachine, Canada. All rights
reserved.
i-Command™ is a trademark of Equity International, Inc. All rights reserved.
AMX® is a registered trademark of AMX Corporation of Richardson, TX. All rights reserved.
Crestron™ is a trademark of Crestron Electronics, Inc. of Rockleigh, NJ. All rights reserved.
23
Page 24
FRANÇAIS
ATTENTION : POUR RÉDUIRE LES RISQUES D’INCENDIE ET D’ÉLECTROCUTION,
NE JAMAIS EXPOSER CET APPAREIL À LA PLUIE OU L’HUMIDITÉ.
ATTENTION
RISQUE D’ÉLECTROCUTION
NE PAS OUVRIR
ATTENTION : POUR RÉDUIRE LES RISQUES D’ÉLECTROCUTION, NE JAMAIS
ÔTER LE CAPOT DE L’APPAREIL. AUCUNE PIÈCE ACCESSIBLE PAR L’UTILISATEUR
À L’INTÉRIEUR. CONSULTER UN TECHNICIEN AGRÉÉ EN CAS DE PROBLÈME.
Le symbole de l’éclair terminé par une flèche dans un triangle équilatéral est destiné à alerter
l’utilisateur de la présence d’une tension électrique « dangereuse » non isolée à l’intérieur de
l’appareil, suffisante pour entraîner l’électrocution des personnes.
Le symbole du point d’exclamation dans un triangle équilatéral est destiné à alerter l’utilisateur de
la présence de conseils et indications importantes dans le manuel accompagnant l’appareil.
Le symbole « CE » (ci-contre, à gauche), indique que l’appareil a reçu le total agrément des
normes de la Communauté Européenne concernant ses caractéristiques électromagnétiques
(EMC, Electromagnetic Compatibility) et basse tension (LVD, Low Voltage Directivity).
Tous les appareils Classé sont conçus en totale conformité avec les directives internationales
concernant les restrictions d’utilisation de substances dangereuses (RoHS) pour l’environnement,
dans les équipements électriques et électroniques, ainsi que pour le recyclage des matériaux utilisés
(WEEE, pour Waste Electrical and Electronic Equipment). Le symbole du conteneur à ordures
barré par une croix indique la compatibilité avec ces directives, et le fait que les appareils peuvent
être correctement recyclés ou traités dans le respect total de ces normes.
Toute l’équipe Classé a pris un soin particulier pour que cet appareil représente pour vous un véritable investissement. Nous sommes fiers de
vous annoncer que tous les appareils Classé ont reçu officiellement l’agrément des normes de la Communauté Européenne (CE).
Cela signifie que votre appareil Classé répond aux normes de sécurité et de fabrication les plus draconiennes du monde. Le symbole « CE »
signifie que votre acquisition satisfait ou dépasse les normes de la Communauté Européenne quant à sa qualité de fabrication spécifique et
individuelle et au respect total de votre sécurité.
Cet appareil a été testé et satisfait totalement aux normes concernant les appareils numériques de Classe B, selon le chapitre 15 des normes
FCC. Ces limites concernent une protection raisonnable contre les risques d’interférences dans une installation résidentielle. Cet appareil
génère, utilise et peut rayonner une énergie radiofréquence, ce qui, s’il n’est pas installé selon les instructions contenues dans ce manuel,
peut générer des parasites dans les radiocommunications. Cependant, il n’y a aucune garantie que de telles interférences ne se produisent pas
dans certains cas d’espèce. Si vous constatez de telles interférences sur la réception radio ou télévision, ce qui peut être mis en évidence en
éteignant puis rallumant cet appareil, nous vous encourageons à les éliminer en essayant une des procédures suivantes :
• Réorientez ou déplacer l’antenne de réception.
• Éloignez plus les appareils de réception et cet appareil les uns des autres.
• Branchez cet appareil dans une prise d’alimentation secteur d’un circuit différent de celui alimentant les appareils de réception.
• Contactez un technicien agréé radio/TV pour assistance.
ATTENTION : Des modifications sur cet appareil, non expressément approuvées par son constructeur, annulent totalement la
responsabilité de ce dernier et la garantie sur l’appareil.
Les informations contenues dans ce manuel sont sujettes à modification sans préavis. La dernière version de ce manuel (en anglais) est en
permanence disponible sur notre site Internet à l’adresse htpp://www.classeaudio.co
REMARQUE
24
Page 25

Importantes instructions concernant la sécurité
Attention :
Veuillez lire et observer toutes les instructions et recommandations de ce manuel
d’utilisation, ainsi que celles inscrites sur l’appareil lui-même. Conservez soigneusement ce
manuel d’utilisation.
1. Ne tentez pas de réparer vous-même cet appareil. N’ôtez pas son capot, pour quelque raison que ce
soit. Un appareil ouvert, surtout s’il est encore branché sur le secteur, présente un danger d’électrisation
mortelle. Adressez-vous toujours à un technicien qualifié et agréé.
2. Pour éviter tout risque d’incendie ou d’électrocution, ne jamais exposer l’appareil à la pluie ou
l’humidité. Si un liquide pénètre dans l’appareil, débranchez-le immédiatement de l’alimentation
secteur et apportez-le chez votre revendeur Classé pour un examen approfondi.
3. Ne posez pas cet appareil près d’une source de chaleur, un radiateur, bouche de chauffage, etc.
Évitez lui aussi les rayons directs du soleil.
4. Branchez l’appareil sur une tension d’alimentation secteur correcte. L’emballage externe et une
étiquette en face arrière à côté de son numéro de série indiquent la tension correcte. L’utilisation d’une
tension différente peut endommager l’appareil et annule sa garantie.
5. Le câble d’alimentation secteur doit être disposé de telle manière qu’il ne puisse être piétiné ou
pincé par des objets posés dessus ou à côté. Ne tirez pas non plus dessus, pour débrancher la prise
notamment. Si vous notez une quelconque détérioration de ce câble, débranchez-le et portez-le chez
votre revendeur agréé, pour son examen, son éventuelle réparation ou son remplacement.
6. Si vous n’utilisez pas l’appareil pendant une certaine période (vacances, etc.), vous devez le
débrancher de son alimentation secteur afin d’éviter tout problème pouvant survenir d’une surtension
ou d’un orage, par exemple.
7. NE JAMAIS laisser pénétrer le moindre liquide à l’intérieur.
8. NE JAMAIS poser de récipient contenant du liquide sur cet appareil.
9. NE JAMAIS bloquer ses ouïes ou ses radiateurs de ventilation.
FRANÇAIS
10. NE JAMAIS court-circuiter le moindre fusible.
11. NE JAMAIS remplacer un fusible par un autre de type ou valeur différents.
12. NE JAMAIS tenter de réparer vous-même cet appareil. Si un problème survient, contactez
immédiatement votre revendeur agréé Classé.
13. NE JAMAIS exposer cet appareil à des températures extrêmes, trop hautes ou trop basses.
14. NE JAMAIS faire fonctionner cet appareil dans une atmosphère explosive.
15. TOUJOURS débrancher les appareils électroniques de précision pendant les orages.
Veuillez noter ci-dessous le numéro de série de votre nouveau maillon Classé, pour future référence.
Numéro de série # : ____________________________________
25
Page 26

FRANÇAIS
Sommaire
Bienvenue dans la famille Classé ...................................................................27
un mot concernant l’installation ............................................................. 27
déballage de votre amplificateur de puissance ....................................... 28
installation ............................................................................................. 28
aération .................................................................................................. 28
installations personnalisées .................................................................... 29
numéro de série ..................................................................................... 29
enregistrez votre achat ! ......................................................................... 29
tension d’alimentation ............................................................................ 29
période de rodage .................................................................................. 30
veuillez lire ce manuel... ........................................................................ 30
conception sophistiquée des circuits ...................................................... 31
tests d’écoute intensifs ............................................................................ 31
longévité extraordinaire ......................................................................... 32
protection totale ..................................................................................... 32
Face avant ......................................................................................................33
Face arrière ....................................................................................................35
Réglage initial ................................................................................................40
configuration du fonctionnement symétrique/asymétrique ............... 40
configuration du délai de mise sous tension/n° de l’amplificateur .... 41
Entretien ........................................................................................................42
Problèmes de fonctionnement .......................................................................43
Spécifications ................................................................................................45
Dimensions .................................................................................................178
26
Page 27

Bienvenue dans la famille Classé
Nous vous félicitons pour l’achat de cet appareil Classé. Il représente le résultat
de nombreuses années d’améliorations continues, et nous sommes certains qu’il
vous apportera des années de plaisir.
Nous attachons une grande importance à la relation avec nos clients. Nous vous
remercions donc de bien vouloir dès maintenant nous retourner votre carte
de garantie, avant que vous ne stockiez le carton d’emballage et ne l’oubliez.
Nous pourrons ainsi vous avertir régulièrement dans l’avenir des mises à jour et
évolutions éventuellement disponibles pour votre maillon Classé.
L’envoi de votre carte de garantie nous permet aussi d’enregistrer votre appareil,
ce qui permettra si nécessaire une intervention beaucoup plus simple et rapide de
notre part, même si vous avez égaré le bon de livraison original.
Veuillez s’il vous plaît prendre quelques minutes de votre
temps pour remplir la carte de garantie et nous la renvoyer
par la poste.
FRANÇAIS
Vous trouverez cette carte de garantie à la fin du livret de garantie, emballé
séparément.
un mot concernant
l’installation
C’est pourquoi nous vous recommandons fortement de
Tous les efforts de notre part ont été faits pour rendre l’installation et l’utilisation
de votre Classé CA-5100 simple et évidente.
Cependant, nous n’avons aucun moyen d’évaluer certains paramètres, comme la
taille et la forme de votre pièce d’écoute, son acoustique, et les maillons que vous
avez choisi d’associer à cet appareil. Tous ces facteurs influencent pourtant les
performances finales de votre système.
faire installer et régler votre système par votre revendeur. Il
possède en effet l’expérience, le savoir-faire et l’équipement
spécialisé capables de faire une très grande différence quant
aux performances finales de votre installation.
27
Page 28

Déballage et installation
amplificateur de puissance
FRANÇAIS
déballage de votre
Important ! Conservez l’emballage et tous ses éléments internes pour
installation Deux options se présentent pour l’installation d’un amplificateur de puissance
Déballez soigneusement l’amplificateur de puissance selon les instructions
fournies, puis retirez tous les accessoires du carton.
tout transport futur de votre appareil Classé. L’utilisation
de tout autre emballage pourrait endommager l’appareil,
dommages non couverts par la garantie.
: soir près des enceintes acoustiques, ce qui sous-entend de longs câbles de
connexion avec le préamplificateur ; soit près du préamplificateur, ce qui sousentend de longs câbles vers les enceintes acoustiques.
Bien que ces deux solutions puissent donner d’excellents résultats, nous vous
suggérons plus volontiers de choisir la première, et ce pour deux raisons.
Premièrement, la qualité du signal se dégrade plus rapidement lorsque celui-ci
doit véhiculer simultanément une tension et un courant élevés, ce qui sousentend que les câbles des enceintes acoustiques doivent être les plus courts
possibles. Deuxièmement, les amplificateurs de très haute qualité utilisent des
alimentations surdimensionnées qui génèrent inévitablement une certaine
dose de rayonnement magnétique. Or, ceux-ci doivent théoriquement rester
raisonnablement éloignés des maillons-sources les plus sensibles.
L’installation la plus simple se trouve dans un meuble-rack spécial, à côté des
autres maillons ; nous vous conseillons de le placer au pied du rack, au-dessous
du préamplificateur et des diverses sources, dont il sera ainsi le plus éloigné.
Cet emplacement garantit aussi une meilleure stabilité au meuble, puisque c’est
certainement l’élément le plus lourd qui y est posé.
Notez qu’une longueur suffisante doit être prévue pour tous les câbles
de liaison et le câble d’alimentation secteur, derrière le CA-5100.
Nous vous suggérons de laisser un espace d’au moins 20 centimètres
derrière l’amplificateur de puissance pour permettre leur passage sans
risque de torsion ou d’arrachage.
aération Votre amplificateur de puissance Classé génère une certaine quantité de chaleur,
en fonctionnement normal. Laissez un espace d’une quinzaine de centimètres
tout autour de l’appareil et au-dessus de lui, afin de permettre la dissipation de
cette chaleur par simple circulation d’air. Évitez de le poser sur une surface nonplane (tapis, par exemple).
28
Page 29

installations personnalisées Les illustrations cotées de l’appareil sont présentes à la fin de ce manuel, afin de
vous aider en cas d’installation particulière, et d’encastrement dans un meuble
sur mesure (voir le chapitre
en option, est disponible pour cet appareil. Contactez votre revendeur agréé
Classé pour de plus amples informations.
numéro de série Le numéro de série de votre amplificateur de puissance se trouve en face arrière
de l’appareil. Veuillez noter et reporter ce numéro sur la page « Instructions
importantes concernant la sécurité » de ce manuel, pour toute future référence.
enregistrez votre achat ! Puisque vous venez de trouver et de noter le numéro de série, c’est le moment
de remplir la carte de garantie ! Veuillez enregistrer votre achat afin que nous
puissions vous avertir des futures éventuelles mises à jour et améliorations le
concernant.
Cela ne vous prendra qu’une minute. Faites-le maintenant, avant d’oublier...
tension d’alimentation Le CA-5100 est réglé en usine pour fonctionner sur une tension d’alimentation
secteur de 100 V, 120 V, 230 V ou 240 V AC, suivant le pays pour lequel il est
vendu (uniquement 230 V dans les pays de l’Union européenne, selon les normes
CE). Cette tension d’alimentation ne peut pas être modifiée par l’utilisateur ou le
revendeur.
Dimensions). Un kit de montage en rack spécifique,
FRANÇAIS
Assurez-vous que l’étiquette présente en face arrière indique bien la tension
d’alimentation présente à votre domicile. Une mauvaise tension d’alimentation
peut endommager votre appareil irrémédiablement.
Attention: Le réglage de la tension d’alimentation secteur de votre
appareil ne peut être modifié par vos soins. Il n’y a pas
de pièces susceptibles d’être modifiées par l’utilisateur
à l’intérieur de l’appareil. Veuillez vous adresser à un
technicien agréé par Classé (revendeur).
Si la tension d’alimentation indiquée n’est pas correcte, contactez
immédiatement votre revendeur agréé Classé.
Le CA-5100 peut être alimenté sans problème sur une ligne électrique
domestique de courant alternatif 15 ampères. Si d’autres appareils sont branchés
sur cette même ligne, leur consommation respective doit toutefois être prise en
compte.
29
Page 30

FRANÇAIS
Le CA-5100 possède un circuit de protection contre les variations importantes
de tension, à la hausse comme à la baisse.
• Au démarrage : la tension d’alimentation doit se trouver dans
une fourchette comprise entre approximativement – 15 % et + 10
% de sa valeur nominale, sinon l’appareil ne s’allumera pas. Par
exemple, un appareil conçu pour fonctionner sur 120 V requiert
une tension d’alimentation effective comprise entre 95 et 135 V
pour s’allumer.
• Surtension pendant le fonctionnement : si la tension
d’alimentation augmente de 10 % ou plus pendant le
fonctionnement, l’appareil se met en mode de protection et
s’éteint automatiquement. La diode de mise en veille
Standby clignote pour indiquer la mise en service de la protection.
• Sous-tension pendant le fonctionnement : si la tension
d’alimentation baisse de 15 % ou plus, l’appareil continue de
fonctionner (à moins que cela ne présente un danger particulier
pour lui), mais il ne sera plus capable de fournir les performances
optimales pour lesquelles il a été conçu. La diode Standby LED se
met à clignoter pour indiquer le problème.
période de rodage Votre nouvel amplificateur de puissance Classé ne délivrera pas la quintessence
de ses performances immédiatement. Vous constaterez une première
amélioration quand l’appareil aura atteint sa température normale de
fonctionnement, tous ses composants internes étant alors « stabilisés ». Selon
notre expérience, les changements les plus importants surviennent après environ
300 heures de fonctionnement, après que l’appareil ait atteint son équilibre
thermique parfait et que ses condensateurs soient parfaitement efficaces. Une
fois cette période de rodage passée, votre nouveau maillon conservera ses
performances optimales pendant des années.
LED
La seule exception à cette règle concerne la situation pendant laquelle l’appareil
est laissé en veille ou débranché de l’alimentation secteur pendant une longue
période, ce qui se traduit par son refroidissement. Alors, suivant la durée
nécessaire pour qu’il revienne à sa température de fonctionnement normale, vous
devrez attendre une brève période de rodage pour qu’il retrouve ses meilleures
performances sonores. Mais cette remise en température n’est alors jamais très
longue. Vous n’aurez fort heureusement jamais à répéter les 300 heures de
période de rodage initial.
veuillez lire ce manuel... Prenez les quelques minutes nécessaires à la lecture de ce manuel, afin de vous
familiariser avec votre nouvel amplificateur de puissance. Nous comprenons que
vous soyez impatient de brancher et d’allumer votre nouvel appareil. Mais, en
lisant ce manuel et en suivant tous les conseils qui y sont prodigués, vous serez
certains d’en tirer le meilleur profit et comprendrez comment tirer tout le parti
de ce véritable investissement de très haute qualité.
30
Page 31

Caractéristiques particulières
conception sophistiquée
des circuits
tests d’écoute intensifs D’excellentes performances mesurées sont indispensables sur les meilleurs
Tous les étages d’amplification analogiques des appareils Classé sont basés sur
des circuits sans cesse améliorés, depuis des années, grâce à un développement
continu.
En démarrant avec des schémas excellents ayant fait leurs preuves depuis
de nombreuses années, nous avons découvert au fil du temps plusieurs
petites améliorations qui ont fini par permettre d’atteindre des performances
exceptionnelles, dans une variété d’applications. Modifiant une tension
d’alimentation ici, utilisant un composant légèrement différent là, nous
avons ainsi pu faire la différence entre des performances excellentes, et des
performances réellement hors du commun.
Ce niveau de raffinement ne peut être que le résultat d’une expérience sans
cesse affirmée mais améliorée, et non le résultat de ceux qui passent toujours
d’une notion à une autre. C’est ce qui explique la constance des performances
de tous les maillons Classé (tous basés sur des étages de gain analogues), et
aussi la constance des excellentes critiques et récompenses décernées par leurs
propriétaires comme par les journalistes spécialisés.
maillons très haut de gamme, et tous les appareils Classé y satisfont. Cependant,
l’expérience a prouvé que d’excellentes performances aux mesures n’étaient pas
suffisantes pour garantir des résultats subjectivement musicaux.
FRANÇAIS
C’est pour cette raison que tous les maillons Classé sont très soigneusement
analysés pendant tout le processus de conception par des tests d’écoute
approfondis. Nos oreilles sont toujours les meilleurs instruments de mesures de
laboratoire que nous possédons, et viennent tout naturellement compléter les
équipements de mesures traditionnels. Dans le but d’optimiser chacun de nos
appareils, des centaines de décisions ne sont volontairement basées que sur des
impressions subjectives, souvent en changeant un composant de haute qualité
par un autre.
Par exemple, nous avons « écouté » une demi-douzaine de résistances à film
métallique de tolérance 0,1 %, de la même valeur, provenant de différents
fabricants. Les tests classiques montraient qu’elles fournissaient des résultats
identiques en terme de bruit, de distorsion, etc. Cependant, invariablement,
l’une d’entre elles donnait de meilleurs résultats quant à la réaction subjective des
testeurs, pendant que le produit était en cours d’élaboration. Plus rarement, un
simple changement peut donner une amélioration très importante.
Multipliez donc ces améliorations par douze, ou même cent, avant que le produit
ne soit finalisé et entre en production, et vous avez une amélioration globale
très importante – entièrement basée sur des tests d’écoute. Vous comprenez
maintenant pourquoi ceux-ci constituent les compléments indispensables à la
connaissance approfondie de la technologie, chez Classé.
31
Page 32

longévité extraordinaire Un autre avantage de travailler depuis des années sur les mêmes schémas de base
FRANÇAIS
éprouvés réside dans la connaissance que nous avons maintenant de la façon
dont ils se comportent sur le long terme.
En n’utilisant que des composants de la plus haute qualité possible, mais en les
utilisant à la fois avec des essais de vieillissement accéléré et une expérience sur le
long terme, nous sommes capables de concevoir et fabriquer des appareils dont
nous sommes certains qu’ils passeront sans problème le test du temps.
Nous sommes ainsi certains que votre nouvel amplificateur de puissance Classé
vous donnera des années et des années de fonctionnement sans histoire, avec
un plaisir musical intact, exactement comme les précédents appareils Classé le
donnent déjà à leurs heureux propriétaires.
protection totale Enfin, votre nouvel amplificateur de puissance Classé intègre toute une série
de circuits de protection, conçus tout à la fois pour protéger et l’amplificateur,
et les enceintes acoustiques qui y sont branchées, contre tous les problèmes
de fonctionnement potentiellement dangereux. D’un point de vue pratique,
ces protections ne viennent jamais ni modifier, ni limiter les performances
intrinsèques de l’amplificateur ; elles se contentent simplement de le placer
en mode de protection dès qu’un des circuits détecte une condition de
fonctionnement anormale.
Ces conditions concernent :
• surcharge présente en sortie de l’appareil
• présence de courant continu
• alimentation secteur en dehors des tolérances précitées
• température de fonctionnement excessive.
Si une de ces conditions est détectée (susceptible, en pratique, d’endommager
l’amplificateur ou même les enceintes acoustiques), l’amplificateur se met
automatique et immédiatement en mode de protection. Dans ce cas, la diode
lumineuse du canal en cause Channel LED se met à clignoter, indiquant quel
est le canal en cause, tandis que le son est et reste coupé tant que le problème
n’est pas résolu.
Si le problème n’est pas cantonné sur un seul canal (par exemple, tension
d’alimentation secteur hors norme), c’est la diode de mise en veille Standby
LED qui se met à clignoter. Dans tous les cas, il sera nécessaire d’éteindre, puis
de rallumer l’appareil une fois que la cause du problème aura été identifiée et
réparée.
32
Page 33

BALANCED
SINGLE-ENDED
1 2 3 4 5
SELECT
MODE
Face avant
1. Touche de mise en veille Standby et indicateur LED
La touche de mise en veille Standby de la face avant permet de faire
basculer l’amplificateur de puissance entre son état de fonctionnement
normal (dit « operate ») et son état de mise en veille (dit « standby ») qui
l’éteint tout en le laissant capable de répondre aux commandes du système
via n’importe laquelle des options de commande (entrée infrarouge IR,
commutation courant continu Trigger, prise CAN Bus ou prise RS-232).
L’état de fonctionnement réel de l’amplificateur de puissance est indiqué
par une diode LED placée au centre de la touche Standby. Dès que
l’appareil est branché sur le secteur et allumé, la diode LED indique l’état
suivant :
FRANÇAIS
• diode allumée = mise en veille standby
• diode clignotante (à l’allumage) = initialisation
• diode éteinte =
• diode allumée
• diode clignotante
(éclat atténué) = afficheur éteint
(après allumage) = tension d’alimentation
fonctionnement réel
hors gamme
Lorsqu’il est en mode de veille Standby, les étages de gain de l’amplificateur
ne sont pas alimentés. Seule une petite partie de l’alimentation et des
circuits de contrôle reste sous tension, consomment relativement peu de
courant. Mais comme par nature les étages de sortie véhiculent un courant
élevé, ils chauffent très rapidement et sont ainsi à même de fonctionner
quasi instantanément au mieux de leurs performances.
Si vous envisagez de ne pas utiliser l’amplificateur de puissance pendant
une période relativement longue (vacances, voyage, etc.), nous vous
conseillons de le débrancher complètement de son alimentation secteur.
Assurez-vous qu’il est bien en mode de veille Standby avant de débrancher
cette prise.
33
Page 34

FRANÇAIS
C’est aussi une excellente habitude que de débrancher tous les maillons
électroniques sensibles pendant un orage, car un éclair tombant près de
votre domicile peut se traduire par une violente surtension dans votre ligne
secteur, celle-ci étant capable d’endommager les appareils les mieux
protégés et les mieux conçus. Le meilleur moyen de protéger les appareils
reste, dans ce cas, de les déconnecter purement et simplement de la ligne
électrique.
2. Touche de sélection Select
La touche Select permet de configurer (conjointement à la touche Mode)
le choix des entrées symétriques ou asymétriques. Elle est également utilisée
pour déterminer le délai avant mise en marche effective de l’amplificateur,
ou le numéro qui lui est attribué, lorsqu’il est relié à un préamplificateur
Classé via une des prises de commutation DC Trigger ou le système de
commande par Bus CAN.
3. Diodes LED indicatrices du fonctionnement des canaux
Chaque amplificateur possède plusieurs diodes indicatrices
une par canal. Elles indiquent quelle entrée est choisie pour chaque canal,
soit symétrique (prise XLR), soit asymétrique (prise RCA).
Ces diodes permettent également de détecter la présence d’un problème de
fonctionnement éventuel. Si une de ces diodes LED se met à clignoter en
rouge, c’est qu’il y a un problème sur le canal en question. Si toutes les
diodes Channel LED se mettent à clignoter, c’est que le problème survenu
n’est pas spécifique à un seul canal, mais concerne tout l’amplificateur.
Channel LED,
Attention ! Si une diode Channel LED se met à clignoter en rouge,
débranchez immédiatement l’amplificateur de son
alimentation secteur. Vérifiez que tous les branchements,
en entrées comme en sorties, sont parfaitement effectués et
sûrs. Si la prise d’alimentation secteur n’est pas facilement
accessible, vous pouvez presser et maintenir la pression sur
la touche de mise en veille Standby pendant trois secondes
pour réinitialiser l’amplificateur. Si le problème ne vous
apparaît pas facilement et immédiatement, ne tentez rien
mais veuillez contacter votre revendeur agréé Classé.
4. Touche Mode
La touche Mode est utilisée (conjointement à la touche Select) pour le
choix de l’entrée, symétrique ou asymétrique. Elle est également utilisée
pour déterminer le délai avant mise en marche effective de l’amplificateur,
ou le numéro qui lui est attribué, lorsqu’il est relié à un préamplificateur
Classé via une des prises de commutation DC Trigger ou le système de
commande par Bus CAN.
34
Page 35

�
Face arrière
La description qui suit est conçue comme référence générale pour la prise
en main de votre nouvel amplificateur. Veuillez vous reporter au chapitre
suivant (intitulé
notamment pour l’intégration parfaite de votre nouvel amplificateur dans votre
installation.
1. Entrées symétriques (prises XLR)
Les liaisons audio en mode symétrique ont été développées à l’origine pour
le monde professionnel, afin de préserver les détails les plus subtils des très
faibles signaux sortant des microphones. De plusieurs années maintenant,
elles sont utilisées sur les maillons Haute Fidélité très haut de gamme des
meilleures marques, comme Classé, afin de préserver intégralement la
qualité du signal des sources.
« Réglage initial ») pour toutes les questions plus complètes, et
FRANÇAIS
Techniquement, les liaisons audio symétriques apportent deux avantages
distincts : elles doublent la force du signal lorsqu’il voyage d’un maillon à
un autre, améliorant le rapport signal-bruit de 6 dB ; elles fournissent
également un excellent travail pour la réjection de tous les bruits parasites
et des interférences pouvant être captées entre les maillons, que ce soit des
interférences électromagnétiques (EMI) ou de fréquences radio (RFI).
Dans notre monde moderne constellé de liaisons sans fil, le nombre
d’interférences potentielles flottant autour de nous est incroyablement plus
élevé qu’il y a quelques années – ce qui revêt une importance particulière
pour profiter au mieux de nos musiques et bandes sonores de films
préférées.
C’est pour toutes ces raisons que nous vous conseillons d’utiliser
uniquement des liaisons de type symétrique, à chaque fois que cela est
possible.
35
Page 36

FRANÇAIS
Le câblage des broches d’une entrée XLR est le suivant :
Broche (pin) 1 : masse du signal
Broche 2 : signal + (non inversé)
Broche 3 : signal – (inversé)
Masse externe de la prise : masse du châssis.
Ce brochage correspond à la norme officielle adoptée par l’Audio
Engineering Society (AES14-1992).
Si vous utilisez votre amplificateur de puissance Classé avec un
préamplificateur Classé, aucun souci : il vous suffit de vous procurer des
câbles de liaison symétrique classiques, et de les brancher sur les deux
appareils. Choisissez ensuite l’entrée symétrique comme indiqué plus loin
dans le chapitre
Si vous utilisez un préamplificateur d’une autre marque, reportez-vous à
son manuel d’utilisation pour vérifier le bon câblage de ses propres prises,
par rapport à celles du CA-5100. Si ces câblages ne sont pas identiques, des
câbles spécifiques adaptés devront être fabriqués, ce dont votre revendeur
agréé se chargera.
2. Entrées asymétriques (prises RCA)
Les câbles asymétriques, terminés par des prises RCA, constituent la liaison
de base pour les branchements analogiques des électroniques grand public.
Lorsqu’il est soigneusement conçu et que l’on utilise de tels câbles
d’excellente qualité, ce type de liaison peut fournir d’excellentes
performances. Classé a dépensé des efforts extraordinaires pour que les
sorties asymétriques (par prises RCA) de votre amplificateur de puissance
donnent les meilleurs résultats possibles. Cependant, une telle connexion
ne pourra jamais offrir la même immunité contre les interférences qu’une
liaison de type symétrique – c’est pourquoi nous vous recommandons des
liaisons symétriques à chaque fois que cela est possible.
Réglage initial.
Pour obtenir les meilleurs résultats possibles, nous vous conseillons de
n’utiliser que des câbles blindés de la meilleure qualité possible. Contactez
votre revendeur agréé Classé pour de plus amples informations à ce sujet.
3. Sorties enceintes acoustiques
Une paire de bornes vissantes acceptant cinq modes de connexion
différents est disponible pour chaque canal de l’amplificateur.
Bien que les prises de votre amplificateur Classé acceptent sans problème
du fil nu, nous vous conseillons vivement d’utiliser plutôt des fourches ou
cosses de contact de très haute qualité, serties et/ou soudées à chaque
extrémité des câbles. L’utilisation de tels connecteurs de très haute qualité
garantit en effet l’absence de détérioration du signal, et la minimisation des
problèmes dus à l’oxydation progressive des brins du fil nu. Elle évite enfin
tout risque de court-circuit entre les bornes adjacentes.
36
Page 37

4. Prises de commande Classé CAN Bus
Ces prises type RJ-45 sont prévues pour de futures applications de
commande et de télécommunication, utilisant les spécifications du système
de réseau de commande développé par Classé « Controller Area Network »,
ou CAN.
5. Entrée et sortie infrarouge (IR)
Votre amplificateur de puissance Classé possède deux prises type mini-jacks
mono 3,5 mm destinées à transmettre les commandes infrarouge (IR)
utilisées désormais par toutes les télécommandes. Un code infrarouge (par
exemple) existe pour passer de l’état de fonctionnement Operate à l’état de
veille Standby, mais aussi, désormais, deux codes infrarouge séparés, l’un
pour l’état de
codes indépendants peuvent ainsi être utilisés pour la réalisation de «
macrocommandes » avec les systèmes de télécommande les plus
sophistiqués, facilitant l’utilisation de l’amplificateur de puissance dans les
installations les plus complètes et les plus complexes.
fonctionnement, l’autre pour l’état de veille Standby. Ces
FRANÇAIS
Notez que la dénomination « entrée et sortie infrarouge »
signaux entrés et sortis de ces prises sont électriques par nature, pas
infrarouge. Mais ils sont utilisés avec des récepteurs, émetteurs et boîtiers
de distribution normalisés (disponibles auprès de votre revendeur),
capables de transformer un signal infrarouge en signal électrique, et
versa. Leur avantage est de pouvoir véhiculer les signaux de commande là
où on a besoin, et avec toute la sécurité d’une liaison électrique.
Parce qu’un système de distribution de codes infrarouge est conçu pour
commander la plupart des maillons de votre système, votre amplificateur
de puissance propose à la fois une entrée IR (pour sa propre commande) et
une sortie IR (pour pouvoir faire transiter les mêmes signaux de
commande vers un autre maillon). Ce principe s’appelle un chaînage «
daisy chain ».
L’amplificateur de puissance est conçu pour répondre à des commandes
infrarouge de 5 volts CC (continu), la pointe de chaque mini-jack étant
définie comme le positif par rapport au corps de la prise.
est fausse ! : les
vice-
37
Page 38

FRANÇAIS
6. Entrée et sortie de commutation type DC Trigger
De nombreux maillons audio/vidéo peuvent fournir une tension continue
pour commander un maillon associé. Votre amplificateur de puissance
Classé sait tirer parti de cette possibilité pour passer de son état de veille
Standby à son état de fonctionnement normal automatiquement, par
exemple simultanément à l’allumage du préamplificateur qui lui est associé.
mini-jacks mono 3,5 mm fournissent par ailleurs des sorties de
Deux
tension continue, qui permettent de faire passer l’amplificateur de son
mode de veille Standby
à son mode de fonctionnement effectif Operate. Ces
prises se contentent de laisser passer ou non la tension de commutation
continue, sans jamais la modifier, selon le mode de chaînage des maillons
dit « daisy-chain », afin que vous puissiez ainsi commander éventuellement
plusieurs maillons ou amplificateurs.
L’entrée de commutation Trigger réagit à la présence d’une tension
continue de 5-12 V, la polarité étant la suivante :
7. Prise de commande RS-232
Cette prise type DB-9 remplit deux rôles :
• charger en mémoire un nouveau logiciel de gestion de votre
amplificateur de puissance (lorsque de nouvelles fonctions sont
ajoutées, par exemple).
• permettre le contrôle de l’amplificateur de puissance par des
appareils de télécommande ou domotique spécialisés, tels ceux
®
fabriqués par les marques i-Command™, AMX
et Crestron™.
Contactez votre revendeur agréé Classé pour de plus amples informations
sur ces systèmes d’automatisation.
8. Entrée alimentation secteur AC Mains
Un câble d’alimentation secteur standard normalisé IEC (fourni) doit être
utilisé avec le CA-5100. Branchez-le dans la prise correspondante IEC
la face arrière, et l’autre extrémité dans une prise d’alimentation murale
adaptée.
9. Fusible d’alimentation général AC Mains Fuse
Votre amplificateur de puissance Classé possède un fusible de protection
général. Le cartouche du fusible d’alimentation général se trouve situé
près de la prise d’alimentation secteur, à l’arrière. Vous n’aurez
normalement jamais à remplacer ce fusible, mais si cette occurrence
survient, débranchez le câble d’alimentation et toutes les entrées et sorties
de l’appareil avant de procéder à ce remplacement, et assurez-vous de
n’utiliser qu’un fusible de remplacement exactement du même type et de la
même valeur que l’ancien, comme indiqué dans la section appropriée du
chapitre Résolution des problèmes
.
de
38
Ne jamais ouvrir votre amplificateur. Il n’y a à l’intérieur du CA-5100
aucune pièce susceptible d’être remplacée par l’utilisateur.
Page 39

Danger ! Des tensions et courants électriques potentiellement
dangereux subsistent à l’intérieur de l’amplificateur de
puissance, même lorsque celui-ci est débranché de son
alimentation secteur. N’essayez jamais d’ouvrir tout ou
partie de son coffret. Il n’y a à l’intérieur aucune pièce
susceptible d’être modifiée par l’utilisateur. Toutes les
interventions internes sur cet appareil doivent être confiées à
un revendeur/technicien qualifié et agréé par Classé.
FRANÇAIS
39
Page 40

FRANÇAIS
Réglage initial
Votre nouvel amplificateur de puissance est d’une utilisation très simple et
immédiate. Veuillez simplement suivre, dans l’ordre, les quelques étapes
détaillées ci-dessous afin de l’utiliser pleinement et en toute sécurité.
Important : Le branchement sur la prise d’alimentation secteur doit
toujours être le dernier branchement effectué sur votre
nouvel amplificateur. De plus, c’est toujours une excellente
idée que de l’allumer en dernier, dans la chaîne des différents
maillons de votre système, après que ceux-ci ont été euxmêmes allumés et aient eu le temps de se stabiliser.
Selon le même principe, il est toujours recommandé
d’éteindre le ou les amplificateurs en premier, car cela
élimine tout risque de transmission de signaux parasites
transitoires générés à l’extinction des autres maillons, dans
les enceintes acoustiques.
1. Déballez chaque élément en suivant les instructions incluses dans
le carton.
Procédez calmement et avec prudence, car l’amplificateur est lourd.
configuration du
fonctionnement
symétrique/asymétrique
2. Installez l’amplificateur (après avoir lu soigneusement le chapitre
« Déballage et installation », au début de ce manuel), puis
branchez sa prise d’alimentation secteur.
Cela sous-entend de décider de l’emplacement définitif de l’amplificateur,
de s’assurer que la ventilation autour de l’appareil sera correcte. Une fois
cela vérifié, vous pouvez brancher le câble secteur dans la prise (sans
allumer l’amplificateur). Pour ce faire, n’utilisez pas de câble rallonge,
d’autant que ceux-ci ne sont généralement pas adaptés aux caractéristiques
électriques de votre amplificateur.
3. Configurez votre amplificateur.
Les deux touches repérées Select
configurer votre amplificateur, pour lui « indiquer » comment il doit
fonctionner en pratique.
L’amplificateur étant en mode de veille Standby, une pression sur la touche
Select a pour effet d’allumer les diodes
la configuration en cours (entrée symétrique ou asymétrique) pour chaque
canal de l’amplificateur.
Dès que les diodes Channel LED se mettent à clignoter, cela signifie que
vous pouvez sélectionner le type d’entrée désiré, symétrique ou
asymétrique, pour chaque canal. Pressez la touche Mode
l’un à l’autre mode de fonctionnement, asymétrique ou symétrique,
indiqué à chaque fois par le clignotement de la diode correspondante.
et Mode vont vous permettre de
Channel LED, indiquant quelle est
pour passer de
40
Page 41

Pressez de nouveau sur la touche Select pour configurer le canal suivant, et
répétez cette procédure pour tous les canaux jusqu’à ce que l’amplificateur
soit exactement configuré comme vous le souhaitez. Pour terminer la
procédure, appuyez puis relâchez la touche Select jusqu’à ce que toutes les
diodes Channel LED, pour tous les canaux, soient éteintes.
Assurez-vous que vous avez bien configuré l’amplificateur en fonction de
tous les types d’entrées réellement retenus pour chacun des canaux. Vous
pouvez ainsi, sans problème et en toute sécurité, utilisez n’importe laquelle
des deux types de connexion, symétrique ou asymétrique, pour chacun des
canaux.
FRANÇAIS
configuration du délai de
mise sous tension/n°
de l’amplificateur
Dans un système utilisant plusieurs amplificateurs Classé, vous pouvez
régler le délai, en secondes, avant que l’amplificateur ne soit effectivement
allumé via un signal de commutation externe ; cela permet de déterminer
exactement l’ordre d’allumage des amplificateurs, plutôt que de les laisser
s’allumer en même temps. (Posséder plusieurs amplificateurs particulièrement
puissants qui s’allument exactement au même moment peut entraîner une
surcharge sur votre alimentation secteur, susceptible de déclencher le disjoncteur
de la ligne.) Ce nombre de secondes se transforme en numéro, dans le cas
d’une commutation effectuée via le Bus CAN.
Par exemple, pour régler ce délai sur deux secondes (ou pour déclarer un
amplificateur déterminé comme étant le n° #2) :
• Placez l’amplificateur en mode de veille Standby. (Diode
Standby LED
• Pressez et maintenez la pression sur la touche Mode, jusqu’à ce
que les diodes Channel LED soient allumées. Une fois cette
touche relâchée, les diodes clignotent, le nombre de clignotement
indiquant le délai en secondes, ou le numéro de l’amplificateur.
(Par exemple, un seul clignotement indique un délai d’une
seconde, ou le n° #1 choisi pour l’amplificateur).
• Si vous désirez changer ce délai ou ce numéro, pressez et
maintenez de nouveau la pression sur la touche Mode, jusqu’à ce
que les diodes Channel LED soient allumées.
• Tout en maintenant la pression sur la touche Mode, pressez deux
fois la touche Select (ou un nombre plus grand de pressions sur
cette touche, ce nombre correspondant au délai en secondes ou
au numéro voulu pour l’amplificateur).
• Relâchez la touche Mode. L’amplificateur confirme votre choix
en faisant clignoter deux fois (ou le nombre choisi) les diodes
Channel LED.
allumée).
4. Effectuez les branchements à partir du préamplificateur.
L’amplificateur étant en mode de veille Standby
alimentation secteur), et en n’utilisant des câbles que de la meilleure qualité
possible, effectuez tous les branchements nécessaires, de type symétrique ou
asymétrique (en respectant la configuration que vous venez de définir dans
l’étape 3.).
(ou débranché de son
41
Page 42

FRANÇAIS
5. Effectuez les branchements des enceintes acoustiques.
Effectuez les branchements entre les sorties des enceintes sur l’amplificateur
et vos enceintes acoustiques, en n’utilisant que du câble spécial de très
haute qualité.
Branchez les prises noires (-) de l’amplificateur sur les prises noires (-) de
chaque enceinte acoustique, et les prises rouges (+) sur les prises rouges (+)
des enceintes.
En cas de bi-câblage, vous utiliserez quatre conducteurs pour chaque canal
de l’amplificateur, vers chaque enceinte acoustique, avec dans ce cas une
paire de conducteurs branché sur les prises +/- du grave de l’enceinte, et
l’autre sur les prises +/- du médium-aigu de l’enceinte. Dans ce cas, vérifiez
bien que vous n’avez pas interverti les conducteurs rouges (+) et noirs (-)
entre l’amplificateur et les deux paires de bornes de l’enceinte acoustique.
Vérifiez soigneusement que chaque branchement est correctement et
fermement assuré, sans possibilité de déconnexion accidentelle. Ne serrez
tout de même pas trop fort les bornes de branchement. Vous devez pouvoir
donner un petit coup sec sur chaque câble sans que celui-ci ne risque de se
débrancher. Mais un serrage trop fort n’améliorera pas les contacts et
risque, à la limite, d’endommager irrémédiablement les connecteurs.
6. Vérifiez deux fois chaque branchement.
Nous avons conscience que cela peut vous sembler pénible !, mais vérifiez
encore une fois tous les branchements. La majorité des problèmes constatés
proviennent de mauvais branchement. C’est seulement après cette seconde
vérification que nous vous conseillons de brancher les câbles d’alimentation
secteur dans les prises murales.
7. Allumez tous les autres maillons de votre système puis, après,
allumez votre amplificateur.
C’est une excellente habitude à prendre que de toujours allumer
l’amplificateur de puissance en dernier, dans la chaîne, et de toujours
l’éteindre en premier. C’est en effet le meilleur moyen d’éviter tout risque
de transmission de bruits parasites transitoires dans les enceintes
acoustiques, susceptibles de les endommager.
Entretien
Pour ôter la poussière du coffret de votre amplificateur de puissance,
utilisez un plumeau ou un chiffon très doux et non pelucheux. Pour retirer
la saleté incrustée ou des traces de doigts, nous recommandons de l’alcool
isopropyle et un chiffon doux. Imbibez tout d’abord très légèrement le
chiffon d’alcool, puis frottez doucement la surface de l’amplificateur de
puissance. N’utilisez jamais de trop grandes quantités d’alcool, susceptible
d’entrer à l’intérieur de l’appareil.
42
Attention ! Ne jamais appliquer directement de liquide sur la surface
de l’appareil. Vous pourriez endommager irrémédiablement
l’électronique interne.
Page 43

Problèmes de fonctionnement
En règle générale, en cas de problème, contactez immédiatement votre revendeur
agréé Classé. Mais, avant de contacter celui-ci, vérifiez que votre problème ne
soit pas répertorié ci-dessous.
1. Il n’y a pas de son et aucune diode des canaux Channel LED n’est
allumée.
• L’amplificateur de puissance n’est pas branché dans sa prise
secteur murale, ou il n’y a pas de courant dans la prise murale
choisie. L’appareil se protégera automatiquement en cas de
tension secteur inadaptée.
• Une microcoupure secteur ou une perte subite de tension
peut nécessiter la réinitialisation du microprocesseur interne
de l’amplificateur. Débranchez l’appareil de sa prise secteur
pendant au moins 30 secondes, puis rebranchez-le et essayez de le
rallumer.
• Le fusible principal a fondu. Voir le problème de fonctionnement
#4, ci-dessous (ou contactez votre revendeur agréé Classé).
• L’alimentation secteur est hors norme. Vérifiez la tension
d’alimentation indiquée à l’arrière de l’appareil.
FRANÇAIS
2. Pas de son, et une ou plusieurs des diodes des canaux Channel
LED clignotent en rouge.
• Le circuit de protection est entré en service. Pour réinitialiser
l’amplificateur, pressez et maintenez la pression pendant
3 secondes sur la touche de mise en veille Standby. Puis
débranchez toutes ses prises, en entrées comme en sorties.
• Essayez de nouveau de rallumer l’amplificateur, en pressant la
touche Standby. Si la diode
y a un problème de fonctionnement de l’amplificateur lui-même.
Débranchez-le du secteur et portez-le chez votre revendeur agréé
Classé pour vérification.
• Si l’amplificateur refonctionne à nouveau sans difficulté,
éteignez-le et rebranchez toutes les entrées. Redémarrez
l’amplificateur. Si les diodes se remettent à clignoter, c’est que
le problème vient d’un des maillons placés avant l’amplificateur,
et très probablement la présence d’un courant continu
parasite. L’amplificateur essaie alors très normalement de
protéger vos enceintes acoustiques (une présence très faible
de courant continu, même pendant un court instant, peut
suffire à endommager irrémédiablement les haut-parleurs de
grave). Essayez de brancher et débrancher l’une après l’autre les
différentes sources, pour tenter de trouver quel est le maillon
fautif, ou si le problème reste permanent (ce qui indiquerait que
le problème vient du préamplificateur). N’hésitez pas à contacter
votre revendeur agréé pour qu’il vous assiste dans cette recherche.
LED continue de clignoter, c’est qu’il
3. L’amplificateur reste silencieux.
• Vérifiez que l’amplificateur bénéficie bien d’une aération
suffisante, et que la température de la pièce est bien inférieure à
40 °C.
• Effectuez la procédure de recherche décrite dans le paragraphe
précédent, si le mode de protection est activé.
43
Page 44

FRANÇAIS
4. Le fusible secteur principal AC Mains est fondu.
Il y a une procédure spécifique pour la résolution de ce problème, car la
survenance – très rare – de cette fusion du fusible indique généralement un
autre problème. Veuillez donc suivre, dans l’ordre, la procédure suivante :
a. Débranchez votre amplificateur de l’alimentation secteur, ainsi
que tous les câbles d’entrée et ceux des enceintes acoustiques,
puis retirez le couvercle du fusible, en face arrière.
b. Si le fusible est bien fondu, remplacez-le par un fusible
exactement de même type et de même valeur (voir ci-dessous).
Le fait d’utiliser un autre type de fusible, ou d’une autre valeur
(notamment plus élevée) peut entraîner des dommages irréversibles à
votre amplificateur. En cas de doute, n’hésitez pas à confier cette
tâche à votre revendeur agréé Classé.
Tension d’alimentation secteur : 100/120 V CA
Type de fusible : MDA à fusion retardée (slow-blow)
Valeur : 12 ampères (12 A)
Tension d’alimentation secteur : 230/240 V CA
Type de fusible : MDA à fusion retardée (slow-blow)
Valeur : 10 ampères (10 A)
c. Après avoir remplacé le fusible et remis le couvercle de son
logement, rebranchez l’amplificateur sur le secteur (n’effectuez
que ce branchement) et rallumez-le, sans rebrancher aucun des
autres câbles, en entrées comme en sorties enceintes. Si le fusible
fond à nouveau, débranchez l’amplificateur et contactez
immédiatement votre revendeur agréé Classé.
d. Si tout semble se passer correctement, placez l’amplificateur dans
son mode de veille Standby et rebranchez les câbles d’entrée, puis
allumez-le. Si le fusible fond à nouveau (ou que l’amplificateur
se met en mode de protection), vous avez un sérieux problème
avec le préampli-processeur branché en entrée. Contactez votre
revendeur Classé.
e. Enfin, si tout se passe bien, remettez l’amplificateur en mode de
veille Standby, et rebranchez les câbles des enceintes acoustiques.
Vérifiez bien les deux extrémités de ces câbles, afin qu’il n’y ait
aucun court-circuit. Puis allumez de nouveau l’amplificateur. Si
tout se passe bien (le fusible ne fond pas), la fusion du premier
fusible était probablement due à une grosse surtension secteur.
Si le fusible fond à nouveau, contactez immédiatement votre
revendeur agréé Classé.
44
5. La diode LED Standby clignote rapidement, et une diode de canal
Channel LED clignote en rouge.
• Essayez de remettre à zéro l’appareil en le débranchant de son
alimentation secteur, en attendant plusieurs secondes puis en
le rebranchant. Si cela ne résout pas le problème, contactez
immédiatement votre revendeur agréé Classé.
Page 45

Spécifications
Classé Audio se réserve le droit d’apporter des améliorations sans préavis.
■ Puissance de sortie 100 W/canal continus rms @ 8 Ω
(tous les canaux en service) 200 W/canal continus rms @ 4 Ω
■ Réponse en fréquence 10 Hz – 22 kHz (+ 0, /- 0,1 dB)
10 Hz – 155 kHz (+ 0, /- 3 dB)
■ Phase inférieure à – 10° @ 22 kHz
■ Rapport signal-sur-bruit 105 dB
■ Séparation des canaux supérieure à 80 dB @ 20 kHz
■ Bruit résiduel (FFT) inférieur à – 95 dBV crête
■ Distorsion (DHT + bruit) 0,003 % @ 8 Ω
(non pondéré, 0.8 Vrms/1 kHz en entrée, 10 Hz – 500 kHz)
■ Gain en tension 29,1 dB
■ Sensibilité 1 Vrms pour puissance maximum @ 8 Ω
■ Impédance d’entrée 100 kΩ
■ Consommation maximum (norme IEC 60065 / 2.3.10) 684 W
■ Consommation moyenne 204 W
■ Tension d’alimentation voir étiquette en face arrière
(ne peut être modifiée par l’utilisateur ou le revendeur)
■ Dimensions (sans les prises et commandes) Largeur : 445 mm
Hauteur : 171 mm
Profondeur : 470 mm
■ Poids emballé 40 kg
■ Poids net 34 kg
(10 Hz – 80 kHz)
FRANÇAIS
Pour de plus amples informations, contactez votre revendeur agréé ou :
Classé Audio
5070 François Cusson
Lachine, Québec
Canada H8T 1B3
Téléphone +1 (514) 636-6384
Fax +1 (514) 636-1428
http://www.classeaudio.com
email: cservice@classeaudio.com
Classé et le logo Classé sont des marques déposées de Classé Audio Inc., Lachine, Canada. Tous droits réservés.
i-CommandTM est une marque déposée de Equity International, Inc. Tous droits réservés.
AMX® est une marque déposée de AMX Corporation, Richardson, Texas. Tous droits réservés.
CrestronTM est une marque déposée de Crestron Electronics, Inc., Rockleigh, New Jersey. Tous droits réservés.
45
Page 46

WARNUNG: UM DIE GEFAHR VON FEUER ODER EINES ELEKTRISCHEN SCHLAGS ZU
DEUTSCH
REDUZIEREN, DAS GERÄT NIEMALS REGEN ODER FEUCHTIGKEIT AUSSETZEN.
ACHTUNG
GEFAHR EINES ELEKTRISCHEN
SCHLAGS
NICHT ÖFFNEN
UM DIE GEFAHR EINES ELEKTRISCHEN SCHLAGS ZU REDUZIEREN, NICHT DIE
GEHÄUSEABDECKUNG ENTFERNEN. IM INNERN BEFINDEN SICH KEINE VOM BEDIENER
ZU WARTENDEN TEILE. ZIEHEN SIE NUR QUALIFIZIERTES PERSONAL ZU RATE.
Das Blitzsymbol mit Pfeil in einem gleichseitigen Dreieck macht den Benutzer auf das
Vorhandensein gefährlicher Spannung im Gehäuse aufmerksam. Diese ist so groß, dass sie für
eine Gefährdung von Personen durch einen elektrischen Schlag ausreicht.
Das Ausrufungszeichen in einem gleichseitigen Dreieck weist den Leser auf wichtige Betriebs-
und Wartungs-(Service-)hinweise in der dem Gerät beiliegenden Literatur hin.
Das CE-Symbol (links dargestellt) weist darauf hin, dass das Gerät den EMC(Electromagnetic
Compatibility)- und den LVD(Low Voltage Directive)-Standards der Europäischen Gemeinschaft
entspricht.
Classé-Produkte entsprechen den internationalen Richtlinien über die Beschränkung der
Verwendung bestimmter gefährlicher Stoffe in Elektro- und Elektronikgeräten (Restriction of
Hazardous Substances (kurz RoHS genannt)) und über Elektro- und Elektronik-Altgeräte (Waste
Electrical and Electronic Equipment (WEEE)). Die durchgestrichene Mülltonne steht für deren
Einhaltung und besagt, dass die Produkte ordnungsgemäß recycelt oder diesen Richtlinien
entsprechend entsorgt werden müssen.
HINWEIS
Alle Mitarbeiter von Classé haben mit äußerster Sorgfalt gearbeitet, um Ihnen als Käufer ein zuverlässiges Gerät anbieten zu können. Wir
sind stolz darauf, dass alle Komponenten von Classé offiziell für das CE-Zeichen der Europäischen Gemeinschaft zertifiziert worden sind.
Das bedeutet, dass alle Classé-Produkte die weltweit strengsten Herstellungs- und Sicherheitsprüfungen bestanden haben.
VORSICHT: Durch nicht ausdrücklich vom Hersteller genehmigte Änderungen oder Modifikationen am Gerät verlieren Sie Ihre
Garantieansprüche.
Classé Audio behält sich im Rahmen der Weiterentwicklung das Recht auf Änderung der Spezifikationen und technischer Details ohne
vorhergehende Ankündigung vor. Die aktuellste Version dieser Anleitung finden Sie auf unserer Website http://www.classeaudio.com.
46
Page 47

Wichtige Sicherheitshinweise
Achtung:
Bitte lesen Sie sich alle Warn- und sonstigen Hinweise in dieser Bedienungsanleitung und auf dem
Gerät genau durch und befolgen Sie diese. Bewahren Sie die Bedienungsanleitung so auf, dass sie
jederzeit zugänglich ist.
1. Versuchen Sie nicht, dieses Gerät selber zu reparieren. Öffnen Sie auf keinen Fall das Gehäuse. Im
Gehäuse befinden sich keine vom Bediener zu wartenden Teile. Ein offenes Gerät stellt, insbesondere, wenn
es an eine Wechselstromquelle angeschlossen ist, eine Gefährdung dar. Das Gerät ist daher ausschließlich von
einem qualifizierten Fachmann zu öffnen und zu reparieren.
2. Um die Gefahr von Feuer oder eines elektrischen Schlags auszuschließen, darf das Gerät weder Wasser
noch Feuchtigkeit ausgesetzt werden. Gelangt Flüssigkeit in das Gerät, ziehen Sie sofort den Netzstecker
und lassen es von Ihrem autorisierten Classé-Händler gründlich prüfen.
3. Stellen Sie das Gerät nicht in die Nähe von Wärmequellen, z.B. nicht in die Nähe von Heizkörpern, Öfen
usw., und setzen Sie es nicht direktem Sonnenlicht aus.
4. Stellen Sie sicher, dass die Betriebsspannung mit der örtlichen Netzspannung übereinstimmt. Die
Betriebsspannung ist auf dem Versandkarton und an der Rückseite des Gerätes angegeben. Wird das
Gerät mit einer davon abweichenden Spannung betrieben, führt dies zu Schäden und Sie verlieren Ihren
Garantieanspruch.
DEUTSCH
5. Netzkabel sind so zu verlegen, dass sie nicht beschädigt werden können (z.B. durch Trittbelastung,
Möbelstücke oder Erwärmung). Besondere Vorsicht ist dabei an den Steckern, Verteilern und den
Anschlussstellen des Gerätes geboten. Ziehen Sie nicht am Netzkabel. Ist das Netzkabel beschädigt, wenden
Sie sich an Ihren autorisierten Classé-Fachhändler, damit er es gründlich prüft und anschließend repariert
bzw. durch ein passendes Kabel ersetzt.
6. Nehmen Sie das Gerät für längere Zeit nicht in Betrieb (z.B. während der Urlaubszeit), ziehen Sie den
Netzstecker aus der Steckdose, um Schäden durch Überspannung oder durch einen Blitzschlag vorzubeugen.
7. NIEMALS das Gehäuseinnere dieses Produktes feucht werden lassen.
8. NIEMALS Flüssigkeit in das Gerät gießen oder spritzen.
9. NIEMALS die Luftzirkulation durch Verdecken der Ventilationsöffnungen oder Kühlkörper verhindern.
10. NIEMALS Sicherungen umgehen.
11. NIEMALS Sicherungen einsetzen, deren Wert bzw. Typ vom angegebenen abweicht.
12. NIEMALS versuchen, dieses Produkt zu reparieren. Treten Störungen auf, setzen Sie sich mit Ihrem
autorisierten Classé-Fachhändler in Verbindung.
13. NIEMALS extrem hohen oder niedrigen Temperaturen aussetzen.
14. NIEMALS das Gerät in einer explosiven Umgebung betreiben.
15. STETS empfindliche Elektronikgeräte bei Gewitter vom Netz trennen.
Bitte tragen Sie die Seriennummer für Ihr neues Classé-Gerät für einen späteren Verwendungszweck hier ein.
Seriennummer:__________________
47
Page 48

DEUTSCH
Inhaltsverzeichnis
Willkommen in der Classé-Familie ................................................................49
Ein Wort zur Installation ......................................................................... 49
Auspacken und Aufstellen des Gerätes ...........................................................50
Auspacken Ihrer Endstufe ....................................................................... 50
Aufstellen des Gerätes ............................................................................ 50
Belüftung ............................................................................................... 50
Custom Installation ................................................................................ 51
Seriennummer ........................................................................................ 51
Lassen Sie sich registrieren! .................................................................... 51
Betriebsspannung ................................................................................... 51
Warmlauf-/Einlaufphase ......................................................................... 52
Bitte lesen Sie diese Bedienungsanleitung... ........................................... 52
Besondere Merkmale Ihrer Endstufe ...............................................................53
Ausgeklügelter Schaltungsaufbau ........................................................... 53
Intensive Hörtests ................................................................................... 53
Extrem hohe Lebensdauer ...................................................................... 54
Bewährte Schutzschaltungen .................................................................. 54
Frontansicht ...................................................................................................55
Rückansicht ...................................................................................................57
Setup .............................................................................................................62
Konfigurieren der Kanäle (symmetrisch oder unsymmetrisch) ........... 62
Konfigurieren der Verzögerungszeit beim
Einschalten/der Nummer der Endstufe ............................................ 63
Pflege & Wartung ...........................................................................................64
Störungssuche und -beseitigung .....................................................................65
Technische Daten ..........................................................................................67
Abmessungen ..............................................................................................178
48
Page 49

Willkommen in der Classé-Familie
Wir gratulieren Ihnen zum Kauf Ihres Classé-Gerätes. Diese Endstufe ist das
Ergebnis jahrelanger Entwicklungsarbeit. Wir sind sicher, dass Sie in den
nächsten Jahren viel Freude an Ihrem Gerät haben werden.
Wir bemühen uns stets um einen guten Kontakt zu unseren Kunden. Daher
bitten wir Sie, dass Sie vor dem Auspacken des Versandkartons die GarantieRegistrierungskarte ausgefüllt an uns zurückschicken und erst anschließend
Ihr Gerät anschließen. Dadurch können wir Sie umgehend über eventuelle
zukünftige Upgrades oder Updates in Bezug auf Ihr Classé-Gerät informieren.
Haben wir Ihnen Ihre Garantiekarte zugeschickt, so können Sie einfach und
schnell unsere Serviceleistungen in Anspruch nehmen.
Bitte nehmen Sie sich ein paar Minuten Zeit, um die
Garantie-Registrierungskarte auszufüllen und an uns zu
schicken.
Sie finden die Garantie-Registrierungskarte am Ende des beliegenden Warranty
Booklets.
DEUTSCH
Ein Wort zur Installation Es sind viele Anstrengungen unternommen worden, um eine einfache
Installation und Bedienung der CA-5100 von Classé zu gewährleisten.
Andererseits wissen wir nichts über andere Variablen wie die Größe des Raumes,
seine Akustik und das mit der Endstufe verbundene Equipment. All diese
Faktoren haben letztendlich einen Einfluss auf die Klangqualität Ihres Systems.
Aus diesem Grund empfehlen wir Ihnen dringend, Ihr System
von Ihrem Fachhändler installieren und kalibrieren zu lassen.
Er bringt die nötige Erfahrung, das erforderliche Fachwissen
und eine entsprechende Ausrüstung mit, um das Optimum
aus dem System herauszuholen.
49
Page 50

Auspacken Ihrer Endstufe Packen Sie Ihre Endstufe den beigefügten Hinweisen entsprechend aus. Nehmen
DEUTSCH
Auspacken und Aufstellen des Gerätes
Sie das gesamte Zubehör aus dem Karton. Seien Sie beim Anheben der Endstufe
vorsichtig, da sie sehr schwer ist.
Wichtig! Heben Sie das gesamte Verpackungsmaterial für einen
eventuellen späteren Transport Ihres Classé-Gerätes auf.
Der Versand Ihres neuen Gerätes in einer anderen als der
Original-Verpackung kann zu Beschädigungen führen, die
nicht von der Garantie abgedeckt werden.
Aufstellen des Gerätes Sie haben zwei Möglichkeiten beim Aufstellen Ihrer Endstufe: Sie können
das Gerät in die Nähe der Lautsprecher stellen, dann benötigen Sie längere
Verbindungskabel zum Vorverstärker. Oder Sie stellen die Endstufe in die Nähe
des Vorverstärkers, dann benötigen Sie längere Lautsprecherkabel.
Obwohl beide Aufstellungsarten zu einer hervorragenden Klangqualität
führen, werden Sie sich aus zwei Gründen wahrscheinlich für die erste Lösung
entscheiden. Zunächst einmal verschlechtert sich die Signalqualität schneller,
wenn das Signal als eine Kombination aus Hochspannung und Hochstrom
übertragen wird, so dass die Lautsprecherkabel so kurz wie möglich gehalten
werden sollten. Zum Zweiten werden in hochwertigen Endstufen massive
Magneten eingesetzt, die zwangsläufig Magnetfelder produzieren. Idealerweise
wird ein möglichst großer Abstand zwischen diesen Feldern und empfindlichen
Quellkomponenten hergestellt.
Bringen Sie Ihre Endstufe und die anderen Systemkomponenten in einem
HiFi-Rack unter, empfehlen wir, die Endstufe unten in das Rack zu setzen und
in möglichst großem Abstand zu den Quellen und der Vorstufe zu platzieren.
Dadurch ist ein hohes Maß an Stabilität gewährleistet. Eine Platzierung
derart schwerer Geräte im oberen Bereich des Racks kann zu einer gewissen
Kopflastigkeit führen.
Sorgen Sie für einen ausreichenden Abstand zwischen Netz- und
Verbindungskabeln und Endstufe. Wir empfehlen, hinter der Endstufe
einen Freiraum von 20 cm zu lassen, damit Sie genügend Platz
haben, die Kabel ohne Kabelsalat oder nicht zu straff zu befestigen.
Belüftung Ihre Classé-Endstufe erwärmt sich während des normalen Betriebs. Um eine
ausreichende Luftzirkulation zur Kühlung zu gewährleisten, ist oberhalb des
Gerätes ein Freiraum von 15 cm und an beiden Seiten ein Freiraum von 8 cm
zu lassen. Die Ventilationsöffnungen an der Ober- und Unterseite des Gerätes
dürfen nicht verdeckt werden, da ansonsten die Luftzirkulation durch das Gerät
erschwert wird. Stellen Sie das Gerät nicht auf weiche Oberflächen (wie z.B. auf
einen Plüschteppich), da dies den Luftstrom einschränkt.
50
Page 51

Custom Installation In dieser Bedienungsanleitung finden Sie Zeichnungen, die den Einbau in
spezielle Systeme und Schränke erleichtern (siehe Dimensions (Abmessungen)
Für dieses Produkt steht ein speziell für diesen Anwendungszweck entwickeltes
Montage-Kit zur Verfügung. Weitere Informationen erhalten Sie von Ihrem
Classé-Fachhändler.
Seriennummer Die Seriennummer Ihrer Endstufe finden Sie auf der Geräterückseite. Bitte
notieren Sie sich diese Nummer unter Wichtige Sicherheitshinweise
Bedienungsanleitung, um sie später bei Bedarf sofort zur Hand zu haben.
Lassen Sie sich registrieren! Haben Sie die Seriennummer des Gerätes gefunden, ist dies ein guter
Augenblick, um die beiliegende Garantie-Registrierungskarte auszufüllen. Haben
Sie sich erst einmal registrieren lassen, können wir Ihnen Updates oder sonstige
interessante Informationen zukommen lassen.
Es kostet Sie nur weinige Minuten. Bitte füllen Sie die Karte jetzt aus, bevor Sie
es vergessen.
Betriebsspannung Die Endstufe CA-5100 wird ab Werk (im Gehäuse), abhängig vom Land,
in dem sie verkauft wird, auf eine Betriebsspannung von 100 V, 120 V, 230
V bzw. 240 V eingestellt. (Entsprechend den CE-Richtlinien 230 V nur in den
europäischen Ländern.) Die Spannungseinstellung kann vom Anwender nicht
verändert werden.
in dieser
).
DEUTSCH
Stellen Sie sicher, dass die an der Rückseite der Endstufe angegebene
Betriebsspannung der örtlichen Netzspannung entspricht. Weicht die
Netzspannung von der Betriebsspannung ab, so führt dies zu einer Beschädigung
der Endstufe.
Warnung: Die Spannungseinstellung Ihrer Endstufe darf vom Anwender
nicht geändert werden. Im Gehäuse befinden sich keine vom
Bediener zu wartenden Teile. Wenden Sie sich bei Problemen
an Ihren autorisierten Classé-Fachhändler.
Ist die auf der Endstufe angegebene Betriebsspannung nicht die richtige, so
wenden Sie sich an den autorisierten Classé-Fachhändler oder -Distributor.
Die CA-5100 arbeitet problemlos mit einem Netzstrom von 15 Ampere.
Werden darüber hinaus andere Geräte über dieselbe Netzleitung betrieben, ist
der zusätzliche Stromverbrauch zu berücksichtigen.
51
Page 52

Die CA-5100 besitzt eine Schutzschaltung, die die Endstufe vor extrem hohen
bzw. niedrigen Spannungen bewahrt.
• Beim Einschalten: Die Netzspannung muss beim Einschalten in
einem Bereich von ungefähr -15 % bis +10 % des Nominalwertes
liegen, oder die Endstufe lässt sich nicht einschalten. So benötigt
eine 120-V-Endstufe beim Einschalten eine Netzspannung
zwischen ungefähr 95 – 135 V.
• Überspannung während des Betriebs: Steigt die Netzspannung
während des Betriebs um etwa 10 % oder mehr, so wird der
Schutzmodus aktiviert und die Endstufe schaltet sich ab. Die
Standby-LED leuchtet auf und zeigt dadurch an, dass der
Schutzmodus aktiviert ist.
• Unterspannung während des Betriebs: Sinkt die Netzspannung
um 15 % oder mehr, spielt die Endstufe weiter (da dies keine
besondere Gefährdung für das Gerät darstellt), jedoch wird unter
diesen eingeschränkten Bedingungen keine optimale Klangqualität
erzielt. Die Standby-LED leuchtet auf, um diese Bedingung
anzuzeigen.
DEUTSCH
Warmlauf-/Einlaufphase Ihre neue Classé-Endstufe liefert von Anfang an eine erstklassige Klangqualität.
Jedoch können Sie noch mit weiteren Klangoptimierungen rechnen, wenn
sie ihre normale Betriebstemperatur erreicht hat und die einzelnen Bauteile
„eingelaufen“ sind. Nach unserer Erfahrung kommt es innerhalb der ersten
300 Stunden zu den größten Veränderungen, bis die Endstufe ihr thermisches
Gleichgewicht erreicht hat und die Kondensatoren perfekt arbeiten. Nach der
ersten Einlaufphase wird die Leistungsfähigkeit Ihres neuen Produktes in den
nächsten Jahren ziemlich konstant bleiben.
Die einzige Ausnahme dieser Regel besteht dann, wenn das Gerät über
einen längeren Zeitraum in den Standby-Modus geschaltet oder von der
Stromversorgung getrennt wird, so dass sie abkühlt. Abhängig vom Grad des
Abkühlens sollten Sie mit einer kurzen Warmlaufphase rechnen, bevor die
Endstufe wieder mit bester Klangqualität aufspielt. Ist Ihre Endstufe nicht zu
stark abgekühlt, wird die Herstellung des thermischen Gleichgewichts nicht sehr
lange dauern. Im besten Fall müssen Sie die 300-Stunden-Einlaufphase niemals
wiederholen.
Bitte lesen Sie diese
Bedienungsanleitung...
Nehmen Sie sich die Zeit, um sich die Bedienungsanleitung durchzulesen und
sich mit Ihrer neuen Endstufe vertraut zu machen. Wir verstehen, dass Sie
es kaum noch erwarten können, Ihre Endstufe in Betrieb zu nehmen. Wenn
Sie sich jedoch zunächst die Anleitung durchlesen und die darin gemachten
Angaben beachten, gewährleisten Sie, dass Sie alle Vorteile dieser einzigartigen
Endstufe nutzen können.
52
Page 53

Besondere Merkmale Ihrer Endstufe
Ausgeklügelter
Schaltungsaufbau
Intensive Hörtests Von besonders hochwertigen Geräten erwartet man exzellente Messergebnisse,
Alle analogen Classé-Verstärkerstufen basieren auf Schaltungen, die im Laufe
vieler Jahre stetig immer weiter optimiert worden sind.
So waren, ausgehend von einem bereits hervorragenden Schaltungsaufbau und
jahrelanger Erfahrung, viele kleine Verfeinerungen möglich, die letztendlich
zu hervorragenden Leistungsparametern geführt haben. Kleine Änderungen
hier oder die Verwendung eines anderen Bauteils da können den Unterschied
zwischen einer stabilen und einer herausragenden Leistung ausmachen.
Dieses Höchstmaß an Verfeinerung ist nur aufgrund von viel Erfahrung
möglich und nicht zu erzielen, wenn man einem Trend nach dem anderen
nacheifert. Es ist diese Kontinuität, der Classé-Produkte ihre herausragenden
Klangeigenschaften (da sie alle auf vergleichbaren analogen Verstärkerstufen
basieren) und die erstklassige Bewertung durch die Besitzer und Kritiker
gleichermaßen verdanken.
die Classé-Geräte natürlich auch erreichen. Die Erfahrung hat jedoch gezeigt,
dass herausragende technische Eigenschaften allein nicht ausreichen, um
besondere musikalische Ergebnisse zu erzielen.
Aus diesem Grund werden alle Classé-Produkte während des
Entwicklungsprozesses ausgesprochen fein abgestimmt. Unsere Ohren sind
immer noch das feinste zur Verfügung stehende Testinstrument und ergänzen
in optimaler Weise traditionelleres Test-Equipment. Im Zuge der Optimierung
des Schaltungslayouts werden viele Hörtests durchgeführt. Es wird subjektiv
beurteilt, wie sich der Klang verändert, wenn ein hochwertiges gegen ein anderes
hochwertiges Bauteil ausgetauscht wird.
DEUTSCH
Beispielsweise hören wir uns ein halbes Dutzend Schichtwiderstände (0,1 %)
von verschiedenen Herstellern an. Standardtests zeigen in puncto Rauschen,
Verzerrungen usw. für alle identische Ergebnisse. Trotzdem ergeben sich während
der Hörtests subjektive Unterschiede in der Klangqualität. Natürlich entscheiden
wir uns für das Bauteil, das nach unserer Beurteilung zu einer weiteren
Verbesserung der Klangqualität beiträgt.
Während des Entwicklungsprozesses und vor der Serienproduktion eines Gerätes
gilt es, Dutzende oder sogar Hunderte solcher Entscheidungen zu fällen, die
zusammen genommen letztendlich zu einer erheblichen Klangoptimierung
führen – eine Entwicklung, die Sie von einem Unternehmen wie Classé erwarten
dürfen.
53
Page 54

Extrem hohe Lebensdauer Ein weiterer Vorteil der langjährigen Arbeit mit ausgeklügelten und
weiterentwickelten Schaltungslayouts besteht darin, dass wir genau wissen, was
langfristig gut funktioniert.
Zunächst einmal verwenden wir nur hochwertigste Teile und setzen diese
einerseits Belastungstests aus und nutzen andererseits unsere langjährige
Erfahrung. Auf diese Weise können wir Produkte entwickeln und herstellen, die
auch langfristig zuverlässig funktionieren.
Daher sind wir zuversichtlich, dass Ihr neues Classé-Gerät Ihnen viele Jahre
erstklassigen Musikgenuss bietet.
Bewährte Schutzschaltungen In Ihre neue Classé-Endstufe sind eine Reihe von Schutzschaltungen integriert,
die sowohl die Endstufe als auch die Lautsprecher vor Schäden bewahren.
Ein wesentlicher Punkt ist, dass diese Schutzschaltungen die normale
Leistungsfähigkeit der Endstufe in keiner Weise einschränken. Die Endstufe
wird einfach in den Schutzmodus geschaltet, wenn Situationen auftreten, durch
die Endstufe und Lautsprecher beschädigt werden können. Dazu zählen:
DEUTSCH
• Überlastung
• DC Offset (Gleichspannungssignal am Eingang)
• Netzspannung (außerhalb der normalen Toleranzen)
• Extreme Betriebstemperaturen
Tritt eine der drei oben genannten Bedingungen an einem Kanal auf
entweder für Ihre Endstufe oder eventuell für die Lautsprecher gefährlich werden
können), schaltet sich die Endstufe sofort in den Schutzmodus. In diesem Fall
blinkt eine Kanal-LED-Anzeige rot und zeigt damit an, auf welchem Kanal das
Problem auftritt. Bis zur Beseitgung der Störung ist kein Ton zu hören.
Ist die Störung nicht kanalgezogen, d.h., liegt beispielsweise die Netzspannung
außerhalb der normalen Toleranzen, blinkt die Standby-LED. In allen Fällen ist
ein Neustart erforderlich, wenn der Fehler beseitigt wurde.
(die
54
Page 55

BALANCED
SINGLE-ENDED
1 2 3 4 5
SELECT
MODE
Frontansicht
1 Standby-Taste & LED-Anzeige
Mit der Standby-Taste an der Gerätefront schalten Sie die Endstufe vom
Betriebs
Endstufe ausgeschaltet, sie reagiert jedoch auf Systembefehle jeder
beliebigen der unterstützen Steuerfunktionen (z.B. IR-Eingang, Trigger,
CAN-Bus oder RS-232).
- in den Standby-Modus und umgekehrt. Im Standby-Betrieb ist die
DEUTSCH
Der aktuelle Status der Endstufe wird durch die
Taste der Gerätefront angezeigt. Das Verhalten dieser
LED an der Standby-
LED zeigt folgendes
an:
• an = Standby
• blinkt (beim Einschalten) = Initialisierung
• aus + Kanal-LED an = Betrieb
• blinkt (nach dem Einschalten) = Netzspannung außerhalb
der normalen Toleranzen
Im Standby-Modus werden die Verstärkerstufen des Gerätes
heruntergefahren. Nur ein kleines Netzteil und die Steuerschaltung (sie
verbrauchen vergleichsweise wenig Strom) bleiben aktiv. Da die
Ausgangsstufen von Natur aus viel Strom ziehen, erwärmt sich die
Endstufe und der Klang ist nach dem Einschalten sehr schnell optimal.
Nutzen Sie Ihre Endstufe über einen längeren Zeitraum nicht
(beispielsweise während einer Urlaubsreise), empfehlen wir, den
Netzstecker zu ziehen. Vergewissern Sie sich, dass sich die Endstufe im
Standby-Modus befindet, bevor Sie dies tun.
Ferner ist es in der Praxis von Vorteil, in dieser Zeit möglichst alle
Elektronikgeräte vom Netz zu trennen, da ein in der Nähe Ihres Hauses
einschlagender Blitz zu einer erheblichen Überspannung im Netz führen
kann. Diese kann (mehrere Tausend Volt betragend) jedes Elektronikteil
beschädigen. Dies gilt auch für hochwertige Bauteile, die gut geschützt
sind.
55
Page 56

2 Select-Taste
Die Select-Taste wird (zusammen mit der Mode-Taste) zur Konfiguration
der Endstufenkanäle (Auswahl zwischen symmetrisch oder unsymmetrisch)
verwendet. Sie wird auch zur Konfiguration der Verzögerungszeit beim
Einschalten bzw. der Nummer der Endstufe genutzt, wenn diese über den
CAN-Bus oder über den Trigger-Anschluss mit einer Classé-Vorstufe
verbunden ist.
3 LED-Anzeigen für den Kanalstatus
Jeder Kanal Ihrer Endstufe hat zwei Kanal-LED-Anzeigen. Sie werden
genutzt, um entweder die Nutzung der symmetrischen (XLR-) oder der
unsymmetrischen (Cinch-) Eingänge für diesen Kanal anzuzeigen.
Diese Anzeigen werden auch zur Anzeige von Störungen Ihrer Endstufe
verwendet, sollte es zu solchen kommen. Blinkt die LED eines Kanals rot,
liegt in diesem speziellen Kanal eine Störung vor. Blinken alle Kanal-LEDs
rot, so liegt eine Störung im System vor, die nicht auf einen bestimmten
Kanal begrenzt ist.
DEUTSCH
Achtung! Blinkt eine oder blinken mehrere der LED-Kanalanzeigen rot,
trennen Sie die Endstufe bitte sofort vom Netz und prüfen,
ob alle externen Verbindungen ordnungsgemäß und sicher
hergestellt wurden. Ist der Netzanschluss nicht ohne weiteres
zugänglich, halten Sie die Standby-Taste für drei Sekunden
gedrückt, um ein Reset der Endstufe durchzuführen. Ist
kein Grund für die Störung zu erkennen, fragen Sie Ihren
autorisierten Classé-Fachhändler.
4 Mode-Taste
Die Mode-Taste wird (zusammen mit der Select-Taste) zur Konfiguration
der Endstufenkanäle (Auswahl zwischen symmetrisch oder unsymmetrisch)
verwendet. Sie wird auch zur Konfiguration der Verzögerungszeit beim
Einschalten bzw. der Nummer der Endstufe genutzt, wenn diese über den
CAN-Bus oder über den Trigger-Anschluss mit einer Classé-Vorstufe
verbunden ist.
56
Page 57

�
Rückansicht
Im Folgenden erhalten Sie eine kurze Beschreibung, falls Sie Fragen zu Ihrem
neuen Gerät haben. Im nächsten Kapitel dieser Bedienungsanleitung (siehe
Setup) erhalten Sie detaillierte Hinweise darüber, wie Sie Ihre neue Endstufe in
das System integrieren können.
1 Symmetrischer (XLR-) Eingang
Symmetrische Audioverbindungen wurden ursprünglich für die
professionelle Audiowelt entwickelt, um die feinsten Nuancen der extrem
kleinen Mikrofonpegel-Signale zu reproduzieren. Seit vielen Jahren werden
symmetrische Verbindungen nun auch von leistungsorientierten
Unternehmen der Unterhaltungslektronik wie Classé eingesetzt, damit Sie
die feinsten Nuancen Ihrer Musiksammlung genießen können.
Technisch betrachtet bieten symmetrische Audioverbindungen zwei entscheidende Vorteile: Sie verdoppeln die Signalstärke bei der Übertragung
von einem Gerät auf das andere, indem sie den potentiellen Geräuschspannungsabstand um 6 dB erhöhen. Zweitens vermeiden Sie Rauschen
und Interferenzen, die sonst aufgrund von EMI (elektromagnetischen
Störbeeinflussungen) oder RFI (Hochfrequenzstörungen) zwischen den
Komponenten entstehen würden. In unserer modernen Welt mit
drahtloser Telekommunikation sind mehr Störbeeinflussungen vorhanden
als jemals zuvor. Daher macht es Sinn, Ihre Musik und Ihre FilmSoundtracks davor zu bewahren.
DEUTSCH
Daher empfehlen wir, die analogen symmetrischen Verbindungen zwischen
Ihren Classé-Komponenten möglichst oft zu nutzen.
57
Page 58

DEUTSCH
Die Pins sind folgendermaßen belegt:
Pin 1: Signal Masse
Pin 2: Positives Signal (non-inverted)
Pin 3: Negatives Signal (inverted)
Steckergehäuse kontaktiert mit Gerätegehäuse-Masse
Diese Pin-Belegungen entsprechen den Standards der Audio Engineering
Society (AES14-1992).
Wird Ihre Classé-Endstufe an einen Classé-Vorverstärker angeschlossen, ist
nichts zu beachten. Verwenden Sie einfach symmetrisches Standardkabel
und verbinden Sie die Geräte damit. Dann aktivieren Sie diesen Eingang
an der Endstufe, indem Sie ihn, wie unter Setup
Bedienungsanleitung beschrieben, konfigurieren.
Verwenden Sie die Vorstufe eines anderen Herstellers, lesen Sie bitte in der
Anleitung zu Ihrer mit symmetrischen Ausgängen ausgestatteten Vorstufe
nach, ob die Pin-Belegungen der Ausgangsanschlüsse denen Ihrer Endstufe
entsprechen. Falls nicht, fragen Sie Ihren autorisierten Fachhändler.
2 Unsymmetrischer (Cinch-) Eingang
Cinch-Kabel mit Cinch-Anschlüssen sind die in der Unterhaltungselektronik
am häufigsten genutzten analogen Verbindungen. Bei sachgemäßer
Implementierung und Verwendung hochwertiger Verbindungskabel
sichern diese Standardanschlüsse eine exzellente Klangqualität. Classé hat
außergewöhnliche Anstrengungen unternommen, um zu gewährleisten,
dass die Cinch-Eingänge Ihrer Endstufe ausgesprochen gut sind. Jedoch
bieten diese Anschlüsse nicht den Schutz gegen Störbeeinflussungen wie
die symmetrischen Verbindungen – daher lautet unsere Empfehlung, wenn
möglich immer die symmetrischen Eingänge zu nutzen.
in dieser
Haben Sie sich für die unsymmetrischen Eingänge Ihrer Classé-Endstufe
entschieden, aktivieren Sie diese Eingänge wie unter Setup
Bedienungsanleitung beschrieben.
3 Lautsprecherausgänge
Für jeden Kanal der Endstufe steht ein hochwertiges MehrwegeAnschlussklemmenpaar zur Verfügung.
Obwohl die Verbindung mit den Schraubklemmen Ihrer Classé-Endstufe
über blanke Drähte möglich ist, empfehlen wir Ihnen die Verwendung
hochwertiger Kabelschuhe, die gekrimpt oder gelötet mit den Enden Ihrer
Lautsprecherkabel verbunden werden. Die Verwendung hochwertiger
Anschlüsse verhindert das Oxidieren von blanken Drähten. Ferner sind
Kurzschlüsse aufgrund von schlecht isolierten Verbindungen so nicht
möglich.
in dieser
58
Page 59

4 Classé-Ports für den CAN-Bus
RJ-45-Anschlüsse stehen für künftige Steuer- und Kommunikations-
Diese
anwendungen bei Nutzung der Classé Audio-Implementierung der
CAN(Controller Area Network)-Spezifizierung zur Verfügung.
5 IR-Ein- und -Ausgang
Ihre Classé-Endstufe verfügt über zwei 3,5-mm-Minibuchsen, um die
heute überall genutzten IR-Fernbedienungen zu unterstützen. Die IRBefehle schalten die Endstufe vom Betriebs
umgekehrt. Ferner werden in „Makros“ diskrete Befehlcodes verwendet,
die die Steuerung der Endstufe im Zusammenspiel mit einem kompletten
System vereinfacht.
Eigentlich ist IR-Ein- und -Ausgang eine unzutreffende Bezeichnung: Das
an diesen Buchsen anliegende Eingangssignal ist kein IR-Signal, sondern
ein elektrisches. Man erhält es durch Einsatz von Standard-IR-Empfängern,
von Infrarot-Weiterleitungssystemen und Sendern (die Sie bei Ihrem
Fachhändler erhalten), um die IR-Signale der Fernbedienung in die
entsprechenden elektrischen Signale zu verwandeln. Ein großer Vorteil
liegt darin, dass die Signale überall dort hin gesendet werden können, wo
sie gebraucht werden. Ferner ist hier die Zuverlässigkeit eines soliden
elektrischen Anschlusses gewährleistet.
- in den Standby-Modus und
DEUTSCH
Da ein Infrarot-Weiterleitungssystem, das Ihr Fachhändler für Sie
zusammenstellen kann, viele Produkte steuern muss, besitzt Ihre Endstufe
sowohl einen IR-Eingang (zur Steuerung des Gerätes selbst) als auch einen
IR-Ausgang (um dasselbe Signal zum nächsten Gerät weiterzuleiten). So
können Sie Ihre Steuerkabel hintereinander von einem Gerät zum nächsten
verlaufen lassen.
Die Endstufe reagiert auf IR-Befehle von 5 Volt Gleichspannung, wobei
die Spitze des Ministeckers als positiv definiert ist.
59
Page 60

DEUTSCH
6 Trigger-Ein- und -Ausgang
Viele Audio-/Video-Vorverstärker können eine Steuerspannung
(Gleichspannung) an angeschlossene Geräte abgeben und dadurch das
gewünschte Verhalten hervorrufen. Ihre Classé-Endstufe kann (auch
zusammen mit dem A/V-Vorverstärker selbst) dank dieses Features
automatisch vom Betriebs- in den Standby-Modus und umgekehrt
geschaltet werden.
Zwei 3,5-mm-Minibuchsen bieten diese Möglichkeit des Einschaltens der
Endstufe über die Fernbedienung (d.h. des Hin- und Herschaltens
zwischen Betriebs- und Standby-Modus). Diese Buchsen leiten die
Steuerspannung von einer Endstufe zur nächsten, so dass eine Reihe von
Endstufen einfach hintereinander geschaltet werden können.
Der Trigger benötigt eine Gleichspannung von 5 – 12 Volt mit der unten
angegebenen Polarität der Steckerspitze:
7 RS-232 Port
Dieser
DB-9-Anschluss hat zwei Aufgaben. Er dient:
• zum Downloaden einer neuen Betriebssoftware für die Endstufe
(wenn beispielweise neue Features hinzugefügt werden)
• zur externen Steuerung Ihrer Endstufe durch Systeme wie iCommand™, AMX® und Crestron™.
Weitere Informationen zu Home Automation Systemen erhalten Sie bei
Ihrem Fachhändler.
8 Netzeingang
Für die CA-5100 wird ein Standard-IEC-Netzkabel verwendet. Verbinden
Sie das Kabel mit dem Netzeingang an Ihrer Endstufe und anschließend
mit einer Netzsteckdose.
9 Netzsicherung
Ihre Classé-Endstufe besitzt an der Geräterückseite eine Netzsicherung
Vermuten Sie, dass die Netzsicherung durchgebrannt ist, ziehen Sie den
Netzstecker. Lösen Sie darüber hinaus alle Eingangs- und Lautsprecherverbindungen. Lesen Sie sich den entsprechenden Punkt unter Störungssuche
und -beseitigung in dieser Bedienungsanleitung durch.
Öffnen Sie die Endstufe nicht. Im Gehäuse befinden sich keine vom
Bediener zu wartenden Teile.
.
60
Page 61

Vorsicht! Auch bei gezogenem Netzstecker existieren im
Endstufengehäuse lebensgefährlich hohe Spannungen
und Ströme. Versuchen Sie auf keinen Fall, das Gehäuse
zu öffnen. Im Gehäuse befinden sich keine vom Bediener
zu wartenden Teile. Die Wartung dieses Gerätes ist
ausschließlich von einem qualifizierten Classé-Fachhändler
oder -Distributor durchzuführen.
DEUTSCH
61
Page 62

Setup
Das Setup Ihrer neuen Classé-Endstufe ist einfach durchzuführen, so dass
Sie schnell die erstklassige Klangqualität Ihrer Endstufe genießen können.
Befolgen Sie die unten genannten Schritte, um ein ordnungsgemäßes Setup zu
gewährleisten und Ihre neue Endstufe in Betrieb nehmen zu können.
Wichtig: Als Letztes ist Ihre neue Endstufe mit dem Netz zu
verbinden. Ferner ist es sinnvoll, Ihre Endstufe(n) erst dann
einzuschalten, wenn alle anderen Geräte eingeschaltet sind
und stabil laufen.
Umgekehrt ist es von Vorteil, die Endstufe(n) als erste
Systemkomponente(n) abzuschalten, da hierdurch etwaigen
Beschädigungen der Lautsprecher vorgebeugt wird.
DEUTSCH
Konfigurieren der Kanäle
(symmetrisch oder
unsymmetrisch)
1. Packen Sie den Kartoninhalt den beiliegenden Anweisungen
entsprechend aus.
Seien Sie dabei vorsichtig, da die Endstufe sehr schwer ist.
2. Platzieren Sie Ihre Endstufe (vergessen Sie nicht, den Abschnitt
„Auspacken und Aufstellen des Gerätes“ zu lesen), und schließen
Sie das Gerät ans Netz an.
Dabei müssen Sie sich für eine Position entscheiden, an der für eine
ausreichende Luftzirkulation und einen adäquaten Freiraum für alle hinter
der Endstufe befindlichen Kabel gesorgt ist. Danach verbinden Sie die
Endstufe direkt mit der Netzsteckdose. Verwenden Sie keine
Verlängerungskabel, da diese nicht die für die Endstufe zum Teil
erforderliche Strommenge liefern.
3. Konfigurieren Sie Ihre Endstufe.
Verwenden Sie die Tasten Select
Betrieb zu konfigurieren.
Drücken Sie im Standby-Betrieb die Select-Taste, so beginnen die Kanal-
LEDs zu leuchten und geben dadurch an, ob der jeweilige Kanal
unsymmetrisch oder symmetrisch konfiguriert ist.
und Mode, um Ihre Endstufe für den
62
Eine der Kanal-LEDs beginnt zu blinken und zeigt dadurch an, dass Sie
für diesen Kanal die Wahl zwischen symmetrischem (balanced) oder
unsymmetrischem (single-ended) Betrieb haben. Drücken Sie die ModeTaste, um zwischen dem symmetrischen und dem unsymmetrischen
Betriebsmodus hin und her zu schalten. Dies wird dadurch angezeigt, dass
die entsprechende der beiden Kanal-LEDs für diesen Kanal blinkt.
Drücken Sie noch einmal die Select-Taste, um den nächsten Kanal
auszuwählen. Wiederholen Sie diesen Prozess, bis die Endstufe Ihren
Wünschen gemäß konfiguriert ist. Um den Vorgang zu beenden, fahren
Sie damit fort, die Select-Taste zu drücken und loszulassen, bis alle Kanal-
LEDs erloschen sind.
Page 63

Stellen Sie sicher, dass Sie die Endstufe für den Typ Eingangsanschluss
konfigurieren, den Sie für jeden Kanal verwenden werden. Sie können jede
beliebige Kombination an unsymmetrischen und symmetrischen
Eingangsanschlüssen nutzen, die für Ihr System erforderlich ist.
Konfigurieren der
Verzögerungszeit beim
Einschalten/der Nummer
der Endstufe
Verfügt ein System über mehrere Classé-Endstufen, so können Sie die
Anzahl der Sekunden für die Einschaltverzögerung für jede Endstufe
festlegen, damit die Endstufen in der von Ihnen festgelegten Reihenfolge
und nicht gleichzeitig eingeschaltet werden. (Sind mehrere leistungsstarke
Endstufen angeschlossen, so kann Ihr Stromnetz zu Hause durch ein
gleichzeitiges Einschalten überlastet werden, so dass der Schutzschalter ausgelöst
wird, um Schäden vorzubeugen). Diese Nummer kann auch zur
Identifizierung bei Nutzung des CAN-Busses verwendet werden.
Gehen Sie folgendermaßen vor, um beispielsweise die Verzögerungszeit auf
zwei Sekunden festzulegen (und eine bestimmte Endstufe als Nr. 2 zu
kennzeichnen):
• Schalten Sie die Endstufe in den Standby-Modus (Standby-LED
leuchtet).
• Drücken Sie die Mode-Taste und halten Sie diese gedrückt, bis
alle Kanal-LEDs leuchten. Lassen Sie die Taste los, blinken die
LEDs und zeigen so die Einschaltverzögerung und die aktuelle
Nummer der Endstufe an (z.B. zeigt einmaliges Blinken eine
Einschaltverzögerung von einer Sekunde an und dass dies die
Endstufe Nr. 1 ist).
• Möchten Sie die aktuelle Nummer für diese Endstufe ändern, so
drücken Sie erneut die Mode-Taste und halten diese gedrückt,
bis die Kanal-LEDs leuchten.
• Während Sie weiterhin die Mode-Taste gedrückt halten,
betätigen Sie die Select-Taste zweimal (die gewünschte Zahl für
die Verzögerungszeit und die Endstufennummer).
• Lassen Sie die Mode-Taste los. Die Endstufe bestätigt Ihre Wahl,
indem die Kanal-LEDs zweimal blinken.
DEUTSCH
4. Stellen Sie die Verbindungen zum Vorverstärker her.
Befindet sich die Endstufe im Standby-Modus (oder ist sie vom Netz
getrennt), so stellen Sie über hochwertige Kabel (entsprechend der
Konfiguration in
unsymmetrischen Anschlüssen her.
Stellen Sie sicher, dass alle Verbindungen gut zusammengepasst sind, selbst
wenn Sie dazu den äußeren Bereich des Cinch-Anschlusses behutsam mit
einer Zange zusammendrücken und ihn noch einmal einführen müssen,
damit die Verbindung optimal passt.
Schritt 3) die Verbindungen zu den symmetrischen bzw.
63
Page 64

DEUTSCH
5. Stellen Sie die Verbindungen zu den Lautsprechern her.
Nutzen Sie zum Anschließen Ihrer Lautsprecher an die Ausgangsanschlüsse
der Endstufe nur hochwertige Lautsprecherkabel.
Verbinden Sie die schwarzen (-) Anschlüsse an der Endstufe mit den
schwarzen (-) Anschlüssen an Ihrem Lautsprecher und die roten (+)
Anschlüsse an der Endstufe mit den roten (+) Anschlüssen an Ihrem
Lautsprecher.
Beim Bi-Wiring werden zwischen dem jeweiligen Verstärkerkanal und dem
entsprechenden Lautsprecher insgesamt vier Verbindungen hergestellt. Es
gibt zwei separate +/- Verbindungen, eine für die Verbindung mit dem
Tieftöner und die andere für die Verbindung mit den Mittel- und
Hochtonbereichen. Stellen Sie sicher, dass sich an keiner Seite zwischen
den roten (+) und den schwarzen (-) Anschlussklemmen Kabel kreuzen.
Stellen Sie sicher, dass alle Verbindungen gut zusammengepasst sind und
nicht klappern. Vermeiden Sie aber ein Überdrehen. Können Sie an den
Lautsprecherkabeln leicht ziehen, ohne dass diese sich bewegen, sind die
Verbindungen gut zusammengepasst. Durch weiteres Festziehen wird die
Verbindung nicht besser, und es kann (im Extremfall) zu einer
Beschädigung der Anschlüsse kommen.
6 Nochmaliges Prüfen der Verbindungen.
Dieser Schritt mag Ihnen als überflüssig erscheinen, jedoch sollten Sie sich
diese zusätzliche(n) Minute(n) gönnen, um sicherzustellen, dass alle
Verbindungen ordnungsgemäß hergestellt sind, bevor Sie die Netzkabel
anschließen.
7. Schalten Sie Ihre Endstufe erst nach allen anderen Geräten ein.
In der Praxis hat es sich als vorteilhaft erwiesen, Endstufen als letztes einund als erstes auszuschalten, da hierdurch etwaige Beschädigungen der
Lautsprecher vermieden werden.
Pflege & Wartung
Um Staub vom Gehäuse der Endstufe zu entfernen, verwenden Sie einen
Staubwedel oder ein fusselfreies, weiches Tuch. Zum Entfernen von Schmutz
und Fingerabdrücken empfehlen wir Isopropylalkohol und ein weiches Tuch.
Tränken Sie das Tuch zunächst mit dem Alkohol und reinigen Sie die Oberfläche
der Endstufe dann vorsichtig mit dem Tuch. Nehmen Sie nicht zu viel Alkohol,
da dieser dann vom Tuch in die Endstufe laufen kann.
64
Achtung! Gießen Sie Flüssigreiniger niemals direkt auf die Endstufe,
da dies zu Beschädigungen der Elektronikbauteile im
Gehäuseinnern führt.
Page 65

Störungssuche und -beseitigung
Im Allgemeinen sollten Sie sich bei Service-Problemen an Ihren Classé-Händler
wenden. Bevor Sie dies tun, gehen Sie bitte die folgende Liste durch, ob das
entsprechende Problem hierin angesprochen wird.
1 Kein Ton, es leuchtet keine Kanal-LED.
• Die Endstufe ist nicht an die Stromversorgung angeschlossen,
oder die Stromversorgung ist unterbrochen (Schutzschalter,
Sicherung).
• Wird die Stromversorgung reduziert oder kurzfristig
unterbrochen, so kann dies zu einem Reset des eingebauten
Mikroprozessors führen. Ziehen Sie den Netzstecker für
mindestens 30 Sekunden. Stecken Sie den Netzstecker
anschließend wieder in die Steckdose und versuchen Sie erneut,
das Gerät einzuschalten.
• Die Netzsicherung ist durchgebrannt. Siehe unter Punkt 4 in
diesem Kapitel (oder wenden Sie sich an Ihren autorisierten
Classé-Händler).
• Die Netzspannung liegt außerhalb des Toleranzbereichs. Prüfen
Sie die an der Geräterückseite angegebene Spannung.
DEUTSCH
2 Kein Ton, eine oder mehrere Kanal-LEDs blinken rot.
• Möglicherweise ist die Schutzschaltung aktiviert worden. Führen
Sie ein Reset der Endstufe durch, indem Sie die Standby-Taste
für drei Sekunden gedrückt halten, um sie herunterzufahren.
Lösen Sie anschließend alle Ein- und Ausgangsverbindungen.
• Versuchen Sie nun, die Endstufe durch Drücken der StandbyTaste einzuschalten. Blinkt die
Störung in der Endstufe selber. Schalten Sie das Gerät in den
Standby-Modus, trennen sie es vom Netz und lassen Sie es von
Ihrem Classé-Fachhändler reparieren.
• Startet sie problemlos, schalten Sie sie noch einmal ab und
schließen Sie sie dann nur über die Eingänge an. Schalten
Sie die Endstufe nun noch einmal ein. Schaltet sie blinkend
in den Schutzmodus, stimmt etwas mit einer der Endstufe
vorgeschalteten Komponente nicht – vielleicht ein DC Offset
oder ein ähnliches Problem. Ihre Endstufe versucht, die
Lautsprecher zu schützen (selbst kleine Gleichspannungsanteile
können die Tieftöner in relativ kurzer Zeit beschädigen). Prüfen
Sie verschiedene Quellkomponenten, um herauszufinden, ob
das Problem auf eine einzige Quelle beschränkt ist oder die
ganze Zeit existiert (was auf ein Problem mit dem Vorverstärker
hindeutet). Lassen Sie sich von Ihrem Fachhändler hinsichtlich
des entsprechenden Gerätes helfen.
LED immer noch, liegt die
3 Die Endstufe bleibt abgeschaltet.
• Stellen Sie sicher, dass eine ausreichende Luftzirkulation um die
Endstufe gewährleistet ist und dass die Raumtemperatur unter
40 °C liegt.
• Hat sich die Endstufe in den Schutzmodus geschaltet, lesen Sie
die oberen Abschnitte dieses Kapitels.
65
Page 66

DEUTSCH
4 Die Netzsicherung ist durchgebrannt.
Wenn Sie nach der Ursache für das Durchbrennen der Netzsicherung
suchen, folgen Sie bitte den angegebenen Schritten in der aufgeführten
Reihenfolge, da dieser selten auftretende Fehler manchmal auf ein
schwerwiegendes Problem hinweist:
a. Ziehen Sie den Netzstecker. Lösen Sie darüber hinaus alle
Eingangs- und Lautsprecherverbindungen. Entfernen Sie den
Sicherungshalter an der Geräterückseite.
b. Scheint die Sicherung durchgebrannt zu sein, ersetzen Sie
diese nur mit einer Sicherung desselben Typs und desselben
Bemessungsstroms. Verwenden Sie einen anderen Sicherungstyp,
der darüber hinaus einen höheren Bemessungsstrom aufweist, führt
dies zu einer dauerhaften Beschädigung Ihrer Endstufe.
Sie die Sicherung nicht selber wechseln, setzen Sie sich mit Ihrem
autorisierten Classé-Fachhändler in Verbindung.
Netzspannung: 100/120 Volt Wechselspannung
Sicherungstyp: MDA träge
Nennstrom: 12 A
Netzspannung: 230/240 Volt Wechselspannung
Sicherungstyp: MDA träge
Nennstrom: 10 A
Möchten
c. Nach dem Einsetzen der Sicherung und Anbringen des
Sicherungshalters schließen Sie nur die Endstufe
Netz an. Schalten Sie sie ein, ohne die Eingangs- und
Lautsprecherverbindungen wieder hergestellt zu haben. Brennt die
Sicherung wieder durch, ziehen Sie den Netzstecker und fragen
Ihren autorisierten Classé-Fachhändler.
d. Scheint alles in Ordnung zu sein, schalten Sie die Endstufe wieder
in den Standby-Modus, schließen vorsichtig das Eingangskabel
an und starten die Endstufe. Brennt die Sicherung dann durch
(oder schaltet die Endstufe in den Schutzmodus), so gibt es ein
schwerwiegendes Problem mit Ihrem Vorverstärker/Prozessor.
Lassen Sie sich von Ihrem autorisierten Fachhändler beraten.
e. Ist wieder alles in Ordnung, schalten Sie die Endstufe in den
Standby-Modus und schließen vorsichtig die Lautsprecherkabel
an. Prüfen Sie
Kurzschlüsse. Starten Sie anschließend die Endstufe neu.
Funktioniert sie einwandfrei (die Sicherung brennt nicht durch),
dann ist die ursprüngliche Sicherung vermutlich durchgebrannt,
um die Endstufe vor Überspannung zu schützen. Brennt
die Sicherung wieder durch, fragen Sie Ihren autorisierten
Fachhändler.
beide Enden des Lautsprecherkabels auf
an das
66
5 Die Standby-LED blinkt schnell, und eine Kanal-LED blinkt rot.
• Versuchen Sie, mit der Endstufe ein Reset durchzuführen, indem
Sie das Gerät vom Netz trennen, einige Sekunden warten und
die Endstufe anschließend wieder an das Netz anschließen. Ist
das Problem dadurch nicht beseitigt, bitten Sie Ihren ClasséFachhändler um Unterstützung.
Page 67

Technische Daten
■ Dauerausgangsleistung 100 Watt/Kanal RMS 8 Ohm
(alle Kanäle aktiv) 200 Watt/Kanal RMS 4 Ohm
■ Frequenzgang 10 Hz – 22 kHz (+ 0/- 0,1 dB)
10 Hz – 155 kHz (+ 0/- 3,0 dB)
■ Phase Besser als - 10° (22 kHz)
■ Geräuschspannungsabstand >105 dB
(10 Hz – 80 kHz)
■ Kanaltrennung Besser als 80 dB (20 kHz)
■ Grundrauschen (FFT) Alle Spitzen unter - 95 dBV
(10 Hz – 80 kHz)
■ Gesamtklirrfaktor + Rauschen 0,003 %, 8 Ohm
(0,8 V RMS/1 kHz Eingang, 10 Hz – 500 kHz)
■ Spannungsverstärkung 29,1 dB
■ Empfindlichkeit 1,0 V RMS bei Nennleistung, 8 Ohm
■ Eingangsimpedanz 100 kOhm
■ Leistungsaufnahme (IEC60065 Para. 2.3.10)
Bei Nennleistung 684 W
Im Leerlauf 204 W
■ Netzspannung An der Geräterückseite angegeben
(kann weder vom Fachhändler noch vom Bediener geändert werden)
■ Abmessungen Breite: 445 mm
(ohne Bedienelemente und Anschlüsse) Höhe: 171 mm
Tiefe: 470 mm
■ Versandgewicht 40 kg
■ Nettogewicht 34 kg
DEUTSCH
Die technischen Daten entsprechen dem Stand bei Drucklegung. Classé
behält sich im Rahmen von Weiterentwicklungen das Recht auf Änderung
technischer Details ohne Vorankündigung vor.
Weitere Informationen erhalten Sie bei Ihrem Classé-Fachhändler oder bei:
Classé Audio
5070 François Cusson
Lachine, Quebec
Canada H8T 1B3
Telefon +1 (514) 636-6384
Fax +1 (514) 636-1428
http://www.classeaudio.com
email: cservice@classeaudio.com
Classé und das Classé-Logo sind Warenzeichen von Classé Audio Inc. of Lachine, Kanada. Alle Rechte
vorbehalten.
i-Command™ ist ein Warenzeichen von Equity International, Inc. Alle Rechte vorbehalten.
AMX® ist ein eingetragenes Warenzeichen der AMX Corporation of Richardson, TX. Alle Rechte vorbehalten.
Crestron™ ist ein Warenzeichen der Crestron Electronics, Inc. of Rockleigh, NJ. Alle Rechte vorbehalten.
67
Page 68

ATTENZIONE: Per ridurre il rischio di incendio e di scossa elettrica
non esponete l’apparecchio all’umidità o alla pioggia.
ATTENZIONE
RISCHIO DI SCOSSA
ELETTRICA, NON APRIRE
AVVERTENZA: PER RIDURRE IL RISCHIO DI SCOSSA ELETTRICA, NON
TOGLIETE IL COPERCHIO. NON CONTIENE PARTI UTILI PER L’UTENTE.
PER L’ASSISTENZA FATE RIFERIMENTO A PERSONALE QUALIFICATO.
Il fulmine inserito in un triangolo vi avverte della presenza di materiale non isolato, sotto
tensione, ad elevato voltaggio all’interno del prodotto che può costituire pericolo di
folgorazione.
Il punto esclamativo entro un triangolo equilatero vi avverte della presenza di istruzioni
d’uso e manutenzione importanti nel manuale o nella documentazione che accompagna il
prodotto.
ITALIANO
Tutti noi di Classè abbiamo fatto il meglio perché il vostro acquisto rimanga nel tempo un investimento di valore. Siamo orgogliosi di infor
marvi che tutti i componenti Classè sono stati ufficialmente certificati con il marchio CE della Comunità Europea.
Questo significa che il vostro prodotto Classè, è stato sottoposto ai più rigorosi test di sicurezza e di produzione del mondo. Il marchio CE
certifica che il prodotto che avete acquistato è conforme alle specifiche imposte dalla Comunità Europea riguardanti la sicurezza dei con
sumatori e la qualità del prodotto.
Questo dispositivo è stato esaminato e definito conforme ai limiti previsti per i dispositivi digitali di Classe B in accordo al regolamento
FCC, parte 15. Questi limiti sono concepiti per fornire ragionevole protezione contro interferenze pericolose in un ambiente residenziale.
Questo apparecchio genera, usa e può irradiare energia in radiofrequenza e, qualora non installato e utilizzato secondo le presenti istruzioni,
può causare interferenze nocive alle comunicazioni radio. Ad ogni modo, non esiste nessuna garanzia che tali interferenze non si producano
in una particolare installazione. Se il presente dispositivo genera interferenze nocive alla ricezione radio o televisiva, fenomeno che può essere
determinato dall’accensione/spegnimento dell’apparecchio stesso, il suo proprietario può cercare di eliminare queste interferenze con uno o
più dei seguenti modi:
Attenzione: Eventuali modifiche a questo prodotto non espressamente autorizzate dal produttore, possono comportare il decadimento
dell’autorità del suo utilizzo da parte dell’utente.
Le informazioni contenute in questo manuale sono soggette a variazioni senza preavviso. La versione più aggiornata di questo manuale sarà
inserita sul nostro sito http://www.classeaudio.com .
Il marchio “CE” indica che questo prodotto è conforme alle norme della Comunità
Europea: EMC (Compatibilità Elettromagnetica) e LVD (Direttive sulla Bassa Tensione).
Tutti i prodotti Classé sono realizzati secondo le norme internazionali per il trattamento
delle sostanze pericolose ( RoHs - Restriction of Hazardous Substances) in apparecchi
elettrici ed elettronici, e per lo smaltimento di prodotti elettrici ed elettronici (WEEE
- Waste Electrical and Electronic Equipment). Il simbolo del cestino dei rifiuti con
una croce sopra, indica la compatibilità con queste norme e che il prodotto deve essere
opportunamente riciclato o smaltito in accordo con le direttive vigenti.
NOTA
-
-
• Posizionare o orientare diversamente l’antenna di ricezione
• Aumentare la distanza tra il prodotto e l’apparecchio disturbato.
• Collegare il prodotto ad una presa di alimentazione collegata ad un diverso circuito da quello a cui è collegato l’apparecchio
disturbato.
• Consultate il vostro rivenditore o un tecnico radio/TV specializzato.
68
Page 69

Importanti informazioni di Sicurezza
ATTENZIONE: Leggete attentamente tutte le istruzioni ed osservate le dovute precauzioni, quando
trovate indicazioni di pericolo o avvertenze, sia sul manuale che sul prodotto. Conservate questo
manuale per ogni riferimento futuro alle istruzioni di sicurezza.
1. Non provate a riparare questo prodotto da soli. Non aprite il coperchio per nessuna ragione.
L’apparecchio non contiene parti utili per l’utente. Un prodotto aperto, in particolar modo se collegato alla
alimentazione AC, da luogo ad una potenziale rischio di scossa elettrica letale. Fate sempre riferimento a
personale autorizzato per qualsiasi evenienza.
2. Per ridurre il rischio di incendio e di scossa elettrica non esponete l’apparecchio all’umidità o alla
pioggia. Se è entrata una qualsiasi sostanza liquida nell’apparecchio, staccate immediatamente il cavo di
alimentazione dalla presa e portatelo l’apparecchio ad un centro di assistenza qualificato per i necessari
controlli.
3. Non posizionate l’apparecchio vicino a nessuna fonte di calore,
dai raggi solari diretti.
4. L’apparecchio deve essere collegato esclusivamente ad una sorgente di alimentazione elettrica adeguata,
del tipo indicato sul pannello posteriore o sull’imballo dell’unità. L’utilizzo di qualsiasi altro tipo di
alimentazione potrebbe danneggiare il prodotto o ed invalidare la garanzia.
5. Non fate passare il cavo di alimentazione AC dove potrebbe essere calpestato o schiacciato da
oggetti posizionati sopra o vicino ad esso. Non piegatelo ad angoli acuti e non cercate di allungarlo
per raggiungere la presa di alimentazione. Nel caso in cui il cavo venga danneggiato, portatelo al vostro
rivenditore Classè che provvederà a controllarlo ed eventualmente a ripararlo o a sostituirlo.
6. Il cavo di alimentazione dovrebbe essere scollegato dalla presa durante i temporali, o quando
l’apparecchiatura rimane inutilizzata per un periodo di tempo piuttosto lungo.
NON posizionate il prodotto in luoghi umidi.
7.
NON fate mai cadere del liquido all’interno del prodotto.
8.
NON bloccate mai le aperture di ventilazione.
9.
NON cercate mai di eliminare le protezioni o i fusibili.
10.
NON sostituite nessun fusibile con un altro fusibile di valore o di tipo diverso da quello specificato.
11.
NON cercate di riparare da soli questo prodotto. Se dovesse presentarsi un problema, contattate il vostro
12.
rivenditore Classè.
come termosifoni, stufe, ecc.., e lontani
ITALIANO
NON posizionate il prodotto a in luoghi con temperature troppo alte o troppo basse.
13.
NON utilizzate questo prodotto in luoghi con pericolo di esplosioni.
14.
15. Scollegate
SEMPRE qualsiasi dispositivo elettronico durante i temporali.
Riportate qui il numero di serie del vostro nuovo prodotto Classè, per farvi riferimento per ogni
esigenza futura.
Numero di Serie: __________________
69
Page 70

ITALIANO
Indice
Benvenuti nella famiglia Classè .....................................................................71
informazioni sull’installazione ............................................................... 71
Sballaggio e posizionamento .........................................................................72
Sballaggio del vostro amplificatore ......................................................... 72
Posizionamento ...................................................................................... 72
Ventilazione ........................................................................................... 72
Installazioni particolari ........................................................................... 73
Numero di serie ..................................................................................... 73
Registrazione della vostra garanzia! ....................................................... 73
Tensione di alimentazione ...................................................................... 73
Periodo di rodaggio ................................................................................ 74
Leggete questo manuale ......................................................................... 74
Caratteristiche speciali ...................................................................................75
Design raffinato dei circuiti .................................................................... 75
Test di ascolto ........................................................................................ 75
Straordinaria longevità ........................................................................... 76
Circuiti di protezione ............................................................................. 76
Pannello frontale ............................................................................................77
Pannello posteriore ........................................................................................79
Impostazioni iniziali ......................................................................................84
Configurazioni operative modo bilanciato/single-ended .................. 84
Configurazione della sequenza di attivazione degli amplificatori .... 85
Cura e manutenzione ....................................................................................86
Risoluzione dei problemi ...............................................................................87
Caratteristiche tecniche .................................................................................89
Dimensioni ..................................................................................................178
70
Page 71

Benvenuti nella famiglia Classè
Congratulazioni per l’acquisto di un prodotto Classè. Ogni prodotto Classè è il
risultato di molti anni di ricerche e miglioramento continuo, e siamo sicuri che
ne potrete godere per molti anni.
Abbiamo a cuore le relazioni con i nostri clienti. Per cortesia, rispediteci il
tagliando di garanzia ora, prima di mettere da parte la scatola d’imballo del
vostro nuovo acquisto e di dimenticarvene. Questo ci permetterà di comunicarvi
eventuali notizie o la disponibilità di eventuali upgrade per il vostro componente
Classè.
Inviandoci il tagliando di garanzia inoltre potrete registrare il vostro prodotto per
potere ottenere un servizio di assistenza in garanzia semplice e veloce.
Per cortesia, compilate il tagliando di garanzia e speditecelo
al più presto.
Troverete il tagliando di garanzia allegato, alla fine del libretto di informazioni
sulla garanzia allegato.
ITALIANO
informazioni
sull’installazione
Per questa ragione vi raccomandiamo di fare installare
Pur essendo un apparecchio di alta qualità e dalle notevoli prestazioni, ci siamo
impegnati per rendere il collegamento e l’utilizzo del Classè CA-5100 il più
semplice possibile.
Le prestazioni del vostro sistema non dipendono solo dall’amplificatore finale,
ma da diversi altre fattori, come ad esempio: la grandezza e la forma della stanza
in cui è installato l’impianto e dalla sua acustica, o dai componenti del sistema
che collegate al vostro amplificatore. Tutti questi, ed altri fattori, determinano le
prestazioni del vostro sistema.
e tarare il sistema dal vostro rivenditore; che, con la sua
esperienza e conoscenza dei prodotti sarà in grado di
ottenere le migliori prestazioni dal vostro impianto.
71
Page 72

Sballaggio e posizionamento
ITALIANO
Sballaggio del vostro
amplificatore
Importante! Conservate la scatola di imballo ed il materiale di
Posizionamento Avete due possibilità di scelta nel posizionamento dell’amplificatore:
Sballate con cautela il vostro amplificatore seguendo le istruzioni allegate, e
rimuovete tutti gli accessori dall’imballo. Fate attenzione quando sollevate
l’amplificatore poiché è molto pesante.
protezione accluso, per eventuali spostamenti del vostro
prodotto Classè. La spedizione o il trasporto del prodotto
in imballi diversi da quello originale, potrebbe provocare il
danneggiamento del prodotto stesso, che non sarebbe quindi
riparabile in garanzia.
potete posizionarlo vicino ai diffusori, il che richiederà l’impiego di cavi di
connessione al preamplificatore molto lunghi; o potete posizionarlo vicino al
preamplificatore, utilizzando cavi di connessione ai diffusori molto lunghi.
Anche se entrambe le soluzioni garantiscono eccellenti prestazioni, è preferibile
considerare la prima opzione per due ragioni: primo, la qualità del segnale
degrada più facilmente quando viene trasmesso con una combinazione di alta
corrente ed alta tensione, suggerendo quindi che i cavi di connessione dei
diffusori devono essere più corti possibile; secondo, gli amplificatori di alta
qualità utilizzano stadi di alimentazione molto potenti che inevitabilmente
producono un campo magnetico di qualche grado. Idealmente, si preferisce
sempre posizionare ad una ragionevole distanza i componenti sorgente più
delicati da questi campi magnetici.
Se per voi è più facile posizionare l’amplificatore in un rack o in un mobile
apposito assieme agli altri vostri componenti, vi suggeriamo di posizionarlo alla
base del mobile o rack, lontano dai componenti sorgente e dal preamplificatore.
Questa è anche la posizione migliore per evitare che il peso considerevole
dell’amplificatore danneggi il mobile e gli altri componenti del sistema, e renda il
mobile o rack più stabile.
Considerate di lasciare uno spazio adeguato dietro al CA-5100 per
permettere il passaggio, e per potere effettuare un agevole collegamento,
dei cavi di connessione e del cavo di alimentazione. Vi consigliamo di
lasciare almeno 20 cm di spazio libero dietro il vostro amplificatore.
Ventilazione Il vostro amplificatore Classè genera calore durante il normale funzionamento.
Assicuratevi di lasciare almeno 15 cm circa di spazio libero da ogni lato per
permettere la dissipazione del calore con la normale circolazione dell’aria. Le
aperture di ventilazione sulla parte superiore ed inferiore del CA-5100 devono
essere lasciate libere da qualsiasi impedimento possa ridurre il flusso d’aria
attraverso l’unità. Non posizionate l’unità su superfici che possano bloccare le
aperture di ventilazione (come ad esempio tappeti).
72
Page 73

Installazioni particolari In questo manuale sono riportati i disegni tecnici con gli ingombri del
prodotto per facilitare l’installazione in mobili o strutture dedicate (vedi la
sezione
per il montaggio a rack. Contattate il vostro rivenditore Classè per maggiori
informazioni.
Numero di serie Trovate il numero di serie del vostro amplificatore sul pannello posteriore
dell’unità. Annotate questo numero nell’apposito spazio in fondo alla pagina
intitolata Importanti informazioni di sicurezza di questo manuale per ogni
esigenza futura.
Registrazione della
vostra garanzia!
Tensione di alimentazione La tensione di alimentazione dell’amplificatore CA-5100 è impostata dalla
Avendo già a portata di mano il numero di serie, è il momento giusto per
compilare il tagliando di garanzia. Per cortesia, registrate la garanzia del vostro
nuovo prodotto; questo ci permetterà di comunicarvi eventuali notizie o la
disponibilità di eventuali upgrade per il vostro prodotto.
fabbrica (internamente) a 100V, 120V, 230V o 240 V AC, in base al paese in
cui viene venduto. (230V solo nei paesi Europei, in conformità con le norme CE.)
L’impostazione della tensione di alimentazione non può essere variata dall’utente.
Dimensioni). E’ inoltre disponibile per questo prodotto un kit apposito
ITALIANO
Assicuratevi che l’etichetta sul pannello posteriore del vostro amplificatore,
indichi la corretta tensione di alimentazione per il vostro paese. Provare ad
utilizzare il vostro amplificatore con una tensione di alimentazione non corretta
potrebbe danneggiare l’unità
Attenzione: L’impostazione della tensione di alimentazione non può
essere variata dall’utente. Il prodotto non contiene parti utili
per l’utente. Per ogni problema fate riferimento ad un centro
assistenza autorizzato Classè.
Se la tensione di alimentazione AC indicata sul vostro amplificatore non è
corretta, contattate il vostro rivenditore o il distributore Classè del vostro paese.
Il CA-5100 può essere collegato ad una normale presa di alimentazione AC da
15 Ampere. Se dovessero esserci altri componenti collegati sulla stessa presa,
tenete conto del loro assorbimento di corrente.
73
Page 74

ITALIANO
Il CA-5100 è dotato di circuiti di protezione atti a prevenire il pericoloso
funzionamento dell’amplificatore in condizioni di alimentazione con una
tensione troppo alta o troppo bassa.
• All’accensione: All’accensione dell’unità, la tensione AC di rete
deve essere compresa fra -15% e +10% del valore nominale di
alimentazione, altrimenti l’amplificatore non si accenderà. Per
esempio, una unità con alimentazione a 120V richiederà una
Tensione di rete di circa 95V-135V per potere funzionare.
• Aumenti di tensione durante il funzionamento: Se la tensione
di rete AC aumenta del 10% o più, durante il funzionamento,
l’amplificatore entrerà in protezione e si spegnerà. Il LED standby
lampeggerà per indicare che è entrato in modalità di protezione.
• Diminuzioni di tensione durante il funzionamento: Se
la tensione di rete AC diminuisce del 15% o più, durante il
funzionamento, l’amplificatore continuerà a funzionare (finchè
non sarà particolarmente pericoloso per l’amplificatore), ma non
sarà in grado di raggiungere le consuete prestazioni finchè la
tensione di rete non torna a livelli accettabili. Il LED standby
lampeggerà per indicare questa condizione
Periodo di rodaggio Il vostro nuovo amplificatore finale Classè vi garantisce eccellenti prestazioni
da subito. Comunque, per raggiungere le massime prestazioni è necessario un
certo tempo dall’accensione per permettere a tutti i componenti di raggiungere
la temperatura ottimale di funzionamento. Secondo la nostra esperienza,
necessitano circa 300 ore di “rodaggio” perché si possano notare grandi
differenze; dopo questo periodo, l’amplificatore raggiunge l’equilibrio termico
ottimale ed i condensatori possono garantire le migliori prestazioni. Dopo questo
periodo iniziale di rodaggio, le prestazioni del vostro nuovo prodotto rimarranno
stabili per tutti gli anni a venire.
L’unica eccezione a questa regola può essere il fatto che l’amplificatore venga
lasciato in modalità standby per un lungo periodo di tempo, permettendogli
di raffreddarsi troppo. In base a quanto si raffredda, dovrete aspettarvi un
breve periodo di riscaldamento prima che la qualità del suono raggiunga il
livello ottimale. Se non lasciate raffreddare troppo il vostro amplificatore, non
dovrebbe impiegare troppo tempo per tornare alle sue normali prestazioni.
Fortunatamente, non dovrete mai ripetere il periodo di rodaggio di 300 ore!
Leggete questo manuale Leggete attentamente questo manuale, in modo da prendete confidenza con
il vostro nuovo amplificatore. Sappiamo che siete ansiosi di collegare tutto e
provare il vostro nuovo prodotto. Comunque, la lettura di questo manuale
e l’osservanza di tutte le indicazioni che vengono fornite, vi assicurerà tutti i
benefici che derivano dall’acquisto di un prodotto di così alta qualità. Grazie.
74
Page 75

Caratteristiche speciali
Design raffinato dei circuiti Tutti gli stadi di amplificazione analogica di Classè derivano da circuiti che
hanno ormai raggiunto lo stato dell’arte, dopo anni di continuo sviluppo.
Partendo da un eccellente design circuitale, implementato anno dopo anno da
migliorie derivate dall’esperienza, siamo in grado di scoprire ulteriori piccole
rifiniture nelle diverse applicazioni, che ci permettono di raggiungere prestazioni
superlative. Modificare la tensione su un determinato punto, o utilizzare un
componente leggermente diverso dove necessario, può determinare la differenza
fra una alimentazione robusta ed una al di fuori del comune.
Questo livello di raffinatezza può essere raggiunto solo con una grande
esperienza, non da chi è capace solo di parlare di nozioni tecniche generiche.
Di tutta la nostra esperienza ne possono godere tutti i nostri clienti nell’uso
quotidiano di qualsiasi nostro prodotto (tutti i prodotti Classè derivano
da circuiti analogici di base sostanzialmente uguali), avvalorato anche dalle
eccellenti qualità dimostrate nelle recensioni e test delle riviste specializzate.
Test di ascolto Da un prodotto di classe e fama mondiale ci si aspettano prestazioni eccellenti,
ed i prodotti Classè non tradiscono le aspettative. Comunque, l’esperienza ci
insegna che, l’eccellenza tecnica da sola non sempre è sufficiente a garantire
prestazioni musicali adeguate.
Per questa ragione, tutti i prodotti Classè vengono collaudati e tarati finemente
durante i processi di produzione con accurate prove di ascolto. Le nostre
orecchie, e quelli dei nostri tecnici, sono il migliore strumento di test di ascolto
al mondo, che completano la nostra dotazione di strumenti di test disponibili
nei nostri laboratori. Nel corso delle procedure di ottimizzazione dei circuiti
per un prodotto, vengono prese centinaia di decisioni in base alle impressioni
soggettive derivate dalla sostituzione di un particolare componente di alta qualità
con un altro.
Per esempio, potremmo ascoltare una dozzina di resistenze da 0.1% dello stesso
valore, ma di diversi produttori; i test standard possono evidenziare per tutte gli
stessi risultati in termini di rumore, distorsione ecc.. Eppure, quasi sempre, una
scelta piuttosto che un’altra determina piccoli miglioramenti nello sviluppo delle
prestazioni di un prodotto in fase di ricerca. Meno spesso, anche una piccola
scelta del genere determina un sorprendente cambiamento delle prestazioni del
prodotto.
Moltiplicate queste scelte per le decine, o anche centinaia, di decisioni da
prendere prima che un prodotto sia pronto per la produzione e la vendita, e
pensate a che livello di qualità finale potrà raggiungere il prodotto – tutto ciò
è basato su accurati test di ascolto, che siamo convinti siano il complemento
necessario per garantirvi la qualità e le prestazioni che vi aspettate da un prodotto
Classè.
ITALIANO
75
Page 76

Straordinaria longevità Un altro beneficio derivato dalla continua ricerca del migliore design circuitale
negli anni è la garanzia della durata nel tempo dei nostri prodotti.
Utilizziamo solo componenti della più alta qualità disponibili sul mercato,
scelti anche in base alla loro durata nel tempo, verificata dalla nostra esperienza
personale e mediante test di invecchiamento dei componenti; in questo modo
siamo in grado di progettare e realizzare prodotti che possono durare nel tempo.
Siamo sicuri che il vostro nuovo prodotto Classè vi assicurerà diversi anni di
piacevole ascolto della vostra musica preferita e senza problemi, proprio come
hanno fatto i precedenti prodotti Classè con i loro proprietari.
Circuiti di protezione Il vostro nuovo amplificatore Classè, è dotato inoltre di diversi circuiti di
protezione, tutti progettati per proteggere sia l’amplificatore stesso che i vostri
diffusori da pericolose condizioni di guasto. Questi circuiti di protezione
non condizionano o limitano in nessun modo le normali prestazioni
dell’amplificatore, semplicemente disattivano l’amplificatore in caso di possibili
condizioni di pericolo. Queste condizioni possono essere:
• Sovraccarico sulle uscite
• Segnali DC in uscita dall’amplificatore
• Sbalzi della tensione di rete (al di fuori delle normali tolleranze)
• Temperature di funzionamento eccessive
ITALIANO
Se dovesse verificarsi una di queste condizioni di malfunzionamento su uno dei
canali (che potrebbe danneggiare sia l’amplificatore che i diffusori), l’amplificatore
si disattiverebbe immediatamente da solo. In questo caso, il LED indicatore
del canale lampeggerebbe in rosso indicando il canale su cui si riscontra
l’inconveniente, ed il suono verrebbe disattivato fino a che il difetto non venisse
corretto.
Se il difetto non dipende dai canali, per esempio, tensione di rete AC troppo
bassa), lampeggerà il LED standby. In ogni caso, l’unità dovrà essere spenta
riaccesa dopo che il problema è stato risolto.
76
Page 77

BALANCED
SINGLE-ENDED
1 2 3 4 5
SELECT
MODE
Pannello frontale
1 Tasto Standby e LED indicatore
Premendo il tasto Standby del pannello frontale commuterete lo stato
dell’amplificatore da pienamente operativo alla modalità standby
, in cui
l’amplificatore è disattivato ma comunque attivabile da un qualsiasi
comando del sistema di controllo esterno ( per esempio, dall’ingresso IR,
un segnale Trigger DC, via CAN Bus, o dalla interfaccia RS-232).
Lo stato dell’amplificatore viene indicato dal
pannello frontale. Il colore del
LED indica:
LED sul tasto Standby sul
• Acceso = Standby
• Lampeggiante (durante l’accensione) = Inizializzazione
• Spento +
• Lampeggiante (dopo l’accensione) = Tensione di alimentazione
LED del canale acceso = Attivo
AC non conforme
Quando è in modalità standby, lo stadio di potenza dell’amplificatore è
spento. Rimangono attivi solo i circuiti di controllo ed una piccola parte
dell’alimentazione, con un assorbimento di corrente minimo. Questo per
permettere all’accensione dell’amplificatore, di raggiungere velocemente la
temperatura ottimale di esercizio.
Se non intendete utilizzare l’amplificatore per un periodo di tempo piuttosto
lungo, magari quando andate in vacanza, vi consigliamo di scollegarlo dalla presa
di rete di alimentazione AC. Assicuratevi che l’amplificatore sia in standby prima
di scollegarlo dalla presa di alimentazione.
E’ sempre consigliabile scollegare tutti gli apparecchi elettronici
dall’alimentazione AC durante temporali, poiché se un fulmine dovesse cadere
vicino alla vostra abitazione potrebbe provocare un tremendo sbalzo di tensione
sulla rete di alimentazione AC. La scarica che ne risulterebbe ( che potrebbe
essere di molte migliaia di Volt) danneggerebbe tutti gli apparecchi ad essa
collegati, anche se di alta qualità e/o dotati di protezione. La migliore protezione
in caso di temporali è semplicemente di scollegare dalla presa di rete tutte le
apparecchiature.
77
ITALIANO
Page 78

ITALIANO
2 Tasto Select
Il tasto Select
la configurazione dei canali dell’amplificatore per il funzionamento con
ingressi bilanciati o RCA. E’ anche usato durante la configurazione della
sequenza di accensione di una serie di amplificatori Classè collegati ad un
preamplificatore Classè attraverso il sistema di comunicazione CAN Bus o
Trigger.
3 LED indicatori dello stato dei canali
Ogni canale dell’amplificatore dispone di due
indicano l’uso di ingressi bilanciati (XLR) o single-ended (RCA) per quel
canale.
Questi LED vengono anche utilizzati per indicare condizioni di guasto nel
vostro amplificatore, se dovesse capitare. Se il LED indicatore di un canale
dovesse lampeggiare con colore rosso, significa che c’è un problema su quel
canale. Se tutti i
significa che c’è un problema di sistema non riferito ad un particolare
canale.
Attenzione! Se vedete uno dei LED indicatori lampeggiare con colore
rosso, scollegate immediatamente l’alimentazione AC
dell’amplificatore e controllate che tutte le connessioni
siano corrette. Se la presa AC non è accessibile facilmente,
potete premere e tenere premuto per circa 3 secondi il tasto
Standby per resettare l’amplificatore. Se non riscontrate
nessun difetto apparente, vi preghiamo di contattare il vostro
rivenditore autorizzato Classè per maggiori dettagli.
viene utilizzato (congiuntamente con il tasto Mode) durante
LED indicatori, che
LED indicatori dovessero lampeggiare con colore rosso,
4 Tasto Mode
Il tasto Mode
la configurazione dei canali dell’amplificatore per il funzionamento con
ingressi bilanciati o single-ended. E’ anche usato durante la configurazione
della sequenza di accensione di una serie di amplificatori Classè collegati ad
un preamplificatore Classè attraverso il sistema di comunicazione CAN
Bus o Trigger.
viene utilizzato (congiuntamente con il tasto Select) durante
78
Page 79

�
Pannello posteriore
Le seguenti informazioni sono rapida descrizione delle funzioni e delle
caratteristiche del prodotto. Andate alla sezione seguente (Impostazioni iniziali
per maggiori dettagli sull’installazione del vostro nuovo amplificatore nel vostro
sistema.
1 Ingresso bilanciato (XLR)
Le connessioni bilanciate audio sono state sviluppate originariamente per il
settore audio professionale, per preservare i dettagli più delicati dei segnali
di più basso livello dei microfoni. Per molti anni, sono stati usati anche da
produttori di prodotti consumer di alta qualità come Classè, per garantire
una riproduzione dettagliata delle più raffinate registrazioni audio della
vostra collezione.
Tecnicamente, le connessioni audio bilanciate hanno due distinte
peculiarità: raddoppiano la forza del segnale durante la trasmissione da un
componente all’altro, incrementando il rapporto S/N potenziale di 6dB; e
consentono il trasferimento del segnale limitando disturbi ed interferenze
EMI (elettromagnetiche) o in radiofrequenza (RFI). Nel mondo attuale,
con i nuovi sistemi di comunicazioni senza fili, le potenziali interferenze ad
apparati elettronici sono notevolmente aumentate – per cui è sempre più
importante riuscire ad evitarle durante la riproduzione di musica o colonne
sonore di film.
Per questa ragione, vi consigliamo di utilizzare le connessioni bilanciate,
quando possibile, tra i vostri componenti Classè.
ITALIANO
)
79
Page 80

La piedinatura di questi connettori di ingresso XLR è:
Pin 1: Massa
Pin 2: Positivo + (non invertito)
Pin 3: Negativo - (invertito)
Corpo del connettore: Massa dello chassis
Questo tipo di piedinatura corrisponde agli standards adottati dalla Audio
engineering society (AES14-1992).
Se utilizzate il vostro amplificatore Classè con un preamplificatore Classè
non avrete problemi; dovete solo comprare un cavo di connessione
bilanciato standard e collegare i due prodotti, quindi abilitare l’ingresso
sull’amplificatore configurandolo come descritto nella sezione Impostazioni
Iniziali
Se invece utilizzate un preamplificatore di un’altra marca, fate riferimento
al manuale di istruzioni del preamplificatore per verificare che la
piedinatura del connettore di uscita corrisponda a quella dei connettori del
vostro amplificatore. Se così non fosse, chiedete informazioni al vostro
rivenditore di fiducia, che potrà fornirvi un cavo appropriato.
.
ITALIANO
2 Ingresso single-ended (RCA)
I cavi di connessione con terminali RCA sono il tipo di connessione più
diffuso nel campo dell’elettronica consumer. Utilizzando cavi di qualità si
possono ottenere risultati eccellenti. Classè ha fatto del suo meglio per
assicurare che la qualità degli ingressi RCA del vostro amplificatore sia la
migliore. Comunque, questo tipo di connessione non può garantire la
limitazione dei disturbi che si ottiene con i cavi bilanciati – ecco il motivo
per cui vi consigliamo di utilizzare cavi bilanciati quando possibile.
Se decidete di utilizzare gli ingressi RCA del vostro amplificatore Classè,
dovrete abilitarli come descritto nella sezione Impostazioni Iniziali
3 Uscite dei diffusori
L’amplificatore dispone di cinque coppie di terminali
diffusori, per ogni canale.
Anche se i connettori sul vostro amplificatore Classè accettano cavi spellati,
vi raccomandiamo di utilizzare terminali ad anello o spinotti di alta qualità,
inseriti e saldati ai capi dei cavi dei diffusori. Utilizzando connettori di alta
qualità sarete sicuri che i collegamenti dei diffusori non si deterioreranno
nel tempo, poiché i semplici cavi spellati potrebbero ossidarsi o logorarsi;
inoltre poterete prevenire corto circuiti accidentali dovuti a collegamenti
male eseguiti o fili del cavo spellato che fuoriescono dal connettore.
di alta qualità per i
.
80
Page 81

4 Porta di collegamento del sistema di controllo Classè CAN Bus
Questo connettore
comunicazione che utilizzano le specifiche Classè Audio del Controller
Area Network (CAN) Bus.
5 Uscita ed ingresso IR
Il vostro amplificatore Classè è dotato di due connettori mono mini-jack
da 1/8 di pollice per il collegamento a sistemi di controllo a raggi infrarossi
(IR) disponibili oggi sul mercato, che permettono il controllo
dell’operazione di accensione/modalità standby dell’amplificatore mediante
appositi codici di controllo. Questi codici possono essere inseriti in
“macro” nei sistemi di controllo più sofisticati, facilitando il controllo
dell’amplificatore nei sistemi più complessi.
L’indicazione ingresso/uscita IR in effetti non è del tutto corretta, in quanto
il segnale fornito a questi connettori è un segnale elettrico e non ad
infrarossi: questo segnale viene ottenuto utilizzando ricevitori standard IR,
amplificatori di distribuzione, ed emettitori (disponibili presso il vostro
rivenditore) che trasformano un segnale a raggi infrarossi di un
telecomando in impulsi elettrici e vice versa. Il grande vantaggio è la
possibilità di inviare i segnali ovunque debbano essere inviati, con la
stabilità di una connessione elettrica.
RJ-45 è riservato a futuri sistemi di controllo e
Nel caso che il sistema di distribuzione IR del vostro impianto controlli
diversi prodotti, il vostro lettore DVD dispone sia di un ingresso IR (per il
controllo di questa unità) che di una uscita IR (per inviare lo stesso segnale
al prodotto successivo se necessario). Questa caratteristica permette il
collegamento tipo “daisy chain”, dei cavi del sistema di controllo, da un
prodotto ad un altro.
L’amplificatore è compatibile con segnali IR da 5V DC, la polarità del mini
connettore mono indicata nella figura seguente:
ITALIANO
81
Page 82

6 Ingresso ed uscita segnale Trigger DC
Molti preamplificatori audio/video possono emettere un segnale DC per
comandare gli altri componenti del sistema. Il vostro amplificatore Classè
può sfruttare questo segnale per essere automaticamente
modalità standby, ad esempio insieme al premplificatore A/V stesso.
acceso o messo in
ITALIANO
Due connettori
a distanza (ogni segnale inviato attiva alternativamente l’accensione
modalità standby) dell’amplificatore. Questi connettori permettono il
collegamento passante del segnale Trigger da un componente all’altro,
permettendovi di effettuare facilmente il collegamento tipo “daisy chain” di
più amplificatori.
L’amplificatore è compatibile con segnali trigger DC da 5-12V, con la
polarità indicata nella figura seguente:
7 Interfaccia di controllo RS 232
Questa interfaccia, dotata di un connettore DB-9, serve per due funzioni:
• Interfaccia con un personal computer per eventuali upgrade
software dell’amplificatore ( ad esempio se venissero sviluppate
nuove funzioni).
• Interfaccia con un sistema di controllo esterno dell’amplificatore
come i-Command™, AMX™ e Creston™.
mono mini jack da 1/8 di pollice permettono l’accensione
e la
Per maggiori dettagli sui sistemi di controllo, contattate il vostro
rivenditore di fiducia.
8 Ingresso alimentazione AC
Il CA-5100 utilizza un cavo di alimentazione IEC standard. Inserite il cavo
nella presa IEC dell’amplificatore, e quindi in una presa di corrente di rete
adeguata.
9 Fusibile principale
Il vostro amplificatore Classè è dotato di un
stadio di alimentazione, situato sul pannello posteriore. Se sospettate che il
fusibile sia bruciato, scollegate l’amplificatore dalla alimentazione,
scollegate tutti gli ingressi ed i cavi dei diffusori, e fate riferimento alle
indicazioni relative contenute nella sezione Risoluzione dei problemi
Non cercate di aprire il vostro amplificatore. Non contiene parti utili
per l’utente.
fusibile a protezione dello
.
82
Page 83

Pericolo! Anche se l’amplificatore è scollegato dalla presa di
alimentazione, potrebbero essere comunque presenti residui
di tensioni e correnti pericolose. Non cercate di aprire il
vostro amplificatore, non contiene parti utili. Per l’assistenza
fate riferimento al vostro rivenditore o all’assistenza tecnica
autorizzata Classè.
ITALIANO
83
Page 84

Impostazioni iniziali
Il vostro nuovo amplificatore Classè è molto semplice da configurare e da
utilizzare. Seguite accuratamente le seguenti indicazioni per impostare ed
utilizzare il vostro nuovo amplificatore.
Importante: Il collegamento del cavo di alimentazione AC del vostro
nuovo amplificatore dovrebbe essere collegato per ultimo.
Inoltre, è sempre meglio accendere l’amplificatore (o gli
amplificatori) per ultimo, dopo che tutti gli altri componenti
sono stati accesi e si sono stabilizzati.
Al contrario, è sempre meglio spegnere l’amplificatore (o
gli amplificatori) per primo, in modo da prevenire qualsiasi
scarica o disturbo proveniente dallo spegnimento di altri
componenti che potrebbe danneggiare i diffusori.
1 Sballate tutto seguendo le istruzioni accluse.
Eseguite questa operazione con cautela, poiché l’amplificatore è molto
pesante.
ITALIANO
modo bilanciato/single-ended
Configurazioni operative
2 Collocate nella posizione desiderata il vostro amplificatore ( dopo
avere letto la sezione “Sballaggio e posizionamento”) e collegatelo
alla presa di rete AC.
Scegliete la collocazione dell’amplificatore, tenendo conto di assicurare una
corretta ventilazione dello stesso, e di lasciare abbastanza spazio per avere la
possibilità di collegare/scollegare in ogni momento i cavi sul pannello
posteriore dell’amplificatore. Una volta posizionato, collegate
l’amplificatore direttamente alla presa di rete AC; non utilizzate prolunghe,
poiché la maggior parte di esse non è adeguata all’assorbimento di corrente
del vostro amplificatore.
3 Configurazione del vostro amplificatore
I tasti Select e Mode vengono utilizzati per la configurazione del vostro
amplificatore, necessaria per impostare le configurazioni operative.
In modalità standby, premendo il tasto Select i LED dei canali
illumineranno, indicando come sono configurati i singoli canali
dell’amplificatore (ingresso bilanciato o RCA).
Uno dei
selezionare l’impostazione dell’ingresso bilanciato o RCA per quel canale.
Premete il tasto Mode per selezionare l’ingresso bilanciato o RCA, che sarà
indicato dal LED corrispondente che lampeggerà.
LED indicatori dei canali lampeggerà, per indicare che potete
si
84
Premete nuovamente il tasto Select per selezionare il canale successivo, e
ripetete l’intera procedura finchè avrete configurato l’amplificatore secondo
le vostre preferenze. Per terminare, premete ripetutamente il tasto Select
finchè i
Assicuratevi di configurare l’amplificatore per il tipo di collegamento in
ingresso che intendete utilizzare per ogni canale. Potrete utilizzare ogni tipo
di combinazione di ingressi RCA e bilanciati che il vostro sistema richiede.
LED si spengono.
Page 85

Configurazione della
sequenza di attivazione
degli amplificatori
In un sistema in cui vengono impiegati più amplificatori Classè, potere
specificare il numero di secondi di ritardo nell’accensione di ogni
amplificatore, facendoli accendere nell’ordine che avete specificato, o tutti
insieme. (L’accensione simultanea di più amplificatori potrebbe mettere a dura
prova l’impianto elettrico di casa vostra, e potenzialmente fare scattare gli
interruttori magnetotermici del contatore.) Questo numero fungerà inoltre
da ID quando utilizzate il sistema CAN Bus.
Per esempio, per impostare un ritardo di due secondi (e per assegnare ad
un particolare amplificatore il numero #2):
• Mettete l’amplificatore in modalità standby
acceso)
• Premete, e tenete premuto, il tasto Mode finchè i
dei canali sono accesi. Quando rilasciate il tasto, i LED
lampeggeranno per indicare il ritardo di accensione ed il
“numero” attuale dell’amplificatore (per es., lampeggeranno
due volte per indicare un ritardo di due secondi e per indicare
l’amplificatore come #2).
• Se volete cambiare il numero relativo all’amplificatore, premete
nuovamente, e tenete premuto, il tasto Mode finchè tutti i LED
dei canali si accendono.
• Tenendo ancora premuto il tasto Mode, premete il tasto Select
due volte (tante volte quanti i secondi di ritardo ed il numero
dell’amplificatore);
• Rilasciate il tasto Mode
volte per confermare la vostra scelta.
4 Collegamento dell’amplificatore al preamplificatore
Con l’amplificatore in modalità standby (o scollegato dalla presa di rete),
utilizzando cavi di connessione di elevata qualità, effettuate gli opportuni
collegamenti tra i connettori bilanciati o single-ended (come indicato al
passo 3).
. I LED dei canali lampeggeranno due
(LED standby
LED
ITALIANO
Assicuratevi che tutti i collegamenti siano sicuri; se i connettori RCA
hanno troppo gioco, potete stringere leggermente il corpo esterno dei
connettori con una pinza, in modo da poterli reinserire nel connettore
dell’amplificatore/preamplificatore applicando una leggera forza.
5 Collegamento dei diffusori
Effettuate le connessioni tra i terminali di uscita dell’amplificatore ed i
diffusori, utilizzando cavi di alta qualità.
Collegate i terminali neri (-) dell’amplificatore ai terminali neri (-) dei
vostri diffusori, ed i terminali rossi (-) dell’amplificatore ai terminali rossi () dei vostri diffusori.
Se utilizzate il collegamento bi-wiring, prevedete di utilizzare quattro cavi
per ogni canale: 2 coppie di cavi +/-, una coppia per i bassi e l’altra per i
medio/alti. Assicuratevi di non confondere i cavi collegati ai terminali rossi
(+) e neri (-) su entrambi i capi del cavo.
Assicuratevi che tutte le connessioni siano eseguite a dovere e ben salde, ma
fate attenzione a non stringerle troppo; è sufficiente che il cavo sia ben
saldo e che non si muova se sollecitato. Stringere ulteriormente il cavo non
produrrà una migliore connessione, e (se stretto troppo) potrebbe
danneggiare il cavo.
85
Page 86

6 Ricontrollate i collegamenti
Sappiamo che questo passo possa risultarvi superfluo, ma è meglio perdere
uno o due minuti per ricontrollare che tutti i collegamenti siano corretti e
ben eseguiti.
7 Accendete tutti gli altri componenti del sistema, e quindi
accendete il vostro amplificatore.
E’ sempre meglio accendere ogni amplificatore per ultimo, e spegnerlo per
primo; in modo da prevenire qualsiasi scarica o disturbo proveniente dalla
accensione/spegnimento di altri componenti che potrebbe danneggiare i
diffusori.
Cura e manutenzione
Per rimuovere la polvere dal cabinet del vostro amplificatore, utilizzate uno
spolverino o un panno morbido. Per rimuovere sporco e ditate potete usare un
panno morbido con alcool: inumidite prima il panno con l’alcool e poi passatelo
delicatamente sulla superficie dell’amplificatore. Non utilizzate quantità eccessive
di alcool, poiché potrebbe colare all’interno dell’amplificatore.
ITALIANO
Attenzione! Non utilizzate mai prodotti per la pulizia liquidi, o spray,
direttamente sull’amplificatore; il liquido potrebbe penetrare
all’interno dell’amplificatore e danneggiare i componenti
elettronici interni.
86
Page 87

Risoluzione dei problemi
Normalmente, per ogni problema è meglio fare riferimento al proprio
rivenditore Classè. Prima di contattarlo, comunque, controllate questa sezione
per verificare se il problema che riscontrate è compreso in questa lista.
1 Nessun suono, ed i LED dei canali sono spenti.
• L’amplificatore non è collegato alla presa di rete AC, o non c’è
tensione nell’impianto (può essere saltato l’interruttore generale
del contatore, o il fusibile).
• Uno sbalzo di tensione temporaneo può avere bloccato il
microprocessore, che deve essere resettato. Scollegate l’unità per
almeno 30 secondi, quindi ricollegatela e riaccendetela.
• Il fusibile principale è bruciato. Andate al paragrafo n°4 di
questa sezione per maggiori informazioni (o contattate il vostro
rivenditore).
• La tensione di rete non è adeguata. Controllate il valore della
tensione di alimentazione dell’amplificatore sul pannello
posteriore.
2 Nessun suono, ed uno o più LED dei canali lampeggia con colore
rosso.
• Potrebbe essere intervenuto il circuito di protezione. Per resettare
l’amplificatore, premete e tenete premuto il tasto Standby
secondi per spegnere l’amplificatore. Quindi scollegate tutti gli
ingressi ed uscite.
• Provate a riaccendere l’amplificatore premendo il tasto Standby
LED continua a lampeggiare, può essersi verificata una
Se il
condizione di guasto all’interno dell’amplificatore stesso.
Dovrebbe essere spento, scollegato dalla alimentazione AC e
portato presso un centro assistenza autorizzato.
• Se si accende senza problemi, spegnetelo nuovamente e
ricollegate solo gli ingressi. Quindi riaccendete l’amplificatore.
Se ritorna in protezione, si è verificata una condizione di guasto
a monte dell’amplificatore – probabilmente un segnale DC
indesiderato o un problema simile. L’amplificatore cerca di
proteggere i diffusori (anche un piccolo segnale DC potrebbe
danneggiare i woofer in pochissimo tempo). Provate a collegare
singolarmente i diversi componenti sorgente, per scoprire se il
problema è limitato ad una singola sorgente o se si manifesta
solo con tutte le sorgenti collegate (il che potrebbe significare un
problema del preamplificatore). Contattate il vostro rivenditore
per maggiori informazioni.
per 3
.
ITALIANO
3 L’amplificatore si spegne in continuazione.
• Assicuratevi che ci sia una adeguata ventilazione
dell’amplificatore, e che la temperatura ambientale non sia oltre i
40°C.
• Ricontrollate le informazioni indicate nei paragrafi precedenti
(considerando che l’amplificatore entri in protezione)
87
Page 88

4 Il fusibile principale è bruciato.
Esiste una procedura specifica di risoluzione dei problemi, nel caso in cui il
fusibile principale sia bruciato; anche se raro, questo tipo di inconveniente
a volte indica un problema abbastanza grave. Seguite le seguenti indicazioni
come indicato:
a. Scollegate l’amplificatore dalla presa di alimentazione, scollegate
gli ingressi ed i cavi dei diffusori, e rimuovete il portafusibile sul
pannello posteriore dell’unità.
b. Se il fusibile sembra bruciato, sostituitelo con uno nuovo di
uguale tipo e portata (specificato di seguito). L’utilizzo di altri tipi
di fusibili, soprattutto se di portata maggiore, potrebbe danneggiare
il vostro amplificatore. Se non siete sicuri di potere effettuare
questa operazione da soli, contattate il vostro rivenditore Classè.
Tensione: 100/120VAC
Tipo di fusibile: MDA slo-blow
Portata:
Tensione: 230/240VAC
Tipo di fusibile: MDA slo-blow
Portata:
12A
10A
ITALIANO
c. Dopo avere sostituito il fusibile bruciato con uno nuovo,
ricollegate l’amplificatore
i cavi degli ingressi ed i cavi dei diffusori. Se il fusibile si brucia
nuovamente, scollegate l’amplificatore dalla presa di rete e
contattate il vostro rivenditore Classè.
d. Se tutto sembra in ordine, mettete l’amplificatore in modalità
standby e ricollegate con cautela i cavi ai rispettivi ingressi,
quindi riaccendete l’amplificatore. Se il fusibile salta nuovamente
(o l’amplificatore va in protezione), l’amplificatore o il
preamplificatore/processore potrebbero essere guasti; in questo
caso contattate il vostro rivenditore Classè.
e. Infine, se tutto è a posto, mettete l’amplificatore in modalità
standby e ricollegate con cautela i cavi dei diffusori. Controllate
entrambi i capi dei cavi dei diffusori per verificare che non ci sia
possibilità di corto circuiti, quindi riaccendete l’amplificatore.
Se l’amplificatore rimane in funzione ( il fusibile non salta),
probabilmente il fusibile era saltato per uno sbalzo di tensione
dell’alimentazione. Se invece il fusibile salta nuovamente,
contattate il vostro rivenditore Classè.
5 Il LED blu standby lampeggia velocemente, uno o più LED dei
canali lampeggia con colore rosso.
• Provate a resettare l’amplificatore scollegandolo dalla presa di
rete, aspettate alcuni secondi, e quindi ricollegatelo. Se questo
non risolve il problema, contattate il vostro rivenditore Classè.
solo alla presa di rete, senza ricollegare
88
Page 89

Caratteristiche tecniche
Classè Audio si riserva il diritto di apportare modifiche senza preavviso.
■ Potenza di uscita 100W/ch continui RMS @ 8Ω
(tutti i canali in funzione) 200W/ch continui RMS @ 4Ω
■ Risposta in frequenza da 10 Hz a 22kHz (+0/-0.1dB)
da 10 Hz a 155kHz (+0/-3.0dB)
■ Fase migliore di -10° @ 22kHz
■ Rapporto Segnale/Rumore -10dB
■ Separazione tra i canali migliore di 80dB @ 20 KHz
■ FFT tutti i picchi al di sotto di -95dBV (10Hz-80kHz)
■ THD+n 0.003% @ 8Ω
(non pesato, ingresso 0.8Vrms/ 1kHz, 10Hz-500kHz)
■ Guadagno 29.1dB
■ Sensibilità 1.0Vrms su uscita media @ 8ohm
■ Impedenza di uscita 100Kohm
■ Consumo medio (secondo Norma IEC60065 par. 2.3.10) 684W
■ Consumo in standby 204W
■ Alimentazione specificata sul pannello posteriore
(non modificabile dall’utente o dal rivenditore)
■ Dimensioni (esclusi comandi e connettori) Larghezza: 445mm
Altezza: 171mm
Profondità: 470mm
■ Peso lordo 40Kg
■ Peso netto 34Kg
(a piena potenza, 10Hz-80kHz)
ITALIANO
Per maggiori informazioni, rivolgetevi al vostro rivenditore Classè, o contattateci:
Classè Audio
5070 François Cuss
Lachine, Québec
Canada H8T 1B3
Telefono: +1 (514) 636-6384
FAX: +1 (514) 636-1428
http://www.classeaudio.com
email: cservice@classeaudio.com
on
Classè ed il logo Classè sono marchi registrati di Classè Audio Inc. di Lachine. Canada. Tutti i diritti riservati.
i-Command™ è un marchio registrato di Equity International. Inc. Tutti i diritti riservati.
AMX® è un marchio registrato di AMX Corporation di Richardson, TX. Tutti i diritti riservati.
Creston™ è un marchio registrato di Creston Electronics, Inc. di Rockleigh, NJ. Tutti i diritti riservati.
89
Page 90

ADVERTENCIA: PARA REDUCIR EL RIESGO DE INCENDIO O DESCARGA ELÉCTRICA, NO
EXPONGA ESTE APARATO A LA LLUVIA O LA HUMEDAD.
PRECAUCION
RIESGO DE DESCARGA
ELÉCTRICA – NO ABRIR
PRECAUCION: PARA REDUCIR EL RIESGO DE QUE SE PRODUZCA UNA DESCARGA
ELÉCTRICA, NO QUITE LA CUBIERTA. EN EL INTERIOR DEL APARATO NO HAY
COMPONENTES QUE PUEDAN SER MANIPULADOS POR EL USUARIO. PARA CUALQUIER
OPERACIÓN DE MANTENIMIENTO, CONSULTE CON PERSONAL CUALIFICADO.
El relámpago con una flecha en el interior de un triángulo equilátero tiene por objeto alertar al
usuario sobre la presencia de “tensiones peligrosas” no aisladas en el interior del producto que
pueden tener la magnitud suficiente para constituir un riesgo de descarga eléctrica para personas.
El signo de admiración en el interior de un triángulo equilátero tiene por objeto avisar al usuario
sobre la presencia de instrucciones de funcionamiento y mantenimiento importantes en la
literatura que acompaña al aparato.
La presencia del símbolo “CE” (izquierda) indica la plena compatibilidad de este dispositivo con
los estándares referentes a EMC (Compatibilidad Electromagnética) y LDV (Directiva de Baja
Tensión) de la Comunidad Europea.
ESPAÑOL
Los productos Classé están diseñados para satisfacer la normativa internacional en materia
de Restricción del Uso de Sustancias Peligrosas (RoHS) en equipos eléctricos y electrónicos y
eliminación de Desechos Procedentes de Equipos Eléctricos y Electrónicos (WEEE). El símbolo
del carro de la basura tachado significa la plena satisfacción de la citada normativa y que los
productos que la incluyen deben ser reciclados o reprocesados en concordancia con las misma.
NOTA IMPORTANTE
En Classé hemos procurado especialmente asegurar que su compra sea una inversión que mantenga intacto su valor en el tiempo. Estamos
orgullosos de hacerle saber que todos los componentes Classé han sido homologados oficialmente para que satisfagan la normativa de la
Comunidad Europea.
Esto significa que su producto Classé ha sido sometido a las pruebas de fabricación y seguridad más rigurosas del mundo. La etiqueta CE
certifica que su compra satisface o excede todas las exigencias de la Comunidad Europea en materia de coherencia de las especificaciones
entre aparatos del mismo modelo y seguridad del consumidor.
Este aparato ha sido debidamente probado y satisface los límites de funcionamiento correspondientes a un componente digital de Clase B
especificados en el Apartado 15 de la Normativa FCC. Dichos límites han sido diseñados para proporcionar una protección razonable frente a
interferencias en instalaciones domésticas. Este equipo genera y puede radiar energía de radiofrecuencia y en el caso de que no sea instalado y
utilizado siguiendo las instrucciones suministradas por el fabricante, puede causar interferencias en comunicaciones de radio o televisión. Sin
embargo, no se garantiza que la citada interferencia no pueda tener lugar en una instalación particular. Si este aparato interfiere la recepción
de programas de radio o televisión, lo que puede determinarse activándolo y desactivándolo, intente corregir la interferencia aplicando una o
varias de las siguientes medidas:
• Reoriente o reubique la antena de recepción (TV, radio, etc.).
• Aumente la separación entre el aparato y el sintonizador del televisor.
• Conecte el aparato a un enchufe perteneciente a un circuito eléctrico diferente del que alimenta al receptor.
• Consulte a su detallista o a un técnico en radio /TV experimentado en caso de que necesite ayuda adicional.
PRECAUCIÓN: Cualquier cambio o modificación en este equipo que no haya sido aprobado expresamente por el fabricante podría
invalidar la autoridad del usuario para manejarlo
La información contenida en este manual está sujeta a cambios sin aviso previo. La versión más actualizada de este manual estará
permanentemente disponible en nuestro sitio web http://www.classeaudio.com.
90
Page 91

Instrucciones de Seguridad Importantes
Precaución: le rogamos que lea y observe todas las advertencias e instrucciones que figuran
en este manual de instrucciones, así como las marcadas en el aparato. Guarde este manual
de instrucciones por si tuviera que necesitarlo en el futuro.
1. No intente reparar este aparato usted mismo. No quite la cubierta por ningún motivo. En el interior del
aparato no hay componentes que puedan ser reparados por el usuario. Un aparato abierto representa, en par
ticular si todavía está conectado a una fuente de corriente alterna, una descarga eléctrica potencialmente letal.
Para cualquier duda al respecto, consulte únicamente a personal de mantenimiento autorizado.
2. Para prevenir cualquier riesgo de incendio o descarga eléctrica, no exponga este aparato al agua o la
humedad. Si entra líquido en el aparato, desconéctelo inmediatamente de la red eléctrica y llévelo a su detal-
lista Classé para que lleve a cabo una revisión completa.
3. No coloque el aparato cerca de ningún dispositivo que genere calor, como por ejemplo un radiador, una
estufa, etc. Y manténgalo alejado de la luz solar directa.
-
4. Conecte su producto únicamente a una fuente de corriente alterna del voltaje adecuado. Tanto el em
balaje como la etiqueta del panel posterior en la que figura el número de serie indicará la tensión de aliment
ación adecuada. El uso de cualquier otro voltaje puede dañar el aparato e invalidar la garantía.
5. Los cables de alimentación deberían colocarse de tal modo que no fuese fácil pisarlos o aplastarlos con
objetos situados encima o contra suyo. En caso de que se dañe el cable de alimentación, llévelo a su detal
lista Classé para que lo revise por completo y lo repare adecuadamente o sustituya por uno nuevo.
6. Si su producto no va a ser utilizado durante un largo período de tiempo (vacaciones, etc.), sería reco
mendable que desconectara el cable de alimentación de la toma de corriente eléctrica para prevenir que se
produzcan problemas debidos a un aumento súbito de la tensión de red o a una tormenta con fuerte aparato
eléctrico.
7. No humedezca NUNCA el interior de este producto con líquidos de ningún tipo.
8. No vierta o derrame NUNCA líquidos directamente en este aparato.
9. No bloquee NUNCA el flujo de aire en las ranuras de ventilación o los disipadores térmicos.
10. No suprima NUNCA ningún fusible.
11. No sustituya NUNCA un fusible por otro de valor o tipo distintos de los especificados.
12. No intente reparar este producto NUNCA. Si aparece un problema, contacte con su detallista Classé.
13. No exponga NUNCA este producto a temperaturas extremadamente altas o bajas.
14. No haga funcionar NUNCA este producto en una atmósfera explosiva.
-
-
-
-
ESPAÑOL
15. Desconecte SIEMPRE los aparatos electrónicos sensibles durante las tormentas con fuerte aparato eléctrico.
Le rogamos que a continuación escriba el número de serie de su nuevo componente Classé para el
caso de que pueda necesitarlo en el futuro.
Número de Serie #: _______________
91
Page 92

Contenido
Bienvenido a la familia Classé .......................................................................93
unas palabras acerca de la instalación .................................................... 93
Desembalaje y Ubicación ..............................................................................94
desembalaje de su amplificador ............................................................. 94
ubicación ............................................................................................... 94
ventilación ............................................................................................. 94
instalaciones personalizadas .................................................................. 95
número de serie ..................................................................................... 95
¡registre su compra! ............................................................................... 95
tensión de alimentación alterna ............................................................. 95
período de calentamiento/rodaje ............................................................ 96
lea este manual, por favor… ................................................................... 96
Detalles de Diseño Relevantes .......................................................................97
diseño circuital extremadamente refinado .............................................. 97
pruebas de escucha intensivas ................................................................ 97
longevidad extraordinaria ...................................................................... 98
protección robusta ................................................................................. 98
Panel Frontal ..................................................................................................99
Panel Posterior .............................................................................................101
Puesta a Punto Inicial ..................................................................................106
configuración del funcionamiento en modo
balanceado/no balanceado ............................................................ 106
configuración de la secuencia de arranque/número
de amplificadores .......................................................................... 107
Cuidado y Mantenimiento ...........................................................................108
Problemas y Posibles Soluciones .................................................................109
Características Técnicas ...............................................................................111
Dimensiones ................................................................................................178
ESPAÑOL
92
Page 93

Bienvenido a la familia Classé
Le felicitamos por haber adquirido un producto Classé. Tiene usted en su poder
el resultado de muchos años de refinamientos continuados y estamos seguros de
que disfrutará con su compra durante muchos años más.
En Classé valoramos especialmente nuestras relaciones con nuestros clientes.
Por este motivo, le rogamos que nos permita estar en contacto con usted
haciéndonos llegar de inmediato (antes de que guarde el embalaje y se olvide
definitivamente del asunto) la tarjeta de garantía del producto que acaba de
adquirir. De este modo nos permitirá informarle sobre cualquier posible mejora
o actualización para su componente Classé que pueda aparecer en el futuro.
El envío de su tarjeta de garantía también nos permitirá ofrecerle un rápido y
eficaz servicio postventa incluso en el caso de que haya perdido su factura de
compra original.
Por favor, tómese la molestia de dedicar unos minutos a
rellenar la tarjeta de garantía y háganosla llegar por correo.
Encontrará la tarjeta de garantía al final del folleto adjunto en el que se explica
nuestra política de garantías.
Se ha hecho todo lo posible para hacer que tanto la instalación como el uso de la
unas palabras acerca
de la instalación
Por esta razón, le animamos especialmente a que sea
Classé CA-5100 sean excepcionalmente simples y rápidos.
Aún así, no tenemos ningún modo de evaluar muchas otras variables, como por
ejemplo el tamaño y la forma de su sala de escucha, la acústica de esta última
y los componentes que usted haya elegido para combinar con su amplificador.
Lógicamente, todos estos factores influyen en los resultados proporcionados por
su equipo.
su detallista quien instale y calibre su equipo, ya que su
experiencia y formación y el instrumental especializado de
que dispone le permitirán introducir profundas diferencias
en las prestaciones finales.
ESPAÑOL
93
Page 94

Desembalaje y Ubicación
desembalaje de
su amplificador
¡Importante! Guarde todos los componentes del embalaje para un futuro
ubicación Tiene dos opciones a la hora de instalar su etapa de potencia: puede colocarla
Desembale cuidadosamente su etapa de potencia siguiendo las instrucciones
suministradas y retire todos los accesorios de la caja del embalaje. Tenga cuidado
cuando levante el amplificador ya que su peso es considerable.
transporte de su producto Classé. El embalaje de su nuevo
componente en una caja y con unos materiales distintos
de los originales puede provocar daños no cubiertos por la
garantía.
cerca de las cajas acústicas, utilizando por tanto cables de interconexión más
largos desde el preamplificador, o puede colocarla cerca de este último utilizando
en consecuencia cables de conexión a cajas más largos.
Aunque cada uno de estos dos enfoques se materializará en unas prestaciones
excelentes, debería considerar la primera opción por dos razones. En primer
lugar, la calidad de la señal se degrada más fácilmente cuando esta última se
transmite como una combinación de alta tensión y alta corriente, lo que sugiere
que los cables de conexión a las cajas acústicas deberían ser lo más cortos
posible. En segundo lugar, los amplificadores de alta calidad utilizan fuentes
de alimentación de grandes dimensiones que inevitablemente radian campos
magnéticos en cierta medida. Idealmente, uno debería querer separar a una cierta
distancia estos campos de fuentes sensibles.
ESPAÑOL
Si para usted es más cómodo colocar el amplificador en un mueble-rack junto
con el resto de componentes de su equipo, le sugerimos que lo ubique en la
parte inferior de dicho mueble estando a la vez lo más lejos posible de las fuentes
y el preamplificador. Esta ubicación también sería más estable que colocar
un componente tan pesado cerca de la parte superior del mueble, ya que ello
dificultaría sustancialmente el desplazamiento de este último.
Observe que debe dejar un espacio suficiente para el cable de red y los
de conexión al resto del equipo detrás de la CA-5100. Le sugerimos
que deje al menos 20 centímetros de espacio libre detrás de su etapa
de potencia con el fin de que todos los cables dispongan del espacio
suficiente para que puedan doblarse sin ser forzados ni sometidos a
fatigas innecesarias.
ventilación Su etapa de potencia Classé genera una cierta cantidad de calor en el transcurso
de su funcionamiento normal. Asegúrese de dejar un mínimo de 15 centímetros
de espacio libre en la parte superior del amplificador y unos 8 centímetros en
sus dos lados para garantizar una ventilación adecuada del mismo. Las ranuras
situadas en las partes superior e inferior de la CA-5100 deben mantenerse libres
de cualquier obstrucción potencialmente capaz de reducir la libre circulación
del flujo de aire a través del aparato. Asimismo, evite colocar su etapa de
potencia Classé en superficies blandas (como por ejemplo una alfombra de felpa)
susceptibles de restringir la circulación del aire.
94
Page 95

instalaciones personalizadas En este manual se incluyen (ver Dimensiones) dibujos para facilitar la inserción
de la CA-5100 en instalaciones especiales o en recintos -para el caso de que
fueran necesarios- hechos a medida. Asimismo, se dispone opcionalmente de
un kit diseñado a medida para el montaje en rack de este producto. Para más
información, contacte con su detallista Classé.
número de serie El número de serie de su etapa de potencia se encuentra en la parte posterior del
aparato. Tome nota de este número y escríbalo en la página del presente manual
correspondiente a las Instrucciones de Seguridad Importantes
pueda necesitarlo en el futuro.
¡registre su compra! Cuando haya encontrado el número de serie sería un buen momento para
rellenar la tarjeta de garantía. Por favor, hágalo y envíenosla para que podamos
aconsejarle sobre posibles mejoras/actualizaciones y otros temas de interés.
Necesitará unos pocos minutos para hacerlo. Por favor, rellene la tarjeta antes de
que se olvide del asunto.
para el caso de que
tensión de alimentación
alterna
Advertencia: El ajuste de la tensión de alimentación de la etapa de
La etapa de potencia CA-5100 está ajustada (internamente) en fábrica para que
trabaje con tensiones de red de 100 V, 120 V, 230 V ó 240 V de corriente alterna
(CA) en función del país en que vaya a ser vendida (230 V sólo en los países de
la Unión Europea con el fin de satisfacer las regulaciones de la CE). El ajuste de la
tensión de alimentación no puede ser cambiado por el usuario.
Asegúrese de que la etiqueta del panel posterior de su etapa de potencia indique
la tensión de alimentación alterna correcta para su lugar de residencia. Si intenta
hacer funcionar su etapa de potencia con una tensión incorrecta es posible que se
produzcan daños en la misma.
potencia CA-5100 no puede ser cambiado por el usuario. No
hay componentes manipulables por el usuario en el interior
del aparato. En caso de que se produzcan problemas, le
rogamos que acuda a un servicio técnico autorizado por
Classé.
Si la tensión de alimentación alterna indicada en su etapa de potencia es
incorrecta, le rogamos que contacte con su detallista o importador Classé local.
ESPAÑOL
La CA-5100 puede ser fácilmente alimentada por una línea de corriente
eléctrica alterna normal de 15 amperios. En el caso de que se alimenten otros
componentes con la misma línea, el consumo de potencia adicional debido a los
mismos debería ser tenido en cuenta.
95
Page 96

La CA-5100 incluye circuitos de protección que evitarán que el amplificador
trabaje con tensiones de alimentación peligrosamente altas o bajas.
• En el momento del arranque: La tensión de alimentación alterna
debe estar comprendida entre un -15% y un +10% de su valor
nominal ya que en caso contrario el amplificador no se pondrá en
marcha. Por ejemplo, un modelo de 120 V necesita que la tensión
de red en el momento de su puesta en marcha esté comprendida
aproximadamente entre 95 y 135 V.
• Sobretensión durante el funcionamiento: Si se producen
incrementos del 10% o más en el valor de la tensión de red
durante el funcionamiento del aparato, el amplificador entrará en
el modo de protección y se desconectará. El
de la posición de espera (“standby”)
el modo de protección ha sido activado.
• Descenso del valor de la tensión de red durante el
funcionamiento: Si la tensión de red desciende hasta un 15% o
más por debajo de su valor nominal, el amplificador continuará
funcionando (ya que ello no representa peligro alguno para
el aparato), aunque habrá que tener en cuenta que bajo unas
condiciones de trabajo tan comprometidas no será capaz de
alcanzar su nivel de prestaciones habitual. El
de la posición de espera (“standby”)
situación.
indicador luminoso
parpadeará para indicar que
indicador luminoso
parpadeará para indicar esta
ESPAÑOL
período de
calentamiento/rodaje
Su nueva etapa de potencia Classé proporcionará unas prestaciones
extraordinarias inmediatamente después de haber sido puesta en marcha. No
obstante, debería contar con que tales prestaciones mejoraran a medida que el
aparato alcance sus temperaturas de funcionamiento normales y los distintos
componentes de su interior finalicen su correspondiente “rodaje”. La experiencia
nos permite afirmar que los mayores cambios tienen lugar en las primeras 300
horas, que es el período que suelen requerir tanto los circuitos del amplificador
para alcanzar su equilibrio térmico óptimo como los condensadores del sistema
de alimentación para estar en plena forma. Después de este período de rodaje
inicial, las prestaciones de su nuevo producto deberían mantenerse prácticamente
constantes durante los próximos años.
La única excepción a esta regla se produce cuando el aparato se deja en el modo
de espera o se desconecta de la red eléctrica durante un período de tiempo lo
suficientemente largo para que sus componentes y circuitos internos se enfríen.
En función del grado de enfriamiento, debería contar con un breve período
de calentamiento para que la etapa de potencia rinda al cien por cien de sus
posibilidades. A menos de que haya permitido que su amplificador se relaje más
de la cuenta, la pertinente reestabilización térmica no debería tardar mucho en
producirse. Por fortuna, en ningún caso deberá repetir el rodaje inicial de 300
horas.
lea este manual, por favor… Le rogamos que dedique unos minutos a leer este manual y familiarizarse con
su nuevo amplificador. Comprendemos que estará ansioso por conectarlo todo
y ponerlo en marcha. No obstante, la lectura de este manual y el seguimiento
de los consejos que en él se dan asegurará que se beneficie plenamente de las
ventajas que merece por haber adquirido un producto tan exclusivo.
96
Page 97

Detalles de Diseño Relevantes
diseño circuital
extremadamente refinado
pruebas de escucha
intensivas
Todas las etapas analógicas de amplificación utilizadas por Classé están basadas
en circuitos que han sido optimizados de manera intensiva a través de muchos
años de desarrollo continuado.
Partiendo de diseños circuitales exclusivos y trabajando con ellos a lo largo de los
años somos capaces de descubrir esos múltiples pequeños refinamientos que se
suman para proporcionar unas prestaciones superlativas en un amplio abanico de
aplicaciones. La alteración de una tensión eléctrica aquí o el uso un componente
ligeramente distinto allí puede marcar la diferencia entre unas prestaciones sólida
sy otras absolutamente sobresalientes.
Este nivel de refinamiento sólo es posible después de muchos años de experiencia
y no puede ser alcanzado por quienes revolotean de un concepto de moda a
otro. Influye en una medida nada despreciable tanto en la consistencia como
en las prestaciones sonoras de los productos Classé (puesto que todos ellos
están basados en etapas de ganancia analógicas similares) y, por supuesto, en
las excelentes impresiones que los mismos provocan en usuarios y periodistas
especializados de todo el mundo.
De los productos de más alto nivel disponibles en el mercado mundial hay que
esperar las máximas prestaciones posibles, situándose las realizaciones de Classé
plenamente en estas coordenadas. No obstante, la experiencia nos ha mostrado
que la excelencia técnica en solitario es insuficiente para garantizar unos
resultados musicales subjetivos de primera clase.
Por esta razón, todos los productos Classé han sido objeto, durante su puesta a punto,
de un laborioso proceso de ajuste fino a través de pruebas de escucha cuidadosamente
controladas. Nuestros oídos figuran todavía entre los mejores instrumentos de
medida disponibles, complementando impecablemente los tradicionales equipos de
prueba utilizados por nuestro departamento de ingeniería. Esto significa que durante
el proceso de optimización de la circuitería de un determinado producto se toman
centenares de decisiones en función de las impresiones subjetivas provocadas por la
sustitución de un componente de alta calidad por otro.
Un ejemplo de lo que acabamos de decir es que podemos evaluar mediante
pruebas de escucha una docena de resistencias de película metálica del mismo
valor con una tolerancia del 0’1% procedentes de fabricantes distintos. Las
pruebas de laboratorio estándar pueden revelar que todas las resistencias
evaluadas observan los mismos resultados en términos de ruido, distorsión
y otros parámetros objetivos. Sin embargo, también de manera invariable se
observa que uno de los componentes seleccionados proporciona pequeñas
mejoras en el comportamiento subjetivo del producto en curso de desarrollo.
Aunque menos a menudo, puede suceder incluso que un único cambio tenga
como resultado una mejora sorprendentemente notable.
Multiplique estas distintas mejoras por las docenas o incluso centenares de
decisiones de este tipo que deben tomarse antes de que el producto esté finalizado
para que pueda entrar en el proceso de producción y llegará a la conclusión
de que se obtienen unas mejoras considerables… basadas todas ellas, por
supuesto, en cuidadosas pruebas de escucha que nosotros consideramos como un
complemento necesario a la sólida ingeniería que cabe esperar de Classé.
ESPAÑOL
97
Page 98

longevidad extraordinaria Otra ventaja derivada del empleo, durante tantos años y de modo intensivo,
de diseños circuitales altamente refinados es que tenemos una vasta experiencia
sobre lo que funciona bien a largo plazo.
Al utilizar únicamente los mejores componentes disponibles como punto de
partida y a continuación emplearlos de la manera correcta como consecuencia
de experimentos de envejecimiento acelerados y experiencia real a largo plazo,
somos capaces de diseñar y construir productos que con toda seguridad
superarán la implacable prueba del tiempo.
Estamos seguros de que su nuevo producto Classé le proporcionará, tal y como
han hecho los modelos por nosotros comercializados hasta la fecha, muchos años
de disfrute musical sin ningún tipo de fallo.
protección robusta Ya para finalizar, su nuevo amplificador Classé incorpora una extensa
variedad de circuitos de protección que han sido diseñados para protegerlo
tanto a él como a las cajas acústicas de su equipo frente a condiciones de
funcionamiento potencialmente peligrosas. Es importante señalar que estos
circuitos de protección no se inmiscuyen ni limitan las prestaciones normales del
amplificador sino que sencillamente se limitan a desactivarlo cuando detectan
condiciones de trabajo susceptibles de dañarlo. Entre estas condiciones figuran
las siguientes:
ESPAÑOL
• sobrecarga en los circuitos de salida
• derivas de continua
• tensión de alimentación alterna situada fuera de los márgenes de
tolerancia normales
• temperaturas de funcionamiento excesivas
En caso de que prevalezca alguna de estas condiciones en uno cualquiera de los
canales (de hecho, cualquiera de ellas puede dañar su amplificador o, posiblemente,
incluso sus cajas acústicas), el amplificador se situará de inmediato en el modo de
protección. Si así sucede, uno de los indicadores luminosos de canal (channel)
del panel frontal parpadeará para indicar el canal que está fallando, silenciándose
el amplificador hasta que el fallo sea corregido.
Si el fallo no está relacionado con ningún canal –caso, por ejemplo, de que la
tensión de alimentación alterna se salga de su rango de trabajo- el indicador
luminoso standby parpadeará. En todos los casos, el aparato necesitará ser
reiniciado una vez se haya corregido la condición de fallo.
98
Page 99

BALANCED
SINGLE-ENDED
1 2 3 4 5
SELECT
MODE
Panel Frontal
1 Botón e indicador luminoso correspondiente a la Posición de
Espera (“Standby”)
El botón Standby del panel frontal hará que el amplificador conmute entre
su modo de funcionamiento plenamente operativo y un modo “de espera”
que “desconecta” el aparato aunque dejándolo preparado para que responda
a órdenes de control enviadas a través de cualquiera de las opciones de
gestión disponibles (entrada de rayos infrarrojos, disparador de corriente
continua, Bus CAN o RS-232).
El estado actual del amplificador es indicado por el
situado en el panel frontal junto al botón Standby. El estado de dicho
indicador luminoso indica lo siguiente:
indicador luminoso
ESPAÑOL
• activado (on) =
standby
• parpadeando (durante el arranque) =
inicialización
• apagado (off) + indicador luminoso Channel activado =
pleno funcionamiento
• parpadeando (después de la puesta en marcha) =
tensión de alimentación alterna fuera de rango
Cuando el amplificador está situado en la posición de espera
, sus etapas de
ganancia son desactivadas, permaneciendo activados únicamente una
pequeña fuente de alimentación y un circuito de control que consumen
relativamente poca energía. Afortunadamente, al conducir las etapas de
salida corrientes intrínsecamente altas su amplificador alcanzará su
temperatura de funcionamiento óptima (y por tanto proporcionará los
mejores resultados musicales posibles) rápidamente.
Si no piensa utilizar el amplificador durante un largo período de tiempo
(quizá porque está de vacaciones), le sugerimos que lo desconecte de la red
eléctrica. Antes de hacerlo, asegúrese de que el aparato esté situado en el
modo de espera.
99
Page 100

Asimismo, es una buena costumbre que desconecte físicamente sus valiosos
componentes audiovisuales durante las tormentas con fuerte aparato
eléctrico, ya que un relámpago que caiga en cualquier lugar cerca de su casa
puede provocar una tremenda descarga eléctrica que puede dañar cualquier
aparato que contenga componentes electrónicos independientemente de lo
bien diseñado y protegido que esté. La mejor protección posible en caso de
que tengan lugar tormentas eléctricas severas consiste simplemente en
suprimir cualquier conexión del aparato en cuestión con la red eléctrica.
2 Botón Select
El botón Select
momento de configurar los canales del amplificador para que trabajen
tanto en modo balanceado como no balanceado. También se usa para
configurar la secuencia de arranque de un conjunto de amplificadores
Classé conectados a un preamplificador Classé mediante el Bus de
Comunicaciones CAN o sistemas de disparo (por corriente continua)
externos.
3 Indicadores luminosos de estado de cada canal
Cada canal de su amplificador incluye sus propios indicadores luminosos
(Channel), disponiéndose de indicadores luminosos separados para
confirmar el uso de entradas no balanceadas (RCA) o balanceadas (XLR)
para cada canal.
se utiliza (conjuntamente con el botón Mode) en el
ESPAÑOL
Estos indicadores también se utilizan para indicar, en caso de que se
produzcan, la presencia de condiciones de funcionamiento erróneo en su
amplificador. Si los indicadores luminosos correspondientes a un canal
parpadean en color rojo, significa que hay un problema en ese canal
concreto. Si todos los indicadores luminosos
significa que se ha producido un problema global que no tiene nada que
ver con ningún canal en concreto.
¡Precaución! Si ve que uno cualquiera de los indicadores luminosos
correspondientes a los canales (“Channel”) parpadean en
rojo, le rogamos que desconecte inmediatamente el aparato
de la red eléctrica y verifique que todas las conexiones
externas han sido efectuadas de un modo limpio y seguro.
Si le resulta difícil acceder a la toma de corriente eléctrica,
puede pulsar y mantener pulsado el botón Standby
durante tres segundos para renicializar el amplificador.
En caso de que no se perciba ningún fallo de forma obvia,
debería contactar con su detallista Classé local para que le
proporcione la asistencia necesaria al respecto.
4 Botón Mode
El botón Mode
momento de configurar los canales del amplificador para que trabajen en
modo balanceado o no balanceado. También se usa para configurar la
secuencia de arranque de un conjunto de amplificadores Classé conectados
a un preamplificador Classé mediante el Bus de Comunicaciones CAN o
sistemas de disparo externos.
se utiliza (conjuntamente con el botón Select) en el
Channel parpadean en rojo,
100
 Loading...