

Page 1

ROTARY LAWN MOWER
MODEL Nos.
CLM420PR & CLM490SR
OPERATING & MAINTENANCE
INSTRUCTIONS
1
0100
Page 2

WARNING!
If not used properly, this lawn mower can be dangerous!
This lawn mower can cause serious Injury to the operator and
others, the warnings and safety instructions MUST be followed
to ensure reasonable safety and efficiency when in use.
The operator is responsible for following the warning and
safety instructions in this manual and on the lawn mower.
NEVER use the mower unless the grass box or guards
provided are in position.
2
Page 3

Thank you for purchasing this CLARKE Rotary Lawn mower.
Before attempting to use the lawn mower, it is most important that you
read this manual thoroughly and carefully follow all instructions given. This
will not only ensure the safety of yourself, and that of others around you,
but also that the machine will give you long and satisfactory service.
GUARANTEE
This CLARKE product is guaranteed against faulty manufacture for a period
of 12 months from the date of purchase. Please keep your receipt as
proof of purchase. This guarantee is invalid if the product is found to have
been abused or tampered with in any way, or not used for the purpose
for which it was intended.
Faulty goods should be returned to their place of purchase, no product
can be returned to us without prior permission.
This guarantee does not effect your statutory rights.
CONTENTS Page
Safety Precautions ............................................................... 4
Assembly ............................................................................... 7
Preparation for Use .............................................................. 9
Starting and Operating ..................................................... 10
Maintenance ...................................................................... 12
Cleaning the Air Filter ............................................ 13
Engine Oil Change ................................................ 13
Blade Replacement .............................................. 13
Adjustments ............................................................ 14
Fault Finding ........................................................................ 14
Parts Diagrams ........................................................... 15 & 16
Specifications ..................................................................... 17
Spare Parts & Servicing contacts ..................................... 17
Notes .................................................................................... 18
3
Page 4

SAFETY PRECAUTIONS
IMPORTANT!
Read the user instructions carefully to make sure you understand all the
controls and what they do.
A. General
1. NEVER allow children or people unfamiliar with these instructions to use the
mower. Local regulations may restrict the age of the operator.
2. Only use the lawn mower in the manner and for the functions described in
these instructions.
3. Never operate the lawn mower when you are tired, ill or under the influence
of alcohol, drugs or medicine.
4. REMEMBER...the operator or user is responsible for accidents or hazards
occurring to other people or their property.
B. Fuel Safety
WARNING - Petrol is highly flammable
1. Store fuel in a cool place in a container specifically designed for the purpose.
In general plastic containers are unsuitable
2. Refuel outdoors only and do not smoke while refuelling
3. Add fuel BEFORE starting the engine. Never remove the cap of the fuel tank
or add fuel while the engine is running or when the engine is hot
4. If petrol is spilled, do not attempt to start the engine but move the machine
away from the area of spillage and avoid creating any source of ignition until
petrol vapours have dissipated
5. Replace all fuel tanks and container caps securely
6. Move the lawn mower away from the fuelling area before starting
C. Preparation
1. Do not mow barefoot or in open sandals. Always wear suitable clothing, gloves,
and stout shoes.
2. Make sure the lawn is clear of sticks, stones, bones, wire and debris....they
could be thrown by the blade.
3. Before use always visually inspect to see that blades, blade bolts and cutter
assembly are not worn or damaged. Replace worn or damaged blades
together with their fixings, in sets, to preserve balance.
4. If the silencer is damaged it must be repaired or replaced.
4
Page 5

D. When in Use
1. Do not operate the engine in a confined space where exhaust fumes (carbon
monoxide) can collect.
2. Use the lawn mower only in daylight or good artificial Iight.
3. Avoid operating your lawn mower on wet grass, wherever possible.
4. Take care in wet grass, you may lose your footing.
5. On slopes, be extra careful of your footing and wear non-slip footwear.
6. Mow across the face of slopes, NEVER up and down.
7 Exercise extreme caution when changing
direction on slopes.
8. Mowing on banks and slopes can be
dangerous. Do not mow on banks or steep
slopes of more than 15 degrees..
9. Do not walk backwards when mowing, you
could trip. Walk, never run.
10. Never cut grass by pulling the mower towards
you.
11. Release the Operator Presence Control ('DEAD MANS'), to stop the engine
before pushing the mower across surfaces other than grass, and when
transporting the lawn mower to and from the area to be mowed.
12. NEVER operate the lawn mower with damaged guards or without guards in
place.
13. Do not overspeed the engine or alter governor settings. Excessive speed is
dangerous and shortens lawn mower life.
14. Disengage all blade and drive clutches before starting.
15. Always start the lawn mower carefully with feet well away from the blades.
16. Do not tilt lawn mower when starting the engine.
17. Do not put hands near the grass discharge chute whilst engine is running.
16. Never pick up or carry the lawn mower while
the engine is running
19 The spark plug wire may be hot - handle with
care.
20. Do not attempt any maintenance on your
lawn mower when the engine is hot.
21. Release the 'Dead Mans' lever, to stop the
engine, and wait until the blade has stopped,
before:
5
Page 6
a. leaving the mower unattended for any period.
b. refuelling.
22. Release the Operator Presence Control, to stop the engine, wait until the blade
has stopped, then disconnect the spark plug lead:
a. before clearing a blockage.
b. before checking, cleaning or working on the
appliance.
c. if you hit an object. (Do not use your
lawn mower until you are sure that the entire
lawn mower is in a safe operating condition).
d. if the lawn mower starts to vibrate
abnormally, check it immediately.
23. Reduce the throttle setting during engine shut down and, if the engine is
provided with a shut-off valve turn the fuel off at the conclusion of mowing.
24. Always keep the lawn mower on the ground when mowing....tilting or lifting
the lawn mower may cause stones to be thrown out.
25. Keep bystanders away....do not mow whilst people especially children or pets
are in the mowing area.
26. Beware of severing toes or hands....DO NOT put hands or feet near a rotating
blade
E. Maintenance and storage
1. ALWAYS disconnect the spark plug before attempting any maintenance,
cleaning or adjustment, or if you are going to leave the lawn mower
unattended for any period.
2. Keep all nuts, bolts and screws tight to ensure the lawn mower is in safe working
condition.
3. Check the grass box frequently for wear or deterioration.
4. Replace worn or damaged parts for safety (consult your Clarke dealer).
5. Only use the replacement blade, blade bolt, and spacer specified for this
product (consult your Clarke dealer).
6. Never store the lawn mower with fuel in the tank inside a building where fumes
can reach an open flame or spark.
7. Allow the engine to cool before storing in any enclosure.
8. To reduce fire hazard, keep the engine, silencer and fuel storage area free of
grass, leaves or excessive grease.
9. If the fuel tank has to be drained, this should be done outdoors.
10. Be careful during adjustment of the machine to prevent entrapment of the
fingers between a moving blade and fixed parts of the machine.
6
Page 7

ASSEMBLY
Lower Handles
1. Insert lower handles into holes
provided in the body (Fig.2)
2. Push the handle firmly down until
the handle collars locate
securely into the holes in the
body (Fig.2A)...push home firmly.
Upper Handles
The upper handle should be fixed to the lower handle using
the kit provided (Fig.3).
Recoil Starter Pull Cord
With the spark plug lead
disconnected, pull the ‘Dead Mans’
lever to the handle to release the
brake on the engine, then gently pull
the starter ‘Pull Cord’ fully (Fig.4), and
locate it in the pull cord guide,
positioned on the handle (Fig.4A).
The Brake Cable and Drive Cable (Where fitted)
1. Insert cable connected to the
engine, into hole in the ‘Dead
Mans’ lever (Fig.5).
1a. Insert cable connected to the
rear axle, into hole in the
Powerdrive lever (CLM490SR)
2. Lock into position. (Fig.5A)
3. Attach the cable bracket to the handle using the locknut, bolt and washer
supplied.
7
Page 8

Grass Box
1. Position the two grass box
halves together and press
each location point (Fig.6)
into position without fully
connecting the clips.
When the location points
are matched correctly
firmly press the grass box together until all clips are securely connected. (Fig.6A)
2. To attach the grass box to your lawn mower, lift the safety flap (Fig.7) and make
sure the discharge chute is clean and free from debris.
3. Locate fully assembled
grass box onto 2 location
points at the rear of the
deck (Fig.7).
4. Locate safety flap onto the
top of the grass box. Ensure
the grass box is securely
located (Fig.7A).
Removal is the reverse procedure.
NOTE
1. Ensure no gap remains between the safety flap and the grass box.
2. Where grass collection is not required you can use the lawn mower without
the grass box, but you MUST ENSURE THE SAFETY FLAP IS FULLY CLOSED.
Assembly is now complete, but before using the lawn
mower, certain important checks MUST be made which are
described in the following pages.
8
Page 9

PREPARING FOR USE
When starting the engine for the first time, it is necessary to fill with oil and petrol.
To fill with oil, remove the oil filler cap and fill to the FULL mark on the dipstick, using
a good quality SAE30, 4 stroke oil (not supplied), available from your Clarke dealer.
Fill the fuel tank with regular grade LEAD FREE petrol. NEVER USE LEADED PETROL.
A. Oil
1. Get into the habit of checking the oil level before each use.
2. Add oil as necessary to keep the level to the FULL mark on the dipstick.
3. Use a good quality SAE 30 four stroke oil.
4. Change the oil after the first five hours operation (see Maintenance), and
thereafter every 25 working hours.
5. Always change the oil while the engine is warm - but not hot - never attempt
any maintenance on a hot engine.
To check the oil level, always clean around the dipstick before unscrewing it.
Once removed, wipe it with a clean cloth then replace, screwing down fully.
Remove once more and check the level.
B. Petrol
1. DO NOT fill the fuel tank when the engine is hot.
2. DO NOT fill the fuel tank whilst smoking.
3. DO NOT remove the filler cap whilst the engine is hot or running. ALWAYS allow
the engine to cool for at least 2 minutes before refuelling.
4. To avoid introducing dirt into the fuel system, wipe all grass and dirt from the
petrol filler cap before unscrewing it.
5. It is recommended that you fill the tank through a funnel with a filter.
6. Wipe away spillages before starting.
7. Use fresh petrol....stale fuel can cause the carburettor to gum up.
8. DO NOT refuel indoors or in an unventilated area.
9. DO NOT operate engine if petrol has been spilled. Move lawn mower well
away from the scene before starting.
IMPORTANT.
We strongly recommend the use of Briggs and Stratton Gasoline Additive, available
from your Clarke dealer.
9
Page 10

STARTING & OPERATING
1. Connect the spark plug lead.
2. If starting from cold, push primer bulb (Fig.8), firmly
three times. DO NOT push the primer bulb if the
engine is hot.
Note: Priming is usually unnecessary when restarting a
warm engine. However, cool weather may require
priming to be repeated.
2. Pull the 'DEAD MANS' handle to the main handle
(Fig.9). this releases the brake.
3. Pull the recoil starter slowly
towards you (Fig.9A) until you
feel the full resistance. Return the
handle slowly then pull the
handle firmly towards you to its
full extent
4. After the engine has started, allow
to run for 30 seconds before
commencing to use.
To stop your lawn mower - release the 'DEAD MANS' handle
Model CLM420PR does not incorporate a drive to its
wheels, the machine must therefore be pushed along
across the lawn.
MODEL CLM420SR incorporates a Powerdrive,
operated by the lever shown in Fig.10.
To operate the Powerdrive, follow the above procedure
to start the machine, then, once started, gently pull the
Powerdrive lever towards the handle, thereby engaging
the drive.
Releasing the Powerdrive Lever stops the drive
automatically.
If the drive does not engage when the powerdrive lever
is pulled towards the handle, screw the adjuster
anticlockwise (Fig.11).
Screw adjuster in opposite direction if the powerdrive
does not disengage with the powerdrive lever free
(Fig.11).
To stop your lawn mower - release the Power drive lever,
then the 'Dead Mans' lever.
10
Page 11

How To Mow
Do not overload your Lawn mower
When mowing in long thick grass a first cut with the cutting height adjusted to its
highest setting (see below), will help reduce motor
overload and will help prevent damage to your lawn
mower.
1. Start mowing from the outside edge of the lawn,
mowing in strips in alternate directions (Fig.12).
2. Mow twice a week in the growing season, your lawn
will suffer if more that one third of its length is cut at
one time and this may also result in poor collection.
Setting the height of cut levers
Model CLM420PR is fitted with four independent
Height of Cut levers (Fig.13), one at each wheel. The
height of cut is altered by pulling the adjustment lever
away from the location slots and moving to the selected
position. Ensure the levers are all adjusted to the same
position before proceeding.
Model CLM420SR is fitted with a single lever, which
adjusts the height for all four wheels.
11
Page 12

MAINTENANCE
After Use
ALWAYS allow a period of time for the engine to cool before cleaning.
NEVER use solvents, or chemical cleaners to clean your lawn mower, as these
products can destroy critical components
Once the engine is cool, remove grass from under the machine with a brush.
Using a soft brush - remove grass clippings from all air intakes, the discharge chute
and the grass box.
Finally, wipe over the surface of your lawn mower with a dry cloth.
Store your Iawn mower in a cool, dry place where it will be protected from damage.
At the End of the Mowing Season
1. Replace the blade, bolts, nuts or screws, if necessary.
2. Clean your Iawn mower thoroughly.
3. Clean the air filter (see Air Filter Removal, page 13)
4. Drain the petrol. (see Changing Oil, page 13)
Maintenance Schedule
Follow the hourly or calendar intervals, whichever occurs first. More frequent service
is required when operating in adverse conditions.
After first 5 hours -
Change engine oil.
Every 5 hours or daily -
Check oil level. Clean around silencer.
Every 25 hours or every season -
Change the oil, and clean the air filter (see page 13).
Every 50 hours or every other season -
Renew the metal blade after 50 hours mowing or 2 years whichever Is sooner regardless of condition.
Every 100 hours or every season -
1. Clean cooling fins. (Clean more often under dusty conditions, or after
prolonged operation cutting tall, dry grass).
2. Replace spark plug.
12
Page 13

Cleaning the Air Filter
At the end of every season, remove the
air filter, as follows:
Using a suitable screwdriver, remove the
single screw, securing the air filter
assembly to the carburettor - shown at
A, Fig. 14.
Remove the lid from the filter box and
withdraw the filter. Wash it thoroughly in
warm soapy water, rinse thoroughly and
allow to dry before reassembling in
reverse order.
Fig. 14
Changing the oil
IMPORTANT: Before changing the oil,
ensure the fuel tank is pumped dry.
Turn the mower on to its side, and remove
the drain plug (arrowed in Fig. 15), using
a 10mm square Key. Use gloves for this
operation, to prevent injury from the
cutting blade.
Turn the mower back on to its wheels,
allowing the oil to drain into a suitably
placed container. Removing the oil filler
will allow the oil to drain more freely.
When completely drained, replace the
drain plug and fill with Clarke SAE30 oil, to the ‘Max’ level on the dipstick.
Replace and secure the oil filler cap.
Shown with blade removed
Fig. 15
Underside of machine
Replacing the blade
IMPORTANT: Before replacing the
blade, ensure the fuel tank is
pumped dry.
Turn the mower on to its side, and
remove the single bolt, with washers,
securing the blade, using a good pair
of industrial gloves to prevent injury
from the blade.
Replace in reverse order ensuring the ‘O’ on the large flat washer faces towards
you.
13
Page 14

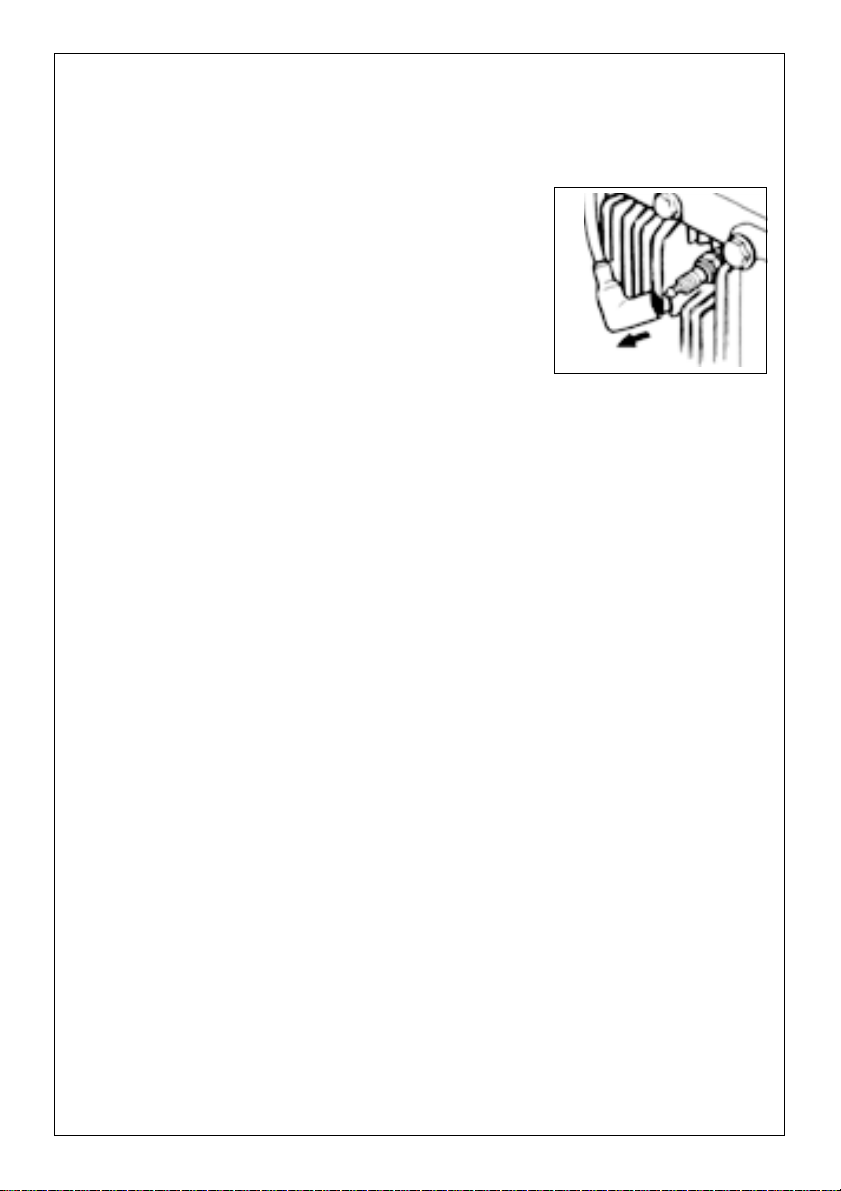
Adjustments
All carburettor adjustments are factory set and should not need attention. You will
note that the idling speed is higher than expected - only 300 to 600 RPM slower
than top speed. This is quite normal.
Storage
If the lawn mower is stored for longer that 30 days, the fuel tank and carburettor
should be drained to avoid the possibility of gumming up. Ensure the engine is run
until it stops for lack of fuel.
If Briggs and Stratton Gasoline Additive is used, ensure the engine is run in order to
distribute the additive to all parts of the fuel system, before storage. The lawn
mower may then be stored for up to 24 months. (Additive available from your
Clarke dealer).
FAULT FINDING
Engine Will Not Start
1. Ensure 'DEAD MANS' Lever is in the start position.
2. Check that there is sufficient fuel in the tank and the cap air vent is clear.
4. Remove and dry the spark plug.
5. Petrol may be stale.... Replace.
6. Check that the blade bolt is tight. A loose bolt could cause difficult starting.
Lack of Engine Power and/or Overheating
1. Check that the control lever is in the normal position.
2. Disconnect the spark plug lead and allow the engine to cool down.
3. Clean grass clippings and debris from around the engine and air inlets and
the underside of the machine including the chute and the fan.
4. Clean the engine air filter thoroughly
5, Petrol may be stale....replace
Excessive Vibration
1. Disconnect the spark plug lead.
2. Check that the blade is correctly fitted see page 13. If the blade is damaged
or worn replace it with a new one.
4. If vibration persists, immediately disconnect the spark plug lead and consult
your local Clarke dealer, or contact the Clarke Service department.
If any of the the above fails to cure the problem...disconnect the spark plug lead
and consult your local Clarke dealer, or the Clarke International Service
Department.
14
Page 15

PARTS DIAGRAM
CLM420PR
15
Page 16

PARTS DIAGRAM
CLM490SR
16
Page 17

SPECIFICATIONS
CLM420PR CLM490SR
Engine Briggs & Stratton Briggs & Stratton
Classic35 Quattro40
Power 1.8kW 2.1kW
Width of cut 42cm 48cm
Guaranteed Sound Power Level 96LWA 96LWA
Speed of Rotation 2800RPM 2800RPM
Weight 22.52kg 31kg
Part No. 3400035 3400040
Please note that the details and specifications contained herein, are correct at the time of going to
print. However, CLARKE International reserve the right to change specifications at any time without prior
notice. Always consult the machine’s data plate
SPARE PARTS & SERVICING
Please contact your nearest dealer, or
CLARKE International, on one of the following numbers.
PARTS & SERVICE TEL: 020 8988 7400
PARTS & SERVICE FAX: 020 8558 3622
or e-mail as follows:
PARTS: Parts@clarkeinternational.com
SERVICE: Service@clarkeinternational.com
17
Page 18

NOTES
18
Page 19

19
Page 20

20
 Loading...