

Page 1
N.I.C.E. 430
Owner’s Manual
Page 2

R00 (USA)
Trademarks
All brand and product names are trademarks or registered trademarks of their
respective companies.
Note
The information in this manual is subject to change without notice.
Page 3

Table of Contents
Precautions and Notices ........................................................................ v
1 Getting Started .................................................................................. 1
1.1 Understanding Hardware Components ................................................ 1
Front Components ............................................................................... 1
Back Components ................................................................................ 2
Right-Side Components ....................................................................... 2
Top Components .................................................................................. 3
Bottom Components ............................................................................ 3
1.2 Performing the Initial Start Up .............................................................. 4
1.3 Charging the Battery via the USB Cable .............................................. 6
1.4 Using the N.I.C.E. 430 in a Vehicle ...................................................... 7
Using the Mounting Bracket ................................................................. 7
Connecting the Cigarette Lighter Adapter ............................................ 7
Connecting the Optional Traffic Module ............................................... 8
1.5 Operating Basics .................................................................................. 9
Turning On and Off .............................................................................. 9
Using the Stylus ................................................................................... 9
The Main Menu .................................................................................. 10
1.6 Inserting a SD/MMC Card .................................................................. 11
2 Audio Player .................................................................................... 13
2.1 Introduction ......................................................................................... 13
2.2 Preparing the Audio Files for Your Device ......................................... 14
2.3 Playing Audio Files ............................................................................. 14
2.4 Playback Controls .............................................................................. 15
2.5 Editing the Play Lists .......................................................................... 16
2.6 Equalizer ............................................................................................ 17
3 Pictures ............................................................................................ 19
3.1 Starting and Exiting Pictures .............................................................. 19
3.2 Preparing the Pictures for Your Device .............................................. 19
i
Page 4

3.3 Viewing Pictures in Thumbnail View .................................................. 20
3.4 Viewing a Picture in Full Screen ........................................................ 21
3.5 On-Screen Control Buttons ................................................................ 21
3.6 Viewing the Slideshow ....................................................................... 23
4 Settings ............................................................................................ 25
4.1 Starting and Exiting Settings .............................................................. 25
4.2 Backlight ............................................................................................. 26
4.3 Volume ............................................................................................... 26
4.4 Screen ................................................................................................ 27
4.5 Power ................................................................................................. 28
4.6 Date/Time ........................................................................................... 29
4.7 Language ........................................................................................... 30
4.8 Bluetooth ............................................................................................ 30
5 Bluetooth HF Phone ....................................................................... 31
5.1 About Bluetooth HF Phone ................................................................ 31
5.2 Pairing with a Mobile Phone ............................................................... 31
5.3 Placing a Call ..................................................................................... 33
Keypad ............................................................................................... 33
Call History ......................................................................................... 34
5.4 Operations during a Call .................................................................... 35
5.5 Receiving a Call ................................................................................. 36
5.6 Miscellaneous Buttons ....................................................................... 37
Connect .............................................................................................. 37
Pair Mode ........................................................................................... 37
Bluetooth Manager ............................................................................. 38
Exit ..................................................................................................... 38
6 Bluetooth Manager ......................................................................... 39
6.1 About Bluetooth Manager .................................................................. 39
6.2 Starting and Exiting Bluetooth Manager ............................................ 39
6.3 Turning On/Off Bluetooth Radio ......................................................... 40
6.4 Exploring Devices .............................................................................. 41
6.5 Using My Shortcuts ............................................................................ 43
6.6 Viewing Active Connections ............................................................... 44
6.7 Configuring Bluetooth Settings........................................................... 45
7 ActiveSync ...................................................................................... 47
7.1 About ActiveSync ............................................................................... 47
Installing ActiveSync .......................................................................... 47
Using ActiveSync ............................................................................... 48
ii
Page 5

8 Troubleshooting and Maintenance ............................................... 49
8.1 Resetting the N.I.C.E. 430 ................................................................. 49
8.2 Troubleshooting ................................................................................. 49
Power Problems ................................................................................. 49
Screen Problems ................................................................................ 49
Connection Problems ......................................................................... 50
GPS Problems.................................................................................... 50
8.3 Maintaining Your Device .................................................................... 51
9 Regulatory Information .................................................................. 53
9.1 Regulations Statements ..................................................................... 53
Class B Regulations ........................................................................... 53
9.2 Safety Precautions ............................................................................. 54
About Charging .................................................................................. 54
About the Cigarette Lighter Adapter .................................................. 55
About the Battery ............................................................................... 55
iii
Page 6

Page 7

Precautions and Notices
z For your own safety, do not operate the controls of the product while driving.
z Use this product carefully. The product is intended for use solely as a
navigation aid. It is not for precise measurement of direction, distance,
location or topography.
z The calculated route is for reference only. It is the user’s responsibility to
follow the traffic signs and local regulations along the roads.
z When you get out of the vehicle, do not leave your device on the dashboard
subjected to direct sunlight. Overheating of the battery can cause malfunction
and/or danger.
z GPS is operated by the United States government, which is solely responsible
for the performance of GPS. Any change to the GPS system can affect the
accuracy of all GPS equipments.
z GPS satellite signals cannot pass through solid materials (except glass). When
you are inside a tunnel or building, GPS positioning is not available.
z A minimum of 4 GPS satellite signals is needed to determine current GPS
position. Signal reception can be affected by situations such as bad weather or
dense overhead obstacles (e.g. trees and tall buildings).
z Other wireless devices in the vehicle might interfere with the reception of
satellite signals and cause the reception to be unstable.
v
Page 8

z A mounting bracket is needed when using the device in the vehicle. Be sure
that you place the device in an appropriate place, so as not to obstruct the
driver’s view, or deployment of airbags.
Do not mount where the driver’s
field of vision is blocked.
Do not mount in front of
airbag panels.
Do not place unsecured
on the dashboard.
Do not mount in front of an
airbag field of deployment.
vi
Page 9
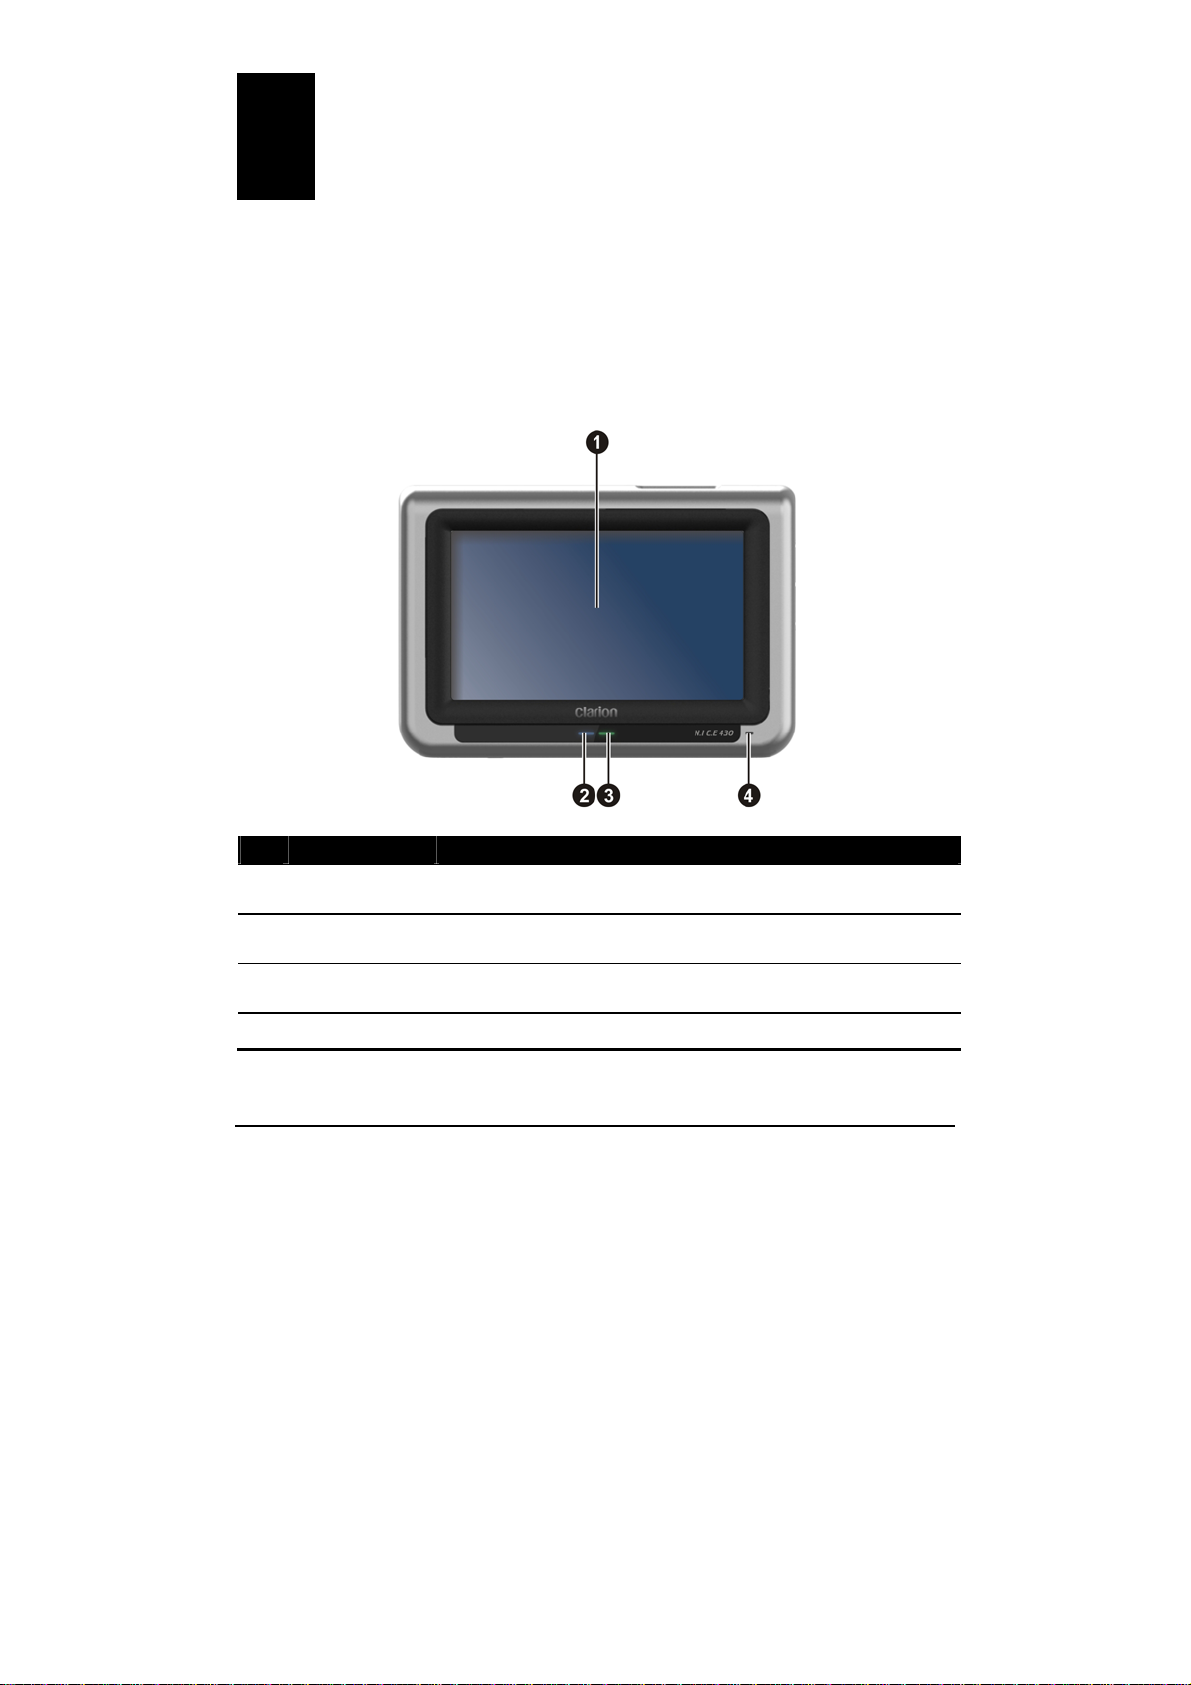
1 Getting Started
1.1 Understanding Hardware Components
Front Components
Ref Component Description
Touch Screen Displays the output of your device. Tap the screen with the
n
Bluetooth
o
Indicator
Charge
p
Indicator
Microphone For Bluetooth hands-free calling.
q
stylus to select menu commands or enter information.
Flashes in blue to indicate that Bluetooth is on.
Glows bright amber to indicate that the battery is charging, and
turns green when the battery is fully charged.
1
Page 10
Back Components
Ref Component Description
External GPS
n
Antenna
Connector
Stylus Tap the touch screen to make selections and enter information.
o
Speaker Audio output for music, sounds and voice.
p
This connector (under rubber dust cover) allows use of an optional
external GPS antenna with magnetic mount, which may be
positioned on top of the vehicl e for better sig nal reception in area s
with poor reception.
Pull the stylus out of its slot to use it, and store it in the slot when
not in use.
Right-Side Components
2
Page 11
Ref Component Description
Power Button Turns on and off the device.
n
Navigation Button Starts the navigation software.
o
When using the Bluetooth HF Phone function:
Hides or displays the Bluetooth HF Phone screen.
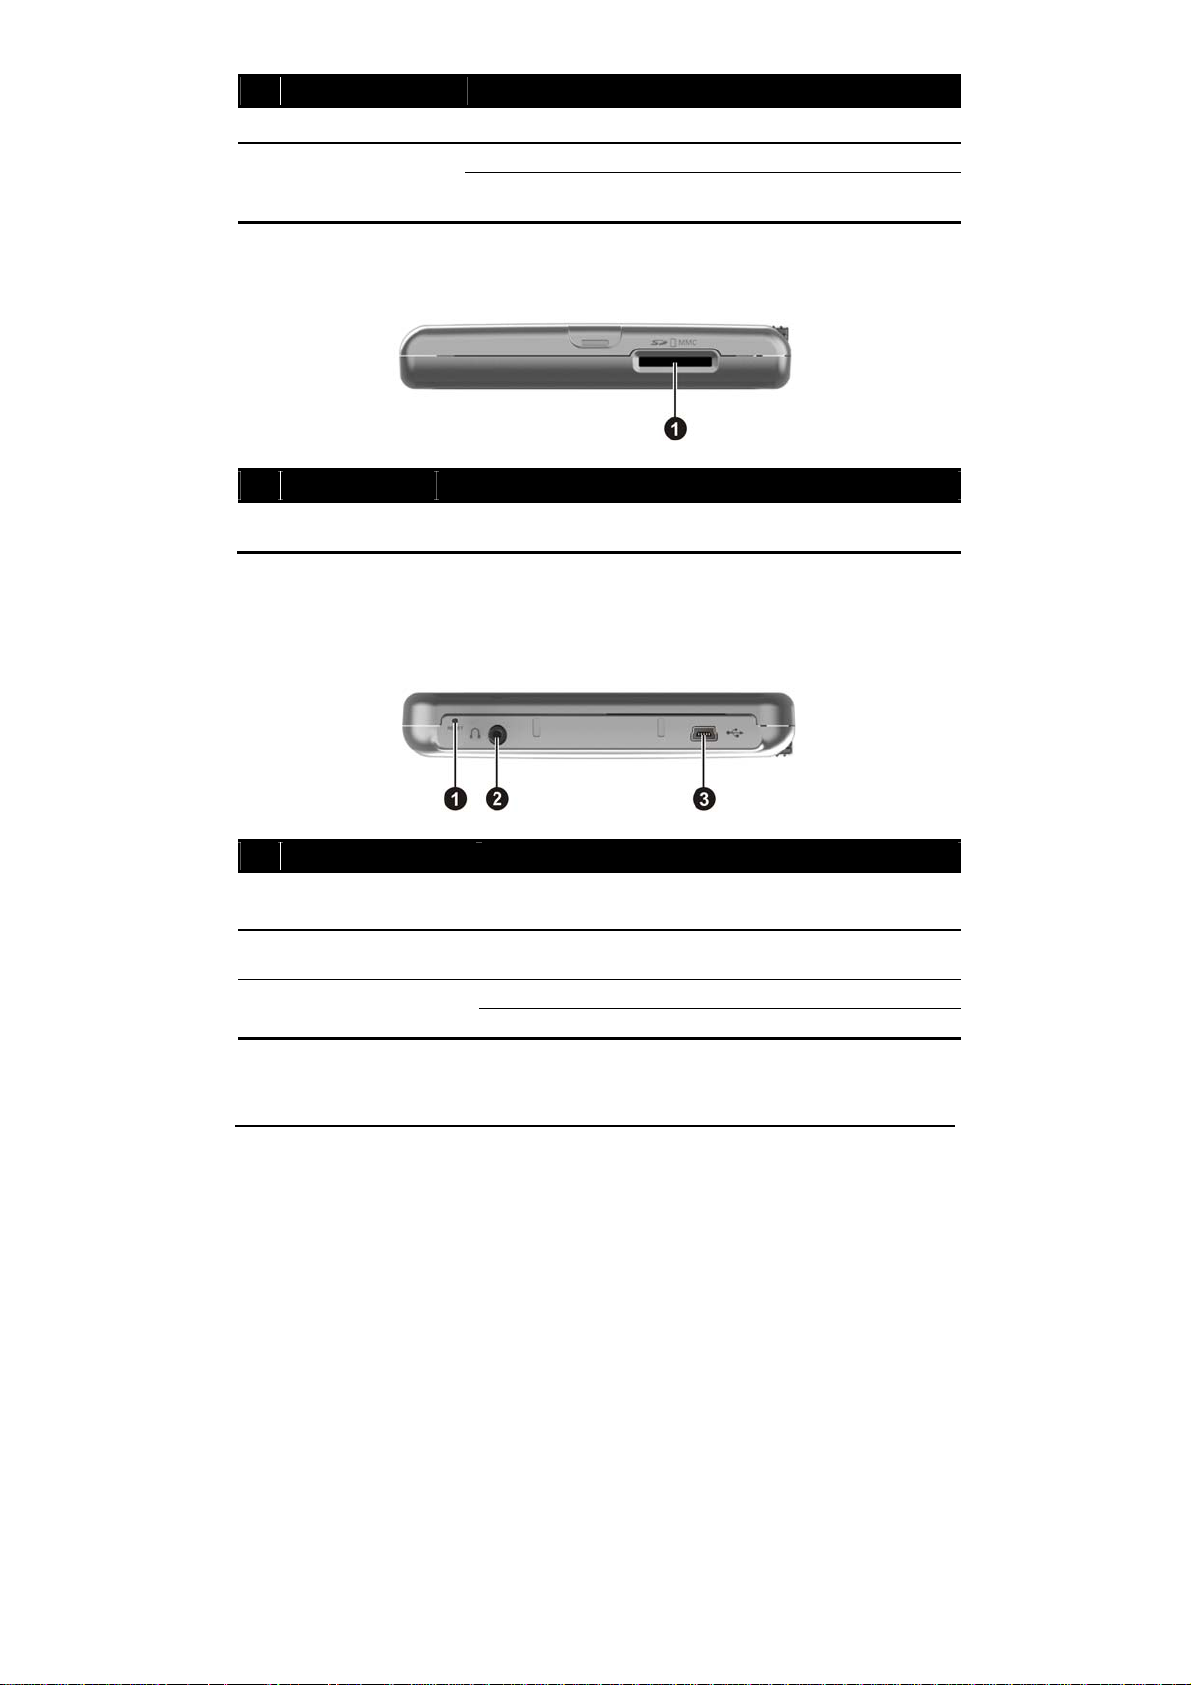
Top Components
Ref Component Description
SD/MMC Slot Accepts a SD (Secure Digital) or MMC (Multi Media Card)
n
card for accessing data such as MP3/WMA music.
Bottom Components
Ref Component Description
Reset Button Resets the N.I.C.E. 430.
n
All saved information will be lost
Headphone
o
Connector
Mini-USB Connector Connects to the vehicle charger or USB cable.
p
Connects to stereo headphones.
Connects to the optional Traffic module (NAVRDS).
3
Page 12
1.2 Performing the Initial Start Up
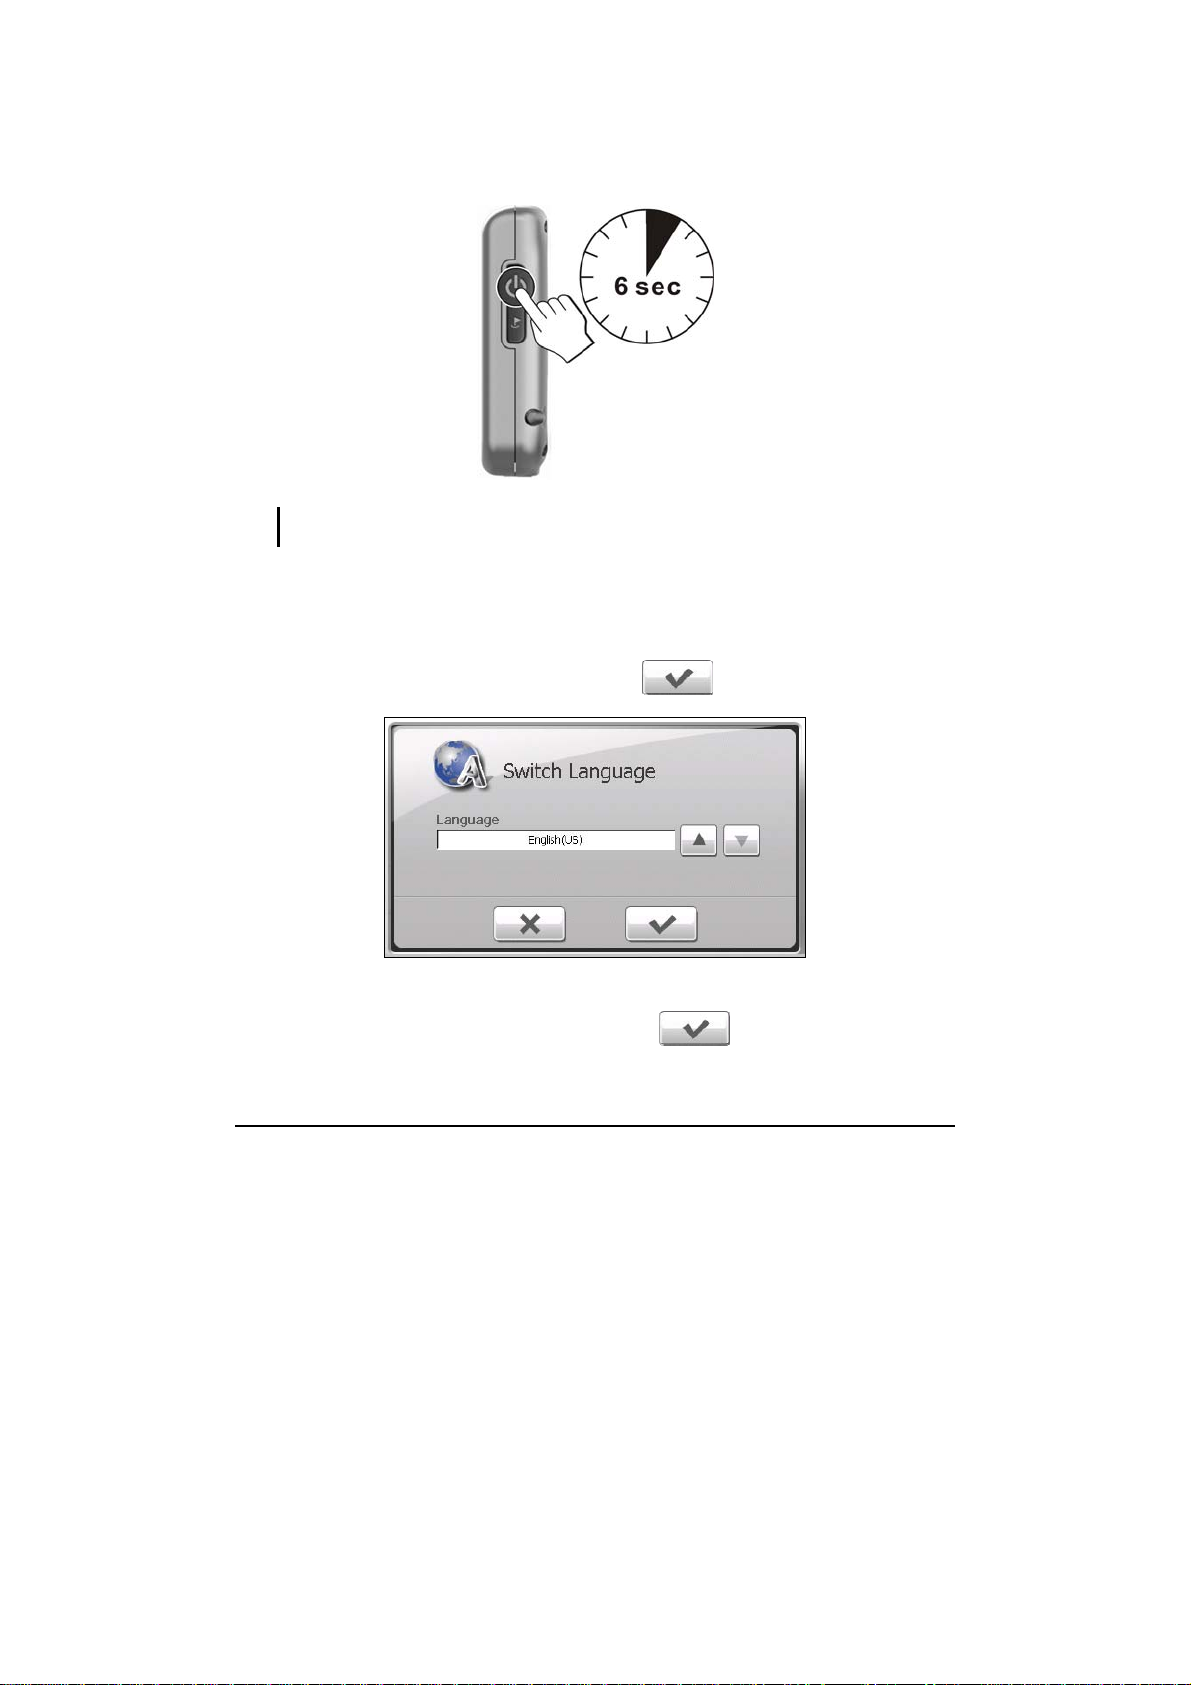
1. For the initial start up, press the power button for 6 seconds to turn on
the N.I.C.E. 430.
NOTE: For sleep mode, briefly press the power button to turn on and off the N.I.C.E.
430.
2. Immediately charge the N.I.C.E. 430 upon the initial start up. Please refer to
the “charging the battery” section for assistance.
3. The “Switch Language” screen appears. Tap the up/down arrow button to
select the desired language. Then, tap the
button.
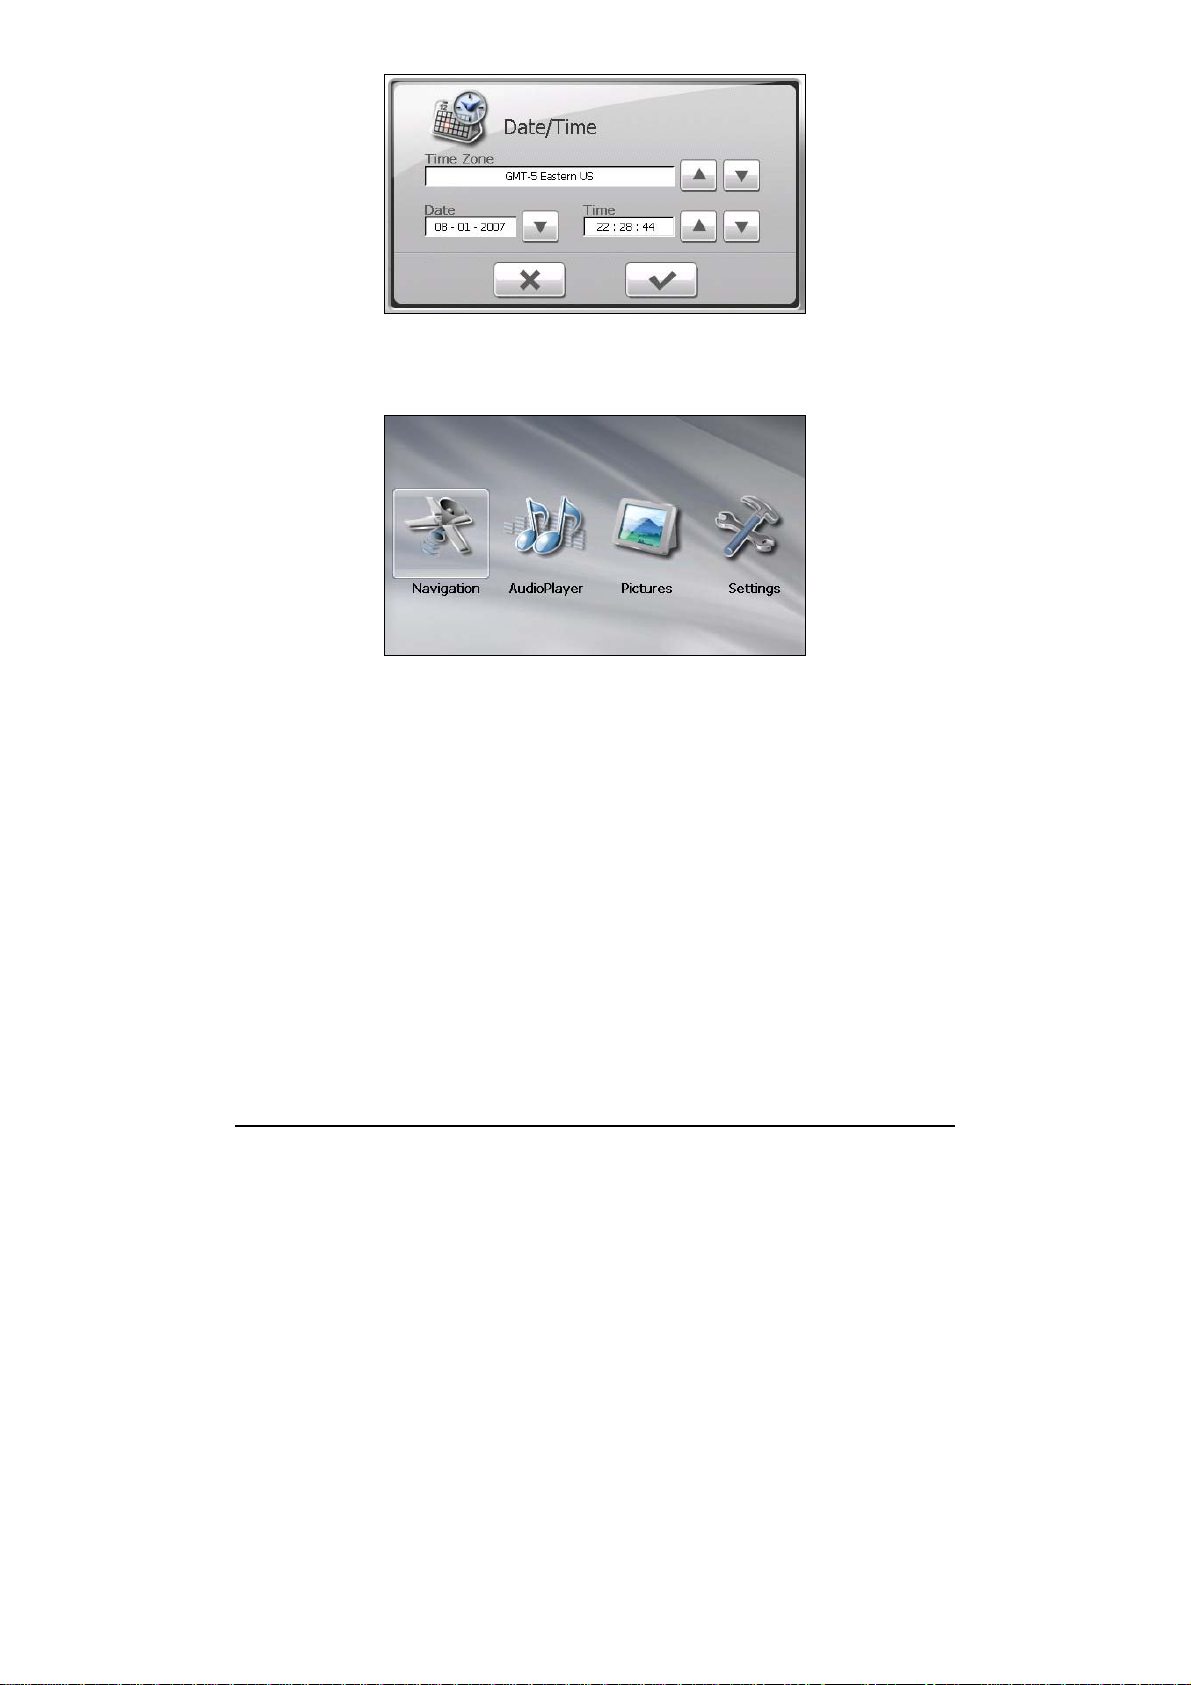
4. The “Date/Time” screen appears. Tap the appropriate arrow button to select
the time zone, date, and time. Then, tap the
button.
4
Page 13
5. Once the Main Menu Screen appears, you can begin using the N.I.C.E. 430. It
is recommended to fully charge the battery before use.
5
Page 14
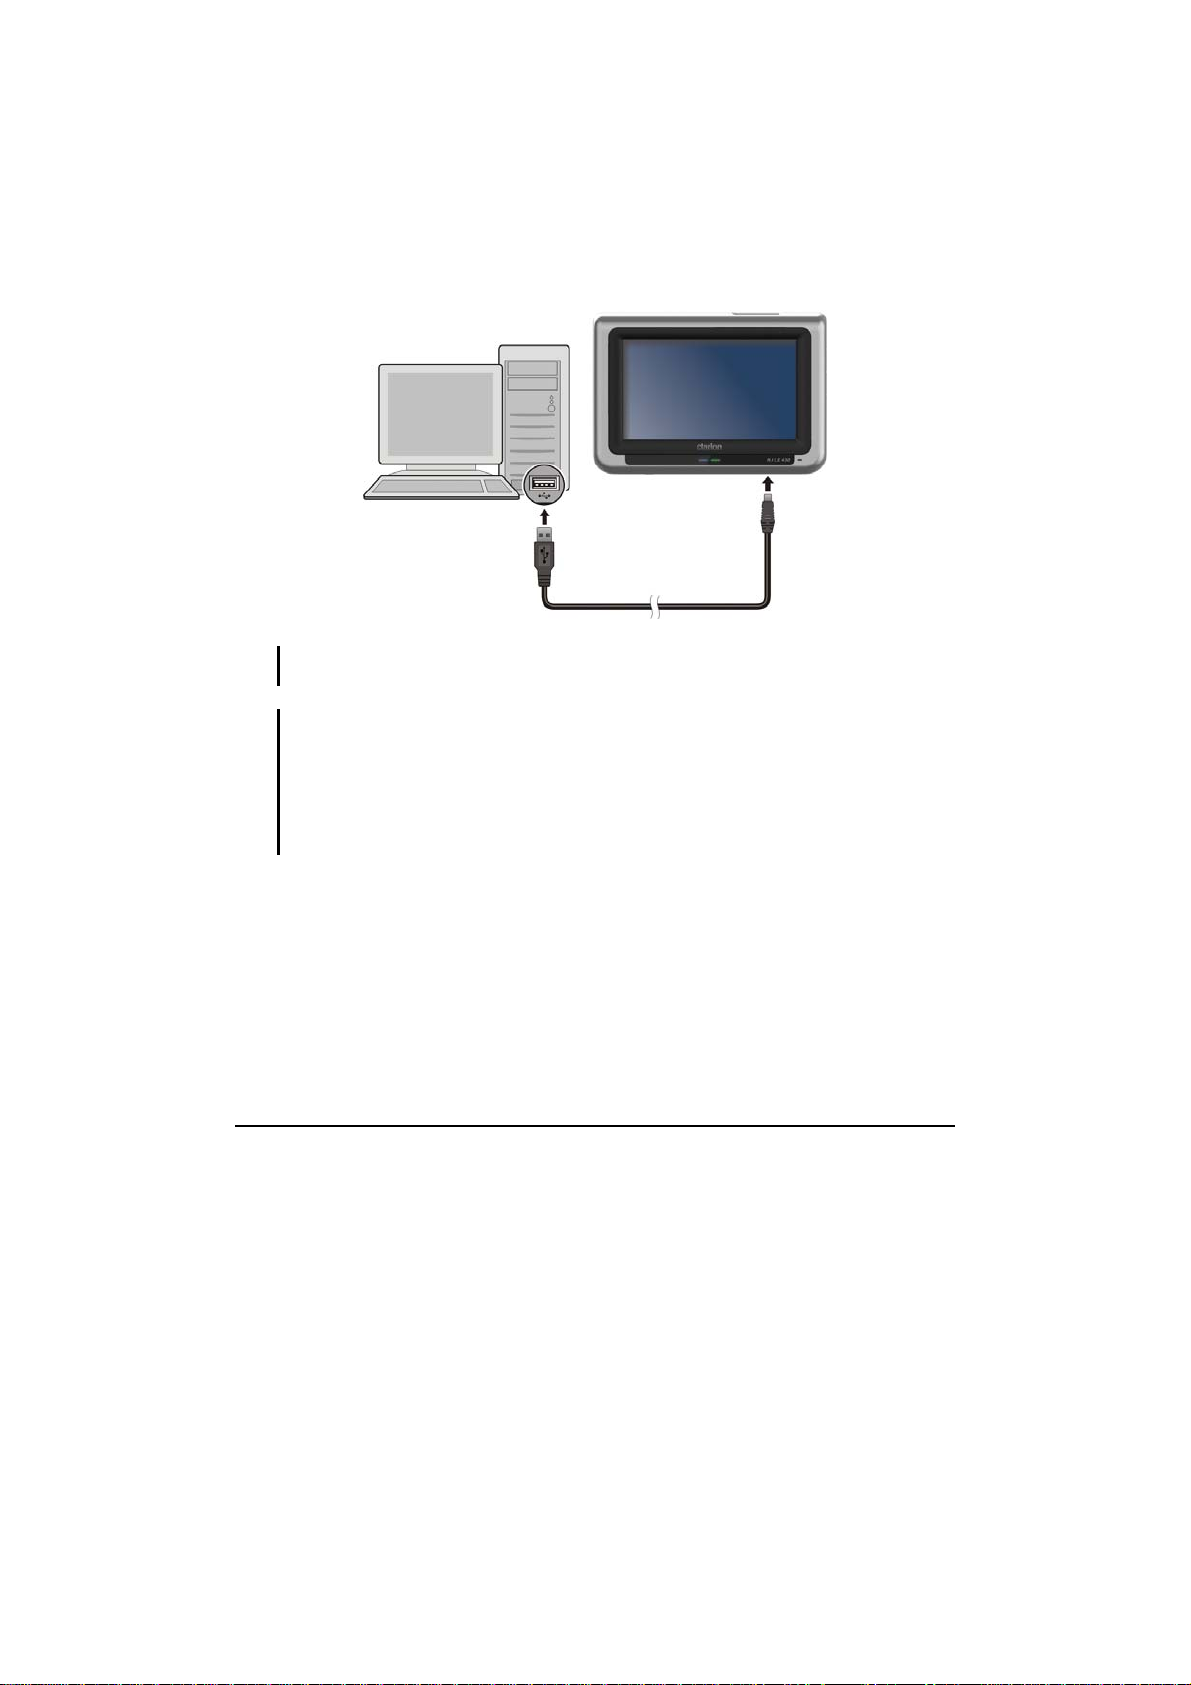
1.3 Charging the Battery via the USB Cable
When charging the battery for the very first time, you should charge it for at least
8 hours.
1. Turn ON the computer.
2. Connect the mini-USB end of the USB cable to the bottom of the N.I.C.E. 430
and the other end to a USB port on your computer.
NOTE: If you intend to charge the N.I.C.E. 430 this way, turn OFF your device so that it takes
less time to charge the battery.
CAUTION: For optimal performance of the lithium battery:
z Do not charge the battery where the temperature is high (e.g. in direct sunlight).
z There is no need to fully discharge the battery before charging. You can charge the battery
before it is discharged.
z When storing the product for a long period of time, be sure to fully charge the battery at
least once every two weeks. Over discharge of the battery can affect the charging
performance.
6
Page 15
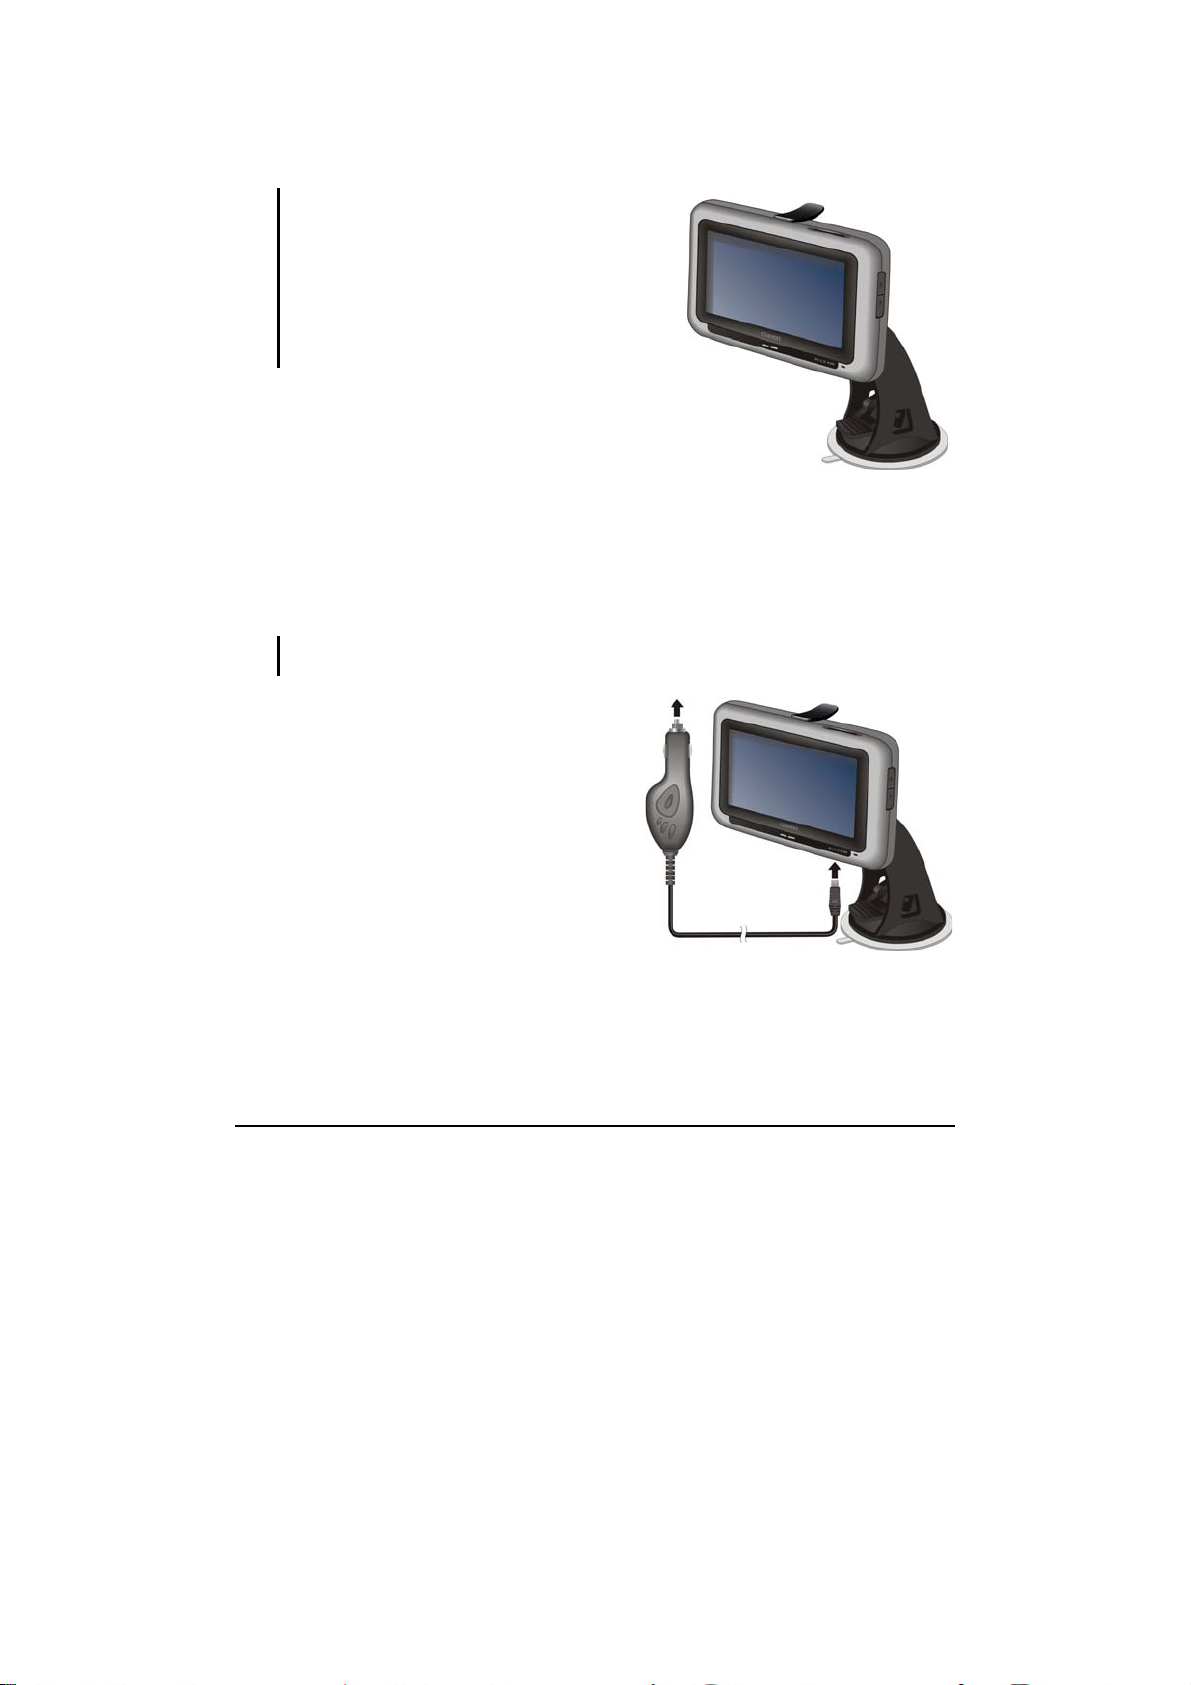
1.4 Using the N.I.C.E. 430 in a Vehicle
Using the Mounting Bracket
CAUTION:
z Select an appropriate location for the mounting
bracket. Never place the bracket where the
driver’s field of vision is blocked.
z If the vehicle’s windshield is tinted with a reflective
coating, an external antenna (optional) may be
needed to route the antenna to the top of the car
through a window. When closing the vehicle’s
window, be careful not to pinch the antenna cable
The mounting bracket consists of a bracket and a
stand. Use the mounting bracket to fix the
N.I.C.E. 430 in the vehicle. Make sure that the
GPS antenna has a clear view of the sky.
Connecting the Cigarette Lighter Adapter
The cigarette lighter adapter supplies power to the N.I.C.E. 430 while in use in the
vehicle.
CAUTION: To protect your device against sudden surges in current, connect the cigarette
lighter adapter only after the car engine has been started.
1. Connect one end of the cigarette lighter
adapter to the power connector of the
N.I.C.E. 430.
2. Connect the other end to the cigarette
lighter adapter into the vehicle’s
cigarette lighter to charge the N.I.C.E.
430. The indicator on the cigarette
lighter adapter lights up green to
indicate that power is being supplied to
the N.I.C.E. 430.
7
Page 16
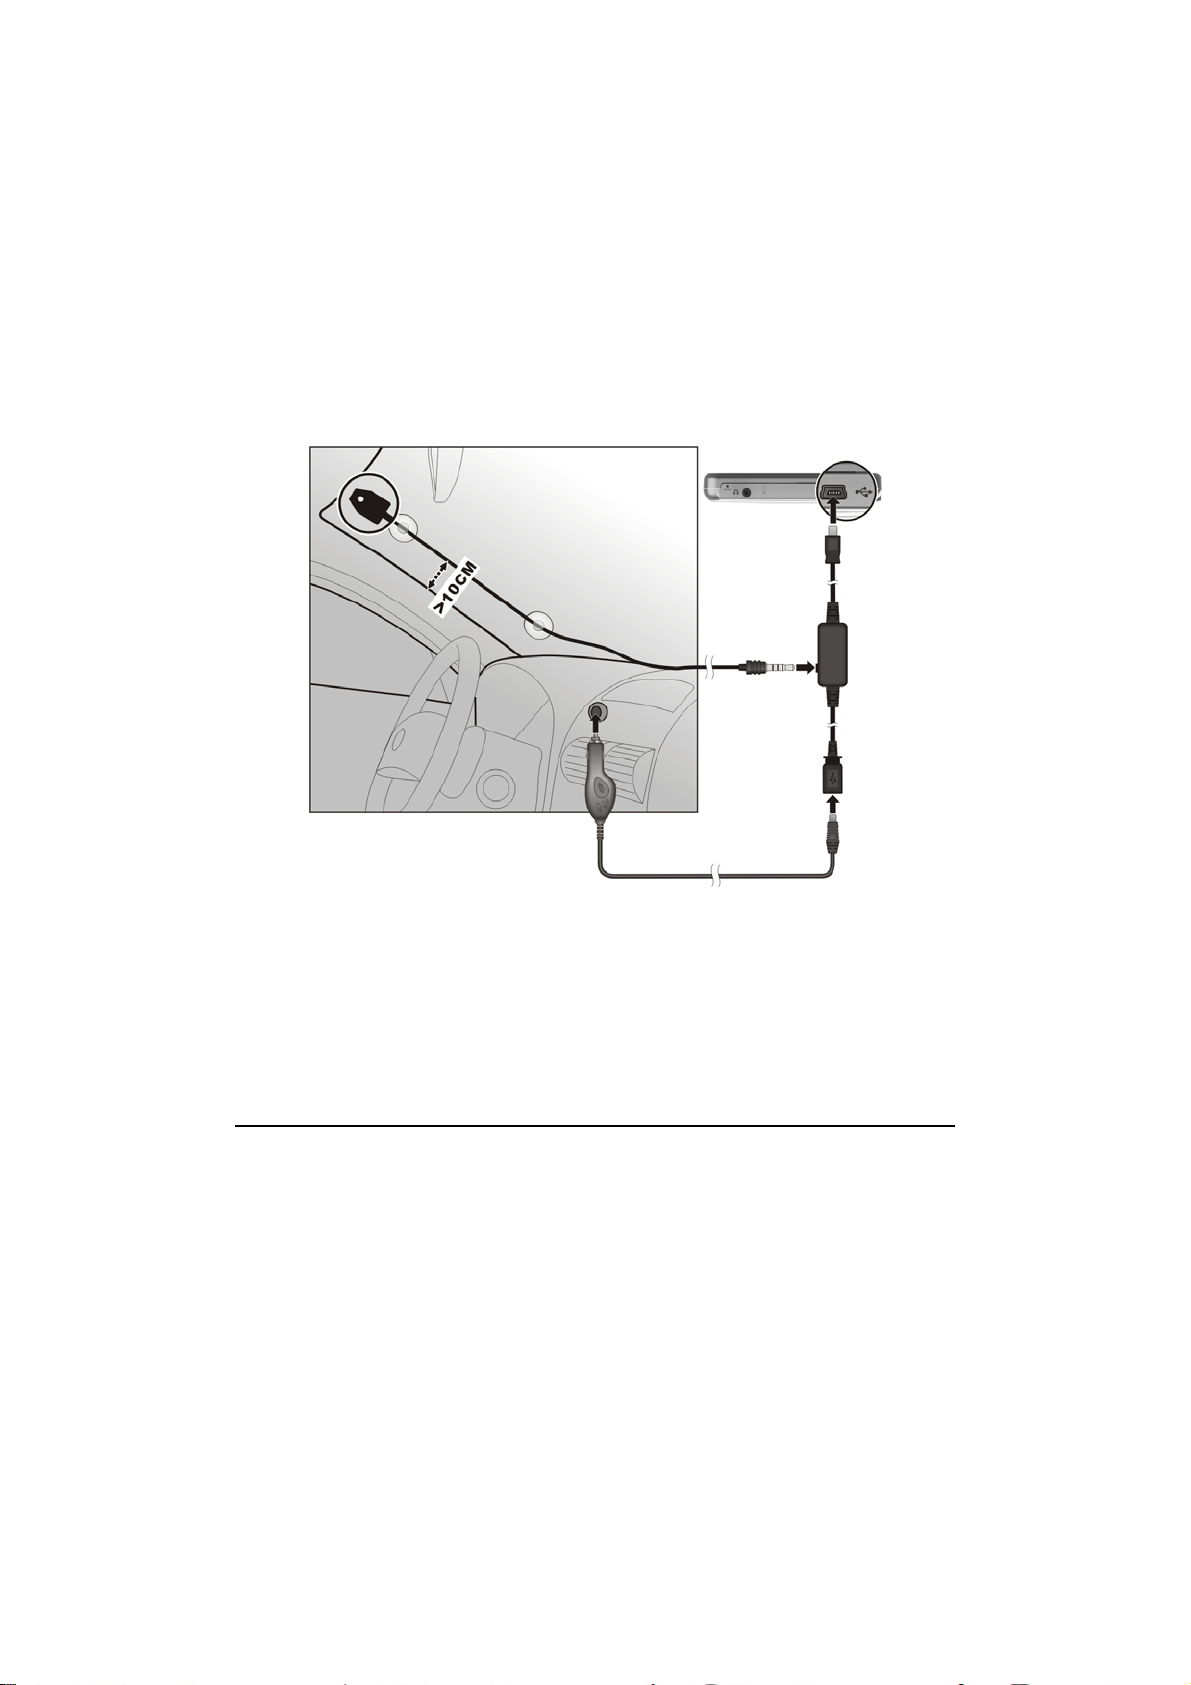
Connecting the Optional Traffic Module
The Traffic Module (NAVRDS, sold separately) allows you to receive radio
transmissions that are used to inform drivers of traffic, weather, and other driving
conditions.
1. Connect one end of the Traffic Module receiver to the bottom of the N.I.C.E.
430.
2. Connect one end of the FM antenna to the Traffic Module receiver and secure
the other end to the top corner of the windshield.
3. Connect one end of the cigarette lighter adapter to the power connector of the
Traffic Module receiver and the other end to the cigarette lighter in the
vehicle.
FM Antenna
Cigarette Lighter Adapter
Traffic Module
Receiver
Traffic information is monitored by the navigation software. Once the information
is received, you can view it on the N.I.C.E. 430 and traffic icons will appear in the
map view. Certain roads with reported traffic will be highlighted and you can
choose to avoid those roads and an alternate route will be automatically
calculated. (See the navigation manual for detailed information.)
8
Page 17
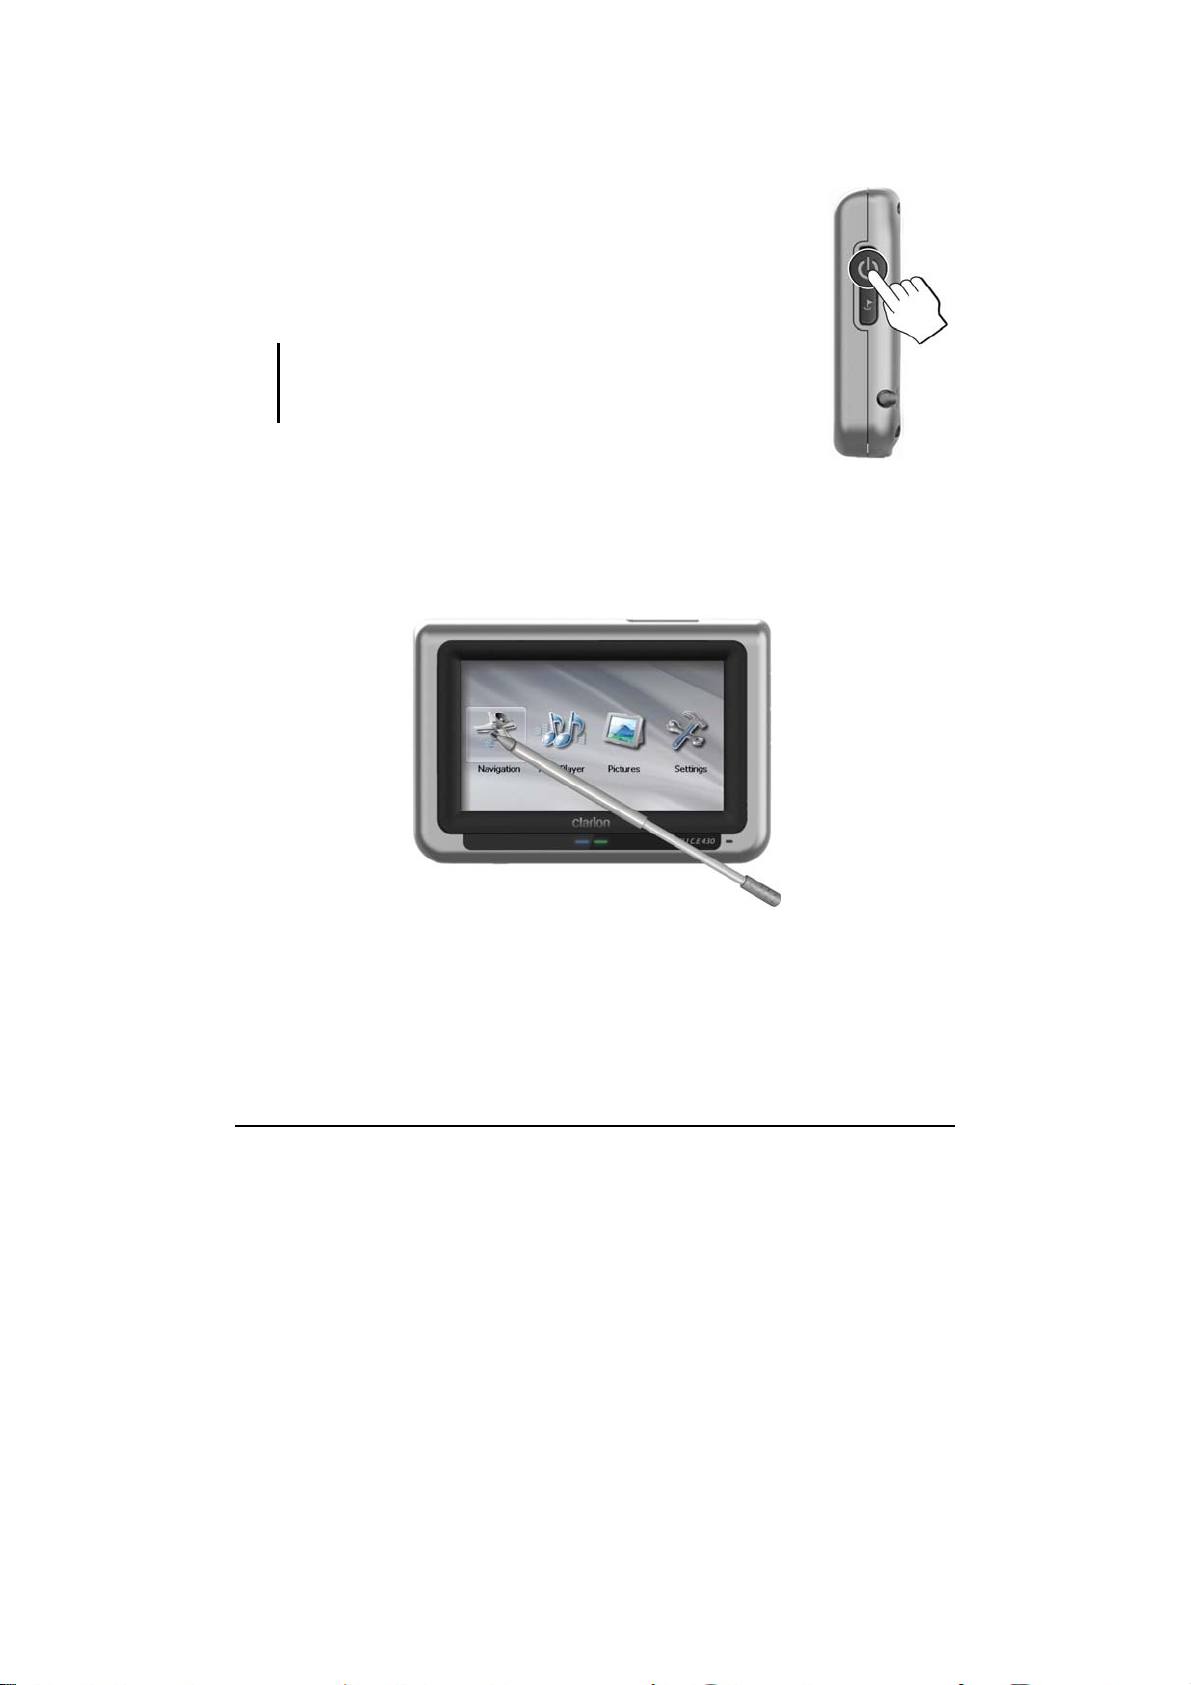
1.5 Operating Basics
Turning On and Off
Briefly press the power button for 6 seconds to turn ON and OFF
the N.I.C.E. 430.
When you press the power button to turn OFF the unit, the
N.I.C.E. 430 actually enters a sleep mode and the system stops
operating. Once you turn ON the system again, it resumes.
NOTE: In case you turn off the power by pressing the power button
for 6 seconds, you will need to press the power button for 6
seconds again for turning ON. You will then see the initial start up
screen.
Using the Stylus
The stylus is your input device. You use it to navigate and select objects on the
screen. Pull the stylus out of the slot and extend it for ease of use. Store it in the
slot when not in use. You can use the stylus for the following actions:
z Tap
Touch the screen once with the stylus to open items or select options.
z Drag
Hold the stylus on the screen and drag up/down/left/right or across the screen.
9
Page 18
z Tap and hold
Tap and hold the stylus until an action is complete, or a result or menu is
shown.
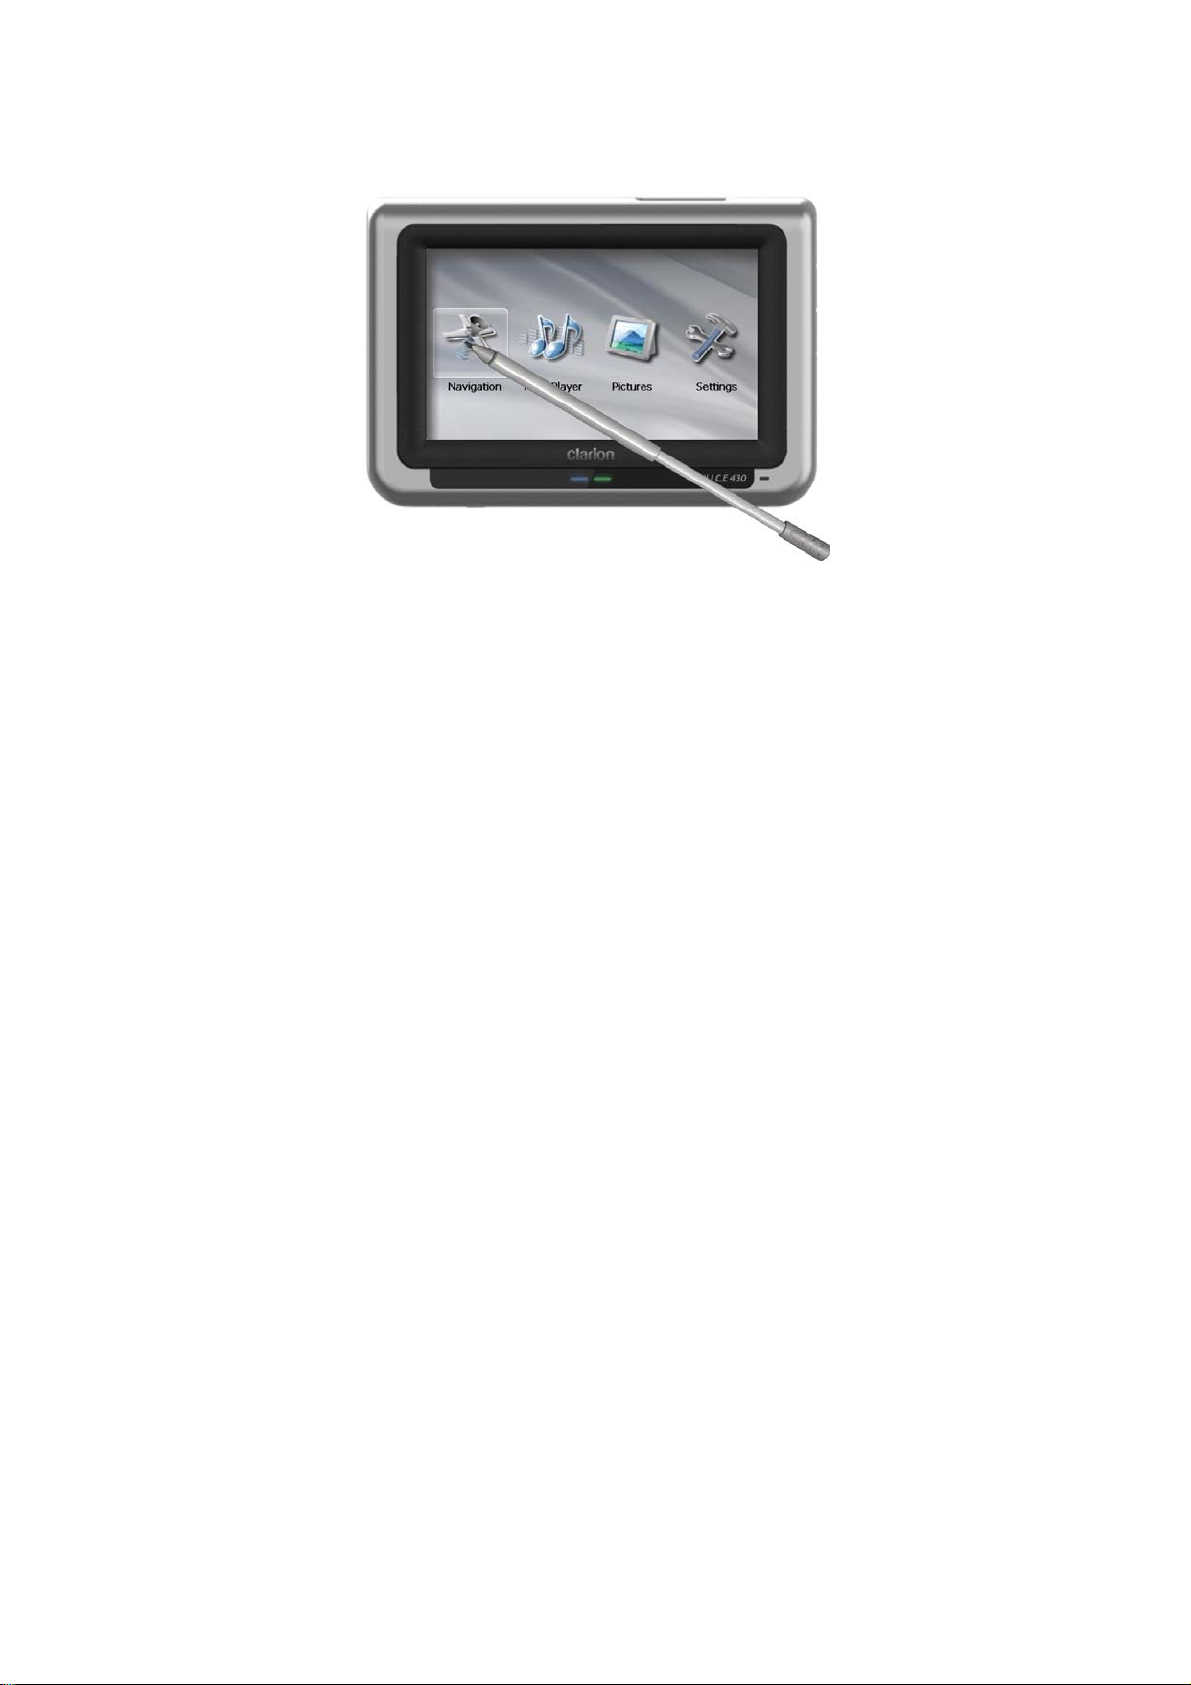
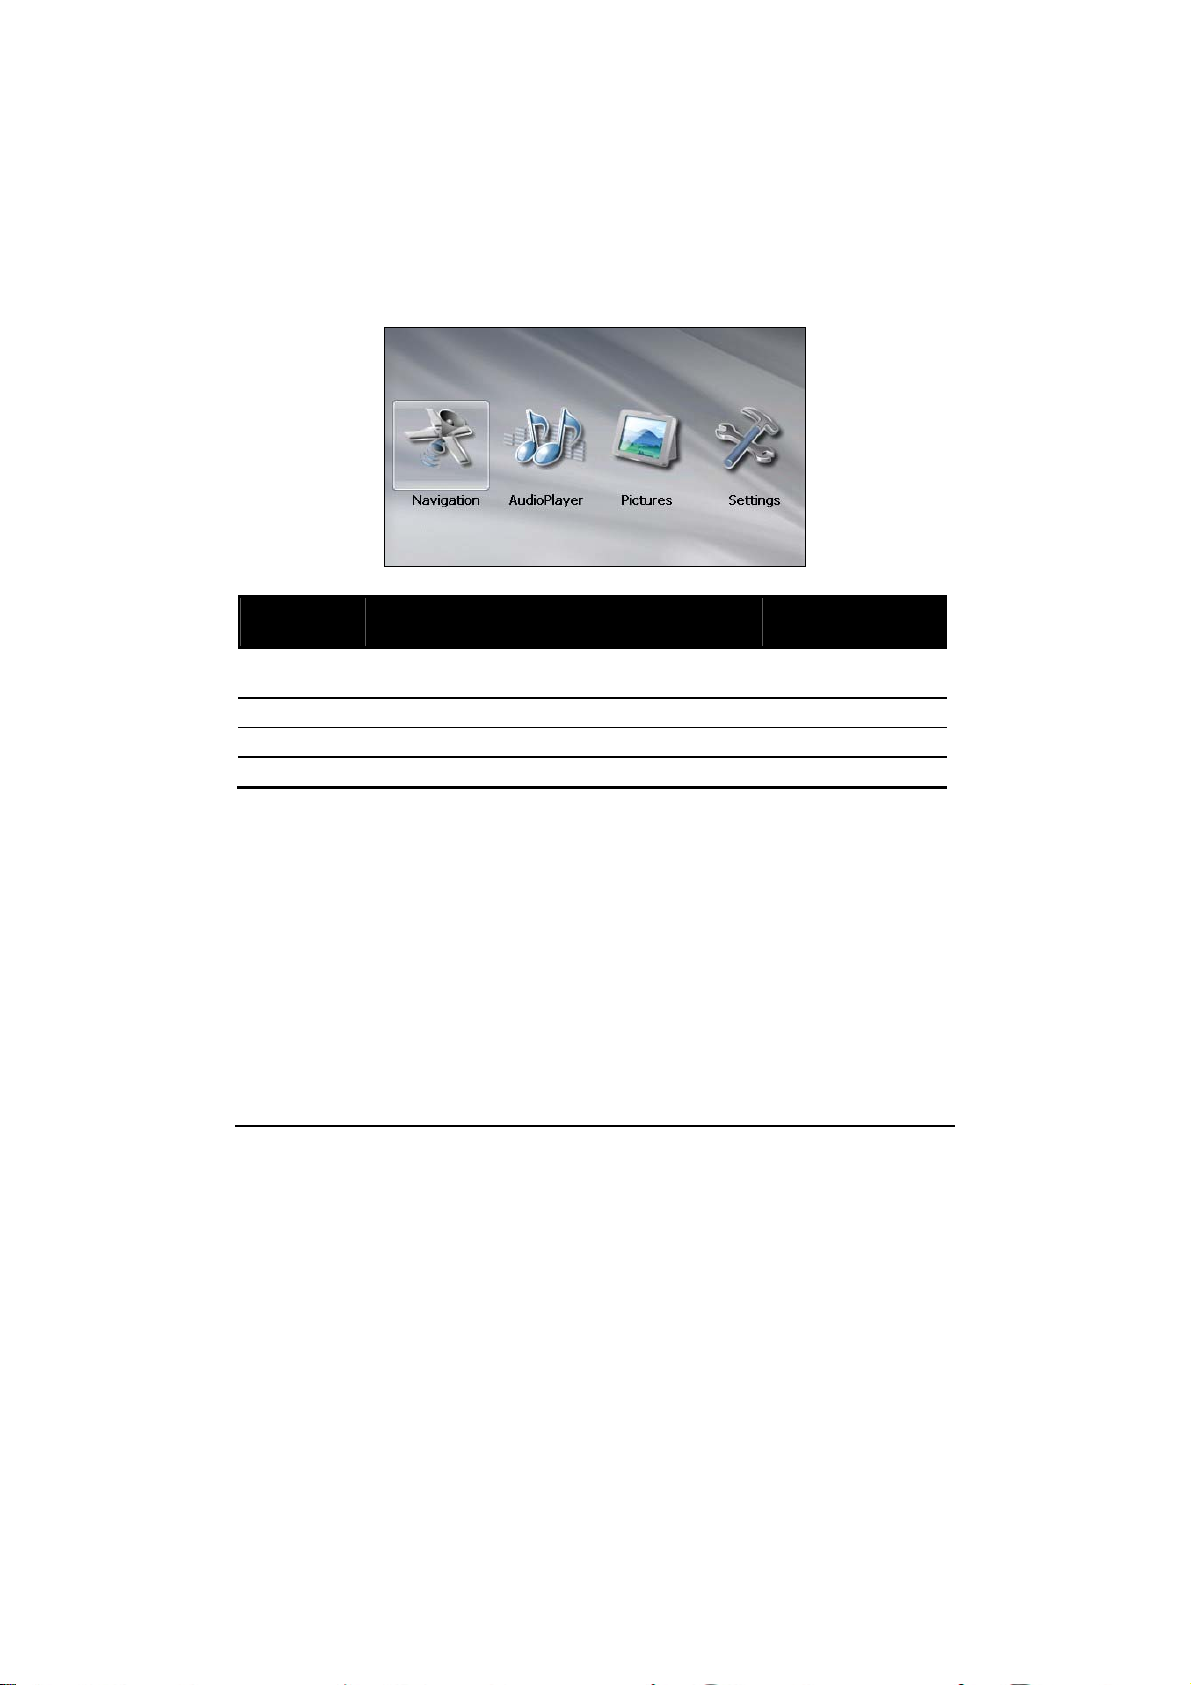
The Main Menu
The first time you initialize your device, the Main Menu screen appears. The
Main Menu screen is your starting place for various tasks. Tap a button to start a
task or open another menu.
Button
Name
Navigation Starts the navigation software. See the navigation
AudioPlayer Plays MP3/WAV/WMA music. Chapter 2
Pictures Displays pictures. Chapter 3
Settings Customizes the system settings. Chapter 4
Description
For Detailed
Information
manual.
10
Page 19

1.6 Inserting a SD/MMC Card
The N.I.C.E. 430 has a SD/MMC slot where you can
insert an optional Secure Digital or Multi Media
Card storage card. It supports up to a 2GB storage
card.
To use a SD/MMC card, insert it into the slot, with
the connector pointing to the slot and its label facing
the front of the device.
To remove a card, first make sure that no application
is accessing the card, then slightly push the top edge
of the card to release it and pull it out of the slot.
NOTE:
z Make sure that no foreign objects enter the slot.
z Keep a SD or MMC card in a well-protected box to avoid dust and humidity when you are
not using it.
11
Page 20

Page 21
2 Audio Player
2.1 Introduction
Audio Player features:
z Playback of MP3/WAV/WMA files
z Basic playback controls such as play, pause, stop, next and previous
z Playback includes single selection playback, repeat, single repeat, sampling
playback, normal sequence and random sequence.
z 11 preset equalizer audio profiles
z Play list support
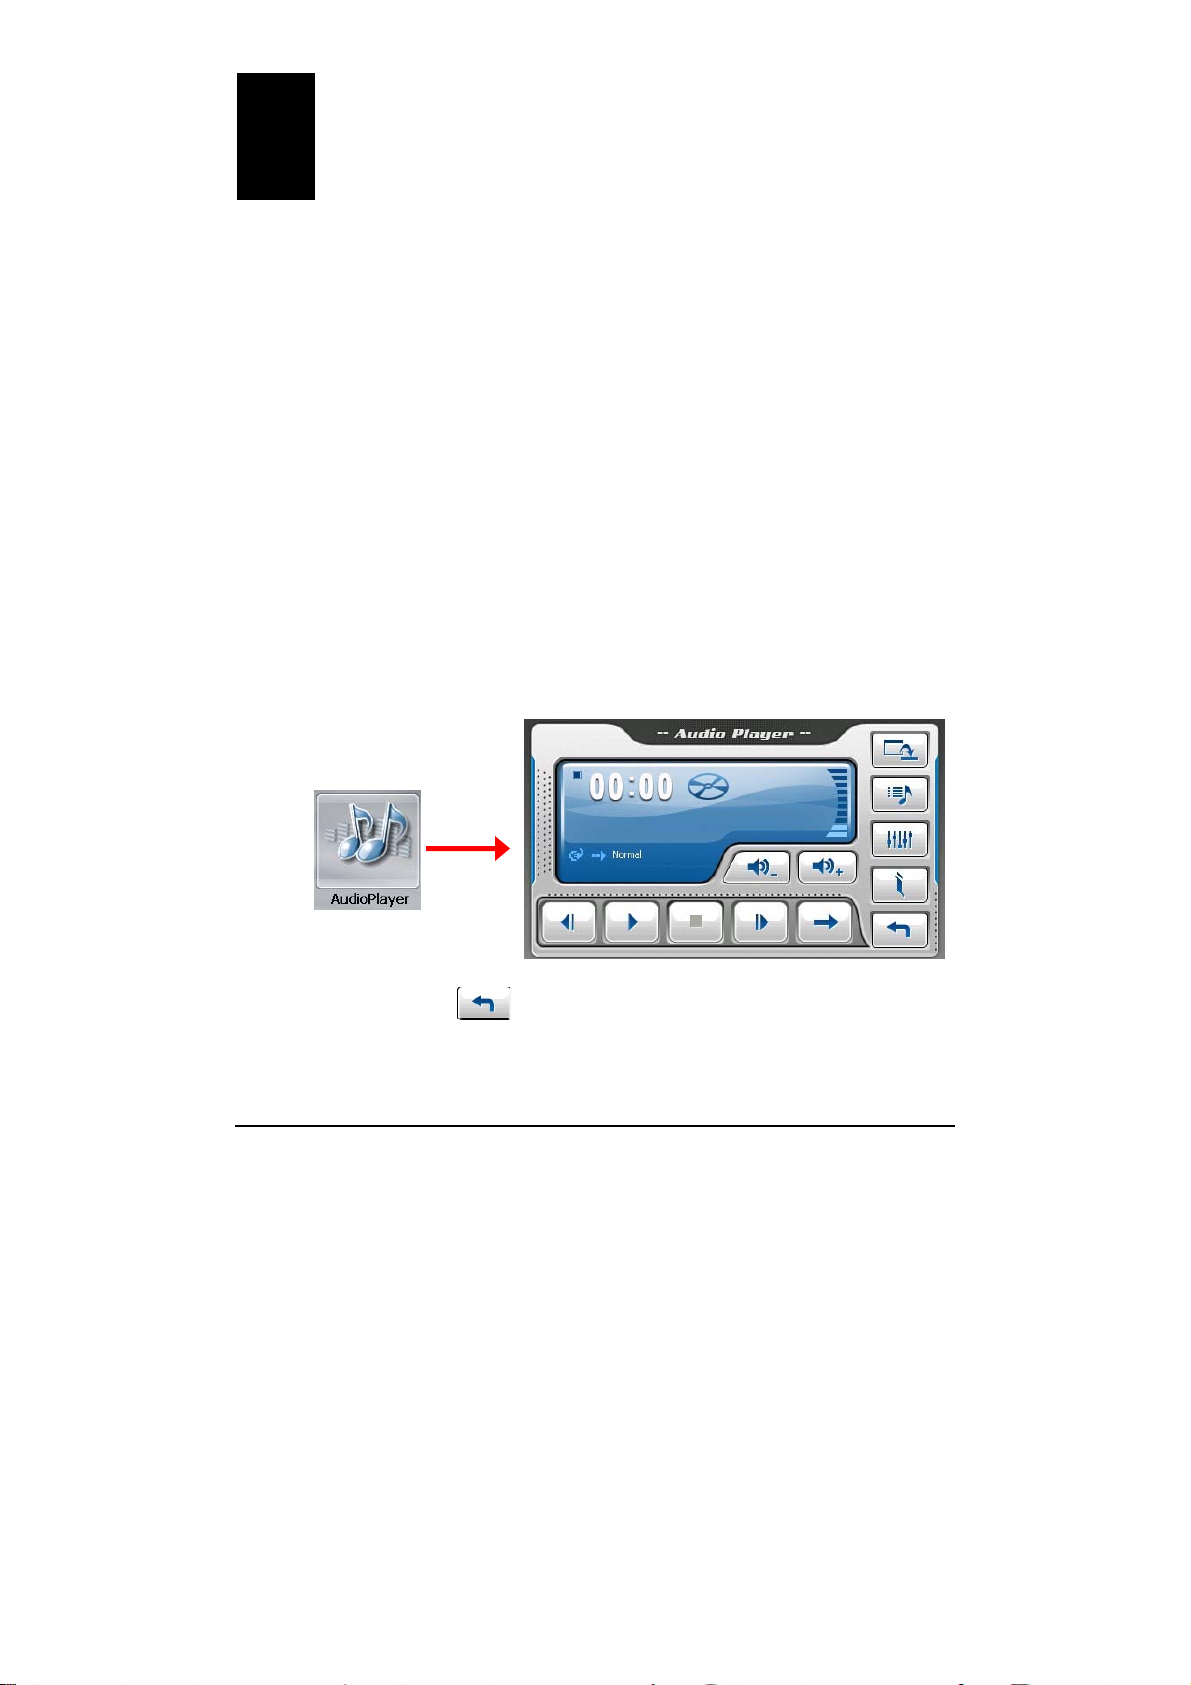
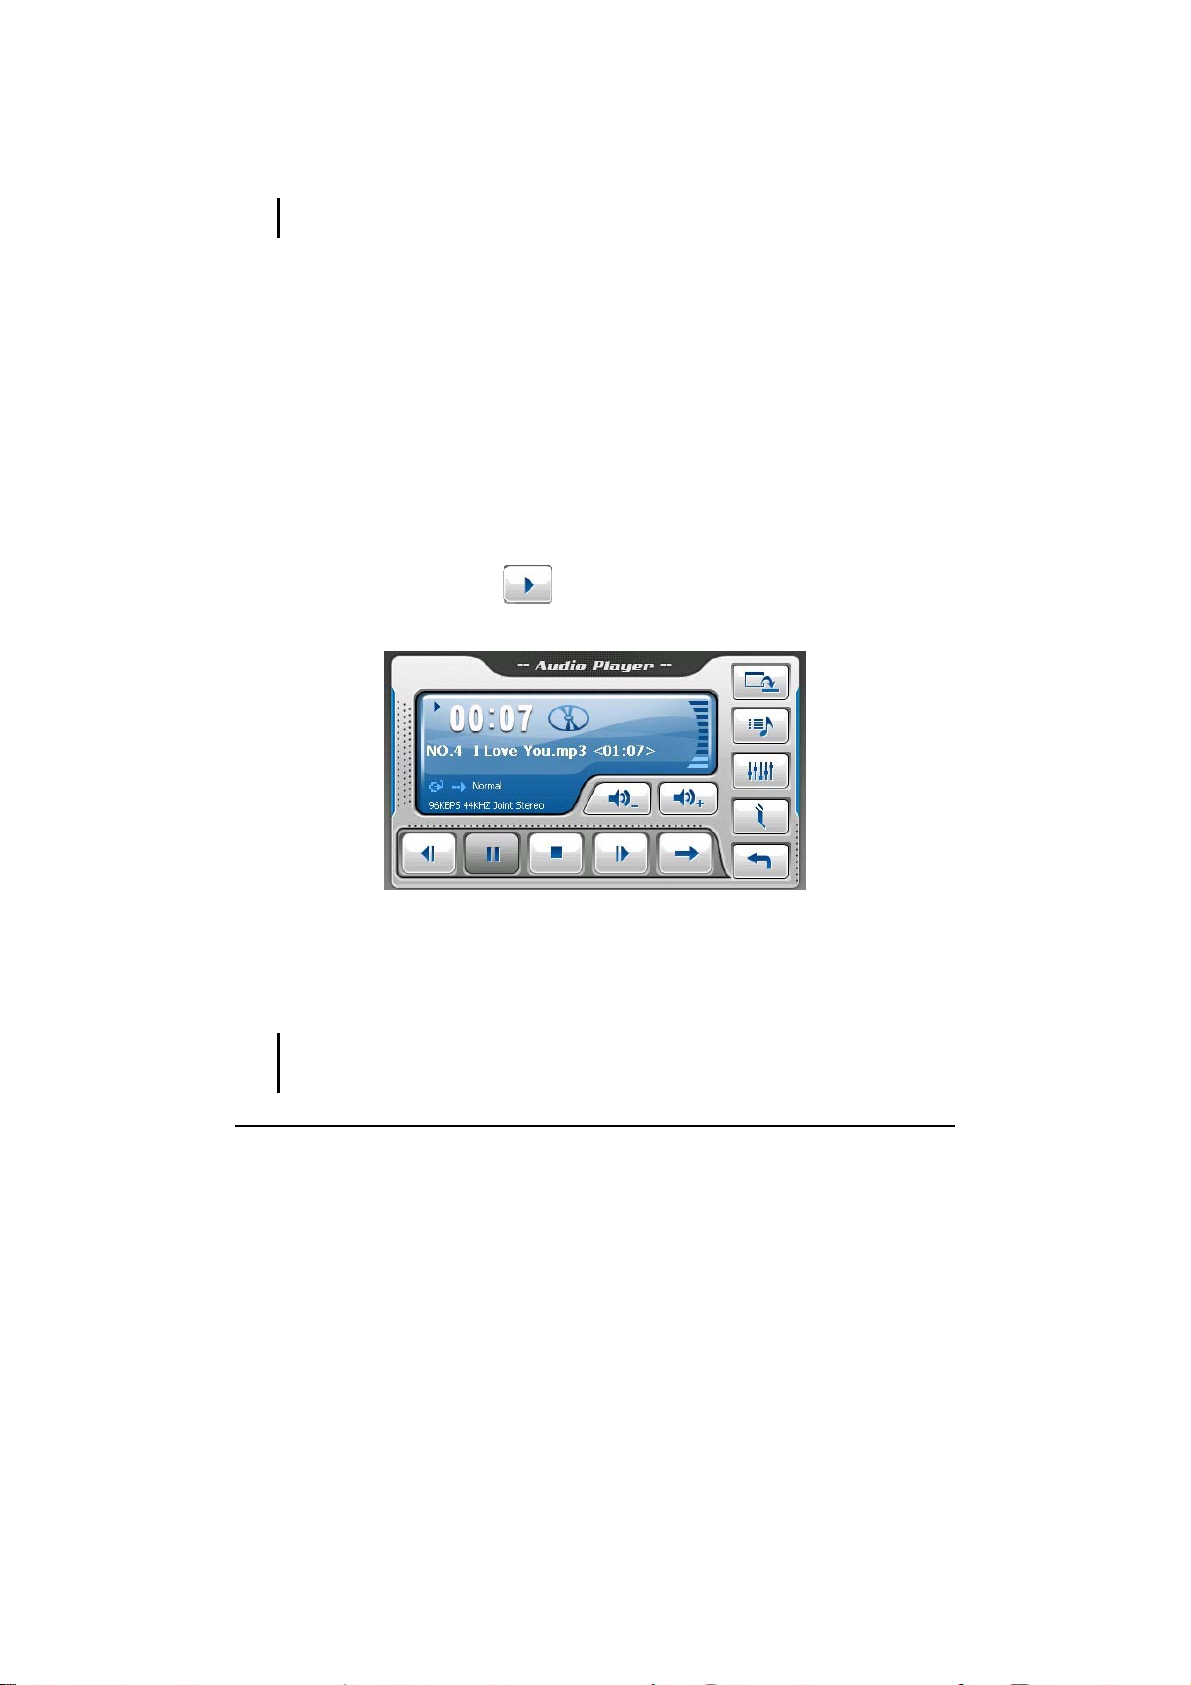
Tap the
panel appears on the screen where you can easily control the player by tapping the
control buttons.
To exit the program, tap
AudioPlayer button on the Home screen to start the program. The control
.
13
Page 22
2.2 Preparing the Audio Files for Your Device
Before using the program, have the files (.mp3, .wav, or .wma) ready on either
your device’s My Flash Disk\My Audio folder or on a storage card.
NOTE: If music files are stored in folders on the SD card, all files will not appear in folders. All
files will appear individually.
Use ActiveSync to copy files from your computer to the correct location. (See
Chapter 7 for information.)
2.3 Playing Audio Files
1. If your files are in a storage card, insert the card into the N.I.C.E. 430.
2. Tap the
3. The program will search for the supported audio files in the N.I.C.E. 430 and
in the storage card. When files are detected, they will be added to the play list.
4. To start the playback, tap . To control the playback, use the control
buttons as described later.
The information area displays the current status including the play/pause/stop
status, the elapsed time, the power status, the playback mode, the volume
level, and the properties of the current song such as the artist (if available with
the file), filename, total length, and stereo/mono information.
AudioPlayer button on the Home screen to start the program.
NOTE: If the total length of a song exceeds 99 minutes and 59 minutes, the information area
cannot correctly display the length because the maximum number allowed is 99:59.
However, the playback of the song is not affected.
14
Page 23
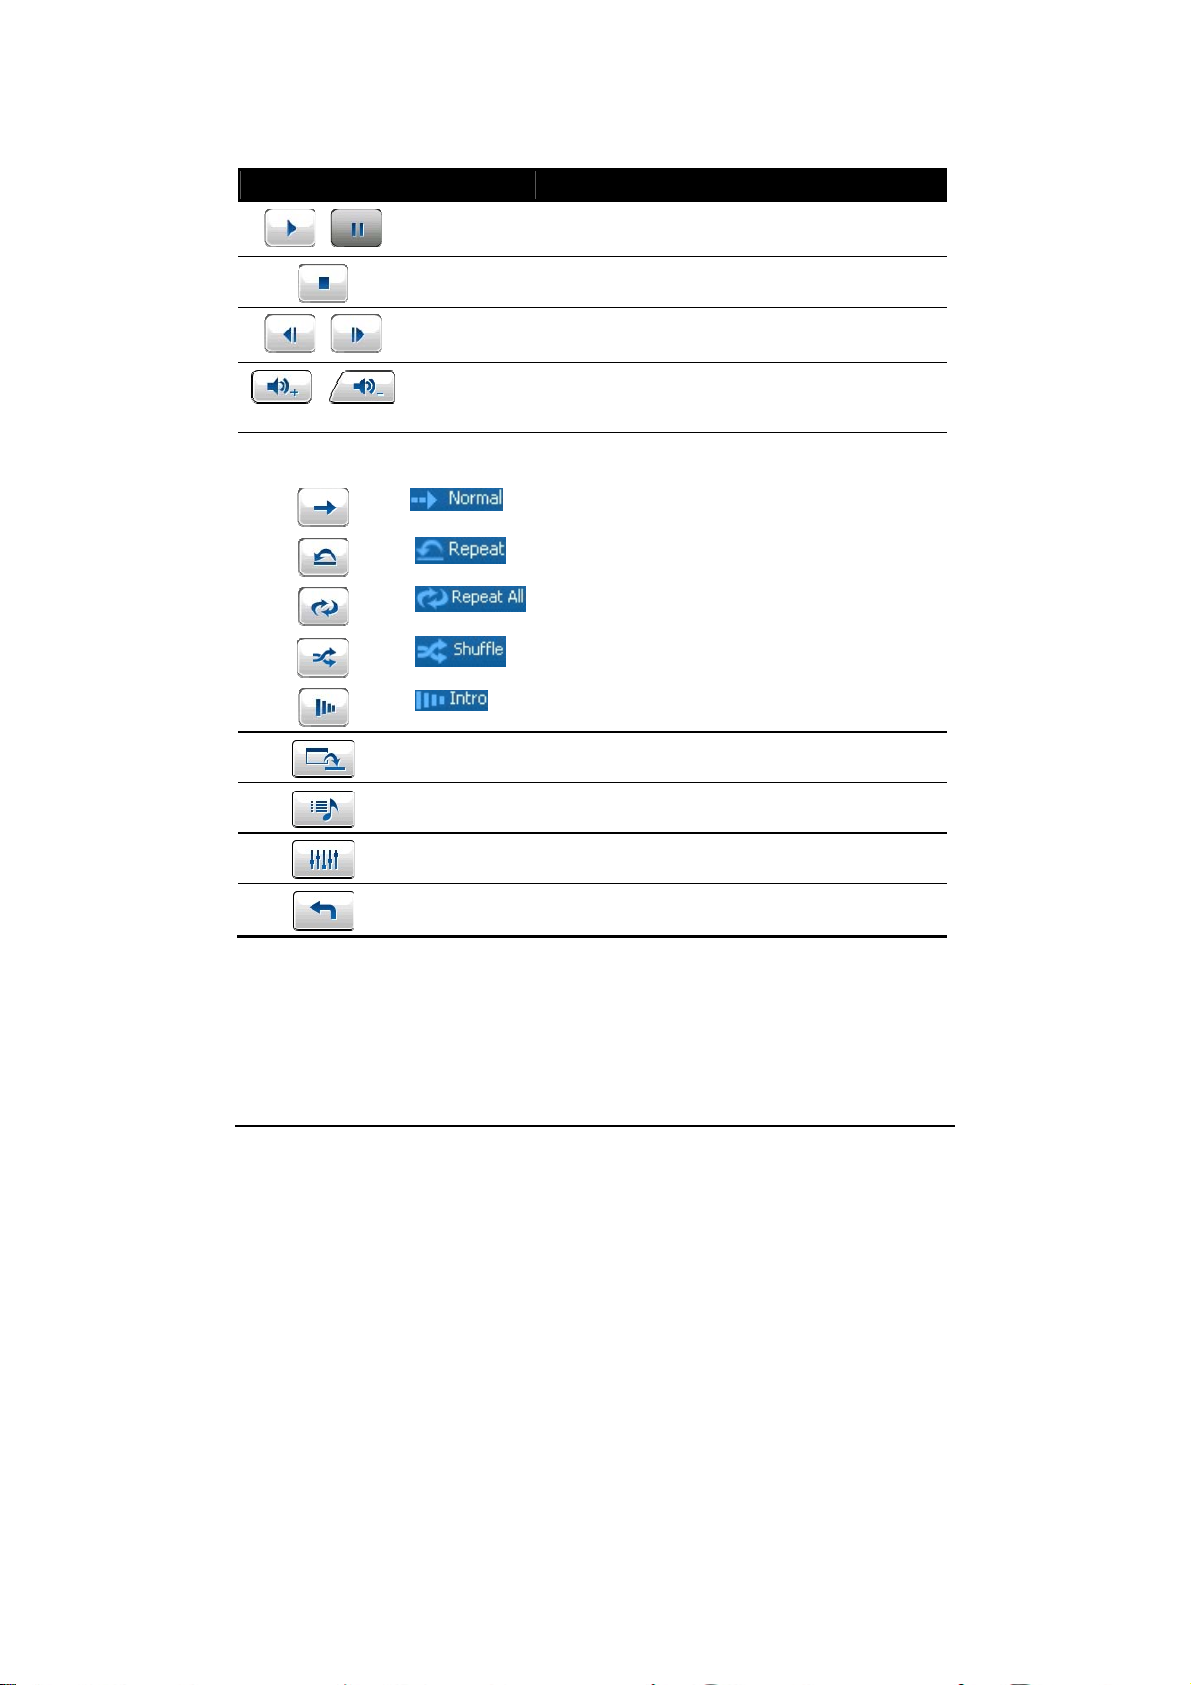
2.4 Playback Controls
Control Button Name Description
Play/Pause Play or pause the playback.
/
Stop Stop the playback.
Previous/
/
/
Next
Volume Increase or decrease the volume.
Playback
Mode
Minimize Minimize the control panel and play the music in
Play List Open play list. (See Section 2.6 for more
Equalizer Open the equalizer panel.
Exit Close the program and return to the Home screen.
Play the previous or next file.
The indicator on the panel shows the current
volume level.
Switch to the next mode:
Repeated playback of the current file.
Repeated playback of all files in the current play
list in sequence.
Playback of all files in the current play list in
random order.
Sampling (10 seconds) playback of all files in the
current play list in random order.
Playback of all files in the current play list in
sequence.
the background.
information.)
(See Section 2.7 for more information.)
15
Page 24
2.5 Editing the Play Lists
You can edit the play list if you want to. The play list is saved when you exit
Audio Player. When you next start Audio Player, the play list remains the same
one as long as all the files still exist. (Files that have been removed will not appear
in the play list) If you have copied more audio files to your device or a storage
card, you can manually add the files to the play list.
NOTE: If you remove and then insert the storage card when using Audio Player, the play list
will be automatically refreshed.
1. Tap on the control panel to open the play list screen. The screen
shows the current play list.
Play the
selected file.
Add song
to play list.
Clear all songs from the current
play list. (No files are deleted.)
Remove the selected song from the
play list or from the storage media.
Back
2. To add a song to the play list, tap
.
3. A screen appears displaying all the audio files. Tap the song(s) you wish to
add and then tap
.
16
Page 25
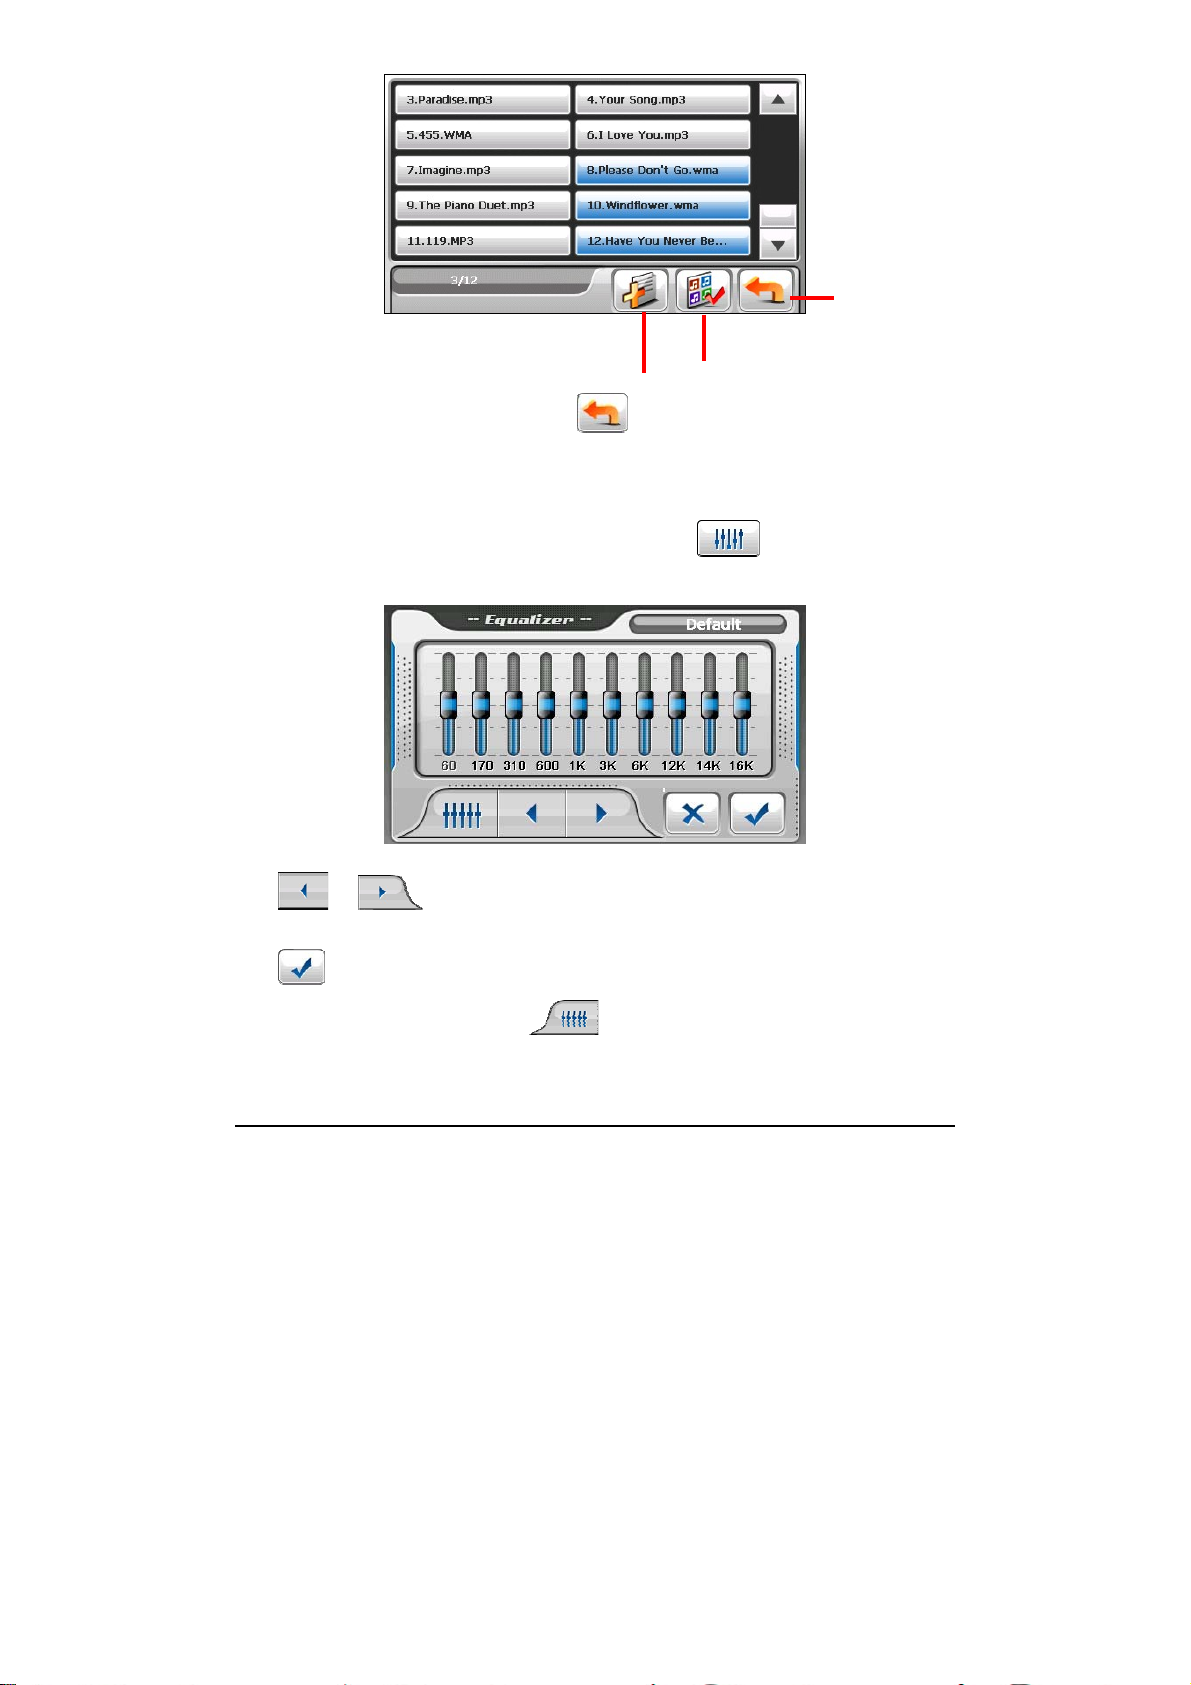
Add the selected song(s)
to the play list.
Select all songs.
Back
4. To return to the control panel, tap
.
2.6 Equalizer
The program provides 11 preset audio profiles. Tap to open the equalizer
panel.
Tap
Soft, Disco, Heavy, Dance, Classical, Jazz, Pop and Rock.
Tap
or to cycle through the available options: Default, Hall, 3D,
to save your selection and return to the control panel.
To select the Default profile, tap
.
17
Page 26

Page 27
3 Pictures
3.1 Starting and Exiting Pictures
Pictures allows you to view pictures in JPG, JPEG, and BMP formats and view
the slideshow of the pictures on your device.
Tap the
To exit the program, tap
Pictures button on the Main Menu screen to start the program.
.
3.2 Preparing the Pictures for Your Device
Before using the program, have the files (.jpg, .jpeg, or .bmp) ready on either your
device’s My Flash Disk\My Pictures folder or on a storage card.
NOTE:
z Picture Viewer does not support the display of BMP files in 32-bit and above color depth
formats.
Use ActiveSync to copy files from your computer to the correct location. (See
Chapter 7 for information.)
19
Page 28
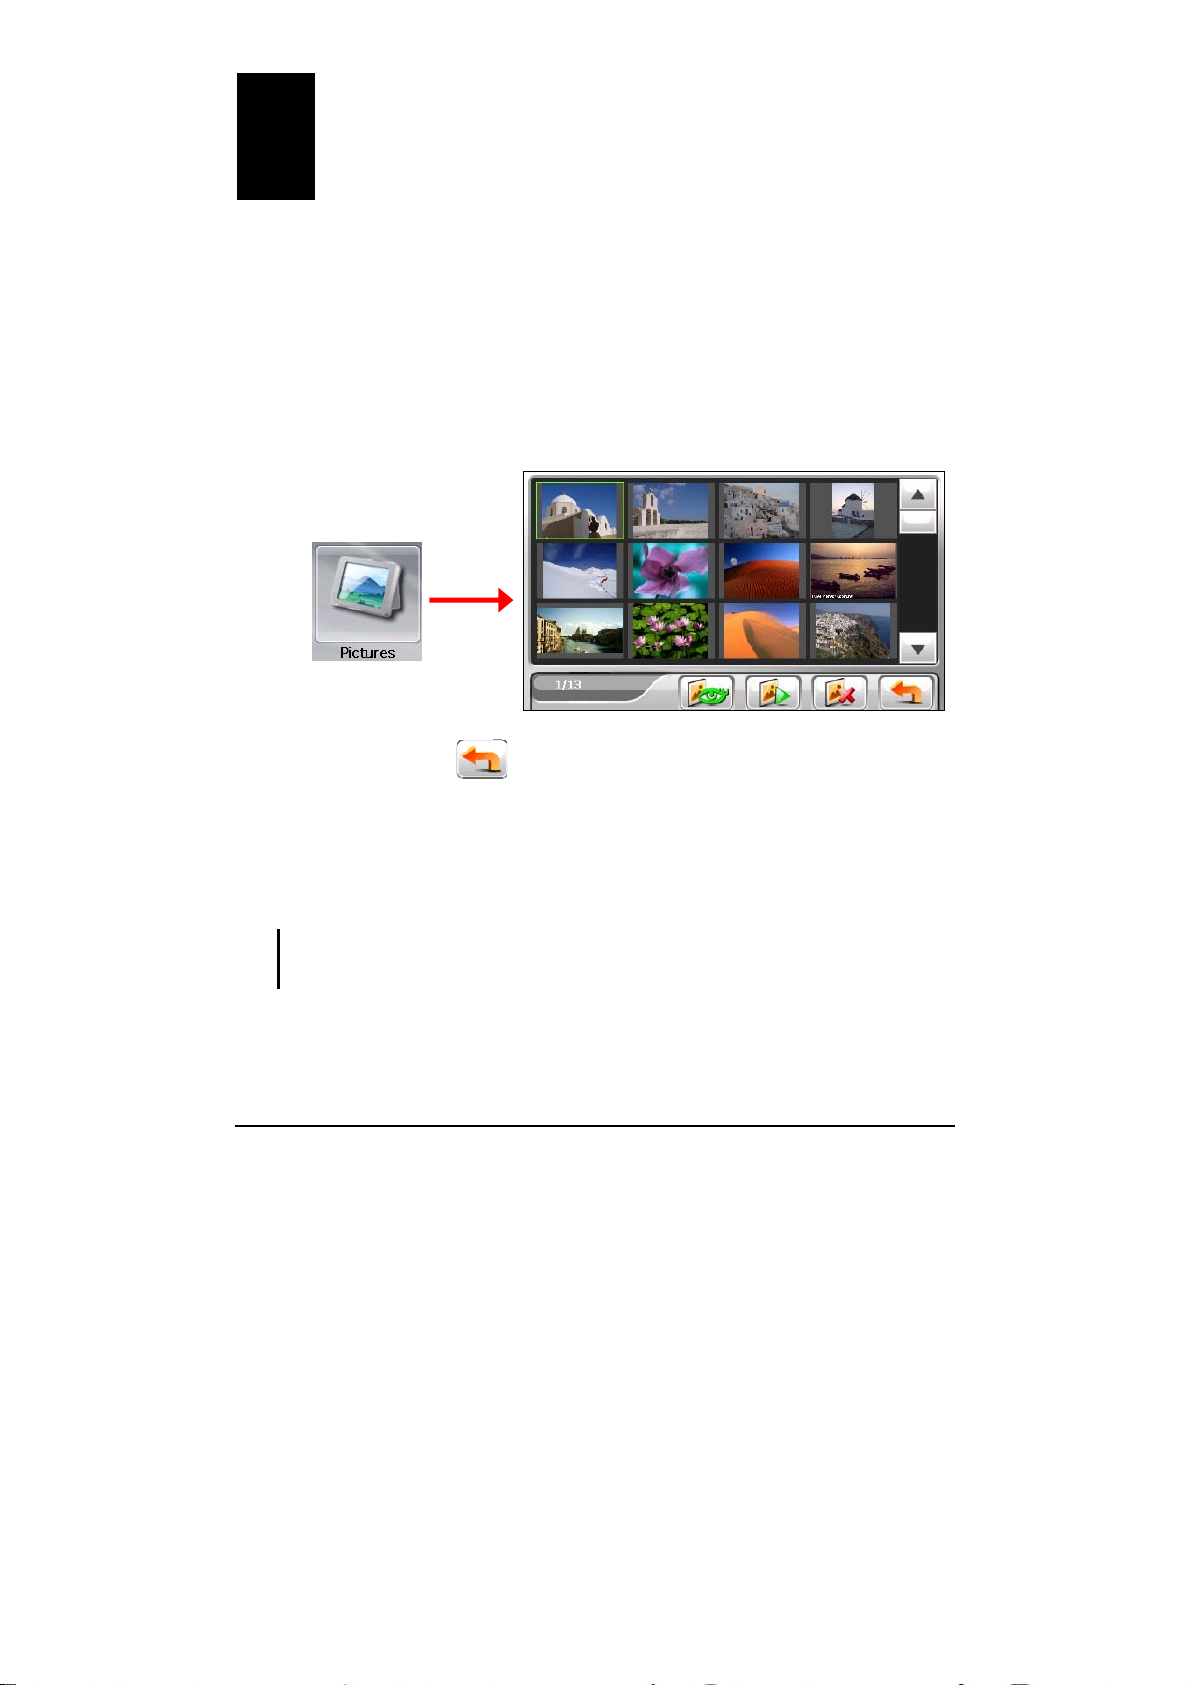
3.3 Viewing Pictures in Thumbnail View
1. If your files are in a storage card, insert the card into your device.
2. Tap the
Pictures button on the Main Menu screen to start the program.
3. The program will search the matching files in the specific folder on the
N.I.C.E. 430 and in all folders on a storage card. It then displays the pictures
in the thumbnail view. You can press the
Up or Down arrow button to go to
next or previous page.
A green frame
indicates the
picture is selected.
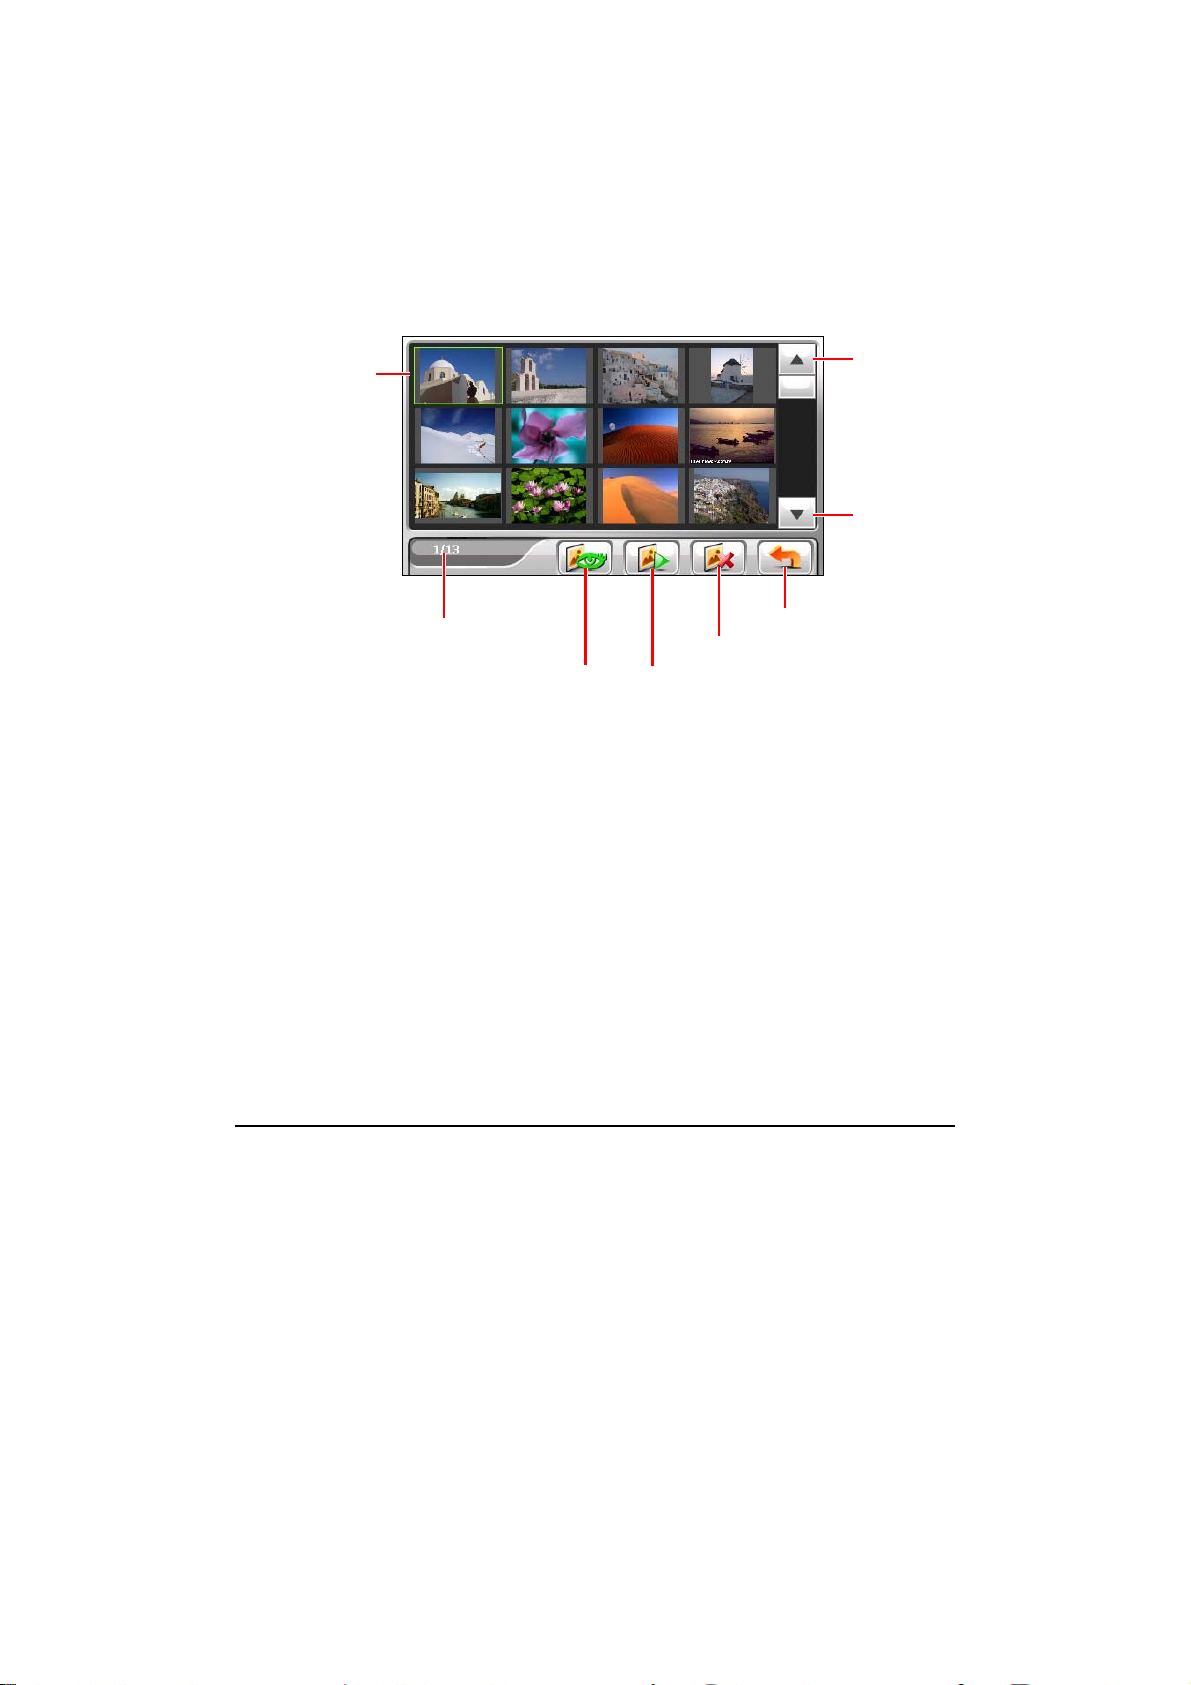
Page up
Page down
Selected file/
Total number of files
Open the selected
picture.
Start the slideshow.
Exit
Delete the selected picture.
20
Page 29
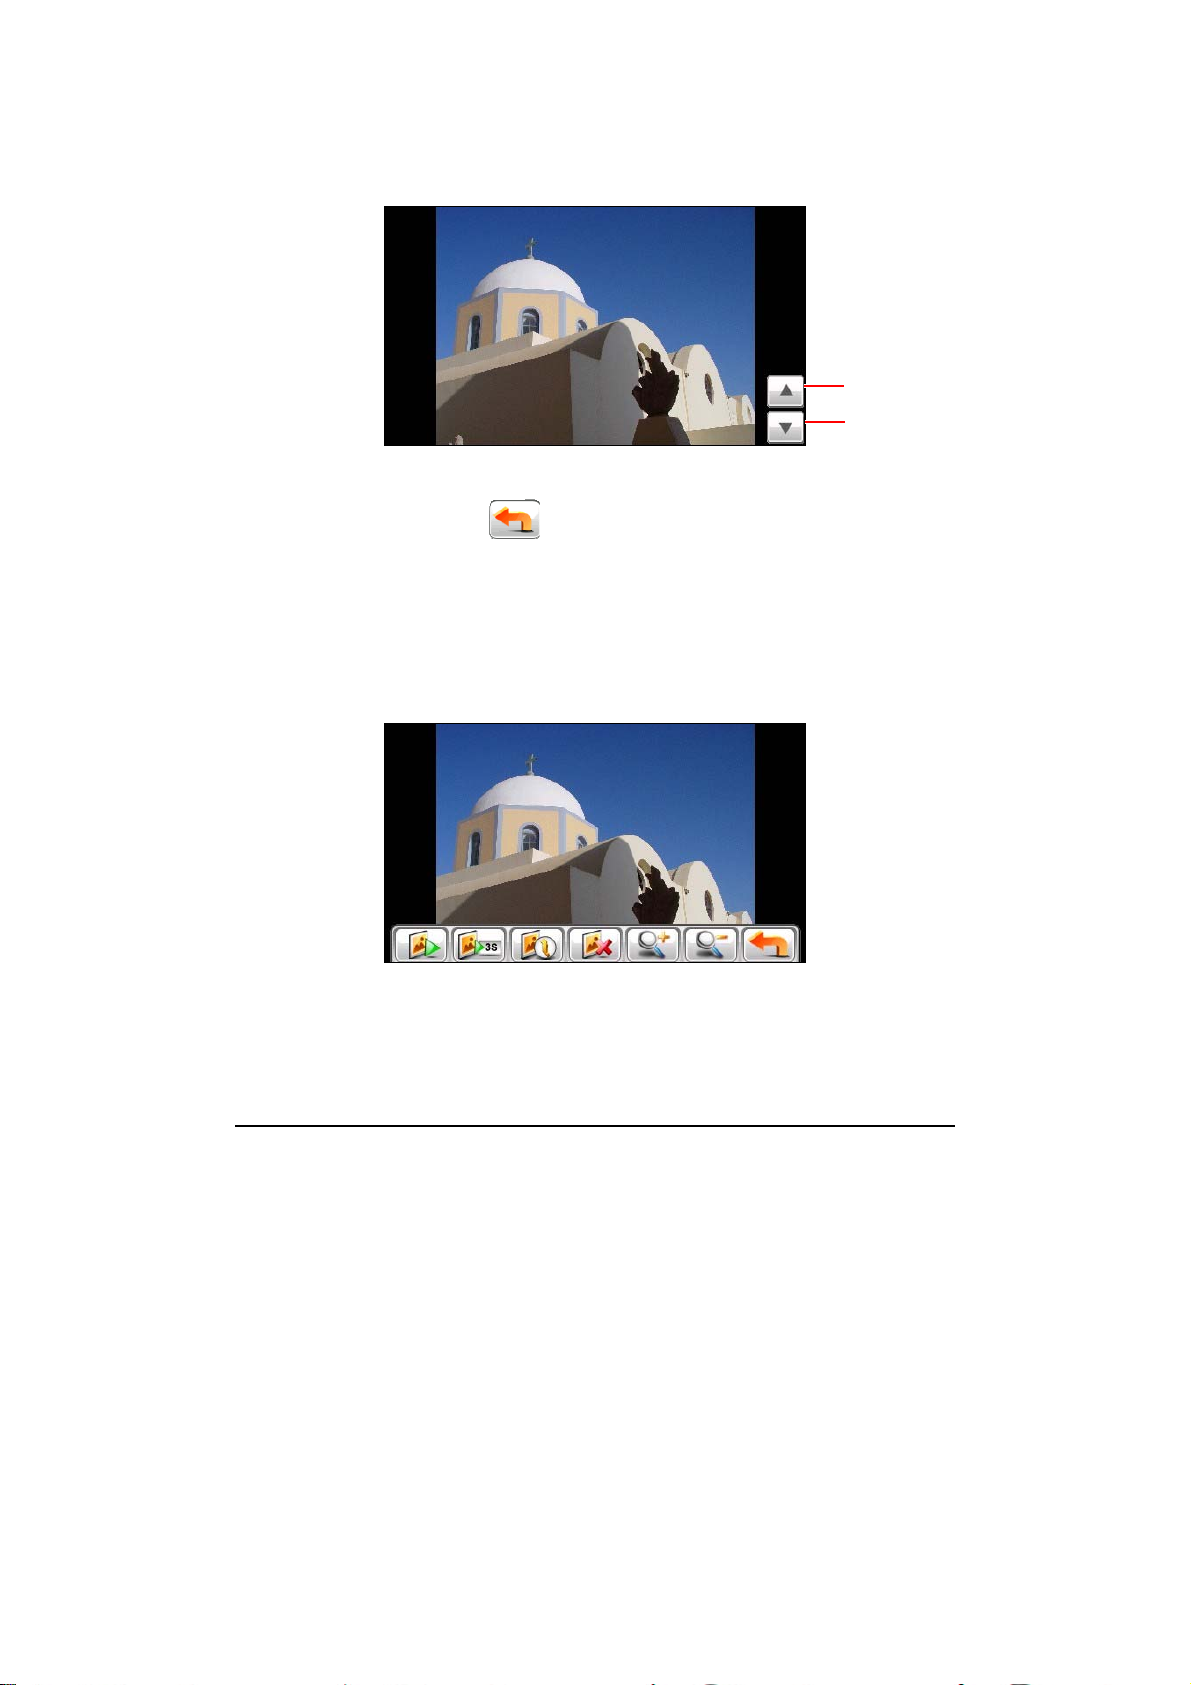
3.4 Viewing a Picture in Full Screen
When you tap a picture twice in the thumbnail view, the picture is displayed in full
screen.
Previous
Next
To go back to the thumbnail view, tap anywhere on the screen to display the
control buttons and then tap
.
3.5 On-Screen Control Buttons
On-screen control buttons provide various functions and settings. Tap anywhere
on the picture to display the buttons as shown below. To close the buttons, tap the
picture again.
21
Page 30
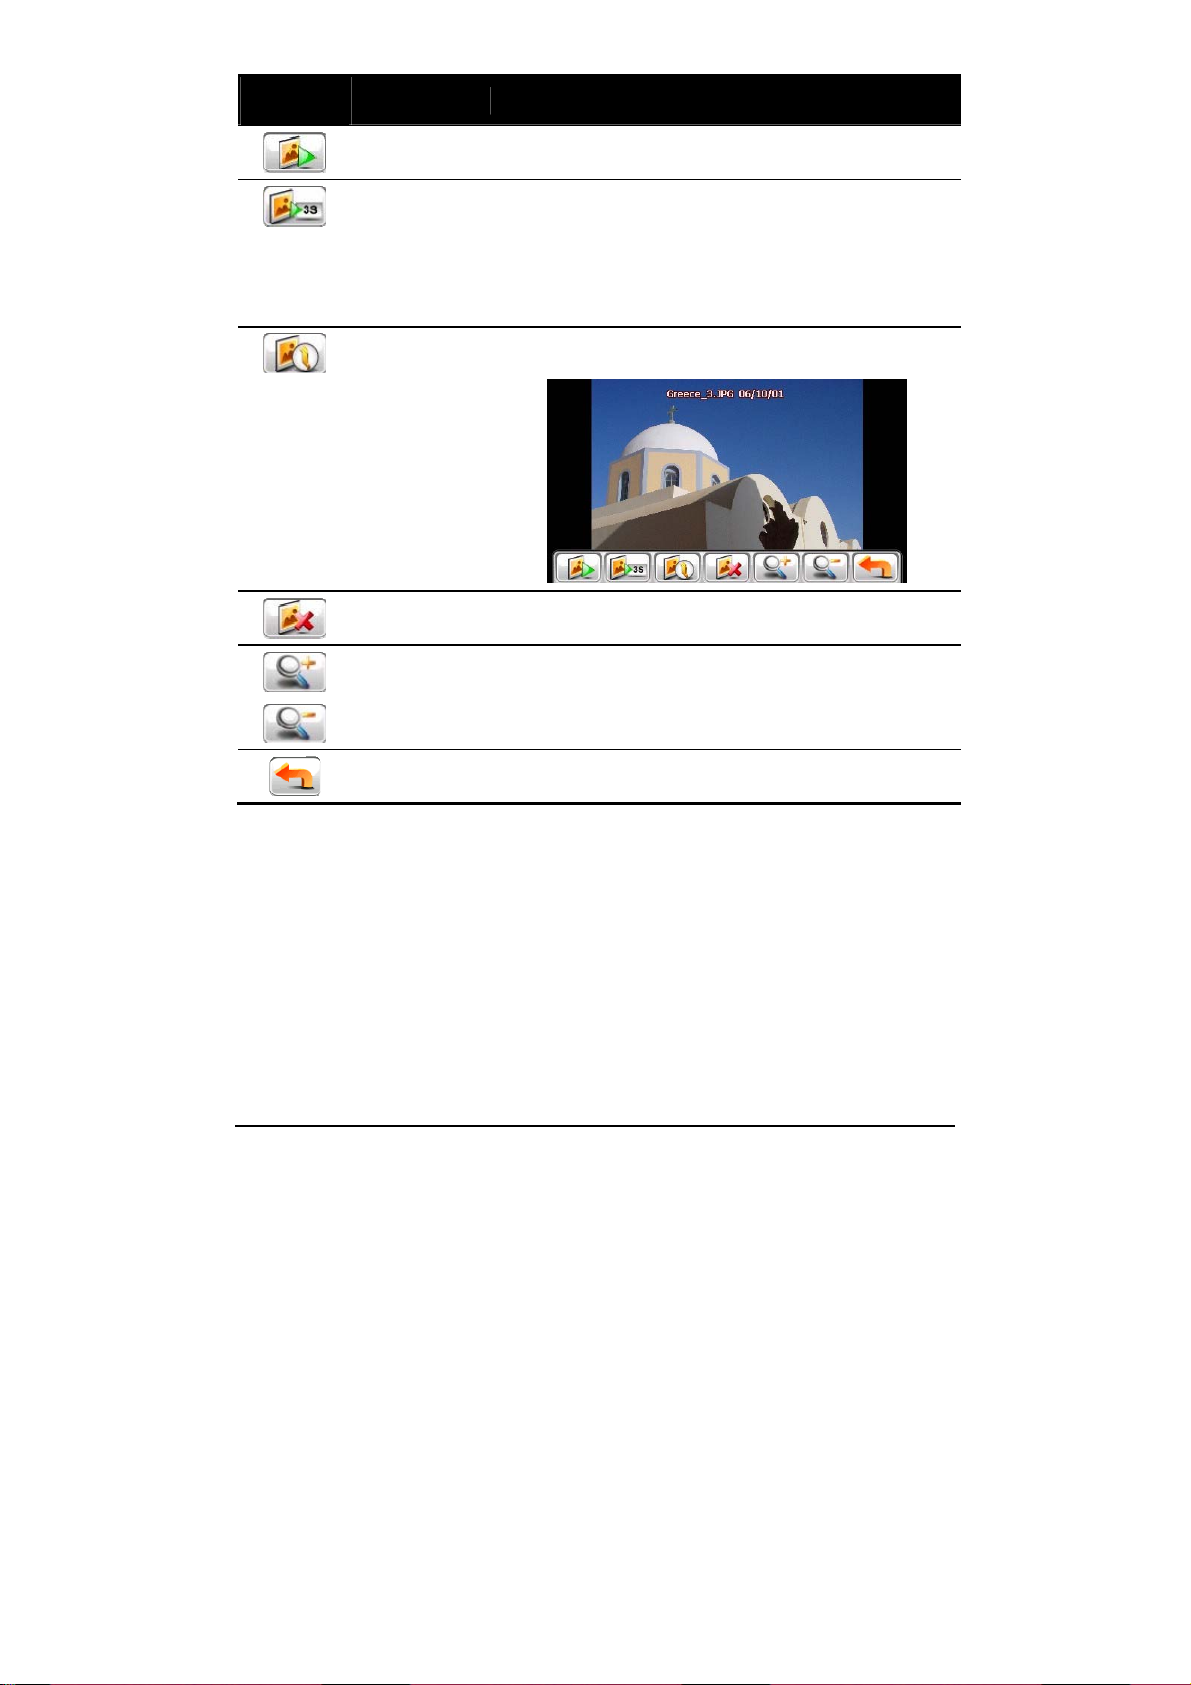
Control
Button
Name Description
Slideshow Starts the slideshow. (See section 3.6 for detailed
Interval
Information Enables or disables the displaying of the name and date
Delete Deletes the current picture.
Zoom Tap the button as many times as needed to zoom in to
Back
information.)
Sets the length of time each slide is displayed before
moving on to the next slide. Tap the button to switch to
the next available option.
1 second
3 seconds
5 seconds
of the file.
1.2x, 1.5x, 1.8x, or 2.0x. When you ha ve zoomed in the
picture, you can drag the picture to view other parts of
the picture.
Goes back to the thumbnail view.
22
Page 31

3.6 Viewing the Slideshow
To view the slideshow of all your pictures, use one of the following ways:
z When in the thumbnail view, tap
z When in full screen, tap anywhere on the picture to display the on-screen
control buttons. Then tap
To stop the slideshow, tap anywhere on the screen.
to start the slideshow.
to start the slideshow.
23
Page 32

Page 33

4 Settings
4.1 Starting and Exiting Settings
You can customize the system settings such as backlight brightness, volume, and
language. Once you change the settings, the new settings will remain until you
change them again.
NOTE: All settings will be restored to default settings if you shut down the device by pressing
the power button for 6 seconds.
Tap the Settings button on the Main Menu screen. The Settings menu appears as
shown below.
To exit Settings, tap
The following sections describe the various buttons and their functions.
.
25
Page 34

4.2 Backlight
1. Tap the Settings button on the Main Menu screen.
2. Tap the
3. Move the cursor along the track bar to adjust the brightness of the backlight.
To darken the backlight, move the cursor to the left. To lighten the backlight,
move the cursor to the right.
4. Tap
Backlight button.
to save the changes.
4.3 Volume
1. Tap the Settings button on the Main Menu screen.
2. Tap the
Volume button.
3. Move the cursor along the track bar to adjust the volume. To decrease the
volume, move the cursor to the left. To increase the volume, move the cursor
to the right.
26
Page 35

4. Tap
save the changes.
4.4 Screen
You can calibrate the touch screen if it is not responding accurately to your taps.
1. Tap the
2. Tap the
3. Tap
4. Tap and hold the center of the target.
Settings button on the Home screen.
Screen button.
to start the calibration.
27
Page 36

5. When the target moves to another position, tap and hold the centre of the new
target. Repeat each time to complete the calibration process.
6. When completed, tap
.
4.5 Power
To check the remaining power level of your battery and/or set up the power saving
feature:
1. Tap the
2. Tap the
3. The screen shows the remaining power of your battery.
You can set a timer to automatically turn sleep mode your device when it is
idle for a set period of time. The options include Never, 30 minutes, 20
minutes, and 10 minutes.
Settings button on the Home screen.
Power button.
28
Page 37

4. Tap to save the changes.
4.6 Date/Time
1. Tap the Settings button on the Main Menu screen.
2. Tap the
3. To change the time zone, tap the up/down arrow in the “Time Zone” item.
4. To change the date, tap the down arrow in the “Date” item. A calendar pops
up. Tap the left arrow on the calendar to go to the earlier month and year or the
right arrow to the later month and year. Alternatively, you can tap the month
or year on top of the calendar to directly change the month or year.
When the calendar shows the current month, tap the date on the calendar.
Date/Time button.
5. To set the time, first tap the hour, minute, or second in the “Time” item and
then tap the up arrow to increase or down arrow to decrease the value.
29
Page 38

6. Tap to save the changes.
4.7 Language
1. Tap the Settings button on the Main Menu screen.
2. Tap the
3. Tap the up/down arrow button to select the desired language.
4. Tap
Language button.
to save the changes.
4.8 Bluetooth
1. Tap the Settings button on the Main Menu screen.
2. Tap the
3. See the next two chapters for detailed information on using Bluetooth®
connectivity.
Bluetooth button.
30
Page 39

5 Bluetooth HF Phone
5.1 About Bluetooth HF Phone
The N.I.C.E. 430 can serve as a hands-free (HF) device for a Bluetooth mobile
phone. After establishing the Bluetooth connection, you can tap the N.I.C.E. 430
to place and receive phone calls instead of picking up the mobile phone, and can
use the built-in speakers and microphone for your conversation.
NOTE: Not all Bluetooth cell phones are compatible with NICE 430. Please see your cell
phone instruction manual to see if your Bluetooth is compatible with NICE 430.
5.2 Pairing with a Mobile Phone
4. Tap the Settings button on the Home screen and then the Bluetooth button. The
Bluetooth radio turns on.
NOTE: The below procedure describes the scenario when you initiate the Bluetooth
connection from your mobile phone. You can also initiate the Bluetooth connection from your
device. (See section 6.4 for information.)
5. If this is the first time you use the program, your device will switch to Pair
Mode and wait for the pairing action from your mobile phone for 60 seconds.
31
Page 40

The connection will be established as long as you initiate the pairing process
on your mobile phone within this period.
6. If prompted to enter the passkey, tap the passkey specified by the mobile
phone and tap
7. You will see the Bluetooth HF Phone main screen after the pairing is
completed. The status bar at the bottom shows the name of the mobile phone
connected.
.
32
Page 41

Reconnect
Keypad
Pair Mode
Call History
Exit (Minimize)
Bluetooth Manager
The next time you run the program, your device will automatically search and pair
with one of the last connected mobile phones.
NOTE:
z Your device must be in Pair Mode for the mobile phone to discover your device. If you
need to manually set your device to Pair Mode, tap Pair Mode on the main screen.
z Some mobile phones can automatically connect the hands-free service.
z Up to 8 sets of paired mobile phones can be stored. A 9th paired mobile phone will replace
the oldest one.
z The Bluetooth HF Phone program cannot access the data such as the phone book and
call history stored in a connected mobile phone.
5.3 Placing a Call
After pairing with your mobile phone, you can place a call using the Keypad or Call
button on the Bluetooth HF Phone main screen.
History
Keypad
By tapping the Keypad button on the Bluetooth HF Phone main screen,
you can enter the telephone number with the onscreen keypad. After entering the
telephone number, tap
to place the call.
33
Page 42

NOTE:
z International calls require a country code to be included in the phone number. On your
device, the country code is separated from the rest of the number sequence by a plus (+)
sign. If you are making an international call, tap and hold the 0 key until the + sign appears.
z To delete the last digit entered, tap the Backspace button.
Call History
NOTE: Bluetooth HF Phone cannot access the call history stored in a connected mobile
phone.
Call History
Tap the
Call History button on the Bluetooth HF Phone main screen to
display the recent incoming, outgoing, or missed calls together with information
such as date, time, and duration of each call.
Tap the respective button (incoming
missed
) to view the last 20 calls of the selected type.
, outgoing , or
34
Page 43

With an item selected, you can tap
delete the item.
to dial the number or
to
To clear all items in the current list, tap
5.4 Operations during a Call
.
During a call:
z If you need to input other numbers, such as an extension number, tap to
open the keypad and tap the digits. The keypad will close when you tap the
button again or when there has been no input for 5 seconds.
z Tap to mute your sound so that the other party cannot hear you. To
end the mute mode, tap the same button again.
z Tap to end the call.
35
Page 44

z Tap to switch the call to your mobile phone. To switch back to your
device, tap the same button again.
z Press the hardware button (
the “Connected” screen again, press the same button.
) to hide the “Connected” screen. To display
5.5 Receiving a Call
When you have a call after pairing with a mobile phone, the device rings and
displays the Incoming Call screen.
To accept the call, tap
To reject the call, tap
To mute the ring tone before receiving or rejecting, tap
.
.
36
.
Page 45

5.6 Miscellaneous Buttons
In addition to buttons for placing a call, there are Connect, Pair Mode, Bluetooth
Manager
below.
Connect
, and Exit buttons on the Bluetooth HF Phone main screen as described
By tapping the
you can manually search the last paired mobile phones for an available
connection.
Connect button on the Bluetooth HF Phone main screen,
Pair Mode
By tapping the
you can manually set your device to Pair Mode. Within the duration of 60
seconds, you can initiate the pairing process on your mobile phone to discover
your device as a hands-free device.
Pair Mode button on the Bluetooth HF Phone main screen,
37
Page 46

Bluetooth Manager
By tapping the Bluetooth Manager button on the Bluetooth HF Phone main
screen, you can run the Bluetooth Manager program. (See Chapter 6 for
information on Bluetooth Manager.)
Exit
To hide the Bluetooth HF Phone screen, tap the
Bluetooth HF Phone main screen. Bluetooth HF Phone is still running in the
background
NOTE: To know how to turn OFF Bluetooth radio, see section 6.3.
Exit button on the
38
Page 47

6 Bluetooth Manager
6.1 About Bluetooth Manager
The N.I.C.E. 430 incorporates Bluetooth wireless communications technology.
Devices with Bluetooth capabilities can exchange information over a distance of
about 10 meters (30 feet) without requiring a physical connection.
Bluetooth Manger allows you to configure and use the Bluetooth capabilities of
the N.I.C.E. 430.
6.2 Starting and Exiting Bluetooth Manager
1. Tap the Settings button on the Main Menu screen and then the Bluetooth button.
2. When the Bluetooth HF Phone screen appears, tap
.
39
Page 48

3. The Bluetooth Manager screen appears as shown below.
A
Bluetooth Settings
ctive Connections
Turn off Bluetooth radio.
Exit
To exit the program, tap
. You will be back to the Bluetooth HF Phone
screen.
6.3 Turning On/Off Bluetooth Radio
Whenever you start Bluetooth Manager, Bluetooth radio is turned ON. The
Bluetooth indicator on your device flashed in blue.
Exiting Bluetooth Manager doesn’t turn off Bluetooth radio. To turn OFF
Bluetooth radio, tap
Bluetooth indicator goes OFF.
40
in the Bluetooth Manager screen. The flashing
Page 49

6.4 Exploring Devices
NOTE: To use the service of a remote device with Bluetooth capability, make sure that the
remote device is in discoverable mode.
1. Start Bluetooth Manager as described in section 6.2.
2. Tap
3. The device list appears on the screen. Tap the target device and tap
Explore a Bluetooth Device to search for nearby devices.
to browse the services of the device.
NOTE: You can also tap the button to pair with the selected device before
browsing its services.
4. Tap the service you want to use.
41
Page 50

5. When prompted to enter the passkey, tap the passkey requested by the target
device and tap
.
NOTE: Once you have established a Bluetooth connection with a remote device, it will be
saved as a shortcut. You can then use My Shortcuts to conveniently use the same service
again. (See section 6.6 for information.)
42
Page 51

6.5 Using My Shortcuts
Once you have established a Bluetooth connection with a remote device, it will be
saved as a shortcut. My Shortcuts allows you to conveniently use the same service
again by tapping the particular shortcut item.
1. Start Bluetooth Manager as described in section 6.2.
2. Tap
My Shortcuts.
↓
3. Tap the desired item and tap
to establish a connection again.
43
Page 52

6.6 Viewing Active Connections
After starting Bluetooth Manager, tap to view the active connections.
After you tap an item, you can tap
to disconnect the selected device.
↓
44
Page 53

6.7 Configuring Bluetooth Settings
After starting Bluetooth Manager, tap to configure Bluetooth settings.
The available options are:
z Other devices can discover me
z Allow other devices to connect
z Share this Folder
Tap
NOTE: When you transfer MP3 or picture files to your device via Bluetooth connection, the
files are transferred to this shared folder. Unless the files are in the correct location for the
Audio Player or Pictures program, the Audio Player or Pictures program cannot detect
them.
Tap to save any changes you have made.
to specify the folder to share with the remote device.
45
Page 54

Page 55

7 ActiveSync
7.1 About ActiveSync
ActiveSync allows you to establish the connection between the N.I.C.E. 430 and
your computer.
Installing ActiveSync
CAUTION: During ActiveSync installation, do not connect your device to your computer
before the message on the screen asks you to.
1. Turn on your computer and the N.I.C.E. 430.
2. Insert the provided DVD into the DVD drive of your computer. The auto run
screen appears.
3. Click the
start automatically. Follow the onscreen instructions to finish the installation.
A status window indicates the progress of the installation.
4. When prompted, connect the mini-USB end of the USB cable to the bottom of
your device and the other end to a USB port on your computer.
Install button in the ActiveSync section. The installation wizard will
47
Page 56

5. When the “Set up partnership” screen appears, select No and Next to connect
as a guest device.
NOTE: This device does not support synchronization with your computer. Therefore, you do
not need to set up a partnership.
Using ActiveSync
Once ActiveSync is installed on your computer, you can use it to transfer files (i.e.
MP3 files) between the N.I.C.E. 430 and your computer.
CAUTION: Be discreet when you delete files from your device. Deleting files of which the
function is unknown can cause programs or features to malfunction.
Whenever you connect the N.I.C.E. 430 to your computer with the USB cable, the
“Set up partnership” screen appears. Always select No and Next to connect as a
guest device. Then you can use the Explorer function to browse the mobile
device and transfer data. (See the ActiveSync online Help for instructions on
copying files.)
48
Page 57

Troubleshooting and
8 Troubleshooting and Maintenance
Maintenance
8.1 Resetting the N.I.C.E. 430
Occasionally, you may need to reset the N.I.C.E. 430. For example, you should
reset the N.I.C.E. 430 when it stops responding; or appears to be “frozen” or
“locked up.”
Insert the stylus into the reset button on the bottom of your device. This is called a
“soft reset.”
8.2 Troubleshooting
Power Problems
Power does not turn ON when using battery power
z The remaining battery power may be too low to run your device. Charge the
battery.
Screen Problems
Screen responds slowly
z Make sure that your device is not running out of battery power. If the problem
still exists, reset the N.I.C.E. 430.
49
Page 58

Screen freezes
z Reset the N.I.C.E. 430.
Screen is hard to read
z Make sure that the backlight of the display is on.
z Move to a location with more light.
Inaccurate response to taps
z Recalibrate the touch screen.
Connection Problems
Cable Connection Problems
z Make sure that the N.I.C.E. 430 and your computer are both turned ON before
trying to establish a connection.
z Make sure that the cable is securely plugged into the USB port on your
computer and on the N.I.C.E. 430. Connect the USB cable directly to your
computer—do not run the cable through a USB hub.
z Reset your device before connecting the cable. Always disconnect your
device before you restart your computer.
GPS Problems
When there are no valid signals available, consider the following:
z Make sure that the device is facing a clear view of the sky.
z Note that the GPS reception can be affected by:
9 Bad weather
9 Dense overhead obstacles (e.g. trees and tall buildings)
9 Other wireless device in the car
9 Reflective car window tint and heated screens.
50
Page 59

8.3 Maintaining Your Device
Taking good care of the N.I.C.E. 430 will ensure trouble-free operation and
reduce the risk of damage to your device.
z Keep the N.I.C.E. 430 away from excessive moisture and extreme
temperatures.
z Avoid exposing the N.I.C.E. 430 to direct sunlight or strong ultraviolet light
for extended periods of time.
z Do not place anything on top or drop objects on the N.I.C.E. 430.
z Do not drop the N.I.C.E. 430 or subject it to severe shock.
z Do not subject the N.I.C.E. 430 to sudden and severe temperature changes.
This could cause moisture condensation inside the N.I.C.E. 430, which could
damage the N.I.C.E. 430. In the event of moisture condensation, allow the
N.I.C.E. 430 to dry out completely before use.
z Take care not to sit on the N.I.C.E. 430. We advise not to carry the device in
one’s back pocket for that reason.
z The screen surface can easily be scratched. Avoid touching it with sharp
objects. Non-adhesive generic screen protectors designed specifically for use
on portable devices with LCD panels may be used to help protect the screen
from minor scratches.
z Never clean the N.I.C.E. 430 with it powered on. Use a soft, lint-free cloth
moistened with water to wipe the screen and the exterior of the N.I.C.E. 430.
z Do not use paper towels to clean the screen.
z Never attempt to disassemble, repair or make any modifications to the
N.I.C.E. 430. Disassembly, modification or any attempt at repair could cause
damage to the N.I.C.E. 430 and even bodily injury or property damage and
will void any warranty.
z Do not store or carry flammable liquids, gases or explosive materials in the
same compartment as the N.I.C.E. 430 and accessories.
51
Page 60

Page 61

9 Regulatory Information
NOTE: Marking labels located on the exterior of the N.I.C.E. 430 indicate the regulations that
your model complies with. Please check the marking labels on your device and refer to the
corresponding statements in this chapter. Some notices apply to specific models only.
9.1 Regulations Statements
Class B Regulations
USA
Federal Communications Commission Radio Frequency Interference
Statement
NOTE:
The N.I.C.E. 430 has been tested and found to comply with the limits for a Class B
digital device pursuant to Part 15 of the FCC Rules. These limits are designed to
provide reasonable protection against harmful interference in a residential
installation. The N.I.C.E. 430 generates, uses, and can radiate radio frequency
energy and, if not installed and used in accordance with the instructions, may
cause harmful interference to radio communications. However, there is no
guarantee that interference will not occur in a particular installation. If the
N.I.C.E. 430 does cause harmful interference to radio or television reception,
which can be determined by turning the equipment off and on, the user is
encouraged to try to correct the interference by one or more of the following
measures:
z Reorient or relocate the receiving antenna.
53
Page 62

z Increase the separation between the N.I.C.E. 430 and receiver.
z Connect the N.I.C.E. 430 into an outlet different from which the receiver is
connected to.
z Consult and authorized Clarion dealer or service station.
Any changes or modifications not expressly approved by the manufacturer could
void the user’s authority to operate the N.I.C.E. 430.
Please note:
The use of a non-shielded interface cable with the N.I.C.E. 430 is prohibited.
Canada
Canadian Department of Communications
Radio Interference Regulations Class B Compliance Notice
This Class B digital apparatus meets all requirements of the Canada
Interference-Causing equipment regulations.
Cet appareil numérique de Classe B respecte toutes les exigences du Règlement
Canadien sur le matériel brouileur.
9.2 Safety Precautions
z Prolonged listening of music in maximum volume can damage the ears.
z The use of headphones other than those recommended/supplied can cause
hearing impairment due to excessive sound pressure.
About Charging
z Use only the charger supplied with the N.I.C.E. 430. Use of another type will
result in malfunction and/or danger.
z The N.I.C.E. 430 is intended to be supplied by a LISTED Power Unit marked
with “LPS”, “Limited Power Source” and output rated + 5 V dc / 1.0 A”.
z Use a specified battery in the N.I.C.E. 430.
54
Page 63

About the Cigarette Lighter Adapter
z Do not use the cigarette lighter adapter in a high moisture environment. Never
touch the cigarette lighter adapter when your hands or feet are wet.
z Allow adequate ventilation around the cigarette lighter adapter when using it
to operate the device or charge the battery. Do not cover the cigarette lighter
adapter with paper or other objects that will reduce cooling. Do not use the
cigarette lighter adapter while it is inside a carrying case.
z Connect the cigarette lighter adapter to a proper power source. The voltage
requirements are found on the product case and/or packaging.
z Do not use the cigarette lighter adapter if the cord becomes damaged.
z Do not attempt to service the cigarette lighter adapter. There are no
serviceable parts inside. Replace the unit if it is damaged or exposed to excess
moisture.
About the Battery
z Use a specified charger approved by the manufacturer.
CAUTION: This unit contains a non-replaceable internal Lithium Ion battery. The battery can
burst or explode, releasing hazardous chemicals. To reduce the risk of fire or burns, do not
disassemble, crush, puncture, or dispose of in fire or water.
z Important instructions (for service personnel only)
9 Caution: Risk of explosion if battery is replaced by an incorrect type.
Dispose of used batteries according to the instructions.
9 Replace only with the same or equivalent type recommended by the
manufacturer.
9 The battery must be recycled or disposed of properly.
9 Use the battery only in the specified equipment.
55
Page 64

Owner’s manual
Navigation
Page 65

Copyright note
The product and the information contained herein may be changed at any time
without prior notification.
This manual nor any parts thereof may not be reproduced or transmitted in any form
either electronically or mechanically, including photocopying and recording, without
the express written consent of Clarion Co., Ltd..
Whereis® map data is © 2006 Telstra Corporation Limited and its licensors
Data Source © 2006 Tele Atlas N.V.
Austria: © BEV, GZ 1368/2003
Denmark: © DAV
France: © IGN France
Great Britain:
Italy: © Geonext/DeAgostini
Northern
Ireland:
Norway:
Switzerland: © Swisstopo
The
Netherlands:
Ordnance Survey data with permission of Her Majesty’s Stationery Office
© Crown Copyright
© Ordnance Survey of Northern Ireland
© Norwegian Mapping Authority, Public Roads Administration /
Mapsolutions
Topografische ondergrond
Copyright © dienst voor het kadaster en de openbare registers, Apeldorn
All rights reserved.
2
Page 66

Thank you for choosing N.I.C.E 430 as your door-to-door in-car navigator. Read the
Quick Start Guide first and start using N.I.C.E 430 right away. This document is the
detailed description of the software. Although N.I.C.E 430 can easily be discovered
by experience, it is still recommended that you read through this manual to clearly
understand the exact function of each button and icon.
3
Page 67

Table of Contents
1 Warnings and safety information......................................................................... 9
2 General information........................................................................................... 10
3 Operating N.I.C.E 430 (Controls) ...................................................................... 11
3.1 Hardware buttons....................................................................................... 11
3.1.1 Power on/off........................................................................................ 11
3.1.2 Find menu........................................................................................... 11
3.2 Screen buttons and controls ...................................................................... 11
3.2.1 Direct selectors ................................................................................... 12
3.2.2 List selectors....................................................................................... 12
3.2.3 Sliders................................................................................................. 12
3.2.4 Switches ............................................................................................. 12
3.2.5 Special switches ................................................................................. 13
3.2.6 Switches in the Quick menu................................................................ 13
3.2.7 Virtual keyboards ................................................................................ 13
3.2.7.1 ABC-type keyboards.................................................................... 14
3.2.7.2 QWERTY-type keyboards ........................................................... 14
3.2.7.3 The numeric keyboard................................................................. 15
4 Discovering the program through the screens .................................................. 16
4.1 Main menu (Navigation Menu) ................................................................... 16
4.2 About screen.............................................................................................. 17
4.3 The map..................................................................................................... 17
4.3.1 2D and 3D map views......................................................................... 17
4.3.2 Zoom levels ........................................................................................ 18
4.3.3 Daylight and night color schemes ....................................................... 19
4.3.4 Streets and roads ............................................................................... 20
4.3.5 Other objects ...................................................................................... 21
4.3.6 Current position and Lock-on-Road .................................................... 21
4.3.7 Selected map point, also known as the Cursor................................... 22
4.3.8 Marked map points (Pin)..................................................................... 22
4.3.9 Visible POIs (Points of Interest) .......................................................... 23
4.3.10 Road safety cameras .......................................................................... 24
4.3.11 Elements of the Active Route.............................................................. 24
4.3.11.1 The start point, via points and the destination ............................. 24
4.3.11.2 Animated turn guidance............................................................... 24
4.3.11.3 The active leg of the route ........................................................... 25
4.3.11.4 Inactive legs of the route.............................................................. 25
4.3.11.5 Roads in the route excluded by your preferences ....................... 26
4.4 GPS Data screen ....................................................................................... 26
4.4.1 GPS data displayed ............................................................................ 26
4.4.2 GPS connection indicator ................................................................... 27
4
Page 68

4.4.3 GPS data quality indicator .................................................................. 27
4.4.4 Time synchronization .......................................................................... 27
4.5 Screens with map ...................................................................................... 28
4.5.1 Turn preview (No. 1) ........................................................................... 30
4.5.2 Zoom in and out (No. 2 & 3)................................................................ 31
4.5.3 Tilt up and down (No. 4 & 5) ............................................................... 31
4.5.4 Follow mode - lock to GPS position and heading (No. 6) ................... 32
4.5.5 Cursor (No. 7) ..................................................................................... 32
4.5.6 Map scale (No. 8) ............................................................................... 32
4.5.7 Menu (No. 9) ....................................................................................... 33
4.5.8 Map orientation and Overview (No. 10) .............................................. 33
4.5.9 GPS position quality (No. 11).............................................................. 34
4.5.10 Battery status (No. 12) ........................................................................ 34
4.5.11 Sound muting (No. 13)........................................................................ 35
4.5.12 Track Log recording/playback indicator (No. 14) ................................ 35
4.5.13 Cursor menu (No. 15) ......................................................................... 35
4.5.14 Current street (No. 16) ........................................................................ 37
4.5.15 Travel and Route data (No. 17) .......................................................... 37
4.5.16 Distance to next turn (No. 18) ............................................................. 38
4.5.17 Next street / Next settlement (No. 19)................................................. 38
4.5.18 Approaching next turn (No. 20)........................................................... 38
4.5.19 Current speed limit (No. 21) ................................................................ 38
4.5.20 Bluetooth or Phone call status (No. 22) .............................................. 39
4.6 Route Information screen........................................................................... 39
4.6.1 Route data displayed (for destination and via points) ......................... 40
4.6.1.1 Route line .................................................................................... 40
4.6.1.2 Distance Left................................................................................ 40
4.6.1.3 Method......................................................................................... 41
4.6.1.4 Time Left...................................................................................... 41
4.6.1.5 Estimated Arrival.......................................................................... 41
4.6.1.6 Destination / Via point.................................................................. 41
4.6.2 Warning icons ..................................................................................... 41
4.6.3 Fit to screen ........................................................................................ 42
4.6.4 Parameters ......................................................................................... 43
4.7 Menu.......................................................................................................... 43
4.7.1 Find tab............................................................................................... 43
4.7.2 Quick tab............................................................................................. 43
4.7.2.1 3D Map (switch)........................................................................... 43
4.7.2.2 Zoom & Tilt (switch)..................................................................... 44
4.7.2.3 Night Mode (switch)..................................................................... 44
4.7.2.4 Manage POI (Points of Interest) .................................................. 45
4.7.2.5 Popup Information (switch) .......................................................... 47
4.7.2.6 Manage Track Logs..................................................................... 48
4.7.3 Route tab ............................................................................................ 50
4.7.3.1 Recalculate.................................................................................. 50
4.7.3.2 Delete .......................................................................................... 51
4.7.3.3 Itinerary........................................................................................ 52
4.7.3.4 Fly Over ....................................................................................... 53
4.7.3.5 Edit .............................................................................................. 54
4.7.3.6 Info............................................................................................... 54
5
Page 69

4.7.4 Main button ......................................................................................... 55
4.8 TMC (Traffic Message Channel) ................................................................ 55
4.8.1 List of TMC messages ........................................................................ 55
4.8.2 TMC control center ............................................................................. 56
4.8.2.1 Selected FM radio station............................................................ 56
4.8.2.2 Subscribe TMC............................................................................ 56
4.8.2.3 Exclude selected station.............................................................. 56
4.8.2.4 Show excluded stations............................................................... 56
4.8.2.5 Sorts events by distance / type.................................................... 56
4.8.2.6 Use traffic information.................................................................. 57
4.8.2.7 Recalculate to avoid traffic........................................................... 57
4.9 Road safety cameras ................................................................................. 57
4.9.1 Camera types ..................................................................................... 57
4.9.1.1 Fixed cameras ............................................................................. 57
4.9.1.2 Mobile cameras ........................................................................... 58
4.9.1.3 Built-in cameras........................................................................... 58
4.9.1.4 Section control cameras .............................................................. 58
4.9.1.5 Red light cameras........................................................................ 59
4.9.2 Controlled traffic direction ................................................................... 59
4.9.3 Speed limit checked............................................................................ 59
4.9.4 Add a new camera or edit an existing one .......................................... 60
4.9.5 Change the settings of the camera warning........................................ 60
5 Settings ............................................................................................................. 61
5.1 General settings......................................................................................... 61
5.1.1 Safety Mode........................................................................................ 61
5.1.2 Set Favorite Destinations.................................................................... 62
5.1.3 Automatic Night Colors ....................................................................... 62
5.1.4 Alerts................................................................................................... 62
5.1.5 Warn When Speeding......................................................................... 63
5.1.5.1 Speeding tolerance...................................................................... 63
5.1.5.2 Alternative speed limit.................................................................. 63
5.1.5.3 Alternative speeding tolerance .................................................... 63
5.1.6 Enable Safety Cameras ...................................................................... 64
5.1.6.1 Audible Warning .......................................................................... 64
5.1.7 Route Recalculation............................................................................ 64
5.1.7.1 Automatic..................................................................................... 64
5.1.7.2 Ask First....................................................................................... 65
5.1.7.3 Disabled....................................................................................... 65
5.2 Map settings............................................................................................... 65
5.2.1 Daylight / Night color profile ................................................................ 65
5.2.2 Alternative Road Names ..................................................................... 66
5.2.3 Show Street Labels............................................................................. 66
5.2.4 Textured Polygons .............................................................................. 66
5.3 Sound settings ........................................................................................... 66
5.3.1 Master sound volume/switch............................................................... 66
5.3.2 Voice guidance volume/switch ............................................................ 67
5.3.3 Key sound volume/switch ................................................................... 67
5.3.4 Dynamic Volume................................................................................. 67
5.3.5 Attention Tone .................................................................................... 67
5.4 Route parameter settings........................................................................... 68
6
Page 70

5.4.1 Method................................................................................................ 68
5.4.2 Route .................................................................................................. 68
5.4.2.1 Short............................................................................................ 68
5.4.2.2 Fast.............................................................................................. 68
5.4.2.3 Economical .................................................................................. 68
5.4.3 Vehicle ................................................................................................ 69
5.4.4 Road types to include/exclude ............................................................ 69
5.4.4.1 Unpaved Roads........................................................................... 69
5.4.4.2 Motorways ................................................................................... 70
5.4.4.3 Ferries ......................................................................................... 70
5.4.4.4 U-turns......................................................................................... 70
5.4.4.5 Permit needed ............................................................................. 70
5.4.4.6 Toll Roads ................................................................................... 70
5.5 Language & Units ...................................................................................... 70
5.5.1 Program language .............................................................................. 71
5.5.2 Voice language ................................................................................... 71
5.5.3 Units.................................................................................................... 71
5.5.4 Set Date & Time Format ..................................................................... 71
5.6 Advanced settings...................................................................................... 72
5.6.1 Display options ................................................................................... 72
5.6.1.1 2D in Map mode (and North-up orientation) ................................ 72
5.6.1.2 3D in Cockpit mode (and track-up orientation) ............................ 72
5.6.1.3 Zoom in after find......................................................................... 73
5.6.1.4 Coordinate display format............................................................ 73
5.6.1.5 Cockpit screen layout .................................................................. 73
5.6.2 Backlight settings ................................................................................ 73
5.6.2.1 Power management..................................................................... 73
5.6.3 Smart Zoom ........................................................................................ 74
5.6.3.1 Smart Zoom settings.................................................................... 74
5.6.3.2 Enable Overview mode................................................................ 74
5.6.3.3 Restore Lock-to-Position and Smart Zoom.................................. 75
5.6.4 Route options...................................................................................... 76
5.6.4.1 U-turn penalty .............................................................................. 76
5.6.4.2 Cross-border planning ................................................................. 77
5.6.4.3 Carpool lanes (for the USA map only) ......................................... 77
5.6.4.4 Keep position on road (Lock-on-Road)........................................ 77
5.6.5 User data management ...................................................................... 77
5.6.5.1 Backup Data ................................................................................ 77
5.6.5.2 Restore Data ............................................................................... 78
5.6.5.3 Remove Pins ............................................................................... 78
5.6.5.4 Clear Data ................................................................................... 78
5.6.5.5 Reset Advanced Settings ............................................................ 78
6 Find ................................................................................................................... 79
6.1 Destination (Main menu)............................................................................ 79
6.2 Selection by tapping the map..................................................................... 79
6.3 Using the Main menu ................................................................................. 80
6.3.1 Find an Address, Street, Intersection or City ...................................... 80
6.3.1.1 Selecting the city and country to search in .................................. 80
6.3.1.2 Selecting a street or the center of the settlement ........................ 83
6.3.1.3 Selecting a house number or the midpoint of the street............... 85
7
Page 71

6.3.1.4 How to select an intersection instead of a house number............ 85
6.3.1.5 An example for a full address search........................................... 85
6.3.2 Find in History..................................................................................... 86
6.3.3 Find Coordinates ................................................................................ 86
6.3.4 Find a POI........................................................................................... 87
6.3.5 Find one of the Favorites (Home/Work) .............................................. 90
7 Troubleshooting guide....................................................................................... 91
8 Glossary............................................................................................................ 93
8
Page 72

1 Warnings and safety information
N.I.C.E 430 is a navigation system that helps you find your way to your selected
destination. It will determine your exact location with the help of an attached GPS
device. The position information obtained from the GPS receiver will not be
transmitted anywhere, so others will not be able to track you by the help of this
program.
If you are the driver of the vehicle, we recommend that you operate N.I.C.E 430
before beginning your journey. The driver’s attention should be on the road. Plan
your route before departure and pull over if you need to change route parameters.
N.I.C.E 430 has a built-in (optional) Safety Mode that will prevent you from using the
screen functions if your car is in motion. Unless a passenger will be the only one to
operate N.I.C.E 430, we strongly encourage you to turn on the Safety Mode.
It is also important that you look at the display only if it is absolutely safe to do so.
You should always observe traffic signs and road geometry before you obey any
instruction from N.I.C.E 430. If you need to deviate from the recommended direction,
N.I.C.E 430 will suggest a modified route according to the new situation.
Never place the PNA where it can obstruct the view of the driver, is within the
deployment zone of airbags, or where it can cause injuries in case of an accident.
9
Page 73

2 General information
N.I.C.E 430 is a navigation system optimized for in-car use. It provides door-to-door
navigation for both single and multi-point routes using adaptable route parameters.
N.I.C.E 430 is capable of planning routes throughout the whole installed map set.
Unlike some other products, N.I.C.E 430 does not require that you change maps or
switch to a poorly detailed general map to navigate between map segments or
countries. You always have complete freedom to go wherever you wish. Just select
your destination and go.
You do not need a stylus to use N.I.C.E 430. All screen buttons and controls are
designed so that you can operate them with your fingertips.
You can access all functions of the program by using hardware and screen buttons.
With the help of these buttons you can travel through all the screens of the program.
Most of the screens (especially menu functions and settings) can be accessed from
several other screens, minimizing the number of actions needed to reach the desired
function.
When using N.I.C.E 430, you do not need to ‘double tap’ or ‘tap & hold’ the touch
screen as these functions cannot be used reliably in a moving vehicle. A single tap
triggers most of the screen controls. The only exceptions are ‘drag & drop’ for
moving the map, or scaling it in Map mode (Page 32).
Most of the screens have a Return button in the top left corner. This arrow
returns to the previous screen or directly to one of the map screens.
Settings screens also have a Help button in the top right corner. This will show
a detailed description of the current settings screen.
10
Page 74

3 Operating N.I.C.E 430 (Controls)
N.I.C.E 430 is designed for easy operation. All controls are operable by fingertips.
Wherever possible, pushbuttons and lists are provided to make accessing functions
or changing settings as easy as possible.
3.1 Hardware buttons
The majority of the N.I.C.E 430 functions can be accessed using the touch screen.
The hardware buttons are the following:
3.1.1 Power on/off
Use this button to turn the power of the N.I.C.E. 430 on or off any time.
If the device power is turned off while N.I.C.E 430 is running, when you turn the
device back on, N.I.C.E 430 will continue the navigation as soon as the built-in GPS
determines the location again.
While the device is switched off, the GPS will not work, no position will be calculated,
track log will not be saved, and navigation will stop.
3.1.2 Find menu
Press this button to open the Cockpit screen with the Find menu.
3.2 Screen buttons and controls
The primary input channel of N.I.C.E 430 is the touch screen. If you read on, you will
realize that most parts of the screen are not only used to display information but also
to initiate functions by tapping. Below you will find a list of the most frequently used
controls in the program.
11
Page 75

3.2.1 Direct selectors
Some of the settings can be chosen from a short list of possible values. If the values
can be described graphically, all values are available on the screen.
Tap one of the icons to set/change the value.
3.2.2 List selectors
When the values in the list need to be named, only the current value is shown
(sometimes together with a short description) in a horizontal stripe with arrows at
both ends.
The arrows are buttons. Tap to move left in the list or tap to move right.
You need not confirm your selection. As soon as you leave the screen, the selected
value becomes effective.
3.2.3 Sliders
When a feature has several different unnamed (numeric) values, N.I.C.E 430 will
show sliders that look like analogue potentiometers to set the desired value.
If the value limits are not displayed at the ends of the slider, the leftmost position
means the minimum value, while the rightmost position represents the maximum
value.
With most sliders you can check the current value on the left.
This control can be operated in two ways. Either drag the handle to move the slider
to its new position, or tap the slider where you want the handle to appear (the thumb
jumps there immediately). As with the list selectors, there is no need to confirm your
selection. As soon as you leave the screen, the selected value becomes effective.
3.2.4 Switches
When a function can only have two values (mainly Enabled and Disabled), a switch
is used. Unlike with list selectors, the horizontal line contains the name of the
12
Page 76

function and not the actual status. There is a lamp on the left to show whether the
function is active or not.
When the lamp is dark , the function is not selected. When it is lit , the function
is enabled. The whole strip works as a button. Tap anywhere to toggle between the
enabled and disabled status.
3.2.5 Special switches
Some switches behave differently. Instead of being dark when not selected, the light
turns red and the lamp becomes crossed out to emphasize the prohibition of use.
Furthermore the switches used for the road types (to be included or avoided when
planning a route) on the Route Parameters screen (Page 69) cannot be changed for
some vehicle types. When such a vehicle is selected, not only the lamp but also the
whole line becomes inactive and dark.
Use these buttons the same way as you would other switches. Tap them anywhere
to toggle between the enabled and disabled states.
3.2.6 Switches in the Quick menu
The switches of the Quick menu (Page 43) behave as normal switches but they look
different in order to fit in with the other menu buttons.
Tap the button to toggle between the enabled and disabled states.
3.2.7 Virtual keyboards
N.I.C.E 430 is designed in a way that you only need to enter letters or numbers when
it is inevitable. In these cases a full screen keyboard pops up that can easily be
operated with your fingertips. You can choose between a separate ABC and numeric
keypad, or a set of QWERTY-type keyboards that contain both letters and numbers.
13
Page 77

N.I.C.E 430 will remember your last choice and offer it the next time you need to
enter data.
The alphabetic keyboards in N.I.C.E 430 do not contain special characters, because
you do not need to enter accents when searching for a destination. Type only the
base letters (the letter most similar to the accented one) and N.I.C.E 430 will search
for all their combinations in the database (e.g. for the French street ‘Cité Bergère ’
you only need to type ‘Cite Bergere’, and the rest is done by the program).
When you type in POI or track log names, N.I.C.E 430 will automatically turn all
initials into capitals to create names that look pleasant.
3.2.7.1 ABC-type keyboards
These keyboards contain only letters (Latin, Hebraic, Greek or Cyrillic). If you wish to
enter numbers, you need to tap the Keys ( ) button to switch to the numeric
keyboard.
Use Backspace (arrow pointing left between Space and Keys) to delete the last letter
you have entered if you have made a mistake, tap Space to enter more words, and
hit Done to finish entering the text.
This type of keyboard has large, finger-friendly buttons.
Note: If you have chosen a program language that uses Latin letters, only the ABC
keyboard appears. If you choose the Greek language, an additional keyboard
appears with Greek letters. Similarly Hebraic and Cyrillic letters are available when
Hebrew or Russian is chosen in Setup / Languages (Page 71).
If you are used to computer keyboards, you may consider trying one of the
QWERTY-type keypads.
3.2.7.2 QWERTY-type keyboards
QWERTY-type keyboards have both letters and numbers on them. Their layout is
the same as of the standard QWERTY, QWERTZ (German) and AZERTY (French)
keyboards. To switch to your desired QWERTY-type keyboard, press the Keys
button repeatedly until the appropriate keyboard appears.
14
Page 78

The special keys described in the previous section are also available here.
3.2.7.3 The numeric keyboard
The numeric keyboard only contains numbers, on huge buttons. The special keys
you find on the other keyboards (except Space) are available here as well.
Although QWERTY-type keyboards also contain number keys, when entering a
house number, the program offers the more convenient numeric keypad.
15
Page 79

4 Discovering the program through the screens
The best way to discover N.I.C.E 430 is to explore each screen in detail, and to find
out how to move from one to another. Read this chapter for a guided tour.
4.1 Main menu (Navigation Menu)
N.I.C.E 430 starts by displaying the Main menu. This is the root of the screen
hierarchy, but you need to return here very rarely while using the program. Screens
are also accessible from each other to reduce the number of actions needed to
initiate a function or change a setting.
Most parts of the program are directly accessible from here by using the buttons
described below.
No. Content
1 Destination: Button to open Find menu
2 Button to open Map screen
3 Button to open Cockpit screen
4 Current position
5 Current date and time
6 Battery Status indicator
7 Button that displays GPS Status and opens the list of TMC messages
8 Button to open Settings
16
Page 80

No. Content
9 Button to open About screen
10 Button to exit N.I.C.E 430 (navigation stops)
4.2 About screen
Tap About on the Main menu screen to open this screen. The About screen is not
used in normal navigation. It is there to inform you about the map licenses you have,
the creators of N.I.C.E 430 and the legal aspects of using the program.
4.3 The map
The most important and most frequently used screens of N.I.C.E 430 are the two
screens with the map (Map screen and Cockpit screen). They are similar in look and
in possible controls but are optimized for different uses. The map they display is
common. The elements of the map are described here. For the controls and special
functions of the two map screens see Page 28.
The current version of N.I.C.E 430 is primarily intended for land navigation. That is
why maps in N.I.C.E 430 look similar to paper roadmaps (when using daytime colors
and 2D map mode). However, N.I.C.E 430 provides much more than regular paper
maps can. The look and the contents can be changed.
4.3.1 2D and 3D map views
Besides the classical top down view of the map (called 2D mode), you have the
possibility to tilt the map to have a perspective view (3D mode) that gives a view
similar to that seen through the windscreen with the possibility to see far ahead.
17
Page 81
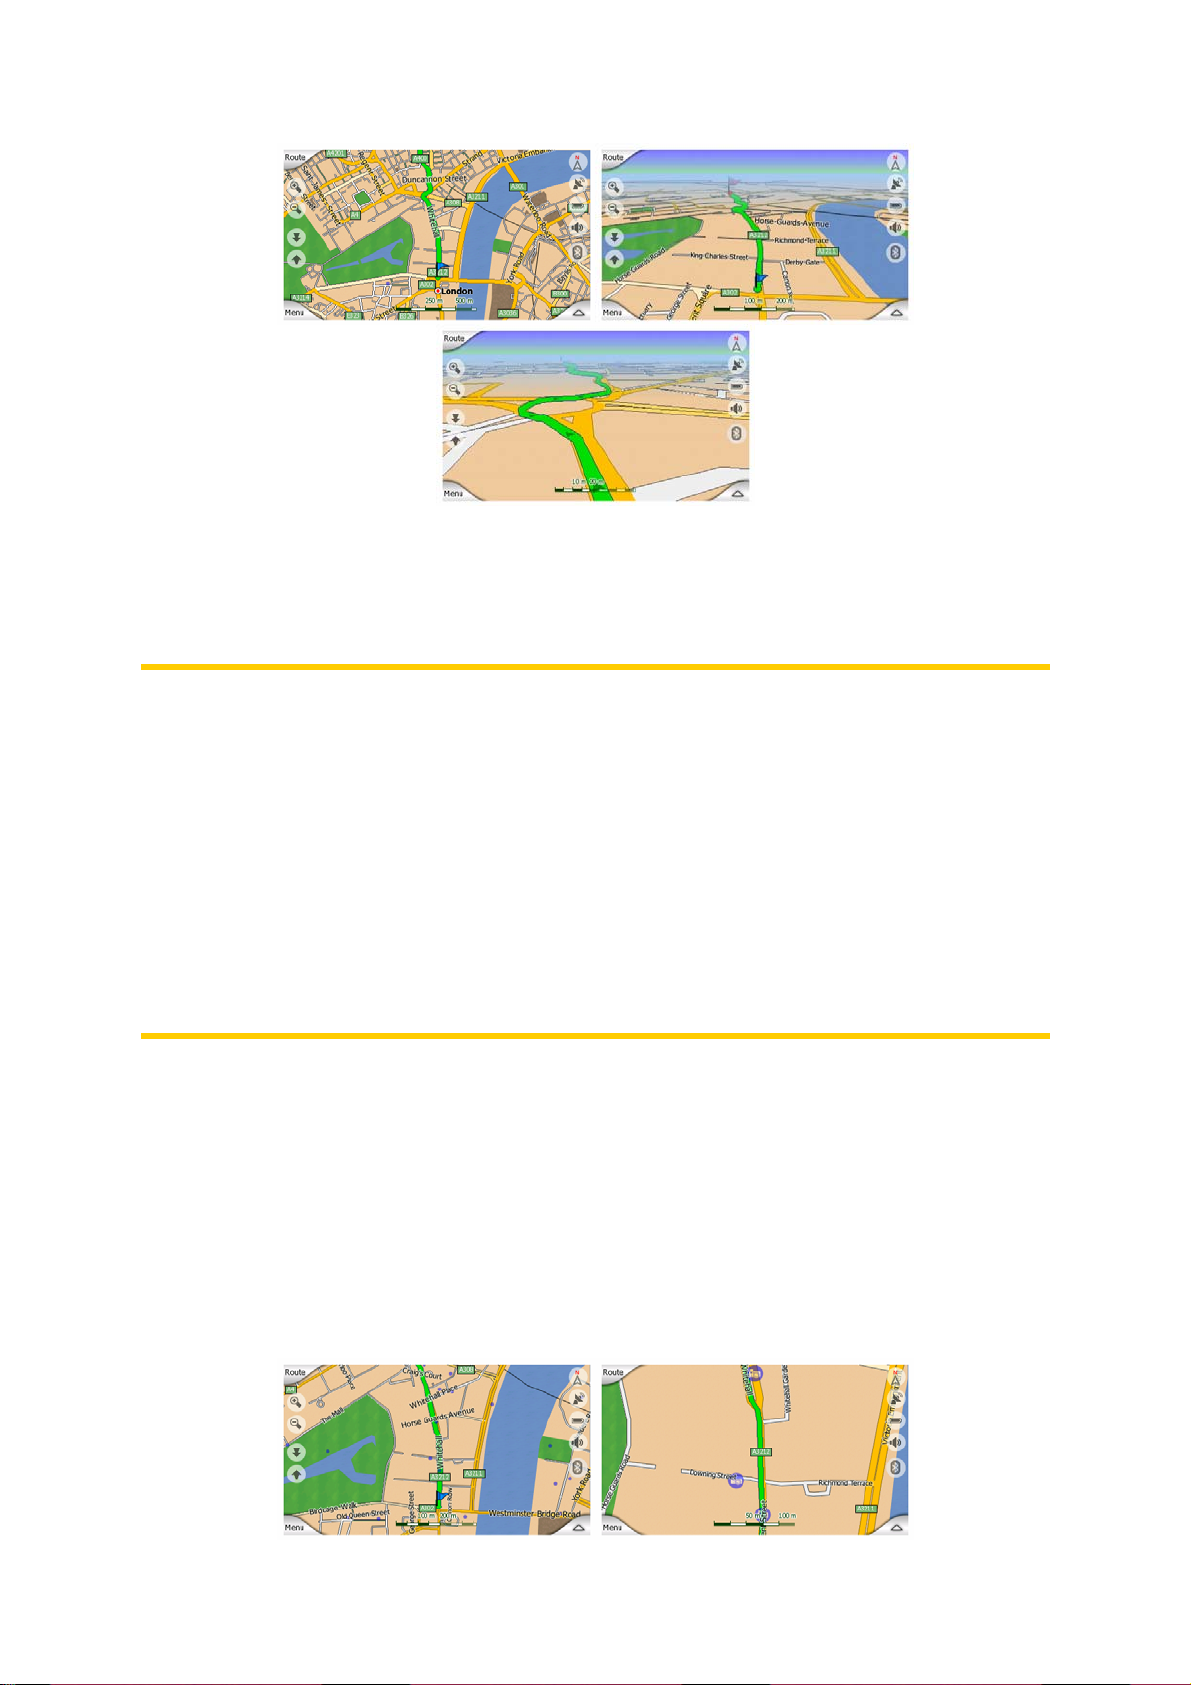
It is easy to change between 2D and 3D modes. You have two options. You can use
the Tilt up and down buttons (Page 31) to tilt the map seamlessly between 2D and all
3D angles, or you can use the switch in the Quick menu (Page 43) to quickly switch
between the two modes.
Note: You may find that 2D mode is more useful in North-up Map mode when
looking for a certain part of the map or an object to select as destination. On the
other hand, 3D mode in Track-up Cockpit mode with Smart Zoom makes navigation
very comfortable. The description of these modes will come later in this manual.
Note: 3D view is only useful for navigation. As you zoom out, the view angle will
automatically be raised. Finally 2D view will be reached. When you zoom back in, 3D
view will gradually return.
Note: Using the Advanced settings, you can force Cockpit mode to always start in 3D
Track-up view (Page 72). You can still rotate and tilt the maps in either mode, but the
next time you enter this screen, the preset look will reappear. Similarly you can force
Map mode to always start in 2D North-up view.
4.3.2 Zoom levels
N.I.C.E 430 uses high quality vector maps that let you see the map at various zoom
levels, always with optimized content (the density of the map details can be
independently set for Map and Cockpit screens in Map settings (Page )). Street
names and other text objects are always displayed with the same font size, never
upside down, and you only see as many streets and objects as needed to find your
way around the map. Zoom in and out to see how the map changes in either the 2D
or 3D view.
18
Page 82

Changing the scale of the map is very easy. You can drag and stretch the scale
(Page 32) at the bottom of the Map screen, or use the zoom icons (Page 31) on both
Map and Cockpit screens.
Note: If you need to zoom out briefly to locate your position on the map, use the
Overview mode instead of zooming out and back in. The Overview mode is a 2D
North-up view that can be started by tapping the compass button on the right (Page
33).
Note: N.I.C.E 430 has a special Smart Zoom function for navigation that
automatically rotates, scales and tilts the map in 3D map mode to always give you
the optimal view in your current situation. When approaching a turn, it will zoom in
and raise the view angle to let you easily recognize your maneuver at the next
junction. If the next turn is at a distance, it will zoom out and lower the view angle to
flat in order to let you see the road in front of you.
4.3.3 Daylight and night color schemes
The different color schemes let you adjust N.I.C.E 430 to the brightness of the
environment. Use the daylight and night color schemes accordingly. Daylight colors
are similar to paper roadmaps, while the night color schemes use dark tints for large
objects to keep the average brightness of the screen low, with carefully selected
colors to still keep you informed about all the necessary information on the screen.
You can change between day and night views manually in the Quick Menu (Page
44) or let N.I.C.E 430 do it automatically (Page 62) for you.
Note: The automatic day/night mode is based upon the current date and GPS
position by which N.I.C.E 430 calculates the exact sunrise and sunset times on the
particular day at the particular location. Using that information N.I.C.E 430 can
automatically switch between the color schemes a few minutes before sunrise, when
the sky has already turned bright, and a few minutes after sunset before it gets dark.
Tip: There are several daytime and night color schemes included with N.I.C.E 430.
To select the one that suits your needs the best, make your selection in Settings
(Page 65).
Tip: To further enhance the effect of the night color scheme, you can instruct N.I.C.E
430 to decrease the display backlight when the night colors are used. Set the
desired backlight levels for both daylight and night modes. Page 73.
19
Page 83

Note: The colors mentioned and screenshots included in this manual refer to the
default daytime and night color schemes. They may not look the same in the
schemes you have chosen.
Tip: If you use N.I.C.E 430 after sunrise or before sunset, look for the sun in the sky
in the map background using a flat 3D view. It is displayed at its actual position to
give you another way to orientate, and also to provide some eye candy.
4.3.4 Streets and roads
The similarity of N.I.C.E 430 to paper roadmaps is also convenient when it comes to
streets, the most important elements of the map concerning navigation. N.I.C.E 430
uses similar color codes to those you are accustomed to, and the width of the streets
also refers to their importance, so it will not be difficult to tell a highway from a small
street.
Streets and roads have names or numbers for identification. Of course, this
information can be displayed on the map. N.I.C.E 430 uses two different ways to
show street labels. The conventional way is the same as a roadmap – it displays the
name of the street aligned with the street. The alternative is a kind of virtual signpost
stuck into the street itself.
You need not choose between the two modes. N.I.C.E 430 will use the one best for
the current tilt and zoom level. Zoom in to have only a few streets on the map, and
start tilting up and down to see how N.I.C.E 430 switches between the two modes in
an instant.
Note: The automatic switching is on even when using Smart Zoom. At first you may
find it odd, but later you will discover how it adjusts the displayed information to the
current view of the map. It is important, as the driver must be able to read the map at
a glance.
20
Page 84

Tip: If you do not want to be bothered by street names during navigation, turn them
off in Map Options (Page 66).
Tip: Major roads usually have alternative names (numbering) besides the primary
name. You can choose whether to display these alternative names or not. You can
set this in Map Options (Page 66).
4.3.5 Other objects
To help orientate you, the map also contains objects that have no other navigating
function than to help you recognize your location on the map. These are surfacewaters, large buildings, forests, etc.
Tip: These objects are normally displayed using textured polygons that look natural
to the eye. You may wish to switch the textured display off (Page 66) to free some of
the resources of your PNA by replacing textures with plain colored surfaces.
4.3.6 Current position and Lock-on-Road
When your GPS position is available, a blue arrow (yellow when using night colors)
shows your location on the map.
The direction of the arrow represents your heading. The arrow is sized and vertically
rotated with the zoom and tilt levels to always look realistic.
N.I.C.E 430 has a built-in Lock-on-Road feature that always puts the position arrow
on the road, on the axis of the street in case of one-way streets, or on the side of the
road where you drive (e.g. on the right in Germany and on the left in the U.K.) on
two-way roads.
The location received from the GPS receiver is shown as a blue dot on the map. This
can help you locate your position if the GPS accuracy is poor, and the Lock-on-Road
21
Page 85

system puts you on the wrong street. It is also the location saved in the track log
(Page 48).
Note: The Lock-on-Road feature can be turned off in Advanced settings (Page 77)
for pedestrian use. When switched off, the arrow is displayed where the blue dot
would be with active Lock-on-Road.
When the GPS position is lost, the arrow turns gray, but the journey continues on the
recommended route for a short period of time with the speed last detected before the
GPS position was lost. When the next route event is reached, or after 40 seconds,
the arrow stops, and remains gray until GPS reception returns. This way short
tunnels can be crossed without losing the position.
4.3.7 Selected map point, also known as the Cursor
If you tap the map somewhere or select a specific item in Find, it will become the
selected point on the map, marked with a small red dot and permanently radiating
red circles to make it conspicuous at all zoom levels, even when it is in the
background of a 3D map view. You can use this point as starting point, via point, or
destination of your route, you can search for a POI near to it, mark it with a drawingpin, or save it as a POI. The cursor, when visible, is also the reference point for map
scaling.
Note: When your GPS position is available, and Lock-to-Position (Page 32) is active,
the cursor is the current GPS position, the blue arrow. When you select another point
by tapping the map, or using the Main menu (Using the Main menu), the new Cursor
is shown on the display with the red dot and the radiating red circles.
4.3.8 Marked map points (Pin)
The Cursor can be marked with a Pin. Pins are shown as being stuck in the map. A
Pin is visible at all zoom levels and remains in its position until you unpin it, or delete
all Pins in Advanced settings (Page 78).
The color of the Pin is automatically selected by N.I.C.E 430. Different colors help
you identify a Pin in the History list (Page 86) later. There they are shown together
with their address and GPS Coordinates.
Tip: A quick way to tell the coordinates of a location you found on the map is to Pin it,
and then look for the coordinates in the History list (Page 86).This way you also save
22
Page 86

the coordinates with the Pin for later reference. If you do not need the coordinates
later, just select the point and start Find Coordinates (Page 86).
4.3.9 Visible POIs (Points of Interest)
N.I.C.E 430 comes with thousands of built-in POIs, and you can create your own POI
database as well. Having all of them displayed on the map would make the map too
crowded. To avoid this, N.I.C.E 430 lets you select which POIs to show and which
ones to hide (Page 45) using their categories and subcategories.
POIs are represented by icons on the map. For a built-in POI it is the icon of the
subcategory of the actual POI. For points you create, it is the icon you had chosen
when you created the POI (it can be changed later).
These icons are large enough to recognize the symbol, and semi-transparent so as
not to cover the streets and junctions behind them.
When the map is zoomed out, the icons are not shown. As you zoom in, small dots
appear at the locations of visible POIs. Zooming in further makes the full icons
appear.
If two points are too close to each other so that icons overlap, a multi-POI icon
shown instead of individual ones. Zoom in more to see them separately. (Should the
two POIs have the same icon, this icon will be displayed instead of the multi-POI
icon.)
is
23
Page 87

Note: When navigating, POI icons can be disabled together with street names (Page
66). If you still need this information during your journey, just drag the map to disable
Lock-to-Position (Page 32). This will restore street names and POI icons
immediately. Now tap Lock to reactivate Lock-to-Position.
Tip: Tap the map on or near a POI item to see the list of the names of the nearest
POIs in a popup list, if it is enabled (Page 47). To see the details of a particular POI
in the list, tap the blue ’i’ icon on the right. If you have too may POIs nearby, this list
may not be complete. In the Cursor menu (Page 35) there is a button called POI that
leads you to the screen of all nearby POI items. There you can open them one by
one to see their details, and select any of them as a route point.
4.3.10 Road safety cameras
Road safety cameras, such as speed cameras and red light cameras are special POI
types in N.I.C.E 430. They are described in detail here: Page 57.
4.3.11 Elements of the Active Route
N.I.C.E 430 uses a multi-destination routing system in which you have a start point
(your current location if GPS position is available), a destination, the line of the active
leg of the route, and optionally via points and inactive legs. They are all shown on
the map.
4.3.11.1 The start point, via points and the destination
These points are represented by flags.
4.3.11.2 Animated turn guidance
Animated arrows represent all route events other than the above-mentioned special
points. These arrows show the direction in which you need to continue your journey.
24
Page 88

4.3.11.3 The active leg of the route
The active leg is the section of the route you are currently driving. If you have not
added any Via points, the whole route will be the active leg. When Via points are
present, the active leg is the part leading from your location to the next via point.
The active section is displayed in green/red. It is always the most conspicuous part
of the map even when in the background of a 3D map view.
The line of the route is displayed on the driving side of the road for two-way and on
the axis in case of one-way streets. When the map is zoomed in and the line is wide
enough, small arrows show the direction of the route. This can be useful if you
preview the route before starting the journey or when entering a complex junction.
4.3.11.4 Inactive legs of the route
Future sections of a route are inactive. They are also shown on the map with the
same color but a darker tint than the active one. An inactive route section becomes
active as soon as you reach its starting Via point.
25
Page 89

4.3.11.5 Roads in the route excluded by your preferences
Although you can choose whether to include or avoid some road types in Route
parameter settings (Page 69), sometimes they are impossible to avoid near the
starting point, via points or the destination.
If so, N.I.C.E 430 will display those segments of the route with an alternate color.
4.4 GPS Data screen
Tap the GPS button at the list of TMC messages screen to open this window.
The GPS Data screen is a collection of information received from the GPS device
and it also serves as the entry point to the following screens:
• Time Sync.
4.4.1 GPS data displayed
The virtual sky on the left represents the currently visible part of the sky above you,
with your position as the center. The satellites are shown at their current positions.
The GPS receives data from both the green and gray satellites. Signals from the
gray satellites are only received, while green ones are used by the GPS to calculate
your current location. On the right you can see the satellite signal strength bars. Grey
bars are for the gray and black bars are for the green satellites. To identify satellites
use their numbers also shown in the virtual sky. The more satellites your GPS tracks
(the green ones), the better your calculated position will be.
Additional pieces of information on this screen are: current position in
latitude/longitude format, elevation, speed, date, time and calculated accuracy.
Note: Accuracy can be affected by several factors the GPS cannot take into account.
Use this accuracy information only as estimation.
There are two icons on the left to show the status of the GPS connection and the
quality of reception.
26
Page 90

4.4.2 GPS connection indicator
In the middle to the left there is a lamp similar to the ones used for switches. This
one has more colors and represents more values:
• a fast blinking green lamp means that there is communication with the GPS
and data is being received,
• other colors may not appear with a built-in GPS. Should any of
these appear, this means a faulty operation of your device.
4.4.3 GPS data quality indicator
In the top left corner there is a satellite dish to show the quality of the GPS position.
Different colors represent different signal quality:
• black with a red cross means there is no connection with the GPS device.
This should never be the case if your device has a built-in GPS.
• red means the GPS is connected but no GPS position is available,
• yellow means 2D reception. A GPS position has been acquired, N.I.C.E 430
is ready for navigation, but the GPS is using enough satellites for calculating the
horizontal position only. Elevation data is not provided, and the position error may
be significant.
•
green means 3D reception. The GPS receiver has enough satellites to
calculate altitude. Position is generally correct (yet it can still be inaccurate due to
different environmental factors). N.I.C.E 430 is ready for navigation.
4.4.4 Time synchronization
In the top right corner of the screen you have another button that leads to a new
screen where you can synchronize the clock of your PNA to the very accurate time
provided by the connected GPS.
27
Page 91

Turn on the Auto Correction switch to let N.I.C.E 430 frequently check and correct
the PNA time with the GPS time.
Below that button you will see the current values of the GPS and the PNA clocks.
You can check here whether any correction is needed. Tap the button to
manually synchronize the time.
Below the PNA time you have hour and minute controls to manually correct the time
with or without a valid GPS time. It also gives you the chance to correct the time after
synchronization if your PNA does not support time zones or daylight saving time.
4.5 Screens with map
Having explained the contents of the map, the description of the other parts of the
map screens follows. There are two map screens: the Map screen and the Cockpit
screen. The way they show the map is the same but their look and controls are
optimized for different purposes.
The Map screen is to be used mainly without a GPS, to browse the map, create user
POI items, or to plan your route based on map points. The Map screen is designed
to give you the maximum map area. This screen is usually used in 2D North-up
mode.
You can set N.I.C.E 430 so it always opens the Map screen in 2D North-up mode
(Page 72).
The Cockpit screen is for driving purposes. Besides showing the map, it contains
some additional travel information if you are just cruising (speed, current street your
are driving in, speed limit for the current street), and some more route data if you are
navigating (e.g. next street in your route, distance to travel, type of the next route
event). This screen is typically used in 3D Track-up mode.
You can make N.I.C.E 430 always open the Cockpit screen in 3D Track-up mode
(Page 72).
There are several controls that function in a similar fashion on the two screens. They
are described on the following pages.
28
Page 92

Map screen contents:
Cockpit screen contents:
No. Display Control
1 (Cockpit only) Turn preview* Voice guidance repeat
2 n/a Zooms in (optional)
3 n/a Zooms out (optional)
4 n/a Tilts down (optional)
5 n/a Tilts up (optional)
Indicates that Lock to GPS
6
position and heading is inactive
7 Selected map point (Cursor)
8 (Map only) Map scale
9 n/a
10 Map orientation and Overview
Re-enables Lock-toPosition / Smart Zoom
Opens Popup Info and
Cursor menu
Zooms in/out by
dragging
Menu (Find, Quick,
Route, Main)
Switches North-up,
Track-up and Overview
11 GPS position quality
12 Battery status Opens settings
Opens the list of TMC
messages
29
Page 93

No. Display Control
13 Sound on or muted Opens Sound settings
14 Track Log recording or playback
15 n/a Opens Cursor menu
16 (Cockpit only) Current street
(Cockpit only) Travel and Route
17
data**
(Cockpit only) Distance to next
18
turn***
19 (Cockpit only) Next street*** n/a
(Cockpit only) Approaching next
20
turn****
21 Current speed limit***** n/a
22 Bluetooth or phone call status
* On Map screen only when a route is active
** Contents differ when a route is active
Opens Track Logs
screen
Opens Route
Information screen
Opens Route
Information screen
Voice guidance repeat
n/a
Opens Bluetooth
Settings
*** Appears only when a route is active
**** Appears only when a route is active and the next turn is near
***** Appears only if speed limit is known for the current road
4.5.1 Turn preview (No. 1)
On the Cockpit screen this field shows a graphic illustration of the next maneuver.
For example when you approach a turn, an arrow will show whether it is a slight,
normal or sharp turn. When showing a roundabout, the number of the exit is also
given in the picture.
This field also serves as a button. Tap it to get the voice guidance repeat. The Map
screen will show a button called Route here if there is an active route, which leads to
the Route menu.
30
Page 94

4.5.2 Zoom in and out (No. 2 & 3)
These semi-transparent buttons are only displayed if "Zoom & Tilt" is enabled in the
Quick menu (Page 44).
Zoom will change the scale of the map. Zoom out shows a larger part of the map,
while Zoom in shows a smaller part of the map in more detail.
The automatic Smart Zoom function will do the necessary zooming for you when
navigating (zooms out if the next turn is at a distance to let you see far ahead and
zooms in when approaching a turn to give you a better view of the upcoming
maneuver). If you manually change the zoom level, Smart Zoom will no longer scale
the map by itself (automatic tilting and rotating remains active).
You need to tap the Follow button (Page 32) to return the zoom control to Smart
Zoom. You can also set N.I.C.E 430 to do this automatically after a few seconds in
case of the Cockpit screen (Page 75).
4.5.3 Tilt up and down (No. 4 & 5)
These semi-transparent buttons are only displayed if "Zoom & Tilt" is enabled in the
Quick menu (Page 44).
This function modifies the vertical viewing angle of the map in 3D mode. You can
change the angle in a wide range starting from a top down view (2D view is
seamlessly integrated) all the way to a flat view that lets you see far ahead.
The automatic Smart Zoom function will do the necessary tilting for you when
navigating (gives a flat view if the next turn is at a distance to let you see far ahead
and raises the angle when approaching a turn to give you a better view of the
upcoming maneuver). If you manually change the view angle, Smart Zoom will no
longer tilt the map by itself (automatic zooming and rotating remains active).
You need to tap the Follow button (Page 32) to return the tilt control to Smart Zoom.
You can also set N.I.C.E 430 to do this automatically after a few seconds (Page 75).
31
Page 95

4.5.4 Follow mode - lock to GPS position and heading (No. 6)
This semi-transparent icon is displayed if GPS position is available, and the map has
been moved. It also appears when you scale or tilt the map while Smart Zoom is
enabled.
This semi-transparent icon is displayed if GPS position is available, and the map has
been moved or rotated. It also appears when you scale or tilt the map while Smart
Zoom is enabled.
Normally N.I.C.E 430 positions the map to keep the GPS position visible somewhere
on the map (when North-up orientation is selected), or always at the bottom center of
the map (when Track-up orientation is selected).
If you manually move the map, it will freeze the map in the new position. To return to
the GPS position, use this Follow button.
When Smart Zoom is enabled, scaling or tilting the map also stops the automatic
zooming or automatic tilting respectively. To reactivate Smart Zoom, tap this button.
Tip: In Advanced settings you can set a delay time after which N.I.C.E 430 pushes
the Follow button for you on the Cockpit screen automatically (Page 75). This can be
turned on for re-enabling both Lock-to-Position and Smart Zoom.
4.5.5 Cursor (No. 7)
As described earlier (Page 22), if you tap the map somewhere or select one specific
item in Find, it will become the selected point on the map, marked with a small red
dot and radiating red circles to make it conspicuous. You can use this point as
starting point, via point or destination for your route, you can search for a POI near it,
mark it with a pin, or save it as a POI.
Note: When GPS position is available, the Follow button will appear indicating that
you have disabled Lock-to-Position. Tapping the Follow button will re-enable the
position lock and move the cursor back to the current GPS position. The same
happens when N.I.C.E 430 restores Lock-to-Position automatically on the Cockpit
screen, if it is set in Advanced settings (Page 75).
4.5.6 Map scale (No. 8)
The scale indicator is only available on the Map screen. In 2D map view it represents
the scale of the map. In 3D view it is the scale of the nearest part of the map only.
32
Page 96

You can use it in both 2D and 3D modes to scale the map. Drag and pull it right to
zoom in, or left to zoom out.
4.5.7 Menu (No. 9)
This button opens the Menu with the Find engine, the Quick menu, the Route menu
and the exit button that takes you to the Main menu screen. The Menu will be
described in detail later: Page 43.
4.5.8 Map orientation and Overview (No. 10)
You can view the map screens in three different presentation modes. This switch will
cycle through them in the following order.
The usual map orientation for navigation is Track-up. It means N.I.C.E 430 rotates
the map during navigation to always face the direction of your travel. In this mode an
arrow (compass) points towards North.
Tap this icon to switch to North-up mode. Now the map is fixed to keep facing North.
The icon changes to show the new rotation mode.
Tap the icon again to enter Overview mode. This mode looks similar to the North-up
mode with one difference: the zoom level in this mode has a fixed default to give you
a better look of where you are on the map. You can change the zoom level at any
time, this will not cause the Follow button to appear, but when entering Overview
mode later, the default zoom level will be restored.
The arrow representing your position will be fixed in the middle of the screen. When
you move the map in Overview mode, the Follow button will appear, and when
pushed, it will move the map to have your current position in the middle of the map
again.
You cannot rotate the map in Overview mode. This mode is strictly north-up.
You can set up N.I.C.E 430 so that it will switch to Overview mode during navigation
when the next turn is far away. You can specify this distance and the fixed zoom
level of Overview in Advanced settings (Page 74).
An airplane icon indicates Overview mode.
33
Page 97

Tap the icon again to return to Track-up (automatic rotation) mode.
4.5.9 GPS position quality (No. 11)
Similarly to the icon found on the GPS Data screen (Page 27), the map screens also
inform you about the GPS signal:
• The black satellite dish with the red exclamation mark shows there is no
connection with the GPS receiver. GPS navigation is not possible. Devices with a
built-in GPS receiver are permanently connected, so this icon may not appear
under normal circumstances.
• Red shows there is a connection, but the signal is too weak to give a
position. GPS navigation is not possible.
• Black shows there is a GPS position, and navigation is possible. When only
one arc is shown, the position is 2D (no altitude available), and position error may
be significant, yet N.I.C.E 430 is ready to navigate.
• A black dish and two arcs represent a 3D GPS position. N.I.C.E 430 is ready
to navigate.
• When small car symbols are displayed under the dish, TMC information is
available.
4.5.10 Battery status (No. 12)
The status of the battery is also shown by N.I.C.E 430. You can estimate the
available power reserve from the length of the bar inside. Some examples:
• The thunderbolt in the battery shows the battery is being charged.
• Battery is not charging, but it is at full capacity.
• Battery in not full, but there is sufficient reserve capacity.
• When the inside of the battery turns red, the battery needs recharging.
34
Page 98

4.5.11 Sound muting (No. 13)
This icon displays the enabled or disabled status of the voice guidance and the key
sounds. When muting is enabled, the speaker icon is crossed out.
When sounds are enabled the red cross disappears.
Tap this button to open Sound settings (Page 66).
Note: Sound can be muted in Sound settings (Page 66), using the Master switch.
4.5.12 Track Log recording/playback indicator (No. 14)
When a track log is being recorded, a red icon is displayed on the map screens. This
icon also functions as a button leading to the Track Log screen (Page 48) where you
can stop the recording or make the track log visible on the map.
During track log playback a green icon will blink. Tapping this icon (in fact, tapping
the screen anywhere) stops the simulation.
4.5.13 Cursor menu (No. 15)
The Cursor is the selected point on the map (marked by a red dot and radiating red
circles around it), or the current GPS position when it is available and Lock-toPosition is enabled. When you tap the screen to place the Cursor, the Cursor menu
pops up automatically to give you the list of possible functions you can use the
Cursor for. At the same time Popup Info (street name, house number and the list of
POIs nearby) appears near the selected map point if Popup Info is enabled in the
Quick menu (Page 43).
If you do not use the Cursor menu in a few seconds, it will automatically vanish back
to the bottom of the screen, and Popup Info disappears, too. You can have them
reappear by reopening the Cursor menu using the arrow in the bottom right corner.
When you open the menu manually, it will stay on until you close it or switch to
another screen.
35
Page 99

Tip: If you want to see the map around the Cursor, close the Cursor menu and
reopen it. When this menu is opened manually, the map is always moved to have the
cursor in the center.
The content of the Cursor menu depends on the screen (Map or Cockpit) and it is
slightly different if there is an active route already planned. You have the following
options:
• Start: use the Cursor as the departure point for your route. This menu point is
available only in Map mode and when there is no active route. In Cockpit mode
the departure point of the route is always the GPS position or if it is not available,
the last known GPS position.
• Route To: use the Cursor as the destination of your route. This button is to start a
new route. The previous route (if it exists) will be deleted and replaced. If a multipoint route is active, N.I.C.E 430 will ask you whether you really want to delete it
together with all its via points.
• Add Via: by inserting the selected map point as a via, you instruct N.I.C.E 430 to
cross this location before the destination of the route. This is the way to build a
multi-point route in reverse order (when you wish to insert a stopover ‘go to A but
first get some fuel at B’ or want to influence the direction of the route). This menu
point works only if a route is already active.
• Remove Via: removes the ‘via point’ near or at the Cursor. The route will be
recalculated immediately excluding the deleted point. This menu point replaces
Add Via and is available only if the Cursor is near or at a via point.
• Add Dest: add a new destination to be reached after the previous destination.
The new destination replaces the old one, which is now demoted to a via point.
This is the way to build your multi-point route in straight order (when you wish to
visit several destinations ‘go to A then to B’). This menu point is available only if a
route is already active.
• Pin: push a colored pin in the map at the selected point for later use. This pin is
visible at all zoom levels and also appears in the History list together with its exact
position. The color of the pin is automatically selected by N.I.C.E 430. This menu
point is only available on the Map screen.
• Unpin: remove the pin near or at the Cursor. This menu point replaces Pin and is
available only if the selected point is near or at a pin.
• POI: opens the list of POIs near the selected point. These are the POIs shown in
the Popup Info window. If you want to add a new POI at the cursor, you can do so
by tapping Add POI in the bottom left corner. You can also add a new road safety
36
Page 100

camera if you tap Add Cam, and set the parameters (type, direction, and speed). If
a camera already exists near the cursor, this button is inactive, and you can
change the parameters of the camera by tapping it in the list.
4.5.14 Current street (No. 16)
This field of the Cockpit screen shows the name or number (as available) of the
current street or road you are driving on.
Tip: Some roads have an alternative name (or number). This is normally shown
together with the primary name in this field. You can hide these alternative names in
Map settings (Page 66).
4.5.15 Travel and Route data (No. 17)
The contents of these three fields are different when cruising (without an active
route) or navigating (following an active route).
While cruising, the fields show the present speed, the current speed limit and the
time of day.
While navigating a route, these fields show the estimated time needed to reach the
destination (ETE), the distance to destination, and the estimated arrival time at the
destination (ETA) by default.
You can choose what to display in these three fields during navigation, by going to
Advanced settings / Display Options (Page 73). See the following list for your
options. The only restriction is that you cannot select a value that already appears in
another field. The possible field contents are:
• Distance to destination (default value for the left field)
• Time to destination (estimated time en route, default value for the middle field)
• Distance to next via point
• Time to next via point
• Time to next maneuver (next route event)
• Speed
• Speed limit
37
 Loading...