

Page 1

Page 2

C
ongratulations on your purchase of the Ungo Security System.
This Ungo Security System was designed in the heart of
California’s high-tech “Silicon Valley” by Ungo Security
Corporation, a subsidiary of Clarion Corporation. Since its founding in
1975, Ungo has been recognized as a pioneer and long time industry
leader in vehicle security.
Please read this manual thoroughly to familiarize yourself with your
system’s components and operation. Discuss any questions you might
have with your installing dealer.
Record the serial number of your Ungo system and keep all dealer
records and receipts. Be sure to discuss the installation with the dealer
so that you understand the specifics of the installation in your vehicle.
Also, do not forget to complete and mail the Product Warranty
Registration Card within 60 days of purchase and insure that the
installing dealer has stamped and signed the appropriate section in
order to properly register your warranty.
Page 3

Table of Contents
1. About Your System . . . . . . . . . . . . . . . . . . . . . . . . . . . . . . . . . . . . . . . . . . . . . . . . . . . . . . . Page 1
2. Remote Transmitters
Remote Transmitter Layout . . . . . . . . . . . . . . . . . . . . . . . . . . . . . . . . . . . . . . . . . . . .Page 2
Two Car Operation . . . . . . . . . . . . . . . . . . . . . . . . . . . . . . . . . . . . . . . . . . . . . . . . . . .Page 3
Adding a New Transmitter into the System . . . . . . . . . . . . . . . . . . . . . . . . . . . . . . . .Page 4
Deleting Transmitters . . . . . . . . . . . . . . . . . . . . . . . . . . . . . . . . . . . . . . . . . . . . . . . . .Page 4
Battery Replacement . . . . . . . . . . . . . . . . . . . . . . . . . . . . . . . . . . . . . . . . . . . . . . . . . .Page 5
3. Basic Operation
Remote Arming . . . . . . . . . . . . . . . . . . . . . . . . . . . . . . . . . . . . . . . . . . . . . . . . . . . . .Page 6
Remote Disarming . . . . . . . . . . . . . . . . . . . . . . . . . . . . . . . . . . . . . . . . . . . . . . . . . . .Page 7
Tamper Alert . . . . . . . . . . . . . . . . . . . . . . . . . . . . . . . . . . . . . . . . . . . . . . . . . . . . . . . .Page 7
Silent Arming / Disarming . . . . . . . . . . . . . . . . . . . . . . . . . . . . . . . . . . . . . . . . . . . . . .Page 7
Arming Mode Selection . . . . . . . . . . . . . . . . . . . . . . . . . . . . . . . . . . . . . . . . . . . . . . . .Page 8
Passive Arming . . . . . . . . . . . . . . . . . . . . . . . . . . . . . . . . . . . . . . . . . . . . . . . . . . . . . .Page 8
Panic Mode . . . . . . . . . . . . . . . . . . . . . . . . . . . . . . . . . . . . . . . . . . . . . . . . . . . . . . . . .Page 8
Emergency Override . . . . . . . . . . . . . . . . . . . . . . . . . . . . . . . . . . . . . . . . . . . . . . . . . .Page 9
Automatic System Rearming . . . . . . . . . . . . . . . . . . . . . . . . . . . . . . . . . . . . . . . . . . .Page 9
Full Time System Diagnostics . . . . . . . . . . . . . . . . . . . . . . . . . . . . . . . . . . . . . . . . . .Page 9
4. Other Features
Valet Mode . . . . . . . . . . . . . . . . . . . . . . . . . . . . . . . . . . . . . . . . . . . . . . . . . . . . . . . . .Page 10
Ignition Controlled Door Locking / Unlocking . . . . . . . . . . . . . . . . . . . . . . . . . . . . .Page 10
Dome Light Control . . . . . . . . . . . . . . . . . . . . . . . . . . . . . . . . . . . . . . . . . . . . . . . . . .Page 10
Auxiliary Function Outputs . . . . . . . . . . . . . . . . . . . . . . . . . . . . . . . . . . . . . . . . . . . .Page 11
Remote Car Starter . . . . . . . . . . . . . . . . . . . . . . . . . . . . . . . . . . . . . . . . . . . . . . . . . .Page 12
Garage Door Receiver . . . . . . . . . . . . . . . . . . . . . . . . . . . . . . . . . . . . . . . . . . . . . . . .Page 12
Additional Remote Transmitters . . . . . . . . . . . . . . . . . . . . . . . . . . . . . . . . . . . . . . .Page 12
5. Reference Chart . . . . . . . . . . . . . . . . . . . . . . . . . . . . . . . . . . . . . . . . . . . . . . . . . . . . . . . . .Page 13
6. Technical Data . . . . . . . . . . . . . . . . . . . . . . . . . . . . . . . . . . . . . . . . . . . . . . . . . . . . . . . . . .Page 14
7. Warranty . . . . . . . . . . . . . . . . . . . . . . . . . . . . . . . . . . . . . . . . . . . . . . . . . . . . . . . . . . . . . . .Page 15
Note: Certain features described in this manual may require additional parts and/or labor. Also, many features of
the Ungo MS3001 / MS3200 security systems have selectable options that must be activated or programmed
during the system’s installation. These items will be identified in the following sections. Your Authorized
Ungo Dealer will be happy to discuss these features with you and help you design your system to meet your
needs.
Page 4

Ungo Security Systems are state-of-the-art vehicle protection systems equipped with features
designed to:
❐
Deter
potential intrusions to the vehicle by continually flashing the system LED status
indicator while the system is Armed, giving a visual indication to any passer-by that the
system is equipped with a security system.
❐
Detect
intrusions to the vehicle, including impacts to the vehicle’s body and glass, and
opening of the doors, trunk and hood.
❐
Alert
those in the vicinity of the vehicle by sounding the system’s siren and flashing,
parking lights, and honking the horn.
❐
Inform
the owner when the system has been triggered and specifically which zone was
violated. The system will also inform the user of any bad switches or sensors that may
be causing the system to function improperly.
❐
Protect
both you and the contents of your vehicle with features such as panic mode,
dome light illumination, and ignition controlled door locking.
Each Ungo MS3001 / MS3200 System comes with:
• Main Unit - the “brain” of the system.
• 2 - Three Button Remote Transmitters
• Siren (MS3001) - Water resistant, high output siren that sounds when system is
triggered.
• Battery Back-up Siren (MS3200) - Water resistant, self contained, battery back-up siren
that sounds for up to 1 full hour when system is triggered or if the siren becomes
disconnected from it’s source of power.
• Status LED - red illuminated indicator that provides system status information.
• Emergency Override / Valet Switch - used to override the system in case the Remote
Transmitters become lost or stolen. Also used to temporarily disable the system when the
vehicle is being serviced or turned over to a parking attendant.
Options and Convenience Features*
The advanced design of the Ungo system incorporates a number of optional inputs and outputs
allowing you to create a customized security / convenience system by easily accommodating
many optional convenience and security features such as:
*May require additional parts and/or labor, see store for details.
About Your Ungo Security System
MS3001 / MS3200 Owner’s Manual - Page 1
❐ Remote Door Locking
❐ Starter Disable
❐ Horn Honk
❐ Illuminated Entry / Exit
❐ Remote Window Control
❐ Remote Car Start
❐ Extended Range Antenna
❐ Power Trunk / Hatch Release
❐ Glass Breakage Sensor
❐ Radar Sensor
❐ Garage Door Receiver
❐ Auxiliary Lighting Control
❐ Stereo System Valet
❐ Remote Head Lamp Control
❐ Back-up Battery Siren
Page 5
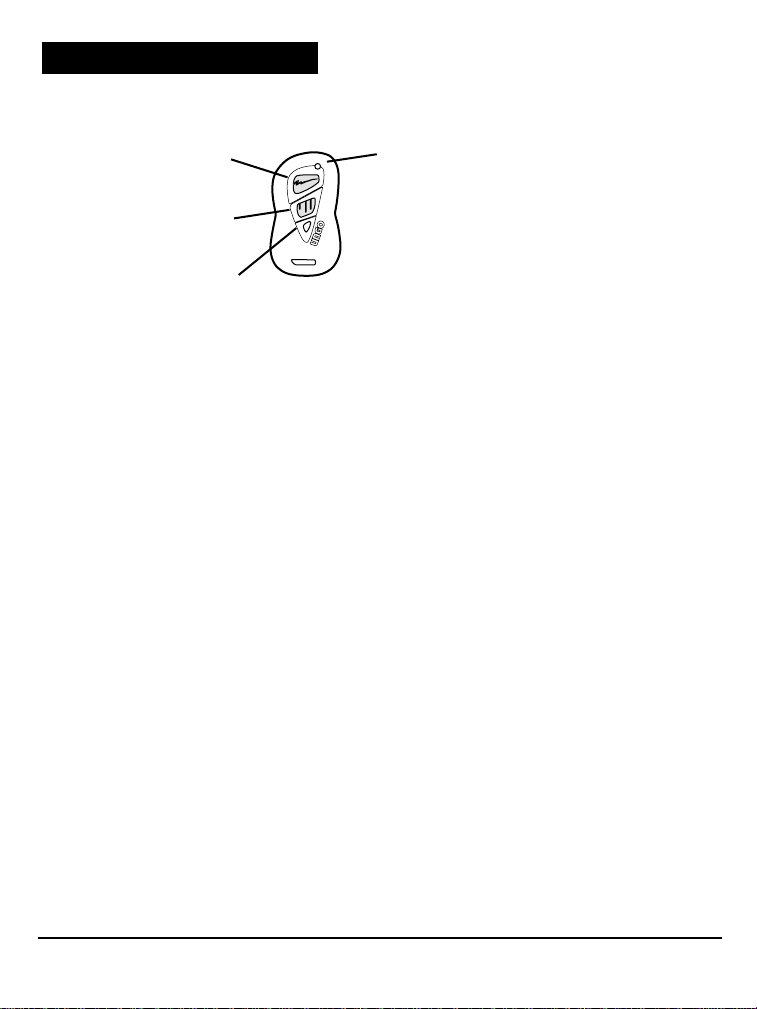
Remote Transmitter Layout
Each MS3001 / MS3200 system comes with 2 multifunction Remote Transmitters used to control
nearly all of the system’s features.
Each time a transmitter button is pressed, the LED will flash to indicate that a transmission is
taking place.
Button 1 Arms and Disarms the system. This Button also locks and unlocks the doors when the
system is in Valet Mode.
Button 2 controls the system’s Auxiliary Function 1, which is normally used for activating a car’s
electric trunk release.
When Button 1 and 2 are pressed together, the system will Arm or Disarm
silently
(without chirp
confirmation).
As an option, your installer can set system to
always
arm without chirp confirmation. If this is done, then
pressing Buttons 1 and 2 together will Arm or Disarm the system
with
chirp confirmation.
The Mode Button will change the function of Buttons 1 and 2 when it is pressed, allowing
Buttons 1 and 2 to control the system’s Auxiliary Function Outputs.
Note also that the LED on the transmitter turns green when the Mode Button is pressed to
indicate the current function of Buttons 1 and 2. The LED will stay on for 5 seconds, then turn
off, returning Buttons 1 and 2 to their default settings.
It is also possible to set individual Remote Transmitters to arm and disarm the system using any
of the Transmitters function Buttons, which is extremely useful when a Transmitter is used to
control multiple systems. See
Adding a Remote Transmitter into the System.
Remote Transmitters
Button 1
Button 2
Mode Button
LED
Page 2 - MS3001 / MS3200 Owner’s Manual
Page 6
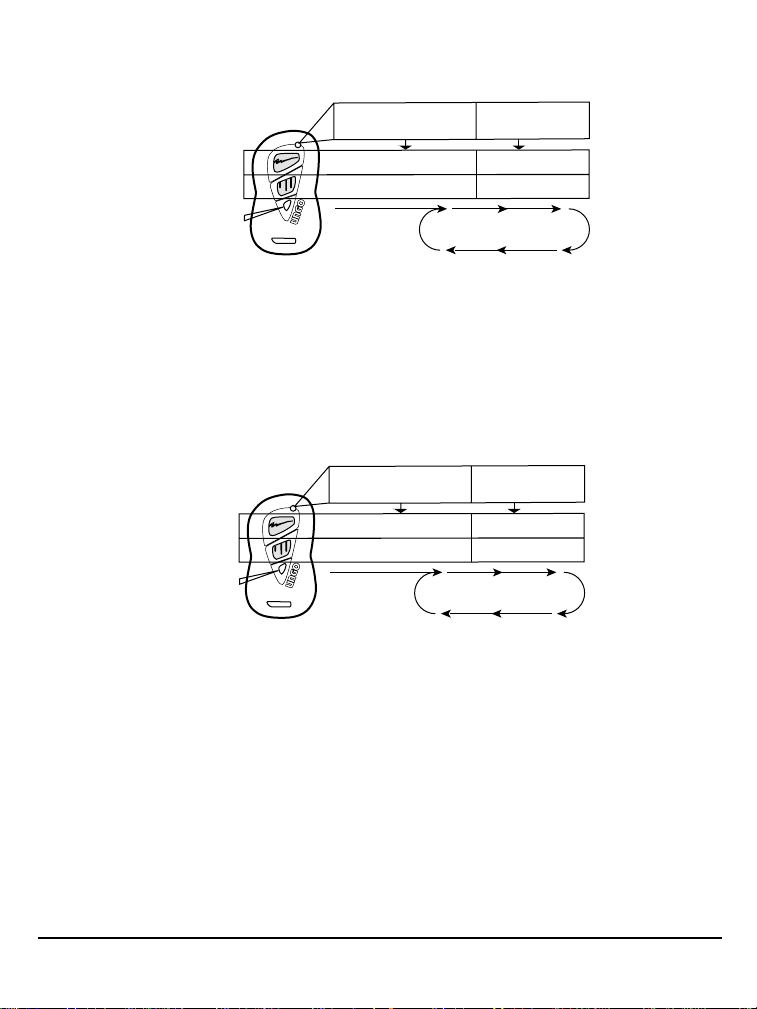
The following diagram illustrates how the Remote Transmitter controls the functions of the
system:
Two Car Operation
If you want to control two or more Ungo Security systems by a single Remote Transmitter, the
unused functions of the Remote Transmitter can be set up by your dealer to operate another
Ungo Security system, giving you the convenience of operating multiple vehicles from a single
Remote Transmitter.
When set for two car operation, the Remote Transmitters will function as in the example below:
For more information about Two Car operation, see your Authorized Ungo Dealer.
MS3001 / MS3200 Owner’s Manual - Page 3
MODE
green
AUX 2
not used
Mode Sequence
BUTTON 1
BUTTON 2
MODE BUTTON
MODE
none
ARM/DISARM
AUX 1
MODE
none
BUTTON 1
BUTTON 2
MODE BUTTON
(A) = Car 1
(B) = Car 2
ARM (A) ARM (B)
AUX 1(A)
MODE
green
Mode Sequence
Page 7

Page 4 - MS3001 / MS3200 Owner’s Manual
Adding a New Transmitter into the System
The MS3001 / MS3200 has the ability to recognize up to 21 individual Remote Transmitters. If
the vehicle is used by multiple drivers, each can have their own Remote Transmitter.
To add Remote Transmitters:
1. Turn on the ignition.
2. Press and hold the Override switch.
• The status LED will turn on red.
3. Within 5 seconds:
Continue holding the Override switch
and Press Transmitter Button 1*
For remote arming
with
chirp confirmation.
--- or ---
Release the Override switch
and Press Transmitter Button 1*
For remote arming
without
chirp confirmation.
• The status LED will flash once quickly to confirm that the new Remote Transmitter
has been added.
4. Turn off the ignition.
* The Button that is pressed will be the Arm/Disarm Button on that Remote Transmitter. You may program
any
of the
Transmitter’s function buttons to arm and disarm the system at this point.
Deleting Transmitters (Adding a Remote Transmitter
and
Erasing All
Other Remote Transmitters From the System)
1. Turn on the ignition.
2. Press and hold the Override switch.
• The status LED will turn on red.
Continue to hold the Override switch.
• After 5 seconds, the status LED will flash 4 times, then turn on red again.
3. Within 5 seconds:
Continue holding the Override switch
and Press Transmitter Button 1*
For remote arming
with
chirp confirmation.
--- or ---
Release the Override switch
and Press Transmitter Button 1*
For remote arming
without
chirp confirmation.
• The status LED will flash once quickly to confirm that the new Remote Transmitter
has been added.
4. Turn off the ignition.
* The Button that is pressed will be the Arm/Disarm Button on that Remote Transmitter. You may program
any
of the
Transmitter’s function buttons to arm and disarm the system at this point.
Page 8

MS3001 / MS3200 Owner’s Manual - Page 5
Battery Type: 23A
Battery Replacement
Your Ungo Remote Transmitter uses a 12 volt alkaline battery, which will need to be replaced
from time to time. Under normal conditions, the battery should last for up to a year before it
needs replacement.
When your Remote Transmitter’s battery is in need of replacement, you will notice a decrease in
your system’s operating range or a decrease in the brightness of the Transmitter’s LED indicator .
To change the battery, remove the 2 screws at the back of the Transmitter and carefully separate
the top and bottom halves of the Transmitter case.
Insert the new battery, making sure that the positive and negative terminals are positioned
correctly and replace the cover.
Page 9

Page 6 - MS3001 / MS3200 Owner’s Manual
Remote Arming
When Armed, the system monitors and protects 5 independent areas, or
zones
, including the
ignition switch, doors, hood/trunk, Shock Sensor, and an optional sensor.
To Arm the System:
1. Turn off the ignition.
2. Press Button 1.
• The siren will chirp once.*
• The doors will lock.
• The parking lights will flash once.
• The LED will turn on red, indicating the ignition, doors, hood and trunk inputs are
activated.
* The siren chirp(s) during Arming will alert you the condition of the system and vehicle when the system is
armed.
1 chirp = normal arming
1 + 3 chirps = Shock Sensor sensitivity is off
1 + 4 chirps = door, hood, or trunk open
During Arming, if the system detects a bad sensor or an open zone, the system will ignore that input, but keep
all other areas protected.
3. After 20 seconds:
• The LED will begin blinking, indicating that the sensor inputs are activated.
While the system is Armed, the system will trigger if:
• The ignition key is turned on.
• The doors are opened.
• The Shock Sensor detects an impact to the vehicle or the motion of the car being raised.
• The hood or trunk is opened.
• A connected optional sensor is disturbed.
When triggered, the siren will sound, the horn will honk, and the parking lights will flash.
If the same input triggers the system 3 times during a single arming cycle, the system will
bypass that input, keeping the other zones protected, until the next time the system is
armed.
If the Shock Sensor detects a light impact to the car or a connected optional sensor triggers
the system’s Warn Away input, the siren will sound a chirp to warn away the potential
intruder.
Basic Features
Page 10

MS3001 / MS3200 Owner’s Manual - Page 7
Remote Disarming
To Disarm the System:
Press Button 1.
• The siren will chirp twice.*
• The doors will unlock.
• The parking lights will flash twice.
• The dome light will turn on.
• The LED will turn off.
* The siren chirps during disarming will alert you if the system had been triggered while armed.
2 chirps = normal disarming
1 long chirp + 1 short chirp = Tamper Alert - system was triggered
Tamper Alert
On Disarming, if the system responds with one long chirp and one short chirp, indicating the
system was triggered, the LED will flash for 60 seconds to indicate the zone that triggered the
system.
LED Flashes (60 seconds):
1 flash = door
2 flashes = Shock Sensor
3 flashes = optional sensor
4 flashes = hood / trunk
example: flash-flash-pause-flash-flash-pause = Shock Sensor
Silent Arming / Disarming
Each Remote Transmitters can be individually set to Arm and Disarm the system with or without
chirp confirmation at the time they are programmed into the system (see Adding a New
Transmitter into the System).
To temporarily cancel the Arming and Disarming confirmation chirps, you can Arm or Disarm the
system by pressing Buttons 1 and 2
together
.
Note: The confirmation chirps will only be cancelled if the system status is normal. The chirp indications for the open
zone warning will not be cancelled when the system is Armed or Disarmed silently .
Page 11

Arming Mode Selection
Your system can be set in one of the following Arming Modes:
• Passive (automatic) Arming
with
chirp confirmation
• Active Arming (by Remote Only)
• Passive (automatic) Arming
without
chirp confirmation
To set the Arming Mode:
1. Turn the ignition on.
2. Within 4 seconds, press Buttons 1 and 2 together.
First push: one chirp = Passive Arming with chirp
Second push: two chirps = Active Arming
Third push: three chirps = Passive without chirp
3. Turn the ignition off to save your selection.
Passive Arming
When the Arming Mode has been set for
Passive Arming
, the system arms itself automatically,
each time the ignition is turned off and all of the doors, hood and trunk are closed.
To start the Passive Arming Process:
1. Turn off the ignition.*
• The status LED will begin to flash quickly.
2. Open the door and exit the vehicle.
• Once all doors are closed and the dome light is turned off, the LED will turn off.
3. After 20 seconds,
• The siren will chirp.
• The parking lights will flash.
• The doors will lock.**
• The status LED will flash red, indicating the system is armed.
4. The system is now armed.
* The ignition must have been on for
at least
4 seconds before the Passive Arming sequence will begin.
** If the Passive Locking feature is selected.
To temporarily disable Passive Arming, you can turn the ignition key on then off, within 4
seconds. The status LED will stop flashing, and the system will not passively arm until the next
time the key is on for more than 4 seconds. This feature is useful for turning off passive arming
when refueling or washing your car or if you want to sit in your car and do not want the system
to arm.
Panic Mode
Allows you to instantly trigger the alarm in an emergency situation by the Remote Transmitter.
To enter Panic Mode:
1. Press and hold Button 1 for 2 seconds.
• The system will trigger.
2. Press Button 1 again to stop Panic Mode.*
If Panic Mode is not stopped by the Remote, it will automatically time out after 40 seconds, and
the system will return to its prior Armed/Disarmed state.
Page 8 - MS3001 / MS3200 Owner’s Manual
Page 12

Emergency Override
In case your Remote Transmitter becomes inoperable, or it is lost or stolen, you can still enter
and drive your car by using the following procedure. Be sure that before you attempt this
procedure you have your ignition key ready and that you know the location of the override switch.
To override the system:
1. Unlock the door using the key.
2. Enter the vehicle.
• Because the system is armed, the system will trigger and the siren will be sounding.
3. Turn ignition key on.
4. Press and hold the override switch.
• The system will disarm.
5. You can now start and drive the car.
Automatic System Rearming
This feature, which can be turned on during the installation, insures the security of the system by
protecting your car in case of an accidental disarm.
If your system becomes disarmed due to an accidental press of the Disarm Button, the system
will automatically rearm if no other activity is detected within one minute.
One minute after Remote Disarming, the system will alert you with a 10 second series of chirps,
then arm. (If the Passive Door Locking feature is selected during the installation, the system will
also relock the doors.)
Any of the following will cancel Automatic System Rearming:
• Turn on the ignition.
• Open the Trunk or Hood.
• Activate Auxiliary Function 1 or 2.
Automatic System Rearming is independent of Passive Arming and only takes place if the system
was Armed (actively or passively) for at least 20 seconds and then Disarmed by the Remote
Transmitter.
Full Time System Diagnostics
The system continuously monitors all protected zones, even when it is not armed, and warns you
if it detects a problem when you turn off the ignition.
1. Turn off the ignition.
2. If the siren chirps twice, the system has detected a problem.
3. The status LED will flash to indicate the zone where the problem has been detected.
1 flash = door
2 flashes = Shock Sensor
3 flashes = optional sensor
4 flashes = hood / trunk
MS3001 / MS3200 Owner’s Manual - Page 9
Page 13

Page 10 - MS3001 / MS3200 Owner’s Manual
Valet Mode
Allows you to temporarily disable the security system when the car is being serviced or turned
over to a parking attendant.
To turn Valet Mode on or off:
1. Turn on the ignition.
2. Press and hold the override switch.
3. While holding the override switch, turn off the ignition.
• The siren will chirp
once
to indicate you have turned Valet Mode on.
• The siren will chirp
twice
to indicate you have turned Valet Mode off.
4. Release the override switch.
While Valet Mode is on, you can continue to lock and unlock your doors with the Remote
Transmitters, as well as operate the Auxiliary Functions.
For added protection, when the doors are locked by the Remote Transmitter , the system’s Starter
Disable circuit will activate and the LED will emit double flashes until the system is unlocked by
the Remote.
If the Remote Transmitter is lost, stolen, or becomes inoperable while the car is locked in Valet
Mode, you can use the
Emergency Override
procedure to deactivate the Starter Disable circuit.
Ignition Controlled Door Locking
For added convenience and safety, this feature automatically locks your car’s doors 10 seconds
after the ignition key is turned on and unlocks the doors when the ignition key is turned off.
To set Ignition Locking / Unlocking:
1. Turn the ignition on.
2. Within 4 seconds, press Transmitter Button 2.
The siren will chirp to indicate the setting.
one chirp = On
two chirps = Off
3. Press Transmitter Button 2 again to change the setting.
4. Turn off the ignition key to save your selection.
To prevent the keys from being locked inside the vehicle when Ignition Controlled Door
Locking is on:
• The system will not lock the doors if any door is open when the ignition is turned on.
• The system will not lock the doors if any door is opened during the 10 second
countdown.
To prevent you from accidentally locking your keys inside the car:
• The system will not automatically lock the doors if a door is open when the ignition key is turned on.
• The system will not automatically lock the doors if a door is opened during the first 10 seconds after the
ignition key is turned on.
Other Features
Page 14

MS3001 / MS3200 Owner’s Manual - Page 11
Dome Light Control
As an option for increased safety and convenience, the system can be set, during the installation,
to automatically turn on the dome light when you Disarm the system and when you turn off the
ignition.
Illuminated Entry. The dome light will turn on for 20 seconds when the system is disarmed (or
unlocked in Valet Mode) using the Remote Transmitter.
Illuminated Exit. If the ignition key has been on for at least 10 seconds, the dome light will turn
on for 20 seconds when you turn off the ignition.
Auxiliary Function Outputs
The system is equipped with two Auxiliary Function outputs that can be used to control a variety
of additional features including, electric trunk release, remote car starter, power windows, power
sunroof, stereo system valet, garage door receiver, etc.
Auxiliary Function 1 - momentary
Normally, this function is used to activate a power trunk release.
To operate Aux. 1, press Button 2.
This function will operate regardless of whether the system is armed or disarmed and will
stay active for as long as Button 2 is held.
Sensor Defeat with Auxiliary 1 (Dedicated Remote Start Mode). When your system is used with an optional Remote
Car Starter (Ungo model SAA4295), Auxiliary Function 1 can be selected to remotely start your car’s engine. With the
MS3001 / MS3200’s Dedicated Remote Start Mode enabled, when Auxiliary Function 1 is used to activate the Remote Car
Starter while the system is armed, the Shock Sensor and optional sensor inputs will be ignored. This will allow the alarm
to continue protecting the door and hood/trunk inputs, but prevent it from triggering due to the motion of the engine starting
and running.
This feature must be enabled by your installer at the time of installation.
Sensor Defeat with Auxiliary 1 (Remote Shock Sensor Bypass). If the Auxiliary Function 1 is not used to activate an
auxiliary feature, it may be used as a remote shock sensor bypass instead. In case of extreme weather conditions such
as high winds, the Shock Sensor can be temporarily bypassed from the Remote Transmitter while the system is armed to
prevent the system from false alarming.
To use this feature, Sensor Defeat with Auxiliary 1 must be enabled by your
installer at the time of installation
.
Page 15

Auxiliary Function 2 - momentary / latched
This Auxiliary Function has two selectable operating modes which can be programmed by your
installer to allow custom operation of your vehicle and its accessories.
Momentary - the system will provide an output for as long as the Transmitter button is held.
Latched - the system will provide an output that turns on when the transmitter button is pressed and turns off when the
transmitter button is pressed again.
Suggested use: The Latched mode works great for activating auxiliary lighting such as neon or off road lights. It can
also be used to activate your stereo system so that it be turned on without having the key in the ignition.
To operate Aux. 2, press the Mode Button, then Button 1.
Remote Car Starter
When an optional Remote Car Starter (Ungo model number SAA4295) is installed into your car,
the Remote Transmitter can be used to remotely start and run your car engine to warm-up the
engine, as well as activate the heating / air conditioning system.
With the Dedicated Remote Start feature designed into the MS3001 / MS3200, the Remote Car
Starter can be used to start your engine even while the system is armed. When the Remote Car
Starter is activated by an Auxiliary Function, the system will receive a signal to temporarily ignore
the Shock Sensor and the optional sensor inputs, so that the system will not trigger due to the
action of the car starting or the vibration of the engine. The doors, hood, and trunk, however,
remain protected.
When the Remote Car Starter is activated, the siren will emit 5 quick chirps, indicating the ignition trigger and
sensor triggers are being temporarily disabled.
Garage Door Receiver
When an optional Garage Door Receiver (Ungo model number SAA5999) is used with your
system, the Remote Transmitters can be set to control almost any automatic garage door opener .
By adding this feature to your system, you not only add the convenience of being able to open
your garage door and activate your car security system by the same remote, but you also add
the protection of Ungo’s V aricode 2 anti-code grabbing technology to your automatic garage door
Page 12 - MS3001 / MS3200 Owner’s Manual
Page 16

MS3001 / MS3200 Owner’s Manual - Page 13
You can use this chart to quickly identify and interpret your system’s chirp indications and LED
flashes.
Reference Chart
1 chirp arming normal arming
1 + 3 chirps arming Shock Sensor sensitivity is off
1 + 4 chirps arming door, hood, or trunk is open
2 quick chirps arming Valet Mode is on
LED double flashes Valet Mode Starter Defeat Activated
2 chirps disarming normal disarming
1 Long + 1 Short Chirp disarming Tamper Alert - system was triggered
no LED flashes after Tamper Alert ignition
1 LED flash after Tamper Alert door
2 LED flashes after Tamper Alert Shock Sensor
3 LED flashes after Tamper Alert optional sensor
4 LED flashes after Tamper Alert hood or trunk
1 chirp while armed Warn Away
5 quick chirps while armed Dedicated Remote Start Mode
activated
Double chirps 1 minute after disarming Automatic Rearming
(for 10 seconds)
LED flashing quickly ignition key off Passive Arming sequence started
Two chirps ignition key off Full Time System Diagnostics
1 LED flash after Full Time Sys. Diag. door
2 LED flashes after Full Time Sys. Diag. Shock Sensor
3 LED flashes after Full Time Sys. Diag. optional sensor
4 LED flashes after Full Time Sys. Diag. hood or trunk
Output When Status
Page 17

Page 14 - MS3001 / MS3200 Owner’s Manual
Technical Data
Specifications
Main Unit
Voltage: 12v, negative ground
Current Consumption: <13.5mA
Temperature Range: -40oF to +170oF
-40oC to +77oC
Auxiliary Output Capability: 150mA
Internal Relays: 12/28A
Transmitter
Current Consumption: <.002mA, standby
Battery Type: miniature 12v, type 23A
FCC ID:
MP62VUUUNGO1001
HP92VUUNGO603/03
T
HIS DEVICE COMPLIES WITH FCC RULES PART 15.
OPERATION IS SUBJECT TO THE FOLLOWING TWO
CONDITIONS: (1) THIS DEVICE MAY NOT CAUSE HARMFUL
INTERFERENCE AND (2) THIS DEVICE MUST ACCEPT ANY
INTERFERENCE THAT MAY BE RECEIVED
, INCLUDING
INTERFERENCE THAT MAY CAUSE UNDESIRED OPERATION
.
Ungo Security Corporation
Gardena, CA
USA
Warranty Information
Model No.: MS3001 / MS3200 (circle one)
Serial No.:
Dealer Name:
Address:
Purchase Date:
Page 18

MS3001 / MS3200 Owner’s Manual - Page 15
1. Ungo Security Corporation of Gardena, California ("Ungo
Security") warrants this Ungo system to be free from defects
in materials and workmanship and to comply with Ungo
Security’s applicable printed specifications.
2. Ungo Security systems carry a limited lifetime warranty on
the Main unit (system brain) and transmitters. The warranty
is limited to Ungo Security systems that have been installed
by an approved Ungo dealer and is extended to the Original
Purchaser ("Owner") and to the original vehicle in which it
was installed only, and is not transferable to any subsequent
owner or owners of the product(s).
All other products (including those products of other
manufacturers which are supplied by Ungo security as a part
of, or an accessory to, an Ungo Security-manufactured
product) are warranted by Ungo security for a period of one
year from the date of sale to the Owner. For specific
identification of such products contact Ungo Security.
3. This warranty shall not cover: (I) any damage caused by
Owner’s negligence or misuse of any kind, or any damage
due to causes unrelated to Ungo Security’s manufacturing,
including, but not limited to improper servicing or repair by
someone other than Ungo security or an authorized service
facility: (II) alterations or modifications to the Ungo System
other than the addition of an authorized accessory: or (III)
improper installation or removal from the vehicle contrary to
Ungo Security’s instructions.
4. Obligations of Ungo Security. In the event the Owner’s
Ungo System does not comply with this warranty, it must be
returned to Ungo security as specified below. Ungo security
will repair or replace it with a new or reworked unit, within
thirty (30) days of receipt and acceptance of such defective
unit, and without cost to Owner.
5. To make a claim under the warranty. Owner must: (I)
provide Ungo security with written notice that the Ungo
System does not comply with the warranty within thirty (30)
days from the date of the Owner’s discovery of the defect
and (II) furnish proof of purchase and purchase date (this
requirement is satisfied if Ungo security has a completed
warranty registration card on file).
6. Owner obligations. To obtain Warranty Service, Owner
must at Owner’s expense: (I) have the Ungo System
removed from the vehicle by an authorized Ungo Security
dealer, (II) package the unit in a reasonable manner to
prevent damage to the unit during shipment; and (III) ship the
unit, freight prepaid, to Ungo Security’s factory or other
authorized repair facility.
7. Repair facility locations. To obtain the name, address and
phone number of the nearest Authorized Ungo Repair
Facility, Owners may contact Ungo security at 310-327-
9100.
8. The Owners of Ungo Systems in California have the right
to have the product serviced or repaired during the warranty
period. The warranty period will be extended for the number
of full days that the product has been out of the Owner’s
hands for warranty repairs. If a defect exists within the
warranty period, the warranty will not expire until the defect
has been fixed. The warranty period will also be extended if
the repair has not been performed due to delays caused by
circumstances beyond the control of the Owner, or if the
warranty repairs did not remedy the defect and the Owner
notifies Ungo Security or the seller of the failure of the repairs
within sixty (60) days after they were completed. If, after a
reasonable number of attempts, the defect has not been
fixed the Owner may return this product for replacement or a
refund, subject in either case, to a deduction of a reasonable
charge for usage. The time extension does not effect the
protection or remedies the Owner has under other laws.
9. Exclusions from liability.
(A) In no event shall Ungo security be liable for any loss or
damages beyond the original purchase price of the Ungo
system, and Ungo security specifically excludes any and all
incidental and consequential damages, whether resulting
from breach of warranty or contract, negligence or other
conduct in connection with any sale, use, servicing or repair
of a unit. (Some states do not allow the exclusion of
incidental or consequential damages, so the above
exclusion may not apply to you.)
(B) There are no warranties, express, statutory or implied,
which extend beyond that which is described herein, and in
particular, all implied warranties of merchantability and
fitness for a particular purpose, and all warranties of title and
against encumbrances, are expressly disclaimed, limited
and excluded as permitted by law; but in no event shall any
implied warranty, whether of merchantability of fitness for a
particular purpose or otherwise, have a duration exceeding
that of the express warranty made herein. (Some states do
not allow limitation on how long an implied warranty lasts, so
the above limitation may not apply to you.)
(C) No agent, officer, employee or representative of Ungo
Security, or any other person, has authority to make any
representations, promises or warranties respecting Ungo
Systems and their authorized accessories.
(D) Owner has the right to bring any action at law or in equity
to resolve disputes concerning, or to enforce, the provisions
of this warranty. No action at law or in equity may be brought
against Ungo security for breach of warranty or contract or
based on negligence of other conduct more than three (3)
years from the date the cause of action has occurred.
(E) This warranty gives you specific legal rights, and you
may also have other rights which vary from state to state.
(F) The remedies extended herein are the sole and
exclusive remedies available to Owners of Ungo systems.
(G) Under no circumstances should this warranty, or the
products covered by it, be construed as an insurance policy
against loss.
Warranty Information
Page 19

Ungo Security Corporation
A Clarion Company
661 West Redondo Beach Blvd.
Gardena, CA 90247
800-Go-Clarion
www.clarionmultimedia.com
© Ungo Security Corporation, Gardena, CA 97-MS3001-10 Rev. 3 (1/99)
 Loading...