

Page 1
Ownei's
manual &Installation manual
Manual de
instrucciones
y de
instalaci6n
VRX485VD
MAX385VD
MULTIMEDIA STATION &
7-inch TOUCH PANEL CONTROL
EQUIPO DVD MULTIMEDIA Y
PANEL
2-DIN DVD MULTIMEDIA STATION &
6.S-inch TOUCH PANEL CONTROL
EQUIPO DVD MULTIMEDIA 2-DIN Y
PANEL
DE
CONTROL
DE
CONTROL
TAcTIL
TAcTIL
DE7pulgadas
DE
6.S
pulgadas
Page 2
CLARION PRODUCTREGISTRATION INFORMATION
For USA and Canada only
www.clarion.com
Dear
Customer:
on
Congratulations
confident that you'll enjoy your Clarion experience.
There
www.clarion.com
We
formisshort
important product information.
Register
are
have
many
made
and
at
www.clarion.com - it's easy
your purchase of a Clarion mobile electronic
benefitstoregistering your product.
to
register your Clarion product.
product registration simple
easytocomplete.
Once
with
our
you're registered,
to
keep
We
invite
easytouse
your Clarion productupto
product.
youtovisit our website at
website.
we
can
keep
We
The
you
date.
are
registration
informed
of
Contents
1.
FEATURES 3
Expanding Systems...................................................................................................... 3
2.
PRECAUTIONS ...............•........................................................................................... 4
3.
CONTROLS/COMMANDES/CONTROLES 5
Names of Buttons......................................................................................................... 6
Outline of Button and Touchkey Operation 7
Remote Control............................................................................................................ 10
Functions
4.
CAUTIONS
Operation panel 13
Cleaning....................................................................................................................... 13
Handling Discs 14
5.
DVD VIDEO SYSTEM 15
DVD Video Features 15
Discs............................................................................................................................. 16
About the registered marks etc. 16
6.
OPERATIONS..............................................................................................................
Basic Operations.......................................................................................................... 18
Radio Operations
DVD Video Player Operations...................................................................................... 22
7.
ACCESSORIES
iPod Operations............................................................................................................
AUX In Operations. 32
Sirius Radio Operations... 33
8.
TROUBLESHOOTING
9.
ERROR DISPLAYS......................................................................................................
1O.SPECIFICATIONS 37
INSTALLATIONAND WIRE CONNECTION MANUAL. 38
of
Remote Control Unit Buttons
ON
HANDLING 13
11
17
21
31
31
35
36
VRX48SVD/MAX38SVD
2
Page 3
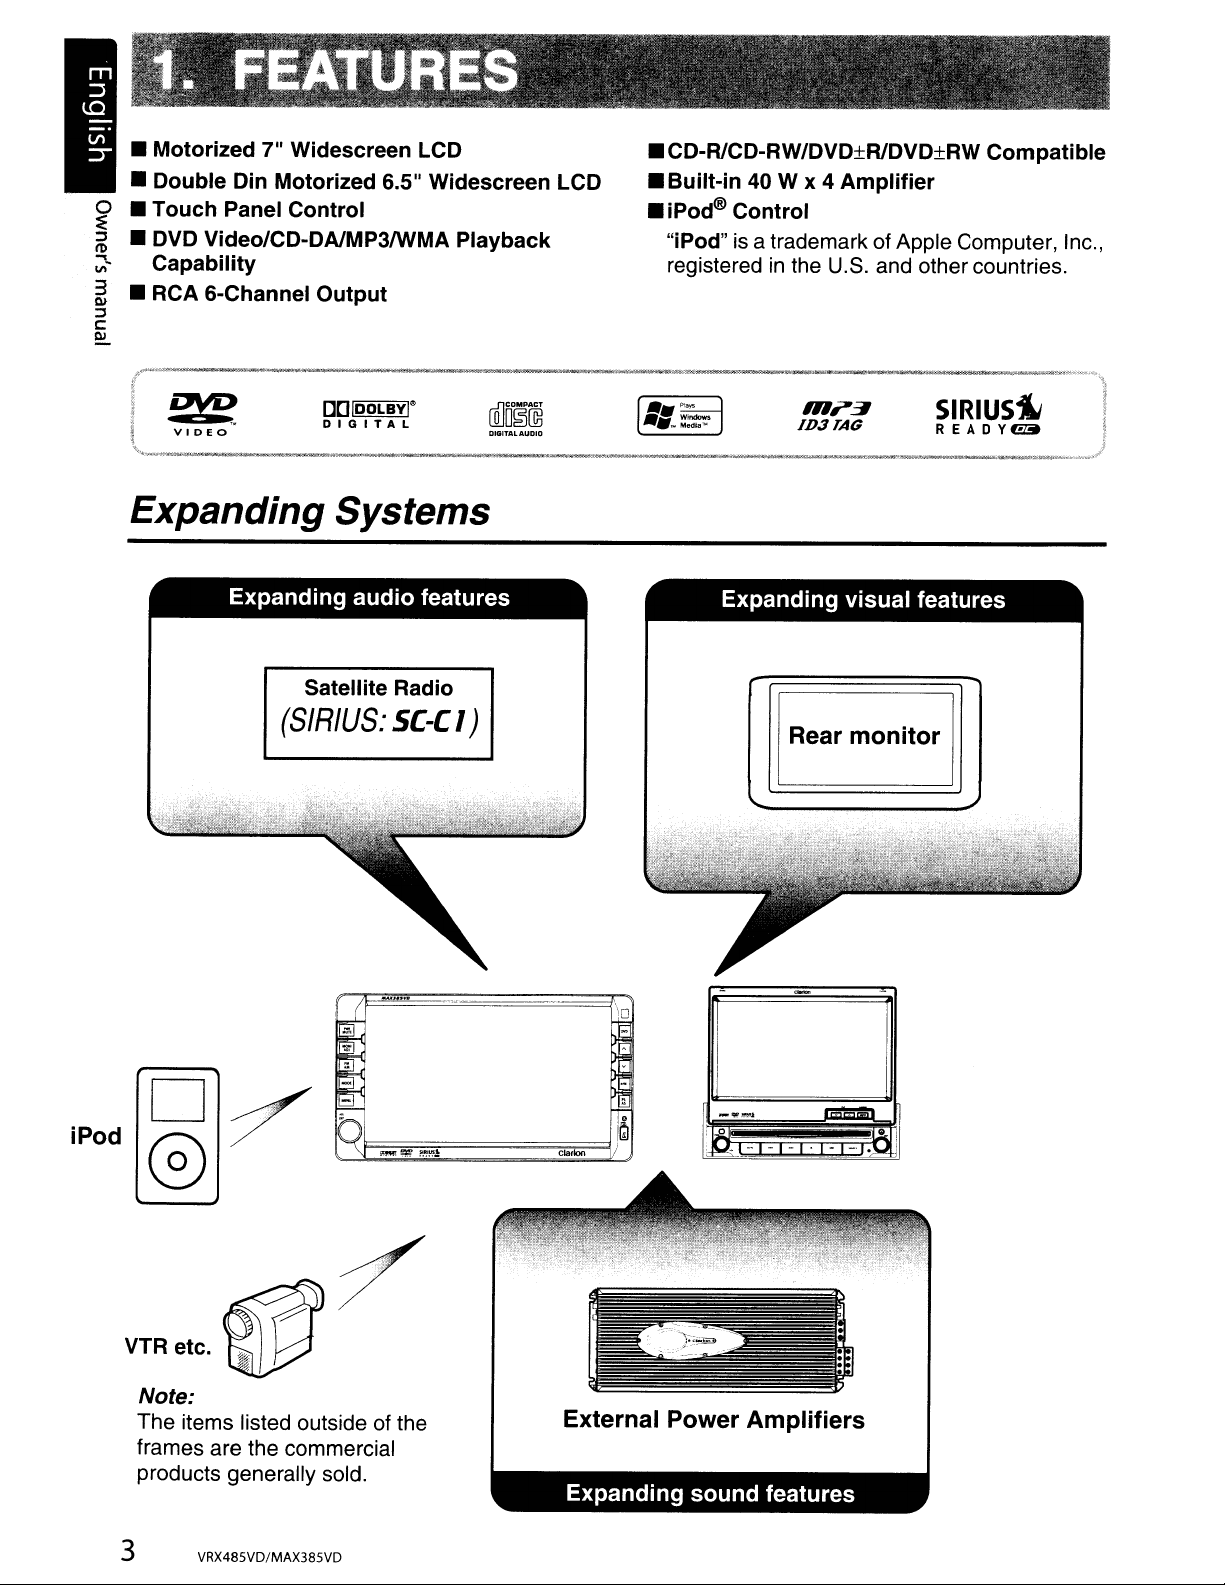
• Motorized 7" Widescreen LCD
• Double Din Motorized 6.5" Widescreen LCD
o •
Touch
:f:
~
• DVD Video/CD-DAlMP3/WMA Playback
:-
Capability
~
• RCA 6-Channel
::::l
c::
Ql
.~----
!
J2'!2
\
"-"_'''''t_lllk
Panel Control
VIDEO
~_'
Output
OOlOOLBVl
DIGITAL
__
._.
8
~
__
Expanding Systems
• CD-R1CD-RW/DVD±R1DVD±RW
• Built-in40W x 4
•
iPod@
Control
Amplifier
Compatible
"iPod" is a trademark of Apple Computer, Inc.,
in
registered
,
._
the U.S. and other countries.
.0_.._.
_.
",?~
ID3TAG
•
....,..
__
~
SIRIUS~
REA
,
0
y~
..~...
""_
....
~~
iPod
Expanding
Satellite Radio
(SIRIUS:
audio
5(-(
features
1)
Expanding
, 0
Rear
visual
monitor
..
II
i
.
:ul
features
;/
VTRetc.~
~
Note:
The items listed outside of the
frames are the commercial
products generally sold.
3 VRX485VD/MAX385VD
External Power
Expanding
sound
Amplifiers
features
Page 4
A.
WARNING
For your safety, the driver
whiledriving. Please note
prohibited
external
1.
When the inside of the caris verycold and the
by
law in some countries. Also, while driving, keep the volumetoa level at which
sounds
can be heard.
should
that
not
watching and operating any video sourceswhiledrivingare
player is used soon after switching on the
heater, moisture may form on the disc (DVDI
CD) or the optical parts of the player and
proper playback may not be possible. If
moisture forms on the disc
(DVD/CD), wipe
off with a soft cloth. If moisture formsonthe
optical parts of the player, do not use the
player for about one hour. The condensation
will disappear naturally allowing normal
operation.
2. Driving on extremely bumpy roads which
cause severe vibration may cause the sound
to skip.
3.
This unit uses a precision mechanism. Even
in
the event that trouble arises, never open
the case, disassemble the unit, or lubricate
the rotating parts.
4.
This equipment has been tested and found to
comply with the limits for a Class B digital
device, pursuant to Part 15 of the FCC Rules.
These limits are designed to provide
reasonable protection against harmful
interference
in
a residential installation. This
equipment generates, uses, and can radiate
radio frequency energy and, if not installed
and used
in
accordance with the instructions,
may cause harmful interference to radio
communications. However, there is no
guarantee that interference will not occur in a
watch any video sources and/or operate the controls
particular installation. If this equipment does
cause harmful interference to radio or
television reception, which can be determined
by turning the equipment off and on, the user
is encouraged to consult the dealer or an
it
experienced radio/TV technician for help.
INFORM
CHANGES
ATION
OR
FOR
MODIFICATIONS
USERS:
TO
THIS
PRODUCT NOT APPROVED BY THE
MANUFACTURER WILL VOID THE
WARRANTY AND WILL VIOLATE
FCC
APPROVAL.
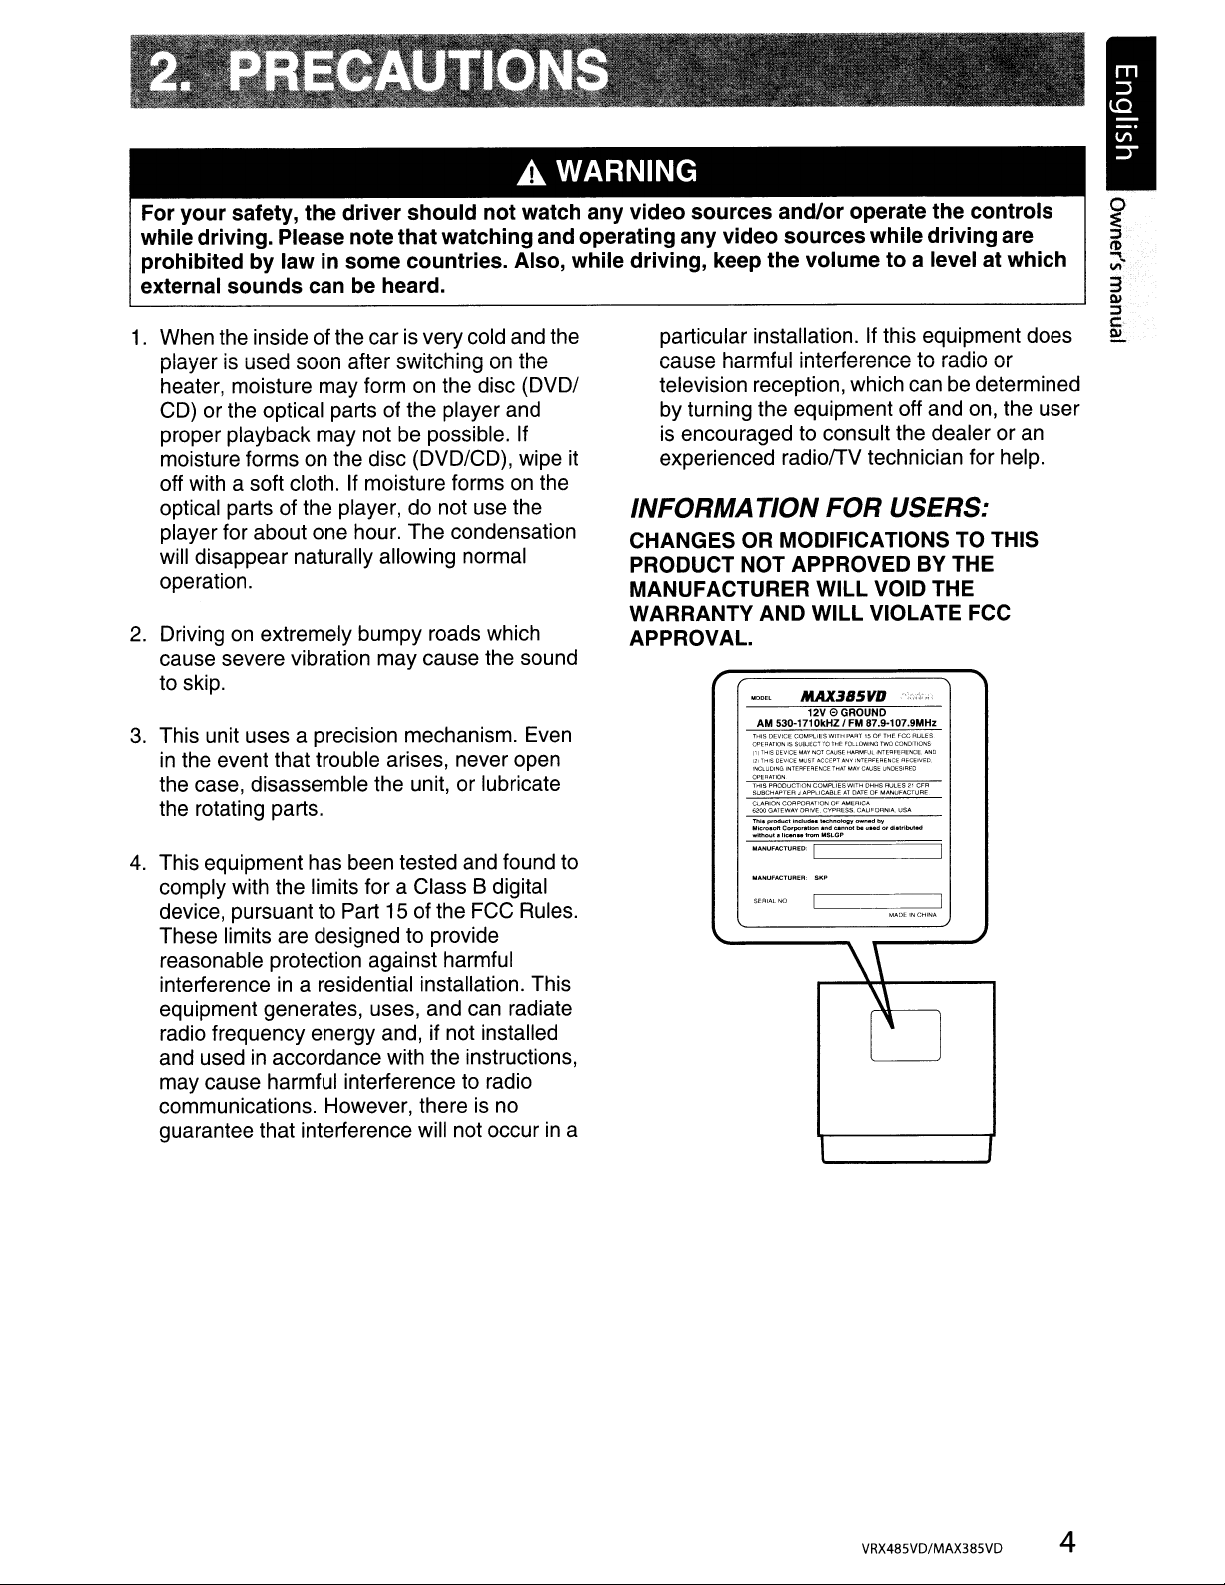
12V 0 GROUND
AM 530-1710kHZI
fHtSOEVECEC()toIPlIE5W1I..f'ItJ'lT'50f'T'1EFCCAlA.ES
OP'Ei',l11Q!l; IS SU8Jf:CTTOIhE
11lTl<iS
lJ~\I.cE
12,-t<rSC~\IiCfl.lUSllICC!.T""",,""'Uln,Q£t.lC£AfCENEC.
'JoClUOtNGIKf('W"£'1fNce·.....
oP£~~TI()Oo
''''SPRQOvCTlONCOt.AI'UESWlI..UHtiSAlA.ES'l
SUBC,",Af'TEf;l J APPliCABlE:ATCloA.T£
ClAAlO"l
CO~PORA'
62OOGAJeWAYOflNE
ThI.pt-.cl
:=.o:=:::.;noor....-
MANUFACT\lI'lEO:
"""V
toOl
CtI;,JSE""'-lJl
'Otl
Ol'
C"'~SS.CAUfORN."'.USA
__
.....
LI
FM
87.9-107.9MHz
FOo-L()M1iQ
rwoCQN:)IlIONS
'''';EQFEI'E~CE
'lolA,vCAl.JS£UI'oOESlA£C
OF"
IUoHOF"l:TUR£
AAlERlC
...
,,_...,
......
,ulO
erR
IritIu-
---'
\\
\\
l' J
,
3
Ql
::J
c·
~
VRX485VD/MAX385VD
4
Page 5
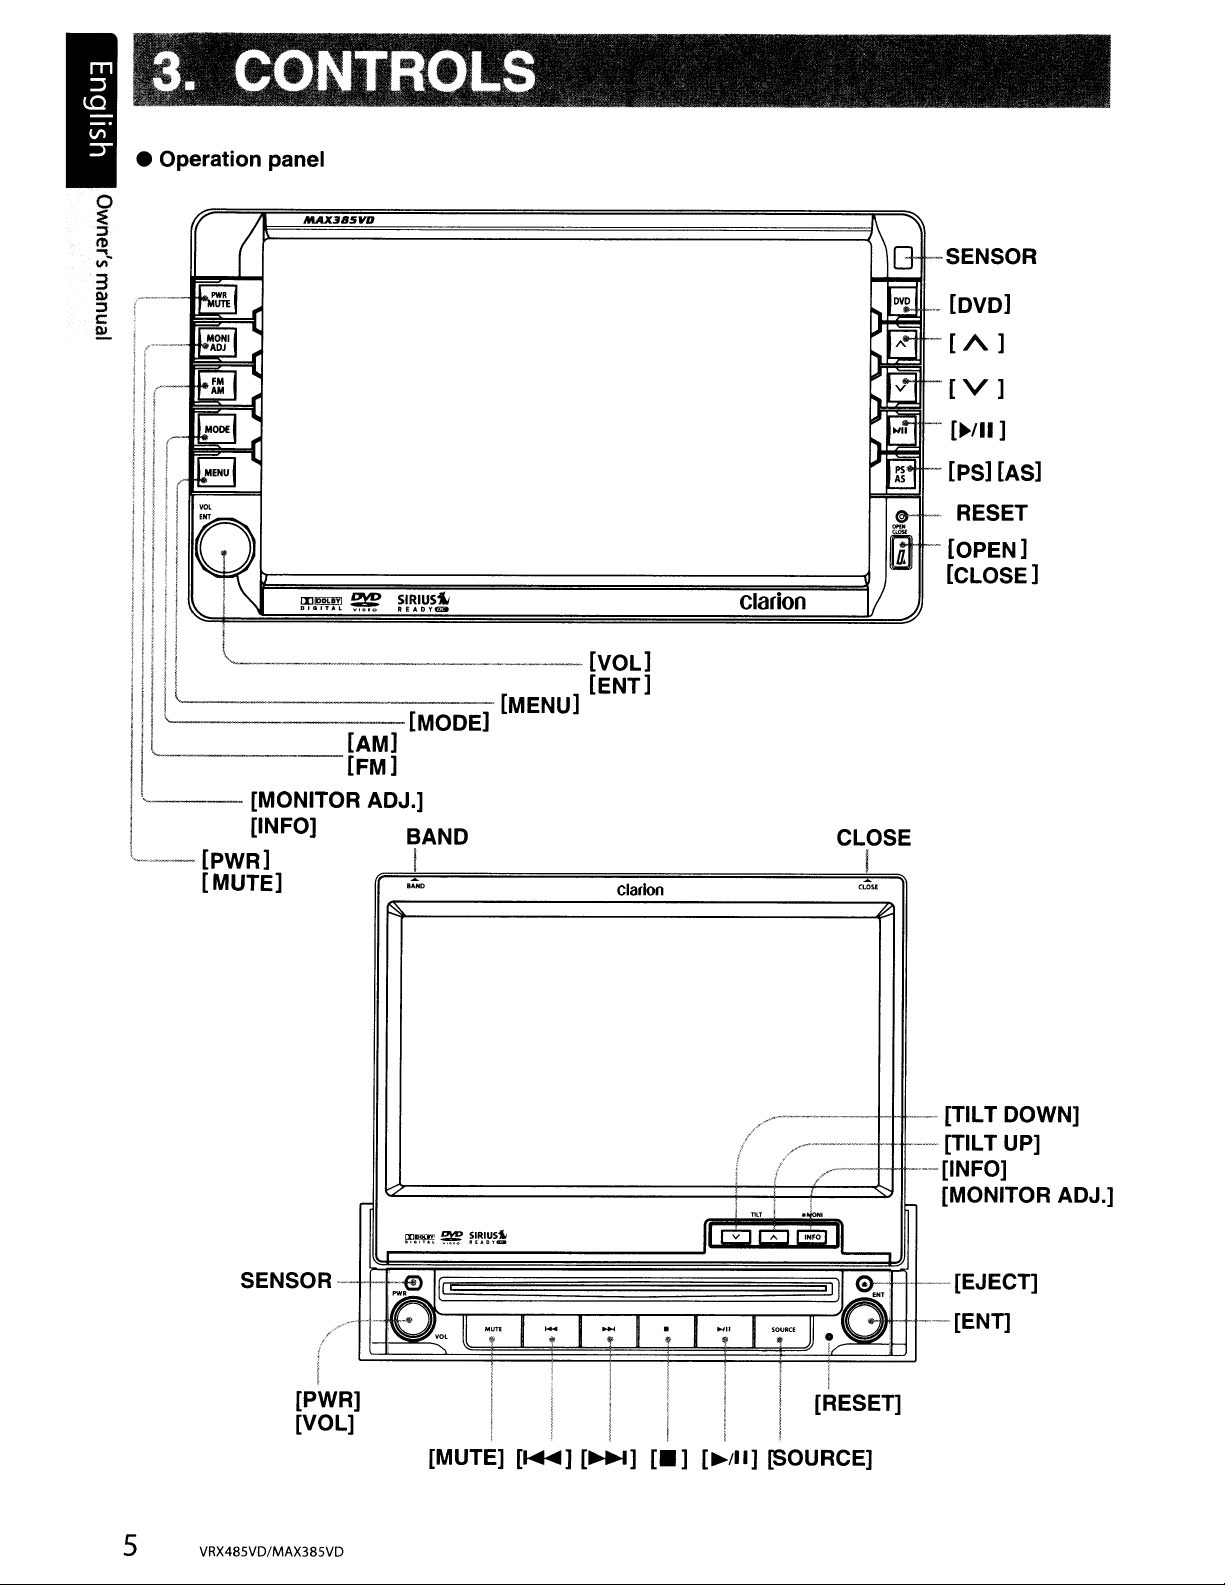
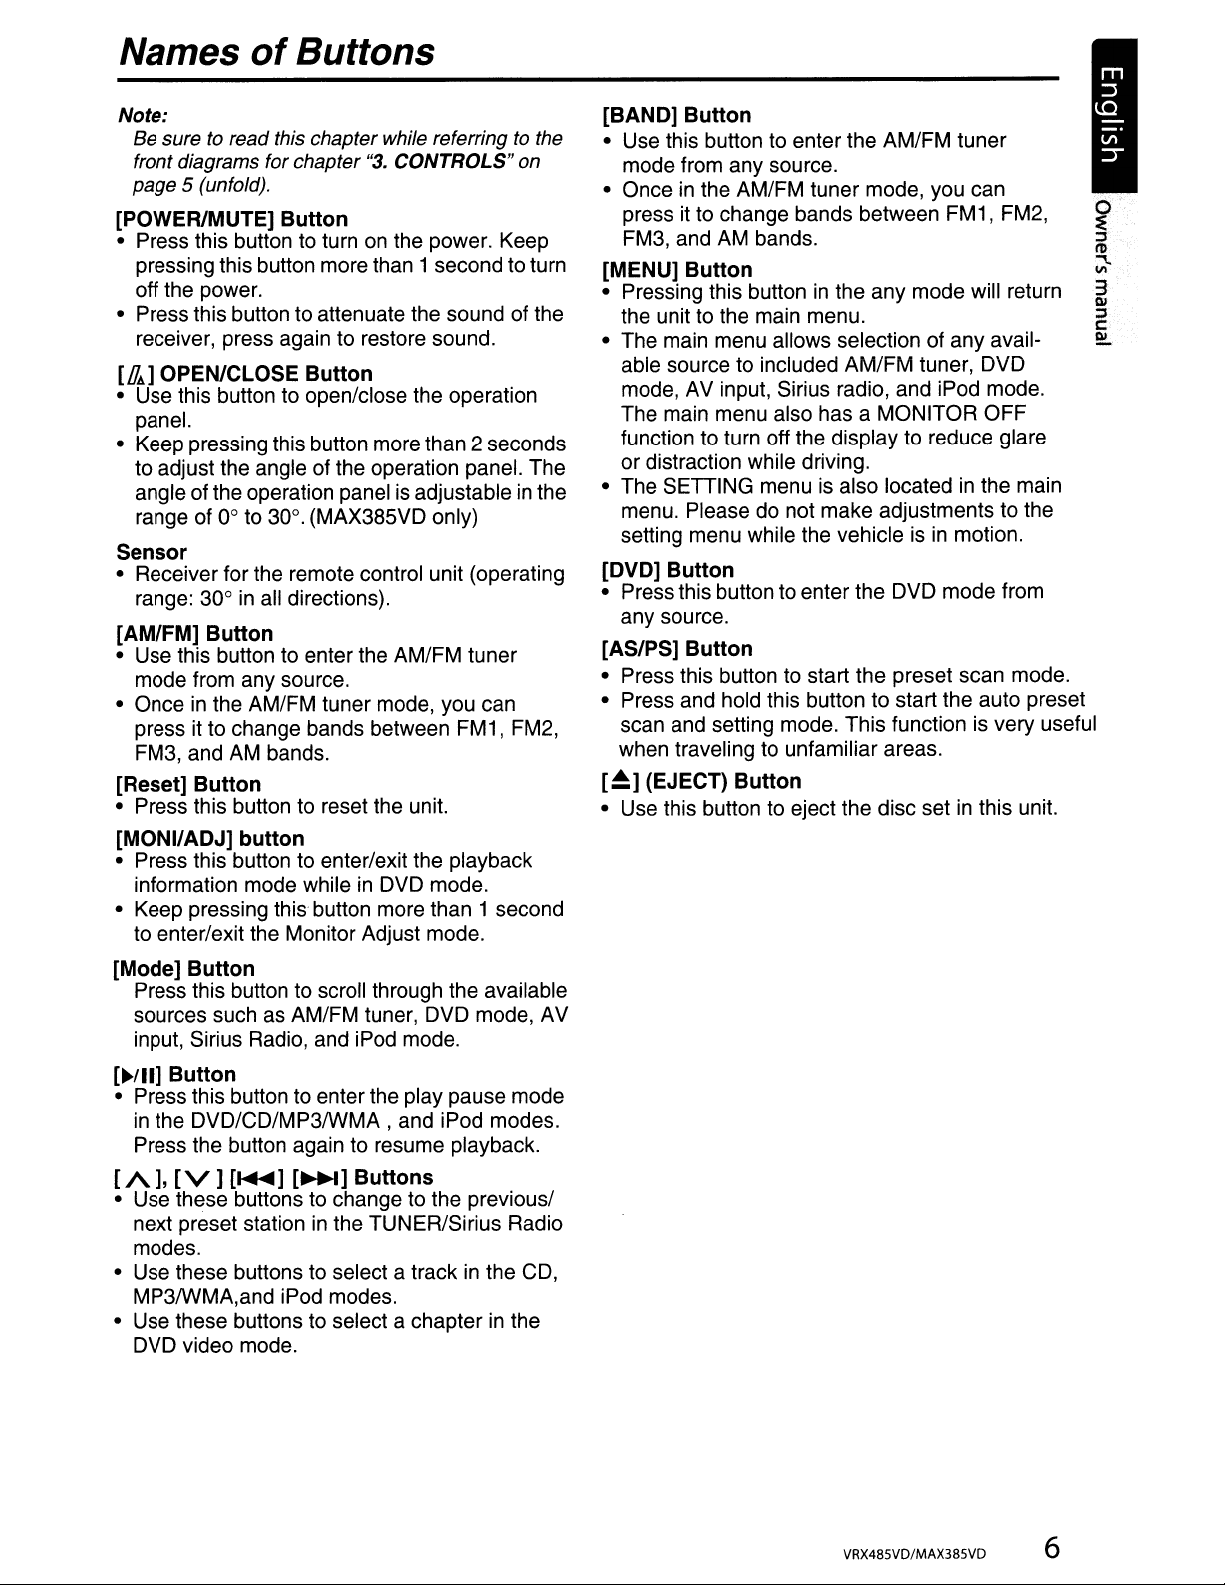
3.
• Operation panel
3
DI
~
c
~i
I (
Ii
,I
,,
IiI
!
II
II
Ii
I
CONTROLS
SENSOR
[DVD]
[A]
[V]
["III
]
[PS] [AS]
IIII
r
11,11
III
i
II
I.I I
~~~~~~~~~=================================================!:b:dI
Iii
I,
L
I,:
Il'"
l~_===.=======~~~-=---
,'-,
-------[MODE]
'--
''----
--
[PWR]
[MUTE]
~mPI
~
~!~I!J~!
[MENU]
[AM]
[FM]
[MONITOR ADJ.]
[INFO] BAND CLOSE
~~l
==============:i;=1
..
""
~~~i~
Clarloo
Clarion
~
,.;
..
RESET
[OPEN]
[CLOSE]
SENSOR-
(/-
~~~~]
5 VRX485VD/MAX385VD
-~
~
-;
[I
• -
[MUTE] [
/
__
~-'----++fI-'-
/
"___
II
! (
I
".,
IIG0811
.un
I
';
I
-;
I
~I~~'
! I I I I
I
I
,-.
/'
.J...
JJ
r/
I I I i I [RESET]
I I I
.....
]
[~]
[_]
[~/II]
[SOURCE]
----,
I]
".'
~
~
....
[TILT DOWN]
[TILT
UP]
[INFO]
[MONITOR ADJ.]
[EJECT]
++--[ENT]
Page 6
Names
of
Buttons
Note:
Be sure to read this chapter while referring to the
"3.
front diagrams for chapter
5 (unfold).
page
CONTROLS"on
[POWER/MUTE] Button
• Press this button to turn on the power. Keep
pressing this button more than 1 second to turn
off the power.
• Press this button to attenuate the sound of the
receiver, press again to restore sound.
[D.d
OPEN/CLOSE Button
• Use this button to open/close the operation
panel.
• Keep pressing this button more than 2 seconds
to adjust the angle of the operation panel. The
angle of the operation panel is adjustable
range of 0° to 30°. (MAX385VD only)
in
the
Sensor
• Receiver for the remote control unit (operating
range: 30°
in
all directions).
[AM/FM] Button
• Use this button to enter the AM/FM tuner
mode from any source.
in
• Once
press
FM3, and
the AM/FM tuner mode, you can
it
to change bands between FM1, FM2,
AM
bands.
[Reset] Button
• Press this button to reset the unit.
[MONI/ADJ] button
• Press this button to enter/exit the playback
information mode while
• Keep pressing this button more than 1 second
to enter/exit the Monitor Adjust mode.
in
DVD mode.
[BAND] Button
• Use this button to enter the AM/FM tuner
mode from any source.
• Onceinthe AM/FM tuner mode, you can
press
it
to change bands between FM1, FM2,
FM3, and
AM
bands.
[MENU] Button
• Pressing this buttoninthe any mode will return
the unit to the main menu.
• The main menu allows selection of any avail-
able source to included AMiFM tuner, DVD
mode, AV input, Sirius radio, and iPod mode.
The main menu also has a MONITOR OFF
function to turn off the display to reduce glare
or distraction while driving.
• The
SETIING
menu. Please do not make adjustments to the
setting menu while the vehicle is
menu is also locatedinthe main
in
motion.
[DVD] Button
• Press this button to enter the DVD mode from
any source.
[AS/PS] Button
• Press this button to start the preset scan mode.
• Press and hold this button to start the auto preset
scan and setting mode. This function is very useful
when traveling to unfamiliar areas.
[~]
(EJECT) Button
• Use this button to eject the disc setinthis unit.
[Mode] Button
Press this button to scroll through the available
sources such as AM/FM tuner, DVD mode, AV
input, Sirius Radio, and iPod mode.
[~!II]
Button
• Press this button to enter the play pause mode
in
the DVD/CD/MP3IWMA , and iPod modes.
Press the button again to resume playback.
[A],
• Use these buttons to change to the previous/
• Use these buttons to select a track in the CD,
• Use these buttons to select a chapter in the
[V][.....
next preset station in the TUNER/Sirius Radio
modes.
MP3IWMA,and iPod modes.
DVD video mode.
]
[~]
Buttons
VRX485VD/MAX385VD
6
Page 7
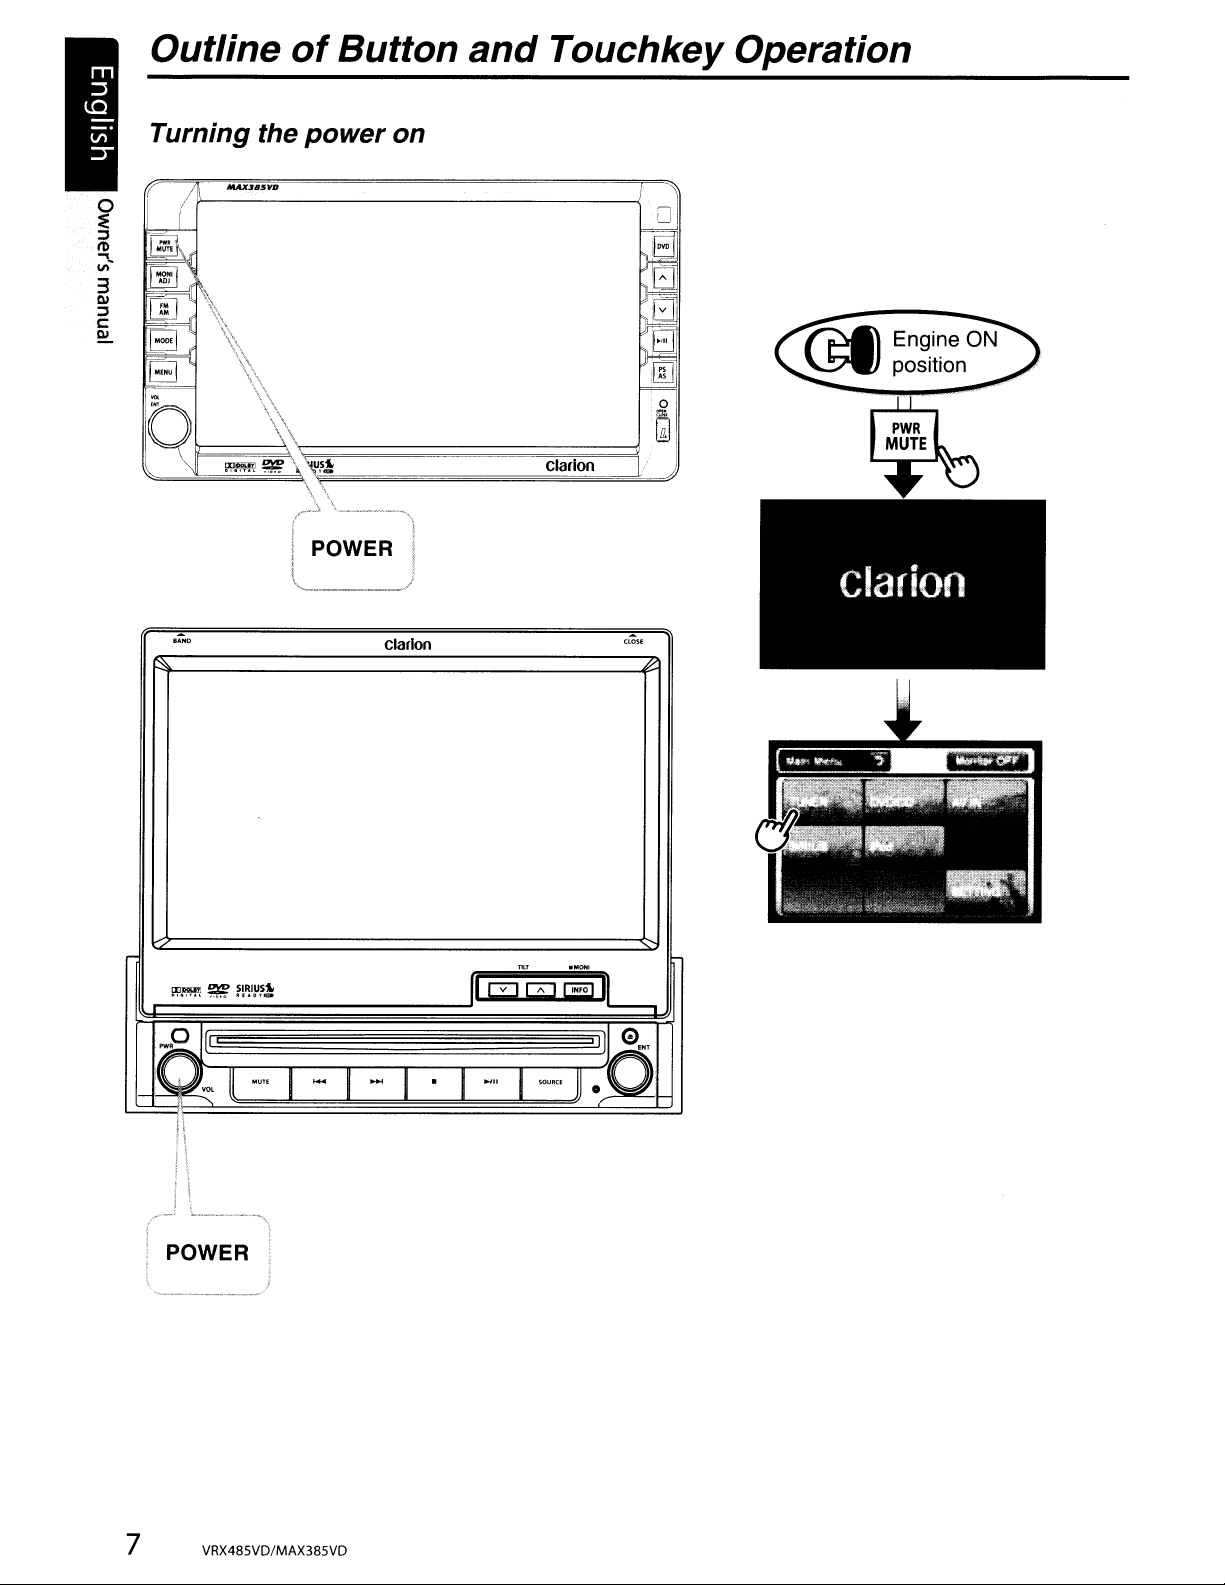
Outline
of
Button
Turning the power on
POWER
and
Touchkey Operation
o
~
clarion
~
BANO
~~~~!~IP~~
O~ll
.on
...
I
Clarion
....
i
I
ClOSE
TILT
.MONI
II
G"J
G"J
~
II
----,
0
I)
EtlT
.,,,
.
I
SOURCE
JJ
•
I
0
7
POWER
VRX485VO/MAX385VO
Page 8
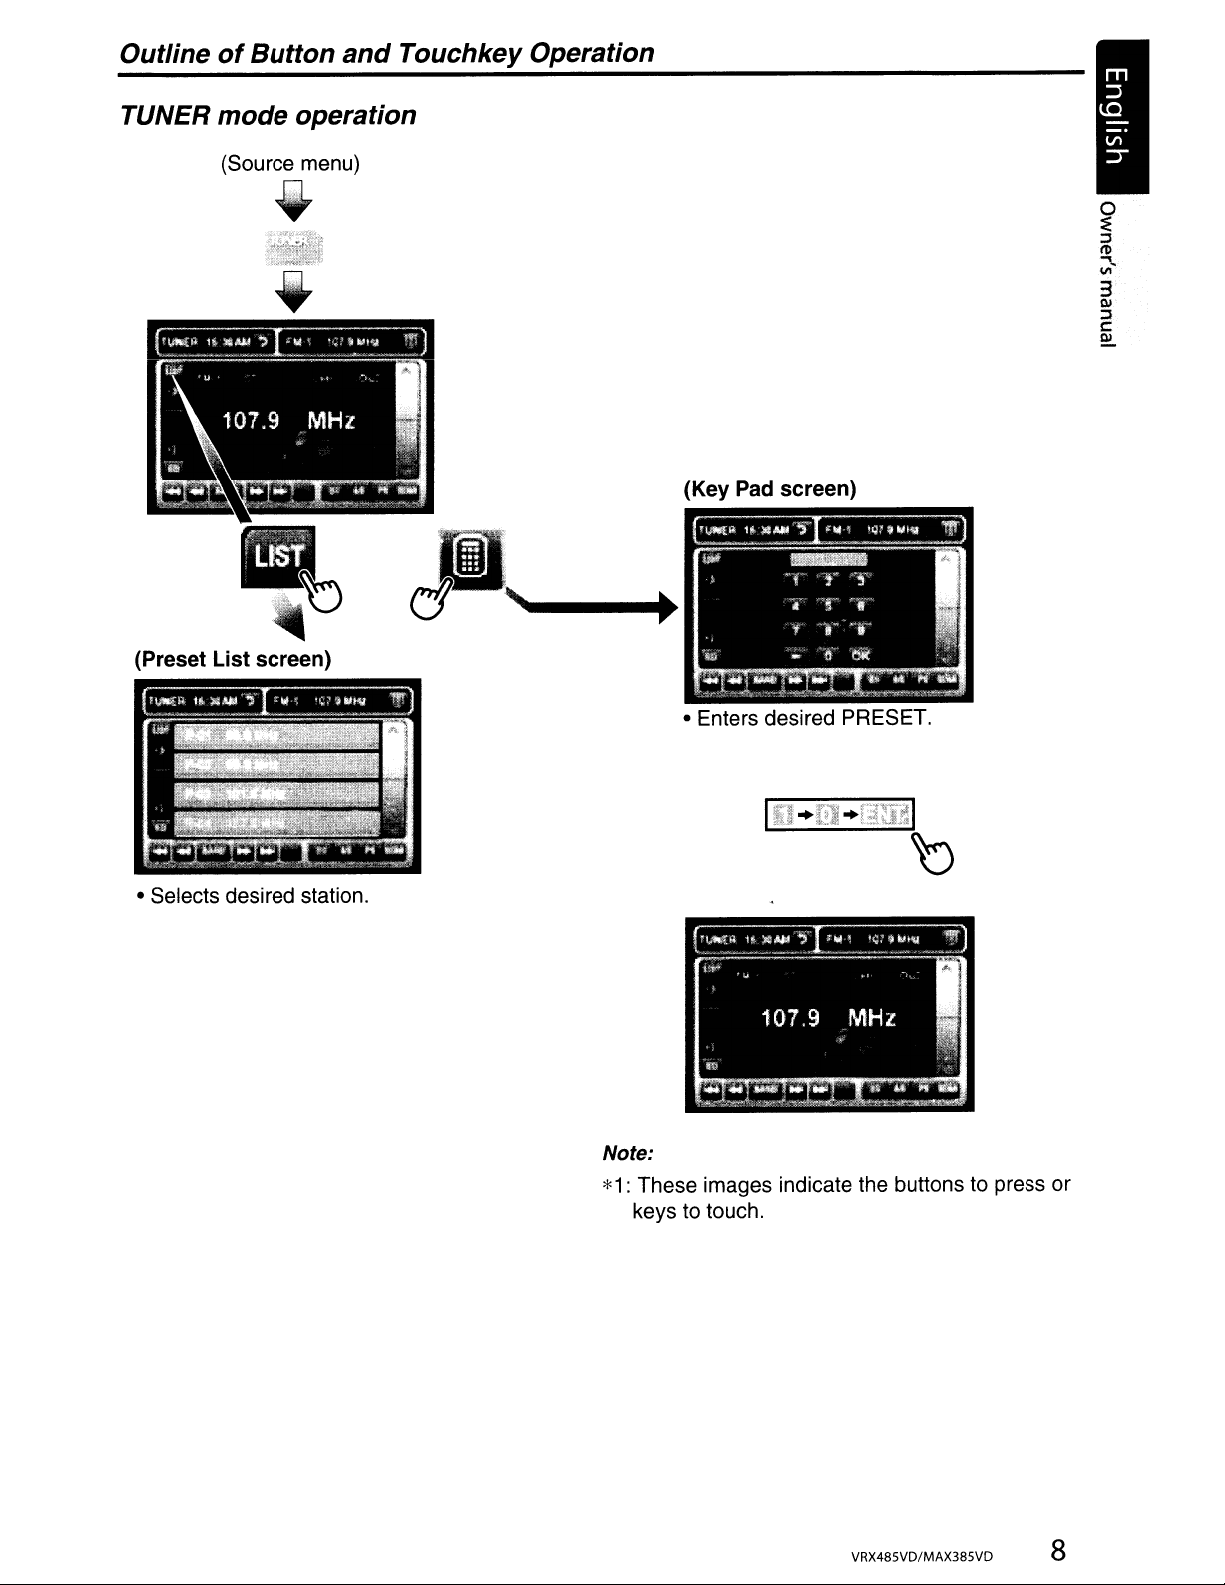
Outline
TUNER mode operation
of
Button
(Source menu)
and
•
Touchkey Operation
(Key Pad screen)
(Preset List screen)
• Selects desired station.
• Enters desired PRESET.
Note:
*1: These images indicate the buttons to press or
keys to touch.
VRX485VD/MAX385VD 8
Page 9
Outline
of
Button
and
Touchkey Operation
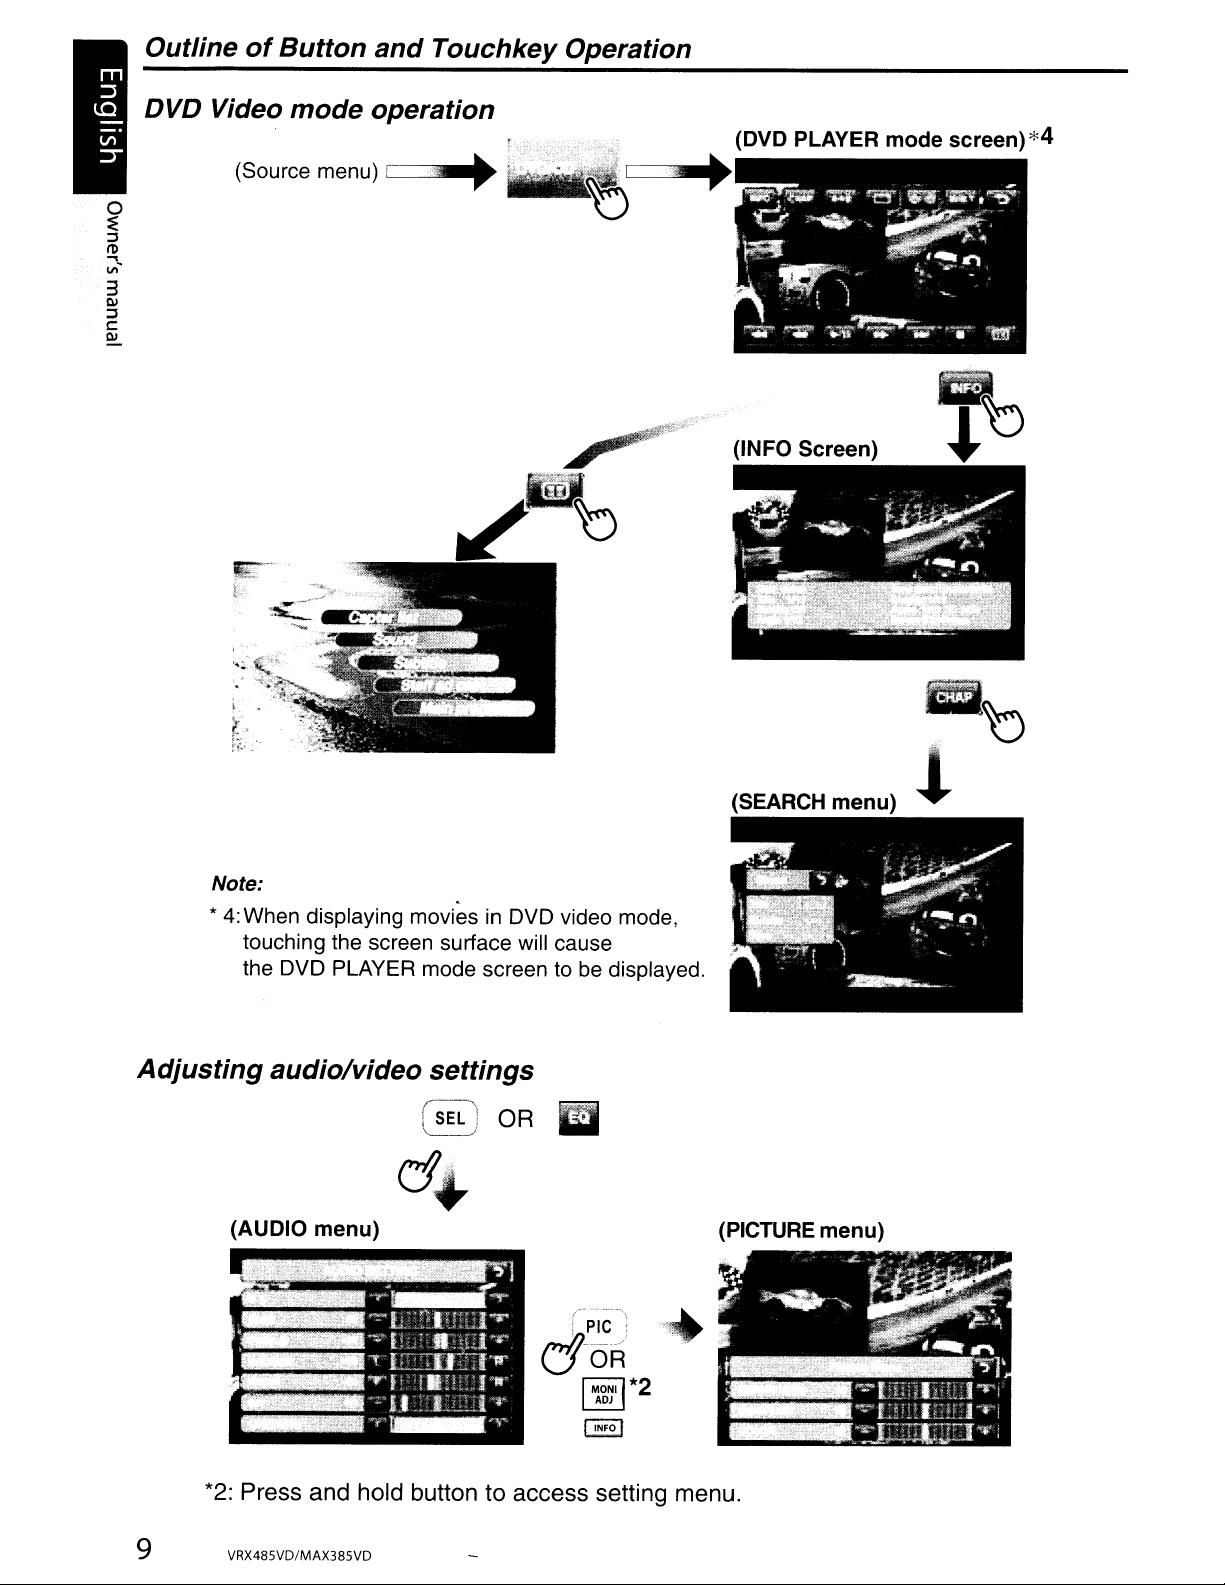
DVD Video mode operation
.--
__
....
(Source menu)
F-"
.,
...........
hi
,-I
_~_,..
r-,;:
(INFO Screen)
Note:
*
4:
When displaying moviesinDVD video mode,
touching the screen surface will cause
the DVD PLAYER mode screen to be displayed.
Adjusting audio/video settings
(SEL)
OR
d~
(AUDIO menu)
II
(SEARCH menu)
(PICTURE menu)
~
...•.
-.,
...
!
~
*2: Press and hold button to access setting menu.
9 VRX485VD/MAX385VD
( \
i
PIC:
r:j-OR'
I
MONII
ADJ
*2
Page 10
Remote Control
Remote
control
[~][~]
unit
-------
[MUTE]-+-------..
[MODE]-+-~---.J
[O-g]-+-
[SRCH]-+-""'-l
[.]
['Y]-+----
[ESC]
[<llII][~
[TITLE]
]
~
Signal transmitter
/ Operating range: 30'inall directions
~---<I---[
-++-+--[POWER]
-+-+--[VOLUME]
r---+--[.'
+--+--[SEL]
.;----t--[MENU]
---------[A- B]
~-[OK]
~-[ROOT]
OPEN]
[INFO]
BAND]
[PIC]
(REPEAT]
[~]
[ZOOM]
[AUDIO]
clarion
Replacing the Batteries
1.
Press the retention tab and pull out the battery
tray and remove the old battery.
2.
Insert the new CR2025 battery and slide the
battery tray back
same direction that you removed it. Please
ensure the tray is insertedinthe correct direction.
Note:
Using batteries improperly can cause them to
explode. Take note
• When replacing batteries, replace both batteries
new
with
• Do notshort-circuit, disassemble
• Do not dispose
• Dispose
ones.
of
spent batteries properly.
in
the remote control the
of
the following points:
or
heatbatteries.
of
batteries into fireorflames.
[SUB
TITLEIVIDEO iPod
[ANGLE/AUDIO iPod MODE*]
MODE*]
* Only when capable iPod
is
connected
VRX485VD/MAX385VD
10
Page 11
Functions
You can use the remote control unit to control the MAX385VD and VRX485VD.
Note:
•
The
wireless remote control operation
of
Remote Control Unit Buttons
may
not be optimalindirect sunlight.
Shared modes
[MODE] button
• Press this button to scroll through the various
available sources such as the AM/FM tuner,
DVD player, iPod, Sirius Radio, or AUX IN.
[VOLUME] buttons
• Increase and decrease volume.
[MUTE] button
• Turns muteonand off.
[POWER] button
• Press this button to turn the unitonor off.
menu screens.
[OPEN] button
• Press this button to OPEN or CLOSE the
motorized screen. Please ensure there are
no obstructions before starting the operation.
[MENU] button
• Press this button to enter the MAIN MENU.
From the main menu, you can select your
desired source or change your settings.
[PIC] button
• Press this button to change your monitor
settings such as Brightness, Color, and
Contrast.
[SEL] button
• Press this button to change your audio
settings such as Tone, Fader, and Balance.
[ESC] button
• Press this button to exit selection and
adjustment menus.
TUNER/Satellite Radio mode
[BAND] button
• Switches reception band.
[0 - 9] buttons
• Use in the Key Pad screen to set the radio
frequency or Satellite Radio channels.
• Use to select the preset number
List screen.
[SEARCH] button
• Press to show/hide the Key Pad screen.
[OK] button
• Press to fix the entered datainthe Key Pad
screen.
[......
],
[~]
• Press to seek the next available higher or
lower station
mode,you will scroll through the categories.
buttons
in
TUNER mode.InSirius Radio
in
the Preset
[
.....
],
[~]
buttons
• Press to manually select the next higher or
lower station
modes.
[.A], [~] buttons
• Press to scroll through the saved presets
the TUNER mode. Press [OK] to tune to the
highlighted preset.
[INFO] button
• Press to switchinand out of the LIST mode
in
while
in
TUNER and Satellite Radio
the TUNER/ Sirius Radio mode.
in
DVD PLAYER mode
[INFO] button
• Press to turnonand off the playtime display
the DVD video.
• Press to switch
while playing CD audio.
[SEARCH] button
• Press to open the direct search menu while
the DVD video mode.
[OK]
• Press to select, play or pause video and
• Press to stop video and audio media playback.
[0 - 9] buttons
• Press to enter DVD video chapters/titlesinthe
• Press to set the track/folder numberof the CD,
[DISC SEL] button
• Press to show/hide the Track List screeninthe
• Press to show/hide the Folder List screen
[TITLE] button
• Press to go to the title menu on the DVD.
button
audio media.
[
./BAND]
Key Pad screen. .
or
MP3IWMAinthe Key Pad screen.
CD mode.
MP3IWMA mode.
[ROOT] button
• Press to go to the root menu on the DVD.
[.A],
[~],
[
....
• Press to select button items on the menu
screen of a DVD video.
....
• Press [
screens
],
in
in
and out of the LIST mode
button
],
[~]
buttons
[~]
to scroll the through the page
the CD and MP3IWMA modes.
in
in
in
the
11
VRX485VD/MAX385VD
Page 12
Functions
[
.....
],
[~]
• Press to select the nexthigher or lower chapter
number
• Press to select the next higheror lowertrack
CD.
[
....
],
[~
• Press to perform fast-forward and fastbackward. Press again to advance to higher
speed reversing or forwarding such as 2x,
4x, ax and 16x. Press once more to resume
normal speed playback.
of
Remote Control Unit Buttons
buttons
in
DVD video mode.
] buttons
in
[RPn button
• Press to perform chapter repeatinthe DVD
video mode, and track repeat
WMA modes.
to
• Press again
mode or folder repeat in MP3IWMA mode.
CD
mode, this will activate the repear
• Press again to perform all repeatinMP3IWMA
playback mode.
perform title repeatinDVD video
[A->B] button
• Press to set initial starting point of repeat.
The screen will show 'REP A-'.
• Press again to set repeat ending point.
The screen will show 'REP A-B'
• Press again to turn off A-B repeating. The
screen will show 'REP AB Off'
[ZOOM] button
• Press to turnonand zoominwhileinDVD
Video mode. You can zoom
in
CD and MP3/
in
up to
3x.
all
In
mode.
iPodmode
[OK]
button
• Press to play or pause the selected media.
[.],
[~]
buttons
• Press to scroll the list screens.
[
.....
],
[~]
• Press to select the next higher or lower track
numbers.
[
....
],
[~]
• Press to perform fast-forward or fast-backward
searching. Press again to change the speed
to 2x, 4x, ax or 16x.
buttons
buttons
[AUDIO] button
• Press to switch the AUDIO functioninthe DVD
video mode.
[SUB-T]button
• Press to display subtitlesinthe DVD video
mode.
[ANGLE] button
• Press to switch the ANGLE functioninthe DVD
video mode when the Angle mark
is
displayed.
VRX485VO/MAX385VO
12
Page 13
4.
CAUTIONS
ON
HANDLING
Operation panel
For a longer service life, be sure to read the following cautions.
• The operation panel will operate properly
temperature range of 0 to 60°C.
• Do not allow any liquids on the set from drinks,
umbrellas etc. Doing so may damage the
internal circuitry.
• Do not disassemble or modify the set
way. Doing so may result
• Subjecting the operation panel to shocks may
result
in
breakage, deformation or other
damage.
•
Do
not let cigarettes burn the display. Doing so
may damage or deform the cabinet.
• If a problem should occur, have the set
inspected at your store of purchase.
•
Do
not insert objects or pokeinthe space
between the operation panel and the main unit
when the panel is tilted.
in
damage.
in
in
any
Cleaning
• Cleaning the cabinet
Use a soft, dry cloth and gently wipe off the dirt.
For tough dirt, apply some neutral detergent
diluted
gently, then wipe again with a dry cloth.
Do not use benzene, thinner, car cleaner, etc.,
as these substances may damage the cabinet
or cause the paint to peel. Also, leaving rubber
or plastic products
for long periods
in
water to a soft cloth, wipe off the dirt
in
contact with the cabinet
of
time may cause stains.
a
• The remote control unit may not work if the
remote control sensor is exposed to direct
sunlight.
•
In
extremely cold weather, the display
movementmayslow down and the displaymay
darken, but this
display will work normally when the
temperature increases.
• Small black and shiny spots inside the liquid
crystal panel are normal for LCD products.
• The touchkeys
slightly touched. Do not press the touchkey
screen with much force.
• Do not push the case surrounding the touchkey
panel with much force. This may cause
malfunctioning of the touchkeys.
is
not a malfunction. The
on
the display operate when
• Cleaning the liquid crystal panel
The liquid crystal panel tends to collectdust, so
wipe it off occasionally with a soft cloth. The
surface
hard objects.
13
is
easily scratched, so do not rubitwith
VRX485VD/MAX385VD
Page 14
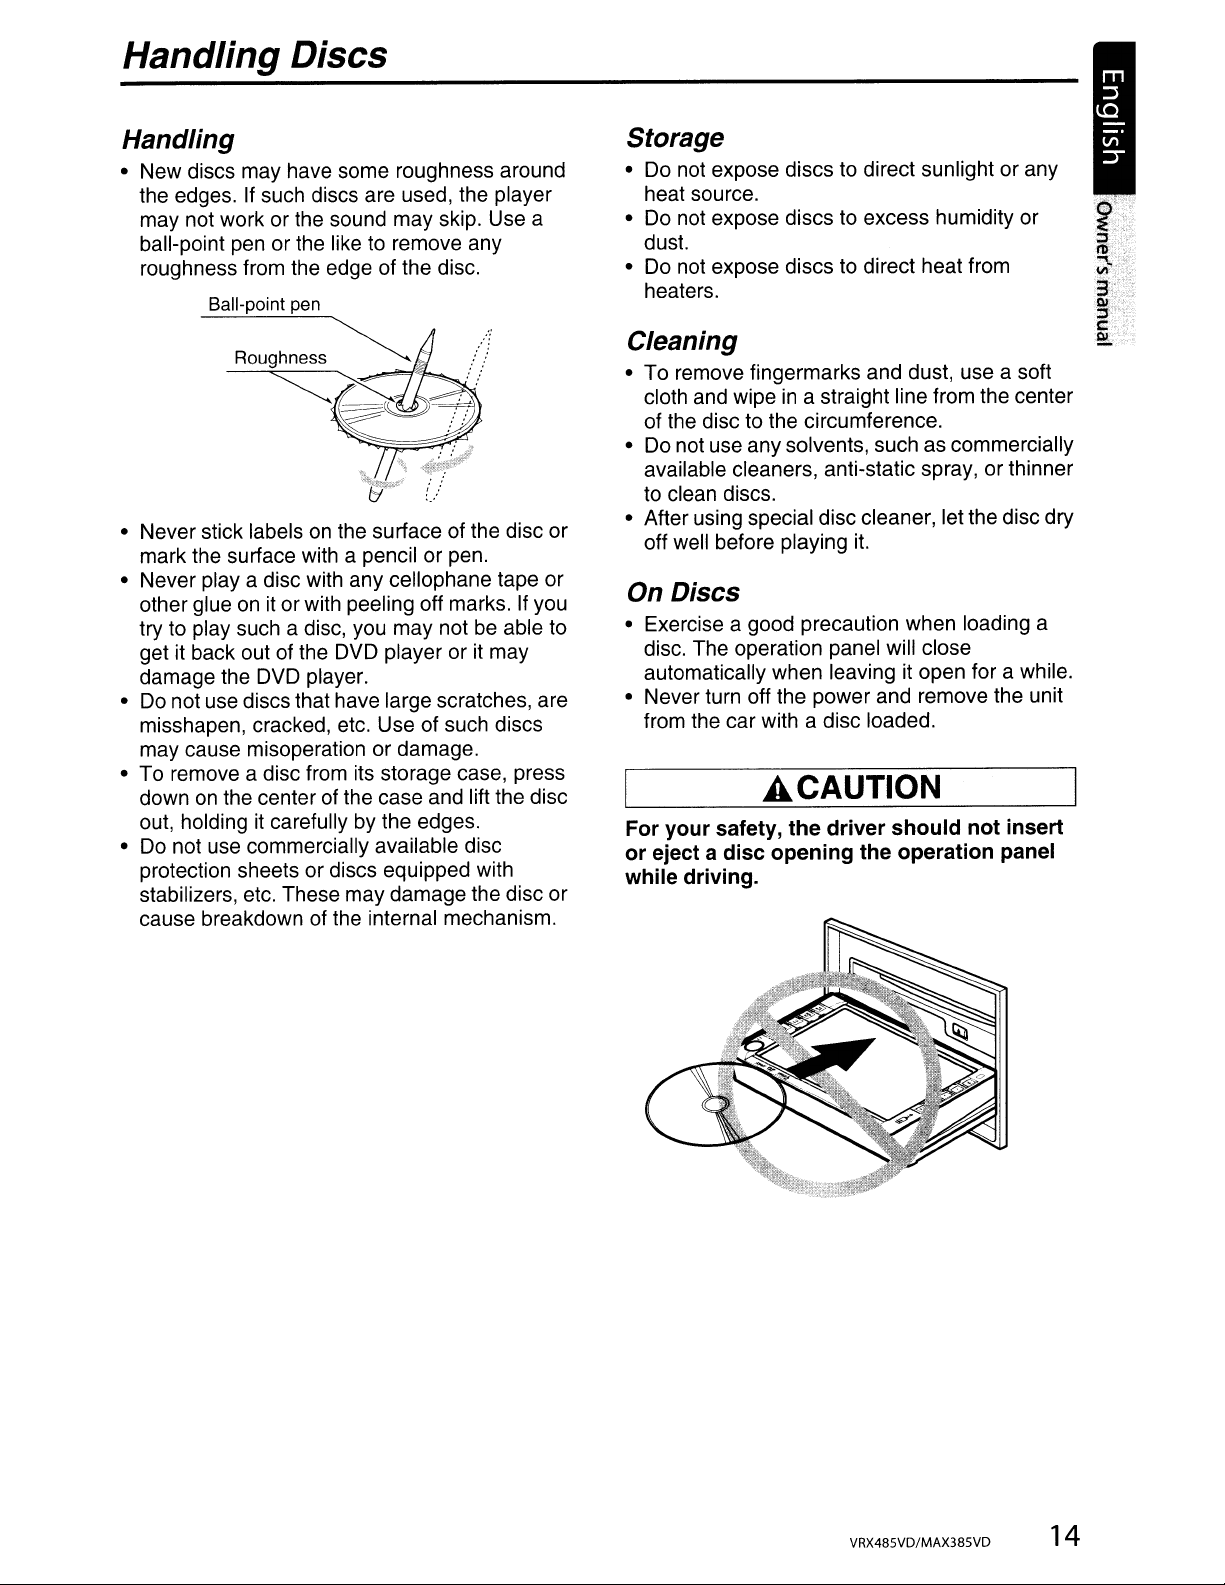
Handling Discs
Handling
• New discs may have some roughness around
the edges. If such discs are used, the player
may not work or the sound may skip. Use a
ball-point pen or the like to remove any
roughness from the edge of the disc.
Ball-point pen
~
~~~.
• Never stick labelsonthe surface of the disc or
mark the surface with a pencil or pen.
• Never
other glue on it or with peeling off marks. If you
try to play such a disc, you may not be able to
get it back out of the DVD player or it may
damage the DVD player.
• Do not use discs that have large scratches, are
misshapen, cracked, etc. Use of such discs
may cause misoperation or damage.
• To remove a disc from its storage case, press
down
out, holding it carefully by the edges.
• Do not use commercially available disc
protection sheets or discs equipped with
stabilizers, etc. These may damage the disc or
cause breakdown of the internal mechanism.
playa
on
disc with any cellophane tape or
the center of the case and lift the disc
~
'~~iJ'
I!
Storage
• Do not expose discs to direct sunlight or any
heat source.
• Do not expose discs to excess humidity or
dust.
• Do not expose discs to direct heat from
heaters.
Cleaning
• To remove fingermarks and dust, use a soft
cloth and wipe
of the disc to the circumference.
• Do not use any solvents, such as commercially
available cleaners, anti-static spray, or thinner
to clean discs.
• After using special disc cleaner, let the disc dry
off well before playing
in
a straight line from the center
it.
On Discs
• Exercise a good precaution when loading a
disc. The operation panel will close
automatically when leaving it open for a while.
• Never turn off the power and remove the unit
from the car with a disc loaded.
ACAUTION
For your safety, the driver
or
eject a
while driving.
disc
opening the operation panel
should
not
insert
VRX485VD/MAX385VD
14
Page 15
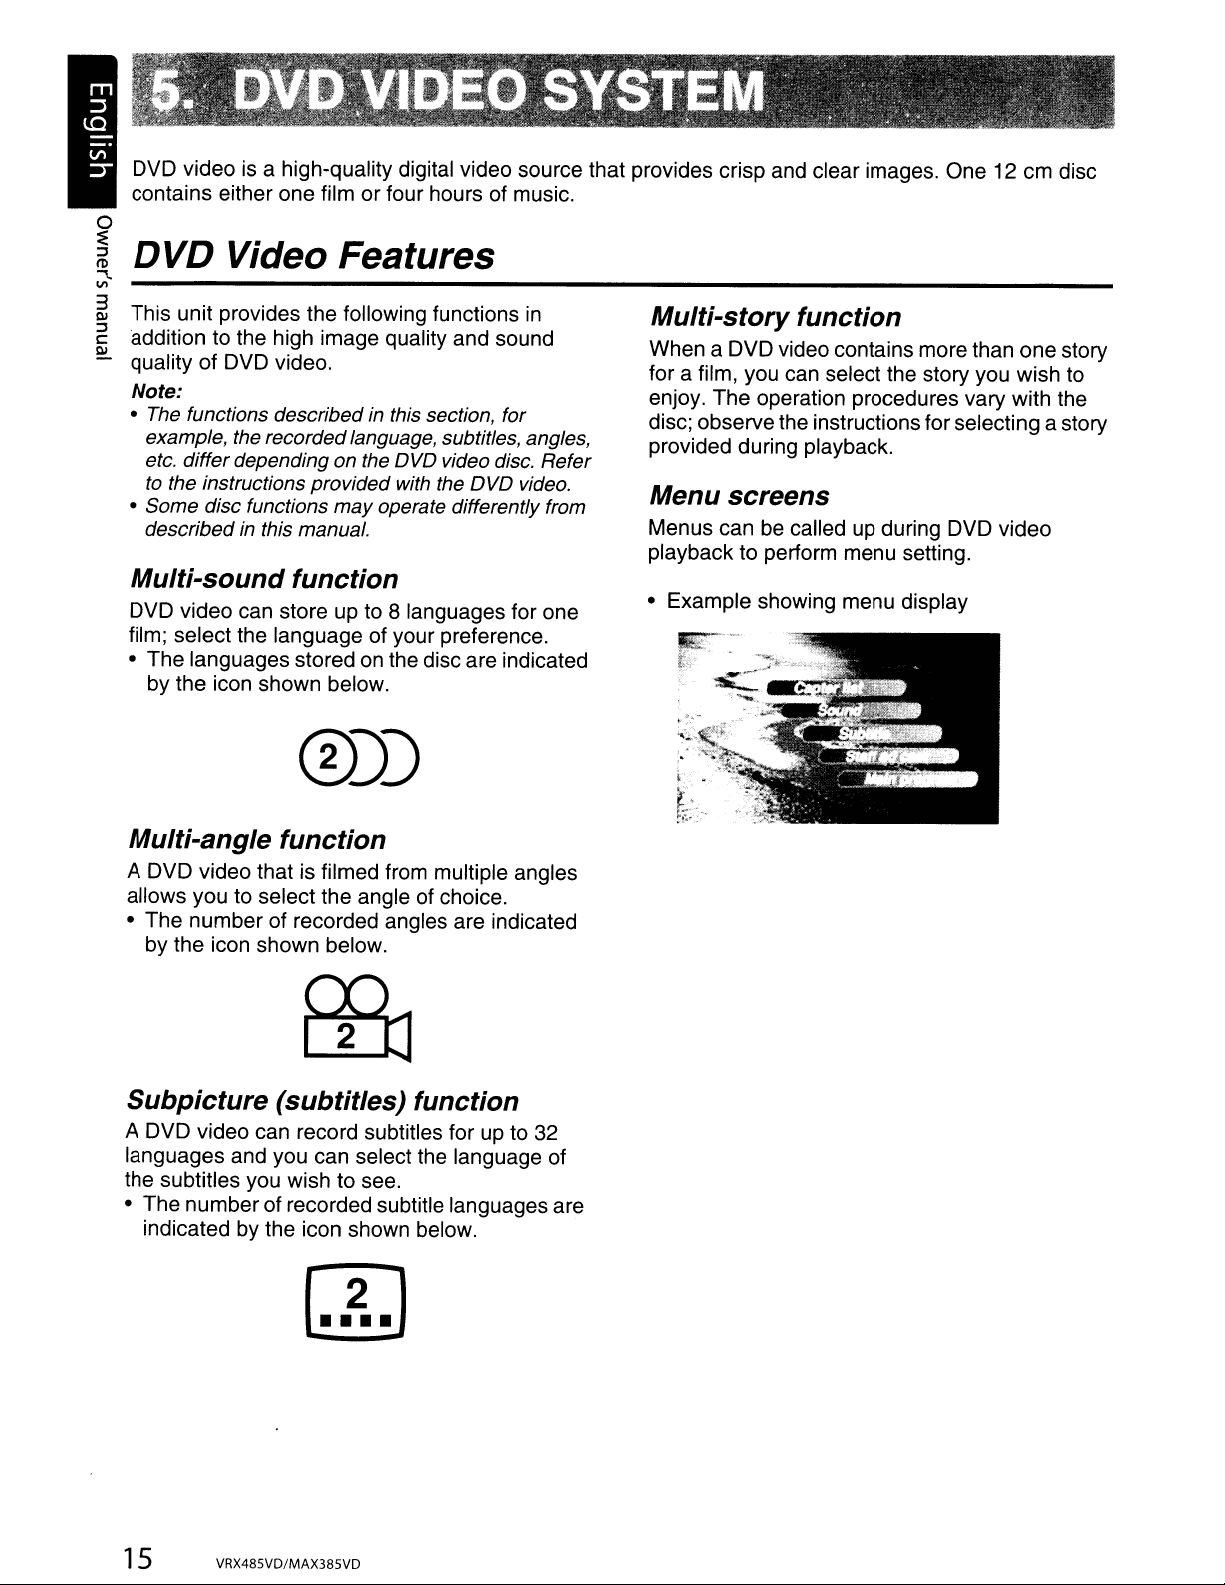
DVD videoisa high-quality digital video source that provides crisp and clear images. One 12 cm disc
contains either one film or four hours of music.
o
~
DVD
""\.
V>
~
This unit provides the following functions
~
caddition
Ql
quality of DVD video.
Note:
• The functions described in this section, for
example, the recordedlanguage, subtitles, angles,
etc. differ depending on the OVO video disc. Refer
to
• Some disc functions
described in this manual.
Multi-sound function
DVD video can store up to 8 languages for one
film; select the language of your preference.
• The languages stored on the discare indicated
by the icon shown below.
Multi-angle function
A DVD video that is filmed from multiple angles
allows you to select the angle of choice.
• The number of recorded angles are indicated
by the icon shown below.
Video Features
in
to the high image quality and sound
the instructions providedwith the OVO video.
may
operate differently from
0))
Multi-story function
When a DVD video contains more than one story
for a film, you can select the story you wish to
enjoy. The operation procedures vary with the
disc; observethe instructions for selecting a story
provided during playback.
Menu screens
Menus canbecalled up during DVD video
playback to perform menu setting.
• Example showing menu display
, .
"
l'
w
>'"
r
·-··~.
~!
P ;
Subpicture (subtitles) function
A DVD video can record subtitles for up to 32
languages and you can select the language of
the subtitles you wish to see.
• The numberof recorded subtitle languages are
indicated by the icon shown below.
15 VRX485VD/MAX385VD
Page 16

Discs
Playable discs
This DVD video player can play the following
discs.
Playable discs
DVD video discs
~
VIDEO
Audio CDs
rnJD~~
••
GmllAU•••
About
A CD Extra disc is a discinwhich a total of two
sessions have been recorded. Thefirst session is
Audio session and the second sessionisData
session.
Your personally-created CDs with more than
second datasessions recorded cannot be played
on this DVD video player.
Note:
• When you
session will be recognized.
About
(MP3,
This player cen play CD-R/CD-RW discs
previously recorded
WMA) or video CD format.
CD Extra discs
playa
CD Extra disc, only the first
playing
a CD-R/CD-RW disc
WMA)
in
MP31D3TAG
m?3
103
TAG
WMA
••
",.=~~~
I
··~
music CD format (MP3,
J
Discs
This DVD video player cannot play back DVDAudio, DVD-RAM, Photo CDs, etc. 0
Note:
• It
recorded on
disc characteristics, cracks, dust/dirt, dust/dirt on
player's lens, etc.)
• Ifa CD-R
finalized is played,
playing. Also, it
depending on its recording conditions.
• You cannot
CD playeris notsupported even
disc.
About
This unit can play back CD-R/CD-RW, DVD-R/
RW and DVD+R/RW discsonwhich MP3IWMA
music data have been recorded.
For a detailed information, see the section
entitled
Note
The DVD video system assigns a region number
to DVD video players and DVD discs by sales
area. DVD videoplayers sold
can play back DVD discs with the region number
"ALL", "1" or any combination of numbers that
also incorporate a "1".
The DVD video region number
disc jacket as shown below.
that
cannotbe
may
also not be possibletoplay
a CD-R unitand
or
CD-RWdisc that has
it
will take a long time to start
may
notbe possible to
play
SuperAudio CDs. Playbackofthe
played
back
CD-RW
not
ifitis a hybrid
unit. (Cause:
MP3IWMA playback
"Listeningtoan MP3IWMA" (page 42).
on
region numbers
in
the United States
is
marked on the
back
CDs
been
play
:e
~
~
.
About
DVD+R/RW
This player cannot play DVD-R/RW and DVD+R/
RW discs previously recordedinvideo CD
format.
However, MP3IWMA files recorded on DVD-R/
RW and DVD+R/RW discs can be played.
About
• This product incorporates copyright protection
technology that is protected by U.S. patents
and other intellectual property rights. Use of
this copyright protection technology must
authorized by Macrovision, and is intended for
home and other limited viewing uses only
unless otherwise authorized by Macrovision.
Reverse engineering or disassembly is
prohibited.
playing
a DVD-R/RW
or
disc
the registered marks etc.
be
fll.·.·.·.·.'j·.·.·.£.L.·.·
..
]1
":-'.-,"
'i,:-/
~,-~,;y
• Manufactured under license from Dolby
Laboratories.
• "Dolby" and the double-D symbol
are trademarks of Dolby Laboratories.
• "iPod" is for legal or rightholder-authorized
copying only.
• Windows Media™, and the Windows® logo are
trademarks, or registered trademarks of
Microsoft Corporation
or other countries.
Do
not steal music.
in
the United States and/
VRX48SVD/MAX38SVD
16
Page 17

Basic
~
;:,
Note:
~
•Besuretoread
3
"3.
CONTROLS"
01
;:,
C
~
When the
stopping
the
maximum level may harm
Be careful about
Turning on
Operations
this
chapter
(page 5).
ACAUTION
unitisturned on,
the engine
with
adjusting
and
off
its
referring to the
starting
volume
your
the volume.
the
and
raised
hearings.
power
chapter
to
Adjusting
1.
Turn the volume knob to adjust the volume.
Clockwise: Increases the volume.
Counter- clockwise: Decreases the volume.
• The volume level indicated in the display
in
a range from 0 (min.) to 40 (max.).
the volume
ACAUTION
While driving, keep the
external
sounds
can be heard.
volume
level at
is
which
Note:
•
Start
the
engine
•
Be
careful
without running the engine.Ifyou
battery
engine
battery.
1. Start the engine. The power
too far,
and
illumination on the unit will light up.
~
~
2. Press the (POWER) button to turn on the
power.
* Pressing this button while the power
on
will mute the volumeonthe MAX385VD,
on
the VRX485VD, the audio settings appear.
3. To turn off the power, press and hold the
[POWER] button for more than 1 second.
about
this
before
you
can
using
this unit.
using this
may
reduce the service lifeofthe
unit
foralong
notbeable to
button/knob
EngineON
position
drain the
time
start
is
Selecting a mode
1.
Press the [MENU] button to display the
Source menu.
* External equipment not connected to this unit
is
not
displayed.
2.
Touch the desired mode key.
car's
the
turned
Mute
1. If using a MAX385VD, press the PWR/MUTE
button to turn the mute on and off.
the mute on and off.
2.
If using a VRX485VD, press the [MUTE] button
to turn the mute on and off.
• When the mute is turned on,
on the LCD screen.
Opening the operation
and
Open the operation panel when inserting/ejecting
a disc.
The angle of the operation panel can be adjusted
depending on the mounting angle of the unit or
light coming into the car.
adjusting
the angle
"-4x" appears
panel
ACAUTION
• Do
not
movethe operation panel
do
not
apply
panel.
• When the operation panel
careful
between the operation panel and main
or
its mechanical parts.
• The
driver
panel while
strong
nottoget
should
driving.
forcetothe operation
is
your
handorfinger
not
operatethe operation
forcibly
operating, be
caught
unit
or
17 VRX485VD/MAX385VD
Page 18

Basic Operations
Opening/closing the operation panel
1.
Press the
[0/:.1
(OPEN/CLOSE) button.
The operation panel will be opened or closed.
Note:
• The operation panel will close automatically when
a disc is inserted. (MAX385VO only)
• When the operationpanelis open, the touchpanel
should
notbeoperated. (MAX385VO only)
Adjusting the angleofthe operation
panel
The angle ofthe operation panel can be adjusted
in the range of
1.
Keep pressing the
more than 2 seconds.
A beep will sound and the operation panel
will start moving.
00to300.
[OA]
(OPEN/CLOSE) button
Returning the operation panel to the
original angle (MAX385VD)
1.
Press the
[lk]
(OPEN/CLOSE) button
to open the motorized LCD panel. 0
2.
Keep pressing the
Wt.]
(OPEN/CLOSE) button
until the panel is back at the normal position.
Adjusting the AUDIO
1.
Press the [EO] button on the screen or
the [SEL] button on the remote control.
2.
Touch the item key to adjust.
3.
Perform the adjustment.
See the following sections for detail.
4.
Touch the
screen.
In
*
regarding adjustments are described,
procedures
Adjusting the balance/fader
1.
Touch the BALANCEorFADER in the
audio menu.
2.
Touch the [F ] or
fader level.
• The factory default setting is "0".
(Adjustment range: front 9 to rear -9)
3.
Touch the [L] or [R] key to adjust to the
balance level.
• The factory default setting is "0".
(Adjustment range: left -9 to right
[Back]
the
following sections, only the details
key to return to the previous
to
select items are skipped.
[R]
key to adjust to the
9)
:E
~
""l
lI\
~
I
1:__,,-
...
:0-1-1'1-11.
- ...
~
.
'---L_
2. When the operation panel is moved to your
desired angle, release the button.
The operation panel will stop.
3. For the VRX485VD, simply adjust your
desired angle by pressing the
[v]
or
[A]
buttons on your control panel.
tilt
Adjusting the BASS
The bass gain and bass frequency can be
adjusted as follows.
1.
Enter the Audio settings menu.
2.
Touch the [-]
or
[+]
key to set the desirable
level.
GAIN:
-7
to 7 (The factory default setting is "0")
3.
To set the bass center frequency, enter
the ASP adjustment in the SETTING menu.
Adjusting the TREBLE
The treble gain and treble frequency can be
adjusted as follows.
1.
Enter the Audio settings menu.
2.
Touch the [-]or[+] key to set the desirable
level.
GAIN:
-7
to 7 (The factory default setting is "0".)
3.
To set the treble center frequency, enter
the ASP adjustment in the SETTING menu.
VRX485VD/MAX385VD
18
Page 19

Basic Operations
•
Adjusting
the
non
fader
output
phase
You can adjust the subwoofer phase from the
SETTING adjustment menu.
1.
Touch the ASP tabinthe SETTING menu.
2.
Touch the [SUB PHASE] buttoninthe ASP
menu and a selection menu will appear.
Setting
range:
oor 180 (The factory default setting
Adjusting
Low
You can adjust the subwoofer phase from the
SETTING adjustment menu.
1.
2.
Setting
80,120 or 160Hz (The default setting is "60")
Pass Crossover
Touch the ASP tabinthe SETTING menu.
Touch the [SUB FILTER] buttoninthe ASP
menu and a selection menu will appear.
range:
the
non
fader
output
Adjusting
and
color
1.
Touch the [PIC] key on the remote control
or [MONI/ADJ] key on the MAX385VD.
2.
Touch the [-] or
to the settings to your desired levels.
"Bright":
Adjusts the brightness of the display.
is
"0")
"Color":
Adjusts the color saturation.
"Contrast":
Adjusts the
or green is emphasized).
Bright/Color/Contrast:
The factory default settingismedium level.
Adjusting
1.
Press the [MENU] button, then touch the
[SETTING] key.
the brightness,
levels
[+]
key to make adjustments
levelofblack.
the SETTING
contrast
Adjusting
the
non
fader
output
volume
You can adjust the volume output from the unit's
Audio adjustment menu.
1.
Touch the [-] or [+] key of the SW VOL item
to adjust to desirable level.
Setting
-7
Turning
The Loudness setting emphasizes the low and
high sound level areas to provide a more full and
dynamic sound without distortion.
1.
2.
Adjusting
1.
2.
3.
range:
to 7 (The factory default setting is "0".)
on/off
Enter the Audio settings menu.
Touch [ON] or [OFF] of the [LOUDNESS]
item to turn on or off the loudness effect.
(The factory default setting
the LOUDNESS
is
"OFF").
the MONITOR
Press the
or [MONI/ADJ] button on the MAX385VD.
Perform the adjustment for the desired item.
See the following sections for detail.
Touch the [Back] key to return to the previous
screen.
*
In
regarding adjustments
procedures
[PIC]
the
following sections, only
button on the remote control
to
select items
are
described,
are
the
details
skipped.
2.
Touch the top navigation tabs to switch
between the SETTING menus. You can
navigate between General, Screen, ASP,
Regional, and Rating.
3.
Perform the adjustment for the desired item.
See the following sections for detail.
4.
Touch the [Back] key to return to the previous
screen.
*
In
the following sections, only
regarding adjustments
procedures to select items
are
the
details
described,
are
skipped.
19 VRX485VD/MAX385VD
Page 20

Basic Operations
Adjusting the CLOCK
1.
Press the [SETTING] button, then touch the
[CLOCK] key.
2. The entry keypad will appear. Enter your time
without spaces. For example, 12:45 would be
entered as '1245'. Press [OK] to accept or [
to backspace and correct your entry.
have selected to display your time in 24 hour
format, you must enter your time
format such as '1745' for 5:45PM.
3.
To change your time from AM to PM, press
AM or
If you have selected to display your time in 24
hour format, you will not have this selection.
PM
textinthe CLOCK selection box.
in
24 hour
...
If
you
Adjusting the RADIO region
1.
Press the [SETTING] button, then touch the
[RADIO]
key.
]
2.
A region selection menu will appear. Scroll
down using the arrow at the bottom of the menu.
Scroll up using the arrow at the top of the menu.
Once you have located the region that matches
your area's radio spacing and frequency range,
touch the region to make your selection.
region selected
be poor.
is
incorrect, radio reception will
Reset to Factory Defaults
1.
Press the [SETTING] button, then touch the
[LOAD FACTORY] key.
2.
A selection menu will appear. Select [YES] to
restore your unit to factory default settings. This
function will erase all memory from the unit and
you must reset all personalized items such as
tuner presets.
NOTE: You will be asked once to confirm that
you would like to reset the unit. The unit will
power down and restart with factory defaults.
If
the
VRX485VD/MAX385VD
20
Page 21

Radio Operations
Listening
1.
Press the [MENU] button, and touch the
[TUNER] key.
o The TUNER mode screen
:E
~
ttl
....
Vl~
3
Ql
:::l
C
Ql
2.
Press the [BAND] button or touch the [Band]
key to select the radio band. Each time the
button
changes
FM1
Seek
1.
Press the [BAND] button ortouch the [Band]
key to select the desired band (FM or AM).
2.
Touch the [
seek a station.
• When touching the
soughtinthe direction of higher
frequencies.
• When touching the [
soughtinthe direction of lower frequencies.
Selecting
This function displays the Key Padonthe screen
allowing you to tune by entering a preset number.
1.
Press the [BAND] button or touch the [Band]
key to select the desired band (FM or AM).
2.
Touch the [DIRECT] key to display the Key
Pad screen.
3.
Touch the [0] to [9] key corresponding with the
preset you desired. When you input the
wrong number, touch the
the last input number.
4.
Touch the [ENT] key to tuneinto the entered
preset.
Manual
1.
Press the [BAND] button or touch the [Band]
key to select the desired band (FM or AM).
2.
Touch the [
select a station.
• When touching the [
is tunedinthe direction of higher
frequencies.
• When touching the [
is tuned
to the radio
is
displayed.
is
pressed, the radio reception band
in
the following order:
...
FM2'" FM3'"
AM
...
FM1
tuning
.....
] or
[~]
presets
key to automatically
[~]
by
key, the station
.....
] key, the station
direct
[~
] key to delete
tuning
....
] or [..] key to manually
..
] key, the frequency
....
] key, the frequency
in
the direction of lower frequencies.
...
access
Recalling a
There are total of 48 preset positions (12-FM1,
12-FM2, 12-FM3, 12-AM) to store individual
radio stations
There are 2 ways available to recall the preset
station.
.Using
1.
2.
the remote
Press the [BAND] button to select the desired
band (FM or AM).
Press the preset number desiredonthe 0-9
numeric keypad.
• Using the Preset
1.
Touch the [List] key.
2.
Touch the corresponding Preset key to recall
is
is
the stored station.
You
can
*
the
[Band]
scroll bar buttonstothe
* Touching
for
more
station
3.
Touch the [List] keytoreturn to the previous
screen.
Manual
1.
Touch the [Band] key to select the desired
band. (FM or AM)
2.
Select the desired station with the seek
tuning, manual tuning, or preset tuning.
3.
Touch the [List] key.
4.
Touch and hold one ofthe Preset key for more
than 2seconds to store the current station into
the preset memory.
5.
Scroll through the 3 pages of presetsineach
band by pressing the scroll bar buttons to the
right of the presets.
preset
in
memory.
select
the
key.
and
holding
than
2 seconds
to
the
preset
memory
station
controller
List
screen
desired
Scroll
through pages
the
memory.
bandbytouching
using
right of the presets.
desired Preset
will
store the current
key
21
VRX485VD/MAX385VD
Page 22

Radio Operations
Auto store
The Auto Storeisa function for storing up to
stations that are automatically tuned in
sequentially. If12receivable stations cannot
received, a previously stored station remains
unoverwritten at the memory position.
1.
Touch the [Band] key to select the desired
band. (FM or AM)
2.
Touch the
the Auto Store function.
A beep sounds and the stations with good
reception are stored automatically to the
preset channels.
[AS]
key momentarily to start
Preset scan
The Preset Scan receives the stations stored
the preset memoryinorder. This function is
useful when searching for the desired station
memory.
1.
Touch the [Band] key to select the desired
band. (FM or AM)
2.
Touch the [PS] key to start the Preset Scan.
The unit starts scanning each station for
seconds sequentially.
3.
When the desired station is tuned
[PS] key again to continue receiving that
station.
in,
touch the
10
12
be
in
Channel
The Channel Scan receives the stations sequentially and scans continuously. This function
is useful when searching for the desired station
in
an unfamiliar area.
1.
Touch the [Band] key to select the desired
band. (FM or AM)
2.
Touch the [SCAN] key to start the Channel
Scan. The unit starts scanning each station
for 10 seconds sequentially.
3.
When the desired station istuned
[SCAN] key again to continue receiving that
station.
DX
/ LOC setting
The
OX
in
sitivityinorder to seperate closely spaced
stations. This feature is useful
have many radio stations in close proximity.
1.
Touch the [DX] key to switch to LOCAL
tuner sensitivity.
2.
Touch the
sensitivity.
scan
in,
touch the
/ LOC setting changes the tuner sen-
in
areas that
[LOC]
key to switch to
OX
tuner
3
QI
::::l
c:
QI
DVD Video Player Operations
Changing DVD System
Settings
Note:
•
If
the Setup operation is performedin the middle
DVD video play, the disc will restart from
beginning.
Selecting the DVD SETUP menu
1.
Press the [MENU] button, and touch the
[SETIING]
The main
2.
Touch the [Screen] key to display the Display
settings menu.
3.
Touch the [Regional] key to display the
Language settings menu.
3.
Touch the [Rating] key to display the
Parental Controls settings menu.
4.
Perform setting for the desired setting items.
See the following sections for detail.
5.
Touch the [Back] key.
*
In
the
regarding settings
procedures
key.
SETIING
following sections, only the details
to
screenisdisplayed.
are
described, the
select items
are
skipped.
of
Screen Saver Feature
1.
Press the [MENU] button, and touch the
[SETIING]
The main
2.
Touch the [Screen] key to display the Display
settings menu.
3.
Touch the [Screen
screen saver selection menu.
4.
Touch the
the screen saver feature
Note:
•
If
the screen saver is
The feature is intended to preventscreen damage
the unit is pausedorstopped for an extendedperiod
of
time.
key.
SETIING
[OFF]
or [ON] key to turn off or
screen is displayed.
Saver]
not
key to display the
for entertainment purposes.
on
if
VRX485VD/MAX385VD
22
Page 23

DVD Video
Player
Operations
~
:::l
/'l)
;;} •
3
Qj
:::l
c:
Qj
•
Setting
1.
Touch the [Aspect Ratio] button to enter
theTVDISPLAY item to change the screen
size to "
• The factory default setting
When
ventional
4:3
The leftmost and rightmost areas of the screen
are cut off.
This function allows displaying the important
partofimage fully on the screen. In some
cases, image is displayed while being panned
(scrolled).
When
typeofthe
16:9
The leftmost and rightmost areas of the screen
are cut off.
up
the screen size
16:9"or"
watchingawide
typeofthe
:
watchingawide
rear
view
:
4:3
".
type
rear
type
monitor
is"
4:3
".
throughacon-
view
monitor
throughawide
(16:9)
(4:3)
Setting
up
• The factory default setting is "0000".
4-1. Touch the [RATING] keyinthe
4-2. Touch the [Set
Note:
• When a disc with view restrictions is inserted, you
will be promptedtoinputa password. The disc will
not
entered.
Setting
You can change the level of parental lock (audiovisual restriction).
This function allows cutting scenes that are
unfavorable for children or replacing them
automatically with other scenes prepared
advance. For example, by replacing scenes
radical violence or portrayals of sex with safe
scenes, you can make a trouble-free story as if it
were so from the beginning.
up
the
password
of
the
parental
menu.
pad will appear.
• Input the old password, and touch the
[OK]
* Input "4356" to return password to "0000".
• Input a new password, and touch the
[ENT] key.
be viewable until the correctpassword is
up
key.
the
level
Password]
parental
for
setting
SETIING
key and a key
level
in
of
Setting
4-1. Touch
4-2. Touch the
Setting
4-1. Touch the
4-2. Touch the
up
the
audio
the
[REGIONAL]
menu.
The Language menu is displayed.
[Audio]
language and set it by touching the
available languages.
• The factory default setting is "ENGLISH".
up
the
subtitle
[REGIONAL]
menu.
The Language menu is displayed.
[Subtitle]
language and
available languages.
• The factory default setting is "ENGLISH".
set
language
key in the
key to selecta.desired
language
keyinthe
key to select a desired
it by touching the
SETIING
SETIING
4-1. Touch the [RATING] keyinthe
menu.
4-1. Touch the
the RATING menu.
4-2. Touch the ten-key (0 to 9) to input a 4-digit
password, and touch the
•
The
password is "0000".
4-3. Touch the appropriate parental rating that
is desired. 1 is similar to G and 8 is similar
to NR.
•
The
[PARENTAL
factory default setting of
factory default setting is "8".
CONTROL]
[ENT]
SETIINGS
key
key.
the
in
23
VRX485VD/MAX385VD
Page 24

DVD Video
The relationship between DVD video category
codes and parental level are shown
below. Use this table when setting the parental
level.
LEVEL7
LEVEL6
LEVEL4 PG-13
LEVEL3 PG
LEVEL1
• The contents that the parental level restricts
vary with the country code.
Player
NC-17
(NO ONE 17 AND UNDER
ADMITTED)
R
(RESTRICTED)
(PARENTS STRONGLY
CAUTIONED)
(PARENTAL GUIDANCE
SUGGESTED)
G
(GENERAL AUDIENCES)
Operations
in
the table
• Some videos
than desired
volume
may
be recorded at higher
volume
levels. Increase the
gradually from the minimal
setting after the video has started.
For
your
•
safety, the driver should
watch the videooroperate the
while
driving.
Please note that watching
and operating the video while
prohibitedbylaw
Note:
• For
your
safety,
safety function which turns
car
is moving, so only the audio can be heard.
picture can only be watched when the
stopped
•
If
turning on the
parking brake while confirming safety,
engage the parking brake again.
and
the parking brake is applied.
"AUDIO ONLY" appears on the screen
ACC
in some countries.
your
entertainmentsystem has a
off
the picture when the
powerofthe car, release the
not
controls
driving
car
is
just
and
are
The
after
then
Basic Operations
Loadingadisc
1.
Press the
the operation panel. (MAX385VD only)
2.
Insert a disc into the center of the insertion
slot with the label side facing up. The disc
plays automatically after loading.
Note:
• Never insert foreign objects into the disc insertion
slot.
• If the disc is notinserted easily, there
another disc in the mechanism
require service.
• 8 cm (single play) discs cannot be used.
[01.]
(OPEN/CLOSE) button to open
may
or
the unit may
be
ACAUTION
For
your
safety, the
or
eject a
disc
while driving.
Watching/Listening
inserted
1.
Press the [MENU] button, and touch the
[DVD/CD] key to select the DVD PLAYER
mode.
Play starts automatically.
If no disc is loaded
icon will be shaded
driver
should
not
insert
opening the operation panel
toadisc
in
the unit, the DVD/CD
in
the display.
already
Pausing
1.
Press the [OK] button or touch the
key to pause play.
"PAUSE" appears
2.
To resume disc play, press the
again.
Ejecting a
1.
Press the
the operation panel. (MAX385VD only)
2.
Press the
"EJECT" appears
mode then switches to the TUNER mode.
*
If
seconds,
(Auto reload).
mode
Note:
• If
you force a disc into before auto reloading, this
can damage the disc.
play
disc
[01.]
(OPEN/CLOSE) button to open
[~]
(EJECT) button to eject disc.
in
a discisleftinthe
the
discisautomatically reloaded
In
this
will remain settothe
[~/II]
in
the display.
[~III]
the display. The play
ejected position for
case,
however,
TUNER
button
15
the play
mode.
VRX485VD/MAX385VD 24
Page 25

DVD Video Player Operations
Watching a DVD-Video
After disc loading, the play mode is automatically
engaged.
• When playback is not started, press the
~
button or touch the
~
• Button operation may differ depending on the
;}
story of the disc.
3
~
• After the menu screen is displayed
~
For normal DVD-Video discs, the DVD menu
screen appears.
After the DVD menu screen is displayed, select
an iteminthe following operations and play
back.
[~/II
] key.
Showing the DVD PLA YER mode
screen
The DVD PLAYER mode screen is used to
control the playback mode from the screen.
1.
Touch the screen.
The DVD PLAYER mode screenisdisplayed.
If you do not touch the screen for 5 seconds,
the display will return to the playback screen.
[OK]
it
Operating the DVD menu
You can select the button items displayedinthe
DVD menu by directly touching
If the button items are hard to select correctly,
you can also operate them by using the remote
control directional buttons.
On the MAX385VD, you can press the volume
knob in momentarily, then turn it to change the
selected items on the screen. Press the
button to select
On the VRX485VD, you can use the right knob
to change the selected items on the screen.
Press the right knob or
it.
[~/II]
it.
[~/II]
button to select
Stopping playback
1.
Showing the DVD PLAYER mode screen,
key.
touch the [ • ]
On the VRX485VD, you can also press the
[.]
key on the front control panel.
2.
To resume playback, press the
Playback resumes from the scene where
playbackisstopped.
Playbackisstopped.
[~/II
] button.
it.
Showing the DVD menu
1.
Showing the DVD PLAYER mode screen,
touch the [Menu] key during playback.
The DVD menu appears.
The
displayed contents may differ depending
*
on
the
DVD
software.
• Example showing DVD menu display
Pausing playback
1.
Press the [ OK] button or touch the
key during playback.
Playback pauses.
2.
To resume playback, press the [
again.
Playback resumes.
[~/II
~!II]
button
]
25 VRX485VO/MAX385VO
Page 26

DVD Video Player Operations
Skipping
•
About
Chapter means a small segment to divide the
data area of the disc.
1-1. Press the
playback.
1-2. Press the [
playback.
Chapters are skipped, as many as the times
the button is pressed, and playback starts.
a chapter (searching)
chapter
[A]
or
[v]
button during
(MAX385VD)
....
] or
[~]
(VRX485VD)
Current
~
location
T
button during
~
'<i,
'i'i
I
Chapter
down.....-
• Pressing the
back from the beginning of the next chapter.
• Pressing the [
back from the beginning of the current chapter.
When this button is pressed again within
about 3 seconds, playback starts from the
beginning of the previous chapter.
Chapter
[~]
....
---+
or
] or
[V]
[A]
Chapter
up
button starts play-
button starts play-
Title
•
A large segment to divide the data area of
the disc.
Chapter
•
A small segment to divide the data area of 0
the disc.
•
Time
A specific time on the disc. 3
2. Input the number of the title/chapter/time that
you want to play back with the [0] to [9] key.
3.
Touch the [ENT] key.
Playback starts from the scene of the input
title number, time
*
If
the input title/chapter/time number does not
exist or searching with a title/chapter number
is
not allowed, the screen
4.
Touch the [Back] key.
or
chapter number.
image
will not change.
~
!!{
til
~
!!!.
Fast
1.
forward
Press the [
fast backward or fast forward during playback.
The playback speed starts at 2x, then will increase to 4x,8x, and 16x with each additional
press.
*
No
audioisreproduced during fast forward and
fast backward operation.
* The fast forward
differ depending
.....
and
] or
and
on
fast
backward
[~]
button to start your
fast backward speed may
the disc.
Searching with a chapter/title
number
You can locate the beginning of a scene using
the chapter numbers or title numbers recorded
on the DVD-Video disc.
1.
Showing the DVD PLAYER mode screen,
touch the [CHAP] key.
The Key Pad screen appears with the chapter
number input mode. Touching the [Title] key
turns the Key Pad to the title number input
mode. Touching the [Time] key turns the Key
Pad to the time number input mode.
Repeat
This operation plays back chapters recorded on
the DVD-Video repeatedly.
1.
Showing the DVD PLAYER mode screen,
touch the [Repeat] key.
2. Touch the [Repeat] key once for Chapter
Repeat, again for Title Repeat.
3.
Press the [Repeat] button again to turn off
the repeat playback.
Using the title
On DVD discs containing two or more titles, you
can select from the title menu for playback.
1.
Showing the DVD PLAYER mode screen,
touch the [Top
The title menu screen appears.
* Depending
2.
Select the button items displayed in the title
menu screen by the same way of the DVD
menu operation.
* Depending
playback
menu
Menu]
on
the disc, the title menu cannot
be
called.
on
the disc, items cannot
selected with the ten-key buttons.
key during playback.
be
VRX485VD/MAX385VD
26
Page 27

DVD Video Player Operations
Switching among languages
On
languages
among
~
::l
1.
m
"'\,
III
discsinwhich
have
the
audio
Touch
•
• It
the
Each
among
may
time
twoormore
bee'
langLlages
[Audio]
you
audio
take
timetoswitch
recorded,
key
during
touch
the
languages.
during
* Depending on the disc, up to 8 audios may be
recorded. For details, see the mark of the disc
(0)):
recorded).
Indicates that 8 audios have been
* When the power is turned on and when the
disc is changed to a newone, the language set
as the factory default is selected. If that
language has not been recorded, the language
specified on the disc.
* Depending on the disc, switching may be
completely impossible or impossible on some
scenes.
The
DVD
2.
seconds
5
PLAYER
after
mode
your
selection is
Switching subtitles
On
DVD
discsinwhich
languages
among
1.
Touch
Each
among
• It
the
the
time
subtitles.
may
have
been
subtitle
[Sub
you
take
timetoswitch
* Depending on the disc, up to 32 kinds of
subtitles may be recorded. For details, see the
mark of the disc
subtitles have been recorded).
* Depending on the disc, switching may be
completely impossible or impossible on some
scenes.
twoormore
recorded,
languages
T.]
key
touch
the
(QJ
during
key,
Indicates that 8 kinds of
audiosoraudio
you
can
playback.
playback.
key,
you
can
among
screen will
during
among
made.
subtitle
you
can
playback.
playback.
you
can
audios.
hide
subtitles.
switch
switch
in
switch
switch
Switching angles
On
DVD
discsinwhich
recordedintwoormore
among
1.
the
angles
Touch
controller
touch
• It
* Dependingonthe disc, up to 9 angles may be
* Depending on the disc, angles may switch
* Depending
the
[Angle]
during
the
key, you
may
take
timetoswitch
recorded. For details, see the mark ofthe disc
(fIt:
indicates multi-angie).
smoothly or switch with a momentary still
image.
on
completely impossibleorimpossible on some
scenes.
video
images
angles,
during
the disc, switching may be
playback.
buttononthe
playback.
can
switch
Each
you
remote
time
among
among
have
can
angles.
* Depending on the disc, scenes recorded in two
or
more angles may be played back.
Displaying the playbackstatus
1.
Showing
touch
2.
or
3.
Touch
screen.
Playback
until it is
Touch
the
DVD
PLAYER
the
[INFO]
the
the
screentohide
statusisdisplayedonthe
manually
key.
[INFO]
buttononthe remote.
the
hidden.
mode
playback
screen,
screen
been
switch
you
angles.
status
2.
The
5
• To
1.
Repeat
Title:
Subtitles
27
DVD
PLAYER
seconds
turn
after
off
subtitles
touching
OFF"isdisplayedonthe
are
VRX48SVD/MAX385VD
your
the
turned
mode
[Sub
off.
screen
selection is
T.]
key
will
made
until"
screen.
hide
.
Sub
in
Page 28

DVD Video Player Operations
Listening
to
a CD
Pausing playback
1.
Press the [OK] buttonortouch the
key during playback.
Playback pauses.
2.
To resume playback, press the [OK] button
or touch the
Playback resumes.
[~!II]
key.
Skipping a track (searching)
1.
Press the [
playback.
Tracks are skipped, as many as the times the
button is pressed, and playback starts.
• Pressing the
from the beginning of the next track.
• Pressing the [
from the beginning of the current track.
When this button
about 2 seconds, playback starts from the
beginning of the previous track.
Fast forward
1.
Press the
back.
Press again to advance to higherspeed
reversingorforwarding such as 2x,4x, ax
and 16x. Press once more to resume
normal speed playback.
[~
.....
] or
[~]
[~]
and
] or
button starts playback
.....
] button starts playback
is
pressed again within
fast backward
[~]
button during play-
button during
[~/II]
Selecting a track on the Track List •
screen
This function allows you to select tracks from a
displayed list.
1.
Touch the [List] key.
The Track List screenisdisplayed.
2.
When the desired trackisnotdisplayed, touc!"
the
[A]
or
[~]
key to scroll the track list.
3.
Touch the desired track title key.
The corresponding trackisstarted playback. -
4.
Press the
screen.
[LIST]
key to return to the previous
Other various play functions
1.
Touch the touch key of the function you want
to play.
[Repeat]: Press once to start a single track
repeat. Press again to activate a repeat all.
is
in
the info
shown
To turn off, press until 'Repeat Off'
on the display.
• Repeat symbols are displayed
in
window
[Track
This operation plays back all tracks on the
disc
turn off the feature.
• A random symbol
window
the upper right area of the screen.
Random]: track random playback
in
no particular order. Press again to
is
displayedinthe info
in
the upper right area of the screen.
~
~
3~
~
~
Searching with a track number
This operation allows searching using the track
numbers recorded on the CDs.
1.
Touch the
2.
Input the track number that you want to play
back with [0] to [9] key.
3.
Touch the
Playback starts from the track of the input
track number.
• If the input track number does not exist or
searching with a track number
allowed, the screen image will not change.
[Direct]
[OK]
key.
key.
is
not
VRX485VD/MAX385VD 28
Page 29

DVD Video Player Operations
Listening to an MP3IWMA
This unitisan ID3 Tag compatible model.
This unit supports the ID3 TAGs of the Version
~
2.4, 2.3,
:§
In
displaying, this unit gives priorityto the Version
~
2.3 and 2.4 TAGs.
1.1
and 1.0.
3 After disc loading, the play mode is automatically
~
engaged.
c:
~
What is MP3IWMA?
MP3isan audio compression method and
classified into audio layer 3 of MPEG standards.
an
WMA is
developed by Microsoft Corporation.
These audio compression methods have
penetrated into
format.
These features compress the original audio data
to about 10 percent of its initial size with a high
sound quality. This means that about 10 music
CDs can be recorded on a CD-R disc or CD-RW
to
disc
to change CDs.
Note:
• Some CDs recordedonCD-R/RW
be
usable.
Displaying MP3IWMA TAG titles
Tag information such as title, artist and album
title can be displayed for
containing Tag information.
Precautions when creating an MP3
disc
• File
1.
Always add a file extension ".MP3" or ".mp3"
to
WMA file by using single byte letters. If you
add a file extension other than specified or
forget to add these file extension, the file
cannot be played.
case and lower case letters (capital and small
letters) mixedly for file extensions, normal
play may not be possible.
2.
Files other than MP3IWMA data cannot be
played.
Playing files with a format not supported will
be skipped, and the scan, random and repeat
playback mode may be canceled.
audio compression method
PC
users and become a standard
allow a long listening time without having
mode
may
an
MP3/WMA file
extensions
an
MP3 file, and ".WMA" or ".wma" to a
In
addition, if you use upper
not
Logical
•
1.
When writing an MP3IWMA fileona disc,
please select
(without
the writing software format. Normal playback
may not be possible if the discisrecorded on
another format.
2.
The folder name and file name can be
displayed as the title during MP3IWMA play
but the title must be within31single byte
alphabetical letters and numerals for the
folder name and file name (including
extension). Entering more letters or numerals
than specified may cause an incorrect
display.
•
Folder
1.
A disc with a folder having more than 8
hierarchical levels will conflict with the
IS09660
.Number
1.
The maximum allowable number of folders
255 (including root directory); the maximum
allowable number of files
folder). This represents the maximum number
of tracks that can be played back.
2.
Tracks are played in the order that they were
recorded onto a disc. (Tracks might not
always be played in the orderdisplayed on the
PC.)
• Some noise may occur depending on the
•
• After disc selection, the play mode
Note:
•IfTag information was
characters, it
reproduced
• MP3IWMA files that the
Management) function is
format
structure
of
type of encoder software used while
recording.
In
case of a track recorded at VBR (variable
bit rate), the display for the play time of the
track may be slightly different from the
actual play time. Also, the recommended
value of VBR ranges from 32 kbps to 320
kbps.
automatically engaged.
(File
system)
"1809660 level 1
including
and playback will be impossible.
filesorfolders
may
properlyonthe display.
expansion
is
entered
occur
thatthe characters
DRM
set
cannotbeplayed.
or
level 2
format)" as
512 (max. 255 per
with 2-byte
(Digital Rights
an
is
are
is
not
29
VRX485VD/MAX385VD
Page 30

DVD Video Player Operations
Regarding MP3IWMA
up
to 8 folder levels (including the root directory)
can be created for MP3IWMA files (items
the illustration). However,onthis unit, folders
created above the third level will be converted to
2 levels.
Pausing
1.
Press the [
key during playback.
Playback pauses.
2.
To resume playback, press the [
or touch the [
Playback resumes.
Skippingatrack
1.
Press the
playback.
Tracks are skipped, as many as the times the
button is pressed, and playback starts.
• Press the
the beginning of the next track.
• Press the
the beginning ofthe current track. When this
button
seconds, playback starts from the
beginning of the previous track.
* This function performs
only.
playback
OK]
button or touch the [
~!II)
(searching)
[~]or[~]
[~)
button starts playback from
[~]
button starts playbackfrom
is
pressed again within about 2
folder
key again.
button during
in
the
creation
1 -
~/
II
OK]
button
current folder
]
Selecting a
folder/track
on the
LIST
•
screen
in
1.
Touch the [List) key during playback.
Folder List screen is displayed.
2.
When the desired folder is not displayed,
touch the
3.
Touch the desired folder name key. 3
The Track List screen appears.
4.
Touch the
touch the desired track name key.
The corresponding track is started playback.
5.
Touch the
Other
1.
Touch the touch key of the function you want
to play.
[Repeat): track random playback
Repeat
This operation plays back the tracks currently
being played back repeatedly.
•
An
the upper right corner of the display.
Repeat Folder: folder repeat playback
This operation plays back tracks
WMA folder repeatedly.
•
An
the upper right corner of the display.
Repeat
This operation plays back tracks
WMA disc repeatedly.
•
An
the upper right corner of the display.
[Random]: folder random playback
This operation plays back tracks recorded on
the disc
An
•
the upper right corner of the display.
[A]
or
[~]
key to scroll the list.
[~]
or
[A]
key to scroll the list, and C
[LIST]
various
Single:
iconisdisplayedinthe info window
icon is displayedinthe info window
All
iconisdisplayedinthe info window
in
no particular order.
icon is displayedinthe info window
key.
play
functions
track repeat playback
: repeat all playback
inanMP31
inanMP31
in
o
~
~
""\.
nI
::l
~
in
in
in
Fast
1.
forward
Press the [
back to start the fast backward or fast forward. A second press will increase speed
to 4x , then
normal playback speed.
and
fast
backward
....
) or
[~)
button during play-
8x, and 16x. Press [
~/
II]
for
VRX485VD/MAX385VD 30
Page 31

iPod Operations
o
~
This unit can be used to control a connected
~
Apple iPod (iPod Mini, fourth generation, iPod
3 nano, iPod with video).
~
Note:
i · Note that iPod versions higher than those noted
above maynotbe playable
The
unit will not operate,ormayoperate
•
improperly with unsupported versions.
• First, second
shuffle cannot be used.
and
thirdgeneration iPod
Notes regarding useofApple iPod
• When usinganiPod, after connecting the iPod
to the connector, select the iPod mode by
touching the
• After the iPod has been connected to this unit
the iPod's buttons are disabled for operation. '
• When the iPod mode has been selected, a
special iPod control screen
from the main screens for other modes.
• This unit can display the Podcast titles*, Artist
names, Album titles, Song titles, Genre names,
Composer names and Audio Book titles*
registered on the iPod. When no data
present, the title display will remain blank.
* Whether these functions
depends
• The iPod is used with the equalizer function
turned OFF.
• Do NOT connect an iPod to the unit with a
headset connected to the iPod.
• Precautions regarding battery
consumption:
When the iPod's internal battery becomes
depleted, the recharge warning indicator
willappearin the iPod's display. In
condition, theiPod
if
attachedtothe unit. Also, the
recharging function cannotbe used to
recharge the iPod.
As
a result, when the iPod's battery
becomes depleted, use the dedicated
charger
battery.
[iPod] key
on
the
provided
iPod
withitto recharge the
or
on
version.
cannot
offerall features.
and
iPod
the Source menu.
is
displayed different
is
are
available or not
this
beplayedeven
unit's
Controlling the iPod
• Selecting the iPod mode
1.
Connect the iPod to the connector.
2.
Press the [iPod] keyonthe Source menu.
• ,Pod menu screen operation keys
[VIDEO] key
• Switches to the screen of which the video
output from the iPod is displayed.
Note:
• Note that not all iPod devices are compatible
to
output videotothis unit.
[FOLDER] List key
• Displays the corresponding list screen.
[Composers], [Artists], [Albums], [Songs]
and
[Genres] are available from the iPod
folder list menu screen.
[Shuffle] key
• Use to switch the shuffle mode onoroff.
When enabled, this function performs
in
playback of tracks
regardless of the order
recorded.
[~/II]
key
• Use to control playback and pause.
• Operation display
Pausing playback
1.
Press the [
key during playback.
Playback pauses.
2.
To resume playback, press the [
or touch the
Playback resumes.
OK]
button or touch the
[~/II]
Skipping a track (searching)
1.
Press the
playback.
Tracks are skipped, as many as the times the
button
• Pressing the
from the beginning of the next track.
• Pressing the
from the beginning of the current track.
When this button is pressed again within
about 2 seconds, playback starts from the
beginning of the previous track.
[~]or[~]
is
pressed, and playback starts.
[~]
[~]
random order,
in
which they are
[~/II
OK]
key again.
button during
button starts playback
button starts playback
button
]
31
VRX485VD/MAX385VD
Page 32

iPod
Fast
1.
Selecting a
1.
2. Touch a desired list item on the screen to
3. Touch the desired track name on the list to
Viewing video datainthe
for
When you connect an iPod with video features by
using the optional connector cable for iPod with
video, you can enjoy the video data and
slideshow data stored in the iPod showing them
on the display of this unit (and the rear monitor if
connected).
Note:
• Do not connect the iPod to this unit when a Video
Operations
forward
Press the [
back.
The first press will advance the music at 2x
speed. Following presses will increase the
speed to 4x, ax, and 16x.
Press the
speed playback.
Touch the Folder List icon in the iPod
selection screen.
display the corresponding list of tracks.
• Use the
* Skip this operation for the Songs list.
play back.
• Use the
and
....
[~/
list
[A]
[A]
fast
backward
] or
[~]
button during play-
II
] button to resume normal
item
and
and
fromalist
[¥]
keys to scroll the list.
[¥]
keys to scroll the list.
screen
iPod
the
iPod
Playlists item is selected on the iPod.
with
video features)
(only
1.
Touch the [VIDEO] key on the iPod menu
screen. The screen will be changed to a
"waiting for iPod video" screen.
In
this condition, the iPod cannot be controlled
from this unit. The iPod
normal operation mode, and you can control
the iPod using the original controls of the iPod ~
(iPod operation mode). 3
2.
Play back your desired video data or
slideshow data from the iPod.
The specified image data will be displayed on
the display.
is
turned into the 0
3. To return to the iPod menu screen, stop your
video content and press the[VIDEO] key.
* When
Note:
• "AUDIO
is moving.
• Image data
the status
you
touch
back image data,
and the first track
played back.
ONLY"
is displayed when the automobile
may
notbe played back according to
of
the iPod.
the
[Music]
the
of
the first playlist will
key
playbackisterminated
during playing
be
~
QI
::;l
C
~
AUX
This function is available when a VTR, etc. is connected to the visual terminal.
For
the
driving.
operating
prohibitedbylawinsome
Switching
Note:
• For your safety, the unithas a safety function
which turns
moving,
picture can only be watched when the
stopped
Press the [MENU] button, and touch the
[AV
IN Operations
A.
WARNING
your
safety,
VTR, etc.
Please
so only the audio can be heard. The
and
IN]
key.
the
or
the
driver
operate
note
VTR, etc.
that
while
should
the
controls
watching
countries.
to the
off
the picture when the caris
the parking brake is applied.
AUXINmode
not
and
driving
car
watch
while
are
is
VRX485VD/MAX385VD
32
Page 33

Sirius Satellite Radio Operations
This function is available when a Sirius Satellite
Radio Receiveris connected through
dedicated connection.This unit requires the
following receiver:
~
• SIRIUS Satellite Radio Receiver: SC-C1
~
(I)
Note:
......
II>
SIRIUS satellite radio is a subscription service.
~
Please contact Sirius Radio to beginoralter
~
yoursubscription:
c
Q1 • Internet: www.sirius.com
Telephone: 888-539-SIRIUS (747487)
Selecting a Satellite Radio
1.
Press the [MODE] or [SOURCE] button until
SIRIUS is displayed or select 'SIRIUS'
main menu. You can reach the main menu
by
pressing the [MENU] button on your unit.
The system changes to the Sirius Satellite
Radio mode.
the.
mode
Confirming
.SIRIUS
1.
Touch the [Search] key to display the Key
Pad screen.
2.
Touch the [0] key, then touch the [ENT] key.
Your Radio ID (12-digits number) will
displayed.
3.
To return to the Sirius Radio, enter a new
channel to resume.
in
the
Displaying
1.
Touch the [LIST] button and the next four
channels are displayed for your ease of
viewing.
2.
Touch the [LIST] button again to return to
the main display screen.
your
Radio ID
channel
be
labels
Selecting
1.
Press the [BAND] button ortouch the [Band]
key to enter the preset memory menu. You
can save
channels for quick access.
Information
•
The following information is displayed when the
satellite radio cannot be received normally.
• When the receiver is turned
after a reset: "UPDATING" followed by a
percentage of completion.
• When a channel
yet received): "ACQUIRING
• A channel without a broadcast has been
selected: "INVALID
• A channel not covered by your contract:
"
CALL
Call (888)539-747487 to activate your radio
• When a channelisout of air time: "OFF AIR"
• When the antenna is disconnected or has
been damaged: "ANTENNA ERROR"
your
up
888-539-SIRIUS"
presets
to 20 presets for your favorite
displayed
is
during
on
being tunedin(no signal
SIGNAL"
CHANNEL"
reception
the first time or
Channel selection
Channels are selected with the [........ ] or
buttons.
*
For
details,
is
descriptions.
Note:
• The audio output is muted
operations are notaccepted during channel
selection.
see
the
following operation
and
otherbutton
[~
~
]
33
VRX485VD/MAX385VD
Page 34

Satellite Radio Operations
Selecting
station
with
the
channel
a
number
1.
Touch the direct access buttononthe Sirius
screen to enter direct channel selection. The
button is at the top right corner.
2.
Enter the channel number of your desired
station by touching the [0] to [9] keys.
If you enter a wrong number, you can cancel
it by touching the [BACK] key.
3.
Touch the
The radio channel you entered will be tuned.
Selecting a
tuning
• Seek
Only channels that canbereceived are selected.
Channels that are locked and channels not
covered by the contract will be skipped.
1.
Touch the
The receiverseeks the next available channel
below or above the current channel.
Savingapreset
A total of 20 satellite radio stations can be stored
in
the receiver's memory. You can access the
presets by pressing the BAND button This allows
you to store your favorite satellite radio stations
the memory for later recall.
1.
Touch the [BAND] button to enter the preset
list to select or save your presets.
2.
Touch and hold for more than 2 seconds the
corresponding preset key to save the selected
channel.
* There
available for your
pages using
of
the
3.
Touch the [BAND] key to return to the previous
screen.
A
uto
preset
1.
Touch the [BAND] button and holditfor 3 seconds and the selected channel will be stored
the next available empty preset location.
mode
tuning
are
screen.
[OK]
key.
station
[~
~]or[~ ~]
with
in
key.
the
station
5 pagesofpreset memory space
use.
You
can
scroll
the
the
scroll bar buttonstothe right
store
Recalling a
A total of 20 satellite radio stations can be recalled
from the receiver's memory. You can access the
presets by pressing the BAND button This allows
you to store your favorite satellite radio stations
the memory for later recall. :)
1.
Touch the [BAND] button to enter the preset
list to select or save your presets.
2.
Touch the corresponding Preset key(1to
to recall the desired preset station.
* There
available for your
pages using
of
the
3.
Touch the [BAND] key to return to the previous
screen.
Deletinga
1.
Touch the [BAND] button and enter the preset
menu.
2.
Select the preset you would like to delete by
touching it
3.
Touch and hold the [DEL] button for more than
3 seconds.
Receiving
preset
are
5 pages of preset memory
the
screen.
station
use.
You
scroll bar buttonstothe
preset
in
the preset menu.
stations
selected
can
scroll
by
category
Satellite Radio allows you to select broadcast
channel category (contents).
1.
Touch the
Scroll the category and select a channel
1-1. Touch the scroll bar buttonsonthe right
to scroll through the available pages.
1-2. Touch the
scroll through the available categories.
1-3. Select your desired channel by touching
it
momentarily on the screen.
1-2. Touch the desired Category item key to
select the category.
2.
Touch the [LIST] button to exit category
in
tuning mode.
Note:
• When the category selection mode is entered. the
category
first.
[I
~~]or[~
[I
~~]or[~
of
the last received channel is displayed
~
~
I]
key.
I]
key to
space
the
right
4)
~
fl)
~
3
QJ
::J
c:
QJ
VRX48SVO/MAX38SVO
34
Page 35

GENERAL
Problem
Power does not turn Fuse is blown.
Cause Measure
Replace with a fuse of the same amperage. If the
on. (No sound is fuse blows again, consult your store of purchase.
produced.)
3
QI
::::s
c
Nothing happens The microprocessor has Turn off the power and open the operation panel.
~
Incorrect wiring.
Consult your store of purchase.
when buttons are malfunctioned due to Press the reset button with a thin rod.
pressed. noise, etc.
Display is not
accurate.
Note:
When the Reset button is pressed, turn
power.
* When the Reset button
is
pressed, frequencies
off
radio stations, titles, etc. storedinmemory are
cleared.
The remote control Direct rays ofthe sun fall on
When direct rays of the sun fall on the light-
unit does not work. the light-receptive part of receptive part of the remote control unit, it may not
the remote control unit. work.
The batteries ofthe remote Checkthe batteries of the remote control unit.
control unit are dead or
there is no batteryinthe
remote control unit.
the
ACC
of
DVD Player
Problem
Disc cannot be
Another disc is already Eject the disc before loading the
loaded. loaded.
There is a foreign matter Eject the foreign matter forcibly.
alreadyinplace.
Sound skips or is Compact disc is dirty.
noisy.
Compact disc is heavily Replace with a compact disc with no scratches.
scratched or warped.
Sound is bad directly Water droplets may form
after power is turned
on.
on the internal lens when
the car is parkedina humid
place.
The image is not
displayed.
Disccannotplay with
the display
The parking brake is not Check that the parking brake is engaged.
engaged.
Feature exceeds set
parental level.
"PARENTAL
VIOLATION" shown.
Cause Measure
new
one.
Clean the compact disc with a soft cloth.
Let dry for about 1 hour with the power on.
See the subsection "level"
VRX485VO/MAX385VO
35
Page 36

If an error occurs, one of the following displaysisdisplayed.
Take the measures described below to solve the problem.
DVD Player
Display
BAD DISC
BAD DISC A disc cannot be played
BAD DISC A disc is loaded upside-
PARENTAL
VIOLATION
WRONG REGION
If an error display other than the ones described above appears, press the Reset button. If the problem
persists, turn off the power and consult your store
* When the Reset button
A disciscaught inside the This is a failure of DVD deck's mechanism and
CD deck and is not ejected.
due to scratches, etc.
down inside the DVD deck
and does not play.
Parental level error Set the correct Parental level.
Region code error
is
pressed, frequenciesofradio stations, titles, etc. storedinmemory
Cause
Measure
consult your store of purchase.
Replace with a non-scratched, non-warped disc.
Eject the disc then reload it properly.
Eject the disc, and replace correct region code
disc.
of
purchase.
are
cleared.
VRX485VD/MAX385VD
36
Page 37

FM Tuner
Frequency Range: 87.9 MHz to 107.9 MHz
~
Usable Sensitivity: 9 dBf
~
50dB Quieting Sensitivity: 15 dBf
~
Alternate Channel Selectivity: 70 dB
3 Stereo Separation(1kHz): 32 dB
~
Frequency Response (±3 dB): 30Hzto 15 kHz
c:
~
AM
Tuner
Frequency Range: 530 kHz to
Usable Sensitivity: 28
dBJ-lV
1710kHz
LCD Monitor
VRX485VD Screen Size: 7-inch wide type
153 mm Width x 87 mm Height
MAX385VD Screen Size: 6.5-inch wide type
141
mm Width x 78 mm Height
Display method:
Transmission type TN liquid crystal display
Drive method: TFT (thin-film transistor)
active matrix driving
Pixels: 336,960 (480 x 3 (RGB) x 234)
DVD Player
System:
Digital Versatile Disc System with CODA
capable
Usable discs:
DVD video disc, Compact disc
Frequency Response:
20 Hz to 20 kHz (CD)
Dynamic Range: 100 dB(1kHz)
Distortion: 0.006%
(±1
dB)
Audio Amplifier
Maximum power output:
160 W (40 W x
Speaker impedance: 4 Q (4 to 8 Q allowable)
4)
Input
Audio input:
130 ±60mVrms (High)
600 ±80mVrms (Mid)
840±1OOmVrms
(input impedance 10 kQ or greater)
Video input:
1.0 ±0.2 Vp-p (input impedance 75 Q)
(Low)
Video Output
Video output:
1.0 ±0.2 Vp-p (output impedance 75 Q)
General
Power source voltage:
14.4 V
Ground: Negative
Current consumption: 4.0 A(1W)
Auto Antenna Rated Current: 500 mA less
MAX385VD Dimensions of the Main Unit:
7" Width (178 mm) x 3-15/16" Height
(100 mm) x 6-1/2" Depth (165 mm)
MAX385VD Weight of the Main Unit: 2.8
VRX485VD Dimensions of the Main Unit:
7"
(50 mm) x 6-5/16" Depth (160 mm)
VRX485VD Weight of the Main Unit: 2.15
Dimensions of the Remote Control Unit:
2-1/8" Width (54 mm) x 9/16" Height
(14
Weight of the Remote Control Unit:
50 g (including battery)
Note:
• Specifications comply with JEITA Standards.
• Specifications
without notice for further improvement.
DC
(10.8 to 15.6 V allowable)
Width (178 mm) x 2" Height
mm)x
4-13/16" Depth (122 mm)
and
design are subjecttochange
kg
kg
37 VRX48SVD/MAX38SVD
Power Output: ..•t 9·"·'
18 W RMS x 4 Channels at 4 Q
and 1 % THD+N
./
Signal to Noise Ratio:
76 dBA (reference: 1 W into 4 Q)
8~~
~
Page 38

• Contents
1.
BEFORE STARTING 38
2.
PACKAGE CONTENTS 38
3.
GENERAL CAUTIONS 38
4.
CAUTIONS
5.
INSTALLING THE MAIN UNIT 40
6.
CAUTIONS ON WIRING 42
7.
WIRE CONNECTION 43
1.
BEFORE STARTING
1.
This set is exclusively for use in cars with a
negative ground 12 V power supply.
2. Read these instructions carefully.
3.
Be sureto disconnect the battery "- "terminal
before starting. This is to prevent shortcircuits
during installation. (Figure 1)
ON
INSTALLATION 39
Car battery
Figure 1
2. PACKAGE CONTENTS
1.
Main unit
2.
Manuals
Owner's manual & Installation manual
Warranty card
3. Power supply cord
4.
Bag for accessories
Flat head screw (M5 x 8) 8 or 4
Sems hexagonal bolt (M5 x 8)............. 8 or 4
3.
GENERAL CAUTIONS
1.
Do not open the case. There are no userserviceable parts inside. If you drop anything
into the unit during installation, consult your
dealer or an authorized Clarion service
center.
(No.1)
5.
Remote control unit
6. Battery
(installed in remote control unit)
7. Finishers
2.
Use a soft, dry cloth to clean the case. Never
usea rough cloth, thinner, benzine, oralcohol,
etc. For tough dirt, apply a little cold or warm
water to a soft cloth and wipe off the dirt
gently.
VRX485VD/MAX385VD 38
Page 39

4.
CAUTIONS
1.
Prepare all articlesnecessaryfor installing the
main unit before starting.
2.
This model features an operation panel that
slides forward.
z On some types
~~
!,>F
>~
'-0
Z or obstruct your view before selecting the
may make contact with the dashboard or
gearshift lever, in which cause it cannot be
installed. Before installing, check that the unit
will not hamperoperation ofthe gearshift lever
instailation iocation. (Figure 2)
Gearshift lever
(check that it does not touch the LCD)
of
Dashboard
ON
cars, the operation panel
INSTALLATION
MAX385VD
4.
If you have to do any modification on the car
body, such as drilling holes, consult your car
dealer beforehand.
5. Use the included screwsfor installation. Using
other screws can cause damage. (Figure
Chassis Chassis
F
114
6.
This unit has a fan motor in the backofthe
main unit so as not to raise the temperature in
the main unit. When the fan motor vent is
covered with cords or mounting bracket, it
maycause a malfunction. Be sure notto cover
it when wiring cords.
~
~~:.
8
+<~~~age
mm
(M5
~cr~~)
- -
Figure 4
4)
Dashboard
Gearshift lever
(check that it does not touch the LCD)
Figure 2
3.
Install the unit within 30° of the horizontal
plane. (Figure 3)
Max.
30'
VRX485VD
Shift lever,/
Max.
39
.
30'
...
VRX485VD/MAX385VD
Figure 3
Page 40

5. INSTALLING THE MAIN UNIT
This unit is designed for fixed installation
dashboard.
1.
When installing the main unitinNISSAN
vehicles, use the parts attached to the unit
and follow the instructions
When installing the main unitinTOYOTA
vehicles, use the parts attached to the vehicle
and follow the instructions
r----
Mounting Screw Holes (Side View of the Main Unit)
in
in
Figure
Figure
in
the
6.
7.
r
jJr
~r®
""-
Installing the Main Unit in a NISSAN Vehicle
~
For NISSAN vehicle For TOYOTA vehicle
l\
2.
3.
r
""-
Wire as shown in Section 7 (see page 72).
Reassemble and secure the unitinthe
dashboard and set the face panel and center
panel.
-----,
~@~
~
,
"
~@~
®
Finisher
Note:
*1:
Position the face panel with its wide edgeatthe
bottom. Fit the edge into the groove
unit.
(*1
)
Mounting bracket
(1
pair for the left and right sides)
Figure 6
of
the main
-----'
VRX48SVD/MAX38SVD
40
Page 41

Installing the Main
Install by using parts attached to the vehicle. (Screws marked *are attached to the vehicle.)
Unit
in
a TOYOTA Vehicle
Center Panel
(* 2)
Note:
*2:
Some panel openings are too smallfor the unit
depending on the vehicle type
such a case, trim the upper
panel frame
can be inserted smoothly.
by
about 0.5to1.5 mm so the unit
and
model.
and
lower sidesofthe
Typical Mounting Brackets
Figure 7
In
....
1-
ur--
*3:
If
with the unit,
similar tool.
........._.....
'------
Mounting bracket
(1
pair for the left
and right sides)
a hook on the installation bracket interferes
bend
and
flattenitwith a nipper
or
Example 1
Affix the screws
Vehicles
In some cases the center panel may require modification. (Trimming, filing, etc.)
• Removing
When the main unit is to be removed, disassemble itinthe reverse of the order in "INSTALLING THE
MAIN UNIT'
41
other
the
(see page 48).
VRX485VD/MAX385VD
than NISSAN
Main
and
Unit
Example 2
to
the.
TOYOTA
Example 3
marks.
Page 42

6.
CAUTIONS
1.
Be sure to turn the power off before wiring.
2. Be particularly careful where you route the
wires.
Keep them well away from the engine, and
exhaust pipe, etc. Heat may damage the
wires.
3.
If the fuse should blow, check to see if the
wiring
If a fuse is blown, replace it with a new one of
the same amperage rating as the original
(15A FUSE).
4.
To replace the fuse, remove the old fuse
the power supply cord and insert the newone.
(Figure
Note:
• There are various typesoffuse holder. Do
the batteryside touch other metalparts.
is
correct.
8)
ON
WIRING
of
not
let
ACAUTION .
After the connection, fix the cord by a clamp
or insulation tape for protection.
Fuse holder
Fuse (15A FUSE)
Figure 8
VRX485VO/MAX385VD 42
Page 43

7.
WIRE CONNECTION
Note:
• Before installing, be sure to disconnect the negative e cable
In
the optional devices, the RCA cables
•
and
the Connector cables are separately-sold items.
of
the car battery.
MAX385VD
Radio
Antenna Jack
I
1111111
@
-
1111I
w
Purole
IIII'rTi
PurDie
Gray
Gray
Black
Black
==lIII[
Black
Sirius
White
••••••
! Sirius
I tuner
: (SC-C1)
fip=i1
Black
rr=:~=====!llillil_tI1!,
IC=JI::ydB~la~c~kb=#=ll
t
White
Connector cable
,.__._._._••Refer to the following page
~
Line Out
-
~te
~
-
~te
..l.L-
~
--
~e
--
111I1
-
Subwoofer
Line Out
RearR
Line Out
RearL
Line Out
Front R
Line Out
Front L
- - - - - - - -- - - --- - - - - - -- - - - - - - - - -
!
I
I
•
,
:J=====C:
!
I
!
:J===t::
g
~
...
,'"
"'"
'."
-
4-Channel Amplifier
-
(CCUIPOD1)
SIRlusii
SATEWTE
RADIO
\'---------'
iPod
D:
@~
i
l
43
--
"'"""""
I
1\!#=~======tIlII(_lJEDLJ
Black
l!===:=:=:==-:II~rnl]:dlilile.
l!====a:::::c=::::lIII(:JTi]lill'LLD
VRX485VD/MAX385VD
BI
~ow
Rear Monitor
:~:
::~
- terminal !
Yellow
k
AUXInVideo !
:
!~
I
I
)-
~
~isu-a~
~.
-
~
_ _ _ _ _ _ _ _ _ _ _ _ _ _ _ _ _ _ _ J
-- - - - - - -- - - - -
Rear monitor
i:~)
I
I
,__. -
__
0 '
...
!
_.0.
Page 44

VRX485VD
rr=====:sCII
[
Refer to the following
page.
==:]1 Radio Antenna Jack
~._._._,_
f:::::::
:!
t
~
••'
ite White iPod
Wh
r.:=======~===~u~~*~-~*¥~·
I
I
I
I
I
III
U
~~
Black
b:::::::l:B~la~c:£k==III!I-B'
Sirius
I
.- - - - - - -- -- -
,-
I
•d
•••
Connector cable
(CCUIPOD1)
...
_------------------
,
tI~.-==;]
iPod
D:
@:
i
~
- - -- - -
~----...,i
SIRlusii
SATEUITE
RADIO
\'--------'
: Connector
I cable
: (SC-C1)
,
"- - - - - - - - - - -- - -- - - - -
f
,
~
Yellow
!:::::=====B:::la:::c==:::m(::=m.:::n
k
Rear Monitor I
!
I
I
I
:~
I
---------------------;
Rear monitor
-_.- - - - - - ---
VRX485VD/MAX385VD
I
!
I
I
I
I
,
I
I
44
Page 45

.....
15A
Yellow
+12V main power
~~
Ri'\
-
/.
'\~
Black
Purple
Purple/Black
Red
~
"R"
"
~
Rear rig
Rear rig
Ground
ht +
ht -
+12V accessory
Gray
/.
)J
\\
Blue/White
Orange/White
Brown
Gray/Black
White
White/Black
Green
Green/Black
B
-
Blue
:a::==::
:a::==::1
Grass-green
~
I Amplifie
I Auto ant
Front rig
Front rig
Front
Ie
Front
Ie
Rear left
Rear left
IIluminat
Phone i
ht +
ht -
ft+
ft-
+
r turn-on cord
ion
enna
nterrupt (*1)
arking brake cord
P
Note:
*1:
Connecting the PHONE INTERRUPTterminal
The
phone interrupt will mute the audioifthe lead receives a negativeorgroundsignal.
45
VRX485VD/MAX385VD
See
next
page
for
howtoconnect
the
parking
brake cord.
Page 46

.Connecting
Connect the cordtoparking brake lamp groundinthe meter panel.
Note:
• Connecting the parking brake cordtolamp ground allows youtowatch iPod video/DVD video/A Vinput
when the parking brake is engaged.
• When
• If "AUDIO ONL
brake while confirming safety,
the
the parking brake cord
parking brake cord is not connected, the monitor will not
Y"
appears on the screen
and
cord to battery
just
after turning on the
then engage the parking brake again.
.How
1.
2.
Parking brake
signal cord Parking brake
to attach the electro-tap
Place the Parking brake cord at the stopper, and
it
backinthe direction of the arrow.
fold
Pass the Parking brake signal cord through, and
it
backinthe direction of the arrow.
fold
~
show
any
video sources.
ACC
powerofthe car, release the parking
./
signal cord
Z
$:~
~~
z'
c'
~~
,-
o
z
Parking brake cord
(Grass-green)
~~c)
Stopper
~
Parking brake cord
(G
)Ir
!
rass-green)
Connecting the Accessories
.Connection
The external amplifiers canbeconnected to the 6 channel RCA output connections. Ensure that the
connectors are not grounded or shorted to prevent damage to the unit.
.Connection
The iPod device can be connectedtodedicated iPod connectiononthe main unit. For detailed
information, refer
Note:
• This unit
The
iPod connection will charge your iPod unless the iPod battery is completely depleted.
•
.If
the specified cord of the cellular phoneisconnected to the phone interrupt cordofthe main
unit, the audio mute
• Sirius Satellite Radio Receiver
When a Sirius Satellite Radio Receiveristobeconnected, use the dedicated connector. For detailed
information,refer
to the external amplifier
to iPod devices
to
the instruction sheet or manual for the iPod cable.
may
not support all functionsofall iPod devices
is
available when the cellular phone is used.
to
the instruction manual of the Sirius Satellite Radio Receiver.
VRX485VD/MAX385VD
46
Page 47

2008/02
Clarion Co., Ltd.
All Rights Reserved.Copyright © 2007: Clarion Co., Ltd.
Printed
in
China /ImprimeauChine
IlmpresoenChina
VRX485VO/MAX385VD
Page 48

I
ilWIffiIE'
GARANTIE LIMITEE DE 1
Clarion
Ce
produit Clarion vendu par marchand autorise Clarion est garanti contre tous defauts de materiel et de mise
CEuvre
effectues chez
Tous cablages, fils
defauts de materiel et de mise
TOUT
SOUMIS
pour une duree de
un
marchand autorise Clarion.
et
autres accessoires Clarion achetes chezunmarchand autorise Clarion, sont garantis contre taus
ACHAT DE PRODUITS CLARION EFFECTUE
A DES RESTRICTIONS DE GRANANTIES DECRI CI-DESOUS.
Les conditions de cette garantie limitee et I'implication delaresponsabilite de Clarion CorporationofAmerica
"Clarion" sous cette garantie limitee sont les suivantes:
1.
DANS LE CAS DE LA GARANTIE L1MITEE DE
D'INSTALLATION
CENTRES DES SERVICES AUTORISES PAR CLARION PEUVENT ETRE OBTENUES
FIN DE CE DOCUMENT.
2.
Cette Garantie Limitee sera annuleesiun dommage est survenuaubien lors d'un service effectue par personne
ou
entreprise qui n'est pas accredite commeunCentre de Service et Garantie Clarion.
3.
Cette Garantie Limitee n'est pas applicable aunaucun produit sujet aI'abus, negligence, accidentes, installation
ou
utilisation incorrects ou que les numeros de serie ont ete modifies, obstrue ou efface, ou qui a ete raccordes,
installes, ajustes ou repares autrement indique par Clarion.
SONT
PourIeCanada
un
(1)
an
acompter de
en
CEuvre
REOUISES. DES INFORMATIONS SUPPLEMENTAIRES
pour une duree de quatre-vingt-dix
et les
Etats-Unis
la
date de vente initiale quand I'achat ET I'installation ont ete
CHEZUNMARCHAND
UN
(1) AN,
seulement
(90)
NON-AUTORISE CLARION SERA
UNE
PREUVE D'ACHAT ET UNE PREUVE
AN
jours deladate d'achat initiale.
CLARION
CONCERNANT
AUX
ADRESSES A LA
LES
en
4.
Cette Garantie Limiteenecouvre pas des interferences electrostatiques, electriques,niles ajustements ou
la
LA
PAR
AVEC
DUREE
tete de lecture
CLARION, NE SONT
LES
PAS
L'ELIMINATION DES GARANTIES SOUS CES CONDITIONS,LAPERIODE DE GARANTIE
EN
ACCORD
DES
nettoyage de
Ie
retraitoula reinstallation
5.
La
responsabilite de Clarion sous cette Garantie Limitee est limitee uniquement a
du produit, qui est sujet uniquement
6.
Ce produit doit est livree dans son emballage d'origine ou equivalent.Lecolis doit etre entierement assure et tous
frais de transport doivent etre prepayes. Clarion n'assumera aucune responsabilite
survenue lors du transport.
7.
TOUS PRODUITS CLARION ACQUIS
CLARION, INCLUANT TOUS ACHATS VIA UN MARCHAND VIRTUEL (ACHAT INTERNET) QUI N'EST
AUTORISE
EN
ACCORD
PERMETTENT
L1MITEE
8.
AUCUNE GARANTIE IMPLICITE NE POURRA S'ETENDRE AU-DELA DE LA PERIODE DE GARANTIE DECRITE
CI-DESSUS, ET CE,
CAS
ou
LIMITER
DIRECTS OU INDIRECTS, CES LIMITATIONS OU EXCLUSIONS PEUVENT NE PAS S'APPLIOUER A VOUS.
QUI S'APPLIQUEAUPRODUIT SERADEQUINZE
ETRE TENUE RESPONSABLE DES PERMETSOUDOMMAGES DIRECTSOUINDIRECTSDUA L'UTILISATION
L'IMPOSSIBILITE DAuTILISATON DU PRODUIT. PUISQUE CERTAINS ETATS NE PERMETTENT
9. CETTE GARANTIE L1MITEE VOUS
DROITS SUPPLEMENTAIRES SELON VOTRE LIEU DE RESIDENCE.
(en
cas de radio cassette) ou elements laser,
ala discretion de Clarion.
PAR
UNE ENTREMISE AUTRE QU'UN MARCHAND AUTORISE
PAS
COUVERTS
LIMITATIONS DEFINIES
AVEC
LES
GARANTIES IMPLICITES,OUDE
DONNE
PARLALOL
L1MITES DEFINIES
DES DROITS LEGAUX PRECIS. VOUS
ni
les frais relies ala manutention pour
la
reparationouau
en
cas de perteoudommages
PAR
LES
GARANTIES L1MITEESDECLARION, ET CE,
DANSLECAS OU
(15)
JOURS A PARTIRDELA
PARLALOL
LIMITERLARESPONSABILITEENCASDEDOMMAGES
LES
LOIS APPLICABLES NE
DATE
CLARION NE POURRA EN AUCUN
POUVEZ
rem
placement
PAR
PAS
D'ACHAT INITIALE.
PAS
POSSEDER DES
DE
10.
Les
lois de j'etat delaCalifornie contralent totalement cette garantie limitee, son interpretationetsa
Si
vous eprouvez des problemes de performance du produit pendantlaperiode de garantie, veuillez communiquer
11.
avec Clarion ou visitez notre site Web
aux produits Clarion.
Aux
Etats-Unis:
Clarion Corporation of America
Attn:Customer Service Manager
6200
Gateway
1-800-GO-CLARION
www.c1arion.com
Drive
Cypress,CA90630
aI'adresse ci-dessous afin d'obtenir une resolution de tout probleme relie
AuInCanada:
Clarion Canada Inc.
de
Centre
2239
Ontario
www.clarion.com
ServiceetGarantie
Winston
L6H
Park
5R1
Drive
(905)829-4600
miseenexecution.
Oakville,
Page 49

clarion
281-0639-00 2007/9
CLARION 1 YEAR LIMITED WARRANTY
For
USA
and
Canada
only
This Clarion
workmanship
an authorized Clarion dealer.
All Clarion cables, wires and other accessories if purchased from an authorized Clarion dealer are warranted against
all defectsinmaterials and workmanship
ALL PURCHASES OF CLARION
TO
FURTHER WARRANTY RESTRICTIONS AS DESCRIBED BELOW.
The conditionsofthis Limited Warranty and the extentofresponsibilityofClarion CorporationofAmerica ("Clarion")
under this Limited Warranty are as
1.
PROOF OF DATE OF PURCHASE FROM AN AUTHORIZED CLARION DEALER WILLBEREQUIRED FOR
WARRANTY SERVICE OF THIS PRODUCT. CENTERS MAY BE OBTAINED BY CONTACTING CLARION
THE ADDRESS LISTED BELOW.
2.
This Limited Warranty will
Service Center resultsindamagetothe product.
3. This Limited Warranty does not apply
or which has had the serial number altered, defaced or removed,
adjustedorrepaired, other thaninaccordance with the instructions furnished by Clarion.
4.
This Limited Warranty does not cover car staticorother electrical interferences, tape headorlaser
cleaningoradjustments, or labor
product
for
purchased from an authorized Clarion dealer are warranted against all
a periodofone
(1)
PRODUCTS
follows:
become
defects
year from the date of original purchase, when purchased from
for
ninety (90) days from the
FROM
void if service performed by anyone other than an approved Clarion Warranty
to
any product which has been subjecttomisuse, neglect or accident,
costs
for
the removal or reinstallationofthe unit
NON-AUTHORIZED
dateoforiginal purchase.
CLARION DEALERS ARE SUBJECT
or
which has been connected, installed,
for
repair.
in materials and
AND
installed
pick-up
by
AT
5.
The sole responsibilityofClarion under this Limited Warranty shall be limitedtothe repairofthe product or
replacement
6.
Product must be shippedinits original carton or equivalent carton, fully insured, with shipping charges prepaid.
Clarion will not assume any responsibility for any loss or damage incurredinshipping.
7.
CLARION PRODUCTS PURCHASED FROM A SOURCE OTHER THAN AN AUTHORIZED CLARION DEALER,
INCLUDING ANY AND ALL PURCHASES VIA THE INTERNET FROM A NON INTERNET AUTHORIZED
CLARION DEALER, SHALL NOT
ALLOWED BY APPLICABLE
ELIMINATION OF WARRANTIES UNDER THESE CIRCUMSTANCES, THE APPLICABLE LIMITED WARRANTY
PERIOD SHALL
8.
ALL IMPLIED WARRANTIES EXCEPT TO THE EXTENT PROHIBITED BY APPLICABLE LAW SHALL HAVE NO
GREATER DURATION THAN THE WARRANTY PERIOD SET FORTH ABOVE. UNDER NO CIRCUMSTANCES
SHALL CLARION
THE USE OR INABILITY TO USE THE PRODUCT. BECAUSE SOME STATES DO NOT ALLOW LIMITATIONS
ON
HOW
CONSEQUENTIAL DAMAGES, THE ABOVE LIMITATIONS OR EXCLUSIONS MAY NOT APPLY TO YOU.
9. THIS LIMITED WARRANTY GIVES YOU SPECIFIC LEGAL RIGHTS, AND YOU MAY ALSO HAVE OTHER
RIGHTS WHICH VARY FROM STATE TO STATE.
10. The laws of the State
11. Should you have any difficulties with the performance
Clarionorvisit
Clarion Customer Service at
of
the product, at the sole discretionofClarion.
BE
COVERED BY ANY CLARION LIMITED WARRANTY TO THE EXTENT
LAW.
IN THE EVENT AND TO THE EXTENT APPLICABLE LAW PROHIBITS
BE
DEEMED TOBEFIFTEEN (15) DAYS FROM THE DATE OF ORIGINAL PURCHASE.
BE
LIABLE FOR ANY LOSS OR DAMAGE, DIRECT OR CONSEQUENTIAL, ARISING OUT OF
LONG AN IMPLIED WARRANTY LASTS OR EXCLUSIONS OR LIMITATIONS OF INCIDENTAL OR
of
California shall govern and control this Limited Warranty, its interpretation and enforcement.
of
this product during the warranty period, please call
our
web
site for a listingofAuthorized Warranty Service Centersinyour area.
the
address listed below for any service help you may need with Clarion products.
You
may also contact
In
USA:
Clarion Corporation of America
Attn:Customer Service Manager
6200 Gateway Drive
Cypress,
1-800-GO-CLARION
www.c1arion.com
CA
90630
In
Canada:
Clarion Canada
Warranty Service Center
2239 Winston Park Drive
Oakville, Ontario
(905)
829-4600
www.clarion.com
Inc.
L6H
5R1
 Loading...