

Page 1
CITROËN C4
Handbook
c4_dd_couv_ed05-2008.indd 1 11/07/2008 12:31:00
Page 2
CAFEINE - TOTAL LUBRIFIANTS, Le Diamant B, 16 rue de la République, 92922 PARIS LA DEFENSE - 552 006 454 RCS Nanterre - www.lubrifiants.total.com
CITROËN and TOTAL
A partnership of expertise
For 39 years, the research teams of CITROëN and
TOTAL have combined their know-how to offer you
the best engine/lubricant combination available. Cutting edge technology for your benefit. With TOTAL, you
can be sure to have chosen the benchmark oil that best
guarantees your C
ITROëN’s performance and life-ex-
pectancy.
A partnership for the environment
TOTAL oils support CITROëN’s advances in fuel economy,
and C0
2
and harmful emission reductions.
The development of new generation oils specially adapted
for Particle Filters, like TOTAL ACTIVA/QUARTZ INEO
ECS can reduce C0
2
emissions by a tonne* and save a
tank of fuel each year**.
* Official C02 emissions reduction of 4 g per km (approx. 6 g per mile). Corresponds to a reduction in C02 emissions
of 1 tonne throughout the life of the vehicle, on a private diesel vehicle with an average life expectancy estimated
at 250 000 km (approx. 160 000 miles). Source: TOTAL.
*
* Or 30 L, average quantity of fuel required to fill a tank at a petrol station. Result obtained using TOTAL ACTIVA/
QUARTZ INEO ECS oil instead of a traditional 15W-40 oil, on a CITROëN C4 1.6 HDi, whose average fuel cons
umption is 58.9 mpg (4.8 L/100 km), travelling 18 000 km (approx. 12 000 miles) per year. Source: TOTAL
A partnership of success
Competitive successes in the national rallies of the World Rally Championship
bear testament to the performance and efficiency of the C
ITROëN – TOTAL
partnership.
CITROËN
prefers
c4_dd_couv_ed05-2008.indd 2 11/07/2008 12:31:02
Page 3
This handbook is compiled on the basis of all the equipment that is available
(whether standard or optional) and of the technical specifications that were known
at the time of going to print.
The level of equipment on your vehicle depends on the model, the options chosen and the
country where the vehicle is marketed.
Some of the equipment mentioned in this handbook may only be available
at a later date.
Descriptions and illustrations are given without obligation.
Automobiles CITROËN reserves the right to modify its models and their equipment
without necessarily being bound to update the present handbook.
The trained professional staff of the CITROËN network are at your disposal
to answer any questions you may have.
We wish you safe and enjoyable motoring in your new CITROËN.
This handbook is an integral part of your CITROËN.
It should be kept in the vehicle where it can be
consulted easily.
Do not forget to pass it on to the new owner
if you should sell the vehicle.
6.2 07-08 Anglais
c4_dd_couv_ed05-2008.indd 3 11/07/2008 12:31:03
Page 4
GB. 08C4. 0031
Anglais
c4_dd_couv_ed05-2008.indd 4 11/07/2008 12:31:03
Page 5
We thank you for choosing to drive a new CITROËN
and we congratulate you on your choice.
Please read this handbook carefully before taking to the road.
It contains essential information about driving your vehicle and operating
its equipment, as well as other important advice to be rigorously followed.
The handbook also contains all you need to know about the servicing
and routine maintenance of your vehicle, thus assuring both your safety
and the reliability of your new CITROËN.
A thorough knowledge of your new CITROËN
will enable you to enjoy driving to the full.
Depending on the version of your vehicle and its options, as well as
on the date of manufacture and the country of marketing, some of the
equipment or certain functions described in this handbook may not be
present on your vehicle.
Please note the following point:
The tting of electrical equipment or accessories that are not recommended by CITROËN may result in
a failure of your vehicle’s electronic system. Please note this specic warning. It is advisable to contact a
CITROËN dealer to be shown the recommended equipment and accessories.
c4_dd_sommaire_ed05-2008.indd 1 10/07/2008 13:57:54
Page 6

2
Display A 31
Display C 34
NaviDrive Display 37
Trip computer 38
II - MULTIFUNCTION
DISPLAYS 31 40
Air distribution 41
Ventilation/Ventilation 43
Automatic air conditioning 45
Scented air freshener 48
Front seats 49
Rear seats 53
Rear view mirrors 55
Steering column adjustment 56
III - COMFORT 41 56
Keys 57
Remote control 58
Alarm 60
Electric windows 62
Child safety 63
Doors 63
Tailgate 64
IV - ACCESS 57 64
Lighting control 65
Headlamp adjustment 66
Direction indicators 67
Hazard warning lamps 67
Directional headlamps 68
Wiper controls 69
Interior lighting 71
V - VISIBILITY 65 72
Interior 73
Boot 77
VI - INTERIOR
COMFORT 73 77
Instrument panel 23
Warning lamps 24
Particle filter (Diesel) 26
Maintenance indicator 27
Engine oil level indicator 29
Display lighting rheostat 29
FAMILIARISATION 4 22
I - OPERATING
CONTROLS 23 30
General 78
Child seats 79
Isofix mountings 81
VII – CHILD SAFETY 78 83
c4_dd_sommaire_ed05-2008.indd 2 10/07/2008 13:57:55
Page 7

3
Tyre pressure sensors 84
Braking assistance
systems (ABS) 85
Trajectory control
systems (ESP/ASR) 86
Seat belts 87
Airbags 90
Safety advice 94
Lane departure warning system 96
VIII - SAFETY 84 96
Handbrake 97
Manual gearbox 99
Electronic gearbox system
(EGS) - 6 speed 100
Hill start assist 105
Automatic gearbox 106
Cruise control 1
10
Speed limiter 1
12
IX - DRIVING 97 115
Bonnet release 116
Petrol engines 1
17
Diesel engines 1
18
Levels 1
19
X - MAINTENANCE 116 123
Refuelling 124
Changing a wheel 125
Replacing bulbs 129
Replacing a fuse 136
Battery 142
Towing 145
Towing a trailer 147
Cold weather shield 148
Accessories 149
XI - PRACTICAL
ADVICE 124 150
Capacities 151
Weights 152
Fuel consumption 157
Dimensions 160
Vehicle identification 162
XII -
TECHNICAL
SPECIFCATIONS
151 162
INDEX 180 183
Radio-RDS-CD 163
CD changer 173
Hands-free telephone 174
Frequently asked questions 178
XIII - RADIO 163 179
c4_dd_sommaire_ed05-2008.indd 3 10/07/2008 13:57:55
Page 8
4
F A M I L I A R I S AT I O N
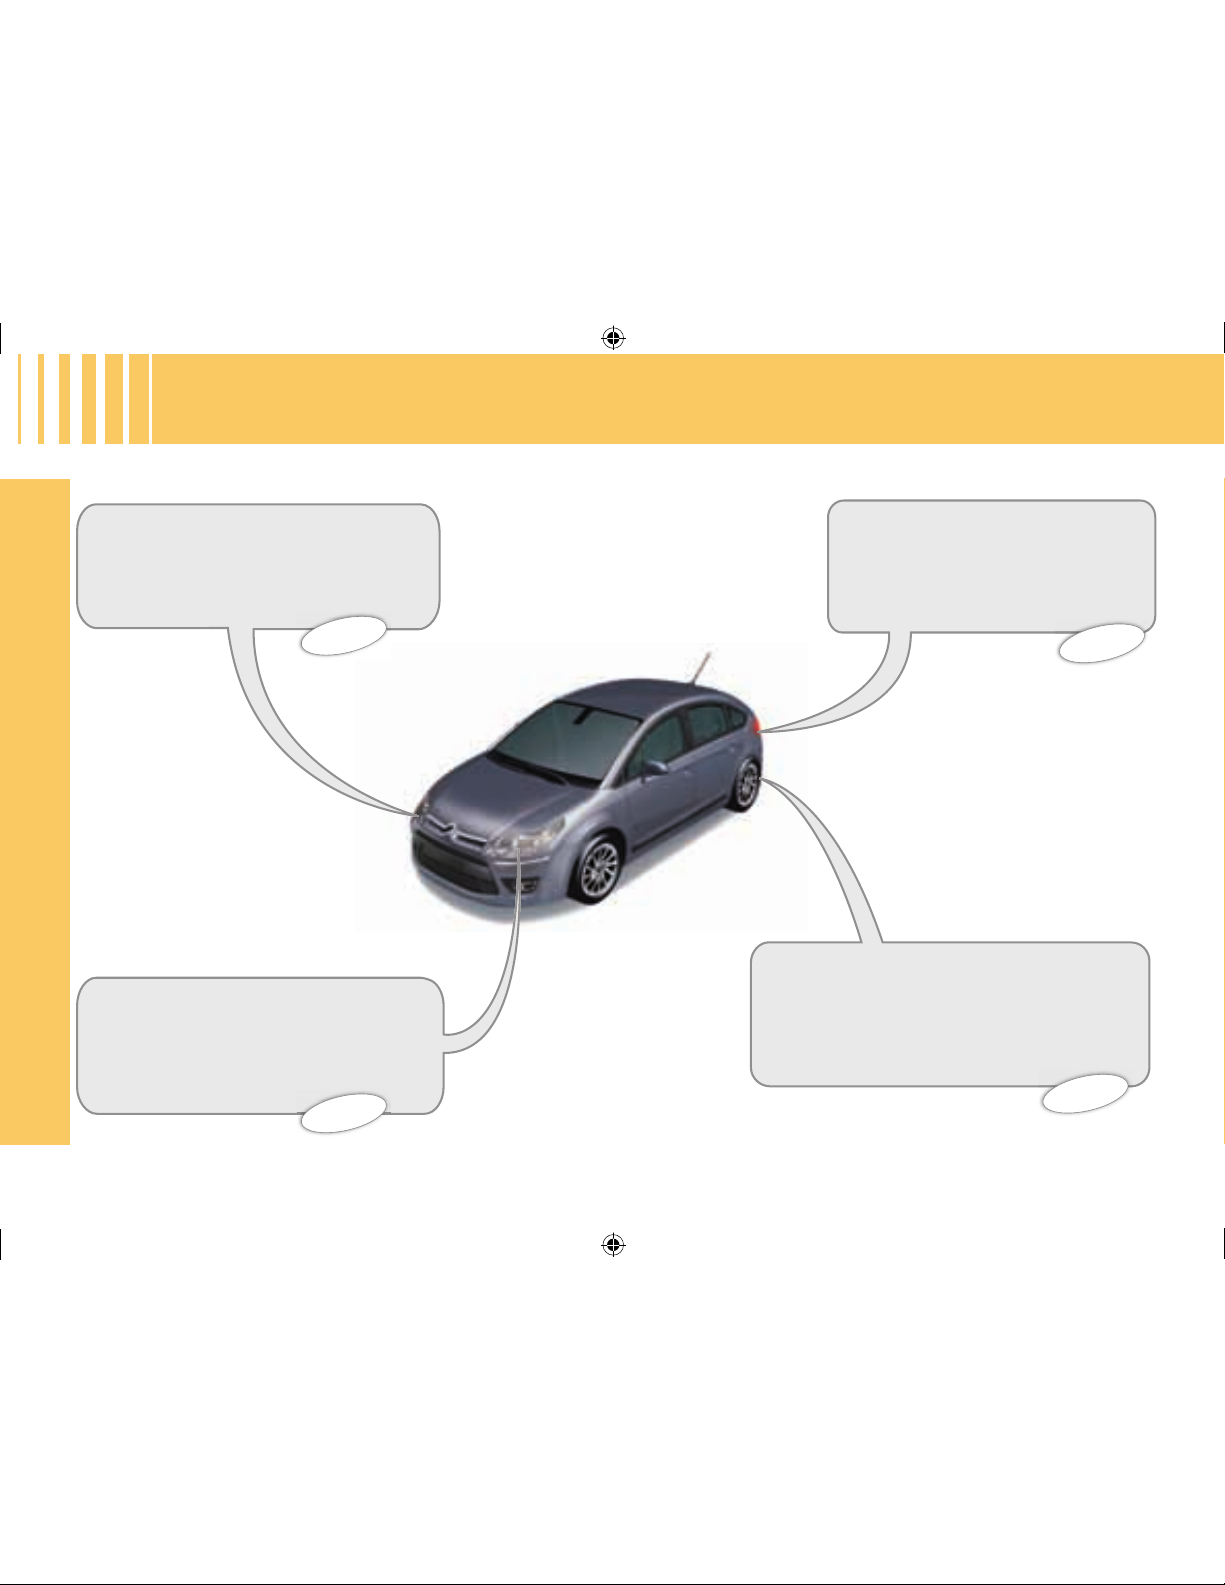
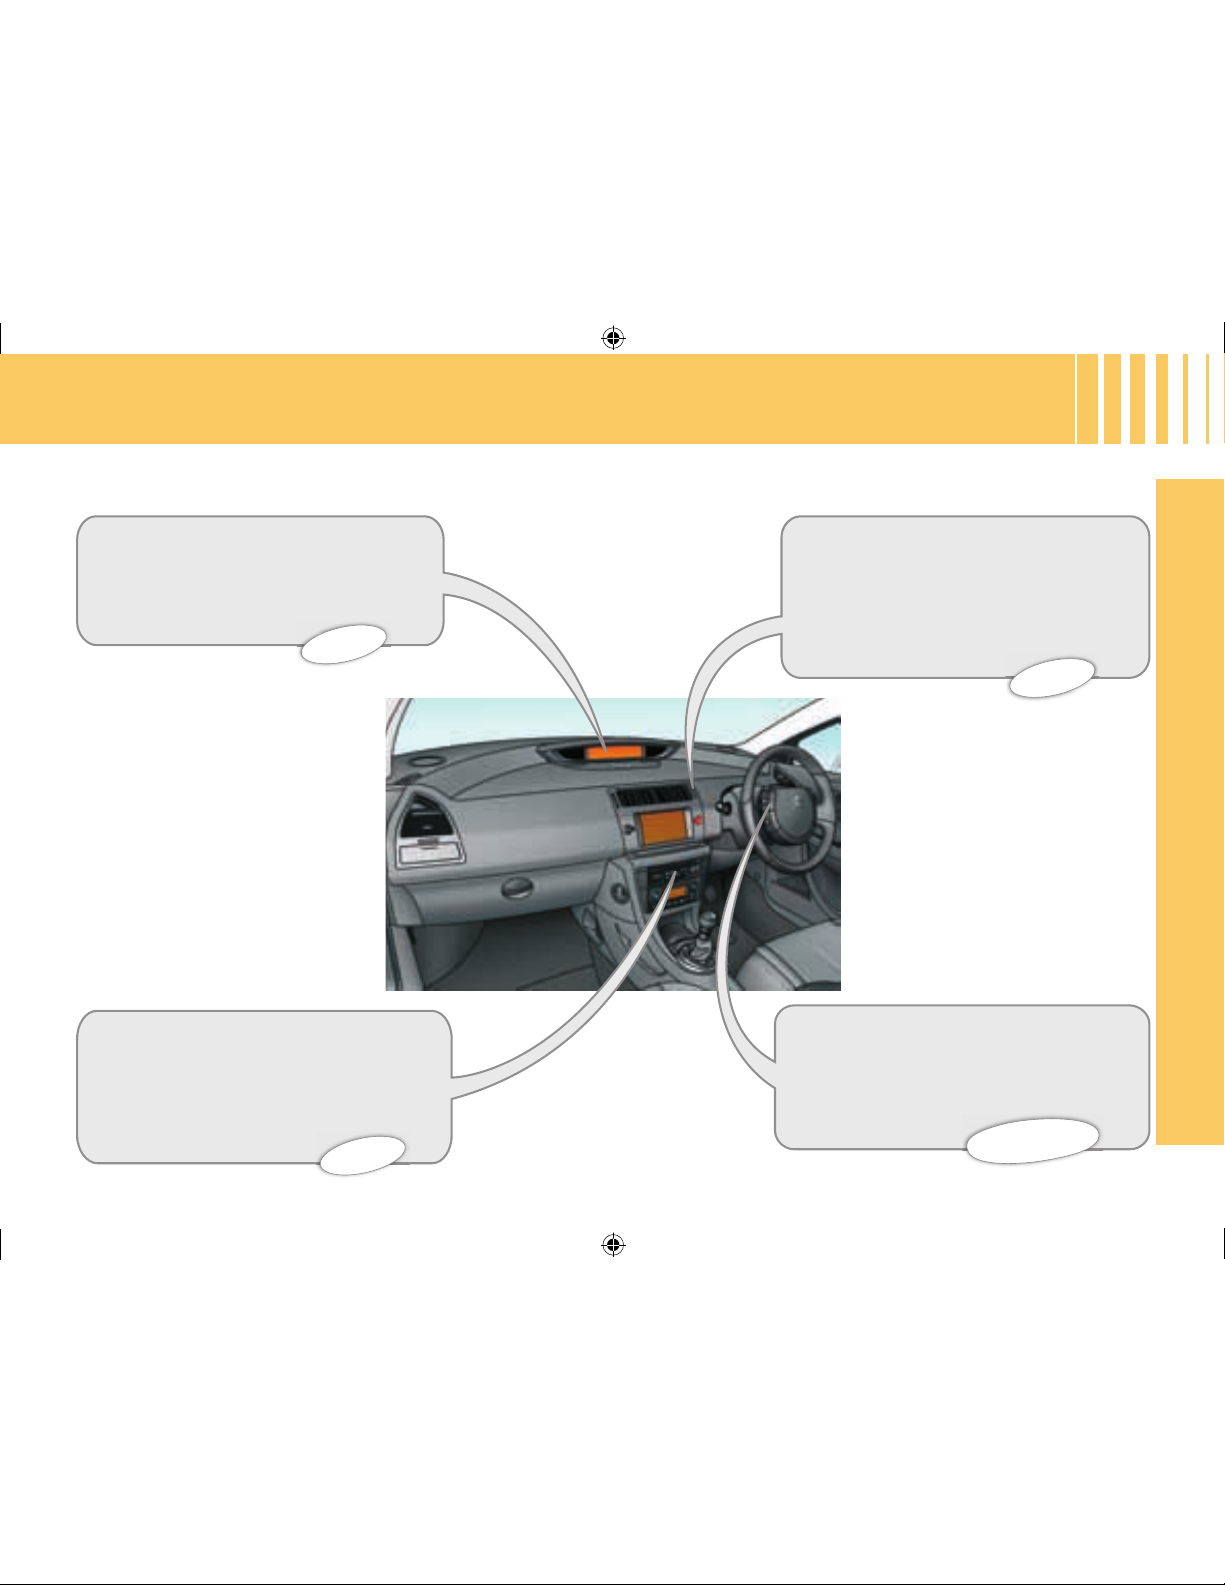
Directional headlamps
This lighting function automatically improves forward vision when cornering.
68
65
96
EXTERIOR
Lane departure warning system
Above 50 mph, this system is activated
automatically if you inadvertently wander
from your lane.
Visual and audible parking
assistance, front/rear
This system warns you if an obstacle
is detected when manoeuvring the
vehicle.
Guide-me-home lighting
The headlamps stay on for a short
period after switching off the ignition.
114
c4_dd_prise en main_ed05-2008.in4 4 10/07/2008 13:56:21
Page 9
5
F A M I L I A R I S AT I O N
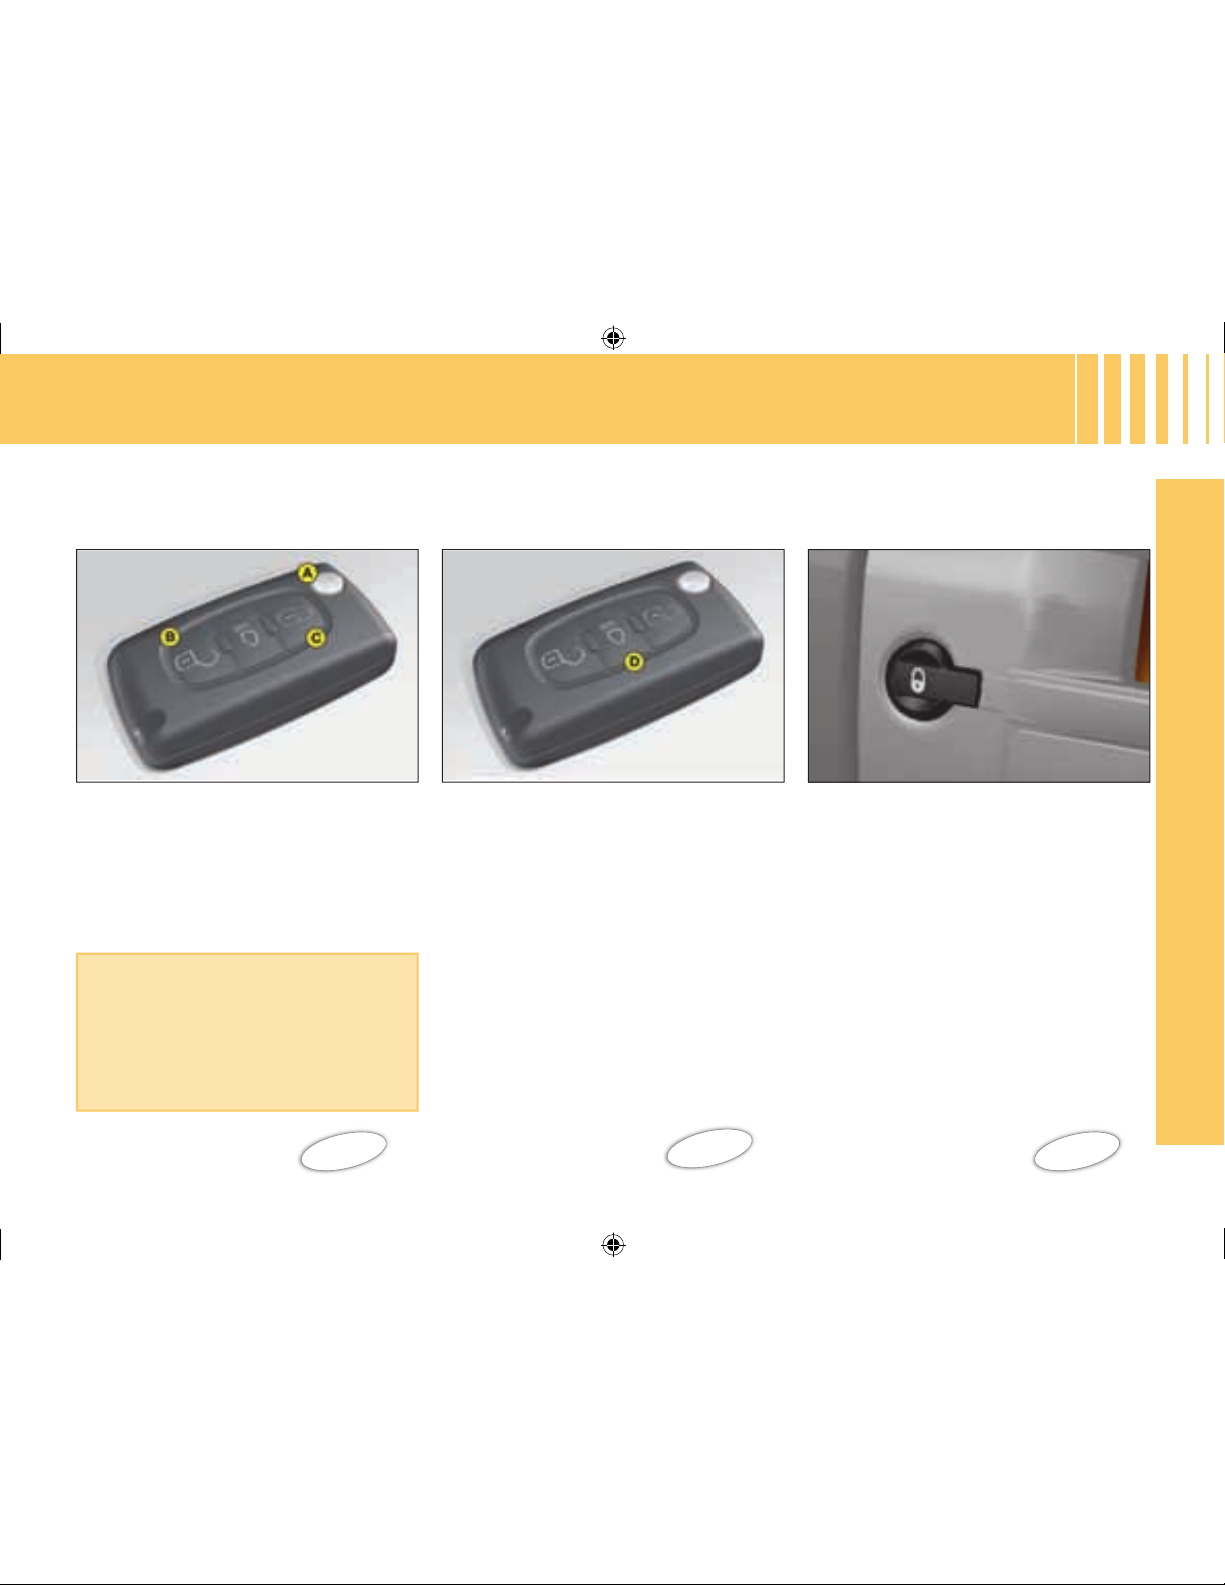
Press once to lock the vehicle.
Press again to unlock the vehicle.
Remote control
A. Unfolding/folding the key.
B. Unlocking the vehicle.
C. Locking the vehicle.
57
Manual central locking
63
OPENING
In addition...
A long press on button C locks the
vehicle and closes the windows.
Two successive presses on button C
deadlocks the vehicle.
D. Activating/deactivating
guide-me-home lighting.
59
c4_dd_prise en main_ed05-2008.in5 5 10/07/2008 13:56:22
Page 10
6
F A M I L I A R I S AT I O N
Unlock the vehicle with the remote control
or the key.
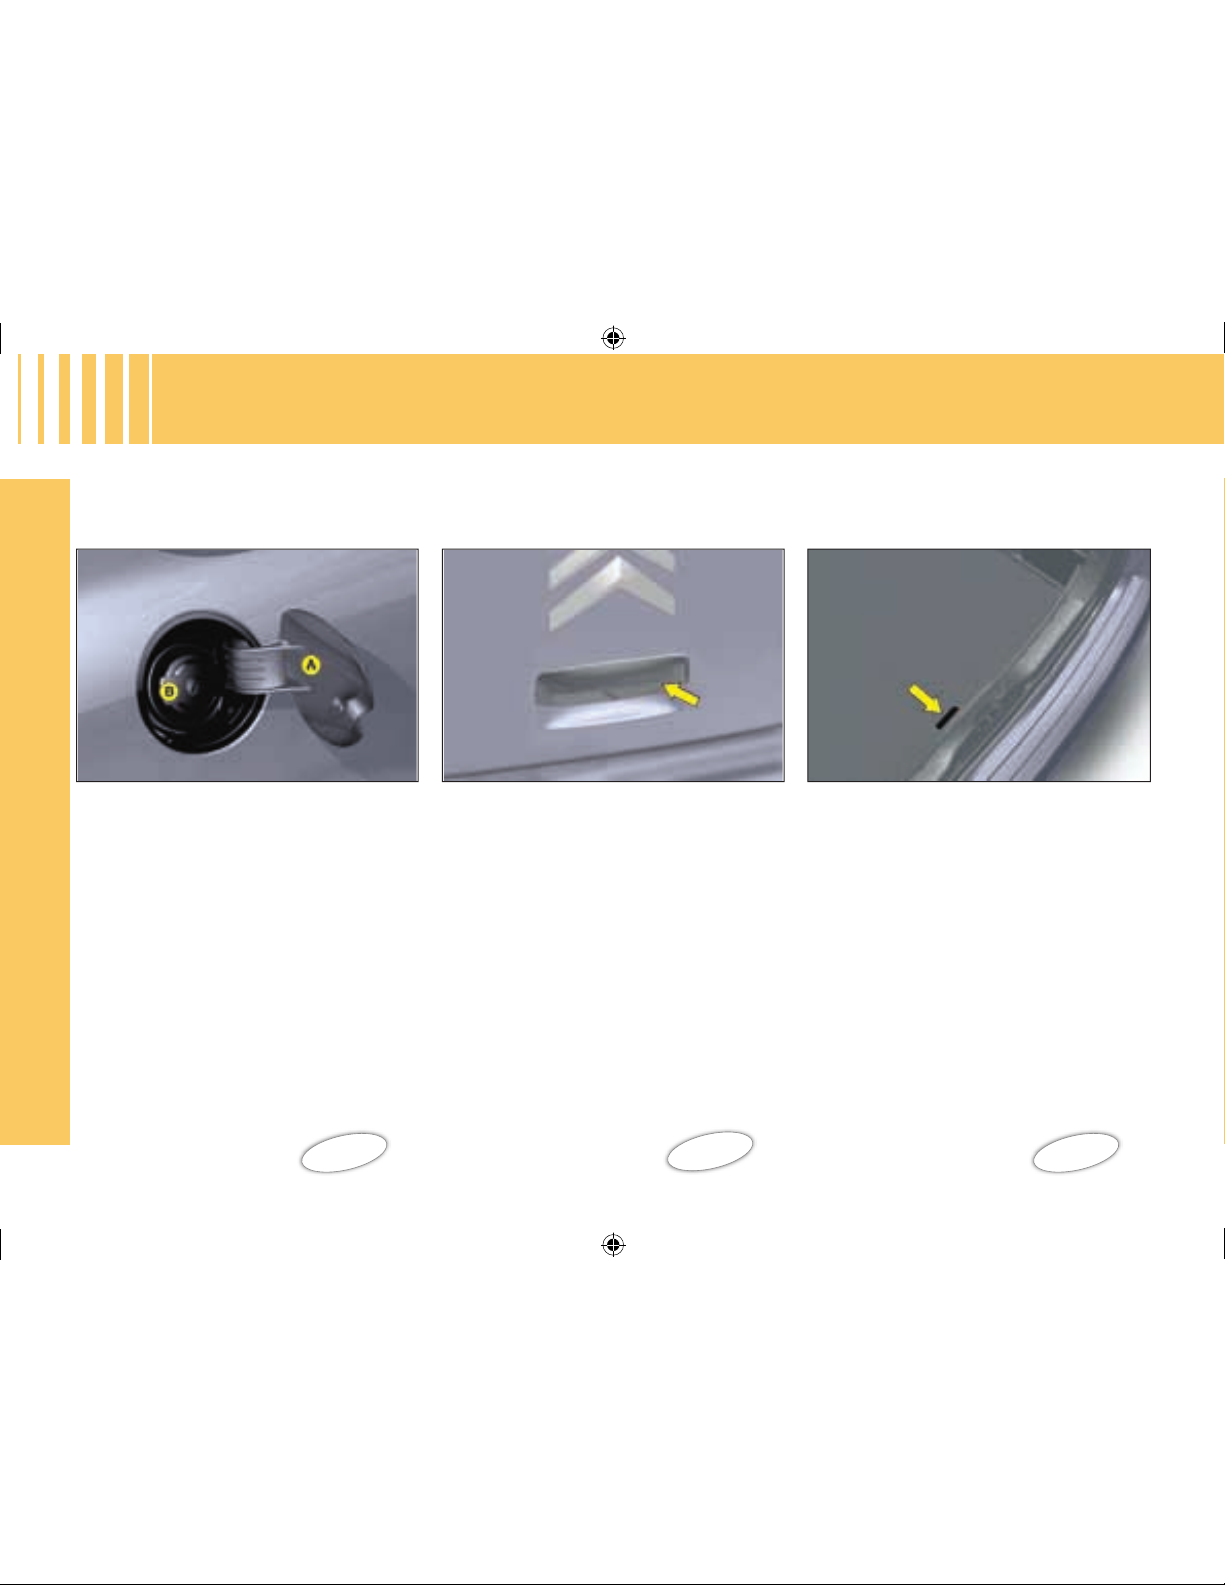
Press up on the lever and lift the tailgate.
Tailgate Spare wheel and tools
Access to the spare wheel
Lift the carpet, then remove the tool
holder to gain access to the wheel.
OPENING
125
Access to the tools
The tools are located in a protective
holder in the spare wheel.
Fuel tank
A. Opening the fuel fi ller fl ap.
124
B. Removing the fi ller cap.
If your spare wheel is of different
dimensions to the wheels on the
vehicle, it is essential to use it only
on a temporary basis, and to not
drive above 80 km/h (50 mph).
64
To open the fuel fi ller fl ap, pull at its
notched edge. There is a fuel label on
the inside of the fl ap.
Locking filler cap
Turn the key a quarter turn to lock and
unlock the fi ller cap.
When refuelling, place the cap on the
carrier on the inside face of the fi ller
fl ap.
Fuel tank capacity: 60 litres approximately.
c4_dd_prise en main_ed05-2008.in6 6 10/07/2008 13:56:23
Page 11
7
F A M I L I A R I S AT I O N
INTERIOR
Translucent instrument panel
This system gives optimum contrast,
whatever the external light level.
Cruise control/Speed limiter
These two systems allow the vehicle’s
speed to be maintained at a programmed
level.
Scented air freshener
The air freshener distributes scented
air throughout the cabin. It is located
in the centre air vent
Audio and communication
systems
These systems make use of the latest
technologies: MP3-compatible audio,
Bluetooth® hands-free kit, GPS mobile
phone.
23
110 , 112
48
163
c4_dd_prise en main_ed05-2008.in7 7 10/07/2008 13:56:24
Page 12
8
F A M I L I A R I S AT I O N
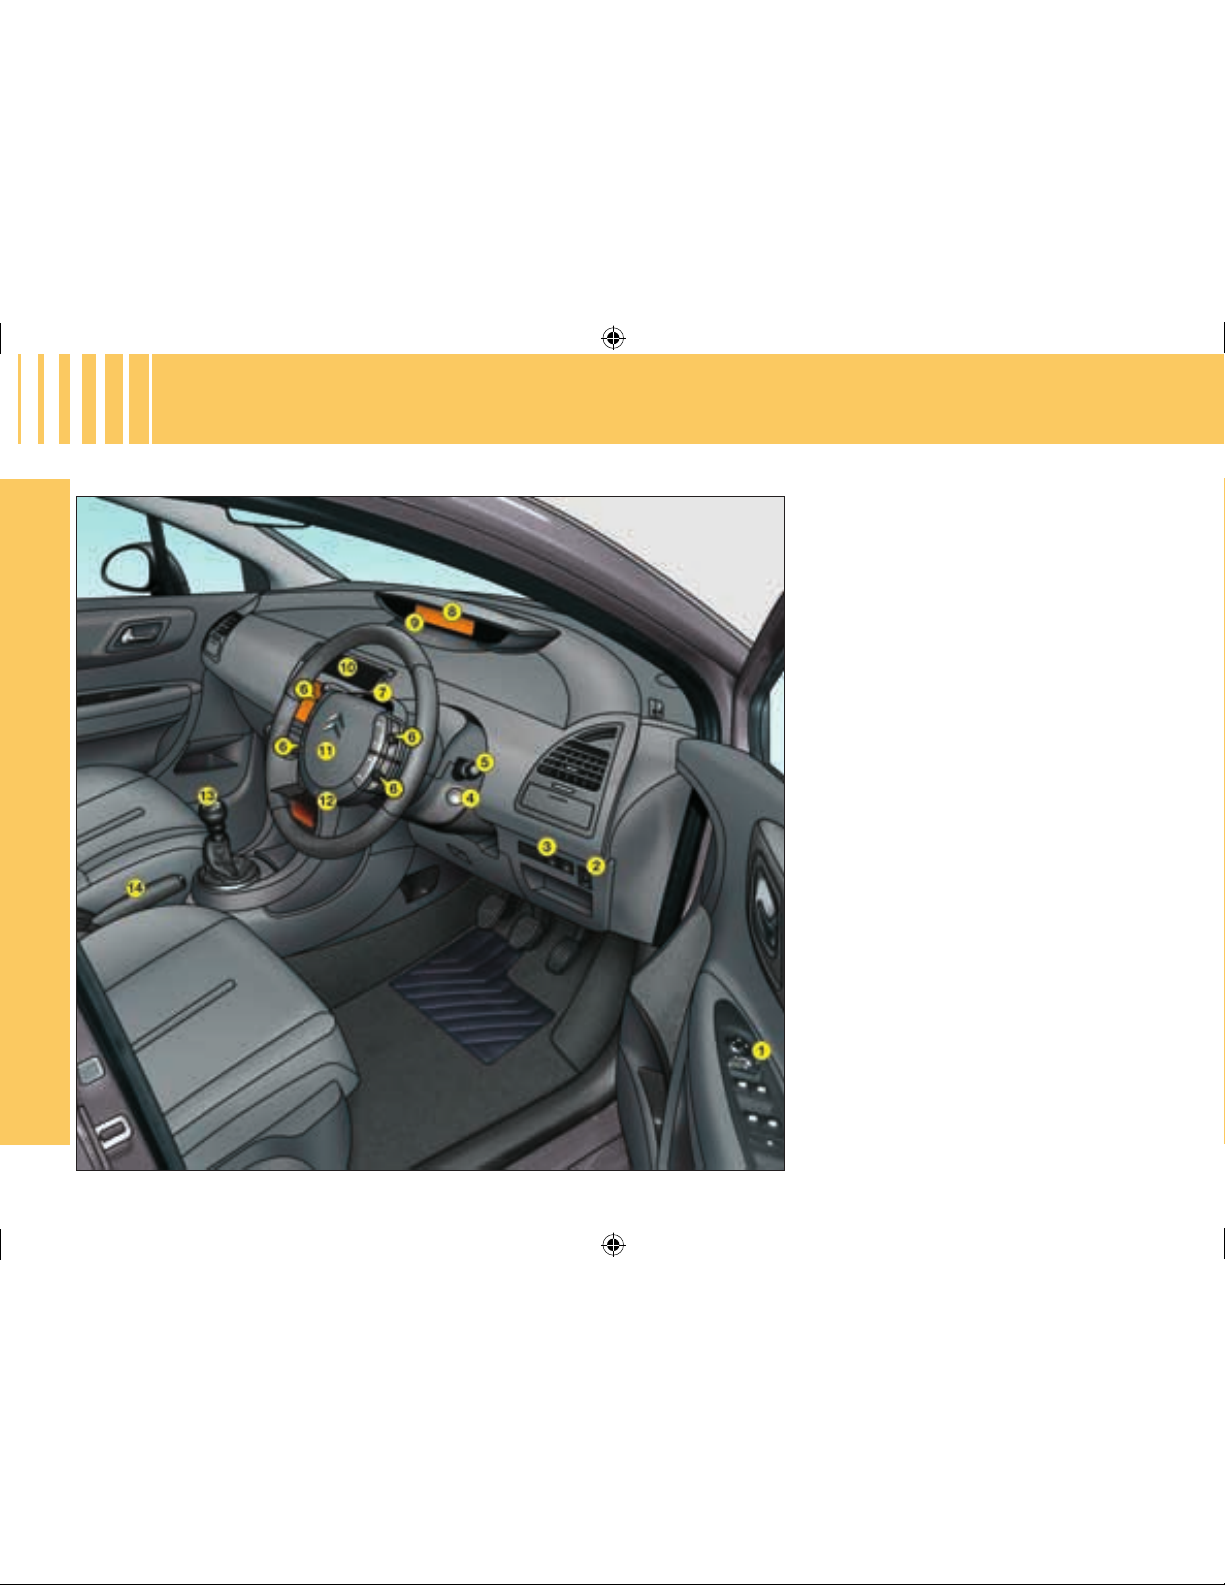
DASHBOARD
1. Controls:
• Mirrors.
• Windows.
• Child safety
2. Headlamp adjustment.
3. Controls:
• ESP
.
• Parking assistance.
• Lane departure warning system.
• Anti-intrusion alarm.
4. Steering lock and ignition switch.
5. Controls:
• Windscreen wiper
.
• Screen wash.
• Rear screen wiper.
• Trip computer.
6. Fixed centred controls.
7. Direction indicator warning lamps.
8. Speed indicator
.
9. Controls:
• T
rip mileage recorder reset
button.
• Display lighting rheostat.
•
Display of alerts and status of
functions.
10. Centre air vents.
11. Driver
’s airbag.
12. Horn.
13. Gear lever
.
14. Handbrake.
c4_dd_prise en main_ed05-2008.in8 8 10/07/2008 13:56:25
Page 13
9
F A M I L I A R I S AT I O N
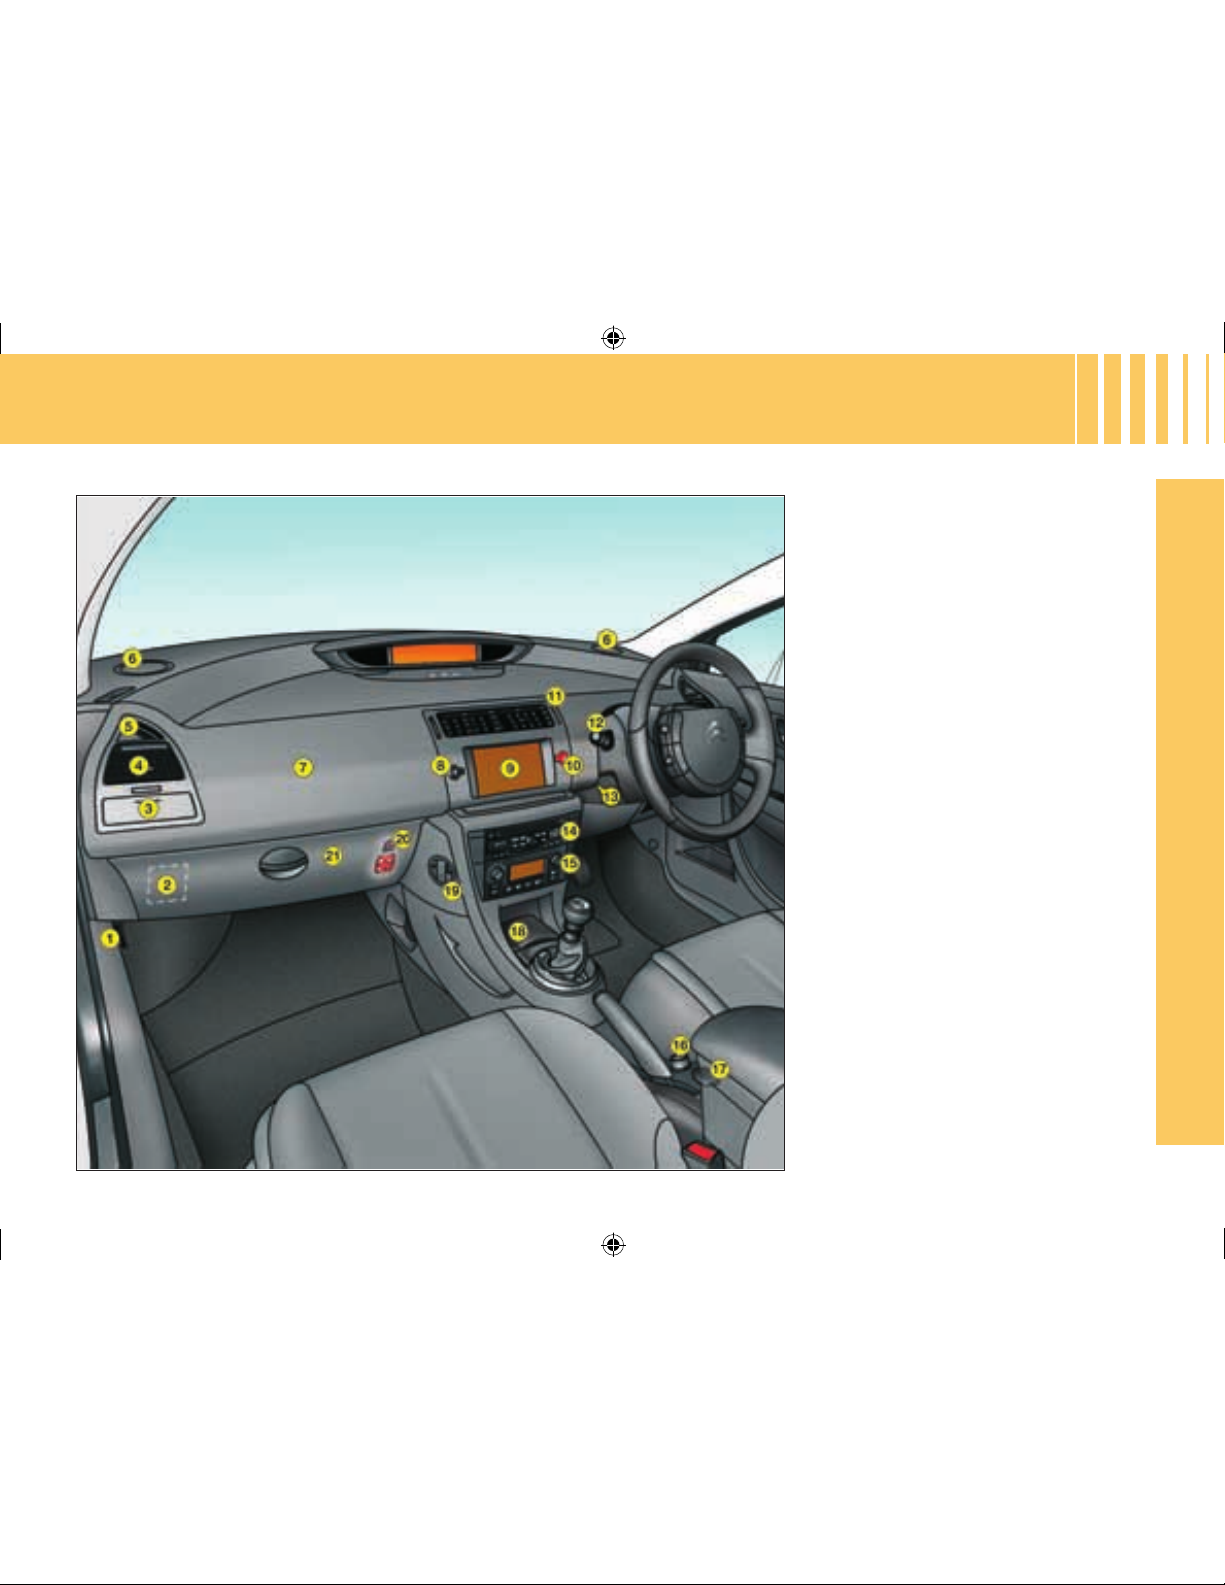
DASHBOARD
1. Bonnet release.
2. Fusebox cover
.
3. Storage drawer (left and right).
4. Lateral air vent (left and right).
5. Side window demister vent
(left and right).
6.
Loudspeaker (Tweeter) (left and right).
7. Passenger’s airbag.
8. Control for central locking of doors
and boot.
9.
Multifunction display.
10. Hazard lamps control.
11. Scented air freshener
.
12. Controls:
• Lighting.
• Direction indicators.
• Front fog lamps
• Rear fog lamps.
13. Steering column adjustment lever
.
14.
Radio-CD or NaviDrive radio navigation
.
15. A
ir conditioning or heating/ventilation
.
16. Cigar lighter.
17.
12-volt accessory socket (150 W max).
or
USB socket.
18. Ashtray
.
19. Carrier bag hook.
20. Key-operated switch:
•
Passenger’s airbag activation/
deactivation.
21. Lower glovebox.
• Handbook pack storage.
c4_dd_prise en main_ed05-2008.in9 9 10/07/2008 13:56:26
Page 14
10
F A M I L I A R I S AT I O N
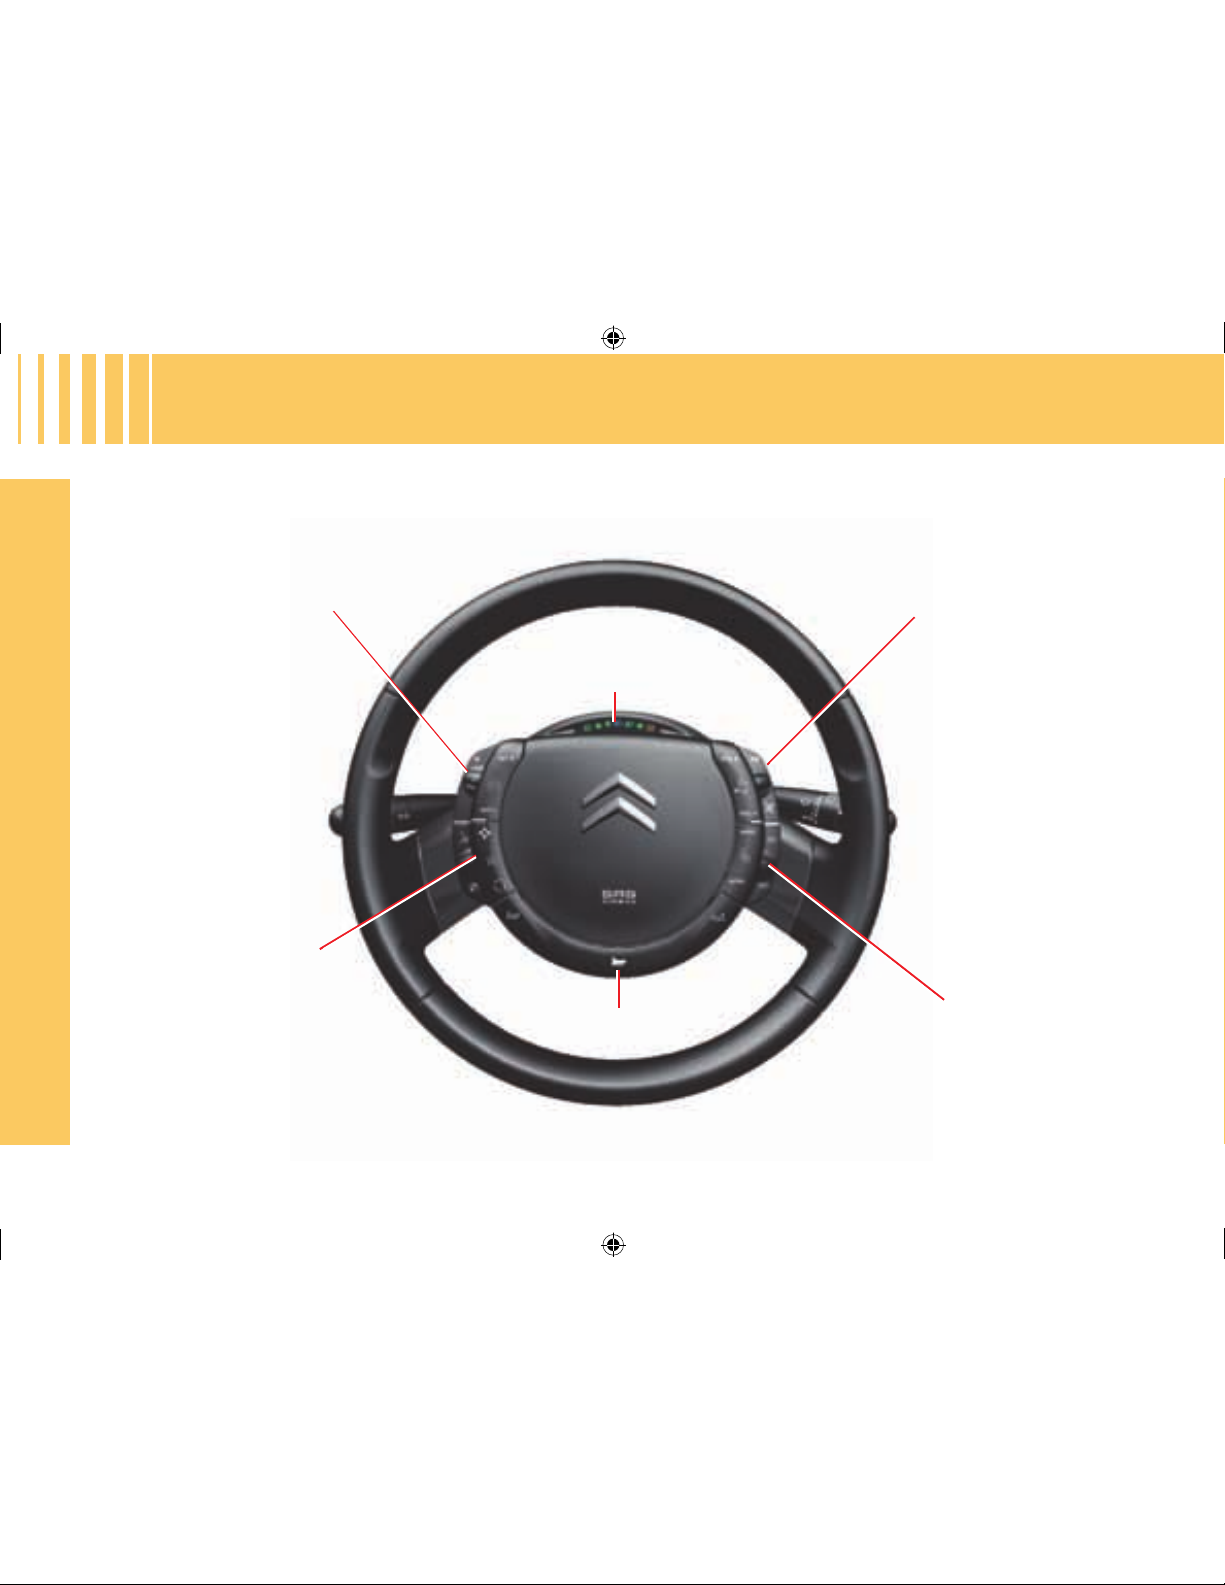
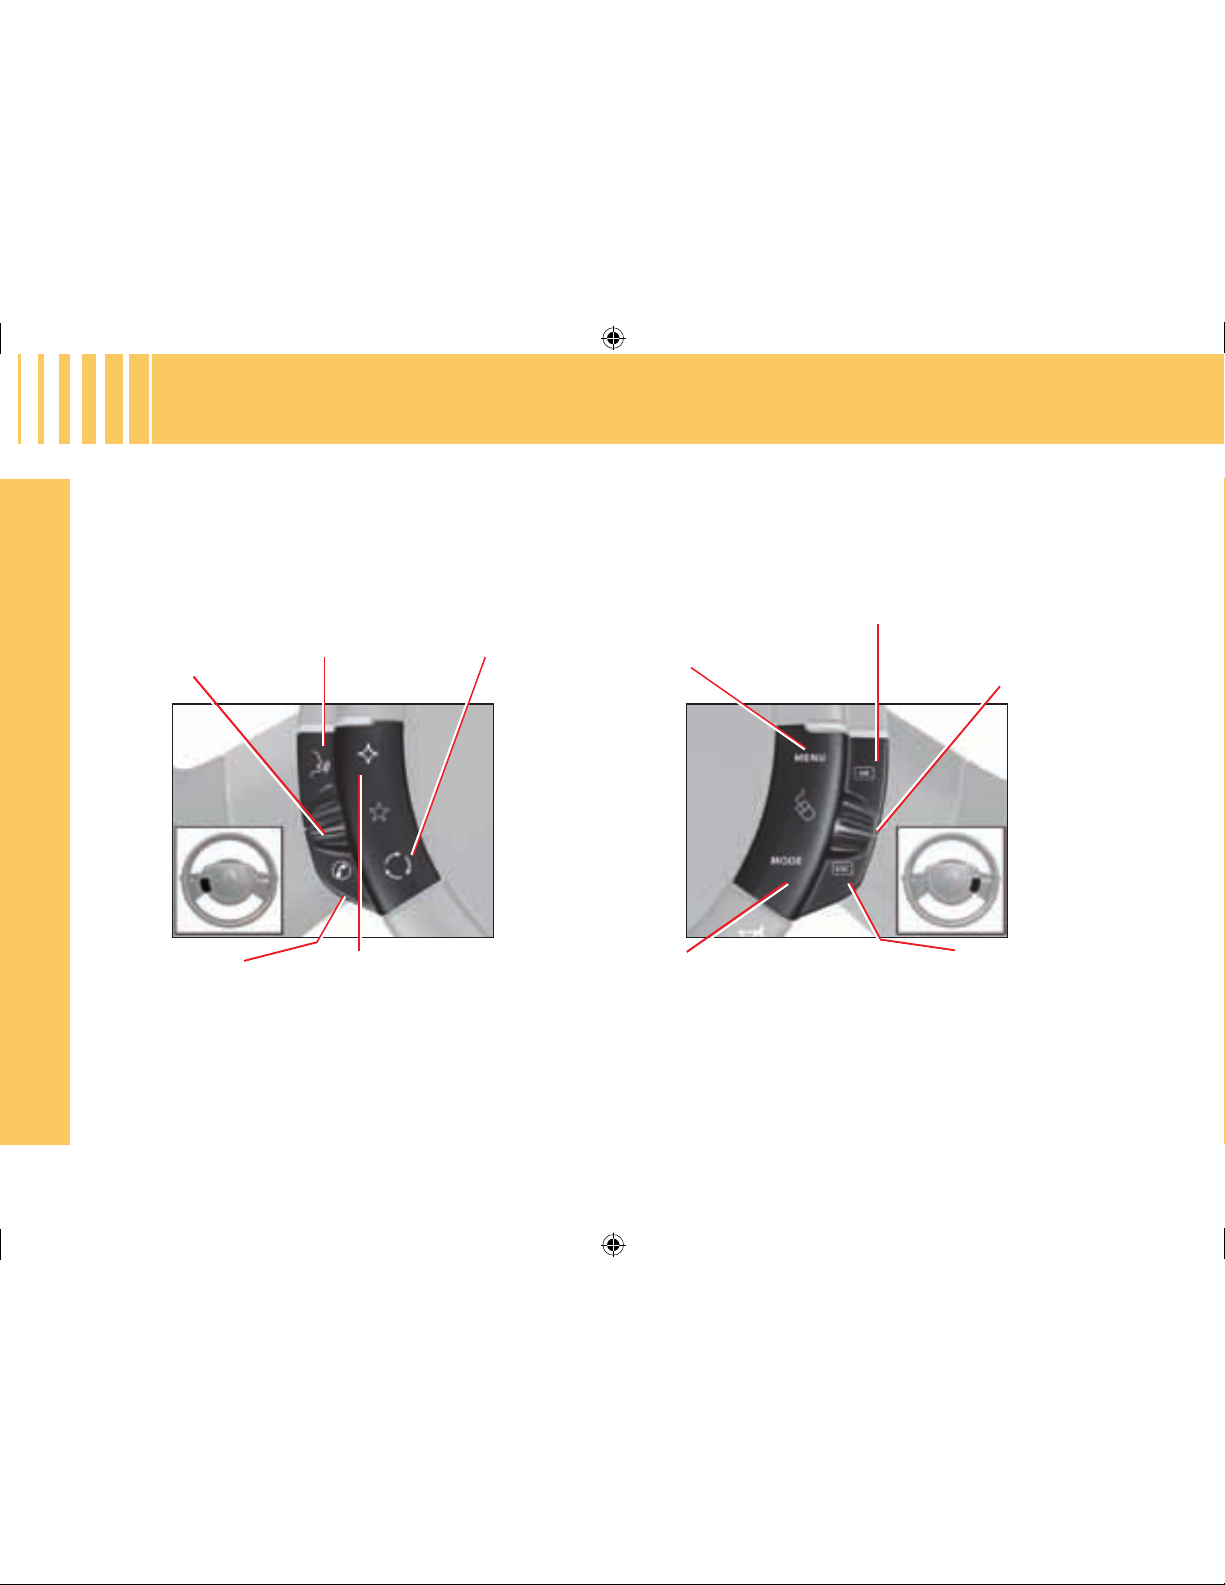
FIXED CENTRED CONTROLS STEERING WHEEL
Controls for speed limiter
and cruise control
Audio system
controls
Warning lamps:
lighting and direction
indicators
Function
controls:
Multifunction display controls
Horn
- Display lighting rheostat
- Voice recognition
- Air recirculation
- Telephone
- Personal button
c4_dd_prise en main_ed05-2008.in10 10 10/07/2008 13:56:27
Page 15

11
F A M I L I A R I S AT I O N
Controls for speed limiter and
cruise control
Audio system controls
See "Audio" or your Navidrive instructions
Selection of speed
limiter or cruise
control
Activation of speed
limiter and
Deactivation/
Reactivation
of cruise control and
speed limiter
Search for
higher radio
frequencies
Scrolling of
memorised
stations
Decrease speed/
Activate cruise
control
Increase speed/
Activate cruise
control
Increase sound
volume
Reduce
sound
volume
Mute
FIXED CENTRED CONTROLS STEERING WHEEL
c4_dd_prise en main_ed05-2008.in11 11 10/07/2008 13:56:27
Page 16
12
F A M I L I A R I S AT I O N
Display
lighting
rheostat
Starting voice
recognition
(See "Audio" or
your Navidrive
instructions)
Access to "Main
menu"*
Scrolling in the
multifunction
display
Telephone pick-
up/hang-up
(See "Audio" or
your Navidrive
instructions)
Personal button:
-
Black panel (default function), or
- Interior lamp on/off, or
- Log of alerts, or
- Status of functions
Give a long press on this button to
display the personalisation menu.
Selection of the type of information displayed on the
right of the screen (radio,
trip computer, navigation/
guidance…) and for screen
A, choice of activation/deactivation of your functions and
choice of your adjustments
Cancel the current
operation or return to the
previous screen
Air recirculation
Validation of the function selected or the
value modied
Pick up/hang up
(See "Audio" or your Navigation instructions)
*
In compliance with national
legislation, in some countries the "menu" control is
deactivated when driving.
Display the
"Directory" menu
(See "Audio" or
your Navidrive
instructions)
FIXED CENTRED CONTROLS STEERING WHEEL
c4_dd_prise en main_ed05-2008.in12 12 10/07/2008 13:56:28
Page 17
13
F A M I L I A R I S AT I O N
SITTING COMFORTABLY
51
Front seats
Forwards-backwards Driver’s seat cushion height and angle
adjustment
Seat back angle and lumbar
adjustment
Manual adjustments
Electrically operated adjustments
(driver’s seat only)
Forwards-backwards
Seat cushion height and angle adjustment
Seat back angle and lumbar
adjustment
50
c4_dd_prise en main_ed05-2008.in13 13 10/07/2008 13:56:30
Page 18
14
F A M I L I A R I S AT I O N
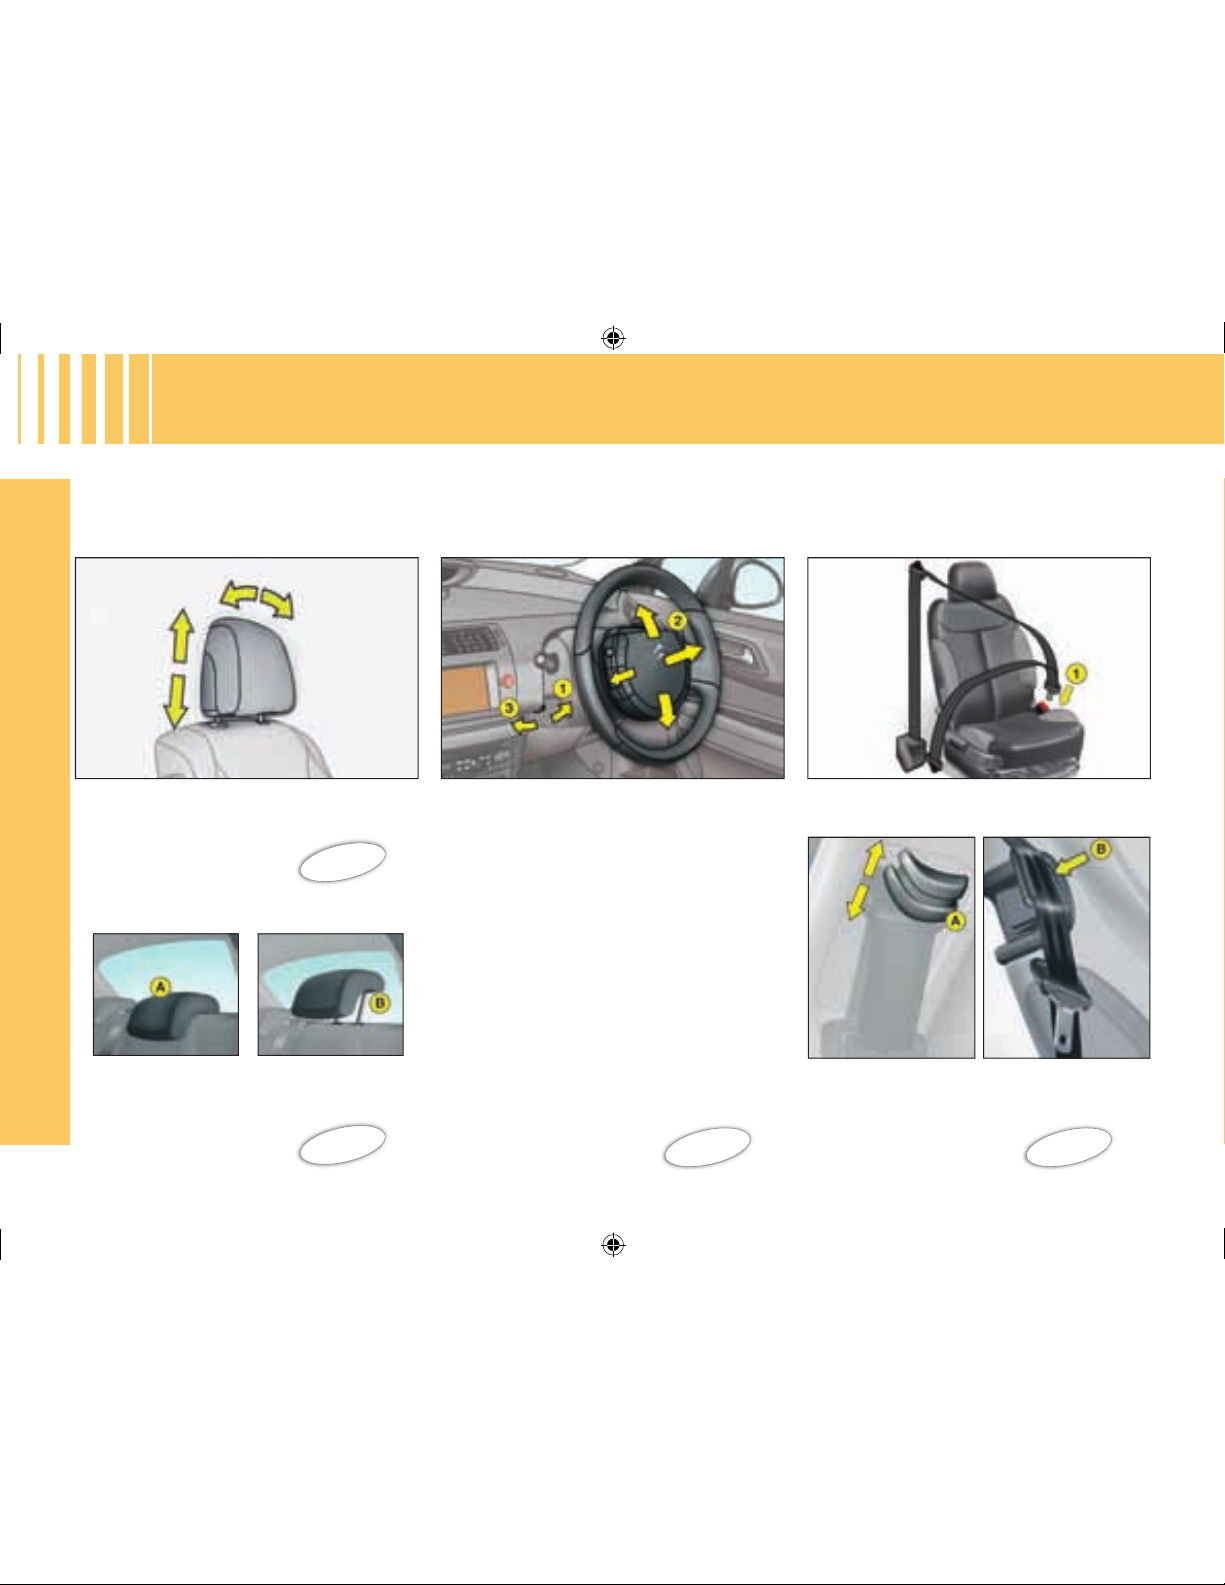
SITTING COMFORTABLY
1. Unlock the steering column using
the lever.
2. Adjust the position of the steering
wheel for height and reach.
3. Lock the steering column with the
lever.
Manual adjustment of steering
wheel height and reach
56
Front seat belt
1. Locking.
87
Adjustment of front head
restraints
Adjustment of rear head restraints
53
Height and angle.
A. Low position.
B. High position.
A. Height adjustment (5-door)
B. Holding the seat belt (3-door)
50
c4_dd_prise en main_ed05-2008.in14 14 10/07/2008 13:56:31
Page 19
15
F A M I L I A R I S AT I O N
Adjustment of exterior rear view
mirrors
A. Select the mirror.
B. Adjust the mirror.
C. Fold-back/Unfolding.
Adjustment of interior rear view mirror
55
SITTING COMFORTABLY
Electric windows
62
Child safety
5. Inhibition of the opening of the
passenger and rear doors and
electric windows.
1. Driver’s window control.
2. Passenger’s window control.
3. Left hand rear window control.
4. Right hand rear window control.
1. Mirror direction.
2. Selection of the mirror’s "day"
position.
56
c4_dd_prise en main_ed05-2008.in15 15 10/07/2008 13:56:32
Page 20
16
F A M I L I A R I S AT I O N
VISIBILITY
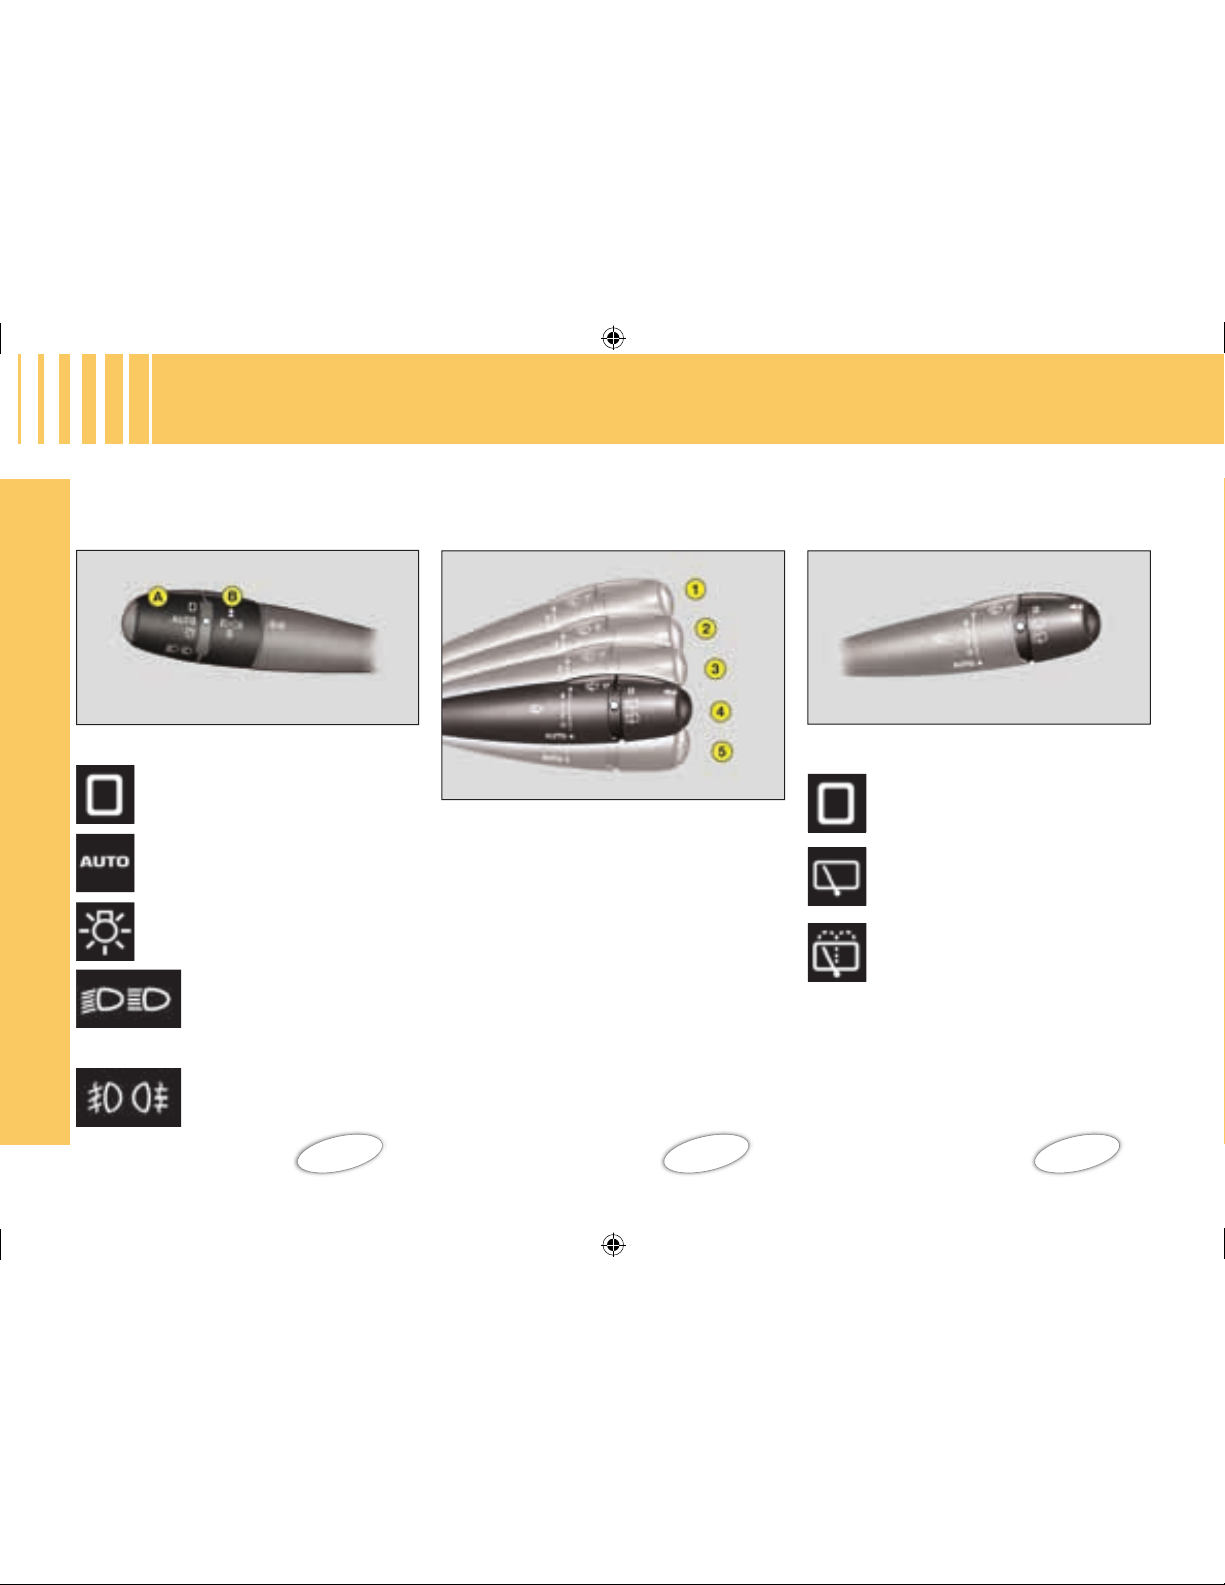
Lighting
Ring A
Ring B
Windscreen wipe
Screen wipe
Rear screen wipe
Front foglamps and rear
foglamps.
65
69
70
Lighting off.
Automatic lighting.
Sidelamps.
Dipped or main beam.
2 Fast speed.
1 Normal speed.
I Intermittent.
0 Off.
AUTO Automatic wipe or single wipe.
Off.
Intermittent.
Timed wipe and wash.
Deactivation of automatic wipe
Go to position I then return to position 0.
c4_dd_prise en main_ed05-2008.in16 16 10/07/2008 13:56:35
Page 21
–
17
F A M I L I A R I S AT I O N
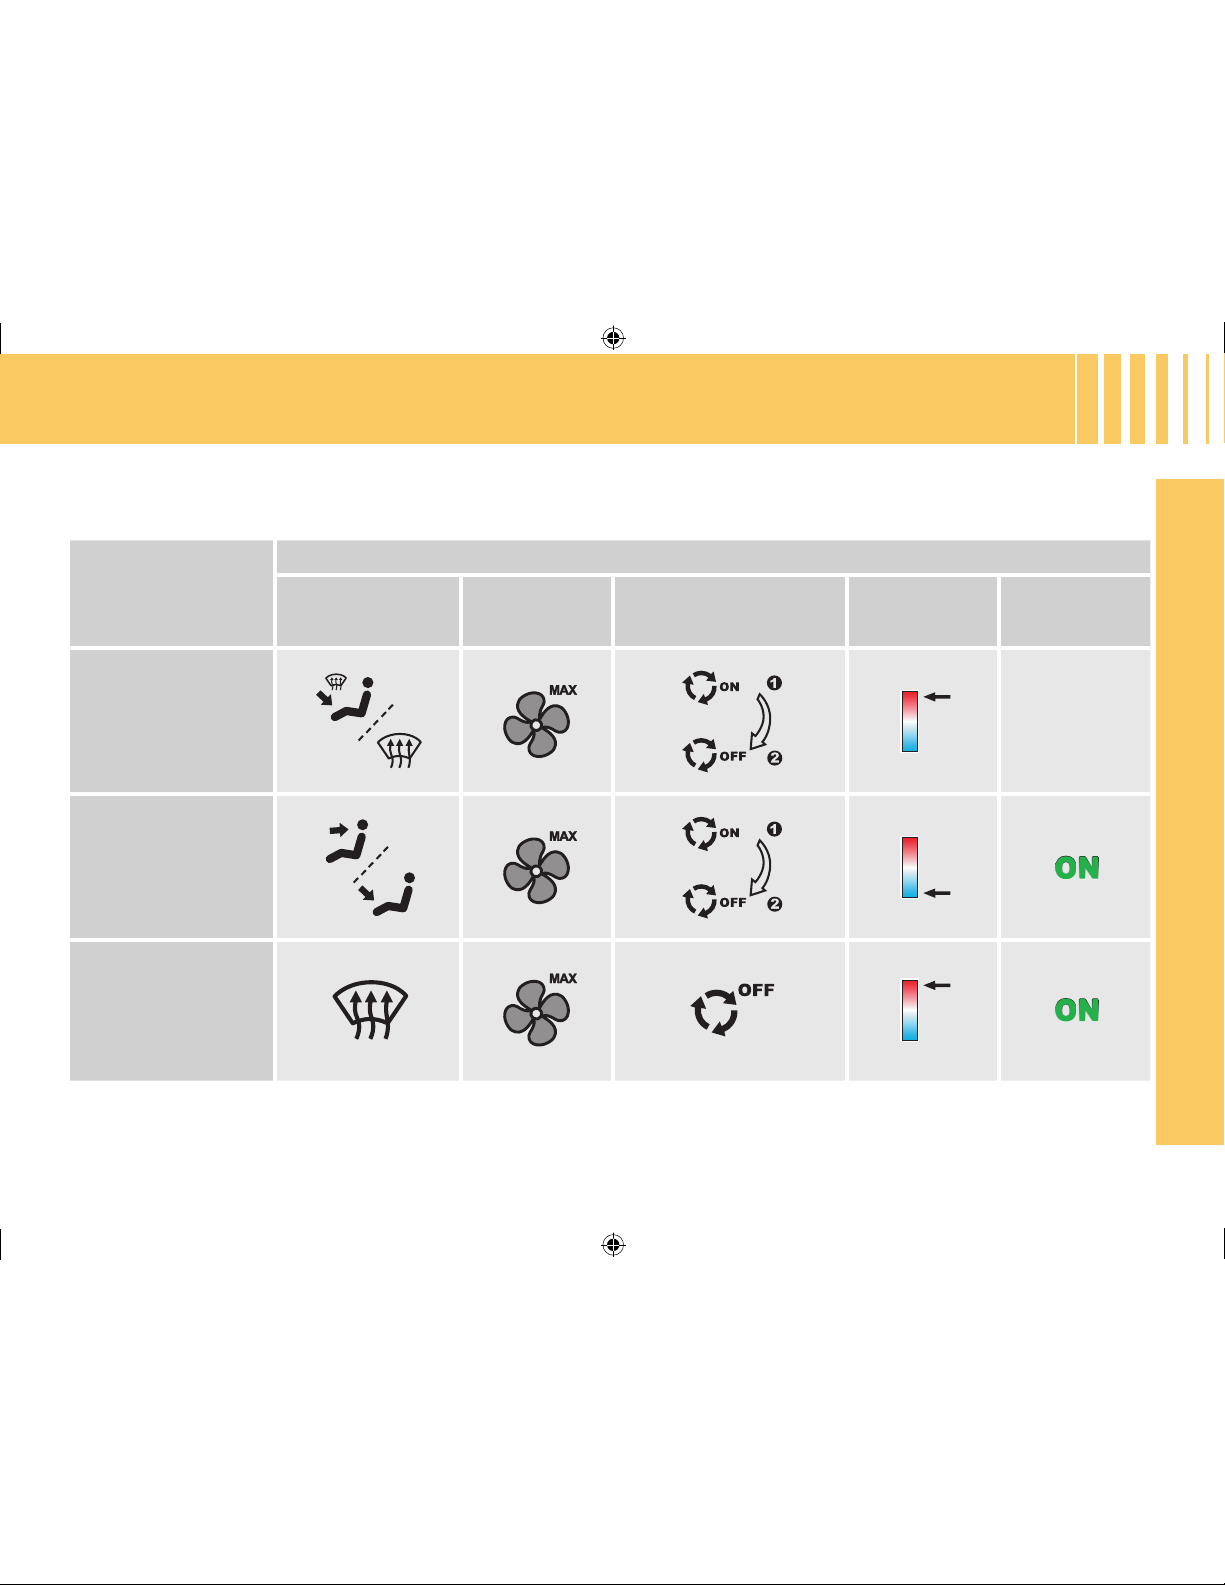
GOOD VENTILATION
To obtain the best from the system, we advise:
I would like ...
Heating or manual Air Conditioning
Air distribution Air ow
Air recirculation/
Fresh air intake
Temperature A/C
HEATING
COOLING
DEMISTING
DEFROSTING
c4_dd_prise en main_ed05-2008.in17 17 10/07/2008 13:56:37
Page 22
18
F A M I L I A R I S AT I O N
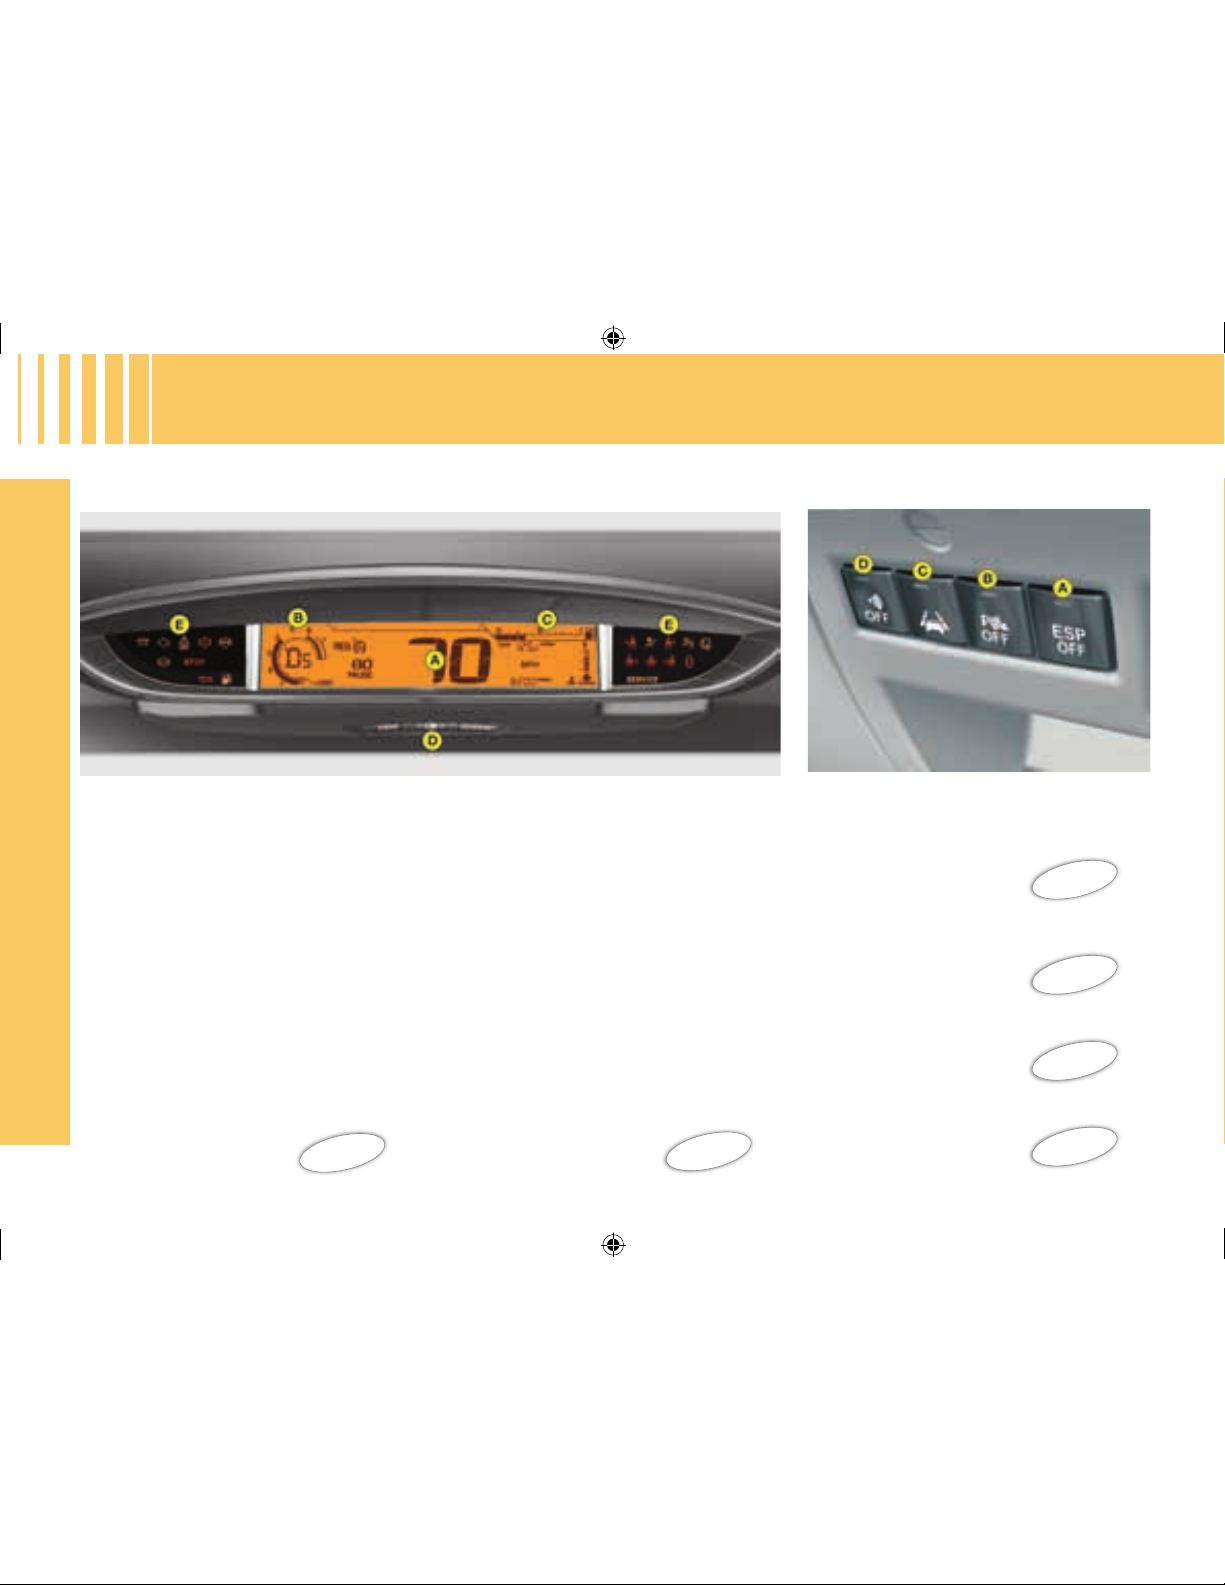
MONITORING
Instrument panel Controls
A. Speedometer.
B. Rev counter.
C. Fuel gauge.
D. Lighting rheostat.
E. Warning lamp.
Ignition on, the orange and red alert
warning lamps come on.
With the engine running, these same
warning lamps should go out.
If a warning lamp stays on, refer to the
relevant page.
Warning lamps
23
24
A. Deactivation of the ESP/ASR
system.
86
B. Deactivation of the visual and
audible parking assistance.
114
C. Deactivation of the lane departure
warning system.
96
D. Deactivation of the alarm
volumetric sensors.
61
c4_dd_prise en main_ed05-2008.in18 18 10/07/2008 13:56:38
Page 23
19
F A M I L I A R I S AT I O N
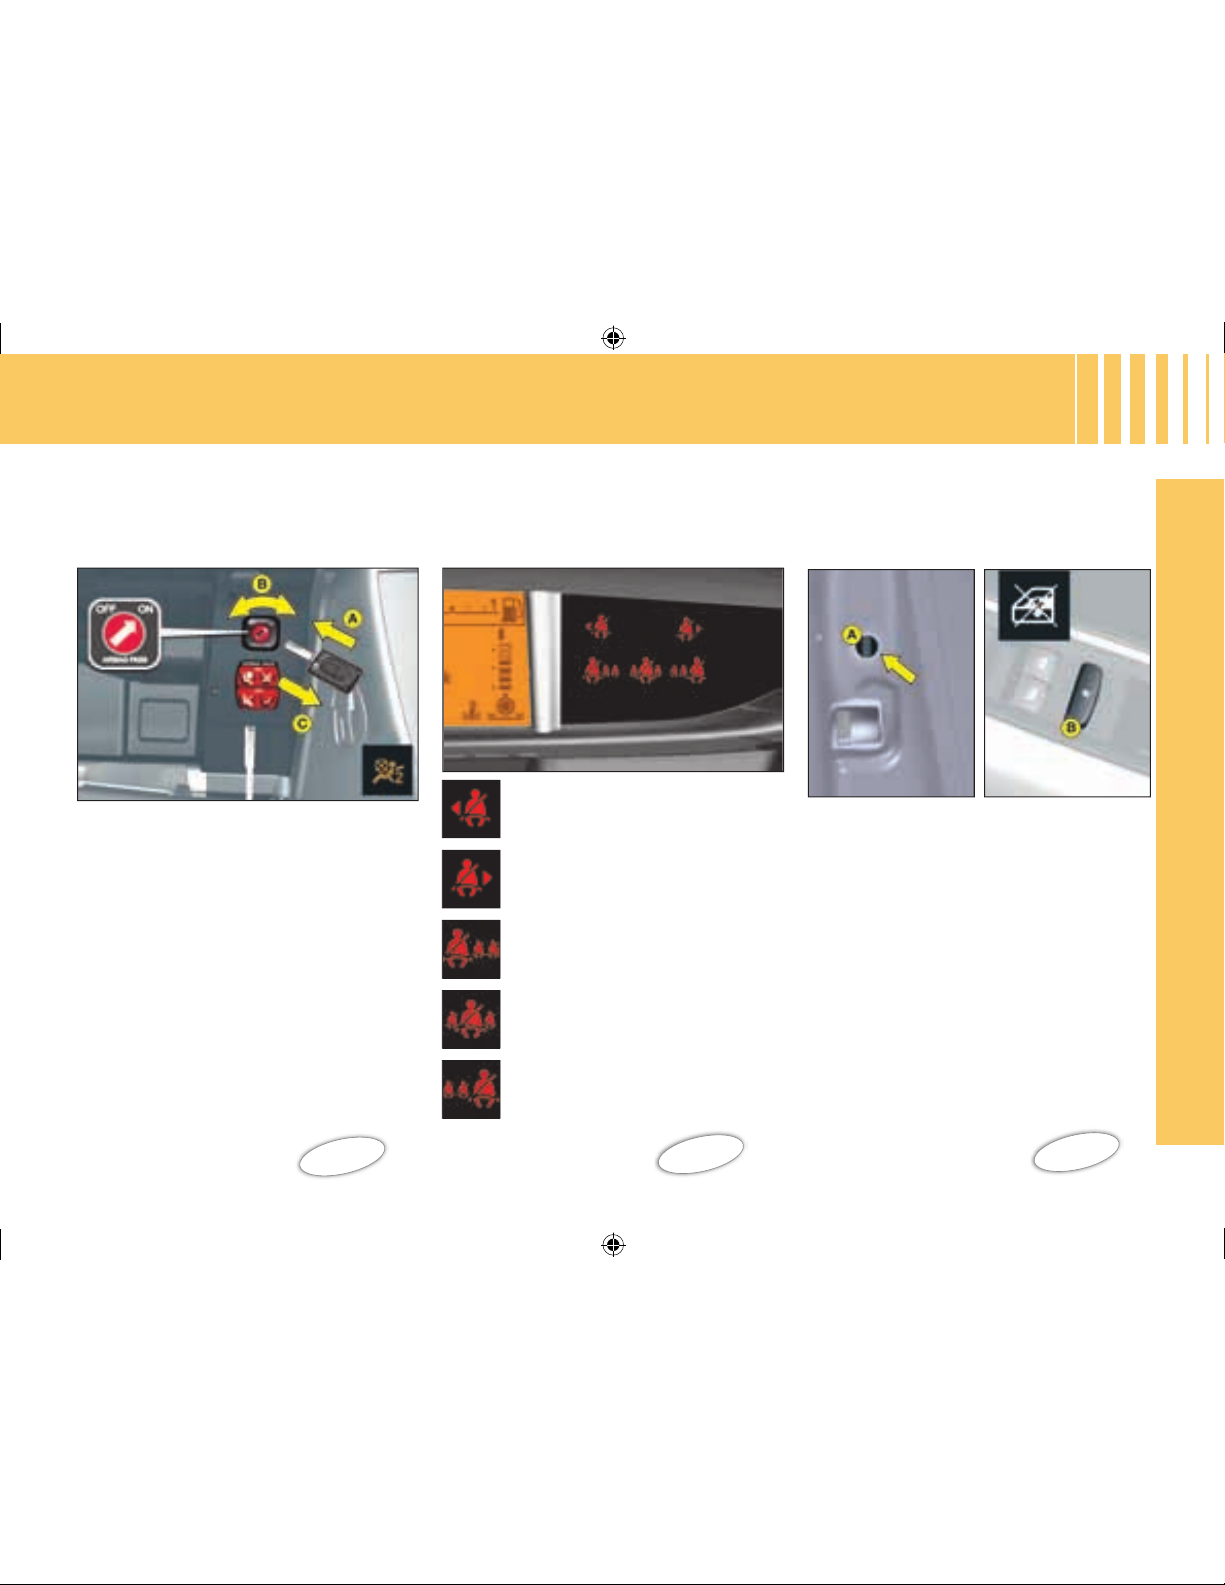
PASSENGER SAFETY
Activation/Deactivation of the
front passenger’s airbag
Child safety
A. Insert the ignition key.
B. Select the "ON" or "OFF" position.
C. Remove the key.
A. Manual control.
B. Electric control.
92
83
Warnings for seat belts
unfastened/not fastened
Driver
Front passenger.
Left rear passenger.
Centre rear passenger.
Right rear passenger.
25
c4_dd_prise en main_ed05-2008.in19 19 10/07/2008 13:56:40
Page 24
20
F A M I L I A R I S AT I O N
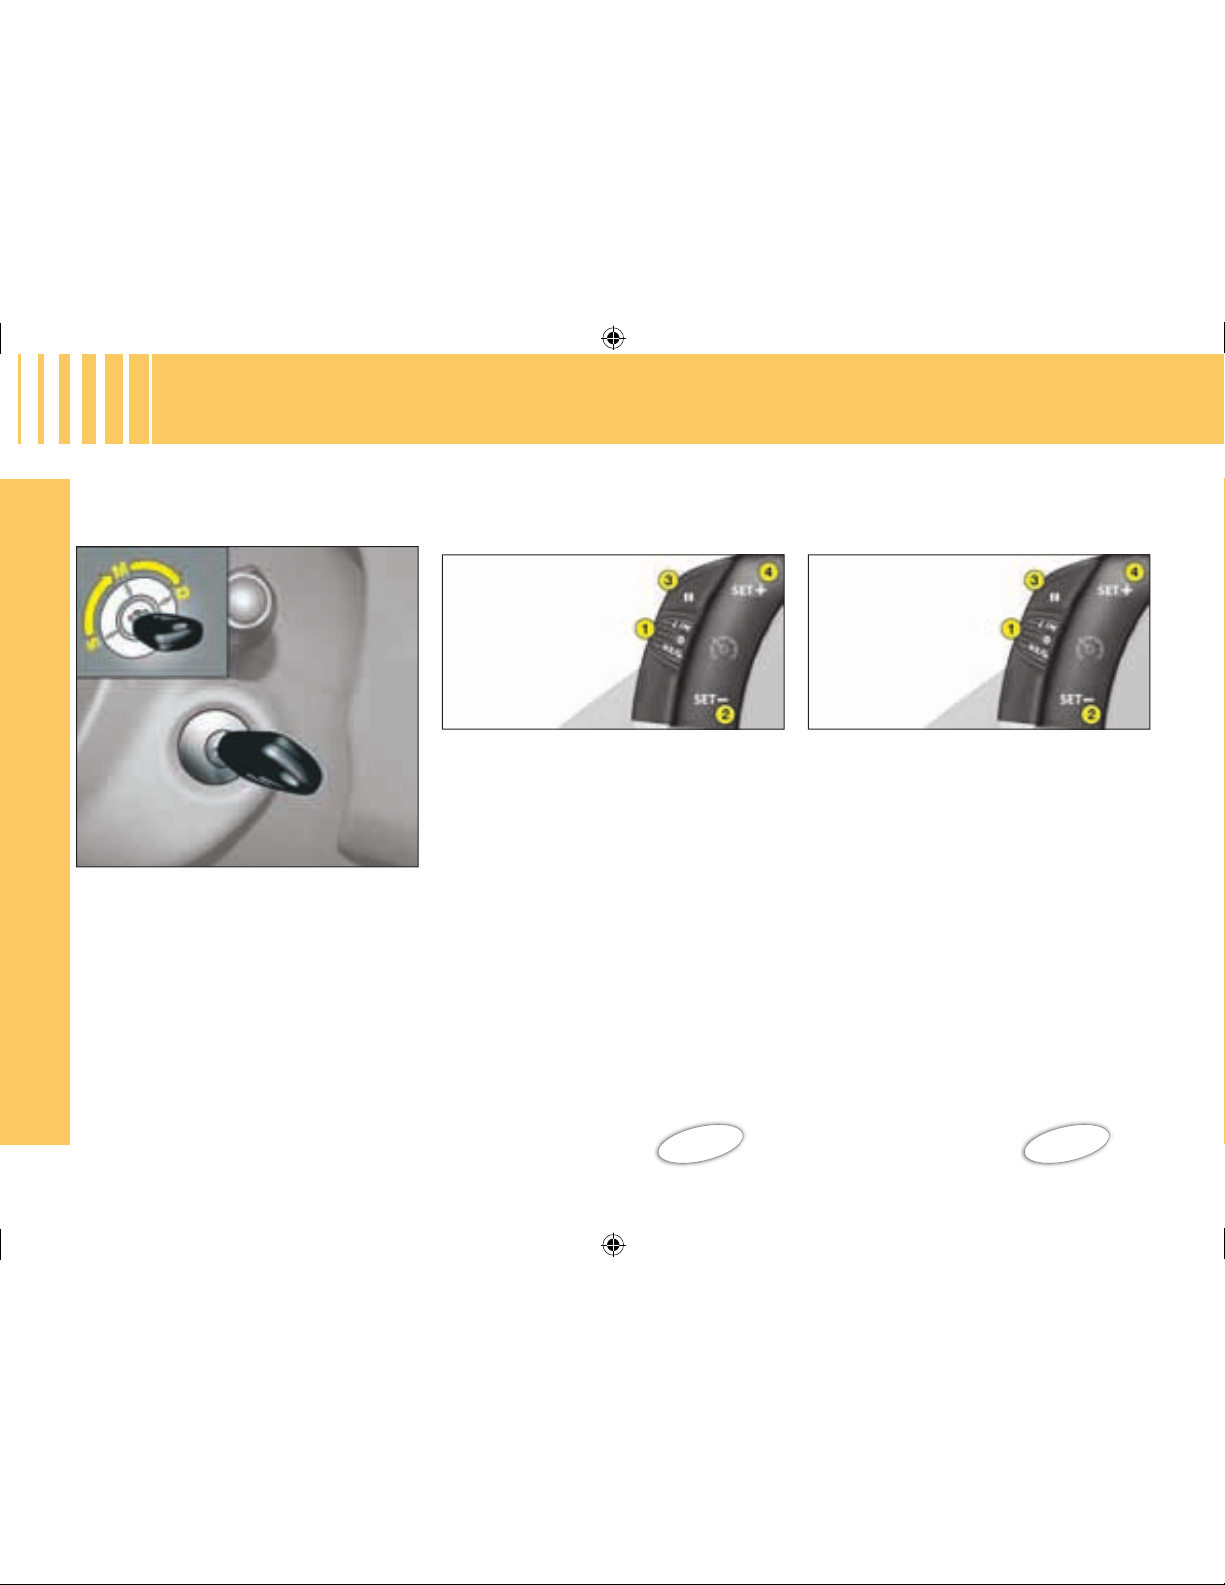
Ignition switch
• S: Steering lock
To free the steering, turn the steering
wheel slightly at the same time as
turning the key, avoiding any undue
force.
• M: Ignition
• D: Starter
Release the key as soon as the
engine has started. Never turn to this
position when the engine is running.
1. Selecting/stopping the cruise
control mode.
2. Setting a cruising speed/Reducing
the value memorised.
3. Stopping/Resuming cruise control.
4. Setting a cruising speed/
Increasing the value memorised.
Cruise control
110
To be memorised or activated, the
speed of the vehicle must be above
40 km/h (25 mph), with fourth or higher
gear selected on a manual gearbox
(second in the case of 6-speed EGS or
automatic gearbox).
DRIVING
Speed limiter
1. Selecting/Stopping the speed
limiter mode.
2. Reducing the value memorised.
3. Starting/Stopping speed limitation.
4. Increasing the value memorised.
112
c4_dd_prise en main_ed05-2008.in20 20 10/07/2008 13:56:41
Page 25
21
F A M I L I A R I S AT I O N
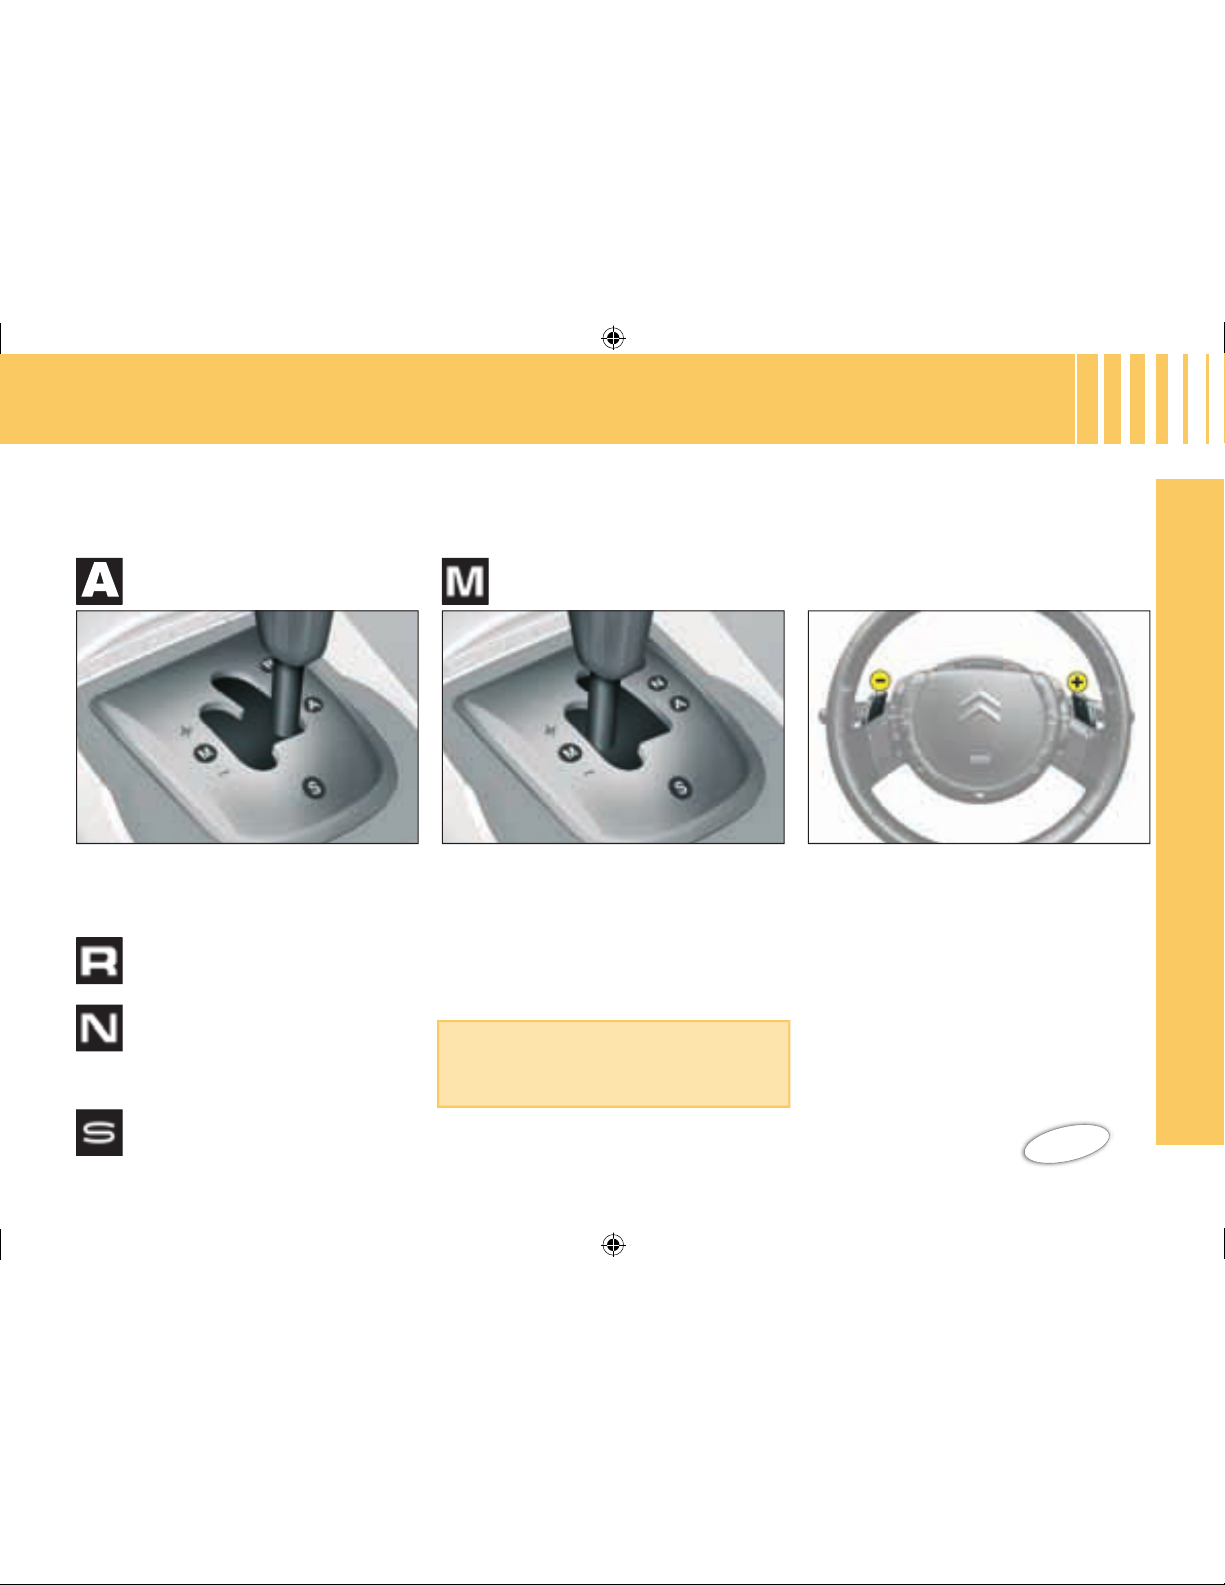
DRIVING
6-speed Electronic Gearbox
System
Automatic mode
Neutral
Do not select this position,
even momentarily, when
the vehicle is moving.
Sport setting
Reverse
Using the lever
Push the lever forwards to change up.
Pull the lever backwards to change
down.
Using the control paddles behind
the steering wheel
Press the "+" or "-" control paddle behind the steering wheel for an immediate gear change up or down respectively.
Under heavy acceleration, a higher
gear will only be engaged if the driver
operates the gear lever or the controls
on the steering wheel.
100
Manual mode
Or
The gearbox operates in auto-active
mode without input on your part.
c4_dd_prise en main_ed05-2008.in21 21 10/07/2008 13:56:43
Page 26
22
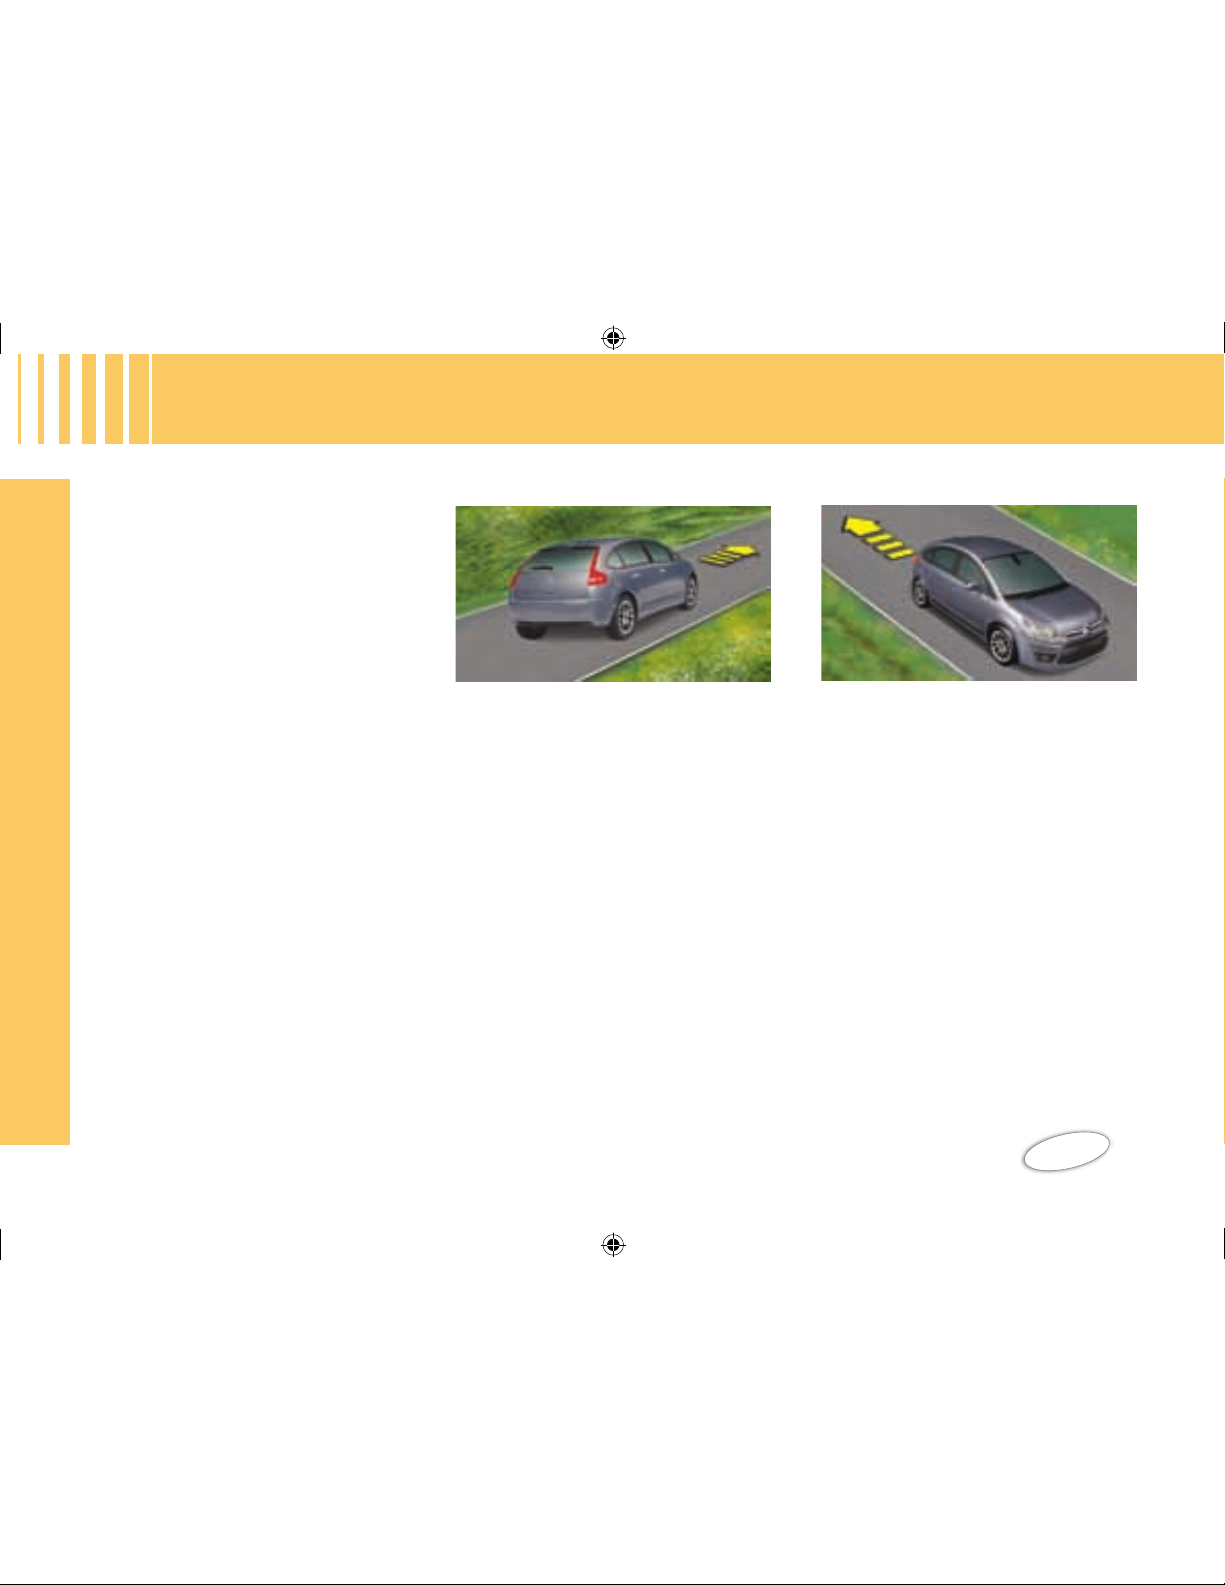
F A M I L I A R I S AT I O N
To aid starting on a gradient, your vehicle is equipped with a system that
keeps it temporarily immobilised.
On a falling gradient, with the vehicle
stationary and reverse gear engaged,
the vehicle is held for a brief moment
after releasing the brake pedal.
On a rising gradient, with the vehicle,
stationary, the vehicle is held for a brief
moment after releasing the brake pedal, if you are in A or M.
DRIVING
Hill start assist (6-speed
Electronic Gearbox System)
105
c4_dd_prise en main_ed05-2008.in22 22 10/07/2008 13:56:44
Page 27
23
I
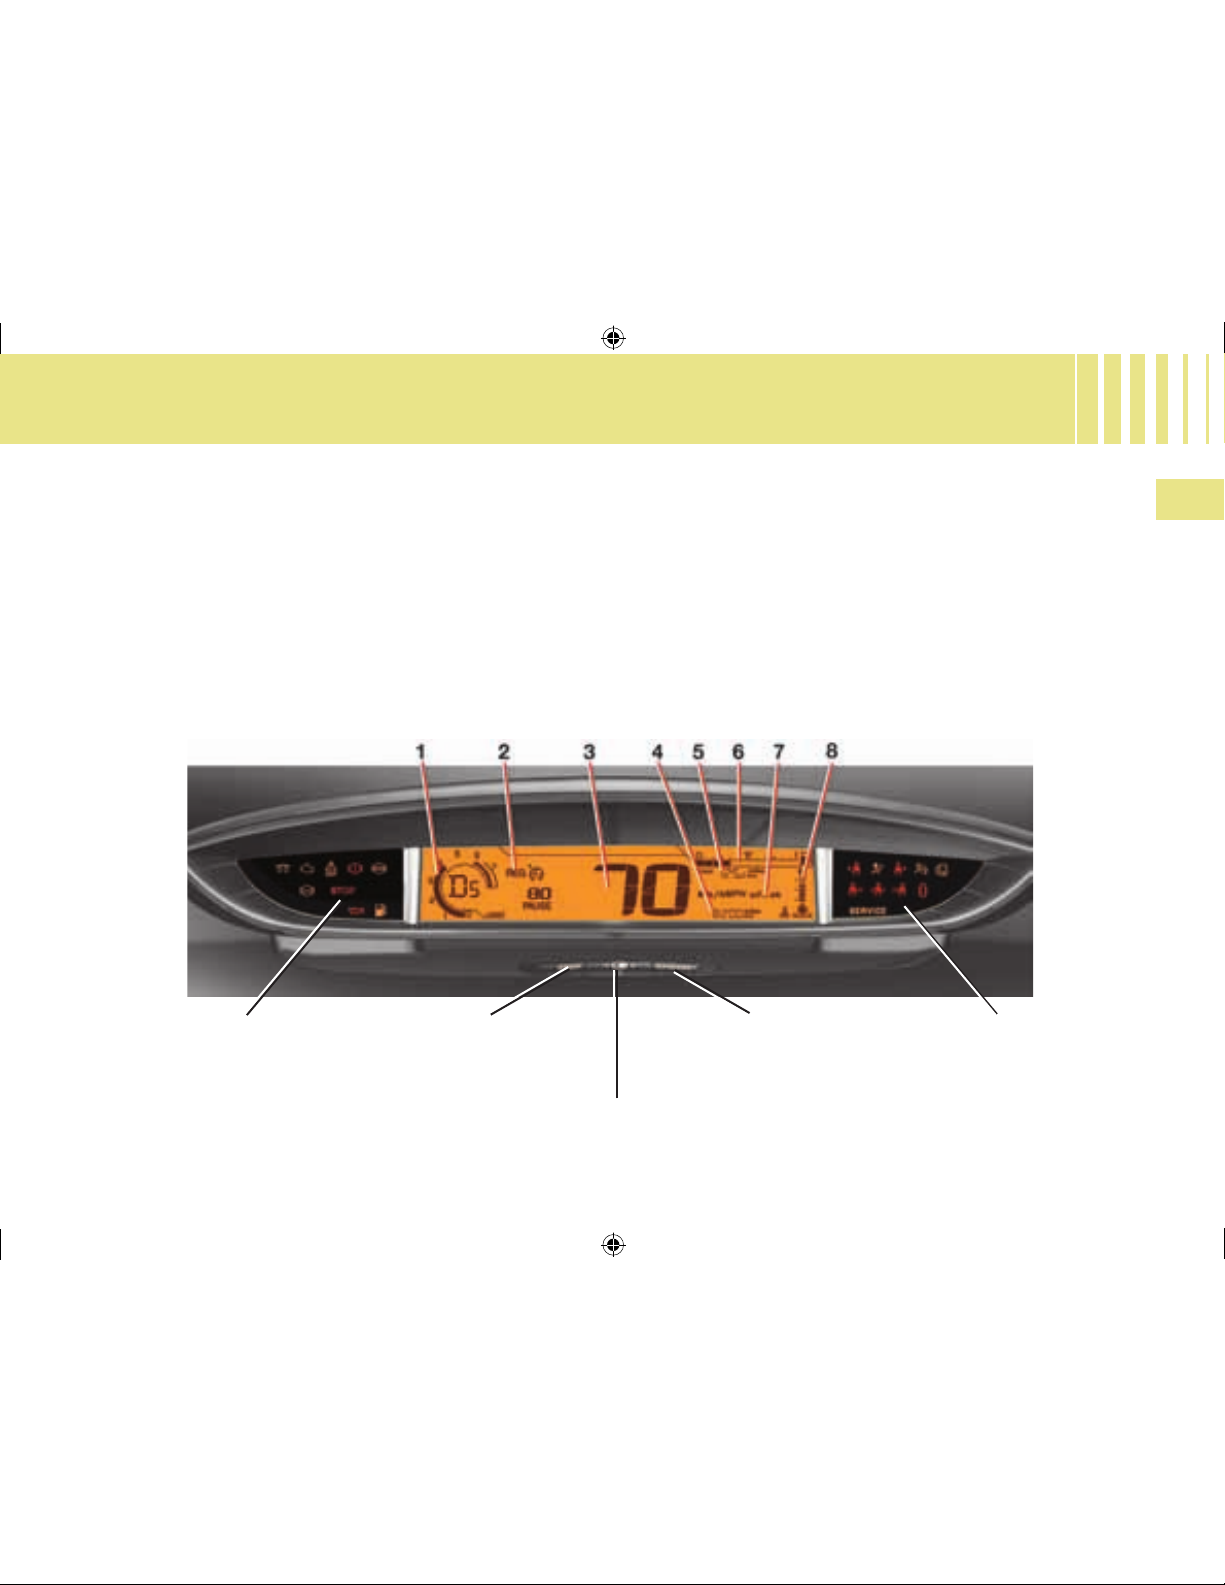
D A S H B O A R D
Display lighting rheostat
On opening the driver’s door or
unlocking with the remote control,
for approximately 30 seconds the
instrument panel is activated, displaying the mileage recorders and if
applicable, the maintenance indicator spanner.
Central display
Display of warning
lamps
Trip mileage
recorder reset
button
Display of alerts
and Status of
functions
Display of warning
lamps
INSTRUMENT PANEL
5 Trip mileage recorder
6 Fuel gauge
7 Engine oil level check
8 Coolant temperature
1
Rev counter
2 Cruise control or speed limiter
settings
3
Speedometer
4 Maintenance indicator on
switching on, then mileage
recorder
c4_dd_chap-01_ed05-2008.indd 23 10/07/2008 13:38:20
Page 28
24
I
D A S H B O A R D
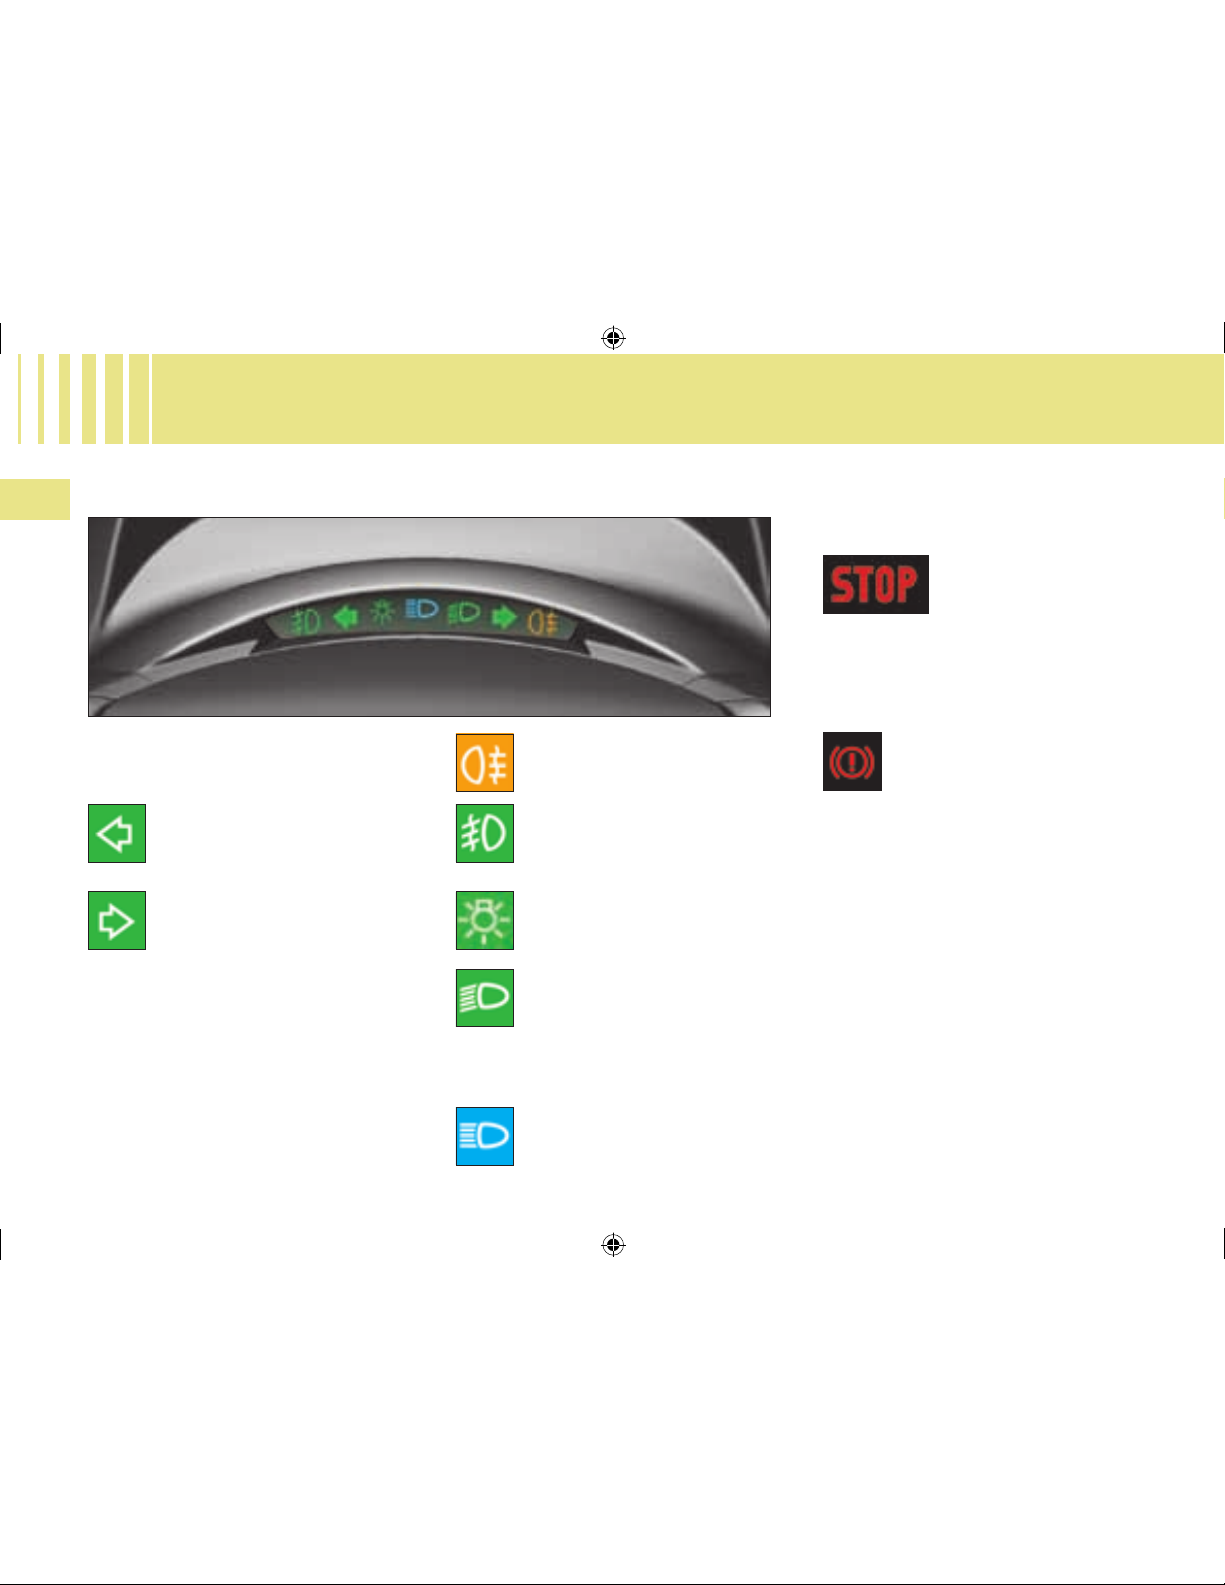
WARNING LAMPS
LH direction indicator
RH direction indicator
Dipped beam
Ifthiswarninglampashes,
it is indicating a malfunctioning of the directional headlamps.
Contact a CIT
ROËN dealer.
Sidelamps
Foglamps (rear)
M
ain beam
Foglamps (front)
The direction indicator lamps all
operate simultaneously when the
hazard warning is on.
L
ighting and signalling lamps
See "Visibility".
Alert warning lamps
Imperative stop
warning lamp
When the warning
lamp comes on, it is
imperative to stop the vehicle and
switch off the engine.
Contact a CIT
ROËN dealer.
Warning lamp for
handbrake, brake
uid level and braking
distribution fault
When the engine is running,
this warning lamp indicates that the
handbrake is applied or incomple-
telyreleased,thatthebrakeuidlevelisinsufcient,orthatthebraking
system is malfunctioning.
If the warning lamp remains lit when
the handbrake is released, stop
immediately
and contact a CITROËN
Dealer (See "Safety").
c4_dd_chap-01_ed05-2008.indd 24 10/07/2008 13:38:26
Page 29
25
I
D A S H B O A R D
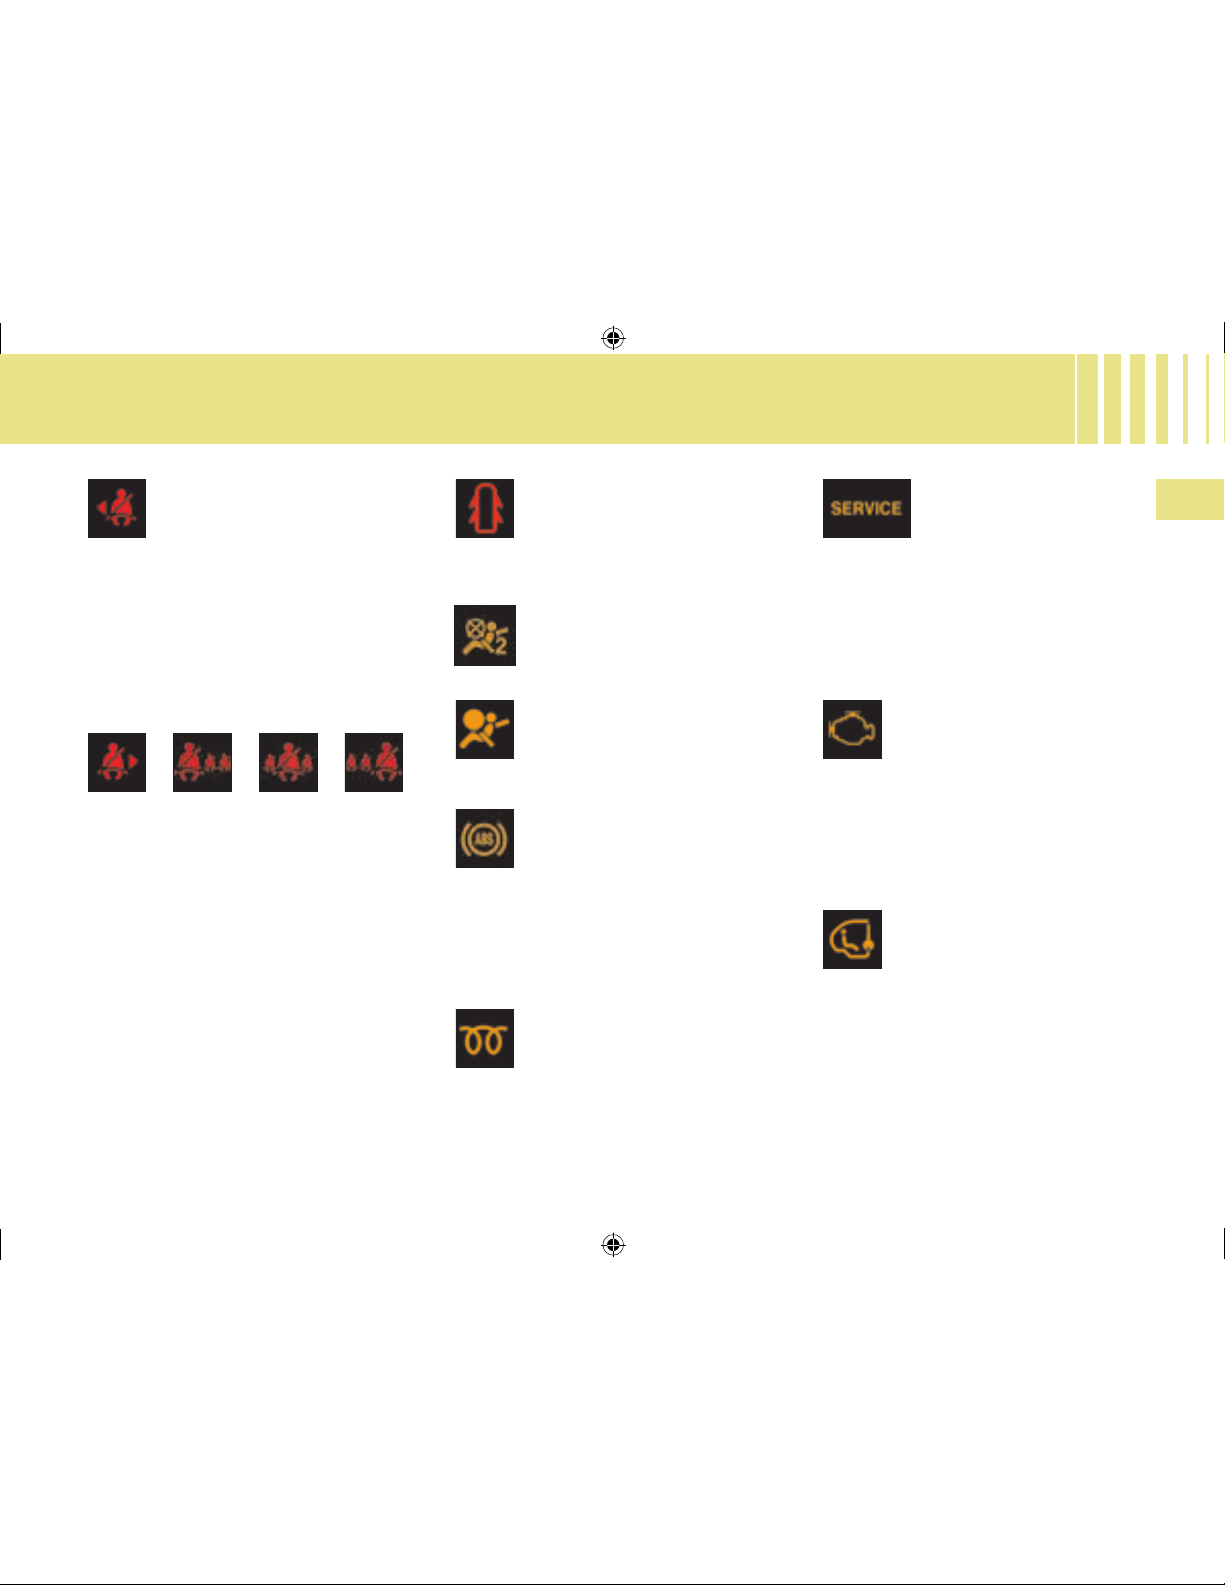
Driver’s seat belt not
fastened
This lamp comes on if the
driver's seat belt is not fastened when the ignition is switched
on and while the vehicle is moving at
up to 20 km/h (approx. 12 mph)
A
bove 20 km/h (12 mph), the war-
ning
lampashesforabout120se-
conds, accompanied by an audible
signal.
Passenger seat belt not fastened/
unfastened
O
n switching on the ignition, the warning lamp comes on when the passenger’s seat belt is not fastened.
It goes out when the engine is running,
doors closed, after 30 se-
conds.
Then it comes on, if the belt is not
fastened, while the vehicle is moving
at up to 20 km/h (approx. 12
mph).
Above 20 km/h (12 mph), the warning
lampashesforabout120seconds,
accompanied by an audible signal.
Front passenger’s airbag
deactivation warning
lamp
(
See "Safety").
Doors open detection
This warning lamp, when the
engine is running, comes on
if a door, the bonnet and/or
the boot is open.
Front/side airbag fault
warning lamp
(
See "Safety").
Anti-lock Braking System
The ABS warning lamp li
ghts when the ignition is
switched on and should go
out after a few seconds.
If the warning lamp does not
go out, there may be a system malfunction.
Diesel
Preheater
Wait for it to go out before
operating the starter.
Depollution system
warning lamp
If
itashesorlightsupwhile
you are driving, this indicates a depollution system operating
fault.
U
rgently consult a CITROËN Dealer.
SERVICE warning
lamp
If
it comes on, this indicates a fault with one of
the systems that do not
have
a specic warning
lamp.
S
ee the radio "Log of alerts" to discover the origin of the corresponding
alert message.
Child safety warning lamp
If child safety is activated,
this warning lamp comes on
then goes out approximately
10 seconds after starting the
engine.
c4_dd_chap-01_ed05-2008.indd 25 10/07/2008 13:38:28
Page 30
26
I
D A S H B O A R D
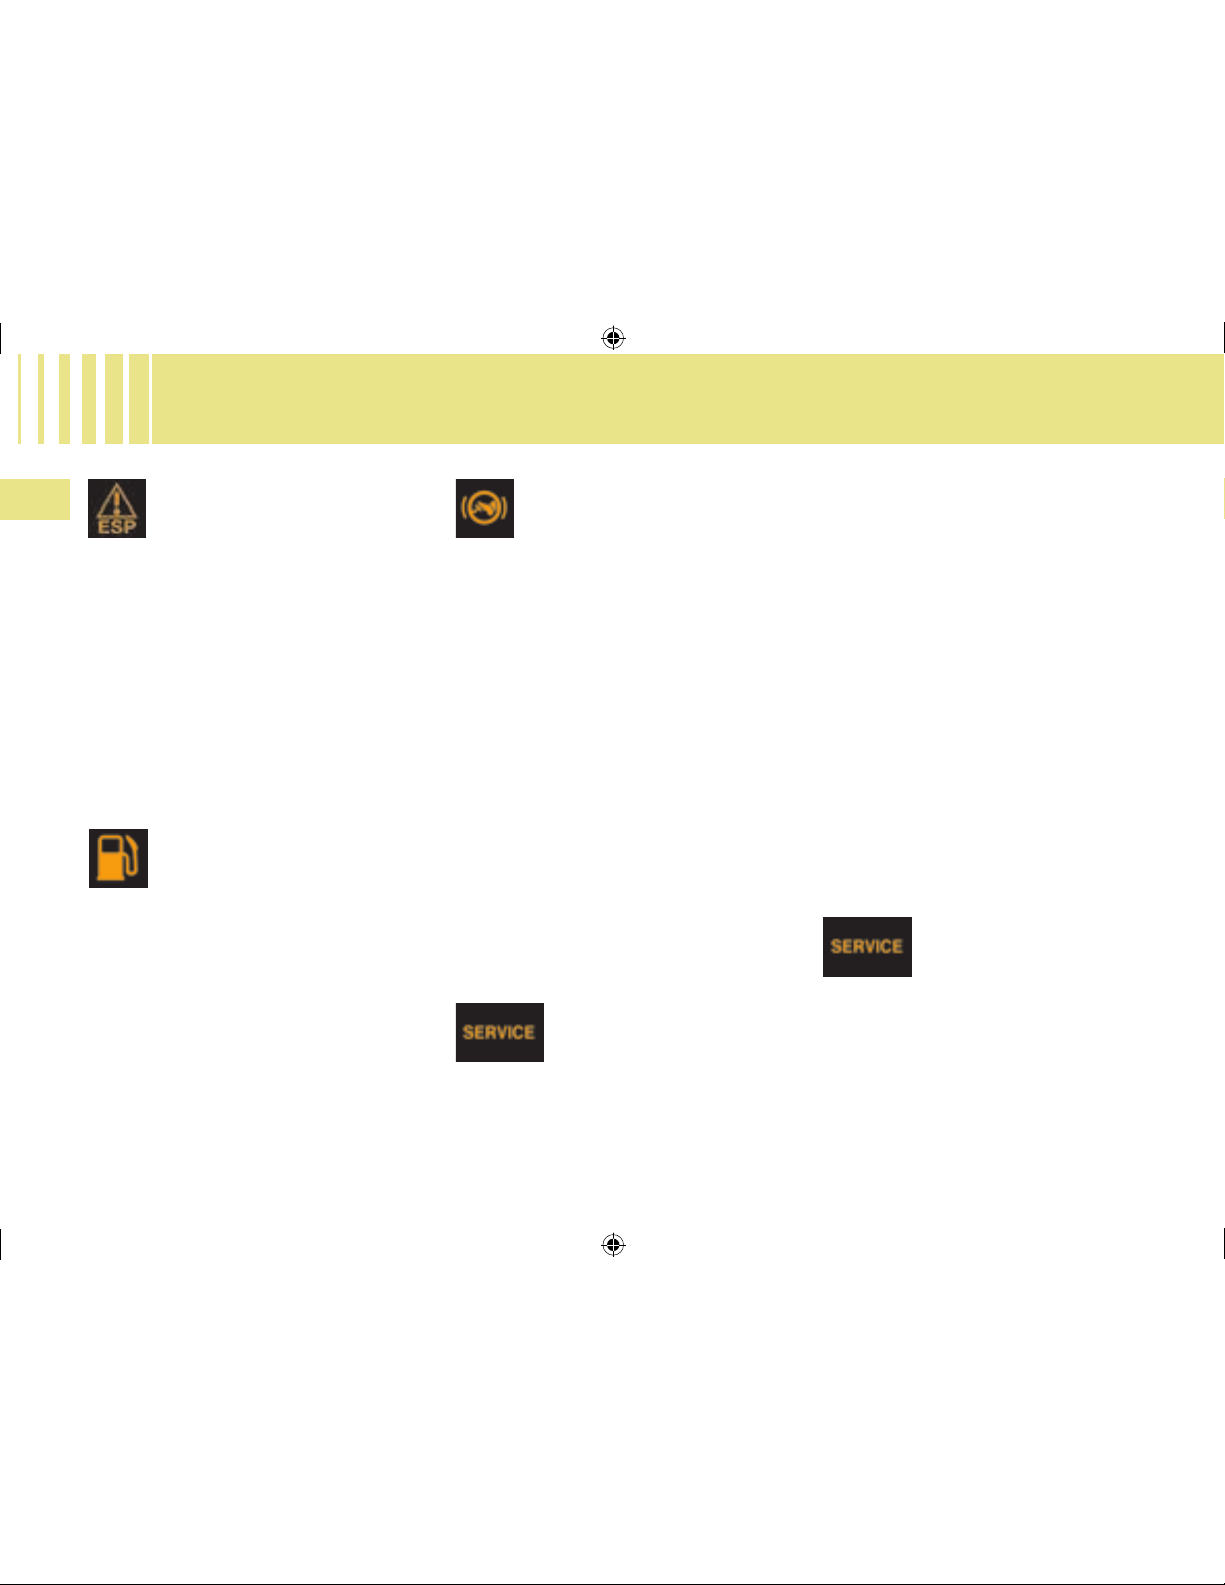
ESP/ASR warning lamp In
operation
When either the ESP or
ASR system is brought into
operation, the E
SP/ASR warning
lampashes.
In the event of a problem
When the vehicle is moving, the lighting of the E
SP/ASR warning
lamp indicates that the system is
malfunctioning.
Contact a CITROËN dealer.
Deactivation
Illumination of the E
SP/ASR warning
lamp and of the ESP control, means
that the system is deactivated.
Fuel gauge and low fuel
warning
When the tank is full, all the
indicator bars are illuminated.
When the low fuel level warning comes on, there remain around
7
litres of fuel in the tank and 2 or
3barsofthegaugewillash.
If the last bar disappears, there are
only around 2 litres of fuel in the tank.
"Foot-on-brake" starting
warning lamp for
(6
speed) Electronic
Gearbox System
During the engine starting phase,
this
ashes if you are not pressing
the brake pedal.
S
ee "(6 speed) Electronic Gearbox
System".
Thiswarninglamp may ash inthe
instrument panel to remind you to
apply the brake when engaging reverse gear.
Complementary to the catalytic
converter
, this lter makes an ac-
tive contribution to the preservation
of air quality by the retaining of the
unburnt pollutant particles. Black
exhaust fumes are thus no longer
emitted.
Clogging of the particle lter
The
SERVICE warning
lamp and a message in
the instrument panel are
displayed indicating that
the
particulate lter is starting to
become clogged (exceptionally prolonged urban driving conditions: re-
ducedspeed,trafccongestion…).
DIESEL PARTICULATE
FILTER SYSTEM
To regenerate the lter, you are
advised to drive, as soon as traf-
cconditions permit, at aspeed of
60 km/h (40 mph) or more for at
least 5 minutes (until the warning
message disappears).
If this alert persists, consult a
CIT
ROËN dealer.
Observation: A
fter prolonged idling
or driving at very low speeds, you
may occasionally notice water vapour being emitted from the exhaust
when accelerating. This is of no
consequence to the running of the
vehicle or to the environment.
Diesel fuel additive level
If the additive level is
low, a message appears
in the multifunction
screen, accompanied by
an audible signal and illumination
of
the SERVICE warning lamp: it is
necessary to have the additive level topped up. Contact a CITROËN
dealer as soon as possible.
c4_dd_chap-01_ed05-2008.indd 26 10/07/2008 13:38:29
Page 31

27
I
D A S H B O A R D
The maintenance indicator informs
you when the next service is due, in
conformity with the servicing programme detailed in the vehicle’s
Maintenance Guide. This information is determined depending on
two parameters: the mileage travelled and the time elapsed since the
previous service.
Operation
When the ignition is switched on
and for several seconds afterwards,
the maintenance spanner symbol
appears; the total mileage recorder
shows how many miles remain to be
travelled before the next service is
due (in thousands and hundreds of
miles).
Functioning if the distance to
the next service is less than
600
miles
Each time the ignition is switched
on,
andforveseconds,the main-
tenance symbol and the mileage will
ash.
For example: you have the following
distance left to travel before the next
service: 900 km.
For
vesecondsonswitchingonthe
ignition, the display shows
A
few seconds afterwards, the total
mileage display appears.
A
few seconds afterwards, the total mileage display appears and the maintenance symbol remains illuminated.
T
his signiesthat the vehicle will be
due for a service shortly.
MAINTENANCE INDICATOR
For example: you have the following dis-
tance left to travel before the next service:
c4_dd_chap-01_ed05-2008.indd 27 10/07/2008 13:38:31
Page 32

28
I
D A S H B O A R D
Functioning if the service interval
is exceeded
Each time the ignition is switched
on, the maintenance symbol and the
extra mileage travelled (with a minus
in
front)willash.
For example: the preset service dist
ance has been exceeded by 300 km.
Your vehicle must be serviced as
soon as possible.
A few seconds after you have switched on the ignition, the total mileage recorder returns to its normal
operation and the maintenance
symbol remains illuminated.
R
esetting the mileage indicator
to zero
Y
our CITROËN dealer performs this
operation after each service. However, if you carry out the servicing
yourself, the procedure for resetting
to zero is as follows:
-
Switch off the ignition, then place
the key on position S, steering
lock.
-
Press control 1 and keep it
pressed.
-
Switch on the ignition.
- Keep control
1 pressed until
the zero appears and the
maintenance symbol disappears.
-
Switch off the ignition.
Maintenance intervals
If your vehicle is used in particularly
harsh conditions, it is necessary to
select the maintenance schedules
for "special operating conditions"
(see the Maintenance Guide) which
consist of more frequent services.
c4_dd_chap-01_ed05-2008.indd 28 10/07/2008 13:38:32
Page 33

29
I
D A S H B O A R D
When the ignition is switched on, the
oil level indicator is displayed for several seconds.
This display indicates normal operating.
Aashing
of"OIL" indicates an oil
level that is below the minimum.
Check using the manual dipstick.
Check the oil level with the vehicle
on horizontal ground, the engine having been switched off for at least
15 minutes.
A ashing
of "OIL --" indicates a
malfunction of the indicator.
Consult your CIT
ROËN dealer.
ENGINE OIL LEVEL
INDICATOR
The rheostat is active if the sidelamps
are on and applies to:
- the instrument panel
- the displays
The desired brightness is selected via
control A
or by pressing control B.
With control B, press until the brightness
is at maximum. Release,
press until you reach minimum.
DASHBOARD LIGHTING
RHEOSTAT
c4_dd_chap-01_ed05-2008.indd 29 10/07/2008 13:38:33
Page 34

30
I
D A S H B O A R D
After the rst press on control C,
only the top part of the display remains illuminated.
A second press on control C triggers
black panel mode.
This function switches off certain of
the displays, for night driving. It can
be activated:
- either by 2 presses on control C
-
or by 1 press on control D if this
control has been programmed
with the black panel function.
D
ARK BUTTON BLACK PANEL
(with headlamps on)
The instrument panel continues to
show vehicle speed as well as the
cruise control and speed limiter
functions if these are activated.
If
thereis analertoramodication
of functions or adjustments, black
panel is interrupted.
To programme control D:
-
give a long press on control D,
-
then select the black panel
function on the multifunction
screen using the arrowed buttons
on your radio/CD or Navidrive
system. Validate with a press on
"OK".
No
te: the dashboard lighting rheostat
still operates in black panel mode.
c4_dd_chap-01_ed05-2008.indd 30 10/07/2008 13:38:33
Page 35

31
M U L T I F U N C T I O N D I S P L A Y
Controls:
A -
Access to the "Main menu"
B -
Scrolling in the display menus.
C - V
alidation and selection in the
menus of the function chosen
or the value modied
D -
Cancellation of the operation or
return to the previous display.
E -
Selection of the type of
information displayed in
zone 2 (date, radio/CD and trip
computer)
E or F -
In the menus, choice of
activation/deactivation of
your functions and choice
of your settings.
Presentation:
1 -
Time
2 -
Date and Display zone
3 -
Ambient temperature
If the outside temperature is between
+3 °C and -3 °C, the temperature
display ashes (risk of ice).
Note: T
he outside temperature
displayed may be higher than the
actual temperature if the vehicle is
standing in bright sunshine.
DISPLAY A
The driver is advised not to
operate the controls when
driving.
c4_dd_chap-02_ed05-2008.indd 31 10/07/2008 13:39:24
Page 36

32
II II
M U L T I F U N C T I O N D I S P L A Y
To activate/deactivate automatic
guide-me-home lighting
-
Press on A.
-
Select, using B, the sub-menu
to personalise-congure your
vehicle, then conrm your choice
by a press on C.
-
Select guide-me-home lighting,
using B.
-
The system tells you whether the
function is active/inactive. Modify
this status by a press on E or F.
-
Validate with a press on C.
To activate/deactivate rear
screen wipe on engaging reverse
gear
-
Press on A.
-
Select, using B, the sub-menu
to personalise-congure your
vehicle, then conrm your choice
by a press on C.
-
Select rear screen wipe, using B.
-
The system tells you whether the
function is active/inactive. Modify
this status by a press on E or F.
-
Validate with a press on C.
Main menu
By pressing control A then B,
you have access to the following
functions:
• Radio-CD (
See "Radio")
•
Vehicleconguration, to activate/
deactivate:
- Triggering of rear screen wipe
- Automatic guide-me-home
lighting, with choice of duration
• Options, to display the alerts
• Display
adjustments, to adjust
the date and time on the display
•
Languages, to select the display
language
• Units, to access the choices of
units
of Temperature and Fuel
Consumption
c4_dd_chap-02_ed05-2008.indd 32 10/07/2008 13:39:25
Page 37

33
M U L T I F U N C T I O N D I S P L A Y
To display the log of alerts
- Press on A.
-
Using B, select the sub-menu for
options.
Conrm with two presses
on C.
Note: You can cancel the start of the
display by selecting E to abandon,
validate with a press on C.
The alerts that have previously
been signalled to you but not
resolved, are recalled to you in a
scroll. To delete the display of an
alert, press D.
To adjust the date and time
-
Press on A.
-
Using B, select the sub-menu for
D
isplay Adjustments then validate
with a press on C.
- Using B, select what you wish to
modify: year, month, day, hour,
minutes, or display mode.
-
Make your adjustment by presses
on E or F. You
can continue
your adjustments, selecting
further parameters by pressing
B. When you have nished your
adjustments, press C.
To choose the language
-
Press on A.
-
Using B, select the sub-menu for
Languages. Conrm your choice
with a press on C.
-
By presses on E or F, select the
language of your choice then
validate with a press on C.
To choose the units
-
Press on A.
-
Using B, select the sub-menu for
Units. Conrm your choice with a
press on C.
-
Using B, select the unit you
wish
to modify (Temperature or
Consumption).
- Via presses on E or F, select the
unit of your choice, then validate
with a press on C.
Note: T
his choice concerns all
the types of information (fuel
consumption, speed, etc.) that
appear on the displays.
c4_dd_chap-02_ed05-2008.indd 33 10/07/2008 13:39:26
Page 38

34
II II
M U L T I F U N C T I O N D I S P L A Y
Main menu
Press control A to display the "Main
menu" for the multifunction screen.
U
sing this menu, you have access
to the following functions:
Presentation:
1 -
Time.
2 -
Ambient temperature
3 -
Date and Display zone
If the outside temperature is between
+3 °C and -3 °C, the temperature
display ashes (risk of ice).
Note: the outside temperature
displayed may be higher than the
actual temperature if the vehicle is
standing in bright sunlight.
Radio-CD
(See "Radio")
Trip computer
Bluetooth hands-free kit
(
See "Radio")
Controls
A -
Access to the "Main menu".
B -
Scrolling in the display menus.
C - V
alidation and selection in the
menus of the function chosen
or the value modied.
D -
Cancellation of the operation or
return to the previous display.
E -
Selection of the type of
information you wish to see
permanently displayed (date,
radio-CD, trip computer) on the
right of the screen.
DISPLAY C
It allows:
- Distance to your destination.
- Access to log of alerts (list of the
alerts that have been previously
signalled).
-
Access to status of functions, for
example activation/deactivation of
automatic lighting of head-lamps,
E
SP, windscreen wipers.
The driver is advised not to
operate the controls when
driving.
c4_dd_chap-02_ed05-2008.indd 34 10/07/2008 13:39:27
Page 39

35
M U L T I F U N C T I O N D I S P L A Y
Personalisation
Conguration
It allows you to activate/
deactivate:
-
Triggering of rear screen wipe.
- Automatic guide-me-home lighting,
with choice of duration.
-
Driving headlamps.
Also to choose:
- Brightness, the time, the date,
units.
-
The display language.
To activate/deactivate rear wipe
on engaging reverse gear
-
Press on A.
-
Use B to select the trip computer
icon, then conrm with a press on C.
- Select your entry of distance,
using B. Conrm your choice with
a press on C.
- To choose the distance, select the
gure to be modied, using
B, then
conrm with a press on C.
- Use B to adjust the value then
validate with a press on C.
-
Validate on "OK" on the display.
To activate/deactivate automatic
guide-me-home lighting
-
Press on A.
-
Use B to select the icon
"Pe
rsonalisation-Configuration"
then conrm your choice with a
press on C.
- Then select the sub-menu for
vehicle parameters. Conrm your
choice with a press on C.
-
Using B, select lighting and
signalling. Conrm your choice
with a press on C.
-
Then with a press on C, select/
deselect guide-me-home lighting
to
activate or deactivate it. After
activation, choose the duration:
press on C then use B to select the
duration and press on C.
- Validate on "OK" on the display.
To activate/deactivate the
directional headlamps
-
Press on A.
-
Use B to select the icon
"Pe
rsonalisation-Configuration"
then conrm your choice with a
press on C.
- Then select the sub-menu for
vehicle parameters. Conrm with
a press on C.
To adjust the display
brightness
-
Press on A.
-
Use B to select the icon
"Pe
rsonalisation-Configuration"
then conrm your choice with a
press on C.
- Select the display conguration
using B. Conrm with a press
on
C.
- Select the adjustment of brightness.
Conrm with a press on C.
-
Use B to select normal or other
display mode, then validate
with a press on C. To
adjust the
brightness, select the symbols "+"
or "-" and conrm your adjustment
with a press on C.
- Validate on "OK" on the display.
-
Using B, select the driving
assistance. Conrm your choice
with a press on C.
-
Then with a press on C, select/
deselect driving headlamps to
activate or deactivate them.
-
Validate on "OK" on the display.
c4_dd_chap-02_ed05-2008.indd 35 10/07/2008 13:39:28
Page 40

36
II II
M U L T I F U N C T I O N D I S P L A Y
To choose units
- Press on A.
-
Use B to select the icon
"Pe
rsonalisation-Configuration"
then conrm your choice with a
press on C.
- Select the display conguration
using B. Conrm with a press on C.
-
Then select the sub-menu for
Units. Conrm with a press on
C.
- Using B, select the unit to
be modied (Temperature or
C
onsumption) then validate with a
press on C.
- Validate on "OK" on the display.
Note: T
his choice concerns all
the types of information (fuel
consumption, speed, etc.) that
appear on the displays.
To choose the language
-
Press on A.
-
Use B to select the icon
"Pe
rsonalisation-Configuration"
then conrm your choice with a
press on C.
- Select the choice of language,
using B.
-
Using B, select the desired
language and validate your choice
with a press on C.
-
Validate on "OK" on the display.
To adjust the date and time
-
Press on A.
-
Use B to select the icon
"Pe
rsonalisation-Configuration"
then conrm your choice with a
press on C.
- Select the display conguration
using B. Conrm with a press
on
C.
- Select the date and time
adjustment, using B, then conrm
with a press on C.
-
Use B to select the values to be
modied. Conrm with a press on C.
- Make your adjustments using B,
validating each adjustment with a
press on C.
- Validate on "OK" on the display.
c4_dd_chap-02_ed05-2008.indd 36 10/07/2008 13:39:29
Page 41

37
M U L T I F U N C T I O N D I S P L A Y
Controls
A -
Access to the "Main menu".
B -
Scrolling in the display menus.
C - V
alidation and Selection in the
menus, of the function chosen
or value modied.
D -
Cancellation of the operation or
return to the previous display.
E -
Selection of the type of
information you wish to see
permanently displayed (date,
radio-CD, trip computer) on the
right of the screen.
Presentation:
1 -
Ambient temperature
2 -
Directory
3 -
Date
4 -
Telephone
5 -
Time
If the outside temperature is between
+3 °C and -3 °C, the temperature
display ashes (risk of ice).
Note: T
he outside temperature
displayed may be higher than the
actual temperature if the vehicle is
standing in bright sunshine.
NAVIDRIVE DISPLAY
Main menu
Press control A to display the "Main
menu" for the multifunction screen.
T
his menu gives access to the
following functions (See "Navidrive"
instructions):
The driver is advised not to
operate the controls when
driving.
T
rafcinformation
Vehicle diagnosis
Audio
Conguration,
for
adjusting various
parameters (date, time,
units)
Map
Video
Navigation/guidance
Audio
c4_dd_chap-02_ed05-2008.indd 37 10/07/2008 13:39:30
Page 42

38
II II
M U L T I F U N C T I O N D I S P L A Y
Display A
The trip computer provides 5 types of
information, which can be accessed
by pressing successively on the end
of the control stalk.
•
Range
• Instantaneous fuel consumption
• Distance travelled
• Average fuel consumption
• Average speed
To cancel the display of the trip
computer information press a sixth
time
Display C or NaviDrive
3 types of instantaneous information:
- Range
- Instantaneous consumption
- Distance remaining to be travelled
To obtain display and selection of
the different types of information,
give short presses on the end of the
windscreen wiper stalk.
To reset trip computer information
to zero, press continuously for a
few seconds on the end of the stalk
when one of the information types is
displayed.
TRIP COMPUTER
It also gives you access to 3 types of
information for two Journeys 1 and 2:
- Distance travelled
- Average consumption
- Average speed
c4_dd_chap-02_ed05-2008.indd 38 10/07/2008 13:39:31
Page 43

39
M U L T I F U N C T I O N D I S P L A Y
Display C or NaviDrive (continued)
The journeys
Journeys 1 and 2 are identical but
independent
of each other. For
example, you can use Journey 1 for
daily calculations and Journey 2 for
monthly calculations.
To reset a journey to zero
When the desired journey is
displayed, give a long press on the
end of the wiper stalk.
Permanent display
P
ressing the "Mode" button causes
the trip computer information to be
displayed permanently.
Enter the distance to be travelled
-
Press A.
-
Using B select the trip computer
icon, then validate by pressing C.
-
Select distance entry, using B.
Validate your choice by pressing C.
- To choose the distance, select the
gure to be modied using B then
validate using C.
- Using B, adjust the value then
validate using C.
-
Validate with "OK" in the display.
To display the log of alerts or
status of functions
-
Press A.
-
Using B select the trip computer
icon, then validate by pressing C.
-
Select the log of alerts or status of
functions.
-
Once the list is displayed, scroll
through the list using B.
-
Press D to return to the permanent
display.
c4_dd_chap-02_ed05-2008.indd 39 10/07/2008 13:39:32
Page 44

40
II II
M U L T I F U N C T I O N D I S P L A Y
Display A Display C or NaviDrive
(continued)
Range
T
his indicates the mileage that can still be travelled using the
fuel remaining in the tank.
When the distance remaining to be travelled is less than about
25 km (approx. 15 miles), only three dashes are displayed.
A
fter resetting the computer, the indication of remaining range is
only reliable after the vehicle has been used for a certain time.
Average fuel consumption
T
he average fuel consumption is calculated from the last reset
of the computer.
Instantaneous fuel consumption
T
his is calculated from consumption over the previous 2 seconds.
This function is only available when travelling at over 30 km/h
(approx. 20 mph).
Average speed
The average speed is obtained, from the last reset of the
computer, by dividing the distance covered by the time taken
(ignition on).
Distance travelled
It indicates the distance travelled since the trip computer was
last reset to zero.
Distance remaining
S
ee previous page.
c4_dd_chap-02_ed05-2008.indd 40 10/07/2008 13:39:36
Page 45

41
C O M F O R T
VENTILATION
Air intake
Make sure that the exterior air inlet
grille at the base of the windscreen
is clean (free of dead leaves, snow
etc.).
If washing the vehicle with a high
pressure jet, take care to avoid targeting close to the air inlet.
Air vents
The air vents have grilles for direct-
ing the ow of air (up/down, right/
left) with controls for adjusting the
volume of air.
Air circulation
Optimal comfort is obtained by a
good distribution of air in the front
and the rear of the passenger compartment.
To ensure efcient operation, take
care not to obstruct the air outlets
located under the front seats.
Pollen lter/odour lter
(active carbon)
Your installation has a lter for excluding dust and restricting disagreeable
odours.
This lter needs to be changed according to the maintenance requirements.
(See: Maintenance Guide).
c4_dd_chap-03_ed05-2008.indd 41 10/07/2008 13:40:28
Page 46

42
III III
C O M F O R T
Air conditioning
At any time of year, the air conditioning is useful for removing air humidity
and misting.
To keep the air conditioning compressor well sealed, it is essential to
operate the air conditioning at least
once in every month.
To be effective, the air conditioning
should only be used with the windows closed.
If you are towing a heavy trailer or if
outside temperatures are very high,
the air conditioning may be temporarily interrupted in favour of engine
cooling.
Sensor
The automatic air conditioning inside
the passenger compartment makes
use of the sunlight sensor, which is
located on the dashboard behind
the instrument panel.
Take care not to obstruct it.
Water arising from condensation in
the air conditioning is allowed to drain
out through an aperture provided for
this purpose; a pool of water may
thus form beneath the vehicle when
stationary.
You are recommended to have the
air conditioning system checked on
a regular basis (see Maintenance
Guide).
The air conditioning uses energy
from the engine to operate. This results in extra fuel consumption
c4_dd_chap-03_ed05-2008.indd 42 10/07/2008 13:40:28
Page 47

43
C O M F O R T
Air ow to the face level
vents.
The heating/ventilation and manual
air conditioning systems can only
function with the engine running.
1 -
Adjustment of the air
distribution
Demisting - Defrosting.
Flow to the windscreen
and front side windows.
Distribution to the windscreen, side windows and
footwells.
Flow to front and rear
passenger footwells.
HEATING/VENTILATION
Distribution from the air blower can
be altered at will by placing the distributor 1 in an intermediate position.
MANUAL AIR CONDITIONING
2 - Air recirculation
3 - Heater blower control
The air blower operates only when
the engine is running. For optimum
comfort in the passenger compartment, the control should not remain
in position
0 (position 1 minimum).
4 - Temperature control
This position is for excluding disagreeable odours
or emissions coming from
outside the cabin. With a
press on control 2, the entry of air
from outside is closed off, the lamp
comes on.
This should be cancelled as soon as
possible to prevent misting and to
allow fresh air into the cabin.
To deactivate air recirculation, press
again on control 2, the warning lamp
goes out.
c4_dd_chap-03_ed05-2008.indd 43 10/07/2008 13:40:30
Page 48

44
III III
C O M F O R T
6 - Air conditioning
The air conditioning will only operate
when the engine is running.
5 -
Rear screen demisting
Can only be operated with the engine running.
Demisting-deicing of the
windscreen and front side
windows
One press on control 5 activates the electric demisting
of the rear screen and, ac-
cording to version, the exterior rear view mirrors. The warning
lamp comes on.
It switches off automatically to avoid
excessive consumption of power.
One press stops the demisting.
A further press starts it again.
Note: If the engine is stopped before the end of demisting, the latter
will resume the next time the engine
is started.
Press on control 6. The
warning lamp comes on.
For air conditioning, the air
blower control 3 must not be
on position "0".
Air conditioning is obtained by mix-
ing the warm air with refrigerated air.
The control for the blown air tempera
ture 4 adjusts the air conditioning
provided the control 6 is operational.
- Place the controls for temperature
and air ow on maximum.
-
Close the central air vents.
- Operate the air conditioning by
pressing the control
6, the warning
lamp comes on.
Note: you should not be in air recirculation.
c4_dd_chap-03_ed05-2008.indd 44 10/07/2008 13:40:31
Page 49

45
C O M F O R T
This system automatically regulates
temperature, air ow and air distribution in the passenger compartment
according to the temperature selected (for each side, right and left).
It provides an optimum level of comfort
regardless of the climatic conditions,
by permanent use of the automatic
air conditioning mode (press the AUTO
button) and with all the vents open.
Having no airow prevents the air conditioning and the system in general
from working.
2 - Adjustment of
temperature on left
hand side
1 -
Automatic operation
To display the desired temperature, rotate control 2
or
3:
AUTOMATIC AIR
CONDITIONING
The display HI (high) corre-
sponds to a demand for maximum heating (above 27).
The display LO (low) corresponds to a demand for
maximum air conditioning
(below 15).
A press on this control, conrmed by the display of "A/C"
and "AUTO", automatically
m
anages all the 5 following
functions according to the temperature chosen:
- Flow of air.
- Cabin temperature.
- Distribution of air.
- Air conditioning.
- Recycling of air.
To enable the system to operate, all
the air vents should be kept open.
3 - Adjustment of
temperature on right
hand side
-
To the left to lower the temperature
- To the right to raise the temperature
The difference between the tem-
peratures on the right and on the left
cannot be greater than 3.
An adjustment around 21 will provide
a temperature that is comfortable.
Depending on your requirements,
an adjustment between 18 and 24 is
normal.
This is the normal operating
mode.
To prevent misting of the
interior of the vehicle in
cold and damp conditions,
the use of AUTO mode is
recommended.
c4_dd_chap-03_ed05-2008.indd 45 10/07/2008 13:40:32
Page 50

46
III III
C O M F O R T
Notes:
- When you enter the vehicle, the
temperature inside the vehicle
may be much colder (or warmer)
than a comfortable temperature. It
is no use modifying the displayed
temperature to try to attain the
desired level of comfort. The system
automatically strives to compensate
this temperature discrepancy as
rapidly as possible.
-
When starting the engine from
cold, in order to avoid distributing
too much cold air, the blower will
attain its optimum level gradually.
Manual recalling of one or more
functions
All the functions 4, 6 and 7 can be
adjusted manually.
Display of the function "AUTO" then
disappears.
Central and lateral air
vents.
Central and lateral air
vents and passenger
footwells.
Passenger footwells.
The windscreen, front
side windows and
passenger footwells.
The windscreen and
front side windows.
4 -
Air conditioning 6 - Adjustment of the air
distribution
5 -
Air recirculation
To stop the air conditioning,
press on the control 4. The
symbol "A/C" disappears.
To restart it, press again on
the control 4. The symbol "A/C" displays.
When
you press on control
5, the entry of air from outside is blocked off and the
associated symbol is displayed.
This function can also be accessed
by pressing the appropriate button
on the steering wheel.
While retaining the other settings,
this position excludes disagreeable
odours or emissions coming from
outside. It should be cancelled as
soon as possible to prevent misting
and to allow fresh air into the cabin.
To deactivate the air recirculation,
press again on control 5.
Press the button successively so that the display shows,
in turn, the air ow to:
c4_dd_chap-03_ed05-2008.indd 46 10/07/2008 13:40:33
Page 51

47
C O M F O R T
7 - Air ow
Heater blower speed: press button:
9 -
Demisting - deicing of the
rear screen
When this function is working, the warning lamp comes
on and the symbol appears
on the display.
This control is for rapid deicing or
demisting of the rear screen.
It switches off automatically to avoid
excessive consumption of power.
To stop it, press again on the control 9.
Press AUTO to return the
system to its automatic
function.
To increase it
To decrease it.
The level of air ow is represented
on the display by the progressive ll-
ing of the fan blades.
A press on the control 7 deactivates
the function "AUTO". To restart it,
press again on the control AUTO.
Note: to avoid condensation and
poor air quality in the passenger
compartment, it is recommended
always to maintain a sufcient ow
of air.
8 -
Demisting - deicing of the
windscreen and front side
windows
While it is operating, the
warning lamp lights and the
symbol appears on the display.
This control is for rapid deicing or
demisting of the windscreen, acting
automatically on the air blower ow,
air distribution, air conditioning and
air entry.
To stop it, press again on control 8
or on the control AUTO.
Note: you should not have air recirculation selected.
c4_dd_chap-03_ed05-2008.indd 47 10/07/2008 13:40:34
Page 52

48
III III
C O M F O R T
The scented air freshener is located
to the right of the central air vent.
You can stop or adjust the ow of
scented air, via control 1.
To remove the cartridge, take the
cap A off the new cartridge that you
will t and put it on the cartridge you
are removing.
To remove the cartridge, take the
cap A from your new cartridge and
place it in the small orice of the cartridge you are removing.
Pull.
As a matter of safety, use the scented air freshener and cartridges only for the purpose intended,
in conformity with the user instructions.
Keep the cartridge packaging together with the user instructions and precautions.
Do not dismantle the cartridges.
Do not touch the scent mesh.
Never try to rell the scented air freshener or the cartridges with a freshener
other than those approved by CITROËN.
Keep these items away from children and animals.
Avoid them coming into contact with the skin or eyes.
In the event of ingestion, consult a doctor and show him the packaging or the label.
Do not install, remove or adjust a cartridge while driving.
SCENTED AIR FRESHENER
The central air vents should be
open.
The cartridges need replacing from
time to time.
c4_dd_chap-03_ed05-2008.indd 48 10/07/2008 13:40:35
Page 53

49
C O M F O R T
FRONT SEATS
c4_dd_chap-03_ed05-2008.indd 49 10/07/2008 13:40:36
Page 54

50
III III
C O M F O R T
To raise, pull upwards. To lower,
press on the unlocking button and
on the head restraint. The adjustment is correct when the upper edge
of the restraint is level with the top of
your head. The head restraint is also
angle-adjustable.
To remove, press on the unlocking
button and pull upwards.
Note: Never drive the vehicle with-
out the head restraints tted.
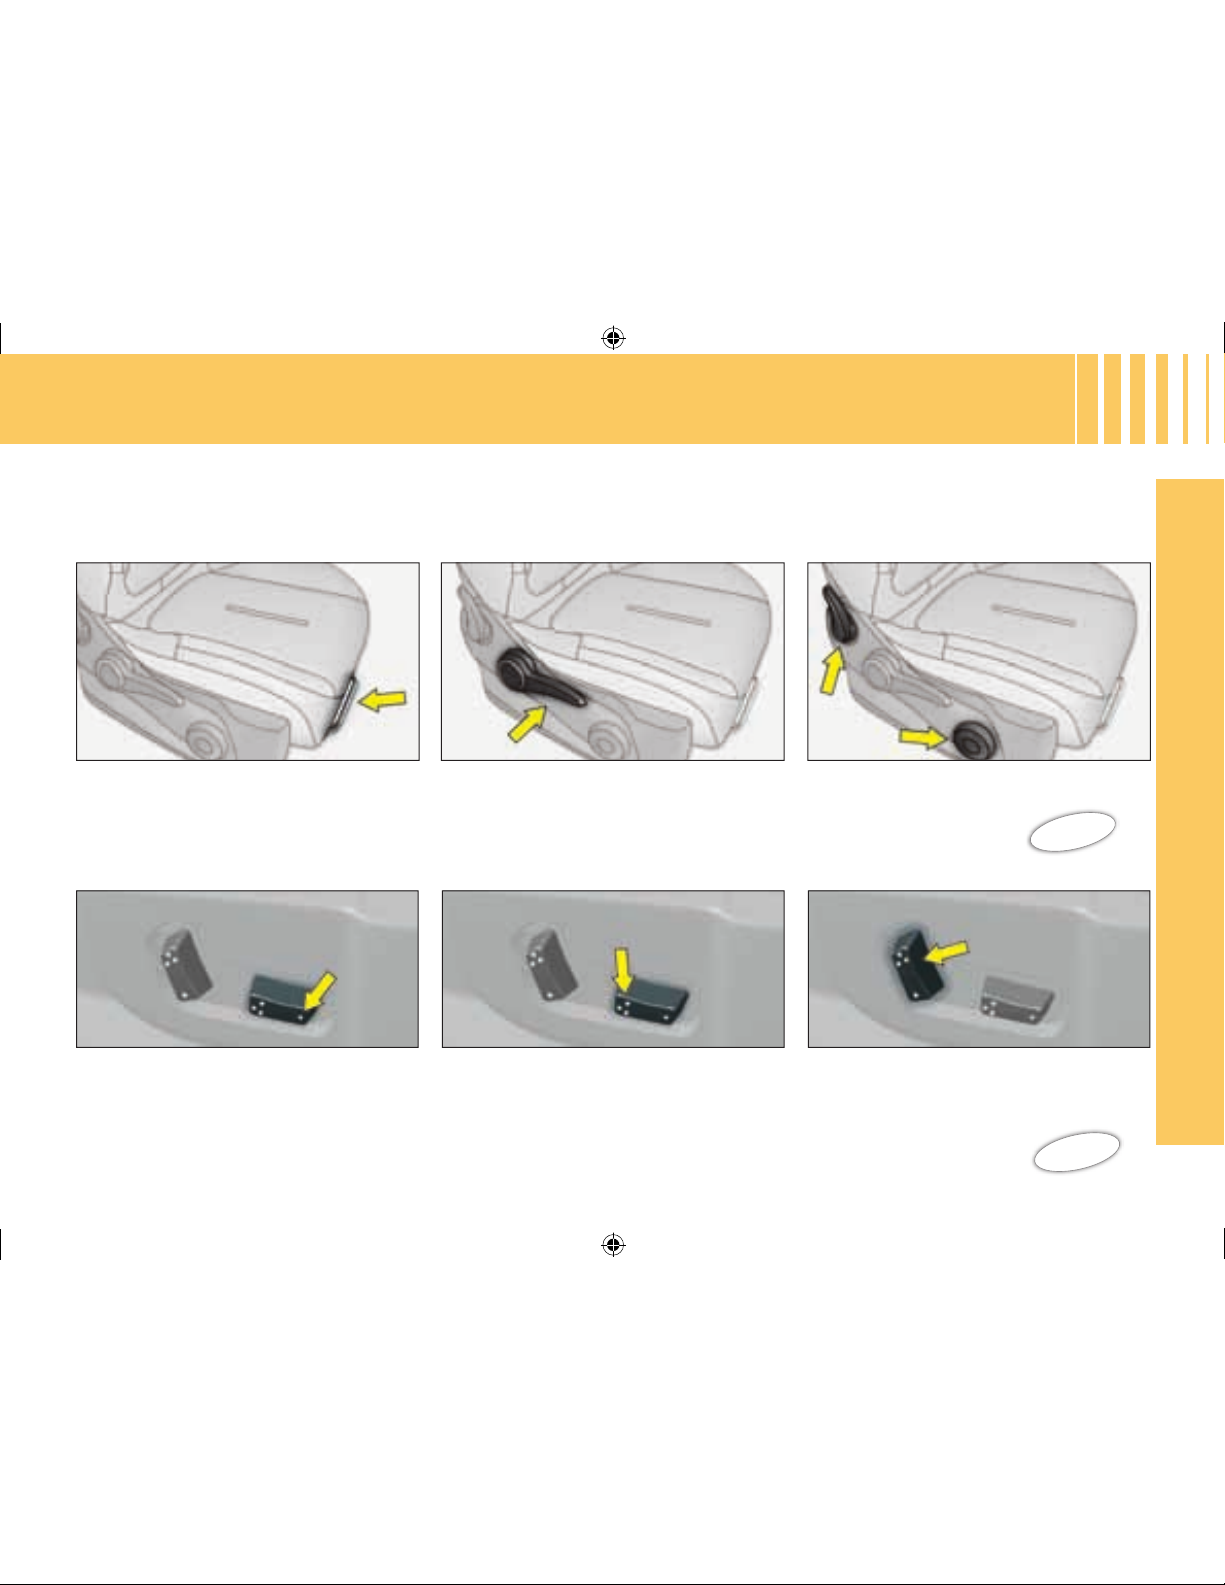
Lumbar support
Driver’s seat height
Backrest angle
Access to the rear
seats
Reach
Manual adjustments
Head restraint
Lift the control bar and adjust the
seat to the desired position.
Turn the control to adjust the seat to
the desired position.
Raise or lower the control the
number of times required to obtain
the desired position.
Use the control A to adjust the back-
rest angle.
It is possible to recline the backrest
to an angle of 45° by tilting it until it
locks; press the control to unlock.
To access or exit the rear seat positions, tilt the control 6 towards the
front to fold the front seat back-rest
and slide the front seat forwards.
Afterwards the front seat will revert
to its initial position.
Make sure that the seat is securely
locked in place.
c4_dd_chap-03_ed05-2008.indd 50 10/07/2008 13:40:38
Page 55

51
C O M F O R T
Heated seats
The front seats can be heated independently. Use the controls placed
on the sides of the seats, turning
them to select one of three heating
levels:
0: Of
f.
1: Gentle heat.
2: Medium heat.
3: Strong heat.
The seat temperature will adjust accordingly.
Note: The heated seats will only operate when the engine is running.
Note: The seats can still be moved
on a temporary basis:
-
when opening one of the front
doors.
-
after switching off the ignition.
Electrically operated adjustments
Adjustment of seat height,
angle and reach
Adjustment of backrest angle
and lumbar support
Raise or lower the front
of control 1 to make the
front of the seat cushion
higher or lower.
Raise or lower the rear
of control 1 to make the
seat higher or lower.
Action control 1 to the
front or to the rear to
move the seat forward or
back.
Push the top of control 2
forward or back to adjust
the backrest angle.
Raise or lower control 2
to increase or decrease
the lumbar support.
c4_dd_chap-03_ed05-2008.indd 51 10/07/2008 13:40:40
Page 56

52
III III
C O M F O R T
Memorisation of driving
positions
You have the possibility to memorise
two driving positions, via the buttons
M/1 and M/2.
Memorisation using the buttons
To memorise, using the buttons located on the side of the seat:
-
turn the ignition key to the drive
position,
-
adjust your seat and your exterior
rear view mirrors,
-
press on button M then immediately
on button 1 "rst driving position"
or on button 2 "second driving
position".
The memorisation is recognised by
an audible signal. Memorising of a
new position cancels the previous
one.
Recall of a memorised driving
position
Vehicle stopped (ignition on or engine running)
-
Press briey on button 1 or
2 to recall the corresponding
memorised position.
Note: after ve consecutive recalls
of a memorised position, this
function will be deactivated until
the engine is started.
Vehicle moving
-
Keep button 1 or 2 pressed to recall
the corresponding memorised
position.
c4_dd_chap-03_ed05-2008.indd 52 10/07/2008 13:40:40
Page 57

53
C O M F O R T
Before folding the seat
Before tipping the rear seat,
make sure that the seat belts will
not be snagged or trapped by the
seat and its catches.
Position them carefully to the
sides of the backrests.
Rear head restraints
The rear head restraints have two
positions:
-
A low stowed position when the
seat is not occupied.
-
A raised position to optimise the
safety of the passenger, by raising
it to its stop, including when used
with a forward facing child seat.
To lower the head restraints, press
on the unlocking controls.
To remove them, pull upwards as far
as permitted, then press on the unlocking controls.
Note: Never drive the vehicle with-
out the head restraints tted.
Rear armrest
-
Lower the rear armrest to improve
your comfort.
-
Lift the cover for access to its
storage box.
This can contain a storage box, two
cup holders and two pen holders.
REAR SEATS
Folding the seat cushion
- raise the front of the seat cushion,
- tilt it towards the front seats.
When repositioning the seat base,
make sure that the seat belt buckles
are back in place.
Note: When you fold a rear seat
cushion, you should also fold the
corresponding backrest.
c4_dd_chap-03_ed05-2008.indd 53 10/07/2008 13:40:41
Page 58

54
III III
C O M F O R T
Folding the backrest
Stow the head restraints.
Press on control A located on the
extremity of the backrest and tilt fully
forwards.
When returning the seat backrest to
the normal position, ensure that it
locks into place: the red warning indicator, located on the control, must
not be visible.
Removing the seat base
To improve seating versatility, the
rear seats are removable.
Detach one of the linkages from its
securing point, then disengage the
other linkage to remove the seat assembly.
When you are handling the rear
seats, avoid trapping the seat belts
and make sure that the belt buckles
are positioned correctly.
c4_dd_chap-03_ed05-2008.indd 54 10/07/2008 13:40:43
Page 59

55
C O M F O R T
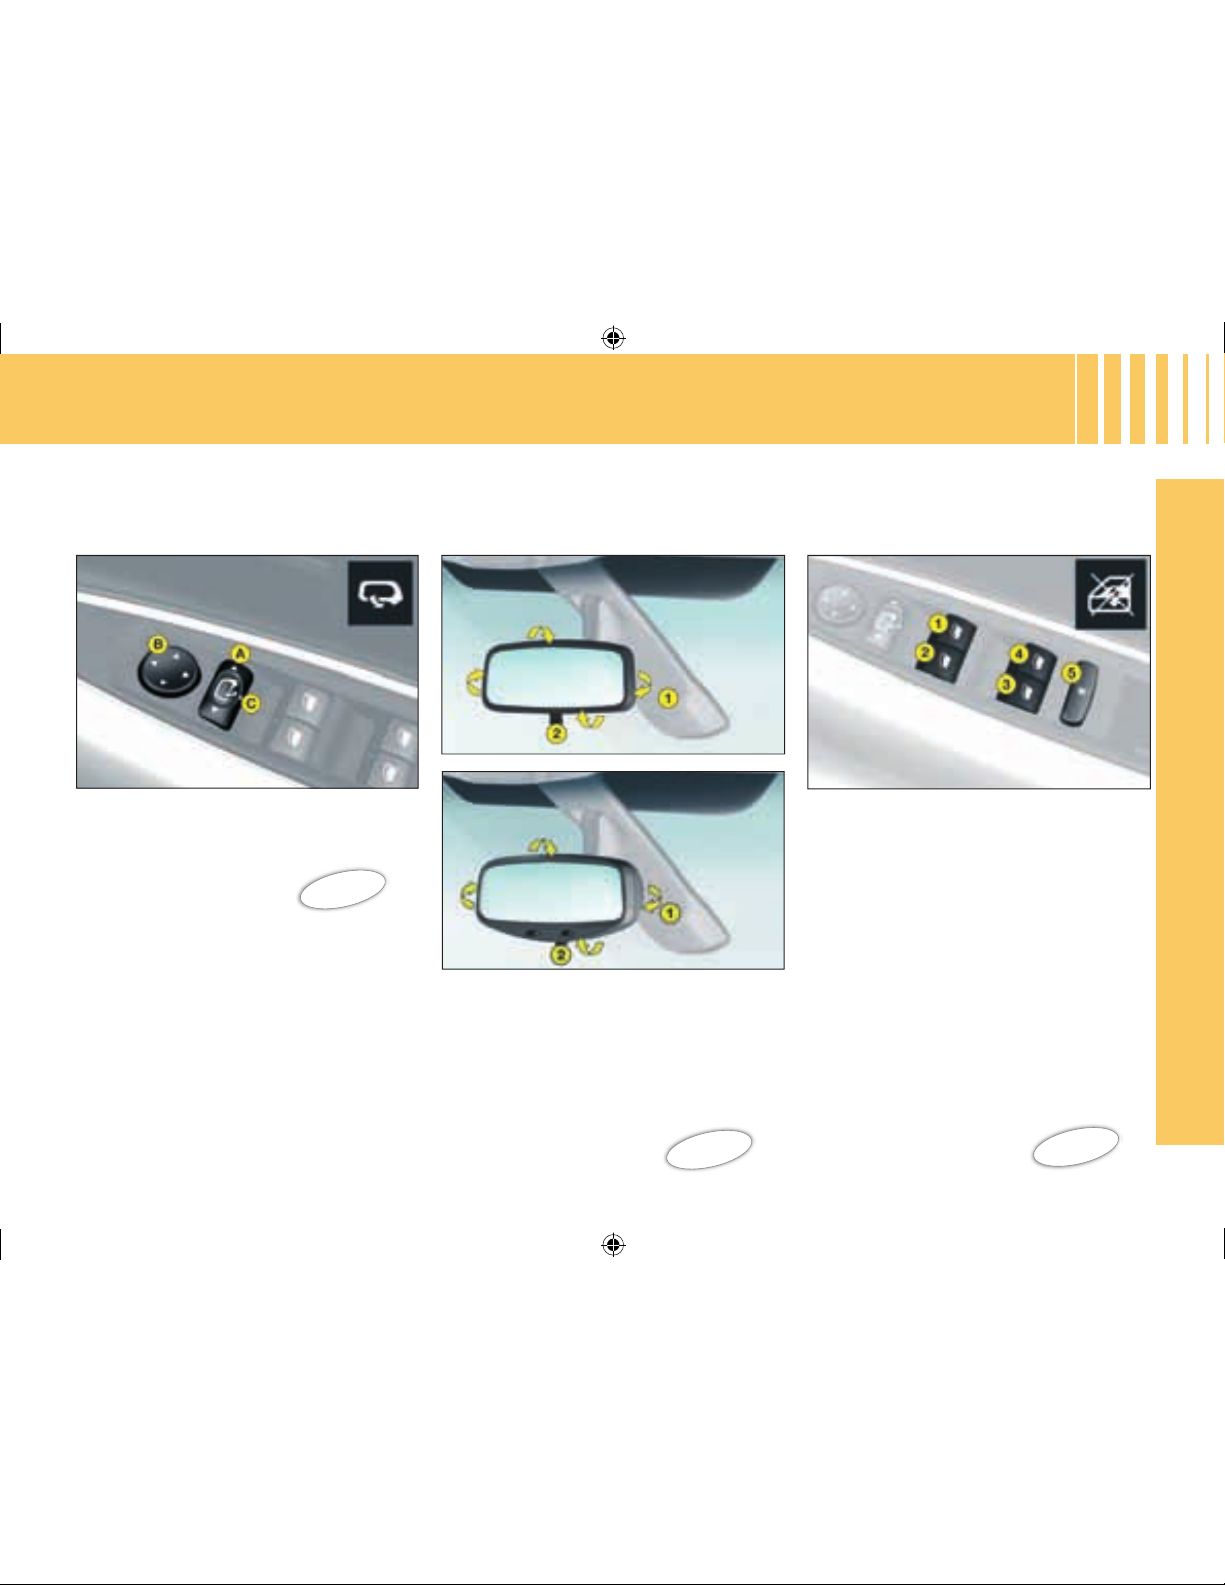
DOOR MIRRORS
Adjustment of rear view mirrors
Functions with ignition switched on.
From the driver’s position, select the
rear
view mirror via the control 1,
then adjust in the four directions by
moving the control 2.
Deicing of rear view mirrors is coupled with electric demisting of the
rear screen.
Fold-back of door mirrors
When the vehicle is parked, the door
mirrors can be folded back either
manually or electrically.
Electric fold-back
From the central position, one press
towards
the rear on control 1 folds
the rear view mirrors back.
To return them to the initial position,
press again on the control towards
the rear.
Automatic electric fold back
Automatic fold-back operates when
you lock the doors with the remote
control.
The opposite movement applies
when you unlock the doors, except
if you operated fold-back before
switching off the ignition.
Note: Automatic fold-back of the
rear view mirrors can be deactivated. Consult your CITROËN dealer.
Automatic tilting of mirrors when
reversing
Ths function automatically gives you
a view of the ground while reversing
the vehicle.
Activation
With the engine running:
-
Select the rear view mirror using
control 1.
-
Engage reverse gear, the mirror
glass automatically positions
itself to improve your vision of the
pavement.
-
If necessary, adjust the mirror to
your preference using the electric
control 2.
Deactivation
To deactivate the function, move
control 1 to the central position.
c4_dd_chap-03_ed05-2008.indd 55 10/07/2008 13:40:43
Page 60

56
III III
C O M F O R T
Automatic photochromic interior
rear view mirror
This provides an automatic and progressive changing between day use
and night use.
To avoid causing dazzle, the mirror automatically becomes darker depending on the intensity of light coming from
the rear. It becomes lighter as soon as
brightness diminishes, thus ensuring
optimal vision.
To operate
Switch on the ignition and press
control 1.
-
Warning lamp 2 on: automatic
mode.
-
Warning lamp 2 off: automatic
mode stopped. The mirror remains
in its lightest denition.
Note: for optimal vision, the mirror
lightens automatically when reverse
gear is engaged.
Manual interior mirror
The lever on the lower edge enables
you to place the rear view mirror in
either of two positions:
Day position: the lever is not visible.
Night position (antidazzle): the lever
is visible.
INTERIOR REAR VIEW MIRROR
Both the height and reach of the
steering wheel can be adjusted.
With the vehicle at rest, rst adjust
the seat to the most suitable position, then adjust the position of the
steering wheel.
STEERING COLUMN ADJUSTMENT
Adjustment
Unlock the steering by pulling the
control towards you.
Adjust the steering wheel position
then lock by pushing the control fully
downwards.
If you press rmly downwards on
your steering wheel after locking, you
may hear a slight click. The steering
is then in its denitive position.
As a safety measure, do not adjust
your driving position while driving.
c4_dd_chap-03_ed05-2008.indd 56 10/07/2008 13:40:44
Page 61

57
A C C E S S
The key operates all the vehicle’s
locks as well as the ignition.
Note: For safety reasons, a buzzer
will sound if you have switched off
the ignition and opened the driver’s
door without previously removing
the ignition key.
The key is used to deactivate the passenger’s front airbag (see "Safety").
It is dangerous to deadlock
the vehicle when someone is
inside as unlocking from the
interior is impossible (without
the remote control).
In the event of loss of the
keys go to a CITROËN dealer
with proof of ownership of the
vehicle.
The CITROËN dealer network
will be able to recover
the key code and the
transponder code to order
replacement keys.
Central locking using the key
A brief action with the key locks the
vehicle.
Central deadlocking using
the key
A second action straight away with
the key deadlocks the vehicle. It is
then impossible to open the doors
from either inside or outside the
vehicle.
A long action with the key closes the
windows.
Note: With the vehicle stationary
and the engine switched off, locking
is signalled by the ashing of the
interior locking control warning
lamp.
If any of the doors, or the boot, is
open or not properly closed, central
locking does not operate.
KEYS
Electronic immobiliser
The key contains a coded electronic
chip. When switching on, the code
must be recognised to allow the
engine to be started.
This electronic immobiliser locks
the engine management system a
few seconds after switching off the
ignition, and prevents unauthorised
starting of the engine.
For any modication concerning
the keys it is essential to contact a
CITROËN dealer taking all of the
keys in your possession with you.
Advice
If the key is not recognised,
starting is not possible.
If this occurs, leave your vehicle
immobilised and contact a CITROËN
dealer.
c4_dd_chap-04_ed05-2008.indd 57 10/07/2008 13:41:18
Page 62

58
IV IV
A C C E S S
Note: The simultaneous use of other
high frequency equipment (mobile
telephones, domestic alarms...) may
momentarily hinder the operation of
the remote control.
In the event of a permanent fault,
the remote control should be reinitialised. (See next page).
It is dangerous to deadlock the
vehicle when someone
is inside as unlocking from
the interior is impossible
(without the remote control).
When closing the windows
using the remote control,
the user should make sure
that nobody is obstructing
the windows from shutting
properly.
Central unlocking
A short press on button B unlocks
your vehicle.
This operation is conrmed by
the rapid ashing of the direction
indicators and the lighting of the
interior lamp (if the function is
activated). It can also deploy the
exterior rear view mirrors.
Central locking, closing
windows, deadlocking
-
A short press on button A locks
your vehicle.
-
A long press on button A locks your
vehicle and closes the windows.
This operation is conrmed by the
direction indicators illuminating for
approx. two seconds and by the
interior lamp switching off. This also
folds the exterior rear view mirrors.
If any of the doors, or the boot, is
open or not properly closed, central
locking does not operate.
For vehicles equipped with deadlocking, two successive presses on
button A deadlocks the vehicle.
It is then impossible to open the
doors from either inside or outside
the vehicle.
REMOTE CONTROL
c4_dd_chap-04_ed05-2008.indd 58 10/07/2008 13:41:19
Page 63

59
A C C E S S
Guide-me-home lighting
A press on button C operates the
guide-me-home lighting (illumination
of the sidelamps and dipped beams
for approx. one minute).
A second press prior to the end of
this timing cancels the guide-mehome lighting.
L
ocating of the vehicle
To locate the vehicle in a carpark,
press button A, the interior lamps
come on and the direction indicators
ash for a few seconds. The vehicle
remains locked.
Folding and ejection of the key
Button D is for folding and ejecting
the key from its housing in the
remote control.
If you do not press on button D, you
could damage the mechanism.
Except when reinitialising, the remote control cannot function
while the key is in the ignition, even when switched off.
Warning: By inadvertently actioning the remote control, when
for example it is in your pocket, you can unlock the vehicle without
your realising it.
However, if no door is opened with 30 seconds of unlocking, the
vehicle locks itself again automatically, without arming the alarm.
Warning: There a is a risk of damage if the replacement
battery is not the correct one.
Only use batteries that are identical or equivalent to those
approved by CITROËN.
Changing the remote control battery
Unclip the cover to gain access to the battery.
Battery: CR 0523: 3
V.
Re-initialisation of the remote control
After a change of battery, it is necessary to re-initialise the remote control. To
do that, switch on the ignition and immediately action button A on your remote
control to trigger the action desired. This may take some ten seconds.
Do not throw away the old batteries. They should be returned to the
CITROËN dealer or deposited in a recognised recycling facility.
Take care not to place the remote control in contact with grease or
dust, or leave it in the rain or in a damp environment.
A hard object also on the key ring, pressing on the key while it is in
the ignition, can cause a malfunction.
c4_dd_chap-04_ed05-2008.indd 59 10/07/2008 13:41:19
Page 64

60
IV IV
A C C E S S
Arming the alarm using the
remote control
Switch off the ignition and leave the
vehicle.
Ensure that all doors and the boot
are closed.
Lock the vehicle using button A on
the remote control.
When the alarm is armed, the
protections become active within
5
seconds (perimeter) and
45 seconds (volumetric).
Your vehicle may be equipped with
an anti-intrusion alarm.
This ensures:
•
Exterior perimeter protection by
means of detectors on the access
points (doors, tailgate, bonnet) as
well as on the electrical supply.
•
Interior volumetric protection
by means of ultrasonic sensors
(detecting movement inside the
passenger compartment).
This
can be deactivated using
control 1.
The installation also includes a siren
and a warning lamp 2 visible from
the outside, indicating the three
possible alarm statuses:
•
Alarm not armed (not on standby),
warning lamp off.
•
Alarm armed (on standby), the
warning lamp ashes slowly.
•
Alarm triggered (signalling an
intrusion), the warning lamp ashes
rapidly if the alarm is disarmed
with
a press on button B. It stops
ashing as soon as you switch on
the ignition.
Note: in the event of a malfunction,
the warning lamp 2 comes on continuously.
ANTI-INTRUSION ALARM
Triggering
Provided the alarm is armed,
any intrusion triggers the siren
for
30 seconds, accompanied by
the illumination of the direction
indicators.
The alarm then reverts to armed
status, but the deployment remains
memorised and is signalled by the
rapid ashing of the alarm warning
lamp 2 when you press the unlocking
button B. The ashing stops when
you switch on the ignition.
The siren is also triggered if there is
a cutting of the electrical supply. To
stop it, restore the electrical supply
then give a press on the unlocking
button B.
c4_dd_chap-04_ed05-2008.indd 60 10/07/2008 13:41:20
Page 65

61
A C C E S S
Deactivation of volumetric
detection
The alarm is able to operate with
only perimeter protection if you
deactivate the volumetric protection
(if for example you wish to leave an
animal in the vehicle).
To do this, switch off the ignition,
then press immediately on control 1
for at least one second.
The warning lamp 2 should be on
permanently. It will start to ash
when the alarm activates.
Arm the alarm by locking your
vehicle using the remote control.
Disarming the alarm using the
remote control
The alarm is disarmed when you
unlock the vehicle (by pressing
button B on the remote control).
Disarming the alarm using
the key
Unlock the doors with the key. The
siren is triggered. Enter the vehicle
and switch on the ignition to stop
the siren. Otherwise the siren will
continue for about 30
seconds.
Note:
•
If you wish to lock your vehicle
without arming the alarm, just lock
the vehicle with the key.
•
If you try to lock your vehicle when
a door or the boot is still open, the
central locking will not operate, but
your alarm becomes armed after
approx. 45 seconds.
Note: the siren is automatically
disarmed (for example if you need to
disconnect the battery) immediately
after you unlock the vehicle using
the remote control.
Automatic activation
(depending on country)
The alarm arms automatically
2
minutes after the boot or the last
door is closed.
In order to prevent the alarm then
being triggered by a door or the boot
being opened, it is essential to press
again on the unlocking button B on
the remote control.
c4_dd_chap-04_ed05-2008.indd 61 10/07/2008 13:41:20
Page 66

62
IV IV
A C C E S S
Electric windows
The driver uses the controls located
on the door to operate the vehicle’s
electric windows.
Note: the electric windows can also
be operated for a limited time after
the ignition has been switched off
(including after the front doors have
been opened).
Anti-pinch device
An anti-pinch device stops the
window from rising. If it meets an
obstacle, it goes back down.
After a battery disconnection or
in the event of a malfunction, you
have to re-initialise the anti-pinch
function:
-
Lower the window fully using the
control, then close. It will rise only
a few centimetres.
-
Press repeatedly on the control
until the window is fully closed.
Warning: During this operation, the
anti-pinch protection does not work.
WINDOWS
Sequential electric window
controls
There are two operating modes:
manual mode
Press or pull the control switch,
without going beyond the point of
resistance. The window stops on
release of the control switch.
automatic mode
Press or pull the control switch
beyond the point of resistance. The
window opens or closes completely
on release of the control switch.
Pressing or pulling the switch again
stops the movement of the window.
A
LWAYS PAY ATTENTION TO WHERE CHILDREN ARE WHEN
OPENING OR CLOSING WINDOWS.
- Always remove the ignition key when leaving the vehicle, even for short
periods.
-
If the driver is operating the passenger’s electric window control, the driver
should ensure that no passenger is obstructing the window from closing.
-
The driver should check that the electric windows are used properly by the
passengers.
-
Should there be any risk of a person becoming trapped by a window
closing, you should immediately reverse the window movement. To do this,
reverse the position of the control concerned.
c4_dd_chap-04_ed05-2008.indd 62 10/07/2008 13:41:21
Page 67

63
A C C E S S
If you decide to drive with
the doors locked, remember that in the event of
an accident this renders
access more difcult for the
emergency services.
Locking the doors from the
inside
With the doors closed, press button
B once to operate the electric central
locking and unlocking.
The doors can still be opened from
inside.
The central locking will not operate
if a door is open, or not properly
closed.
The lamp on the control B can signal
any of 3 statuses:
-
It ashes if the doors are open
when the vehicle is stationary,
engine stopped.
-
It lights up if the doors are locked
and the ignition is switched on.
-
It goes out if the doors are not
locked.
DOORS
Note: Control B is inactive if the
vehicle has been locked with the
remote control or with the key.
Personal security
When the vehicle is started, the
system automatically locks the doors
and tailgate as soon as you reach a
speed of approx. 10 km/h (6 mph).
Note: If a door is opened, this door
will automatically relock as soon as
the vehicle reaches approx. 6
mph.
Activation/Deactivation
of the function
After switching on the ignition, give a
long press on the central unlocking
button until a message is displayed.
This allows from the front,
deactivation of the opening
of the rear doors and the
use of the rear windows.
It is activated by means of a press
on control A located on the electric
windows control panel. The warning
lamp in the instrument panel lights
up for approx. 10 seconds.
Each time the ignition is switched
on, the warning lamp comes on for
approx. 10 seconds.
Opening of the doors from the
outside and operation of the rear
electric windows remain possible
from the front of the vehicle.
Electric child safety
c4_dd_chap-04_ed05-2008.indd 63 10/07/2008 13:41:21
Page 68

64
IV IV
A C C E S S
Manual operation
(emergency mode)
In the event of an electrical fault, it is
possible to lock the vehicle’s doors
by actioning control C on each door.
With the door open, insert the end of
a key or similar item into the aperture
and turn.
Close the door.
After a repair, normal functioning
resumes using either the unlocking
control B, the remote control, or the
key used in the driver’s door.
Closing the tailgate
Lower
the tailgate, using the 2 handhold zones located on the tailgate
interior trim.
Removing your ngers, press down
to close.
TAILGATE
Opening from the outside
Press upwards on lever 1 which is
located between the number plate
lamps.
Anti-theft security
In all cases, as soon as the vehicle
is
moving (at above approx. 10 km/h
or 6 mph) the tailgate locks automatically. The tailgate unlocks when
a door is opened or if the interior
locking/unlocking button is pressed.
Emergency unlocking
If there is a problem with unlocking
the tailgate, it can be unlocked from
inside the boot:
-
insert a screwdriver or similar tool
into hole 2 of the lock,
-
turn it in order to unlock the tailgate.
c4_dd_chap-04_ed05-2008.indd 64 10/07/2008 13:41:23
Page 69

65
V I S I B I L I T Y
LIGHTING CONTROLS
1 Off
2 Automatic lighting
3 Sidelamps
4 Dipped beam/Main beam
Sidelamps on
Dipped beams/
main beams on
Pull the stalk towards
you to change from dipped beam to
main beam and vice versa.
Turn the barrel A forward.
Turn the barrel A forward.
Automatic lighting of
headlamps
Sidelamps and dipped beams come
on automatically in conditions of
poor ambient light or when the wipers are in continuous operation.
Guide-me-home lighting
This function leaves the headlamps
on temporarily to assist your exit in
low light conditions.
This function is activated:
•
Manually by pulling the lighting
stalk towards you, ignition switched
off.
•
Automatically, provided that:
- the automatic headlamp lighting
has been activated,
-
the guide-me-home lighting has
been activated. For this, select
in the "Main menu", then in "Per-
sonalisation-Conguration", the
lighting and signalling sub-menu
and then activate the function.
See "Multifunction displays".
Note: It is possible to modify the du-
ration of the guide-me-home lighting
(approx.
60, 30 or 15 seconds) in
the menu "Personalisation-Conguration".
For display A the period is xed (approximately 30 seconds)
Turn the barrel A forward.
They go out as soon as the light
is once again sufcient or approx.
5
minutes after the wipers have
stopped.
To activate this function, place con-
trol A on position 2.
Do not cover the brightness sensor, which is visible from the outside of the windscreen, behind
the interior rear view mirror.
All lighting off
Lights left on
An audible warning signal is triggered on opening the driver’s door,
ignition off, to indicate that the vehicle’s lights are still on.
It stops on closing the door, switching off
the lights or switching on the ignition.
There is no signal if automatic
lighting or guide-me home lighting
is activated.
c4_dd_chap-05_ed05-2008.indd 65 10/07/2008 13:41:55
Page 70

66
V V
V I S I B I L I T Y
Vehicles with front and rear
foglamps
(Ring B)
In conditions of poor visibility,
if the ambient brightness does
not trigger the automatic light-
ing, it is up to you to switch on
your dipped beams manually,
as well as your foglamps.
They operate when
sidelamps, dipped
beams or main beams
are switched on.
HEADLAMP ADJUSTMENT
You are advised to adjust the aim of
the headlamps in accordance with
vehicle load.
In the dashboard on the right hand
side of the steering column.
0. 1 or 2 occupants in the front
seats.
-. 3 occupants.
1. 5 occupants.
-. Intermediate position.
2. 5 occupants + maximum au-
thorised load.
-. Intermediate position.
3. Driver + maximum authorised
load.
Note: vehicles equipped with Xenon
headlamps have automatic headlamp adjustment.
For a vehicle equipped with front
and rear foglamps:
-
1st notch forwards: switches on
front foglamps.
-
2nd notch forwards: switches on
rear foglamps.
-
1st notch rearwards: switches off
rear foglamps.
-
2nd notch rearwards: switches off
front foglamps.
Note:
The rear foglamps must only be
used when visibility is severely reduced (fog, snow).
For a vehicle equipped with rear
foglamps:
-
1st notch forwards: switches on
rear foglamps.
-
1st notch rearwards: switches off
rear foglamps.
c4_dd_chap-05_ed05-2008.indd 66 10/07/2008 13:41:55
Page 71

67
V I S I B I L I T Y
SIGNALLING
Direction indicators
Left: move the stalk downwards.
Right: move the stalk upwards.
Movement of the steering wheel
returns the stalk to the off position
automatically.
Hazard warning lamps
Simultaneous operation of the direction indicators.
Only use these if there is danger,
for example when you have to stop
suddenly or in unusual driving conditions.
They also operate without the ignition being on.
Headlamp ash
Pull the stalk towards you to ash
headlamps.
The headlamp ash operates even
with the ignition off.
Emergency lighting of hazard
warning lamps
Sudden vehicle deceleration automatically causes the hazard warning
lamps to activate.
These cease automatically when
you reaccelerate or manually if you
press the hazard warning lamps
control on the dashboard.
Driving with the hazard warning
lamps on renders the direction
indicators inoperable.
c4_dd_chap-05_ed05-2008.indd 67 10/07/2008 13:41:56
Page 72

68
V V
V I S I B I L I T Y
Function activated
If there is a malfunction, the "Dipped beams"
warning lamp ashes.
Have the system checked by a CITROËN dealer.
You are recommended to have both Xenon bulbs changed if
there has been a malfunction in either of them.
Function deactivated
This function is associated with
headlamps that have Xenon bulbs.
Whether on dipped beam or main
beam, your headlamps follow the direction of the road ahead.
Lighting quality when driving round
bends is considerably improved.
Activation/Deactivation
This can be activated/deactivated in
the "Main menu". See "Multifunction
displays".
See "Multifunction displays".
DIRECTIONAL HEADLAMPS
The status of the function is memorised on switching off the ignition.
By default, this function is in activated
mode.
Note: At zero or very low speed,
or in reverse gear, this function is inactive.
c4_dd_chap-05_ed05-2008.indd 68 10/07/2008 13:41:56
Page 73

69
V I S I B I L I T Y
Windscreen wiper stalk
2 Fast speed
1 Normal speed
I Intermittent
0 Of
f
AUTO Automatic wiping.
Position I: The timing of the inter-
mittent wipe adjusts automatically to
the speed of the vehicle.
Position 1 or 2: when stationary, the
windscreen wiper speed automatically reduces.
SCREEN WIPE
Deactivating automatic wiping
Go to position I then return to position 0.
WARNING:
Do not cover the rain sensor,
which is visible from the outside of
the wind-screen, behind the interior
rear view mirror.
When washing the vehicle, switch
off the ignition or deactivate automatic wiping.
Automatic wiping
AUTO position: press downwards to
activate automatic wiping.
Press downwards: Automatic wipe
activated.
Note: A press downwards triggers a
single wipe, but without deactivating
automatic wipe.
As a safety precaution, the wiper
system is deactivated approx.
1
minute after the ignition has
been switched off.
On switching the ignition back on, to
reactivate the function:
-
return to the Off position,
-
change to the position desired.
c4_dd_chap-05_ed05-2008.indd 69 10/07/2008 13:41:57
Page 74

70
V V
V I S I B I L I T Y
A - Windscreen washer
To operate the windscreen wash,
pull the wiper stalk towards you.
Screen wash is accompanied by a
timed screen wipe, the headlamp
wash also operates if dipped beams
are switched on.
Always check that the windscreen and rear screen wipers can operate
freely, for example if tting a bicycle carrier,
or in freezing temperatures.
Remove any accumulation of snow from
the base of the windscreen.
B -
Rear screen wiper
To deactivate.
Intermittent rear wipe.
Timed rear screen wash/
wipe.
Changing the wiper
blades
The wipers should be stopped in the
maintenance position (during re-
placement).
Switch off the ignition and action the
wipe stalk within one minute. The
wipers will position themselves in
the middle of the windscreen.
For this, switch off the ignition
then, within one minute, action the
wiper stalk. The wipers will posi-
tion themselves to the centre of the
windscreen.
For optimum wiping performance,
replace the wiper blades as soon as
they leave traces on the screen; otherwise change them once or twice
per year (in spring and autumn, for
example).
Reversing
On engaging reverse gear, if the front
wiper is on, the rear wiper starts.
Activation/deactivation of this function is possible in the menu "Person-
alisation-Conguration"of the "Main
menu".
Deactivation of this function is nec-
essary when a bicycle carrier is installed on the tailgate.
c4_dd_chap-05_ed05-2008.indd 70 10/07/2008 13:41:58
Page 75

71
V I S I B I L I T Y
1 - Spotlamps
A press on one of the buttons will
switch the corresponding spotlamp
on or off.
They will not come on if the ignition
is switched off or the vehicle is in
economy mode.
Automatic lighting of interior
lamps
-
When you enter the vehicle:
They come on immediately you
unlock the vehicle or open a door.
They
go out 30 seconds after
doors have been closed, or after
the ignition has been switched on.
-
When you leave the vehicle:
They come on when you remove
the ignition key (for about 30 sec
-
onds), or when a door is opened.
They
go out after 30 seconds with
the doors closed, or immediately
the vehicle is locked.
In this position, the interior
lamp comes on when you
open a door or the boot.
In this position, it is deactivated and switched off permanently.
In the front, the spotlamps are deactivated.
In this position, lighting is
permanent.
2 -
Front and rear interior lamps
INTERIOR LIGHTING
Welcome lighting
c4_dd_chap-05_ed05-2008.indd 71 10/07/2008 13:41:58
Page 76

72
V V
V I S I B I L I T Y
Glovebox lighting
Comes on automatically when the
cover is opened.
Do not forget to close it again. Does
not work with the ignition off.
Boot lighting
Operates automatically on opening
the tailgate.
Sill lighting
These light up automatically with the
interior lamps.
c4_dd_chap-05_ed05-2008.indd 72 10/07/2008 13:41:59
Page 77

73
I N T E R I O R C O M F O R T
Glovebox
To open, pull the handle and lower
the lid.
The glovebox has:
-
Storage locations for pens,
spectacles, telephone cards, etc.
-
Three sockets for connecting
audio/video equipment.
-
A ventilation nozzle A, which can
be closed manually. It delivers the
same air-conditioned air as the
front and lateral air vents.
WARNING: As a safety measure,
the glovebox must remain shut
when the vehicle is in motion.
To open: press at the centre of the
drawer.
To retrieve an object, lift the drawer
up using the aperture provided.
Storage ap
To open: press at the centre.
INTERIOR COMFORT
If removing the mat on the driver’s
side:
- slide the seat as far as possible
rearwards,
-
completelyundothefixings,
-remove the fixings, then the oor
mat.
When
refitting,positiontheoormat
correctlyandpressthefixingsfirmly
home.
Check
thattheoormatissecurely
in position.
To prevent any hindrance under
the pedals:
-
use only the oor mats that
are compatible with the fixings
already present in the vehicle.
It is essential to use these
fixings.
-
never fit any further oor mats
on top.
Storage drawers Floor mats
c4_dd_chap-06_ed05-2008.indd 73 10/07/2008 13:42:29
Page 78

74
VI VI
I N T E R I O R C O M F O R T
Storage pockets in the front doors and rear panels
Storage pockets
Oddments tray on front central
console
c4_dd_chap-06_ed05-2008.indd 74 10/07/2008 13:42:30
Page 79

75
I N T E R I O R C O M F O R T
Sun visors
Fold visors down to avoid dazzle
from ahead.
They can be disengaged from their
central
fixingandpivotedovertothe
side windows if required.
The passenger’s and driver’s sun
visors each have a mirror that can
be covered.
Sun visor with illuminated mirror
Illuminates automatically on opening
the
mirrorcoverap(ignitionon).
Glasses-holder Carrier bag hook
-
Press at the bottom to deploy the
hook.
-
Press at the top to stow the hook.
Grab handles/
Coat hooks
Toll payment/Parking windows
The
heat-reective windscreen
includes a zone either side of the
interior mirror base that allows optical
reading
of accessbadges(fora toll
paymentcard,forexample).
c4_dd_chap-06_ed05-2008.indd 75 10/07/2008 13:42:31
Page 80

76
VI VI
I N T E R I O R C O M F O R T
Cigar lighter
Operates when the ignition is on.
Push in and wait a few moments.
The cigar lighter will release
automatically. The cigar lighter will
gradually emerge for easy removal.
12 V accessories socket
(Maximum
power:120Watts)
Operates when the ignition is on.
It is located on the central console.
Ashtray
T
oopenit,lifttheap.
To empty the ashtray, lift at the rear
and pull towards you.
T
o refit
Reposition the front part of the
ashtray, then press on the rear part.
Panoramic roof
The roof has two opaque blinds
positioned at the front and rear.
To close the front blind, pull the
handle rearwards.
To close the rear blind, pull the
handle forwards.
The blinds have a delay mechanism
which stows them automatically
when you release them.
c4_dd_chap-06_ed05-2008.indd 76 10/07/2008 13:42:32
Page 81

77
I N T E R I O R C O M F O R T
Luggage securing rings
Usethe2sidefixingsattherear,as
well as the 6 anchoring rings on the
boot
oorandtherearseatbackrest,
to secure your loads.
For safety reasons, in case of hard
braking, heavy objects should be
placed as far forward as possible.
Protective net
This helps to secure objects stowed
in the boot.
BOOT
Boot hook
Removing the rear shelf
(3-
doormodel)
- Detach the cords.
- Carefully lift then pull, tilting it
slightly on one side.
Removing the rear shelf
(5-doormodel)
- Detach the cords.
- Carefully lift then pull.
Avoid using the rear shelf for
heavy or hard items.
These could be dangerous if
thrown around during harsh
braking or, if they touch the
rear screen, could damage the
heating elements.
c4_dd_chap-06_ed05-2008.indd 77 10/07/2008 13:42:32
Page 82

78
VII VII
C H I L D S A F E T Y
When children are in the car
For maximum safety, consult the
relevant authority in your country to
be sure that you know the rules for
the carrying of children. Observe
the following recommendations:
In accordance with European
Regulations, all children of under
12 years of age or of height less
than 1m 50 must be carried in
approved child seats suitable for
their age and weight, on seats
equipped with a seat belt or ISOFIX
anchorage. Check that the child
seat is in compliance with current
legislation, ensuring that it bears
an orange label featuring the range
of weights for which it is suitable as
well as its approval no.
children under 9 kg must be
carried in a rear-facing child
seat, whether installed in the
front or at the back.
It is recommended to use this
position for as long as possible (up
to 2 or 3 years old).
Statistically, the safest seats for
the carrying of children are the
vehicle’s rear seat positions.
CITROËN recommends you to
install your child in one of the rear
seat positions, even when using a
rear-facing child seat.
•
•
•
•
•
Children must not under any
pretext be carried on the knees
of a passenger (risk of being
thrown against the dashboard
or windscreen should there be a
collision).
Children must not be allowed to
stand between the backrests of the
front seats, as they could be thrown
forwards under sudden braking or
in the event of a collision.
The rear doors are equipped with a
"Child Safety" locking device. This
allows the doors to be opened from
the outside unless they are under
central locking.
Each time you switch on the
ignition, check that this device is
activated.
Never leave a child in a vehicle that
is exposed to sunshine.
Before opening a door, make sure
that it is safe to do so.
When leaving your vehicle, remove
the ignition key and properly apply
the parking brake.
Do not leave the key in the vehicle,
as children could lock themselves
in, either using the remote control
or by pressing the central locking
button.
Children should not be left alone in
the vehicle.
•
•
•
•
•
•
•
•
•
Regulations for the carriage
of children in the front
passenger seat position
If the child is travelling in a rearfacing child seat, it is essential to
deactivate the passenger's front
airbag. Otherwise the child risks
being killed or seriously injured
should the airbag deploy.
In the front passenger's seat, children less than 10 years of age
must not be carried "forward-facing", except if:
The rear seats are occupied by
other children.
The rear seats cannot be used (if
they are folded or not present).
If your child is travelling forwardfacing in the front passenger seat
position, slide the front passenger
seat to an intermediate position
and leave the airbag activated.
•
•
c4_dd_chap-07_ed05-2008.indd 78 10/07/2008 13:43:10
Page 83

79
C H I L D S A F E T Y
CITROËN offers you a complete
range of child seats that can be
secured by means of the vehicle
seat belt. These child seats have
been tested on vehicles in collision conditions and they guarantee
maximum safety for your children.
They have also been selected for
their ease of installation as well as
for the comfort of the child.
In all cases, be sure to follow the
child seat tting instructions as
detailed in the installation manual
provided by the seat manufacturer.
GROUP 0+ from birth to 13 kg
(around 1 year old)
Römer Baby-Safe Plus (L1): rearfacing, for use with a three-point
seat belt. The deep, reinforced shell
is designed to provide the maximum
protection to the child in the event of
a lateral impact.
GROUPS 2/3 (from 15 to 36 kg)
Recaro Start (L2): for use with a
three-point seat belt. The height and
width of the backrest as well as the
length of the seat cushion should be
adjusted depending on the age and
girth of your child.
Klippan Optima (L3): for use with a
three-point seat belt. From 6 years
old (approx. 22 kg), only height
adjustment is required.
GROUPS 1/2/3 (from 9 to 36 kg)
Kiddy Life (L4): for use with a
three-point seat belt. The height
and width of the backrest as well
as the length of the seat cushion
should be adjusted depending on
the age and girth of your child. For
the safety of young children (from 9
to 18 kg), CITROËN recommends
you to use the protection apron.
Other child seats are recommended: see ISOFIX child seats
in the handbook. See "Child
restraints".
The majority of serious injuries resulting from accidents occur
when a child either is not secured or is secured incorrectly.
It is essential to adhere to the child seat tting instructions
as detailed in the installation manual provided by the seat
manufacturer. ISOFIX child seats are particularly recommended
for their ease and safety of use.
When a rear-facing child seat is installed on the front passenger’s
seat, the front passenger’s airbag must be deactivated. Otherwise
there is a risk of death or serious injury to the child on deployment
of the airbag.
"Passenger airbag OFF"
c4_dd_chap-07_ed05-2008.indd 79 10/07/2008 13:43:11
Page 84

80
VII VII
C H I L D S A F E T Y
CHILD SEATS secured by means
of the vehicle seat belt
In accordance with European Regulations, the table tells you to what
extent each of the seat positions
in your vehicle may take a child
seat that is secured by means of
the vehicle seat belt and approved
as "Universal" depending on the
weight of the child.
Take care to comply with the tting instructions given in the child seat
manufacturer’s user guide.
U: Seat suitable for the installation of a universal rear- facing c
hild seat and
a universal forward- facing child seat
U(R):
Seat position suitable for installation of a universal rear- facing
child seat and of a forward- facing seat. The vehicle seat should be
adjusted to the highest position.
(a) It is essential to deactivate the front passenger
’s airbag when a "rear
facing" child seat is installed in the front passenger’s seat position.
Before placing your child in the front passenger’s seat position, consult
the legislation currently in force in your country on the carrying of children
in this position.
L-: Only the child seats indicated may be installed in the seat po
sition
concerned (depending on country).
X: Position not suitable for installation of a child seat of the we
ight group
indicated.
Seat(s)
Weight of child
Up to 10 kg
Up to 13 kg
(groups 0 and 0+)
9 - 18 kg
(group 1)
15 - 25 kg
(group 2)
22 - 36 kg
(group 3)
Front
passenger (a)
Fixed seat U U U U
Height-
adjustable seat
U(R) U(R) U(R) U(R)
Lateral rear U U U U
Central rear L1 X L3 L3
c4_dd_chap-07_ed05-2008.indd 80 10/07/2008 13:43:11
Page 85

81
C H I L D S A F E T Y
ISOFIX anchoring points and the
ISOFIX fastening system
The lateral rear seat positions are
equipped with the ISOFIX regulation
anchorages.
Some ISOFIX child seats also have
a top belt, which is for attaching on
the ISOFIX "top" ring
c.
To attach the top belt, raise the head
restraint of the vehicle seat, then
pass the buckle between the two
supports. Next x the buckle on the
"top" ring c and tension the top belt.
In all cases, the head restraint has
to be raised to the maximum.
This xing system is intended for
children weighing up to 18 kg.
There are 3 rings for each seat
position:
-
Two "bottom" rings a and b located
between the backrest and the
vehicle seat. These are about 28
cm apart.
-
One "top" ring c located in the boot
between the wheelarch and the
seat backrest.
ISOFIX child seats have two latches
which are easy to secure on the two
"bottom" rings a and
b.
c4_dd_chap-07_ed05-2008.indd 81 10/07/2008 13:43:13
Page 86

82
VII VII
C H I L D S A F E T Y
Incorrect installation of a child seat in
a vehicle compromises protection of
the child in the event of a collision.
The ISOFIX fastening system
enables you to reduce those risks
posed by incorrect tting, offering
you a convenient, strong and
reliable tting for a child seat in your
vehicle.
The ISOFIX child seat
recommended for your vehicle is:
ISOFIX RÖMER Duo:
It is sold by the CITROËN network. This seat has an upper strap,
which must be attached to the
ISOFIX "upper tether".
The RÖMER Duo Plus ISOFIX is
approved specically for your vehicle.
If it is installed in a rear seat position,
the vehicle’s corresponding front
seat should be adjusted so that the
child’s feet do not touch the backrest
of this front seat.
This ISOFIX child seat can also be
installed in seat positions that are
not equipped with ISOFIX anchoring
points. In this case, it is compulsory
to secure it to the vehicle seat by
means of the vehicle seat belt.
c4_dd_chap-07_ed05-2008.indd 82 10/07/2008 13:43:13
Page 87

83
C H I L D S A F E T Y
Manual operation
Rear doors are locked by operating the lever on the rear face of the
door in question.
When the manual safety is in use,
the aperture is horizontal.
Electric operation
The electrical safety is activated
by pressing the control located to
the rear of the electric windows
panel. This prohibits movement of
the rear electric windows and rear
passenger doors.
It is still possible to open the doors
from the outside, provided the vehicle is not locked.
This system is independent
of and in no way replaces the
central locking.
Check the status of the child
safety locks every time the ignition is switched on.
Always remove the ignition key
when leaving the vehicle even
if only for a short time.
In the event of a violent impact,
the electric child safety locks
are deactivated automatically
to allow rear passenger to get
out of the vehicle.
If the child safety lock is
activated, the warning
lamp comes on for approximately 10 seconds when
switching on the ignition.
LOCKING REAR DOORS
c4_dd_chap-07_ed05-2008.indd 83 10/07/2008 13:43:14
Page 88

84
VIII
S A F E T Y
Any repair or any change
of tyre, on a wheel tted
with a sensor, should be
carried out by a CITROËN
Dealer.
The system may be affected
from time to time by interference
from radio transmissions on
similar frequencies.
This function alerts you in the event of
a tyre being deated or punctured. For
this purpose, sensors continuously
monitor the condition of the vehicle’s
wheels.
This system does not absolve the
driver of the need to check the tyre
pressures regularly.
The SERVICE warning
lamp lights up and
a vehicle outline is
displayed. The wheel(s)
concerned will be shown
ashing on the vehicle
outline. Check the tyre pressures as
soon as possible.
Under-ination warning
The STOP warning lamp
lights up and a vehicle
outline is displayed.
The wheel(s) concerned
will be shown ashing on
the vehicle outline. Stop
the vehicle immediately, avoiding
any violent actions on the steering
wheel or brakes.
Puncture
Change the damaged wheel (whether
punctured or substantially deated),
have the tyre repaired as soon as
possible, then check the tyre pressure
as soon as you can after that.
The wheel affected will no longer be
detectable by the alert system if it
is in the boot or undergoing repair
(information given by the vehicle
outline). The spare wheel will not be
monitored by the alert system.
The SERVICE warning
lamp lights up and
a vehicle outline is
displayed. The wheel(s)
concerned will be shown
as absent on the vehicle
outline. If you have not changed a
wheel, this information indicates a
malfunctionong of the system.
Consult the CITROËN network to have
the defective sensor(s) replaced.
The deation detection system is a
driving assistance function which
does not absolve the driver from
the responsibility to be vigilant,
or from the need to check the tyre
pressures regularly (see "Vehicle
identication").
Wheel
without senso
TYRE PRESSURE SENSORS
This system does not absolve the
driver of the need to check the tyre
pressures on a regular basis (see
"Identication"), to ensure that the
vehicle behaves as it should and to
avoid premature wear on the tyres,
especially when the vehicle is being
subjected to heavy loads or driven
at high speeds.
Do not forget to check the tyre
pressure on the spare wheel.
c4_dd_chap-08_ed05-2008.indd 84 10/07/2008 13:45:46
Page 89

85
VIII
S A F E T Y
Braking system
Your vehicle’s most important safety
feature, the braking system, is pro-
vided by brake discs (or discs and
drums) and a dual hydraulic circuit.
When the engine is running, power
assistance is provided so that pedal
effort is reduced.
On wet roads, or after washing
the vehicle, there can be a slight
delay in brake response. From
time to time, apply the brakes
briey so that the heat generated
can dispel any moisture.
•
When the engine is not
running, the braking system will not have power-
assistance.
The effort required on the brake
pe dal wil l be con side rabl y
increased.
Take al l reaso nabl e safet y
precautions if you have to move
the vehicle.
Never drive the vehicle without
the engine running.
BRAKES
ABS - Anti-lock Braking
System
This system improves vehicle safety by preventing the
wheels from locking under emergency braking or when braking on
surfaces offering poor adhesion.
It thus allows control of the steering
to be retained.
The operational capacity of the vari-
ous electrical components of the
ABS is continuously monitored, both
before and during your journey. On
switching on the ignition, the ABS
warning lamp will light up and then
should go out after a few seconds.
If the warning lamp stays on, this
means that the ABS has been disconnected because a fault was
detected. If the warning lamp lights
up when you are driving, this means
that the ABS system is not active.
Emergency braking assistance
This system enables you in an
emergency to achieve the optimum
braking pressure, thus to reduce the
stopping distance. It is triggered by
your speed of action on the brake
pedal, which reduces its resistance
to that action. Keep the brake pedal
pressed until the vehicle comes to a
stop.
In the event of emergency braking,
press and keep the pedal down very
rmly without reducing the level of
effort.
In either case, the normal braking
system remains effective, as on a
vehicle without ABS. Nevertheless,
to restore the additional safety af-
forded by correct functioning of ABS,
it is recommended that the vehicle
be taken to a CITROËN dealer as
soon as possible.
On slippery roads (loose stones,
snow, ice, etc.), it remains essential
to drive with caution.
If the parking brake is off, the lighting
of this warning lamp, in conjunction
with the STOP warning lamp,
indicates that the brake uid level is
low or that the braking distributor is
malfunctioning.
It is essential to stop the vehicle.
Contact a CITROËN dealer as soon
as possible.
c4_dd_chap-08_ed05-2008.indd 85 10/07/2008 13:45:47
Page 90

86
VIII
S A F E T Y
SAFETY RECOMMENDATIONS
The ESP system offers increased
driving safety but is not in place to
encourage the driver to take additional risks or to drive at excessive
speeds.
The functioning of this system is subject to compliance with the manufacturer’s recommendations on wheels
(tyres and rims), brake parts and electronic components, as well as with
CITROËN’s assembly and repair procedures.
After any collision, have this system
checked by a CITROËN dealer.
Electronic Stability Programme
(ESP) and Traction Control (ASR)
These systems are closely connected to the ABS and additional
to it. Where a difference is detected
between the trajectory followed by
the vehicle and that wanted by the
driver, the ESP system acts au-
tomatically on the brake of one or
more wheels to return the vehicle to
the trajectory wanted, within the limits of the laws of physics. The ASR
system optimises traction and prevents wheel spin by acting on the
brakes of the driving wheels. It also
improves steering stability during
acceleration.
ELECTRONIC STABILITY
PROGRAMMES
Deactivation
In exceptional conditions (vehicle
stuck in snow, soft ground, etc.) it
may prove useful to deactivate the
ESP/ASR system to allow the wheels
to spin and thus regain traction.
Press on control A, the ESP/ASR
warning lamp and the control light
up. The ESP/ASR systems are no
longer active.
The ESP/ASR systems will activate
again:
-
Automatically after the ignition
has been switched off.
-
Automatically when you drive at
above approx. 30 mph.
-
Manually with another press on
control A.
Operational anomaly
If there is a system malfunction, the
ESP/ASR warning lamp comes on.
Contact CITROËN to have the system checked.
Operation
When either the ESP or ASR system is brought into operation,
the ESP/ASR warning lamp ashes.
c4_dd_chap-08_ed05-2008.indd 86 10/07/2008 13:45:48
Page 91

87
VIII
S A F E T Y
Holding the seat belt
(3-door model)
Raise then lock part A, to retain the
seat belt buckle when it is unfas-
tened.
It is necessary to remove the seat
belt from the buckle retainer before
moving the seat to access the rear
seat positions.
As a safety measure,
these operations should
only be done at standstill.
Seat belt height adjustment
(5-door model)
The correct positioning for the seat
belt anchorage is mid-shoulder
height.
To adjust it, pinch the control and
slide it in the desired direction.
SEAT BELTS
c4_dd_chap-08_ed05-2008.indd 87 10/07/2008 13:45:48
Page 92

88
VIII
S A F E T Y
Legislation makes it compulsory for
all the vehicle's occupants to wear
seat belts, including pregnant women
and however short the journey.
Inside the cabin, the seat belt is the
most important protection for passengers.
A warning lamp informs you if the
driver's and/or front/rear passengers' seat belts are not fastened,
when the ignition is switched on.
In the event of a collision or on emergency braking, the seat belt will hold
you in your seat, preventing you
from being thrown from the vehicle.
Pyrotechnically pretensioned
seat belts with force-limiters
In the event of a collision:
The pretensioners pull back the
front seat belts. The occupants
are thus held more rmly against
their seats.
The force limiters reduce the pres-
sure of the seat belt against the
occupant’s chest, thus enhancing
the protection that the seat belt
provides.
•
•
Warning
When the pretensioners are
deployed, there is a light discharge
of harmless smoke and a loud noise,
both due to the detonation of the
integral explosive cartridges that
activate them.
Depending on the nature and the
force of the impact, this triggering may
happen prior to, and independently of,
the deployment of the airbags.
In all cases, the airbag warning lamp
comes on.
Seat b elts and pyro-
t
echnic pretensioner
systems
They must be replaced following
a deployment, preferably by a
CITROËN dealer or by an authorised repairer.
D
ue to the safety regulations
in forc e, a ny c hec k or a ny
replacement should preferably
be
carried out by the CITROËN
network which guarantees the
work and ensures that it is done
correctly.
Any repair that is not done in
strict compliance with requirements could result in the systems operating incorrectly or
randomly, with the risk of bodily
injuries being caused.
c4_dd_chap-08_ed05-2008.indd 88 10/07/2008 13:45:49
Page 93

89
VIII
S A F E T Y
Fastening
Pull the belt down in front of you in a
steady movement, making sure that
it does not become twisted.
Press the fastening into its buckle.
Check that the seat belt has fas-
tened correctly and that the automatic reel lock is working correctly
by pulling the strap.
The abdominal part of the strap
should be positioned as low down
as possible in the lap and as tight
as possible.
The chest part should be positioned
if possible in the channel of the
shoulder.
Each belt has a reel that adjusts its
length automatically to the girth of
the seat occupant.
Positioning of the belt
recommended for pregnant
women
Position the lower part of the belt
as low down as possible on the lap,
so that it exerts no pressure on the
abdomen.
Always adjust your seat belt while the vehicle is stationary.
The driver must ensure that all the passengers have correctly
fastened their seat belts.
Do not pass the belt over hard or breakable objects that you
may have in your pockets.
Never use clamps or clips to loosen your seat belt.
Never carry a child on your knee.
Regularly check the condition and cleanliness of the seat belts. See
"Maintenance".
Have the seat belts checked periodically by a CITROËN dealer as
well as after any accident, even a minor one.
•
•
•
•
•
•
•
Unfastening
Press the red button on the buckle
to unfasten the belt.
The belt retracts automatically when
not in use.
Recommendations
To be effective, a seat belt:
Must be able to restrain a single
person of adult size.
Must not bear any signs of being
cut or frayed.
Do not swap buckles, as then they
would not full their proper roles.
Before and after use, make sure that
the belt is correctly retracted.
If the seats have armrests, the
central part of the belt should pass
underneath.
•
•
c4_dd_chap-08_ed05-2008.indd 89 10/07/2008 13:45:50
Page 94

90
VIII
S A F E T Y
AIRBAGS
Replacement of the pyrotechnic systems associated with the airbags
After the airbags have been
deployed, the pyrotechnic systems have to be changed in strict
compliance with the manufacturer's specications.
Your vehicle may have:
A driver’s airbag located in the
steering wheel, under the central
cover.
A passenger's airbag in the dashboard.
Two side airbags located in the
backrests of the driver’s seat
and front passenger’s seat (door
side).
Two curtain airbags located on
the interior edges of the roof.
The control unit for the airbags and
sensors analyses any frontal and
lateral impacts suffered in the collision detection zones (see illustration
p
91).
•
•
•
•
According to the degree of serious-
ness of impacts, it determines:
Whether the seat belt is sufcient
to protect you (Slight impact).
Whether the seat belt pretensioner needs to be additionally
actioned in order to hold you in
your seat (Medium impact).
Whether the airbag should be
deployed in addition to the two
initial systems (Violent impact).
Never deactivate the passenger's
airbag when a passenger is present
(unless a child in a rear-facing child
seat). See "Passenger's airbag
deactivation".
Each time you switch on the ignition,
a warning lamp in the dashboard
lights up for a few seconds and then
goes out.
•
•
•
Consult a CITROËN dealer in the
following situations:
The warning lamp ashes for a
few minutes then remains on.
The warning lamp does not light
up.
A message appears on the display.
•
•
•
c4_dd_chap-08_ed05-2008.indd 90 10/07/2008 13:45:50
Page 95

91
VIII
S A F E T Y
Area of side impact
Area of side impact
Area
of
frontal
impact
Side airbags and curtain airbags
Deployment of these airbags requires
a violent lateral impact applied on all
or part of one of the lateral collision
zones, coming in a horizontal plane
from the side.
The role of the side airbag is to
place itself between the occupant
(driver or front passenger) and the
door panel, thus limiting the risk of
injuries to the chest.
Front airbags and knees airbags
For these airbags to deploy, it
requires a violent frontal impact
applied on all or part of the frontal
impact zone (see illustration) from
forward of the vehicle in a horizontal
plane.
The airbag interposes itself between
the vehicle's front occupant and the
dashboard to cushion the person
from being thrown forward. The air-
bag thus limits the risk of trauma to
the head and chest. For the driver,
the knees airbag protects the knees.
The front passenger’s airbag can be
deactivated. see "Passenger's airbag deactivation".
Examples of impact detection zones
The role of the curtain airbag is to
place itself between the front or
rear occupant and the windows,
thus limiting the risk of injuries to
the head.
These airbags may not deploy if
there is only a slight collision on the
side of the vehicle, or if the vehicle
rolls over. They will not deploy for a
front or rear collision.
c4_dd_chap-08_ed05-2008.indd 91 10/07/2008 13:45:51
Page 96

92
VIII
S A F E T Y
To reactivate the front
passenger’s airbag
Don’t forget to reactivate the airbag
function for a passenger or a forward
facing child seat.
To do that, with ignition switched off:
- Insert and turn the key to the "ON"
position, the airbag is activated.
The warning lamp in the instrument
panel comes on for a few seconds
when you switch the ignition on.
The front passenger’s airbag can be
deactivated.
Passenger’s airbag deactivation
In order to be able to use a "rear-facing" child seat in the front passenger
position, it is essential to deactivate
the passenger airbag.
To do that :
- With the ignition off, insert the key
into the switch A, located in the
glovebox.
- Turn the key to position "OFF".
The passenger’s airbag is deactivated.
The
front passenger airbag deactivation warning lamp in the instrument panel lights up (ignition on).
If there is a malfunction, the
"airbag fault" warning lamp
comes on.
In
the front passenger’s seat
position, it is essential to deactivate the front passenger’s airbag whenever a "rear-facing"
child seat is installed there.
Otherwise the child risks being
killed or seriously injured should
the airbag deploy.
c4_dd_chap-08_ed05-2008.indd 92 10/07/2008 13:45:51
Page 97

93
VIII
S A F E T Y
The wearing of seat belts
is compulsory for all vehicle occupants. Inside the
cabin, the seat belt is the
most important protection for
passengers.
The airbag is a protection in addition to the seat belt. Its effectiveness requires the seat belt to be
worn
correctly.
Children under ten years of age
should always be carried in the rear
seats. See "Child safety".
The driver and passengers must
adopt a normal, vertical sitting position that is compatible with deployment of the airbags. See "Driving
position".
Never attach anything to the steering wheel central cover, to the sides
of the front seats or to the vehicle
pillars or roof (risk of injuries should
the airbags deploy).
Hold the steering wheel in the "quarter-past-nine" position: do not hold it
by the branches or rest your hands
on its central cover.
Smoke as little as possible in the
vehicle (risk of burns or injury should
the airbag be deployed).
Do not leave any accessory or
object on the dashboard or between
your body and the airbag (risk of
malfunction or personal injury).
Fit only seat covers that are approved
by CITROËN.
Do not put your feet on the dash-
board (risk of injury should the front
passenger airbag deploy).
The airbags do not deploy in the
case of a slight collision or an impact
at the rear of the vehicle or in certain
manoeuvring conditions.
The deployment of one or more air-
bags is accompanied by a small
release of unharmful smoke, as well
as by a detonation that is caused by
the activation of the pyrotechnic cartridge integral to the system. This
smoke is not toxic but may be an
irritant to persons who are sensitive.
The noise of the detonation may
affect hearing for a brief time.
Vacate the vehicle as soon as pos-
sible after the accident (provided it is
safe to do so). If this is not possible,
open the windows or doors.
Even observing all the advised precautions, the risk of injury or slight
burning to the head, chest or arms
during deployment of an airbag cannot be ruled out. In fact, ination of
the airbag is virtually instantaneous
(approx. 30 milliseconds); then it
deates in the same time, emitting
hot gases through holes provided for
this purpose. This equipment works
only once. It cannot operate to provide further protection in the event of
a second impact.
It is imperative to have the system
overhauled in strict compliance
with the manufacturer's speci-
cations.
c4_dd_chap-08_ed05-2008.indd 93 10/07/2008 13:45:51
Page 98

94
VIII
S A F E T Y
Any operation under the bonnet
necessitates a number of safety precautions.
Be particularly careful both before and
during all checks under the bonnet:
Allow the engine to cool down.
Keep children away from the ve-
hicle.
Make sure that you possess the
necessary tools and expertise.
Bonnet
Before opening the bonnet, make
sure that your hands and clothing
are protected. Allow the engine to
cool down.
Make sure that the bonnet is stable
in the open position. Beware of gusts
of wind that could cause the bonnet
to fall and cause seriuous injuries.
•
•
•
Work in safety
The rst rule of safety is to choose a
suitable environment.
Do not use open roads or public
rights of way. Other trafc represents a hazard.
If you need the engine running,
work outdoors and not
in a conned
space as there is a health risk from
exhaust gases.
Make sure that your vehicle is not
parked over inammable materials
(dry grass, fuels, etc.) as the very
high temperatures associated with
the catalytic converter could ignite
them.
Choose rm, level ground sheltered
from the wind. Keep children away
from the vehicle.
SAFETY ADVICE
Puncture
Switch on your hazard warning
lamps and get all passengers away
to a place of safety, well away from
the trafc (for example behind crash
barriers or on the grass verge).
Position the jack correctly to
ensure that the vehicle is stable. See
"Changing a wheel".
Never attempt any repairs under
a vehicle that has been jacked up,
without rst supporting it on axle
stands or some other reliable support.
Moving parts
There will be a certain number of
moving parts when the engine is
running.
Even when the engine is switched
off, the cooling fan could still operate
without warning. D
o not wear loose
clothing (ties, scarfs, etc.), tie back
long hair, all of which could become
entangled in a pulley or be dragged
into a drive belt.
On the road
If a warning lamp comes on while
you are driving, stop the vehicle with
due regard to the safety of other road
users and switch off the ignition.
c4_dd_chap-08_ed05-2008.indd 94 10/07/2008 13:45:52
Page 99

95
VIII
S A F E T Y
Radiator
In normal usage, the coolant temperature
reaches or exceeds 100 °C.
Never remove the cap of a radia-
tor that is hot: there is danger from
projection of scalding liquid and
steam. See "Levels".
The antifreeze contained in the coolant lends it the following properties:
Protection against low temperatures (initial protection: -35
°C).
Anti-corrosion protection.
Resistance to high operating
temperatures.
See the Maintenance Guide.
•
•
•
Fuel cut-off switch
Your vehicle is equipped with a
safety device which cuts off the fuel
supply in the event of a collision.
Oil
In normal use, the engine oil can
exceed
temperatures of 130 °C and
thus can cause serious burns.
Exhaust system
Beware of the very high temperatures attained by the various com-
ponents of the exhaust system (risk
of burns).
Petrol
Be extremely careful when decanting
or draining petrol or when repairing
petrol leaks because of the high risk
of re.
Diesel fuel
The diesel fuel system of an HDi
vehicle is a high pressure system. Any
repair work must be carried out by
suitably qualied personnel, such as
can be guaranteed by the CITROËN
network.
At all times:
Avoid attempting repairs while
close to moving trafc. If this is
absolutely necessary, take all
possible precautions.
Ensure that your passengers seek
safety away from the vehicle and
off the roadway (road verges and
motorway hard shoulders are not
safe places).
Keep children away from the
vehicle and in safety.
Operate the hazard lamps and
erect warning signs.
Preferably summon assistance
from a CITROËN-approved
breakdown service.
For guaranteed quality and
safety, use CITROËN products.
•
•
•
•
•
•
c4_dd_chap-08_ed05-2008.indd 95 10/07/2008 13:45:52
Page 100

96
VIII
S A F E T Y
This driving assistance device alerts
you if you are wandering from your
lane (continuous or dotted line marking
on the road surface).
It is designed especially for use on
motorways and dual carriageways,
operating only at speeds above
80
km/h (approx. 50 mph).
The driver must still
remain attentive and in
complete control of the
vehicle.
Operation
Provided you are travelling at over
8
0 km/h (approx. 50 mph), if you
cross a lane marking, you are alerted
by a vibration within the cushion of
your seat:
- oriented to the right for crossing a
lane marking to the right,
-
oriented to the left for crossing a
lane marking to the left.
The system does not alert you while
your direction indicator is operating,
nor for about 20 seconds after your
direction indicator has stopped.
Activation/Deactivation
A press on control A activates the
function, the warning lamp on the
control lights up.
A second press on control A deacti-
vates the function, the warning lamp
on the control goes out.
Whenever you start the engine, the
mode (activated/deactivated), selected
when you last switched off the engine,
is retained.
LANE DEPARTURE
WARNING SYSTEM
The effectiveness of the system may
be temporarily affected by conditions
external to the vehicle:
• Detection of lanes made difcult
by:
-
Markings that are worn or
erased.
-
Insufcient contrast with the sur-
face of the road.
•
Masking of the sensors due to:
- Driving in snow or heavy rain.
- Driving on roads covered with
mud or surface water.
If the system is ineffective for a prolonged period, contact a CITROËN
dealer.
Note: This device is designed to
identify trafc lane markings.
In certain specic instances, it may
trigger an unwanted alert, for example when you cross a direction arrow
or some other random marking.
c4_dd_chap-08_ed05-2008.indd 96 10/07/2008 13:45:52
 Loading...