

CITIZEN PPU-700 Reference Guide
PRINTER PRESENTER UNIT
Command Reference
Model: PPU-700
Revision: 1.03 2006/10/26
REVISION
Rev No. Date Comment
0.00 2004/01/14 Newly issued
“GS g 0”, “GS g 2”, “FS g 3”, “FS g 4”, “GS ( K (fn = 200 ~ 208)”,
1.00 2005/03/4
1.02 2005/04/25 Change of code pages
1.03 2006/10/26 Add 4.5 Black Mark Layout and Operating Condition
“GS ( E (fn = 5:200 ~ 211, 240/fn = 6: 200 ~ 211)”,
“GS I (n = 250, 251)”were deleted
CITIZEN is a registered trade mark of CITIZEN WATCH CO., LTD., Japan.
CITIZEN es una marca registrada de CITIZEN W ATCH CO., LTD., Japón.

TABLE OF CONTENTS
1. OUTLINE..........................................................................................................6
1.1 Operation Mode.......................................................................................................6
1.2 Character Set...........................................................................................................6
1.3 Control Commands..................................................................................................6
1.3.1 Control Command Details.......................................................................................6
1.3.2 How to Send Control Commands ............................................................................6
2. CONTROL COMMANDS.....................................................................................7
2.1 ESC/POS Command List ..........................................................................................7
2.1.1 Description of Items .............................................................................................11
2.2 Command Details ..................................................................................................12
2.2.1 Print Control Commands.......................................................................................12
LF............................................................................................................................. ...........12
CR.......................................................................................................................................12
FF........................................................................................................................................13
ESC FF ................................................................................................................................14
ESC J n................................................................................................................................15
ESC d n...............................................................................................................................16
2.2.2 Print Character Commands...................................................................................17
CAN ....................................................................................................................................17
ESC SP n.............................................................................................................................18
ESC ! n................................................................................................................................19
ESC % n .............................................................................................................................21
ESC & s n m [a [p] s×a] m-n+1.........................................................................................22
ESC – n...............................................................................................................................23
ESC ? n ...............................................................................................................................24
ESC E n ...............................................................................................................................25
ESC G n...............................................................................................................................26
ESC M n ..............................................................................................................................27
ESC R n...............................................................................................................................27
ESC V n...............................................................................................................................28
ESC t n................................................................................................................................29
ESC { n ...............................................................................................................................30
GS ! n..................................................................................................................................31
GS B n.................................................................................................................................32
GS b n.................................................................................................................................33
2.2.3 Print Position Commands......................................................................................34
HT.......................................................................................................................................34
ESC $ n1 n2........................................................................................................................35
ESC D [n]k NULL ................................................................................................................36
ESC T n ...............................................................................................................................37
ESC W xL xH yL yH dxL dxH dyL dyH.................................................................................38
ESC \ nL nH .....................................................................................................................40
ESC a n ...............................................................................................................................41
- 1 -

GS $ nL nH..........................................................................................................................42
GS L nL nH..........................................................................................................................43
GS T n.................................................................................................................................44
GS W nL nH ........................................................................................................................45
GS \ nL nH....................................................................................................................... 47
2.2.4 Line Feed Span Commands ...................................................................................48
ESC 2..................................................................................................................................48
ESC 3 n...............................................................................................................................49
2.2.5 Bit Image Commands............................................................................................50
ESC * m n1 n2 [d]k ............................................................................................................50
GS * n1 n2 [d] n1×n2×8....................................................................................................52
GS / m................................................................................................................................53
GS v 0 m xL xH yL yH d1...dk .............................................................................................54
2.2.6 Status Commands.................................................................................................56
DLE EOT n...........................................................................................................................56
ESC v (At Serial I/F Selection) ..........................................................................................59
GS a n.................................................................................................................................60
GS r n..................................................................................................................................63
2.2.7 Paper Detecting Commands..................................................................................64
ESC c 3 n.............................................................................................................................64
ESC c 4 n.............................................................................................................................65
2.2.8 Panel Switch Commands.......................................................................................66
ESC c 5 n.............................................................................................................................66
2.2.9 Macro Commands..................................................................................................67
GS :.....................................................................................................................................67
GS ^ n1 n2 n3....................................................................................................................68
2.2.10 Cutter Commands ...............................................................................................69
ESC i ...................................................................................................................................69
ESC m.................................................................................................................................70
GS V m … (1)......................................................................................................................71
GS V m n … (2)...................................................................................................................71
2.2.11 Bar Code Commands...........................................................................................72
GS H n ................................................................................................................................72
GS f n..................................................................................................................................73
GS h n.................................................................................................................................74
GS k m [d1...dk] NULL … (1)...............................................................................................75
GS k m n [d1...dn] … (2) .....................................................................................................75
GS w n................................................................................................................................81
- 2 -

2.2.12 Commands for Non-volatile Memory ..................................................................82
GS ( C pL pH m fn b [c1 c2] [d1...dk].................................................................................82
fn = 0, 48: Function 0 Erasing Specified Record....................................................................... 83
fn = 1, 49: Function 1 Storing Data to Specified Record ...........................................................83
fn = 2, 50: Function 2 Sending Data Stored in Specified Record ................................................ 84
fn = 3, 51: Function 3 Sending Use Amount ............................................................................85
fn = 4, 52: Function 4 Sending Remaining Capacity ................................................................. 85
fn = 5, 53: Function 5 Sending Key Code List of Stored Record.................................................86
fn = 6, 54: Function 6 Erasing All User NV Memory Area in a Lump ........................................... 87
FS p n m .............................................................................................................................88
FS q n [xL xH yL yH d1…dk]1 … [xL xH yL yH d1…dk]n ...................................................89
2.2.13 Printer Function Setting Commands...................................................................92
GS ( E pL pH fn […]............................................................................................................92
fn = 1: Function 1 Transferring to Printer Function Setting Mode...............................................93
fn = 2: Function 2 End of Printer Function Setting Mode........................................................... 93
fn = 3: Function 3 Setting Memory Switch Value......................................................................94
fn = 4: Function 4 Sending the Set Memory Switch Value .........................................................96
fn = 5: Function 5 Setting Customized Value ...........................................................................97
fn = 6: Function 6 Sending the Set Customized Value ............................................................100
fn = 7: Function 7 Copying User-defined Page....................................................................... 103
fn = 8: Function 8 Defining Data by the Column Format to Character Code Page of Work Area.. 104
fn = 9: Function 9 Defining Data in the Raster Format to the Character Code Page of Work Area ...........105
fn = 10: Function 10 Erasing Data of Character Code Page Data in Work Area ......................... 106
fn = 11: Function 11 Setting Communication Conditions of Serial Interface .............................. 107
fn = 12: Function 12 Sending the Set Communication Conditions of Serial Interface ................. 108
fn = 48: Function 48 Erasing Paper Layout............................................................................ 109
fn = 49: Function 49 Setting Paper Layout ............................................................................ 110
fn = 50: Function 50 Sending Paper Layout Information......................................................... 111
fn = 255: Function 255 Setting All Contents Set by Printer Function Setting Mode to the State at Shipment..... 112
GS ( K pL pH fn m.............................................................................................................113
fn = 48: Function 48 Setting Print Control Mode .................................................................... 113
fn = 49: Function 49 Setting Printing Density ........................................................................114
fn = 50: Function 50 Setting Printing Speed .......................................................................... 115
fn = 97: Function 97 Setting Number of Divisions for Head Conducting.................................... 115
GS ( M pL pH fn m ............................................................................................................116
fn = 1, 49: Function 1 Copies the set value stored in work area to the storage area.................. 117
fn = 2, 50: Function 2 Copies the set value stored in storage area to the work area.................. 117
fn = 3, 51: Function 3 Specifies the auto loading function of the set value at initialization to be valid or invalid 118
GS ( N pL pH fn m.............................................................................................................119
fn = 48: Function 48 Selects character color.......................................................................... 119
- 3 -

2.2.14 Special Commands............................................................................................120
ESC n n.............................................................................................................................120
ESC Y n1 n2......................................................................................................................120
GS R 0...............................................................................................................................121
GS R 1 n............................................................................................................................121
GS S..................................................................................................................................122
FS ( L pL pH fn m..............................................................................................................123
fn = 48: Function 48 Sending Position Information................................................................. 124
fn = 66: Function 66 Executing Paper Feeding to Cut Position................................................. 125
fn = 67: Function 67 Executing Paper Feeding to Initial Position..............................................125
2.2.15 Other Commands ..............................................................................................126
DLE ENQ n ........................................................................................................................126
DLE DC4 fn m t (Specification of fn = 8).........................................................................127
ESC = n.............................................................................................................................128
ESC @ ...............................................................................................................................129
ESC L ................................................................................................................................130
ESC S................................................................................................................................131
ESC RS..............................................................................................................................131
GS ( A pL pH n m..............................................................................................................132
GS I n ...............................................................................................................................133
GS P x y............................................................................................................................135
GS ( L pL pH m fn [parameter].........................................................................................136
GS 8 L p1 p2 p3 p4 m fn [parameter]..............................................................................136
fn = 0, 48: Function 48 Sending NV Graphics Memory Capacity............................................... 137
fn = 2, 50: Function 50 Printing Graphics Data Stored in Print Buffer....................................... 137
fn = 3, 51: Function 51 Sending the Remaining Amount of NV Graphics Memory...................... 138
fn = 64: Function 64 Sending Key Code List of Defined NV Graphics........................................ 139
fn = 65: Function 65 Erasing All Data of NV Graphics in a Lump.............................................. 140
fn = 66: Function 66 Erasing Specified NV Graphics Data .......................................................140
fn = 67: Function 67 Defining Raster Type Graphics Data to NV Memory ................................. 141
fn = 69: Function 69 Printing Specified Graphics.................................................................... 142
fn = 112: Function 112 Storing Raster Type Graphics Data to Print Buffer................................ 143
GS C 0 n m........................................................................................................................144
GS C 1 aL aH bL bH n r .....................................................................................................145
GS C 2 nL nH.....................................................................................................................145
GS C ; sa ; sb ; sn ; sr ; sc ;...............................................................................................146
GS c ..................................................................................................................................146
- 4 -

3. CHARACTER CODE TABLE ............................................................................147
3.1 Code Page............................................................................................................147
3.1.1 Code page 00H to 7FH & PC437 (USA、Europe Standard)...................................147
3.1.2 Code page 00H to 7FH & Katakana.....................................................................148
3.1.3 Code page 00H to 7FH & PC850 (Multilingual)...................................................149
3.1.4 Code page 00H to 7FH & PC860 (Portuguese)....................................................150
3.1.5 Code page 00H to 7FH & PC863 (Canadian-French)...........................................151
3.1.6 Code page 00H to 7FH & PC865 (Nordic) ...........................................................152
3.1.7 Code page 00H to 7FH & PC852 (Eastern Europe)..............................................153
3.1.8 Code page 00H to 7FH & PC866 (Russian) .........................................................154
3.1.9 Code page 00H to 7FH & PC857(Turkish)...........................................................155
3.1.10 Code page 00H to 7FH & PC864 (Arabic)..........................................................156
3.1.11 Code page 00H to 7FH & Windows Code page ..................................................157
3.2 International Character Code Table....................................................................158
4. APPENDIX ....................................................................................................159
4.1 Explanation on PAGE MODE ................................................................................159
4.1.1 Overview.............................................................................................................159
4.1.2 Values Set by Each Command in STANDARD MODE and PAGE MODE.................159
4.1.3 Mapping of Print Data in the Print Area..............................................................160
4.1.4 Example of Using PAGE MODE ............................................................................162
4.2 Bidirectional Parallel Interface ...........................................................................165
4.2.1 Parallel Interface Communication Mode.............................................................165
4.2.2 Interfacing Phases..............................................................................................166
4.2.3 Negotiation .........................................................................................................167
4.3 Identification of Send Status ..............................................................................174
4.4 Memory Switch....................................................................................................175
4.4.1 Memory Switches................................................................................................175
4.4.2 Details of Memory Switches................................................................................176
4.5 Black Mark Layout and Operating Condition.......................................................186
- 5 -

1. OUTLINE
1.1 Operation Mode
PPU-700 has ESC/POSTM as control commands.
1.2 Character Set
All print data sent from the host computer to the printer are automatically converted to one-byte
alphanumeric or katakana characters (ANK) or two-byte Kanji corresponding to the characters and
symbols.
NOTE: For the contents of character set, refer to “3. Character Code Table” of this document.
1.3 Control Commands
1.3.1 Control Command Details
Control Commands are used for controlling the operations of the printer such as starting/stopping of
printing, line feeding, paper feeding, etc. They control all functions related to printing, such as type
of characters, enlargement of characters or setting of format.
1.3.2 How to Send Control Commands
Some methods are available for sending Control Commands from the host computer to the printer.
Here, a method of sending by BASIC programming is explained.
Example 1
Let’s print a character string “CITIZEN” in enlarged (double-height, double-width) and in normal
format.
Program coding
The Control Command shows that the command name for setting the size of a character is GS !.
Let’s make a program using this code. An example is shown below.
In lines 20 and 50, setting and canceling of enlarging a character is sent. As a result, lines 30 and 60
print the same character string but line 30 prints enlarged characters and line 60 cancels the
enlargement and prints in normal format.
* In this document, sample programs are in BASIC. For details of BASIC programming, refer to the
10 A$="CITIZEN"
20 LPRINT CHR$(&H1D);"!"; CHR$(&H33);
30 LPRINT A$;
40 LPRINT CHR$(&HA); CHR$(&HA);
50 LPRINT CHR$(&H1D);"!"; CHR$(&H00);
60 LPRINT A$;
70 END
manual for BASIC.
Program List
CITIZEN
CITIZEN
Print Result
- 6 -
2. CONTROL COMMANDS
2.1 ESC/POS Command List
○Print Control Commands
Command Function MODE GS P Page
LF Printing and paper feed
CR Back to printing
(1) Printing in PAGE MODE and returning to
STANDARD MODE (at the selection of PAGE
FF
ESC FF Printing data in PAGE MODE P 14
ESC J Printing and feeding paper in minimum pitch
ESC d Printing and feeding the paper by “n” lines
○Print Character Commands
Command Function MODE GS P Page
CAN Canceling print data in PAGE MODE P 17
ESC SP Setting the right spacing of the character
ESC ! Collectively specifying the printing mode
ESC % Specifying/canceling download character set
ESC & Defining the download characters
ESC -
ESC ? Deleting download characters
ESC E Specifying/canceling emphasis printing
ESC G Specifying/canceling double strike printing
ESC M Selection of character fonts
ESC R Selecting the international character set
ESC V Specifying/canceling 90°-right-turned characters S 28
ESC t Selecting the character code table
ESC { Specifying/canceling the inverted characters S 30
GS ! Specifying the character size
GS B
GS b Specifying/canceling the smoothing
MODE)
(2) Printing of Black mark and paper feeding to the
top of the print position (with Black mark paper
selected)
Specifying/canceling underline
Specifying/canceling the black/white inverted
printing
S・P
S・P
P 13
S・P ○
S・P
S・P ○
S・P
S・P
S・P
S・P
S・P
S・P
S・P
S・P
S・P
S・P
S・P
S・P
S・P
12
12
15
16
18
19
21
22
23
24
25
26
27
27
29
31
32
33
- 7 -
○Print Position Commands
Command Function MODE GS P Page
HT Horizontal tab
ESC $ Specifying the absolute positions
ESC D Setting horizontal tab position
ESC T
ESC W Defining the print area in PAGE MODE P
ESC \
ESC a Aligning the characters S 41
GS $
GS L Setting the left margin S
GS T Moving print position to top of the line S 44
GS W Setting the print area width
GS \
Selecting the character printing direction in PAGE
MODE
Specifying the relative position
Specifying the absolute vertical position of
characters in PAGE MODE
Specifying the relative vertical position of a
character in PAGE MODE
○Line Feed Span Commands
Command Function MODE GS P Page
ESC 2 Specifying 1/6-inch line feed rate
ESC 3 Setting line feed rate of minimum pitch
○Bit Image Commands
Command Function
ESC * Specifying the bit image mode
GS * Defining the download bit image
GS / Printing the downloaded bit image
GS v 0 Printing of raster bit image S 54
○Status Commands
Command Function MODE GS P Page
DLE EOT Sending status in real-time
ESC v Sending printer status
GS a Enabling/disabling ASB (Automatic Status Back)
GS r Sending status
○Paper Detecting Commands
Command Function MODE GS P Page
ESC c 3
ESC c 4
Selecting the Paper Sensor valid for Paper-end
signal output
Selecting the Paper Near-end Sensor valid for print
stop
○Panel Switch Commands
Command Function MODE GS P Page
ESC c 5 Enabling/disabling the panel switches
○Macro Commands
Command Function MODE GS P Page
GS : Starting/ending macro definition
GS ^ Executing the macro
S・P
S・P ○
S・P
P 37
S・P ○
P
S・P ○
S・P ○
S・P
S・P ○
MODE GS P Page
S・P
S・P
S・P
S・P
S・P
S・P
S・P
S・P
S・P
S・P
S・P
S・P
34
35
36
○
○
○
48
50
52
53
56
59
60
63
64
65
66
67
68
38
40
42
43
45
47
49
- 8 -

○Cutter Commands
Command Function MODE GS P Page
ESC i Full cutting of paper S 69
ESC m Full cutting of paper S 70
GS V Cutting the paper
○Bar Code Commands
Command Function MODE GS P Page
GS H Selecting of printing position of HRI characters
GS f Selecting the font of HRI characters
GS h Specifying the height of the bar code
GS k Printing the bar code
GS w
Specifying the horizontal size (magnification) of bar
code
○Commands for Non-volatile Memory
Command Function MODE GS P Page
GS ( C Editing user NV memory S 82
FS p Printing the download NV bit images S 89
FS q Defining the download NV bit image S 88
○Printer Function Setting Commands
Command Function MODE GS P Page
GS ( E Printer function setting command S 92
GS ( K Selecting print control method S 113
GS ( M Customizing the printer S 116
GS ( N Designating font attribute S 119
○Special Commands
Command Function MODE GS P Page
ESC n Setting the remaining amount of printout S 120
ESC Y
GS R 0 Collect the receipt S 121
GS R 1 Setting receipt collection timer S 121
GS S Detecting a black mark S 122
FS ( L Controlling black mark paper S 123
Specifying length of paper feed after black mark
detection
S・P ○
S・P
S・P
S・P
S・P
S・P
S
72
73
74
75
81
71
120
- 9 -
○Other Commands
Command Function MODE GS P Page
DLE ENQ Real-time request to printer
DLE DC4 Buffer clear
ESC = Data input control
ESC @ Initializing the printer
ESC L Selecting PAGE MODE S 130
ESC S Selecting STANDARD MODE P 131
ESC RS Sound buzzer
GS ( A Execution of test printing S 132
GS I Sending the printer ID
GS P Specifying the basic calculation pitch
GS ( L
GS 8
GS C 0 Setting counter print mode
GS C 1 Setting counter mode (A)
GS C 2 Setting counter value
GS C ;
GS c Print the counter
L
In the Mode column: S = STANDARD MODE, P = PAGE MODE
O = shows the command affected by GS P.
Specifying graphics data S 136
Setting counter mode (B)
S・P
S・P
S・P
S・P
S・P
S・P
S・P
S・P
S・P
S・P
S・P
S・P
126
127
128
129
131
133
135
144
145
145
146
146
- 10 -

2.1.1 Description of Items
XXXX
[Function] The name of a command.
[Code] The string of codes comprising the command is represented by < >H for hexadecimal
numbers, < >B for binary numbers, and < > for decimal numbers, [ ] k denotes the
number of repetition of “k” times.
[Range] Indicates the values (setting range) of arguments of the command.
Note: If values outside the defined domain specified with control codes are used,
malfunctions could possibly occur, so be sure to use the values within the
defined domain.
[Outline] Describes the functions of the command.
[Caution] Describes important points and cautionary notes, as required.
[Default] Initial values for the command if it has arguments.
[See Also] Describes commands related to the command when it is used.
[Sample Program]
Describes examples of coding on Quick-Basic.
* Examples are only for reference. They may vary depending on language and version.
For details, please refer to a manual in your language.
[Print Results] Describes the print results obtained by executing the above programs. However, the
print results shown are different in scale from actual print results.
- 11 -

y
2.2 Command Details
2.2.1 Print Control Commands
LF
[Function] Printing and paper feed
[Code] <0A>H
[Outline] Prints data inside the print buffer and feeds paper based on the line feed amount having
been set.
[Caution] After this command is executed, the beginning of the line is taken as the start position
for the next point.
[See Also] ESC2
[Sample Program] [Print Results]
LPRINT "AAA"; CHR$(&HA);
LPRINT "BBB"; CHR$(&HA); CHR$(&HA);
LPRINT "CCC"; CHR$(&HA);
, ESC3
AAA
BBB
CCC
Print and line feed
Print and line feed
Line feed onl
Print and line feed
CR
[Function] Back to printing
[Code] <0D>H
[Outline] (1) When memory switch 1-5 is OFF: This command is ignored.
(2) When memory switch 1-5 is ON: The same operation as LF is executed.
[See Also] LF
[Sample Program] [Print Results]
LPRINT "AAA"; CHR$(&HD);
LPRINT "BBB"; CHR$(&HD);
LPRINT CHR$(&HD);
LPRINT "CCC"; CHR$(&HD);
In case of (2)
AAA
BBB
CCC
Print and line feed
Print and line feed
Line feed only
Print and line feed
- 12 -

FF
[Function] (1) Printing in PAGE MODE and returning to STANDARD MODE (at the selection of PAGE
MODE)
(2) Printing of Black mark and paper feeding to the top of the print position (with Black
mark paper selected)
[Code] <0C>H
(1) At selection of PAGE MODE
[Outline] Executes a batch printout of the data mapped in the entire print area, and then returns
to STANDARD MODE.
[Caution] • All mapped data is erased after printout.
• The print area set up by ESC W is initialized.
• This command does not execute a paper cut.
• After this command is executed, the beginning of the line is taken as the start position
for the next print.
• This command is only effective when the PAGE MODE is selected.
[See Also] Appendix 4.1.4 “Example of Using PAGE MODE”
ESC FF
, ESC L, ESC S
(2) At selection of Black mark paper (valid only for Black mark specification)
[Outline] This command prints the data in the printer buffer and searches for the head of the
next Black mark (Black mark position)
[Caution] • This command does not execute a paper cut.
• After this command is executed, the beginning of the line is taken as the start position
for the next print.
- 13 -

ESC FF
[Function] Printing data in PAGE MODE
[Code] <1B>H<0C>H
[Outline] Executes a batch printout of the data mapped in the entire print area in PAGE MODE.
[Caution] • This command is only effective when PAGE MODE is selected.
• Mapped data, as well as the ESC T and ESC W settings, and the character mapping
position are held even after printing.
[See Also] Appendix 4.1 “Explanation on PAGE MODE”
, ESC L, ESC S
FF
- 14 -

ESC J n
[Function] Printing and feeding paper in minimum pitch
[Code] <1B>H<4A>H<n>
[Range] 0≦n≦255
[Outline] Prints the data held in the print buffer and feeds paper by [n basic calculation pitch] ・
inches.
[Caution] • After this command is executed, the beginning of the line is taken as the start position
for the next print.
• The line feed width can be set separately for the STANDARD and PAGE MODES.
• This command does not affect the line feed width defined by ESC 2 or ESC 3.
• The basic calculation pitch is set by GS P.
• Fractions resulting from calculation are corrected with the minimum pitch of the
mechanism, and the remainder is omitted.
• In STANDARD MODE, this command uses the vertical (paper feed direction) basic
calculation pitch (y).
• In PAGE MODE, this command acts differently depending on the start point:
(1) If the start point specified by ESC T is top left or bottom right, the command
uses the vertical (paper feed direction) basic calculation pitch (y).
(2) If the start point specified by ESC T is top right or bottom left, the command
uses the horizontal (perpendicular to the paper feed direction) basic calculation
pitch (x).
• The maximum settable line feed width is 1016 mm (40 inches). A setting greater than
this maximum is trimmed to the maximum.
[Default] The initial value is not defined.
[Sample Program]
Refer to Sample Program and Print Results for ESC 2.
- 15 -

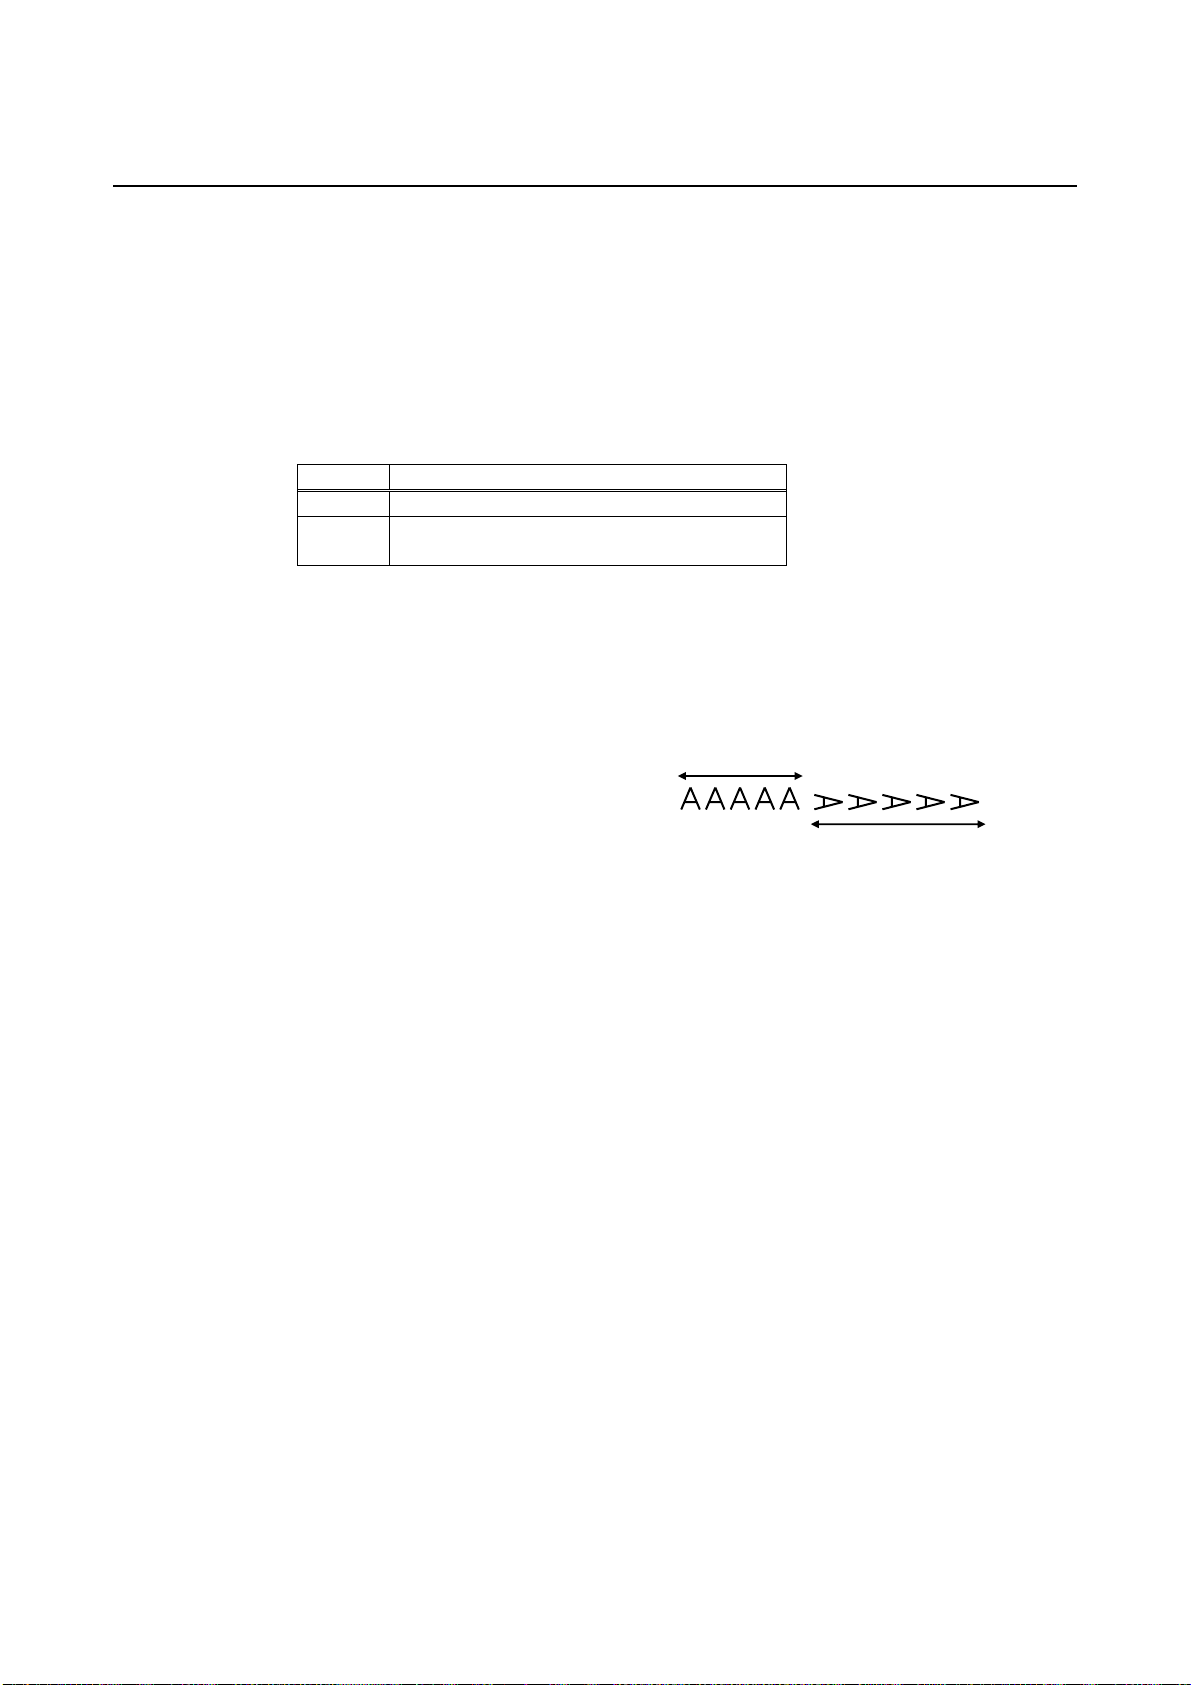
ESC d n
[Function] Printing and feeding the paper by “n” lines
[Code] <1B>H<64>H<n>
[Range] 0≦n≦255
[Outline] Prints data in the print buffer and feeds paper by “n” lines. Specified lines do not
remain.
[Caution] • After this command is executed, the beginning of the line is taken as the start position
for the next print.
• If [n×line feed width] exceeds approximately 1016 mm, this command feeds paper by
approximately 1016 mm (40 inches).
[Default] The initial value is not defined.
[Sample Program] [Print Results]
LPRINT "AAAAA";
LPRINT CHR$(&H1B);"d";CHR$(2);
LPRINT "AAAAA";CHR$(&HA);
AAAAA
AAAAA
2/6-inch line feed
- 16 -

2.2.2 Print Character Commands
CAN
[Function] Canceling print data in PAGE MODE
[Code] <18>H
[Outline] Erases all data contained in the currently effective print area in PAGE MODE.
[Caution] • This command is only effective when PAGE MODE is selected.
• If the previously established print area overlaps the currently effective print area, the
overlapped data in the previously established area will be erased.
[See Also] Appendix 4.1 “Explanation on PAGE MODE”
, ESC W
ESC L
- 17 -

p
p
p
ESC SP n
[Function] Setting the right spacing of the character
[Code] <1B>H<20>H<n>
[Range] 0≦n≦255
[Outline] Sets the right spacing of character to [n×basic calculation pitch] inches.
[Caution] • If the horizontal magnification of character is 2 or more, the right spacing increases
with the magnification.
• Does not affect Kanji.
• The right spacing can be set separately for the STANDARD and PAGE MODES.
• The basic calculation pitch is set by GS P. Once defined, the right spacing is not
changed if the basic calculation pitch is changed by GS P.
• Fractions resulting from calculation are corrected with the minimum pitch of the
mechanism, and the remainder is omitted.
• In STANDARD MODE, this command uses the horizontal basic calculation pitch (x).
• In PAGE MODE, the basic calculation pitch used by this command depends on the start
point:
(1) If the start point specified by ESC T is top left or bottom right, the command
uses the horizontal basic calculation pitch (x).
(2) If the start point specified by ESC T is top right or bottom left, the command
uses the vertical basic calculation pitch (y).
• The maximum right spacing is capable of approximately 31.906 mm (255/203 inches).
A setting greater than this maximum is trimmed to the maximum.
[Default] n = 0
[See Also] GS P
[Sample Program] [Print Results]
LPRINT CHR$(&H1B);" "; CHR$(0);
LPRINT "AAAAA"; CHR$(&HA);
LPRINT CHR$(&H1B);" "; CHR$(1);
LPRINT "AAAAA"; CHR$(&HA);
LPRINT CHR$(&H1B);" "; CHR$(12);
LPRINT "AAAAA"; CHR$(&HA);
AAAAA
A A A A A
A A A A A
0-dot s
1-dot s
12-dots s
ace
ace
ace
- 18 -
ESC ! n
[Function] Collectively specifying the printing mode
[Code] <1B>H<21>H<n>
[Range] 0≦n≦255
[Outline] Printing mode is assigned.
Bit Function
0 Character Font Font A (12×24) Font B(9×17)
1 Undefined ―― ――
2 Undefined ―― ――
3 Emphasis Canceled Specified
4 Double height Canceled Specified
5 Double width Canceled Specified
6 Undefined ―― ――
7 Underline Canceled Specified
[Caution] • With double height and double width being specified simultaneously, quadruple
characters are created.
• An underline is attached to the full character width, which, however, is not attached to
the part having been skipped by the horizontal tab (HT). Neither is it attached to
90°-right-turned characters.
• The underline width is as specified by the ESC – command. (The default setting is 1
dot width.)
• Setting by this command is invalid for Kanji except setting and canceling of enhanced
printing.
• In case characters with different vertical magnification ratios coexist on the same line,
they are printed on the same base line.
• ESC E, ESC M, ESC –, and GS ! can individually set or cancel the mode but the
command processed last is valid.
• Setting or cancelling of enhanced 3rd bit is valid for alphanumric and kana and kanji.
Other print mode is valid only for alphanumeric and kana characters.
[Default] n = 0
[See Also] ESC E
, ESC M, ESC -, GS !
0 1
Value
- 19 -
p
g
[Sample Program]
LPRINT CHR$(&H1B);"!";CHR$(&H00);"H";
LPRINT CHR$(&H1B);"!";CHR$(&H01);"H";
LPRINT CHR$(&H1B);"!";CHR$(&H08);"H";
LPRINT CHR$(&H1B);"!";CHR$(&H10);"H";
LPRINT CHR$(&H1B);"!";CHR$(&H20);"H";
LPRINT CHR$(&H1B);"!";CHR$(&H80);"H";
LPRINT CHR$(&H1B);"!";CHR$(&HB9);"H";
LPRINT CHR$(&HA);
[Print Results]
Font B + Emphasis +
Quadruple + Underline
Font A + Underline
Font A + Double width
Font A + Double hei
Font A + Em
Font B
Font A
hasis
ht
- 20 -
ESC % n
[Function] Specifying/canceling download character set
[Code] <1B>H<25>H<n>
[Range] 0≦n≦255
[Outline] Specifying/canceling download characters.
• “n” is valid only for the lowest bit (n0).
• Control by the lowest bit (n0) is shown as follows:
n0 Function
0 Canceling download character set
1 Specifying download character set
[Default] n = 0
[See Also] ESC &
[Sample Program]
GOSUB SETCHR DATA 6
LPRINT CHR$(&H1B);"%";CHR$(0); DATA &HFF,&H80,&H00
LPRINT "@A";CHR$(&HA); DATA &H80,&H80,&H00
LPRINT CHR$(&H1B);"%";CHR$(1); DATA &H80,&H80,&H00
LPRINT "@A";CHR$(&HA); DATA &H80,&H80,&H00
END DATA &HFF,&HFF,&HFF
SETCHR: DATA &HFF,&HFF,&HFF
LPRINT CHR$(&H1B);"&"; DATA 12
LPRINT CHR$(3);"@";"A"; DATA &HFF,&HFF,&HFF
FOR J=1 TO 2 DATA &H80,&H07,&HF9
READ REP DATA &H80,&HFF,&HF9
LPRINT CHR$(REP); DATA &H87,&HFE,&H01
FOR I=1 TO REP*3 DATA &H9F,&H06,&H01
READ D DATA &HF8,&H06,&H01
LPRINT CHR$(D); DATA &HF8,&H06,&H01
NEXT I DATA &H9F,&H06,&H01
NEXT J DATA &H87,&HFE,&H01
RETURN DATA &H80,&HFF,&HF9
DATA &H80,&H07,&HF9
DATA &HFF,&HFF,&HFF
[Print Results]
@A Internal character set
A Download character
- 21 -
ESC & s n m [a [p] s×a] m-n+1
[Function] Defining the download characters
[Code] <1B>H<26>H<s>H<n>H<m>H[<a>H<p1>H<p2>…<ps×a>]m-n+1
[Range] s=3(FontA, B) s=2(FontC)
32≦n≦m≦126
0≦a≦12(FontA)、0≦a≦9 (FontB)、0≦a≦8 (FontC)
0≦p1…ps×a≦255
[Outline] Defines the font of download characters of alphanumeric characters.
• “s” indicates the number of bytes in vertical direction. “n” indicates the start character
code and “m” the end character code. To define only one character, set n = m.
Character codes definable includes 95 ASCII codes in total in the range of <20>H to
<7E>H.
• “a” indicates the number of dots to be defined in horizontal direction. “p” is the data
to be defined, which indicate a pattern equal to “a” dots in horizontal direction from
the left end. The rest of the pattern on the right side is filled with space.
• The number of data to be defined is “s
valid until redefinition, execution of ESC @, GS *, FS q, GS ( A, deletion by ESC ?, or
power OFF is performed.
[Caution] Download characters and download bit images cannot be defined simultaneously.
Running this command clears the definition of the download bit image.
[Default] Same as the internal character set.
[See Also] ESC %
[Example]
[Sample Program]
24dot
, ESC ?
12dot
p1
p4
p2
p5
p3
p6 p36
FontA
Create each data bit by setting “1” for a printed dot and “0” for an unprinted dot.
Refer to Sample Program and Print Results for ESC %.
p34
MSB
p35
LSB
a”. Download characters thus defined・ remain
- 22 -
ESC – n
[Function] Specifying/canceling underline
[Code] <1B>H<2D>H<n>
[Range] 0≦n≦2、48≦n≦50
[Outline] Specifying/canceling an underline.
n Function
0,48 Canceling underline
1,49 Setting 1-dot width underline
2,50 Setting 2-dot width underline
[Caution] • An underline is attached to the full character width. It is, however, not attached to the
part having been skipped by horizontal tab (HT) command.
• An underline is not attached to 90°-right-turned characters and white-on-black
character.
• Underline can also be specified/canceled by ESC ! but the setting of command last
processed is valid.
• Specifying/canceling by this command is not valid for kanji.
• Underline width is constant in the specified thickness regardless of the character size.
[Default] n = 0
[See Also] ESC !
[Sample Program] [Print Results]
LPRINT CHR$(&H1B);"-";CHR$(0);
LPRINT "AAAAA";
LPRINT CHR$(&H1B);"-";CHR$(1);
LPRINT "AAAAA";CHR$(&HA);
, FS -
Underline canceled
AAAAAAAAAA
Underline specified
- 23 -

ESC ? n
[Function] Deleting download characters
[Code] <1B>H<3F>H<n>
[Range] 32≦n≦126
[Outline] Deletes the downloaded characters of specified code.
[Caution] • The character “n” indicates the character code used to delete the defined pattern.
After the deletion, characters are printed in the same pattern as the internal
characters.
• This command deletes the code-defined pattern of the character font selected by
ESC !.
• This command is ignored if the specified character code is undefined.
[See Also] ESC &
, ESC %
- 24 -
ESC E n
[Function] Specifying/canceling emphasis printing
[Code] <1B>H<45>H<n>
[Range] 0≦n≦255
[Outline] Specifying/canceling the emphasized characters.
• “n” is valid only for the lowest bit (n0).
• Control by the lowest bit (n0) is shown as follows:
n0 Function
0 Canceling emphasis printing
1 Specifying emphasis printing
[Caution] • Emphasis printing can also be specified/canceled by ESC ! but the setting of command
last processed is valid.
• Valid for all character types except HRI characters.
[Default] n = 0
[See Also] ESC !
[Sample Program] [Print Results]
LPRINT CHR$(&H1B);"E"; CHR$(0);
LPRINT "AAABBB"; CHR$(&HA);
LPRINT CHR$(&H1B);"E"; CHR$(1);
LPRINT "AAABBB"; CHR$(&HA);
AAABBB Emphasis canceled
AAABBB Emphasis specified
- 25 -
ESC G n
[Function] Specifying/canceling double strike printing
[Code] <1B>H<47>H<n>
[Range] 0≦n≦255
[Outline] Specifying/canceling the double strike printing.
• “n” is valid only for the lowest bit (n0).
• Control by the lowest bit (n0) is shown as follows:
n0 Function
0 Canceling double strike printing
1 Specifying double strike printing
[Caution] • With this printer, double-strike printing and emphasis printing provide completely the
same results.
• Valid for all character types except HRI characters.
[Default] n=0
[See Also] ESC E
[Sample Program] [Print Results]
LPRINT CHR$(&H1B);"G"; CHR$(0);
LPRINT "AAABBB"; CHR$(&HA);
LPRINT CHR$(&H1B);"G"; CHR$(1);
LPRINT "AAABBB"; CHR$(&HA);
AAABBB Double strike printing canceled
AAABBB Double strike printing specified
- 26 -
ESC M n
[Function] Selection of character fonts
[Code] <1B>H<4D>H<n>
[Range] 0≦n≦2、48≦n≦50
[Outline] Selects character fonts.
n Function
0,48
1,49
2,50
[Caution] ESC ! can also select fonts, but the setting made by the command that has last been
processed becomes valid.
[Default] n=0
[See Also] ESC !
Selection of font A(12×24)
Selection of font B(9×24)
Selection of font C(8×16)
ESC R n
[Function] Selecting the international character set
[Code] <1B>H<52>H<n>
[Range] 0≦n≦13
[Outline] Depending on the value of “n”, one of the following character sets is specified;
n Character Set n Character Set
0 U.S.A 7 Spain I
1 France 8 Japan
2 Germany 9 Norway
3 U.K 10 Denmark II
4 Denmark I 11 Spain II
5 Sweden 12 Latin America
6 Italy 13 Korea
[Default] n = 0 (Overseas), n = 8 (Domestic)
[See Also] 3.2 “International Character Code Table”
- 27 -
ESC V n
[Function] Specifying/canceling 90°-right-turned characters
[Code] <1B>H<56>H<n>
[Range] 0≦n≦2、48≦n≦50
[Outline] Specifying/canceling 90°-right-turned characters.
n Function
0,48 Canceling 90°-right-turned characters
1,49
2,50
[Caution] • No underlines are attached to 90°-right-turned characters.
• This command does not affect PAGE MODE but setting is maintained.
[Default] n=0
[Sample Program] [Print Results]
LPRINT CHR$(&H1B);"V"; CHR$(0);
LPRINT "AAAAA";
LPRINT CHR$(&H1B);"V"; CHR$(1);
LPRINT "AAAAA"; CHR$(&HA);
Specifying 90°-right-turned characters
90° rotation canceled
90° rotation specified
- 28 -
 Loading...