

Page 1
English
2
W
F158
Abbreviated instruction
• This watch is solar-powered. Expose the dial to light and use it sufficiently charged.
• When operating the watch, make sure that it is not wet.
• To see details of charging time, specifications and operations, refer to the instruction manual:
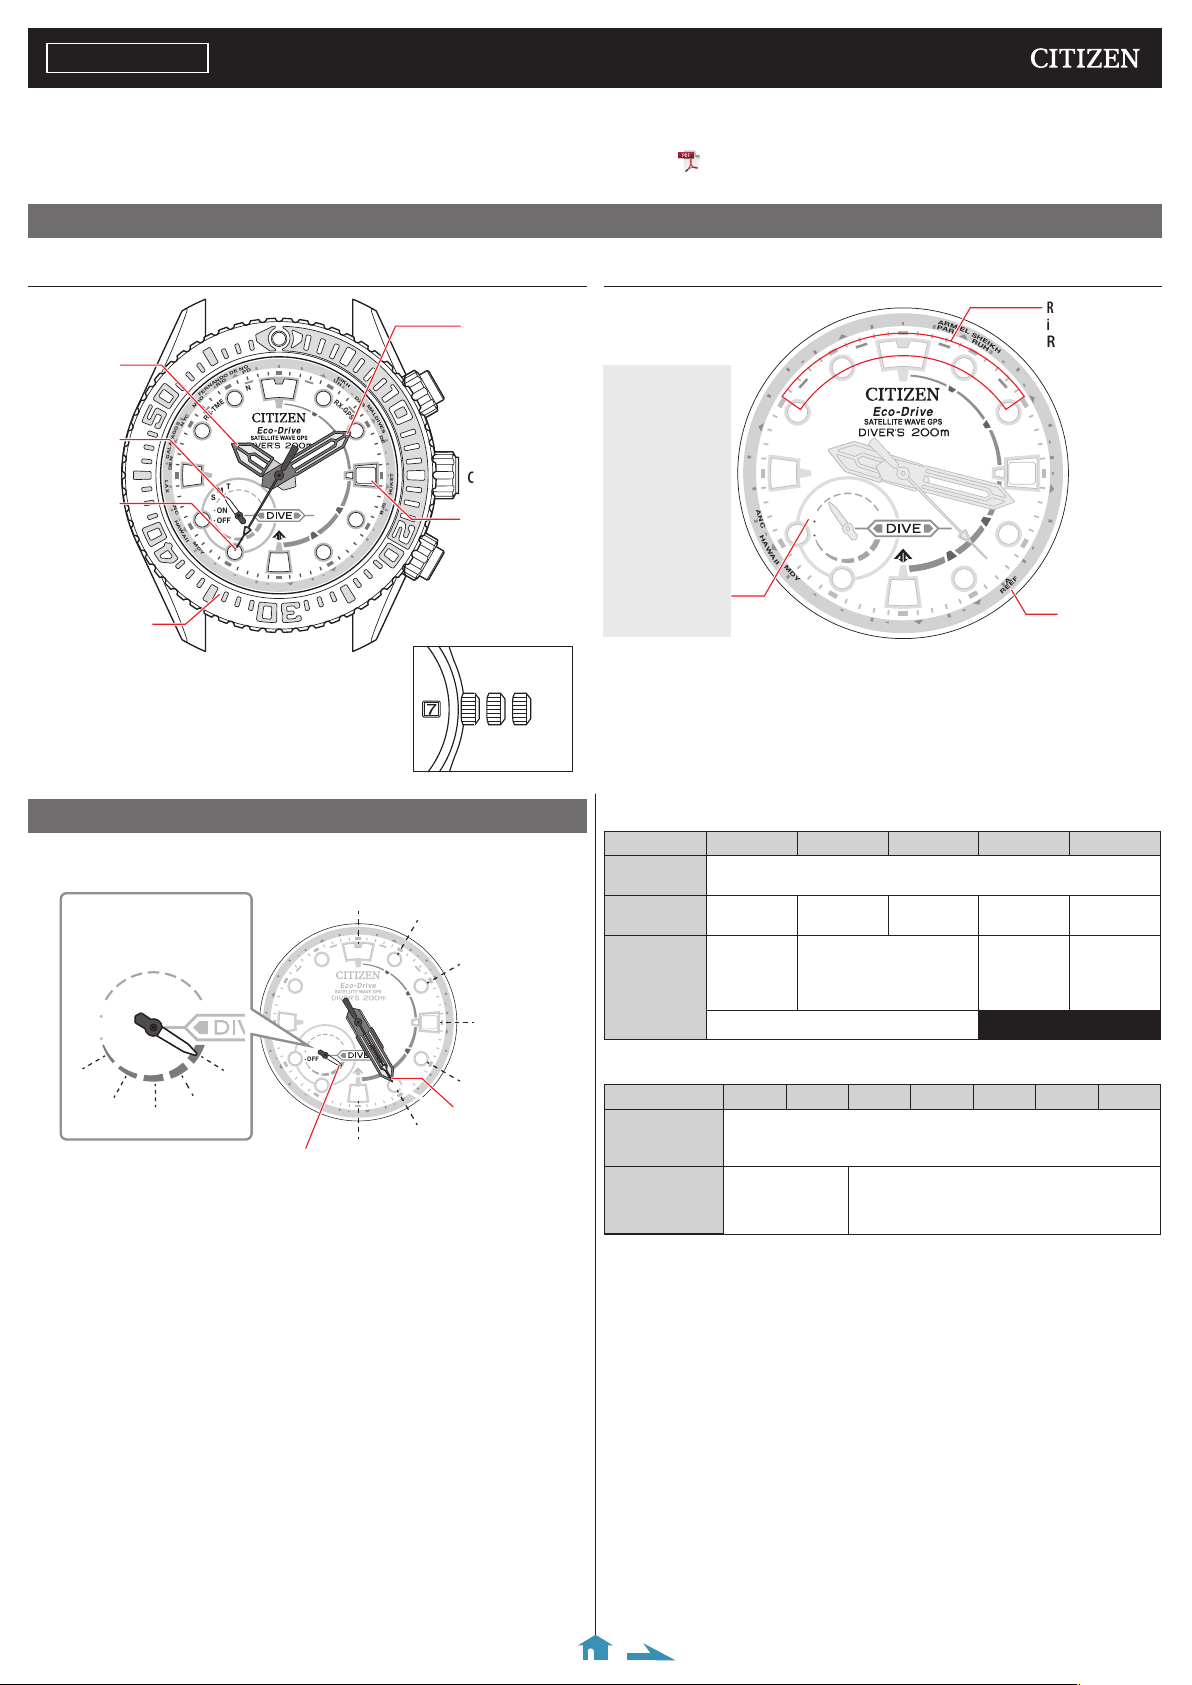
Component identification
F158 instruction manual
Hands and buttons
Minute hand
N
O
L
A
S
H
H
N
A
O
Hour
hand
Function
hand
Second
hand
R
O
N
D
E
P
D
O
D
N
O
I
A
R
N
N
R
E
F
O
A
E
M
M
T
-
X
C
R
Y
S
N
O
G
A
P
A
L
A
G
N
E
D
L
A
X
A
N
C
H
A
W
A
I
I
M
M F
S S
ON
OFF
D
Y
W
T T
T
R
M
P
L
O
B
U
A
E
R
L
S
H
E
R
I
U
K
H
H
O
K
D
X
R
B
M
X
-
A
G
L
P
D
S
I
V
E
D
7
O
Y
T
L
D
F
A
E
E
R
R
E
I
R
R
A
B
T
U
A
O
N
E
R
G
I
J
I
F
Button
B
S
E
L
D
A
C
T
E
K
U
H
P
S
J
B
Crown
Date
indication
Button
A
Rotating bezel
• Actual appearance may differ from the illustrations.
Crown's position
• The crown has two positions when pulling it out.
0 1 2
Checking the current power reserve and power generation
amount
Indication of power reserve
in levels
T T
M F
S S
ON
OFF
0
1
1.
Push the crown in to position 0.
2.
Press and release the upper right button B.
The power reserve and power generation amount at the moment of pressing
the button are indicated in level.
4
3
Function hand
Indication of power
generation amount in levels
E
M
T
-
X
R
W
T T
M F
S S
ON
OFF
0
O
N
6
1
O
K
R
X
-
G
P
S
5
2
7
3
4
Hour, minute and second
hands
Indication
I
K
H
D
X
B
M
-
A
G
P
S
7
Y
T
L
D
F
A
E
E
R
R
E
I
Reception-in-progress
indication (
RX-GPS
Reception result
indication (
L
D
I
V
E
S
D
E
L
D
A
C
T
E
K
U
H
P
S
J
B
O
Place name/time
zone
O
D
N
O
I
A
R
N
R
E
F
O
A
E
M
S
O
G
A
N
C
H
A
W
C
Y
N
A
I
I
M
D
M
T
-
X
R
T T
M F
S S
ON
OFF
Y
S/M/T/W/T/F/S:
Day-of-week
indication
Power reserve
indication (in
five levels)
ON/OFF:
Summer time
P
A
L
A
G
N
E
D
L
A
X
A
(DST) setting
DIVE:
Diving mode
Power reserve level (function hand)
•
N
O
R
O
N
L
D
E
P
D
O
N
W
T
B
U
A
R
M
P
A
E
R
L
S
H
E
R
U
H
O
K
R
X
R
R
A
B
T
U
A
O
N
E
R
G
I
J
I
F
N
O
L
A
S
H
H
Level 4 3 2 1 0
Indication
Duration
Meaning
•
Level of power generation amount (hour, minute and second hands)
See “Indication of power reserve in levels” on the figure in the left
column.
24 - 19
months
Power
reserve is
sufficient.
19 - 14
months
14 - 5
months
Power reserve is OK.
5 months - 5
days
Power
reserve is
get ting low.
OK for normal use. Charge immediately.
Level 6 5 4 3 2 1 0
Indication
Meaning
3.
Press and release the upper right button B to finish the
See “Indication of power generation amount in levels” on the figure
in the left column.
Sufficient power
generation for
charging.
Charge in a brighter location where the level of
power generation amount reaches "5" or "6".
procedure.
The hands returns to current time indication.
• They return to current time indication automatically in about 10 seconds.
RX-TME/
)
OK/NO
5 days or
shorter
Insufficient
charge
warning has
started.
)
Page 2
Checking the reception result of the satellite signal
X
B
M
A
L
D
I
V
E
S
R
X
-
G
P
S
R
U
H
D
X
B
M
M
E
L
S
H
E
I
K
H
M
A
L
D
I
V
E
S
O
K
R
X
-
G
P
S
P
A
R
R
U
H
D
X
B
D
E
L
A
L
O
N
S
H
A
R
M
E
L
S
H
E
I
K
H
M
A
L
D
I
V
E
S
1.
Push the crown in to position 0.
2.
Press and release the lower right button A.
The previous reception result is indicated.
N
O
L
A
S
H
H
N
A
O
R
R
M
O
P
L
A
E
R
L
S
H
E
R
I
U
K
H
H
O
O
K
A
H
N
O
R
O
N
L
D
E
P
D
O
D
N
O
I
A
R
N
O
N
R
E
M
T
-
X
R
Reception was successful.
D
R
X
-
G
P
S
N
O
L
S
H
A
R
P
A
R
O
K
Reception failed.
NO
OK
N
D
P
N
E
F
O
A
• The indication shows the result of the last reception, regardless types of
received information, or information of location or time.
3.
Press and release the lower right button A to finish the
procedure.
The hands returns to current time indication.
• They return to current time indication automatically in about 10 seconds.
Setting the world time manually
This watch can indicate the time around the world according to which of 38 time
zones (offsets from UTC — Coordinated Universal Time) is chosen.
1.
Pull the crown out to position 1.
The second hand indicates the current world time setting and the function
hand indicates the current summer time (DST) setting.
2.
Rotate the crown to set time zone.
Time indication changes.
3.
Push the crown in to position 0 to finish the procedure.
The second hand returns to indicate the second.
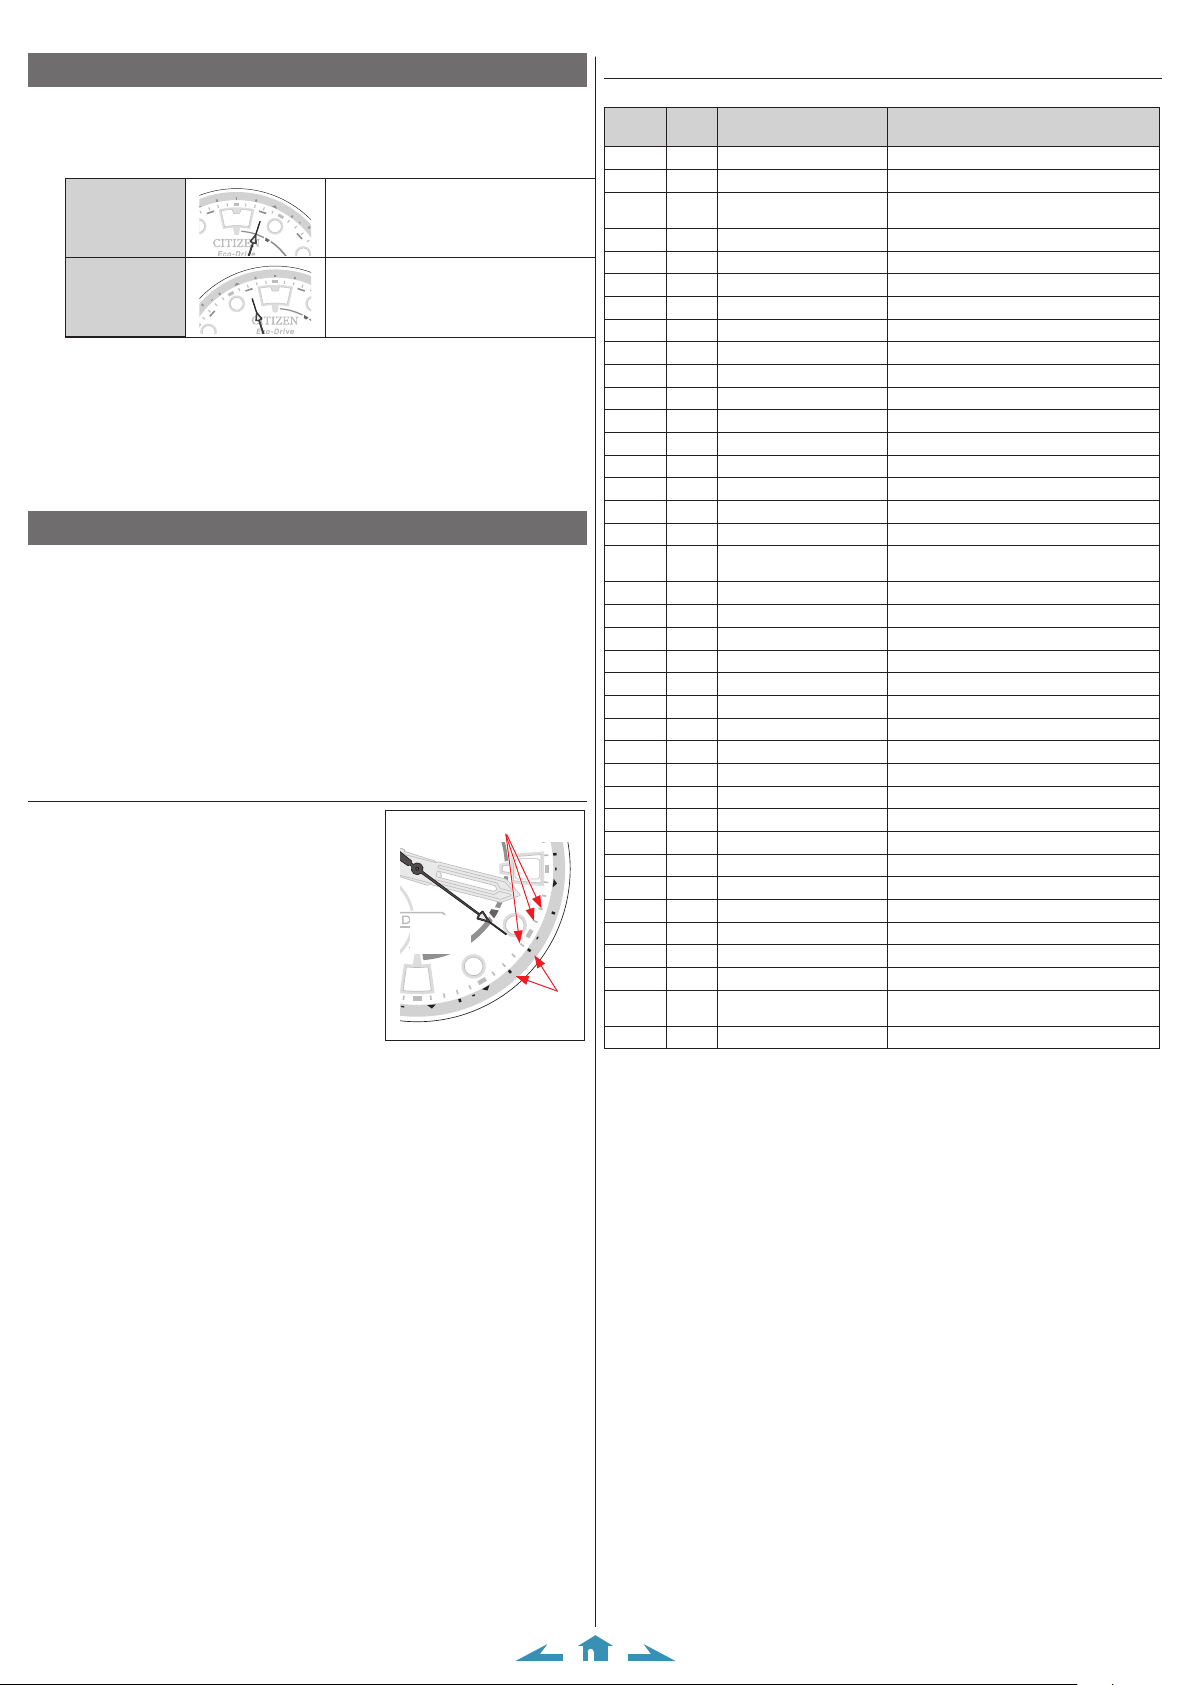
How to read indication of the world time setting
The watch has 38 time zone markers with several
representative area names. A time zone is set by
pointing the second hand at one of the markers.
In the illustration on the right, the second hand
points to 21 seconds and time zone setting is"+9".
• Time zones are represented by offsets from UTC.
Time zone marker
Second
hand
A
B
T
U
A
O
N
E
R
G
I
J
I
F
7
O
Y
T
L
D
F
A
E
E
R
R
E
I
R
R
Representative
area
D
A
C
T
E
K
U
H
P
S
J
B
Table of time zones and representative places
(Based on information as of September 2019)
Time
zone
0
+1
+2
+3
+3.5
+4
+4.5
+5
+5.5
+5.75
+6
+6.5
+7
+8
+8.75
+9
+9.5
+10
+10.5
+11
+12
+12.75
+13
+14
–12
-11
-10
–9.5
-9
-8
-7
-6
-5
-4
–3.5
-3
-2
-1
Second
hand
0
2
4
6
7
8
9
10
12
13
14
15
16
18
20
21
23
25
26
27
29
31
32
34
36
38
40
41
42
44
46
48
50
52
53
54
56
58
Area name Representative area
LON
PAR
SHARM EL SHEIKH/
SSH
RUH
—
DXB
—
MALDIVES/MLE
DEL
—
DAC
—
PHUKET/HKT
BJS
—
TYO
ADL
GREAT BARRIER
REEF/—
—
NOU
FIJI/NAN
—
TBU
—
—
MDY
HAWAII/HNL
—
ANC
LAX
DEN
GALAPAGOS/SCY
NYC
MAO
—
RIO
FERNANDO DE
NORONHA/FEN
PDL
London
Paris
Sharam El Sheikh, Athens
Riyadh
Teh ra n
Dubai
Kabul
Maldives, Karachi
Delhi
Kathmandu
Dhaka
Yangon
Phuket, Bangkok
Beijing/Hong Kong
Eucla
Tok yo
Adelaide
Great Barrier Reef, Sydney
Lord Howe Island
Noumea
Fiji Islands, Auckland
Chatham Islands
Nuku'alofa
Kiritimati
Baker Islands
Midway
Hawaii, Honolulu
Marquesas Islands
Anchorage
Los Angeles
Denver
Galápagos Islands, Chicago
Ne w Yor k
Manaus
St. John's
Rio de Janeiro
Fernando de Noronha
Azores
F158 Abbreviated instruction
Page 3

F158 Abbreviated instruction
ON
S S
M F
T T
W
N
O
O
K
R
X
-
T
M
E
R
X
-
G
P
S
P
A
R
R
U
H
D
X
B
D
E
L
P
D
L
R
I
O
M
A
O
N
Y
C
D
E
N
G
A
L
A
P
A
G
O
S
F
E
R
N
A
N
D
O
D
E
N
O
R
O
N
H
A
L
O
N
S
H
A
R
M
E
L
S
H
E
I
K
H
M
A
L
D
I
V
E
S
D
A
C
S
J
B
L
D
A
N
A
T
E
K
U
H
P
O
Y
T
X
A
L
F
E
E
R
R
E
I
R
R
A
B
T
7
-
T
D
A
D
I
V
E
S
Receiving the satellite time signal
• To cancel the reception, press and hold any button until the second hand
returns to indicate the second.
Obtaining location information
A time zone is set automatically and time and calendar are consequently adjusted
based on the chosen zone.
• It may take 30 seconds - 2 minutes to obtain location information.
1.
Push the crown in to position 0.
2.
Press and hold the upper right button B for 4 seconds until
the second hand points “RX-GPS”.
• Release the button as the hand points “RX-GPS”. Reception starts.
• After finishing the reception, the second hand indicates the new setting or
“NO” of the reception result and returns to indicate the second.
Time reception
• It may take 3 -30 seconds to receive time information.
1.
Push the crown in to position 0.
2.
Press and hold the lower right button A for 2 seconds until
the second hand points “RX-TME”.
• Release the button as the hand points “RX-TME”. Reception starts.
• After finishing the reception, the second hand indicates the reception
result and returns to indicate the seconds.
Leap second reception
• It may take 36 seconds - 13 minutes to receive leap second information.
1.
Push the crown in to position 0.
2.
Press and hold the lower right button A for 7 seconds.
• Release the button after the second hand points “RX-TME” and turns fully
around to point “RX-TME” again. Reception starts.
• After finishing the reception, the second hand indicates the reception
result and returns to indicate the seconds.
Switching the summer time and standard time
1.
Pull the crown out to position 1.
The second hand indicates the current world time setting and the function
hand indicates the current summer time (DST) setting.
• When you rotate the crown, the time zone setting changes.
2.
Press and release the lower right button A.
ON
OFF
Summer time is indicated.
The standard time is indicated.
W
T T
M F
S S
ON
OFF
Using the diving mode
By using the diving mode, you can prevent unintended operation of buttons and
deactivate the signal reception function.
1.
Push the crown in to position 0.
W
2.
Press and release both the lower right
button A and upper right button B
simultaneously.
T T
M F
S S
ON
OFF
The hands temporarily show 0:00:00, then the
function hands points “DIVE” and the watch
turns into the diving mode.
• When the hands are kept stopped, deactivate the diving mode and try
again.
Deactivating the diving mode
Press and release both the lower right button A and upper right button B at the
same time to deactivate the diving mode.
• Changing the position of the crown also deactivates the diving mode.
Checking and adjusting the leap second setting
You can find a list of leap seconds at the homepage of IERS (INTERNATIONAL
1.
2.
3.
• Adjustable range is from 0 to ‒90 seconds.
4.
EARTH ROTATION & REFERENCE SYSTEMS SERVICE).
http://hpiers.obspm.fr/eop-pc/earthor/utc/TAI-UTC_tab.html
Pull the crown out to position 2.
The second hand points to 0 second.
Press and hold upper right button B for 2 seconds or more.
Using the “0:00:00” position as the starting point, the minute and second
hands indicate the leap second setting.
When the leap s econd setting is
“-37 seconds”
C
H
OFF
A
W
A
I
I
M
D
Y
N
T
B
U
I
J
I
F
The hands point to “0 minute 37
se conds”.
When the leap s econd setting is
“-65 seconds”
N
O
L
A
H
N
O
R
O
N
L
D
E
P
D
O
D
N
O
I
R
O
N
E
U
O
E
R
G
M
A
The hands point to “1 minute 5
se conds”.
S
H
A
R
M
P
A
E
R
L
S
H
E
R
I
U
K
H
H
O
K
D
X
R
B
M
X
-
A
G
L
P
S
Turn the crown to adjust the setting if the leap second is not
correct.
Push the crown in to position 0 to finish the procedure.
• Each time you press the button, ON and OFF changes alternately.
3.
Push the crown in to position 0 to finish the procedure.
The second hand returns to indicate the second.
Page 4

F158 Abbreviated instruction
Adjusting the time and calendar manually
• Execute world time setting beforehand following “Setting the world time
manually”.
1.
Pull the crown out to position 1.
2.
Press and hold the upper right button B until the second
hand points to 30 seconds.
3.
Pull the crown out to position 2.
The second hand points to 0 second.
4.
Press and release the lower right button A repeatedly to
change the hand/indication to be corrected.
• Each time you press button A, the target changes as follows:
Minute → hour → date → year/month → day of week → (back to the
top)
• The hands and indications slightly moves when selected to show they
become adjustable.
5.
Rotate the crown to adjust the hand/indication.
• Date indication changes to the next as the function indication rotates 5
times.
• When you rotate the crown quickly a few times, the hand/indication will
move continuously. To stop the rapid movement, rotate the crown in either
direction.
• Year and month are indicated with the second hand.
“Month” corresponds to one of
the 12 zones shown in the figure
below.
Each number means month.
12
11
10
9
8
7
6
6.
Repeat steps 4 and 5.
7.
Push the crown in to position 0 in accordance with a reliable
1
2
3
4
5
time source to finish the procedure.
The second hand starts moving from 0 second.
The year corresponds to the
years since leap year and is
indicated with the position of the
second hand.
Years since leap year: 0 (Leap
year)
Years since leap year:
Years since leap year:
Years since leap year:
0
1
2
3
Checking the reference position
1.
Pull the crown out to position 2.
2.
Press and hold the lower right button A for 4 seconds.
The hands and indication start to move to the current reference positions
stored in memory.
• Release the button as the hands start to
move.
• Some hands show special movement to
adjust their position.
3.
Check the reference position.
Correct reference positions:
•
Hour, minute and second hands: 0 hour
00 minute 0 second
•
Date indication: midway between “31”
and “1”
•
Function hand: “S” (Sunday)
A
N
R
E
F
O
A
M
T
-
X
C
R
Y
S
N
O
G
A
P
A
L
A
G
N
E
D
L
A
X
S S
A
N
C
H
A
W
A
I
I
M
D
Y
N
E
D
O
D
N
O
I
R
E
M
W
T T
M F
ON
OFF
N
O
L
A
S
H
H
N
A
O
R
R
O
P
M
P
L
D
O
N
T
A
E
R
L
S
H
E
R
I
U
K
H
H
O
K
D
X
R
B
M
X
-
A
G
L
P
D
S
I
V
E
S
D
E
L
D
A
C
T
E
K
U
H
P
S
J
B
O
Y
T
L
D
F
A
E
E
R
R
E
I
R
R
A
B
T
U
A
O
N
E
R
B
G
U
I
J
I
F
When the current reference position is different from the correct one,
proceed to step 3 of “Correcting the reference position”.
4.
Push the crown in to position 0 to finish the procedure.
Correcting the reference position
1.
Pull the crown out to position 2.
2.
Press and hold the lower right button A for 4 seconds.
The hands and indication start to move to the current reference positions
stored in memory.
• Release the button as the hands start to move.
• Some hands show special movement to adjust their position.
3.
Press and release the lower right button A.
1
2
3
The function hands move slightly.
4.
Press and release the lower right button A repeatedly to
change the hand/indication to be corrected.
• Each time you press button A, the target changes as follows.
Date indication/function hand → hour hand → minute hand → second
hand
→
(back to the top)
• The hands slightly move when selected to show they become adjustable.
5.
Rotate the crown to adjust the hand/indication.
• When you rotate the crown quickly a few times, the hand/indication will
move continuously. To stop the rapid movement, rotate the crown in either
direction.
6.
Repeat steps 4 and 5.
7.
Push the crown in to position 0.
8.
Press and release the lower right button A to finish the
procedure.
• The watch returns automatically to the time indication as about 2 minutes
passed without any operation.
Resetting the watch — All Reset
1.
Pull the crown out to position 2.
2.
Press and hold buttons A and B at the same time for 3
seconds or more and release them.
As you release the buttons, the hands move slightly to indicate that reset
completed.
The setting values after All Reset
Calendar January of leap year (5-second position)
World time ±0 from UTC (LON), London
Summer time (DST) OFF at all time zones
Leap seconds
Rollover number
After All Reset
After All Reset, adjust the reference position and set the time and calendar.
No change after All Reset
 Loading...