


Cissi
Form
Finisher
Models
FCCG FCFG
FCCD FCAC
OWNER’S MANUAL
CISSELL MANUFACTURING COMPANY
HEADQUARTERS |
PHONE: (502) 587-1292 |
831 SOUTH FIRST ST. |
SALES FAX: (502) 585-3625 |
P.O. BOX 32270 |
SERVICE/PARTS FAX: (502) 681-1275 |
LOUISVILLE, KY 40232-2270 |
|
THIS MANUAL MUST BE GIVEN TO THE EQUIPMENT OWNER.
MAN38 5/97
Page 1
WARRANTY
The Cissell Manufacturing Company (Cissell) warrants all new equipment (and the original parts thereof) to be free from defects in material or workmanship for a period of one (1) year from the date of sale thereof to an original purchaser for use, except as hereinafter provided. With respect to non-durable parts normally requiring replacement in less than one (1) year due to normal wear and tear, including, but not limited to, cloth goods, valve discs, hoses, and iron cords, and with respect to all new repair or replacement parts for Cissell equipment for which the one (1) year warranty period has expired, or for all new repair or replacement parts for equipment other than Cissell equipment, the warranty period is limited to ninety (90) days from date of sale. The warranty period on each new replacement part furnished by Cissell in fulfillment of the warranty on new equipment or parts shall be for the unexpired portion of the original warranty period on the part replaced.
With respect to electric motors, coin meters and other accessories furnished with the new equipment, but not manufactured by Cissell, the warranty is limited to that provided by the respective manufacturer.
Cissell's total liability arising out of the manufacture and sale of new equipment and parts, whether under the warranty or caused by Cissell's negligence or otherwise, shall be limited to Cissell repairing or replacing, at its option, any defective equipment or part returned f.o.b. Cissell's factory, transportation prepaid, within the applicable warranty period and found by Cissell to have been defective, and in no event shall Cissell be liable for damages of any kind, whether for any injury to persons or property or for any special or consequential damages. The liability of Cissell does not include furnishing (or paying for) any labor such as that required to service, remove or install; to diagnose troubles; to adjust, remove or replace defective equipment or a part; nor does it include any responsibility for transportation expense which is involved therein.
The warranty of Cissell is contingent upon installation and use of its equipment under normal operating conditions. The warranty is void on equipment or parts; that have been subjected to misuse, accident, or negligent damage; operated under loads, pressures, speeds, electrical connections, plumbing, or conditions other than those specified by Cissell; operated or repaired with other than genuine Cissell replacement parts; damaged by fire, flood, vandalism, or such other causes beyond the control of Cissell; altered or repaired in any way that effects the reliability or detracts from its performance, or; which have had the identification plate, or serial number, altered, defaced, or removed.
No defective equipment or part may be returned to Cissell for repair or replacement without prior written authorization from Cissell. Charges for unauthorized repairs will not be accepted or paid by Cissell.
CISSELL MAKES NO OTHER EXPRESS OR IMPLIED WARRANTY, STATUTORY OR OTHERWISE, CONCERNING THE EQUIPMENT OR PARTS INCLUDING, WITHOUT LIMITATION, A WARRANTY OF FITNESS FOR A PARTICULAR PURPOSE, OR A WARRANTY OF MERCHANTABILITY. THE WARRANTIES GIVEN ABOVE ARE EXPRESSLY IN LIEU OF ALL OTHER WARRANTIES, EXPRESS OR IMPLIED. CISSELL NEITHER ASSUMES, NOR AUTHORIZES ANY PERSON TO ASSUME FOR IT, ANY OTHER WARRANTY OR LIABILITY IN CONNECTION WITH THE MANUFACTURE, USE OR SALE OF ITS EQUIPMENT OR PARTS.
For warranty service, contact the Distributor from whom the Cissell equipment or part was purchased. If the Distributor cannot be reached, contact Cissell.
Page 2
TABLE OF CONTENTS |
|
GENERAL INFORMATION |
|
Warranty ...................................................................................................................... |
1 |
Cissi Form Finisher Features ..................................................................................... |
3-4 |
SPECIFICATIONS |
|
Motor, Steam Pressure, Weights .................................................................................. |
4 |
Outline Dimensions ..................................................................................................... |
5 |
INSTALLATION AND OPERATION |
|
Installation Instructions.............................................................................................. |
6 |
Steam Piping Illustrations ......................................................................................... |
7-8 |
Operating Instructions .............................................................................................. |
9-10 |
Overbag ....................................................................................................................... |
11 |
ADJUSTMENTS AND SERVICE |
|
Changing Bag ........................................................................................................... |
12-13 |
Adjustment of Revolving Form Height ...................................................................... |
14 |
Solenoid Linkage Adjustment .................................................................................... |
15 |
Motor Mounting Dimensions ..................................................................................... |
16 |
Trouble Shooting Charts .......................................................................................... |
17-20 |
ILLUSTRATED PARTS |
|
Revolving Form ........................................................................................................... |
21 |
Foot Switch .................................................................................................................. |
22 |
Tower of Power Parts .................................................................................................. |
23 |
Rear Base Assembly ................................................................................................... |
24 |
Shallow Base ............................................................................................................... |
25 |
Valve Parts .................................................................................................................. |
26 |
Blower, Motor, and Motor Mount................................................................................ |
27 |
Jacket and Filter ......................................................................................................... |
28 |
Damper Control Assembly.......................................................................................... |
29 |
Condenser Assembly and Tubing ............................................................................... |
30 |
Water Spray Gun ........................................................................................................ |
31 |
Condenser ................................................................................................................... |
32 |
Rear and Front Paddle Assemblies ............................................................................ |
33 |
WIRING DIAGRAMS |
|
Schematic .................................................................................................................... |
34 |
Rear Base .................................................................................................................... |
35 |
Control Box ................................................................................................................. |
36 |
Page 3
CISSI FORM FINISHER
Loving Care for Garments
CISSELL FINISHER
HELPS GIVE ORIGINAL LOOK
TO ANY GARMENT
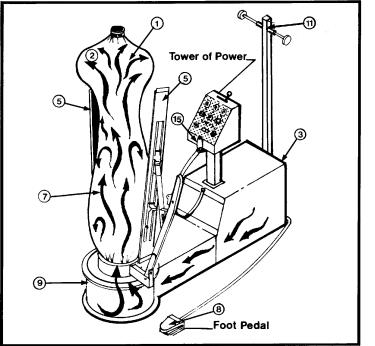
(1) Sturdy, stainless steel, rust-resis- tant frame. (2) Controlled porosity nylon bag for better steam and air distribution. (3) Cleanable inlet air filter reduces bag replacement; helps keep garments clean. (4) Flow of air shapes garment whether heavy or light material. (5) Clamps. (6) Easily adjustable steaming; conditioning and drying controls. (7) Steam evenly distributed throughout entire form. (8) Easy to use foot pedal for starting. (9) Low base makes entire form easy for short operators to use. (10) Form revolves 360 degrees. (11) Clothes rack for hanging finished garments. (12) Vent clamps. (13) Net overbag. (14) Hand pad. (15) Water spray gun. (16) Sleevers.
All parts quickly accessible for ease in maintenance.
*Numbers 12, 13, 14 and 16 are not illustrated.
MODELS
CISSI BASE (FC);
FCFG with Geni Revolving Assembly
FCAF with Aire Form Revolving Assembly
FCCD with Form Finisher Revolving Assembly
FCCG with Finisher 6” Taller Revolving Assembly
Base can also be used with ANY Cissell Garment Manufacturer’s model revolving assembly.
Buy the Cissi with your choice of assembly chosen from above; or, buy the Base only - to use with any Cissell revolving assembly you have now.
Page 4
TOWER FEATURES
•Steaming Timer w/Light
•Conditioning Timer w/Light
•Drying Timer w/Light
•Push Button Start Switch
•3 Position Cycle Switch:
1.Steam and Air Conditioning, Drying;
2.Steaming, Conditioning, Drying;
3.Pre-steam Only
•Combination Sizing and Cancel Rocker Switch
•Water Spray Gun
•Air Damper Control
The flexibility of these controls on the new model Form Finisher permits the proper steam/air cycles to quickly and efficiently finish heavy, or hard-woven, badly wrinkled garments.
But cycle control is not the only new feature on the Form Finisher. Remember! This Finisher offers the option of multiple revolving assemblies as noted on front side. The choice is yours!
SPECIFICATIONS
Electric Motor: 1/2 HP, |
Operating Steam Pressure 60 to |
Width: 17” |
1725 RPM, 115 Volt, 60 |
100 Pounds |
Net Weight: 226 Lbs. (approx.) |
cycle, single phase 1/2 HP, |
Boiler HP: Approx. 2 |
SHIPPING WEIGHTS: |
1425 RPM, 230 Volt, 50 |
Steam Supply Line: 1/2” |
Domestic: 300 pounds (approx.) |
cycle, Single Phase |
Steam Return Line: 1/2” |
Export: (500 pounds (approx.) |
|
Depth: 54” |
Export: Shipping Dimensions: |
|
Height: 17” (to top of cabinet) |
66” (H); 71” (L); 25” (W) |
|
72” (to top of clothes rack) |
Cubic Feet Export Crating: |
|
36” (to top of controls) |
67.8 (approx.) |
Fully guaranteed for one year against manufacturer’s defects.
Page 5

Page 6
CISSI
Installation Instructions
Refer to illustration sheet
(1)UNCRATE MACHINE. Check the nameplate voltage and current, making sure it is the same as the supply voltage and current.
(2)SET MACHINE IN POSITION.
(3)REMOVE THE REVOLVING FORM by holding the turning knob and the opposite weight “bucket” and lifting approximately 22”.
(4)CONNECT STEAM SUPPLY LINE as shown on next page.
(5)CONNECT RETURN LINE as shown on next page.
NOTE: |
Before final return line connection is made, open the steam supply |
|
valve and blow all foreign matter out of the steam lines and |
|
chamber. Failure to do so will cause trap to leak. |
(6)MAKE ELECTRICAL CONNECTIONS in 3” junction box on rear of the machine, according to applicable electric codes. Connections should include a fused disconnect switch or circuit breaker with “slo-blow” characteristics and be capable of carrying 15 amps 115 volts or 8 amps 230 volts.
(7)MAKE SURE THE CONDENSER VALVE IS OPEN (condenser located behind the air filter) before connecting clothes tree.
(8)CONNECT CLOTHES TREE TO REAR OF BASE by the two 1/4” bolts.
(9)TURN ON ELECTRICAL POWER AND TEST THE MACHINE. Replace the revolving assembly, remove the plastic protective bag, and open the return and steam lines.
Page 7

Page 8

Page 9

OPERATION INSTRUCTIONS FOR “CISSI” FORM FINISHER
(Machine can be operated from either side).
1.Position garment on form and adjust shoulders. A knob on top of the form is used to adjust the form shoulder width. Turn knob clockwise to increase shoulder width.
Turn knob clockwise to increase shoulder width.
2.Press white switch to “air on” to size the bag by moving the damper control on top of the tower.
3.Set the time on each timer. Recommended is: Steam: 6-9 seconds
Conditioning: 4-9 seconds Drying: 12-16 seconds.
4.Either presteam or not; whatever your demands require.
5.Position the cycle switch for whatever cycle you desire. Recommend steaming, conditioning, drying the central position of the switch.
6.Push the push-to-start switch or step on the foot switch and the cycle will automatically sequence.
7.If you desire to cancel that cycle at any time, push the white switch toward the cycle off location.
Page 10
CISSI FORM FINISHER
The “Tower of Power” is at your fingertips for all of the finishing combinations you will ever need. All three timers (steaming, conditioning, drying) are adjustable from 0 to 30 seconds. The cycle switch provides (presteam only, steaming-conditioning-drying, steam & air-conditioning-drying) which ever is required. The white switch allows you to have air only for sizing and provides a cancel position to terminate the cycle at any time. The automatic push-to-start switch is available on the tower or by the foot switch. The lights will glow whenever you are in any of the timer periods. Damper control lever is on top of tower.
Where possible, perform all touch-up of sleeves, collars, trim, etc., prior to finishing on the Genie. In this way, differences in sheen will be eliminated from the garment.
GENERAL SUGGESTIONS
When finishing knits or soft unlined woolens, place net overbag on form before positioning garment. After garment is positioned on form, repeat Step #2 in Operating Instructions. Push damper knob all the way to obtain full air pressure and repeat step 6 to start cycle.
To finish coats and other open front garments, use front paddle clamp to hold front of garment in place. Use the hand vent clamps to hold rear vent or pleat.
When additional moisture is needed for hard set wrinkles, use the water spray gun, spraying into the steam from a distance of approximately 15”. Rotate the garment to the spray gun, using the turning knob on the revolving assembly.
Keep the nylon bag clean and in good repair. A vacuum cleanable air filter is provided to help keep the bag clean. Vacuum clean the filter weekly. Remove nylon bag (see detailed instructions) and wet clean as required. Repair holes or worn spots. To obtain proper characteristics of cloth porosity, bag size, and control strings, use only genuine Cissell replacement bags.
Page 11
 Loading...